

Page 1
INSTRUCTION MANUAL
COMPACT PORTABLE
WASHING MACHINE
Page 2

UNPACKING YOUR WASHING MACHINE
1.Inspect and remove all packing material.
2.Inspect and remove any remains of packing ,tape or printed
materials before powering on the Washer.
DANGER
Risk of child entrapment .Before throwing away
your old appliance ,remove the door so that children
may not easily become trapped inside.
1
2
Notes
5
8
10
11
13
14
15
16
18
19
20
Co ntent s
Safety and pr eca uti ons ... ... ... .......... ... ... ... ... ... ............. ... ... ... ... ... ..........
Installat ion o f the w ash er.. ... ... .......... ... ... ... ... ... ............. ... ... ... ... ... ........
Preparati on be for e was hin g.. ... .......... ... ... ... ... ... ... .......... ... ... ... ... ... .......
Parts ident ifi cat ion o f the w ash er.. .......... ... ... ... ... ... ... .......... ... ... ... ... ... ...
Instructi on of t he wa she r ope rat ion p anel......... ... ... ... ... ... .......... ... ... ... ...
Quick start ... ... ... ... ... ............. ... ... ... ... ... .......... ... ... ... ... ... ............. ... ... ...
The m ain w ash ... ... ... .......... ... ... ... ... ... ............. ... ... ... ... ... .......... ... ... ... ...
Special fea tur es. ... ... ... ... .......... ... ... ... ... ... ............. ... ... ... ... ... .......... ... ...
About the proc edu re of f ull a uto mat ic wa sh program..... ... ... ... ... ... .......... ... .
Cleaning an d Mai nte nan ce of t he wa shi ng machine..... ... ... ... ... ... ............. ... ... ... ... .
Identify usual trouble of washer.............................................................................
Malfuncti on di spl ay an d sol uti ons ............. ... ... ... ... ... .......... ... ... ... ... ... ....
Technical spe cif ica tio ns. ... ... .......... ... ... ... ... ... ............. ... ... ... ... ... .......... ... ... ...
12
21
Important safety instructions
......... ... ... ... ... ... .......... ... ... ... ... ... ... .......... ... ..
3
9
......... ... ... ... ... ... .......... ... ... ... ... ... ... .......... ...
Installing Quick Sink Adapter
Page 3

IMPORTANT SAFETY INSTRUCTIONS
IMPORTANT SAFETY INSTRUCTIONS
WARNING-To reduce the risk of fire, electric shock, or injury to persons when using your
appliance, follow basic precautions, including the following :
1. Read all instructions before using the appliance .
2. Use this appliance only for its intended purpose as described in this use and care guide.
3. Use only detergents or softeners as recommended for use in this manual and keep them
out of the reach of children.
4. This appliance must be properly installed in accordance with the installation instructions
before it is used.
5. Never unplug your appliance by pulling on the power cord. Always grasp the plug firmly
and pull straight out from the outlet.
6. Replace immediately any worn power cord, loose plugs and power outlets.
7. Unplug your appliance before cleaning or before making any repairs.
8. If your old appliance is not being used, we recommend that you remove the door.
This will reduce the possibility of danger to children.
9. Do not operate your appliance in the presence of explosive fumes.
10. Do not wash or dry articles that have been previously cleaned in, washed in,
soaked in or spotted with gasoline, dry-cleaning solvents, other flammable or explosive
substances as they give off vapors that could ignite or explode.
11.Clothes or rags used to clean flammable or explosive materials should not be washed
in this appliance until all traces of this material have been removed.
12.Do not add or mix any flammable or explosive substances to the wash.
13.Do not try to remove clothes while the tub is moving. Allow it to come to a complete stop
before reaching in.
14.The appliance’s loading door must be closed when the tub is spinning.
15.Do not operate your appliance when parts are missing or broken.
16.Do not use this appliance for commercial uses.
17..Do not operate this appliance unless all enclosure panels are properly in place.
18.Do not tamper with controls.
19.Do not allow children to play on or in the appliance. Close supervision of children is
necessary when the appliance is used near children.
20.This appliance must be connected to a proper electrical outlet with the correct electrical
supply.
21.Proper grounding must be ensured to reduce the risk of shock and fire. DO NOT CUT OR
REMOVE THE GROUNDING PLUG. If you do not have a three-prong electric receptacle
outlet in the wall, have a certified electrician install the proper receptacle. The wall
receptacle MUST be properly grounded.
22.Under certain condition , hydrogen gas may be produced in a hot water system that
has not been used for 2 weeks or more . HYDROGEN GAS IS EXPLOSIVE .If the
hot water system has not been used for such a period , before using a washing
machine or combination washer-dryer ,turn on all hot water faucets and let the water
SAVE THESE INSTRUCTIONS
GROUNDING INSTRUCTION
This appliance must be grounded. In the event of malfunction or
breakdown, grounding will reduce the risk of electric shock by
providing a path of least resistance for electric current.
This appliance is equipped with a cord having an equipmentgrunding conductor plug. The plug must be plugged into an appropriate
outlet that is properly installed and grounded in accordance with all
local codes and ordinances.
WARNING - Improper connection of the equipment-grounding
conductor can result in a risk of electric shock. Check with a qualified
electrician or serviceman if you are in doubt as to doubt as to whether
the appliance is properly grounded.Do not modify the plug provided
with the appliance - if it will not fit the outlet, have a proper outlet
installed by a qualified electrician.
WARNING – To reduce the risk of electric shock disconnect this
appliance from the power supply before attempting any user
maintenance. Turning the controls to the OFF positiondoes not
disconnect this appliance from the power supply.
IMPORTANT SAFETY INSTRUCTIONS
4
3
flow each for several minutes . This will release any accumulated hydrogen gas .As the
gas is flammable ,do not smoke or use an open flame during this time.
23.Do not repair or replace any part of the appliance or attempt any servicing unless
specifically recommended in the user-repair instructions, which you understand and have
the skill to carry out.
Note:If for any reason this product requires service, we strongly recommend that a
certified technician perform the service.
24.To reduce the risk of electric shock or fire, do not use extension cords or adapters to
connect the unit to an electrical power source.
Page 4
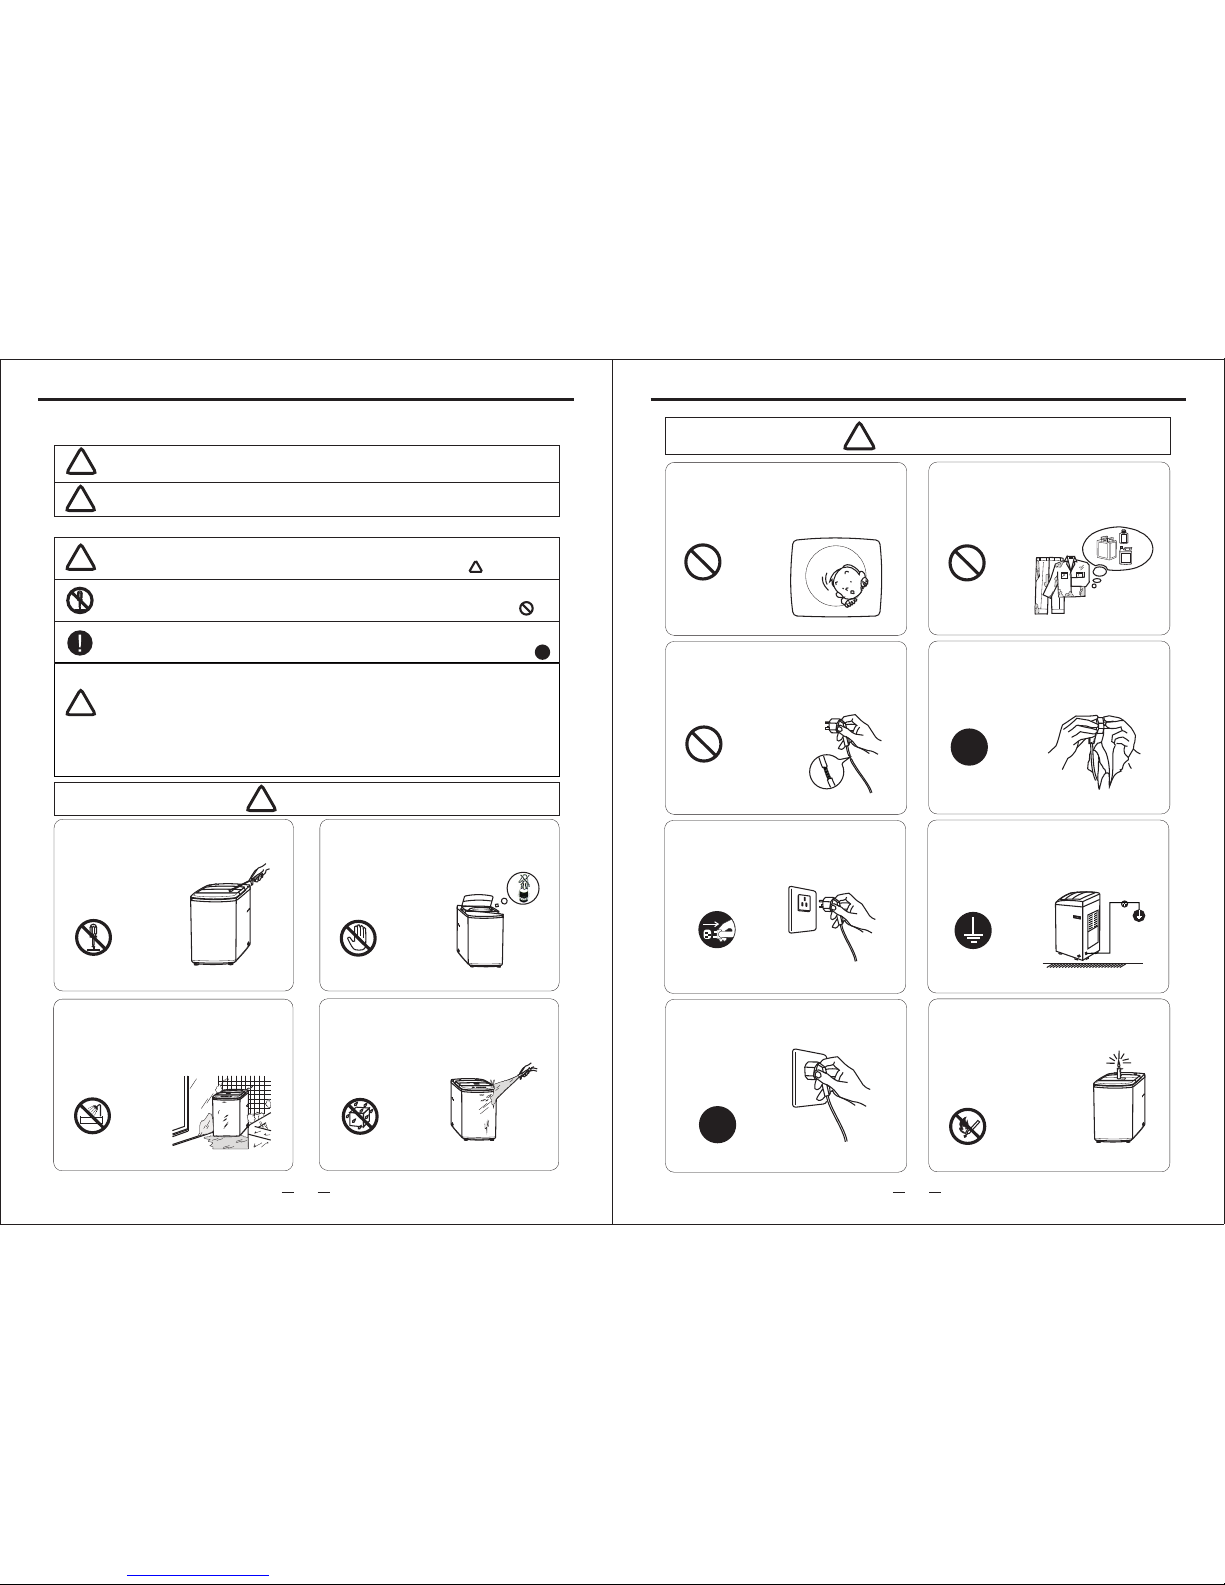
Please do not let children climb the
machine or peer into the rotating
spin barrel to avoid accidents.
It is prohibited to wash the clothes
touching with kerosene, gasoline,
alcohol and other flammable materials.
Please do not damage power flexible
cord and power plug to avoid electric
shocking, short circuit and catching
fire.
Regularly clean the power plug to
remove dust and dirt to avoid contact
failure.
Please pull out plug from the socket
if the machine is not in use.
Please well connect the earth line of
socket to avoid electric shocking by
accidental leakage.
(earthing)
Please insert the power plug tightly.
!
!
!
Prohibited
Prohibited
Prohibited
Smoke and fire prohibited
Earthing
Pull out the plug
Warning
Please do not place on the washer
burning candle, mosquito-repellent
incense, cigarette and other
flammable things, as well
as electric stove, air
heating fan and other
heating
sources.
6
5
Please do not directly rinse the
machine with water when
cleaning.
Please do not install the machine in
damp and raining environment to avoid
electric shocking, catching fire, faults
and distortion
accidents.
No dampness
No rinsing
小天鹅
小天鹅
Observe the following items in order to prevent from injuring yourself, others
and the damage of property:
Please observe following contents of graphics.
!
Warning
Caution
This indicates serious injury or death to human
being may be caused.
This will remind you that injury to people and
damage to property may occur.
This graphics represents (operation prohibited), and detailed
prohibitive items will be displayed inside the graphics.
This graphics represents(cause attention),and detailed
cautions will be displayed inside the graphics.
This graphic represents (forcible execution), and detailed
forcible execution items will be displayed inside the graphics.
Warning
No dismantling
No touching
Please do not disassembly
and assembly the
machine without
authorization.
Please do not insert your hand
and take out clothes inside the
spin barrel before
it is fully stopped.
This appliance is not intended for use by persons (including
children) with reduced physical, sensory or mental capabilities,
or
lack
knowledge, unless they have been
of experience and
given supervision
or instruction concerning
use of the appliance
by a person responsible for their safety.
Children
should be
supervised to ensure that they do not play with the appliance.
!
!
!
!
Safety and precautions Safety and precautions
Page 5
7
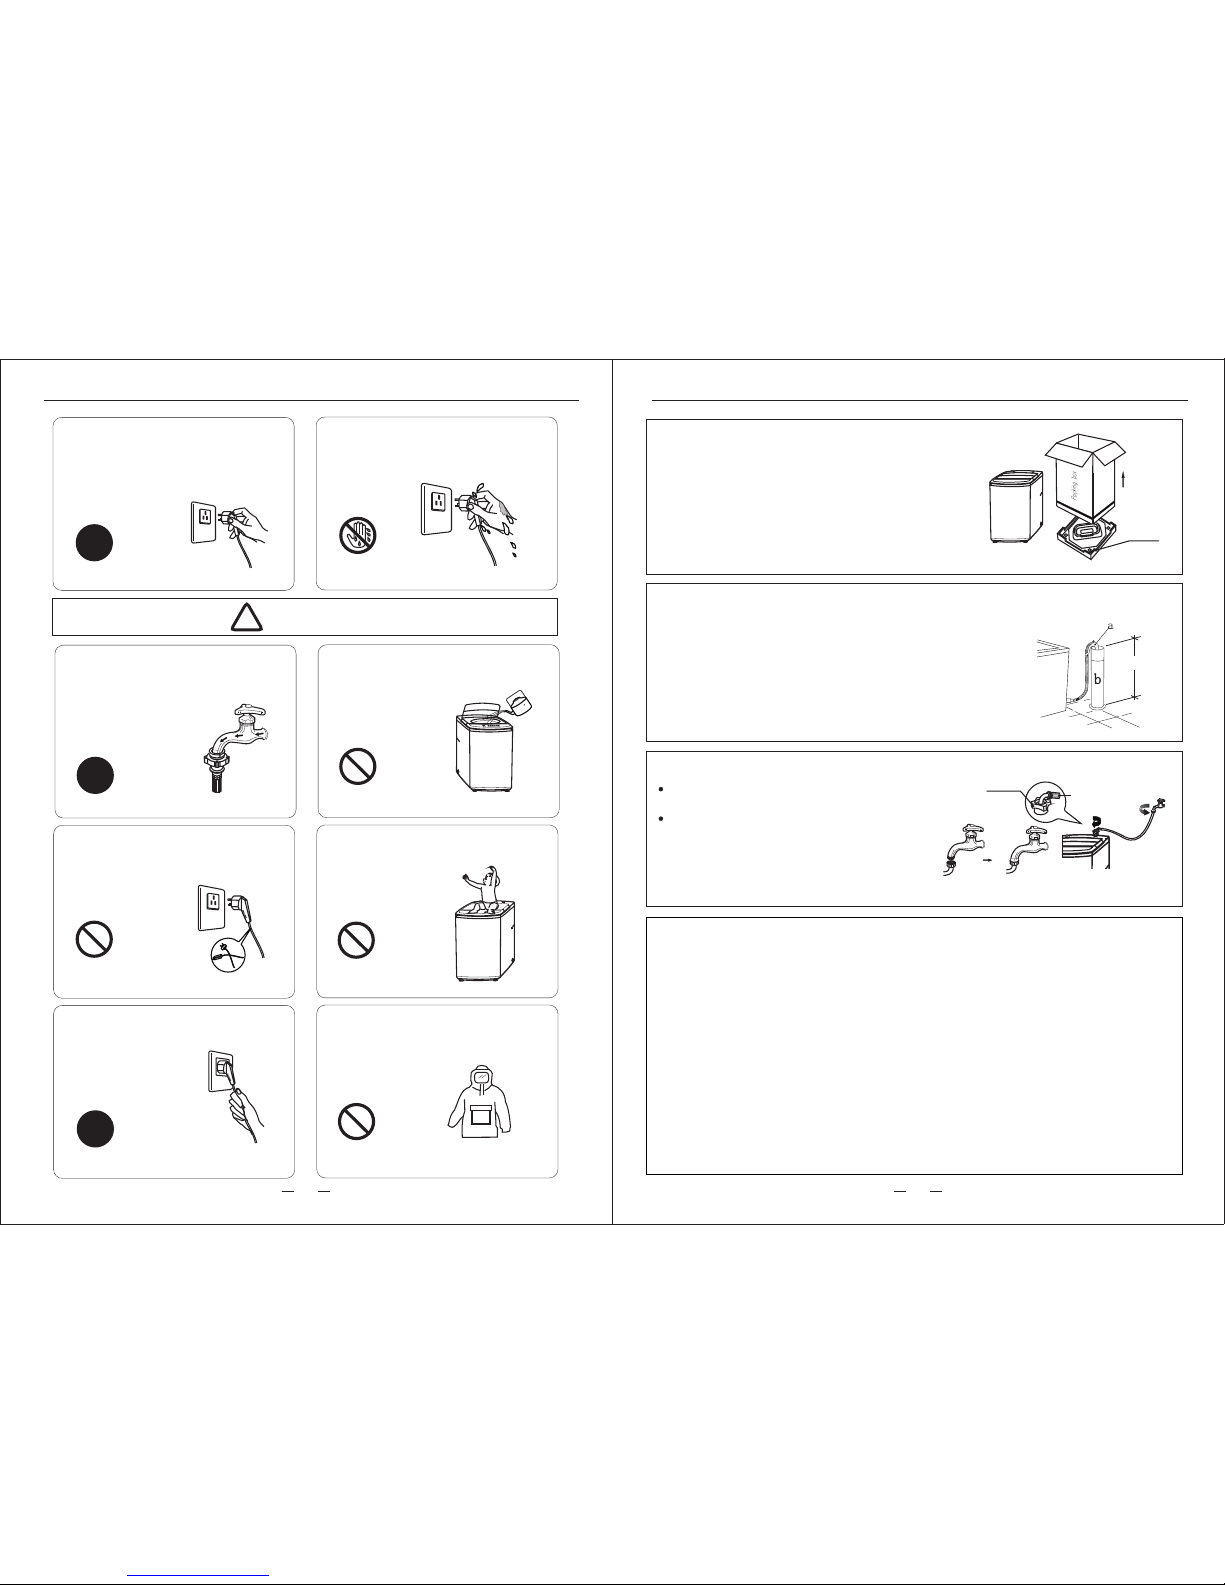
Please use correct power source.
Please do not pull out or insert the
plug with wet hands to avoid electric
shocking.
Please ensure that the water inlet pipe
is connected and the tap is opened
before washing
clothes.
Customers are not allowed to change
the power line without permission.
It is strictly prohibited to place and sit
children or lay
weights on the
washer.
Please do not pull the electric cord
when pulling out the
plug.
Please do not wash down raincoat,
fishing coat and similar
clothes in the
washer.
!
!
!
!
+
+
>
55 C
The water temperature shall not exceed
55℃ when washing
with warm water.
Prohibited
Prohibited
Prohibited
Prohibited
Caution
8
Installation of the washer
Remove package
! Remove package and take out the bottom board of
the cabinet on the foam cover.
! Open the lid of washer's door and take out accessories.
! A trial operation or washing on the foamed cushion is
strictly forbidden.
Base foamed cushion
The height of d rai n hos e (“a ”)s hou ld be tween 86-100 cm.
Diameter of “ b”s hul d not l ess t han 3 c m, an d flow capacit y
not less than 4 0 L/M in.
86~100 cm
Placement of upper water drain hose
Before wash ing m ach ine s tar ts, u ser s hould hang up th e
drain pipe 86 -10 0cm h eig ht fr om th e flo or.
Installation of water inlet pipe
Put the water inlet pipe(which has
metallic filtering bag) screw on to the tap.
Tightly screw another end of water
inlet hose on water inlet valve .
(with rubber seal ring inside).
Note: When tightening the
evenly apply the force and do not twist
the water inlet valve to avoid breaking of
water inlet valve joint.
clamping nut,
Water inlet hose
Clamping nut
If the supply cord is damaged, it must be replaced by the manufacturer, its
service agent or similarly qualified persons in order to avoid a hazard.
The instructions for appliances connected to the water mains by detachable
hose-sets shall state that the new hose-sets supplied with the appliance are
to be used and that old hose-sets should not be reused.
The openings must not be obstructed by a carpet.This appliance is for indoor use only.
When choosing the water inflowing to wash tub or spin tub , please do not move
the water inlet valve during the process of water inflowing.
If strong vibration occurs in time of spinning, open the spin cover immediately.
Make sure that the washing machine is placed on a flat and stable floor ,and then
adjust washing materials, distribute them evenly.
To do spinning and draining together, please spin for 1 minute before draining.
Do not wash or spin waterproof clothes or clothes that float easily to avoid abnormal
vibration or damage to the clothes.
Wet hands are
prohibited
Safety and precautions
Safety and precautions
Page 6
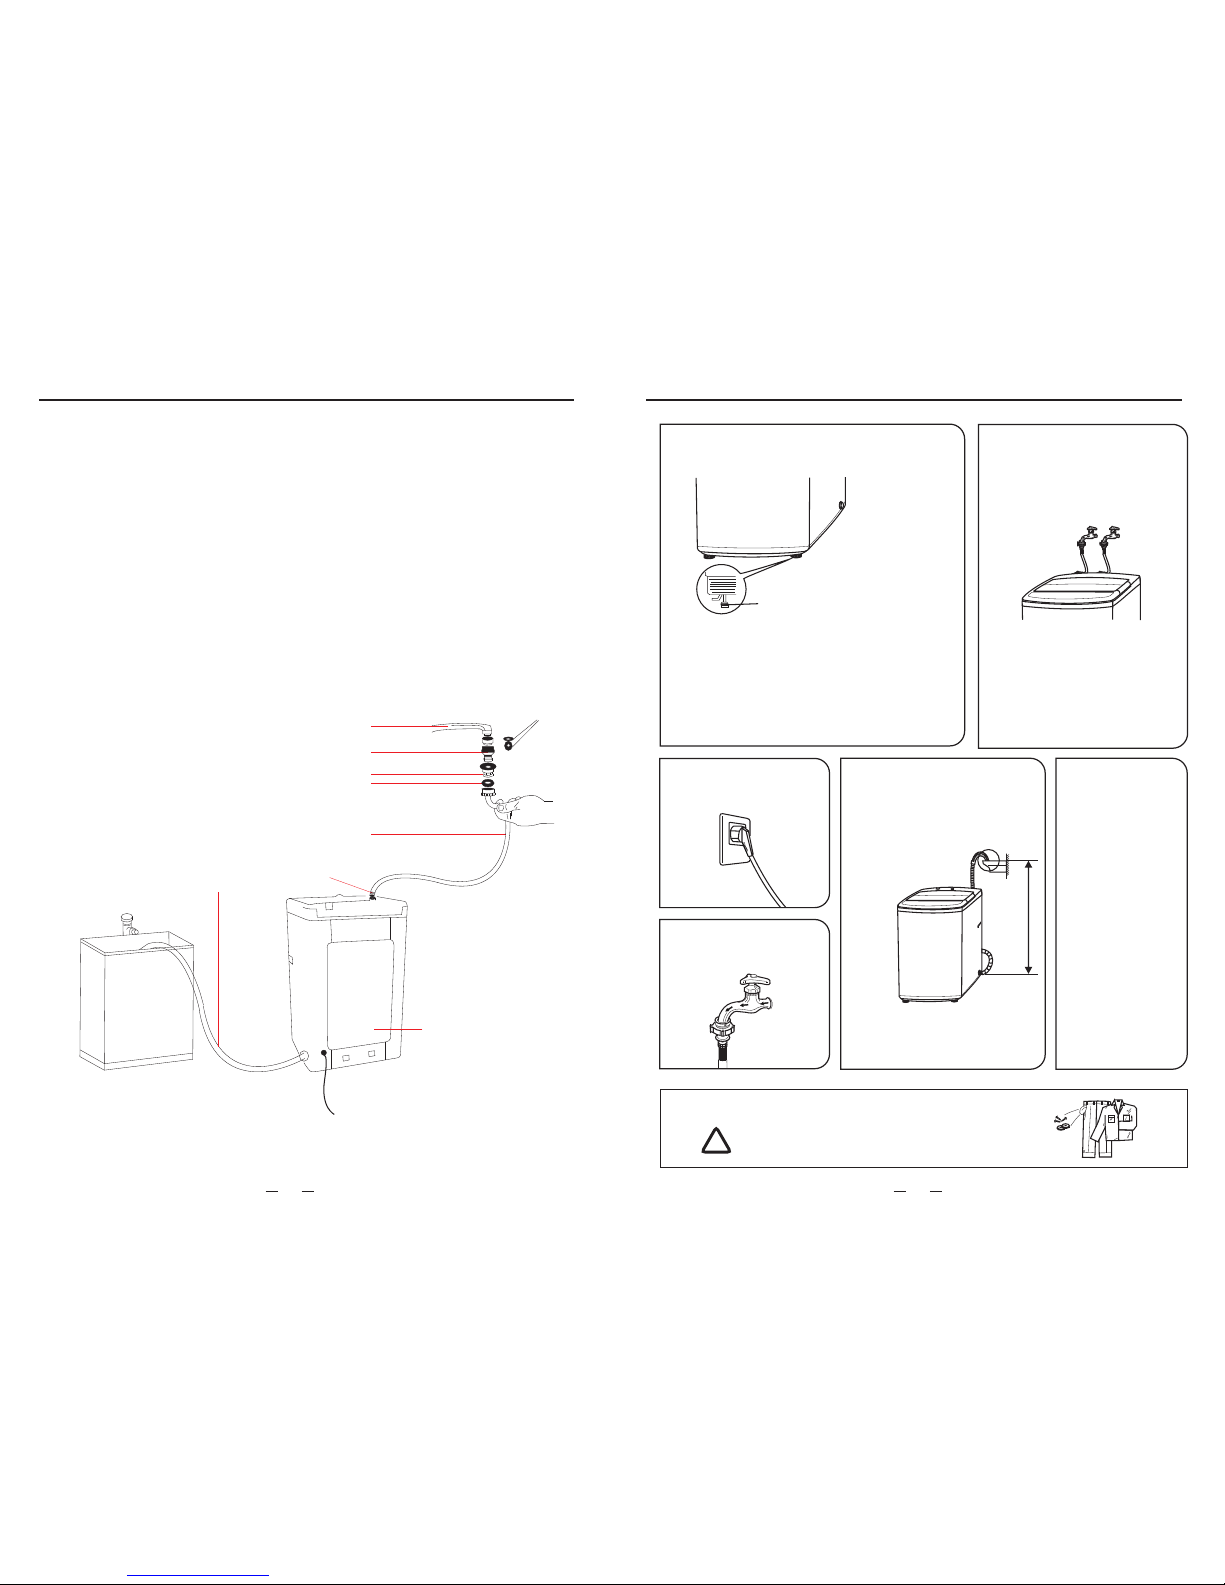
10
Preparation before washing
Before washing, please do take out coins,
keys and other hard goods, and zip up clothes
and
barrel from damage.
!
NOTICE
Adjust the adjustable foot to make
the washer be placed stable.
1
Adjustable foot (extend when
clockwise rotating and shorten
when counterclockwise rotating)
(Slightly incline the washer first and loosen the
adjustable foot knob. Adjust the adjustable foot so
as to ensure four corners of washer be steadily
contacted with the ground. Then tighten the
adjustable foot knob and lock it. If the ground is
obviously not flat, correction should be made on
the ground surface, otherwise the washer barrel
will incline and knock the cabinet)
Connect with to
power source.
3
4
+
+
Put down the drain
hose.
5
Upper drain
Note:
The water
will overflow
when the
height of
the drain
hose under
860mm.
>860mm
Put in
clothes
and
suitable
amount of
washing
powder.
6
Install the water
inlet hose.
2
For two inlet hoses
+++
+
tightly to prevent them
Turn on the
water s upply.
When instal lin g the q uic k sin k fau cet a dapter to the fa uce t, fo llo w the s tep s bel ow:
1.First,r emo ve th e aer ato r fro m you r faucet nozzl e and d ete rmi ne th e siz e/t ype of
the faucet.
2.Once you de ter min e the s ize /ty pe of t he faucet(Ou tsi de Th rea ded End or Inside
Thr ead ed En d), pla ce th e proper sized r ubb er wa she r int o the s ilv er faucet adapter.
3.Attach th e sil ver f auc et co nne cto r to the faucet.
4.Attach th e fau cet c onn ect or to t he wa ter inlet hose a nd ma ke su re th at th e rub ber
washer is pla ced i n bet wee n.
5.Attach th e oth er en d of th e wat er in let h ose to the washe r wat er in let a nd ma ke
sure that the r ubb er wa she r is pl ace d in be tween.
Washers
Faucet
Faucet Adapter
Quick Connector
Washer
Water inlet hose
Drain hose
Washer
Rear View of Washer
Installing Quick Sink Adapter
9
Page 7
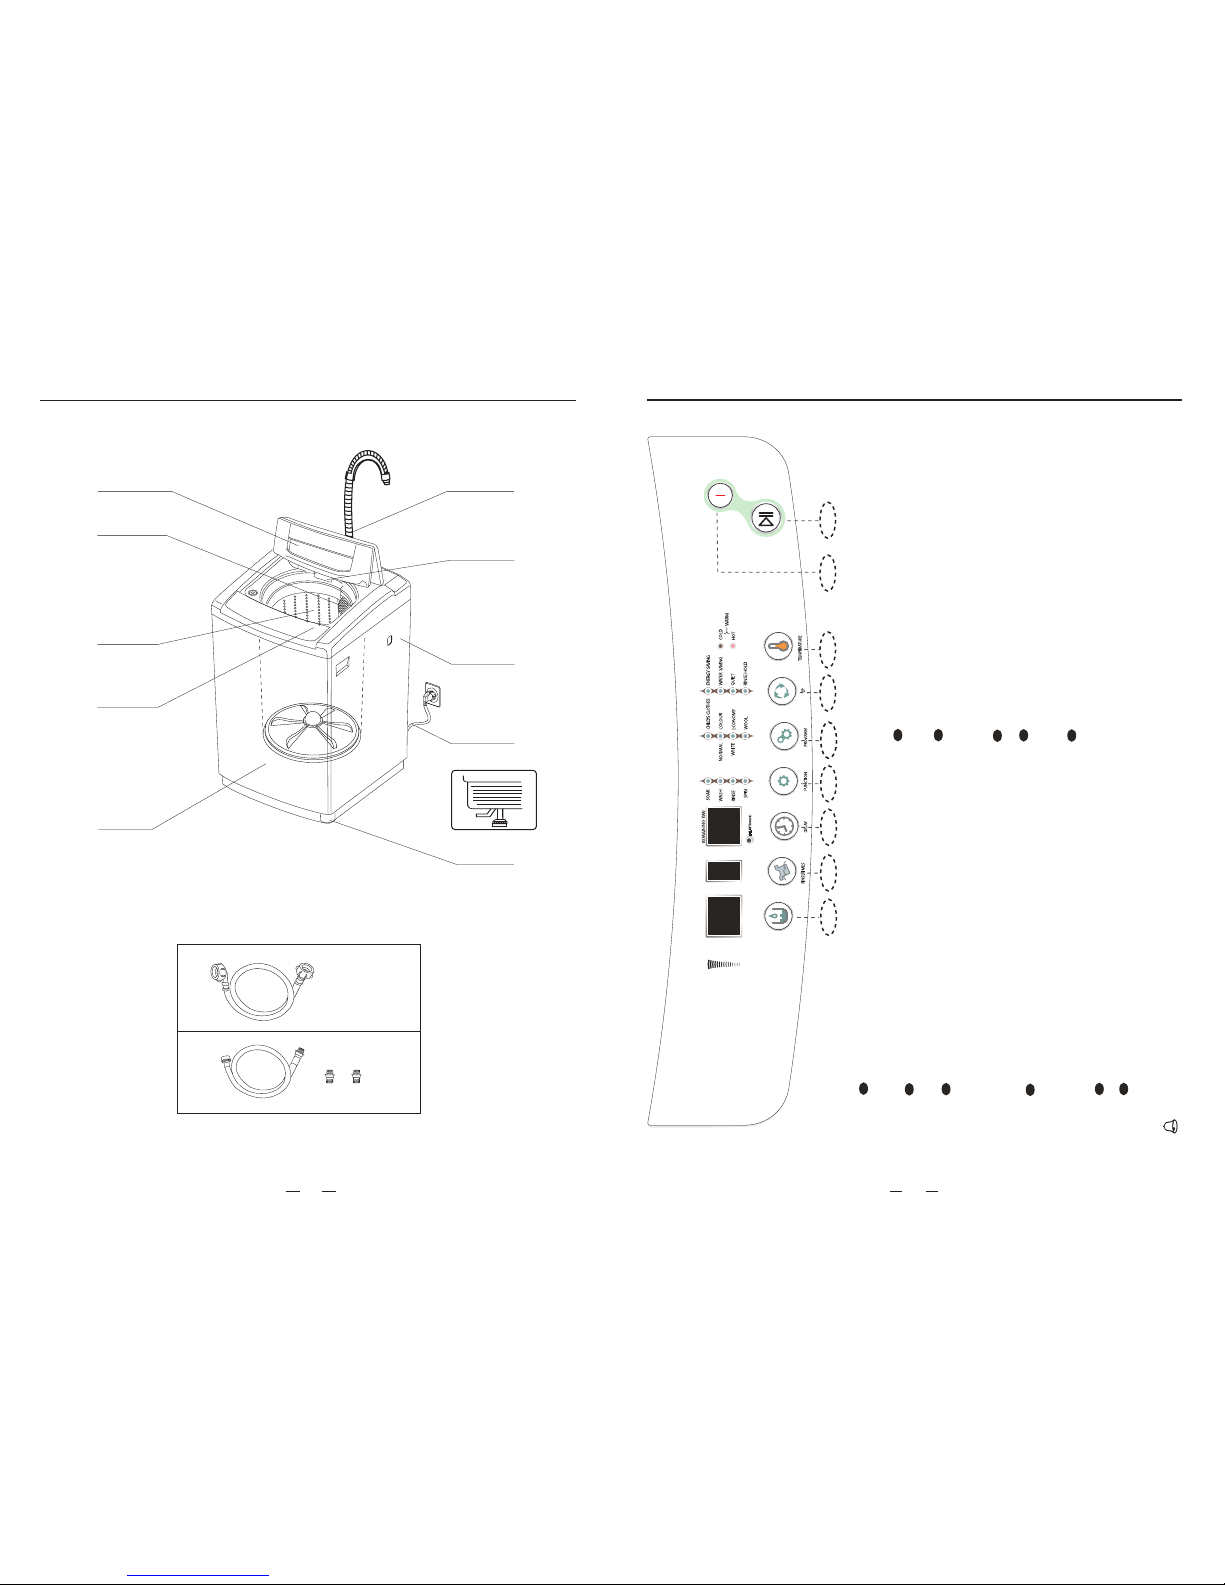
Parts identification of the washer
Instruction of the washer operation panel
Inlet hose 1pc
Accessories
Please refer to the real material as the attachment
Top lid
Lint filter
Control panel
Cabinet
Drain hose
Inner tub
Impeller
Detergent dispenser
Adjustable leg
Power plug
11
12
Rinse setting
Press the button , you can choose between 1-4 times rinse.
Delay
Each time we press the preset button, the preset time
is added by 1hr. For more than 24hrs preset time, each
press of the button would add 6hrs. preset time can be
set up to 48 hrs. When the light of preset is on, it means
the preset time, or no preset time.
Program setting
Select wash program of [ ], ], white , ,
[child`s clothes],[color], [economic] and [wool].
heavy [normal [ ] [jeans]
The indicator light moves to the selected program. The
expected water level, no of rinses and total time to complete
the program will be displayed in the indicator.
Environment protect
We can select “energy saving”, water saving quiet operation,
Water temperature
press the button to select different temperature water for washing .
when the "hot"is on ,it does not means washing machine will use
water supplied by the water inlet
Start/pause
After program selection, press the button to start. The
flashing indicator light will indicate that selected program
is working and its current states. Press the button to pause
the operation during the wash program, repressing of button
will continue the program till the program is finished.
ON/OFF switch
When “ON/OFF” button is pressed, the washing machine is in
working state, and starts in standard program.
During the operation if the button is pressed ,
wouldend the running program, and is in the state of power off.
“ON/OFF” it
If drawing is changed, no inform any more.
1
2
3
4
5
6
7
8 9
1
2
3
4
5
6
7
8
9
Load Size select
Selection of function
START
PAUSE
ON/OFF
HEAVY
LOAD SIZE
Press “Load size” button, the user can set water level freely.
LED display :“1”(small)、“2”(medium)、“3”(large)
small
medium
large
2
3
1
JEANS
1.The function display light Indicate that a selected feature
is ON or what the cycle is about to begin.
2.During the wash cycle ,the light indicates the current
STATUS of wash/ rinse /spin cycle.
Page 8
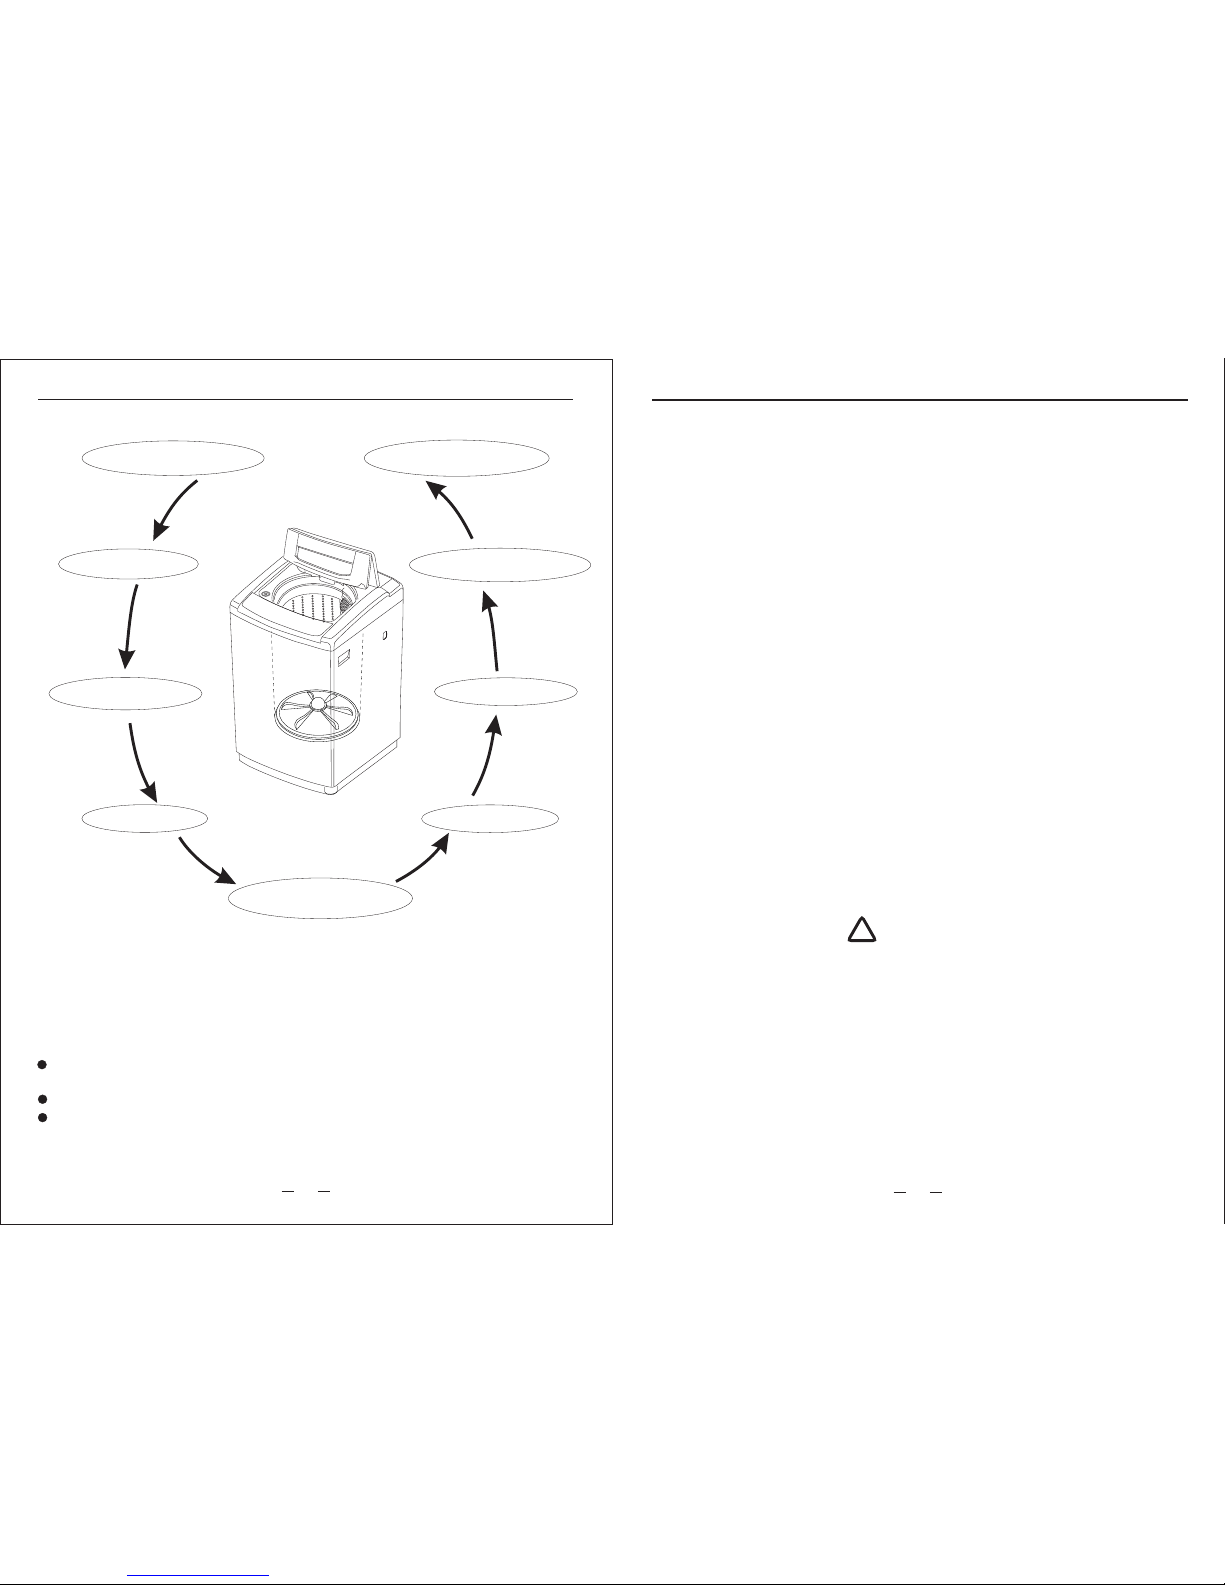
The was h stops
Progr amme se lecti on
1 Install the washing
machine
3 Measure out the
detergent
7 Plug the power supply
6 Turn on the water supply
8 Select the desired
program
5 Hang up the drain
pipe firmly
4 Close the top lid
9 Press the
[start/pause] key
13
When th e was h sto ps, the buzz er wi ll bu zz continu ous ly fo r 6 times and
then th e pow er wi ll be automa tic all y cut off.
Tur n off t he wa ter t ap.
Although the power can be cut off automatically, the power plug must be pull
out for the safety.
1
Press t he butto n.ON/OF F
3
Press t he St art /Pause key.
2
Selec t the p rop er water lev el an d oth er attache d fun cti ons.
2 Load the laundry
Instr uctio n of the Heavy p roced ure
Instr uctio n to sing le wash p rocedure
Steps i n detai ls
1.Press the b utt on.
2.Accordi ng to t he wa shi ng am oun t cho ose the proper wate r lev el.
3.Press Sta rt/ Pau se bu tto n.
ON/OF F
14
! Close the lid of the door when machine is running, otherwise, it will automatically
stop working during spin process and send out abnormal warning.
!The washer will not work when the filled water does not reach the set water level.
1.[ ] wash program is the easiest, most convenient and most common washing
program. When the user press the switch and then press [Start/Pause]
button, the washing program will start to work.
2.When the washer start to work, the digital tube show the remain time. The indicator
light which stand for remaining time is flickering.
Heavy
“ON/OFF”
Heavy
! User can freely select any single procedure, or any combination of procedures
among Wash, Rinse and Spin according to the actual requirements. It is only
required to turn off any one or two of these three indicators that not needed by the
user. And keep the indicator be on showing the process needed by the user.
! Single wash -- after switching on the power, turn off Rinse and Spin two indicators
by pressing these two keys. The operation for single rinse and single spin is similar.
! Single wash-spin – after switching on the power, turn off Rinse indicator by pressing
that key. The operation for single rinse-spin and single wash-rinse is similar.
NOTICE
!
Quick start
The main wash
Use the cleaning solution for twice
1. Put the laundry in the first batch and wash powder and press “Function” button to set
single “wash” to run.
2. Take out the laundry in the first batch after hearing the buzzing sound.
3. put in the laundry in the second batch, and run “ Wash”, “Rinse”, “Spin”.
4. Take out the laundry in the second batch after hearing the buzzing sound.
5. Put in the laundry in the first batch and press “ Function” button to run “Rinse” and “Spin”.
Page 9

Special features
About the procedure of full automatic wash program
Preset time means the staring time of washing
2.Open the tap and lay the drain hose.
3.Put in the laundry and detergent.
Preset time program
1.Switch on the “ON/OFF” .
4.Select the proper water level according to the
quantity of clothes.
5.Select the functions and programs.
6.Press “DELAY” button to select the beginning
time of washing.
7.Close the lid and press “START/PAUSE”button.
Confirmation and examination of the preset
1.After the press starting, the corresponding light will be turned on, the display digit shows the
washing machine starting time.
2.After starting preset, you can press the preset button continuously to check the preset status,
then loose the preset button, the program returns to preset status, if you open the lid now, the
washing machine will alarm.
Cancel the delay time or alternate the delay time
2. To change the delay time , cancel the delay time first , and then press “Delay” button to reset.
1. Press “ Power” button to cancel the delay time.
Method of use of delay button
Press the “ DELAY” button each time,
the number on the digital indication
adds by “1” ; After the number reaches
“24” , press the “ DELAY”button each
time , the number adds by “6” ; After
the number reaches 48, the light of delay
time turns off , and the delay program returns
to original status.
Heavy
Powerful in washing and applicable for washing clothes of a family in any season.
Normal
Powerful in washing, applicable for washing seriously stained clothes.
White
Especially suitable for washing cotton clothes.
Colour
Suitable for washing easily fading clothes and don't mix the clothes with different color.
Especially suitable for washing underclothes and child's clothes.
Child's clothes
Wool
The washing time is short. Applicable for washing light stained clothes.
Economy
Jeans
Powerful in washing, applicable for washing seriously stained clothes.
Suitable for washing woolen clothes.
Soak wash
1. Switch on the power. Open the tap and lay the drain hose.
2. Put in clothes and detergent.
3. Select proper water level according to the weight of clothes.
4. Press the Function button, the lights of “Soak” “Wash” “Rinse” “Spin” will turn on.
5. Press “Start/Pause” button and close the lid.
1. Pressing the “start/pause” button, the rinse light is on, when the program enters washing
state, the light starts to flash.
2.In the process of soaking, the washing machine does not stop working completely, it alters
washing and stopping, which mixes the laundry fully.
Wash of blanket
The weight of blanket should be less than 5kg, it is better to use a washing net.
1. Dissolve the detergent with proper amount of warm water, then pour it into the
washing machine.
2. Fold up the blanket as the method showed in the figures below and put it into the washing tub.
Notes:
Weight standard of clothes
Union suit including coat and
trousers(blended) about 800g
Pyjamas including coat and
trousers (cotton) about 500g
Long sleeves shirt
(blended) about 200g
Short sleeves shirt
(cotton) about 130g
Bed sheet (cotton)
about 500g
Bath towel (cotton)
about 300g
Trunks (cotton)
about 50g
Socks (blended)
about 50g
Notes:
Undo the net after washing; take the blanket out by holding it in the center .Put blanket into the
wash tub the same direction with the edge downwards when not using the net .Only the blanket
with marks “hand wash” can be washed.
Use the cleaning solution for twice
1. Put the laundry in the first batch and wash powder and press “Function” button to set
single “wash” to run.
2. Take out the laundry in the first batch after hearing the buzzing sound.
3. put in the laundry in the second batch, and run “ Wash”, “Rinse”, “Spin”.
4. Take out the laundry in the second batch after hearing the buzzing sound.
3. Switch on the “ON/OFF”and press the “Program” button to select the“ program and“Large”orJeans”
“Medium” water level.
4. Press the “Start/Pause” button, and close the lid.
5. After the ending of washing, put it to clothes line for sunshine . Make sure that the blanket is flat and
free of wrinkle.
15
16
Page 10

Features of five fully auto program are as follows:
Normal
Jeans
program
16' 40"+2 0"
36' 30"+3 0"
8'4 0"+20 "
11'4 0"+20 "
11'4 0"+20 "
2'4 0"+20 "
2'4 0"+20 "
14' 40"
6mi ns
7mi ns
81m ins
43m ins
76m ins
79m ins
91m ins
31m ins
22m ins
67m ins
Heavy
White
Child`s clothes
program
Col our
Nor mal
Wool
Normal
Economy
Normal
Notes :
It is r ecomm ended t o use low o r mid foa m powde r.
The volume of wash powder is changed with different type .You need to read its usage manual.
The wat er volume above listed is based on normal clothes volume.
Water volume i s different b ecause of cl othes vari ety. When washi ng machine doe
not
run properly, please adjust clothes volume or water level.
The tes t Progr am
Dur ing program, it is identifi ed as Efficien cy Program .“No rma l”
Recommended Load size:
Load size in lbsLoad size
Small
Medium
Large
Less than 7.76
7.76
12.5
Approximate Water
used in gallon
17.17
11.89
6.61
Large
Large
Large
Large
Large
Large
Large
Large
Small-Large
Default
Small-Large
Small-Large
Small-Large
Small-Large
Small-Large
Small-Large
Small-Large
Total time
End of pr ogram
The w ashing m achine w ill send off the s ound
of dou-dou at the end of any program operation
to remind you to take out the laundry or operate
it again.
Afte r the sou nd ,the w ashing machi ne retu rns
to its power-off state with no display and all lights off.
Please shut off the tap, pull out the plug when not
in use to avoid water leakage or the fire accidents.
" "
Maint enance
Use gentle clothing to wipe off the water and dirt on
the surface each time after using the washing machine.
Deter gent , prope llant and
othe r chemi cals ar e not
allowed to use so as to avoid
any dam age to the pla stic
acces sories.
Clean t he water in let
Clean t he lint fil ter in the dr ain pump (o nly for hav ing drain f ilter)
1. Drai n the water ou t of the
pump, under whic h use a
conta iner to coll ect.
2. Loos en the pump co ver
antic lockwise .
3. Take out the li nt filter.
4. Clea n the filter.
5. Rest ore it and adj ust the
conve x place to ali gn at
the pum p hole.
6. Tighte n the pump cov er
clock wise.
If the drain filter is not cleaned at proper time (every 10 times of use),Drain problem could be caused.
Notes :
Clean O f the filte r
After long time use, the water inle t mesh bag may
be blocked wit h smudginess, and sho uld be cleaned
according to t he following steps:
1. Switch on th e power, followed by sh utting off the tap .
2. Let the wash er works for 5 seconds so th at water
flows into the t ub through the water in let hose. then
turn off the powe r.
3. Unload the w ater inlet hose and clea n the mesh bag,
then restore t he water inlet assemb ly.
After using th e washing machine for a p eriod, please clean
it according t o the following steps :
1. Take out the lint filter .
2.Open the fil ter and wash it clean in the water.
3. Restore it a nd fix it.
After using the washing machine for a period, clean it
according to the following steps:
1. Take off the lint filter.
2. Turn over the mesh bag and wash it clean in the water.
3. Restore and fix it.
(only f or magic fi lter)
(only f or normal f ilter)
Cleaning and Maintenance of the washing machine
About the procedure of full automatic wash program
17
18
Load size
Page 11

The washing machine can self determine and send buzzing alarming to some errors and
incorrect operation. The causation of the error will show on the LED display . In this
case, please check the points hereinafter. Plug out and contact with the local service
center for their help if the washing machine can not self rectify after all the following
points have been checked. Do not repair by yourself, which is dangerous.
Symptom
The machine
does not work
The electricity is off
The power plug is not plugged tight.
The power switch is not switched on
Turn the electricity on
Re-plug the power plug.
Check the power socket, or
change other
inlet was stopped up by the sundries.
Whether the washing machine leak
Power off, wait for coming water.
Open the lid and tap, close the lid
Open the lid, dislodge the sundries,
close the lid.
Power off, plug out, send to repair
Alarming for
opening lid
Having opened the lid before spin
Open the lid after preset
Cover the top lid
Cover the top lid
Unbalance alarming
The laundry is uneven.
Open the top lid, replace the
laundry evenly, and close the top lid.
Does not drain
The drain hose is twisted or
jammed or placed too high.
Open the lid, solve the problem
of jam, and close the lid
Overflow alarming
Water level is higher than rated
overflow level
Power off, repair
Causation Solution
No water supply
The tap is not open
Flashing.
(Water inlet
error)
1.There is water injection during washing or rinse. That is because the washer senses a lack of water
and changes water level automatically.
2.There is the phenomenon of intermittent spinning in the beginning of spinning, which is performed
to achieve better spinning effects.
3. In the course of spin, the program returns to the rinse program .This is designed to rectify unbal anced distribution of load in the tub.
The following cases are not faults
Doo r-loc k failu re
Not normally open or unlocked
door
the door can be open only by pull
up the power when the door is
locked, and it can power-off and
alarm-cleared by press the power
key when the door lock is open.
No
washing
Abnormal
draining
Abnormal
spin
Identify usual trouble of washer
List of faults and inspection
Faults
Inspection Items
No water
flows in
! If the power is off or the fuse is burned out.
! If the water supply is cut off or the water pressure is too low.
! If the inlet hose is properly connected and the water tap is opened.
! If the filtering screen of inlet valve is blocked by dirt.
! If the coil of inlet valve is damaged. (The slight electromagnetic
sound is normal phenomenon when the inlet valve is switched on)
! If the "Start / Pause" button is pressed after the power
switch is pressed.
! If the door lid is closed.
! If all clothing piled largely at one side of barrel or the clothing
is excessively placed.
! If the washer is not placed in stable condition or it is placed in
inclination state. (The ground is not flat).
! If the motor belt is loosened.
Note: During the spin process, if washing are piled at one side of the spin barrel,
it will cause unbalance of spin barrel resulting in striking. At this moment, the
computer inside the washer will feel this unbalance phenomenon and will automatically
correct it ( fill in water Washing ). However, if unbalance situation is not removed after
continuous three corrections, which means the computer auto-correction can not
resolve the problem. Then the user has to manually and evenly place the clothing
inside the barrel to solve the problem.
When the washer is in trouble, please contact local service office or the sales service
department of our company and the customer should not dismantle the machine without
permission.
If the washer can not work normally, or appear abnormity or alarms, please check and
correct as follows.
! If the water drain hose is placed very high.
! If the end of water drain hose is sealed in pond.
! If the internal rubber ring of drain valve is blocked by dirt.
! If the power is off or the fuse is burned out.
! If the power supply voltage is too low.
! If the water amount reaches to the required water level.
(The washer will not work if the water amount does not reach the
required water level)
! If it is set to "Delay" washing mode. (It will only start to work
until the reservation time reached)
Malfunction display and solutions
19
20
Page 12

Technical specifications
120
45Kg
Current
value
5.0A
601X625X1015
Dru m Size
3.0Cu.ft
60Hz
0.5Mpa
0.1Mpa
Technical specifications
21
Page 13

Mod é le N o.:RPW302
Pour votre sécu rlté e t afl n de ga ran tlr u ne ut lll sation correct de c et ap par ell ,ve ull lez l ire
attentive men t tou tes l es di rct ive s qui s uivent avant d’ut ili ser c et ap par eil .
“RC A”, NIP PER&C HIPPER” ARE T RADE MAR KS OF RC A TRADEMAR K MAN AGEM ENT
USE D UNDER L ICENSE TO CUR TIS INTER NATIO NAL LTD .
“
LAVEUSE COMPACTE
PORTABLE
MANUEL D’INSTRUCTIONS
Page 14

DÉBALLER VOTRE LAVE-LINGE
DANGER
1
2
Remarques
Table des matières
1. Vérifiez et retirez tous les éléments d'emballage.
2. Vérifiez et retirez tous les restes d'emballage, de ruban
ou de documents avant de mettre en marche le lave-linge.
Risque d'enfermement des enfants .Avant de jeter votre
ancien appareil, veuillez enlever la porte pour que les
enfants ne peuvent pas facilement être piégés à
l'intérieur.
Consignes d e séc uri té importantes . . . . . . . . . . . . . . . . . . . . . . . . . . . . . . . . . . . . . . . . . . 3
Sécurité et p réc aut ions . . . . . . . . . . . . . . . . . . . . . . . . . . . . . . . . . . . . . . . . . . . . . . . . . . . 5
Installat ion d u lav e-linge . . . . . . . . . . . . . . . . . . . . . . . . . . . . . . . . . . . . . . . . . . . . . . . . . . 8
Installer l 'ad apt ateur rapide d'évier . . . . . . . . . . . . . . . . . . . . . . . . . . . . . . . . . . . . . . . . . . 9
Préparati on av ant l e lavage . . . . . . . . . . . . . . . . . . . . . . . . . . . . . . . . . . . . . . . . . . . . . . 10
Identific ati on de s pièces du lave-linge. . . . . . . . . . . . . . . . . . . . . . . . . . . . . . . . . . . . . . . 11
Instructi on du p ann eau de fonctionnement de la machine à l ave r . . . . . . . . . . . . . . . . . 12
Démarrage r api de . . . . . . . . . . . . . . . . . . . . . . . . . . . . . . . . . . . . . . . . . . . . . . . . . . . . . . 13
Le lavage pri nci pal . . . . . . . . . . . . . . . . . . . . . . . . . . . . . . . . . . . . . . . . . . . . . . . . . . . . . 14
Caractéri sti que s spéciales . . . . . . . . . . . . . . . . . . . . . . . . . . . . . . . . . . . . . . . . . . . . . . . 15
À propos de la pr océ dur e du programme de lavage automatiqu e int égr al . . . . . . . . . . . 16
Nettoyage e t ent ret ien du lave-linge . . . . . . . . . . . . . . . . . . . . . . . . . . . . . . . . . . . . . . . . 18
Identifie r les p rob lèmes courants du lave-linge. . . . . . . . . . . . . . . . . . . . . . . . . . . . . . . . 19
Aff ich age des pannes et solutions . . . . . . . . . . . . . . . . . . . . . . . . . . . . . . . . . . . . . . . . . 20
Spécifica tio ns te chniques . . . . . . . . . . . . . . . . . . . . . . . . . . . . . . . . . . . . . . . . . . . . . . . . 21
Page 15

Consignes de sécurité importantes
Consignes de sécurité importantes
CONSERVEZ CES INSTRUCTIONS
Consignes de sécurité importantes
4
3
AVERTISS EMENT : Pou r rédu ire le ri sque d' incen die, de d échar ge élec triqu e ou de blessu res
aux p erson nes lor s de l'ut ilisa tion de v otre ap parei l, suiv ez les pr écaut ions de b ase, do nt les
sui vante s :
1. Lis ez tout es les co nsign es avan t d'uti liser l 'appa reil.
2. Uti lisez u nique ment ce t appar eil pou r son usa ge prév u comme d écrit d ans ce gu ide
d'u tilis ation e t d'ent retie n.
3. Uti lisez u nique ment de s déter gents o u des ass oupli ssant s recom mandé s dans ce
man uel et co nserv ez-le s hors de p ortée d es enfa nts.
4. Cet a ppare il doit ê tre ins tallé c orrec temen t confo rméme nt aux in struc tions d 'inst allat ion
ava nt d'êt re util isé.
5. Ne dé branc hez jam ais vot re appa reil en t irant s ur le cor don éle ctriq ue. Sai sisse z
tou jours f ermem ent la fi che et re tirez -la fra nchem ent de la p rise.
6. Rem place z imméd iatem ent tou t cordo n élect rique u sé, fic he et pri se élec triqu es
des serré s.
7. Déb ranch ez votr e appar eil ava nt de le ne ttoye r ou d'ef fectuer d es répara tions.
8. Si vo us n'ut ilise z pas vot re anci en appa reil, n ous vou s recom mando ns de ret irer la
por te.
Cel a rédui t la poss ibili té de dan ger vis -à-vi s des enf ants.
9. N'u tilis ez pas vo tre app areil e n prése nce de va peurs e xplos ives.
10. Ne lavez p as ou ne sé chez pa s d'art icles a yant pr écéde mment é té nett oyés, l avés,
tre mpés ou t achés a vec de l' essen ce, des s olvan ts pour n ettoy age à sec o u toute a utre
sub stanc e infla mmabl e ou expl osive c ar elle s émett ent des v apeur s pouva nt
s'e nflam mer ou ex plose r.
11. Le s vête ments o u les chi ffons u tilisés p our netto yer des pro duits inf lammabl es ou
exp losif s ne doiv ent pas ê tre lav és dans c et appa reil ju squ'à c e que tou tes les t races d e
ces s ubsta nces ai ent été e nlevé es.
12. N'ajou tez pas o u ne méla ngez pa s de subs tance s infla mmabl es ou exp losiv es au
lav age.
13. N'essa yez pas d e retir er des vê temen ts pend ant que l a cuve to urne. L aisse z-le s' arrêt er
com plète ment av ant d'y a ccéde r.
14. La porte d e charg ement d e l'app areil d oit êtr e fermé e quand l a cuve to urne.
15. Ne faite s pas fon ction ner vot re appa reil si d es pièc es sont m anqua ntes ou c assée s.
16. N'util isez pa s cet app areil à d es fins c ommer ciale s.
17. Ne faite s pas fon ction ner cet a ppare il si tou s les pan neaux d e ferme ture ne s ont pas
cor recte ment en p lace.
18. Ne dérég lez pas l es comm andes .
19. Ne laiss ez pas le s enfan ts joue r sur ou da ns l'ap parei l. Une su rveil lance é troit e des
enf ants es t néces saire q uand l' appar eil est u tilis é à proxi mité de s enfan ts.
20. Cet appa reil do it être b ranch é à une pri se élec triqu e appro priée a vec une a limen tatio n
éle ctriq ue corr ecte.
21. Vou s deve z vous as surer d e la mise à l a terre c orrec te afin d e rédui re le ris que de
déc harge e t d'inc endie . NE COUP EZ PAS OU NE R ETIREZ PAS LA PR ISE DE T ERRE.
Si vo us n'av ez pas de p rise él ectri que mur ale à tro is born es, fai tes ins talle r la pris e
app ropri ée par un é lectr icien c ertif ié. La pr ise mur ale DOI T être cor recteme nt raccor dée
à la te rre.
22. Sous cer taine s condi tions , de l'hy drogè ne peut ê tre pro duit da ns un sys tème d' eau
cha ude qui n 'a pas ét é utili sé pend ant 2 sem aines o u plus. L 'HYDR OGÈNE E ST
EXP LOSIF. Si l e systè me d'ea u chaud e n'a pas é té util isé pen dant un e telle d urée, a vant
d'u tilis er un lav e-lin ge ou une c ombin aison l ave-l inge/ sèche -ling e, ouvr ez tous l es
rob inets d 'eau ch aude et l aisse z l'eau c ouler p endan t plusi eurs mi nutes . Cela li bérer a
de l' hydro gène ac cumul é .Car ce g az est in flamm able, n e pas fum er ou uti liser u ne
fla mme nue p endan t ce temp s.
23. Ne répar ez pas ou n e rempl acez pa s les piè ces de l' appar eil ou n' essay ez pas d' effec tuer
d'e ntret ien sau f si reco mmand é spéci fique ment da ns les co nsign es de rép arati on pour
l'u tilis ateur, q ue vous c ompre nez et po ur lesq uelle s vous av ez les co mpéte nces.
Rem arque : S i, pour u ne rais on quel conqu e, ce pro duit né cessi te une ré parat ion , nou s
vou s recom mando ns fort ement d e conta cter un t echni cien ag rée.
24. Pour réd uire le r isque d e décha rge éle ctriq ue ou d'i ncend ie, n'u tilis ez pas de r allon ges
ou d' adapt ateur s pour br anche r l'app areil à u ne sour ce d'al iment ation é lectr ique.
Cet appareil doit être raccordé à la terre. En cas de
dysfonctionnement ou de panne, la mise à la terre réduit le risque de
décharge électrique en fournissant un chemin de moindre
résistance pour le courant électrique.
Cet appareil est équipé d'une corde muni d'un équipementconducteur de terre. La fiche doit être branchée à une prise
appropriée, correctement installée et raccordée à la terre
conformément à tous les codes et décrets locaux.
AVERTISSEMENT : Un raccordement incorrect du conducteur de
terre peut entraîner un risque de décharge électrique. Vérifiez avec
un électricien ou un agent de service qualifiés si vous doutez de la
mise à la terre correcte de l'appareil. Ne modifiez pas la fiche fournie
avec l'appareil : si elle ne convient pas à la prise, faites installer une
prise appropriée par un électricien qualifié.
AVERTISSEMENT : Afin de réduire le risque de décharge
électrique, débranchez cet appareil de l'alimentation
électrique avant de procéder à une opération d'entretien. Lors
de tourner les touches de commande à la position OFF, ne pas
débrancher l'alimentation électrique.
Page 16

Veuillez ne pas laisser les enfants monter
sur la machine ou regarder dans le
tambour d'essorage rotatif afin d'éviter
des accidents.
Il est interdit de laver les vêtements en
contact avec du kérosène, de l'essence,
de l'alcool et tout autre produit inflammable.
Veuillez ne pas endommager le cordon
flexible d'alimentation et la fiche électrique
pour éviter une décharge électrique,
un court-circuit ou un incendie.
Nettoyez régulièrement la fiche électrique
pour retirer la poussière et la saleté afin
d'empêcher tout faux contact.
Veuillez débranchez l'appareil de
la prise électrique s'il n'est pas utilisé.
Veuillez bien raccorder la ligne de terre de
la prise pour éviter une décharge
électrique par fuite accidentelle.
(mise à la terre)
Veuillez bien insérer la fiche électrique.
!
!
Interdit
Interdit
Interdit
La fumée et le feu interdit
Mise à la terre
Retirez la fiche
Avertissement
Veuillez ne pas poser sur le lave-linge une
bougie allumée, de l'encens anti-moustique,
une cigarette et d'autres produits inflammables
ainsi qu'une cuisinière électrique, un ventilateur
chauffant et d'autres
sources de chauffage.
6
5
Veuillez ne pas rincer directement
l'appareil avec de l'eau lors du
nettoyage.
N'installez pas l'appareil dans un
environnement humide et pluvieux afin d'éviter
une décharge électrique, un incendie ou des
accidents causés par des défaillances
et des déformations.
Aucune humidité
Pas de rinçage
小天鹅
小天鹅
Observez les points suivants afin d'éviter de vous blesser, de blesser d'autres
personnes et d'endommager les biens :
Veuillez observer le contenu suivant des graphiques.
Avertissement
Attention
Ceci indique que des blessures graves ou la mort
peuvent être causées.
Ceci vous rappelle que des blessures aux personnes
et des dommages aux biens peuvent être occasionnés.
Ce graphique représente (opération interdite) et les points interdits
sont affichés en détail à l'intérieur du graphique.
Ce graphique représente (nécessite attention) et les précautions sont
affichées en détail à l'intérieur du graphique.
Cette image représente (exécution forcée), et les éléments d'une exécution
forcée détaillée seront affichés à l'intérieur de la carte graphique.
Avertissement
Pas de désassemblage
Ne pas toucher
Ne démontez pas et
n'assemblez pas
l'appareil sans
autorisation.
Veuillez ne pas insérer votre main
ni retirer les vêtements à l'intérieur
du tambour d'essorage avant
qu'il ne soit complètement arrêté.
Cet appareil n'est pas destiné à être utilisé par des personnes (notamment
des enfants) avec des capacités physiques, sensorielles ou intellectuelles
réduites, ou par des personnes inexpérimentées ou de connaissances
réduites, à moins qu'on leur ait donné une supervision ou des instructions
quant à l'utilisation de l'appareil par une personne responsable de leur
sécurité. Les enfants doivent être surveillés afin de s'assurer qu'ils ne jouent
pas avec l'appareil.
Sécurité et précautions Sécurité et précautions
Page 17

7
Veuillez utiliser la source
électrique correcte.
Veuillez ne pas retirer ou insérer la fiche
avec les mains mouillées afin d'éviter une
décharge électrique.
Veuillez vous assurer que le tuyau d'arrivée
d'eau est raccordé et que le robinet est
ouvert avant de laver les
vêtements.
Les clients ne sont pas autorisés à
modifier la ligne électrique sans permission.
Il est strictement interdit de placer et
d'asseoir des enfants ou
de poser des poids
sur le lave-linge.
Veuillez ne pas tirer sur le cordon
électrique quand vous retirez la fiche.
Veuillez ne pas laver d'imperméables en
duvet, de manteaux de pêche et de
vêtements similaires
dans le lave-linge.
!
!
!
+
+
>
C
55
La température de l'eau ne doit pas
dépasser 55℃ lors d'un lavage
avec de l'eau chaude.
Interdit
Interdit
Interdit
Interdit
Attention
8
Installation du lave-linge
Défaites l'emballage.
Coussin de base en mousse
La ha uteur d u tuyau d e vidan ge ("a" ) doit êt re comp rise en tre 86
et 10 0 cm. Le di amètr e de "b" ne d oit pas ê tre inf érieu r à 3 cm,
et la c apaci té de flu x ne doit p as être i nféri eure à 40 L/Min .
86~100 cm
Positionnement de l'embout de drainage supérieur.
Ava nt de lance r la machin e, l'util isateur d oit racco rder le tuy au
de vi dange e t le posi tionn er à 86/1 00 cm du so l.
Installation du conduit d'alimentation en eau intérieur.
Tuyau d'entrée d'eau
Ecrou de serrage
Les mains mouillées sont interdites
Sécurité et précautions
Sécurité et précautions
! Défaites l' emb all age et extrayez le carton
du polistyr ène p ar le b as.
! Ouvrez le car ton e t ret ire les accessoires.
! Toute opérati on de t est o u le lavage de la
mousse sont s tri cte ment interdits.
· Pla cez le tu yau d'e ntrée d 'eau (q ui a un sac
mét alliq ue filt rant) e t visse z-le su r le robi net.
· Vis sez fer memen t l'aut re extr émité d u tuyau
d'e ntrée d 'eau su r vanne d 'entr ée d'ea u. (ave c une
bag ue en cao utcho uc à l'in térie ur)
Rem arque : L orsqu e vous se rrez l' écrou d e vissa ge,
app lique z une for ce régu lière e t ne fait es pas pi voter l a
van ne inté rieur e afin de n e pas la fi ssure r ni de fis surer
son j oint.
Si le c ordon e st endo mmagé , il doit ê tre rép aré par l e fabri cant ou p ar l'un d e ses tec hnici ens
agr éés. Se ules le s perso nnes qu alifi ées son t autor isées à i nterv enir.
Les i nstru ction s, pour l es appa reils c onnec tés au ré seau de d istri butio n d'eau s uivan t des
dis posit ifs de tu yaux dé tacha bles, d oiven t indiq uer que l es nouv eaux di sposi tifs de t uyaux
fou rnis av ec l'ap parei l doive nt être u tilis és et que l es anci ens dis posit if de tuy aux ne do ivent p as
êtr e réuti lisés .
Les o rific es ne doi vent pa s être ob strué s par un ta pis. Ce t appar eil est c onçu po ur une ut ilisa tion
en in térie ur uniq uemen t.
Lor s du choi x de l'ap port d' eau ver s le bac de l avage o u le bac d' essor age , veu illez n e pas
dép lacer l a vanne d 'entr ée d'ea u au cour s du proc essus d 'appo rt d'ea u.
Si de f ortes v ibrat ions se p rodui sent lo rs de l'e ssora ge, ouv rez le co uverc le de l'e ssore use
imm édiat ement .
Ass urez- vous qu e la mach ine à lav er est pl acée su r un sol pl at et sta ble ,pu is régl ez les
mat ériau x de lava ge; rép artis sez-l es de man ière un iform e.
Pou r effec tuer à l a fois l' essor age et la v idang e, veui llez es sorer p endan t 1 minut e avant l e
dra inage .
Ne la vez ou n' essor ez pas le s vêtem ents im permé ables o u les vêt ement s qui sur nagen t
fac ileme nt, afi n d'évi ter des v ibrat ions an ormal es ou des d égâts a ux vête ments .
Page 18

10
Préparation avant le lavage
!
AVIS
1
3
4
+
+
5
>860mm
6
2
Pour deux tuyaux d'entrée
+++
+
Machines à laver
Robinet
Adaptateur du robinet
Connecteur rapide
Machines à laver
Tuyau d'entrée d'eau
Tuyau d'évacuation
Machines à laver
Vue arrière de la machine à laver
Installer l'adaptateur rapide d'évier
9
Lorsque vous in stallez l'adapta teur au robitnet, suivez les étapes suivantes:
1. Tout d'abord, ret irer l'aérateur su r votre buse de robine t et déterminer la
taille / type du ro binet.
2. Une fois cela dét erminé (extrémit é filetée intérieu re ou extérieure),
positionnez u ne bague en caoutchou de taille adaptée sur l'adaptateur.
3. Fixez l'adapt ateur au robinet.
4. Fixez l'adaptateur au conduit d'alimentation en eau intérieur
et vérifiez que la bague en caoutchouc a été correctement
placée.
5. Reliez l'autre extrémité du conduit d'alimentation intérieur et
vérifiez que la bague en caoutchouc est bien positionnée.
Ajustez le pied r églable pour place r
la machine à lave r stablement.
Installez le tu yau
d'entrée d'ea u.
Pie d régla ble (ét endu lo rs de tou rner da ns le sen s des
aig uille s d'une m ontre e t racco urci lo rs de tou rner co ntre le
sen s des aig uille s d'une m ontre ) ( i nclin er légè remen t la
mac hine à la ver tou t d'abo rd et des serre z le bout on du pie d
rég lable . Aju ster le p ied rég lable d e façon à a ssure r que les
qua tre coi ns de la ma chine à l aver so ient so lidem ent en
con tact av ec le sol . Ensui te, ser rez le bo uton du p ied
rég lable e t le verr ouill er. Si le so l n'est é videm ment pa s
pla t, la cor recti on doit ê tre app ortée s ur la sur face du s ol,
sin on le tam bour de l a machi ne à lave r se penc he et fra ppe
le ca binet )
Connectez-v ous
avec une source
d'alimentat ion.
Tourner le robinet
d'alimentat ion
d'eau.
Déposez le tuya u
de vidange.
Tuya u de vidang e
sup érieu r
Rema rque :
L'ea u va
débo rder
lors que la
haut eur du
tuya u de
vida nge est
infé rieur e à
860m m.
Mettre les
vêtements et
une quantité
appropriée
de lessive.
Ava nt le l avage, veuillez retirer les mo nna ies ,
des clés et d'a utr es ma tériaux dures, et fermer
bien la zip afi n d'é vit er l'endommagement au
tambour ou au x vêt eme nts.
Page 19

Identification des pièces du lave-linge
Instruction du panneau de fonctionnement de la machine à laver
Tuyau d'entrée 1pc
Accessoires
Référez-vous aux documents réels comme pièces jointes
Couvercle supérieur
Filtre à charpie
Panneau de commande
Cabinet
Tuyau d'évacuation
Bac intérieur
Turbine
Distributeur de détergent
Pied réglable
Fiche d'alimentation
11
12
1
2
3
4
5
6
7
8 9
START
PAUSE
ON/OFF
LOAD SIZE
Petit
Moyen
Grand
2
3
1
Temps rest ant
Retard ( heur es)
Trempe r
Lavage
Rinçag e
Essore r
Lourd
NORMAL
BLANC
JEANS
VêTEMENTS P OUR ENFA NTS
COULEU R
éCONOM IE
LAINE
éCONOMIE D' éNERG IE
éCONOMIE D' EAU
SILENCIEU X
RINçAGE SUS PENDU
Froid
TIèDE
CHAUD
1 Sélection de la taille d e la ch arg e
Appu yez sur l e bouto n "Taille d e la char ge", l' utili sateu r peut
lib remen t régle r le nive au de l'e au.
Aff icha ge LED : "1 " (peti t), "2" ( moyen ), "3" (l arge)
2 Paramètres de rinçage
Appuyez sur le bouton, vous pouvez choisir entre rincer 1-4 fois.
3 Retard
A chaq ue fois q ue nous a ppuyo ns sur le b outon d e pré-
rég lage, l 'heur e de préd éfini e est aug menté e d'une h eure.
Pou r une heu re préd éfini e de plus d e 24 heur es, cha que
foi s que vou s appuy ez sur le b outon c ela ajo utera 6 h.
L'h eure pr édéfi nie peu t être ré glée ju squ'à 4 8 h. Lors que le
voy ant de pr é-rég lage es t allum é, cela s ignif ie que la d urée
pré défin ie, ou au cune he ure pré défin ie.
4 Sélection de la foncti on
1. L'i ndic ateur d e la fonc tion in dique q u'une f oncti on
sél ectio nnée es t Act ivée ou q ue le cyc le est am orcé.
2. Au co urs du c ycle de l avage , le voya nt indi que le
STATUT actuel du cy cle de l avage /rinç age/e ssora ge.
5 Paramètres du programme
Sél ectio nnez le p rogra mme de la vage de [ lourd ],
[no rmal] ,[bla nc], [j eans] , [vête ments d 'enfa nts], [coul eur],
[éc onomi que] et [ laine ]
Le té moin lu mineu x se dépl ace ver s le prog ramme
sél ectio nné. Le n iveau d 'eau pr évu, no mbre de r inçag es et
tem ps tota l néces saire p our com pléte r le prog ramme s eront
aff iché s dans le t émoin .
Si le d essin e st modi fié, il n 'info rme plu s.
6 Protection de l'envi ron nem ent
Nou s pouvo ns séle ction ner "éc onomi e d'éne rgie" , écono mie
d'e au fonc tionn ement s ilenc ieux,
7 Températ ure d e l'e au
Sel on diff érent s vêtem ents, v ous pou vez cho isir "e au chau de ",
"ea u froid e" et "ea u tempé rée".
8 Interrupteur ON/OF F
Lor sque le b outon " ON/OF F" est ap puyé, l a machi ne à lave r est
en ét at de fon ction nemen t, et dém arre da ns le pro gramm e
sta ndard .
Au co urs de l' opéra tion, s i le bout on "ON/ OFF" es t press ée ,il
met tra fin a u progr amme en c ours d' exécu tion, e t est dan s l'éta t
de mi se hors t ensio n.
9. Start/Pause (Mise à m arc he / Pa use)
Apr ès la sél ectio n du prog ramme , appuy ez sur le b outon p our
dém arrer. L e témoi n lumin eux cli gnota nt indi quera q ue le
pro gramm e sélec tionn é fonct ionne e t ses éta ts actu els.
App uyez su r le bout on pour i nterr ompre l 'opér ation p endan t le
pro gramm e de lava ge, app uyez en core su r le bout on
pou rsuiv ra le pro gramm e jusqu 'à ce que l e progr amme so it
ter miné.
Page 20

1 Installer la machine
à laver
3 Mesurer le détergent
7 Branchez le cordon
d'alimentation
6 Ouvrez le robinet d'eau
8 Sélectionnez le
programme souhaité
5 Raccrochez fermement
le tuyau de vidange
4 Fermer le couvercle supérieur
9 Appuyez sur la touche
[Start / Pause]
13
2 Charger le linge à laver
14
AVIS
!
Démarrage rapide
Le lavage principal
Sélection du programme
1 Appuyez su r le bouton . "ON/OFF"
2
. Sélectionnez l e bon niveau d'eau ainsi que les fonctions correspondant.
3. Appuyez sur le bo uton Start/Pause .
Le lavage s'arrête.
· Lorsque le lavage s'arrête, le buzzeur émet un e alarme sonore 6 fois d e suite
puis l'alimen tation est automat iquement coupée.
· Fermez le robinet.
· Bien que l'alimentation peut être coupée aut omatiquement, la p rise
d'alimentat ion doit être retiré e pour la sécurité.
Instruction of the procedureHeavy
1. programme de lavage est le plus facile, la plus pratique et la [Heavy(Lo urd )]
plus cou ran te programme de l avage. Lorsque l' uti lis ate ur appuie sur le
commutate ur , puis a ppu ie sur le bouton [Start /Pa use ], le programme "ON/OFF"
lavage se me t en ma rche.Heavy
2. Lorsque la mac hin e s'arrête, l'écran numérique affiche l e temps r est ant .
L'indicat eur i ndi quant le temps restant qui se scin til le.
Etapes en détails.
1. Appuyer sur l e bou ton O N/OFF.
2. Selon le mont ant d e lin ge à laver, sélectionnez le niveau d'e au ad apt é.
3. Appuyez sur l e bou ton S tart/Pause.
Consignes pour un lavage seul
! L'utilisa teu r peut décider de ne fa ire qu'un la vag e seul ou de combiner la vage,
rinçage et séchage, en fonctio n de ses b esoins. Les voyants corres pon dan t aux
fonctions sont allumés ou éteints en fonc tio n de leur activation ou no n. Les
voyants ind iqu ent à l 'utilisateur le mode en cours de fonc tio nne ment.
! Lavage se ul- - Après avoir allumé le c our ant , désativez les voy ant s Rinçage et
Séchage en app uya nt sur les boutons c orr esp ond ant. L'utilisation en rin çag e et
en séchage si mpl e est s imilaire.
! Rinçage/S éch age seul- après l a mise sous t ens ion , éteignez le voyant de
rinçage en appuyant sur le bouton corr esponant. L'ut ili sation en rinçage et e n
séchage sim ple e st si milaire.
Utiliser la solution de nettoyage pendant deux fois
1. Placez le ling e da ns l e pr emier tambour, placez la lessi ve, pui s a ppuyez sur la
touche "Fon cti on" p our régler le mode "Lavage seul".
2. Sortez le lin ge du p rem ier tour, après avoir entendu le signa l de fi n.
3. Placez da ns le l ing e dans le deuxième tamb our, et exécuter lava ge "," rin çag e
"," Spin ".
4. Sortez le lin ge da ns le d euxième lot, après avoir entendu le b our don nement.
5. Mettez dans la buanderie dans le premier lot et appuyez s ur la t ouc he
"Fonction " pou r acc éder aux mode Riçage et Séchage.
! Fermez le cou ver cle d e la porte quand la machine est en marche , sin on, c ette
dernière s' arr ête ra automatiquement de foncti onn er pe nda nt le processus de
rinçage et ém ett tra u n son anormal.
! L'apparei l ne fo nct ionne pas lorsque l'eau n'atteint p as le n ive au d'eau correct.
Page 21

Caractéristiques spéciales
À propos de la procédure du programme de lavage automatique intégral
Méthode de l'utilisation du bouton "retard"
15
16
Appu yez sur l e bouto n "RETAR D" chaq ue fois ,
le nom bre sur l e témoi n numér ique au gment e
de " 1". U ne fois q ue le nom bre att eint "2 4",
appu yez sur l e "RETAR D" bout on chaq ue fois ,
le nom bre aug mente d e "6". Un e fois qu e le
nomb re atte int 48, l a lumiè re du tem ps de
reta rd s'ét eint , et l e progr amme de r etard
reto urne à l' état in itial .
· Program me d'heur e prédéfi nie
Heu re préd éfini e signi fie que l e délai d e lavag e
1. Appuyez s ur "ON/OF F" .
2. Ouvrez la p orte et pla cez le tuya u
d'é vacua tion.
3. Placez le l inge et la le ssive.
4. Sélecti onnez le ni veau d'ea u appropr ié en
fon ction d e la quan tité de s vêtem ents.
5. Sélecti onnez les f onction s et les prog rammes.
6. Appuyez s ur DELAY pour l ancer l e démar rage
en dé calé.
7. Appuyez s ur le bouto n " START / PAU SE".
· C onfirma tion et exa men du pré- réglage
1. A u démarrag e, le témoi n corresp ondant s' allume, l e chiffre de l'af fich age ind ique
l'h eure de d émarr age de la m achin e à laver .
2. A près le d émarrage p rédéfin i, vous pou vez appuy er sur le bou ton de prés électio n en
con tinu po ur véri fier le s tatut p rédéf ini, pu is dess errer l e bouto n de pré- régla ge, le
pro gramm e retou rne au st atut de p ré-ré glage ; si vous o uvrez l e couve rcle
mai ntena nt, la ma chine à l aver so nnera l 'alar me .
· A nnuler ou m odifier l e temps de dé calage.
1. Appuy ez sur le b outon " Power " pour an nuler l e temps d e décal age.
2. Pour mo difie r le temp s de déca lage, a nnule z d'abo rd l'he ure con figur ée, pui s
app uyez su r le bout on "Del ay" pou r réini tiali ser le sy stème .
Lou rd
Pui ssant p our le la vage et a pplic able po ur lave r des vêt ement s de fami lle en to ute sai son.
Nor mal
Par ticul ièrem ent ada pté pou r laver d es vête ments e n coton .
Whi te
Pui ssant p our le la vage et a pplic able po ur lave r des vêt ement s série useme nt tach és.
jea ns
Pui ssant p our le la vage et a pplic able po ur lave r des vêt ement s série useme nt tach és.
Chi ld's cl othes
Par ticul ièrem ent ada pté pou r laver l es sous -vête ments e t les vêt ement s d'enf ants.
COU LEUR
Ada pté pou r laver l es vête ments q ui se déc olore nt faci lemen t et ne mél angez p as les
vêt ement s de coul eur dif férente .
éCO NOMIE
Le te mps de la vage es t court . App licable p our laver l es vêteme nts légèr ement tac hés.
Lai ne
Ada pté pou r le lava ge de vêt ement s en lain e.
· Tre mper le l inge
1. Mettre s ous tensi on. Ouvre z la porte et p lacez le tu yau d'éva cuation .
2. Mettez -y des vête ments et du d étergen t.
3. Sélect ionnez le n iveau d'e au approp rié en fonc tion du poi ds des vête ments.
4. Appuye z sur le bout on "Funct ion" et les l umières d e “Soak” “Wash” “ Rinse” “S pin”
s'a llume ront.
5. Appuye z sur le bout on "Start /Pause" b outon et fe rmez le cou vercle.
Observ ation s:
1. Appuye r sur la touc he "start /pause" b outon, le v oyant "Ri nce" est al lumé; lor sque le
pro gramm e passe à l 'état d e lavag e, le voy ant com mence à c ligno ter.
2. Dans le pr ocessus d e trempag e, la machi ne à laver ne s 'arrête p as complè tement de
fon ction ner, ell e alter ne lava ge et arr êt, ce qu i perme t de bien m élang er le lin ge.
· La ver une cou verture
Le po ids de la c ouver ture do it être i nféri eur à 5 kg. I l est pré férab le d'ut ilise r un file t de
lav age.
1. D issolve z le déterg ent suiva nt la quant ité d'eau t iède conv enable, p uis verse z-le dans
la ma chine à l aver.
2. P liez la cou verture c omme la mét hode mont rée sur les f igures ci -dessou s et placez -la
dan s la cuve d e lavag e.
3. A ppuyez su r "ON/OFF " et appuye z sur le bout on "Progr am" pour sé lection ner le
pro gramm e "Jean s" et le ni veau d' eau "La rge"o u Mediu m".
4. A ppuyez su r le bouton " Start/P ause" bou ton et ferm ez le couve rcle.
5. A près le lav age, séch ez-la sur u ne corde à li nge. As sure z-vou s que la co uvert ure est
pla te et san s frois semen t.
O bserv ation s:
Déf aites l e filet a près le l avage ; faite s sorti r la couv ertur e en la ten ant au ni veau du c entre .
Met tez la co uvert ure dan s le bac de l avage s uivan t la même d irect ion que l e bord ve rs le bas ,
lor sque vo us n'ut ilise z pas le fi let. Se ule la co uvert ure ave c les ins cript ions "l avage à l a
mai n" (han d wash) p eut êtr e lavée .
· Ut iliser la s olution d e nettoya ge pendan t deux fois
1. Pl acez le lin ge dans le pr emier tam bour, plac ez la lessi ve, puis ap puyez sur l a touche
"Fo nctio n" pour r égler l e mode "L avage s eul".
2. So rtez le lin ge du premi er tour, apr ès avoir en tendu le si gnal de fin .
3. Pl acez dans l e linge dan s le deuxiè me tambou r, et exécut er lavage " ," rinçag e "," Spin
".
4. So rtez le lin ge dans le de uxième lo t, après av oir enten du le bourd onnemen t.
· Po ids stand ard des vêt ements
Costu me Unio n y compr is mant eau et
panta lon(m élang ées) en viron 8 00g
Pyjam a, y comp ris man teau et
panta lons (c oton) e nviro n 500g
Chemi se manc hes lon gues
(méla ngées ) envir on 200g
Chemi se manc hes cou rtes (c oton)
envir on 130g
Drap de l it (cot on) env iron 50 0g
Servi ette de b ain (co ton) en viron
300g
Slip (c oton) e nviro n 50g
Chaus sette s (méla ngées )
envir on 50 g
Page 22

Caractéristiques de cinq programmes automatiques sont les suivants:
Observation s:
Le programme de test
Au cours de pro gra mme “ , il est identi fié c omm e Programme d'Effica cit é.Normal”
Fin du programme
Entretien
Nettoyer l'entrée d'eau
Nettoyez le filtre à charpie dans la pompe de vidange (uniquement si vous avez un filtre de vidange)
1. Videz l'eau de la pompe,
vous utiliserez u n bol
pour re cueillir d e l'eau.
2. Dé vissez le couv ercle de
la pomp e dans le sens
anti-horaire.
3. Sortez le filtre
4. Ne ttoyez le fi ltre.
5. Re mettez-le à sa p lace et
ajuste z la partie conv exe pour
l'alig ner sur l'orif ice de la
pompe.
6. Vissez le couvercle de la
pompe d ans le sens
horai re.
Si le f iltre n 'est pa s netto yé au bon m oment ( t outes l es 10 heu res d'u tilis ation ) , u n probl ème
de vi dange p ourra it résu lter .
Observations:
Nettoyer le filtre
Après une util isation continue , le ta mbour et le filtres
peuvebt être e ncombrés et doivent do nc être nettoyés
selon les étap es suivantes :
1. Mettez sous tension , puis fermez le robinet .
2. Faites tourner la machine à vide pendant 5
secondes afi n que l'eau s'écoule dan s la cuve par
le tuyau d'arr ivée d'eau .
(uniquement pour filtre magique)
(uniquement pour filtre normal)
Nettoyage et entretien du lave-linge
À propos de la procédure du programme de lavage automatique intégral
17
18
Capacité de charge
Programme
Par défaut MODE
Tremper le
linge
Durée de lavage
Temps
d'éssorage
Temps total
Programme
Intensif
Grand Petit-Large 36'30"+30" 6mins 81mins
Programme
Normal
Grand Petit-Large 16'40"+20" 7mins 43mins
Programme
Blanc
Grand Petit-Large 20 mins 8'40"+20" 5mins 76mins
Programme
Jeans
Grand Petit-Large 20 mins
11'40"+20"
5mins 79mins
Programme
vêtements
d'enfant
Grand Petit-Large 20 mins 11'40"+20" 5mins 91mins
Couleur
normale
Grand Petit-Large 2'40"+20" 2mins 31m ins
économie
normale
Grand Petit-Large 2'40"+20" 2mins 22m ins
Laine Norm ale
Grand
Petit-Large 20 mins
14'40"
2mins 67mins
Capacité de charge recommandée:
Capacité de charge Capacité de charge en livres L'eau utilisée approximatif en gallon
Grand 12,5 17,17
Moyen 7,76 11,89
Petit Moins de 7,76 6,61
Il es t recom mandé d 'util iser de l a poudr e bas ou mi m ousse .
Le vo lume de l essiv e est cha ngé à plu sieur s types . Vous dev ez lire s on manu el
d'u tilis ation .
Le vo lume d' eau est d iffér ente en rai son de vête ments div ers. Si la ma chine à lav er ne
fon ction ne pas, v euill ez ajus ter le vo lume de v êteme nts ou le n iveau d 'eau.
Le vo lume de l 'eau én uméré s ci-de ssus es t basée s ur le vol ume des v êteme nts
nor maux.
· La ma chine à l aver ém et un sig nal son ore la fi n de
tou te opér ation d e progr amme po ur vous r appel er de
réc upére r le ling e mouil lé dans l e tambo ur.
· Apr ès le bip s onore , l a machi ne à lave r revie nt à son
éta t hors te nsion , sans éc ran et sa ns voya nts
lum ineux .
· Veui llez: · f ermer l e robin et , débr anche r la pris e
lor sque la m achin e n'est p as util isée af in d' évi ter les
fui tes d'e au ou les r isque s d'inc endie .
Uti liser d es tiss us doux p our ess uyer l' eau et la s aleté s ur la
sur face de l a macin e, aprè s chaqu e utili satio n.
N'u tilis ez ni dét ergen ts, ni pr oduit s abras ifs, af in de ne pa s
ris quer d' endom mager l es acce ssoir es en pla stiqu e .
Une fois la mach ine utilisée, veuill ez suivre les
consignes de n ettoyage suivantes :
1. Sortez le filtre intérieur.
2. Ouvrez-le et mettez-le à tremper dans le d'eau.
3. Repositionnez-le après l'avoir légèrement séché.
Après chaque u tilisation, nettoy er la machine en
respectant les étapes suivantes:
1. Retirez le filtre.
2. Retournez le sac et faite-sle tremper dans l'eau .
3. Repositionnez-le après l'avoir légèreme nt séché.
Page 23

Symptôme
The electricity is off
L'interrupteur d'alimentation n'est pas allumé
Allumez l'électricité
Branchez à nouveau la fiche d'alimentation.
Vérifiez la prise d'alimentation, ou changez-la
l'entrée a été obstruée par les divers articles séchés.
Si la machine à laver présente une fuite
éteignez, attendez l'eau à recueillir.
éteignez, débranchez, envoyez pour réparation
Avoir ouvert le couvercle avant l'essorage
Ouvrez le couvercle après le pré-réglage
Couvrez le couvercle supérieur
Couvrez le couvercle supérieur
Le linge est inégal.
Cause Solution
Aucune alimentation en eau
Le robinet n'est pas ouvert
Les cas suivants ne sont pas des pannes
Identifier les problèmes courants du lave-linge
Vérifiez l'état général de la machine
Remarque : Pendant le processus d'essorage le linge est empilé sur un seul côté du cylindre
d'essorage, cela peut provoquer le déséquilibre du tambour. Dans ce cas, la
machine tentera de réajuster automatiquement l'équilibre (une fois le lavage
terminé). Toutefois, si ce déséquilibre n'est pas rectifié, cela signifie que la
fonction d'auto-correction ne peut pas résoudre le problème. Dans ce cas,
arrêtez la machine et repositionnez de manière équilibrée le linge dans le
tambour.
Lorsque la machine montre des signes de faiblesse, contacte votre revendeur le plus
proche ou votre technicien habituel afin de la faire contrôler.
Si la machine semble ne pas fonctionner normalement ou émet des bruits anormaux ,
suivez les consignes suivantes:
Affichage des pannes et solutions
19
20
Pannes Éléments d'inspection
L'eau ne coule
pas
! L'alimentation est peut-être coupée ou le fusible est grillé.
! L'alimentation en eau est peut-être coupée ou la pression d'eau est trop faible .
! Le tuyau d'alimentation est-il correctement branché et le robinet d'eau est-il ouvert?
! Le filtre et la vanne sont-ils propres et non pas encrassés?
! La bobine de la vanne n'est-elle pas endommagée? Ă Į Ō NǾÞÒP ÕŮŊÑǾ ÑŒP ŌŎǾÖ MÕ
lorsque la vanne intérieure est activée)
! ĬÒ ÕÑ NŎÞPŎŌ ÀĬ PMǾP C Ĩ MÞŒÑÀ ÑŒP ÑŌŃÕÑŌŃOé après que l'interrupteur a été
activé.
Pas de lavage
! L'alimentation est peut-être coupée ou le fusible est grillé.
! La tension d'alimentation est trop faible.
! La quantité d'eau atteint le niveau d'eau requis .
(La machine ne fonctionnera pas si la quantité d'eau nécessaire n'est pas
respectée)
! La machine est en mode Démarrage en décalé. (Elle ne se lancera qu'à l'heure
configurée)
Evacuation
anormale
! L'embout d'évacuation est mal positionnée, ou positionné trop haut.
! L'embout du tuyau d'évacuation est mal vissé.
! La bague en caoutchouc est encrassée.
Rinçage
inefficace
! La porte est mal fermée.
! Si tous les vêtements empilés sur un même côté de la machine ou s'ils sont trop
volumineux.
! ĬÒ ÕM Ö MŃOÒŌÑ ŌĀÑŒP ŐMŒ ŒPMNÕÑ ŎÞ ÑŒP ÒŌŃÕÒŌŮÑB [ ś sol n'est pas lisse)
! Si la courroie du moteur est desserrée.
La machine à la ver p eut a utomatique déterminer et envoye r des a lar mes sonores
pour certai nes e rre urs et un mauvais fonctionnement. L a rai son d e l'erreur s'affi che ra
sur l'écran L ED . Da ns ce c as, veuillez vérifier les points ci -ap rès . Débranchez et
contactez l e cen tre d e service local pour leur assistanc e, si l a mac hine à laver ne peut
pas s'auto- rép are r, après que tous les points suivants ai ent é té vé rifiés. Ne la réparez
pas vous-mê me: c ela q ui dangereux.
La fi che d'a limen tatio n n'est p as
fer memen t branc hée.
La ma chine n e
fon ction ne pas.
Cli gnota nt.
(Er reur de
l'e ntrée d 'eau)
Ala rme pou r
avo ir ouve rt le
cou vercl e
Ala rme lié e au
dés équil ibre
Ne vi dange p as
Ala rme de
déb ordem ent
Pro blème d e
ver rouil lage de
la po rte
Le tu yau de vi dange e st tord u ou
coi ncé ou pl acé tro p haut.
Le ni veau d' eau est p lus éle vé que
cel ui du déb ordem ent nom inal
Por te qui ne s 'ouvr e pas ou ne s e
dév errou ille pa s norma lemen t
Ouv rez le co uverc le et le ro binet ,
fer mez le co uverc le
Ouv rez le co uverc le, ret irez le s
art icles s échés , ferme z le couv ercle .
Ouv rez le co uverc le supé rieur,
dis posez l e linge u nifor mémen t, et
fer mez le co uverc le supé rieur.
Ouv rez le co uverc le, rés olvez l e
pro blème d e bloca ge et fer mez le
cou vercl e
éte ignez , répar ez
la po rte que p eut-ê tre uni queme nt
ouv erte en d ébran chant l a fiche ,
lor sque la p orte es t verro uillé e, et il
peu t être ét eint et s ans ala rme en
app uyant s ur la tou che de mi se en
mar che lor sque la p orte es t ouver te.
1. Il y a un e injecti on d'eau au c ours du lav age ou du r inçag e. C'es t parce q ue la lav euse
dét ecte un m anque d 'eau et c hange l e nivea u d'eau a utoma tique ment.
2. Il y a un p hénomèn e d'essor age inter mitte nt au déb ut de l'e ssora ge: cec i se prod uit pou r
avo ir des me illeu rs effe ts d'esso rage.
3. Au co urs de l'es sorage, l e program me reto urne au p rogra mme de ri nçage . Ceci es t conçu
afi n de rect ifier t oute ré parti tion in égale d e la char ge dans l e bac.
Page 24

Spécifications techniques
Spécifications techniques
21
Dimensions (mm)
601X625X1015
Poids du produit
45Kg
Valeur actuelle
5,0A
Taille du tambour
3.0Cu.ft
Tension
nominale
120V~
Pression d'eau maximale
autorisée dans l'entrée d'eau
0.5Mpa
Fréquence
nominale
60Hz
La pression minimale de l'eau
est autorisée pour l'entrée d'eau
0.1Mpa
 Loading...