

Page 1
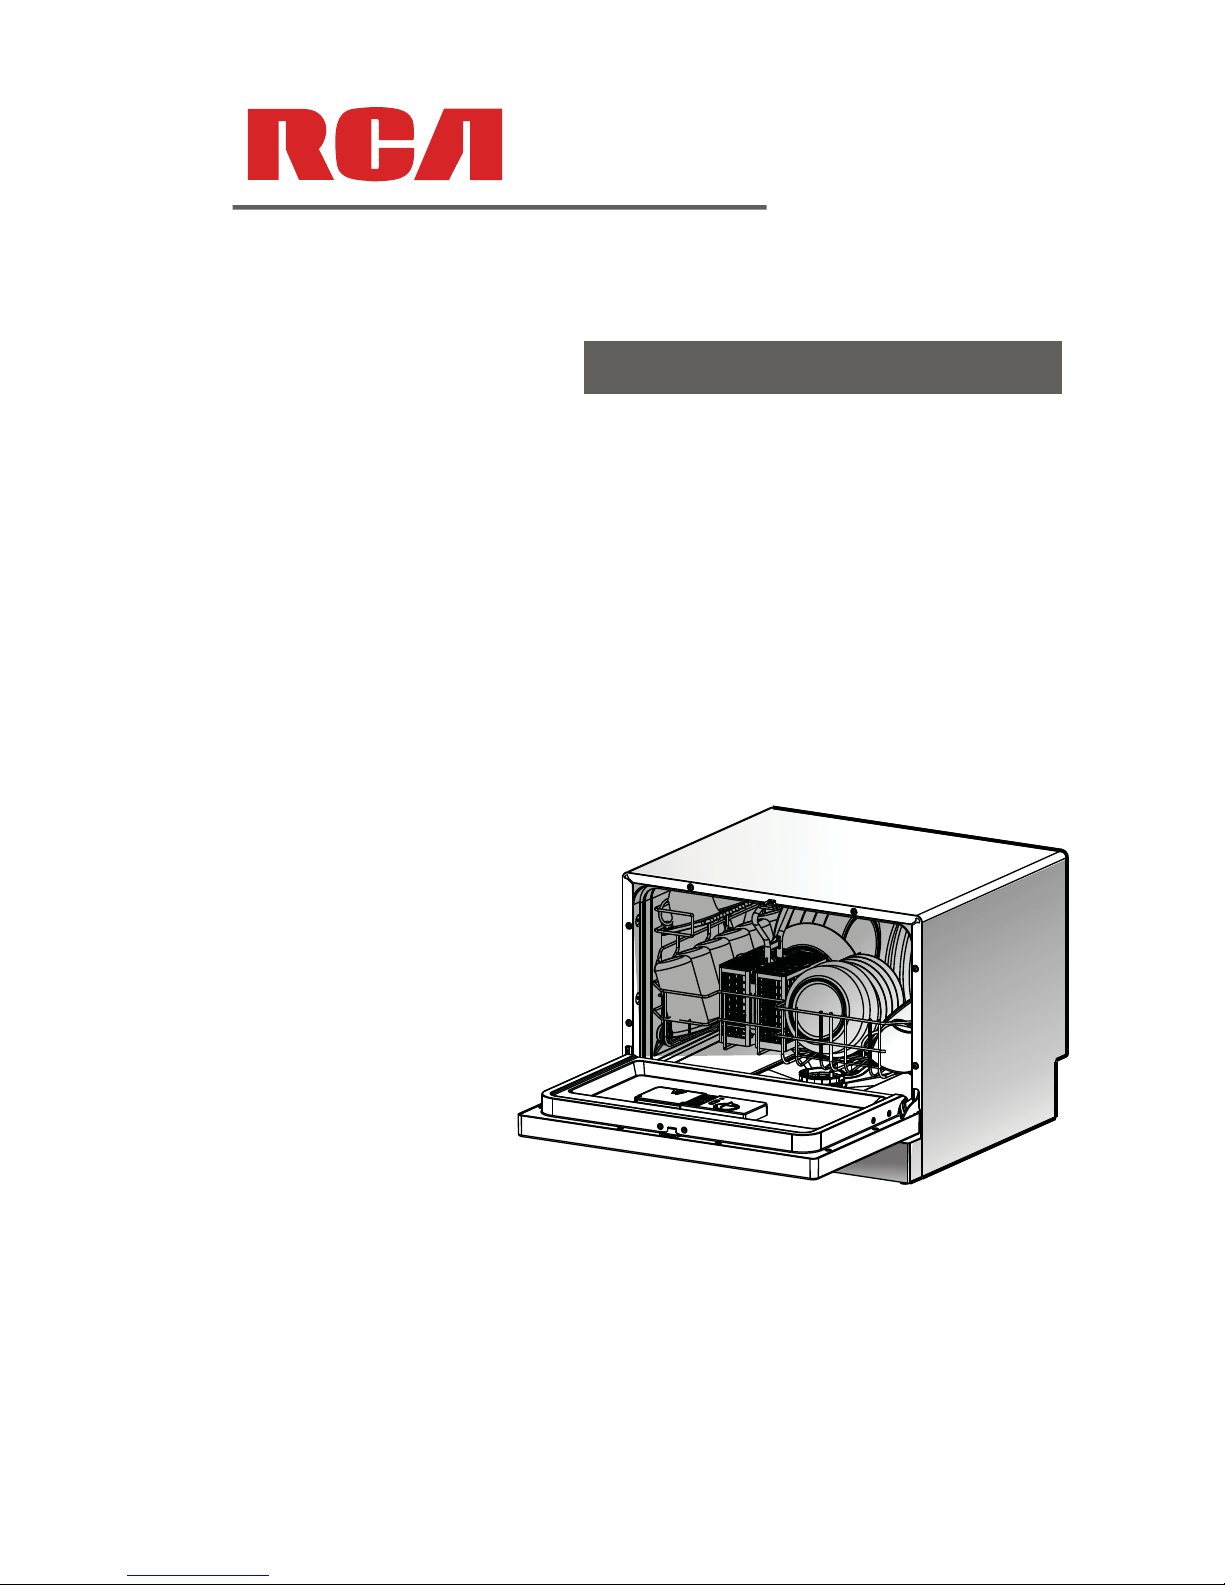
Instruction Manual
Instruction Manual
Dishwasher
RDW3208
Page 2
Dear Custo mer,
Pleasecarefully reading it before using thedishwasher
willhelpy outo use andm aintainthe dishwasherp roperly.
Keepit to refer to a t alater date.
Passit on toany sub sequent o wner ofthe ap pliance.
This manual contains sections of SafetyInstructions,
OperatingIn structions,InstallationIn structions and
TroubleshootingTips, etc.
Toreview the sectiononTroubleshooting Tips
willhelpy ou t o solvesome common problems
by yourself .
Ifyou c an not reso lvethe troubles by your self ,
pleaseask for the help ofprofessional tec hnicians.
ControlPanel...................................................3
DishwasherFeatures.................................... ...3
A FilltheRinse Aid Dispenser.........................4ʙ
B Functionof Detergent.................................4ʙ
Attentionbefore orafter loadingthe Dishwasher
Baskets..........................................................6
LoadingtheBasket...........................................7
CutleryBasket............................................... 8
Wash Cycle Table........ . ...... ..... . . .. ..... . . ............ 9
Turning on theAppliance................................ 9
Changethe Pro gramme.............. ................10....
At theE n d o f t heWashCycle... ..... . . ............. ....10
FilteringSystem.............................................11
Caring f or the Dishwasher..................... .........12.
PositioningtheAppliance................... ..........14..
AboutPowerConnection........................ .......14.
Water C onnection.................................. .......14.
Connectionof Drain Hoses..................... . ......16.
Start of d ishwasher............................. .. ......16.. ..
Themanufacturer,followinga policy ofc onstant
developmentand updatingof the product,may
makemodifications without giving p rior notice.
Before calling for service........................... .....17.
Errorcodes.................................... ..............18.
Tech nic a l in f ormation ........... . .. ... ............. ..... 1 9..
Page 3
When using your dis hw asher, follow the p recautions listed below:
This appliance must be grounded. In theevent of a
malfunction or breakdown, grounding will reduce
theriskofelectricshockbyprovidingapathof
leastresistance of electric current. Thi s appliance
is equippedwith a cord having an equipmentgroundingconductor and a groundingplug.
The plugmust be plugged into an appropriate outlet
that is installed and groundedin accordance with
all local codes and ordinances.
Do not abuse, sit on, or standon the door or dish
rack of the di shwasher.
Do not touch the heating element during or
immediately after use.
(This instruction is only applicable to machines
witha visual heating element.)
Do not operateyour dishwasherunlessall
enclosure panels are properly in place. Open
the door very carefully if the dishwasher is
operating, there is a risk of water squirting out.
Do not place any heavyobjects of standon the
door when it is open. The appliance could tip
forward.
Whenloading itemsto be washed:
1) Locate sharp i temsso that they are not likely
todamage the door seal;
)
2 Warning:Knives and ot herutensils with
sharppoints must beloaded in the basket
with their point s down or placed in a
horizontalposition.
When using your dishwasher, you should
prevent plastic items from coming into contact
with heating element.(Thisins truction is only
applicableto machineswith a visualheating
element.)
Check that the detergent r eceptibleis empty
after compl etionof th e wash cy cle.
Do not wash plastic items unless they are marked
dishwashersafeor the equivalent. For plastic items
n
ot so marked, checkthe manufacturer's
recommendations.
Useonly detergent and rinse additives
designedfor an automatic dishwasher.
Never use soap, laundrydetergent, orhand
washingdetergent in yourdishwasher.Keep
these pr oducts out of t he reach of chil dre n.
Improper connection of the equipment-grounding
conductor can result in a risk of electric shock.
Check with a qualifiedelectrician or service
representative if you are in doubt whether the
appliance is properly grounded. Do not modify the
plug provided with the appliance; If it is not fit for
theoutlet.Have a properoutlet installedby a
qualified electrician.
Keep children away fromdetergent and rinse aid, keep
child awayfromthe open door of thedishwasher,
ren
therecouldstill be some detergent left inside.
This appliance is not intended for use by pe rsons
(including children with reduced physical, sensory or
mental capabilities, or lack of experience and
knowledge ,unless they have been given supervision
or instruction concerning use of the applianceby a
person responsible for their safety.
Children shouldbe supervised to ensurethat theydo
not play with the appliance.
Dishwasherdetergents ar e strongly alkaline, they
can be extremely dangerous if swallowed.Avoid
contact with skin and eyes and keepchildren away
from the di shwasher whe n the door isopen.
The doorshould not be leftin the open position
since this could presenta tripping ha zards.
If th e su p ply c or d i s damag ed , i t must be rep l ace d
by themanufacturer o r i ts s ervice agent or a
similarly qualifiedpersonin order toa void a
hazard.
Remove the door to the washing compartment when
removing an old dishwasher from service or discarding
it.
Pleas e di sp ose of pac k i ng ma terials pr operl y.
Use the dishwasher only for its intended function.
During installation, the po wer s upplymust not
be excessively or dangerously bent orflattened.
Do not tamper with controls.
The appliance isto be c onnectedto the water
mains using new hos e s ets andthat old hose- sets
should not be reused.
The maximum number of place sett ings tobe
washed is6.
The maximum permissible inlet water pressureis
1Mpa.
The mi nimumpe rmissible inlet water pre ssureis
0.04Mpa.
)
1
Page 4
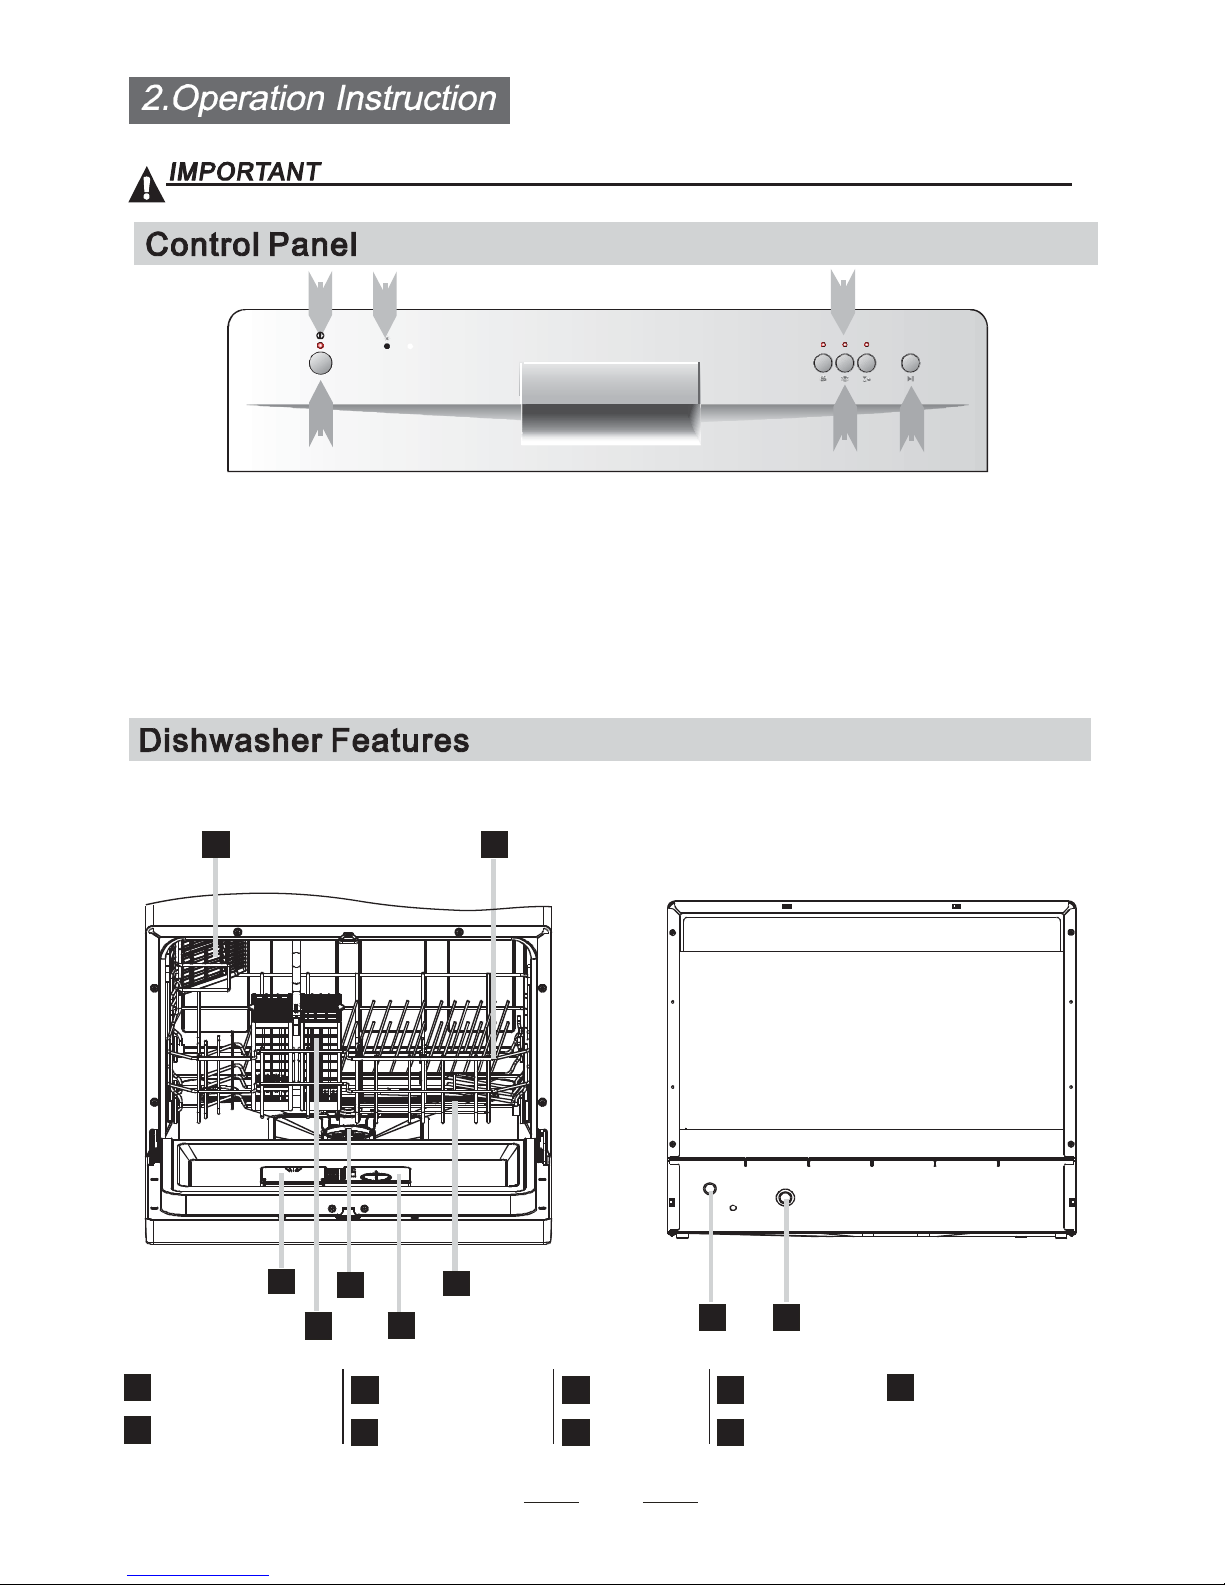
To g et t he bes t perfor ma n ce fr o m you r dishwas her, re ad al l op er ati n g ins t ruc ti ons
bef o r e usi ng it f o r t he f irst ti me .
1
212))
212))
3
2
1PXFS PO MJHIU 5P DPNF PO XIFO 1PXFS 0/0''
1
CVUUPOJT QSFTTFE EPXO
0/0'' #V UUPO 5P UVSO POPGG UIF QPXFS TVQQMZ
2
3JOTF "JE 8BSOJOH -JH IU 5P CF PO XIFO UIF
3
SJOTF BJE E JTQFOTFS OFFET UP CF SFGJMMFE
1SPHSBN JOEJDBUPS MJHIU XIFO ZPV TFMFDU XBTIJOH
4
QSPHSBN UIF DPSSFTQPOE MJHIU XJMM EJTQMBZ
6 7
'SPOU WJFX
4
1SPHSBN JOEJDBUPS CVUUPO XIFO ZPV QSFTT XBTIJOH
5
QSPHSBN CVUUPO UIF DPSSFTQPO E MJHI U XJMM EJTQMBZ
4UBSU3FTFU #VUUPO 1SFTT UIJT CVUUPO UP TUBSU
6
PS QBVTF UIF EJTIXBTIFS UIF QSPDFTTQJMPU
MBNQ XJMM CF CMJOLJOH XIFO T UBSUJOH
#BDL 7JFX
1
1
CutleryBasket
2
3
2
4
Filter a ssemblyDet erge nt Dispe n ser
3
4
Rinse Aid Dispenser
5
9
Basket
7
Drainpipeconnector
8
Inletpipe connector
9
Spray Arms
5
Cup Shelf
6
2
8
Page 5
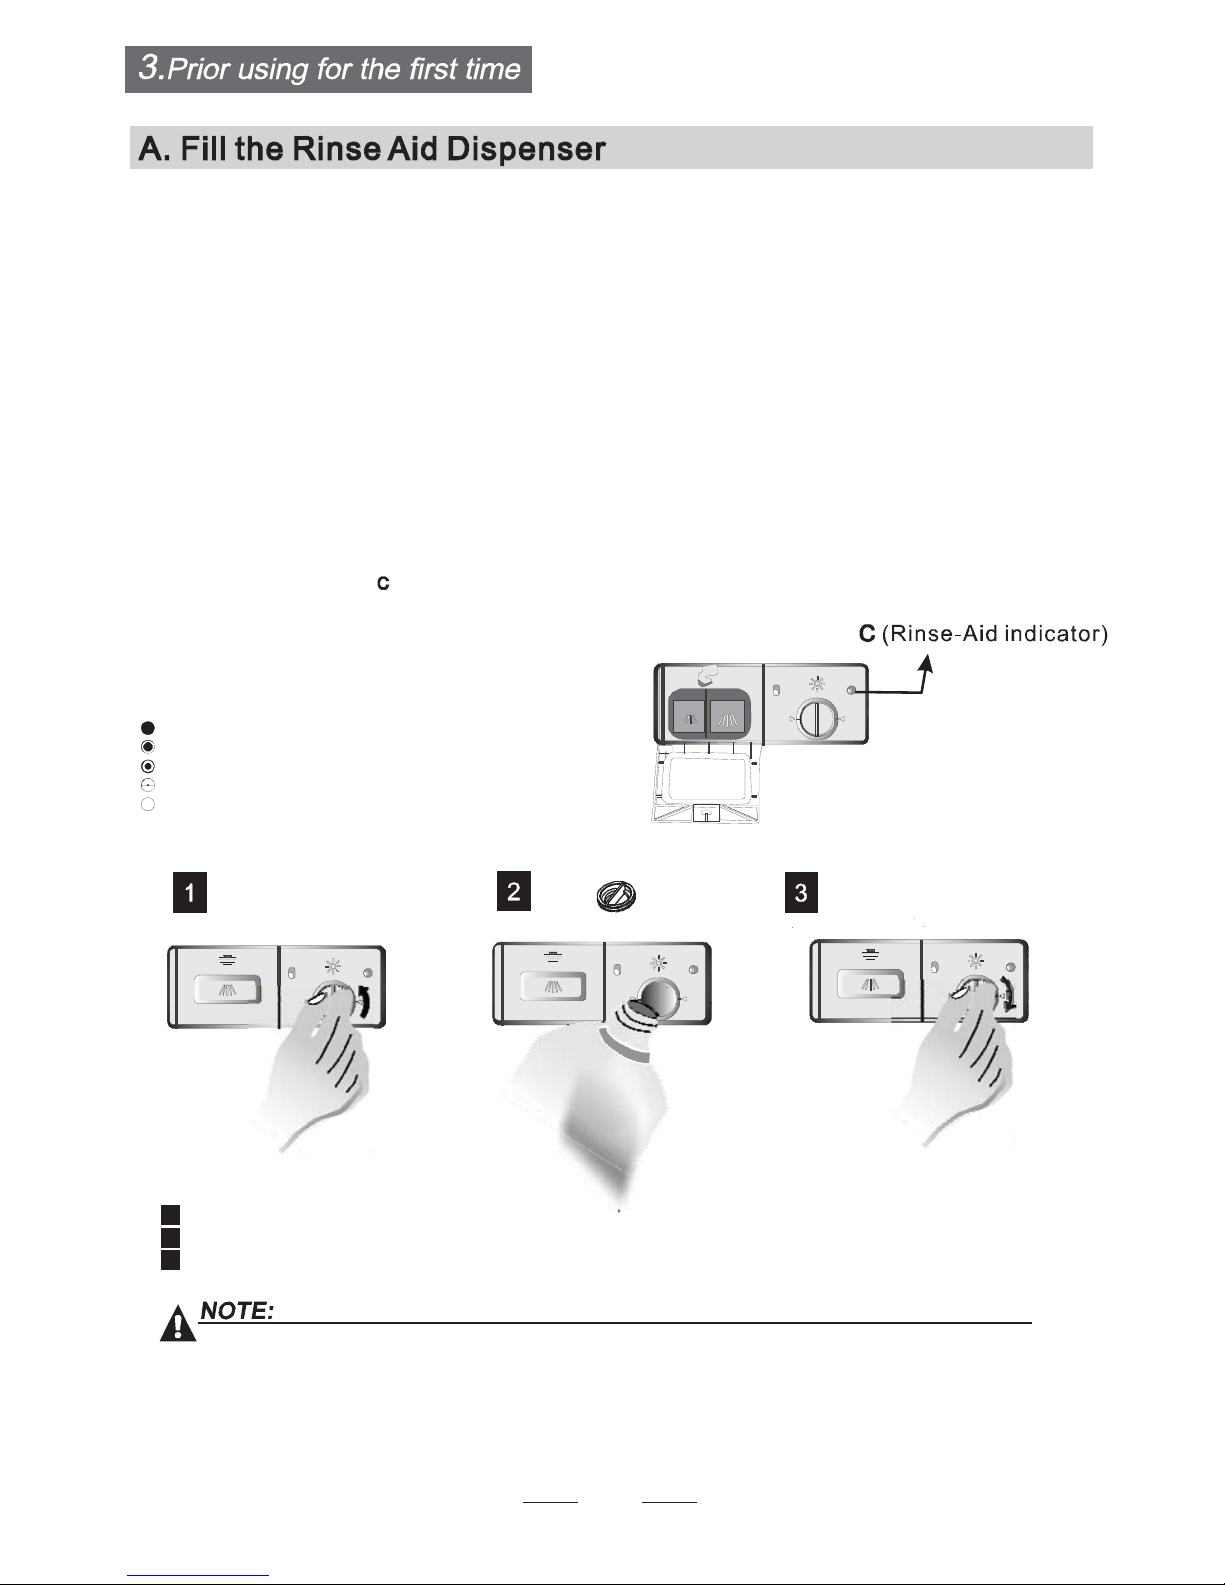
Rinse Ai d D isp ens er
Therinseaid is releasedduringthe finalrinse to prevent water fromforming dropletson yourdishes.That can leave
spots a nd streaks. It also impro vesdryingby allowingwa terto sheetoff thedishes. Yourdishwasherisdesignedto
use li quid rins e ai d s . T he r ins e ai d dis p ens e r is loc a ted inside the d oor next to th e d etergen t dispenser. To fill the
dispenser,openthecap and po urthe rinse aid intothe dispenseruntilthe level indicatorturnscompletelyblack.
The volume of the rinse aid co ntainer is about 110ml.
Funct ion of R ins eAid
Rinseaid isa utomaticallyaddeddu ringt helast rinse, ensuringtho rough ri nsing, andspot a nd s treakfree drying.
Attention!
Onlyuse brand edrinse aid for dishwasher.Neverf illthe rinseaid dispenser w ithany othersu bstances
(e.g.Dishwasher c leaninga gent,li quiddetergent).This would da maget he appliance.
Whento Refill theRinseAid Dispenser
Ifthere i s nor inse-aidwarning light in the control panel, you c an ju dge thea mountof rinse-aid byth e color
ofthe optical level indicator located ne xt to thecap. W hen therinse-aid container i sful l, the whole
indicatorwill bedark .A s t he rinse-aid diminishes, thesiz e of the d arkd ot decreases. You shouldnever let
the ri nse ai d get b elow 1/ 4 full.
Asthe rinse ai d diminis hes, the siz e o f the black dot
onthe ri nse ai d leve l indicator chang es , as i llust rated below.
Full
3/4full
1/2full
1/ 4 full - Shoul d refill to elimin ate spotti ng
Empty
To open thedispenser, turn thecap to the "open"(left)arrow and liftit out.
1
Pourtherinse aidinto the d ispenser,being careful notto overfill.
2
Replacethecap by inserting italignedwith "open"arrow andturningit to the closed(right)arrow.
3
Clean upany rinsea id sp litdu ringfilling with anabsorbent cloth toavoid e xcessive foaming
during the next wash.
Don'tfo rgett o replace the c ap be fore you close dishwasherd oor.
3
Page 6
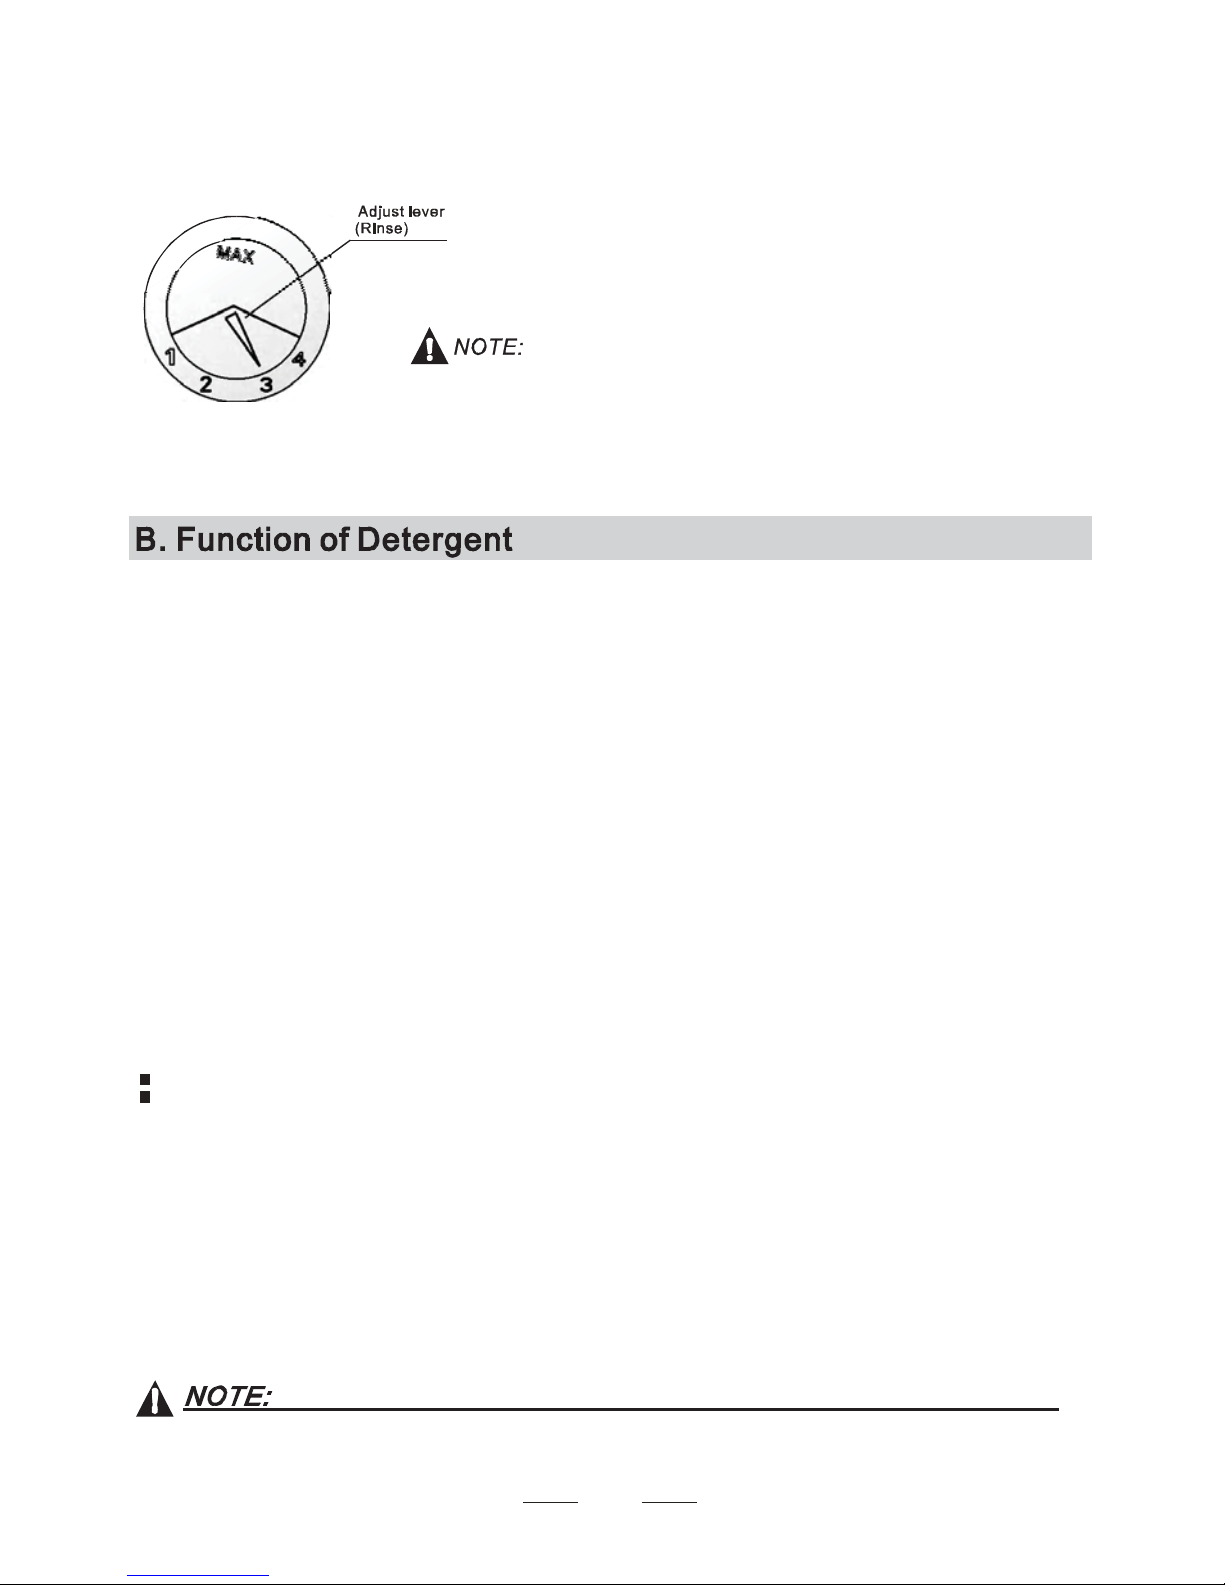
AdjustingR inseAid Dispenser
The rins e aid dis penser has fourset tings.The recommended setting is on "3 ".
Ifthedishes still are notd rying properly or are spotted,adjustt he di alto the
next h igher number on "4".
Increase thedose ifthereare drops of water or lime spots o n the dishes after washing.
Reduce it if there aresticky whitish s tains on your dis hes or a bluish fi lm on glassw are or
knife blades.
Prop er Use o f Det ergen t
Detergentswith its chemical ingredients are necessary t o r emove dirt,crush di rt and tran sportit out ofthe dishwasher.
Useonly detergent s pecificallymade for use in dishwashers. Keep your detergent fresh
Don't put powder det ergent into the disp enser until you're r eady t o w ash dishes.
anddry.
Detergents
There are 3 s orts of detergents
1.Withphosphatean dwith c hlorine
2.Withphosphate and without chlorine
3.Withoutphosphate and withoutchloride
Normallynew pulveriseddetergentis without p hosphate.T hewater softenerf unctionof
phosphateis n ot gi ven. Inthis case we recommendto fillsalt in thesalt c ontainer e ven w hen
thehardness of wat eris only 6 d H. If d etergents withoutphosphate were used in c ase of hardw a ter
often white sp ots a ppear at d i shesand glasses. In this caseplease a dd more detergent toreach
bett er r es u lts . Dete rgent s w ithout c hl or ine do onl y b l eac h a littl e. Str ong a nd col oured spot s wi l l n ot
removed c om pletel y. In this case pl ease choose a p r ogramme wi th high er Tempe r ature.
ConcentratedDetergent
Based o n the i r chem ical composi ti on, d ishwasher can be spli t in two basic type s:
conventional , alkal ine detergents with c austic co mponents
low alkaline concent rated det ergents wit h n atu ral enzymes
The use of normal washing p rogra mme s in conjun c t i on w i th c oncen tr ate d det ergents
reduces pollution andisgood for your dishes;these wash programmes are speciallymatched
tothe dirt-dissolvingproperties o f the enzymes of the concentrated detergent.For this reason
normal wash pr ogrammes in which concentrateddetergents are used can achievethe s ame
Ŷŷ
resultsthat can otherwise only be achieved using heavy program.
Ŷŷ
Ŷŷ
DetergentTablets
Detergenttabletsof different brandsdissolveat different s peeds. Fo r thi s reason some
detergent tablets cannot dissolve and dev el op their full cl eaning p ow er during sho rt
programmes. Therefore pleas e use l ong pr ogr ammes when us in g deterge nt tablets, to
ensurethe com pleteremoval of d etergentr esiduals.
Detergenttabletsareo nlyfor themodels with3 in1 functio nor3 in 1program.
4
Page 7

Detergent Dispenser
The dispenser mustbe refilled before t he start of each wash cyclefollowingtheinstructions
providedin the WashCycle Table. Yourdishwasheruses l ess d etergent andrinse aidthen
conventionald ishwasher.G enerally, o nly o ne tablespoon of de tergent is neededfor
a normal wash load. Also, more heavily soiled items need more detergent. Alwaysadd the
detergent just beforestarting t he dishwasher, otherwi seit could get damp and will not
dissolve properly.
Amount of Detergent to Use
Detergent powder
Detergent tablet
Ifthe l id i s cl osed: press release button.The lid springs open.
Alwaysaddthe detergent jus t before starting each wash cycle.
Onlyuse branded detergent aid for dishwasher.
Dishwasher deterg ent is corrosi ve! Take c are to kee p it ou t of reach of children.
Fillin detergent
Fill the d etergent d ispenserwith detergent.
The marking i ndicates th e dosing leve ls , as
illustrated on right:
Theplace can load 15g detergent.
A
T he pl ace can load 25g deterg en t .
B
Please observethe manufacturersdosing and storage
Recommendationsass tated onthede tergentp ackaging.
Closethe lid and press until itloc ks in place.
Ifthe dishesa reheavily soiled, pl ace anadditional
detergent dose in the pre-wash d etergent chamber.This dete rgent will take effect during the pre-wash phase.
You find informat ion about theamount ofdetergentfor the single programme on the last page.
Please aware,t hat ac cording to t hel evel soiling and thespecifich ardness o f wa ter d ifferencesare p ossible.
Please observethe manufacturer's r ecommendationson the detergentpackaging.
5
Page 8

Consider buying utensilswhich are identifiedas dishwasher-proof.
Usea mild detergentthat is describeda s 'kind of dishes'. I f necessary, se ek further
information from detergent manufacturers.
Forparticular i tems, select a programme with as lowa temperature.
To prevent damage, don ot take glass a nd cutlery out of the dishwasher immediately
afterthe programme has ended.
Are not su itable
Cutlery with woode n, hor n china or
mother-of-p earl handles
Plastic items that are not
Older c utl ery with glued par ts t hat is not
temperature resistant
Bonded c utl ery items or dish es
Pewter o r cooper items
crystal g lass
Steel it ems subj ect to rusti ng
Wooden pl atters
Items m ade from s ynthetic fibre s
(For best perf ormance o f t he dishwa sh er, follo w t he se loading guidelin es .
Fea tures and app earan ce of baskets and cut l er y bas kets ma y vary f rom your mode l.)
Scrapeoff any large am ounts ofleftover foo d. S often remnants ofb urnt food in pans
It is notnecessary to rinse the dishesunderrunning water.
Placeobjects inthe dishwasherin following way:
1.Items suchas cups,glasses, pots/pans,etc. are face down.
2.Curved items,or those with recesses, sh ould b e lo aded ata slant so that water c an ru n off .
3.All utensils are s tacked sec urely and can not tip ov er.
4.All utensils are placedin theway that the spray armscanrotated freely during washing.
Very sm all items shou l d n ot be w ash e d in t he dish was her as t hey coul d easil y fall out of th e ba s ket .
heatresis tant
Areof limitedsuitability
Some ty pes of glasses can b ecome
dull af ter a larg e n umber of was hes
Silver an d aluminiu m parts h ave a
tendency to discol our during washing
Glazed patterns may fa de if m achine
washed f r equently
Load hol l ow item s such as c ups , glasses, pan s etc . Wi th the o pening downwards s o that
water c annot collect in the container ora deep base.
Dishes anditems of cutlery must not l ie in side one another, or covereach other.
To avoiddamage togl asses,t hey mustn ottouch.
Load lar ge i temswhich are mostdifficult tocleaninto thebasket.
Longbladed knives s tored inan upright positio n ar e a potential ha zard!
Longand/o rsharp items o f cutlery s uch a s car ving knivesmust be positioned
hor izont ally in t h e bas ket.
Please donot overloadyour dishwasher. This is import antfor good re sults and for
reasonable energyconsume.
6
Page 9

Loading the Basket
Loading the Basket
Position the dishes and cookware so that they will not get moved by the spray of water.
1
5
6
1
1
Cups
3
Glasses
5
Fruit bowl
7
Dinner plates
Cutlery basket
2
Serving bowl
4
Saucers
6
Oval platter
8
Bread and
butter plates
9
Plate racks of Basket
The basket is fitted with plate racks which
can be stowed horizontal if required.
7
Page 10

Cutleryshould be placed in the cutlery basket withhandles at the bottom. If the rack has side baskets, the spoon
shouldbe loaded individually i nto the appropriate slots, especiallylong utensilsshould be placed in the horizontal
positionat the front of the upper basket as shown.
Dinner forks
1
325
44
1
Salad for ks
2
44
3
2
2
2
2
4
1
1
3
3
3
4
3
2
4
1
1
4
6
4
4
1
Do not let any item ext end through bot tom.
Always loa d s harp ut ensils with the s harp point dow n!
4
4
5
3
Knives
Teaspoons
4
Servin g s poons
5
Servin g f or ks
6
8
Page 11

()
Means:ne edto fill rinseinto t he Rinse-AidDi spenser.
*AHAMDW-1-2005 :This program isthe test cycle,the rinse-aid dispenser
setting is recommended to Position 3.
Heavy
Nor mal
(*A HAM DW-1-200 5 )
Speed
For the heaviest soiled loads ,
such as pot s,pans ,casser ole
dishesa nd dis hes that have
been s itti ng wi th dried f ood
ont hem for a wh ile.
Fornor mal lysoi le d loads,
such as po ts, plate s,gla sse s
and lightly soiled pans.
standard daily cycl e.
Ashorterwashforlightly
soiled loads that do not
need drying.
Pre -w as h
Pre -w as h 50
Wash (55 )
Wash (50 )
Rins e
Rins e (65 )
Dryi n g
Pre-wash
Pre-wash
Wash (55 )
Rinse
Rinse (65 )
Dryin g
Pre-was h
Pre-was h
Wash(50 )
Rinse
Rinse(55 )
(50 )
ć
ć
()
ć
ć
ć
ć
ć
ć
ć
18g
18g
15g.
100
85
45
0.424
0.361
0.233
14.5
12
12
Startingawashcycle...
1. Drawout the bas ket(seethe section entitled LoadingtheD ishwasher );
2. Pourin the detergent (see the s ection entitled Salt, Detergent andRinseAid );
3. Insert the plug into thesocket. Thepowersupplyis120V/60 Hz;
4. Makesure thatthe water s upply is turned onto full pressure;
5. Closethed oora nd p
Pressthep rogram b utton to s elect washprogram you need
6.
Heavy->Normal->Speed
.
7.Thenpress theSt art/Resetbutton, the d ishwasher beginsto start.
ress the button
POPGG 5P UVSO PO UIF QPXFS TVQQMZ
Wh en yo u p r e ss th e St ar t/R eset b u t ton t o p aus e dur i n g washin g ,
the programlightwill stopblinkingand the dishwasher willmooing
everyminute u nlessyou pressthe Start/Resetbu ttonto start.
Āā
Āā
9
Page 12

Premise: You can modify the washingp rogram, Whenthedishwasher j ust
runs for a s hort t ime. Otherwi se, t hede t ergent may h ave alr eady been
released,and theappliancemay have alreadydrained the wash water. Ifthis
is the case,t he detergent dispensermust be refilled(seethe section entitled
" Loadingth e Detergent" ).
To chang the w ashing program, pressthe st art/reset button t o pause the wor king program ,
thenpress the program b uttonmoreth an 3 seconds which you need,the washing resume
The lightsshow the st ate of the dishwasher:
1SPHSBN JOEJDBUPS
a)All lightsoff ----------------------------------On standb y
b) One of the ghts on----------------------Being paused
c) One of the blinking----------------------Running
1SPHSBN JOEJDBUPS MJ
1SPHSBNJOEJDBUPSMJHIU
If youopen the doorwhen washing, the machi new illpause. When y ou c lose thedoor ,
themachine will k eep on wo rkingafter 10 sec onds
Aforgotten dish can be added any time before the detergent cup opens.
Press the start/reset button
1
Open the door a little to stop the washing.
2
After the spray arms stop working,you can open the door
3
completely.
Whenthe workingc yclehas finished,the bu zzer ofdis hwasher will sound 8 seconds, thenstop. Turnoff
theappliance us ing the ON/OFFb utton, shut off thew ater supply and opent he door ofthe dishwasher.
Wait a few minutes beforeunloading the dishwasherto avoidhandling th e dishesand utensils whilethey
are stillhot and more susceptibleto breakage.They will also drybetter.
Addforgottendishes.
4
Close the door
5
Press the start/reset button, the dishwasher will run
6
after 10 seconds.
Switch Off t he Dishwash er
eAll t h phase light s are off
1.S wi tc h off the di s hwasher by p r es sing the ON / OFF button .
2.Turn offthe watertap!
,only in this case the programme has ended.
Open t he do or c ar eful ly.
Hot dishesare sensitiveto knocks. T he d ishes should t herefore b e allowed tocooldo wna round 15 minutes
before removi ng from t he a p plia nce.
Opent hedi shwasher's door,leave it ajar and waita few minutesbefore removing the dishes.In this way they
wi ll be c oo l er and the dry i ng wil l be impr ov ed.
Unloadin g the dishwash er
It is normal that t he dishw ashe r is wet ins ide.
It i s dangerou s t o ope n the door whe n w ashin g, b eca us e th e hot wa ter may scald y ou.
10
Page 13

The filter preventlarger remnants offoodor other objects from getting in sidet he p ump.
The filter syst em c onsists of a coa rse filter, a fla t (Main fil t er)
and a micro filte r ( fine fi lter ).
1
2
3
1
3
2
Mainfilter
Food and soil particlestrapped byt his filter are pulverizedby a
specialjet on t he sprayarm and washed down tod rain.
Fine fil ter
This filterhold sso iland food residuein the sumparea and
prev ents it fro m be i ng re deposit o n the dishes duri ng was h c yc l e.
Coarsefilter
Larger items, such as pieces of bon e or glass,that couldblock
the drain are trapped in the coarse f il te r.Torem ove t he ite ms
caught by t he filter, g ently squeeze the t ap on the topof this
filter and lift out.
Filter as semb ly
The filter e ffici ent ly
Forbest p erformanceand results, thef ilter a ssembly must be r egularly. thisre ason, itis a goodidea t o
removethelar gerf oodparticles t rappingin the filteraf ter each wash cycleby rinsingth e filter and cup under
runningwater.To remove the filter assembly,pull onthe cup ha ndle i nthe upward d irection.
rem oves food par ticles from the was h w ater, al lowing it to be re- c y clated d uring the cyc le.
For
Neverr un the dishwasher withoutthe filters inp lace.
The dishwasher m ust never beusedw ithout t he filters.
Improperreplacement of the filter may reducet he performance level of theappliance
anddamage dishes andutensils.
6WHS웒웛FRQWUDURWDWH WKH )LQH
ILOWHU
OLIW LW XS6WHS
6WHS웛OLIW WKH 0DLQ ILOWHU XS
If do it from step1 to step 3, the filter system will be removed; Reverse operate by placing the
main filter ,then screw up the fine filter to finish installation
11
Page 14

Remarks:
- Inspect the filtersfor blockingevery time the dishwasher has been used.
- By unscrewingthe coarse filter.youc anr emove the filter system.Removeany food remnantsand
cleanthe filters u nder running water.
The entirefilter assembly should becleane doncea week.
Cleanin gTheFilter
To clean the coarsefilter and the fine filter, use a cleaning brush.Reassemble thefilter parts as shown in thefigures
in the last pa ge an d rein sert t he en tire a sse mbl y in the dis hwa s her, pos iti oning in its seat and pr es sing do w nward .
When cle aning the filte r s , don 't kn ock on th em. Ot h erw i s e, th e filt e rs could be
contorteda ndthe performance of dis hwasher co uldbe debased.
The control panelcan be cleaned by using a lightly dampened clothand dry thoroughly.
The exterior use a good appliance polish wax.
Neveruse sharp objects, scouring pads or harsh cleanerson any partof the dishwasher.
Cleanin gTheDoor
Tocle anth eedge aroundthe door,you s hould use only a softwarm,
damp cloth. To avoid penetration of water intothe door lock and
electricalcomponents, do not use a spray cleaner ofany kind.
Neverus ea spray cleanerto cleanthe doorpanelas it may dam aget hedoor lo ck
and electrical components.
Abrasiveagent orsome paper towel sh ould notbe used because of the risk of
scratchingor leavingspots on the stainless steelsurface.
ProtectAgainst Freezing
please t a ke fr os t pro te ct ion measur es o n di shw as he r in w inte r. E fte r wa shing cyc le s,
pleaseoperate as follows
1.C ut off electrical power to the d ishwasher.
2.Turn off the water supply and disconnect thew aterinlet pipe from the water valve.
3.D rain water fromthe inlet pipe and water v alve. (Use a panto catch the water)
4.R econnect thew aterinlet pipe to the water valve.
5.R emove the filterat the bottom ofthe tub and use a sponge touse up wateri nsump.
˖
achtime a
Ifyour dishwasher cannot workbecause of t he ice,please contact professionalservice persons.
12
Page 15

Clean in g the S pray Arms
The spray arms can be easi l y rem oved for p eri odic clea ning
ofthe nozzles, to prevent p ossible cl ogging.Wash them
underrunning waterand carefully replacethem i nt heir seats,
checkingthat theirrotary m ovement is inno w ay impeded.
Graspthe middle of the spray arm,pull it upwardsto remove
it.Washthe arms undera je t of runningwater andreturn them
carefullytotheirseat. After reassembly, c heckthatthes pray
armsturn freely.Ot herwise,check t hat theyhave b een
install ed c orr ectly.
After E v e r y W ash
After ev ery was h, t urn off the water supp ly to the
appliance and leave the door sli ghtly open so that
moisture and odors a re not trapped inside .
Removet hePlug
Before cleani ng or perfo rming mainten ance, alway s
remove the plug from the socket.
No Solv e nts or Abrasiv e Cl ea nin g
To c lean th e e xte rior and r ubber par ts of the di s hwasher,
do not use solvents or abrasiv e cleaning produc ts.
Only use a cloth with warm so apy water.
To r emove spot s or stains from the surfac e of the
interior, us e a cloth da mpened with water w ith a little
vinegar,or a c leaning product m ade specifical ly for
dishwashe rs.
Whenitisnotinneedforalongtime
Itis reco mme nd th at yo u run a wa sh c ycle with t he
dishwashere mpty and then removethe plugfrom the
socket, turn o ff the watersupply andleave the door o f
the appliance sligh tly open. This will h elp the d o or
sea l s to ast longer and pre vent odours from fo r min g
withintheappliance.
MovingtheAppliance
Iftheappliancemustbemoved,trytokeepitinthe
vertical position. I f ab solutely n ecessary,itcan be
positioned on itsback.
Se a ls
Oneo f the factors that causeodors toform i n the
dishwasher isfood t hat remains trapped in the seals.
Periodic cleaning with adamp spongew ill prevent this
fromoccurring.
The i nsta llat ion o f t he pipes
and ele ct ri ca l e qu i p ments
should be donebyprofessionals.
The inst a llat i on pos it ion o f dis hwa sh er should b e ne ar the ex is ti ng inl e t and dr a in
hosesand power cord.
Onesideofthe cabinet sinkshould bechosentofacilitatethe connection ofdrain
hoses o f the dish washer.
Electric al Shock Ha zard
Disconnec t elect rical pow er before
installingdishwasher.
Failuretodosocanresultindeath
or electri cal shoc k.
13
Page 16

Pos ition th e a pplia nce i n the d esired lo cat i on. T he back should r est aga i ns t the wall behi nd it,
and the sides, along the adjac ent ca bi nets o r wa l l. The di shwas her is equ ip ped with wate r s u pply
anddr ainhoses that can be po sitioned t othe right or th eleft to f acilitateproper installation.
For personal safety:
DO NOT USE AN EXTENSION CORD OR AN ADAPTER PLUG WITH THIS APPLIANCE.
DO NOT, UNDER ANY CIRCUMSTANCES, CUT OR REMOVE THE EARTHING
CONNECTION FROM THE POWER CORD.
Pleaselookat the rating label to knowthe rating vol tage and c onnectth e dishwas herto the appropriatepo wer supply.
Use th e re quired fus e 10 amp, time delay fuse or circuit breaker r ecommended and prov i de separate cir cu it serving
onlythis appliance.
Ensure the voltage and frequencyof the power being co rrespondsto
those onthe r ating plate. Only insertthe plug into an electrical socket which is earthed
properly. If the electricalsocket to which the appliance must be c onnected is not
appropriatefor the plug , replacethe socket, rather thanusing a adaptors orthe like as
they c ouldcause overheating a ndburns.
This appliance must be earthed. In the event of a malfunction or breakdown, earthing will reduce the risk of
electric shock by providing a path ofleast resistance for the electriccurrent. This appliance is equipped with
a cord having an equipment-earthing conductor and an earthing plug. The plug must be plugged into an
appropriate outlet that is installed and earthed in accordance with all local standards and requirements.
Improper connection of the equipment earthing conductor can result in the risk of an
electric shock.
Check with a qualified electrician or service representative if you are in doubt whether the
appliance is properly earthed.
Do not modify the plug provided with the appliance. If the plug does not fit properly to the
outlet, please have a qualified electrician to install a proper outlet.
for personal safety:
DO NOT USEAN EXTENSION CORD OR AN ADAPTER PLUG WITH THIS APPLIANCE.
DO NOT, UNDER ANY CIRCUMSTANCES, CUT OR REMOVE THE
CONNECTION
FROM THE POWER CORD.
EARTHING
14
Page 17

#BDL 7JFX
Your dishwashercomesequippedwith a'quick connect'assembly(includesinletand drainhose).The
faucetadaptermust beinstalledon the faucetbefore youcan connectthe dishwasher.T his adapteris
included inside your dishwasher. The faucetadapter iscompatiblewith faucets inclusiveof eithermale
(outside) orfemale (inside)threadedfaucetconnections.
In order to avoid that ther e is more wat er staying in the inlet hose, ple ase close the fauc et after using .
15
Page 18

1
ˊ
Screwthe faucetadapteronto (or into) the faucettap.Check for leaks (useTeflon tape toeliminateif
necessary).
2.
Conn ec t th e six-si d ed con nect ion o f the drai n h ose to the dr ain p o rt co nnect i o n o n the ba ck of the
dishwasher cabinet. Don otover-tighten ( to avoiddamaget o threads).
3.
Connectthe star-shape d connection ofthe inlet hoseto the inletport on theback of the dishwasher
cabinet.Do notover-tighten(to avoiddamageto threads).
4.
Connectthe circular connection of the drainhose onto the longer (bottom)maleconnectionon the quick
connect.
5.
Connectthe circular connection of the inlet hoseonto theshorter (top)male connection onthe quick
connect.
6.
Attachtheq uickconnect ontothe faucetadapter, by pulling downthe outerlocking collar on thequick
co n nec t, whil e pushing th e quick con n e ct upwa rd o nto the fauc et a d apte r.
7.
When t he qui c k co nne ct s na p s ont o the f au cet a d ap t er, rel e a se the locki ng co l lar. Veri fy the conn e cti on
is secur e.
8.
Slowly open the hot waterline and checkfor a ny signof waterleaksa t allhose connections. If leaksare
located,immediately close thewater supplyand repairtheh oseconnections.
Impor tan t
1.Onceyou open thew atersupplyline, (even ifit is closedimmediately thereafter), theinlet hosewill be
pressurized.
2.Torelievewater pressuref rominside the inl ethose,(m akesurethe waterline (faucet)is closed):press
andholdthe red pressurereliefbuttonon the quick connectuntilthe flow ofwater stops.
WARNING
FAILURE TORELIEVEWATER PRESSURE, BEFOREDISCONNECTING THE QUICK-CONNECT
FROM T HE FAUCET, WILLRESULTIN BACK-PRESSUREOVER-SPRAY. THE TEMPERATURE OF
INCOMINGWATER C AN BE VERYHOT,AND BACK-PRESSURE OVER-SPRAY C OULD CAUSE
SEVE RE BU R N S AND / OR S CALD IN G.
DANGER
DO NOT LE T CH I LDR E N DISC O N NECT THE DI SH WASH ER; CL OSE SU PE RV ISI ON OF CHILD RE N IS
ALWAYSIMPORTANT AROUNDAPPLIANCES.
NOTE :
Hard water c on diti ons w ill a dve rsel y affe ct t he w ashi ng pe r forman ce of your dis hwas her. Hard
water con d itions w ill also c ont ribut e t o 'lim e' ( whi te film substanc e) d epos its and/or 'scali n g' on the
stainless steel s urfa ce of the dis hwas her tub and heater e lement, loc ated i n t he sum p underneath
theremovablefilter screen. Toa ssistin minimizingtheseconditions, it i s recommended t o
periodicallyoperate/rinse the in sideof the dishwasher(empty) using 1 cup of w hite vinegar atleast
once a week.
Disconnecting yo ur Dishwas her
1.
Shutoff the watersupplyat the f aucet.
2.
Disconnectthe powersupplycord
The followi ng things sho ul d be che c ked bef o re star ting t he d is h wash er.
1
Thedi shwas her is leve l and fixed properly
2
The i nl et valve i s open
There i s a leak a ge at th e conn ec t i ons of the cond uc t s
3
4
Thewir es are tig htly con nected
5
The powerisswitched on
6
Thein let and drain hos es are kno tted
7
All pa cki ng mater ials and print ings should be ta ken out fro m the dishw asher
After in stall at i on, ple a se mak e su re t o ke ep t his ma nual .
The con tent o f t his ma nua l is very hel pf ul to the use rs.
16
Page 19

Fuse blown, or the
circuit breaker tripped.
Power supply is not
turned on.
Replace fuse or reset circuit breaker. Remove any other
appliances sharing the same circuit with the dishwasher
Make sure the dishwasher is turned on and the door is
closed securely.
Make sure the power cord is properly plugged into the
wall socket.
Technical
problems
General
problems
Door of dishwasher
not properly closed.
Kink in drain hose
Filter clogged.
Kitchen sink clogged.
Improper detergent
Spilled rinse-aid
Detergent with
colourantwas used.
Hardwaterminerals
The affected items are
not corrosion resistant.
Closed dishwasher making sure that door latches.
Check drain hose.
Check coarse the filter.
(see section titled )" CleaningThe Filter"
Check kitchen sink to make sure it is draining well.
If problem is kitchen sink not draining ,you may need
a plumber rather than a serviceman for dishwasher.
Use only the special dishwasher detergent to avoid
suds. If this occurs, open the dishwasher and let suds
evaporate. Add 1 gallon of cold water to the tub. Close
and latch the dishwasher, then Start the "soak" wash
cycleto drain out the water . Repeat if necessary.
Always wipe up rinse-aid spills immediately.
Make sure that the detergent is the one without
colourant.
T oclean the interior, use a damp sponge with
dishwasher detergent and wear rubber gloves.
Never use any other cleaner than dishwasher
detergent for the risk of foaming or suds.
Noise
Aprogrammewasnot
run after dishwasher
salt was added.
Traces of salt have
got into the wash cy le.c
The lid of softer
is loose.
The sp ay arm is
r
knocking against
an item in a basket.
Item of crockery
are insecure
in the wash cabinet.
This may be caused
by on-site installation
or the cross-sectionof
the piping.
17
Always run the Quick wash programme .
without any crockery inthe dishwasherand
without selecting the Turbo function (if present),
after adding dishwasher salt.
Check the lip .Ensure the fix is fine.
Interrupt the programme, and rearrange the items
which are obstructing the sp ay arm.r
Interrupt the programme,
and rearrange the items of crockery.
This has no influence on dishwasher function.
if in doubt, contact a suitably qualified plumber.
Page 20

Unsatis
-fact ory
washing
resul t
The dishes were not
loaded correctly.
The programme was
not powerful enough.
Not enough detergent
was dispensed.
Item are blocking
thepathofspayarms.r
The filter combination
in the base of wash
cabinet is not clean or
is not correctly fitted.
This may cause
the sp ay arm jets
r
to get blocked.
Combination of soft
water and too much
detergent.
Aluminum utensils
have rubbed against
dishes.
Dishes block
detergent cups.
See notes in " Loading the Dishwasher Baskets ".
Selecta more intensiveprogramme.
See" Wash Cycle Table ."
Use more detergent, or change your detergent.
Rearrange the items so that the sp ay can rotate freely.r
Clean and/or fit the filter combination correctly.
Clean the sp ay arm jets. See "Cleaning the Spray
Arms".
Use less detergent if you have soft water and select
a shortest cycle to wash the glassware and to get
them clean.
Use a mild abrasive cleaner to eliminate those marks.
Re-loading the dishes properly.
r
Load the dishwasher as suggested in the directions.
Increase the amount of rinse-aid/Refill the rinse-aid
dispenser.
Do not empty your dishwasher immediately after
washing. Open the door slightly so that the steam can
escape. Begin unloading the dishwasher only once t
he dishes are barely warm to the touch. Empty the low
basket first. This prevents water form dropping off
dishes in the upper basket.
In short programmes the washing temperature is lower.
This also lowers cleaning performance. Choosea
programme with a long washing time.
Water drainage is more difficult with these items.
Cutleryor dishes of thistype are not suitablefor
washing in the dishwasher.
Unsatis
-fact ory
drying
resul t
Improper loading
Too little ri nse-aid
Dishes are removed
too soon.
Wrong programme
selection
Using cutlery with
a low-quality coating
When some malfunctions come on, the appliance will display error codes to warn you:
Longer inlet time.
Faucets is not opened, or waterintakeis restricted,
or water pressure is too low.
Overflow.
If overflow occurs, turn off the main water supply before calling a service.
If there is water in the base pan becauseof an overfill or small leak,
thewatershouldberemovedbeforerestartingthedishwasher.
Some element of dishwasher leaks .
18
Page 21

)FJHIU NN
8JEUI NN
%FQUI NN
7PMUBHF DPOOFDUFE -PBE TFF SBUJOH MBCFM
8BUFS QSFTTVSF .1B
)PU XBUFS DPOOFDUJPO NBY Ɔ
1PXFS TVQQMZ TFF SBUJOH MBCFM
$BQBDJUZ 1MBDF TFUUJOHT
19
 Loading...