

Page 1
Communications Systems
RDR4300 Series
Digital Radios
QUICK START GUIDE
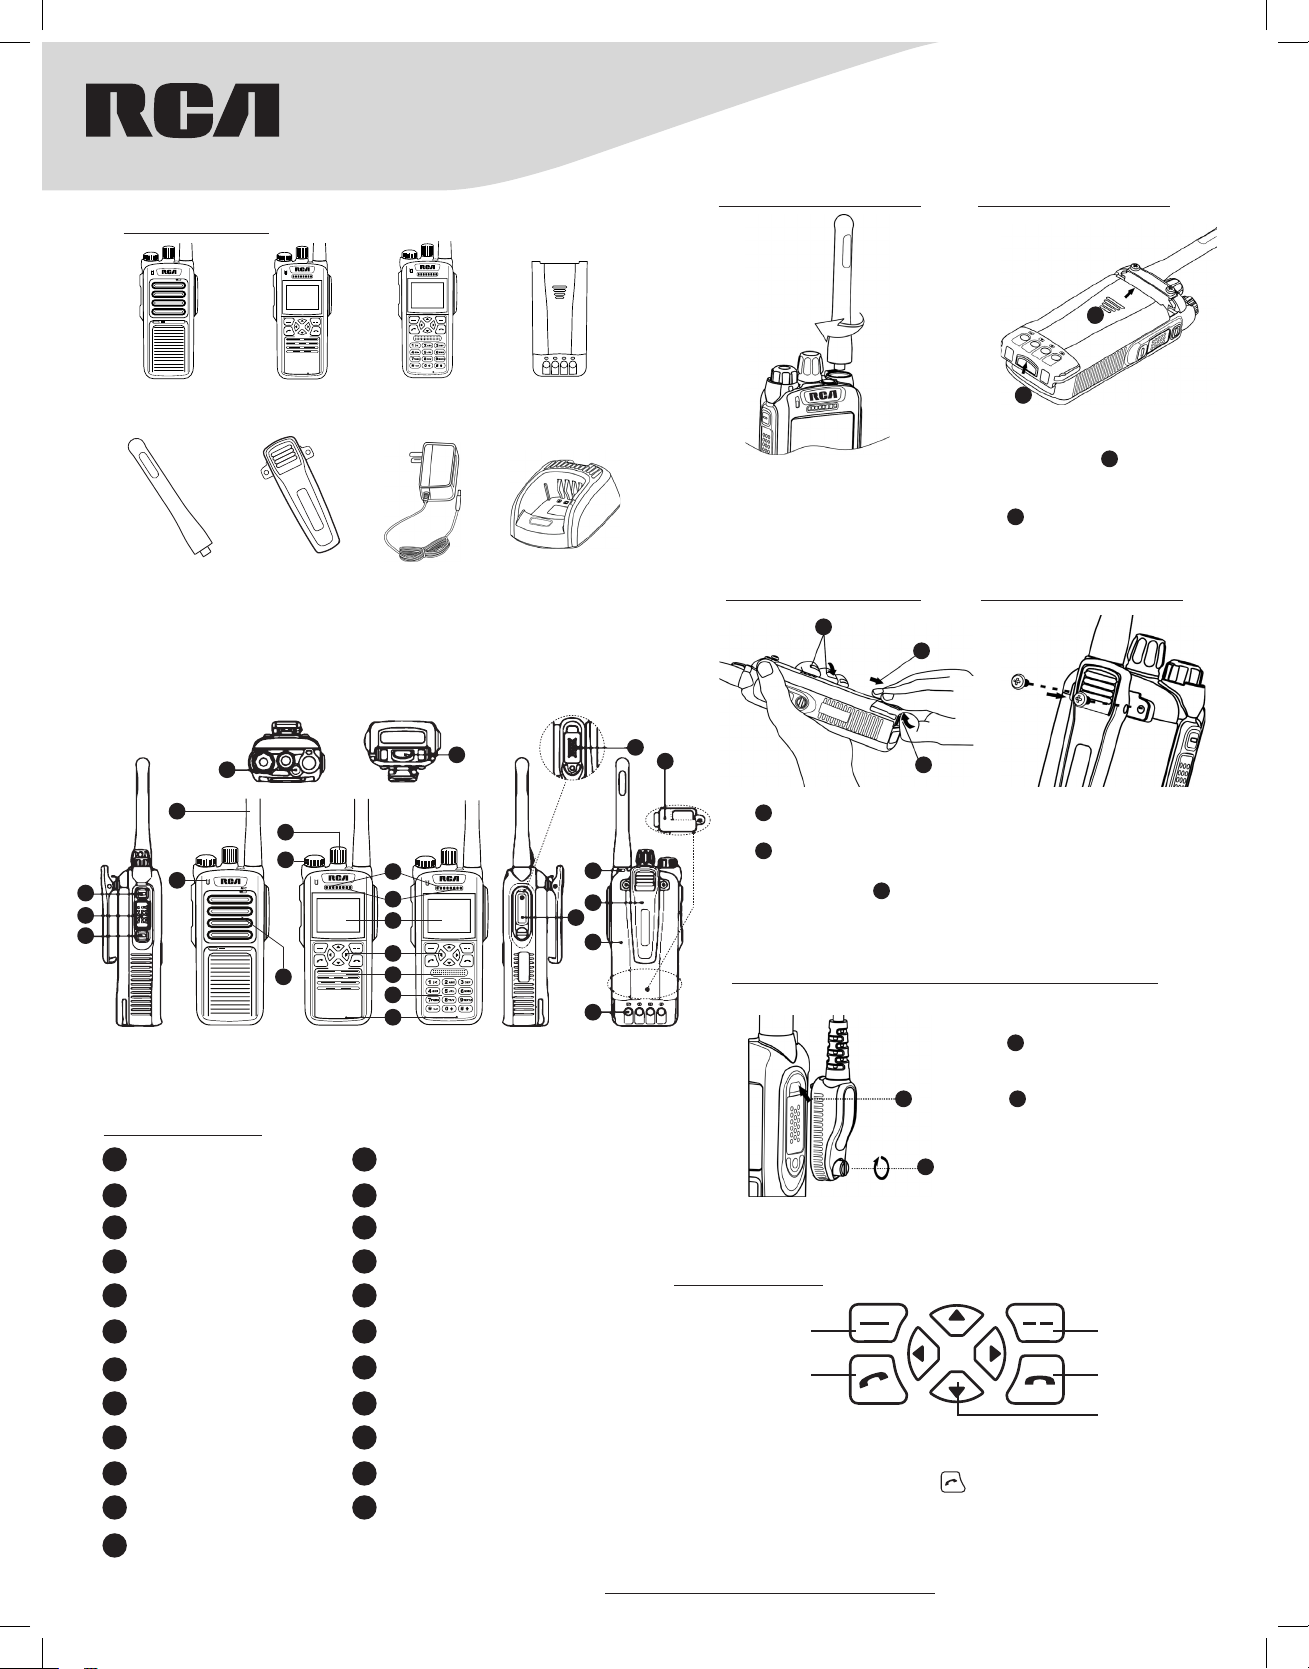
What’s Included:
MIC
RDR4320
Handheld Radio
Antenna
ANH4300U - UHF
ANH4300V - VHF
4
RDR4350
Handheld Radio
BC4300
Belt Clip
RDR4380
Handheld Radio
PS4301
Power Supply
16
B4323LI
Li-Ion Battery
(2550 mAh)
CH4301
Desktop Rapid
Charger
Attaching the Antenna:
Attaching the Battery:
1
2
1. While laying flat, put the battery
1. Turn the antenna clockwise to
attach it.
Note: To remove the antenna,
rotate it counter-clockwise.
into the radio as shown,
horizontally push to the top along
the aluminum slot.
2
2. As shown, push the battery
latch up and slide battery forward
1
until a click is heard.
Removing the Battery:
1
2
22
23
3
Attaching the Belt Clip:
5
7
8
1
2
3
6
13
RDR4320 RDR4350 RDR4380
9
10
11
12
13
14
15
Product Overview
1 P1 Key (hot key) 2 PTT Key (transmit key)
3 P2 Key (hot key) 4 Emergency Call Key
5 Antenna 6 LED Indicator
7 Channel Knob 8 Radio On-O/ Volume Knob
9 Earpiece (RDR4350/RDR4380 only) 10
LCD Display (RDR4350/RDR4380
11
only)
13 Speaker 14
Duplex Microphone (RDR4350/
15
RDR4380 only)
Simplex Microphone (RDR4350/
RDR4380 only)
Function Keypad (RDR4350/RDR4380
12
only)
Numeric Keypad (RDR4350/RDR4380
only)
16 Battery Latch
17 Accessory Jack Cover 18 Strap hole
19 Belt Clip 20 Battery
21 Battery Pole Piece 22 Accessory Jack
Micro SD Encryption Card
23
Cover
Complete User Manual at: RCACommunicationsSystems.com
1
1. As shown, hold the radio like
this.
2
18
19
17
20
2. As shown, push the battery
latch up with the other hand.
3. Slide the battery as arrow
3
direction shown.
1. Rotate the screws counterclockwise to remove them.
2. Align the screw holes on the
belt clip with those on the
radio’s body, then insert and
tighten the screws clockwise.
Note: To remove the belt clip,
loosen the screws.
Attaching audio accessory / programming cable:
21
1
1. Open the accessory jack cover.
1
As shown, align the plug
with the accessory jack, then
connect it.
2
2. As shown, tighten the screw
clockwise on the plug.
Note: To remove accessories,
loosen the screw counter-
2
clockwise.
Function Keypad (RDR4350 / RDR4380 models)
Function/Enter key
Receive/Call key
Programmable Keys
[P1] key, [P2] key, four direction keys, key, can be set as function or
menu shortcut keys by your RCA dealer. The default state of [P1] and [P2]
shortcuts are for high-low power switching. You only need to press the
corresponding shortcut key to quickly access the needed menu or function.
Back/Option key
Hangup key
Direction key
Page 2
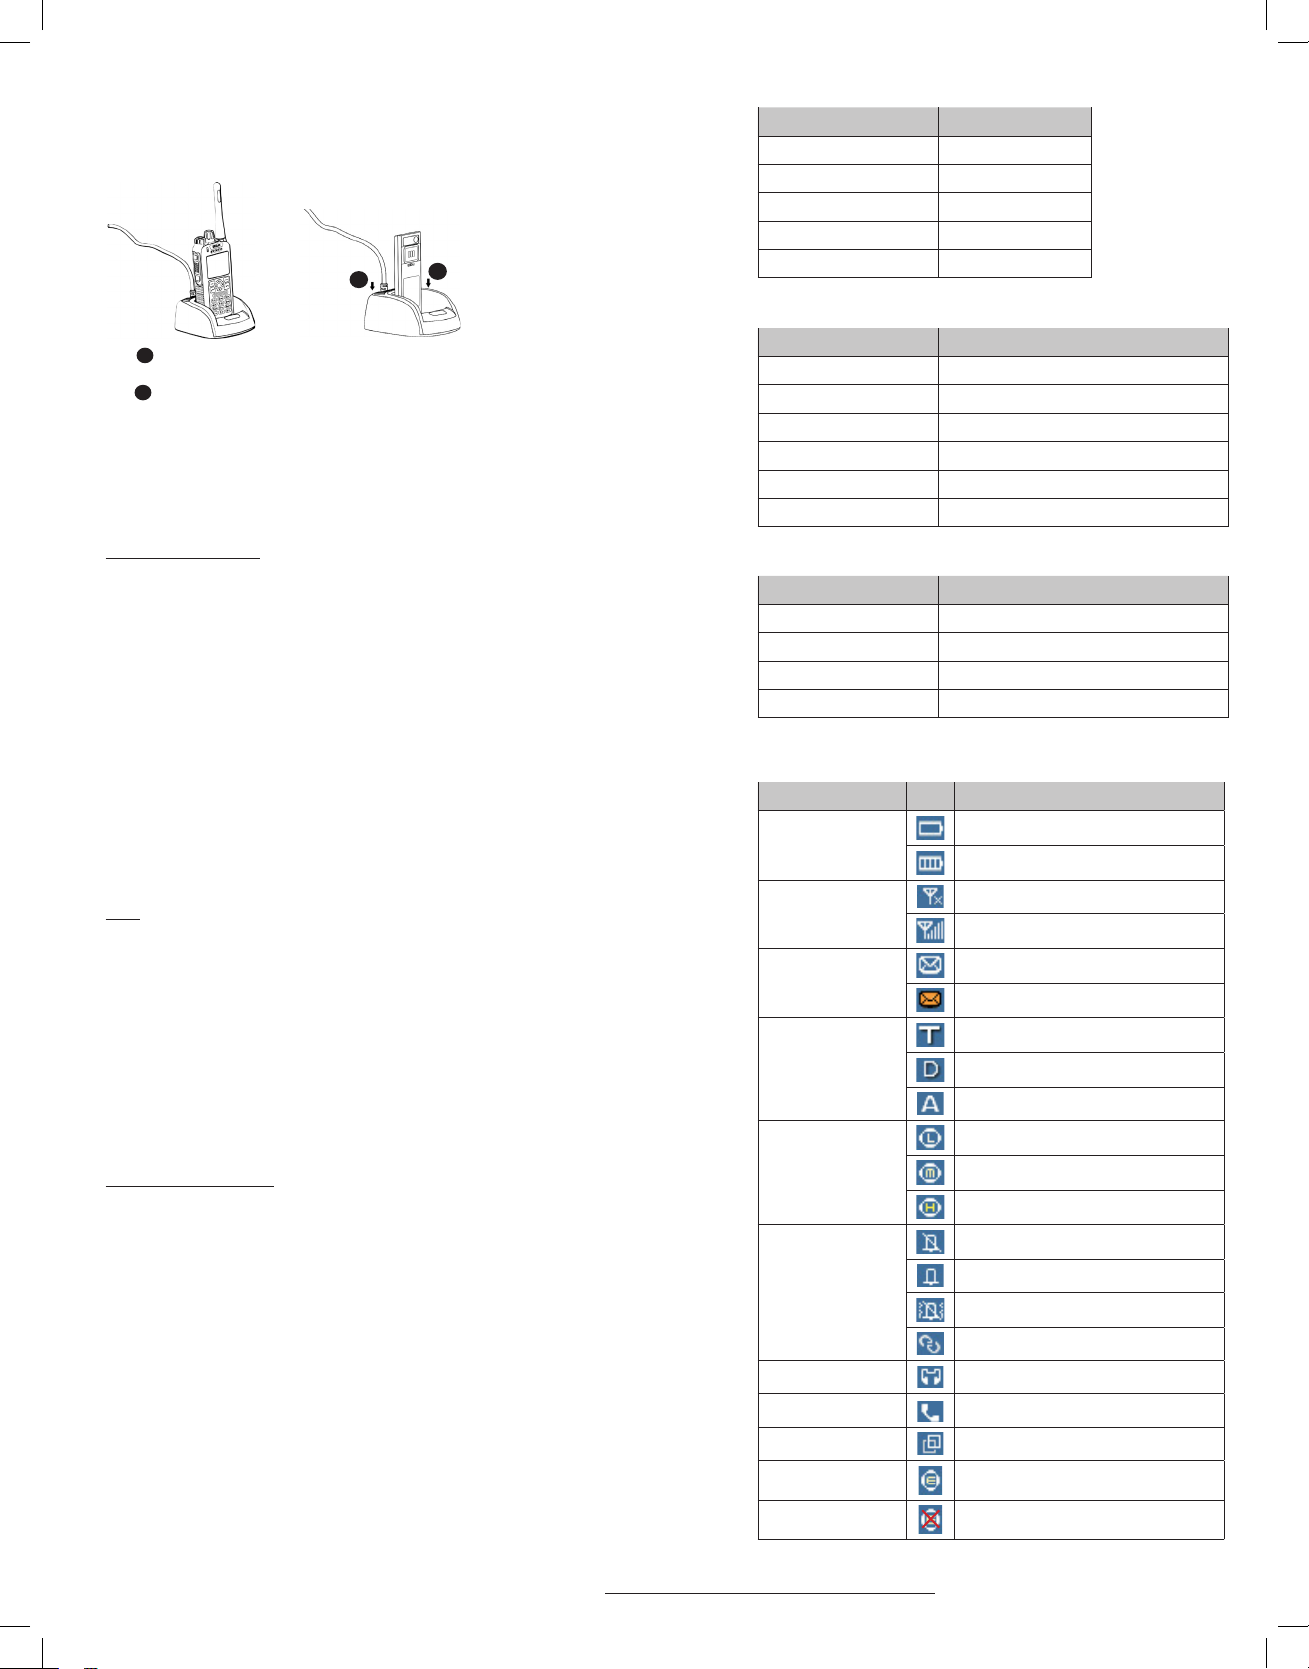
Charging the Battery
Charging Operation Steps
Use only the charger and batter y specified by RCA Communications
Systems. Charger LED indicates the changing progress.
1
1
1. As shown, connect the power adapter to AC power
2
socket and the jack at the back of the charger.
2
2. As shown, inser t battery or radio with battery in
the charger, and make sure there is good contact
between battery and charging terminals.
3. The charging process starts when LED glows red.
4. LED glows green to indicate that charging is complete.
NOTE: The standard 2250mAh battery charging normally
takes about 4 hours, for optimal batter y performance. Initial
charging for new batter y should take up to 5 hours.
Basic Operations
Turning on/o radio
Rotate the Radio On-O/Volume knob clockwise / counter-clockwise until a
click is heard to turn on/o the radio.
Adjust the volume
After turning the radio on, rotate the Radio On-O/Volume knob clockwise to
increase the volume or counter-clockwise to decrease the volume.
Selecting a channel
Locate the channel number on the Channel Knob rotate it to select the desired
channel. While rotating the knob, there is an automated channel number Voice
prompt.
Mode Switch
Through Channel Selector knob. Each channel of the radio can be set as
analog channel or digital channel by the dealer. The user can set them up
through CPS software.
Call
Group Call
Talk group can be set by the dealer in advance and the operation methods are
the same under DMO mode and TMO mode.
• Transmitting a group call
1. Select the desired talk group through Channel Knob.
2. Hold down [PTT] key to transmit a group call.
• Receiving and replying a group call
You can receive the group call without any key operation. If reply is needed,
please hold down [PTT] key after the speech of the other side and then
speak to microphone.
Care and Cleaning
To guarantee optimal performance as well as a long service life of your radio,
please follow the tips below.
Radio Care
Keep the radio far away from substances that can corrode the electronic
circuit.
Do not hold the radio by its antenna or headset cable directly to prevent
damage to its normal use.
Attach the accessory jack cover when the radio is not in use.
Radio Cleaning
Clean up the dust and fine particles on the radio surface and charging piece
with a clean and dry lint-free cloth or a brush regularly.
Use neutral cleanser and a non-woven fabric to clean the keys, control knobs
and front case after long-time use. Do not use chemical preparations such as
stain removers, alcohol, sprays or oil preparations, so as to avoid surface case
damage. Make sure that the radio is completely dry before use.
NOTE: Turn o the radio and remove the battery before cleaning.
LED indicator and charging status in charger
LED Indication Charging Status
LED Flashes Red Slowly Standby (no load)
LED Glows Red Charging
LED Glows Orange 85% Charged
LED Glows Green Fully Charged
LED Flashes Red Rapidly Error
Radio LED indicator
LED Indication Radio Status
LED Glows Red Transmitting the call
LED Glows Green Receiving the call
LED Glows Red On Both Sides Phone Call
LED Flashes Red Slowly Low Battery Power
LED Flashes Green Slowly Channel is Idle
LED Glows Orange Channel is Busy
Battery indicator
Battery Usage Status Indicator Light Status
Power > 40% Battery indicator light is o
10% < Power < 40% Green light flash
Power < 10% Red light flash
No Power LED indicator light and battery indicator light o
STATUS INDICATION IN RADIO (RDR4360 / RDR4365 / RDR4390 / RDR4395 models)
LCD Icon
Icon Name Icon Radio Status
Battery Strength Icons
RSSI
Message Icons
Operation Mode Icons
Power Icons
Profiles Icon
Audio Accessories Audio accessory has been connected
Call Status Icon On the phone
Group Selection Icon Select talk group
Encryption Icon Encryption ON
Encryption Icon Encryption OFF / Wrong Encryption Key
Low battery power
More bars indicate more battery power
No Signal
More bars indicate better signal strength
New message/unread message
Inbox is full
TMO mode
DMO mode
Analog mode
Transmit with lower power
Transmit with middle power
Transmit with high power
Silent mode
Ring
Vibrate
Custom
Complete User Manual at: RCACommunicationsSystems.com
 Loading...