

Page 1

Lyra Wireless
User’s Guide
Changing Entertainment. Again.
RD900W
Page 2
Important Information
WARNING
To reduce the risk of fire or
electric shock, do not expose
this product to rain or
moisture.
Refer to the identification/rating label located on the back panel of your product for its proper operating voltage.
FCC Regulations state that unauthorized changes or modifications to this equipment may void the user’s authority
to operate it.
Product Registration
Please fill out the product registration card (packed separately) and return it immediately or register on-line at
rca.com. Registering allows us to contact you if needed.
Product Information
Keep your sales receipt to obtain warranty parts and service and for proof of purchase. Attach it here and record the
serial and model numbers in case you need them. The numbers are located on the bottom or back of the product.
WARNING
RISK OF ELECTRIC SHOCK DO
NOT OPEN
This symbol indicates
"dangerous voltage" inside
the product that presents a
risk of electric shock or
personal injury.
To reduce the risk of electric shock,
do not remove cover (or back). No
user serviceable parts inside. Refer
servicing to qualified service
personnel.
This symbol indicates
important instructions
accompanying the
product.
Model No. _______________________________________________________________________
Serial No. ________________________________________________________________________
Purchase Date: ___________________________________________________________________
Dealer/Address/Phone: _____________________________________________________________
Page 3

Table of Contents
Chapter 1: Connections and Setup
Things to Consider Before You Connect ................................................... 3
Protect Against Power Surges.................................................................................................. 3
Protect Components from Overheating ................................................................................ 3
Position Cables Properly to Avoid Audio Interference ...................................................... 3
Connection Pictures .................................................................................................................... 3
Audio System Requirements ...................................................................... 4
Computer System Requirements ................................................................ 4
Windows® PC Requirements .....................................................................................................4
Unpack the box and check your parts ...................................................... 5
Front of the Lyra Wireless Units ............................................................... 6
Back of the Lyra Wireless Units ................................................................ 6
Connecting the Lyra Wireless Transmitter to your Computer................ 7
Connecting the Lyra Wireless Receiver to your Audio Receiver ............ 8
Improving Performance .............................................................................. 9
Orientation of the Antennas .....................................................................................................9
Fine Tuning the Lyra Wireless.................................................................... 9
If there is no signal at all .......................................................................................................... 9
If the signal is weak or there is interference..................................................................... 10
Avoiding Interference ............................................................................... 10
Cordless Phone and Baby Monitor Interference ............................................................... 10
Chapter 2: MUSICMATCH and the Lyra Wireless
Install the software on your computer ................................................................................ 11
Launching MUSICMATCH ......................................................................... 13
Launching the Remote Control Software ............................................... 14
Turning off the Chime .............................................................................................................. 14
Closing the Remote Control Software ................................................................................. 14
Audio Setup ...............................................................................................15
Settings in MUSICMATCH ....................................................................................................... 15
Soundcard Settings in Your Computer’s Control Panel .................................................. 16
CD-ROM Settings in Your Computer’s Control Panel ...................................................... 17
More on MUSICMATCH ............................................................................ 18
Install Batteries in the Remote ................................................................19
1
Page 4

Table of Contents
Using the Remote with the Lyra Wireless and Other Components...... 19
Playing Music through the Lyra Wireless ............................................... 20
Fine Tuning the Lyra Wireless.................................................................. 20
If there is no signal at all ........................................................................................................ 20
If the signal is weak or there is interference..................................................................... 20
Improving Performance ............................................................................ 20
Orientation of the Antennas .................................................................................................. 20
Using the Remote with MUSICMATCH ................................................... 21
Launching MUSICMATCH ........................................................................................................ 21
Music Sources ............................................................................................................................ 21
Playing Music ............................................................................................................................. 21
Changing Tracks and Scanning Within a Track................................................................. 21
Adjusting the Volume ............................................................................................................... 21
Changing Playlists and Internet Radio Stations ............................................................... 21
Repeating a Playlist .................................................................................................................. 21
Buying Music .............................................................................................................................. 21
Chapter 3: Additional Information
Troubleshooting ......................................................................................... 23
Care and Cleaning ..................................................................................... 24
Other Buttons on the Remote Control.................................................... 25
Programming the Remote to Operate Other Components.................... 27
Find Out If You Need to Program the Remote .................................................................. 27
Programming the Remote ....................................................................................................... 27
How to Use the Remote After You’ve Programmed It .................................................... 28
Code List .................................................................................................... 29
FCC and Industry Canada Information ....................................................33
Limited Warranty ...................................................................................... 34
2
Page 5

Chapter 1: Connections and Setup
Things to Consider Before You Connect
Protect Against Power Surges
• Connect all components before you plug any of their power cords into the wall outlet.
• Turn off all components before you connect or disconnect any cables.
Protect Components from Overheating
• Don’t block ventilation holes on any of the components. Arrange the components so that air can
circulate freely.
• Don’t stack components.
• When you place components in a stand, make sure you allow adequate ventilation.
• If you connect an audio receiver or amplifier, place it on the top shelf so the heated air from it
won’t flow around other components.
Position Cables Properly to Avoid Audio Interference
• Insert each cable firmly into the designated jack.
Chapter 1 3
Illustrations contained in this document are for representation only.
Page 6

Chapter 1: Connections and Setup
Audio System Requirements
• Audio receiver with auxiliary inputs (line level) or other component with audio inputs (TV, VCR, etc.).
Computer System Requirements
Windows® PC Requirements
• Pentium 300MHz or higher
• Windows
• Microsoft Internet Explorer 5.0 or higher
• Internet access
• 50MB free hard disk space
• 400MB for MUSICMATCH Jukebox Radio MX™ feature (recommended)
• 96MB RAM (32MB for Win98)
• CD-ROM drive capable of digital audio extraction
• Available USB port
• 16-bit color video card
®
98SE, Me, 2000, or XP
Windows is a trademark of Microsoft Corporation, registered in the U.S.A. and other countries.
MUSICMATCH, MUSICMATCH Jukebox, and MUSICMATCH Radio MX are registered trademarks of MUSICMATCH
Corporation.
4 Chapter 1
Page 7
Chapter 1: Connections and Setup
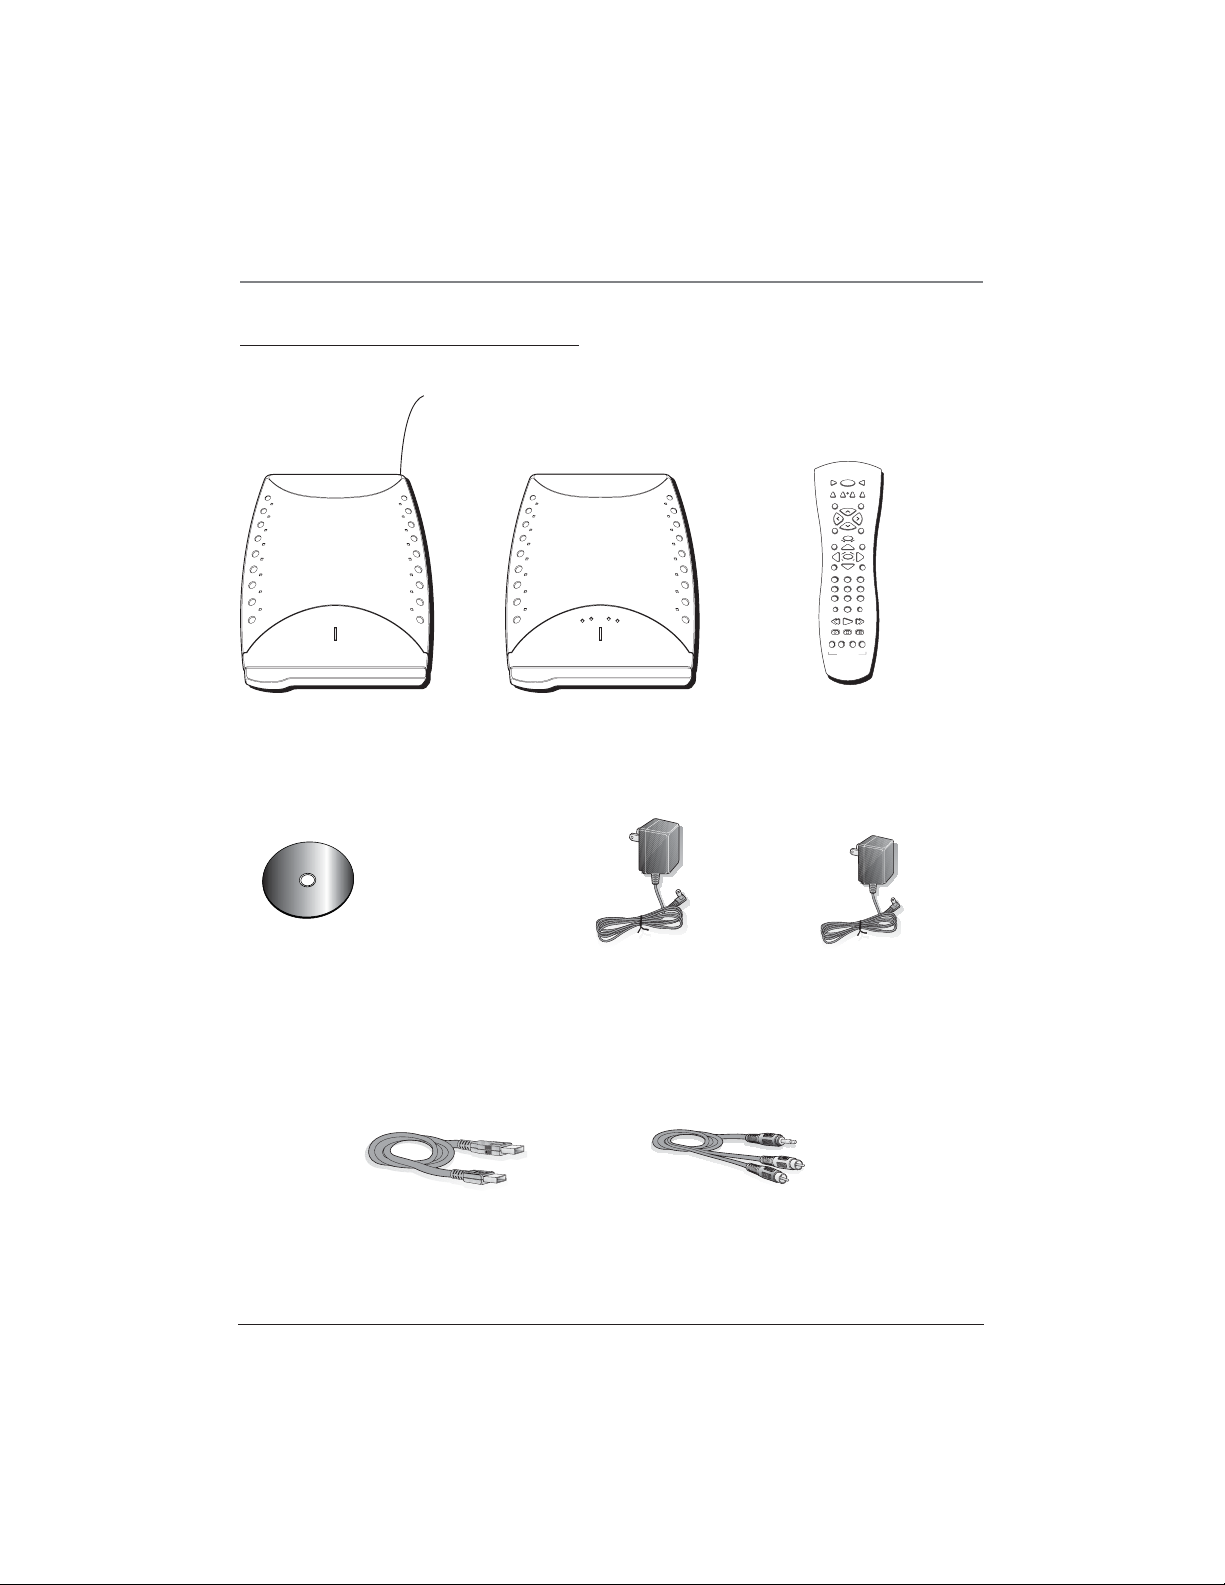
Unpack the box and check your parts
All of the items shown below should have come packed in the box with your Lyra Wireless.
LYRA
ON • OFF TV
WIRELESS
VCR AM•FMSAT•CABLE
DVD
TAPECD
PRESET + / CH +
VOL
VOL
PRESET - / CH -
GO BACK• DISCMUTE
SHOP
GUIDE•RDM
INFO
OK
TRK+
TRK-
SELECT
CLEARMENU
1 2 3
4 5 6
7 8 9
WHO•INPUT SHUF•REPEAT
0
REVERSE FORWARD PLAY
POWER
TRANSMITTER
POWER
RECEIVER
SIGNAL
RECORD PAUSE STOP
FILE RADIO
CD FAV
LYRA WIRELESS
Lyra Wireless Transmitter
m
e
e
n
g
t
a
S
n
o
a
f
t
M
w
c
a
i
s
r
e
u
M
Music Management CD
Contains the Lyra Wireless remote control
software and MUSICMATCH software (for
Windows only)
Mini-B USB cable
Part number: 5-4140
Lyra Wireless Receiver
Larger power supply for
transmitter unit
Part number: 5-4146
Remote control and
batteries
Smaller power supply
for receiver unit
Part number: 5-4147
Line out cable
Part number: 5-4138
Chapter 1 5
Page 8
Chapter 1: Connections and Setup
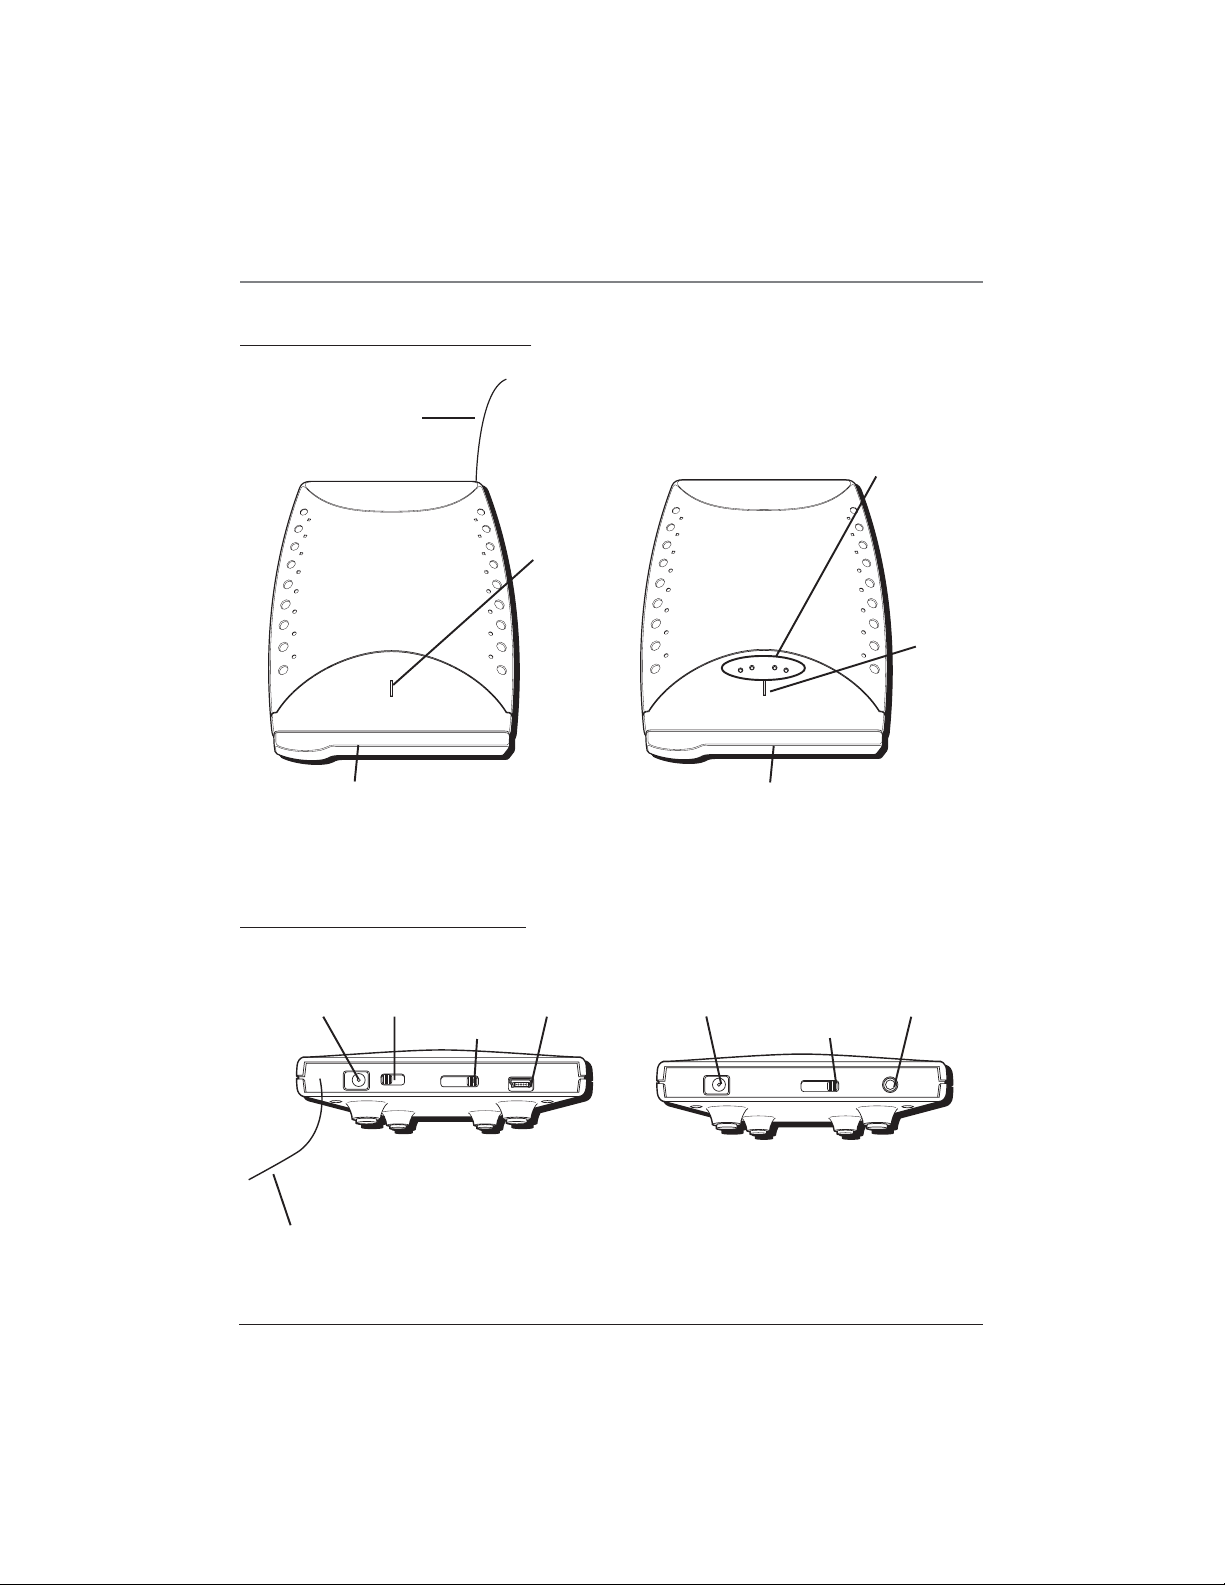
Front of the Lyra Wireless Units
Remote
control
antenna
Power
indicator
POWER
TRANSMITTER
Signal strength
indicators
Power
indicator
SIGNAL
POWER
RECEIVER
Antenna
Transmitter
Antenna
Receiver
Back of the Lyra Wireless Units
Power jack ON switch
9V
ON OFF
Transmitter Receiver
Remote
control
antenna
CHANNEL
switch
CHANNEL
1 2 3 4
USB jack Power jack
USB
9V
CHANNEL
switch
CHANNEL
1 2 3 4
LINE OUT jack
LINE OUT
6 Chapter 1
Page 9
Chapter 1: Connections and Setup
POWER
3
9V
ON OFF
POWER
CHANNEL
1 2 3 4
4
USB
2
1
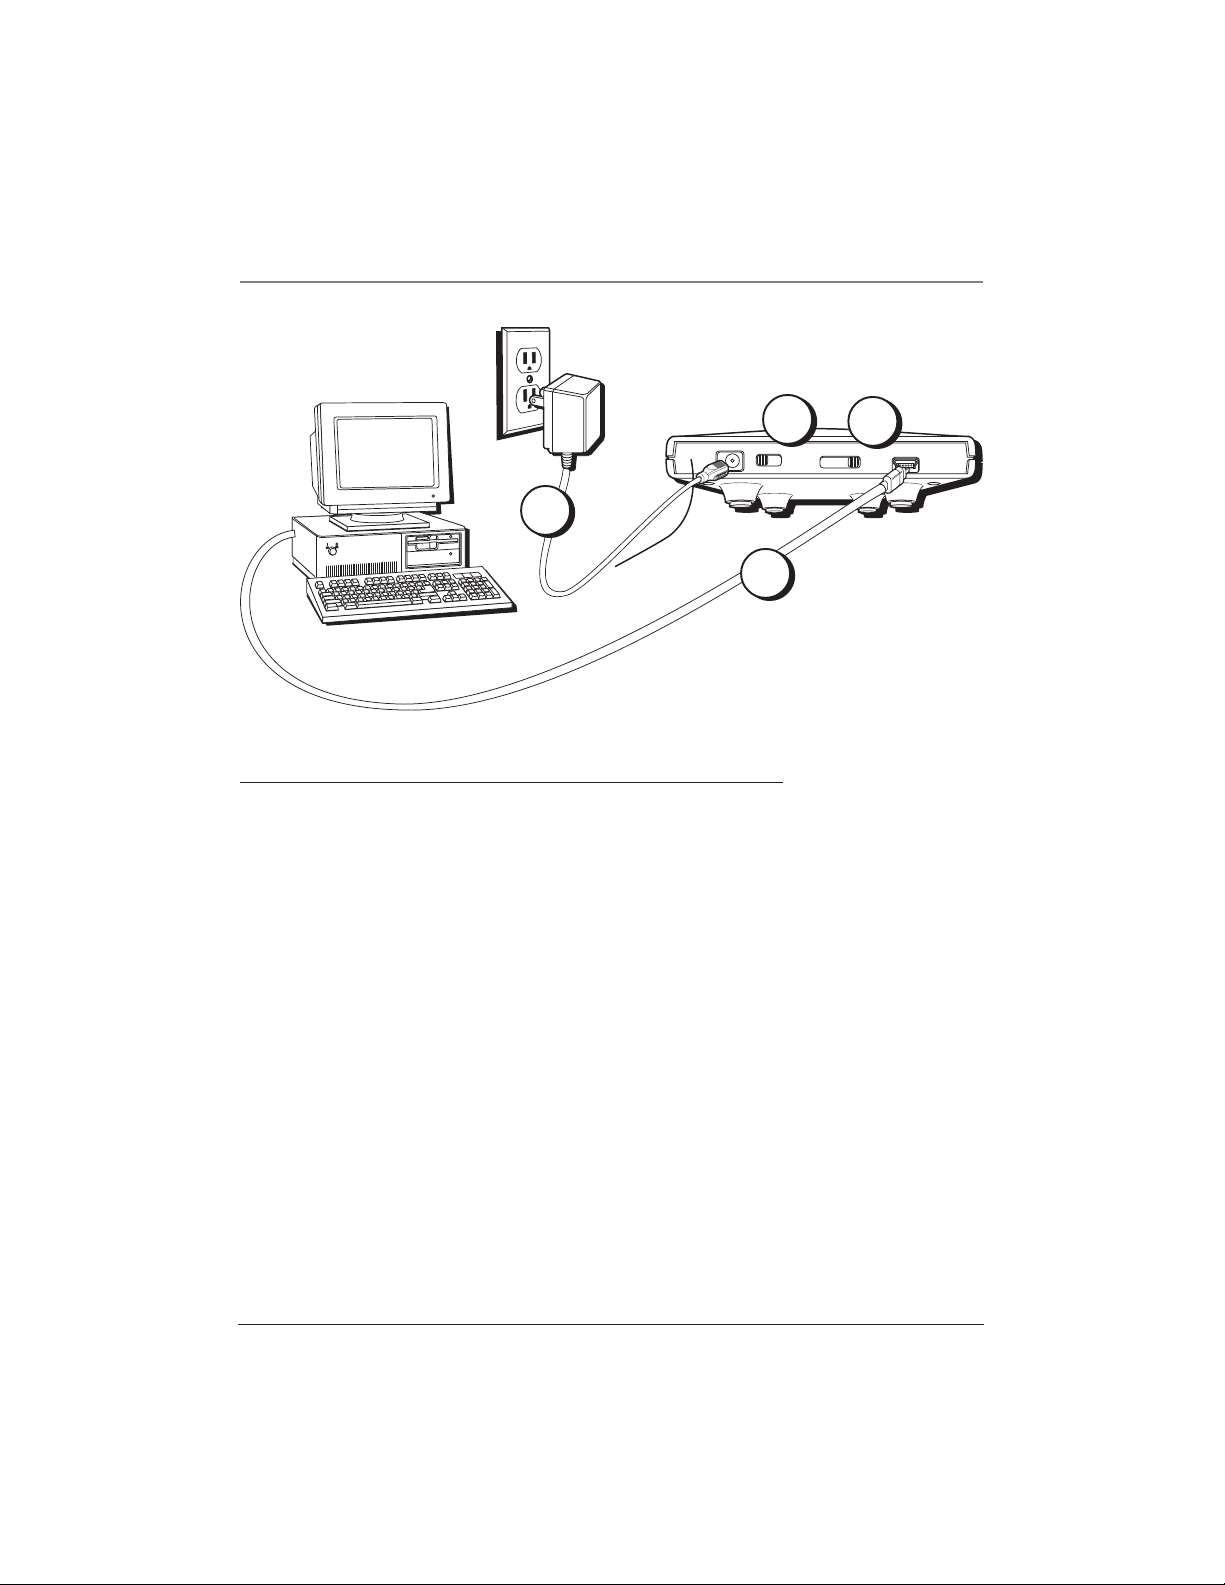
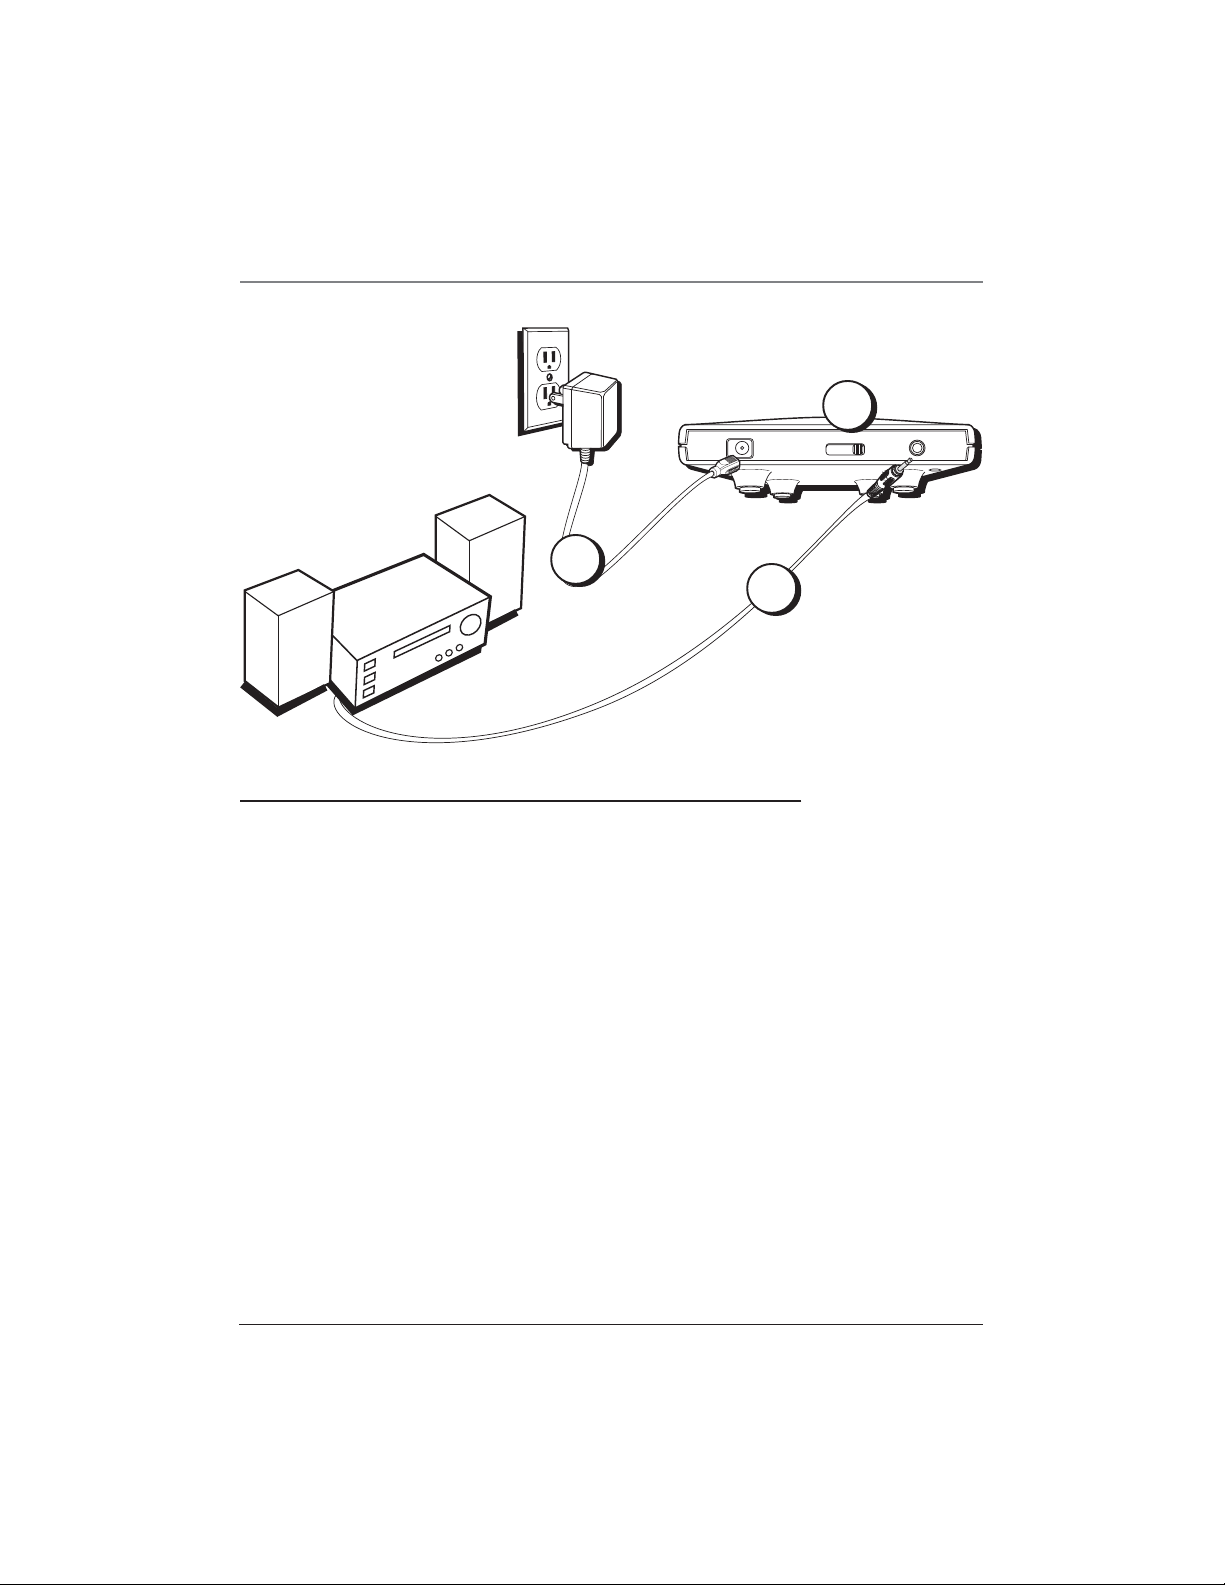
Connecting the Lyra Wireless Transmitter to your Computer
1. Connect the small end of the USB cable to the USB jack on the back of the Lyra Wireless
transmitter and the other end to the USB jack on your computer.
2. Connect the small end of the large power supply to the power jack on the back of the Lyra Wireless
transmitter and the other end into an AC outlet.
3. Make sure the ON switch is set to ON (the power indicator comes on).
4. Make sure the CHANNEL switch is set to the same channel as the CHANNEL switch on the Lyra
Wireless receiver.
5. Raise the antenna on the front of the unit so it is straight up.
6. Position the transmitter so that it is facing in the general direction of the receiver.
7. Follow the steps on the next page to connect the Lyra Wireless receiver to your audio receiver.
Chapter 1 7
Page 10
Chapter 1: Connections and Setup
POWER
3
9V
POWER
CHANNEL
1 2 3 4
LINE OUT
2
1
Important: Make
sure to push the
plug of the audio
cable all the way
into the LINE OUT
jack.
Connecting the Lyra Wireless Receiver to your Audio Receiver
1. Connect the small end of the audio cable to the LINE OUT jack on the back of the Lyra Wireless
receiver and the other ends (the red and white plugs) to the Audio Input jacks (sometimes labeled
Aux or Line ) on your audio receiver. Also, make sure to put your audio receiver in the right mode
to receive the sound from those jacks (see your audio receiver’s owner’s manual for more
information).
2. Connect the small end of the small power supply to the power jack on the back of the Lyra Wireless
receiver and the other end into an AC outlet.
3. Make sure the CHANNEL switch is set to the same channel as the CHANNEL switch on the Lyra
Wireless transmitter.
4. Raise the antenna on the front of the unit so it is straight up.
5. Position the receiver so that it is facing in the general direction of the transmitter.
8 Chapter 1
Page 11
Chapter 1: Connections and Setup
Improving Performance
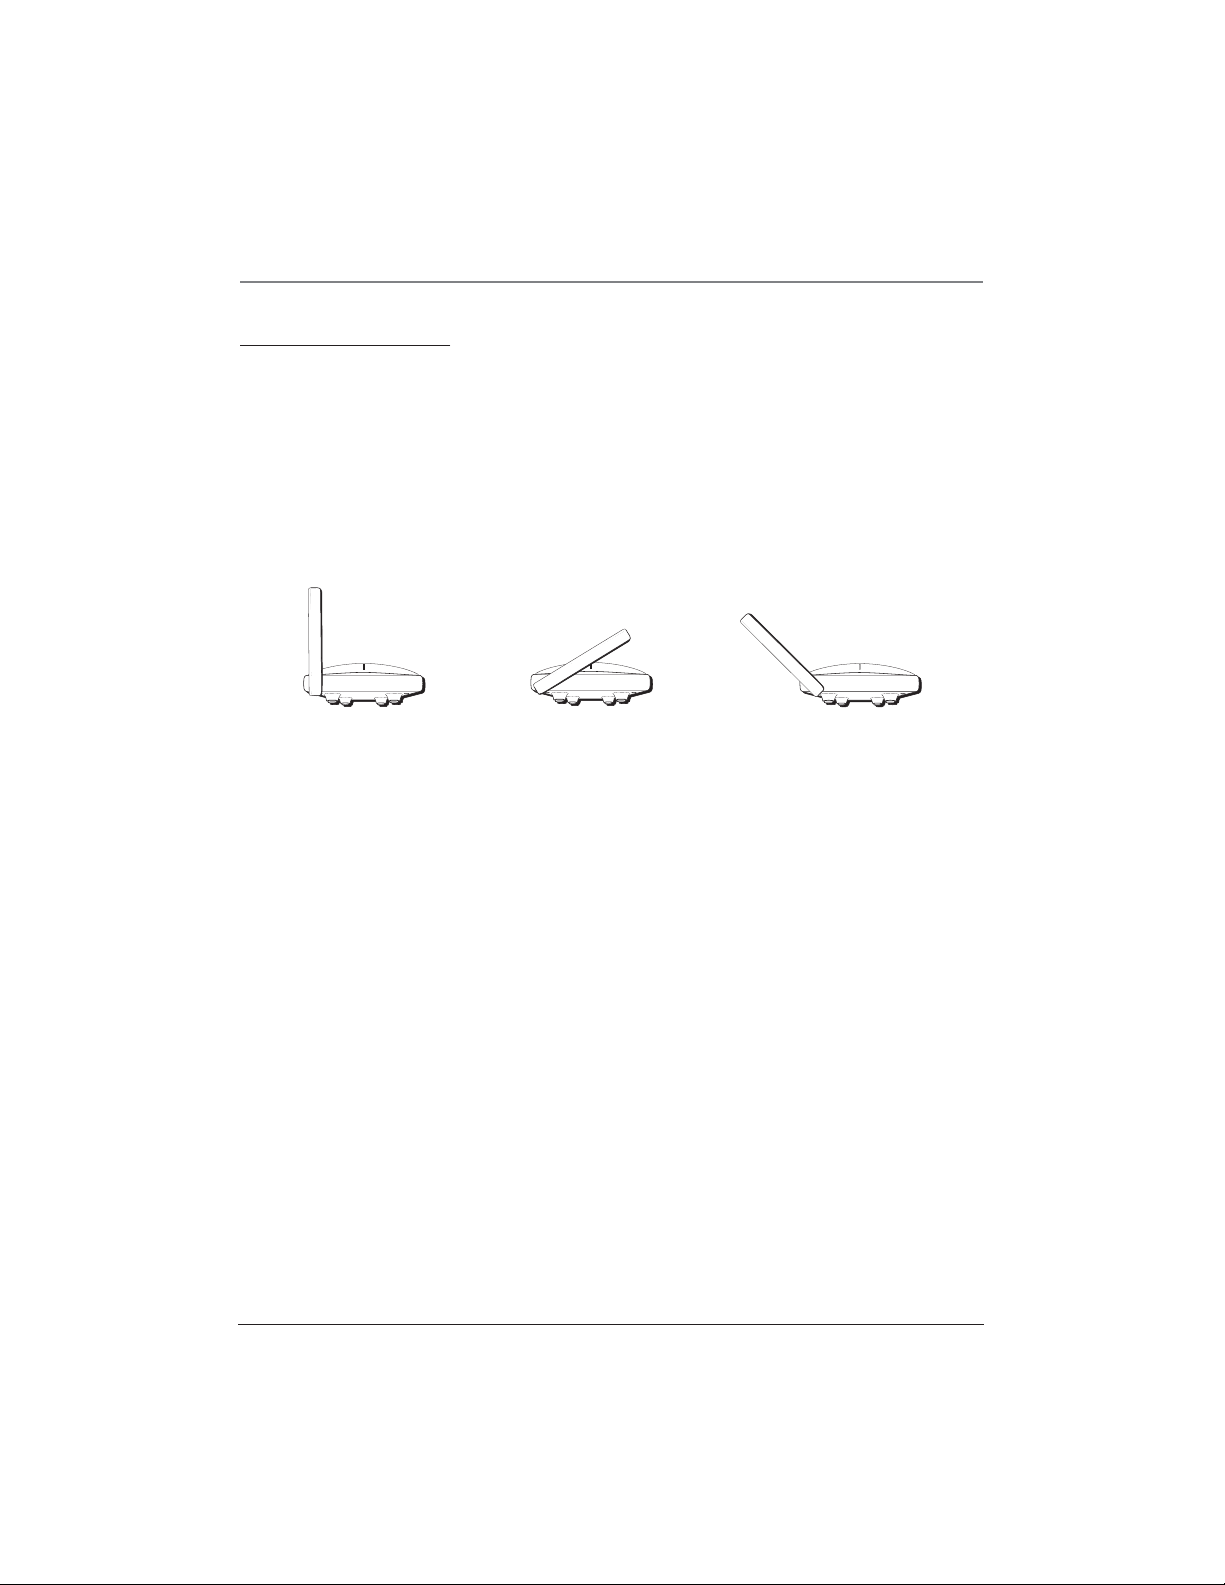
Orientation of the Antennas
Proper orientation of the antennas is important for good performance. You may find that the system
works better with one or more of the antennas in the horizontal (flat) position. The receiver and
transmitter tend to operate better in high locations, where the signal path is wider and stronger (on a
shelf, for example). Watch the receiver signal strength indicators for indication of signal strength.
You may also need to experiment with the position of the remote control antenna on the transmitter
unit. See what position works the best for the remote control.
The Lyra Wireless transmitter and receiver antennas can rotate to multiple positions. You may
want to try several different angles for the best reception.
Chapter 1 9
Page 12

Chapter 1: Connections and Setup
Fine Tuning the Lyra Wireless
To get the best signal reception, the Lyra Wireless units should face each other using an imaginary “line
of sight.” You can place the transmitter and receiver in separate rooms, or even separate floors of your
house, so you don’t have to worry about the units being close to each other. Other barriers in your
house may affect the signal, so you may need to adjust the positions of the transmitter and receiver
somewhat.
If the transmitter is sending the signal to the receiver properly, you should see some of the receiver’s
signal strength meter indicators light up.
If there is no signal at all
Make sure the CHANNEL switch on the back of both units is set to the same number.
If the signal is weak or there is interference
Try changing the channel on both units. Make sure the CHANNEL switch is set to the same channel on
both units.
Lyra Wireless Receiver
Table or
high shelf
Lyra Wireless
Transmitter
Table or
high shelf
The Lyra Wireless system can transmit
through walls and floors (up to 100 ft.).
Avoiding Interference
Cordless Phone and Baby Monitor Interference
The transmitter and receiver have 4 RF channels, but if you have a 900Mhz cordless phone or baby
monitor, pick a channel that doesn’t interfere with the phone or monitor. Channel 4 is typically the
channel with the least interference with telephones and baby monitors. If you have interference, leave
your cordless phone or monitor on, then switch to a channel on both Lyra Wireless units that is clear.
10 Chapter 1
Page 13

Chapter 2: MUSICMATCH and the Lyra Wireless
Install the software on your computer
In order to play music through the Lyra Wireless system, you need to install some software first. The
Music Management CD that came with your Lyra Wireless contains all the software you need.
The MUSICMATCH Jukebox™ software organizes your music collection and plays it through the Lyra
Wireless system, and the remote control application makes it easier to navigate through MUSICMATCH.
MUSICMATCH compresses audio files (from music CDs) to the mp3 format so you can play them
through the Lyra Wireless system. It also enables you to play music from internet radio.
1. Turn on your computer and place the Music Management CD that came with your Lyra Wireless
into your computer.
2. If the setup screen does not appear, double click My Computer, double click your CD-ROM drive
icon, and double click install.exe. You can also click, Run, then type D:\install.exe (where D is the
letter of your CD-ROM drive). (The Lyra Wireless Quick Start screen appears.)
3. Click Install Remote Control Application to install the
Lyra Wireless remote control application.
4. When the RCA Lyra Wireless Setup screen appears, click
Next to begin setup.
5. Read the License Agreement and click Yes to continue
the installation.
The Lyra Wireless Quick Start
screen.
6. Click Next to select the destination location of the
installed files.
7. Click Next to install all necessary files.
8. Click Finish to complete Lyra Wireless remote control
software installation.
Notes:
• If you’re running Windows 98SE, you may need to install
several different system software components. Don’t cancel
setup before it says it is finished. Also, your computer may
reboot itself between installation of the software
components.
The Lyra Wireless Setup screen.
• If you’re re-installing the Lyra Wireless remote control
software, you need to close the remote control software
first, if it is running. Right click on the transmitter tower
icon in your computer’s system tray (the software menu
appears). Click Exit. When you start to re-install the
software, the computer asks you to confirm that you want
This screen appears if you try to re-install
the remote control software while it is still
running.
Chapter 2 11
Illustrations contained in this document are for representation only.
to re-install it.
MUSICMATCH and MUSICMATCH Jukebox are registered trademarks
of MUSICMATCH Corporation.
Page 14

Chapter 2: MUSICMATCH and the Lyra Wireless
9. When the remote control software installation is
complete, click Install MUSICMATCH Jukebox on the Lyra
Wireless Quick Start screen to install MUSICMATCH.
The Lyra Wireless Quick Start
screen.
10. When the MUSICMATCH Jukebox Setup screen appears,
click Next to begin setup.
Note: It is recommended to uninstall any previous installations of
the MUSICMATCH Jukebox software before proceeding.
After the uninstall process has been completed, delete the
C:\Program Files\MUSICMATCH folder from Windows and where
C:\Program Files is the path where the software was installed.
11. After you’ve read the license agreement, click Yes to
The MUSICMATCH Jukebox Setup
screen.
accept (to continue, you must click Yes), or No to decline.
If you click Yes, the User Registration Information screen
appears.
12. Enter your name, e-mail address, postal code, country,
year of birth, and sex (male or female).
Note: You must enter an e-mail address to proceed. If you don’t have
an e-mail address, enter yourname@xyz.com
13. Click Next (the Personalize Music Recommendation
screen appears). Read the screen to determine if you
want to use this feature or not — you can always change
the setting later. Select Yes or No.
14. Click Next (the Installation Options dialog screen
appears). Select Express Setup and click Next to continue
(the installation starts).
15. After the installation is complete, click Finish.
16. If necessary, close the main setup screen.
17. Some computers might request that you reboot your
computer (a dialog box will appear on the computer
screen if this is necessary).
• To view the MUSICMATCH Jukebox tutorial, click Tutorial
on the Quick Start screen.
• To exit the Quick Start screen, click Quit.
12 Chapter 2
Page 15

Chapter 2: MUSICMATCH and the Lyra Wireless
The MUSICMATCH icon found in
your computer’s system tray.
The MUSICMATCH Jukebox Getting
Started screen.
Launching MUSICMATCH
The MUSICMATCH software converts audio files to the mp3
format so you can play them on your Lyra Wireless. This
section describes some basic MUSICMATCH features and
explains how to convert music to the mp3 format. For more
information about MUSICMATCH, see the tutorial on the
Lyra Wireless Quick Start screen or go to
www.musicmatch.com.
1. Remove the Music Management CD from your computer.
2. Start the MUSICMATCH Jukebox software (click on the
MUSICMATCH icon in your system tray or on your
desktop).
3. The first time you launch MUSICMATCH, a Getting
Started screen appears providing information about
MUSICMATCH and the software.
4. Detailed information, Getting Started tips, and
troubleshooting are available through the Help menu
and the MUSICMATCH internet site (accessed from the
Help and Site menus). We recommend you familiarize
yourself with the MUSICMATCH Welcome Tips and view
the On-line FAQs before using and recording files.
Note: Logging onto the internet while using MUSICMATCH Jukebox
takes advantage of all its features.
5. Choose Settings under the Options menu to customize
the MUSICMATCH Jukebox functionality.
Note: You can access the Options menu at almost any time by
pressing the right mouse button.
Chapter 2 13
Page 16

Chapter 2: MUSICMATCH and the Lyra Wireless
Launching the Remote Control Software
The remote control software is automatically launched every time you start your computer, but if you
need to launch it manually, follow these steps:
If you have Windows 98SE, 2000, or Me
1. Click on the Start icon in the lower left-hand corner of your screen.
2. Select Programs, followed by RCA Lyra Wireless.
If you have Windows XP
1. Click on the Start icon in the lower left-hand corner of your screen.
2. Select All Programs, followed by RCA Lyra Wireless.
When the Lyra Wireless remote control software is launched,
you’ll see a TV transmitter tower icon in your computer’s
system tray.
The Lyra Wireless Remote Control
icon found in your computer’s system
tray.
Turning off the Chime
You may want to turn off the chime sound the computer
makes each time you press a valid button on the remote. To
do this, right click on the transmitter tower icon in your
computer’s system tray (the software menu appears). Click
The Lyra Wireless software menu.
Chime Sound.
Closing the Remote Control Software
To close the remote control software, right click on the
transmitter tower icon in your computer’s system tray (the
software menu appears). Click Exit.
14 Chapter 2
Page 17

Chapter 2: MUSICMATCH and the Lyra Wireless
Audio Setup
Depending on how your computer is currently set up, you may have to make some adjustments so that
the music and sound are directed to the right places. You may need to make sure MUSICMATCH is
configured properly, too (see below).
Settings in MUSICMATCH
1. Make sure the MUSICMATCH application is launched on
your computer. If it’s not, press the LYRA WIRELESS
button on the remote.
2. From MUSICMATCH’s main menu, click on Options and
then Settings.
3. Select the Player tab, then click on the arrow under
Output Control and select USB Audio Device (or Lyra
Wireless for Windows XP).
Note: For Windows 98SE, 2000, and Me, the Lyra Wireless is
recognized as a “USB Audio Device.” If there is more than one USB
audio device, the system numbers all the devices.
The MUSICMATCH Settings screen for
Windows 98SE, 2000, and Me.
The MUSICMATCH Settings screen for
Windows XP.
Chapter 2 15
Page 18

Chapter 2: MUSICMATCH and the Lyra Wireless
Soundcard Settings in Your Computer’s Control Panel
Note: This setting configures the chime and Windows sounds that play through your computer’s sound card. If you
want them to play through the Lyra Wireless, select USB Audio Device (or Lyra Wireless, for Windows XP) under the
preferred device setting.
If you have Windows 98SE or Me
1. Click on the Start icon in the lower left-hand corner of
your screen.
2. Select Settings, followed by Control Panel (the Control
Panel window appears).
3. Double click on the Multimedia icon, and select the
Audio tab.
4. Click on the arrow under Preferred device and make sure
your sound card is selected.
The sound card settings screen for
Windows 98SE and Me.
If you have Windows 2000
1. Click on the Start icon in the lower left-hand corner of
your screen.
2. Select Settings, followed by Control Panel (the Control
Panel window appears).
3. Double click on the Sounds and Multimedia icon, and
select the Audio tab.
4. Click on the arrow under Preferred device and make sure
your sound card is selected.
The sound card settings screen for
Windows 2000.
16 Chapter 2
Page 19

Chapter 2: MUSICMATCH and the Lyra Wireless
The sound card settings screen for
Windows XP.
If you have Windows XP
1. Click on the Start icon in the lower left-hand corner of
your screen.
2. Select Settings, followed by Control Panel (the Control
Panel window appears).
3. Double click on the Sounds and Audio Devices icon, and
select the Audio tab.
4. Click on the arrow under Default device and make sure
your sound card is selected.
CD-ROM Settings in Your Computer’s Control Panel
If you have Windows 98SE or Me
1. Click on the Start icon in the lower left-hand corner of
your screen.
2. Select Settings, followed by Control Panel (the Control
Panel window appears).
3. Double click on the Multimedia icon, and select the CD
Music tab.
4. Under CD-ROM Selection, click the box for Enable digital
CD audio for this CD-ROM device.
The CD-ROM settings screen for Windows
98SE and Me.
Chapter 2 17
Page 20

Chapter 2: MUSICMATCH and the Lyra Wireless
If you have Windows 2000
1. Click on the Start icon in the lower left-hand corner of
your screen.
2. Select Settings, followed by Control Panel (the Control
Panel window appears).
3. Double click on the Sounds and Multimedia icon, and
select the Hardware tab.
4. Select your CD-ROM in the list, and click Properties (the
Properties window appears).
5. Click the Properties tab, then under Digital CD Playback,
click the box for Enable digital CD audio for this CD-
ROM device.
The sound card settings screen for
Windows 2000.
If you have Windows XP
1. Click on the Start icon in the lower left-hand corner of
your screen.
2. Select Settings, followed by Control Panel (the Control
Panel window appears).
3. Double click on the Sounds and Audio Devices icon, and
select the Hardware tab.
4. Select your CD-ROM in the list, and click Properties (the
Properties window appears).
5. Click the Properties tab, then under Digital CD Playback,
click the box for Enable digital CD audio for this CD-
ROM device.
The sound card settings screen for
Windows XP.
More on MUSICMATCH
To let you get started listening to your music, we’ll only mention the MUSICMATCH features that directly
apply to the Lyra Wireless in this user’s guide. For additional information about MUSICMATCH Jukebox
features such as MUSICMATCH Radio MX, creating music CDs, and all the music library features, go to:
• The MUSICMATCH tutorial on the Lyra Wireless Quick Start screen.
• Getting Started tips
• Online help (www.musicmatch.com)
Note: MUSICMATCH Radio MX requires a subscription. See the MUSICMATCH website for details.
18 Chapter 2
Page 21

Chapter 2: MUSICMATCH and the Lyra Wireless
Install Batteries in the Remote
1. Remove the battery compartment cover on the back of the remote.
2. Insert new batteries. Match the polarities (+ and –) on the batteries with the diagram on the
remote.
3. Put the battery compartment cover back on the remote.
Important Battery Information
• If you’re not going to use the remote for a month or more, be sure to remove the batteries because
they can leak and cause damage.
• Dispose of batteries in the proper manner, according to federal, state, and local regulations.
• Any battery may leak electrolyte if mixed with a different battery type, if inserted incorrectly, if all
batteries are not replaced at the same time, if disposed of in fire, or if an attempt is made to charge
a battery not intended to be recharged.
• Discard leaky batteries immediately. Leaking batteries can cause skin burns or other personal injury.
Using the Remote with the Lyra Wireless and Other Components
The software that comes with your Lyra Wireless enables you to use the remote to control many of the
MUSICMATCH features. When you want the remote to operate MUSICMATCH, point it at the Lyra
Wireless transmitter and press a button.
The remote control antenna of the Lyra Wireless system allows you to operate MUSICMATCH from
another room, or even another floor of your house, so you don’t have to worry about being right in
front of the transmitter. For more information on how to use the remote with MUSICMATCH, go to the
end of this chapter.
For other components (TV, VCR, etc.), the remote has to be pointed in the correct direction and toward
the correct component in order for the remote control’s signal to communicate with the sensor on the
component. Make sure there is a clear path between the remote control and the component you want
to operate, so the signal isn’t blocked.
Chapter 2 19
Page 22

Chapter 2: MUSICMATCH and the Lyra Wireless
Playing Music through the Lyra Wireless
Now that you have connected your Lyra Wireless and installed all the necessary software, it’s time to
listen to some music.
1. Make sure the MUSICMATCH application is launched on your computer. If it’s not, press the LYRA
WIRELESS button on the remote.
2. Select the music source you want to play by pressing the corresponding button on the remote (FILE,
RADIO, CD). If you choose FILE or CD, also select the song you want to play.
3. Turn on your audio receiver or other audio component and make sure it is on the right input mode
for how you connected the Lyra Wireless receiver unit (AUX, INPUT, etc.). See you owner’s manual
for the audio system or audio component for more details.
4. Adjust the volume on your computer and audio receiver to a comfortable level.
5. Press PLAY (the song plays through your audio receiver).
Fine Tuning the Lyra Wireless
To get the best signal reception, the Lyra Wireless units should face each other using an imaginary “line
of sight.” You can place the transmitter and receiver in separate rooms, or even separate floors of your
house, so you don’t have to worry about the units being close to each other. Other barriers in your
house may affect the signal, so you may need to adjust the positions of the transmitter and receiver
somewhat (see the diagrams in Chapter 1).
If the transmitter is sending the signal to the receiver properly, you should see some of the receiver’s
signal strength meter indicators light up.
If there is no signal at all
Make sure the CHANNEL switch on the back of both units is set to the same number.
If the signal is weak or there is interference
Try changing the channel on both units. Make sure the CHANNEL switch is set to the same channel on
both units.
Improving Performance
Orientation of the Antennas
Proper orientation of the antennas is important for good performance (see the diagrams in Chapter 1).
You may find that the system works better with one or more of the antennas in the horizontal (flat)
position. The receiver and transmitter tend to operate better in high locations, where the signal path is
wider and stronger (on a shelf, for example). Watch the receiver signal strength indicators for
indication of signal strength.
You may also need to experiment with the position of the remote control antenna on the transmitter
unit. See what position works the best for the remote control.
20 Chapter 2
Page 23

Chapter 2: MUSICMATCH and the Lyra Wireless
Using the Remote with MUSICMATCH
You can use the remote to control several of the functions of MUSICMATCH, including launching the
MUSICMATCH software; changing play modes (radio, music files, CDs); adjusting the volume; and
changing tracks, playlists, and internet radio stations.
LYRA
WIRELESS
button
VOL and
PRESET/CH
buttons
MUTE
button
SHOP
button
SHUF•REPEAT
button
Play and
record
buttons
ON•OFF
button
LYR A
ON • OFF TV
WIRELESS
VCR AM•FM SAT•CABLE
DVD
TAPECD
PRESET + / CH +
SHOP
OK
CD FAV
VOL
GO BACK• DISCMUTE
INFO
CLEARMENU
VOL
PRESET - / CH -
GUIDE•RDM
1 2 3
4 5 6
7 8 9
WHO•INPUT SHUF•REPEAT
0
REVERSE FORWARD PLAY
RECORD PAUSE STOP
FILE RADIO
LYRA WIRELESS
Launching MUSICMATCH
You can start MUSICMATCH by pressing the LYRA WIRELESS
button on the remote. When you are ready to close the
application, just make sure the remote is in Lyra Wireless
mode and press ON•OFF.
Music Sources
The music source buttons (FILE, RADIO, and CD) let you select
what music source your want to hear. Press FILE for files on
your computer, RADIO for internet radio, and CD for an
audio CD.
Playing Music
You can play music from any selected source by pressing the
PLAY button. To pause music, press PAUSE. To stop playing,
press STOP.
Changing Tracks and Scanning Within a Track
To skip to the next track, press the FORWARD button. To
return the previous track, press REVERSE. To scan within a
track, use the left and right arrow buttons.
Adjusting the Volume
While the music is playing, use the VOL up and down buttons
to adjust the volume. You can also adjust the volume on
your audio receiver for even more volume. To mute the song
that’s playing, press MUTE.
Changing Playlists and Internet Radio Stations
To change playlists or radio stations, use the PRESET +/CH+
or PRESET -/CH- buttons.
Repeating a Playlist
To repeat the current playlist, press SHUF•REPEAT.
Buying Music
To display the screen to buy music online, press SHOP.
Music source buttons
Chapter 2 21
Page 24

This page intentionally left blank.
Page 25

Chapter 3: Additional Information
Troubleshooting
Most problems you encounter with your Lyra Wireless can be corrected by consulting the following
troubleshooting list.
Note: If you prefer, we can provide you with the name of an Authorized Service Representative who will visit your home
for a fee to install your electronic entertainment system and to instruct you in its operation. For details about this
service, call 1-800-206-3359 or visit rca.com.
General Problems
Lyra Wireless won’t turn on
• Make sure both the transmitter and receiver are plugged in.
• Check the wall receptacle (or extension cord) to make sure it is “live” by plugging in something else.
No sound
• Make sure all the connections are snug between the Lyra Wireless receiver and your audio receiver
(or other component).
• Make sure the music is not being sent to your sound card. In the MUSICMATCH menu, select
Options, then Player, then Settings. Under Output Control, make sure USB Audio Device is selected
(or Lyra Wireless for Windows XP). If it wasn’t already selected, you may have to restart
MUSICMATCH to activate the new setting. Once you restart, try playing the music again. You
should hear audio play through your audio system (not from your PC). The normal Windows sound
prompts should still play through your PC.
• Make sure the correct input mode or channel is selected on your audio system. In order for your
audio system to receive the sound coming from the Lyra Wireless, the correct input mode must be
selected (AUX, INPUT, etc.). See your owner’s manual for the audio system or component for more
details.
The chime sound and Windows prompts are playing through the Lyra Wireless
• Make sure your sound playback settings are correct. If all sounds are playing through your audio
system, including Windows sound prompts, you need to set the Windows prompts to only play
through your sound card. See page 16 for details.
Poor reception
• Make sure the antenna is positioned correctly. Proper orientation of the antenna is important for
good performance. You may find that the system works better with one or more of the antennas in
the horizontal (flat) position. The receiver and transmitter tend to operate better in high locations,
where the signal path is wider and stronger (on a shelf, for example). Watch the receiver signal
strength indicators for indication of signal strength.
• Your cordless phone or baby monitor may be causing interference. The transmitter and receiver
have 4 RF channels, but if you have a 900Mhz cordless phone or baby monitor, pick a channel that
doesn’t interfere with the phone or monitor. Channel 4 is typically the channel with the least
interference with telephones and baby monitors. If you have interference, leave your cordless
phone or monitor on, then switch to a channel on both Lyra Wireless units that is clear.
Chapter 3 23
Illustrations contained in this document are for representation only.
Page 26

Chapter 3: Additional Information
The Remote Control Doesn’t Work
• Something might be between the remote and the remote sensor on the component. Make sure
there is a clear path. (This is only when using the remote to operate other components, such as a TV
or VCR.)
• Maybe batteries in remote are weak, dead, or installed incorrectly. Put new batteries in the remote.
• You might need to drain the remote’s microprocessor: remove batteries and press the number 1
button for at least 60 seconds. Release the 1 button, replace the batteries, and reprogram, if
necessary.
Care and Cleaning
CAUTION: Turn OFF your unit before cleaning.
You can clean the unit as required, using a soft lint-free cloth. Be sure to occasionally dust the
ventilation slots in the cabinet to help assure adequate ventilation.
Never use strong cleaning agents, such as ammonia-based cleaners, or abrasive powder. These types of
cleaners will damage the unit.
Avoid placing drinks or vases with water on top of the unit. This could increase the risk of fire or shock
hazard or damage to the unit.
24 Chapter 3
Page 27

LYRA
ON • OFF TV
WIRELESS
VCR AM•FM SAT•CABLE
DVD
TAPECD
PRESET + / CH +
VOL
VOL
PRESET - / CH -
GO BACK• DISCMUTE
GUIDE•RDM
1 2 3
4 5 6
7 8 9
WHO•INPUT SHUF•REPEAT
REVERSE FORWARD PLAY
RECORD PAUSE STOP
FILE RADIO
SHOP
OK
0
CD FAV
LYRA WIRELESS
INFO
CLEARMENU
Note: The TV, VCR, DVD and
SAT•CABLE buttons also turn on
most RCA, GE, and Proscan products.
Chapter 3: Additional Information
Other Buttons on the Remote Control
(0-9) Number buttons Selects channels up to 99 by
pressing two number buttons. Selects 3-digit channels by
pressing and holding 1 until 1 – – appears on screen. Then
press the other two numbers.
AM•FM Puts a compatible audio receiver in radio mode.
CLEAR Removes any menu or display from the screen and
returns you to normal viewing. Resets the time counter to
0:00:00 for some compatible VCRs. Also clears on-screen
menu item entries when setting the time and date or timer
recordings.
DVD Turns on a compatible DVD player and puts the
remote in DVD mode.
FAV For future use. No current function.
FORWARD Fast forwards the tape when the VCR is in stop
mode. In DVD and VCR mode, searches forward if pressed
during playback.
GO BACK•DISC Switches between the current and
previous channels and changes discs on a compatible CD
player.
GUIDE•RDM Displays the channel guide on some RCA, GE,
and Proscan TVs and satellite receivers. Also puts a
compatible CD player in random mode.
INFO Shows the status displays on screen of the VCR, TV,
DVD player, etc. (whichever component is set as the remote
control’s active device).
MENU Displays the on-screen menu system.
MUTE Reduces the volume to a minimum level on some
compatible TVs.
OK In on-screen menus, acts as an Enter button (used in
conjunction with the remote control’s arrow buttons). This
button selects the highlighted on-screen menu choice.
PRESET CH + and – Selects next higher or lower channel
in the channel list for some compatible components.
RECORD In VCR mode, starts recording.
REVERSE Rewinds the tape when the VCR is stopped. In
DVD and VCR mode, searches backward through a tape
during playback.
SAT•CABLE Turns on a compatible RCA, GE, or Proscan
satellite receiver and can be programmed to operate
different brands of receivers.
Chapter 3 25
Page 28

Chapter 3: Additional Information
SHUF•REPEAT Puts a compatible CD player or DVD player in repeat or shuffle mode.
STOP Stops the current function (record, playback, rewind, etc).
TAPE Puts a compatible audio receiver in tape mode.
TV Turns on a compatible RCA, GE, or Proscan TV and puts the remote in TV mode. Also used with the
ON•OFF button to turn on/off a compatible TV.
VCR Turns on a compatible VCR and puts the remote control in VCR mode.
VOL < and > Raises and lowers the volume of some compatible TVs.
WHO• INPUT In VCR or TV mode, selects between the Video Input Channels and the tuner. Video
Input Channel refers to the signal coming from the component connected to audio/video input jacks
on the VCR or TV.
26 Chapter 3
Page 29

Chapter 3: Additional Information
LYRA
WIRELESS
Indicator
REVERSE
You’ll use these buttons when you
program the remote.
Important: The remote may not be
compatible with all models of all brands of
components. It also may not operate all
functions of the remote that came with
your component.
DVD
ON • OFF
VCR
AM•FM
PLAY
STOP
TV
SAT•CABLE
CLEAR
Tip
To stop the automatic code search without
programming any components, press and hold
CLEAR until the indicator on the remote turns
off.
Programming the Remote to Operate Other
Components
The universal remote can be programmed to operate most
brands of remote controllable components. The remote is
already programmed to operate most RCA, GE, and Proscan
components.
Find Out If You Need to Program the Remote
To determine whether the universal remote needs to be
programmed for your component, turn the component ON.
For example, to program the remote for a TV, turn on the TV.
Point the remote at the TV, and press the TV button. Then
press ON•OFF or CH + (channel up) or CH – (channel down)
to see if the TV responds to the remote commands. If the
component does not respond, the remote needs to be
programmed.
Programming the Remote
There are two ways to program the remote control:
• automatic code search
• direct entry
Using Automatic Code Search
The following instructions can be used to program the
remote to operate each of your components. If you want to
stop the automatic code search without programming any of
your components, press CLEAR until the indicator on the
remote turns off.
1. Turn on the component you want to operate (TV, Cable
Box, etc.)
2. Press and hold the component button you want to
program (TV, etc.). While holding the component button,
press and hold ON•OFF until the indicator on the remote
turns on, then release both buttons.
3. Point the remote at the component. Press and release
PLAY, then wait 5 seconds or until the indicator on the
remote stops flashing.
At this point the remote is searching for the correct code
to program. If, after 5 seconds, the component you want
to operate does not turn off, press PLAY again to tell the
remote to search the next set of codes.
Continue pressing PLAY until the component turns off or
you have searched through all of the codes. There are 20
total sets of codes. If the component does not turn off
after pressing PLAY 20 times, then the remote can’t be
programmed to operate that component.
Chapter 3 27
Page 30

Chapter 3: Additional Information
Important
You must continue pressing the component
button while you enter the code.
Let’s say you have a Zenith TV. To program the
universal remote to operate the VCR, you
would:
Press and hold the TV button while you enter
the first code listed for Zenith in the TV Codes
column.
Release the TV button. Press ON•OFF to see if
the TV responds. If it doesn’t, follow the same
steps, but enter the second code for Zenith TVs
instead of the first.
Note
Some of the remote’s buttons might operate
differently for other components, especially
when you’re using another component’s menu
system.
If the component you want to control does turn off:
1. Press and release REVERSE, then wait 2 seconds. Repeat
this step until the device turns back ON.
2. To finish, press and hold STOP until the indicator on the
remote turns off.
Using Direct Entry
1. Turn on the component to be programmed.
2. Look up the brand and code number(s) for the
component on the code list in this section.
3. Point the remote at the component.
4. Press and hold the component button you want to
program on the remote.
5. Enter the 4-digit code from the remote control code list
on the following pages. If the indicator flashes, you have
either entered an invalid code or the button isn’t
programmable.
6. Release the component button, and then press ON•OFF
to see if the component responds to the command. If it
doesn’t, try pressing the component button and then
ON•OFF again.
• If you get no response, repeat these steps using the next
code listed for your brand, until the component responds
to the remote commands.
• If you try all the codes for your component brand and
none work, try the automatic code search method. If
automatic code search doesn’t find the code, the remote
is not compatible with your component.
How to Use the Remote After You’ve Programmed It
Because this universal remote can control several different components (TV, DVD, VCR, satellite receiver,
etc.) it uses operational modes triggered by the component buttons. For example, if you want the
remote to control the TV, you would press the TV button to put the remote into TV mode before you
could control the TV.
1. Press the appropriate component button (DVD, TV, VCR, SAT•CABLE, AUX) to set the remote to
control the component.
2. Press ON•OFF to turn the component ON or OFF.
3. Use the remote buttons that apply to that component.
Notes:
• The remote may not be compatible with all brands and models of components. It also may not operate all
functions of the remote that came with your component.
• If you keep pressing buttons and nothing happens, the remote is probably in the wrong mode. You must press
the component button that matches the component you want to operate (i.e., if you want to operate the VCR,
press VCR on the remote control to put the remote in VCR mode.)
28 Chapter 3
Page 31

Chapter 3: Additional Information
Code List
TV Codes
Abex .............................................................................. 1172
Admiral .................................................... 1001, 1173, 1211
Adventura ..................................................................... 1174
Aiko ............................................................................... 1016
Akai ........................................................... 1002
Alleron .......................................................................... 1046
Amtron .......................................................................... 1038
Anam National .................. 1003, 1038, 1192, 1193, 1194
AOC ................ 1004, 1005, 1006, 1007, 1175, 1176, 1195
Audiovox ......................................................................1038
Belcor ............................................................................ 1004
Bell & Howell .......................................... 1001, 1083, 1162
Bradford ........................................................................ 1038
Brokwood ..................................................................... 1004
Candle ........................................... 1004, 1006, 1008, 1174
Celebrity ....................................................................... 1002
Centurion ...................................................................... 1009
Citizen .......................................... 1004, 1006, 1008, 1016,
Colortyme ................................................ 1004, 1006, 1010
Concerto ............................................................ 1004, 1006
Contec/Cony .................................. 1012, 1013, 1014, 1038
Craig .............................................................................. 1038
Crown .................................................................. 1038, 1171
Curtis-Mathes ......................................... 1000, 1004, 1006,
CXC ............................................................................... 1038
Daewoo ................................................... 1004, 1005, 1006,
Daytron .................................................... 1004, 1006, 1171
Dimensia ....................................................................... 1000
Dumont ...............................................................1004, 1151
Dynatech ....................................................................... 1178
Electronband ................................................................ 1002
Electrohome ............ 1003, 1004, 1006, 1019, 1020, 1022
Emerson1004, 1006, 1012, 1023, 1024, 1025, 1026,
Envision ............................................................. 1004, 1006
Fisher .................................. 1048, 1049, 1051, 1162, 1180
Fujitso ........................................................................... 1046
Funai .................................................................. 1038, 1046
Futuretec ....................................................................... 1038
GE ...................................... 1000, 1003, 1004, 1006, 1022,
Gibralter .............................................................. 1004, 1151
Goldstar ........................................ 1004, 1005, 1006, 1012
Grundy ..................................................... 1038, 1046, 1171
Hallmark ............................................................ 1004, 1006
Harvard ......................................................................... 1038
1027, 1028, 1029,1030, 1031, 1032, 1033,
1034, 1035, 1036, 1037, 1038, 1039, 1041,
1042, 1043, 1044, 1046, 1047, 1123, 1124,
1052, 1054,1055, 1087, 1164, 1165, 1166,
1038, 1105, 1171, 1174, 1177
1015, 1105, 1162, 1171, 1212
1016, 1017, 1018, 1127, 1171, 1196
1162, 1171, 1177, 1179, 1191, 1208
1167, 1168, 1181, 1213
1019, 1056, 1057, 1058, 1155, 1156,
1171, 1172
Hitachi .................... 1004, 1006, 1012, 1013, 1014, 1059,
IMA ............................................................................... 1038
Infinity .......................................................................... 1062
Janeil ............................................................................. 1174
JBL ................................................................................. 1062
JCB ................................................................................ 1002
JC Penney .... 1000, 1004, 1005, 1006, 1008, 1022, 1052,
Jensen ................................................................ 1004, 1006
JVC ..................................... 1012, 1013, 1014, 1054, 1060,
........................ 1065, 1066, 1067, 1157, 1158, 1159, 1182
Kawasho .................................................. 1002, 1004, 1006
Kenwood ..................................................1004, 1006, 1019
Kloss Novabeam .......................... 1068, 1069, 1174, 1183
KTV ................................................ 1038, 1070, 1171, 1177
Loewe ............................................................................ 1062
Logik ............................................................................. 1083
Luxman .............................................................. 1004, 1006
LXI ........................................................... 1000, 1006, 1049,
Magnavox .............. 1004, 1006, 1008, 1019, 1062, 1068,
Majestic ......................................................................... 1083
Marants ......................................................................... 1062
Marantz ......................................... 1004, 1006, 1062, 1078
Megatron ........................................................... 1006, 1059
Memorex ............................. 1001, 1006, 1082, 1083, 1162
MGA .............. 1004, 1005, 1006, 1019, 1022, 1051, 1079,
Midland ................................ 1054, 1151, 1171, 1172, 1181
Minutz ........................................................................... 1052
Mitsubishi ............... 1004, 1005, 1006, 1019, 1022, 1051,
Montgomery Ward ...................................................... 1083
Motorola ............................................................ 1003, 1173
MTC ............................................... 1004, 1005, 1006, 1105
Multitech ...................................................................... 1038
Multivision ................................................................... 1084
NAD ................................................ 1006, 1071, 1072, 1185
NEC ..................................... 1003, 1004, 1005, 1006, 1200
Nikko .................................................................. 1006, 1016
NTC ................................................................................ 1016
Onwa ............................................................................. 1038
Optimus ......................................................................... 1185
Optonica ............................................................ 1095, 1173
Orion ................................................................... 1035, 1191
Panasonic ........................... 1003, 1054, 1062, 1170, 1214
Philco ............ 1003, 1004, 1005, 1006, 1008, 1012, 1019,
Philips ........... 1003, 1004, 1008, 1012, 1019, 1062, 1068,
Pilot ..................................................................... 1004, 1171
1060, 1061, 1135, 1136, 1137, 1138,
1139, 1140, 1141, 1142, 1143, 1144, 1145,
1146, 1148, 1150, 1179, 1198, 1199
1054, 1058, 1063, 1064, 1072, 1087, 1105,
1062, 1071, 1072, 1073, 1162, 1181, 1207
1069, 1075, 1076, 1086, 1087, 1088, 1089
1128, 1171, 1172, 1181, 1201
1069,1075, 1076, 1077, 1088, 1130,
1131, 1132, 1133, 1134, 1183,
1079, 1080, 1081, 1082, 1125
1062, 1068, 1069, 1075, 1077, 1183
1219, 1235
1080, 1082
Chapter 3 29
Page 32

Chapter 3: Additional Information
Pioneer ........... 1004, 1006, 1090, 1091, 1092, 1179, 1185
Portland .............................. 1004, 1005, 1006, 1016, 1171
Price Club ..................................................................... 1105
Prism ............................................................................. 1054
ProScan ............................................................... 1000, 1181
Proton ........................................... 1004, 1006, 1012, 1093
Pulsar .................................................................. 1004, 1151
Quasar ........................................... 1003, 1054, 1070, 1094
Radio Shack/Realistic ...... 1000, 1004, 1006, 1012, 1038,
RCA ......................... 1000, 1003, 1004, 1005, 1006, 1007,
Runco ............................................................................ 1151
Sampo ............................................ 1004, 1006, 1171, 1172
Samsung ................. 1004, 1005, 1006, 1012, 1015, 1019,
Samsux ......................................................................... 1171
Sansui ........................................................................... 1191
Sanyo ...................................................... 1004, 1048, 1049,
Scotch ........................................................................... 1006
Scott .............. 1004, 1006, 1012, 1024, 1035, 1038, 1046
Sears ............. 1000, 1004, 1006, 1013, 1014, 1019, 1046,
Sharp .............. 1004, 1006, 1012, 1029, 1095, 1111, 1112,
Shogun .......................................................................... 1004
Signature ................................................. 1001, 1083, 1115
Simpson ........................................................................ 1008
Sony .............................................. 1002, 1205, 1216, 1218
Soundesign ........................ 1004, 1006, 1008, 1038, 1046
Squareview ................................................................... 1189
SSS ..................................................................... 1004, 1038
Starlite .......................................................................... 1038
Supre-Macy .................................................................. 1174
Supreme ........................................................................ 1002
Sylvania ....... 1004, 1006, 1008, 1019, 1062, 1068, 1069,
Symphonic .............................................. 1033, 1038, 1189
Tandy ............................................................................ 1173
Tatung ...........................................................................1003
Technics ........................................................................ 1054
Techwood................................................. 1004, 1006, 1054
Teknika 1004, 1005, 1006, 1008, 1012, 1013, 1014, 1016,
Telecaption ................................................................... 1117
TMK .................................................................... 1004, 1006
Toshiba...................... 1049, 1071, 1072, 1105, 1109, 1117,
Totevision ..................................................................... 1171
Universal ............................................................ 1052, 1087
Victor ................................................................. 1066, 1182
Vidtech ..................................................... 1004, 1005, 1006
Viking ........................................................................... 1174
Wards ............1000, 1001, 1004, 1005, 1006, 1019, 1024,
Yamaha ......................................... 1004, 1005, 1006, 1019
Zenith ....................... 1004, 1083, 1151, 1152, 1153, 1154,
1048, 1049, 1051, 1066, 1071, 1072, 1109,
1075, 1076, 1077, 1088, 1116, 1161, 1183
1033, 1046, 1052, 1062, 1068, 1069, 1075,
1076, 1083, 1087, 1088, 1095, 1119, 1120
1049, 1095, 1162, 1171, 1172
1019,1096, 1098, 1099, 1100, 1101,
1102, 1103, 1129, 1179, 1181, 1187,
1188,1190, 1202, 1203, 1215, 1233
1104, 1105, 1106, 1171, 1172, 1204
1080, 1107, 1108, 1162, 1169, 1180
1110, 1162, 1180, 1181, 1189
1113, 1122, 1171, 1173
1038, 1046, 1076, 1082, 1083, 1105,
1170, 1171
1118, 1160, 1162
1210, 1217
VCR Codes
Admiral ............................................................................. 2132
Adventura ......................................................................... 2026
Aiko ................................................................................... 2027
Aiwa .................................................................................. 2026
Akai .......................................2003, 2004, 2005, 2007, 2008,
........................................................................ 2111, 2112, 2113
American High ................................................................. 2021
Asha .................................................................................. 2013
Audio Dynamics ................................................... 2009, 2010
Audiovox .......................................................................... 2014
Bell & Howell ....................................................................2011
Beaumark .......................................................................... 2013
Broksonic ............................................................... 2012, 2025
Calix .................................................................................. 2014
Candle .............................................. 2013, 2014, 2015, 2016,
...................................................................... 2017, 2018, 2019
Canon ........................................................... 2021, 2022, 2114
Capehart .................................................................. 2020, 2110
Carver ................................................................................ 2062
CCE ......................................................................... 2027, 2061
Citizen ................................................................... 2013, 2014,
...................................... 2015, 2016, 2017, 2018, 2019, 2027
Colortyme ......................................................................... 2009
Colt .................................................................................... 2061
Craig .................................................. 2013, 2014, 2023, 2061
Curtis-Mathes ............................................ 2000, 2009, 2013,
............................ 2016, 2018, 2021, 2022, 2024, 2115, 2131
Cybernex .......................................................................... 2013
Daewoo ................................. 2015, 2017, 2019, 2025, 2026,
Daytron .............................................................................. 2110
DBX ........................................................................ 2009, 2010
Dimensia ................................................................ 2000, 2131
Dynatech ........................................................................... 2026
Electrohome .......................................................... 2014, 2029
Electrophonic ................................................................... 2014
Emerson ......................2012, 2014, 2015, 2021, 2024, 2025,
.............. 2026, 2029, 2030, 2031, 2032, 2033, 2034, 2035,
.................................... 2036, 2037, 2038, 2039, 2040, 2041,
.................................. 2042, 2044, 2045, 2046, 2047, 2065,
........................................................... 2113, 2116, 2117, 2130
Fisher .......................................................... 2011, 2023, 2048,
................................................ 2049, 2050, 2051, 2052, 2118
Fuji .......................................................................... 2021, 2119
Funai ................................................................................. 2026
Garrard .............................................................................. 2026
GE ................................................................2000, 2001, 2013,
...................................... 2021, 2022, 2053, 2115, 2120, 2131
Goldstar ................................. 2009, 2014, 2018, 2054, 2131
Gradiente .......................................................................... 2026
Harley Davidson .............................................................. 2026
Harman Kardon ............................................................... 2009
Harwood ........................................................................... 2061
Headquarter ....................................................................... 2011
Hitachi .................................................................. 2055, 2056,
.................................................. 2057, 2107, 2111, 2120, 2122
Hi-Q ................................................................................... 2023
Instant Replay .................................................................. 2021
JCL ..................................................................................... 2021
JC Penney .........................................2009, 2010, 2011, 2013,
............................................... 2014, 2021, 2022, 2055, 2056,
................................................. 2058, 2059, 2060, 2107, 2118
2027, 2028, 2110
30 Chapter 3
Page 33

Chapter 3: Additional Information
Jensen ........................................................ 2055, 2056, 2111
JVC .............................. 2009, 2010, 2011, 2018, 2111, 2123
Kenwood ................................................... 2009, 2010, 2011,
......................................................... 2016, 2018, 2111, 2123
KLH .................................................................................. 2061
Kodak ................................................................... 2014, 2021
Lloyd ............................................................................... 2026
Logik ............................................................................... 2061
LXI ................................................................................... 2014
Magnavox ............................................... 2021, 2022, 2062,
............................................... 2063, 2104, 2105, 2108, 2124
Magnin ............................................................................ 2013
Marantz ..................................................... 2009, 2010, 2011,
............................................. 2016, 2018, 2021, 2062, 2064
Marta ............................................................................... 2014
Masushita ....................................................................... 2021
Mei .................................................................................. 2021
Memorex .............................................................. 2011, 2013,
.................................... 2014, 2021, 2023, 2026, 2104, 2132
MGA ........................................................... 2029, 2065, 2113
MGN Technology ........................................................... 2013
Midland ........................................................................... 2053
Minolta ...................................................... 2055, 2056, 2107
Mitsubishi ..... 2029, 2055, 2056, 2065, 2066, 2067, 2068,
.... 2068, 2070, 2071, 2072, 2073, 2074, 2106, 2113, 2123
Montgomery Ward ..............................................2075, 2132
Motorola .............................................................. 2021, 2132
MTC ...................................................................... 2013, 2126
Multitech ............................. 2013, 2016, 2026, 2053, 2061
NEC ........................................ 2009, 2010, 2011,2016, 2018,
..................................... 2064, 2076, 2078, 2079, 2111, 2123
Nikko ............................................................................... 2014
Noblex ............................................................................. 2013
Olympus .......................................................................... 2021
Optimus ................................................................. 2014, 2132
Optonica ......................................................................... 2096
Panasonic .................. 2021, 2022, 2109, 2125, 2126, 2127
Pentax ...................................2016, 2055, 2056, 2107, 2120
Pentex Research............................................................. 2018
Philco .............................................. 2021, 2022, 2062, 2063
Philips ............................................. 2021, 2062, 2096, 2124
Pilot ................................................................................. 2014
Pioneer ................................. 2010, 2055, 2080, 2081, 2123
Portland ........................................... 2016, 2017, 2019, 2110
PROSCAN .................................................. 2000, 2001, 2131
Protec .............................................................................. 2061
Pulsar .............................................................................. 2104
Quarter ............................................................................. 2011
Quartz .............................................................................. 2011
Quasar ........................................................ 2021, 2022, 2125
RCA ................ 2000, 2001, 2003, 2013, 2021, 2055, 2056,
........... 2082, 2083, 2084, 2085, 2086, 2087, 2088, 2089,
................ 2090, 2091, 2107, 2115, 2120, 2125, 2131, 2133
Radioshack/Realistic ..................... 2011, 2013, 2014, 2021,
............. 2022, 2023, 2026, 2029, 2049, 2050, 2096, 2132
Radix ............................................................................... 2014
Randex ............................................................................ 2014
Ricoh ............................................................................... 2128
Runco .............................................................................. 2104
Samsung .................... 2005, 2013, 2015, 2033, 2053, 2112
Sanky .................................................................... 2104, 2132
Sansui .............................................. 2010, 2092, 2111, 2123
Sanyo ......................................................... 2011, 2013, 2023
Scott ................................................ 2012, 2015, 2025, 2032
2038, 2065, 2093, 2116
Sears ............................. 2011, 2014, 2021, 2023, 2048,
................. 2049, 2050, 2051, 2055, 2056, 2107, 2118
Sharp ....... 2017, 2029, 2094, 2095, 2096, 2097, 2131
Shintom .................................. 2004, 2056, 2061, 2098
Shogun .................................................................... 2013
Signature ................................................................. 2131
Singer ................................................. 2021, 2061, 2128
Sony ........................................ 2004, 2098, 2099, 2119
STS ................................................................ 2021, 2107
Sylvania .......................................................2021, 2022,
..................................... 2026, 2062, 2063, 2065, 2124
Symphonic ............................................................. 2026
Tandy ....................................................................... 2011
Tashiko .................................................................... 2014
Tatung ...................................................................... 2111
TEAC ................................................... 2026, 2085, 2111
Technics ........................................................ 2021, 2109
Teknika ......................... 2014, 2021, 2026, 2100, 2129
TMK .................................................... 2013, 2024, 2047
Toshiba.............................................. 2015, 2049, 2051,
................................................ 2055, 2065, 2093, 2116
Totevsion ...................................................... 2013, 2014
Unitech .................................................................... 2013
Vector Research ...................... 2009, 2010, 2015, 2016
Victor ....................................................................... 2010
Video Concepts ............ 2009, 2010, 2015, 2016, 2113
Videosonic .............................................................. 2013
Wards ......................................2013, 2014, 2015, 2021,
......................... 2023, 2026, 2029, 2055, 2056, 2061,
.................. 2096, 2101, 2102, 2103, 2107, 2116, 2132
XR-1000 ............................................ 2021, 2026, 2061
Yamaha .......................... 2009, 2010, 2011, 2018, 2111
Zenith ............................ 2004, 2098, 2104, 2119, 2128
Cable Box Codes
ABC ........ 5002, 5003, 5004, 5005, 5006, 5007, 5053
Antronix ...................................................... 5008, 5009
Archer ...................................... 5008, 5009, 5010, 5011
Cabletenna .............................................................. 5008
Cableview ............................................................... 5008
Century .................................................................... 5011
Citizen ...................................................................... 5011
Colour Voice................................................. 5012, 5013
Comtronics ................................................... 5014, 5015
Contec ..................................................................... 5016
Eastern .................................................................... 5017
Garrard ..................................................................... 5011
GC Electronics ........................................................ 5009
Gemini ............................................... 5018, 5019, 5049
General Instrument ............................................... 5003
Hamlin ......................... 5020, 5021, 5022, 5035, 5045
Hitachi .................................................................... 5003
Hytex ....................................................................... 5002
Jasco ......................................................................... 5011
Jerrold ..... 5003, 5005, 5007,5018, 5023, 5024, 5046,
Magnavox .............................................................. 5025
Memorex ................................................................. 5026
Movie Time ....................................... 5002, 5027, 5028
NSC ..................................................... 5002, 5027, 5028
Oak ...................................................... 5002,5016, 5029
Panasonic .................................................... 5048, 5052
Paragon ................................................................... 5026
5053
Chapter 3 31
Page 34

Chapter 3: Additional Information
Philips . 5011, 5012, 5013, 5019, 5025, 5030, 5031, 5032
Pioneer ................................................................5033, 5034
Pulsar ............................................................................ 5026
RCA .......................................................... 5047, 5049, 5052
Realistic .............................................................. 5009, 5049
Regal ................................................................... 5022, 5035
Regency ......................................................................... 5017
Rembrandt .................................................................... 5003
Runco ............................................................................ 5026
Samsung ............................................................. 5014, 5034
Scientific Atlanta ......................... 5006, 5036, 5037, 5038
Signal .................................................................. 5014, 5018
Signature ...................................................................... 5003
SL Marx ......................................................................... 5014
Sprucer .......................................................................... 5052
Starcom .................................................... 5007, 5018, 5053
Stargate ............................................................... 5014, 5018
Starquest ........................................................................5018
Tandy ............................................................................ 5040
Teleview .........................................................................5014
Tocom ...................................................... 5004, 5023, 5041
Toshiba.......................................................................... 5026
Tusa ................................................................................5018
TV86 .............................................................................. 5027
Unika ........................................................ 5008, 5009, 5011
United Artists ............................................................... 5002
United Cable ................................................................. 5053
Universal ........................................ 5008, 5009, 5010, 5011
Videoway ...................................................................... 5044
Viewstar ........................................ 5015, 5025, 5027, 5040
Zenith ....................................................... 5026, 5050, 5051
Satellite Receiver Codes
Alphastar ....................................................................... 5079
Chapparal ........................................................... 5056, 5057
Dishnet ........................................................................... 5078
Drake ...................................................................5058, 5059
Echostar ........................................................................ 5089
GE ........................................................................ 5000, 5001
General Instruments ............................... 5060, 5061, 5062
Hitachi ................................................................ 5083, 5084
Hughes ................................................................ 5077, 5090
JVC ................................................................................ 5082
Panasonic ...................................................................... 5075
Philips ........................................................................... 5085
Primestar ....................................................................... 5076
PROSCAN ........................................................... 5000, 5001
RCA ..................................... 5000, 5001, 5071, 5080, 5081
Realistic ........................................................................ 5063
Sony ............................................................................... 5072
STS1 .............................................................................. 5064
STS2 .............................................................................. 5065
STS3 .............................................................................. 5066
STS4 .............................................................................. 5067
Toshiba................................................................ 5068, 5073
Uniden .......................................................................... 5086
Audio Codes
RCA and Dimensia
AM/FM .......................................................... 4003, 4270
AUX ......................................................................... 4004
Phono ......................................................................... 4005
Tape............................................................................. 4006
CD ........................................................... 4007, 4190, 4211
Receivers
Aiwa .............................................. 4261, 4262, 4263, 4264,
4265, 4266, 4267, 4277
Denon ............................................................................... 4283
Harman Kardon .............................................................. 4276
JVC ................................................................................... 4268
JVL ................................................................................... 4276
Kenwood ..........................................................................4269
Onkyo ............................................................................... 4278
Optimus ............................................................................ 4284
Panasonic ............................................................. 4279, 4280
Pioneer ............................................................................. 4275
RCA .................................................................................. 4270
Sherwood ......................................................................... 4282
Sony ............................................................ 4271, 4272, 4281
Technics ................................................................ 4279, 4280
Wards ............................................................................... 4275
Yamaha ................................................................. 4274, 4275
CD Players
ADC ............................................................ 4200, 4201, 4220
Aiwa ...................................................................... 4175, 4203
Akai .................................................................................. 4205
Denon ............................................................................... 4208
Dynatech .......................................................................... 4177
Emerson ........................................................................... 4178
Fisher .......................................................... 4179, 4212, 4213
GE ..................................................................................... 4216
Hitachi ............................................................................. 4180
JVC ......................................................................... 4181, 4221
Kenwood .................................................... 4183, 4222, 4224
Luxman ............................................................................ 4225
Marantz ................................................................. 4185, 4226
Mitsubishi ............................................................. 4229, 4230
MCS .................................................................................. 4228
Nakamichi ............................................................ 4232, 4233
NEC ................................................................................... 4184
Onkyo ......................................................... 4186, 4234, 4235
Optimus ...................................................... 4237, 4238, 4239
Panasonic ........................................................................ 4188
Pioneer .................................................................. 4189, 4240
RCA ........................................................................ 4190, 4211
Sanyo ............................................................................... 4250
Sears ................................................................................. 4207
Sherwood ......................................................................... 4243
Sony ........................................................... 4195, 4209, 4244
Teac ............................................................ 4245, 4246, 4247
Technics ........................................................................... 4197
Toshiba............................................................................. 4231
Yamaha ....................................................... 4198, 4199, 4268
32 Chapter 3
Page 35

Chapter 3: Additional Information
FCC and Industry Canada Information
This device complies with Part 15 of the FCC Rules. Operation is subject to the following two
conditions: (1) this device may not cause harmful interference, and (2) this device must accept any
interference received, including interference that may cause undesired operation.
This equipment has been tested and found to comply with the limits for a Class B digital device,
pursuant to Part 15 of the FCC Rules. These limits are designed to provide reasonable protection
against harmful interference in a residential installation. This equipment generates, uses, and can
radiate radio frequency energy and, if not installed and used in accordance with the instructions, may
cause harmful interference to radio communications. However there is no guarantee that interference
will not occur in a particular installation. If this equipment does cause harmful interference to radio or
television reception, which can be determined by turning the equipment off and on, the user is
encouraged to try and correct the interference by one or more of the following measures:
• Reorient or relocate the receiving antenna.
• Increase the separation between the equipment and receiver.
• Connect this equipment into an outlet on a circuit different from that to which the receiver is
connected.
• Consult your service provider or an experienced radio/TV technician for help.
FCC regulations state that unauthorized changes or modifications to this equipment may void the
user’s authority to operate it.
This Class B digital apparatus meets all requirements of the Canadian Interference Causing Equipment
Regulations.
Chapter 3 33
Page 36

Chapter 3: Additional Information
Limited Warranty
What your warranty covers:
• Defects in materials or workmanship.
For how long after your purchase:
• 90 days from date of purchase - Unit repair or exchange, which includes parts and labor.
• 91 days to 1 year from date of purchase - Unit repair or exchange, which includes parts only; you
pay the labor.
• The warranty for rental units begins with the first rental or 45 days from date of shipment to the
rental firm, whichever comes first.
What we will do:
• During the initial 90 days:
Repair or exchange the defective portion of your Lyra Wireless. If the unit is replaced it will be
with a new or, at our option, refurbished unit.
• After the 90 days and within one year:
Repair or exchange the defective portion of your Lyra Wireless. If the unit is replaced it will be
with a new or, at our option, refurbished unit.
We will charge you a flat rate to repair or replace a defective Lyra Wireless. This charge covers the
labor cost for its repair.
How you get service:
• Call 580-634-0115 and have your unit’s date of purchase and model/serial number ready. The
model/serial number information is on your unit.
• A representative will troubleshoot your problem over the phone.
• If the representative determines that you should receive a replacement unit, you will be provided
with a Service Request (SR) number and the location of a nearby exchange point, if one exists. No
returns will be accepted without an SR number.
• Proof of purchase in the form of a bill of sale or receipted invoice which is evidence that the
product is within the warranty period must be presented to obtain warranty service. For rental
firms, proof of first rental is also required.
• Write the SR number on the outside of the carton used to return the unit. Make sure you insure
your shipment in case of damage or loss.
• Carefully pack the unit using the original box and packing material if possible. Please retain all
non-defective accessories that were included with your unit such as the headphones.
• Include with the shipment:
1. Evidence of purchase date such as a bill of sale.
2. A brief note describing your unit’s problem.
3. Your name, address and phone number.
• After we receive your product, it will be repaired, or a new, or at our option, refurbished unit will be
shipped to you.
34 Chapter 3
Page 37

Chapter 3: Additional Information
What your warranty does not cover:
• Acts of nature, such as but not limited to lightning damage.
• Adjustment of customer controls.
• Damage from misuse or neglect.
• A unit that has been modified or incorporated into other products or is used for institutional or
other commercial purposes.
• Batteries.
• Units purchased, serviced or operated outside the U.S.A.
• Loss of customer’s software, firmware, information, or memory data.
• Installation.
• Shipping damage if the unit was not packed and shipped in the manner prescribed by Thomson.
Product Registration:
• Please complete and mail the Product Registration Card packed with your product. It will make it
easier to contact you should it ever be necessary. The return of the card is not required for
warranty coverage.
Limitation of Warranty:
• THE WARRANTY STATED ABOVE IS THE ONLY WARRANTY APPLICABLE TO THIS PRODUCT. ALL
OTHER WARRANTIES, EXPRESS OR IMPLIED (INCLUDING ALL IMPLIED WARRANTIES OF
MERCHANTABILITY OR FITNESS FOR A PARTICULAR PURPOSE) ARE HEREBY DISCLAIMED. NO
VERBAL OR WRITTEN INFORMATION GIVEN BY THOMSON MULTIMEDIA INC., ITS AGENTS OR
EMPLOYEES SHALL CREATE A GUARANTY OR IN ANY WAY INCREASE THE SCOPE OF THIS
WARRANTY.
• REPAIR OR REPLACEMENT AS PROVIDED UNDER THIS WARRANTY IS THE EXCLUSIVE REMEDY OF
THE CONSUMER. THOMSON MULTIMEDIA INC. SHALL NOT BE LIABLE FOR INCIDENTAL OR
CONSEQUENTIAL DAMAGES RESULTING FROM THE USE OF THIS PRODUCT OR ARISING OUT OF
ANY BREACH OF ANY EXPRESS OR IMPLIED WARRANTY ON THIS PRODUCT. THIS DISCLAIMER
OF WARRANTIES AND LIMITED WARRANTY ARE GOVERNED BY THE LAWS OF THE STATE OF
INDIANA. EXCEPT TO THE EXTENT PROHIBITED BY APPLICABLE LAW, ANY IMPLIED WARRANTY
OF MERCHANTABILITY OR FITNESS FOR A PARTICULAR PURPOSE ON THIS PRODUCT IS LIMITED
TO THE APPLICABLE WARRANTY PERIOD SET FORTH ABOVE.
How State Law relates to warranty:
• Some states do not allow the exclusion nor limitation of incidental or consequential damages, or
limitations on how long an implied warranty lasts, so the above limitations or exclusions may not
apply to you.
• This warranty gives you specific legal rights, and you also may have other rights that vary from
state to state.
If you purchased your unit outside the United States:
• This warranty does not apply. Contact your dealer for warranty information.
Chapter 3 35
Page 38

This page intentionally left blank.
Page 39

Page 40

Visit our website at www.rca.com
Please do not send any products to the Indianapolis address listed in this
manual or on the carton. This will only add delays in service for your
product.
Thomson multimedia Inc.
10330 North Meridian Street
Indianapolis, IN 46290
©2002 Thomson multimedia Inc.
Trademark(s)® Registered
Marca(s) Registrada(s)
Printed in China
THOMSON
TOCOM 55516710
 Loading...