

Page 1
www.LyraZone.com
RD2211
Page 2
Important Safety Information
Be sure to read all the safety information before you begin to use this product.
FEDERAL COMMUNICATIONS COMMISSION INFORMATION
This device complies with Part 15 of the FCC Rules. Operation is subject to the following two conditions: (1) This device may not cause harmful interference, and (2) This device must accept any
interference received, including interference that may cause undesired operation.
Note: This equipment has been tested and found to comply with the limits for a Class B digital
device, pursuant to part 15 of the FCC rules. These limits are designed to provide reasonable protection against harmful interference in a residential installation. This equipment generates, uses
and can radiate radio frequency energy and, if not installed and used in accordance with the
instructions, may cause harmful interference to radio communications. However, there is no guarantee that interference will not occur in a particular installation. If this equipment does cause
harmful interference to radio or television reception, which can be determined by turning the
equipment off or on, the user is encouraged to try to correct the interference by one or more of
the following measures:
– Reorient or relocate the receiving antenna.
– Increase the separation between the equipment and the receiver.
– Connect the equipment into an outlet on a circuit different from that to which the receiver is
connected.
– Consult the dealer or an experienced Radio/TV technician for help.
This Class B digital apparatus complies with Canadian ICES-003.
SERVICE
This product should be serviced only by those specially trained in appropriate servicing techniques. For instructions on how to obtain service, refer to the warranty in this guide.
Attach your sales receipt for future reference, or write down the date you purchased or received
this product as a gift. This information will be valuable if service should be required during the
warranty period.
Model No: RD 2211
Serial No:
Purchase Date:
Purchased From:
IMPORTANT NOTE: To reduce the risk of fire or shock hazard, do not expose this
player to rain or moisture.
This symbol indicates "dangerous voltage"
inside the product that presents a risk of
electric shock or personal injury.
This symbol indicates important instructions accompanying the product.
TO REDUCE THE RISK OF ELECTRIC SHOCK, DO NOT REMOVE THE COVER (OR
BACK). NO USER-SERVICEABLE PARTS ARE INSIDE. REFER SERVICING TO QUALIFIED SERVICE PERSONNEL.
CAUTION
RISK OF ELECTRIC SHOCK
DO NOT OPEN
ATTENTION
RISQUE DE CHOC ELECTRIQUE
NE PAS OUVRIR
Page 3

Introduction
Your LYRA2 personal digital player is designed to give you hours of listening pleasure. To get the most out of your new purchase, we suggest that you take a few minutes right now to read through this instruction manual.
If you have any questions or problems, consult the Troubleshooting Guide or visit
www.lyrazone.com for help and recent updates.
Important Information . . . . .3
Warnings about Copyright Laws . . .3
Caution While Driving . . . . . . . . . .3
Precautions for CompactFlash Card
. . . . . . . . . . . . . . . . . . . . . . . . . . . .3
Computer System Requirements . . .4
Getting Started . . . . . . . . . . .5
Unpack the Player and Accessories
. . . . . . . . . . . . . . . . . . . . . . . . . . . .5
Insert the Included Software CD
into Your CD-ROM Drive . . . . . . . . .6
Install the CompactFlash* Drivers . .6
Connect the CompactFlash External
Drive . . . . . . . . . . . . . . . . . . . . . . . .7
Install the Music Management
Software . . . . . . . . . . . . . . . . . . . . .8
Install the MusicMatch Jukebox**
Software . . . . . . . . . . . . . . . . . . . . .9
Set MusicMatch Jukebox Basic
Preferences . . . . . . . . . . . . . . . . . .10
Learn the Basic Controls . . . . . . . .14
Save CD Tracks to Play on Your
PC or LYRA2 Player . . . . . . . . . . . .15
Download Music From the Internet
. . . . . . . . . . . . . . . . . . . . . . . . . . .16
Use MusicMatch Jukebox to Play
Net Radio on your PC . . . . . . . . . .17
Organize the Music Library . . . . .18
Create a Playlist for Playing or
Downloading . . . . . . . . . . . . . . . .19
Edit Tags for Your Songs . . . . . . . .20
Transfer the Audio Files to the
CompactFlash Card . . . . . . . . . . . .21
Install the RealJukebox*** Software
. . . . . . . . . . . . . . . . . . . . . . . . . . . .23
Set Basic Preferences . . . . . . . . . .24
Learn the RealJukebox Basic
Controls . . . . . . . . . . . . . . . . . . . .26
Save CD Tracks to Play on Your
PC or LYRA2 Player . . . . . . . . . . . .26
Download Music From the
Internet . . . . . . . . . . . . . . . . . . . . .28
Organize the Playlist . . . . . . . . . .29
Table of Contents
* CompactFlash is a trademark of SanDisk Corporation
** MusicMatch Jukebox is a registered trademark of MusicMatch Corporation
*** G2, RealJukebox and RealNetworks are trademarks of Real Networks, Inc.
1
Page 4

Create a Playlist for Playing or
downloading . . . . . . . . . . . . . . . .29
Create an Auto-Playlist . . . . . . . . .30
Searching for Tracks . . . . . . . . . . .30
Radio . . . . . . . . . . . . . . . . . . . . . .31
Transfer the Audio Files to the
CompactFlash Card . . . . . . . . . . . .32
Install the LYRA2 User’s Guide and
Documentation . . . . . . . . . . . . . . . .34
Insert the Alkaline Batteries Into
the Player . . . . . . . . . . . . . . . . . . . .35
Insert the CompactFlash Card In
the Player . . . . . . . . . . . . . . . . . . . .36
Attach the Headphones to the
Player . . . . . . . . . . . . . . . . . . . . . . .36
Player Features . . . . . . . . . . .37
Controls . . . . . . . . . . . . . . . . . . . . . .38
Remote Control . . . . . . . . . . . . . . . .40
Playing a CompactFlash Card . . . . .41
Playback Features . . . . . . . . . . . . . .43
Pause Feature . . . . . . . . . . . . . . . .43
Auto Resume Feature . . . . . . . . . .43
Skip and Search Features . . . . . . .44
Scroll Feature . . . . . . . . . . . . . . . .42
Mode Menu . . . . . . . . . . . . . . . . . .45
Repeat and Shuffle Features . . . .45
Program Feature . . . . . . . . . . . . . .46
DSP (Digital Signal Processor)
Menu . . . . . . . . . . . . . . . . . . . . . . . .47
DSP Modes . . . . . . . . . . . . . . . . . .47
Equalizer Feature . . . . . . . . . . . . .47
Radio Mode . . . . . . . . . . . . . . . . . . .48
Search Features . . . . . . . . . . . . . . .48
Preset Memory . . . . . . . . . . . . . . .48
Multi Function Scoll . . . . . . . . . . .49
Delete Preset Memory . . . . . . . . .49
Surppressing Stereo Signal . . . . . .49
DSP (Digital Signal Processor . . . .49
Stop Feature . . . . . . . . . . . . . . . .49
Included Accessories . . . . . . .50
CompactFlash Memory Cards . . . .50
Removable Belt Clip . . . . . . . . . . .50
Car Kit . . . . . . . . . . . . . . . . . . . . . .51
Optional Accessories . . . . . . .52
Specifications . . . . . . . . . . . .54
Troubleshooting Guide . . . . .55
Limited Warranty . . . . . . . . . .56
Index . . . . . . . . . . . . . . . . . . .59
Table of Contents
2
Page 5
Important Information
The LYRA2 player works with your computer to let you play your favorite music from
files recorded on removable CompactFlash cards. The player plays files encoded with
the popular MP3, Windows Media* Audio and RealNetworks** G2 audio formats and
may allow for future upgrades of some alternative audio compression formats.
Because the player has no moving parts, the audio can be played back virtually anywhere without skipping.
You can download MP3, Windows Media and G2 encoded music files from several
Internet sites to your computer hard drive or record your favorite CD using the software supplied.
Some of the Internet sites you may want to explore are:
www.emusic.com
www.real.com
www.musicmatch.com
www.mpeg.org
www.mp3.com
www.windowsmedia.com
* Windows Media and the Windows Logo are trademarks or registered trademarks of Microsoft
Corporation in the United States and/or other countries.
**G2, RealJukebox, and RealNetworks are trademarks of RealNetworks, Inc.
Warning: Use of this product is for your personal use only. Copying CDs or
downloading music files for sale or other business purposes is a violation of
copyright law. It is also a violation of copyright law to download files
without permission of the copyright owner.
Caution While Driving: Use of headphones while operating an automobile or
moving vehicle is not recommended and is unlawful in some states and areas.
Be careful and attentive on the road. Stop operation of the unit if you find it
disruptive or distracting while driving.
Caution: Exposure to direct sunlight or extreme heat (such as inside a parked
car) may cause damage or malfunction.
Precautions for CompactFlash Card:
• Use a soft dry cloth to clean any dirt.
• Do not bend CompactFlash Card.
• Do not operate or store CompactFlash Card in places with frequent static electricity as recorded data may be damaged.
• It is normal for CompactFlash card to get warm after being used for a long
time.
• Do not store CompactFlash card near fire, places with high temperature/
humidity or places with direct sunlight.
3
Page 6

Important Information
Computer System Requirements
Minimum
• Pentium 166 MHz or faster
• 32MB RAM
• Windows* 98 or Windows 2000
(Parallel Port also available for
Windows 95)
• 45 MB free hard disk space plus 1
MB for every minute of CD quality
music you store on your hard drive
• CD-ROM Drive
• USB Port
• Full Duplex Sound Card
Optimum
• Pentium II 300 MHz or higher
• 64 MB RAM
• Windows 98SE or Windows 2000
• 50 MB free hard disk space plus 1
MB for every minute of CD quality
music you store on your hard drive
• CD-ROM Drive
• USB Port
• Full Duplex Sound Card
• Internet Explorer 4.0 or more with
latest access
* Windows and Microsoft are registered trademarks of Microsoft Corporation in the United States and/or
other countries.
4
Page 7
Getting Started
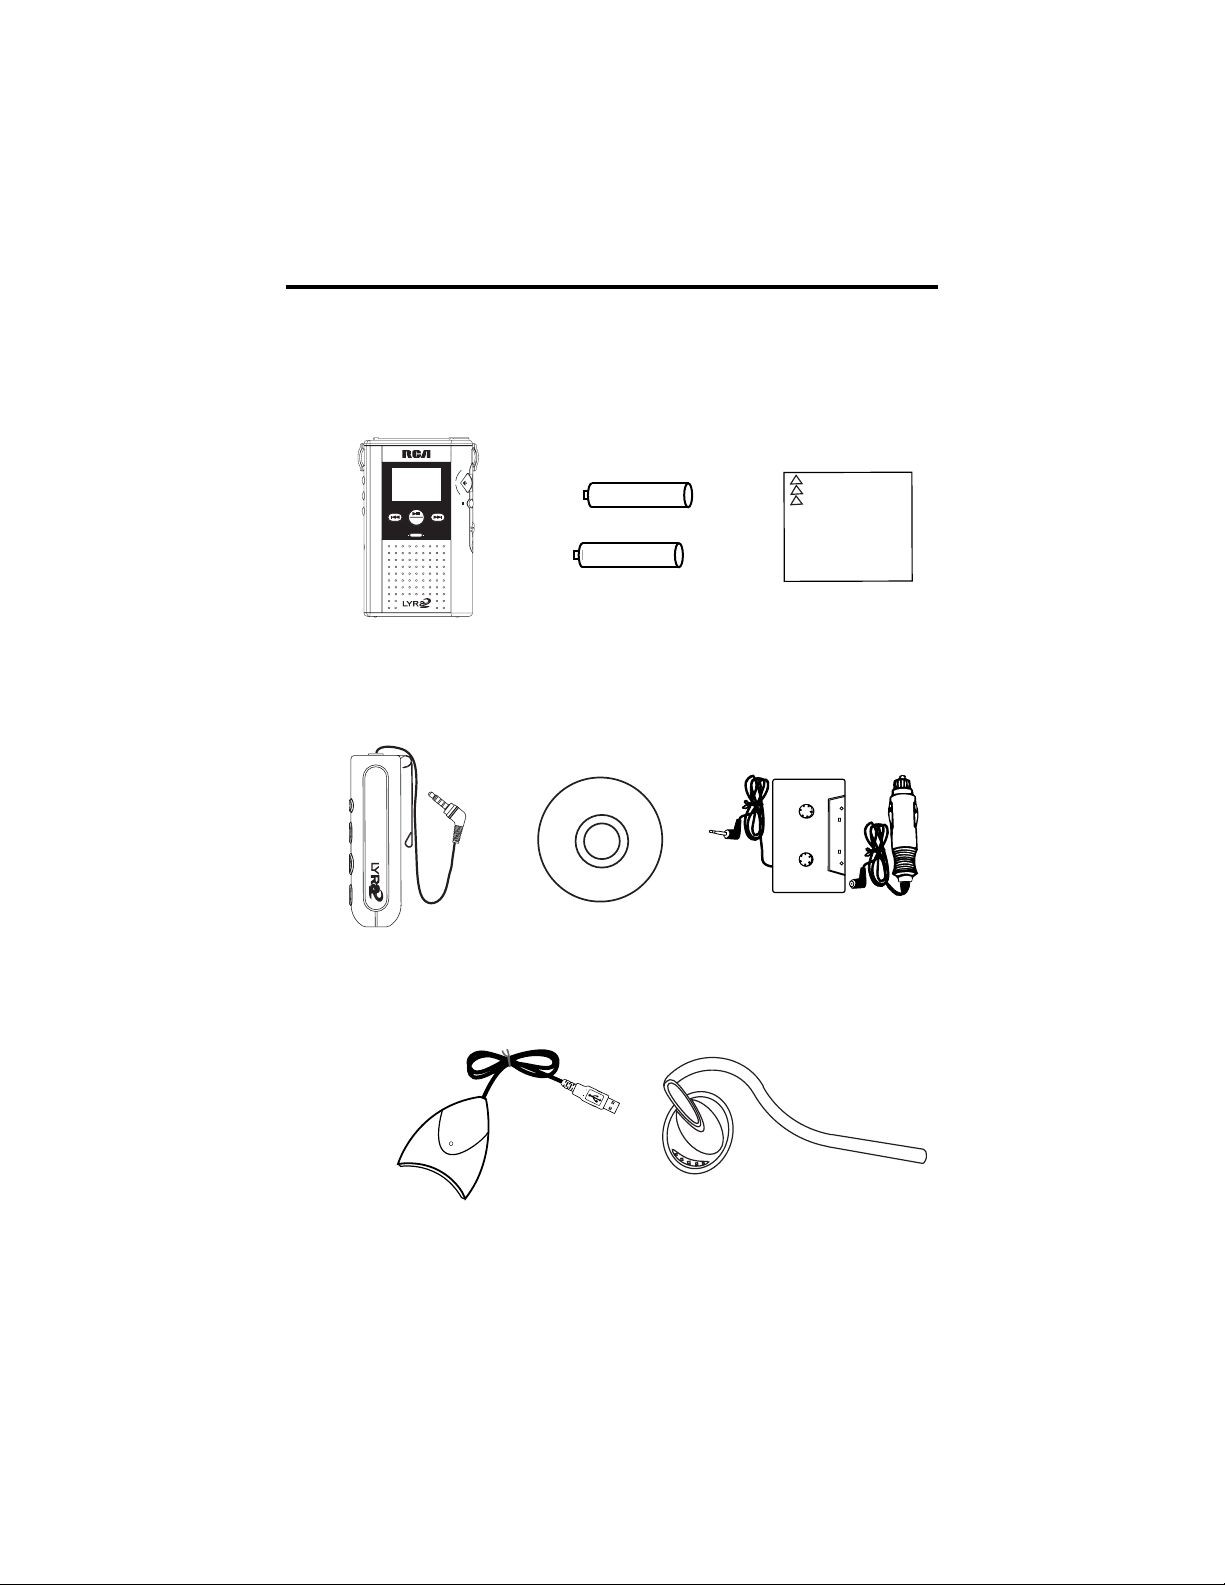
When you unpack your new player, be sure you have removed all the accessories
and information papers. The items shown below are packed with your player.
Multi-Media Player
with Removable Belt Clip
"AA" Alkaline Batteries
CompactFlash
Removable Memory Card
Software CD
Car Conversion Kit
External Drive for
CompactFlash Card
Headphones
1. Unpack the player and accessories.
Remote Control
5
b.skip
tune
PERSONAL DIGITAL PLAYER / FM TUNER
LCD Display
play / pause
ON
PLL
max
e
n
t
e
vol
r
min
stop
/off
f.skip
tune
on
lock
off
FM radiodigital
+ -
+ -
CompactFlash
Page 8
Getting Started
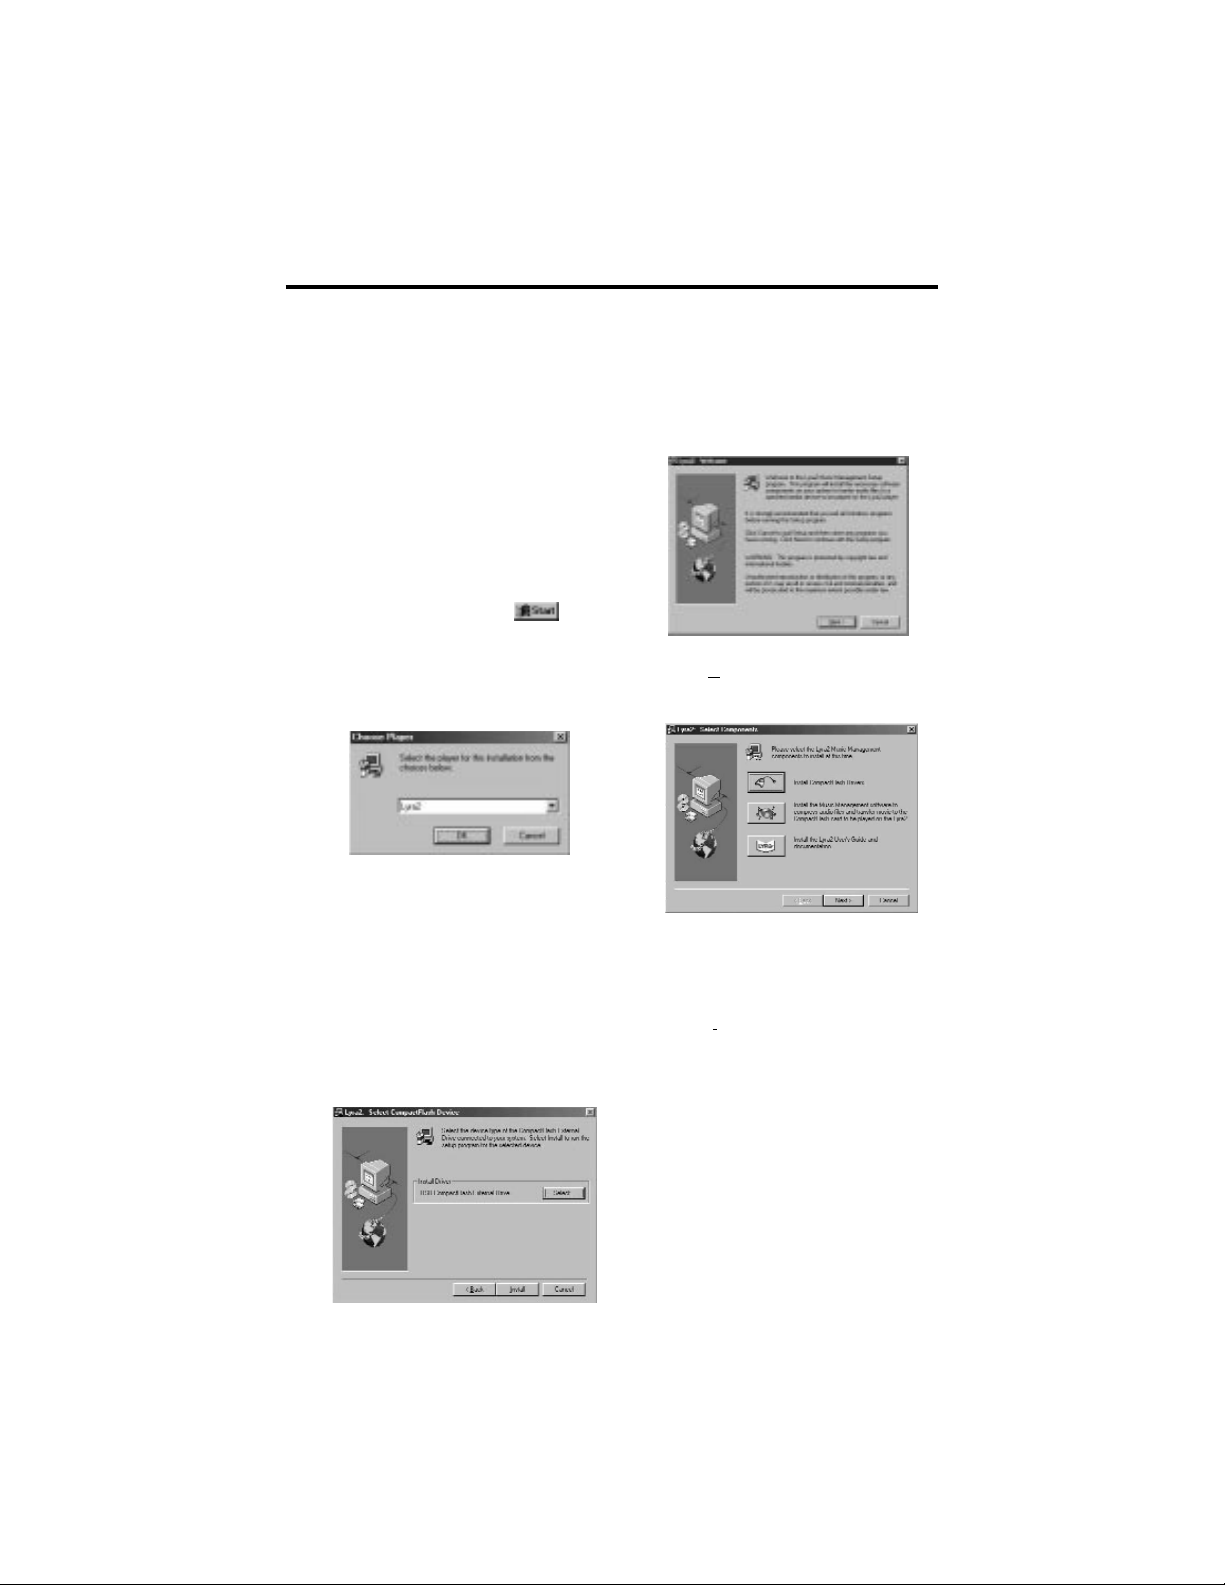
Use the software setup program on the included CD to install the CompactFlash
drivers, Music Management software, and User’s guide and documentation.
2. Insert the included software CD into your CD-ROM
drive.
A. Turn on your computer and insert
the software CD. The LYRA2 Software
Setup program will automatically
run.
Note: If the setup screen does not appear,
double click My Computer, double click
your CD-ROM drive icon, and double click
setup.exe. You can also click , Run,
then type D:\setup.exe (where D is the letter of your CD-ROM drive).
B. Select Lyra2 from Choose Player
Dialog.
C. Click OK to display the Welcome
Dialog.
D. Click Next to display the Select
Components screen.
3. Install the CompactFlash drivers.
A. Click the Install CompactFlash
Driver icon to display the Select
CompactFlash Device screen.
B. Click Install and follow the
onscreen instructions to install the
USB drivers for the USB external
drive included with your LYRA2 player.
Note: If you wish to install parallel port
drivers, click Select and choose the type of
drivers you wish to install.
C. Restart your computer.
6
Page 9
Getting Started
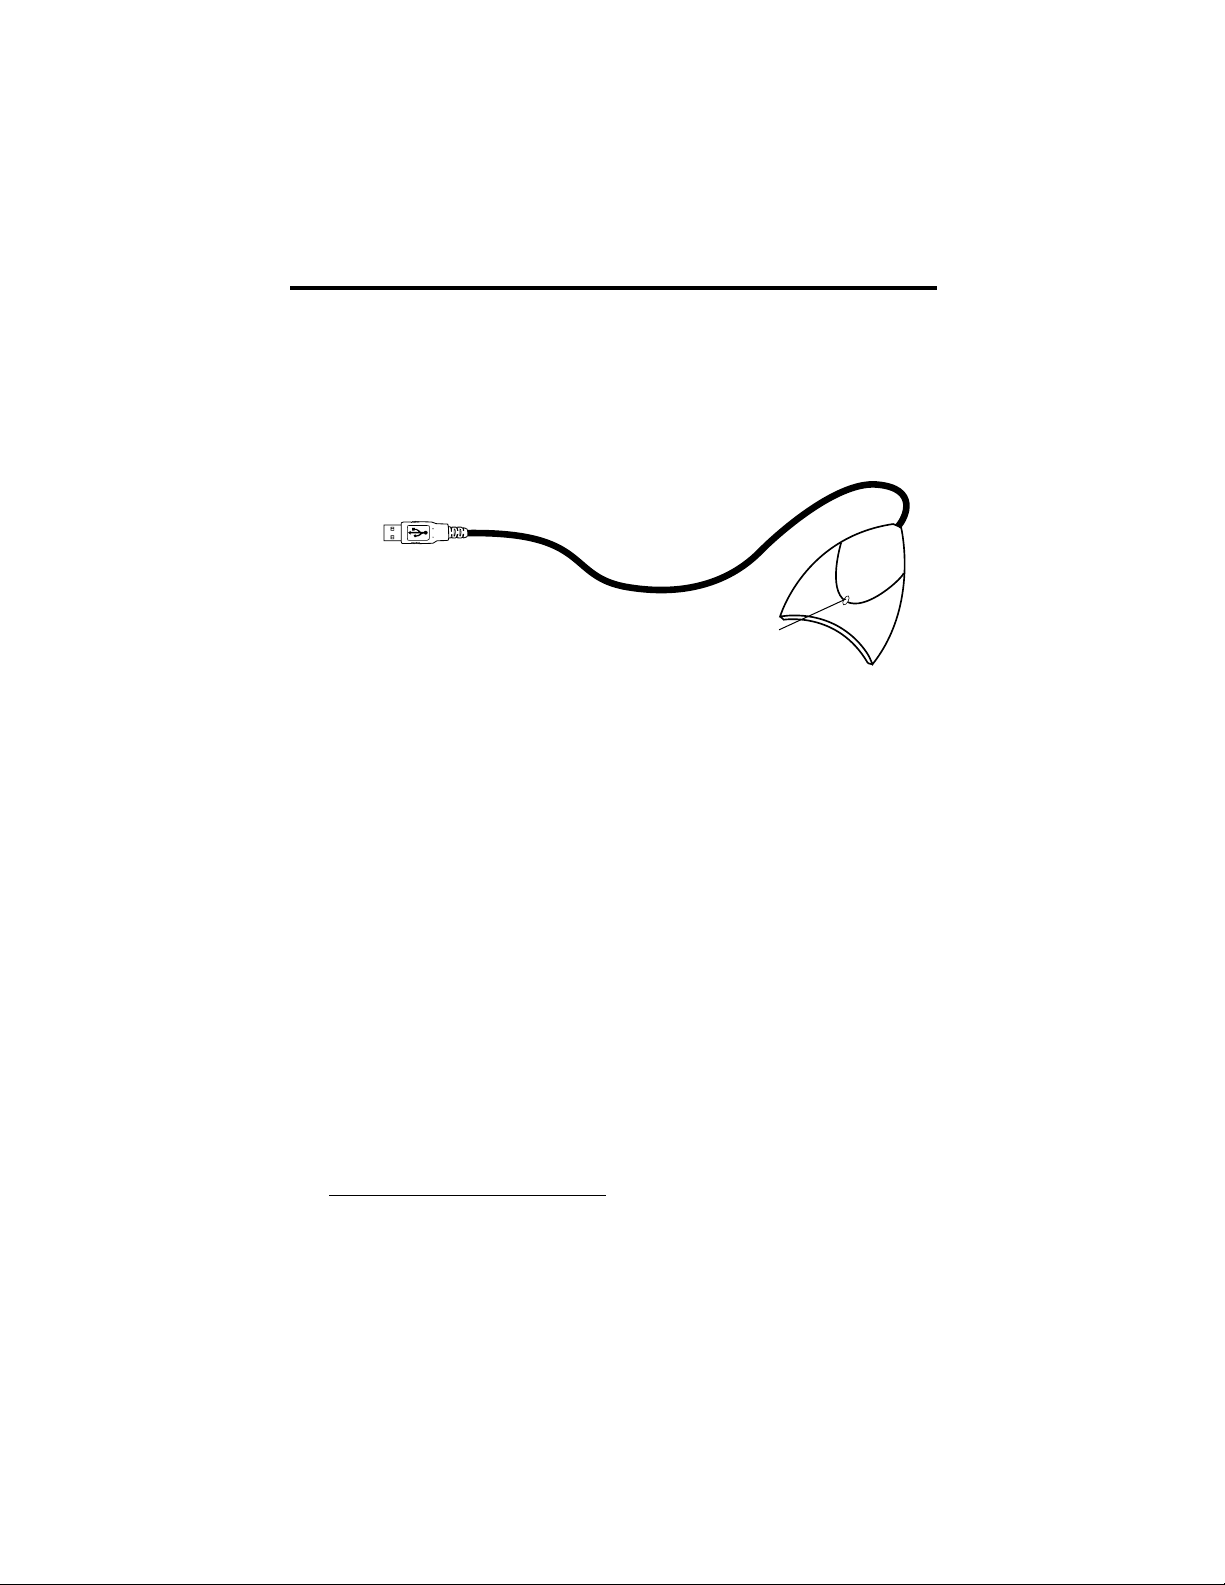
4. Connect the CompactFlash external drive.
The external drive allows you to transfer MP3, Windows Media audio, or G2 files
to the CompactFlash card. The drivers for this drive must be installed first so
Windows can find them when you connect the external drive.
A. Make sure you have installed the
USB drivers and that your computer
has been restarted.
B. Once the computer has been
restarted, connect the CompactFlash
external drive to an available USB
port of your computer as shown
above.
C. Windows will automatically install
the drivers for the CompactFlash drive
after you connect it.
Note: Consult your computer or device’s
owner manual for USB port specifications
and troubleshooting.
MusicMatch Jukebox and RealJukebox software are both on the CD. We recommend MusicMatch Jukebox for ease of use and functionality. Both software
programs operate as players on your PC, compress CDs to MP3 format, download files from the Internet, and transfer the files to a CompactFlash card you
can play on your LYRA2 player. Download MP3 and Windows Media audio formats to the player with the MusicMatch Jukebox software. Download MP3 and
G2 formats to the player with the RealJukebox software. Install one or both of
these programs.
Note: LYRA2 player specific updates are available at
http://www.Lyrazone.com/downloads.html. MusicMatch system requirements for the download are 166 MHz processor or better, Windows 95 / 98 / NT / 2000, 16 MB RAM (32 for NT),
30 MB hard drive, SVGA or higher resolution monitor, 4x CD-ROM drive, mouse, keyboard,
SoundBlaster compatible card, speakers, video card and installation of Microsoft’s Media
Player 6.4 for video.
Attach to USB port of computer. (Symbol on plug typically matches symbol on USB
port.)
Note: Actual items may differ
in appearance.
Yellow LED
5. Install the music management software.
7
Page 10
Getting Started
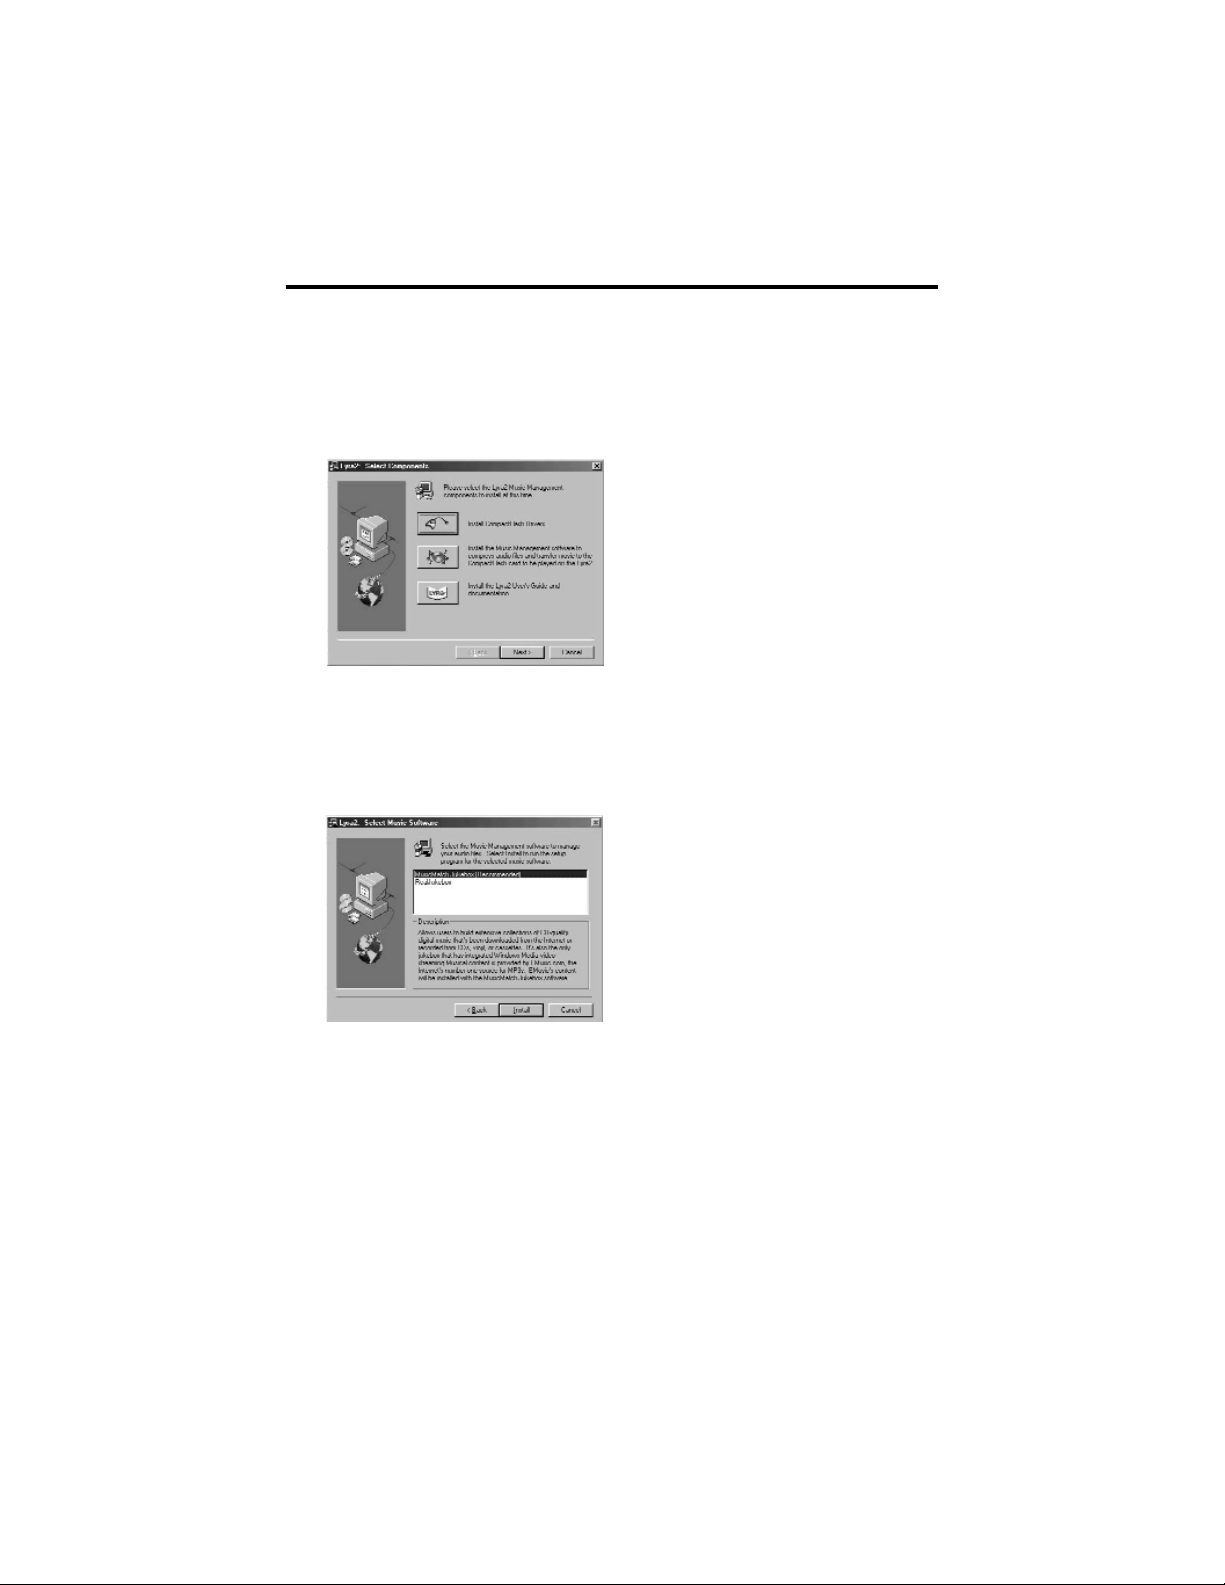
5. Install the music management software. (continued)
A. Insert the LYRA2 software disc
into your CD-ROM drive. Follow the
directions under Step 2 to display the
Select Components screen.
B. Click the Install the Music
Management Software icon to dis-
play the Select Music Software
screen.
C. Select the software you want to
install and click Install.
• Select MusicMatch Jukebox
(Recommended) to install the
MusicMatch Jukebox software.
MusicMatch Jukebox is capable of
MP3, WAV, and Windows Media
audio format compression. Musical
content is provided by EMusic.com*,
the Internet’s number one source for
MP3s. EMusic’s content will be
installed with the MusicMatch
Jukebox software.
Go to Step 6.
• Select RealJukebox to install the
RealJukebox software. RealJukebox is
capable of MP3, wave, and G2 compression.
Go to Step 7.
*EMusic.com, the EMusic.com Logo and other proprietary names of EMusic.com are trademarks of
Emusic.com Inc.
8
Page 11
Getting Started
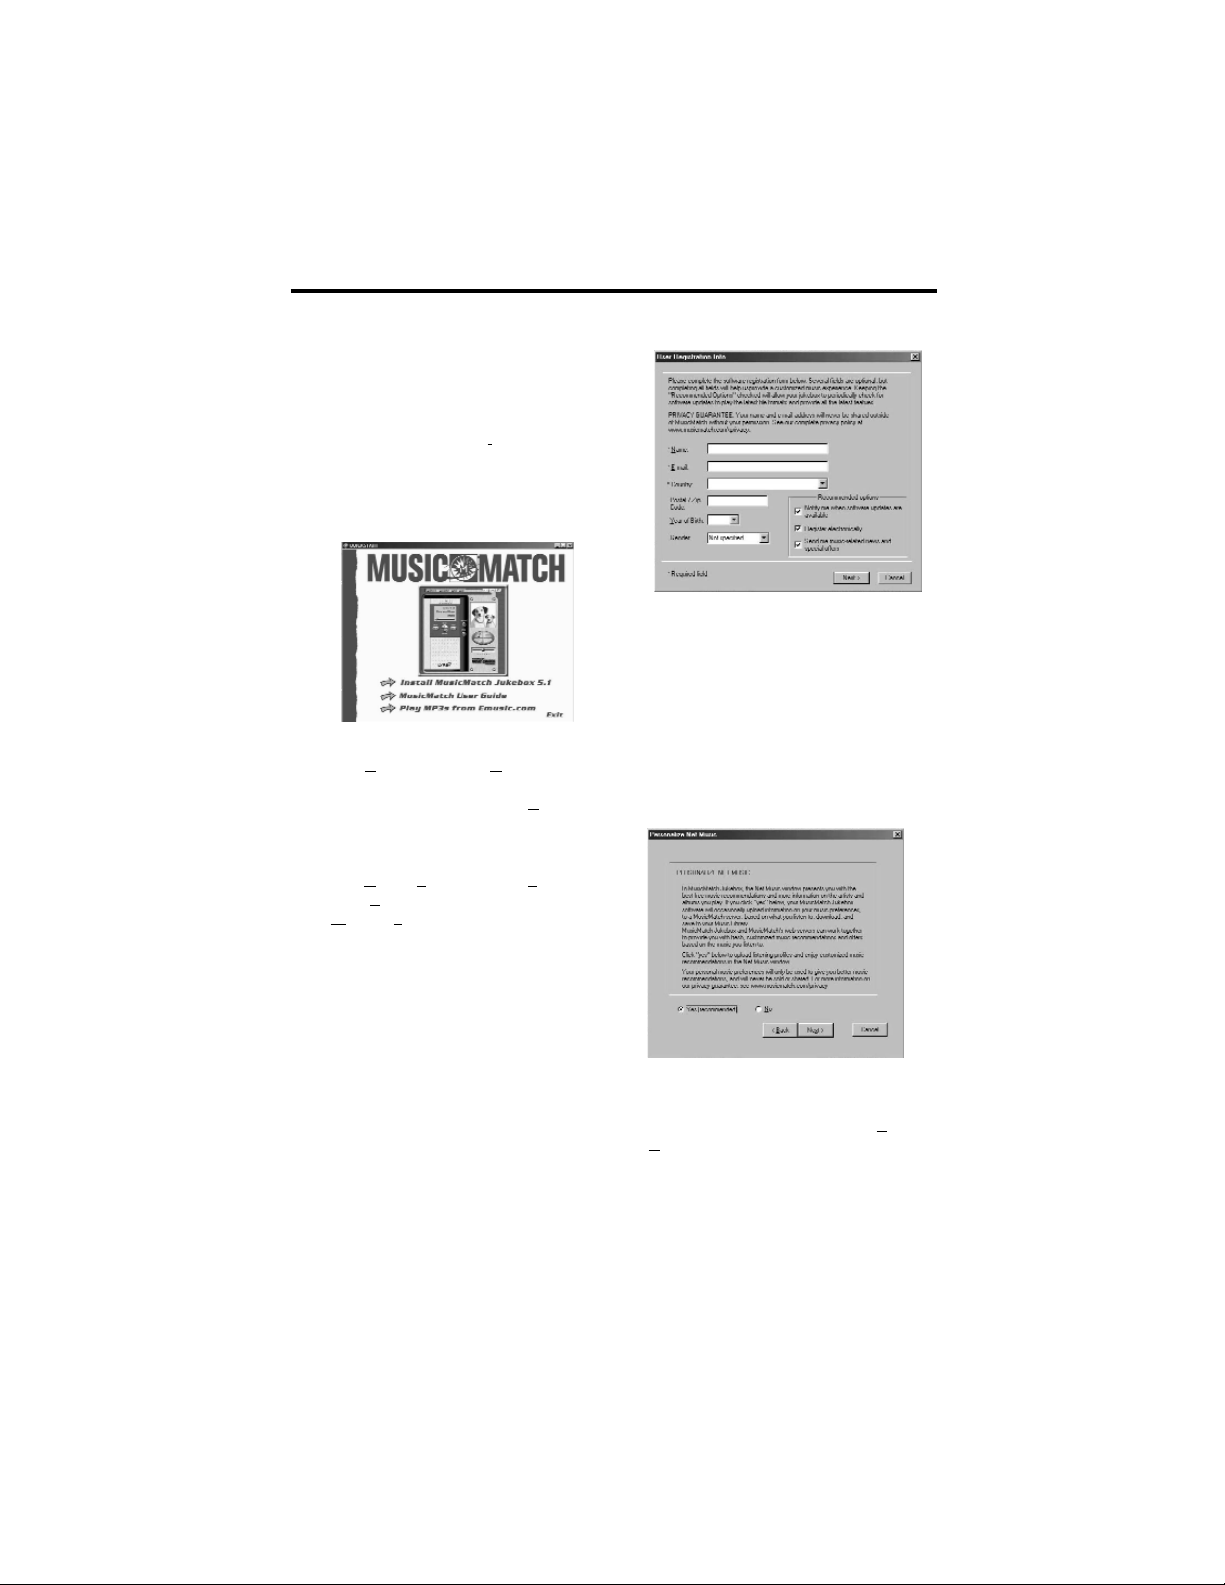
6. Install the MusicMatch Jukebox™ software.
A. Display the Select Music Software
screen as described in Step 5.
Make sure MusicMatch Jukebox is
highlighted and click Install.
QUICKSTART screen will appear after
installation has started. Click on
Install MusicMatch Jukebox 5.1.
Click Yes to accept or No to decline
after you have read the license
agreement. You must click Yes to
continue.
When the next screen appears, enter
your Name, Email address, Postal
code, Country, Year of Birth, and sex
(Male or Female).
Notes: Enter an Email address or
yourname@home.com if you don’t have
email. You must enter an email address to
proceed.
If you do not want to be informed of program updates or receive news and offers
via email, uncheck the boxes.
B. Click Next to display Personalize
Net Music screen.
Read the screen and decide if you
would like to enable the PERSONAL-
IZE NET MUSIC feature. Select Yes or
No. This setting can be changed later.
9
Page 12
Getting Started
Install the MusicMatch Jukebox™ software. (continued)
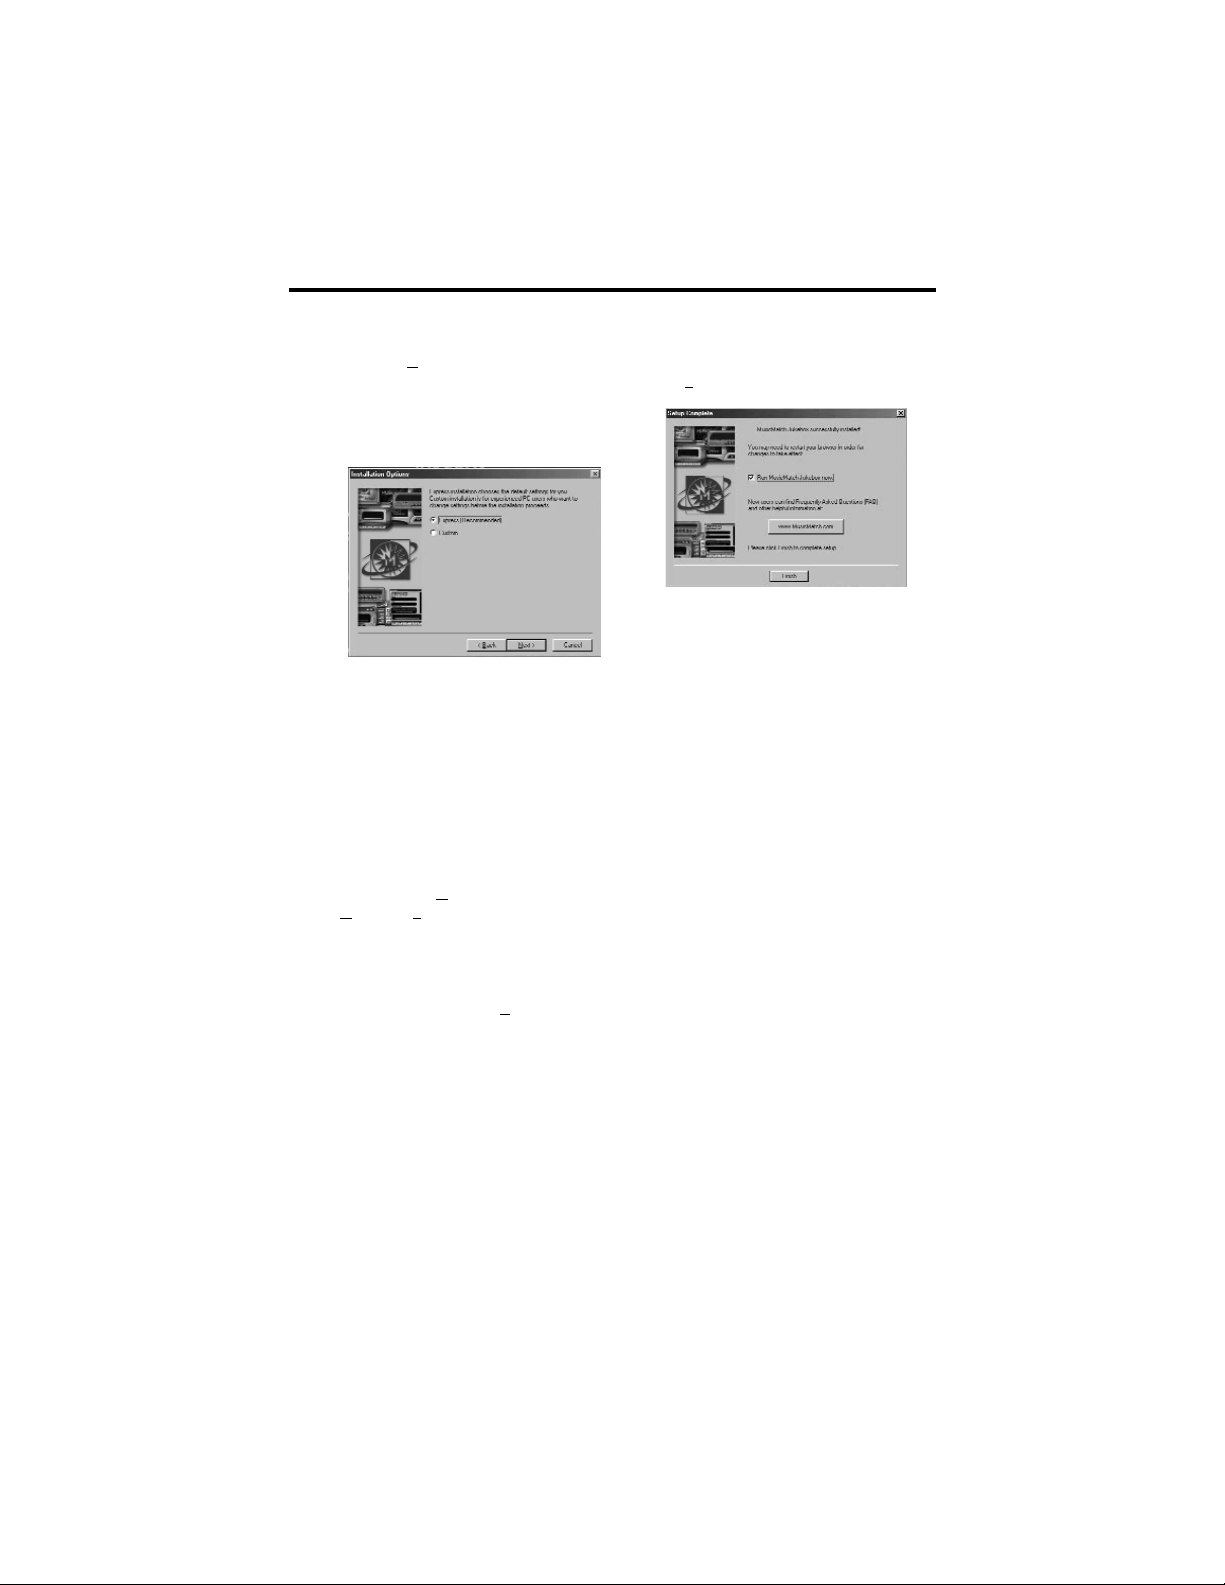
C. Click Next to display Installation
Options dialog. Select the installa-
tion option you wish to use.
Express Setup is recommended.
Click Next to continue.
D. After the installation is complete,
click Finish to complete setup.
If necessary, close the main setup
screen.
You may need to restart your web
browser. Reboot your computer if
any other software was installed
specifically USB compact flash
drivers.
Set MusicMatch Jukebox basic preferences.
Detailed information, Welcome Tips, and troubleshooting are available
through the Help menu and the MusicMatch Internet site (accessed from the
Help and Sites menus). We recommend you familiarize yourself with the
MusicMatch Welcome Tips and view the Online FAQ’s before using and record-
ing files. Logging onto the Internet while using MusicMatch Jukebox takes
advantage of all its features.
We feel a few of the Recording Settings options need to be discussed before
you start using the MusicMatch Jukebox software.
10
Page 13
Getting Started
Set MusicMatch Jukebox basic preferences. (continued)
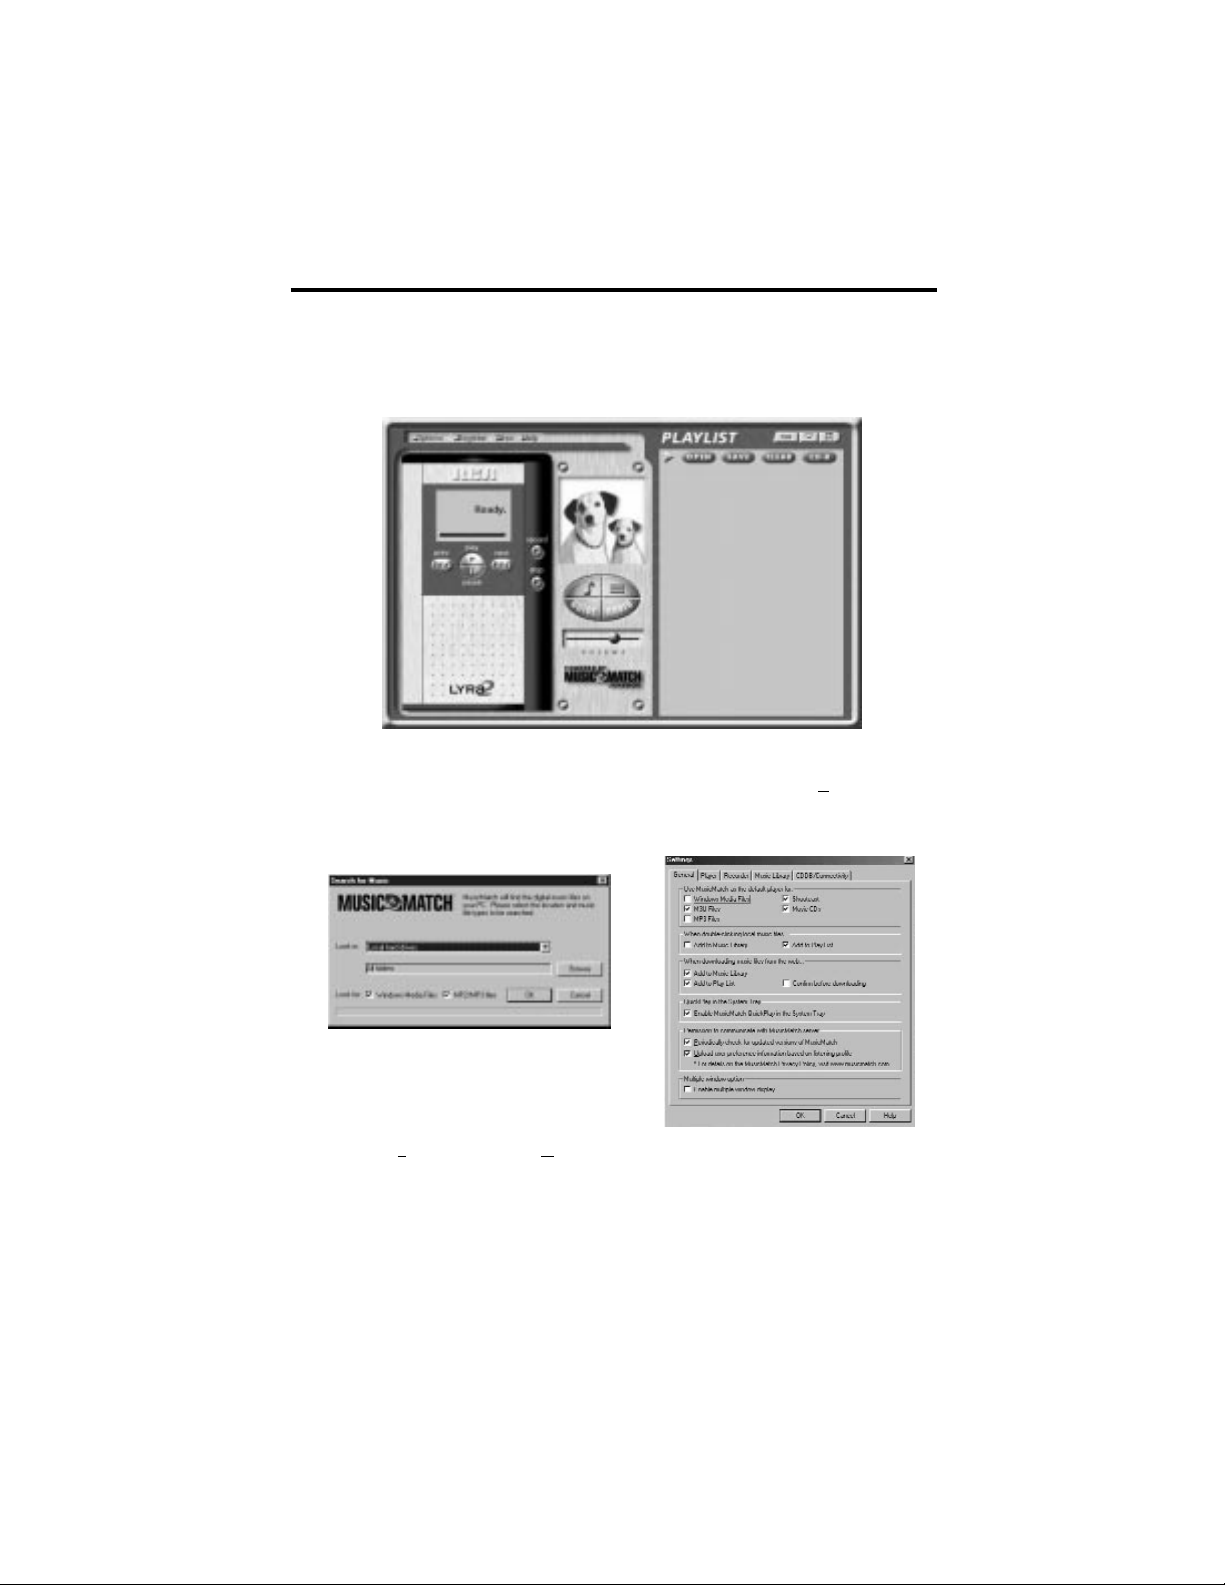
A. Start the MusicMatch Jukebox software.
B. The Search for Music screen
appears asking if you want the program to search for existing compatible music files.
Click OK, to have the files found
appear in the Music Library.
C. Display the Settings menu by
choosing Settings under the Options
menu.
Note: You can access the Options menu at
almost any time by pressing the right
mouse button.
11
Page 14
Getting Started
Set MusicMatch Jukebox basic preferences. (continued)
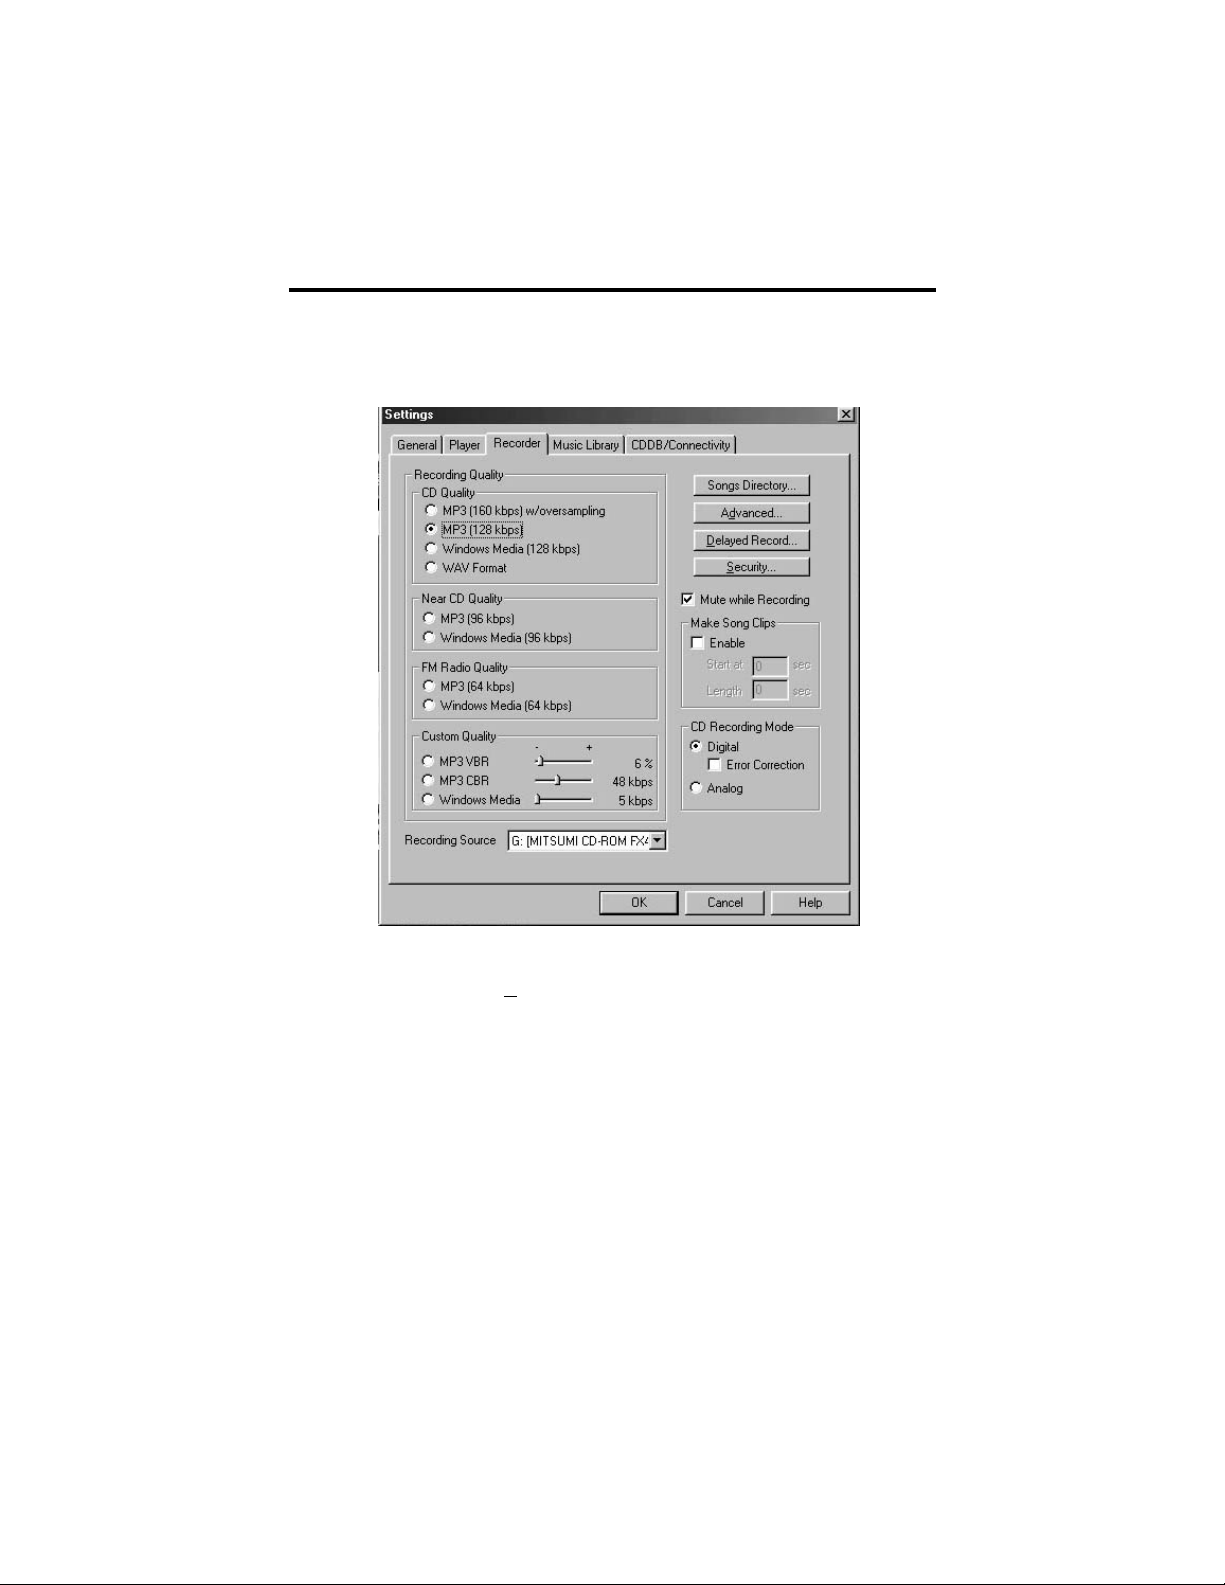
D. Click the Recorder tab to display the Recorder settings.
E. Select the recording Quality level.
CD Quality MP3 (128Kbps) is the recommended quality level.
MP3 and Windows Media formats
are supported by MusicMatch
Jukebox for the LYRA2 player.
• MP3 audio is MPEG
Layer-3 Audio available at various
compression levels. The highest compression level has the best quality
sound, but uses the most disk space.
12
Page 15

Getting Started
Set MusicMatch Jukebox basic preferences. (continued)
• Windows Media audio is a
compression format created by
Microsoft. This audio format
incorporates digital rights management.
• WAV audio is unencoded music
that is not compressed. This format has the best quality sound
but requires the largest file size,
as much as 650MB per CD. WAV
audio files are much larger than
MP3 audio files.
Note: Custom Quality settings are for
advanced users only.
F. Select a CD Recording Mode.
1. Check Digital and Error
Correction for the best results.
Error checking and correction will
be performed while you are
recording.
Note: Choosing Error Correction will
slow down your recording speed.
2. Check Analog if your CD-ROM
drive does not support digital
audio extraction.
G. Select a default Recording
Source. If you have more than one
recording source, select the source
you record from the most.
H. Mute while Recording. This feature allows you to mute the audio
while it is being recorded. Uncheck
this box to hear the audio as it is
recorded.
Note: This is not recommended as it will
decrease the recording speed.
13
Page 16
Getting Started
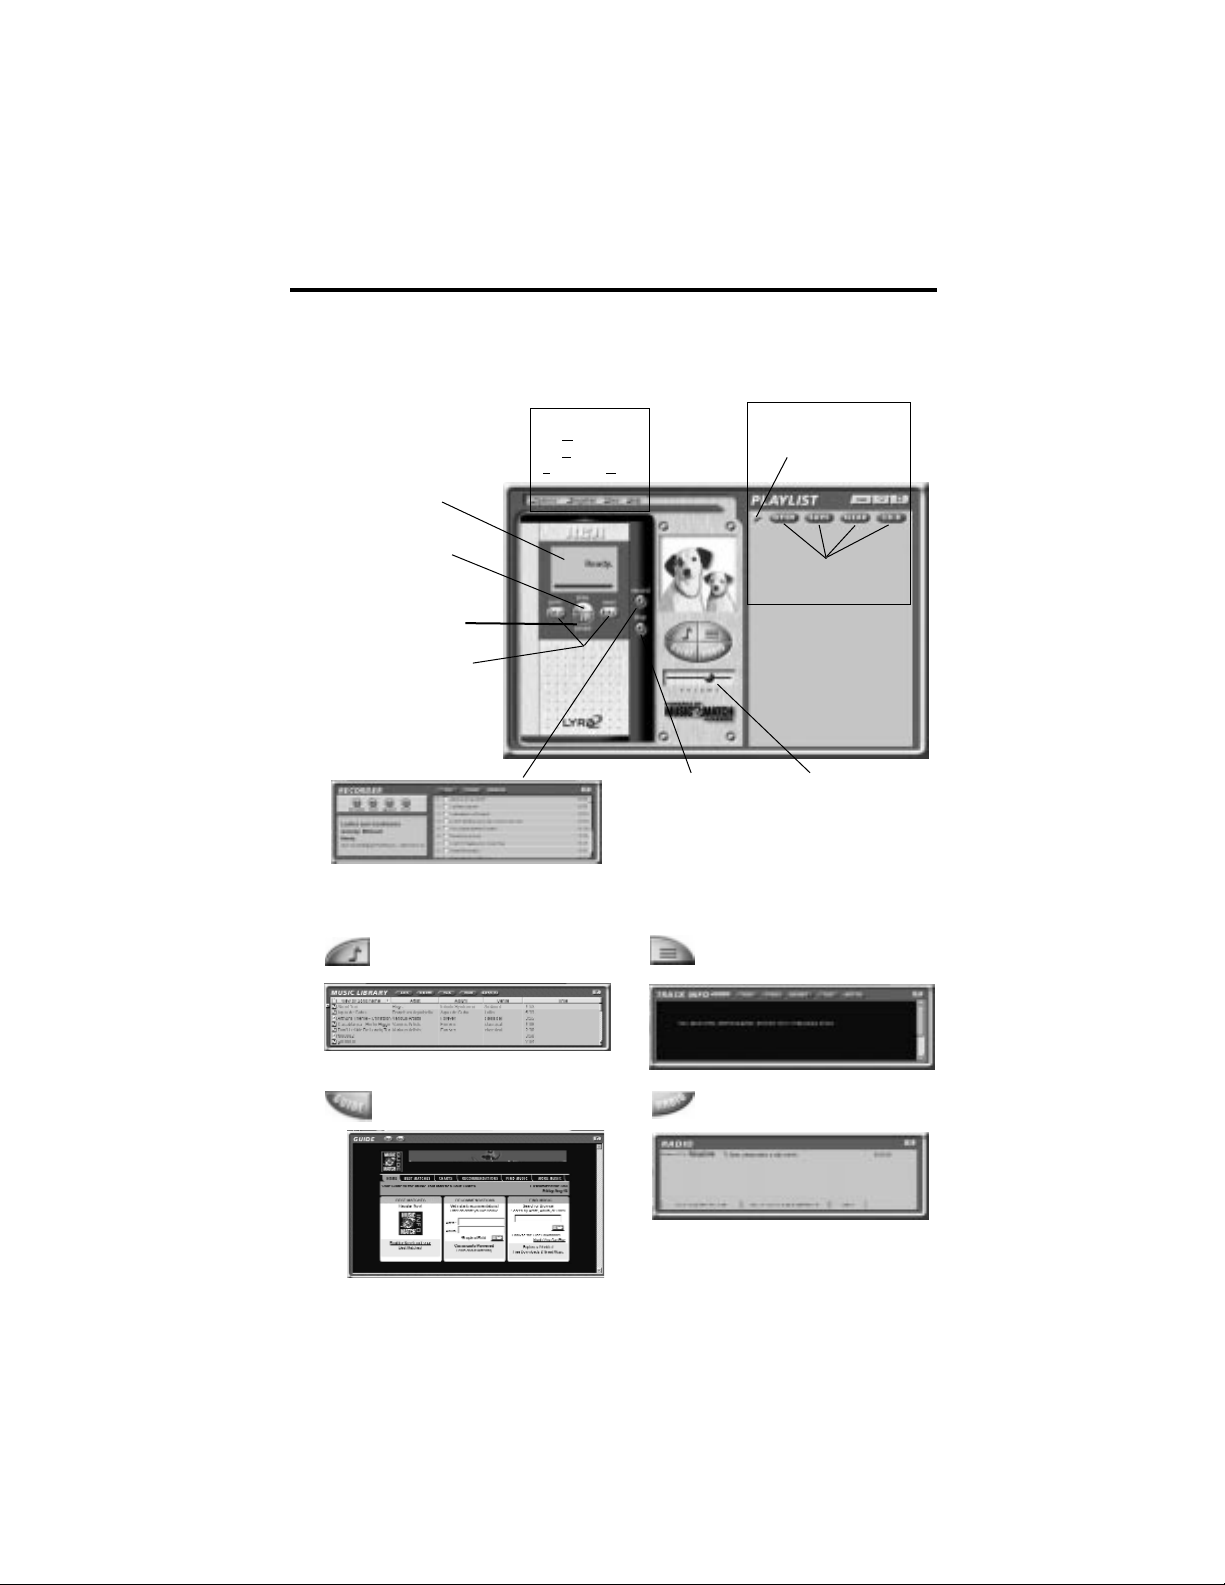
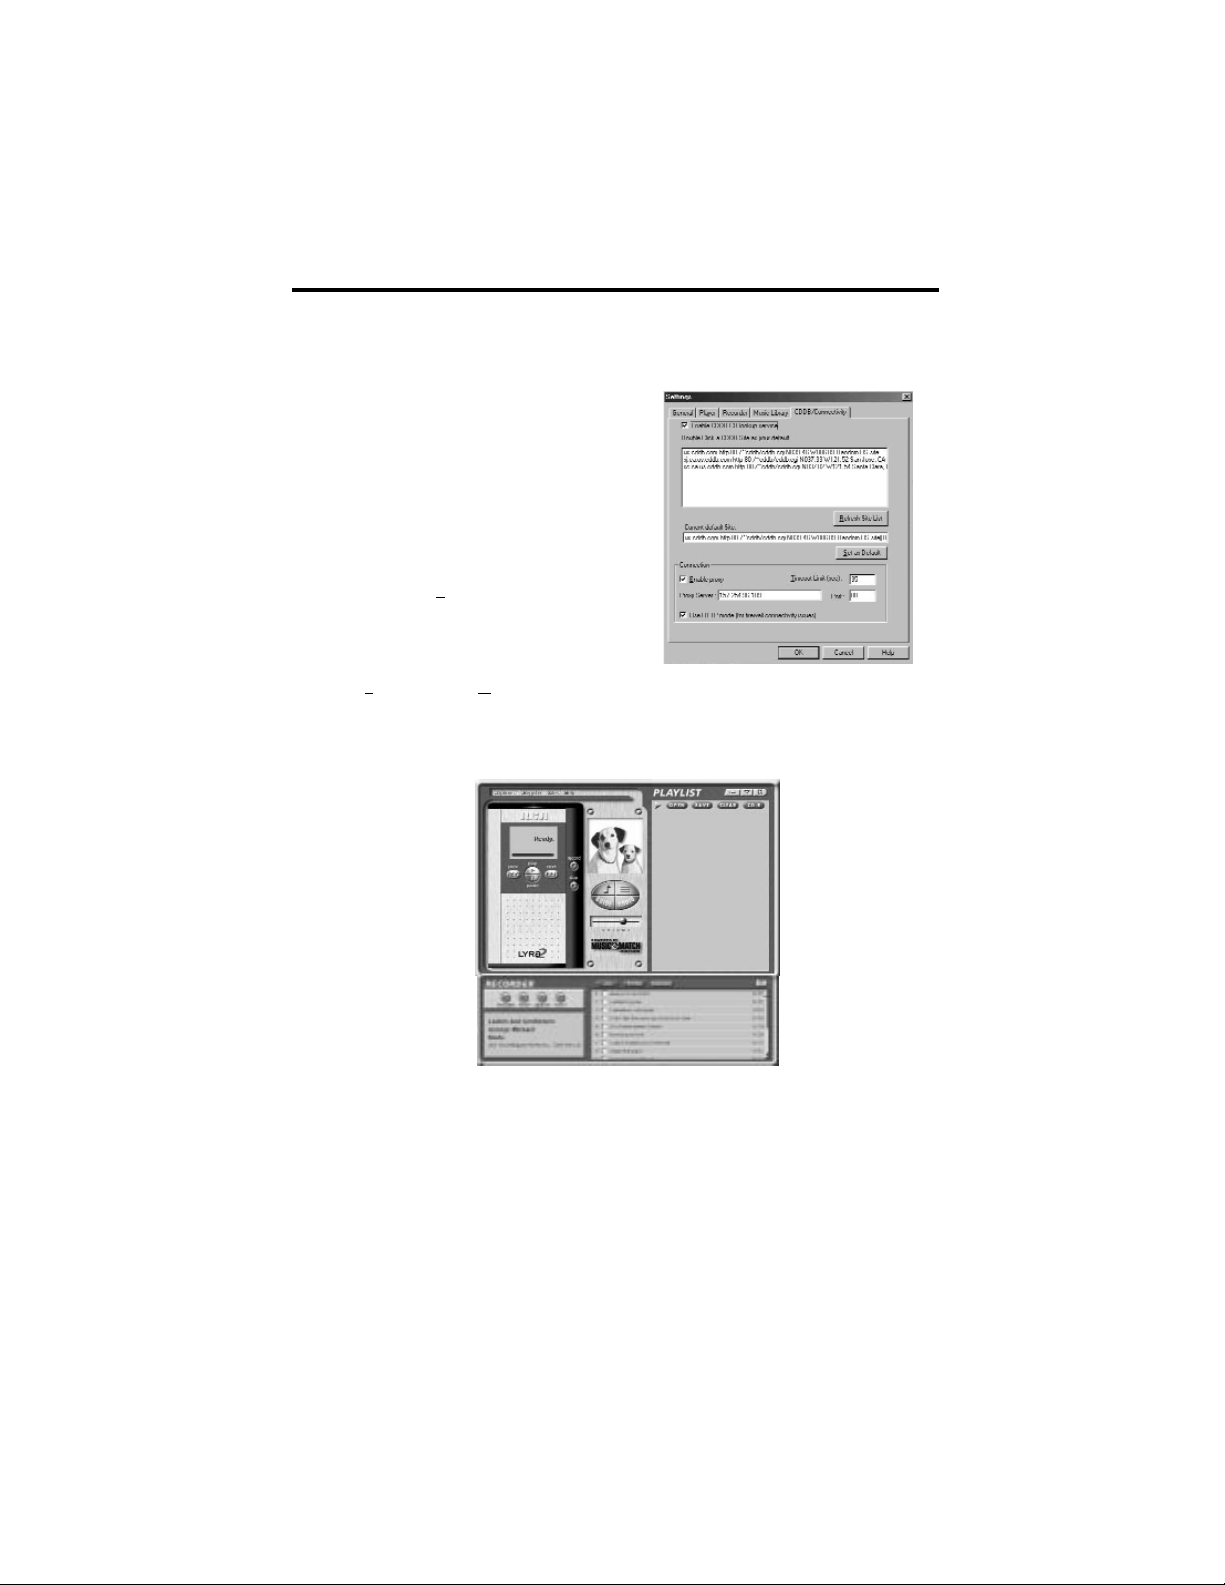
Learn the MusicMatch Jukebox basic controls.
Current Selection
Display Area
PLAY Button (Press
to start playback.
PREV and NEXT
Buttons (Use to select
the next or previous
song in the playlist.)
STOP Button
VOLUME
Control
Displays the Music Library
Window
Displays the Recorder Window
Displays the Track Info Window
Displays the Music Guide Window
Displays the Radio Window
Note: These secondary display windows normally attach to the lowest open window. You may need
to close, move, or open windows to view them.
Playlist Controls
Docks and Undocks
Playlist Window
OPEN, SAVE, CLEAR,
and CD-R
Menus
O
ptions,
Register,
Sites and Help
Listed below are the basic functions of the main controls for the program.
Playlist Window
14
PAUSE Button (Press
to pause playback)
Page 17
Getting Started
Save CD tracks to play on your PC or in your LYRA2
player.
A. Insert a CD into your CD-ROM
drive. If you are connected to the
Internet, MusicMatch Jukebox will
retrieve information about the CD in
the CD-ROM drive.
If you are on a LAN system and the
titling feature does not work, contact
your administrator.
Make sure the Enable CDDB CD
lookup service is selected on the
CDDB Preferences page if you are
able to make a connection to the
Internet. Choose CDDB Preferences
from Settings in the Options menu.
B. The information from the Internet appears.
If the information cannot be retrieved
from the Internet, enter it manually.
You can enter information or edit
existing information by clicking in the
desired box and typing.
Important Note: If the information
is not entered before recording,
default song names and information
will be used.
15
Page 18

Getting Started
Save CD tracks to play on your PC or in your LYRA2
player. (continued)
C. Press the REC button if the Recorder window is not open. Press REFRESH if the
songs are not listed.
D. Select the tracks you want to
record.
• To start recording, click RECORD.
• To stop recording the current
track, click stop.
• To cancel the entire recording
session for all selected tracks, click
cancel
• To eject the CD, click eject CD.
• To select all songs, click All.
• To deselect all songs, click None.
• To refresh the track title information
or to attempt detection again, click
Refresh.
E. After recording is completed, the
songs will be stored in the Music
Library.
Download music from the Internet.
A. Click the MUSIC GUIDE button to connect to the MUSICMATCH MUSIC GUIDE
download site.
Notes: You can also select Show Music
Match Guide from View in the Options
menu to display this window.
If you have not established an Internet
connection, MusicMatch Jukebox will
attempt but fail to connect.
Music you download from the MUSIC
GUIDE window will automatically be
placed in the Music Library.
You can download files using your regular browser. Be sure to import (and/or
move) them into MusicMatch Jukebox.
CD Info
Display Area
ALL
Button
NONE
Button
REFRESH
Button
RECORD
Button
Cancel
Button
Stop
Button
Eject
CD
Song Selection Area
16
Page 19
Getting Started
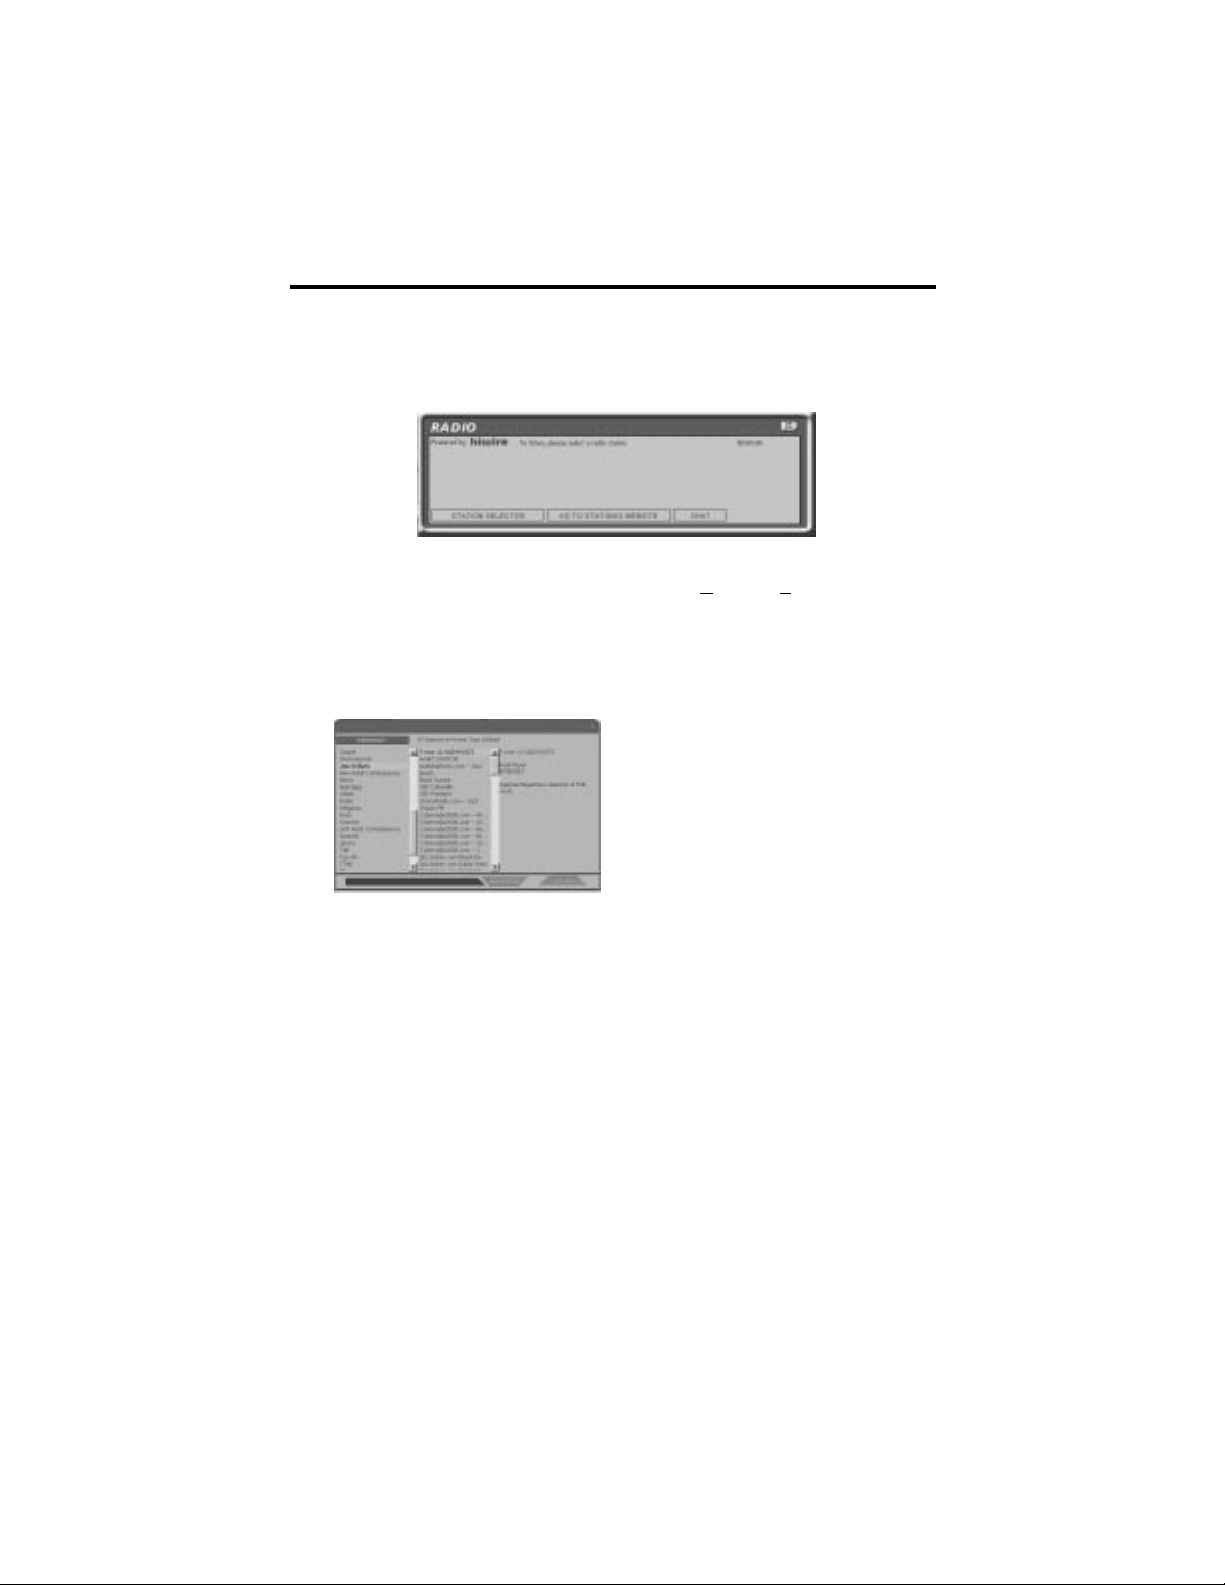
Use MusicMatch Jukebox to play Radio on your PC.
A. Click the Radio button to open the Radio window.
Note: You can also select Show MusicMatch Radio from View in the Options menu to dis-
play this window.
B. Click on STATION SELECTOR to
open the following window.
Click the button in the upper left corner to toggle between FORMAT, CITY,
or COUNTRY to select the station you
want to listen to.
• Select FORMAT to choose a station
by the type of music you like to listen
to.
• Select CITY to choose a station in a
certain city.
• Select COUNTRY to choose a station in a certain country
• If you want to search for a certain
station, use the SEARCH feature on
the bottom of the window.
C. Click once on a station to display
it. Click twice on the station (or click
PLAY) to play music from the station.
The station you select appears in the
Playlist.
D. To connect to the station’s website, click the GO TO STATION’S WEB-
SITE button on the bottom of the Net
Radio Window.
Note: If the station you select is not available, this is usually a temporary situation.
Try again later.
17
Page 20
Getting Started
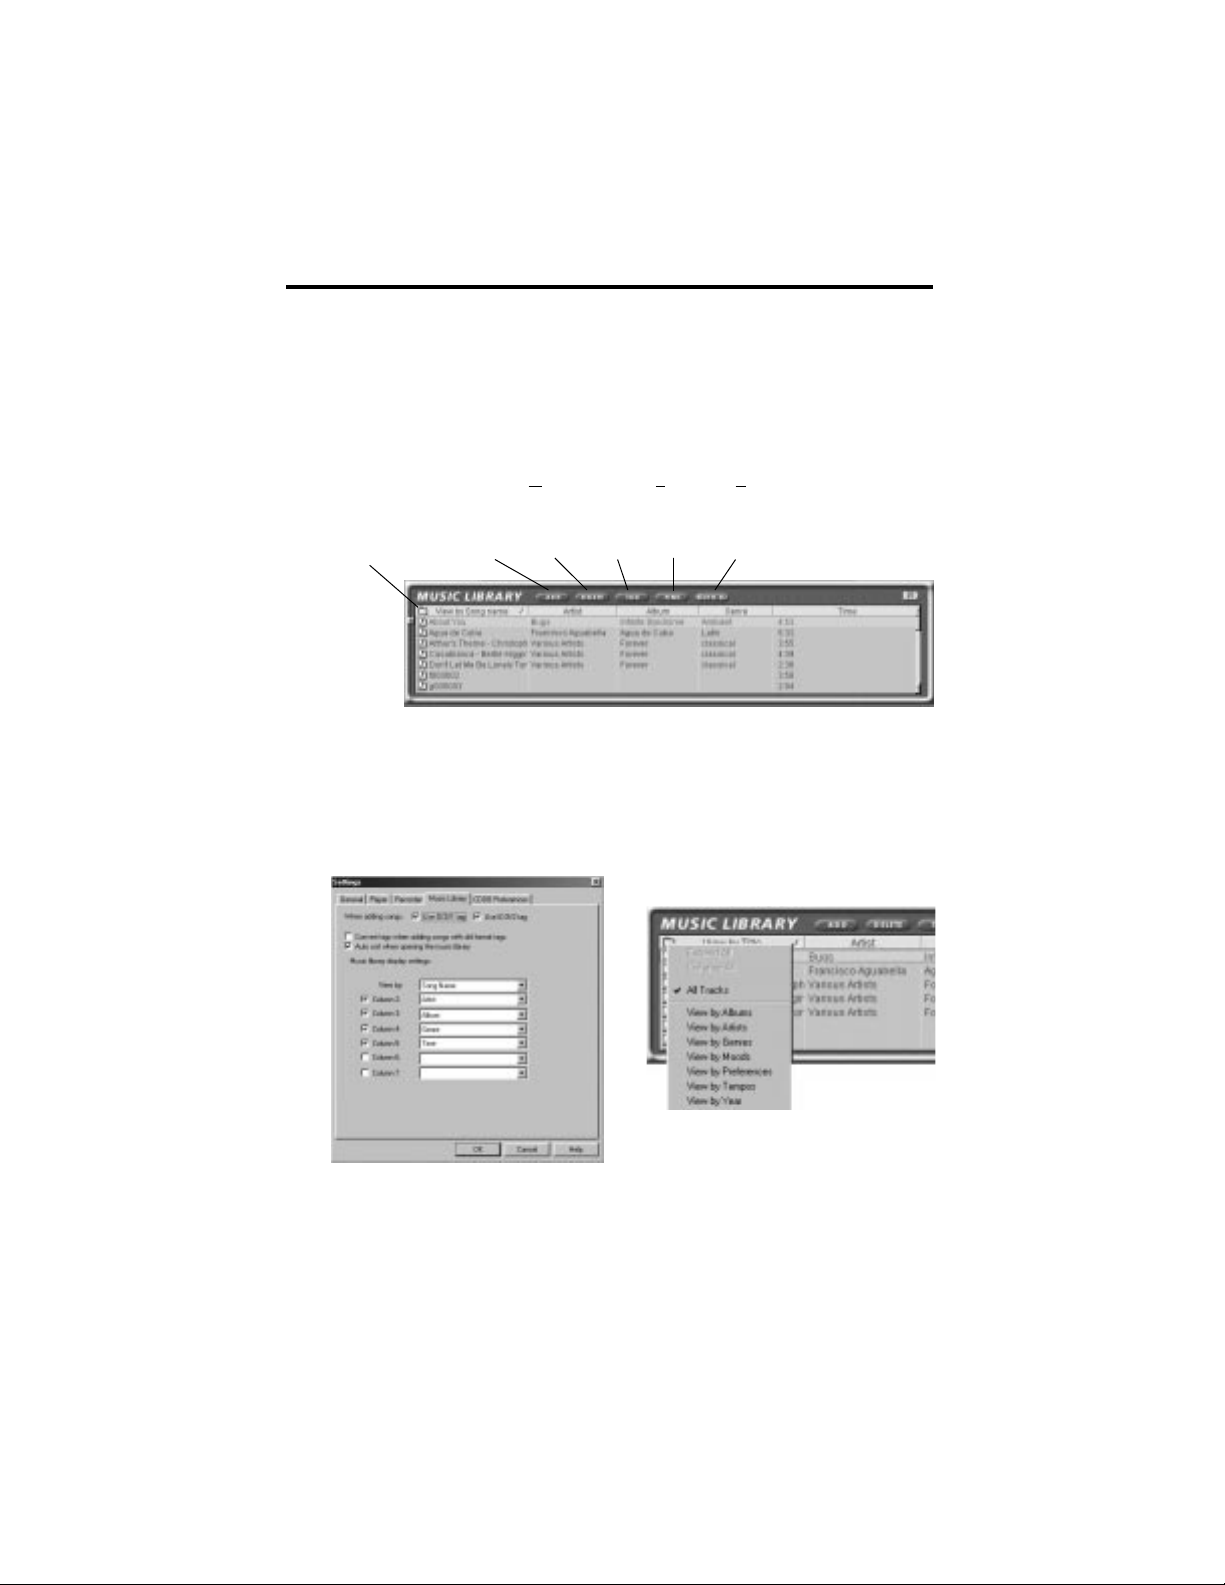
Organize the Music Library.
You can choose how to view your music library. You can select as many as seven
categories to display at one time.
A. Click the Music Library button from the Main window to display the Music
Library window.
Note: you can also select Show Music Library from View in the Options menu.
B. Setup the Music Library for your
preferences. Select Music Library from
Settings in the Options menu to display the Music Library Settings screen.
Select the number of columns and
type of information you want displayed in each, and then click OK.
C. The Music Library now displays
your selections. To sort by categories
click on the folder icon (sort/view button) in the Music Library window.
to Select how you want to view your
songs.
D. To add a track from your Music
Library to your playlist, either double
click it or drag and drop it.
ADD
Button
DELETE
Button
TAG
Button
FIND
Button
AUTO DJ
Button
Sort/View
Button
Preview
Button
Music Library Window
18
Page 21

Getting Started
Create a playlist for playing or downloading.
To create a playlist, you can drag and drop files from your Music Library
or you can open an existing playlist.
ADD
Button
DELETE
Button
TAG
Button
FIND
Button
AUTO DJ
Button
Sort/View
Button
Preview
Button
Music Library Window
A. To manually add tracks to the
playlist, double click the track or drag
and drop the track from the Music
Library into the playlist display.
To play a track before adding it to
the playlist, click next to the
desired track in the Music Library
window.
Note: Click to select a song, Shift and click
to select groups of songs, or Ctrl and click
to select multiple songs.
B. Click OPEN to open an existing
playlist, browse for tracks from a specific group, or play an audio CD.
C. To clear an entire playlist from the
playlist window, click CLEAR.
D. To save your current playlist, click
SAVE. When the window appears, enter
a playlist name and click Save.
Playing Info
CD-R
Button
CLEAR
Button
SAVE
Button
OPEN
Button
Undocks and Docks
Playlist Window
PLAY
Button
Displays
Music
Library
Playlist
Window
19
PAUSE
Button
Page 22

Getting Started
Create a Playlist for playing or downloading. (continued)
E. To remove a single track from the
playlist, click on the track to highlight
it, and then press Delete on the keyboard.
F. Click Play to play the songs from
the playlist. You can also double click
the song in the playlist to begin playing.
Edit Tags for Your Songs
You can edit or delete the tags for the tracks in your Music Library. If you delete
the track’s tag, all of the information about the track will be deleted.
A. Highlight the track in the Music Library and click the Tag button to display the
Tag Song File window.
Note: Right click on the highlighted track to display a menu. Select Edit Track Tag
to display the Tag Song File window.
B. You can edit the tag with your personal preferences for each of the tracks in
your Music Library.
20
Page 23

Getting Started
Transfer the audio files to the CompactFlash Card.
Use MusicMatch Jukebox to transfer music files to the CompactFlash card for the
LYRA2 player. Make sure the external drive is installed properly and the
CompactFlash card is inserted.
A. Choose Options, Send to Device,
Download Playlist to Lyra to display
the Download To Lyra window.
B. Make sure Compact Flash is listed
in the Portable Device Memory area.
Note: If it is not listed, check all connections, click the Refresh button to refresh
the portable device memory list, make sure
the CompactFlash card is properly inserted
in the drive, restart your computer, and
consult online troubleshooting for possible
causes.
C. Double click Compact Flash to see
what is recorded on the flash card.
D. Select the desired path for the
files. If you would like to create new
directories for your music, click
to add a directory. Make sure the
correct folder is highlighted before
you start downloading.
E. Select and highlight the tracks you
want to download to the
CompactFlash card in the Files To
Download area.
Notes: If you remove and reinsert the
card, press Refresh to refresh the Portable
Device Memory list.
Click to select a song, Shift and click to
select groups of songs,
or Ctrl and click to select
multiple songs.
Note: Actual items may differ in
appearance from those shown.
Yellow LED
Insert card top first with front
(dogs) facing up.
Important Note
Removing the card
before the data is
completely written
may cause loss of the
entire contents of the
card and damage the
card.
21
Page 24

Getting Started
Transfer the audio files to the CompactFlash Card.
(continued)
F. After you have selected all of the
music you want to record on the
CompactFlash card, click the
Download button on the bottom of
the screen.
File size and availability are listed in
the status and window displays.
Note: Transfer all your MP3 or Windows
Media audio files in groups to prevent
reloading the appropriate driver for each
type and compression ratio.
G. Click Done when you are finished.
H. Click Exit under File in the Options
menu to close MusicMatch Jukebox.
I. Pull the card out to remove it
from the external drive.
J. Skip to page 34, Step 8 if you do
not want to install the Real Jukebox
software.
Information for installing the
RealJukebox software starts on the
next page.
Caution
The yellow LED on the
CompactFlash external drive
turns bright yellow when
files are being written to the
CompactFlash Card.
After the yellow light
dims, wait at least 5 seconds
before removing the card
from the external hard
drive.
Removing the card before
the data is completely
written may cause loss of
the entire contents of the
card and damage the
card.
Helpful Hints
For detailed information on
CompactFlash card file management, creating playlists,
and grouping management,
please consult the online documentation or Help section.
The external drive can also be
used to transfer files from
digital cameras using
CompactFlash cards to the PC
or store files from the PC on
CompactFlash cards.
22
Note
MP3 files transferred to the CompactFlash card using Lyra compatible software are converted to an encrypted form for purposes of copyright protection, but the encryption
process does not change the MP3 encoding characteristics of the file or the file's compliance with the MPEG-1, Layer 3 (MP3) standard. Additionally, the original file is left unaffected on the user's system.
Page 25

Getting Started
7. Install the RealJukebox software.
After you have installed the external drive and placed the LYRA2 software CD in
the CD-ROM drive as described on pages 6-8, follow these directions to install the
RealJukebox software.
A. Display the Select Music Software
screen as described in Step 5.
Make sure RealJukebox is highlighted
and click Install.
B. Click Accept or Cancel after you
read the license agreement.
Note: You must Accept to continue.
C. When the Setup of RealJukebox
screen appears, verify the correct destination path for the program files.
Click Next.
D. Select how to configure shortcuts
for RealJukebox and click Finish to
start installation of the software.
E. Once the RealJukebox software
has started, complete the Electronic
Registration Card. Enter your Country
and Zip Code. Click Next to proceed.
Note: If you don’t have email, enter
yourname@home.com. You must enter an
email address to proceed.
F. Read Information about
RealJukebox window appears. Click
Tell Me More for more information or
click Next to continue.
G. Setup Options screen. Select the
setup option you wish to use. Express
Setup is recommended. Click Next to
continue.
H. Confirm Express Setup screen.
These screens will give a summary of
the most common and default configuration settings. You can change the
settings or click Finish.
We suggest you click Finish and
not change any of the settings at
this time.
I. If necessary, close the main setup
screen.
Note: You can access the Configuration
Wizard from the Tools menu at any time
later when you are more familiar with the
program.
23
Page 26

Getting Started
Set basic preferences.
Detailed information, tutorials, and troubleshooting are available through the
Help menu and the RealJukebox Internet site (accessed from the Help and Sites
menus).
Note: We recommend you familiarize yourself with the RealJukebox New User’s Guide and
complete the Online Tutorial before using and recording files.
We also recommend that you log onto the Internet while using RealJukebox to
take advantage of all the features.
We feel the Recording Method and a few of the Audio Quality Preferences need
to be discussed before you start using the RealJukebox software.
A. Start the RealJukebox software.
B. Display the Preferences menu by
choosing Preferences under the Tools
menu.
C. Click Recording to display the
Recording menu.
D. Select a recording method.
1. Check Digital and Use Error
Correction for the best results.
Error checking and correction will
be performed while you are
recording.
Note: Choosing Use Error Correction
will slow down your recording speed.
24
Page 27

Getting Started
Set basic preferences. (continued)
2. Check Analog if your CD-ROM
drive does not support digital
audio extraction.
E. With the Preferences menu displayed, click Audio Quality to display
the Audio Quality menu.
F. Select a recording Format and
Quality Level.
1. RealAudio is RealNetworks’
audio format. This format saves
your music as RealAudio (.rmx)
secure or RealAudio unsecured
(.rmj) files. Compression levels
available are (96, 64, and 44
Stereo, and 32 Kbps Mono).
96kbps Stereo has the best quality
sound, but uses the most disk
space.
2. MP3 Audio is MPEG layer 3
Audio available at multiple compression levels from 32 kbps mono
to 320 kpbs stereo. 320 kbps has
the best quality sound, but uses
the most disk space. We recommend using 128 kbps.
3. Wave Audio is unencoded music
that is not compressed. This format
has the best quality sound but
requires the largest file size, as much
as 650MB per CD. Wave Audio files
are much larger than RealAudio and
MP3 Audio files.
G. Select a Secure Files setting
1. Secure Files On
Files recorded with security on
can only be played on the PC on
which they were recorded.
Note: If you record with the security
feature on, make sure you perform a
security key back up (Backup Security
Key feature located under Options
menu).
2. Secure Files Off
Most people choose to turn the
Secure Files feature off.
Notes: In the future, some music may
require the security feature turned on
to record to your computer.
Turn this feature off if you own two
computers and exchange files
between them.
3. Click OK.
25
Page 28

Getting Started
Learn the RealJukebox basic controls.
Listed below are the basic functions of the main controls for the program.
Save CD tracks to play on your PC or in your LYRA2
player.
A. Insert a CD into your CD ROM
drive. If you have auto play/record
enabled, the CD will automatically
begin playing and recording.
Note: If you do not want the CD to
automatically start playing or recording,
you can change the settings.
Choose Preferences in the Tools menu,
and set the options for your personal
preference.
Record
Button
Play
Button
Pause
Button
Stop
Button
Previous
Button
Next
Button
Progress Bar
Continuous
Play Button
Shuffle Play
Button
Program
Information
Display Area
Volume Control
Mode
Selection
Menus
26
Page 29

Getting Started
Save CD tracks to play on your PC or LYRA2 player.
(continued)
RealJukebox is an internet enabled
application and connects to the
Internet to retrieve information
about the CD in the CD ROM.
Make sure the Automatic CD Lookup
Information is selected in the Internet
Settings Preferences. Choose Internet
Setting from Preferences in the Tools
menu.
If you are on a LAN system and the
titling feature does not work, contact your administrator.
The information from the Internet appears on your
screen.
If the information cannot be retrieved from the Internet, enter it manually.
Important Note: If the information is not entered, titling and sorting informa-
tion will not be available in the library.
Press View Track Info for information on the artist of the track.
27
Page 30

Getting Started
Save CD tracks to play on your PC or LYRA2 player.
(continued)
B. Select the tracks you want to play
or record.
• To start or stop playback, click play.
• To start or stop recording, click
record.
• To pause playback, press pause.
• To stop playback and recording,
press stop.
C. After recording is complete, the
songs will be stored in the Playlist.
Download music from the Internet.
28
A. Click the Music Guide icon to have
RealJukebox connect you to the
Internet.
B. Download the music you select to
your PC, and add it to your playlists.
Note: You can also download files using
your regular browser. Just be sure to import
(and/or move) them into RealJukebox.
You can also search the internet to
download the music you want
through the search mode.
A. Click the Search icon on the mode
selection row.
B. Key in information on how you
want the search to be done.
Page 31

Getting Started
Organize the Playlist.
A. All tracks can be grouped by
Genre, Artist / Album, or all three.
Choose Music Files from Preferences
in the Tools menu.
B. Click Change Sub-Folders... to
select the groupings, that you would
like to use for your music (any combination of Artist, Album, or Genre).
Click OK.
C. Click the Genre or Artist/Album
icon on the mode selection row to
view the groups of songs.
To play a song, double click it or
highlight it, and press play.
29
Create a Playlist for playing or downloading.
A. Click the Playlist icon in the mode
selection mode. Click New Playlist
button on the right of the screen.
B. Fill out the Create Playlist form
to give specifications as to the name
of the new playlist, which tracts to
put into the playlist and the location
where you want to put it.
C. Press Add Tracks on the right
hand side in Playlist mode. Click on
the song(s) you want to add to the
playlist so it is highligted. Press Add
Tracks >> to store. Repeat this step
to enter additional tracks.
Note: Click to select a song, Shift and click
to select groups of songs, or Ctrl and click
to select multiple songs.
Page 32

Getting Started
Create an Auto-Playlist.
A. Click the Auto-Playlist icon in the
mode selection mode. Click New
Auto-Playlist button on the right of
the screen.
B. Fill out the Create a New Auto
Playlist form to give specifications as
to how songs will be organized in the
the new Auto playlist.
Click and highlight the the playlist
you want to edit. Click Edit
Autoplaylist on the right side column
to change preferences at any time.
All tracks saved on your PC will automatically be placed in this folder if
track information follows specifications.
Searching for Tracks
A. Click on the Search button on the
mode selection bar.
B. Click on the Search All Tracks
page.
C. Key in the music you wan to
search for and Click Search Now to
begin search.
30
Page 33

Getting Started
Radio
A. Click on the Radio icon on the
Mode Selection banner.
B. Click on the Features page to
search for stations according to
Featured Genre or view Featured
Stations.
Click the Find Station page to search
the internet for the type of station
you like to find.
A. Click My Stations to view stations
that you have bookmarked in the
past.
B. To add a station to your My
Station list, click on the button
beside the station you want to store.
C. Your RealPlayer will automatically
open when you click on a station to
listen to the internet radio
Note: First time users of RealPlayer will
need to fill out the registration form to
personalize RealPlayer.
31
Page 34

Getting Started
Transfer the audio files to the CompactFlash card.
Use RealJukebox to transfer music files to the CompactFlash card so you
can take the music with you anywhere.
A. Make sure the external drive is
installed properly and the
CompactFlash card is inserted.
Note: If you remove and reinsert the card,
press F5 to refresh the Organizer directory.
Make sure your player is listed in the
Organizer under Devices / Storage.
B. Double click the Lyra icon to display the Flash Card icon or click on
button beside Lyra on the
Organizer directory.
C. Double click the Flash Card icon to
see what is recorded on the flash
card.
D. Click the Add Tracks icon on the
right side column. Select the music
and click Add Track>> button on the
bottom.
Note: Click to select a song, Shift and click
to select groups of songs, or Ctrl and click
to select multiple songs.
Note: Actual items may differ in
appearance from those shown.
Yellow LED
Insert card top first with front
(dogs) facing up.
Important Note
Removing the card
before the data is
completely written
may cause loss of the
entire contents of the
card and damage the
card.
32
Page 35

Getting Started
Transfer the audio files to the CompactFlash card.
(continued)
E. After you have selected all of the
music you want to record on the
flash card, double click the Flash Card
icon.
File size and availability are listed in
the status and window displays.
Notes: The card operates like a floppy
drive. The same drag and drop or copy
methods apply.
Transfer all your MP3 or G2 files in groups
to prevent reloading the appropriate driver for each type
.
F. Click the Begin Transfer button on
the right of the screen to download
your songs to the CompactFlash card.
G. Click Exit under the File menu to
close RealJukebox.
H. Pull the card out to remove it
from the external drive.
Caution
The yellow LED on the
CompactFlash external drive
turns bright yellow when files
are being written to the
CompactFlash Card.
After the yellow light dims,
wait at least 5 seconds
before removing the card
from the external hard drive.
Removing the card before
the data is completely written may cause loss of the
entire contents of the card
and damage the card.
Helpful Hints
For detailed information on CompactFlash card file management, creating
playlists, and grouping management, please consult the on-line documentation or Help section.
The external drive can also be used to transfer files from digital cameras using
CompactFlash cards to the PC or store files from the PC on CompactFlash
cards.
33
Note
MP3 files transferred to the CompactFlash card using Lyra compatible software are converted to an encrypted form for purposes of copyright protection, but the encryption
process does not change the MP3 encoding characteristics of the file or the file's compliance with the MPEG-1, Layer 3 (MP3) standard. Additionally, the original file is left unaffected on the user's system.
Page 36

Getting Started
8. Install the LYRA2 user’s guide and documentation.
After you have installed the external drive and placed the LYRA2 software CD in
the CD ROM drive as described on pages 6-8, follow these directions to install the
LYRA2 User’s Guide and documentation.
A. Display the Select Components
screen.
Click the Install the Lyra2 User’s Guide
and documentation button.
B. Select the Destination folder
where you want the LYRA2 User’s
Guide installed and click Next.
C. Select the location for the program icons and click Next.
D. Click Finish to complete the
installation.
34
Page 37

Getting Started
10. Insert the alkaline batteries into the player.
Battery Compartment Door
(Insert two alkaline "AA" batteries.)
Before you can use the player, you must
insert two alkaline "AA" batteries.
A. Slide the battery compartment door
in the direction of the arrow and lift
up.
B. Insert the batteries into the battery
compartment making sure the polarities (+ and –) are aligned correctly with
the + and – markings in the compartment.
C. Close the door to the battery compartment.
Low Battery Indicator ( )
The low battery indicator appears in
the LCD display when the batteries are
getting low. Replace the batteries.
Battery Safety Precautions
Any battery may leak electrolyte if mixed with a different battery type, if inserted
incorrectly, or if all batteries are not replaced at the same time.
Any battery may leak electrolyte if disposed of in fire or an attempt is made to
charge a battery not intended to be charged.
Discard leaky batteries immediately. Leaking batteries can cause skin burns or
other personal injury. When discarding batteries, be sure to dispose of them in
the proper manner, according to your state/provincial and local regulations.
Rechargeable Batteries
Risk of fire or explosion if the following is not observed:
Do not charge any battery other than PC202MH, PC204MH, or PC224 in this
equipment.
Do not use or charge the batteries if they appear to be leaking, discolored,
deformed or in any way abnormal.
35
EJECT
OPEN
Fire and Snow-Jo
di Ward
128K
NORMAL FLAT
Trk=03 1:38
Page 38

(A.) Check to make sure the unit is turned off. (B) Insert the card top first
into the player with the front of the card facing the front of the player as
shown. Make sure the card is inserted fully into the player.
Caution: Do not force the card into the player as this may cause
damage to the card and/or player.
Note: To remove the card from the player, (A) turn off the player (B) slide
the eject lever on the back of the player with your thumb to eject the card.
Getting Started
11. Insert the CompactFlash™ card in the player.
Before you use the digital audio feature, you must insert the removable card
with the MP3, Windows Media Audio or G2 music files into the player.
12. Attach the headphones to the player.
Insert the plug on the headphone cable into the headphone jack ( ) on
the top of the player and place the headphones on your head by fitting it
around your ears.
Headphone Jack
( )
36
CompactFlash memory card
LCD Display
CompactFlash
max
e
n
t
e
vol
r
min
b.skip
tune
LCD Display
play / pause
ON
PLL
max
e
n
t
vol
e
r
min
stop
/off
f.skip
tune
on
lock
off
FM radiodigital
EJECT
OPEN
PERSONAL DIGITAL PLAYER / FM TUNER
Page 39

Player Features
Controls
1
5
6
7
15
2
3
4
8
9
OPEN
EJECT
12
13
14
10
37
11
Rear
mode
recall
DSP
light
CompactFlash memory card
max
e
n
t
e
vol
stop
/off
r
min
LCD Display
b.skip
play / pause
f.skip
PLL
ON
tune
FM radiodigital
lock
on
off
tune
DC4.5V
PERSONAL DIGITAL PLAYER / FM TUNER
Page 40

Player Features
Controls (continued)
4. LIGHT Button
Press to turn light on and off in the LCD
panel. (Light turns off automatically
after approximately 7 seconds for every
press)
5. PLAY / PAUSE Button
• At player Off mode: Press once to
turn on player, press again to start playback in digital music mode or turn radio
on. OR
Press and hold to return to the mode
last used before entering standby
mode.
• While player is playing: Press to
place the player in the pause mode.
Press again to return to playback.
• At tuner On Mode: Press to toggle
between Forced Mono and Stereo
reception modes.
6. B. SKIP / Tune back Button
• While player is playing: Press once
momentarily to skip back to the last
track. Press and hold to search backward within the same track.
• Player Stopped: Press to move the
cursor back to previous item.
• Player with Equalizer Displayed:
Press to cycle through the five frequency bands of the equalizer. You can
adjust the gain of the selected band
with the SELECT/VOLUME control.
• Tuner On Mode: Press to tune
down radio frequency.
1. Headphone Jack ( )
Insert the plug from the headphone in
this jack on the top of the player.
2. MODE / RECALL Button
• Selects Playback mode: Press to
select a playback mode (NORMAL,
REPEAT 1, REPEAT ALL, SHUFFLE,
REPEAT ALL SHUFFLE, PROGRAM, or
REPEAT ALL PROGRAM).
Press twice to adjust the contrast of the
LCD display.
• Contrast Adjustment: When in
stop mode, you can adjust the contrast
between the light and dark images in
the LCD display. Press the MODE button twice to display the contrast feature. Use the SELECT/VOLUME control
to adjust the contrast. Press MODE or
STOP to remove the display.
• Enter Station Recall Mode
3. DSP (Digital Signal
Processor) Button
In Digital Music Mode, press to select a
DSP mode: FLAT, BASS BOOST, ROCK,
POP, JAZZ, or EQ (equalizer). The
equalizer lets you cycle through five
frequency bands and adjust the gain of
the selected band for your personal
preference.
In Radio Mode, press DSP to toggle
between Bass Boost ON/OFF.
38
Page 41

Player Features
7. F. SKIP / Tune Up Button
• Player Playing: Press once momen-
tarily to skip to the next track. Press
and hold to search forward within
saved tracks.
• Player Stopped: Press to move the
cursor forward to an item.
• Player with Equalizer Displayed:
Press to cycle through the five frequency bands of the equalizer. You can
adjust the gain of the selected band
with the SELECT/VOLUME control.
• Tuner On Mode: Press to tune up
radio frequency.
8. MULTI-FUNCTION SCROLL,
SELECT/ ENTER / VOLUME
CONTROL
• Player Playing: Turn the dial up or
down to adjust volume.
• Player Stopped: Turn the dial up or
down to move the cursor to an item.
Press this control in to select the item
for playing or adding/removing the
item to/from a program.
• Player with Equalizer Displayed:
Turn the dial up or down to adjust the
gain of a selected frequency band. The
band is selected with F. SKIP or B.SKIP.
9. STOP•OFF Button
• Player Playing: Press to place the
player in the stop mode.
• Player Stopped: Press to turn off
the player.
Controls (continued)
• Tuner On Mode: Press to return to
the Selection Menu or turn off the
radio.
• Press and hold to turn off player
from all modes.
10. LOCK Button
• Slide button to LOCK ON position to
inactivate all buttons.
• Slide button to LOCK OFF position to
release lock on all button functions.
11. Car Kit and AC Adapter
Plug
• Connect the car cord adapter (Refer
to Included Acessories: Car Kit for further information) and the AC power
adapter here.
12. Eject Lever
Slide lever in direction of arrow to
remove card from the player.
13. Belt Clip (Removable)
The removable belt clip attaches here.
14. Battery Compartment Door
Open door by sliding in direction of
arrow and lifting. Insert batteries making sure polarities (+ and – ) are aligned
correctly.
15. Card Slot
Insert the removable card here top first
with front facing front of player.
39
Page 42

Player Features
Remote control
1. Volume Control
2. Stop / Off Button
3. Play / Pause / On Button
4. f.skip Button
5. Lock Button
play
pause
ON
f.skip
tune
stop
off
volume
1
2
3
4
5
Connecting the Remote Control
• Plug the remote into the headphone
jack on top of the player.
Note: When using the remote control to
operate the player, it is best to lock buttons
on the main unit to avoid accidentally pressing them.
• Shift the LOCK button on the main unit to
the ON position. A lock key icon will show
on the LCD display. Only the buttons on the
main unit will be locked.
40
lock on off
CompactFlash memory card
Page 43

Player Features
Playing a CompactFlash Card
Headphones Jack ( )
1. Make sure batteries are installed in
the player.
2. Insert the headphone cable plug
into the headphone jack ( ) on
top of the player.
Please refer to GETTING STARTED
NO.12 (pg 36) for further instructions
3. Insert the card encoded with MP3,
Windows Media Audio or G2 format
music files. Make sure to fully insert the
card.
Please refer to GETTING STARTED NO.
11 (pg 36) for detailed information on
inserting CF card.
4. Press PLAY to turn on the player.
The selection menu for DIGITAL AUDIO
or FM RADIO appears on the display.
5. If you cannot see the display in
shaded or dark areas, press LIGHT to
turn on the light in the LCD display.
Note: The light will automatically time out
after 7 seconds if no buttons are pressed.
PLAY
button
B.SKIP
(Reverse)
Button
STOP•OFF
F.SKIP (Forward)
Button
(Insert removable card top first -front facing front of player)
SELECT / VOLUME
Control
Either:
1. Press ENTER dial to confirm selection
or
2. use f.skip / b. skip to select.
NOTE: If DIGITAL AUDIO is selected and no
CF card is in the slot, you will remain in the
selection menu.
Remember that you MUST turn off the unit
completely to insert the CF card otherwise it
cannot be read.
Power On the unit again after the card is
fully inserted.
Note: The unit will turn off to save battery
power automatically after 1 minute if no buttons are pressed
41
CompactFlash
LCD Display
play / pause
b.skip
tune
f.skip
ON
tune
FM radiodigital
PLL
max
e
n
t
e
vol
r
min
stop
/off
on
lock
off
01>Walking FanÐJ
02 Don’t See Me
03 Fire and Snow
04 AtlantaÐJerry
Page 44

Player Features
Playing a CompactFlash Card (continued)
The name of the song, artist, album,
playback mode selected, DSP mode
selected, number of the track playing,
and the elapsed playing time of the
track appear.
Note: The Volume bar, data rate and battery
indicators may also appear.
Search / Select Track in STOP Mode
To play a different track when the player is stopped: Press F. SKIP. or B.SKIP or
turn the SELECT/VOLUME control up or
down to move the cursor down or up
the list.
Press PLAY to play the track.
8. Press STOP•OFF to place the player
in the stop mode. The playlist will
show on the display
Note: After approximately one minute without key activation, the player will turn off to
conserve batteries.
9. Press STOP•OFF again to return to
the selection menu.
or
Press and hold STOP•OFF to turn off
the player.
10. Press STOP•OFF from the selection
menu and the player will power off.
Cautions: Headset Safety
Do not play your headset at a high volume.
Hearing experts advise against continuous extended play.
If you experience a ringing in your ears, reduce the vol-
ume or discontinue use.
Do not use the headphones while operating a motorized
vehicle or bicycle. It may create a traffic hazard and is illegal in many areas.
Use extreme caution or temporarily discontinue use in potentially hazardous
situations.
Search in Playback
To play the next or previous track while
the player is playing, press F.SKIP or
B.SKIP.
7. During playback, adjust the volume
by turning the SELECT/VOLUME control
up or down. The Volume level selected
appears in the display.
6. Press PLAY again to start playing the
first track in the list. Detailed information about the track that is playing
appears in the LCD display.
42
Fire and Snow-Jo
di Ward
128K
NORMAL FLAT
Trk=03 1:38
Fire and Snow-Jo
id Ward
NORMAL 128K
Volume=30 FLAT
01 Walking FanÐJ
02 Don’t See Me
03 Fire and Snow
04 AtlantaÐJerry
05 Show the Mood
>Somewhere
Page 45

Player Features
Playback Features
Pause Feature
During Digital Music playback, you
can pause the player and mute the
volume.
• Press PLAY during playback to
pause the player. PAUSE will flash
on the display.
Note: If the player is left in pause for
approximately one minute, it will turn
off automatically. Press PLAY to activate
the auto resume feature.
• Press PLAY again to resume play-
back.
Auto Resume Feature
The player will automatically turn
off if no buttons are activated for
approximately one minute. The
player will retain the following
information and setting if the
same card remains in the player.
• Play/repeat mode selected
• Track play list
• Volume control setting
• Last track played information
• DSP and equalizer settings
Press PLAY to resume playback
from the track the player was
paused.
SELECT/
VOLUME
Control
b.skip
(Reverse)
Button
PLAY / PAUSE
Button
f.skip
(Forward)
Button
43
LCD Display
play / pause
b.skip
tune
max
e
n
t
e
vol
r
min
stop
/off
f.skip
ON
tune
FM radiodigital
PLL
lock
on
off
Page 46

Player Features
Playback Features
Skip and Search Features
Skip Feature
When the file list is displayed, F. SKIP
and B.SKIP. or the SELECT/VOLUME con-
trol allows you to select which track to
play using the file list.
• Press F. SKIP. to move the cursor
down the list.
• Press B.SKIP. to move up the list.
Note: If you search beyond the last
track, the cursor will return to the first
track.
Press PLAY to play the selected track.
During playback or pause, press and
release F. SKIP . or B.SKIP. to skip to the
next or previous track.
• Press F. SKIP . to skip to the next
track.
• Press B.SKIP. to skip to the beginning
of the current track being played. Press
again to skip to the previous track.
Note: If you skip the last track, you will
return to the first track in the list.
Search Feature
During playback, F. SKIP . and B.SKIP.
allow you to audibly search through
the tracks at a faster speed.
• During playback, press, hold and
release F. SKIP . to search forward at a
faster speed.
• During playback, press, hold and
release B.SKIP to search in reverse at a
faster speed.
Notes:
If you search in reverse beyond the
beginning of the playing track, the
player will start playing.
If REPEAT 1 is activated and you search
in reverse beyond the beginning of the
track, the player will start playing that
track.
Scroll Feature
When the player is stopped, you can
scroll down the list of tracks by turning
the SELECT/VOLUME control up or
down.
Note: If you continue to scroll down
the list beyond the last track, the player return to the first track on the list.
1. Place the player in the stop mode.
2. Turn the SELECT/VOLUME control up
or down to scroll through the list of
tracks available on the card inserted in
the player.
3. Turn and hold the SELECT/VOLUME
control up or down for more than one
second for continuous page up or page
down.
44
Page 47

Player Features
MODE
Menu
You can use the MODE menu to select several playback features (REPEAT 1, REPEAT
ALL, SHUFFLE, REPEAT ALL SHUFFLE, PROGRAM, and REPEAT ALL PROGRAM). These
are described on the next two pages.
Repeat and Shuffle Features
1. Place the player in the stop mode,
and press MODE to display the MODE
menu.
2. Press F. SKIP or turn the
SELECT/VOLUME control to move the
cursor to the feature you want to
select.
• Select REPEAT 1 to repeat one track
over and continuously.
MODE
Button
• Select REPEAT ALL to play all the
tracks in the selected playlist over continuously.
• Select SHUFFLE to randomly play up
to 20 tracks. No tracks will be repeated.
• Select REPEAT ALL SHUFFLE to play
tracks randomly with repetition.
Note: A cursor will appear before
REPEAT ALL and SHUFFLE.
3. Press the SELECT/VOLUME control in
to select the mode or the player will
select the mode next to the cursor after
five seconds.
Notes: Pressing PLAY also starts the
player playing with the selected feature.
When the player is playing, you can
cycle through the playback modes by
pressing MODE then b.skip / f.skip. The
mode selected appears in the display.
45
f.skip
tune
max
e
n
t
e
vol
r
min
stop
/off
on
lock
off
LCD Display
play / pause
b.skip
ON
tune
FM radiodigital
PLL
NORMAL
REPEAT 1 M
REPEAT ALL O
SHUFFLE D
PROGRAM E
Fire and Snow-Jo
di Ward
SHUFFLE FLAT
Trk=03 1:38
128K
Page 48

Player Features
MODE
Menu (continued)
Program Feature
1. Display the MODE menu, and press F.
SKIP to move the cursor to PROGRAM
2. Press the SELECT/VOLUME control in
to display the list.
Press F. SKIP ,B. SKIP . or turn the
SELECT/VOLUME up or down to move
the cursor to the first track you want in
your program. Press SELECT/VOLUME in
to select a track. A program mark
appears in front of the selected track.
Note: To remove a track from the program, move the cursor to the track and
press in the SELECT/VOLUME control.
3. Continue to mark the tracks in the
order you want them to play (up to 20
total).
Note: If you try to select more than 20
tracks, the message MEMORY FULL
appears.
4. Press PLAY to start the program play-
ing.
5. Press MODE to select PROGRAM REP
to have the program keep repeating
over and over.
6. Press PLAY to pause the program.
Press STOP•OFF to stop the program.
To Clear Programs from
Memory
1. Press STOP.
2. Press MODE.
3. Select PROGRAM. A message will
appear and ask if you want to clear all
programs. Select YES to clear program
by turning the SELECT/VOLUME contol
button.
4. Press ENTER in to confirm selection.
46
NORMAL
REPEAT 1 M
REPEAT ALL O
SHUFFLE D
PROGRAM E
01 Walking FanÐJ
02 Don’t See Me
03>Fire and Snow
04 AtlantaÐJerry
05 Show the Mood
06 Somewhere In
Fire and Snow-Jo
di Ward
PROGRAM FLAT
Trk=03 1:38
Fire and Snow-Jo
di Ward
PROGRAM REP FLAT
Trk=03 1:38
128K
128K
Page 49

Player Features
DSP
(Digital Signal Processor) Menu
You can use the DSP menu to select several DSP modes (FLAT, BASS BOOST, ROCK,
POP, JAZZ) or adjust the equalizer (EQ).
DSP Modes
1. Place the player in the stop mode,
and press DSP to display the DSP menu.
You can select FLAT, BASS BOOST,
ROCK, POP, JAZZ, or use the equalizer
(EQ) to personally adjust the sound.
2. Press F.SKIP or B. SKIP to move the
cursor to FLAT, BASS BOOST, ROCK, POP,
or JAZZ.
DSP
Button
Note: If you select EQ (equalizer), the
equalizer menu appears.
3. Press the SELECT/VOLUME control in
to select the DSP feature. The player
returns to the file list.
Notes: Pressing PLAY also starts the
player playing with the selected feature.
When the player is playing, you can
cycle through the playback modes by
pressing DSP. The mode selected
appears on the display.
Equalizer Feature
1. Display the DSP menu, and press
F.SKIP to move the cursor to EQ (equal-
izer).
2. The EQ (equalizer) display will
appear in approximately one second.
• Press F.SKIP or B.SKIP. to select one of
the five frequency bands (60, 250, 1k,
4k, and 12k).
• Turn the SELECT/VOLUME control up
or down to adjust the band (+15dB to 15dB).
Note: Press the SELECT / VOLUME con-
trol in to reset the band to 0.
3. Press PLAY to start playback with the
adjustments you have selected.
47
max
e
n
t
e
vol
LCD Display
b.skip
tune
play / pause
ON
PLL
f.skip
tune
FM radiodigital
FLAT
BASS BOOST D
ROCK S
POP P
JAZZ
EQ
r
min
stop
/off
on
lock
off
Ice and Snow-Joe
Jones
128K
NORMAL EQ
Trk=03 1:38
FLAT
BASS BOOST D
ROCK S
POP P
JAZZ
EQ
FREQ 1K 0DB
+
0
–
Page 50

Player Features
Radio Mode
RADIO Mode
1. Press the PLAY to turn on the play-
er
2. Selection Menu for Digital Audio
and FM Radio appears on the LCD display
3. Press b.skip or f.skip to select by
highlighting the Radio icon.
4. Press PLAY to confirm selection.
PLAY
Button
F. SKIP (Forward)
Button
B. SKIP (Reverse)
Button
STOP•OFF
Button
DSP
Button
Multi Function
Scroll
(SELECT/ ENTER /
VOLUME Control)
Search Features
• Press F.SKIP / B.SKIP for manual tun-
ing to step forward / backward in radio
frequency.
• Press and hold F.SKIP / B.SKIP for
more then 1 second and release for
SEEK UP / DOWN mode. Search continues until a station is found.
• Press and hold F.SKIP / B. SKIP for
more then 3 seconds for SCROLL UP /
DOWN mode. Search will only stop
when the button is released.
Preset Memory
• 15 Memory spaces are available for
storing channel frequency.
1. Press F.SKIP / B.SKIP to select the
desired station you want to store.
2. Push ENTER to enter the Program
menu. The player will automatically
locate an available memory location.
48
RECALL
Button
LCD Display
play / pause
b.skip
ON
tune
PLL
max
e
n
t
e
vol
r
min
stop
/off
f.skip
tune
FM radiodigital
lock
on
off
FM 99.1 MHz
BASS M-1
88 93 99 108
MEMORY 101.3MHz
1 98.1 MHz
2 > EMPTY
3 99.1 MHz
4 99.5 MHz
"Enter" to Store
Page 51

Player Features
Memory Recall
• Press MODE / RECALL to browse the
15 channel memory locations.
• Turn the multi function scroll or press
f.skip / b.skip to tune to a preset channel.
NOTE: Recall will automatically exit if
no buttons are pressed for 10 seconds.
OR Press ENTER / PLAY to exit recall
mode sooner
Preset Memory (cont’d)
3. Turn the multi-function scroll (select)
button or press f.skip / b.skip to select
the desired channel number (1-15) you
want to store in.
4. Push ENTER to confirm storage and
exit Program mode
NOTE: Program Mode will automatically exit if no buttons are pressed for 10
seconds. In this case, the station will
not be stored.
OR Press DSP / PLAY to exit Program
Mode sooner without storing the station.
NOTE: Press DSP / PLAY to exit program
mode will not change settings in radio
mode.
DSP (Digital Signal Processor)
• Press to select Bass Boost ON/Off.
Bass indicator will appear when Bass
Boost is on.
STOP Feature
• Press STOP / OFF to return to the
Selection Menu.
• Press STOP / OFF again to turn off
the player.
OR
• Press and hold to turn off player.
Radio Mode
Surppressing Stereo Signal
• Press PLAY to toggle between FM
mono and stereo for stereo FM stations.
A stereo indicator will appear when in
stereo mode.
49
Delete Preset Memory
1. Press MODE / RECALL to view the
current Preset Memory list.
2. Turn the dial or press f.skip / b.skip
to select the preset memory you want
to delete.
3. When the desired one is selected,
press and hold MODE / RECALL for 2
seconds to delete.
4. “EMPTY” will show beside the memory location that was cleared and it will
tune to the next stored frequency.
FM 99.1 MHz
88 108
RECALL
1 98.1 MHz
2 > 98.5 MHz
3 99.1 MHz
4 99.5 MHz
"Enter" To Exit
BASS M-1
RECALL
1 98.1 MHz
2 EMPTY
3 > 99.1 MHz
4 99.5 MHz
"Enter" to Exit
Page 52

Included Accessories
CompactFlash™ Memory Cards
Attach Belt
Clip Here
Inserting a Card
Insert the card with the top first and
the front of the card facing the front
of the player as shown. Make sure the
card is inserted firmly.
Do not force the card into the player as this may cause damage to the
card and/or player.
Removing a Card
Turn the player off. Slide the eject
lever in the direction of the arrow to
eject the card from the player.
Notes: Refer to the troubleshooting
guide on page 55 if you have any difficulty playing, reading, or writing to
the card.
Removable Belt Clip
The player has a removable belt clip. Fit the belt clip into the slot on both sides of
the player. You should hear a “click” sound when it is locked in place. Make sure to
attach the belt clip firmly before using it to carry your player.
Insert removable card
top first --front facing
front of player.
Removable belt
clip. Fit the belt
clip into the slot
until it is snapped
in place .
The player uses Type I and II CompactFlash memory cards. Make sure you use only
these cards. Use of the wrong card could damage your player or CompactFlash Card
reader. We recommend the use of RCA memory cards available from your local dealer or by phone order on page 52.
The cards can be used over and over again. Use Music Match Jukebox or RealJukebox
to delete the old tracks and then transfer the new tracks to the card.
Storage: CompactFlash cards can store approximately 2 minutes of audio per MB at
an MP3 bit rate of 64 kbps.
Eject Lever
(Slide in direction of arrow to
eject card.)
50
CompactFlash
LCD Display
play / pause
b.skip
ON
tune
PLL
PERSONAL DIGITAL PLAYER / FM TUNER
max
e
n
t
e
vol
r
min
stop
/off
f.skip
tune
on
lock
off
FM radiodigital
EJECT
OPEN
Page 53

Included Accessories
Car Kit
The car kit is included with Model RD2211. It can also be purchased as an optional
accessories from your local dealer or by phone on page 52. This accessory kit includes
a car cord adapter (#54095) and a cassette adapter (#54097). The car cord adapter
lets you power your LYRA2 from the cigarette lighter socket of a car, truck, or RV. It
converts 12-volts to a 4.5-volt output. The cassette adapter lets you listen to the
LYRA2 in an automobile or RV safely without having to wear headphones.
Caution: Make sure to place the wire securely into the slot on the cassette in the
correct direction for the type of player you have.
The car cord adapter is designed to be used only with vehicles having negative
ground electrical systems. Use of any other car cord adapter may damage your
LYRA2 and void your warranty.
Turn the LYRA2 player off before removing the car cord’s plug from the cigarette
lighter socket.
1. Insert the plug on the cassette
adapter into the jack on the player. If the headphone is attached,
remove it.
2. Set your cassette player to your normal listening level.
3. Insert the cassette (Side A up) into
your cassette player making sure the
cord is placed in the correct position for
your type of player.
4. Attach the car cord adapter to the
LYRA2 as shown above.
5. Remove the cigarette lighter from
the socket, and insert the car cord into
the socket.
6. Insert the CompactFlash card you
wish to play into the player, start playing the card, and set the volume at a
medium level.
7. Control the volume with the cassette
player.
8. Remove the cassette adapter from
the cassette player when you are finished.
51
SIDE A
LCD Display
play / pause
b.skip
ON
tune
PLL
PERSONAL DIGITAL PLAYER / FM TUNER
max
e
n
t
vol
e
r
min
stop
/off
f.skip
tune
on
lock
off
FM radiodigital
Page 54

52
Optional Accessories
Pricing information and ordering instructions can be
obtained by calling 1-800-338-0376 or visit
www.lyrazone.com.
CompactFlash Memory Card
External CompactFlash Drive
No. PC32CF, PC48CF,
and PC64CF
No. PC 2200U / PC 2200P
USB Parallel
Any of these CompactFlash memory
cards can be used with your player.
The PC 2200U external CompactFlash
Drive attaches to the universal serial
bus port on your computer.
The PC 2200P external CompactFlash
drive attaches to the parallel printer
port of your computer. The drive has a
passthrough connector for your printer
and keyboard.
Stereo Headphones
Removable Belt Clip
Lightweight stereo headphones with
3.5mm stereo plug.
This belt clip allows you to carry the
player on your belt.
No. 54118 No. 54119
CompactFlash
Page 55

Optional Accessories
Rechargeable Batteries
Car Kit (Cassette and Car Cord
Adapters)
+ -
These nickel-metal-hydride batteries
are rechargeable. They operate the
LYRA approximately 1/2 as long as new
alkaline batteries.
These batteries can be charged over
and over again. To charge these batteries, you need the AC power adapter
#PC611.
No. 54097 and No. 54095
Each of these items is purchased separately.
The cassette adapter #54097 allows you
to listen to the LYRA though your car’s
speakers by using the car’s cassette
player.
The car cord #54095 allows you to
power your LYRA from the cigarette
lighter socket of a car, truck, or RV.
AC Power Adapter PC611
This adapter allows you to power your
player from 110-120V AC power.
This adapter is required to charge the
rechargeable nickel-metal-hydride batteries #PC202MH.
See AC adapter’s instruction book for
proper operating details.
No.PC202MH
Caution
Use of other nickel-metal-hydride
batteries may void your warranty.
Specifications and descriptions of optional accessories
are subject to change without notice.
53
+ -
Page 56

Specifications
Player
Size: (H) 4.11 x (W) 2.5 x (D) 0.75 inches
Weight: 3.2oz. without batteries or memory card
Solid state memory
Batteries: 2 alkaline "AA"
Signal-to-noise ratio: > 70 db (MP3 mode) 55db (radio mode)
Slot: 1 external CompactFlash slot:
supports Type I or Type II CompactFlash cards.
Connectors: Headphone, DC Jack
CompactFlash Card Reader / Writer
• Universal Serial Bus (USB) Transfer Rate: up to 8 Mbps
54
The descriptions and characteristics given in this document are given as a general indication and not as a guarantee. In order to
provide the highest quality product possible, we reserve the right to make any improvement or modification without prior
notice. The English version serves as the final reference on all product and operational details should any discrepancies arise in
other languages.
Page 57

Troubleshooting Guide
Trouble Checks and Adjustments
No power to external
drive
Player does not operate
CompactFlash card will
not play or you cannot
insert it all the way into
the player
Player repeats same track
or all tracks
Player plays tracks in random order
Player plays audio with
DSP sound
Player pauses during play
Long delay between
songs
Songs not in same order
as CD
Audio distorted at high
volume
Player displays "Config
File Not Found"
Poor radio reception
Radio auto search does
not stop
• Check all connections. See page 4.
• Make sure computer is turned on and plugged into an operating outlet.
• Batteries may be weak. Install new batteries.
• Remove batteries and hold down one or more buttons for
several seconds to drain the microprocessor inside the player to
reset it. Reinstall the batteries and try player again.
• Make sure card is inserted correctly into player--top facing in
and front facing the front of player. Do not force.
• Card is not encoded with compatible audio format (MP3, G2,
or other compatible format).
• Card may be damaged.
• Card may need to be defragmented (or reformatted--this
will erase all data on the card).
• Repeat play is turned on. Press MODE to change the play
mode.
• Shuffle play is turned on. Press MODE to change the play
mode.
• Program play is turned on. Press MODE to change the play
mode.
• Press DSP to change the DSP mode. Make sure equalizer is
set to your preferences.
• Press PLAY to resume playback.
• May be alternating between MP3 and other formats. Try
grouping songs by format, and then transfer the files.
• Songs are listed in order they were transferred to
CompactFlash card.
• In equalizer mode, reduce the BASS gain.
• Switch from BASS BOOST mode.
• Reduce volume.
• Transfer files to CompactFlash card using MusicMatch
Jukebox or RealJukebox software.
• Ensure headphones are plugged in the plug.
• Straighten the headphone cord and re-orient the cable
• Turn off nearby electrical appliances, such as hair dryer, vaccuum cleaner, microwave, flurescent lights.
• Press PLAY to switch to FM mono.
• Move to another area for stronger signal reception
55
Page 58

Limited Warranty (For US)
What your warranty covers:
• Any defect in materials or workmanship.
For how long after your purchase:
• 90 days - Unit exchange, which
includes parts and labor.
• 91 days to 1 year - Unit exchange,
which includes parts only; you pay the
labor.
• The warranty for rental units begins
with the first rental or 45 days from
date of shipment to the rental firm,
whichever comes first.
What we will do:
• During the initial 90 days:
Exchange the defective portion of your
Player with a new or, at our option,
refurbished unit.
• After the 90 days and within one
year:
Exchange the defective portion of your
Player with a new or, at our option,
refurbished unit.
We will charge you a flat exchange cost
to replace a defective player. This
charge covers the labor cost for its
repair.
How you get service:
• Contact us on the Internet at
www.lyrazone.com and have your unit’s
date of purchase and model/serial number ready. The model/serial number
information is on the back of your
Player.
• Self diagnostic screens will allow you
to troubleshoot your problem over the
Internet.
• If after going through the troubleshooting screens, we determine that
you should receive a replacement Player
you will be provided with a Return
Authorization (RA). No returns will be
accepted without the RA number.
• For your convenience you may also
call 317-415-4391.
Option I:
1. Provide your Discover, MasterCard or
Visa account number and expiration by
entering on the appropriate screen. This
is for security purposes only and your
account will not be charged at this time
2. We will send you a replacement unit.
3. If you return the unit to us within 14
days from the date you were provided a
RA number, only items not covered by
warranty will be charged to your
account. If your unit is not received
within 14 days, the suggested retail
value of the Player will be charged to
your credit card. This amount will be
credited, less a $10 handling fee, if the
unit is subsequently received.
4. Ship your defective unit back to us
using the replacement unit’s carton.
Shipping instructions will be included on
the carton along with your RA number
which will allow you to easily ship the
unit back to us. Make sure you insure
your shipment in case of damage or
loss. Include with the shipment:
• Evidence of purchase date such as a
bill of sale.
• A brief note describing your Player
problem.
• Your name, address, and phone number.
Only ship the defective portion of your
Player. In all cases retain the
CompactFlash card. Thomson will not be
responsible for any software you have
returned with your product.
56
Page 59

Option II:
• Write the RA number on the outside
of the carton used to return the unit.
Make sure you insure your shipment in
case of damage or loss.
• Carefully pack the unit using the
original box and packing material if
possible. Please retain all non-defective
accessories that were included with
your unit such as the headphones.
DO NOT return the CompactFlash card.
Thomson will not be responsible for lost
software.
• Include with the shipment:
1. Evidence of purchase date such as a
bill of sale.
2. A brief note describing your Player
problem.
3. Your name, address, and phone
number.
• After we receive your product, a new
or refurbished unit will be shipped to
you.
What your warranty does not
cover:
• Acts of God, such as but not limited
to lightning damage.
• Adjustment of customer controls.
• Damage from misuse or neglect.
• A unit that has been modified or
incorporated into other products or is
used for institutional or other commercial purposes.
• Batteries.
• Units purchased, serviced or operated
outside the U.S.A.
• Loss of software, programming.
• Installation.
• Shipping damage if the unit was not
packed and shipped in the manner prescribed by Thomson.
Product Registration:
• Please complete and mail the Product
Registration Card packed with your
Player. It will make it easier to contact
you should it ever be necessary. The
return of the card is not required for a
warranty coverage.
How state law relates to warranty:
• This warranty gives you specific legal
rights, and you may have other rights
that vary from state to state.
If you purchased your product
outside the United States:
• This warranty does not apply. See
your dealer for warranty information.
57
Limited Warranty (For US)
Page 60

Limited Warranty (For Canada)
Thomson Consumer Electronics Canada, Inc. warrants to the purchaser or gift recipient that if any manufacturing defect becomes apparent in this product within 1 year
from the original date of purchase, it will be replaced free of charge, including
return transportation.
This warranty does not include damage to the product resulting from accidents misuse or leaking batteries.
Should your product not perform properly during the warranty period, either:
1. Return it to the selling dealer with proof of purchase for replacement,
2. Remove the batteries (where applicable), and pack product complete with accessories in the original carton (or equivalent).
Mail prepaid (with proof of purchase) and insured to:
Thomson Consumer Electronics Canada, Inc.
Distribution Centre
6200 Edwards Blvd.
Mississauga, Ontario L5T 2V7
The provisions of this written warranty are in addition to and not a modification of
or subtraction from the statutory warranties and other rights and remedies contained
in any applicable legislation, and to the extent that any such provisions purport to
disclaim, exclude or limit any such statutory warranties and other rights and remedies, such provisions shall be deemed to be amended to the extent necessary to comply therewith.
If you are unable to find a qualified servicer for out of warranty service, you may
write to:
Thomson Consumer Electronics Canada, Inc.
P.O. Box 0944
Indianapolis, Indiana, U.S.A., 46206-0944
58
Page 61

Index
A
AC adaptor 53
Accessories
included 5, 50, 51
optional 52, 53
Auto resume feature 43
B
Batteries
indicator 35
inserting 35
safety precautions 35
Belt clip 39, 50
Belt clip, attaching 50
Browse button 32
B. skip button 38
C
Card slot 39
Cassette adapter car kit 39, 51
Caution while driving 3
Cautions 3, 36, 42, 51, 53
Checks and adjustments 51
CompactFlash card
insert in player 36, 50
play 41
remove 36,50
slot 36
types 50
using 50
CompactFlash drivers installation 6
CompactFlash external drive, connect 7
Computer system requirements 4
Contrast adjustment 38
D
DSP button 37, 38, 47, 49
DSP modes 38, 47, 49
E
Eject lever 36, 50
Equalizer 47
F
Features 36
auto resume 43
DSP (digital signal processor) 47
MODE menu 45, 46
pause 43
scroll 44
search 44
skip 44
G
Getting started 5
H
Headphone jack 36, 38
Headphones, attach 36
Headset safety 42
I
Important information 3
Important safety information
inside front cover
Included accessories 5, 50
Internet sites
download music 3
LYRA updates 7
www.lyrazone.com 1
Introduction 1
L
LCD display 37, 45, 46
LIGHT button 37, 38
Limited warranty 56, 57
LOCK button 39, 40
LYRA software 6,
59
Page 62

Index
M
Memory Recall 49
MODE button 38, 45
MODE menu 45, 46
MP3 audio 12
Multi function scroll 39
Music management software 7, 8
MusicMatch Jukebox 14
basic controls 14
basic preferences 10
CD-R button 19
CLEAR button 19
CompactFlash card 21
create a playlist 19
digital rights management
option 13
Download button 22
Download music 16
download music from the
Internet 16
download playlist to LYRA2 21
edit tags 20
email address 9
install 9, 10
Internet site 10
Music Guide button 16
Music Guide Window 14
Music Library 18, 19
Music Library Window 14
OPEN button 19
Options menu 11
Pause button 14
PLAY button 14
playlist controls 14
PREV and NEXT buttons 14
Quickstart 9
Radio 17
Radio window 17
REC button 16
Recorder window 14, 16
recording quality level 12, 13
REFRESH button 16
registration 9
SAVE button 19
save CD tracks 15, 16
search for music 11
Security feature 13
set basic preferences 10, 11
STOP button 14
track information window 14
transfer music files 21, 22
VOLUME control 14
O
Optional accessories 52
P
Pause button 37, 38, 40
Pause feature 38, 43
Phones jack 36, 38
PLAY button 37, 38,40, 41
Player features 37, 38
Precautions for CompactFlash card 3
Preset memory 48
Problem solving 51
PROGRAM feature 46
60
Page 63

R
Radio mode 48
RealJukebox
basic controls 26
CompactFlash card 32
continuous play button 26
create an autoplaylist 30
create a playlist 29
download music from the
Internet 28
eject button 26
email address 23
install 8, 23
Lyra2 CD Music window 32
next button 26
organize your playlist 29
pause button 26
play button 26
previous button 26
progress bar 26
radio 31
record button 26
recording preference 24, 25
saving CD tracks on CD or Lyra2 26
search 30
set basic preferences 24
shuffle play button 26
stop button 26
track information 27, 28
transfer files to CompactFlash
card 32
Recall button 37, 38
Remote Control 40
Removable belt clip 50
REPEAT 1 feature 45
REPEAT ALL feature 45
REPEAT ALL PROGRAM feature 45
REPEAT ALL SHUFFLE feature 45
61
S
Scroll feature 44
Search feature 42, 44, 48
SELECT/VOLUME control 37, 39, 40, 41,
42, 43
SHUFFLE feature 45
SKIP/FOR. (forward) button 37, 38, 40,
41, 42, 44, 45
SKIP/REV. (reverse) button 37, 39, 41,
42, 44, 45
Sleep mode 35
Software CD 6
Software setup program 6
Specifications 54
STOP•OFF button 16, 37, 39, 40, 49
Suppressing stereo signal 49
T
Table of contents 1, 2
Troubleshooting guide 55
U
Unpack the player 5
USB drivers, install 7
User’s guide installation in PC 34
V
Volume level 37, 39, 40
W
Warnings 3
Warranty, limited (for Canada) 58
Warranty, limited (for US) 56, 57
WAV audio 13
Windows Media 13
Index
Page 64

THOMSON CONSUMER ELECTRONICS
10330 N. meridian St.
Indianapolis, IN 46290
©2000 Thomson Consumer Electronics, Inc.
Trademark(s) © Registered
Marca(s) © Registrada(s)
Marque(s) © Deposée(s)
55089180 (REV. 1)
www.rca.com
 Loading...