

RCA PSVR87 Owner’s Manual
VCR
USER'S MANUAL
P RO S CAN'
J
_ • _ _ _ _; i ,_! _,¸¸_¸
%
%.
'%•
• %•
MODEL PSVR87

WARNING
To reduce risk of fire or
shock hazard, do not
expose this product to
rain or moisture.
TO REDUCE THE RISK OF ELECTRICSHOCK, DO NOT REMOVE
COVER (OR BACK). NO USERSERVICEABLE PARTSINSIDE.
REFER SERVICING TO QUALIFIED SERVICE PERSONNEL.
,_ This symbol indicates imporlant _ This symbol indicates"dangerous
instructions accompanying the _,_ voltage" inside the product that presents
product, a risk of electric shock or personal injury.
Cautions
Care and Cleaning:
Caution: To prevent electric shock, match wide blade of plug to wide slot, fully
insert.
Attention: Pour 6viter les chocs _lectriques, introduire la lame la plus large de la
fiche dans la borne correspondante de la prise et pousser jusqc_ au fond.
Refer to the identification/rating label located on the back panel of your product
for its proper operating voltage.
FCC Regulations state that unauthorized changes or modifications to this
equipment may void the user's authority to operate it.
Cable TV Installer: This reminder is provided to call your attention to Article 820-
40 of the National Electrical Code (Section 54 of the Canadian Electrical Code,
Part 1) which provides guidelines for proper grounding and, in particular, specifies
that the cable ground shall be connected to the grounding system of the building
as close to the point of cable entry as pract ca
Use a soft cloth or the dusting attachment of your vacuum cleaner to dust your
VCR. Remove dust from the ventilation holes.
Plastic surfaces are easily scratched and can be marred by alcohol and vanous
solvents. Avoid excessive use of oil-based furniture polishes since the materials
used in the cabinet will accumulate more dust. A nonabrasive, antistatic cleaner/
polisher is recommended.
Product Registration
Please fill out the product registration card and return it immediately. Returning the card allows us to contact you if needed.
Keep your sales receipt to obtain warranty parts and service and for proof of purchase. Attach it here and record the serial and model
numbers in case you need them. The numbers are 5ocatedon the back of the product.
Model No. PSVR87
Serial No.
Purchase Date:
Dealer/Address/Phone:
VCR Plus+ system and PlusCode are register_:l trademarks of Gemstar Development Corporation
The VC_ Plus+ System i_ manu[a( lured under the licetlse (tom Gemstar Developmen( Corporation¸
COMMERCIAL ADVANCE and MOVIE ADVANCE are registered trademarks of 5R T, Inc.; a lerry Iggulden invention licensed in ascot iation with Arthur D. Little _nterprises,

First Things First ...................................................................................3
Using the QuickSet Guide ...................................................................5
Setting Up theVCR .............................................................................7
Using the Menus to Set Up Features ................................................8
Language.............................................................................................8
Setup for a Digital Satellite Receiver ...........................................9
Cable Box Setup .............................................................................I0
VCR Channels List..................................;......................................12
Auto Channel Searching .........................................................12
Changing the Signal Type .........................................................13
Adding or Removing Channels ..............................................13
Time and Date ................................................................................14
Auto Clock Set Feature ..........................................................14
SettingTime and Date Manually ............................................15
VCR Plus+@ GOLD Programming System .............................. 16
MappingVCR Plus+ System Channels Manually ................ 17
VCR Plus+ System Worksheet .........................................18
Additional Set Up Features in the Preferences Menu ............ 19
Remote VCRI/VCR2 Option .................................................19
Auto Play ....................................................................................20
Auto TV/VCR ............................................................................20
EnergySaver ................................................................................20
Front Panel Brightness (VCR Display) .................................2I
Tape Speed .................................................................................2 I
SetAuto Repeat ........................................................................21
VCR Basics ..............................................................................................23
Remote Buttons ...................................................................................24
Component Buttons .....................................................................24
VCR Function Buttons ..................................................................25
"IV Function Buttons .....................................................................26
PlayingaTape ........................................................................................27
Automatic Rewind .........................................................................27
Tape Eject .........................................................................................27
Recording ..............................................................................................28
Recording .................................................................................................29
Recording Features .............................................................................30
Express Recording (XPR) .............................................................30
Program Express ............................................................................3 I
Timer Recording ............................................................................3I
Timer RecordingWith the VCR Plus+ System ..................33
Setting Up the Channel List ..............................................33
Using the VCR Plus+ Programming System ...................33
Stopping aTimer Recording ...................................................34
Reviewing and Clearing Programs ........................................35
Editing a Timer Program ...............................................................35
Recording Broadcast StereoTV or SAP (Second Audio
Program) .......................................................................................35
Recording Audio Only .............................................................36
Playing Back Audio Only .........................................................37
Using Two VCRs for Copying and Editing Tapes ......................37
Using Dual Remote with AutoEdit .............................................38
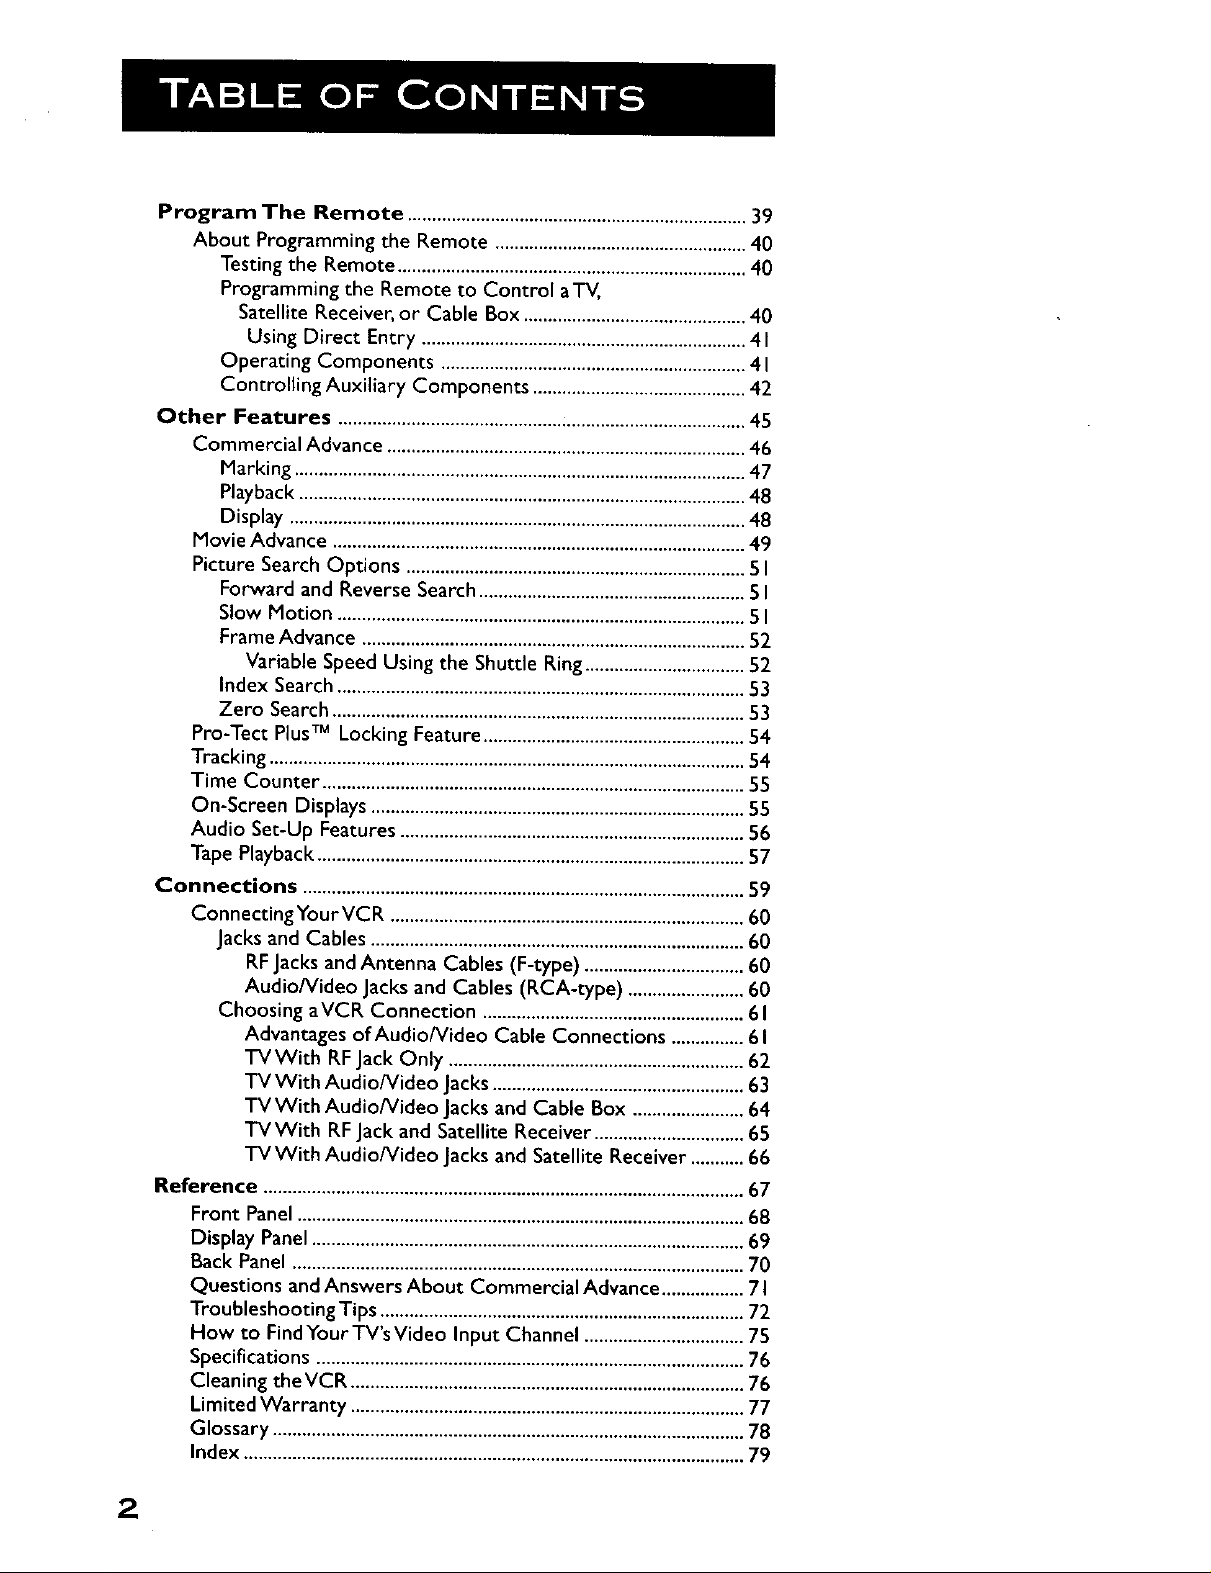
Program The Remote ......................................................................39
About Programming the Remote ....................................................40
Testing the Remote ........................................................................40
Programming the Remote to Control aTV,
Satellite Receiver, or Cable Box ..............................................40
Using Direct Entry ...................................................................4 I
Operating Components ...............................................................41
Controlling Auxiliary Components ............................................42
Other Features ....................................................................................45
Commercial Advance ..........................................................................46
Marking .............................................................................................47
Playback ............................................................................................48
Display ..............................................................................................48
Movie Advance .....................................................................................49
Picture Search Options ......................................................................5I
Forward and Reverse Search .......................................................5 I
Slow Motion ....................................................................................5I
Frame Advance ...............................................................................52
Variable Speed Using the Shuttle Ring.................................52
Index Search ....................................................................................53
Zero Search .....................................................................................53
Pro-Tect PlusTM Locking Feature ......................................................54
Tracking ..................................................................................................54
Time Counter .......................................................................................55
On-Screen Displays .............................................................................55
Audio Set-Up Features .......................................................................56
Tape Playback ........................................................................................57
Connections ...........................................................................................59
ConnectingYourVCR .........................................................................60
Jacks and Cables .............................................................................60
RFJacks andAntenna Cables (F-type) .................................60
Audio/Video Jacks and Cables (RCA-type) ........................60
Choosing aVCR Connection ......................................................61
Advantages of Audio/Video Cable Connections ...............61
TVWith RFJack Only .............................................................62
TV With Audio/Video Jacks ....................................................63
TVWith Audio/Video Jacks and Cable Box .......................64
TVWith RFJack and Satellite Receiver ...............................65
TVWith Audio/video Jacks and Satellite Receiver ........... 66
Reference ...................................................................................................67
Front Panel ............................................................................................68
Display Panel .........................................................................................69
Back Panel .............................................................................................70
Questions and Answers About Commercial Advance .................7 I
Troubleshooting Tips ...........................................................................72
How to Find Your TV's Video Input Channel .................................75
Specifications ........................................................................................76
Cleaning theVCR .................................................................................76
Limited Warranty .................................................................................77
Glossary .................................................................................................78
Index .......................................................................................................79
2
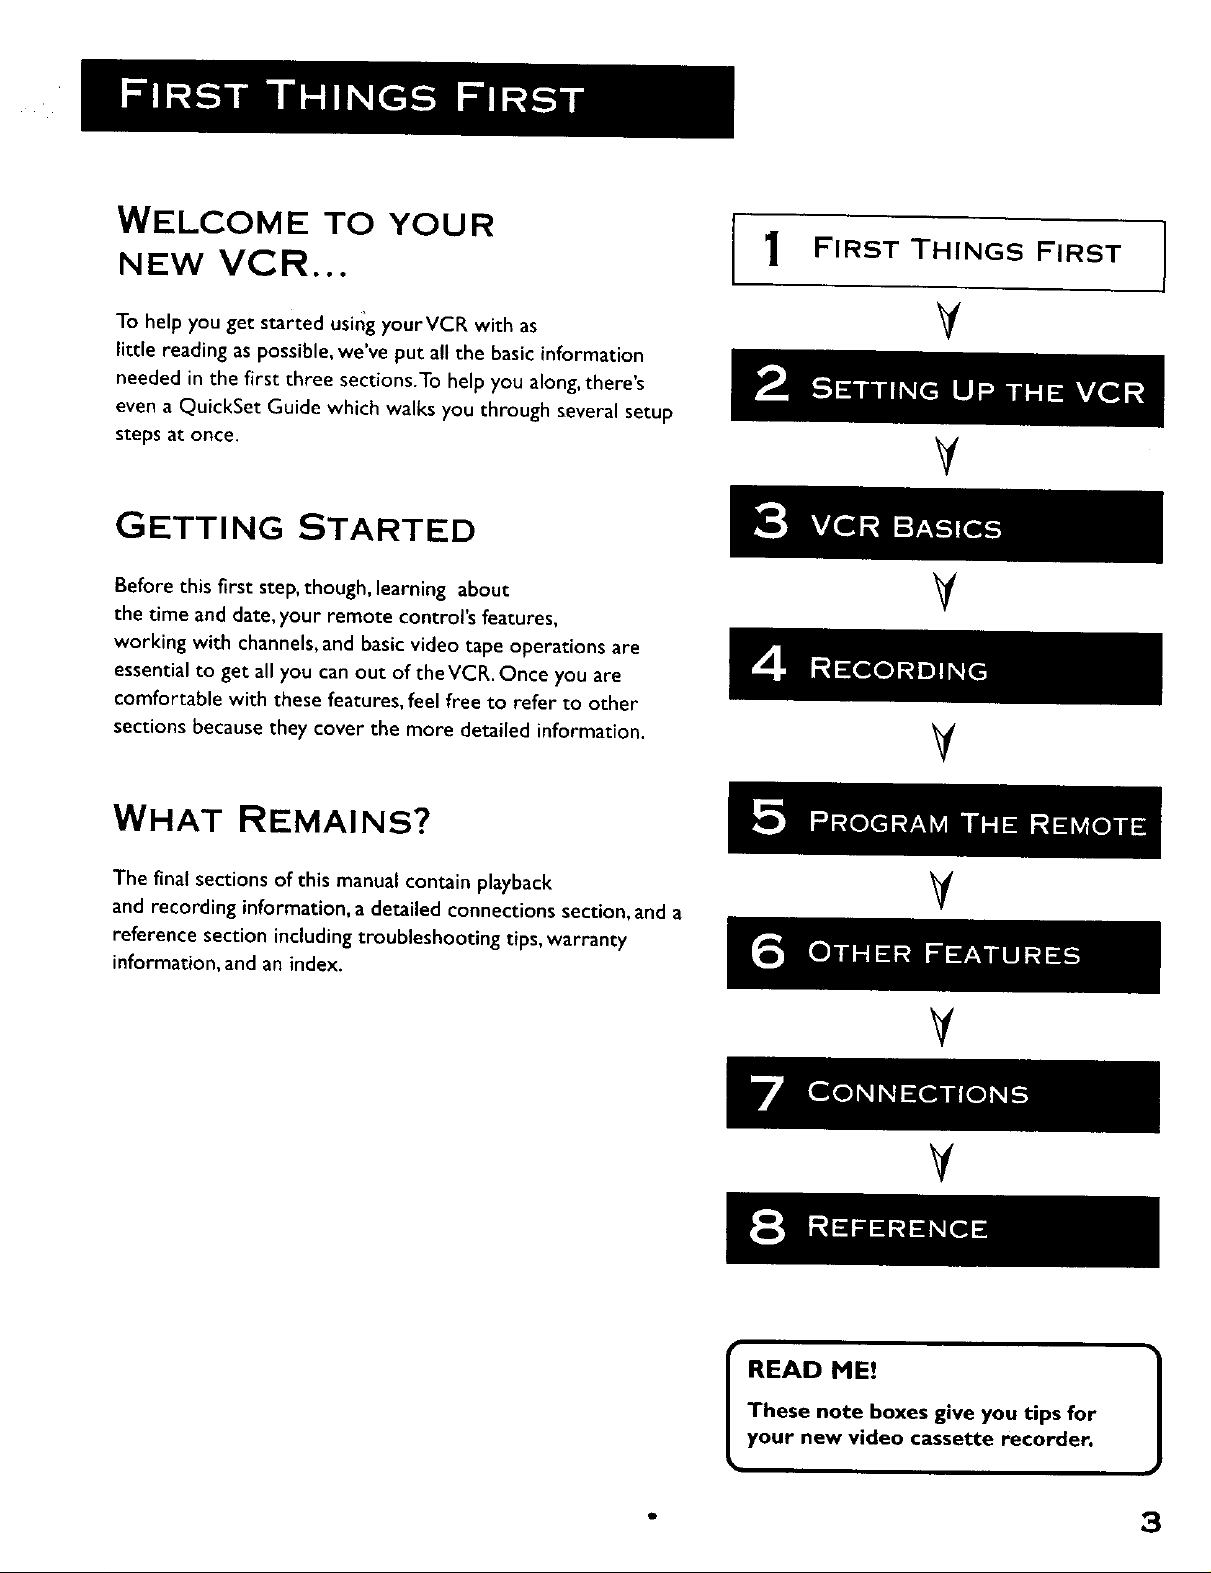
WELCOME TO YOUR
NEW VCR...
1 FIRST THINGS FIRST I
I
To help you get started using yourVCR with as
little reading as possible, we've put all the basic information
needed in the first three sections.To help you along, there's
even a QuickSet Guide which walks you through several setup
steps at once.
GETTING STARTED
Before this first step, though, learning about
the time and date, your remote control's features,
working with channels, and basic video tape operations are
essential to get all you can out of the VCR. Once you are
comfortable with these features, feel free to refer to other
sections because they cover the more detailed information.
WHAT REMAINS?
The final sections of this manual contain playback
and recording information, a detailed connections section, and a
reference section including troubleshooting tips, warranty
information, and an index.
¥
V
V
V
¥
V
V
READ ME!
These note boxes give you tips for
your new video cassette recorder.
- 3

STEP 1: WHAT'S IN THE Box?
The following items come packed in the box:
• • VCR
• Remote control
• RF coaxial cable
STEP 2: INSTALL BATTERIES
THE REMOTE CONTROL
Follow these steps whenever you need to install or change the
batteries in your VCR's remote.
.
Remove the cover of the battery compartment.
.
Place the batteries into the remote's back panel. Match the
positive (+) and negative (-) ends of each battery to the
diagram inside the battery compartment.
3. Replace the cover.
L _
.-:
QQq
STEP 3: CONNECT YOUR VCR
if you connect your VCR to your home antenna or cable system
and then to your TV, use the VCR's ANT. IN and RF OUT jacks
for a good signal as shown to the right.
If you have a TV with AUDIO/VIDEO jacks, use the jacks for a
better connection. Refer to the section, Connections, toward
the back of the manual, for additional connection options.
STEP 4: PLUG IN THE VCR
Your VCR's power cord has a plastic band strung through the
blades. Remove plastic band before plugging the cord into the
power outlet. To remove band, cut with a pair of scissors and
pull it free of the blades. Once the plastic is removed, match the
wide blade of the power cord to the wide slot in the AC outlet.
Be sure to insert the plug completely.
Coaxial Connection
CABLE, CABLE BOX, OR ANTENNA
VCR
I I
'N
I
4
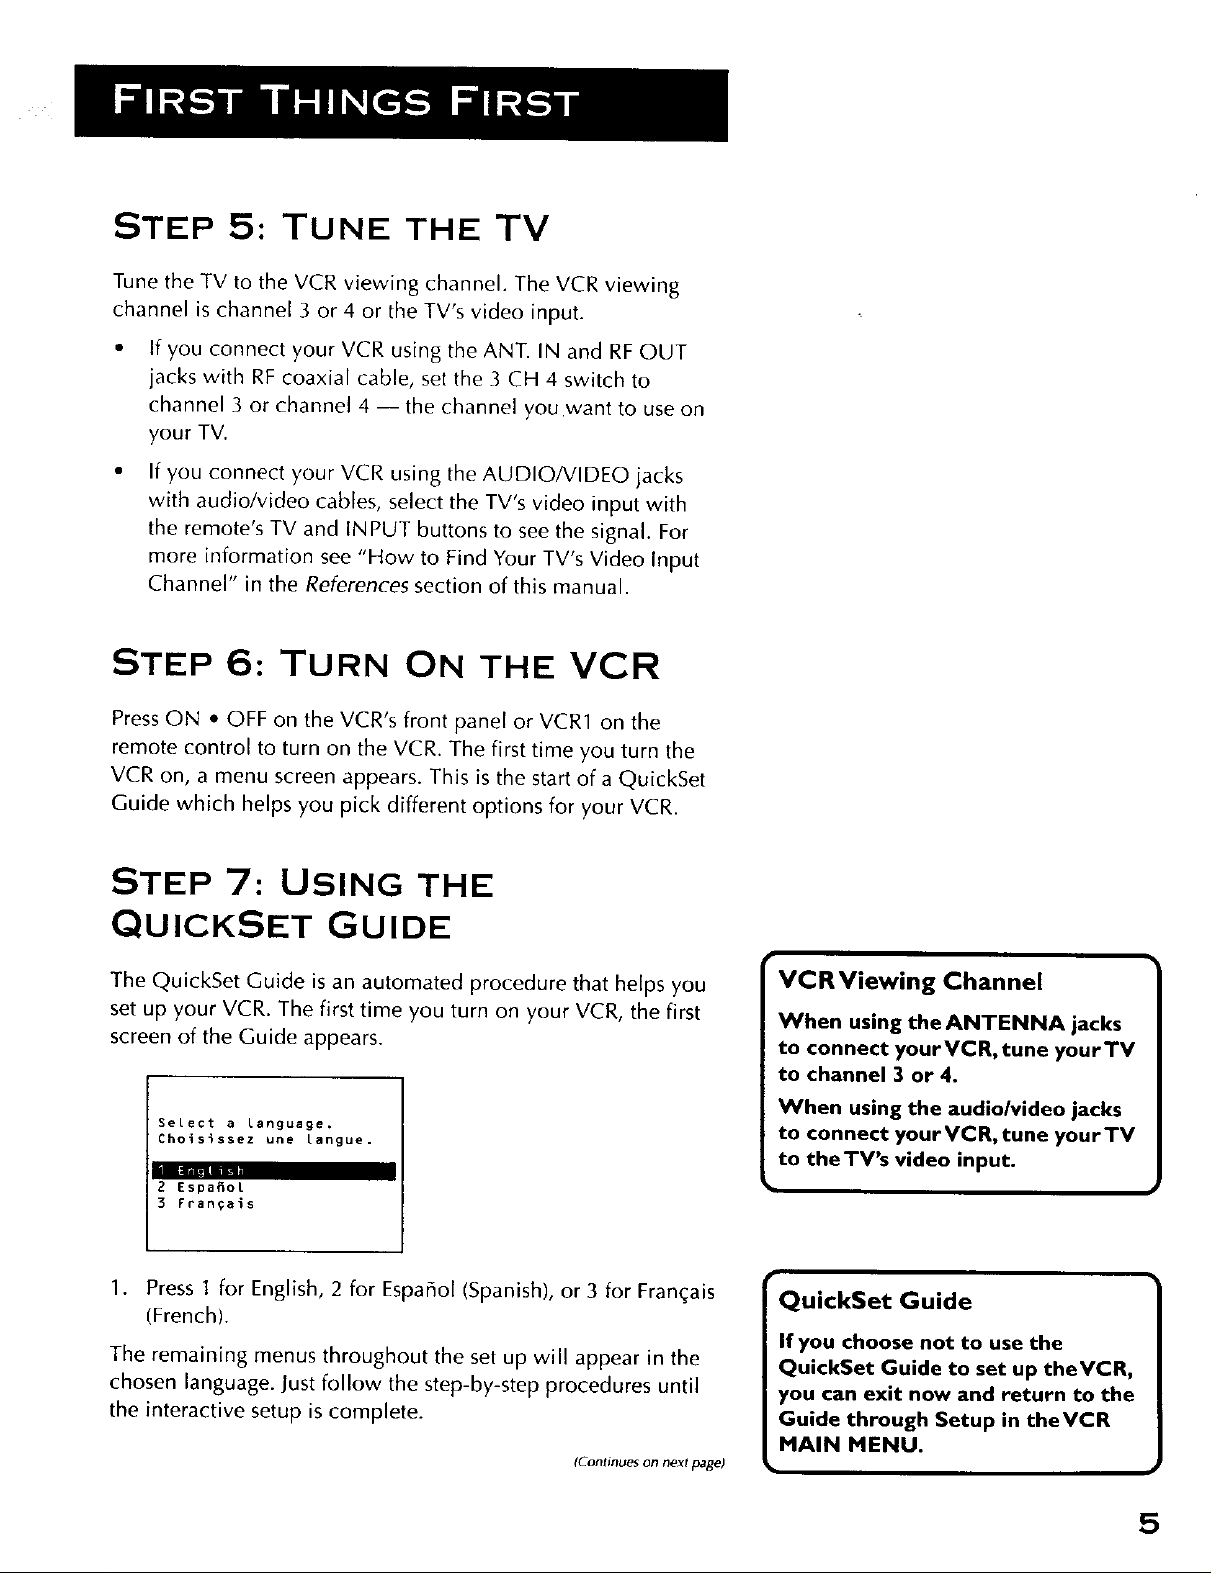
STEP 5: TUNE THE TV
Tune the TV to the VCR viewing channel. The VCR viewing
channel is channel 3 or 4 or the TV's video input.
• If you connect your VCR using the ANT. IN and RF OUT
jacks with RF coaxial cable, set the 3 CH 4 switch to
channel 3 or channel 4-- the channel you want to use on
your TV.
• If you connect your VCR using the AUDIO/VIDEO jacks
with audio/video cables, select the TV's video input with
the remote's TV and INPUT buttons to see the signal. For
more information see "How to Find Your TV's Video Input
Channel" in the References section of this manual.
STEP 6: TURN ON THE VCR
Press ON • OFF on the VCR's front panel or VCR1 on the
remote control to turn on the VCR. The first time you turn the
VCR on, a menu screen appears. This is the start of a QuickSet
Guide which helps you pick different options for your VCR.
STEP 7: USING THE
QUICKSET GUIDE
The QuickSet Guide is an automated procedure that he[ps you
set up your VCR. The first time you turn on your VCR, the first
screen of the Guide appears.
Select a Language.
Choisissez une Langue.
-I- I
2 Espa_ol
3 Fran_ai$
1. Press I for English, 2 for Espaffol (Spanish), or 3 for Fran(,:ais
(French).
The remaining menus throughout the set up will appear in the
chosen language. Just follow the step-by-step procedures until
the interactive setup is complete.
(Continues on next page)
VCR Viewing Channel
When using the ANTENNA jacks
to connect yourVCR, tune yourTV
to channel 3 or 4.
When using the audio/video jacks
to connect yourVCR, tune yourTV
to theTV's video input.
QuickSet Guide
If you choose not to use the
QuickSet Guide to set up theVCR,
you can exit now and return to the
Guide through Setup in theVCR
MAIN MENU.
5
(L-ontinued lronl previous pag(')
If the menu does not appear:
• Make sure the TV is tuned to the same channel as the 3 CH
4 switch or the TV's video input "channel" (see "How to
Find Your TV's Video Input Channel" in the References
section of this manual for more information).
• Make sure the VCR indicator is on in the VCR display if you
connected your VCR using the ANT. IN and RF OUT jacks.
• Check your connections.
If you choose to set up your VCR options individually rather
than setting them up in the QuickSet Guide, then go to the next
section.
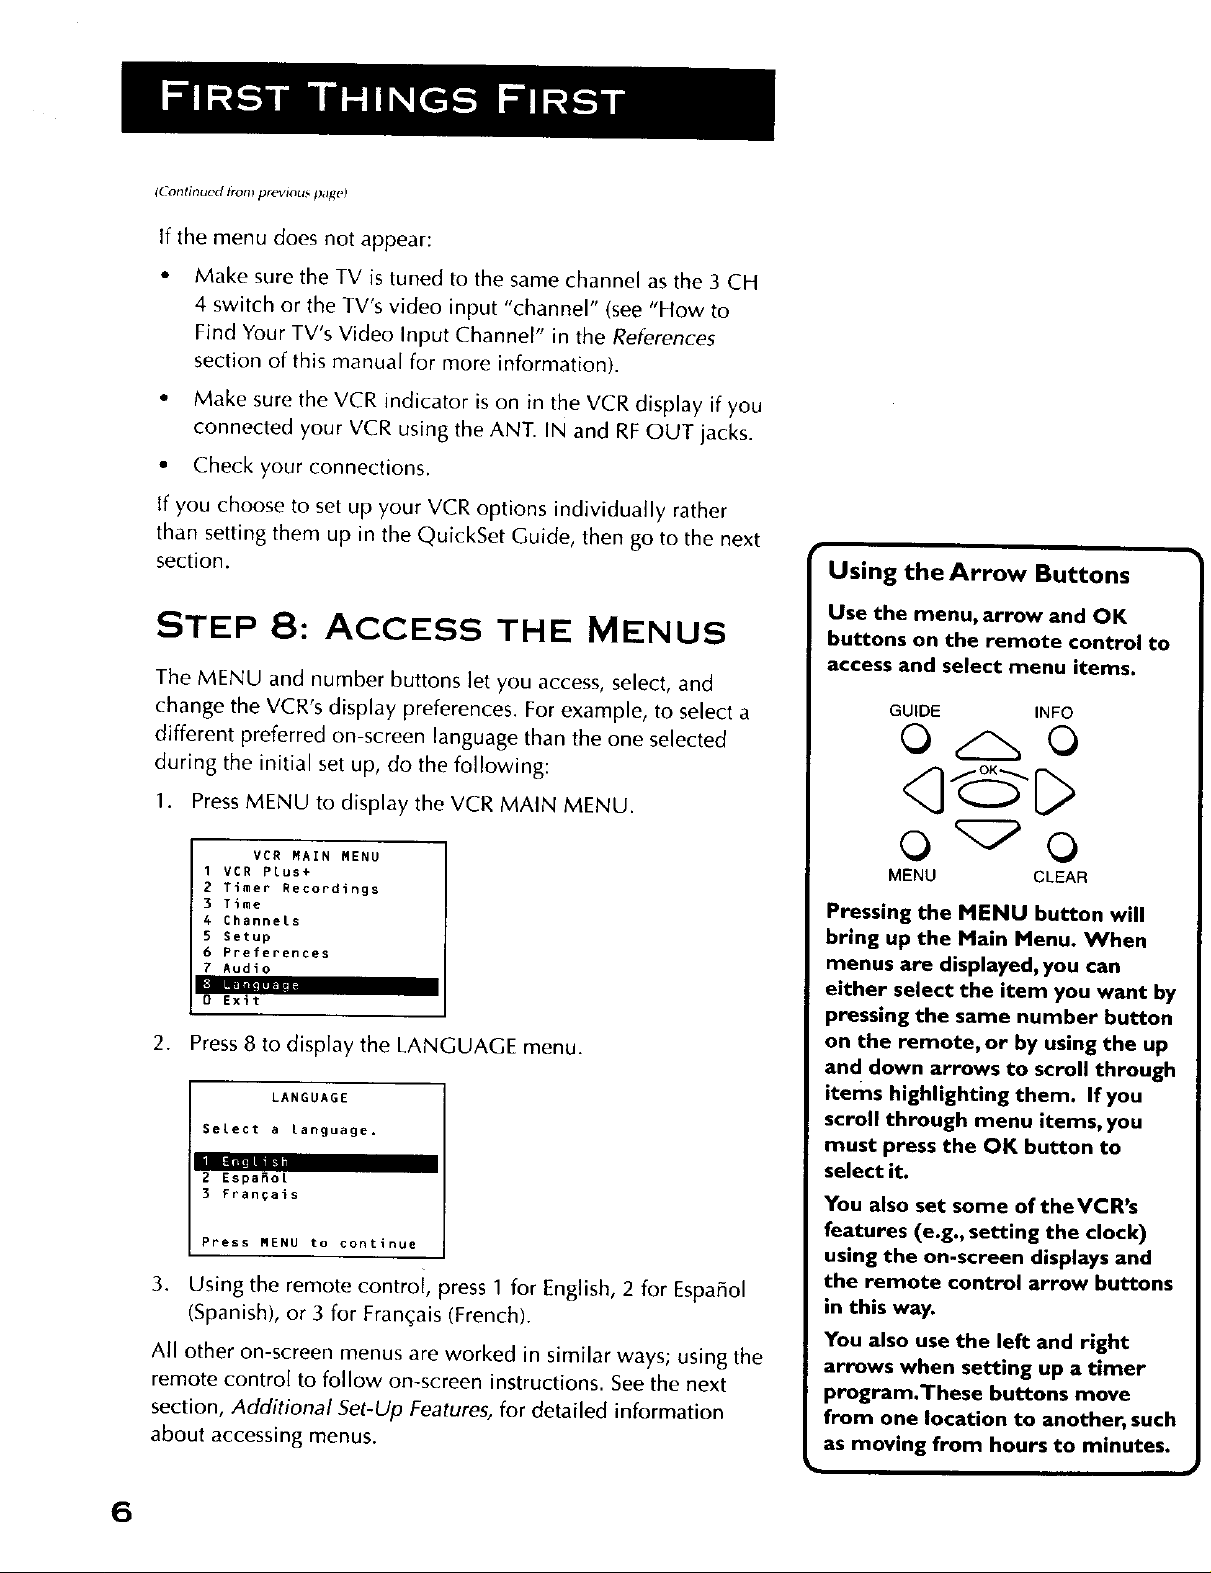
STEP 8: ACCESS THE MENUS
The MENU and number buttons let you access, select, and
change the VCR's display preferences. For example, to select a
different preferred on-screen language than the one selected
during the initial set up, do the following:
Using the Arrow Buttons
Use the menu, arrow and OK
buttons on the remote control to
access and select menu items.
GUIDE INFO
O O
1. Press MENU to display theVCR MAIN MENU.
VER MAIN MENU
1 VCR PLus+
2 Timer Recordings
3 Time
4 Channels
5 Setup
6 Preferences
7 Audio
|
0 Exit
| |i|
2. Press 8 to display the LANGUAGE menu.
LANGUAGE
SeLect a Language.
2 Espa_ot
3 Fran_ais
Press MENU to continue
3. Using the remote control, press 1 for English, 2 for Espaffol
(Spanish), or 3 for Fran£:ais (French).
All other on-screen menus are worked in similar ways; using the
remote control to follow on-screen instructions. See the next
section, Additional Set-Up Features, for detailed information
about accessing menus.
MENU CLEAR
Pressing the MENU button will
bring up the Main Menu. When
menus are displayed, you can
either select the item you want by
pressing the same number button
on the remote, or by using the up
and down arrows to scroll through
items highlighting them. If you
scroll through menu items, you
must press the OK button to
select it.
You also set some of theVCR's
features (e.g., setting the clock)
using the on-screen displays and
the remote control arrow buttons
in this way.
You also use the left and right
arrows when setting up a timer
program.These buttons move
from one location to another, such
as moving from hours to minutes.
6
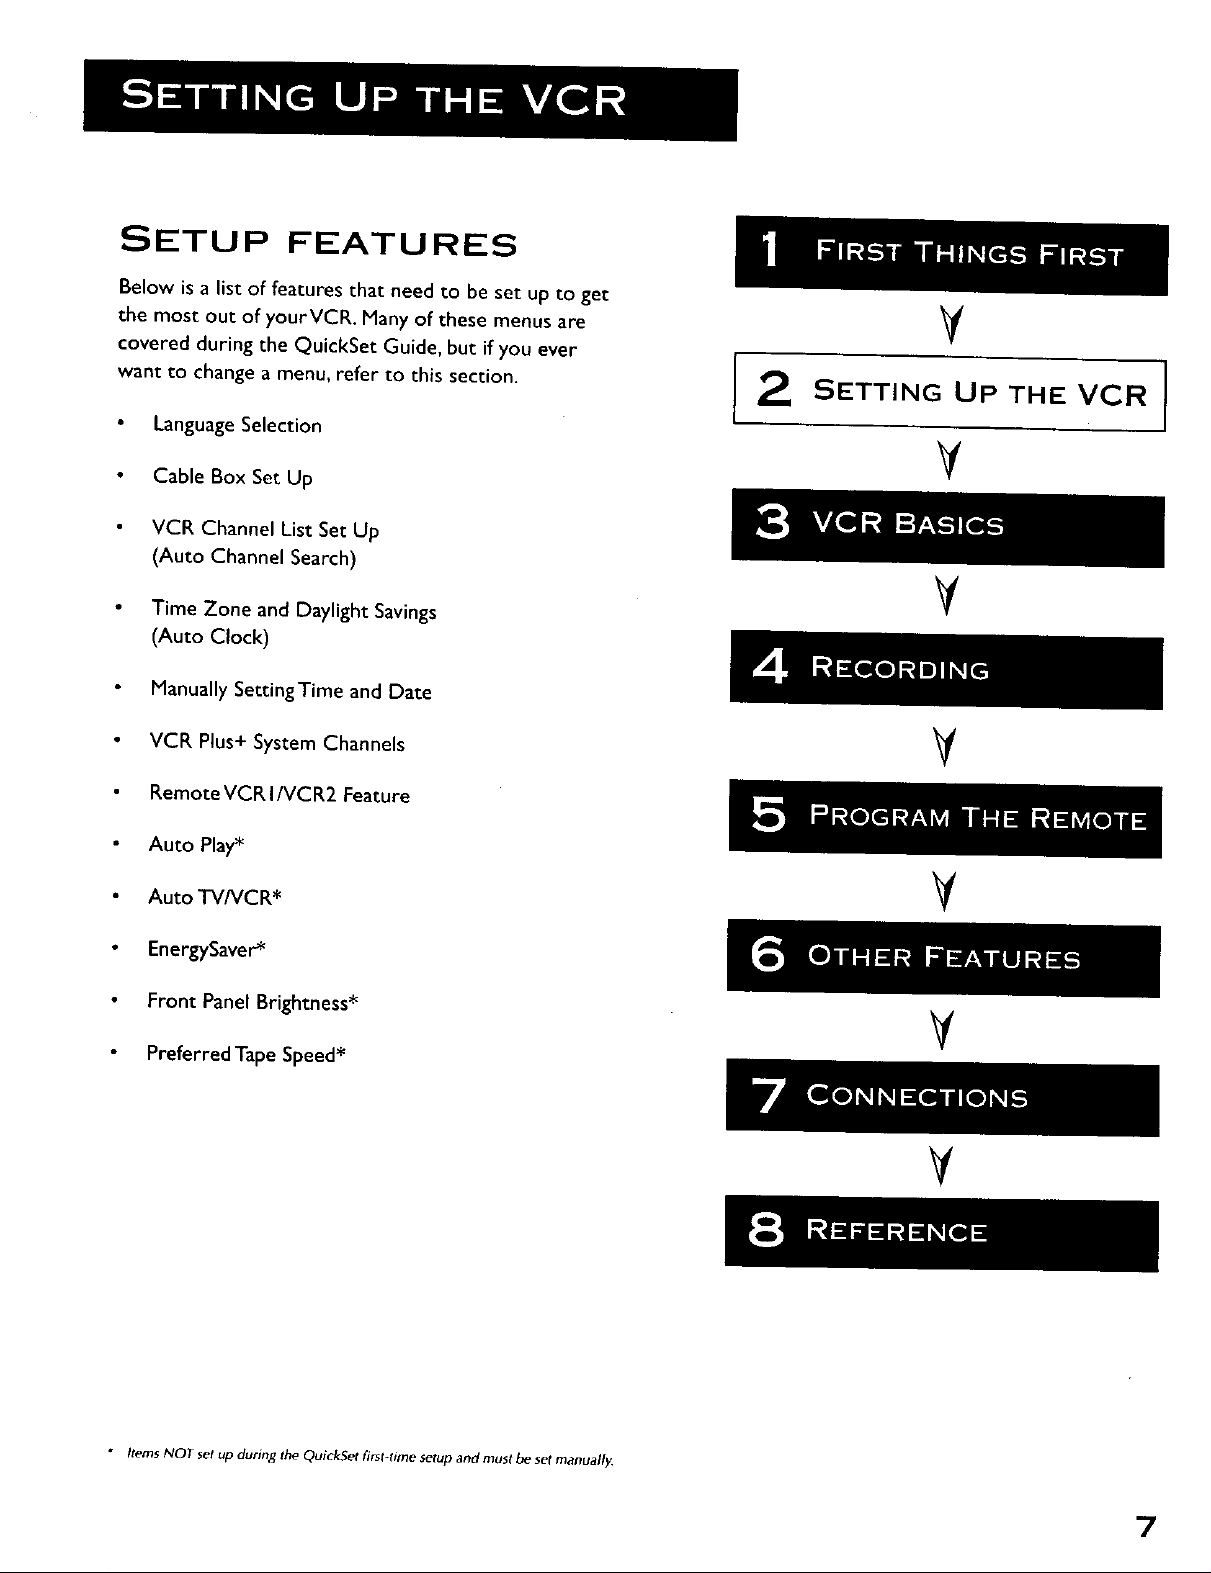
SETUP FEATURES
Below is a list of features that need to be set up to get
the most out of yourVCR. Many of these menus are
covered during the QuickSet Guide, but if you ever
want to change a menu, refer to this section.
Language Selection
Cable Box Set Up
VCR Channel List Set Up
(Auto Channel Search)
Time Zone and Daylight Savings
(Auto Clock)
Manually SettingTime and Date
¥
SETTING UP THE VCR
V
V
VCR Plus+ System Channels
RemoteVCR I/VCR2 Feature
Auto Play*
Auto TV/VCR*
EnergySaver*
Front Panel Brightness*
Preferred Tape Speed*
V
V
V
[ • • •
V
• Items NOT set up during the QuickSet first-fime setup and must be set manuall_
7
USING THE MENUS TO SET
UP FEATURES
You set up features by using the menu system as discussed in
the previous section. Each feature that appears in the QuickSet
Guide is explained in this section as well as a few other features
you should set up before you begin using your VCR.
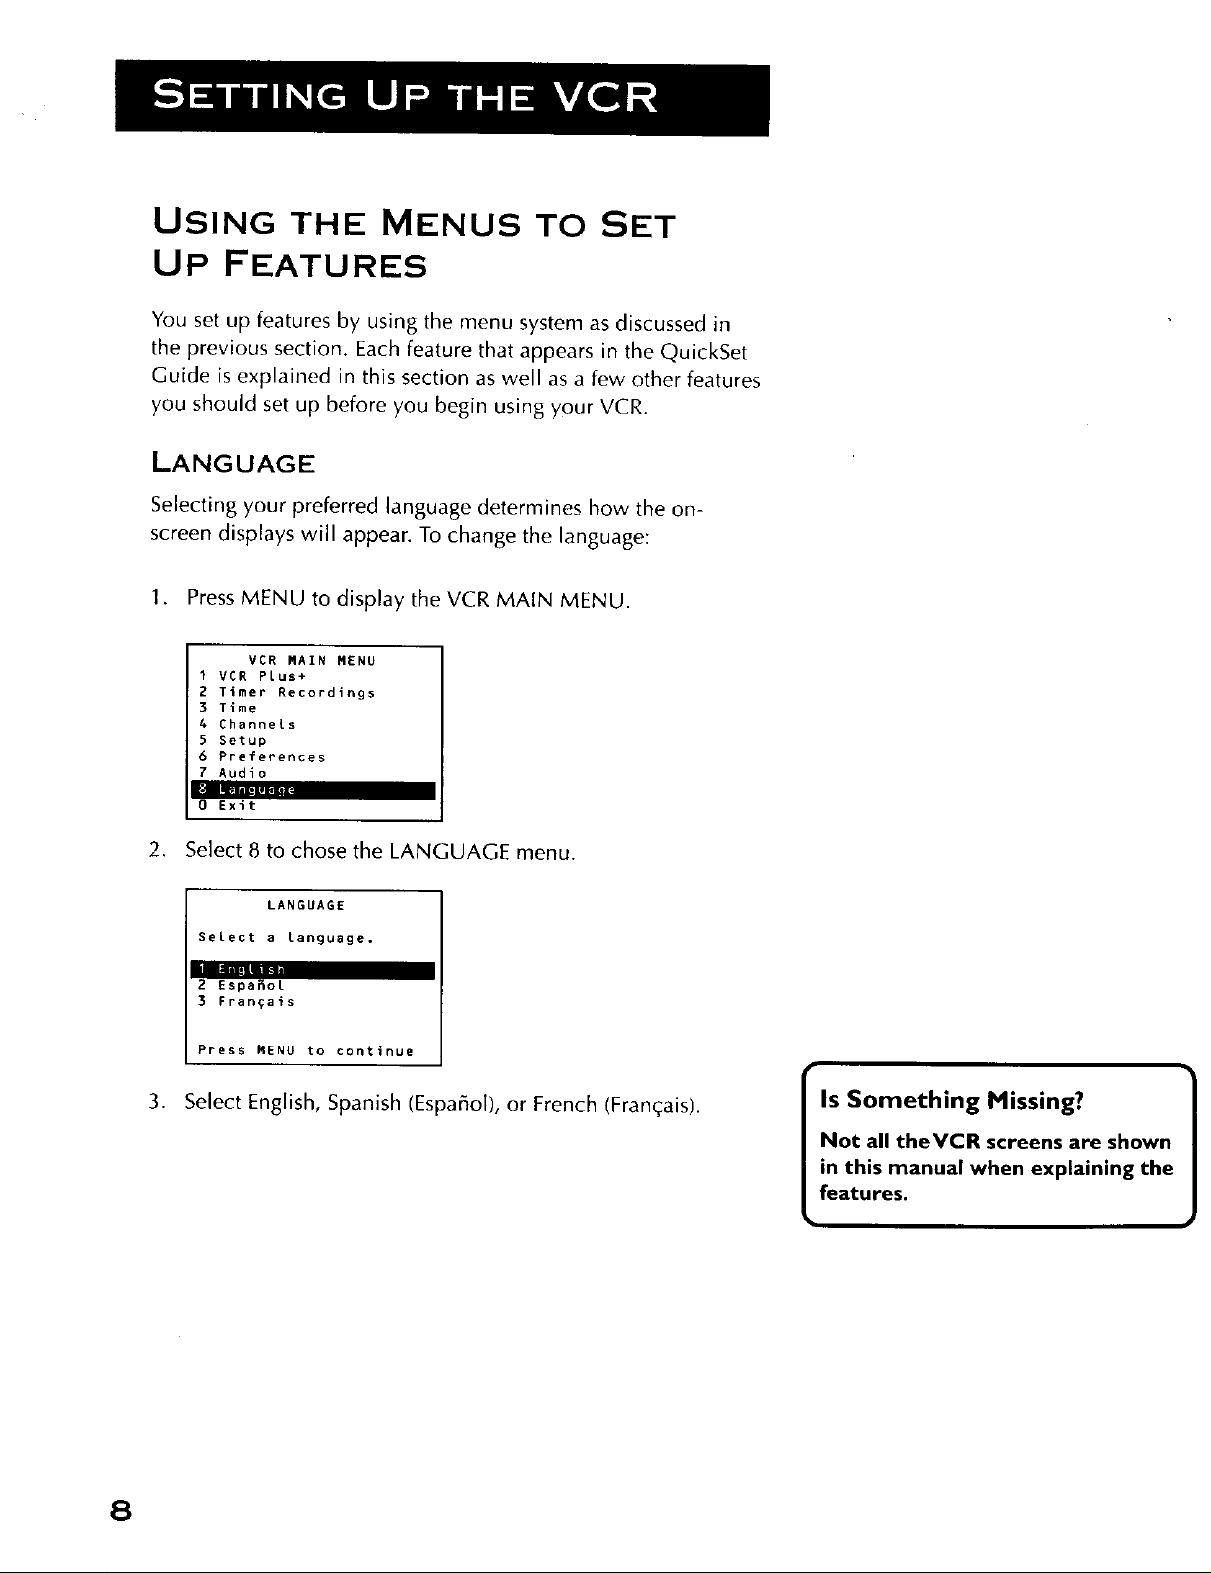
LANGUAGE
Selecting your preferred language determines how the on-
screen displays will appear. To change the language:
1. Press MENU to display the VCR MAIN MENU.
VCR MAIN MENU
I VCR Plus+
2 Timer Recordings
3 Time
4 Channels
5 Setup
6 Preferences
7 Audio
I •
0 Exit
2. Select 8 to chose the LANGUAGE menu.
LANGUAGE
Select a language.
2 EspaSot
3 rrangais
Press MENU to continue
,
Select English, Spanish (Espaffol), or French (Fran_ais).
Is Something Missing?
Not all theVCR screens are shown
in this manual when explaining the
features.
8
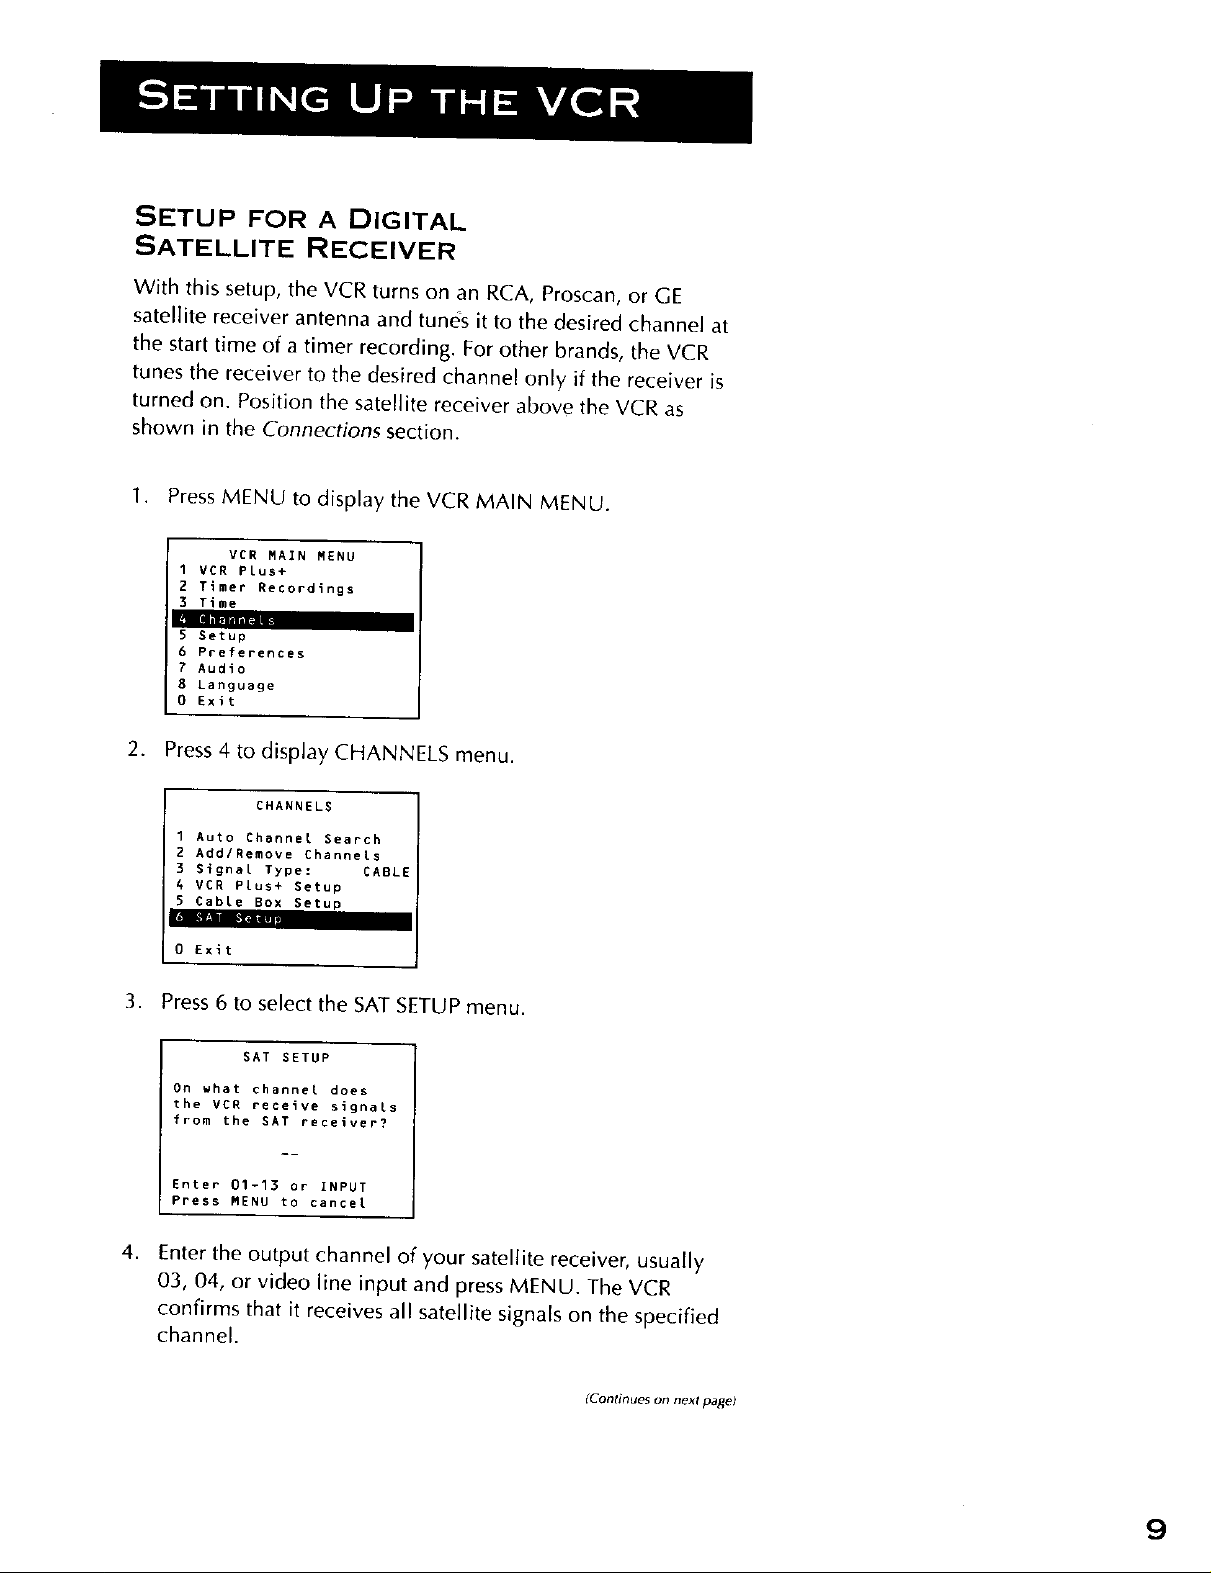
SETUP FOR A DIGITAL
SATELLITE RECEIVER
With this setup, the VCR turns on an RCA, Proscan, or GE
satellite receiver antenna and tunes it to the desired channel at
the start time of a timer recording. For other brands, the VCR
tunes the receiver to the desired channel only if the receiver is
turned on. Position the satellite receiver above the VCR as
shown in the Connections section.
1. Press MENU to display the VCR MAIN MENU.
VCR MAIN MENU
I VCR Plus+
2 Timer Recordings
3 Time
5 Setup
6 Preferences
7 Audio
8 Language
O Exit
2. Press 4 to display CHANNELS menu.
CHANNELS
1 Auto Channel Search
2 AddlRemove Channels
3 Signal Type: CABL{
4 VCR Plus+ Setup
5 CabLe Box Setup
I
0 Exit
3. Press 6 to select the SAT SETUP menu.
SAT SETUP
On what channel does
the VCR receive signals
from the SAT receiver?
Enter 01-13 or INPUT
Press MENU to cancel
4,
Enter the output channel of your satellite receiver, usually
03, 04, or video line input and press MENU. The VCR
confirms that it receives all satellite signals on the specified
channel.
IContinaes on next parle)
9
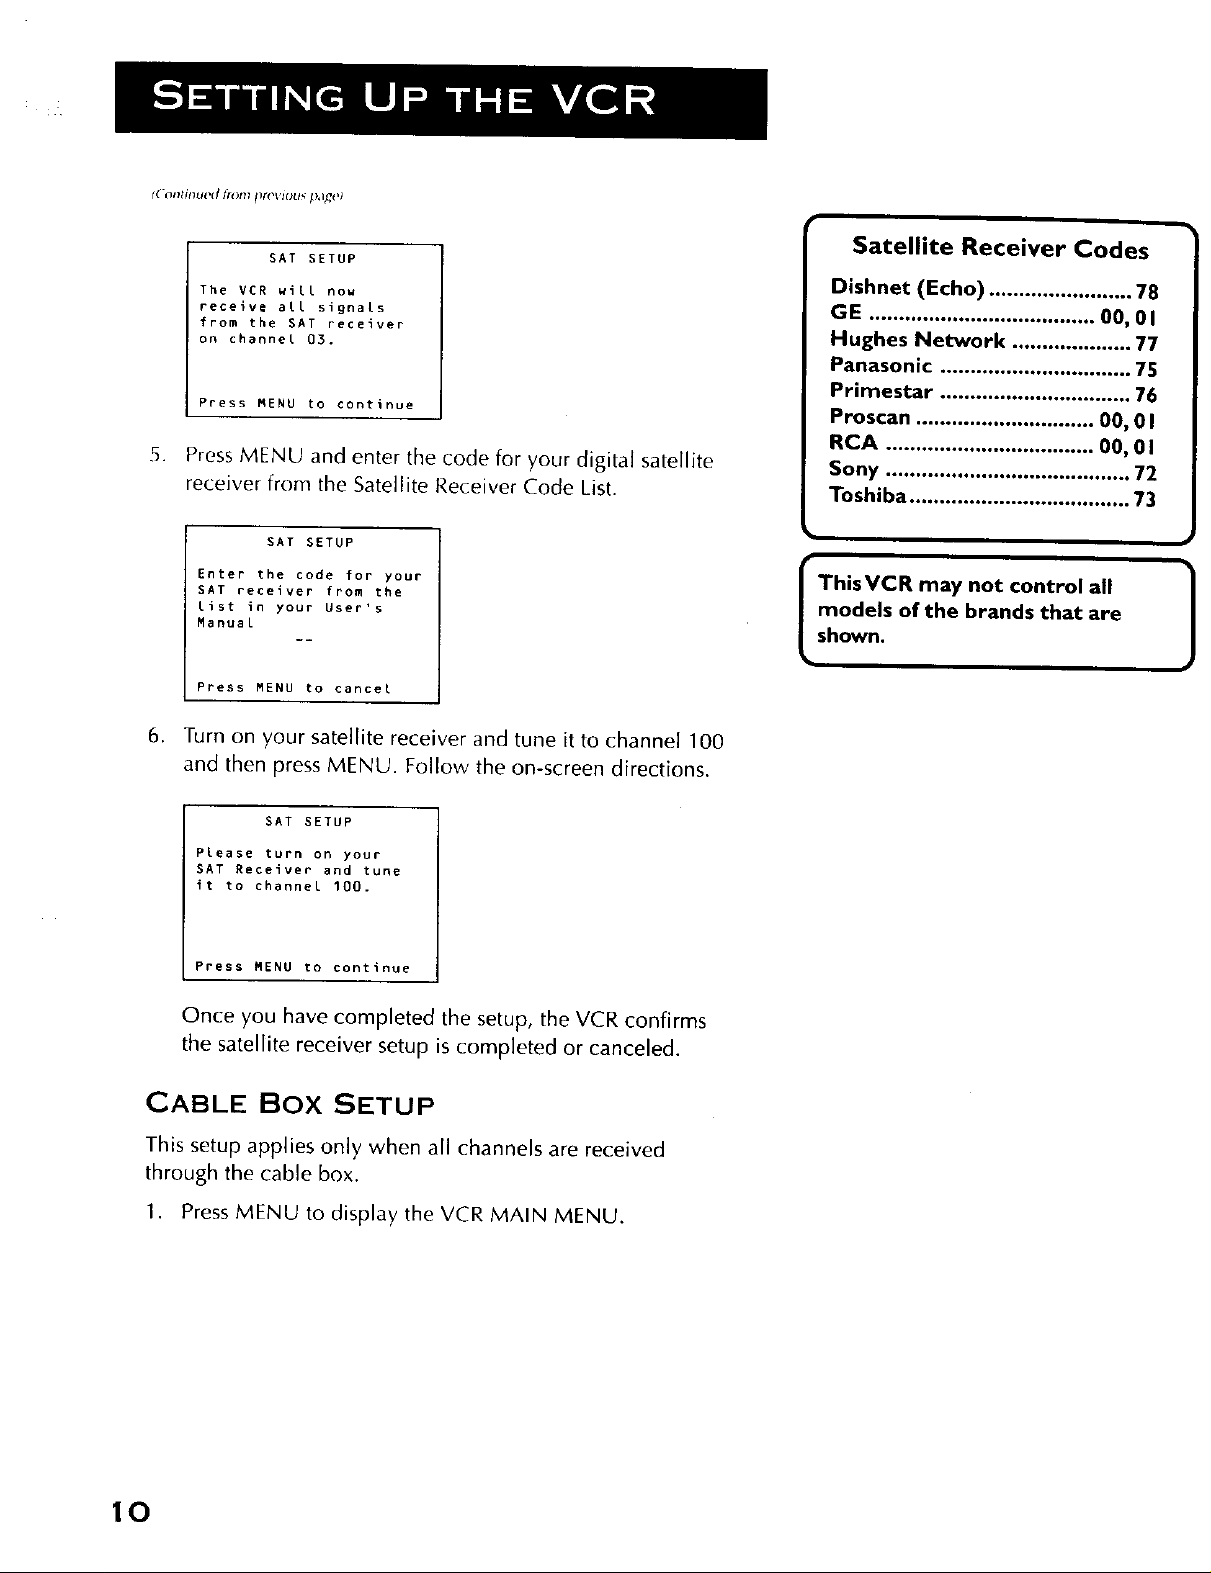
f( ontinued #ore !lrel sl_us f_,Uql'_
SAT SETUP
The VER will now
receive all signals
from the SAT receiver
on channel 03.
Press MENU to continue
5. Press MENU and enter the code for your digital satellite
receiver from the Satellite Receiver Code List.
SAT SETUP
Enter the code for your
SAT receiver from the
[ist in your User's
ManuaL
Press MENU to cancel
6. Turn on your satellite receiver and tune it to channel 100
and then press MENU. Follow the on-screen directions.
SAT SETUP
PLease turn on your
SAT Receiver and tune
it to channel 100.
Satellite Receiver Codes
Dishnet (Echo) ........................ 78
GE ...................................... 00, 01
Hughes Network .................... 77
Panasonic ................................ 75
Primestar ................................ 76
Proscan .............................. 00, 0 I
RCA ................................... 00, 0 I
Sony ......................................... 72
Toshiba ..................................... 73
models of the brands that are
ThisVCR may not control all
shown.
)
Press MENU to continue
Once you have completed the setup, the VCR confirms
the satellite receiver setup is completed or canceled.
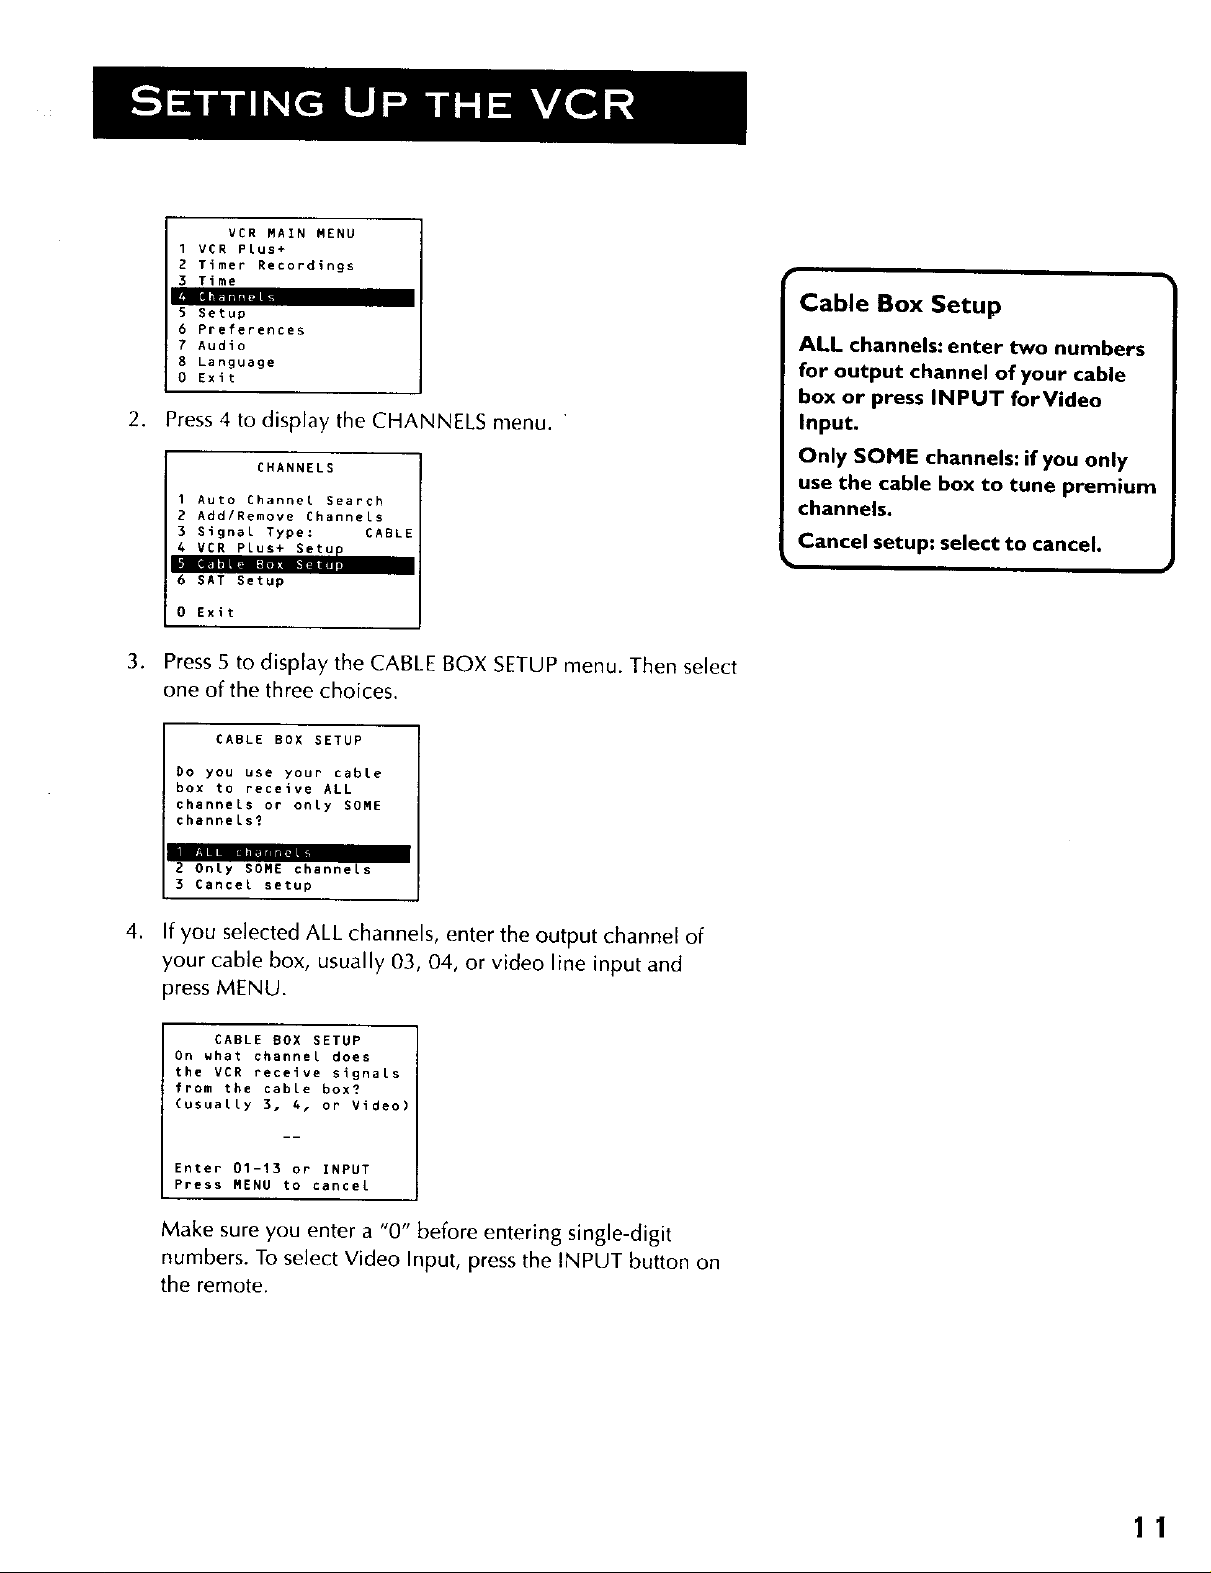
CABLE BOX SETUP
This setup applies only when all channels are received
through the cable box.
I. Press MENU to display the VCR MAIN MENU,
10
VCR MAIN MENU
1 VCR PLus+
2 Timer Recordings
3 Time
5 Setup
6 Preferences
7 Audio
8 Language
0 Exit
2. Press 4 to display the CHANNELS menu.
Cable Box Setup
ALL channels: enter two numbers
for output channel of your cable
box or press INPUT forVideo
Input.
CHANNELS
1 Auto Channel Search
2 Add/Remove Channels
3 Signal Type: CABL
4 VCR Plus+ Setu
6 SAT Setup
0 Exit
3. Press 5 to display the CABLE BOX SETUP menu. Then select
one of the three choices.
CABLE BOX SETUP
Do you use your cable
box to receive ALL
channels or onLy SOME
channeLs?
mm
2 OnLy SOME channels
3 Cancel setup
,
If you selected ALL channels, enter the output channel of
your cable box, usually 03, 04, or video line input and
press MENU.
CABLE BOX SETUP
On what channel does
the VCR receive signals
from the cabLe box?
(usuaLLy 3. 4, or Video)
Only SOME channels: if you only
use the cable box to tune premium
channels.
Cancel setup: select to cancel.
Enter 01-13 or INPUT
Press MENU to cancel
Make sure you enter a "0" before entering single-digit
numbers. To select Video Input, press the INPUT button on
the remote.
11

CABLE BOX SETUP
The VCR will now
receive all signals
from the cable box
on channel 04.
Press MENU to continue
Once you complete the setup, the on-screen menus confirm
that the VCR will receive all signals on the designated
channel.
VCR CHANNELS LIST
If you use a cable box for all channels, this step is not necessary.
Your VCR may come with a channel list preset at the factory.
Even though your VCR may come with such a list, it's possible
that you will want to add or delete certain channels depending
on whether they are active.
AUTO CHANNEL SEARCHING
1. Press MENU to display the VCR MAIN MENU.
2. Press 4 to display the CHANNELS menu.
CHANNELS
Auto Channel Search
Use the Auto Channel Search
feature to place all available
channels in memory.
If you ever change cable or
antenna signals, you may need to
Auto Channel Search again.
W
2 Add/Remove Channels
3 Signal Type: CABLE
4 VCR Plus+ Setup
5 Cable Box Setup
6 SAT Setup
0 Exit
3. Press 1 to display the AUTO CHANNEL SEARCH menu.
AUTO CHANNEL SEARCH
What type of signal
are you using?
1 Cable TV
2 Antenna
_ Fial'.llllmllllunllllm i_ m
0 Cancel
4. Select one of the three AUTO CHANNEL SEARCH options.
• Cable TVsearches for cable stations from a single channel
• Antenna searches for local broadcast stations on all channels
• Detect Automatically will make this decision for you
12
Detect Automatically
A strong cable or antenna signal
in your area may cause Auto
Detect to mis-detect. If this
should happen, select I or 2 for
the system you have.
}
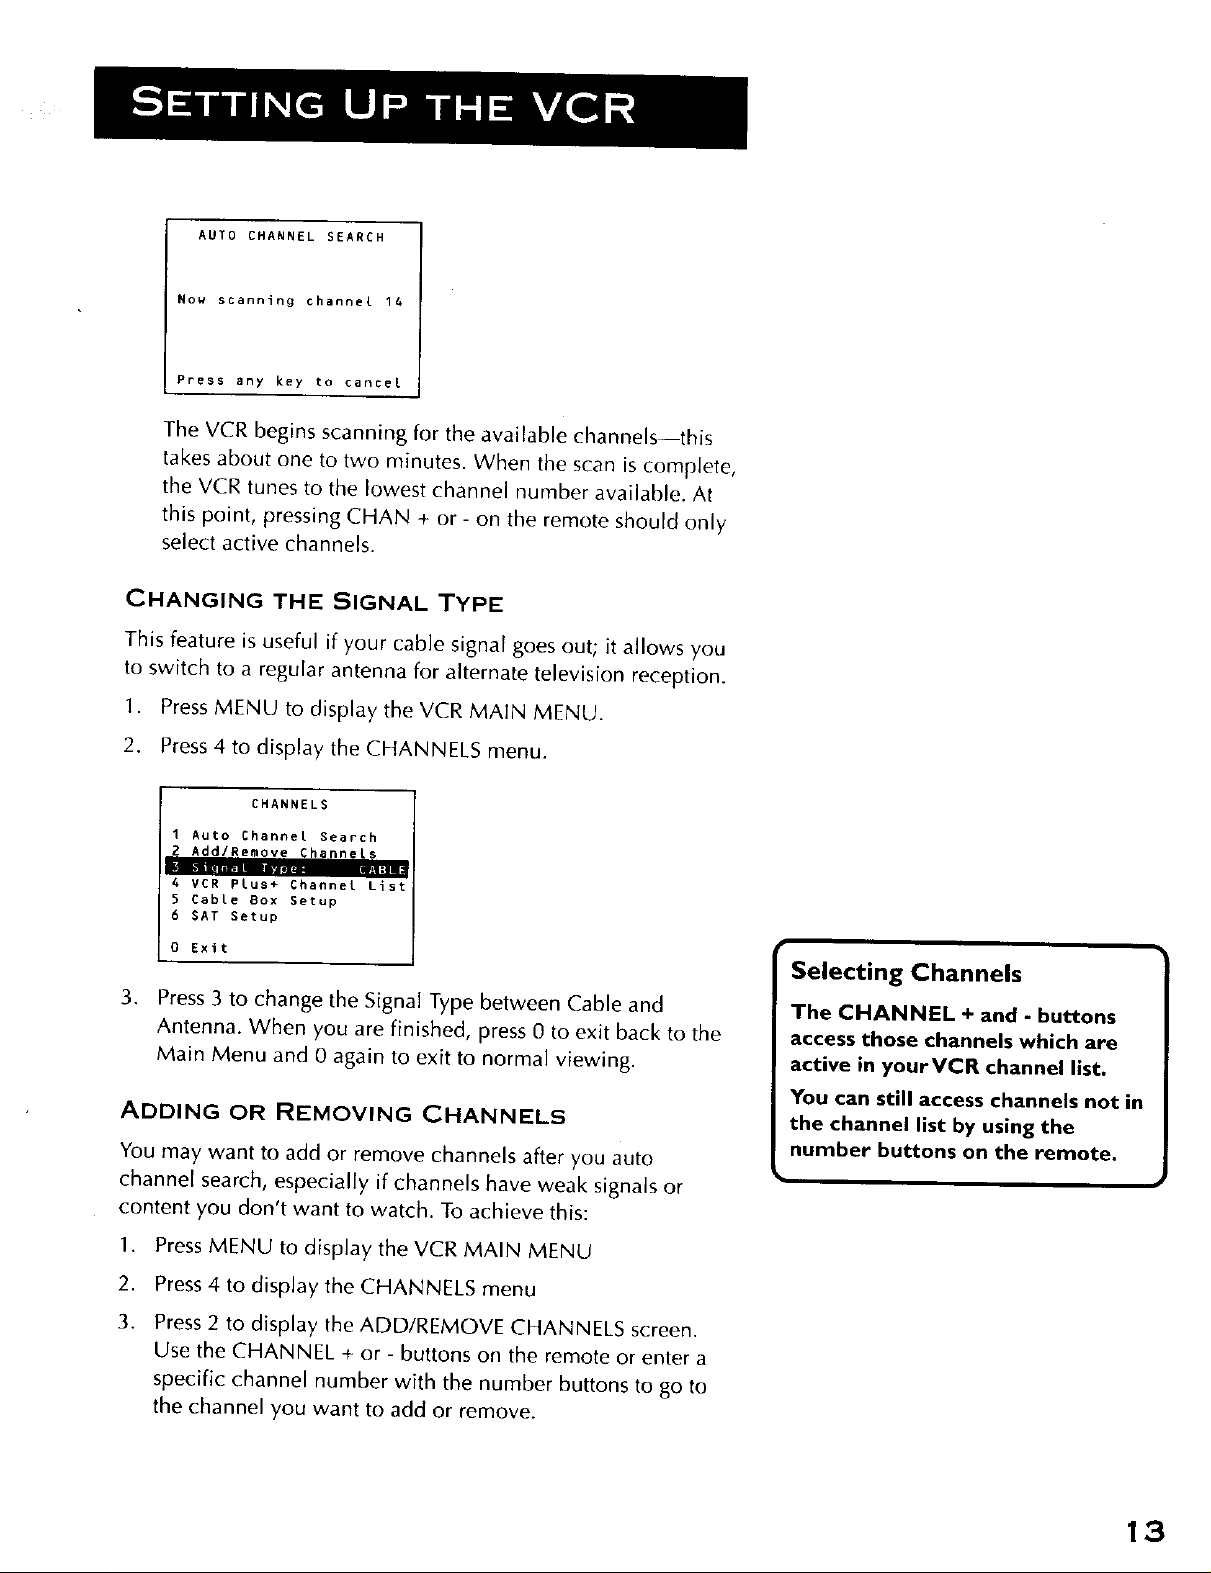
AUTO CHANNEL SEARCH
Now scanning channel 14
Press any key to cancel
The VCR begins scanning for the available channels--this
takes about one to two minutes. When the scan is complete,
the VCR tunes to the lowest channel number available. At
this point, pressing CHAN + or - on the remote should only
select active channels.
CHANGING THE SIGNAL TYPE
This feature is useful if your cable signal goes out; it allows you
to switch to a regular antenna for alternate television reception.
1. Press MENU to display the VCR MAIN MENU.
2. Press 4 to display the CHANNELS menu.
CHANNELS
I Auto _hannel Search
2 Add/Remove Channels
A VCR Plus+ Channel List
5 Cable Box Setup
6 SAT Setup
0 Exit
Selecting Channels
3. Press 3 to change the Signal Type between Cable and
Antenna. When you are finished, press 0 to exit back to the
Main Menu and 0 again to exit to normal viewing.
ADDING OR REMOVING CHANNELS
You may want to add or remove channels after you auto
channel search, especially if channels have weak signals or
content you don't want to watch. To achieve this:
1. Press MENU to display theVCR MAIN MENU
2. Press 4 to display the CHANNELS menu
3. Press 2 to display the ADD/REMOVE CHANNELS screen.
Use the CHANNEL + or- buttons on the remote or enter a
specific channel number with the number buttons to go to
the channel you want to add or remove.
The CHANNEL + and - buttons
access those channels which are
active in yourVCR channel list.
You can still access channels not in
the channel list by using the
number buttons on the remote.
13

ADD/REMOVE CHANNELS
ADD/REMOVE CHANNELS
Channel 115
is presently ADDED
Press CLEAR to remove
Press MENU to exit
Channel 115
is presently REMOVED
Press INFO to add
Press MENU to exit
Once you have reached your selection, the screen will tell
you if the channel is currently in your viewing list. Press
CLEAR to remove a channel. Press INFO to add a channel.
Once you are completed, you can press MENU to exit out of
the menus.
TIME AND DATE
The VCR gives you two ways to set the time and date; manually
or by using the Auto Clock feature. Using Auto Clock enables
the VCR to update the clock each time you turn off the VCR.
The Auto Clock feature is advantageous because it updates the
time for you automatically.
AUTO CLOCK SET FEATURE
The Auto Clock feature is set to ON by default at the factory. In
the ON setting, the VCR looks for a channel carrying AIISet time
data and updates the clock using the Coordinated Universal
Time. There are certain steps which are required, such as Auto
Channel Search, setting the Time Zone, and setting the Daylight-
Savings feature, before the Auto Clock feature works.
SETTING THE TIME ZONE
1. Press MENU to display the VCR MAIN MENU.
2. Press 3 to display the TIME menu.
1 Set Time and Date
2 Auto Clock Set: ON
L
4 Set Daylight Savings
TIME
DisplayingTime and Date
Pressing the INFO button on the
remote control orVCR displays
the time and date on screen
temporarily.
Auto Clock Info
With a cable box, theVCR will not
reset the clock after a power
outage unless the cable box is set
to the channel carrying the
broadcast signal.
If Auto Clock Set is unsuccessful,
try tuning theVCR (or cable box)
to a channel carrying AIISet time
information (usually PBS),then
turn theVCR off. If the time does
not set within I 0 minutes, set the
time and date manually through
theTime menu.
0 Exit
3. Press3 to displaytheSET TIME ZONE screen.
14
Check local cable system orTV
stations for availability of channels
with AIISet information.
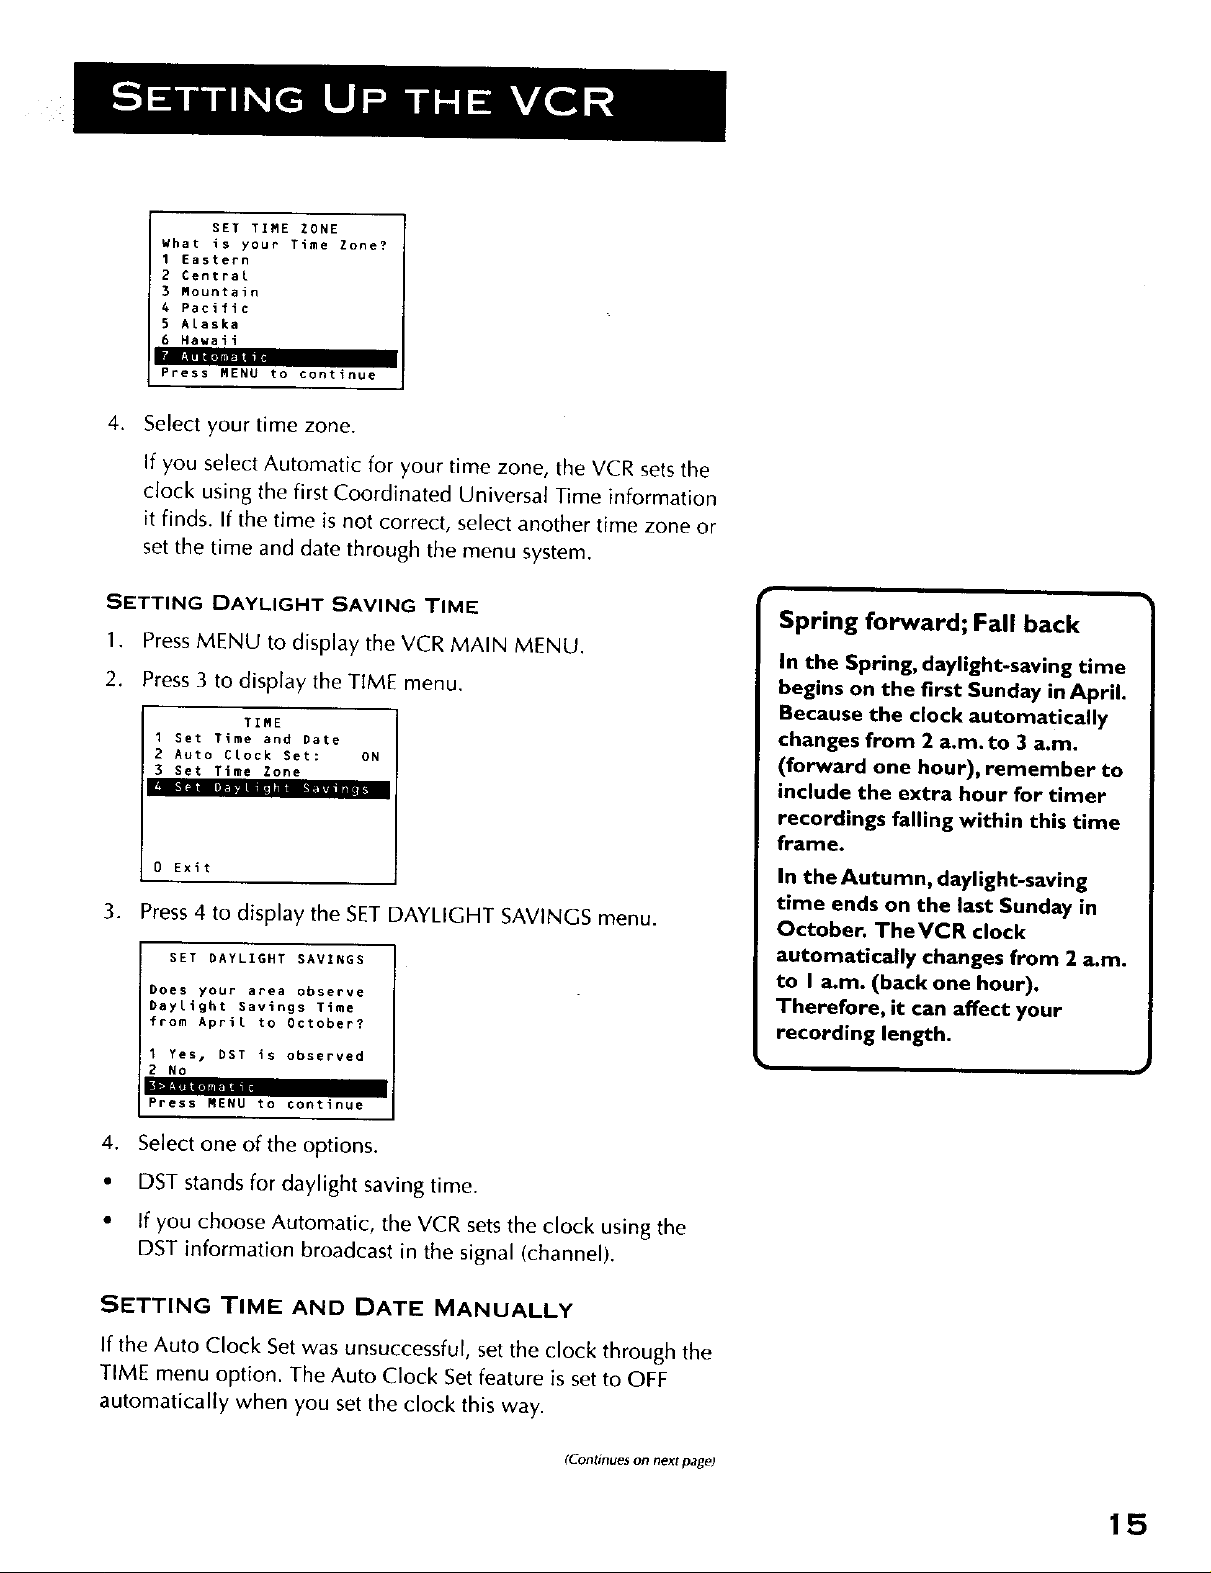
SET TIME ZONE
What is your Time Zone?
1 Eastern
2 Central
3 Mountain
A Pacific
5 Alaska
6 Hawaii
r_llR
Press MENU to continue
4. Select your time zone.
If you select Automatic for your time zone, the VCR sets the
clock using the first Coordinated Universal Time information
it finds. If the time is not correct, select another time zone or
set the time and date through the menu system.
SETTING DAYLIGHT SAVING TIME
1. Press MENU to display the VCR MAIN MENU.
2. Press 3 to display the TIME menu.
I Set Time and Date
2 Auto CLock Set: ON
3 Set Time Zone
Ill i- i liB.|lit mlii_ I • i IAII_!
0 Exit
TIME
3. Press 4 to display the SET DAYLIGHT SAVINGS menu.
SET DAYLIGHT SAVINGS
Does your area observe
Daylight Savings Time
from April to October?
1 Yes, DST is observed
2 NO
Press MENU to continue
4. Select one of the options.
Spring forward; Fall back
In the Spring, daylight-saving time
begins on the first Sunday in April.
Because the clock automatically
changes from 2 a.m. to 3 a.m.
(forward one hour), remember to
include the extra hour for timer
recordings falling within this time
frame.
In the Autumn, daylight-saving
time ends on the last Sunday in
October. TheVCR clock
automatically changes from 2 a.m.
to I a.m. (back one hour).
Therefore, it can affect your
recording length.
• DST stands for daylight saving time.
• If you choose Automatic, the VCR sets the clock using the
DST information broadcast in the signal (channel).
SETTING TIME AND DATE MANUALLY
If the Auto Clock Set was unsuccessful, set the clock through the
TIME menu option. The Auto Clock Set feature is set to OFF
automatically when you set the clock this way.
(Continues on next page)
15

iCiinlinu_,lt tronl ille,l Jou_ page9
1. Press MENU tl) display the VCR MAiN MENU.
2. Press 3 to display the TIME menu.
3. Press 1 to display the SET TIME AND DATE menu.
SET TIME AND PATE
Time --:--
(hh:mm)
Date --/--/--
Press MENU to cancel
4,
Enter the data using the number buttons. Press 0 before
single-digit numbers and follow the on-screen directions to
exit the menus.
SET TIME AND DATE
Time 12:34 PM
Date 11/16/00 Thursday
Press CLEAR to correct
Press MENU to set
VCR MAIN MENU I
3 VCR P£us÷
2 Timer Re_ordi_ls
TIME
2 Auto Clock Set: OFI
3 Set Time Zone
4 Set Daylight SavigDs
Time Data was not found.
0 Exit
i
I
I
VCR Plus+ ® GOLD
PROGRAMMING SYSTEM
The VCR P{us+ GOLD programming system makes VCR set up
automatic by setting and updating the clock and channel list for
you. During the one-time QuickSet Guide set up, the VCR
prompts you to enter your zip code. Soon after, the VCR clock
will set itself and overnight, your VCR Plus+ programming
system channel list will be input for you.
Time, date, and VCR Plus+ system information are downloaded
from participating TV stations over your antenna or cable
system. Time and date are updated each time the VCR is turned
off (and after every power interruption). So, when your TV
stations or cable company update their lineups, your Proscan
VCR will get the most current channel list automatically, freeing
you from having to manually change the channe[ list yourself.
If your VCR Plus+ GOLD system fails to download the proper
information for any reason, you can always manually map the
channels. You can also turn off AUTO VCR Plus+ if you keep
getting prompts about "multiple cable" services by choosing (2)
in the VCR Plus+ SETUP menu.
VC_ PLUS+ s_ gt(_'{ll ix d f_.,_lgt(!r(,_d (raden_,lrk O( Ge(_s(af (]eveloprnent Cord]of{it{on
The VCR Plus + system is manufadured under the license flora Gemstar Development Corporation.
VCR Plus+ Download
When theVCR Plus+ GOLD
system first downloads
information, this can take
anywhere from five minutes to
several hours depending on when
local broadcasters send the data.
16

MAPPING VCR Plus+ PROGRAMMING SYSTEM
CHANNELS MANUALLY
Using the VCR Plus+ GOLD programming system can make
taping timer recordings for cable or off-air antenna easier. If your
VCR Plus+ GOLD system setup failed during the QuickSet, then
you will need to map the channels for your local service
manually. A worksheet and abbreviated codes for typical cable
services in the U.S. and Canada are provided.
1. Press MENU to display the VCR MAIN MENU.
.
In the MAIN MENU, press 4 to display the CHANNELS menu.
3.
In the CHANNELS menu, press 4 to select VCR Plus+
Channel List. This displays the VCR PLUS+ SETUP menu:
_ETUP
2 Auto VCR PLus+: ON
VCR Plus+ data was foun
on channel O5.
O Exit
4. Press 1 to display the Set Channel Lists screen
VCR+ Channel Ry Channel
5 --
4 --
3 -> -> -> --
2 --
1 --
Use CH+/- to select
Ppess 0-9 to change
Press MENU to save
,
Enter the data following the on-screen directions using your
worksheet.
VCR+ Channet Ry Channel
5 46
A --
3 -> -> -> 23
1 --
Use CH+/- to select
Press 0-9 to change
Press MENU to save
Two-Digit VCR Plus+ System
Channel Numbers for
Cable TV (U.S. List)
35 American Movie Classics
39 Arts &-Entertainment
57 Black Entertainment
54 Bravo
42 Cable News Network
45 Cinemax
98 Cinemax 2
37 The Discovery Channel
53 The Disney Channel
63 Entertainment Television
34 ESPN Sports Network
47 The Family Channel
33 Home Box Office
95 Home Box Office 2
96 Home Box Office 3
51 The Learning Channel
46 Lifetime
58 The Movie Channel
48 Huslc Television
49 The Nashville Network
38 Nickelodeon
64 Nostalgia Television
99 Quality Value Cable
41 Showtime
97 Showtime 2
59 Sports Channel
52 Turner Network Television
44 USA-Network
62 Video Hits I
93 Viewer's Choice I
94 Viewer's Choice 2
55 WGN Chicago
43 WTBS Atlanta
60 WWOR-New York
S('e next page for Canadian List
VCR Plus+ Programming
System Channel List
Screen use(I is for an example onl_
Refer to your local television list
for a complete VCR Plus+ system
channel list for your viewing area
or contact your cable company.
Using the list may save you some
time.
17
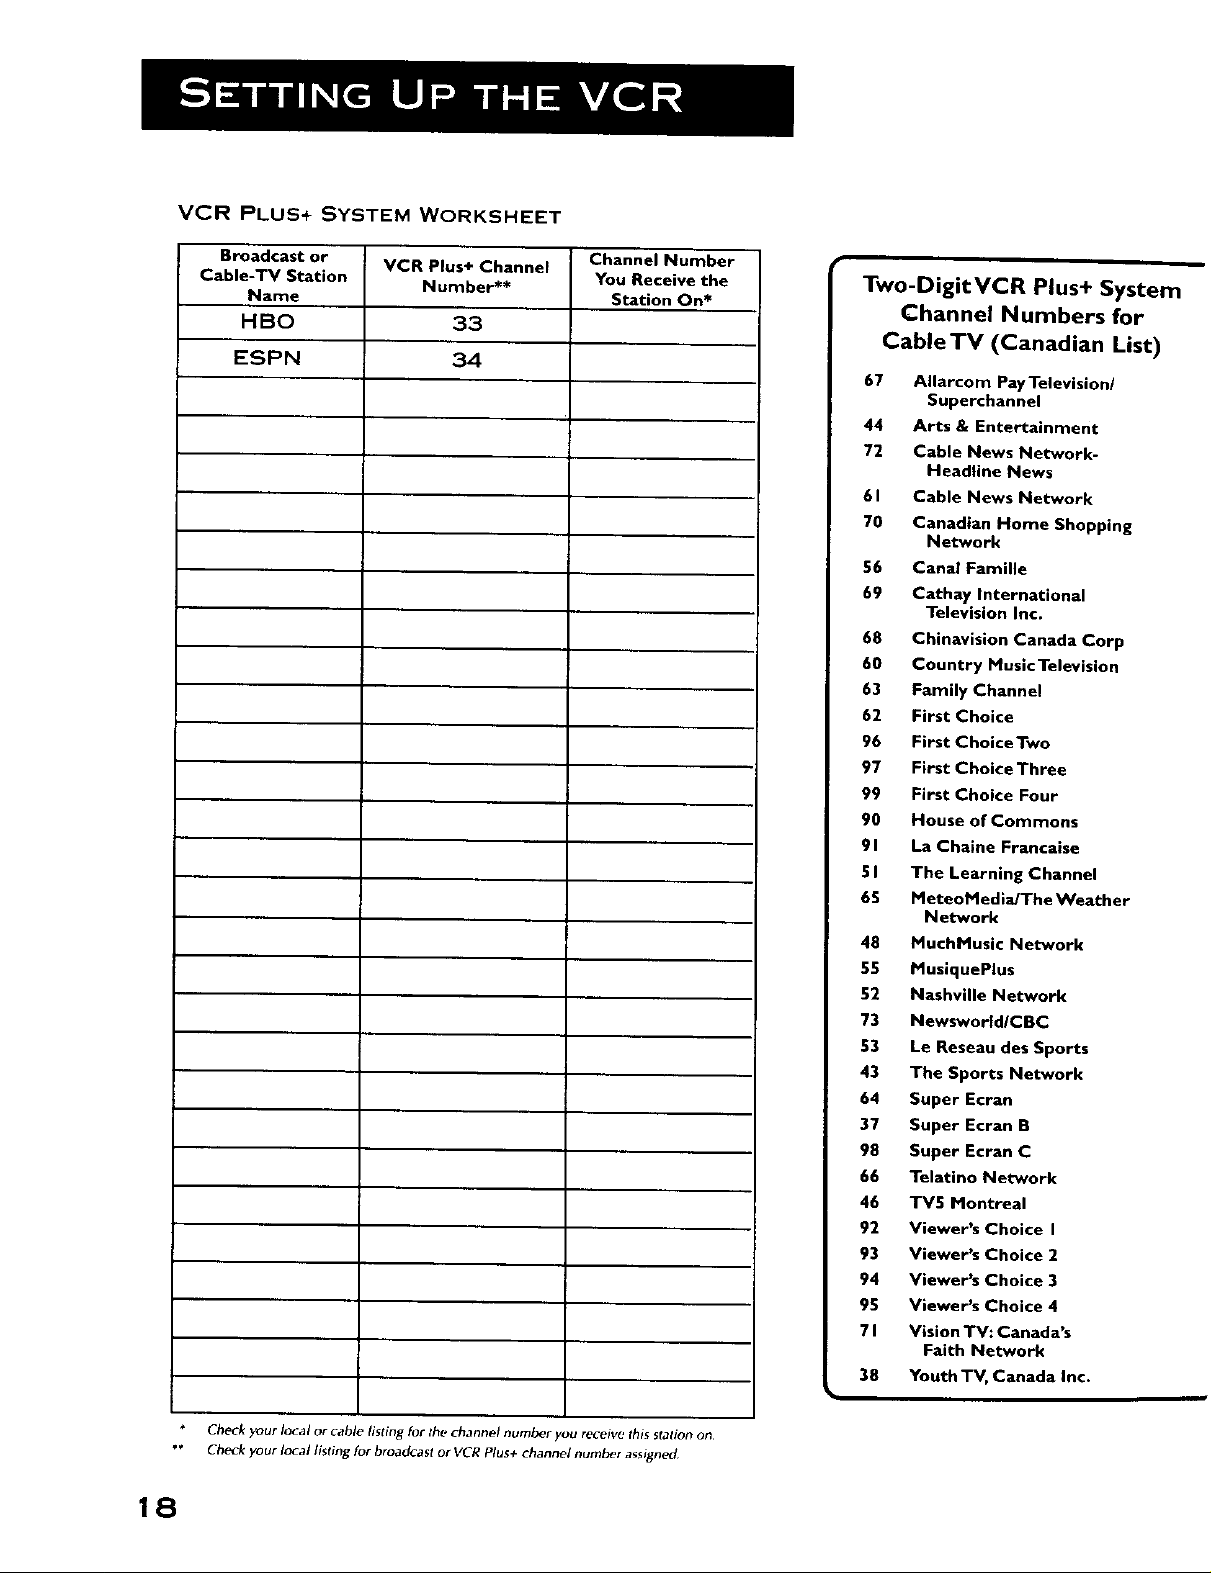
VCR PLUS+ SYSTEM WORKSHEET
Broadcast or
Cable-TV Station
Name
HBO
ESPN
VCR Plus+ Channel
Number**
33
34
Channel Number
You Receive the
Station On*
Two-DigitVCR Plus+ System
Channel Numbers for
CableTV (Canadian List)
67 Allarcom Pay Television/
Superchannel
44 Arts & Entertainment
72 Cable News Network-
Headline News
61 Cable News Network
70 Canadian Home Shopping
Network
56 Canal Famille
69 Cathay International
Television Inc.
68 Chinavision Canada Corp
60 Country Music Television
63 Family Channel
62 First Choice
96 First Choice Two
97 First Choice Three
99 First Choice Four
90 House of Commons
91 La Chalne Francaise
51 The Learning Channel
65 MeteoM ediaJThe Weather
Network
48 MucbMusic Network
55 MusiquePlus
52 Nashville Network
73 Newswortd/CBC
53 Le Reseau des Sports
43 The Sports Network
64 Super Moran
37 Super Ecran B
98 Super Moran C
66 Telatino Network
46 TV5 Montreal
92 Viewer's Choice I
93 Viewer's Choice 2
94 Viewer's Choice 3
95 Viewer's Choice 4
71 Vision TV: Canada's
Faith Network
38 Youth TV, Canada Inc.
Check your local or cable listing for the channel number you receiw, this sfation on
_'" Check your local listing for broadcast or VCR Plu_+ channel number a_signed
18
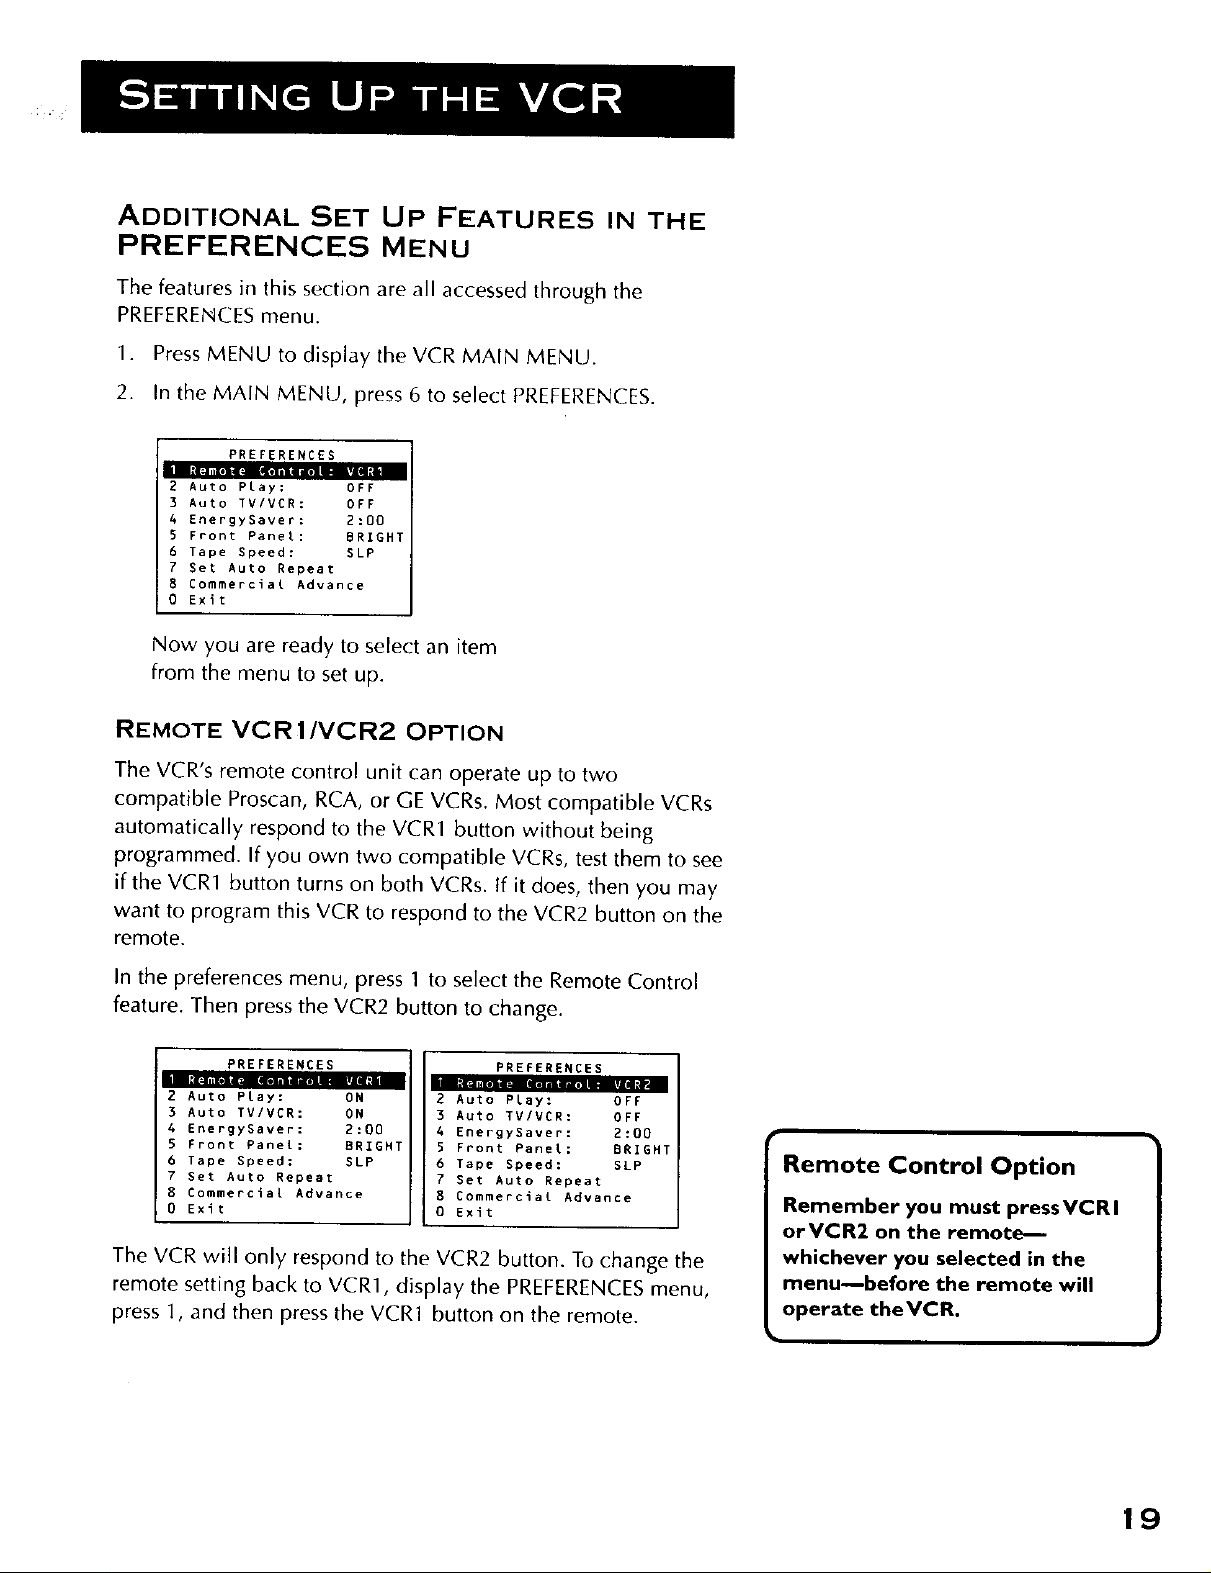
ADDITIONAL SET UP FEATURES IN THE
PREFERENCES MENU
The features in this section are all accessed through the
PREFERENCES menu.
1. Press MENU to display the VCR MAIN MENU.
2. In the MAIN MENU, press 6 to select PREFERENCES.
PREFERENCES
2 Auto PLay: OFF
3 Auto TV/VCR: OFF
4 EnergySaver: 2:00
5 Front Panel: BRIGHT
6 Tape Speed: SLP
7 Set Auto Repeat
8 Commercial Advance
0 Exit
Now you are ready to select an item
from the menu to set up.
REMOTE VCR 1/VCR2 OPTION
The VCR's remote control unit can operate up to two
compatible Proscan, RCA, or GE VCRs. Most compatible VCRs
automatically respond to the VCR1 button without being
programmed. If you own two compatible VCRs, test them to see
if the VCR1 button turns on both VCRs. tf it does, then you may
want to program this VCR to respond to the VCR2 button on the
remote.
In the preferences menu, press 1 to select the Remote Control
feature. Then press the VCR2 button to change.
PREFERENCES
2 Auto Play: ON
3 Auto TV/VCR: ON
4 EnergySaver: 2:00
5 Front Panel: BRIGHT
6 Tape Speed: SLP
7 Set Auto Repeat
8 Commercial Advance
0 Exit
The VCR will only respond to the VCR2 button. To change the
remote setting back to VCR1, display the PREFERENCES menu,
press 1, and then press the VCR1 button on the remote.
6 Tape Speed: SLP
0 Exit
PREFERENCES
2 Auto Play: OFF
3 Auto TV/VER: OFF
A EnergySaver: 2:00
5 Front Panel: BRIGHT
7 Set Auto Repeat
8 Commercial Advance
Remote Control Option
Remember you must press VCR I
orVCR2 on the remot_
whichever you selected in the
menu--before the remote will
operate theVCR.
]
19
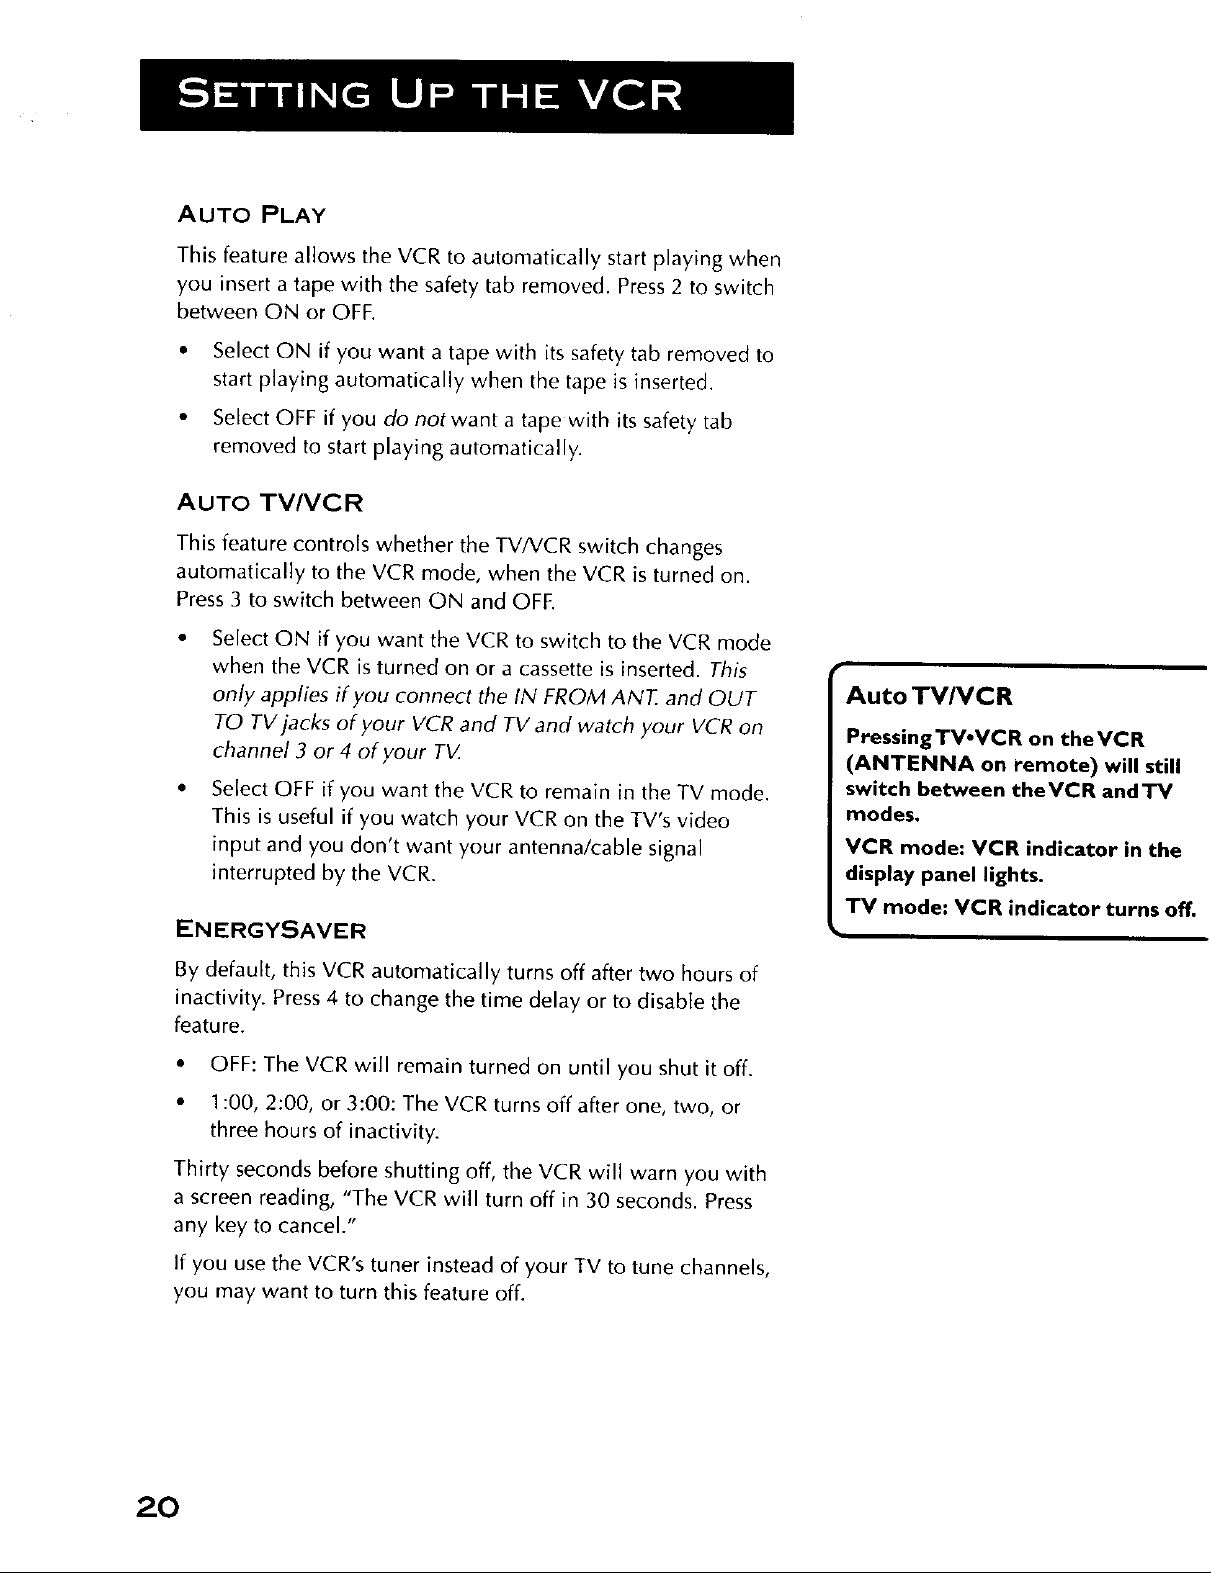
AUTO PLAY
This feature allows the VCR to automatically start playing when
you insert a tape with the safety tab removed. Press 2 to switch
between ON or OFF.
• Select ON if you want a tape with its safety tab removed to
start playing automatically when the tape is inserted.
• Select OFF if you do not want a tape with its safety tab
removed to start playing automatically.
AUTO TVNCR
This feature controls whether the TV/VCR switch changes
automatically to the VCR mode, when the VCR is turned on.
Press 3 to switch between ON and OFE
• Select ON if you want the VCR to switch to the VCR mode
when the VCR is turned on or a cassette is inserted. This
only applies if you connect the IN FROM ANT. and OUT
TO TV jacks of your VCR and TV and watch your VCR on
channel 3 or 4 of your T_Z
• Select OFF if you want the VCR to remain in the TV mode.
This is useful if you watch your VCR on the TV's video
input and you don't want your antenna/cable signal
interrupted by the VCR.
ENERGYSAVER
Auto TV/VCR
PressingTV.VCR on theVCR
(ANTENNA on remote) will still
switch between the VCR and TV
modes.
VCR mode: VCR indicator in the
display panel lights.
TV mode: VCR indicator turns off.
By default, this VCR automatically turns off after two hours of
inactivity. Press 4 to change the time delay or to disable the
feature.
• OFF: The VCR will remain turned on until you shut it off.
• 1:00, 2:00, or 3:00: The VCR turns off after one, two, or
three hours of inactivity.
Thirty seconds before shutting off, the VCR will warn you with
a screen reading, "The VCR will turn off in 30 seconds. Press
any key to cancel."
If you use the VCR's tuner instead of your TV to tune channels,
you may want to turn this feature off.
20

FRONT PANEL BRIGHTNESS
(VCR DISPLAY)
You can change the brightness level of the fluorescent display
panel on the front of the VCR. Press 5 to switch between the
options.
• AUTO brightens the display when the VCR is on and dims
the display when the VCR is off.
• BRIGHT keeps the display bright.
• DIM keeps the display at a low brightness level.
TAPE SPEED
You can select a preferred tape speed for recording. The speed
you select appears in the display panel and in the timer and VCR
Plus+ recording menus. Press 6 to switch between SP and SLP.
You can override the preferred tape speed:
• Press the SPEED button on the remote.
• Set the tape speed in the timer or VCR Plus+ recording
menu.
When you turn off the VCR, the tape speed reverts to the one
you have selected.
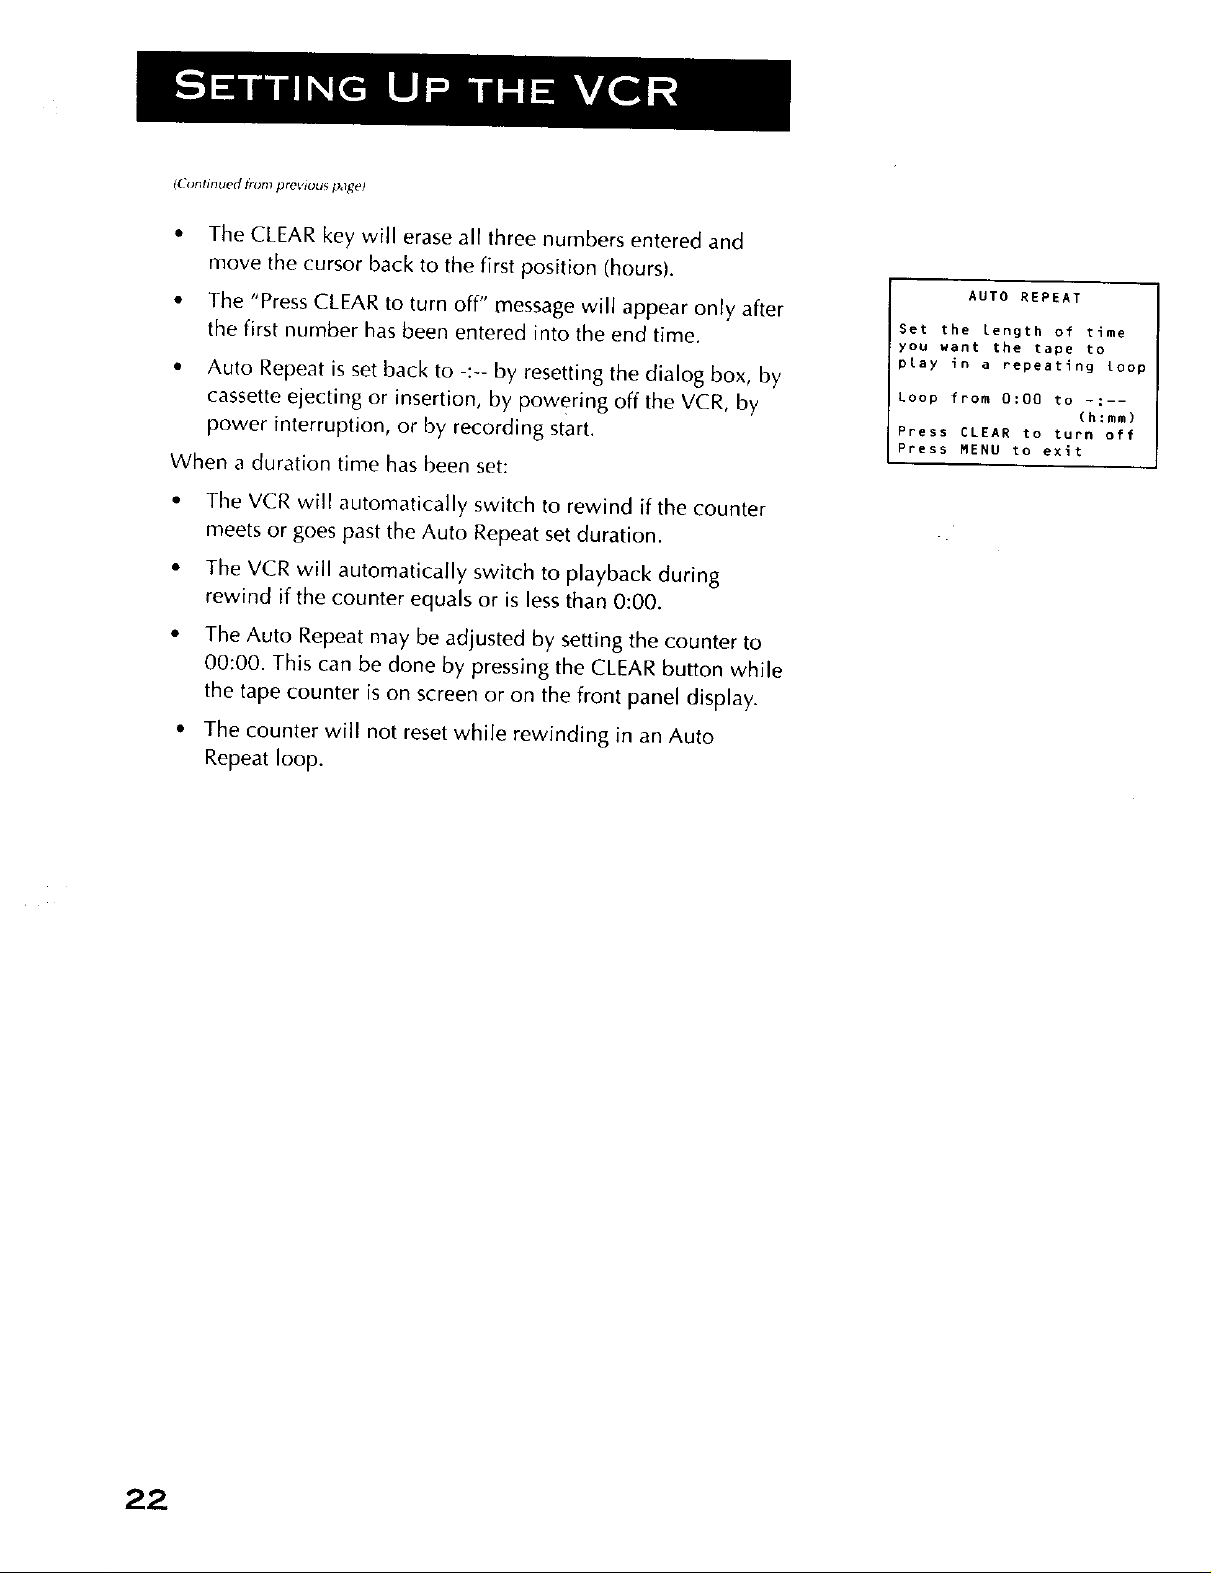
SET AUTO REPEAT
A tape can be set to play the same segment over and over in a
repeating loop with the Set Auto Repeat feature. Set Auto
Repeat uses the VCR's memory counter to determine the
duration of the loop.
In the PREFERENCESmenu, press 7 to choose Set Auto Repeat.
The Set Auto Repeat dialog box will ask for a loop end time to
be specified:
AUTO REPEAT
Set the length of time
you want the tape to
play in a repeating loop
Loop from 0:00 to -:--
Press CLEAR to turn off
Press MENU to exit
(h:mm)
Tape Speeds
SP (Standard Play)
Gives the best quality recording,
but fewer programs can be
recorded on the tape. Special
effects such as pause, slow motion,
picture search, and frame advance
work well when you play back
tapes recorded in this speed.
SLP (Super Long Play)
Gives three times the recording
time of tapes recorded in SP.
Special effects such as pause, slow
motion, picture search, and frame
advance work well when you play
back tapes recorded in this speed.
RecordingTimes
Cassette SP SLP
T- 120 2 Hr 6 Hr
T-160 2 Hr/40 Min 8 Hr
(Continues on Next Page)
21
(C(_ntmued t_l_rn prel,lc;us p,l_t*)
• The CLEAR key will erase all three numbers entered and
move the cursor back to the first position (hours).
• The "Press CLEAR to turn off" message will appear only after
the first number has been entered into the end time.
• Auto Repeat is set back to -:-- by resetting the dialog box, by
cassette ejecting or insertion, by powering off the VCR, by
power interruption, or by recording start.
When a duration time has been set:
The VCR will automatically switch to rewind if the counter
meets or goes past the Auto Repeat set duration.
The VCR will automatically switch to playback during
rewind if the counter equals or is less than 0:00.
The Auto Repeat may be adjusted by setting the counter to
00:00. This can be done by pressing the CLEAR button while
the tape counter is on screen or on the front panel display.
The counter will not reset while rewinding in an Auto
Repeat loop.
AUTO REPEAT
Set the Length of time
you want the tape to
play in a repeating loop
Loop from 0:00 to -:--
(h:mm)
Press CLEAR to turn _f_
Press MENU to exit
22
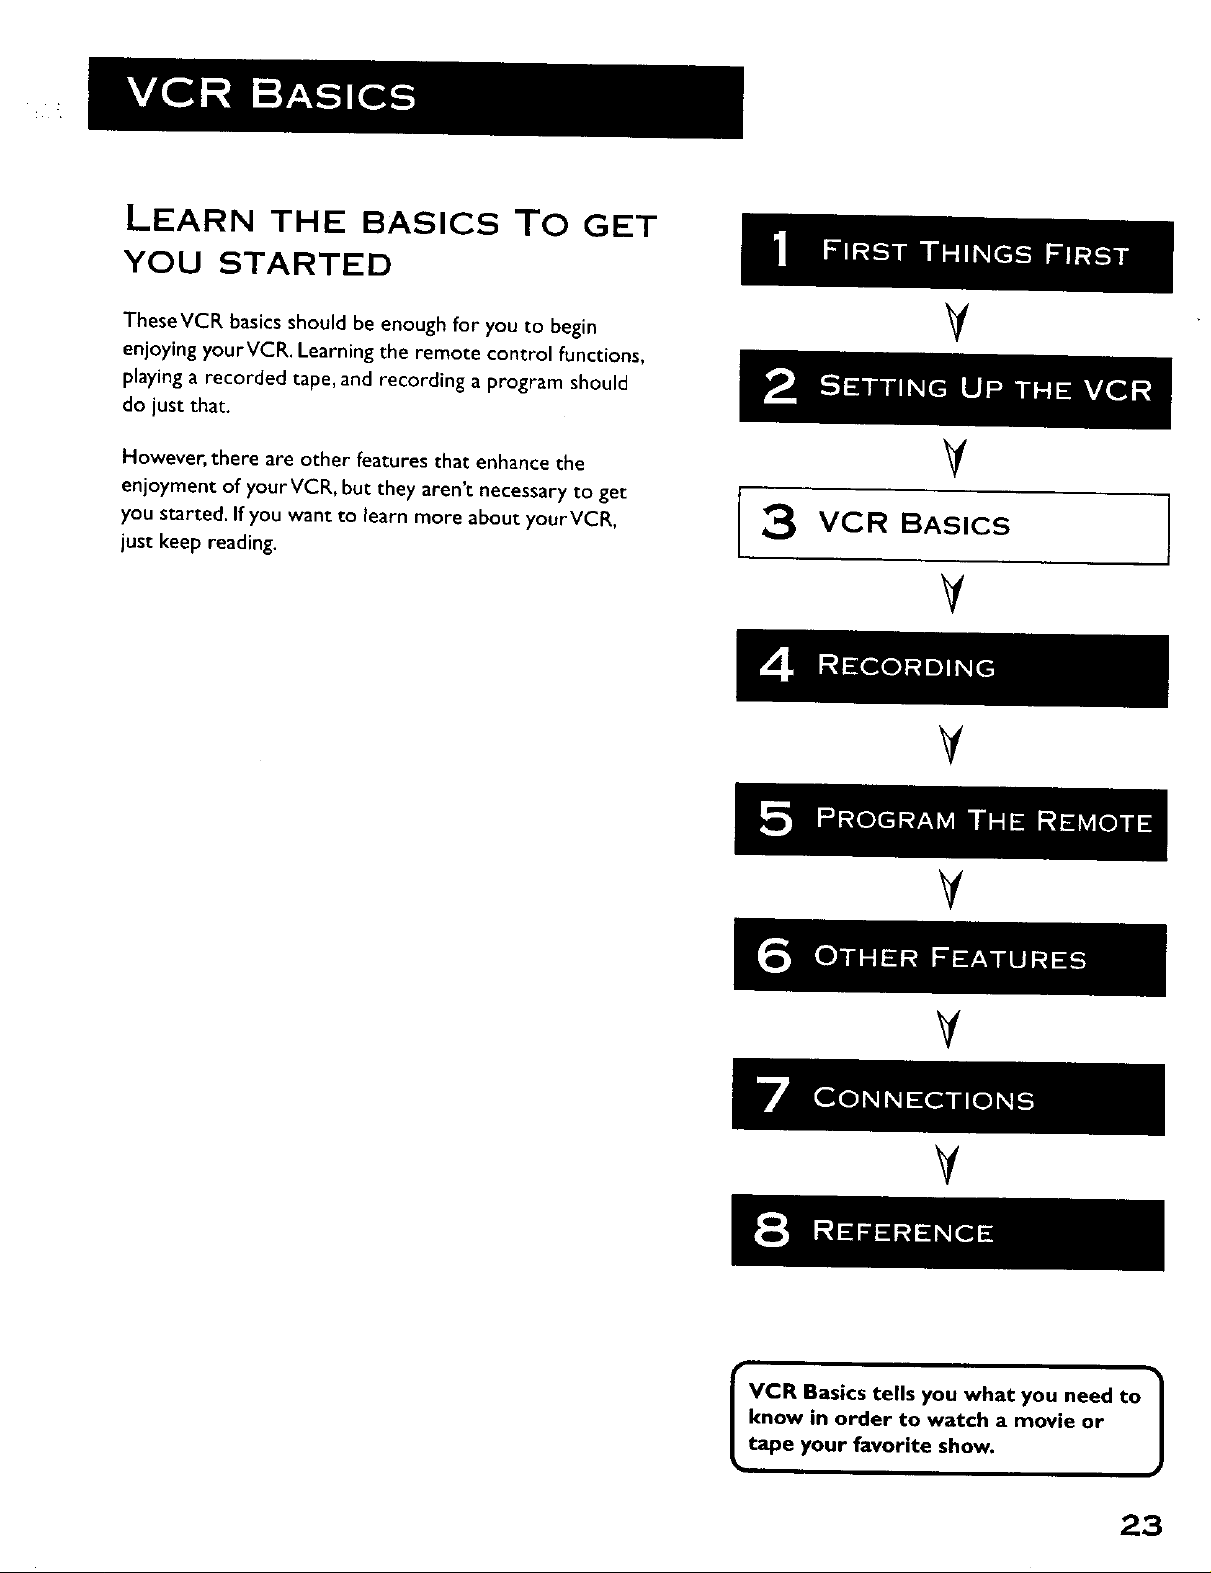
LEARN THE BASICS TO GET
YOU STARTED
TheseVCR basics should be enough for you to begin
enjoying yourVCR. Learning the remote control functions,
playing a recorded tape, and recording a program should
do just that.
However, there are other features that enhance the
enjoyment of yourVCR, but they aren't necessary to get
you started. Ifyou want to learn more about yourVCR,
just keep reading.
V
V
3 VCR BASICS
V
V
V
V
V
know in order to watch a movie or
VCR Basics tells you what you need to /
tape your favorite show.
23
J

REMOTE BUTTONS
Your backlit remote has a light button (0) that glows in the
dark. Press this button to light the buttons on the remote. The
remote buttons remain lit when they are pressed within a few
seconds of each other. If a button is not pressed within
approximately seven seconds, the light turns off to conserve
battery power.
The remote control is capable of controlling more than just your
VCR. If you have compatible Proscan, RCA, or GE components,
you may be able to control them without having to program the
remote.
COMPONENT BUTTONS
AUX Turns on a compatible RCA or Proscan amplifier/receiver
or audio/video receiver. Can be programmed to control a
Proscan or RCA auxiliary component.
DVD Controls a compatible Proscan, RCA, or GE DVD player.
Use arrow and OK buttons to move around and select items in
DVD's menu system.
I
I
.Q o
CLEAR
ON.OFF Turns VCR on or Off when remote is set to control
the VCR. Also turns other compatible components on or off.
SAT-CABLE Turns on a compatible Proscan, RCA, or GE
satellite receiver and sets the remote to control the receiver. Can
be programmed to control different brands of receivers. Used
with the ON.OFF button to turn on a compatible cable box (if
programmed) and sets the remote to control the cable box.
IV Turns on a compatible Proscan, RCA, or GE TV and sets the
remote to control the TV. Also used with the ON.OFF button to
turn on a different brand of TV (if programmed) and sets the
remote to control the TV.
WZR1 Turns on a compatible Proscan, RCA, or GE VCR and
sets the remote to control the VCR.
VCR2 Turns on a compatible Proscan, RCA, or GE VCR and
sets remote to control VCR when it has been set up. Used with
ON-OFF button to turn on a compatible Proscan, RCA, or GE
LaserDisc player and sets remote to control the player.
INPUT ANTENN A
eoQ •
REVERSE PLAy FORWAR D
RECORD STOp PAUSE
TRACKING + EDIT FR.ADV
0000
24
VCR FUNCTION BUTTONS
ANTENNA Switches the picture signal so that it either comes
from the VCR or cable/antenna system. Turns VCR indicator in
VCR display panel on or off.
Arrow Buttons (,'7) Allow you to move through the menus,
enter data, and change settings of selected features.
CH + and- Selects next higher or lower channel in the VCR's
channel memory.
CLEAR Resets time counter to 0:00:00. Allows you to change
entries when setting the clock or a timer recording.
EDIT Simultaneously pauses and unpauses two VCRs when
dubbing.
FORWARD Fast forwards the tape when the VCR is stopped.
Searches forward through a tape during playback. Starts slow
motion during play-pause and increases slow-motion speed.
FR. ADV (Frame Advance) Advances the tape one frame at a
time during play-pause.
GO BACK Switches between two channels. Select one
channel and then se{ect another using the number buttons. Press
GO BACK to switch between the two channels.
INFO Shows the status displays on the TV screen.
INPUT Selects between the line inputs and the VCR's tuner.
Line input refers to the signal coming from the component
connected to the audio/video input jacks on the back or front of
the VCR.
MENU Displays and accesses menu system.
Numbers (0 through 9) Select a channel up to 99 by pressing
two numbers. Select a cable channel over 99 by pressing and
holding I until I -- appears on the screen. Then press the other
two numbers.
ON,OFF Turns the VCR off or on.
PAUSE Pauses playback or recording. Press PAUSE again to
return to playback or recording.
PLAY Plays a tape.
RECORD Starts VCR recording. Also used for express recording.
REVERSE Rewinds the tape when the VCR is stopped. Searches
backward through a tape during playback. Starts slow motion
during play-pause and decreases slow-motion speed.
25
 Loading...