

_Cr¸O,k_I
WARNING .... ' _' ': °.
To reduce the risk of fire or,
shock hazard,,do not expose
thisTV to rain or moisture..' -*_;_
Toreduce the risk of electric shock, do not remove
cover (or back). No user serviceable partsinside.
ISH0CKDO NOT OPENIRefer.se'rvicingto qualified service personnel. - '
=:l:his;_nibol indicates
"dangerous voltage" inside A This Symbol indicates
, inli_rtant instructiOns
- .the product that presents a _lLalo_panyill_ithe_o_t.
risk of electric shock or " _'- _J */_" C
personalinjury.
Caution: To reduce th_k _)f elea___i ._
blade of plug to wide_, f_," sert.t . __ _
• _ _lb.# _ _. _ " \
Attention: Pour•dviterlle_h_cs _l_rij_bs , [l_rfodul_a _
lame la plus large de lafiche dens lab_'orne_s' _" % ,_._-
correspondent e de la prise eaMIl_U41_rj_ a_f_lQ
Refer to the identification/rating label Iocate_t_t_a_pa_f_
product for its proper operating voltage.
FCCRegulations state that unauthorized. ChaMglif o_n_ c_ica t_,t Cl_ljis
•equipment may void theuser's authority to operate it.
,
,,,,,,ooo ,_o°
peri'ods, tltey may be permanently
image_ include network Iogos, phone numbers, and video gaE_is.
This damage is not covered by your wa_i_lkv, f_lte_d vit_iq_
of Channels displayii_ these images shol__vo_. __
Cable lrv Installer:. This reminder isprovided to call your attention to
Article 820-40 Of the National Electrical Code (Section 54 of the Canadian
Electrical Code, Partl) which provides guidelines for proper grounding
and, in particular, specifies that the cable ground shall be connectecito the
grounding system of the building asclose to the point of cable entry as
practical.
f ";i _ _ " _ " " i'" "" " "" '- , .' " _'_
The GUIDE Plus+ Gold system is manufactured, under license from Index.
!
lSystemslnc. * ::,....-;_ • " . - . .,' i._ " '

SETUP AND CONNECTIONS r................... ................................. ...'.3
Step 1: Unpack the TV ..................... .............. :.................................. 4
Step 2:;Connecting your TV .................. _............... =............... ............ 4
"iV Only ................ _................. ...................................................... 4
The BasicConnection ............ .................. .............. ,......... ........... 5
Advanced Connections.... ......................... _...... ......... ............. i,.6
-:Step 3:Connecting the IR Controller .9
• Attaching the IR Controllers ......... .......... _............................. .... 9
Step 4_ Plug in the TV.. ...................... ....... .................................... .. 10
Step S: Place batteries in remote ' 10
Step 6: Turn on the TV ................................................................... 10
On-Screen ProgramGuide. .................... ................. .................. 10
Step 7: Program the TV .................................................................. 10
INTERACTIVE SETUP .... ....... ........ :........................................ ...... .. 11
Using Point and Select .............. ............... ,.................................... :12
Entering Setup ........... ........................... ......................................... 112
Select a Language " _ 13
Auto Channel Search .................................. ................................... 13
GUIDE Plus+ System . 14
Set the Time ,.., ....................... ............ ......:..........:........................... 14
Set the VCR1 Channel (auto tuning) ....................... :..................... 15
Setthe VCR2 Channel (auto tuning) ............................ ................. 15
Set the DVD channel (auto tuning) .............................................. 16
Set tl_e SAT/CABLE Channel (auto tuning) ....................... ............. 17
Label the Channels ...i................. ............. ............ ............... ............ 18
What Now? ......... ................... ............ :....................................... .... 18
Program the Remote ............................................................. .. 18
USl big TH E REMOTE ....... ,......................................... .................... 19
Remote Buttons ............ .................................................................. 20
Using the WHO-INPUT button ................................................ 21
Programming the Remote ......... ,............................... ..................... 22
Testing the remote. ........... .......................................... ;.......... ..22
: Programming the remote ................................ .......... _............. 22
' Usingthe remote to control a device ,......._.......'.............. ....... 23
" .i::t:, _ ,.. • . , _ ,; . . ;
, _Modes of operation ..:......:.. _......]./.L;................ .....'._.....,....:.. 23
Front Panel L.....,..._ ..........................._.].,:.-!]..;..........i..... ............... 23
• 1
FEATURESAND MENUS'.....:....;...L_............:.............................2S
Menus and Control Panels ._................................... ._....... i.............. 26
. Menus.._ ............ ............ :.,.,.. ........,..........:....,.......... _..... ........ ,..26
Control Panels ............................................ .............................. 27
Audio Menu..°..,......_.._............. i.... ....................... _.................. ......... 28
Using the.remote to Select an audio'processor ............................ 29
_ -Picl;ureQuality Menu. ...................... ........... ..i.......... ........... ..,........ 30
Screen Menu ................. ;...... ...... ............... ................................... ,.. 31
Using Closed Captioning 32
Channel Menu 33
Time Menu .................................................................... .................. 34
Parental Controls Menu'....i .................. .......................................... 35
GUIDE Plus+ Menu ......................................................................... 36
Setup Menu ' 36
PIP (Picture-in-Picture) Operation ...... ............... _........................... :37
Channel Marker ................ i...,.; ....................................................... 38
TROUBLESHOOTING .................................................................... 39
CARE AND CLEANING ................ _................................................ 40
R_J_DIRECT Vl EW 5"-36" TELEVI sION LIMITED WARRANTY 41
RCA PROJECTION "II'V LIMITED WARRANTY ...... _.................... 42
ACCESSO RI ES........................ ............................................. ........... :43
INDEX. ............... ........................................... ............................... ...45
2

G ETTING STARTE D
This manual is designed to get you started quickly.
:,:Thefirst four Sections of the manual•show you how:: ,,,
to get your TV Setup and Connected, run the
Interactive Setup, Program the Remote, and use al! of
the Features andMenus of your TV." -4- "
The Reference section in the back of the book
contains troubleshooting tips, care and cleaning
- instructions, accessory ordering information and your
warranty.
Well... if your TV's out of the box, let's get started.
No<.N=o. i
': SETUPA O E I S:
V
, • i
_..Checkout the _ th= havebeen_ded -1
/th_ghouttt_m=nua! intheseTip i :!' i- /
/ Boxe_11_ere=msome.|mportant:,-:;i. L ::-/
t tips:that wi!l help you get themost from,://
yourTV. "......._ ...." '. _:, .... ':_:_"" " ::,"."
,: !_ ,
3
STEP 1: UNPACK THE TV
.Make sure to locate the remote control and your GUIDE Plus+ Bo?klet,
STEP 2: CONNECTING YOUR TV
-: There arethree types of connectionsoutlinedin this section:
i • .. •
TV Only: . If you're only going tO connect the
TV to your home antenna or cable •
system.
The Basic Connection:
If you're going to connect the TV to a
VCR or satellite receiver.
Advanced Connections:
If you're going to make multiple
Connections,hooking up the TVto
one ortwo VCRs,DVD player,and a
satellite receiver.
Cable information and illustrations are given for each type of connection.
Once you, have completed your desired connectionYou may skip forward
to Step 3.
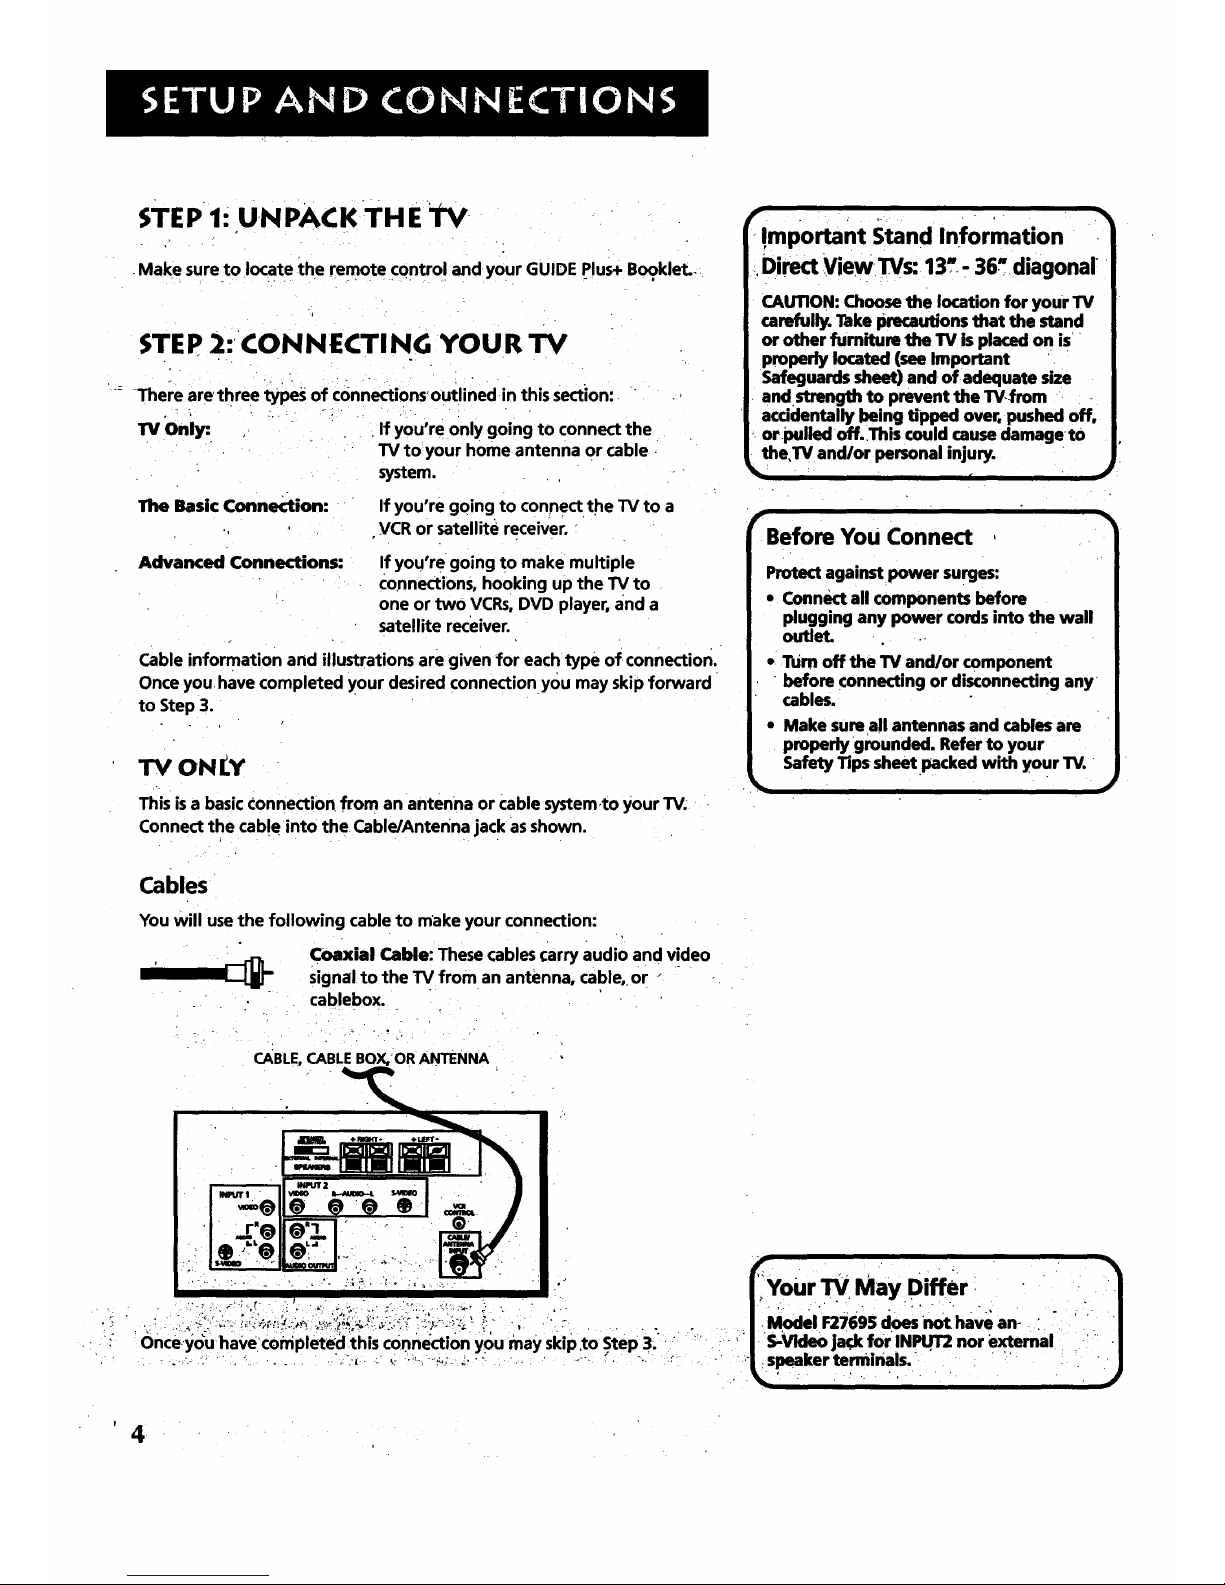
TV ONLY
This is a basic Connection from an antenna or Cable system,to your TV:
Connect the cable into the Cable/Antenna jack as shown.
Cables •
You will use the following cable to make your connection:
Coaxial Cable: These cables (:arry audio and v!deo
signal to the TV from an antenna, cable, or "
.. • . , ' .
_ . .. : cab!ebox. , I
CABLE,CABLEBOX/OR ANTENNA "
!mportant Stand Information
Direct View TVs: 13,. - 36_ diagonal
CAUTION: Choose the location for your TV
carefully. Take precautions that the stand
or other fumiture the TV is placed on is
properly located (see Important
Safeguards sheet) and of adequate size
and strength to prevent the TV._rom
accidentally being Upped over, pushed off.
orpulled off. This could cause damageto
the,TV and/or personal injury.
(
f_
Before You Connect
_q
Protect against power surges:
• Connect all components before
plugging any power cords into the wall
outlet.
• TUrn off the TV and/or component
before connecting or disconnecting any
cables.
• Make sure all antennas and cables are
properly rgrounded. Refer to your
Safety Tips sheet packed with your TV.
%
•May Differ _,
S-Video jack forINPUT2 nor e._ernal i'! : "
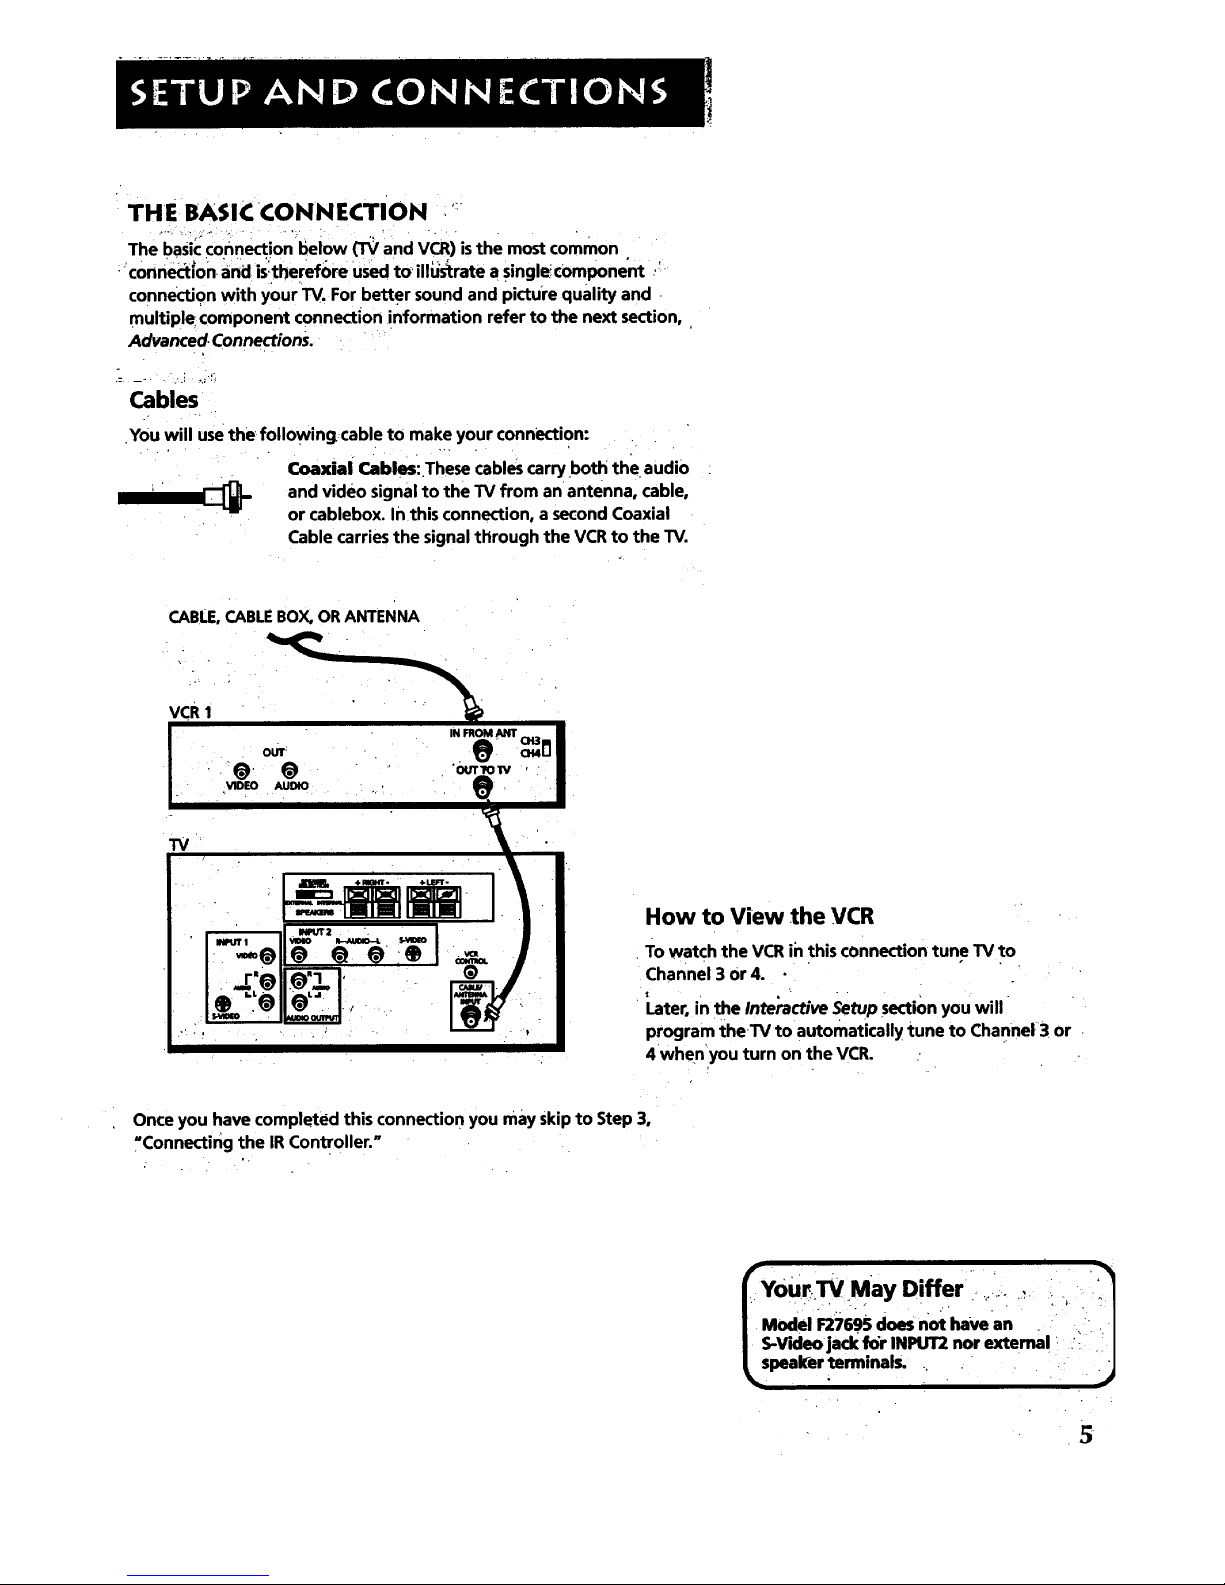
THE BASIC CONNECTION "
.... ..... ., . ,
The basic connection below (TV and VCR) is the most common
connection and is:therefl>re used toillUstrate a single, component '
connection with your TV. For better sound and picture quality and
multiple component connection information refer to the next section,
Advanced. Connections.
Cables
You will usethe following cable to make your connection"
Coaxial Cables: These cables carry both the audio
and video signal to the TV from an antenna, cable,
or cablebox. In this connection, a second Coaxial
Cable carries the signal through the VCR to the TV.
CABLE,CABLEBOX, OR ANTENNA
VCR 1
OUT
_@. @
VIDEO AUDIO
How to View the VCR
To watch the VCR in this connection tune TV to
Channel 3 or 4.
I.ater, in the Inte'ractive Setup section you will
program theTV to automatically tune to Channel 3 or
4 when you turn on the VCR.
Once you have completed this connection you may Skip to Step 3,
"Connecting the IR Controller. =
I
/Model F'Zi69Sdoesnot havean : . i I
/S-V'.Jeojack for INPUT2 nor extema! .:: I
Lspealc'er terminals .... . .- j
.
:ADVANCED CONN ECTIONS
• • j
Advanced ConneCtions give you better sound and video by separating
the audio and Videos[gnals and enable youto connect multiple -i ,
components.
This section describes the types of inputs available on the back of your
TV and suggests ways you can usethem for optimum performance.
1
• , ,. . , ,
Once_you *have made your connections
you will need to program the TV to tune
to the correct Video INPUT channel in ;
order to see and hear audio and Video
from the component You will prbgram
this later in thelnteractive Setup.
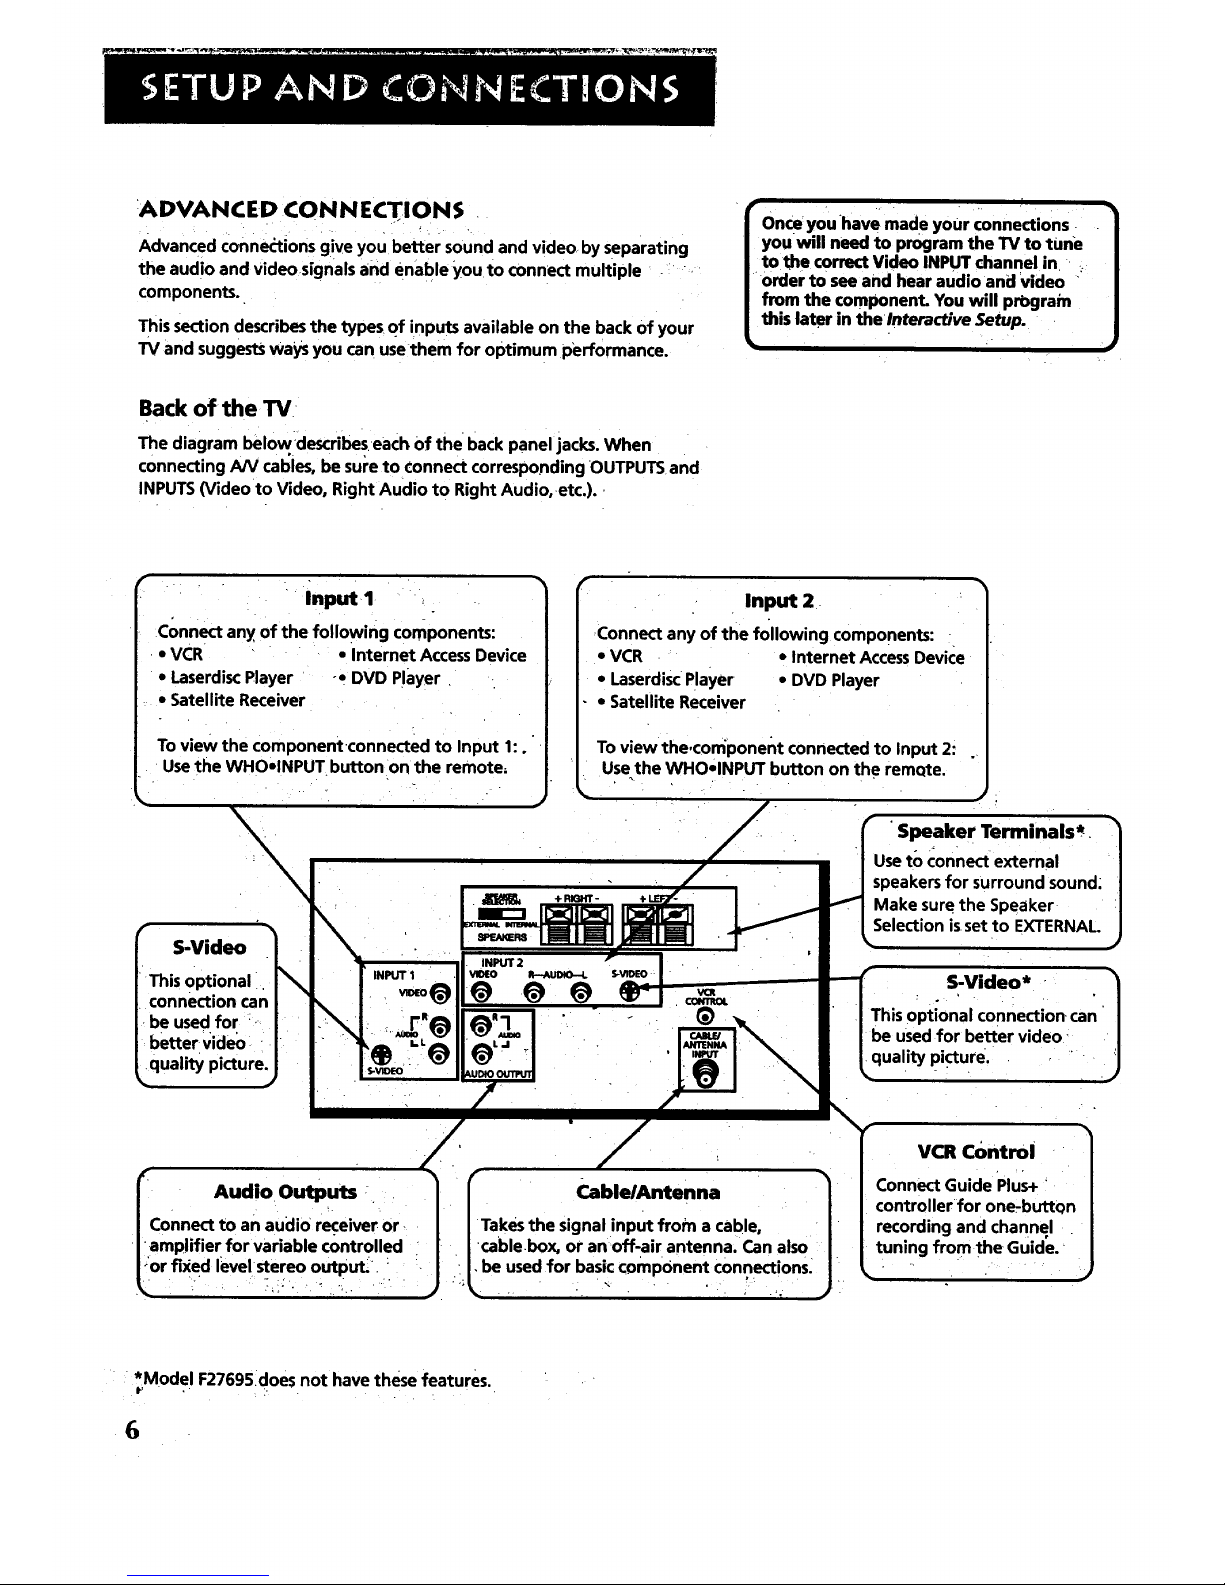
Backof the TV
The diagram belowdescribeseach Of the backpanel jacks.When
connectingAN cables,be suretoconnect correspondingOUTPUTSand
INPUTS(Video to Video, Right Audio to RightAudio,etc.).
Input I
Connect any of the following components:
. VCR • Internet Access Device
• Laserdisc Player -• DVD Player
• Satellite Receiver
To view the componentconnected to Input 1:.
Use the WHO•INPUTbutton on the remote,
S-Video
Input 2
Connect any of the following components:
• VCR • Internet Access Device
• Laserdisc Player • DVD Player
• Satellite Receiver
To view the,component connected to Input 2:
Use the WHOelNPUT button on the remQte.
This optional i
connection can
be used for
better video
•quality picture.
I Audio Outputs .
Connect to an audio receiver or-
I-amp!ifier for variable controlled
or fixed level stereooutput._. '
CablelAntenna
Takes the signal input from a cable,
cable.box, or an •off-air antenna. Can also
. be used for basic component connections.
1
• 1
Speaker Terminals*,
Use to connect external
speakers for surround sound;
Make sure the Speaker
Selection is•set to EXTERNAL.
S-Video* " i1
o , . . . •
This optional connection, can '
be used for better video'
quality picture.
VCR Control
Connect Guide Plus+
controller for one-button
recording and channel
tuning from the Guide.'
• * *Model F27695does not have these features.
6

Sample Connections
The following are sample connection scenarios which you may encounter
when connecting components to your TV. Note: those Components which
offer an S-Video connection, such as DVD, VCR or Satellite Receivers; _
• must match their S-Vide*0 c0nhection With their audio INPUT connecti0n _._ '"
Cables
You Will use th= ,v,,u.,,,_ _.,= ,u ,,,a_ yuu_ Lu.._uu..
1/1111_i _* Coaxial Cables: Carries the signal from the
antenna or cable directly tothe television or
through a cablebox, as needed.by your cable
system.
Audio/Video Cables: Carries sound ancl video
from the component to the TV.
S-Video Cable: Carries video from an S-Video
capable component which provides best
picture quality.
TV and Stereo VCR
•CABLE,CABLE BOX, OR ANTENNA
•Cautions:
Position cables to Avoid Audio Hum
or interference .,
'. insert all cables firmly into jacks.
• Place the audio/vldeo cables tQthe
_ides of the TV's back panel instead of
straight down the middle.
', Try not to coil any twin-lead cables and
keep them away from the audio/video
, cabies, i. ; / _ ,
•_tect your components from
Overheating
• Do not block ventilation holes in any of
• the components. Arrange the
components so that air can circulate
freely.
• Do not stack components.
• Allow _dequate ventilation when
placing your componenl_, in a stand.
• Place an amplifier on the top shelf of
the stand so heated air rising from it
will not flow around other
components.
TV
How to View Your VCR
To watch the VCR in tl_is connection, pressTVto put the
remote Control'into TV mode, then press WHO•INPUT to
scroll through thelvideo input channels until you.tune to
VID1 input.
!n the Interactive Setup section you can program theTV to
automatically tune to the VIDI input channel when you '
turn on the VCR.
Compared to the Basic Connection, using audio, video and
S-Video (if available)cables will enhance the sound and picture qualitY•
from a comporient.
MostAudio/Video cables are combined "
into one cablewith three
heads on each end. v_o
We
r_bles in these
7
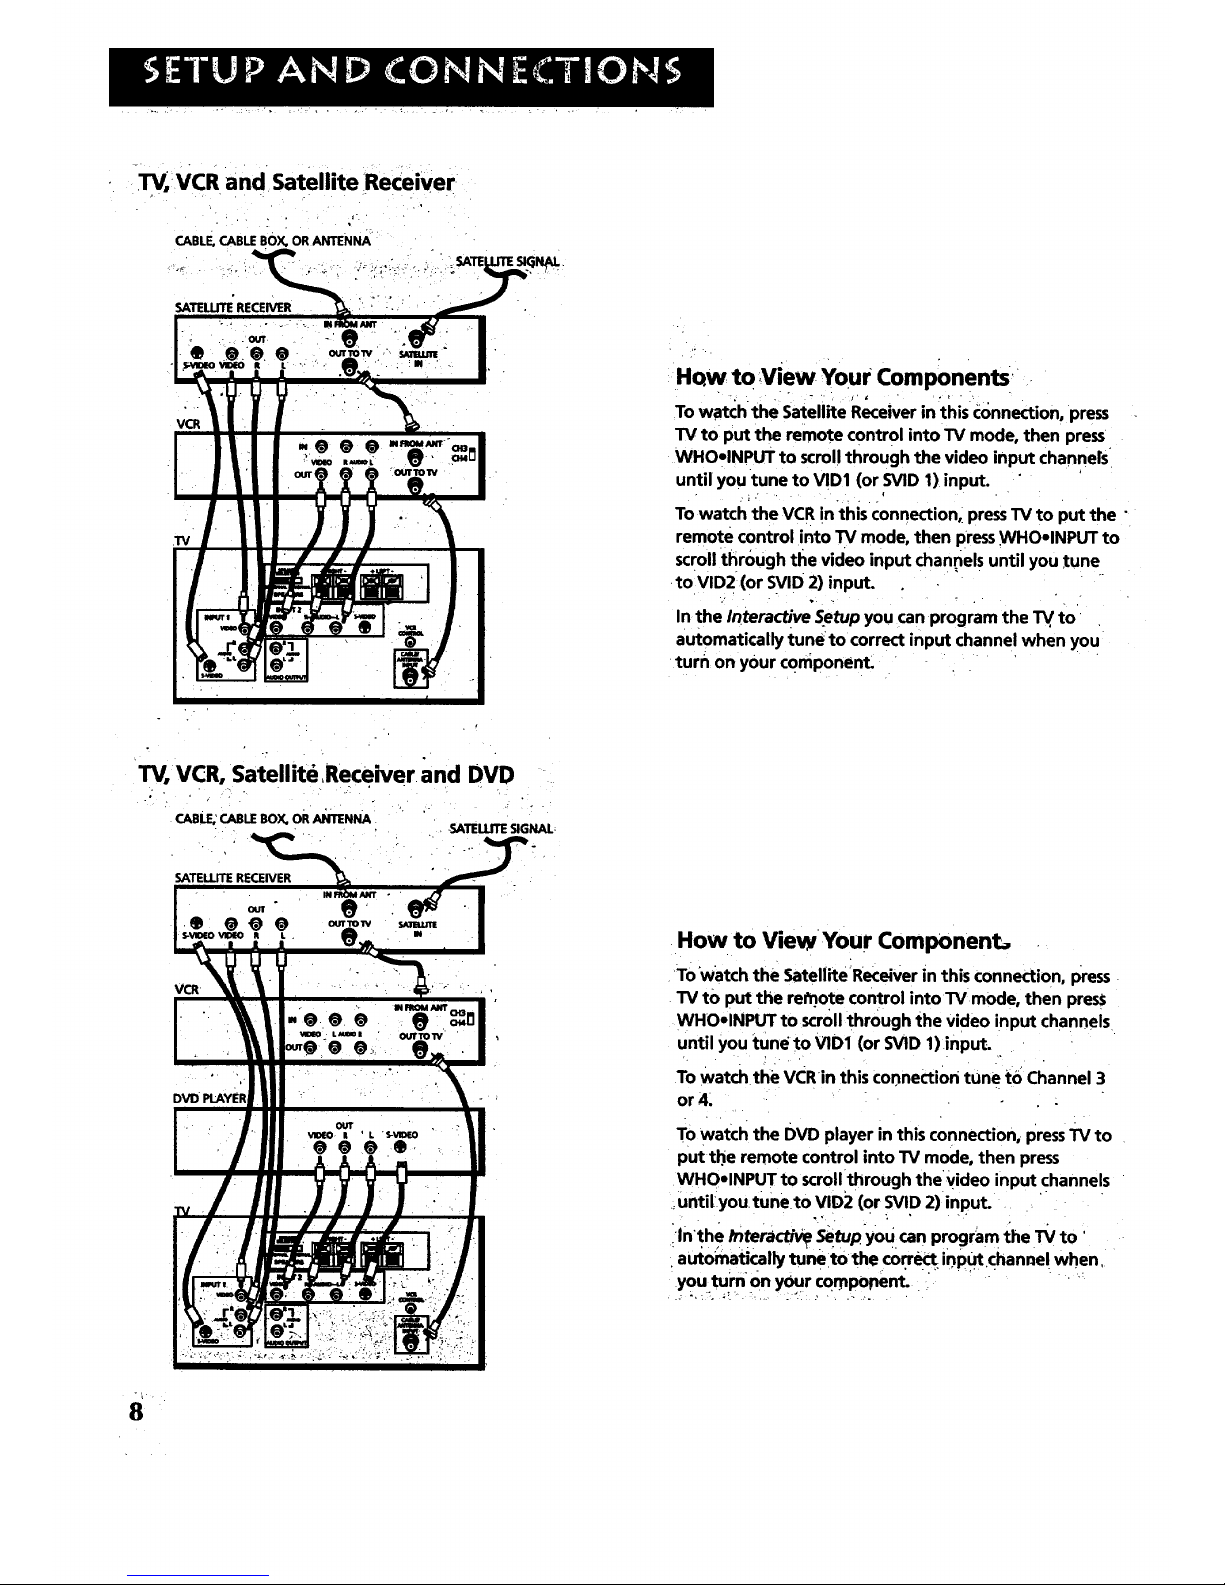
TV, VCR and Satellite ReceiVer
CABLE,CABLE BOX, OR ANTENNA'
SATELLITE'RECEIVER " : • "
VCR
TV, VCR, Satellite Receiver• and DVD
CABLE;CABLE BOX, oR ANTENNA
SATELLITESIGNAL-
SATELLITE RECEIVER
VCR
iHo.w to view Your Components _
To watch the Satellite Receiver in thisconnection, press
TV to •put the remote control into TV mode, then press
WHO-INPUT to scrol! through the video input channers.
until you tune to VID1 (or SVID 1)input. " '
TO watch'the VCR in thisconnection, press TV to put the"
remote control into TV mode, then pressWHOoINPUT to
scro!lthr0ugh the video input channel suntil you tune
to VID2 (or SVID 2) input.
Inthe Interactive Setup you can program the TV,to'
automatically tuneto correct input channel when you:
turn on your c0mponent. . . " '
How to ViewYour Component_
To Watch the Satellite ReceiVer in this connection, press
TV tO put the re_ote control into TV mode, then press
WHOelNPUT to scroll through the video input channels.•
until you tune !:o VID1 (or SVlD 1)input.
To watch the VCR in this connection tune to Channel 3
or 4.
. , . . .
To watch the DVD player in this connection, press TV to
put the remote control into TV mode, then press
WHOoINPUT to scroll through the Video input channels
:until:youtuneto VID2 (or SVID 2) input.
ilnthe tnteracl_ ._.tup Y0U. can program the TV to'
•auto_t!cally tune to thecoF_ i_Put.channe! when,
you turn on your compotnent.. " " " • ':
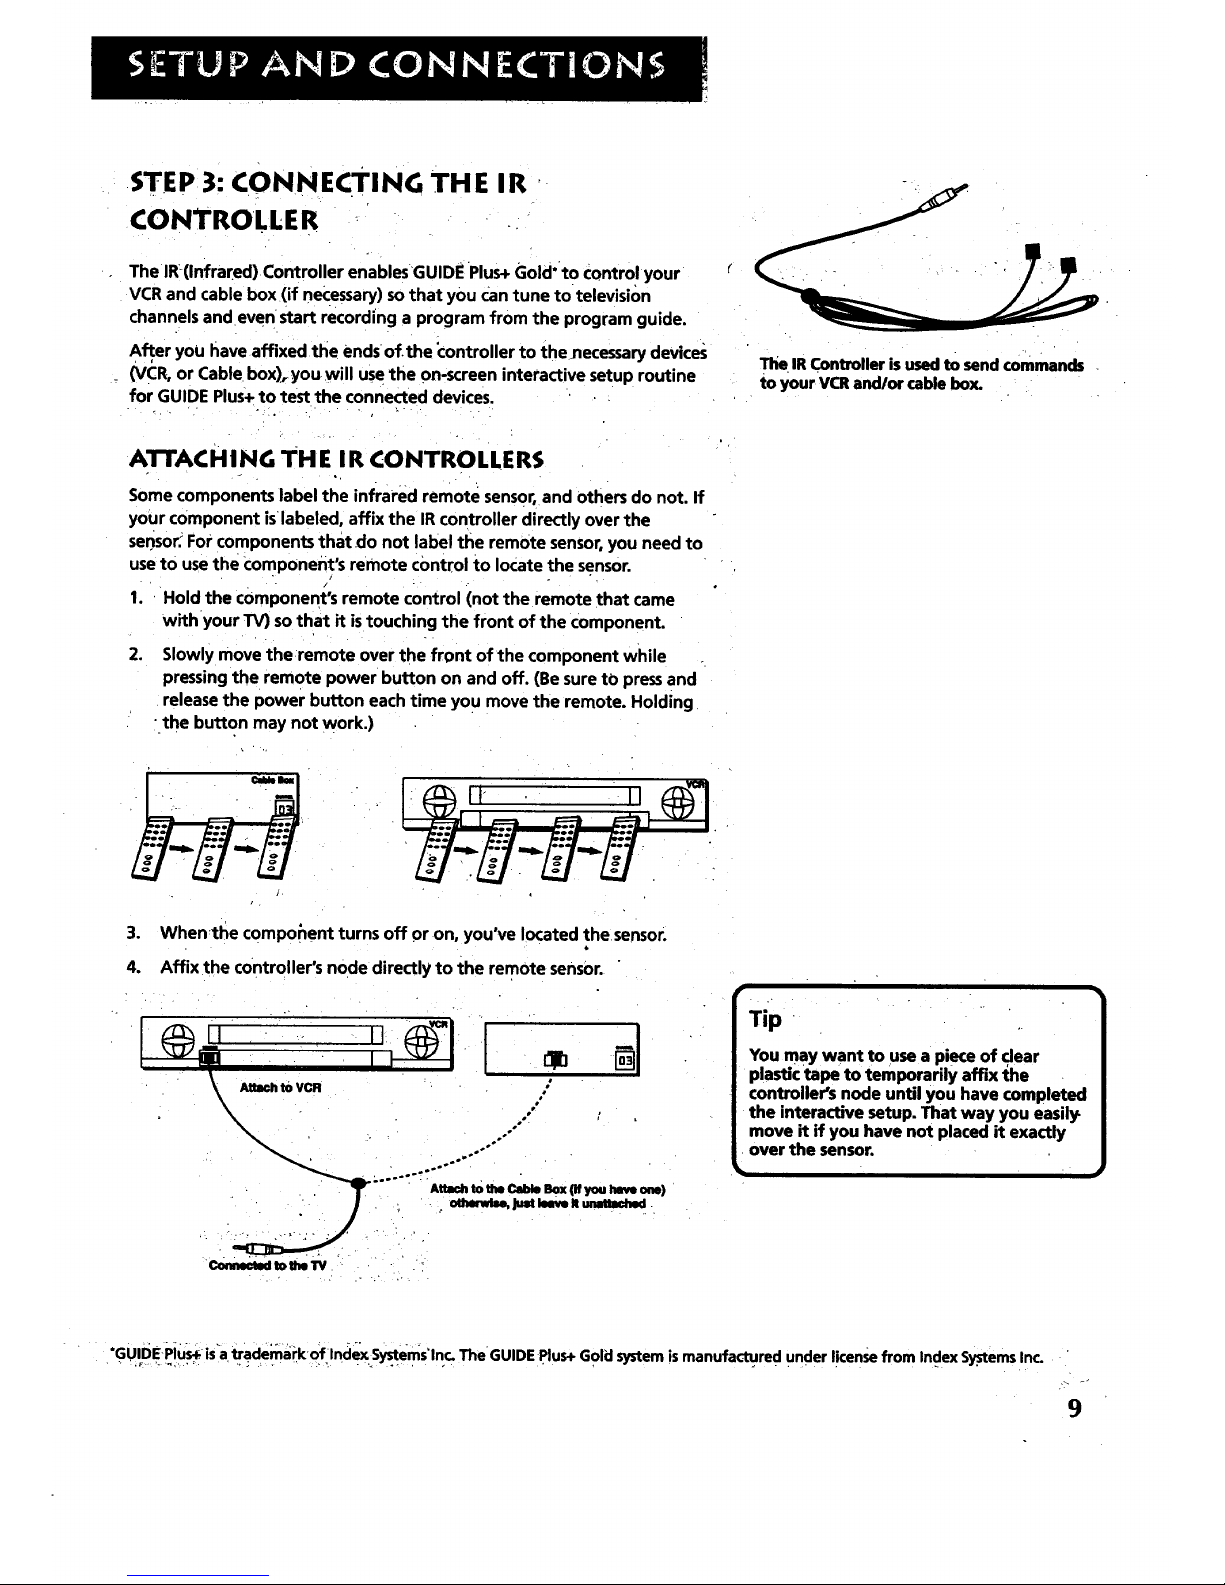
STEP 3: CONNECTING THE IR •
CONTROLLER ..
The IR(Infrared) Controller enablesGUIDE Plus+ Gold" to control your
VCR and cable box (if necessary) so that you Gantune to television
channels and even start recording a program from the program guide.
After you have affixed the ends of.the _ontroller to thenecessary devices
(VCR, or Cable box),you will use the on-screen interactive setup routine
for GUIDE Plus+to test the connected devices.
A3-FACHING THE I R CONTROLLERS
Some components label the infrared remote sensor, and Others do not. If
your component is labeled, affix the IR controller directly over the
sensor._For components that do not label the remote sensor, you need to
use to use the ¢omponeiit's remote control to locate the sensor.
1. Hold the component's remote control (not the remote that came
with your TV) so that it istouching the front of the component.
2. Slowly move the remote over the front of the component while
pressing the remote power button on and off. (Be sure tO press and
release the power button each time you move the remote. Holding
the button may not work.)
The IRController is used to send commands
to your VCRand/or cable box.
I ' "
3. Whenthe component turns off or on, you've located the sensor.
6
4. Affix the controller's node directly to the remote sensor.
: ii......i.....-------i
Colmlltld tO the TV .
You may want to use a piece of dear
plastic tape to temporarily affix the
controller's node until you have completed
the interactive setup. That way you easily
move it if you have not placed it exactly
over the sensor.
*GUIDEPiu_ is'atradem'_rk'of IndexSystems'Inc.TheGUIDE Plus+Golclsystemismanufactured underlicemefrom IndexSyFtemsInc. '
9
-, STEP 4:_PLUG I NTH E.I_.
Plug the end intOthe wall Outlet, matchingthe wide blade of ihe plug
-with the wide slot inthe outlet.-Be sure to insert the plug completely.
STEP 5: PLACE BATTERIES IN REMOTE.
• Remove the battery compartment cover from the back of the
remote.
• Insert fresh batteries. Make sure that the polarities (+ and -) are
aligned correctly.
• Replace the cover.
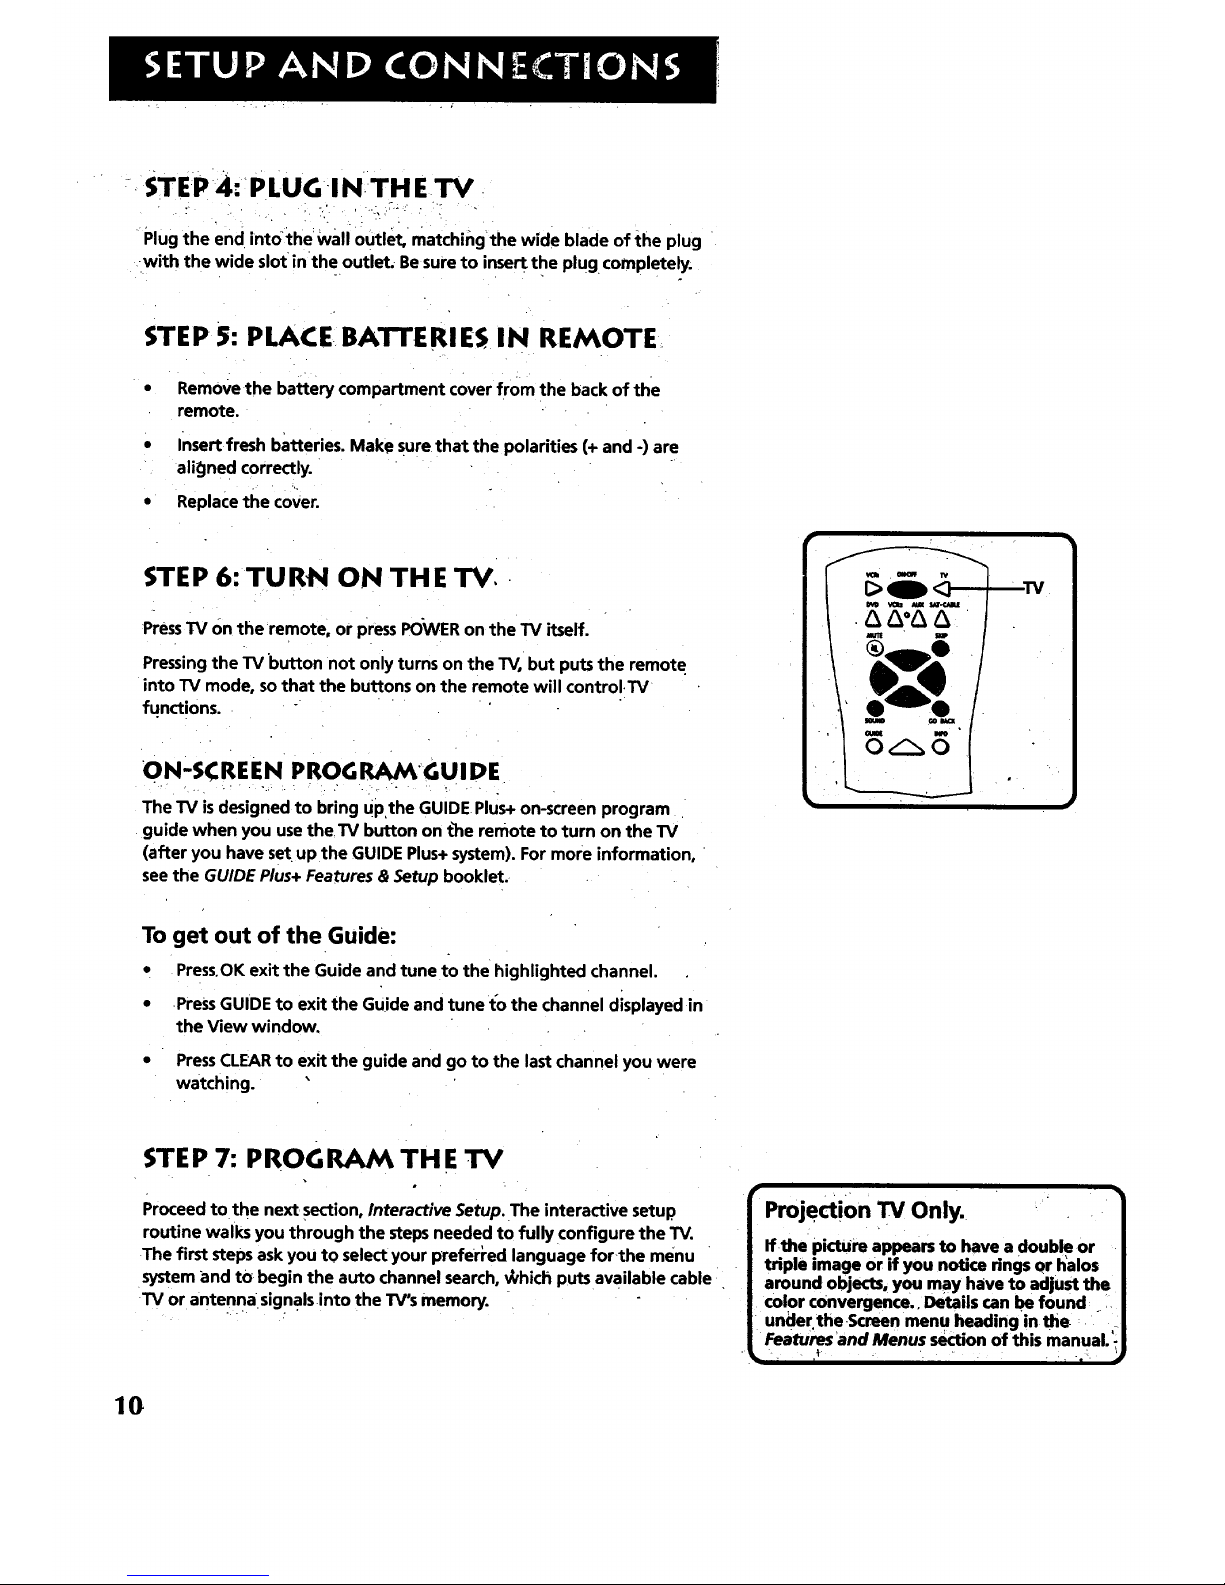
STEP 6: TURN ON THE TV, •
PressTV on the remote, or press POWER on the TV itself.
Pressing the TV button not only turns on the TV, but puts the remote
into TV mode, so that the buttons on the remote will control TV
functions.
ON-SCREEN PROGRAMGUIDE
The TV is designed to bring upthe GUIDE Plus+ on-screen program
guide when you use theTV button on the remote to turn on the TV
(after you have set up the GUIDE Plus+system). For more information,
see the GUIDE Plus+ Features & Setup booklet.
To get out of the Guide:
° Press.OK exit the Guide and tune to the highlighted channel.
• Press GUIDE to exit the Guide and tune t'othe channel displayed in
the View window.
• PressCLEAR to exit the guide and go to the last channel you were
watching.
STEP 7: PROGRAM THE TV
Proceed to the next section, Interactive Setup. The interactive setup
routine walks you through the steps needed to fully configure the TV.
The first steps ask you to select your preferPed language for the menu
system and tO begin the auto channel search, v_hich puts available cable
TV or antenna signals into the TV's memory.
i
r
Projection TV Only,
if the pictUre appears to have a double or
triple image or if you notice rings or halos
around objects, you may have to adjust the
color convergence.. Details can be found i
undertheScreen menu heading inthe
Features and Menus s_tion of this manual.
i ' I_" " " " " ' ' "I "
10

• • Setthe VC-R2channel
• Setthe DVD channel
• Set the SAT/CABLEchannel
'THERE'SAN ON-SCREEN SETUP ROUTINE
The interactive setup routine takes you through the steps.
needed to configure the TV:
Select a menu language
Search for available channels
Set up the GUIDE Plus+ system
Set the time
f
Set the VCR1 channel
•Make the channel list and labels
"2INTERACTIVE SETUP
, _, , .
V
o
,I
Y
• ..
11.

USING POINT AND SELECT
You only need to know one rule when using the remote to accesson- •
screen menus and control panels: pointand select.The point and select
method has two steps.
1. Point to a menu item using the MOVF_arrows on the remote.
To point up or down, press.the up or d_m arrows. To .point left or
right, press the left o.rright arrows.
r..
Select a menuitem by pressing MENU or OK.
I
• Selecting an item tells theTV's menu system to go ahead and make
thechange or go to a place you have indicated.
ENTERING SETUP
The first screen of the Interactive Setup appears automatically when
you turn on your TV for the first time or after a power outage.
1. Press MENU to begin setup or CLEAR to exit.,
o O
MENU
Point and Select
buttons
You can also accessthe Interactive setup through the Main menu:
1. Press MENU to bring up the Main menu.
2;
Point to Setup and press MENU or OK. The first Setup screen comes
up; asking you to confirm thatyou Want to begin.
. , . , . o ..
YOUcan als0 select a menu item by
entering theitem number with the
number buttons on the remote,
PressCLEAR at anytime to remove all ,
displays from the screen and return to TV
viewing. " •
Many VCR user manuals refer to a
PROGRAM button. The MENU button on
this remote works as a PROGRAM button
in VCR mode, Other manuals may refer to
"a SELECT SUtton, The oK'b_ton on this
remote Works as a SELECTbutton. .... ,
tm "'_ I " ....
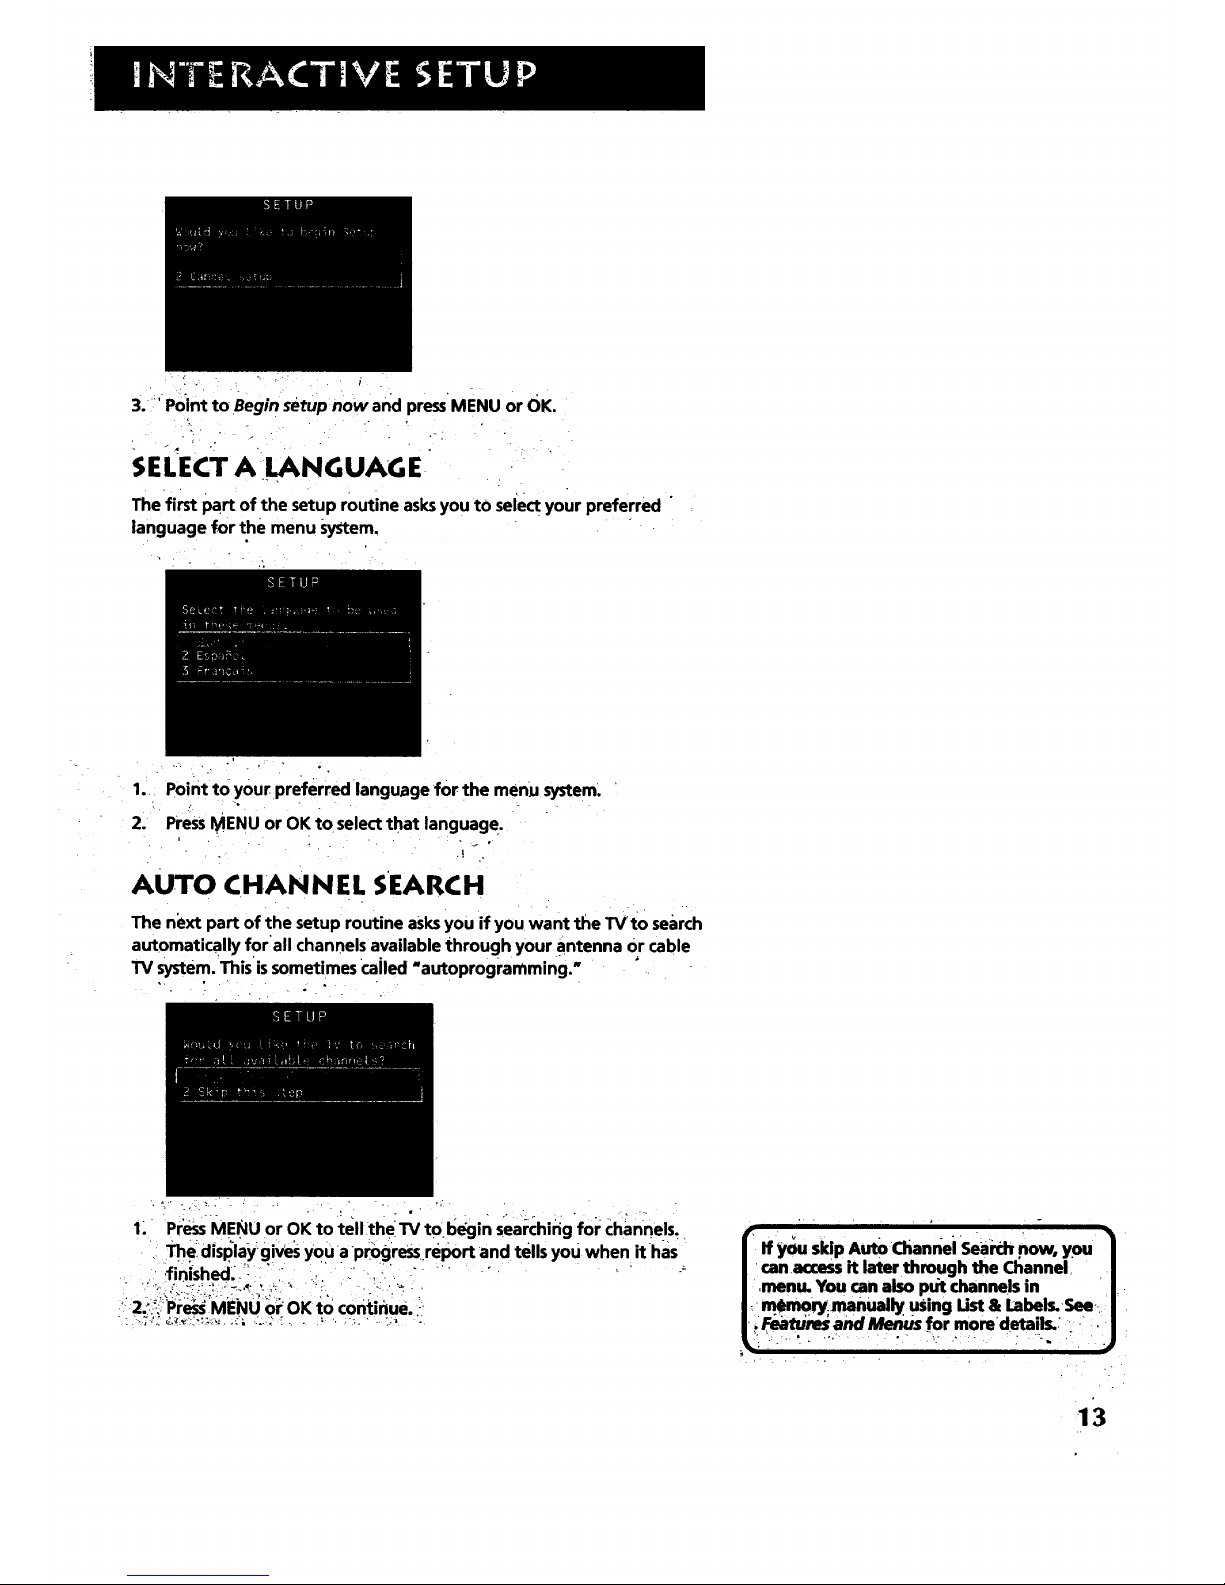
3. _'Point to Beginsetup now and pressIMENU or OK.
SELECT A I.LANGUAGE
Thefirst part of the setup routine asksyou to select your preferred "
language for the menu _yStem,
" . '. . • .
1.:.: Point to your preferred •language for the menu system.
2. PressMENU or OK to select that languag e.
I
AUTO CHANNEL SEARCH
The next part of the setup routine asks you •ifyou want the TVto search
automatically for;all channels available through your antenna Or cable
TV system. This issometimes called "autoprogramming., '
• • _ , . . •
1: Pr_s MENU or OK to :telltheTV to bL_Jinsearching for Channels.
'. Th.edisplaygives You aPmgreSs.report and tells you when ithas
, ifinished_-i_ :_"ii :..,..-",'.:...'
' 2:_::.,Press MENU or OK to continue.--
13

•_ GUIDE PLUS+ cY¢'rl:_____.... •..... :. :,, ;._.,.. ,.:_:. _ ::.:,,_...:.: .
-- - -- lets * GUIDE i ForMoreGUlDE PluS+ __ :, -
• iThenext step you setup the Plus+systemto disPlayyour ,_ i..f^._.÷;._. _' _ _
localprogram listings,and control yourcable box andVCR. I "' v"'=uV ''' _ , '
"" : g " " _ " " : " " " " r '' ' ': " _ ' " ...... : " : :_:, : - Specific information about theGUlDl ': -'
Youcaneither pressMENU orOK to bring up the GUIDEPlus+initial : I PluS+S"stemis containedin a.... rate
menu or point to SkipthisStepto move.to:the next step in the " : | boolde_that accompaniedthis_uct. "
Interactive Setup. " . . . .....
L
: _ .. :.:U. ', : _,i:i_ ,.,- .
Seethe GUIDEPlus+Features& Setup Bookletfor detailed setup
instructions.
sETTEE TIME
The next step inthe InteractiveSetup letsyou setthe time of day.If your
.GUIDEPlus+systemhasnot completed its firstdownload you need to set
thetime, .Oncethe Guidesystemhascompleted itsfirst doWnload, it sets
the time for you automatically. , •
• 1., PressMENUor OKto bring upthe Set71mec0ntrol panel.
k
•ii: 2; ' Usethe left and right arrowsto pointto the hour andminutes . .
i _.:";:_!i_!!_::Spaces::U_ the: upaqd downarrows tO st#oilthrough-the numbers.:
i-,,i ::.:'ii::i_a_dChan_ie'fromAM to PM, '_. " ',: -: ' " -' ' :; "_:
/ r:3"" " PressMENU or OKto continue.
,.

SETTHE VCR1 CHANNEL(AUTO TUNING]
• • o ,
The next step lets you Set the VCR1 channel. When you set the VCR1
channel, you're telling the TV whl_ channeltotuneto when you press:
the VCR1 button on the remote, This is Auto Tuning.
i
Indicate which inputyou used to connect the VCR. If you don't have a
VCR1 comporlent connected to the TV, Skip this step or select No.t
connected from the VCR1Channelchoice list. (For rnore, see Auto
-_Tuning in the Features and Menus section..)
PressMENu orOK to bring up the VCR1 choicelist.
,
.
Point to the choice that matches the way you have your VCR
connected to the TV.
Press MENU or OK to continue.
SET THEVCR2 CHANNEL (AUTOTUNING)
The next step lets you set the _/CR2 channel. Whenyou set the VCR2
channel, you're telling the TV what channel to tune to when you press
the VCR2 button on the remote.
•Indicate which input you used to Connect a second VCR. If you don:t
have a second VCR component connected to the TV, skip this step or
select NotConnected from the VCR2 channel choice list (For more, _;ee
Aul:o Tuning in the Features and Menus section.)
. . - . , . , " ,
15

1_' Pr_ MFNI! _r OK tn hrinn .n the VCl_2 choic elist.
2.
3_
Point to the choicethat matches the wayyou have your second VCR
connected to the TV.
" PressMENU or'OK to continue.
SET THE DVD CHANNEL (AUTOTUNING)
o
The next step letsyou setth e DVD channel. When you set the DVD
channel, you're telling the TV•what channel to tune to when you press
the DVD button on the remote.
Indicate which in put you used to connect a'DVD PlaYer. If you don't have
a DVD player connected to the TV, skipthis step or •selectNot Connected
from the DVD Channel choice list. (For more, see Auto Tuning in the
Features end Menus section.) ....
.... :._ , ... ' _.. o • ,. • . ,_, : . . , . .
_ 1, Press MENU 0rOK tobring Up the: DVD choice list.
16•

2. ' Point to thechoice that matches the way you have your DV D player
' connected to the'IV.
3. Press MENU or OK to continue.
SET THE SAT/CABLE CHANNEL (AUTO
TUNING)
The next step lets you set the SATICABLEchannel. When you set the SAT/
CABLEchannel, you'retelling the TV what channel to tune to when you
pressthe SAT.CABLE button on the remote;
Indicate whic h input you used to connect a satellite receiver or a cable
box_If you don,t have a satellite receiver or cable box connected to the
TV;skip this step or select Not Connected from the SAT/CABLEChannel
choice list. (For more, seeLAuto Tuning in the Features and Menus section.)
1_. Press MENU or OK to bring tip the SAT/CABLE choice list.
2:/: Point to the choice,that matches the Way you haveyour satellite ..
:_,"receiverormbleboxconne_-tedtotl_eTV.+ ............. . . .
• +
3_ +.Press.MENUOP OK to continue.
o+
+.'
._ . ..._ • ,%,•
17

LABEETHE CHANNELS
This laststep in the'Interactive Setup lets you create your channel list and
label your channels, (For more: see List and Labels in the Features and
Menus section.)
Use the,CH ^-(channel up) or CH v
(channel down) buttons to change , ,
channels in the Chan# field. This works
even if you,re not in the Chan# field. Or,
enter the channel number directly using
the number buttons on the universal
remote.To enter a number greater than
99, press and hold "1, to enter the. _
hundreds digit; then press the two
remaining numbers. .......
The list and labels feature can also be: "
accessed from the Channel menu. Because
this procedure can be timeconsuming,
feel free to skip this step and come back
to it later.
1. Press MENU or OK to bring up the List and Labe|s control panel.
2,
,
4,
., _..
Use the left and right arrows topoint to the three different areas of
the Control panel (called "fields").
Use the up and down arrows to scroll through the numbers and
letters and select Yesor No in the Normal Listfield. You may wish to
refer to the call letters listed in your newspaper's TV section for ideas
on labelling the channels.
Repeat this process for each of your channels. Then press MENU or
OK to continue. The TV can store up to 27 labels in memory.
WHAT NOW?
Now that you've finished the interactive setup, you can sit back, relax,
and enjoy the TV. Or...
PROGRAM THE REMOTE
. , - ,
Since,you've gone this far, you can take a few minutes to program the
remoteto control your VCR, DVD player, Satellite rec.e!ver, or..other
components.;To findout how to program the remote, go to the next
;_ioi_ _..-,'.- -. . . ::-. . . . .- : .
181

HOW TO USE YOUR UNIVERSAL REMOTE
This section defines the buttons of the remote and
how to program it to control other components.
The i_niversal 'remote canbe programmed to control
most brands of remote controllable VCRs, satellite
receivers, DVD players and cable boXes. If you have
an RCA, GE, or PROSi::::/LN component, you
probably don"t need to program it at all.
• i
USING THE REMOTE
¥
Modes of Operation
.., : , .
Because this universal remote can control _
several.different components (DVD
player, VCR, Cable Box, etc.) it uses . -
°peratd°nal re°des triggeredby the
component bUttOnS. Forlexample if you_.
wantltlte remote _t9Control_the TV, you • :
would:presst_eTV button to put-the :;-::._::-:,
• remote into-TV mode_Sefore'yoUcould _:
control the TV. = '
• - • , . . ,.i: ._ -.; . - ' :.
19

REMOTE BUTTON,S- I
ON.OFF When in TV mode, turns TV on and off. If in another device
mode (VCR; DVD, Satellite, etc.)and programmed; will turn the deVice
on and off. When pressed twice within two seconds all devices that are'
on will be turned off (this feature only works with most RCA, ProScan
and GE:prodiJCtS).
• . . .
VCR1 Puts the remote in VCR mode and if autotuning is ehabled,' it will '
turn on theTV and tune to the correct channel. "
lrv Turns on the TV and puts the remote in TV mode. Also displays
channel information. _
DVD Putsthe remote in DVD mode and.ifautotuning isenabled, it will
turn on the TVand tune to the correctchannel.
VCR2 Puts the remote in VCR2 mode and if autotuning isenabled, it
will turn on the TV and tune to the correct channel.
LED Redlight which indicates programming mode whenprogramming
the remote.
AUX Puts the remote in AUX mode. Also turns on the TV.
SAT.CABLE Puts the remote in SAT.CABLE mode and if autotuning is
enabled, it will turn on the TV and tune to the correct channel.
MUTE Reduces the TV's volume tO itsminimum level. Pressagain to
restorethe volume. "-
SKIP Press once before changing channels and theTV will wait 30
seconds before returning you to the original channel. Pressrepeatedly
to add more time.
CH ^ or CH v Scans up or down through the current channel list. Press
once to change thechannel up or down; press and hold to continue
changing channels.
VOL - or VOL + Decreases or increases tile TV's volume.
SOUND Pressonceto display the audio processor choice' list. Point and
select to choose a different processor or pressCLEAR to exit
GO BACK Returns you to the previous channel.
GUIDE Brings up GUIDE Plus+ system and exits the Guide. In SAT,CABLE
mode brings up available on-screen guides.
INFO Brings up channel information.
MOVE (Arrows) Used to point to different items in the menu system.
Also usedtO adjustthe menu controls. Also move the PiP window when
no men us are on the screen.
OK When in themenu system, sele_s highlighted items or returnsyou
to the previou_ menu. • :
MENiJ Bdn_ _P the Main:menuand Select. highiighteditems, when in _
VCR nlbde;'itfunction$ as a PROGI_AM button. • ", ' " ", _. :
=
f_
2O
im
DVD " VCIt_ AUX, SAT,CABLE
MUTE SKiP
WHO-INPUT ANTENNA
O°O •
REVERSE° PLAY. FORWARD
_ STOP PAUSE
PiP _,10 I_ _ RESET
OOOO

_ClLEAR Removes any menu ordisplay from the screen and returns you
to TV viewing. Will also exil: the Guide system_....
(0-9) Number Buttons Enters channel numbers and time settings
direct_ though the remote control. To enter a;two-digit, channel, press
the tw0 digits. To enter a three-digit channel; press and hold the first
digit until #- appears, then add the secondtwo. Example: to tune to
channel 123, press and hold 1 until 1-appears then press 2 and 3.
Wl_O.INPUT inTv mode, press to toggle through theavailable input
_-soq_ces (VlD1/SVID1, VID2/SVlD2, previous Charlne!). In SAT mode, press
to select a_ailable channel lists. _ .
• AN1-P.NNA Functions as TVNCR button in VCR mode and TV/receiver
button in SAToCABLEmode'.
RERRSE, RLA.Y; FORWARD, RECORD, _-IroP, PAUSE If programmed,
provides transport control for some remote-controllable VCRs, DVD
players, laserdisc p!ayers, tape decks, and CD players. Pressing RECORD
when using the GUIDE Plus+ system setstheVCR to record a program.
•PIP Bringsup the small picture-in-picture window. Pressagain to'
remove the PIPwindow. When PIP Caption Display - Alternate with PIP-
has been Selected, will display captioning in the PIP window.
SWAP Swapsthe main picturewith the PIPwindow.
CH (_PRL Selects the picture window, (that is, the main Or PIPwindow)
tobe changed by the CH ^ (channel up) or CH v (channel down) buttons.
RESET: Resets:picture qualityc_ontrois to the Bright Ughting Picture "
Control Preset. Point and select to choose a different Picture Control
Preset,
USING THE WHO.INPUT BUTTON
Use the WHO.iNPUT button to scroll through the availableinPut channels
and view components you have connected to the TV.
1_ Pres_TV to place tJ_eremote in TV mode. Make sure that the
component you want to view isturned ON.
L
2. PressWHO-INPUT to tune to an available input Channel.
3. Continueto pressthe WHO.INPUT button to scrollthrough the
channels..
Modes of Operation.
Because this universal
remote can control
several different components (DVD:
player, VCR, _Cabl_Box, etc.) it uses , ..
•operational modestriggered by the "
component butt0nr_ For example if you :-
want the remototo control the W, you
_..wouM press'the WbuttxD.d to pt,_l:_e", ..:,_--
:_remtoi.to wo.xie befomyou_u!d r :
21

PROG RAMMi NG TH E!REMOTE
The Universal remote Can be programmedto controt most brandsof
remote controllable VCRs,satellite receivers and cable boxes. The
remote is already programmed to cbntrol most R_ GE'and PROSC2_
TVs, VCRs, DVD players;.laserdisc players and satellite receivers.
TESTING TH E REMOTE
To determine Whether the universal remote needs to be programmed,
turna device ON, suCh+asa VCR, point the remote at the VCR, and press
the VCR1 button. Then press POWERorCH ^ (channel up) or CH v
(channe! down) to see if the VCR responds to the remote commands. If
not+ the remote needs to be programmed.
PROGRAMMI NG TH E REMOTE
Using Automatic Code Sea'rch
The following instructions can be used to programtheremote to
control each Of the devices connected to your TV. If you want to exit the
automatic code search without programming any of your devices, press
CLEARuntil the LED turns off,
1. Turn on the"device you want to control (VCR; SAT,etc.)
2._- Pressand h01d the button you want to.pr0.gram (VCR1, VCR2; etc.).
While holding the device button, press and hold ON.OFF until
red light on the remote turns on, then release both butt0rjs.
3. Press and release PLAY,then wait 5 seconds or until the LED stops
flashing.
At this point the remote is searching for'the correct Code to
program. If, after 5 seconds, the device you want to control does
hot turn off, press PLAY again to tell.the remote to search the next
set of codes.
Continue preying PLAY until the device turns Off or you have
searched through all'of the codes. There are 20 total sets Of codes.
If the device does not turn off after pressing PLAY 20 times, then
the remote cannot control that particular device:
If th e device you want to control does turn off:.
1_ "Pressand release REVERSE,then wait 2 seconds. Repeat this step
until the device turns back O.N.
2. " To finish, press andJ_old STOP untilthe red light on the remote
turns off.
Using Di_ Ent_
.:.p,.+,r .+ "+. +'"+. _ ...:_: • ,+"
i.++_l"urn!on+_e icomDonent to I_ Dro<3rammed.
DVD VO_ U $M.r_.14_
You'll use these buttons when you
program the remote to control any
• device.
The remote may not operate all mod.els
of all brands.
22'

2. Loo_ upthe brand'and code number(s) for the component on the
code"ston the last page of.this sec_ion_Using theRemote.. ::
3: Press and hold the button ontheremote you want to program.
4.i _:Enter tl_e code from the'code list, "°
5. Release button, and then press ON-OFF to see if the component
:. responds to the remote commands. If it doesn't, try pressing the
componentbutton and then ONoOEF again."
-6. If-you get no response, repeat these steps using the next code listed
• for your brand, until the component respondsto the remote
commandr_
USING TH E REMOTE TO CONTROL A DEVICE
Once the remote has been programmed successfully,you are readyto
use it to control your dev!ces.
To;operate the device:
1.'. Press the device button (TV, VCR1; VCR2, DVD, AUX, or SATeCABLE)
to set the remote to control the device.
2. Press ON.OFF to turn the device ON or OFF.
3.- Use the remote buttons that apply tothat device.
MODES OF OPERATION
"Because this universal remote can control several different components
(DVD player,VCR, Cable Box, etc.) it uses operational modes triggered
bythe component buttons. For example if you want the remote to
control the TV, you would pressthe TV button to put the remote into TV
mode before you could control the TV_
FRONT PANEL
If you cannotlocate your remote you can Usethe front panel of your _ .
to operate many of _he TV's features.
MENU Brings up the Main menu. When in the menu system, it select-s
highlighted items. Also returns you to the previous menu.
CH v Scansdown through the current channel list. In the menu system,
it points dowQ to items and adjusts, menu controls.
O! ^ Scans up through the channel list. In the menu system_it points
up to items and adjusts menu _ontrols.
VOL- Decreases the volume, When in the menu system, VOL- isused
to point left to items arid adjust menu coritmls. : -
VO[ ÷:,,:Increas_ the volume. When m the menu system, VOL+ is used.
:'to point right to items and adjust menucontrols.
POWER iTums the TV on and off.
l ,
MENU CHV CHA
m II
.v_- .'vot.+ PCIWF.Fr
The front panel above showsa typical
button layout. The exact look of the
buttons maybe different from those on
the front of your .TV.:
If you use theChannel Block feature_the
, front panel no longer provides a_ess to
the, menu_ The Front Panel Lockout..
featuredisables all front panel, buttons. .'ii
FOr more information, see Parental _._i_;_',;_
I '1 " " _ ' I -T [ I
]
23

2011
- 2mi,_#._2125
RCA'. _ ...... 2000,2001,2003,2013,2021,
..--,--._. 2055, 2056, 21)82,20&1, 2064,2065, 20B6,20eT,
2098,2009,2090,2091,2107,2115,2120,2125
P-,_i_llstlc +- , 2._2011,2013,2014._
. 2021,2022,2023,2026,2029,2049.2050,2096,2131
l_dlX ................. 2014
................. 2014
RJeoK - .__ - .__212B "
P,,un_o..... " ............ 2104
Samsur,fl[-_,,___. 2005,2013,2015,2033,2053,2112
Sank,/ - ..... " ...... 2132,21,O4
Sw',mi ++-" -2010,2092,211h2123
Sanyo..... ;___ 201 I, 2013, 2023
Scott _ 2012,2015,202.5, 2032,2035,2038,2065, 2_
Sears. + . ...... 2011,2014,2021,2023,2048,
+ - 204_,2050, 2051,20S5, 2056, 2107, 2119
Sharp-- _'2017, 2029, 2094, 2095, 2096",2131
Sylvania2002, 2021.2022. 2026"2062, 2063, 2065,2 i24
S_mphonlc.. 2OO2.2O26
Tandy ................ _ 2002, 2011
Tasl_iko............. 2014
Tatunll . 2058, 2111
TEAC ..... .__ 2002, 2026"20.L_ 20_5, 211 I
Technics.... 2021,2109
Teknika .-- 2002,2014,2021,2026"2100,2129
Trek :-_-- 2013, 2024, 2047
Toshll_ _ "2015, 2049,2051,2055,2065,2093,2116
•To_Vlslon _ __ _ + + 2013,2014
_, + -................ 2013
V_'tor Research _...,. 2009,2010,2015.2016
_ Victor . . • - .... 2010
V'Id_o Concepts _____ 2009,20010,2015,2016,2113
Vldeesonlc _ ++......... __ __ 2013
Wards,...;.--, 2002;2013,2014,2015,2021,2023,2026,
.20"+.20 5, 102,
........
..... 2oo,.2o,o.20,i.20,+.20s+ 2,,,
Zenith __....... 20021,20911,2104, 2119, 21211
HarleyDavidson - 2026
Harman Kardon2_-_ _ . ' ............2009
Harwood .............................__.;+. 2061
Headquarter .._ ...................... 2011
Hitachi2002, 2055, 2056,2057,2107,2111,2120,2122
HI-Q ................................ 2023
Instant Replay__. 2021
JCL ,:-2021
.ICPenney.-- 2009,2010.2011,2013,2014,202.1,
__ 2022,2055.2056" 2050,2059,2060, 2tOT,2t 10
_men .... - 2055,2056,2111
200,.20,0.20,1.201m20m211!.2m
--- '2010,2011"20" I,
KLH __ " __ .... ..T, - 2061"
Kodak .......... :..2014,2021
Lloyd .......... -- 2002+ 2026
Lo_k ......................... _. 206 I
LXI .................................. 2014
Magnavox._ 2021,2022, 2062, 2063, 2104, 2100,2124
Ha&,nin........................................... 2013
Maran___ ......................... 2009, 2010, 201I,
.................... 2016,2010,2021,2058,2062,2064
Marta ....... ...... ._....... _.............. 2014
Hasushita__.................... 202 I
MB .___ ..:+-,---- 2021
Memomx .... ' " _--2002,2011,.
• _ 2013,2014,2021,2023,2026,2104,2131
MGA . 2029,2065,2"113
mm
: ____-_ S056'5057
Dral_ ...... 50511,5059
GE D_S ___ .... .. 5000, 5001
Gonenllnstun_m_ _ . . 5060,5061,5062
PamsonlcDSS . - __...'..___ ,5075
Prim_tm" DBS" " -- .__ 5076"
_DSS. 5000,5001
RC._ D_ "' 5000,5001
Re_',sdc + _5063
. ,.sooyDss -• _ .- ..... 5072
STSI_ . _____ 506q
S'I'$2 __5065
STS3 - -+ ....... -.. 5066
__5067
Toshiba_.+._..--_...._,_,. ...... 5068
ToshibaDSS .......... .__ 5073
Unldon DSS..................... 5069
m
AH/FM .... 4003
ABC .----'r- 5002" 5003"5004' 5005, 500_ 5007' 50S3 Aux • " -: " " ' " - " 4004
Anu_lx,,, -. , ". " 50¢!1,5009 _ • , •.4005
....... ..... 5008,5009,5010,5011 CD .4007
c.meu._-, .... , • , +":,;, " -..m_oa T_ ...... -, , :i , •...... 4oo6
HIdland " - " " " 2053 -- - , " - , " .... : -'."":. ' : .., .+:• _ :," . ,
, -. .... • .... .C4,_aJ__ " - - . '- 5011 +,.. +- ........ • • -. ,: • " " +.+_' -
_.. ...... " 2055,_2!07". , O_l_ton ..... " " " " + "" _ " 3011. ". •- • -_- ,.
2070,20712072,2073'2074 210_2113 2123 -- _- ..... " '+ ..... 5014,5015": r" '""''':+S.,+:._4"+_-''".T,;<__:_._: _. "_',<_;.:._ ...,......+
H ' " _ • ' ' ' • " " ' - • " --, • ' ," GE' _ ":" ............... :'-" + "- 2001
• ontgonNmry.V_'_rd - + : 2075,2131. : • Com,l_:; _'+" " " " " • ..... • 5016 ,.:'.+."_.._e--"-":. '" ".:''. '. '- '+" 200 _
otm_& - __ 2021,2131 r_.._,,,,., - " r^,+ .... - .... +. +. - ,
....... f. ._ +.,.-:.2.0q'.'.z.2013,20_. .. . . _. : . _+ . . - , . .
24"

USING THE TV _I_
This sectionexplores,tl_efeat'uresand menus ofy0ur TV
•beginningwith some information on using menus and control
panels.." _
Eachmenulisthen outlined and special features are detailed in
order to helpyOUgbt the mostfrom your'TV. "
....... . ,;_ . .
Information on usingyour GUIDEPlus÷system can befound in.
a separatebooklet for easieraccessand:soitcan be placed.near-
•you while you becomewith the feature_ .
V
¥
!
25" '

MENUSAND CONTROL PANELS
using the bu_ons on •both the remote and frontpanel enable you to
access and make changes tQ theMenus and Control Panels.
Menus use the point and select rule to navigate, but control panels use a
variety of methods to adjustfeatures on your TV. The following pages
detail__how to use,_these, controls in_,.orderto... customize the functions of
vour, lv. - - •
MENUS
The first menu iscalled the Main menu. Press MENU on the remote or on
the front panel to bring up,the Main menu: •
M'enus take you to another menu or acontrol panel_There are two ways
to select a choice in a menu: "
• Point with the MOVE arrows and then select with MENU or OK.
• Pressa number button on the remote. For example, in the Main
menu press 3 to go straight tothe Screen menu.
i i
Exiting a menu
There are three ways to exit a menu:
• Point to Exit and press MENU or OK,
• Press0 on the remote.
• PressCLEAR, Theon-screen displays are cleared from the screen and
you are returned to TV viewing.
i
Feel free to explore the menu system. If
you're eVer unsure wl_ere you are in the .
menu system, or you're just Plain tired of
exploring,.press CLEARto remove, the "
menus.from the screen and start over
again. - " - ' _
• j
26

CONTROL PANELS
Control Panels allow you to adjust thedefault settings on many features
of your TV. You can choose a setting, enter a number, or adjust a level
such as tint or brightness. There are threetypes of control panels: sliders,
choice lists, and numeric entry.
Sliders
Sliders are used to make adjustments to a particular'•€ontrol.
To usea Slider in a menu:
1. Pressthe up or down arrow to select the slider •control for the
feature you want to adjust.
2. Pressthe right or left arrowto adjust the indicator lineon the slider.
Numeric Entry ,
A numeric entry control panel iSused to enter numbers or letters.;
A pointer appears underneath the column you are changing.
Arrows
v_J • _ "iv
OVD VClb_ AUX SAT.CAI_
_. Press the up arrow to enter a number in the column above the
pointer.
2. Pressthe righ_tarrow t°m°ve to th e next column, then press the up
or down arrow to enter a number.
3. When you have finished entering information, press MENU 0rOK.:
- ff the_. control panel is not set at the :i,o __
current time, use the left:arrow to go back
over.the columns and theup arrow to, _ ...,
make changes. _-* :' ,_ i,. ' -:
.Youcan also _i" num_ _di're_ly L)y:.
using the number buttons., : - , '
d
27

CHOICE LISTS
• , • .
Choice lists are used to choose a particular setting frOmra list of settings.
1_ Point toa choice Ona menu and press MENU;Or_OK t'Oselect that
choice..
Now that you know howto accessthe menus and adjust the control
panels the following, pages provide a brief explanation of all the menu
features. The features are organized in order of their location on the
Main Menu.
AUDIO MENU
Mute Press OK to reduce the TV's volume to its minimum level, Press
OK again -to restore the volume;
Tone controls Displays the slider controls for adjusting the TV's treble,
bass and balance. :'
Audio Processor Displays a choice list of available audio modes, which
control the way the sound comes through your speakers.
Mono Plays thesound in mono only. Use this setting when
receiving broadcasts with weak stereo signals.
Stereo Splits the incoming stereo audio signal into left and right
channels. Most "iV programs and,recorded materials have stereo
audio. The TV displays the word STEREOwhen you tuneto a
program that isbroadcast in stereo.
SRS Stereo (o) SRS* is an audio processing technology that adds
greater depth and stereo separation to stereo audio signals.
Enhanced SRS Stereo Enhance_the SRSSignal to give the
impression of even greater depth and stereo separation.
Sound Logic Stereo Sound Logic monitors a program's at_dio track.
and limits.volume excursions to a minimum and maximum volume
range'from the current volume setting. Acting like a dynamic range,
it compress_.t 0 lim!t Sudden.volume increases_like when a . . -
commercial comes on.
sRs, Sound Retrieval S_/stemand the SRSlogo (o)_are reg!stered trademarks of SRS L_bs,.Inc. .
28

Second Audio Program (SAp)plays th e program's audio in a _.....
second language,: if 0neis available. TheTV displays the word SAP
when you tune to a program that is broadcast with SAP
information.: SAp.audio is broadcast in mono. SAP isalso Lised to
broadcaSf_a _rogram's audio With descriptions Of the video for the
visually,impaired. •
Audio Outi_,& Speakers, Dispiays a choice listthat lets you turn the
-TV'sintern_| Si_eakerson Or Off and set the audio 0utputsto fixed-ievel
or variablecontro| level. - :_i. °_ __ _
va.ab,, turn speake
on and allows Variable output from the TV's audio output jacks.
Variable Output; Speakers Off Thissettir_gturnsthe TV's"
speakersoff andallows variable output from the TV'saudio output
jacks.
Fixed Output, Speakers Off This setting turnsthe TV's speakers
.off and allows fixed output from the TV's audio output jacks to an
external device such as a surround sound amplifier. With Fixed
Output On, the TV's volume control, tone controls and mute are
disabled.
USING THE REMOTE TO SELECT AN
AUDIO PROCESSOR
r
You can change the audio processor from the .Audio menu,,as illustrated
above, or by pressing the SOUND button on the remote, TO make a.
selection using the remo_e:
1. Press SOUND to display the audio processor choice list.
2. Point to and, select a different audio processor'or press CLEARto
_xit_
Sound
button
S0UNO 60 lACK
Gum_ mlO
O_O
I_Y FORWARD
RECO_ £roF, ,

PICTURE QUALITY MENU
-. . .
hsic Picture Con_ls Displays the five slider controls for adjusting
theway the,piCture looks. _. - .:. :':_....... " _" ._
Contrast Adjusts the difference between the light and dark areas
of the picture.
Color Adjusts the richness of the color.
Tint Adjusts_the b.alance between the red,and green levels.
Black level Adjusts the brightness of the picture.
Sharpness Adjusts the crispness of edges in the picture.
When exiting this menu the Save Personal Picture Preset Choice List Will
appear. You can choose either Yes or No.
Picture I_esuts Displays a choice list that !ets you select.on e of three
preset picture settings: Bright Ughting, Normal Lighting, Soft Lighting
or Personal Ricture Presets_Choose the setting that isbest for your
viewing environment and edit your Personal Picture Preset.
Auto•Color: Displays a choice list thai lets you turn •on the feature tha t
automatically corrects the color of the picture. (This is especially useful
for tracking realistic flesh tone colors as you switch from channel to
channel.) Choose On or Off, depending on your preference. Its your
choice.
Color Warmth Displays a choice list that lets you set bne o_ three
•automatic color adjustment: Cool for a more blue palette of picture
colors; Normal.:,and Warm for a more red palette of picture colors..The
warm settirigcorresponds to the NTSCstandard of 6500°K.
Video Noise Reduction Displays a choice list that lets you turn on the
feature l_hat automatically reduces noise from the picture.
/ bring up the Picture Control P_choice "I
/ list..,Point tothe desired _ng;press ::;_ /
'L- MENU or OK tO select it. ,".... -' i.J
3O

. CREEN MENU:
Closed-Caption Display bvsplays a choice list thatriets you choose the
way closed captionin_g information isshown onthe screen.. - : .:
Off No captioning information displayed. "
On" Captioning information shown always, when available.
On When Sound is Muted Displayscaptioning information, when
: _ available, whenever the TV's'sound is muted by pressing the MuTE
button. The captioning information isnot displayed when the sound
is not muted.
Cl_ed-Caption Mode Displays a choice list that lets you Choosewhich
captioning mode isused for displaying captioning information,
PIP Closed-Caption Display Displays a choice list that lets you choose
the way closed captioning information is shown in the PIP window.
Off No captioning information displayed.
On Captioning information shown always, when available.
Alternate with PIP button" Displays captioning information,
when available, by pressing the PIP button while the PIPwindow is
displayed.
PiPClosed-Caption Mode Displays a choice list that letS_you choose
which captioning mode.is used for displaying captioning information
within the PIP window.
Menu Language Displays a choice list that lets you select your
preferred.language for the menus: English, Spanish or French.
Picture Tilt (Direct View W: 32" or above) Your TV has an extra-
large picture tube, which makes it vulnerable to "theeffects of the Earth's*
magnetic field. You may need to adjust the picture _ilt- Use the left and
right arrow buttons adjUst the picture tilt.
Adjust ProjectionW (Projection W only) Lets you adjust the TV's.
three colors. Sel_-ting Green Centering brings up a control panel that
lets you center the green projection tube on the screen. Selecting Red
Convergence or Blue Convergence lets you align the red and blue
projection tubes.
Center the green projection tube first. Then, adjustthe red and blue
,projection tubes until the test patterns on-the TV screen appear white.
Direct V_ew T_. 32" or above Screen menu
Projection TV Screen menu
r •
You_projectfi)nTV has three color
. projection tubes - one for red, one for
• green, and one for b!ue_When the tubes
are precisely aligned they create the color
images you seeon the TV screen. Over " ,
'tim,".'tl_e picture can drift out of . :.-. -.
a!ignmentdue.tononnal Component, .,-:. .:
.aging_ bumps and vibrations or moving.,.
:the.l_V_..!f you"notica :rings. or.halos around.::
. Objects inthe.picture, you may want to_ >:.i;
i readjust'the picture tubes. :: ; . .' '_
31

USING _:i_LO$ED_"CAPTION ING
Many programs are encoded with closed captioning information, which
: ie_ _ou: disp_iaythe audro' _ortion of a pr?gram as textloh the TV screen
_Closed captioningisnot availab!e on all channels at all times. Only
•specific programs encodedwith Closed captioning information are
•applicable. When a program'iSd_ captioned, theletters CC are_
displayedin the channel marker:""
Closed, CaPtioning Modes
The.TV offe_rseight Cl03ed-captionedmodes, including four text modes.
To Set the Closed-Captioning Mode:
1. Select Screen from the Main menu
2. Point tO Closed-Caption Mode and press O_. A choice list displays:
.
Point to your •ChOiceand'press OK to select it and rel_um tothe
Screen menu.
Turning off Closed Captioning
1. Select Screen from the Main menu.
2. Press OK to select Closed-Caption Display"
3. Point to OffAIways and press OK, Theclosed .captioning is turned
. , . .. .
off and you are returnedto the Screen menu_
l:.:among;the modes,:y_ mayp_r_.to;i. /:|
l!lea;¢e the _'i_l_tioned. _modeset t01-'_'i'_ : /
!' CC1;whicbdisp!ays_€o.mplete_textof the _;/
| Program in the,prima_!angu'age in y0uri_|
32 _

CHANNEL, MENU,
Signal Type Displays a choice listthat lets you select the current
antennatype. This option does n0tappearwhen the TV GUIDE Plus+
system isset.up.
UHF/VHF Antenna Choose thief you are currently using an off-air
antenna for TV signals.
= - '_.abla TV Ch00sethis if you are currently using cable or a cable
box for,TV signals.
Auto Channel Search Tells the TV to search'automatically for all the
c11annelsavailable through the, antenna input. When the TV finds an
active channel, it places it in the channel list; inactive channels (weak
stations or Chanhels withno signal at all) will be removed from the
channel list. If you are using a cable box and have setup your GUIDE
Plus+system, this option will not appear.
List and Labels Displays a control panel that lets you custom-build
your Normal channel list and choose a six-character label for each
channel. Follow the on-screen dire_ions to enter your channels and
other information.
Chan# Usethe up and down arrows to scroll up and down
•through the channel scan list. You can enter the channel number
directly using the number buttons.
Normal List Only the channels included in the Normal list are
available when you scan up and down using the CHAN buttons, use
the up and down arrows to indicate whether the channel number
indicated is included (Yes) or is not included (No) in the Normal
channel list.
Chan Labels Use the up and down arrows toentera six-character
label for each Channel. Holdthe button down to scroll quickly
through the characters. PressRESETto clear a label. The TV can
store up to 27 labels in memory.
Auto Tuning Display_ a choice list that lets you setup the TV to
automaticallytune to the correct input channel when you press a,
component button (VCR1, DVD, VCR2, AUX or SAT.CABLE) on th_
remote.
Set VCR I channel Displaysa choicelistthat letsyou select the
channelthat the TV tunesto when you pressthe VCR1button.
Set VCR2 Channel Displays a choice list that lets you select the
channel that the TV tunes to _vhen you press the VCR2 button.
Set DVDChannei. Displays.a choice list that lets yod select the
channel that the TV tunes_to when you press the DVD button.
SptSAT/_!=le;Channel Displays a choice list that lets you selecl_
the channel,that the TV tunesto whenyou pressthe SAT*CABLE
button;.,
33

The _choices for each screen are: -
Not Connected Choose this if you do not have a component
connected to an antenna or video input0n the back of the TV, or if
you don't wantthe TV to tune to a channel when the particular,
component button is pressed.
- i
ChannelL2 (SATICabla only) Choose this if your component is
connected to the antenna jack on the back of the TV, and _;ou'want
the TV to tune to channel 2 when you pressthe_specified
component button, Reminder: Make sure the components Ch 2/3/4
switch is setto channel 2.
i - .o
Channel 3 Choose this if your component isconnected to the
antenna jack on the back of the TV, and you want the TV tO tune to
channel 3 when you pressthe specified component button.
Reminder: Mike sure the components Ch 3/4 switch isset to
channel 3.
Channel 4 Choose this if your component is connected to the
antenna jack on the back of the TV, and you want the TV to tune to
channel 4 when you press the specified component button.,
Reminder: Make sure the components Ch 3/4 switch isset to
channel 4.
Video I Input Choose this if your component isconnected to the
INPUT1 jacks on the back of the TV and you want the TV to tune to
VIDI(SVID1 if you used an S-Video cable) input channel when you
press the specified component button.
Video 2 Input Choose this if your component isconnected to the
INPUT2 jacks on the back of the TV and you'want the TV to tune to
VlD2 (SVID2 if you used an S-Video Cable) input channel when you
press the specified component button.
TIME MENU
Sleep Timer Displaysa control panel that lets you select the amount
•of time you want to give the TV before it shuts itself off.
Schedule Displays a control panel that lets you set up a schedule for
turn!ng the TV on and off automatically. Make sure to turn the
schedule On. The on-screen directions guide you through the steps
needed to set the schedule.
Set Time Displays a control panel that lets you enter the current time.
The on-screendirections guide you through the stepsneeded to set the
time. If your TV Guide Plus+ system issetup, and running then itwill
automatically update your time and this option will not be available-
• View Warranty Clock Displays the number of hours the.TV has been in
Operation (up to 5 years)and the date the TV was first turned on.
•34

PARENTAL CONTROLS MENU
Parent ApprOvedChannels Displays a control panel that lets you'
de,cidewhat channels canbe viewed or selected using,the,TV's frot_t
Panel controls.
than # Use the upand down arrows to scroll up and down
through the channel scan list. You can enter the channel 'number
directly using the number buttons:, -
Parent ARprovbd Use the up and down arrowsto choose
whether the channel indicated should be shown when the Channel
Block feature is turned on. Select Yesto indicate that the channel
can be shown at anytime, regardless of whether Channel Biockis
turned on. Select No to indicate that the front panel cannot tune to
that channel when Channel Block isturned on. Important: You
mUst turn the Channel Block feature on. (See Channel Block, r
below.)
Channel Block Displays a control panel that lets you decide when a
channel can be viewed. With Channel Block On, the Menu button on
the front panel of the TV will be locked so that settings cannot be
aitered. In orderfor this to be used as a parental control, the remote
must be hidden or placed out of reach of children.
Off All channels are available.
On Always The front panel CH (channel) buttons will tune
only to channels that you have marked ,as"Parent Approved."
The remote will still tune to any channel.
Scheduled Selected channels will be blocked out between
start and stop times you enter in the control panel. The front
panel CH (channel) buttons will tune only to channels that you
have marked as "Parent Approved." The remote will still tune to
any channel.
Front Panel Lockout Displays a control panel that lets you lock
(disable) the TV's frontcontrol panel; or unlock (enable) the TV's front
contro ! panel. The remote will still tune to any channel.
Front Panel lockout can be used to:
• Keep children from watching TV when the parent is not present.
• Keep small children from playing wit% the buttons.
(When using this as a Parental Control method you must remove access
to the remote while you have the Front Panel locked.)
ff you can't access a channel or use the TV's front panel buttons,
maybe you've;forgotten to turn off a parental control. Check
the Channel Block.and Front Panel Lockout control panels;
3s •

GUIDE+ PLUS+ MENU
GUIDE Plus+ Setup Displays the GUIDE Plus+ setup screen.
Setul_ 'Setting up tl_e GUIDE Plus+ System is detailed in the GUIDE
Plus+ booklet.
View Demo Runs the GUIDE Plus+ demonstration.
GUIDE Plu_ Label Displays theGUIDE Plus+ Label menu.
On Displays the station name when you change channels.
Off DisableSthe Label feature.
GUIDE Plus+ Auto Display Disp!ays the GUIDE Plus+display options.
on Automatically displays the Guide when you use the TV button
on the remote to turn on the TV.
Off Disables the Guide from being displayed when you usethe TV
button on the remote to turn on the TV.
Continuous Demo Runsthe GUIDE Plus+ demonstration untii it is
turned off.
For additional information on using the GUIDE Plus+ system see the
GUIDE Plus+ Setup & Features booklet included in your literature pack.
SETUP MENU
The setup routine isdetailed earlier in the manual in the Interactive
Setup section.
The first screen of the Interactive Setup appears automatiCally when you
turn on your TV for the first time or after a power outage.
You can also accessthe Interactive Setup from the Main Menu. J
36

" . 2, :. _" _- _'_ :.' 4""*/'¸ :_"_ *._ _" ,_x'" :"
PI P (PICTU RE-I :PI TURE) OPE RATION
The PIP(picture:inLpicture) feature letsybu display a second, smaller
picture on top of the mainpicture.-_i_:_4_:¢
• •. .%;$- _ $.:- _, ,,:_.• - ,, .- ..- .... •.. , . ..
PIP Buttor_s
There are se_en remote butt0ns.that control the way the PIPwindow
worksil:
- /pIP Brings upthe pIPWi_dow. PressPIPagain to remove the
•winclow.
MOVIE buttons Letyou move the PIP window to different
areasof the screen.
SWAP Switches, or""swaps," the video from the PIP window
with the main picture! _ _ '
CH CTRL (Channel Control) Lets you switch channel control
between the PIP window and the main picture.
For instance, pressPIP to'bring up the PiPwindow. You can
change channels by entering channel numbers or pressing
the CH ^ (channel up) or CHv (channel down) buttons. When
you pressthe CH CTRL button the channel control switches to
the main picture. You can now change channels in the main
•picture by entering channe! numbers or pressing the CH^
or CH v buttons.
PressCI_ CTRL again to returnthe channelcontr01 to the PIP
window.
Two TJpsfor Using PIP,Buttons
, - • . . .
Skip to Pl_'Channel Surfing in the Main Picture
You•can surf thr0ugh•thechannels during comercial'b_eaks using the
sKIP and CH (channel) buttons.
1. Press SKIPto set thecommercial skip timer andbring up the PIP
window.
2. P_esstheCH ^•Or CH V buttons to surf through the cha.nnels in the
main pic!(Jre: whet1 rile'SKIP-feature times out, the main picture will
tune to the original channel automatically.
Channel Surfing in the PIP Window
You can usethe _IP windowto surf through channels aswell.
I. ,pressPIP to bring up thePiP window.
• ., =,.: . ....... _ .!.... "'_,. - .,.
2, -Presstt_e, CH^ or CHv buttons. The TV begins, displaying each channel
./,: ,in:the:PiP Wind0w: Ify(_u_¢e a channel that interests yeu, press
-SWAP,
•PiPb_tons
Move
buttons
Atypical use of SWAP isto.scan through
channels in •the PIP window, and when
you flna.a dmhnel you like, press SWAP
:"t6display'that Channel in the main- _ _
"pictum,'sendingthe current channelto
the PIPwindow. .
_.'_ . ; , . .- . -. _ , .. o
37

CHANNEL MARKER
There .areseveral indicators that come up when you press the TV, INFO, PIP
or SWAP button. This display is called the Channel Marker. -
12:01 Displays the current time.
CC Displayed When Closed Captioning isavailable on'the current
channel.
VCR1 Displays'the label assigned to'the current c_annel.
riD1 Displays the current channel or input channel.
Mute (or $tL_mo) Mute is displayed when you mute the audio. Stereo
isdisplayed whenthe current channel is broadcasting in Stereo.
SAP Displayed when the current channel is broadcasting SAP (Second
Audio Program) information.
PIP 59 (PIP chan) Displays the current PIP channel.
Sleep Displayed when the Sleep _mer has been set.
00:00 Displayed to count downtime left on the commercial skip (SKIP)
timer.
8
Sampledisplayson a ChannelMariner"

TROUBLESHOOTING
Troubles sometimes are caused by simple.'faults" that you can correct without the help of a service technician. If you
experience any difficulty With your TV, check a few basic remedies before calling your service technician.
TV will not turn on
•. CJ_eckto make sure it is plugged in.
• _ Check the wall receptacle (or extension cord) to make sure it is "live"by plugging in something else.
• Maybe batteries in remote control are "dead."
• Maybe remote control is not aimed at remote sensor.
• The front panel controls may be locked (disabled). Use the remote control to unlock the front panel controls by
selecting the Front Panel Lockout in the Parental Controls menu and choosing Unlock.
Controls don't work
• If using remote control, make sure remote is in TV mode by first pressing TV button.
• The front panel MENU button may be disabled. Use the remote control to turn off channel blocking. Select
Channel Block in the Parental Controls menu andchoose Off.
• Try unplugging set for two minutes and then plug it back in and turn it on again.
Problems with Remote
• Maybe something is between the remote and the remote sensor.
• Maybe the remote is not aimed directly at the component (TV or VCR) you are trying to control.
• Maybe remote isnot in TV Mode. Pressthe TV button so remote will control TV.
• Maybe batteries in remote are weak, dead or installed incorrectly, l_ryreplacing batteries. (Note, if you remove the
batteries, you may have reprogram the remoteto controIother components.)
0 Remove batteries and hold number 1 for at least 60 seconds to drainthe microprocessor inside the remote. Release
number 1, replace the batteries, and (if necessary) reprogram the remote.
• Remove all batteries for approximately 12 hours. Then replace batteries and (if necessary) reprogram the remote.
Guide Comes On When I Turn on TV
• The Guide automatically comes up when you use the TV button on the remote to turn on the TV. You can turn off thi
feature by selecting GUIDE Plus+°Auto Display from the GUIDE Plus+ Menu, andsetting it to off.
Turns off while playing
• Schedule off function may have been activated.
• Electronic protection circuit may.have been activated because of a power surge. Wait 30 seconds and then turn on
again. If this happens frequently, the voltage in your house may be abnormally high or low.
TV Turns on unexpectedly
• Schedule On or Watch from the Guide may have been activated.
Blank screen
• Maybe the component connected tothe input jacks !s not turne d on.
• Try anothel: channel.
• PressRESET,in casethe picture controls are set too low.
NO sound, picture okay _
• _Maybe_sound is muted. Try pressingvolume up button tO restore sound.
• Maybe speakersare turned off. "Check theAudio Output and Speakers control panel inthe _AudiO':menu___'__......
• _if Udng an S-VHSComponent, reii_ember to also Connect the component's L and RAUDIOOUT jacks to,the TV's L and R
INPUT jacks. ' "
39

Can't select certain channel
• Channel may be blocked or not approved in the Parental Controls menu.
• If using aVCR, check to make sure the TV/VCR switch'on the VCR is in the Correct position
Noisy stereo reception
• May be a weak station. Use SOUND button to change to mono mode instead of stqreo.
No picture, no sound but TV is on
• Maybe the cable/air function is set to the wrong position.
• Maybe a vacant channel istuned.
• If watching VCR (connected only through antenna input), make sure TV istuned to channel 3 or 4- same as CH3/4
switch on VCR. Also check to make sure TV/VCR switch on VCR isin correct position.
Sound okay, picture poor
• Check antenna connections.
• Try adjusting sharpness function to improve weak signals.
Black Box appears on the screen
• Caption!ng may be turned on. Check the Closed-Caption Display control panel in the Channel mer_u.
GUIDE Plus+ IR Controllers not working
• Check to make sure the controllers are positioned correctly over the IR remote sensors.
• Your remote may be interfering with the IR controller. Place a pieceof dark tape over the IR controller.
' • GUIDE Plus+ control of cable box is slower than direct control Of the box itself. Keep this in mind when changing
channels.
CARE AND CLEANING
CAUTION: Turn OFF your TV before cleaning.
You can clean the TV as required, using a soft lint-free cloth. Be sure to occasionally dust the ventilation slots
in the cabinet to help assure adequate ventilation.
The TV's screen may be cleaned with a soft, lint-free, cloth as weJl. Take care not to scratch or mar the screen. If
necessary, you may use a Cloth dampened with warm water.
Never use strong cleaning agents, such as ammonia-based cleaners, or abrasive powder. These types of
cleaners will damage the TV.
While cleaning do not Spray liquid directly on the scree.; or allow liquid to run down the screen and inside the
TV. Also, avoid placing drinks or vases with water on top of the TV. This could increase the risk of fire or shock
hazard or damage to the TV.
.. [ i
fl Caution: ff fixed (nob-moving)images a_e left on thelscreen for iong _peri_,:th_ may _ permanently i_nprint_:l On the
/ _reen. Such images include networl_ Iogos, phonenun_bers, and:videQ games, This damage is not covered by your_ :_i
i"warranty._E,xtended._iewing 'of channels displaying.the_e.i_ges sil_uJd be avoicled., i,.i_, ::..,.,.; !i:,.. _._- .,:,;.i,_.i'I '_.,ii . I
._ ..... .. :. _ • _, . . .,_ . .r.... : . "-i''_'_- "" _'"""_ .... _"°'_° _' " " _" '"" ..... _ :" " _ _ ' '" I
4O

RCA DIRECT VIEW 5"-36_ TELEVISION LIMITED WARRANTY
What your warrantY c0ve_:_ ......
• Any.defect in materials or workmanship.
For how long after your purchase:
• 90 daysfor labor charges.
- One yearfor parts.-
• Twoyears for the picturetube.
The warranty periodfor rental units beginswith the first rental or 45 daysfrom date of shipmentto the rental firm,
whichevercomesfirst.
What we will do:
• Pay any Authorized RCA Television Service Center the labor charges to repair your television.
• Pay any Authorized RCA Television Service Center for the new or, at our option, refurbished replacement parts
and picture tube required to repair your television.
How you get service:
• Forscreen sizes of 20" and smaller:. Take your RCA television to any Authorized RCA Television Service Center and
pick up when repairs are complete.
• Forscreen sizes larger than 20": Request home service from any Authorized RCA Television Service Center, provided
that your television is located within the geographic territory covered by an Authorized RCA Television Service
Center. If not, you must take your television to the Service Center location at your own expense, or pay for the cost
the Service Center may charge to transport your television to and from your home.
• To identify your nearest Authorized RCA Television Service Center, ask your dea|er, look in the Yellow Pages, or
call 1-800-336-1900.
• Show the Authorized Service Center Representative your evidence of purchase date or first, rental.
What your warrantY does not cover:
• Customer instruction. (Your Owner's Manual clearly describes how to install, adjust, and operate your television.
Any additional information should be obtained from your dealer.)
• Installation and related adjustments.
• Signal reception pa;oblems not caused by your television.
• Damage from misuse or neglect
• Batteries. '
• Customer replacement fuses.
• Images burnt onto the screen.
• A television that has been modified or incorporated into other products or is used for institutional or other
commercial purposes.
• A television purchased or serviced outside the !3.SJ_
• Acts of God,, such as but not limited to lightning damage.
Product Registration: _ ' - - • . .......
• Please complete and mail the Product Registration Card packed with your television. It Will make it easier to
contact you Should it ever be necessary,_The return of the card isnot required for warranty coverage.
: How:state !aW, relates,to this Warrailty:i_'."ii_,.ii-_ :; "_ _!.. _ -. - * ....... _ .....
:"io"_:_This Wa'rrdntygives you specific I_alri_igh_?_tidyo_als0__a_ have*0ther H'ghtSthat vary'from :state i_-state.: .'*._"_;"'
you purChased your product'outside the Unitedstates: - ' ° ..... " .....
. -' " Th=s warranty does not apply.. Contact your dealerfor warranty information.
. , = • . .
41"

RCA PROJECTION Tv LIMITED WARRANTY
What your warranty covers:
• Any defect in materialsor workmanship.
For how long after your purchase:
• .One year for labor charges.-
- One yearfor parts.
• TWoyears for picturetubes.
The warranty period for rentai units beginswith the first rental or 45 daysfrom.date of shipmentto the rental firm.
whiche:vercomesfirst.
What we will do:
• Pay any Authorized RCA Television Service Center the labor charges to repair your television.
.
oo Pay any Authorized RCA Television Service Center for the new or, at our option, refurbished replacement parts and
• picture tubes required to repair your television.
How you get service:
• Request home service from any Authorized RCA Television Service Center, providedthat your television is located
within the geographic territory covered by an Authorized RCA Television Service Center. If not, you must take your
-televisionto the Service Center location at your own_expense, or pay for the costthe Service Center may charge to
transport your television to and fromyour home. To identify your nearest Authorized RCA Television Service
Center, ask your dealer, look in the Yellow Pages, or call 1-800-336-1900.
• Show the Authorized Service Center Representative your evidence of purchase date or first rental
What your warranty does not cover:
• Customer instruction. (Your Owner's Manual clearly describes how to install, adjust, and operate your television.
Any additional information should be obtained from your dealer.)
• Installation and related adjustments.
• Signal reception problems not caused by your television.
0 Damage from misuse or neglect.
• Batteries.
• Images burnt onto the screen.
• A television that has been modified or incorporated into other products or is used for institutional or other
commercial purposes.
• A television purchased or serviced outside the U.S.A.
• Acts of God;,such as but not limited to lightning damage.
ProductRegistration: .-
• Please complete and mail the Product Registration Card packed with your product'. It will make it easier to contact
you should it ever be necessary. The return of the card is not required for warrantycoverage.
How State Law relates to this warranty:
• "This warranty gives,you specific legal rights and you also may have other rights tha t vary fromstate to state, .
. _ "_ .:.. - _ .. .. ,... . .
if you pu_hased your television outside the UnitedStates: - •
• "Thiswarranty doesn= apply, Contact your dealer for _Narranty information,
42

CRK76TA1
Remote Control This isthe
remote contrOl that came packed
v_ith your TV. Replacements or
spares can be ordered as needed.
....
Splitter VH47
ANT200
2..way Signal Splitter helps you
connectto a secondTVor VCR.
Amplified VHF/UHF/FM
Antenna allows you to easily
switch from the antenna signal to
cable or satellite easily without
disconnecting antenna.
Antenna Cables
VH81 (3-ft)NH82 (6-ft)
VH89 (6-ft)
Gold-Tipped cable
VH83 (6-ft)
Screw-on Cable attaches to the
round antenna connectors (called
75-ohm F_type) on the back of
your VCR or TV. The ends screw
onto the connectors for a secure
connection,
Push-on Cable attaches to the
round antenna i:onnectors (called
75-ohm F-type ) on the beck of
your VCR or TV. Ends push on for a
quick connection.
Audio/Video Cables
Monaural VCR Dubbing Cable
Double cable that lets you'connect
the video and audio jacks of,two
VHS VCRs to duplicate tapes. Can
also be used to connect a VCR to
your TV. Cable is color-coded and
shielded; Has RCAotype phono
plugs on each end.
Stereo VCR Dubbing Cable
Triple cablethat letsyou connect
Accessory Order Form
DescriptiOn " :: '
Screw-on antenna cable (3-ft)
i
Screw-on antenna cable (6-ft)
VH82 $6.95
Push-on antenna cable (6-ft) VH89 $5.95
Monaural VCR Dubbing Cab e (6-ft_ • VH83 $5.95
Stereo VCR Dubbing Cable' (6-ft) VH84 $9.95
S-Video Cable (6-ft) VH976 $7.95
S-Video Cable (12-ft) VH913 $8.95
2-way Signal Splitter VH47 $3.95
Amplified Antenna ANT200 . $49.95
Antenna Mixer 193984 $10.95
Remote Control (CRK76TA1) 240895 $39.95
Audio-Video AdaPter 228449 . $4.35
Prices are subject tochange without notice.
Total Merchandise ............................................ $
Sales Tax .......................... _.................................. $ _
We are required by law to collect the
appropriate sales tax for each individual
state, country, and locality to wllich the
merchandise is being sent.
Shipping and Handling $ 5.00.
Total Amount Enclosed $
.
Use VISA, MasterCard, or Discover Card
preferably.
the v_Eo and AuDIojacks of t i Money order or check must be in U.S.
stereo components, currency only.
"Gold-Tipped cable C _No COD or CASH.
o i. . . . . ,
AH84 (6-ft)" ° All accessories aresubject _o avaiiability.: _;ii;:_;i:_'- "_
S'VldleoCable hasmulti_pi_n _'-._...:o.:Where applicable, we will Ship a superseding model.i_:
c0n'nectors on each end for J_ " _ " ' ""'-, ' ' _ ""- _"_'';- _;:'_ *' : _"
• cor_necting S-Videocomponents _ '•: ; '_" " _.. '
VH97_ (6-'ft)NH913 (12-ft) toyourTV, i_ "
43

Charge your order on your VISA,
• MasterCard,or Discover Card by
filling in below •
....... R_DIT
USE YOUR C CARD r_ :
IMPORTA_IT: Copy complete accountnumber VISA"
-, from_yoarVISA card ,_
iil iv-l- iiii,Ill
o
IMPORTANT:. Copy complete accotmt number
frordyour Mast__.ard
II I I II I I I II II III I I II
aboveyour expires: "
namc*on
M_te_
IMPORTANT: Copy complete accountnumber
from yourDiscover Card
IIil-I! I I I ,11. !-! ! .I[FF_-
[-1--!
AUTHORIZED SIGNATURE
(Credit card order will not beprocessed without signature)
Prices at_esubject to change without notice.
Print of type your name and [ A complete and correct
address clearly. This will be _ order will save you days,yourmailinglabel. _.• of waiting.
Name: " • ' ,
Street:
Apt:
City:
. " ' . , .State:, " Zip:
.
Please make sure that both side_iof this form
have _nfilled out Completely. _'_ :_ :.:i- .
, Allow4o.weeks fotdelivery,.:. :. _ '
• All aC_ssories are subject to availability_
• Prices aresubject tochange :
_J
United States and Canada Orders
To place your order by phonel have your Visa, MasterCar d
_ or Discover Card ready and cal! the toll-free number listed _
below between 8AM and 8PM (EST) Monday through Friday
or between 9AM and 5PM (EST) Saturday.
Use this number only to place on order for•accessory items
listed on this order form.
1-_,o-33_3n -
To place your order by mail, detach and mail the completed.
order form with creditcard information, money order or
check in US currency (madepayable to Thomson Consumer
Electronics, Inc.) to the following address:
Video Accessories
• PO Box 8419
Ronks, PA' 17573 ,
44

A m
Accessories 43
Advanced Connections 4, '6
Audio Menu 28
Audio OutputVol. & Speakers 29
Audio Processor 28
Audio remote codes 24
Audio/Video cables 7
Auto Channel Search 13, 33
AutoColor 30
Auto Tuning 18
DVD Channel 16, 33
SAT/Cable Channel 17, 33
VCR1 Channel 15, 33
VCR2Channel 15, 33
B
Backof the TV 6
BasicConnection 4, 5
BasicPicture Controls 30
Batteries 10, 38
Black Level 30
Buttons
Remote 20
¢
Cable Box remote codes 24
Care and Cleaning 40
CC 38
Chan # 33
Chan Labels 33
Channel 3 34
Channel 4 34
Channel Block 35
Channel Marker 38
Channel menu 33
Channels
DVD/VCR2 Channel 18
Closed Caption
Display 31
Mode 31, 3_
PIPDisplay 31
PIPMode 31
Coaxial cable 4, 5, 7
Color 30
.Color Warmth 30
Connections
Advanced 4, 6
Basic 4, 5"
TVand stereo VCR..7
TV.Only 4 " ..
TV, VCRand..satellite receiver 8.
_TV,VCR,..Sat Receiver & DVD 8
Fixed images 40
Fixed Output, SpeakersOff 29
Front panel buttons 23
Front Panel Lockout 35
G
GUIDE Plus+
Getting in and out 10 .
Menu 36
Setup 14
.
INPUT1 34
INPUT2 34
IR Controller
attaching to other components
9
locating IR sensorso'n your
components 9
L
Labels 18, 33
Language 13, 31
Locating IRsensors 9
M
Memo 33
Menu Language 1,3, 31
Menus 26
Mono 28
Mute 28
P
Parent Approved 35
Parental Controls
Channel Block 35
Front Panel Lockout 35
,ParentaiControls menu 35
Picture Presets30
Picture Quality menu 30
Picture Tilt 31 "
PIP(Picture in Picture)
Closed caption display 31
Closed caption mode 31
Explained 37
PIPChan. 38
Remote buttons -37
Using 37
:Point and Select 12
Programming the remoteto,
• control Components_22
Contrast- 30 ' -:' "_ "....
_ .!,.i_"_:: ._" :!.:' .- ; . Projection "IV ,_ ,., 1
C°nt_°lPanels _.:::_i..;:':;;_.;".:_ii'_", _ ,i: • -Convergence'31
DVEi Channel 16, 33: : _ Remote Control
DVD player remote cedes 24-
• Installing the batteries. 10
Programming 22
Remote batteries are 10w 38_
$
S-Video cable 7
SAP 38
SAT/Cablechannel 17, 33
Satellite Receiverremote codes 24
Schedule 34
Screen menu 31
SecondAudio Program (SAP) 29
Set
DVD Channel 16, 33
DVD/VCR2 Channel 18
SAT/CABLEChannel 17, 33
VCR1 Channel 15, 33
VCR2Channel 15, 33
Set Time 34
Setup 12
Setup menu 36
Sharpness 30
Signal Type
Cable TV 33
UHF/VHF Antenna 33
Sleep 38
Sleep Timer 34, 38
Sound LogicStereo 28
SRSStereo 28
Stereo 28, 38
T
_me
Current 38
Set Time 14
Time menu, 34
Tint 30
-Tone Controls 28
Troubleshooting 39
TV Only connection 4
.
UHF/VHF Antenna 33
V
Variable Output, Speakers Off 29
Variable Output, Speakers On 29
VCR remote cedes 24
VCR1 Channel 15, 33
VCR2Channel 15, 33
VideoNoise Reduction 30
V¢
.Warranty .
Direct View 5"-36" diagonal 41
Projection TV 42; " "
,Warranty Clock .34 - _'
45

o. • r : " _ " _ 'L: :i ......
!! RE Ti N REENER ,FuTuR E
<At Th0msonConsumer Electronics we are dedicated t& the preservation of_our
natural heritage and to a healthy and safe Way oT life for current and future
generations. This isa global effort which encompasses every THOMSON facility.
throughout the world.
We believe that clean air, clean water, a protected earth, and healthy people arenot
only practical and desirable goals, but achievable ones as well. Our Corporate
Environmental, Health and Safety Charter acknowledges our commitment to protect
these precious assets and provides a challenging vision and guideline for conducting
our business.
Below are a few examples of Thomson's achievements in our efforts to preserve our natural resources.
THE EARTH
Thomson reclaims millions-of pounds
of hazardous waste annually, diverting
it from landfills.
Thomson treats millions of pounds of
waste water sludge annually and
renders it non-hazardous.
Thomson recycles over 50 million
pounds of non-hazardous material
annually that otherwise would have
been treated as trash, an overall
recovery rate of 50%.
Thomson globally recycles millions of
pounds of broken television picture
tube glass annually through both
internal and external reclaim processes.
THE AIR
Thomson has replaced solvent-based
paints at many locations resulting in an
80% reduction in toxicair emissions for
equivelant material used.
Thomson has eliminated the use of
ozone-depleting substances at television
manufacturing facilities around the
world.
Thomson collects and returns over 1.5
million pounds of glass and furnace dust
to the glassmaking process annually.
Thomson has launched worldwide
energy savings programs which
contribute to effortS to reduce air
emissions from electrical generating
facilities.
TH EWATE R
Thomson recovers over 2 million
pounds of fine glass particles from
process water each year and recycles
them back into its glassfurnaces.
Thomson's state-of-the-art waste water
treatment plants filter out over 26
million pounds of solids from process
water each year.
Thomson's U.S. glass factory recycles
2,500 gallons of water per minute and
cleans 2.6 million gallons of water per
day.
Thomson is researching new processes
and is developing new manufacturing
•equipment and technologies to further
reduce Ibrge volume water use.
Thomson has also increased its usage of recycled materials for packaging of our products. For example; in the U.S. and Mexico
our television plants use recycled content in our television cartons and instruction booklets. The inks used for the print on
cartons and instruction booklets are soy based. For a free brochure regardingThomson's Environmental Health and Safety
Programs, write to Thomson Consumer Electronics" address below, attention Environmental Programs: INH340.
Pleasedo not sendany productsto the.Indianapolis addresslistedin this manual or on the carton.Thiswill onlyadd delays in
servicefor your product.
The following materialswere used in
printing this publication:
'IHOMSQN CONSUMER ELECTRONICS
10330 North Meridian Street
Indianapolis, IN 46290
O-1998 Thomson Consumer Electronics, Inc.
Trademark(s)® Registered
M arca (s) Registra d a(s)
o.
Printed in USA
_rOCOM 1531048A
85%
lln iBNIitB fl
-
 Loading...