

USER'S
.r
GUIDE
qoq
.j _,"
"¢/
C 0
WARNING
RISK OF ELECTRIC SHOCK
DO NOT OPEN
TO REDUCE THE RISK OF •ELECTRIC SHOCK, DO NOT REMOVE
COVER (OR BACK). NO USER SERVICEABLE PARTS INSIDE, REFER
SERVICING TO QUALIFIED SERVICE PERSONNEL.
A Thissy_nbolindicates "dangerous _ Thissymbolindicatesimportant
voltage"insidethe productthat _k instructionsaccompanying the
presentsa risk ofelectric shock or product.
personal injury.
Cautions
CAUTION:
To prevent electric shock, match wide blade of plug to wide slot, fully
insert.
ATTENTION:
Pour _viter les chocs _lectfiques, introduire la lame la plus large de la
fiche dans la borne correspondante de la prise et pousser jusqfi au fond.
Operate TV only on 120 volts, 60 Hz AC power (normal house power).
FCC Regulations state that unauthorized changes or modifications to this equipment
may void the user's authority to operate it.
If fixed(non-moving) images are left on the screen for long periods, they may be
permanently imprinted on the screen. Such images include network logos, phone
numbers, and video games. This damage is not covered by your warranty. Extended
viewing of channels displaying these images should be avoided.
Note To Cable TV Installer
This reminder is provided to call yourattention to Article 820-40 of the National
Electrical Code (Section 54 of the Canadian Electrical Code, Part 1) which provides
guidelines for proper grounding and, in particular, specifies that the cable ground shall
be connected to the grounding system of the building as close to the point of cable entry
as practical.
Mail Your Registration Card Today Record Vital Information Here
• A Product Registration Card is packedwith your set. Please
fill out the caid and return it immediately.
• Your prompt submission of this card conf'mns your right to
the protectt_on available under the terms and conditions of the
warranty and also allows us to contact you should it ever
become necessary.
• With your card on file, we can also help you in the event of
loss or theft by verifying your ownerstfip.
• If you did not receive a Product Registration Card, please
contact your dealer.
Attach Your Sales Receipt Here and File at Home for
Future Reference
• To obtain warranty parts and service, you must show your
sales receipt (or eviilence of purchase)to your Authorized TV
bervlcenter.
• Tape or staple your sales receipt to this manual so you will
have it handy should service ever be needed. File it at home
for future reference. Do not mail your sales receipt to us.
• No other set has the same serial number as yours. You will
find the serial number and the model number on the back of
your set.
• Make sure you record both numbers below so that you will
have them in case your set is stolen or if you need a complete
description for identification.
Model:
Serial:
Purchase Date:
Dealer Name/Address/Phone:
Thank you for choosing RCA
Congratulations on your purchase of
an RCA TV. You have selected a
high-quality, precision-engineered
instrument designed to give you
years of enjoyment.
About This Manual
To take full advantage of all the
featlJres and benefits of this unique
TV, be sure to read this owner's
manual carefully and then keep it for
future reference.
Table of Contents
Safety Precautions. ..... ........................................... Inside Front Cover
Product Registration ............................................. Inside Front Cover
First-Time Operation ...... :.............................................................. 2-3
Operating Instructions
Remote Control
• Installing Batteries ........ ................................. i...................................... :...4
• Basic Operation Theory ..... ....................................................................... 5.
• TV Functions ......................................................................................... 6-7
Front Panel Controls ................................................................................... 8
TV On-Screen Status Displays ................................................................... 9
Freeze and Zoom ............................................ _.......................................... 10
Channel Guide ........................................................................................... 11
Picture-in-Picture ................................................................................. 12-13
VIDEO Menu- General InstruCtions ......................................................... 14
• Color Convergence ...................... ........................................................ :.. 15
AUDIO Menu- General Instructions ........................................................ 16
• Sound Retrieval System-SRS(•) ......................................................... 17
SETUP Menu:- General Instructions........ ................................................. 18
• Setting Closed Captioning ...................................................................... 19
• Setting the Sleep Timer........................................................................... 20
• Setting the Alarm .................................................................................... 21
• Labeling Channels .................................. ................................................ 22
• Parental,Control ...................................................................................... 23
• Channel Memory (Autoprogramming Channels) ........................... ........24
• Channel Memory (Erasing/Adding Channels) ....................... ................ 24
• Changing Antenna Input ......................................................................... 25
• Setting up VCR Channels ...................................................................... 26
• Setting up Cable Box Channel....: ....._................................................ _....27
Detailed Connections
Tips to Read Before Connecting Components .................. ,........................ 28
Monitor Panel ............................................................................................ 29
Antenna and Cable Connections
• Home Antenna Connections ................................................................... 30
• Cable-TV Connections ...................................................................... 31-32
• Programming Remote to Control Cable Box .......................... ........... :....33
• Cable-TV Operation ............................................................................... 34
Component Connections
• Standard VCR .................................................................................... 35-36
• S-VHS (Super VHS) VCR ...................................................................... 36
• Remote Buttons That Control RCA VCRs....... ...................................... 37
• Controlling Other Brands of VCRs ............. ........................................... 38
• Camcorder ............................................................................................... 39
• Computers and Other Equipment ........................................................... 40
• Audio Amplifier ........................................... ....... ................................... 41
• Programming Remote to Control Audio Equipment ............................... 42
• Speaker Connections ................... :........................................................... 43
Reference Section
Optional Accessories and Order Form ................................................. 44-46
Trouble Checks ......................................................... ........................... 47-49
Cleaning and Care ....... .............................................................................. 56,
Limited Warranty .................................. .................................................... 51
Index (Alphabetical Subject Reference) ............................... :...............52-53
The steps below will help you get your TV connected and
working quickly.
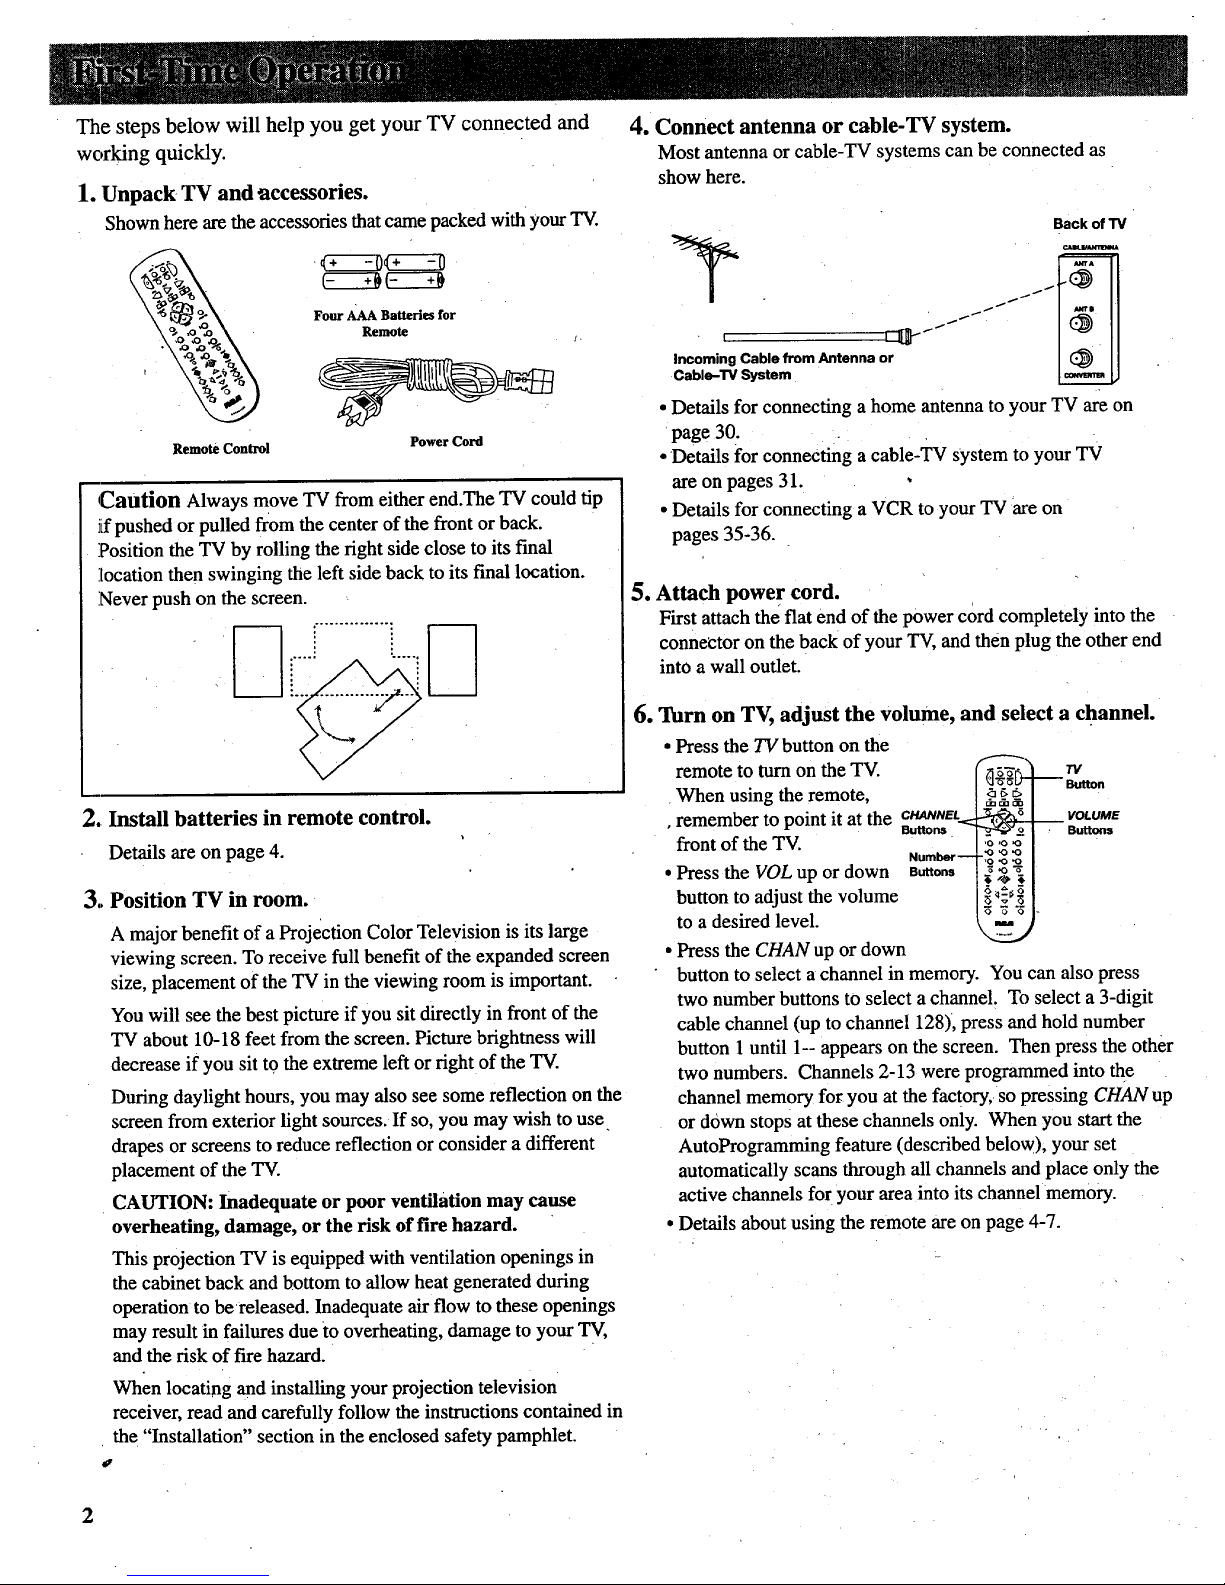
1. Unpack TV and accessories.
Shown here are theaccessories thatcame packed with your TV.
Remote Control
Four AAA Batteries for
Remote
Power Cord
1
Caution Always move TV from either end.The TV could tip
J[fpushed or pulled from the center of the front or back.
Position the TV by rolling the right side close to its final
location then swinging the left side back to its final location.
Never push on the screen.
Install batteries in remote control.
Details are on page 4.
3,,Position TV in room.
A majorbenefit of a Projection Color Television is its large
viewing screen. To receive full benefit of the expanded screen
size, placement of the TV in the viewing room is important.
You will see the best picture if you sit directly in front of the
TV about 10-18 feet from the screen. Picture brightness will
decrease if you sit to the extreme left or right of the TV.
During daylight hours, you may also see some reflection on the
screen from exterior light sources. If so, you may wish to use
drapes or screens to reduce reflection or consider a different
placement of the TV.
CAUTION: Inadequate or poor ventilation may cause
overheating, damage, or the risk of fire hazard.
4. Connect antenna or cable-TV system.
Most antenna or cable-TV systems can be connected as
show here.
Back of TV
, _JJ'"zJ _
Incoming Cable from Antenna or
Cable-TV System
• Details for connecting a home antenna to your TV are on
page 30.
• Details for connecting a cable-TV system to your TV
are on pages 31.
• Details for connecting a VCR to your TV are on
pages 35-36.
5. Attach power cord.
First attach the flat end of the power cord completely into the
connector on the back of your TV, and then plug the other end
into a wall outlet.
6. Turn on TV, adjust the volume, and select a channel.
• Press the TV button on the
remote to turn on the TV.
When using the remote,
• remember to point it at the ButtonseWUWVEt
front of the TV.
Number-
• Press the VOL up or down a_on,
button to adjust the volume
to a desired level.
• Press the CHAN up or down
_ Button
VOLUME
Buttons
button to select a channel in memory. You can also press
two number buttons to select a channel. To select a 3-digit
cable channel (up to channel 128), press and hold number
button 1 until 1-- appears on the screen. Then press the other
two numbers. Channels 2-13 were programmed into the
channel memory for you at the factory, so pressing CHAN up
or down stops at these channels only. When you start the
AutoProgramming feature (described below), your set
automatically scans through all channels and place only the
active channels for your area into its channel memory.
Details about using the remote are on page 4-7.
This projection TV is equipped with ventilation openings in
the cabinet back and bottom to allow heat generated during
operation to bereleased. Inadequate air flow to these openings
may result in failures due to overheating, damage to your TV,
and the risk of fire hazard.
When locating and installing your projection television
receiver, read and carefully follow the instructions contained in
the "Installation" section in the enclosed safety pamphlet.
#,
2

7. AutoProgram the TV's channel memory.
To start the TV autoprogramming itself, press the
MENUopROG button repeatedly to select SETUP MENU and
then press + to display the setup functions. Repeatedly press
MENUopROG again to select the AUTOPROGRAM function,
•"rodthen press +. Details are on page 24.
9. Review menus.
1. To see the video menu, repeatedly press MENUopROG
button to select VIDEO MENU and then press +.
Repeatedly press MENUopROG to select desired
function and then press + or - to adjust it. Details are on
page 14.
You can also add and erase channels from memory as desired. _ :
Press MENUopROG repeatedly to select the SETUP MENU,
then press + to display the setup functions. 2. To see the audio menu repeatedly press MENUopROG to
select the AUDIO MENU and then press + or - to adjust
Press MENU°PROG repeatedly to select (highlight) the it. Details begin on page 16.
CHAN MEM function. Select the desired channel number by _ _
pressing the CHAN up or downbutton or by pressing the two
ll
I
corresponding number buttons.
" I
M --" Y " -- :
Then press + to add a channel, or press to erase a channel.
Details are on page 24.
8. Set the clock.
1. Repeatedly press the MENU.PROG button to select the
SETUP MENU and then press +. Press MENU.PROG
repeatedly again to select the CLOCK SET display.
2. Press and hold the - button to select the correct hour
(including AM or PM). Press and hold the + button to
select the correct minute: The correct time will now
appear on thescreen whenever you change channels or
press the TV or DISPLAY button.
Note: If power is interrupted for an extended time, you Will
need to reset the clock.
3. To see the setup menu, repeatedly press MENUopROG to
select SETUP MENU and then press +. Repeatedly press
MENUopROG to select desired function and then press +
or - to adjust it. Details begin on page 18.
2__
•3

Beforeattemptingtooperateyour
remotecontrol,installthebatteries
as;shownhere.
The remote control produces an
invisible (infrared) beam that travels
in, a straight line much as the beam
of a flashlight. For this reason,
when operating the remote control,
you must point it directly at the front
of the TV without objects between
that can block the infrared light
beam.
Your remote control is designed to
be very rugged and will withstand a
considerable drop. If it receives an
extreme blow, the case is designed
to slightly separate at the seam
rather than fracture. If this happens,
simply squeeze the case where it
separated until it snaps back
together. The operation of the
remote will probably not be affected.
--Installing/Replacing Batteries
1. Turn the remote control face
down.
2. Press down on the ridged area of
the battery cover and slide it off.
3. Install four "AAA" batteries in the
battery compartment as shown.
Make sure you insert the negative
(-) end of each battery first.
4. Replace the cover and turn remote
over-face up.
Notes:.
• Never place anything heavy on top of
.the remote control or lay it upside-
down. This may accidentally depress
the buttons for a long time and
discharge the batteries.
Replace the batteries when the TV falls
to respond to the remote control.
If you programmed your remote to
control other components, you may
have to reprogram the code numbers
when you change the batteries. Try not
to press any buttons while changing
batteries.

Basic Operation Theory
Step 1
First press one of these five component
buttons to tell remote which component
you want to control. You can program
each of these buttons to control most
brands of equipment.*
Step 2
Thenpress POWER button to turn on that
component.
Note: The TV and some other components will
automatically turn on when you press the
component button in step 1. Press this button to
turn the component off.
Step 3
These function buttons can now be used
to control the basic functions of the
component you selected in step 1. To
control a different component, first press
its component button (VCR1, VCR2oLD,
DSSoCABLE, AUDIO, or TV), and then
press the desired function button.
Note: Not all components have functions that can
be controlled by these buttons, but you can
experiment with your particular models to
discover exactly which buttons will control it.
*The TV button automatically controls your TV - no additional
programming is required_ Details for programming the VCR1 and
VCR2oLD buttons to control other brands of VCRs are on page
35. Details for programming the AUDIO button to control audio
equipment axe on page 39. Details for programming the
DSSoCABLE button to control cable boxes or an RCA DSS ®
receiver are on page 33.
DSS®is a registered trademark of DIRECTV, Inc., a unit of GM Hughes, Electronics.
Universa\

Only the buttons that are used to control the TV are described here. The rest of the
buttons are usedto operate VCRs (pages 37-38),'an RCA DSS® Receiver or cable-TV
boxes (page 33), and audio equipment (page 42).
VCR1 DSSOCABLE TIc
O0
VCR2"LD AUD)O
O0
REW PLAY FF
REC STOP PAUSE
r-i-1
DISPLAY CI'IAN • SKIP
CHAN
MUTE PREVCH
40 50 60
'0 '0"0
INPUTo 0 0 ANTENNAo
CLEAR RESET
PIP ,_. SWAP
_IN _ MOVE [_ FRE_EZE
ZM OUT (e) SRS CH GUIDE
0 o 0
TV Button
• Turns on TV and puts remote in "TV Mode" so that the other remote
buttons will control the TV.
• Displays time (if clock has been set) and channel number on the TV
screen.
Important Note: Some b:uttons on the remote control will not control
the TV unless the remote is in the '€I'V Mode". If another component
button (such as VCR2.LD) is pressed, the remote will go into the
"VCR Mode" and will control a compatible VCR. To get back into
the 'TV Mode", simply press the button labeled TV. The remote will
go back into the "TV Mode" and will control the TV again.
POWER Button
• PressPOWERtoturnoff TV.
CHAN Buttons
• Press CHAN up to select the next higher channel in channel
memory.
• Press CHAN down to select the next lower channel in channel
memory.
• You can add or erase channels in memory as desired. Details are on
page 24.
VOL Buttons
• Press VOL up to increase volume.
* Press VOL down to decrease volume.
DISPLAY Button
• Displaystime (if clock hasbeen set) and channel number on the TV
screen.
• Quicklyremoves menus and displaysfrom the screen
SKIP (Commercial Skip) Button
• Use this button when you want to scan other channels during a
program break.
• When a break occurs, pressSKIP once before changing channels.
The TV will count down 30 seconds on the screen and then
automatically switch channels back to the original channel.
• Press SKIP twice if you want the TV to count down 60 seconds.
Each additional press will add another 30 seconds to the countdown
time (up to five minutes) and then each additional press will add
another 60 seconds to the countdown time (up to 60 minutes).
• To cancel, press CLEAR. The countdogcn clock will disappear from
the screen, and the TV will stay tuned to the present channel.

MUTE Button
• Press MUTE to quickly reduce sound to minimum level without
affecting the picture. This is especially useful during telephone calls
or other interruptions.
• When the sound is muted, the word MUTE will be displaye d on the
screen.
• To restore sound, press MUTE again or press VOL up.
PREV CH (Previous Channel) Button
• Pressing the PREV CH button causes the TV to change back to the
last tuned channel. This is useful should you want to monitor two
channels.
• To operate, select the f'Lrstchannel you wish to watch. Then select
the other channel by pressing two number buttons (for example,
press 0 then 6 for channel 6). The TV will now change back and
forth between the two channels each time you press the PREV CH
button.
Number Buttons (0-9)
• These buttons let you directly access any channel number-even if the
channel is not in the channel memory.
• To select a channel, press two number buttons (t'n'st one, then the
other). For example, press 0 then 6 for channel 6. Press 1 then 3 for
channel 13.
• To select a 3-digit cable channel (like 127), press and hold number
button 1until 1-- appears on the screen. Then press the other two
numbers.
Note: Your TV will tune up to channel 128. Check with your cable
company to determine which channels are available in your area.
INPUT Button
• Lets you quickly view signals from the INPUT jacks. Pressing this
button switches the TV from its current channel directly to channel
90, then channel 91, then channel 92.
• Channel 90 lets you see the signals coming from a device that is
connected to the S-VIDEO connector. Channel 91 accesses the
INPUT 1jacks and channel 92 accesses the INPUT 2 jacks.
ANTENNA Button
• Because your TV has two different antenna inputs onthe back
(labeled ANTA and ANTB) you can connect more than one antenna
or signal source. Press the ANTENNA button to switch from one
input to the other.
• The color of the channel numbers on the screen indicates which
antenna input you are watching. The channel numbers are blue for
ANTA and yellow forANTB. If the channel numbers are blue, you
are watching whatever is connected to the ANTA input on the back
of your TV. If the channel numbers are yellow, you are watching
whatever is connected to the ANT B input on the back of the TV.
Details are on page 25.
CLEAR Button
• Pressing CLEAR clears the screen of all on-screen display messages
except MUTE and PARENTAL CONTROL.
RESET Button
• Press RESET to return the picture adjustments to the original
settings.
MENUoPROG Button and -4+ Buttons
• Press MENU, PROG repeatedly until the menu you want to display is
selected, then press + or-. Next press MENU,PROG repeatedly to
select the function you want to adjust and then press + or - to adjust
the setting. Details about using each function begin on page 14.
Arrow Buttons
• Pressing the arrow -/+ buttons lets you adjust functions in the menu
system.
Picture-in-Picture Buttons
• Press PIP to activate the picture-in-picture feature.
• Press PIP again to deactivate the picture-in-picture feature.
• Press FREEZE to freeze the small picture.
• Press the arrow buttons to move the small picture around the screen.
• Press SWAP to switch the small picture with the large picture.
• Press ZM IN or ZM OUT to enlarge or reduce the small picture.
• Details are on pages 12-13.
SRS (O)* Button
• Press repeatedly to change settings of SRS (0) function (Sound
Retrieval System).
• Details are on pages 16-17.
* SRS, Sound Retrieval System, and the SRS logo (o) are registered trademarks of SRS
Labs, Inc.
CHANNEL GUIDE Button
• Activates the channel guide feature so you can see multiple channels
at the same time.
• Details are on page 11.
ZM IN Button
. Press ZMIN to zoom in onpicture.
• Details are on page 10
ZM OUT Button
• Press ZM OUTto zoom out to normal picture.
• Details are on page 10.
7

Shown here is the front panel control. You
can use either the front panel controls or the
remote control to operate the TV. When using
the remote control, point it toward the screen.
\
I
MENU CH v CH A VOLV VOLA POWER
ql) )
t
C) POWER Button
• Press once to turn on TV.
• Press again to turn off TV.
• On some models, an indicator on the POWER button will
light whenever the TV is turned on.
_) VOL (Volume) Buttons
• Press VOL up to increase volume, or press VOL down to
decrease volume.
• The volume display wiU automatically appear on the
screen when you press the VOL buttons.
_'[,3) CH (Channel) Buttons
• Press CH up to see the next higher channel in memory.
• Press CH down to see the next-lower channel in memory.
• You can add or erase channels in memory as desired.
Details are on page 24.
(_) MENU Button
• Press repeatedly until the menu you want to display is
selected, then press + or-. Next press MENU repeatedly to
select the function you want to adjustand then press ÷ or-
to adjust the setting.
• Details about using each function begin on page 14.
(_ - and + Buttons
Use these buttons after you have pressed the MENU button
to enter or adjust functions.
8
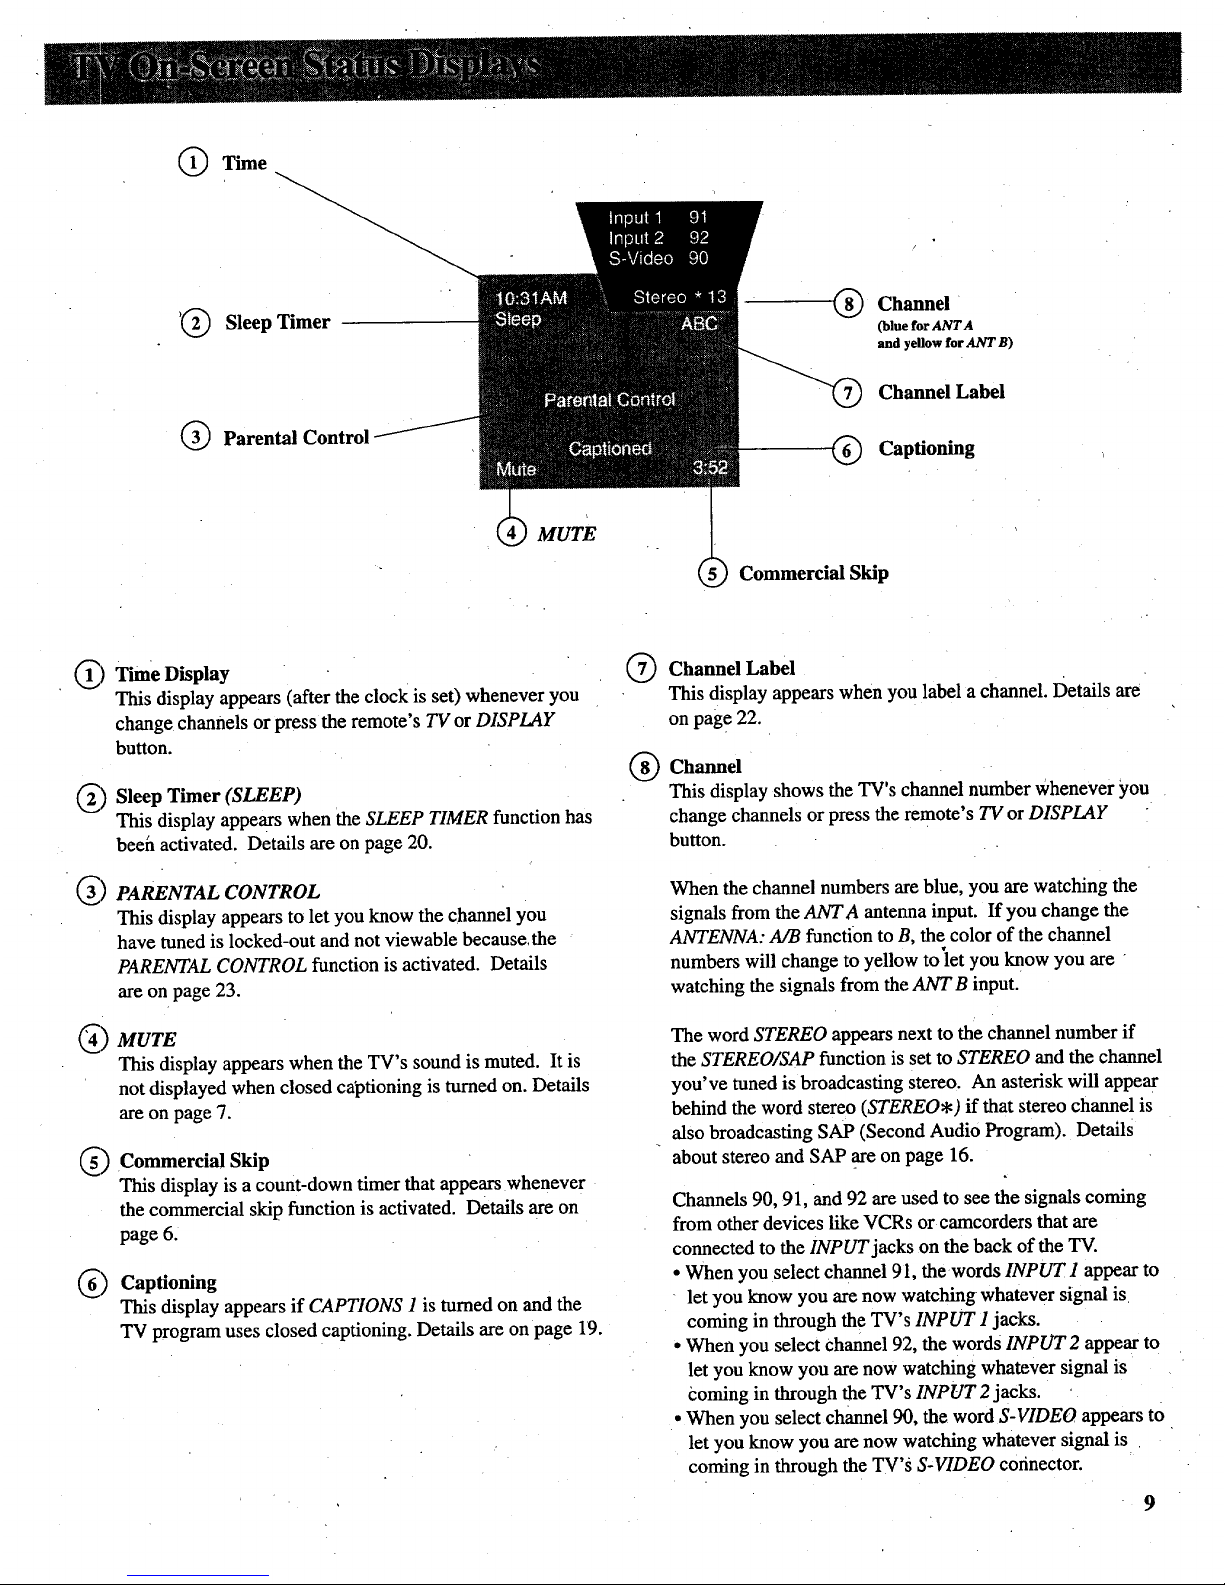
Time
_@ Sleep Timer G Channel
(blue for ANTA
and yellow for ANT B)
Parental Control
_) Channel Label
Captioning
MUTE
Commercial Skip
C)
C)
@
C)
Time Display
This display appears (after the clock is set) whenever you
change channels or press the remote's TV or DISPLAY
button.
Sleep Timer (SLEEP)
This display appears when the SLEEP TIMER function has
beeh activated. Details are on page 20.
PARENTAL CONTROL
This display appears to let you know the channel you
have tuned is locked-out and not viewable because.the
PARENTAL CONTROL function is activated. Details
are on page 23.
MUTE
This display appears when the TV's sound is muted. It is
not displayed when closed captioning is turned on. Details
are on page 7.
Commercial Skip
This display is a count-down timer that appears whenever
the commercial skip function is activated. Details are on
page 6.
Captioning
This display appears if CAPTIONS 1 is turned on and the
TV program uses closed captioning. Details are on page 19.
G
®
Channel Label
This display appears when you label a channel. Details are
on page 22.
Channel
This display shows the TV's channel number whenever you
change channels or press the remote's TV or DISPLAY
button.
When the channel numbers are blue, you are watching the
signals from the ANTA antenna input. If you change the
ANTENNA: A/B function to B, the color of the channel
numbers will change to yellow to'let you know you are
watching the signals from the ANTB input.
The word STEREO appears next to the channel number if
the STEREO/SAP function is set to STEREO and the channel
you've tuned is broadcasting stereo. An asterisk will appear
behind the word stereo (STEREO*) if that stereo channel is
also broadcasting SAP (Second Audio Program). Details
about stereo and SAP are on page 16.
Channels 90, 91, and 92 are used to see the signals coming
from other devices like VCRs or camcorders that are
connected to the INPUT jacks on the back of the TV.
• When you select channel 91, the words INPUT 1 appear to
let you know you are now watching whatever signal is
coming in through the TV's INPUT 1 jacks.
• When you select Channel 92, the words INPUT 2 appear to
let you know you are now watching whatever signal is
Coming in through the TV's INPUT 2 jacks.
• When you select channel 90, the word S-VIDEO appears to
let you know you are now watching whatever signal is
coming in through the TV's S-VIDEO corinector.
9

Anytimeyou'rewatchingaTVprogram
(oraVCRtapethroughyourTV),you'll
beabletousethespecialfeatures
describedbelow:
Note: The remote must be in the "TV Mode"
before the FREEZE and ZM buttons will
function. To put the remote in the 'q'V Mode",
press the TV button.
O0
REW Pt.AY FF
REC STOP PAUSE
r-_-i r-i--1 c_-i
'O
IN._/T ANT_INA
O oO O
Feature
(Buttons Used)
Freeze FREEZE
7A_IN
ZM IN 0
ZM OUT
ZM OUt 0
Arrows iN
MOVE
x7
J
How to make
it work:
Press FREEZE once to freeze the TV picture.
The sound of the program will not be affected
Press and hold ZM IN until desired zoom amount is
reached.
Press and hold ZM OUT to reduce the zoom amount and
return to normal size.
After you have zoomed in, you can press the arrow buttons
to move around the screen (pan).
Note: Sometimes you may want to freeze the picture first and then
zoom in, or you can zoom in and then freeze the picture.
How to
stop it:
Press FREEZE again.
To quickly return the picture to
its normal size, press and hold
ZM OUT until the picture
returns to normal size.
10
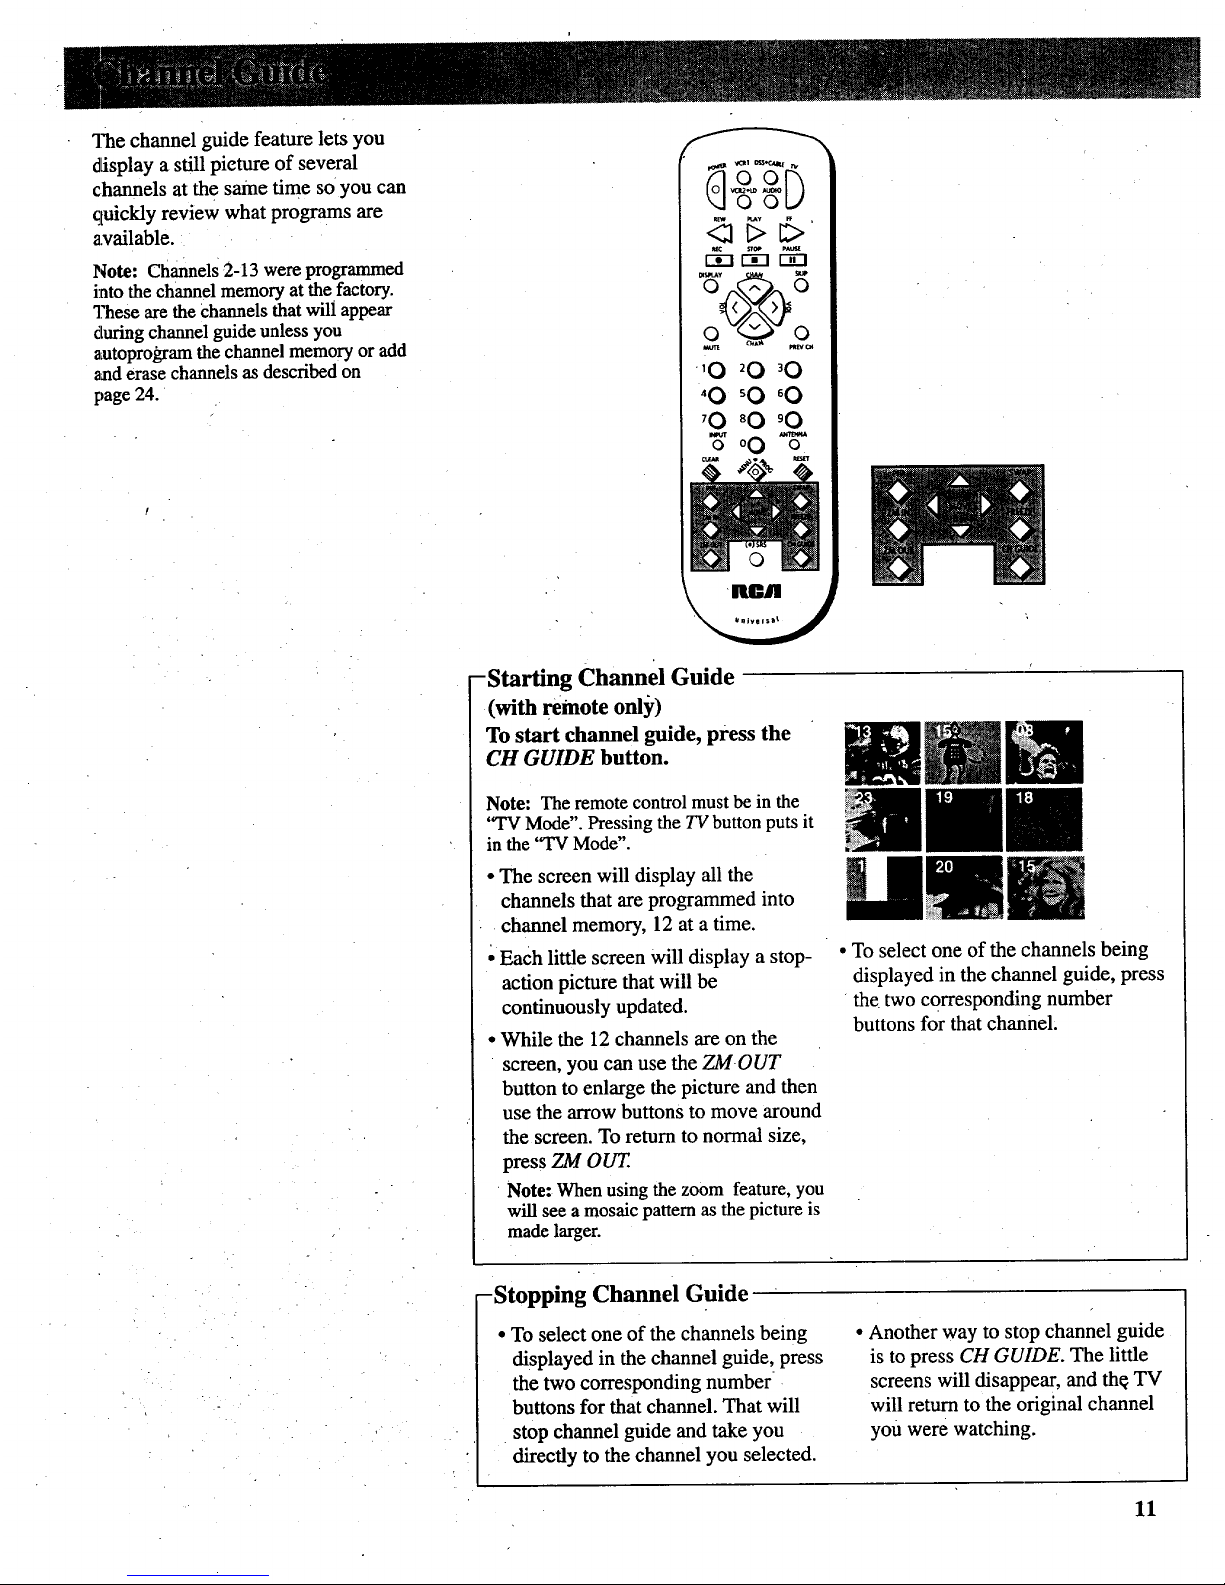
Thechannelguidefeatureletsyou
displayastillpictureofseveral
channelsatthesametimesoyoucan
quicklyreviewwhatprogramsare
available.
Note: Channels 2-13 were programmed
into the channel memory at the factory.
"]Yaeseare the Channels that will appear
during channel guide unless you
autoprogram the channel memory or add
aaaderase channels as described on
page 24.
o o L.,,'
'0 '0 '0
'0 '0 _0
3,00-,5-,
• • v
-Starting Channel Guide
(with remote only)
To start channel guide, press the
CH GUIDE button.
Note: The remote control must be in the
"TV Mode". Pressing the TV button puts it
in the "TV Mode".
• The screen will display all the
channels that are programmed into
channel memory, 12 at a time.
Each little screen will display a stop-
action picture that will be
continuously updated.
• While the 12 channels are on the
screen, you can use the ZMOUT
button to enlarge the picture and then
use the arrow buttons to move around
the screen. To return to normal size,
press ZM OUT
Note: When using the zoom feature, you
will see a mosaic pattern as the picture is
made larger.
• To select one of the channels being
displayed in the channel guide, press
the two corresponding number
buttons for that channel:
-Stopping Channel Guide
• To select one of the channels being
displayed in the channel guide, press
the two corresponding number
buttons for that channel. That will
stop channel guide and take you
directly to the channel you selected.
• Another way to stop channel guide
is to press CH GUIDE. The little
screens will disappear, and th¢ TV
will return to the original channel
you were watching.
11

After you connect another video source (like a VCR) to your
TV, you'll be able to display two different programs on the TV
at the same time.
TwoFootballGames
SurveillanceSystem
Starting Picture'in-Picture (PIP)
1 Connect another video source (such as a VCR or
camcorder) to INPUT I or INPUT2 on your TV (as shown
on pages 35-36).•
2
3
Turn on the TV and select a channel.
Press the PIP button.on the remote. A little picture will
appear on the screen. The little picture and the big picture
will be the same.
• If the other source is connected to the TV's INPUT 1
jacks, select TV channel 91 to see the signal. If you have
programmed the VCR1 (or VCR2°LD) button to
automatically select channel 9! as described on page 24,
press VCR1 (or VCR2oLD).
° Select channel 92 if the other source is connected to the
TV's INPUT2 jacks. If you have programmed the
VCR1 (or VCR2°LD) button to automatically select
channel 92 as described on page 24, press VCR1 (or
VCR2oLD).
• Select channel 90 if the other source is connected to the
TV's S-VIDEO connector. (Remember to also connect
the regular video cable to the VIDEO INPUT 1 jack for
picture-in-picture viewing.). The TV automatically
minimizes any annoying differences in tint between the
small and large picture by electronically coupling the S-
VIDEO input to the INPUT 1 inpuL If you have
programmed the VCR1 (or VCR2oLD) button to
automatically select channel 90 as described on page 24,
press VCR1 (or VCR2oLD).
Changing Channels (PIP)
To change channels on the picture fromthe TV, press the T_
button on the remote, and then press either the CHAN up
or down button or two number buttons.
4
Note: The remote must be
in the "TV mode" when you
press the I,tJ"button. To put
remote in 'q'V mode", press
the rv button.
To get a picture from the other source (VCR, camcorder,
etc.), f'u'stturn on the other source, and then select TV
channel 90, 91, or 92 (explained at top of next column).
The picture from the other source will appear in the little
picture.
PicturefromTV
To change channels on the picture coming from the VCR,
press the VCR1 or VCR2oLD button (if you've programmed
one of these buttons to control the VCR as described on page
37) and then press either the CHAN up or down button or two
number buttons. YOUcan also change the VCR's picture by
pressing the CHAN buttons on the front of the VCR.
PicturefromW
PicturefromVCR
PicturefromVCR
.Additional Features(PIP)
Whenever the picture-in-picture feature is activated, the small
picture can be moved, frozen, or switched with the main
picture as desired. Details are on the next page.
12
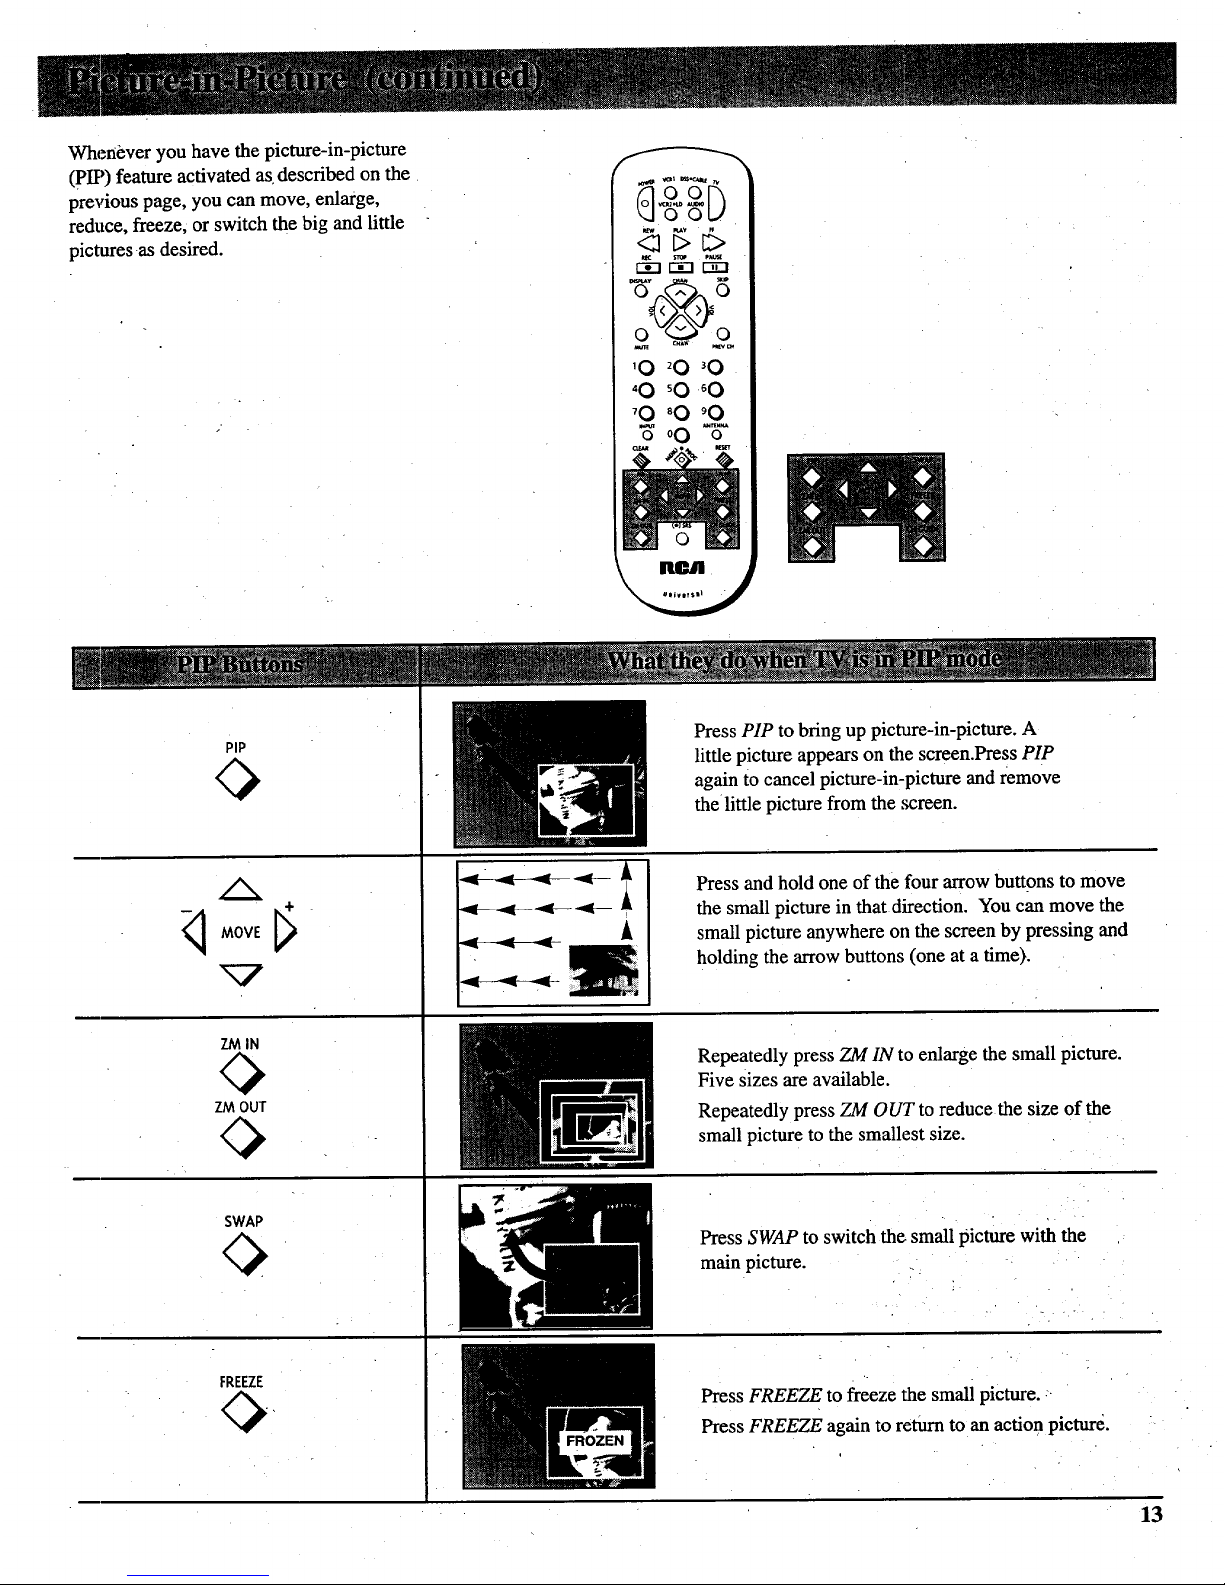
Whenever you have the picture-in-picture
(PIP) feature activated as described on the
previous page, you can move, enlarge,
reduce, freeze, or switch the big and little
pictures as desired.
&2h
o o t.,!
-@-
o o
0 o
'0 _0 _0
'0 _0 _0
_0 _0 _0
oO %-
Pip
MOVE [_ -
ZM IN
Press PIP to bring up picture-in-picture. A
little picture appears on the screen.Press PIP
again to cancel picture-in-picture and remove
the little picture from the screen.
Press and hold one of the four arrow buttons to move
the small picture in that direction. You can move the
small picture anywhere on the screen by pressing and
holding the arrow buttons (one at a time).
SWAP
FREEZE
A
Repeatedly press ZM IN to enlarge the small picture.
Five sizes are available.
Repeatedly press ZM OUT to reduce the size of the
small picture to the smallest size.
Press SWAP to switch the small picture with the
main picture.
Press FREEZE to freeze the small picture. -
Press FREEZE again to return to an action picture.
13

l. Repeatedly press MENUopROG to select VIDEO MENU
and then press ÷ or - to display the video menu. COLOR function adjusts the amount of color in the picture.
Press + to increase color or press - to decrease color.
The TINT function adjusts the color of flesh tones. Press + to add
more red tint, or press - to add more green tint.
The CONTRAST function adjusts the overall brightness and contrast
of the picture. Press + to increase contrast, or press - to decrease
contrast.
2. Repeatedly
press
MENU°PROG
to select
function, then
press + or - to
adjust it.
The Video menuwill automatically disappear from the screen if
you do not press + or - within a few seconds.
VJ[aremote control,your TV will "remember" which function
ycm displayed last-even after the menu has disappeared from
the screen. So, if you want to adjust the same function again,
simply press the + or - button on the remote control. The last
function you adjusted will reappear on the TV screen.
The BRIGHTNESS function adjusts the brightness of the dark
of the picture. Press + to increase brightness, or press - to
The SHARPNESS function adjusts picture sharpness. Press + to
increase sharpness, or press - to decrease sharpness.
[The PICTURE RESET function lets you quickly change all the
video functions (shown above) back to the factory settings. Press
either + or - to reset the video functions.
The CONVERGENCE function allows you to precisely align the
beams of the three projection picture tubes (red, green, blue) for
optimum picture detail. Press the + button to display the pattern and
VOL up or down to align the colors. See next page for details.
Adjusting for a Color Picture that Pleases You
1. Decrease color to minimum. This will leave ablack-and-white
image on the screen.
2. Adjust contrast until the picture pleases you.
3. Adjust brightness until the black partsof the picture appear
black. You may need to wait until the picture shows something
you're sure is black to make this adjustment. Be careful not to
lose the details in darkly shaded areas.
4. Increase color until you reach a pleasing level of intensity.
5. Adjust tint until flesh tones or other color objects appear natural.
6.Adjust sharpness for a pleasing level of picture sharpness. (For
weak signals, the picture may be more pleasing with sharpness
decreased.)
,?
Custom Picture Memory for Input Channels
The channel numbers you select to see signals from components
(like a VCR) that are connected to the INPUT jacks on the back of
the TV are called input channels. Selecting channel 90 lets you see
the signal coming from whatever component is attached to the
S-VIDEO connector, channel 91 lets you see the signal from the
INPUT 1 jacks, and channel 92 lets you see the signal from the
INPUT 2 jacks. Your TV is _quipped with a custom picture
memory for these input channels. When the TV is tuned to one of
these channels (90, 91, 92), you can change the picture settings for
that component's signal as desired without changing the settings of
any other channel. This is very useful because you'll be able to
adjust for the best picture from each of your components and the
TV will remember those settings automatically the next time you
tune that input channel.

I I: . I __L_ !Flit III
Converging (Aligning) the Colors
--(with remote only)
Your projection TV has three color
projection tubes-one for red, one for
green, and one for blue. When mixed
together in the proper proportion, the
outPut of these three color tubes can
produce many colors. To produce
these colors, however, the beams
must be precisely aligned over each
other so that the colors can be mixed..
The process of aligning these picture
be_mas is called setting the
"convergence".
Over a period of time, the picture
tubes can drift out of alignment due
to normal bumps and vibrations or
moving the TV. If you move your
"IW or if, after a time, you notice
colored rings or halos around objects
in the picture, you may want to
converge (align) the colors.
To simplify convergence, an on-
screen menu is provided that allows
you to display a test pattern of four
lines on the screen. Properly
converged, the lines appear
white-which is actually a
combination ofthe outputs of the
three color tubes. The position of the
green lines is stationary. The
positions of the red and blue lines are
adiustable. When properly adjusted,
the; red and blue lines should lie
directly over the green lines to
produce single white lines.
1. Turn on the TV and select a channel
that is active in your area. Allow the
TV to operate at least ten minutes
before converging.
2. Repeatedly press the VIDEO button
until the CONVERGENCE function is
selected.
!
_[Olel|ltrl
3. Then press the + button to display the
pattern.
lil
B USE VOL
TV TO EXIT
4. When properly converged, all three
colors in the pattern (red, blue, and
green) should align to form white
lines. If you see any red or blue lines
in the pattern, you can move them to
align with the green lines by pressing
the VOL up or down button.
5. Press the + button to select the arrow
color and direction, then press the
VOL up or down button to move the
lines.
•Pressing
VOL up or
down when
these blue
arrow s
appear,
moves the
blue lines
left or right.
Pressing
VOL up or
down when
these blue
arrows
appear,
moves the
blue lines up
or down.
Pressing
VOL up or
down when
these red
arrows
appear,
moves the
red lines left
or right.
I ress + to
select arrow
color and
direction.
VOL
TV TO EXIT
VOL
TV TO EXIT
TV TO EXIT
Pressing
VOL up or
down when
these red _H
arrows
appear, USE VOL
movesthe
red lines up TVTOEXIT
or down. [
Note: You can also press the - button to
return to a previous screen. Pressing -
displays the arrows, in reverse order than
shown above.
6. When finished, press the TV button
to remove the pattern from the
screen.
15
 Loading...