

Page 1

\
USER'S
C UIDE
'PSc.qf..o
1%'z.qz_
/
Page 2

WARNING
To reduce the risk of fire or shock
hazard, do not expose this TV to
rain or moisture.
DO NOT OPEN
TO REDUCE THE RISK OF ELECTRIC SHOCK, DO
NOT REMOVE COVER (OR BACK). NO USER
SERVICEABLE PARTS INSIDE. REFER SERVICING
TO QUALIFIED SERVICE PERSONNEL.
This symbol indicates
"dangerous voltage" inside
the product that presents a
risk of electric shock or
personal injury.
This gymbol indicates
important instructions
accompanying the
product.
CAUTION: To prevent electric shock, match wide blade of
plug to wide slot, fully insert.
ATTENTION: Pour _viter les chocs _lectriques, introduire la
lame 1a plus large de la fiche dans la borne correspondante de
la prise et pousser jusqfiau fond.
Do not defeat the safety feature of the plug. The wide blade fits into the
wall socket only one way. If you need an extension cord, make sure it
matches the plug of the TV.
Operate TV only on 120 volts, 60 Hz AC power (normal house power).
For safetyreasons, make sure any equipment or accessories connected to
this product bears the ULlisting mark or the CSA certification mark. If in
doubt, contact qualified service personnel.
FCC Regulations state that unauthorized changes or modifications to this
equipment may void the user's authority to operate it.
Note To Cable TV Installer This reminder is provided to call your attentiori to Article 820-40 of the
National Electrical Code (Section 54 of the Canadian Electrical Code,
Part 1) which provides guidelines for proper grounding and, in particular,
specifies that the cable ground shall be connected to the grounding system
of the building as close to the point of cable entry as practical.
Product
Registration
Please fill out the product registration card and return it immediatel3a
Returning this card allows us to contact you if needed.
Keep your sales receipt to obtainwarranty parts and service and-for proof
of purchase. Attach it here and record the serial and modelnumbers in
case you ever need them. The numbers are located on the back of the TV.
-Model No.
Serial No.
Purchase Date:
Dealer/Address/Phone:
i
Page 3

Thank youfor choosingRCA
Congratulations on your purchase of
an RCA TV. You ha'_e selected a
high-quality, precision-engineered
instrument designed to give you
years of enjoyment.
Table of Contents
Safety Precautions ................................................. Inside Front Cover
Product Registration ............................................. Inside Front Cover
First-Time Operation ..................................................................... 2-6
Operating Instructions
Front Panel Controls ................................................................................... 7
Remote Control
• Installing Batteries .................................................................................... 8
• Basic Operation Theory ............................................................................. 9
• TV Fun&ions... .................................................................................. 10-11
TV On-Screen Status Displays .................................................................. 12
VIDEO Menu- General Instructions ........ ................................................. 13
• Color Convergence Adjustnients ............................................................ 14
AUDIO Menu- General Instructions ........................................................ 15
SETUP Menu- General Instructions .......................................................... 16
• Setting Closed Captioning ...................................................................... 17
• Setting the Sleep Timer ........................................................................... 18
• Setting the Alarm .................................................................................... 19
• Labeling Channels .................................................................................. 20
• Parental Control ....................................................................................... 21
• Channel Memory (Autoprogramming Channels) ................................... 22
• Channel Memory (Erasing/Adding Channels) ...,..................... .............. 22
• Changing Antenna Input ........................................................................ 23
• Setting up VCR Channels ........................................ .............................. 24
• Setting up Cable Box Channel..,. ........................................................... 25
Picture-in-Picture (PIP) ....................................................................... 26-27
Detailed Connections
Tips to Read Before Connecting Components ........................................... 28
Monitor Panel ............................................................................................ 29
Antenna and Cable Connections
• Home Antenna Connections .................. i................................................ 30
• Cable-TV Connections ...................................................................... 31-32
• Programming Remote to Control Cable Box .......................................... 33
• Cable-TV Operation .......................................................................... :....34
Component Connections
• Standard VCR ................................................. i.................................. 35-36
• S-VHS (Super VHS) VCR ................................................................. _....36
• Remote Buttons That Control RCA VCRs ............................................. 37
• Controlling Other Brands of VCRs ......................................................... 38
• Camcorder ........................................... ].................................................... 39
• Computers and Other Equipment ........................................................... 40
• Audio Amplifier ................... ................................................................... 41
• Programming Remote to Control Audio Equipment .............................. 42
• Speaker Connections .............................................................................. 43
Reference Section
Optional Accessories and Order Form................................ ................. 44246
Trouble Checks .................................................................. _................ '.48-49
Cleaning and Care............ .................................... ........................... ...........49
Index "(Alphabetical. Subject Reference) ........................................ :.....50-51
Limited Warranty ....... _................................. :.......... _........:.........Back Cover
Page 4

The steps below will help you get your TV connected and
wo,rking quickly. The page numbers on which you can find
delailed instructions for each of these steps are also listed
for your convenience.
1. Unpack 'IV and accessories.
Shown here are the accessories that came packed with your TV.
Remote Control
'1+ -U(+ -U
(:.._.t._(-+_
Four AAA Batteries for
Remote
Power Cord
2. Install batteries in remote control.
Details are on page 8.
3. Position TV in room.
A major benefit of a Pf'ojection Color Television is its large
viewing screen. To receive full benefit of the expanded screen
size, placement of the TV in the viewing room is important.
The illustrations suggest the "best viewing areas" relating to
the TV's screen.
You will see the best picture if you sit directly in front of the
TV about 10-18 feet from the screen. Picture brightness will
decrease if you sit to the extreme left or right of the TV.
Your Projection TV is designed to provide a watchable picture
when viewed within the full 160° horizontal viewing area.
During daylight hours, you may also see some reflection on
the screen from exterior light sources. If so, you may wish to
use drapes or screens to reduce reflection or consider a
different placement of the TV.
2
CAUTION: Inadequate or poor ventilation may
cause overheating, damage, or therisk of fire
hazard.
This projection TV is equipped with ventilation openings in
the cabinet back and bottom to allow heat generated during
operation to be released. Inadequate air flow to these openings
may result in failures due to overheating, damage to your "IV,
and the risk of f-ire-hazard.
When !ocating and installing your projection television
receiver, readand carefully follow the instructions contained
in the "Installation" section in the enclosed safety pamphlet.
Side View
i
o
+10 o
CenterofScreen
!
5'
I
15'
Top View
Page 5

4. Connect antennaor cable-TV system.
Most antenna or cable-TV systems can be connected as
show here.
Incoming Cable from Antenna or
Cablo-TV System
Back
of TV
_A
_J
• Details for connecting a home antenna to your "IV are on
page 30."
• Details for Connecting a cable-TV system to your TV
are on pages 31-32.
• l')etails for connecting a VCR to your TV are on
1:ages 35-36.
5. Attach power cord.
FLrstattach the flat end of the power cord completely _nto the
connector on the back of your TV, and then plug the other
end into a wall outlet.
6. "I_arnon TV, adjust the volume, and select a
channel.
• Press the TVbutton on the remote _ turn on the TV.
When using the remote, remember to point it at the front
of the TV.
• Press'the VOL up or down button to adjust the volume to a
desired level. '
• Press the CHAN up or down button to select the next
channel in memory. You can also press two number
buttons to select a channel. To select a 3-digit cable
channel (up to channel 128), press and hold numberbutton
1 until 1-- appears on the screen. Then press the other two
numbers. Channels 2-13 were programmed into the
channel memory for you at the factory, so pressing CHAN
up or down stops at these channels only. When you start
theAutoProgramming feature (described in"step 8), your
set will automatically scan through all channels and place
only the active channels for YOurarea into its channel
memory.
,.Details about using the remote are on page 8-11.
CHAN
Button
VOL
Button
Number
Buttons
TV
VOL(Volume)
Down Button
CHAN (Channel) Down
Button
Page 6
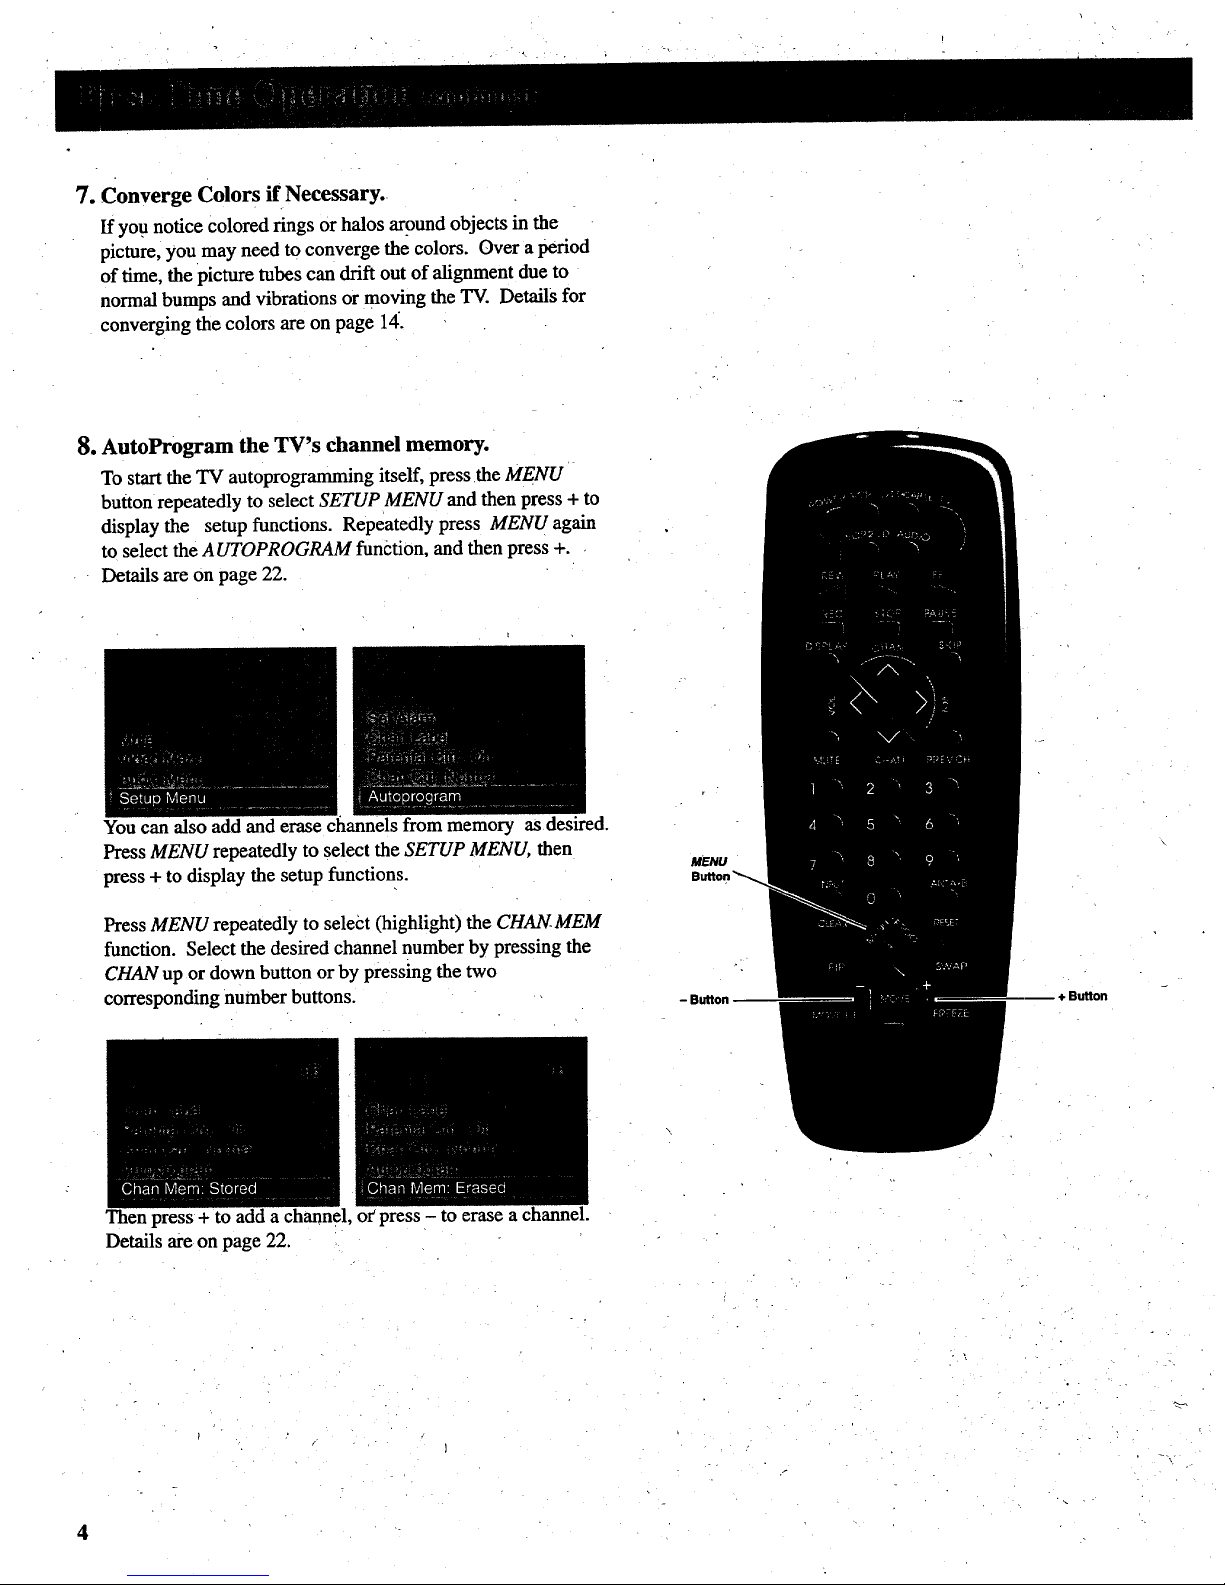
7. Converge Colors if Necessary.
If you notice colored rings or halos argund objects in the
picture, you may need to converge the colors. Over a period
of time, the picture tubes can drift out of alignment due to
normal bumps and vibrations or moving the 'IV. Details for
converging the colors are on page 14.
8. AutoProgram the TV's channel memory.
To start the TV autoprogramming itself, press the MENU
button repeatedly to select SETUP MENU and then press + to
display the setup functions. Repeatedly press MENU again
to select the AUTOPROGRAM function, and then press +.
Details are on page 22.
You can also add and erase channels from memory as desired.
Press MENU repeatedly to select the SETUP MENU, then
press + to display the setup functions.
Press MENU repeatedly to select (highlight) the CHAIE.MEM
function. Select the desired channel number by pressing the
CHAN up or down button or by pressing the two
corresponding number buttons.
MENU
Button
Then press+ to add a channel, or press - to erase a channel.
Details are on page 22.
4
Page 7
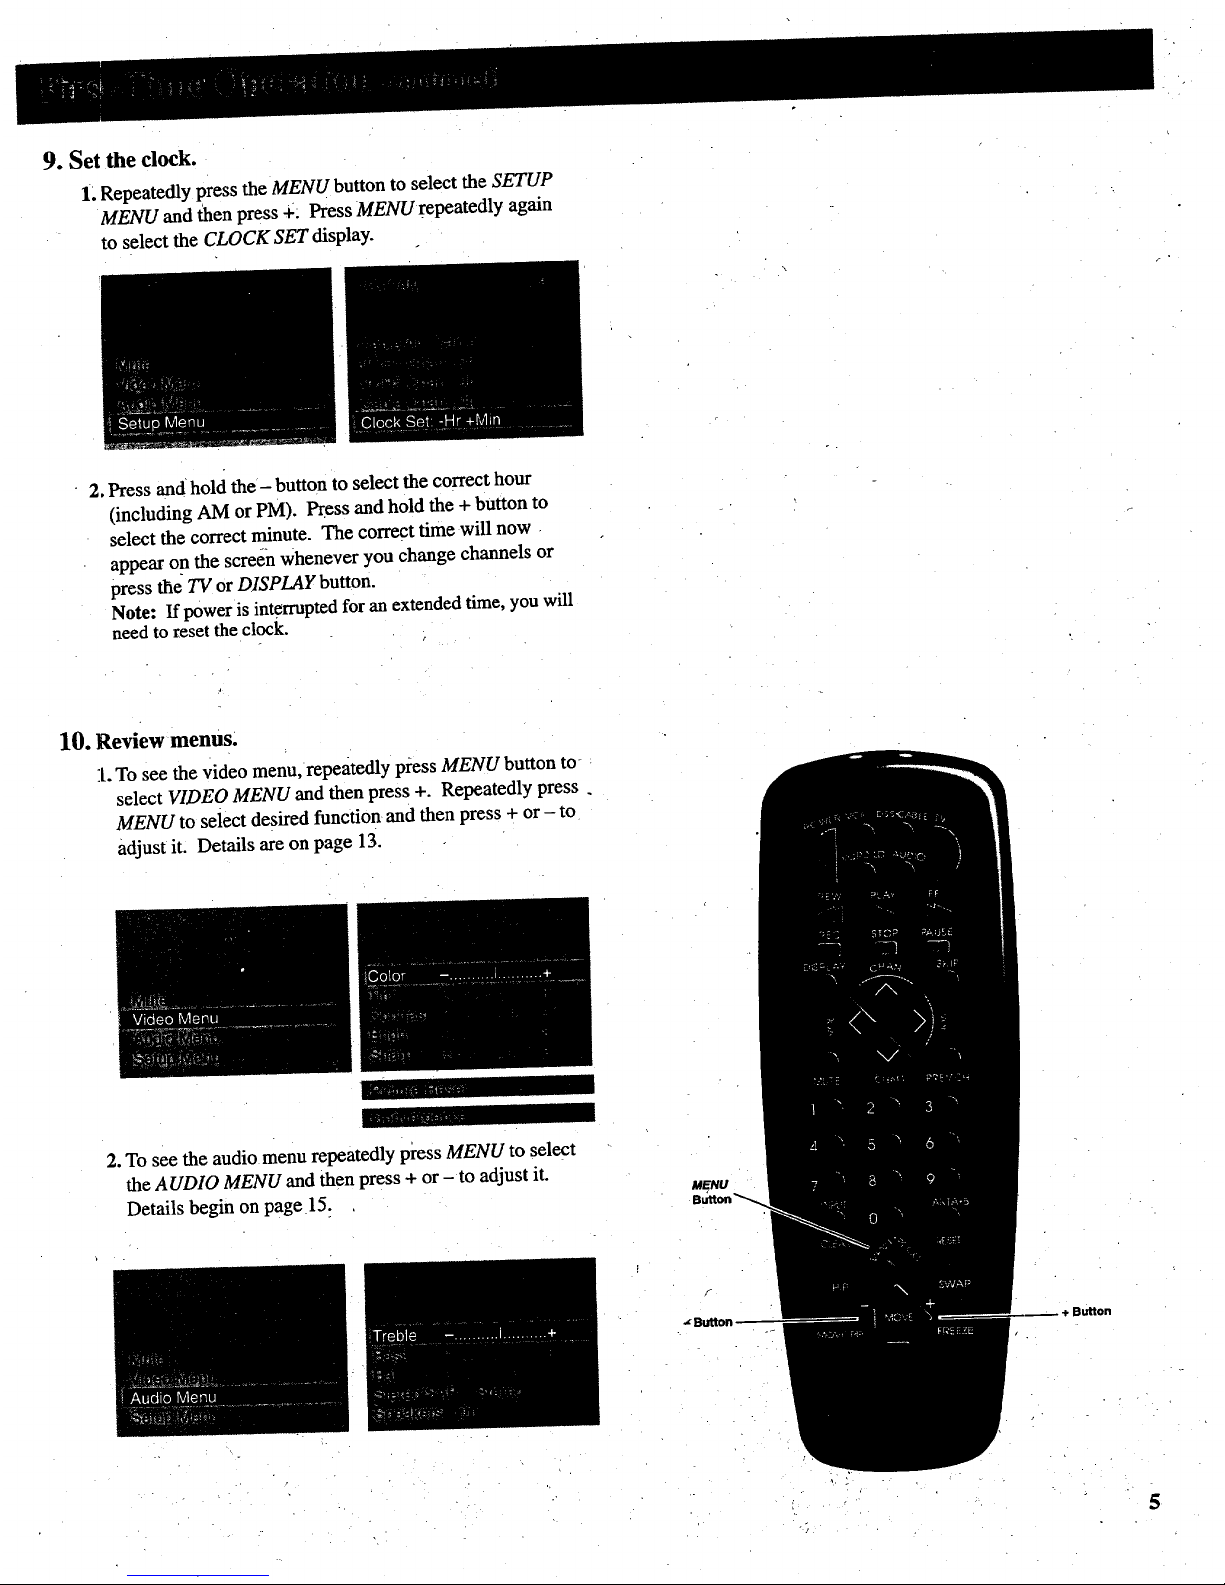
9. Set the clock.
1. Repeatedly press the MENU button to select the SETUP
MENU and then press +; Press MENU repeatedly again
to select the CLOCK SET display.
2, Press and hold the- button to select the correct hour
(including AM or PM). Press and hold the + button m
select the correct minute. The correct time will now
appear on the screen whenever you change channels or
press the TV or DISPLAY button.
Note: If power is interrupted for an extended time, you will
need to reset the clock.
10. Review menus.
1. To see the video menu, repeatedly press MENU button to
select VIDEO MENU and then press +. Repeatedly press.
MENU to select desired function and then press + or - to
adjust it. Details are on page 13.
2. To see the audio menu repeatedly press MENU to select
the AUDIO MENU and then press + or - to adjust it.
Details begin on page 15:
Button
Page 8

3..To see the setup menu,-repeatedly press MENU to select
SETUP MENU and then press +. Repeatedly press
MENU to select desired function and then press + or- to
adjust it. Details begin on page 16.
111. Review other features.
Later, after you feel comfortable with your TV and remote
control, you can review the detailed control descriptions and
special features covered in this manual.
You can use'the rest of this manual as a reference guide to
review detailed information about each operating control
and function. The alphabetical index in the back will help
you quickly locate desired information.
6
Page 9

Shownherearethefrontpanelcontrolsfor
your'IV. You Can use either the front panel
controls or the remote control to operate the
TV. When using the remote control, point it
toward the screen.
I
-- +
ee
i
MENU CH v CH/_
e
• (
VOL v VOL/', POWER
l
(_ POWER Button
• Press once to turn on TV.
• Press again to turn off TV.
• If your model has an indicator light inside the POWER
button, it will light whenever the TV is turned on.
QVOL (Volume) Buttons
• Press VOL up to increase volume, or press VOL down to
decrease volume.
• The volume display will automaticafiy appear on the
screen when you press the VOL buttons.
(_)CH (Channel) Buttons
,, Press CH up to see the next higher channel in memory.
,, Press CH down to see the next lowerchannel in memory.
,, You can add or erase channels in memory as desired.
Details are on page 22.
Q MENU Button
• Press repeatedly until the menu you want to display is
selected, then press + or-. Next press MENU repeatedly to
select the function you want to adjust and then press + or-
to adjust the setting.
• Details about using each function begin on page 13.
- and + Buttons
Use these buttons after you have pressed the MENU button
to enter or adjust functions.
7
Page 10

Beforeattemptingtooperateyour
remotecontrol,installthebatteries
asshownhere.
Theremotecontrolproducesan
invisible(infrared)beamthattravels
in astraightlinemuchasthebeam
ofaflas.hlight.Forthisreason,
whenoperatingtheremotecontrol,
youmustpointit directlyatthefront
oftheTVwithoutobjectsbetween
thatcanblocktheinfraredlight
beam.
Yourremotecontrolisdesignedto
beveryruggedandwill withstanda
considerabledrop.If it receivesan
extremeblow,thecaseisdesigned
toslightlyseparateattheseam
ratherthanfracture.If thishappens,
sirnplysqueezethecasewhereit
separateduntilit snapsback
together.Theoperationofthe
remotewill probablynotbeaffected.
--Installing/Replacing Batteries
1. Turntheremote control face
down.
2. Pull off the cover of the battery
compartment.
Notes:
• Never place anything heavy on top of
the remote control or lay it upside-
down. This may accidentally depress
the buttons for a long time and
discharge the batteries.
3. Install four "AAA" batteries in the
battery compartment as shown,
matching the -I-and m end of
each battery in the compartment.
4. Replace the cover and turn remote
over-face up.
Replace the batteries when the TV fails
to respond to the remote control.
If you programmed your remote to
control other components, you may
have to reprogram the code numbers
when you change the batteries. Try not
to press any buttons while changing
batteries.
8
Page 11

Basic Operation Theory
Step 1
First press one of these five
component buttons to tell remote
which component you want to
control. You can program each of
these buttons to control your brand of
equipment.*
Step 2
Then press POWER button to turn on
that c_omp0nent.
Note: The TV and some Othercomponents
will automatically turn on When you press the
component button in step 1.
Step3
These function buttons can now be
used to control the basic functions of
the component you selected in step 1.
To control a different component, first
press its component button(VCR,
VCR2, CABLE, AUDIO, or TV), and
then press the desired function button.
__Note: Not all components have functions
that can be controlled by these buttons, but
you can experiment with your particillar
models to discover exactly which buttons will
control it.
Function Buttons
* The TV button automatically controls your TV - no additional
programming is required. Details for programming the VCR1 and
VCR2 buttons to control other brands of VCRs are on page 38.
Details for programming the AUDIO button to control audio
equipmen(are on page 41. Details for progi'amming the CABLE
button to control cable boxes are on page 33.
9
Page 12

Only the buttons that are used to control the TV are
described here. The rest of the buttons are used to
operate VCRs (pages 37-38), Cable-TV boxes
(pal;e 33), and audio equipment (page 42).
.
.
\
\
®
®
(9
.@
@
@
®
®
@
q)
TV Button
• Turns on TV and puts remote in "TV Mode" so that the other
remote buttons will control the TV.
• Displays time (if clock has been set) and channel number on the
TV screen.
Important Note: Some buttons on the remote control will not
control the TV unless the remote is in the "TV Mode". If another
component button (such as VCR2) is pressed, the remote will go into
the "VCR Mode" and will control a compatible VCR. To get back
into the '"rv Mode", simply press the button labeled TV. The remote
will go back into the "TV Mode" and will control the TV again.
®
SKIP (Commercial Skip) Button
• Use this button when you want to scan othe_ channels during a
program break.
• When a break occurs, press SKIP once before changing channels.
The TV will count down 30 seconds on the screen and then
automatically switch channels back to the original channel.
• Press SKIP twice if you want the TV to count down 60 seconds.
Each additional .press will add another 30 seconds to the
countdown time (up to five minutes) and then each additional
press will add another 60 seconds to the countdown time. (up to
60 minutes).
• To cancel, press CLEAR. The countdown clock will disappear
from the screen, and the TV will stay tuned to the present
channel.
• When CLOSED CAPTIONING is turned on, the counter will only
displays for two seconds.
ltlr
Page 13
:1
f--_
L_-Y VOL (Volume) Buttons
• Press VOL up to increase volume.
• Press VOL down to decrease volume.
(4_ -PREV CH (Previous Channel) Button
• Pressing the PREV CH button causes the TV to change back
to the last tuned channel. This is useful should youwant to
monitor two channels.
• To operate, select the first channel you wish to watch. Then
select the other channel by pressing two number buttons (for
example, press 0 then 6 for channel 6). The TV will now
"change back and_forth between the two channels each time
you press the PREVCH button.
Number Buttons (0-9)
• These buttons let you directly access any channel
number-even if the channel is not in the channel memory.
• To select a channel, press two number buttons (first one, then
the other). For example, press 0 then 6 for channel 6. Press 1
then 3 for channel 13.
• To select a 3-digit cable channel (like 127), press and hold
number button 1 until 1-- appears on the screen. Then press
the other x-wonumbers.
Note: Your TV will tune up to channel 128. Check with your
cable company to determine which channels are available in
your area.
MENU Button and _r+ Buttons
• Press MENU repeatedly until the menu you want to display is
selected, then press + or-. Next press MENU repeatedly to
select the function you want to adjust and then press + or - to
adjust the setting. Details about using each function begin on
page 13.
® Picture-in-Picture Buttons
• Press PIP to activate the picture-in-picture feature.
• Press PIP again to deactivate the picture-in-picture feature.
• Press FREEZE to freeze the small picture.
• Press MOVE PIP to move the small picture to the next corner.
• Press SWAP to switch the small picture with the large picture.
• Details are on pages 26-27.
®
®
CLEAR Button
• Pressing CLEAR clears the screen of all on-screen display
messages except MUTE and PARENTAL CONTROL.
1@
®
@
@
INPUT Button
• Lets you quickly view signals from the INPUT jacks. Pressing
this button switches the TV from its current channel directly to
channel 90, then channel 91, then channel 92.
• Channel 90 lets you see the signals coming from a device that is
connected to the S-VIDEO connector. Channel 91 accesses the
INPUT 1jacks and channel 92 accesses the INPUT2 jacks.
MUTE Button
• Press MUTE to quickly reduce sound to minimum level without
affecting the picture. This is especially useful during telephone
calls or other interruptions.
• Except when CAPTIONING is on, the word MUTE will be
displayed on the screen when the sound is muted.
• To restore sound, press MtFFE again or press VOL up_
CHAN (Channel) Buttons
• Press CHAN up to select the next higher channel in channel
memory.
• Press CHAN down to select the next lower channel in channel
memory.
• You can add or erase channels in memory as desired. Details
are on page 22.
DISPLAY Button
• Displays time (if clock has been set) and channel number on the
TV screen.
• Quickly removes menus and displays from the screen.
POWER Button •
Press POWERtoturnoff "IV.
11
Page 14
Sleep Timer
Parental Control
Channel
(blue forANTA
and yellow for ANT B)
Channel Label
Captioning
MUTE
Commercial Skip
(13
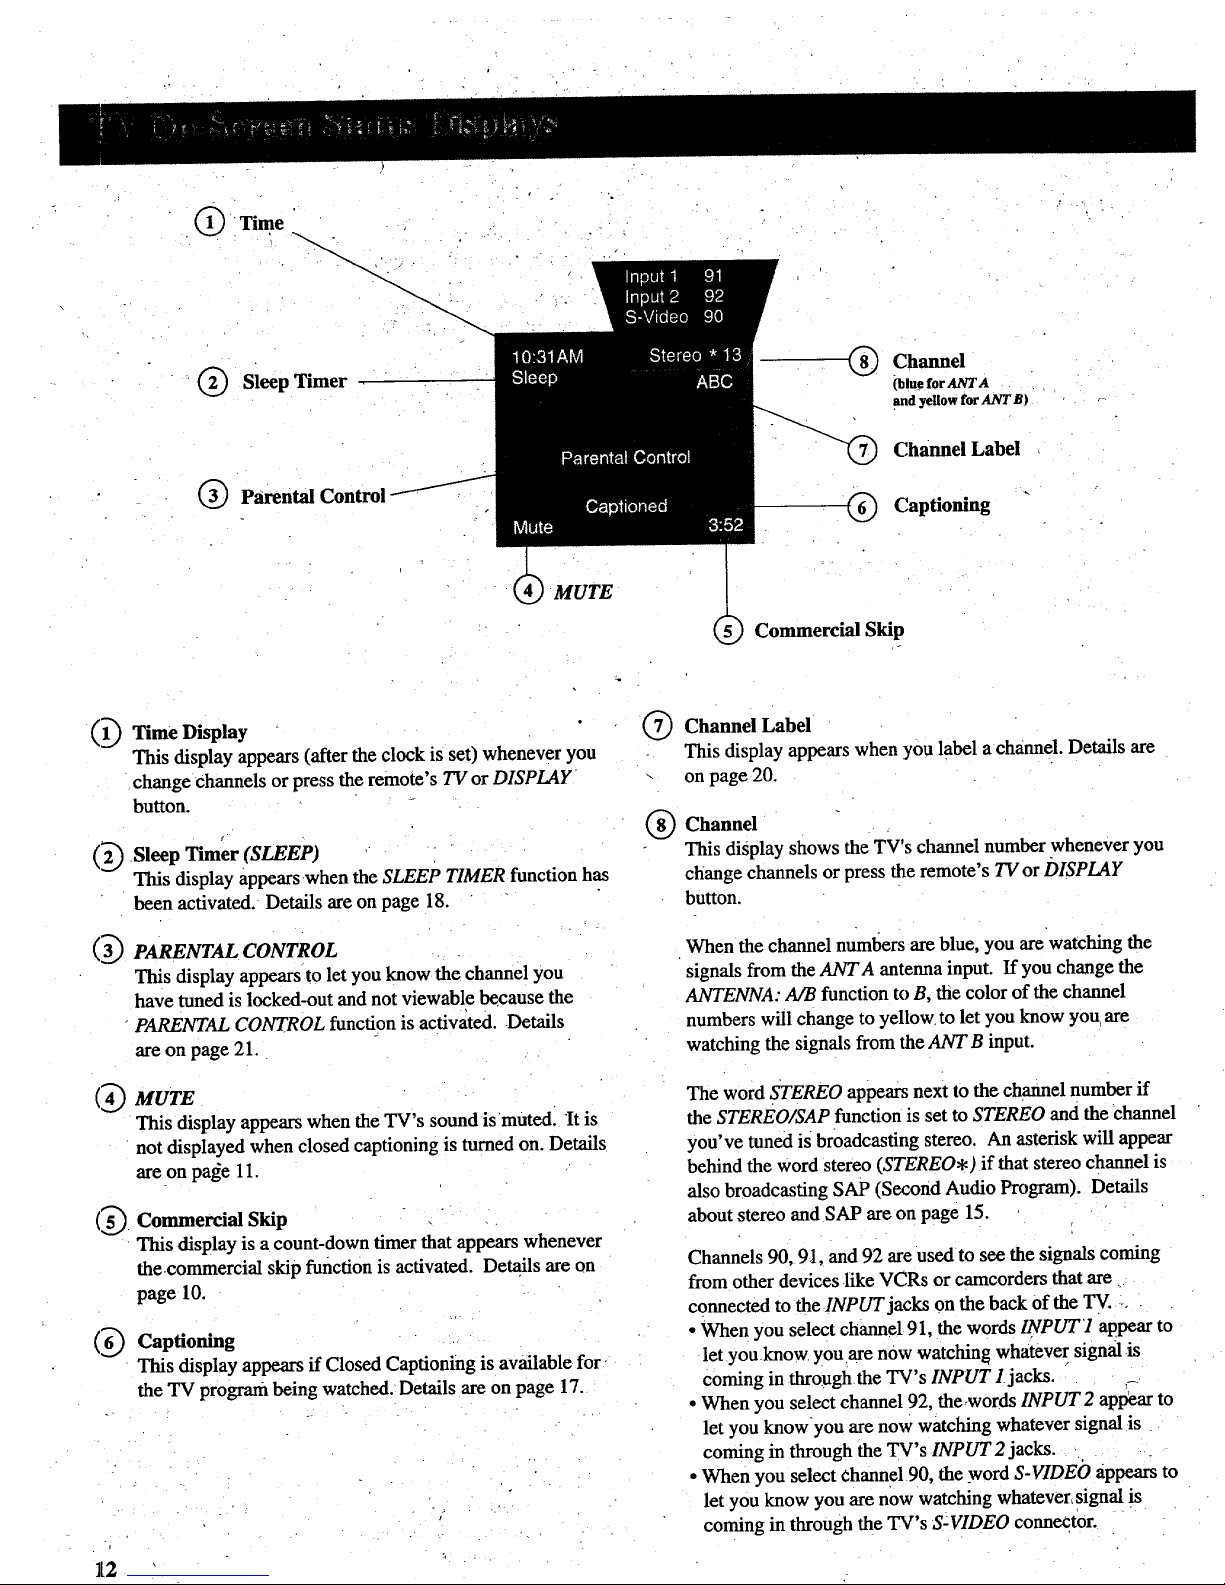
Time Display
This display appears (after the clock is set) whenever you
change Channels or press the remote's TV or DISPLAY
button.
Sleep Timer (SLEEP)
This display appearswhen the SLEEP TIMER function has
been activated. Details are on page 18.
PARENTAL CONTROL
This display appears to let you know the channel you
have tuned is locked-out and not viewable because the
PARENTAL CONTROL function is activated. Details
are on page 21.
MUTE
This display appears when the TV's sound is mutedl It is
not displayed when closed captioning is turned on. Details
are on pa_e 11.
Commercial Skip
This display is a count-down timerthat appears whenever
the commercial skip function is activated. Details are on
page 10.
Captioning
This display appears if Closed Captioning is available for
the TV program being watched. Details are on page 17.
®
®
Channel Label
This display appears when you label a channel. Details are
on page 20.
Channel
This display shows the TV's channel numberwhenever you
change channels or press the remote's TV or DISPLAY
button.
When the channel numbers are blue, you are watching the
signals from the ANTA antenna input. If yon change the
ANTENNA: A/B function to B, the color of the channel
numbers will change to yellow• to let you know you. are
watching the signals from the ANT B input.
The word STEREO appears next to the channel number if
the STEREO/SAP function is set to STEREO and the channel
you've tuned is broadcasting stereo. An asterisk will appear
behind the word stereo (STEREO*) if that stereo channel is
also broadcasting SAP (Second Audio Program). Details
about stereo and SAP are on page 15.
Channels 90, 91, and 92 are used to see the signals coming
from other devices like VCRs orcamcorders that are
connected to the INPUT jacks on the back of the TV....
• When you select channel 91, the words !NPUT7 appear to
let you _knowyou are now watching whatever signal is
coming in thro_Ighthe TV's INPUT 1jacks.
• When you select channel 92, the.words INPUT2 apI_earto
let you knowyou are now watching whatever signal is
coming in through the TV's INPUT 2 jacks.
• When you select channel 90, the _wordS-VIDEO appears to
let you know you are now watching whatever, signal is
coming in through the TV's S=VIDEO connector.
12
Page 15

1. Repeatedly press MENU to select vIDEO MENU and
then press + or - to display the video menu. The COLOR function adjusts the amount of color in the picture.
Press + to increase color or press - to decrease color.
The TINT function adjusts the color of flesh tones. Press + to add
more red tint, or press - to add more green tint.
The CONTRAST function adjusts the overall brightness and contrast
of the picture. Press + to increase contrast, or press -_to decrease
contrast.
2, Repeatedly
press
MENU to
select
function,
then press
q-or- to
adjust it.
The BRIGHTNESSfunction adjusts the brightness of the dark
portions of the picture. Press + to increase brightness, Orpress -.to
decrease brightness.
The SHARPNESS function adjusts picture sharpness. Press + to
increase sharpness, or press - to decrease sharpness.
The PICTURE RESET function lets you quickly change all the
video functions (shown above) back to the factory settings. Press
either + or - to reset the video functions.
The CONVERGENCE function allows you to precisely align the
beams of the three projection picture tubes (red, green, blue) for
- _ optimum picture detail. Press the + button to display the pattern and
_ql VOL up or down to align the colors. See next page for details.
The video menu will automatically disappear from the screen if
you do no t press + or - within a few seconds.
Via remote control, your TV will "remember" which function
you displayed last--even after the menu has disappeared from
the screen. So, if you want to adjust the Same function again,
slimply press the + or - button on the remote control. The last
• thnction you adjusted will reappear on the "IV screen.
Adjusting for a Color Picture that Pleases You
1.
Decrease color to minimum. This will leave a black=and-white
image on the screen.
2. Adjust contrast until the picture pleases you.
3. Adjust brightness until the black parts of thepicture appear
black. You may need to wait until the picture shows something
you're sure is black to.make this adjustment. Be careful not to
lose the detailsin darkly shaded areas.
4. Increase color until you reach a pleasing level of intens)ty.
5. Adjust tint until flesh tones or other color objects appear natural.
6. Adjust sharpness for a pleasing level of picture sharpness. (For
weak signals, the picture may be more pleasing with sharpness
decreased.)
Custom Picture Memory for Input Channels
The channel numbers you select to see signals fromcomponents
(like a VCR) that are connected tOthe iNPUT jacks oh the back of
the TV are called input channels. Selecting channel 90 lets you see
the signal coming from whatever component is attached to the
S-VIDEO connector, channel 91 lets you see the signal from the
INPUT 1jacks, and channel 92 lets you see the signal from the
INPUT 2 jacks. Your TV is equipped with a custom picture
memory for these input channels. When the TV is tuned to one of
these channels (90, 91, 92), you can change the picture settings for
that component's signal as desired without changing the settings of
any other channel. This is very useful because you'll be able to
adjust for the best picture from each of your components and tile
TV will remember those settings automatically the next time you
tune that input channel. 13
Page 16

Your projection TV has three color
projection tubes--one for red, one for
g_een,andone for blue. When mixed
together in the proper proportion, the
output of these three color tubes can
produce many colors. To produce
these colors, however, the beams
must be precisely aligned over each
other so that the colors can be mixed.
"[he process of aligning these picture
beams is called setting the
6t "
convergence .
Over a period of time, the picture
tubes can drift out of alignment due
to normal bumps and vibrations or
moving the TV. If you move your
I_¢ or if, after a time, you notice
colored rings or halos around objects
in the picture, you may want to
conyerge (align) the colors.
Ib simplify convergence, an on-
screen menu is provided that allows
ou to display a test pattern of four
hnes on the screen. Properly
converged, the lines appear
white-which is actually a
combination of the outputs of the
l_hree color tubes. The position of the
green lines is stationary. The
positions of the red and blue lines are
adjustable. When properly adjusted,
the red and blue lines should lie
directly over the green lines to
produce single white lines.
Converging (Aligning) the Colors
--(with remote only)
1. Turn on the TV and select a channel
that is active in your area. Allow the
TV to operate at least ten minutes
before converging.
2. Repeatedly press the VIDEO button
until the CONVERGENCE function is
selected.
3. Then press the + button to display the
pattern.
i§i
USE VOL
TV TO EXIT
o
4. When properly converged, all three
colors in the pattern (red, blue, and
green) should align to form white
lines. If you see any red or blue lines
in the pattern, you can move them to
align with the green lines by pressing
the VOL up or down button.
5. Press the + button to select the arrow
color and direction, then press the
VOL up or down button to move the
lines.
Pressing
VOL up or
down when
these blue
alTOWS
appear,
moves the
blue lines
left or right
Pressing
VOL up or
down when
these blue
arrows
appear,
moves the
blue lines up
or down.
Press + tO
select arrow
color and
direction.
... III --
III
USE VOL
TV TO EXIT
1
m U SE VOL
TV TO EXIT
1
Pressing
VOL up or
down when
these red _H
arrows
appear, USE VOL
moves ,the
red lines left TVTOEXIT
or right. 1
..J|!
B USE VOL
TV TO EXIT
I
Pressing
VOL up or
down when
these red ",<.
arrows
appear,
moves the
red lines up
or down.
Note: You can also press the -button.to
return to a previous screen. Pressing -
displays the arrows in reverse order than
shown above.
6. When finished, press the TV button
to remove the pattern from the
screen.
14
Page 17

1•.Repeatedly press MENU to selectAUDIO MENU
a_adthen press + or - to display the audio menu.
o
Repeatedly
press
MENU to
select
function,
then press
+ or-to
adjust it.
The audio menu will automatically
disappear from the screen if you do not
press + or - within a few seconds.
Via remote control, your TV will "remember"
which function you displayed last-even after
the menu has disappeared from the screen. So,
if you want to adjust the same function again,
.,;imply press the + or - button on the remote
control. The last function you adjusted will
reappear on the TV screen.
The TREBLE function adjusts the high frequency audio. Press + to
increase treble or press - to decrease treble.
The BASS function adjusts the low frequency audio. Press + to increase
bass, or press - to decrease bass.
The BALANCE function adjusts the left/right balance of sound from the
speakers. When adjusting the BALANCE function, sit in your normal
viewing seat while pressing the + and - buttons until the sound seems to
originate from a point halfway between the speakers. Press + to increase
sound from the fight speaker, or press - to increase sound from the left
speaker.
The STEREO/SAP function lets you choose either MONO (monaural),
STEREO, or SAP audio (if available) by pressing + or-. When a station is
broadcasting stereo and the STEREO/SAP function is set to STEREO, the
stereo indicator (STEREO) will appear on the screen before the channel"
number. Normally you can leave the STEREOISAP function set to
STEREO and your TV will then automatically reproduce either monaural or
stereo audio-whichever is broadcast. Some TV stations that broadcast
stereo also broadcast another sound channel called SAP (Second Audio
Program) which is sometimes used to offer the program in another
language: Your TV lets you know when SAP audio is available by
displaying an asterisk (*) on the screen .after the stereo indicator like this
(STEREO*). If you want to listen to the SAP channel when the asterisk
appears, change the STEREO/SAP function to its SAP setting. The SAP
setting will only appear in the function when SAP is available. Your TV
will thenreproduce the SAP audio until you change Channels or return the
STEREO/SAP function back to STEREO.
Note: Some TV stations transmit a "pilot" signal that makes your TV
think it's receiving stereo, even though the broadcast signal is monaural.
The pilot signal will make the stereo indicator (STEREO) appear on the
screen next to the channel number, however, you will not be able to hear
stereo sound. If this happens, check with the TV station to inquire whether
the programbeing broadcast is in true stereo or monaural audio.
The EXPAND STEREO function lets you add greater depth and dimension
to stereo.broadcasts. You can turn this function on and off as desired by
pressing + or- to change the setting between ON and OFF. Yon may
prefer to leave this function set to ON. Your TV will then automatically
process the stereo signals whenever a stereo broadcast is received (or
whenever a stereo tape is played through a stereo VCR that is connected to
the TV's audio/video jacks labeled INPUT).
The SPEAKERS function lets you turn off the TV's internal speakers by
pressing + or- to change the setting between ON and OFF. You will
probably want to •leave the TV's speakers turned on unless you connect an
amplifier (with its own set of speakers) to the appropriate jacks on the back
of the TV a's described on page 27.
15
Page 18

1°RepeatedlypressMENU to select SETUP MENU
and then press + or - to display the setup menu.
2. Rer eatedly
press
MENU to
select
function,
then press
+or-to
adjust it.
The se.tup menu will automatically disappear
from the screen if you do not press + or -
within a few seconds.
Via remote control, your TV will "remember"
which function you displayed last-even after the
menu has disappeared from the screen. So, if you
want: to adjust the same function again, simply
press the + or- button on the remote control.
The last function you adjusted will appear on the
TV ,;creen.
16
The CAPTIONING feature lets you display as text on the screen the audio
portion of certain programs encoded with Closed Captioning (CC)
information. Four types of closed captioning are available. Select
CAPTIONS 1 for full translation of the primary, language in your area.
CAPTIONS 2 is used for secondary language translation, simplified English,
or whatever is being transmitted in your area. Two Text modes are also
supported.
By setting the SLEEP TIMER, youcan program your TV to turn iiself off
after a certain period of time. This is useful whenever you want to watch TV
for an hour or so before going to sleep. Press the + or - button to select the
length of time you want the TV to stay on.
You can program your TV to turn on and/or off.at the times yo,uchoose by
Setting the ALARM ]_unction.
CHAN LABEL lets you program names (or labels) for the channel numbers.
The names you select will then appear on the screen whenever the channel
number is displayed.
The PARENTAL CONTROL feature lets you lock out any channels between 1
and 99 that you don't want your children to watch. Pressing + or- switches
this function from OFF to ON. When this function is set to ON, channels
that have been locked out with the CHAN CTRL function cannot be viewed.
When this function is set to OFF, all channels,can be viewed.
The CHAN CTRL (Channel Control) function works hand-in-hand with the ,
PARENTAL CONTROL function. It lets you select the channels you want to
lock out. First select the channel number you want to lock out and then
press + to change this function from NORMAL to LOCKED. When the
PARENTAL CONTROL function is set to ON, the channels you locked with
this function cannot be viewed
When you press + or- to start the A UTOPRO6RAM function, the TV will
automatically cycle through all channels and place the active channels for
your area in its channel memory. Pressing the CHAN up or down buttons
will then allow you to scan only active channels.
The CHANMEM function allows you to erase'and add channels to channel
memory as desired.
Because your TV has two separate antenna inputs on the back labeled
ANTA and ANTB, yoUcan connect two different signal sources, if desired.
By pressing + to change theANTENNA function, you can switch back and
forth between.the two signal sources. Each time you press +, the antenna
input will change.
The CABLE/AIR function tells your TV whether you have a cable-TV system,
or a home antenna connected to the TV. Your TV is so automatic that you
will probably never need to change this function. When your TV
autoprograms, it automatically adjusts the CABLE/AIR setting for you. If
you should ever need to override the automatic setting, press + or - to
change it,
The V.CR 1 CHAN function lets you program to which channel the TV will
automatically tune when you press the VCR button on the remote.
The VCR 2 CHAN function lets you program to which channel the TV will
automatically tune when you press the VCR 2 button on the remote.
The CABLE CHAN function lets you program t9 which channel the TV will
,'iutomatically tune when you press the CABLE button on the remote.
After you set the clock, you will be ab.le to see the on-screen time display
whenever you change channels or press the DISPLAY or TV button on the
remote control. To set the clock when this function is selected, first press
and hold - to set the correct hour (including AM and PM). Then press and
hold + to set the correct minutes.
Page 19

The CAPTIONING feature lets
you ctisplay the audio portion of a
prog_:am as text on the TV screen.
This is useful to the hearing
impaired or anyone who wants to
watch a program without the
sound.
There are four types of closed
captioning transmissions
available. CAPTIONS 1 displays
the full translation of the primary
language in your area.
CAPTIONS 2 may be used as a
second source for secondary
lanl_:uages, simplified English, Or
othex translations Ixansmitted in
yottr area.
The closed captioning feature in
this TV also supports a Text
Mode. Text mode is used to
display text sent directly from the
TV or cablestation. Typically, this
information consists of program
information, weather bulletins,
local activities, etc. The two
inputs for Text Mode are TEXT 1
and TEXT 2.
Not,e: Closed Captioning is hot available on
all channels or at all times. Only specific
pro_Tamsencoded with Closed Captioning
information (CC) are applicable.
When Closed Captioning is available, the
_votd "Captioned" appears on the screen
when you change channels or press the TV or
DIYPLAY button on the remote.
- Setting Closed Captioning
1oRepeatedly press MENU to select
SETUP MENU, and then press + or - to
display setup functions.
CAPTIONING will be highlighted since
it is the first function in the setup menu.
(with or without remote)
4. The screen will begin to display the
TV program's audio portion as text
if the program has captioning.
2. Press the + or - button to select the
type of closed captioning: OFF,
CAPTIONS 1, CAPTIONS 2, TEXT 1
or TEXT 2.
3. When finished, the display will
automatically disappear from the screen
in a few seconds. To make it disappear
more quickly, press the CLEAR button.
-Turning Captioning ,Off
To turn off the closed captioning
feature, enter the CAPTIONING
functiori and press the + or - button
until the screen shows "Off."
17
Page 20

By setting the Sleep Timer, you
can program your TV to turn itself
off after a certain period of time
(up to four hours).
This is useful whenever you want
to watch TV for an hour or so
before going to sleep.
- Setting Sleep Timer (with or without remote)
/
1. Repeatedly press MENU to select
SETUP MENU, and then press + or -
to display setup functions. Press
MENU to select SLEEP TIMER.
/
4. The sleep timer will begin to count
down to zero. The word "SLEEP"
will appear onthe screen whenever
you change channels or press the
remote's TV or DISPLAY button to
let you know the sleep timer is
activated.
2. Press the + or- button to select the
length of time (up to four hours) you
want the TV to stay on.
• Each time you press the + or -
button, the time will increase 30
minutes (up to 4 hours). Then the
time display will start over.
The amount of time remaining
before the TV shuts itself off will
appear in the sleep timer menu
whenever you display the SLEEP
TIMER function.
1 hour
and
23 minutes
remaining
3. When finished, the display will
automatically disappear from the
screen in a few seconds. To make it
disappear more quickly, press the
CLEAR button.
5. When the sleep timer counts down
to 0:00, the sleep timer display will
appear on the screen for a few
seconds. Then the TV will turn
itself off.
you want the TV to stay on when
this display appears, press the +
button on the remote to add more
time to the SLEEP TIMER display.
- Clearing Sleep Timer
To cancel the sleep timer, enter the
SLEEP TIMER function and then press
the + or- button until the screen shows
0:00.
18
Page 21

By setting the alarm, you can
program the TV to turn on and/or off
by itself.
After the ON TIME is set and the
ALARM ON/OFF function is set to
ON, the "IV will automatically turn
on each day at the time you selected
and remaih on until the OFF TIME
is reached. If no OFF TIME has
been programmed, the TV will
remain on until you turn it off.
The ALARM ON/OFF functior_lets
you easily deactivate or reacti_ ate
the alarm without having to reset the
ON TIME _and OFF TIME.
When the alarm time is reached, the.
set will turn on at. whatever volume
you left it when you last turned it
off. So if you want the TV to come
on loudly at the ON TIME, be sure
the TV is playing loudly when you
turn off the TV for the last time.
When the ALARM ON/OFF function
displays SET CLOCK, you will need
to set the clock time before you will
be able to turn on the alarm function.
Details for setting the.clock are
on page 5.
IMPORTANT NOTE: During extended
power failures the alarm function will be
disabled. The alarm ON TIME and OFF
TLVIE will stay set but the ALARM ON/OFF
function will be set to OFF and will display
SET CLOCK to inform you that the clock
must be reset to the correct time. Once the
clock has been reset you can reactivate the
A/k4RM function by changing the ALARM
function to ON.
Setting the Alarm
1. Repeatedly press MENU to select
SETUP MENU, and then press + or-
tO display setup functions. Press
MENU to select SET ALARM
function, and then press + or- to
display the alarm settings.
2. When the first ALARM function is
selected, pressing + or- will switch
the setting between ON and OFF. Set
this function to ON if you want to
activate the alarm. When.this
function is set to OFF, the alarm is
deactivated and the TV will not turn
on or off by itself.
°
Note: If SET CLOCK is displayed next to
ALARM, you Will need to set the clock
time before you will be able to turn on the
alarm function. Details for setting the
clock are on page 5.
Press MENU to select the next
function called ON TIME. If you.
want the TV to turn on by itself, enter
the desired time by fu'st pressing - to
select'the hour (including AM and
PM) and then pressing + to select the
minutes. If.you only want the TV
to turn off by itself and not turn on,
you can disable the ON TIME by
pressing - until the word
DISABLED appears.
Note: Rememberto check the AM/PM
setting. Midnight is 12:00 AM and
noon is 12:00 PM.
,
Press MENU to select the next
function called OFF TIME. If you
want the TV to turn off by itself,
enter the desired time by first
pressing - to select the hour
(including AM and PM) and then
pressing + to select the minutes. If
you only want the TV to turn on by
itself and not turn off, you can
disable the OFF TIME by pressing
until the word DISABLED appears.
°
Press MENU to select the next
function called CHANNEL This
function lets you program which
channel the TV will tune when it
turns on at the ON TIME. Press
CHAN up or down to select the
channel, and then press + or - to
enter it into the CHANNEL function.
Note: The TV will change to the
channel thatyou select. This will help
you to confuan that it is indeed the
channel you want the "IV to turn on to.
19
Page 22

The labeling feature lets you program
names (or labels) for the channel
numbers. The name you program
will then pppear on the screen below
the channel numbei" whenever the
channel number is displayed.
Each name cancontain up to four
characters, and you'll be able to
assign up to 64 names. After 64
names or labels have been entered,
the TV will display this, message to
let you know no more channels can
be labeled: CHAN LABEL: FULL
Listed below are the letters and
characters from which you'll be able
to choose whenprogramming the
charmel labels!
ABCDEFGH1JKLM
NOPQRSTUVWXYZ
(blank space) ! "# $ % &' ( )
_+,_./0123456789:;
<=>?@
You must use your remote control to
create or erase labels.
. _ . . . ---,
. -'., ,.
Labeling Channels (with remote only)
1. Repeatedly press MENU to select 5.
SETUP MENU, and then press + or -
to display setup functions. Repeatedly
press MENU to select CHAN LABEL
function.
Then press + to move to the next
letter frame. Pressing - moves you
back to the previous letter frame.
D
Press + to enter the CHAN LABEL
function. Four blank letter frames
will appear under the channel number.
.
-7.
Repeat steps 4 and 5 until the name
is complete. You can now label
another channel, if desired, by.
selecting the channel number and
repeating steps 4 and 5.
When finished, the display will
automatically disappear from the
screen in a few seconds. Your
labels will remain in memory until
you erase them. They are not •
affected by power failures.
=
Select the channel number you want
to label by pressing the CHAN up or
down button (or by pressing two
number buttons).
Erasing Labels
To erase a channel label, first follow
steps 1, 2, and 3 above, and then press
CLEAR on the remote control.
.
Press and hold the VOL up or down
button until the letter or character you
want appears on the screen. Pressing
VOL up sequences through the
characters in alph_ibetical order.
Pressing VOL down sequences the
letters in reverse order.
Note: Autoprogramming new channels
into the channel memory does not effect
the channel labels that are already entered.
2O
Page 23

The PARENTAL CTRL and CHAN
CTRL functions let you lock any
channels between 1 and 99 so they
carmot be viewed by your children.
Channels that have been locked can
be viewed only when the
PARENTA.L CTRL function is set to
OFE Tiffs can only be done with the
remote control-it can not be changed
with the buttons on the front of the
TV. Therefore, after you turn on
PARENTAL CTRL, you simply hide
the remote control so that your
children can not watch the locked
channels. An optional simplified
remote (shown on page 45)is also
available that your children can use.
The simplified remote does not allow
access to the locked channels.
Tile locked-out channels will remain
UnLviewable even if the TV is
unplugged or the channels are •
autoprogrammed again. The only
way to view locked channels is to use
the supplied remote control to set the
PARENTAL CTRL function to OFF.
-Activating Parental Control (with remote only)
The PARENTAL CTRL and the CHAN
CT_L functions work hand-in-hand.
The instructions below will first tell
you how to turn parental control on or
off with the PARENTAL CTRL function
and then how to lock desired channels
with the CHAN CTRL function.
2. To iock channels, press the MENU
button to select the CHAN CTRL
function.
1. Repeatedly press MENU to select
SETUP MENU, and then press + or
- to display setup functions.
Repeatedly press MENU to select
the PARENTAL CTRL function.
Select a channel you want to lock by
pressing CHAN up or down. Then
press +. The CHAN CTRL setting
will change from NORMAL to
LOCKED when that channel is
locked. To return the channel to
NORMAL, press the - button.
• When this function is set to ON,
PARENTAL CTRL is activated and
any channels you locked with the
CHAN CTRL function will not be
viewable.
• When this function is set to OFF,
PARENTAL CTRL is deactivated
and all channels are viewable.
Repeat step 2 for each channel you
want to lock.
If the PARENTAL CTRL function is
set to ON while you are locking out
channels, each channel will go
blank as you lock it.
When the PARENTAL CTRL
function is set to ON and a channel
which has been locked out is tuned,
the TV will display the words
PARENTAL CONTROL to let your
kids know you have locked it.
21
Page 24

ThechannelmemoryisthelistofTV
ChannelnumbersyourTV will stop
onwhenyoupresstheCHAN up or
down button. You can program any
list of channels into the channel
memory.
The quickest way to program your
channel memory is to use the
A UTOPROGRAM function. If you
use the A UTOPROGRAM function,
your TV wi!l automatically cycle.
through all channels and place active
chaimels into the channel memory.
First follow the instructions to
auto,program channels, and then add
or e:case individual channels as
desired.
1. AutoProgramming Channels into Channel Memory
--(with or without remote)
1. Connect home antenna(s) or cable-
TV to your set,
2. After you have turned on the TV
and adjusted the volume, repeatedly
press MENU to select SETUP
MENU, and then press + or - to
display the setup functions.
Repeatedly press MENU to select
the A UTOPROGRAM function.
3. Press either + or- to begin
autoprogramming. The TV will first
program all channels for ANTA
input and then program all channels
for ANT B input (even if you only
have one antenna input connected).
4; When the TV is finished cycling,
you can check to see which channels
are in memory by pressing the
CHAN up or down button.
Notes:
• The AutoProgram feature will place into
memory active TV channels that have a
va_[id.signalat the time you autoprogram
your TV.
• Artactive channel may be missed
occasionally if its signal is very weak or if
the channel happens to be "off the air"
when the TV is autoprograrnmed.
• Artinactive channel may be included in the
channel memory if there happens to be
sonae sort of "noise" or "stray signal" on
the channel when the TV is
autoprogrammed.
• Signals from other components connected
to the INPUT jacks can not be
autoprogrammed. Channel 91 (which
accesses INPUT 1jacks) was added to the
channel memory at the factory and will
remain in the channel memory until you
erase it. Channel 92 (INPUT2) and
Channel 90 (S-VIDEO connector) can be
added to channel memory if desired.
• Ordy channels 1-99 can be stored in
channel memory.
2. Erasing/Adding Channels in Channel Memory
(with or without remote).
1. To erase or add a channel,
repeatedly press MENU to select
SETUP MENU, and then press + or
- to display the setup functions.
Repeatedly press MENU to select
CHAN MEM function.
2_
Then select the desired channel
number by pressing CHAN up or
down (or the two corresponding
number buttons on the remote).
3. Press + to add the channel to
memory, or press - to erase the
channel from memory.
3. Adding Video Input Channels to Channel Memory
-- (with remote)
If you have a video device Connected to
the S-VIDEO or INPUT jacks on the
back of the TV, you can view its signal
either by directly selecting channel 90
(for S-VIDEO connector), channel 91
(for INPUT 1 jacks), or channel 92 (for
INPUT 2jacks) with the number buttons
on theremote or by adding those
channels to the channel memory.
Adding channels 90, 91, and 92 to
channel memory allows access to the
video inputs at the TVby pressing the
CHAN up and down buttons as well as
by using the remote control.
22
Page 25

Yottr TV has two separate antenna
inputs on the back (labeled ANTA
and ANTB) that allowyou to connect
two different signal sources if
desired. For example, you can
connect a cable-TV System to one
input and a home antenna to the other
input.
By changing the ANTENNA: A/B
display in the SETUP menu, you can
switch back and forth between the
two signal sources.
Listed below are some other common
use:; of the two antenna inputs:
• connecting a cable-TV system (or
antenna) to one input and a VCRto the
other.
• connecting a cable-TV system (or
antenna) to one input and.a video game
to the other.
• connecting a double-trunl( cable
system to both inputs,
• connecting a cable-TV
converter/decoder box that scrambles
only premium channels. Connection
details are on pages 31-32.
• connecting a cable-TV system to one
inputand an antenna (VHF/UHF) to
the other. This allows you to tune in
local stations that are not included on
your cable system. Remember to
change the CABLEZAIR function as
described on page i8 if using your set
t_ke this. -
The Channel Memory is the list of
ch;mnels your TV will stop on when
you press the CHAN up or"down
buttons. Your TV provides two
separate Channel Memories-one for
ANTA input and one forANTB
input. This alloWs you to add or
delete channels into each channel
memory as desired.
When you use the AUTOPROGRAM
ftmction, the TV automatically
checks both inputs and sets up a
separate channel memory for each.
Changing Antenna Input
(with remote)
.
Press the ANT (Antenna) button on
the remote control to switch from the
ANTA input to the ANTB input.
The color of the channel numbers
will change from blue to yellow to
let you know you are now watching
whatever signal is connected to the
ANT B jack on the back of the TV.
,for
Yellow for
2. Press the ANT button again to switch
back to ANTA. Thecolor of the
channel numbers will change back to
blue to let you know you are now
watching whatever signal source is
connected tOthe ANTA jack.
(without remote)
1. Repeatedly press MENU to select
SETUP MENU and then press +
or - to display setup functions.
Repeatedly press MENU to select
ANTENNA: A/B function.
2. Press the - or + buttonso change
the setting. The screen display
will change from A to B to let you
know you are now watching
whatever signal is connected to :
the AAr/' B jack on the back of the
TV. The color of the channel
numbers will ,change from blue to
yellow.
3. Press the - or + button again to
switch back to ANTA. The screen
display' will change back to
ANTENNA: A to let you know you
are now watching whatever signal
source is connected to the ANTA
w
jack on the back of the TV.
23
Page 26

TheVCR 1 CHAN function lets you
program to which channel the TV
will automatically tune when you
press the VCR button on the remote.
This is handyif you connect a VCR
to ),our TV. You will no longer have
to remember to which input jacks the
VCR is connected because the TV
will remember for you.
For example, if you connect a VCR's
AUDIO/VIDEO OUT jacks to the
TV's INPUT 1 jacks (as shown on
page 35), you will no longer have to'
remember to select channel 91 on the
TV to see what the VCR is playing.
By entering channel 91 next to the
VCR 1 CH-AN function, the TV will
automatically tune to channel 91
each time you press the VCR button
on the remote.
This function is especially
convenient if you havea compatible
VCR that can be operated by the
VCR button on the remote. Pressing
VCR will then not only turn on the
VCR but also automatically tune the
TV to the proper channel for viewing
the picture from the VCR. You can
program most brands of remote-
co:atrollable VCRs to respond to the
VCR button as described on page 38.
Tile VCR 2 CHAN function works
the same way.. It lets you program to
which channel the TV will
automatically tune when you press
the VCR2 button on the remote. You
can program most brands of remote-
controllable VCRs to respond to the
VCR2 button as described on
page 38. Pressing the VCR2 button
will then not only turn on the VCR
but also automatically tune the TV to
the proper channel for viewing the
picture from the VCR.
Note: Pressingthe VCR or VCR2 button does
not change betweenANTA and ANTB
amenna inputs as explainedon page 18.
Press the ANTENNA button on the remote
control to change antenna inputs if necessary.
-Setting Up VCR Channels (with or without remote) •
1° Repeatedly press MENU toselect 4. If you have another VCR connected
SETUP MENU, and then press + or - to the TV, press MENU to select the
to display the setup functions. VCR 2 CHAN function.
Repeatedly press MENU to select the
VCR 1 CHAN function.
2. Enter the channel number you want to
program by pressing two digit buttons
on the remote control. (The channel
number you enter is the channel to
which the TV will tune automatically
when you later pressthe VCR button
on the remote.)
. Enter the'channel number you want
to program by pressing two digit
buttons on the remote control. (This
is the channel number to which the
TV will tune automatically when you
later press the VCR2 button on the
remote.) See the notes below if you
are unsure about which channel
number to enter.
3. Press the + button to program the
channel number you selected into the
TV's memory.
6. Press the + button to program the
channel number you selected into the
VCR 2 CHAN function memory.
Note: Pressing the - button here will turn
off this feature and display
VCR 1 CHAN: OFF again.
Note: Pressing the - button here will
turn off this feature and display
VCR 2 CHAN: OFF again.
Notes about Entering Channel Number: ,
• Enter channel 91 if VCR is connected to the TV's audio and video INPUT 1 jacks.
• Enter channel 92 if VCR is connected to the TV's audio and video INPUT2 jacks.
• Enter channel 90 if you have a Super-VHS VCR that is connected to the TV's
-. S-VIDEO connector and INPUT 1 audio jacks (labeled L and R/MONO).
Enter channel 03 (or 04) if you did not use any audio/video cables and connected the
VCR to the TV's round antenna jack labeled ANTA or ANT B. Enter the same
channel number (03 or 04) as the position of the VCR's CH3/CH4 switch.. This is
the channel to which you must tune your TV for viewing signals from your VCR.
• Refer to pages 35-36 if you want to review details about connecting your VCR to
your TV.
Page 27

The CABLE CHAN function lets you
program to which channel the TV
will[ automatically tune when you
press the CABLE button on the
remote._ This is handy if you have to
connect a cableb0.xto your TV. You
wiII no-16nger have to remember the
output channel of the cable box
because the TVwill remember for
you.
For example, if you connect- a cable
box to the TV's CABLE/ANTENNA
cormector(as shown on page 31 or
33), you will no longer have to
remember to select channel 2, 3, or 4
on the TV to see what's coming from
the cable box. By entering the cable
box's Output channel (usually 02, 03,
or 134)next to the CABLE CHAN
function, the TV Will automatically,
tune to that channeleach time you
pre.ss the CABLE button on the
reraote.
This function is especially convenient
if you have a remote-controllable
cable box that can be operated by the
CABLE button on the remote (as
described on page 33). Pressing the
CABLE button will then not only
switch the remote to cable mode but
will also automatically tune the TV to
the proper channel for viewing the
picture from the cable box.
Note: Pressing the CABLE button does not
ch_alg.ebetween ANTA and ANT B antenn_a
inputs as explained on page 18. Press the
ANTbutton on the remote control to change
antenna inputs if necessary.
7Sgtting Up Cable Box Channel (with or without remote)
1. Repeatedly press MENU to select the
SETUP MENU, and tben press + or -
to display the setup functions.
Repeatedly press MENU to Select the
CABLE CHAN function.
3. Press the + button to program the
channel number you selected into
the CABLE CHAN function memory.
Note: Pressing the - button here will
turn off this feature and display
CABLE CHAN: OFF again.
° Enterthe channel number you want to
program by pressing two digit buttons
• on the remote coiatrol. (The channel
number you enter isthe channel to
which the TV will tune automatically
when you later press the CABLE
button on the remote.) The TV will
change to the channel you select.
This will help•you to Confirm that it is
indeed the channel you want the TV
to automatically tune. Most cable
boxes output their signals Oneither
channel 02, 03, or 04.
•25
Page 28

After you connect another video source (like a VCR) to your
TV, you'll be able to display two different programs on the TV •
at the same time. ,
Two Football Games
Surveillance System
Starting Picture-in-Picture (P!P)
1, Connect another video source (such as a VCR or
camcorder) to INPUT 1 orINPUT2 on your TV (as shown
on pages-35-36).
2. Turn on the TV and select a channel.
3. Press the PIP button on the remote. A little picture will
appear on the screen. The httle.picture and the big picture
will be the same.
Note: The remote must be
in the 'q'V mode" when you
press the PIP button... To put
remote in "TV mode", press
the TV button.
4. To get a picture from the other source (VCR, camcorder,
etc.), first turn on the other source, and then select TV
channel 90, 91, or 92(explained at top of next column).
Thepicture from the other source will appear in the little
picture.
• If the other source is connected to the TV's INPUT 1 "
jacks, select TV channel 91 to see the signal. If you have
programmed the VCR (or VCR2) button to automatically
select channel 91 as described on page 22, press VCR (or
VCR2)_
• Select channel 92 if the other source is connected to the
TV's INPUT 2 jacks. If you have programmed the VCR
(or VCR2) button to automatically select channel 92 as
described on page 22, press VCR (or VCR2).
• Select channel 90 if the other source is connected to the
TV's S-VIDEO connector. (Remember to also connect
the regular video cable to the VIDEO INPUT 1 jack $or-
picture-in-pi_tureviewing.) The TV automatically
minimizes any annoying differences in tint between the
small and large picture by electronically coupling the
S-VIDEO input to the INPUT 1 input. If you have
programmed the VCR (or VCR2) button to automatically
select channel 90 as described on page 22, press VCR (or
VCR2)_
Changing Channels (PIP)
To change channels on the picture from the TV, press the TV
bfitton on the remote, and then press either the CHAN up
or down button ortwo numberbuttons.
from TV
To change channels on the picture coming from the VCR,
press the VCR or VCR2 button (if you've programmed one of
these buttons to control the VCR as described on page 36) and
then press either the CHAN up or down button, or two number
buttons. You can also change the VCR's picture by pressing
the CH (Channel) buttons on the front of the VCR.
Picture from TV
- Picture from VCR
from VCR r
Additional Features (PIP)
Whenever the picture-in-picture feature is activated, the small
picture can be moved, frozen, orswitched withthe main
picture as desired. Details are on the next page.
26
Page 29

Whenever you have the picture:in-picture
(PIP) feature activated as described on the
prev_Louspage, you can move, freeze, or
switch the big and little pictures as+des_ed.
o
.. . , ,
PIP Button
Move PIP Button--
+
p Button
Bu_on
+,
+
+
• -+ +
MOVEPIP,
FREEZE
PIP
+
+
+ •' •
m
Press and release MOVE PIP to move the
small picture to the next corner.
Press SWAP to switch the small picture with
the main picture.
Press FREEZE to freeze the small picture.
Press FREEZE again to return to an action
picture.
Pressing the PIP button will cancel PIP and -+
remove the little picture from the screen.
• + •
27
Page 30

Compatible Components
A wide variety of compatible RCA Video Cassette Recorders
(VCRs), camcorders, and audio components are available.
Check with your RCA dealer for details.
Other brands of components can also be connected to your TV.
Refer to the component's owner's manual for the
manufacturer's recommended hookup instructions.
Stacking Arrangements
If you areconnecting several components and plan to use a
component rack, follow these general rules when arranging your
components, i_
• If the components are arranged horizontally, allow/at least an
inch or two of space between them so air canc_(?ulate freely.
This x_illalso provide some space between the ¢_udiodevices
to nainimize interference.
/
• If components are arranged vertically on she_ves, place the
Stereo Amplifier at the top so that heated aid/rising from it will
not pass around the other components.
• Do not block the ventilation holes in the components. If
components are placed on rugs or deep-pile mats, the
ventilation holes in the bottoms may be blocked and
overheating could result.
• Some VCRs may cause interference in TVs. When placing a
VCR under your TV, try to keep at least 18 inches between the
bottom of the TV and the top Ofthe VCR. If interference is
pre,;ent when the VCR is used on top of theTV or at the
18-inch distance below the set, move the VCR beside the TV.
If moving the VCR does not solve the interference problem,
try plugging the VCR into a different wall socket.
Plugging in Power Cords
Do not plug any power cord into awall outlet until you are
finished making connections.
Many components have "convenience outlets" on their back
pane:is so you can plug power cords from other components into
a "convenience outlet" instead of a wall outlet. Usually these
outlets will be labeled either "switched" or "unswitched".
•If the outlet is labeled "switched", that means power to the
outlet will be switched off when the component's power button
is switched off.
• If the outlet is labeled 'hanswitched",that means power will
always be available at that outlet, even when the component is
turned off.
Depending on the size of your system, 3,oumay prefer to use an
exter sion cord or a "multiple adapter" to get enough outlets for
all your components. -
The power cords on your RCA components are "polarized" (one
blade is wider than the other). Be sure the extension cord or
multiple adapter is also polarized: The plug should fit in the
outlet only one way.
Turning Off Power Before Connecting Components
Always turn off power to all components before you connect or
disconnect any cables. This will protect your components from
possible electrical surges that could damage your equipment.
This is a good practice for all your audio and video
components-TVs, VCRs, audio systems, computers, etc.
Positioning Cables to Avoid Hum
The possibility of picking up hum (interference noise) in the-
audio/video cables will be reduced if you keep them away from
the back of the TV. Route the cables to the sides of the TV's
back panel instead of straight down the middle.
All cable plugs should be firmly seated' in the jacks where they
connect to the equipment. If a plug is not connected firmly,
audio hum or smeared video may result.
If your antenna cable is flat twin-lead cable, try to keep it away
•from the audio/video cables as much as possible. Excess fiat,
twin-lead cable should be cut off instead of coiled behind the
TV. Round, coaxial, antenna cable is usually shielded and can
be coiled or placed next to audio/video cables without causing
interference.
Positioning Speakers to Avoid Interference
Placing external speakers with unshielded magnets too close to
the TV may result in the speaker magnets affecting the quality
of the picture. Such speakers should be located at least eight
inches away.
If unshielded spea_kersare too close to the'TV, colored streaks
will appear along the sides of the picture. If this happens, turn
off the TV for several minutes while moving the speakers
farther away. Then turnthe TV back on.
28
Page 31

@
I
CAUTION
TO AVOID DAMAGE:
1. DO NOT CONNECT
SPEAKER_DUTPUT
TO A SEPARATE
AMPUFIER OR
TO SPEAKERS
CONNECTED TO
ANOTHER
PROOUCT.
2. DO NOT CONNECT
LEFT AND RIGHT I
SPEAKER OUTPUTS
TOGETHER.
CAISILE/ANTENNA
_) CABLE/ANTENNA Connectors-used when attaching a
home antenna and/or acable-TV system to your TV.
Connection details are on pages 31-32.
_) EXTERNAL SPEAKERS Terminal_permit direct
connection of auxiliary speakers. Connection details are
on pages 43. •
_) SPEAKER Switch-when you connect additional speakers
to the EXTERNAL SPEAKERS terminals on the TV, this
switch lets you optimize the sound for the speaker location
you choose.
• If you place the speakers on each side of the TV, put
switch in EXT position. Theinternal audio from the TV's
speakers will be muted.
• If you place the speakers behind the viewer (at the back
of the room), put switch in INT/EXT SURR position.
This maintains normal volume of the TV's internal
speakers and a surround signal to rear speakers.
• Details about connecting speakers to the TV are on
pages 43.
IMPORTANT: Always place switch in INT/EXT SURR
position if no external speakers are used (or if external
speakers are ever disconnected).
@ @ SELECT OUT Jacks-provide fixed-level audio-and
video output from whatever is displayed on the TV
screen (except signal from S-VIDEO connector). Provide
audio and video signals suitable for recording.
Can be used for several applicati0ns such as:
• • VCR editing with two or three VCR's (page 36).
• recording TV programs onto a camcorder (page 39).
• recording cable-TV programs onto a VCR that is not
cable-ready (page 36).
• recording audio onto an audio _assette tape recorder
(page 41).
Notes:
-•Remember that the signalcoming _)utof these jacks is
whatever you see(and/or hear) on the TV screen. So,
whatever you wantto record mustbe displayed on the TV
screen duringrecording. Menus, status displays, and special
effects suchas picture-in-picture and channel guidewill not
appear in the recording.
• Video signals fromS-VIDEO connector can not be recorded
from the SELECT OUT`VIDEOjack. To record from an
S-VHS component connected to the S-VIDEO connector,you
must also connect the video cable to the VIDEO INPUT`1jack
and then select channel 91 on the TV screen.
iNPUT 2 Jacks-provide for direct connection of video
devices 0ike VCR's) or compatible home computers and
TV games with audio/video outputs. To see the signals
from a device that is connected to the INPUT2 jacks,
tune your TV to channel 92.
t PVr I Jacks-provide for direct connection of video
devices (like VCR's) or compatible home computers and
TV games with video/audio outputs. To see the signals
from a device that is connected to the INPUT 1 jacks,
tune your TV to channel 91.
Q S-VIDEO Connector-provides for direct S-VHS video
connection from S-VHS VCR or camcorder.
Remember to also connect the S-VHS VCR's or
camcorder's audio jack(s) to the TV's INPUT1 LEFT
and/or R/MONO audio jacks. This is necessary because
S-Video cables only carry the super video (picture), not
the audio signal. Connection details are on pages 36
and 39.
Signals from S-VHS devices connected to the TV's
S-VIDEO conn_tor and INPUT 1 audio jack(s) can be.
viewed by pressing the TV button followed by 9 then 0
on the remote Control(or by scanning to TV channel 90
if you have added "90" to channel memory as described
on page 22).
Note: Remember tOconnect the S-VHS component's reguiar
video cable to the VIDEO INPUT 1jack. Tune to channel 91 if-
using SELECT OUTjack.
Q HI F1 OUT Jacks-feed volume-controlled Stereo audio
out from whatever is displayed on the TV screen. Allow
connection of audio amplifier and let you adjust sound
level with TV's remote. Connection details are on page 41.
29 :
Page 32

Follow one of the steps below to connect an indoor or outdoor antenna to your TV (only if you do not have.a
cable-TV system). You canconnectthe antenna to eitherANTA orANT B as explained on page 23.
A
If the antenna cable coming from your home antenna is a 75-ohm round coaxial cable that carries only VI-IF (channels 2-13),
only UHF (channels 14-69), orVHF and UHF channels, connect it to your set like this:
Incoming
Cable
From
Home
Antenna
VHF or UHF Only
or
VHF/UHF Combination
CAB_NNA
ANTA
Am"e BACK
OFW
CONVERTER
B
C
D
--OR-
If the antenna cable coming from your home antenna is a 300-ohm flat twin lead that carries only VHF (channels 2-13),
only UHF (channels 14-69), or VHF and UHF channels, connect it to your set like this: CAB_ANrmNA
Incoming
Cable _:_.
From _
Home _"
Antenna VHF or UHF Only
or
VHF/UHF Combination
Antenna Adap_ I
(such as RCA #193983)
_ t Push on
ANT A
.@
BACK
ANTB
(_ OFTV'
-OR-
If the antertha cables coming from your home antenna(s) are a 75-ohm round coaxial cable that carries VHF (channels 2-13)
and a 300-ohm flat twin-lead cable for UHF (channels 14-69), connect them to your set like this:
Incoming UHF
Cables
From _ and
Home
Antenna(s) VHF
• ,ntenn.oc,,10,0Sl,
--OR-
CABI.EIANTENNA
ANTA
--_ BACK
OF'IV
_B
CONVERTER
If the antenna wires coming from your home antenna(s) are two 300-ohm flat twin-lead cables as shown here, conneci them
to your set like this:
Incoming UHF
Cables
From _ and
Home
Antenna(s) VHF
(_:L_--::::::::::__ ' AntennaMlxer,
__ (such as RCA #193984)
Note: Be sureto connecttheUHF antenna cableto the'UHF screws on the Antenna
Mixer and _e VHF antenna cable to the screws marked VHF.
CABLE/ANTENNA
ANTA
ANT B
@
CONVERTER
BACK
OF'rV
30
* Optional accessoriesareavailablefrom most dealers or electronics supply stores.
Page 33

Followone of these steps to connect a cable-TV system to your TV instead ofa home antenna.
Since cable-'lT systems vary, you may wish to consult your local cable-TV company for additional information.
You can connect the cable-TV system to either ANT A or ANT B as explained on page 23.
A Follow this diagram if your cable company does not require a converter/decoder box (no scrambled channels):
CABL_TENNA
Incoming
Cable
ANTA
ANTB
BACK
OF TV
B
Follow this diagram if your cable company requires a converter/decoder box that can be controlled by remote control.
Most brands of remote-controllable boxes can be controlled by the remote that came packed with your TV.
Details for programming your TV's remote to also control the converter/decoder box are on page 33.
See diagram D if you want to connect a VCR.
Incoming ._ I_
Cable
OUT
CONVERTER/DECODER BOX
Remember to tune your TV to the
output channel of the converter box
(usually 2, 3, or 4) when selecting
channels via the converter box_
CABLE/ANTENNA
ANTA
._(_) .
_n'B
CONVERTER
BACK
OF TV
C
Follow this diagram if your cable company requires a converter/decoder box that cannot be controlled by remote control.
Scrambled Cable-TV Channels
Some cable-TV decoders require that you manually switch
from regular to scrambled channels on the decoder
whenever you wish to view the premium pay channels.
By connecting the decoder to the ANTA input and
CONVERTER output on the TV as shown here, you can
switch between the scrambled and unscrambled channels
using the remote control.
To change the incoming signal from ANTA toANTB,
simply press the ANT (Antenna) button on the remote. Each
time you press the ANT button, the channel numbers will
change color on the screen to show which antenna signal
you are watching.
* Optional accessories are available from most RCA dealers and
electronics supply stores.
Incoming
Cable
"l_ -o
(Converter/Decoder)
BACK
OFTV
CABLE/ANTENNA
ANTA I
(_)--- .
CoaxialAntennaCables*
Nonscrambledcable channels will come thru the ANTB input
whenever the channel numbers are yellow. The scrambled
channel from the decoder box will come thru the ANTA input
whenever the Channel numbers are blue. Be sure to leave the
decoder box set to the scrambled channel, and remember to
tune your TV to the output channel of the converter box
(usually 2, 3, or 4). 31
Page 34

D Followdaisdiagramifyourcablecompanyrequiresaconverter/decoderboxforpremiumchannelsandyoualsowantto
connectaVCR.
Incoming
Cable 9
2-way Signal Splitter*
(such as AH047)
Coaxial Antenna Cables*
.(such as AH0370r AH065G)
CONVERTER_)ECODER BOX
Remember to tune the
VCR to the ouzputchannel
of the converter box
(usually 2, 3, or 4).
OUT
TO
"p/
BACK OFVCR
CABLEIAHTENNA
rl
CONVERTER _
BACK
OF TV
Remember to tune the TV to
the output channel ofthe VCR
(usually 3 or 4)--the same
channel as the position of the
VCR's CH3/CH4 switch.
Most cable companies that require use of a converter/decoder box
only require the box for Scrambled premium channels like HBO or
Showtime. All the other cable-TV channels can usually be viewed
without the converter box. Therefore, by using a signal splitter, you
can send the incoming cable-TV signals directly to the TV and also
thin the converter/decoder box and VCR as shown above.
You can easily switch between the signals coming into the ANTA
jack and the ANT B jack by pressing the ANT button on the remote
control. The channel numbers will change color to let you know
whiich antenna signal you are watching. When the numbers are
blue, you are seeing the ANTA signals. When the numbers are
yel]Low,you are seeing the ANT Bsignals.
The cable-TV channels that are not scrambled can then be seen
whomever the TV is receiving the ANTA signals. The cable-TV
channels that are scrambled canthen be seen thru the converter box
and then thru the VCR whenever the TV is receiving the ANTB
signals. Most VCR's will feed the signal thru their antenna jacks
even when the VCR is turned off. This allows you to watch
scrambled channels from the converter box without havingto turn
on the VCR.
This connection can be useful because it will let you record a
scr_mabledchannel on the VCR at the same time you are watching a
non-scrambled channel thru the ANTA jack on the TV.
For picture-in-picture viewing,, be sure tOalso connect the audio and
video cables from the VCR to the TV as shown on pages 35-36.
The VCR must be turned on and tuned to the output chanfiel of the
cablle box (usually 2, 3, or 4) for picture-in-picture:viewing.
Note: If you have a stereo VCR. be sure to also connect the
AUDIO and VIDEO OUT jacks on the VCR to the AUDIO and
VIDEO IN jacks on the TV as shown on page 35. These additional
audio/video connections are required for picture-in:picture.
operation and for stereo playback from the VCR. To see the
signals from the VCR th_itare going into the INpUT jacks, select
TV channel 91 if you connected the VCR to the INPUT 1 jacks or
select channel 92 if you connected the VCR to the INPUT 2 jacks:
Select TV channel 90 if you have an S-VHS VCR connected to the
TV 's S-VIDEO connector.
*OFtional accessories are availablefrom most RCA dealers and
electronics supply stores.
32
Page 35

If your cable box has its own remote
to change channels, you will
probably be ableto program the TV's
remote to Control both the TV and
the (:able box.
The TV's remote is designed to
control several brands of cable
boxes. TO program the remote, just
hold down CABLE while entering the
two.-digit code number for your
brand of cable box. Refer to the
chm_ below to find the code number
for your cable box. Press the
POWER button next to confirm
ope_Fation.
You may need to try each of the code
numbers listed for your brand'until
you find the one that works.
t
After the TWs remote is
programmed, you'll be able to turn
on the cable box by pressing CABLE,
then POWER. You can change
channels on the Cable box by
pressing the CHAN buttons whenever
the remote is in the "cable" mode.
To put the remote in the "cable"
mode, press the CABLE button.
Press the TV button to put the remote
back into the TV mode so the remote
but_Lonswill control theTV again.
Programming Remote To Control Cable Box
-(with remote only)
1. Refer to the chart below to find the
code number that corresponds to the
brand name of your cable box. Keep
this number in mind. If more than
one number is listed, you may need
to try each one separately until you
find the one that works.
1. Hold down CABLE button on
remote.
3. Press two number buttons (firstone,
then the other) to enter the code
number for your brand of cable box
5. Point the remote at the cable box and
press the POWER button to turn it "
on. If nothing happens, try pressing
the CABLE button and then the
POWER button.
• If the right number was entered, the
cable box should turn on. Pressing
the CHAN buttons should then
also change channels on the cable
box.
• If the cable box does not react to
the remote (or if the remote turns
on the cable box but does not
change channels), repeat steps 1
thru 5 with another code number.
4. Release CABLE button.
Operating Notes:
• After the remote is programmed, it will
turn on the cable box whenever you press
CABLE and then POWER.
• To turn off the cable box, press CABLE,
then POWER.
• To change channels on the cable box,
press CABLE then CHAN up or down.
• You may have to reprograrn the remote
control if you change its batteries. Try
not to press any buttons while changing
batteries.
/
ABC ....... ........................ :...: .......... ...... 22,46
Anvision ..._......... :,.:............................. 07,08
Cablestar,...:.: ............ ,:...,.., ................. 07,08
Eagle. ........................................................ 08
Eastern International ................... ....... :.....02
General/nstrumenL ........... ............. .............. "
04,05,15,23,24,25,30,36,46
Hamlin ............................... ;...i...'12,13,34,48
Hitachi .............................. :............. 37,43,46
Jerrold...: ..................................................... :.
04,05,15,23,24,25,30,36,45,46,47 " •
Macom..;_ .............. .:.........:..:................ 37,43
/vlagnavox ......... ;.,:........... ....... ....... :.:.:......;..;
07,08; 19,21',26,28,29,32,33,40,41
l_SC ..... ,....,:, ......... ,....._....... :......, ....... ....,0_
Oak .2 .......................... :. ......... ; .......... 01,16,38
Oak Sigma ....................... :.......................... 16
Panasonic .......... .:...... :....................... 03,27,39
Philips ...................................................... ...:...
07,08,19,21,26,28,29,32,33,40,41
Pioneer ....... , ........................... .....2... 18,20144
Randtek .......... ......... :............. .......... ....... 07,08
RCA ....................................................... 00,27
Regal ...................................................... 12,13
:Regency ...... ..:... ....... _............. ........ ,_...... 02,33
Samsung ........... . ................................... .....44
Scientific Atlanta ............ ............... _.03,22,35
Signature...,.: .......................... :...,................ 46
Sprucer..,.., i....... ,.............................. =...,....27
Stareom ......... :;............................................ 46
Sylvania .............................................. ........ 11
Teknika ....................................................... 06
Texscan .................................................. 10,11
Tocom ............................ :............. 17,21,49,50
Unika .................. =..,....... ......... :........ 31,32,41
Viewstar ..........................................................
07,08,19,21,26,28,29,32,33,40,41
Warner Amex .......... ........... :'....................... A4
Zenith ............................................. ........ 14,42
33
Page 36

"Yournew TV is designed to receive up
to 1_1 channels in the U.S.A. including
125 non-scrambled cable channels (see
chal_ below). To use this TV on a cable-"
TV system, confirm that the cable-TV
system is properly connected to your TV.
Since cable systems vary, you may wish
to consult your local cable-TV company
for additional information.
If yourcable-TV company follows
EIA/NCTA channel-identification
standards, most of the channels offered
by ),our cable company will be identified
by channel numbers that are identical to
those on your TV. For example, if your
cable-TV system has programs on cable
chmme120, you can choose this channel
by selecting channel 20 on your TV.
If your cable company offers cable
channels 90, 91, or 92 you can tune them
by selecting theTV channels shown
below.
Some cable-TV companies do not follow
the EIA/NCTA' standards and instead
assign their own channel identification.
For example, some use the standard
broadcast channel numbers (2-! 3) for
channels 2-13, but identify their other
channels with letters. If your cable
company does not follow the EIA/NCTA
standards, ask them for a cross reference
that shows to which channels you should
tune your TV to receive their cable-TV
channels.
Not all cable-TV channels will be active
on your particular cable-TV system.
Also some cable companies may require
the use of a decoder with their cable-TV
system. Consult your cable company or
local dealer for details.
Scrambled Cable-TV Channels
Some cable companies offer "premium-
pay" channels,in which the signal is
scrambled. Descrambling these signals
for norm.al viewing requires.the use of a
descrambler device (cable box) which is
generally provided by the cable
company.
How you connect the cable box to your
TV depends upon whe.ther or not the
cable box can be controlled by remote
control. The TV's remote can also
control most brands of cable boxes, so if
your cable box is remote controllable,
you may want to connect it as shown in
Diagram B on page 31 or Diagram D on
page 32. Instructions for programming
the TV's remote to control the cable box
are on page 33.
If your cable box cannot be controlled by
remote control, you will still be able to
remotely contro!''unscrambled'"
channels with the connection shown in
Diagram C on page 31 or Diagram D on
page 33.
Since cable systems vary, you may wish
to consult your local cable company for
additional information.
90 126"
91 127"
92" 128"
* To tune cable channels100 through
12[I,press and hold number button 1
until 1-- appearson the screen.Then
enterthe other twonumbers.
4" i
The chart below lists the "'total" channel and cable count.
• Low VHF A-8 (Channel 01)
• VHF (Channels 2-13)**
• UHF (Channels 14-69)
• Low Midband A-5 thru A-1 (Channels 95-99) •**
• Midband (Channels 14-22 or A-l)
• Superband (Channels 23-36 or J-W)
• Hyperband (Channels 37-64 or W+I to W+28)
• Ultraband (Channels 65-94 and 100-125 or
t "
W+29 to W+84)
Total **
m
1.2**
56
68
1
12"*
***
9
14'_
28
56
125
;ls'2-13On
** VHF is only countedonce in total channel count because you can receive chann,
both "off-air" and "cable" channels. Therefore the total channel count for "off-air" and
"cable" is 181channels (68+125-12=18I).
*** Channels 95, 96, and 97 are notapphcable in Canada. Therefore the total number of
channelsfor Canada is 178 (68+122-12=178). .
Page 37

Standard VHS VCR (Not S-VHS)
(These connections allow you to record TV programs and play back tapes.)
Preferred Method
(for areas with good reception)
/
/-
/-
/
Incoming iJ_-l_ /
Oab,e
CoaxialAntennaCables**
(such as RCA#AH065G)
** These optional accessories
(one AH047-2-way splitter, two
AH065G-antenna cables, and one
AH077G-audio/video cable) are
available as akit under #AVH500.
2-WaySignalSplitter**
J (suchas RCA#AH047)
Back of VCR
Back of TV
AUmO
@=@
HI-FI OUT SELECT OUT
Shown here is the preferred method of connecting a VCR to
your TV. This method uses a 2-way signal splitter to run
sepexate signals to the VCR and TV. This way you can view
either TV programs or VCR tapes and not be concerned about
the position of the VCR's TV/VCR switch. If your cable
company requires a decoder box for premium channels, refer to
page 32.
Note: When connected this way, the audio/videoconnections from the
VCR to the TV are required forpicture-in-picture viewing and for you
to watch tapes being played by the VCR.
OPeration:
• If the VCR is connected to INPUT 1jacks as shown, select
channel 91 on the TV to view whatever the VCR is playing.
• If you connect a second audio/video device to INPUT 2; select
channel 92 on the TV to view whatever the second device is
playing.
Note: YoucanprogramyourTVto automaticallyselecttheproper VCR
inputchannel (91or 92)when you press the VCR1 or VCR2button.
Detailsare onpage 24.
Simplified Method
Back of TV
AUDIO
@=-@
HI-FI OUT SELECT OUT
Incoming
Cable
Back of VCR
CoaxialAntennaCable*
(suchas RCA #AH037)
Shown here is a simplified method of Connecting a VCR to your
TV If your cable company requires a decoder box for premium
channels, refer to page 32.
Note: The audio/video connections from the VCR to the TV are
required for picture-in-picture viewing and for stereo playback from
stereo VCR's.
*Optionalaccessories are av;iilablefrom mostRCA dealersand
electronics supply stores.
Operation:
• If the VCR is connected to INPUT 1 jacks as shown, select
channel 91 on the TV to view whatever the VCRis playing.
• If you connect a second audio/video device to INPUT2, select
channel 92 on the TV'to view whatevei the second device is
playing.- , :
Note: YOucanprogramyourTV to automaticallyselect the proper VCR
inputchannel(91 Or92)when you pressthe VCR1or VCR2button. .
Detailsare onpage 34.
r
35
Page 38

Special Recording onto VCR
(This connection only allows you to record on the VCR whatever is currently being displayed
on Ihe TV screen.)
This is not a common application for recording
with your VCR, but you may find it useful in
certain situations. This connection will let you
record onto the VCR whatever is being displayed
on the TV screen such as a TV program. You'll
also be able to:record signals from another VCR
(or similar device) that is connected to the TV's
INPUT 1 or 2 jacks.
The TV must remain turned on during recording.
If you changechannels on the TV, the channel
change will be recorded on the VCR tape unless
you pause the VCR during recording.
Because your TV is Cable-compatible, this
application may be used to record cable-TV ..
programs from the TV onto a VCR that' is not cable-
compatible.
Yott may also want to use this connection to dub or edit VCR
tapes with two or three VCRs. By connecting one VCR (or
carncorder) to the INPUT 1 jacks and another VCR (or
carncorder) to the INPUT 2 jacks, you!ll be'able to selectively
edit and record whatever is playing on the TV screen on to a
third VCR (or camcorder) connected as shown here to the
SELECT OUT jacks.
If you connect a surveillance system to your monitor, you'll be
able to record what the camera is displaying on the TV screen
by connecting a VCR (or camcorder) to the SELECT OUT jacks
as shown here.
Back of VCR
Back of TV
AudioNideo Cables*
(such as RCA #AH069G)
Audio-
Just remember that you'll be able to record whatever is being
displayed on the TV screen. To see the signal from a device
connected to the INPUT 1 jacks, select channel 91. Select
channel 92 to see the signal from a device connected to the
INPUT 2 jacks.
Notes: Signals from the S-VIDEO connectordonot come thruthe
SELECT,OUTjacks. Torecord from an S-VHScomponent, remember
to also connect theregular video cable to the VIDEOINPUT 1jack
and then tuneto channel 91.
Menus, status displays, and Sl_ecialeffects like picture-in-picture and
channel guide will not appear in the recording.
S-VHS (Super VHS) VCR
(This connection allows you to record
TV programs and play back tapes.)
Incoming
Cable
Back of VCR
S-VHSCable(suchasRCA#VAA020)*
J
J
Audio/VideoCables*-
(suchasRCA CoaxialAntennaCable*
#AH069G) (suchasRCA#AH037)
_l m mmmmmmmamm_ _1_ ....
SI_own here is the preferred method of connecting your S-VHS
VCR to your TV. If your cable company requires a decoder
box for premium channels, refer to page 32.
Connect the S-VIDEO OUT connector on the back of the VCR
to the S-VIDEO connector on the back of your TV iasing an
S-VHS cable. Remember to connect the audio cables from the
VCR to the INPUT 1 LEFT and R/MONO jacks bn the back of
the TV. The S-VHS cable carries only video.
Ne,te: Remember to connect the video cable to VIDEO I_PUT 1.
* Optional accessories are available frommost RCA dealersand
electronics supply stores..
36
Whenrecording from SELECT oUT jacks, tune the TV to channel91
to seethe signalfrom the S-VHS VC1L When displayingl_icture-in-
picture, the TV automaticallyminimizes any annoyingdifferences in
tint between the small andlarge picture by electronicallycoupling the
S-VIDEOinput to the VIDEO1 input.
Operation:
• Kthe S-VHS VCR is connected as shown above, tune the TV
to channel 90to view whatever the VCR is playing. The word
S-VIDEO will appearon the TV When you select Channel 90.
• You can program your TV to automatically select channel 90
when you press the VCR1 or VCR2 button. Details are on
page 24.
Page 39

The digital remote control that came packed with your TV
conW)ls your TV and up to two compatible RCA VCRs.
To control a compatible RCA VCR, first press the VCR or
VCR2 button to put the remote in the "VCR mode". The
butto:as shown below will then control the VCR.
Selected models ofRCA VCRs have a switch that lets you
detera-tine which VCR will be controlled by the VCR button,
and which VCR by the VCR2 button. Other models have an
PO_R Button
Press to turn off VCR.
REW (Rewind) Button
• Pre:_s while yCR is stopped to
rewind tape.
• Pre:_s while VCR is playing to
seaJch backward, .'
REC (Record) Button
Pres,; to record.
DISPLAY Button
Press to bring VCR's displays to TV
screen.
Number Buttons
• Press two numbers to select
channel.
• Press a "0" before a single-digit
channel number.
CLEAR Button
Used when setting the VCR's
clock and programming its timer.
"/
Notes:
•The; six VCR buttons grouped together
(PLAY,PAUSE, STOP, REW,,FF,,and REG")
control the VCR even ffthe remote is in
the "TV Mode".
The ANT; PROG, CLEAR, and DISPLAY
buttons are for RCA VCRs only.
on-screen menu that lets you determine if it will be controlled
by VCR or VCR2. Additional information about controlling
two RCA VCRs is in the note on the next page.
!f you have another brand of VCR, you can probably also
program your remote to control it. Details are on the next
page.
VCR2 Buttons
• Press to turn on VCR and put
remote in "VCR Mode" so other
buttons will control the VCR.
• Press the TV button to put remote
back into '_V Mode".
Press to start tape playing.
(Fast Forward) Button
• Press while VCR is stopped to
fast forward tape.
• Press while VCR'is playing to
search forward.
Button
• Press to pause play or record
mode.
Press to stop whatever VCR is doing:
Haying, Recording, Rewinding, or
Fast Forwarding.
(Channel) Buttons
Press to select the next higher or lower
channel in VCR channel memory.
Button
Same as VCR or TV/VCR button on
front of VCR. Lets you record one
channel with VCR and watch another
channel on TV.
9G (Program) Button
Used when setting the clock and
programming the timer.
37
Page 40

The digital remote control/.hat came
packed with your TV controls your TV
and up to two compatible VCRs, including
most other brands.
To program the remote, just hold down
VCR (or VCR2), while entering the two-
digit Code number for your brand of VCR.
Note About Controlling Two VCRs
• This rem6te can control two VCRs
independently as long as each VCR operates
on a different remote transmitting code.
• Some newer VCRs are capable of working
on either of two remote codes. These VCRs
have either a switch labeled VCR1/VCR2 or
an qn-screen display tiffed REMOTE
VCR1/VCR2. You can then set your new
VCR to respond to the remote's VCR2
button and your older VCR to respond to the
VCR button.
• Some olde_ VCRs have a NO_WUNIFIED
switch that can also respond to either the
VCR or VCR2 button on the remote. Place
I_aisswitch in the UNIFIED position for the
VCR to respond to the VCR1 button or in the
NORM position for the VCR2 button. In the
NORM position, you must program the
VCR2 button to respond to code number 05.
•" If neither of your VCRs have switchable
code capabilities, you still may be able to
utsethe VCR1/VCR2 feature to control two
VCRs of the same brand, since many older
VCRs use remote codes that are different
from newer VCRs' codes. You may want to
experiment to See what works with your
[,articular VCRs.
-Programming Remote To Control Other Brands of VCRs
1. Refer to the chart below to find the
code number that corresponds td the
brand name of your VCR. Keep
, this number in mind. If more than
one number is listed, you may need
to try each one separately until you
find the one that works.
2, Pressthe VCR or VCR2 button on
remote (depending on which button
you want to program for that VCR).
You can program each button to
control a different VCR.
3. Hold down the VCR button.
4. Press two number buttons (first one,
then the other) to enter the code
number for your brand of VCR.
5. Release the VCR button.
6. Point the remote at the VCR and
press the POWER button to test the
code number. 'If nothing happens,
try pressing VCR or VCR2
(whichever buttonyou are
programming) and then the
POWER button.
• If the right number was entered,
the VCR should turn on."
• If the VCR does not react to the
remote, repeat steps ! thru 5 with
another code number.
Note: Some older VCRs do not have an
POWER switch on their remote controls
and cannot be turned Onand off
remotely. If you have this type of VCR,
you can test the code number by
pressing the CHAN button instead of the
- POWER button. Make sure the VCR is
already turned on when you test the code
number.
Operating Notes:
or VCR2.
• You'll be able to control the VCR
whenever the remote is in the "vcR
mode". To put the remote in the "VCR
mode", press the VCR or VCR2 button
(depending on which button you
programmed). The other VCR buttons
(such as PLAY, PAUSE, STOP REW,, FE
and REC) will control the VCR when the
remote is in the "VCR mode".
• To turn off the VCR, press VCR (or
VCR2), then POWER.
' To change channels on the VCR, press
VCR (or VCR2), then CHAN up or down.
• You may need to reprogram the remote
when you change the batteries. Try not to
press any buttons when changing
batteries.
Aiwa ......:................................................ 15
Akai ..:........................................... 03,22,23
Audio Dynamics ................................ 14,16
Broksonie ............................................... 10
C_aaon ..................................................... 08
C_Lpehart_................................................ 01
Citizen .................................................... 09
Craig ........................................ :......... 07,12
Cta'tis Mathes ............................... 00,08,15
Daewoo .................................................... 13
dbx ..................................................... 14,16
Dimensia ................................................. 00
Dynatech ................................................. 15
Eraerson .......... 09,10,13,15,20,23,24,34,41
Fisher ......... ......................... 02,12,18,19,43
Funai ............................................... _....... 15
GE ........................... ............ 00,07,08,32,37
Goldstar ............................................. 09,14
H;a'man Kardon ................. ..:.................. 14
Hitachi ..................................... 05,15,35,36
In.,;tant Replay ..................... r................... 08
JCL ......................................................... 08
JCPenney ..... ........ 02,05,07,08,14,16,30,35
JVC .......................................... 02,14,16,30
Kenwood ............................... _.02,14,16,30
Lloyd's .................................................... 15
Magnavox .......................................... 08,29
Marantz .......................... 02,08,14,16,29,30
Marta ..................................................... 09
MEI ................................... ;..................... 08
Memorex ....:............................ 08,09,12,15
MGA .................................................. 04,27
Minolta .............................................. 05,35
Mitsubishi_ ...................... ....04,05,27,35,40
Montgomery Ward ................................. 06
MTC .................................................. 07,15
Multitech ................................. 07,15,31,32
NEC ......................................... 02,14,16,30
Panasonic ................................................ 08
Pentax. ................... :........................... 05,35
Philco ................................................. 08,29
Philips ................. 5.......................... ,..08,29
Pioneer ....... ........_..._...................... 05,1.6,33
ProScan ............................... ;................... 00
Quartz ........... :......................................... 02
Quasar ..................................................... 08
RCA .......................... 00,05,07,08,28,35,37
Realistic ............... 02,06,08,09,12,15,19,43
Samsung ............................. 07,13,22,32,42
Sansui ..................................................... 16
Sanyo ................................................. 02,12
Scott .............................................. 04,13,41
Sears ..................... 02,05,09,12,18,19,35,43
Sharp ............................................. 06,24,39
Shintom ......................................... 17,2.6,31
Sony .............................................. 17,26,38
Sylvania ....................................... 08,15,29
Symphonic .......................... . .............. 02,15
Tashiko .................................................... 09
Tatung ......................................... ............ 30
Teac .................................................... 15,30
Technics ........................................... ....... 08
Teknika ..................................... 08,09,15,21
Toshiba .......................................... 05,13,19
Totevision ........................................... 07,09
Umtech ................. ................................... 07
Vector Research ................................. 14,16
Victor ................................ :................... ..16
Video Concepts ................. ................ .14,16
Videosonic. ............................................. 07
Wards ..........................................................
................... 05,06,07,08,12,13,15,25,31,35
Yamaha .......;........................... .02,14,16,30
Zenith ................................................. 11,17
38
Page 41

/
t
S-VHS or Standard VI-IS Camcorder
(This connection allows you tO play back tapes in the camcorder and watch them on the TV.)
AUOIO
S-VHSCable @"_ Backof TV
HI-FI Oulr _-CT _r
(sometimes a separate cable
thatattachesdirectlytocamcorder) @ L@
AVOUTJack _(_d _1_(_ _. _)
(AudioNideoOut) withCamcorder)
An S-VHS or standard camcorder can be connected directly to
yottr TV. If you have an S-VHS camcorder, connect the S-VHS
video cable to the S-VIDEO connector on your TV. If you have
a standard VHS camcorder, connect the video cable to the
VIDEO INPUT 1jack on the back of your TV. With either
video connection, attachthe audio cable to the INPUT 1
RAtIONO audio jack.
Nol_s:
Whenthe Adapter's S-VI-ISCable is connected tothe S-VIDEO
connector,the video plug does nothave to be connected. However,you
mayprefer to plug it in anywayto keep it out ofthe way.TheS-VHS
video willautomaticallyoverride the VIDEOINPUT1.signalwhenyou
sek,ctChannel90.
Be sure toconnect the videocable,however,ifyou plan to use the
cameorderfor picture-in-pictureviewingor ifyou plan to use the
SELECTOUTjacks forrecording. When recordingfromthe SELECT
OUTjacks, tune to channel 91to see the signal fromthe cameorder.
Whendisplaying picture-in-picture, the TV automatically minimizes
any annoyingdifferences in-tint between the smalland large picture by
electronicallycoupling the S-VIDEO inputto the VIDEO 1 input.
Operation:
• If the camcorder is connected to the VIDEO INPUT 1 jack
(instead of the S-VIDEO connector), select channel 91 on the
"IVto view whatever the camcorder is playing.
• If the camcorderis connected to the S-VIDEO connector and
INPUT1 audiojack, select channel 90 on the TV to view
whatever the camcorder is playing.
S-VItS or Standard .VHS Camcorder
(Tiffs connectionallows you to record onto the camcorder
whatever is currently being displayed on the TV screen.)
Back of "IV
Audio
Video
A V/N Jack
(Audio/Video In) --
Audio/Video Input Cable.
(usually Supplied with
camcorder)
This connection will let you record onto the camcorder
whatever is being displayed on the screen such as a TV
•program. You'll also be able to record signals from a VCR (or
si_ailar device) that is connected to the TV's INPUT 1 or 2
jacks.
The TV must remain turned on during recording. If you change
channels on the TV, the channel change will be recorded on the
ca_aacordertape unless you pause the camcorder during
recording. '
You may.also want to use this connection to dub or edit VCR
tapes with two or three camcorders (or VCRs). By connecting
one camcorder (or VCR) to the INPUT 1 jacks and another
canacorder (or VCR) to thelNPUT2jacks, you'll be able to
sel_ectivelyedit and record whatever is playing on the TV screen _
onto a third camcorder connected as shown here to the
SELECT OUT jacks.
If you connect a surveillance system to your monitor, you'll be
able to record what the camera is displaying on the TV screen
by connecting a camcorder (or VCR )to the SELECT OUT
jacks as shown here. .
Just remember that you'll be able to record whatever is being
displayed onthe "IV screen. To see the signal from a device
connected to the INPUT 1 jacks, select channel 91. Select
channel 92 to see the signal from a device connected to the
INPUT 2 jacks.
Notes: SignalsfromtheS-VIDEO connector donot come thin the
SELECT OUTjacks. Torecord from an S-VHS component, remember
to also connect itsregular video cable to the VIDEO INPUT I jack and
thentune the "IV to channel 91.
.... picture-in-pictureMenus,statusdisplays, and specialfeaturessuch as
will notappearinthe recording.
39
Page 42

Computers'and Other Equipment with Audio/Video Outputs "_
Back of TV
AUDIO
@:@
HI4_ OUT Sl_LEfflrOUT
@.@
If the INPUT/.jacks
already, have
another component
connected to them,
you can connect the
computer to the
INPUT2 jacks.
@
OUT
Your.TV can also be used as a display device for many video
games and home computers. If your game or computer has a
normal NTSC (American Standard) VIDEO output, it can be
connected directly to either the INPUT 1 or INPUT 2 jacks on
the TV as shown here.
If the computer or other device has monaural audio output (only
one AUDIO OUT jack instead of L and R), connect it to the
TV's R/MONO jack. This will enable the TV to reproduce the
sound through both the left and fight speakers.
To View Signals From Computer
• If you connected the computer to the TV's INPUT 1jacks,
select channel 91 on the TV so you cansee whatever signal is
coming from the computer. _ '
• If you connected the computer to the TV's INPUT 2:jacks,
select channel 92 onthe TV so you can see whatever signal is
coming from the computer.
COMPUTER
oR TV GAME
AudioNideo Cables*
(such as RCA
#AH069GI
* Oplional accessories are available frommostRCAdealersor electronics supply stores.
40
Page 43

Audio Amplifier
AudioNideoCables*
(such as RCAAH069G) "-_
.._)- ..@ Backof TV
. OO7 L_tCr ou'r
If'.your stereo amplifier is not part of a "system" that has its
own remote, connect it to the TV as shown here. If the stereo
amplifier is-part of a system that has its own remote, you may
choose to connect it to the TV as shown below using the
SELECT OUT jacks.
With the connection shown here, you'll be able to change and
mute volume with the TV's remote control. You'll also be able
to remotely control bass and treble functions.
Connection:
Connect the "L" and "R" HI FI OUT jacks to the corresponding
input jacks on the stereo amplifier (such as AUX, TUNER, or CD).
Do not use the PHONO inputs. If your a[nplifier is not stereo
(mono), connect it to the TV's R/MONO jack. Consult the
amplifier's owner's manual for the manufacturer's recommended
hookup.
Operation:
If desired, turn off TV's internal speakers as described on page 161
Adjust the amplifier for normal listening. Then control sound with
the VOLUME and MUTE buttons on the TV's remote.
Audio Cassette Recorder or Amplifier
Back of TV
tmo
@_-
m4qotrr &_.zcqr otrr
N,ur_- I
,_u,_,, .,,, ,,^' ;'4;o^_:'4e" CASSETTERECORDER
OR AMPLIFIER
(suchas RCA #AH069G) (STEREO)
If your stereo amplifier is part of a "system" that has its own
retaote control, Connect it to the SELECT OUT jacks asshown
here. The "fixed level" audio signal present at these jacks is also
ideal for connecting an audio cassette recorder to record audio
from the TV. This constant audio signal is not affected by
pressing the VOLUME buttons on the TV's front panel or the
TV's remotecontrol.
ConnectiOll"
ConnectSELECT OUT"L" and"R" to thecorrespondinginput
jacks on the stereo amplifier or audio cassette recorder.
If your amplifier is not stereo (mono), connect it to the "IV's
R/MONOjack. Consult the equipment's owner's manual for the
manufacturer's recommended hookup.
Operation:
Select a "IV channel and turn down the sound on the TV, or turn
off TV's internal speakers. Adjust sound with controls Onthe
amplifier or cassette recorder. If the amplifier or cassetie recorder
is part of a "system" Lhathas its own remote, use the system's
remote to adjustsonnd.
* Optional accessories are available from mostRCA dealers orelectronics supply stores.
41
Page 44

The digital remote control that came
packed with your TV is also capable of
controlling a compatible audio
component.
To program the remote, just hold down
the AUDIO button while entering the
two-digit code number for your brand
of audio equipment.
-Programming Remote to Control Audio Equipment
°
Refer to the chart below to find the
code number that corresponds to
the brand name of your audio
equipment. If more than one
number is listed, you may need to
try each one separately to find the
one that works.
2. Hold down the AUDIO button on
remote (depending on which
button you want to program).
3. Press two number buttons (first
one, then the other) to enter the
code number for your brand Of
audio equipment.
4. Release the AUDIO button. If
nothing happens, try pressing the
POWER button and then the
AUDIO button.
5. Point the remote at the audio
equipment arm press the POWER
button to test the code number.
• ff the right number was entered,
the audio equipment will turn on.
• If the audio equipment does not
react to the remote, repeat steps 1
thru 5 with another code number.
Operating Notes:
After the AUDIO button is programmed, the
buttons described below will operate the
basic functions of most audio equipment.
Depending on the age, brand, model, and
type of audio equipment, some models may
not be able to respond to all the function
buttons listed below. You will want to
experiment with each button to determine the
exact function for your component.
• POWER: Press to turn on component.
Press again to turn off. Some components
will turn on automatically when you press
this button.
• VOL (Volume): Press to change volume
level.
• CHAN (Channel: Press to select the next
higher or lower channel in the component's
channel memory.
• Number Buttons: Press two numbers to
directly select a channel.
•. PLAY: Press to start component playing.
• PAUSE: Press to pause play or record. To
release pause, press again.
• STOP: Press to stop whatever the
component is doing: playing, recording,
rewinding, etc.
• REW (Rewind): Press while component
is stopped to rewind tape.
• FF (Fast Forward): Press while
component is stopped to fast forward tape.
• REC (Record): Press to start recording.
• ANTENNA: Performs various functions
depending on the type of equipment.
Experiment with this button.
Note: Refer to the information sheet packed
with your remote control for the latest list of
br_md names and code numbers. Because this
list of brand names is continually growing, the
information sheet packed _with your remote
control may be a later version of this list and
contain additional brands and/or code numbers.
42
ads
Akai
Dimensia
DynamicBass
Fisher
jvc
Kenwood
Kyocera
Marantz '
Mitsubishi
Nakamichi
Panasonic
Pioneer
RCA
Sansui
Sherwood
Sony . .
Teae
Technics
Yamaha
AMP"
01
02,08
23
16
17
09
22
15
20
12
14
24.
11,13
21
10
18,19
AM/FM
03
29
30,35
38
42
03
CD TAPE PHONO AUX
07
25
32
36
39
07,43,44
45
46
50
06
26,27
33,34
37
40,41
06
48,53
51
05
28
05
47
.04
31
04,54
Page 45

Connecting Speakers to Back of TV
If you connect an amplifier or receiver to your TV, connect the
speakers to the amplifier/receiver instead of the TV.
Caution: Do not connectexternal speakers to more than one audio source at a time. You can connect a set of
speakers to either the TV or the Amplifier but not to both at the same time. If you connect the same speakers to
both the TV and the amplifier, you will damage your equipment:
If youdo not connect an amplifier or receiver to your TV, you
can connect external speakers to the back of the TV to enhance
theTV's sound.
The diagram below shows how to connect external speakers to
the :;peakerterminals on the back of the TV.
1. Remove the vinyl covering and twist the wire core.
2. Press and hold the lever down while inserting the wire core
into the hole. Be sure to connect (+) to (+) and (-) to (-) as
explained in the note below.
3. Release the lever. "_ _'_
Notes:
• lifter releasing the lever, pull gently on the wire and
check-that it is connected securely to its terminal.
• Do not allow the wire core to protrude from its terminal or
contact other wires or terminals. If the cores of two wires
touch each other, damage to components could result.
Helpful Hints:
• External speakers placed next to the TV will sound better the
higher quality they are.
• Very efficient small "bookshelf' or "compact" speakers will
give good results for surround-sound use.
• Surround effect can often be improved by experimenting
With rear speaker placement.
• Surround-encoded movies (broadcast or tape) give the best
surround effect, but regular stereo and mono programs will
also benefit.
Connecting Speakers to Back of Amplifier or
Receiver
If you connect an Amplifier or Receiver to your TV, connect
the speakers to the Amplifier/Receiver instead of the TV.
Sound from the TV will then come through the
Amplifier/Receiver and the TV's internal speakers. You can
turn off the TV's internal speakers with the SPEAKERS:
ON/OFF function described on page 15.
The diagram here shows how to connect external speakers to
the speaker terminals on the back of a typical
Amplifier/Receiver. Check the owner's manual for your
Amplifier/Receiver if its speaker terminus look different than
those shown.
The speaker switch on the back of the TV allows you to use the
external speakers two ways:
• To enhance the sound from the TV, place the speakers in the
front of the viewing area (.usually beside the TV), and slide
the speaker switch to EXT. This provides full power to the
external speakers for a "fuller" sound. The internal audio
from the TV's speakers will be turned off.
Err I'_'--! nwrr=rr r-wa
SURR _ "
Notes:
• After connecting speaker wire, pull it gently and check
that it is connected securely to its terminals.
• Do not allow the wire_core to protrude from its
terminal or contact other wires or terminal. If the cores
of two wires touch each other, damage to components
could result.
• To obtain a "surroundsound" effect, place the external
speakers in the rear of the viewing area, and slide the
speaker switch to INT/EXT SURR. This provides full power
to the TV's internal speakers for the front sound and a
surround signal to the rear speakers.
43
Page 46

Compatible Components
A wide variety ofcompatibl e Video Cassette Recorders
(VCR's), camcorders, and audio components are
available. Check with your dealer for details, Other
components can also be connected to your TV. Refer to
the component's owner's manual for the manufacturer's
recommended hookup instructions.
General Cable Information
AJatenna (or cable-TV)
connections are made
with either coaxial
antenna cable or twin-
lead cable. Coaxial
cables are shielded so
_ -,_.........;-- SHp-onEnd
[_-91-------Screw-on End
Round 75-ohm coaxial cable
such as No. AH037 (screw-on),
AH06SG (push-on), or AH066G (push-on)
they are less susceptible
to hum or interference from adjacent cables.
Most audio/video connections ___=
be,tween components can be
made with shielded audio and Standard Audio/Video Cable
with RCA-type phono plugs
video cables that have RCA-type (suchasNo.AH069G) '
phono connections. When
connecting components to each other, be sure that you
always connect left outputs to left inputs and right outputs
to right inputs. If a component has only one output
(mono), connect it to the R/MONO input jack.
To connect S-VHS (Super-VHS)
components, an S-VHS video cable is
required.
S-VHS Cable
(such.as No. VAA020)
Audio/A/ideo Cables
Audio/Video Cable
Shielded cable for connecting AUDIO and
VIDEO jacks. Has an RCA-type phono
plug on each end.
Stereo Audio Cable
Double gold-tipped cable generally used
forconnecting stereo audio components.
Stereo VCR Dubbing Cable
Triple cable thatlets you connect the
VIDEO and AUDIO jacks of stereo
components.
Gold-Tipped Cables
AH069G (3-ft)
AH070G (5-ft)
Gold-Tipped Cable
AH072G (3-ft)
Gold-Tippe!l. Cable
AH077G (6-ft)
•The following accessories are available from most
dealers in case you want to position your components
farther apart or need additional cables.
Antenna Cables
Screw-on Antenna Cable
Attaches to the round antenna connectors
(called 75-ohm F-type) on the back of
your VCR or "IV. The ends screw onto
the connectors for a secure connection.
l_ash-on Antenna Cable
Attaches to the round antenna connectors
(called 75-ohm F-type) on the back of
your VCR or TV. Ends push on for a
quick €onnection.
_ft)
Gold-Tipped Cables
AH065G (6-fl)
AH066G(Z0-ft)
44
Monaural VCR Dubbing Cable
Double cable that lets you connect the
VIDEO and AUDIO jacks of two VHS
VCR's to duplicate tapes. Can also be used
to connect a VCR to your TV. Cable is
color-coded and shielded. Has RCA-type
phono plugs on each end.
Gold-Tipped Cable
AH075G (6 ft)
S-VHS Video Cable
Has multipin S-connector on each end for
connecting S-VHS components to your TV.
When connecting an S-VHS component to
the S-VIDEO jack on your TV, remember to VAA020(8-ft)
also connect the left and right audio cables
to the INPUT 1 jacks because the S-VHS
cable carries only the picture, not the sound.
Page 47

Remote Control 224262)
This :isthe remote that came packed
witli :yourTV. You can use the order
form to orderit direct by mail if desired.
Remote Control (206800)
This is an optional remote that can be
used to turn your set on/off, change
channels, and adjust volume. It is a
simplified reniote that can be used to
conu'ol basic functions.
CIZ2
C32;2
Accessory Order Form
(Book No. 1Q57496-01A)
Description
Screw-on Antenna Cable (3-ft)
Signal Splitter AH047
Gold-Tipped Antenna Cable (6-ft) " AH065G
Gold-Tipped Antenna Cable (10-ft) AH066G
Gold-Tipped Audio/Video Cable (3-ft) AH069G
Gold-Tipped Audio/Video Cable (5-ft) AH070G
Gold-Tipped Stereo Audio Cable (3-ft) AH072G
Gold-Tipped Dubl)ing Cable (6-ft) A]-I0750
Gold-Tipped Dubbing Cable (6-t_) AH077G
VCR Connection Kit • AVH500
S-VHS Video Cable (8-ft) -- VAA020
Replacement Power Cord (5 1/2-ft) 187802
Antenna Adapte_ ' 193983
Antenna Mixer 193984
Antenna Mixer 197551
Replacement Remote Control CRK74F 224262
Optional Basic Remote 206800
$ 3.99
$ 6.99
$ 8.99
$ 5.99
$ 7.99
$ 8.99
$10.99
$14.99
$32.95
$29.95
$I0;15.
$ 6.95
$10.73
$10.95
$39.85
$38.15
Total
Note: All specifications and descriptions of
accessories are subject to change without notice.
CD
Prices are subject to change Withoutnotice
Total Merchandise ($10 Minimum Order) ...........
Sales Tax ..............................................................
We are required by law to collect the appropriate
sales tax for each individual state, county, and
locality to which the merchandise is being sent.
Shipping, Handling, and Insurance ......................
Total Amount Enclosed ........................................
Use VISA or MasterCard preferably. Money order
or check must be in U.S. currency only. No COD
or CASH•
$
$
-$ 5.00
$
All accessories are subject to availability.
Where applicable, we will ship a superseding model.
45
Page 48

Charge your order on your VISA
or MasterCard by
filling in below
USEYOUR CREDIT CARD "
]_dPORTANT: Copy complete account number
from your VISA card
[itl ir--F-Fqr--r-yqr-vvq
Mycardexp ,r-r-1r-N
IMPORTANT: Copy complete account number
• from your MasterCard
[ I I I II I I I II I I III I I I I
Copy Number
above your
name on
MasterCard
II. lll
expn-es:
AUTHORIZED SIGNATURE
Prices are subject to change withoutnotice. '
PLEASE
Print or type your name and
address clearly. This will be your
mailing label.
A complete and correct order will
save you days of waiting.
,City:
State:
Apt:
Zip:
Please make sure that both sides of this form have
been filled out completely.
46
I
I
I
-I
-3
To order accessories, contact your local dealer.
If a dealer is notnearby,you can also follow the directions
below tO order by telephone or direCtTby-mail. . •
UnitedStates and Canada OrderS •
To place your order by phone, have your Visa or MasterCard
ready and Call the toll-flee number listed below between 8AM
and 8PM Eastern Standard Time. Use this number only to
place an order for accessory items fisted onthis order
form.
1 =-800 - 338 - 0376
Most times your order will be shipped UPS within 72 hours
of receipt; If ever it is not possible to ship within 30 days, we
will notify you with an update on your order and an option to
cancel.
To place your order by mail, detach and mail the completed
order form with credit card information, money'order, or
check in U.S. currency (made payable to Thomson Consumer
Electronics, Inc.) to the following address:
Video Accessories
PO Box 8419
Ronks, PA 17573
For more information on these accessories (or current
prices), write to the following address:
Video Accessories Customer Service
Thomson Consumer Electronics, Inc.
Distributor & Special Products
2000 Clements Bridge Rd
Depfford, NJ 08096-2088
m
[
I
I
I
I
I
I
I
International Orders
This offer is valid only in the 50 United States. For
international orders, please send your request for quotation
(not an order) to: '
International Customer Service
Thomson Consumer Electronics, Inc.
Distributor & Special Products
2000 Clements Bridge Rd
Deptford, NJ 08096-2088 USA
Page 49

Troublessometimes are caused by simple "faults!' that you can
easily correct without the help of a servicetechnician by.first
checldng a few basic remedies.
Befo:re you call or take your unit to an Authorized RCA TV
Servicenter, look below for the type of trouble you are
experiencing. Then perform the simple checks and adjustments
listeklfor that trouble.
If your unit is still in warranty, these checks and adjustments
could save you time and the cost of an unneeded trip to the
servicer. They also could save you the cost of a diagnosis not
covered by your warranty.
If your unit is out of warranty, these checks and adjustments
could save you the cost of an unneecled diagnosis. If service
should be necessary, the warranty explains how to get it.
TV will not turn on
Controls don't work
Intermittent or no remote
Tmaas off while playing
Tturns on unexpectedly
Marm does not turn off TV at
correct time
Bl,'mk Screen
No sound, picture okay
TV picture is fuzzy or detailg ouilined
by red, green, orrblue
• Check to make sure TV is plugged in.
• Check the wall receptacle (or extension cord) to make sure it is "live" by
plugging in something else. •
• Maybe batteries in remote control are "dead". Try replacing batteries.
• ,Maybe remote was not aimed at remote sensor. Press POWER button on TV.
• Make sure power cord •is fully inserted into back of TV.
• If using remote control, make sure remote is in "TV Mode" by first pressing
the TV button.
• Try unplugging set for two minutes and then turning it on again.
• Make sure power cord is fully inserted into back of TV.
• Maybe something was between the remote and the remote sensor.
• Maybe the remote was not aimed directly at the component (.TV or VCR)
you were trying to control.
• Maybe remote is not in 'TV Mode". Press the TV button so remote will
control TV.
• Maybe batteries in remote are weak or dead. Try replacing batteries.
• Maybe batteries were installed incorrectly. Try replacing batteries correctly.
• SLEEP TIMER function may have been activated.
• ALARM OFF function may have been activated.
• Electronic protection circuit may have been activated because of a power
surge. Wait 30 seconds and then turn on again, ff this happens frequently,
the voltage in your house may be abnormally high.
• Make sure power cord is fully inserted into back of TV.
• ALARM ON function may have been activated.
• Check ALARM ON/OFF function. Must be set to ON.
• Check to make sure CLOCK function is set to the correct time.
• Maybe Channel 90, 91, or 92 selected, but device connected to those
INPUT jacks is not turned on.
• Try another channel.
• Maybe sound is muted. Try pressing VOL up button to restorersound.
• Maybe TV's speakers are turned off. Check SPEAKERS ON/OFF function.
• Check position of SPEAKER switch on back of TV.
Use the remote CONVERGENCE function to realign the projection picture
tubes.
47
Page 50

Can'tselectcertainchannel
Noisystereoreception
!
Channel may not be in Channel Memory. Try pressing number buttons.
If using VCR, check to make sure TV/VCR switch on VCR is in correct
position.
To select cable channels 100 thru 128, press number button 1 until 1--
appears. Then press other two number buttons. CABLE/AIR function must
be in CABLE mode to select channels higher than 69.
Channel may be locked-out with Parental Control feature.
May be a weak station. Change STEREO/SAP function to MONO setting
instead Of STEREO.
No picture, no sound but power light
is on
• Maybe someone changed CABLE/AIR function to wrong position.
• Maybe a vacant channel is tuned.
• For Channels 90, 91, and 92, make sure the component connected to those
INPUT jacks is turned on in order to see the picture.
• If watching VCR (connected only through antenn_ input), make sure TV is
tuned to channel 3 or 4-same as CH3/CH4 switch on VCR. Also check to
make sure TV/VCR switch on VCR is in correct position.
Sound okay, picture poor
Picture okay, sound poor
t
• Check antenna connections.
• Try adjusting SHARPNESS function to improve weak signals.
• Try another channel.
• Try adjusting VOL, BASS, and TREBLE controls.
• If station is sending stereo, try changing STEREO/SAP function to MONO
setting for clearer sound.
No stereo on known stereo station • Make sure STEREO/SAP function is in STEREO mode.
Can't ge t two channels in Pix-in-Pix • One channel must come thru ANTA or B jack and the other channel must
come thru the INPUT 1 or 2 jacks.
If using the VCR or VCR2 button, make sure it is Programmed to select the
! proper video input channel as described on page 26.
• If usingan S-VH S component, make sure its regular VIDEO cable is
connected to INPUT 1 VIDEO jack on the TV.
If using a VCR, make sure the AUDIO and VIDEO OUT jacks on the VCR
are connected to the TV's AUDIO and VIDEO IN jacks.
No picture while using PixZin-Pix,
with S-VHS VCR or camcorder
Small picture does not have color.
Remote no longer controls cable box,
VCR or audio equipment
If you have an S-VHS VCR (orcamcorder) connected, you must also
connect a cable from the VCR's VIDEO OUT jack to the TV's corresponding
VIDEO IN jack in addition to the S-VHS cable.
i.
The small picture will not have color if the large picture signal does not have
the color biarst reference. All color signals and some black-and-white signals
are sent with color burst information. Try changing channels of the large
picture. -
Try not to press an_, buttons on the remote while Changing its batteries. You
may have to reprogram the proper code into the. remote. .
48 - continued on next page
Page 51

No closed captioning
i
Black boxes appear on the creen
• Turn on the CAPTIONING function.
• TV program does not have closed captioning.
• Closed captioning is temporarily turned off when using We channel guide
and the special features of freeze and zoom. Details are on pages 12 and 13.
, TurnoffCAPTIONING function.
Dust TV as required, using asoft cloth or the dusting
attachment of your vacuum cleaner. Occasionally
wtcuum the ventilation slots in the cabinet to help assure
adequate ventilation. Take care not to scratch the plastic
sm'faces.
If your TV's cabinet has a textured finish, do not use
furniture polish. Because textured finishes are porous,
using furniture polish will mar their appearance. They
c_m be easily cleaned with a damp, soft cloth.
To clean the screen, you can wipe it with a damp soft
cloth. (Avery diluted, mild soap can be used on the
screen if it is extremely dirty.) Do not put cleaner directly
on the screen.
Do not use strong cleaners, polishes, or chemically-
treated cloths to clean the screen or cabinet.
Never place drinks or vases with water on top of your TV.
.- .
49
Page 52

+ and - Buttons ..................................... ;.............. 4,5,6,12,13-25
Accessories ................................................................... 44,45,46
Adding Channels to Memory ......................................... i.......22
AL4RM Function ............................................................... 16,19
Aliguing picture ................................ _..................................... 14
Amplifier ......................................... .................................. 41,42
A!_TA/ANT B Connectors ............................................... 30-32
AA'T A an_ ANT B Inputs ........................................... 8,16,22,23
AATENNA Button ............................................................. 23,29
AATENNA Function ..... .......................................................... 23
Antenna Connections ........................................................... ..30
Arrow Buttons .............................................................. 13,11,14
Attaching Power Cord ....................................... ....................... 3
AUDIO Button ................................................. _................. 10,42
AUDIO MENU .................................................. _................ _5,15
Audio_ Other Brands .............................................................. 42
A UTOPROGRAM Function ........................................... 4,16,22
Back of TV_............................................................................. 29
B/_ffVCE Function. ............... ............................................... 15
BASS Function ........................................................................ 15
Batteries (Remote) .................... i....... _................ _............ 9,33,38
Best Picture ............................................................................ 13
Brand Lists ................................................................. ..33,38,42
BRIGHTNESS Adjustment ..................................................... 13
Buttons, Remote ............................................................. 9-12,37
Buttons, VCR ............................................................. :........... 37
CABLE Button .............................................................. !0,25, 33
CABLE CHAN Function .................................................... 16,25
Cable Box Setup .................................................. •.................. 25
Cable Box, Other Brands ....................................................... 33
Cable-TV ................................................................ "..........31-32
CABLE/AIR Function ............................................................. 16
CABLE/ANTENNA Connectors. ........................................ 25,29
Cables ................................................................................ 44-46
Camcorder .............................................................................. 39
Care ................................................ •....................................... 49
Cassette Tape Deck ....................................... •........................ 41
CH3/CH4 Switch ............................................................... 24,25
CHAN CTRL Function ...................................................... 16,21
CHAN GUIDE Button ............................. ............................... 11
CHAN LABEL Function ......................................................... 20
CHAN LABEL:FULL Display ................................................ 20
CHAN MEM Function ............................................. •......4,16,22
CHAN (Channel) Buttons ....................................... .....4,7,11,20
CHANNEL Function .................... . .......................................... 19
Channel Guide ........................................................................ 11
Channel Labeling ................................................................... 20
Channel Memory ................................................. •........ 19,22,23
Channel Number Display ............. ,.................. ......................... 8
Channels 90,91,92 .................. 8,12,13,22,24,26,29,34,35,39,40
Channels above 99 ................................................................. 12
Chart (Cable Channels) ......................... ................................. 34
Cleaning _................................................................................. 49
CLEAR Button .......... ............. :............................ 12,16,18,20,37
C.learing Sleep Timer,:.. ......................................................... 18
Closed Captioning ......................................... ._..................... ... 17
CLOCK SET Function ................................... ...................... 5,16 "
COLOR Adjustment ............................................................... 13
•ColorConvergence ................................. ....................... ......4,14
Commercial Skip......_. ........ ................................................... 11
Commercial Skip Display ........................................................ 8
Compatible Components ........................................................ 28
Component Buttons ................................................................ 10
Computers ................... ..................... ...................................... 40
Contents ................................................................ 2.................. 1
CONTRAST Adjustment .......................................................... 13
Controls (Front Panel)..... ......................................................... 7
Controls (Remote),_ .............................................................. 9-12
Converging Colors'. ............................................................. 4,14
CONVERGENCE Function .................................................... 14
CONVERTER Jack .......................................................... •......31
Custom Picture Memory ........................................................ 13
Decoder Box ...................................................................... 31;32
Deleting Channels from Memory ........................................... 22
DISABLED Display .................................................. •....... -..... 19
DISPLAY Button ................................................ 5,8,12,16,18,37
Displays (On-Screen) ....................................... •....................... 8
Erasing Channels from Memory ............................................ 22
Erasing Labels ........................................................................ 20
EXTERNAL SPEAKERS Terminals ................................ .........29
Fast Forward Button ............................................................... 37
FF (Fast Forward) Button ...................................................... 37
First-Time Operation ............................................................ :2-6
FREEZE Button ................................................................. 12,27
Front Panel Controls ............................... .................................. 7
Function Buttons ......................................................... :........... 10
HI FI OUT Jacks ............................................................... 29,41
Home Antenna .......................................................... •............. .30
Imprint Caution ...................... ._................................................ 1
INPUT Button ........... ...................................................... _......12
iNPUT Jacks ............................... 8,12,13,22,24,29,3.5,36,39-43
Installing Batteries ..................................................................... 9
Interference ............................................................................. 28
Labeling Channels ....................................... ;.......................... 20
_Last Function Memory ................................................. 13,15,16
Locking Out Channels ....................................................... .....21
Memory (Channel) ........................... ...................................... 22
MENU Button ................................................ 4,5,7,12,13,I5-25
Menus ........................................................................... ::4,13-25
Mode, TV .............................................................. i............ 10,11
Monaural ............................................................... -................ 15
Monitor Panel .......................................................................... 29
MONO Position ............................................................. ,......... 15
MOVE PIP Button ............................................................. 12,27
MUTE Button .......................................................................... 12
MU_I'EDisplay ..................................................... .......:2...... 8,12
NORM/UNIFIED Switch ....................................................... 38
Number Buttons .............................................................. _.12,37,
OFF TIME Function ....... _....................... _............................... 19
ON TIME Function ................................................................. 19
5,1)
Page 53

On-Screen Displays .................................................................. 8
Optianal Accessories ........................................................ 44-46
Order Form (Accessories) ................................................. 46,47
PARENTAL CONTROL Display .......................................... 8,21
PARENTAL CONTROL Function ........................................... 21
PA USE Button ................................................................... _....37
PICI'URE RESET Function .................................................... 13
Picture Adjustments ............................................................... 13
Picture Meniory ...................................................................... 13
Picture-in-Picture .............................................................. 26-27
Picture-in-Picture Buttons ............................................ 12,26,27
PIP Button .................................................................... 12,26,27
PLAY Button .............................................. _............................ 37
Plugging in Cords .............................................................. :....28
Positioning Cables .................................................................. 28
Positioning Speakers .............................................................. 28
Positioning TV ......................................................................... 2
POWER Button .............................................................. 7, I0,12
Power Cord ............................................................................ 2,3
Power Failures ........................................................................ 19
Power Indicator ........................................................................ 7
Precautions (Safety) .............. :...................... Inside Front Cover
Product Registration ..................................... Inside Front Cover
PROG Button ................................... :.................................. L.37
Programming Remote .................................................. 33,38,42
RE(; (Record) Button ............................................................. 37
Registration Card ......................................... Inside Front Cover
Remote Control .............................................. .9-11,33,38,42,45
Remote, Programming ................................................. 33,38,42
Repair ...................................................................... Back Cover
Replacing Batteries .................................................................. 9
REW (Rewind) Button ............................................................ 37
S- V_DEO Connector ........................ _.......... 8,12,22,24,29,37,39
Safety Precautions ........................................ Inside Front Cover
SAP. ........................................................................................ 15
Scrambled Channels ..................................................... 31,32,34
SELECT OUT Jacks ................................................ 29,36,39,41
Ser6ce ............................................................... .47,Back Cover
SET CLOCK Display ........................................................ 5,8,19
Setting Sleep Timer ................................................................ 18
SETUP MENU ............................................................... 4,16:25
SHARPNESS Adjustment ....................................................... 13
SLEEP Display ......................................................... •.......... 8,18
SLEEP TIMER Function ............................ _...................... 16,18
Sleep Timer Display ............ ................................................ 8,18
Sleep Timer, Clearing ............................................................. 18
SPEAKER Switch ............................................... :.............. 29,43
Speaker Connections .. ............................................................ 43
SPEAKERS Function ..................................... :................... 15,43
Stacking Components ............................................................. 28
Stmld .......................................... :............................................ 45
Status Displays ......................................................................... 8
STEREO Indicator ............ ........................................... ......... 8,15
STEREO/SAP Function ............................................ 15
SWAP Button .......................................................................... 27
Table of Contents ...................................................................... 1
Time Display ............... ............................................................. 8
TINT Adjustment ................................................................... 13
Tips on Connecting Components ........................................... 28
TREBLE Function .................................................................. 15
Trouble Checks ..................................... ................. ........... 47-49
TV Button ............................................................... 3,4,7,8,10,11
TV Mode ................ ............................................................ 10ill
VCR 1 CHAN Function ..................................................... 16,24
VCR 2 CHAN Function ..................................................... 16,24
VCR Channel Setup ............................................................... 24
VCR Connections ............................................................... 35,36
VCR Mode ...................................................................... ,..37,38
VCRs, Other Brands .......................................................... 38,42
VCR Button ........................................................ 10,24,26,38,39
VCR2 Button ....................................................... 10,24,26,38,39
VIDEO MENU ........................................................................ 13
Video Game Caution ...................................................... 1,13,40
Video Input Channels ............................... 22,29,34,36,38,39,40
Viewing Area ............................................................................. 2
VOL (Volume) Buttons .......................................... 3,7,12,14,20
Warranty ................................................................. .Back Cover
Warranty Registration Card ........................... Inside Front Cover
STOP Button ................. .......................................................... 37
51
Page 54

Page 55

Page 56

Limited Warranty
What your warranty covers:
• Any _lefect in material or workmanship.
For how long after your purchase:
• 1 year for labor charges.
. One year for parts.
• Two years.for picture tube.
The warranty period for rental units begins with the first rental.
What we will do:
• Pay any ,h,uthorized RCA Television Servicenter the labor charges to repair
your television.
• P;_y any Authorized RCA Television Servicenter for the new or, at our
option, rebuilt replacement parts and picture tube required to repair your
television.
How you get service:
• Request in-home service from any Authorized RCA Television Servicenter.
To identify your nearest Authorized RCA Television Servicenter, ask your
13ealer, look in the Yellow Pages, or call 1-800-336-1900.
• Show the _ervice technician your evidence of purchase date.
What your warranty does not cover:
• Customer instruction. (Your Owner's Manual clearly describes how to
install, adjust, and operate your television. Any additional information
should be obtained from your Dealer.)
• Ialstallation and related adjustments.
• Signal reception problems not caused by your television.
• Damage from misuse or neglect.
• l_',emotecontrol batteries.
• A television that has been modified or incorporated into other products or is
used for institutional or other commercial purposes.
• A television purchased or serviced outside the USA.
Product Registration:
• Please complete and mail the Product Registration Card packed with your
set. It will make it easier to contact you should it ever be necessary. The
return of the card is not required for warranty coverage.
How state law relates to this warranty:
• This warranty gives you specific legal rights, and you also may have other
rights that vary from state to state.
If you purchased your television outside the U.S.A.:
f_ THOMSON CONSUMER ELECTRONICS
Thomson Consumer Electronics
10330 North Meridian Street
Indianapolis, IN 46290-1024
©1995 Thomson Consumer Electronics, Inc.
Trademark(s) ®Reciistered
Marca(s) Registrada(s)
Printed in the U.S.A.
TOCOM 15133510
100% mm
• EIII_ Sl'__ nllIB
 Loading...