

Page 1
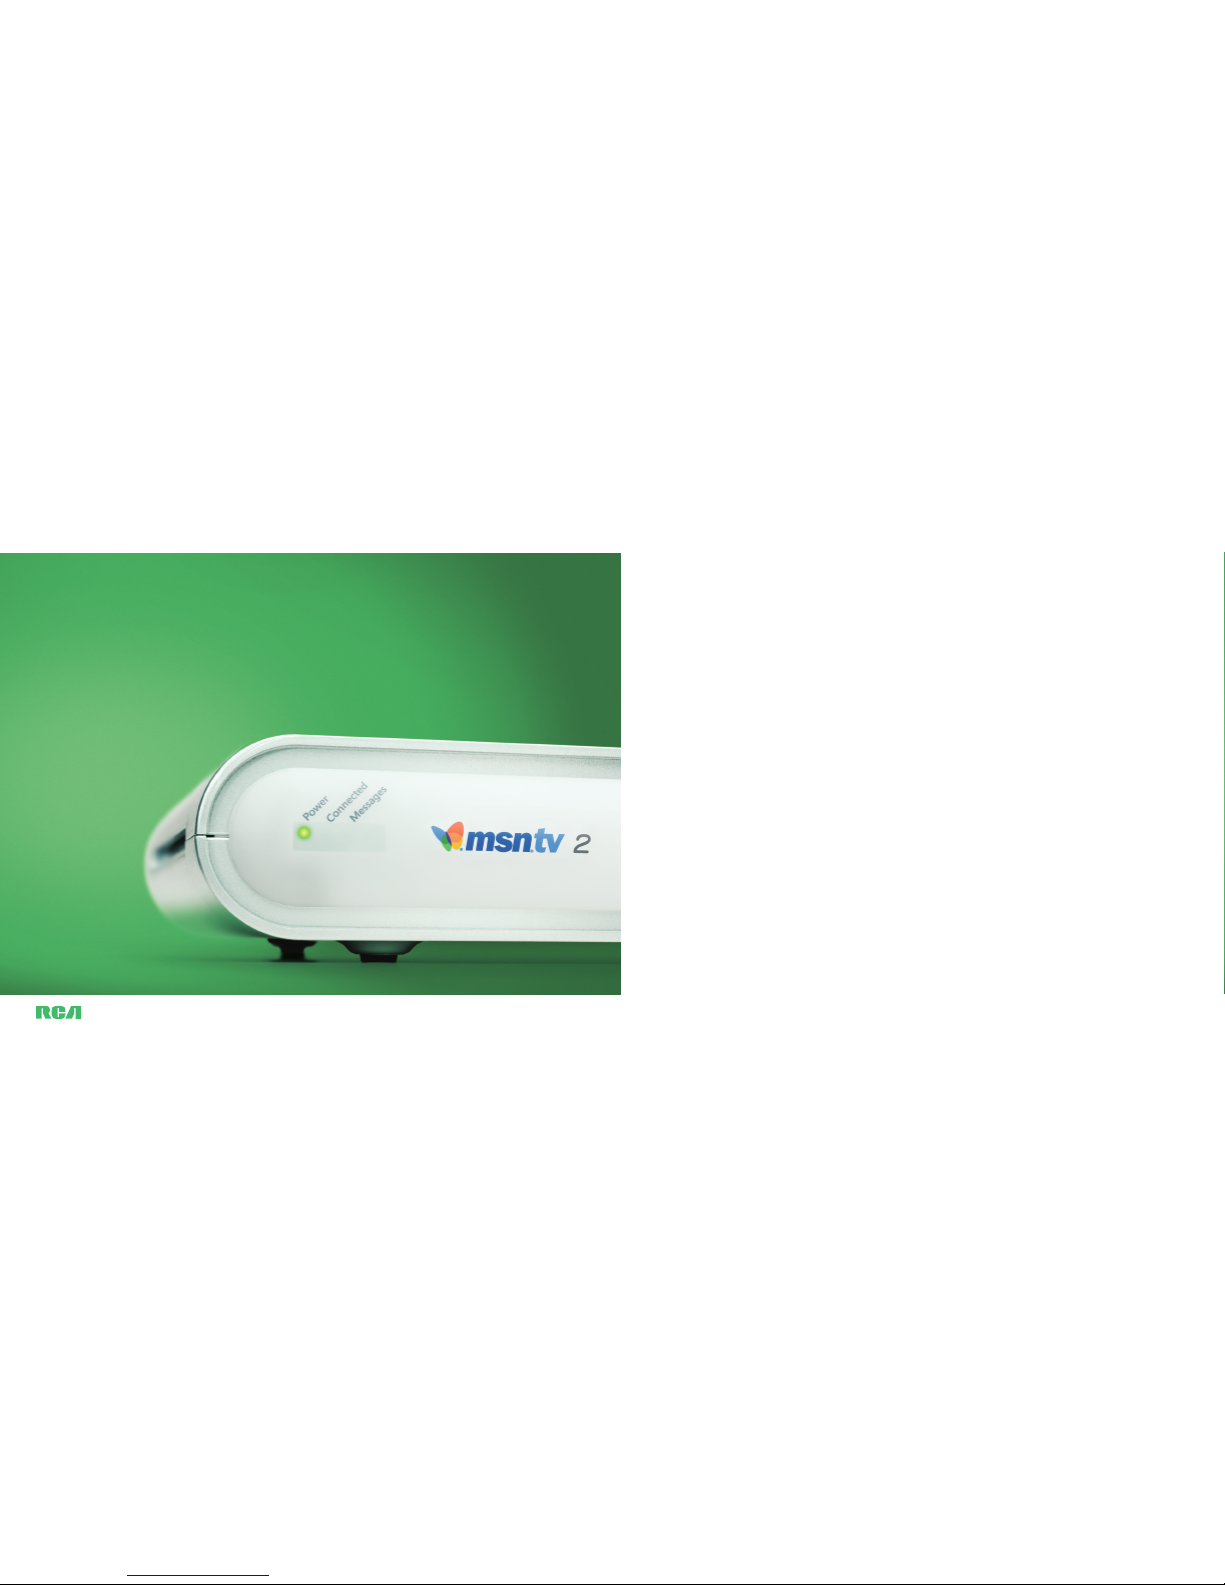
Setup
Guide
Use this guide to get
your Internet player
up and running.
Page 2
This symbol indicates “dangerous voltage” inside the product
that presents a risk of electric shock or personal injury.
This symbol indicates important instructions accompanying
the product.
IMPORTANT SAFETY INSTRUCTIONS
When using your telephone equipment, basic safety precautions
should always be followed to reduce the risk of fire, electric shock
and injury to persons, including the following:
• Do not use this product near water, for example, near a bathtub,
washbowl, kitchen sink or laundry tub, in a wet basement or near
a swimming pool.
• Avoid using a telephone (other than a cordless type) during an
electrical storm. There may be a remote risk of electric shock
from lightning.
• Do not use the telephone to report a gas leak in the
vicinity of the leak.
• Use only the power cord indicated in this manual.
SAVE THESE INSTRUCTIONS
Cautions
• Do not stack electronic components or other objects on top of
the Internet player.
• The slots on top must be left uncovered to allow proper airflow to
the unit. Blocking the airflow to the unit could impair performance or damage your Internet player and other components.
• Do not stack the Internet player on top of a “hot component”
such as an audio power amplifier.
• Refer to the identification/rating label on the bottom of the
product for the proper operating voltage.
•
FCC Regulations state that unauthorized changes or modifications
to this equipment may void the user’s authority to operate it.
Safety Information
CAUTION
To reduce the risk of electric shock, do
not removecover (or back). No user
serviceable parts inside. Refer servicing
to qualified service personnel.
Page 3

What’s in this guideWelcome to MSN TV.
This guide walks you through the process of
getting your Internet player up and running,
getting connected to the MSN TV®service,
and creating an account with MSN TV.
Don’t worry if you’ve never set up video or
electronic equipment before. We’ve laid out
all the details and illustrated every step. Relax
and have fun!
2 Unpack the box
4 The Internet player
6 Connect to your TV or VCR
10 Connect to the MSN TV service
12 Turn on your Internet player
13 Get MSN TV to appear on your screen
16 Creating an account with MSN TV
17 Choosing an MSN TV service plan
18 The keyboard and remote
20 Troubleshooting
23 Warranty information
26 Programming your remote control
Page 4
Unpack the box
MSN TV 2 Internet player
Wireless keyboard
Remote control (with 2 AAA batteries)
Power supply
Phone line splitter
Audio/video cable
Phone cord with filter
Unpack all of the items in the box
and lay them out on a flat surface
near your TV. You may not need to
use all of the parts pictured.
Other things you’ll need
• A grounded AC power outlet
• A working telephone jack near the television
OR
an existing Broadband connection, such as DSL,
cable -modem, or home network. This is also called an
Ethernet connection. If you’re using a Broadband
connection, you need to purchase an Ethernet cable
with RJ-45 connectors (such as CAT5, CAT5e, or CAT6)
• A flashlight, if it’s dark behind your television
• A notepad to take a few simple notes
Note If your phone jack is far from your television, you
may need to purchase a longer phone cable.
Placing the Internet player
Place the Internet player near your television,
along with your other components.
• Do not place or stack anything on top of
the Internet player.
• Do not place the unit on top of anything that
gets hot, such as an audio amplifier.
• For the remote control and the wireless keyboard to
work properly, the entire front of the Internet player
should be visible from where you normally sit and
watch TV. The front and the back of the Internet
player are shown on the next pages.
Note For safety, do not modify or cut the ground prong
off of the Internet player’s plug.
23
Page 5
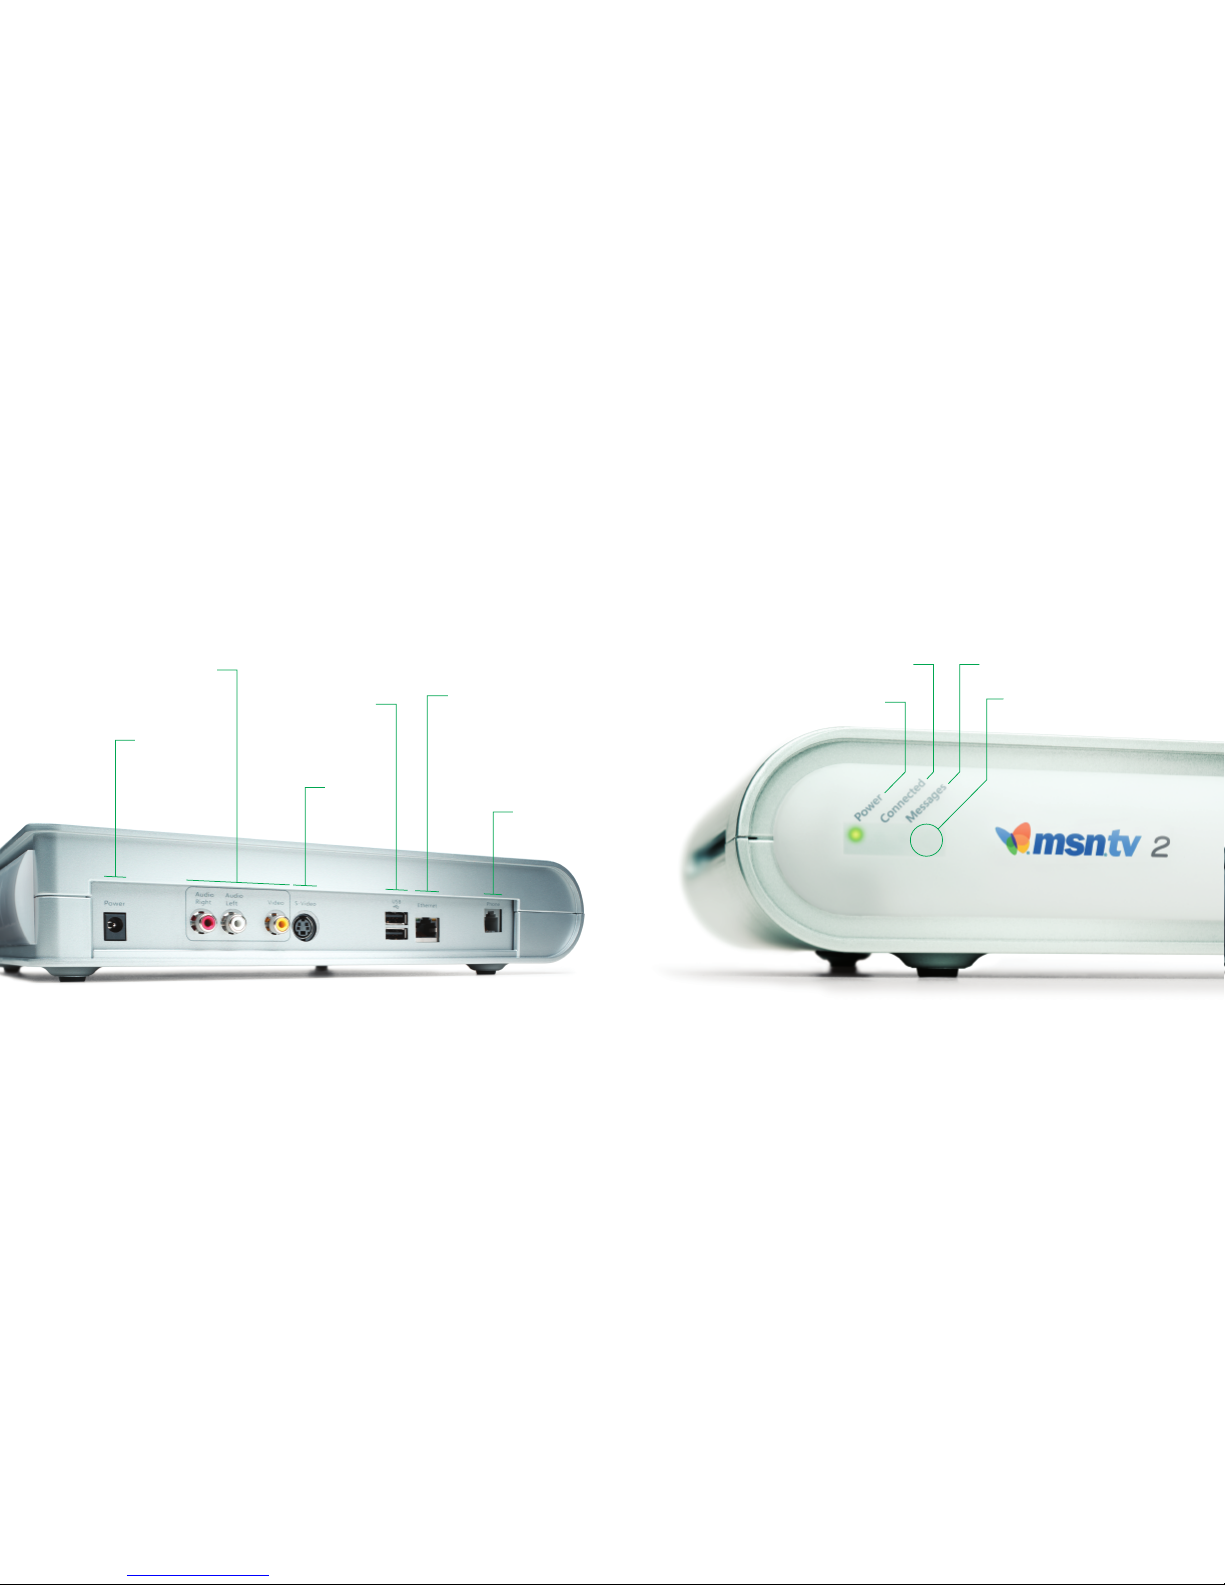
The Internet player
This lights up when you are
connected to the Internet
This lights up when the
Internet player is on
This lights up when you
have unread e-mail
Audio/Video Jacks
S-Video Jack
2 USB Ports
(See the Photos and
Printing sections
in the User Guide)
Phone Jack
Ethernet Jack
45
Back
Front
Aim your remote
and keyboard here
Power Jack
Page 6
The first step in setting up your
MSN TV 2 Internet player is connecting it to your TV, or to a piece of
equipment that’s already connected
to your TV, such as a VCR.
Because there are so many models
and variations of TVs and VCRs,
there are different ways to connect
your Internet player.
You only need to connect using
one method.
Does your TV or
VCR have available audio/video
jacks like these?
Yes
If you see input jacks like these that aren’t being
used on your TV or VCR, use the instructions on
the next page to connect using audio/video
jacks. If another device connected to your TV has
input jacks like these, you can use the same steps
as those for connecting a VCR.
No
If your TV or VCR doesn’t have any audio/video
input jacks, or if all of these jacks are being used,
you can try connecting your Internet player to
an antenna jack. Turn to page 9 for instructions
on connecting using an antenna jack.
Televisions vary in the alignment and placement of their
jacks. They can be on the front or the back of the TV.
Focus on the types of jacks you have, not on where they
are or how they are aligned. This set of jacks may be
labeled IN, INPUT, AUDIO/VIDEO IN, or something similar.
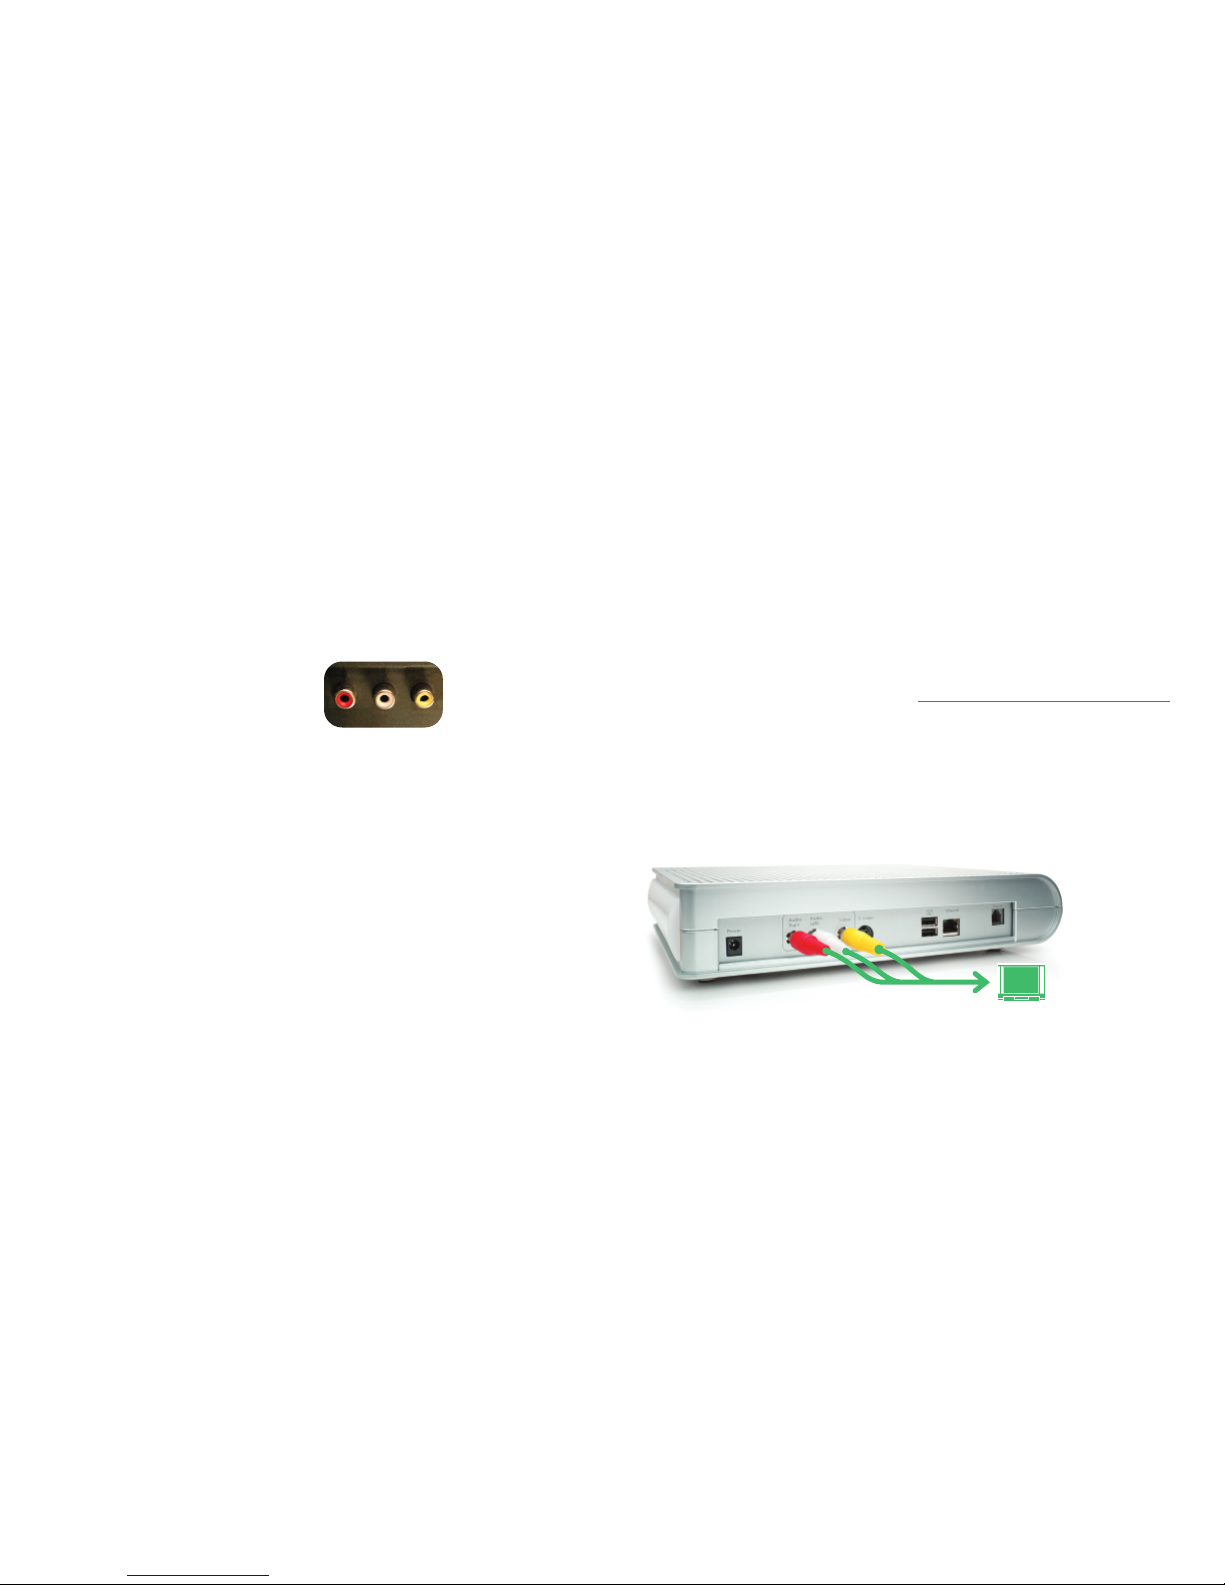
Connect to your TV or VCR
To connect using audio/video jacks
1
Turn off your television and any equipment that
is connected to it, such as a VCR, DVD, DVR, or
cable box.
2
Look at the supplied audio/video cable. Note that
there are three colored connectors on each end.
3
Connect the cable so that it goes from the Internet
player to the set of Input jacks on your TV or VCR.
Connect the yellow connectors to the yellow jacks,
the white connectors to the white jacks, and the red
connectors to the red jacks. If you don’t have red jacks
on your TV or VCR, do not use the red connectors.
Important Be sure to connect the cables to IN or INPUT
jacks on your television or VCR. Do not connect the cables
to the OUT or OUTPUT jacks.
After you’re finished with these steps, make a note of
what you’ve connected your Internet player to
—
your
TV or VCR. You’ll need to know this information later
on in the setup process.
The next step in setting up your Internet player is connecting to a phone line or a Broadband connection. Turn to
page 10 for instructions.
to TV or VCR
67
Page 7

Does your TV or VCR
have an antenna jack
like this?
Yes
Use the instructions to the right to connect using
an antenna jack.
No
Check again to see if you have available audio/video
input jacks and see the previous section, To connect using audio/video jacks, on page 7. If you
don’t have either of these connections, disconnect
something to make a connection available.
If you only have an antenna jack available, you need to
purchase an RF modulator to connect your television
or VCR to your MSN TV 2 Internet player.
You may also need to purchase additional cables. These
are available from your local electronics store. The RF
modulator and cables are sometimes sold together as a DVD
installation kit. For details on installing the RF modulator
and cables, see the instructions that come with them.
To connect using an antenna jack
1
Connect the audio/video cable to the RF modulator.
2
Connect the other end of the audio/video cable
to the Internet player. Be sure to plug the white
connector on the cable into the white jack on your
Internet player, the red connector into the red jack ,
and the yellow connector into the yellow jack.
3
Set the switch on your RF modulator to a channel
that is not broadcast in your area.
Note Many RF modulators have input jacks for several
devices. Each RF modulator has a different method for
switching inputs. For information on switching inputs, see
the instructions that come with the RF modulator.
Make a note of how you connected your Internet
player. You’ll need to know this information later on in
the setup process.
The next step in setting up your Internet player is connecting to a phone line or Broadband connection. Turn to
page 10 for instructions.
Optional connection Another way to connect to your TV or VCR
If your television has an
S-Video input jack like this
that isn’t being used, you can
use an S-Video cable (sold separately)
instead of the yellow video cable.
S-Video provides only video, not audio. You’ll still need
to connect your television and Internet player with the
red and white connectors on the audio/video cable,
or just the white connector if your TV does not have a
red input jack.
Connecting your Internet player to your television
using S-Video provides improved picture quality on
some televisions.
To connect using an S-Video jack
1
Connect the S-Video cable to the S-Video jack
on the back of your Internet player.
2
If your TV has a red input jack, connect the red cable
to the red jack on the back of the Internet player.
Repeat this with the white cable and jack.
3
Connect the S-Video cable to the television.
4
If your TV has a red input jack, connect the red cable
to the red input jack on the television. Repeat this
with the white cable and jack.
The next step in setting up your Internet player is
connecting to a phone line or Broadband connection.
Turn to page 10 for instructions.
89
Page 8

to phone jack
To connect a phone line to your Internet player
1
Connect the end of the phone cord with the filter to
the phone jack on the back of the Internet player.
2
Plug the other end of the phone cord into
the phone jack on the wall.
Note If the wall jack you’re using is already in use, plug
the included phone line splitter into the wall jack. Then
plug the two phone cords into the splitter. The splitter lets
you connect two devices to the same telephone wall jack.
You can only use the phone line for one device at a time.
Your Internet player communicates
with the MSN TV service either
through a phone line or through a
Broadband connection.
The most common way to connect to the MSN TV service
is by using a phone line.
You only need to connect using one of these methods.
Once you’ve connected a phone line or Broadband cable
to your Internet player, turn to page 12.
To connect a Broadband cable (such as DSL, cable-modem,
or home network) to your Internet player
1
Plug one end of a straight-through Ethernet cable
with RJ-45 connectors (such as CAT5, CAT5e, or
CAT6) into your DSL or cable-modem, or network
router. The package for the cable, or markings on the
cable itself, will usually tell you what kind of cable it is.
2
Plug the other end of the Ethernet cable into the
Ethernet jack on your Internet player.
Connect to the MSN TV service
If you have an existing computer
and home network connected to
DSL, a cable-modem, or an analog
modem, you can use a Broadband
(Ethernet) cable to connect the
Internet player to the MSN TV
service. If you don’t have an existing
home network or aren’t sure, use a
phone line.
Your Internet player is designed to automatically detect
settings for many Broadband connections.
If you know your Broadband connection settings, or if
your ISP has given you specific Broadband settings, choose
Settings on the troubleshooting page you’ll see onscreen
during registration and follow the instructions on that page.
For the latest information on connecting to an existing
home network, use your computer to visit this Web site:
http://www.msntv.com
10 11
to router
filter
Page 9

In this section, you’ll get the MSN TV
service to show up on your TV screen.
If you already see the screen below, go to page 16.
In order for your TV or VCR to show you the available
options so that you can select MSN TV, you may need to
press some buttons, or change a switch. This is known
as changing the input.
You might press a button on your television or television
remote control to watch a tape in the VCR, or change a
setting to watch something on cable television, or tune to
a specific channel to switch to shows received through
the antenna. In this section, you’ll do something very
similar. You’ll change the input setting or settings so that
you can see MSN TV.
The next pages guide you through this process.
Get MSN TV to appear on your screen
13
Now that everything is connected,
you can turn on your Internet player.
Before you turn on your Internet player
1
Install the two included AAA batteries into the
MSN TV remote control.
2
Remove the plastic wrapping that covers the
front of the keyboard.
3
Remove the protective plastic from the battery
compartment on the back of the keyboard by
pulling on the white tab with an arrow on it.
Turn on your Internet player
12
4
Assemble the power supply and connect it to the
Internet player. Connect the other end of the power
cord to a grounded AC outlet.
After you have finished these steps, press the
MSN Power button on the wireless keyboard to
turn on your Internet player. The green light on
the front of the Internet player will come on.
5
Turn on your TV and your VCR (if you connected
your Internet player to your VCR). If you connected
your Internet player to another device, make sure
that device is turned on as well.
You may or may not see a picture on your TV screen. You
may see snow. Don’t worry. Just continue to the next section.
Page 10

TV
Getting MSN TV to appear on your screen if you
connected your Internet player directly to your TV
• If you used audio/video jacks, change the input
setting on your TV. This is usually a button or switch
on your TV or TV remote that says something like
TV-Video, TV-VCR, or Input.
• If you used the antenna jack, change the settings on
the RF modulator to a channel that is not broadcast
in your area. Then change the channel on your TV
to match the modulator setting. For details, see the
manual that came with the modulator. You may also
need to change the input setting on your television
to Antenna.
VCR
Getting MSN TV to appear on your screen if you
connected your Internet player to your VCR
Note You can also use the suggestions below if you con-
nected your Internet player to another device connected
to your TV, rather than a VCR.
1
Switch the TV input. Switch your TV input as if you
were going to use your VCR. If you haven’t done this
before, look for a button or switch on the TV or TV
remote that says something like TV-Video, TV-VCR,
or Input.
2
Change the input setting on the VCR. This is usually
a button or switch on your VCR or VCR remote. Do
this so that you can see MSN TV.
Tips on switching inputs
The button or switch you use to change inputs may be
located in a variety of places. Here are some tips to help
you find it:
• It’s usually on the front of your TV or VCR.
• It’s often also on your TV remote control or
your VCR remote control.
• It’s probably labeled TV-VIDEO, TV-VCR,
INPUT, AUX, or something similar.
• On some TVs and VCRs, you change inputs
by tuning to different channels.
To change the input settings, you may need to press this
input button, or move the switch. You may need to press
the button repeatedly to go through the choices. If you
have a switch, you may need to switch through several of
the options.
There are many different makes and models of TVs and
VCRs. Yours may say something different. If you’re not
sure how to change the input settings, see your TV’s
and VCR’s owner’s manuals or contact the company or
companies that made them.
Once you’ve switched to the right input, you may
see the Welcome screen shown on page 13, or the
Update screen shown below. If you see an MSN TV
screen saver (also shown below), press any key on
your keyboard to continue.
If you don’t see one of these screens, see the
Troubleshooting section on page 20 of this guide.
Tip It may help to write down the steps you took to
get MSN TV to appear on your screen so you can switch
to MSN TV more quickly the next time you turn on your
Internet player.
What did you connect your Internet player to?
14 15
Page 11

Your MSN TV service plan is your
monthly subscription to MSN TV.
It includes access to the Internet,
e-mail, and all of the other features
of MSN TV.
You’ll choose a service plan during registration. The service
plan you choose is based on whether you’re connecting
to MSN TV using a phone line or a Broadband connection
and what Internet service provider (ISP) you use.
If you connect to MSN TV using a phone line, you will
likely use MSN TV as your ISP (the most common option).
If you already have a computer at home connected to the
Internet, you might choose to use your own ISP to connect
to the MSN TV service.
If you connect to MSN TV using an existing Broadband
connection, you will use your Broadband ISP as your
service provider.
You’ll learn more about MSN TV’s service plans during
registration.
To begin registration, follow the instructions on the
Welcome screen you see on your TV.
Choosing an MSN TV service plan
17
Now that you’ve set up your Internet
player and can see the Welcome
to MSN TV screen, you’re ready to
register for the MSN TV service.
When you register, you’ll create an e-mail name and
password. If you already have an existing MSN or Hotmail
e-mail address, you can use that on MSN TV. Your e-mail
name and password will become the account you’ll use
on your MSN TV 2 Internet player. You’ll also choose a
service plan and a billing method.
Once you create an account on MSN TV, you’ll be able
to access your e-mail on any computer connected to the
Internet, as well as on your Internet player.
Throughout registration, follow the instructions on
your screen.
During registration, we’ll ask for some specific information.
All of this information will be electronically encoded and
encrypted to help ensure your security and confidentiality.
MSN TV will only use this information to create your
account and to bill you for your service plan. This information will include:
•
Your name
•
Your address
•
Your phone number
•
A valid credit or debit card
Creating an account with MSN TV
16
Page 12

The remote
19
The keyboard
18
Press to go to the
MSN TV home page
Press to use MSN TV features
Turn the Internet
player on and off
Press to go
back one page
or screen
Use these keys to
move the yellow
highlight box
around the screen
Use these keys
to move the
page around if
it is too tall to
fit on the screen
Press to go to the
MSN TV home page
Press to go back one
page or screen
Press the arrow buttons
to move the highlight
box around the screen.
Press the
OK button to
select a highlighted item
Turn the Internet
player on and off
Use these buttons
to move the page
around if it is too tall
to fit on the screen
Press to switch between
viewing MSN TV and
watching TV (see page 26
for more information)
Use these to control
your TV if you’ve
programmed your
remote (use your
keyboard to type
numbers on the
MSN TV service)
Press the
OK key
to select an item
highlighted by
the yellow box
Page 13

The Internet player has no power
• Check to see if the green light labeled Power on
the front of the Internet player is on. This light will
illuminate when the Internet player is on.
• Be sure to turn on the Internet player using the
MSN Power button on the remote control or
keyboard. There is not a power button or switch
on the Internet player.
• Point your remote control or keyboard at the Internet
player and press MSN Power on the remote control
or keyboard. If the green light comes on, your Internet
player has power.
• If the green power light on the Internet player does
not come on, check to be sure the batteries in your
keyboard or remote control are installed correctly.
• Make sure the power supply is connected securely
to a power outlet and to the Power jack on the back
of the Internet player.
• Try connecting another device to the power outlet
you’re using to be sure the outlet works properly.
You don’t see the MSN TV
service on your TV
• Make sure the green power light is illuminated on
the Internet player. (A blinking green light indicates
that the Internet player is turning off. If the green
light is blinking, wait until it stops, then press the
MSN Power button on the Internet player’s remote
control once.)
• Press the TV/Video button on your television’s
remote control or on the front of your television
until the MSN TV service appears.
• If you connected your Internet player through a
VCR, make sure the VCR power is on, the TV is set
to receive the signal from the VCR (as if you wanted
to watch a videotape), and the VCR is set to receive
the signal from the Internet player.
Use the VCR’s remote to select the Internet player
input (press the TV/VCR or Input button). Use the
TV’s remote to set the TV to view the signal from
your VCR (press the TV/Video button or tune to
channel 3 or 4).
21
Here are a few quick answers to
common problems you may have.
Find the problem and follow the
suggestions below it.
Your television does not
have a yellow Video input jack
Your television may have only an antenna input jack.
You can still use the Internet player, but you must use
an RF modulator (sold separately). Details are on page 9
in this guide.
Your television only has
one audio input jack
If your television only has one audio input jack, connect
the white audio cable to the white Audio L jack on the
Internet player and to the white Audio Input jack on your
television. You will not use the red Audio R jack on the
Internet player or the red audio cable.
Some of the jacks on
the Internet player are not
connected to anything
You will not need to use all of the jacks on the
Internet player.
Troubleshooting
20
Page 14

For information on MSN TV service features, go to the Help pages
provided by the service. Press
Home on the keyboard or remote to
go to the home page. On the home page, choose
Help.
If you can’t find what you’re looking for online, call Customer Service.
Before you call
• Know the model number and serial number of your product.
They’re displayed on the bottom of the Internet player.
• Be prepared to tell us your e-mail name and
ZIP code. We need
this information in order to serve you efficiently.
• If you are seeing error messages from the Internet player, write
them down and tell the service representative about them.
• Always disconnect the Internet player from the power supply
before changing connections.
Contact RCA at 1-800-722-9599 for assistance with
• Defects in the Internet player or supplied accessories
Call MSN TV at 1-866-466-7688 if you have questions about
• Connecting your Internet player
• Internet service providers (ISPs)
• The MSN TV service or its features
• Subscriptions
• Signing up for the MSN TV service
• Billing/account status
Customer service
If you can’t connect using
Broadband, follow these steps
• Make sure that the Ethernet cable is properly connected
to both your router and your Internet player.
• Make sure that you’re using the right kind of cable
between the router and the Internet player. It must
be an Ethernet cable, such as CAT5, CAT5e, or CAT6.
It must also be a straight-through (not crossover)
cable. The package for the cable, or markings on the
cable itself, will usually tell you what kind of cable it is.
• Check your home network to make sure that it’s
working properly. Try to access the Internet from a
computer connected to the network. If you can access
the Internet with that computer, continue following
the troubleshooting steps. If not, you may need to
consult the manuals that came with your network
router and modem, and you may need contact your
ISP (Internet service provider).
• You may need to reset your modem and router after
connecting your Internet player. To do this, turn off
or unplug the modem and router, wait one minute,
and then turn them on or plug them in again.
• Your Internet player is designed to automatically
detect the proper connection settings for Broadband.
This works for many Broadband connections. If you
know your Broadband connection settings, or if
your ISP has given you specific Broadband settings
(such as an IP address), choose
Settings on the troubleshootingpage you see during registration, and
follow the instructions on that page to type in your
settings manually.
• If you’ve gone through all of the troubleshooting
steps above and you still can’t connect, contact
MSN TV at 1-866-466-7688 for help.
Troubleshooting
2322
Limited warranty
What your warranty covers
Any defect in materials or workmanship.
For how long after your purchase
• 90 days —Unit exchange, which includes parts and labor.
•
91 days to 1 year
—
Unit exchange, which includes parts only;
you pay the labor.
• The warranty for rental units begins with the first rental or
45 days
from date of shipment to the rental firm, whichever comes first.
What we will do
During the initial 90 days:
Exchange the defective portion of your Internet player with a new
or, at our option, refurbished unit.
After the
90 days and within one year:
Exchange the defective portion of your Internet player with a new
or, at our option, refurbished unit. We will charge you a flat service
fee to replace the defective unit.
How you get service
• Call 1
-
800-722-9599 and have your unit’s date of purchase
and model/serial number ready. The model/serial number
information is on the bottom of your unit.
• A representative will troubleshoot your problem over the phone.
• If the representative determines that you should receive a
replacement unit you will be provided with a Service Request (
SR)
number and return instructions. No returns will be accepted
without the
SR number.
Page 15

Federal Communications Commission (FCC) Statement
This equipment complies with Part 68 of the FCC rules and the
requirements adopted by the
ACTA. On the bottom of this equip-
ment is a label that contains, among other information, a product
identifier in the format
US:G95EQ##TXXXX. If requested, this number
must be provided to the telephone company.
A plug and jack used to connect this equipment to the premises
wiring and telephone network must comply with the applicable
FCC
part 68 rules and requirements adopted by the ACTA. A compliant
telephone cord and modular plug is provided with this product. It is
designed to be connected to a compatible modular jack that is also
compliant. See installation instructions for details.
The
REN is used to determine the number of devices that may be
connected to a telephone line. Excessive
RENs on a telephone line may
result in the devices not ringing in response to an incoming call. In
most but not all areas, the sum of
RENs should not exceed five (5.0).
To be certain of the number of devices that may be connected to a
line, as determined by the total
RENs, contact the local telephone
company. The
REN number is located on the label of this device.
If this equipment causes harm to the telephone network, the
telephone company will notify you in advance that temporary
discontinuance of service may be required. But if advanced notice
isn’t practical, the telephone company will notify the customer
as soon as possible. Also, you will be advised of your right to file
a complaint with the
FCC if you believe it is necessary.
The telephone company may make changes in its facilities, equipment, operations or procedures that could affect the operation of
the equipment. If this happens the telephone company will provide
advanced notice in order for you to make necessary modifications
to maintain uninterrupted service.
FCC statement
Limitation of warranty
• THE WARRANTY STATED ABOVE IS THE ONLY WARRANTY APPLICABLE
TO THIS PRODUCT. ALL OTHER WARRANTIES, EXPRESS OR IMPLIED
(INCLUDING ALL IMPLIED WARRANTIES OF MERCHANTABILITY OR
FITNESS FOR A PARTICULAR PURPOSE) ARE HEREBY DISCLAIMED.
NO VERBAL OR WRITTEN INFORMATION GIVEN BY THOMSON INC.,
ITS AGENTS OR EMPLOYEES SHALL CREATE A GUARANTY OR IN
ANY WAY INCREASE THE SCOPE OF THIS WARRANTY.
• REPAIR OR REPLACEMENT AS PROVIDED UNDER THIS WARRANTY
IS THE EXCLUSIVE REMEDY OF THE CONSUMER. THOMSON INC.
SHALL NOT BE LIABLE FOR INCIDENTAL OR CONSEQUENTIAL
DAMAGES RESULTING FROM THE USE OF THIS PRODUCT OR ARISING
OUT OF ANY BREACH OF ANY EXPRESS OR IMPLIED WARRANTY ON
THIS PRODUCT. THIS DISCLAIMER OF WARRANTIES AND LIMITED
WARRANTY ARE GOVERNED BY THE LAWS OF THE STATE OF
INDIANA. EXCEPT TO THE EXTENT PROHIBITED BY APPLICABLE
LAW, ANY IMPLIED WARRANTY OF MERCHANTABILITY OR FITNESS
FOR A PARTICULAR PURPOSE ON THIS PRODUCT IS LIMITED TO
THE APPLICABLE WARRANTY PERIOD SET FORTH ABOVE.
How state law relates to warranty
• Some states do not allow the exclusion nor limitation of incidental
or consequential damages, or limitations on how long an implied
warranty lasts, so the above limitations or exclusions may not
apply to you.
• This warranty gives you specific legal rights, and you also may
have other rights that vary from state to state.
If you purchased your product outside the United States
This warranty does not apply. See your dealer for warranty information.
If trouble is experienced with this equipment, for repair or warranty
info rmati on please refer to the appropriate section of this manual. This
device is not user serviceable. If the equipment is causing harm to
the telephone network, the telephone company may request that
you disconnect the equipment until the problem is solved.
Connection to party line service is subject to state tariffs. Contact
the state public utility commission, public service commission, or
corporation commission for information.
If your home has specially wired alarm equipment connected to the
telephone line, ensure the installation of this equipment does not
disable your alarm equipment. If you have questions about what
will disable alarm equipment, consult your telephone company or a
qualified installer.
This equipment has been tested and found to comply with the limits
for a Class B digital device, pursuant to Part
15 of the FCC Rules.
These limits are designed to provide reasonable protection against
harmful interference in a residential installation. This equipment
generates, uses, and can radiate radio frequency energy and, if not
installed and used in accordance with the instructions, may cause
harmful interference to radio communications. However, there is no
guarantee that interference will not occur in a particular installation.
If this equipment does cause harmful interference to radio or television reception, which can be determined by turning the equipment
off and on, the user is encouraged to try to correct the interference
by one or more of the following measures:
• Reorient or relocate the receiving antenna.
• Increase the separation between the equipment and Internet player.
• Connect the equipment into an outlet on a circuit different
from that to which the Internet player is connected.
• Consult the dealer or an experienced radio/
TV technician for help.
25
What your warranty does not cover
• Customer instruction. (Your Owner’s Manual describes how to
install, adjust, and operate your unit. Any additional information
should be obtained from your dealer.)
• Acts of nature, such as but not limited to lightning damage.
• Adjustment of customer controls.
• Damage from misuse or neglect.
• A unit that has been modified or incorporated into other products
or is used for institutional or other commercial purposes.
• Batteries.
• Units purchased, serviced or operated outside the continental
U.S.A. and Alaska.
• Internet Service Access.
• Loss of programming.
• Installation.
• Shipping damage if the unit was not packed and shipped in the
manner prescribed by Thomson.
Product Registration
Please complete and mail the Product Registration Card packed
with your product. It will make it easier to contact you should
it ever be necessary. The return of the card is not required for
warranty coverage.
24
Page 16

Remote programming codes
27
Programming your remote control
26
If you have an RCA, GE, or Proscan
TV, your Internet player’s remote
might already operate your TV.
To see if the Internet player’s remote operates your TV
1
Make sure your TV is on.
2
Point the remote at your TV.
3
Press the TV Power button.
If your TV turns off, then you don’t need to program
the remote to operate it.
If your TV does not turn off, use the following steps
to program the remote to operate your TV.
Note This remote control can be programmed to operate
many different brands and models of TVs. However, there
are some TVs the remote cannot be programmed to
operate. If you’ve used all of the codes available for your
TV’s brand and the remote still doesn’t operate your TV,
the remote might not be able to operate your TV.
To program this remote control to operate your TV
1
Find your brand of TV in the list of remote
programming codes starting on the next page.
2
Press and hold the TV Power button. While holding
the button, enter the first four-digit code in the list
of codes for your brand.
3
Release the TV Power button.
4
Make sure your TV is on. Point the remote at
your TV and press the TV Power button.
If your TV turns off, then you’ve successfully programmed
the remote to control your TV. If your TV does not turn
off, repeat the steps for programming the remote and use
the next code in your brand’s list of codes.
Note If you use one of the codes listed in bold to
program your MSN TV remote, you can use the Input
button on the remote to switch between viewing
MSN TV and watching TV.
Goldstar 1004, 1005, 1006, 1012
1019, 1056, 1057, 1058
1155, 1156, 1171, 1172
Grundy 1038, 1046, 1171
Hallmark 1004, 1006
Harvard 1038
Hitachi 1004, 1006, 1012, 1013, 1014
1059, 1060, 1061, 1135, 1136
1137, 1138, 1139, 1140, 1141
1142, 1143, 1144, 1145, 1146
1148, 1150, 1179, 1198, 1199
IMA 1038
Infinity 1062
JCPenney 1000, 1004,
1005, 1006
1008, 1022, 1052, 1054, 1058
1063, 1064, 1072, 1087, 1105
1128, 1171, 1172, 1181, 1201
Janeil 1174
JBL 1062
JCB7 1002
Jensen 1004, 1006
JVC 1012, 1013, 1014, 1054, 1060, 1065
1066, 1067, 1157, 1158, 1159, 1182
Kawasho 1002, 1004, 1006
Kenwood 1004, 1006, 1019
Kloss Novabeam 1068, 1069, 1174, 1183
KTV 1038, 1070, 1171, 1177
Loewe 1062
Brand Code
Abex 1172
Admiral 1001, 1173, 1211
Adventura 1174
Aiko 1016
Akai 1002
Alleron 1046
Amtron 1038
Anam National 1003, 1038, 1192
1193, 1194
AOC 1004,
1005, 1006
1007, 1175, 1176, 1195
Audiovox 1038
Belcor 1004
Bell & Howell 1001, 1083, 1162
Bradford 1038
Brokwood 1004
Candle 1004, 1006, 1008, 1174
Celebrity 1002
Centurion 1009
Citizen 1004, 1006, 1008, 1016
1038, 1105, 1171, 1174, 1177
Colortyme 1004, 1006, 1010
Concerto 1004, 1006
Contec/Cony 1012, 1013, 1014, 1038
Craig 1038
Crown 1038, 1171
Curtis Mathes 1000, 1004, 1006, 1015
1105, 1162, 1171, 1212
CXC 1038
Daewoo 1004,
1005, 1006, 1016
1017, 1018, 1127, 1171, 1196
Daytron 1004, 1006, 1171
Dimensia 1000
Dumont 1004, 1151
Electroband 1002
Electrohome 1003, 1004, 1006,
1019, 1020, 1022
Emerson 1004, 1006, 1012, 1023
1024, 1025, 1026, 1027, 1028, 1029
1030, 1031, 1032, 1033, 1034, 1035
1036, 1037, 1038, 1039, 1041, 1042
1043, 1044, 1046, 1047, 1123, 1124
1162, 1171, 1177, 1179, 1191, 1208
Envision 1004, 1006
Fisher 1048, 1049, 1051, 1162, 1180
Fujitso 1046
Funai 1038, 1046
Futuretec 1038
GE
1000, 1003, 1004, 1006, 1022
1052, 1054, 1055, 1087, 1164
1165, 1166, 1167, 1168, 1181, 1213
Gibralter 1004, 1151
Page 17

Logik 1083
Luxman 1004, 1006
LXI 1000, 1006, 1049, 1062, 1071
1072, 1073, 1162, 1181, 1207
Magnavox 1004, 1006, 1008, 1019
1062,1068, 1069, 1075, 1076
1077, 1088,
1130, 1131, 1132
1133, 1134, 1183, 1219, 1235
Majestic 1083
Marants 1062
Marantz 1004, 1006, 1062, 1078
Megatron 1006, 1059
Memorex 1001, 1006, 1082, 1083, 1162
MGA 1004,
1005, 1006, 1019
1022, 1051, 1079, 1080, 1082
Midland 1054, 1151, 1171, 1172, 1181
Minutz 1052
Mitisubishi 1004,
1005, 1006, 1019, 1022
1051, 1079, 1080, 1081, 1082, 1125
Montgomery Ward 1083
Motorola 1003, 1173
MTC 1004, 1005, 1006, 1105
Multitech 1038
Multivision 1084
NAD 1006, 1071, 1072, 1185
NEC 1003, 1004, 1005, 1006, 1200
Nikko 1006, 1016
NTC 1016
Onwa 1038
Optimus 1185
Optonica 1095, 1173
Orion 1035, 1191
Panasonic 1003, 1054, 1062, 1170, 1214
Philco 1003, 1004,
1005, 1006
1008, 1012, 1019, 1062
1068, 1069, 1075, 1077, 1183
Philips 1003, 1004, 1008, 1012
1019, 1062, 1068, 1069, 1075
1076, 1086, 1087, 1088, 1089
Pilot 1004, 1171
Pioneer 1004, 1006, 1090
1091, 1092, 1179, 1185
Portland 1004, 1005, 1006, 1016, 1171
Price Club 1105
Prism 1054
Proscan 1000, 1181
Proton 1004, 1006, 1012, 1093
Pulsar 1004, 1151
Quasar 1003, 1054, 1070, 1094
Radio Shack/Realistic 1000, 1004, 1006
1012, 1038, 1049
1095, 1162, 1171, 1172
RCA
1000, 1003, 1004, 1005
1006, 1007, 1019, 1096, 1098
1099, 1100, 1101, 1102, 1103
1129, 1179, 1181, 1187, 1188
1190, 1202, 1203, 1215, 1233
Runco 1151
Sampo 1004, 1006, 1171, 1172
Samsung 1004,
1005, 1006, 1012
1015, 1019, 1104,
1105
1106, 1171, 1172, 1204
Samsux 1171
Sansui 1191
Sanyo 1004, 1048, 1049, 1080
1107, 1108, 1162, 1169, 1180
Scotch 1006
Scott 1004, 1006, 1012
1024, 1035, 1038, 1046
Sears 1000, 1004, 1006
1013, 1014, 1019, 1046, 1048
1049, 1051, 1066, 1071, 1072
1109, 1110, 1162, 1180, 1181, 1189
Sharp 1004, 1006, 1012, 1029, 1095
1111, 1112, 1113, 1122, 1171, 1173
Shogun 1004
Signature 1001, 1083, 1115
Simpson 1008
Sony 1002, 1205, 1216, 1218
Soundesign 1004, 1006, 1008, 1038, 1046
Remote programming codes
2928
Squareview 1189
SSS 1004, 1038
Starlite 1038
Supre-Macy 1174
Supreme 1002
Sylvania 1004, 1006, 1008, 1019
1062, 1068, 1069, 1075, 1076
1077, 1088, 1116, 1161, 1183
Symphonic 1033, 1038, 1189
Tandy 1173
Tatung 1003
Technics 1054
Techwood 1004, 1006, 1054
Teknika 1004,
1005, 1006, 1008, 1012
1013, 1014, 1016, 1038, 1046
1076, 1082, 1083, 1105, 1170, 1171
Telecaption 1117
TMK 1004, 1006
Toshiba 1049, 1071, 1072, 1105
1109, 1117, 1118, 1160, 1162
Totevision 1171
Universal 1052, 1087
Victor 1066, 1182
Vidtech 1004, 1005, 1006
Viking 1174
Wards 1000, 1001, 1004,
1005, 1006
1019, 1024, 1033, 1046, 1052
1062, 1068, 1069, 1075, 1076
1083, 1087, 1088, 1095, 1119, 1120
Yamaha 1004, 1005, 1006, 1019
Zenith 1004, 1083, 1151, 1152
1153, 1154, 1210, 1217
Page 18

Index
30
K
keyboard . . . . . . . . . . . . . . . . . . . . . . . . . . . . . . . . . . . . . . . . . 2
illustration . . . . . . . . . . . . . . . . . . . . . . . . . . . . . . . . . . 18
where to aim . . . . . . . . . . . . . . . . . . . . . . . . . . . . . 3, 5
L
lights, front-panel . . . . . . . . . . . . . . . . . . . . . . . . . . . 5, 21
M
messages light . . . . . . . . . . . . . . . . . . . . . . . . . . . . . . . . . . . 5
modem connection . . . . . . . . . . . . . . . . . . . . . . . 10-11
MSN Power button,
keyboard and remote control . . . 18-19, 21
MSN TV 2 Internet player,
. . . . . . . . . . . . . . . . . . . . . . . . . . . See Internet player
MSN TV service
Choosing a service plan . . . . . . . . . . . . . . . . . . 17
connecting to . . . . . . . . . . . . . 10-11, 13-15, 21
creating an account . . . . . . . . . . . . . . . . . . . . . . . 16
registering . . . . . . . . . . . . . . . . . . . . . . . . . . . . . . . . . 16
Update screen . . . . . . . . . . . . . . . . . . . . . . . . . . . . . 15
Welcome screen . . . . . . . . . . . . . . . . . . . . . . 13, 15
N
network router,
connecting Ethernet cable to . . . . . . . . . . . . . . 11
A
A/V (audio/video) cable . . . . . . . . . . . . . . . . . . . . . . . .2
A/V (audio/video) jacks . . . . . . . . . . . . . . . . . . . . . . . . . 4
connecting Internet player
to TV or VCR with . . . . . . . . . . . . . . . . . . . . . . . . 6, 7
unused . . . . . . . . . . . . . . . . . . . . . . . . . . . . . . . . . . . . . 20
antenna jack, TV . . . . . . . . . . . . . . . . . . . . . . . . . . 6, 9, 20
arrow buttons/keys . . . . . . . . . . . . . . . . . . . . . . . . 18, 19
B
Broadband connection . . . . . . . . . . . . . . . . . 3, 10-11
entering connection settings . . . . . . . . 11, 22
troubleshooting . . . . . . . . . . . . . . . . . . . . . . . . . . . 22
C
cable-TV box,
connecting Internet player to . . . . . . . . . . 6-9
cable-modem connection . . . . . . . . . . . . . . . . . 3, 11
connected light . . . . . . . . . . . . . . . . . . . . . . . . . . . . . . . . . . 5
customer service information . . . . . . . . . . . . . . . . 23
D
DSL connection . . . . . . . . . . . . . . . . . . . . . . . . . . . . . 3, 11
DVD installation kit . . . . . . . . . . . . . . . . . . . . . . . . . . . . . 9
DVD player,
connecting Internet player to . . . . . . . . . . 6-9
DVR player,
connecting Internet player to . . . . . . . . . . 6-9
E
e-mail light . . . . . . . . . . . . . . . . . . . . . . . . . . . . . . . . . . . . . . . 5
Ethernet, connection . . . . . . . . . . . . . . . . . . . . 3, 4, 11
F
FCC statement . . . . . . . . . . . . . . . . . . . . . . . . . . . . . . . . . 25
H
high-speed connection . . . . . . . . . . . . . . . . 3, 10-11
home network,
connecting to MSN TV using . . . . . . . . . . 3, 11
I
Internet player
back panel . . . . . . . . . . . . . . . . . . . . . . . . . . . . . . . . . . . 4
components of . . . . . . . . . . . . . . . . . . . . . . . . . . . . . . 2
connecting to TV or VCR . . . . . . . . . . . . . . . . 6-9
front panel . . . . . . . . . . . . . . . . . . . . . . . . . . . . . . . . . . 5
lights . . . . . . . . . . . . . . . . . . . . . . . . . . . . . . . . . . . . . 5, 21
placement of . . . . . . . . . . . . . . . . . . . . . . . . . . . . . . . . 3
troubleshooting . . . . . . . . . . . . . . . . . . . . . . . 20-22
turning on . . . . . . . . . . . . . . . . . . . . . . . . . . . . . 12, 21
V
VCR
antenna jack . . . . . . . . . . . . . . . . . . . . . . . . . . . . . . . . . 9
connecting Internet player to . . . . . . . . . . 6-9
W
warranty information . . . . . . . . . . . . . . . . . . . . . . 23-24
Welcome screen . . . . . . . . . . . . . . . . . . . . . . . . . . . 13, 15
wireless keyboard . . . . . . . . . . . . . . . . . See keyboard
P
phone cord . . . . . . . . . . . . . . . . . . . . . . . . . . . . . . . . . . 2, 10
phone jack . . . . . . . . . . . . . . . . . . . . . . . . . . . . . . . . . . . 3, 10
phone line splitter . . . . . . . . . . . . . . . . . . . . . . . . . . 2, 10
phone line, connecting . . . . . . . . . . . . . . . . . . . . . . . 10
power jack . . . . . . . . . . . . . . . . . . . . . . . . . . . . . . . . . . . . . . . 4
power light . . . . . . . . . . . . . . . . . . . . . . . . . . . . . . . . . . . . . . . 5
blinking . . . . . . . . . . . . . . . . . . . . . . . . . . . . . . . . . . . . . 21
power supply . . . . . . . . . . . . . . . . . . . . . . . . . . . . . . . . . . . . 2
R
RCA cable . . . . . . . . . . . . . . . . . . . . . . . . . See A/V cable
remote control
controlling TV with . . . . . . . . . . . . . . . . . . . . 26-29
illustration . . . . . . . . . . . . . . . . . . . . . . . . . . . . . . . . . . 19
MSN Power button . . . . . . . . . . . . . . . . . . . 19, 21
programming to operate TV . . . . . . . . . . 26-29
where to aim . . . . . . . . . . . . . . . . . . . . . . . . . . . . . 3, 5
RF modulator . . . . . . . . . . . . . . . . . . . . . . . . . . . . . . . . . . . . 9
router, connecting Ethernet cable to . . . . . . . . 11
S
Settings page . . . . . . . . . . . . . . . . . . . . . . . . . . . . . . 11, 22
S-Video
connecting Internet
player to TV using . . . . . . . . . . . . . . . . . . . . . . . . . . 8
Internet player jack . . . . . . . . . . . . . . . . . . . . . . . . . 4
T
telephone cord . . . . . . . . . . . . . . . . . See phone cord
telephone jack . . . . . . . . . . . . . . . . . . See phone jack
television . . . . . . . . . . . . . . . . . . . . . . . . . . . . . . . . . . See TV
troubleshooting . . . . . . . . . . . . . . . . . . . . . . . . . . . . 20-22
customer service phone number . . . . . . . . . . 23
Web site . . . . . . . . . . . . . . . . . . . . . . . . . . . . . . . . . . . . 11
TV
A/V (audio/video) jacks . . . . . . . . . . . . . . . . . 6, 7
antenna jack . . . . . . . . . . . . . . . . . . . . . . . . . . . . . . 6, 9
connecting Internet player to . . . . . . 6-9, 20
controlling with remote . . . . . . . . . . 19, 26-29
input jacks . . . . . . . . . . . . . . . . . . . . . . . . . . . . . . . . 6 -8
S-Video jack . . . . . . . . . . . . . . . . . . . . . . . . . . . . . . . . . 8
U
Update screen . . . . . . . . . . . . . . . . . . . . . . . . . . . . . . . . . . 15
USB ports . . . . . . . . . . . . . . . . . . . . . . . . . . . . . . . . . . . . . . . . . 4
31
Page 19

Microsoft, MSN, and the MSN logo are either registered trademarks or trademarks
of Microsoft Corporation in the United States and/or other countries. Other
company or product names mentioned herein may be the trademarks of their
respective owners.
©2004 Microsoft Corporation, portions Thomson Inc. All rights reserved
Trademark(s)® Registered. Marca(s) Registrada(s). Printed in Mexico.
TOCOM 1638375A
Thomson Inc.
10330 North Meridian Street
Indianapolis, IN 46290
 Loading...