

Page 1

DVD Player
User's Manual
The New Era in Entertainment.
Model: MRP1150
TOCOM 1583577A
Please read this manual
before using this product for
the first time.
Page 2
CAUTION
RISK OF ELECTRIC SHOCK
DO NOT OPEN
This symbol indicates
“dangerous voltage” inside the
product that presents a risk of
electric shock or personal injury.
This symbol indicates
important instructions
accompanying the product.
WARNING
To reduce the risk of fire or shock
hazard, do not expose this DVD
player to rain or moisture.
CAUTION
THIS PRODUCT UTILIZES A
LASER. USE OF CONTROLS OR
ADJUSTMENTS OR
PERFORMANCE OF
PROCEDURES OTHER THAN
THOSE SPECIFIED HEREIN
MAY RESULT IN HAZARDOUS
RADIATION EXPOSURE. DO
NOT OPEN COVERS AND DO
NOT REPAIR YOURSELF.
REFER SERVICING TO
QUALIFIED PERSONNEL.
CAUTIONS
Caution: To prevent electric shock,
match wide blade of plug to wide
slot, fully insert.
Power Consumption:
100-240V ~ 50/60 Hz
15 W
To prevent electromagnetic interference with
electric appliances, such as radios and televisions,
use shielded cables and connectors for connections.
TO REDUCE THE RISK OF ELECTRIC SHOCK, DO NOT
REMOVE THE COVER (OR BACK). NO USERSERVICEABLE PARTS ARE INSIDE. REFER
SERVICING TO QUALIFIED SERVICE PERSONNEL.
CAUTION: DVD PLAYERS USE A VISIBLE
LASER BEAM WHICH COULD CAUSE
HAZARDOUS RADIATION EXPOSURE IF
DIRECTED. BE SURE TO OPERATE THE
PLAYER CORRECTLY AS INSTRUCTED.
Note:
This DVD player is designed and
manufactured to respond to the
Region Management Information.
If the Region number of a DVD
disc does not correspond to the
Region number of this DVD player,
this DVD player cannot play the
disc. The Region number for this
DVD player is Region No 4.
Note:
This device is protected by U.S. patent numbers
4,631,603 and 4,577,216 and 4,819,098 and
other intellectual property rights. The use of
Macrovision’s copy protection technology in the
device must be authorized by Macrovision and is
intended for home and other limited pay-perview uses only, unless otherwise authorized in
writing by Macrovision. Reverse engineering or
disassembly is prohibited.
Note:
This unit can be used only where the
power supply is AC 100-240 V, 5060Hz. It cannot be used elsewhere.
CLASS 1
LASER
PRODUCT
Page 3

1
Table of Contents
Manufactured under license from Dolby Laboratories. “Dolby” and the double-D symbol are trademarks of Dolby Laboratories.
Confidential unpublished works. ©1992-1997 Dolby Laboratories, Inc. All rights reserved.
DTS is a registered trademark of Digital Home Theater Systems, Inc.
Chapter 1 – Setup and Connections
Things to Consider Before You Connect ......................................................................6
Choose Your Connection...............................................................................................7
DVD Player + TV with Audio/Video Input Jacks...................................................8
DVD Player + TV + VCR..........................................................................................9
DVD Player + TV + Dolby Pro Logic, Dolby Digital or DTS Receiver ...................11
DVD Player + TV + VCR + Satellite Receiver ......................................................... 13
Install Batteries in the Remote .....................................................................................14
Important Battery Information.............................................................................14
Turn on the TV and DVD Player ....................................................................................14
How to Find Your TV’s Video Input Channel ............................................................... 15
How to Move Around the DVD Player’s Menu System .............................................. 16
Set the Menu Language................................................................................................16
The Remote Control Buttons ........................................................................................17
Chapter 2 – Playing DVDs
Regional Coding ............................................................................................................20
Using Different Menus..................................................................................................20
Loading and Playing Discs ............................................................................................20
Using a Disc Menu ......................................................................................................... 22
DVD Playback Features .................................................................................................23
Fast Motion Playback (Picture Scan).....................................................................23
Freeze Frame and Frame Advance .......................................................................23
Slow Motion Playback (in Freeze Frame mode) ..................................................24
Random Playback ..................................................................................................24
Program Playback ..................................................................................................25
Deleting Programmed Chapters ...........................................................................25
Using the On-Screen Info Banner.................................................................................26
Selecting a Title Number.......................................................................................26
Selecting a Chapter Number.................................................................................26
Using Subtitles ....................................................................................................... 27
Using Elapsed Time................................................................................................27
Changing the Subtitle Language (On the Player) ...............................................28
Changing the Audio Language ............................................................................29
Changing the Camera Angle ................................................................................29
Using the Marker Feature ............................................................................................. 30
Storing a Marker During DVD Playback...............................................................30
Recalling a Marked Scene ..................................................................................... 30
Clearing a Marker..................................................................................................30
Page 4

2
Table of Contents
Chapter 2 – Playing DVDs (continued)
Using the Repeat Feature .............................................................................................31
To Repeat a Chapter or Title ................................................................................. 31
A•B Repeat.............................................................................................................31
Turning Off Repeat Functions...............................................................................31
Using the 3-D Surround Button....................................................................................32
Special Features ............................................................................................................. 32
Screen Saver ...........................................................................................................32
Auto Power Off .....................................................................................................32
Pro-tect Plus™ Locking Feature............................................................................32
Chapter 3 – Playing Audio CDs
Loading and Playing an Audio CD ............................................................................... 34
Audio CD Playback Features ......................................................................................... 34
Selecting a Specific Track ...................................................................................... 34
Random Playback ..................................................................................................34
Program Playback ..................................................................................................35
Deleting Programmed Tracks................................................................................35
Using the Repeat Feature .............................................................................................36
Repeating a Track or Disc ...................................................................................... 36
A•B Repeat.............................................................................................................36
Loading and Playing an MP3 CD ..................................................................................37
The MP3 Menu...............................................................................................................37
Skipping Songs....................................................................................................... 38
Chapter 4 – Playing Video CDs
What is a Video CD? ...................................................................................................... 40
The Video CD Disc Menu...............................................................................................40
Loading and Playing a Video CD ..................................................................................40
If the Video CD Has Playback Control .......................................................................... 41
Bypassing Playback Control ..................................................................................41
Resuming Playback Control ..................................................................................41
Video CD Playback Features .........................................................................................42
Selecting a Specific Track ...................................................................................... 42
Changing the Audio Channel Output ..................................................................42
Random Playback ..................................................................................................42
Program Playback ..................................................................................................43
Deleting Programmed Chapters ...........................................................................43
Disc View........................................................................................................................44
Page 5

3
Table of Contents
Chapter 5 – The Menu System
The Audio Menu – Selecting the Audio Preference .................................................... 46
The Subtitles Menu – Selecting the Subtitle Language..............................................47
The Player Menu – Changing the Player Menu Language .........................................47
The Disc Menu – Selecting the Disc Menu Language .................................................48
The Rating Limit Menu..................................................................................................48
Creating a Password ..............................................................................................48
Setting the Rating Limit ........................................................................................49
Unlocking the Rating Limit ...................................................................................50
Changing the Password.........................................................................................50
If a DVD’s Rating Exceeds the Player’s Rating Limit ............................................51
The Audio Options Menu ............................................................................................. 51
Selecting Digital Output Type...............................................................................51
DTS..........................................................................................................................52
Dynamic Compression ........................................................................................... 52
2x Playback Audio .................................................................................................52
The Display Menu..........................................................................................................53
Selecting the Screen Format Setting .................................................................... 53
Using Still State......................................................................................................54
Turning the On-Screen Messages On and Off ..................................................... 54
Dimming the Front Panel Display.........................................................................55
Changing the Black Level......................................................................................55
Chapter 6 – Other Information
Troubleshooting ............................................................................................................ 58
The Jacks on the Back of the DVD Player ....................................................................61
Front Panel Controls......................................................................................................62
Front Panel Display........................................................................................................ 63
Index...............................................................................................................................65
Page 6

This page intentionally left blank.
Page 7

Chapter Overview
• Things to Consider Before You Connect
• Choose your Connection
• Connections
• Installing the Batteries
• How to Find Your TV’s Input Channel
• How to Move Around the DVD Player’s Menu System
• Set the Menu Language
• Setting Other Options
• The Remote Control
Connections and Setup
The New Era in Entertainment.
Illustrations contained in this document are for repr esentation only.
5
Chapter 1
Page 8
6 Chapter 1
Connections and Setup
Things to Consider Before You Connect
Protect Against Power Surges
• Connect all components befor e you plug any of their power cor ds into the wall outlet.
• T urn off the TV and/or components befor e you connect or disconnect any cables.
• Make sur e all antennas and cables ar e properly gr ounded. Refer to the Impor tant Safeguar ds
sheet packed with your DVD player .
Protect Components from Overheating
• Don’t block ventilation holes on any of the components. Arrange the components so that air
can circulate fr eely.
• Don’t stack components.
• When you place components in a stand, make sur e you allow adequate ventilation.
• If you connect an audio r eceiver or amplifier , place it on the top shelf so the heated air fr om
it won’ t flow ar ound other components.
Position Cables Properly to Avoid Audio Interference
• Insert each cable fir mly into the designated jack.
• If you place components above the TV , route all cables down the side of the back of the TV
instead of straight down the middle of the back of the TV .
• If your antenna uses 300-ohm twin lead cables, do not coil the cables. Also, keep the twin
lead cables away fr om audio/video cables.
Connection Pictures
Audio/video cables ar e usually bundled together . For better visibility , the connection pictur es in
this book show each cable separately (audio left, audio right, and video).
Note: The illustrations in this book are representational, and in some instances may not
exactly match the item represented.
VIDEO CD
Manufactured under license from Dolby Laboratories. “Dolby” and the double-D symbol are trademarks of Dolby Laboratories.
Confidential unpublished works. ©1992-1997 Dolby Laboratories, Inc. All rights reserved.
DTS is a registered trademark of Digital Home Theater Systems, Inc.
Types of Discs Your DVD Player will Play
• DVD video discs – DVD video discs contain high quality pictur e and
sound content.
• Audio discs – Audio CDs contain musical or sound content only.
• Video CD discs – Like DVD video discs, Video CDs contain pictur e and
sound content. The dif ference is the amount of infor mation that can be
stor ed on the disc.
Page 9
Chapter 1 7
Connections and Setup
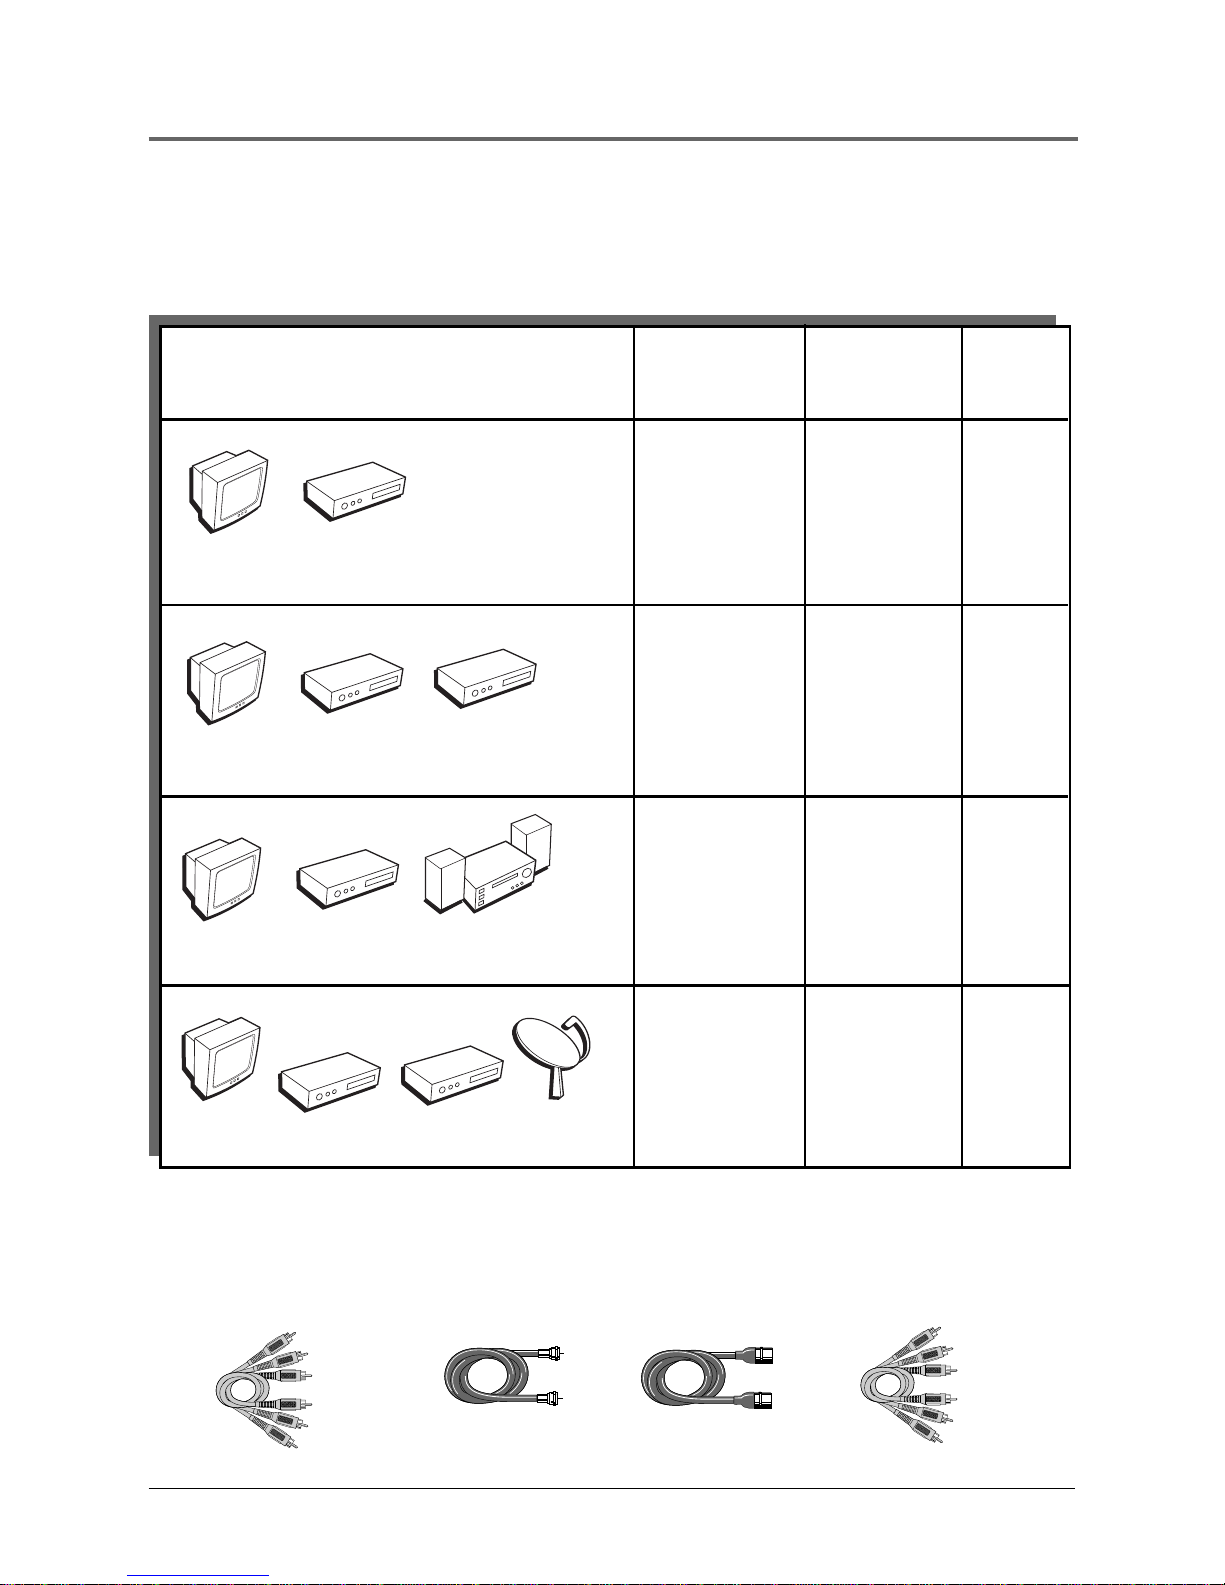
Choose Your Connection
There are several ways to connect your DVD player . Please use the following char t to deter mine
which connection is best for you. T urn to the appr opriate page and connect your DVD player .
TV
DVD
Components Cables Connection Go to...
Needed Title
• Coaxial
• Audio/video
• S-Video
(optional)
• Component
video (optional)
• Coaxial
• Audio/video
• S-Video
(optional)
• Component
video (optional)
Dolby Digital
Receiver
• Coaxial
• Audio/video
• S-Video
(optional)
• Component
video (optional)
Satellite
Cables Needed to Connect Components to Your TV
The pictur es below show the cables needed for the connections r epresented in this book.
Note: Audio/Video cables (A/V cables for short) are usually sold as a bundled set, but the
connection pictures in this book show each cable separately for better visibility.
TV
DVD
TV
DVD
TV + DVD page 8
TV + DVD +
Dolby Digital
pages
10-11
TV + DVD +
VCR + Satellite
page
12-13
VCR
TV
DVD
• Coaxial
• Audio/video
• S-Video
(optional)
• Component
video (optional)
TV + DVD + VCR
page 9
VCR
Audio/Video cables
Coaxial cable
S-Video cable
Component video cables
Page 10
8 Chapter 1
Connections and Setup
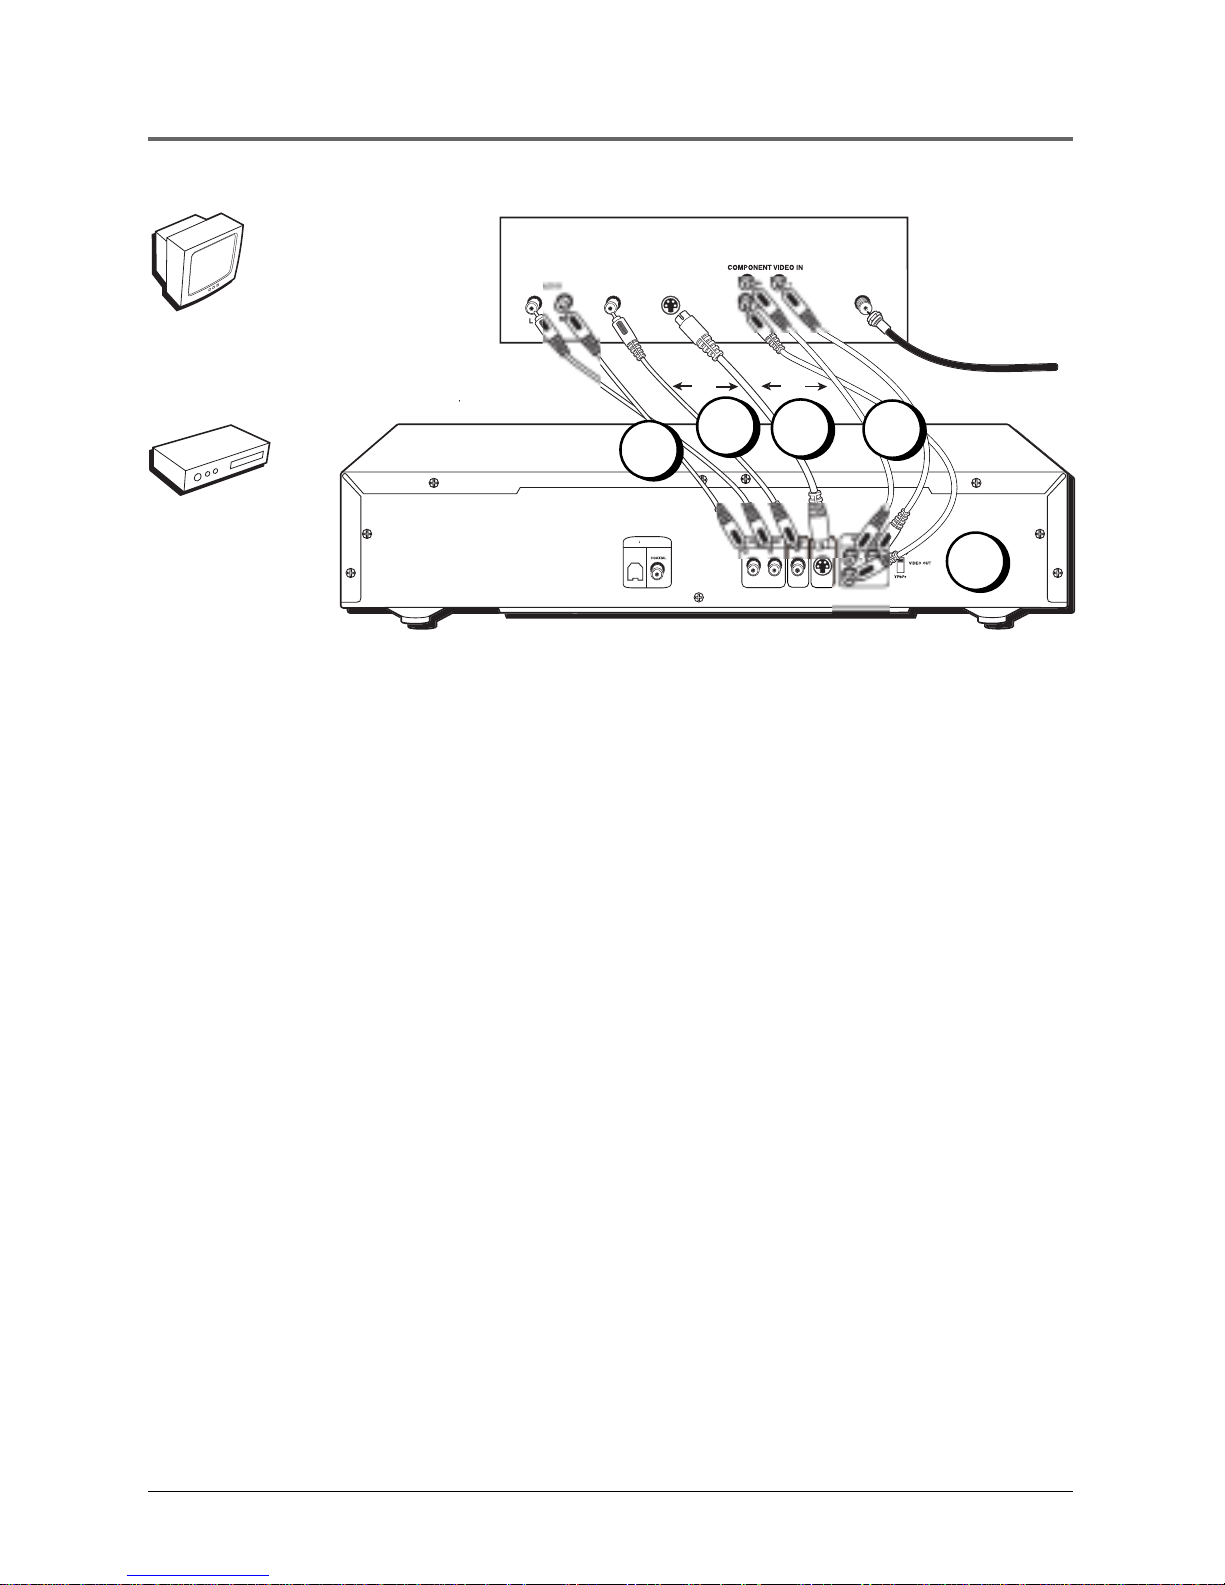
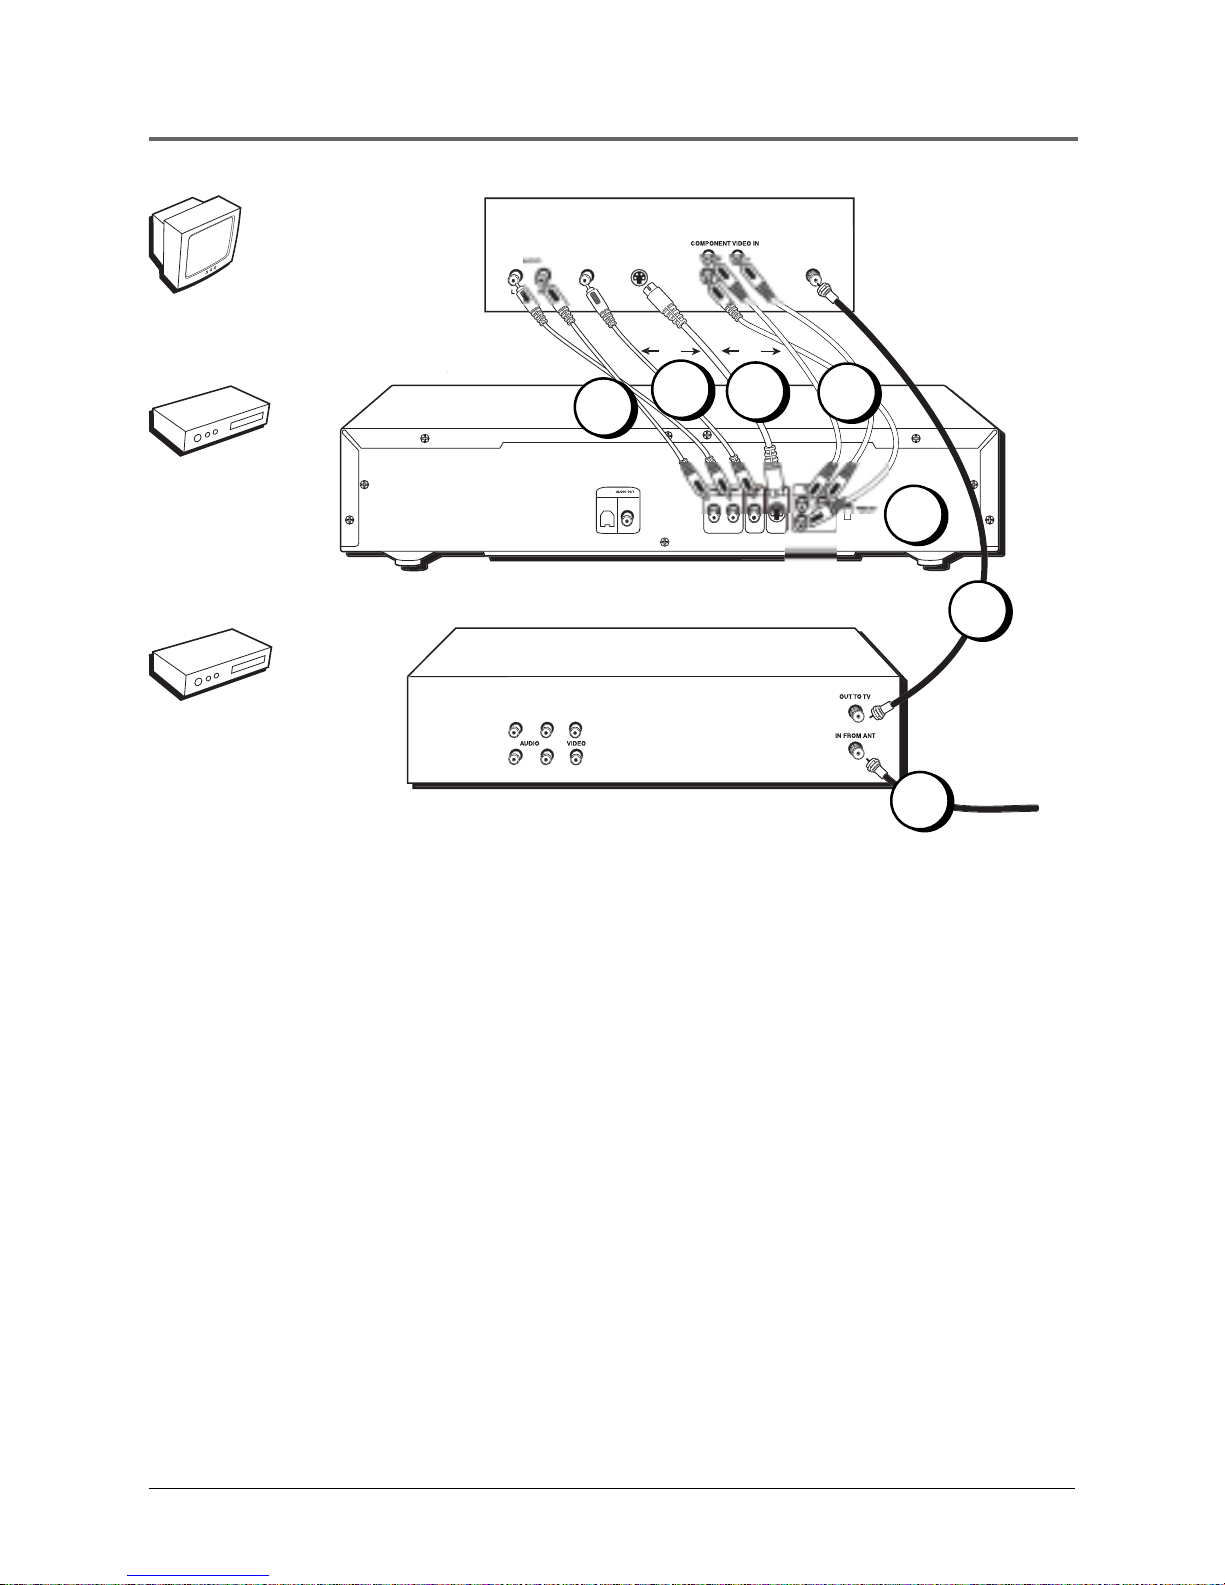
DVD Player + TV with Audio/Video Input Jacks
1. Connect the audio cables to the AUDIO OUT L (left – white) and R (right – r ed) jacks on the
back of your DVD Player , and to the cor responding Audio Input jacks on your TV .
2. Connect the video cable(s).
A. Basic video connection – Connect the video cable (yellow) to the VIDEO OUT jack on
the back of your DVD Player , and to the V ideo Input jack on your TV .
OR
B. S-Video (optional) – If your TV has an S-V ideo Input jack, connect the S-V ideo cable to
the S-VIDEO OUT jack on the back of your DVD Player and to the S-V ideo jack on your
TV . If your TV doesn’ t have S-V ideo, use the basic video connection listed above.
OR
C. Component video (optional) – If your TV has component video (Y , PB , and PR jacks)
use video-grade cables for the Y , PB , and PR connections. Note that it is essential to
match the color -coded connectors with a compatible TV . If your TV doesn’ t have
component video, use the S-V ideo or Basic video connection listed above.
3 . Set the VIDEO OUT SELECT switch to S-VIDEO or YPbPr , depending on the type of
connection you used. Either setting works for the Basic video connection (2A).
Note: Your cable or off-air connection to the television should not be affected by this
connection. Connect your cable or off-air antenna to your television as you normally
would. You may need to consult your television manual for details.
Go to page 14
S
ELE
CT
DIGIT
AL
AUDIO
OUT
O
PTICAL
YER
(BACK PANEL)
TV (BA
CK P
ANEL)
VIDE
O
C
ABLE OR
O
FF-AIR
SIG
NAL
A
S
-VIDEO I
N
OR
OR
TV
DVD
1
3
2A
2B
2C
Page 11
Chapter 1 9
Connections and Setup
SELECT
YPbPr
DIGIT
AL
O
PTICAL
CO
AXIA
L
YER
(BACK PANEL)
TV (BA
CK P
ANEL)
VIDE
O
A
S
-VIDEO I
N
OR
OR
VCR(BACK PANEL)
OUT
C
ABLE OR
O
FF-AIR
SIG
NAL
DVD Player + TV + VCR
1. Connect the audio cables to the AUDIO OUT L (left – white) and R (right – r ed) jacks on the
back of your DVD Player , and to the cor responding Audio Input jacks on your TV .
2. Connect the video cable(s).
A. Basic video connection – Connect the video cable (yellow) to the VIDEO OUT jack on
the back of your DVD Player , and to the V ideo Input jack on your TV .
OR
B. S-Video (optional) – If your TV has an S-V ideo Input jack, connect the S-V ideo cable to
the S-VIDEO OUT jack on the back of your DVD Player and to the S-V ideo jack on your
TV . If your TV doesn’ t have S-V ideo, use the basic video connection listed above.
OR
C. Component video (optional) – If your TV has component video (Y , PB , and PR jacks)
use video-grade cables for the Y , PB , and PR connections. Note that it is essential to
match the color -coded connectors with a compatible TV . If your TV doesn’ t have
component video, use the S-V ideo or Basic video connection listed above.
3 . Set the VIDEO OUT SELECT switch to S-VIDEO or YPbPr , depending on the type of
connection you used. Either setting works for the Basic video connection (2A).
4. Connect the antenna or cable to the Antenna Input jack on the VCR.
5. Connect a coaxial cable to the antenna output jack on the VCR and to the Antenna Input jack
on the television.
Go to page 14
TV
DVD
1
3
4
5
VCR
2A
2B
2C
Page 12
10 Chapter 1
Connections and Setup
DIGIT
AL
AUDIO
OUT
O
PTICAL
CO
AXIA
L
YER
(BACK PANEL)
TV (BA
CK P
ANEL)
VIDE
O
C
ABLE OR
O
FF-AIR
SIG
NAL
AUDI
O
S
-VIDEO I
N
OR
OR
AL RECEIVER
AL RECEIVER
(
BACK PANEL
)
A
U
O
PTICA
L
COAX
DIGITAL AUDI
O
OR
OR
Dolby Digital® and DTS
®
Both Dolby Digital and DTS ar e audio for mats used to r ecord 5.1-channel audio signals onto the
digital track of film (while the film is being made). Both of these for mats pr ovide up to six separate
channels: left, right, center , left r ear, right r ear, and common subwoofer .
The disc will play 5.1-channel sound only if you’ve connected a DTS or Dolby Digital r eceiver or
decoder and if the original movie the disc was r ecor ded fr om was encoded in the Dolby Digital or
DTS format.
Please Read This Before Using the DIGITAL AUDIO OUT Jack!
This player’s digital output jack is designed for a connection to a Dolby Digital or DTS
receiver or decoder.
Older digital equipment may not be compatible with the Dolby Digital bitstream. Such a
connection can create a high level of noise that may be harmful to your ears, and could
damage headphones or speakers.
It is important to choose the correct Digital Output setting in the DVD Player’s Sound menu,
especially when you use the DIGITAL AUDIO OUT jack. For more information, see chapter 5.
3
Dolby Digital
Receiver
TV
DVD
2A
2B
2C
1A
1C
1B
Page 13

Chapter 1 11
Connections and Setup
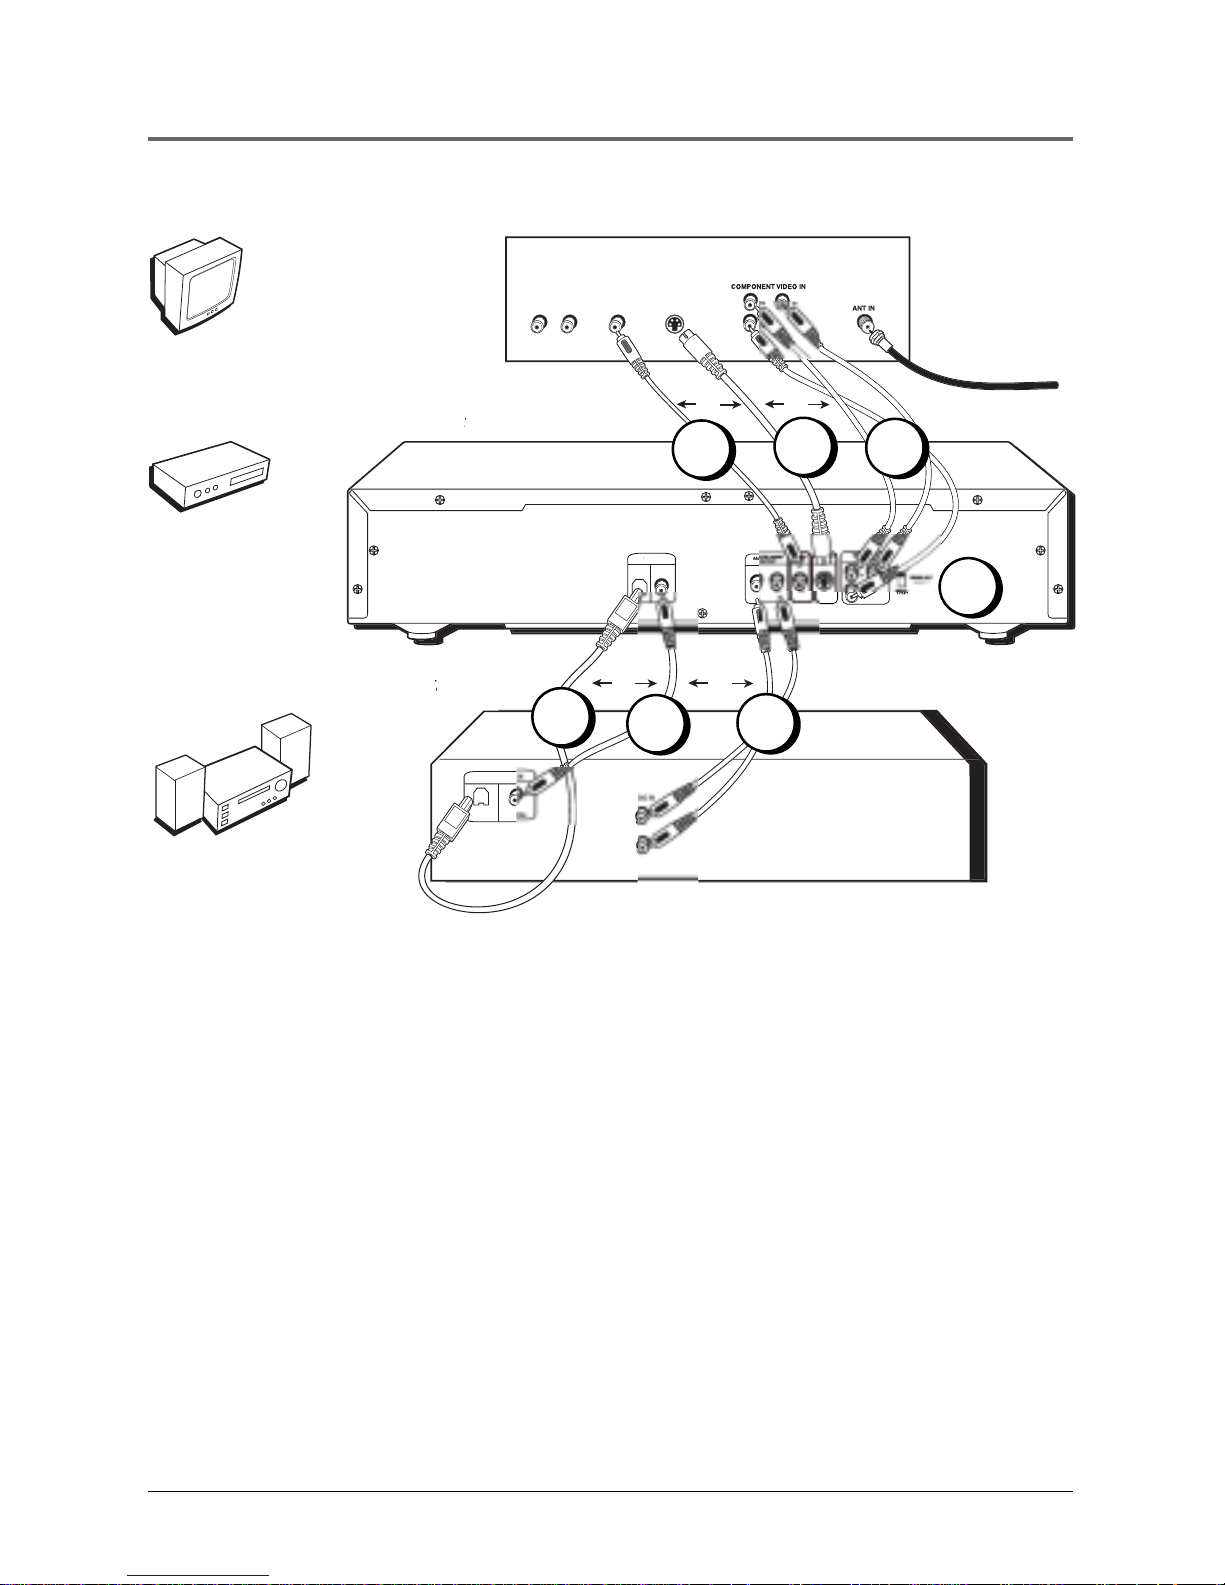
DVD Player + TV + Dolby Pro Logic, Dolby
Digital or DTS Receiver
To Connect the DVD Player
1. Connect the audio cable(s).
A. Basic audio connection – Connect the left and right audio cables
to your audio/video r eceiver and to the AUDIO OUT L (left – white)
and R (right – r ed) jacks on the back of your DVD player .
OR
B. Optical digital audio connection – If you have a Dolby Digital or
DTS receiver with an optical digital connection, inser t an optical
digital cable (not pr ovided) in the OPTICAL digital audio out jack on
the DVD player . Connect the other end of the cable to the Optical
Digital Input jack on the back of the r eceiver. Y ou must also set the
Digital Output setting in the Sound menu (see Chapter 5).
OR
C. Coaxial digital audio connection – If you have a Dolby Digital or
DTS receiver with a coaxial digital connection, inser t a coaxial
digital cable (not pr ovided) in the COAXIAL digital audio out jack
on the DVD player . Connect the other end of the cable to the
Coaxial Digital Input jack on the back of the r eceiver. Y ou must also
set the Digital Output setting in the Sound menu (see Chapter 5).
2. Connect the video cable(s).
A. Basic video connection – Connect the video cable (yellow) to the
VIDEO OUT jack on the back of your DVD Player , and to the V ideo
Input jack on your TV .
OR
B. S-Video (optional) – If your TV has an S-V ideo Input jack, connect
the S-V ideo cable to the S-VIDEO OUT jack on the back of your
DVD Player and to the S-V ideo jack on your TV . If your TV doesn’ t
have S-Video, use the basic video connection listed above.
OR
C. Component video (optional) – If your TV has component video (Y ,
PB , and PR jacks) use video-grade cables for the Y , PB , and P
R
connections. Note that it is essential to match the color -coded
connectors with a compatible TV . If your TV doesn’ t have
component video, use the S-V ideo or Basic video connection listed
above.
3 . Set the VIDEO OUT SELECT switch to S-VIDEO or YPbPr , depending on
the type of connection you used. Either setting works for the Basic video
connection (2A).
Go to page 14
Page 14
12 Chapter 1
Connections and Setup
S
ELE
CT
DIGIT
AL
AUDIO
OUT
O
PTICAL
YER
(BACK PANEL)
TV (BA
CK P
ANEL)
VIDE
OAUDIO
S
-VIDEO I
N
OR
COMPONEN
OR
VCR(BACK PANEL)
OU
T TO T
V
OUT
VIDE
O
S
-VIDE
O
SA
SA
TELLITE RECEIVER
TELLITE RECEIVER (BACK PANEL
)
CABLE, CABLE BOX, OR ANTENN
A
SA
TELLITE SIGNAL
TELLITE SIGNAL
1
3
4
Satellite
TV
DVD
VCR
5
2A
2B
2C
Page 15

Chapter 1 13
Connections and Setup
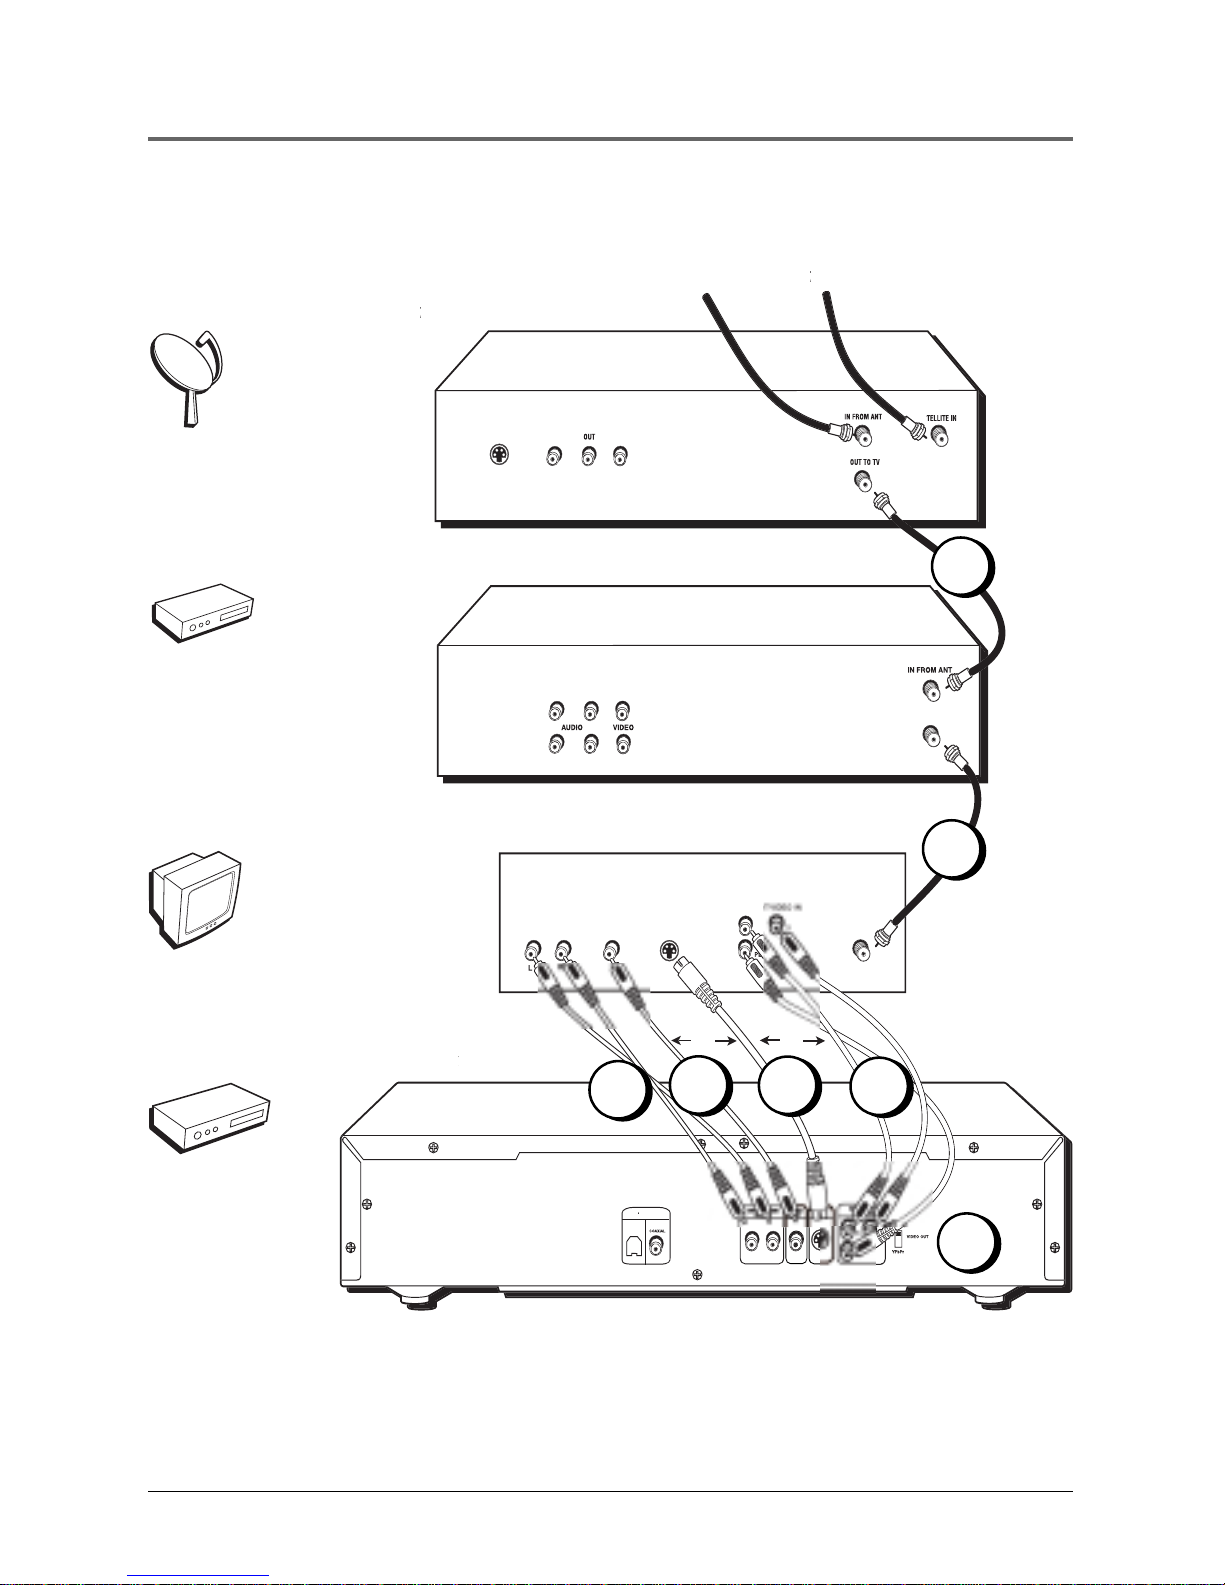
DVD Player + TV + VCR + Satellite Receiver
1. Connect the audio cables to the AUDIO OUT L (left – white) and R (right – r ed)
jacks on the back of your DVD Player , and to the cor responding Audio Input jacks
on your TV.
2. Connect the video cable(s).
A. Basic video connection – Connect the video cable (yellow) to the VIDEO
OUT jack on the back of your DVD Player , and to the V ideo Input jack on
your TV.
OR
B. S-Video (optional) – If your TV has an S-V ideo Input jack, connect the S-
Video cable to the S-VIDEO OUT jack on the back of your DVD Player and to
the S-V ideo jack on your TV . If your TV doesn’ t have S-V ideo, use the basic
video connection listed above.
OR
C. Component video (optional) – If your TV has component video (Y , PB , and
PR jacks) use video-grade cables for the Y , PB , and PR connections. Note that
it is essential to match the color -coded connectors with a compatible TV . If
your TV doesn’ t have component video, use the S-V ideo or Basic video
connection listed above.
3 . Set the VIDEO OUT SELECT switch to S-VIDEO or YPbPr , depending on the type
of connection you used. Either setting works for the Basic video connection (2A).
4. Use a coaxial cable to connect the antenna output on the satellite r eceiver to the
antenna input on the VCR.
5. Use a coaxial cable to connect the OUT TO TV jack on the VCR to the antenna
input on the TV .
Go to page 14
Page 16

14 Chapter 1
Connections and Setup
Install Batteries in the Remote
1. Remove the batter y compar tment cover on the back of the r emote.
2. Insert new batteries. Match the polarities (+ and –) on the batteries with
the diagram on the r emote.
3. Put the batter y compar tment cover back on the r emote.
Important Battery Information
• If you’r e not going to use the r emote for a month or mor e, be sur e to
remove the batteries because they can leak and cause damage.
• Dispose of batteries in the pr oper manner , according to federal, state, and
local regulations.
• Any batter y may leak electr olyte if mixed with a dif fer ent batter y type, if
inserted incor rectly, if all batteries ar e not r eplaced at the same time, if
disposed of in fir e, or if an attempt is made to char ge a batter y not
intended to be r echar ged.
• Discard leaky batteries immediately. Leaking batteries can cause skin
burns or other personal injur y.
Point the Remote in the Right Direction
When you want the r emote to operate the DVD Player , point the r emote at the
DVD Player, not the TV. The remote has to be pointed in the cor rect dir ection
and towar d the cor rect component in or der for the r emote contr ol’s signal to
communicate with the sensor on the component. Make sur e ther e is a clear
path between the r emote contr ol and the component you want to operate so
the signal isn’t blocked.
Turn on the TV and DVD Player
1. T urn on your TV and tune to the cor rect video input channel (see
following page).
2. Press the ON•OFF button on the r emote or on the DVD player itself.
Page 17

Chapter 1 15
Connections and Setup
How to Find Your TV’s Video Input
Channel
In order to see what’ s playing on your DVD player , you need to tune your TV
to the V ideo Input Channel that cor responds to the jacks you used to hook up
the player to the TV . The video channel on TVs varies for dif fer ent brands and
different models. In or der for your DVD r emote to work, your TV must be set
on the cor rect video input channel. Below ar e some things to tr y.
• If your TV brand is RCA, GE, or Pr oScan, pr ess the TV button on the
remote that came with your TV (not the DVD r emote). Then pr ess the
INPUT button on the r emote.
• If you have another brand, consult your TV’s Owner’s Manual.
If those options don’t work, try one of the following options.
• Press a button on the TV r emote (see table below).
• Select it fr om the TV’ s menu system.
• T une dir ectly to the DVD input channel by pr essing a specific number
(see table below).
• Go thr ough all the channels in the channel list by pr essing the channel
up/down buttons on the TV .
Some common scenarios ar e listed in the following table:
Video Input Channel Variations
Button/switch Button on the Channel #
on the TV TV Remote
VIDEO VID 1 00
SIGNAL LINE 90
VID 1 VID 91
VID 2 VIDEO 92
S-VID S-VID 93
S-VIDEO INPUT VID 1
S-VIDEO VID 2
SOURCE
AUX
Page 18
16 Chapter 1
Connections and Setup
3
6
1
2
5
748
9
0
PLAY MODE
FORWARD
STOP
PAUSE
INFO
PLAY
REVERSE
REPEAT
3-D
FORMAT
MARKER INDEX
ZOOM
ANGLE
SUBTITLE
AUDIO
OPEN CLOSE
ON OFF
G
O
B
A
C
K
M
E
N
U
G
U
ID
E
CLEAR
SKIP - SKIP
+
OK
How to Move Around the DVD
Player’s Menu System
The technical ter m for how you move thr ough the DVD
Player’s menu system is “Navigation.”
This book tells you how to select dif fer ent menu items,
but you can explor e the menu system on your own by
following a few “navigational rules.”
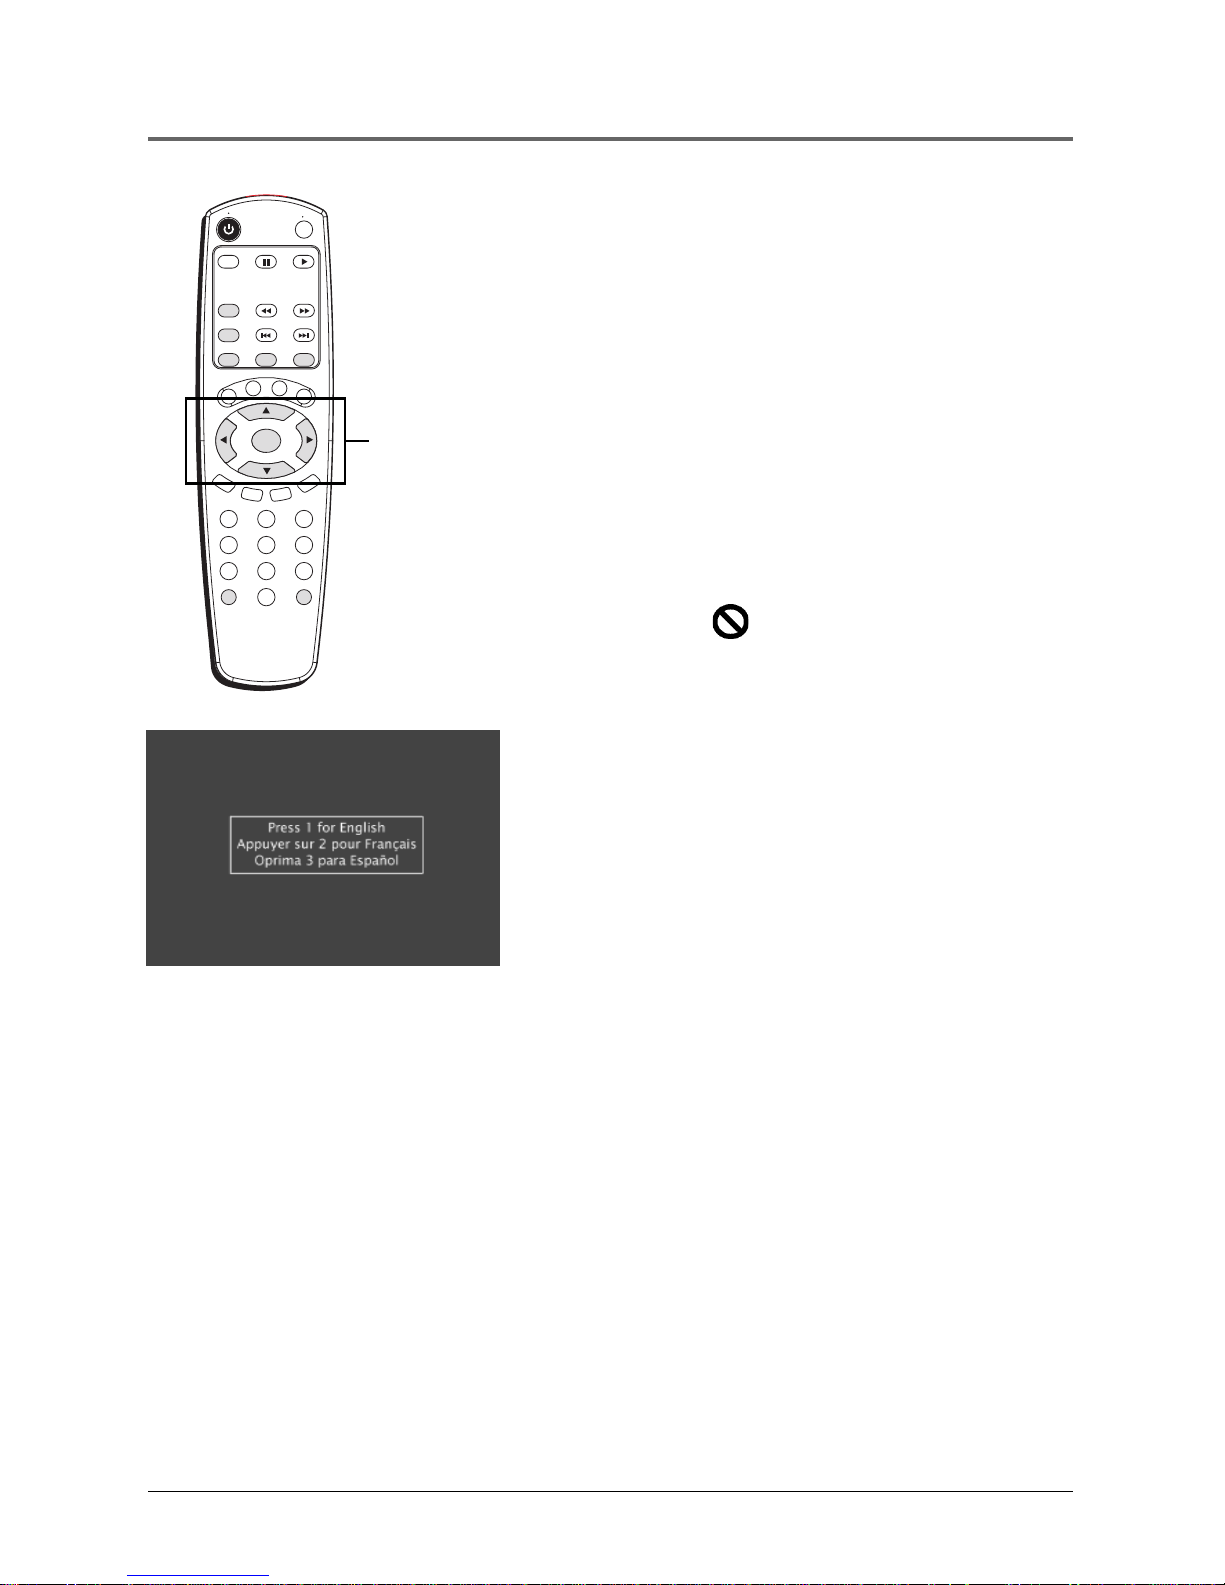
Press the ar row buttons on the r emote (highlighted in the
pictur e on the left) to highlight dif fer ent menu items on
the scr een. (In your DVD Player ’s menu, a highlighted
item appears brighter than the other items on the scr een.)
T o select a menu item, pr ess OK on the r emote when the
menu item is highlighted.
The invalid symbol appears on the TV scr een when
you press a button that doesn’ t have any function on that
disc.
Set the Menu Language
When you turn on your DVD player for the first time,
the Language Selection screen appears. This screen
sets all language preferences for on-screen displays to
the same language.
If you do not select a language, this screen will appear
each time you turn on the player until you select a
language.
By default, the player’s on-screen displays are shown in
English. If you want the on-screen menus to appear in
English, press OK or PLAY on the remote to accept
the default.
To change the language:
1. Press the number button on the remote which
corresponds to the number of the language you
want to select.
You can use the DVD player menu to set individual
language preferences (see chapter 5).
This is the Language Selection
screen. English is the default
language.
These are the
navigation
buttons
Page 19

Chapter 1 17
Connections and Setup
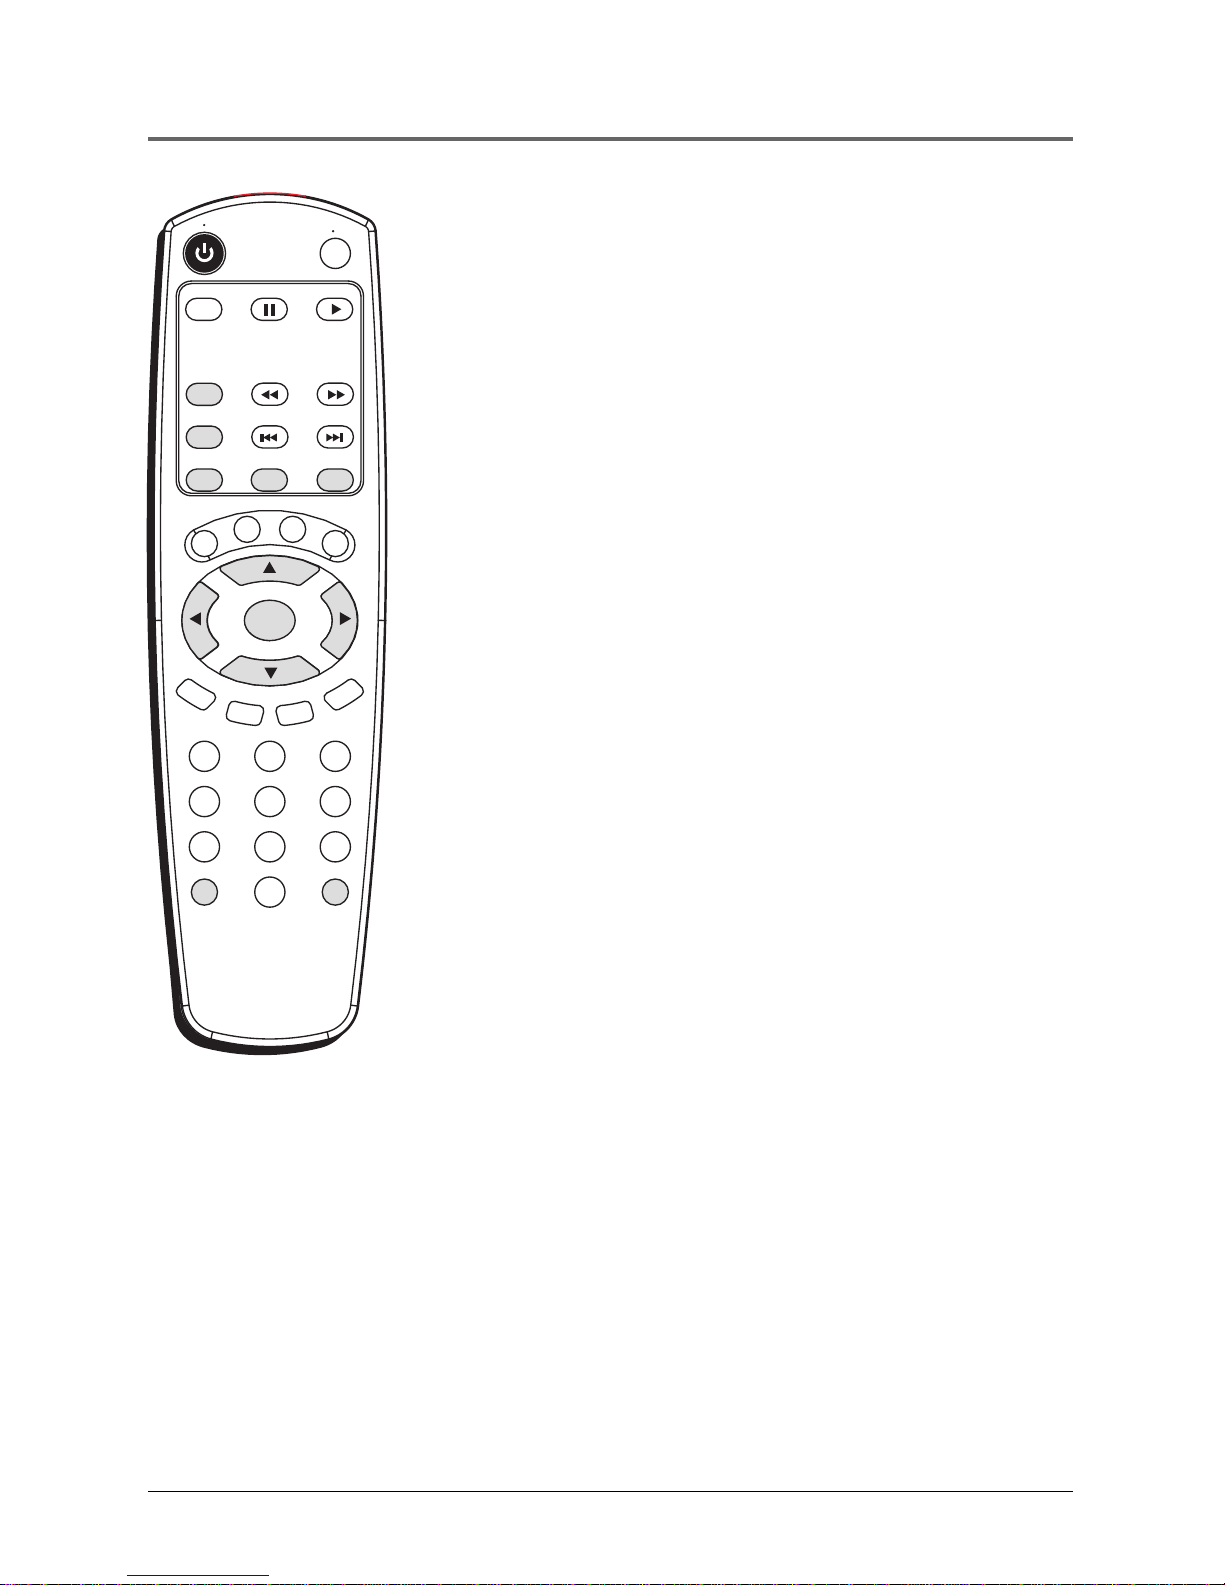
The Remote Control Buttons
(listed alphabetically)
This section describes what each button does when the
remote is operating the DVD Player .
3-D Press this button to simulate a 3-D sur round ef fect fr om
2 ster eo speakers (this featur e only works if the disc was
recor ded using Dolby Sur round or Dolby Digital).
Arrow buttons Use the ar row buttons (left, right, up, and
down) to move thr ough the on-scr een menus. Y ou highlight a
menu item by pr essing the ar row buttons and select a
highlighted item by pr essing the OK button.
ANGLE Press this button to access various camera angles on
a disc (this featur e only works if the disc contains multiple
camera angles).
AUDIO Use this button to access various audio languages
on a disc (if the disc contains multiple audio str eams).
CLEAR Clears menus and on-scr een displays.
FORMAT If the DVD for mat is 16:9 and if the Scr een For mat
option of the Player Menu is set as 16:9 wide, you can use
this button to toggle the dif ferent display options.
FORWARD Allows you to sear ch for war d thr ough a disc
while it is in play mode. Each pr ess of the button incr eases
the sear ch speed. When in Pause mode, pr ess to sear ch
forward at slow speed.
GO BACK When you’r e using the DVD Player ’s menu
system, pr ess this button to r etur n to the pr eceding menu
screen.
GUIDE Allows you to see the titles that ar e available on the
current disc (if the disc contains a guide menu).
INDEX Brings up the index scr een for DVD and VCD discs.
INFO Press this button while you’r e playing a disc to see
the on-scr een infor mation banner . The infor mation banner
contains various playback featur es and gives you infor mation
about the disc you’r e playing.
MARKER Press this button to access the Marker info banner .
The Marker info banner allows you to set markers at points
on the disc that you’d like to r etur n to.
MENU T o see the disc’ s menu, pr ess this button when
you’r e playing a disc. T o see the DVD player ’s menu, pr ess
this button when a disc is not playing.
Number buttons (0-9) Use the number buttons to input
infor mation such as chapter numbers, track numbers, or to
make selections on some menu scr eens (if a number appears
next to a menu item).
3
6
1
2
5
7
4
8
9
0
PLAY MODE
FORWARD
STOP
PAUSE
INFO
PLAY
REVERSE
REPEAT
3-D
FORMAT
MARKER INDEX
ZOOM
ANGLE
SUBTITLE
AUDIO
OPEN CLOSE
ON OFF
GO BACK
MENU
GUIDE
CLEAR
SKIP - SKIP
+
OK
Note:
Some of the buttons on the
remote (3-D, Angle, etc.) won’t
work if the disc wasn’t created
with that particular feature.
For example, if you press
ANGLE, but the disc’s author
didn’t put multiple camera
angles on the disc, you won’t
see a different angle (the icon
will appear to indicate that
the ANGLE button is inactive).
Page 20
18 Chapter 1
Connections and Setup
OK Press this button to select a highlighted menu item.
ON•OFF T urns on the player when it is in standby mode;
or puts the player in standby mode when power is on. Pr ess
twice within 3 seconds to tur n off all of the RCA, GE and
PROSCAN components the r emote operates.
OPEN•CLOSE Press and hold to open and close the disc
tray.
PAUSE Pauses disc play . Each subsequent push of the
button advances one frame.
PLAY Begins disc play (and closes disc tray if it is open).
PLA Y MODE Press this button to access the Play Mode info
banner to set random and pr ogram playback.
REPEAT Press this button to bring up the Repeat info
banner . Y ou can repeat par t or all of a chapter , track, or an
entir e disc.
REVERSE Allows you to sear ch backwar d thr ough a disc
while it is in play mode. Each pr ess of the button incr eases
the sear ch speed. When in Pause mode, pr ess to sear ch
backward at slow speed.
SKIP+ Skips to the next chapter , track (VCDs and audio
CDs) or song (MP3).
SKIP- Skips to the pr evious chapter , track (VCDs and audio
CDs) or song (MP3).
STOP Stops disc play.
SUBTITLE When a disc is playing, pr ess this button to show
the Subtitle banner (if the disc was cr eated with subtitles).
ZOOM Use this button to zoom in on the pictur e.
3
6
1
2
5
7
4
8
9
0
PLAY MODE
FORWARD
STOP
PAUSE
INFO
PLAY
REVERSE
REPEAT
3-D
FORMAT
MARKER INDEX
ZOOM
ANGLE
SUBTITLE
AUDIO
OPEN CLOSE
ON OFF
GO BACK
MENU
GUIDE
CLEAR
SKIP - SKIP
+
OK
Page 21

Chapter Overview
• Regional Coding
• Using Different Menus
• Loading and Playing Discs
• Using a Disc Menu
• DVD Playback Features
• Using the On-Screen Info Banner
• Special Features
Playing DVDs
The New Era in Entertainment.
Illustrations contained in this document are for representation only.
19
Chapter 2
Page 22

Playing DVDs
20 Chapter 2
Regional Coding
Both the DVD player and the discs are coded by region. These regional codes
must match in order for the disc to play. If the codes don’t match, the disc
won’t play. This player’s code is region 4.
Using Different Menus
Each disc is programmed with different features. There are three separate ways
you can use to access features:
• The Disc menu – The Disc menu is part of each disc and is separate
from the DVD player’s menu. The contents of each disc menu varies
according to how the disc was authored and what features are included.
The disc menu is turned on and off (while the disc is playing) with the
MENU button on the remote.
• The DVD player menu – The DVD player’s menu system is accessed
only when a disc isn’t playing. Press MENU on the remote to bring up the
DVD player menu.
Remember that a feature will only work if the disc was programmed with that
feature. For example, if you have subtitles turned on, the subtitles will only
appear if the disc was created with subtitles. If a menu item is “grayed out” it
means that item isn’t available.
• Information Banners – Banners are a type of information display that
appear across the top of the screen during playback. Information banners
are activated by pressing the INFO button on the remote.
Loading and Playing Discs
Your DVD player plays DVD discs and audio CD discs. Before you load a disc,
make sure that it is compatible with the player. The following discs CANNOT
be used with this player:
• Laserdiscs
• CD-I, CD-ROM (computer-only discs), CD-R, CD-RW, DVD-ROM
• Discs recorded using other broadcast standards (i.e. PAL or SECAM)
• CD-G discs play audio only, not graphics
Page 23

Playing DVDs
Chapter 2 21
C
a
n
'
t
C
a
t
c
h
U
p
C
a
n
'
t
C
a
t
c
h
U
p
To Load and Play a Disc
Turn on the TV and your DVD player (press ON•OFF on the player or the
remote control).
1. Press the OPEN•CLOSE button on the front of the DVD Player.
2. Place a disc gently into the tray with the disc’s label facing up (double-
sided discs have content on both sides, so you can place either side up).
3. Press the OPEN•CLOSE or PLAY•PAUSE button on the front of the player
to close the disc tray.
The DVD Player reads the disc’s table of contents, and then one of three
things happens depending on how the disc was programmed:
• The disc starts playing.
• The disc menu appears on the screen. One of the options will start
disc play. Highlight that option and press OK.
• The DVD Player’s main menu appears on the screen. Press the PLAY
button on the remote.
When you stop playing a disc, the player remembers where you stopped.
When you start playing the disc again, the DVD Player picks up where you left
off. To begin the title over, press STOP twice.
Note: Many discs skip the disc menu and start playing automatically.
To access the disc menu when you’r e playing a disc, pr ess MENU on
the r emote.
C
a
n
'
t
C
a
t
c
h
U
p
(
W
i
d
e
s
c
r
e
e
n
V
e
r
s
i
o
n
)
This is an
example of a
one-sided disc.
This is an
example of a
2-sided disc. The
title is in the
center.
Page 24

Playing DVDs
22 Chapter 2
In this example, The Language setting is
highlighted. To see language options, press
OK on the remote.
Using a Disc Menu
A disc is capable of having an on-screen menu that is separate from the DVD
player’s menu system and on-screen information banners. The disc menu
might only contain a list of the titles and chapters, or it may allow you to
change features such as language and playback settings.
Note: “Default settings” ar e the settings that the player will default to
each time it is tur ned on.
Any settings you change with the disc menu only temporarily override
the default settings.
Use the Setup Menu of the DVD player to change the default settings
(See chapter 5).
Although the content and operation of disc menus varies from disc to disc, the
following example will give you an idea of what to expect.
1. While the disc is playing, press MENU. The disc
menu appears.
2. Press the up/down arrow buttons to highlight the
menu item you want to choose, and press OK. In the
example on the left, Language has been highlighted.
An example of a disc menu. Menus on discs
vary.
Page 25

Playing DVDs
Chapter 2 23
In the example above, English is highlighted.
Press OK on the remote to play the disc with
English dialog.
3. Press the up/down arrows to select a language, and
press OK.
4. Press MENU to r esume playback.
Note: Any settings you change on the disc menu
only override the settings in the DVD Player’s
menu temporarily . Default settings ar e the
settings that you set up in the DVD Player’s
menu system. T o change the default settings, see
Chapter 5.
DVD Playback Features
Fast Motion Playback (Picture Scan)
To scan through a section of the disc during playback, use the Picture Scan
feature. You can search in forward or reverse mode.
1. Press the REVERSE or FORWARD button on the remote during playback
to search through a disc.
2. Press the button again on the remote to search at the next speed. Picture
Scan has 6 speeds. With each consecutive press of the button, the search
speed increases. If you press the button more than 6 times, Picture Scan
stays at the highest speed and the invalid symbol will appear.
3. Press the PLAY button on the remote to resume normal playback.
Freeze Frame and Frame Advance
1. Press PAUSE once to freeze playback.
2. Each subsequent press of the PAUSE button advances the picture one
frame at a time.
3. Press PLAY to resume normal playback.
Page 26

Playing DVDs
24 Chapter 2
Slow Motion Playback
(In Freeze Frame Mode)
While the disc is in freeze frame mode, you can invoke either forward or
backward slow motion playback.
• Press REVERSE on the remote for backward slow motion playback. Press
the button again to increase the speed.
• Press FORWARD on the remote for forward slow motion playback. Press
the button again to increase the speed.
• Press PLAY to resume normal playback.
Random Playback
Random playback plays a disc title’s chapters in random order. If there is more
than one title, the title with the most chapters is selected. If there is more that
one title and all titles have an equal amount of chapters, the first title is
selected. If each title has only one chapter each, the titles/chapters will be
played in random order.
1. Press PLAY MODE on the remote control (the Play
Mode info banner appears).
2. Use the left/right arrow buttons to highlight Random
on the info banner.
3. Use the up/down arrows buttons to toggle Random
on or off and press OK.
To stop random playback, press STOP twice or press the
PLAY MODE button, highlight Random and use the up/
down arrow buttons to select Off.
Page 27

Playing DVDs
Chapter 2 25
Program Playback
Program playback lets you set up a specific order to play back the chapters on a disc.
1. Press the PLAY MODE button on the remote (after a
moment the play mode info banner appears).
2. Select the Program option with the left/right arrow
keys (the PROGRAM screen appears). Press OK.
3. Use the left/right arrow buttons to highlight the first
chapter to add to the program and press OK. The
selected chapter appears in the Program Order box.
4. Repeat Steps 2-4 to add additional chapters. Up to 20
chapters may be programmed at once.
5. Press PLAY to begin playing the program.
To resume normal playback, use the CLEAR button to
remove programmed chapters.
Deleting Programmed Chapters
1. Press the PLAY MODE button on the remote (the play mode info banner
appears).
2. Select the Program option with the left/right arrow buttons (the
PROGRAM screen appears).
3. To remove the last chapter that was added to the program, press the
CLEAR button. Each subsequent press of the CLEAR button deletes the
next chapter in the opposite order the chapters were programmed.
All programmed chapters are deleted when the disc is removed or the DVD
player is turned off.
Press STOP twice to turn off program mode.
Page 28

Playing DVDs
26 Chapter 2
Using the On-Screen Info Banner
The on-screen information banner can be used to:
• access a specific title or chapter on a DVD
• Start disc play from elapsed time
• turn on subtitles and select a subtitle language
• change the audio language
The on-screen information banner is accessed by pressing the INFO button on
the remote. Pressing the INFO button once displays the title, chapter and
elapsed time icons. Press the INFO button again to see the audio language and
subtitle icons. Press a third time to turn the info banner off.
Selecting a Title Number
1. During disc playback, press INFO on the remote (the
info banner appears).
2. Use the left/right arrow buttons to highlight the
current title number.
3. Use the up/down arrow buttons to scroll through the
title numbers or use the number buttons to enter a
different title number.
4. Press OK to begin playing the selected title.
Selecting a Chapter Number
1. During disc playback, press INFO on the remote (the
info banner appears).
2. Use the left/right arrow buttons to highlight the
chapter number.
3. Use the up/down arrow buttons to scroll through the
chapter numbers or use the number buttons to enter
a different chapter number.
4. Press OK to begin playing the selected chapter.
Note: These featur es won’ t work with a DVD
without title and chapter numbers.
Page 29

Playing DVDs
Chapter 2 27
Using Subtitles
When a DVD is recorded with subtitles, you can use the Subtitle feature to
view the subtitles on-screen. To turn subtitles on:
1. Press the SUBTITLES button on the remote (the
subtitles info banner appears).
2. Use the left/right arrow buttons to highlight the on/
off option.
3. Use the left right arrow buttons to toggle subtitles on
or off.
Using Elapsed Time
1. During disc playback, press INFO on the remote.
The info Banner appears.
2. Use the right arrow button to highlight the time.
3. Use the number buttons to enter the time from which
you want to start playback.
4. Press OK to begin playback starting at the elapsed
time indicated.
Note: Some DVDs cannot be sear ched using this
featur e.
Page 30

Playing DVDs
28 Chapter 2
Changing the Subtitle Language (On the Player)
You can temporarily change the default subtitle language (provided additional
languages are included on the DVD) from the info banner.
1. During disc playback, press SUBTITLE on the
remote.
2. Use the up /down arrow buttons to select a subtitle
language from the list.
3. Press OK to accept the subtitle language changes and
turn off the subtitle banner.
• Press CLEAR to remove the subtitle
information without making changes.
• If you change the language, the subtitles will
automatically turn on.
When the player is turned on, the default subtitle
language is selected. If the disc does not contain this
language, the disc’s default language is automatically
selected.
If the disc was created with subtitle languages that are not
available in the subtitle languages menu, the additional
languages will appear here.
Page 31

Playing DVDs
Chapter 2 29
Changing the Audio Language
When a DVD is recorded with multiple soundtracks, you can use the Audio
Language feature to temporarily change the initialized audio language and
audio output.
1. During disc playback, press AUDIO on the remote
(the audio language banner appears).
2. Use the up/down arrow buttons to select an audio
language from the list.
3. Press OK to accept the audio language changes and
turn off the audio language banner.
Press CLEAR to remove the audio information
without making changes.
When the player is turned on, the default audio language and audio output is
selected. If the disc does not contain this language, the disc’s default language is
automatically selected.
This feature is disc-dependent, and may not work with all DVDs.
If the disc was created with audio languages that are not available in the audio
languages menu, the additional languages will appear here.
Changing the Camera Angle
Some DVDs contain multiple angles of a particular scene or sequence. To
indicate that multiple angles are available, a camera icon appears on the screen.
1. During disc playback, press ANGLE on the remote.
(The angle banner appears. If no additional camera
angles are available, the symbol will be
displayed.)
2. Use the up/down arrow buttons to select a camera
angle.
3. Press the ANGLE button to accept the camera angle
you selected and turn off the angle banner.
Press CLEAR to remove the camera angle information
without making changes.
Note: This featur e does not work when a DVD
has not been r ecor ded with a multi-camera
angle system.
Page 32

Playing DVDs
30 Chapter 2
Using the Marker Feature
Use the Marker feature to mark parts of a DVD so that you can quickly go to the section at a later
time.
Storing a Marker During DVD
Playback
1. At the point where you want to set a marker during
disc playback, press MARKER on the remote (the
marker banner appears).
2. Use the left/right arrow button to highlight an
unused marker. Unused markers are represented as
dashes in the marker banner. Used markers are
indicated by a number.
3. Press OK to activate the marker. A number appears
in the banner to represent the marker.
4. Press PLAY to begin playing the DVD from the
marked scene.
5. Press MARKER to remove the banner from the
screen.
If all three markers are used, you must clear one of the
markers before marking a new scene.
Recalling a Marked Scene
1. During disc playback, press MARKER on the remote
to bring up the marker banner.
2. Use the left/right arrow buttons to highlight the
appropriate marker.
3. Press PLAY to activate the marker. The DVD begins
playing at the marked location.
Clearing a Marker
The markers are cleared each time a disc is removed from
the player, or when the power is turned off. You can also
clear a marker manually.
1. During disc playback, press MARKER on the remote
to bring up the marker banner.
2. Use the left/right arrow buttons to highlight the
appropriate marker.
3. Press CLEAR to remove the marker.
4. Press MARKER to turn off the marker banner.
Page 33

Playing DVDs
Chapter 2 31
Using the Repeat Feature
There are four repeat options:
• Off
• Chapter – repeats the chapter that is playing
• Title – repeats the title that is playing
• A–B Repeat – repeats a selected segment of the disc
To Repeat a Chapter or Title:
1. While a disc is playing, press REPEAT (the repeat
banner appears).
2. Use the left/right arrow buttons to highlight either
Chapter or Title.
3. Press OK.
A–B Repeat
A–B Repeat lets you repeat a specific segment on the
DVD that you define.
1. At the start of the segment you want to repeat, Press
REPEAT on the remote. The repeat banner appears.
2. Use the left/right arrow buttons to highlight the A,
and press OK to mark the beginning of the segment.
The B is automatically highlighted.
3. Allow the movie to play to the end of the segment
you want to mark. You must let the movie play in
standard playback mode to set the B point in A–B
Repeat. If you rewind or fast-forward, the A–B
Repeat is cancelled.
4. Press OK. The A–B Repeat that you set plays until
you turn off Repeat.
Turning Off Repeat Functions
Repeat functions remain active until you turn them off, open the disc tray or
turn off the power.
To turn off Repeat, press REPEAT, use the left/right arrow buttons to highlight
Off, then press OK.
Page 34

Playing DVDs
32 Chapter 2
Using the 3-D Surround Button
The 3-D Surround button can be used to simulate surround sound.
1. Press the 3-D button (the 3-D Surround banner
appears).
2. Use the up/down arrow buttons to change the
setting from Off to On.
3. Press OK to clear the banner.
Special Features
Screen Saver
Your DVD player displays a screen saver so images don’t burn into your
television screen. The screen saver appears automatically two minutes after
you pause a disc, or immediately after you stop a disc.
Auto Power Off
Your DVD player will turn off automatically after 30 minutes of non-use.
Pro-tect Plus™ Locking Feature
The DVD player’s disc tray can be locked shut. You can still play a disc as long
as it was inserted in the player before locking the tray. The disc cannot be
removed from the player until the tray is unlocked. You can lock the disc tray
only when the DVD player is turned on.
To lock the tray, first make sure the remote is in DVD mode by pressing the
DVD button. Then simultaneously press the ON•OFF button on the remote
and the STOP button on the DVD front panel. The message “...dealer lock
on...” appears in the front panel display. To unlock the tray, repeat the
process.
Page 35

Playing Audio CDs
and MP3 Discs
Chapter 3
33
The New Era in Entertainment.
Illustrations contained in this document are for representation only.
Chapter Overview
• Loading and Playing an Audio CD
• Audio CD Playback Features
Page 36

34 Chapter 3
Playing Audio CDs and MP3 Discs
Loading and Playing an Audio CD
Before you load a disc, make sure that it is compatible with the player. Note
that the following discs CANNOT be used with this player:
• Laserdisc
• CD-I, CD-ROM, CD-R, DVD-ROM
• MiniDisc
• CD-G discs play audio only, not graphics
Insert with the
label facing up.
To Load and Play an Audio CD
1. Press the OPEN•CLOSE button on the front of the DVD player.
2. Place a disc gently into the tray with the disc’s label facing up.
3. Press PLAY to close the disc tray.
The DVD player reads the disc’s table of contents, and then begins disc playback.
4. Press STOP to stop playback.
Audio CD Playback Features
When playing audio CDs, your DVD player has many of the same features that your CD player has,
including track skip, repeat play, and programmed playback.
Selecting a Specific Track
The current track number and elapsed playback time for that track are displayed on the front of the
player. You can also see this information by accessing the info banner (by pressing INFO on the
remote).
Use the up/down arrow buttons to highlight a track and press OK. You can also use the number
buttons on the remote to enter the desired track number. You must enter a 2-digit number. For
tracks 1–9 of a CD, press 0 and then the track number, and then press OK.
Random Playback
Random playback plays a disc’s tracks in random order.
1. Press PLAY MODE on the remote control (the Play Mode info banner appears).
2. Use the left/right arrow buttons to highlight Random on the info banner.
3. Use the up/down arrows buttons to toggle Random on or off. Press OK.
To stop random playback, press STOP twice or press the PLAY MODE button, highlight Random
and use the up/down arrow buttons to select Off.
Page 37

Chapter 3 35
Playing Audio CDs and MP3 Discs
Program Playback
Program playback lets you set up a specific order to play back the tracks on a disc.
1. Press the PLAY MODE button on the remote (after a
moment the play mode info banner appears).
2. Select the Program option with the left/right arrow
keys (the PROGRAM screen appears). Press OK.
3. Use the left/right arrow buttons to highlight the first
track to add to the program and press OK. The
selected track appears in the Program Order box.
4. Repeat Steps 2-4 to add additional tracks. Up to 20
tracks may be programmed at once.
5. Press PLAY to begin playing the program.
To resume normal playback, use the CLEAR button to
remove programmed titles.
Deleting Programmed Tracks
1. Press the PLAY MODE button on the remote (the play mode info banner
appears).
2. Select the Program option with the left/right arrow keys (the PROGRAM
screen appears).
3. To remove the last track that was added to the program, press the CLEAR
button. Each subsequent press of the CLEAR button deletes the next track
in the opposite order the tracks were programmed.
4. Press PLAY or PROGRAM PLAY to clear the screen.
All programmed tracks are deleted when the disc is removed or the DVD
player is turned off.
Page 38

36 Chapter 3
Playing Audio CDs and MP3 Discs
Using the Repeat Feature
There are four repeat options:
• Off
• Track – repeats the track that is playing
• Disc – repeats the disc that is playing
• A–B Repeat – repeats a selected segment of the disc
Repeating a Track or Disc
1. While a disc is playing, press REPEAT. The repeat
banner appears.
2. Use the left/right arrow buttons to highlight either
Track or Disc.
3. Press OK.
A–B Repeat
A–B Repeat lets you repeat a specific segment on the CD that you define. For
example, if you want to listen to a particular guitar riff within a song, you can
set the A–B Repeat to play that part of the song over and over.
1. At the start of the segment you want to repeat, Press REPEAT on the
remote. The repeat banner appears.
2. Use the left/right arrow buttons to highlight the A, and press OK to mark
the beginning of the segment. The B is automatically highlighted.
3. Allow the CD to play to the end of the segment you would like to mark.
You must let the CD play in standard playback mode to set the B point in
the A–B Repeat. If you rewind or fast-forward the CD, the A–B Repeat is
cancelled.
4. Press OK. The A–B Repeat that you set plays until you turn off Repeat.
Repeat functions remain active until you turn them off, open the disc tray
or turn off the power.
5. To turn off Repeat, press the REPEAT button on the remote, use the arrow
buttons to highlight Off, then press OK.
Page 39

Chapter 3 37
Playing Audio CDs and MP3 Discs
Loading and Playing an MP3 CD
Before you load a disc, make sure that it is compatible with the player.
Make sure that you have properly connected the DVD player (see “Setup and
Connections”) before you begin.
1. Press the OPEN•CLOSE button on the front of the DVD player.
2. Place a disc gently into the tray with the disc’s label facing up.
3. The DVD player reads the disc’s table of contents, and then displays the
MP3 menu. Playback begins.
4. Press STOP to stop playback.
The MP3 Menu
When you play a MP3 disc, the MP3 menu will be displayed instead of the DVD
player menu. The DVD player menu is not available when playing MP3 discs.
MP3 content can be divided into Albums and songs. A disc may hold several
albums and each album can contain several songs. (Similar to titles and chapters
on a DVD disc.)
The MP3 song list screen appears after you
have selected an Album from the Album list.
1. Use the up/down buttons on the remote to select an
album. Press OK to select that album.
2. A list of the songs in that album will be displayed. If
you want to play a particular song, use the arrow
keys on the remote to highlight a song and press OK
to play that song.
3. If you are in a song list and want to return to the
Album list, press GO BACK to return to the previous
menu screen.
After approximately 5 minutes, the screen saver will be
displayed instead of the MP3 menu. To bring up the MP3
menu again, press MENU on the remote.
Page 40

38 Chapter 3
Playing Audio CDs and MP3 Discs
Skipping Songs
• To skip forward to the beginning of the next song on a MP3 CD, press
SKIP+ on the remote or the player.
• To skip backward to the beginning of the song that is playing on a MP3
CD, press SKIP- on the remote or the player. Press the button again to
go to the beginning of the preceding song.
Page 41

VIDEO CD
Chapter Overview
• What is a Video CD?
• The Video CD Disc Menu
• Loading and Playing a Video CD
• Video CD Playback Features
• Disc View
Playing Video CDs
Chapter 4
39
The New Era in Entertainment.
Illustrations contained in this document are for representation only.
Page 42

Playing Video CDs
40 Chapter 4
What is a Video CD?
Like DVD video discs, Video CDs contain picture and sound content. Video
CDs (VCDs) are encoded in a different format. VCDs don’t hold as much
information as DVD discs and the picture quality is not as high.
VCDs are divided into tracks, and each track is divided into indexes. A track is
similar to a title and an index is similar to a chapter.
The Video CD Disc Menu
A Video CD disc is capable of having an on-screen menu that is separate from
the DVD player’s menu system and on-screen infomation banners. If the disc
has a menu, the menu will appear after the disc is loaded into the player.
The content and operation of disc menus varies from disc to disc. Check the
instructions that accompany the Video CD for more information on how to use
the playback control functions for that specific disc.
If a disc menu appears:
1. Use the number buttons on the remote to select a track (similar to a title).
2. Press OK or PLAY on the remote to begin playback of the selected track.
3. Press SKIP+ or SKIP- on the remote to scroll through the tracks.
4. Press the MENU button on the remote to stop playback and return to the
disc menu, or press STOP and MENU to stop playback and bring up the
DVD player menu.
To bring up the disc menu during disc play, press the MENU button on the
remote.
Loading and Playing a Video CD
Before you load a disc, make sure that it is compatible with the player. Note
that the following discs CANNOT be used with this player:
• Laserdiscs
• CD-I, CD-ROM (computer-only discs), CD-R, CD-RW, DVD-ROM
• Discs recorded using other broadcast standards (i.e. PAL or SECAM)
• CD-G discs play audio only, not graphics
Page 43

Chapter 4 41
Playing Video CDs
To Load and Play a Video CD
1. Press the OPEN•CLOSE button on the front of the DVD player.
2. Place a disc gently into the tray with the disc’s label facing up.
3. Press OPEN•CLOSE or PLAY to close the disc tray.
The DVD player reads the disc’s table of contents, and then displays the
playback control menu or begins disc playback.
4. Press STOP to stop playback.
T
he N
ew
M
e
anin
g of It A
ll Library
V
olum
e
O
ne
All Hands in the Cookie Jar
All Hands in the Cookie Jar
Insert with the
label facing up.
If the Video CD Has Playback Control
If a disc is encoded with the playback control function, a menu screen
appears after the disc is loaded into the player.
1. Use the number buttons on the remote to select a track.
2. Press OK or PLAY to begin playback of the selected track.
4. Press GO BACK to stop playback and return to the menu or press STOP
to stop playback and remove the menu from the screen.
Bypassing Playback Control
If a Video CD has playback control, you can bypass the disc’s menu by
following these steps when you first load the discs.
1. Press STOP to put the player in the stop mode.
2. Use the number buttons on the remote to enter the desired track
number, and then press PLAY. When playback begins, the disc will
respond as if it is not in the Playback Control mode.
Resuming Playback Control
To resume the Playback Control mode, press MENU (the disc’s menu
appears).
Page 44

Playing Video CDs
42 Chapter 4
Video CD Playback Features
Selecting a Specific Track
1. Use the number buttons on the remote to enter your desired track
number. Entering a two-digit number automatically starts playback
without having to press PLAY or OK. For tracks 1–9, press “0” and then
the track number.
Note: This feature does not work in Playback Control mode.
Changing the Audio Channel Output
If you are playing a stereo Video CD, you can change the channel output from
the player.
1. During disc playback, press AUDIO on the remote (the audio info banner
appears.
2. Use the up/down arrow buttons to select an audio channel (left, right, or
stereo).
3. Press AUDIO again to turn off the info banner.
Random Playback
Random playback plays tracks in random order.
1. Press PLAY MODE on the remote control (the info banner appears).
2. Use the left/right arrow buttons to highlight Random on the info banner.
3. Use the up/down arrows buttons to toggle Random on or of f. Press OK.
To stop random playback, press STOP twice or press the PLAY MODE button,
highlight Random and use the up/down arrow buttons to select Off.
Page 45

Chapter 4 43
Playing Video CDs
Program Playback
Program playback lets you set up a specific order to play back the tracks on a
disc.
1. Press the PLAY MODE button on the remote (the PLAY MODE screen
appears).
2. Use the left/right arrow buttons to highlight the first track to add to the
program and press OK. The selected track appears in the Program Order
box.
3. Repeat Step 2 to add additional tracks. Up to 20 chapters may be
programmed at once.
4. Press PLAY to begin playing the program.
To resume normal playback, use the CLEAR button to remove programmed
tracks.
Deleting Programmed Chapters
1. Press the PLAY MODE button on the remote (after a moment the play
mode info banner appears).
2. To remove the last chapter that was added to the program, press the
CLEAR button. Each subsequent press of the CLEAR button deletes the
next chapter in the opposite order the chapters were programmed.
All programmed chapters are deleted when the disc is removed or the DVD
player is turned off.
Page 46

Playing Video CDs
44 Chapter 4
Disc View
Some VCDs are programmed with a Disk View menu that allows you to view
thumbnails of tracks and indexes. Track View displays one to two thumbnails,
and Index View displays up to nine thumbnails. By selecting a thumbnail, you
go directly to that point in the playback.
To access Disk View:
1. Press the GUIDE button on the remote (the Disk View banner appears).
2. Use the up/down arrow buttons to highlight Track View or Index View
(the selected view screen appears).
3. Use the arrow buttons to highlight the desired thumbnail and press OK
on the remote to select. Playback will begin from the selected track or
index.
Page 47

Chapter Overview
• The Audio Menu
• The Subtitles Menu
• The Player menu
• The Disc Menu
• The Rating Limits Menu
• The Audio Options Menu
• The Display Menu
The Menu System
Chapter 5
45
The New Era in Entertainment.
Illustrations contained in this document are for representation only.
Page 48

46 Chapter 5
The Menu System
The Audio Menu – Selecting the Audio Preference
Use the Audio menu to select the soundtrack language.
1. With no disc playing, press the MENU button on the
remote (the Main Menu appears).
2. Press 1 on the remote to select Audio. The AUDIO
screen appears.
3. Use the up/down arrow buttons to highlight a
language and press OK.
• Select Original if you want the default
soundtrack language to be the language the
disc was originally recorded in.
• Select Other if the language you want is not
listed. A list of languages appears. Use the up/
down arrow buttons to highlight the desired
language and press OK.
Notes:
Not all discs provide multiple languages for the
soundtrack.
Some discs may not contain the language you
selected as your initial language; in that case the
disc will use its own default language setting.
Page 49

Chapter 5 47
The Menu System
The Subtitles Menu – Selecting the
Subtitle Language
Use the Subtitle Language menu to select the language the disc’s subtitles are
to be displayed in.
1. With no disc playing, press MENU (the main menu
appears).
2. Press 2 to select Subtitles (the SUBTITLE LANGUAGE
screen is displayed).
3. Use the up/down arrow buttons to highlight a
language and press OK.
• Select Automatic if you want the subtitle
language to be the same as the one selected
as your audio preference.
• Select Other if the language you want is not
listed. A list of languages appears. Use the up/
down arrow buttons to highlight the desired
language and press OK.
Note: Not all discs provide multiple languages
for the subtitles.
The Player Menu – Changing the Player
Menu Language
Use this feature to change the language for the player’s on-screen menu system.
1. With no disc playing, press MENU (the main menu
appears).
2. Press 3 to select Player Menu (the PLAYER MENU
LANGUAGE screen appears).
3. Use the up/down arrow buttons to highlight the
desired language for the on-screen menu system and
press OK.
Page 50

48 Chapter 5
The Menu System
The Disc Menu – Selecting the Disc
Menu Language
Use the Disc Menu Language menu to select the language you want a DVD’s
disc menu to be displayed in.
1. With no disc playing, press MENU (the main menu
appears).
2. Press 4 to select Disc Menu (the DISC MENU
LANGUAGE screen appears).
3. Use the up/down arrow buttons to highlight a
language and press OK.
• Select Other if the language you want is not
listed. A list of languages appears. Use the up/
down arrow buttons to highlight the desired
language and press OK.
Note: Not all discs provide multiple languages
for the disc menu.
The Rating Limit Menu
Creating a Password
By default, the Rating Limit feature is unlocked (no password required). To set rating limits,
you will need to create a password.
1. With no disc playing, press MENU (the main menu appears).
2. Press 5 to select Rating Limit (the RATING LIMIT screen appears).
3. Press the right arrow button to turn Use Password on (the CREATE PASSWORD screen
appears.
4. Enter a four-digit password using the number keys on the remote.
5. To confirm the new password, you will be prompted to re-enter it. Re-enter the new
password.
• If you’ve re-entered the new password correctly, you are returned to the
RATING LIMIT screen.
• If you’ve re-entered the new password incorrectly, the message New passwords
do not match appears. The CREATE PASSWORD screen appears again and you
must re-enter the new password and confirm it.
Page 51

Chapter 5 49
The Menu System
Setting the Rating Limit
The Ratings Limit feature is a rating limit system, sort of like movie ratings. It
works with DVD discs that have been assigned a rating. This helps you control
the types of DVDs that your family watches.
The Rated Titles option lets you determine how your player will react to discs
that contain movies that are rated (in the U.S.A., the Motion Pictures
Association of America rates movies as G, PG, PG-13, etc.).
You decide which ratings require a password and which ones don’t. This
system ranks the ratings 1 through 8 in order to accommodate different
countries’ ratings systems (1 is considered a movie title with the least offensive
material).
In order for the Rating level feature to work, the disc must be encoded with
rating information.
1. With no disc playing, press MENU (the main menu
appears).
2. Press 5 to select Rating Limit (the CHECK
PASSWORD screen appears).
3. In order to set a rating limit, the Password feature
must be turned on. If the password feature isn’t on,
press the right arrow button to toggle password on.
The Rating Limit screen appears.
4. Press 2 to set the rating limit (the SET RATING LIMIT
screen appears).
5. To set the rating, use the up/down arrow buttons to
highlight your preferred rating level and press OK to
return to the RATING LIMIT screen.
6. Press GO BACK to return to the previous menu.
Page 52

50 Chapter 5
The Menu System
Unlocking the Rating Limit
To unlock the rating limit:
1. With no disc playing, press MENU (the main menu appears).
2. Press 5 to select Rating Limit (the PASSWORD CHECK screen appears).
3. Enter your 4-digit password.
4. Press 1 to select Use Password. Press the right arrow button to unlock.
5. Press the GO BACK button to return to the main menu.
Changing the Password
You can change the password at your convenience.
1. With no disc playing, press MENU (the main menu appears).
2. Press 5 to select Rating Limit (the PASSWORD CHECK screen appears).
3. Enter your 4-digit password (the RATING LIMIT Menu screen appears).
4. Press 3 to select Change Password. The CHANGE PASSWORD screen
appears.
5. Use the number buttons to enter a new 4-digit password. The second
CHANGE PASSWORD screen appears.
6. Enter the new password.
7. To confirm the new password, you will be prompted to re-enter it. Reenter the new password.
• If you’ve re-entered the new password correctly, you are returned
to the RATING LIMIT screen.
• If you’ve re-entered the new password incorrectly, the message
New passwords do not match appears. The CHANGE PASSWORD
screen appears again and you must re-enter the new password and
confirm it.
Page 53

Chapter 5 51
The Menu System
If a DVD’s Rating Exceeds the Player’s
Rating Limit
Some discs are authored with a rating override feature included. When you
play a disc with this feature, this message is displayed:
Your selection exceeds the rating limit for this player. Do you want to override
the limit?
Select Yes, override or No, cancel. If you choose to override the rating limit,
you will need to enter your 4-digit password to begin playback.
This overrides the rating limit for the current disc only.
The Audio Options Menu
Selecting Digital Output Type
If you have a receiver with a digital signal input, use this feature to select your
player’s type of digital output.
1. With no disc playing, press MENU (the main menu
appears).
2. Press 6 to select Audio Options (the AUDIO OPTIONS
screen appears).
3. Press 1 to select Digital Output.
4. Use the left/right arrow buttons to select the type of
output your receiver uses.
PCM This is the default setting. Allows
downsampling of 96kHz/24-bit digital recordings so
that 48kHz/16-bit digital recordings can be made
directly via digital cable.
Bitstream This setting turns on the digital optical
output. Do not use this setting unless you have
hooked up your DVD player to an external audio
product via the optical jack. Some older digital
components are not compatible with the Bitstream
setting. If you experience noise and distortion during
Dolby Digital playback, select PCM instead.
5. Press GO BACK to return to the main menu.
Page 54

52 Chapter 5
The Menu System
DTS
Turn this option on ONLY if you connected a DTS receiver or decoder to your
DVD Player.
1. With no disc playing, press MENU (the Main Menu appears).
2. Press 6 to select Audio Options (the AUDIO OPTIONS screen appears).
3. Press 2 to highlight the DTS option.
4. Use the left/right arrow buttons to toggle the setting on or off.
Dynamic Compression
This feature compresses the dynamic range (quietest sound to loudest sound)
of a disc’s soundtrack. For example, action scenes might be very loud, while
whispered dialog is quiet. The Dynamic Compression feature evens out the
range of the volume by making loud sounds quieter and soft sounds louder.
The Dynamic Compression option is a toggle, it can be turned on or off. The
default setting is on.
1. With no disc playing, press MENU (the main menu appears).
2. Press 6 to select Audio Options (the AUDIO OPTIONS screen appears).
3. Press 3 to highlight the Dynamic Compression option.
4. Use the left/right arrow buttons to toggle the setting on or off.
2x Playback Audio
This feature turns audio off or on when a disc is in 2x playback mode.
1. With no disc playing, press MENU (the main menu appears).
2. Press 6 to select Audio Options (the AUDIO OPTIONS screen appears).
3. Press 4 to highlight the 2x Playback Audio option.
4. Use the left/right arrow buttons to toggle the setting on or off.
Page 55

Chapter 5 53
The Menu System
The Display Menu
Selecting the Screen Format Setting
Depending on the type of television you have, you may want to adjust the screen setting
(aspect ratio). The default setting is 4x3 (pan & scan).
1. With no disc playing, press MENU (the main menu
appears).
2. Press 7 to select Display Options (the DISPLAY
OPTIONS screen appears.
3. Press 1 to select Screen Format (the SCREEN
FORMAT screen appears).
4. Use the up/down arrow buttons to highlight a
screen setting. Press OK.
4x3 PS (Pan & Scan)
4x3 Letterbox
16x9 Widescreen
4 x 3 PS (Pan & Scan) – Choose this setting if you want
the movie to fill the entire screen of your TV. This might
mean that parts of the picture (the left and right edges)
won’t be seen.
Most discs produced in a widescreen format can’t be
cropped in this fashion. This means the black bars will
appear at the top and the bottom of the screen.
4 x 3 Letterbox – Choose this setting if you want to see
movies in their original aspect ratio (height-to-width ratio).
You’ll see the entire frame of the movie, but it will take up
a smaller portion of the screen vertically. The movie might
appear with black bars at the top and bottom of the
screen.
16 x 9 Wide – Choose this setting if your DVD Player is
connected to a widescreen TV. If you choose this setting
and you don’t have a widescreen TV, the images on the
screen may appear distorted due to vertical compression.
If you play a disc recorded in 4 x 3 format on a
widescreen TV, the left and right side of the screen will
appear black.
Page 56

54 Chapter 5
The Menu System
Using Still State
If the picture flickers when you pause a DVD, try changing the Still State
setting.
1. With no disc playing, press MENU (the main menu
appears).
2. Press 7 to select Display Options. The DISPLAY
OPTIONS screen appears.
3. Press 2 to select Still State.
4. Use the left/right arrow buttons to change the setting.
Auto The default setting.
Field Select this for a clearer picture in still state.
Frame Select this to see small letters more clearly
in still state.
5. Press GO BACK to return to the main menu.
Turning the On-Screen Messages On and Off
Use this feature to turn on or off the on-screen messages and icons that appear
at the top and in the upper right corner of the screen (for example, camera
angle, transport speed, etc.).
1. With no disc playing, press MENU (the main menu
appears).
2. Press 7 to select Display Options. The DISPLAY
OPTIONS screen appears.
3. Press 3 to select On-Screen Messages.
4. Use the left/right arrow buttons to change the setting
from On to Off.
5. Press GO BACK to return to the main menu.
Page 57

Chapter 5 55
The Menu System
Dimming the Front Panel Display
Use this feature to adjust the brightness of the player’s front panel display.
1. With no disc playing, press MENU (the main menu
appears).
2. Press 7 to select Display Options. The DISPLAY
OPTIONS screen appears.
3. Press 4 to select Display Brightness.
4. Use the left/right arrows to select a display setting.
Auto Dim – This is the default setting. It dims
display when a disk is playing.
Bright – The display is always bright.
Dim – The display is always dim.
5. Press GO BACK to return to the main menu.
Changing the Black Level
The Black Level setting can be changed to lighten the picture when it appears
too dark. This allows you to change the brightness of the picture without
adjusting your television.
The black level is measured by IRE level. Complete black is 0 IRE while pure
white is 100 IRE. The Light setting (which is a black level of 7.5 IRE) adds light
to improve a too-dark picture.
1. With no disc playing, press MENU (the main menu
appears).
2. Press 7 to select Display Options. The DISPLAY
OPTIONS screen appears.
3. Press 5 to select Black Level.
4. Use the left/right arrows to select a display setting.
Normal – The picture will be darker (0 IRE).
Light – The picture will be lighter (7.5 IRE).
5. Press GO BACK to return to the main menu.
Page 58

This page intentionally left blank.
Page 59

Chapter Overview
• Troubleshooting
• The Jacks on the Back of the DVD Player
• Front Panel Controls
• Front Panel Display
• Index
Other Information
Chapter 6
57
The New Era in Entertainment.
Illustrations contained in this document are for representation only.
Page 60

58 Chapter 6
Other Information
Common Problem Solution
No Power Insert the power cord’s plug securely into the outlet.
Power turns itself off The power is automatically turned off after approx 30
minutes have elapsed in the stop mode (auto power-off
feature). Turn power back on.
Player fails to start, even • Ensure that the disc is installed with the label side
when PLAY is pressed facing up.
Play commences but then • This player plays only DVD discs, Audio CDs and
stops immediately Video CDs.
• The disc is dirty. Clean it.
• Condensation has formed. Allow player to dry out.
No picture • Ensure that the equipment is connected properly.
• Turn on the TV’s power.
• Ensure that the input setting for the TV is correct.
Picture is distorted during • It is normal for some distortion to appear while
forward and reverse scan scanning.
No sound or distorted sound • Ensure that the equipment is connected properly.
• Ensure that the input settings and the volume
adjustment for the TV and/or receiver are correct.
• No sound is heard during still, frame advance, or slow-
motion play.
No operations can be • The batteries in the remote may need replacing.
performed with remote • Operate the remote control closer to the DVD player.
• Remove any obstacles between the remote and the
DVD player or other component.
• Remove batteries and hold down one or more buttons
for 60 seconds to drain the microprocessor inside the
remote to reset it. Reinstall batteries and try remote
again. You may need to reprogram it.
The
icon appears on screen • The feature or action cannot be completed at this
time because:
1. The DVD’s software restricts it.
2. The DVD software doesn’t support the feature
(e.g., angles).
3. The feature is not available at the moment.
4. You’ve requested a title or chapter number or
search time that is out of range.
Troubleshooting
Page 61

Chapter 6 59
Other Information
No sound while playing a DVD • The DTS option is selected but your receiver has no
DTS decoder, or you don’t have a receiver
connected.
Subtitle and/or audio • If the subtitle and/or audio language does
language is not the one not exist on the disc, the initial settings will not be
selected from the initial seen/heard. The disc’s priority language is selected
setting instead. Set the subtitle and or audio language
initial setting manually.
No on-screen display • The Off setting is selected for OSD Display; select
On in the setup menu.
The menu is displayed in a • The Menu Language preference is set to that
Foreign language language. With no disc playing, press the MENU
button on the remote. From the main menu, press 3
to access the PLAYER MENU LANGUAGE screen.
Play doesn’t begin when • The rating level has been set and the disc is subject
a title is selected to that restriction.
No forward or reverse scan • Some DVDs have sections that prohibit rapid
scanning, or title and chapter skip.
Disc won’t play • Both the player and the DVD is coded by region. If
the regional codes don’t match, the disc cannot be
played. This player is Region No. 4. Check the disc
code.
• Verify that the disc is a type that this player can read.
• Clean the disc.
• Try another disc to see if the disc that won’t play is
bad.
Desired angle cannot
• Some DVDs do not have the multi-camera angle
be changed
system, and some discs have it only on certain
portions.
Picture is not displayed • Make sure the TV SCREEN feature in the setup
menu is set with correct aspect ratio for your
television.
• Make sure the VIDEO OUTPUT switch on the back
of your DVD player is set to the type of output you
are using – YPbPr for Composite Video or S-VIDEO
for an S-Video connection.
Troubleshooting
Common Problem Solution
Page 62

60 Chapter 6
Other Information
Troubleshooting
Forgot Rating Limit Password • With the power on, press and hold the STOP and
PLAY/PAUSE buttons on the player. This resets the
password feature and all other settings to the initial
factory settings. You may be required to select a
menu language the next time you power up.
Cannot copy discs to
• This player is equipped with anticopy protection.
video tape
“will not read disc” or • Turn the player off and unplug it to reset the
other error message DVD player. Wait approximately 2 minutes, plug the
player back in and turn it on.
Common Problem Solution
Page 63

Chapter 6 61
Other Information
The Jacks on the Back of the DVD Player
When connecting, make sure you connect Output jacks to Input jacks, Video to Video, Right Audio
to Right Audio, etc.
AUDIO OUT R and L
Insert audio cables (left and
right) from these jacks on
your DVD player to the
corresponding Audio Input
jacks (left and right) on your
TV or receiver.
DIGITAL AUDIO OUT
Use a digital optical cable (not
provided) to connect your DVD
Player to a compatible Dolby
Digital or DTS receiver or
decoder.
S-VIDEO
If your TV has an S-Video
jack, you can connect an
S-Video cable for increased
video quality. The S-Video
cable only carries the
picture signal; remember
to connect the left and
right audio cables.
VIDEO OUT
(Composite Video Output)
Connect a video cable to
this jack and to the Video
Input jack on your TV.
DIGIT
AL
AUDIO
OUT
VIDE
O
OUT
S
-VIDE
O
OUT
O
PTICAL
CO
AXIAL
VIDEO
OUT
S
ELE
CT
YPbP
r
S
-VIDE
O
COMPONENT VIDEO
OUT
Use these jacks if you have
a TV with Component
Video input jacks. These
jacks provide Pr, Pb and Y
video. Component Video
provides the best picture
quality.
VIDEO OUT
SELECT
Use this switch to
set the type of
video output you
are using. Set this
switch to S-VIDEO
to use the S-Video
output. Set this
switch to YPbPr to
use that output.
Page 64

62 Chapter 6
Other Information
ADVANCED MP3 DECODER • DUAL LASER PICKUP
Front Panel Controls
1. Disc Tray Press OPEN•CLOSE to open and close disc tray.
2. OPEN•CLOSE Press to open and close the disc tray.
3. ON•OFF Use to turn the power on and off.
4. Front Panel Display See following page for details.
5. PLAY/PAUSE Begins disc play (and closes disc tray if open), or pauses
disc play.
6. STOP Stops disc play.
7. SKIP REV Allows you to move to the beginning of the preceding title,
chapter, or track on a disc (in effect, “skipping” the title, chapter, or
track). Press and hold to reverse through the DVD or CD; each
subsequent press and hold increases the reverse speed.
8. SKIP FWD Allows you to move to the beginning of the next title,
chapter, or track on a disc (in effect, “skipping” the title, chapter, or
track). Press and hold to forward through the DVD or CD; each
subsequent press and hold increases the forward speed.
1
3
4
5
7/8
2
6
Page 65

Chapter 6 63
Other Information
Front Panel Display
1. Angle indicator.
2. Disc type indicator.
3. DVD: title number.
4. DVD: Chapter number.
5. Video/Audio CD: Track number.
6. Repeat play mode.
7. Linear PCM audio output.
8. Dolby Digital Disc.
9. Reverse playback/Pause/Forward playback.
10. Lights when 3D surround is turned on.
11. Displays various messages concerning operations such as PLAY, STOP, LOAD, RANDOM, etc.
NO DISC: No disc loaded.
OPEN: The disc tray is open.
LOAD: Player is loading disc information.
12. DTS (Digital Theater System) output.
13
4
57
8
1211
REPEAT ALL A B LPCM
SVCDVD
3D
Digital
CHP
TITLE
TRK
2
109
6
Page 66

This page intentionally left blank.
Page 67

Chapter 6 65
Other Information
Index
Symbols
2x Playback Audio 52
3-D Surround button
17, 32
4 x 3 Letterbox 53
4 x 3 Standard 53
A
A•B repeat
audio CD 36
DVD 31
ANGLE button 17, 29
Arrow buttons 17, 46
Aspect ratio 53
Audio
Dolby Digital 10
AUDIO button 29
Audio CD
loading a disc 34
playback features 34
Audio channel output,
changing 42
Audio equipment
Dolby Digital 10
DTS 10
Audio for 2x playback 52
Audio language
changing 29
Audio Options 51
Audio R and L jacks 61
B
Batteries, remote 14
Bitstream 51
Black Level 55
C
Camera angle 29
Chapter number ,
selecting 26
Chapter, repeating 31
Common Problems
58, 59, 60
Connections 8, 9, 11, 13
Connections, types of 7
Controls, remote 17
D
Deleting programmed
tracks
DVD 25, 35, 43
DIGITAL AUDIO OUT
jack 10, 61
Digital output type,
selecting 51
Disc menu 22
Disc Menu Language 48
Discs
digital video discs 21
Displays, front panel 63
Dolby Digital 11
Dolby Pro Logic 11
DTS 10
DVD
playback features 23
program playback
25, 35, 43
E
Elapsed time 27
F
Fast motion playback 23
FORWARD button 17, 23
Frame Advance 23
Freeze frame (pause) 23
Front panel controls 62
Front panel display 63
dimming 55
G
GO BACK button 17
GUIDE button 17
I
Info Banner, using 26
INFO button 17, 26
Installing batteries 14
Invalid icon 16
J
Jacks
AUDIO OUT R/L 61
DIGIT AL AUDIO
OUT 61
R and L 61
S-VIDEO 61
VIDEO OUT 61
Page 68

66 Chapter 6
Other Information
L
Loading a disc
audio CD 34
video CD 37, 40
Locked disc tray 32
M
Marker 30
clearing 30
recalling 30
storing 30
MARKER button 17, 30
MENU button 17
Menu language
changing 47
Motion Pictures Association
of America 49
N
Navigation 16
Number buttons 17
O
OK button 18
ON•OFF button 18
On-Screen Info Banner 26
On-screen messages
turning on/off 54
OPEN•CLOSE button
18, 62
P
Password, changing 50
PAUSE button 18, 23
PCM 51
Picture scan 23
PLAY button 18, 23, 62
PLAY MODE button 18
Playback control
bypassing 41
resuming 41
video CD 41
Playback features
audio CD 34
DVD 23
Frame advance 23
Freeze frame 23
Slow motion 24
Playing
digital video discs 20
Power Off, Auto 32
Pro-tect Plus™ 32
Program playback
deleting tracks
25, 35, 43
DVD 25, 35, 43
R
R and L jacks 61
Random Playback
DVD 24, 34
video CD 42
Remote control
other buttons 17
pointing 14
Remote, installing batteries
14
Repeat
A•B 31, 36
chapter 31
disc 36
title 31
track 36
REPEAT button 18, 31
Repeat play 31
REVERSE button 18, 23
S
S-VIDEO jack 61
Screen Format, selecting
53
Screen saver 32
Search
fast motion playback 23
Searching for scenes
using elapsed time 27
Selecting
Chapter number 26
Title number 26
Selecting a track
audio CD 34
Skipping tracks
video CD 38
Slow motion playback 24
Still Mode 54
SUBTITLE button 18, 28
Subtitle language
changing 28
Surround sound,
simulated 32
T
Title
repeating 31
Title Number
selecting 26
Track
selection, audio CD 34
selection, video CD 38
skipping, video CD 38
Troubleshooting
58, 59, 60
TV's Video Input
Channel 15
Types of Discs the Player
Can Play 14
V
VIDEO OUT jack 61
Page 69

This page intentionally left blank.
Page 70

This page intentionally left blank.
Page 71

This page intentionally left blank.
Page 72

IMPORTER (for Mexico only):
Comercializadora Thomson de México, S.A. de C.V.
Miguel de Cervantes Saavedra No. 57
Col. Granada
México D.F. C.P. 11520
Telephone: 52 54 53 73
R.F.C. CTM-980723 KS5
EXPORTER:
Thomson multimedia Inc.
10330 North Meridian Street
Indianapolis, IN 46290
©2001 Thomson multimedia Inc.
Trademark(s)® Registered
Product Country of Origin: China
Printed in Korea
TOCOM 1583577A
Please do not send any products to the Indianapolis address listed in
this manual or on the carton. This will only add delays in service for
your product.
 Loading...