

Page 1

Television
User’s Guide
Changing Entertainment. Again.
Please read this manual before
operating this product for the
first time.
TOCOM 16066640
Model: MR53R400
Page 2
Instruction Manual
WARNING
To reduce the risk of fire or electric
shock, do not expose this product
to rain or moisture.
CAUTION
RISK OF ELECTRIC SHOCK. DO
NOT OPEN.
This symbol indicates
“dangerous voltage”
inside the product that
presents a risk of electric
shock or personal injury.
Caution: To prevent electric shock, match wide blade of
plug to wide slot, fully insert.
Refer to the identification/rating label located on the back
panel of your product for its proper operating voltage.
FCC Regulations state that unauthorized changes or modifications to this
equipment may void the user’s authority to operate it.
Caution: Using video games or any external accessory with
fixed images for extended periods of time can cause them to
be permanently imprinted on the picture tube (or projection
TV picture tubes). ALSO, some network/program logos, phone
numbers, etc. may cause similar damage. This damage is not
covered by your warranty.
Caution: To reduce the risk of
electric shock, do not remove
cover (or back). No user
serviceable parts inside. Refer
servicing to qualified service
personnel.
This symbol indicates
important instructions
accompanying the
product.
Cable TV Installer: This reminder is provided to call your attention to
Article 820-40 of the National Electrical Code (Section 54 of the Canadian
Electrical Code, Part 1) which provides guidelines for proper grounding
and, in particular, specifies that the cable ground shall be connected to
the grounding system of the building as close to the point of cable entry
as practical.
NOM Requirements- Power Consumption: 110- 130V AC 60Hz 90W
2
Page 3

MR53R400
IMPORTANT SAFETY INSTRUCTIONS
1. Read these instructions.
2. Keep these instructions.
3. Heed all warnings.
4. Follow all instructions.
5. Do not use this apparatus near water.
6. Clean only with dry cloth.
7. Do not block any ventilation openings. Install in accordance with the manufacturer’s instructions.
8. Do not install near any heat sources such as radiators, heat registers, stoves, or other apparatus (including
amplifiers) that produce heat.
9. Do not defeat the safety purpose of the polarized or grounding-type plug. A polarized plug has two blades with
one wider than the other. A grounding type plug has two blades and a third grounding prong. The wide blade or
third prong is provided for your safety. If the provided plug does not fit into your outlet, consult an electrician for
replacement of the obsolete outlet.
10. Protect the power cord from being walked on or pinched particularly at plugs, convenience receptacles, and the
point where they exit from the apparatus.
11. Only use attachments/accessories specified by the manufacturer.
12. Use only the cart, stand, tripod, bracket, or table specified by the manufacturer, or sold with the
apparatus. When a cart is used, use caution when moving the cart/apparatus combination to avoid
injury from tip-over.
13. Unplug this apparatus during lightning storms or when unused for long periods of time.
14. Refer all servicing to qualified service personnel. Servicing is required when the apparatus has been damaged in
any way, such as power-supply cord or plug is damaged, liquid has been spilled or objects have fallen into the
apparatus, the apparatus has been exposed to rain or moisture, does not operate normally, or has been dropped.
IMPORTANT STAND AND BASE SAFETY INFORMATION
Choose the location for your TV carefully. Place the TV on a stand or base that is of adequate size and strength to
prevent the TV from being accidentally tipped over, pushed off, or pulled off. This could cause personal injury and/or
damage the TV. Refer to the Important Safety Instructions above.
3
Page 4

MR53R400
BEFORE YOU BEGIN
Feature Descriptions
181 Channel Tuner - total number of channels the TV can receive: 2-69 in Air mode, or 1-125 in Cable mode
Channel Recall - returns to the last channel viewed
Closed Caption Display - feature that displays the text of a TV broadcast
Remote Control - the remote control can execute all functions of the TV
On/Off Timer - feature that allows the user to set a time for the TV to turn on or off
Parental Control - used to lock unacceptable programming
Screen Size - the diagonal size of the TV screen in inches
Selectable Picture Modes - preset standards for TV display: Normal, Theater, and Memory
Trilingual On Screen Display (OSD) - TV’s on screen display can be either English, French, or Spanish
Feature MR53R400
181 Channel Tuner 1
Channel Recall
Closed Caption
Remote Control
On/Off Timer
Parental Control
Screen Size
Picture Modes
Trilingual OSD
21”
1
1
1
1
1
1
1
4
Page 5
Instruction Manual
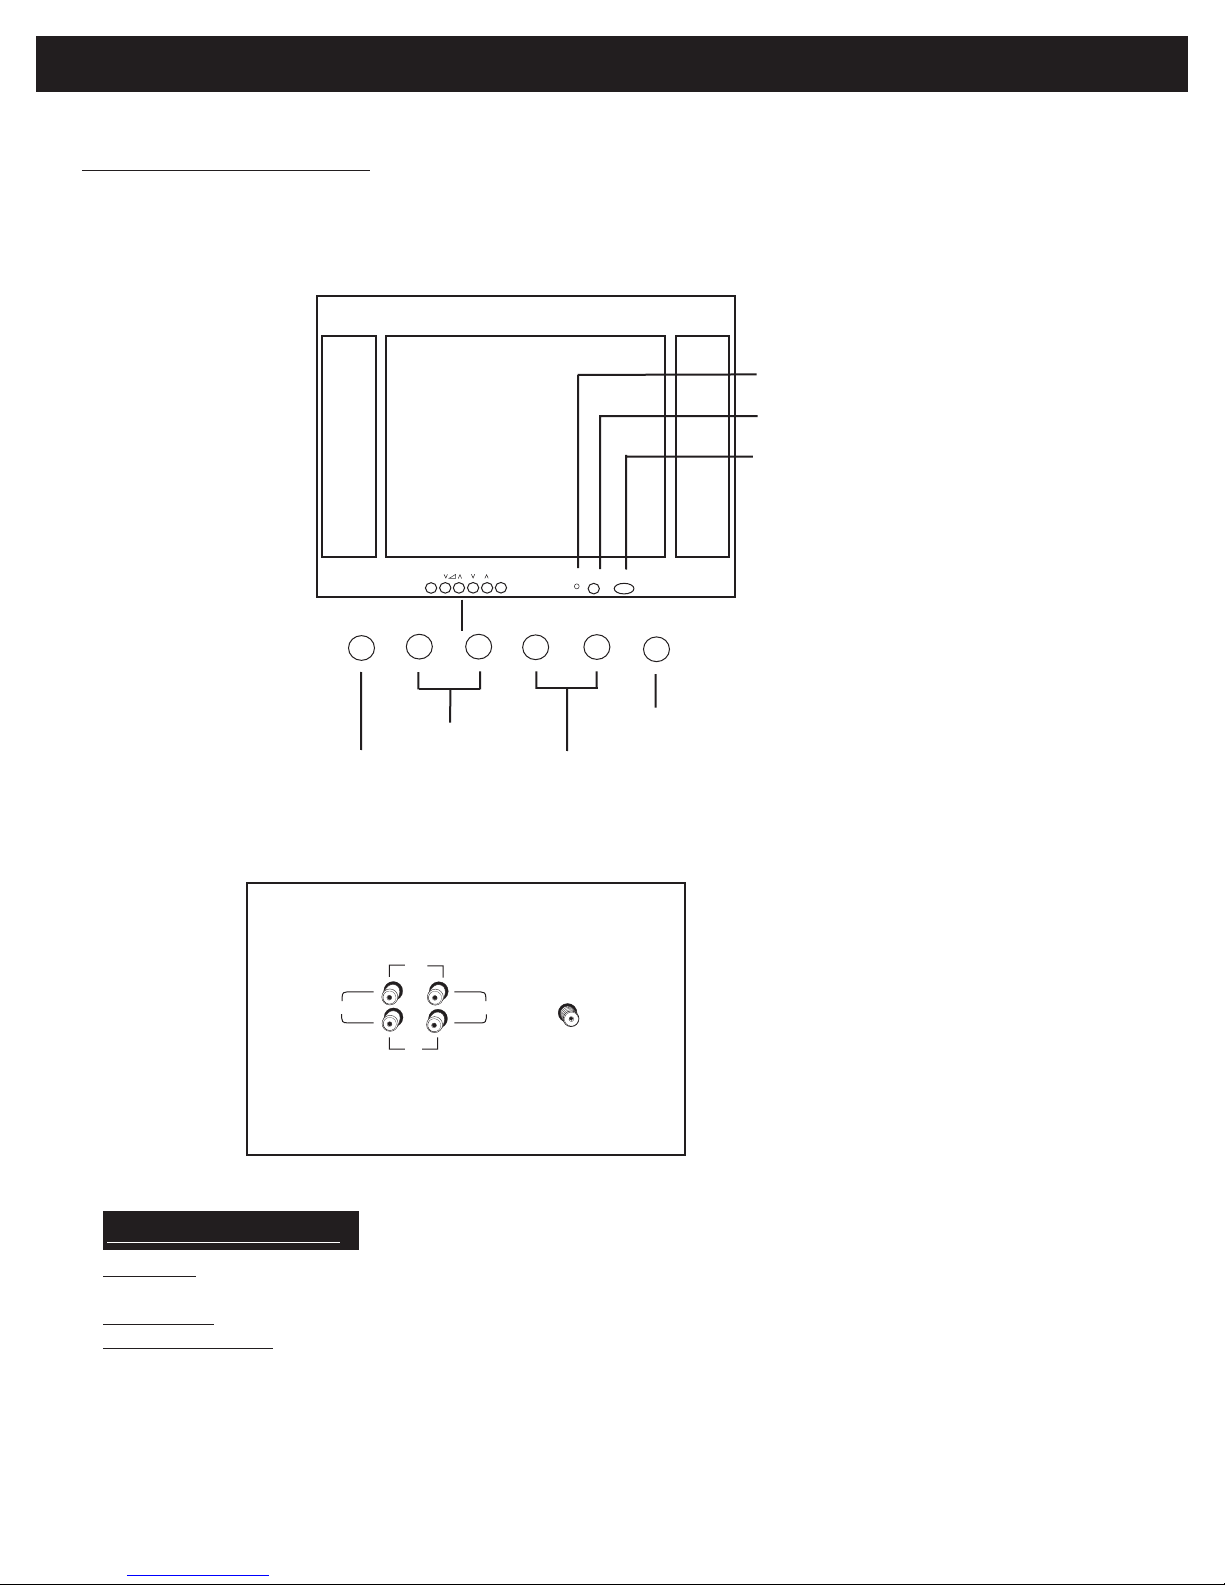
Front and Back Panels
Front panel
TV
MENU
POWER LED
INFRARED SENSOR
MAIN POWER SWITCH
CH
TV/AV
VOLUME DOWN/UP
MENU SELECT
CHANNEL DOWN/UP
TV/VIDEO SELECT
Back panel
TV (back panel)
OUT
VIDEO
IN
AUDIO
Panel Descriptions
AV Input - standard composite input designed for use with A/V devices, such as a VCR or DVD
player
AV Output - composite output for signals from TV to devices such as VCRs
Antenna IN Jack - standard coaxial antenna jack
5
Page 6

Remote Control Features
FUNCTION Used for
volume control and
child lock (press MUTE
at same time to lock
buttons. Use same
process to unlock)
Number buttons Selects
channel by number
100+ Used for channels
over 99
TIME Accesses the
Timer menu
ARROWS Used to
navigate through TV
menus
F
1
4
7
0
100+
23
5
8
6
9
CH
MENU
MR53R400
STANDBY Turns the TV
On or Off
CH + / - Used to adjust
the current channel
VOL + / - Used to adjust
the volume up or down
DISPLAY Brings up the
TV display
MENU Accesses the
TV menus
PICTURE Selects the
various Picture Modes
RECALL Returns to the
last channel viewed
CC Activates Closed
Captioning
RECALL
SCAN
CC
6
MUTE
VIDEO
MUTE Mutes or restores
the TV volume
SCAN The TV will scan
all active channels
VIDEO Cycles through
the Video/Air modes
Page 7

Instruction Manual
INSTALLATION
- Please read the safety instructions in this manual completely before installation.
- Install your TV in an area where direct sunlight will not fall upon the screen.
- Soft, indirect light is best for television viewing.
- Allow enough space (at least 10 cm.) between the TV and any walls or enclosures for proper ventilation.
- The optimum television viewing distance is 5-7 times the screen’s vertical length.
Auto-Degaussing
Color television can be easily affected by magnetism, which shows as color distortion on the screen. If your TV is affected by
nearby magnetic components or appliances, press the MAIN POWER SWITCH on the front of the TV to power off your TV for at
least 1 hour. The built-in auto-degaussing circuit will eliminate the magnetic interference.
Connecting the Antenna
75-ohm coaxial cable (not supplied)
VHF
UHF
or Cable
VHF
UHF
300-ohm twin-lead cable (not supplied)
OR
OR
U/V mixer
(not supplied)
Antenna
adapter
(not supplied)
Notes:
• It is recommended that a 75 ohm coaxial cable be used in order to
eliminate interference and noise which may occur due to nearby radio
transmissions.
• The antenna cable should not be tied together with other wiring.
• Set up a lightning rod and check it regularly when an outdoor
antenna is used.
Installing the Remote Control Batteries
RF Input
(back of TV unit)
1. Remove the battery compartment lid.
2. Insert two AAA batteries (included.) Make sure the positive (+) and
negative (-) polarities are correctly aligned.
3. Reattach the battery lid.
Notes:
• Alkaline batteries are recommended for longer life.
• Always replace both batteries at the same time.
• Do not expose batteries to fire or break them open.
• To avoid battery leakage, remove batteries from the remote control
when it is not to be used for a long period of time or the batteries
are exhausted.
7
Page 8

MR53R400
INSTALLATION (continued)
To Connect External Equipment
The following are diagrams showing basic instructions for attaching external equipment, like a VCR or DVD player,
to your TV set. Please refer to operation manuals of external audio/video equipment that will be connected to
your set for additional instructions. PLEASE TURN ALL POWER OFF BEFORE CONNECTING DEVICES TOGETHER.
Connect VCR’s RF OUT terminal to the ANTENNA IN jack
located on the back panel of the TV.
Coaxial Cable
VCR with Modulator
Input from Device to TV
AUDIO/VIDEO OUT
DVD Player
Yel low
Camcorder
VCR
White
VIDEO
AUDIO
Yellow
White
ANTENNA IN
VIDEO
AUDIO
IN
Output from TV to Device
AUDIO/VIDEO IN
VCR
Yellow
White
VIDEO
AUDIO
8
Yellow
White
VIDEO
OUT
AUDIO
Page 9

Instruction Manual
FUNCTIONS & FEATURES
Power On/Off
1. Power On
Plug in the power cord, and press the MAIN POWER SWITCH on the front of the TV to turn the power on.
2. Standby (Soft Off)
With the main power ON, press the Standby button on the remote control. This will put the TV in “Standby” or “soft off”
mode. The red indicator light on the TV set will NOT turn off. To turn the TV on again, simply press the Standby key on
the remote control, or press one of the CH +/ - keys on the TV set.
3. Power Off
With the power ON or in Standby mode, press the MAIN POWER SWITCH on the front of the TV set to completely turn off
the power to the TV set. The red indicator light on the front of the TV set will turn off. When turned back on, all settings
are reset. If previously set, the time must be re-entered.
4. Auto Off
If the TV is ON (not Standby mode), and there is no signal coming into the TV set for 15 minutes, the TV will turn off.
On Screen Display
Tuner Mode
Pressing the key on the remote control while in Tuner mode will cause the channel number, antenna mode, and clock
to appear in the upper right corner of the screen. To remove, press
again.
Video Mode
Pressing the key on the remote control while in Video Mode will cause the word Video and the clock to be displayed.
Press
again to remove. Video will continue to be displayed if no video signal is present.
Basic Functions
Changing the Channel
While in Tuner mode, press the CH +/ - keys to change the channel, or use the number buttons to enter a new channel. For
channels over 99, press the 100+ button and then the last two digits of the channel.
Adjusting the Volume
To adjust the volume, press the VOL +/ - keys. Also, you may press the FUNCTION (F) key along with the VOL +/ - keys to
adjust the volume in increments of 4.
Muting the Volume
To mute the volume, press the MUTE key. To restore the volume, press MUTE again or press the VOL + key.
Function Selection Menus
All Function menus can be accessed by pressing the MENU key on the remote control or front panel. When finished,
press the MENU key until the screen clears.
9
Page 10

FUNCTIONS & FEATURES (continued)
Picture Menu
Access
From the Main menu screen, press the MENU key until Picture is highlighted in
red. Press the left or right arrow key to access this menu.
Features
This menu allows you to adjust the various picture settings. Use the up & down
arrow keys to move between the various settings, and the left & right arrow
keys to adjust them. When finished, press the MENU key to return to the main
menu.
TINT
: -31 (more greenish) to +31 (more purplish)
BRIGHTNESS
CONTRAST:
COLOR:
Tuner Menu
Access
Press the MENU key until Tune r is highlighted in red. Press the left or right
arrow key to access this menu. Use the up & down arrow keys to move between
the various settings. When finished, press the MENU key to return to the main
menu.
Note
: This menu is only accessible while the TV is in Tuner mode.
Channel: This feature allows you to select the channel being displayed. Either
use the left & right arrow keys or the number buttons to select the channel.
Add/Erase: This feature is used to either add or remove the presently selected
channel from the active channel list, which is used by the TV when CH +/ - are
pushed. Use the left & right arrow keys to select Add or Erase.
: 0 (dimmest) to 63 (brightest)
0 (less contrast) to 63 (more contrast)
0 (less color) to 63 (more color)
Picture
Tint .................00
➔
Brightness .................32
Contrast .................32
Color .................32
Sharp .................32
Tuner
Channel
Add/Erase
Antenna
Auto Program
➔
Stop Start
MR53R400
2
Add
Air
Antenna: This feature sets the TV tuner to an Air antenna or a Cable antenna.
Please use Air mode when using an over-the-air antenna; use Cable mode for
a cable hookup. Use the left & right arrow keys to select between the two
options.
Auto Program:
list, based on the presence of a signal. If a signal is detected, that channel will be
added. If there is no signal detected then the channel will not be added. Use the
right arrow key to start the process; use the left arrow key to stop the process.
This feature will automatically add channels to your channel
10
Page 11

Instruction Manual
FUNCTIONS & FEATURES (continued)
Timer Menu
From the Main Menu screen, press the MENU key on the remote control until
Timer on the main screen is highlighted in red. Press the left or right arrow key
to enter this menu.
Time
This feature allows you to set the clock on the TV. With Time highlighted in
red, use the left & right arrow keys to set the hour. Once the hour has been
set, press the down arrow key to move to minutes, and then set them as well.
Repeat this process for the AM/PM aspect also. Please note that on some
models, the number “0” is used instead of “12.” Press the down arrow
again to move on to the next feature, or simply let the display disappear after
six seconds.
On Time
This feature allows you to program the TV to turn on at a preset time, and to a
preset channel (see On Channel, below.) Use the down arrow key to highlight
this feature in red. Next, use the left & right arrow keys to set the hour that
you wish for the TV to come on. Use the down arrow key to move to minutes,
and then set them using the left & right arrow keys to set them as well. Repeat
this process for the AM/PM aspect also. Please note that some models use the
number “0” instead of “12.” Press the down arrow to move to the next feature,
or simply let the display disappear after six seconds.
Timer
Time - -:- -
➔
On Time - -:- On Channel Off Time - -:- -
On Channel
This feature ties into the On Time feature described above. Use the down arrow
key to highlight this feature in red. Next, use the left & right arrow keys, or the
numeric keypad, to set the channel that the TV set will be on when the timer
activates. Press the down arrow key to move to the next feature, or simply let
the display disappear after six seconds.
Off Time
The procedure to set this feature is the same as the procedure described above
in On Time. Please note that some models use the number “0” instead of “12.”
Press the down arrow to move to the next feature, or simply let the display
disappear after six seconds.
11
Page 12

FUNCTIONS & FEATURES (continued)
System Menu
From the Main Menu screen, press the MENU key until System is highlighted in
red. Press the right arrow key to enter this menu. Use the up & down arrow keys
to move between the various feature selections in this menu.
Language
This feature will allow you to change the language that is used for the on
screen display. With Language highlighted in red, use the left & right arrow
keys to select which of the three languages you wish to use - English (Eng.),
Spanish (Esp.), or French (Fra.)
Blue Back
This feature, when activated, will display a blue background on your TV screen
when there is no signal present. With Blue Back highlighted in red, use the left
or right arrow keys to select between On or Off.
Closed Captions
When the Closed Captioning system is turned on, your TV can decode and
display the Closed Captioning signal. Closed Captioning provides an on screen
display of the dialogue, narration, and sound effects of a TV program. Closed
Captions will be displayed at either the top or bottom of the screen.
MR53R400
System
Language Eng. Fra. Esp.
➔
Blue Back On
Closed Captions CC1
Parental Guide On
MPAA-X TV-MA
With the Text Mode selected, the TV will decode and display any teletext signal
that is being transmitted with the TV program. This information is usually not
related to the program itself. Text will be displayed on a portion of the TV
screen.
With Closed Captions highlighted in red, use the left & right arrow keys to
select one of the four Closed Captioning selections (CC1-4), or one of the four
Text selections (T1-4). Setting this feature to Off (CCD/Text Off) will turn off any
Closed Captions.
Notes: A Closed Caption signal may not display under the following conditions:
• When viewing a dubbed video tape
• When there is poor or weak signal reception
• When the signal is changed or altered (due to interference)
• When the program does not have a Closed Caption or Text signal to decode
12
Page 13

Instruction Manual
FUNCTIONS & FEATURES (continued)
System Menu (continued)
Parental Guide
This feature allows parents to block certain programs from being
viewed, based on the programs’ rating. In order to access this menu, you
must first enter a pass code. The factory default is 6688. With Parental
Guide highlighted in red, use the number buttons to enter the pass code.
If this turns the Parental Guide off, press the right arrow key until Parental
Guide is On. With Parental Guide on, press the right arrow key to access the
TV Rating grid.
System
Language Eng. Fra. Esp.
Blue Back On
Closed Captions CC1
Parental Guide On
➔
TV-Rating
Using the up & down arrow keys to navigate between the ratings, press
the MENU key to block out a particular rating completely. Or, if you wish,
press the down arrow key to highlight an individual rating (anywhere a U
is displayed in the middle of the grid.) Pressing the MENU key with one of
these individual ratings highlighted will block only programs that feature
that particular aspect. See the TV rating diagram at right for an example. TV
ratings are defined in the charts below:
Age Defined as
TV - Y All Children
TV - Y7 Directed to Older Children (over 7)
TV - G General Audience
TV - PG Parental Guidance Suggested
TV - 14 Parents Strongly Cautioned
TV - MA Mature Audience Only
MPAA-Rating
Press the right arrow key with Parental Guide highlighted until the MPAARating screen appears. Use the up & down arrow keys to navigate between
the MPAA ratings. Pressing the MENU key with a rating highlighted will block
that particular rating from being shown on this TV. A B will show in red next
to the blocked rating. Please note that blocking a lower rating (for example,
PG) will block all higher ratings (PG-13, R, NC-17, X.)
Pass code Menu
This menu allows you to change the access code for the Parental Guide
functions of the TV set. Press the MENU key when Pass Code Control is
highlighted. This will turn on or off the Pass Code function. With the Pass
Code function ON, you can also change the Pass Code. Use the down arrow
key to highlight Pass Code, then enter the new Pass Code using the numeric
keypad. Press the left arrow key when finished.
Contents Defined as
FV Fantasy Violence
D Sexual Dialogue
L Adult Language
S Sexual Situations
V Violence
MPAA-X TV-MA
Enter Pass Code - - - -
TV-Rating
Rating FV D L S V
➔
TV-Y U
TV-Y7 U U
TV-G U
TV-PG U U U U U
TV-14 B B B B B
TV-MA B B B B
Age Based Rating
MPAA-Rating
Movie Rating
➔
G U
PG U
PG-13 U
R U
NC-17 U
X U
Age Based Rating
Notes:
• The factory default pass code of 6688 is also the override code, in case
you forget your new pass code.
• The factory defaults have TV-MA and MPAA-X ratings blocked.
13
Page 14

TROUBLESHOOTING GUIDE
Check the following guide for a possible correction to a problem before contacting customer service.
Symptoms Correction
MR53R400
No power
No picture
No sound
No TV signal
Stripe or purple
interference appears in the
screen.
Picture becomes
snowy.
• Connect the power plug into the wall outlet securely.
• If a component is connected to the TV, make sure the video cables are firmly
connected. Then switch the TV to the appropriate Video mode.
• Verify coaxial cable from antenna is connected to the ANTENNA IN jack on the TV.
• If a receiver is connected to the TV, make sure the audio cables are firmly
connected. Then switch to the appropriate mode on the receiver. Refer to your
audio amplifier owner’s manual.
• Mute feature may be enabled.
• Check whether the antenna is firmly connected to the TV.
• Unplug the TV from the wall for 30 seconds, then plug in and try again.
• Unplug the antenna connection from the back of the TV, unplug the TV from
the wall, wait 30 seconds, then try again.
• Interference may come from high frequency sources such as a broadcasting
station, poor ground connection in cable used, or non shielded audio speakers
too close to the picture tube.
• Check the antenna lead wire to see if it has open circuit or not.
• Check the connection of antenna lead wire to the TV set input.
• Check whether there is any damage to antenna.
• Change the direction of antenna to minimize the multi-image.
Picture with multi-image
TV channel not received
Black box appears on
screen.
Remote control
doesn’t operate.
• The video frequency radiated from TV station can be reflected by tall buildings,
high tower, etc.
• Make sure the Air/Cable setting is correct.
• Channel may be locked with the block channel feature through Parental Guide.
• Check Add/Erase feature, as channel might have been erased during set up.
• Closed Caption feature might be activated.
• Batteries may be weak. Replace batteries.
• Make sure remote sensor is not blocked including deflection from curved glass
cabinet.
14
Page 15

Instruction Manual
Comercializadora Thomson de México S.A de C.V. garantiza este producto en
sus partes y mano de obra, contra cualquier defecto de fabricación y funcionamiento,
a partir de la fecha de entrega al cliente final. Bajo el siguient e término:
Televisores c/cinescopio de 36,6
cm. (14 pulgadas) y menores
Televisores c/cinescopio de 48,3
cm (19 pulgadas) y mayores.
Televisión de Proyecció 1 año
Videocaseteras 1 año 1 año
Videocámaras 1 año 1 año
Equipos de Audio 1 año 1 año
Reproductor de DVD 1 año 1 año
Accesorios 1 año 1 año
POLIZA DE GARANTIA
Producto Partes Mano de Obra
2 años cinescopio.
1 año otras partes.
2 años cinescopio.
2 años otras partes.
1 año
todas
1 año.
2 años
CONDICIONES
1. Para ser efectiva esta garantía se requiere presentar esta póliza o factura de
compra debidamente sellada y requisitada, junto con el producto en cualquiera de
nuestros Centros de Servicios Autorizados, (que se indican en la hoja anexa), o en
el lugar donde fué adquirido.
2. Comercializadora Thomson de Mexico se compromete a reparar y/o reponer las
piezas y componentes defectuosos sin cargo al consumidor, o en caso de que a
criterio de dicha empresa no sea posible la reparación, cambiar por uno nuevo,
exactamente del mismo modelo o su similar. Los gastos de transportación dentro
de la red de servicios, que se deriven del cumplimiento de esta póliza de garantía
serán cubiertos por Comercializadora Thomson de México S.A de C.V.
3. Todos los productos deberán ser llevados a cualquier Centro de Servicio
Autorizado, excepto los televisores con pantalla de 63,5 cm (25 pulgadas) o mas,
los cuales serán reparados en el domicilio del cliente.
4. El tiempo de reparación en ningún caso será mayor a 30 días, contados a partir de
la recepción del producto en el Centro de Servicio Autorizado.
5. Para la adquisición de partes y accesorios, contactar al 01-800-1117221 o acudir a
Comercializadora Thomson de México, .
NOTAS:
En caso de extravío de la póliza, el consumidor podrá recurrir a su distribuidor para
su reposición, previa presentación de la factura o nota de compra.
Para su comodidad, solicite informes sobre la localización del Centro de Servicio
Autorizado mas cercano a su domicilio, llamando al:
,
01-800-1117221
Comercializadora Thomson de México S. A de C.V
Miguel de Cervantes Saavedra # 57, Col. Ampliación Granada
México, D.F. C.P. 11529; Apartado Postal 41540
No. de Póliza:
___________
PRODUCTO:
._____________________________________________
DATOS DEL PRODUCTO
MODELO:__________________ NO.DE SERIE______________________
EXPEDIDA A:_________________________________________________
DATOS DEL CLIENTE
DIRECCION:_________________________________________________
____________________________________________________________
NOMBRE:__________________________________________________________
DIRECCION:__________________________________________________________
____________________________________________________________________
FECHA DE COMPRA:______________________________
SELLO Y FIRMA DEL VENDEDOR
ESTA GARANTIA NO TIENE VALIDEZ EN LOS SIGUIENTES CASOS
• Si el producto no ha sido operado de acuerdo con el instructivo de uso
en español que acompaña al producto.
• Si el producto ha sido utilizado en condiciones distintas a las normales
y/o se hace caso omiso de los cuidados y advertencias que se señalan en
el manual de usuario.
• Si el producto ha sido alterado, modificado o sufrido daños por causas
ajenas al fabricante
u ocasionadas por el consumidor.
• Si se ha tratado de reparar el aparato por personas no autorizadas
por Comercializadora
Thomson de Mexico
15
Page 16

MR53R400
México, D.F. Estado de México Monterrey. N.L. Guadalajara, Jal.
Centro de Servicios Autorizados Express (servicio en 24 horas)
Digital Service Vallejo Digital Service Tultitlán Audio Estéreo Aguilar Servicio Especializado de Jalisco
Av. 3 A No. 12, Local 2 Av. López Portillo Km. 21 # 90A Gral. Zuazua 738 Nte. Enrique Díaz de Leon No. 821
Col. Santa Rosa Col. Bello Horizonte Col. Centro Col. Sagrada Familia
México, D.F. Tultitlán, Edo. de México 54944 Monterrey. N.L. Guadalajara, Jal.
Tels (55) 55673972, 53677347, Tel (55) 5894 8390 Tel (81) 83724989 Tel (33) 31267431, 31267430
(55) 53677349 Tel/Fax (55) 5894 8389 83755884 38253229, 38258262
Tel/Fax (55) 53889621
AGUASCALIENTES CAMPECHE
Electrónica JIMSA Videoservicio
Av. Adolfo López Mateos No. 230 Ote. Av. López Mateos No. 24 Col. Centro Zona Centro Col. Narvarte Col. Centro, C.P. 50060
Col. Centro Col. Barrio Sn. Roman. Cd. Delicias, Chihuahua Piedras Negras, Coahuila. C.P. México, D.F. C.P. 03020 Toluca, EDM.
Aguascalientes, Ags. C.P.2000 Campeche, Camp. C.P.24040 Tel/ Fax (639) 4743026 Tel/Fax (878) 7821875 Tel (55) 6390812 Tel (722) 2149330, 2133424
Tel. (449) 915 5181; 978 0757 Tel. (981) 816 3333 Fax (55) 6391184 Fax (722) 2132291
Fax. (449) 915 8100 Fax. (981) 811 0664
BAJA CALIFORNIA NORTE CHIAPAS
Electrónica General Internac KC Vídeo
Blvd. Insurgentes No. 16174, Loc. 2AC. 10a. Norte Oriente No. 153A
Plaza de Abastos Los Almos Col. Centro
Tijuana, BCN C.P. 22440 Tuxtla Gutiérrez, Chis. C.P. 29000
Tel. / Fax: (664 ) 6212215 Tel/Fax (961) 618 1908; Tel. (961) 618 3643
Baja Electronics Serv. Elec. Especializado
Hacienda de Corralejo No. 2099 Cuahutémoc No. 2A
Col. Hidalgo Col. Centro, C.P. 29200
Mexicali, B.C.N. C.P. 21389 San. Cristóbal de las Casas, Chis.
Tel/Fax (686) 5619818, 5619808 Tel/Fax. (967) 6781355
Serv. Electrónico Ensenada Ele Aplicada Serv Digitales
Calle 4ta No. 1050, Local B 4a. Av., Sur No. 51
Col. Centro. Col. Centro, C.P. 30700
Ensenada, B.C.N. C.P. 22800 Tapachula, Chis.
Tel. (646) 1740532 Tel. (962) 6269998
Fax.(646) 1788356 Fax. (962) 6256953
BAJA CALIFORNIA SUR CHIHUAHUA
Digital Sound Zener Electrónica
16 de Septiembre No. 390 Trasviña y Retes No. 3503A
Col. Centro Col. Sn. Felipe
La Paz, Baja California SurChihuahua, Chih. C.P. 31240
Tel/Fax (612) 1232017 Tel/Fax (614) 4265041 Tel (614) 4140116
Video Servicio Beluz Magnavox Serel. S.A.
Carretra a todos Santos No. 32 Tlaxcala 1161 Calle Nueva No.307 Av. Tláhuac No. 4798 Col. Villa de las Flores Av. 16 de Septiembre No. 1076
Col. Infonavit Las Brisas. Col. Hidalgo Col. González Barrio de S. Sebastian Tulyehualco Xoch. Coacalco, Edo. de Mex. C.P. 55710 Col. Centro, C.P. 38600
Los Cabos san Lucas, BCS C.P. 23410 Cd. Juarez, Chihuahua. C.P. 32010 Piedras Negras, Coahuila. C.P.26000 México D.F. Tel 58793404 Acambaro, Gto.
Tel/Fax (624) 14313 65 Tel/Fax (656) 6124031 Tel/Fax (878) 7827104 Tel/Fax (55) 55842491 Fax 58790330 Tel/Fax (417) 1720780
Electronica Tony Electro Vision Novatron. SHUREE Electrónica
Av. Tercera Pte. No. 213 Allende No. 114 esq. Xicotencatl Diag. San Antonio No. 1213 Av. De los Maestros No. 113A
Taller Electrónico Tony Multiservicios del Norte
20 de Noviembre No. 1521 5 de Mayo 295 Sur.
Col. Centro. Col. Centro
Cd. Camargo, Chihuahua. C.P. Sabinas, Coahuila. C.P. 26700
Tel/Fax (639) 4743026 Tel/Fax (861) 6126431
COAHUILA
Electrónica Profesional
Blvrd. Francisco Coss No. 450-1
Col. Centro
Saltillo, Coah C.P. 25000
Tel/Fax (844) 4123044
Audio y Video Electronica
Miguel Blanco 307-A
Col Zona Centro.
Monclova, Coahuila. C.P. 25700
Tel/Fax (866) 6339406
Electro Visión
Juan Aldama No. 6 y Presid. Carranza
Col. Centro
Nueva Rosita, Coahuila. C.P.
Tel/Fax (861) 6145844
Vacom
Av. Morelos 1016 ote.
Col. Centro
Torreón, Coah. C.P. 27000
Tel. 01 871 718 39 05, 7 22 15 51
Fax. 01 871 718 11 98
COLIMA
Elec. Saturno de Colima
Nigromante No. 138
Col. Centro
Colima, Col. C.P. 28000
Tel/Fax (312) 3145554, Tel (312) 3145000
Lab. Elect. De la Mora
Allende No. 110
Col. Centro
Manzanillo, Col. C.P. 28200
Tel (314) 3323004
Tel/Fax (314) 3354667
DISTRITO FEDERAL
Laboratorio Electrónico.
Retorno 52 Cecilio Róbelo, Edif 1, Loc16-02
Col. Jardin Balbuena
México, D.F.
Tel/Fax (55) 57620264, 57626494, 57684483
ADE Electrónica Tlanepantla, E.D.M. C.P. 54170
Corea No. 79 Tel. (55) 55877599
Col. Romero Rubio Fax: (55) 55878971
México D.F. C.P.
Tel/Fax (55) 57027223
Electro Digital C. De servicio Aut. L .Portillo, esq. Blvd. Coacalco
SIMEL TV Servideo
Rio Churubusco No. 2215 Oriente 9 No. 182
Col. Agricola Oriental Col. Reforma
Mexico, D.F. C.P. 08500 Cd. Neza, Edo. De Mex. C.P. 57840
Tel. (55) 57563785 Tel (55) 58572547
Fax. (55) 57560883 Fax (55) 58576399
Electrónica Rangel.
San Felipe No. 157
Col. Pedregal de Santa Ursula
México D.F. C.P. 04800
Tel (55) 56193213
Fax (55) 56194565
DURANGO
Macroservicios.
Calle Patoni No. 105 sur.
Col. Centro
Durango, Dgo.
Tel/Fax (618) 812 26 86
ESTADO DE MEXICO
Digital Service Prensa
Prensa No. 1253
Col. Prensa Nal. Ind. Vallejo.
Ctro Serv. Electrónicos
Electrónica Alcántara.
Reforma No. 36
Col. Centro
Chalco, Edo. de Mex. C.P. 56600
Tel/Fax (55) 59774366
GUANAJUATO
Tecnología Electrónica
Blvd. Adolfo López Mateos No. 2834A
Col. Haciendas El Rosario
León, Gto. C.P. 37130
Tel/Fax (477) 773 6634
Mar Electronic's
Brisas No. 999
Col. Las Reinas, C.P. 36660
Irapuato, Gto.
Tel/Fax (462) 624 7140
Tele Servicio Chucho.
Blv Adolfo López Mateos No 510 Pte
Col. Centro, C.P. 38000
Celaya, Gto.
Tel. (461) 6124714
Tel/Fax (461) 6130591
Tele Radio Ortega.
16
Page 17

Instruction Manual
RED NACIONAL DE SERVICIO
GUERRERO
Nueva Elec. Auditron
Aquiles Serdán No. 14B
Col. Centro
Acapulco, Gro. C.P. 039300
Tel (744) 4826242
Tel/Fax (744) 4832062
HIDALGO
Tec. Electrónica Digital
Blvd. Valle de San. Javier No. 308
Col. Fracc. Valle de San. Javier
Pachuca, Hgo. C.P. 42086
Tel/Fax (771) 7132436
Electrónica Especializada
Independencia No. 102 Loc. C
Col. Centro, C.P. 43600
Tulancingo, Hgo,
Tel/Fax (775) 7552654 Tel (775) 7539120
JALISCO
Serv. Esp. De Jalisco
Ignacio Ramírez No. 567
S.H. Sta. Teresita
Guadalajara, Jal. C.P. 44200
Tel/Fax (33) 38253229 Tel (33) 38270721
Electrónica Integral
Candelaria No. 202, Esq. Analco
Col. Sta. María
Puerto Vallarta, Jal. C.P. 48348
Tel (322) 2243736
Tel/Fax (322) 2248590
Setesa
5 de Febrero No. 2786
Col. Rancho Blanco
Tlaquepaque, Jalisco. C.P. 44890
Tel (33) 36354404
Tel/Fax (33) 36351875
MICHOACAN
Alka Electrónica
García de León No. 271
Col. Chapultepec Sur.
Morelia, Mich. C.P. 58260
Tel (443) 3145521, 3159036
Tel/Fax (443) 3159425
Centro Electrónico Sony
Justo Mendoza No. 12 Húzares No. 207
Col. Centro Col. Centro Negrete No. 612 Col. El Rastro Independencia No.306
Uruapan, Mich. C.P. 60000 Oaxaca, Oax. C.P. 68000 Col. Centro Nogales, Sonora. C.P. 84000 Col. Manuel Ávila Camacho
Tel (452) 5243778, 5240838 Tel (951) 5164737 Cd. Valles, SLP. C.P. 79000 Tel (631) 3146857 Coatzacoalcos,Ver. C.P. 96420
Tel/Fax (452) 5245909 Fax (951) 5147297 Tel/Fax (481) 3820651 Fax (631) 3123087 Tel/Fax (921) 2140028
Multiserv Prof. Zamora
Colon No. 181-1 Ote.
Col. Centro
Zamora, Mich. C.P. 59600
Tel/Fax (351) 5155416
MORELOS
Electrónica Hertz
Insurgentes No. 190
Col. Emiliano Zapata
Cuautla, Mor. C.P. 62744
Tel/Fax (735) 3538410
Electrónica Hertz
Libertad No. 108
Col. La Carolina
Cuernavaca, Mor. C.P. 62190
Tels (777) 3130049, 3189044, 3182866
Fax (777) 3139092
NUEVO LEÓN
Audio Estéreo Aguilar
Gral. Zuazua 738 Nte.
Col. Centro
Monterrey, Nvo. León. CP. 64000
Tels (81) 83724989, 83755440
Tel/Fax (81) 83755884
Equipo y Mant. Electrónico.
Platón Sánchez No. 1404 Nte.
Col. Terminal
.
Monterrey Nvo. León
Tel (81) 83724798
Fax (81) 86762799
Teleservicio Murillo
Allende No. 595 Sur.
Col. Centro
Cd. Linares, Nvo León. C.P. 67700
Tel/Fax (821) 2126650
NAYARIT
Electrónica Show
San Luis No. 118 sur
Col. Centro
Tepic, Nay. C.P. 63000
Tel/Fax (311) 2145800
OAXACA
El Francistor
Telestar
Av.Libertad No. 1557
Col. La Piragüa
Tuxtepec , Oaxaca
Tel/Fax (287) 8752544
PUEBLA
Serv. Express Electrónico
Prol. Reforma No. 6908A
Col. La Libertad
Puebla, Pue. C.P. 72130
Tel (222) 2497819
Tel/Fax (222) 2313293
Centro de Servicio P.C.
Av. Independencia Pte. No. 407
Col. Centro
Tehuacan, Puebla C.P. 75700
Tel/Fax (238) 3823835
QUERETARO
Blauton Industrial
Av. Universidad No. 44B
Col. Pathe
Querétaro, Qro. C.P. 76020
Tels (442) 2232266, 2234934
Tel/Fax (442) 2232267
QUINTANA ROO
Electrónica Beta
Av. Sun Yax Chen No. 43 Loc. 4
Col. Centro
Cancun, Q. Roo. C.P. 77508
Tel (998) 8845412
Tel/Fax (998) 8873813
Electrónicos y Mas
Ignacio Zaragoza No. 204-A
Col. Centro. C.P. 77000
Chetumal, Q. Roo
Tels (983) 8326663, 8324622
Fax (983) 8326014
SAN LUIS POTOSI
Electrónica Especializada
Manuel J. Clouthier No. 212C
Col. Las Águilas
San Luis Potosí, SLP. C.P. 78270
Tel (444) 8176279
Tel/Fax (444) 8141902
Estéreo Car
SINALOA TABASCO
Serv. Electrónico del Pacifico Elec. Sigma de Tabasco
Mariano Escobedo No. 1022 Av. Gregorio Méndez No. 2819
Col. Centro Col. Atasta
Mazatlán, Sin. C.P. 82000 Villahermosa, Tab. C.P. 86100
Tel/Fax (669) 9820155 Tel (993) 3545410
Reparaciones Electrónicas Electrónica Arizona
J.Jose Ríos No. 178 ote.
Col. Miguel Alemán.
Culiacán Sinaloa. C.P. 80200
Tel/Fax (667) 7168132, (667) 7165145
Electrónica Morelos.
Morelos No. 201 ote
Col. Centro.
Los Mochis, Sinaloa. C.P. 81200
Tel/Fax (668) 8120588
SONORA
Wong's Electrónicos
12 de Octubre No.116 Esq.Q.Roo.
Col. San Benito
Hermosillo, Son. C.P. 83180
Tel (662) 2100586
Tel/Fax (662) 2105495
Dasetronik.
Guerrero No. 308-A este.
Col. Centro.
Navojoa, Sonora. C.P. 85800
Tel (642) 4224064
Fax (642) 4213664
Audio video Electrónica
Av. Zaragoza No. 516 pte.
Col. Centro.
Cd. Obregón, Sonora. C.P. 23000
Tel (664) 4143828
Fax (664) 4147575
Electrónica Universal.
Calle 29 Av. Alfonso Idberry No. 401
Col. Centro
Cd. Guaymas, Sonora. C.P. 85400
Tel/Fax (622) 2229411
Electrónica Castillo
Noche Buena # 37
Tel/Fax (993) 3540033
TAMAULIPAS
Electrónica Digital
Independencia No. 112 esq. 11
Col. Centro
Matamoros, Tamps. C.P. 88000
Tel/Fax (868) 8135013
Centro de Servicio Lugo
Rosalinda Guerrero No. 285
Col. Prol. Longoria
Reynosa, Tamps. C.P. 88699
Tel/Fax (899) 9249243
Esp. Electrónicas
Matamoros Poniente 225
Col. Centro
Cd. Victoria, Tamps. C.P. 87000
Tel (834) 3129945
Fax (834) 3125193
Micronics
Calle 10 No. 607.
Col. Jardín 20 de Noviembre
Madero, Tamps. C.P. 89440
Tel (833) 2159689
Fax (833) 2103882
Laboratorio Electrónico
Washington 3142
Col. Juarez (Centro)
Nuevo Laredo, Tamps. C.P. 88000
Tel (867) 7149592
Tel/Fax (867) 7149852
Electrónica Emmanuel
Obregón No. 206 Pte.
Zona Centro
Cd. Mante, Tamaulipas. C.P. 89800
Tel/Fax (831) 2329081
VERACRUZ
Grupo Digital
Serv Técnicos Prof.
Av. 13 No. 400 Esq. Calle 4
Col. Bella Vista
Córdoba, Ver. C.P. 94500
Tel (271) 7127322
Fax (271) 7122539
Bustamante No. 46
Col. Centro
Jalapa, Ver. C.P. 91000
Tel (228) 8122534, 8186506
Fax (228) 8187868
Com. y Electrónica
Miguel Hidalgo No. 103
Col. Buena Vista Sur
Minatitlán, Ver. C.P. 96730
Tel (922) 2234744
Tel/Fax (922) 2231565
Electrónica Digital BORR
Av. Juárez No. 516
Col. 27 de Septiembre
Poza Rica, Ver. C.P. 93320
Tel (782) 8229899
Tel/Fax (782) 8236949
Electrónica DICA
F. del Paso y Troncoso No. 908
Col. Centro
Veracruz, Ver. C.P. 91700
Tel (229) 9312296
Tel/Fax (229) 9312033
Seguridad Plus.
Oriente 4 No. 187 Esq. Sur 5
Col. Centro
Orizaba, Ver. C.P.94300
Tel/Fax (272) 7250235, (272) 7256626
YUCATAN
Servicentro
Calle 70 No. 443, oc. 7 por 49
Col. Centro
Mérida, Yuc. C.P. 97000
Tel (999) 9285428
Tel/Fax (999) 9285905
ZACATECAS
Electrónica Mario.
Morelos Poniente No. 1214
Col. Centro
Zacatecas, Zac. C.P. 98000
Tel/Fax (492) 9227561
17
Page 18

Visit the RCA web site at www.rca.com/latinamerica
Please do not send any products to the Indianapolis address listed in this manual or on the
carton. This will only add delays in service for your product.
Country of Origin: Mexico
IMPORTER: (for Mexico only)
Comercializadora Thomson de México, S.A. de C.V.
Miguel de Cervantes Saavedra 57
Col. Ampliación Granada
C.P. 11529 Mexico D.F.
Telefono: (55) 25 81 53 20
R.F.C. CTM-980723-KS5
EXPORTER:
Thomson multimedia Inc.
10330 North Meridian Street
Indianapolis, IN 46290
©2002 Thomson multimedia Inc.
Trademark(s) ® Registered
Marca(s) Registrada(s)
Printed in Mexico
TOCOM 16066640
 Loading...