

Page 1
i i
Changing Entertainment. un.
Please read this manual before
!this the
first time.
TOCOM 15695640
Page 2

WARNING
To reduce the risk of fire or
electric shock, do not expose
this TV to rain or moisture.
To reduce the risk of electric shock, do not remove
cover (or back). No user serviceable parts inside.
Refer servicing to qualified service personnel.
This symbol indicates
"dangerous voltage" inside
the product that presents a
risk of electric shock or
personal injury.
_, This symbol indicates
important instructions
accompanying the product.
Caution: To prevent electric shock, match wide blade of
plug to wide slot, fully insert.
Power Consumption: 120V -- 60 Hz A.C.
125 W (models MR27310 and
MR29310)
If fixed (non-moving) images are left on the screen for long periods,
they may be permanently imprinted on the picture tube. Such
images include network Iogos, phone numbers, and video games.
This damage is not covered by your warranty. Extended viewing of
channels displaying these images should be avoided.
Cable TV Installer: This reminder is provided to call your attention to
Article 820-40 of the National Electrical Code which provides guidelines for
proper grounding and, in particular, specifies that the cable ground shall be
connected to the grounding system of the building as close to the point of
cable entry as practical.
Page 3
Chapter 1: Connections & Setup
Things to Consider Before You Connect ......................................................................... 4
Protect Against Power Surges ................................................................................... 4
Protect Components from Overheating ................................................................... 4
Position Cables Properly to Avoid Audio Interference ............................................ 4
Important Stand and Base Safety Information ........................................................ 4
Use Indirect Light ....................................................................................................... 4
Choose Your Connection .................................................................................................. 5
Connection: TV Only .................................................................................................. 6
Connection: TV + VCR ................................................................................................ 7
Connection: TV + VCR + Satellite Receiver ............................................................... 8
The Front of Your TV ........................................................................................................ 9
Complete the Interactive Setup ..................................................................................... 11
Set the Menu Language .......................................................................................... 11
Complete Auto Channel Search .............................................................................. 11
The Buttons on the Remote Control ............................................................................. 12
Chapter 2: Using the TV's Features
Channel Banner .............................................................................................................. 14
Parental Controls and V-Chip ......................................................................................... 14
Channel Block ........................................................................................................... 15
Front Panel Block ..................................................................................................... 15
Lock/Unlock Parental Controls ................................................................................ 15
Chapter 3: Using the TV's Menu System
How to Use the Different Types of Menus and Control Panels .................................. 18
Menus ....................................................................................................................... 18
Control Panels .......................................................................................................... 18
Audio Menu .................................................................................................................... 20
Picture Quality Menu ..................................................................................................... 21
Screen Menu ................................................................................................................... 22
Using Closed Captioning .......................................................................................... 22
Closed-Caption Modes ............................................................................................. 22
Channel Menu ................................................................................................................. 23
Time Menu ...................................................................................................................... 23
Chapter 4: Other Information
Troubleshooting .............................................................................................................. 26
Care and Cleaning .......................................................................................................... 28
Index ................................................................................................................................ 29
1
Page 4

This page left blank intentionally
Page 5
1
Chapter Overview:
&Seep
• Things to Consider Before You Connect
• Choose Your Connection
• The Front of Your TV
• Put Batteries in the Remote
• How to Use the Remote Control to Complete the
Interactive Setup
• Buttons on the Remote Control
NOTE: Illustrations are for representation only. Your product and on-
screen displays might differ.
Changing Entertainment. Again.
3
Page 6
Things to Consider Before You Connect
Protect Against Power Surges
Conr:ect all componer:ts befoie you plug any of theil power cords into tile wall outlet.
Tm'n off tile TV and/or component before you conr:ect oi disconnect any cables.
Make sure all antenr:as and cables are p[operly grounded. Refer to the Imporlant
Safeguards sheet packed with your TV.
Protect Components from Overheating
Don't block ver:tilation holes or: any of tile componer:ts. Arrange tile cornponents so that
air carl circulate fieely.
Don't stack cornponer:ts.
When you place components in a stand, ::lake sure you allow adequate ventilation.
If you cormect an audio ieceiver oi amplifier, place it on tile top shelf so tile heated air
from it won't flow a_our:d other componer:ts.
Position Cables Properly to Avoid Audio Interference
Insert each cable firrnly into tile designated jack.
If you place components above tile TV, route all cables down tile side of the back of tile
TV instead of straight down the middle of the back of tile TV.
If your antenna uses 300-ohm twirl lead cables, do not coil the cables. Also, keep tile twirl
lead cables away from audio/video cables.
Important Stand and Base Safety Information
Choose tile location fo: your TV carefully. Place tile TV on a stand or base that is of adequate
size and strength to prevent the TV from being accidentally tipped over, pushed off, or pulled
off. This could cause personal ir:jm-y and/or damage tile TV. Refer to the Imporl.ant Safeguards
sheet packed with your TV.
Use Indirect Light
Don't place tile TV where sunlight o: room lighting will be directed toward tile screen. Use soft
or indirect lighting.
4 Chapter I
Page 7
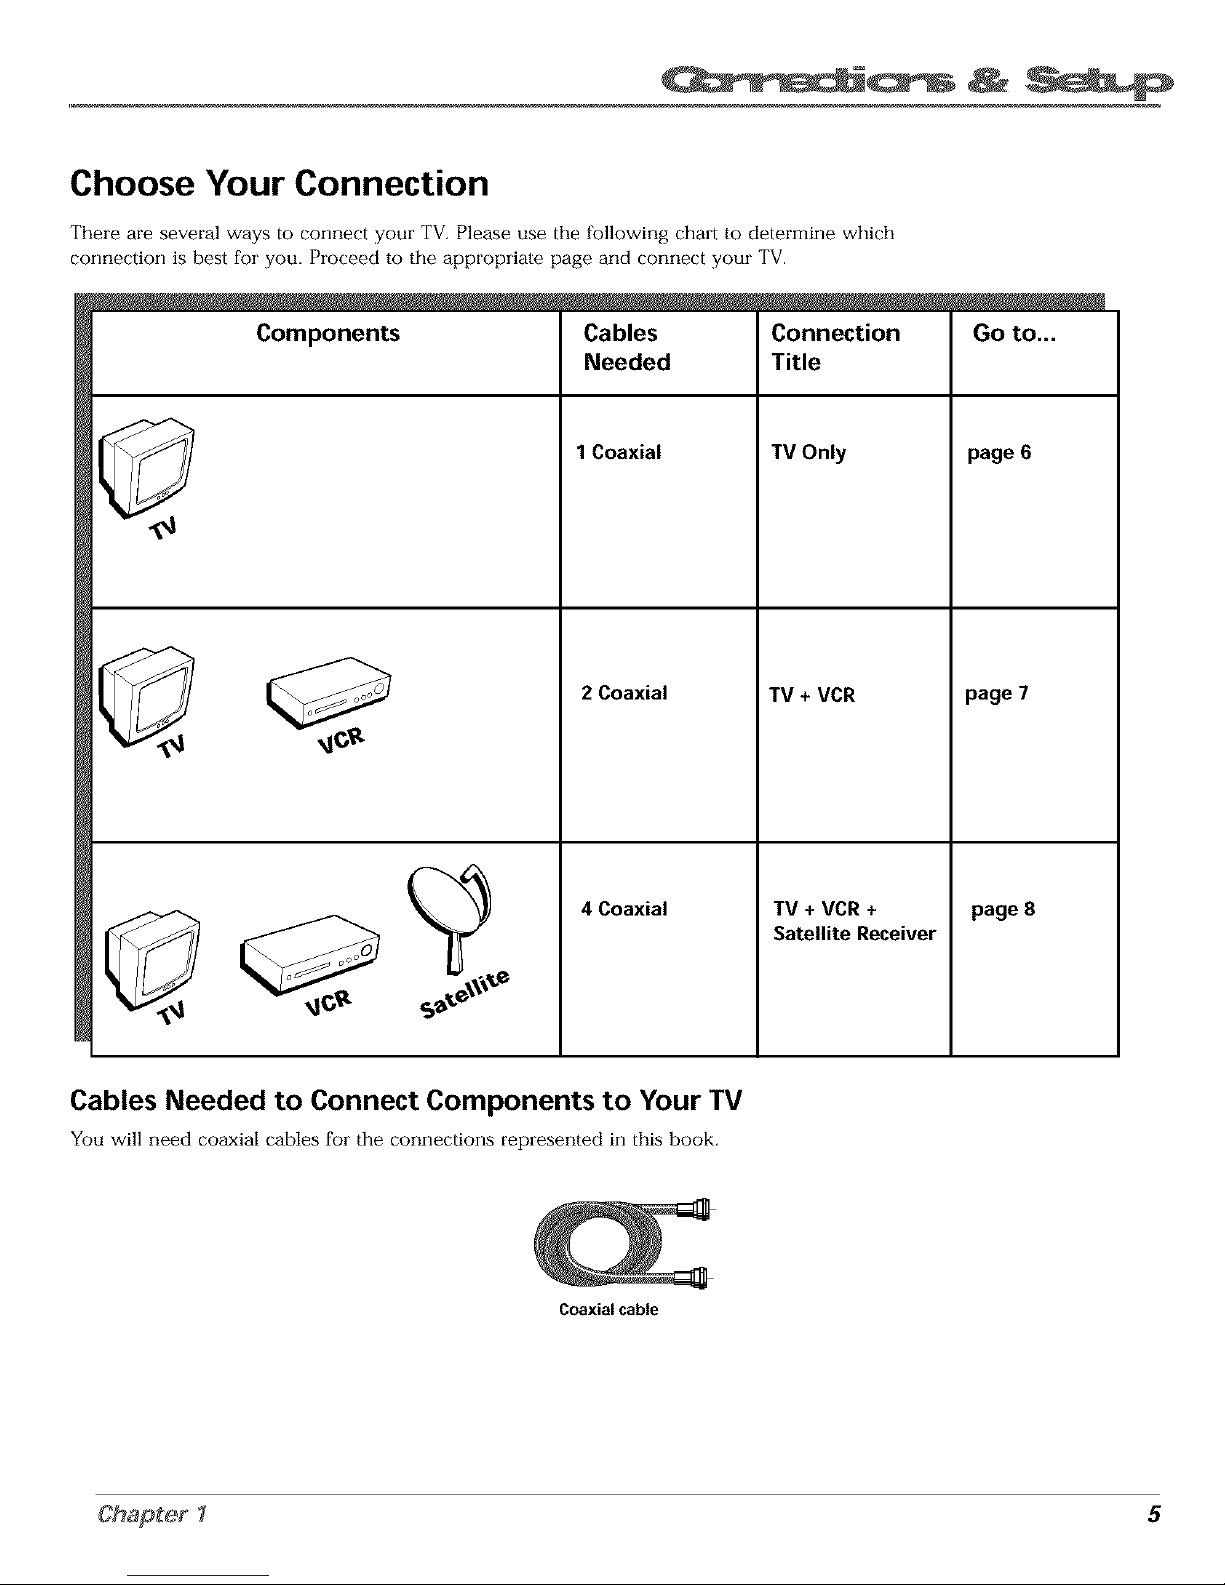
Choose Your Connection
There are several ways to connect your TV. Please use the following chart to determine which
connection is best for you. Proceed to the appropriate page and connect your TV.
Components
Cables
Needed
1 Coaxial
2 Coaxial
4 Coaxial
Connection
Title
TV Only
TV + VCR
TV + VCR +
Satellite Receiver
Go to...
page 6
page 7
page 8
Cables Needed to Connect Components to Your TV
You will need coaxial cables foi the connections replesented in this book.
Coaxialcable
5
Page 8
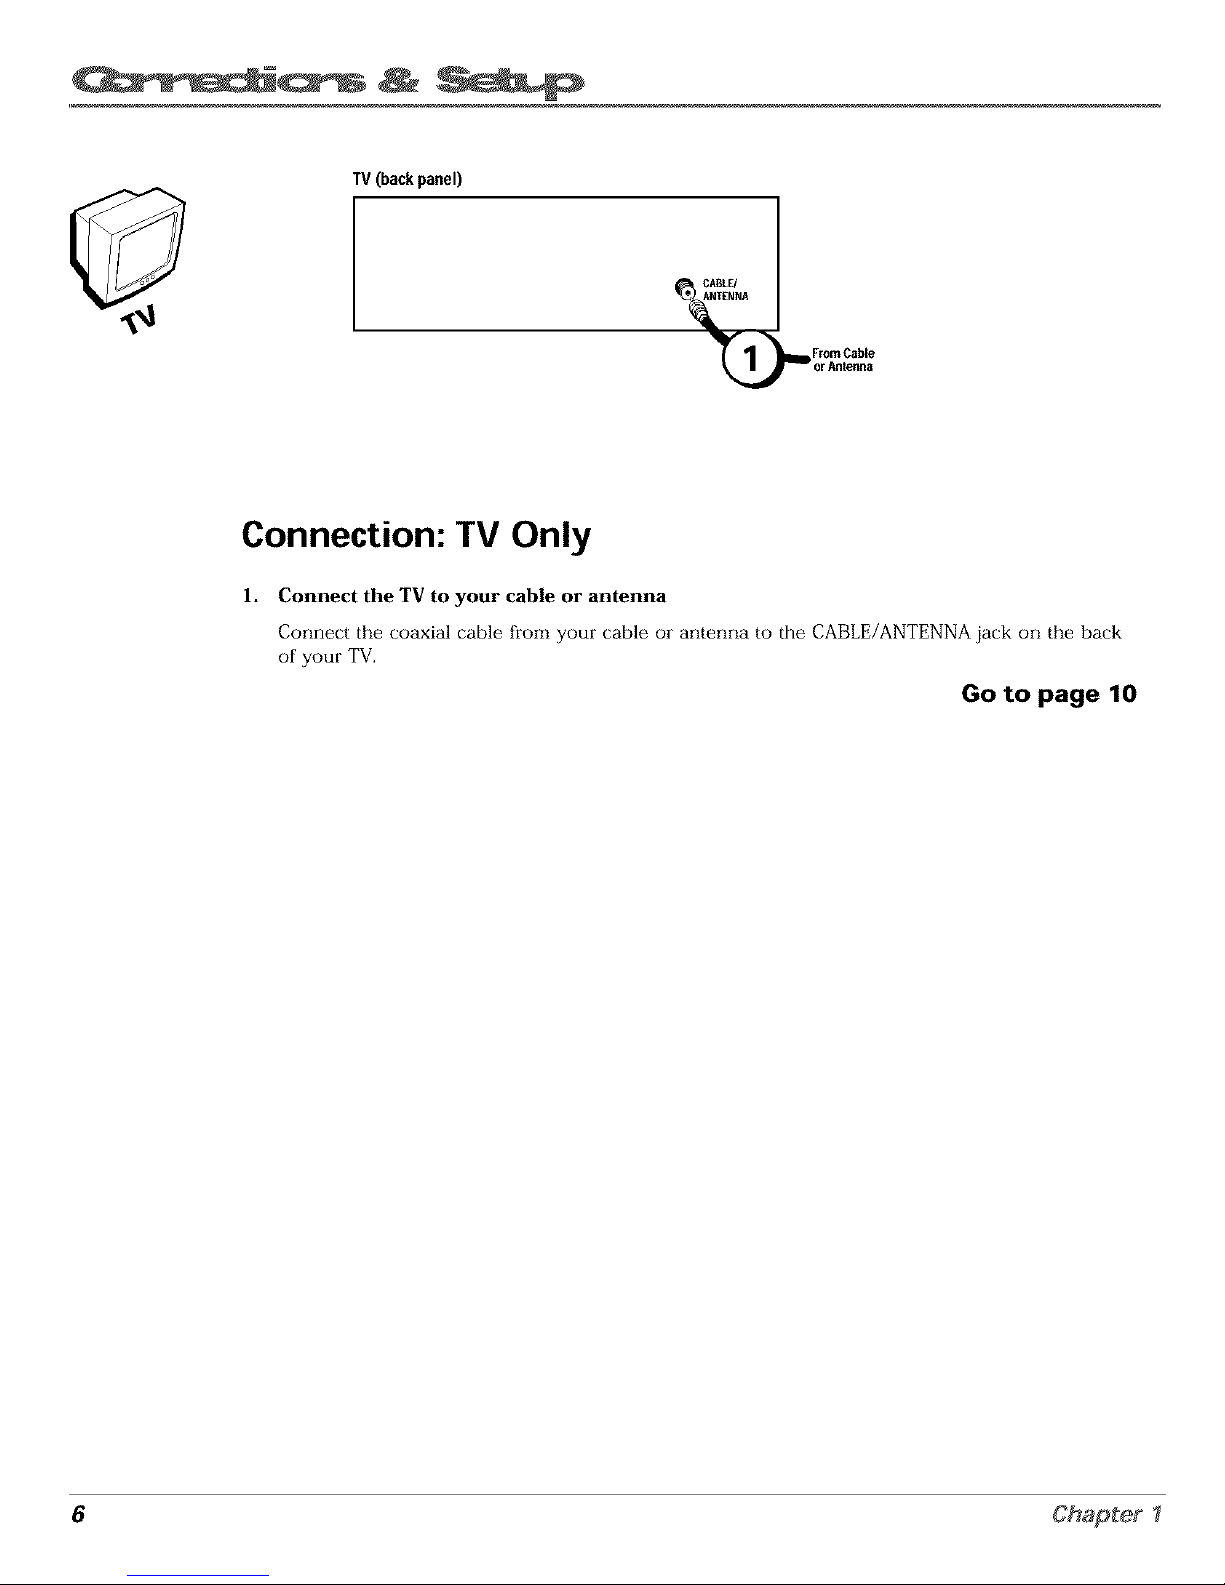
TV(backpanel)
FromCable
_Dor Antenna
Connection: TV Only
1.
Connect the TV to your cable or antenna
Connect the coaxial cable from your cable or anterma to the CABLE/ANTENNA jack on the back
of your TV.
Go to page 10
6 Chapter I
Page 9
TV (back panel)
CABLE/
ANTENNA
VCR
\
VIDEO AUDIO iNFROMANT
R L
R L
FromCable,
CableBox,
r Antenna
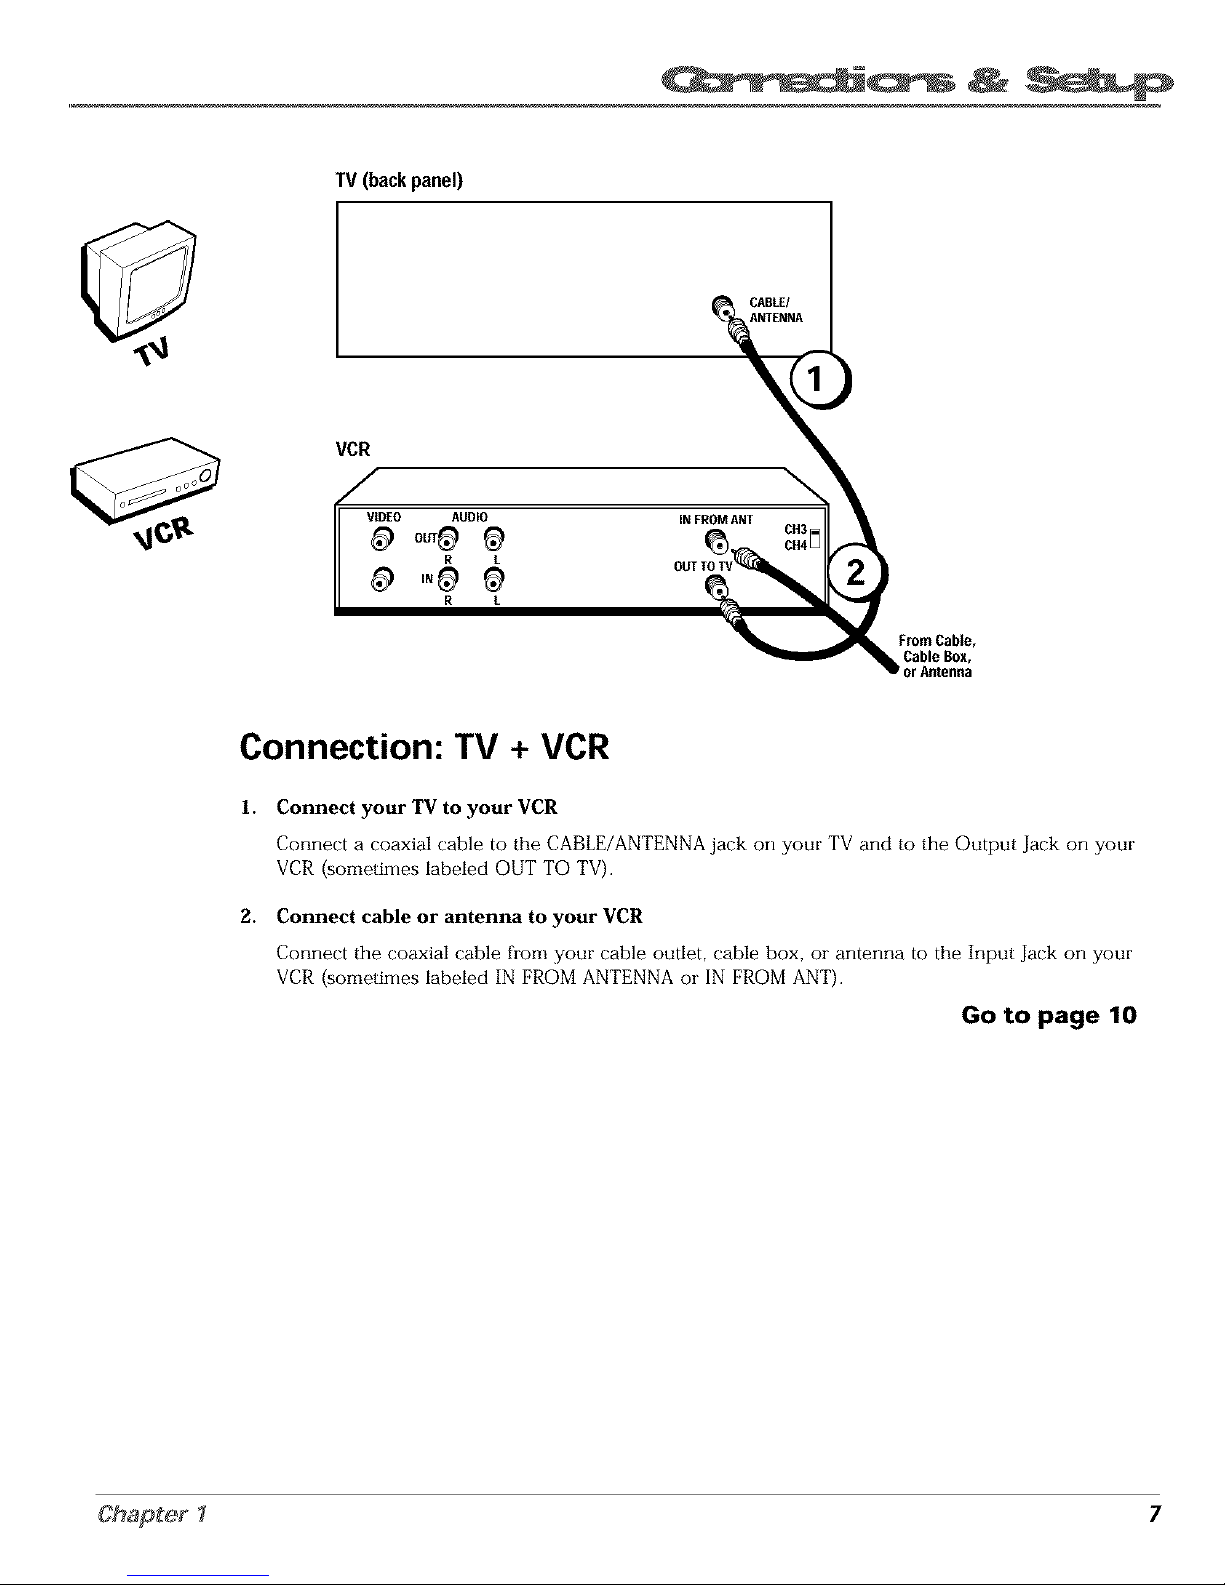
Connection: TV + VCR
1.
2.
Connect your TV to your VCR
Connect a coaxial cable to the CABLE/ANTENNA jack on your TV and to tile Output Jack on your
VCR (sometimes labeled OUT TO TV),
Connect cable or antenna to your VCR
Connect tile coaxial cable flom your cable outlet, cable box, or antenrla to the Input Jack on your
VCR (sometimes labeled IN FROM ANTENNA oi IN FROM ANT).
Go to page 10
7
Page 10
SATELLITE RECEIVER FromCableorAntenna
VCR
OUT
VIDEO R
INFROMANT
@ OUTTO ,
L S-VIDEO
SATELLITE
IN
Satellite
Si_al
OUTTOTV
TV (back panel)
_ CABLE/
ANTENNA
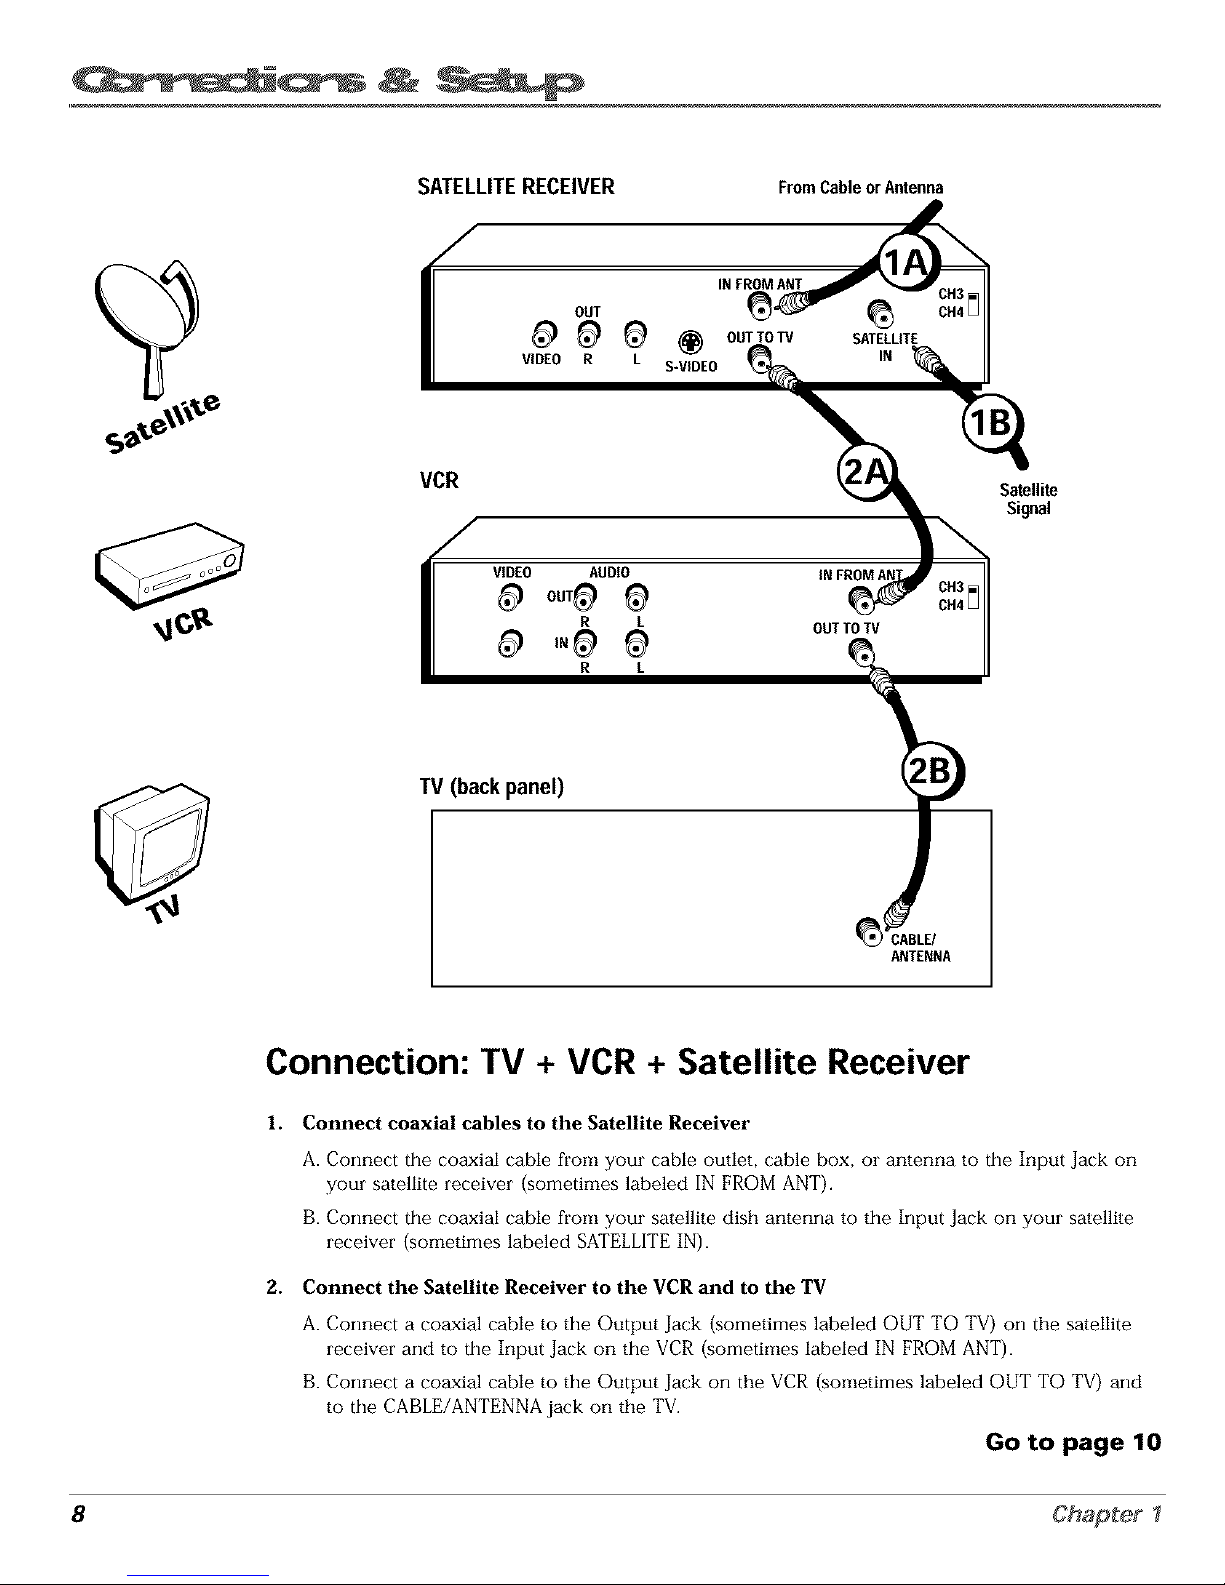
Connection: TV + VCR + Satellite Receiver
1. Connect coaxial cables to the Satellite Receiver
A. Connect the coaxial cable from your cable outlet, cable box, or antenna to the Input Jack on
your satellite receiver (sometimes labeled IN FROM ANT).
B. Connect the coaxial cable from your satellite dish antenna to the Input Jack on your satellite
receiver (sometimes labeled SATELLITE IN).
2. Connect the Satellite Receiver to the VCR and to the TV
A. Connect a coaxial cable to the Output Jack (sometimes labeled OUT TO TV) on the satellite
receiver and to the Input Jack on the VCR (sometimes labeled IN FROM ANT).
B. Connect a coaxial cable to the Output Jack on the VCR (sometimes labeled OUT TO TV) and
to the CABLE/ANTENNA jack on the TV,
Go to page 10
8 Chapter I
Page 11

The Front of Your TV
Front Panel
If you cannot locate your remote you carl use tile buttons of your TV to operate
many of the TV's features.
MENU Brings up tile Main menu. When in the menu system, it selects
highlighted items. Also returns you to tile previous menu.
CH v Scans down through the current channel list. When you're using tile TV's
menu system, it acts like the arrow down button on tile remote contlol.
CH ^ Scans up through tile channel list. When you're using the TV's menu
system, it acts like tile arrow up button on the remote control.
VOL - Decreases tile volume. When you're using tile TV's menu system, it acts
like the left arrow button on the remote control.
VOL + Increases tile volume. When you're using tile TV's menu system, it acts
like the right arrow button on tile remote control.
POWER Turns the TV on and off.
I VIDEO UMONO R I
Front Panel Jacks
You can access the component you cormected by plessing the INPUT button on
your remote (FRNT appears on tile scieen).
VIDEO (in) Allows you to connect a component such as a VCR, camcorder or
Intemet access device.
L/MONO (left audio) and R (right audio) Receives audio signals from
another component such as a VCR, camcorder or Intemet access device.
9
Page 12

Plug in the TV
Plug the end of the power cord into the wall outlet. Match the wide blade of the
plug with the wide slot in tile outlet. Insert the plug completely into
tile outlet,
Put Batteries in the Remote
]. Remove tile battery cornpamnent cover on the remote.
2. Insert new batteries. Match tile polarities (+ and -) on the batteries with the
diagram on tile remote.
3. Put the battery cornpa[lment cover back on tile remote.
<_6D
%/
Use the arrow buttons and the OK
button to move through the menu
system.
How to Use the Remote Control to
Complete the Interactive Setup
The technical term is "Navigation" how you move through the on-screen
menus. The theory is the same throughout tile menu screens: highlight your
choice and select it.
To highlight a menu item, press the arrow buttons on tile remote to highlight
one of the items listed on tile screen. Use tile up or down arrow button to move
up or down. Use tile right or left arrow button to move right or left.
To select the item that you've highlighted, press OK.
Note: Highlighted means that the menu item stands out fi'om
other menu items on the list (appears darker, bri_hter; or a
diftbrent color).
Turn on the TV
Press the POWER button on the remote control or tile TV (tile first screen of tile
Interactive Setup appears). The menu screens "time out" after a period of time if
you don't make a selection. Tile tips in this section tell you how to access tile
Setup menu screens manually,
10 Chapter I
Page 13

Complete the Interactive Setup
The menu system in your TV allows the TV's features to work properly. In this
Tip book, we call it the "interactive seiup" because the TV asks you questions, you
To access the setup menus manually, answer, and tile TV makes tile appropriate adjustments, Tile first time you turn
press MENU and choose Setup. on your TV, the setup scleens appeal" automatically,
Set the Menu Language
The first part of the SETUPasks you to select your preferred language for the
menu system.
l. Highlight your preferred language foi the menu system.
2, Press OK to select that language.
Complete Auto Channel Search
The next part of the SEFUPasks you if you want the TV to search for all
channels viewable thiough your antenna or cable TV system. This is sometimes
called "auto programming."
l. Press OK to tell the TV to begin searching for channels. A progress report
appears on tile screen,
2. When the screen on tile TV tells you tile search is complete, press OK.
Note: If you skip Auto Channe] Search now, you can access it ]ater
throu_qh the Channel menu. See Chapter 3 for more details.
11
Page 14

POWER
The Buttons on the Remote Control
0-9 (Number buttons) Enter channel numbers and time settings directly
through tile remote control.
To enter a two-digit channel, press tile two digits. To enter a three-digit channel,
press and hold tile first digit for two seconds until two dashes appear to the
right of the number, then add the second two. Example: to tune to channel 123,
press and hold 1 for two seconds, press 2, then press 3.
Arrow buttons (up, down, left, right) Press the arrow buttons to move
through tile on-screen menu system.
CHAN (up and down) buttons Scan up or down through the current channel
list. Press once to change tile channel up or down; press and hold to continue
changing channels.
CLEAR Removes any menu or display fiom the screen and returns you to
TV viewing.
GO BACK Returns you to the previous channel.
GUIDE This button is for a feature that is not availat01e on the MR27310 or
MR29310.
INEO Displays channel information.
INPUT Changes your TV to its video input channel. The Video Input Charmel
is the channel your TV inust tune to in order for you to access a component
that's connected to your TV's VIDEO IN and AUDIO IN jacks. Example: to view
a tape from your camcorder, connect the camcorder to the TV's AUDIO and
VIDEO jacks with tile audio/video cables.
MENU Displays the TV's Main menu.
MUTE Lowers the volume to its minimum level. Press again to restore volume.
OK When a menu is on tile screen, press OK to select tile item that
is highlighted.
POWER Turns the TV on and off.
SKIP If you press this button before you change tile channel, tile TV waits 30
seconds and automatically goes back to the original channel. Each time you
press SKIP, you add 30 seconds (i.e, if you press SKIP two times before you
change the channel, tile TV waits 60 seconds and automatically turns back to tile
original channel).
VOlt, (up and down) buttons Decrease or increase tile TV's volume.
12 Chapter
Page 15

2
Udrg
Chapter Overview:
• The Channel Banner
• Parental Controls and V-Chip
NOTE: Illustrations are for representation only. Your product and on-screen
displays might differ.
Changing Entertainment.
13
Page 16

Sample displays or= a Channel Banner.
Channel Banner
There are several indicators that might appear when you press tile TV or INFO
buttons on the remote. This display is called the Channel Banner. The following
list describes the items on tile Channel Banner screen (left to right and top to
bottom),
12.'01
ESPN
60
SAP
Displays the current time.
The lock is displayed to indicate when Parental Controls are
locked or unlocked.
Displayed when Closed Captioning is available on tile
current channel.
Displays the label assigned to tile current channel.
Displays the current channel or input channel (FRNT).
Mute is displayed when you mute the audio.
Stereo is displayed when the current channel is broadcasting
in Stereo.
Displayed when tile current channel is broadcasting SAP
(Second Audio Program) information.
Displayed when the Sleep Timer has been set.
Displayed to count down time left on tile commercial skip
(SKIP) timer,
Parental Controls and V-Chip
Tile Parental Controls menu allows you to program your TV so that children
cannot see certain programs, channels, or use the front panel controls.
Tile first three choices in the Parental Controls menu involve software inside
your TV (referred to as V-Chip). These three V-Chip functions may not work on
your TV because the features depend upon special additions to the broadcast
signal, which may not be available in your market. Please disregard these three
V=Chip functions (by default, tile software inside your TV is turned "off," so if
you don't want to use this feature, you call just ignore it).
You call, however, use the remaining features in tile Parental Controlsmenu:
Channel Block, Front Panel Block and Lock Parental Controls.
14 Chapter 2
Page 17

Channel Block
Selecting this option lets you decide what channels carl be viewed.
View Makes tile selected channel viewable.
Block The front panel and remote control CH (channel) buttons will tune
only to channels that you have marked as View, Tile remote will still tune
to tile blocked channel if you use tile digits to access the channel, but the
channel will be blocked.
Don't foiget to lock parental controls after you change tile status of Channel
Block. If you do not, tile channel block will not take effect.
Note: If you have a digital cable box channels 126-999 can be blocked
but will not be removable from your scan list.
Front Panel Block
Selecting this option lets you block (disable) oi unblock (enable) the TV's front
panel. Tile remote still tunes to any channel. Front Panel Biock can:
Keep children fi'om watching TV when the parent is not present.
Keep young children from playing with the buttons.
(When using this as a Parental Control method, you should remove access to
any remote that is capable of operating the television while you have the front
panel blocked.)
Don't forget to lock parental controls after you change tile status. If you do not,
the front panel block will not take effect.
Lock/Unlock Parental Controls
Selecting this option lets you lock and unlock parental controls settings using a
password.
If you do not lock parental controls, none of the settings for V-Chip,
Channel Block, or Front Panel Block will take effect.
If you forget your password, simultaneously press and hold MENU on the
television and volume down on tile remote for 3 seconds. Nothing appears on
the screen, Parental Contlols simply unlock and you can re-enter a password
via Lock Parental Controls.
15
Page 18

This page left blank intentionally
Page 19

Chapter Overview:
• How to Use the Different Types of Menus and Control Panels
• Audio Menu
• Picture Quality Menu
• Screen Menu
• Channel Menu
• Time Menu
NOTE: Illustrations are for representation only. Your product and on-screen
displays might differ,
Changing Entertainment. Again
17
Page 20

How to Use the Different Types of Menus and
Control Panels
Tile TV's menu system has three types of screens: menus, control panels, and choice lists. You use
the buttons on tile remote oi tile front panel to access tile menu system and make changes to tile
settings.
The following pages explain how to use tile different types of menus to adjust tile features of
your TV.
Menus
The first menu is called tile Main menu. Press MENU on the remote or on the
fi'ont panel to bring up the Main menu.
Menus take you to another menu or a control panel. There are two ways to
select a choice in a menu:
Use your arrow buttons on your remote control to highlight your choice,
and press OK.
Press a number button on the remote. For example, in the Main menu press
3 to go straight to the Screen menu.
Feel free to explore the menu system.
If you're ever unsure where you are in
the menu system, or yeu'rejust plain
tired of exploring, press CLEAR to
remove the menus from the screen
and start over again.
Exiting a menu
There are throe ways to exit a menu:
Highlight Exit and press OK.
Press 0 on the remote.
Press CLEAR. The on-screen displays are cleared from tile screen and you
return to TV viewing.
Control Panels
Control panels allow you to adjust the default settings on marly features of your
TV. You can choose a setting, enter a number, or at{just a level such as tint or
brightness. There are three types of control panels: sliders, numeric entry and
choice lists.
18
Page 21

np
If the control panel is not set to the
current time, use the arrows to go
back over the columns and the digits
to make changes.
You can also enter numbers by using
the up and down arrows on the
remote.
Sliders
Sliders a_e used to make adjustments to a particular control.
To use a Slider in a menu:
1. Press the up or down arrow button to select tile slider control for the
feature you want to adjust.
2. Press the right or left arrow button to adjust the indicator line on tile slider.
Numeric Entry
A rmmeric entry control panel is used to enter rmmbers oi letters.
A pointer appears underneath the column you are changing,
l. Use tile digits to enter a number in the column above tile pointer.
2. Press the right arrow button to move to the next column, then use tile digits
to enter a number,
3. When you have finished entering information, press MENU or OK.
Choice Lists
Choice lists aide used to choose a particular setting from a list. When the choice
list appears, the highlighted item is tile one that is currently selected, or "in
use."
Highlight a choice on a menu and press OK to select that choice. You will then
return to tile previous screen,
Now that you know how to access the menus and adjust the control panels the
following pages provide a brief explanation of all tile menu featur_es. The
features are organized in order of their location on tile Main Menu.
Chapter 3 19
Page 22

Audio Menu
Mute Press OK to reduce the TV's volume to its minimum level. Press OK
again to restore the volume,
Tone Controls Displays the slider controls for adjusting the TV's treble, bass
and balance.
Audio Processor Displays a choice list of available audio modes, which
control the way tile sound comes through your speakers. You carl also access
the AUDIO PROCENSORmenu by pressing the SOUND button on the remote.
Mono Plays tile sound in mono only. Use this setting when receiving
broadcasts with weak stereo signals.
Stereo Splits the incoming stereo audio signal into leR and right channels.
Most TV programs and recorded materials have stereo audio. Tile word
STEREO appears on tile TV when you tune to a program that is broadcast
in stereo.
Expanded Stereo Electronically "widens" sound from stereo broadcasts,
stereo VCRs, digital satellite systems, DVD players, and LaserDisc players
for a fuller, inoi_ spacious sound.
Sound Logie TM Stereo Reduces the annoying blasts in volume during
commercial breaks, and also amplifies softer sounds in program material.
Eliminates tile need to constantly adjust volume control.
Second Audio Program (SAP) Plays the program's audio in a second
language, if one is available. The word SAP appeais on the TV when you
tune to a program that is broadcast with SAP information. SAP audio is
broadcast in mono. SAP is also used to broadcast a program's audio with
descriptions of the video for tile visually impaired.
2O
Page 23

Picture Quality Menu
Basic Picture Controls Displays the five slider controls for adjusting tile way
tile picture looks.
Contrast Adjusts tile difference between tile light and dark areas of
tile picture,
Color Adjusts the richness of the color.
Tint Adjusts the balance between the red and green levels.
Black Level Adjusts the brightness of tile picture.
Sharpness Adjusts tile crispness of tile edges in the picture.
When exiting this menu, the Save Personai Picture Preset choice list will appear.
You can choose either Yes or No. If you save the settings as a Personal Picture
Preset, tile TV will stem tile settings so you can m-select them quickly if
someone changes the settings.
PicturePresets Displays a choice list that lets you select one of thme preset
picture settings: Bright Lighting, Normal Lighting, Soft lighting or Personal
Picture Preset. Choose tile setting that is best for your viewing environment.
Auto Color Displays a choice list that lets you turn on tile feature that
automatically corrects the color of the picture. (This is especially useful for
tracking realistic flesh tone colors as you switch fi'om channel to channel.)
Choose On or Off, depending on your preference.
Color Warmth Displays a choice list that lets you set one of throe automatic
color adjustments: Cooifor a more blue palette of picture colors; Normai; and
Warm for a more red palette of picture colors. The walm setting colmsponds to
tile NTSC standard of 6500 K.
Chapter 3 21
Page 24

Screen Menu
Closed-Caption Display Displays a choice list that lets you choose the way
closed captioning inforrnation is shown on the screen.
Off always No captioning information is displayed.
On always Captioning information is shown always, when available.
On when soond is muted Captioning irlfoi marion is showrl, when
available, whenever the TV's sound is muted. (To mute tile sound, piess the
MUTE button.) The captioning information is not displayed when the sound
is not muted.
Closed-Caption Mode Displays a choice list that lets you choose which
captioning mode is used for displaying captioning information.
Menu Language Displays a choice list that lets you select your preferred
language for tile menus: English, Spanish or Erench.
Using Closed Captioning
Marly programs are encoded with closed-captioning information, which lets
you display the audio portion of a program as text on tile TV screen.
Closed captioning is not available on all channels at all times. Only specific
programs encoded with closed-captioning information are applicable. When a
program is closed captioned, the CCicon is displayed in tile channel banner.
See Chapter 2 for more information about the channel banner.
If you don't know which Closed-Caption mode
to use, select CCI. CC1 is probably the mode
that is used in your area. CC2, CC3, and CC4
are reserved for foreign languages, but are
rarely used at this time.
Closed-Caption Modes
The TV offers eight closed-captioned modes, including four text modes.
To set the Closed-Caption Mo&_
I. Select Screen from the Main menu.
2. Highlight Closed-Caption Mode and press OK (the Closed-Caption Mode
appears).
3. Highlight your choice and press OK (tile Screen menu appears again).
Note: Tire Text modes cover nearly half of the picture on tire screen to
display the closed-captioned text. Most broadcasters use the CC mode,
which displays a few lines of captions at a time.
Turning off Closed-Caption
I. Select Screen from tile Main menu.
2. Piess OK to select Closed-Caption Display.
3. Highlight Off Always and press OK. The closed captioning is turned off and
you go back to tile Screen menu.
22
Page 25

To enter a number greater than 99, press and
hold "1 " to enter the hundreds digit, then
press the two remaining numbers.
Channel Menu
Signal Type Displays a choice list that lets you select the current antenna
type.
UHF/VHYAntenna Choose this if you are currently using an off-air
antenna for TV signals.
Cable TV Choose this if you are currently using cable or a cable box for
TV signals.
Auto ChannelSearch Tells the TV to search automatically for all the channels
availat01e through the antenna input. When the TV finds an active channel, it
places it in the Normal channel list; inactive channels (weak stations or
channels with no signal at all) will be removed fiom the channel list.
List and Labels Displays a control panel that lets you edit your Normal
channel list and choose a six-character label for each channel. Follow the on-
screen directions to enter your channels and other information.
Channel # Use the up and down arrows to scroll up and down through
the channels availat01e via your antenna. You can entei the channel number
directly using the number buttons.
NormalList Only the channels included in the Normal list are available
when you scan up and down using channel up and down. Use the up and
down arrow buttons to indicate whether the channel number indicated is
included (Yes) or is not included (No) in the Normal channel list.
ChannelLabel Use the up and down arrow buttons to enter a six-
character label for each channel. Hold the bu|ton down to scroll quickly
through the characters. The TV can store up to 27 labels in memory.
Time Menu
Sleep Timer Displays a control panel that lets you select the amount of time
you want to give the TV before it shuts itself off.
Schedule Displays a control panel that lets you set up a schedule for turning
the TV on and off automatically. Reminder: you must turn the schedule On, The
on-screen directions guide you through the steps needed to set the schedule.
Set Time Displays a control panel that lets you enter the currant time. The on-
screen directions guide you through the steps needed to set the time.
Chapter 3 23
Page 26

This page left blank intentionally
Page 27

IIIII
Chapter Overview:
• Troubleshooting
• Care and Cleaning
• Index
Changing Entertainment. Again
25
Page 28

Troubleshooting
Most problems you encounter with your TV you can correct by consulting the Troubleshooting list that follows.
TV Problems
TV won't turn on
Press the POWER button.
Make sure the TV is plugged in.
Check the wall receptacle {or extension cord) to make sure it is "live" by plugging in something else.
Something might be wrong with your remote control. Press the POWER button on the front of the TV. If the TV turns on, check the
remote control solutions on the next page.
The front panel buttons may be locked {disabled). Use the remote control to unlock the front panel controls by selecting the Front
Panel Block in the Parental Controls menu and choosing Unb!oek.
Buttons don't work
The front panel buttons may be locked {disabled). Use the remote control to unlock the front panel controls by selecting the Front
Pane] Block in the Parenta! Controls menu and choosing Unb!oek.
Unplug the TV for two minutes and then plug it back in. Turn the TV on and try again.
TV turns off while playing
Scheduled Off function may have been activated. Go to p. 23 for instructions.
Electronic protection circuit may have been activated because of a power sm-ge. Wait 30 seconds and then turn the TV on again. If
this happens frequently, the voltage in your house may be abnormally high or low.
TV turns on unexpectedly
Scheduled On may have been activated. Go to p. 23 for instructions.
Blank screen
Make sure the component connected to tile TV is turned on.
Try another channel.
No sound, picture okay
Maybe sound is muted. Press the volume up button to restore sound.
Can't select certain channel
Channel may be blocked or not approved in the Parental Controls menu.
If using a VCR, make sure the TV/VCR button on the VER is in the correct mode {press the TV/VCR button on your VCR).
Noisy stereo reception
The station might be weak.
26
Page 29

Troubleshooting
No picture, no sound but TV is on
Maybe the cable/air setting is set to the wrong position. Select Channelfrom the Main menu, select the SignalTypeoption, and
provide the correct information on the following screen. Go to pages 23 for detailed instructions.
The channel might be empty change channels.
If you're watching your VCR and it's connected with coaxial cable to the CABLE/ANTENNA jack, tune the TV to channel 3 or 4
(whichever channel is selected on the 3/4 switch on the back of your VCR). Also check to make sure the TV/VCR button on the
VCR is in the conect mode (press the TV/VCR button on your VCR).
Sound okay, picture poor
Check antenna connections. Make sure all of the cables are firmly connected to tile jacks.
T_T adjusting sharpness function to improve weak signals. Go to page 21 for more instructions.
Black box appears on the screen
Closed-captioning might be on. Check the C]osedCaption Display control panel in the Screen merm. Go to page 22 for more
instructions.
The Remote Control Doesn't Work
Something might be between the remote and the remote sensor on the component. Make sure there is a clear path.
Maybe the remote isn't aimed directly at the component (TV or VCR) that you're trying to operate.
Maybe batteries in remote are weak, dead or installed incorrectly. Put new batteries in the remote.
You might need to drain the remote's microprocessor: remove batteries and press the number 1 button for at least 60 seconds.
Release the 1 button, replace the batteries, and (if necessary) program the remote again.
Problems with V-Chip/Parental Controls
The rating limits don't work
You must lock the settings. Go to the TVMAINMENU (press MENU on your remote), select Parenta! Contro]s (press 6 on your
remote), select lock Parenta] Controls (press 6 on your remote).
I don't remember my password and I want to unlock the TV
If you forget your password, simultaneously press and hold MENU on the television and volume down on the remote for 3 seconds.
Nothing appears on the screen, Parental Controls simply unlock and you can reenter a password via !;ock Parental Con[ro]s.
The V-Chip won't let me watch a program even though it's not rated as violent.
Maybe the movie was given an NR (Not Rated) status. After you block movie ratings, you must set NR to View separately in order to
view movies with an NR rating.
27
Page 30

Care and Cleaning
CAUTION: Turn OFF your "IV before cleaning.
You can clean the TV as required, using a soft lint-flee cloth. Be sure to occasionally dust tile ventilation slots in the cabinet
to help assure adequate ventilation.
The TV's screen may be cleaned with a soft, lint-free cloth as well. Take care not to scratch or mar the screen. If
necessary, you may use a cloth dampened with warm water.
Never use strong cleaning agents, such as ammonia-based cleaners, or abrasive powder. These types of cleaners
will damage the TV.
While cleaning do not spray liquid directly oil tile screen, or allow liquid to run down the screen and inside the TV. Also,
avoid placing drinks or vases with water on top of the TV. This could increase tile risk of fire or shock hazard or damage to
tile TV.
Caution: If fixed (non-moving) images are left on tile screen for long periods, they may be permanently imprinted oil tile
picture tube. Such images include network logos, phone numbers, and video games. This damage is not covered by your
warranty. Extended viewing of channels displaying these images should be avoided.
28
Page 31

Index
A
Advanced connections 8
Arrow buttons 12
Audio
Menu 20
Processoi 20
Auto
Channel Search I 1, 23
Color 21
B
Basic
Connections 6, 7
Picture Controls 21
Batteries for the remote 1O
Black Level 2l
Block
Channel 15
Front Panel 15
Buttons, remote control 12
C
CABLE/ANTENNA jack 6, 7, 8
Cables
coaxial 5
G-LINK 5
CC (Closed Captioning) 22
CHAN +/ buttons 12
Channel
Banner 14
Block 15
Labels 23
Menu 23
Search 11
CLEAR button 12
Closed Caption
Display 22
Mode 22
Coaxial cable 5
Color Warmth 21
Connections
multiple 8
TV + VCR 7
TV Only 6
Con|rast 21
Control Panels 18
Fixed Images 28
Front panel
block 15
bu|tons 9
jacks 9
G
GO BACK button 12
GUIDE button 12
INFO button 12
INPUT button 12
Interactive setup l l
L
Labels 23
Language 22
Languages
Selecting 11
Lock, Parental Controls 15
M
Memory 23
Menu
Audio 20
Channel 23
Language 22
Picture Quality 21
Screen 22
Time 23
MENU button 12
Mono 20
Mute 20
MUTE button 12
N
Normal List 23
Number buttons 12
O
OK button 12
P
Parental Controls
Locking, Unlocking 15
Menu 14
Picture
Presets 21
Quality Menu 21
POWER button 12
R
Remote, ba|teries I0
Remote control buttons 12
$
SAP 20
Satellite Receiver, connecting 8
Schedule 23
Screen Menu 22
Second Audio Program (SAP) 20
Set Time 23
Sharpness 21
Signal Type
Cable TV 23
UHF/VHF Antenna 23
SKIP bu|ton 12
Sleep Timer 14, 23
Stereo 20
Time Menu 23
Tint 21
Tone Controls 20
Tioubleshooting 26
TV, connecting 6
U
UHF/VHF Antenna 23
Unlock, Parental Controls 15
V
VCR, connecting 7
VOL+ button 12
VOL- button 12
29
Page 32

Please do not send any products to the Indianapolis address listed in this manual or on the carton. This will only
add delays in service for your product.
IMPORTED BY:
Comercializadora Thomson de M_xico, S.A. de C.V.
Sierra Candela No. 111, Piso 11
Col. Lomas de Chapultepec
Del. Miguel Hidalgo
M_xico D.F.C.R 11000
R.F.C.CTM-980723 KS5
EXPORTED BY:
Thomson multimedia Inc.
10330 North Meridian Street
Indianapolis, IN 46290
©2001 Thomson multimedia Inc.
Trademark(s)® Registered
Marca(s) Registrada(s)
Printed in USA
TOCOM 15695640
 Loading...