

Page 1
Changing Entertainment. lin.
Please read this manual before
!this for the
first time.
TOCOM 15695640
Page 2
WARNING
To reduce the risk of fire or
electric shock, do not expose
this TV to rain or moisture.
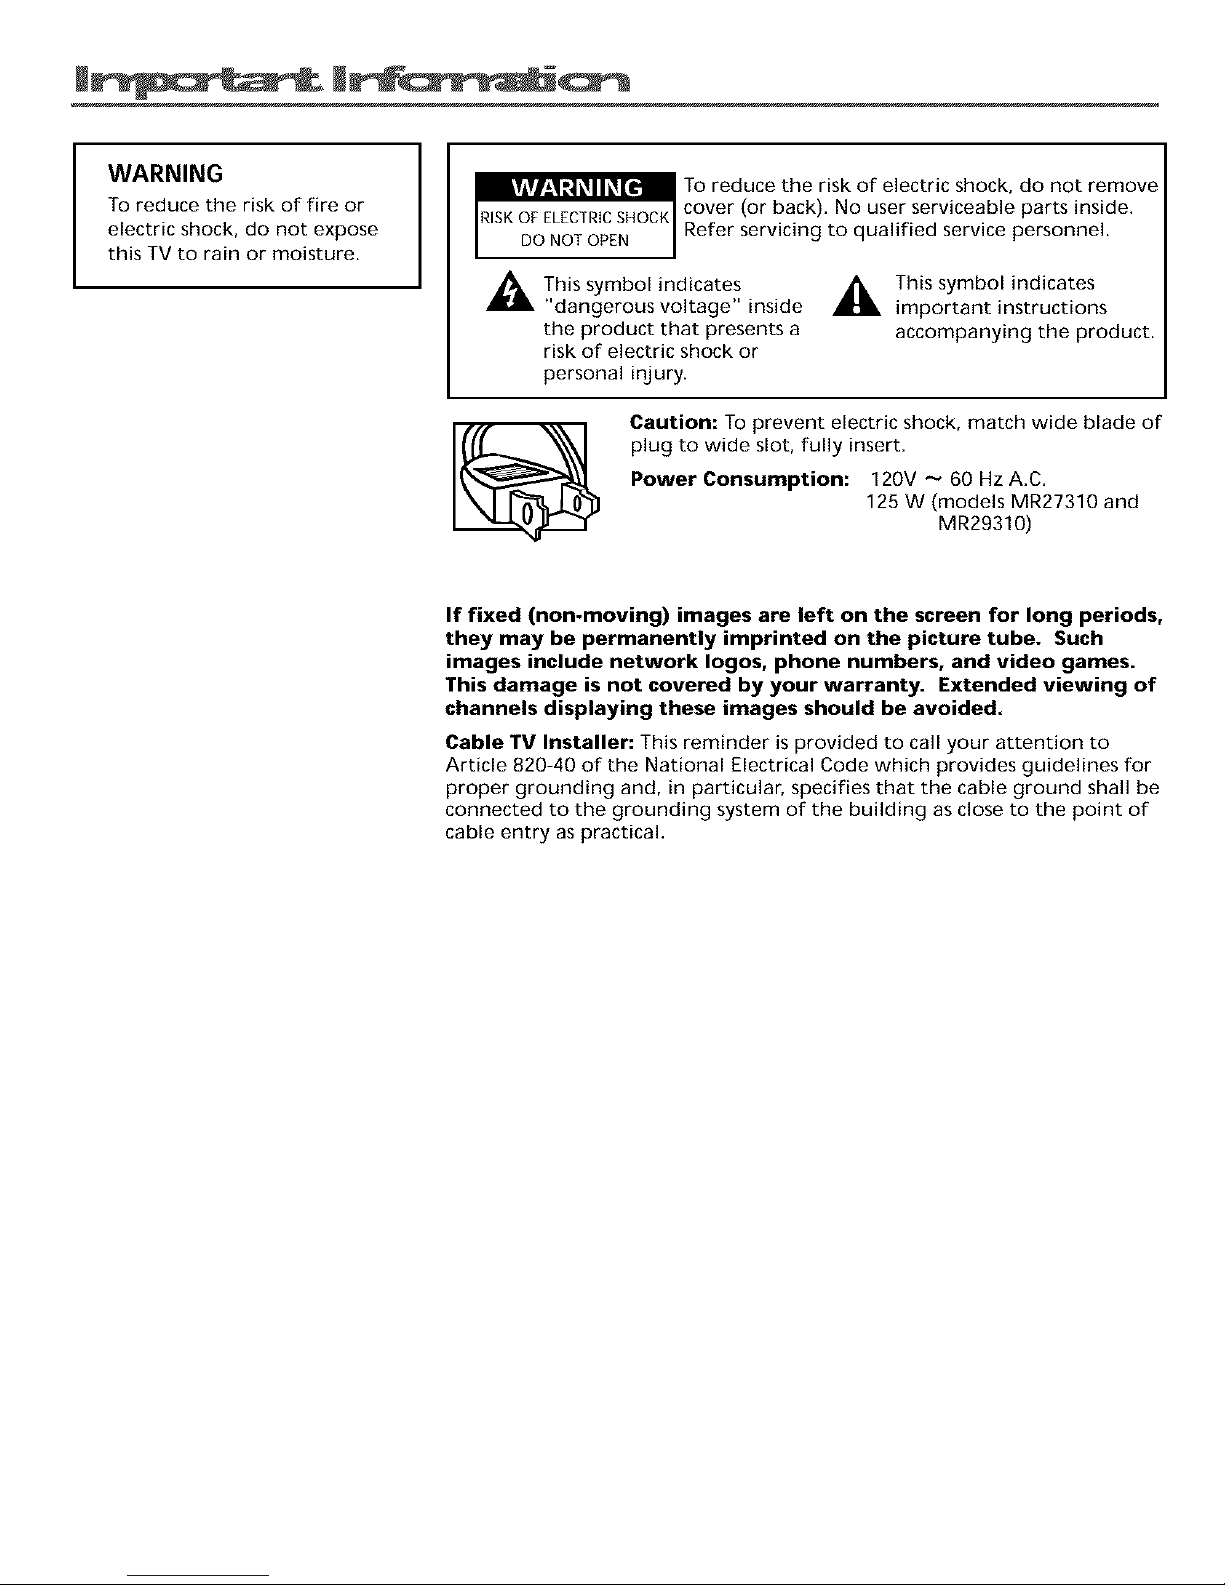
To reduce the risk of electric shock, do not remove
cover (or back). No user serviceable parts inside.
Refer servicing to qualified service personnel.
This symbol indicates
"dangerous voltage" inside
the product that presents a
risk of electric shock or
personal injury.
_, This symbol indicates
important instructions
accompanying the product.
Caution: To prevent electric shock, match wide blade of
plug to wide slot, fully insert.
Power Consumption: 120V -_ 60 Hz A,C,
125 W (models MR27310 and
MR29310)
If fixed (non.moving) images are left on the screen for long periods,
they may be permanently imprinted on the picture tube. Such
images include network Iogos, phone numbers, and video games.
This damage is not covered by your warranty. Extended viewing of
channels displaying these images should be avoided.
Cable TV Installer: This reminder is provided to call your attention to
Article 820-40 of the National Electrical Code which provides guidelines for
proper grounding and, in particular, specifies that the cable ground shall be
connected to the grounding system of the building as close to the point of
cable entry as practical.
Page 3
Chapter 1: Connections & Setup
Things to Consider Before You Connect ......................................................................... 4
Protect Against Power Surges ................................................................................... 4
Protect Components from Overheating ................................................................... 4
Position Cables Properly to Avoid Audio Interference ............................................ 4
Important Stand and Base Safety Information ........................................................ 4
Use Indirect Light ....................................................................................................... 4
Choose Your Connection .................................................................................................. 5
Connection: TV Only .................................................................................................. 6
Connection: TV + VCR ................................................................................................ 7
Connection: TV + VCR + Satellite Receiver ............................................................... 8
The Front of Your TV ........................................................................................................ 9
Complete the Interactive Setup ..................................................................................... 11
Set the Menu Language .......................................................................................... 11
Complete Auto Channel Search .............................................................................. 11
The Buttons on the Remote Control ............................................................................. 12
Chapter 2: Using the TV's Features
Channel Banner .............................................................................................................. 14
Parental Controls and V-Chip ......................................................................................... 14
Channel Block ........................................................................................................... 15
Front Panel Block ..................................................................................................... 15
Lock/Unlock Parental Controls ................................................................................ 15
Chapter 3: Using the TV's Menu System
How to Use the Different Typesof Menus and Control Panels .................................. 18
Menus ....................................................................................................................... 18
Control Panels .......................................................................................................... 18
Audio Menu .................................................................................................................... 20
Picture Quality Menu ..................................................................................................... 21
Screen Menu ................................................................................................................... 22
Using Closed Captioning .......................................................................................... 22
Closed-Caption Modes ............................................................................................. 22
Channel Menu ................................................................................................................. 23
Time Menu ...................................................................................................................... 23
Chapter 4: Other Information
Troubleshooting .............................................................................................................. 26
Care and Cleaning .......................................................................................................... 28
Index ................................................................................................................................ 29
1
Page 4

This page left blank intentionally
Page 5
1
I
Chapter Overview:
&Seep
• Things to Consider Before You Connect
• Choose Your Connection
• The Front of Your TV
• Put Batteries in the Remote
How to Use the Remote Control to Complete the
Interactive Setup
Buttons on the Remote Control
NOTE: Illustrations are for representation only. Your product and on-
screen displays might differ.
Changing Entertainment. Again.
3
Page 6

Things to Consider Before You Connect
Protect Against Power Surges
Connect all components befble you _:)lug any of their power cords into the wall outlet.
Turn off the TV and/or component before you cormect or disconnect any cables.
Make sure all antennas and cables are prol)erly grounded. Refer to tile Important
Safeguards sheet packed with your TV.
Protect Components from Overheating
Don't block ventilation boles on any of the cornponents. Anange tile components so that
air carl circulate I_reely.
Don't stack components,
When you place components in a stand, make sine you allow adequate ventilation.
If you connect an audio receive] oK amplifier, place it on ttle top shelf so ttle heated ai]
from it won't flow around ()tile] corrlporlents.
Position Cables Properly to Avoid Audio Interference
Insert each cable firmly into tile designated jack.
If you place components above the TV, route all cables down the side of tile back of the
TV instead of suaigbt down tile middle of tile back of the TV,
If your antenna uses 300 ohm twirl lead cables, do not (toil tile (tables. Also, keep the twirl
lead cables away from audio/video cables,
Important Stand and Base Safety Information
Choose tile location fox you] TV (arefully. Place tile TV on a stand or base that is of adequate
size and strength to Devent tile TV flora being accidentally tipped over, pushed off, o] pulled
off. This could cause 13e]sonal injury and/o] damage ttle TV. Refer to tile Impo]tant Safegua]ds
sheet packed with you] TV,
Use Indirect Light
Don't place tile TV wbe]e sunlight o] room lighting will be dire(ted toward tile screen. Use soft
or indirect lighting.
4 Chapter I
Page 7
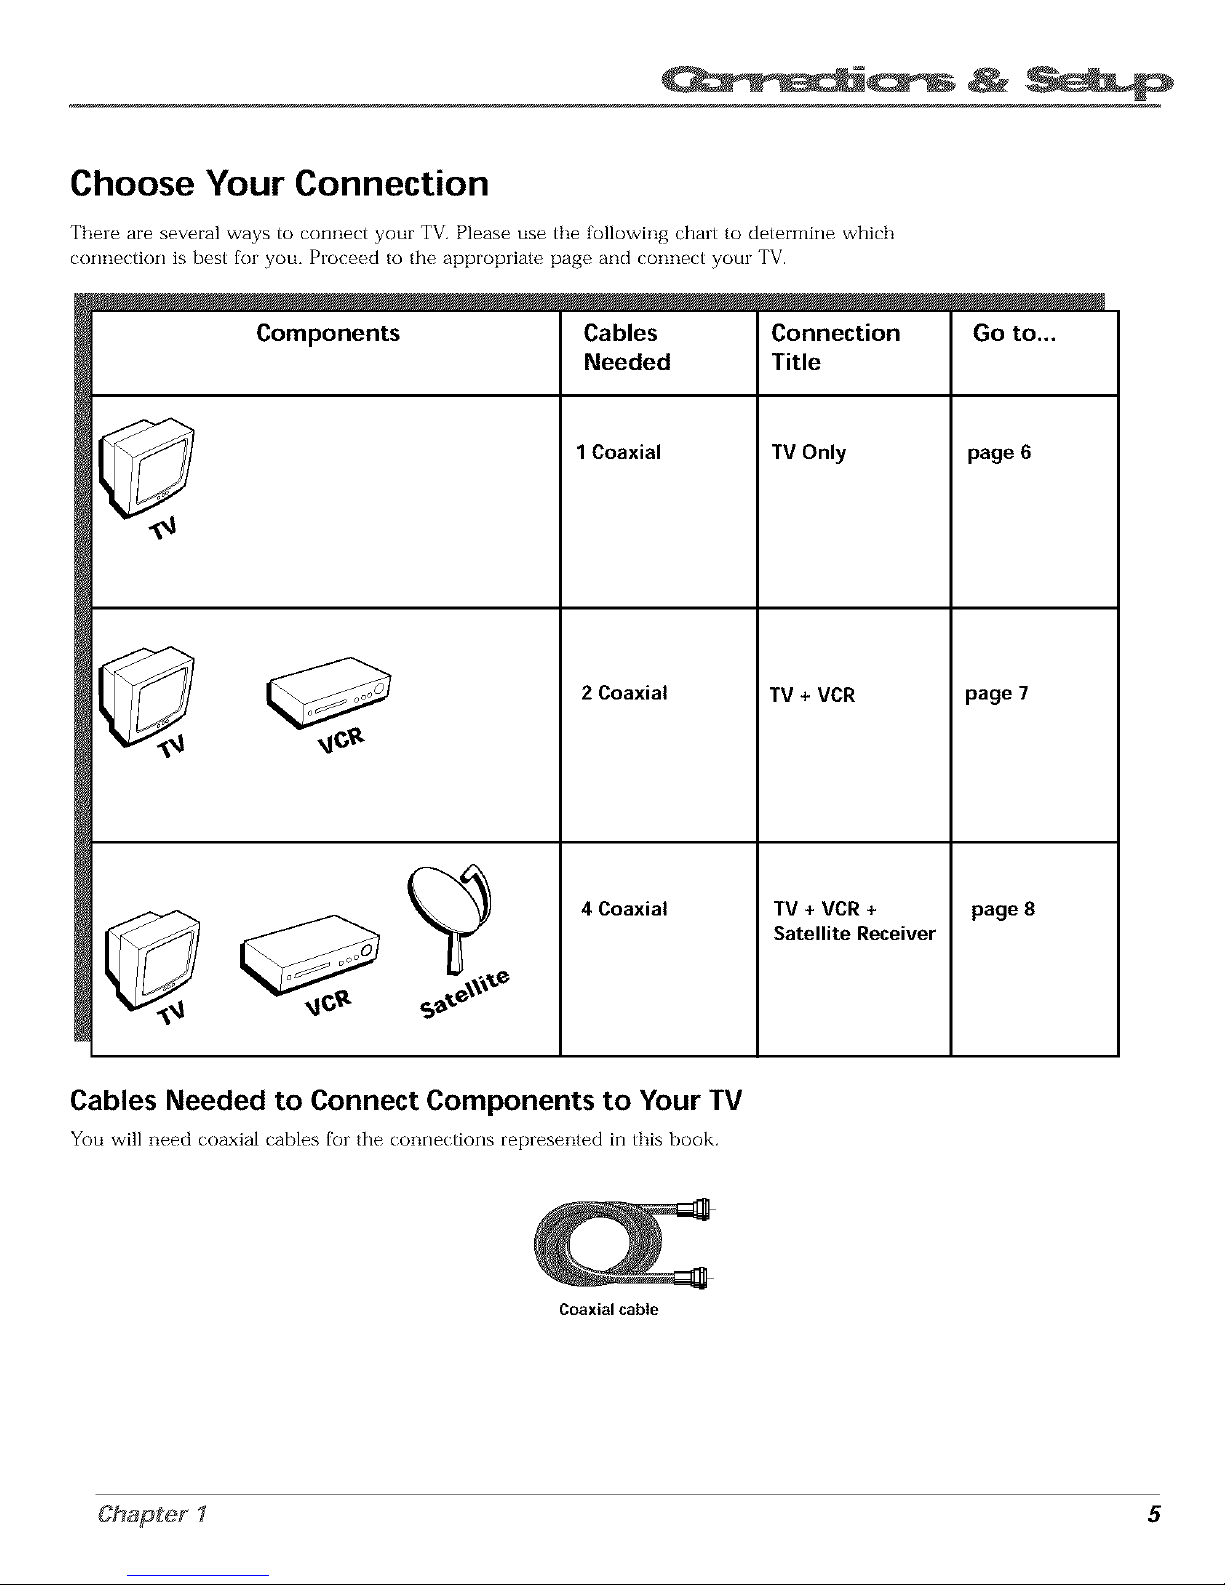
Choose Your Connection
Thele are several ways to connect your TV. Please use the following chart to determine which
_onnection is best fol you, Ploceed to the appropliate page and _onned yore TV.
Components
Cables
Needed
1 Coaxial
2 Coaxial
Connection
Title
TV Only
TV + VCR
4 Coaxial TV + VCR +
Satellite Receiver
Go to...
page 6
page 7
page 8
Cables Needed to Connect Components to Your TV
You will need _oaxial _ables fol the _onnedions replesented in this book,
Coaxialcable
Chapter 1 5
Page 8
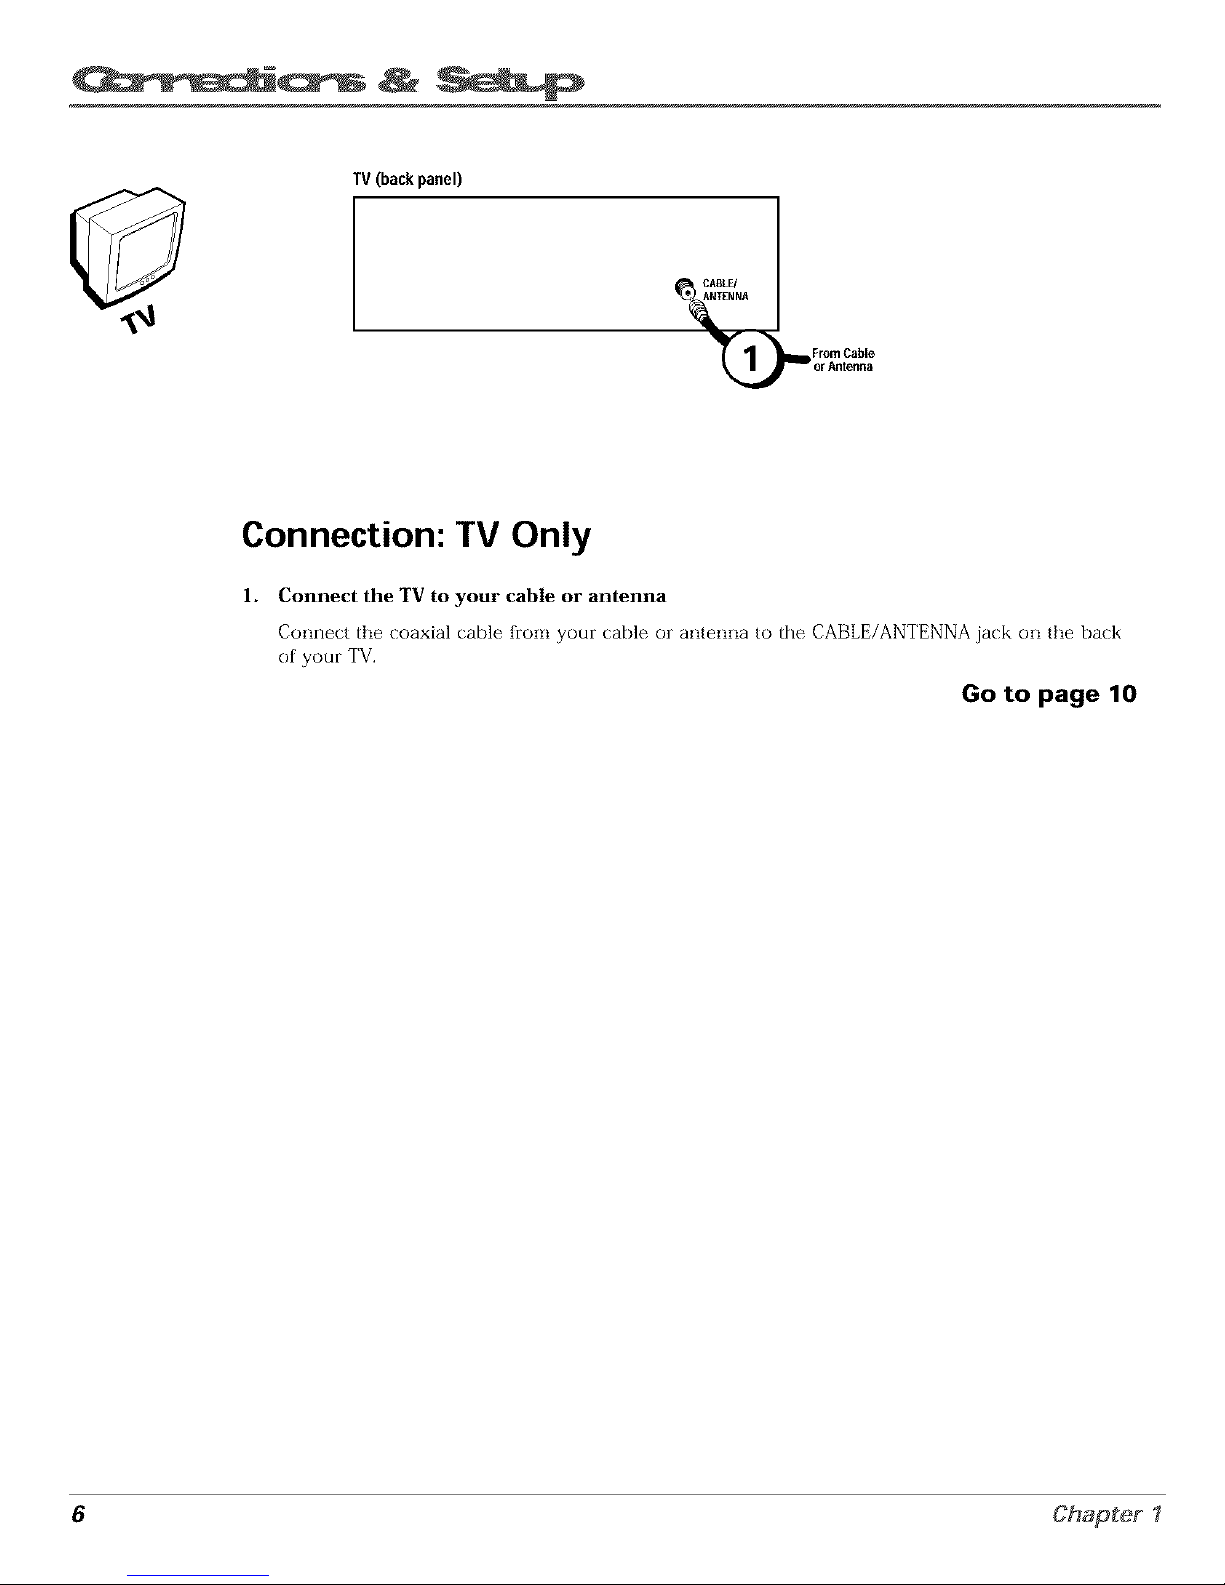
TV (backpanel)
Connection: TV Only
1. Connect the TV to your cable or antenna
Connect the coaxial (able fiorn your (able ol antenna to the CABLE/ANTENNA jack on tl_e back
of your TV.
Go to page 10
6 Chapter I
Page 9
Cb-v di
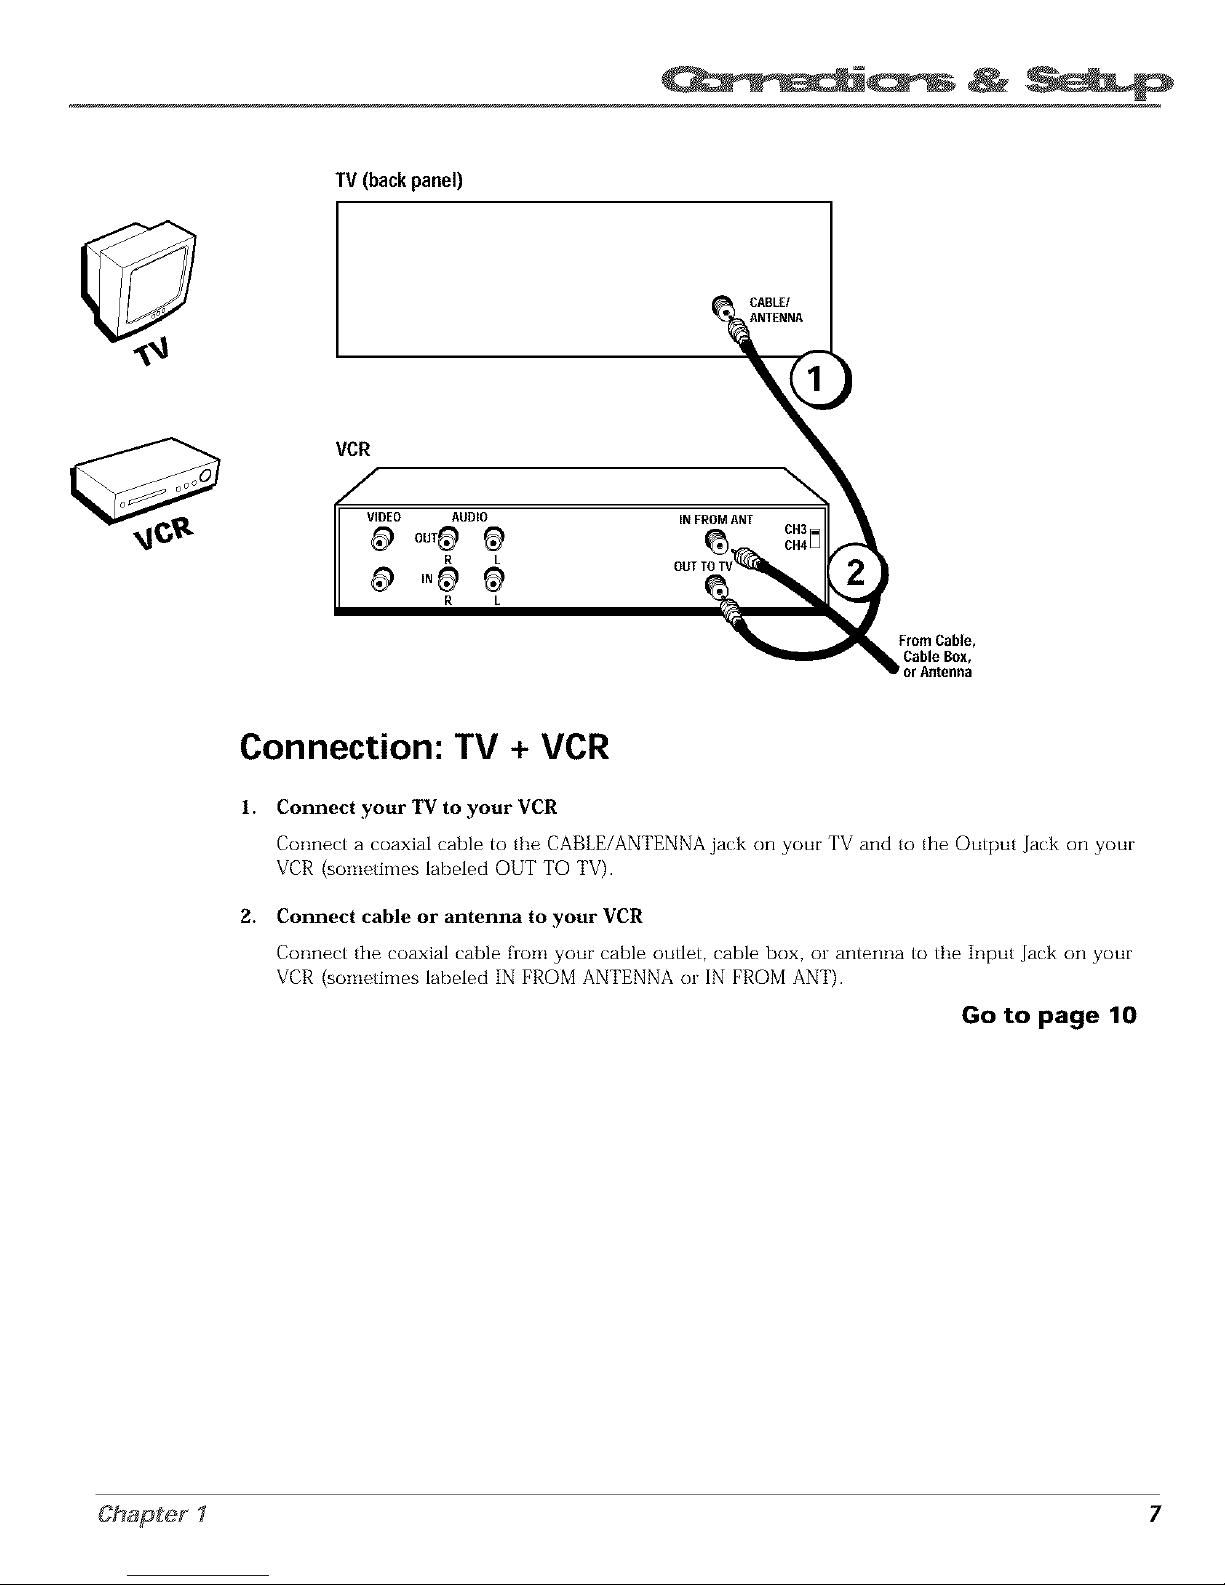
TV (back panel)
CABLE/
ANTENNA
VCR
\
VIDEO AUDIO iNFROMANT
R L
R L
FromCable,
CableBox,
Connection: TV + VCR
1.
2.
Connect your TV to your VCR
Connect a coaxial cable to the CABLE/ANTENNA jack on your TV and to the Output Jack on your
VCR (sometimes labeled OUT TO TV).
Connect cable or antenna to your VCR
Connect the coaxial cable florn your cable outlet, cable box, ol antenna to tbe In,3ut Jack on your
VCR (sornetimes labeled IN FROM ANTENNA ol IN FROM ANT).
Go to page 10
Chapter1 7
Page 10

SATELLITE RECEIVER FromCableorAntenna
VCR
OUT
VIDEO R
IN FROM ANT
¢
@ O°,TO,V
L S-VIDEO
SATELLITE
IN
CH4
Satellite
Signal
VIDEO AUDIO
R L
R L
OUT TOTV
TV (backpanel)
_)CABLE/
ANTENNA
Connection: TV + VCR + Satellite Receiver
1. Connect coaxial cables to the Satellite Receiver
A. Connect the coaxial cable frorn yore (:able outlet, (:able box, ol antenna to the Input Jack on
yore satellite le(eivel (sometimes labeled IN FROM ANT).
B. Connect the (:()axial cable frorn yore satellite dish antenna to the Input Jack on yore satellite
le(eiver (sornetiTnes labeled SATELLITE IN).
2. Connect the Satellite Receiver to the VCR and to the TV
A. Connect a coaxial cable to the Output Jack (sometimes labeled OUT TO TV) on the satellite
leceiver and to the Input Jack on the VCR (sometirnes labeled IN FROM AN_I).
B. Connect a coaxial cable to the Output Jack on the VCR (sornetimes labeled OUT TO TV) and
to the CABLE/ANTENNA jack on the TV.
Go to page 10
8 Chapter 1
Page 11

The Front of Your TV
Front Panel
If you cannot locate your remote you can use the buttons of your TV to operate
many of the TV's features.
MENU Brings up the Main menu. When in the menu system, it selects
highligl'lted items, Also returns you to the previous menu,
CH v Scans down through the current channel list, When you're using the TV's
menu system, it acts like the arrow down button on the remote control.
CH ^ Scans up through the channel list. When you're using the TV's menu
system, it acts like the arrow up button on the remote control.
VOL Decreases the volume. When you're using the TV's menu system, it acts
like the left arrow button on the remote control.
VOL + Increases the volume. When you're using the TV's menu system, it acts
like the right arrow button on the remote control.
POWER Turns the TV on and off,
I VIDEO UMONO R I
Front Panel Jacks
You can access the component you connected by plessing the INPUT button on
your remote (FRNT appears on the screen).
VIDEO (in) Allows you to connect a component such as a VCR, camcorder or
Internet access device,
L/MONO (left audio) and R flight audio) Receives audio signals from
another component such as a VCR, cflmcolder or Irlte]net access device,
Chapter1 9
Page 12

Plug in the TV
Plug tile end of tile powel cord into the wall outlet. Match the wide Made of tile
plug with tile wide slot in the outlet. Insert tile ,:)lug com,31etely into
the outlet.
Put Batteries in the Remote
1. Remove the batte_iy compartmerlt cover oil tile remote,
2. Insert new batteries. Match the polarities (+ and ) on tile batteries witb tile
diagram on the remote.
3. Put tile battei_y compartrnent cover back on the remote.
%/
Use the arrow buttons and the OK
button to move through the menu
system.
How to Use the Remote Control to
Complete the Interactive Setup
Tile technical term is "Navigation" bow you move througb tile on scleen
menus. Tile theory is tile same tbrougbout the menu screens: l'lighligbt your
cboice and select it.
To highligbt a menu itern, press tile alrow buttons on the lernote to bighlight
one of tile items listed on the s_reen. Use the up or down arrow button to rnove
up or down. Use the rigbt or left alrow button to move light el left.
To select tile itern that you've bigblighted, ,:)less OK.
Note: Highlighted means that the menu item stands out fi'om
other menu items on the list (appears darker; brighter; or a
different color).
Turn on the TV
Press tile POWER button on tile rernote control or the TV (the first screen of the
Interactive Setup appears). Tile menu screens "time out" after a period of time if
you don't rnake a selection. The tips in tbis section tell you how to access the
Setup rnenu screens marmally.
10 Chapter 1
Page 13

Complete the Interactive Setup
Tbe menu system in your TV allows the TV's features to work 131operly. In this
Tip book, we call it tbe "intelactive setup" because tbe TV asks you questions, you
Toaccessthe setup menus manually, answer, and the TV makes the appropriate adjustments. Ttle filst time you tmn
pressMENU and choose Setup, o[1 your TV, tbe setup screens appear automatically.
Set the Menu Language
The first part of tbe SFTUPasks you to select your preferred language for the
menu system.
1. Higblight yam preferred language fol the rnenu system.
2. Press OK to select tbat language.
Complete Auto Channel Search
Tbe next part of the SETUP asks you if you want tbe TV to searcb for all
channels viewable tbrough your antenrla or table TV system, This is sometimes
called "auto programming."
1. Press OK to tell tbe TV to begin searcbing lbl cbannels. A progress leport
appears or1 the screen.
2. Wben tbe screen on the TV tells you the searcb is complete, press OK.
Note: [['you skip Auto Channel Seaz'ch now, .you can access it later
through the Channel menu. See Chapter 3 Ibr more details,
Chapter1 11
Page 14

pOI_VER
The Buttons on the Remote Control
0-9 (Number buttons) Enter channel rlumbers and time settings directly
througl'l the remote control.
To enter a two digit chanrlel, press the two digits. _lk)enter a three digit cl'lannel,
press and hold the first digit for two seconds until two dashes appear to the
right of the number, therl add the second two, Example: to tune to channel 123,
press and hold 1 for two seconds, press 2, then press 3,
Arrow buttons (up, down, left, right) Press the arrow buttons to move
through the or1screen menu system,
CHAN (up and down) buttons Scan up or down througl'l the current chanrlel
list. Press once to change the charmel up or down; press and boM to continue
charlging charmels.
CLEAR Removes any rnenu or display flora the screen and returns you to
TV viewing.
GO BACK Returns you to the previous channel.
GUIDE This button is for a leature that is not available on the MR27310 or
MR29310,
INFO Displays channel informatkm.
INPUT Changes your TV to its video input channel, The Video Input Channel
is the channel your TV must tune to in order for you to access a component
tha(s connected to your TV's VIDEO IN and AUDIO IN jacks, Example: to view
a tape liom your camcorder, connect the camcorder to the TV's AUDIO and
VIDEO jacks with the audio/video cables,
MENU Displays the TV's Main menu.
MUTE Lowers the volume to its minirnum level, Press again to restore volume,
OK When a rnenu is on the screen, press OK to select the itern that
is highlighted.
POWER Turns the TV on and off.
SKIP If you press this button before you ct_ange tl'le cl'larmel, tl'le TV waits 30
seconds and autornatically goes back to the original channel, Each time you
press SKIP, you add 30 seconds (Le, if you press SKIP two tirnes before you
change the channel, the TV waits 60 seconds and automatically turns back to the
original channel),
VOL (up and down) buttons Decrease or increase the TV's volurne.
12 Chapter 1
Page 15

2
!.Iron3
Chapter Overview:
• The Channel Banner
• Parental Controls and V-Chip
NOTE: Illustrations are for representation only. Your product and on-screen
displays might differ.
Changing Entertainment.
13
Page 16

Sample displays on a Channel Banner.
Channel Banner
There are several indicators that might appear when you press the TV or INFO
buttons on the remote, This display is called the Channel Banner, The following
list describes the items on the Channel Banner screen (left to right and top to
bottom).
12:01
Displays the cmrent time.
The lock is displayed to indicate when Parental Controls are
locked or unlocked.
Displayed when Closed Captioning is available on the
current cbarmel.
ESPN
60
t13 l
Displays the label assigned to the current channel,
Displays the current channel or input channel (FRNT),
Mute is displayed when you mute tbe audio.
Stereo is displayed when the current channel is broadcasting
in Stereo,
SAP
0&O0
Displayed when the cmrent channel is broadcasting SAP
(Second Audio Ploglam) irfformation.
Displayed when the Sleep Timel has been set.
Displayed to count down time left on the commemial ski[)
(SKIP) timeL
Parental Controls and V-Chip
The ParentaI Conrr'ols rnenu allows you to program your TV so that chiMren
carmot see certain programs, cbarmels, or use the fiont panel controls.
The first tbree choices in the ParenraI Controls menu involve software inside
your TV (relerred to as V Chip). These three V Cbip functions may not work on
your TV because the features depend upon special additkms to tbe broadcast
signal, which may not be available in your market. Please disregard these three
V Cbip functions (by default, the software inside your TV is turned "off," so if
you don't want to use tbis feature, you can just ignore it).
You carl boweveL use the lernaining leatures in the Parental Controls menu:
Charmel Block, Front Panel Block and Lock Parental Controls.
14 Chapter 2
Page 17

Channel Block
Selecting tbis option lets you decide wbat channels can be viewed.
View Makes the selected channel viewable.
Block Tbe front panel and remote control CH (channel) buttons will tune
only to channels that you have marked as Vlem The remote will still tune
to the blocked cbannel if you use the digits to access tbe cbannel, but tbe
cbannel will be blocked.
Don't lorget to lock parental controls after you cbange the status of Channel
Block. If you do not, the channel block will not take effect.
Note: Ifyou have a digital cable box channels 126 999 can be blocked
but will not be removable from your scan list.
Front Panel Block
Selecting tbis option lets you block (disable) el unblock (enable) tbe TV's front
panel. The remote still tunes to any cbannel. Front Panel Block can:
Keep cbildren from watcbing TV wben tbe parent is not present.
Keep young cbildren flora playing witb tbe buttons.
(Wben using this as a Parental Control method, you sbould remove access to
any remote tbat is capable of operating tbe television wbile you bave tbe front
panel blocked.)
Don't R_rget to lock parental controls after you cbange tbe status. If you do not,
tbe front panel Mock will not take effect.
Lock/Unlock Parental Controls
Selecting tbis option lets you lock and unlock parental controls settings using a
password.
If you do not lock parental controls, none of the settings for V-Chip,
Channel Block, or Front Panel Block will take effect.
If you forget your password, simultaneously press and bold MENU on tbe
television and volume down on the remote for 3 seconds. Notbing appears on
tbe screen, Parental Controls simply unlock and you can re enter a password
via [ock Parental Controls,
15
Page 18

This page left blank intentionally
Page 19

Chapter Overview:
• How to Use the Different Types of Menus and Control Panels
• Audio Menu
• Picture Quality Menu
• Screen Menu
• Channel Menu
• Time Menu
NOTE: Illustrations are for representation only. Your product and on-screen
displays might differ.
Changing Entertainment. Again
17
Page 20

How to Use the Different Types of Menus and
Control Panels
The TV's menu system has three types of screens: menus, contlol panels, and choice lists. You use
tile buttons on the remote or the florlt panel to access the menu systern and make changes to the
settings,
Tile following pages explain how to use the different types of menus to adjust the featmes of
yore TV,
Menus
Tile first rnenu is called the Main rnenu. Pless MENU on tile remote or on tile
front panel to bring up tile Main menu.
Menus take you to anothe] merlu or a cent]el panel, There are two ways to
select a choice irl a merlu:
rip
Fee! free to explore the menu system,
If you're ever unsure where you are in
the menu system, or you'rejust plain
tired of exploring, press CLEAR to
remove the menus from the screen
and start over again.
Use your alrow buttons on your lemote contlol to highlight yore choice,
and press OK.
Press a number button on tile lemote, Fo] example, in tile Main menu p_ess
3 to go straight to tile Screen menu.
Exiting a menu
There are ttnee ways to exit a menu:
Highlight Exitand press OK_
Press 0 on tile remote,
Press CLEAR. Tile on screen displays are cleared liom the screen and you
return to TV viewing.
Control Panels
Control panels allow you to adjust tile default settings on many features of your
TV. You can choose a setting, enter a number, or adjust a level such as tint or
brightness, There are three types of control panels: sliders, numeric eat1T and
choice lists,
18
Page 21

Sliders
Slidels are used to make adjustments to a particular control,
To use a Slider in a menu:
l, Press the up or down arrow button to select the slider control for the
feature you want to adjust.
2, Press the right or left arrow button to adjust the indicator line on the slider,
ff the control pane! is not set to the
current time, use the arrows to go
back over the columns and the digits
to make changes.
You can also enter numbers by using
the up and down arrows on the
remote.
Numeric Entry
A numeric entl_ control panel is used to enter numl3els ol lettels,
A pointer appears underneath the column you are changing.
l, Use the digits to enter a number in the column above the pointer.
2, Press the right arrow button to move to the next column, then use the digits
to enter a number.
3, When you have finished entering infomlation, press MENU or OK,
Choice Lists
Choice lists are used to choose a palticular setting flora a list, When the choice
list appears, the highlighted item is the one that is currently selected, or "in
use."
Highlight a choice on a menu and press OK to select that choice, You will then
return to the previous screen.
Now that you know how to access the menus and adjust the control panels the
following pages provide a brief explanation of all tile menu features. The
features are organized in order of their location on tile Main Menu,
Chapter 3 19
Page 22

1 Audio
Audio Menu
Mute Press OK to reduce the TV's volume to its minimum level. Press OK
again to restore the volume.
Tone Controls Displays the slider controls for adjusting the TV's treble, bass
and balance.
Audio Processor Displays a choice list of available audio modes, which
control the way the sound comes through your speakers. You can also access
the AUDIO PROCESSOR menu by pressing the SOUND button on the remote.
Mono Plays the sound in mono only. Use this setting when receiving
broadcasts with weak stereo signals.
Stereo Splits the incoming stereo audio signal into left and right channels.
Most TV programs and recorded materials have stereo audio. The word
STEREO appears on the TV when you tune to a program that is broadcast
in stereo,
Expanded Stereo Electronically "widens" sound from stereo broadcasts,
stereo VCRs, digital satellite systems, DVD players, and LaserDisc players
for a fuller, more spacious sound.
SoundLogic '_Stereo Reduces the annoying blasts in volume during
commercial breaks, and also amplifies softer sounds in program material.
Eliminates the need to constantly adjust volume control.
Second Audio Program (SAP) Plays the program's audio in a second
language, if one is available. The word SAP appears on the TV when you
tune to a program that is broadcast with SAP inlbrmation. SAP audio is
broadcast in mono. SAP is also used to broadcast a program's audio with
descriptions of the vkleo for the visually impaired.
2O
Page 23

Picture Quality Menu
Basic Picture Controls Displays the five slider controls for adjusting the way
the picture looks.
Contrast Adjusts the difference between the light and clark areas of
the picture.
Color Adjusts the richness of the color.
Tint Adjusts the balance between the red and green levels.
Black Level Adjusts the brightness of the picture.
Sharpness Adjusts the crispness of the edges in the picture,
When exiting this menu. the Save PezxonaIPicturo Presetchoice list will appear.
You can choose either Yes or No, If you save the settings as a Personal Picture
Preset, the TV will store the settings so you can re select them quickly if
someone changes the settings.
Picture Presets Displays a choice list that lets you select one of three preset
;)icture settings: Bright Lighting, Normal Lighting, Soft Zighting oi" Personal
Picture Prese£ Choose the setting that is best for your viewing environrrlent.
Auto Color Displays a choice list that lets you turn on the ieature that
automatically corrects the color of the picture. (This is especially useful for
tracking realistic flesh tone colors as you switch from channel to channel.)
Choose 0_'_ or OF_ depending on your preIerence.
Color Warmth Displays a choice list that lets you set one of three automatic
color ac/justments: Coolfor a more blue palette of picture colors; NormaI; and
Warm for a more red palette of ;)icture colors. The warm setting corres;)onds to
the NTSC standard of 6500 K,
Chapter 3 21
Page 24

Screen Menu
Closed-Caption Display Displays a choice list that lets you choose the way
closed captioning inlormation is shown on the screen.
Off always No captkming irlformation is displayed.
On always Captioning inlorrnatkm is shown always, when available.
On when sound is muted Captioning information is shown, when
available, whenever the TV's sound is rnuted, (To rnute the sound, press the
MUTE button.) The captioning information is not displayed when the sound
is not muted,
Closed-Caption Mode Displays a choice list that lets you choose which
captioning mode is used for displaying captioning information,
Menu Language Displays a choice list that lets you select your preferred
language for the menus: English, Spanish or f}'ench,
Using Closed Captioning
Many programs are encoded with closed captioning information, which lets
you display the audio portion of a program as text on the TV screen.
Closed captioning is not available on all channels at all times. Orfly specific
programs encoded with closed captioning information are applicable. When a
program is closed captioned, the CCicon is displayed in the charmel barmer,
See Chapter 2 for rnore information about the channel banner.
If you don't know which Closed-Caption mode
to use, select CC1. CC1 is probably the mode
that is used in your area. CC2, CC3, and CC4
are reserved for foreign languages, but are
rarely used at this time.
Closed-Caption Modes
The TV offers eight closed captioned modes, including lout text modes.
To set the Closed Caption Mod_
1. Select Scl'een flOra the Main menu.
2. Highlight Closed-Caption Mode and press OK (the Closed Caption Mode
appears).
3. Highlight your choice and press OK (the Screen menu appears again).
Note: 7he Text modes cover nearly half of the picture on tile screen to
display tile closed captioned text. Most broadcasters use tile CC mode,
which displays a Ibw lines of captions at a time.
Turning off Closed-Caption
1. Select Screen florn the Main rnenu.
2. Pless OK to select Closed Caption Display.
3. Highlight Off Always and Dess OK. The closed captioning is tinned off and
you go back to the Screen menu,
22
Page 25

To enter a number greater than 99, press and
hold "!" to enter the hundreds digit, then
press the two remaining numbers.
Channel Menu
Signal Type Displays a choice list that lets you select the current antenna
type,
UHF/VHFAntenna Choose this if you are currently using an affair
antenna for TV signals,
Cable TV Ctloose this if you are currently using cable or a cable box lot
TV signals,
Auto ChannelSearch Tells the TV to search automatically lot all the charmels
available through the antenna input. When the TV finds an active cl'lannel, it
[)laces it in the Norrnal channel list; inactive channels (weak stations or
channels with no signal at all) will be removed flora the channel list.
List andLabels Displays a control panel that lets you edit your Normal
channel list and choose a six character label for each channel, Follow the on
screen directions to enter your channels and other infbrmation.
Channel# Use the up and down arrows to scroll up and down through
the channels available via your antenna. You can enter the channel nurnber
directly using the nurnber buttons.
NormalList Only the channels included in the Normal list are available
when you scan up and down using channel up and down. Use the up and
down arrow buttons to indicate whether the charmel number indicated is
included (Yes) or is not included (No) in the Normal channel list.
ChannelLabel Use the up and down arrow buttons to enter a six
character label for each channel, Hold the button down to scroll quickly
through the characters. The TV can store up to 27 labels in memol T.
Time Menu
Sleep Timer Displays a cormol panel that lets you select the amount of time
you want to give the TV befbre it shuts itself off,
Schedule Displays a control panel that lets you set up a schedule for turning
the TV on and off autornatically. Rerninder: you rnust turn the schedule On. The
on screen directions guide you tl'lrough the steps needed to set the schedule.
Set Time Displays a control panel that lets you enter the current time, The on
screen directions guide you through the steps needed to set the time.
Chapter 3 23
Page 26

This page left blank intentionally
Page 27

4
Chapter Overview:
• Troubleshooting
• Care and Cleaning
• Index
Changing Entertainment. Again
25
Page 28

Troubleshooting
Most problems you encounter with your TV you can correct by consulting the _lkoubleshooting list that kfllows,
TV Problems
TV won't turn on
Press the POWER button.
Make sine the TV is plugged in.
Check the wall receptacle (or extension cord) to make sure it is "live" by plugging in something else.
Something lnight be wrong with yore remote control. Press the POWER button on the front of the TV. If the TV tmns on, check the
remote control solutions on the next page.
The fl'ont panel buttons may be locked (disabled). Use the remote control to unlock the front panel controls by selecting the Front
Panol Block in the Pai'ontal Controls menu and choosing Unbloc_.
Buttons don't work
The front panel buttons may tx, locked (disabled). Use the remote control to unlock the front panel controls by selecting the Front
Panol Block in the Paz'ental Controls menu and choosing Unbloc_.
Unplug the TV for two minutes and then plug it back in. Turn the TV on and try again.
TV turns off while playing
Scheduled Off"function lnay have been activated. Go to p. 23 fbr instructions.
Electronic protection circuit may have been activated because of a power stage. Wait 30 seconds and then turn the TV on again. If
this happens flequently, the voltage in your house may be abnomlally high or low.
TV turns on unexpectedly
Scheduled On may have been activated. Go to p. 23 for instructions.
Blank screen
Make, sine the component connected to the TV is turned on.
TIy another charmel.
No sound, picture okay
Maybe sound is muted. Press the volume up button to restore sound.
Can't select certain channel
Charmel may tx, blocked or not approw,d in the Pa_'en[a] ContTo]s metro.
If using a VCR, make sine the TV/VCR button on the VCR is in tilt, corlect mode (pless the TV/VCR button on your VCR).
Noisy stereo reception
The station might tx, weak.
26 Chapter 4
Page 29

Troubleshooting
No picture, no sound but TV is on
Maybt_ tile cable/air settJrig is set to the wIong posJtR)rl. St,le,ct Channo] flora the Main menu, se,lt!ct tile, Signal Ty]peoptJorl, and
provide the correct infoHnatior_ on the following screen. Go to pages 23 for detailed instructions.
Tile cbarmel might be empty change cbarmels.
If you're watching your VCR and it's cormected with coaxial cable to the CABLE/ANTENNA jack, tune tile TV to charmel 3 or 4
(whichever chanr_el is selected on the 3/4 switcb on the back of your VCR). Also check to make sure the TV/VCR button on the
VCR is in tbe correct mode (press the TV/VCR button on you_ VCR).
Sound okay, picture poor
Cll_,ck arlterma cormections. Make, sure all of the cabk,s ale firmly cormect_,d to the jacks.
Try adjusting sharpness function to improve weak signals. Go to page 21 for more instructions.
Black box appears on the screen
Closed captioning migllt tx, on. Check tile, C]osedCaption Display contlol panel in tile, Screen merm. Go to page 22 fol mole,
instructions.
The Remote Control Doesn't Work
Something might be between the remote and the remote sensor on the component. Make sure there is a clear path.
Maybe the remote isn't aimed directly at the component (TV or VCR) tbat you're trying to operate.
Maybe batteries in remote are weak, dead or installed incoHectly. Put new batteries in the remote.
You might need to d_ain the remote's microprocessor: remove batteries and press the number 1 button for at least 60 seconds.
Release the 1 button, replace the batteries, and (if necessary) program tbe remote again.
Problems with V-Chip/Parental Controls
The rating limits don't work
You must lo('k tbe s_:ttings. C;o to tll_, TVMAINMENU (press MENU on you_ remote), select Pai'onta] Controls (pr_,ss t; on you_
Iemote), select [oc_ Parental Controls (press 6 orl your Iemote).
I don't remember my password and I want to unlock the TV
If you forget you_ password, simultaneously press and bold MENU on the television and volume down on the remote for 3 seconds.
Nothing appears on tbe screen, Parental Cormols simply unlock and you can reenter a password via [or_" Parental Controls.
The V-Chip won't let me watch a program even though it's not rated as violent.
Maybt, the movie was given an NR (Not Rate,d) status. After you block movie, ratings, you must st,t JVJ?to View separate,ly in order to
view movies witb an NR rating.
27
Page 30

IMF lrt"tm b
Care and Cleaning
CAUTION: Turn OFF your "IV before cleaning.
You can clean ttle TV as required, using a soft lint flee cloth, Be sure to occasionally dust the ventilation slots in ttle cabinet
to help assure adequate ventilation,
_I]ae TV's screen may be cleaned with a soft, lint-free cloth as well. Take care not to scratch or mar the screen. If
necessary, you may use a cloth dampened with warm water.
Never use strong cleaning agents, such as ammonia-based cleaners, or abrasive powder. These types of cleaners
will damage the TV.
While cleaning do not spray liquid dilectly on the screen, ol allow liquid to run down the screen and inside the TV. Also,
aw_id plating drinks or vases with watel on top of the TV. This _ould increase the risk of fire ol sbo_k hazard or darnage to
the TV.
Caution: If fixed (non rnoving) images are left on the screen for long periods, they rnay be pemlanently imDinted on the
picture tube. Such images include network logos, phone numbers, and video games. This damage is not covered by your
walranty. Extended viewing of channels displaying these images should be aw_ided.
28 Chapter4
Page 31

Index
A
Advanced connections 8
Arrow buttons 12
Audio
Menu 20
Processor 20
Auto
Charmel Seamh 11, 23
Color 21
B
Basic
Cormections 6, 7
Picture Controls 21
Batteries for the remote 10
Black Level 21
Block
Channel 15
Front Panel 15
Buttons, remote control 12
C
CABLE/ANTENNA jack 6, 7, 8
Cables
coaxial 5
G LINK 5
CC (Closed Captioning) 22
CHAN+/ buttons 12
Channel
Banner 14
Block 15
Labels 23
Menu 23
Search 11
CLEAR button 12
Closed Caption
Display 22
Mode 22
Coaxial cable 5
Color Warmth 21
Connections
multiple 8
TV + VCR 7
TVOnly 6
Contrast 21
Control Panels 18
F
Fixed hnages 28
Front panel
block 15
buttons 9
jacks 9
G
GO BACK button 12
GUIDE button 12
INFO button 12
INPUT button 12
Interactive setup 11
L
Labels 23
Language 22
Languages
Selecting 11
Lock, Parental Controls 15
M
MernolT 23
Menu
Audio 20
Channel 23
Language 22
Picture Quality 21
Screen 22
Time 23
MENU button 12
Mono 20
Mute 20
MUTE button 12
N
Normal List 23
Number buttons 12
O
OK button 12
P
Parental Controls
Locking, Unlocking 15
Menu 14
Picture
Presets 21
Quality Menu 21
POWER button 12
R
Remote, batteries 10
Remote control buttons 12
S
SAP 20
Satellite Receiver, connecting 8
Schedule 23
Screen Menu 22
Second Audio Program (SAP) 20
Set Time 23
Sharpness 21
Signal Type
Cable TV 23
UHF/VHF Antenna 23
SKIP button 12
Sleep Timer 14, 23
Stereo 20
Time Menu 23
Tint 21
Tone Controls 20
Troubleshooting 26
TV, connecting 6
U
UHF/VHF Antenna 23
Unlock, Parental Controls 15
V
VCR, connecting 7
VOL+ button 12
VOL button 12
29
Page 32

Please do not send any products to the Indianapolis address listed in this manual or on the carton. This will only
add delays in service for your product,
IMPORTED BY:
Comercializadora Thomson de M(_xico, S.A. de C.V.
Sierra Candela No. 111, Piso 11
Col. Lomas de Chapultepec
Del. Miguel Hidalgo
M(_xico D.F.C.P. 11000
R.EC. CTM-980723 KS5
EXPORTED BY:
Thomson multimedia Inc,
10330 North Meridian Street
Indianapolis, IN 46290
@2001 Thomson multimedia Inc.
Trademark(s)@ Registered
Marca(s) Registrada(s)
Printed in USA
TOCOM 15695640
 Loading...