

Page 1

Copyright © 2015 RCA Communications Systems
1
MR240TM VHF Marine Two-Way Radio Instruction Manual
Congratulations on selecting the MR240TM from
RCA Communications Systems - The Most Trusted Name In Radio!
Our new series of business communications products establishes a new benchmark in
premium radio products made to perform awlessly under the most demanding commercial
conditions. Cutting edge design, professional grade materials and components, simple
operat io n and sup erior assembl y quality - RCA Communic ations Syste ms has it all, including
our exclusive no-nonsense, two-year “Warranty Protection Program” one of the most
comprehensive warranties in the communications industry.
To ensure you achieve maximum performance from your MR240TM radio, please be sure to
carefully read this manual.
MODELS COVERED IN THIS MANUAL:
MR240 Handheld Marine Two-Way Radio
Page 2

MR240TM VHF Marine Two-Way Radio Instruction Manual
2
FOREWORD
Thank you for purchasing an RCA MR240TM
Handheld Marine Two-Way Radio. Read all
instructions carefully and completely before
using the transceiver.
MR240 Handheld Marine Two-Way Radio is a
powerful marine radio. It is designed to
IMO (International Maritime Organization)
standards. With proper care this radio
should provide you with years of trouble-free
operation.
SAVE THIS INSTRUCTION MANUAL - This
instruction manual contains important
operating instructions. Please read all the
instructions carefully and completely before
using the transceiver.
CAUTION
■ NEVER connect the transceiver to an AC out-
let. This may pose a re hazard or result in an
electric shock.
■ DO NOT use or place the transceiver in direct
sunlight or in areas with temperatures below
5°F (-15°C) or above 131°F (55°C).
■ KEEP the transceiver at least 1 meter away
from your vessel’s magnetic navigation
compass.
■ BE CAREFUL the transceiver meets IP-X7
requirements for waterproof protection.
However, once the transceiver has been dropped,
waterproof protection cannot be guaranteed
because of possible damage to the
transceiver’s case or the waterproof seal.
Page 3
Copyright © 2015 RCA Communications Systems
3
MR240TM VHF Marine Two-Way Radio Instruction Manual
■ MAKE SURE the exible antenna and battery
cover are securely attached to the transceiver and
that antenna and battery cover are dry before
attachment. Exposing the inside of the
transceiver to water will result in serious
damage to the transceiver.
RECOMMENDATION
Clean the transceiver thoroughly with fresh
water after exposure to saltwater, and dry it
before operating. Otherwise, the transceiver’s
key, switches and controllers may become
unusable due to salt crystallization.
NOTE: DO NOT submerge the transceiver
in water if there is any reason to suspect the
waterproof protection may not be effective.
For example, in cases where the battery
cover or DC power jack rubber seal is
damaged, cracked or broken, or the
transceiver has been dropped, or when the
battery cover, antenna or DC power jack are
detached from the transceiver.
FEATURES
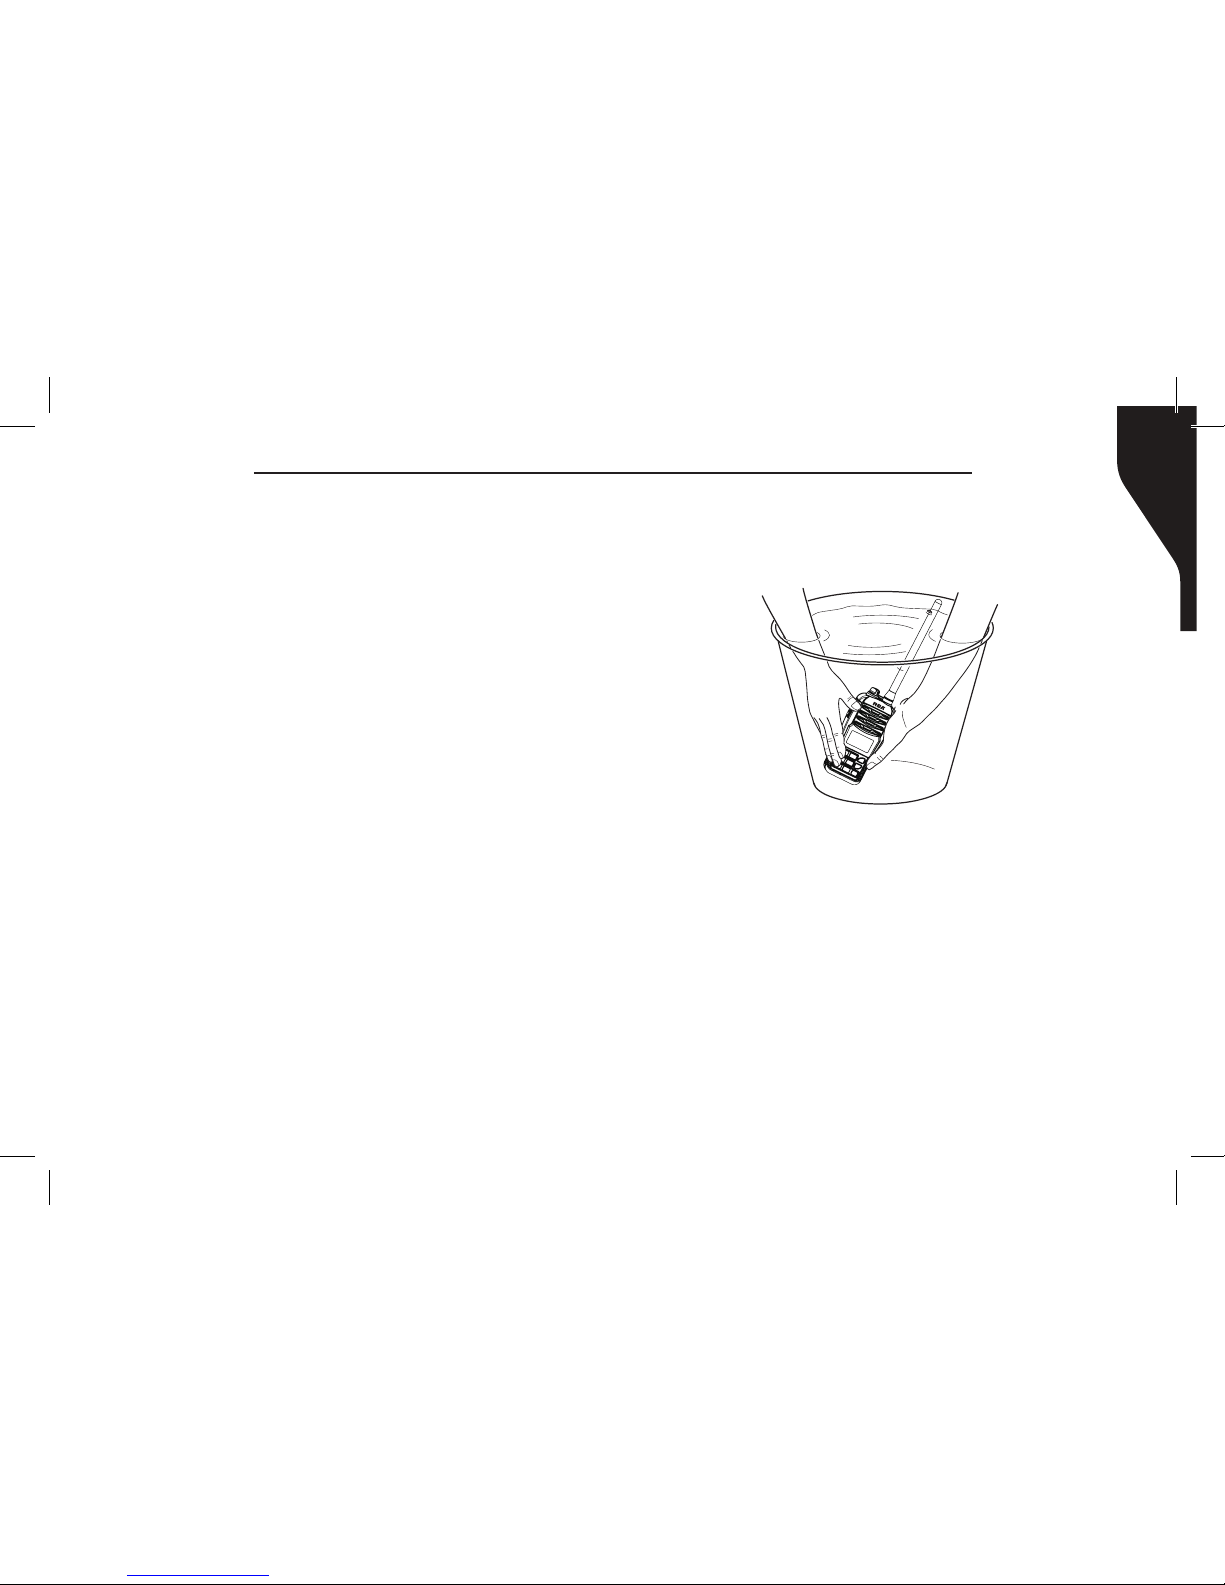
■ FLOATS ON WATER
The transceiver oats in fresh or salt water even
when the supplied accessories are attached.
Unit may not oat when third-party replace-
ment parts and/or accessories are used.
Page 4
MR240TM VHF Marine Two-Way Radio Instruction Manual
4
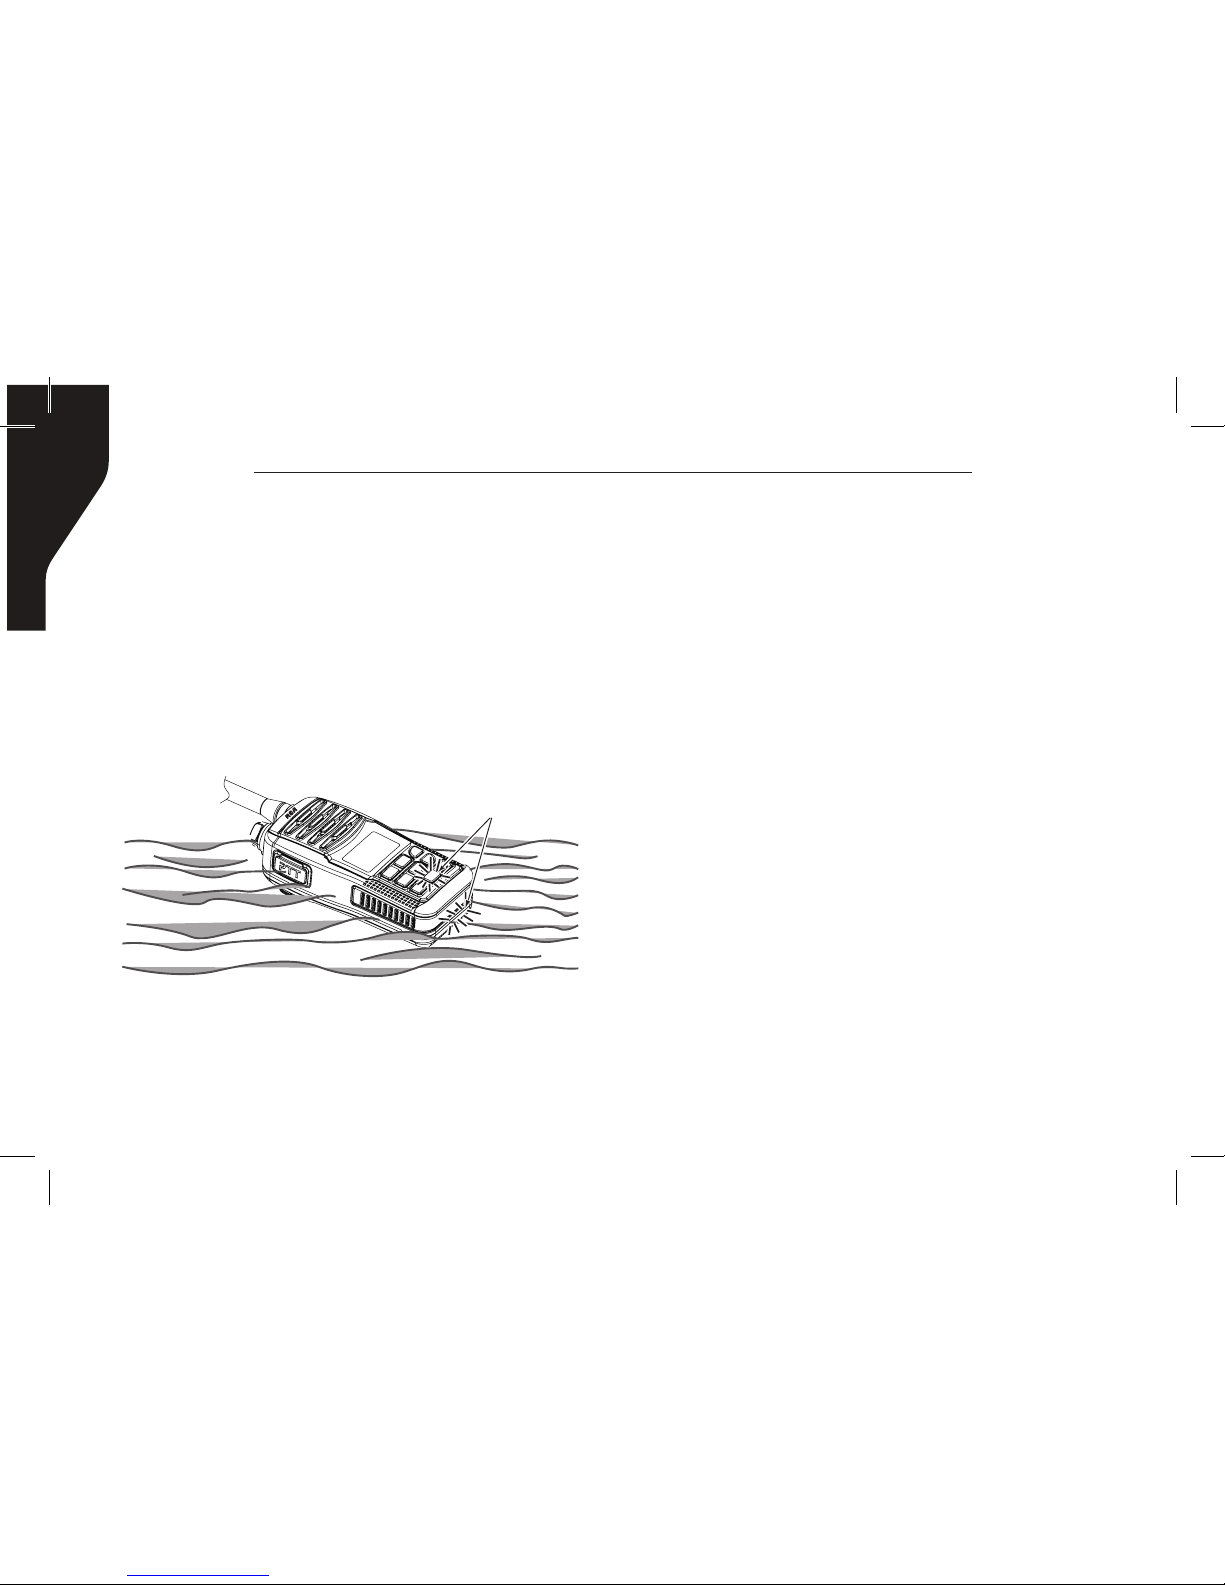
■ FLOATS AND FLASHES
At the bottom of each radio is a light that blinks
while oating in the water. The LED light is
noticeable in the dark (like a ashing shing
oat) so the radio can easily be found while
in the water. The light works even when the
radio is turned OFF.
Flashing Warning Lights
■ WATER CLEAN
WaterClean is new technology that helps
clears water from the speaker. The WaterClean
function emits a vibrating beep that helps
remove water, which can mufe the sound
coming from the speaker, from the speaker
housing.
ADDITIONAL FEATURES
■ Up To 5 Watts
■ Dual Bands / Three Bands Frequency Watch
■ Large LCD Display Easy To See And Operate
■ Auto Scan Function
■ Built-in Charger Circuitry
Page 5

Copyright © 2015 RCA Communications Systems
5
MR240TM VHF Marine Two-Way Radio Instruction Manual
IN CASE OF EMERGENCY
If your vessel requires assistance, contact other
vessels and the Coast Guard by sending a distress call on Channel 16.
DISTRESS CALL PROCEDURE
USING CHANNEL 16
1. “MAYDAY MAYDAY MAYDAY.”
2. “THIS IS ..........................” (name of vessel)
3. Your call sign or other indication of the
vessel.
4. “LOCATED AT ..................” (your position)
5. The nature of the distress and assistance
required.
6. Any other information which might
facilitate the rescue.
Page 6

MR240TM VHF Marine Two-Way Radio Instruction Manual
6
PREPARATION
Supplied Accessories .................................... 8
Charging the Battery Pack .......................... 8
Battery Pack ................................................ 9
Flexible Antenna ......................................... 10
Belt Clip .................................................... 10
Hand Strap .................................................10
PANEL DESCRIPTION
Panel Description ....................................... 11
Display ....................................................... 13
Turn ON/OFF ............................................... 15
Adjusting the Volume Level .......................... 15
Adjusting the Squelch Level ........................ 16
Receiving and Transmitting .......................... 16
Receiving .............................................. 16
Transmitting .......................................... 17
Channel Group Selecter .............................. 17
Channel Selection ...................................... 18
Channel 16 ............................................ 18
Channel 9 (Call Channel) ...................... 18
Weather Channels ................................. 19
Call Channel Programming .......................... 19
Monitor Function ...................................... 20
Volume Loud Function .............................. 21
Volume Mute Function .............................. 21
Automatic Backlight .................................. 21
Lock Function ............................................ 21
WaterClean Water Draining Function ......... 22
SCAN OPERATION
Scan Types ................................................ 22
Setting TAG Channels ............................... 24
Setting (or clearing) a TAG Channel .......24
Setting (or clearing) all Tagged Channels .. 24
Starting a Scan...........................................24
CONTENTS
Page 7

Copyright © 2015 RCA Communications Systems
7
MR240TM VHF Marine Two-Way Radio Instruction Manual
DUALWATCH / TRI-WATCH
Description..........................................25
Operation ..................................................25
SET MODE
Set Mode Programming ............................26
Set Mode Operation .......................... 26
Set Mode Items .........................................28
Beep Tone Function (“bP”) ...................... 28
Weather Alert (“AL”)............................ 28
Priority Scan Function (“Pr”) ................ 28
Scan Resume Time (“St”) ......................28
Auto Scan Function (“AS”) ................... 28
Dual/Tri-watch Function (“dt”) ............... 29
Monitor Key Action (“Sq”) ................... 29
Automatic Backlighting (“bL”) ............. 29
LCD Contrast Setting (“LC”) .................. 29
Power Save Function (“PS”) ................... 29
CHANNEL LIST .......................................... 31
SPECIFICATIONS ......................................... 32
TROUBLESHOOTING .................................. 34
BATTERY CAUTION ................................... 36
WARRANTY STATEMENT ........................... 40
RF EXPOSURE ............................................ 43
CONTENTS [continued]
Page 8

MR240TM VHF Marine Two-Way Radio Instruction Manual
8
PREPARATION
■ Supplied Accessories
Carefully unpack the transceiver. We
recommend that you identify items listed in
the table below before discarding the packing
materials. If any items are missing or damaged,
please contact your dealer immediately.
Items Qty.
Antenna 1
Battery Pack 1
Adaptor 1
Belt Clip 1
Hand Strap 1
Instruction Manual 1
■ Charging the Battery Pack
Important: Prior to using the transceiver for
the rst time, the battery pack must be fully
charged for optimum life and operation. To
avoid damage to the transceiver, turn the
power OFF while charging.
1. Connect the AC Adapter to a standard
electrical outlet.
2. Rotate and remove the power jack cap on
the top of the transceiver and plug the power
adapter connector into the female connection.
When the unit is charging,
and will
show up on the display.
3. Once the battery is charged, “FL” will appear
on the DISPLAY. Remove Power Adapter from
radio.
Page 9

Copyright © 2015 RCA Communications Systems
9
MR240TM VHF Marine Two-Way Radio Instruction Manual
NOTE: If the battery pack is not installed or
improperly installed, the DISPLAY will show
“Er” when trying to charge the unit.
■
Battery Pack
To insert the battery pack:
Place the battery into the transceiver so it ts
at, and securely attach the battery cover as
shown. Push the cover until the latch comes
back to the locked position.
To remove the battery pack, slide the latch
and lift the battery cover to remove it. Then
remove the battery pack, as shown.
CAUTION: When inserting or replacing the
battery pack, please be sure the battery cover
latch is returned to the locked position. If the
latch is not properly locked, water may enter
the unit causing damage.
Power Switch
Charging Interface
Power Adapter
AC Outlet
Power Contacts
Battery Pack
Snap
Battery Cover
Battery Pack
Power Contacts
Snap
Page 10
MR240TM VHF Marine Two-Way Radio Instruction Manual
10
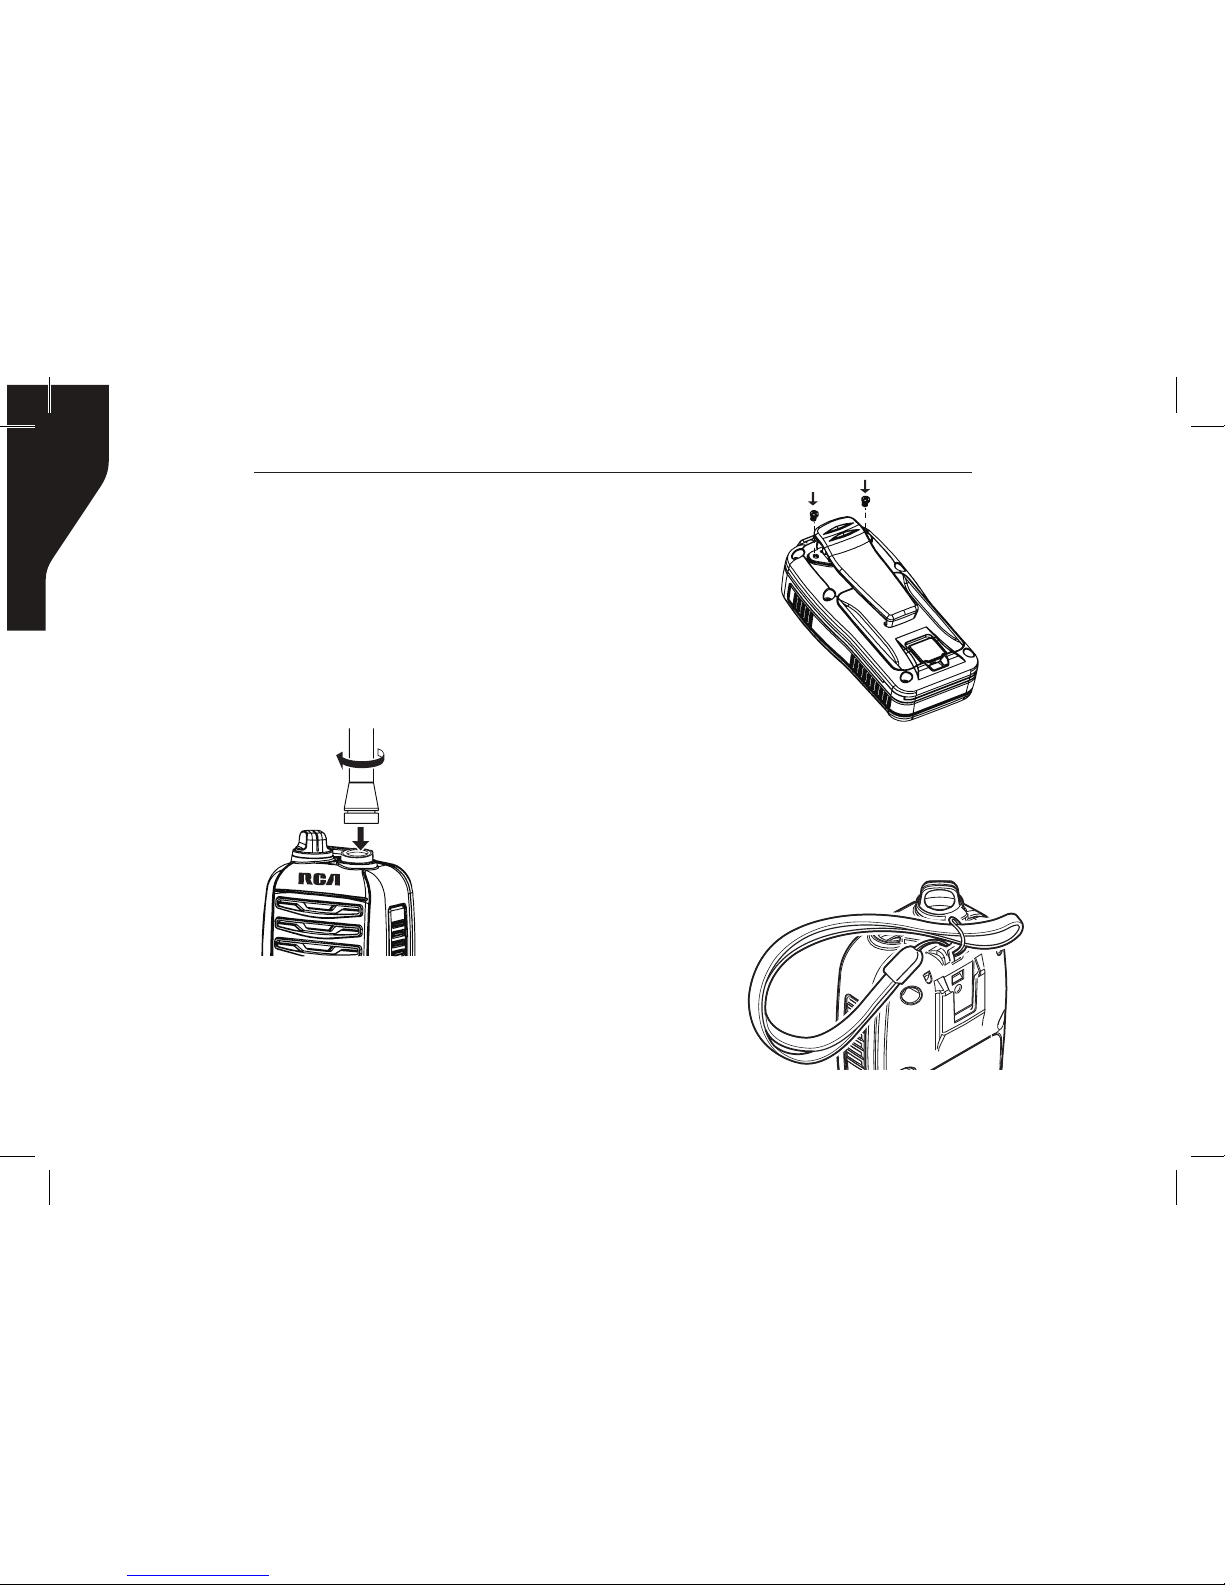
■ Flexible Antenna
1. To connect the supplied xable antenna to
the antenna connector, rotate it clockwise.
2. To remove the antenna, rotate it counter-
clockwise.
- NEVER carry the transceiver by the antenna
■
Belt Clip
Using the two supplied screws, attach the belt
clip to the back of the transceiver.
■
Hand Strap
Pass the hand strap through the loop on the
side of the transceiver as illustrated at right.
This facilitates carrying.
Page 11
Copyright © 2015 RCA Communications Systems
11
MR240TM VHF Marine Two-Way Radio Instruction Manual
PANEL DESCRIPTION
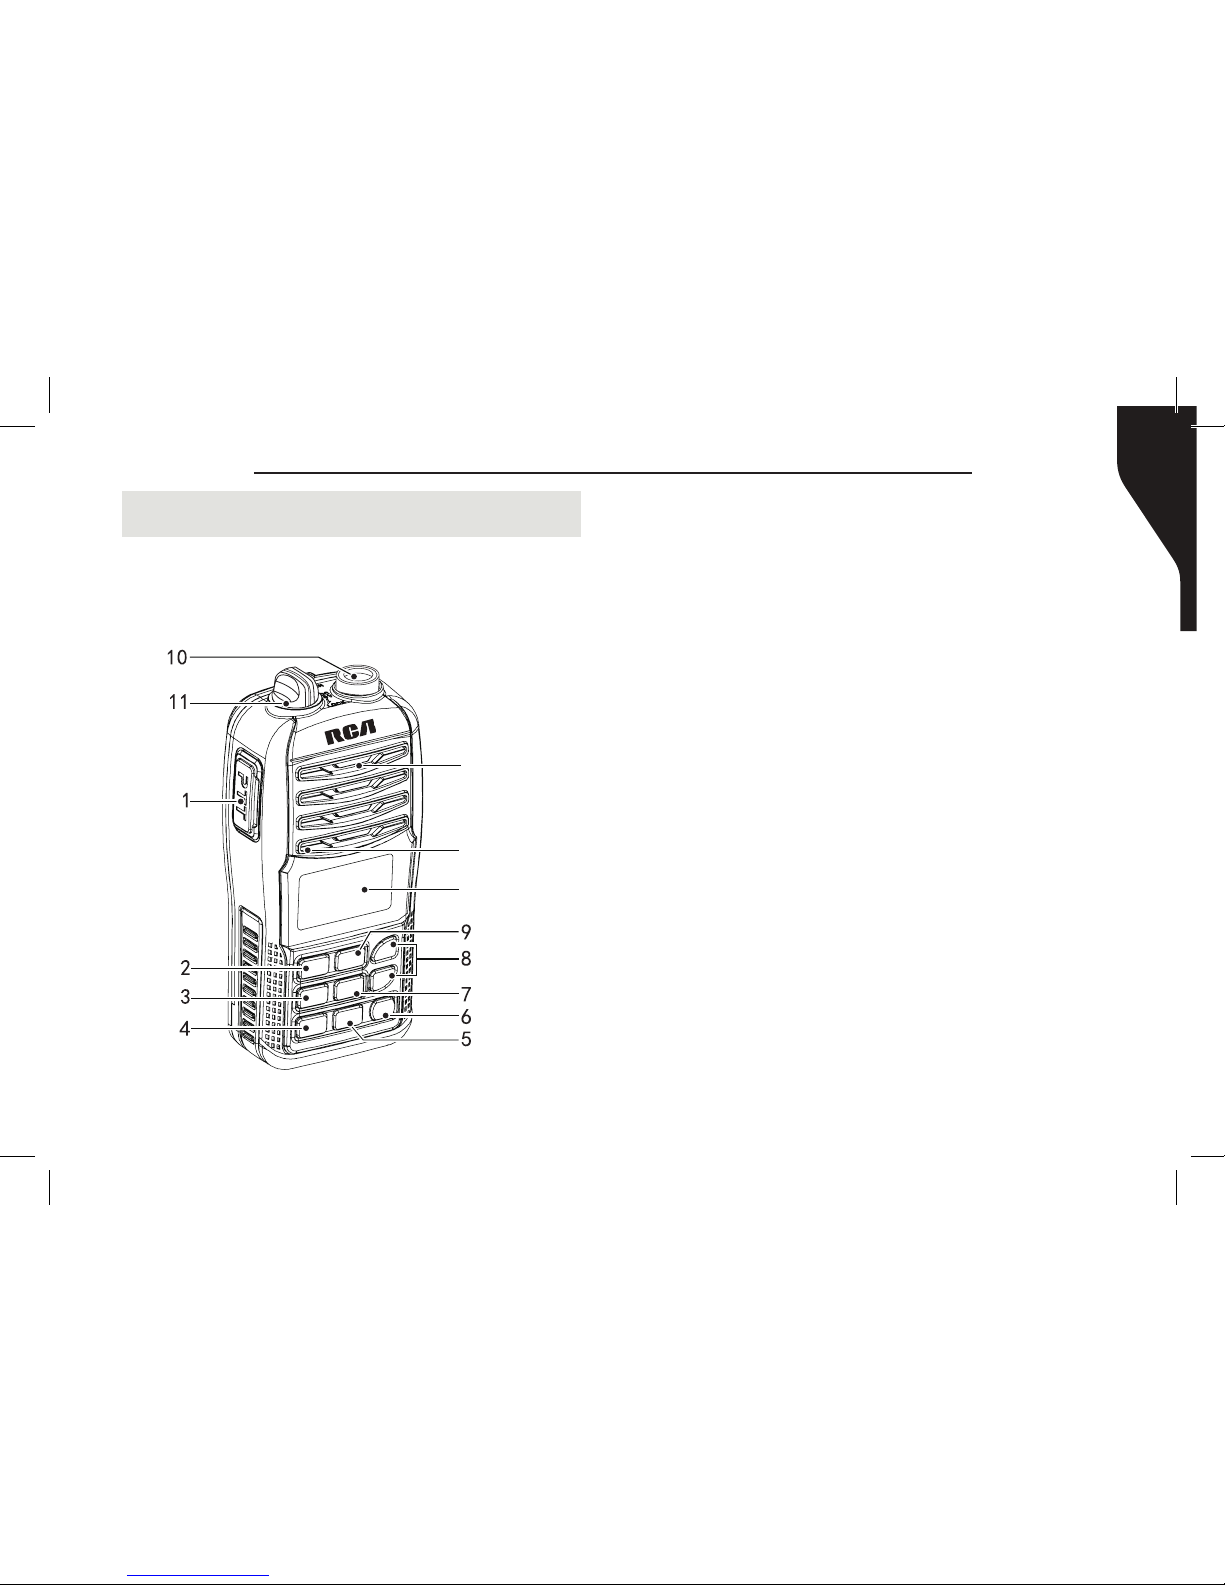
PANEL DESCRIPTION
1. PTT (Push To Talk)
- Hold down to transmit; release to receive.
2. 16/C (Channel 16/Call Channel)
- Push to select channel 16.
- Hold for 1 second to select the call channel.
(factory default: channel 9 )
- When the call channel is selected, hold for 3
seconds to enter the call channel programming
mode.
- While in the set mode, push to return to the
normal operation mode.
3. FAV/TAG
- PUSH to sequentially select your favorite
channels in a channel group.
- Hold for 1 second to set or clear the TAG for
Speaker
Microphone
Display
Page 12

MR240TM VHF Marine Two-Way Radio Instruction Manual
12
6. POWER [ ]
- Push to turn power ON or OFF.
7. VOL./SQL/MONI
- Push to enter the volume adjustment mode
or the squelch adjustment mode.
- Hold for 1 second to activate the Monitor
function.
- While holding this key, hold [
] key to
turn ON the power and enter the Set Mode
function.
- While in the Set Mode, push to select an item.
- While holding this key, push[▼]to turn ON
the Volume Mute function .
Do the same steps again to turn OFF the
function.
the display channel.
- While holding, turn ON the power to clear
or set all TAG channels in the selected channel
group.
4. SCAN/DUAL
- Push to start or stop a normal or priority scan.
- Hold for 1 second to enter the Dual/Tri-watch
mode.
- Push to exit the Dual/Tri-watch mode
- Hold this key and HI/LO key for 1 second,
to activate the WaterClean function. (See page
22 for AutoQuake information.)
5. [HI/LO]/[
]
- Push to select the high or low output power.
- Hold for 1 second to turn the Lock function
ON or OFF.
Page 13
Copyright © 2015 RCA Communications Systems
13
MR240TM VHF Marine Two-Way Radio Instruction Manual
10. ANTENNA CONNECTOR
- Connect the supplied antenna here.
11. [DC 6V]
- Connect the adaptor or optional power cable
here.
NOTE: Reattach the power jack cap when the
adaptor is not connected. Otherwise, water
may be able to get into the transceiver.
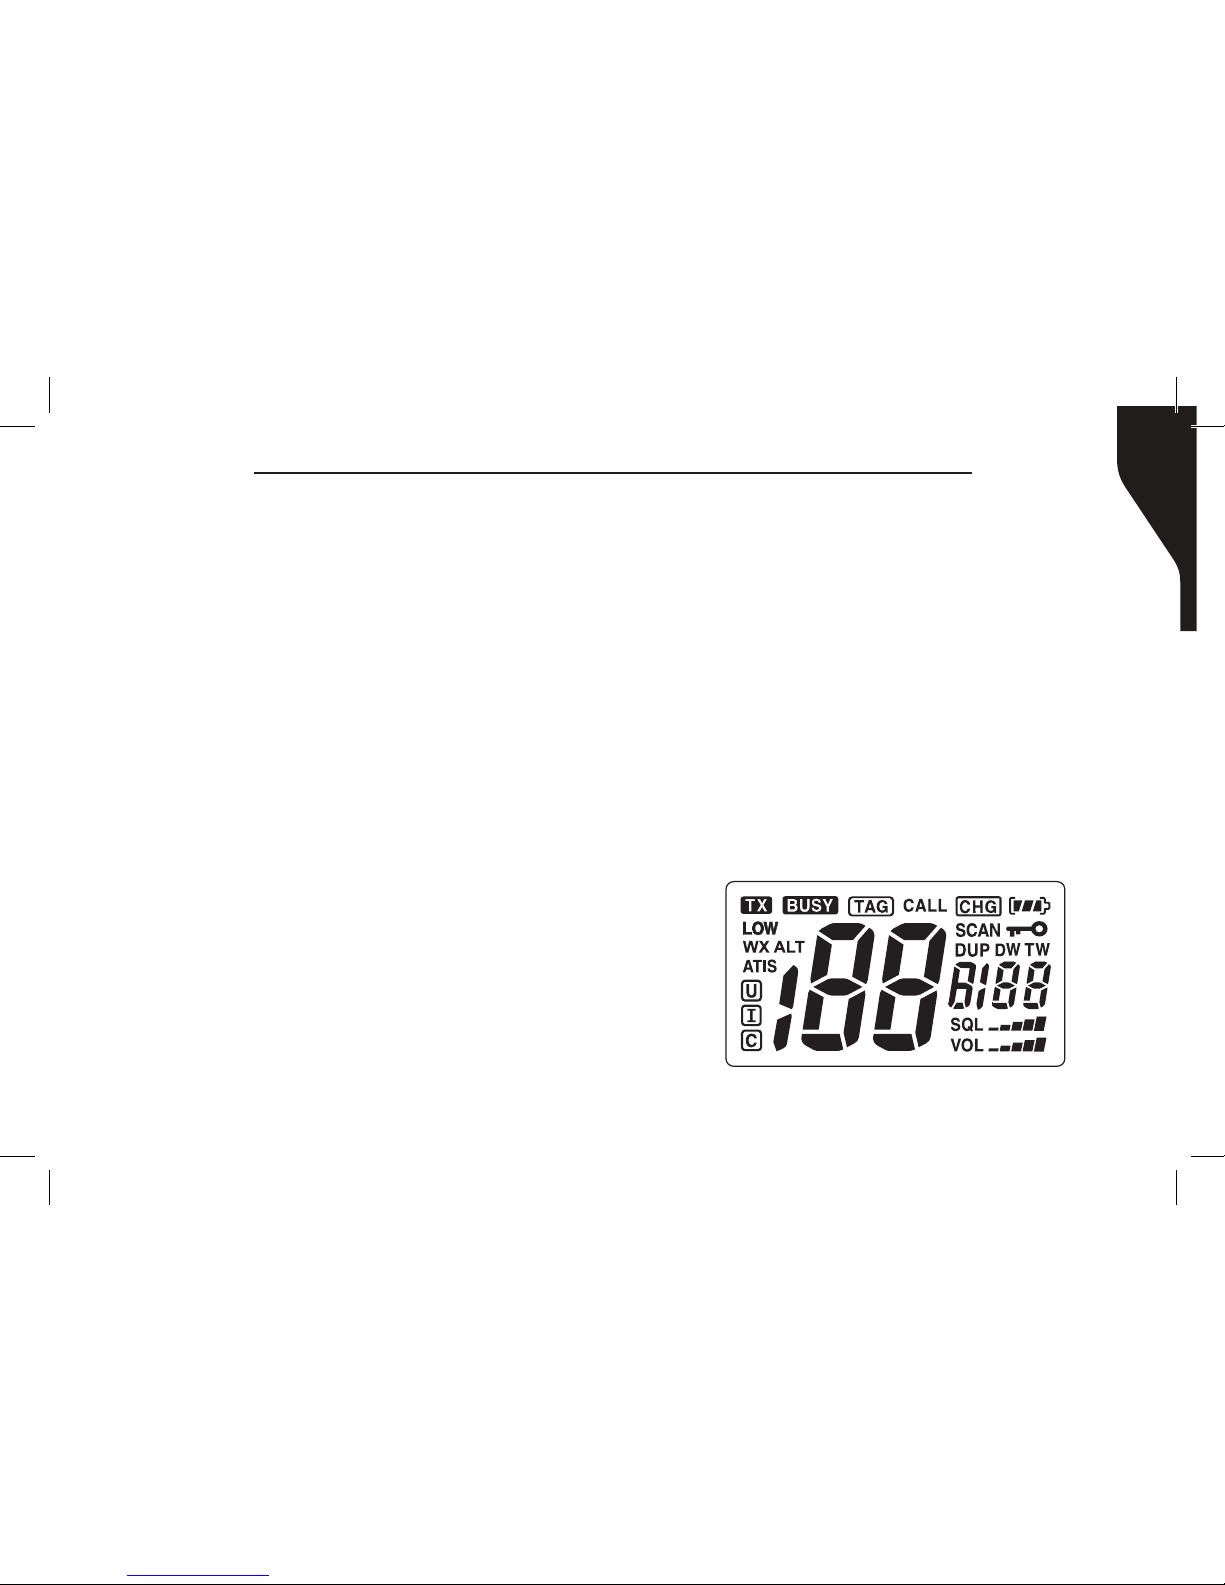
DISPL AY
- While holding this key, push [▲] to turn ON
the Volume Loud function.
Do the same steps again to turn OFF the
function.
8. [
▲]/[▼]UP/DOWN
- Push to select an operation channel.
- While in the Set Mode, push to select the
setting or value of an item.
- Push to check TAG channels or change
scanning direction during a scan.
9. [CH]
- Hold for 1 second, one or more times, to
select a USA, International, or Canada channel
group.
- Push to return to the previous channel before
selecting Channel 16 or the calling channel.
Page 14
MR240TM VHF Marine Two-Way Radio Instruction Manual
14
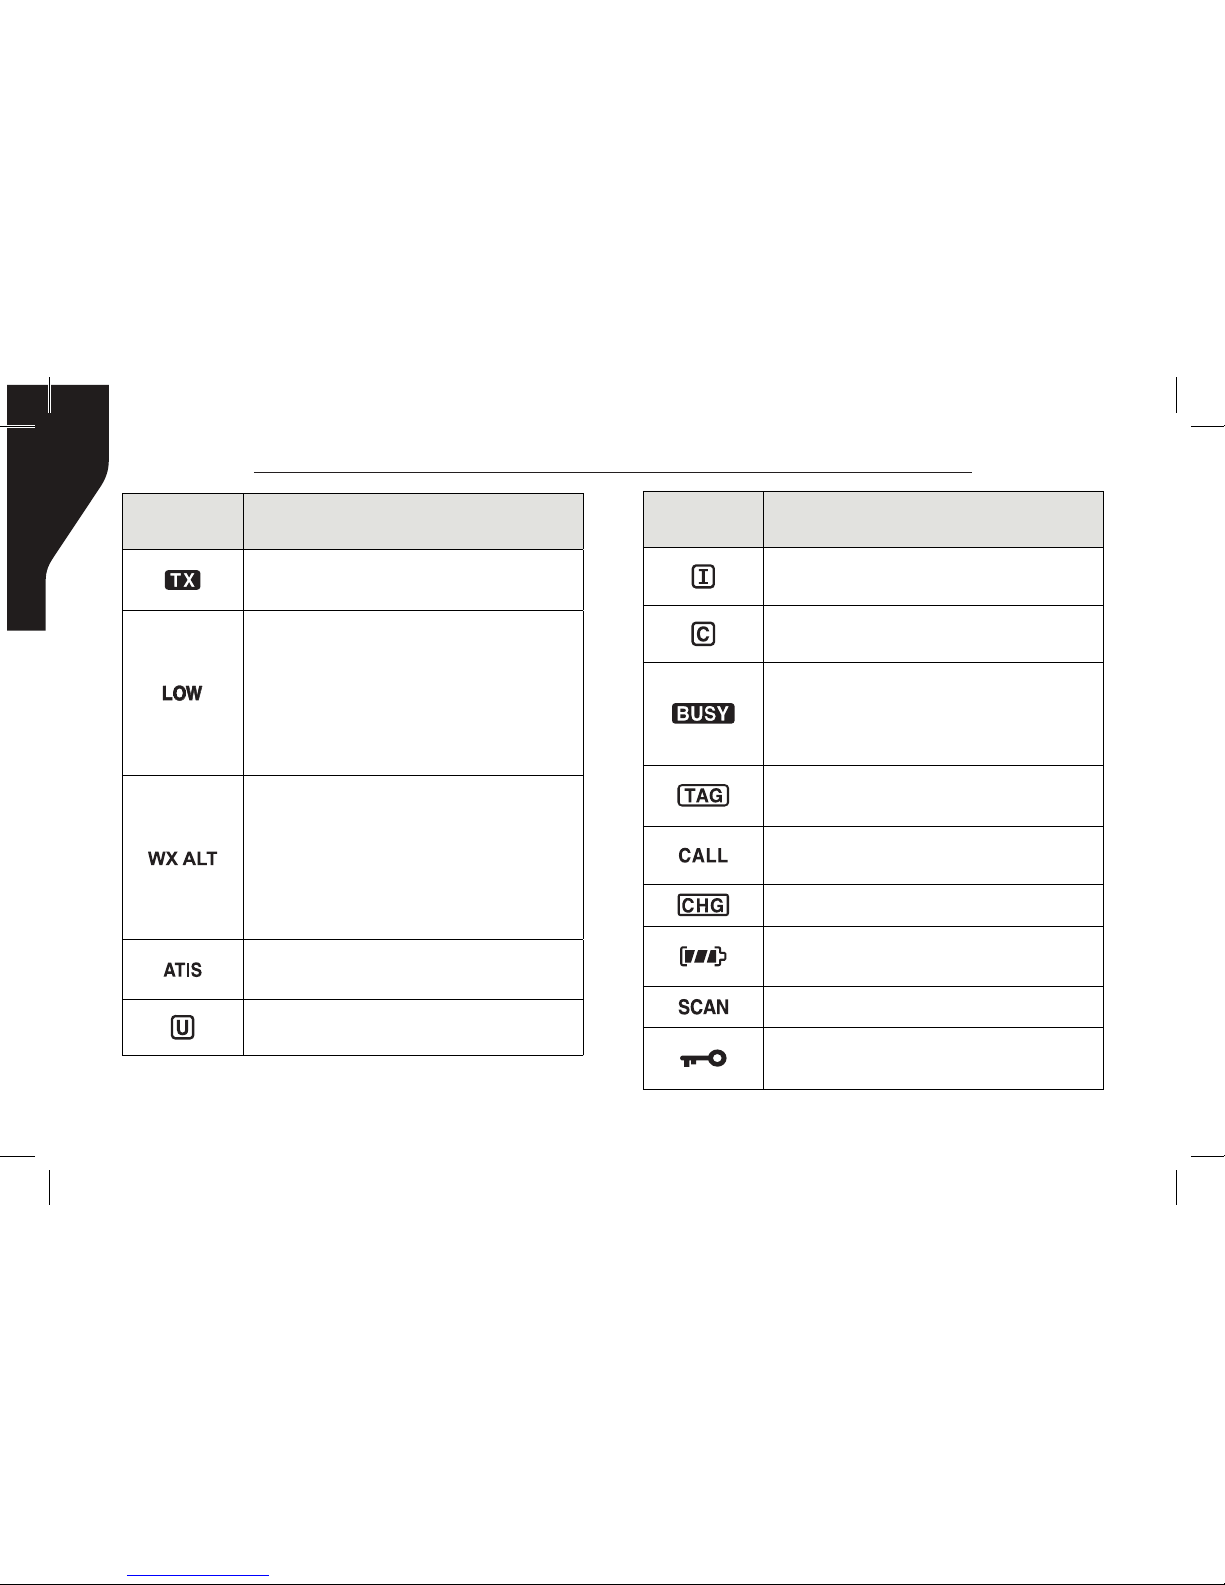
Icon Description
Appears when International
channel group is selected
Appears when Canadian channel
group is selected
Appears when receiving a
signal or when the squelch
opens
Blinks while monitoring
Appears when a TAG
channel is selected
Appears when the call
channel is selected
Appears when the radio is charging
Battery Indicator, remaining
battery power
Blinks while scanning
Appears while the lock function is
activated
Icon Description
Transmit Indicator. Appears
while transmitting
Low Power indicator
1) “LOW” appears when
low power is selected
2) “LOW” blinks when switching
forced low power mode
because of a high temperature
error or low voltage
Weather Channel and Weather
Alert Indicator “WX” appears
when the weather channel
group is selected. “WX ALT”
appears while the weather alert
function is activated; icon blinks
when an alert tone is received.
Appears while working
in ATIS Channel
Appears when U.S.A.
channel group is selected
Page 15

Copyright © 2015 RCA Communications Systems
15
MR240TM VHF Marine Two-Way Radio Instruction Manual
BASIC OPERATION
TURN ON/OFF
1. Press [ ] for 1 second to turn ON.
2. Press again [
] for 1 second to turn OFF.
ADJUSTING THE VOLUME LEVEL
The volume level can be adjusted using [VOL/
SQL] and [▼] or [▲].
1. Push [VOL/SQL] once to enter the volume
adjustment mode. Then press [▼] or [
▲] to
adjust the volume level.
- The ”VOL” icon starts blinking.
- The transceiver has 31 volume levels and OFF.
- When no key operation is performed for 5
Icon Description
Appears when a duplex
channel is selected
Appears when in Dualwatch mode.
Appears when Tri-watch mode.
Channel number readout.
Indicates the selected
operating channel number
In Set Mode, indicates the
selected condition
In Dual/Tri-watch mode shows
CH16 during priority scan.
Appears while volume selecting
Appears while SQL selecting
Appears while mode selecting
Shows squelch level
Shows volume level
Blinks when the volume
mute is activated
Page 16

MR240TM VHF Marine Two-Way Radio Instruction Manual
16
seconds, the transceiver returns to the normal
mode.
2. Push [VOL/SQL] twice to exit the volume
adjustment model.
ADJUSTING THE SQUELCH LEVEL
The squelch level can be adjusted using [VOL/
SQL] and [▼] or [
▲] in the order to properly
receive signals. Be sure to adjust the squelch
when scanning channels to ensure proper
reception.
1. Push [VOL/SQL] twice to enter the squelch
adjustment mode, then push [▼] or [
▲] to
adjust the squelch level.
- The ”SQL” icon starts blinking.
- The transceiver has 11 squelch levels: OP is
completely open; 10 is tight squelch; 1 is
loose squelch.
- If a squelch adjustment is not made within 5
seconds, the transceiver returns to the normal
mode.
2. Push [VOL/SQL] again to exit the squelch
adjustment mode.
RECEIVING AND TRANSMITTING
■ Receiving
1. Set the volume levels by push [VOL/SQL],
[▼] or [
▲].
2. Set the squelch levels by [▼] or [
▲].
- When receiving a signal, [
] appears and
audio is heard from the speaker.
- To conserve battery power, the transceiver’s
“Power Save” function automatically activates
when no signal is received for 5 seconds.
Page 17

Copyright © 2015 RCA Communications Systems
17
MR240TM VHF Marine Two-Way Radio Instruction Manual
■ Transmitting
1. Push [Hi/Lo] to select output power.
- “LOW” appears when low power is selected.
- Choose low power for short range
communications; choose high power for
longer distance communications.
- Some channels work in low power mode
only.
2. Hold down [PTT] to transmit, then speak
into the microphone.
- “TX” appears.
- Channel 70 cannot be used for transmission.
3. Release [PTT] to receive.
NOTE: Transmitting without an antenna can
damage the transceiver.
- To maximize the readability of your transmitted
signal, pause for a second after pushing [PTT]
hold the microphone 2” - 4” (5 - 10cm) from
your mouth and speak into the microphone at
a normal voice level.
CHANNEL GROUP SELECTER
This transceiver is pre-programmed with
U.S.A., International, Canadian channels.
Choose the appropriate channel groups for
your operating area.
1. Push [CH] to select a regular channel.
2. Hold down [CH] for 1 second, one or more
times,to select the desired channel group.
- The selectable channel groups are different,
depending on your operating area.
Page 18

MR240TM VHF Marine Two-Way Radio Instruction Manual
18
3. Push [▼] or [▲] to select a channel.
- “A” appears when a simplex channel is
selected.
CHANNEL SELECTION
■ Channel 16
Channel 16 is the distress and safety channel. It
used for establishing initial contact with an aid
station and for emergency communications.
Channel 16 is monitored in both Dualwatch
and Tri-watch mode. When not broadcasting,
you must always monitor Channel 16.
1. Push [16/C] momentarily to select Channel
16.
2. Push [CH] to return to the channel used
before Channel 16, or push [▼] or [
▲] to
select a channel.
■ Channel 9 (Call Channel)
Each regular channel group has separate
leisure-use call channels. The Call Channel is
monitored during Tri-watch. The Call Channels
can be programmed and are used to store
your most often used channel in each channel
International Channel Group
U.S. Channel Group Canadian Channel Group
Page 19

Copyright © 2015 RCA Communications Systems
19
MR240TM VHF Marine Two-Way Radio Instruction Manual
1. Push [CH] to select weather channel or
normal channel.
- Appears “WX” when weather channel
selected.
- Appears “WX ALT” when turned on weather
alert function.
2. Push [▼] or [
▲] to select channel.
CALL CHANNEL PROGRAMMING
Call Channel is used to access the channels you
use most often. Channel 9 is the Call Channel
default. However, you can set up Call Channels
in each channel group for quick recall of the
channels you use most often.
group for quick recall.
1. Push and hold 16/C for 1.5 second to select
the Call Channel of the selected channel group.
“CALL” and call channel number appears.
2. Push [CH] to return to return to the previous
channel, or push [▼] or [
▲] to select a channel.
■ Weather Channels
The MR240TM transceiver has 10 preprogrammed weather channels. There are
used for monitoring weather broadcasts. The
transceiver can automatically detect a weather
alert tone on the selected weather channel
while receiving on another channel or while
scanning.
Page 20

MR240TM VHF Marine Two-Way Radio Instruction Manual
20
1. Push [CH] to select a desired channel group
to be programmed
2. Push [16/C] for 1 second to select a Call
Channel.
3. Push [16/C] for 3 seconds until you hear a
beep and a “DUDU” tone. After the tone, you
can begin entering the channels you want in
Call Channel Programming.
- Channel number blinks.
4. Push [▼] or [
▲] to select desired call channel
5. Push [16/C] to conrm and save. Push [CH]
cancel and exit.
MONITOR FUNCTION
The monitor function opens the squelch.
- Push [MONI] to active monitor function.
- “BUSY” will blink and sound while monitor
function actives.
Dual-Band Duty
Page 21

Copyright © 2015 RCA Communications Systems
21
MR240TM VHF Marine Two-Way Radio Instruction Manual
VOLUME LOUD FUNCTION
The volume loud function temporarily
maximizes the volume level. It has no effect
when the volume level is 31.
1. Push [VOL/SQL] and [
▲] to turn ON the
function.
2. Push [VOL/SQL] and [
▲] to turn it OFF.
VOLUME MUTE FUNCTION
Volume Mute can be activated temporarily.
1. Push [VOL/SQL] and [
▲] to activate.
- The audio is muted.
- The volume level indicator starts blinking.
2. Push [VOL/SQL] and [
▲] to turn Volume
Mute off.
AUTOMATIC BACKLIGHT
This function is convenient for night time
operation. The automatic backlighting can be
activated in Set Mode.
- Push any key except for [PTT] to turn the
backlighting ON.
- Backlighting is automatically turned OFF after
5 seconds of inactivity.
LOCK FUNCTION
This function electronically locks all keys
(except for [PTT], [▼], [▲], [VOL /SQL], and
[ ]) to prevent accidental changing of the
channel and function access.
- Push and hold [
] for 1 second to turn the
function ON and OFF.
Page 22

MR240TM VHF Marine Two-Way Radio Instruction Manual
22
WATERCLEAN WATER DRAINING
The MR240 uses new technology to clear
water away from the speaker grill: WaterClean.
WaterClean helps drain water away from the
speaker housing (water that might otherwise
mufe the sound coming from the speaker).
The MR240 emits a vibrating beep when this
function is activated.
- Push and hold [SCAN] and [HI/LO]
- A low beep tone sounds for 9 seconds to
drain water, regardless of volume level setting.
- The transceiver does not perform key
operations while the WaterClean function is
activated. The WaterClean function can not
be activated when an optional speaker or
microphone is connected.
SCAN OPERATION
SCAN TYPES
Scanning is an efcient way to locate signals
quickly over a wide frequency range. The
transceiver has priority scan and normal scan.
In addition, the weather alert and auto
scan functions are available for standby
convenience. These functions can be activated
simultaneously, depending on the setting in
Set Mode.
Page 23

Copyright © 2015 RCA Communications Systems
23
MR240TM VHF Marine Two-Way Radio Instruction Manual
Normal Scan
Normal Scan searches through all TAG channels
in sequence. However, unlike priority scan,
Channel 16 is not checked unless Channel 16
is set as a TAG channel.
Priority Scan
Priority scan sequentially searches through all
TAG channels while monitoring Channel 16.
When a signal is detected on Channel 16, the
scan pauses until the signal disappears; when
a signal is detected on a channel other than
Channel 16, the scan switches to Dualwatch,
until the signal disappears.
Normal Scan
Priority Scan
Page 24

MR240TM VHF Marine Two-Way Radio Instruction Manual
24
SETTING TAG CHANNELS
For more efcient scanning, set your most used
channels as TAG Channels. Channels that are
not tagged will be skipped during scanning.
Tagged Channels can easily be changed. See
below.
■ Setting (or clearing) a TAG channel
1. Push [CH] to select desired channel group.
2. Push [▼] or [
▲] to select the desired
channels to be set as a TAG Channel.
3. Push and hold “
“ for 1 second. To set
the displayed channel as a TAG Channel.
- “ “ appears in the function display.
4. To cancel a TAG channel setting, push and
hold “
“ for 1 second.
- “ “ disappears.
■ Setting (or clearing) all tagged channels
1. While pushing and holding [TAG], turn
power [
] ON to clear all
TAG channels in the selected channel group.
2. Repeat above procedure to set all channels
as TAG channels.
STARTING A SCAN
1. Push [SCAN] to start normal scan or priority
scan.
- “SCAN” Blinks.
- “16” appears on the sub channel readout
during a priority scan.
- When a signal is received, the scan pauses
until the signal disappears, or resumes after
pausing 5 seconds, depending on the Set
Mode setting.
Page 25

Copyright © 2015 RCA Communications Systems
25
MR240TM VHF Marine Two-Way Radio Instruction Manual
- Push [▼] or [▲] to sequentially select TAG
channels, change the scanning direction or
manually resume the scan.
2. Push [SCAN], [PTT], [16/C], [CH] or [FAV] to
stop the scan.
To set the Priority Scan Function, Scan Resume
Timer and the Auto Scan Function in advance,
see Set Mode (page 26).
DUALWATCH /
TRI - WATCH
DESCRIPTION
Dualwatch monitors Channel 16 while you
are receiving on another channel; Tri-watch
monitors Channel 16 and a call channel while
receiving another channel. Dualwatch/Tri-
watch is convenient for monitoring channel 16
when you are operating on another channel.
OPERATION
1. Push [SCAN/DUAL] for 1 second to start
Dualwatch or Tri-watch.
- “DW” blinks during Dualwatch; ”TW” blinks
during Tri-watch.
- A beep tone sounds when a signal is received
on Channel 16.
Dual-Band Duty
Call Channel
Tri-Band Duty
Dualwatch Tri-watch
Page 26

MR240TM VHF Marine Two-Way Radio Instruction Manual
26
- Tri-watch switches to Dualwatch when
receiving a signal on the call channel.
2. Push [SCAN/DUAL] to cancel Dualwatch/ Tri-
watch.
SET MODE
SET MODE PROGRAMMING
Set Mode is used to change the settings of
transceiver’s functions: Beep Tone Function,
Priority Scan Function, Scan Resume Timer,
Auto Scan Function, Dual/Tri-watch Function,
Monitor Key Action, Automatic Backlighting,
LCD Contrast Setting and Power Save Function.
■ Set Mode operation
1. Turn OFF the power.
2. While holding down [VOL/SQL], turn ON the
power to enter Set Mode.
3. Release [VOL/SQL]. “bP” appears on display.
4. Push [VOL/SQL]to select a desired option of
the item.
5. Push [▼] [
▲] to select the desired option.
6. To exit Set Mode, push [16/C]
Dual-Band Duty Tri-Band Duty
Dualwatch Tri-watch
Page 27

Copyright © 2015 RCA Communications Systems
27
MR240TM VHF Marine Two-Way Radio Instruction Manual
No. Show Set Project
Set parameter
options
The default
value
1
bP Beep (Off/On)
of /on on
2
AL Weather Warning (Off/On)
of /on of
3
Pr Priority Scan (Off/On)
of /on of
4
St Scan Resume Timer (Off/On)
of /on of
5
AS Automatic Scanning (Off/On)
of /on of
6
dt Dualwatch / Tri-watch Duty
d-/t- d-
7
Sq Monitor Key Functions (Push/Hold)
Pu / Ho Pu
8
bL Automatic Backlight (Off/On)
of /on on
9
LC LCD Contrast
Hi / Lo Hi
10
PS Power Save (Off/On)
of / on on
Page 28

MR240TM VHF Marine Two-Way Radio Instruction Manual
28
SET MODE ITEMS
■ Beep Tone Function (“bP”)
Turns the key touch beep sound ON or OFF.
■ Weather Alert (“AL”)
U.S.A. NOAA broadcast stations transmit
a weather alarm when there is signicant
weather information. When the weather alert
function is turned on, the radio will sound
an alarm at the same time “WXALT” symbol
ashes on the screen. During the scan, the
current weather channel in use will be scanned.
■ Priority Scan Function (“Pr”)
The transceiver has 2 scan types - normal (OFF)
and priority (ON) scan. A normal scan searches
all TAG channels in the selected channel group.
A Priority Scan sequentially searches all TAG
channels while monitoring Channel 16.
■ Scan Resume Timer (“St”)
The Scan Resume Timer can be set as a pause
(OFF) or timer scan (ON).
- OFF: when a signal is detected, the scan
pauses on the channel until the signal
disappears, and then resumes.
- ON: When a signal is detected, the scan
pauses on the channel for 5 seconds, and then
resumes.
■ Auto Scan Function (“AS”)
The Auto Scan Function automatically starts
a normal or priority scan when no signal is
received, and no operation is performed for 30
seconds.
Page 29

Copyright © 2015 RCA Communications Systems
29
MR240TM VHF Marine Two-Way Radio Instruction Manual
- The backlighting is automatically turned OFF
after 5 seconds of inactivity.
■ LCD Contrast Setting (“LC”)
Set the LCD contrast level to high contrast or
low contrast.
- The LCD contrast level has little effect during
indoor use.
■ Power Save Function (“PS”)
The power save function reduces battery drain
by turning OFF the receiver circuit for preset
intervals.
- OFF: Function is turned OFF
- ON: Function is turned ON and will be
activated when no signal is received and no
operation is performed for 5 seconds.
■ Dual/Tri-watch Function (“dt”)
Set the watch type to Dualwatch or Tri-watch.
■ Monitor Key Action (“Sq”)
The Monitor Key temporarily opens the
squelch. This item sets the key action.
- “PU” (Push): The monitor function is activated
by holding down [MONI]. The squelch open
while holding down the key.
- “Ho” (Hold): The monitor function is activated
by holding down [MONI] for 1 second. The
squelch stays open until any key is pushed.
■ Automatic Backlighting (“bL”)
This function is convenient for night-time
operation. The backlight can be changed to
ON and OFF.
Page 30

MR240TM VHF Marine Two-Way Radio Instruction Manual
30
SET MODE ITEMS (The display shows the current settings, and the selected function is displayed
in the dotted circle.)
• Auto scan
Starting item
• Dual/Tri-watch
• Automatic
backlighting
• Power save
• LCD contrast • Monitor key action
: Push +
: Push Push
or
+
Page 31

Copyright © 2015 RCA Communications Systems
31
MR240TM VHF Marine Two-Way Radio Instruction Manual
CHANNEL LIST
Channel number
Channel number
Channel number
Channel number
Frequency(MHz)
Frequency(MHz) Frequency(MHz)
Frequency(MHz)
USA
USA
USA
USA
Frequency(MHz)
INT
INT INT
INTCAN CAN CAN CAN
Transmit
Transmit
Transmit
Transmit
Transmit
Receive Receive
Receive
Receive
Receive
Weather Channel
Page 32

MR240TM VHF Marine Two-Way Radio Instruction Manual
32
SPECIFICATIONS
General
Frequency Range
TX: 156.000-161.450MHz
RX: 156.000-163.425MHz
Type of emission FM (16K0G3E)
Battery Pack 1500mAh Li-ion (DC 3.7V)
Frequency stability ±10 PPM
Operating
temperature range
5°F (-15°C) - 131°F (55°C)
Antenna
impedance
50Ω
Dimensions
(H × W × D)
5.5” (140mm) × 2.6”
(65mm) × 1.6” (41mm)
Weight 8.7 oz (247g)
Transmitter
Output Power 5W/1W
Maximum Frequency
Deviation
±5kHz
Spurious Emissions 0.25uW
Adjacent Channel Power ≥70dB
Audio Harmonic Distortion ≤10%
Current Drain
≤1.5A
(High power)
≤0.9A
(Low power)
≤0.35A
(Max audio output)
Page 33

Copyright © 2015 RCA Communications Systems
33
MR240TM VHF Marine Two-Way Radio Instruction Manual
Receiver
Receive Sensitivity ≤0.22μV
Squelch Sensitivity ≤0.22μV
HUM and Noise ≥40dB
Adjacent Channel Selectivity ≥70dB
Spurious Response ≥70dB
Intermodulation ≥68dB
Audio Output Power ≥0.6W (10%)
SPECIFICATIONS [continued]
Page 34

MR240TM VHF Marine Two-Way Radio Instruction Manual
34
TROUBLESHOOTING
Radio operation issues are generally due to improper connections, incorrect settings, or incomplete
programming, not by unit failure. Please check the troubleshooting issues and refer to the relevant
section of the manual in an effort to solve any radio issues. If you do not see a relevant troubleshooting
issue, please contact Customer Support for more information.
PROBLEM POSSIBLE CAUSE SOLUTION Pg. #
The transceiver does not
turn ON.
1. The battery is exhausted.
2. The battery pack is not
correctly inserted.
1. Recharge the battery pack
2. Correctly insert the battery pack.
- 8
- 9
No sound from speaker.
1. The squelch level
is too high.
2. Volume level is too low.
3. Speaker has been
exposed to water.
1. Set the squelch level to
the threshold level.
2. Adjust the audio level
to a suitable level.
3. Remove water from the speaker
grill using WaterClean.
- 16
- 15
- 22
Page 35

Copyright © 2015 RCA Communications Systems
35
MR240TM VHF Marine Two-Way Radio Instruction Manual
TROUBLESHOOTING [continued]
PROBLEM POSSIBLE CAUSE SOLUTION Pg. #
Transmitting is
impossible,
or high power can
not be selected.
1. Some channels are
limited to low power
2. Some channels only receive.
3. The output power is set to low.
4. The battery is exhausted.
1. Change the channel.
2. Push [Hi/Lo] to select
high power.
3. Recharge the battery pack.
- 17-19
- 17
- 8
The displayed
channel
cannot be changed.
1. The Lock function is activated.
1. Hold down [
] (Hi/
Lo) for 1 second to turn
OFF the function.
- 21
Scan does not start.
1. “TAG” channels are
not programmed.
1. Set desired channels as
“TAG” channels.
- 24
No beep sounds. 1. Beep Tone function is turned OFF.
1. Turn ON the Beep Tone
in the set mode.
-28
Page 36

MR240TM VHF Marine Two-Way Radio Instruction Manual
36
BATTERY CAUTION
Misuse of Lithium-ion batteries may result in the following hazards: smoke, re, or the battery may
rupture. Misuse can also cause damage to the battery or degradation of battery performance.
■ DANGER! Use and charge only specied Icom battery pack with Icom radios or Icom chargers.
Only Icom battery packs are tested and approved for use and charge with Icom radios or Icom
chargers. Using third-party or counterfeit battery packs or chargers may cause smoke, re, or cause
the battery to burst.
■ DANGER! DO NOT hammer or otherwise impact the battery. Do not use the battery if it has
been severely impacted or dropped, or if the battery has been subjected to heavy pressure. Battery
damage may not be visible on the outside of the case. Even if the surface of the battery does not
show cracks or any other damage, the cells inside the battery may rupture or catch re.
■ DANGER! NEVER use or leave battery pack in areas with temperatures above +122°F (+50°C).
High temperature buildup in the battery, such as could occur near res or stoves, inside a sunheated
car, or by setting the battery in direct sunlight may cause the battery to rupture or catch re.
Excessive temperatures may also degrade battery performance or shorten battery life.
■ DANGER! DO NOT expose the battery to rain, snow, saltwater, or any other liquids. Never charge
or use a wet battery. If the battery gets wet, be sure to wipe it dry before using. The battery by itself
is not waterproof.
Page 37

Copyright © 2015 RCA Communications Systems
37
MR240TM VHF Marine Two-Way Radio Instruction Manual
■ DANGER! NEVER incinerate a used battery pack since internal battery gas may cause them to
rupture or may cause an explosion.
■ DANGER! NEVER solder the battery terminals, or NEVER modify the battery pack. This may cause
heat generation, and the battery may rupture, emit smoke or catch re.
■ DANGER! Use the battery only with the transceiver for which it is specied. Never use a battery
with any other equipment, or for any purpose that is not described in this instruction manual.
■ DANGER! If uid from inside the battery gets in your eyes, blindness can result. Rinse your eyes
with clean water, without rubbing them, and see a doctor immediately.
■ WARNING! Immediately stop using the battery if it emits an abnormal odor, heats up, or is
discolored or deformed. If any of these conditions occur, contact your Icom dealer or distributor.
■ WARNING! Immediately wash, using clean water, any part of the body that comes into contact
with uid from inside the battery.
■ WARNING! NEVER put the battery in a microwave oven, high pressure container, or in an induction
heating cooker. This could cause overheating, a re, or cause the battery to rupture.
■ CAUTION: Always use the battery within the specic temperature range for the transceiver (–4°F
to +140°F; –20°C to +60°C) and the battery itself (–4°F to +140°F; –20°C to +60°C). Using the
battery out of its specic temperature range will reduce the battery’s performance and battery life.
Page 38

MR240TM VHF Marine Two-Way Radio Instruction Manual
38
BATTERY CAUTION [continued]
CAUTION: Shorter battery life could occur if the battery is left fully charged, completely discharged,
or in an excessive temperature environment (above +140°F; +60°C) for an extended period of
time. If the battery must be left unused for a long time, it must be detached from the radio after
discharging. You may use the battery until the remaining capacity is about half, then keep it safely
in a cool dry place with the temperature range as follows:
–4°F to +122°F (–20°C to +50°C) (within a month)
–4°F to +95°F (–20°C to +35°C) (within three months)
–4°F to +77°F (–20°C to +25°C) (within a year)
CHARGING CAUTION
Charge the battery pack at least once every six months, even if it has been not used for a long
period of time. The battery pack will have slowly self-discharged, even though it has not been used.
If the battery pack is left for a long period without being charged, its life cycle will be shorter, or
worse, it will never accept a charge again.
Due to the characteristics of the Li-ion rectangular battery, the battery pack may change its shape
as the charge and discharge cycles are repeated. This is a normal phenomenon, and it is quite safe
to continue to use the pack, as long as it is properly handled. However, when the shape of the
battery pack is so changed that the battery pack or battery cover can not be correctly attached to
Page 39

Copyright © 2015 RCA Communications Systems
39
MR240TM VHF Marine Two-Way Radio Instruction Manual
the transceiver, it is time to replace it with a new one. Otherwise, the transceiver can be damaged
due to the loss of air tightness.
■ DANGER! NEVER charge the battery pack in areas with extremely high temperatures, such as
near res or stoves, inside a sun-heated car, or in direct sunlight. In such environments, the safety/
protection circuit in the battery will activate, causing the battery to stop charging.
■ WARNING! DO NOT charge or leave the battery in the battery charger beyond the specied time
for charging. If the battery is not completely charged by the specic time, stop charging and remove
the battery from the battery charger. Continuing to charge the battery beyond the specic time limit
may cause a re, overheating, or the battery may rupture.
■ WARNING! NEVER insert the transceiver (battery attached to the transceiver) into the charger
if it is wet or soiled. This could corrode the battery charger terminals or damage the charger. The
charger is not waterproof.
■ CAUTION: DO NOT charge the battery outside of the specied temperature range: +32°F to
+113°F (±0°C to +45°C). Icom recommends charging the battery at +68°F (+20°C). The battery may
heat up or rupture if charged out of the specied temperature range, and battery performance or
battery life may be reduced.
Page 40

MR240TM VHF Marine Two-Way Radio Instruction Manual
40
WARRANTY STATEMENT
RCA Communications Systems warrants each new radio product it supplies to be free from defects in
material and workmanship under normal use and service for the time period listed below, provided
that the user has complied with the requirements stated herein.
The warranty period begins on the date of purchase from an Authorized RCA Communications
Systems Sales and Service Outlet. This warranty is offered to the original end user and is not assignable
or transferable. RCA Communications Systems is not responsible for any ancillary equipment which
is attached to or used in conjunction with RCA Communications Systems products.
RCA Communications Systems offers to the original end user a Two (2) Year Limited Warranty on
the RCA MR240
TM
Radio Handset. The MR240TM Antenna, MR240TM Battery and the MR240TM
Battery Charger are covered under a One (1) Year Limited Warranty. The MR240TM Belt Clip is not
covered under the warranty.
During this period, if the product fails to function under normal use because of manufacturing
defect(s) or workmanship, it should be returned to the Authorized RCA Communications Systems
Sales and Service Outlet from which it was purchased. The Sales and Service Outlet will repair the
product to full operating specications or replace the product with a new product of the same
make and model. The user is responsible for all charges incurred in returning the product to the
Authorized RCA Communications Systems Sales and Service Outlet. RCA Communications Systems
will be responsible for all charges in returning the product to the end user via standard ground
shipping service.
Page 41

Copyright © 2015 RCA Communications Systems
41
MR240TM VHF Marine Two-Way Radio Instruction Manual
RCA Communications Systems shall have no obligation to repair or replace the product, if there
is damage as a result of normal wear and tear or if the damage is caused in whole or in part by
catastrophe, fault or negligence of the user, improper or unauthorized alterations or repairs to the
product, incorrect wiring, use of the product in a manner for which it was not designed, or by
causes external to the product. This warranty is void if the product serial number is altered, defaced
or removed.
THE EXPRESS WARRANTIES CONTAINED HEREIN ARE IN LIEU OF ALL OTHER WARRANTIES, EITHER
EXPRESSED OR IMPLIED OR STATUTORY, INCLUDING, WITHOUT LIMITATION, ANY WARRANTY OF
MERCHANTABILITY OR FITNESS FOR A PARTICULAR PURPOSE.
FOR ANY PRODUCT WHICH DOES NOT COMPLY WITH THE WARRANTY SPECIFIED, THE SOLE
REMEDY WILL BE REPAIR OR REPLACEMENT. IN NO EVENT WILL RCA COMMUNICATIONS SYSTEMS
BE LIABLE TO THE BUYER OR ITS CUSTOMERS FOR ANY DAMAGES, INCLUDING ANY SPECIAL,
INCIDENTAL, INDIRECT OR CONSEQUENTIAL DAMAGES, OR THE LOSS OF PROFIT, REVENUE OR
DATA ARISING OUT OF THE USE OR THE INABILITY TO USE THE PRODUCT.
RCA Communications Systems endeavors to achieve the accuracy and completeness of this manual,
but is not liable for any possible omission and printing mistakes.
All the above specications and design are subject to change without prior notice.
All the reproduction and translation of this manual without authorization is prohibited.
Page 42

MR240TM VHF Marine Two-Way Radio Instruction Manual
42
In this manual, we strive to achieve accuracy and completeness, but provide no warranty of accuracy
or reliability. All the above specications and design are subject to change without notice due to
continuous development.
No part of this manual may be copied, reproduced, translated, stored in a retrieval system, distributed,
or transmitted in any form or by any means, electronic or mechanical, for any purpose without the
expressed, written permission from RCA Communications Systems.
The end-user of any two-way radio is solely responsible for obtaining any license or other
authorizations required by the Federal Communications Commission (FCC). For further information
visit www.fcc.gov or call 1-888-CALL-FCC (1-888-225-5322).
Page 43

Copyright © 2015 RCA Communications Systems
43
MR240TM VHF Marine Two-Way Radio Instruction Manual
RF EXPOSURE COMPLIANCE AND CONTROL
GUIDELINES AND OPERATING INSTRUCTIONS
To control your exposure and ensure compliance with the occupational/controlled environment
exposure limits always adhere to the following procedures.
Guidelines:
Do not remove the RF Exposure Label from the device.
User awareness instructions should accompany device when transferred to other users.
Do not use this device if the operational requirements described herein are not met.
Operating Instructions:
Transmit no more than the rated duty factor of 50% of the time. To transmit (talk), push the PushTo-Talk (PTT) button. To receive calls, release the PTT button.
Transmitting 50% of the time, or less, is important because this radio generates measurable RF
energy exposure only when transmitting (in terms of measuring for standards compliance). Hold
the radio in a vertical position in front of face with the microphone (and the other parts of the
radio, including the antenna) at least one inch (2.5 cm) away from the nose. Keeping the radio at
the proper distance is important because RF exposures decrease with distance from the antenna.
Antenna should be kept away from eyes.
Page 44

MR240TM VHF Marine Two-Way Radio Instruction Manual
44
When worn on the body, always place the radio in a approved clip, holder, holster, case, or body
harness for this product.
Using approved body-worn accessories is important because the use of or other manufacturer’s nonapproved accessories may result in exposure levels which exceed the FCC’s occupational/controlled
environment RF exposure limits.
If you are not using a body-worn accessory and are not using the radio in the intended use position
in front of the face, then ensure the antenna and the radio are kept at least one inch (2.5 cm) from
the body when transmitting. Keeping the radio at the proper distance is important because RF
exposure decreases when increasing distance from the antenna.
Use only RCA Communications Systems approved supplied or replacement antennas, batteries, and
accessories. Use of third party antennas, batteries, and accessories may exceed the FCC RF exposure
guidelines.
For Sales, Warranty and Customer Support please contact:
Discount Two-Way Radio Corporation – North American Distributor
555 W Victoria Street
Rancho Dominguez, CA 90220
Phone: 310-224-5100 / Fax: 310-224-5101
www.discounttwo-wayradio.com
Copyright © 2015 RCA Communications Systems
 Loading...