

RCA Lyra X2400 Quick Start Manual
X2400
Portable Multimedia Player
Quick Start Guide
IMPORTADOR
Comercializadora Thomson de México, S.A. de C.V.
Álvaro Obregón No. 151. Piso 13.
Col. Roma. Delegación Cuauhtémoc
C.P. 06700. México, D.F.
Telefono: 52-55-11-020360
RFC: CTM-980723-KS5
Thomson Inc.
P.O. Box 1976
Indianapolis, IN 46206-1976
© 2006 Thomson Inc.
Trademark(s) ® Registered
Marca(s) ® Registrada(s)
Marque(s) ® Deposée(s)
www.rca.com
Printed In China / Impreso en China
56298950
X2400 QSG (28_08_06) 28/8/06 10:41 AM Page 1
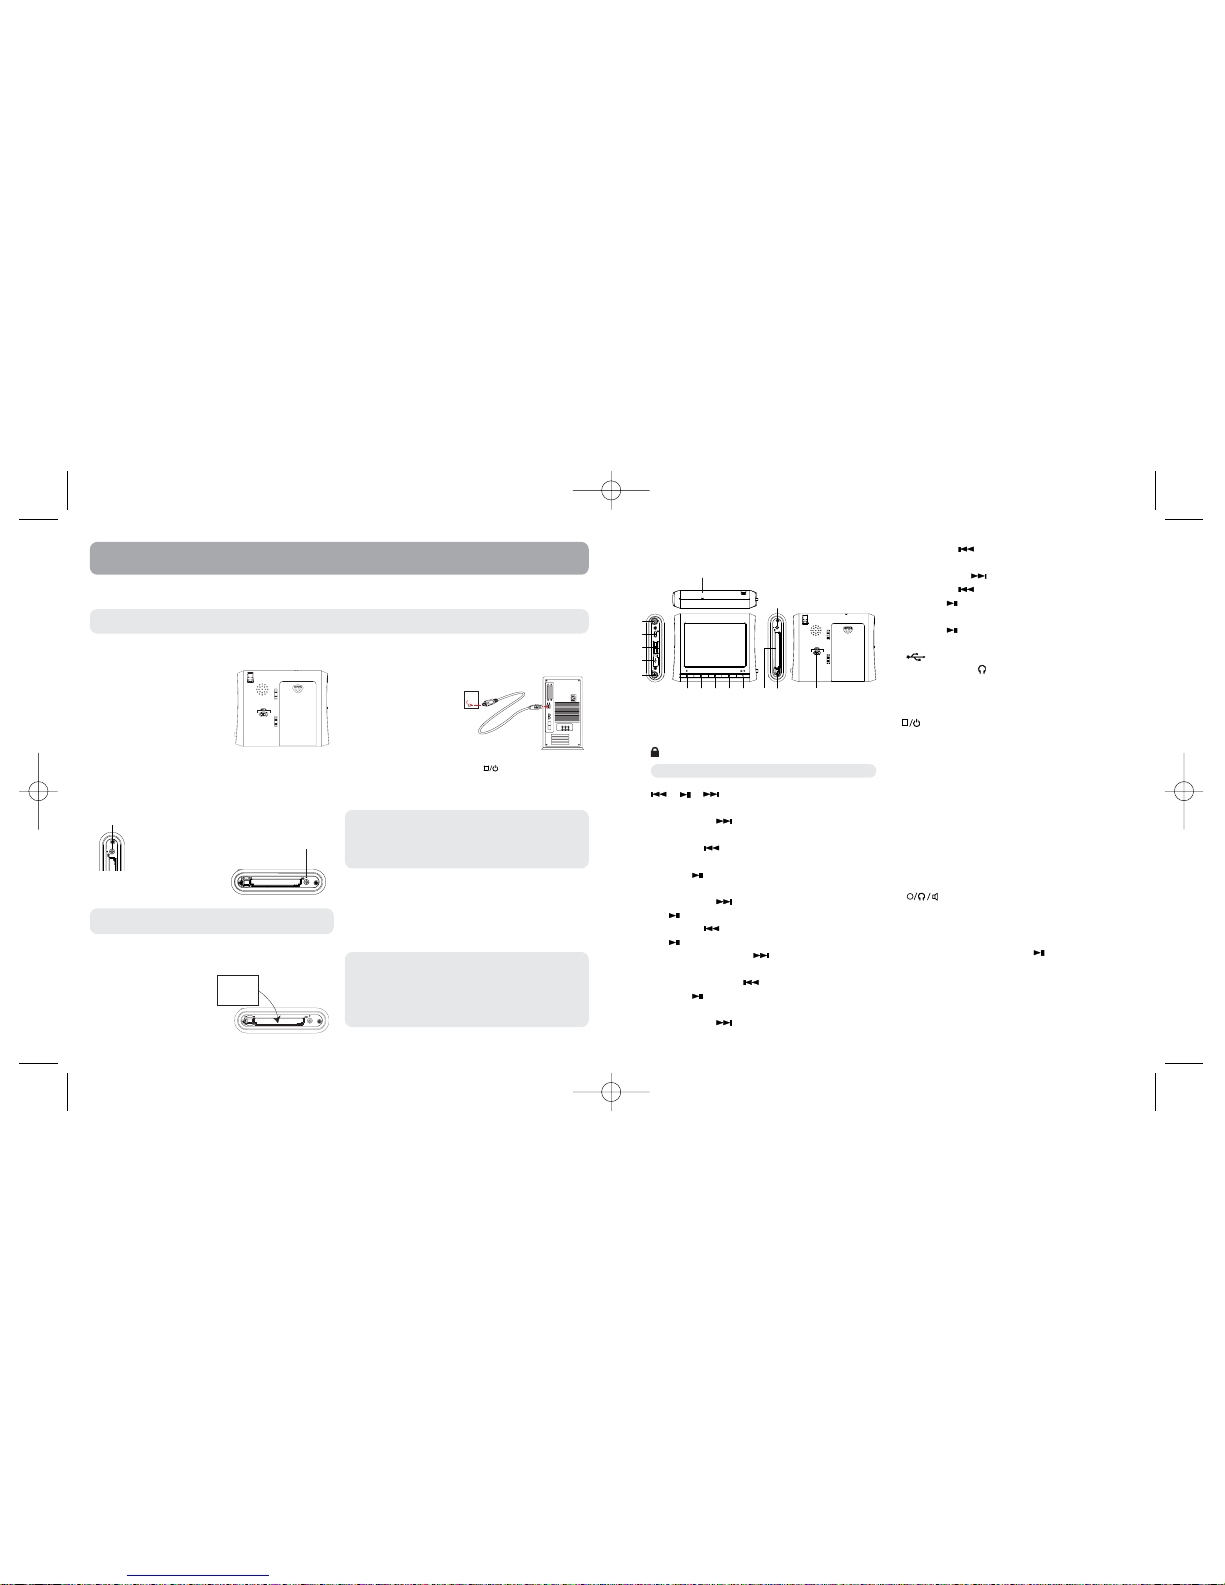
Inserting Battery into the Unit
1. Remove the battery door by
applying thumb pressure.
Slide the battery door in the
direction of the arrow, then
lift the battery door out and
off the cabinet.
2. Insert the Lithium polymer
rechargeable battery.
Insure that the contacts of the battery line up with the
contacts of the player.
3. Close the door of the battery compartment.
Charging the Unit
Connect the power cord of the AC/DC adapter
to DC for battery charging.
The charging light indicator
changes from red to
blue when the battery
is fully charged.
Inserting Compact Flash Card
First ensure the unit power is
OFF. Then insert a Compact
Flash Card into the card slot
on the right side of the unit
as illustrated.
Connecting the Unit to the Computer
Ensure the Compact Flash
Card has been inserted
and the LOCK switch is in
the UNLOCK position.
Insert the smaller end of
the USB cable to the USB
jack on the unit. Connect
the larger end of the cable
to the USB port on the
computer tightly. Press and hold to switch on the
unit. The message “USB CONNECTED” will appear on the
unit display. Then the unit will appear as a Removable
Disk drive on the computer.
Transferring Files via Windows Explorer
(Drag and Drop)
From Windows Explorer, highlight all the files or folders
you want to transfer to the unit and drag them to the
drive letter that is associated with the unit.
General Controls
1. Mic - Records voice in voice recording mode.
2. AV IN (Black)- Input audio and video signal when the
audio and video cable is connected.
3. - Slide to lock or unlock the keys of the unit.
4. / /
• In video playback mode:
• slide down to toggle the playback speed
among 1x, 2x, 4x, 8x and 20x
• slide up to toggle the reverse playback
speed among 1x, 2x, 4x, 8x and 20x.
•press to start and pause playback.
• In audio playback mode:
• slide down to go to the next track and press
to start playback.
• slide up to go to previous track and press
to start playback.
• slide down and hold to fast forward the
track.
• slide up and hold to review the track.
•press to start and pause playback.
• When browsing photos:
• slide down to go to the next file
• slide up to go to the previous file.
• In menu mode:
• slide down to go to the next option
• slide up to go to the previous option
• press to select option.
• In AV recording mode:
• press to switch between speaker and
headphone output.
5. - USB connector
6. AV OUT (Green)/
• Output audio and video signal when the audio
and video cable is connected.
• Insert the headphones here.
7.
• In the main menu mode, press and hold to turn
on/off the unit.
• In playback mode, press to stop playback.
• In menu mode, press to return to previous menu.
8. -
• Press to decrease volume.
• Press to go to the previous page during file
browsing.
9. M - Press to enter menu setting mode
10. +
• Press to increase volume.
• Press to go to the next page during file browsing.
11.
• Press to record in audio/video recording mode.
• In playback mode, press to switch between speaker
and headphone output.
• In AV recording mode, press to switch between
speaker and headphone output.
12. DC - Connect the power cord for battery charging.
13. Push to eject compact flash card.
14. Compact flash card slot
15. LCD ON/AV OUT - Slide to select between LCD output
or AV output.
This Lyra Quick Start Guide just gives you the basics. For more information, go to the User Manual stored in the
installer CD or www.rca.com for FAQ information and User Manual updates.
Quick Start Guide
Compact Flash Card
(not supplied)
The Player
(provided)
The Player
Note: It might take several seconds for the
unit to be detected, especially in Windows 2000/XP. Click
Refresh in the drop down menu or press F5 on the
keyboard when in My Computer or Explorer to make sure
the unit has been detected.
Attention: Do not disconnect the USB cable or remove the
Compact Flash card during files transfer. Doing so may
corrupt system files or the files being transferred.
Note: Since this player acts as a Mass Storage Class device,
it can transfer files that are not compatible with the unit
from one computer to another.
Note: The User Manual is in the Adobe Acrobat PDF format. If you do not have the Adobe Acrobat Reader, download it for
free at www.adobe.com.
ON
OFF
/ AV OUT
Charging light indicator
12
DC
1
2
3
4
5
6
7891011
12
13 15
14
ON
OFF
/ AV OUT
MIC
AV INAV OUT
Note: To use AC/DC adapter, the existing insert must be
removed and replaced with the 2-prong insert provided.
Note: Unlock the device before operating or connecting USB.
X2400 QSG (28_08_06) 28/8/06 10:41 AM Page 2
 Loading...