

Page 1

Lyra Jukebox
User’s Guide
Changing Entertainment. Again.
3rd Review • 9/4/2001
LyraIB.00.Cover 9/4/01, 5:07 PM1
RD2800
Page 2
Important Information
WARNING
To reduce the risk
of fire or electric
shock, do not
CAUTION
RISK OF ELECTRIC
SHOCK DO NOT OPEN
expose this
product or AC
charger to rain or
moisture.
This symbol indicates
"dangerous voltage"
inside the product that
presents a risk of
electric shock or
personal injury.
To reduce risk of injury, charge only rechargeable batteries recommended by the manufacturer for
this product. Other types of batteries may burst causing damage and personal injury.
FCC Regulations state that unauthorized changes or modifications to this equipment may void the
user’s authority to operate it.
FEDERAL COMMUNICATIONS COMMISSION INFORMATION
This device complies with Part 15 of the FCC Rules. Operation is subject to the following two conditions: (1) This
device may not cause harmful interference, and (2) This device must accept any interference received, including
interference that may cause undesired operation.
Note: This equipment has been tested and found to comply with the limits for a Class B digital device, pursuant to
part 15 of the FCC rules. These limits are designed to provide reasonable protection against harmful interference in a
residential installation. This equipment generates, uses and can radiate radio frequency energy and, if not installed
and used in accordance with the instructions, may cause harmful interference to radio communications. However,
there is no guarantee that interference will not occur in a particular installation. If this equipment does cause harmful
interference to radio or television reception, which can be determined by turning the equipment off or on, the user is
encouraged to try to correct the interference by one or more of the following measures:
– Reorient or relocate the receiving antenna.
– Increase the separation between the equipment and the receiver.
– Connect the equipment into an outlet on a circuit different from that to which the receiver is connected.
– Consult the dealer or an experienced Radio/TV technician for help.
This Class B digital apparatus complies with Canadian ICES-003.
SERVICE
This product should be serviced only by those specially trained in appropriate servicing techniques. For instructions
on how to obtain service, refer to the warranty in this guide.
Product Registration
Please fill out the product registration card and return it immediately. Returning this card
allows us to contact you if needed.
Product Information
Keep your sales receipt for proof of purchase to obtain warranty parts and service and attach
it here. Record the serial number and model numbers — both numbers are located on the
product.
Model No. _____________________________ Serial No. ––––––––––––––––––––––––––––––––
To reduce the risk of electric
shock, do not remove cover (or
back). No user serviceable parts
inside. Refer servicing to qualified
service personnel.
This symbol
indicates
important
instructions
accompanying
the product.
Purchase Date _________________________ Place of purchase ________________________
i
LyraIB.00.Cover 9/4/01, 5:07 PM2
Page 3

Table of Contents
Chapter 1: Getting Started
Things to consider before you get started... .............................................. 4
Computer System Requirements ..................................................... 4
Warning ............................................................................................ 4
Caution .............................................................................................. 4
Caution While Driving ...................................................................... 4
Back up your data............................................................................. 4
What you want to know & where to go .................................................... 5
Unpack the box and check your parts ........................................................ 6
Overview of buttons and the display ......................................................... 7
Basic Operation........................................................................................... 10
Playback operation ......................................................................... 11
Operation: Step-by-Step Examples ........................................................... 12
Sort by Artist ................................................................................... 13
Sort by Album ................................................................................. 14
Sort by Title ..................................................................................... 15
Sort by Genre .................................................................................. 16
Sort by User Playlists ....................................................................... 18
Sort by Audio Files .......................................................................... 19
Sort by All Files ............................................................................... 20
LCD Screen During Playback ...................................................................... 21
Setup Information – the details................................................................. 22
Step 1: Install software in your computer ..................................... 22
Step 2: Launch the MusicMatch software ..................................... 25
Set up the Recorder Settings .................................................. 26
Save CD tracks to play on your PC or in your Lyra Jukebox.. 28
Download music from the Internet........................................ 29
Organizing Your Music ........................................................... 29
Creating Personalized Playlists. .............................................. 30
Step 3: Transfer files to your Lyra Jukebox ................................... 31
LyraIB.00.TOC 9/4/01, 5:13 PM1
1
Page 4

Table of Contents
Chapter 2: Lyra Jukebox Menus and Features
Using the Play Modes................................................................................. 34
How to access the play modes ....................................................... 35
Repeat A-B .................................................................................................. 35
Adjusting DSP Settings .............................................................................. 36
Personalizing DSP Output (GRAPHIC EQ menu item) .................. 37
Setting LCD Preferences (SYSTEM SETTINGS menu) ................................ 38
Playing Your Lyra Jukebox in your car stereo .......................................... 40
Playing Your Lyra Jukebox on your stereo system .................................. 41
Chapter 3: Additional Information
Tips and Troubleshooting .......................................................................... 44
FAQ (Frequently Asked Questions) ........................................................... 45
Specifications .............................................................................................. 45
Limited Warranty........................................................................................ 48
Index ............................................................................................................ 51
2
LyraIB.00.TOC 9/4/01, 5:13 PM2
Page 5
Chapter 1
Getting Started
Chapter Overview:
• Things to consider before you get started
• What’s where — what you want to know vs. where to go
• Parts checklist
• Overview of Lyra Jukebox buttons
• Basic operation (how to play music on your Lyra Jukebox)
• Setup details
• How to use MusicMatch to transfer files
to your Lyra Jukebox
Changing Entertainment. Again.
Illustrations contained within this publication are for representation only and subject to change.
LyraIB.01 9/4/01, 5:37 PM3
3
Page 6

Getting Started
Things to consider before you get
started...
Computer System Requirements
• Pentium 233MHz or higher (Pentium II 300 MHz or higher
recommended)
®
• Windows
• Internet Explorer 4.0 or higher
• Internet access
• 4 MB free hard disk space for the software plus 1 MB for every
minute of CD quality music you store on your hard drive.
• 32MB RAM (64 MB recommended)
• CD-ROM drive capable of digital audio extraction
• USB port
• Installed sound card
• 16-bit color video card
Warning
Use of this product is for your personal use only. Unauthorized
recording or duplication of copyrighted material may infringe upon the
rights of third parties and may be contrary to copyright laws.
98SE, Me, 2000, or XP
Caution
Exposure to direct sunlight or extreme heat (such as inside a parked
car) may cause damage or malfunction.
Caution While Driving
Use of headphones while operating an automobile or moving vehicle
is not recommended and is unlawful in some states and areas. Be
careful and attentive on the road. Stop operation of the unit if you find
it disruptive or distracting while driving.
Back up your data
As with any device that has a hard drive, you must back up the drive.
RCA and Thomson multimedia are not responsible for lost data.
4 Chapter 1
LyraIB.01 9/4/01, 5:37 PM4
Page 7
Getting Started
What you want to know Go to page ...
Parts checklist —
everything that was in the Lyra box
6
1
2
3
????
Buttons —
where they are and what they do
Operation — the details
If the information on the printed QuickStart
guide wasn’t enough, this section gives you a
little more detail about the basics of sorting
and playing music on your Lyra Jukebox.
Setup information — Step-by-Step
instructions
The Lyra QuickStart Guide (the printed foldout
that came with your Lyra Jukebox) stepped
you through the basics of installing software
and downloading files.
If you need more detail, you’re in the right
place — go to page 22 for step-by-step
instructions.
Answers...
to questions and solutions to problems
— FAQ and Troubleshooting
7
10
22
Chapter 3 (p. 43)
Chapter 1 5
LyraIB.01 9/4/01, 5:37 PM5
Page 8
Getting Started
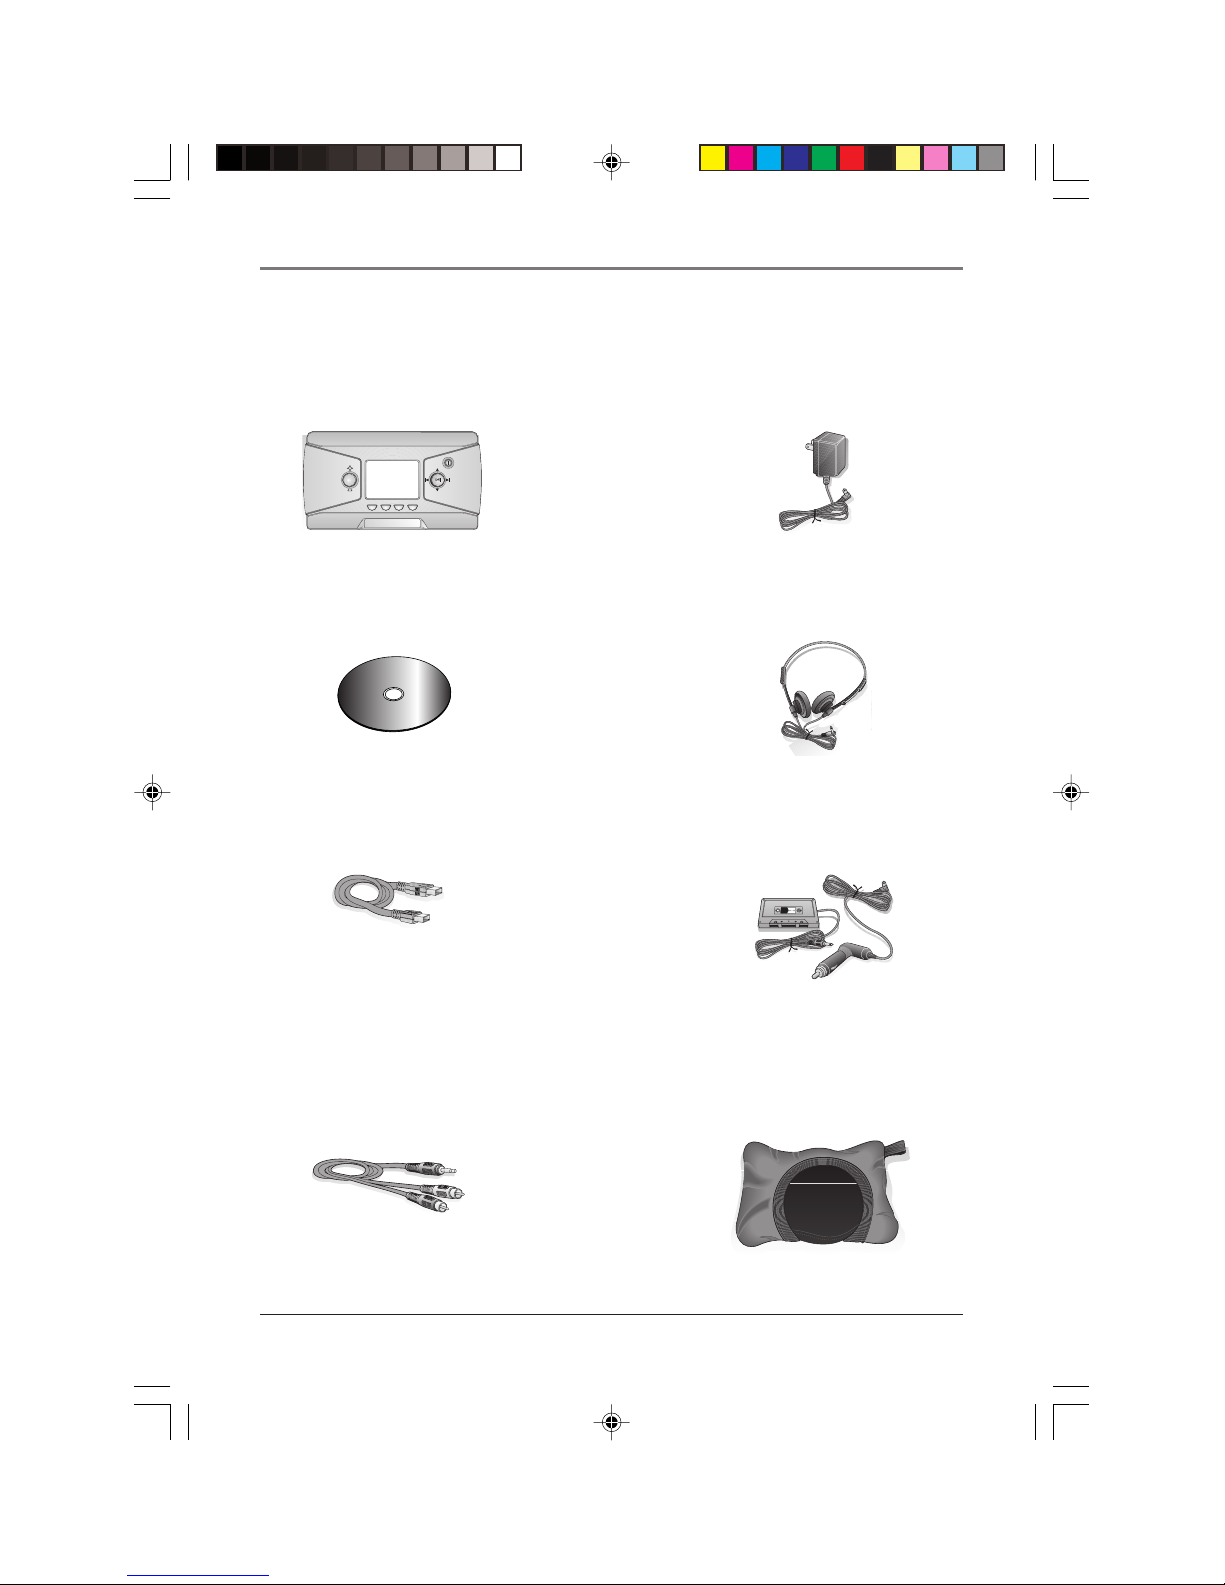
Unpack the box and check your parts
Your Lyra Jukebox came with everything you need to make music portable — all of the
items shown below should have been packed in the box with your Lyra Jukebox.
v
s
a
mode
select
v
e
v
stop
Lyra Jukebox model
number RD 2800
m
e
e
n
g
t
a
S
n
o
a
f
t
M
w
c
i
s
u
M
a
r
e
Music Management CD
contains the Lyra Jukebox
Applications & MusicMatch
Jukebox software
Mini USB cable
Part number: 5-4140
Plug the small end into your Lyra
Jukebox (next to the Headphones
jack), and plug the other end into
your computer’s USB port. Go to
page 24 for connection details.
AC/DC adapter charger
part number: 5-4130
Headphones
part number: 5-4139
Car adapter kit
Part number: 5-4097
Go to page 40 for instructions.
Line Out cable — used to
connect your Lyra Jukebox to
your audio system.
For details, go to page 41.
6 Chapter 1
LyraIB.01 9/4/01, 5:37 PM6
Carrying case
Part number: 5-4141
Page 9
Getting Started
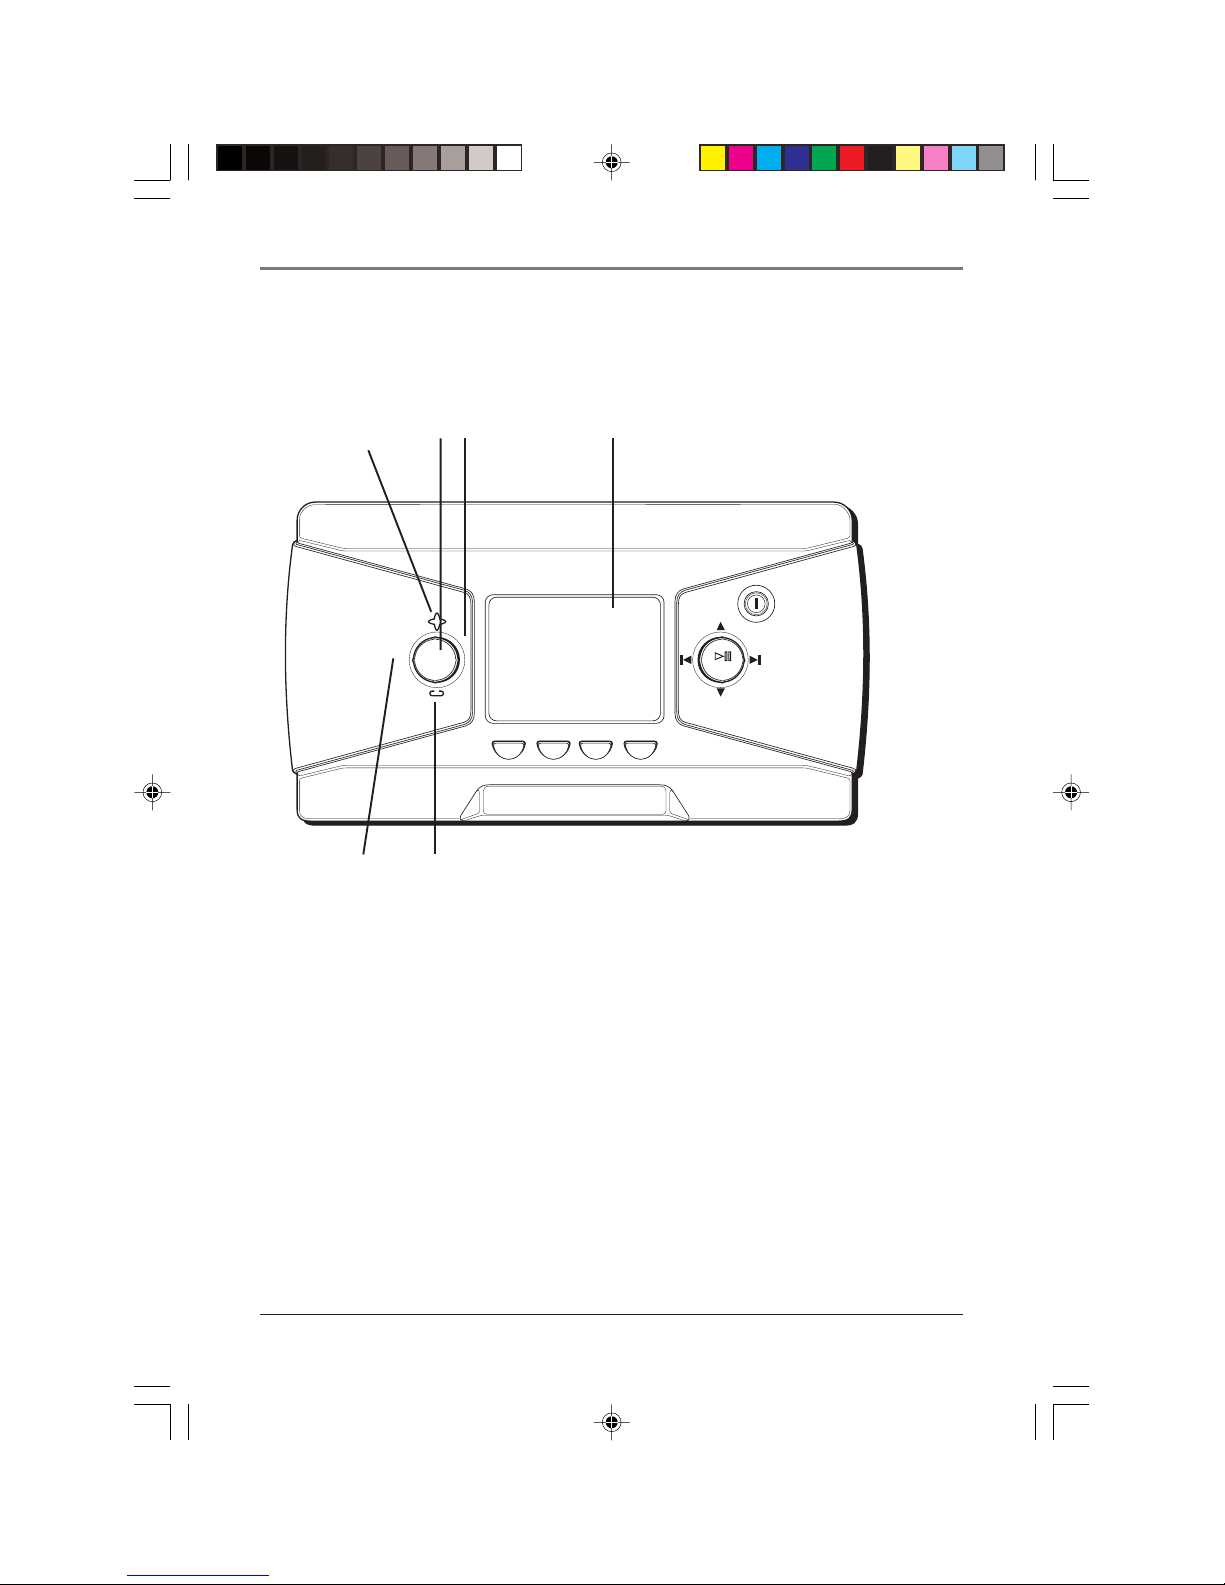
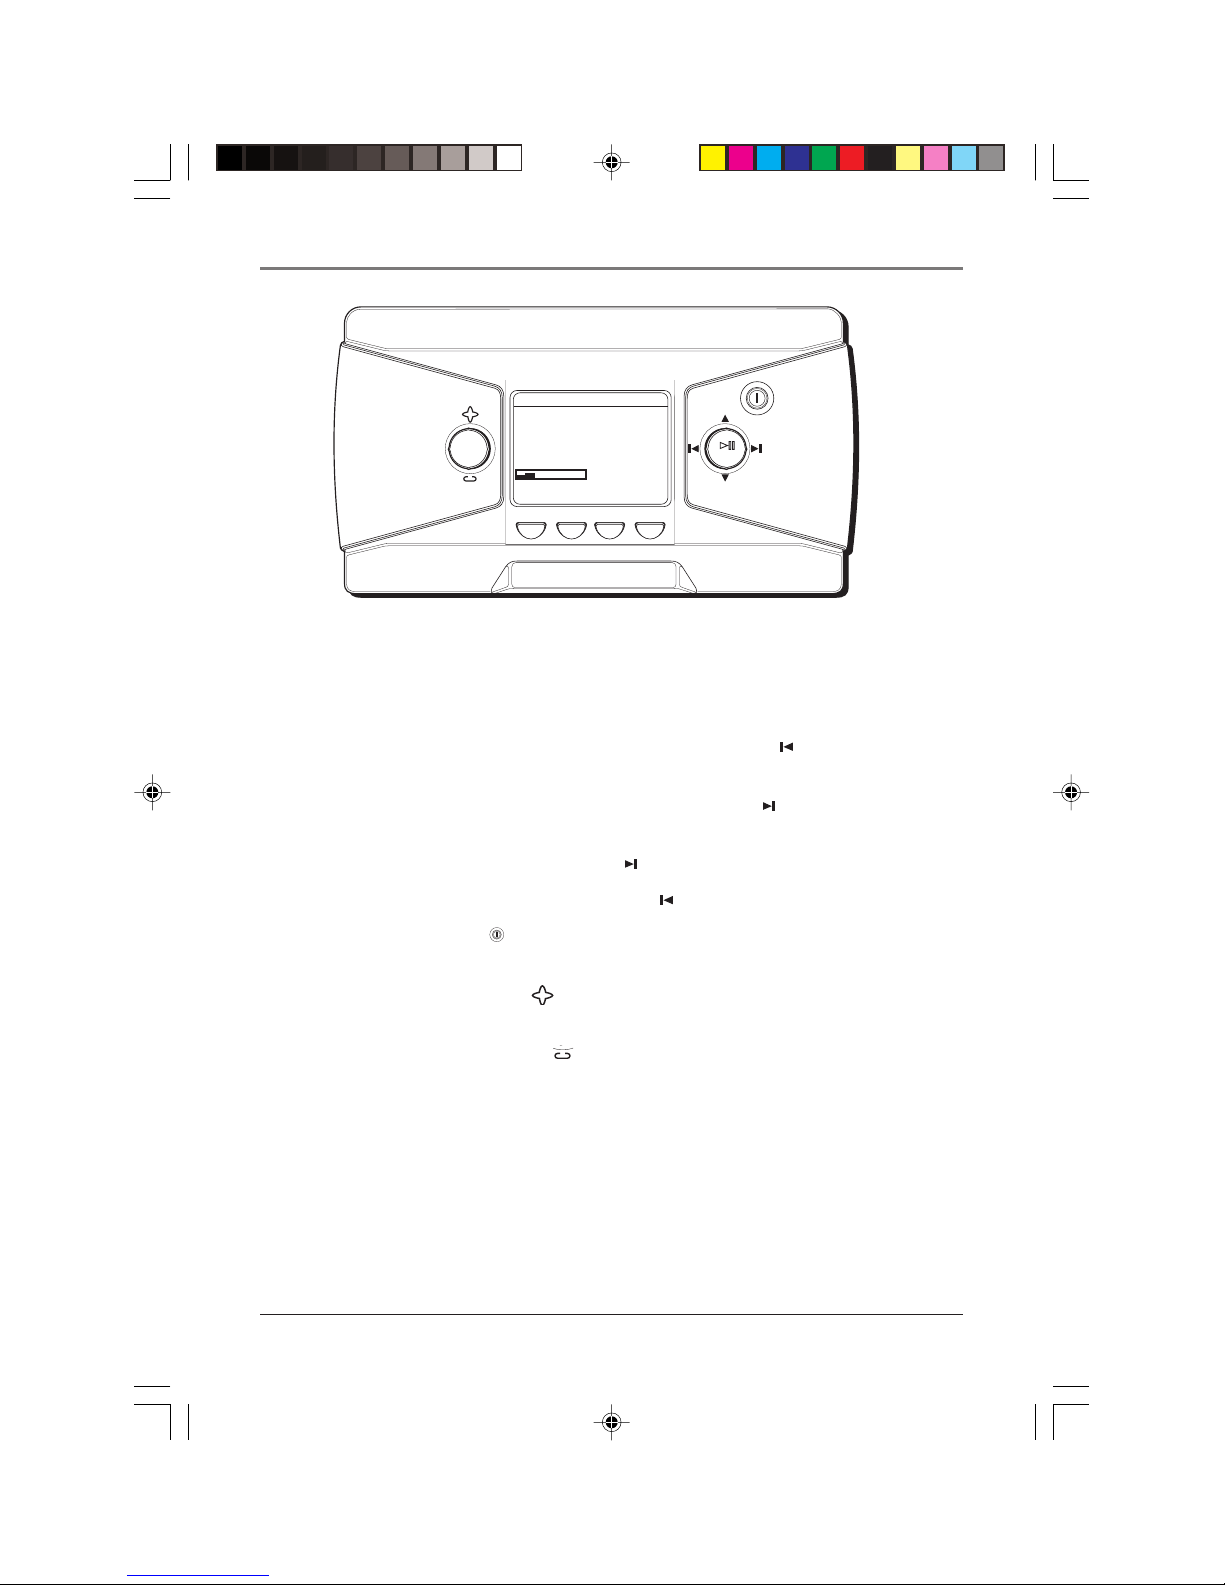
Overview of buttons and the display
The following pages explain what each button does — some of the buttons have more
than one function depending upon whether you’re playing music or not.
24
1
3
v
m
select
o
d
e
v
save
stop
select
65
1 Volume up – Increases the volume level.
2 SELECT– When using the Lyra Jukebox menu, selects a highlighted item. When
you’re creating a User Playlist and you’ve highlighted a title, SELECT tags a song to
be included in a User Playlist.
3 MODE – Accesses the mode menu where you can choose the following playback
modes: NORMAL, REPEAT, REPEAT 1, REPEAT ALL, SHUFFLE, and REPEAT ALL
SHUFFLE. For details about playback modes, go to page 34.
4 LCD (Liquid Crystal Display) – This is where the Lyra’s user interface appears (go
to page 21 for an explanation of the items that appear on the LCD during playback).
5 SAVE – Saves a user playlist that consists of the songs you’ve tagged. You can create
a new playlist or add songs to an existing User Playlist
6 Volume down – Decreases the volume level.
continued on next page
Chapter 1 7
LyraIB.01 9/4/01, 5:37 PM7
Page 10
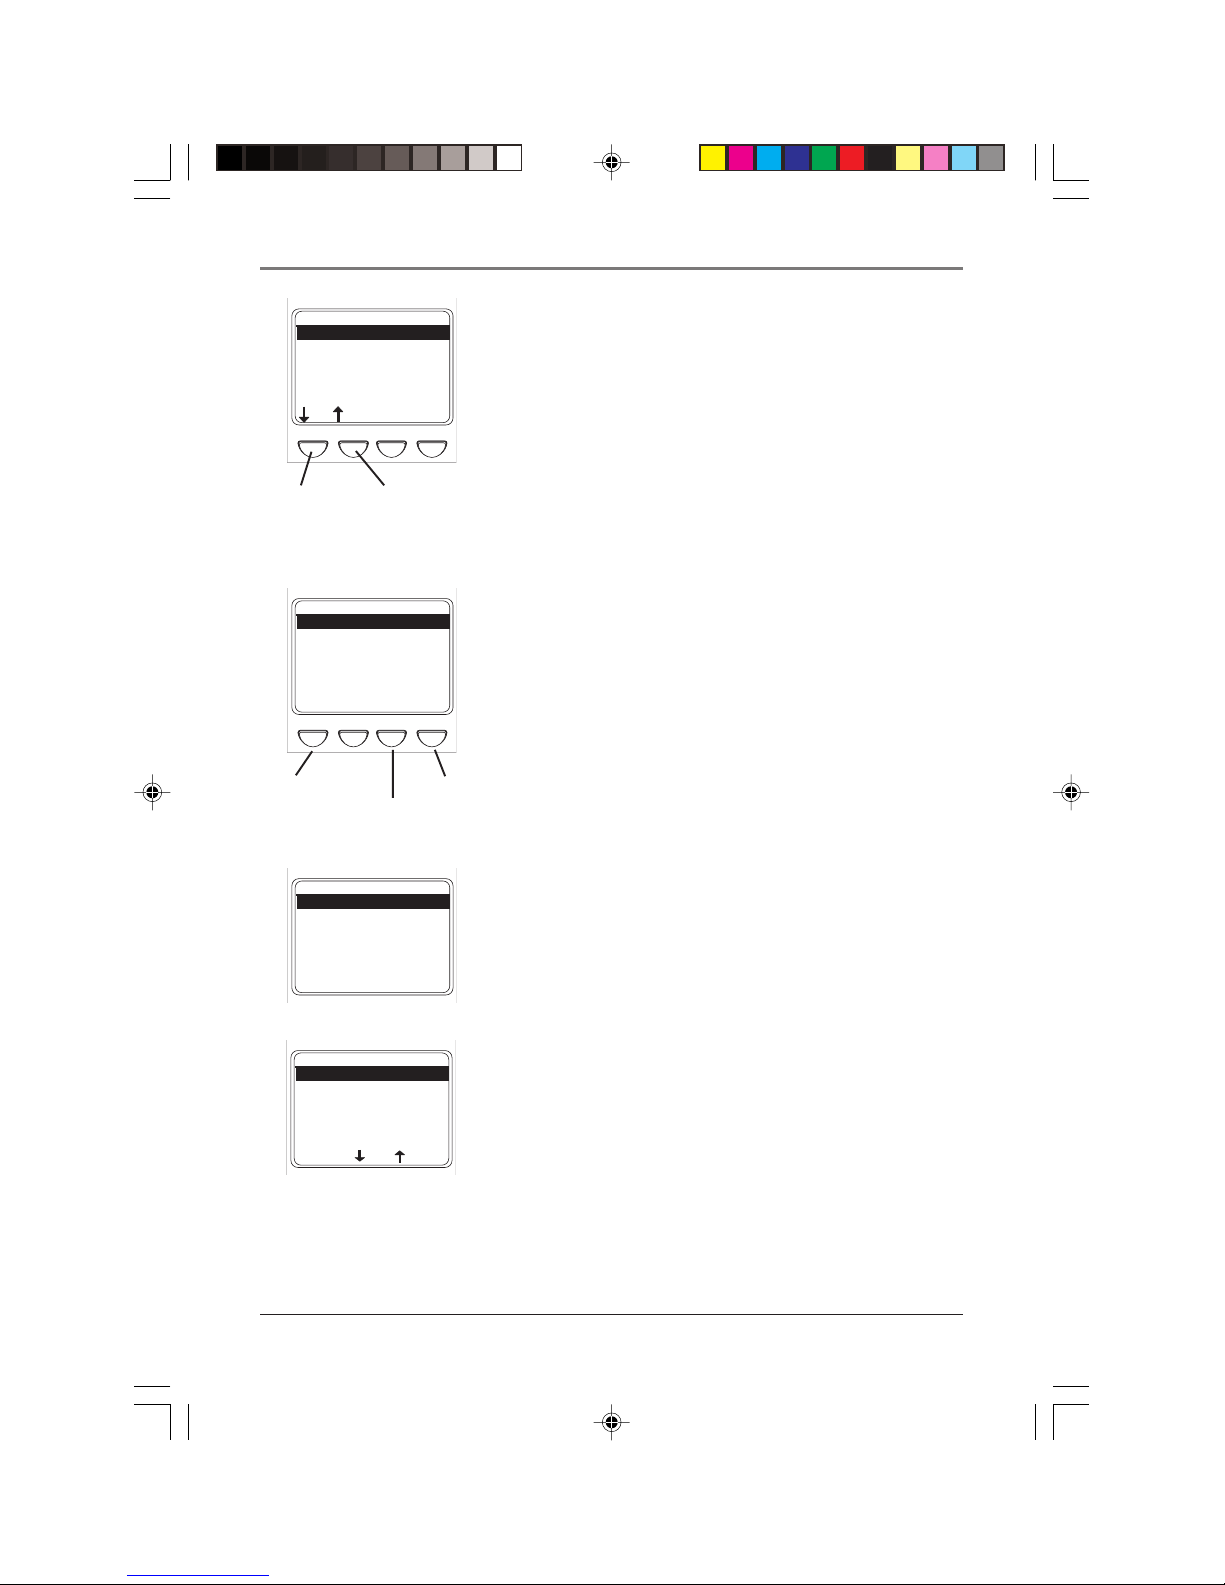
Getting Started
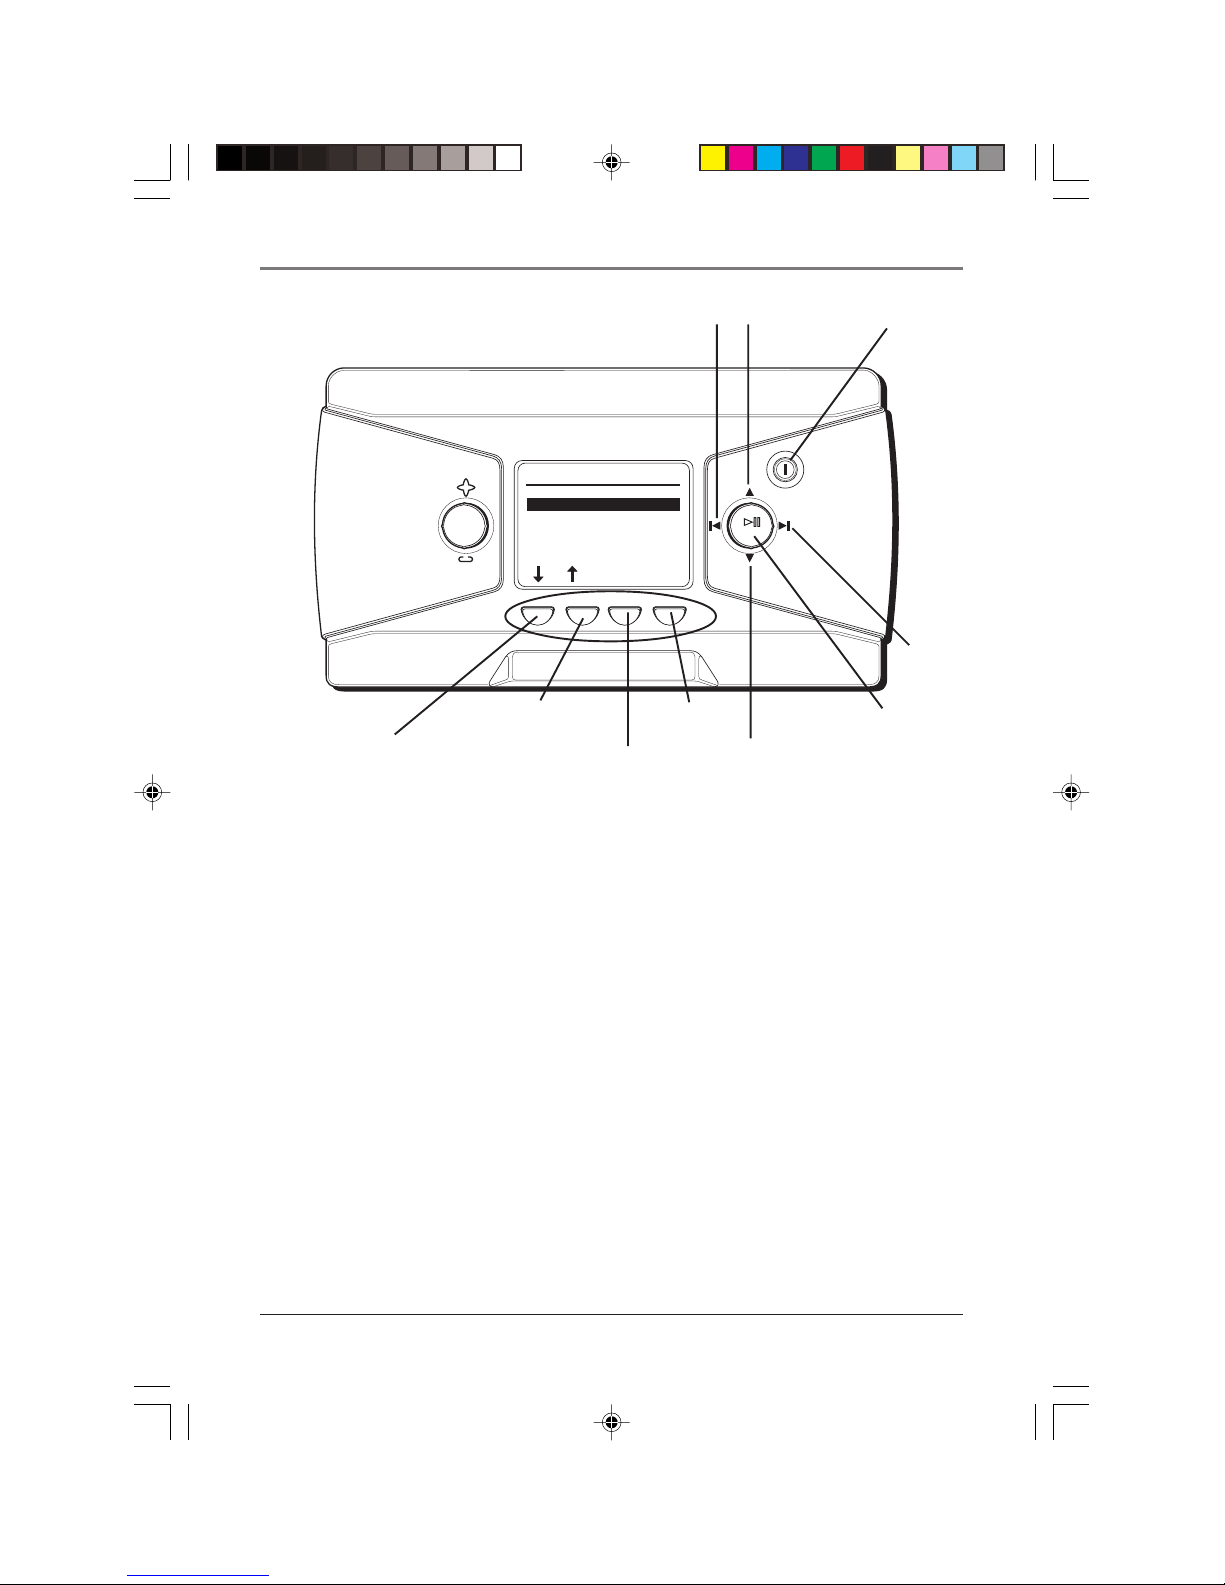
78
v
m
select
o
d
e
v
save
SORT BY
Artist
Album
Title
Genre
User Playlists
Audio Files
HELP
stop
select
MORE
9
10
11
soft key 1
soft key 2
soft key 4
soft key 3
12
7 Left arrow button – When you’re playing music, press and release to skip back to
the previous song (to scan backwards in the song that’s playing, press and hold).
When you’re using the Lyra Jukebox menu, moves highlight left.
8 Up arrow button – When using the Lyra Jukebox menu, moves the highlight up.
9 Stop/power – Turns on your Lyra Jukebox. To turn off the Lyra Jukebox, press and
hold the stop/power button. When you’re playing music, stops playback.
10 Right arrow button – When you’re playing music, press and release to skip forward
to the next song (to scan forwards in the current song, press and hold). When you’re
using the Lyra Jukebox menu, moves highlight right.
11 PLAY/PAUSE – Press to play. During playback, press to pause music.
12 Down arrow button – When using the Lyra Jukebox menu, moves the highlight
down.
Soft keys – These buttons provide quick access to the menu items that appear at the
bottom of the screen (the LCD). You’ll notice that the items on the screen change based
on the features you’re using — these are called adaptive navigation keys.
In the illustration above, press soft key 1 to move down (Title would be highlighted);
press soft key 2 to move up (Artist would be highlighted); soft key 3 (HELP) takes you to
the Lyra Jukebox’s on-screen help information; soft key 4 (MORE) takes you to additional
menu items.
8 Chapter 1
LyraIB.01 9/4/01, 5:37 PM8
Page 11
Getting Started
POWER
CHARGE
power charge
DC IN
dc in
RESET
reset
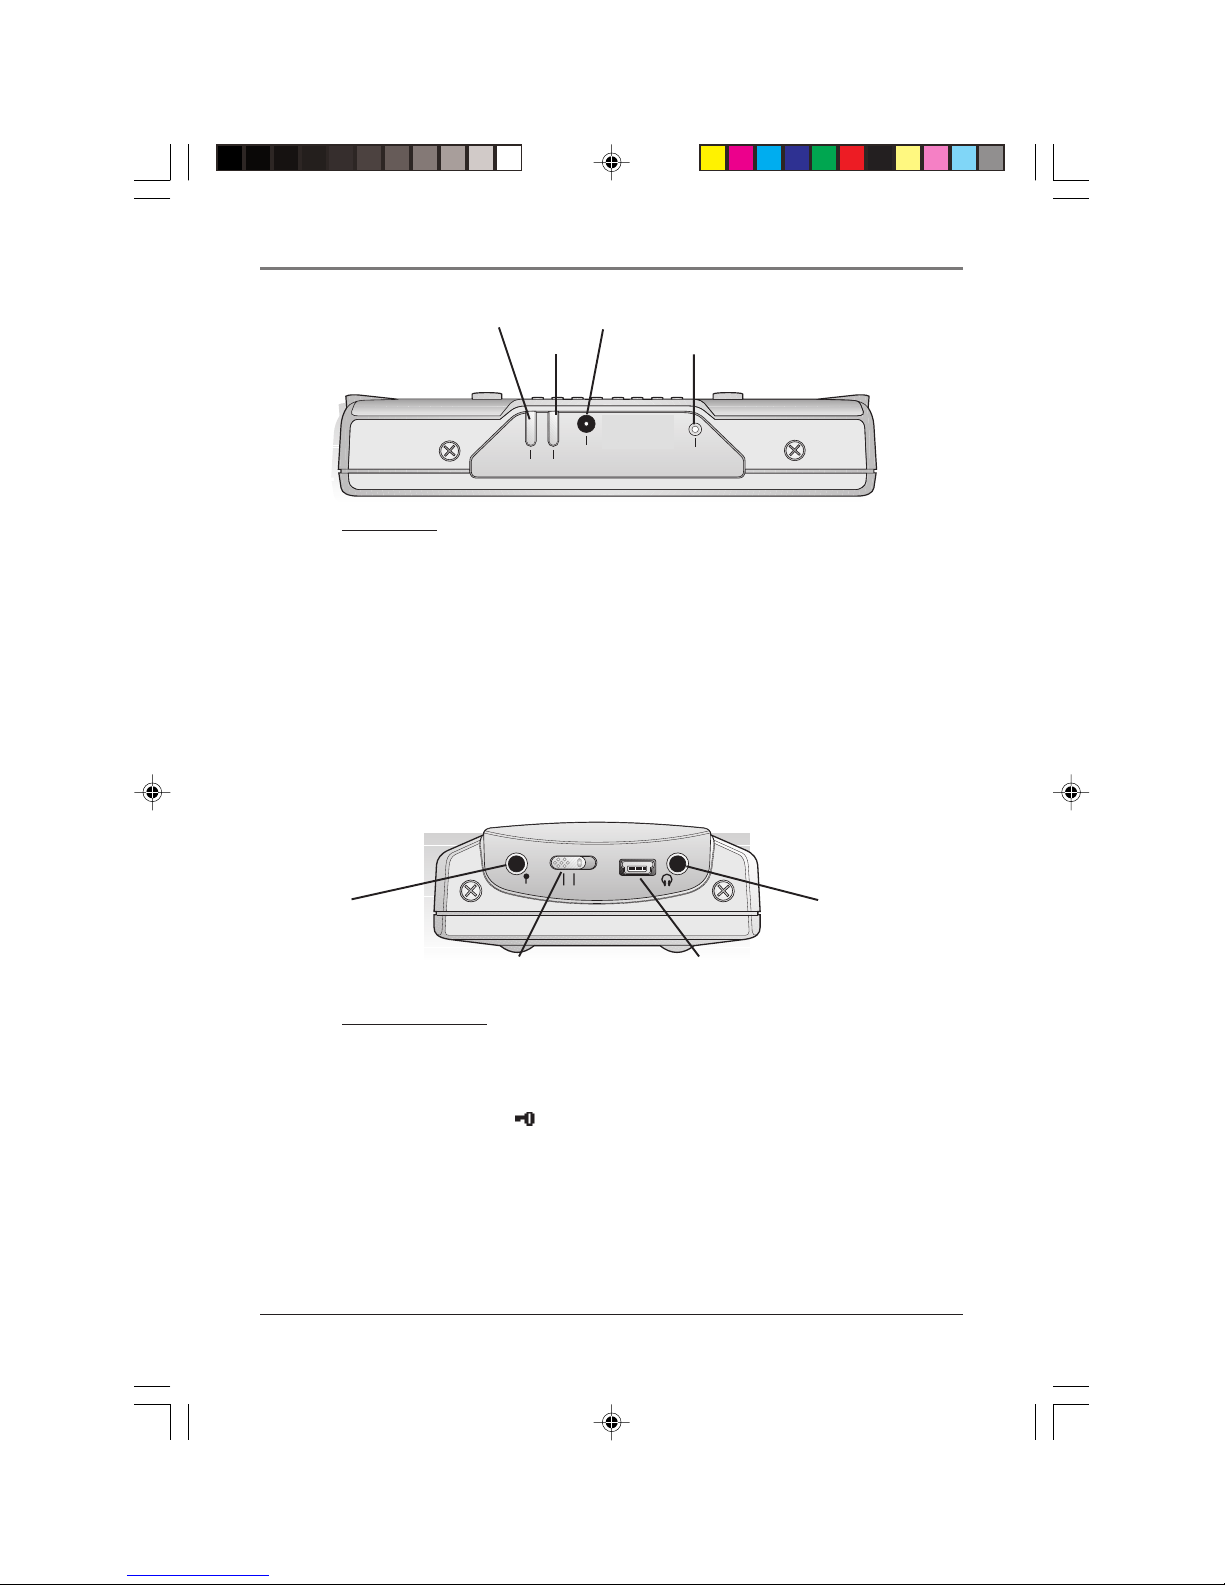
Back view
POWER – Lights when the Lyra Jukebox is on (receiving power).
CHARGE – Lights when the battery is charging.
DC IN – Plug in the AC power adapter here. When you plug in the
AC adapter, the battery inside of the Lyra Jukebox automatically starts
charging.
RESET – Press this button to reset all of the settings to the factory
defaults and clear the memory.
line out
off / lock
LINE OUT
Headphones
jack
Lock button
USB port
Right side view
LINE OUT – Attach the line out cable here when you’re connecting
the Lyra Jukebox to an audio system.
OFF/LOCK switch – To make the buttons inactive, slide the switch to
the lock position (the key icon appears in the display to remind
you that you’ve locked the buttons). Slide the switch to the OFF
position for normal operation (button lock off).
USB port – Attach the small end (Type B) of the mini-USB cable here.
Attach the large end (Type A) to your computer.
Headphones jack – Insert the headphones cable here.
Chapter 1 9
LyraIB.01 9/4/01, 5:37 PM9
Page 12
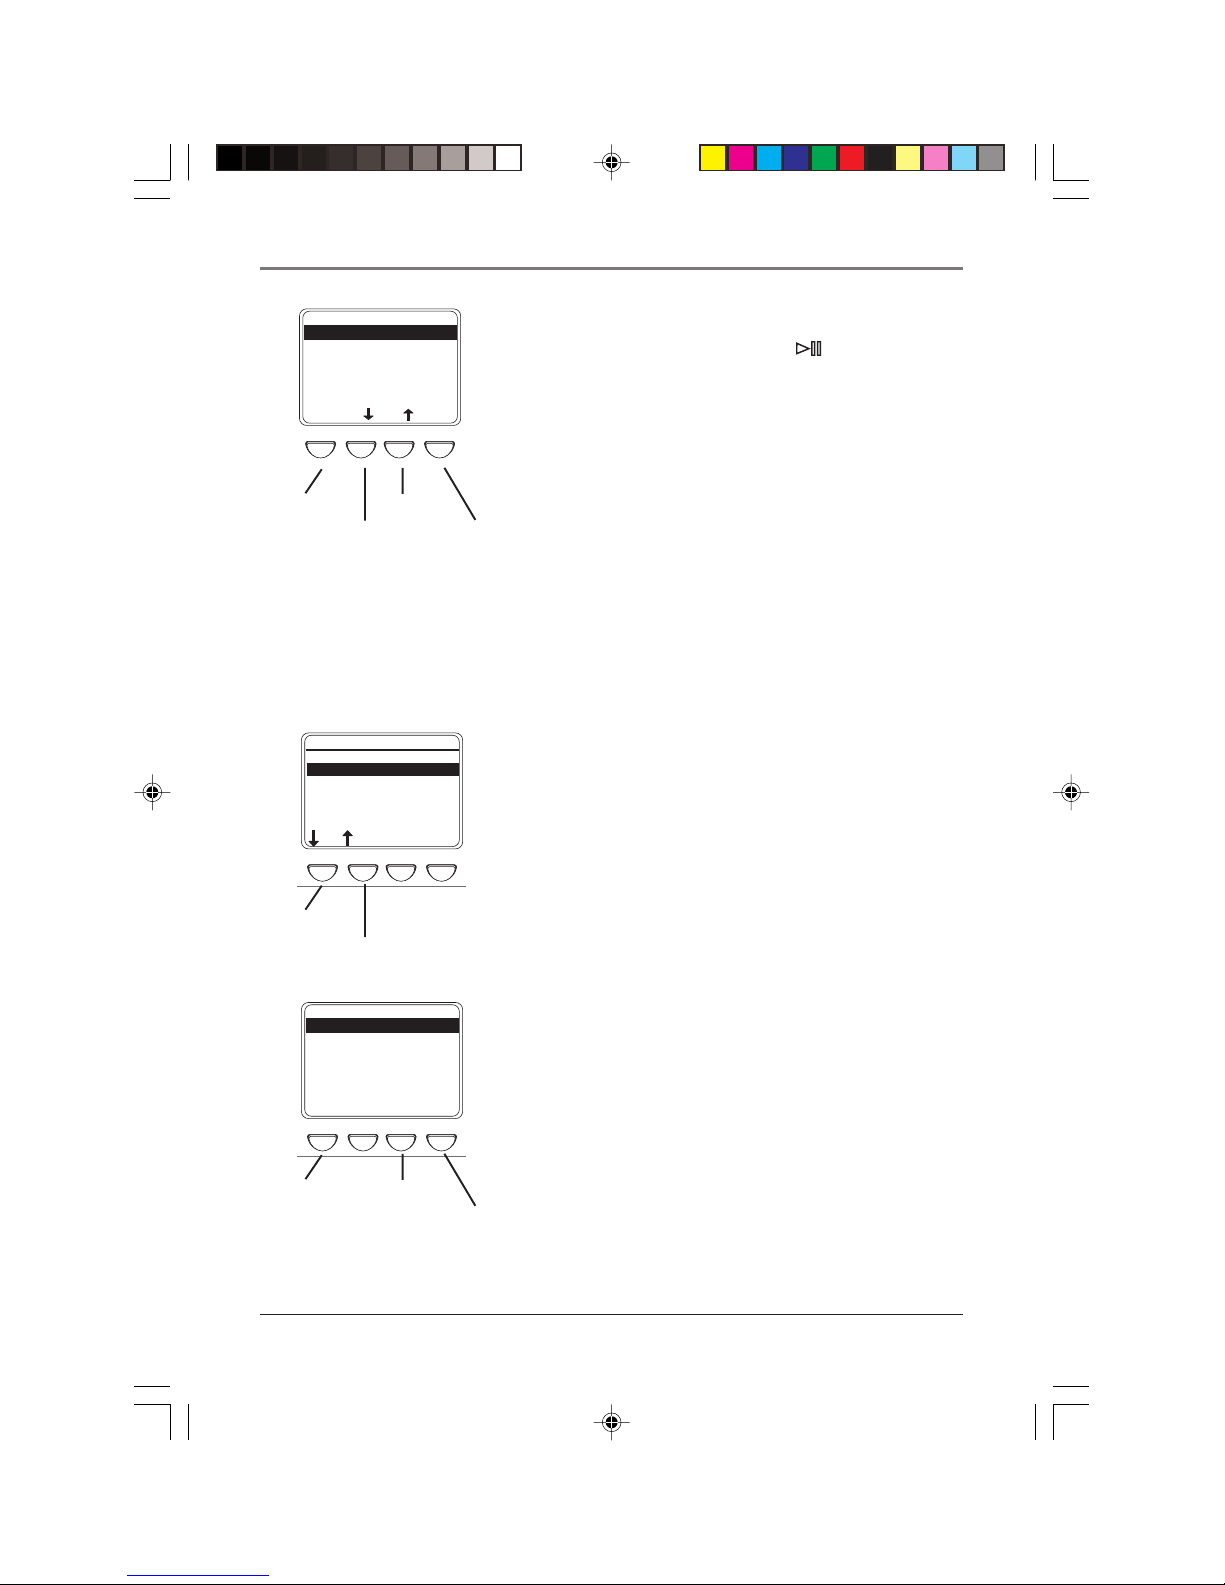
Getting Started
Basic Operation
The information in this section presumes you’ve successfully transferred files to your Lyra
Jukebox, and you’re ready to play some music.
If you need specific set-up information (downloading music, transferring files, installing
software), go to page 22.
If you want more detailed information about the Lyra Jukebox’s features, go to page 34.
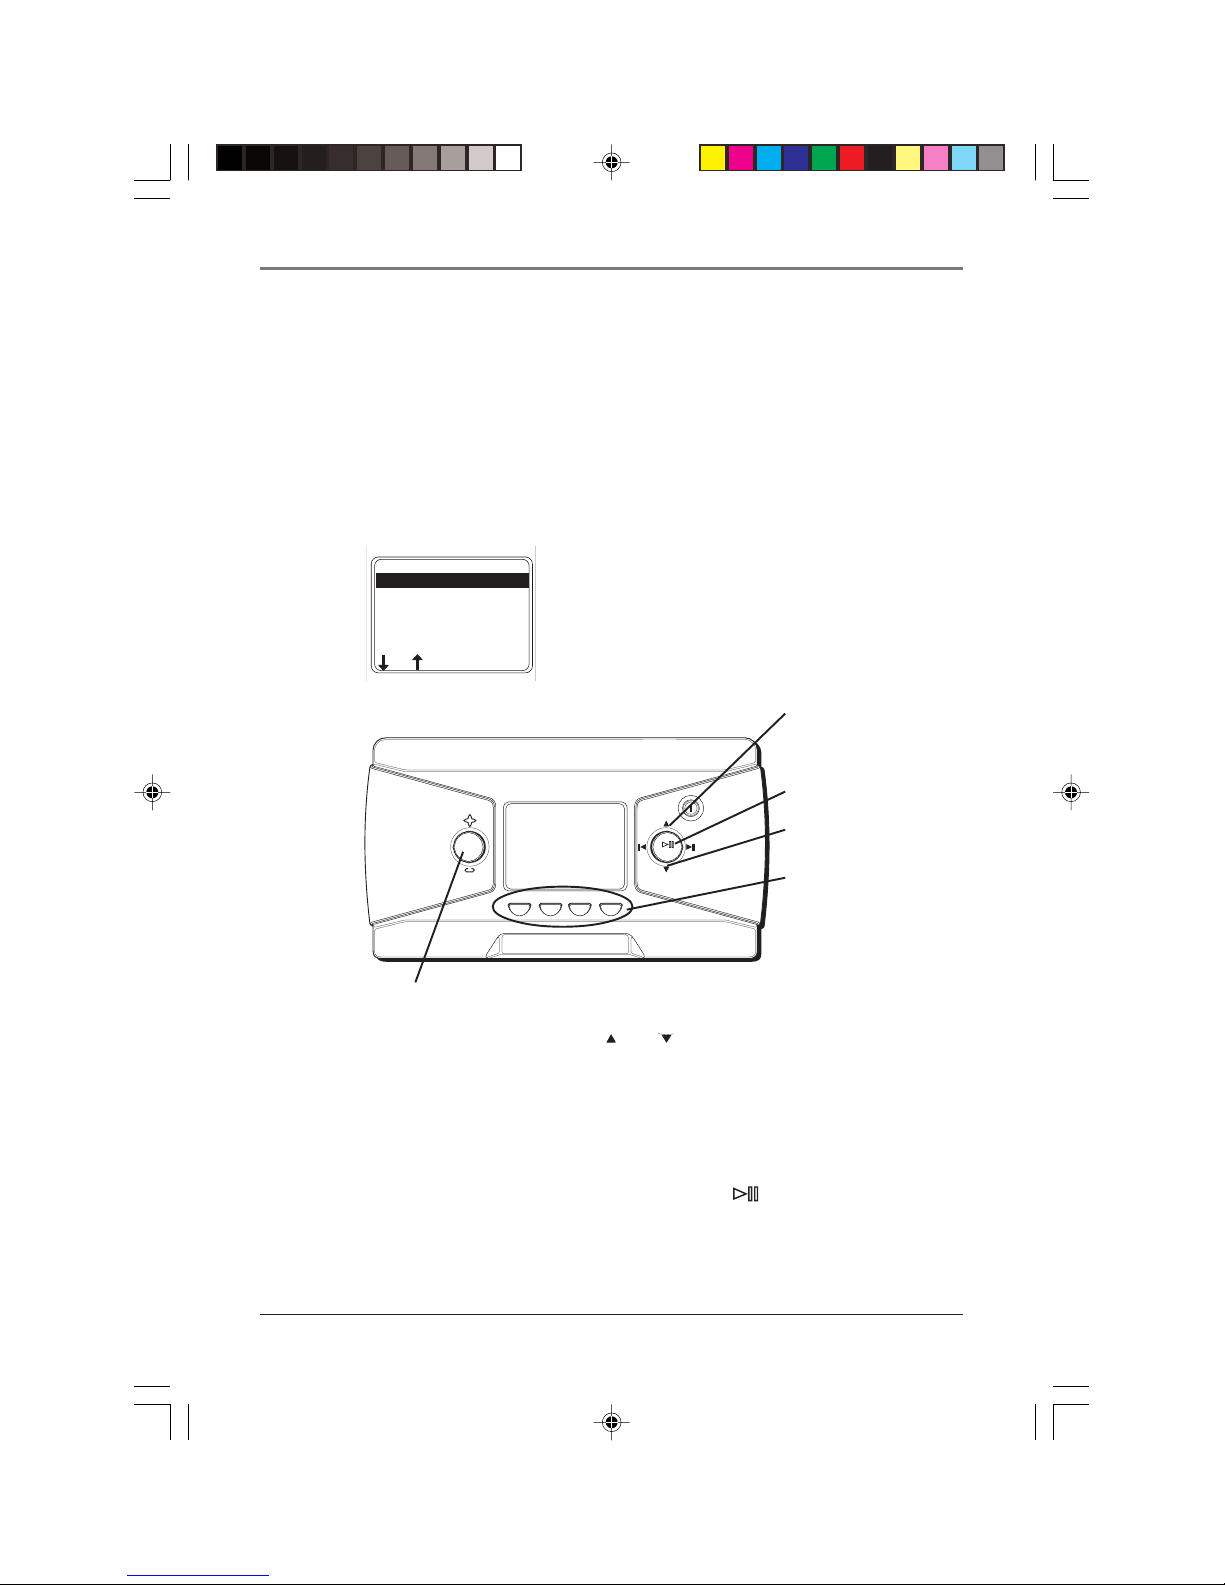
Understanding how to navigate through the Lyra Jukebox’s menu system, combined with
how the buttons operate, will give you the information you need for basic functionality.
SORT BY
Artist
Album
Title
Genre
User Playlists
Audio Files
HELP
The SORT BY menu is the main menu. The
navigation scheme is the same no matter how many
menus you access:
MORE
UP arrow
PLAY/PAUSE
v
m
o
save
select
d
e
v
stop
select
DOWN arrow
These are
called soft keys
SELECT
1. Press the arrow up and down buttons ( and ) to highlight different items
on the screen.
2. To see the submenu, press the SELECT button.
3. Use the soft keys if necessary to get to the song title you want to hear.
Note: If you need more explanation, go to page 11.
4. Once the song you want to play is on the screen, press (play/pause) to play the
track. Press again to pause playback.
10 Chapter 1
LyraIB.01 9/4/01, 5:37 PM10
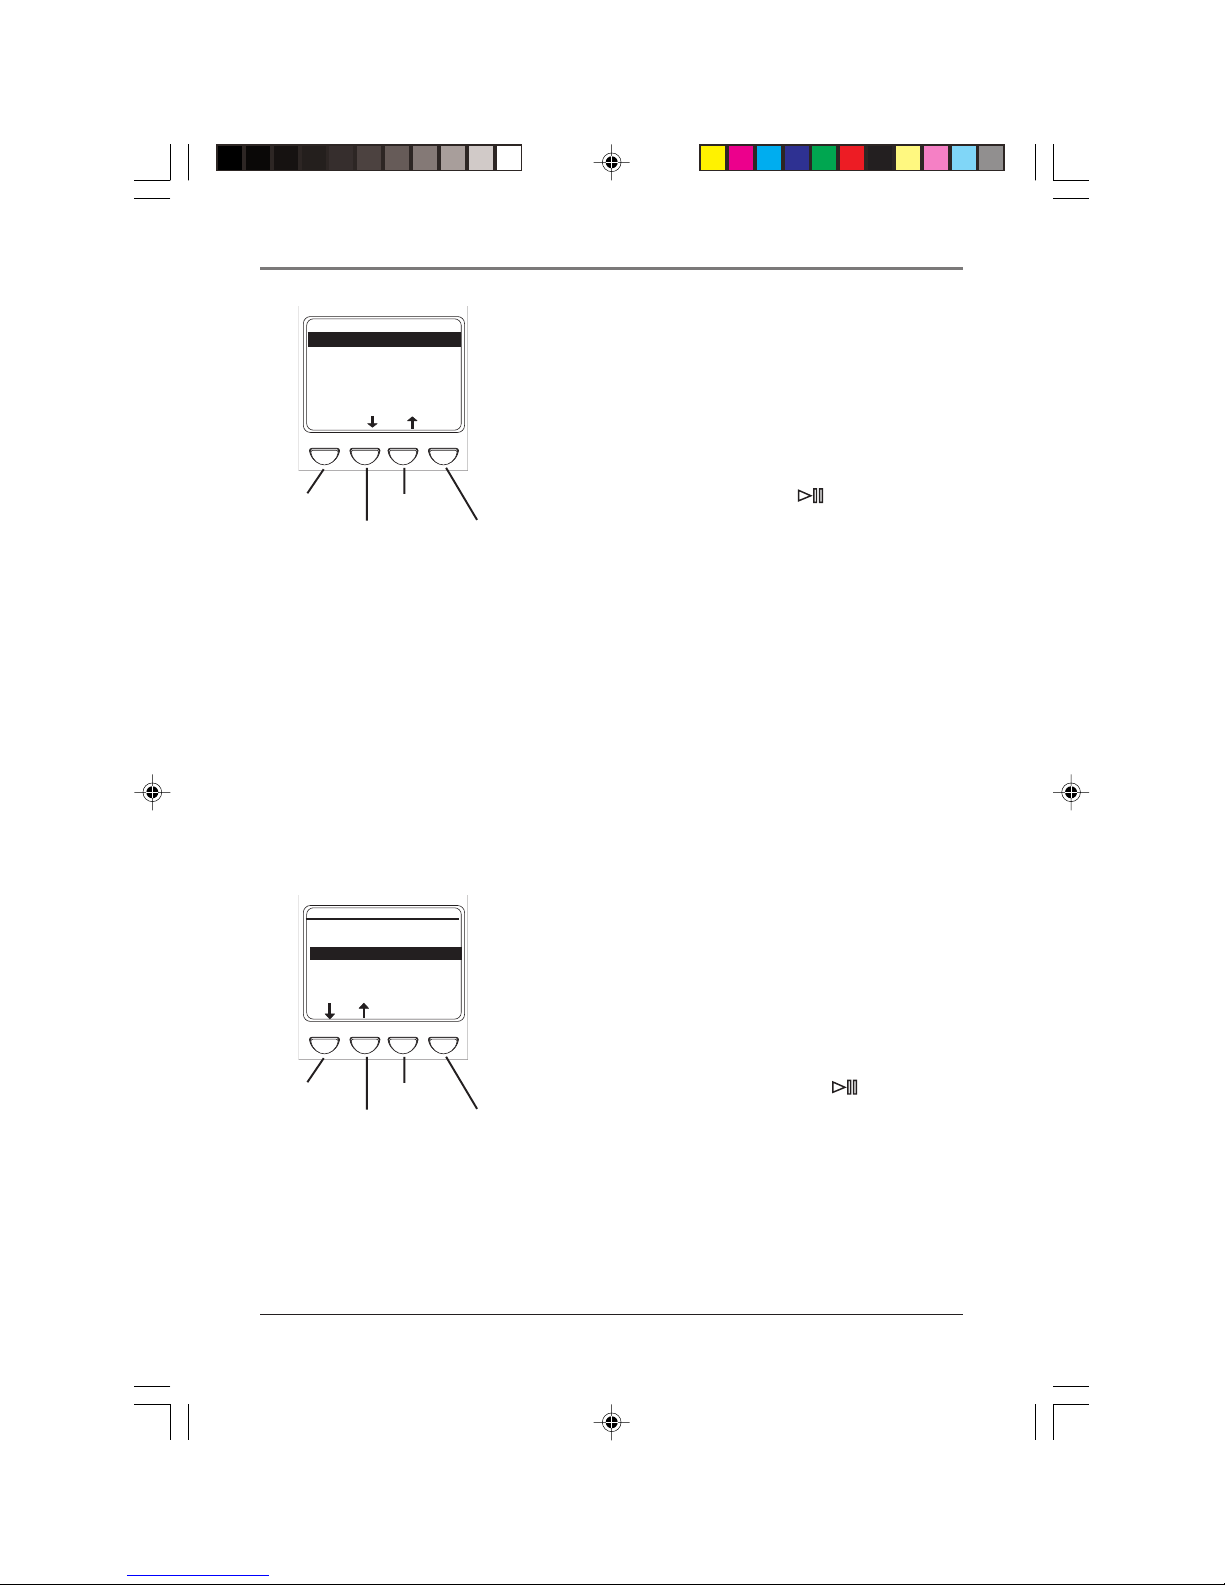
Page 13
Getting Started
USER PLAYLIST 1
My favorite song
v
Simon and Caroline
m
The Two of Us
save
o
select
Classic Rock 00:00:42
d
e
TRK=03 0001/0012 128K
v
BACK DSP INFO A-B
FLAT
Playback operation
• To scan backwards in the track that’s playing, press and hold (the left arrow
button).
stop
select
• To scan forwards in the track that’s playing, press and hold
(the right arrow
button).
• To go to the next track, press and release
• To go to the previous track, press and release
• To stop playback, press
(the STOP button). The display returns to the previous
(the right arrow button).
(the left arrow button).
menu location.
v
• To turn up the volume, press
(the volume up button), The volume display bar
updates to show the increase in volume level.
v
• To turn down the volume, press
(the volume down button). The volume display
bar updates to show the decrease in volume level.
• To change the play mode setting, press the MODE button (for details about the
different play modes go to page 34)
Chapter 1 11
LyraIB.01 9/4/01, 5:37 PM11
Page 14

Getting Started
Operation: Step-by-Step Examples
The following example illustrates (with more detail than the previous information) how
you find the song you want to play.
1. These instructions presume you’ve already done the following:
• Installed the MusicMatch Jukebox software and the Lyra MP3/Personal Jukebox
profiler application (go to page 22 for detailed instructions).
• Transferred music from your computer to the Lyra Jukebox (page 31 has detailed
instructions) and profiled the contents of the Lyra Jukebox through MusicMatch
Jukebox or the Profiler software.
Note: the music you’re transferring could be from a CD you put in your computer,
the internet, or music you already had loaded onto your computer.
2. If you haven’t already unplugged the Lyra Jukebox from your computer, disconnect
the USB cable from the Lyra Jukebox.
Note: If you’re running Windows 2000, XP, or Me, you must stop the device before
unplugging it. Click the icon (the Unplug or Eject hardware icon) from the system
tray and select the USB Mass Storage device for the drive letter associated with the
Lyra Jukebox, and click STOP. See the Windows Help for details about the Unplug or
Eject Hardware topic.
3. If you’ve fully charged the battery (the Lyra Jukebox needs to be plugged in for
about 4 hours before the battery is fully charged), disconnect the AC adapter from
the outlet and then from your Lyra Jukebox.
Note: If the battery isn’t fully charged, keep the Lyra Jukebox plugged in while you
listen to the music you’ve transferred from your computer.
4. Connect the headphones to your Lyra Jukebox (plug the connector into the phones
jack on the side of the Lyra).
5. If your Lyra Jukebox isn’t already on, turn it on (press and hold the
two seconds). The RCA Lyra logo flashes on the screen and then the main menu
appears — the SORT BY menu.
12 Chapter 1
LyraIB.01 9/4/01, 5:37 PM12
button for
Page 15
Getting Started
SORT BY
Artist
Album
Title
Genre
User Playlists
Audio Files
HELP
Soft key 1 Soft key 2
ARTIST
Aerosmith
America
Animals
Anna Belle
Another Group
Assume the worst
MAIN
Soft key 1
Soft key 3
ANNA BELLE
Absolutely
Another Record
Can’t Make It
Happy Music II
Hello Money
Honey
MAIN
I-Q
I-Q
MORE
R-Z
Soft key 4
R-Z
Sort by Artist
1. Highlight Artist (press the up or down arrow
button).
Note: You can also highlight items on the
screen by pressing the soft keys when they
have arrows above them. In this example soft
key 1 would move the highlight down and
soft key 2 would move the highlight up.
2. Press the SELECT button (the ARTIST menu
appears with the artists stored on your Lyra
Jukebox listed in alphabetical order).
• To see the list of artists whose names start
with I - Q, press soft key 3.
• To see artists from R - Z, press soft key 4.
• To return to the SORT BY menu, press soft
key 1 (labeled MAIN).
3. To see the albums for the artist highlighted,
press SELECT (the album titles for that artist
appear in alphabetical order).
ANOTHER RECORD
01 A Song for You
02 Be Yourself
08 Assume the Worst
09 Do Your Best
10 Another Song
BACK
PG
PG
Chapter 1 13
LyraIB.01 9/4/01, 5:37 PM13
INFO
4. To see the songs on the album you’ve
highlighted, press SELECT (the songs for that
album appear).
The SELECT button may be used alternately to
select and de-select titles that you want to
save in the programmable playlist.
Page 16
Getting Started
ANOTHER RECORD
01 A Song for You
02 Be Yourself
08 Assume the Worst
09 Do Your Best
10 Another Song
BACK
PG
Soft key 1
Soft key 2
User Playlists
Audio Files
PG
Soft key 3
SORT BY
Artist
Album
Title
Genre
HELP
INFO
Soft key 4
MORE
Highlight the desired song.
• To play the song, press
(the play/pause
button).
• To go to the previous menu, press soft key 1
(BACK).
• To scroll down the list 5 songs at a time,
press soft key 2 (PG down).
• To scroll up the list 5 songs at a time, press
soft key 3 (PG up).
• To get more info about the song, press soft
key 4 (INFO).
Note: The information provided in the INFO
screen depends upon the ID3 tags that have
been set up for the song.
Sort by Album
1. Highlight Album (press the up or down arrow
buttons, or the first or second soft key).
Soft key 1
Soft key 2
ALBUM
Absolutely
Another Record
Can’t Make It
Happy Music II
Hello Money
Honey
MAIN
I-Q
R-Z
2. Press SELECT (the ALBUM menu appears with
the titles of the albums stored on your Lyra
Jukebox listed in alphabetical order).
• To see the list of albums with names starting
with I - Q, press soft key 3.
• To see albums from R - Z, press soft key 4.
Soft key 1
Soft key 3
Soft key 4
• To return to the SORT BY menu, press soft
key 1 (labeled MAIN).
14 Chapter 1
LyraIB.01 9/4/01, 5:37 PM14
Page 17
Getting Started
01 A Song For You
02 Do Your Best
03 Be Yourself
04 Integrity Song
05 Freedom
BACK
Soft key 1
Soft key 2
HAPPY MUSIC II
PG
PG
Soft key 3
INFO
Soft key 4
3. To see the songs for the album highlighted,
press SELECT (the songs on that album
appear).
The SELECT button may be used alternately
to select and de-select titles that you want to
save in the programmable playlist.
4. Highlight the song you want to play.
• To play the song, press
(the play/pause
button).
• To go to the previous menu, press soft key 1
(BACK).
• To scroll down the list 5 songs at a time,
press soft key 2 (PG down).
• To scroll up the list 5 songs at a time, press
soft key 3 (PG up).
• To get more info about the song, press soft
key 4 (INFO).
Note: The information provided in the INFO
screen depends upon the ID3 tags that have
been set up for the song.
SORT BY
Artist
Album
Title
Genre
User Playlists
Audio Files
HELP
MORE
Sort by Title
1. Highlight Title (press the up or down arrow
buttons, or the first or second soft key).
2. Press SELECT (the TITLE menu appears that lists
all of the song titles in alphabetical order that
are stored on your Lyra Jukebox).
Soft key 1
Soft key 2
Soft key 3
Soft key 4
• To play the first song, press
pause button).
(the play/
• To highlight a different song on the list, press
the up or down arrow button.
• To see the titles with names that start with
I - Q, press soft key 3.
Chapter 1 15
LyraIB.01 9/4/01, 5:37 PM15
Page 18
Getting Started
ANNA BELLE
A Song For You
Anytime You Want t...
Be Yourself
Details of Today
Do Your Best
BACK
PG
Soft key 1
Soft key 2
SORT BY
Artist
User Playlists
Audio Files
Soft key 1
Soft key 2
PG
Soft key 3
Album
Title
Genre
HELP
INFO
Soft key 4
MORE
• To see the titles from R - Z, press soft key 4.
• To return to the SORT BY menu, press soft
key 1 (labeled MAIN).
• To get more info about the song, press soft
key 4 (INFO).
Note: The information provided in the INFO
screen depends upon the ID tags that have
been set up for the song.
Sort by Genre
1. Highlight Genre (press the up or down arrow
buttons, or the first or second soft key).
GENRE
Blues
Classic Rock
Country
Dance
Disco
Funk
MAIN
I-Q
R-Z
2. Press SELECT (the GENRE menu appears).
• To highlight different genres, press the up
and down arrow buttons.
• To see the list of genres starting with I - Q,
press soft key 3.
• To see the list of genres starting with R - Z,
Soft key 1
Soft key 3
Soft key 4
press soft key 4.
• To return to the SORT BY menu, press soft
key 1 (labeled MAIN).
16 Chapter 1
LyraIB.01 9/4/01, 5:38 PM16
Page 19

Getting Started
Cool Caroline’s...
Disco King Kuntz
Disco Madness Band
Disco Queen
Disco King Kuntz
Gold Disco Band
MAIN
COOL CAROLINE’s...
Disco Beat
Disco Dream
Disco Fantastic
Simon
Tired of Disco
BACK
Soft key 1
Soft key 2
DISCO
I-Q
PG
ARTST
R-Z
Soft key 4
INFO
PG
Soft key 3
Soft key 4
3. To see a list of artists for the genre you’ve
highlighted, press SELECT (a list of artists for
that genre appears). To jump to the complete
Artist listing, press soft key 4 (ARTST).
4. To see the songs for the artist that you’ve
highlighted within this genre, press SELECT (the
songs appear in alphabetical order).
The SELECT button may be used alternately to
select and de-select titles that you want to
save in the programmable playlist.
5. Highlight the song you want to play.
• To play the song, press
(the play/pause
button).
• To go to the previous menu, press soft key 1
(BACK).
• To scroll down the list 5 songs at a time,
press soft key 2 (PG down).
• To scroll up the list 5 songs at a time, press
soft key 3 (PG up).
• To get more info about the song, press soft
key 4 (INFO).
Chapter 1 17
LyraIB.01 9/4/01, 5:38 PM17
Note: The information provided in the INFO
screen depends upon the ID3 tags that have
been set up for the song.
Page 20

Getting Started
SORT BY
Artistt
Album
Title
Genre
User Playlists
Audio Files
HELP
MORE
Sort by User Playlists
1. Highlight User Playlists (press the up or down
Soft key 1
Soft key 2
Playlist1.m3u
Playlist2.m3u
Playlist3.m3u
Playlist4.m3u
Playlist5.m3u
MAIN
Soft key 1
Soft key 2
USER PLAYLISTS
DEL
PG
Soft key 3
HELP
Soft key 4
2. Press SELECT (a list of User Playlists you’ve
How to Create User Playlists
If you need information about Creating
User Playlists, go to page 30.
PLAYLIST1.M3U
All About Yout
Ego Waltz
Global Gone Mad
Losing Faith
Lucky Me Audio
PG
BACK
MOVE
DONE
3. When the individual songs of the playlist are on
• Play the song that you’ve highlighted, by
• Scroll through the songs in the playlist by
arrow buttons, or soft key 1 or soft key 2).
created and stored on your Lyra Jukebox
appears on the screen).
• To see contents of the playlist that’s
highlighted, press SELECT (skip to step 3 for
more information).
• To play the first song in the User Playlist that
is highlighted, press
(the play/pause
button).
• To go back to the SORT BY menu, press soft
key 1 (MAIN).
• To scroll down to the next 5 User Playlists,
press soft key 2 (PG down).
• To delete the playlist that’s highlighted, press
soft key 3 (DEL). A screen appears asking
you to confirm that you want to delete the
playlist.
• For on-screen help, press soft key 4 (HELP).
the screen:
pressing
(play/pause button) .
pressing the up and down arrow buttons.
Soft key 1
Soft key 3
Soft key 2
18 Chapter 1
LyraIB.01 9/4/01, 5:38 PM18
Soft key 4
To sroll a page at a time, press soft key 2 (PG
down)
Page 21

Getting Started
All About Yout
Ego Waltz
Global Gone Mad
Losing Faith
Lucky Me Audio
BACK
Soft key 1
All About Yout
Ego Waltz
Global Gone Mad
Losing Faith
Lucky Me Audio
Soft key 1
Soft key 2
PLAYLIST1.M3U
PG
MOVE
Soft key 3
Soft key 2
PLAYLIST1.M3U
MOVE
MOVEDONE
Soft key 3
DONE
Soft key 4
CANCEL
Soft key 4
• Delete a song from the playlist by DEL (delete)
— soft key 3 — (a screen appears asking you
to confirm that you want to delete this item).
• Rearrange the order of the songs in the playlist
by pressing soft key 4 (MOVE) — go to
instructions below for more information.
How to rearrange the order of the songs
1. When the individual songs of the playlist are on
the screen, use the up and down arrow buttons
to highlight a song you want move and press
soft key 4 (MOVE) – explained in previous
section.
• To move the song down one position, press
soft key 2 (MOVE down).
• To move the song up one position, press soft
key 3 (MOVE up).
Note: If you want to keep the playlist order
the same, just press soft key 4 (CANCEL) — the
previous screen appears and the original
order of this playlist is restored.
3. When you have the songs in the playlist
arranged in the order you want, press soft key 1
(DONE).
Sort by Audio Files
1. Highlight Audio Files (press the up or down arrow buttons, or the first or second soft
key).
2. Press SELECT (the AUDIO FILES menu appears). It lists all supported audio files that
are stored on your Lyra Jukebox by file name in alphabetical order.
• To play the first song, press
• To highlight a different song on the list, press the up or down arrow button.
• To see the audio files with file names that start with I - Q, press soft key 3.
• To see the audio files from R - Z, press soft key 4.
• To return to the SORT BY menu, press soft key 1 (labeled MAIN).
Chapter 1 19
LyraIB.01 9/4/01, 5:38 PM19
(the play/pause button).
continued on next page
Page 22

Getting Started
• To get more info about the song, press soft
key 4 (INFO).
Note: The information provided in the INFO
screen depends upon the ID3 tags that have
been set up for the song.
User Playlists
Soft key 1
Soft key 2
ALL FILES
Work stuff
Caroline’s song.mp3
Simon’s song.mp3
Steve’s song.mp3
my_resume.doc
Maggie’s song.mp3
MAIN
PG
Soft key 1
Soft key 2
SORT BY
Album
Title
Genre
Audio Files
All Files
HELP
PG
Soft key 3
MORE
INFO
Soft key 4
Sort by All Files
Your Lyra Jukebox can be used to store and transport
files since it has a hard drive with 10 Gigabytes of
storage space. To see all of the files that are stored
on your Lyra Jukebox:
1. Highlight All Files (press the up or down arrow
buttons, or the first or second soft key).
Note: the All Files category doesn’t appear on
initial Sort By menu (it’s below Audio Files).
2. Press SELECT (the ALL FILES menu appears).
Folders are listed first and individual files follow.
Note: The folders and files are sorted in the
order they were transferred to the Lyra
Jukebox (the folder you transferred most
recently appears last in the list and the file
you transferred most recently would be the
last file to appear after the folder names.
• To see the folders/files stored in a folder,
highlight the folder and press SELECT.
• To scroll down 5 files/folders at a time, press
soft key 2 (PG down).
• To scroll up 5 files/folders at a time, press
soft key 3 (PG up).
• To see information about the file, press soft
key 4 (INFO).
• To return to the main menu (SORT BY
menu), press soft key 1 (MAIN).
20 Chapter 1
LyraIB.01 9/4/01, 5:38 PM20
Page 23

LCD Screen During Playback
Getting Started
1
2
3
4
5
6
7
My favorite song
Simon and Caroline
The Two of Us
Classic Rock 00:00:42
0005/0012 128K
BACK DSP INFO AB
This picture illustrates what you’ll see on your Lyra
Jukebox LCD screen when you’re playing music.
PLAYLIST 1
FLAT
8
9
10
11
LCD Screen during Playback
1 Playlist name, or path of file
2 Song title or file name – based on ID3 tag information if it is available. If no ID3
tag information is available, it will be blank.
3 Artist name – based on ID3 tag information if it is available. If no ID3 tag
information is available, it will be blank.
4 Album title – based on ID3 tag information if it is available. If no ID3 tag
information is available, it will be blank.
5 Genre – based on ID3 tag information if it is available. If no ID3 tag information is
available, it will be blank.
6 Current item – Current track being played/out of total files being played (varies
depending on the playback mode setting).
7 Volume level indicator – there are 50 steps in the volume control. Press the
volume up/down buttons to change the volume.
8 Elapsed time of track or pause indicator– When you’re playing music, the
amount of time that the track has played appears; when you pause playback, the
pause icon appears.
9 Playback mode indicator
Shuffle, etc.). The icon that appears in the picture above is the Repeat Shuffle
icon (
10 Bit-rate format (Recording Quality Level) – the setting you chose in the Recorder
menu (tab) that dictates the bit-rate value that’s used when you convert (record) the
song using the MusicMatch Jukebox software. Go to page 27 for more information.
11 DSP setting (FLAT) – the DSP (Digital Signal Processing) setting (Flat, Rock, Bass,
etc,). For more information about DSP settings, go to page 36.
).
– Displays current playback mode (Normal, Repeat,
Chapter 1 21
LyraIB.01 9/4/01, 5:38 PM21
Page 24

Getting Started
Setup Information – the details
1. Install software in your computer
The Music Management CD that came with your Lyra Jukebox contains all of the
necessary software components you need to make your Lyra Jukebox work properly.
These components do the following:
• enable you to transfer files from your computer to your Lyra Jukebox
• profile and sort the contents, update the system and help files
• use the MusicMatch Jukebox software to organize your music collection and transfer
the music to your Lyra Jukebox
• install the User’s Guide and documentation for the Lyra Jukebox
The MusicMatch Jukebox™ software compresses audio files (from music CDs) to the MP3
format so you can play them on your Lyra Jukebox. The MusicMatch software also
enables you to download files from the internet that are already compressed and then
transfer those files to your Lyra Jukebox (or play the music on your computer).
1. Turn on your computer and place the Music Management CD that came with your
Lyra Jukebox into your computer.
IMPORTANT: Don’t connect the USB cable to the PC or Lyra Jukebox before or
during the driver installation.
If you’re running Windows 2000, XP, or Me, no additional drivers are required. If
you’re running Windows 98SE, you must install the device drivers from the CD-ROM
in order for the Lyra Jukebox to function properly.
2. If the setup screen does not appear, double click My Computer, double click your
CD-ROM drive icon, and double click Quickstart.exe. You can also click, Run, then
type D:\QuickStart.exe (where D is the letter of your CD-ROM drive).
The Lyra Jukebox and MusicMatch Jukebox quick start program runs.
3. Select the Install Lyra MP3 Jukebox Applications
option to run the Lyra Jukebox System
Applications setup program.
4. Click Yes to agree to the License Agreement.
5. Click the software components you’re going to
install (a list follows):
22 Chapter 1
LyraIB.01 9/4/01, 5:38 PM22
Page 25

Getting Started
Note: This book only discusses the
MusicMatch features that directly apply to
your Lyra Jukebox. For additional
information about MusicMatch Jukebox
features such as MusicMatch radio MX,
creating Music CDs, Music Library features,
go to:
MusicMatch tutorial on the Music
Management CD
Getting Started tips
On-line help (www.musicmatch.com)
Help that’s available within the software
• The System Profiler Application component
• Universal Serial Bus Drivers (Windows 98SE
• User’s Guide and Documentation installs all
6. Click Next to select the destination location of
7. Click Next to install all necessary files.
8. Click Finish to complete installation and return
9. Click Install MusicMatch Jukebox 6.1 Software to
10. Click Next to dismiss the Welcome Screen (the
must be installed in order for the Lyra Jukebox
to function properly. This application allows you
to sort and profile the music that you’ve
transferred to your Lyra Jukebox, and update the
system files and the help files that are stored on
the Lyra Jukebox.
only) must be installed in order for the Lyra
Jukebox to be recognized by your computer’s
operating system and appear as a drive letter.
necessary Lyra Jukebox documentation and help
files.
the installed files.
to the Quickstart program.
Note: If you’re running Windows 98SE,
rebooting your computer will be required.
run the MusicMatch setup program.
Note: It is recommended to uninstall any
previous installations of the MusicMatch
Jukebox software before proceeding. After
the uninstall process has been completed,
delete the C:\Program Files\MusicMatch folder
from Windows as well where C:\Program Files
is the path where the software was installed.
License Agreement appears).
Chapter 1 23
LyraIB.01 9/4/01, 5:38 PM23
11. After you’ve read the license agreement, click
Yes to accept (to continue, you must click Yes),
or No to decline. If you click Yes, the User
Registration Information screen appears.
Page 26

Getting Started
12. Enter your name, e-mail address, postal code, country, year of birth, and sex (male
or female).
Note: You must enter an e-mail address to proceed. If you don’t have an e-mail
address, enter yourname@home.com
13. Click Next (the Personalize Music Recommendation screen appears). Read the screen
to determine if you want to use this feature or not — you can always change the
setting later. Select Yes or No.
14. Click Next (the Installation Options dialog screen appears). Select Express Setup and
click Next to continue (the installation starts).
15. After the installation is complete, click Finish.
16. If necessary, close the main setup screen.
17. Some computers might request that you reboot your computer (a dialog box will
appear on the computer screen if this is necessary).
USB PORT
line out
COMPUTER
DIGITAL
Transfer the files to Lyra Jukebox via Explorer
1. Connect the Lyra Jukebox to your computer with the mini USB cable provided. The
Lyra Jukebox will appear as a Removable Disk drive letter.
Note: It might take several seconds for the device (the Lyra Jukebox) to be detected,
especially in Windows 2000. Click Refresh in My Computer or Explorer to make sure
the device has been detected.
2. From Explorer, highlight all of the files/folders you want to transfer to your Lyra
Jukebox and drag them to the drive letter that is associated with it.
24 Chapter 1
LyraIB.01 9/4/01, 5:38 PM24
Page 27

Profiler application icon found
in your computer’s system tray.
Getting Started
3. Select the Profile Lyra MP3/Personal Jukebox
Device menu from the
profiler application icon that’s in your PC’s
system tray, bottom right of your computer
screen). The Lyra Jukebox/Personal Jukebox
Profiler Application appears.
4. The application will profile and sort all
supported audio files so you can sort them and
play them properly. Press Done to dismiss the
application when profiling is finished.
5. Select the Update Lyra MP3/Personal Jukebox
System files menu item to update all system files
and help files.
Note: If more than one Lyra Jukebox device is
connected to the system, a submenu appears
listing the drive letters of the Lyra Jukebox
devices. Select the desired drive letter to
Profile and Update.
Step 2: Launch the MusicMatch
software
1. Remove the Music Management CD from your
computer.
icon (the Lyra Jukebox
2. Start the MusicMatch Jukebox software (click on
the MusicMatch icon in your system tray or
desktop).
The MusicMatch icon found in
your computer’s system tray.
Note: If the RCA Lyra theme doesn’t appear,
select the Change Skins menu item from the
Options menu. Select the RCA item from the
list and click OK to change to the proper
theme.
3. The first time you launch MusicMatch, a Getting
Started screen appears providing information
about MusicMatch and the software.
continued on next page
Chapter 1 25
LyraIB.01 9/4/01, 5:38 PM25
Page 28

Getting Started
Note: This book only discusses the
MusicMatch features that directly
apply to your Lyra Jukebox. For
additional information about
MusicMatch Jukebox features, go to
www.musicmatch.com
4. Detailed information, Getting Started tips, and
5. Choose Settings under the Options menu to
Set up the Recorder Settings
Click the Recorder tab to display the Recorder
settings.
troubleshooting are available through the Help
menu and the MusicMatch Internet site (accessed
from the Help and Site menus). We recommend
you familiarize yourself with the MusicMatch
Welcome Tips and view the On-line FAQ’s
before using and recording files.
Note: Logging onto the Internet while using
MusicMatch Jukebox takes advantage of all its
features.
customize the MusicMatch Jukebox functionality.
Note: You can access the Options menu at
almost any time by pressing the right mouse
button.
Note: Recorder settings are used when you’re
using the MusicMatch software to convert
(record) music files to the compressed format
that your Lyra Jukebox can play.
26 Chapter 1
LyraIB.01 9/4/01, 5:38 PM26
Page 29

Getting Started
Select the recording Quality level – CD Quality
MP3 (128Kbps) is recommended
• MP3 audio is MPEG Layer-3 Audio available at
various encoding bit rates. The highest bit rate
has the best quality sound, but uses the most
disk space.
• WAV audio is unencoded music that is not
compressed. This format has the best quality
sound but requires the largest file size, as
much as 650MB per CD. WAV audio files are
much larger than MP3 audio files.
• Windows Media™ audio is a compression
format crated by Microsoft. This audio format
incorporates digital rights management.
Notes:
Custom Quality settings are for advanced
users only.
Lyra Jukebox currently only supports MP3
audio format.
Select a CD Recording Mode
1. Check Digital and Error Correction for the best
results. Error checking and correction will be
performed while you are recording (if your
computer doesn’t support this setting, you will
get a message prompting you to change to
Analog).
Note: Choosing Digital and Error Correction
will slow down your recording speed.
2. Check Analog if your CD-ROM drive doesn’t
support digital audio extraction.
Chapter 1 27
LyraIB.01 9/4/01, 5:38 PM27
3. Select a default Recording Source. If you have
more than one recording source, select the
source you record from the most.
4. Mute while Recording (this is not recommended
as it will decrease the recording speed). This
feature allows you to mute the audio while it is
being recorded. Uncheck this box to hear the
audio as it is recorded.
Page 30

Getting Started
Save CD tracks to play on your PC or in your Lyra Jukebox
1. Insert a CD into your CD-ROM drive. If you are connected to the Internet,
MusicMatch Jukebox will retrieve information about the CD in the CD-ROM drive.
Note: If you are on a LAN system and the titling feature does not work, contact your
administrator.
2. If you’re able to connect to the internet, make sure the Enable CDDB CD lookup
service is selected on the CDDB Preferences page. Choose CDDB Preferences from
Settings in the Options menu. (The information from the Internet appears).
Notes: If the information cannot be retrieved from the Internet, enter it manually.
You can enter information or edit existing information by clicking in the desired box
and typing the information.
If the information is not entered before recording, default song names and
information will be used.
RECORD icon (record button)
REFRESH
3. If the Recorder window (shown above) isn’t open, press the icon (the record
button). If the songs aren’t listed, press REFRESH if the songs are not listed.
4. Select the tracks you want to record (recording the tracks enables the
MusicMatch software to convert the song to the selected audio format that the
Lyra Jukebox plays).
• To start recording, click
• To stop recording the current track, click
(record).
(stop).
• To cancel the entire recording session for all selected tracks, click
• To eject the CD, click
(eject).
• To select all songs, click ALL.
• To deselect all songs, click NONE.
• To refresh the track title information or to attempt detection again, click
REFRESH.
5. After recording is completed, the songs will be stored in the Music Library.
28 Chapter 1
LyraIB.01 9/4/01, 5:38 PM28
(cancel).
Page 31

Getting Started
Main player
area
Music Guide
tab (window)
Playlist area
ADD button
Music Library
window
Download music from the Internet
1. Make sure you’re connected to the internet.
2. Click MUSIC GUIDE to connect to the MusicMatch download site.
Note: You can also select Show MusicMatch Guide from View in the Options menu
to display this window. If you have not established an Internet connection,
MusicMatch Jukebox will attempt but fail to connect.
Music you download from the MUSIC GUIDE window will automatically be placed in the
Music Library.
You can download files using your regular browser. Be sure to import (and/or move)
them into MusicMatch Jukebox.
You can also select Show MusicMatch Radio from View in the Options menu to display
this window.
Organizing Your Music
The Music Library now displays your selections. To sort by categories click on the folder
icon (sort/view button) in the Music Library window.
Adding Tracks
1. Click ADD button from the Music Library window (the Add Tracks to Music Library
screen appears).
2. Select the folder location on your system that you would like to import music from
and select OK (all supported music tracks will be imported into the Music Library).
Chapter 1 29
LyraIB.01 9/4/01, 5:38 PM29
Page 32

Getting Started
Creating Personalized Playlists.
To create a playlist, you can drag and drop files from your Music Library or you can open
an existing playlist.
1. To manually add tracks to the playlist, double click on the track or drag and drop the
track from the Music Library into the playlist display (the song automatically starts
playing if no other song is playing). To preview a track before adding it to the
playlist, click to the left of the desired track in the Music Library window.
Note: Click to select a song, Shift and click to select groups of songs, or Ctrl and click
to select multiple songs.
2. Click OPEN to open an existing playlist, browse
for tracks from a specific group, or play an
audio CD.
3. To clear an entire playlist from the playlist
window, click CLEAR.
4. To save your current playlist, click SAVE. When
the window appears, enter a playlist name and
click Save.
5. To remove a single track from the playlist, click
on the track to highlight it, and then press
DELETE on your computer’s keyboard.
6. Click Play to play the songs from the playlist.
You can also double click the song in the
playlist to begin playing.
30 Chapter 1
LyraIB.01 9/4/01, 5:38 PM30
Page 33

Getting Started
Step 3: Transfer files to your Lyra Jukebox
Once you have created the current playlist that has all of the songs you want to transfer
to your Lyra Jukebox follow the steps below:
1. If your Lyra Jukebox isn’t already connected to your computer, use the mini-USB
cable that came with your LyraJukebox to connect the LyraJukebox to the computer.
Go to page 24 for instructions.
2. From the File menu, select the Send to Device option, and select Download to Lyra
Jukebox/Personal Jukebox item (the Download dialog appears).
Lyra Jukebox
Files to
Download
area
3. Highlight the tracks you want to download (transfer) to your Lyra Jukebox in the
Files To Download area.
Files stored
on your Lyra
Jukebox’s
hard drive
continued on next page
Chapter 1 31
LyraIB.01 9/4/01, 5:38 PM31
Page 34

Getting Started
This is the
Portable
Device
Memory
area
Refresh button
Delete button
Device connected to
your computer’s USB
port (in this example,
you Lyra Jukebox
Files to
Download
area
Files stored on your
Lyra Jukebox’s hard
drive
Progress
indicator
Download button
4. After you have selected all of the music you want to transfer to your Lyra Jukebox
player, click the Download button on the bottom of the screen.
IMPORTANT: If your Lyra Jukebox doesn’t appear in the Memory area, click the
REFRESH button.
During transfer a progress indicator appears in the Download to Lyra MP3/Personal
Jukebox screen (shown above), and Transfer in progress appears in the Lyra Jukebox’s
LCD.
When the transfer is finished, the Lyra MP3/Personal Jukebox Profiler application
automatically runs so it can sort/profile the newly transferred files.
Caution: Make sure all data are transferred to the Lyra Jukebox player before
unplugging the USB cable.
If you’re running Windows 2000, XP, or Me, you must stop the device before
unplugging it. Click the icon (the Unplug or Eject hardware icon) from the system
tray and select the USB Mass Storage device for the drive letter associated with the
Lyra Jukebox, and click STOP. See the Windows Help for details about the Unplug or
Eject Hardware topic.
Deleting Files
To delete files from the Lyra Jukebox:
1. Select the Jukebox device item from the Portable Device Memory area.
2. Select files to be deleted.
3. Press the delete button on the screen.
32 Chapter 1
LyraIB.01 9/4/01, 5:38 PM32
Page 35

Chapter 2
Features & Menus
Chapter Overview:
• Play modes (Repeat, A-B Repeat, Shuffle, etc.)
• Adjusting DSP settings (flat, rock, jazz, etc.)
• Setting LCD preferences (contrast, backlight, etc)
• Connecting your Lyra Jukebox to your car stereo
• Connecting your Lyra Jukebox to your stereo system
Changing Entertainment. Again.
LyraIB.02 9/4/01, 5:41 PM33
33
Page 36

Lyra Jukebox Features & Menus
Using the Play Modes
Once you have music transferred to your Lyra Jukebox you can use the MODE button to
access different play modes that are used in other audio equipment: Shuffle, Repeat 1,
Repeat, Repeat All, Repeat Shuffle.
Note: The REPEAT A-B play mode can only be accessed when you’re playing music,
go to page 35 for more information.
You can choose a play mode before you start playing a song (via the MODE SETTINGS
menu appears) or you can cycle through the play modes during playback by pressing the
MODE button (the play mode icons appear in the LCD).
No icon
in LCD
Normal: Plays the songs in the order they appear (no icon appears in
the LCD).
Repeat 1: Plays the current song repeatedly.
Repeat: Plays a series of songs repeatedly, based on option you
selected in the SORT BY menu (main menu) when you started
playback.
Repeat All: Plays all songs repeatedly, based on option you selected in
the SORT BY menu (main menu) when you started playback.
Shuffle: Plays the songs in random order, based on option you
selected in the SORT BY menu (main menu) when you started
playback.
Repeat Shuffle: Plays selected songs in random order, repeatedly
based on option you selected in the SORT BY menu (main menu) when
you started playback.
Repeat All Shuffle: Continually plays all songs in random order based
on option you selected in the SORT BY menu (main menu) when you
started playback.
34 Chapter 2
LyraIB.02 9/4/01, 5:41 PM34
Page 37

Lyra Jukebox Features & Menus
How to access the play modes
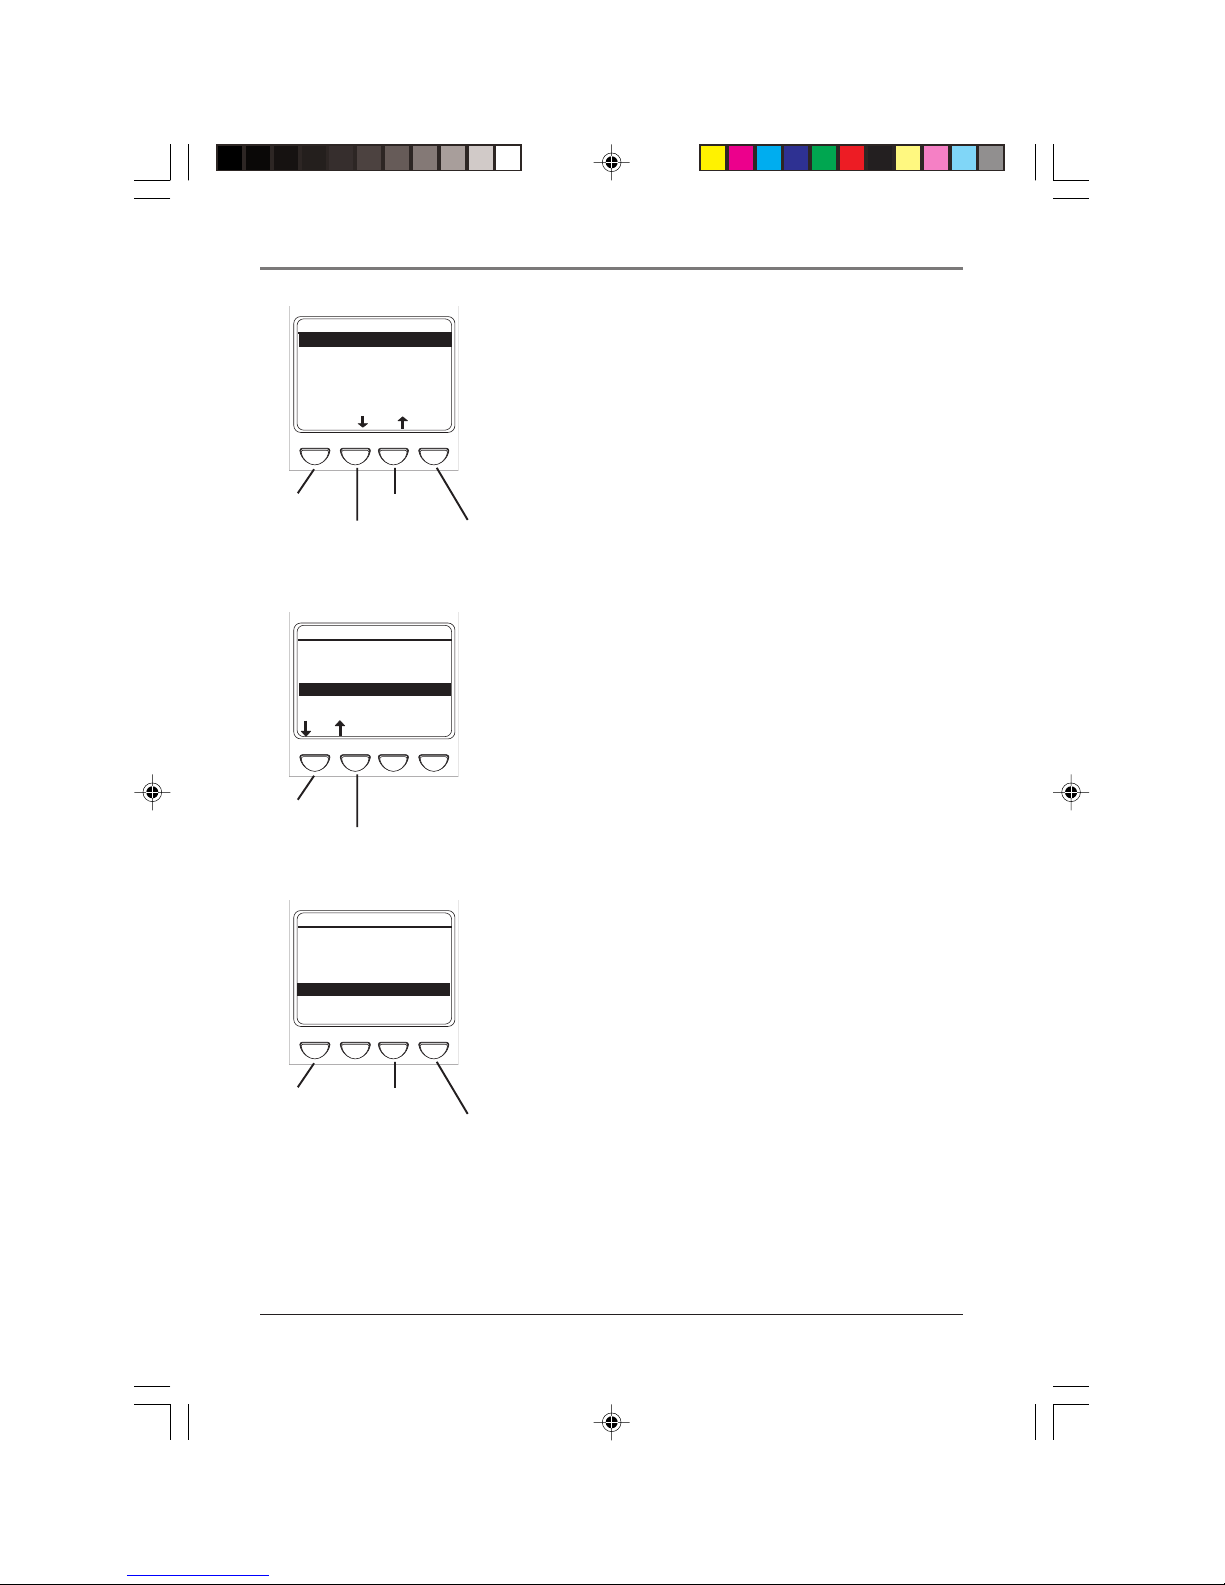
During navigation mode (you’ve turned on your Lyra Jukebox, but you are using
the menu system and not playing music)
1. Press the MODE button (the MODE SETTINGS menu appears).
2. Press the arrow down button (or soft key 2) or the arrow up button (soft key 3) until
the play mode you want to use is highlighted.
3. Press BACK (soft key 1) to return to the previous screen and the mode selection will
be updated to reflect the choice you made in step 2.
4. To change the current play mode, just press the MODE button during playback.
During playback
1. Press the MODE button to cycle through the choices (the play mode icons are
updated on the LCD).
Note: No icon appears in the LCD for the Normal playback mode.
Repeat A-B
Repeat A-B enables you to mark a starting point and an ending point during playback —
the Repeat A-B playback mode will only play the segment that you marked. When the
end of the segment (the B point) is reached during playback, the Lyra will start playback
again from the beginning (the A point).
Note: Unlike other playback modes, Repeat A-B is only available during playback
(you can’t access it from the MODE SETTINGS menu).
1. To set up Repeat A-B, start playback – press (play/pause).
2. When the song you’re playing reaches the place that you want to be the starting
point, press A -B (soft key 4). You’ll notice that the icon appears in the LCD
where the other mode icons are displayed.
3. Continue to let the music play. When you reach the end of the segment you want to
repeat, press A-B again (soft key 4). The icon appears in the LCD.
Note: You can only mark A and B points within the same song or track.
4. The Lyra Jukebox will repeatedly play the segment of music you marked. To cancel
A-B repeat and return to normal playback, just press the MODE button.
Chapter 2 35
LyraIB.02 9/4/01, 5:41 PM35
Page 38

Lyra Jukebox Features & Menus
Adjusting DSP Settings
DSP Settings (Digital Signal Processor settings) adjust the the various levels of the audio
output for different types of songs. For example, the DSP setting for BASS makes the bass
sounds more prominent. You can also personalize the levels via the GRAPHIC EQ menu
item. The default DSP setting for your Lyra Jukebox is FLAT.
SORT BY
Artist
Album
Title
Genre
User Playlists
Audio Files
HELP
Soft key 4
SORT BY
Artist
Album
Title
Genre
User Playlists
Audio Files
DSP SYS INFO HELP
Soft key 1
DSP SETTINGS
FLAT
BASS
ROCK
POP
JAZZ
GRAPHIC EQ
BACK
1. From the main menu, press MORE (soft key 4).
MORE
2. Select DSP (press soft key 1). The DSP SETTINGS
menu appears.
3. Press the arrow down (or soft key 2) or arrow
up (soft key 3) to highlight the DSP setting you
want to use.
• FLAT
• BASS
Soft key 3
Soft key 2
Note: When the Lyra Jukebox is playing, you
can cycle through the DSP settings by
pressing DSP (soft key 2). The new DSP
setting will take effect immediately and the
DSP display text will be updated.
36 Chapter 2
LyraIB.02 9/4/01, 5:41 PM36
• ROCK
• POP
• JAZZ
• GRAPHIC EQ: enables you to personalize
audio output settings. Go to the next
section for instructions.
Page 39

Lyra Jukebox Features & Menus
SORT BY
Artist
Album
Title
Genre
User Playlists
Audio Files
DSP SYS INFO HELP
Soft key 1
DSP SETTINGS
FLAT
BASS
ROCK
POP
JAZZ
GRAPHIC EQ
BACK
Soft key 3
Soft key 2
GRAHIC EQ
60 250 1K 4K 12K
BACK
Soft key 3
Soft key 2
Soft key 4
Personalizing DSP Output (GRAPHIC
EQ menu item)
1. During navigation, press soft key 1 (DSP).
2. Press soft key 2 (arrow down) until GRAPHIC
EQ is highlighted (the GRAPHIC EQ submenu
appears automatically after GRAPHIC EQ has
been highlighted for a second or two).
3. Press soft key 2 (down arrow) to decrease the
level for the first equalizer band. Press soft key 3
(up arrow) to increase the level of the first
equalizer band.
4. When you have the level for this first equalizer
band where you want it, press soft key 4 (right
arrow) to go to the next equalizer band.
5. Repeat steps 3 and 4 until you have all of the
equalizer bands where you want them.
USER PLAYLIST 1
My favorite song
Simon and Caroline
The Two of Us
Classic Rock 00:00:42
0005/0012 128K
BACK DSP INFO MORE
Chapter 2 37
LyraIB.02 9/4/01, 5:41 PM37
FLAT
6. Press BACK when all EQ settings are set, or let
the display timeout and return to navigation.
Note: When you’re playing music, you can
access GRAPHIC EQ by pressing soft key 2
(DSP) until the EQ selection appears. After a
few seconds, the GRAPHIC EQ submenu
automatically appears.
Page 40

Lyra Jukebox Features & Menus
Setting LCD Preferences (SYSTEM SETTINGS menu)
You can personalize the setting of your LCD (Liquid Crystal Display).
SORT BY
Artist
User Playlists
Audio Files
SORT BY
Artist
Album
Title
Genre
User Playlists
Audio Files
DSP SYS INFO HELP
Soft key 1
Soft key 2
SYSTEM SETTINGS
Backlight Timeout 5s
LCD Contrast 0
BACK
Album
Title
Genre
HELP
Soft key 3
1. From the SORT BY menu (the main menu), press
soft key 4 (MORE). Four new menu items
appear at the bottom of the LCD screen.
MORE
Soft key 4
3. Highlight SYS (press soft key 2). The SYSTEM
SETTINGS menu appears.
Soft key 4
4. Highlight the setting you want to adjust (to
highlight LCD Contrast press soft key 2 – the
down arrow). Instructions for adjusting LCD
Contrast and Backlight Timeout follow:
HELP
Soft key 3
Soft key 2
38 Chapter 2
LyraIB.02 9/4/01, 5:42 PM38
Page 41

Lyra Jukebox Features & Menus
SYSTEM SETTINGS
Backlight Timeout 5s
LCD Contrast 0
BACK
HELP
Soft key 3
Soft key 2
SYSTEM SETTINGS
Backlight Timeout 5s
LCD Contrast 0
BACK HELP
• Backlight Timeout: you can adjust the amount
of time that the backlight stays on by
highlighting Backlight Timeout. Press (the
right arrow button on your Lyra Jukebox) to
increase the amount of time. Press (the left
arrow button) to decrease the amount of time.
• LCD Contrast: to increase the contrast (make
the letters darker and the background lighter),
press
(the right arrow button). To decrease
the contrast, press the left arrow button.
Chapter 2 39
LyraIB.02 9/4/01, 5:42 PM39
Page 42

Lyra Jukebox Features & Menus
Playing Your Lyra Jukebox in your car stereo
The cassette adapter lets you listen to the Lyra in an automobile or RV safely without
having to wear headphones.
The car kit is included with your Lyra Jukebox. This accessory kit includes a car cord
adapter (#54095) and a cassette adapter (#54097). The car cord adapter lets you power
your Lyra from the cigarette lighter socket of a car, truck, or RV. It converts 12-volts to a
4.5-volt output.
1. Insert the plug on the cassette adapter into the headphone jack on the player. If the
headphones are attached, remove them.
2. Set your cassette player to your normal listening level.
3. Insert the cassette (Side A up) into your cassette player making sure the cord is
placed in the correct position for your type of player.
4. Attach the car cord adapter to the Lyra Jukebox.
5. Remove the cigarette lighter from the socket, and insert the car cord into the socket.
6. Turn on your Lyra Jukebox, and operate the Lyra Jukebox to play music as
described in Chapter 1.
7. Control the volume with the cassette player.
8. When you’re finished,
A. Remove the cassette adapter from the cassette player.
B. Turn off the Lyra Jukebox.
C. Remove the car cord’s plug from the cigarette lighter socket.
Cautions: Make sure to place the wire securely into the slot on the cassette in the
correct direction for the type of player you have. The car cord adapter is designed
to be used only with vehicles having negative ground electrical systems. Use of any
other car cord adapter may damage your Lyra Jukebox and void your warranty.
40 Chapter 2
LyraIB.02 9/4/01, 5:42 PM40
Page 43

Lyra Jukebox Features & Menus
Playing Your Lyra Jukebox on your stereo system
Your Lyra Jukebox came with a Line Out Cable that you can use to connect your Lyra to
your audio system.
1. Make sure your Lyra Jukebox is off.
2. Connect the black end of the cable to the LINE OUT jack on your Lyra Jukebox
player.
3. Connect the red (audio left) and white (audio right) cables to the corresponding left
and right audio jacks on your stereo system.
4. Turn on the power to your audio system.
5. Turn on your Lyra Jukebox – press and hold
6. Operate the Lyra Jukebox to play music as described in Chapter 1.
for 2 seconds.
Chapter 2 41
LyraIB.02 9/4/01, 5:42 PM41
Page 44

LyraIB.02 9/4/01, 5:42 PM42
(This page intentionally left blank.)
Page 45

Chapter 3
Additional Information
Chapter Overview:
• Troubleshooting
• FAQ (Frequently Asked Questions)
• Limited Warranty
• Specifications & System Requirements
Changing Entertainment. Again.
LyraIB.03 9/4/01, 5:43 PM43
43
Page 46

Additional Information
Tips and Troubleshooting
Problem: Player repeats same tracks or all tracks.
• Repeat play is turned on. Press the MODE button to change the play mode.
Problem: Audio distorted at high volume.
• In DSP mode, reduce the BASS gain.
• Select another DSP setting.
• Turn down the volume.
Problem: The audio tracks on my Lyra keep skipping or popping.
• Close all of your other applications, and re-record audio track.
Problem: Player turns itself off.
• Player turns itself off if you leave it in pause mode for an inordinate amount of time.
Problem: Songs aren’t listed in any of the sort modes (Album, Genre, Title,
Audio Files).
• The contents of the Lyra Jukebox haven’t been profiled (sorted) since the last file
transfer. Select the Profile Lyra MP3/Personal Jukebox Device menu item from the
Lyra Jukebox profiler system tray application on your PC to profile (sort) the
contents of the device. The icon in the system tray looks like this
.
Problem: Bad or missing file error message displayed on the Lyra Jukebox.
• The Lyra Jukebox system files are corrupted or missing. Select the Update Lyra
Jukebox System Files menu item from the Lyra Jukebox profiler system tray
application on your PC to update the necessary system files.
44 Chapter 3
LyraIB.03 9/4/01, 5:44 PM44
Page 47

Additional Information
FAQ (Frequently Asked Questions)
Question: What is MP3?
MP3 is an abbreviation for MPEG-1, Layer 3 Audio (MPEG = Motion Picture Experts
Group). This is a digital sound encoding and compression process that was developed by
the Fraunhofer Institut fur Integrierte Schaltungen and Thomson multimedia. MP3 is an
international standard and is well suited for the transfer of high quality audio files over
telephone or ISDN lines, and over the internet.
Specifications
Hardware
• Dimensions: 1.1" D, 5.1" W, 3.0" H
• Unit Weight: 11.0 Ounces
• 10 Giga Byte Storage
• Stereo Headphone Jack
• Adaptive Navigation Softkeys
• Mini USB Connection Jack
• Stereo Line Out Jack
• External 5V DC Jack
• Battery Operated: Up to 12 hours of playback with internal rechargeable Lithium ion
battery.
Chapter 3 45
LyraIB.03 9/4/01, 5:44 PM45
Page 48

Additional Information
Hard Disc
• External Hard Disc Drive: When connected to a computer via USB, the Lyra Hard
Disc player is capable of storing any file type allowing the user a fast, convenient
method of storing, retrieving, and transferring files. Including word processing files,
presentations, spreadsheets and any other computer files.
• Capacity: 10GB
• Rotational Speed: 4200 RPM
• Average Access Time: 12 MS
• Connection: USB 1.1
Software
• Includes Music Management software with the Lyra Jukebox applications and the
MusicMatch Jukebox software.
Lets the user organize all tracks in a digital music library, create custom playlists
through drag and drop interface.
– Encodes both MP3 and MP3 Pro files.
– Auto DJ creates automatic Playlists based on the user’s sorting preferences. Scans the
entire Music Library for specific search results.
– Integrated CD Player.
– Export to WAV
– MP3 Equalizer
46 Chapter 3
LyraIB.03 9/4/01, 5:44 PM46
Page 49

Additional Information
PC Hardware Requirements
– 233MHz or higher (Pentium II 300 MHz or higher recommended)
– Windows® 98SE, Me, XP or 2000
– Internet Explorer 4.0 or better with Internet access
– 32 MB RAM (64 MB recommended)
– Free hard disk space (4 MB for the software plus 1 MB for every minute of CD quality
audio that will be stored on the PC).
– CD-ROM drive capable of digital audio extraction
– USB port
– Installed sound card
– 16-bit color video card
Accessories
• CD-ROM Music Management Software
• USB Connection Cable
• AC/DC Adapter
• X-Phone™ Stereo Headphones
• Audio Line-Out Cable
• Car DC Adapter: Supplies power to Lyra Jukebox playerfrom car battery via cigarette
lighter plug.
• Car Cassette Audio Output Adapter
Miscellaneous Specifications
• Signal to Noise Ratio (>85dB)
• THD (<0.1%)
1 MusicMatch and MusicMatch Jukebox are registered trademarks of MusicMatch Corp.
2 Warning – This product is not intended for the unauthorized recording or duplication of copyrighted material.
Chapter 3 47
LyraIB.03 9/4/01, 5:44 PM47
Page 50

Additional Information
Limited Warranty
What your warranty covers:
• Defects in materials or workmanship.
For how long after your purchase:
• 90 days from date of purchase - Unit repair or exchange, which includes parts and
labor.
• 91 days to 1 year from date of purchase - Unit repair or exchange, which includes
parts only; you pay the labor.
• The warranty for rental units begins with the first rental or 45 days from date of
shipment to the rental firm, whichever comes first.
What we will do:
• During the initial 90 days:
Repair or exchange the defective portion of your Hard Drive. If the unit is replaced
it will be with a new or, at our option, refurbished unit.
• After the 90 days and within one year:
Repair or exchange the defective portion of your Hard Drive. If the unit is replaced
it will be with a new or, at our option, refurbished unit.
We will charge you a flat rate to repair or replace a defective Hard Drive. This
charge covers the labor cost for its repair.
How you get service:
• Contact us on the Internet at www.lyrazone.com and have your unit’s date of
purchase and model/serial number ready. The model/serial number information is
on your unit.
• Self diagnostic screens will allow you to troubleshoot your problem over the
Internet.
• If after going through the troubleshooting screens, you determine that your player
requires service, contact us at 317-415-4391. You must contact us to obtain a Service
Request Number (SR) for a service repair or exchange. No returns will be accepted
without the SR number.
• Proof of purchase in the form of a bill of sale or receipted invoice which is evidence
that the product is within the warranty period must be presented to obtain warranty
service. For rental firms, proof of first rental is also required.
48 Chapter 3
LyraIB.03 9/4/01, 5:44 PM48
Page 51

Additional Information
• Write the SR number on the outside of the carton used to return the unit. Make sure
you insure your shipment in case of damage or loss.
• Carefully pack the unit using the original box and packing material if possible.
Please retain all non-defective accessories that were included with your unit such as
the headphones.
• Include with the shipment:
1. Evidence of purchase date such as a bill of sale.
2. A brief note describing your unit’s problem.
3. Your name, address and phone number.
• After we receive your product, it will be repaired, or a new, or at our option,
refurbished unit will be shipped to you.
• Please retain a copy of all items loaded into your Hard Drive. Thomson multimedia
will not be responsible for your software, firmware, information, or memory data
contained in, stored on, or integrated with any products returned to Thomson for
repair or exchange whether in or out of warranty.
What your warranty does not cover:
• Acts of nature, such as but not limited to lightning damage.
• Adjustment of customer controls.
• Damage from misuse or neglect.
• A unit that has been modified or incorporated into other products or is used for
institutional or other commercial purposes.
• Batteries.
• Units purchased, serviced or operated outside the U.S.A.
• Loss of customer’s software, firmware, information, or memory data.
• Installation.
• Shipping damage if the unit was not packed and shipped in the manner prescribed
by Thomson.
Product Registration:
• Please complete and mail the Product Registration Card packed with your Hard
Drive. It will make it easier to contact you should it ever be necessary. The return of
the card is not required for warranty coverage.
Chapter 3 49
LyraIB.03 9/4/01, 5:44 PM49
Page 52

Additional Information
Limitation of Warranty:
• THE WARRANTY STATED ABOVE IS THE ONLY WARRANTY APPLICABLE TO
THIS PRODUCT. ALL OTHER WARRANTIES, EXPRESS OR IMPLIED
(INCLUDING ALL IMPLIED WARRANTIES OF MERCHANTABILITY OR FITNESS
FOR A PARTICULAR PURPOSE) ARE HEREBY DISCLAIMED. NO VERBAL OR
WRITTEN INFORMATION GIVEN BY THOMSON MULTIMEDIA INC., ITS AGENTS
OR EMPLOYEES SHALL CREATE A GUARANTY OR IN ANY WAY INCREASE THE
SCOPE OF THIS WARRANTY.
• REPAIR OR REPLACEMENT AS PROVIDED UNDER THIS WARRANTY IS THE
EXCLUSIVE REMEDY OF THE CONSUMER. THOMSON MULTIMEDIA INC.
SHALL NOT BE LIABLE FOR INCIDENTAL OR CONSEQUENTIAL DAMAGES
RESULTING FROM THE USE OF THIS PRODUCT OR ARISING OUT OF ANY
BREACH OF ANY EXPRESS OR IMPLIED WARRANTY ON THIS PRODUCT. THIS
DISCLAIMER OF WARRANTIES AND LIMITED WARRANTY ARE GOVERNED BY
THE LAWS OF THE STATE OF INDIANA. EXCEPT TO THE EXTENT PROHIBITED
BY APPLICABLE LAW, ANY IMPLIED WARRANTY OF MERCHANTABILITY OR
FITNESS FOR A PARTICULAR PURPOSE ON THIS PRODUCT IS LIMITED TO THE
APPLICABLE WARRANTY PERIOD SET FORTH ABOVE.
How state law relates to warranty:
• Some states do not allow the exclusion nor limitation of incidental or consequential
damages, or limitations on how long an implied warranty lasts, so the above
limitations or exclusions may not apply to you.
• This warranty gives you specific legal rights, and you also may have other rights that
vary from state to state.
If you purchased your product outside the United States:
• This warranty does not apply. See your dealer for warranty information.
50 Chapter 3
LyraIB.03 9/4/01, 5:44 PM50
Page 53

Index
Additional Information
A
A-B Repeat 35
AC/DC adapter charger 6
Adapter
AC/DC 6
car 6, 40
ADD button 29
Album menu 14
All Files menu 20
Analog setting 27
Arrow button 8
Arrow buttons
left 11
right 11
Artist menu 13
Assistance 4, 26, 34, 44, 48
Audio Files menu 19
Audio problems 44
B
Backlight Timeout, changing 39
Backup data 4
Bad file message 44
Basic operation 10
Bass 36
Battery, charging 12
Box, what's in the 6
Buttons
down arrow 8
explanation 7
left arrow 8, 11
MODE 7, 11
play/pause 8
RESET 9
right arrow 8, 11
SAVE 7
SELECT 7
Soft 8
STOP 11
STOP/power 8
up arrow 8
volume down 7, 11
volume up 7, 11
C
Cables
line out 6, 9
USB 6
Car
adapter 6, 40
play the Lyra in 40
Case 6
CD 6, 22
contents 23
CD quality setting 27
CD recording mode 27
CDDB Preferences 28
Changing play modes 35
Changing the order of songs 19
CHARGE light 9
Charger 6
Computer requirements 4
Connecting
car adapter 40
to stereo system 41
to your computer 24
Creating a playlist 30
Customer service 48
D
Data 4
DC IN jack 9
Digital and Error Correction setting 27
Display 7
Down arrow button 8
Download music from the internet 29
Drivers 22, 23
DSP Output 37
DSP Settings menu 36
Chapter 3 51
LyraIB.03 9/4/01, 5:44 PM51
Page 54

Additional Information
E
Eject hardware icon 12
Error messages 44
F
Flat 36
G
Genre menu 16
Graphic EQ 36
GRAPHIC EQ menu 37
H
Headphones 4, 6
Headphones jack 9
Help 26,48
I
Icon
MusicMatch 25
Icons
eject hardware 12
key 9
lock 9
Lyra Jukebox profiler application
25
play mode 34
playback 21
unplug 12
ID3 tags 15
Important information 2
Installing software 22
Instruction book 23
Instructions
setup 22
step-by-step 12
Internet 29
J
Jack
DC IN 9
Headphones 9
LINE OUT 9
Jazz 36
K
Key icon 9
L
L.E.D.
CHARGE 9
POWER 9
LAN system 28
LCD 7
adjusting contrast 39
Backlight Timeout: 39
changing appearance 38
LCD Contrast 39
LCD Screen 21
Left arrow button 8, 11
Light
CHARGE 9
POWER 9
Limited Warranty 48
Line Out cable 6
Line out cable 41
LINE OUT jack 9
LOCK switch 9
Logo, RCA 12
Loss of data 4
Lyra Jukebox profiler application icon
25
52 Chapter 3
LyraIB.03 9/4/01, 5:44 PM52
Page 55

Additional Information
M
Menus
Album 14
All Files 20
Artist 13
Audio Files 19
DSP Settings 36
Genre 16
Graphic EQ 37
Profile Lyra MP3/Personal Jukebox Device
25
Sort By 10
System Settings 38
Title 15
Update Lyra MP3/Personal Jukebox System
25
User Playlists 18
Mini USB cable 6, 24
Missing file message 44
MODE button 7, 11
MP3 27
Music Guide 29
Music Library 29
Music Management CD 6
MusicMatch icon 25
MusicMatch Radio 29
Mute while Recording setting 27
O
OFF/LOCK switch 9
Operation, playback 11
Options menu 26
P
Parts checklist 6, 44, 45
PC Requirements 4
Play modes 34
Play/pause button 8
Playback operation 11
Playback problems 44
Playing music 11
Playlists 18, 30
Pop 36
POWER light 9
Power adapter 9
Power button 8
Problems, solving 44
Product registration 2
Profile Lyra MP3/Personal Jukebox Device
menu 25
R
RCA Lyra logo 12
Rearranging the order of the songs 19
Recorder settings 26
Recording quality level 27
Repeat A-B 35
Requirements
computer 4, 47
RESET button 9
Right arrow button 8, 11
Rock 36
Chapter 3 53
LyraIB.03 9/4/01, 5:44 PM53
Page 56

Additional Information
S
SAVE button 7
SELECT button 7
Settings menu 26
Setup instructions 22
Soft keys 8
Software 22
SORT BY menu 10
Sorting
by Album 14
by All Files 20
by Artist 13
by Audio Files 19
by Genre 16
by Title 15
by User Playlists 18
Sorting problems 44
Specifications
accessories 47
hard disc 46
hardware 45
software 46
Step-by-step instructions 12
STOP button 8, 11
Storage space 20
Stuff packed with the player 6
System Profiler Application 23
System Settings menu 38
System tray 25
U
Unplug icon 12
Up arrow button 8
Update Lyra MP3/Personal Jukebox System menu
25
USB 23
USB cable 6, 24
USB port 9
User Playlists 30
User Playlists menu 18
User’s Guide 23
V
Volume down button 7, 11
Volume level indicator 21
Volume up button 7, 11
W
Warranty 48
WAV audio 27
Windows Media 27
T
Title menu 15
Troubleshooting 44
54 Chapter 3
LyraIB.03 9/4/01, 5:44 PM54
Page 57

LyraIB.03 9/4/01, 5:44 PM55
(This page intentionally left blank.)
Page 58

visit us at www.rca.com or www.lyrazone.com
Please do not send any products to the Indianapolis address listed in this
manual or on the carton. This will only add delays in service for your
product.
Thomson multimedia Inc.
10330 North Meridian Street
Indianapolis, IN 46290
©2001 Thomson multimedia Inc.
Trademark(s)® Registered
Marca(s) Registrada(s)
THOMSON
TOCOM
LyraIB.03 9/4/01, 5:44 PM56
 Loading...