

RCA LGB336GET, LGB356GET, LGB356WEV, LGB356SEV Use And Care & Installation
I
Careand Clea@ng
RcM@ng/-
“ Guide 21,22
H
SEV
I
adrrii=
12,13
se eanin
25-27
~H
Wm
I
Ccmmunerservices
55 She@s
15,16
I
II
I
Important Phone Numbers 55
I
Features
6,7
Powe+
Outa~e
13
I
II
Probl+mSohrer
51,52
1
H
I
Installation In8&tacti0n8 *5O TIM+rn ostat Adjustment-
1
II
Air Adjustm@
42
Flooring Undp Range 36
Leveling
43
LP Conversion
44--50
Model
and Se@ Numbers 2
oven 14-27
Baking
16-19
Broilinjz/Bmilinjz Guide 23,24
ContmI SettixW 11
Door Removal 31
I+(IU Yourself 20
I
I
!kf~ Instructions
3-5
I
I
Surfa+e Cooking
8-1o
r
I
Bux+ers 8-1o I
I
Cor
trol settings
8,9
I
Coc#top Comparison
8
I
I
Co@ware
Tiips
10
de%ie
9
I
L@wingInstructions
8
w
-@Y
Back Cover
L
{
I
Use and Care & Installation
.
.,
! ,,
9 of YourGas Range
m“4@w
1
HELP US HELP YOU...
r
Read this guidq C4Wdki&.
It is intended to help you operate and maintain your
new range properly.
Keep it handy for *were to your questions.
If you don’t understand something or need more help,
write (include your @honenumber):
Consumer Affairs
Appliance Park
Iaisville, KY 4(1225
Write dwn the pdel and serial numbers
Depending on your
%
ge, you’ll find the model and
serial numbers onal
Ionthefnmtoftiqe,
behind the kick panelkstorage drawer or broiler drawer.
These numbers are ~so on the Consumer Product
Ownership Registra@m Card that came with your
range. Before sending in this@ please write these
numbers hem:
ModBlMJmtJer
SerialNumber
Use these numbers k any comespondence or service
calls concerning yoti range.
If
you received aldamaged range...
Immediately contact @edealer (or builder) that sold
you the range.
Save time and mfmey.
Before you NMpMjstservice...
Check the Problem S@ver in the back of this guide.
It lists causes of mino~operating problems that you
can
correctyourself.
W~G: If the information in this
guide is notfollowed exactly, a fim or
explosion may result causing
property
-% Pm iqjury ordeath.
—Donotstore orusegasolin e or other
flammable vapors andliquids in the
vicinity of thisor any other appIiance.
— WHATTODO IF YOU SMELL GAS
● Do not try to light any appliance.
● h not touch illly electrkai switch; do
not use anyphone in your buiidingo
● Immediately call your gassupplier fmm
a neighbor’sphone, Follow the gas
supplier’sinstruction
. If you cannot mwh your gas supplier9
call the fire department.
— Installationand service must be
performed bya qualifkd installer,service
agency or the gas supplier.
.
IF YOU NEED SERVICE
To obtain service, see the Consumer Services page in
the back of this guide.
Toobtain replacement parts, contact GWRCA
Service Centers.
We’re proud of our service and want you to be
pkased If for some reason you are not happy with the
service you receive, here are three steps to follow for
fhrther help.
FIRST, contact the people who serviced your
~pfimce. Explainwhy you are not pleased. In most
cases, this will solve the problem.
NEXT, if you am still not pleas~ write all the
details-including your phone number-to:
Manager, Consumer Relations
Appliance Park
Louisville, KY 40225
FINALLY, if your problem is still not resolved, write:
Major Appliance Consumer Action Program
20 North W~ker Drive
Chicago, IL 60606
topublishdist bf &Manees
~--;
birthdefECtsOmther
harnUndrpqu4eS
● businesses towarn -
ofpotentialkxp&mretosuchsubstances.
-%;
+
●*
tbulWmhafWyvldveSOll
8xmtaiKlInercury.Ify
modelhas
r
f-s, theymustbe I13eycl
acceding * 10Castateandf- codes.
,
whenYoaqtYour Ramge
a
● &ve f&
ShoWyouthelodonof
valvead how toshut it
or
ifnecesmry.
0 Have pm
z
imtalbdandproperiy
=&b a q-
in
‘v
●OII Instructions. Any adjus t
andserdmI
%
dbeperfbrmmionly byq “ ed
gasrangei&s
rs orservicetechnicians.
•~~
toretpairormpiaceany part
your
a>.~a
itia
intids semieingshOuMben!?fi43cd
toaquaMi@
hniciaw
●lUgymU
*
tito
a U&wit gmundtd
outlet only.
not
removetheround
P&&~: Ug.xhtiti
&
‘cd sym it isyour
-w++~~~ve~
outletrep-~with a properlygroUnde4~-
+
prongoutkt in
amdanee withthe National
Electrical
c
.In Gna&Jheappliancem@be
electricali~
inaccordaneewiththe
CaMdian
“Cdcode.mnotusean*
cordwith
this *plianee.
@
s
●-
2
outafkMentra6cpath ,
andout
iocatkmtoprevws tpikk
imtage (q pilot models) and poor
air
3he
raiqp 6efomx@3mtingit topreventfire or
SmokeCiamag@ah6uldthepackingmaterkdignite.
~IBesure your&&e is eozmctiy@@sW
by a
_ t@mkian or installer for the
=- (natmdorU9 that is to be used.
Yourrangecan
reconverted forusewitheither
&p of ~. %M.lEIXMtdMonInstructions.
w-a Tksea@usmen
tsmustbemadebya
.
@l&d*~iIl~~~&e
manuf”s instructions and all codes and
4@==@$
of the authority having jurisdiction.
Failure tofo~owthesehS@UCtiOIIS couki msdt in
seriousinjury ~propatydamag
e.Ilw qualified
- @-h Wr’kassumesresponsibility
ibrtheconversion.
● -r
prO1On@weofa ran&+high fi4mr
tenqeratums may tit and many floor
Coveringswmmotwithstmdt iwof=.
Neverinstalltherangeovervinyl tile
orlinoleum
thatcannotwithstandsuchtypeof use.Never
installit directlyoverinteriorkitchencarpeting.
Q!!!
instig theAnti-TipdeviceSU@kCi. ~
Tocheckif thedeviceis installedand
=W@ P*y,
Ca’1’efuytipthe
rangefwani. TheAnti-TipDeviceshouldengage
andpreventtherangefimn tippingover.
If youpulltherangeoutfromthe wall
for any
reasow make sure the device is properly engaged
whenYou Pushtherangebackagainstthewall.
If itis”nog-thereis a p&sible risk ofthe range I
tipphg OVfXand causing iqjury if youor a child I
stand,sitor leanonanopendoor.
Pleaserefmtothe Anti-Tipdeviceinformation
inthis guide.Failuretotakethis precautioncould (
msukin tippingoftherangeandinjury.
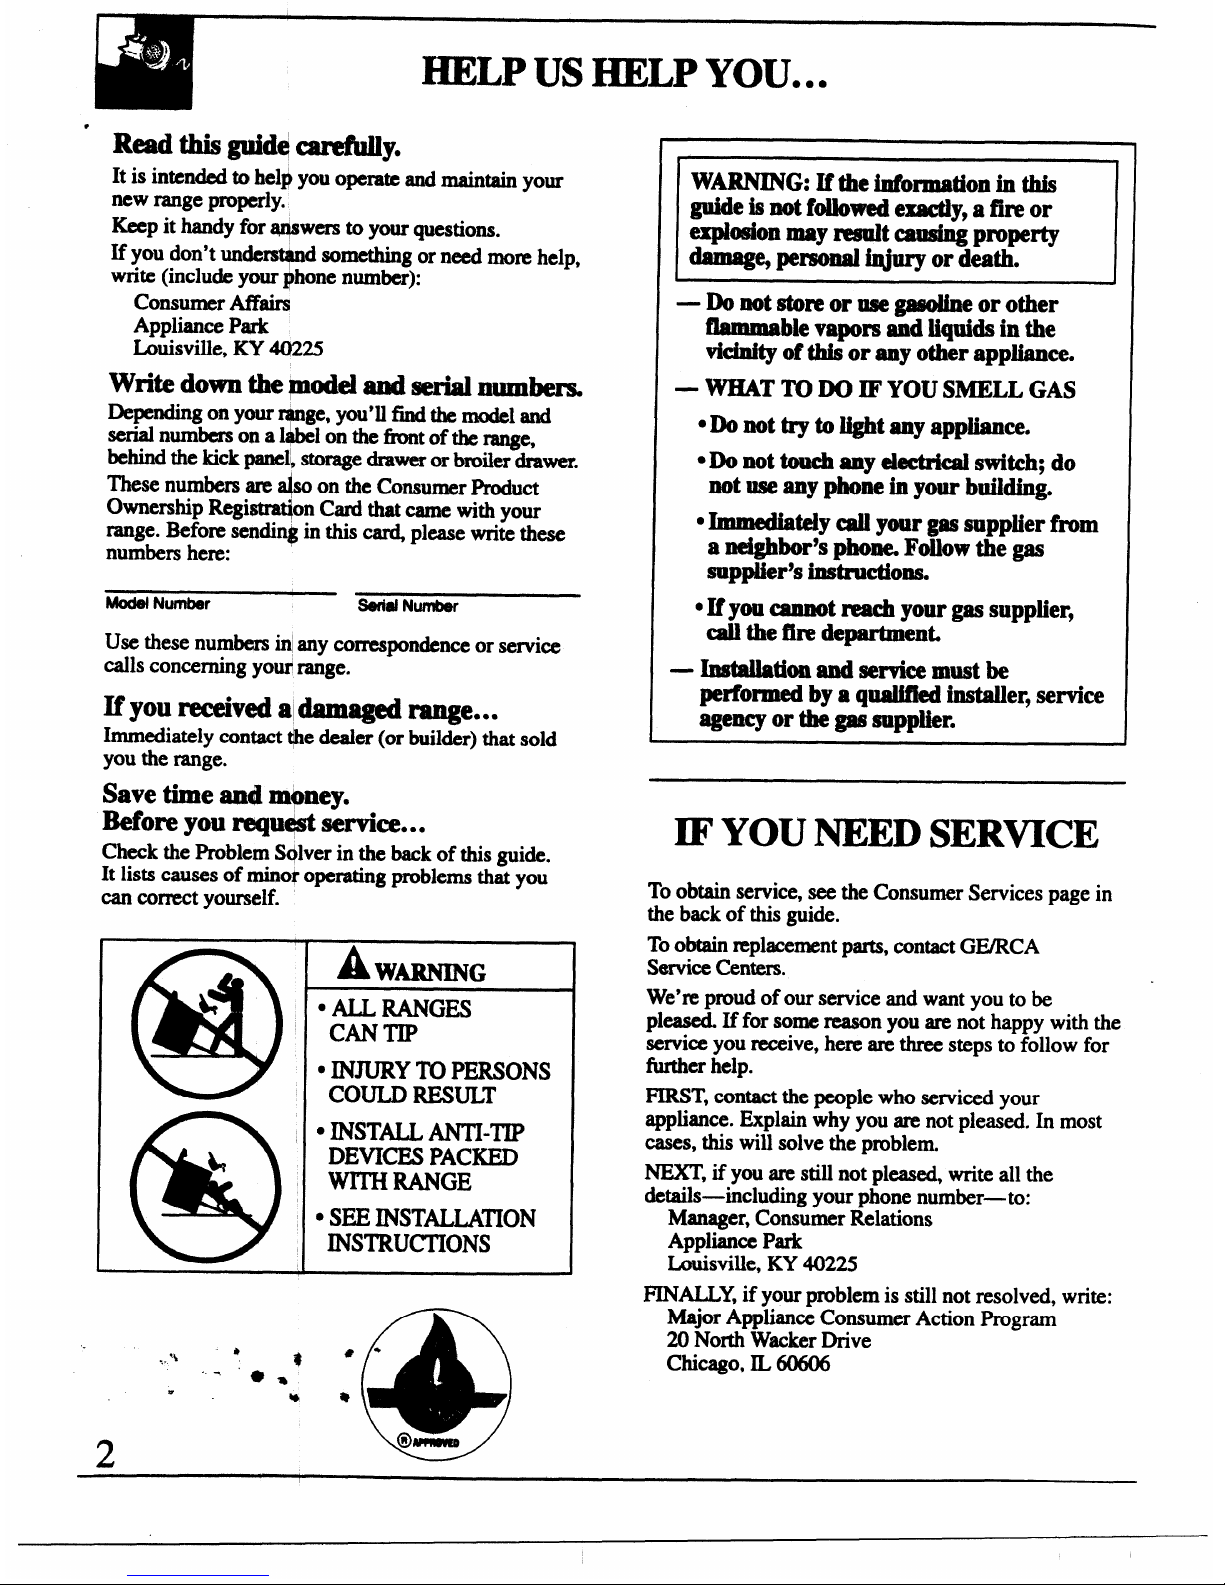
● ~ ~ ~ve M-n ~OIWor unat@ndd
I
$
whew a range is hot or in operation.
They
couldbe seriouslyburned.
● For your safety,never use yo~ appliance for
warming orheatingtherocm
(Cmtinuediwupqe)
3

●Donotusewatpropgrea$efires.Nev=Pw
w
the controlsoff.Smothera
41w8yst uMd Hul%cei MlrMrs tooffbefore “
a
-P-l’%
flamingpanonp
w
ace
unitbyC(W- the
removing Cookware
win
coxndetelviti a well-fittixu litL cddc sheet
Wamdhliywatchf oodsbeingf kiedatahigh
L
‘&flattriiy.U&lam ti-purposeJ& chemicalor
foam-type@
~Xth ●sher.
FiaminggreasePu@’eapancanbeputoutby
coveringit with
&
W& or, if mdabk, by
usinga multi-
drychemicalor foam-type
fn extinguished
Flamein theov+nc+nbesmothemdcompletelyby
turningthe ovenoffor
drychemicalorfoam-
thmeseiting ~
;.*
● Never b~ ~ ~~ (~
Opedngs)ofthe ‘ -x
-
~eY Pvi* ~ * *t ad ou~~ttitm
necesmg for therangetooperateproperlywith
correctcombustion.Airopeningsarelocatedatthe
rearof thecooktop,atthetop andbottomofthe
ovendoor,andatthebottomof the rangeunderthe
broilerdrawer.
-, =– –—– ._.= -r_–___,_
•~~~
nmtddsktam~a
over the burner grate to suppoti-the wok;This
drawemrmaracooktop.
ringactsas
aheattrap,whichmay damagethe
J!!?
burnergrateandburnerhead.Also,it maycause
•~N~ST()
R USE COMBUSTIBLE
MATERIALS,G
LINEOROTEER
theburnerto
work improperly. This may causea
FLAMMABv
RSANDLIQm IN
carbon
monoxide levelabovethatallowedby
THEVI
THIS(MMNYOI!HER
cumnt standds, resultingin a healthhazard.
APPLIANCE.
sFoo&f~f&@_~~&y~
podbk?LFrost
---~=-= ‘
oniixmmfdormoistum onikshf~cancause
●4Hlotletcooqag
hotfhttobubbleup andoverthe sklesofthepan.
o.U= ~ ~ _
amount of M for effbctive
●VhencOoking ~folk)w tbedirectiCmsexactly
8h@0wordeep4Mfryingo Fiigthepant00fW
andalwaysc
%
thc$neattoaIlinte31A@lpem@e
off~ cancausespilioverswhenfd isadded.
of atleast 17
~
assurestha@th@rc4nOtE
possibilitythattic “
Inaybepmsentinthem
ou~~~~~
wheneverpossibleto
preventOverhatmg
“ fatbeyondthesmokingpoinL
itwillbe W~
meatwillbe safetoeat.
}
● Never try tomove a panof hotf@ especiallya
Surface Coo@qig,
deep fat @cr. Wtit untilthefat is cool.
•~~*_q*e sure itis
● ~ways heat fk$tij?iy, and watchaait heat&
4
designedfortop-of-rangecooking.
.
J
‘ .~>.”:;. ,
,, ./,, ~,.
,,
,.,. ~
•~:a
.>= ~ ~vm.ti+ greasebuikhp.
‘/
emouMw&MmheddfWop isa
‘i. mmdenceinMfthgk~f~Ittitia
again$tbm!nsfkmntouching hot
anstabieor
4&fkce$Ofthe d4MHwrovenwalk. me lowest
flatbottoms enoughto
properlycontainf
position%3sian@&si@ed to
dide.
andspilloversandlarge {
*~~~
unopsM&food4xMabm. I?reMmm
cmddbuikiupandtiwmdnercoddbarst+
e’~~t~
ablmhmm foil anywhere
in the oven
canbeeasily
except as descdbdin this guide.
Misuse could
~awayfhulthetopb urnerso
resultinaf~hazardordamag
e totherange.
● Keepall
•~n~
cooking orxwastingbags inthe
●
ov~ followthe manufhctum’sdirections.
● theOldyglass
cookwme that is recommended
fmuse in gasovals.
QAlwaymanovetheb roilerpanfrom ~eas
●
soon as youl!hdshbroiling. Greaseleft m the pan
can catch fire if oven is used without removing
the grease fkom the broiier pan.
●Vhembroilh @meatistooc losetotheflame,
●
the f~ may ignite. Trimexcessfat toprevent
excessive flare-ups.
SMakesure the broiler panistnplacecorrectly
to
reducethepossibilityofgreasefins.
dfyoushmkhweagrea$efkein thebroikp%
turnoff oven contm~andkep broiler drawer and
ovendoorclosedtocontainfireuntilitbumsout
●rangeis
<%
nearawindow, donothan
long ●
$%
COukiblow
OVCr the tOp bUIII
andcreatea
●-a
T
oat&nstmCkng“ pikltmodels,
youwillde tafaintodorof
G
J
as yoursi
torelightth pil Whenreli
● gthepiloc
makesure
?$
controlsareinthe off
positioq,
and
follow“
CtiOIIS in thiS bookto reli@t.
●If you
3
andyou have alreadymades
pilotsadit on
J
● gpilotmodels), tumdf
gast#Mhe
Y
callaqudfiedservice “ ●
Neveruse
flametolocateakako
B-h
oi&g and Raasting
Se!wcleaning oven
● ~ ~t ~ door ~eL Thedoorgasketis
essentialfora goodseal.Careshouldbe takennot
torub,damag
e ormovethegasket.
•DO~WOWHICkmgmLNO commerdoven
cleaner or oven liner protective coating
ofanykind
shouldbeusedin oraroundnyprtofti oven.
Residuefim ovencleanerswilldamagetheinside
ofthe ovenwhentheself-cleancycleisused.
● ~o~ ~
-dean@ the ov~ remove the
shei~ the broiler pan and grid and other
41’
•~n~t~
venfbrastozqparem
.Mluretowipeupexc esl$spiilage before
Items
intheovencanignk
f
-*@-
qleratiom
●lacetheo $h4!lve$Mhede4dredpo$itloq
whiletheo $seool.
•~**
+4e4mhgmode
mdfiwtions, turn
9
theovenoffanddkmnect
the power supply.
● s-d am
T
theralB@whenopedng*
Have
it serviced by a qualifiedtechnician.
door of a
en. Thehotairand steam that
escapes can cau e burns to
hands,fwe andeye$.
SAW THESE
INSTRUCTIONS
5
—
d
:
-1
0--1
●
*9
*
I
I
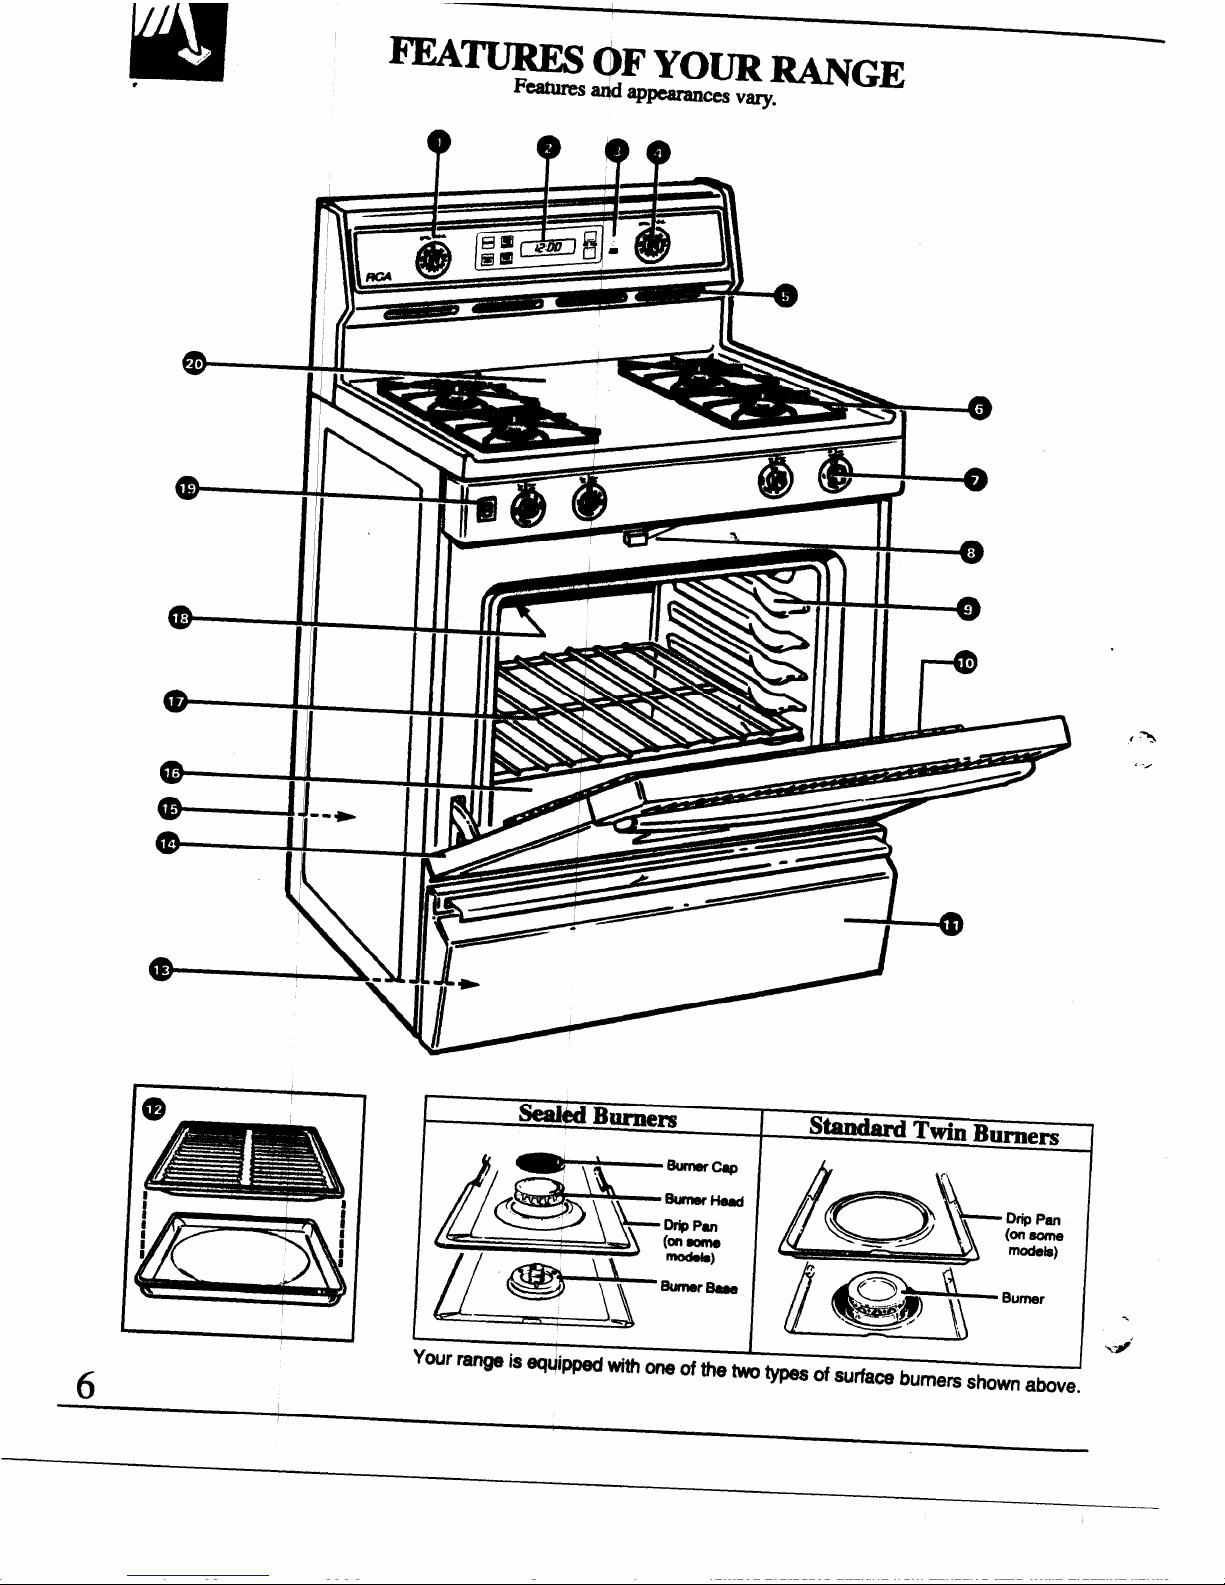
=-cm Yom ~GE
Ratllres Wd ap-es vary.
I
6
z=a’ 22
ZL
~z
1
Your range k eqqippd w“th one of the two Wes of surface bumem shoti above.
.
a
’4’
I
●
“$
Expiained
onp8ge
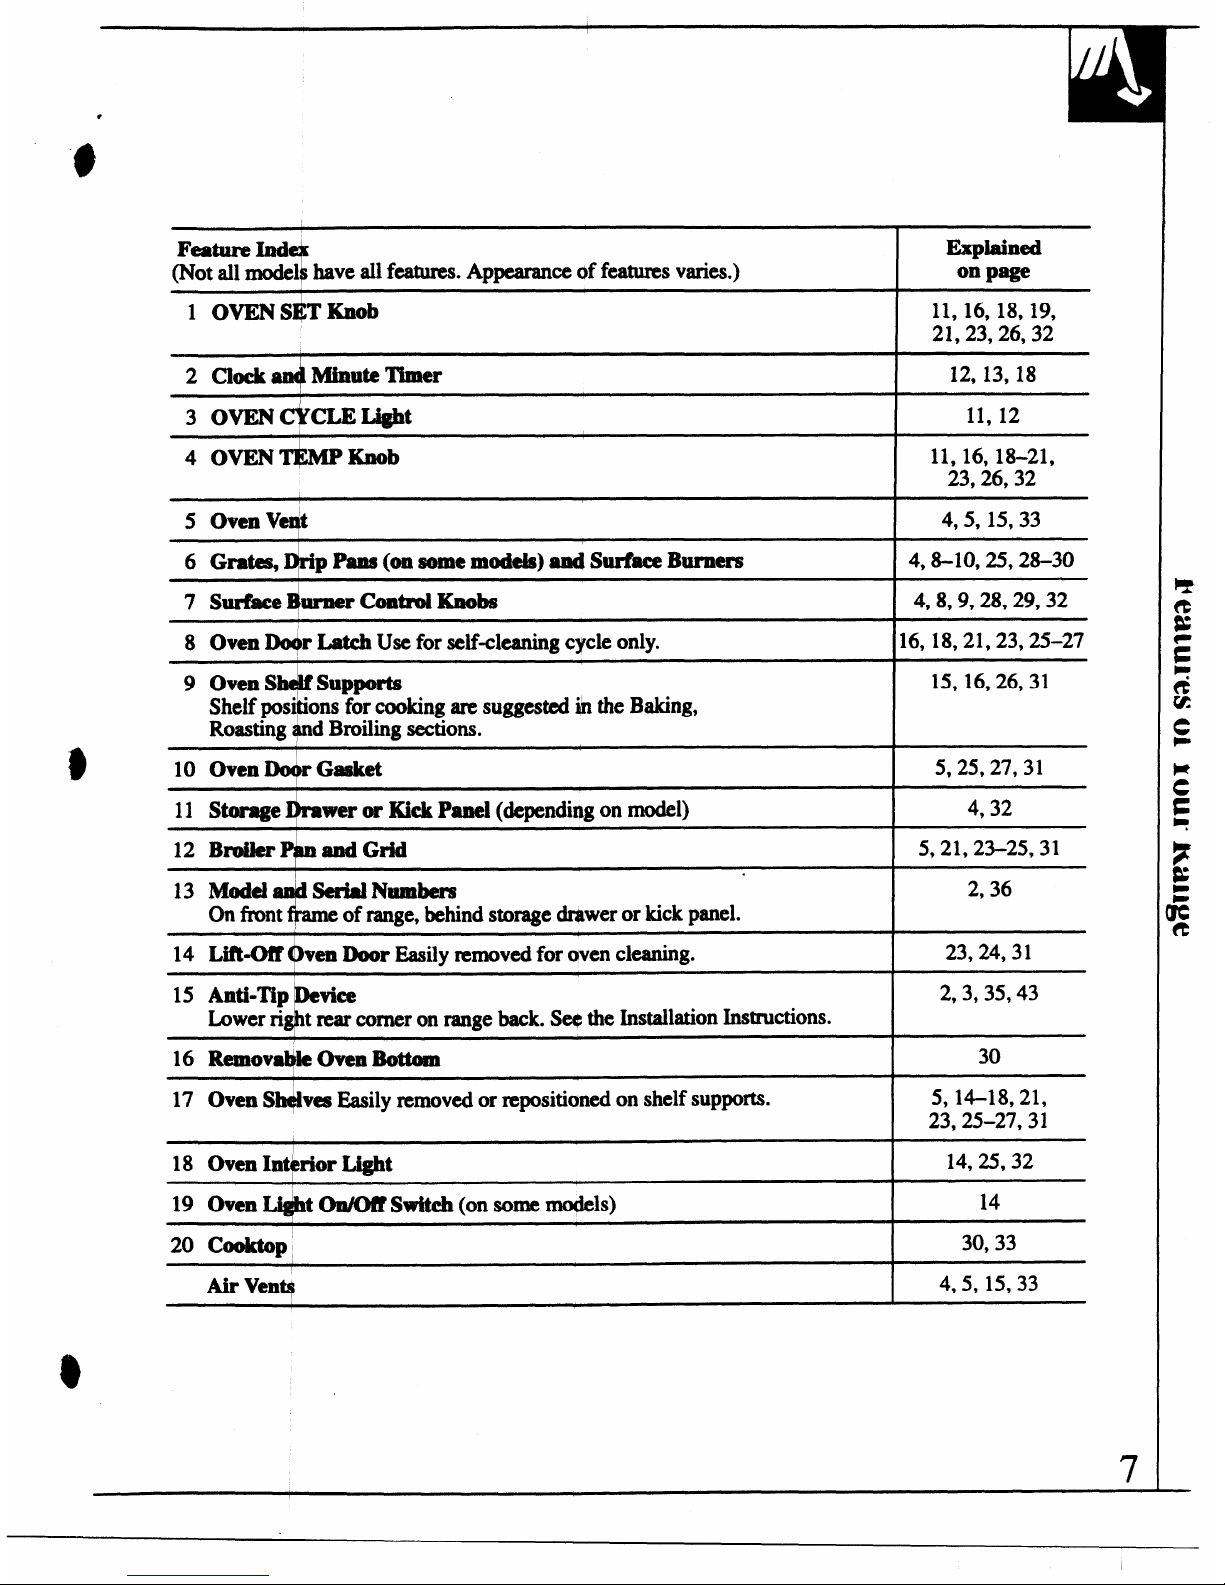
FeatureInd
‘1
(Not all model have all features. Appearance of features varies.)
11, 16, 18, 19,
21,23,26,32
1 OVEN SI$T Knob
2 Clock amllkfimltel%mer
12, 13, 18
3 OVEN
C@E Light
11, 12
11,16,18-21,
23,26,32
4
OVEN* KDOI)
4,5, 15,33
5
Oven V+
6 Gram ~p Pares(on some modeh) andSti’ Burners
4,8-10,25,28-30
7
Sur!beI$lrnerc4wwrOIKnobs
4,8,9,28,29,32
[6, 18,21,23,25-27
8 Oven
Dw$rLatchUse for self-cleaning cycle only.
15, 16,26,31
T
9 Oven S
supports
Shelf posi “ensfor cooking am suggested in the Baking,
Roasting @d Broiling sections.
5,25,27,31
10
OvenDo+rGasket
11 Storage @raweror Kick Panel (dependi~g on model)
4,32
12 BmMe+mandGdd
5,21,23-25,31
13 Model
+
Serial Nmnbem
on fillnt of range, behind storage d.mweror kick pnel.
14 LMMM @mi
Door Easily removed for aven cleaning.
2,36
23,24,31
2,3,35,43
15
Anti-Tip~vice
Lower ri@ rear corner on range back. S* the Installation Instructions.
16 Renmvd$e oven ~
30
17
Oven SWves Easily removed or repositkmed on shelf supports.
5,14-18,21,
23,25-27,31
14,25,32
14
I
18 Oven In@ior Light
19
Oven Li$M On/OiY Switch (on some models)
20
CooMop
Air Ve@
30,33
4,5, 15,33
7
HOW DOES THIS COOKTOP COMP!!
TO YOUR OLD ONE?
●
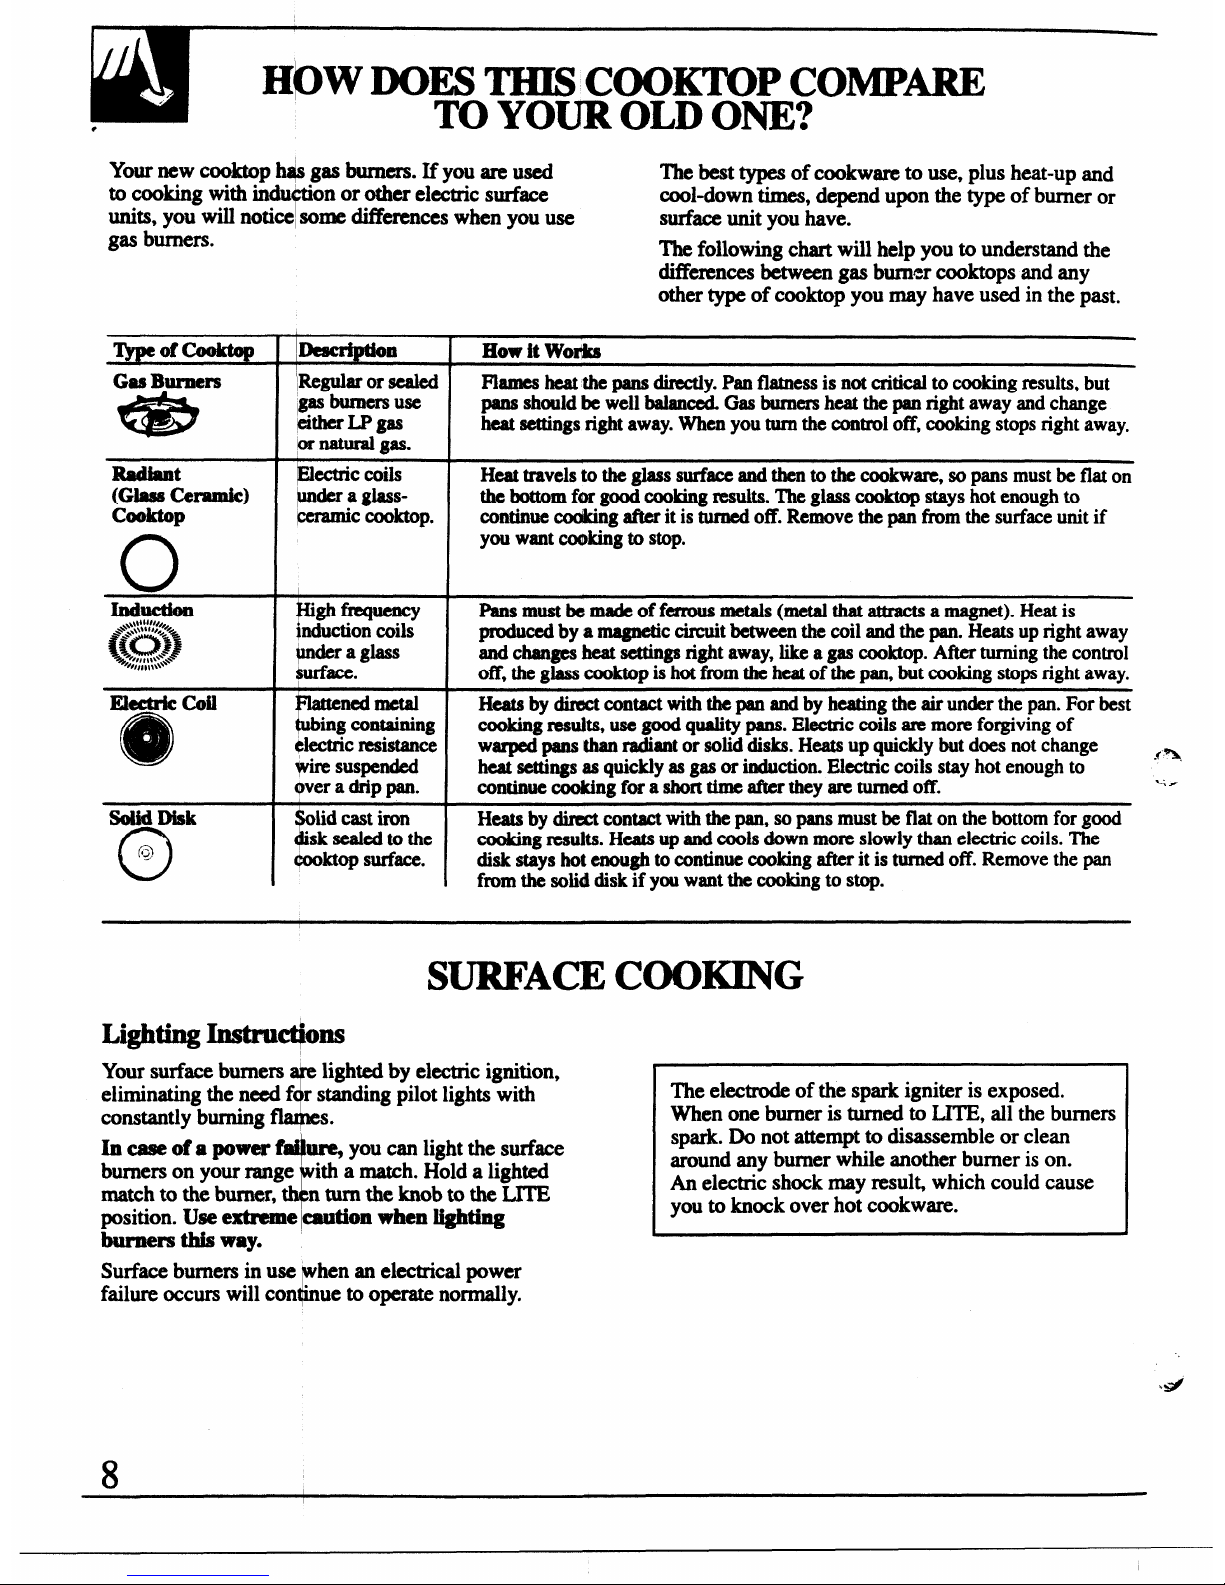
Ywnewcooktop hqsgasburners. Ifyouareused
The best types of cookware to use, plus heat-up and
to
cooking with indu “onor other electric surface
P
cool-down times, depend upon the type of burner or
units, you wiIl noti=l some dii%rences when you use
surface unit you have.
gas burners.
The following chart will help you to understand the
differences between gas burner cooktops and any
other type of cooktop you may have used in the past.
‘IypeOfcooktop
! ~
n
I
Howit Wodks
Gas Burners
~Wguk orsealed
FJamesheatthe pansdirectly.Panflatnessis notcriticalto cooking
results, but
QSJ
,gasburners use
pans should be
wellbalanced Gasburnersheat the panright awayand change
IdtherLP gas
heat settingsrightaway.Whenyouturnthecontroloff,cookingstopsrightaway,
or naturalgas.
Radiant @ctric coils
Heattravelsto theglasssurfaceandthento the cookware,so pans mustbeflaton
gmhtiearnic)
bier a giass-
thebottomf~ goodcookingresults.Theglasscooktopstayshotenoughto
-C Cooktop.
continuecockingafterit is turnedoff.Removethe pan from the surface
unit if
o
you wantcookingto stop.
I
IndducJion
mmm-
Pansmustbe madeofferrous metals(metalthatat&actsamagnet). Heatis
*#
~B{l
-... @hwtioncoils
producedby a magneticcircuitbetweenthe coilandthe pan. Heatsup right away
.
~.,,,,,\.*;\.*
pnderaglass
andchangesheatsettingsrightaway,likea gas cooktop.Afterturningthecontrol
~#,,,,,,\\\~
$urface.
off,the glasscooktopishotfromthe heatof the pan,but cookingstopsrightaway.
metriccoil
1111111
Heatsby directcontactwiththe pan andby heatingthe air underthe pan.For best
cookingremits, usegmd qualitypans.Electriccoilsaremoreforgivingof
~-c resistance
warpedpans thanradiantor soliddisks.Heatsup quicklybut
does not change
$&3 suspended
heat settings as
quicklyasgas or induction.Electriccoils stay hot enoughto
.f%%
overa drippan.
continuecookingf~ a shorttime afterthey areturnedoff.
~.*
So&l
Disk lid castiron
Heatsby directcontactwiththe pan, so pansmustbe flaton thebottomforgood
o
I@
“sksealed to the
cooking results.
Heatsupand cods downmoreslowlythan electriccoils.The
@oktopsurface.
disk stayshot enoughto continuecookingafterit is turnedoff.Removethepan
fmm the soliddiskif you wantthe cookingto stop.
SURFACE COOKING
Your surface burners&lighted by ekctric ignition,
eliminating the need f r standing pilot lights with
constantly burning .
In ease of a power f~uxu+ you can light the surface
burners on your range ith a match. Hold a lighted
match to the burner,
4
ntumtheknob tothe LITE
position. Use extreme
Imtion when_
burnm thisway.
The electrode of the spark igniter is exposed.
When one burner is turned to LITE, all the burners
spark. Do not attempt to disassemble or clean
around any burner while another burner is on.
An electric shock may result which could cause
you to knock over hot cookware.
Surface burners in use hen an electrical power
&
failure occurs will con “ ue to ox normally.
+’
8
●
“ ‘rheknobsthat
the surfaceburners on and off are
%
located on the con 1panel in fkontof the bumem.
The two knobs on e left control the left front and
left rear burners.
+
two knobs on the right control
the right tint and “ght~ b~erso
On ranges with sealed burn==
● The smaller burner (right rear position) will give
the best simmer results. It offers precise cooking
perfo~ce for delica@fti, such as sauces or
foods which need to cmk over low heat for a
long time. It can be turned down to a very low
simmer setting.
● The right front burner is higher powered than the
others and will bring liquids to a boil quicker
(natural gas instiltions only).
Before Li@@u a Burner
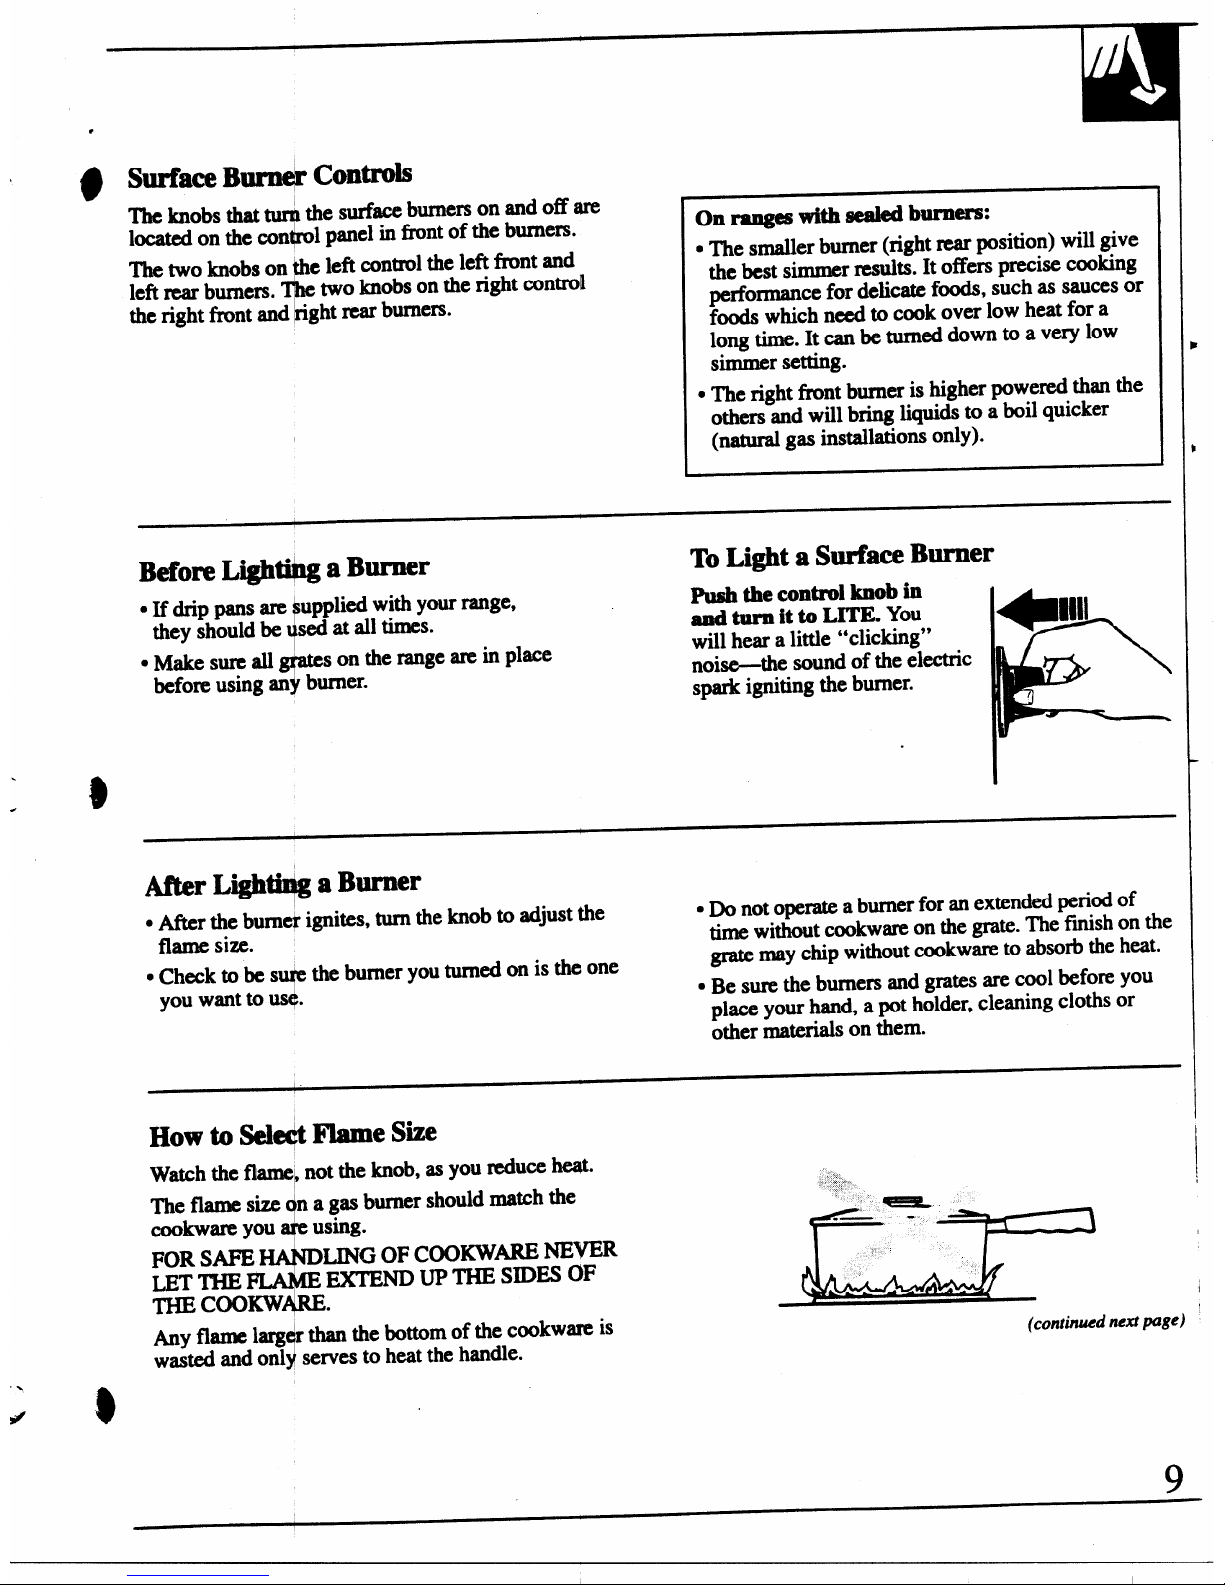
To Light a Surface Burner
-.
.
/
. If drip pans are upplied with your range,
IWsh the
controlknobin
they should be sed at all times.
twtiiturn
itto LITE. YOU
will hear a litie “clicking”
● Make sum M @es on the range are in place
before using an$ burner.
noise-tie sound of the ekwtric
spark igniting the burner.
.
.
.
8
After Lighth$ga Burner
● After the bumc$ ignites, turn the knob to adjust the
. Do not operate a burner for an extended period of
flame size.
time without cookwm on the grate. The ftish on the
● Check to be S* the burner you turned on is the one
grate may chip without cookw~ to absorb the heat.
you want to us+.
● Be sure the burners and grates are cool before you
placc your hand, a pot holder, cleaning cloths or
other materials on them.
How toSale+Flame Si
Watch the flame) not the knob, as you reduce heat.
. “.’.
The flaIXE size n a gas burner should match the
$
,,.
cookware you using.
t
%
FOR SAFE
LING OF COOKw~ NEVER
LET TI=IE
EXTEND UP THE STDESOF
THE
COOKW ●
I
$
Any fltUIMlarg r than the bottom of the cookwm is
(continued neti pqw)
wasted
and onl serves to heat the handle.
9
I
SURFACE!COOKING
(Cominued)
Tipof-Range Coo~ware
Aluminum: Medium-w ight cookware is
r
recommended because i heats quickly and evenly.
Most foods brown even yin an aluminum skillet.
\
Use saucepans with tigh -fitting lids when cooking
with minimum amounts Iofwater.
Cast-Iron: If heated slowly, most skillets will give
Satisfilctoryresults.
EMudwlu’e:
underso
?
conditions, the enamel of
sonw cookware may me Follow cookware
manufacturer’s R?comm+dations for cooking rmXhods.
Glass: There are two
typesof glass cookware-those
for oven use only and those for top-of-range cooking
(saucepans, coffee and teapots). Glass conducts heat
very slowly.
Heatproof GhmmCeramic Canbe used for either
surfkceor oven cooking. It conducts heat very slowly
and cools very slowly.Check cookware manufactumr’s
directions to be sum it can be used on gas ranges.
Stainless Sttek
This metal alone has poor heating
prop@es and is usually combined with copper,
ahumnum or other metals for improved heat
distribution. Combination metal skillets usually work
satisfactorily if they arc used with medium heat as the
manufacturer recommends.
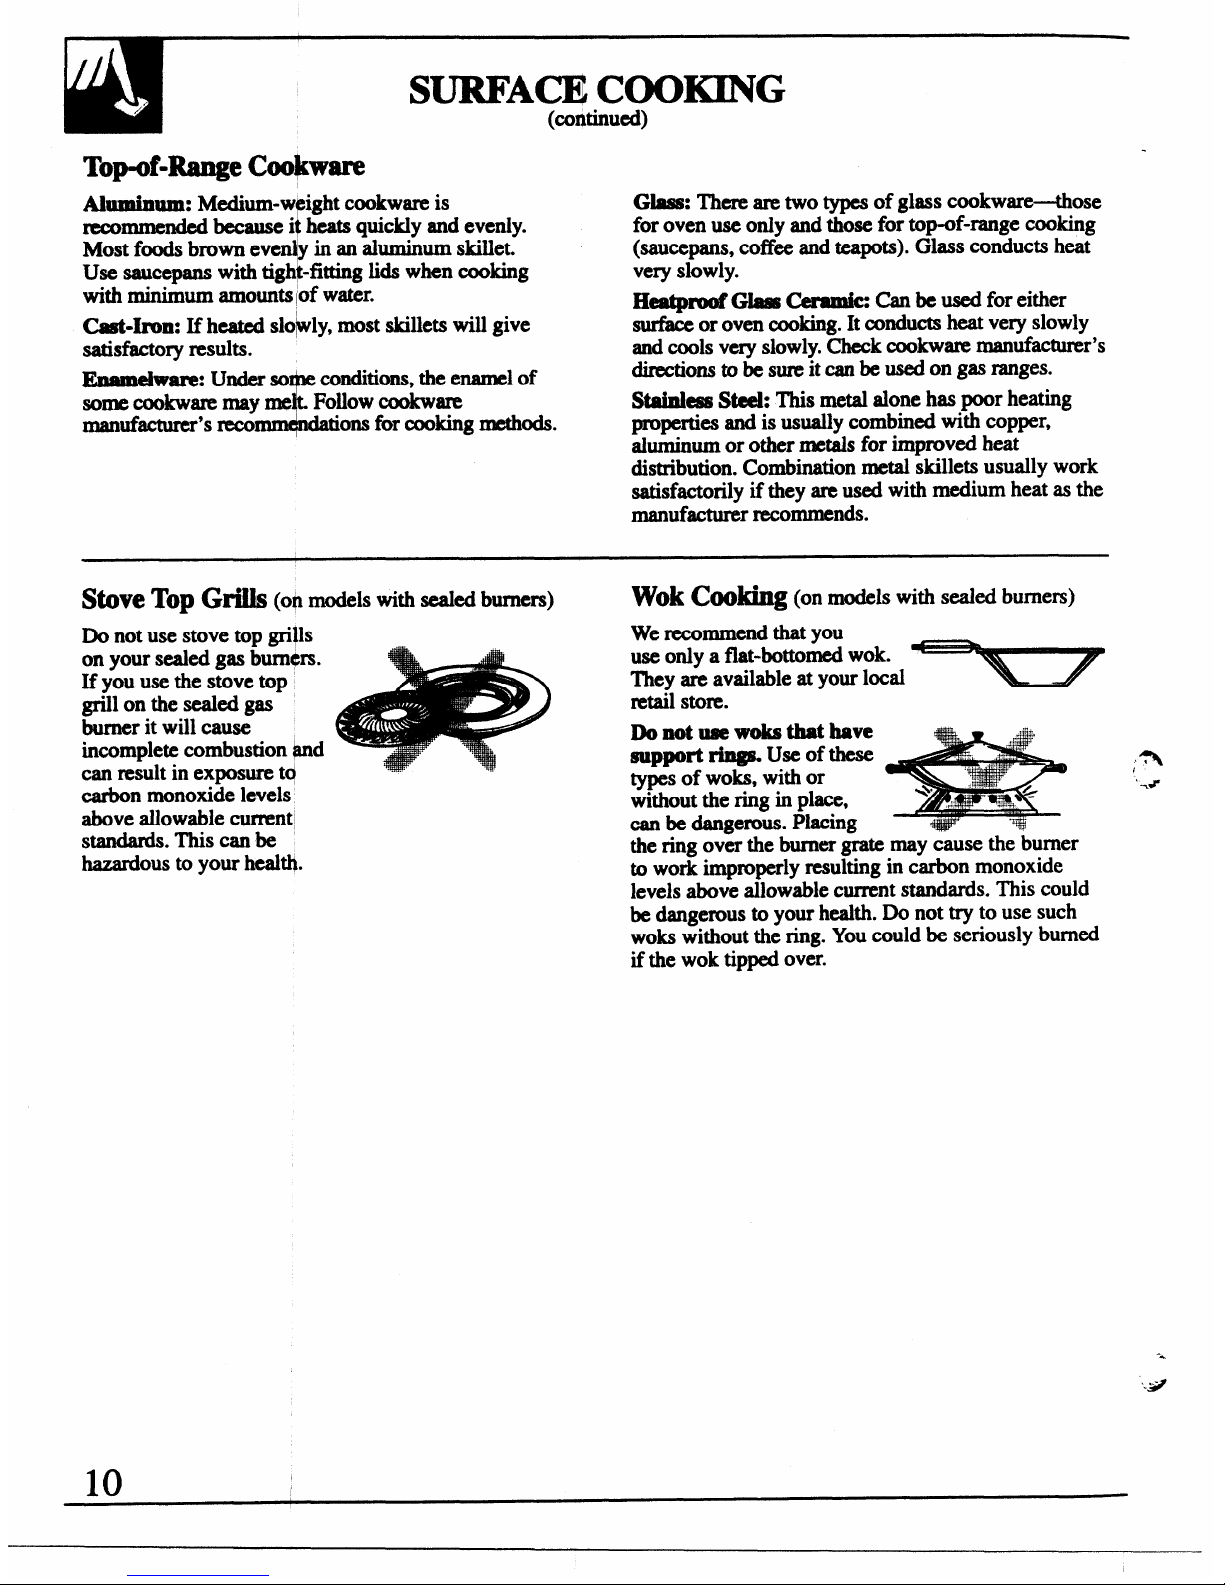
Stove Top Griils (OPmodels with seakxi burners) WokCdhg (on models with sealed burners)
Do not use stove top grills
We recommend that you
on your sealed gas bum@s.
use only a flat-bottomed wok.
If you use the stove top
They are available at your local
grill on the sealed gas retail store.
burner it will cause
Donotuse woksthdhave
incomplete combustion ~d
support~ useof these
;*
can result in exposure t~
carbon monoxide levels
types of woks, with or
‘Y*
above allowabie cument
without the ring in place,
can be dangerous. Piacing
standards. This can be
bZdOUS tOyOUrhealtl$.
the ring over the burner grate may cause the burner
to work improperly resulting in carbon monoxide
leveis above al~owablecurrent standards. This could
be dangerous to your health. Do not try to use such
woks without the ring. Youcould be seriously burned
if the wok tipped over.
-+
‘.9
~TURES OF lfOUR OVEN CONTROLS
●
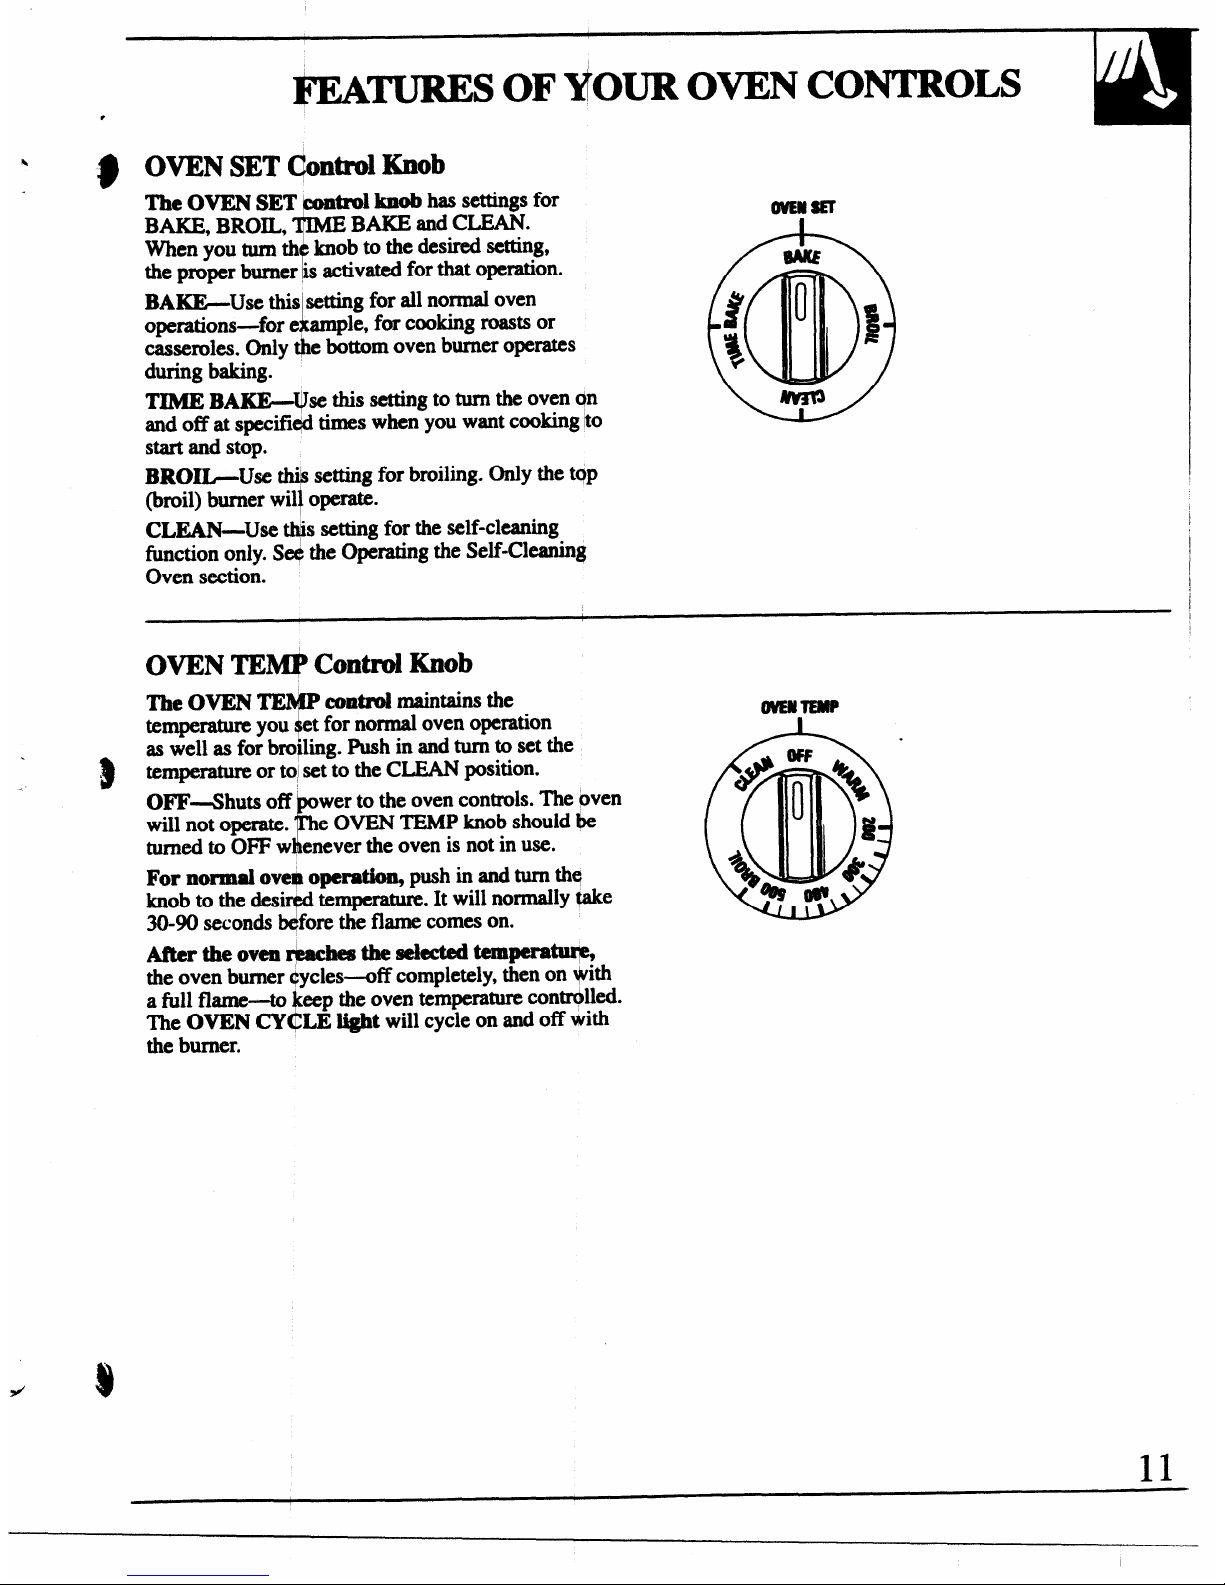
$ OVENSET Qontd Knob
TheOVENSET
1knob has settings for
BAKE, BROIL,
F
BAKE and CLEAN.
When you tum th knob to the desired setting,
the proper burner ksactivated for that operation.
BAKE-Use thkj setting for all normal oven
operations-for eiample, for cooking roasts or
casseroles. Only $e bottom oven burner operates
during baking.
ovEasEl
W!!!&”
TIME BAqse this setting to tum the oven qn
and off at specifie@times when you want cooking ito
S@’tand stop.
BROIL-Use
7
“ setting for broiling. Only the t~p
(broil) burner wil operate.
CLEAN-Use @is setting for the self-cleaning
fimction only. Sex?the Operating the Self-Cleanin~
Oven section.
The OVEN W contd maintains the
r
temperature you t for normal oven operation
as well as for bro ling. Push in and turn to set the
temperature or tolset to the CLEAN position.
OFF-Shuts off wer to the oven controls. The pven
will not operate.
F
e OVEN TEMP knob shouid W
turned to OFF w enever the oven is not in use.
For nomnal oveqhoperatkm push in d tLUTIthq
knob to the ales”
?
temperature. It will
nodly take
30-90
seconds fore the flame comes on.
After the oven - the S@kdd -P*
theoven burner ftycles+ff completely, then on *ith
J
a fill flame-to eep the oven temperature contrc)lled.
The OVEN CY LE
Ii@ will cycle on and off with
the burner.
11
I
I
1
FE&TURES OF YO OVEN CONTROLS,
*
Ii%)
CLOCK TIMER
(c@Xinued)
??
n
CLOCK
m
TIMER
Orvoff
El
SET TIME
a
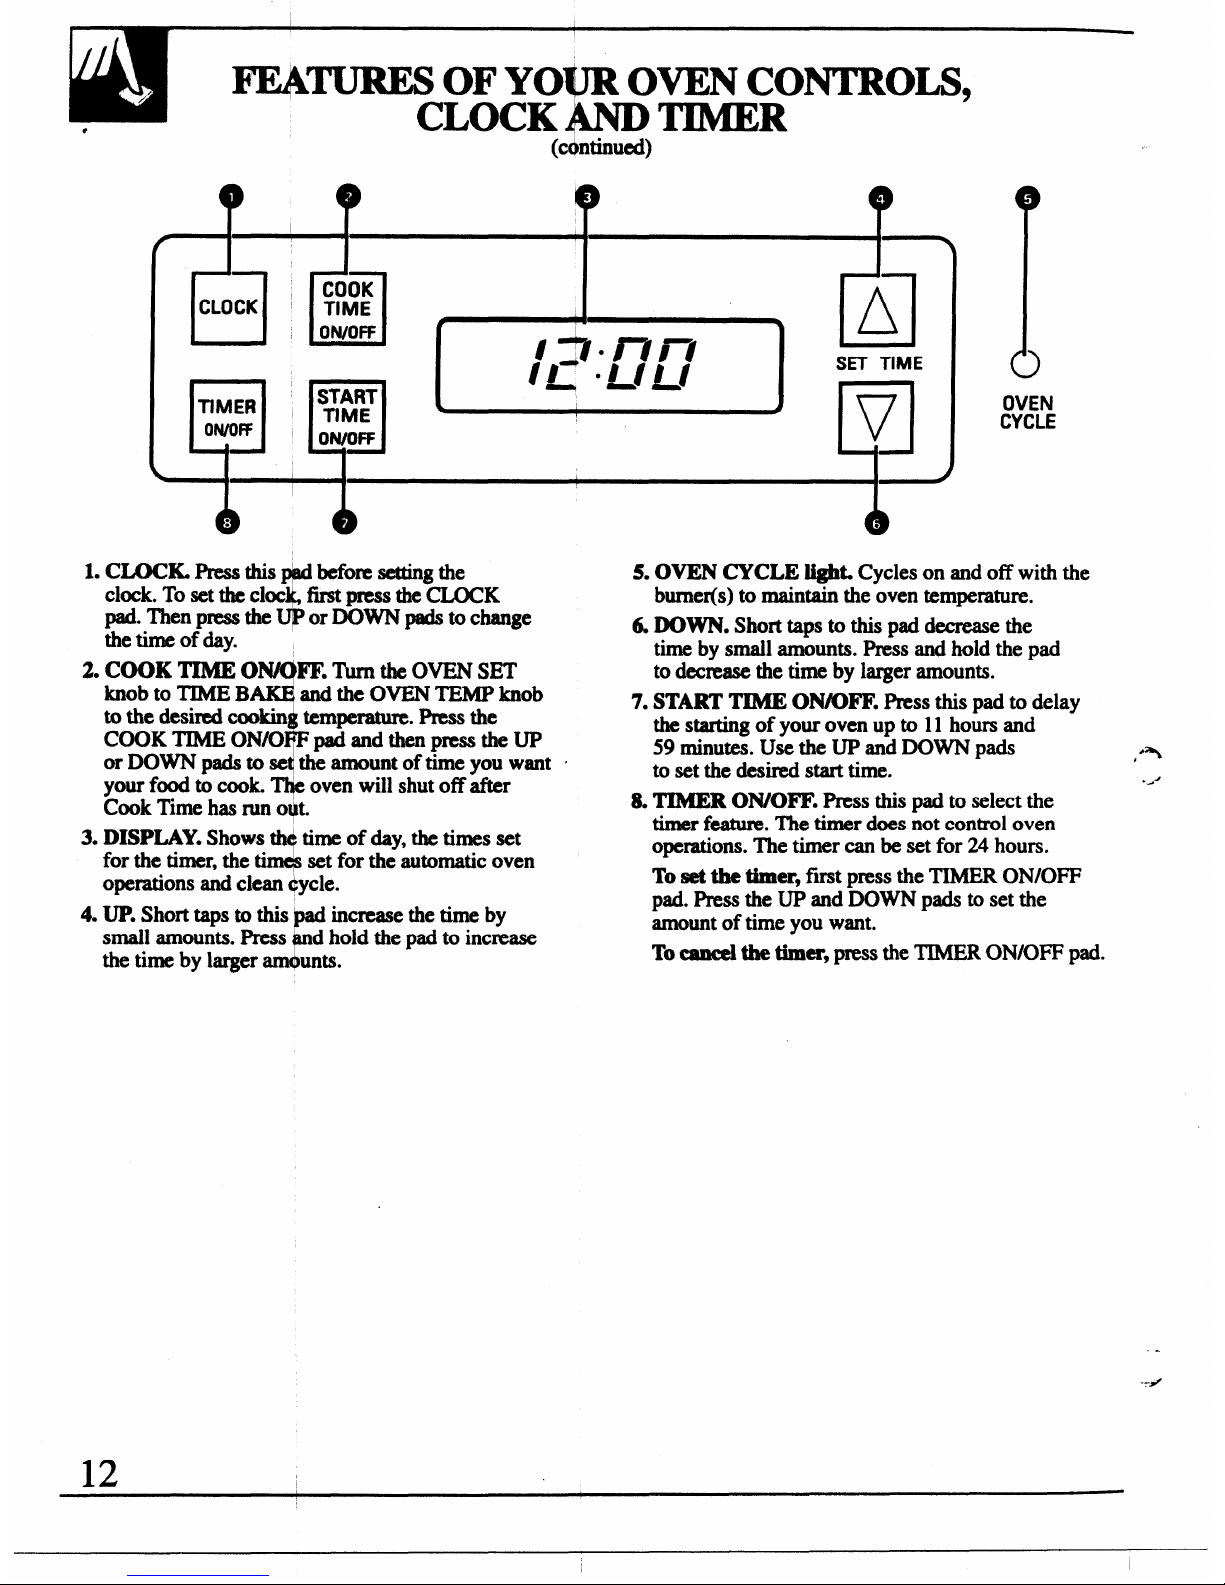
1. CLOCK Pressthis* before settingthe
$
clock. To set the C1OCfirst press the CLOCK
pad. Then press the
or DOWN @s to change
the time of day.
?
2. COOK TIMEO FE. Turn the OVEN SET
knob
to TIME B andtheovENTEMPknob
to
the desired ctxhkin temperature. Press the
COOK TIME ON/O padandthen press the UP
or DOWN pads to se the amount of time you want ‘
your fd to cook ~ oven will shut off after
Cook Time has mn o$t.
3. DISPLAY. Shows ~ time of (@t,the tiRNXset
for the timer, the timc# set for the automatic oven
operations and clean ~ycle.
4. ~. Short tZlpSto thiS
P
increase the time by
small amounts. Press d hold the pad to increase
the time by larger am@mts.
OVEN
CYCLE
5. OVEN CYCLE MgWCycles on and off with the
burner(s) to maintain the oven temperature.
4 DOWN. Short taps to this pad decrease
the
time
by small amounts. Press and hold the pad
to decrease the time by larger amounts.
7.
START TIME ON/OFF. Press this pad to delay
the starting of your oven up to 11 hours and
59 minutes. Use the UP and DOWN pads
to set the desired start time.
& TIMER
ON/OFF. Press thispad to select the
timer f-. The timer does not control oven
operations. The timer can be set for 24 hours.
To set the timeE, first press the TIMER ON/OFF
pad. Press the UP and DOWN pads to set the
amount of time you want.
To cancel the timer., press the TIMER ON/OFF pad.
12
I
1
OWN CONTROL$, CLOCK AND TIMER
●
$ Ckck
The clock must be ~ for the automatic oven timing $nctions to work
~rly. The* oil’~y -ot be changed during alTimed
Baking Or
a Self-Cleaning cyck$.
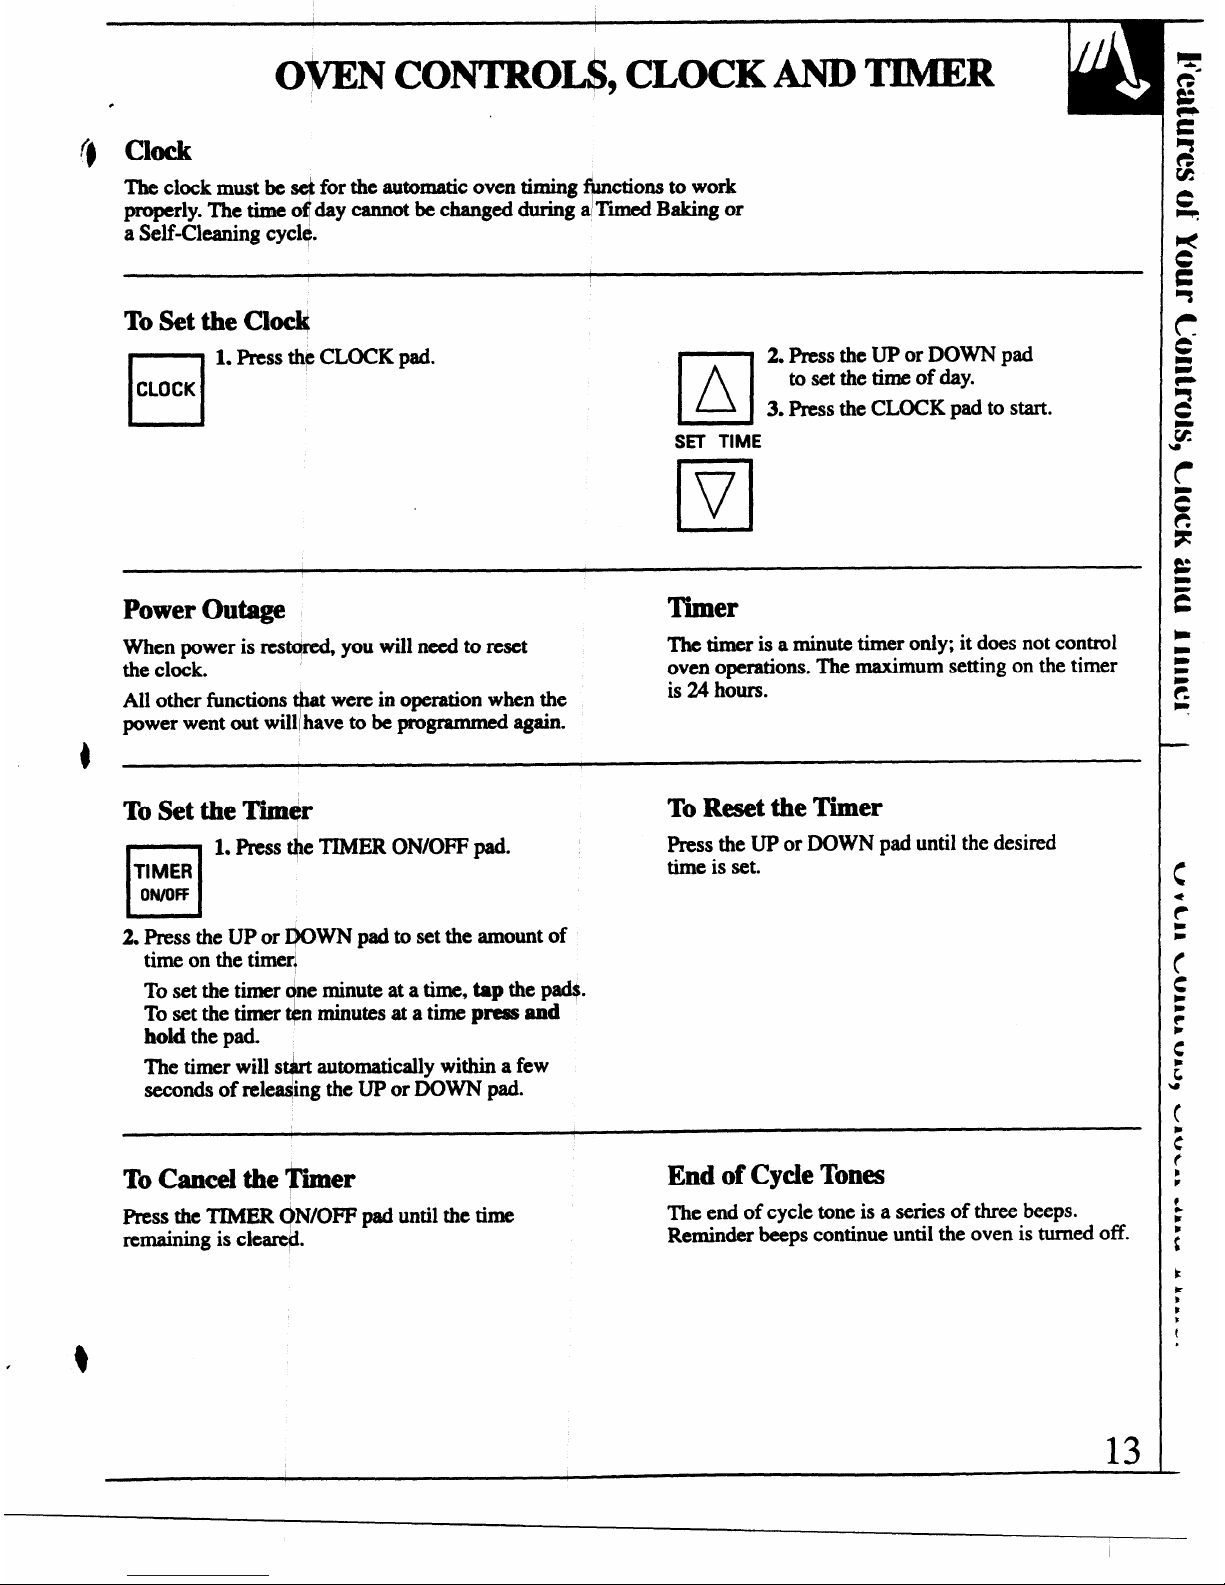
To Set the Ck@
c1
1. press th~CLOCK pad.
CLOCK
ZI
2. Press the UP or DOWN pad
to set the time of day.
3. Press the CLOCK pad to start.
Power Outage
Timer
When power is restc@ed,you will need to reset
The timer is a minute timer only; it does not control
the clock. ‘
oven operations. The maximum setting on the timer
All other fimctions
r
t were in operation when the
is 24 hours.
power went out will have to be programmed again.
\
TO Set the Tinw
❑
1. Pressde TIMERON/OFFpad.
TIMER
Owoff
2
Press the UP or Q(3WN pad to set the amount
time on the timerl
To Reset the Timer
Press the UP or DOWN pad until the desired
time is set.
of
To set the timer ne minute at a time, tap the pad$
$
Tosetthetimer nminutesat atimep~=d
hoid the pad.
The timer wills
$
automatically within a few
seconds of ml ing the UP or DOWN pad.
ToCancel the ~er
Press the TIMER ~N/OFF pad until the time
remaining is cleart$.
End of Cycle Tones
The end of cycle tone is a series of three beeps.
Reminder beeps continue until the oven is turned off.
13
USING YOUR OVEN
●
Before Wing Y~urOven
Be sure you undcrst@ how to set the controls
Prop=iy” Practic@re
t
ving and replacing the shelves
while the oven is c 1.Read the information and tips
on the following pag . Keep thiSguide handy WhCm
you can refer to i~ es
“allyduring the first weeks of
using your new rang+
Electric Ignition
Theovenburner+bm)il bumerm~Wby
electric ignitiom
To light either b
x
, turnthe OVEN SET knob to
the desired oven o “onand the OVEN TEMP
knob to the desired te@eratum. The burner should
ignite within 30-90 ~onds.
Mlkr the oven mache$ the selected tempemtum, the
oven burner cyck+d!f completely, then on with a
fill flame-to keep the oven temperature controlled.
Oven Light
Power Outage
CAUTION: Do not make any attempt to operate
the electric ignition oven during an electrical
power failure.
The oven or broiler cannot be lit during a power
ftilure. Gas will not flow unless the glow bar is hot.
If the oven is in use when a power failure occurs,
the oven burner shuts off and cannot be m-lit until
power is restored.
Use the switch on the fontrol panel to turn the oven light on or off.
Oven Moisture
As your oven heats up~the temperature change of the
air in the oven may
7
e water droplets to form on the
door glass. These drop ets are harmless and will
evaporate as the oven +ontinues to heat up.
.
-.
->
14
●
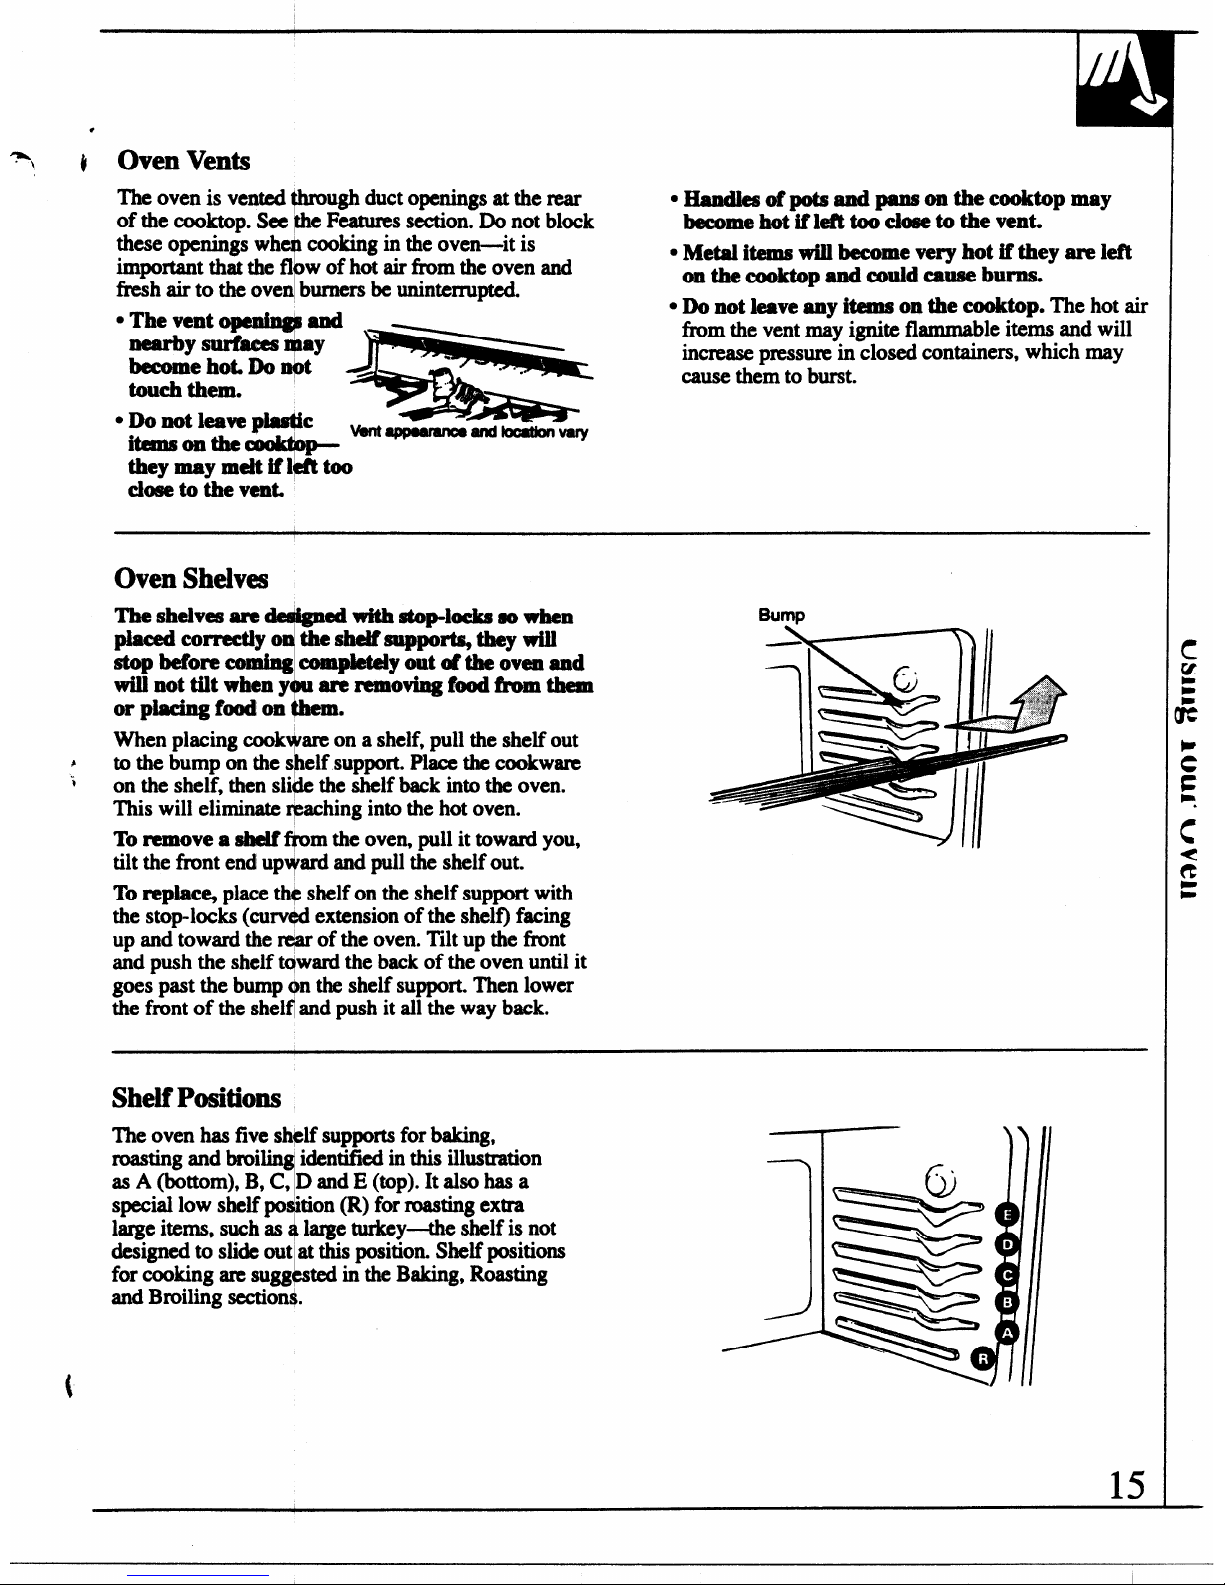
The oven is vented fhrough duct openings at the rear
of the
cooktop. See ~e Features section. Do not block
these openings wh7cooking in the oven—it is
important that the fl w of hot air tirn the oven and
fresh air to the oven burners be unintmupted.
● The vent
become hot, Do n@t
touch them*
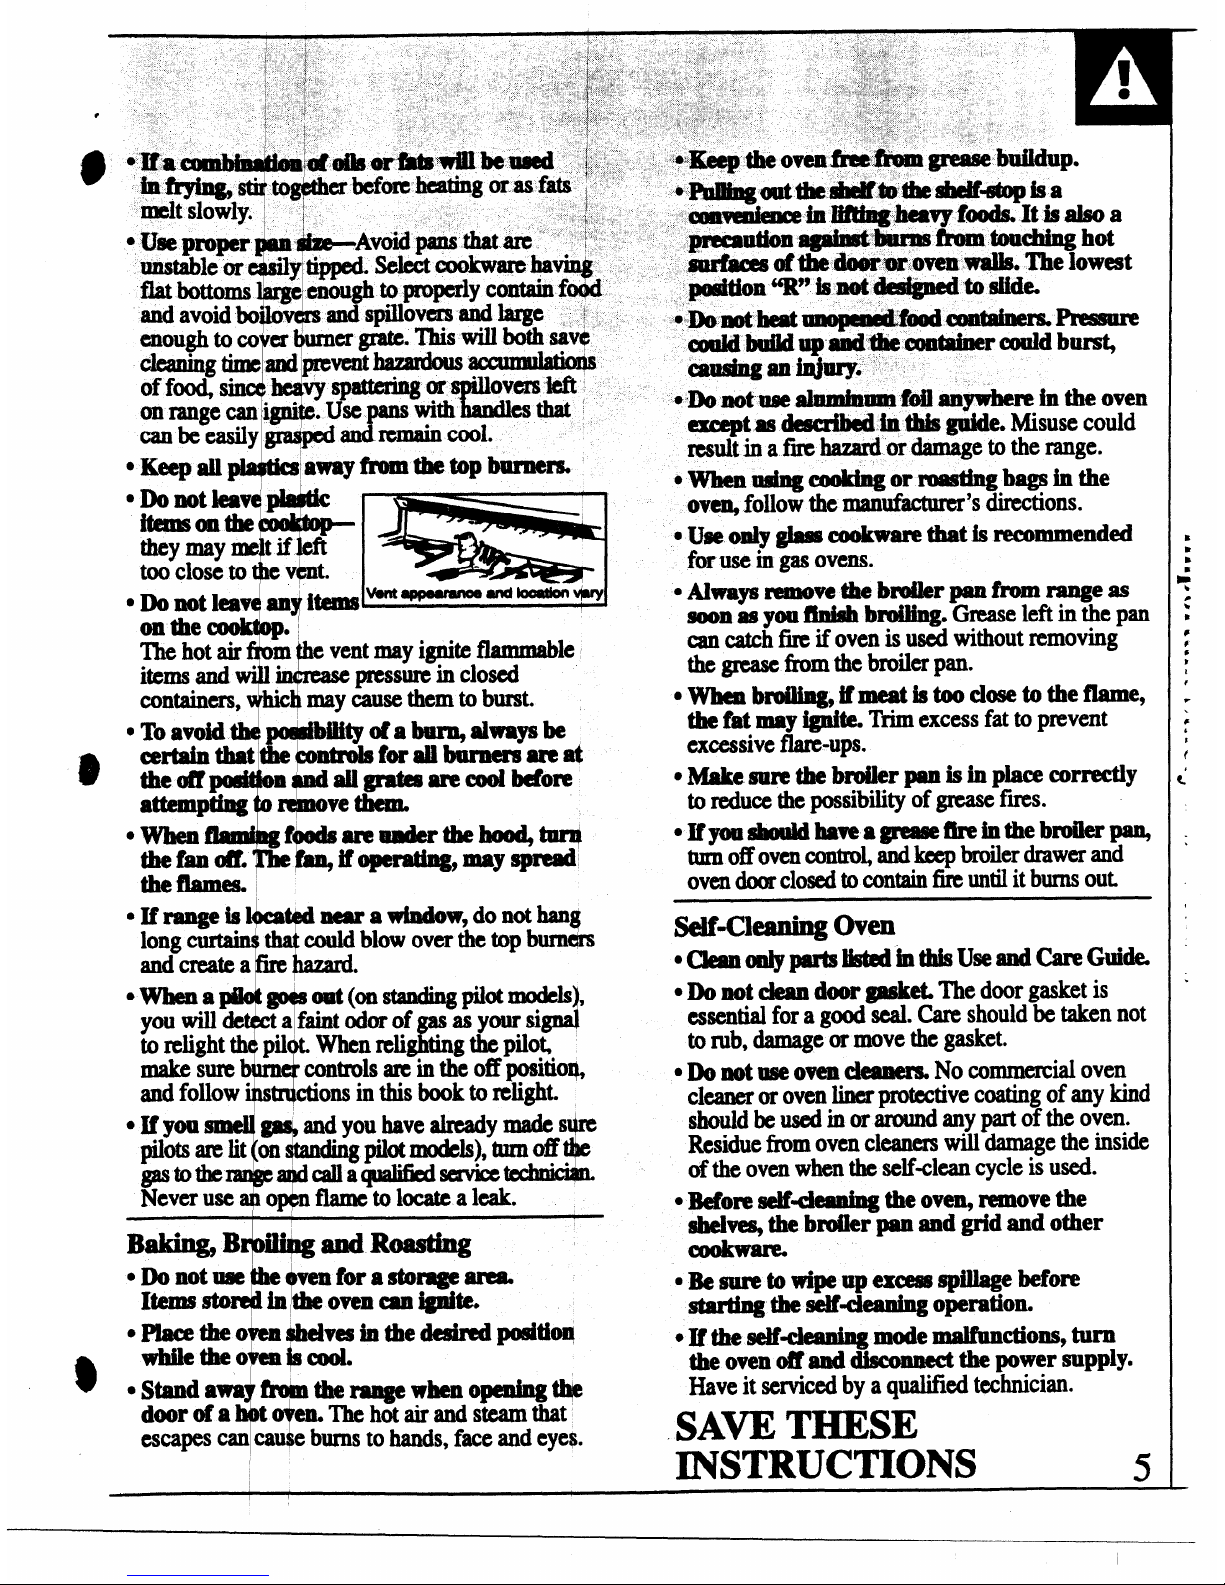
● Do not leave plastic
itOmsonthemoktql-
vm~Wullum&nlVq
they may melt if 1* too
close to the v4W
●Handles ofpotsand panson thecooktop may
become hot if left too dose to the vent.
●Metal items will become very hotiftheyareieft
on the (50&top and could cause burns.
● Do not leave any items on the cooktop. The hot air
from the vent may ignite flammable items and will
increase pressure in closed containers, which may
cause them to burst.
Oven Shelves
The shelves am
T
d with stop-locks so when
Pkedeomectlyo theshelfsupport4@leywul
stop
b4!fOl”e cOm@ COI@ddy OUt Of the OV@?Band
will not tilt when y al’eremovin gfdfhomthem
orpiacingfoodon m.
When placing cook are on a shelf, pull the shelf out
b
T
to the bump on thes elf support. Place the cookware
i
on the shelf, then sli$lethe shelf back into the oven.
This will eliminate rpaching into the hot oven.
To remove a shelf f@m the oven, pull it toward you,
tilt the front end up~ard and pull the shelf out.
To replace place@ shelf on the shelf support with
the stop-locks (curw$dextension of the shelf) facing
up and toward the repr of the oven. ‘131tup the front
and push the shelf ~ward the back of the oven until it
goes past the bump @ the shelf support. Then lower
the front of the shelfiand push it all the way back.
Burnt)
Shelf Positions
The oven has five sh@fsupports for baking,
roasting and baling i&ntified in this illustration
as A (bottom), B, C, D and E (top). It also has a
!
special low shelf po “tion(R) for roasting extra
large items, such as large turkey-the shelf is not
designed to slide out at this position. Shelf positions
L
for cooking am sugg ted in the Baking, Roasting
and Broiling section$.
15
BAKING
Donotiocktheoven
*
Withthelatchduring
If you think an adjustment is necessary, see the Adjust
linking. mlatehkl
for selkleaxdng only.
the Oven Thermostat section. It gives easy
Do It
Your oven tempaatwe * controlled very
accurately
lixmse~instructions on how to adjust the thermostat.
using an oven control s~stem. It is recommended that
1
you operate the oven f a number of weeks to
become familiar with y ur new oven’s performance.
How to Set Y- R@ge for Baking
To avoid poasilie Q place the shelves in the
2 Check the food for doneness at the minimum time
conect position before fiu turn the oven on.
on the recipe. Cook longer if necessary.
1. Close the
oven door. urn the OVEN SET knob to
&
3. Tum the OVEN TEMP knob to OFF and
BAKE and then turn e OVEN TEMP knob to the
then remove the food.
desired temperature.
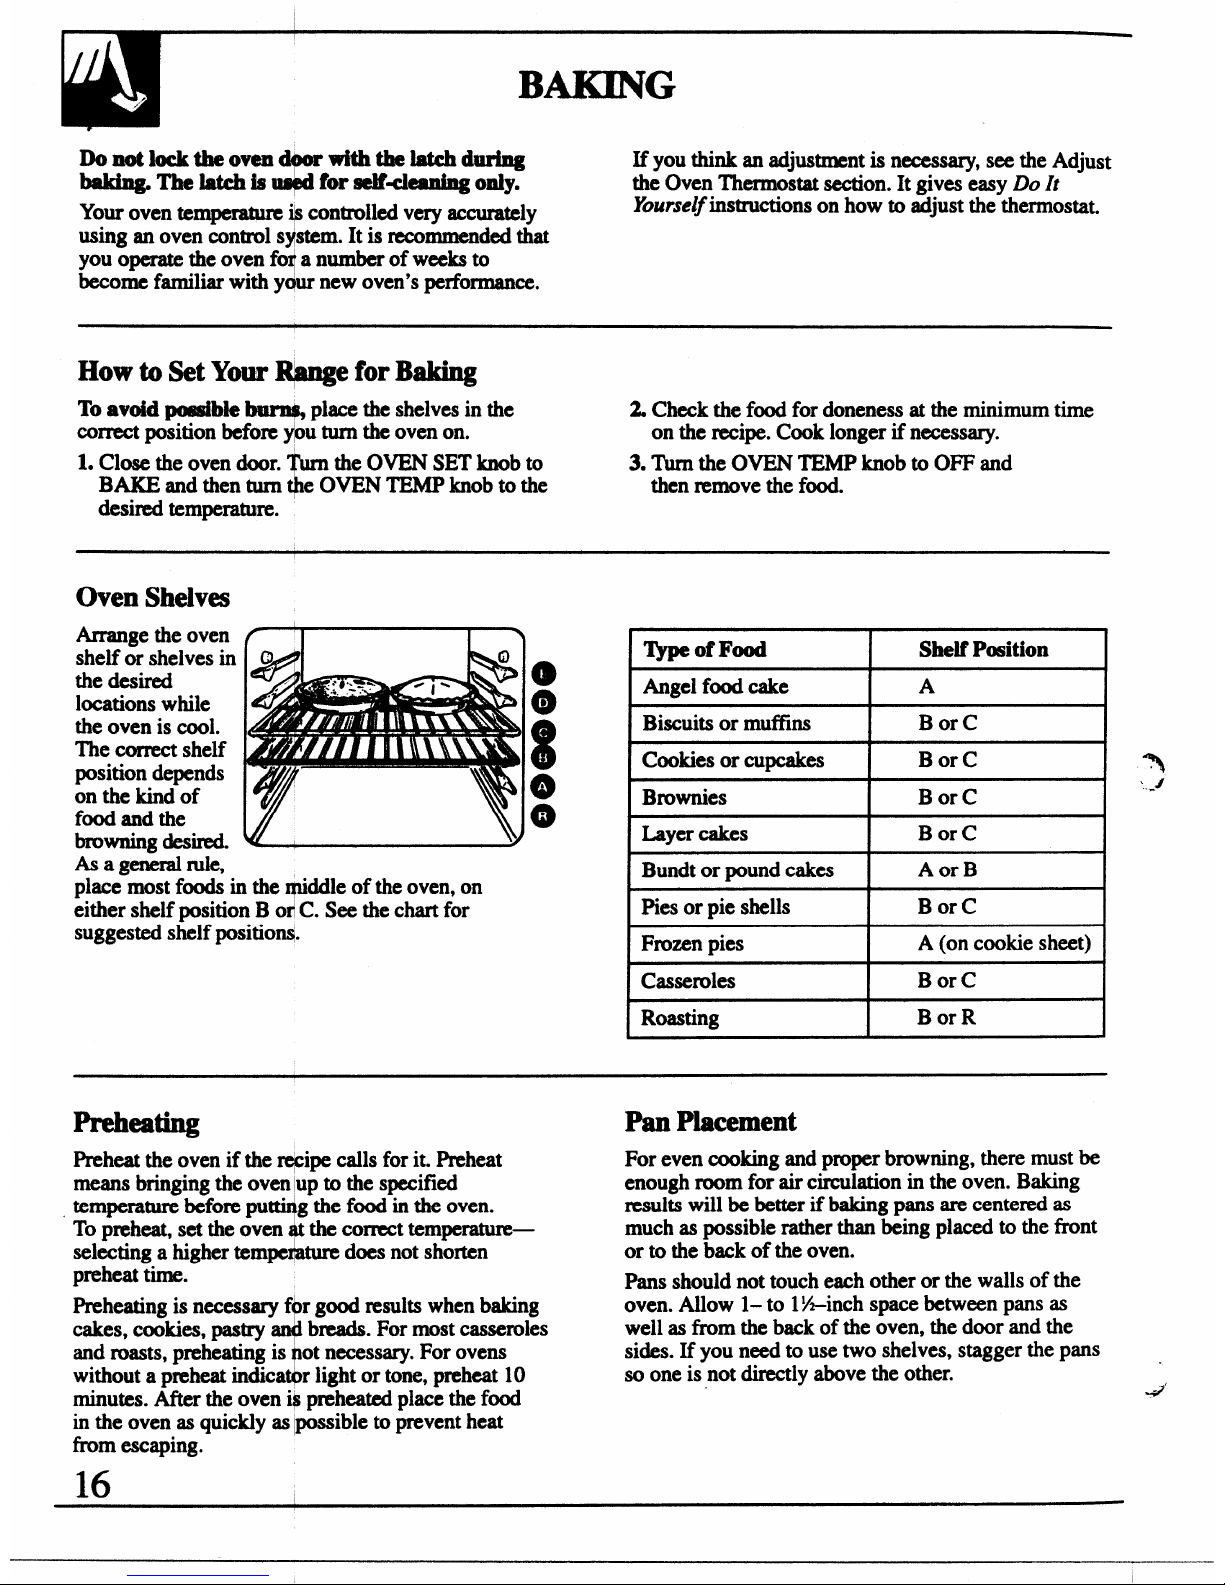
Oven Shelves
An=angethe oven
shelf or shelves in
the desired
locations while
the oven is cool.
The correct shelf
position depends
on the kind of
food and the
browning desired.
As a general rule,
----- -
I‘&peofFood
I Shelf Position I
IAngel food cake I A
I
I Biscuits or muffins I BorC
I
I Cookies or cupcakes I B orC
1%
s
I
Brownies
I
Bor C
‘##
ILayer cakes I BorC
I
I Bundt or pound cakes I A or B
I
tke-most fti in the tiddle of the oven. on
i
1
I
~ither shelf position B OXPC. See the chart for
I Pies or pie shells
I BorC
I
suggested siielf positio~.
Frozen pies
A (on cookie sheet)
Casseroles
Bor C
I
Roasting Bor R
Preheating Pan Placement
Preheat the oven if the Wipe calls for it. Preheat For even cooking and proper browning, there must be
means bringing the oven Iupto the specified
enough room for air circulation in the oven. Baking
temperature before pu~g the fd in the oven.
results will be better if baking pans are centered as
To preheat, set the oven the correct temperature—
$
much as possible rather than being placed to the front
selecting a higher tempe tum does not shorten
or to the back of the oven.
preheat time.
Pans should not touch each other or the walls of the
Preheating is necessary f~r good results when baking
oven. Allow 1-to 1Yi-inchspace between pans as
cakes, cmkies, pastry ~ breads. For most casseroles
well as ffom the back of the oven, the door and the
and masts, preheating is pot necessary. For ovens
sides. If you need to use two shelves, stagger the pans
without a preheat indica~r light or tone, preheat 10 so one is not directly above the other.
minutes. After the oven ip preheated place the food
&
in the oven as quickly as l~ible to prevent heat
from escaping.
16
I
When using pmpan@ baking mixes, follow package recipe or
instructions fa besi baking ~SUltS.
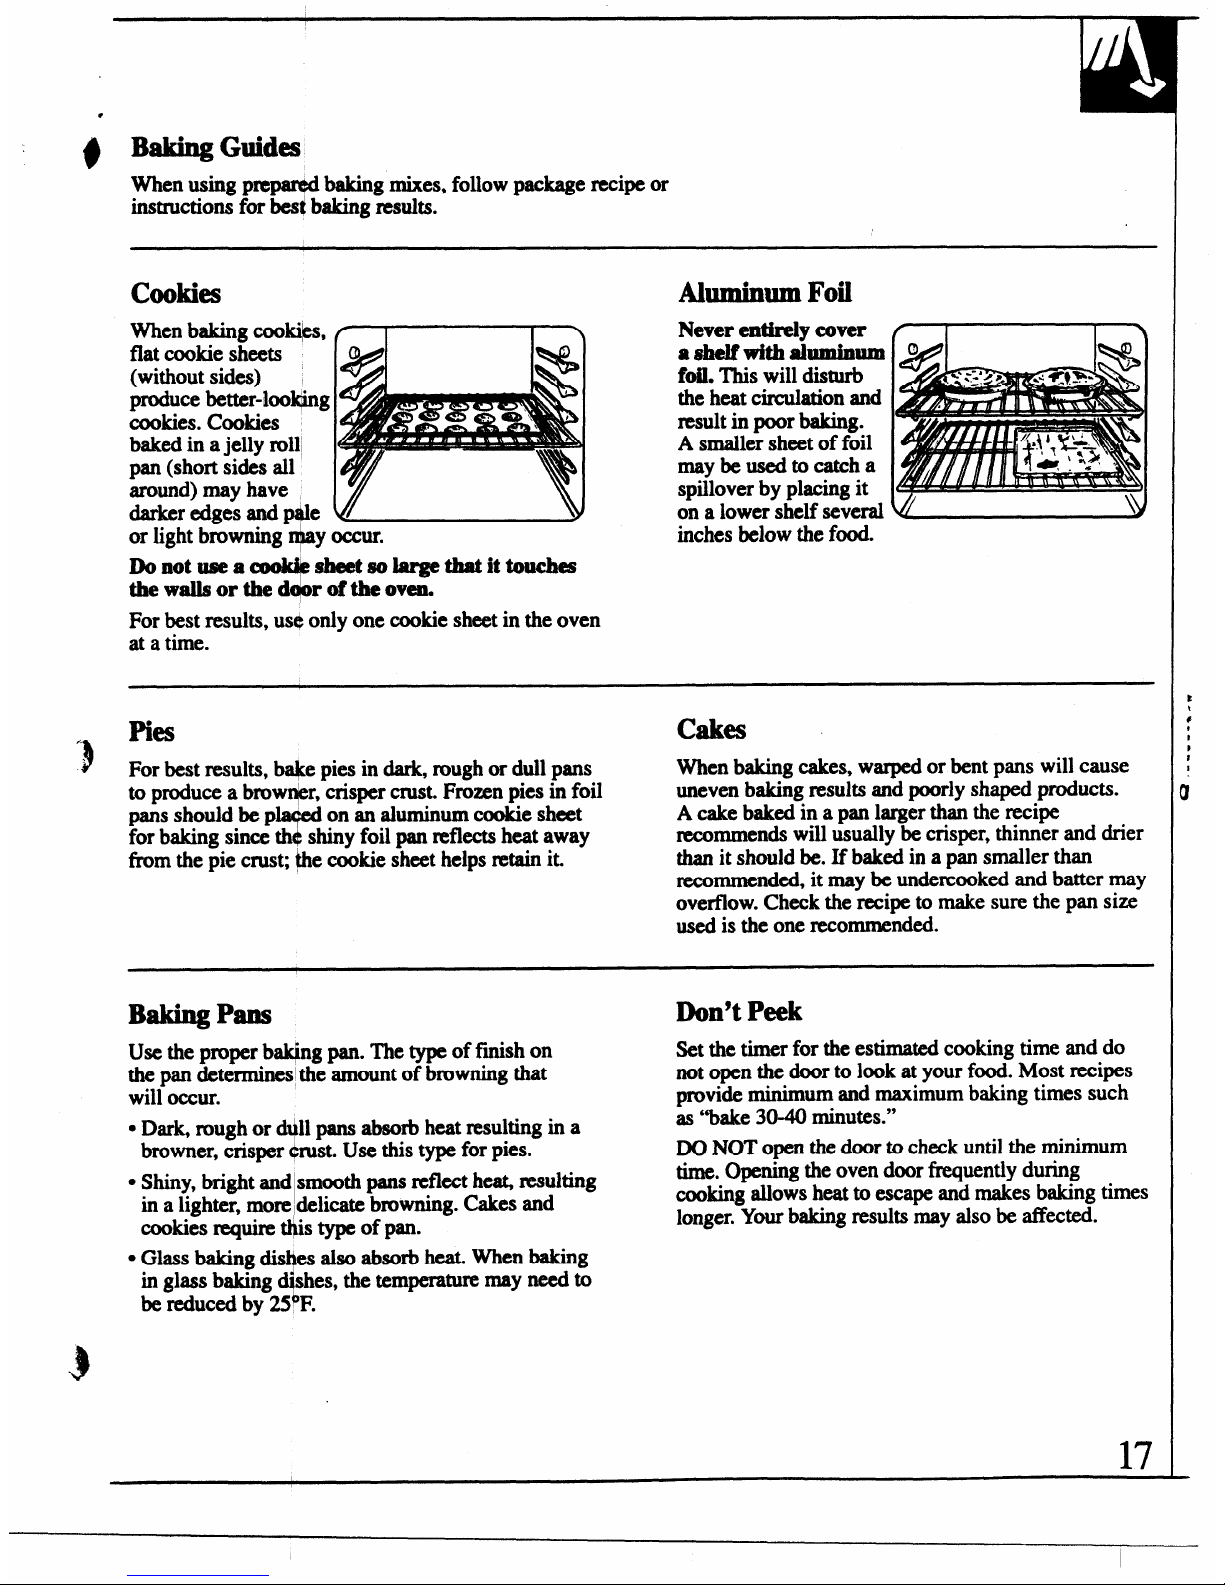
cookies
When baking cooki~,
flat cookie sheets
(without sides)
produce better-kd@ing
cookies. Cookies
baked in a jelly roll
P (short sides all
around) may have
darker edges and p#e vt
~
or light browning r#y occur.
Donotusea
%
sheet sokrgethat ittouches
thewallsorthed roftheovem
For best results, usq only one cookie sheet in the oven
at a time.
Aluminum Foil
Never entirely cover
a shelf with aluminum
f@. This will disturb
the heat circulation and
result in poor baking.
A smaller sheet of foil
may beusedtocatcha
spillover by placing it
on a lower shelf several
inches below the food.
Pies
cakes
For best results, we pies in dark, rough or dull pans
When baking cakes, warped or bent pans will cause
to produce a bro~r, crisper crust. Frozen pies in foil
uneven baking results and poorly shaped products.
pans should be pw on an aluminum cookie sheet
A cake baked in a pan larger than the recipe
for baking since th@shiny foil pan reflects heat away
recommends will usually be crisper, thinner and drier
from the pie crust; the cookie sheet hcips retain i~
than it should be. If baked in a pan smaller than
recommended, it maybe undercooked and batter may
ovefflow. Check the recipe to make sure the pan size
used is the one recommended.
Baking Pans
Use the proper bal@g pan. The type of ftih on
the pan determines the amount of browning that
will occur.
cDark, rough or d~ll pans absorb heat resulting in a
browner, crisper trust. Use this type for pies.
● Shiny, bright and smooth pans reflect hex resulting
in a lighter, mor+elicate browning. Cakes and
cookies require @is type of pan.
4
● Glass baking dis es AJOabsorb heat. When baking
in glass baking shes, the temperature may need to
be lXXhlCedby 25 F.
Don’t Peek
Set the timer for the estimated cooking time and do
not open the door to look at your food. Most recipes
provide minimum and maximum baking times such
as “bake 30-40 minutes.”
DO NOT open the door to check until the minimum
time. Opening the oven door fkquently during
cooking allows heat to escape and makes baking times
longer. Yu baking results may also be affected.
17
I
 Loading...