

Page 1

contents
connections 7
remote 20
features 28
menus 34
FAQs 41
warranty 47
user’s guide
|
LCD FLAT PANEL HDTV
For use with models: L42FHD2X48/L46FHD2X48
/L52FHD2X48
Table of contents
1
Page 2

Important Information
CAUTION
RISK OF ELECTRIC SHOCK.
DO NOT OPEN
Caution: To reduce the risk of electric shock, do not remove cover (or back). No user serviceable parts inside. Refer
servicing to qualified service personnel.
This symbol indicates "dangerous voltage"
inside the product that presents a risk of
electric shock or personal injury.
WARNING
To reduce the risk of fire or electric shock, do
not expose this product to rain or moisture. This
product should not be exposed to dripping or
splashing. No objects filled with liquids, such as
vases, should be placed on the component.
This symbol indicates that this product contains mercury. Special disposal of this product for environmental reasons
may be required under the laws applicable to your jurisdiction. For disposal or recycling information, please contact
your local authorities or the Electronic Industries Alliance: www.eiae.org.
This symbol indicates that this product incorporates double
insulation between hazardous main voltage and user accessible
parts. When servicing, use only identical replacement parts.
This symbol indicates important instructions
accompanying the product.
WARNING
The TV is unstable if it is not properly attached to
the base or mounted to the wall. Please follow
the base or wall mounting instructions provided in
the User’s Guide to ensure your safety.
Refer to the identification/rating label located on the back panel of your product for its proper operating voltage.
FCC regulations state that changes or modifications to this unit not expressly approved by the party responsible for compliance
could void the user’s authority to operate the equipment.
Cable TV Installer: This reminder is provided to call your attention to Article 820-40 of the National Electrical Code (Section 54 of
the Canadian Electrical Code, Part 1) which provides guidelines for proper grounding and, in particular, specifies that the cable
ground should be connected to the grounding system of the building as close to the point of cable entry as practical.
Important: This television is a table model and is designed to sit on a firm, flat surface. Don’t place the TV on soft carpeting or a
similar surface, as the ventilation slots on the bottom of the unit may be blocked, resulting in reduced lifetime from overheating.
To assure adequate ventilation for this product, maintain a spacing of 4 inches from the top and sides of the TV receiver and 2
inches from the rear of the TV receiver and other surfaces.
Also, make sure the surface or stand is of adequate size and strength to prevent the TV from being accidentally tipped over,
pushed off, or pulled off. This could cause personal injury and/or damage to the TV. Refer to the Important Safety Instructions
on the next page.
The power button (followed by the power symbol) on this TV and your remote control puts the TV into a very low-power
standby mode but will not completely shut the power off. In order to shut the power off, you will need to disconnect the
power cord from your outlet. Therefore, you should make sure the TV is installed in a way that allows you to disconnect the
power cord when desired.
Product Registration
Please fill out the product registration card (packed separately) and return it immediately. For US customers: Your RCA
Consumer Electronics product may also be registered at www.rca.com/television. Registering this product allows us to
contact you if needed.
Product Information
Keep your sales receipt to obtain warranty parts and service and for proof of purchase. Attach it here and record the serial
and model numbers in case you need them. These numbers are located on the product.
Model No. ___________________________ Serial No.______________________ Purchase Date __________________
Dealer/Address/Phone ______________________________________________________________________________
Page 3
Important Safety Instructions
1. Read and follow all instructions.
2. Do not block any ventilation openings. Install in accordance with the manufacturer’s instructions.
3. Do not install near any heat sources such as radiators, heat registers, stoves, or other apparatus (including amplifiers) that
produce heat.
4. Do not negate the safety purpose of the polarized or grounding-type plug. A polarized plug has two blades with one
wider than the other. A grounding type plug has two blades and a third grounding prong. The wide blade or the third
prong is provided for your safety. If the provided plug does not fit your outlet, consult an electrician for replacement of the
obsolete outlet.
5. Protect the power cord from being walked on or pinched particularly at plugs, receptacles, and the point where it exits
from the component.
6. Do not use this component near water.
7. Only use the attachments/accessories specified by the manufacturer.
8. Clean only with dry cloth.
9. Use only with the cart, stand, tripod, bracket, or table specified by the manufacturer, or sold with the component. When
the TV is placed on a cart, use caution when moving the cart to avoid injury from tip-over.
10. Unplug this component during lightning storms or when unused for long periods of time.
11. Refer all servicing to qualified service personnel. Service is required when the component is damaged in any way, such as
power supply cord or plug damage, liquid spilled on or objects falling onto the component, rain or moisture exposure,
abnormal operation, or if the component has been dropped.
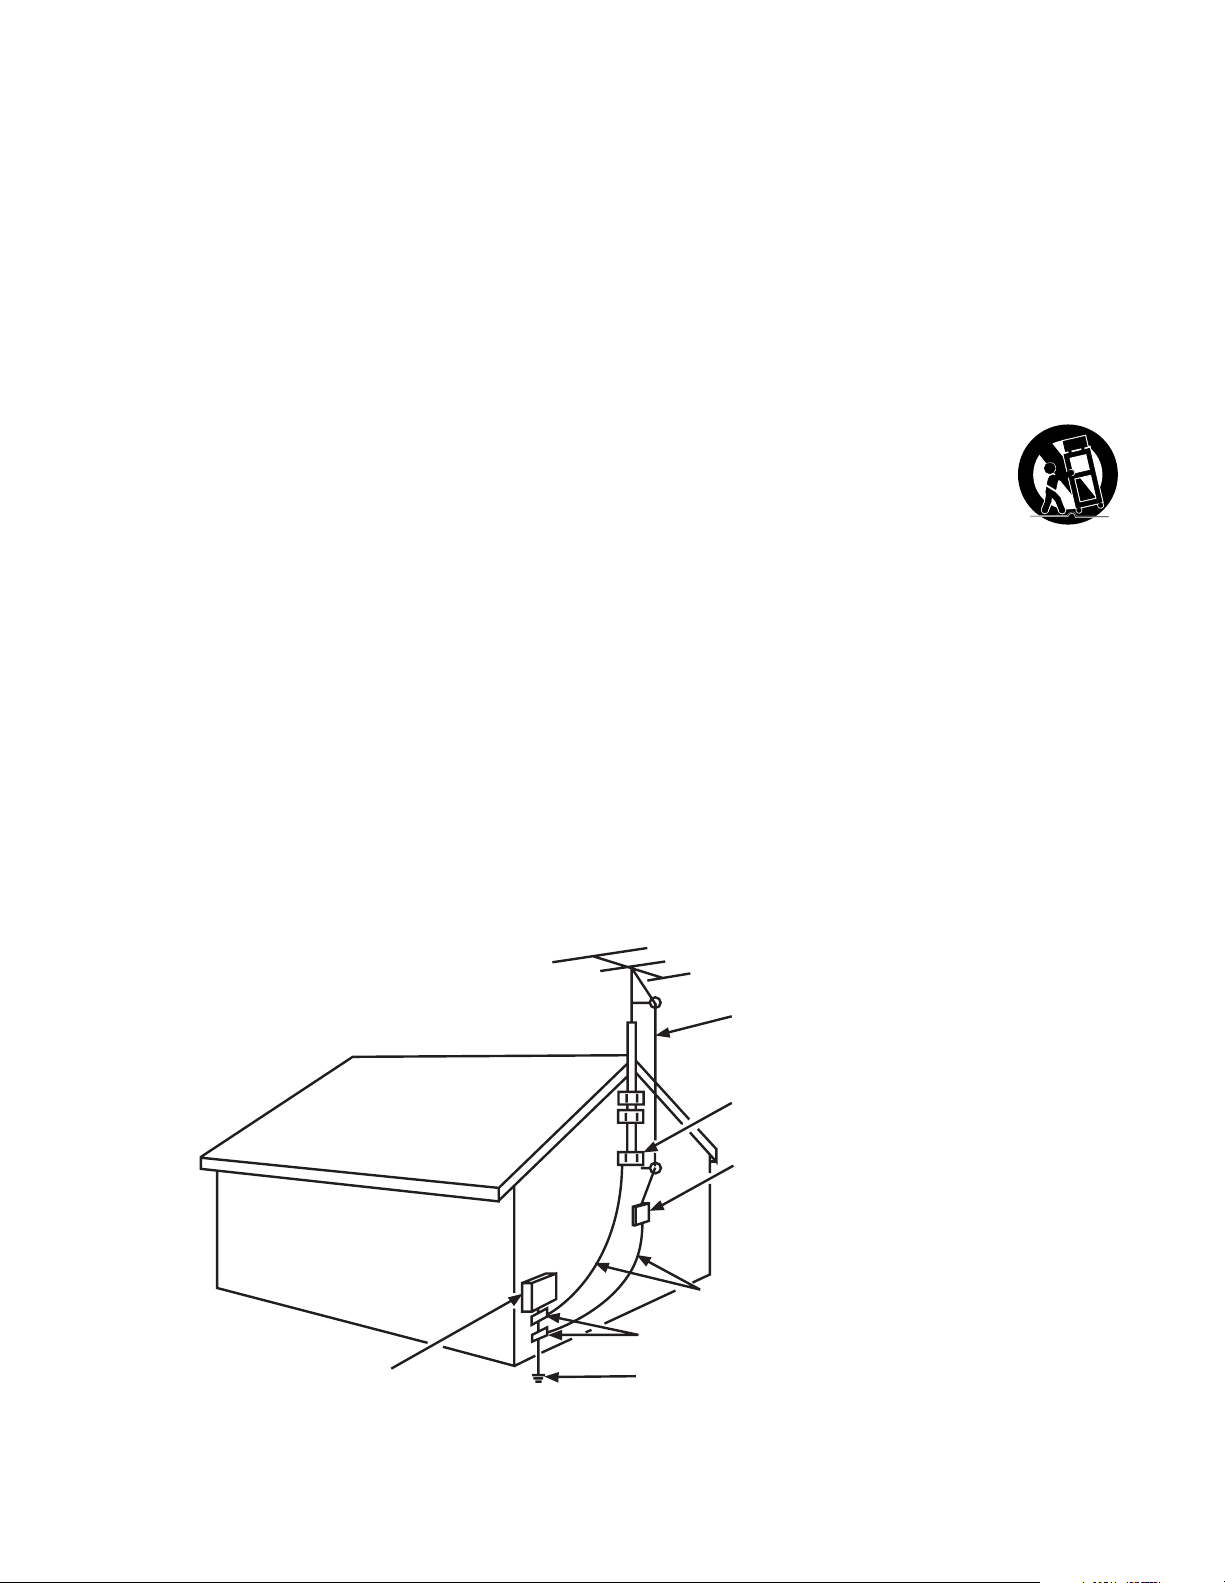
12. If an outside antenna or cable system is connected to the product, be sure the antenna or cable system is grounded so
as to provide some protection against voltage surges and built-up static charges. Section 810 of the National Electrical
Code, ANSI/NFPA No. 70-1984 (Section 54 of Canadian Electrical Code, Part 1) provides information with respect to
proper grounding of the mast and supporting structure, grounding of the lead-in wire to an antenna-discharge unit, size of
grounding conductors, location of antenna-discharge unit, connection to grounding electrodes, and requirements for the
grounding electrode. See following example:
ELECTRIC SERVICE
EQUIPMENT
ANTENNA
LEAD IN
WIRE
GROUND CLAMP
ANTENNA
DISCHARGE UNIT
(NEC SECTION 810-20)
GROUNDING CONDUCTORS
(NEC SECTION 810-21)
GROUND CLAMPS
POWER SERVICE GROUNDING
ELECTRODE SYSTEM
(NEC ART 250, PARTH)
Page 4

Table of Contents
Important Safety Instructions ..................................................................................................................... i
Chapter 1 I Connections & Setup
Before Initial Setup .......................................................................................................................... 7
Protect Against Power Surges............................................................................................................ 7
Safety Information .............................................................................................................................. 7
Avoid Audio Interference .................................................................................................................... 7
Avoid Direct Light ............................................................................................................................... 7
Check Supplied Parts ........................................................................................................................ 7
Removing the Table Stand .............................................................................................................. 8
Mounting Your TV to the Wall .......................................................................................................... 8
Obtain the Signal.............................................................................................................................. 9
What You Need ..................................................................................................................................9
What you Need to Know ....................................................................................................................9
Choose Your Connections ..............................................................................................................10
Connecting a Component with Composite Video (Good) ..................................................... 11
Connecting a Component with Component Video (Better) .................................................. 11
Connecting a Component with HDMI (Best) ........................................................................ 12
Connecting a PC Component ............................................................................................. 13
Viewing the Picture from the Connected Component ..........................................................14
Viewing a PC....................................................................................................................... 14
Plug in the TV .................................................................................................................................. 15
Put Batteries in the Remote ........................................................................................................... 15
Turn on the TV .................................................................................................................................15
Using the Remote Control to Complete Initial Setup ....................................................................15
Complete the Initial Setup .............................................................................................................. 16
Set the Menu Language ....................................................................................................................16
Set the TV Location Mode ................................................................................................................. 16
Complete Channel Setup .................................................................................................................. 16
What To Expect ............................................................................................................................... 17
Waching TV-Analog Channels ........................................................................................................... 17
Waching TV-Digital Channels ............................................................................................................. 17
Changing Channels ........................................................................................................................... 17
4 Table of Contents
Page 5

Explanation of Jacks (in alphabetical order).................................................................................. 18
Buttons and Other Jacks on Your TV ............................................................................................. 19
Side Input Jacks ............................................................................................................................... 19
Side Panel Buttons............................................................................................................................ 19
Chapter 2 I Using the Remote Control
Remote Control Buttons................................................................................................................. 20
TV Functions ..................................................................................................................................... 20
INPUT Button .................................................................................................................................... 21
Programming the Remote to Operate Other Components ........................................................... 21
Determine If You Need to Program Remote .................................................................................. 21
Programming the Remote .............................................................................................................. 22
Using Direct Entry ........................................................................................................................... 22
Using a Manual Code Search ......................................................................................................... 22
Using Automatic Code Search ....................................................................................................... 22
Using the Remote ........................................................................................................................... 23
Modes of Operation ........................................................................................................................ 23
Manual Reset .................................................................................................................................. 23
Remote Code List ........................................................................................................................... 24
Chapter 3 I Using TV Features
Channel Banner .............................................................................................................................. 28
Autotuning ....................................................................................................................................... 28
Parental Controls and V-Chip ........................................................................................................ 29
V-Chip - US and Canada................................................................................................................... 29
Lock Parental Controls...................................................................................................................... 30
Unlock Parental Controls .................................................................................................................. 30
V-Chip Rating Screen ....................................................................................................................... 30
US V-Chip TV Ratings ....................................................................................................................... 30
Blocking Specific Content Themes .................................................................................................... 31
US V-Chip Movie Rating Limit ........................................................................................................... 31
Blocking Canada V-Chip Ratings ...................................................................................................... 32
Block Channel .................................................................................................................................. 32
Block Buttons ................................................................................................................................... 32
Blocking Unrated/Exempt Programs ................................................................................................. 32
Future Rating Region ........................................................................................................................ 32
Additional Features......................................................................................................................... 33
Fetch Feature............................................................................................................................................ 33
Screen Formats ................................................................................................................................ 33
Table of Contents 5
Page 6

Chapter 4 I Using the TV Menu
Using the Menu System ................................................................................................................. 34
Sound Menu .................................................................................................................................... 34
Picture Menu ................................................................................................................................... 35
Channel List Menu .......................................................................................................................... 37
Setup Menu ..................................................................................................................................... 37
Parental Control Menu.................................................................................................................... 39
Time Menu....................................................................................................................................... 39
USB Menu ....................................................................................................................................... 40
USB Connection ............................................................................................................................. 40
Chapter 5 I Other Information
Frequently Asked Questions (FAQs) .............................................................................................. 41
Troubleshooting .............................................................................................................................. 42
V-Chip Rating Explanations ........................................................................................................... 45
US V-Chip Rating System ................................................................................................................. 45
Canadian English V-Chip Rating System...........................................................................................45
Canadian French V-Chip Rating System ........................................................................................... 46
Limited Warranty............................................................................................................................. 47
Care and Cleaning .......................................................................................................................... 51
6 Table of Contents
Page 7
1 Connections and Setup
Before Initial Setup
Protect Against Power Surges
• Connect all components before you plug any power cords into the wall outlet or power strip.
NEVER plug your TV into an outlet that is controlled by a wall switch.
•Turn off the TV before you connect or disconnect any cables.
•Make sure all antennas and cables are properly grounded. Refer to the Important Safety Instructions.
Safety Information
•Protect components from overheating.
•
Don’t block ventilation holes on any of the components. Arrange the components so that air can circulate freely.
• Don’t stack components.
• If you place the component in a stand, make sure you allow adequate ventilation.
• If you connect an audio receiver or amplifier, place it on the top shelf so the heated air from it won’t harm
other components.
Avoid Audio Interference
• Position cables properly; insert each cable firmly into the designated jack.
• If you place components above the TV, route all cables down one side of the back of the TV instead of
straight down the middle.
• If your antenna uses 300-ohm twin lead cables, do not coil the cables.
• Keep twin lead cables away from audio/video cables.
Avoid Direct Light
Don’t place the TV where sunlight or room lighting is directed toward the screen. Use soft or indirect lighting.
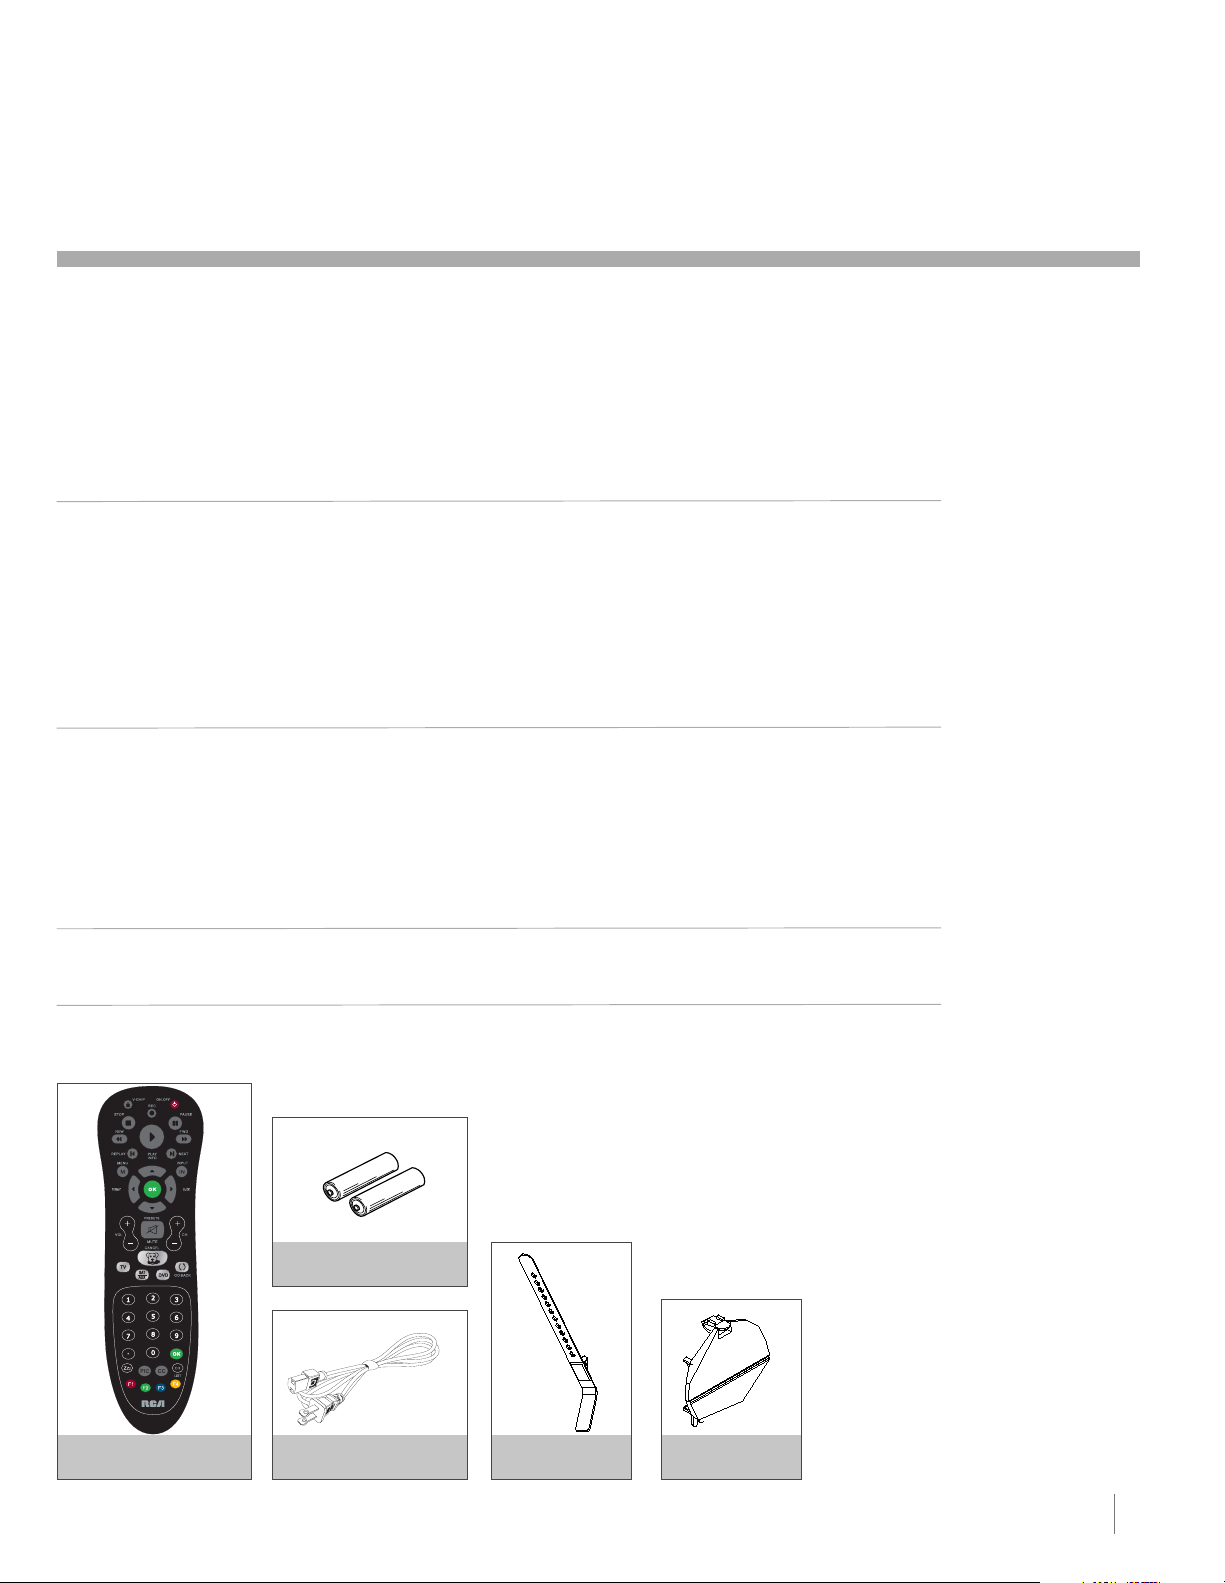
Check Supplied Parts
Check that the following parts were packed with your product.
2 AA BATTERIES
REMOTE CONTROL
PART # RC2254705/01
Graphics contained within this publication are presentation only.
POWER CORD
CABLE MANAGE-
MENT STRAP
STAND CAP
Connections and Setup Chapter 1 7
Replacing your remote
If you need to replace
your remote, call
1-800-338-0376. A
shipping and handling
fee, and the appropriate
sales tax, will be
charged upon ordering.
Have your Visa,
MasterCard, or Discover
Card ready.
Page 8
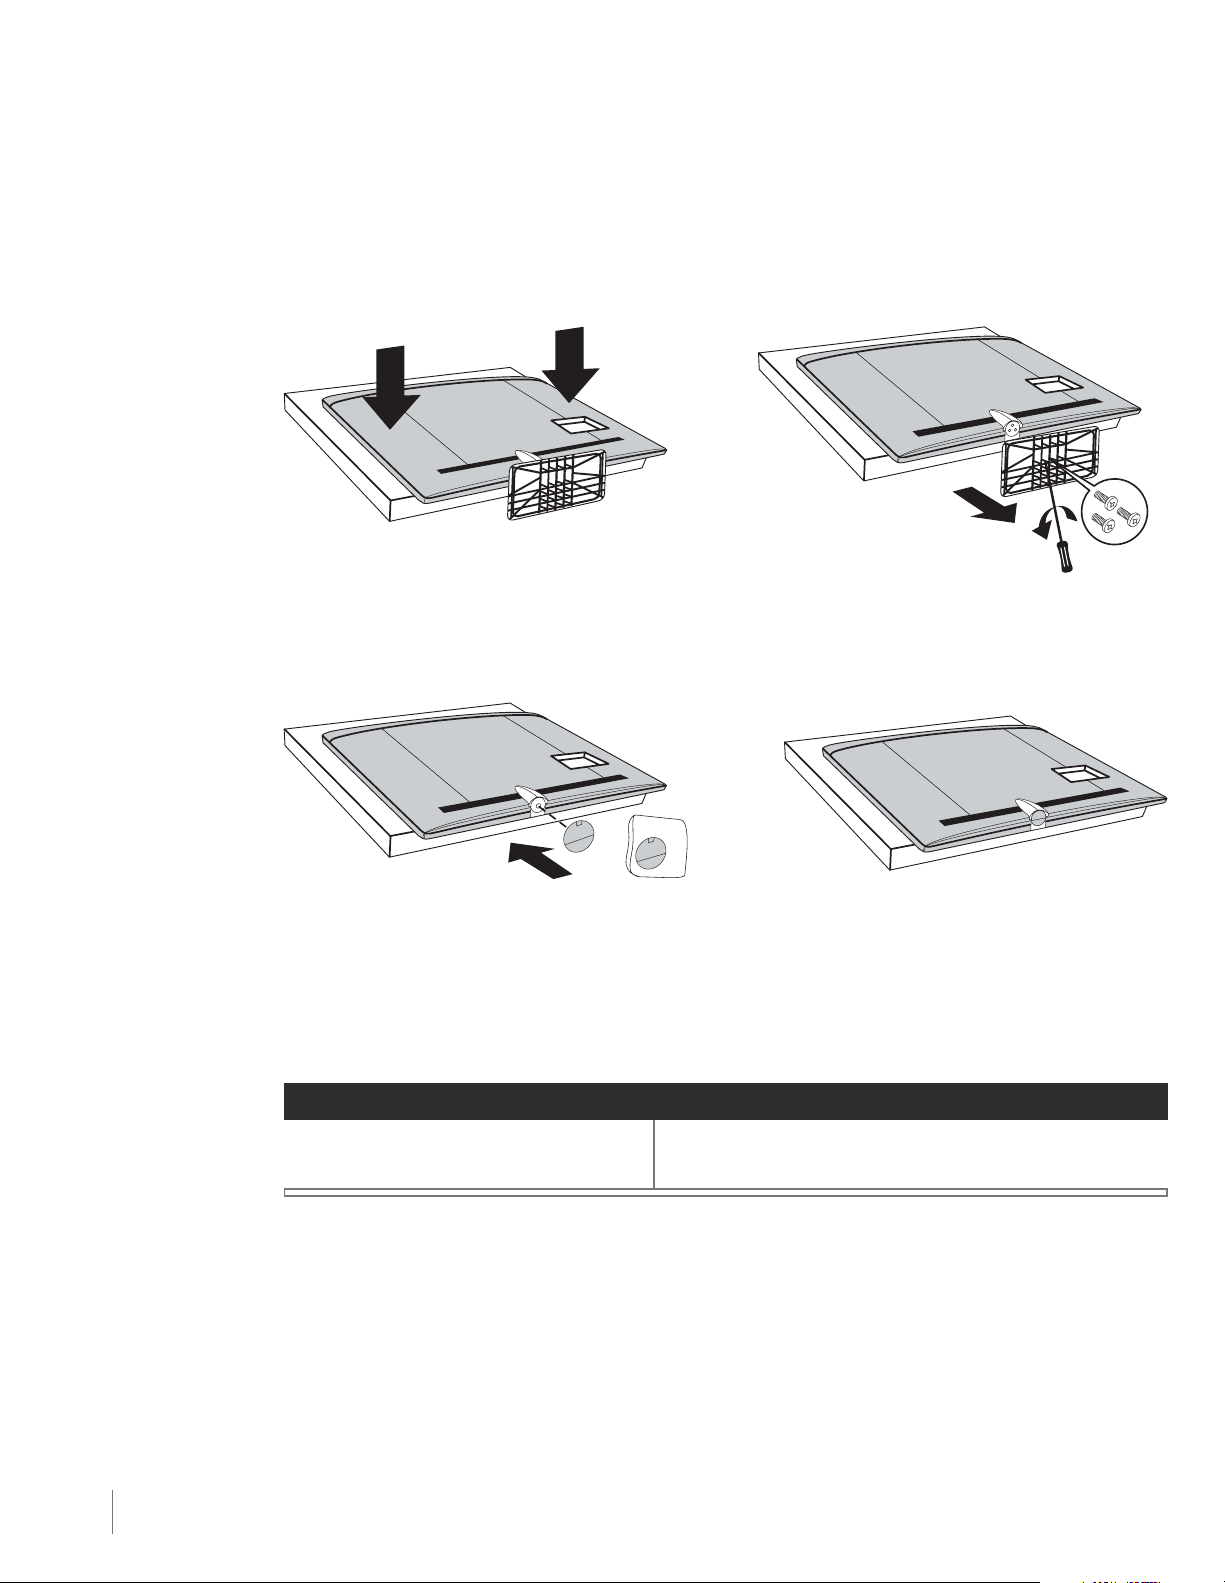
Removing Table Stand
Your TV comes with the table stand attached. If you want to mount your TV to the wall, remove the table
stand by following the instructions below:
Caution: Your wall
mount must be able to
bear a minimum of five
times the TV’s net
weight to avoid
causing damage.
Step 1
1. Take the TV bag and place it on a flat table.
2. Take the TV set and place it face down on
the TV bag.
Step 3
Attach the Stand Cap to the TV cabinet .
Step 2
Remove the Table Stand from the TV cabinet by
taking off the three size M6 St-screws with a
screwdriver. (Note: there are four M5 St-screws
for models L46FHD2X48 & L52FHD2X48)
TV cabinet with Stand Cap attached.
Mounting Your TV to the Wall
To mount your TV to the wall, purchase a VESA wall mount
Models L42FHD2X48
/L46FHD2X48/L52FHD2X48
The VESA number is the horizontal and vertical measurement of the mounting holes. For example,
600x400 refers to fact that the mounting measurements are 600mm horizontally and 400mm vertically.
Follow the directions included with the wall mount to mount the TV to the wall.
Purchase a VESA 600 x400, M6 screw
8 Chapter 1 Connections and Setup
Page 9

Obtain the Signal
The first step in connecting your TV is obtaining the signal. The back panel of your TV allows you to receive
analog and/or digital channels by using the ANTENNA/CABLE INPUT.
Before you connect your TV, you have to determine whether you will be using an antenna or a cable service
to obtain the signal.
What You Need
Antenna (Rabbit Ears) or Outdoor Antenna with Coaxial Cable
Plug the antenna or coaxial cable from the wall outlet into the ANTENNA/CABLE INPUT on the back of the
TV. You are ready to receive off-air local digital and analog channels.
Cable Service
Plug the coaxial cable from the wall outlet into the ANTENNA/CABLE INPUT on the back of the TV. You are
ready to receive your cable channels.
Set-Top Box
If you have a set-top box, you may need to call your cable company or satellite service provider. They may
recommend special cables to allow you to view digital channels.
What You Need to Know
•Visit www.antennaweb.org for help in deciding what type of antenna to use in order to receive the local
digital channels available to you. Enter your location, and the program will list local analog and digital
stations available using your antenna.
• When you watch TV, the Channel Banner displays the type of channel currently viewed. A “D” at the bottom
of the screen denotes digital channels and an “A” denotes analog channels. For more information on
Channel Banners, see page 28.
OR
COAXIAL CABLE OUTDOOR OR INDOOR ANTENNA
Connections and Setup Chapter 1 9
Page 10

Choose Your Connections
Note for US
Customers: If you
prefer, we can provide
you with the name of
an Authorized Service
Representative who
will, for a fee, install
your electronic
entertainment system
and instruct you in its
operation.
For details about this
service, call
1-888-206-3359.
There are several ways to connect components, such as DVD players and setup boxes, to your TV. Please
use the following chart to determine which connections are best for you. Proceed to the appropriate pages
to connect your components.
Jacks Used Cable Needed Go to...
page 11
Audio R and L Video
Y Pb Pr
Audio R and L
1
HDMI/DVI
Audio R and L
Component Video Audio
HDMI
Audio/Video
TM
HDMI
TM
+ HDMI/DVI Adapter +ORAudio
pages 11-12
pages 12-13
VGA
pages 13-14
VGAAudio
Audio
HDMI, the HDMI logo, and High-Definition Multimedia Interface are trademarks or registered trademarks of HDMI
Licensing LLC.
Input Signal Compatability
Ant/Cable 480i, 480p, 720p, 1080i (NTSC, ATSC, and QAM formats)
Composite Video 480i
S-Video 480i
Component Video 480i, 480p, 720p/60Hz, 1080i/60Hz
PC VGA, SVGA, XGA
HDMI 480i, 480p, 720p/60Hz, 1080i/60Hz, 1080p
Customer Support
For additional assistance in using your RCA product, please visit www.rca.com/customersupport.
10 Chapter 1 Connections and Setup
Page 11
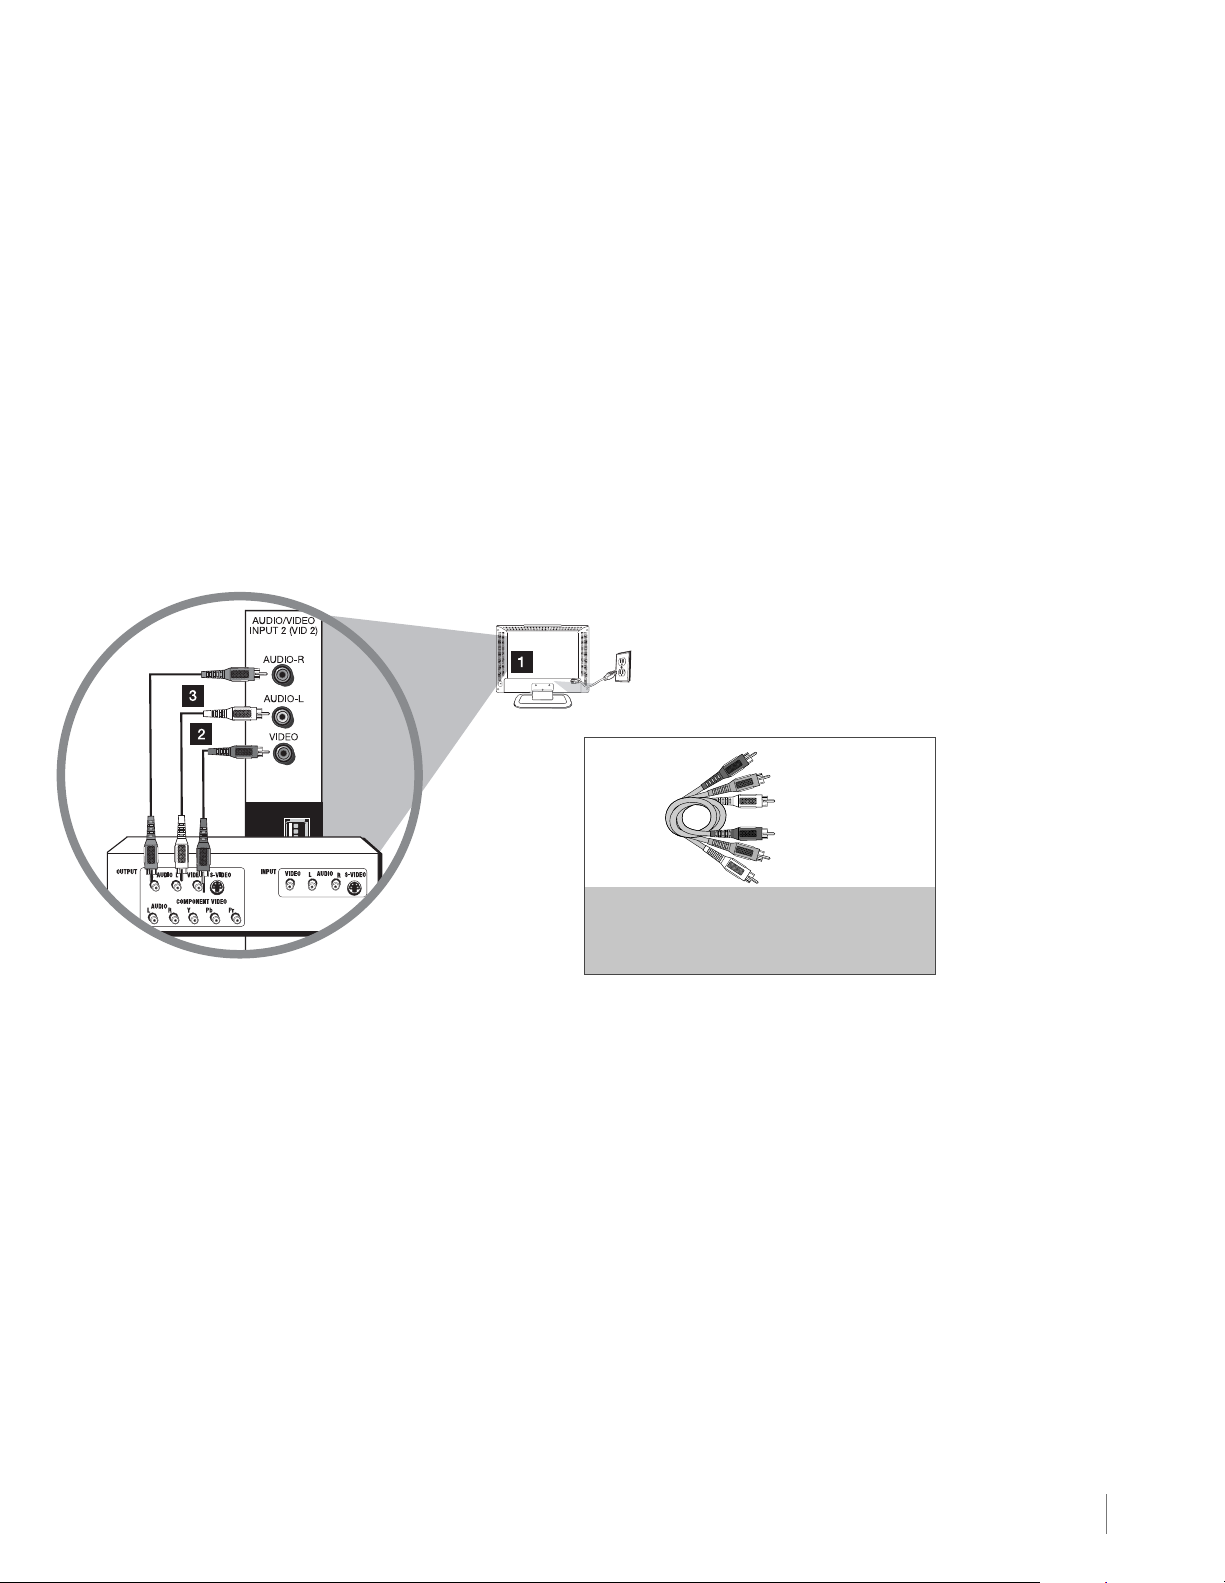
Connecting a Component with Composite Video (Good)
To connect a component with a video output jack, such as a DVD player, follow these steps:
Example: DVD Player
1. Connect your cable and/or off-air antenna as described on page 9.
2. Connect the video cable to the (VID 2) VIDEO jack on the side of the TV and to the video output jack on
the DVD player.
3. Connect the red and white audio cables to the (VID 2) right and left audio jacks on the side of the TV and
to the audio output jacks on the DVD player.
Composite Video Connection
This is an example of a connection using the composite video jack.
Red
Yellow
White
Don’t forget:
If necessary, connect
antenna or cable to get
a picture. Go to page 9
for instructions.
COMPOSITE CABLES ARE COLOR
CODED-YELLOW=VIDEO
RED=RIGHT AUDIO; WHITE=LEFT AUDIO
Connecting a Component with Component Video (Better)
To connect a component that has Y Pb Pr jacks, such as a DVD player, follow these steps:
Example: DVD Player
1. Connect your cable and/or off-air antenna as described on page 9.
2. Connect three video cables or special Y Pb Pr cables to the COMPONENT INPUT (CMPT) Y Pb Pr jacks
on the back of the TV and to the Y Pb Pr outputs on the DVD player.
3. Connect your red and white audio cables to the COMPONENT INPUT (CMPT) right and left AUDIO jacks
on the back of the TV and to the audio output jacks on the DVD player.
Connections and Setup Chapter 1 11
Page 12
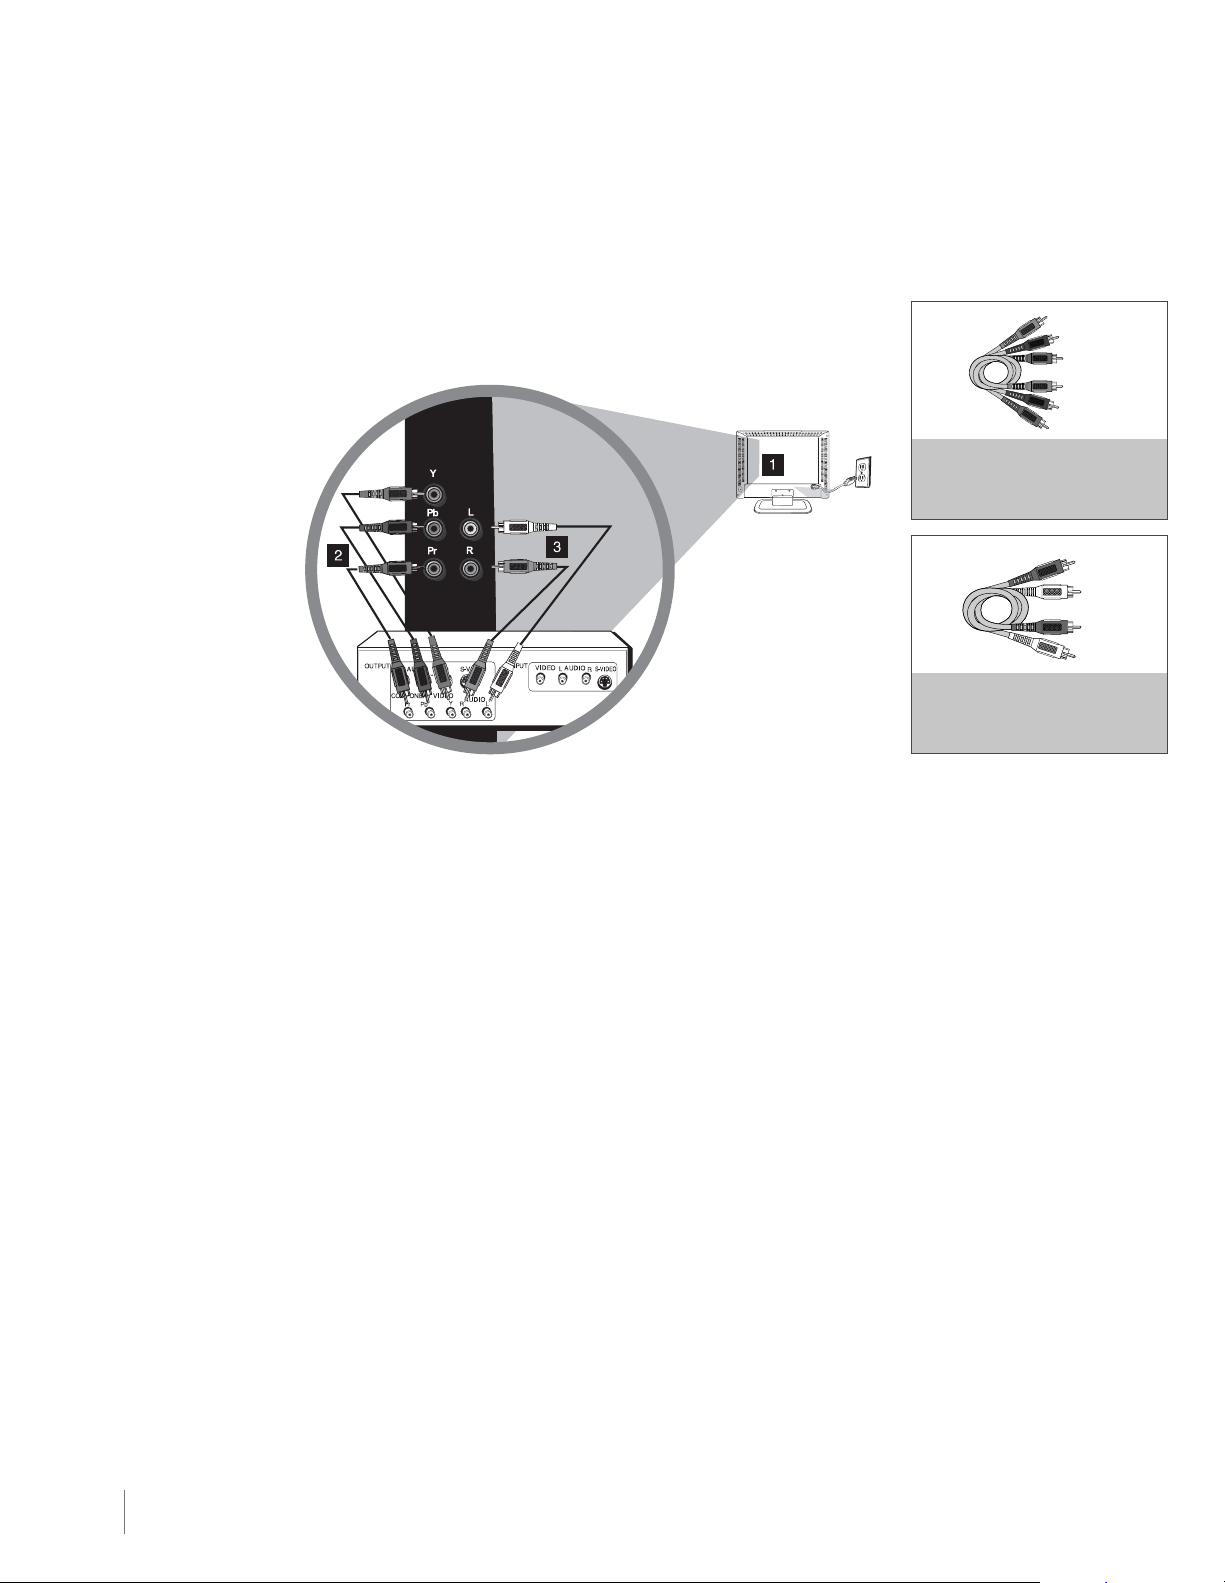
Component Video Connection
This is an example of a connection using the component video
jacks. Go to page 11 for specific instructions.
Green
Red
Blue
Don’t forget:
If necessary, connect
antenna or cable to get
a picture. Go to page 9
for instructions.
COMPONENT VIDEO CABLES
(Y Pb Pr) ARE COLOR CODED-
GREEN, BLUE AND RED
Red
White
AUDIO CABLES ARE COLOR
CODED - RED= RIGHT AUDIO,
WHITE=LEFT AUDIO
Connecting a Component with HDMI (Best)
High-Definition Multimedia Interface (HDMI) technology is an uncompressed digital connection that carries
both video and audio data by way of an integrated mini-plug cable. Since HDMI technology is based on
Digital Visual Interface (DVI), the jack on the back of your TV is also compatible with components that have a
DVI output jack.
Example: Set-top box with HDMI jack:
1. Connect an HDMI cable to the HDMI/DVI INPUT 1 jack on the back (or the HDMI INPUT 2/HDMI INPUT 3
jacks on the back or HDMI INPUT 4 on the side panel of the TV) and to the HDMI output jack on the back
of the set-top box.
Example: Set-top box with DVI jack
To connect an HDMI cable and an HDMI/DVI adapter:
1. Connect an HDMI cable to the HDMI/DVI INPUT 1 jack on the back of the TV.
2. Attach an HDMI/DVI adapter to the end of the HDMI cable; then connect the adapter to the DVI output
jack on the set-top box.
3. Since you’re using an HDMI/DVI adapter, you need to connect separate audio cables to the DVI AUDIO
INPUT right and left jacks on the back of the TV and to the right and left audio jacks on the back of the
set-top box.
12 Chapter 1 Connections and Setup
Page 13
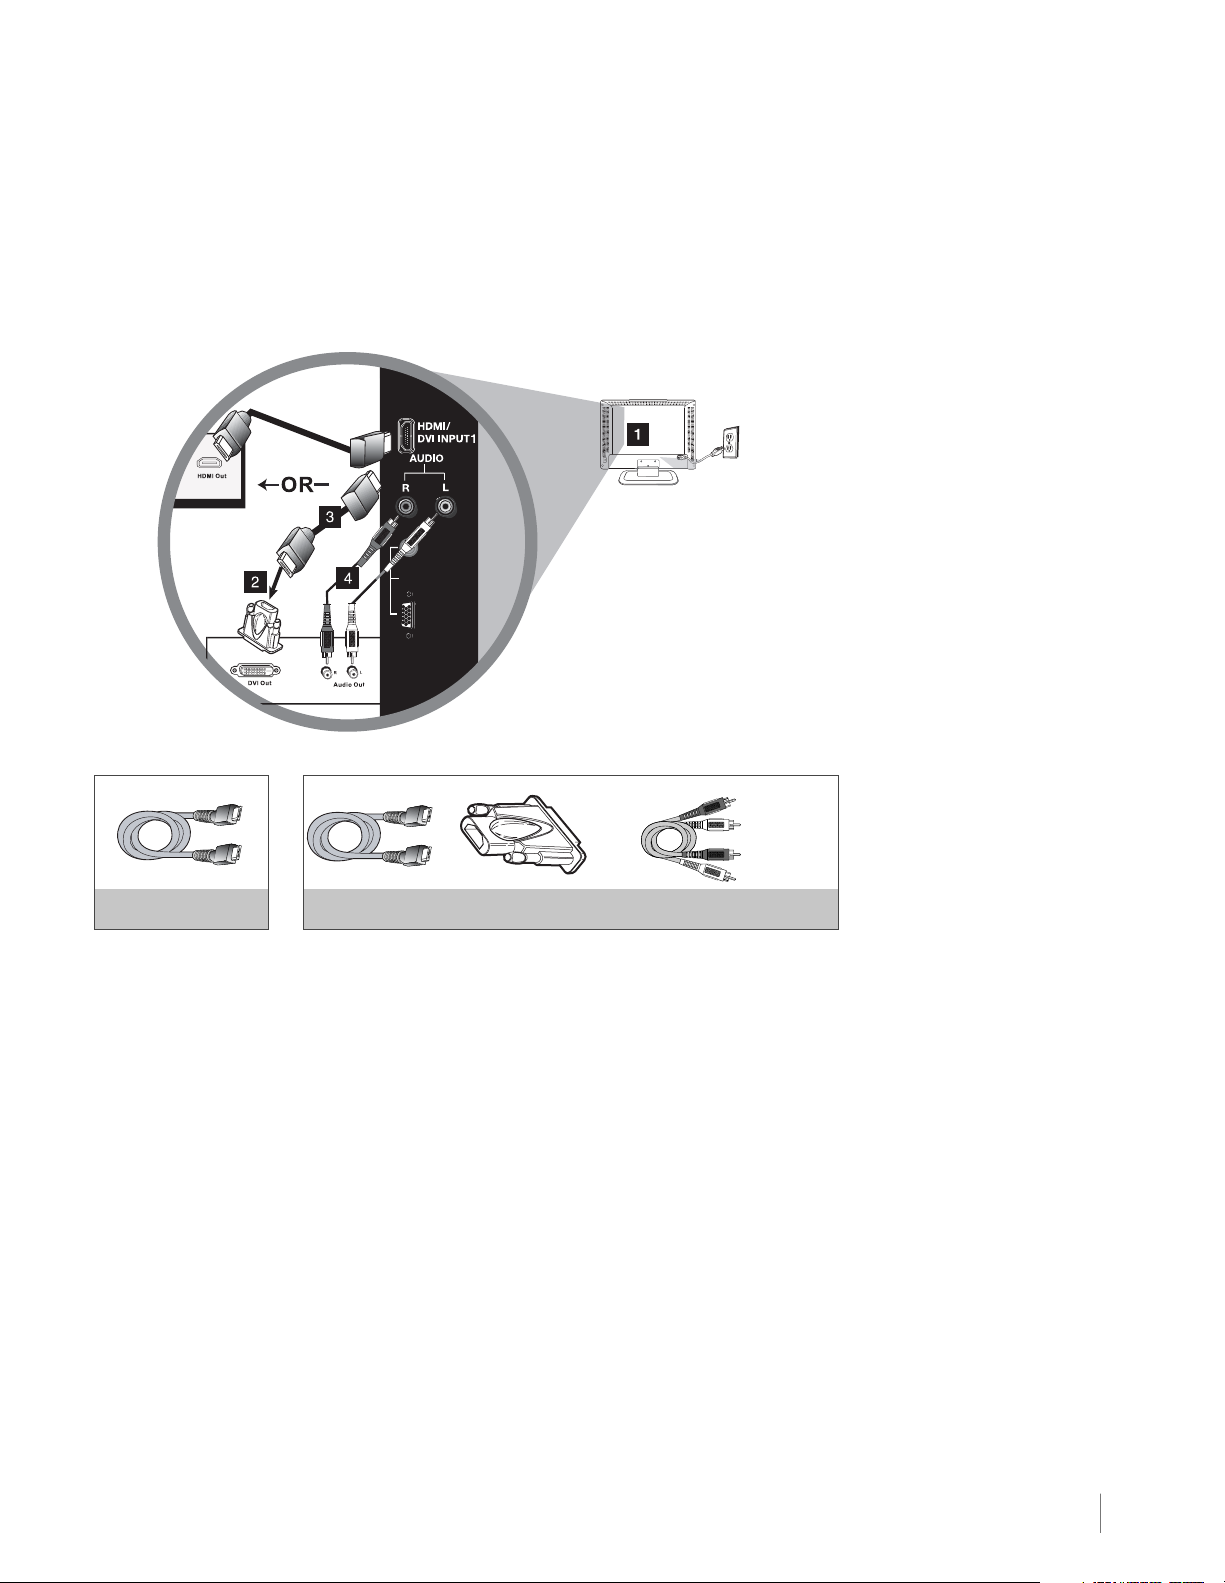
HDMI/DVI Connection (Best)
This is an example of a connection using the HDMI/DVI INPUT 1 jack. Go to page 12 for
specific instructions.
AUDIO
PC INPUT
VIDEO
Don’t forget:
If necessary, connect
antenna or cable to get
a picture. Go to page 9
for instructions.
Red
White
HDMI Cable
OR
HDMI Cable + HDMI/DVI Adapter +
Audio cables are color coded
Red=right audio; white=left audio
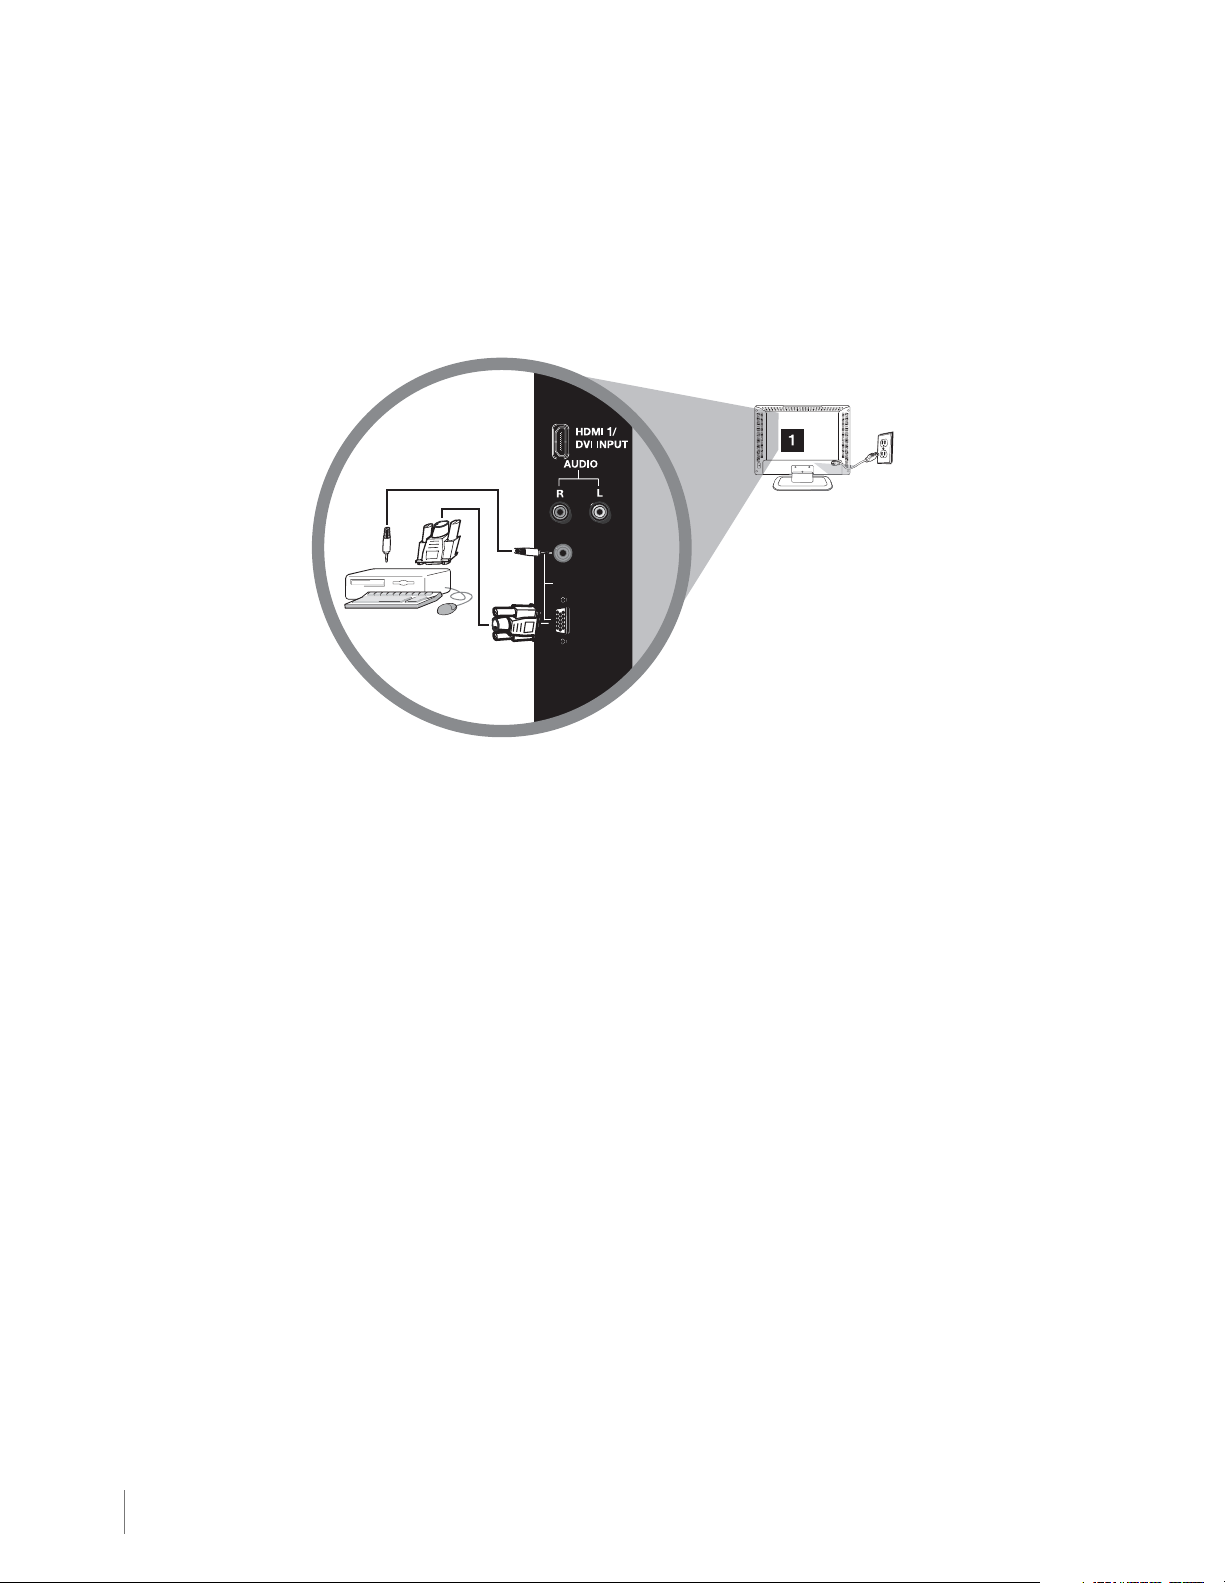
Connecting a PC Component
To connect a personal computer and use your TV as a monitor, follow these steps:
1. Connect your cable and/or off-air antenna as described on page 9.
2. Connect one end of a 15-pin monitor cable to the PC VIDEO jack on the TV and the other end to the
PC's video output jack.
Note: If your PC's video output isn't 15-pin, you'll need an adapter that can connect to a 15-pin monitor cable.
3. Connect a 3.5mm stereo mini-pin audio cable (sometimes referred to as 1/8" stereo mini-pin) to the PC
AUDIO jack on the back of the TV and the other end to the audio output jack on the PC.
Note: The maximum
resolution is
1024x768. Be sure to
set your PC monitor
setting accordingly.
Connections and Setup Chapter 1 13
Page 14
Don’t forget:
If necessary, connect
antenna or cable to get
a picture. Go to page 9
for instructions.
PC Connection
This is an example of a connection using the PC VIDEO jack. Go to page 13 for specific
instructions.
AUDIO
PC INPUT
VIDEO
Viewing the Picture from the Connected Component
1. Plug in the TV (see page 15 for details) and the component, such as a DVD player or a VCR.
2. Turn on the TV and the component you want to view.
3. Repeatedly press the INPUT button on the remote control to select VID 1 (if connected to the AUDIO/
VIDEO INPUT 1 jacks), CMPT (if connected to the COMPONENT INPUT jacks) or HDMI1 (if connected to
the HDMI/DVI INPUT 1 jack) displayed at the top left of the TV screen. To return to viewing TV channels,
use the number buttons to enter the channel you wish to view.
Note: If the picture from the DVD player appears black and white and your component is connected to the VIDEO
INPUT, you may be tuned to the wrong input. Make sure you press INPUT until you select VID 1, CMPT or HDMI 1
displayed at the top left of the TV screen.
Note: When you have connected all additional components to your TV, go to page 16 for initial setup instructions.
Viewing a PC
1. Plug in the TV and the computer.
2. Turn on the TV and the computer.
3. Repeatedly press the INPUT button on the remote control until you select PC displayed at the top left of
the TV screen. To go back to viewing TV channels, use the digit keys to enter the channel or press CH+
or CH- buttons continuously.
Note: When you have connected all additional components to your TV, go to page 16 for initial Setup Instructions.
14 Chapter 1 Connections and Setup
Page 15

Plug in the TV
Plug the end of the power cord into the back of the TV. Plug the other end into an outlet, inserting the plug
completely. Do not plug the TV into an outlet controlled by a light switch.
Put Batteries in the Remote
• Remove the battery compartment cover from the back of the remote control by pushing the tab and lifting
off the cover.
• Insert 2 AA batteries, making sure the polarities (+ and -) are aligned correctly.
• Replace the cover.
Turn on the TV
Turn on your TV by pressing the Power button ( ) on the side of the TV or the ON•OFF button on the
remote control.
Using the Remote Control to Complete Initial Setup
You will need to use the remote control to complete the setup of your TV. The remote control allows you to
navigate through and select items that appear in the on-screen menus. The process works the same on all
menu screens: highlight your choice and select it.
To select a menu item, press the arrows to highlight one of the items listed on the screen. Use the up or
down arrows to move up or down. Use the right or left arrow to view other selections for a menu choice or
to display a sub-menu.
Note: Highlighted
items stand out from
other menu items on
the list (appear darker,
brighter, or a different
color).
Connections and Setup Chapter 1
15
Page 16

Complete the Initial Setup
The menu system in your TV allows all of the TV’s features to work properly. The first time you turn
on your TV, the language screen appears.
Exit
Sound
Picture
Channel List
Setup
Parental Control
Time
USB
Exit
Sound
Picture
Channel List
Setup
Parental Control
Time
USB
Exit
Sound
Picture
Channel List
Setup
Parental Control
Time
USB
Menu Language
English
F r a n ç a i s
Español
TV Location
Retail
Home
Energy Star compliant
Channel Setup
Signal Type
Channel Search
Press < / > or OK to change this setting.
Channel Setup
Signal Type
Channel Search
Searching for Analog Chan nels.
Searching for Digital Channels.
Removing Scrambled Channels.
Progress
Analog channels found
Digital channels foun d
Auto Channel Search in progress. Press CANCEL to cancel. Any
channels already foun d will be stored.
Channel Setup
Go Back
Signal Type
Channel Search
Channel search complete. Press OK to revi ew channels. Press
CANCEL to exit, MENU for Setup menu.
Cable
Cable
Running
Cable
12%
0
0
Set the Menu Language
The first step of the setup requires you to select your preferred language for the menu system. If
English is your preferred language, press the OK button or right arrow and proceed to set the TV
Location Mode. To choose another language, press the down arrow until that language is
highlighted, and select it by pressing the OK button or right arrow.
Set the TV Location Mode
After choosing the language, a menu screen asks you to set the TV Location. Choosing “Home” for
the TV Location assigns the optimal picture settings for most home environments. This is also the
most energy-efficient setting. Press OK to display the Channel Setup menu.
Complete Channel Setup
Make sure you've connected the TV to the cable or an off-air signal before you start the next part of
the setup.
Set the Signal Type
From the Channel Setup menu, press the up or down arrow to highlight Signal Type. If you have
connected the cable to your ANTENNA/CABLE INPUT jack, the option is chosen for you. Simply
press the down arrow to continue.
To choose Antenna, press the OK button or right arrow; then press the down arrow to continue.
Complete the Channel Search
With Channel Search highlighted, press the OK button to begin the channel search. If you chose
Cable as your signal type, the search takes a while because it is looking for both analog and digital
channels. Then, it removes scrambled channels.
The Channel Search process includes the following steps:
1. The search first seeks analog channels and places the number of channels found next to Analog
Channels Found.
2. The search then looks for digital channels and places the number of channels found next to Digital
Channels Found. This number may seem high. This is because the number includes both
scrambled (for example, Pay-Per-View) and non-scrambled channels. These channels are
dependent upon what your cable company is sending.
3. The search might appear as if it is complete, but as long as the search says Running, it is still in
progress. The TV is now removing scrambled channels from the channel list.
4. When Channel Search is in progress, you can press the CANCEL button to cancel the search.
Any channels already found will be stored.
5. When the search is complete, the Channel Setup Menu displays the following help text: “Channel
Search complete. Press OK to review channels. Press CANCEL to exit, MENU for Setup Menu.”
If this is the TV’s first installation, the help text displays “Channel Search complete. Press OK to
review channels. Press CANCEL to exit.”
You may find there are still some channels in your list that are unavailable to view. To delete these
channels, press MENU and choose Setup. Highlight and select List and Labels.
Note: Removing channels from your channel list may be time-consuming, so you may want to do it later.
Go to page 37 for details on editing your channel list.
Note: If you are using a satellite or cable set-top box, you do not need to complete Channel Search.
16 Chapter 1 Connections and Setup
Page 17

What To Expect
Watching TV
Analog Channels
An “A” at the bottom of the screen denotes that you are watching an analog channel. Analog video is sent in a
4/3 format. Your TV can display these channels in a 16/9 format by pressing the FORMAT buttons to view
the different formats available. Go to page 33 for more explanation of screen formats.
Digital Channels
A “D” at the bottom of the screen denotes that you are watching a digital channel. Most digital video is sent in a
16/9 format, which fills the screen. However, it is sometimes sent in 4/3 format, which does not fill your
screen. The format is dependent on how the station or source component is configuring the video.
If there are bars on-screen, press the FORMAT button to try a different format. This may eliminate the bars.
Note:
Some bars can't be removed because of the way the format is sent by the broadcaster. Go to page 33 for more
explanation of screen formats.
Changing Channels
• Digital channels can have both primary channels (like the analog channel number) and sub-channels. To
tune to a digital channel with a sub-channel, such as 10.1, enter the primary channel number (10), then
press the right arrow button. Enter the sub-channel number (1) and press OK.
• Depending upon the type of signals you have connected to your HDTV, you may notice that the channels
change more slowly than usual. This is perfectly normal. Digital channels sometimes take longer to tune.
Connections and Setup Chapter 1 17
Page 18

HDMI
INPUT 3
HDMI
INPUT 2
Explanation of Jacks (in alphabetical order)
This section describes the jacks on the back panel of your TV/DVD. There are several ways to connect
components.
ANTENNA/CABLE Lets you connect a coaxial cable to receive the signal from your antenna, cable, or cable box.
HDMI/DVI
INPUT 1
L
R
DVI AUDIO INPUT
AUDIO
PC INPUT
VIDEO
COMPONENT
INPUT (CMPT)
L
AUDIO
R
R
AUDIO
L
VIDEO
(Optical)
Y
Pb
Pr
R
AUDIO
L
FIXED AUDIO OUTPUT
S-VIDEO
INPUT
AUDIO/VIDEO INPUT 1 (VID1)
DIGITAL AUDIO
OUTPUT
AUDIO/VIDEO INPUT 1 (VID 1) Lets you connect a component that has composite video jacks, such as a
VCR or DVD player.
• L AUDIO Provides left audio connection when using the VIDEO INPUT 1 jack. The left audio connectors
are usually white. Use when connecting to the VIDEO or S-VIDEO INPUT. For mono audio sources, be
sure to use the left AUDIO INPUT.
• R AUDIO Provides right audio connection when using the VIDEO INPUT 1 jack. The right audio connector is
usually red. Use when connecting to the VIDEO or S-VIDEO INPUT.
COMPONENT INPUT Lets you connect a component that has component video jacks, such as a DVD player.
• CMPT Y Pb Pr (Component Video) Provides optimum picture quality because the video is separated
into three signals. Use three video-grade or component video cables for the connection. When using
CMPT Y Pb Pr, make sure you connect left and right audio cables to the CMPT L and R AUDIO jacks.
• CMPT L AUDIO Provides left audio connection when using the CMPT VIDEO inputs. The left audio
connector is usually white. For mono audio sources, be sure to use the left AUDIO input.
• CMPT R AUDIO Provides right AUDIO connection when using the CMPT VIDEO inputs. The right audio
connector is usually red.
DIGITAL AUDIO OUTPUT (optical) Use a digital optical cable to connect your TV to a compatible audio
receiver.
FIXED AUDIO OUTPUT Use the left and right audio cables to connect your TV to a compatible audio
receiver.
HDMI INPUT 2 or HDMI INPUT 3 Lets you connect a component, such as a digital cable box, with an
HDMI output for the best picture quality.
ANTENNA/CABLE
HDMI/DVI INPUT 1 (High-Definition Multimedia Interface/Digital Visual Interface) Provides an uncompressed
digital connection that carries both video and audio data by way of an integrated mini-plug cable. Since
HDMI technology is based on Digital Visual Interface (DVI), the jack on the back of your TV is also compatible
Note: If using a DVI
component, remember to connect the
left and right audio
cables because the
DVI cable carries only
the picture signal, not
the sound.
Note: Do not connect
the S-VIDEO and VID1
at the same time.
with DVI components.
• DVI AUDIO L (used for DVI only) Provides left audio connection when using the HDMI 1 jack for DVI.
The left audio connector is usually white. For mono audio sources, be sure to use the left AUDIO input.
• DVI AUDIO R (used for DVI only) Provides right audio connection when using the HDMI 1 jack for DVI.
The right audio connector is usually red.
PC VIDEO INPUT Connect your computer or other component with a VGA output to this jack using a 15-pin,
D-sub cable.
PC AUDIO (Stereo mini jack) Use to obtain sound when a PC is connected to the PC input. Use a 3.5mm
stereo mini-pin cable (sometimes referred to as 1/8” stereo mini-pin) to connect a PC to your TV.
S-VIDEO INPUT Allows you to connect an S-VIDEO cable from another component. Make sure you also
connect audio cables form the component to the TV. To access a component connected to the S-VIDEO
jack, press the INPUT button on your remote until you select VID 1.
18 Chapter 1 Connections and Setup
Page 19

Buttons and Other Jacks on Your TV
Side Input Jacks
HEADPHONES Allow you to connect headphones to listen to the sound coming from the TV.
AUDIO/VIDEO INPUT 2 (VID 2) Lets you connect a component that has composite video jacks, such as a
VCR or DVD player.
• L AUDIO Provides left audio connection when using the VIDEO INPUT 2 jack. The left audio connectors
are usually white. Use when connecting to the VIDEO INPUT. For mono audio sources, be sure to use the
left AUDIO INPUT.
• R AUDIO Provides right audio connection when using the VIDEO INPUT 2 jack. The right audio connect
or is usually red. Use when connecting to the VIDEO INPUT.
HDMI INPUT 4
USB
This connection allows you to plug in a USB flash drive or connect to a compatible mass storage
device with USB.
Allows you to connect a component with an HDMI OUTPUT.
Side Panel Buttons
If you cannot locate your remote, you can use the side panel buttons on your TV to operate many TV
features.
( ) POWER Turns the TV on and off.
MENU/(OK) Brings up the TV Main Menu. When in the menu system, it displays sub-menus and selects
highlighted items.
VOL ( ) Increases the volume. In the TV menu system, it acts like the right arrow on the remote control
and can be used to select menu options.
VOL ( ) Decreases the volume. In the TV menu system, it acts like the left arrow on the remote control and
can be used to select menu options.
CH ( ) Scans up through the channel list. In the TV menu system, it acts like the up arrow on the remote
control and can be used to select menu options.
CH ( ) Scans down through the channel list. In the TV menu system, it acts like the down arrow on the
remote control and can be used to select menu options.
( ) (FETCH=MENU + VOL ( ) ) Press the MENU and VOL ( ) at the same time and the remote control
barks to be located.
Connections and Setup Chapter 1 19
Page 20

2 Using the Remote Control
Remote Control Buttons
TV Functions
Alphanumeric Buttons Using these buttons, enter channel numbers, time setting.
To enter a channel, press the number buttons and press OK (or let the entry timeout).
To enter a digital channel with a sub-channel, enter the main channel; then, press the right arrow to
enter the sub-channel and press OK.
Arrows ( / / / ) Use the four arrows to highlight different items in the TV menu and to adjust
the menu controls. When viewing a channel, arrow functions are as follows:
• Left Arrow/FORMAT Press to change the screen format. Go to page 33 for more information on
screen formats.
• Right Arrow/GUIDE Press this button first to display the electronic program guide-EPG (when
available). Press again to view the program in the schedule.
• UP Arrow/INFO Press the up arrow once to display the Channel Banner; press again to remove
the menu.
• Down Arrow/PRESETS Press this button to enter the PRESET Menu. Display Picture and Sound
preset; CC Setting; Current Audio Track.
CC Takes user directly into the Closed Caption sub-menu.
Remote control part number RC2254705/01
This is a multi-component remote control and
many of the buttons have multiple functions.
Note: If you need to replace
your remote, call
1-800-338-0376. A shipping
and handling fee, and the appropriate sales tax, will be
charged upon ordering. Have
your Visa, MasterCard, or
Discover Card ready.
CH + or CH - Scans up or down through the current channel list. Press once to change the channel
up or down; press and hold to continue changing channels.
CH LIST When you tune to a particular channel, press the CH LIST button to enter the List and labels
Menu directly to add/remove the channel from channel list.
(FETCH)/CANCEL Cancels the barking when Fetch has been activated. Cancel function:
removes any menu or display from the screen and returns to normal viewing. Go to page 19 or 33 for
more details.
DVD Places the remote in DVD Mode. If auto-tuning is enabled, turns on the TV and tunes it to the
DVD channel. The DVD button illuminates when you press a valid button in DVD Mode (see Modes of
Operation on page 23 for more details).
F1-F4 Favorite channel buttons. Set a favorite channel button (F1/F2/F3/F4) to the current channel by
holding the button down for two seconds. Each button can be set to a favorite channel, and you can
change your selections at any time.
GO BACK Returns to the previous channel.
INPUT Accesses the available input channels (WATCH TV, VID 1, VID 2, CMPT, PC, HDMI 1, HDMI 2,
HDMI 3 and HDMI 4.). To resume TV viewing, press the number buttons to enter the channel or press
the CH+ or CH- buttons.
MENU Accesses the Main Menu.
20 Chapter 2 Using the Remote Control
Page 21

MUTE Reduces the TV volume to its minimum level. Press again to restore the volume.
OK When in the menu system, pressing the OK button selects the highlighted item.
PIC Press the PIC button to display the Picture sub-menus.
ON•OFF When in TV Mode, pressing the ON•OFF button turns the TV on or off. If in another programmed
mode (SAT/AUX or DVD), pressing the ON•OFF button turns the component on or off.
REW, REPLAY, PLAY, NEXT, FWD, REC, STOP, PAUSE (buttons at TOP of the remote)
If programmed, these buttons provide transport control for some remote-controllable components, such as
VCRs or DVD players.
ZZZ (SLEEP) Press this button to display the TIME Menu and set the Sleep Timer.
SAT/AUX Places the remote in SAT/AUX mode. If Autotuning is enabled, pressing this button turns on the
TV and tunes it to the satellite or cable box Video Input Channel. This button illuminates when you press a
valid button in SAT/AUX mode (see Modes of Operation on page 23 for more details).
TV Turns on the TV, displays current status and puts the remote in TV Mode.
V-CHIP Press to display the Parental Control sub-menu.
VOL - or VOL + Decreases or increases the TV volume.
INPUT Button
Use the INPUT button to scroll through the available video input channels and view components connected
to the TV.
1. Make sure the component is turned ON.
2. Press INPUT to tune to an available video input source and view the component.
3. To return to the previous channel, press the INPUT button until you return to the channel.
Programming the Remote to Operate Other
Components
The universal remote can be programmed to operate many brands of remote-controllable components,
such as VCRs, audio components, DVD players, cable boxes, and satellite receivers. Your remote control
also comes pre-programmed to control some RCA components.
Notes:
• The TV button can’t be programmed to control other components.
• The remote may not be compatible with all models of all brands of components. It also may not provide
complete functionality.
Determine If You Need to Program Remote
To determine whether the universal remote needs to be programmed to operate one of the components
connected to your TV, such as a DVD player, follow these steps:
1. Turn on the component (for example, the DVD player).
2. Point the remote at the component.
3. Press the corresponding component button (DVD button).
4. Press ON•OFF to see if the DVD responds. If it doesn’t, you need to program the remote to operate it.
Using the Remote Control Chapter 2 21
Page 22

Programming the Remote
The CANCEL button is used as visual feedback during the programming operation. During programming,
the CANCEL button illuminates when buttons are pressed and turns off when buttons are released. When
programming is finished, the CANCEL button blinks slowly to indicate success and blinks rapidly to indicate
failure.
Note: All component buttons are inoperable during Programming Mode.
There are three ways to program the remote control to operate other components: Direct Entry, Manual
Code Search, and Automatic Code Search. You must try Direct Entry for at least one code before trying the
other methods.
Using Direct Entry
1. Turn on the component you want to control.
2. On your remote control, simultaneously press and hold the ON•OFF and MUTE buttons (approximately 3
seconds) until the CANCEL button illuminates. Release the buttons.
3. Press and release the component button.
4. Enter the appropriate four-digit code for the component you want to operate. The first digit indicates the
component type (0 for DVD, 1 for Satellite TV, 2 for Cable, 3 for DVR, 4 for VCR, 5 for Audio, 6 for CD);
the other three digits indicate the brand and model. Look up the brand and codes for the component in
the list at the end of this section. Codes are listed by component type and are arranged alphabetically.
5. The CANCEL button blinks slowly to indicate success. Repeat these steps until you’ve tested all codes
for your component’s brand, or try to run a Manual Code Search.
Using a Manual Code Search
Note: Before using Manual Code Search, use Direct Entry. This lets the remote know which type of component
you are programming. Then proceed with the following steps:
1. Turn on the component you want to control.
2. On your remote control, simultaneously press and hold the ON•OFF and MUTE buttons (approximately 3
seconds) until the CANCEL button illuminates. Release the buttons.
3. Press and release the component button.
4. Repeatedly press and release the left or right arrow, watching for the component to respond. If the
component turns off, press and release the OK button to save the code. The CANCEL button blinks
slowly to indicate success.
5. When all codes have been searched, the CANCEL button blinks rapidly to indicate failure, and the remote
returns to normal operation.
Note: Use the right arrow to search ahead; use the left arrow to search back. Press the ON•OFF button to switch
to Automatic Code Search Mode.
Using Automatic Code Search
1. Turn on the component you want to control.
2. On your remote control, simultaneously press and hold the ON•OFF and MUTE buttons (approximately 3
seconds) until the CANCEL button illuminates. Release the buttons.
3. Press and release the component button.
4. Press and release the ON•OFF button once. The remote starts the code search.
5. Once the component turns off, quickly press the OK button to save the code. The CANCEL button blinks
slowly to indicate success.
22 Chapter 2 Using the Remote Control
Page 23

6. When all codes have been searched, the CANCEL button blinks rapidly to indicate failure, and the remote
returns to normal operation.
Note: If you accidentally passed the code before saving it, use the left arrow to backtrack through the codes. Use
the right arrow to go forward through the codes again. Once the left or right arrow has been pressed, the search
mode changes to Manual Code Search.
Using the Remote
Once the remote has been programmed successfully, it is ready to operate your components.
To operate the component:
1. Press the component button (SAT/AUX or DVD) to set the remote to control the component. For
example, press DVD to control your DVD player.
2. Press ON•OFF to turn the component ON or OFF.
3. Use the remote buttons that apply to that component.
Modes of Operation
The button that corresponds to the mode the remote is in illuminates when you press any button that
applies to the component. For example, if you’re in TV Mode and you press the VOL+ button, the TV button
lights up. This tells you that the command to increase the volume is being sent to the TV.
Note: The remote control may not be compatible with all brands and models of components.
Manual Reset
The Manual Reset is used to reset the remote settings to default.
Note: The reset can also be accomplished by replacing the batteries; however replacing the batteries does not
always cause a reset. You can perform a manual reset by following these steps:
1. On your remote control, simultaneously press the V-Chip, ON•OFF and MUTE buttons.
2. The CANCEL button will blink slowly to indicate success, and the remote control returns to normal
operation.
Using the Remote Control Chapter 2 23
Page 24

Remote Code List
Note: The codes are programmable to any of the device buttons (SAT /AUX or DVD) on the remote. The remote code is a 4-digit
code. The first digit indicates the database device type (0 for DVD, 1 for Satellite TV, 2 for Cable, 3 for DVR, 4 for VCR, 5 for Audio
and 6 for CD), the following 3 digits indicate the brands as follows:
Audio Codes
Accuphase ......................................................032
Accurus ...........................................................033
ADC .................................................................074
Adcom ..............................................................056
Admiral .............................................................150
ADS .................................................................151
Aiwa 014 072 073 109 214 225 279 287 335 369
Akai .................................................................142
Alco ..................................................................093
Alpine ................................................................152
Altec Lansing ................................................140
Amphion Media Works ............................104 107
Amplifier Technologies ...................................118
AMW .........................................................104 107
Anam .........................................................080 148
Angstrom .......................................................034
Apex ...................................................403 407 095
Aragon ............................................................033
Arcam ..............................................................131
Atlantic technology .......................................120
Audio Research ................................................154
Audio Source ................................................035
AudioPhase ....................................................388
Audiotronic .......................................................061
Audiovox ............................................093 399 417
B & K ............................................................155
Bang & Olufsen ................................................353
Bel Canto Design .............................................036
Biamp ...........................................................037
BOSE ............................010 075 082 117 371 384
Boston Acoustics .............................................121
Brix ...............................................................146
California Auido Lab .........................................028
CambridgeSoundWorks....................................418
Cpetronic .......................................................074
Carver .......................................................061 073
Cary Audio Design ...........................................031
Casio ...........................................................125
CCE .............................................................177
Chase Technologies ........................................029
Cinema Sound ................................................038
Clarinette ......................................................125
Clarion ..........................................................156
Classe ...........................................................039
Classic ..........................................................411
Coby .............................................................018
Counterpoint ..................................................157
Creative .........................................................129
Criterion ........................................................136
Curtis ............................................................409
Cary Audio Design ...........................................031
Curtis ...........................................................409
Curtis Mathes ...............................................022
Daewoo .......................................................132
Dell ................................................................134
Delphi ............................................................158
Denon ..........................009 058 090 205 220 226
227 242 259 263 267 282 286 304 305 309 310
311 312 315 341 344 345 368 413
Digital Audio Control ......................................030
Durabrand ...........................................040 434
EAD ...............................................................159
Eclipse .........................................................209
Elan ................................................................041
ESA ...............................................................160
Fisher ...........................................................114
Fosgate ...........................................................042
Garrard ...........................................................128
Gateway .........................................................145
GE .................................................................020\
Glory Horse ......................................................133
Go Video .........................................................144
GPX .........................................................404 421
Gradiente ........................................................389
Halfer ...........................................................161
Harman/Kardon .....................................013 026
073 078 088 264 319 397
Hitachi ...........................................................114
Honyas ...........................................................162
iLive ................................................................429
Initial ..............................................................137
Inkel ..............................................................122
Insignia ...........................................337 338 416
Integra .........................................................055
Jamo ................................................................275
JBL .....................................................051 088 397
Jensen ...........................................................163
Jerrold ..............................................................391
JVC .........004 023 092 097 201231 249 261 272
273 300 303 307 318 355 359 360 366 373 376
377 408
Kenwood ........005 089 105 106 185 186 188
189 198 200 219 223 232 237 240 251 255 296
308 320 331 370 380
KLH ..........................................................093 094
Knoll System ...................................................043
Koss ........................................................091 394
Krell ................................................................326
Lasonic ...........................................................149
Left Coast ........................................................026
Lenoxx .............................................................138
Lexion .............................................................130
LG ..........................................................406 432
Linn ................................................................073
Liquid Video ....................................................141
Lloyds ..............................................................125
Logitech ...........................................................044
Luxman ............................................................045
LXI ................................................................124
Magnadyne .....................................................164
Magnavox ....................016 061 073 074 100 401
Marantz ............................026 061 073 329 340
Mark Levinson ..............................................046
McIntosh .........................................................047
MCS ................................................................126
Memorex ..........................................................165
Midland ...........................................................048
Mitsubishi ..............................................290 313
Modulaire ........................................................125
Motorola ...........................................................139
NAD ..............................................................066
Nakamichi .......................................065 067 070
NEC ..............................................................027
Neo ..............................................................158
Nexxtech .........................................................119
Niro ...............................................................166
Norcent ...........................................................135
Nova ..............................................................167
Omnifi ...........................................................147
Onkyo ....006 055 057 069 077 101 190 194 203
210 213 233 252 260 265 266 269 270 271 274
278 291 292 306 323 324 348 350 398
Optimus ..............................022 074 076 079 080
Oritron ...........................................................091
Panasonic ............002 087 102 108 112 113 153
229 289 301 316 354 357 364 375 385 386 390
395 396 422 423 424 425 426 427 433
Parasound ......................................................062
Penny ...........................................................125
Philco ...........................................................168
Philips ....................................012 026 061 073
085 349 362 379 412
philips Magnavox .........................................435
Pioneer ..............003 022 052 071 074 079 183
184 192 193 195 212 221 222 224 238 239 241
353 314 330 336 342 343 346 352 383
Polaroid ...........................................................436
Polk Audio .....................................026 073 328
Proscan ...........................................................083
Pyle ..............................................................169
Radio Shack .............................................133 434
RCA .....................................007 022 074 079 080
083 093 099 363 367 372 380 393 434
RCA & Dimensia ............................................437
Realistic ..........................................................125
Regent ...........................................................138
Rio ................................................................116
Rotel ..............................................................334
Saba ...............................................................143
Samsung ...................011 068 098 332 428 431
Sansui ...........................................................073
Sanyo ..............................................096 114 414
Schneider ......................................................170
Scientific Atlanta...............................................127
Scott .............................................................123
Sharp ..........................................015 361 378 419
Sharp Image .....................................................133
Sherwood ........................................297 339 420
Shinsonic ........................................................171
shure ............................................................027
Skyfi .............................................................158
Sonic Blue ......................................................116
Sony .....................000 025 050 084 103 110 111
115 178 179 180 181 182 187 197 207 215 216
217 218 230 235 276 277 293 294 295 325 356
358 365 374 382 387 392 400 430
Soundesign ..............................................020 076
Soundmatters ..................................................063
SoundStream ..................................................049
Starcom ...........................................................391
Stereophonics ..............................................079
STS ..............................................................172
Sunfire ...........................................................089
Sylvania ...........................................................327
Symphonic ......................................................150
TAG McLaren ..................................................173
Tao ...............................................................158
Teac .......................................................080 093
Technics .........................008 204 208 211 228
280 281 283 299
Techwood ......................................................174
Thomson ......................................................175
Thorens ...........................................................061
Toshiba ...........................................................410
Vector Research ............................................176
Venturer ...................................................093 415
Victor ............................................................023
Wards .........................................020 071 073 346
XM Radio ......................................................158
Yamaha ...................001 021 024 053 054 055
059 060 064 081 086 191 196 199 206 234 236
243 244 245 246 247 262 268 284 285 288 302
317 321 347 351 402 405
Yorx ...............................................................125
Zenith ...............................................019 333 406
Cable Codes
ABC .............................008 009 022 026 032 034
040 041 042 081 085
Adelphia ................................................005 025
Americast .....................................................092
Antronix .................................................045 046
Archer ....................................................046 047
AT & T ..........................................................002
Bell South ......................................................092
Cable Vision ...............................................004 102
Cabletenna ....................................................045
Cableview .....................................................044
Citizen ............................................................051
Clearmaster .....................................................091
ClearMax ......................................................091
Colour Voice ............................................049 050
Comcast .........................................000 001 039
Comtronics ............................................035 051
Contec .............................................026 031 053
Coolmax ..........................................................091
COX ..............................................................001
Director ...................................................001 089
Eastern ..........................................................054
Everquest ..............................................035 086
Focus ...........................................................088
GC Electronics ..........................................046 051
GE .........................................................040 041
Gemini ...............................................055 056 086
General Instrument ......000 001 041 083 089 101
Goldstar ....................................................035 036
Hamlin ...057 058 059 065 071 074 082 095 096
Hitachi ............................................................041
illico ..............................................................102
Jasco ............................................................086
Jerrold ..........001 041 055 060 061 075 081 083
086 087 089 101
Magnavox ......................................................062
Memorex ..................................................063 085
Monarch ..........................................................051
Motorola .001 002 018 039 087 089 094 101 103
Movie Time ..............................................051 064
Multi Canal .....................................................051
Multitech .........................................................091
NEC ..............................................................043
24 Chapter 2 Using the Remote Control
Page 25

NET Brazil ....................................................006
Novavision ....................................................027
NSC ..............................................................064
Oak .........................................................053 066
Pace ...................007 008 009 010 011 012 013
014 015 016 017 022 024 025
Panasonic .......................................077 080 085
Paragon ..........................................................085
Philips ................................048 049 050 052 056
062 067 068 069 098 099
Philips Magnavox ..................................056 098
Pioneer ..............007 019 024 025 036 037 070
084 090 102
Popular Mechanics ........................................088
Proscan ..................................................040 041
Pulsa .....................................................051 085
Quasar ..........................................................085
Radio Shack ..........................................086 091
RCA ..................................044 076 078 080 083
Realistic ..........................................................046
Recoton ..........................................................088
Regal .................................059 071 082 096 097
Regency ..........................................................054
Rembrandt ....................................................041
Rogers ..........................................................102
Runco ..........................................................085
Samsung ...........................035 036 037 038 051
Scientific Atlanta ........002 005 007 008 009 019
020 022 023 024 025 026 027 028 029 030 031
032 033 034 102
Signal .......................................035 051 055 086
Signature ..........................................................041
SL Marx ..........................................................035
Sony .......................................................004 093
Sprucer ..........................................................080
Standard Component ..............................072 073
Starcom ..........................................055 081 086
Stargate ...................................035 051 055 086
Starquest ...............................................055 086
Supercable ..............................................087 104
Supermax .....................................................091
Te leView ...................................................035 051
TIME WARNER .......................................003 102
Timeless ..........................................................035
Tocom ....................................................042 060
Toshiba ..........................................................085
Tristar ............................................................091
Tusa .....................................................055 086
TV86 ............................................................064
U.S.Electronics ................................................026
Unika ......................................................045 046
United Cable ...................................................081
Universal ..........................................045 046 047
V2 .................................................................091
Verizon ..........................................................105
Videotron ......................................................102
View Star ..........................................053 062 064
Vision ............................................................091
Vortex View .....................................................091
Zenith ......................................079 085 092 100
Zentek ..........................................................088
CD Codes
Aiwa ..............................................................009
BOSE ..............................................................011
Denon ......................................................007 019
Harman/Kardon ..............................................004
JVC ...........................................001 013 025 026
Kenwood ..................................................010 014
Marantz .........................................................015
Onkyo ........................................................006 016
Panasonic .................................000 017 023 029
Philips .......................................................003 032
Pioneer..............................................................005
RCA ..............................................................028
Sanyo ..............................................................022
Sharp ..............................................................002
Sherwood .........................................................020
Sony .....................................012 024 027 030 031
Teac ..............................................................021
Technics.........................................................008
Yamaha .........................................................018
DVD
Accele Vision ................................................177
Accurian ...........................................................353
Advent ..............................................................029
Aiwa .......................................................017 232
Akai ..........................................................022 236
Alco ..................................................................027
Allegro ..............................................................059
Alpine ................................................................220
Amphion MediaWorks ............................014 033
AMW .........................................................014 033
Anaba ............................................................067
Anam ............................................................068
Apex ..............005 045 046 126 136 164 166 176
188 242 243 244 324 390 457 461
Apple .............................................................426
Arrgo ............................................................050
Aspire ..............................................................032
Astar ..............................................................351
Audiologic ....................................................069
Audiovox ..............004 011 027 224 454 471 475
Axion ..............................................................070
B & K ............................................................071
Bang & Olufsen ................................................048
Bel Canto Design .............................................072
Blaupunkt ...............................................046 153
Blue Parade .................................................043
BOSE ..............................................245 430 441
Boss Audio System ..............................073 444
Broksonic ...................................022 233 372 406
California Auido Labs .......................................024
CambridgeSoundWorks ...................................474
CAVS ...........................................................074
CineVision ........................................049 113 414
Clarion .........................................................246
Classic ............................................216 247 463
Coby .....................012 030 031 157 192 206 451
Criterion ........................................................075
Curtis ............................................................451
Curtis Mathes ...............................................060
CyberHome ............................................006 050
Cytron ...........................................................491
Daewoo ....................................141 234 271 419
Denon ...........004 024 116 165 175 195 296 467
DiamondVison ................................................289
Disney ...................................................010 140
Dual .............................................................076
Duarabrand ........................027 051 054 113 259
DVD2000 ........................................................040
Eclipse ..........................................................301
Elta ................................................................084
Eltax ................................................................064
Emerson ...............010 023 052 248 391 395 465
Enterprise .........................................................056
ESA .......................................................052 235
Farenheit ...........................................................077
Fisher .......................................................249 280
Flex Vision .......................................................078
Fun TV ..........................................................079
Funai ....................................010 052 340 379 391
Gateway .........................................................323
GE ..............................041 046 125 167 205 250
Go Video .....................003 187 226 227 323 402
404 413 418 420 421
Goldstar .......................................................425
GPX ............................................251 278 451 458
Gradiente .................................................024 274
Greenhill .......................................................046
Grundig .......................................................042
Harman/Kardon .....................................199 210
Hitachi ..................003 144 200 217 299 376 417
Hiteker ..........................................................045
Honda ...........................................................080
Honyas ...........................................................081
iLive ................................................................484
iLo ................................................................053
Ingelen ...........................................................105
Initial ..............................................................046
Insignia ...............................013 052 113 375 470
Integra .....................................025 043 057 062
Irradio ............................................................346
Jamo ................................................................082
Jaton ................................................................083
JBL ................................................................452
Jenken ...........................................................106
Jensen ...........................................................031
JMB ..............................................................107
JVC .........007 044 142 143 207 212 219 269
281 317 318 319 321 364 365 366 367 397
398399 400 403 409
Jwin...............................................................084
Karcher ...........................................................108
Kawasaki ......................................................027
Kendo ...........................................................109
Kenwood ........004 024 116 198 204 214 230
231 252
KLH ....................................................027 046 147
Konka ......................................................018 019
Koss ..........................................015 026 035 448
Lasonic ...........................................................253
Landel .............................................................222
Lenoxx ..............................................034 051 054
Lexia .............................................................110
Lexicon ............................................................085
LG ..............................013 284 331 333 352 369
370 373 460 486 488
Lifetec ............................................................111
Limit .............................................................110
Liquid Video ....................................................035
Liteon ........................................323 332 348 353
Loewe .............................................................086
Logiclab ........................................................104
Logix .............................................................112
Luxman ............................................................113
Luxor ................................................................109
Magnavox ...............010 023 039 042 052 150
156 185 326 356 380 388 437 456
Malata .............................................................087
Marantz ..........................................042 156 275
Memorex ..................................010 022 140 254
Microsoft .......................................................041
Mintek .......................................................046 255
Mitsubishi ............................016 038 040 161 194
Momitsu .......................................................088
Mustek ..........................................................458
NAD .........................................................248 256
Nakamichi ....................................................257
Nesa ..............................................................046
Next Base .......................................................058
Nexxtech ...................................................055 276
Niro ...............................................................089
Nissoho Iwai ..................................................079
Norcent .............................030 222 237 258 279
Onkyo ........................025 039 159 190 225 453
Oppo .............................................................047
Optiview .........................................................067
Oritron ..............................................026 035 260
Orion .............................................................022
Panasonic ...........004 024 039 116 117 127 149
152 172 173 178 208 265 266 267 290 291 292
299 300 312 336 341 371 383 385 386 387 407
431 432 434 436 438 443 449 450 476 477 478
479 480 489 490
Philco ...........................................................065
Philips .............002 010 039 042 150 156 162
196 209 294 305 334 337 342 391 437 448
philips Magnavox ...........................162 209 337
Pioneer ...009 036 043 134 146 160 170 181 193
201 203 238 282 295 313 314 315 339 377 429
Polaroid ...........................................014 390 423
Polk Audio ...................................................042
Portland ...........................................................090
Presidian .................................................010 391
Prima .............................................................091
Princeton ......................................................092
Proceed ...........................................................045
Proscan ...........................................041 125 184
Provision .......................................................093
Pye ...............................................................356
Qwestar ..........................................026 239 260
RCA .......000 008 027 041 043 046 125 130 179
184 191 197 228 288 338 389 401 411 422 447
regent ...........................................................034
Rio ................................................................066
Rotel ..............................................................044
Rowa ..............................................................028
Saba ..............................................................094
Sampo ..........................................................261
Samsung .....003 024 120 124 139 145 148 183
189 285 293 322 325 330 336 355 357 368 384
396 405 412 415 439 445 472 481 485 487
Sansui .............................................022 233 378
Sanyo ...................................022 280 347 424 468
Sensory Science ...........................................323
SEG ..............................................................014
Sharp .................010 128 137 320 343 344 374
379 410 473
Sharper Image ..................................................095
Sherwood ...............................................262 474
Shinco ....................................................166 240
Shinsonic ........................................................037
Sigma Designs ..............................................092
Using the Remote Control Chapter 2 25
Page 26

Sonic Blue ...................................059 061 063 066
Sony ..........001 020 037 115 118 121 122 123
131 133 135 154 155 158 163 168 223 229 268
283 306 307 308 335 354 358 360 362 381 392
394 427 428 433 435 440 442 446 455 464 466
482 483
Sungale ........................................................270
Superscan ........................................................023
SVA ..............................................................096
Sylvania ................010 023 052 340 391 395 416
Symphonic ..............................................010 391
Teac .......................................................027 224
Technics ................................................004 024
Technosonic .................................................097
Techwood ...............................................241 263
Terapin ..........................................................098
Theta Digital .....................................................043
Tivo ..............................................................099
Toshiba ...............002 021 022 039 119 129 132
138 171 180 182 286 297 302 303 304 309 310
311 316 327 328 329 359 363 382 393 408 462
Tredex ...........................................................100
Trutech ...........................................................273
TView .............................................................067
Urban Concepts ............................................039
US Logic ........................................................224
Venturer ..................................................027 469
Vizio ...............................................................101
Vocopro............................................................102
Westinghouse ..................................................492
Xbox ...............................................................041
Xwave ...............................................................103
Yamaha ....................024 042 116 150 169 174
196 202 211 215 218 277 345 459
Zenith .............013 039 113 151 186 213 227 264
298 349 350 369 425 460
WHITE WESTINGHOUSE ................................492
DVD/VCR Combo Codes
Where the code is listed as [### ###] the first is for
the DVD and the second is for the VCR. Otherwise
just the one code operates both the DVD and the
VCR. Remember to add the code for the database
device type 0 for DVD, 4 for VCR, [0### 4###].
Broksonic ..............[372 062] [022 072] [406 088]
Hitachi ..................................[376 013] [417 103]
Insignia .................[375 016] [013 047] [113 117]
JVC ....................[364 052] [365 053] [366 054]
[367 055] [317 056] [318 058] [319 059] [403 094]
[397 079] [398 080] [399 081] [400 082] [403 085]
[409 095] [317 056] [318 058] [319 059]
LG ......................[369 016] [373 060] [013 047]
[331 060] [370 060]
Pioneer ................................................[377 064]
Sansui .....................................[378 065] [022 072]
Sharp ....................[374 124] [379 125] [410 111]
Toshiba ....................[363 051] [382 067] [119 091]
[119 096] [393 076] [408 092] [393 115]
Zenith ....................[369 016] [151 116] [227 099]
Apex ....................................................[390 074]
CineVision .............................[113 101] [414 117]
Daewoo ...............................................[419 107]
Durabrand ...............................................[113 117]
Emerson ..............................[395 010] [395 103]
Funai ....................................................[379 125]
Go Video .................[227 100] [402 084] [404 086]
[413 087] [418 106] [420 108] [421 109]
Goldstar ................................................[425 114]
Magnavox .............[156 009] [380 126] [156 104]
[388 071]
Memorex ................................................[022 072]
Panasonic .............[383 061] [385 068] [386 069]
[407 089] [407 105] [371 061]
Philips ...................................[156 009] [391 075]
Polaroid ...................................[390 074] [423 112]
Presidian ..............................................[391 075]
RCA .........[389 073] [401 083] [411 097] [422 110]
Samsung ..............[368 005] [384 070] [396 078]
[405 087] [412 098] [415 087]
Sanyo ....................................................[424 113]
Sony .....................[360 048] [361 049] [362 050]
[381 066] [392 093] [394 093] [394 077] [392 090]
Sylvania ...................[391 075] [395 102] [416 103]
Symphonic .............................................[391 075]
Diamond Vision ......................................[289 126]
AKAI .....................................................[236 127]
Superscan .............................................[023 128]
DVR Codes
ABS ..............................................................020
Alienware..........................................................020
AT&T ...........................................................030
Bang & Olufsen ................................................023
Cyberpower ..................................................020
Dell ...............................................................020
DIRECTV ..............002 007 008 010 011 012 015
019 021 024 026 027
Dish Network ..........................................017 018
Dishpro .............................................................017
Echostar ...................................................017 018
Expressvu .........................................................017
Gateway.........................................................020
GOI.................................................................017
Hewlett Packard .............................................020
HNS ..............................................................009
Howard Computers .........................................020
HP ................................................................020
HTS ...............................................................017
Hughes...............................001 010 011 012 015
Hughes Network System .................001 010011
012 015 024 026 027
Humax............................................................015
Hush...............................................................020
iBUYPOWER....................................................020
JVC ....................................................001 017 018
Linksys ...........................................................020
Media Center PC..............................................020
Microsoft.........................................................020
Mind ..............................................................020
Niveus Media ...................................................020
Northgate..........................................................020
Panasonic...........................................005 022 030
Philips............................001 009 012 015 024 025
Pioneer............................................................031
Proscan...........................................................019
RCA ..............................001 002 009 016 019 021
ReplayTV ..........................................004 022 030
Samsung..................................................009 024
Sonic Blue.........................................004 022 030
Sony............................................000 013 014 020
Stack 9 .............................................................020
Systemax .........................................................020
Tagar Systems ..................................................020
Tivo ..............................000 001 002 003 010 013
014 015 025 026 027 028
Toshiba ......................................................006 020
Touch ..............................................................020
UltimateTV ........................................................021
Viewsonic ........................................................020
Voodoo ............................................................020
ZT Group ..........................................................020
Home Theatre in a Box
Where the code is listed as [### ###] the first is for
the DVD and the second is for the AUDIO. Otherwise just the one code operates both the DVD and
the AUDIO. Remember to add the code for the database device Type, 0 for DVD, 5 for Audio [0### 5###].
Apex ....................................[457 403] [461 407]
Audiovox .................[471 417] [475 399] [454 399]
BOSE ......................................[430 384] [441 010]
CambridgeSoundWorks ..........................[474 418]
Classic .................................................[463 411]
Coby ....................................................[451 018]
Curtis ....................................................[451 409]
Denon ....................................................[467 413]
Emerson ...............................................[465 017]
GPX ......................................[451 421] [458 404]
iLive .....................................................[484 429]
Insignia ....................................................[470 416]
Jamo ....................................................[082 275]
JBL ......................................................[452 397]
Koss ....................................................[448 394]
LG .......................[284 432] [460 406] [486 406]
[488 406]
Magnavox ................................[437 016] [456 401]
Onkyo ....................................................[453 398]
Panasonic ................[431 385] [432 390] [434 386]
[436 385] [438 385] [449 395] [450 396] [476 422]
[477 423] [478 425] [479 426] [480 427] [489 433]
[490 434] [438 424]
Philips .....................................[437 016] [448 412]
Pioneer ....................................................[429 383]
RCA .....................................................[447 393]
Samsung ................[439 011] [445 011] [481 332]
[485 431] [487 431] [481 428]
Sanyo ..................................................[468 414]
Sharp ...................................................[473 419]
Sherwood ............................................[474 420]
Sony .......................[427 382] [433 430] [435 387]
[440 430] [442 387] [446 430] [455 400] [464 387]
[466 430] [482 430] [483 430] [433 392]
Toshiba ....................................................[462 410]
Venturer ................................................[469 415]
Yamaha ..................................................[459 405]
Zenith .....................[460 406] [425 019] [425 333]
Durabrand ..............................................[259 434]
JVC ........................................................[143 408]
Satellite TV Codes
Alphastar ..........................................................051
Amstrad..........................................................100
Chaparral ........................................................045
DIRECTV ..................001 006 007 008 009 010
013 014 015 031 032 034 036 039 043 044 054
055 057 058 059 062 063 064 066 067 068 069
074 078 079 080 081 084 086 087
Dish Network ................002 004 017 018 019 020
021 022 023 024 025 026 027 028 029 030 033
035 037 041 061 083
Dishpro ...........................................035 037 061
Drake ............................................................046
Echostar ........002 004 033 035 037 061 071 083
Expressvu ........................................037 061 07
BELL EXPRESSVU ..........................................071
FORTEC STAR ..............................................101
GE ..........................................................063 087
General Instrument ...........................047 048 056
GOI ...............................................................061
Grundig ..........................................................100
Hisense ..........................................................060
Hitachi ..........................................................009
HTS ..............................................................061
Hughes Network Systems..........................003 006
008 015 031 043 057 064 073
Humax ..........................................................090
iLo ................................................................060
Jerrold ..........................................................056
JVC .............................002 004 033 052 061 083
LG ..........................................................011 059
Magnavox ........................................................014
Memorex ..........................................................014
Mitsubishi ................................006 008 064 093
Motorola ............................................038 056 065
Next Level ........................................................056
Pace ............................................................100
Panasonic .....................010 062 086 092 096 100
Pansat ..........................................................088
Paysat ..........................................................014
Philips ..........................001 003 009 014 015 031
054 055 057 064 081
Philips Magnavox ............................009 054 055
Pioneer ..........................................................015
Primestar ......................................................050
Proscan ......................................013 036 063 095
Proton ..........................................................060
Radio Shack .....................................................056
RCA ........................000 003 013 034 040 044
058 063 075 076 077 078 080 082 091 094 095
097
Realistic ..........................................................049
Samsung ............003 007 015 057 070 085 098
Sharp ............................................................016
SKY NETWORK ..............................................100
Sony .....................005 032 042 066 074 079 084
Star Choice ....................................038 056 072
STS ..............................................................053
Sylvania ..........................................................099
Tivo .................................................003 015 057
Toshiba ......................................006 008 009 064
UltimateTV .......................................................058
Uniden ..........................................................014
US Digital .....................................................060
USDTV ..........................................................060
Viewsat ..........................................................089
Voom ............................................................056
Zenith .....................................................012 067
VCR Codes
ABS ...............................................................038
Adventura ...........................................010 028 125
ADMIRAL ..........................................................097
Aiwa..............................................010 028 035 125
Aiko ...............................................................107
26 Chapter 2 Using the Remote Control
Page 27

Akai .............................................017 018 033 127
Alienware...........................................................038
American High .................................................025
Apex ...............................................................074
Asha ...............................................................021
Audio Dynamics ...............................................019
Audiovox ..........................................022 035 121
Bang & Olufsen ................................................037
Beaumark .........................................................021
Bell & Howell ....................................................020
Broksonic...................................027 062 072 088
Calix .........................................................022 035
Candle ......................................021 022 023 024
Canon .......................................................015 025
CARVER.........................................................104
CCE ..............................................................107
CineVision .................................................101 117
Citizen .................................021 022 023 024 035
Colortyme .......................................................019
COLT .............................................................046
Craig .........................................021 022 026 035
Curtis Mathes .............................012 015 019 021
024 025
Cybernex .......................................................021
CyberPower...................................................038
Cyperpower...................................................038
Daewoo ...............................011 023 027 028 107
Davidson.................................................010 125
DBX ...............................................................019
Dell..................................................................038
Denon ...............................................................030
DiamondVision .................................................126
Dimensia ........................................................012
Durabrand ...............................................017 117
Dynatech .........................................010 028 125
Electrohome .............................................022 035
Electrophonic.............................................022 035
Emerson ................................010 017 022 023
025 027 028 035 075 103 125
Emerex ...........................................................001
ESA ...............................................................047
Fisher ..............................................020 026 045
Fuji .........................................................018 025
Funai ...................................010 028 036 075 125
Garrard ...........................................010 028 125
Gateway ........................................................038
GE .............................................012 015 021 025
Go Video ...............084 086 087 100 106 108 109
Goldstar ............................019 022 024 035 114
Gradiente .........................................010 028 125
Harley Davidson .............................................028
Harman/Kardon .............................................019
HARWOOD ...................................................046
Headquater ...................................................020
Hewlett Packard ..............................................038
Hi-Q ...............................................................026
Hitachi ........................010 013 030 033 103 125
Howard Computers .......................................038
HP .................................................................038
Hush .................................................................038
Hughes Network Systems ...............................030
iBUYPOWER ...................................................038
Insignia ..............................................016 047 117
Instant Replay ................................................025
JC Penney .............015 019 020 021 022 025 0230
JCL .................................................................025
Jesen .......................................................030 033
JVC ............................004 019 020 024 033 041
052 053 054 055 056 057 058 059 079 080 081
082 085 094 095
KEC .................................................................035
Kenwood ...................................019 020 024 033
Kodak ...............................................022 025 035
KLH .................................................................046
LG .............................................016 022 047 060
Linksys ............................................................038
Lloyd’s ............................................010 028 125
LOGIK .............................................................046
LXI ..........................................................022 035
magnavox 006 007 010 015 025 032 071 104 125
Magnin ..............................................................022
magnasonic .....................................................010
Marantz .....................................019 020 024 025
Marta .....................................................022 035
Matsushita ......................................................025
Media Center PC ............................................038
MEI .................................................................025
Memorex ...................007 010 014 020 021 022
025 026 028 032 035 046 072 125
MGN Technology .............................................021
MGA .................................................................008
Microsoft ..........................................................038
Midland ............................................................029
Mind .................................................................038
Minolta ............................................................030
Mitsubishi ..................................................008 030
Motorola ..........................................................025
MONTGOMERY WARD ..................................097
MTC ................................................010 021 125
Multitech ..............................010 021 028 029 125
NEC .........................................019 020 024 033
Nikko ......................................................022 035
Niveus Media .................................................038
Noblex .............................................................021
Northgate .........................................................038
Olympus ..........................................................025
Orion .................................................................014
Panasonic ............000 015 025 039 061 068 069
089 105 118 119
Penney ............................................................035
Pentax ............................................................030
Pentex Research ..............................................024
Philco ......................................................015 025
Philips .........................................009 025 075 104
Philips Magnavox ...........................................104
Pilot ..........................................................022 035
Pioneer .....................................................030 064
Polaroid .....................................................074 112
Polk Audio .......................................................104
Presidian .........................................................075
Proscan ............................................012 043 044
PROTEC ........................................................046
PROFITRONIC ..................................................021
Pulsar .....................................................007 032
Quarter ..........................................................020
Quartz ............................................................020
Quasar ......................................................015 025
Radio Shack ....................................010 022 125
Radio Shack/Realistic ................015 020 021 022
025 026 028
Radix ......................................................022 035
Randex ...................................................022 035
RCA ....................003 012 017 021 025 030 042
073 083 097 110
Realistic .............010 015 020 021 022 023 025
026 028 035 125
Ricavision ......................................................038
Ricoh .............................................................034
Runco ......................................................007 032
Samsung .........005 021 023 029 070 078 087 098
Sanky ......................................................007 032
Sunsui ........................010 014 033 065 072 125
Sanyo ................................020 021 026 045 113
Scott.........................................................023 027
Sears .............010 020 022 025 026 030 035 125
Sharp ..................................010 063 111 124 125
Shintom ..........................................................018
Shogun ..........................................................021
Singer .....................................................025 034
SIGNATURE ..................................................110
Sony ................001 010 018 031 038 040 048 049
050 066 077 090 093 123 125
Stack .............................................................038
Stack 9 .............................................................038
STS ................................................................025
Superscan ........................................................128
Sylvania ...........010 015 025 028 075 102 103 125
Symphonic .........................010 028 036 075 125
Systemax ........................................................038
Tagar Systems .................................................038
Tandy .............................................................020
Tashiko .............................................................022
Tatung .............................................................033
Teac .........................................010 028 033 125
Te chnics .........................................................025
Teknika ..........................010 022 025 028 035 125
Thomas ..................................................010 125
TMK .............................................................021
Toshiba ...........002 023 030 038 051 067 076 091
092 096 115
Totevision .........................................021 022 035
Touch .............................................................038
Unitech .............................................................021
Vector Research ........................................019 023
Vector .............................................................002
Video Concepts ........................................019 023
Videomagic ......................................................035
Videosonic ......................................................021
Viewsonic .......................................................038
Villain .........................................................010 125
Voodoo .............................................................038
Wards .................................010 021 022 023 025
026 028 030 125
White Westinghouse .......................................036
Westinghouse ................................................046
XR-100 .....................................010 025 028 125
Yamaha ....................................019 020 024 033
Zenith ..............007 010 016 018 032 034 099 116
117 120 122 125
ZT Group ........................................................038
Using the Remote Control Chapter 2 27
Page 28

3 Using TV Features
Channel Banner
There are several indicators that may appear when you press the INFO button on the remote control. This
display is called the Channel Banner. The following list describes the items on the Channel Banner screen
(left to right and top to bottom).
TruSurroundXT This is sound mode. Go to page 34 for more information.
Stereo This is sound type. If the current channel is analog, “Stereo” appears when broadcasting
in stereo and “Mono” appears when the current channel is broadcasting in mono. If the
current channel is digital and the sound mode is off, this space is blank.
SAP If the current channel is analog, this shows it is broadcasting SAP (Second Audio
Program) information. If the current channel is digital, this area shows the language.
720 p 60 Broadcast signal resolution.
Unrated Rating information of the current program.
Parental Control The Parental Control state (locked or unlocked) of the current program.
D 10 CBS The “D” denotes a digital channel; an “A” denotes an analog channel. The channel, sub-
channel (if available for digital channels) and program (only for digital channels) are
displayed.
CC Closed Captioning is available on the current channel.
Cinerama Current screen format. If there are bars on the screen, you may be able to delete them by
pressing the FORMAT button on the remote. Go to page 33 for more information on
screen formats.
ZZZ 00:25 Current time left on sleep timer, if the sleep timer is set.
( ) 02:16 AM Current time.
Autotuning
Go Back
Exit
Sound
Picture
Channel List
Setup
Parental Control
Time
USB
Set DVD Channel
Set SAT-AUX Channel
Press < or > to select input for the DVD key.
N/A
N/A
Note : This feature only
works with other RCA
devices.
28 Chapter 3 Using TV Features
Autotuning
Note: This feature only works with other RCA components.
The Autotuning feature automatically tunes the TV to the correct video input channel for the different
components connected to your TV. When you set up Autotuning in the menu system, you don’t
have to remember to change your TV to the VID 1 input, for example, when you want to watch a
tape on the VCR. To set up the Autotuning feature, follow these steps:
1. Press the MENU button (the Main Menu appears).
2. Highlight Setup and press OK on your remote control.
3. Highlight Autotuning and press OK.
Page 29

4. Choose which component button you would like to set:
Set DVD Channel - Allows you to set the channel the TV tunes to when you press the DVD button.
Set SAT-AUX Channel - Allows you to set the channel the TV tunes to when you press the SAT/AUX
button.
5. Press the left or right arrow to select the choice that matches the way you have the component
connected to this TV.
You can select from the following inputs or channels:
N/A – Choose this option if you don’t have a component connected to the TV, or if you don’t want the TV
to automatically tune to the correct channel/input when you’re using this component.
Channel 3 or 4 - Choose this option if the component is connected to the ANTENNA/CABLE jack on the
back of the TV, and you want the TV to tune to channel 3 when you press the corresponding button on
the remote. Reminder: Make sure the component’s Channel 3/4 switch is set to channel 3.
VID 1 or VID 2 (Video Input) – Choose this option if the component is connected to the VIDEO INPUT 1
jack on the back of the TV or the VIDEO INPUT 2 jack on the side of the TV and you want the TV to tune
to the VIDEO INPUT channel when you press the corresponding component button.
CMPT (Component Video Input) – Choose this option when a compatible component video source,
such as an HDTV tuner, satellite receiver, or DVD player, is connected to the three component VIDEO
INPUT jacks (Y Pb Pr) on the back of the TV and you want the TV to tune to the component VIDEO
INPUT channel (CMPT) when you press the corresponding component button.
PC – Choose this option when the component is connected to the PC INPUT jack on the back of the TV
and you want the TV to tune to the PC input when you press the corresponding component button.
HDMI 1, HDMI 2, HDMI 3 or HDMI 4 – Choose this option when the component is connected to the
HDMI 1/DVI or the HDMI 2/HDMI 3 INPUT on the back of the TV or HDMI 4 on the side of the TV, and
you want the TV to tune to the HDMI INPUT channel when you press the corresponding component
button.
Parental Controls and V-Chip
The choices in the US V-Chip and Canada V-Chip menus involve software inside your TV, referred to as
V-Chip, which allows you to block TV programs and movies. TV programs can be blocked by age-based
ratings, such as TV-MA (See page 30). If available, TV programs can also be blocked by content, such as
adult language (L) (See page 31). Movies can only be blocked by age-based ratings (See page 31). Once
you block programs, you can unblock them by entering a password. By default, the software inside your TV
is turned off or unlocked. For instructions to lock V-Chip, see page 30.
V-Chip - US and Canada
V-Chip reads the program’s age-based rating (TV-MA, TV-14, etc.) and content themes (Violence (V), Adult
Language (L), etc.). If you have blocked the rating and/or content themes that the program contains, you
receive a message that the channel is currently blocked. Change the channel or press OK to enter your
password and temporarily deactivate the parental controls.
Broadcasters are not required to provide content themes, so programs received with no content themes are
blocked only if you block their age-based rating. You can also block programs that have been given an
Exempt rating, and programs that are considered unrated. See page 45 for the US and Canada ratings
explanations.
Using TV Features Chapter 3
Note: Parental control
settings are not
available for HDMI 1,
HDMI 2, HDMI 3,
HDMI 4, CMPT or PC
INPUTS. These
settings must be set in
the connected
component’s parental
controls.
29
Page 30

Go Back
Lock Parental Control
Exit
Select Channel
Sound
Block Channel
Picture
Channel List
Parental Control
Block Buttons
US V-Chip
Setup
Canada V-Chip
Unrated/Exempt Ratings
Time
USB
To l ock pa re ntal controls, ente r 4 digit password using the digit
keys.
Note: If you do not lock
parental controls, none of
the settings for V-Chip,
Block Buttons or Block
Channel will take effect.
Note: If you forget your
password, turn off the TV,
simultaneously press and
hold VOL DOWN on the side
panel and CANCEL on the
remote for 5 seconds. The
next time you enter the
Parental Control Menu, enter
a new password.
HDMI1 HDMI1
View
Lock Parental Controls
• When the Parental Control Menu is accessed from the Main Menu and the parental controls
are permanently unlocked, the following message is displayed:
“Parental Controls are UNLOCKED. Rating limits and Channel Block will NOT require a
password to view the picture. Use ‘Lock Parental Control’ to lock. Press any key to continue.”
•Pressing any key displays the Parental Control Menu and highlights Lock Parental Control.
•To lock parental controls, enter a four-digit password using the digit keys. After a password is
entered and parental controls are still unlocked, you must repeat entering the password. Once
the password is confirmed, this message is displayed: “Parental Controls are LOCKED.
Blocked programs will require a password to view the picture.”
Unlock Parental Controls
If parental controls are locked or temporarily unlocked, the Password Menu appears when the user
tries to enter the Parental Control Menu. After the correct password is entered, the parental controls
are unlocked.
V-Chip Rating Screen
The following graphic details where items are located within the TV Ratings option with the
US V-Chip menu.
Rating Status Field
Lets you select whether the status of the agebased rating to the left limit is view or block.
TV Ratings
Go Back
Status
Rating Field
Lets you select
from a list of agebased ratings you
can block or view.
Exit
Sound
Picture
Channel List
Setup
Parental Control
Time
USB
TV-MA
TV-14
TV-PG
TV-G
TV-Y7
TV-Y
Press OK to view/block programs with this rating.
DL SV FV
Block
View
View
View
View
View
Content Themes
Lists the content
themes you can
block or view.
TV Ratings
Exit
Sound
Picture
Channel List
Setup
Parental Control
Time
USB
Go Back
TV-MA
TV-14
TV-PG
TV-G
TV-Y7
TV-Y
Press OK to view/block programs with this rating.
Status
Block
View
View
View
View
View
DL S VFV
30 Chapter 3 Using TV Features
Content Status Fields
Lets you select which content themes to view for
the selected rating, and whether the status of
the content theme is currently unlocked ( ) or
locked ( ).
US V-Chip TV Ratings
Blocking Age-Based Ratings
You can automatically block all program ratings above a specified age-based rating level.
1. Choose Parental Control from the Main Menu. If parental controls have previously been locked,
you must enter your password.
2. Highlight and select US V-Chip. Press OK or right arrow to enter the menu.
3. Highlight and select TV Ratings.
4. Press the up or down arrow to scroll to the rating corresponding with the lowest rating you wish
to block.
Page 31

5. Press the OK button to toggle between View and Block. The status for the rating and all higher
ratings automatically changes to Block.
6. Use the MENU button repeatedly to return to the Parental Control Menu.
7. Select Lock Parental Control from the Parental Control Menu. For rating limits to take effect, enter
the correct password twice.
To view age-based ratings after you’ve locked them, follow the same steps as above to unlock.
Blocking Specific Content Themes
You can block programs based on their content. (Content is represented by the D, L, S, V and FV
on your screen.) When you block a content theme for a particular rating, you automatically block
that content theme for higher-rated programs as well. To block program content:
1. Choose Parental Control from the Main Menu. If parental controls have previously been locked,
you must enter your password.
2. Highlight and select US V-Chip. Press OK or right arrow to enter the menu.
3. Highlight and select TV Ratings.
4. Determine the content themes you want to block.
5. Press the down arrow to scroll to the rating whose content theme you want to change.
6. Press the right arrow to highlight a particular content theme.
7. Press the OK button to change its status to block. (For example, if you block the language (L)
corresponding with TV-14, the language for TV-MA is blocked as well.)
To view content themes after you've locked them, follow the same steps as above to unlock.
Note: If you unlock the language corresponding with TV-14, the language for TV-MA doesn't unlock.
You have to unlock the content theme status for each rating separately.
TV Ratings
Go Back
Status
Exit
Sound
Picture
Channel List
Setup
Parental Control
Time
USB
TV-MA
TV-14
TV-PG
TV-G
TV-Y7
TV-Y
Press OK to view/block programs with this rating that contain
adult language.
DL SVFV
View
View
View
View
View
View
Note: Broadcasters are not
required to provide content
themes or age-based
ratings. You must
remember to lock Parental
Controls for rating limits to
take effect.
Hierarchy of Age-Based Ratings
TV-MA
TV-14
TV-PG
TV-G
TV-Y7
TV-Y
Mature Audience Only
Parents Strongly Cautioned
Parents Guidance Suggested
General Audience
Directed to Children 7 Years and Older
All Children
D
L
S
V
FV
Content Themes
Sexually Explicit Dialogue
Adult Language
Sexual Situations
Violence
Fantasy Violence
US V-Chip Movie Rating Limit
Set movie rating limits by blocking movies rated above a specified level. To access the Movie
Rating Limit Menu, follow these steps:
1. Press MENU on the remote control (the Main Menu appears).
2. Select Parental Control. Press OK or the right arrow to enter menu.
3. Highlight and select US V-Chip.
4. Highlight and select Movie Ratings.
5. Press the down arrow to scroll to the rating you want to change.
6. Press the OK button to change its status to block (all ratings above the one you selected
change to block).
7. Press the MENU button repeatedly to exit the Parental Control Menu.
Note: If you forget your
password, turn off the TV,
simultaneously press and
hold VOL DOWN on the
side panel and CANCEL on
the remote for 5 seconds.
The next time you enter the
Parental Control Menu,
enter a new password.
Movie Ratings
Go Back
Exit
Sound
Picture
Channel List
Setup
Parental Control
Time
USB
X
NC-17
R
PG-13
PG
G
Press OK to view/block Movies with this rating.
View
View
View
View
View
View
Using TV Features Chapter 3
31
Page 32

English Ratings
Go Back
18+
Exit
14+
Sound
PG
Picture
Channel List
Parental Control
G
C8+
Setup
C
Time
USB
Press OK to view/block programs with this rating.
Note: These ratings are
available only if the
broadcaster is sending
them.
Go Back
Lock Parental Control
Exit
Select Channel
Sound
Block Channel
Picture
Channel List
Parental Control
Channel List
Parental Control
Block Buttons
US V-Chip
Setup
Canada V-Chip
Unrated/Exempt Ratings
Time
USB
Press < / > to block/unblock the selected channel.
Go Back
Lock Parental Control
Select Channel
Exit
Setup
Time
USB
rol
Block Channel
Block Buttons
US V-Chip
Canada V-Chip
Unrated/Exempt Ratings
Press < / > or OK to change this setting.
Sound
Picture
Note: You must
remember to lock
Parental Controls for
rating limits to take
effect.
Note:These ratings are
available only if the
broadcaster is sending
them.
View
View
View
View
View
View
HDMI1 HDMI1
View
HDMI1 HDMI1
View
Blocking Canada V-Chip Ratings
If you receive Canadian programs, you can block Canadian English and French V-Chip by ratings
only. When you block a particular rating, you automatically block the higher-rated programs as
well. To block Canadian English and French program ratings, follow these steps:
1. Press MENU on the remote control (the Main Menu appears).
2. Select Parental Control.
3. Select Canada V-Chip.
4. Highlight English Ratings or French Ratings and press OK.
5. Press the down arrow to scroll to the rating you want to change.
6. Press the OK button to change its status to block (all ratings above the one you selected
change to block).
7. Press the MENU button repeatedly to exit the Parental Control Menu.
Block Channel
Turn this option on to block the channel you choose in the Select Channel option. Use the digit
keys to enter the channel you want to block. Then press the down arrow to select Block Channel.
Press the OK or right arrow button to place a checkmark in the Block Channel box to block the
channel. When you tune to that channel, you'll need to enter a password to view the channel if
parental control is locked.
Block Buttons
Select this option to block (disable) or unblock (enable) the TV’s side panel buttons so that they
can't be used. The remote still tunes to any channel. If you're using this to keep children from
changing channels, remove access to any remote that is capable of operating the television while
you have the side panel blocked. Don’t forget to lock parental controls after you change the
status. If you don’t, the Block Buttons action will not take effect.
Blocking Unrated/Exempt Programs
The Unrated/Exempt Ratings option lets you decide if programs that the V-Chip recognizes as
unrated or exempt can be viewed. Unrated TV programs may include news, sports, political,
religious, local and weather programs, emergency bulletins, public announcements, and programs
without ratings. The Exempt option applies to both US and Canadian unrated programs and
Canadian programs rated E.
Press the down arrow to highlight Unrated/Exempt Ratings. Then press the OK button or the right
arrow to toggle between View and Block.
View All unrated programs are available.
Block All unrated programs are not available.
Future Rating Region
You may notice an option in your Parental Control Menu that wasn't there before. This is because
broadcasters have the capability to add a new rating system for TV programs. These ratings let
you define additional parameters for parental controls. This option and its name are dependent on
the content acquired from the broadcaster.
32 Chapter 3 Using TV Features
Page 33

Additional Features
There are additional features available unrelated to parental controls. These features can be found in other
menus.
Fetch Feature
This is a unique “Fetch” remote control finder function on the HDTV. Pressing the MENU and VOLUME UP
buttons on the side panel of the TV set at the same time causes the remote control to bark from its current
location.
Screen Formats
Screen format refers to the way the picture is displayed on your TV. Press the FORMAT button on your
remote to see if a different format is available for the video you are viewing. The format changes as you press
the FORMAT button and the format type is displayed at the top left of the screen.
Analog video is sent in a 4/3 format, which your TV displays in a 16/9 format. Most digital video is sent in a
16/9 format which fills your screen, but it sometimes is sent in 4/3, which does not fill your screen. It
depends on how the station or component connected to your TV is formatting the video. If there are bars on
the screen, press the FORMAT button to try a different format that may eliminate the bars. Some bars can't
be removed because of the way the format is sent by the broadcaster.
Examples of the different formats appear below available for SD video :
Note: For HD video,
press FORMAT to
choose among Full,
Expand, Cinerama and
Zoom; for VGA signal,
you can choose format
among Normal or Full ;
NO Overscan for HDMI/
CMPT signal.
Normal
Cinerama
Full
Zoom
Using TV Features Chapter 3 33
Page 34

4 Using the TV Menu
Using the Menu System
This section explores the menus of your TV. Each menu is outlined and detailed to help you get the
Exit
Sound
Picture
Channel List
Setup
Parental Control
Time
USB
most from your TV. The Parental Control Menu is discussed in Chapter 3. To access the menu
system, follow these steps:
1. Press the MENU button.
2. Use the up or down arrow to highlight an option and press OK to display it. The name of the
menu is displayed at the top of the menu screen.
3. Press the up or down arrow to move to a different option within the menu. If necessary, press the
OK button to display the choices of the option you’ve highlighted. If available, use the text at the
bottom of each screen for help.
4. To return to the Main Menu, press the MENU button repeatedly until it is displayed.
Descriptions of each menu are discussed in the order they appear.
There are two ways to exit a menu:
•Press the CANCEL button. The menus are cleared from the screen and you return to TV viewing.
•Press the MENU button repeatedly until the menus disappear.
Sound Menu
Go Back
Equalizer
Exit
Sound
Picture
Channel List
Setup
Parental Control
Time
USB
Sound Type
Sound Mode
Dynamic Bass
Balance
Auto Volume Level
Internal Speaker
Advanced Settings
Press OK or > to open this menu.
Stereo
TruSurroundXT
Off
0
Note: All digital channels
are broadcast in stereo.
34 Chapter 4 Using the TV Menu
The Sound Menu lets you adjust audio output. To access the Sound Menu, press MENU on the
remote, and then select Sound from the Main Menu. The following audio items can be adjusted:
Equalizer The five-band graphic equalizer allows you to adjust the audio frequency settings. You can
select one of the five-band Equalizer Presets or create your own personal preset.
Sound Preset Allows you to choose a specific Sound Preset. Press the right arrow to cycle through
the options: Standard, Movie, Voice, Music and Personal.
Frequency Range Displays the different graphic equalizer bands set for each Sound Preset option.
Choose a band and make adjustments. When you make adjustments, the Sound Preset option
automatically changes to Personal. Press the left or right arrow to select the frequency (100Hz,
300Hz, 1KHz, 3KHz, 10KHz) you want to adjust. Use the up or down arrow to adjust the level.
When you are done adjusting the levels, press the MENU button to exit.
To view the frequency of another Sound Preset option, press the left or right arrow until no band is
selected and Frequency Range is highlighted. Press the up arrow to highlight Sound Preset.
Sound Type Controls the manner in which the sound comes through the speakers. The available
options vary according to the input selected.
Mono (available for regular TV viewing only) – This option plays the sound in mono only. Use this
setting when receiving broadcasts with weak stereo signals.
Stereo This option splits the incoming stereo audio signal into left and right channels. Most TV
programs and recorded materials have stereo audio. The word “Stereo” appears in the Channel
Banner when you tune to a program that is broadcast in stereo.
Sound Mode Provides special processing through the speakers (depending on the setting chosen
as the Sound Type). The available Sound Modes are:
Off No special sound processing.
TurSurroundXT
Page 35

Dynamic Bass Improves bass output. Displays a choice list of available settings: Off and On.
Balance Press the left or right arrow to adjust the level of audio sent to the left and right speakers.
Auto Volume Level Reduces the annoying blasts in volume during commercial breaks and also
amplifies softer sounds in program material. Eliminates the need to constantly adjust the volume.
Internal Speakers Turns the internal speakers off and on. If you have a component connected to
the AUDIO OUTPUT jacks on the back of the TV and you want to control the sound by the component
instead, uncheck the box.
Advanced Settings
Second Audio Program (SAP) – This option plays the program’s audio in a second language, if
available. The letters “SAP” appear in the Channel Banner when you tune to a program that is
broadcast with SAP information. SAP audio is broadcast in mono only. SAP is also used to
broadcast a program’s audio with descriptions of the video for the visually impaired.
Default Audio Language – Use this selection to choose the language you prefer for dialog on
digital channels. If your preferred language is being broadcast with a program, the TV plays it. If
not, the TV plays the default option for the program (usually English in the US). The default digital
channel audio language options are English, Spanish, French, German and Italian.
Current Audio Track (not available for analog channels) – Press the right arrow to choose from
the list of languages available for the program you’re watching. The language chosen becomes
your preferred language for all digital channels until you turn the TV off. If the language chosen is
not being broadcast with a program, the TV plays the default language for the program (usually
English in the US).
Note: The Current Audio Track menu item grays out when the current channel selected is analog.
Exit
Sound
Picture
Channel List
Setup
Parental Control
Time
USB
Advanced Settings
Go Back
SAP
Default Audio Language
Current Audio Track
Press < / > or OK to change this setting.
English
Unkown
Picture Menu
The Picture Menu contains menus and controls to configure the way the picture appears. The Picture
Menu options apply to the video for the main TV and VIDEO INPUT selections. All picture options can
be applied to each input - VID 1, VID 2, CMPT, HDMI 1, HDMI 2, HDMI 3, HDMI 4 and PC.
Picture Preset - (not available on PC) Allows you to select one of the preset picture settings:
Vibrant, Sports, Personal, Natural, or Cinematic. Choose the setting that is best for your viewing
environment.
Brightness - Use the left or right arrow to adjust the brightness of the picture.
Contrast - Use the left or right arrow to adjust the difference between the light and dark areas of the picture.
Color - Use the right or left arrow to adjust the richness of the color.
Sharpness (not available on PC) - Use the right or left arrow to adjust the crispness of the edges in the
picture.
Tint (not available on PC) - This option adjusts the balance between the red and green levels.
Color Warmth - This option allows you to select one of three automatic color adjustments: Cool for
a bluer palette of picture colors; Normal; or Warm for a redder palette of color. The warm setting
corresponds to the NTSC standard of 6500 K. Use the left or right arrow to make adjustments.
Phase (only available on PC) - Adjusts the picture if there is flicker of screen letters, color misalignment or blurring.
Exit
Sound
Picture
Channel List
Setup
Parental Control
Time
USB
Go Back
Picture Preset
Brightness
Contrast
Color
Sharpness
Tint
Color Warmth
Video No ise Reduc tion
Advanced Settings
Press < / > or OK to change this setting.
Personal
32
53
35
3
32
Normal
Medium
Using the TV Menu Chapter 4 35
Page 36

Exit
Sound
Picture
Channel List
Setup
Parental Control
Time
USB
Advanced Settings
Go Back
Motion Enhancer
Cinema Drive
Game Mode
Color Enhancer
Motion Profile
Demo Mode
Reset
Press < / > or OK to change this setting.
Off
On
Off
Low
High
Off
Video Noise Reduction (not available on PC) - This setting reduces picture “static” or any type
of interference. This feature is especially useful for providing a clearer picture in weak analog signal
conditions. Press the right arrow to choose between these options:
Off for no noise reduction.
Low for a softer, smoother picture that retains picture sharpness and detail.
Medium for a slightly softer picture than the Low setting.
High for an even softer, smoother picture than the other settings (the picture detail is somewhat
decreased).
Advanced Setting
Motion Enhancer Provides smoother picture movement and reduces picture blur.
On: Provides more sharpness on moving picture
Off: Turns off the Motion Enhancer
Cinema Drive Provides improved picture movement when playing DVD or VCR images taken
on film, reduces picture judder.
Game Mode The Game Video mode does not apply motion processing to the input video. This
mode is also known as the low latency mode, because there is no video delay caused by
motion processing. Provides the optimum screen for viewing images when input from video
games equipment and PCs.
On: For video games equipment and PCs.
Off: For video or film-based contents.
Color Enhancer Make color more vivid.
High: Higher level
Low: Standard level, recommended mode
Off: Turns off the Color Enhancer
Motion Profile Choose high level to keep the picture sharp at all times; however, very small
details may fade a little at high speed. Choose low or medium levels to reduce the motion
compensation.
High: For high speed movement and higher motion compensation
Medium: For normal movement and less motion compensation
Low: Less motion compensation
Demo Mode Vertical split demo features Motion Enhancer/Cinema Drive and Color Enhance.
The right side features the enhanced modes.
Reset Reset all the advanced settings to the default values. The default values are:
Motion Enhancer = On; Cinema Drive = On; Game Mode = Off; Color Enhancer = Low;
Motion Profile = High; Demo Mode = Off.
36 Chapter 4 Using the TV Menu
Page 37

Channel List Menu
The Channel List Menu allows you to view all the channels available in your channel list. Press the up
or down arrow to highlight a channel. Press the OK button to tune to the channel.
Setup Menu
The Setup Menu allows you to configure the TV with your preferences. Press MENU on the remote
control; then highlight and select Setup from the Main Menu.
Channel Setup
Signal Type Choose the type of signal you have connected to the ANTENNA/CABLE INPUT.
Channel Search Searches for channels currently being received. See page 16 for more
information.
List and Labels
Edit the channels in the list or choose labels for each video input channel.
Channel Number Use the number buttons on your remote to enter the channel number, or press
the left and right arrows to select the VIDEO INPUT channel among VID 1, VID 2, CMPT, PC,
HDMI 1, HDMI 2, HDMI 3 and HDMI 4.
In Channel List (only available for TV channels) If you’ve entered a channel you want to add to
the channel list, highlight In Channel List and press the right arrow to place a check in the
checkbox. If you’ve entered a channel you want to delete from the channel list, press the right
arrow to uncheck the box. When an AV INPUT is displayed in the Channel Number field, the line
“In Channel List” is grayed out.
Channel Label (not available for TV channels) Allows you to select a label for the video input
channel selected in Channel Number. The label is displayed on the screen when you tune to this
input channel. When a channel number is displayed in the Channel Number field, this is grayed-
out.
Exit
Sound
Picture
Channel List
Setup
Parental Control
Time
USB
Exit
Sound
Picture
Channel List
Setup
Parental Control
Time
USB
Go Back
Channel Setup
List and Labels
Autotuning
Closed Caption
Preferences
Dynamic Backlight
Light Sensor
HDMI CEC
Press OK or > to open this menu.
List and Labels
Go Back
Channel Number
In Channel Lis t
Channel Label
Enter a channel number or use the < / > keys.
On
Off
Off
VID1
VID1
Autotuning See Chapter 3 for details about the Autotuning feature.
Closed Caption
Many programs are encoded with closed captioning information, which lets you display the audio
portion of a program as text on the TV screen.
Note: Closed caption settings are not available for HDMI 1, HDMI 2, HDMI 3, HDMI 4, or CMPT INPUTS.
These settings must be set in the connected component’s menu. Closed captioning is not available on all
channels at all times. Only specific programs are encoded with closed captioning information. When a
program is closed captioned, CC is displayed in the Channel Banner. See Chapter 3 for more information
about the Channel Banner.
The Closed Caption options are:
CC Setting Allows you to choose the way closed captioning information appears on the screen.
OFF No captioning information displayed.
On always Captioning information shown always, when available.
On when muted Displays captioning information, when available, whenever the TV’s sound is
muted by pressing the MUTE button. The captioning information is not displayed when the sound
is not muted.
Using the TV Menu Chapter 4 37
Exit
Sound
Picture
Channel List
Setup
Parental Contro l
Time
USB
Closed Caption
Go Back
CC Setting
Analog CC Type
Digital CC Type
Digital CC Preset
Digital CC Style
Press < / > or OK to change this setting.
Off
CC1
Service1
Dfault
Page 38

Exit
Sound
Picture
Channel List
Setup
Parental Control
Time
USB
Digital CC Style
Go Back
Digital CC Size
Digital CC Font
Digital
CC Opacity
Digital CC Color
Digital CC Back. Opacity
Digital CC Back. Color
Press < / > or OK to change this setting.
Standard
Semi Serif
Solid
White
Solid
Black
Analog CC Type If available, this option allows you to select the captioning mode used for
displaying captioning information. If you are unsure of the differences among the modes, you may
prefer to leave the closed captioning mode set to CC1, which displays complete text of the
program in the primary language in your area.
Digital CC Type If available, this allows you to select a closed caption service mode (1-6) for
digital channels.
Digital CC Preset If available, this allows you to select between Default and Custom options.
The custom option changes according to what you set for the options below.
Digital CC Style If available, this allows you to customize the following display options:
Digital CC Size Allows you to set the size of the digital closed caption text: Standard, Large or
Small.
Digital CC Font Allows you to select a character design for the digital closed caption text. A
font is a complete assortment of letters, numbers, punctuation marks, etc, in a given design.
Choose from a variety of fonts: Semi Serif, Screen Serif, etc.
Digital CC Opacity Allows you to set the appearance of the digital closed caption text: Solid,
Transparent, Translucent or Flashing.
Digital CC Color Allows you to choose the color if the digital closed caption text: White, Red,
Green, Blue, Yellow, Magenta, Cyan or Black.
Digital CC Back. Opacity Lets you set the appearance of the space behind the digital closed-
caption text: Solid, Transparent, Translucent, or Flashing.
Digital CC Back. Color Lets you choose the color of the area of the screen behind the digital
closed-caption text: White, Red, Green, Blue, Yellow, Magenta, Cyan or Black.
Note: These captioning style options only have an effect on true digital closed captions. Not all captioning
on digital channels is digital captioning—it depends on what the broadcaster is sending. If the closed
captioning for a program is not digital, the Digital CC style settings will not have an effect.
Preferences
Go Back
Ch. Number Display
Exit
Language
Sound
Power Save Mode
Picture
Channel List
Setup
Parental Control
Time
USB
To al wa ys display the channel number on screen, put a check in
the box using the OK key.
Note: The connected
HDMI device must be
HDMI CEC-compliant
for this feature to work.
Some HDMI may utilize
specific protocols that
are not fully CEC
compliant and may
prevent the feature from
working properly.
English
Preferences
Channel Number Display Turn this feature on if you want the channel number always visible.
Language Allows you to select your preferred language for the menus: English, Espanol, or Francais.
Power Save Mode If no signal is detected from the Input/RF INPUT for five minutes, the TV set
goes to Standby Mode.
Dynamic Backlight Option: On/Off. If you choose On, the TV continually monitors the video content
being displayed and adjusts the backlight to achieve optimum contrast levels.
Light Sensor If you choose On, this feature is activated.
When activated, this feature monitors the ambient light conditions in the room and adjusts the TV’s
backlight for optimum viewing. It also serves as an energy-saving feature by lowering the backlight
power level when appropriate (typically in darker room conditions).
HDMI CEC (Consumer Electronics Control)
If you choose On, the HDMI CEC function is enabled. This feature provides expanded capabilities when
your TV is connected to an HDMI CEC-compliant component using a certified HDMI 1.3 cable.
Here is an example using an HDMI CEC-compliant DVD player connected to the TV.
• Upon activating the feature, the TV searches for HDMI CEC-compliant components that are
connected. In this example, a connected DVD player is found.
• When both the TV and DVD player are on and a disc is inserted into the DVD player, the TV
automatically switches to the associated input and initiates play.
38 Chapter 4 Using the TV Menu
Page 39

•When the TV is on and the DVD player is turned on with the disc already loaded, the TV automatically
switches to the associated input and initiates play.
• If you connect another HDMI CEC component and/or change the HDMI input used for an existing
HDMI CEC component, you should turn the HDMI CEC function off and then turn it on again in
order for the TV to complete a new search for the connected devices.
Parental Control Menu
The Parental Control Menu is explained in Chapter 3. Go to Page 29 for more information.
Time Menu
Sleep Timer Press the left or right arrow to set the TV to turn off after a given amount of time.
Auto Time Channel Choose a station to have the TV set the time for you. Wait approximately one
minute after you program this for the time to be set.
Time Zone Select the current local time: Atlantic, Newfoundland, Central, Mountain, Pacific,
Alaska, Hawaii and Eastern.
Daylight Saving (DST) Choose between Off and Automatic Modes.
Enter Time If you did not set the time reference channel, enter the current time manually. Use the
number keys or the right or left arrow to set hours and minutes. Use the OK button to choose
between AM/PM.
Exit
Sound
Picture
Channel List
Setup
Parental Control
Time
USB
Go Back
Sleep Timer
Auto Time Channel
Time Zone
Daylight Saving
Enter time
Wake up Tim er
Wake up Tim e
Turn of f Ti mer
Turn of f Ti me
Press < / > or OK to change this setting.
Off Z
--
Eastern
Automatic
10:35AM
Off
6:00AM
Off
- - :- - AM
Z
Z
Wake up Timer Use the left or right arrow to choose between Off, Once or Daily to set the TV to
turn itself on just one time or at the same time each day.
The Wake Up Timer is available only when the time has been set.
Note:
Wake up Time Set the time you want the TV to turn itself on. Use the number keys or the right or
left arrow to set hours and minutes. Use the OK button to choose between AM/PM.
Turn off Timer Use the left or right arrow to choose between Off, Once, or Daily to set the TV to
turn itself off just one time or at the same time daily.
Turn off time Set the time you want the TV to turn itself off. Use the number keys or the right or left
arrow to set hours and minutes. Use the OK button to choose between AM/PM.
Using the TV Menu Chapter 4 39
Page 40

USB Menu
The USB feature allows you to play audio files (format supported: MP3) or display pictures (format
supported: JPEG). Select USB in the Main Menu; then select USB Device.
Exit
Sound
Picture
Channel List
Setup
Parental Control
Time
USB
USB Device
Picture If you have pictures on the USB component connected to your TV, this menu allows you
to view the pictures individually by pressing the up or down arrow to highlight the pictures (the
picture is displayed on the right).
Note: To play a slideshow of all the pictures available on your component, highlight a folder and
press PLAY.
Music If you have MP3 audio files on the USB component connected to the TV, this menu allows
you to play files individually by pressing the up or down arrow to highlight the song.
Note: To play all the music files available on your component, highlight a folder and press PLAY.
USB Connection
Connecting a Component with USB or a USB Flash Drive
Note: When using a
USB connection, a
picture slideshow
can only be set for a
folder, not an
individual picture.
This connection allows you to insert a USB flash drive directly or connect to a compatible mass
storage device with USB, such as a digital camera, multi-format card reader, or MP3 player.
If you have a USB flash drive, plug in the drive directly.
If you have a component with USB:
• Connect one end of the USB cable to the USB component and the other end to the USB jack on
•To access and adjust the options of the USB component, press MENU. Choose USB from the
40 Chapter 4 Using the TV Menu
the side of the TV.
Main Menu.
Page 41

5 Other Information
Frequently Asked Questions (FAQs)
What’s the quickest way to view High Definition (HD) video?
Connect an off-air antenna to the ANTENNA/CABLE Input to view free local digital channels. You may need
to purchase an antenna. (See page 9 for more information).
Visit www.antennaweb.org for assistance in deciding what type of antenna to use to receive the local digital
channels available to you. By entering your location, this mapping program tells you which local analog and
digital stations are available using a certain antenna.
Are there other ways to view High Definition (HD) video?
Besides using an off-air antenna as mentioned above, you can also use a set-top box to receive
digital video. Contact your cable company or satellite provider to purchase digital programming
and have them connect the box to ensure you are viewing channels the best way.
How do I tell an analog channel from a digital channel?
Press the INFO button to display the Channel Banner. Look at the bottom left corner of the screen. An “A” is
displayed for an analog channel. A “D” is displayed for a digital channel.
Why are there bars on my screen, and can I get rid of them?
Most digital video is sent in a 16/9 format which fills your screen, but is sometimes sent in 4/3 which does
not fill your screen. It depends on how the station or device connected to your TV is formatting the video. If
there are bars on the screen, press the FORMAT button to try a different format that may eliminate the bars.
Some bars can't be removed because of the way the format is sent by the broadcaster. The format changes
as you press the FORMAT button and the format type is displayed at the top left of the screen. For more
information on screen formats, go to page 33.
Why does channel search find a lot of channels, but when I try to tune to them,
there’s nothing there?
Some channels enabled by the cable company don’t carry programming, such as video ondemand. When
channels are unavailable, your TV screen is blank or appears like snow. You probably want to remove these
channels from your channel list. Remove these in the Channel List Menu. Go to page 37 for more information.
Why does the first channel search take a long time?
If you have both analog and digital channels, the TV is looking for all available channels in the channel list. If
you do have digital channels, the TV is also searching for scrambled channels, non-scrambled channels,
and each sub-channel of that digital channel.
Other Information Chapter 5 41
Page 42

Troubleshooting
Most problems you encounter with your TV can be corrected by consulting the following troubleshooting list.
TV Problems
The TV won’t turn on.
• Make sure the TV is plugged in.
• Check the wall receptacle (or extension cord) to make sure it is “live” by plugging in another device.
• The side panel controls may be locked (disabled). Use the remote control to unlock the side panel
controls. Select the Block Buttons feature on the Parental Control menu and press OK to uncheck the
box.
There is no picture and no sound but the TV is on.
•You may be tuned to an input with no component connected to it. If you're trying to view a connected
component, press INPUT until the picture from that component appears.
• The Signal Type option may be set incorrectly. Go to page 16 for detailed instructions.
• The channel may be blank. Try changing channels.
• If you’re watching your VCR and it’s connected with coaxial cable to the ANTENNA/CABLE jack, tune the
TV to channel 3 or 4 (whichever channel is selected on the 3/4 switch on the back of your VCR). Also
make sure the TV/VCR button on the VCR is in the correct mode (press the TV/VCR button on your VCR).
The sound is fine, but the picture is poor quality.
• If you're getting a black and white picture from a component you've connected to your TV, you might
have your video cables connected to the wrong jacks. A yellow video cable connects to the yellow VIDEO
INPUT jack on the side or back of your TV; three video cables or bundled component video cables (red,
blue, and green) connect to the corresponding COMPONENT INPUT jacks on the back of your TV.
• Check the antenna connections. Make sure all of the cables are firmly connected to the jacks.
•Try adjusting the sharpness function to improve weak signals. Go to page 35 for more instructions.
There is no sound, but the picture is fine.
• The sound might be muted. Try pressing the volume up button to restore sound.
• If using DVI, S-Video, or Y, PB, PR, remember to also connect the device’s left and right audio output
jacks to the TV’s L and R AUDIO INPUT jacks.
• The sound settings may not be set correctly. Go to page 34 for more information.
• The internal speakers might be turned off. Go to page 35 for more information.
• If your audio source has only one jack or is a (mono) audio source, make sure you have plugged the
connection into the L AUDIO INPUT jack on the TV.
42 Chapter 5 Other Information
Page 43

The screen is blank.
• Check your connections. If you used red, white and yellow cables to connect, make sure they're
connected to the red, white and yellow AUDIO/VIDEO INPUT jacks on the side or back of the TV.
• If you're trying to watch something that's playing on a component connected to the TV (like a DVD), press
INPUT until you get to the correct video input channel.
• Make sure the component connected to the TV is turned on.
•Try another channel.
The buttons on the side panel don’t work.
• The side panel controls may be locked (disabled). Use the remote control to unlock the side panel controls
by selecting the Block Buttons feature in the Parental Control Menu and press OK to uncheck the box.
• Unplug the TV for 10 minutes and then plug it back in. Turn the TV on and try again.
The TV turns off unexpectedly.
•The Sleep Timer may have been activated. Go to page 39 for instructions.
• The electronic protection circuit may have been activated because of a power surge. Wait 30 seconds and
then turn the TV on again. If this happens frequently, the voltage in your house may be abnormally high or low.
• Unplug. Wait 10 minutes. Plug in again.
The TV turns on unexpectedly.
•Wake up timer might have been activated. Go to page 39 for instructions.
You can’t select a certain channel.
• The channel may be blocked or not approved in the Parental Control Menu.
• If using a VCR, check to make sure the TV/VCR button on the VCR is in the correct mode (press the TV/
VCR button on your VCR).
•Press the TV button and then try to change channels.
The stereo reception is noisy.
• It may be a weak station. Use the Sound Menu and Sound Type to choose mono.
A black box appears on the screen.
•Closed captioning might be on. Check Closed Caption in the Setup menu. Go to page 37 for more
instructions.
Other Information Chapter 5 43
Page 44

You are having problems with the HDMI Connection.
• Make sure the HDMI or DVI component is turned on and the cables are firmly connected. If problems still
occur, turn off your component and reconnect it. Reset the power by unplugging the power cord and
plugging it back in.
• If you are tuned to the HDMI 1, HDMI 2, HDMI 3 or HDMI 4 INPUT and you’re receiving an Unusable Signal
message onscreen, press the INFO button on the remote. If Acquiring Channel appears in the Channel
Banner, the HDMI or DVI device isn’t responding. Contact the manufacturer of the HDMI or DVI device for
further assistance.
• If you tune to the HDMI 1, HDMI 2, HDMI 3 or HDMI 4 INPUT and you see snow, the video goes in and
out, or the video takes a long time to appear, your HDMI or DVI component is having trouble sending video
information to the TV. Reconnect your device. Reset the power by unplugging the power cord and
plugging it back in. If problems persist, try connecting the Y Pb Pr jacks if they are available or contact the
manufacturer of the HDMI or DVI component for further assistance.
• If you have black bars on each side of your picture, the component you connected might have a switch or
a menu option allowing you to change the picture quality output that will fix this. Choose either 720p or 1080i.
The Remote control doesn’t work.
• Something might be between the remote and the remote light sensor on the front of the TV. Make sure
there is a clear path.
•The remote may not be aimed directly at the TV.
• The batteries in the remote may be weak, dead, or installed incorrectly. Put new batteries in the remote.
(Note: If you remove the batteries, you may have to reprogram the remote to operate other component.)
You are experiencing problems with V-Chip/Parental Controls.
• If the rating limits don’t work, you must lock the settings. Go to the Main Menu (press MENU on your remote),
select Parental Control, select Lock Parental Control.
I don’t remember my password and I want to unlock the TV.
• If you forget your password, turn the TV off. Simultaneously press and hold VOL DOWN on the side panel
and CANCEL on the remote for 5 seconds. Next time you enter the Parental Control Menu, enter a new
password.
What Else Can I Do?
If you’ve been through the Troubleshooting section and nothing has fixed your problem, try rebooting your TV.
Note that after a reboot, you may need to run your TV through the setup process again. To do a reboot,
unplug the power cord from the wall outlet or power strip. Keep your TV unplugged for about 5 minutes. Then
plug in the TV and turn it on. See if the problem is fixed. If the problem remains, then please click on the
Customer Support Menu at www.rca.com/television for updated FAQs or contact RCA Customer Support at
the support number provided in your Warranty under How To Get Service.
44 Chapter 5 Other Information
Page 45

V-Chip Rating Explanations
US V-Chip Rating System
TV-MA (Mature Audience Only) Specifically designed to be viewed by adults and may be unsuitable for
children under 17. It contains one or more of the following content themes: crude indecent language (L),
explicit sexual activity (S), or graphic violence (V).
TV-14 (Parents Strongly Cautioned) Contains some material that many parents would find unsuitable for
children under 14. Parents are strongly urged to exercise greater care in monitoring this program and are
cautioned against letting children under the age of 14 watch unattended. This program contains one or more
of the following content themes: intensely suggestive dialogue (D), strong coarse language (L), intense sexual
situations (S), or intense violence (V).
TV-PG (Parental Guidance Suggested) Contains material that parents may find unsuitable for younger
children. Many parents may want to watch it with their younger children. The program contains one or more
of the following content themes: some suggestive dialogue (D), infrequent coarse language (L), some sexual
situations (S), or moderate violence (V).
TV-G (Parental Audience) Most parents would find this program suitable for all ages. It contains little or no
sexual dialogue (D) or situations (S), no strong language (L), and little or no violence (V).
TV-Y7 (Directed to Children 7 years and older) Designed for children ages 7 and above. It may be more
appropriate for children who have acquired the developmental skills needed to distinguish between make
believe and reality. Themes and elements in this program may include mild fantasy violence (FV) or comedic
violence, or may frighten children under the age of 7.
TV-Y (All Children) Themes and elements in this program are designed for a young audience, including
children ages 2-6. It is not expected to frighten younger children.
Canadian English V-Chip Rating System
18+ (Adult) Programming intended for adults 18 and older. It may contain elements of violence, language,
and sexual content which could make it unsuitable for viewers under 18. Violence Guidelines: May contain
violence integral to the development of the plot, character or theme, intended for adult audiences. Other
Content Guidelines: May contain graphic language and explicit portrayals of nudity and/or sex.
14+ (Viewer 14 and over) Programming contains themes or content which may not be suitable for viewers
under the age of 14. Parents are strongly cautioned to exercise discretion in permitting viewing by pre-teens
and early teens. Violence Guidelines: May contain intense scenes of violence. Could deal with mature themes
and societal issues in a realistic fashion. Other Content Guidelines: May contain scenes of nudity and/or
sexual activity. There could be frequent use of profanity.
PG (Parental Guidance) Programming intended for a general audience but which may not be suitable for
younger children (under the age of 8). Parents may consider some content inappropriate for unsupervised
viewing by children aged 8-13. Violence Guidelines: Depictions of conflict and/or aggression will be limited
and moderate; may include physical, fantasy, or supernatural violence. Other Content Guidelines: May contain
infrequent mild profanity, or mildly suggestive language. Could also contain brief scenes of nudity.
G (General Audience) Programming considered acceptable for all ages groups. While not designed specifically
for children, it is understood younger viewers may be part of the audience. Violence Guidelines: Will contain
very little violence, either physical or verbal or emotional. Will be sensitive to themes which could frighten a
younger child, will not depict realistic scenes of violence which minimize or gloss over the effects of violent
acts. Other Content Guidelines: There may be some inoffensive slang, no profanity and no nudity.
Other Information Chapter 5 45
Page 46

C8+ (Children 8 and older) Programming generally considered acceptable for children 8 years and over to
watch on their own. Violence Guidelines: Violence will not be portrayed as the preferred, acceptable, or only
way to resolve conflict or encourage children to imitate dangerous acts which they may see on television. Any
realistic depictions of violence will be infrequent, discreet, of low intensity and will show the consequences of
the acts. Other Content Guidelines: There will be no profanity, nudity or sexual content.
C (Children) Programming intended for children under age 8. Violence Guidelines: Careful attention is paid to
themes which could threaten children’s sense of security and well being. There will be no realistic scenes of
violence. Depictions of aggressive behavior will be infrequent and limited to portrayals that are clearly
imaginary, comedic or unrealistic in nature. Other Content Guidelines: There will be no offensive language,
nudity or sexual content.
Canadian French V-Chip Rating System
18+ (Adult) Programming is for adults only. This program contains sustained violence or extremely violent
scenes.
16+ (Viewer 16 and over) Programming is not suitable for those under age 16. This program contains
frequent scenes of violence or intensely violent scenes.
13+ (Viewer 13 and over) Programming may not be suitable for children under the age of 13. This program
either contains several violent scenes or one or more scenes that are violent enough to affect them. Viewing in
the company of an adult is therefore strongly recommended for children under the age of 13.
8+ (Viewer 8 and over) Not recommended for young children. This program is suitable for most audiences,
but it contains mild or occasional violence that could upset young children. Viewing in the company of an
adult is therefore recommended for young children (under the age of 8) who do not distinguish between reality
and imagination.
G (General Audience) This program is suitable for audiences of all ages. It contains no violence, or any
violence that it does contain is either minimal or is presented in a humorous manner, as a caricature, or in an
unrealistic way.
46 Chapter 5 Other Information
Page 47

TTE Technology, Inc. (“TTE”) Limited Warranty
All LCD Models
EXCEPT TO THE EXTENT PROHIBITED BY APPLICABLE LAW, THIS WARRANTY
DOES NOT COVER, AND AS DESCRIBED BELOW TTE EXPRESSLY DISCLAIMS, ALL
ACTUAL AND IMPLIED WARRANTIES WITH RESPECT TO ANY PRODUCT USED FOR
INSTITUTIONAL OR OTHER COMMERCIAL PURPOSES (INCLUDING BUT NOT
LIMITED TO RENTAL PURPOSES).
What your warranty covers: Defects in materials or workmanship to the original owner
New LCD Televisions - Screen Sizes 32” and smaller:
For how long after your purchase:
• Ninety (90) days from date of purchase for labor charges. After ninety (90) days, labor charges will be at
owner expense.
• One (1) year from date of purchase for parts.
What we will do:
• At TTE’s discretion, pay an Authorized RCA Service Center for both labor charges and parts to repair
your television, or replace your television with a new or refurbished/remanufactured unit. See “How to
get service”
New LCD Televisions - screen sizes 33” and larger:
For how long after your purchase:
• One (1) year from the date of purchase for labor charges.
• One (1) year from the date of purchase for parts.
What we will do:
• At TTE’s discretion, pay an Authorized RCA Service Center for labor charges and parts to repair your
television, or replace your television with a new or refurbished/remanufactured unit. See “How to
get service”
All Remanufactured/Refurbished LCD Televisions:
For how long after your purchase:
• Ninety (90) days from date of purchase for labor charges.
•Ninety (90) days from date of purchase for parts.
What we will do:
• At TTE’s discretion, pay an Authorized RCA Service Center for both labor charges and parts to repair
your television, or replace your television with a refurbished/remanufactured unit. See “How to
get service”
How to get service:
• Call 1-800-951-9582. Please have your unit’s date of purchase and model/serial number ready. The
model/serial number information can be found on the back of your unit.
•A representative will troubleshoot your problem over the phone.
• If it is determined that your unit requires service, the service location will be at the sole discretion of TTE
based upon the TTE Limited Warranty statement.
• At the sole discretion of TTE, television screen sizes 32” and smaller are either consumer carry-in to an
Authorized RCA Service Center or directly exchanged for a new or refurbished/remanufactured unit.
• At the sole discretion of TTE, television screen sizes 33” and larger are either consumer carry-in to an
Authorized RCA Service Center or directly exchanged for a new or refurbished/remanufacture unit.
•Proof of purchase in the form of a bill of sale or receipted invoice from an Authorized Dealer which is
evidence that the product is within the warranty period must be presented to obtain warranty service.
Other Information Chapter 5 47
Page 48

What your warranty does not cover:
•Customer instruction. (Your Owner’s Manual describes how to install, adjust, and operate your unit. Any
additional information should be obtained from your dealer.)
• Installation and related adjustments.
• Damage resulting from non-approved installation methods.
• Signal reception problems not caused by your unit.
• Damage from misuse or neglect.
• Batteries.
•A television that has been modified or incorporated into other products or is used for institutional or other
commercial purposes (including but not limited to rental purposes).
•A unit purchased or serviced outside the USA.
• Acts of nature, such as but not limited to lightning damage.
• Special, incidental or consequential damages.
Product Registration:
Please complete and mail the Product Registration Card packed with your unit or register on-line at
www.rca.com/television. It will make it easier to contact you should it ever be necessary. The return of the
card is not required for warranty coverage.
Limitation of Warranty:
• THE WARRANTY STATED ABOVE IS THE ONLY WARRANTY APPLICABLE TO THIS
PRODUCT. NO VERBAL OR WRITTEN INFORMATION GIVEN BY TTE
TECHNOLOGY, INC., ITS AGENTS OR EMPLOYEES SHALL CREATE A GUARANTY
OR IN ANY WAY INCREASE OR MODIFY THE SCOPE OF THIS WARRANTY.
• REPAIR OR REPLACEMENT AS PROVIDED UNDER THIS WARRANTY IS THE
EXCLUSIVE REMEDY OF THE CONSUMER. TTE TECHNOLOGY, INC. SHALL NOT
BE LIABLE FOR SPECIAL, INCIDENTAL OR CONSEQUENTIAL DAMAGES RESULTING
FROM THE USE OF THIS PRODUCT OR ARISING OUT OF ANY BREACH OF ANY
EXPRESS OR IMPLIED WARRANTY ON THIS PRODUCT. THIS DISCLAIMER OF
WARRANTIES AND LIMITED WARRANTY ARE GOVERNED BY THE LAWS OF THE
STATE OF INDIANA. EXCEPT TO THE EXTENT PROHIBITED BY APPLICABLE LAW,
ANY IMPLIED WARRANTY OF MERCHANTABILITY OR FITNESS FOR A PARTICULAR
PURPOSE ON THIS PRODUCT IS LIMITED TO THE APPLICABLE WARRANTY AND
WARRANTY PERIOD SET FORTH ABOVE.
How State Law relates to this warranty:
• Some states do not allow the exclusion nor limitation of incidental or consequential damages, or limitations
on how long an implied warranty lasts, so the above limitations or exclusions may not apply to you.
• This warranty gives you specific legal rights, and you also may have other rights that vary from state to state.
If you purchased your unit outside the United States or seek warranty coverage
outside the United States:
This warranty does not apply. Contact your dealer for warranty information.
Service calls which do not involve defective materials or workmanship are not covered
by this warranty. Costs of such service calls are the sole responsibility of the purchaser.
48 Chapter 5 Other Information
Page 49

TTE Technology Canada Ltd. (“TTE”) Limited Warranty
EXCEPT TO THE EXTENT PROHIBITED BY APPLICABLE LAW, THIS WARRANTY
DOES NOT COVER, AND AS DESCRIBED BELOW TTE EXPRESSLY DISCLAIMS, ALL
ACTUAL AND IMPLIED WARRANTIES AND CONDITIONS WITH RESPECT TO ANY
PRODUCT USED FOR INSTITUTIONAL OR OTHER COMMERCIAL PURPOSES
(INCLUDING BUT NOT LIMITED TO RENTAL PURPOSES).
What your warranty covers:
• Defects in materials or workmanship to the original purchaser.
For how long after purchase:
•All RCA televisions: One year parts and labour.
• All RCA Scenium televisions: One year parts and labour.
What TTE Technology Canada Ltd. will do:
At TTE’s discretion, pay an Authorized RCA Service Centre for both labor charges and parts to repair your
television, or replace your television with a new or refurbished/remanufactured unit. See “How to get
service”
How to get service:
• Call 1-866-465-7157 (French: 1-800-522-0445). Please have your unit’s date of purchase and model/
serial number ready. The model/serial number information can be found on the back of your unit.
•A representative will troubleshoot your problem over the phone.
• If it is determined that your unit requires service, the service location will be at the sole discretion of TTE
based upon the TTE Limited Warranty statement.
• At the sole discretion of TTE, RCA CRT DV televisions are either consumer carry-in to an Authorized RCA
Service Centre or directly exchanged for a new or refurbished/remanufactured unit.
• At the sole discretion of TTE, RCA LCD televisions are either consumer carry-in to an Authorized RCA
Service Centre, directly exchanged for a new or refurbished/remanufacture unit or provided in-home
service.
• At the sole discretion of TTE, RCA Scenium LCD televisions are either consumer carry-in to an
Authorized RCA Service Centre, directly exchanged for a new or refurbished/remanufacture unit or
provided in-home service.
•Proof of purchase in the form of an original bill of sale or receipted invoice from an Authorized Dealer
which is evidence that the product is within the warranty period must be presented to obtain warranty
service.
Other Information Chapter 5 49
Page 50

Your warranty does not cover damages which are caused by:
• Fire, accident, lightening, flood and/or other acts of God;
• Faulty installation, set-up adjustments, improper antenna, inadequate signal reception, adjustment of
con sumer controls and/or improper maintenance; and/or
• Failure which results from misuse, abuse, neglect, mishandling, misapplication, and/or alteration.
What your warranty does not cover:
• Customer instruction (Your Owner’s Manual describes how to install, adjust, and operate your unit. Any
additional information should be obtained from your dealer);
•Transportation cost to and from the Service Centre (Unless you have made other arrangements with your
dealer at the time of purchase whereby he undertakes this responsibility);
• Installation and set-up service adjustments;
•Products connected otherwise than as outlined in the Owner’s Manual;
•Products on which the serial number has been altered or removed;
• External antenna or cable systems;
• Remote control batteries;
•A television that has been modified or incorporated into other products or is used for institutional or other
commercial purposes (including but not limited to rental purposes);
•A unit purchased or serviced outside Canada;
• Special, incidental or consequential damages; and/or
•Normal wear or cosmetic damage.
How Provincial law relates to this warranty:
This warranty gives you specific legal rights, which are in addition to statutory warranties, which may vary from
Province to Province and which take precedence over the terms of this warranty.
If you purchased your unit outside of Canada:
This warranty does not apply. Contact your dealer for warranty information.
©2009 TTE Technology Canada Ltd.
6605 Hurontario Street, Mississauga, Ontario L5T 0A3
50 Chapter 5 Other Information
Page 51

Care and Cleaning
Caution: Turn OFF your TV before cleaning.
You can clean the TV as required, using a soft lint-free cloth. Be sure to occasionally dust the ventilation slots
in the cabinet to help assure adequate ventilation.
IMPORTANT: Never use strong cleaning agents, such as ammonia-based cleaners, or
abrasive powder. These types of cleaners will damage the TV. The TV’s screen may
be cleaned with a soft, lint-free cloth as well. Take care not to scratch or mar the
screen. If necessary, you may use a cloth dampened with warm water. While
cleaning, do not spray liquid directly on the screen, or allow liquid to run down the
screen and inside the TV. Also, never place drinks or vases with water on top of the
TV. This could increase the risk of fire, shock hazard or damage to the TV.
Other Information Chapter 5 51
Page 52

ENERGY STAR is a set of power-saving guidelines issued by the U.S. Environmental Protection Agency (EPA).
Manufactured under license from Dolby Laboratories.
“Dolby” and the double-D symbol are registered trademarks of Dolby Laboratories.
is a trademark of SRS Labs, Inc.
TruSurround XT technology is incorporated under license from SRS Labs, Inc.
FCC Information
This equipment has been tested and found to comply with the limits for a Class B digital device, pursuant to Part 15
of the FCC Rules. These limits are designed to provide reasonable protection against harmful interference in a
residential installation. This equipment generates, uses, and can radiate radio frequency energy and, if not installed
and used in accordance with the instructions, may cause harmful interference to radio communications. However,
there is no guarantee that interference will not occur in a particular installation. If this equipment does cause harmful
interference to radio or television reception, which can be determined by turning the equipment off and on, the user
is encouraged to try to correct the interference by one or more of the following measures:
• Reorient or relocate the receiving antenna.
• Increase the separation between the equipment and receiver.
• Connect the equipment into an outlet on a circuit different from that to which the receiver is connected.
• Consult the dealer or an experienced radio/TV technician for help.
This Class B digital apparatus complies with Canadian ICES-003.
Visit the RCA website at www.rca.com/television
Please do not send any products to the Indianapolis address listed in this manual or on the carton. This will only add
delays in service for your product.
TTE Technology, Inc.
101 West 103rd Street
Indianapolis, IN 46290
© 2009 TTE Technology, Inc.
RCA and associated marks are trademarks of THOMSON S.A.
used under license to TTE Corporation.
Printed in USA
Part No.: 72-NP90NA-E001C
 Loading...