

,.Color:_
Iil!llllll Ow e , a ua,
?

WARNING: To prevent fire or shock hazard, do not
expose this TV to rain or moisture.
If you suspect that liquid has entered the TV, unplug it
immediately and have it inspected by an RCA TV Servicenter.
Turning it off is not enough - your TV has power applied to
some circuits even when the TV is turned off.
A
CAUTION; TO REDUCE THE
RISK OF ELECTRIC SHOCK,
DO NOT REMOVE COVER
{OA BACK). NO USER-
SERVICEABLE PARTS
INSIDF.. REFER SERYICING
TO QUAURED SERVICE
PERSONNEL
A
The exdammlon
point wfthln tl'm
lxkmoIo iz a
w'wn_g#k_
rottingyouo!
|mporlmnl
instructions
accompanying the
CAUTION: Maintain electrical safety. Powerline-operated
equipment or accessories connected to this unit should bear the
UL listing mark or CSA certification mark on the accessory
itself and should not have been modified so as to defeat the
safety features. This will help avoid any potential hazard from
electric shock or fire. If in doubt, contact qualified service
personnel.
Note to Cable TV Installer: This reminder is provided to call
your attention to Article 820-22 of the National Electrical
Code (Section 54 of the Canadian Electrical Code, Part 1)
which provides guidelines for proper grounding and, in
particular, specifies that the cable ground shall be connected to
the grounding system of the building as close to the point of
cable entry as practical.
• Your TV operates on 120 volts, 60 Hz AC power (normal
house power) and has a polarized AC plug. Because one
blade of the plug is wider than the other, the plug fits into the
wall socket only one way. Do not defeat the safety feature of
this plug. If you need an extension cord, make sure it is
polarized.
_ AUTION: To prevent electric shock, do not use
the polarized plug on this TV with an extension
cord, receptacle, or other outlet unless both blades
can be fully inserted to prevent blade exposure.
MISE EN GARDE: Pour prrvenir les chocs
61ectriques, ne pas utiliser la fiche polarisre de cet
appareil avec une rallonge, une prise de courant
ou une autre sortie, _ moins que les lames ne
puissent _.tre insrr_es _ fond sans qu'aucune partie ne soit
laissre _ drcouvert.
• All operating controls and their functions are identified and
explained in this manual. For warranty service or routine
maintenance, contact the nearest Authorized RCA TV
Servicenter. All servicing and adjustments to electrical
components should be done by a qualified service technician.
Mail Your Enrollment Card Today
• An RCA Owner's Club Enrollment Card is packed with
your set. Please fill out the card and return st
immediately.
• Your name then will be enrolled in the next drawing,
which takes place every three months. If your name is
drawn, you will be reimbursed for the fuil purchase
price of your new RCA product (restricted to residents
of USA only).
• Your prompt submission of this card confirms your right
to the protection available under the terms and
conditions of the warranty and also allows us to contact
you in the unlikely issuance of a safety modification.
• With your card on file, we can also help you in the event
of loss or theft by verifying your ownership. "
• If you did not receive an RCA Owner's Club Enrollment
Card, please contact your dealer.
Attach Your Sales Receipt Here and File at Home For
Future Reference
• To obtain warranty parts andservice, you must show
your sales receipt (or other evidence of purchase) to
your Authorized RCA TV Servicenter.
• Tape or staple your sales receipt to this manual so you
will have it handy should service ever be needed. Do
not mail your sales receipt to us. File it at home with
your owner's manual for future reference.
Record Vital Information Here
• No other set has the same serial number as yours. You
will find the serial number and the model number on
the back of your set (and pre-printed on your
Enrollment Card).
• Make sure you record both numbers below so that you
will have them in case your set is stolewor in case you
need a complete description for any other reason.
Model:
Serial:
Purchase Date:
Dealer Name/Address/Phone:

Thank you for choosing RCA
Congratulations on your purchase of
an RCA TV. You have selected a
high-quality, precision-engineered
instrument designed to give you years
of video and audio enjoyment.
Despite its sophistication, your new
TV is amazingly simple to operate
because it has so many automatic
features. To simplify operation even
more. the TV provides on-screen
prompts that guide you thru each step
of the special functions. The remote
control allows adjustment of major
operating controls from the comfort
of your favorite easy chair.
About This Manual
To take full advantage of all the
features and benefits of this unique
TV. be sure to read this owner's
manual carefully and then keep it in a
safe place for future reference.
Table of Contents
Safety Precautions .................................... Inside Front Cover
Warranty Registration ................................ Inside Front Cover
Television Features ..................................................... 2
Basic Installation Instructions
General Installation Information ...................................... 3
First-Time Operation ................................................. 3
Antenna/Cable Information .......................................... 4
Home Antenna Connections .......................................... 5
Cable-TV Connections ............................................... 6
Cable-TV Operation .................................................. 7
Basic Operating Instructions
Front Panel Controls ............................................... 8-9
Remote Control Operation ....................................... 10-11
VIDEO Button-General Instructions ................................ 12
Video (Picture) Adjustments ......................................... 13
SETUP Button-General Instructions ................................ 14
Cable/Air Function ................................................. 15
Channel Memory (AutoProgram) .................. .................. 16
Channel Memory (Erasing/Adding Channels) ........................ 17
Additional Operating Notes ......................................... 18
Cleaning & Care Tips ................................................. 18
Accessories and Order Form .................................. ....... 19-20
Trouble Checks ....................................................... 21
Warranty .................................................... Back Cover
Square-Corner CO'IN Picture Tube-
COTY (Combined Optimum Tube
and Yoke) picture tube technology
produces a sharp, brilliant color
picture. The square-corner screen
delivers a noticeably larger viewing
area than a conventional round-
cornered picture. The COTY design
also improves reliability and picture
definition. Hi-Con TM picture tube
screen is tinted to enhance contrast
when set is on and add a dramatic
high-tech look when set is off. Dark
screen absorbs room light for a vivid
color picture.
Digital Remote Control-provides
across-the-room operating convenience
from the comfort of your favorite easy
chair.
[]
rzq
Cable-compatible Quartz Tuning-
receives up to 147 channels in the
USA including 91 non-scrambled
cable channels. Quartz synthesizer
tunes the channels, and digital
counters and comparators
automatically lock the tuning system
to the signal.
Special On-screen Displays-This TV
delivers an array of additional
convenience features, also accessed via
the SETUP button. Special purpose
features include:
• AutoProgramming-Auto-start
AutoProgramming locks in active
channels the very first time the set
is turned on, so there are no
cumbersome set-up procedures. For
added convenience, the tuner
automatically selects cable or off-air
mode during AutoProgramming.
The TV will reprogram the tuner
automatically in the event its
memory is erased (due to a power
failure or other cause).
AUTOPROGRAM PUSH ÷
• Chaired Memory-lets you
conveniently alter the
AutoProgramming scan list in the
electronic tuner memory to
eliminate those channels you wish
to skip or add channelsnot present
during AutoProgramming(such as
a VCR on channel 3 or 4).
CHAH MEMORY: STORED
• Cable/Air Switching-instantly
switch from cable to off-air
broadcast mode to tune in local
channels not carried by your cable
system. This feature operates
automatically during
autoprogramming.
CABLEIAIR: CABLE
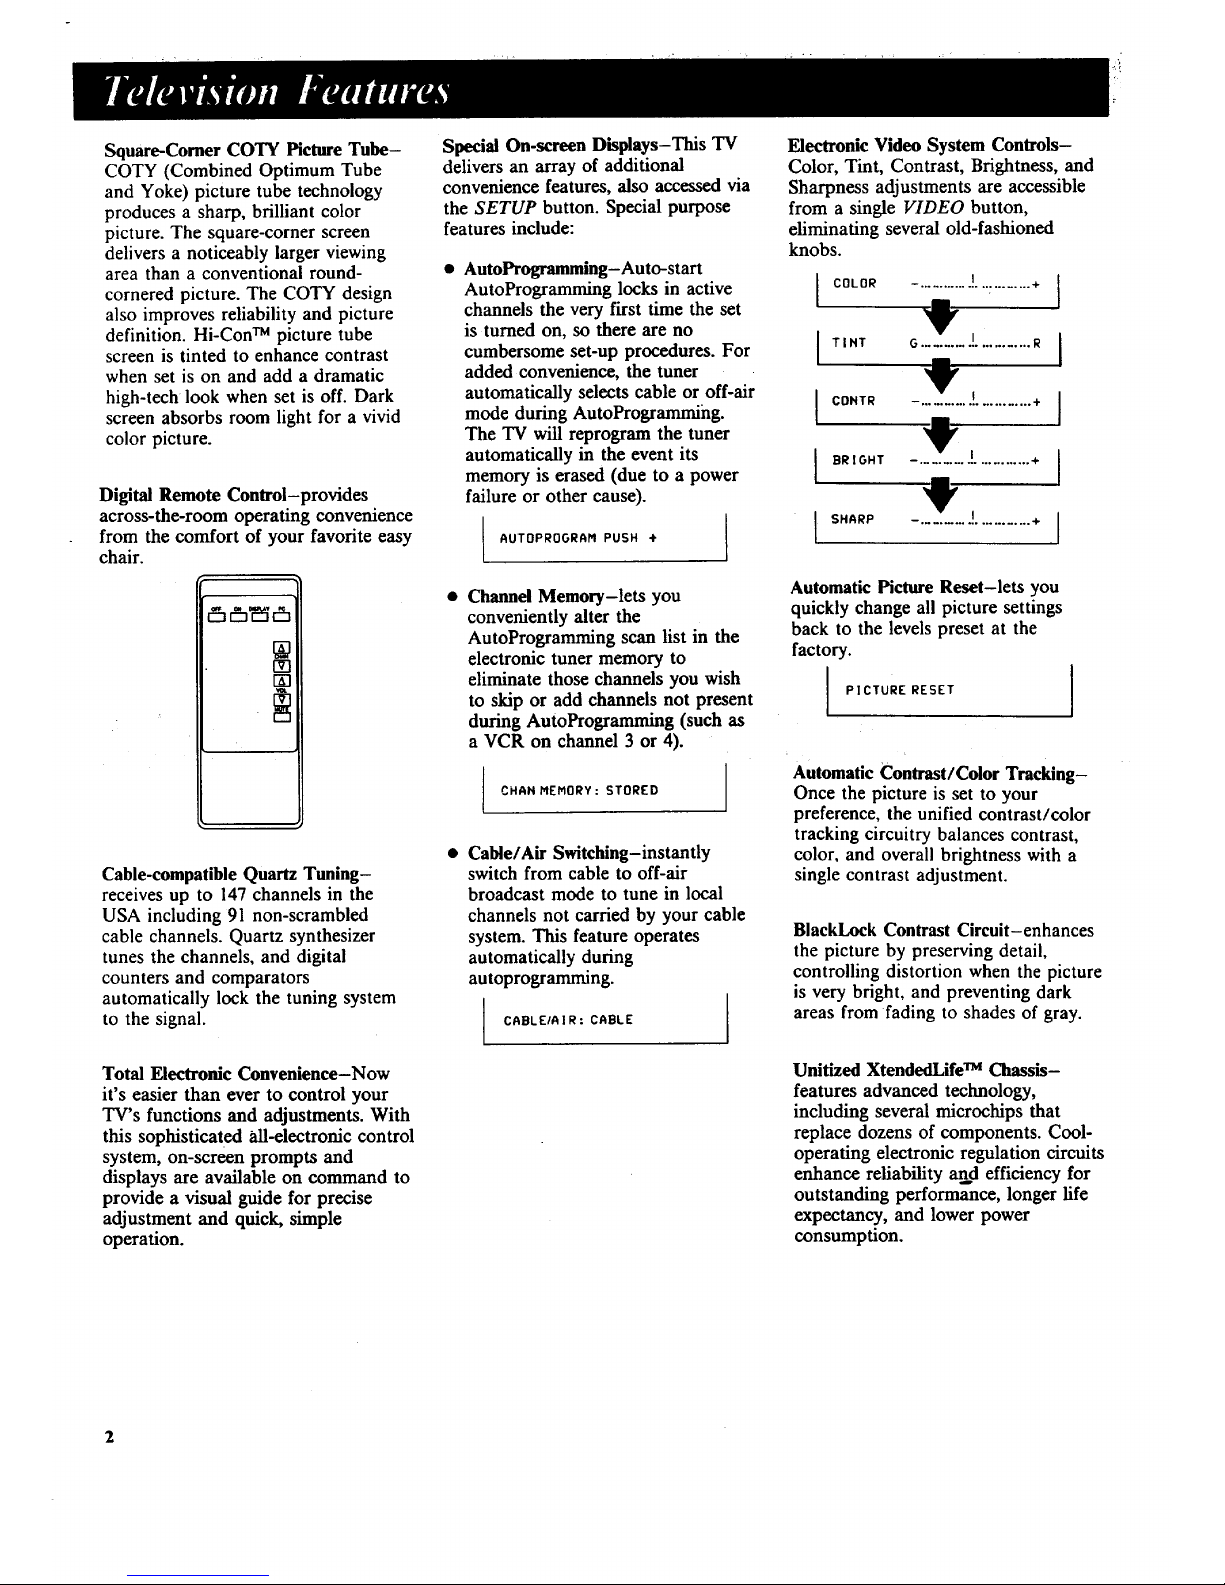
Electronic Video System Controls-
Color, Tint, Contrast, Brightness, and
Sharpness adjustments are accessible
from a single VIDEO button,
eliminating several old-fashioned
knobs.
COLOR
I TINT
I COHTR
I BRIGHT
I SHARP
I
-. ......................... +
G........ / ............ R
--, .......... ! ............ ÷
_ I ............ +
--, ..................... ÷ [
I
I
1
Automatic Picture Reset-lets you
quickly change all picture settings
back to the levels preset at the
factory.
PICTURE RESET ]
Automatic Contrast/Color Tracking-
Once the picture is set to your
preference, the unified contrast/color
tracking circuitry balances contrast,
color, and overall brightness with a
single contrast adjustment.
BlackLock Contrast Circuit-enhances
the picture by preserving detail,
controlling distortion when the picture
is very bright, and preventing dark
areas from fading to shades of gray.
Total Electronic Convenience-Now
it's easier than ever to control your
TV's functions and adjustments. With
this sophisticated all-electronic control
system, on-screen prompts and
displays are available on command to
provide a visual guide for precise
adjustment and quick, simple
operation.
Unitized XtendedLife TM Chassis-
features advanced technology,
including several microchips that
replace dozens of components. Cool-
operating electronic regulation circuits
enhance reliability and efficiency for
outstanding performance, longer life
expectancy, and lower power
consumption.
2

Unpacking TV
Shown here are the accessories that
come packed with your TV. When
you unpack your new set. be sure you
have removed all the accessories and
information sheets. We recommend
that you save the packing materials
and box in case you ever need to ship
or store your TV.
Choosing the Best Location
• Choose a location that is
convenient but away from sources
of heat such as direct sunlight and
heating units.
• Allow for air circulation around the
set. This is especially important if
you install it in a cabinet with
several other components. Cleaning
the ventilation slots on the cabinet
Remote Control
<+ -0
Two Batteries
for Remote Control
Antenna Adapter
Replace adapter only with
RCA stock # 193983.
at regular intervals will help assure
adequate ventilation.
To prevent electric shock, avoid wet
areas such as kitchens or
bathrooms.
Try to avoid direct light on the
screen during operation. Because
the picture tube emits light, direct
light on the screen will weaken
picture quality and intensity.
If you are using an indoor antenna,
an outside wall is a good location.
You may want to try a few
different locations to find the best
possible spot for reception.
Note: Your TV operates on 120 volts,
60 Hz (normal household current) and
has a polarized plug. Because one
blade of the plug is wider than the
other, the plug fits into the wall
socket only one way. Do not defeat
the safety feature of this plug. If you
need to use an extension cord, make
sure it is polarized.
Your TV has been designed with a
special convenience feature that will
automatically program active channels
into your television's memory the first
time you turn it on. To use this
feature:
!. Attach antenna(s) or cable-TV
system to back of TV.
2. Then plug power cord into wall
outlet.
3. Press POWER button to turn on
TV. Your TV will automatically
cycle through all channel
numbers and place active
channels into the Channel Scan
Memory.
The Channel Scan Memory is the list
of channels your TV will stop on
when you press the CHANNEL A or
V buttons.
This display will appear on the screen
while your TV is autoprogramming
active channels.
G7
AUTOPROGRAHHIHO
When your TV is finished
autoprogramming, it will tune to the
lowest channel number in its Channel
Scan Memory. You can check the
channels in memory by pressing the
CHANNEL A or V buttons. Your
TV will stop on each channel in
memory.
You can also add or erase individual
channels as desired. Details are on
page 17.
3

The antenna is the "signal receiver'"
for television. Most modern TV
antennas receive both VHF (Very
High Frequency) and UHF (Ultra
High Frequency) channels. Channels
2-13 are VHF channels and channels
14-69 are UHF channels.
Typical
Indoor
Antenna
Typical
Outdoor
Antenna
In most situations you will get
better picture quality if you use an
outdoor antenna or connect your
TV to a cable-TV system.
Cable-TV (CATV) supplies television
signals directly by cable without the
need for a home antenna. Cable-TV
delivers both VHF and UHF
channels and other channels not
available from your antenna.
Shown below are two basic types of
antenna cables. Signals from a home
antenna may be conducted through
either type. Cable-TV signals.
however, are always conducted
through round. 75-ohm coaxial
cable.
TYPES OF ANTENNA CABLES
Flat 300-ohm
twin-lead cable
_IU_ _ Slip-on End
IBl_l_lm_ ..--_- Screw-on End
Round 75-ohm
coaxial cable
Use the connector shown below to
connect your antenna or cable-TV
system to the back of the TV.
CASL_
ANTENNA
Connecting an Optional Dipole Antenna
The optional dipole antenna is available from your RCA dealer.
2.
.
Insert the antenna base into the
pocketed slot on the back of your set.
Stand at the back of your set, with
the antenna twin-lead facing you,
press the base of the antenna into the
slot until it locks in place.
Connect the ends of the twin-lead
to the Antenna Adapter
(supplied).
Connect the Antenna Adapter to
the CABLE/ANTENNA
connector on the back of the TV.
4. Later, after you've turned on the
TV, adjust the length and
position of the antenna rods for
best reception.
• For viewing VHF channels,
extend the rods fully.
• For viewing UHF channels,
shorten the rods for best
reception.
Note: The optional dipole antenna
(RCA # 156265) is designed to fit and
lock into the slot in the back of your
DipoleAntenna
(such as .#156265)
\
Base
Adapter Slot
(supplled)_
@
Twin
Lead
CABLE/
ANTENNA
4
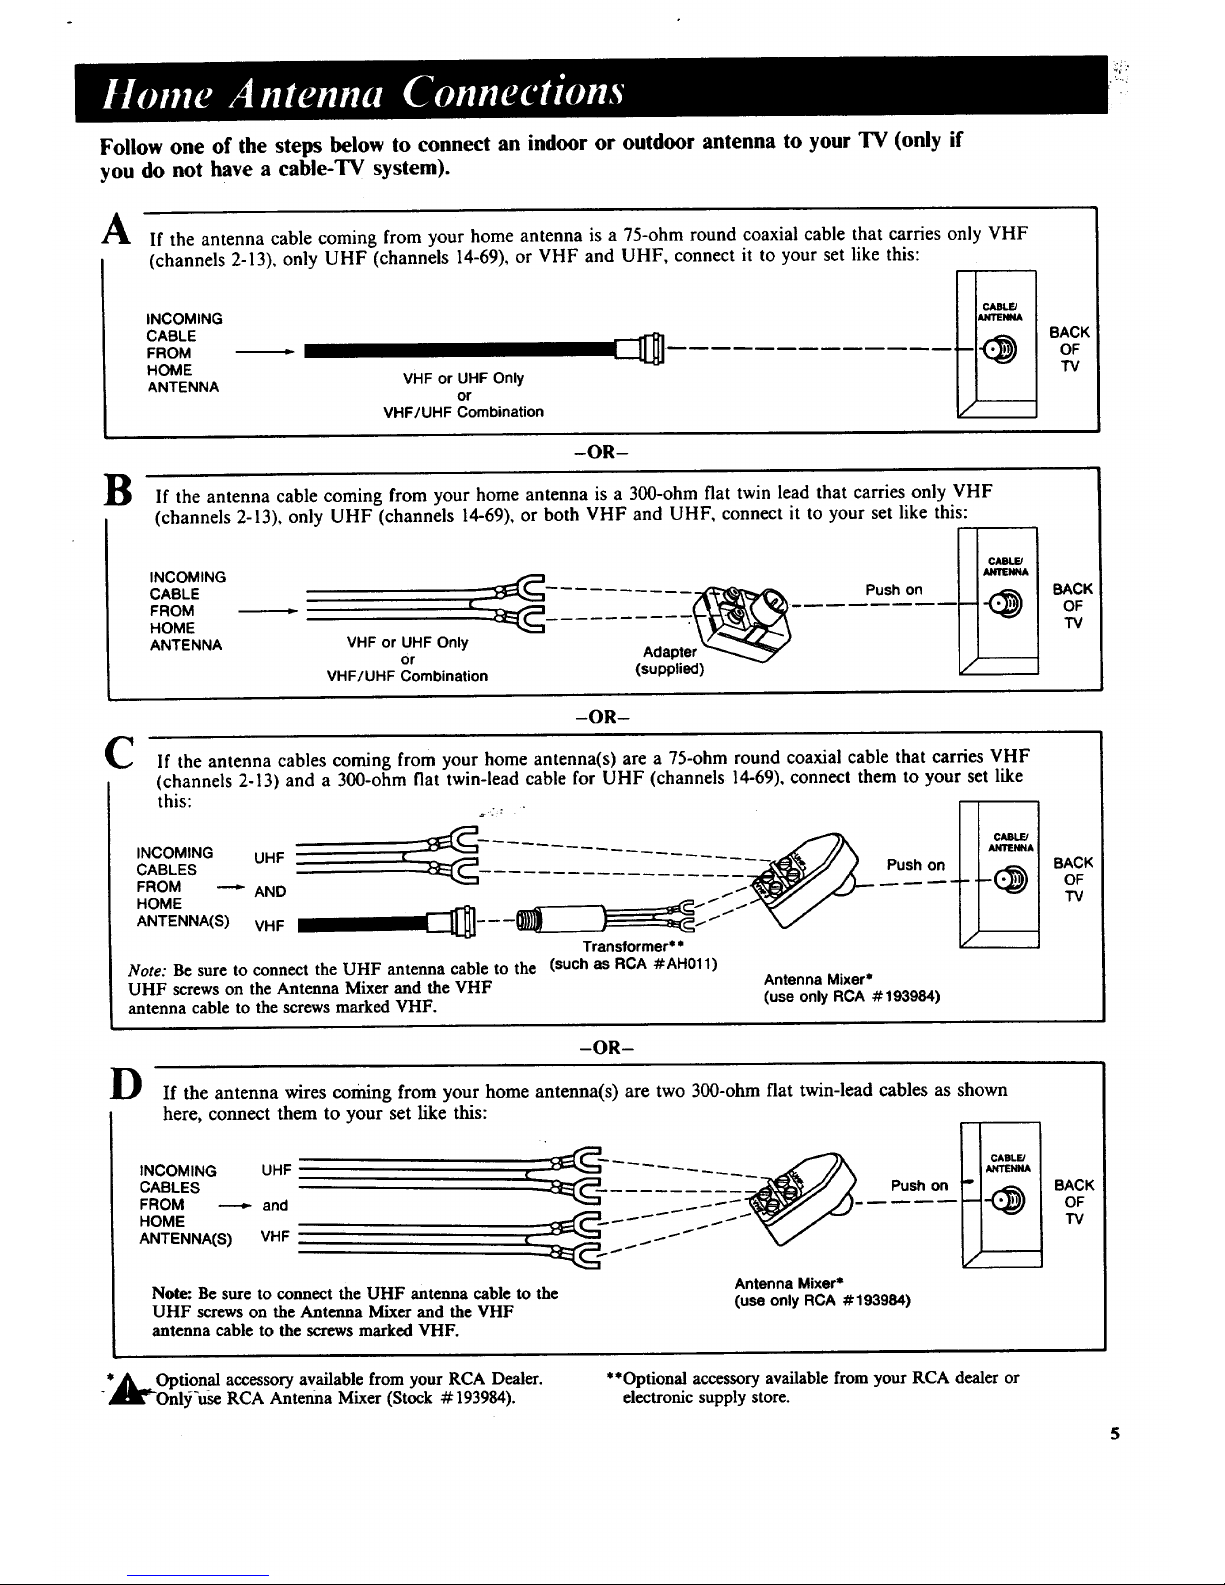
Follow one of the steps below to connect an indoor or outdoor antenna to your TV (only if
you do not have a cable-TV system).
A If the antenna cable coming from your home antenna is a 75-ohm round coaxial cable that carries only VHF
(channels 2-13), only UHF (channels 14-69), or VHF and UHF, connect it to your set like this:
B
C
D
INCOMING
CABLE
FROM
HOME
ANTENNA
VHF or UHF Only
or
VHF/UHF Combination
I CABLE/
I_NITENNA
-OR-
BACK
OF
TV
If the antenna cable coming from your home antenna is a 300-ohm flat twin lead that carries only VHF
(channels 2-13), only UHF (channels 14-69), or both VHF and UHF, connect it to your set like this:
I CABLFJ I
INCOMING _ I _ I
CABLE _' _ Push on BACK
-t 1 OF
HOME -- "IV
ANTENNA VHF or UHF Only
or Adapte
VHF/UHF Combination (supplied)
-OR-
If the antenna cables coming from your home antenna(s) are a 75-ohm round coaxial cable that carries VHF
(channels 2-13) and a 300-ohm flat twin-lead cable for UHF (channels 14-69), connect them to your set like
this:
..... I ANTENNA
INCOMING UHF [
CABLES _- Push on____ jl.. (_ BACKoF
FROM _ AND TV
HOM ANTENNA(S) VHF - -- --
Transformer**
Note: Be sure to connect the UHF antenna cable to the (such as RCA #AH011)
UHF screws on the Antenna Mixer and the VHF
antenna cable to the screws marked VHF.
Antenna Mixer*
(use only RCA #193984)
-OR-
If the antenna wires coming from your home antenna(s) are two 300-ohm flat twin-lead cables as shown
here, connect them to your set like this:
INCOMING UHF
CABLES
FROM _ and
HOME
ANTENNA(S) VHF
Antenna Mixer*
Note: Be sure to connect the UHF antenna cable to the
UHF screws on the Antenna Mixer and the VHF
antenna cable to the screws marked VHF.
Push on
(use only RCA #193984)
I CABLE/I
I_'_IENNAI
" ' BACK
TV
r _
*__ Optional accessory available from your RCA Dealer.
-,Ri'-Onl3_'use RCA Antenna Mixer (Stock # 193984).
**Optional accessory available from your RCA dealer or
electronic supply store.
5
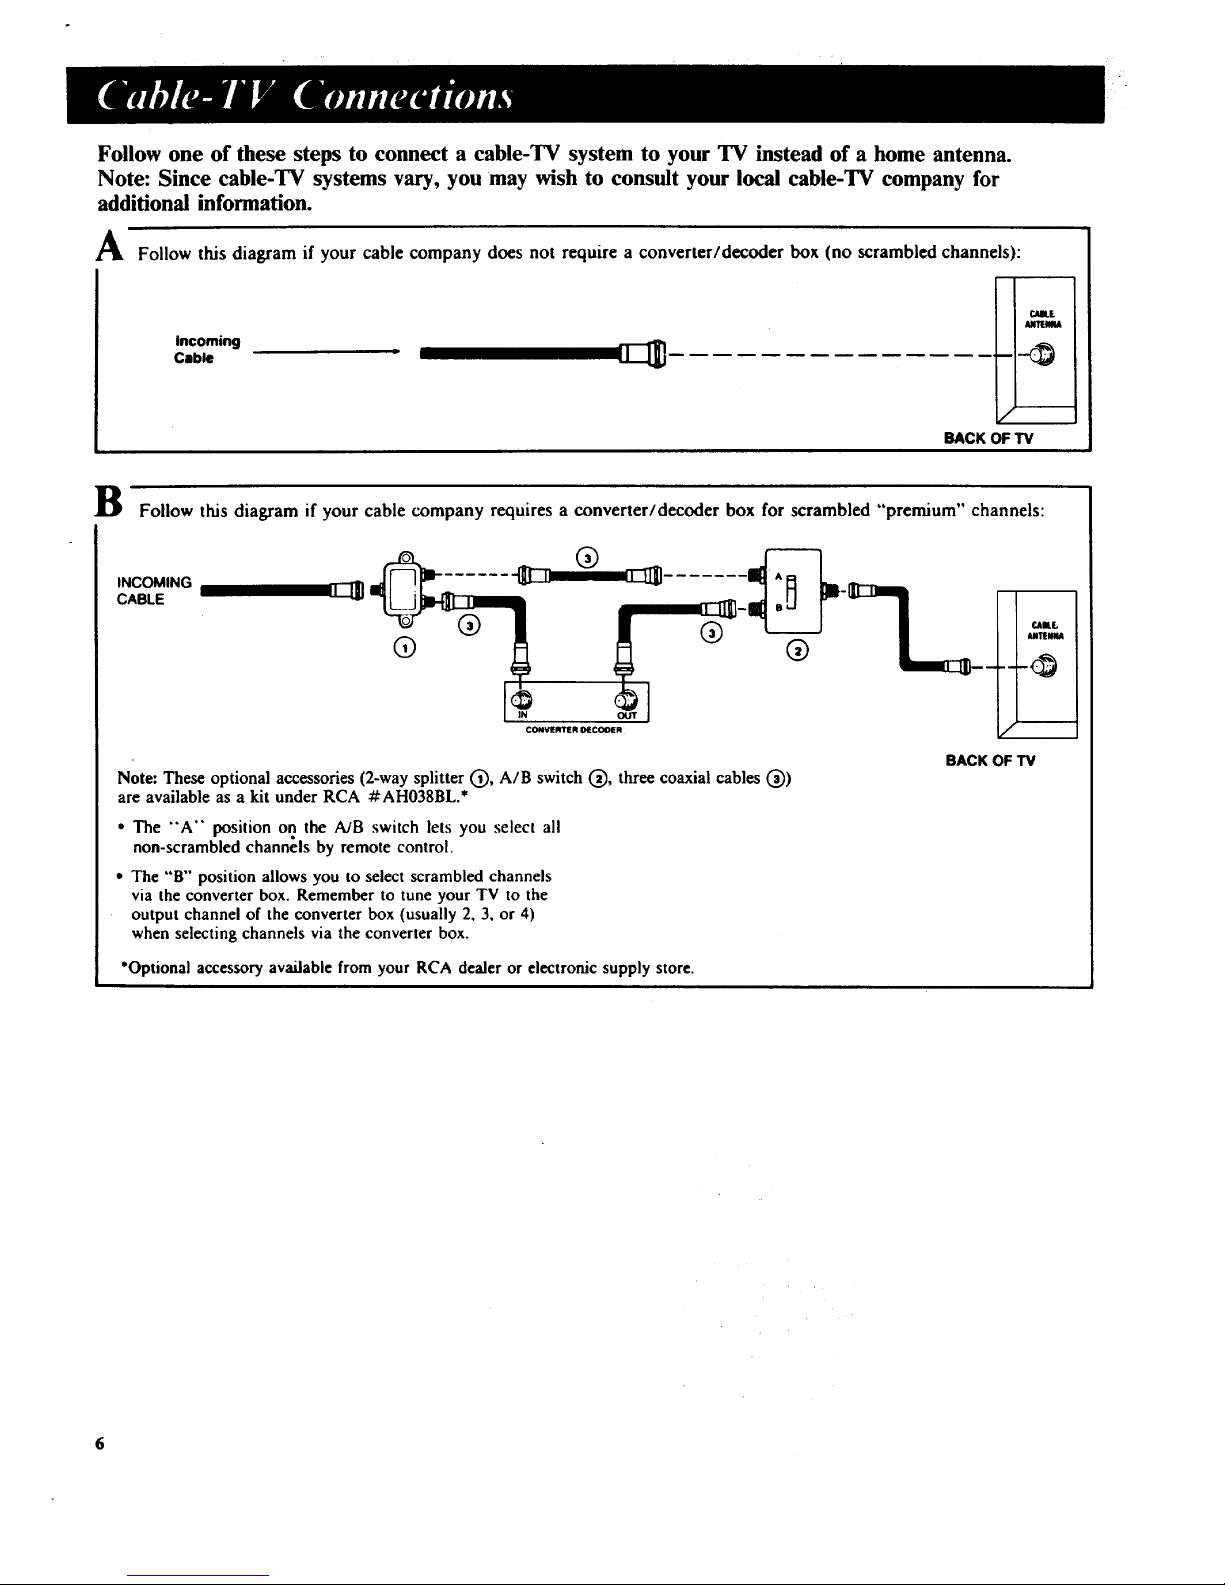
Follow one of these steps to connect a cable-TV system to your TV instead of a home antenna.
Note: Since cable-TV systems vary, you may wish to consult your local cable-TV company for
additional information.
_Jk Follow this diagram if your cable company does not require a converter/decoder box (no scrambled channels):
incoming (]_
Cable
I _T_m
BACK OF TV
B Follow this diagram if your cable company requires a converter/decoder box for scrambled "premium" channels:
INCOMING
CABLE
-- I _IU..
I m+_tmu
CONVERTER OECOI_ R
Note: These optional accessories (2-way splitter (_), A/B switch (_), three coaxial cables (_))
are available as a kit under RCA #AH038BL.*
• The "'A" position on the A/B switch lets you select all
non-scrambled channels by remote control.
• The "B'" position allows you to select scrambled channels
via the converter box. Remember to tune your TV to the
output channel of the converter box (usually 2, 3, or 4)
when selecting channels via the converter box.
•Optionalaccessoryavailable from your RCA dealer or electronic supply store.
BACK OF TV

Your new TV is designed to receive
up to 147 channels including 91 non-
scrambled cable channels (see chart
below). To use this TV on a cable-TV
system, confirm that the cable-TV
system is properly connected to your
TV. Since cable systems vary, you
may wish to consult your local cable-
TV company for additional
information.
If your cable-TV company follows
EIA/NCTA channel-identification
standards, most of the channels
offered by your cable company will be
identified by channel numbers that
are identical to those on your TV. For
example, if your cable-TV system has
programs on cable channel 20, you
can choose this channel by selecting
channel 20 on your TV. If your cable
company offers cable channels A-1 or
A-2, you can tune them by selecting
TV channels 99 or 98.
Some cable-TV companies do not
follow the EIA/NCTA standards and
instead assign their own channel
identification. For example, some use
the standard broadcast channel
numbers (2-13) for channels 2-13, but
identify their other channels with
letters. If your cable company does
not follow the EIA/NCTA standards,
ask them for a cross reference that
shows to which channels you should
tune your TV to receive their cable-
TV channels.
Not all cable-TV channels will be
active on your particular cable-TV
system. Also some cable companies
may require the use of a decoder with
their cable-TV system. Consult your
cable company or local dealer for
details.
Scrambled Cable-TV Channels
Some cable companies offer
"premium-pay" channels in which the
signal is scrambled. Descrambling
these signals for normal viewing
requires the use of a descrambler
device which is generally provided by
the cable company.
The descrambler device may or may
not be a part of the cable converter.
Diagram B on page 6 shows how to
connect this type of converter/
descrambler device to the TV.
To do so, you'll need a 2-way splitter,
an A/B switch, and suitable lengths of
coaxial antenna cables. These
accessories are available from most
electronics supply stores.
Since cable systems vary, you may
wish to consult your local cable
company for additional information.
The chart below lists the "total" channel and cable count.
• Low VHF A-8 (Channel 01) - 1
• VHF (Channels 2-13)* 12" 12"
• UHF (Channels 14-69) 56 -
• Low Midband A-2, A-l (Channels 98-99) - 2
• Midband (Channels 14-22 or A-I) - 9
• Superband (Channels 23-36 or J-W) - 14
• Hyperband (Channels 37-64 or W+ l to W+28) - 28
• UItraband (Channels 65-89 or W+29 to W+53) - 25
Total* 68 91
* VHF is only counted once in total channel count because you can receive
channels 2-13 on both "off-air" and "cable" channels. Therefore, the "total"
channel count for "'off-air" and "cable" is 147 channels (68+91 -12 = 147).

Shownherearethefront-panel
controls.Thecontrolsonyoursetwill
resemblethepictureshownbelow.
Youcanuseeitherthefront-panel
controlsor theremotecontrolto
operatetheTV.
J
Q Channel Display
SETUP Button
POWER Button
F7
./
(_emote Sensor NEL A and Y Buttons
VIDEO Button
VOLUME Buttons ( + and - )
DISPLAY Button

Channel Number Display
• Shows the number of the
channel you're watching.
• Appears whenever TV is
turned on, channel is changed,
or DISPLAY button is
pressed.
• Also appears whenever you
change volume with the
VOLUME buttons on the TV.
@
SETUP Button
• Press repeatedly until the
function you want appears on
the screen.
• Function choices will appear
in this order:
1) AutoProgramming Channel
Memory,
2) Adding or Erasing Channels
in Channel Memory, and
3) Changing Cable/Air
Setting.
• Details about using each
function begin on page 14.
POWER Button
• Press once to turn on TV.
• Press again to turn off TV.
@ DISPLA Y Button-Press to
display channel number on the
TV screen.
®
VIDEO Button
* Press repeatedly until the
video function you want
appears on the screen.
• Function choices will appear
in this order:
i) Color Adjustment,
2) Tint Adjustment,
3) Contrast Adjustment,
4) Brightness Adjustment,
5) Sharpness Adjustment,
6) Picture Reset (returns
picture controls to their
factory settings).
• Details about using each
function begin on page 12.
®
VOLUME Buttons (Also "-"
and "+" Buttons)
• Press VOLUME + to increase
volume.
• Press VOLUME - to
decrease volume.
• The - and + buttons are
used to make adjustments
after the VIDEO or SETUP
button is pressed.
@
CHANNEL A and V Buttons
• Press CHANNEL A to see the
next higher channel in
memory.
• Press CHANNEL V to see the
next lower channel in memory.
®
Remote Sensor-Receives
commands from the remote
control. When using the remote
control, point it toward this
sensor.

Before attempting to operate your
remote control, install the batteries as
shown here.
-Installing/Replacing Batteries
!. Turn the remote control face
down.
2. Press down on the ridged area
of the battery cover and slide it
off.
. Install two "AAA" batteries as
shown. Make sure you match
the + end of each battery to
the + end of the battery
compartment.
4. Replace the covgr and turn
remote over-face up.
Notes:
• Never place anything heavy on
top of the remote control or lay it
upside-down. This may
accidentally depress the buttons
for a long time and discharge the
batteries.
Replace the batteries when the TV
fails to respond to the remote
control.
Remove the batteries from the
remote control if it will not be
used for a month or more. This
will prevent possible damage from
battery leakage.
OFF Bu_on
OFF
r---1
I
ON DISPL.AY PC
r--1 v-1 v--I
[Z3--
e_,_N
[Z?"
VOL
MUTE
>
>
ON Button
DISPLAY Button
PC Bu_on
Channel Selection
(via scan)
(_VOL (Volume) &/V
Buttons
(_ MUTE Button
I0

Q ON Button
• Press to turn on TV.
@
DISPLA Y Button
• Press while TV is on to
display the channel number on
the screen.
• Also removes channel number
and menus from the screen if
they are displayed.
Q PC (Previous Channel)
Button
• Pressing the PC button causes
the TV to change back to the
last tuned channel. This is
useful should you want to
monitor two channels.
To operate, press CHAN A or
_7 to select the first channel.
Then press and hold CHAN A
or _7 until the other channel
appears.
The TV will now change back
and forth between the two
channels each time you press
the PC button.
(_) Channel Selection (via Scan)
• Press CHAN A to select the
next higher channel in channel
mempry.
• Press CHAN V to select the
next lower channel in channel
memory.
®
VOL (Volume) A/V Buttons
• Press VOL A to increase
volume.
• Press VOL V to decrease
volume.
®
®
MUTE Button
• Press MUTE to quickly reduce
sound to minimum level
without affecting the picture.
• This is very useful during
telephone calls or other
interruptions.
• When sound is muted, the
word "MUTE" will be
displayed in the bottom left
corner of the screen.
• To restore sound, press MUTE
again or press VOL A.
OFF Button
• Press the OFF button to turn
off the TV.
1!

It
VIDEO
Repeatedly press the VIDEO
button on the front of the TV until
the function you want appears on
the screen.
COLOR I ............ +
-. .............
9
I
G ......................... R
9
I COHTR
I BRIGHT -. ......... / ............. +
I SHRRP
--. .......... / ............. +
I ........... +
I PICTURE RESET
-,,----- 1 Press
I-------2 Presses
-._------3 Presses
4------ 4 Presses
-------5 Presses
]-',--_-- 6 Presses
The on-screen displays will appear
in this order as you press the
VIDEO button.
or!+l
COLOR -. ........ J ............ +
0
Press the "-" or "+" button on
the front of the TV to adjust the
function appearing on the "IV
screen.
Notes:
• The on-screen display will
automatically disappear from the
screen if you do not press "-"
or "+" within a few seconds.
• Whenever a display disappears
from the screen, the "-" and
"+'" buttons on the "IV become
the VOLUME adjustment
buttons.
• Press the "-" button to
decrease a function.
• Press the "+" button to increase
a function.
The display will automatically
disappear in a few seconds unless
you press "-" or "+" again.
Note: The Picture Reset function is
explained on the next page.
12

-Color Adjustment
The Color function adjusts the
amount of color in the picture.
1. Press the VIDEO button once.
The Color graph will appear
on the TV screen.
VoDEO
COLOR -. ..... J ............ +
2. Press "-" button to decrease
color, or press "+" button to
increase color.
-Tint Adjustment
The Tint function adjusts the color
of flesh tones.
1. Press the VIDEO button
repeatedly until the Tint graph
appears on the TV screen.
VIDEO
TZ.T o ............!............ R
2. Press "-" to add more green
tint, or press "+" to add
more red tint.
-Contrast Adjustment
The Contrast function adjusts the
overall brightness and contrast of
the picture.
1. Press the VIDEO button
repeatedly until the Contrast
graph appears on the screen.
viDEO
CONTR -. .......... 2 ............. *
2. Press "-'" button to decrease
contrast, or press "+" button
to increase contrast.
-Brightness Adjustment "
The Brightness function adjusts the
brightness of the dark portions of
the picture.
1. Press VIDEO button
repeatedly until the Brightness
graph appears on the TV
screen.
VIDEO
BRIGHT -. ........ !........... +
2. Press the "-" button to
decrease brightness, or press
the "+" button to increase
brightness.
.Sharpness Adjustment
The Sharpness function adjusts
picture sharpness.
1. Press the VIDEO button
repeatedly until the Sharpness
graph appears on the TV
screen.
VIDEO
SHARP -. ......... ! ............ +
2. Press the "-" button to
decrease sharpness, or press
the "+" button to increase
sharpness.
-How to Adjust for a Color
Picture that Pleases You
I. Decrease Color to minimum. This
will leave a black-and-white image
on the screen.
2. Adjust Contrast until the picture
pleases you.
3.
4o
5.
6.
Adjust Brightness until the black
pans of the picture appear black.
You may need to wait until the
picture shows something you're
sure is black to make this
adjustment. Be careful not to lose
the details in darkly shaded areas.
Increase Color until you reach a
pleasing level of intensity.
Adjust Tint until flesh tones or
other color objects appear natural.
Adjust Sharpness for a pleasing
level of picture sharpness.
o For normal viewing, adjust to
midrange.
• For a sharper picture, increase
Sharpness.
• For weak signals, the picture
may be more pleasing with
Sharpness decreased.
- Picture Reset
The Picture Reset function lets you
quickly change the video functions
(Color, Tint, Contrast, Brightness,
and Sharpness) back to the factory
settings.
1. Press the VIDEO button
repeatedly until the Picture
Reset function appears on
the TV creen.
VIDEO
-
PICTURC RES[T
2. Press either "-" or "+" to
reset the Video functions
back to the factory settings.
13

Bu_on
0
k k
14
SETUP
AUTOPROGRAM PUSH
CHAN MEMORY" STORED
CABLEIAIR" CABLE
÷ [ "*--- 1 Press
-*--- 2 Presses
-*--- 3 Presses
Repeatedly press the SETUP
button on the front of the TV until
the function you want appears on
the screen.
The on-screen displays will appear
in this order as you press the
SETUP button.
@
Press the "-" or "+" button on
the front of the TV to adjust (or
change) the function appearing on
the TV screen.
Detailed instructions about each
function begin on the next page.
Notes:
• The on-screen display will
automatically disappear from the
screen if you do not press "-"
or "+" within a few seconds.
• Whenever a display disappears
from the screen, the "'-" and
"+" buttons on the TV become
the VOLUME adjustment
- buttons.

Your TV is so automatic that you will
probably never need to change this
function. That's because when your
set autoprograms the Channel
Memory, it automatically adjusts the
Cable/Air setting for you.
The Cable/Air function tells your TV
whether you have a cable-TV system
or a home antenna connected to it.
During AutoProgramming the TV
automatically determines whether
cable signals or antenna (air) signals
are being received. It will then
automatically set the Cable/Air
function.
When the Cable/Air function is set to
Cable, it allows the TV to receive
cable channels. When the Cable/Air
function is set to Air, it allows the TV
to receive whatever TV channels
(VHF and UHF) are broadcast in
your area.
Normally you will never need to use
this function because your TV
automatically autoprograms itself and
selects the Cable/Air setting the first
time you turn it on (and after each
extended power interruption). The
Cable/Air function allows you to
override the automatic settings and
thus provides maximum flexibility
should you desire to use your TV for
special applications.
- Changing the
Cable/Air Function
.
Repeatedly press the SETUP
button until the Cable/Air
function appears on the TV
screen.
SETUP
2. Press either "-'" or "+" to
change the Cable/Air
function.
E][Z]
12
CABLEIAIR: CABLE
Note: The Cable/Air function will
change each time you press the
"- " or "+" button.
15

Button
The Channel Memory is the list of
channel numbers your TV will stop
on when you press the CHANNEL A
or V button. You can program any
list of channels into the Channel
Memory.
Your TV is so automatic that you will
probably never need to manually
operate this feature.
The first time you turn on your TV, it
will automatically cycle through all
channels and place active channels
into the Channel Memory. You can
then add or erase channels as desired
by following the instructions on the
next page.
1. AutoProgramming Channels into Channel Memory
|. Connect home antenna(s) or 3.
cable-TV to your set.
2,
After you have turned on the
TV and adjusted the volume,
repeatedly press the SETUP
button until the AutoProgram
display appears on the screen.
SETUP
E
AUTOPROGR_M PUSH +
Press either "-" or "'+" to
begin programming. The TV
will cycle thru available
channels in your area and
place active channels into
memory. If all available
channels are of reasonable
signal strength and you prefer
not to add or erase any
channels from memory,
programming is complete.
AUTOPROGRAHMING
S7
4. When the TV is finished
cycling, you can check to see
what channels are in memory
by pressing the CHANNEL A
or V button. Your set will
stop on each of the channels
in memory.
Notes:
• Make sure the outlet you plug your TV into is "on" al! the time (not
on a wall switch) to prevent the TV from losing its channel memory.
• if there is an extended power failure, your TV will automatically
reprogram active channels the first time you turn it on after the power
failure.
16

Button
2. Erasing/Adding Channels in Channel Memory-
Erasing Channels
1. To erase a channel, first press
the CHANNEL A/V button
until the channel number you
want to erase appears on the
screen.
2. Then repeatedly press the
SETUP button until the
Channel Memory display
appears on the screen.
SETUP
CHAN HEMORY: STORED
12
3. Then push the "-" button to
erase that channel from
memory.
12
CHgN HEMORY: ERASED
4. Wait until Channel Memory
display disappears from the
screen. You can then check
channels in memory by
pressing the CHANNEL A or
V button. If you want to
erase another channel, repeat
steps 1 thru 3.
Adding Channels
I°
Repeatedly press the SETUP
button until the Channel
Memory display appears on
the screen.
SETUP
CHAH HEHORY: STORED
_2
2. To add a channel, press the
CHANNEL A/V button
until the channel number you
want to add appears on the
screen.
3. Then push the "+" button to
add that channel to the
memory.
CHAN HEHORY: ERRSED
O6
4. If you want to add another
channel, repeat steps 2 and 3.
Note: The Channel Memory display will automatically disappear from
the screen in a few seconds after you have finished erasing or adding
channels.
17

-Using "-" and "+" Buttons-
on Front of TV
O The "-" and "+"
buttons are used after
you have pressed
either the VIDEO or
SETUP button to change settings
or make adjustments.
Whenever a display disappears
from the screen, the "-" and "+ '"
buttons on the front of the TV
automatically become the
VOLUME adjustment buttons. If
the "'-'" or "+" button on the TV
is pressed after the display has
disappeared, the TV will change
volume level.
If you want to make additional
adjustments after a display has
disaplSeared, press the VIDEO or
SETUP button again to bring the
display back to the screen. This
will automatically activate the "-"
and "'+" buttons again.
- Power Failures
These functions are not affected by
brief power interruptions. After
longer interruptions, the following
occurs when power is restored:
Function Condition After Extended Power Failure
• On/Off: ............... Set stays off when power comes back.
• Volume: ............... Volume returns to I/3 of full volume.
• Channel Memory: ......
• Previous Channel: .....
Set will automatically reprogram channel
memory the first time it is turned on after an
extended power failure.
PC information must be reset.
• Color, Tint, Sharpness
Contrast, Brightness: ... Set goes to original Factory settings.
Dust TV as required, using a soft cloth
or the dusting attachment of your
vacuum cleaner. Occasionally vacuum
the ventilation slots in the cabinet to help
assure adequate ventilation. Take care
not to scratch the plastic surfaces.
Ifyour TV's cabinet has a textured
finish, do not use furniture polish.
Because textured finishes are porous,
using furniture polish could mar their
appearance. They can be easily cleaned
with a damp, soft cloth.
To clean the screen, you can wipe it with
a damp, soft cloth. Then dry it with a
soft cloth. (A mild soap may be used on
the screen if it is extremely dirty.) You
can also use a non-abrasive glass cleaner
like Windex ® or Glass Plus ® with a soft
cloth. Be sure to turn off the TV before
cleaning the screen, and do not allow
liquid to run down the screen and inside
the TV.
A special antistatic cleaning polishing
solution (AH035) is available for use on
most TV screens and non-textured
cabinets. This non-abrasive formula
imparts brilliance, repels dust, and resists
fingerprints. Lint-free polishing cloths
are included.
Do not use strong cleaners, polishes, or
chemically-treated cloths to clean the
screen or cabinet.
Avoid placing drinks or vases with water
on top of your TV.
AH035
Cleaner/Polisher
18

Antenna Cables
Screw-on Antenna Cable
Attaches to the round antenna
connectors (called 75-ohm F-type) on
the back of your VCR orTV. The ends
screw onto the connectors for a secure
connection. Two lengths are available.
Push-on Antenna Cable
Attaches to the round antenna
connectors (called 75-ohm F-type) on
the back of your VCR orTV. Ends
push on for aquick connection. Gold-
tipped cables arealso available to
provide lowest possible signal loss.
Remote Controls
Remote Control (CRK53K)
This is the remote that came packed with
your TV. You canuse the order form to
order it direct by mail if desired.
Remote Control (CRK59H)
This is an optional remote thatcan be
programmed to control most brands of
remote controllable VCR's and cable
boxes. It also allows control of the TV's
VIDEO and SETUP menus from across
the room.
Antenna
Dipole Antenna (156265)
Designed to attach to the back of
20-inch* models. Can be used for both
VHF and UHF channels.
* 20-inch models in the USA arereferredto as
21-inch models in Canada.
Note: All specifications and descriptions of
- a-det_ories-aCe subject to change without
notice
3 Fl_. or 9 FT.
AH037 (3-ft)
AH008 (9-ft)
AH094(5ft)
Gold-Tipped Cables
AH065G (6-tl)
AH066G (10-ft)
d5 dS_d_5'_
[]
_" °<5"<5 5
ObOz
Obb
Obbz
_* "ff W "6'
t_
I
I
I
Description
Accessory Order Form
(Book No. 1Q57 107-01B)
Part No.
Push-on Antenna Cable (5-ft) AH004
Screw-on Antenna Cable (9-ft) AH008 $ 8.95
Transformer(page 5) AH011 $ 1.95
Cleaner/Polisher (page 18) AH035 $ 6.95
Screw-on Antenna Cable (3-ft) AH037 $ 3.00
Cable Kit (page 6) AH038BL $16.95
Gold-Tipped Antenna Cable (6-ft) AH065G $ 6.99
Gold-Tipped Antenna Cable (10-ft) AH066G $ 8.99
Optional RCA RCU t00 $69.95
Remote Control (CRK59H)
Dipole Antenna (page 4) 156265 $19.50
Antenna Mixer (page 5) 193984 $19.45
Replacement Remote Control (CRK53K) 194514 $37.30
Pricesaresubjecttochangewithoutnotice
Total Merchandise ($10 Minimum Order) ......
Sales Tax ................................
We are required by law tocollectthe appropriate
salestax for eachindividualstate, county,and
localitytowhich the merchandiseis beingsent.
Shipping, Handling, and Insurance ............
Total Amount Enclosed .....................
Use VISA or MasterCard preferably. Money order
or check must be in U.S. currency only. No COD
or CASH.
$
$
$
$
All accessories are subject to availability.
Where applicable, we will ship a superseding model.
Total
4.,5Q
19

2O
Charge your order on your VISA
or MasterCard by
filling in below
USE YOUR CREDIT CARD
IMPORTANT: Copy complete account number
from your VISA card
I lll II-T-r-17VV1
Myc oils:I--N
IMPORTANT: Copy complete account number
from yourMasterCard
I'lll II--l--V llllllllll
Copy Number
above your
name on
MasterCard
My.ca VT--ivr-I
expires:
AUTHORIZED SIGNATURE
Pricesaresubjecttochangewithoutnotice.
PLEASE
ii+l
Print or type your name and
address clearly. This will be your
mailing label.
A complete and correct orderwill
save you days of waiting.
Name:
Street:
City:
State:
Apt:
P
Zip:
Please make sure that both sides of this form have
been filled out completely.
o
I
I
To order accessories, contact your local dealer.
If a dealer is not nearby, you can also follow the instructions
below to order by telephone or direct-by-mail.
United States Orders
To place your order by phone, have your Visa or MasterCard
ready and call the toll-free number listed below between 8AM
and 5PM Eastern Standard Time. Use this number only to
place an order for accessory items listed on this order
form.
1 - 800 - 338 - 0376
Most times your order will be shipped UPS within 72 hours
of receipt. If ever it is not possible to ship within 30 days, we
will notify you with an update on your order and an option to
cancel.
To place your order by mail, detach and mail the completed
order form with credit card information, money order, or
check in U.S. currency (made payable to Thomson Consumer
Electronics) to the following address:
Video Accessories
PO Box 8419
Ronks, PA 17573
For more information on these accessories (or current
prices), write to the following address:
Video Accessories Customer Service
Thomson Consumer Electronics
Distributor & Special Products
2000 Clements Bridge Rd
Deptford, NJ 08096-2088
Canadian Orders
For Canada inquiries, please call one of these toll-free
numbers for information about accessories:
English: 1- 800 - 668 - 5518
French: 1- 800 - 668 - 5507
International Orders
This offer is valid only in the 50 United States. For
international orders, please sendyour request for quotation
(not an order) to:
International Customer Service
Thomson Consumer Electronics
Distributor & Special Products
2000 Clements Bridge Rd
Depfford, NJ 08096-2088 USA

• Troubles sometimes are caused by
simple "faults" that you can easily
correct without the help of a service
technician by firstchecking a few
basic remedies.
• Before you call or take your unit to
an Authorized RCA TV
Servicenter, look below for the type
of trouble you are experiencing.
Then perform the simple checks
and adjustments listed for that
trouble.
If your unit is still in warranty, these
checks and adjustments could save
you time and the cost of an
unneeded trip to the Servicer.They
also could save you the cost of a
diagnosis not covered by Your ,:
warranty. (See "What does your
warranty not cover" on the back
cover page.)
• lfyour unit is out of warranty, these
checks and adjustments could save
you the cost of an unneeded
diagnosis.
• If service should be necessary, the
warranty information on the back
cover page lists what your warranty
covers and explains how to get
service.
Intermittent or no remote
• Check to make sure it is plugged in. "
• Check the wall receptacle (or extension cord) to make sure it is "live" by
plugging in something else.
• Maybe batteries in remote control are "dead".
• Maybe remote control was not aimed at remote sensor. (Press POWER button
on front of TV.)
• Maybe something was between the remote and the remote sensor.
• Maybe the remote was not aimed directly at the TV.
• Maybe batteries in remote are weak or dead. Try replacing batteries.
Turns off while playing * Electronic protection circuit may have been activated because of a power surge.
Wait 30 seconds and then turn on again. If this happens frequently, the voltage
in your house may be abnormally high (especially if you burn out a lot of light
bulbs).
Blank Screen • Try another channel.
No sound, picture okay • Maybe sound is muted. Try pressing VOLUME A button to restore sound.
Can't select certain channel •
No picture, no sound
Channel may not be in Channel Memory.
If using VCR, check to make sure TV/VCR switch on VCR is in correct
position.
Maybe someone changed CABLE/AIR function to wrong position.
Maybe a vacant channel is tuned.
If watching VCR (connected only through antenna input), make sure TV is
tuned to channel 3 or 4-same as CH3/CH4 switch on VCR. Also check to
make sure TV/VCR switch on VCR is in correct position.
Sound okay, picture poor • Check antenna connections.
• Try adjusting SHARPNESS function to improve weak signals.
Picture okay, sound poor • Try another channel.
Controls don't work • Try unplugging set for 30 seconds and then turning it on again.
21

r_
,...I
,,..1
What your warranty covers:
• Any defect in material or workmanship.
For how long after your purchase:
• 90 days for labor charges.
• One year for parts.
• Two years for picture tube.
The warranty period for rental units begins with the first
rental.
What we will do:
• Pay any Authorized RCA Television Servicenter the
labor charges to repair your television.
• Pay any Authorized RCA Television Servicenter for the
new or, at our option, rebuilt replacement parts and
picture tube required to repair your television.
How you get service:
• Request in-home service from any Authorized RCA
Television Servicenter. To identify your nearest
Authorized RCA Television Servicenter, ask your
Dealer, look in the Yellow Pages, or call 1-800-336-
1900.
• Show the service technician your evidence of purchase
date.
IB-XZ01&ZGS
MANL OWNER
What your warranty does not cover:
•Customer instruction. (Your Owner's Manual clearly
describes how to install, adjust, and operate your
television. Any additional information should be
obtained from your Dealer.)
• Installation and related adjustments.
• Signal reception problems not caused by your
television.
• Damage from misuse or neglect.
• Remote control batteries.
• A television that has been modified or incorporated into
other products or is used for institutional or other
commercial purposes.
• A television purchased or serviced outside the USA.
How state law relates to this warranty:
•This warranty gives you specific legal rights, and you
also may have other rights that vary from state to state.
If you purchased your television in Canada:
• The Canadian Warranty applies in place of this
Warranty.
Si unlivretd'instructionsen fran(;aisn'estpasindusavecvotre
appareil,vouspouvezen obtenirun(INDIQUER LENUM_RO DE
MODELE, VOTRE NOM, ETVOTRE ADRESSE) envous
adressant&:
ThomsonElectroniqueGrandPublicduCanada, Inc.
Servicedesdonneestechniques
6540 TomkenRoad
Mississauga,Ontario,Canada L5T 2E9
nor
For your nearest RCA dealer
or Authorized RCA
Servicenter call
toll free in U.S.A.
1900
_R___ homson Consumer Electronics
600 N Sherman Dr, PO Box 1976
Indianapolis, IN 46206-1976
@1991 Thomson Consumer Electronics Inc.
Trademark(s) ® Registered
Marca(s) Registrada(s)
Job 88127
Part Number 1Q57 107-01B
 Loading...