

Page 1

RCA
Color TV
Owner's Manual
Page 2

WARNING: To prevent fire or shock hazard, do not
expose this TV to rain or moisture.
If you suspect that liquid has entered the TV, unplug it
immediately and have it inspected by an RCA TV Servicenter.
Turning it off is not enough - your TV has power applied to
some circuits even when the TV is turned off.
The lightning
and wTowhead
within the h'langle
is • warning sign
alerting you of
"dangerous
voltage" inside the
product that
presents a risk of
electric shock.
CAUTION: TO REDUCE THE
RISK OF ELECTRIC SHOCK,
DO NOT REMOVE COVER
(OR BACK). NO USER-
SERVICEABLE PARTS
INSIDE. REFER SERVICING
TO QUALIFIED SERVICE
PERSONNEL
The exclamation
point within the
_mngle Ism
warning mlgn
alertingyou of
iml:_:_tant
in_s
accompanylng
product.
CAUTION: Maintain electrical safety. Powerline-operated
equipment or accessories connected to this unit should bear the
UL listing mark or CSA certification mark on the accessory
itself and should not have been modified so as to defeat the
safety features. This will help avoid any potential hazard from
electric shock or fire. If in doubt, contact qualified service
personnel.
I
Note to Cable TV Installer: This reminder is provided to call
your attention to Article 820-22 of the National Electrical
Code (Section 54 of the Canadian Electrical Code, Part 1)
which provides guidelines for proper grounding and, in
particular, specifies that the cable ground shall be connected to
the grounding system of the building as close to the point of
cable entry as practical.
• Your TV operates on 120 volts, 60 Hz AC power (normal
house power) and has a polarized AC plug. Because one
• blade of the plug is wider than the other, the plug fits into the
wall socket only one way. Do not defeat the safety feature of
this plug. If you need an extension cord, make sure it is
polarized.
_ AUTION: To prevent electric shock, do not use
the polarized plug on this TV with an extension
cord, receptacle, or other outlet unless both blades
can be fully inserted to prevent blade exposure.
MISE EN GARDE: Pour pr_venir les chocs
_lectriques, ne pas utiliser la fiche polaris6e de cet
appareil avec une rallonge, une prise de courant
ou une autre sortie, _ moins que les lames ne
puissent &re ins_r6es h fond sans qu'aucune partie ne soit
laiss_e h d_couvert.
• All operating controls and their functions are identified and
explained in this manual. For warranty service or routine
maintenance, contact the nearest Authorized RCA TV
Servicenter. All servicing and adjustments to electrical
components should be done by a qualified service technician.
Mail Your Enrollment Card Today
• An RCA Owner's Club Enrollment Card is packed with your
set. Please fill out the card and return it immediately.
• Your name then will be enrolled in the next drawing, which
takes place every three months. If your name is drawn, you
will be reimbursed for thefMl purchase price of your new
RCA product (restricted to residents of USA only).
• Your prompt submission of this card confirms your right to
the protection available under the terms and conditions of the
warranty and also allows us to contact you in the unlikely
issuance of a safety modification.
• With your card on file, we can also help you in the event of
loss or theft by verifying your ownership.
• If you did not receive an RCA Owner's Club Enrollment
Card, please contact your dealer.
/ \\ ,-----,--.-, .... \\
I \ --------------?._\,,,.,,.,,,,_:,,i,,,,,.,,- \
Attach Your Sales Receipt Here and File at Home For
Future Reference
• To obtain warranty partsand service, you must show your
sales receipt (or other evidence of purchase) to your
Authorized RCA TV Servicenter.
• Tape or staple your sales receipt to this manual so you will
have it handy should service ever be needed. Do not mail
your sales receipt to us. File it at home with your owner's
manual for future reference.
Record Vital Information Here
• No other set has the same serial number as yours. You will
find the serial number and the model number on the back of
your set (and pre-printedon your Enrollment Card).
• Make sureyou record both numbers beloW'so that you will
have them in case your set is stolen orin case you need a
complete description for any other reason.
Model:
Serial:
Purchase Date:
Dealer Name/Address/Phone:
Page 3

Thank youfor choosingRCA
Congratulationsonyourpurchaseof
anRCA TV. You have selected a
high-quality, precision-engineered
instrument designed to give you
years of enjoyment.
Despite its sophistication, your new
TV is amazingly simple to operate
because it has so many automatic
features. To simplify operation even
more, the TV provides on-screen
prompts that guide you thru each
step of the special functions. The
remote control allows adjustment of
major operating controls from the
comfort of your favorite easy chair.
Not only is your new set a state-of-
the-art television receiver that
combines sophistication with ease of
operation, it also has monitor
capability thus providing you
flexibility whenever you choose to
add an additional component.
About This Manual
To take full advantage of all the
features and benefits of this unique
TV, be sure to read this owner's
manual carefully and then keep it in
a safe place for future reference.
Table of Contents
Safety Precautions ............................................... Inside Front Cover
RCA Owner's Club ............................................. Inside Front Cover
First-Time Operation ................................................................... 2-3
Operating Instructions
Front Panel Controls ....................................................................... 4
TV On-Screen Status Displays ....................................................... 5
Remote Control
• Installing Batteries ....................................................................... 6
• TV Functions ............................................................................ 6-7
VIDEO Button - General Instructions ............................................ 8
AUDIO Button - General Instructions ........................................... 9
SETUP Button - General Instructions .......................................... 10
• Sleep Timer ................................................................................ 11
• Alarm Function .......................................................................... 12
• Channel Memory (AutoProgramming Channels) ...................... 13
• Channel Memory (Erasing/Adding Channels) ........................... 13
Detailed Connections
Monitor Panel ............................................................................... 14
Tips to Read Before Connecting Components ............................. 15
Antenna and Cable Connections
• Antenna and Cable Information ................................................. 16
• Home Antenna Connections ...................................................... 17
• Cable-TV Connections ............................................................... 18
• Cable-TV Operation ................................................................... 19
Component Connections
• VCR ........................................................................................... 20
• Remote Buttons that Control VCR ............................................ 21
• Camcorder .................................................................................. 22
• Computers and Equipment with A UDIO/VIDEO Outputs ........ 22
Reference Section
Trouble Checks ............................................................................. 23
Optional Accessories and Order Form .................................... 24-26
Quick-Reference Operating Guide ........................................ 27-28
Cleaning and Care ........................................................................ 29
Index (Alphabetical Subject Reference) ....................................... 29
Limited Warranty ........................................................... Back Cover
Page 4
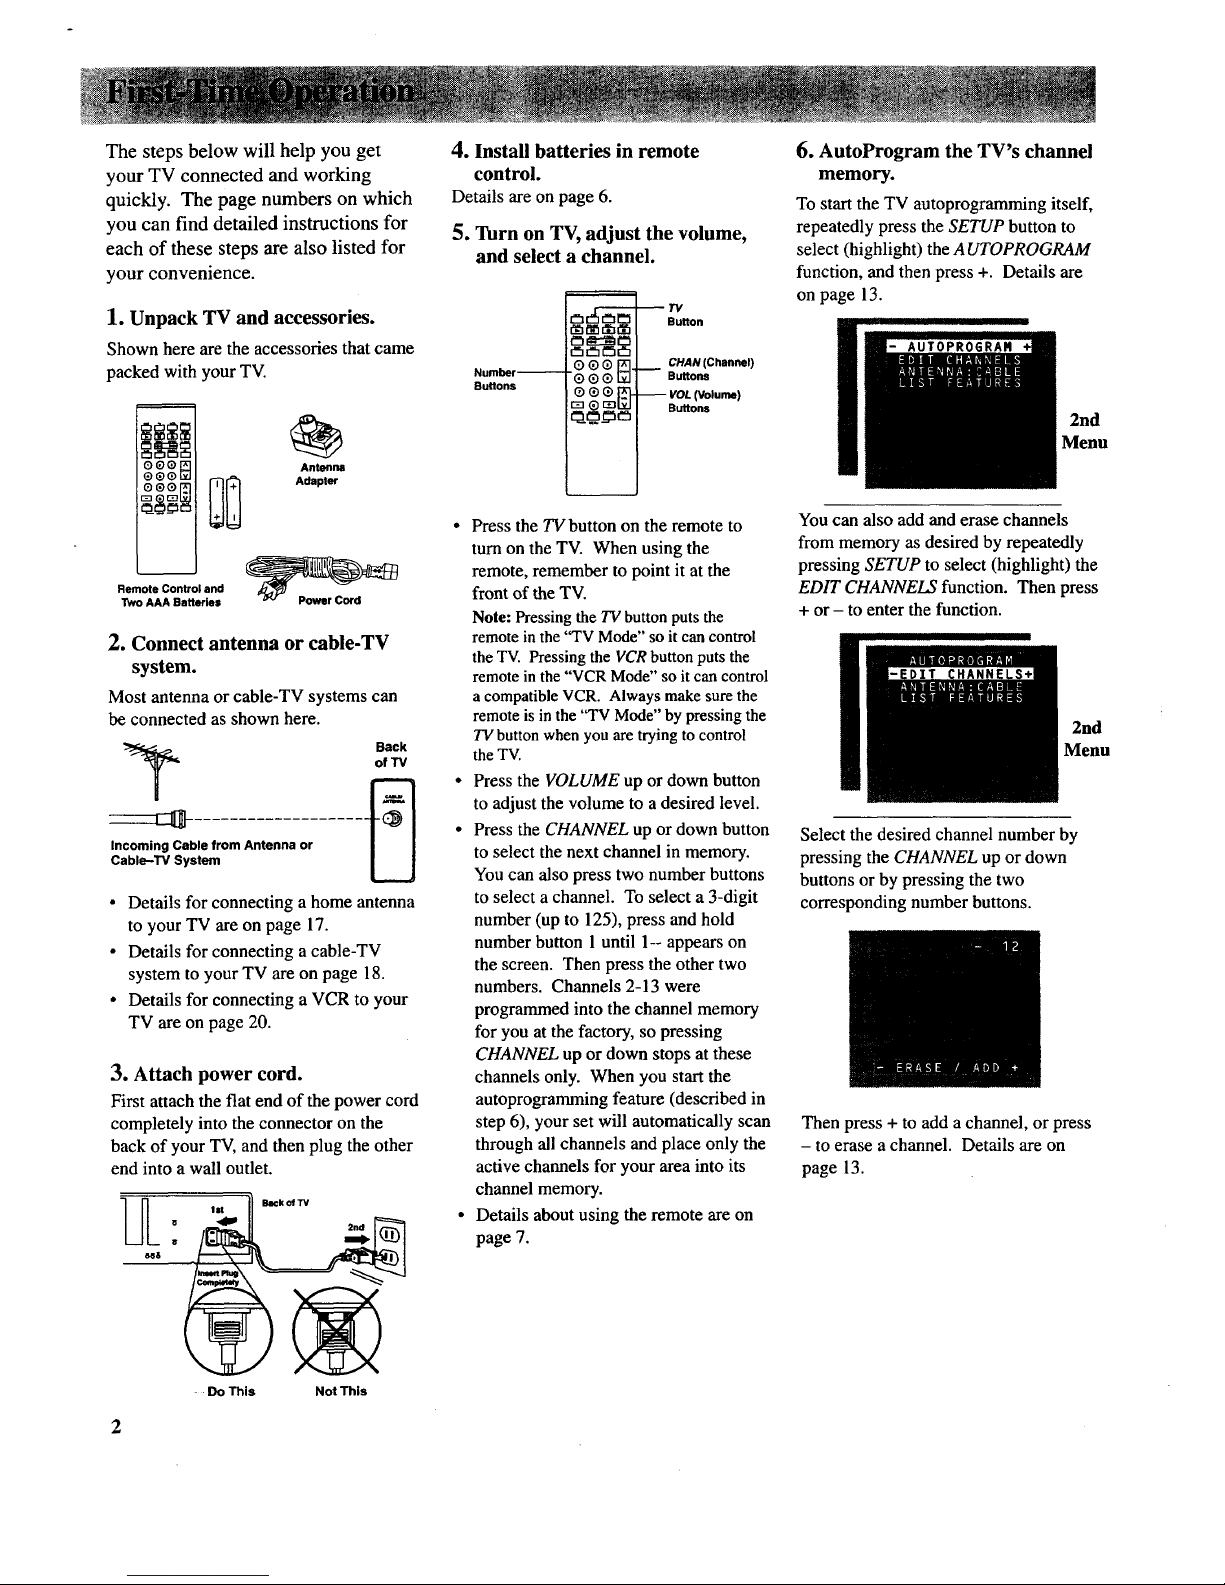
The steps below will help you get
your TV connected and working
quickly. The page numbers on which
you can find detailed instructions for
each of these steps are also listed for
your convenience.
1. Unpack TV and accessories.
Shown here are the accessories that came
packed with your TV.
oeoE91
@ @® Lv.JI
g_&g l
Antenna
Adapter
Remote Control and
Two AAA Batteries
2. Connect antenna or cable-TV
system.
Most antenna or cable-TV systems can
be connected as shown here.
Incoming Cable from Antenna or
Cable--TV System
Back
of TV
Details for connecting a home antenna
to your TV are on page 17.
Details for connecting a cable-TV
system to your TV are on page 18.
Details for connecting a VCR to your
TV are on page 20.
3. Attach power cord.
First attach the fiat end of the power cord
completely into the connector on the
back of your TV, and then plug the other
end into a wall outlet.
•Do This
Back Of TV
2nd
Not This
4. Install batteries in remote
control.
Details are on page 6.
5. Turn on TV, adjust the volume,
and select a channel.
Number--
Buttons
_emee_e_
eeel_l.
"® ® ® I__1
_ (,9 r_ L.Y.J
--TV
Bu_on
CHAN (Channel)
Buttons
-- VOL (Volume)
Buttons
Press the TV button on the remote to
turn on the TV. When using the
remote, remember to point it at the
front of the TV.
Note: Pressingthe TV button puts the
remote in the "TV Mode" so it can control
the TV. Pressing the VCR button puts the
remote in the "VCR Mode" so it can control
a compatible VCR. Always make sure the
remote is inthe "TV Mode" by pressing the
TVbutton when you are trying to control
the TV.
Press the VOLUME up or down button
to adjust the volume to a desired level.
Press the CHANNEL up or down button
to select the next channel in memory.
You can also press two number buttons
to select a channel. To select a 3-digit
number (up to 125), press and hold
number button 1 until 1-- appears on
the screen. Then press the other two
numbers. Channels 2-13 were
programmed into the channel memory
for you at the factory, so pressing
CHANNEL up or down stops at these
channels only. When you start the
autoprogramming feature (described in
step 6), your set will automatically scan
through all channels and place only the
active channels for your area into its
channel memory.
Details about using the remote are on
page 7.
6. AutoProgram the TV's channel
memory.
To startthe TV autoprogramming itself,
repeatedly press the SETUP button to
select (highlight) the A UTOPROGRAM
function, and then press +. Details are
on page 13.
2nd
Menu
You can also add and erase channels
from memory as desired by repeatedly
pressing SETUP to select (highlight) the
EDIT CHANNELS function. Then press
+ or - to enter the function.
2nd
Menu
Select the desired channel number by
pressing the CHANNEL up or down
buttons or by pressing the two
corresponding number buttons.
Then press + to add a channel, or press
- to erase a channel. Details are on
page 13.
Page 5

7. Set the clock.
Press VIDEO
once to see
1st video menu
VIDEO
Press SETUP
to see 1st
setup menu.
SLEEP :
• Repeatedly press the SETUP button to
select the CLOCK function.
• Press and hold the + or - button to set
the clock. The + button advances the
time forward. The - button moves the
time backward.
• After the clock is set, the time will
appear on the screen whenever you
change channels or press the
DISPLAY button.
• You will have to reset the clock after
extended power interruptions. The TV
will let you know that power has been
interrupted by displaying --:-- in the
CLOCK function and by no longer
showing the time display on the screen
when you press the TV or DISPLAY
button on the remote.
8. Review audio, video, and setup
menus.
Press AUDIO
to see the
audio menu.
Press the VIDEO button once to see the
first video menu. The VIDEO RESET
function lets you quickly return all the
picture controls back to the factory
settings by pressing + or -.
Press VIDEO
again to see
2nd video
menu
Color
adjustment
display
To see the second video menu press
VIDEO again. Repeatedly press
VIDEO to select (highlight) the desired
function, then press + or - to see the
adjustment display on the bottom of the
screen. You can now adjust that display
to your personal preference by pressing
+ or -. Details are on page 8.
Press SETUP
repeatedly to
see 2nd setup
menu.
Repeatedly press the SETUP button to
select (highlight) the function you want
to adjust, then press + or - to change it.
Details begin on page 10.
9. Review other features.
Later, after you feel comfortable with
your TV and remote control, you can
review the detailed control descriptions
and special features covered in this
manual.
You can use the rest of this manual as a
reference guide to review detailed
information about each operating control
and function. The alphabetical index in
the back will help you quickly locate
desired information. A quick-reference
operating guide is also printed on pages
27 and 28 for your convenience.
To see the audio menu press the AUDIO
button.
Repeatedly press AUDIO to select
(highlight) desired function, then press +
or - to change it. Details are on page 9.
3
Page 6

te Sensor
/ ::i
POWER Button
Q Power Indicator --
Q AUDIO Button --
VOLUME Buttons
(Also + and - Buttons)
Q CHANNEL Buttons
O POWER Button
• Press once to turn on TV.
• Press again to turn off TV.
VOLUME Buttons
(Also + and - Buttons)
• Press VOL + to increase volume,
orpress VOL - to decrease
volume. The volume display will
automatically appear on the screen
when you press the VOL buttons.
• The + and - buttons are also used
afterone of the menu buttons is
pressed (AUDIO, VIDEO, or
SETUP) to change or adjust
special functions. When the menu
display disappears from the
screen, these buttons once again
become the volume adjustment
controls.
CHANNEL Buttons
• Press CHAN ^ to see the next
higher channel in memory.
• Press CHAN v to see the next
lower channel in memory. ,.
• You can add or erase channels in-
--._aaemory as desired. Details are on
page 13.
Q VIDEO Button --
--Q SETUP Button
Q SETUP Button
• Press repeatedly until the function
you want is selected (highlighted),
then press VOL + or VOL - to
adjust the setting.
• Details about using each function
begin on page 10.
VIDEO Button
• Press the VIDEO button once to
see the first video menu. To reset
the picture controls back to
factory settings, press VOL + or
VOL -.
• Press the VIDEO button again to
see the second video menu.
Repeatedly press VIDEO to select
desired function, thenpress
VOL + or VOL - to see the
adjustment display. Press VOL +
or VOL - again to set the
adjustment display to your
preference.
• Details about using each function
areon page 8
(_ A UDIO Button
• Press repeatedly until the function
you want is selected, then press
VOL + or VOL - to adjust the
setting.
• Details about using each function
begin on page 9.
Power Indicator
• Lights whenever TV is turned on.
Remote Sensor
• Receives commands from the
remote control.
• When using the remote control,
point it toward this sensor.
Page 7

VideoInput Display
(AVINPUT)
Sleep Timer Display
(_) Stereo Display (ST)
Channel Number Display
Alarm Timer Display
MUTE Display
Time Display
®
®
®
Stereo Display (ST)
This display appears when the
STEREO function is set to ON and a
TV station is broadcasting stereo.
Details are on page 9.
Channel Number Display
This display appears whenever you
change channels or press the TV or
DISPLAY button on the remote.
Time Display
This display appears (after the clock
is set) whenever you change
channels or press the TV or
DISPLAY button on the remote.
Note: If the power is interrupted for an
extendedperiod of time, the time display
will not appear on the screen. If this
happens, the clock will need to be reset.
I(I_ MUTE Display
This display appears when the TV's
sound is muted. Details are on
page 7.
Alarm Display (ALM)
Timer
This display appears when the
alarm timer has been activated.
Details are on page 12.
®
®
Sleep Timer Display (SLP)
This display appears when the sleep
timer has been activated. Details are
on page 11.
Video Input Display (AVINPUT)
This display appears when the TV is
tuned to channel 91. Channel 91 is
used to view the signal from another
component (such as a VCR,
camcorder, laserdisc player, etc.) that
is connected to the INPUT 1 jacks on
the back of the TV. Details are on
pages 20-22.
Page 8
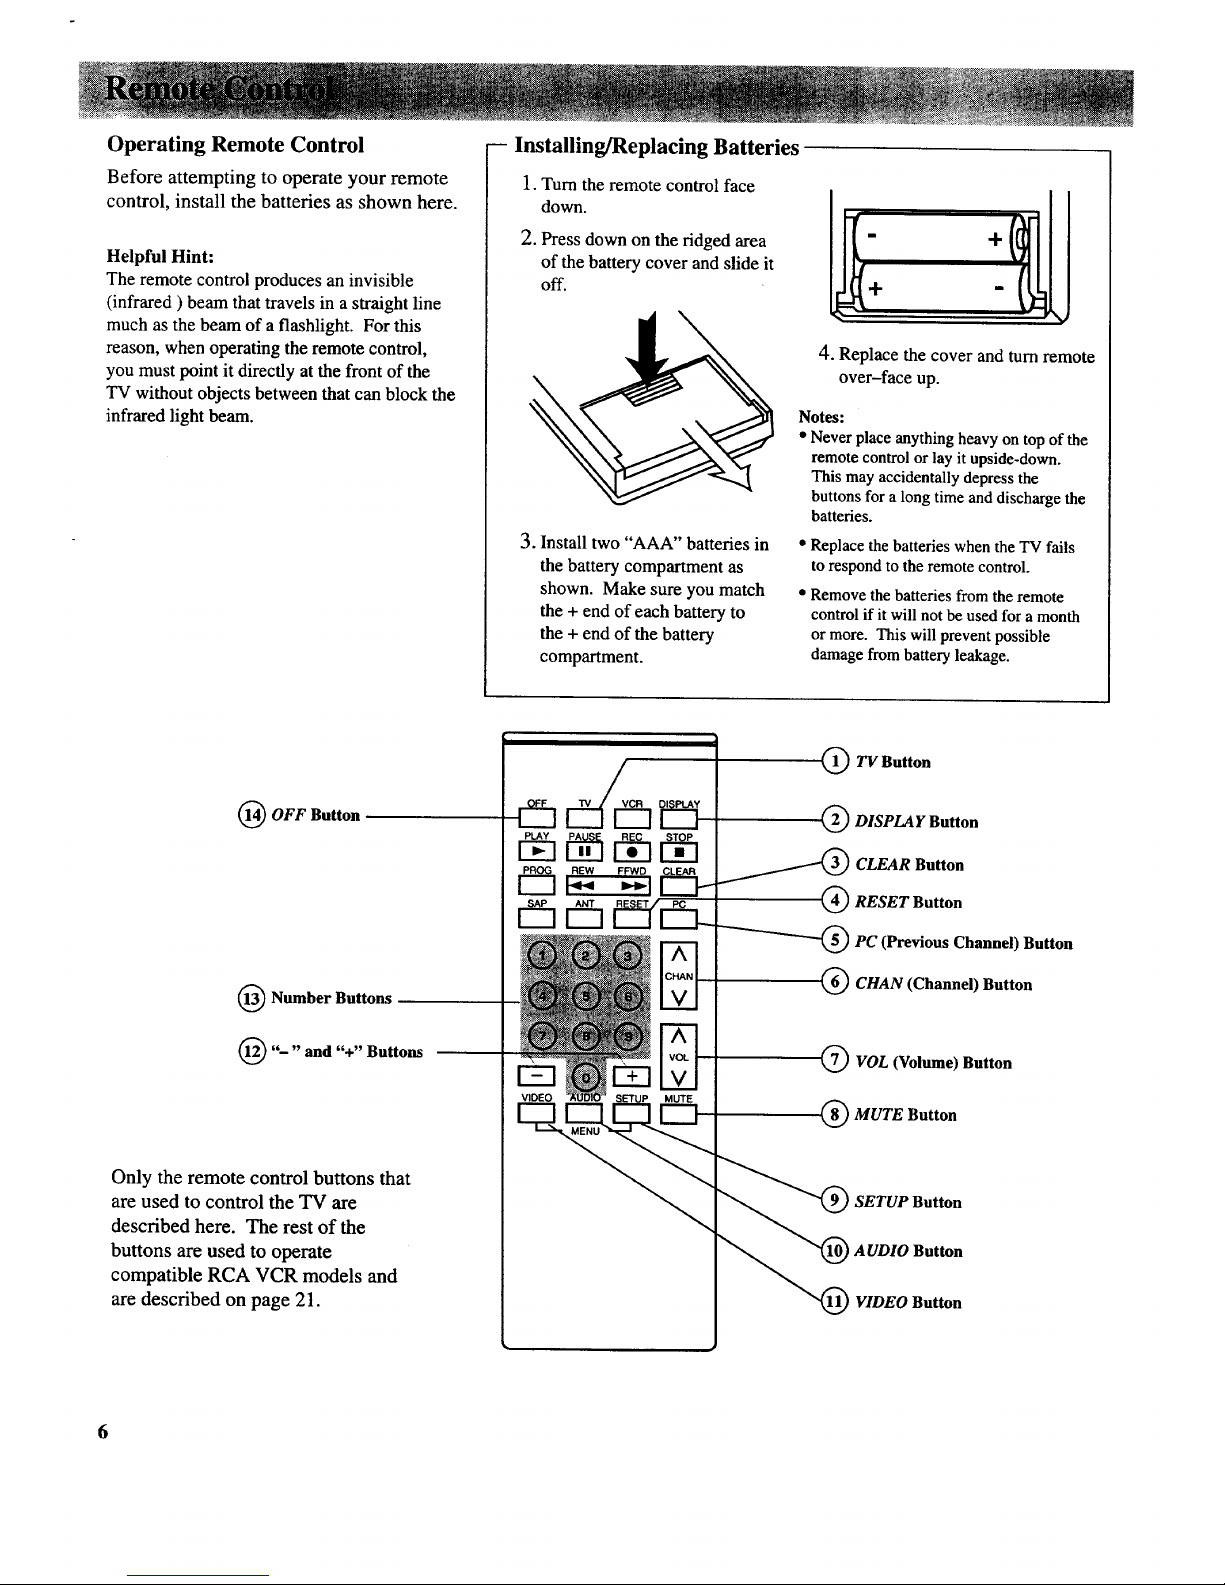
Operating Remote Control
Before attempting to operate your remote
control, install the batteries as shown here.
Helpful Hint:
The remote control produces an invisible
(infrared) beam that travels in a straight line
much as the beam of a flashlight. For this
reason, when operating the remote control,
you must point it directly at the front of the
TV without objects between that can block the
infrared light beam.
-- Installing/Replacing Batteries
1. Turn the remote control face
down.
2. Press down on the ridged area
of the battery cover and slide it
off.
4. Replace the cover and turn remote
over-face up.
Notes-
• Never place anything heavy on top of the
remote control or lay it upside-down.
This may accidentally depress the
buttons for a long time and discharge the
3. Install two "AAA" batteries in
the battery compartment as
shown. Make sure you match
the + end of each battery to
the + end of the battery
compartment.
batteries.
Replace the batteries when the TV fails
to respond to the remote control.
Remove the batteries from the remote
control if it will not be used for a month
or more. This will prevent possible
damage from battery leakage.
OFF Button
Number Buttons
'"" and "+" Buttons
Only the remote control buttons that
are used to control the TV are
described here. The rest of the
buttons are used to operate
compatible RCA VCR models and
are described on page 21.
O TV Button
(_ DISPLAY Button
_ CLEAR Button
/
_ RESET Button
--'-_-_PC (Previous Channel) Button
_CHAN (Channel) Button
Q VOL (Volume) Button
(_ MUTE Button
"(_ SETUP Button
AUDIO Button
"_ VIDEO Button
Page 9
@
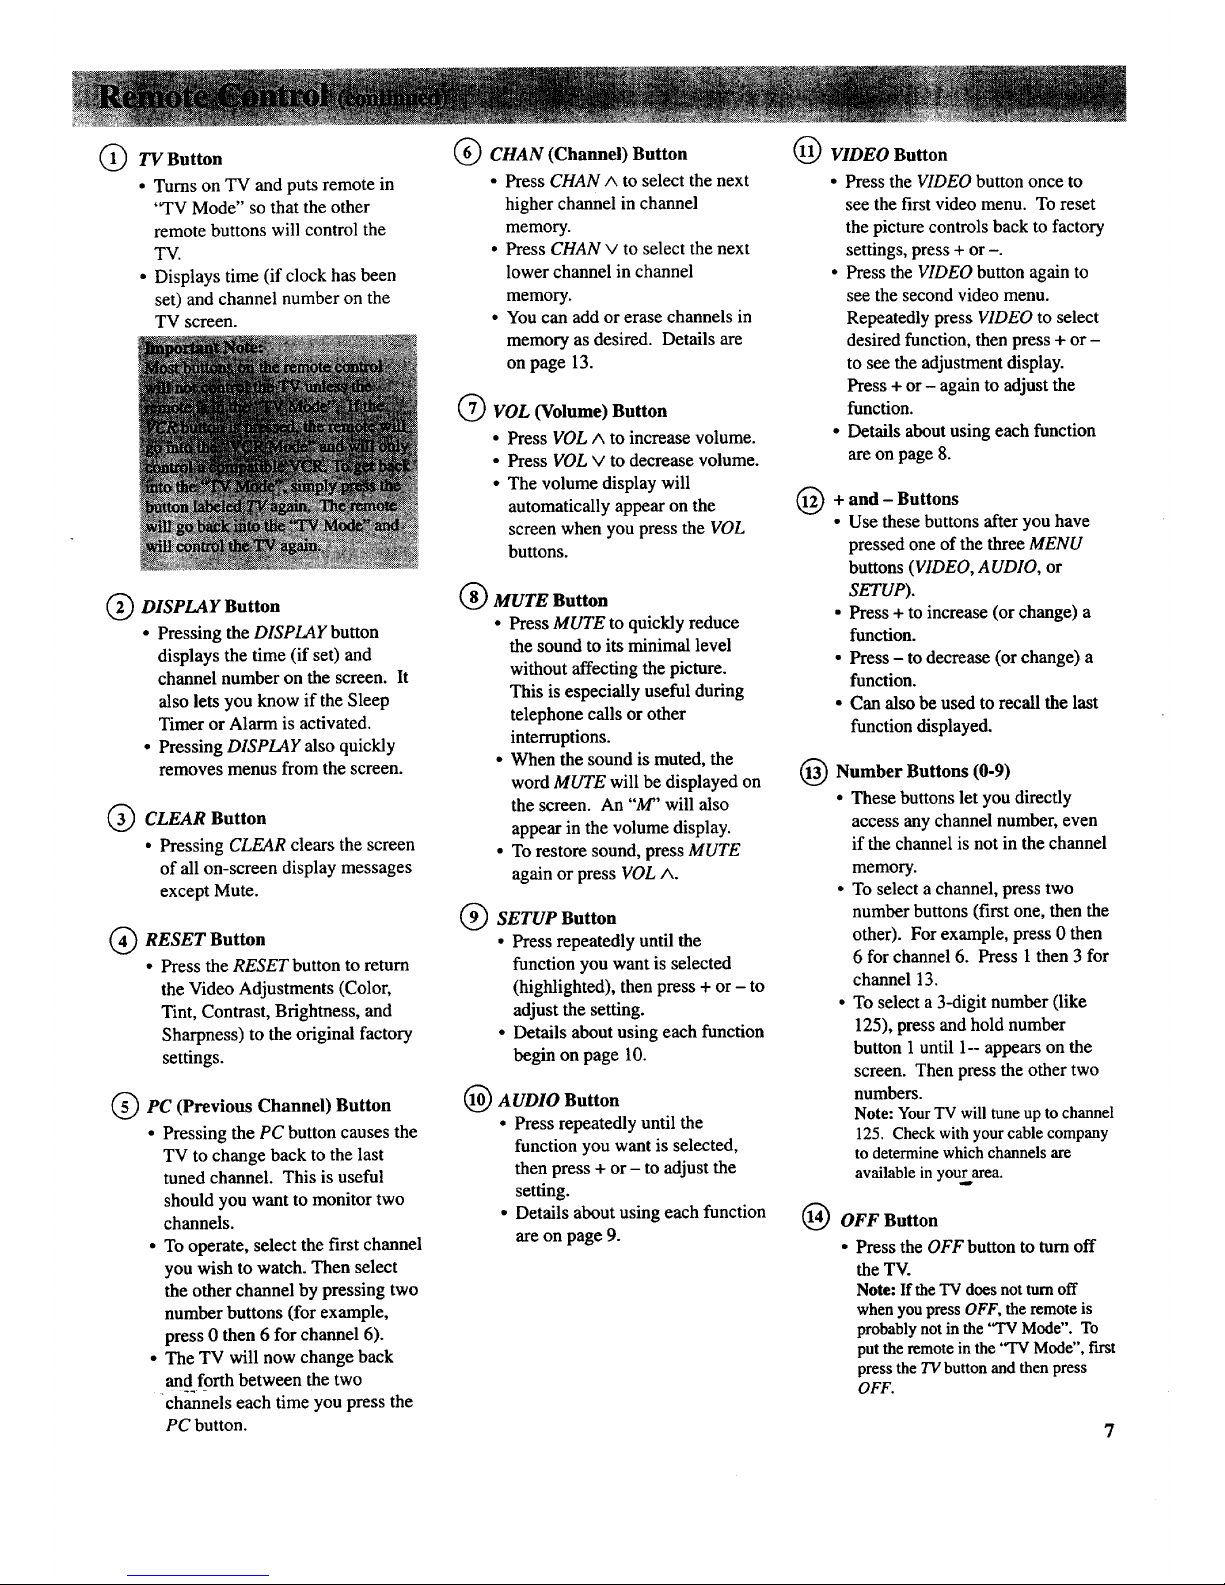
TV Button
• Turns on TV and puts remote in
'°TV Mode" so that the other
remote buttons will control the
TV.
• Displays time (if clock has been
set) and channel number on the
TV screen.
DISPLAY Button
• Pressing the DISPLAY button
displays the time (if set) and
channel number on the screen. It
also lets you know if the Sleep
Timer or Alarm is activated.
• Pressing DISPLAY also quickly
removes menus from the screen.
CLEAR Button
• Pressing CLEAR clears the screen
of all on-screen display messages
except Mute.
RESET Button
• Press the RESET button to return
the Video Adjustments (Color,
Tint, Contrast, Brightness, and
Sharpness) to the original factory
settings.
PC (Previous Channel)
Button
• Pressing the PC button causes the
TV to change back to the last
tuned channel. This is useful
should you want to monitor two
channels.
• To operate, select the first channel
you wish to watch. Then select
the other channel by pressing two
number buttons (for example,
press 0 then 6 for channel 6).
• The TV will now change back
and forth between the two
--7"--
channels each time you press the
PC button.
CHAN (Channel) Button
• Press CHAN ^ to select the next
higher channel in channel
memory.
• Press CHAN v to select the next
lower channel in channel
memory.
• You can add or erase channels in
memory as desired. Details are
on page 13.
® VOL (Volume) Button
• Press VOLm to increase volume.
• Press VOL v to decrease volume.
• The volume display will
automatically appear on the
screen when you press the VOL
buttons.
®
®
MUTE Button
• Press MUTE to quickly reduce
the sound to its minimal level
without affecting the picture.
This is especially useful during
telephone calls or other
interruptions.
• When the sound is muted, the
word MUTE will be displayed on
the screen. An "M" will also
appear in the volume display.
• To restore sound, press MUTE
again or press VOL ^.
®
SETUP Button
• Press repeatedly until the
function you want is selected
(highlighted), then press + or - to
adjust the setting.
• Details about using each function
begin on page 10.
AUDIO Button
• Press repeatedly until the
function you want is selected,
then press + or - to adjust the
setting.
• Details about using each function
are on page 9.
VIDEO Button
• Press the VIDEO button once to
see the first video menu. To reset
the picture controls back to factory
settings, press + or -.
• Press the VIDEO button again to
see the second video menu.
Repeatedly press VIDEO to select
desired function, then press + or -
to see the adjustment display.
Press + or - again to adjust the
function.
• Details about using each function
are on page 8.
@
+ and - Buttons
• Use these buttons after you have
pressed one of the three MENU
buttons (VIDEO, AUDIO, or
SETUP).
• Press + to increase (or change) a
function.
• Press - to decrease (or change) a
function.
• Can also be used to recall the last
function displayed.
@
®
Number Buttons (0-9)
• These buttons let you directly
access any channel number, even
if the channel is not in the channel
memory.
• To select a channel, press two
number buttons (first one, then the
other). For example, press 0 then
6 for channel 6. Press 1 then 3 for
channel 13.
• To select a 3-digit number (like
125), press and hold number
button 1 until 1-- appears on the
screen. Then press the other two
numbers.
Note: YourTV will tune up to channel
125. Check withyour cable company
to determine which channelsare
available inyourarea.
OFF Button
• Press the OFF button to turnoff
the TV.
Note: Ifthe TV doesnotturnoff
whenyoupressOFF,the remoteis
probablynotin the 'q'VMode". To
putthe remote inthe "TV Mode", fast
press the TV button and then press
OFF.
Page 10
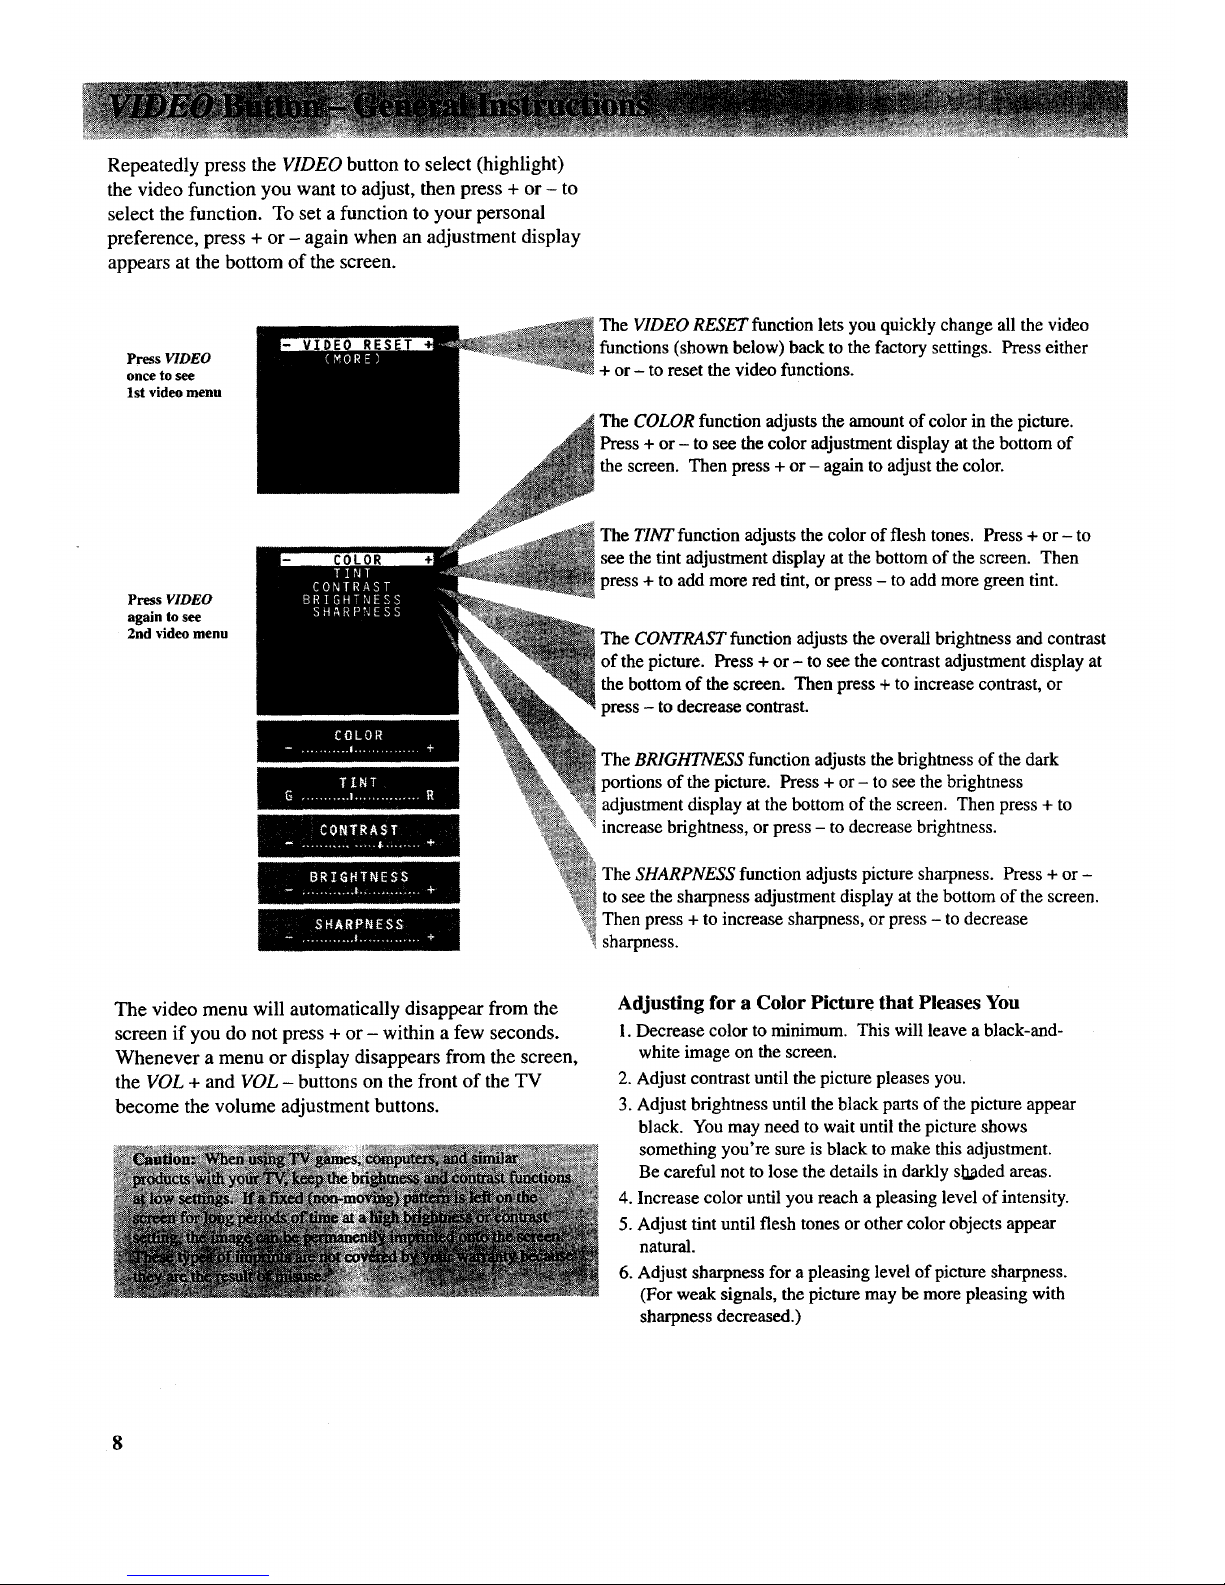
Repeatedly press the VIDEO button to select (highlight)
the video function you want to adjust, then press + or - to
select the function. To set a function to your personal
preference, press + or - again when an adjustment display
appears at the bottom of the screen.
Press VIDEO
once to see
1st video menu
The VIDEO RESET function lets you quickly change all the video
functions (shown below) back to the factory settings. Press either
+ or- to reset the video functions.
The COLOR function adjusts the amount of color in the picture.
Press + or - to see the color adjustment display at the bottom of
the screen. Then press + or- again to adjust the color.
Press VIDEO
again to see
2nd video menu
llOR
The TINT function adjusts the color of flesh tones. Press + or - to
see the tint adjustment display at the bottom of the screen. Then
press + to add more red tint, or press - to add more green tint.
The CONTRAST function adjusts the overall brightness and contrast
of the picture. Press + or - to see the contrast adjustment display at
the bottom of the screen. Then press + to increase contrast, or
press - to decrease contrast.
The BRIGHTNESS function adjusts the brightness of the dark
portions of the picture. Press + or - to see the brightness
adjustment display at the bottom of the screen. Then press + to
increase brightness, or press - to decrease brightness.
The SHARPNESS function adjusts picture sharpness. Press + or -
to see the sharpness adjustment display at the bottom of the screen.
Then press + to increase sharpness, or press - to decrease
sharpness.
The video menu will automatically disappear from the
screen if you do not press + or - within a few seconds.
Whenever a menu or display disappears from the screen,
the VOL + and VOL - buttons on the front of the TV
become the volume adjustment buttons.
Adjusting for a Color Picture that Pleases You
1. Decrease color to minimum. This will leave a black-and-
white image on the screen.
2. Adjust contrast until the picture pleases you.
3. Adjust brightness until the black parts of the picture appear
black. You may need to walt until the picture shows
something you're sure is black to make this adjustment.
Be careful not to lose the details in darkly skaded areas.
4. Increase color until you reach a pleasing level of intensity.
5. Adjust tint until flesh tones or other color objects appear
natural.
6. Adjust sharpness for a pleasing level of picture sharpness.
(For weak signals, the picture may be more pleasing with
sharpness decreased.)
8
Page 11

RepeatedlypresstheAUDIO button to select
(highlight) the function you want to change, then
press + or - to change the setting.
Press AUDIO
to see the
audio menu.
STEREO: ON
The STEREO function lets you choose either monaural or stereo
audio. When a station is broadcasting stereo, the stereo indicator
(ST) will appear on the screen before the channel number. Press the
+ or - button to change between the STEREO: ON and
STEREO: OFF display. Normally, you can leave the stereo
function ON. Your TV will then automatically produce either
monaural or stereo audio-whichever is broadcast.
Note: Some television stationstransmit a "pilot" signalthat makes your
TV thinkit's receiving stereo, even though the broadcast signal is
monaural. The "pilot" signalwill make the stereo indicator (ST) appear on
the screen next to the channel number, however,you will notbe able to
hear stereo sound. If the stereo indicator appearsbut you can not hear
stereo sound, check with the television stationto inquirewhether the
program being broadcast is intrue stereoor monaural audio.
The TONE function allows you to select HIGH or LOW. If you
prefer to listen to the high frequencies, set the tone display to
HIGH. If you prefer to listen to the low frequencies, set the tone
display to LOW. Press either the + or - button to switch between
the HIGH and LOW display. Experiment with this feature and set it
to your personal preference.
The audio menu will automatically disappear from the
screen if you do not press + or - within a few seconds.
Whenever a menu or display disappears from the screen,
the VOL + and VOL - buttons on the front of the TV
become the volume adjustment buttons.
9
Page 12
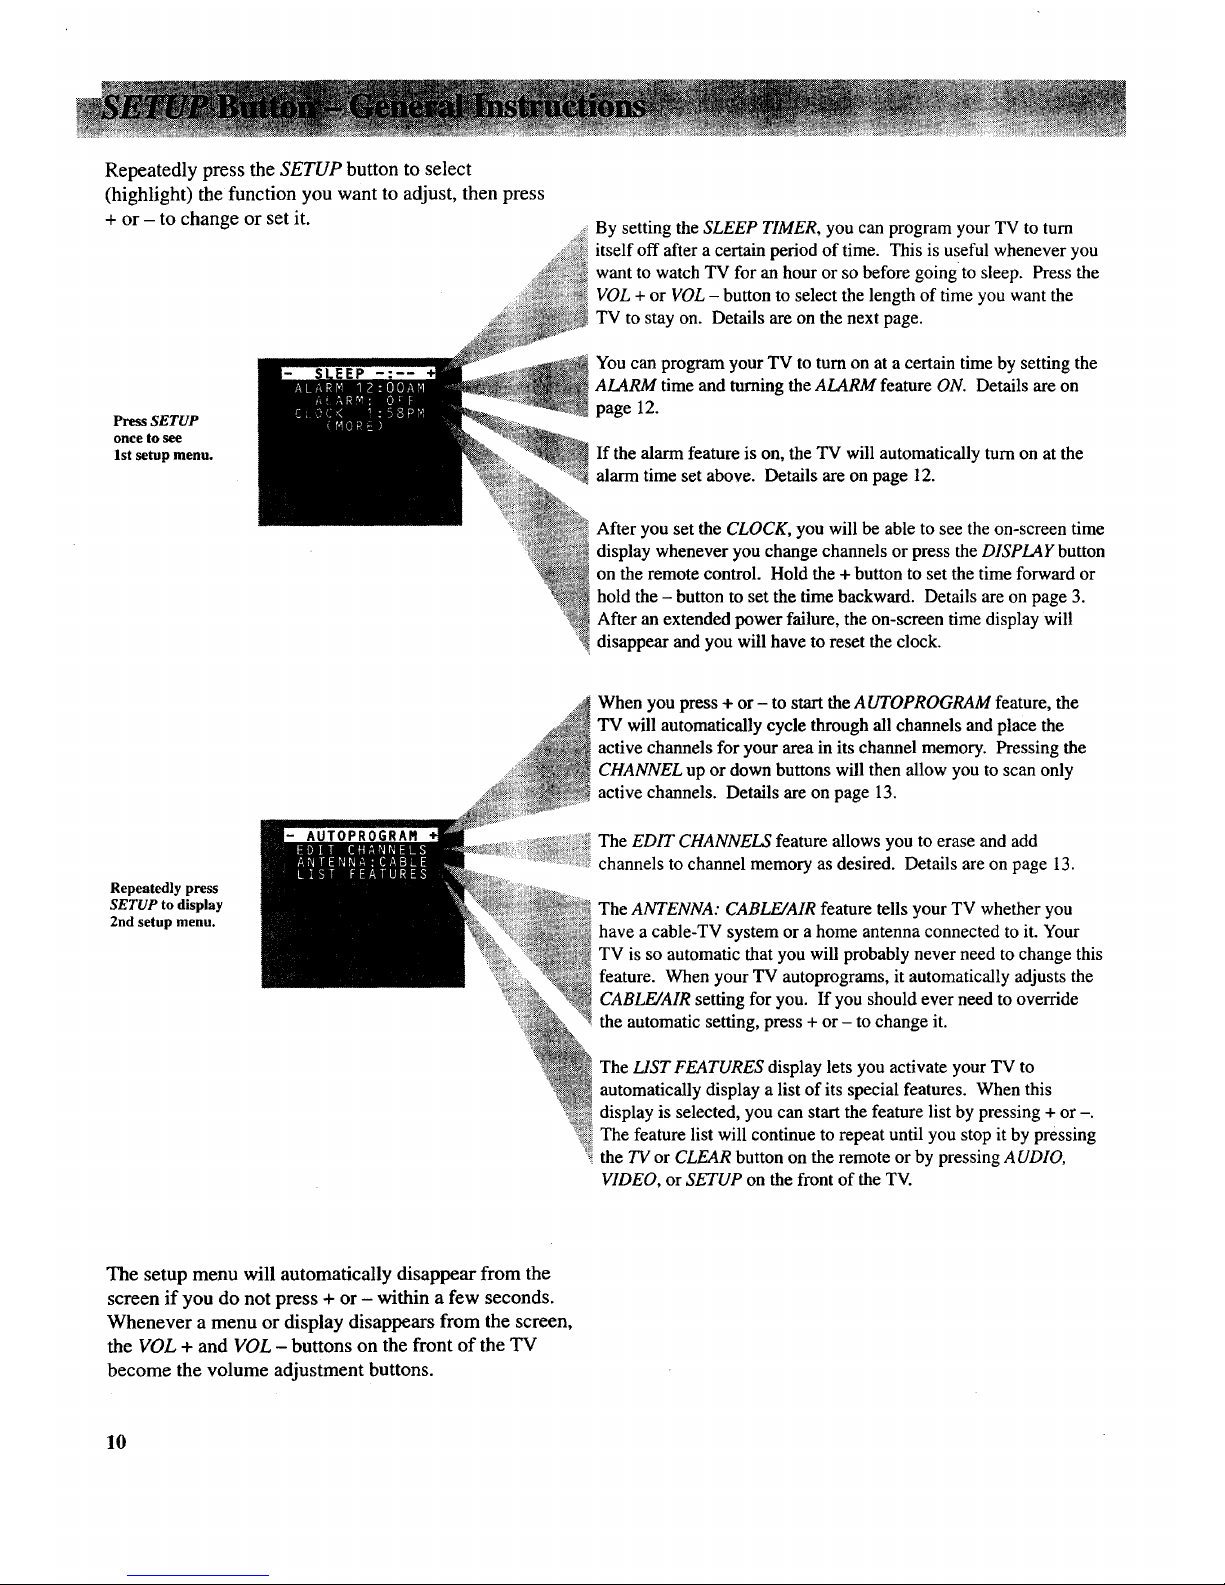
RepeatedlypresstheSETUP button to select
(highlight) the function you want to adjust, then press
+ or - to change or set it.
Press SETUP
once to see
1st setup menu.
By setting the SLEEP TIMER, you can program your TV to turn
itself off after a certain period of time. This is useful whenever you
want to watch TV for an hour or so before going to sleep. Press the
VOL + or VOL - button to select the length of time you want the
TV to stay on. Details are on the next page.
You can program your TV to turn on at a certain time by setting the
ALARM time and turning the ALARM feature ON. Details are on
page 12.
If the alarm feature is on, the TV will automatically turn on at the
alarm time set above. Details are on page 12.
After you set the CLOCK, you will be able to see the on-screen time
display whenever you change channels or press the DISPLAY button
on the remote control. Hold the + button to set the time forward or
hold the - button to set the time backward. Details are on page 3.
After an extended power failure, the on-screen time display will
disappear and you will have to reset the clock.
Repeatedly press
SETUP to display
2nd setup menu.
AUTOPROGRAR
When you press + or - to start the AUTOPROGRAM feature, the
TV will automatically cycle through all channels and place the
active channels for your area in its channel memory. Pressing the
CHANNEL up or down buttons will then allow you to scan only
active channels. Details are on page 13.
The EDIT CHANNELS feature allows you to erase and add
channels to channel memory as desired. Details are on page 13.
The ANTENNA: CABLE/AIR feature tells your TV whether you
have a cable-TV system or a home antenna connected to it. Your
TV is so automatic that you will probably never need to change this
feature. When your TV autoprograms, it automatically adjusts the
CABLE/AIR setting for you. If you should ever need to override
the automatic setting, press + or - to change it.
The LIST FEATURES display lets you activate your TV to
automatically display a list of its special features. When this
display is selected, you can start the feature list by pressing + or -.
The feature list will continue to repeat until you stop it by pressing
the TV or CLEAR button on the remote or by pressing AUDIO,
VIDEO, or SETUP on the front of the TV.
The setup menu will automatically disappear from the
screen if you do not press + or - within a few seconds.
Whenever a menu or display disappears from the screen,
the VOL + and VOL - buttons on the front of the TV
become the volume adjustment buttons.
10
Page 13

Bysettingthesleeptimer,youcan
programyourTV toturnitselfoff
after a certain period of time (up to
four hours).
This is useful whenever you want
to watch TV for an hour or so
before going to sleep.
-Setting Sleep Timer
1. Press the SETUP button once to
select the 1st setup menu and
highlight thesleep timer.
IEP : --
2, Press the + or - button to select the
length of time (up to four hours) you
want the TV to stay on.
Each time you press the + or-
button, the time will increase 30
minutes (up to four hours). Then the
time display will start over.
SLEEP 2:00 2 hours
3. When finished, the display will
automatically disappear from the
screen in a few seconds.
4. The sleep timer will begin to count
down to zero. The letters "SLP"
will appear on the screen whenever
you change channels or press the
DISPLAY button to let you know the
sleep timer is activated.
The amount of time remaining
before the TV turns itself off will
appear in the sleep timer menu
whenever you press the SETUP
button.
remaining
5. When the Sleep Timer counts down
to one minute, the sleep timer
display will appear on the screen.
When the last minute is up, the TV
will turn itself off. If desired, you
can add additional time to the sleep
timer by pressing + when the display
appears.
Cancelling Sleep Timer
--(before it turns off TV)
To cancel the sleep timer before it turns off
the TV, first press the SETUP button to
enter the sleep timer function and then
press the + or - button until the screen
shows -:
11
Page 14

Bysettingthealarm,youcan
programtheTVtoturnonbyitself.
Thisisusefulwheneveryouwantthe
settoturnitselfonatacertaintime
(likeanalarmclock).
Afterthealarmtimeisset,theTV
will automaticallyturnoneachday
atthetimeyouselected,playforone
hour,andthenturnoff. The
ALARM: ON/OFF function lets you
easily deactivate or reactivate the
alarm without having to reset the
alarm time.
When the alarm time is reached, the
set will turn on at whatever volume
and channel you left it when you last
turned it off. If you want the TV to
come on softly at the alarm time, be
sure the TV is playing softly when
you turn off the set for the last time
before the alarm comes on.
When the set turns itself on, it
automatically activates the sleep
timer for one hour. This allows the
set to turn itself off after one hour.
This is helpful in case you leave for
the weekend and forget to deactivate
your alarm. You won't have to
worry about your TV turning on and
playing all week-end.
When setting the alarm, check to
make sure the clock is set to the
correct time. The clock will show
" : " if it has not been set or if
there has been an extended power
failure. Details for setting the clock
are on page 3.
Your TV lets you know when the
alarm function is activated (turned
on) by displaying the letters "ALM"
on the screen whenever you press the
TV or DISPLAY button or change
channels. This means the TV will
turn itself on at the time you
programmed.
--Setting the Alarm Time
1, Repeatedly press the SETUP button
to select the ALARM time function.
3. When you set the ALARM time
function, the ALARM ON/OFF
function will automatically change
to ON. Be sure to set this function
to OFF if you do not want the TV
to turn on by itself at the alarm
time you selected.
,.
Then press + or - to set the time you
want the alarm to turn on. Pressing
and holding + quickly moves the
time forward, pressing and
holding - quickly moves the time
backward.
Note: Remember to check the AM/PM
setting. Midnight is 12:00 AMand
noon is 12:00PM.
Notes:
• When the alarm time is reached, the
set will turn on at whatever volume
and channel you left it when you last
turned it off. It will play for one hour
and then turn off.
• If you want to turn offthe set sooner,
just press POWER on the TV or
OFF on the remote.
• If you do not want the TV to turn off
after one hour, cancel the remaining
time in the SLEEP TIMER display.
Details are on page 11.
-Turning the Alarm On and Off
+
Repeatedly press the SETUP button
to select the ALARM ON/OFF
function, and then press + or - to
change it.
When this function is turned OFF,
the alarm is deactivated and your
set will not turn on by itself.
When this function is turned ON,
the alarm is activated and your set
will turn on at whatever volume
and channel you left it when you
last turned it off.
Important Note: During extended power
failures, the alarm function will work the
same as an analog-type alarm clock. The
alarm will stay programmed to the time it was
set, but the clock will stop during the power
failure. When power returns, the clock will
remember what time the power went off and
start again from that time. For example, if the
power was lost at 10:00PM and returned at
I0:15PM, the clock will be 15 minutes slow.
Therefore, unless you reset the clock to the
correct time, the alarm will turn on
15 minutes late. You can tell if a power
failure has occurred because the time display
will not appear on the TV screen when you
press the DISPLAY button.
12
Page 15

The channel memory is the list of TV
channel numbers your TV will stop
on when you press the CHANNEL up
or down button. You can program
any list of channels into the channel
memory.
The quickest way to program your
channel memory is to use the
A UTOPROGRAM function. If you
use the A UTOPROGRAM function,
your TV will automatically cycle
through all channels and place active
channels into the channel memory.
First follow the instructions to
autoprogram channels, and then add
or erase individual channels as
desired.
Notes:
• The AutoProgram feature will place into
memory active TV channels that have a
valid signal at the time you autoprogram
your TV.
• An active channel may be missed
occasionally if its signal is very weak or if
the channel happens to be "off the air"
when the TV is autoprogrammed.
• An inactive channel may be included in the
channel memory if there happens to be
some sort of "noise" or "stray signal" on
the channel when the TV is
autoprogrammed.
• Signals from scrambled cable channels
having unusual signal conditions may not
be autoprogrammed.
• Video input channel 91 (which accesses the
INPUT 1jacks) can be added to channel
memory but cannot be autoprogrammed.
You can add it to memory by using the
EDIT CHANNELS function described at
the right. Once channel 91 has been added
to memory, it will remain in memory until
you erase it. Autoprogramming will not
erase it from memory.
•1. AutoProgramming Channels into Channel Memory
1o Connect home antenna(s) or cable- 3. Press either + or - to begin
TV to your set. autoprogramming.
2. After you have turned on the TV
and adjusted the volume, repeatedly
press the SETUP button on the front
of the TV until AUTOPROGRAM is
selected (highlighted).
_TOPROGRAM
2nd
Menu
4° When the TV is finished cycling,
you can check to see which
channels are in memory by pressing
the CHANNEL up or down button.
2. Erasing/Adding Channels in Channel Memory
1. To erase or add a channel, press 3. Press + to add the channel to
SETUP repeatedly until the memory, or press - to erase the
EDIT CHANNELS function is channel from memory.
selected (highlighted). Then press
+ or - to enter the function.
°
2nd
Menu
Select the desired channel number
by pressing CHANNEL up or down
(or the two corresponding number
buttons on the remote).
Note: To select a 3-digit number (up to
125), press and hold number button 1
until 1-- appears on the screen. Then
press the other 2 numbers.
• If a "+" appears next to the
channel number, then the channel
is in the channel memory list. To
erase the channel, press -.
• If a "-" appears next to the channel
number, then the channel is not in
the channel memory list. Press +
to add the channel.
3. Adding Video Input Channel to Channel Memory
If you have a video device connected to
the INPUT jacks on the back of the TV,
you can view its signal either by directly
selecting channel 91 with the number
buttons or by adding that channel to the
channel memory.
Adding channel 91 to channel memory
allows access to the video input at the
TV by pressing the CHANNEL up and
down buttons as well as by using the
remote control.
13
Page 16

0
!
I
O ABLE/ANTENNA
Connector
INPUT I Jacks
CABLE/ANTENNA Connector-
used when attaching either a home
antenna or a cable-TV system to your
TV. Connection details areon
pages 16-18.
® INPUT 1 Jacks--make it easy to
directly connect another video device
(like a VCR or camcorder) to your
TV with audio/video cables.
To see the signals from a device that
is connected to the INPUT 1jacks,
tune your TV to channel 91.
14
Page 17

Stacking Arrangements
If you are connecting several
components and plan to use a
component rack, follow these general
rules when arranging your
components.
•If the components are arranged
horizontally, allow at least an inch
or two of space between them so air
can circulate freely. This will also
provide some space between the
audio devices to minimize
interference.
• If components are arranged
vertically on shelves, place the
stereo amplifier at the top so that
heated air rising from it will not
pass around the other components.
•Do not block the ventilation holes in
the components. If components are
placed on rugs or deep-pile mats,
the ventilation holes in the bottoms
may be blocked and overheating
could result.
• Some VCR's may cause
interference in TV's. When placing
a VCR under your TV, try to keep at
least 18 inches between the bottom
of the TV and the top of the VCR.
If interference is present when the
VCR is used on top of the TV or at
the 18-inch distance below the set,
move the VCR beside the TV. If
moving the VCR does not solve the
interference problem, try plugging
the VCR into a different wall
socket.
Plugging in Power Cords
Do not plug any power cord into a
wall outlet until you are finished
making connections.
Many components have "convenience
outlets" on their back panels so you
can plug power cords from other
components into a "convenience
outlet" instead of a wall outlet.
Usually these outlets will be labeled
either "switched" or "unswitched".
• If the outlet is labeled "switched",
that means power to the outlet will
be switched off when the
component's power button is
switched off.
• If the outlet is labeled "unswitched",
that means power will always be
available at that outlet, even when
the component is turned off.
Depending on the size of your system,
you may prefer to use an extension
cord or a "multiple adapter" to get
enough outlets for all your
components.
The power cords on your components
may be "polarized" (one blade is
wider than the other). Be sure the
extension cord or multiple adapter is
also polarized. The plug should fit in
the outlet only one way.
Turning Off Power Before
Connecting Components
Always turn off power to all
components before you connect or
disconnect any cables. This will
protect your components from
possible electrical surges that could
damage your equipment.
This is a good practice for all your
audio and video components-TV's,
VCR's, audio systems, computers,
etc.
Positioning Cables to Avoid Hum
The possibility of picking up hum
(interference noise) in the audio/video
cables will be reduced if you keep
them away from the back of the TV.
Route the cables to the sides of the
TV's back panel instead of straight
down the middle.
All cable plugs should be firmly
seated in the jacks where they
connect to the equipment. If a plug is
not connected firmly, audio hum or
smeared video may result.
If your antenna cable is flat twin-lead
cable, try to keep it away from the
audio/video cables as much as
possible. Excess flat, twin-lead cable
should be cut off instead of coiled
behind the TV. Round, coaxial,
antenna cable is usually shielded and
can be coiled or placed next to
audio/video cables without causing
interference.
15
Page 18
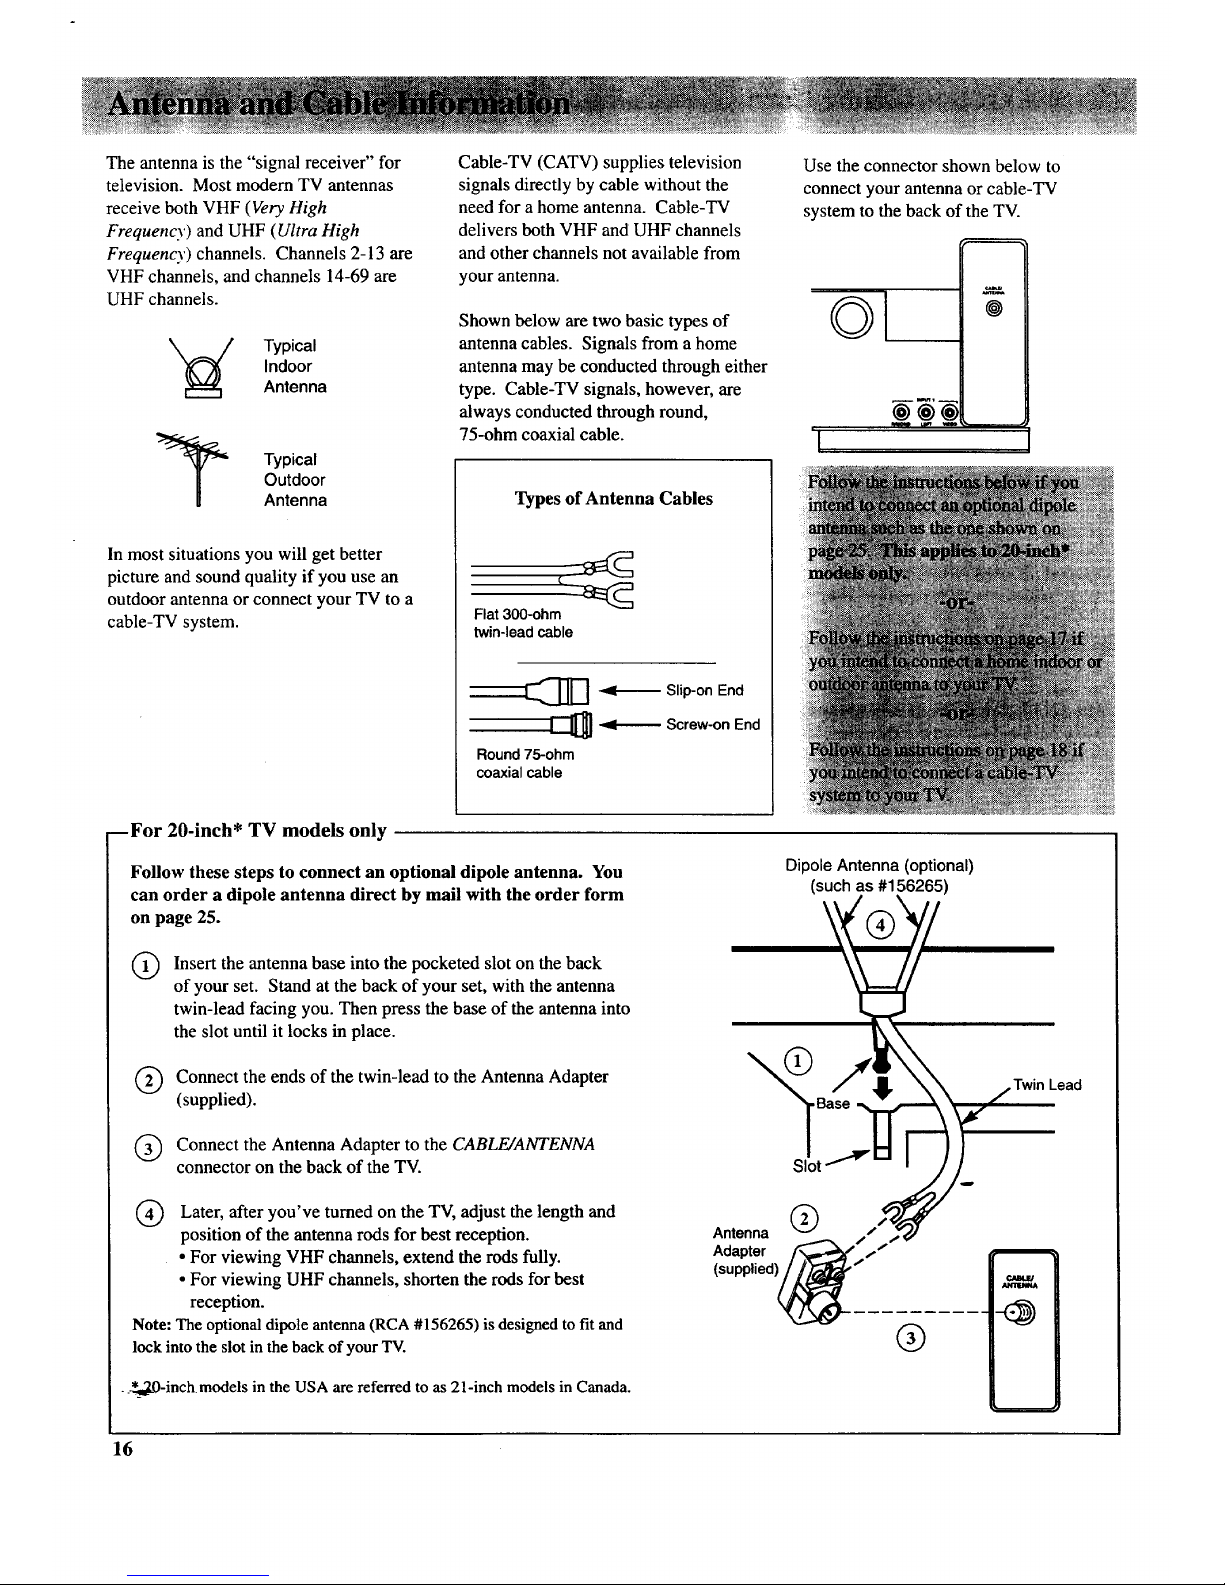
The antenna is the "signal receiver" for
television. Most modern TV antennas
receive both VHF (Very High
Frequency) and UHF (Ultra High
Frequency) channels. Channels 2-13 are
VHF channels, and channels 14-69 are
UHF channels.
'_ Typical
Indoor
Antenna
Typical
Outdoor
Antenna
In most situations you will get better
picture and sound quality if you use an
outdoor antenna or connect your TV to a
cable-TV system.
Cable-TV (CATV) supplies television
signals directly by cable without the
need for a home antenna. Cable-TV
delivers both VHF and UHF channels
and other channels not available from
your antenna.
Shown below are two basic types of
antenna cables. Signals from a home
antenna may be conducted through either
type. Cable-TV signals, however, are
always conducted through round,
75-ohm coaxial cable.
Types of Antenna Cables
Flat 300-ohm
twin-lead cable
::_1_ -4{-_ Slip-on End
[_ -,_.----_ Screw-on End
Round 75-ohm
coaxial cable
Use the connector shown below to
connect your antenna or cable-TV
system to the back of the TV.
©1
1-'----'-'-'---
!
I
'1
BFor 20-inch* TV models only
Follow these steps to connect an optional dipole antenna. You
can order a dipole antenna direct by mail with the order form
on page 25.
O
Insert the antenna base into the pocketed slot on the back
of your set. Stand at the back of your set, with the antenna
twin-lead facing you. Then press the base of the antenna into
the slot until it locks in place.
Q Connect the ends of the twin-lead to the Antenna Adapter
(supplied).
Connect the Antenna Adapter to the CABLE/ANTENNA
connector on the back of the TV.
) Later, after turned the TV, the length and
you've
on
adjust
position of the antenna rods for best reception.
• For viewing VHF channels, extend the rods fully.
• For viewing UHF channels, shorten the rods for best
reception.
Note: The optional dipole antenna (RCA #156265) is designed to fit and
lockinto the slot in the back of your TV.
..*__20-inchmodels in the USA are referred to as 21-inch models in Canada.
Dipole Antenna (optional)
(such as #156265)
\
®
Twin Lead
16
Page 19

Follow one of the steps below to connect an indoor or outdoor antenna to your TV (not cable-TV).
A If the antenna cable coming from your home antenna is a 75-ohm round coaxial cable that carries only VHF (channels 2-13),
only UHF (channels 14-69), or VHF and UHF channels, connect it to your set like this:
Incoming
Cable _]From _ I
Home
VHF or UHF Only
Antenna
or
VHF/UHF Combination
CABLE/
ANTENNA
BACK
OF TV
-OR-
B If the antenna cable coming from your home antenna is a 300-ohm flat twin lead that carries only VHF (channels 2-13),
only UHF (channels 14-69), or VHF and UHF channels, connect it to your set like this:
Incoming
Cob,e _ .
From r t
Home VHF or UHF Only
Antenna or Adapter
VHFIUHF Combination (supplied)
Push on
CABLE/
ANTENNA
BACK
OF TV
-OR-
C If the antenna cables coming from your home antenna(s) are a 75-ohm round coaxial cable that carries VHF (channels 2-13)
and a 300-ohm fiat twin-lead cable for UHF (channels 14-69), connect them to your set like this:
Incoming UHF
Cables
From _ and
Home
Antenna(s) VHF
:_ ..... __R_AM#19r;551 )
CABLEl
Am'ENNA
BACK
OF TV
-OR-
D If the antenna wires coming from your home antenna(s) are two 300-ohm flat twin-lead cables as shown here, connect them
to your set like this:
Incoming UHF
Cables
From _ and
Home
Antenna(s)
[ __ //_ Push on
[_----_:-_-_;__/f AntennaMixsr*
_"q_ (such as RCA #193984)
VHF
CAm.El
A_E_I
Note: Be sure to connect the UHF antenna cable to the UHF screws on the Antenna
Mixer and the VHF antenna cable to the screws marked VHF.
BACK
OF TV
* Optional accessories are available from most dealers or electronics supply stores.
17
Page 20

Follow one of these steps to connect a cable-TV system to your TV instead of a home antenna.
Since cable-TV systems vary, you may wish to consult your local cable-TV company for additional information.
A Follow this diagram if your cable company does not require a converter/decoder box (no scrambled channels):
¢/_II.W
Am'EN_
Ca ,e'°C° 'n0 -@
BACK
OF_
B
/
Follow this diagram if your cable company requires a converter/decoder box that can be controlled by remote control. Most
brands of remote-controllable boxes can be controlled by the optional RCU 100 remote shown on page 25. Details for
programming the optional RCU 100 remote to also control the converter/decoder box are packed with the remote.
Remember to tune yourTV to the
Q-_ I output channel of the converter box
our (usually2, 3, or 4) when selecting
channels via the converter box.
CONVERTER/DECODER BOX
CJu_J
BACK
OF TV
C Follow this diagram if your cable company requires a converter/decoder box that cannot be controlled by remote control:
Incoming
Cable
_1---- -...... _ @ c::_
-__
CO_E_E_OECODER BOX
BACK
OF TV
Note: These optional accessories (2-way splitter(_), A/B switch (_), three coaxial cablesC) )
are available as a kit under #AH041BL.*
• The "A" position on the A/B switch lets you select all
non-scrambled channels by the TV's remote control.
• The "B" position allows you to select scrambled channels
via the converter box. Remember to tune your TV to the
output channel of the converter box (usually 2, 3, or 4)
when selecting channels via the converter box.
* Optional accessories are available from most dealers or electronics supply stores.
18
Page 21
YournewTVisdesignedtoreceive
upto 178TV channelsincluding122
non-scrambledcablechannels(see
chartbelow).TousethisTVona
cable-TVsystem,confirmthatthe
cable-TVsystemisproperly
connectedtoyourTV. Sincecable
systemsvary,youmaywishto
consultyourlocalcable-TVcompany
foradditionalinformation.
If yourcable-TVcompanyfollows
EIA/NCTAchannel-identification
standards,mostofthechannels
offeredbyyourcablecompanywill
beidentifiedbychannelnumbersthat
areidenticaltothoseonyourTV.
Forexample,if yourcable-TV
systemhasprogramsoncable
channel20,youcanchoosethis
channelbyselectingchannel20on
yourTV.
If yourcablecompanyofferscable
channelsA-I, A-2,90,91or92you
cantunethembyselectingtheTV
channelsshownbelow.
Somecable-TVcompaniesdonot
followtheEIA/NCTAstandardsand
insteadassigntheirownchannel
identification.Forexample,some
usethestandardbroadcastchannel
numbers(2-13)forchannels2-13,
butidentifytheirotherchannelswith
letters.If yourcablecompanydoes
notfollowtheEIA/NCTAstandards,
askthemfor acrossreferencethat
showstowhichchannelsyoushould
tuneyourTVtoreceivetheircable-
TV channels.
Notallcable-TVchannelswillbe
activeonyourparticularcable-TV
system.Alsosomecablecompanies
mayrequiretheuseofadecoderwith
theircable-TVsystem.Consultyour
cablecompanyorlocaldealerfor
details.
ScrambledCable-TV Channels
Some cable companies offer
"premium-pay" channels in which
the signal is scrambled.
Descrambling these signals for
normal viewing requires the use of a
descrambler device (cable box)
which is generally provided by the
cable company.
How you connect the cable box to
your TV depends upon whether or
not the cable box can be controlled
by remote control. The optional
RCU100 remote (shown on page 25)
can also control most brands of cable
boxes, so if your cable box is remote
controllable, you may want to
connect it as shown in Diagram B on
page 18. Instructions for
programming the optional RCU 100
remote to control the cable box are
included with the remote.
If your cable box cannot be
controlled by remote control, you
will still be able to remotely control
"unscrambled" channels with the
connection shown in Diagram C on
page 18.
Since cable systems vary, you may
wish to consult your local cable
company for additional information.
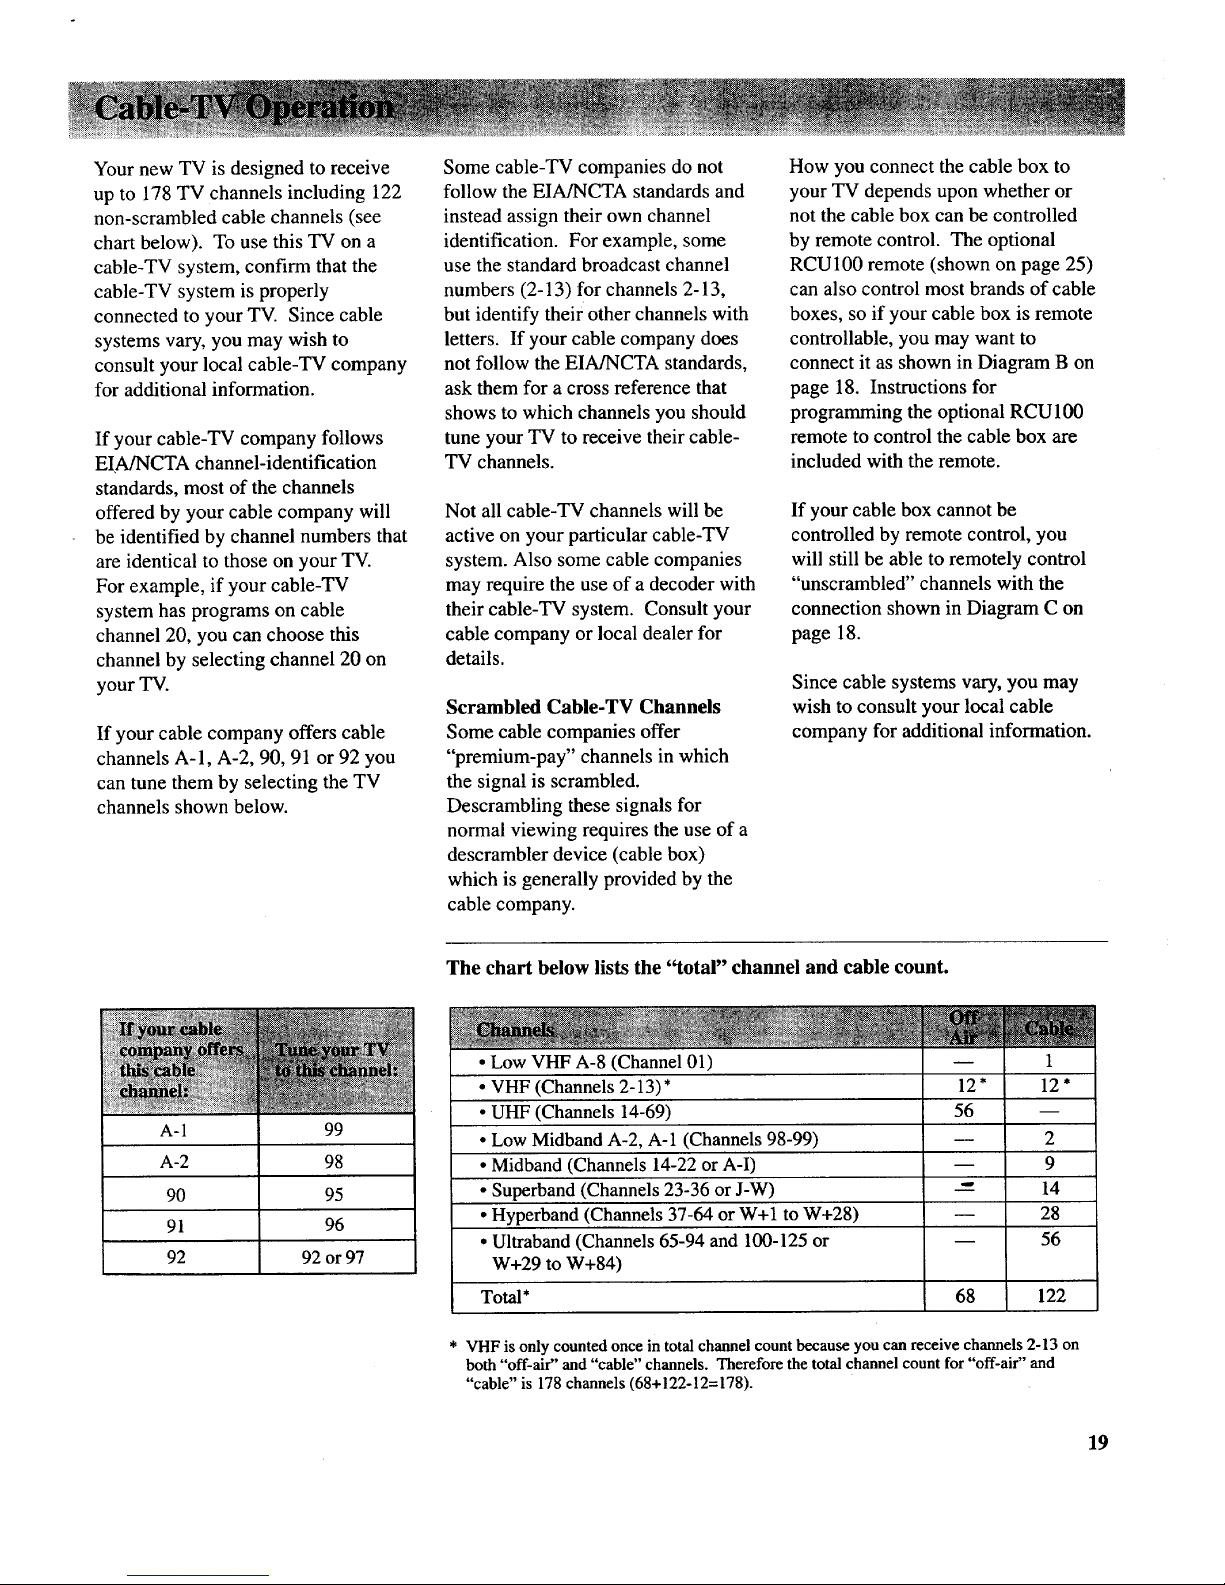
The chart below lists the "total" channel and cable count.
A-1 99
A-2 98
90 95
91 96
92 92 or 97
• Low VHF A-8 (Channel 01)
• VHF (Channels 2-13)*
• UHF (Channels 14-69)
• Low Midband A-2, A-1 (Channels 98-99)
• Midband (Channels 14-22 or A-I)
• Superband (Channels 23-36 or J-W)
• Hyperband (Channels 37-64 or W+I to W+28)
• Ultraband (Channels 65-94 and 100-125 or
W+29 to W+84)
Total*
m
12"
56
1
12"
2
9
14
28
56
68 122
* VHF is only counted once in total channel count because you can receive channels 2-13 on
both "off-air" and "cable" channels. Therefore the total channel count for "off-air" and
"cable" is 178 channels (68+122-12=178).
19
Page 22
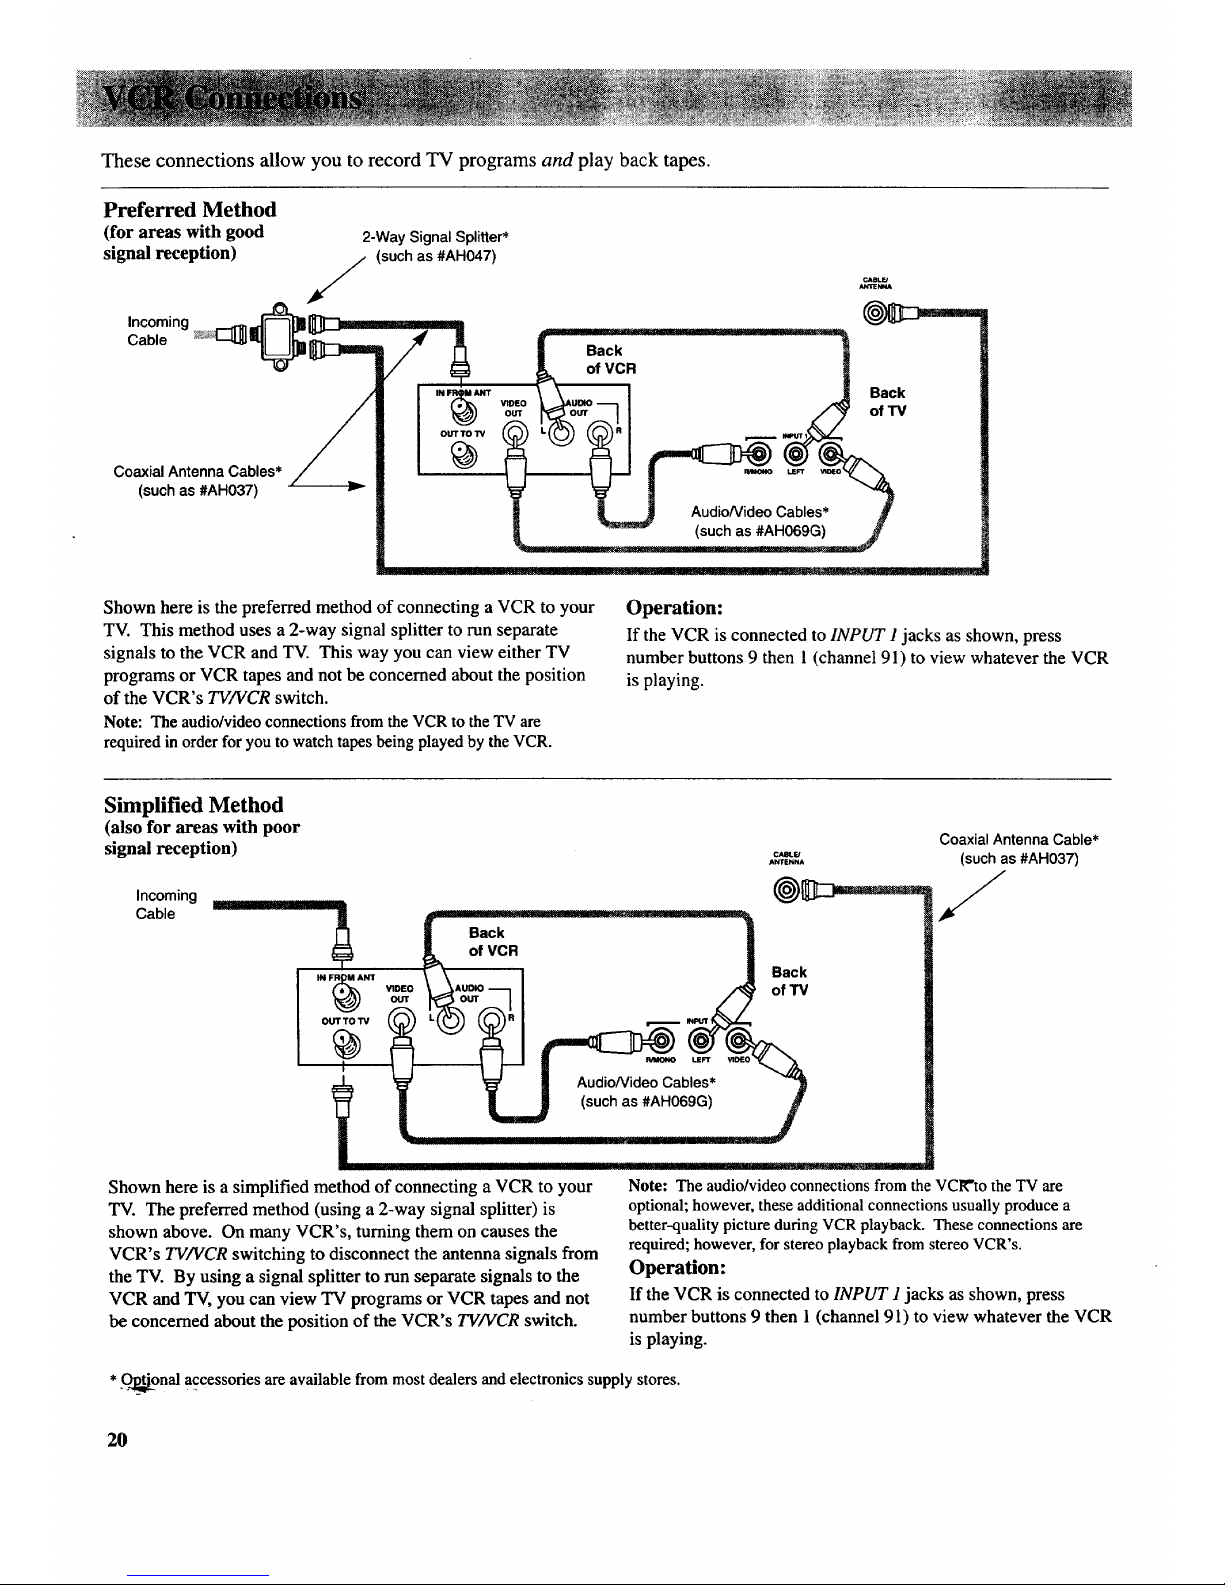
These connections allow you to record TV programs and play back tapes.
Preferred Method
(for areas with good
signal reception)
Incoming
Cable
Coaxial Antenna Cables*
(such as #AH037)
2-Way Signal Splitter*
(such as #AH047)
Back
of VCR
_oU_ I Back
71 f o,Tv
...,_.j AudioNideo Cables* ff
Shown here is the preferred method of connecting aVCR to your
TV. This method uses a 2-way signal splitter to run separate
signals to the VCR and TV. This way you can view either TV
programs or VCR tapes and not be concerned about the position
of the VCR's TV/VCR switch.
Note: The audio/videoconnections from the VCR to the TV are
required in order for you to watchtapes being played by the VCR.
Operation:
If the VCR is connected to INPUT 1jacks as shown, press
number buttons 9 then 1 (channel 91) to view whatever the VCR
is playing.
Simplified Method
(also for areas with poor
signal reception)
A_E_A
,.coming
of VCR
\ [ Back
bles
U J (such as #AH069G) 1
Shown here is a simplified method of connecting a VCR to your
TV. The preferred method (using a 2-way signal splitter) is
shown above. On many VCR's, turning them on causes the
VCR's TV/VCR switching to disconnect the antenna signals from
the TV. By using a signal splitter to run separate signals to the
VCR and TV, you can view TV programs or VCR tapes and not
be concerned about the position of the VCR's TV/VCR switch.
Coaxial Antenna Cable*
(such as #AH037)
/
Note: The audio/video connectionsfrom the VC1Vtothe TV are
optional; however, these additionalconnectionsusually produce a
better-qualitypicture during VCRplayback. Theseconnections are
required; however,for stereo playback fromstereo VCR's.
Operation:
If the VCR is connected to INPUT 1 jacks as shown, press
number buttons 9 then 1(channel 91) to view whatever the VCR
is playing.
* _nal accessories are available from most dealers and electronics supply stores.
20
Page 23

The Digital remote control that came
packed with your TV controls your TV
and a compatible RCA VCR.
To control a compatible RCA VCR, first
press the VCR button to put the remote
in the "VCR mode". The buttons shown
below will then control the VCR.
OFF Button
Press to turn
PLAY Button
Press to start
REW (Rewind) Button
• Press while VCR is stopped to rewind\
tape.
• Press while VCR is playing to search
backward.
PROG (Program) Button
Used when setting the VCR's clock and
programming its timer.
SAP Button
Press to receive SAP audio.
ANT Button
Press to change VCRkTV switch on VCR
to other position.
Number Buttons
• Press two numbers to select channel.
• Press a"0" before a single-digit
channel number.
PAUSE Button
• Press to pause play or record mode.
• Press again to release pause.
-- VCR Button
• Press to turn on VCR and put remote in
"VCR Mode" so other buttons will
control only the VCR.
• Press the TV button to put remote back
into "TV Mode".
REC (Record) Button
Press to record. It is not necessary to
press PLAY and RECORD with this
remote.
STOP Button
Press to stop whatever VCR is doing:
Playing, Recording, Rewinding, or Fast
Forwarding.
Button
Used when setting the VCR's clock and
programming its timer.
(Fast Forward) Button
* Press while VCR is stopped to fast
forward tape.
• Press while VCR is playing to search
forward.
CHAN Buttons
Press to select next higher or lower
channel in VCR channel memory scan
list.
21
Page 24
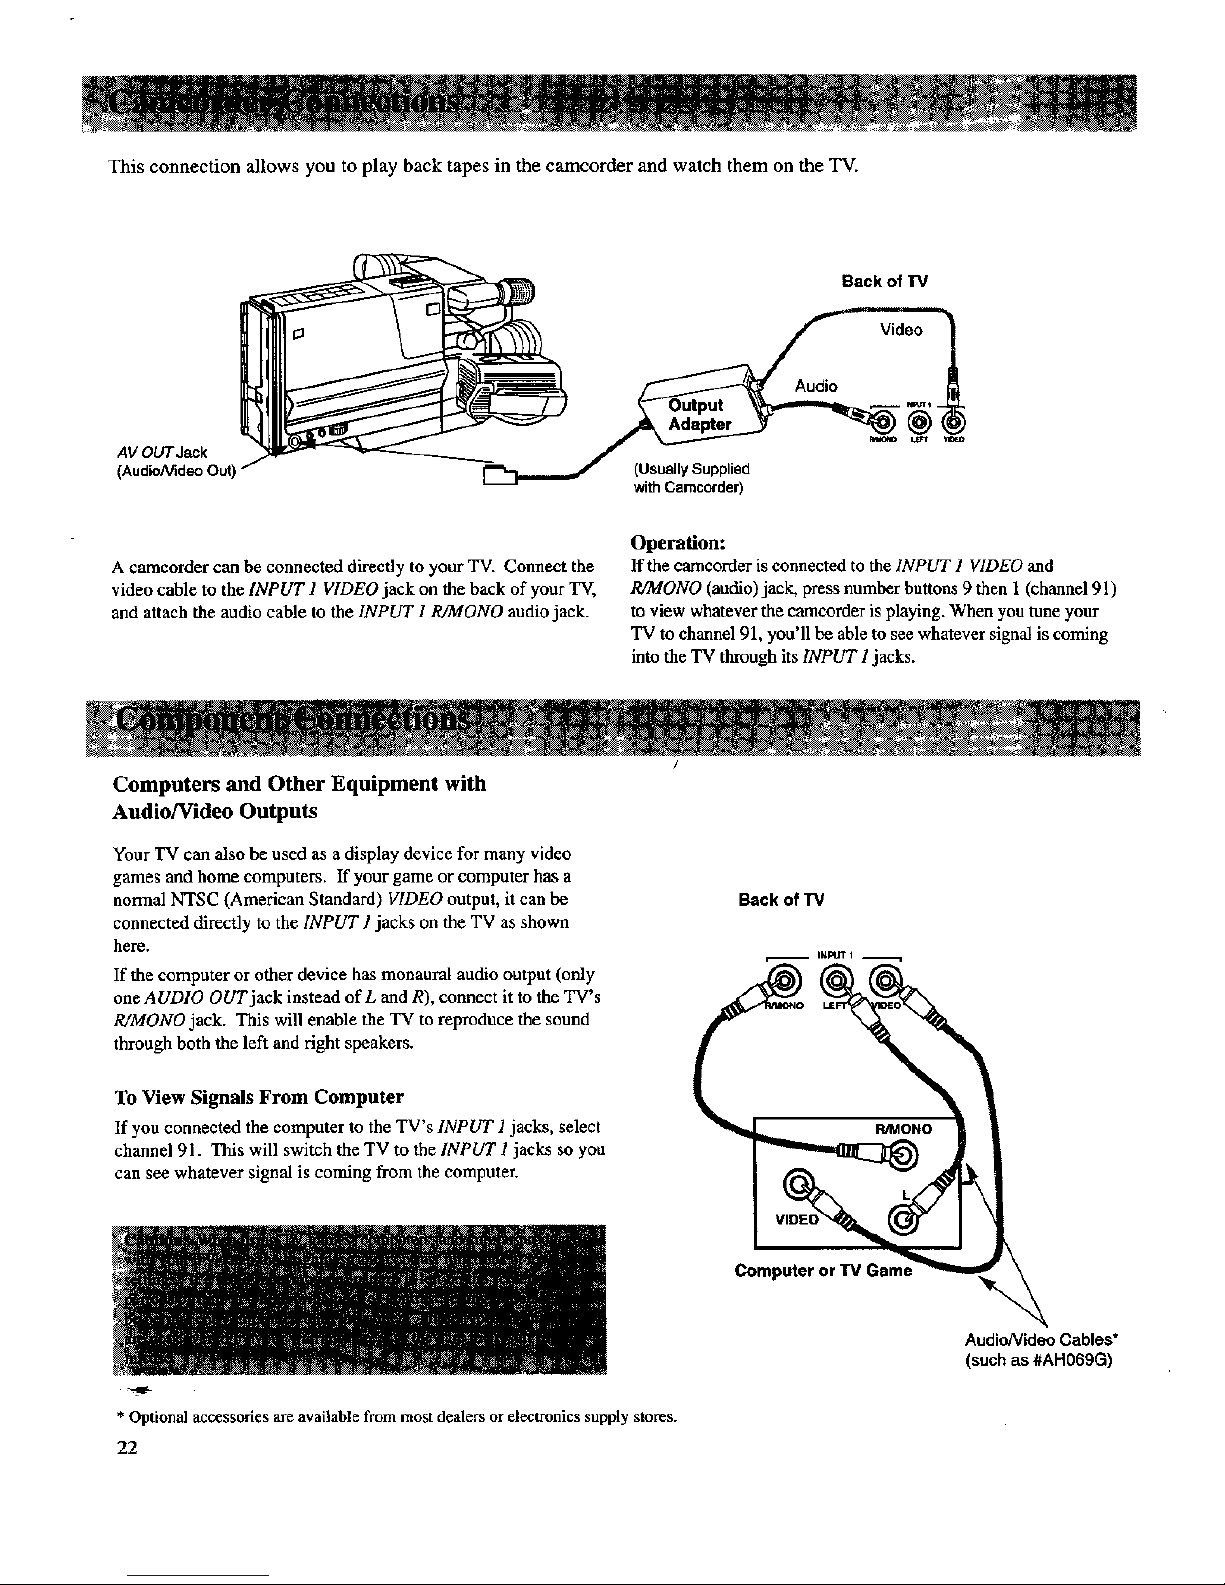
This connection allows you to play back tapes in the camcorder and watch them on the TV.
AVOUTJack
(Audio/Video OutI _
(UsUally Supplied
with Camcorder)
Back of TV
A camcorder can be connected directly to your TV. Connect the
video cable to the INPUT 1 VIDEO jack on the back of your TV,
and atlach the audio cable to the INPUT 1 RiMONO audio jack.
Operation:
If the camcorder is connected to the INPUT 1 VIDEO and
R/MONO (audio) jack, press number buttons 9 then 1(channel 91)
to view whatever the camcorder is playing. When you tune your
TV to channel 91, you'll be able to see whatever signal is coming
into the TV through its INPUT 1 jacks.
Computers and Other Equipment with
Audio/Video Outputs
Your TV can also be used as a display device for many video
games and home computers. If your game or computer has a
normal NTSC (American Standard) VIDEO output, it can be
connected directly to the INPUT ] jacks on the TV as shown
here.
If the computer or other device has monaural audio output (only
oneAUDlO OUT jack instead of L and R), connect it to the TV's
R/MONOjack. This will enable the TV to reproduce the sound
through both the left and right speakers.
To View Signals From Computer
If you connected the computer to the TV's INPUT 1 jacks, select
channel 91. This will switch the TV to the INPUT 1 jacks so you
can see whatever signal is coming from the computer.
* Optional accessories are avadable from mogt dealers orelectronics supply stores.
22
AudioNideo Cables*
(such as #AH069G)
Page 25

Troubles sometimes are caused by simple
"faults" that you can easily correct without the
help of a service technician by first checking a
few basic remedies. Before you call or take
your TV to an Authorized RCA TV
Servicenter, look below for the type of trouble
you are experiencing. Then perform the simple
checks and adjustments listed for that trouble.
If your TV is still in warranty, these checks and
adjustments could save you time and the cost of
an unneeded trip to the servicer. They also
could save you the cost of a diagnosis not
covered by your warranty.
If your TV is out of warranty, these checks
and adjustments could save you time and the
cost of an unneeded trip to the servicer.
If service should be necessary, the warranty
information lists what your warranty covers
and explains how to get service.
TV will not turn on
Controls don't work
Intermittent or no remote
Turns off while playing
• Check to make sure it is plugged in.
• Check the wall receptacle (or extension cord) to make sure it is "live" by plugging in something
else.
• Maybe batteries in remote are "dead". Try using POWER button on 'IV.
• Maybe remote control was not aimed at remote sensor.
• Make sure power cord is fully inserted into back of TV.
• If using remote, make sure remote is in "TV Mode" by pressing TVbutton.
• Try unplugging set for two minutes and then turning it on again.
• Make sure power cord is fully inserted into back of TV.
• Maybe something was between the remote and the remote sensor.
• Maybe the remote was not aimed directly at the TV.
• Maybe batteries in remote are weak or dead. Try replacing batteries.
• Maybe batteries were installed incorrectly. Try replacing batteries correctly.
• Maybe remote is not in "TV Mode". Press TV button so remote will control the TV.
• Sleep Timer function may have been activated.
• If TV turned on because of alarm, it will automatically turn off after one hour.
• Electronic protection circuit may have been activated because of a power surge. Wait 30
seconds and then turn on again. If this happens frequently, the voltage in your house may be
abnormally high (especially if you burn out a lot of light bulbs).
• Make sure power cord is fully inserted into back of TV.
Turns on unexpectedly • Alarm function may have been activated.
Blank screen • Maybe Channel 91 is selected,but the deviceconnected to those INPUTjacks is not turned on.
• Try another channel.
No sound, picture okay • Maybesound is muted. Trypressing VOLUMEup button to restoresound.
Can't select certain channel • Channel maynot be in Channel Memory.
• If using VCR,check to makesure TV/VCR switch onVCRis in correct position.
No picture, no sound butpower lightis on
• For channel 91, make sure the component connected to those INPUT jacks is turned on in order
to see picture.
• If watching VCR (connected only through antenna input), make sure TV is tuned to channel 3
or 4-same as CH3/CH4 switch on VCR. Also check to make sure TV/VCR switch on VCR is in
correct position.
Sound okay, picture poor • Check antenna connections.
•Try adjusting SHARPNESS function to improve weak signals.
Picture okay, sound poor •Try another channel.
•Try adjusting VOLUME or TONE controls.
•If station is sending stereo, try turning off STEREO function for clearer sound.
Noisy stereo reception -May be a weak station. Use AUDIO button to place STEREO function in off mode.
No stereo on known stereo station -Make sure STEREO function is turned on.
23
Page 26

Compatible Components
A wide variety of compatible Video Cassette Recorders
(VCR's), camcorders, and audio components are
available. Check with your dealer for details. Other
components can also be connected to your TV. Refer to
the component's owner's manual for the manufacturer's
recommended hookup instructions.
General Cable Information
Antenna (or cable-TV)
connections are made
with either coaxial
antenna cable or twin-
lead cable as explained
on page 16. Coaxial
--:_-----_ [JH _ Slip-on End
[_]] -_-------- Screw-on End
Round 75-ohm coaxial cable
such as No. AH037 (screw-on) or
No. AH065G (push-on)
cables are shielded so they are less susceptible to hum
or interference from adjacent cables.
Most audio/video connections
between components can be --_:_
made with shielded audio and Standard Audio/Video Cable
with RCA-type phono plugs
video cables that have RCA-type (suchas No.An070G)
phono connections. When
connecting components to each other, be sure that you
always connect left outputs to left inputs and right outputs
to right inputs. If a component has only one audio output
(mono), connect it to the R/MONO input jack.
The following accessories are available from most
dealers in case you want to position your components
farther apart or need additional cables.
Audio/Video Cables
Audio/Video Cable
Shielded cable for connecting AUDIO and
VIDEO jacks. Has an RCA-type phono
plug on each end.
Stereo Audio Cable
Double gold-tipped cable generally used
for connecting stereo audio components.
Stereo VCR Dubbing Cable
Triple cable thatlets you connect the
VIDEO and AUDIO jacks of stereo
components.
Gold-Tipped Cables
AH069G (3-ft)
AH070G (5-ft)
Gold-Tipped Cable
AH072G (3-tt)
Gold-Tipped Cable
AH077G (6-ft)
Antenna Cables
Screw-on Antenna Cable _--/_')_"_
Attaches to the round antenna connectors
(called 75-ohm F-type) on the back of
your VCR or TV. The ends screw onto ft)
the connectors for a secure connection.
Push-on Antenna Cable
Attaches to the round antenna connectors
(called 75-ohm F-type) on the back of
your VCR or TV. Ends push on for a
Gold-Tipped Cables
quick connection. AH065G(6-ft)
AH066G (10-ft)
Monaural VCR Dubbing Cable
Double cable that lets you connect the
VIDEO and AUDIO jacks of two VHS
VCR's to duplicate tapes. Can also be used
to connect a VCR to your TV. Cable is
color-coded and shielded with RCA-type
phono plugs on each end.
Gold-Tipped Cable
AH075G (6-ft)
24
Page 27

Remote Controls
Remote Control (CRK50A-179472)
This is the remote that came packed with
your TV. You can use the order form to
order it direct by mail if desired.
_t_
®®
Remote Control (RCU100)
This is an optional remote that not only
controls your TV but can also be
programmed to control most brands of
remote controllable VCR's and cable
boxes. Can be used to replace lost or
broken remotes and is easy to use and
program.
a0.oa
DOOV
_OOA
Antenna
Dipole Antenna (156265)
Designed to attach to the back of
20-inch* models. Can be used forboth
VHF and UHF channels.
*20-inch models in the USA are referred to
as 21-inch models in Canada.
Note: All specifications and descriptions of
acc4__ ries are subject to change without notice.
)(
¢0
I
!
Accessory Order Form
(Book No. 1Q57 189-01A)
Description
Cleaner/Polisher (page 29)
Screw-on Antenna Cable (3-ft)
Cable Connection Kit (page 18)
Signal Splitter (page 20)
Antenna Adapter
Gold-Tipped Antenna Cable (6-ft)
Gold-Tipped Antenna Cable (10-ft)
Gold-Tipped Audio/Video Cable (3-ft)
Gold-Tipped Audio/Video Cable (5-ft)
Gold-Tipped Stereo Audio Cable (3-ft)
Gold-Tipped Dubbing Cable (6-ft)
Gold-Tipped Dubbing Cable (6-ft)
Optional Remote Control
Dipole Antenna (page 16)
Replacement Remote Control (CRK50A)
Replacement Power Cord (5 1/2-ft)
Antenna Mixer (page 17)
Antenna Mixer (page 17)
Part No.
AH035
AH037 $ 3.00
AH041BL $19.95
AH047 $ 3.99
AH055 $ 4.95
AH065G $ 6.99
AH066G $ 8.99
AH069G $ 5.99
AH070G $ 7.99
AH072G $ 8.99
AH075G $10.99
AH077G $14.99
RCUI00 $69.95
156265 $20.30
179472 $45.00
187802 $ 9.30
193984 $10.73
197551 $10.95
Total
Prices are subject to change without notice
Total Merchandise ($10 Minimum Order) ......
Sales Tax ................................
We arerequired by law to collect the appropriate
salestax for each individual state, county, and
locality to which themerchandise is being sent.
Shipping, Handling, and Insurance ............
Total Amount Enclosed .....................
Use VISA or MasterCard preferably. Money order
or check must be in U.S. currency only. No COD "
or CASH.
$
$
$
4.50
All accessories are subject to availability.
Where applicable, we will ship a superseding model.
25
Page 28
Charge your order on your VISA
or MasterCard by
filling in below
USE YOUR CREDIT CARD
IMPORTANT: Copy complete account number
from your VISA card
I I I I II I I II I I II I I I
Myc dexpir FIG
IMPORTANT: Copy complete account number
from your MasterCard
[-[-[-NllllllllllN-I-Tq
Copy Number
above your
name on
MasterCard
MycardVT1 fiE]
expires:
AUTHORIZED SIGNATURE
Prices are subject to change withoutnotice.
PLEASE
Print or type your name and
address clearly. This will be your
mailing label.
A complete and correct order will
save you days of waiting.
Name:
Street:
City:
State:
Apt:
Zip:
Please make sure that both sides of this form have
been filled out completely.
26
..1
IO
O
_O
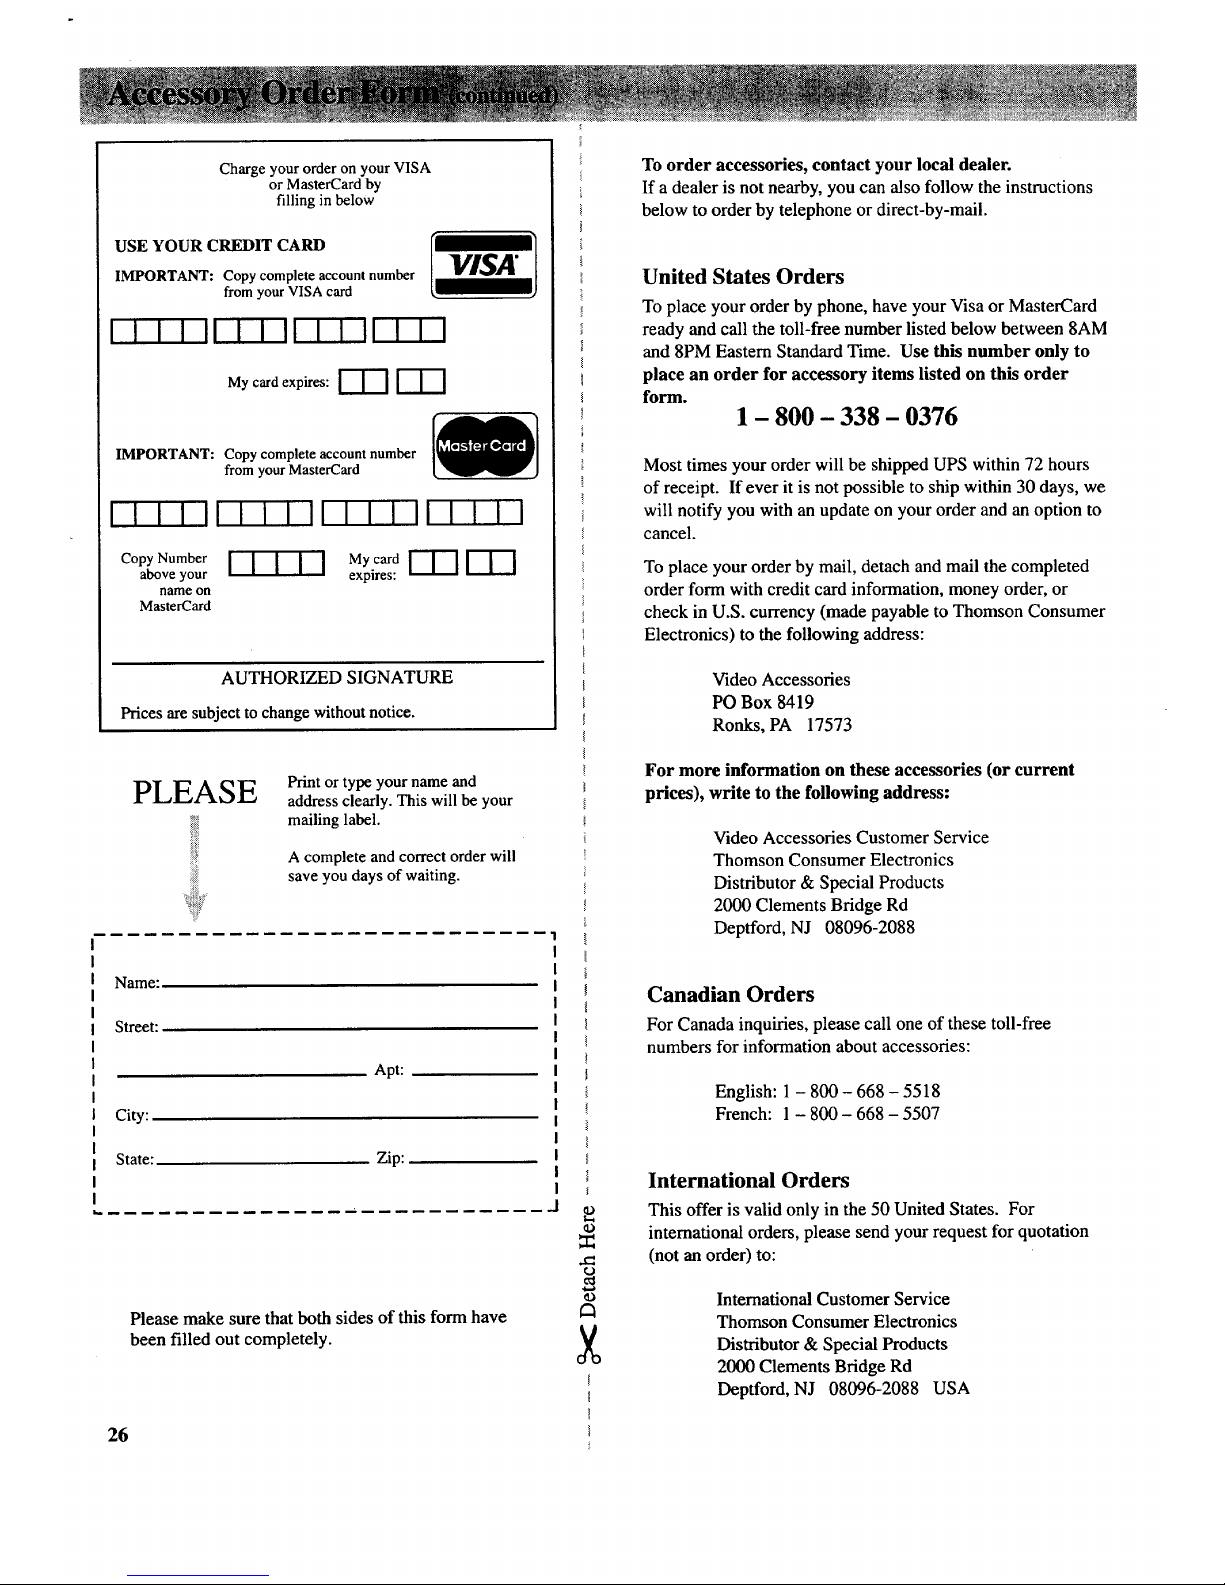
To order accessories, contact your local dealer.
If a dealer is not nearby, you can also follow the instructions
below to order by telephone or direct-by-mail.
United States Orders
To place your order by phone, have your Visa or MasterCard
ready and call the toll-free number listed below between 8AM
and 8PM Eastern Standard Time. Use this number only to
place an order for accessory items listed on this order
form.
1 - 800 - 338 - 0376
Most times your order will be shipped UPS within 72 hours
of receipt. If ever it is not possible to ship within 30 days, we
will notify you with an update on your order and an option to
cancel.
To place your order by mail, detach and mail the completed
order form with credit card information, money order, or
check in U.S. currency (made payable to Thomson Consumer
Electronics) to the following address:
Video Accessories
PO Box 8419
Ronks, PA 17573
For more information on these accessories (or current
prices), write to the following address:
Video Accessories Customer Service
Thomson Consumer Electronics
Distributor & Special Products
2000 Clements Bridge Rd
Deptford, NJ 08096-2088
Canadian Orders
For Canada inquiries, please call one of these toll-free
numbers for information about accessories:
English: 1 - 800 - 668 - 5518
French: 1 - 800 - 668 - 5507
International Orders
This offer is valid only in the 50 United States. For
international orders, please send your request for quotation
(not an order) to:
International Customer Service
Thomson Consumer Electronics
Distributor & Special Products
2000 Clements Bridge Rd
Deptford, NJ 08096-2088 USA
Page 29

Resetting Picture Controls to
Factory Settings (p 8 )
VIDEO RESET
Adjusting the Audio (p 9) Setting the Alarm (p 12)
1. Press the VIDEO button once to
display the VIDEO RESET menu.
2. Press + or - to reset the video
functions to the factory settings.
Adjusting the Video (Picture) 0, 8)
I. Repeatedly press the AUDIO
button until the function you want
to adjust is selected (highlighted).
2. Press + or - to adjust the function.
Setting the Sleep Timer (p11)
o
.
Repeatedly press the SETUP
button to select (highlight) the
ALARM time function.
Press and hold + or - to set the
time you want the TV to turn on.
Note: Setting the alarm time
automatically sets the ALARM:
ON/OFF function to ON.
COL(
2nd
Menu
Turning Alarm On and Off (p12)
1. Repeatedly press the VIDEO button
until the function you want to adjust
is selected (highlighted).
2. Press + or - to see the adjustment
display on the bottom of the screen.
3. Press + or - again to adjust the
display to your personal preference.
1. Press the SETUP button to select
(highlight) the SLEEP function.
2. Press + or - to select the length of
time you want the TV to stay on.
Each press adds another 30
minutes (up to four hours).
Cancelling Sleep Timer (p11)
1. Press the SETUP button to select
the SLEEP function.
2. Repeatedly press + or - to change
the time to "- :- -"
1,
.
Repeatedly press the SETUP
button to select (highlight) the
ALARM: ON/OFF function.
Press + or - to change it. When
this function is turned OFF, the TV
will not turn itself on.
(continued on next page)
27
Page 30

Setting the Clock (p 3)
Erasing/Adding Channels in
Memory (p13)
Changing Cable/Air Function (p10)
2nd
Menu
!NNA: AIR
2nd
Menu
1. Repeatedly press the SETUP button
until the CLOCK display is selected
(highlighted).
2. Press the + button to set the time
forward, or press the - button to set
the time backward.
AutoProgramming Channels into
Channel Memory (p 13)
2nd
Menu
1. Repeatedly press the SETUP button
until the A UTOPROGRAM function is
selected (highlighted).
2. Press + or - to start the TV
AutoProgramming itself.
1. Repeatedly press the SETUP button
until the EDIT CHANNELS function is
selected (highlighted). Then press +
or - to enter the function.
2. Select the desired channel number by
pressing the two corresponding
number buttons or by pressing
CHANNEL up or down.
3. Press + to add a channel, or press - to
erase a channel.
1. Repeatedly press the SETUP
button to select (highlight) the
ANTENNA: CABLE/AIR function.
2. Press + or - to change the setting.
Note: The TV automatically sets this
function for you when it AutoPrograms the
channel memory.
Listing Features (p lo)
2nd
Menu
1. Repeatedly press the SETUP
button to select (highlight) the
LIST FEATURES function.
2. Press + or - to start the TV listing its
features automatically.
3. To stop the displays, press the TV or
CLEAR button on the remote (or
press AUDIO, VIDEO, or SETUP on
the front of the TV).
28
Page 31

DustTVasrequired,usingasoftclothor
thedustingattachmentofyourvacuum
cleaner.Occasionallyvacuumthe
ventilationslotsinthecabinettohelp
assureadequateventilation.Takecare
nottoscratchtheplasticsurfaces.
IfyourTV'scabinethasatextured
finish,donotusefurniturepolish.
Becausetexturedfinishesareporous,
usingfurniturepolishwillmartheir
appearance.Theycanbeeasilycleaned
withadamp,softcloth.
Tocleanthescreen,youcanwipeit with
adamp,softcloth.Thendryitwitha
softcloth.(Amildsoapmaybeusedon
thescreenif itisextremelydirty.)You
canalsouseanon-abrasiveglasscleaner
likeWindex®orGlassPlus®withasoft
cloth.BesuretoturnofftheTVbefore
cleaningthescreen,anddonotallow
liquidtorundownthescreenandinside
theTV.
Aspecialantistaticcleaningpolishing
solution(AH035)isavailableforuseon
mostTVscreensandnon-textured
cabinets.Thisnon-abrasiveformula
impartsbrilliance,repelsdust,andresists
fingerprints.Lint-freepolishingcloths
areincluded.
Donotusestrongcleaners,polishes,or
chemically-treatedclothstocleanthe
screenorcabinet.
Avoid placing drinks or vases with water
on top of your TV.
AH035
Cleaner/Polisher
+ and - Buttons ........................ 2,3,7-10,27,28
Accessories ............................................. 24,25
Adding Channels to Memory .................. 13,28
ALARM Function ............................... 10,12,27
ALM Display ............................................. 5,12
ANTENNA Function .................................... 28
Antenna Cables .................................. 16,24,25
Antenna Connections .............................. 16,17
Antenna/Cable Information ............... 16,17,18
ANTENNA: CABLE/AIR Function ............... 10
Attaching Power Cord ................................... 2
AUDIO Button .................................... 3,7,9,27
Auto Demo (List Features) ..................... 10,28
AUTOPROGRAM Function ............ 2,10,13,28
AV INPUT Display ......................................... 5
Back View .................................................... 14
Batteries (Remote) ......................................... 6
Best Picture .................................................... 8
Brightness Adjustment ................................... 8
Cable TV ................................................. 18,19
CABLE/ANTENNA Connector ...... 14,16,17,18
Cables ..................................................... 24,25
Camcorder .................................................... 22
Care and Cleaning ........................................ 29
CATV (Cable-TV) ............................. 16,18,19
Caution (Video Games) ............................... 22
CHANNEL Button ................................. 2,7,13
Channel 91 ................................. 5,13,14,20,22
Channel Memory ......................................... 13
Channel Number Display .............................. 5
Channels Above 99 ........................................ 7
Chart (Cable Channels) ................................ 19
Cleaning and Care ........................................ 29
CLEAR Button ............................................... 7
CLOCK Function ................................. 3,10,28
Color Adjustment ........................................... 8
Computer ..................................................... 22
Coning Components (Tips) ................... 15
Contrast Adjustment ...................................... 8
Controls (Front Panel) ................................... 4
Controls (Remote) ...................................... 6,7
Decoder Box ........................................... 18,19
Deleting Channels from Memory ........... 13,28
Demo (List Features) .............................. 10,28
DISPLAY Button ............................ 3,5,7,11,12
Displays (On-Screen) ..................................... 5
EDIT CHANNELS Function ........... 2,10,13,28
Enrollment Card ................ Inside Front Cover
Erasing Channels from Memory ............. 13,28
First-Time Operation .................................. 2,3
Front Panel Controls ...................................... 4
Hum (Avoiding) ........................................... 15
INPUT 1 Jacks ........................... 5,13,14,20,22
Interference .................................................. 15
LIST FEATURES Function ..................... 10,28
Memory (Channel) ............................. 10,13,28
Memory (Clock/Alarm) ............................... 12
Menus .............................................. 2,3,8,9,10
Monaural Audio ............................................. 9
Monitor Panel .............................................. 14
MUTE ......................................................... 5,7
Number Buttons ............................................. 7
OFF Button .................................................... 7
On-Screen Displays ....................................... 5
Operating Guide (Quick-Reference) ....... 27,28
Optional Accessories ......................... 24,25,26
Order Form (Accessories) .................. 24,25,26
Owner's Club Card ............ Inside Front Cover
PC Button ...................................................... 7
Picture Adjustments ....................................... 8
Picture Reset .................................................. 8
Polarized ....................... Inside Front Cover,15
Positioning Cables ....................................... 15
Power Cord .......................................... 2,15,25
Power Failures ............................................. 12
Power Indicator .............................................. 5
Precautions (Safety) ........... Inside Front Cover
Quick-Reference Guide .......................... 27,28
RCA Owner's Club ........... Inside Front Cover
Registration Card ............... Inside Front Cover
Remote Control ........................................... 6,7
Remote Control Sensor .................................. 5
Repair ....................................... 23,Back Cover
RESET Button ................................................ 7
Safety Precautions ............. Inside Front Cover
Scrambled Channels ............................... 18,19
Service ..................................... 23,Back Cover
Setting Clock ................................................. 3
SETUP Button .......................... 2,3,7,10,27,28
Sharpness Adjustment ................................... 8
SLEEP Timer Function ...................... 10,11,27
SLP Display .............................................. 5,11
ST Indicator ................................................. 5,9
Stacking Arrangements ................................ 15
STEREO Function .......................................... 9
Stereo Display "ST'. ................................... 5,9
Switched Outlets .......................................... 15
Time Display .................................................. 5
Tint Adjustment ............................................. 8
Tips (Connecting Components) ................... 15
TONE Function .............................................. 9
Trouble Checks ............................................ 23
TV Button .................................................... 2,7
UHF/VHF Channels ............................. 16,17
Unswitched Outlets ...................................... 15
VCR Connections ........................................ 20
VHF/UHF Channels ............................... 16,17
VIDEO Button .................................... 3,7,8,27
VIDEO RESET Function ........................ 3,8,27
Video Game Caution ...................................... 8
VOLUME Buttons ....................................... 2,7
Warranty ........................................ Back Cover
Warranty Registration Cardlnside Front Cover
29
Page 32
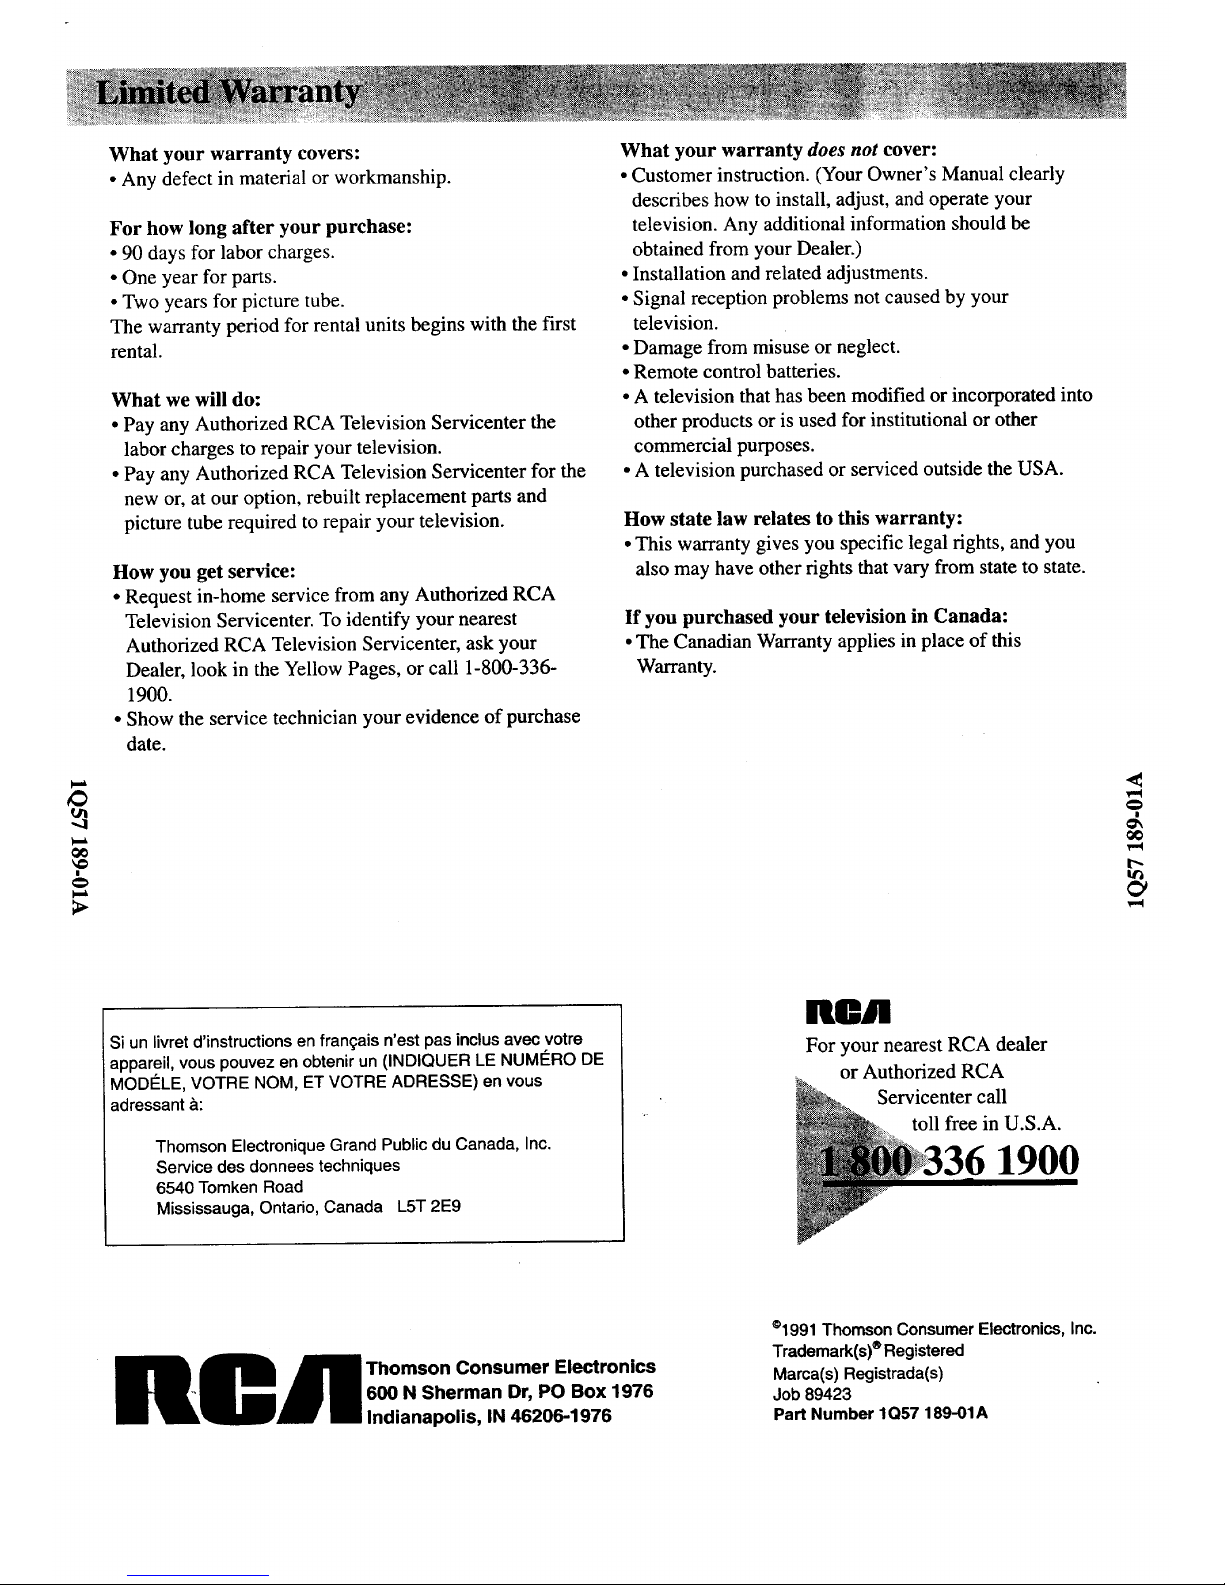
What your warranty covers:
• Any defect in material or workmanship.
For how long after your purchase:
• 90 days for labor charges.
• One year for parts.
• Two years for picture tube.
The warranty period for rental units begins with the first
rental.
What we will do:
• Pay any Authorized RCA Television Servicenter the
labor charges to repair your television.
• Pay any Authorized RCA Television Servicenter for the
new or, at our option, rebuilt replacement parts and
picture tube required to repair your television.
How you get service:
• Request in-home service from any Authorized RCA
Television Servicenter. To identify your nearest
Authorized RCA Television Servicenter, ask your
Dealer, look in the Yellow Pages, or call 1-800-336-
1900.
• Show the service technician your evidence of purchase
date.
What your warranty does not cover:
• Customer instruction. (Your Owner's Manual clearly
describes how to install, adjust, and operate your
television. Any additional information should be
obtained from your Dealer.)
• Installation and related adjustments.
• Signal reception problems not caused by your
television.
• Damage from misuse or neglect.
• Remote control batteries.
• A television that has been modified or incorporated into
other products or is used for institutional or other
commercial purposes.
• A television purchased or serviced outside the USA.
How state law relates to this warranty:
• This warranty gives you specific legal rights, and you
also may have other rights that vary from state to state.
If you purchased your television in Canada:
• The Canadian Warranty applies in place of this
Warranty.
Si un livret d'instructions en fran_ais n'est pas inclus avec votre
appareil, vous pouvez en obtenir un (INDIQUER LE NUMC:RO DE
MODI_LE, VOTRE NOM, ET VOTRE ADRESSE) en vous
adressant &:
Thomson Electronique Grand Public du Canada, Inc.
Service des donnees techniques
6540 Tomken Road
Mississauga, Ontario, Canada L5T 2E9
nor
For your nearest RCA dealer
or Authorized RCA
_._ erv_c_ntfT:eC?21. S.A"
RCR homson Consumer Electronics
600 N Sherman Dr, PO Box 1976
Indianapolis, IN 46206-1976
°1991 Thomson Consumer Electronics, Inc.
Trademark(s) ®Registered
Mama(s) Registrada(s)
Job 89423
Part Number 1Q57 189-01A
 Loading...