

Page 1

NOW YOU NEVER HAVE TO ASK…
WHO IS IT?
English instructions ................... 1
Instructions en français ........... 15
Instrucciones en español ....... 29
HSDB2 QSG 04
Installation Guide
Page 2
2
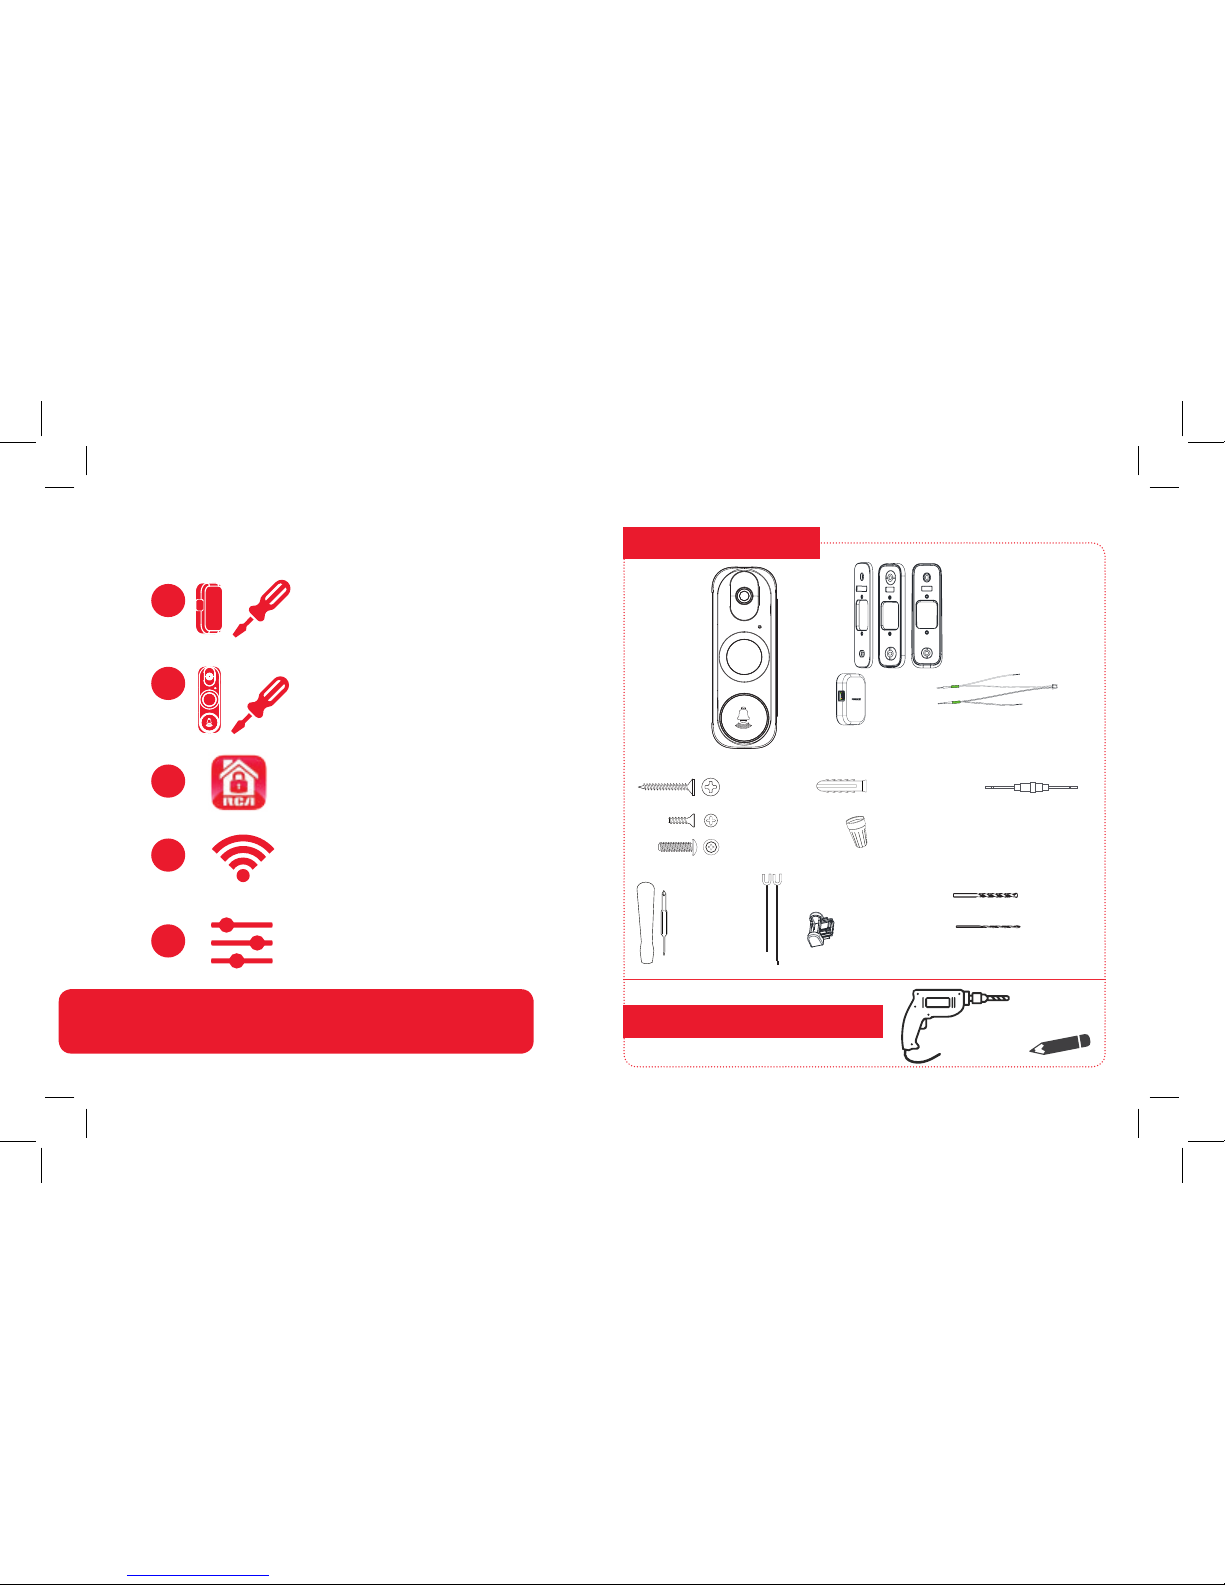
Video
doorbell
with 1
faceplate
installed
+ 2
faceplate
options
WHAT YOU GET
TOOLS YOU’LL NEED
3 mounting plate
options
Installation kit:
(3) Mounting
anchors
(3) Mounting
screws
Drill
Screwdriver
handle and
reversible bit
(2) Extra terminal
screws
(4) Wire nuts
(1) 7/32” Masonry drill bit
(1) 1/16” Wood drill bit
(2) Wire leads
EASY SETUP
1
Connect the power kit to your
existing wired chime
3
Download the RCA Security App
4
Connect to Wi-Fi
5
Customize your device
settings
(2) Faceplate
security screws
Pencil or
marker
(1) Bubble level
Power
kit
+ connection wires and wire nuts
2
Connect and mount the video
doorbell to existing doorbell
wiring
(1) Resistor
(for installations
without a chime box)
Check out our setup videos
On your computer, go to
http://www.rcaaudiovideo.com/doorbell2installvideo
Page 3
3
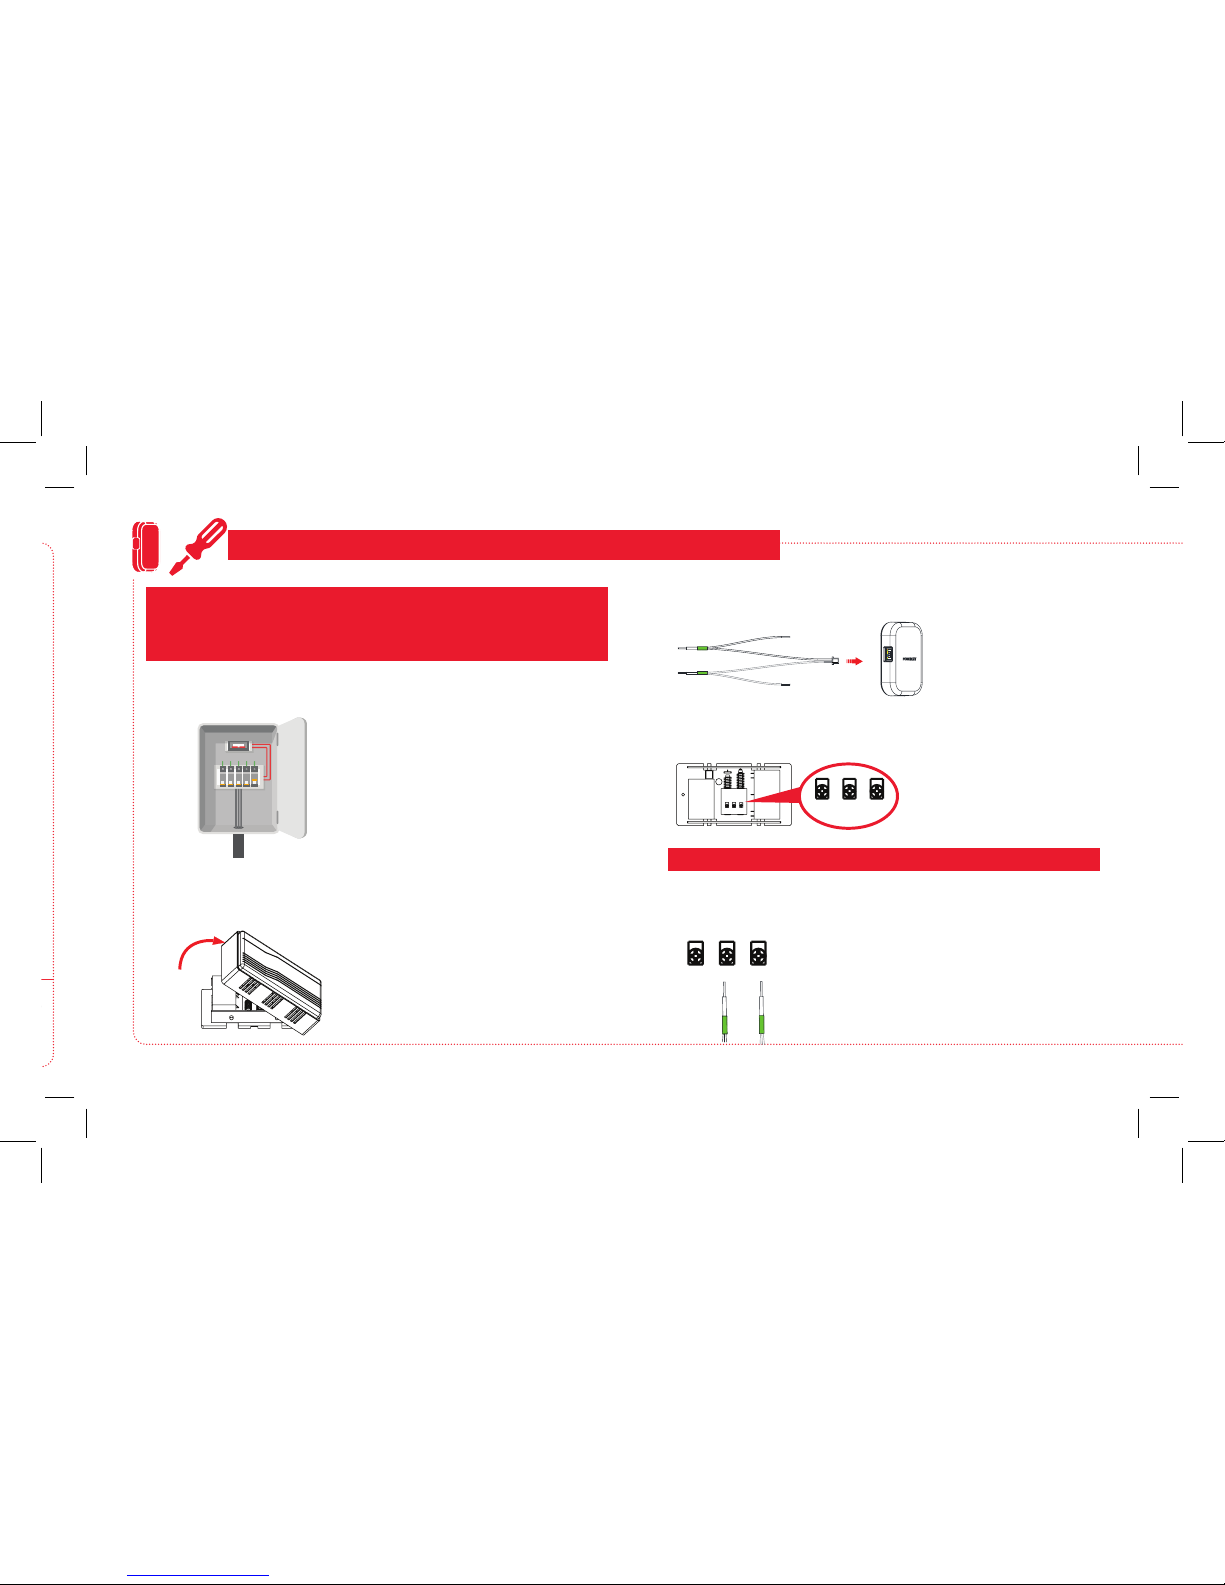
CONNECT & MOUNT THE POWER KIT
Find the breaker that controls the
circuit for your doorbell. Turn it off
before you continue installation.
Turn off power to your doorbell’s circuit
1
Remove the cover from your doorbell’s chime box
2
Find your doorbell’s chime. Remove
its cover.
IMPORTANT: If your doorbell does not have a chime box, you will need to
install the resistor provided to regulate the power to the doorbell camera.
You can skip this section and follow the instructions in the “If You Don’t
Have A Chime Box” section on page 7.
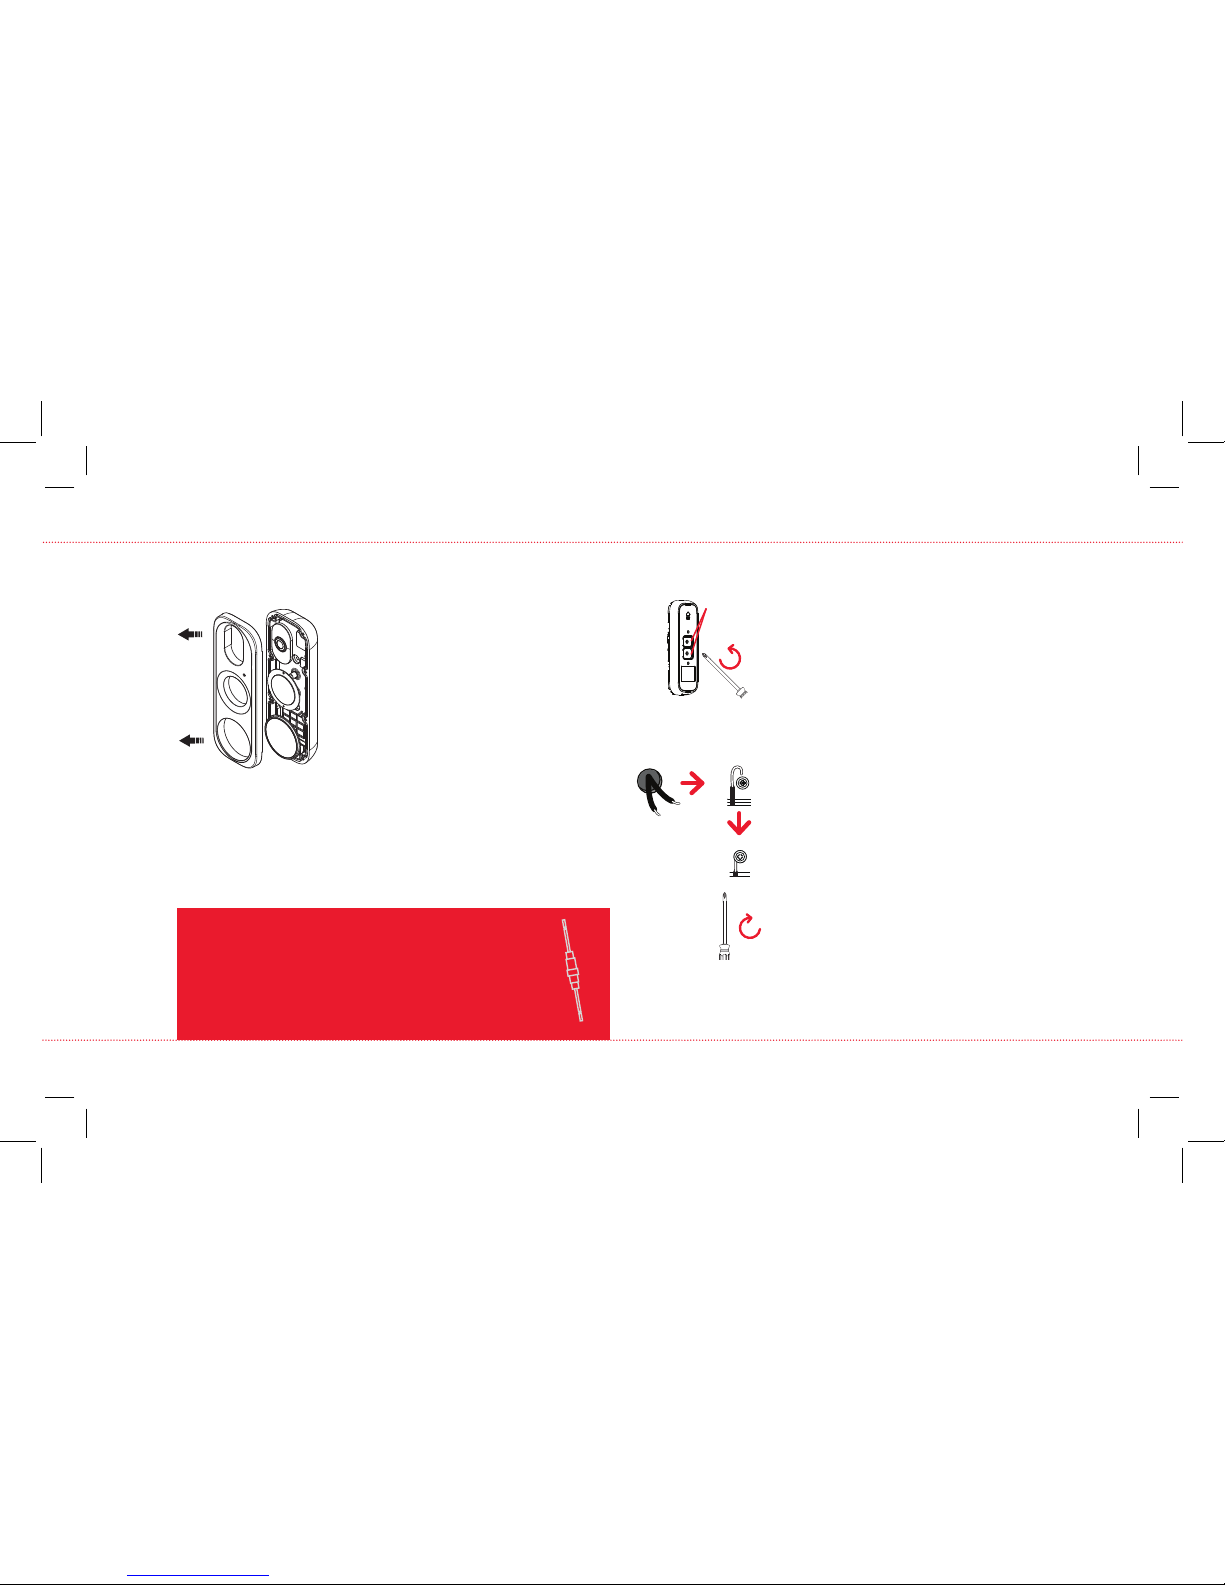
Connect the power kit connection wires
to the power kit
3
Insert the joined
connector into the
slot on the side of the
power kit.
Remove the existing wires from the chime terminals
4
TRANS FRONTREAR
Loosen the terminal
screws for the doorbell
you want to replace.
Remove the leads from
those terminals.
TRANS FRONT
REAR
IMPORTANT: Keep track of which lead goes to which terminal!
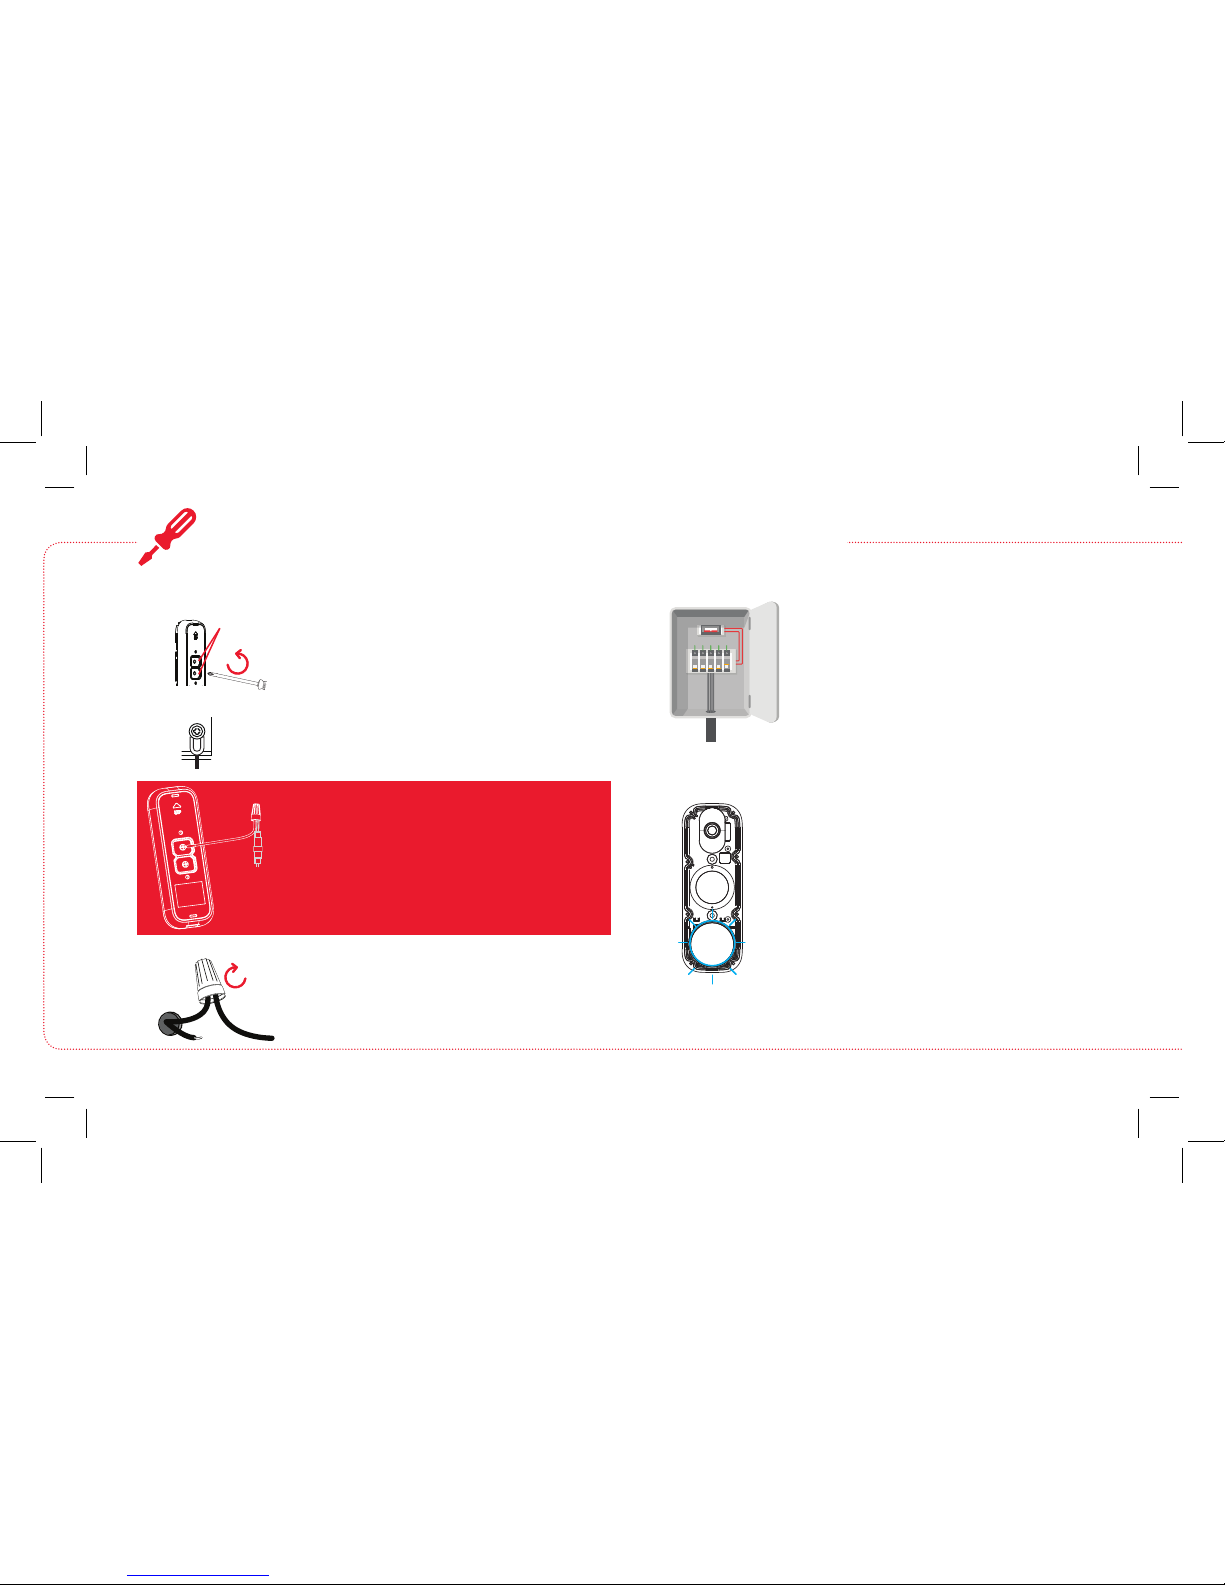
Connect the power kit connection wires to the
chime terminals.
5
TRANS FR ONTREAR
Remove the sheaths covering the ends
of the solid-wire power kit leads. Bend
the ends of each lead over the terminals
where the old leads were. Then tighten the
terminal screws to hold the leads in place.
Page 4
4
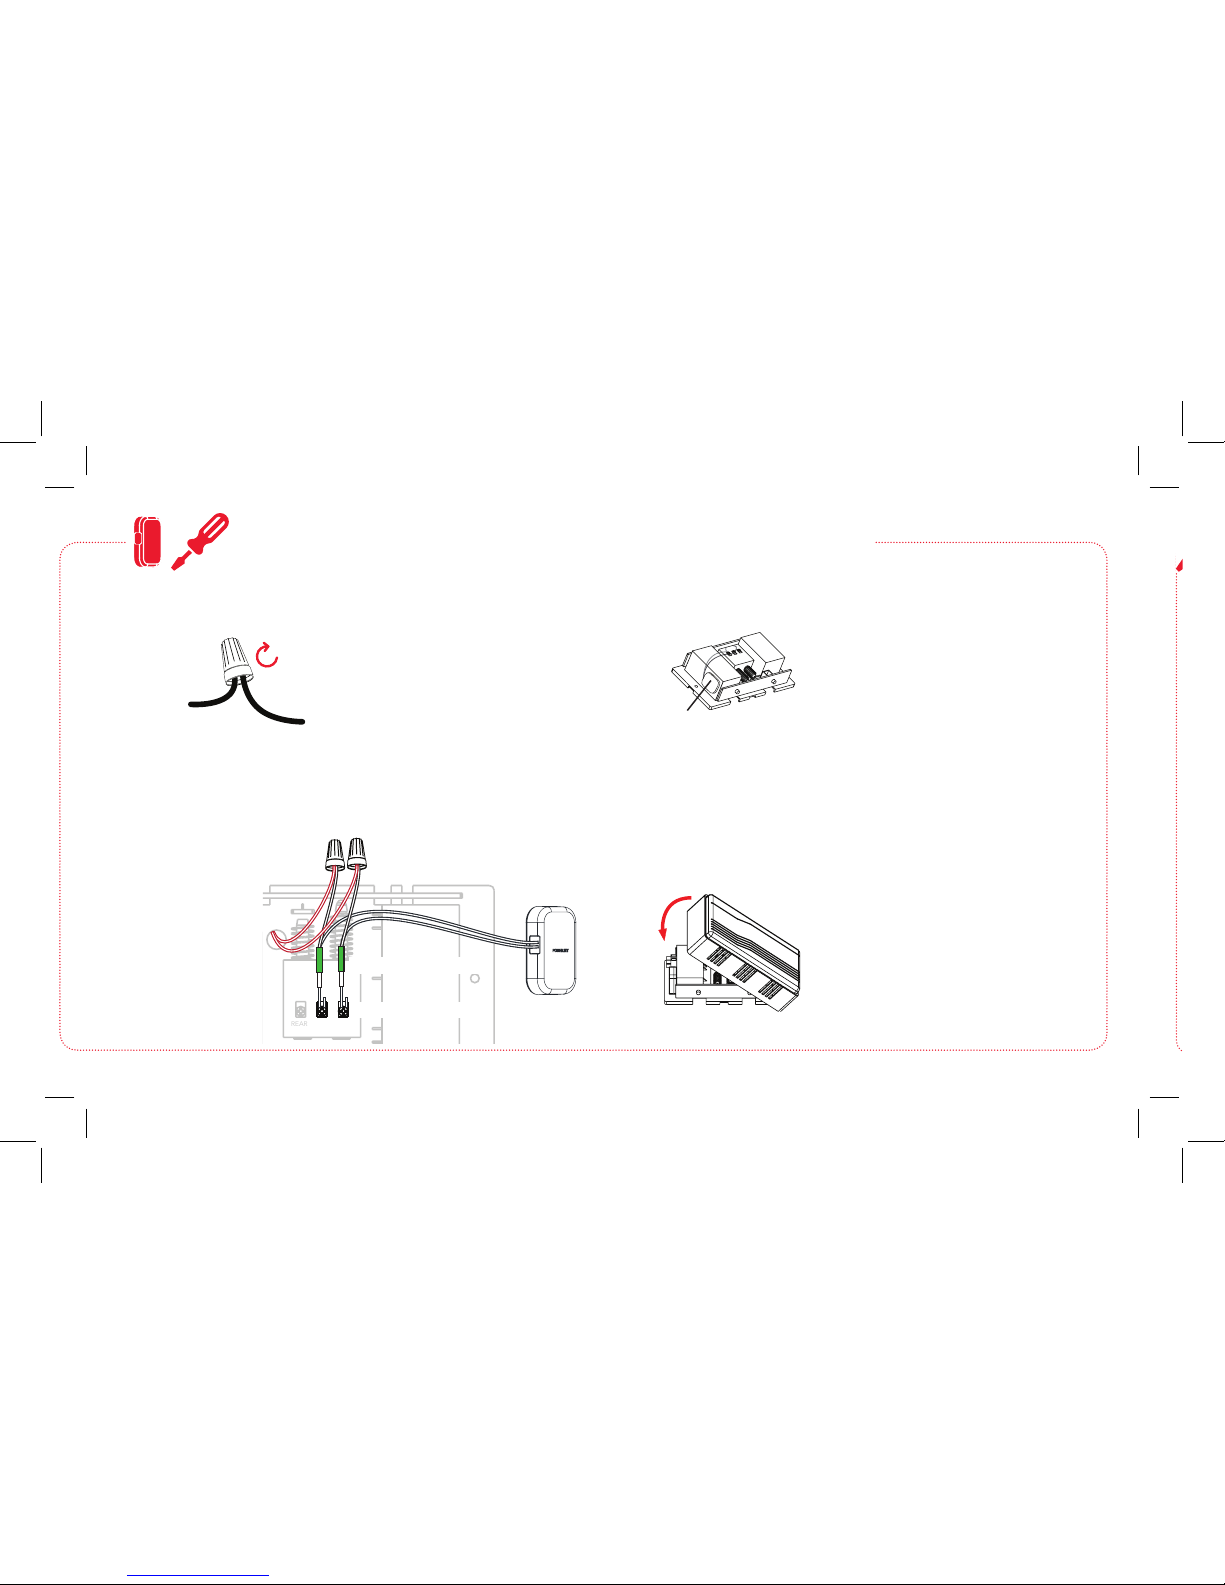
CONNECT & MOUNT THE POWER KIT (continued)
Join the power kit connection wires and the old
chime leads.
6
Remove the sheaths covering the ends
of the stranded-wire leads from the
power kit.
Put the ends of one power kit wire lead
and one old chime lead together and
insert them into a wire nut. Then twist the
wire nut until you feel tension. Repeat
with the other set of leads and wire nut.
The end result will look something like
the diagram below.
Chime lead
Wire nut
Twist
Power kit
wire lead
Mount the power kit to the side of the chime box.
7
Find a spot on the side of the chime box
where the power kit will t when the
chime box’s cover is put back on.
Peel the cover off the top of the adhesive
strip on the bottom of the power kit. Put
the power kit where you want to mount it
and press it in place until it’s secure.
Put the cover from your doorbell’s chime box back
in place
8
Put your chime box’s cover back on.
REAR TRANS FRONT
Chime leads
Wire nuts
Chime box terminals
Power kit wire leads
Power kit
Power kit
Page 5
5
Find the breaker that controls the
circuit for your doorbell. Make
sure it’s off before you continue
installation.
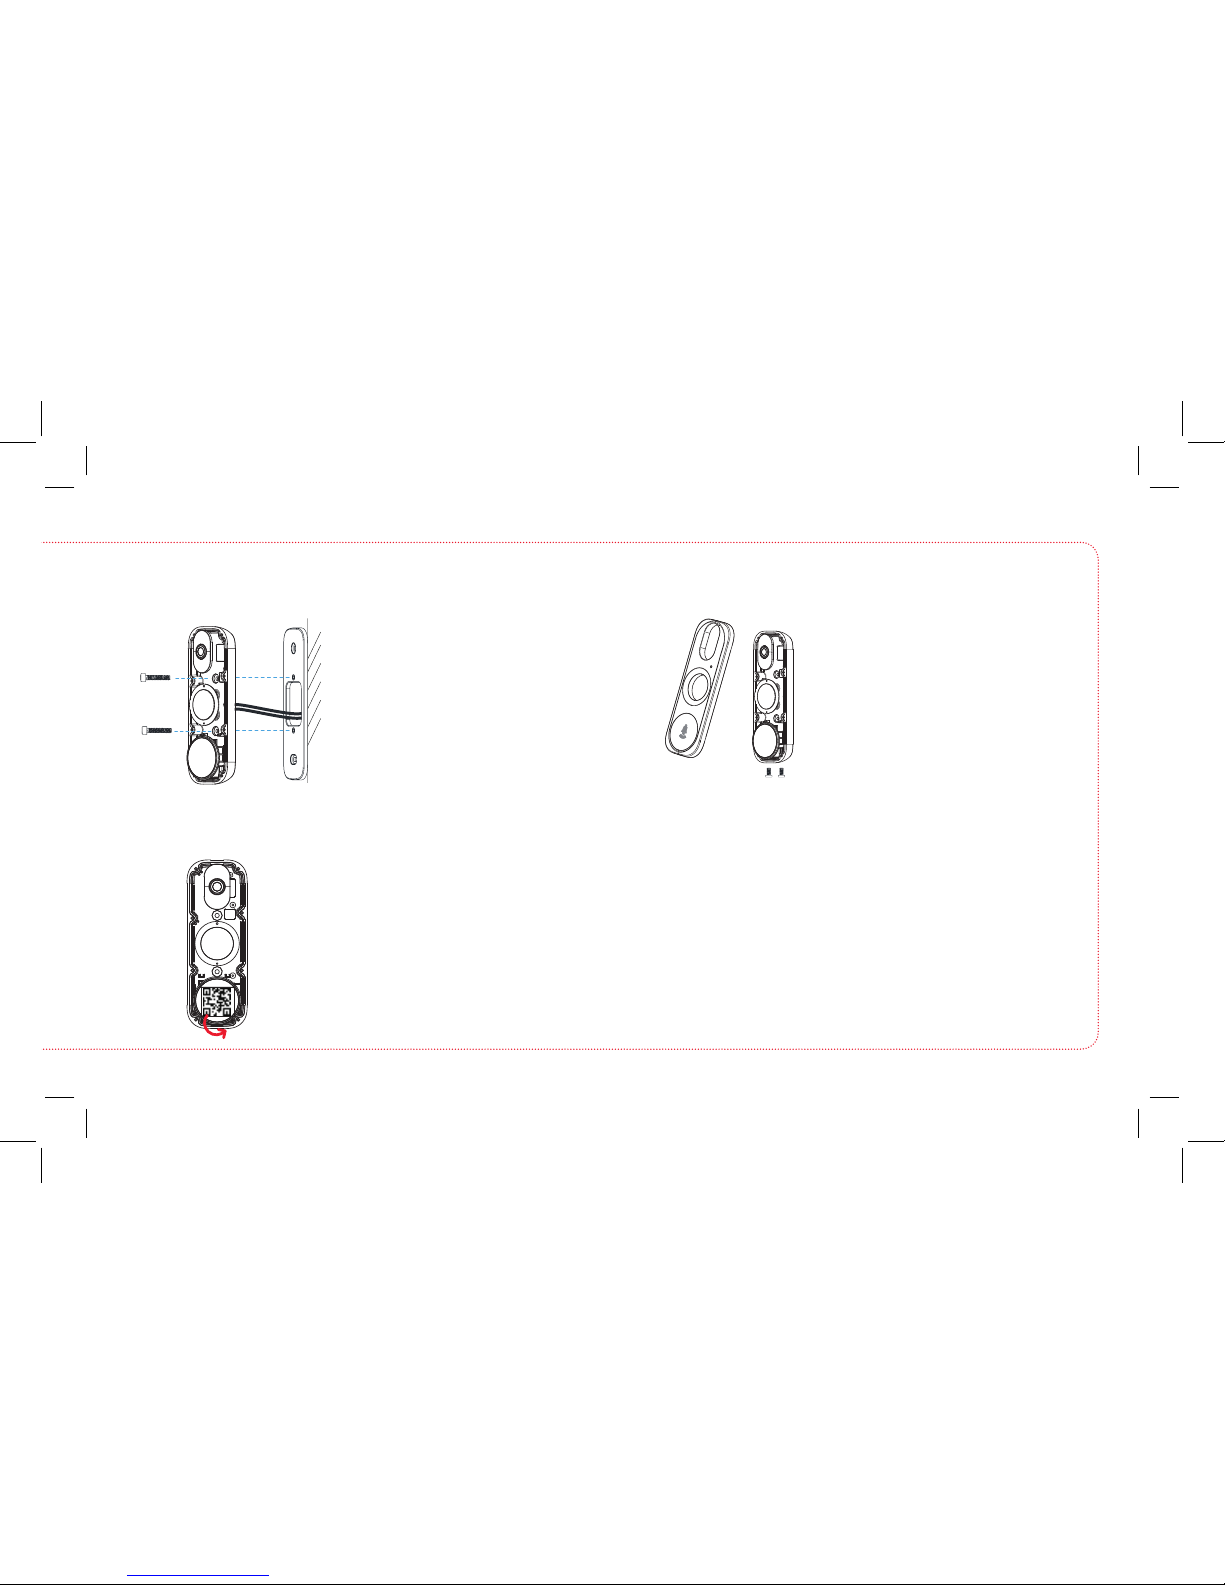
Find the mounting plate option that works best
Try the three mounting plate options
where you want to mount the video
doorbell. Choose the one that gives
you the position and angle you want
for your video doorbell.
3
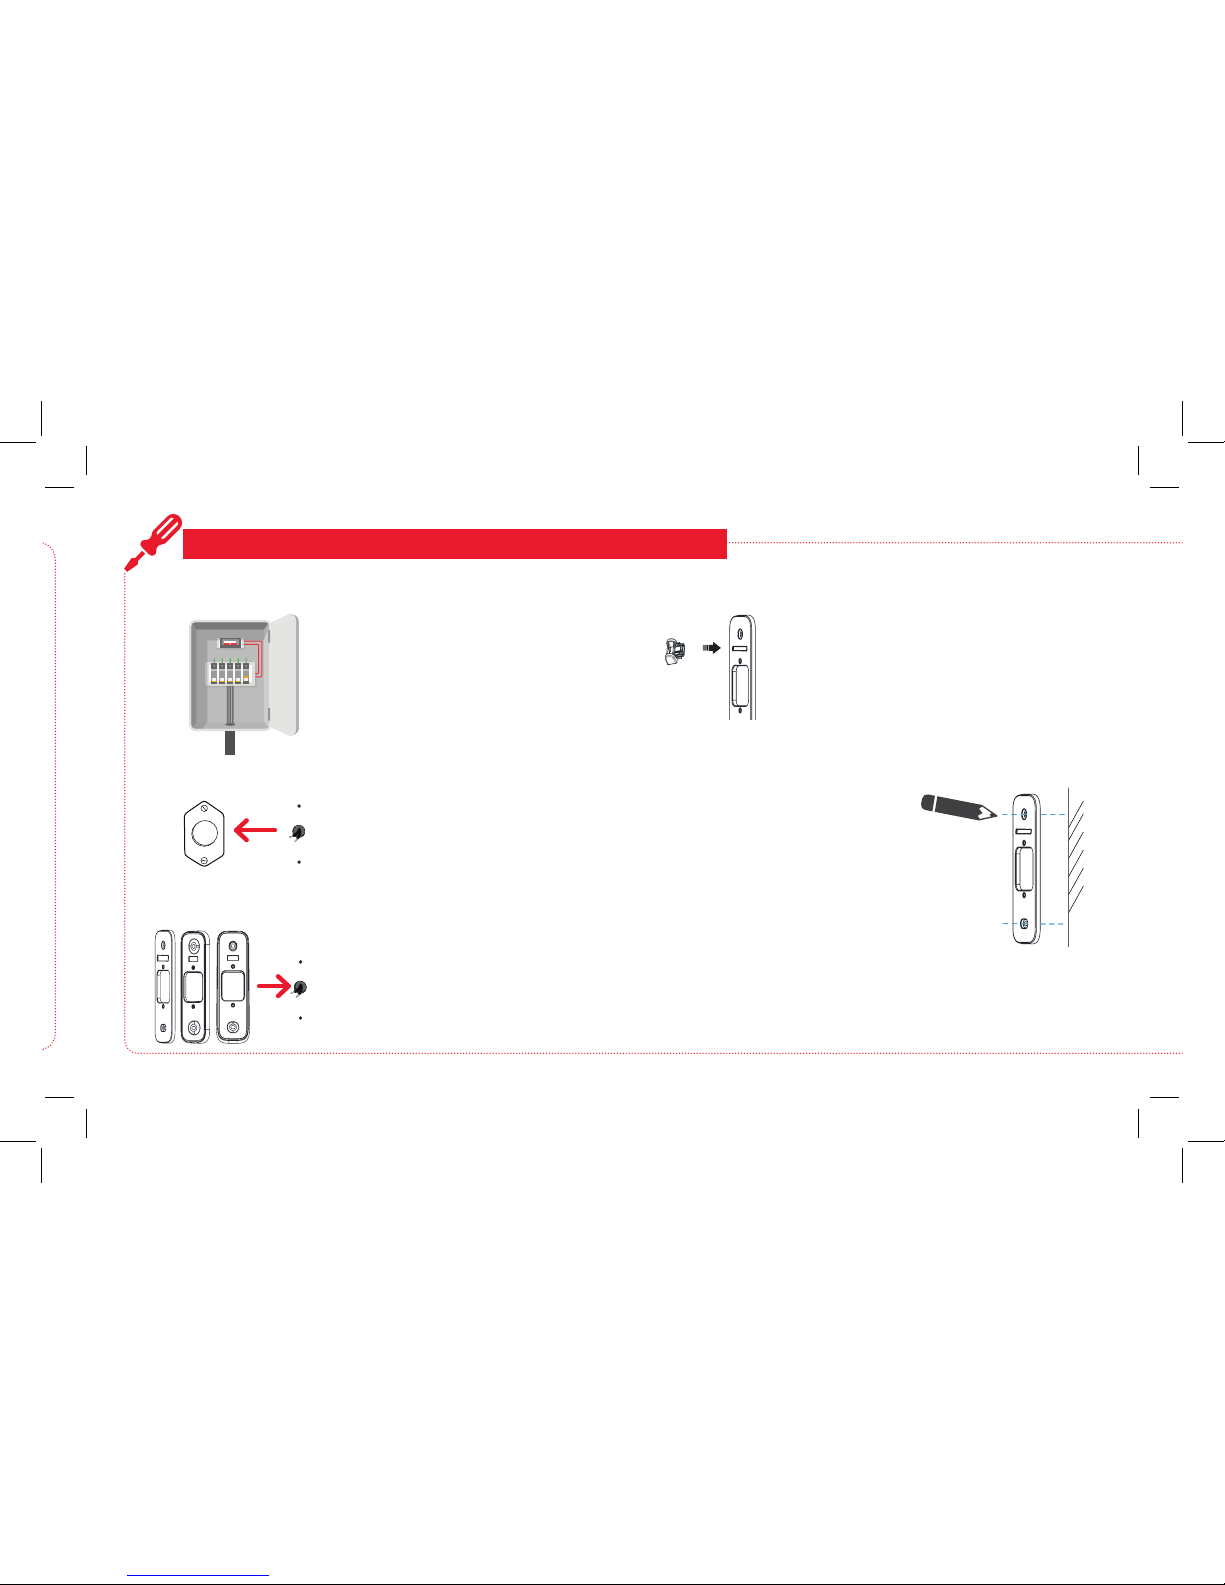
CONNECT & MOUNT THE VIDEO DOORBELL
Make sure the power to your doorbell’s circuit is off
1
Remove your existing doorbell
2
Carefully remove your existing
doorbell from the wall. Then
unhook your home’s wiring from the
doorbell’s terminals.
Remove &
unhook
5
Position the mounting plate and mark location
Place the mounting plate where
you want to mount it. Make sure
that...
(1) the center of the plate is over
the hole where your home’s
doorbell wiring comes out,
and
(2) the mounting plate is level
continues on the next page...
4
Insert the bubble level into the mounting plate
Snap the bubble level into the slot on the
front of the mounting plate you want to use.
Use a marker or pencil to mark the top and bottom holes. Then
take the mounting plate down.
Page 6

6
CONNECT & MOUNT THE VIDEO DOORBELL (continued)
6
Drill holes for the mounting plate
(1/16”)
Drill two holes where
indicated by your markings.
Insert the correct drill bit for
your surface into an electric
drill:
brick or stucco = larger
bit
(7/32”)
wood surface = small bit
—OR—
Drill
Insert
Stucco,
masonry
Wood
Mount the mounting plate to the wall
7
Anchors
If you’re mounting to masonry or brick, insert
the provided anchors in the holes you drilled
before proceeding.
Align the holes on the mounting plate with the
holes you drilled.
Mount the mounting plate to the wall using the
screws provided.
Page 7
7
IMPORTANT! Handle the video doorbell carefully! Make
sure not to scratch its lens.
Connect the video doorbell to home power
(OPTIONS A & B)
9
OPTION A: If your home’s doorbell power wires are long enough
Loosen
Doorbell
camera
back
Terminals
Use the screwdriver provided in this package
to loosen the terminal screws on the back of
the video doorbell.
Terminals
Home
doorbell
wires
Tighten
Connect the doorbell power wires directly
to the terminals on the back of the video
doorbell. Loop each wire end around each
terminal on the back of the video doorbell.
Note: It doesn’t matter which wire you put on
which terminal.
Tighten the screws to hold the wires rmly in
place.
8
Remove the faceplate from the video doorbell
Before you mount it, take the faceplate
off the video doorbell—you’ll need
access to several items behind the
faceplate during setup.
IF YOU DON’T HAVE A CHIME BOX
You must use the resistor provided in this package to
connect the video doorbell to your home’s wiring. Follow
the instructions for OPTION B on the next page, including
the resistor instructions in the red box.
continues on the next page...
Page 8
8
Home
doorbell wire
Wire nut
Twist
Wire
lead
OPTION B: If your home’s doorbell power wires are NOT long
enough.
Turn on power to your doorbell’s circuit
Turn the circuit that powers your
doorbell back on.
10
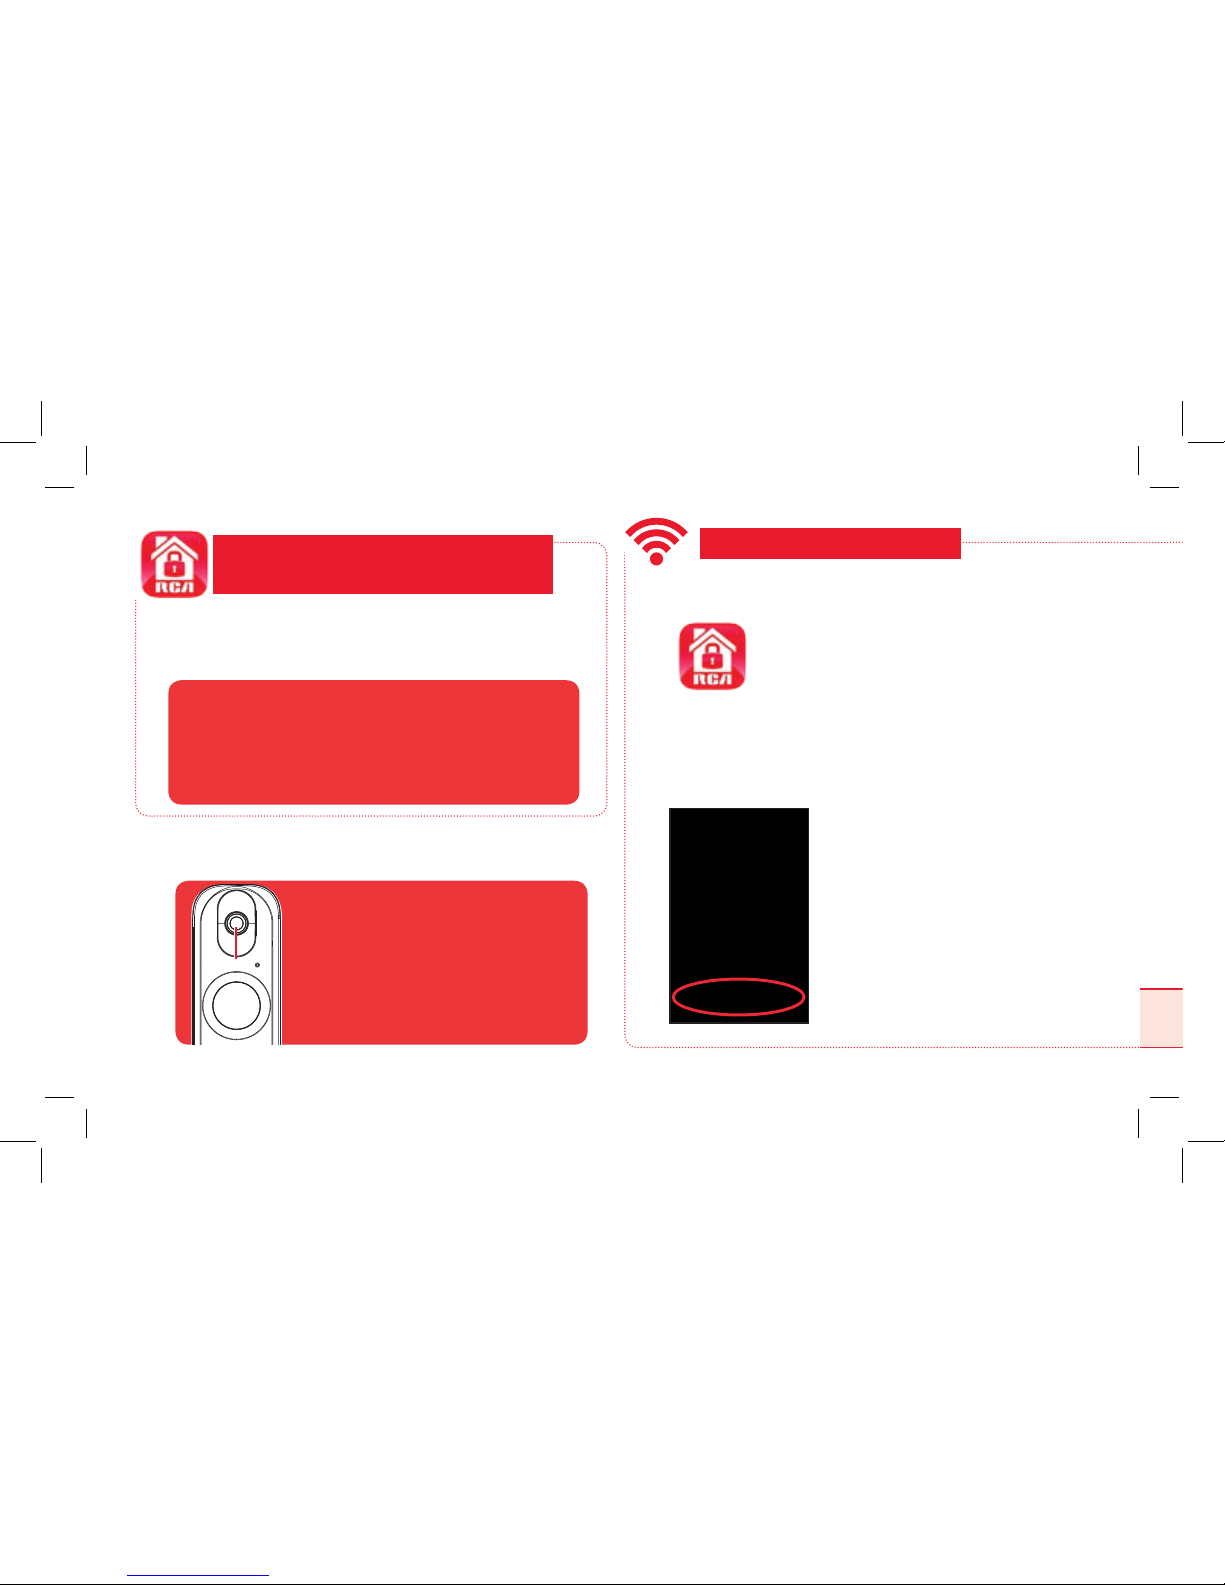
Conrm the video doorbell has power
The indicator around the doorbell’s call
button ashes when it has power (rst
red, then blue).
If the indicator is ashing: Go to the
next step.
If the indicator is NOT ashing: First,
check the connections on the back of
the video doorbell. Then, press and hold
the reset button on the front of the video
doorbell for 4 seconds, until the doorbell
says “reset successful.”
11
Use the screwdriver provided in this package
to loosen the terminal screws on the back of
the video doorbell.
Loosen
Doorbell camera back
Terminals
Place the terminal of each provided wire lead
completely under each terminal screw. Then
retighten both terminal screws.
Put the ends of one wire lead and one home
doorbell wire together and insert them into
a wire nut. Then twist the wire nut until you
feel tension. Repeat with the other wire lead,
home doorbell wire, and wire nut.
CONNECT & MOUNT THE VIDEO DOORBELL (continued)
RESISTOR INSTRUCTIONS
(IF YOU DON’T HAVE A CHIME BOX)
To install the resistor provided: Remove the sheaths
covering the ends of the resistor. Put one end of
the resistor together with one of the wire leads
connected to the video doorbell. Use one of the
provided wire nuts to twist these ends together.
Connect the other end of the resistor to your home
doorbell wire following the instructions below.
Page 9
9
Route the power wires and/or wire
leads into the wall.
Align the holes on the video
doorbell’s body with the holes
in the mounting plate. Insert the
screws provided through the
video doorbell’s body and into the
mounting plate. Tighten these screws
completely.
Install the video doorbell on the mounting plate
12
Install the faceplate of your choice
14
Place the faceplate of your choice
onto the front of the video doorbell
as shown here. Insert the 2 provided
set screws into the bottom of
the video doorbell to secure the
faceplate.
Peel off the QR code sticker from the front of the
video doorbell and store it in a safe place
13
QR code
sticker
Peel off
Gently peel off the QR code sticker
from the front of the video doorbell.
Make sure you put it in a safe place—
you’ll need it to complete setup!
Page 10
10
Please be patient with your WiFi network! Certain parts of the WiFi setup, like
connecting to your network, could take up to 5-6 minutes to complete.
Got screen freeze? Exit out of the App and start again.
Launch the App
Once the RCA Security App has installed on
your smarphone or tablet, press the icon to
launch the App.
IMPORTANT: The rst time you launch it, the
App will ask if it can send you notications.
Click “Allow” to let the App push notications
to your phone or tablet.
1
Register as a new user
2
The rst time you launch the RCA
Security App, you’ll need to create a
user name and password so that you
can access your camera securely.
Press the New User Registration
button to get started. Follow the steps
to register and go to the next step
when you’ve nished.
Notes: If you already have an RCA Security
user name and password enter them in the
appropriate spaces and press the Login button.
For security reasons, each e-mail address or
phone number is limited to one account only.
3
CONNECT TO WIFI
In the Google Play or Apple App Stores, search for “RCA
SECURITY” and look for the icon shown here. Then download and
install the App.
DOWNLOAD THE RCA
SECURITY APP
• iOS 7 or later
• Android version 4.4 or later
Minimum Operating System Requirements for
the RCA Security App
NOTE: Once you’ve nished installing
and setting up your doorbell camera,
make sure you carefully remove the
protective lm covering its lens and IR
light.
Lens
IR Light
Page 11
11
Once the App recognizes your doorbell’s
serial number, the App asks you to connect
to your WiFi network. Tap the Connect to a
Network button in the App.
Please be patient with your WiFi network! Certain parts of the WiFi setup, like
connecting to your network, could take up to 5-6 minutes to complete.
Got screen freeze? Exit out of the App and start again.
Connect the camera with your WiFi network
3
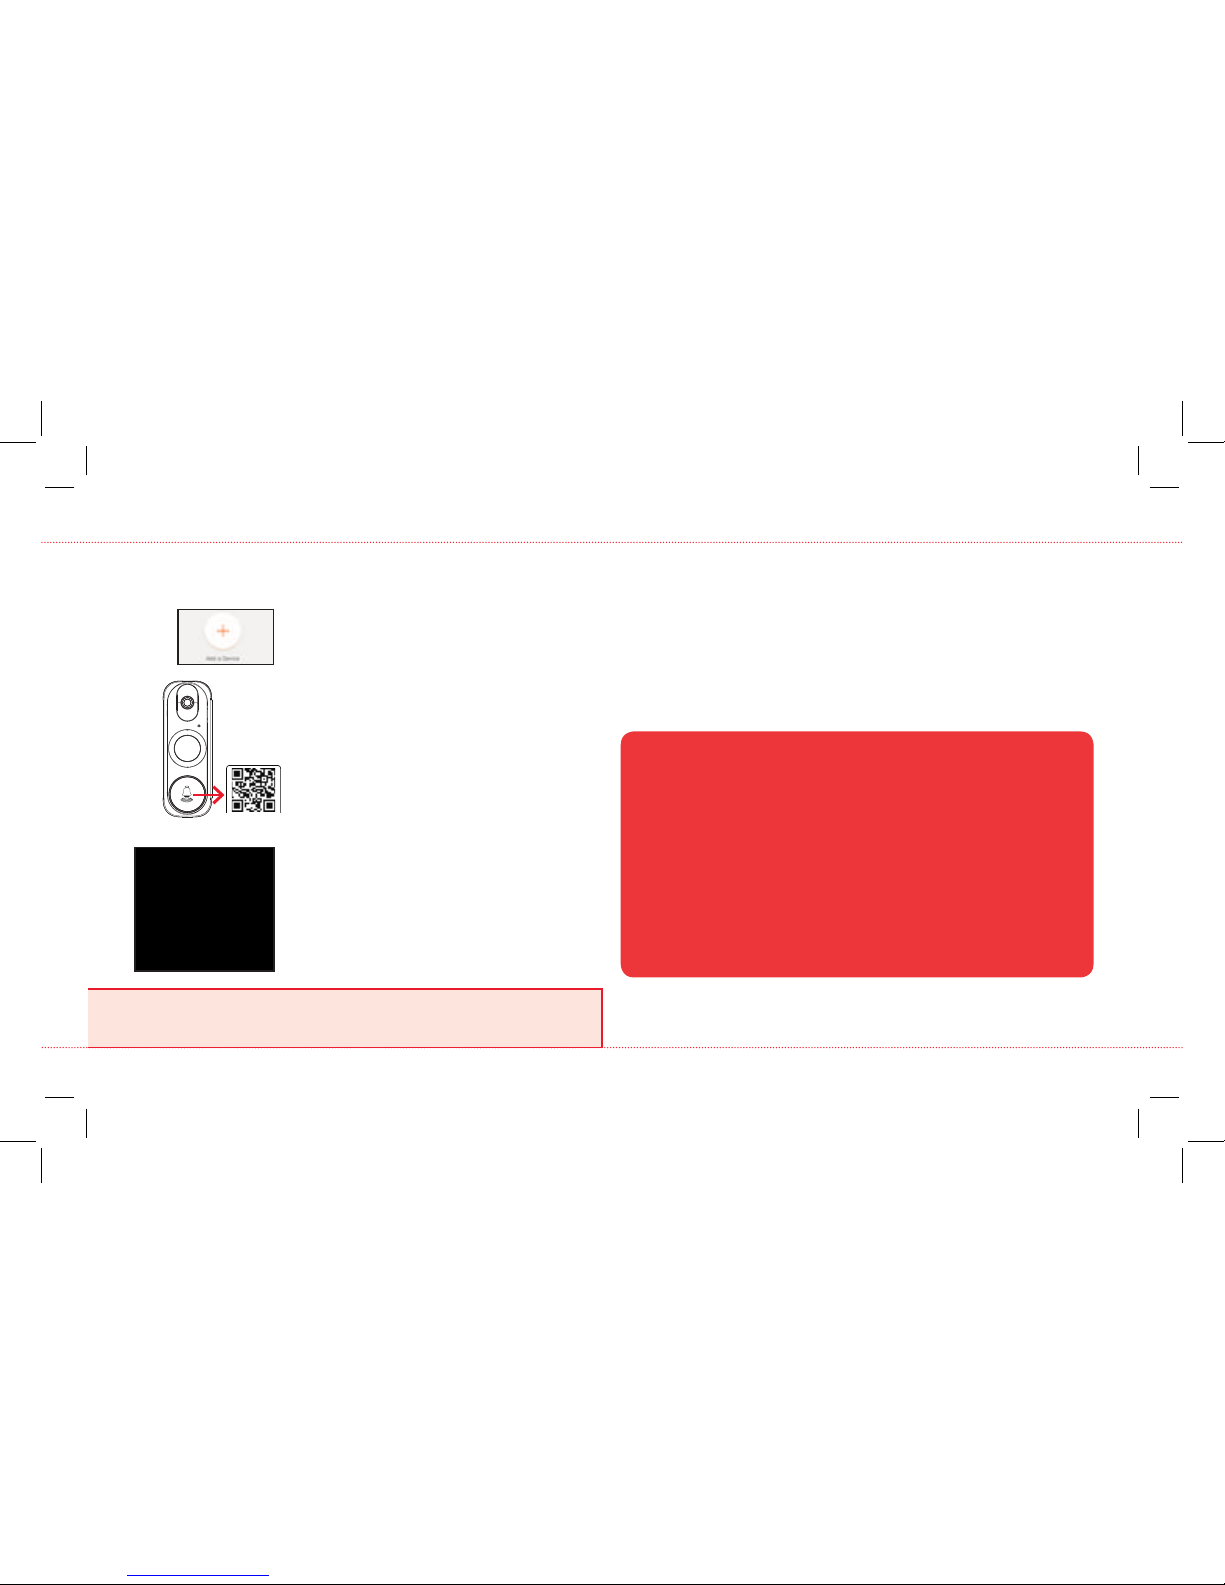
In the RCA Security App, tap the + symbol
in the middle of the screen.
Find the QR code and serial number
you removed from the front of the video
doorbell.
Scan this QR code with your phone when
prompted by the App.
NOTE: The QR code is also on the back of the
doorbell.
Follow the steps in the App’s guided setup
4
The RCA Security App will lead you through the steps to set up
your video doorbell with your WiFi network and home.
IMPORTANT: You can also get a detailed App setup guide
online—just visit bit.ly/2He6WmR and look in the manuals
section for the latest and greatest version.
+ Make sure your phone or tablet is connected to the WiFi network you want to use.
+ Make sure the camera is getting a good signal from your WiFi router.
+ Test your WiFi network with other devices to make sure its working.
+ Double check that you’ve entered the correct password for your WiFi network in
the App.
+ Make sure that your WiFi router uses either WPA2-PSK/WPA-PSK or AES as its
encryption method.
+ Make sure that there is no MAC lter on router or add MAC address to router
whitelist.
+ Reset the camera to set up connection again. Press and hold RESET key on the
front of the doorbell (under the faceplate) for 4 seconds.
Connection Troubleshooting
For additional assistance, please call 1-833-236-6561.
Page 12

12
(Back) goes back to the device list screen.
(Settings) accesses the Settings menu for this camera. Press this icon to turn motion alarms on or off, adjust
camera audio, check storage status and the version of the device’s software, adjust the time and date settings,
and more.
Camera view shows you the image from your Doorbell Camera. Turn your phone/tablet sideways to take over the
entire screen.
(Stop) and (Pause) stops/starts or pauses the live video.
(Sound On/Off) turns the sound from the camera on and off.
(Multi-Camera View) lets you see multiple cameras at once on a single screen (if you’ve set up multiple
cameras). Press the number you want to access a multi-camera view screen.
(Zoom) zooms in on the live view.
(Talk) lets you speak through this camera’s built-in speaker. Press this icon to start speaking.
(Snapshot) takes a still photo of the camera video. The snapshot le is saved to your smartphone or tablet.
(Record) starts/stops recording video. The video le is saved to your smartphone or tablet.
TOUR OF THE SYSTEM: LIVE VIEW SCREEN
(Video Quality) lets you switch between high- and standard-denition video on the view screen.
Call log shows you a history of the times when someone has rung the doorbell.
Video History accesses the doorbell camera’s timeline, allowing you to access recordings stored on the doorbell camera’s memory card by the
times they occurred.
Page 13
13
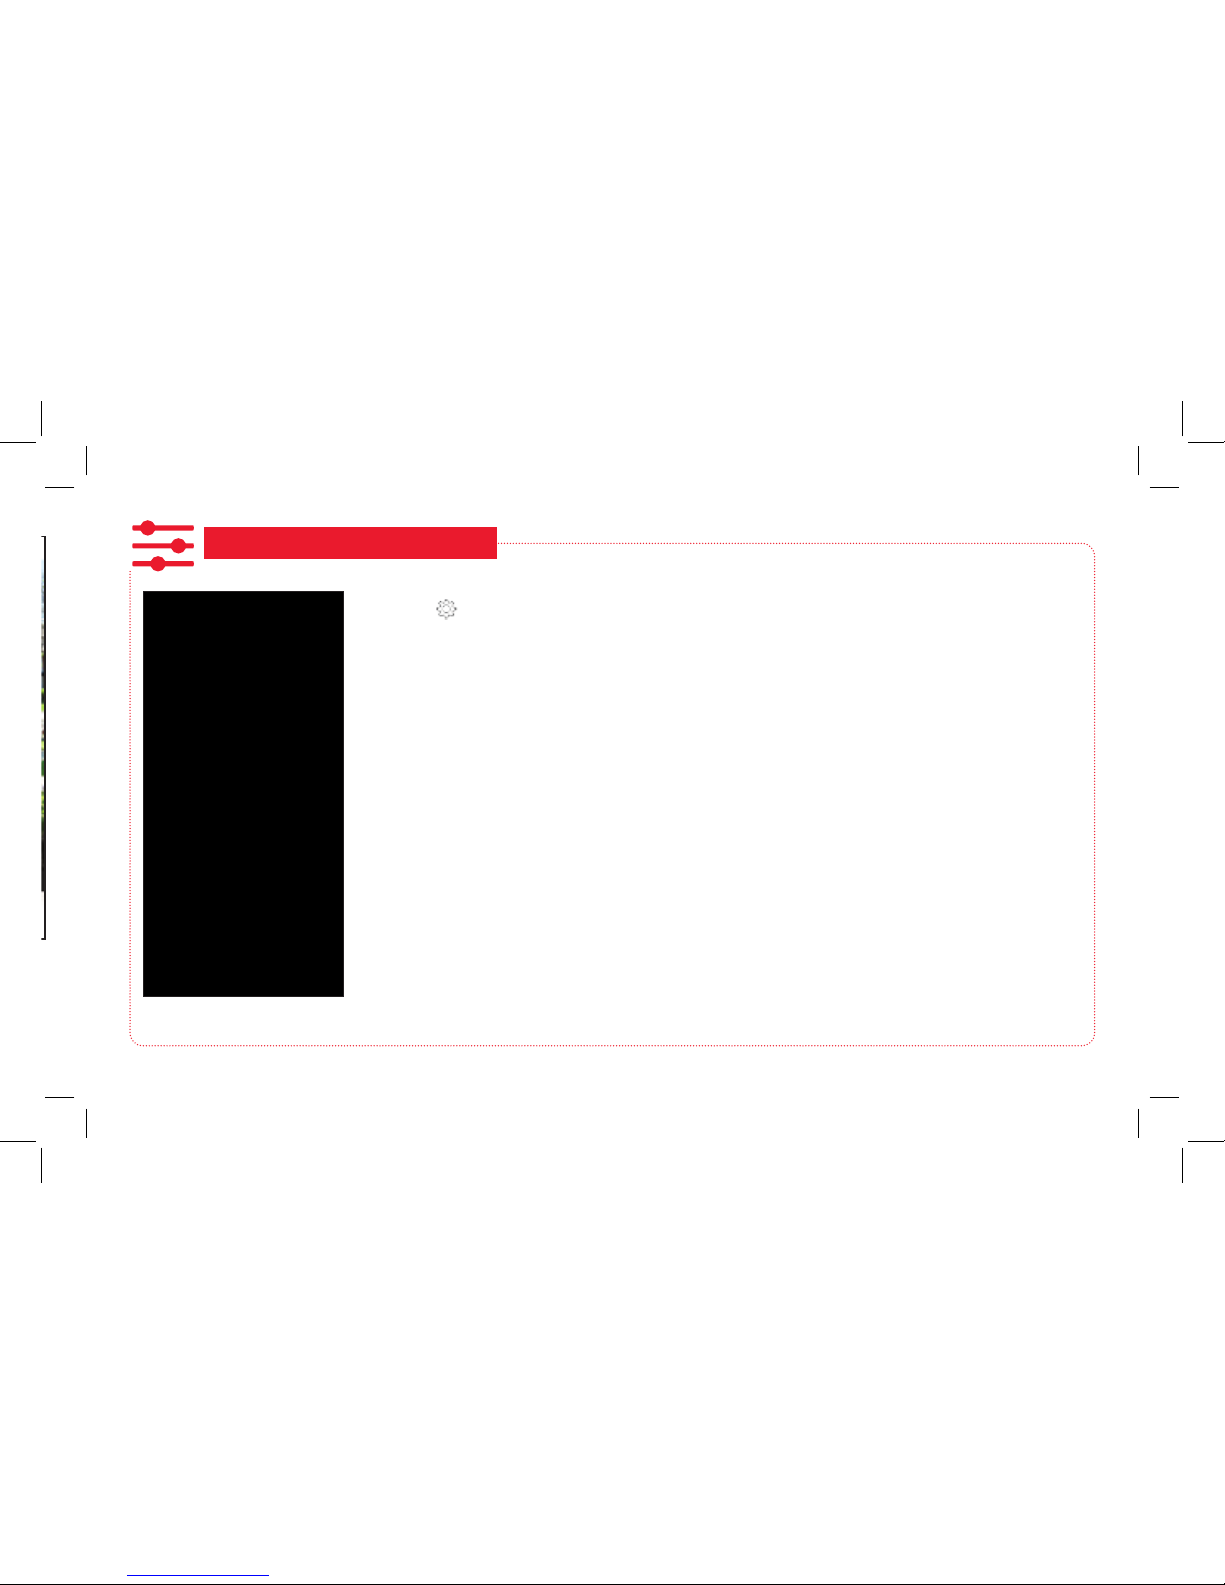
Using the Settings Menu
Press the icon in the Live View screen to access the following customizable parameters of your doorbell
camera.
Receive doorbell call lets you set whether you want to receive alerts on your phone when someone rings
the doorbell.
Chime type lets you set the kind of chime you have in your home (electrical, mechanical, or none installed).
Audio turns audio on/off for recording and live viewing.
IR Light turns the camera’s night vision feature on/off.
Alarm Notication lets you set notication schedules for when you want to receive alerts. Also lets you set
the motion detection area for alerts and the detection sensitivity, as well as the sound the doorbell camera
makes when motion is detected.
Time Zone, Daylight Savings Time, and Date Format let you adjust the time zone, daylight savings time,
and date format settings you made during setup.
Wi-Fi lets you change WiFi network information for your doorbell camera and keep the device active on the
new network. This is a convenient option if you get a new wireless router, for example.
Storage Status lets you format the inserted memory card. A dot next to this item in the menu means that
the SD card requires attention.
Device Version shows you the rmware version of the doorbell camera. A dot next to this item in the menu
means that a rmware update is available. Choose this option and following the instructions to update.
Image Encryption increases the security of the video from the doorbell camera. This option is on by
default.
CUSTOMIZE AND USE!
Page 14
14
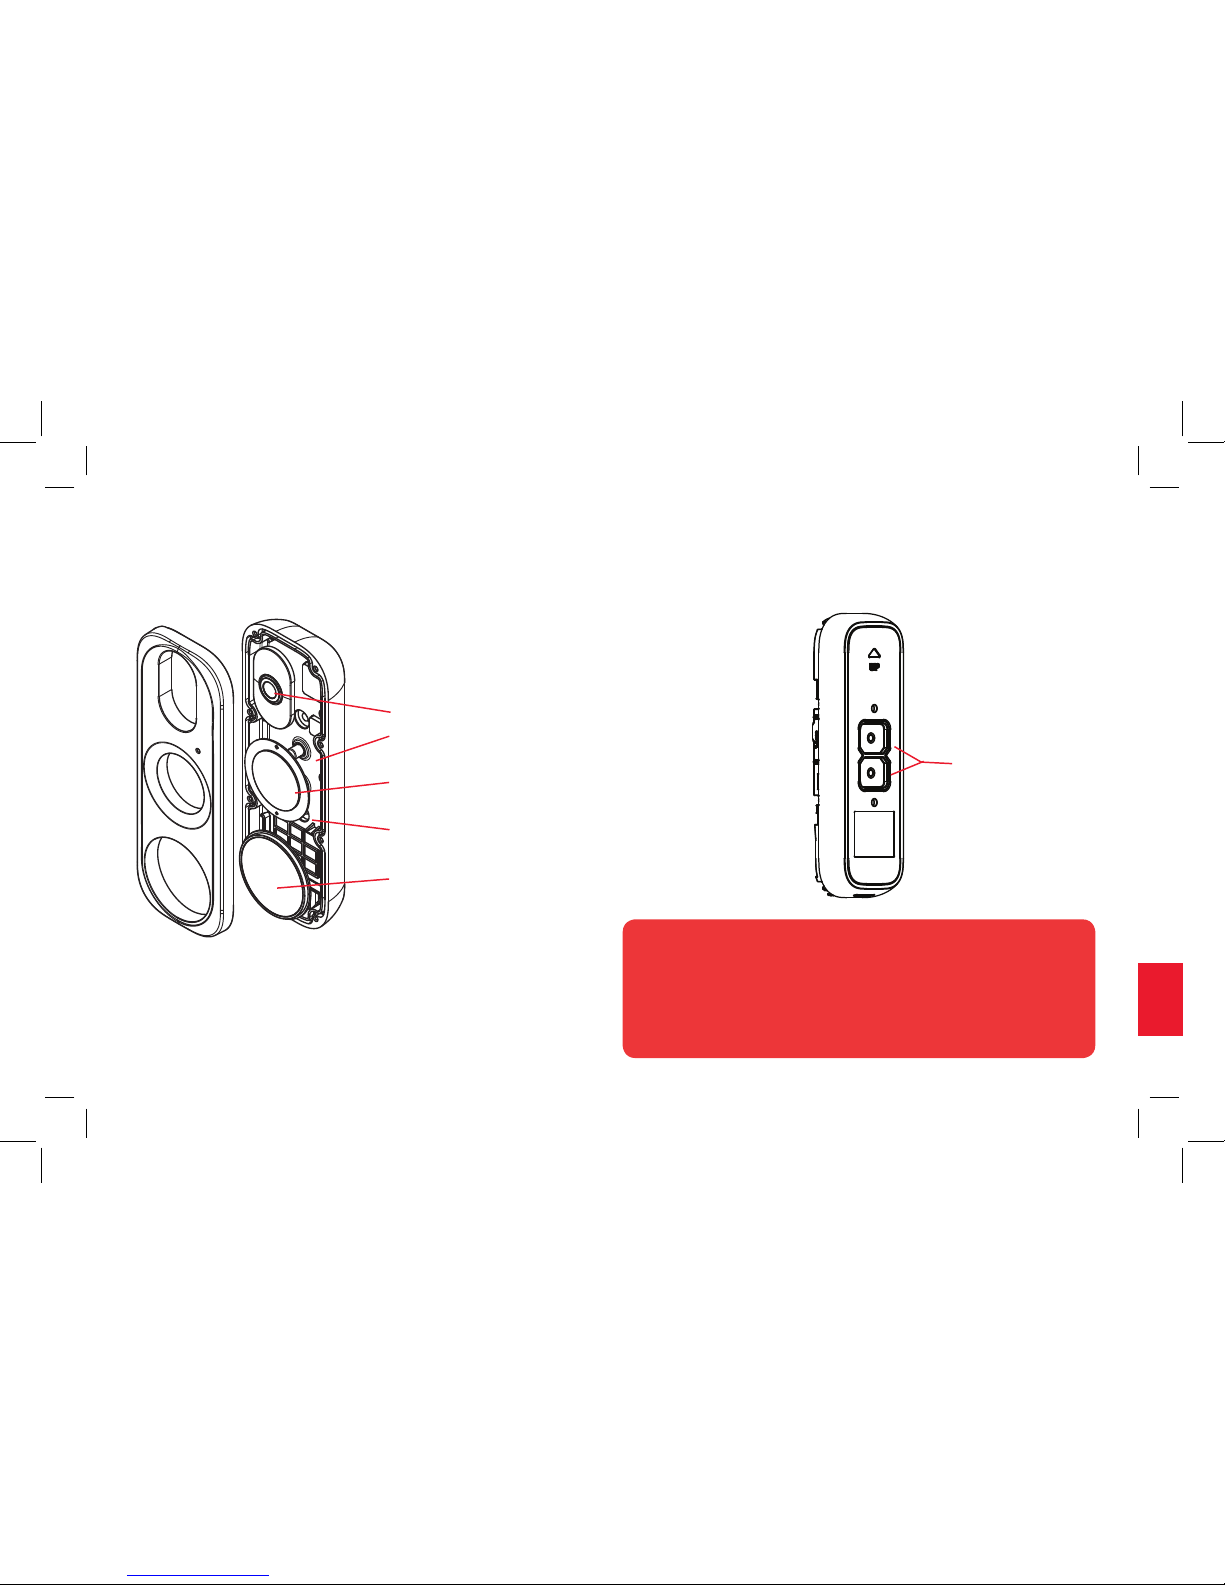
TOUR OF THE DOORBELL CAMERA
FRONT BACK
Lens captures video in front of the doorbell.
Micro SD card slot holds the micro SD card
that comes with your doorbell camera.
IR sensor detects changes in ambient light
and adjusts video settings accordingly.
RESET button restores the doorbell camera
to factory settings (hold for 15 seconds).
Call button triggers the doorbell.
Screw terminals
connect to the
doorbell power
source from your
home.
Your doorbell camera comes with an SD card pre-installed, for recording alerts.
To remove or replace this card, you’ll rst need to remove the doorbell camera’s
faceplate by unlocking its set screws and pulling it off. Press the installed SD card
to unlock it and pull it out. Place the new SD card in and lock it into place. Then
place the SD card cover back on and put the doorbell camera’s faceplate over the
doorbell camera. Finally, insert the set screw and screw it back in place.
Removing/Replacing the SD Card
Page 15

15
HSDB2 QSG 04
VOUS N’AUREZ PLUS JAMAIS
BESOIN DE DEMANDER...
QUI EST-LÀ?
English instructions ................... 1
Instructions en français ........... 15
Instrucciones en español ....... 29
Guide d’installation
Page 16

16
Sonnette
vidéo
avec 1
plaque
frontale
installée
+ 2 options
de plaque
frontale
CE DONT VOUS DISPOSEZ
OUTILLAGE NÉCESSAIRE
3 options de plaque
de montage
Kit d’installation :
(3) Chevilles de
montage
(3) Vis de
montage
Perceuse
(2) Vis supplémentaires
de bornier
(4) Raccords
de ls
Foret à maçonnerie de 5,5 mm (7/32 po)
Foret à bois de 1,6 mm (1/16 po)
(2) Fils de câblage
CONFIGURATION FACILE
1
Connecter le kit d’alimentation à
votre carillon laire existant.
3
Télécharger l’application RCA Security.
4
Se connecter au Wi-Fi.
5
Personnaliser les paramètres
de votre appareil.
(2) Vis de sécurité pour
plaque frontale
Crayon ou
marqueur
(1) Niveau à bulle
Kit
d’alimentation
+ ls de connexion et raccords de ls
2
Connecter et monter la sonnette
vidéo au câblage existant de la
sonnette.
(1) Résistance
(pour les installations
sans carillon)
Poignée de
tournevis
et embout
réversible
Découvrir nos vidéos de conguration
Sur l’ordinateur, se rendre sur
http://www.rcaaudiovideo.com/doorbell2installvideo
Page 17

17
CONNEXION ET MONTAGE DU KIT D’ALIMENTATION
Repérer le disjoncteur qui commande le
circuit de la sonnette. Le désactiver avant
de continuer l’installation.
Couper l’alimentation du circuit de la sonnette
1
Retirer le couvercle du carillon de la sonnette
2
Localiser le carillon de votre sonnette.
Retirer son couvercle.
IMPORTANT : Si votre sonnette n’a pas de carillon, il est nécessaire
d’installer la résistance fournie pour réguler l’alimentation de la caméra de
sonnette. Il est possible d’ignorer cette section et de suivre les instructions
de la section « Si vous n’avez pas de carillon » à la page 21.
Connecter les ls de connexion du kit d’alimentation
au kit d’alimentation
3
Insérer le connecteur joint
dans la fente sur le côté
du kit d’alimentation.
Retirer les ls existants des bornes du carillon
4
TRANS FRONTREAR
Desserrer les vis des
bornes de la sonnette qui
est à remplacer. Retirer
les ls de ces bornes.
TRANS AVANT
ARRIÈRE
IMPORTANT : Garder une trace de quel l va à quelle borne!
Connecter les ls de connexion du kit d’alimentation
aux bornes du carillon
5
TRANS AVANT
ARRIÈRE
Couper et retirer les gaines recouvrant les
extrémités des ls rigides du kit d’alimentation.
Plier les extrémités de chaque l pour les
insérer sur les bornes où se trouvaient les
anciens ls. Serrer ensuite les vis des bornes
pour maintenir les ls en place.
Page 18

18
CONNEXION ET MONTAGE DU KIT D’ALIMENTATION (suite)
Connecter les ls de connexion du kit d’alimentation et
les ls de l’ancien carillon
6
Couper et retirer les gaines recouvrant
les extrémités des ls toronnés du kit
d’alimentation.
Rassembler les extrémités d’un l de câblage
du kit d’alimentation et un l de l’ancien
carillon et les insérer dans un raccord de
ls. Puis tourner le raccord de ls jusqu’à
ressentir une tension. Répéter l’opération
avec l’autre jeu de ls et de raccord de ls.
Le résultat nal ressemblera au schéma
ci-dessous.
Fil du
carillon
Raccord
de ls
Tourner
Fil de
câblage du kit
d’alimentation
Monter le kit d’alimentation sur le côté du carillon
7
Trouver une place sur le côté du carillon où
le kit d’alimentation peut s’adapter lorsque
le couvercle du carillon est remis en place.
Retirer la pellicule protectrice de la bande
adhésive au bas du kit d’alimentation. Placer
le kit d’alimentation là où il doit être monté
et appuyer dessus jusqu’à ce qu’il soit xé.
Remettre le couvercle du carillon de votre sonnette
en place
8
Replacer le couvercle du carillon.
REAR TRANS FRONT
Fils du
carillon
Raccords de ls
Bornes du carillon
Fil de câblage du kit
d’alimentation
Kit
d’alimentation
Page 19

19
Repérer le disjoncteur qui commande le
circuit de la sonnette. S’assurer qu’il est
désactivé avant de continuer l’installation.
Déterminer l’option de plaque de montage qui
s’adapte le mieux
Essayer les trois options de plaque de
montage là où la sonnette vidéo doit
être installée. Choisir celle qui donne
la position et l’angle désirés pour la
sonnette vidéo.
3
CONNECTER ET MONTER LA SONNETTE VIDÉO
S’assurer que l’alimentation du circuit de la sonnette est
désactivée
1
Retirer la sonnette existante
2
Retirer délicatement la sonnette existante
du mur. Ensuite, déconnecter le câblage
venant de la maison des bornes
de la sonnette.
Retirer et
décrocher
5
Positionner la plaque de montage et marquer
l’emplacement
Placer la plaque de montage à
l’endroit déni pour le montage.
Vérier que...
(1) le centre de la plaque est au-
dessus du trou d’où le câblage
de sonnette de votre maison
sort et
(2) la plaque de montage est de
niveau.
Suite à la page suivante…
4
Insérer le niveau à bulle dans la plaque de montage
Encliqueter le niveau à bulle dans la fente sur le
devant de la plaque de montage utilisée.
Utiliser un marqueur ou un crayon pour marquer les trous supérieur et
inférieur. Puis enlever la plaque de montage.
Page 20

20
CONNECTER ET MONTER LA SONNETTE VIDÉO (suite)
6
Percez des trous pour la plaque de montage
Percer les deux trous indiqués
par les marques.
Insérer le foret approprié à la
surface de montage dans la
perceuse électrique :
brique ou stuc = foret plus gros
[5,5 mm
(7/32 po)]
surface en bois = petit foret
[1,6 mm
(1/16 po)]
— OU —
Perceuse
Insérer
Stuc,
maçonnerie
Bois
Montage de la plaque de montage contre le mur
7
Chevilles
Si la plaque de montage est installée sur de la
maçonnerie ou de la brique, insérer les chevilles
fournies dans les trous précédemment forés avant
de continuer.
Aligner les trous de la plaque de montage avec les
trous forés précédemment.
Monter la plaque de montage sur le mur à l’aide
des vis fournies.
Page 21

21
IMPORTANT! Manipuler la sonnette vidéo avec soin!
S’assurer de ne pas rayer l’objectif.
Connecter la sonnette vidéo à l’alimentation provenant
de la maison (OPTIONS A et B)
9
OPTION A : Si les ls d’alimentation de la sonnette provenant de la
maison sont assez longs.
Desserrer
Dos de la
caméra de
sonnette
Bornes
Utiliser le tournevis fourni dans cet emballage
pour desserrer les vis des bornes au dos de la
sonnette vidéo.
Bornes
Fils de
sonnette
provenant de
la maison
Serrer
Connecter les ls d’alimentation de la sonnette
directement aux bornes à l’arrière de la sonnette
vidéo. Faire une boucle sur les extrémités des ls
autour de chaque borne au dos de la sonnette
vidéo. Remarque : Peu importe quel l est branché
sur quel terminal.
Serrer les vis pour maintenir fermement les ls
en place.
8
Retirer la plaque frontale de la sonnette vidéo
Avant de la monter, retirer la plaque frontale
de la sonnette vidéo, car il est nécessaire
d’accéder à plusieurs éléments derrière
la plaque lors de la conguration.
S’IL N’Y A PAS DE CARILLON
Il est nécessaire d’utiliser la résistance fournie dans cet
emballage pour connecter la sonnette vidéo au câblage
de votre maison. Suivre les instructions pour l’OPTION
B sur la page suivante, y compris les instructions de la
résistance dans la boîte rouge.
Suite à la page suivante…
Page 22

22
OPTION B : Si les ls d’alimentation de la sonnette provenant de la maison
ne sont PAS ASSEZ longs.
Mettre sous tension l’alimentation du circuit de
la sonnette
Activer le circuit qui alimente la sonnette.
10
Conrmer que la sonnette vidéo est alimentée
L’indicateur autour du bouton d’appel de la
sonnette clignote lorsqu’il est sous tension
(d’abord rouge, puis bleu).
Si l’indicateur clignote : Passer à l’étape
suivante.
Si l’indicateur NE clignote PAS : Tout
d’abord, vérier les connexions au dos de
la sonnette vidéo. Ensuite, appuyer sur le
bouton de réinitialisation sur l’avant de
la sonnette vidéo et le maintenir enfoncé
pendant 4 secondes, jusqu’à ce que la
sonnette indique « reset successful »
(Réinitialisation réussie).
11
Utiliser le tournevis fourni dans cet emballage
pour desserrer les vis des bornes à l’arrière de
la sonnette vidéo.
Desserrer
Dos de la caméra
de sonnette
Bornes
Placer la borne de chaque l fourni complètement
sous chaque vis des bornes. Puis resserrer les
deux vis des bornes.
INSTRUCTIONS POUR LA RÉSISTANCE
(S’IL N’Y A PAS DE CARILLON)
S’il est nécessaire d’utiliser la résistance fournie, couper
et retirer les gaines recouvrant les extrémités de la
résistance. Réunir une extrémité de la résistance avec
l’un des ls connectés à la sonnette vidéo. Utilisez l’un
des raccords de ls fournis pour torsader ces extrémités
ensemble. Connecter l’autre extrémité de la résistance
à votre l de sonnette de la maison en suivant les
instructions ci-dessous.
Réunir les extrémités d’un l et d’un l de sonnette
de la maison ensemble et les insérer dans un
raccord de ls. Puis tourner le raccord de ls
jusqu’à ressentir une tension. Répéter l’opération
avec l’autre l de câblage, le l de la maison et le
raccord de câblage.
CONNECTER ET MONTER LA SONNETTE VIDÉO (suite)
Fil de
câblage
Raccord
de ls
Tourner
Fil de sonnette
provenant de
la maison
Page 23

23
12
Installer la plaque frontale de son choix
14
Placer la plaque frontale de son choix
sur l’avant de la sonnette vidéo comme
indiqué ici. Insérer les 2 vis de blocage
fournies dans le bas de la sonnette vidéo
pour xer la plaque frontale.
Décoller l’autocollant de code QR de l’avant de la
sonnette vidéo et le ranger dans un endroit sûr
13
Autocollant
de code QR
Décoller
Décoller délicatement l’autocollant de
code QR de l’avant de la sonnette vidéo.
S’assurer de le mettre dans un endroit
sûr, — il sera nécessaire pour terminer
la conguration!
Faire passer les ls d’alimentation et/ou
les ls de câblage dans le mur.
Aligner les trous du corps de la sonnette
vidéo avec les trous de la plaque
de montage. Insérer les vis fournies
dans le corps de la sonnette vidéo et
dans la plaque de montage. Serrer
complètement ces vis.
Installer la sonnette vidéo sur la plaque de montage
Page 24

24
Soyez patient avec votre réseau WiFi! Certaines parties de la conguration WiFi,
comme la connexion à votre réseau, peuvent prendre entre 5 et 6 minutes.
L’écran est gelé? Quitter l’application et recommencer.
Lancer l’application
Une fois que l’application RCA Security est installée
sur le téléphone portable ou la tablette, appuyer
sur l’icône pour lancer l’application.
IMPORTANT : La première fois qu’elle est lancée,
l’application demande si elle peut vous envoyer des
notications. Cliquer sur « Allow » (Autoriser) pour
permettre les notications push de l’application sur
votre téléphone ou votre tablette.
1
S’inscrire en tant que nouvel utilisateur
2
La première fois que l’application RCA
Security est lancée, un nom d’utilisateur et
un mot de passe doivent être créés an de
pouvoir accéder à la caméra en toute sécurité.
Appuyer sur le bouton New User
Registration (Inscription d’un nouvel
utilisateur) pour commencer. Suivre les
étapes pour s’inscrire et passer à l’étape
suivante lorsque l’inscription est terminée.
Remarque : Si vous disposez déjà d’un nom
d’utilisateur et d’un mot de passe RCA Security,
les saisir dans les espaces appropriés et appuyer
sur le bouton Login (Connexion).
Pour des raisons de sécurité, toute adresse
électronique ou numéro de téléphone ne
peuvent être associés qu’à un seul compte.
3
CONNEXION AU WIFI
Dans les magasins Google Play ou Apple App, rechercher
« RCA SECURITY » et rechercher l’icône illustrée ci-contre.
Ensuite, télécharger et installer l’application.
TÉLÉCHARGER L’APPLICATION
RCA SECURITY
• iOS 7 ou une version ultérieure
• Android version 4.4 ou ultérieure
Conguration minimale du système d’exploitation
pour l’application RCA Security
REMARQUE : Une fois la caméra de sonnette
installée et congurée, s’assurer de retirer
avec précaution le lm de protection qui
recouvre son objectif et son éclairage IR.
Objectif
Lumière
IR
Page 25

25
Une fois que l’application reconnaît le numéro
de série de la sonnette, elle invite à se connecter
au réseau WiFi. Appuyer sur le bouton Connect
to a Network (Se connecter à un réseau)
dans l’application.
Soyez patient avec votre réseau WiFi! Certaines parties de la conguration WiFi,
comme la connexion à votre réseau, peuvent prendre entre 5 et 6 minutes.
L’écran est gelé? Quitter l’application et recommencer.
Connecter la caméra au réseau WiFi
3
Dans l’application RCA Security, appuyer sur
le symbole + au milieu de l’écran.
Ressortir le code QR et le numéro de
série que vous avez retirés de l’avant de
la sonnette vidéo.
Balayer ce code QR avec le téléphone dès
l’invite par l’application.
REMARQUE : Le code QR est également au dos
de la sonnette.
Suivre les étapes de la conguration guidée de
l’application
4
L’application RCA Security vous guide à travers les étapes pour
congurer la sonnette vidéo avec le réseau WiFi domestique.
IMPORTANT : Il est également possible d’obtenir un guide
d’installation détaillé de l’application en ligne. Il suft de visiter le site
bit.ly/2He6WmR et de consulter la section des manuels pour obtenir
la dernière version.
+ S’assurer que son téléphone ou sa tablette est connecté(e) au réseau WiFi
souhaité.
+ Vérier que la caméra reçoit un bon signal du routeur WiFi.
+ Tester le réseau WiFi avec d’autres appareils pour s’assurer de son fonctionnement.
+ Vérier que le mot de passe correct pour le réseau WiFi considéré a été saisi
dans l’application.
+ Vérier que le routeur WiFi utilise WPA2-PSK/WPA-PSK ou AES comme méthode
de cryptage.
+ Vérier qu’il n’y a pas de ltre MAC sur le routeur ou ajouter une adresse MAC
à la liste blanche du routeur.
+ Réinitialiser la caméra pour recongurer la connexion. Appuyer sur le bouton
RESET (Réinitialiser) sur l’avant de la sonnette (Sous la plaque frontale) et le
maintenir enfoncé pendant 4 secondes.
Dépannage de la connexion
Pour toute assistance supplémentaire, composer le
1-833-236-6561.
Page 26

26
(Back) (Retour) revient à l’écran de la liste des périphériques.
(Settings) (Paramètres) permet d’accéder au menu Paramètres de cette caméra. Appuyer sur cette icône pour activer
ou désactiver les alarmes de mouvement, régler le son de la caméra, vérier l’état du stockage et la version du logiciel de
l’appareil, régler les paramètres de l’heure et de la date, etc.
Camera view (Afchage de la caméra) montre l’image transmise par la caméra de sonnette. Mettre le téléphone / la tablette sur le
côté pour prendre en charge l’écran entier.
(Stop) (Arrêt) et (Pause) permettent d’arrêter/démarrer ou de mettre en pause la vidéo en direct.
(Sound On/Off) (Son activé/désactivé) permet d’activer ou de désactiver le son en provenance de la caméra.
(Multi-Camera View) (Vue multi-caméras) permet d’afcher plusieurs caméras à la fois sur un seul écran (si plusieurs
caméras sont congurées). Appuyer sur le nombre de caméras auxquelles il est souhaité d’accéder sur un écran de vue multi-
caméras.
(Zoom) permet de zoomer sur la vue en direct.
(Talk) (Parler) permet de communiquer via le haut-parleur intégré de cette caméra. Appuyer sur cette icône pour commencer
à parler.
(Snapshot) (Instantané) permet de prendre une photo xe de la vidéo de la caméra. Le chier de l’instantané est
enregistré sur votre téléphone intelligent ou votre tablette.
PRÉSENTATION DU SYSTÈME : ÉCRAN VUE EN DIRECT
(Record) (Enregistrement) permet de démarrer/arrêter l’enregistrement vidéo. Le chier vidéo est enregistré sur votre téléphone intelligent ou votre tablette.
(Video Quality) (Qualité vidéo) permet de basculer entre des vidéos haute dénition et standard sur l’écran d’afchage.
Call log (Journal des appels) montre l’historique des heures où quelqu’un a sonné à la porte.
Video History (Historique vidéo) donne accès à la chronologie de la caméra de sonnette, ce qui vous permet d’accéder aux enregistrements stockés sur la carte
mémoire de la caméra de sonnette selon l’heure à laquelle ils se sont produits.
Page 27

27
Utilisation du menu paramètres
Appuyer sur l’icône dans l’écran Live View (Vue en direct) pour accéder aux paramètres personnalisables suivants
de la caméra de sonnette.
Receive doorbell call (Recevoir un appel de la sonnette) permet de dénir si la réception des alertes sur son téléphone
est souhaitée lorsque quelqu’un sonne à la porte.
Chime type (Type de carillon) permet de sélectionner le type de carillon qu’il y a dans la maison (électrique,
mécanique, ou aucun installé).
Audio active/désactive l’audio pour l’enregistrement et la visualisation en direct.
IR Light (Lumière IR) permet d’activer et désactiver la fonction de vision infra-rouge de la caméra.
Alarm Notication (Notication d’alarme) permet de planier les moments souhaités pour recevoir des notications
d’alertes. Permet également de dénir la zone de détection de mouvement pour les alertes et la sensibilité de
détection, ainsi que le son produit par la caméra de sonnette lorsqu’un mouvement est détecté.
Time Zone (Fuseau horaire), Daylight Savings Time (Heure d’été) et Date Format (Format de date) permettent
d’ajuster les paramètres de fuseau horaire, d’heure d’été et de format de date qui ont été dénis lors de la
conguration.
Wi-Fi permet de modier les informations de réseau WiFi pour la caméra de sonnette et de garder l’appareil actif sur le
nouveau réseau. C’est une option pratique si un nouveau routeur sans l est utilisé, par exemple.
Storage Status (État de stockage) permet de formater la carte mémoire insérée. Un point à côté de cet élément dans le
menu signie que la carte SD nécessite une attention particulière.
Device Version (Version de l’appareil) afche la version du micrologiciel de la caméra de sonnette. Un point à côté de
cet élément dans le menu signie qu’une mise à jour du micrologiciel est disponible. Choisir cette option et suivre les
instructions pour le mettre à jour.
Image Encryption (Cryptage de l’image) augmente la sécurité de la vidéo de la caméra de sonnette. Cette option est
activée par défaut.
PERSONNALISER ET UTILISER!
Page 28

28
PRÉSENTATION DE LA CAMÉRA DE SONNETTE
AVANT DOS
Objectif Il permet de capturer la vidéo devant la
sonnette.
Emplacement de la carte Micro SD Il contient
la carte micro SD qui est livrée avec la caméra de
sonnette.
Capteur IR Il détecte les changements de lumière
ambiante et ajuste les paramètres vidéo en
conséquence.
Bouton de réinitialisation Il permet de rétablir
les paramètres d’usine de la caméra de sonnette
(maintenir enfoncé pendant 15 secondes).
Bouton d’appel déclenche la sonnette.
Bornes à vis Elles
permettent de se
connecter à la source
d’alimentation de
sonnette de son
domicile.
La caméra de sonnette est équipée d’une carte SD préinstallée, pour
l’enregistrement des alertes. Pour retirer ou remplacer cette carte, il est d’abord
nécessaire de retirer la plaque frontale de la caméra de sonnette en déverrouillant
ses vis de blocage pour la retirer. Appuyer sur la carte SD installée pour la
déverrouiller et la retirer. Placer la nouvelle carte SD et la verrouiller en place.
Ensuite, replacer le couvercle de la carte SD et placer la plaque frontale sur la
caméra de sonnette. Enn, insérer les vis de blocage et les revisser en place.
Retrait / Remplacement de la carte SD
Page 29

29
HSDB2 QSG 04
AHORA NUNCA TENDRÁ
QUE PREGUNTAR...
¿QUIÉN ES?
English instructions ................... 1
Instructions en français ........... 15
Instrucciones en español ....... 29
Guía de Instalación
Page 30

30
Timbre
de video
con 1
carátula
instalada
+ 2
opciones
de carátula
LO QUE USTED RECIBE
HERRAMIENTAS NECESARIAS
3 opciones de placa
de montaje
Juego de instalación:
(3) Anclajes de
montaje
(3) Tornillos de
montaje
Taladro
(2) Tornillos de terminal
adicionales
(4) Tuercas para
alambre
Broca de 7/32 pulgadas (5.6 mm)
para mampostería
Broca de 1/16 pulgadas (1.6 mm)
para madera
(2) Conductores
de conexión
FÁCIL DE CONFIGURAR
1
Conecte el juego de potencia a su
campanilla cableada existente.
3
Descargue la aplicación RCA Security
App (Aplicación de seguridad RCA).
4
Conéctese a WiFi.
5
Personalice los ajustes de
su dispositivo.
(2) Tornillos de seguridad
para la carátula
Lápiz o
marcador
(1) Nivel de burbuja
Juego de
potencia
+ conductores de conexión y
tuercas para alambre
2
Conecte y monte el timbre de video
en el cableado del timbre existente.
(1) Resistencia
(para instalaciones
sin una caja de
campanilla)
Mango de
destornillador y
punta reversible
Consulte nuestros videos de instalación
En su computadora, vaya a
http://www.rcaaudiovideo.com/doorbell2installvideo
Page 31

31
CONECTE Y MONTE EL JUEGO DE POTENCIA
Encuentre el cortacircuito que controla
el circuito para su timbre. Desconéctelo
antes de continuar con la instalación.
Desconecte la alimentación eléctrica para el
circuito del timbre
1
Retire la tapa de la caja de campanilla de su timbre
2
Encuentre la campanilla del timbre.
Retire la tapa.
IMPORTANTE: Si su timbre no tiene una caja de campanilla, entonces
tendrá que instalar la resistencia suministrada para regular la potencia
para el timbre con cámara. Puede saltar esta sección y seguir las
instrucciones en la sección “Si no tiene una caja de campanilla”
en la página 35.
Conecte los conductores de conexión del juego
de potencia al juego de potencia
3
Inserte el conector unido
en la ranura situada en
el lateral del juego
de potencia.
Retire los conductores existentes de las terminales
de la campanilla
4
TRANS FRONTREAR
Aoje los tornillos de
terminal para el timbre
que desea reemplazar.
Retire los conductores
de esas terminales.
TRANS ANTERIORPOSTERIOR
IMPORTANTE: ¡Recuerde qué conductor va con cuál terminal!
Conecte los conductores de conexión del juego de
potencia en las terminales de la campanilla
5
TRANS ANTERIORPOSTERIOR
Retire los forros que cubren los extremos de
los conductores de alambre sólido del juego
de potencia. Doble los extremos de cada
conductor sobre las terminales donde se
encontraban los conductores antiguos.
Luego apriete los tornillos de terminal
para jar los conductores en posición.
Page 32

32
3
1
2
CONECTE Y MONTE EL JUEGO DE POTENCIA (continuación)
Una los conductores de conexión del juego de potencia
con los conductores de campanilla antiguos
6
Retire los forros que cubren los extremos
de los conductores de alambres trenzados
del juego de potencia.
Una los extremos de un conductor del juego
de potencia y un conductor de campanilla
antiguo e insértelos en una tuerca para
alambre. Luego gire la tuerca para alambre
hasta que sienta tensión. Repita con el otro
juego de conductores y tuerca para alambre.
El resultado nal será algo parecido al
diagrama siguiente.
Conductor de
campanilla
Tuerca para
alambre
Girar
Conductor
del juego de
potencia
Monte el juego de potencia en un lado de la caja de
campanilla
7
Encuentre en un lado de la caja de
campanilla un espacio en el que pueda
alojar el juego de potencia con la tapa
de la caja de campanilla reinstalada.
Pele la cubierta de la parte superior de la tira
adhesiva situada en la parte inferior del juego
de potencia. Coloque el juego de potencia
donde desee montarlo y aplique presión
sobre él hasta que esté rmemente sujeto.
Reinstale la tapa de la caja de campanilla de su timbre
8
Reinstale la tapa de la caja de campanilla.
REAR TRANS FRONT
Conductores de
campanilla
Tuercas para alambre
Terminales de la caja
de campanilla
Conductores del juego
de potencia
Juego de
potencia
Page 33

33
Encuentre el cortacircuito que controla
el circuito para su timbre. Asegúrese que
la alimentación esté desconectada en el
cortacircuito antes de continuar con la
instalación.
Encuentre la opción de placa de montaje que
funcione mejor
Pruebe las tres opciones de placa de
montaje donde desee montar el timbre
de video. Elija la que le proporcione la
posición y el ángulo deseados para
su timbre de video.
3
CONECTE Y MONTE EL TIMBRE DE VIDEO
Asegúrese que la alimentación eléctrica para el circuito
del timbre esté desconectada
1
Extraiga el timbre existente
2
Retire cuidadosamente su timbre
existente de la pared. Luego desconecte
el cableado de su casa de las terminales
del timbre.
Retire y
desconecte
5
Sitúe la placa de montaje y marque la posición
Coloque la placa de montaje donde
desee montarla. Asegúrese que...
(1) el centro de la placa esté situado
sobre el oricio de salida del
cableado del timbre de
su casa, y
(2) la placa de montaje esté a nivel
continúa en la siguiente página...
4
Inserte el nivel de burbuja en la placa de montaje
Monte el nivel de burbuja en la ranura en la parte
frontal de la placa de montaje que desee usar.
Utilice un marcador o lápiz para marcar los oricios superior e inferior.
Luego retire la placa de montaje.
Page 34

34
9
CONECTE Y MONTE EL TIMBRE DE VIDEO (continuación)
6
Taladre oricios para la placa de montaje
Taladre dos oricios en las
posiciones previamente
marcadas.
Inserte la broca correcta para su
supercie en un taladro eléctrico:
ladrillo
o estuco = broca más grande
(7/32 pulgadas
[5.6 mm])
supercie
de madera = broca pequeña
(1/16 pulgadas [1.6 mm])
— O —
Taladrar
Insertar
Estuco,
mampostería
Madera
Monte la placa de montaje en la pared
7
Anclajes
Si está montando en una pared de mampostería
o ladrillo, inserte los anclajes suministrados en
los oricios que taladró antes de proceder.
Alinee los oricios en la placa de montaje con los
oricios que taladró.
Monte la placa de montaje en la pared usando los
tornillos suministrados.
Page 35

35
¡IMPORTANTE! ¡Manipule con cuidado el timbre de
video! Asegúrese de no rayar la lente.
Conecte el timbre de video al suministro eléctrico
de la casa (OPCIONES A y B)
9
OPCIÓN A: Si los conductores de alimentación eléctrica de la casa
para el timbre son sucientemente largos.
Aojar
Parte posterior
del timbre
con cámara
Terminales
Utilice el destornillador suministrado con este
paquete para aojar los tornillos de terminal
situados en la parte posterior del timbre de video.
Terminales
Conductores
de la casa
para el timbre
Apretar
Conecte los conductores de alimentación para
el timbre directamente en las terminales situadas
en la parte posterior del timbre de video. Enrolle
el extremo de cada conductor alrededor de cada
terminal situada en la parte posterior del timbre
de video. Aviso: El orden de conexión de los
conductores con las terminales no es importante.
Apriete los tornillos para sujetar rmemente los
conductores en su posición.
8
Retire la carátula del timbre de video
Antes de montarlo, retire la carátula del
timbre de video — necesitará acceso a
varios componentes que están detrás
de la carátula durante la instalación.
SI NO TIENE UNA CAJA DE CAMPANILLA
Deberá utilizar la resistencia suministrada con este
paquete para conectar el timbre de video al cableado
de su casa. Siga las instrucciones para la OPCIÓN B
en la página siguiente, incluyendo las instrucciones
para la resistencia en la caja roja.
continúa en la siguiente página...
Page 36

36
CONECTE Y MONTE EL TIMBRE DE VIDEO (continuación)
OPCIÓN B: Si los conductores de alimentación eléctrica de la casa
para el timbre NO son sucientemente largos.
Utilice el destornillador suministrado con este
paquete para aojar los tornillos de terminal
situados en la parte posterior del timbre de video.
Aojar
Parte posterior del
timbre con cámara
Terminales
Coloque la terminal de cada conductor
suministrado completamente debajo de cada
tornillo de terminal. Luego vuelva a apretar
ambos tornillos de terminal.
INSTRUCCIONES PARA LA RESISTENCIA
(SI NO TIENE UNA CAJA DE CAMPANILLA)
Si necesita usar la resistencia suministrada, desforre
los extremos de la resistencia. Una un extremo de la
resistencia con uno de los conductores conectados
al timbre de video. Utilice una de las tuercas de
alambre suministradas para jarlos uno con el otro.
Conecte el otro extremo de la resistencia al conductor
del timbre de la casa siguiendo las instrucciones que se
dan a continuación.
Una los extremos de un conductor de conexión y
un conductor de la casa para el timbre e insértelos
en una tuerca para alambre. Luego gire la tuerca
para alambre hasta que sienta tensión. Repita con
el otro conductor de conexión, conductor de la
casa para el timbre y tuerca para alambre.
Conductor
de conexión
Tuerca para
alambre
Girar
Conductor de
la casa para
el timbre
Conecte la alimentación eléctrica para el circuito
del timbre
Vuelva a conectar la alimentación
eléctrica para el circuito del timbre.
10
Conrme que el timbre de video recibe alimentación
eléctrica
El indicador alrededor del botón de llamada
del timbre parpadea cuando está energizado
(primero en color rojo, luego en color azul).
Si el indicador está parpadeando: Vaya al
paso siguiente.
Si el indicador NO está parpadeando:
Primero, revise las conexiones en la parte
posterior del timbre de video. Luego oprima
y no suelte el botón de restablecimiento en la
parte anterior del timbre de video durante 4
segundos, hasta que el timbre diga
“reset successful” (reinicio satisfactorio).
11
Page 37

37
12
Instale la carátula que eligió
14
Coloque la carátula que eligió sobre la
parte anterior del timbre de video como
se muestra aquí. Inserte los 2 tornillos de
jación suministrados en la parte inferior
del timbre de video para jar la carátula.
Quite la pegatina de código QR de la parte anterior
del timbre de video y guárdela en un lugar seguro
13
Pegatina de
código QR
Quitar
Quite cuidadosamente la pegatina de
código QR de la parte anterior del timbre
de video. Asegúrese de guardarla en
un lugar seguro — ¡la necesitará para
nalizar la conguración!
Pase los conductores de alimentación
y/o conductores de conexión a través
de la pared.
Alinee los oricios en el cuerpo del
timbre de video con los oricios en la
placa de montaje. Inserte los tornillos
suministrados a través del cuerpo del
timbre de video y en la placa de montaje.
Apriete completamente estos tornillos.
Instale el timbre de video en la placa de montaje
Page 38

38
¡Tenga paciencia con su red WiFi! Ciertas partes de la conguración WiFi, como
conectar a su red, podrían demorar hasta 5 o 6 minutos para nalizar.
¿Se congeló la pantalla? Salga de la aplicación y comience de nuevo.
Inicie la aplicación
Una vez que la RCA Security App se haya instalado
en su teléfono inteligente o tablet, oprima el icono
para iniciarla.
IMPORTANTE: Al iniciarla por primera vez, la
aplicación le pedirá si puede enviarle noticaciones.
Haga clic en “Allow” (Permitir) para permitir que
la aplicación inserte noticaciones en su teléfono
o tablet.
1
Regístrese como un nuevo usuario
2
La primera vez que inicie la aplicación
RCA Security App, tendrá que crear un
nombre de usuario y una contraseña
para que pueda acceder a su cámara
en forma segura.
Oprima el botón New User Registration
(Registro de usuario nuevo) para comenzar.
Siga los pasos para registrarse y vaya al paso
siguiente cuando haya nalizado.
Aviso: Si ya tiene un nombre de usuario y
contraseña de RCA Security, introdúzcalos
en los espacios adecuados y oprima el
botón Login (Iniciar sesión).
Por razones de seguridad, cada dirección de
correo electrónico o número de teléfono están
limitados a una cuenta solamente.
3
CONECTE A WIFI
En las tiendas Google Play o Apple App, busque “RCA SECURITY”
y el icono mostrado aquí. Luego descargue e instale la aplicación.
DESCARGUE LA APLICACIÓN RCA
SECURITY APP
• iOS 7 o posterior
• Android versión 4.4 o posterior
Requisitos mínimos del sistema operativo para la
RCA Security App (aplicación de seguridad RCA)
AVISO: Una vez que haya terminado de
instalar y congurar su timbre con cámara,
asegúrese de quitar cuidadosamente la
película protectora que cubre la lente y
la luz IR.
Lente
Luz IR
Page 39

39
Una vez que la aplicación reconoce el número de
serie de su timbre, ésta le pide que se conecte
a su red WiFi. Toque el botón Connect to a
Network (Conectar a una red) en la aplicación.
¡Tenga paciencia con su red WiFi! Ciertas partes de la conguración WiFi, como
conectar a su red, podrían demorar hasta 5 o 6 minutos para nalizar.
¿Se congeló la pantalla? Salga de la aplicación y comience de nuevo.
Conecte la cámara a su red WiFi
3
En la aplicación RCA Security App, toque el
símbolo + en el medio de la pantalla.
Encuentre el código QR y el número de serie
que usted quitó de la parte anterior del timbre
de video.
Escanee el código QR con su teléfono cuando
se lo pida la aplicación.
AVISO: El código QR también se encuentra en la parte
posterior del timbre.
Siga los pasos de la conguración guiada de la
aplicación
4
La aplicación RCA Security App le guiará a través de los pasos
para congurar su timbre de video con su red WiFi y su casa.
IMPORTANTE: Si lo desea, también puede obtener una guía
de conguración de aplicación detallada en línea — sencillamente
visite bit.ly/2He6WmR y busque la mejor y más reciente versión
en la sección manuales.
+Asegúrese que su teléfono o tablet estén conectados a la red WiFi que usted
quiere usar.
+Asegúrese que la cámara esté recibiendo una señal buena de su enrutador WiFi.
+Pruebe su red WiFi con otros dispositivos para asegurarse que esté funcionando.
+Asegúrese doblemente que haya introducido la contraseña correcta para su red
WiFi en la aplicación.
+Asegúrese que su enrutador WiFi utilice ya sea WPA2-PSK/WPA-PSK o AES como
su método de codicación.
+Asegúrese que no haya ningún ltro MAC (control de acceso a medios) en el
enrutador o agregue una dirección MAC en la lista blanca del enrutador.
+Restablezca la cámara para volver a congurar la conexión. Oprima y no suelte la
tecla RESET (Restablecer) en la parte anterior del timbre (debajo de la carátula)
durante 4 segundos.
Resolución de problemas de conexión
Para ayuda adicional, llame al 1-833-236-6561.
Page 40

40
(Back) (Atrás) regresa a la pantalla de lista de dispositivos.
(Settings) (Ajustes) accede al menú de ajustes para esta cámara. Oprima este icono para activar o desactivar las alarmas
de movimiento, ajustar el audio de la cámara, vericar el estado de la memoria y la versión del software del dispositivo, ajustar
los valores de la hora y la fecha, y mucho más.
Camera view (Vista de cámara) le muestra la imagen de su timbre con cámara. Coloque de lado el teléfono o tablet para llenar
toda la pantalla.
(Stop) (Detener) y (Pause) (Pausa) detiene/inicia o pausa el video en vivo.
(Sound On/Off) (Sonido activado/desactivado) activa y desactiva el sonido de la cámara.
(Multi-Camera View) (Vista multicámara) le permite ver simultáneamente múltiples cámaras en una sola pantalla
(si ha instalado y congurado múltiples cámaras). Oprima el número que desea acceder a la pantalla de vista multicámara.
(Zoom) acerca/aleja la imagen de la vista en vivo.
(Talk) (Hablar) le permite hablar a través del altavoz incorporado de la cámara. Oprima este icono para comenzar a hablar.
(Snapshot) (Instantánea) toma una imagen ja del video de la cámara. El archivo de instantáneas se guarda en su teléfono
inteligente o tablet.
(Record) (Grabar) inicia/detiene la grabación de video. El archivo de video se guarda en su teléfono inteligente o tablet.
(Video Quality) (Calidad de video) le permite cambiar entre video de alta denición y video de denición estándar en la
RECORRIDO DEL SISTEMA: PANTALLA DE VISTA EN VIVO
pantalla de vista.
Call log (Registro de llamadas) le muestra un historial de las veces cuando alguien ha tocado el timbre.
Video History (Historial de video) accede a la línea de tiempo de la cámara donde usted puede acceder a las grabaciones guardadas en la tarjeta de memoria de
la cámara por la hora en que se grabaron.
Page 41

41
Uso del menú Settings (Conguración)
Pulse el icono en la pantalla Live View (Vista en vivo) para acceder a los siguientes parámetros personalizables del
timbre con cámara.
Receive doorbell call (Recibir llamada del timbre) le permite establecer si usted quiere recibir alertas en su teléfono
cuando alguien toca el timbre.
Chime type (Tipo de campanilla) le permite establecer el tipo de campanilla que usted tiene en su casa (eléctrica,
mecánica, o ninguna instalada).
Audio enciende y apaga el audio para la grabación y la visualización en vivo.
IR Light (Luz de IR) enciende y apaga la función de visión nocturna de la cámara.
Alarm Notication (Noticación de alarma) le permite congurar horarios de noticación para cuándo desea recibir
alertas. También le permite establecer el área de detección de movimiento para las alertas y la sensibilidad de
detección, así como el sonido que hace el timbre con cámara cuando se detecta movimiento.
Time Zone (Zona horaria), Daylight Savings Time (Horario de verano) y Date Format (Formato de fecha) le
permiten ajustar los valores de la zona horaria, el horario de verano y el formato de fecha que programó durante
la conguración.
Wi-Fi (red WiFi) le permite cambiar la información de la red WiFi para el timbre con cámara y mantener el dispositivo
activo en la nueva red. Esta es una opción que viene muy bien si instala un nuevo enrutador inalámbrico, por ejemplo.
Storage Status (Estado de la memoria) le permite formatear la tarjeta de memoria insertada. Un punto junto a este
elemento en el menú signica que la tarjeta SD requiere atención.
Device Version (Versión del dispositivo) muestra la versión de rmware del timbre con cámara. Un punto junto a este
elemento en el menú signica que hay una actualización de rmware disponible. Seleccione esta opción y siga las
instrucciones para instalar la actualización.
Image Encryption (Codicación de imagen) aumenta la seguridad del video del timbre con cámara. Esta opción
está activada de forma predeterminada.
¡PERSONALICE Y UTILICE!
Page 42

42
RECORRIDO DEL TIMBRE CON CÁMARA
PARTE ANTERIOR PARTE POSTERIOR
Lente: captura video en frente del timbre.
Ranura para una tarjeta micro SD: retiene la
tarjeta micro SD que viene con su timbre con
cámara.
Sensor de IR: detecta cambios en la iluminación
ambiente y cambia los ajustes de video según
corresponda.
Botón RESTABLECER: restablece el timbre con
cámara a sus ajustes de fábrica (oprima y no suelte
durante 15 segundos).
Botón de llamada: hace sonar el timbre.
Terminales de
tornillo: se conectan
al suministro eléctrico
de su casa para el
timbre.
Su timbre con cámara viene con una tarjeta SD preinstalada, para grabar alertas.
Para retirar o reemplazar esta tarjeta, primero tendrá que quitar la carátula del
timbre con cámara mediante el desbloqueo de sus tornillos de jación y tirando
de ella para retirarla. Oprima la tarjeta SD instalada para desbloquearla y sacarla.
Inserte la nueva tarjeta SD y bloquéela en posición. Luego reinstale la cubierta de
la tarjeta SD y vuelva a colocar la carátula del timbre con cámara sobre el mismo.
Finalmente, inserte los tornillos de jación y fíjelos en posición.
Para retirar o reemplazar la tarjeta SD
Page 43

43
Page 44

HSDB2 QSG 04
© 2018 Voxx Accessories Corp.
3502 Woodview Trace, Suite 220
Indianapolis, IN 46268
If you have any questions about this product, visit
RCAAudioVideo.com or call our toll-free help line at
1-833-236-6561.
Pour toute question concernant ce produit, visiter le site
RCAAudioVideo.com ou appeler notre ligne d’assistance
sans frais en composant le 1-833-236-6561.
Si tiene preguntas sobre este producto,
visite RCAAudioVideo.com o llame a nuestra línea de ayuda
libre de cargo al 1-833-236-6561.
Page 45

FCC Information
Please take attention that changes or modication not expressly approved by the
party responsible for compliance could void the user’s authority to operate the
equipment.
FCC compliance: This equipment has been tested and found to comply with
the limits for a Class B digital device, pursuant to part 15 of the FCC Rules.
These limits are designed to provide reasonable protection against harmful
interference in a residential installation. This equipment generates, uses and
can radiate radio frequency energy and, if not installed and used in accordance
with the instructions, may cause harmful interference to radio communications.
However, there is no guarantee that interference will not occur in a particular
installation. If this equipment does cause harmful interference to radio or television
reception, which can be determined by turning the equipment o and on, the user
is encouraged to try to correct the interference by one or more of the following
measures:
—Reorient or relocate the receiving antenna.
—Increase the separation between the equipment and receiver.
—Connect the equipment into an outlet on a circuit dierent from that to which
the receiver is connected.
—Consult the dealer or an experienced radio/TV technician for help.
This equipment should be installed and operated with a minimum distance 20cm
between the radiator and your body.
The device for operation in the band 5150-5250 MHz is only for indoor use
to reduce the potential for harmful interference to co-channel mobile satellite
systems.
The maximum antenna gain permitted for devices in the bands 5250-5350 MHz
and 5470-5725 MHz shall comply with the e.i.r.p. limit.
The maximum antenna gain permitted for devices in the band 5725-5825 MHz
shall comply with the e.i.r.p. limits specied for point-to-point and non point-topoint operation as appropriate.
High-power radars are allocated as primary users (i.e. priority users) of the
bands 5250-5350 MHz and 5650-5850 MHz and that these radars could cause
interference and/or damage to LE-LAN devices.
FCC Conditions
This device complies with part 15 of the FCC Rules. Operation is subject to the
following two conditions:
1. This device may not cause harmful interference.
2. This device must accept any interference received, including interference that
may cause undesired operation.
Industry Canada ICES-003 Compliance
This device meets the CAN ICES-3 (B)/NMB-3(B) standards requirements.
This device complies with Industry Canada licence-exempt RSS standard(s).
Operation is subject to the following two conditions:
(1) this device may not cause interference, and
(2) this device must accept any interference, including interference that may
cause undesired operation of the device.
Cet appareil est conforme aux normes d’exemption de licence CNR d’Industrie
Canada Son utilisation est soumise aux deux conditions suivantes :
(1) cet appareil ne doit pas provoquer d’interférences et
(2) cet appareil doit accepter toute interférence, y compris les interférences qui
peuvent causer un mauvais fonctionnement de l’appareil.
Under Industry Canada regulations, this radio transmitter may only operate using
an antenna of a type and maximum (or lesser) gain approved for the transmitter by
Industry Canada. To reduce potential radio interference to other users, the antenna
type and its gain should be so chosen that the equivalent isotropically radiated
power (e.i.r.p.) is not more than that necessary for successful communication.
En vertu de la réglementation d’Industrie Canada, cet émetteur radio ne peut
être utilisé qu’avec une antenne d’un type et d’un gain maximal (ou inférieur)
approuvé pour l’émetteur par Industrie Canada. Pour réduire les interférences
radio potentielles avec d’autres utilisateurs, le type d’antenne et son gain doivent
être choisis de manière à ce que la puissance isotrope rayonnée équivalente
(p.i.r.e.) ne soit pas supérieure à celle nécessaire à une communication réussie.
This equipment should be installed and operated with a minimum distance 20cm
between the radiator and your body.
Cet équipement doit être installé et utilisé en respectant une distance minimale
de 20 cm entre le radiateur et le corps.
Symbol Conventions
The symbols that may be found in this document are dened as follows.
Provides additional information to emphasize or
supplement important points of the main text.
Indicates a potentially hazardous situation, which if not
avoided, could result in equipment damage, data loss,
performance degradation, or unexpected results.
Indicates a hazard with a high level of risk, which if
not avoided, will result in death or serious injury.
WARNING
● The working temperature of the device is from -30° C to 50° C .
● All the electronic operation should be strictly compliance with the electrical
safety regulations, re prevention regulations and other related regulations
in your local region.
● Please use the power adapter, which is provided by normal company. The
power consumption cannot be less than the required value.
● Do not connect several devices to one power adapter as adapter overload
may cause over-heat or re hazard.
● Please make sure that the power has been disconnected before you wire,
install or dismantle the device.
● When the product is installed on wall, the device shall be rmly xed.
● If smoke, odors or noise rise from the device, turn o the power at once and
unplug the power cable, and then please contact the service center.
● If the product does not work properly, please contact your dealer or the
nearest service center. Never attempt to disassemble the device yourself.
(We shall not assume any responsibility for problems caused by unauthorized
repair or maintenance.)
● Do not drop the device or subject it to physical shock, and do not expose it to
high electromagnetism radiation. Avoid the equipment installation on vibrations
surface or places subject to shock (ignorance can cause equipment damage).
● Do not place the device in extremely hot (refer to the specication of the device
for the detailed operating temperature), cold, dusty or damp locations, and do
not expose it to high electromagnetic radiation.
● The device cover hall be kept from rain and moisture.
● Exposing the equipment to direct sun light, low ventilation or heat source such
as heater or radiator is forbidden (ignorance can cause re danger).
● Do not aim the device at the sun or extra bright places. A blooming or smear
may occur otherwise (which is not a malfunction however), and aecting the
endurance of sensor at the same time.
● Please use the provided glove when open up the device cover, avoid direct
contact with the device cover, because the acidic sweat of the ngers may
erode the surface coating of the device cover.
● Please use a soft and dry cloth when clean inside and outside surfaces of the
device cover, do not use alkaline detergents.
● Please keep all wrappers after unpack them for future use. In case of any failure
occurred, you need to return the device to the factory with the original wrapper.
Transportation without the original wrapper may result in damage on the device
and lead to additional costs.
● Please connect a resistor (included in the box content) to the doorbell if no
electrical chime or mechanical chime is connected.
NOTE
Make sure the power voltage across the doorbell should be between 8 VAC
and 24 VAC.
• The power supply must conform to LPS. Use the attached adapter, and do
not change the adaptor randomly.
Legal Disclaimer
TO THE MAXIMUM EXTENT PERMITTED BY APPLICABLE LAW, THE PRODUCT
DESCRIBED, WITH ITS HARDWARE, SOFTWARE AND FIRMWARE, IS
PROVIDED “AS IS”, WITH ALL FAULTS AND ERRORS, AND VOXX MAKES NO
WARRANTIES, EXPRESS OR IMPLIED, INCLUDING WITHOUT LIMITATION,
MERCHANTABILITY, SATISFACTORY QUALITY, FITNESS FOR A PARTICULAR
PURPOSE, AND NON-INFRINGEMENT OF THIRD PARTY. IN NO EVENT
WILL VOXX, ITS DIRECTORS, OFFICERS, EMPLOYEES, OR AGENTS BE
LIABLE TO YOU FOR ANY SPECIAL, CONSEQUENTIAL, INCIDENTAL, OR
INDIRECT DAMAGES, INCLUDING, AMONG OTHERS, DAMAGES FOR LOSS
NOTE
WARNING
DANGER
OF BUSINESS PROFITS, BUSINESS INTERRUPTION, OR LOSS OF DATA OR
DOCUMENTATION, IN CONNECTION WITH THE USE OF THIS PRODUCT, EVEN
IF VOXX HAS BEEN ADVISED OF THE POSSIBILITY OF SUCH DAMAGES.
REGARDING TO THE PRODUCT WITH INTERNET ACCESS, THE USE OF
PRODUCT SHALL BE WHOLLY AT YOUR OWN RISKS. VOXX SHALL NOT
TAKE ANY RESPONSIBILITIES FOR ABNORMAL OPERATION, PRIVACY
LEAKAGE OR OTHER DAMAGES RESULTING FROM CYBER ATTACK, HACKER
ATTACK, VIRUS INSPECTION, OR OTHER INTERNET SECURITY RISKS;
HOWEVER, VOXX WILL PROVIDE TIMELY TECHNICAL SUPPORT IF REQUIRED.
SURVEILLANCE LAWS VARY BY JURISDICTION. PLEASE CHECK ALL
RELEVANT LAWS IN YOUR JURISDICTION BEFORE USING THIS PRODUCT
IN ORDER TO ENSURE THAT YOUR USE CONFORMS THE APPLICABLE LAW.
VOXX SHALL NOT BE LIABLE IN THE EVENT THAT THIS PRODUCT IS USED
WITH ILLEGITIMATE PURPOSES.
IN THE EVENT OF ANY CONFLICTS BETWEEN THIS MANUAL AND THE
APPLICABLE LAW, THE LATER PREVAILS.
HSDB2 NA Safety-Warranty 02
12-Month Limited Warranty
Voxx Accessories Corporation (the “Company”) warrants to the original retail
purchaser of this product that should this product or any part thereof, under
normal use and conditions, be proven defective in material or workmanship within
12 months from the date of original purchase, such defect(s) will be repaired or
replaced with new or reconditioned product (at the Company’s option) without
charge for parts and repair labor. To obtain repair or replacement within the terms
of the warranty, the product is to be delivered with proof of warranty coverage (e.g.
dated bill of sale), specication of defect(s), transportation prepaid, to an approved
warranty station. For the location of the nearest warranty station to you, call toll-free
to our control oce: 1-800-645-4994.
This Warranty is not transferable and does not cover product purchased, serviced
or used outside the United States or Canada. The warranty does not extend to
the elimination of externally generated static, noise, or loss of range or audio/video
quality due to external factors, to costs incurred for the installation, removal or
reinstallation of the product, or to damage to digital media devices or memory. The
warranty does not apply to any product or part thereof which, in the opinion of the
company, has suered or been damaged through alteration, improper installation,
mishandling, misuse, neglect, accident or exposure to moisture. This warranty does
not apply to damage caused by an AC adapter not provided with the product or
by removal or defacement of factory serial number/barcode labels. THE EXTENT
OF THE COMPANY’S LIABILITY UNDER THIS WARRANTY IS LIMITED TO THE
REPAIR OR REPLACEMENT PROVIDED ABOVE AND, IN NO EVENT, SHALL THE
COMPANY’S LIABILITY EXCEED THE PURCHASE PRICE PAID BY PURCHASER
FOR THE PRODUCT. This Warranty is in lieu of all other express warranties or
liabilities. ANY IMPLIED WARRANTIES, INCLUDING ANY IMPLIED WARRANTY
OF MERCHANTABILITY OR FITNESS FOR A PARTICULAR PURPOSE, SHALL
BE LIMITED TO DURATION OF THIS WARRANTY. ANY ACTION FOR BREACH
OF ANY WARRANTY HEREUNDER, INCLUDING ANY IMPLIED WARRANTY,
MUST BE BROUGHT WITHIN A PERIOD OF 24 MONTHS FROM THE DATE OF
ORIGINAL PURCHASE. IN NO CASE SHALL THE COMPANY BE LIABLE FOR
ANY CONSEQUENTIAL OR INCIDENTAL DAMAGES WHATSOEVER. No person
or representative is authorized to assume for the Company any liability other than
expressed herein in connection with the sale of this product.
Some states/provinces do not allow limitations on how long an implied warranty
lasts or the exclusion or limitation of incidental or consequential damage so the
above limitations or exclusions may not apply to you. This Warranty gives you
specic legal rights and you may also have other rights which vary from state/
province to state/province.
eectivement du brouillage nuisible à la réception de la radio ou de la télévision, ce qui
peut être déterminé en éteignant et rallumant l’équipement, l’utilisateur est invité
à essayer de corriger le brouillage par une ou plusieurs des mesures suivantes :
—Réorienter ou déplacer l’antenne de réception.
—Augmenter la distance séparant l’équipement du récepteur.
—Brancher l’équipement sur une prise dont le circuit est diérent de celui où est
branché le récepteur.
—Consulter le revendeur ou un technicien expérimenté de radio/télévision.
Cet équipement doit être installé et utilisé en respectant une distance minimale de 20 cm
entre le radiateur et le corps.
Les dispositifs fonctionnant dans la bande 5150-5250 MHz sont réservés uniquement
pour une utilisation à l’intérieur an de réduire les risques de brouillage préjudiciable aux
systèmes de satellites mobiles utilisant les mêmes canaux.
Le gain d’antenne maximal autorisé pour les appareils dans les bandes 5250-5350 MHz
et 5470-5725 MHz doivent respecter le pire limiter.
Le gain d’antenne maximal autorisé pour les appareils dans la bande 5725-5825 MHz
doivent respecter le pire limites spéciées pour le point-à-point et l’exploitation non point
à point, le cas échéant.
Les utilisateurs de radars de haute puissance sont désignés utilisateurs principaux (c.à-d., qu’ils ont la priorité) pour les bandes 5250-5350 MHz et 5650-5850 MHz et que ces
radars pourraient causer du brouillage et/ou des dommages aux dispositifs LAN-EL.
Conditions FCC
Cet appareil est conforme à la partie 15 du règlement de la FCC. Son utilisation est
soumise aux deux conditions suivantes :
1. Cet appareil ne doit causer aucune interférence nuisible.
2. Cet appareil doit accepter toute interférence reçue, y compris des interférences qui
peuvent provoquer un fonctionnement non désiré.
Déclaration de conformité ICES-003 d’Industrie Canada
Cet appareil répond aux exigences des normes CAN ICES-3 (B)/NMB-3 (B).
Cet appareil est conforme aux normes d’exemption de licence CNR d’Industrie Canada.
Son utilisation est soumise aux deux conditions suivantes :
(1) cet appareil ne doit pas provoquer d’interférences et
(2) cet appareil doit accepter toute interférence, y compris les interférences qui peuvent
causer un mauvais fonctionnement de l’appareil.
En vertu de la réglementation d’Industrie Canada, cet émetteur radio ne peut être
utilisé qu’avec une antenne d’un type et d’un gain maximal (ou inférieur) approuvé pour
l’émetteur par Industrie Canada. Pour réduire les interférences radio potentielles avec
d’autres utilisateurs, le type d’antenne et son gain doivent être choisis de manière à ce
que la puissance isotrope rayonnée équivalente (p.i.r.e.) ne soit pas supérieure à celle
nécessaire à une communication réussie.
Cet équipement doit être installé et utilisé en respectant une distance minimale de 20 cm
entre le radiateur et le corps.
Conventions symboliques
Les symboles qui peuvent se trouver dans le présent document sont dénis comme suit.
Fournit des informations supplémentaires pour souligner
ou compléter les points importants du texte principal.
Indique une situation potentiellement dangereuse qui,
si elle n’est pas évitée, peut entraîner des dégâts matériels,
une perte de données, une dégradation des performances
ou des résultats inattendus.
Indique un danger avec un risque élevé qui, s’il n’est pas
évité, entraînera la mort ou des blessures graves.
AVERTISSEMENT
● La température de fonctionnement de l’appareil est de -30 °C à 50 °C.
● Toute l’utilisation électronique doit être strictement conforme aux réglementations en
matière de sécurité électrique, à la prévention des incendies et à d’autres règlements
connexes dans votre région.
● Utilisez l’adaptateur secteur, normalement fourni par l’entreprise. La puissance fournie
ne peut pas être inférieure à la valeur requise.
● Ne connectez pas plusieurs périphériques à un adaptateur secteur car la surcharge
de l’adaptateur peut provoquer une chaleur excessive ou un risque d’incendie.
● Vériez que l’alimentation a été déconnectée avant de câbler, installer ou démonter
l’appareil.
REMARQUE
AVERTISSEMENT
DANGER
Déclaration de la Federal Communication Commission (FCC)
Veuillez prendre note que les changements ou les modications eectués qui ne sont
pas expressément approuvés par la partie responsable de la conformité peuvent annuler
l’autorisation accordée à l’utilisateur de se servir de l’équipement.
Conformité FCC : Cet équipement a été soumis à des essais et a été déclaré conforme
aux limites stipulées pour un appareil numérique de classe B, conformément aux
spécications de la partie 15 du règlement de la FCC. Ces limites ont pour but d’assurer
une protection raisonnable contre le brouillage nuisible dans une installation résidentielle.
Cet équipement produit, utilise et peut dégager une énergie de fréquence radio et, s’il
n’est pas installé et utilisé conformément aux instructions, il peut causer des interférences
nuisibles aux communications radio. Cependant, il est impossible de garantir qu’aucun
brouillage ne se produira dans une installation particulière. Si cet équipement provoque
Page 46

● Lorsque le produit est installé sur un mur, l’appareil doit être solidement xé.
● Si de la fumée, des odeurs ou du bruit augmentent en provenance de l’appareil,
mettez-le hors tension et débranchez le câble d’alimentation, puis contactez le
centre de service.
● Si le produit ne fonctionne pas correctement, contactez votre revendeur ou le centre
de service le plus proche. Ne tentez jamais de démonter l’appareil vous-même. (Nous
n’assumons aucune responsabilité pour les problèmes causés par une réparation ou
une maintenance non autorisées).
● Ne laissez pas tomber l’appareil ni ne le soumettez pas à un choc physique, et ne
l’exposez pas à un rayonnement électromagnétique élevé. Évitez l’installation du
matériel sur des surfaces vibrantes ou des emplacement soumis à des chocs
(le non-respect de cette consigne peut causer des dommages matériels).
● Ne placez pas l’appareil à des emplacements très chauds (voir la spécication de
l’appareil pour la température de fonctionnement détaillée), froids, poussiéreux ou
humides, et ne l’exposez pas à des rayonnements électromagnétiques élevés.
● Le capotage de l’appareil ne doit pas être exposé à la pluie ni à l’humidité.
● L’exposition de l’équipement à la lumière directe du soleil, à une faible ventilation
ou à une source de chaleur telle qu’un chauage ou un radiateur est prohibée
(le non-respect de cette consigne peut causer un danger d’incendie).
● Ne dirigez pas l’appareil vers le soleil ni vers des zones très lumineuses. Sinon un
éblouissement ou une bavure peut se produire (ce qui n’est pas un dysfonctionnement)
et aecter l’endurance du capteur à la même occasion.
● Utilisez le gant fourni lorsque vous ouvrez le capotage de l’appareil, évitez tout contact
direct avec le capotage de l’appareil, car la sueur acide des doigts peut éroder le
revêtement de surface du capotage de l’appareil.
● Utilisez un chion doux et sec lors du nettoyage intérieur et extérieur du capotage de
l’appareil. N’utilisez pas de détergent alcalin.
● Gardez tous les matériaux d’emballage pour une utilisation ultérieure éventuelle.
En cas de panne, vous devez retourner l’appareil à l’usine dans son emballage
d’origine. Le transport sans l’emballage d’origine peut endommager l’appareil et
entraîner des coûts supplémentaires.
● Connectez une résistance (incluse dans le contenu de la boîte) à la sonnette si aucune
sonnerie électrique ni mécanique n’est connectée.
REMARQUE
Vériez que la tension d’alimentation de la sonnette est comprise entre 8 V c.a. et
24 V c.a.
• L’alimentation électrique doit être conforme à LPS (système de protection contre la
foudre). Utilisez l’adaptateur joint, et ne changez pas d’adaptateur au hasard.
Clause de non responsabilité légale
DANS LES LIMITES PERMISES PAR LA LOI EN VIGUEUR, LE PRODUIT DÉCRIT,
AVEC SON MATÉRIEL, SON LOGICIEL ET SON MICROLOGICIEL, EST FOURNI
« EN L’ÉTAT », AVEC TOUTES SES DÉFAILLANCES ET ERREURS, ET VOXX NE
GARANTIT PAS, DE MANIÈRE EXPLICITE OU IMPLICITE, Y COMPRIS, SANS
LIMITATION, LA QUALITÉ MARCHANDE, LA QUALITÉ SATISFAISANTE, L’ADAPTATION
À UN USAGE PARTICULIER ET LA NON-VIOLATION D’UNE TIERCE PARTIE. EN
AUCUN CAS VOXX, SES ADMINISTRATEURS, DIRIGEANTS, EMPLOYÉS OU AGENTS
NE POURRONT ÊTRE TENUS RESPONSABLES DE TOUT DOMMAGE SPÉCIAL,
CONSÉCUTIF, ACCESSOIRE OU INDIRECT, Y COMPRIS, ENTRE AUTRES, LES
DOMMAGES POUR PERTE DE PROFITS D’ENTREPRISE, L’INTERRUPTION D’ACTIVITÉ
OU LA PERTE DE DONNÉES OU DE DOCUMENTATION, EN RELATION AVEC
L’UTILISATION DE CE PRODUIT, MÊME SI VOXX A ÉTÉ AVISÉ DE LA POSSIBILITÉ DE
TELS DOMMAGES. EN CE QUI CONCERNE LE PRODUIT DISPOSANT D’UN ACCÈS
À INTERNET, L’UTILISATION DU PRODUIT EST ENTIÈREMENT À VOS PROPRES
RISQUES. VOXX DÉCLINE TOUTE RESPONSABILITÉ POUR UN FONCTIONNEMENT
ANORMAL, UNE FUITE DE CONFIDENTIALITÉ OU D’AUTRES DOMMAGES RÉSULTANT
D’UNE CYBERATTAQUE, DE L’ATTAQUE DE PIRATE, DE L’INFECTION PAR UN VIRUS
OU D’AUTRES RISQUES DE SÉCURITÉ LIÉS À INTERNET. TOUTEFOIS, VOXX FOURNIT
UNE ASSISTANCE TECHNIQUE OPPORTUNE SI CELA S’AVÈRE NÉCESSAIRE.
LES LOIS SUR LA SURVEILLANCE SONT DIFFÉRENTES SELON LES JURIDICTIONS.
VEUILLEZ VÉRIFIER TOUTES LES LOIS PERTINENTES DE VOTRE JURIDICTION AVANT
D’UTILISER CE PRODUIT POUR GARANTIR QUE VOTRE UTILISATION EST CONFORME
À LA LOI EN VIGUEUR. VOXX NE SERAIT ÊTRE TENUE RESPONSABLE DANS LE
CAS OÙ CE PRODUIT EST UTILISÉ À DES FINS ILLÉGITIMES.
EN CAS DE TOUT CONFLIT RÉSULTANT DU CONTENU DU PRÉSENT MANUEL ET
DE LA LOI EN VIGUEUR, CETTE DERNIÈRE PRÉVAUT.
Garantie limitée de 12 mois
Voxx Accessories Corporation (l’ « Entreprise ») garantit à l’acheteur au détail d’origine
de ce produit que si, dans les 12 mois suivant la date d’achat d’origine, ce produit ou
l’une quelconque de ses pièces, sous réserve d’utilisation et de conditions normales,
présente un ou des défauts de matériau ou de fabrication, ce ou ces défauts feront l’objet
d’une réparation ou d’un remplacement avec un produit reconditionné (à la discrétion
de l’Entreprise) sans frais pour les pièces et pour la main-d’œuvre. Pour obtenir une
réparation ou un remplacement en vertu des termes de la garantie, le produit doit être
livré avec preuve de couverture de garantie (c’est-à-dire une preuve d’achat datée), une
description du ou des défauts, et les frais de transport payés d’avance, à un centre de
réparation agréé. Pour connaître l’emplacement du centre de réparation le plus proche
de chez vous, veuillez appeler sans frais notre bureau de contrôle au :
1-800-645-4994
.
La présente garantie ne peut pas être transférée et ne couvre pas les produits achetés,
réparés ou utilisés à l’extérieur des États-Unis ou du Canada. La présente garantie ne
couvre ni l’élimination de l’électricité statique générée de manière externe, ni la perte de
portée ou la détérioration de la qualité audio/vidéo due à des facteurs externes, ni les frais
encourus pour l’installation, l’enlèvement ou la réinstallation du produit, ni les dommages
causés aux appareils multimédias numériques ou à la mémoire. La garantie ne s’applique
pas à tout produit ou toute pièce du produit qui selon l’avis de l’Entreprise, a subi des
dommages suite à une altération, une installation incorrecte, une manipulation incorrecte,
une mauvaise utilisation, une négligence, un accident ou une exposition à de l’humidité.
La présente garantie ne couvre pas les dommages occasionnés par un adaptateur c.a.
non fourni avec le produit ni par l’enlèvement ou la dégradation des étiquettes de numéro
de série/codes barres d’usine.
L’ÉTENDUE DE LA RESPONSABILITÉ DE L’ENTREPRISE EN VERTU DE LA PRÉSENTE
GARANTIE EST LIMITÉE À LA RÉPARATION OU AU REMPLACEMENT INDIQUÉS
CI-DESSUS ET, EN AUCUN CAS, LA RESPONSABILITÉ DE L’ENTREPRISE NE
PEUT DÉPASSER LE PRIX D’ACHAT PAYÉ PAR L’ACHETEUR POUR LE PRODUIT.
La présente garantie remplace toute autre garantie ou responsabilité expresse.
TOUTE GARANTIE IMPLICITE, INCLUANT TOUTE GARANTIE IMPLICITE DE QUALITÉ
MARCHANDE OU D’ADAPTATION À UN USAGE PARTICULIER, EST LIMITÉE À LA
DURÉE DE LA PRÉSENTE GARANTIE. TOUTE ACTION POUR VIOLATION DE TOUTE
GARANTIE MENTIONNÉE DANS LES PRÉSENTES, INCLUANT TOUTE GARANTIE
IMPLICITE, DOIT ÊTRE PRÉSENTÉE DANS LES 24 MOIS SUIVANT LA DATE DE
L’ACHAT D’ORIGINE. EN AUCUN CAS L’ENTREPRISE NE PEUT ÊTRE TENUE
RESPONSABLE D’UN QUELCONQUE DOMMAGE CONSÉCUTIF OU INDIRECT.
Aucune personne ni aucun représentant n’est autorisé à assumer pour l’Entreprise
une quelconque responsabilité autre que celle exprimée dans les présentes en relation
avec la vente de ce produit.
Certaines juridictions n’autorisent pas de limites quant à la durée d’une garantie implicite
ou quant à l’exclusion ou à la limitation de dommages indirects ou consécutifs; les
limitations et exclusions indiquées dans les présentes pourraient donc ne pas s’appliquer
à votre cas. La présente garantie vous donne des droits légaux spéciques et vous
pourriez également bénécier d’autres droits qui varient selon l’État, de province à État,
selon la province.
Información de la FCC
Por favor, tenga en mente que los cambios o modicaciones no aprobados expresamente
por la parte responsable del cumplimiento podrían anular la autoridad conferida al usuario
para utilizar este equipo.
Cumplimiento con las normas de la FCC: Este equipo ha sido sometido a prueba y
cumple con los límites de los dispositivos digitales de Clase B, de acuerdo con la parte 15
de las normas de la FCC. El objetivo de estos límites es ofrecer una protección razonable
contra interferencias nocivas en una instalación residencial. Este equipo genera, utiliza y
puede radiar energía de radiofrecuencia y, si no se instala y utiliza de acuerdo con estas
instrucciones, puede generar interferencia perjudicial para las radiocomunicaciones.
Sin embargo, no se garantiza que no se producirá interferencia en una instalación
en particular. Si su equipo causa interferencia perjudicial para la recepción de radio
o televisión, lo que se puede determinar apagando y encendiendo el equipo, intente
corregirla mediante uno o varios de los siguientes procedimientos:
—Vuelva a orientar o cambie de lugar la antena receptora.
—Aumente la separación entre el equipo y el receptor.
—Conecte este equipo a un tomacorriente en un circuito diferente al que esté
conectado el receptor.
—Consulte al distribuidor o a un técnico experimentado de radio y televisión para
solicitar asistencia.
Este equipo debe instalarse y utilizarse con una distancia mínima de 20 cm entre el
radiador y su cuerpo.
El dispositivo que funciona en la banda de 5150 MHz a 5250 MHz debe usarse solo en
espacios interiores para reducir la posibilidad de interferencia perjudicial en los sistemas
de satélite móviles de canal común.
La ganancia de antena máxima permitida para dispositivos que funcionan en las bandas
de 5250 MHz a 5350 MHz y 5470 MHz a 5725 MHz deberá cumplir con el límite de PIRE.
La ganancia de antena máxima permitida para dispositivos que funcionan en la banda de
5725 MHz a 5825 MHz deberá cumplir con los límites de PIRE que se especiquen, ya se
trate de transmisión punto a punto o no según corresponda.
Los radares de alta potencia se han establecido como usuarios principales (es decir,
prioritarios) de las bandas de 5250 MHz a 5350 MHz y de 5650 MHz a 5850 MHz y
pueden causar interferencia o daños en los dispositivos de red local exentos de licencia.
Condiciones de la FCC
Este dispositivo cumple con la Parte 15 de las normas de la FCC. Su funcionamiento está
sujeto a las siguientes dos condiciones:
1. Este dispositivo no debe causar interferencia dañina.
2. Este dispositivo debe aceptar toda interferencia recibida, incluida aquélla que puede
causar un funcionamiento no deseado.
Cumplimiento con las normas ICES-003 de la Industria Canadiense
Este dispositivo cumple con los requisitos de las normas CAN ICES-3(B)/NMB-3(B).
Este dispositivo cumple con las normas RSS exentas de licencia de la Industria
Canadiense. Su funcionamiento está sujeto a las siguientes dos condiciones:
(1) este dispositivo no debe causar interferencia dañina, y
(2) este dispositivo debe aceptar toda interferencia recibida, incluida aquélla que puede
causar un funcionamiento no deseado del dispositivo.
Bajo los reglamentos de la Industria Canadiense, este radiotransmisor sólo debe
funcionar usando una antena de tipo y máxima (o menor) ganancia aprobados para el
transmisor por la Industria Canadiense. Para reducir la posible interferencia de radio
a otros usuarios, el tipo de antena y su ganancia deben elegirse para que la potencia
radiada isotrópicamente equivalente (e.i.r.p.) no sea superior a la potencia necesaria
para una comunicación satisfactoria.
Este equipo debe instalarse y utilizarse con una distancia mínima de 20 cm entre el
radiador y su cuerpo.
Convenciones de símbolos
Los símbolos que quizá contenga este documento se denen a continuación.
Provee información adicional para enfatizar o
complementar puntos importantes del texto principal.
Indica una situación de posible peligro que, de no evitarse,
podría resultar en daño al equipo, pérdida de datos,
degradación del rendimiento o resultados inesperados.
Indica un peligro con un alto grado de riesgo que, de no
evitarse, causará la muerte o una lesión grave.
ADVERTENCIA
● La temperatura de funcionamiento del dispositivo es de -30 °C a 50 °C.
● Todo el funcionamiento electrónico deberá cumplir estrictamente con los reglamentos
de seguridad eléctrica, los reglamentos de prevención de incendios y otros
reglamentos relacionados en su región local.
● Por favor, utilice el adaptador de alimentación, que es suministrado por una compañía
normal. El consumo de corriente no puede ser menor que el valor requerido.
● No conecte varios dispositivos a un único adaptador de alimentación, ya que la
sobrecarga del adaptador podría causar sobrecalentamiento o un peligro de incendio.
● Por favor, asegúrese que se haya desconectado la alimentación eléctrica antes de
cablear, instalar o desarmar el dispositivo.
● Cuando se instale el producto en la pared, deberá jarse rmemente el dispositivo.
● Si el dispositivo emite humo, olores o ruido, desconecte inmediatamente la
alimentación eléctrica y desenchufe el cable de alimentación, y luego contacte al
centro de servicio.
● Si el producto no funciona correctamente, póngase en contacto con el distribuidor
o el centro de servicio más cercano a usted. Nunca trate de desarmar el dispositivo
usted mismo. (No asumiremos ninguna responsabilidad por problemas causados
por reparaciones o mantenimientos no autorizados).
● No deje caer el dispositivo ni lo someta a impactos físicos, y no lo exponga a una alta
radiación electromagnética. Evite instalar el equipo en supercies con vibraciones o
lugares sujetos a impactos (la ignorancia puede causar daño al equipo).
● No coloque el dispositivo en lugares extremadamente calientes (consulte la
especicación del dispositivo para la temperatura de funcionamiento detallada), fríos,
polvorientos o húmedos, y no lo exponga a una alta radiación electromagnética.
● La cubierta del dispositivo no debe exponerse a la lluvia y la humedad.
● La exposición del equipo a la luz solar directa, una ventilación insuciente o una fuente
de calor, tal como un calentador o radiador, está prohibida (la ignorancia puede causar
un peligro de incendio).
● No apunte el dispositivo hacia el sol o lugares demasiado brillantes. De lo contrario,
podría ocurrir un efecto de difusión lateral de pixeles o borrosidad (lo cual no es una
avería), y afectar la resistencia del sensor al mismo tiempo.
● Por favor, utilice el guante suministrado cuando abra la cubierta del dispositivo y
evite el contacto directo con la cubierta del dispositivo, porque el sudor acídico de los
dedos podría desgastar el recubrimiento de la supercie de la cubierta del dispositivo.
● Por favor, utilice un paño suave y seco cuando limpie las supercies interiores y
exteriores de la cubierta del dispositivo; no utilice detergentes alcalinos.
● Por favor, guarde todo el material de embalaje después de desempacar el dispositivo,
para uso futuro. En caso de que ocurra algún fallo, tendrá que enviar el dispositivo a
la fábrica con el material de embalaje original. El transporte sin el material de embalaje
original podría resultar en daño al dispositivo y costos adicionales.
● Por favor, conecte una resistencia (incluida en el contenido de la caja) al timbre si
éste no tiene conectado un carillón eléctrico o mecánico.
AVISO
Asegúrese que el voltaje de alimentación a través del timbre sea entre 8 V CA y 24 V CA.
• La fuente de alimentación debe cumplir el requisito LPS (fuente de alimentación
limitada). Utilice el adaptador instalado, y no cambie éste aleatoriamente.
Exclusión de responsabilidad legal
HASTA EL ALCANCE MÁXIMO PERMITIDO POR LA LEY APLICABLE, EL PRODUCTO
DESCRITO, CON SU HARDWARE, SOFTWARE Y FIRMWARE, SE SUMINISTRA
“TAL COMO ESTÁ”, CON TODAS SUS FALLAS Y ERRORES, Y VOXX NO OTORGA
NINGUNA GARANTÍA EXPRESA O IMPLÍCITA, INCLUYENDO SIN LIMITACIÓN,
COMERCIABILIDAD, CALIDAD SATISFACTORIA, ADECUACIÓN PARA UN PROPÓSITO
EN PARTICULAR, Y NO CONTRAVENCIÓN DE LOS DERECHOS DE TERCEROS. EN
NINGÚN CASO, VOXX, SUS DIRECTORES, DIRECTIVOS, EMPLEADOS O AGENTES
SERÁN RESPONSABLES ANTE USTED POR CUALESQUIERA DAÑOS ESPECIALES,
CONSECUENTES, INCIDENTALES O INDIRECTOS, INCLUYENDO ENTRE OTROS,
DAÑOS POR PÉRDIDA DE BENEFICIOS COMERCIALES, INTERRUPCIÓN LABORAL,
O PÉRDIDA DE DATOS O DOCUMENTACIÓN, EN CONEXIÓN CON EL USO DE ESTE
PRODUCTO, AUN CUANDO VOXX HAYA SIDO ADVERTIDO DE LA POSIBILIDAD DE
TALES DAÑOS. CON RESPECTO AL PRODUCTO CON ACCESO A INTERNET, EL
USO DEL PRODUCTO SERÁ TOTALMENTE POR SU PROPIA CUENTA Y RIESGO.
VOXX NO SERÁ RESPONSABLE POR UN FUNCIONAMIENTO ANORMAL, FUGAS DE
PRIVACIDAD U OTROS DAÑOS QUE RESULTEN DEBIDO A ATAQUES CIBERNÉTICOS,
ATAQUES DE PIRATAS CIBERNÉTICOS, INSPECCIÓN DE VIRUS, U OTROS RIESGOS
DE SEGURIDAD DE INTERNET; SIN EMBARGO, VOXX BRINDARÁ UN SOPORTE
TÉCNICO OPORTUNO, SI ES NECESARIO. LAS LEYES DE VIGILANCIA VARÍAN SEGÚN
LA JURISDICCIÓN. POR FAVOR, REVISE TODAS LAS LEYES RELEVANTES EN SU
JURISDICCIÓN ANTES DE USAR ESTE PRODUCTO, PARA ASEGURARSE DE QUE SU
USO CUMPLA CON LA LEY APLICABLE. VOXX NO SERÁ RESPONSABLE EN CASO
QUE ESTE PRODUCTO SE UTILICE PARA FINES ILEGÍTIMOS.
EN CASO DE CUALQUIER CONFLICTO ENTRE ESTE MANUAL Y LA LEY APLICABLE,
ÉSTA ÚLTIMA PREVALECE.
Garantía limitada de 12 meses
Voxx Accessories Corporation (la “Compañía”) le garantiza a usted, el comprador
original de este producto que si, bajo condiciones y uso normales, se encontrara que
este producto o alguna pieza del mismo presenta defectos materiales o de mano de obra
dentro de los primeros 12 meses a partir de la fecha de compra original, tales defectos
serán reparados o reemplazados con un producto nuevo o renovado (a opción de la
Compañía) sin cargo alguno por las piezas y el trabajo de reparación. Para obtener los
servicios de reparación o reemplazo dentro de los términos de esta garantía, el producto
se entregará con prueba de cobertura de garantía (por ejemplo, factura con fecha de
venta), especicación de los defectos, transporte prepagado, a una estación de garantía
aprobada. Para ubicar la estación de garantía más cercana a su domicilio, llame libre
de cargo a nuestra ocina de control al:
1-800-645-4994
.
Esta Garantía no es transferible y no cubre un producto adquirido, mantenido o
utilizado fuera de los Estados Unidos o Canadá. La garantía no incluye la eliminación
de estática o ruido generados externamente, ni la pérdida de alcance o de calidad
de audio/video debido a factores externos, ni los costos incurridos en la instalación,
retirada o reinstalación del producto, ni los daños a los dispositivos de medios digitales
o a la memoria. La garantía no aplica a ningún producto o pieza que, en opinión de la
compañía, haya sufrido daños debido a alteraciones, instalación inadecuada, abuso,
uso indebido, negligencia, accidente o exposición a la humedad. Esta garantía no aplica
a daños ocasionados por un adaptador de CA no suministrado con el producto o
por la eliminación o degradación de las etiquetas de fábrica de código de barras
o número de serie. EL ALCANCE DE LA RESPONSABILIDAD DE LA COMPAÑÍA
BAJO ESTA GARANTÍA ESTÁ LIMITADO A LA REPARACIÓN O EL REEMPLAZO
PROVISTO ARRIBA Y, EN NINGÚN CASO, DEBERÁ LA RESPONSABILIDAD DE LA
COMPAÑÍA EXCEDER EL PRECIO DE COMPRA PAGADO POR EL COMPRADOR
POR ESTE PRODUCTO.Esta Garantía reemplaza cualesquiera otras responsabilidades
o garantías expresas. CUALESQUIERA GARANTÍAS IMPLÍCITAS, INCLUYENDO
CUALQUIER GARANTÍA IMPLÍCITA DE COMERCIABILIDAD O ADAPTABILIDAD PARA
UN PROPÓSITO EN PARTICULAR, ESTARÁN LIMITADAS A LA DURACIÓN DE ESTA
GARANTÍA. CUALQUIER ACCIÓN POR INCUMPLIMIENTO DE CUALQUIER GARANTÍA
EN EL PRESENTE, INCLUYENDO CUALQUIER GARANTÍA IMPLÍCITA, DEBERÁ
PRESENTARSE DENTRO DE UN PERÍODO DE 24 MESES A PARTIR DE LA FECHA
DE COMPRA ORIGINAL. EN NINGÚN CASO LA COMPAÑÍA SERÁ RESPONSABLE
POR DAÑOS EMERGENTES O INCIDENTALES. Ninguna persona ni representante
están autorizados a asumir, en nombre de la Compañía, ninguna responsabilidad
salvo la expresada aquí en conexión con la venta de este producto.
Algunos estados/provincias no permiten limitaciones sobre la duración de una garantía
implícita o la exclusión o la limitación de daños incidentales o emergentes, de modo
que es posible que las limitaciones o exclusiones anteriores no apliquen en su caso.
Esta Garantía le conere derechos legales especícos y es posible además que
usted tenga otros derechos que pueden variar según el estado/provincia.
AVISO
ADVERTENCIA
PELIGRO
 Loading...