

Page 1

HD DVD Player
User’s Guide
Changing Entertainment. Again.
HDV5000
cover.indd 2 3/8/06 5:08:14 PM
Page 2

Model No. ___________________________________________Serial No._______________________
Purchase Date: ________________________________________________________________
Dealer/Address/Phone: __________________________________________________________
Important Information
Product Registration
Please fill out the product registration card and return it immediately. Returning this card allows
us to contact you regarding future updates and downloads.
Keep your sales receipt to obtain warranty parts and service and for proof of purchase. Attach it here and
record the serial and model numbers in case you need them. The numbers are located on the back of the player.
CAUTION
RISK OF ELECTRIC SHOCK DO
NOT OPEN
This symbol indicates “dangerous voltage” inside the product
that presents a risk of electric
shock or personal injury.
This symbol indicates
important instructions accompanying the product.
WARNING
To reduce the risk of fire or shock hazard, do not
expose this HD DVD player to rain or moisture.
CAUTION
THIS PRODUCT UTILIZES A LASER. USE OF CONTROLS
OR ADJUSTMENTS OR PERFORMANCE OF PROCEDURES OTHER THAN THOSE SPECIFIED HEREIN MAY
RESULT IN HAZARDOUS RADIATION EXPOSURE. DO
NOT OPEN COVERS AND DO NOT REPAIR YOURSELF.
REFER SERVICING TO QUALIFIED PERSONNEL.
HDV5000
Note:
This HD DVD player is designed and manufactured to
respond to the Region Management Information. If
the Region number of a DVD disc does not correspond to the Region number of this HD DVD player
this HD DVD player cannot play the disc. The Region
number for this HD DVD player is Region No 1.
Note:
This device is protected by U.S. patent numbers
4,631,603 and 4,577,216 and 4,819,098 and other
intellectual property rights. The use of Macrovision’s
copy protection technology in the device must be
authorized by Macrovision and is intended for home
and other limited pay-per-view uses only, unless otherwise authorized in writing by Macrovision. Reverse
engineering or disassembly is prohibited.
CAUTION
FCC Regulations state that unauthorized changes or
modifications to this equipment may void the user’s
authority to operate it.
FCC INFORMATION
This equipment has been tested and found to comply with the limits for a Class B digital
device, pursuant to Part 15 of the FCC rules. These limits are designed to provide reasonable
protection against harmful interference in a residential installation. This equipment
generates, uses and can radiate radio frequency energy and, if not installed and used in
accordance with the instructions, may cause harmful interference to radio communications.
However, there is no guarantee that interference will not occur in a particular installation. If
this equipment does cause harmful interference to radio or television reception, which can
be determined by turning the equipment off and on, the user is encouraged to try to correct
the interference by one or more of the following measures.
• Reorient or relocate the receiving antenna.
• Increase the separation between the equipment and receiver.
• Connect this equipment into an outlet on a circuit different from that to which the
receiver is connected.
• Consult the dealer or an experienced radio/TV technician for help.
This class B digital apparatus meets all requirements of the Canadian Interference--Causing
Equipment Regulations.
Refer to the identification/rating label located on the back panel of
your product for its proper operating voltage.
The apparatus should not be exposed to dripping
or splashing and objects filled with liquids, such as
vases, should not be placed on the apparatus.
CLASS 1
LASER
PRODUCT
Ventilation:
You must adequately ventilate the product. Make sure there is adequate space around
the HD DVD player to provide proper air flow for ventilation. See diagram.
IMPORTANT!
DO NOT RETURN THIS PRODUCT TO YOUR DEALER.
If you experience problems, call RCA customer support or mail your
product in for replacement.
See the warranty on page 51 for details.
cover.indd 3 3/8/06 5:08:15 PM
Page 3
15. Do not overload wall outlets; extension cords,
or integral convenience receptacles as this can
result in a risk of fire or electric shock.
16. Apparatus should not be exposed to dripping or
splashing and objects filled with liquids, such
as vases, should not be placed on the
apparatus.
17. Keep your fingers well clear of the disc tray as
it is closing. Neglecting to do so may cause
serious personal injury.
18. Do not place anything on top of this unit.
19. Do not place the apparatus on amplifiers or
equipment that may produce heat.
20. Do not cover the ventilating holes for the inside
cooling fan.
21. Do not use a cracked, deformed, or repaired
disc. These discs are easily broken and may
cause serious personal injury and apparatus
malfunction.
22. If the ap p ar atus sh o ul d sm o ke or sm e ll ,
immediately disconnect the power cord from the
wall outlet. Wait until the smoke or smell stops,
call customer support.
Neglecting to do so may cause fire.
23. Dur in g t h un de rsto r ms, do not tou c h th e
connecting cables or the apparatus.
24. Handling the cord on this product or cords
associated with accessories sold with this
product, will expose you to lead, a chemical
known to the State of California to cause birth
defects or other reproductive harm.
Wash hands after handling.
cover.indd 4 3/8/06 5:08:16 PM
Page 4

cover.indd 5 3/8/06 5:08:16 PM
Page 5

i
Table of Contents
Chapter 1: Connections and Setup
Accessories Included with your HD DVD Player .............................................................................4
Things to Consider Before You Connect ..........................................................................................
4
Types of Discs Your HD DVD Player will Play ............................................................................5
Playing HD DVD Discs ................................................................................................................5
Other Features ...........................................................................................................................6
System Requirements .................................................................................................................6
Choosing the Best Connection to Your TV ......................................................................................
7
HDMI ...........................................................................................................................................7
Copy Protection and High Definition Viewing ........................................................................7
Multi-channel audio ..................................................................................................................7
Installing Batteries in the Remote ............................................................................................8
Connecting to a TV with an HDMI Input Jack ..........................................................................9
Connecting to a TV with Component (Y, Pb, Pr) Jacks ..........................................................10
Connecting to a TV with Composite or S-Video Jacks ...........................................................11
Connecting an Audio System ..................................................................................................12
The Jacks on the Back of the HD DVD Player ...............................................................................14
Front Panel Controls .......................................................................................................................15
The Display Panel ............................................................................................................................
16
A Quick Tour of the Remote ..........................................................................................................
17
Programming the HD DVD Remote to Operate Your TV ......................................................19
Operating the TV with the Remote ........................................................................................19
TV Codes ...................................................................................................................................20
Chapter 2: Playing Discs
Regional Coding ..............................................................................................................................22
Types of Discs your HD DVD Player will Play ................................................................................
22
Using Different Menus ...................................................................................................................
23
Loading and Playing Discs ..............................................................................................................
23
Using a Disc Menu ..........................................................................................................................
24
Playback Features ...........................................................................................................................25
Playing at Different Speeds .....................................................................................................25
Selecting a Title Number .........................................................................................................26
Selecting a Chapter Number ...................................................................................................26
Entering an Elapsed Time ........................................................................................................26
Resume Playback ......................................................................................................................26
Subtitles ....................................................................................................................................26
Changing the Audio Language ...............................................................................................27
Changing the Camera Angle ...................................................................................................27
Using the Repeat Feature ........................................................................................................28
Checking the Operational Status and Settings ......................................................................28
Playing mp3/WMA files ..................................................................................................................
29
Connecting Game Controllers ........................................................................................................
30
continued on next page
toc.indd 1 3/8/06 6:12:00 PM
Page 6

Table of Contents
ii
Chapter 3: The Menu System
The Setup Menu .............................................................................................................................32
The Picture Menu .....................................................................................................................33
TV Shape ............................................................................................................................33
Enhanced Black Level .......................................................................................................33
Picture Mode .....................................................................................................................33
The Audio Menu ......................................................................................................................34
Digital Out SPDIF ..............................................................................................................34
Digital out HDMI ..............................................................................................................34
Dynamic Range Control ....................................................................................................35
Dialog Enhancement ........................................................................................................35
Speaker Setup ...................................................................................................................35
Speaker Setting .................................................................................................................36
The Language Menu ................................................................................................................37
Disc Menu Language .......................................................................................................37
Subtitle Language .............................................................................................................38
Audio Language ...............................................................................................................38
On Screen Language .........................................................................................................38
The Ethernet Menu ..................................................................................................................38
The General Menu ...................................................................................................................39
Parental Lock .....................................................................................................................39
Creating a Password ..................................................................................................39
Changing the Password .............................................................................................39
Setting Parental Lock ................................................................................................
39
Clock Set ............................................................................................................................40
OSD On/Off .......................................................................................................................40
Screen Saver ......................................................................................................................40
Skin ....................................................................................................................................40
Maintenance .....................................................................................................................40
Initialize ......................................................................................................................
40
Update ........................................................................................................................40
Persistant Storage ......................................................................................................40
Chapter 4: Using an Internet Connection
Before You Connect to the Internet ..............................................................................................42
Requirements ...........................................................................................................................42
Connecting to the Internet
.............................................................................................................43
Internet Settings .............................................................................................................................
44
DHCP setting ............................................................................................................................44
Proxy setting .............................................................................................................................44
User Name and Password ........................................................................................................44
Clock Adjustment Setting ........................................................................................................45
Using Your Internet Connection ....................................................................................................
45
Chapter 5: Other Information
Troubleshooting ..............................................................................................................................48
Language Code List .........................................................................................................................
49
Output Sound Conversion Table ....................................................................................................
50
Limited Warranty ............................................................................................................................
51
Information on Software Updates ................................................................................................
52
Software License Agreement .........................................................................................................
53
toc.indd 2 3/8/06 6:12:00 PM
Page 7

Connections and Setup
Chapter Overview:
• Accessories Included with your HD DVD Player
• Things to Consider before you Connect
• System Requirements
• Choosing the Best Connection to your TV
• The Jacks on the Back of the HD DVD Player
• Front Panel Controls
• The Display Panel
• The Remote Control
3
Chapter 1
Changing Entertainment. Again.
s&c1.indd 3 3/15/06 9:30:51 AM
Page 8
4
Setup and Connections
Things to Consider Before You Connect
Protect Against Power Surges
• Connect all components before you plug any of their power cords into the wall outlet.
• Turn off the TV and/or components before you connect or disconnect any cables.
• Make sure all antennas and cables are properly grounded. Refer to the Important Safeguards sheet packed
with your HD DVD player.
Protect Components from Overheating
• Don’t block ventilation holes on any of the components. Arrange the components so that air can circulate
freely.
• Don’t stack components.
• When you place components in a stand, make sure you allow adequate ventilation.
• If you connect an audio receiver or amplifier, place it on the top shelf so the heated air from it won’t flow
around other components.
Position Cables Properly to Avoid Audio Interference
• Insert each cable firmly into the designated jack.
• If you place components above the TV, route all cables down the side of the back of the TV instead of
straight down the middle of the back of the TV.
• If your antenna uses 300-ohm twin lead cables, do not coil the cables. Also, keep the twin lead cables away
from audio/video cables.
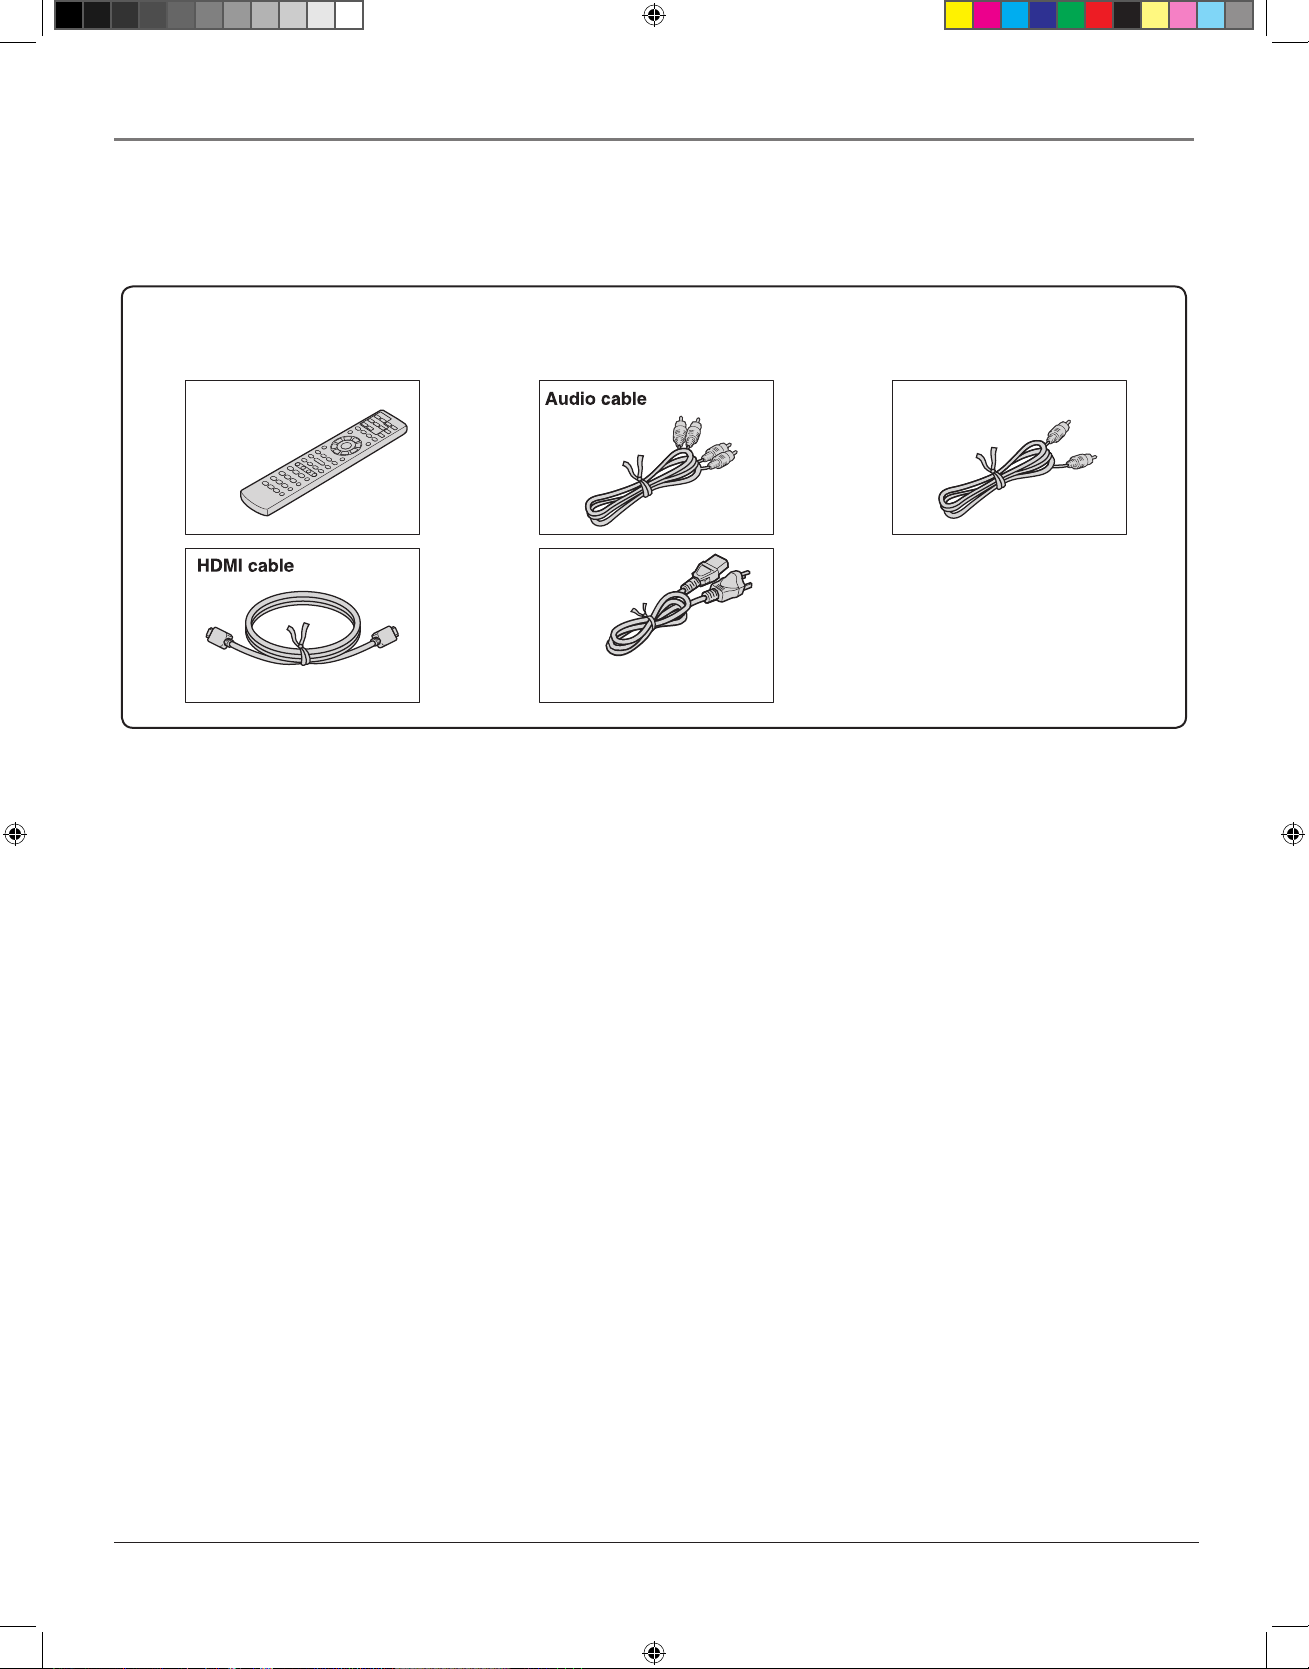
Accessories
Remote control
Batteries
(AAA)x2
Power cord
Caution
• Do not use this power cord with
any device other than this player.
Video cable
Check that the following accessories are supplied.
Accessories Included with your HD DVD Player
HDMI, the HDMI logo and High-Definition Multimedia Interface are trademarks or registered trademarks of HDMI Licensing LLC.
s&c1.indd 4 3/15/06 9:30:54 AM
Page 9

chapter 1 5
Connections and Setup
Types of Discs Your HD DVD player will Play
• HD DVD video discs – because this is a new format, disc compatibility issues are possible. If you experience a disc compatibility problem, contact RCA Customer Support.
Note: Some content providers may use an Image Constraint Token (ICT) for HD DVD movie titles played
through an analog connection. An ICT constrains the picture to half the resolution of a full HD picture. If
an ICT is used, the content provider is required to put a warning label on the disc to let consumers know of
the limitation.
• Audio CDs
• DVDs
• CD-RW and CD-R (mp3 files, WMA files)
– CD-R/CD-RW discs must be recorded using CD-DA method for CD audio playback.
– This player may not support some mp3/WMA recordings due to differences in recording formats, disc
structure or condition. (Use of CD-RW for mp3 files is not recommended.)
• DVD-RAM, DVD-RW, and DVD-R
– Some discs may be incompatible due to laser pick-up and disc design.
• DVD+R/DVD+RW (not certified)
NOTE: Blu-ray Discs cannot be played on this player.
Playing HD DVD discs
• HD DVD video discs are high-density, high-capacity discs.
• HD DVD twin format discs have HD DVD material and standard DVD material on a single side but the
information is on different layers.
• Standard DVD material is intended for use in standard DVD players, but some standard DVD players
may encounter problems playing twin format discs.
• To view high-definition picture in HD DVD discs, an HDTV display (720p, 1080i) is recommended.
• Connect an HDTV set to the COMPONENT OUTPUT jacks or the HDMI OUTPUT jack on this
player.
• Viewing high-definition content and up-converting standard DVD content may require an HDMI-capable input or HDCP-capable DVI input on your display device.
• Some HD DVD discs and DVD discs may restrict the use of some operation commands or features.
• Dolby Digital Plus and DTS-HD (DTS core only) capability limited to 5.1 channels.
• DTS-HD processing of DTS core only. Full DTS-HD is not supported.
• Dolby TrueHD processing for two channels only.
s&c1.indd 5 3/15/06 9:30:55 AM
Page 10

6 chapter 1
Connections and Setup
Other Features
Internet connection feature (LAN port)
You can connect to a network with an always-on broadband connection and access special HD DVD sites.
System Requirements
For high definition video playback:
• High definition display (720p and 1080i input capable).
• HD DVD disc with high definition content.
• HDMI or HDCP capable DVI input on your display device required for some content (as specified by
disc authors).
• For up-conversion of standard definition DVD, an HDMI or HDCP capable DVI input on your display
device is required for copy protected content.
For Dolby® Digital Plus and DTS-HD (DTS core only) multi-channel audio playback:
• Receiver or processor/amp combination with 5.1ch channel analog input or HDMI™ multi-channel
LPCM capable audio input.
• Main, center, surround speakers and subwoofer as necessary for chosen format.
For on-line interactive features:
• Ethernet connection to customer supplied always-on broadband internet service.
• Some features may require higher bandwidth.
s&c1.indd 6 3/15/06 9:30:56 AM
Page 11

chapter 1 7
Connections and Setup
Choosing the Best Connection to Your TV
In order to view high definition content from a disc, you will need to connect the HD DVD player to a TV
with an HDMI cable or component video (Y, Pb, Pr) cables. To view 480, 720, or 1080 resolution video,
use the HDMI connection or the Component video connection. Some discs may require use of the HDMI
OUTPUT for viewing of high resolution material.
• When you connect the player to your TV, be sure to turn off the power and unplug both units before
making any connections.
• Connect the player directly to your TV. If you connect the player to a VCR, TV/VCR combination, video
selector or AV amplifier, the playback picture may be distorted due to copy protection.
• If you TV does not have an HDMI jack or component video jacks, and you can only connect to a composite video jack, you will not be able to see high definition content.
• Depending on a combination of the characteristics of the connected TV, resolution of the video source,
and video output resolution of the player, high-resolution output may not provide the best picture.
Change the output resolution according to your preferences.
HDMI
HDMI stands for High Definition Multimedia Interface. HDMI transfers digital audio and uncompressed
digital video on a single cable. If your TV has an HDMI jack, you don’t need to connect any other audio or
video cables.
• HDMI output is digital only, DVI analog is not supported.
• HDMI is an evolving technology, so it is possible that some devices may not operate properly with this
player.
Copy Protection and High Definition Viewing
HD DVD and DVD video disc creators can include copy protection instructions in their discs that prohibit
the output of high definition video (original 720p or 1080i or up-converted 480i or 480p) from a component
connection. If such instructions are present in the disc you are playing, you must use an HDMI connection to
view the disc in a high definition format. If you view the disc through a component connection, the video will
play in 480i or 480p resolution.
Multi-Channel Audio
If your TV or display does not support multi-channel audio, to use multi-channel audio you will need to either
use an AV receiver that supports multi-channel audio over HDMI (set “Digital out HDMI” to “Auto” or to
match the decoding capability of your equipment) or use a receiver that has a coaxial or optical SPDIF digital
audio input (set “Digital audio SPDIF” to match the decoding capability of your equipment).
s&c1.indd 7 3/15/06 9:30:56 AM
Page 12
8 chapter 1
Connections and Setup
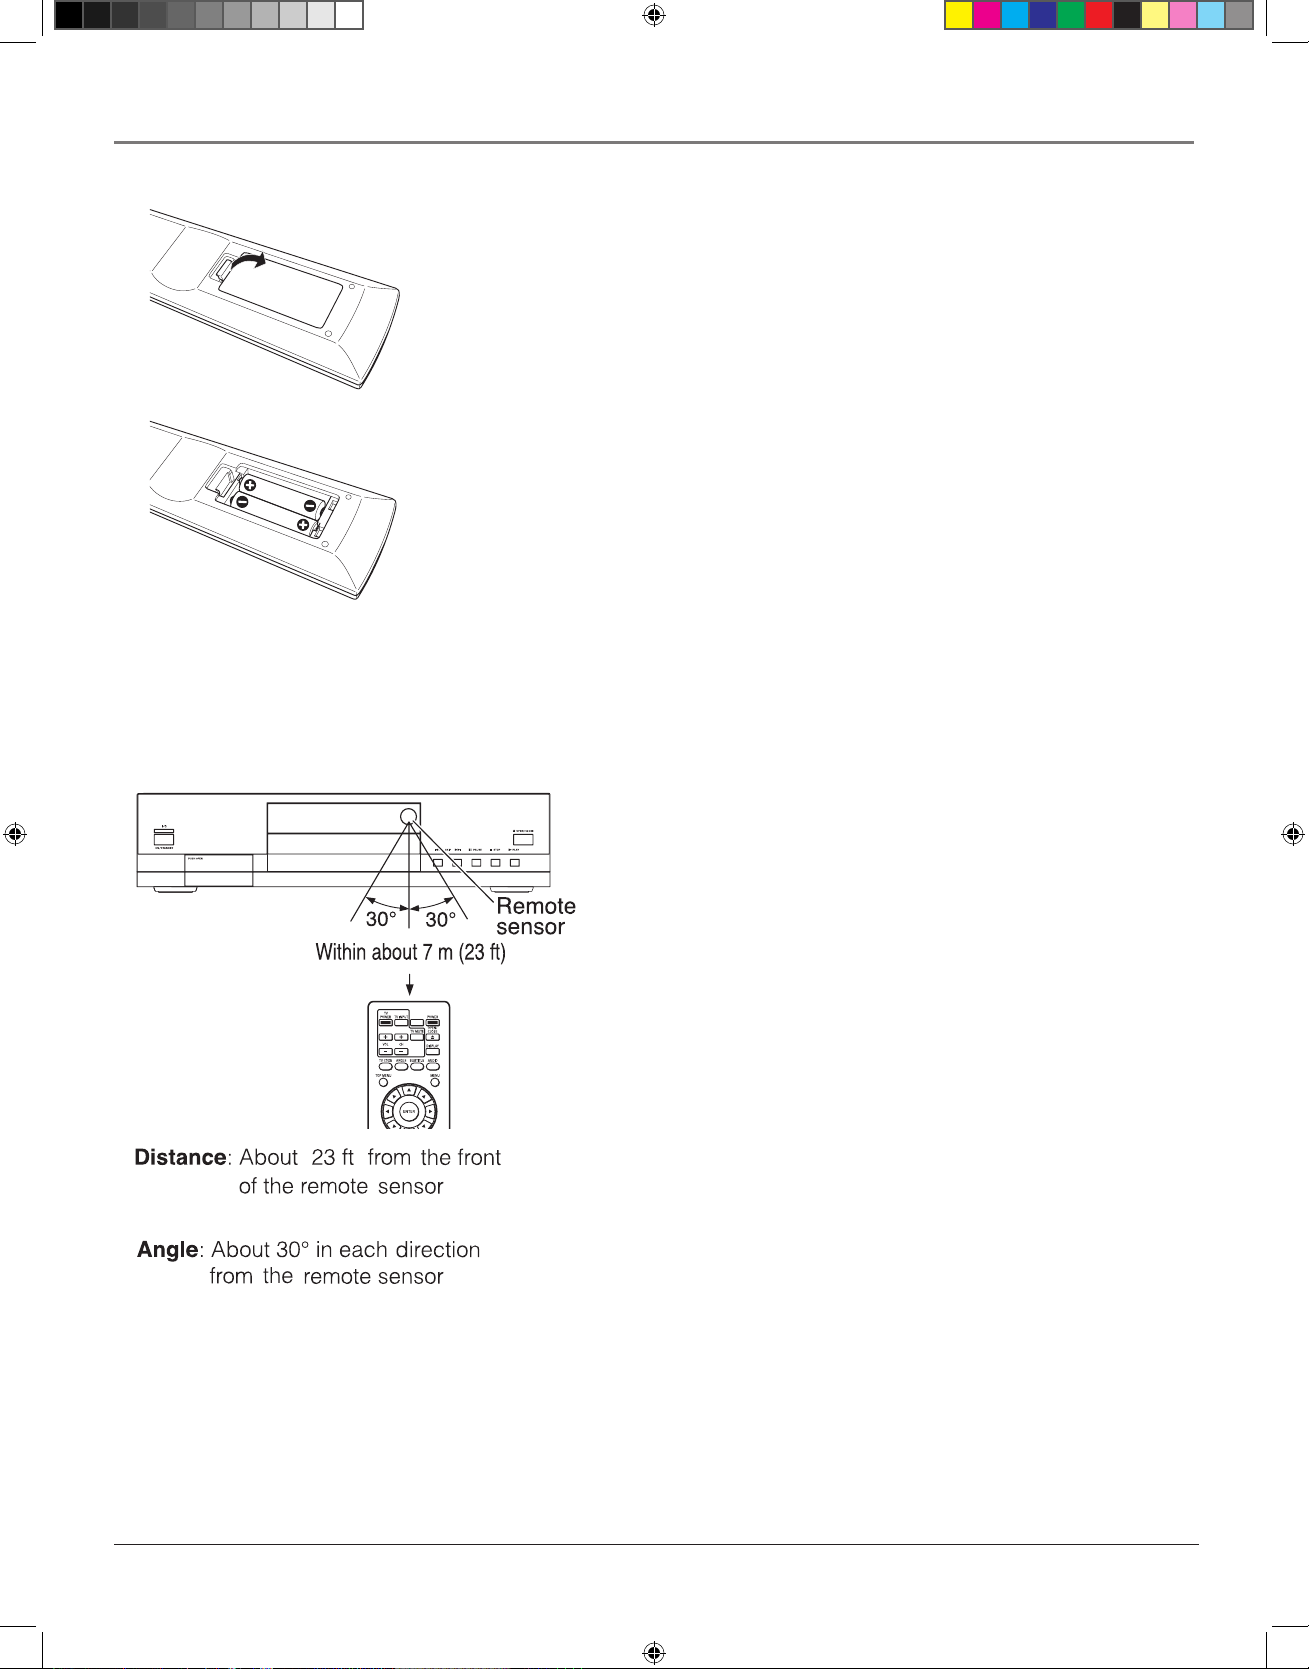
Install Batteries in the Remote
1. Remove the battery compartment cover on the back of the remote.
2. Insert new batteries. Match the polarities (+ and –) on the batteries with the diagram on
the remote.
3. Put the battery compartment cover back on the remote.
Important Battery Information
• If you’re not going to use the remote for a month or more, be sure to remove the batteries because they can leak and cause damage.
• Dispose of batteries in the proper manner, according to federal, state, and local regulations.
• Any battery may leak electrolyte if mixed with a different battery type, if inserted incorrectly, if all batteries are not replaced at the same time, if disposed of in fire, or if an
attempt is made to charge a battery not intended to be recharged.
• Discard leaky batteries immediately. Leaking batteries can cause skin burns or other
personal injury.
Point the Remote in the Right Direction
When you want the remote to operate the HD DVD Player, point the
remote at the HD DVD Player, not the TV. The remote has to be pointed
in the correct direction and toward the correct component in order for the
remote control’s signal to communicate with the sensor on the component. Make sure there is a clear path between the remote control and the
component you want to operate so the signal isn’t blocked.
s&c1.indd 8 3/15/06 9:30:59 AM
Page 13
chapter 1 9
Connections and Setup
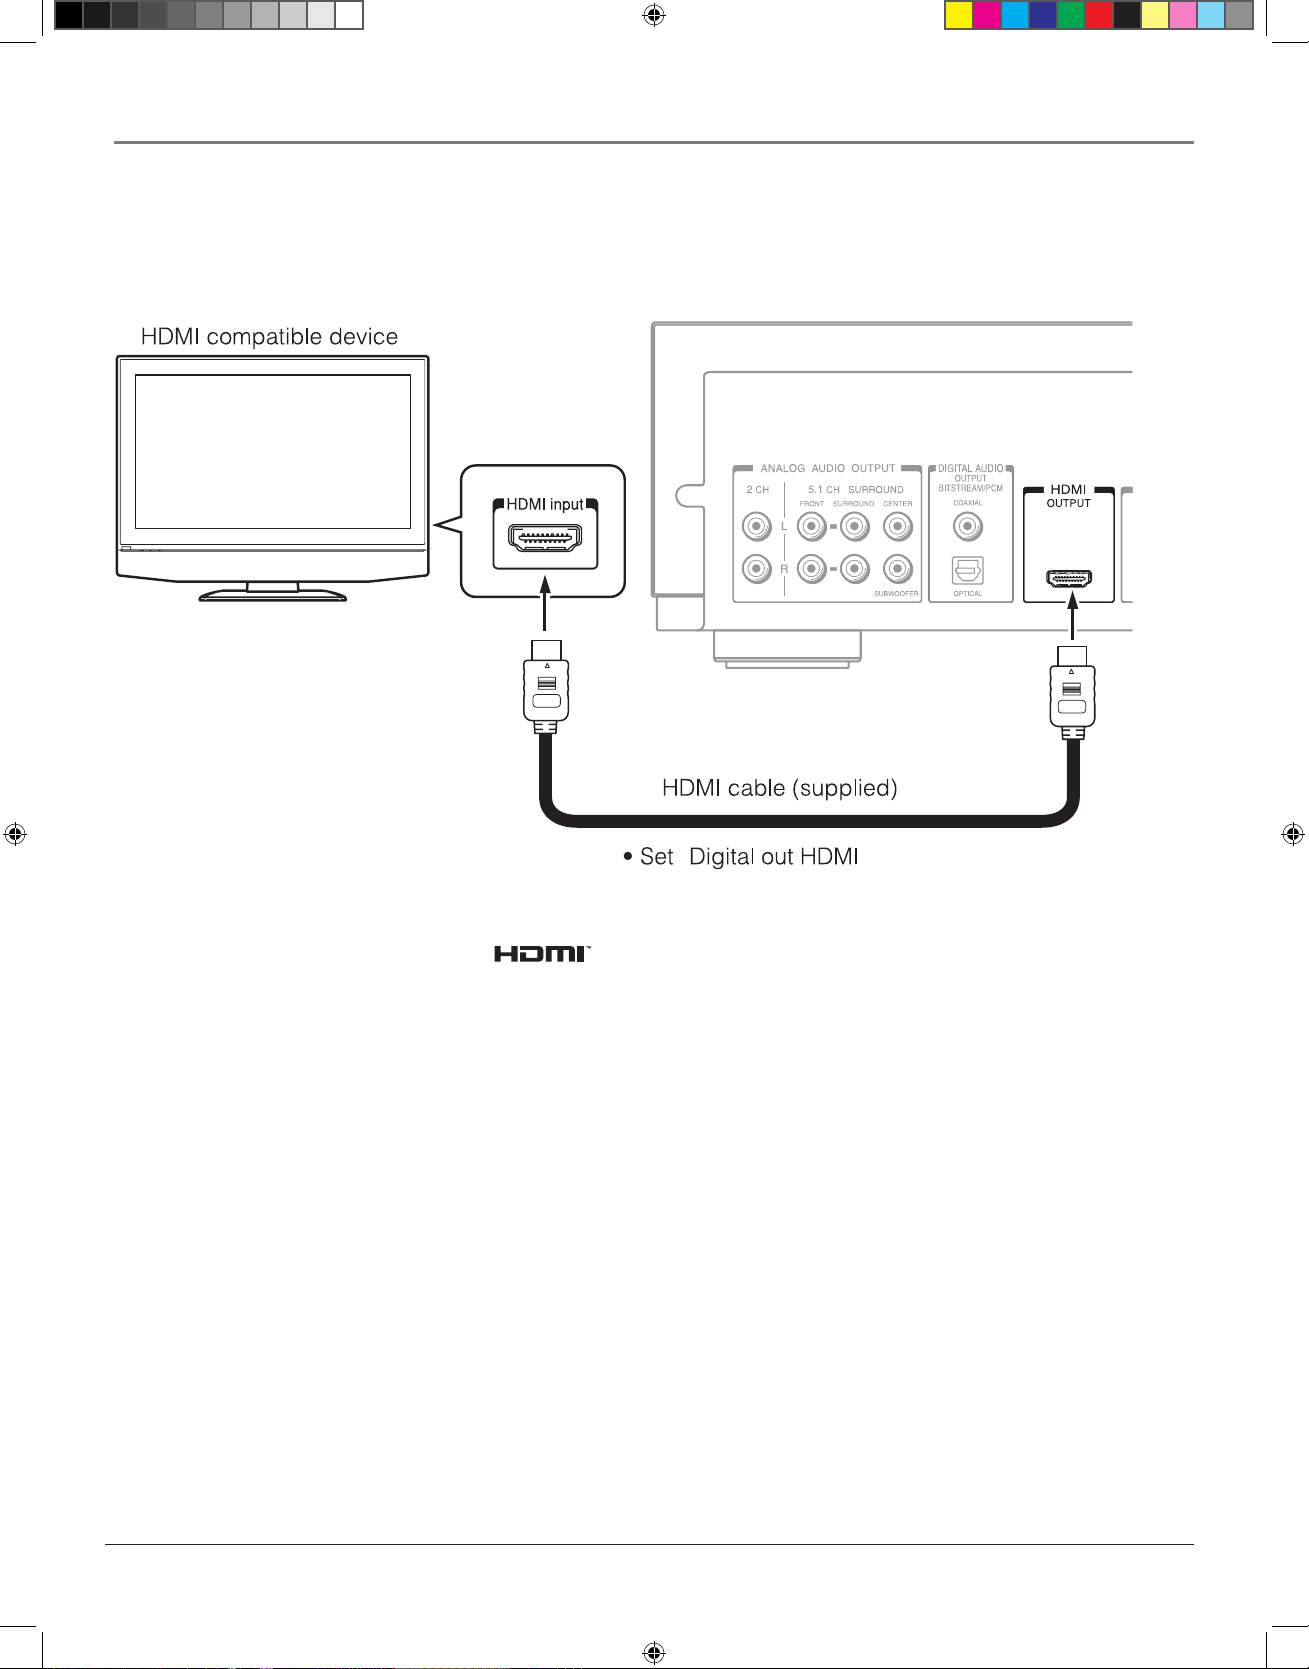
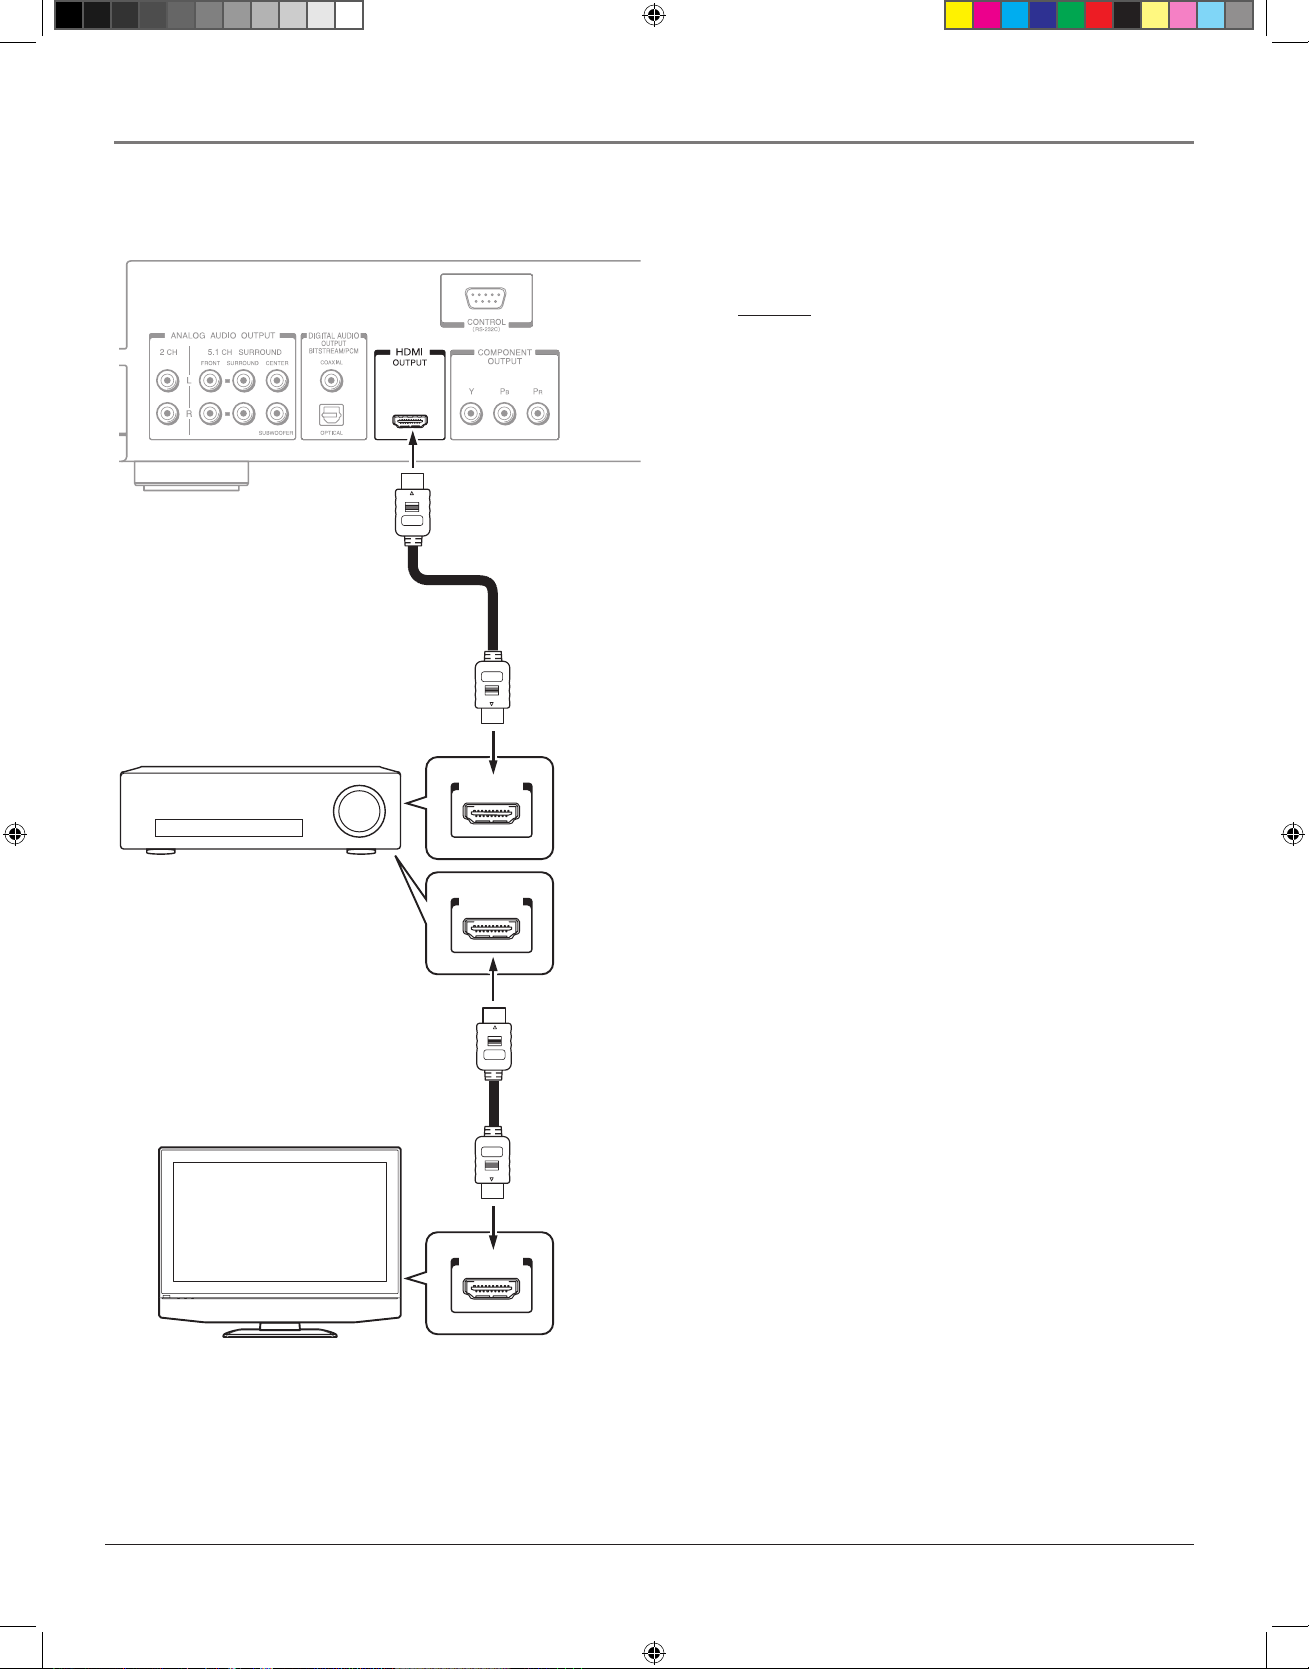
Connecting to a TV with an HDMI Input Jack (recommended)
1. Use an HDMI cable with the HDMI logo ( ) to connect an HDMI compatible display.
2. Turn on the display and your HD DVD player.
3. When you turn the unit on for the first time, a setting menu appears. Use the arrow buttons and the OK button to select the General option, and then the Clock Set option (for details, see page 32). Set the proper time and date. When you are finished, press the
SETUP button to exit the menu system.
4. Press the V. OUTPUT button on the remote until HDMI is shown on the display.
5. Press the RESOLUTION button on the remote until the resolution output (480p, 720p or 1080i) matches the resolution of the
TV or display.
Note: If the type of display you are connecting doesn’t output sound (such as a projector or monitor), change the Digital out HDMI
setting in the Audio menu to PCM.
s&c1.indd 9 3/15/06 10:17:18 AM
Page 14
10 chapter 1
Connections and Setup
TV
Video cable
(not supplied)
Connect to audio input
jacks on your TV using
the audio cable.
Component video input
1. Connect the audio cables to the ANALOG AUDIO OUTPUT 2CH L (left – white) and R (right – red) jacks on the back of your
HD DVD Player, and to the corresponding Audio Input jacks on your TV.
2. Connect the color-coded Y, Pb, Pr cables from the output jacks on the back of your HD DVD player to the Y, Pb, Pr video in jacks on
your TV.
3. Turn on the unit and your TV.
4. When you turn the unit on for the first time, a setting menu appears. Use the arrow buttons and the OK button to select the General option, and then the Clock Set option (for details, see page 32). Set the proper time and date. When you are finished, press the
SETUP button to exit the menu system.
5. Press the V. OUTPUT button until the HDMI indicator on the display is OFF.
6. Press the RESOLUTION button on the remote until the resolution output (480i, 480p, 720p or 1080i) matches the resolution of the
TV or display.
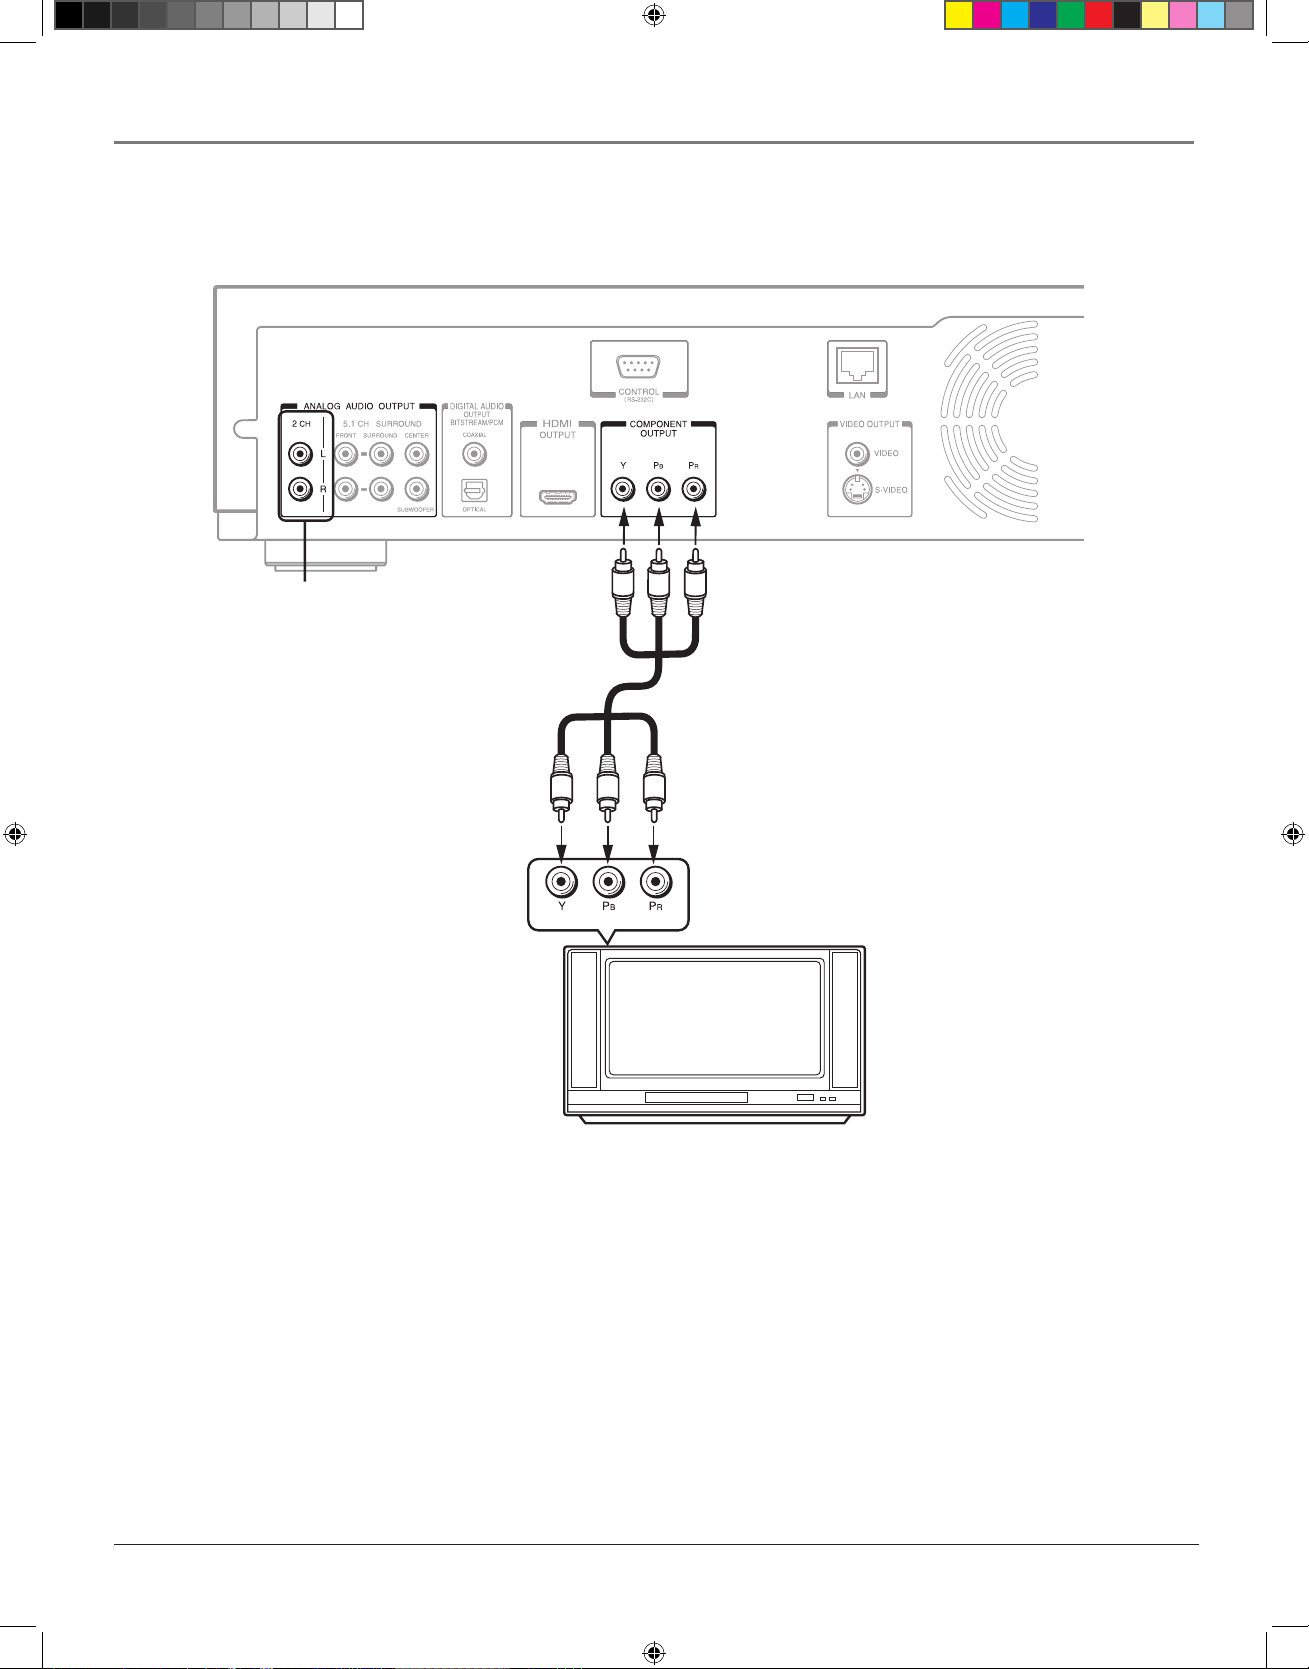
Connecting to a TV with Component (Y, Pb, Pr) Jacks
s&c1.indd 10 3/15/06 10:17:21 AM
Page 15
chapter 1 11
Connections and Setup
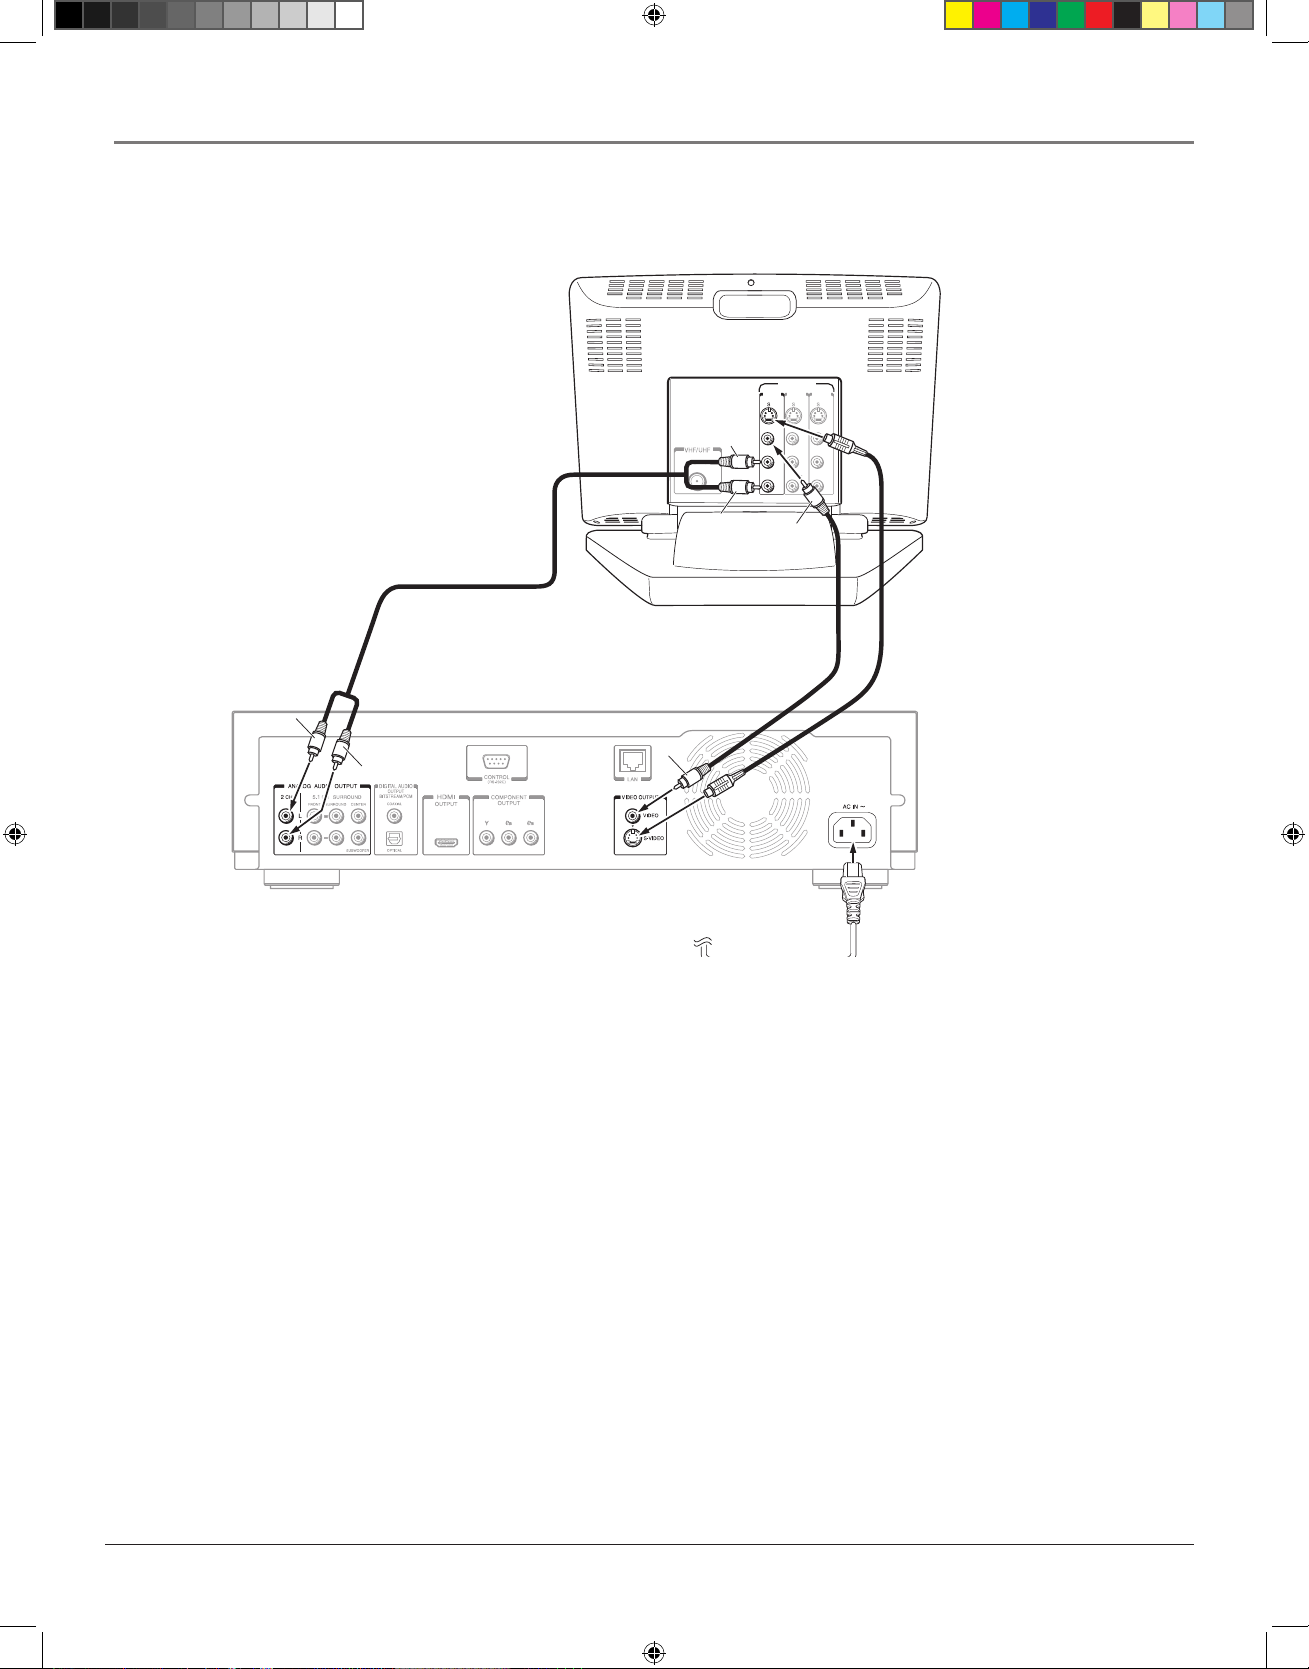
1. Connect the audio cables to the ANALOG AUDIO OUTPUT 2CH L (left – white) and R (right – red) jacks on the back of your
HD DVD Player, and to the corresponding Audio Input jacks on your TV.
2. Connect the video cable.
• Basic video connection – Connect the video cable (yellow) to the VIDEO OUTPUT jack on the back of your HD DVD Player,
and to the Video Input jack on your TV.
OR
• S-Video (optional) – If your TV has an S-Video Input jack, connect an S-Video cable to the S-VIDEO jack on the back of your
HD DVD Player and to the S-Video INPUT jack on your TV. If your TV doesn’t have S-Video, use the basic video connection
listed above.
3. Turn on the unit and Your TV.
4. When you turn the unit on for the first time, a setting menu appears. Use the arrow buttons and the OK button to select the General
option, and then the Clock Set option (for details, see page 32). Set the proper time and date. When you are finished, press the
SETUP button to exit the menu system.
5. Press the V. OUPUT button on the remote until the HDMI indicator on the display is OFF.
6. Press the RESOLUTION button on the remote until 480i is shown on the display. If 1080i or 720p is selected, video can’t be
displayed from the S-VIDEO jack and VIDEO jack (yellow).
Note: Your cable or off-air connection to the television should not be affected by this connection. Connect your cable or off-air antenna
to your television as you normally would. You may need to consult your television manual for details.
INPUT
INPUT
(FROM ANTENNA)
INPUT
VIDEO INPUT
INPUT
White
Yellow
Red
White
Red
Yellow
VIDEO VIDEO VIDEO
L L L
AUDIO AUDIO AUDIO
R R R
S-video cable
(not supplied)
Video cable
(supplied)
Audio cable (supplied)
Connecting to a TV with Composite or S-Video Jacks
s&c1.indd 11 3/15/06 10:17:24 AM
Page 16
12 chapter 1
Connections and Setup
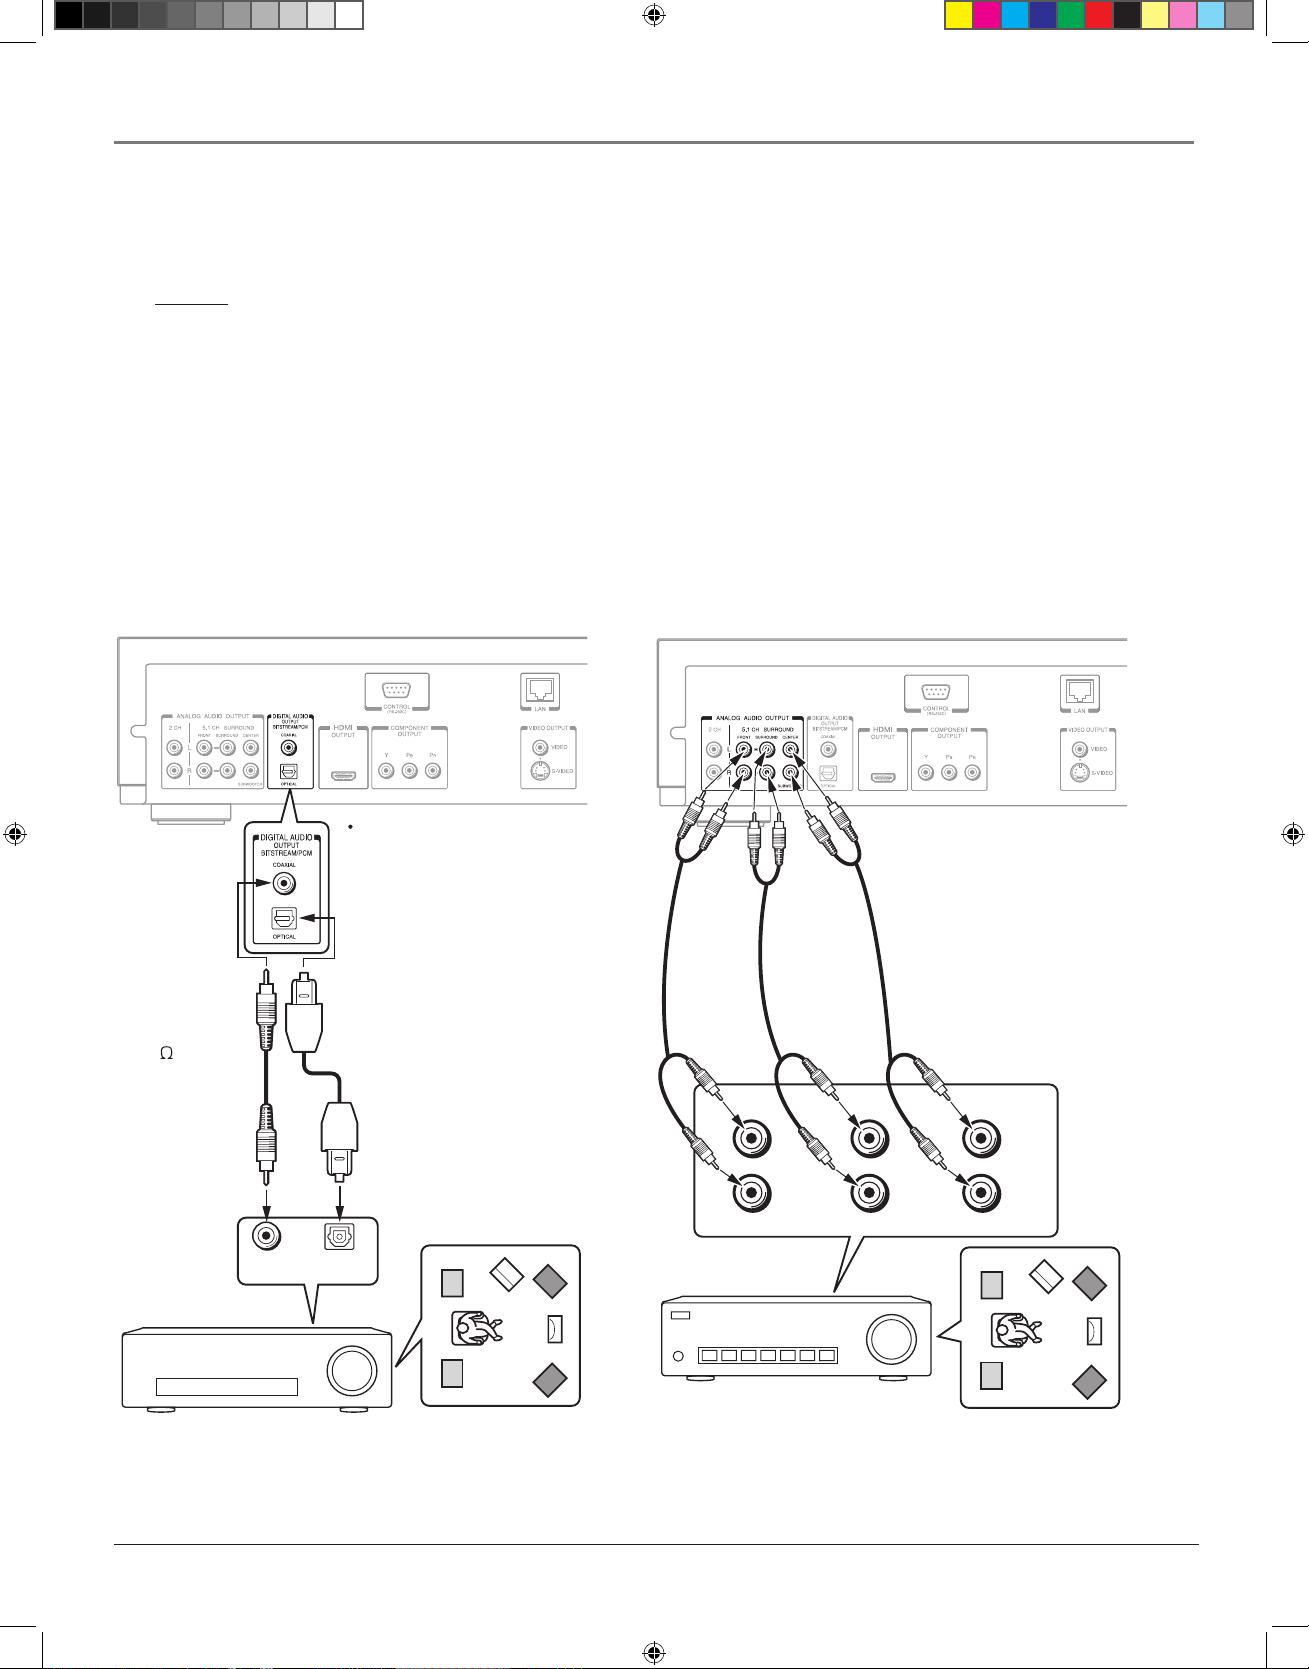
Connecting an Audio System
You can enjoy multichannel surround-sound by connecting to an amplifier compatible with Dolby® Digital and DTS® sound.
Caution
When you are connecting an AV decoder via the DIGITAL AUDIO OUTPUT BITSTREAM/PCM jack that does not
have Dolby Digital, DTS or MPEG decoding capability, set the Digital out SPDIF option in the Audio menu to PCM.
Otherwise, high volume sound may damage your hearing as well as the speakers.
Dolby Digital® and DTS
®
Both Dolby Digital and DTS are audio formats used to record 5.1-channel audio signals onto the digital track of film (while the film is being made). Both of these formats provide up to six separate channels: left, right, center, left rear, right rear, and common subwoofer.
The disc will play 5.1-channel sound only if you’ve connected a DTS or Dolby Digital receiver or decoder and if the original movie the
disc was recorded from was encoded in the Dolby Digital or DTS format.
Manufactured under license from Dolby Laboratories. Dolby and the double-D symbol are trademarks of Dolby Laboratories.
Confidential unpublished works. ©1992-1997 Dolby Laboratories, Inc. All rights reserved.
DTS is a registered trademark of Digital Home Theater Systems, Inc.
AV amplier
Audio cable
(not supplied)
FRONT(R)
FRONT(L)
SURROUND(R)
SURROUND(L)
5.1 analog audio input
CENTER
SUBWOOFER
or
AV amplier
Optical digital cable
(not supplied)
75 coaxial
cable
(not supplied)
Digital input
Coaxial
Digital input
Optical
Set "Digital out SPDIF"
Via digital audio output
Via 5.1ch analog audio output
Via Digital Audio Output
Via 5.1 ch Analog Audio Output
s&c1.indd 12 3/15/06 9:31:10 AM
Page 17
chapter 1 13
Connections and Setup
HDMI compatible device
HDMI cable (supplied)
HDMI cable
(not supplied)
You may need to adjust the HDMI
audio output to match the
capabilities of your AV amplifier.
• Set Digital out HDMI
AV amplifier
HDMI input
HDMI input
HDMI output
Via HDMI Output
Caution
When you are connecting an AV decoder via the HDMI
OUTPUT jack that does not have Dolby Digital or
DTS decoding capability, set the Digital out HDMI
option in the Audio menu to PCM or Downmixed
PCM. Otherwise, high volume sound may damage your
hearing as well as the speakers.
Notes:
• Dolby Digital Plus and DTS-HD (DTS core only)
capability limited to 5.1 channels.
• DTS-HD processing of DTS core only. Full DTSHD is not supported.
• Dolby TrueHD processing for two channels only.
s&c1.indd 13 3/15/06 9:31:13 AM
Page 18
14 chapter 1
Connections and Setup
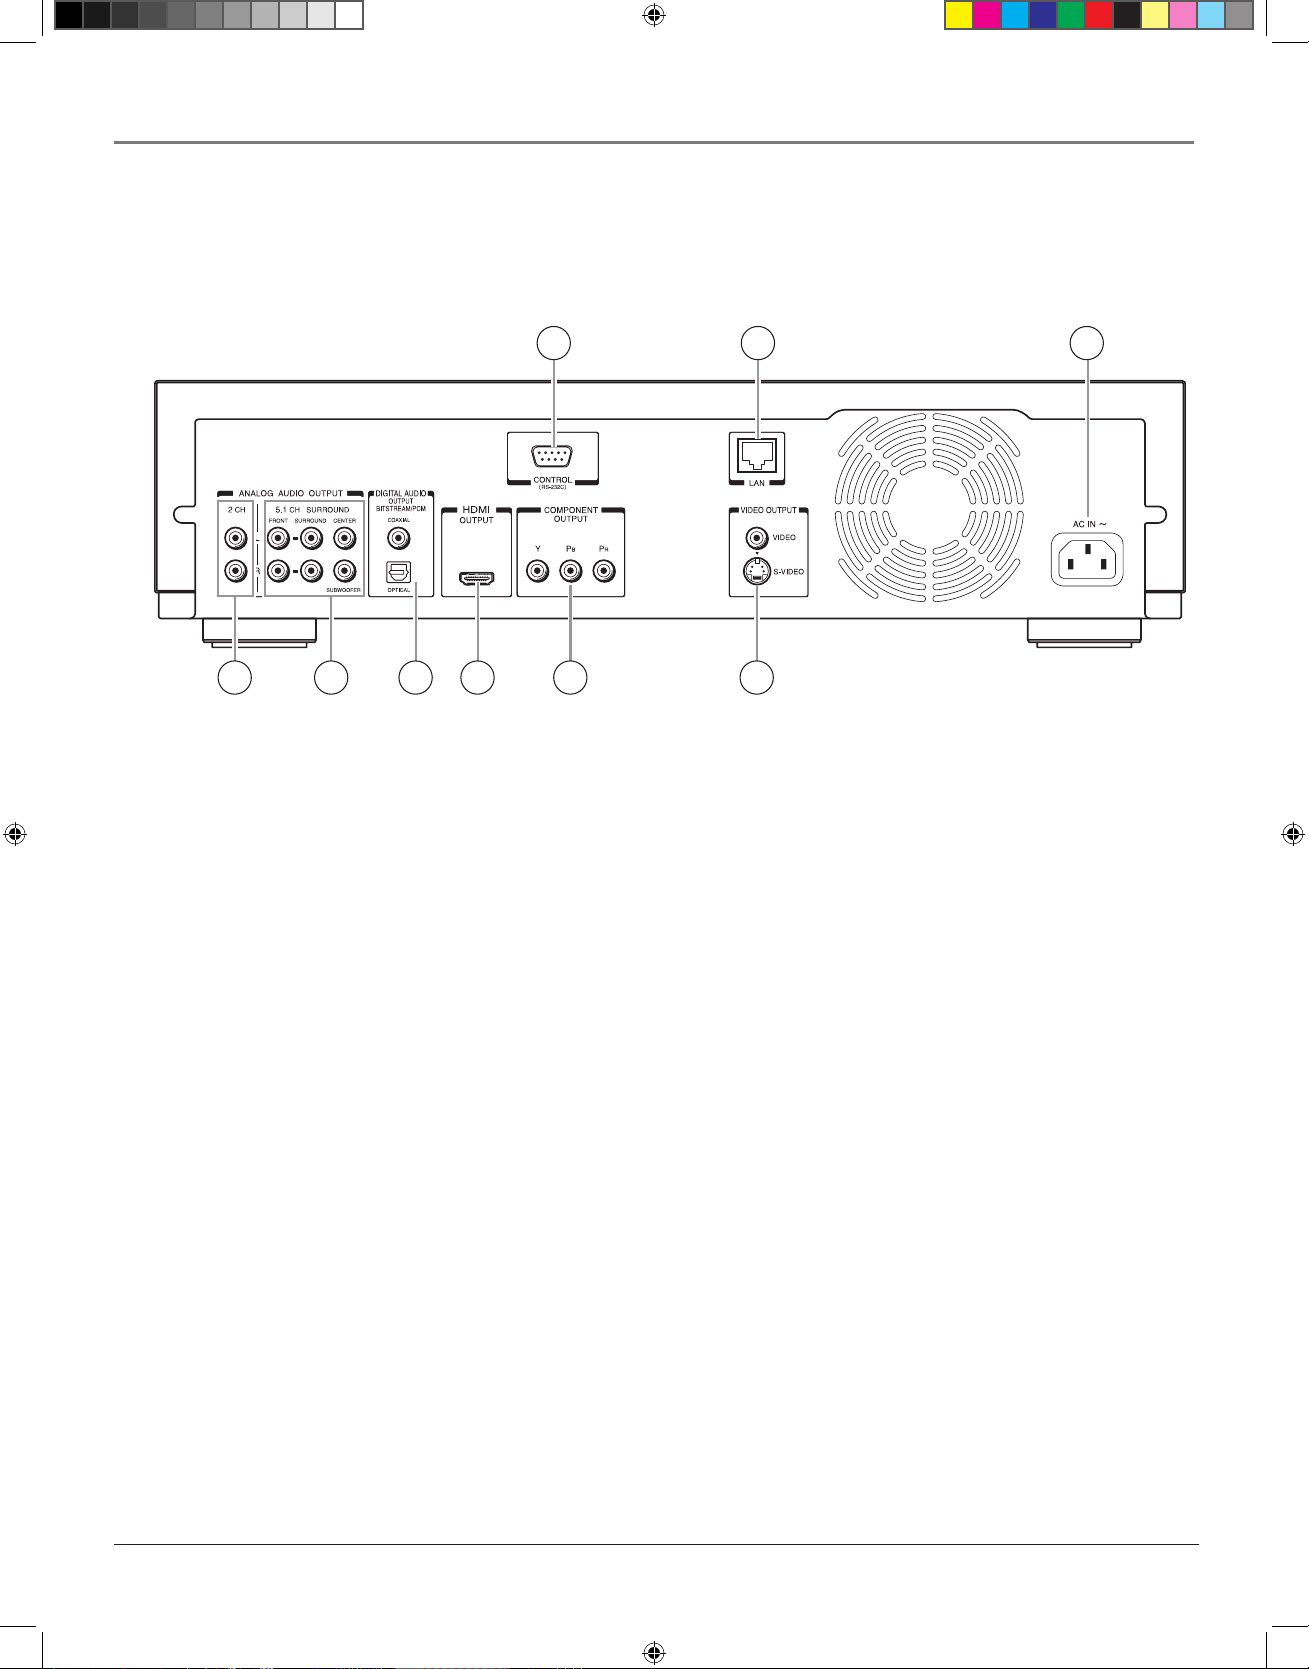
The Jacks on the Back of the HD DVD Player
When connecting, make sure you connect Output jacks to Input jacks, Video to Video, Right Audio to Right Audio, etc.
1 2 3
45678
9
1. CONTROL jack
Used for custom control devices
2. LAN port
Use this to connect to a network with an always-on broadband
connection
3. AC IN
Connect the power cord here.
4. VIDEO OUTPUT (VIDEO, S-VIDEO) jacks
Outputs video and audio signals to a connected TV or ampli-
fier.
5. COMPONENT OUTPUT jacks
Outputs video signals to a connected TV or monitor.
6. HDMI OUTPUT jack
Outputs video/audio signals to a connected TV, monitor or AV
amplifier. Connect to a TV, monitor or AV amplifier equipped
with HDMI input.
7. DIGITAL AUDIO OUTPUT BITSTREAM/PCM (OPTICAL/COAXIAL) jacks
Outputs digital audio signals. Connect to a digital audio input
on an amplifier equipped with digital audio decoder. When connecting the optional digital cable, fit the connector into the jack
firmly.
8. ANALOG AUDIO OUTPUT 5.1 CH SURROUND jacks
Connect to an amplifier equipped with 5.1 CH audio input.
9. ANALOG AUDIO OUTPUT 2 CH jacks
Outputs audio signals to a connected TV or AV amplifier.
s&c1.indd 14 3/15/06 9:31:15 AM
Page 19
chapter 1 15
Connections and Setup
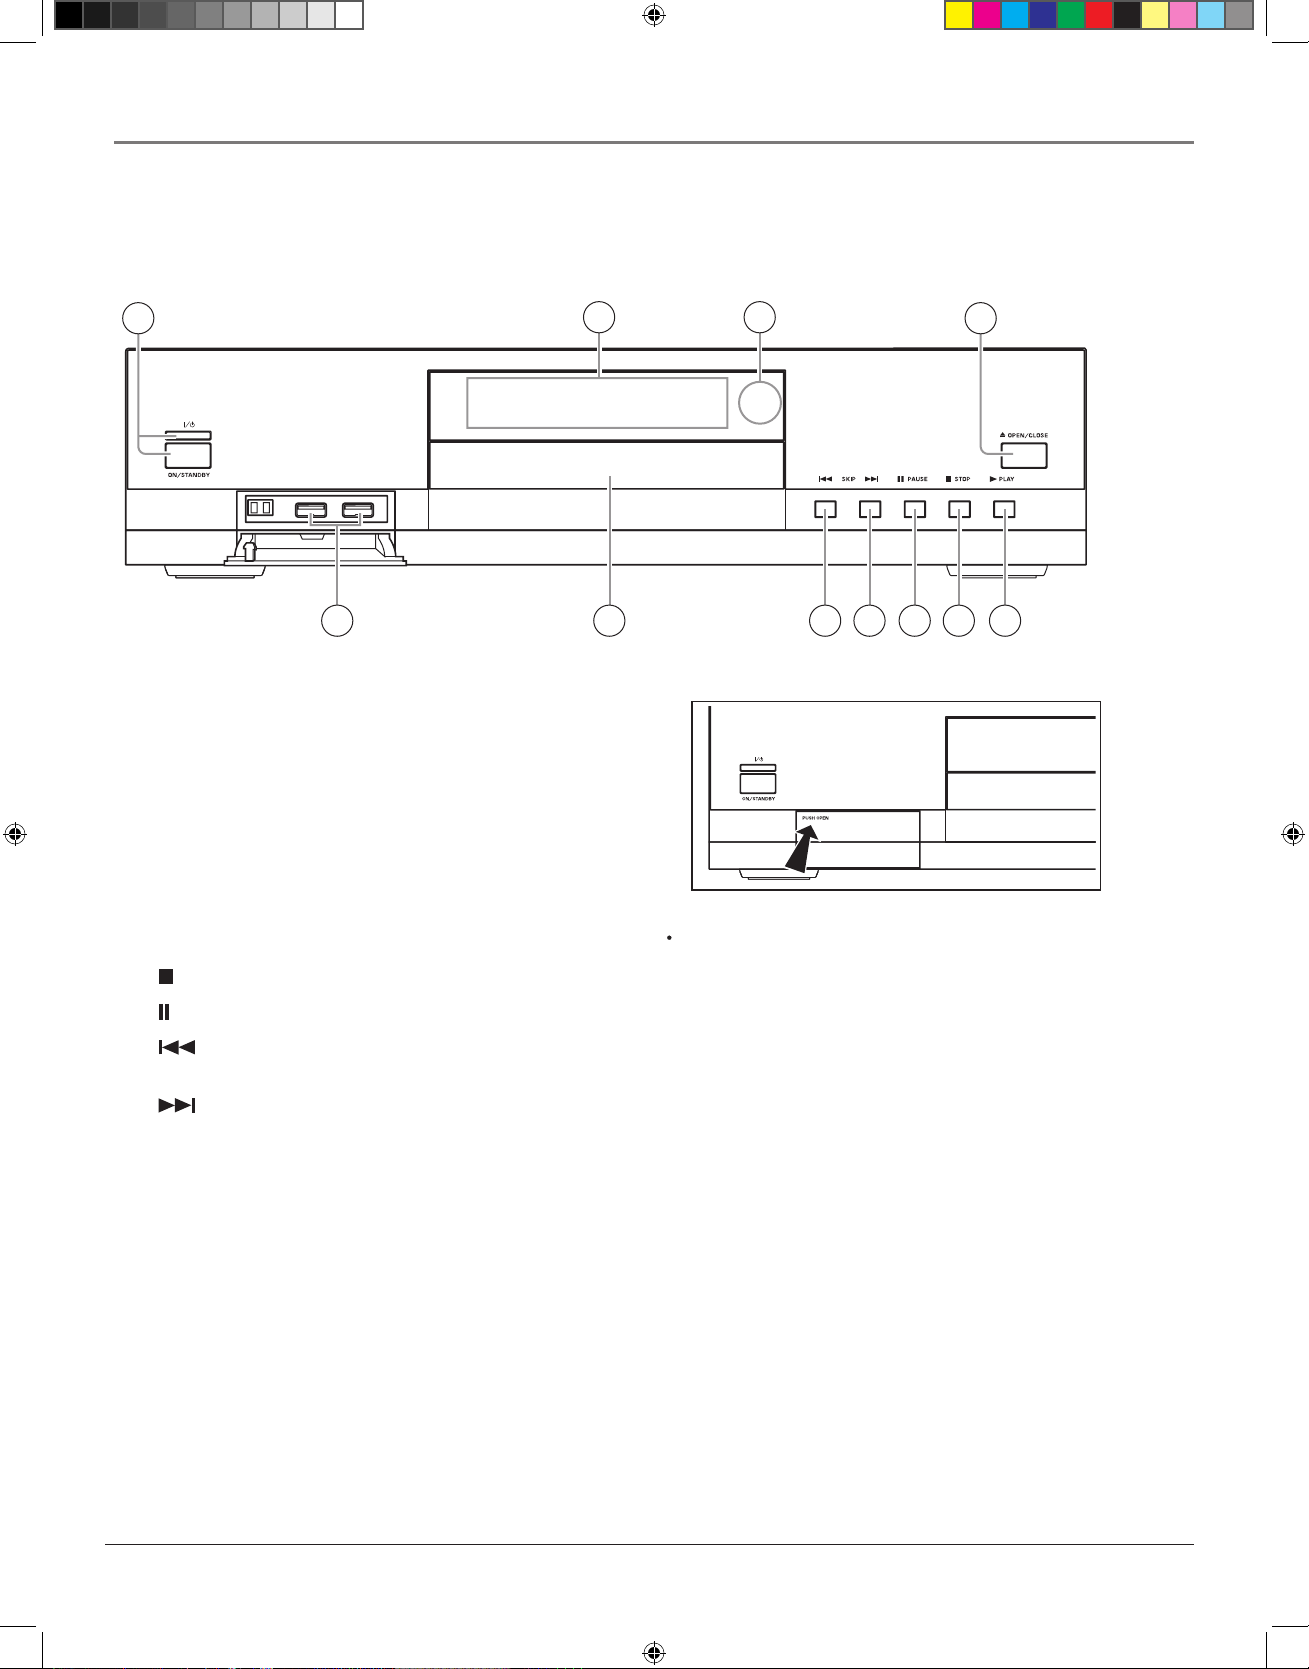
Front Panel Controls
Note
Do not place a heavy object on the cover while it is open.
Doing so may damage the player.
2 3
1 4
11 10
56789
* The above illustration displays the front panel with the cover open. See below on how to open the cover.
1. ON/STANDBY Turns the unit on or puts it in STANDBY
mode (off).
2. Front Panel Display Displays information about the current
state of the player and/or disc.
3. Remote sensor Picks up signals from the remote.
4. OPEN/CLOSE Press to open and close the disc tray.
5. PLAY Begins disc play (and closes disc tray if open).
6. (stop) Stops disc play.
7. (pause) Pauses disc play.
8. (skip backward) During playback, moves to the
beginning of the preceding title, chapter, or track on a disc.
9. (skip forward) During playback, advances to the
beginning of the next title, chapter or track.
10. Disc Tray Discs are inserted here. Press OPEN/CLOSE to
open and close disc tray.
11. Game Controller Ports Use to connect a game controller(s).
s&c1.indd 15 3/15/06 9:31:18 AM
Page 20

16 chapter 1
Connections and Setup
1. Status indicator
Shows whether disc is playing or paused.
2. Disc indicator
HD DVD is displayed when an HD DVD disc is loaded.
DVD is displayed when a DVD disc is loaded.
3. TITLE indicator
Lights when a title number is displayed.
4. CHP (Chapter) indicator
Lights when a chapter number is displayed.
5. CD indicator
Lights when a CD is loaded.
6. HDMI Indicator
Lights when selecting the HDMI output.
7. TRK (Track) indicator
Lights when a track number is displayed.
8. TOTAL indicator
Lights when the total playing time of the disc is displayed.
9. REMAIN
Lights when a remaining playback time is displayed.
10. 2ch indicator
Lights when 2 channel (L/R) sound is output.
11. MULTI indicator
Lights when 5.1 channel sound is output.
12. Repeat mode indicator
Lights when playing in repeat mode.
13. Angle icon indicator
Lights when playing a scene recorded with multi angles.
14. Multi display
Displays the total playing time of the disc, elapsed time, re-
maining time, title number, chapter number or message, etc.
15. Video output format indicator
Displays the video output format currently selected.
480i : 480 interlace
480p : 480 progressive
720p : 720 progressive
1080i : 1080 interlace
NOTES:
Every time you press DISPLAY button, the display changes the contents. The display may not change, depending on the disc conditions.
Press the DIMMER button on the remote control to change the brightness of the display. Turning off the power resets the display to the
default.
The Display Panel
s&c1.indd 16 3/15/06 9:31:21 AM
Page 21

chapter 1 17
Connections and Setup
A Quick Tour of The Remote
This remote may not operate some or all features of your TV or monitor, so it may be
necessary to use your original remote. The buttons must be programmed to operate other
brands of TVs (see page 19).
Buttons that operate your TV
In order to use this remote with your TV, you first have to program the remote. See page 19.
TV ON/STANDBY Use this button to turn on a compatible TV.
TV INPUT Changes the TV input selection.
VOL+/- Changes the TV volume.
CH +/- Changes the TV channels.
TV MUTE Reduces sound to an inaudible level.
TV CODE Use this button to program your remote to control your TV (see page 19).
Buttons that operate your HD DVD Player
ON/STANDBY Use this button to turn on your HD DVD player.
OPEN/CLOSE Press to open and close the disc tray.
DISPLAY Press this button to display information about a disc.
ANGLE Press this button to access various camera angles on a disc (if the disc contains
multiple camera angles).
SUBTITLE When a disc is playing, press this button to show the Subtitle display (if the disc
was created with subtitles).
AUDIO Press this button to select a different language for disc playback (provided the disc
was authored with multiple languages).
TOP MENU Accesses the DVD disc guide (if available).
MENU Brings up a menu for recordable discs.
OK Selects menu items.
Arrow buttons Use the arrow buttons (left, right, up, and down) to move through the
on-screen menus. You highlight a menu item by pressing the arrow buttons and select a
highlighted item by pressing the OK button.
RESUME PLAY Press this button to resume playback at the point you stopped watching.
RETURN Goes back to the previous screen.
(skip backward) During playback, moves to the beginning of the preceding title,
chapter, or track on a disc.
REV Press this button during playback to reverse through the disc.
FWD Press this button during playback to advance through the disc.
s&c1.indd 17 3/15/06 9:31:22 AM
Page 22

18 chapter 1
Connections and Setup
PAUSE/STEP Press this button to pause disc play. For HD DVD discs, press again to play
forward a frame at a time.
PLAY Begins disc play.
STOP Stops disc play.
(skip forward) During playback, advances to the beginning of the next title, chapter
or track.
CURSOR Press this button to use a cursor on discs that include game or drawing software.
After you press the CURSOR button, press the arrow buttons to move the cursor.
REPEAT Press this button to bring up the Repeat info display. You can repeat part or all of
a chapter, track, or an entire disc.
DIMMER Press this button to change the brightness of the display.
SLOW Plays video in slow motion.
A, B, C, D buttons These buttons perform certain functions during HD DVD playback.
The functions differ from disc to disc; use them as indicated on the disc.
Number buttons Use the number buttons to input information such as chapter numbers,
track numbers, or to make selections on some menu screens.
T. SEARCH Use this button to go to an elapsed time on a disc.
RESOLUTION Press to set the resolution to match the TV. The resolution setting is
displayed in the player window.
V. OUTPUT Switches to the HDMI output. When HDMI output is selected. Component
or composite video can’t be displayed.
SETUP Brings up the Setup menu, which you can use to customize features and settings.
s&c1.indd 18 3/15/06 9:31:24 AM
Page 23

chapter 1 19
Connections and Setup
Programming the HD DVD Remote to Operate
Your TV
This remote is already programmed to work with RCA TVs. If you have a TV that is another brand, the remote can be programmed to control most brands of remote controllable TVs.
Entering Codes
To control a TV that is not an RCA TV, you’ll need to enter the specific codes for the brand of TV you have.
1. Turn on the TV to be programmed.
2. Look up the brand and code number(s) for the TV on the following page.
3. Point the HD DVD Player’s remote at the TV.
4. Press and hold the TV CODE button on the remote.
5. Enter the code for your TV (from the list on the next page).
6. Release the TV CODE button, and then press TV ON/STANDBY to see if the TV responds to the
command.
7. If you get no response, repeat these steps using the next code listed for your brand, until the TV responds
to the remote commands.
Notes: This remote may not be compatible with all brands and models of televisions.
Once you program this remote to operate you TV, it may not operate all the features on your TV. If you
want to use features on your TV that this remote doesn’t control, use the TV’s original remote.
When you replace the batteries in the remote, you will have to reprogram the remote.
Important!
You must continue pressing the TV CODE button while you enter the code.
For example, let’s say you have a Toshiba TV. To program the remote to operate the TV you would:
Press and hold the TV CODE button while you enter the first code listed for Toshiba in the Brand Code
Table.
Release the TV CODE button. Press TV ON/STANDBY to see if the TV responds. If it doesn’t, follow the
same steps, but enter the second code instead of the first.
Operating the TV with the Remote
Once you have programmed the remote, use the TV INPUT button to change the video input between the
TV and HD DVD player.
s&c1.indd 19 3/15/06 9:31:25 AM
Page 24

20 chapter 1
Connections and Setup
TV Codes
RCA
0501 0621 0661
0711
0051 0221
0871 0921 0941 1001
1241 1301
1041
1071
1461
1521
1091 1181
1531 2481 4361 4861 4881
5681
6641
Bell & Howell
0081 0431
Emerson
0051 0111 0121 0141 0151 0161
0201 0211 0351 0381
0431 0521
0561 0621 0691 1241 1291 1371
1561 2481 4861
Fisher
0251 0401 0431 1151 2451
GE
0051 0091 0181 0321 0371 0591
0621 0711 0741 1041 1471 1521
2481 4691 4881 4891 6671
Citizen
0051 0381
0851
1561
0471 0551 0621
Curtis Mathes
0051 0431
1521
1561
0531
6671
0621 0851
Infinity
0631
JBL
0631
Hitachi
0031 0051 0161 0191 0301 0601
0621 0641 0671 0811 0951 1011
1061 1241 1361 2131 2381 4731
4911 4961
JVC
0101 0161 0191 0241 0331 0511
0561 0601 0741 1321 1421 2171
4351 4701 4751 4771 4971 5031
5041 5051
LXI
0411 0431 0621 0631 1041 1171
1521 2491 6671
Marantz
0051 0481 0621 0631 0641 2491
Memorex
0081
5251
0431 0501 0621 2491 4421
Magnavox
0051 0271 0291 0341 0361 0421
0551 0621 0631 0661 0971 0981
2221 5221 5231 5241
Goldstar
0051 0161 0231 0451 0501 0621
0661 0771 0961 1431 1561 2491
Brand name Brand code
Optonica
0541 1101
MGA
0051
0661 0761
0251 0261 0371 0501 0621
NAD
0411 0621 1061
MTC
0051 0501 0621 0851
Mitsubishi
0051 0251 0261 0371 0491 0501
0621 0661 0761 2231 5261 5271
Brand name Brand code
Philco 0051 0161 0271 0291
0621 0631
0361 0421
0661 07110501 0551
Philips 0051 0161 0271 0321
0621 0631
0361 0421
0661 07110461 0551
2141 2351 5221 5401
5481 5501
5411 5431
5531 55415451
5601
5461
Proton 0051 0161 0621 0651 2491
Pioneer 0051 0621 0681 0721 0751 1061
1241
Runco 0011
Realistic 0431 1521
Sanyo 0051 0261 0401 0431 0791 0901
1151
Samsung 0051 0161 0501 0531
1021 1141
0621 0661
1431 15610851 0931
1841 2311 4011
Radio Shack 0431 1521 2481
Quasar 0711 0741 0801 1271 2281 5651
5661
Radio Shack/Realistic
1561 6671
0051 0161 0381 0431 0541 0621
1431
Sears 0051 0151 0191 0251
0621 0661
0331 0401
1041
2481 6671
10810411 0431
1151 1481 1521
Soundesign 0381 0551 0621 24810051 0151
Sony 1231 1511 19010441 1111
Sharp 0051 0111 0161 0351
0731
5751
0891
0541 0581
1101 15610611 0621
2181 5741
Tandy 1101
Technics 0741
Sylvania 0051 0071 0271 0291
0621
2201
0631
0341 0361
0661
4151 5481
08610421 0551
1441 2191
Teknika
0051 0081 0151 0161
0501
2481
0551
0191 0341
0621 08510381 0471
1271 1561
Wards 0051 0081 0141 0151
0321
0541
0341
0181
0361
0621
2491
6671
0631
0211
0271 0421 0501
15210661 1051
Zenith 0011
0051
4821 6151
0081 24410781
6171 6181
1281
Toshiba
0021 0071 0411 0431 0831 0841
0851 1341 1781 2121 2491 4371
5951 5971 6041
(default code is 0001)
s&c1.indd 20 3/15/06 9:31:28 AM
Page 25

Chapter Overview:
• Regional Coding
• Types of Discs your HD DVD Player will Play
• Using Different Menus
• Loading and Playing Discs
• Using a Disc Menu
• Playback Features
• Playing mp3/WMA files
• Connecting Game Controllers
Chapter 2
Changing Entertainment. Again.
Playing Discs
21
playing2.indd 21 3/8/06 4:46:45 PM
Page 26

22 chapter 2
Playing Discs
Regional Coding
Both the HD DVD player and the discs are coded by region. These regional codes must match in order for the
disc to play. If the codes don’t match, the disc won’t play. This player’s code is region 1.
Image Constraint Warning Labels
Some content providers may use an Image Constraint Token (ICT) for HD DVD movie titles played through
an analog connection. An ICT constrains the picture to half the resolution of a full HD picture. If an ICT
is used, the content provider is required to put a warning label on the disc to let consumers know of the
limitation.
Types of Discs your HD DVD Player will Play
upport.
(not certified)
(CPRM compatible discs
cannot be played)
Finalized discs only
Finalized discs only
playing2.indd 22 3/8/06 4:46:46 PM
Page 27

chapter 2 23
Playing Discs
Loading and Playing Discs
Turn on the TV and your HD DVD player (press ON/STANDBY on the player or the remote control).
1. Press the OPEN/CLOSE button on the remote control or the front of the
HD DVD player.
2. Place a disc gently into the tray with the disc’s label facing up (double-sided
discs have content on both sides, so you can place either side up).
3. Press the OPEN/CLOSE or PLAY button on the front of the player to close
the disc tray.
The HD DVD player reads the disc’s table of contents, and then one of three
things happens depending on how the disc was programmed:
• The disc starts playing.
• The disc menu appears on the screen. One of the options will start disc
play. Highlight that option and press OK.
• The HD DVD player’s main menu appears on the screen. Press the PLAY
or OK button on the remote.
When you stop playing a disc, the player remembers where you stopped. Press
RESUME PLAY to begin playback from the place you stopped. To begin the title
over, press STOP again.
This is an example of a
one-sided disc.
This is an example of a
2-sided disc. The title is
in the center.
Using Different Menus
Each disc is programmed with different features. There are two separate ways to access features:
• The Disc menu – The Disc menu is part of each disc and is separate from the HD DVD player’s menu.
The contents of each disc menu varies according to how the disc was authored and what features are
included. The disc menu is turned on and off (while the disc is playing) with the TOP MENU button on
the remote.
If a disc was recorded from a personal device such as a DVD recorder, it may contain a title menu.
For discs recorded on personal devices, press the MENU or TOP MENU button.
• The HD DVD player menu – The HD DVD player’s menu system is accessed only when a disc isn’t
playing. Press SETUP on the remote to bring up the HD DVD player menu.
Remember that a feature will only work if the disc was programmed with that feature. For example, if you have
subtitles turned on, the subtitles will only appear if the disc was created with subtitles.
playing2.indd 23 3/8/06 5:57:28 PM
Page 28
24 chapter 2
Playing Discs
2. Press the up/down arrow buttons to highlight the menu item you want
to choose, and press OK. In the example on the left, Language has been
highlighted.
In this example, The Language setting
is highlighted. To see language options, press OK on the remote.
In the example on the left, English is
highlighted. Press OK on the remote to
play the disc with English dialog.
3. Press the up/down arrows to select a language, and press OK.
4. Press PLAY to resume playback.
Note: Any settings you change on the disc menu only override the settings in
the HD DVD player’s menu temporarily. Default settings are the settings
that you set up in the HD DVD player’s menu system. To change the default
settings, see Chapter 3.
An example of a disc menu. Menus on
discs vary.
Using a Disc Menu
A disc is capable of having an on-screen menu that is separate from the HD DVD player’s menu system and
on-screen information display. The disc menu might only contain a list of the titles and chapters, or it may
allow you to change features such as language and playback settings.
Note: “Default settings” are the settings that the player will default to each time it is turned on.
Any settings you change with the disc menu only temporarily override the default settings.
Use the Setup Menu of the HD DVD player to change the default settings (See chapter 3).
Although the content and operation of disc menus varies from disc to disc, the following example will give you
an idea of what to expect.
1. While the disc is playing, press TOP MENU. The disc menu appears.
playing2.indd 24 3/8/06 4:46:47 PM
Page 29

chapter 2 25
Playing Discs
OK
Advancing frame-by-frame
During playback, press to pause the
picture.
If you press while a picture is paused,
you can advance one frame at a time.
To resume normal playback, press PLAY.
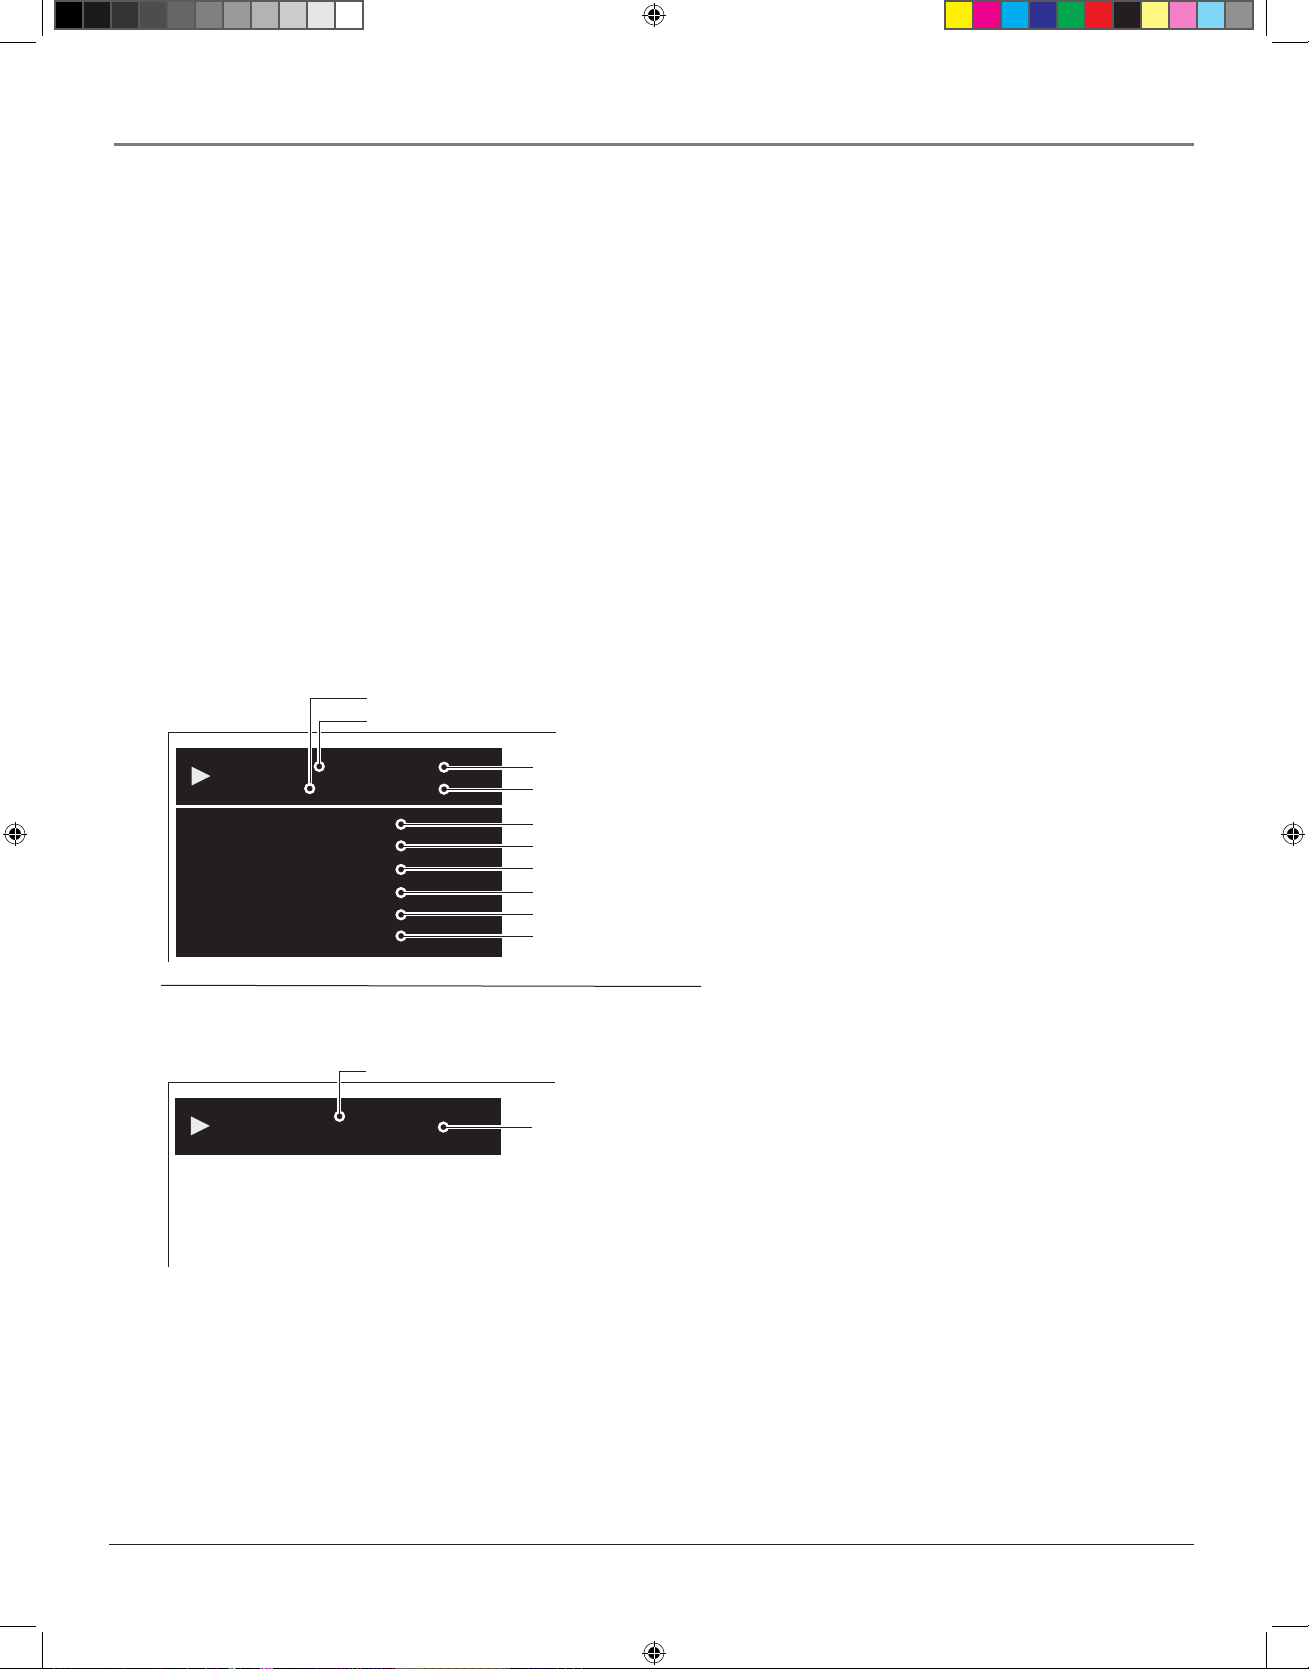
Playback Features
Playing at Different Speeds (DVDs and CDs)
Fast reverse or Fast Forward
During normal playback, press
for fast forward playback
for fast reverse playback
Each time you press the button, the
playback speed increases.
To resume normal playback, press
PLAY.
Skipping backwards to chapters or
tracks
Press to start playback from the
beginning of the current chapter or track.
Press twice to start playback from the
beginning of the previous chapter or track.
Skipping ahead to chapters or
tracks
Press to start playback from
the beginning of the next chapter
or track.
Slow Motion
Press SLOW during playback to
play video in slow motion.
Each time you press the button,
the slow-motion speed changes.
To resume normal playback, press
PLAY.
Not available in CD playback.
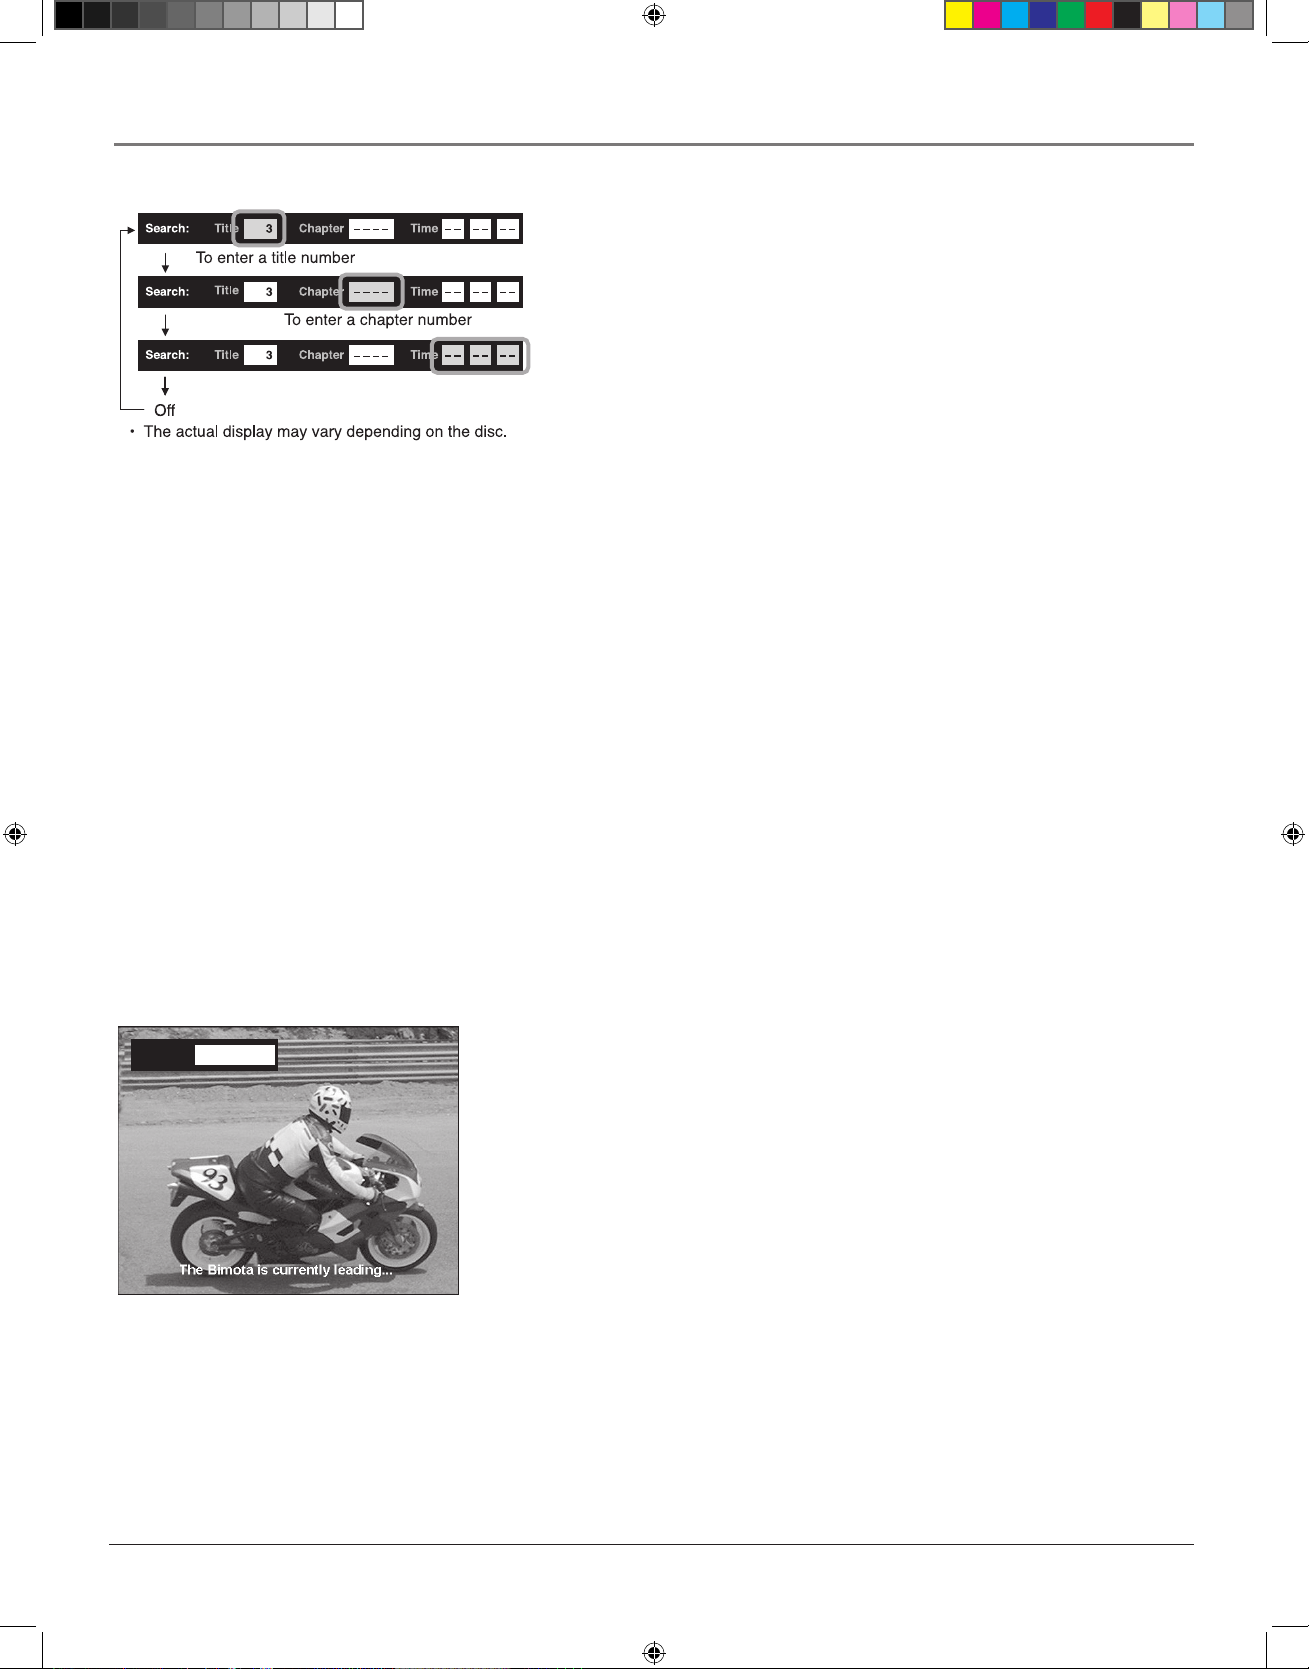
Search
Press to bring up the Search
display. Search for a title,
chapter or enter an elapsed
time to go to an exact
location on a disc.
playing2.indd 25 3/8/06 4:46:49 PM
Page 30
26 chapter 2
Playing Discs
Selecting a Title Number
1. Press the T. SEARCH button on the remote control to bring up the search
display. The Title field is highlighted.
2. Use the number buttons to enter the number of the title you want to play and
press OK.
3. To clear the banner from the screen, press T. SEARCH three more times.
Selecting a Chapter Number
1. Press the T. SEARCH button on the remote control to bring up the search
display. Press again to move to the chapter section.
2. Use the number buttons to enter the number of the chapter you want to play
and press OK.
3. To clear the banner from the screen, press T. SEARCH two more times.
Entering an Elapsed Time
You can use the Time Search feature to go to a specific point in a title.
1. Press the T. SEARCH button to bring up the info display. Press again until the Time section is highlighted.
2. Use the number buttons to enter the elapsed time you want to go to in that title. For example, entering 01:35:12 will start playback
one hour, thirty-five minutes and twelve seconds into the title.
3. Press T. SEARCH again to clear the display from the screen.
Resume Playback
If you stop playback (by pressing STOP) and want to start again where you left off, press RESUME PLAY. If you press STOP a second
time, the resume feature is canceled.
The Resume feature won’t work when:
− you select a disc menu language or change the parental lock setting.
− you open the disc tray.
1ENG
Subtitle:
Subtitles
When a DVD is recorded with subtitles, you can use the Subtitle feature to view the
subtitles on-screen. To turn subtitles on:
1. Press the SUBTITLE button on the remote during playback. The Subtitle info
display appears showing the current setting. The setting is shown as an abbreviated
code. For a list of language codes, see page 49.
2. To display subtitles, press the SUBTITLE button again. The languages included
on the disc will be displayed. To select a different language, use the up/down arrow
buttons to scroll through the available languages. When the desired language is
highlighted, press the right/left arrows to turn subtitles on/off.
Notes:
Some DVD video discs are set to display subtitles automatically.
Not all discs display language name or codes.
Depending on the scene, subtitles may not appear immediately after you set the
subtitle function to on.
Some DVD discs will only allow you to change subtitle languages and turn subtitles
on or off through the disc (top) menu.
When you turn on the player or replace a disc, the player returns to the default setting.
playing2.indd 26 3/8/06 4:46:50 PM
Page 31

chapter 2 27
Playing Discs
Changing the Audio Language
When a DVD is recorded with multiple soundtracks, you can use the Audio feature to temporarily change the
audio language (the language of the soundtrack).
1. During disc playback, press AUDIO on the remote (the audio language info banner appears). The current
audio setting is shown as a code. See page 49 for a list of language codes.
2. Press the down arrow key to scroll through available languages.
3. When the highlight is on the desired language, press AUDIO again to select it.
Note: When you play a disc the player’s default audio language is selected. If the disc does not contain the
language you selected, the disc’s default language is automatically selected.
This feature is disc-dependent, and may not work with all DVDs.
Some DVD discs will only let you change the audio language through the DVD (top) menu.
Discs recorded in DVD VR mode
Use the steps above to change the audio language on discs recorded in DVD VR mode. Depending on the disc
or the type of broadcast, variation of sound differs.
• Stereo sound contents
“Stereo” or “LR” (Left main channel and right sub channel) “L” (Left main channel) “R”
(Right sub channel) Back to “Stereo” or “LR”
• SAP sound contents
“Main” “Sub” “Main and Sub” Back to “Main”
Changing the Camera Angle
Some DVDs contain multiple angles of a particular scene or sequence.
1. During disc playback, press ANGLE on the remote (The angle icon appears. If no additional camera
angles are available, an invalid symbol is displayed).
2. If multiple camera angles are available, the ANGLE icon displays the current angle number and the
number of angles available. For example, 1/4 indicates that angle one is being displayed, and there are four
different angles available.
3. Press the ANGLE button again to go to the next camera angle.
4. To resume normal playback, scroll through the camera angles until ANGLE turns off.
You can also change the camera angle when playback is paused. The camera angle changes to the new setting
when you resume normal playback.
Note: This feature does not work when a DVD has not been recorded with a multi-camera angle system.
playing2.indd 27 3/8/06 4:46:50 PM
Page 32
28 chapter 2
Playing Discs
Using the Repeat Feature (DVDs and CDs)
There are five repeat options:
• Chapter – repeats the chapter that is playing
• Title – repeats the title that is playing
• Track – repeats the track that is playing
• All – repeats entire disc
• Off – turns the repeat function off
1. While a disc is playing, press REPEAT for a list of repeat options.
2. Use the up/down arrow buttons to select the repeat option you want to use.
3. Press OK to begin repeat.
4. To turn repeat off, press the REPEAT button for the lst of repeat options. Select the OFF option and press
OK, or press the STOP button.
002 00:19:13
00:00:280003
Chapter
Title
Video Codec:
Audio:
Subtitle:
Angle:
Video Output:
Audio Output:
ENG 1
– – –
1/1
1080i
Chapter number
Title number
Elapsed time of a title
Elapsed time of a chapter
Video codec
Language setting
Subtitle setting
Angle number
Definition
Sound output setting
002 00:03:12
Track
Audio:
Repeat:
Disc:
Track Repeat
CD
Track number
Elapsed time of a track
Sound output setting
Repeat mode
Category of disc
CD Settings
DVD Settings
Checking the Operational
Status and Settings
To check the current staus and settings of the player,
press the DISPLAY button on the remote. The
display will vary, depending on the disc.
Note: Graphics are for respresentation only; actual screen graphics are subject to change.
playing2.indd 28 3/8/06 4:46:51 PM
Page 33

chapter 2 29
Playing Discs
Playing mp3/WMA Files
mp3/WMA is an audio file format which compresses recorded music. The main advantage of the mp3/WMA format is that CD-quality
music tracks can be stored on a personal computer in user-friendly compressed files.
1. Press the OPEN/CLOSE button to open the disc tray. Insert the disc with mp3 or WMA files and close the tray. Depending on the
recording, playback may begin automatically.
2. If playback doesn’t begin automatically, a menu is displayed. Use the arrow buttons to select a file.
3. Press OK.
Playable files
Playable discs: CD-R, CD-RW
Sampling frequency: 44.1 kHz
Bitrate: WMA: 48 kbps - 192 kbps
mp3: 32 kbps - 320 kbps
Format: MODE 1
File system: ISO9660 Level
File name (mp3): A file name should be alphanumeric (letters and numbers) characters only, and must incorporate the “mp3”
extension. (e.g. “********.mp3”)
Less than 50 bytes
File name (WMA): A file name should be alphanumeric (letters and numbers) characters only, and must incorporate the “WMA”
extension. (e.g. “********.WMA”)
Less than 50 bytes
Total number of files: Less than 650
WMA codec version: V7, V8, V9 (Stereo sound only)
This player requires discs/recordings to meet certain technical standards in order to achieve optimal playback quality.
There are many different types of recordable disc formats (including CD-R containing MP3/WMA les). Not all recordable discs
will produce optimal playback quality. The technical criteria set forth in this user’s guide are meant only as a guide. Use of
CD-R W for MP3 les is not recommended.
You must obtain any required permission from copyright
owners to download or use copyrighted content. Thomson
cannot and does not grant such permission.
Microsoft, Windows Media, and the
Windows Logo are trademarks or
register ed trademarks of Microsoft
Corporation in both the United States
and other countries.
playing2.indd 29 3/8/06 4:46:51 PM
Page 34

30 chapter 2
Playing Discs
Connecting Game Controllers
Some HD DVD discs include game software and drawing software. Your HD DVD player has two ports where you can connect two game
controllers to play games. USB compatible controllers are required. Some disc functions may not work with all controllers.
OK
1. Open the cover on the front panel.
2. Make sure the connector is facing right side up.
Connect the controllers to the game controller
ports.
3. Insert the HD DVD game disc into the disc tray.
4. Follow the on-screen directions provided on the
disc.
Using the Cursor
1. When you are using a disc that supports cursor use, press the CURSOR
button on the remote.
2. The cursor appears on-screen. Use the arrow buttons to move the cursor.
For detailed information on cursor operations, refer to each disc’s guide.
OK
playing2.indd 30 3/8/06 4:46:53 PM
Page 35

The Menu System
Chapter Overview:
• The Picture Menu
• The Audio Menu
• The Language Menu
• The Ethernet Menu
• The General Manu
31
Chapter 3
Changing Entertainment. Again.
menu5.indd 31 3/8/06 4:49:58 PM
Page 36

32 chapter 3
The Menu System
The Setup Menu
The Setup menu lets you customize the settings of your HD DVD player. The various settings are described on
the following pages. To change settings:
SET UP MENU
Picture
Audio
Language
Ethernet
General
Audio Output Setting category.
SET UP MENU
Audio
Picture
Audio
Language
Ethernet
General
Digital out SPDIF
Digital out HDMI
Dynamic Range Control
Dialog Enhancement
Speaker Setting
Select SPDIF Output Format.
In the image above, the Audio submenu is
selected. The Audio menu options appear
on the right.
Digital out SPDIF
Digital out HDMI
Dynamic Range Control
Dialog Enhancement
Speaker Setting
Bitstream
Auto
5.1ch
Submenus
Off
Off
Submenu
Options
1. Press the SETUP button on the remote. The Setup menu apprears
with a list of submenus.
2. Use the arrow buttons to highlight a submenu option and press OK
to select it.
3. The submenu options appear on the right. Use the arrow buttons to
select an option and press OK.
Note: Graphics are for representation
only. Actual on-screen graphics are subject
to change.
menu5.indd 32 3/8/06 5:19:24 PM
Page 37

chapter 3 33
The Menu System
The Picture Menu
TV Shape
Depending on the type of television you have, you may want to adjust the screen setting
(aspect ratio).
4:3
Choose this setting if you want the movie to fill the entire screen of your TV. This might
mean that parts of the picture (the left and right edges) won’t be seen.
Most discs produced in a widescreen format can’t be cropped in this fashion. This means the
black bars will appear at the top and the bottom of the screen.
4:3 Letterbox
Choose this setting if you want to see movies in their original aspect ratio (height-to-width
ratio). You’ll see the entire frame of the movie, but it will take up a smaller portion of the
screen vertically. The movie might appear with black bars at the top and bottom of the screen.
16:9
Choose this setting if your player is connected to a widescreen TV. If you choose this setting
and you don’t have a widescreen TV, the images on the screen may appear distorted.
If you play a disc recorded in 4:3 format on a widescreen TV, black bars will appear on the
left and right side of the screen.
Notes:
When an HD DVD disc or a DVD video disc has a set picture shape, the contents may
not be compatible with other picture shapes.
DVD video discs containing 4:3 picture format only always display video in 4:3 format
regardless of the setting on your player.
Actual picture shape may depend on signal types of broadcasts or input sources, or
settings on the connected TV. Refer to you TV User’s Guide.
4:3
4:3 Letterbox
16:9
Enhanced Black Level
Black level refers to the quality of black in the picture.
• Select On to display deeper, richer black.
• Select Off to display softer black.
Picture Mode
There are two types of source content in video recorded on DVD video discs: film content (pictures recorded at 24 frames per second) and
video content (video signals recorded at 30 frames per second). Make this selection according to the type of content you are viewing, or
select the Auto option to have the player automatically detect the type of content.
Film – The player converts film content to the progressive output format. Suitable for playback of film content.
Video – The player filters video signal, and converts it to the progressive output format. Suitable for playback of video content.
Auto – The player automatically detects the source content (film or video) of playback source, and converts that signal to the appropriate
progressive output format.
Note: Depending on the disc, the Auto setting may not be able to detect source content. If the picture is doubled, roughened, or abnormal,
select the Film or Video option to improve the picture.
menu5.indd 33 3/8/06 4:50:00 PM
Page 38

34 chapter 3
The Menu System
The Audio Menu
Digital out SPDIF
Use this option to select the output sound format when an audio device, such as an amplifier, is connected to
the DIGITAL AUDIO OUTPUT BITSTREAM/PCM jack on your player.
For details about output sound selection, see page 50.
• Bitstream
Select this when an amplifier equipped with built-in Dolby Digital, DTS or MPEG decoder is connected
to the player. When you play a disc recorded in Dolby Digital or DTS format, digital audio signal
(bitstream audio) is output.
• PCM
Select this when a 2 channel digital stereo amplifier is connected to the player. When you play an HD
DVD or DVD video disc recorded in Dolby Digital, Dolby Digital Plus, Dolby TrueHD, DTS or DTSHD format, sound is converted into PCM (2 channel) format to output.
Digital out HDMI
Use this option to select the output sound format when a device equipped with an HDMI terminal is
connected to the HDMI OUTPUT jack on this player.
For details about output sound selection, see page 50.
• Auto
Select this when an HDMI device equipped with built-in Dolby Digital, DTS, MPEG or linear PCM
decoder is connected to this player. When you play a disc recorded in Dolby Digital or DTS format,
digital audio signal (bitstream audio) is output.
If a connected HDMI device does not support Dolby Digital, DTS or MPEG, sound is converted into
linear PCM to output.
• Bitstream
Select this when an HDMI device equipped with built-in Dolby Digital, DTS or MPEG decoder is
connected to this player. When you play a disc recorded in Dolby Digital, DTS or MPEG format, digital
audio signal (bitstream audio) is output.
• PCM
Select this when an HDMI device which has multi channel output is connected to this player. When you
play an HD DVD or DVD video disc recorded in multi channel in Dolby Digital, Dolby Digital Plus,
Dolby TrueHD, DTS or DTS-HD format, the sound is decoded and output in multi channel in linear
PCM format.
• Downmixed PCM
Select this when a 2 channel digital stereo amplifi er is connected to this player. When you play a DVD
video disc recorded in Dolby Digital, DTS, MPEG1 or MPEG2 format, sound is converted into PCM (2
channel) format to output.
menu5.indd 34 3/8/06 4:50:00 PM
Page 39

chapter 3 35
The Menu System
Left, Right (Front Speakers)
Front speakers carry primarily music and sound effects.
Center
In surround mode, the center speaker carries most of the dialog as well as music and effects. It
should be set between the left and right speakers.
Surround (Rear Speakers)
The rear speakers’ overall sound balance should be as close as possible to the front speakers.
Proper placement is vital to establish an evenly distributed sound field.
Subwoofer
A subwoofer is designed to reproduce powerful low bass effects (explosions, the rumble of
spaceships, etc.) which dramatically heighten the action on the screen.
Dynamic Range Control
This option compresses the dynamic range (quietest sound to loudest sound) of a disc’s soundtrack. The Range
Control feature evens out the volume by making loud sounds quieter and soft sounds louder.
• On
When Dynamic range control is on, the difference between loud and soft noises is lessened. The sound is
more even.
• Off
When Dynamic range is off, the sound is as it was recorded.
Note: This function is effective only in playback of Dolby Digital recorded HD DVD or DVD video discs.
The effect of this option varies depending on the disc.
Dialog Enhancement
This option changes the dialog volume on a DVD disc.
• On
When this option is on, the volume of dialog is increased.
• Off
When this option is off, dialog is as it was recorded.
Note: This function works only in playback of Dolby Digital recorded HD DVD or DVD video discs. The
effect of this option varies depending on the disc.
This function works only when speaker setting is set to 2 ch.
Speaker Setup
Positioning speakers
Follow the suggestions for speaker placement below to get the best results. Once you have your speakers
positioned, adjust the settings.
1
1
2
3
3
1
2
3
Courtesy Dolby Laboratories
1
2
3
menu5.indd 35 3/8/06 4:50:01 PM
Page 40

36 chapter 3
The Menu System
Front Speaker Placement
Alignment
Align the center speaker evenly with (A) or slightly behind (B) (the left and right speakers), but not
ahead of them.
Angle
Place the left and right speakers to form a 45-degree angle with your favorite viewing position to
duplicate the soundtrack mixer’s perspective.
Height
The mid- and high-frequency drivers of the three front speakers should be as close as possible to
the same height. This often requires placing the center speaker directly on top (A) or beneath (B)
the TV set.
Preferred Surround Placement
Location
If possible, place surround speakers to either side of the listening area, not behind it.
Height
If space permits, install surround speakers 2-3 feet above viewers. This helps to minimize
localization effects.
Aiming
Aim surround speakers straight across the room, not down at viewers, to help create a more
open, spacious surround sound field.
Alternative Surround Placement
Rear Wall
If rear wall mounting is the only choice, aim the speakers at each other (A), towards the
front (B) or towards the sidewalls (C, D). Experiment with placement until sounds seem to
surround you, rather than come from behind you.
1
1
2
3
3
1
2
3
Courtesy Dolby Laboratories
Courtesy Dolby Laboratories
Courtesy Dolby Laboratories
Speaker Setting
Use this option to select parameters for the analog 5.1 channel output.
• 2ch
Select when a 2 channel stereo system is connected to the player.
• 5.1ch
Select when a 5.1 channel surround system is connected to the player.
When you select 5.1 ch, you can set the speaker sizes, distance to each speaker and the crossover frequency.
Crossovers split the audio signal into separate frequency bands and sends the frequencies to the speakers that
are capable of playing them. For example, if your small speakers can’t play frequencies lower that 80Hz, the
crossover will separate the audio signal so frequencies lower than 80Hz will go to a larger speaker that is capavle
of playing them. You can choose between 80 Hz/100 Hz/120 Hz.
1 Select a speaker by pressing the arrow buttons, and press OK.
2 Select the size by pressing the up/down buttons, and press OK.
menu5.indd 36 3/8/06 4:50:01 PM
Page 41

chapter 3 37
The Menu System
Front Left / Front Right
Small: If the speaker cannot output low frequency, select the appropriate Crossover Setting.
Large: If the speaker can output low frequency, select the appropriate Crossover Setting.
Center / L Surround / R Surround
Small: If the speaker cannot output low frequency, select the appropriate Crossover Setting.
Large: If the speaker can output low frequency, select the appropriate Crossover Setting.
None: Select if no speaker is connected.
Subwoofer
Select when a subwoofer is connected.
Setting the Speaker Distance
1. Select a distance to each speaker from the listening position.
2. Select Next by pressing the arrow buttons, and press OK.
3. Select Automatic Test Tone by pressing the arrow buttons, and press OK.
4. A test signal is sent to each speaker. Adjust the volume of each speaker by pressing the right/left arrow
buttons to select a speaker, an pressing the up/down arrow buttons to adjust the volume of that speaker. .
Note: For further adjustment, check the channel balance on theamplifier.
5. When complete, select OK and press the OK button.
The Language Menu
Disc Menu Language
This option lets you select which language you want the disc (top) menu displayed in.
You can select a language from the list, or, if the language you want isn’t listed, you can input the language of
your choice by using the Language Code List.
1. Get the language code of your preferred language from the Language code list ( page 49).
2. Select the first character by pressing the up/down arrow buttons.
3. Press the right/left arrow buttons to move to the next position. Select the second character with the up/
down arrow buttons.
4. Select OK and press the OK button.
Note: The menu language will only appear in the language you have selected if the disc was programmed to
display that language. Languages vary from disc to disc.
menu5.indd 37 3/8/06 4:50:02 PM
Page 42

38 chapter 3
The Menu System
Subtitle Language
This option lets you select which language you want subtitles displayed in.
You can select a language from the list, or, if the language you want isn’t listed, you can input the language of
your choice by using the Language Code List.
1. Get the language code of your preferred language from the Language code list ( page 49).
2. Select the first character by pressing the up/down arrow buttons.
3. Press the right/left arrow buttons to move to the next position. Select the second character with the up/
down arrow buttons.
4. Select OK and press the OK button.
Note: The subtitle language will only appear in the language you have selected if the disc was programmed
with subtitles in that language. Languages vary from disc to disc.
Some discs only allow you to change subtitle language from the disc (top) menu.
Audio Language
This option lets you choose a preferred soundtrack language. You can select a language from the list, or, if the
language you want isn’t listed, you can input the language of your choice by using the Language Code List.
1. Get the language code of your preferred language from the Language code list ( page 49).
2. Select the first character by pressing the up/down arrow buttons.
3. Press the right/left arrow buttons to move to the next position. Select the second character with the up/
down arrow buttons.
4. Select OK and press the OK button.
Note: The audio language will only be played in the language you choose if the disc was programmed with
that language. Languages vary from disc to disc.
On Screen Language
This option lets you select a preferred language for the HD DVD player’s on-screen displays.
You can choose between English, French and Japanese.
The Ethernet Menu
This menu offers options that are required in order to use the internet feature. It contains settings necessary to
use the web access function connecting this player to internet. See page 44 for a full description of the options.
menu5.indd 38 3/8/06 4:50:02 PM
Page 43

chapter 3 39
The Menu System
The General Menu
Parental Lock
Creating a Password
You can use the Parental Lock feature to control what types of movies your family watches. When Parental
Lock is on, a password is required to watch movies with certain ratings (you can set which ratings require a
password).
When you use your HD DVD player for the first time, enter a 4-digit password using the number buttons and
press OK. If you make a mistake, press the CLEAR button before pressing OK.
Changing the Password
To change the password:
1. At the Parental Lock menu, press the STOP button 4 times, then press OK. The password is cleared.
2. Enter a new 4-digit password by using the number buttons.
3. Press OK.
Setting Parental Lock
1. Select On or Off by pressing the up/down arrow buttons. Press the right arrow
button to move to the Area Code field.
2. Press the up/down arrow buttons to enter the code of a country/area whose
standards were used to rate a disc (see country list on the left). Press the right
arrow button to move to the Level field.
3. Select the desired rating level by pressing the up/down arrow buttons.
The ratings for the US are as follows:
Level 1 : G
Level 3 : PG
Level 4 : PG13
Level 6 : R
Level 7 : NC-17
4. Select “OK” then press OK button.
When Parental Lock is turned on, a disc that has a higher rating level than your
selected rating level cannot be played back. For example, if you select level 7, discs
exceeding level 8 are locked and cannot be played back.
Changing the Parental Lock Rating Level
To change the rating level of the Parental Lock function, follow steps 1 - 3 above.
Parental Lock
Lock
Off
Area Code Level
S 8U OK Cancel
to move
/
to
/
change
1
3
2
COUNTRY AREA CODE LIST
AU AUSTRALIA
BE BELGIUM
CA CANADA
CN CHINA
HK CHINA HONG KONG
DK DENMARK
FI FINLAND
FR FRANCE
DE GERMANY
ID INDONESIA
IT ITALY
JP JAPAN
MY MALAYSIA
NL NETHERLANDS
NO NORWAY
PH PHILIPPINES
RU RUSSIAN FEDERATION
SG SINGAPORE
ES SPAIN
SE SWEDEN
CH SWITZERLAND
TW TAIWAN
TH THAILAND
GB UNITED KINGDOM
US UNITED STATES
menu5.indd 39 3/8/06 4:50:02 PM
Page 44

40 chapter 3
The Menu System
Clock Set
To set the clock of the player.
1. Press the arrow buttons to select the field you want to change.
2. Press the number buttons to change the digits to set the date and time.
3. Press the up/down arrow buttons to select AM or PM and your time zone.
4. Select OK and press the OK button.
The clock starts.
OSD On/Off
Use this option to turn on-screen displays on or off.
Remote Control Sound
When remote control sound is on, a beep sounds to tell you a remote command has been received. You can turn the sound off.
Screen Saver
Your HD DVD player has a screen saver function that helps protect your TV from image burn when still image stays on-screen for a
prolonged period of time. When playback has been paused for 20 minutes, the screen saver is activated. The screen saver will disappear
from the screen when you resume playback or perform another function.
You can turn off the screen saver so it doesn’t appear at all. However, it is recommended that you keep the screen saver function activated.
Skin
Use this option to select the pattern of the on screen controls.
Maintenance
Initialize
This option resets all the settings to the factory default settings.
Update
If you have your HD DVD player connected to the Internet, you can use this option to confirm the current cersion of software and to
download software updates and to confirm. Before you can use this function, the player needs to be connected to the Internet via an
always-on broadband connection. For details on connecting, go to page 42.
Note: Before you download a software update, an End User License Agreement will appear on-screen. You must agree with the terms and
conditions in order to download the update.
To download software updates, press the SETUP button. Follow the instructions displayed on your screen. If there is no update available,
a message appears and the process is canceled. Please check the support section of the RCA website for information about software updates
(including information on how to obtain updates on disc rather than using the Internet Connection feature of the player).
If you do not have the player connected to the Internet, go to the RCA customer support section of the website for details on how to
obtain updates on a disc, or if you don’t have Internet access, call RCA customer support.
Caution!
Do not unplug, turn off or use any other feature of the player during the download. The writing of the software
being downloaded will be halted and the player may no longer work properly. If the player stops working,
contact RCA Customer Support.
Persistent Storage
This option lets you control the HD DVD player’s memory allocated to contents. The menu selections vary depending on the contents.
Follow the on-screen instructions.
Clock set
09 : :27 48
03 / /12 06
AM Eastern Time
(Month/Day/Year)
OK Cancel
to change
/
Number buttons
to change
menu5.indd 40 3/15/06 10:25:32 AM
Page 45

Using an
Internet connection
Chapter Overview:
• Before You Connect to the Internet
• Connecting to the Internet
• Internet Settings
41
Chapter 4
Changing Entertainment. Again.
internet.indd 41 3/8/06 5:05:54 PM
Page 46

42 chapter 3
Using an Internet Connection
Before you Connect to the Internet
If you connect the player to the Internet via an always-on broadband connection, you can directly access special HD DVD sites. For example, if an HD DVD site includes content such as movie trailers, you can watch
the content on the player via the Internet. You will also be able to download software updates for the player
when available.
You do not need to connect to a PC, you can connect directly from your HD DVD player.
Requirements
An always-on internet broadband internet connection is required to connect your HD DVD player to the
Internet.
A 10 Base-T or 100 Base-TX LAN port is required for connection to this player. If your internet service does
not allow for such a connection, you will not be able to connect the player. If a cable LAN connection is not
available in your home, use an optional wireless LAN ethernet adapter to access a wireless LAN access point.
A DSL modem is required to use DSL service and a cable modem is required to use cable modem service. Depending on the access method of and subscriber agreement with your Internet Service Provider, you may not
be able to use the internet connection feature contained in this player or you may be limited to the number of
devices you can connect at the same time. (If your ISP limits subscription to one device, this player may not be
allowed to connect when a PC is already connected.)
Before using this feature, please read and understand the important information below.
• This always-on internet broadband internet connection requirement may change without advance notice.
All operations are not guaranteed.
• Thomson is not responsible for any malfunction of the player and/or the internet connection feature due
to communication errors/malfunctions with your broadband internet connection, or other connected
equipment.
• Thomson is not responsible for any trouble in your internet connection.
• The features of HD DVD discs made available through the Internet Connection feature are not created
or provided by Thomson, and Thomson is not responsible for their functionality or continued availability.
Some disc related material available by the Internet Connection may not be compatible with this player. If
you have questions about such content, please contact the producer of the disc.
• Some internet content may require a higher bandwidth connection.
• You do not need to connect to a PC to use the Internet.
• An HD DVD disc compatible with this feature (commercially available) is required. Not all HD DVD
discs are compatible.
• Even if the player is properly connected and configured, some internet content may not operate properly
because of internet congestion, the quality or bandwidth of your internet service, problems at the provider
of the content or compatibility issues.
• The communication features of this player comply with the Institute of Electrical and Electronic
Engineers (IEEE) 802.3.
• Some internet connection operations may not be possible due to certain restrictions set by the Internet
service provider (ISP) supplying your broadband Internet connection.
• Any fees charged by an ISP including, without limitation, connection charges are your responsibility.
• The use of a Router may not be allowed or its usage may be limited depending on the policies and restrictions of your ISP. For details, contact your ISP directly.
internet.indd 42 3/8/06 5:05:54 PM
Page 47

chapter 3 43
Using an Internet Connection
Connecting to the Internet
with an RJ 45 connector (not supplied)
Category 5/CATS or better
internet.indd 43 3/8/06 5:05:55 PM
Page 48
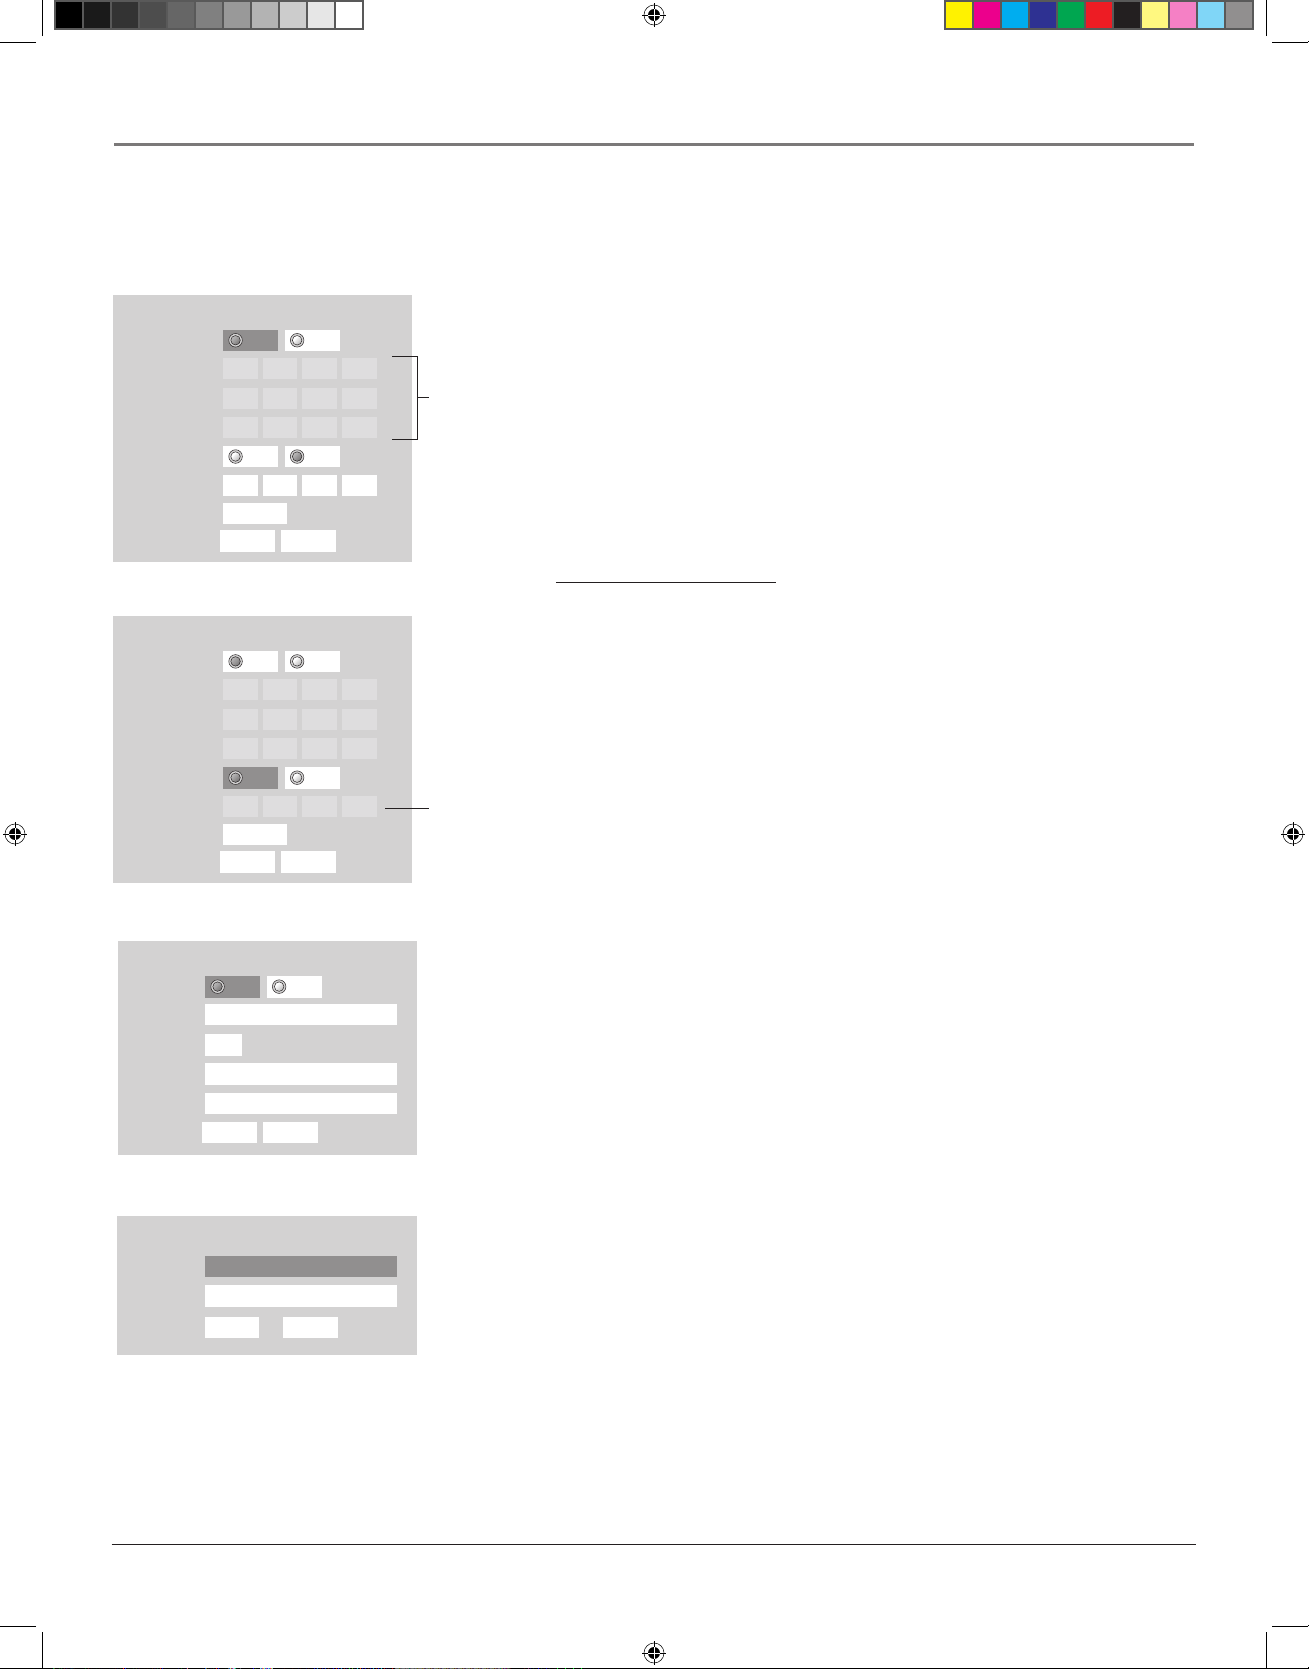
44 chapter 3
Using an Internet Connection
Internet Settings
DHCP setting
1. Press the SETUP button on the remote. The Setup menu appears.
2. Use the arrow buttons to highlight the Ethernet option, then press OK.
3. Use the arrow buttons to highlight the DHCP option, then press OK.
4. Set the DHCP option to On, then press OK.
5. Set the DNS option to On, then press OK.
6. Select Confirm, then press OK. Confirming starts.
7. If the setup is successful, an IP appears. Press the OK button.
If the setup is not successful:
1. Set the DHCP option to Off then press OK.
2. Input the addresses into IP address, Subnet Mask and Gateway using the
number buttons.
Refer to the table on the next page.
3. Set the DNS option to Off then press OK.
4. Input the address into DNS Server.
5. Press OK. Confirming starts.
Connections
Playback
(Basic)
Others
DHCP
DHCP
IP Address
Subnet Mask
Gateway
DNS
DNS Server
OKOnCancel
0 . 0 . 0 . 0
0 . 0 . 0 . 0
0 . 0 . 0 . 0
0 . 0 . 0 . 0
Confirm
Off
On Off
DHCP
DHCP
IP Address
Subnet Mask
Gateway
DNS
DNS Server
OKOnCancel
0 . 0 . 0 . 0
0 . 0 . 0 . 0
0 . 0 . 0 . 0
0 . 0 . 0 . 0
Confirm
Off
On Off
Skipped when
“DHCP” is set
to “On”.
Skipped when
“DHCP” is set
to “On”.
Proxy Setting
Proxy
Server
Port
User
Password
OK Cancel
a
********** **
On Off
a
0
User information
User
Password
OK Cancel
********** **
A
Connections
Playback
(Basic)
Proxy Setting
Proxy
Server
Port
User
Password
OK Cancel
a
********** **
On Off
a
0
Proxy setting
Use this setting only if your provider requires a proxy setting.
1. On the Ethernet menu, press the arrow buttons to select Proxy setting, then press OK.
2. Set the Proxy option to ON and press OK.
3. Use the arrow buttons to input information into the Server, Port, User and Password fields.
4. Select OK and press the OK button.
User Name and Password
1. On the Ethernet menu, use the arrow buttons to select the User Information option, then
press OK.
2. Select User and press OK.
3. Use the up/down arrow buttons to input letters/numbers. Use the right/left arrow buttons
to move to a new position. Press OK.
4. Select Password and press OK. Input your password using the arrow buttons as described
above. Press OK.
5. When your password is entered, Select OK and press the OK button.
Connections
Playback
(Basic)
Others
Proxy Setting
Proxy
Server
Port
User
Password
OK Cancel
a
********** **
On Off
a
0
User information
User
Password
OK Cancel
********** **
A
internet.indd 44 3/8/06 5:05:57 PM
Page 49

chapter 3 45
Using an Internet Connection
Clock Adjustment Setting
1. On the Ethernet menu, press the up/down buttons to select the NTP Server option, then press OK.
2. Select On or Off by pressing the up/down arrow buttons.
Refer to the table below.
3. Select OK then press the OK button.
Notes
Please contact the router manufacturer when the router DHCP feature is not operating properly.
The fi rmware in this player is updateable.
DHCP On* Network information will be automatically set.
Off Network information will be manually set.
IP Address This sets a different address within the same subnet of the
PC on your network.
e. g . : If th e IP add r ess of the PC is 19 2 .168.1. 1 0 , se t
192.168.1.15 (or some other unused address).
Subnet Mask This sets the subnet mask of the network environment that
will be connected.
e.g.: 255.255.255.0
Gateway This sets the gateway used by the player (e.g.; 192.168.11).
DNS This sets the DNS server to be used by the player.
e.g.; 192.168.1.1
Proxy Setting Off* This is set when your provider does not require proxy setting.
On Enter the proxy server address when your provider requires proxy setting. (Up to 63
single-byte alphanumeric characters or symbols)
Mac Address (Unable to
set)
Displays the MAC address of the player. It cannot be changed.
User
Information
User Set a user name and a password to prevent improper access. Select a password that
is unique and not known to or easily guessed by others. (Example of passwords to
avoid: your name or your family’s name, telephone number, birth date, street number
of address, and car license plate numbers, as well as repetition of the same number or
symbol.)
When the password is entered, the characters are displayed as “ ”. If you forget the
password, enter a new password.
Password
NTP Server On* The player automatically accesses an internet server to adjust its clock via the network
time protocol.
Off The player does not access an internet server to adjust its clock.
*indicates default setting
Information on Internet Settings
Using Your Internet Connection
1. Insert an HD DVD disc and close the disc tray.
2. If the disc does not begin to play automatically, press PLAY.
3. If a menu does not appear, press TOP MENU or MENU.
4. Use the arrow ubttons to select an item from the menu and press OK.
internet.indd 45 3/8/06 5:05:58 PM
Page 50

This page intentionally left blank.
internet.indd 46 3/8/06 5:05:58 PM
Page 51

Other Information
47
Chapter 5
Changing Entertainment. Again.
Chapter Overview:
• Troubleshooting
• Language Code List
• Output Sound Conversion Table
• Limited Warranty
• Information on Software Updates
other4.indd 47 3/8/06 5:07:13 PM
Page 52

48 chapter 5
Other Information
Troubleshooting
to the player, i.e., the audio
amplifier input
Is the HD DVD player installed in a place with poor ventilation, or are its ventilation
holes on the back covered? If the inside temperature raises, the HD DVD player turns
itself off. Make sure the HD DVD player is in a well ventilated area.
Power turns off
during operation.
IMPORTANT!
DO NOT RETURN THIS PRODUCT TO YOUR DEALER.
If you experience problems, call RCA customer support or mail your
product in for replacement.
See the warranty on page 51 for details.
other4.indd 48 3/8/06 5:16:42 PM
Page 53

chapter 5 49
Other Information
Language Code List
other4.indd 49 3/8/06 5:07:16 PM
Page 54

50 chapter 5
Other Information
Output Sound Conversion Table
Notes
Some discs allow you to change audio selections only via the disc menu. If this is the case, press TOP MENU button and choose the
appropriate language from the selections on the disc menu.
When you turn on the player or replace a disc, the player returns to the initial default setting.
Depending on a disc, a specifi c type of audio the disc has is output.
Immediately after you have switched sounds, there may be a temporary discrepancy between the display and actual sound.
The BITSTREAM/PCM jack may not output SAP sound you select. In this instance, set “Digital out SPDIF” to “PCM”.
Manufactured under license from Dolby Laboratories. Dolby and the double-D symbol are trademarks of Dolby Laboratories.
Manufactured under license from Digital Theater Systems, Inc. U.S. Pat. No's. 5,451,942; 5,956,674; 5,974,380; 5,978,762;
6,226,616; 6,487,535 and other U.S. and world-wide patents issued and pendling. "DTS" and "DTS Digital Surround" are
registered trademarks of Digital Theater Systems, Inc.
Copyright 1996, 2003 Digital Theater Systems, Inc. All Rights Reserved.
Disc Audio Format
Analog
5.1ch/2ch
Digital out SDPIF
Bitstream PCM
HD DVD Video
Standard
contents
DD plus 5.1ch 5.1ch/2ch Bitstream*2 2ch PCM
True HD 48kHz 2ch/2ch 2ch PCM 2ch PCM
96kHz 2ch/2ch 2ch PCM*1 2ch PCM*1
192kHz 2ch/2ch 2ch PCM*1 2ch PCM*1
dts-HD 5.1ch 5.1ch/2ch Bitstream*3 2ch PCM*4
L-PCM 48kHz Yes 2ch PCM 2ch PCM
96kHz Yes 2ch PCM*1 2ch PCM*1
192kHz 2ch/2ch 2ch PCM*1 2ch PCM*1
MPEG 2ch/2ch Bitstream 2ch PCM
Advanced con. 5.1ch/2ch DTS Bitstream 2ch PCM
DVD-Video
DD 5.1ch 5.1ch/2ch Bitstream 2ch PCM
L-PCM 48kHz 2ch/2ch 2ch PCM 2ch PCM
96kHz 2ch/2ch 2ch PCM*1 2ch PCM*1
dts 5.1ch 5.1ch/2ch Bitstream 2ch PCM*4
MPEG 2ch/2ch Bitstream 2ch PCM
CD
L-PCM 44.1kHz Yes 2ch PCM 2ch PCM
dts 44.1kHz Yes Bitstream 2ch PCM
MP3 2ch/2ch 2ch PCM 2ch PCM
WMA 2ch/2ch 2ch PCM 2ch PCM
DVD-VR
DD Yes Bitstream 2ch PCM
L-PCM Yes 2ch PCM 2ch PCM
MPEG Yes Bitstream 2ch PCM
Disc Audio Format
Digital out HDMI
Auto Bitstream PCM Downmixed PCM
HD DVD Video
Standard
contents
DD plus 5.1ch Depend on HDMI receiver Bitstream*2 upto 5.1ch PCM 2ch PCM
True HD 48kHz Depend on HDMI receiver 2ch PCM 2ch PCM 2ch PCM
96kHz Depend on HDMI receiver 2ch PCM*1 2ch PCM*4 2ch PCM*1
192kHz Depend on HDMI receiver 2ch PCM*1 2ch PCM*4 2ch PCM*1
dts-HD 5.1ch Depend on HDMI receiver Bitstream*3 upto 5.1ch PCM*4 2ch PCM*4
L-PCM 48kHz Depend on HDMI receiver 2ch PCM Multi PCM 2ch PCM
96kHz Depend on HDMI receiver 2ch PCM*1 Multi PCM*4 2ch PCM*1
192kHz Depend on HDMI receiver 2ch PCM*1 2ch PCM*4 2ch PCM*1
MPEG
Depend on contents
Depend on HDMI receiver Bitstream 2ch PCM 2ch PCM
Advanced con. Depend on HDMI receiver 2ch PMC*1 96kHzMulti PCM*4 2ch PCM*1
DVD-Video
DD 5.1ch Depend on HDMI receiver Bitstream Multi PCM 2ch PCM
L-PCM 48k Depend on HDMI receiver 2ch PCM 2ch PCM 2ch PCM
96k Depend on HDMI receiver 2ch PCM*1 2ch PCM*4 2ch PCM*1
dts 5.1ch Depend on HDMI receiver Bitstream Multi PCM 2ch PCM
MPEG Depend on HDMI receiver Bitstream 2ch PCM 2ch PCM
CD
L-PCM 44.1kHz 2ch PCM 2ch PCM 2ch PCM 2ch PCM
dts 44.1kHz Depend on HDMI receiver Bitstream Multi PCM 2ch PCM
MP3 2ch PCM 2ch PCM 2ch PCM 2ch PCM
WMA 2ch PCM 2ch PCM 2ch PCM 2ch PCM
DVD-VR
DD Depend on HDMI receiver Bitstream Multi PCM 2ch PCM
L-PCM 2ch PCM 2ch PCM 2ch PCM 2ch PCM
MPEG Depend on HDMI receiver Bitstream 2ch PCM 2ch PCM
*1: Downsampling PCM.
*2: Bitstream audio output is possible only when the connected HDMI device has bitstream decoding function. If not, sound is output in PCM (48kHz)
format.
*3: Multi channel PCM audio output is possible only when the connected HDMI device has multi channel decoding function.
*4: This out format is possible only when the resolution is set to 720p or 1080i. When 480p is selected this will be 48kHz 2ch PCM..
other4.indd 50 3/8/06 5:07:17 PM
Page 55

chapter 5 51
Other Information
Limited Warranty
What your warranty covers:
• Defect in materials or workmanship.
For how long after your purchase:
• 90 days from date of purchase - Unit exchange, which includes parts and labor.
• 91 days to 1 year from date of purchase - Unit exchange, which includes parts only; you pay the labor.
• The warranty for rental units begins with the first rental or 45 days from date of shipment to the rental firm, whichever comes first.
What we will do:
During the initial 90 days:
• Provide you with a new, or at our option, a refurbished unit. The exchange unit is under warranty for the remainder of the original
product’s warranty period.
After the 90 days and within one year:
Provide you with a new or, at our option, refurbished unit. The exchange unit is under warranty for the remainder of the original product’s
warranty period. We will bill you a flat exchange charge to replace a defective unit. This charge covers the labor cost for its repair.
How to make a warranty claim:
• Call 1-800-311-9263 and have your unit’s date of purchase and model/serial number ready. The model/serial number information is
on the back of your unit.
• A representative will troubleshoot your problem over the phone.
• If the representative determines that you should receive a replacement unit you will be provided with a Service Request (SR) number
and instructions on how and where to return your unit.
• Proof of purchase in the form of a bill of sale or receipted invoice which is evidence that the product is within the warranty period
must be presented to obtain warranty service. For rental firms, proof of first rental is also required.
What your warranty does not cover:
• Acts of nature, such as but not limited to lightning damage.
• Adjustment of customer controls.
• Damage from misuse or neglect.
• A unit that has been modified or incorporated into other products or is used for institutional or other commercial purposes.
• Batteries.
• Units purchased or serviced outside the U.S.A.
• Shipping damage if the unit was not packed and shipped in the manner prescribed by Thomson.
Product Registration:
Please complete the online Product Registration on RCA.com/productregistration or complete and mail the Product Registration Card packed with your
unit. It will make it easier to contact you should it ever be necessary. The return of the card is not required for warranty coverage.
Limitation of Warranty:
• THE WARRANTY STATED ABOVE IS THE ONLY WARRANTY APPLICABLE TO THIS PRODUCT. ALL OTHER
WARRANTIES, EXPRESS OR IMPLIED (INCLUDING ALL IMPLIED WARRANTIES OF MERCHANTABILITY OR
FITNESS FOR A PARTICULAR PURPOSE) ARE HEREBY DISCLAIMED. NO VERBAL OR WRITTEN INFORMATION
GIVEN BY THOMSON INC., ITS AGENTS OR EMPLOYEES SHALL CREATE A GUARANTY OR IN ANY WAY
INCREASE THE SCOPE OF THIS WARRANTY.
• REPAIR OR REPLACEMENT AS PROVIDED UNDER THIS WARRANTY IS THE EXCLUSIVE REMEDY OF THE
CONSUMER. THOMSON INC. SHALL NOT BE LIABLE FOR INCIDENTAL OR CONSEQUENTIAL DAMAGES
RESULTING FROM THE USE OF THIS PRODUCT OR ARISING OUT OF ANY BREACH OF ANY EXPRESS OR
IMPLIED WARRANTY ON THIS PRODUCT. THIS DISCLAIMER OF WARRANTIES AND LIMITED WARRANTY ARE
GOVERNED BY THE LAWS OF THE STATE OF INDIANA. EXCEPT TO THE EXTENT PROHIBITED BY APPLICABLE
LAW, ANY IMPLIED WARRANTY OF MERCHANTABILITY OR FITNESS FOR A PARTICULAR PURPOSE ON THIS
PRODUCT IS LIMITED TO THE APPLICABLE WARRANTY PERIOD SET FORTH ABOVE.
other4.indd 51 3/9/06 3:49:22 PM
Page 56

52 chapter 5
Other Information
How state law relates to warranty:
• Some states do not allow the exclusion nor limitation of incidental or consequential damages, or limitations on how long an implied
warranty lasts, so the above limitations or exclusions may not apply to you.
• This warranty gives you specific legal rights, and you also may have other rights that vary from state to state.
If you purchased your product outside the United States:
* This warranty does not apply. See your dealer for warranty information.
Information on software updates
• If you connect your HD DVD player to the internet, you can receive software updates if available. See page 42.
• If you do not have an internet connection, you can get software updates on a disc. For information on how to get a disc with software
updates, go to www.rca.com or call RCA customer suppott.
other4.indd 52 3/9/06 3:49:22 PM
Page 57

chapter 5 53
Other Information
License Information on the Software used in the
RCA HD DVD Receiver
other4.indd 53 3/9/06 3:49:28 PM
Page 58

54 chapter 5
Other Information
other4.indd 54 3/9/06 3:49:36 PM
Page 59

chapter 5 55
Other Information
other4.indd 55 3/9/06 3:49:44 PM
Page 60

56 chapter 5
Other Information
other4.indd 56 3/9/06 3:49:49 PM
Page 61

other4.indd 57 3/9/06 3:49:51 PM
Page 62

©2006 Thomson Inc.
Trademark(s) ® Registered
Marca(s) Registrada(s)
Printed in Japan
TOCOM 16669540
Please do not send any products to the Indianapolis address listed in this manual
or on the carton. This will only add delays in service for your product.
Thomson Inc.
10330 North Meridian Street
Indianapolis, IN 46290
Visit our website at www.rca.com
other4.indd 58 3/9/06 3:49:54 PM
 Loading...