

Page 1

High-Definition
Television
User’s Guide
Changing Entertainment. Again.
Page 2
Important Information
WARNING
To reduce the risk of fire or
electric shock, do not expose
this product to rain or moisture.
CAUTION
RISK OF ELECTRIC SHOCK
DO NOT OPEN
This symbol indicates
"dangerous voltage" inside
the product that presents a
risk of electric shock or
personal injury.
Refer to the identification/rating label located on the back panel of your
product for its proper operating voltage.
FCC Regulations state that unauthorized changes or modifications to this
equipment may void the user’s authority to operate it.
Caution: Using video games or any external accessory with fixed
images for extended periods of time can cause them to be
permanently imprinted on the picture tube (or projection TV picture
tubes). ALSO, some network/program logos, phone numbers, black
borders (sides, top, bottom) etc. may cause similar damage. This
damage is not covered by your warranty.
Cable TV Installer: This reminder is provided to call your attention to Article
820-40 of the National Electrical Code (Section 54 of the Canadian Electrical
Code, Part 1) which provides guidelines for proper grounding and, in
particular, specifies that the cable ground shall be connected to the grounding
system of the building as close to the point of cable entry as practical.
Caution: To reduce the risk of electric shock, do
not remove cover (or back). No user serviceable
parts inside. Refer servicing to qualified service
personnel.
This symbol indicates
important instructions
accompanying the product.
Product Registration
Please fill out the product registration card (packed separately) and return it immediately. For U.S. customers: Your
RCA Consumer Electronics product may also be registered at www.rca.com/productregistration. Returning the card
allows us to contact you if needed.
Product Information
Keep your sales receipt to obtain warranty parts and service and for proof of purchase. Attach it here and record
the serial and model numbers in case you need them. These numbers are located on the product.
Model No. ______________________________________________________________________________________________
Serial No ._______________________________________________________________________________________________
Purchase Date: __________________________________________________________________________________________
Dealer/Address/Phone: ___________________________________________________________________________________
VCR Plus+, C
related affiliates. The GUIDE Plus+ and VCR Plus+ systems are protected by one or more issued United States patents
such as 6,331,877; 6,239,794; 6,154,203; 5,940,073; 4,908,713; 4,751,578; 4,706,121; 6,466,734; 6,430,359; 6,091,882;
6,049,652; 5,335,079; 5,307,173.
THOMSON INC. AND GEMSTAR-TV GUIDE INTERNATIONAL AND/OR ITS RELATED AFFILIATES ARE NOT IN
ANY WAY LIABLE FOR THE ACCURACY OF THE PROGRAM SCHEDULE INFORMATION PROVIDED BY THE
GUIDE PLUS+ SYSTEM. IN NO EVENT SHALL THOMSON INC. OR GEMSTAR-TV GUIDE INTERNATIONAL AND/
OR ITS RELATED AFFILIATES BE LIABLE FOR ANY AMOUNTS REPRESENTING LOSS OF PROFITS, LOSS OF
BUSINESS, OR INDIRECT, SPECIAL, OR CONSEQUENTIAL DAMAGES IN CONNECTION WITH THE PROVISION
OR USE OF ANY INFORMATION EQUIPMENT, OR SERVICES RELATING TO THE GUIDE PLUS+ SYSTEM.
3,
PlusCode, G-LINK, and GUIDE Plus+ are trademarks of Gemstar-TV Guide International, Inc. and/or its
VCR required for recording.
Page 3
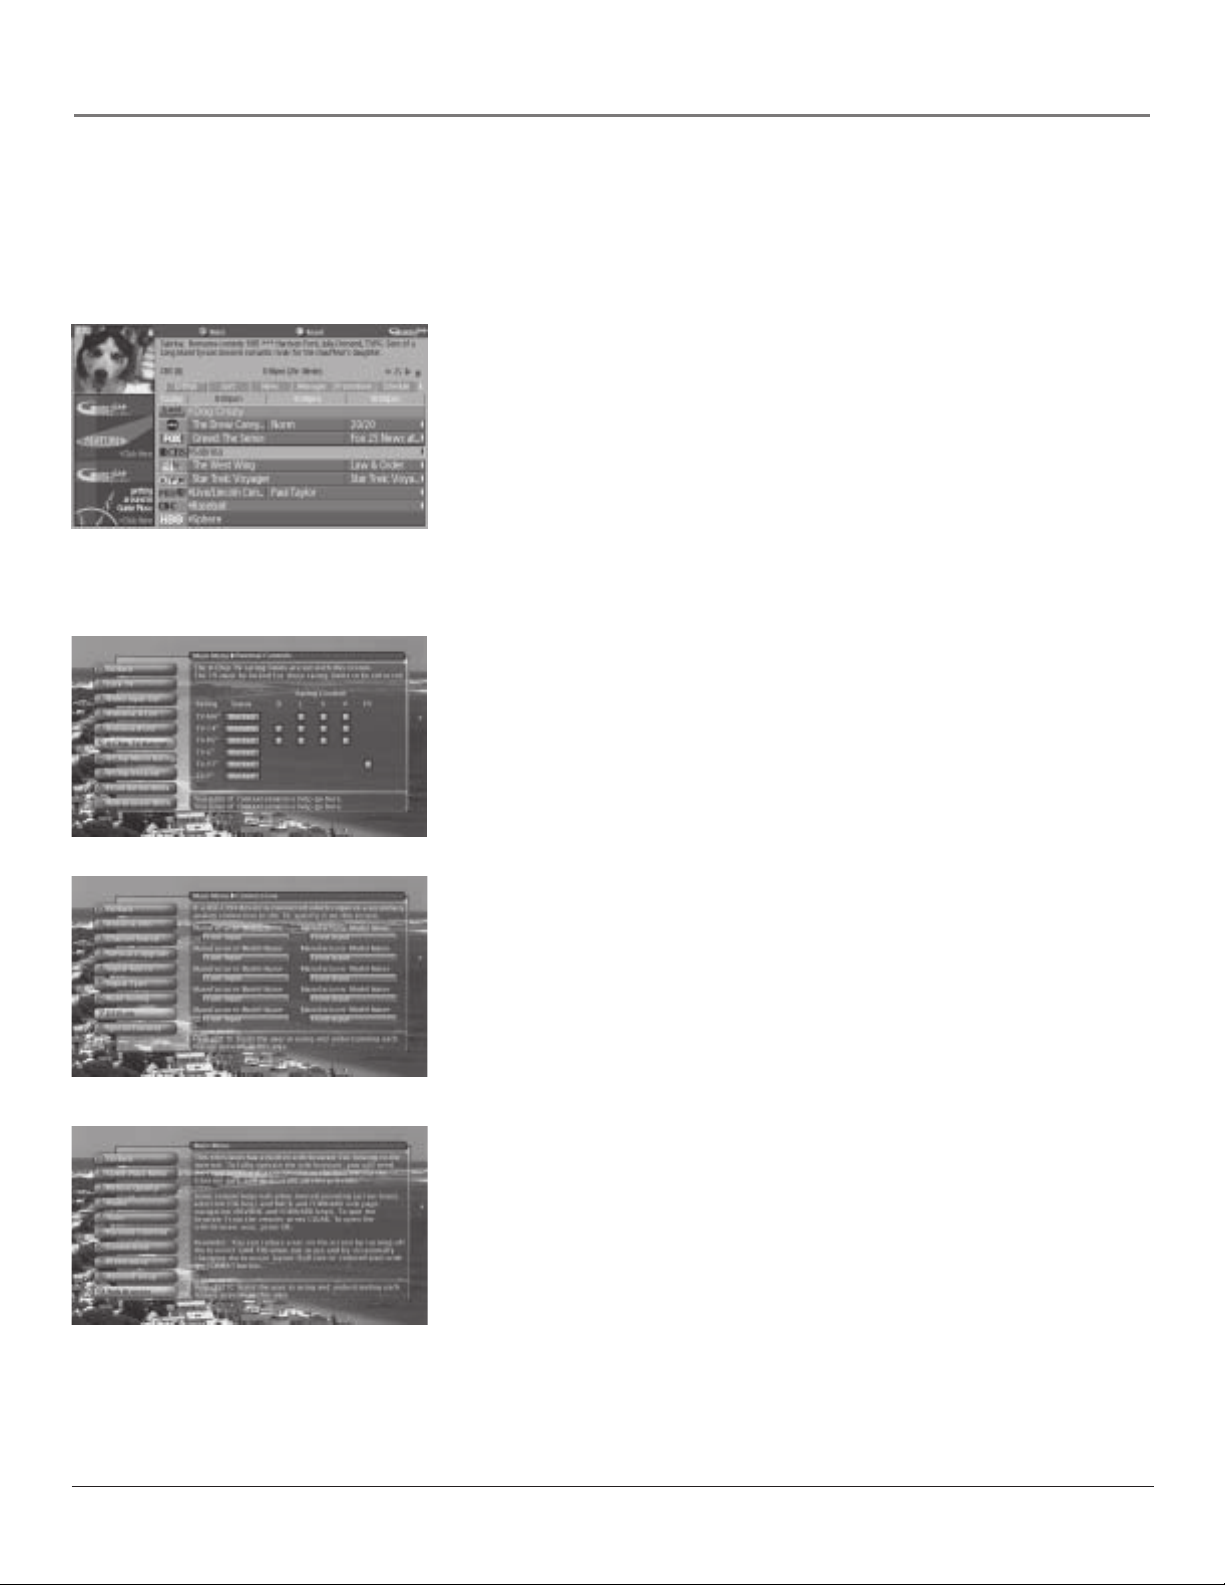
Table of Contents
Key Features Overview
Your TV is equipped with features that will add to your TV viewing experience. The following
information summarizes a few of these features. Chapter 3 provides more information about the
rest of the TV’s features and how to use them.
On-Screen Program Guide
The GUIDE Plus+™ system is a “no-fee,” on-screen interactive list of programs and
information that is built into your TV. You can scroll through the guide to see what’s on
and tune directly to that program from the guide. You can also browse programs by
category with the Sort feature or sort them alphabetically. When you access the News
feature, MSNBC will appear in your video window if available and display current news
stories by headline. One-Touch VCR Recording is another benefit of the GUIDE Plus+
system. You don’t have to remember to program your VCR or use the menus in your VCR
to set up a recording.
Complete the on-screen assisted setup. You’ll find detailed instructions in Chapter 1.
V-Chip: Parental Controls
You can block programs and movies by content, age-based ratings, and/or movie ratings.
Set up the Parental Controls menu in the TV’s main menu (Chapter 3 has details). The
broadcasters must use the rating system when they send the program to your TV in order
for your TV to block the program. The TV must be locked for the parental controls
settings to take effect.
DTVLink® (Digital Television Link)
Better known to some as IEEE 1394 or FireWire*, these jacks enable connection of highspeed digital technology to devices with a DTVLink logo on them. With the two
DTVLink connectors, you can network your digital devices by linking them together.
Web Browser
A web browsing software package is built into your television that allows access to the
Internet including the World Wide Web. The browser interprets HTML (HyperText
Markup Language), the programming language of the Internet, into the words and
graphics (jpeg and gif files) that you see when viewing a web page. This browser has some
limitations and might not be equipped to interpret all files, such as streaming video and
audio. You’ll need a high-speed connection, such as a DSL (digital subscriber line) unit or
cable modem to use the web browser.
DTVLINK® Certification Logo is a U.S. registered mark of CEA.
*Firewire is a trademark of Apple Computer, Inc., registered in the U.S. and other countries.
1
Page 4
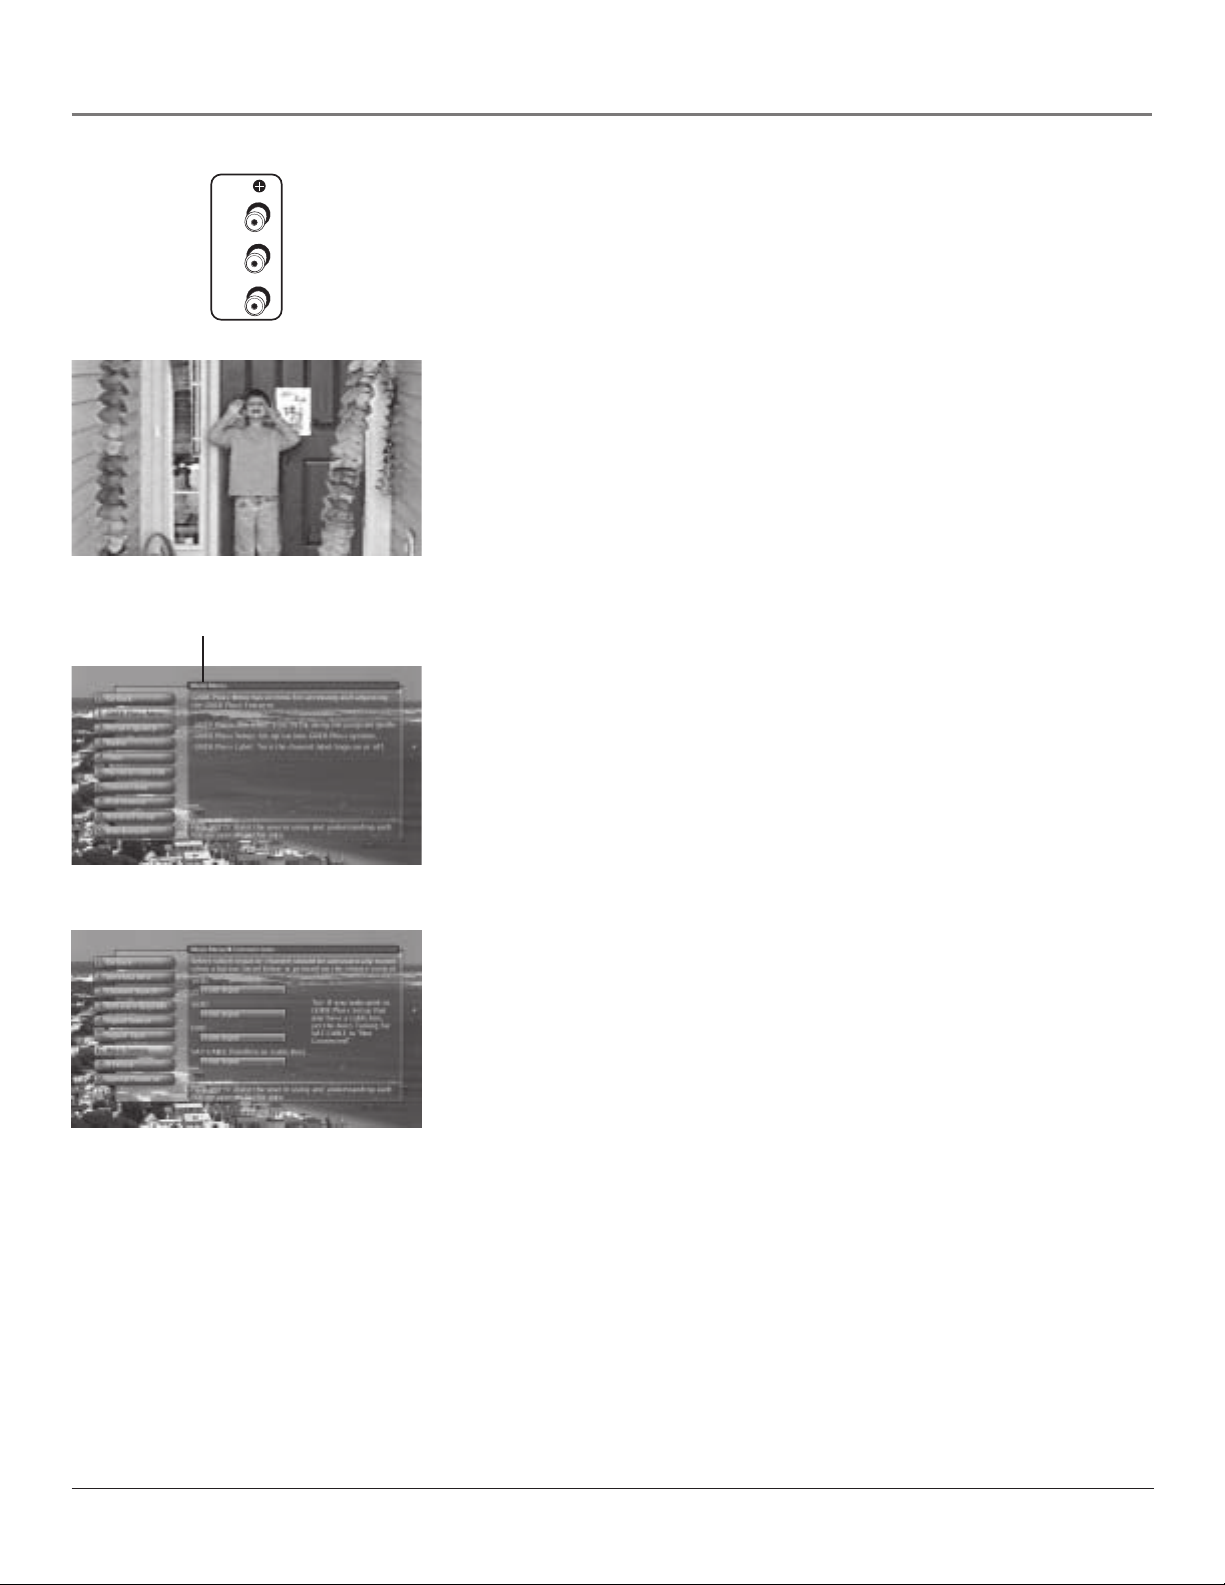
Table of Contents
RECORD
OUTPUT
VIDEO
AUDIO
R
L
Menu Path
Record Output Jacks
You can record digital TV (and analog) programs by using the RECORD OUTPUT
VIDEO OUT and AUDIO OUT L/R (you can also record analog programs). Your TV
must be tuned to the channel in order to record the program.
Integrated HDTV Tuner
Decodes all 16 formats of ATSC Digital TV broadcasts for a clearer picture without
ghosting or snow. Decodes NTSC analog TV broadcasts. For digital TV, can output sound
in Dolby Digital 5.1 and pictures in 16:9 widescreen (if the broadcast supports it).
On-Screen Help Text
The elaborate on screen help text along with the user’s guide assists you in learning to use
the features of your television. A menu path appears at the top of the screen to remind you
where you are in the menu system. The help text consists of step-by-step instructions,
definitions, information, tips, etc.
Auto Tuning
The Auto Tuning feature allows you to set up the TV to tune to a specific channel when
you press a certain component (VCR, DVD Player, etc.) button on the remote. See
Chapter 3 for details.
2
Page 5

Table of Contents
Key Features Overview ................................................................................................................... 1
Chapter 1: Connections & Setup
Things to Consider Before You Connect ........................................................................................ 6
Choose Your Connection ................................................................................................................. 7
How to Connect: TV + VCR + DVD Player .................................................................................................. 8
How to Connect: TV + Satellite Receiver + VCR ......................................................................................... 9
Audio Connections .................................................................................................................................... 10
How to Connect: TV + Receiver with Dolby Digital + Speakers .............................................................. 10
How to Connect: TV + A/V Receiver + Speakers + Use TV as Center Channel ....................................... 10
How to Connect: TV + Speakers Without A/V Receiver .......................................................................... 12
Explanation of Input Jacks and Cables ........................................................................................ 13
Back of the TV ................................................................................................................................ 15
Why You Should Connect the G-LINK™ Cable ............................................................................ 18
Placing the G-LINK Wands ........................................................................................................................ 18
How to Find the Remote Sensor ............................................................................................................... 18
The Front of Your TV ..................................................................................................................... 19
Front Input Jacks ........................................................................................................................................ 19
Front Panel ................................................................................................................................................. 19
Plug in the TV................................................................................................................................. 20
Put batteries in the remote........................................................................................................... 20
Turn on the TV ............................................................................................................................... 20
Use the Remote Control to Complete the Assisted Setup.......................................................... 20
Complete the Assisted Setup........................................................................................................ 21
Set the Menu Language ............................................................................................................................ 21
Complete Channel Search ......................................................................................................................... 21
The GUIDE Plus+™ System Setup ............................................................................................................. 21
What to Expect .............................................................................................................................. 25
Changing Channels........................................................................................................................ 25
Next Steps ...................................................................................................................................... 25
Chapter 2: Using the Remote Control
The Buttons on the Remote Control ............................................................................................ 28
Programming the Remote to Operate Other Components ........................................................ 30
Using the INPUT Button ................................................................................................................ 32
Code List ......................................................................................................................................... 33
Chapter 3: Using the TV’s Features
About the Channel Banner ........................................................................................................... 36
Digital or Analog TV Channel ....................................................................................................... 37
About the GUIDE Plus+ System ....................................................................................................38
Parental Controls ........................................................................................................................... 42
Lock/Unlock TV .......................................................................................................................................... 42
Channel Lists (Video Input List, Antenna A List, Antenna B List) ........................................................... 42
How V-Chip Works..................................................................................................................................... 43
V-Chip TV Ratings ...................................................................................................................................... 43
Blocking Specific Content Themes ............................................................................................................ 45
V-Chip Movie Rating Limit ........................................................................................................................ 46
V-Chip Unrated Program Block ................................................................................................................. 47
Front Button Block .................................................................................................................................... 47
Web Browser Block .................................................................................................................................... 47
Auto Tuning Feature...................................................................................................................... 48
PIP (Picture-in-Picture) Operation ................................................................................................. 49
Using the Web Browser ................................................................................................................ 50
3
Page 6

Table of Contents
Chapter 4: Using the TV’s Menu System
Menus, On-screen Help, and Control Panels ............................................................................... 54
Navigating the Menu System .................................................................................................................... 54
Exiting a menu ........................................................................................................................................... 54
On-Screen Help .......................................................................................................................................... 54
Controls ...................................................................................................................................................... 54
Picture Quality Menu .................................................................................................................... 56
Picture Settings .......................................................................................................................................... 56
Picture Presets ............................................................................................................................................ 56
Convergence .............................................................................................................................................. 57
Color Warmth ............................................................................................................................................ 57
Noise Filter ................................................................................................................................................. 57
Auto Color .................................................................................................................................................. 57
Graphic Equalizer ...................................................................................................................................... 58
SVM ............................................................................................................................................................ 58
Reset Controls ............................................................................................................................................ 58
Audio Menu ................................................................................................................................... 58
Audio Processor ......................................................................................................................................... 59
Sound Logic ................................................................................................................................................ 59
Audio Language ........................................................................................................................................ 59
Digital Audio Out ...................................................................................................................................... 60
Fixed/Variable Out ..................................................................................................................................... 60
SAP (Second Audio Program) .................................................................................................................... 60
Balance ....................................................................................................................................................... 60
Time Menu ..................................................................................................................................... 61
Connections Menu......................................................................................................................... 61
Antenna Info .............................................................................................................................................. 61
Subwoofer .................................................................................................................................................. 61
Software Upgrade ..................................................................................................................................... 62
Channel Search .......................................................................................................................................... 62
Signal Source .............................................................................................................................................. 62
Signal Type ................................................................................................................................................. 62
DTVLink® (Digital Television Link) ........................................................................................................... 63
Special Features ......................................................................................................................................... 63
Auto Tuning ............................................................................................................................................... 63
Ethernet Setup ........................................................................................................................................... 64
Preferences Menu .......................................................................................................................... 64
Closed Captioning ..................................................................................................................................... 64
Screen Format ............................................................................................................................................ 66
Menu Language ......................................................................................................................................... 67
Record Output ........................................................................................................................................... 67
Color Scheme ............................................................................................................................................. 67
Translucency ............................................................................................................................................... 67
Digital Channel Info .................................................................................................................................. 68
Chapter 5: References
Troubleshooting ............................................................................................................................. 70
HD Specifications ........................................................................................................................... 74
Accessory Information .................................................................................................................. 76
Limited Warranty........................................................................................................................... 79
FCC Information ............................................................................................................................. 81
Care and Cleaning ......................................................................................................................... 82
Index ............................................................................................................................................... 89
4
Page 7

Chapter 1
Connections & Setup
Chapter Overview:
• Things to Consider Before You Connect
• Choose Your Connection
• How To Connect
• Back of the TV
• Why You Should Connect the G-LINK Cable
• The Front of Your TV
• Plug in the TV
• Put Batteries in the Remote
• How to Use the Remote Control to Complete
the Assisted Setup
•Turn on the TV
• Complete the Assisted Setup
Changing Entertainment. Again.
Graphics contained within this publication are for representation only. 5
Page 8

Connections & Setup
Things to Consider Before You Connect
Protect Against Power Surges
• Connect all components before you plug any of their power cords into the wall outlet or
power strip. NEVER plug your TV into an outlet that is controlled by a wall switch.
•Turn off the TV and/or component(s) before you connect or disconnect any cables.
• Make sure all antennas and cables are properly grounded. Refer to the Important Safeguards
sheet packed with your TV.
Protect Components from Overheating
• Don’t block ventilation holes on any of the components. Arrange the components so that air
can circulate freely.
• Don’t stack components.
• When you place components in a stand, make sure you allow adequate ventilation.
• If you connect an audio receiver or amplifier, place it on the top shelf so the heated air from it
won’t flow around other components.
Position Cables Properly to Avoid Audio Interference
•Insert each cable firmly into the designated jack.
Use Indirect Light
Don’t place the TV where sunlight or room lighting will be directed toward the screen. Use soft or
indirect lighting.
Using a Stand
If a stand or base is used, ensure that it is of adequate size and strength to prevent the TV from
being accidentally tipped over, pushed off, or pulled off. This could cause personal injury and/or
damage the TV. Refer to the Important Safety Instructions packed separately.
Connection Illustrations
The components used in the connection illustrations are for representation only. The input jacks
and the output jacks on the back of your components (VCR, DVD player, etc.,) might look different
than those illustrated.
6 Chapter 1
Page 9
Connections & Setup
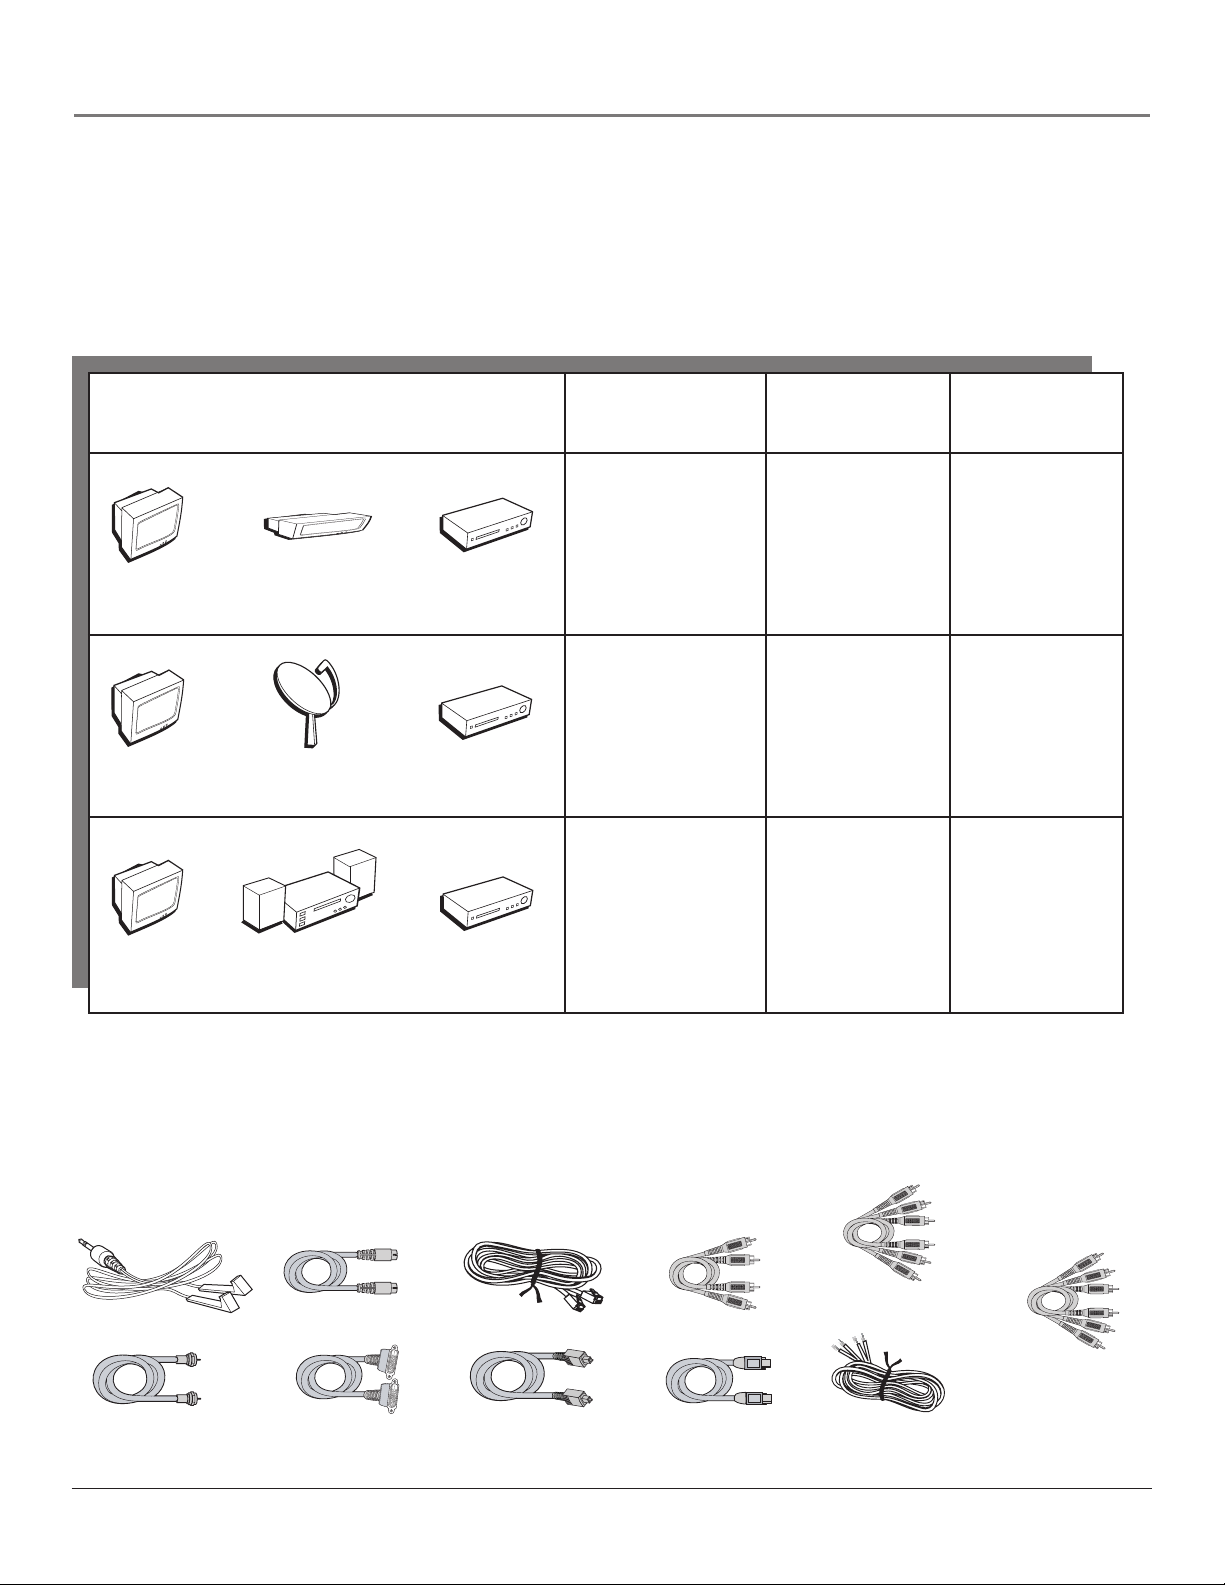
Choose Your Connection
There are several ways to connect your television, depending on the components you want to connect and the quality of
the signal you want to achieve. Please use the following chart to determine which connection is best for you. Proceed to the
appropriate page and connect your TV. For more information about the relationship between the cables, jacks, and the
quality of the signal you see on your TV, go to page 13.
Components Cables Connection Go to..
Needed Title
Coaxial
Audio/video
G-LINK
TV
DVD
VCR
Component
Coaxial
Audio/video
G-LINK
TV
Satellite Receiver
VCR
Coaxial
Audio/video
G-LINK
TV
A/V Receiver
VCR
Cables You Need to Connect Components to Your TV
TV + DVD + VCR
TV + Satellite
Receiver + VCR
TV + A/V
Receiver + VCR
page 8
page 9
pages 10, 11
The pictures below show the cables you may need for the connections represented in this book.
Note: Please locate the G-LINK cable (provided) when you’re getting ready to set up your TV. You need to connect this
cable to your TV and to your VCR and/or cable box in order for all of the features of the program guide to work
properly.
G-LINK cable
Coaxial cable DVI-D cable
S-Video cable
Ethernet Cable
Digital Optical Cable
A/V Cable
1394 Cable
Composite Video
Audio/ Video cable
Component Video
Y•Pb•Pr cable
Speaker Wire
Chapter 1 7
Page 10
Connections & Setup
Note for U.S. Customers: If you
POWER
+
VOL
—
VOL
H
C
CH
MENU
prefer, we can provide you with
the name of an Authorized
Service Representative who will
TV
visit your home for a fee to install
your electronic entertainment
system and to instruct you in its
operation. For details about this
service, call 1-888-206-3359. For
additional assistance while using
DVD
VCR
VCR
your RCA product, please visit
www.rca.com/customersupport.
VIDEO
ANTENNA IN
ANTENNA OUT
L
OUT
VIDEO
L
IN
3A
AUDIO
R
R
AUDIO
3B
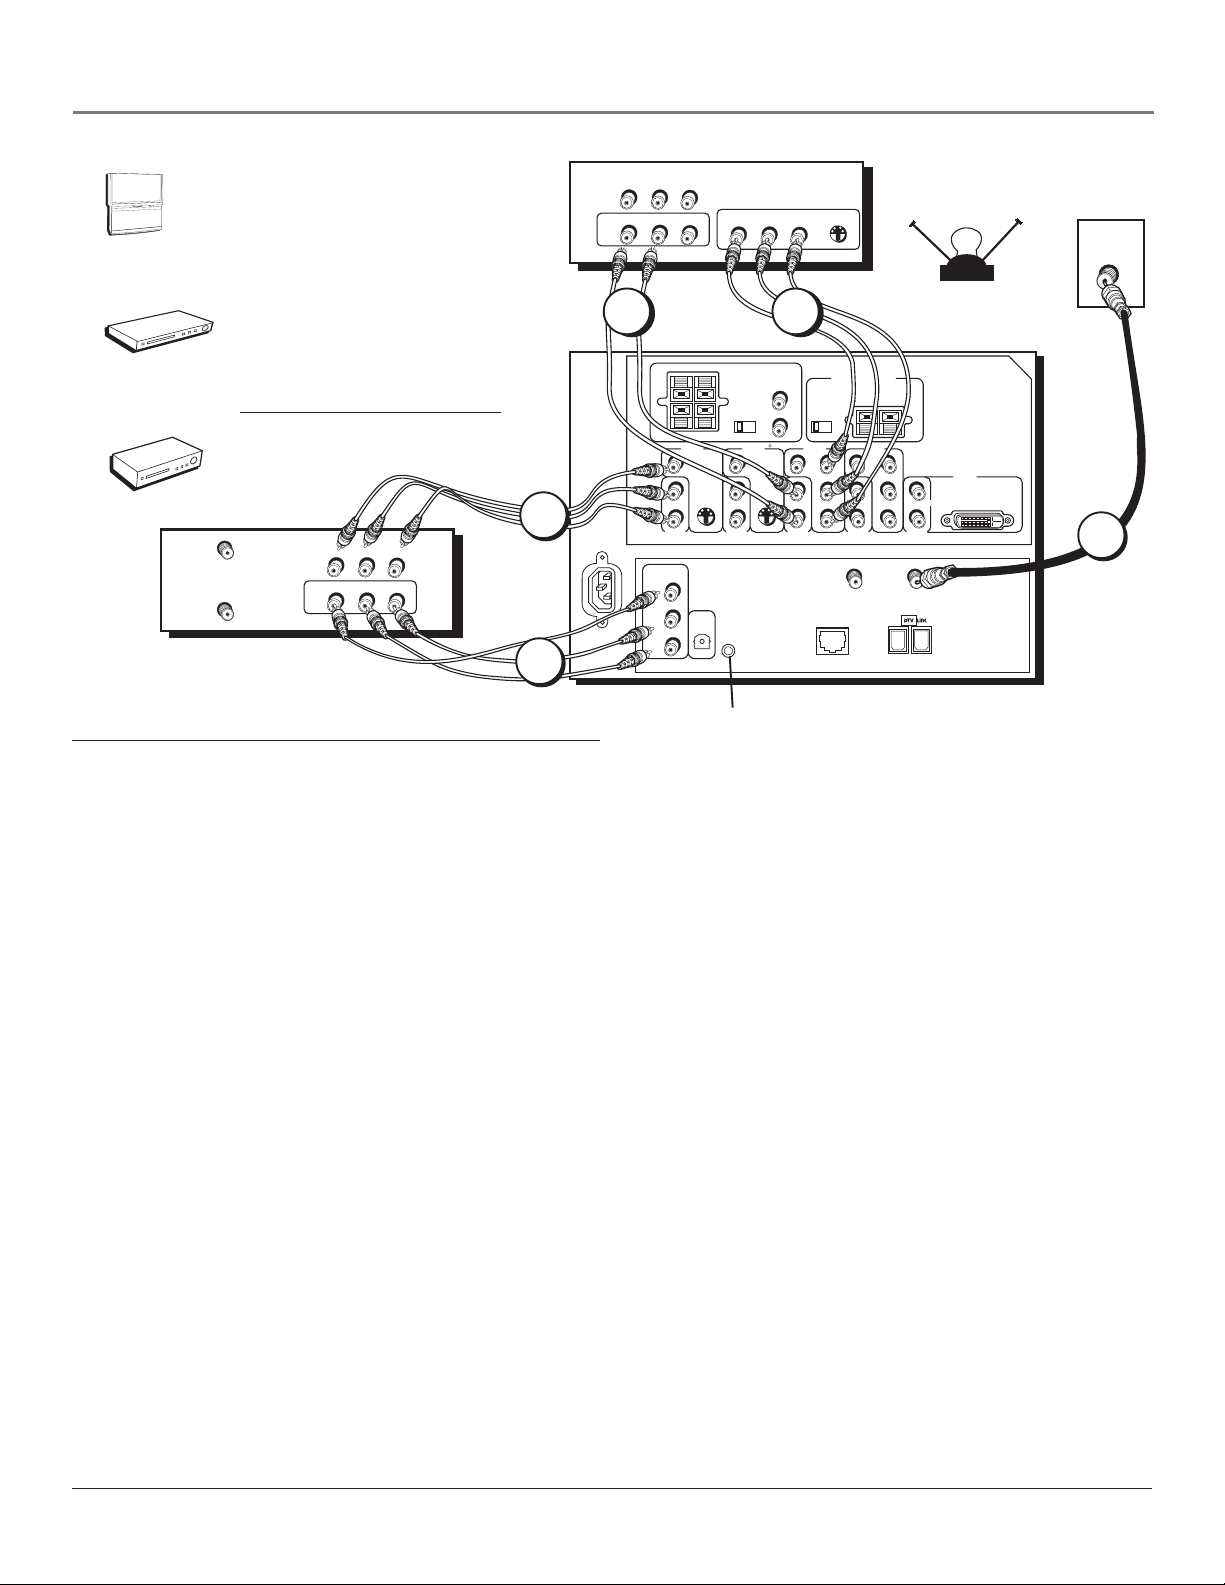
How to Connect: TV + VCR + DVD Player
AUDIO
VIDEO
L
R
IN
AUDIO
L
R
OUT
PR PB
VIDEO
DVD
S-VIDEO
Y
CABLE
OR
OFF-AIR ANTENNA
EXT
MONO
AUDIO
SPEAKER
SELECT
INPUT 2
G-LINK
INT W/
EXT
SURR
VIDEO
2
VIDEO
INPUT 5
DVI-HDTV
TV
1
AUDIO
OUTPUT
R
L
S-VIDEOS-VIDEO
V
MONO
L/
R
AUDIO
INPUT 3
INTERNAL
SPEAKER
SOURCE
TV EXT AMP
VIDEO
INPUT 3
ETHERNET
CENTER CHANNEL INPUT
EXTERNAL AMPLIFIER
MAXIMUM POWER RATING!
(60 WATTS into 8 OHMS)
VIDEO
INPUT 4
V
R
P
L/
P
B
MONO
Y
R
AUDIO
INPUT 4
ANTENNA B
INPUT
R
P
B
P
Y
ANTENNA A
L/
MONO
R
AUDIO
INPUT 5
INPUT
2
RIGHT FIXED/VARIABLE
EXTERNAL SPEAKERS
V
L/
MONO
R
AUDIO
INPUT 1
RECORD
OUTPUT
VIDEO
AUDIO
R
L
VIDEO
INPUT 1
DIGITAL
AUDIO
OUTPUT
LEFT
V
L/
R
INPUT 2
Connect G-LINK Cable (see page 18)
1. Connect your cable or off-air signal to ANTENNA A.
If you have cable and an off-air antenna, connect the cable signal to ANTENNA A INPUT (antenna A is the only source
for the GUIDE Plus+ system). Connect the off-air antenna to ANTENNA B INPUT. If you have only an off-air antenna,
connect it to ANTENNA A INPUT.
2. Connect your DVD Player to your TV.
Connect the DVD player’s component (Y PB PR) and audio outputs to INPUT 3 on the TV using component cables. If your
DVD player has composite audio/video and an S-Video output, use INPUTs 1 or 2 and use the S-VIDEO jack instead of
the VIDEO jack.
Notes: If you are using an S-Video cable (INPUT 1 or 2) or component video cables, you must also use audio cables. The
S-Video cable and component video cables only transfer video information.
If your DVD player has a component video output, we recommend you use the component video input on the TV instead of
the composite video or S-Video connection. Don’t forget to also connect audio cables when using the component video cables.
3. Connect your VCR to your TV.
A. Connect the VCR’s audio/video outputs to INPUT 1 (audio/video) on the TV using composite audio/video cables.
B. Connect the VCR’s audio/video inputs to RECORD OUTPUT on the TV. This enables recording of digital programs
(unless copy protected, using DVI HDTV or component video formats), as well as analog programs.
Viewing the Components
1. Turn on the TV and the component(s) you want to view.
2. Press the TV button on the remote control.
3. Press the INPUT button on the remote control to scroll through the Video Input Channels.
• The VCR can be viewed on the INPUT 1 channel.
• The DVD player can be viewed on the INPUT 3 channel.
Note: You can set up the TV to automatically tune to the correct Video Input Channel. This is called Auto Tuning. (See
Chapter 3 for more information.)
Go to page 18
8 Chapter 1
Page 11
POWER
+
VOL
—
VOL
H
HC
C
MENU
TV
Satellite
Receiver
VCR
VCR
ANTENNA IN
ANTENNA OUT
Connections & Setup
SATELLITE
EXT
MONO
L/
R
AUDIO
INPUT 2
SPEAKER
SELECT
G-LINK
INT W/
EXT
SURR
VIDEO
INPUT 2
S-VIDEOS-VIDEO
R
L
AUDIO
OUTPUT
RECEIVER
INTERNAL
SPEAKER
SOURCE
TV EXT AMP
VIDEO
INPUT 3
V
L/
MONO
R
AUDIO
INPUT 3
ETHERNET
CENTER CHANNEL INPUT
EXTERNAL AMPLIFIER
MAXIMUM POWER RATING!
(60 WATTS into 8 OHMS)
VIDEO
INPUT 4
V
P
R
P
B
MONO
L/
Y
R
AUDIO
INPUT 4
ANTENNA B
INPUT
P
R
B
P
Y
ANTENNA A
L/
MONO
R
AUDIO
INPUT 5
INPUT
OFF-AIR ANTENNA
VIDEO
INPUT 5
DVI-HDTV
CABLE
OR
TV
1
S-VIDEO
AUDI
VIDEO
L
R
3
LEFT
RIGHT FIXED/VARIABLE
EXTERNAL SPEAKERS
VIDEO
INPUT 1
V
V
MONO
L/
RECORD
OUTPUT
VIDEO
AUDIO
R
AUDIO
INPUT 1
DIGITAL
AUDIO
OUTPUT
R
L
2A
VIDEO
AUDIO
L
OUT
VIDEO
IN
R
L
R
AUDIO
2B
Connect G-LINK Cable (see page 18)
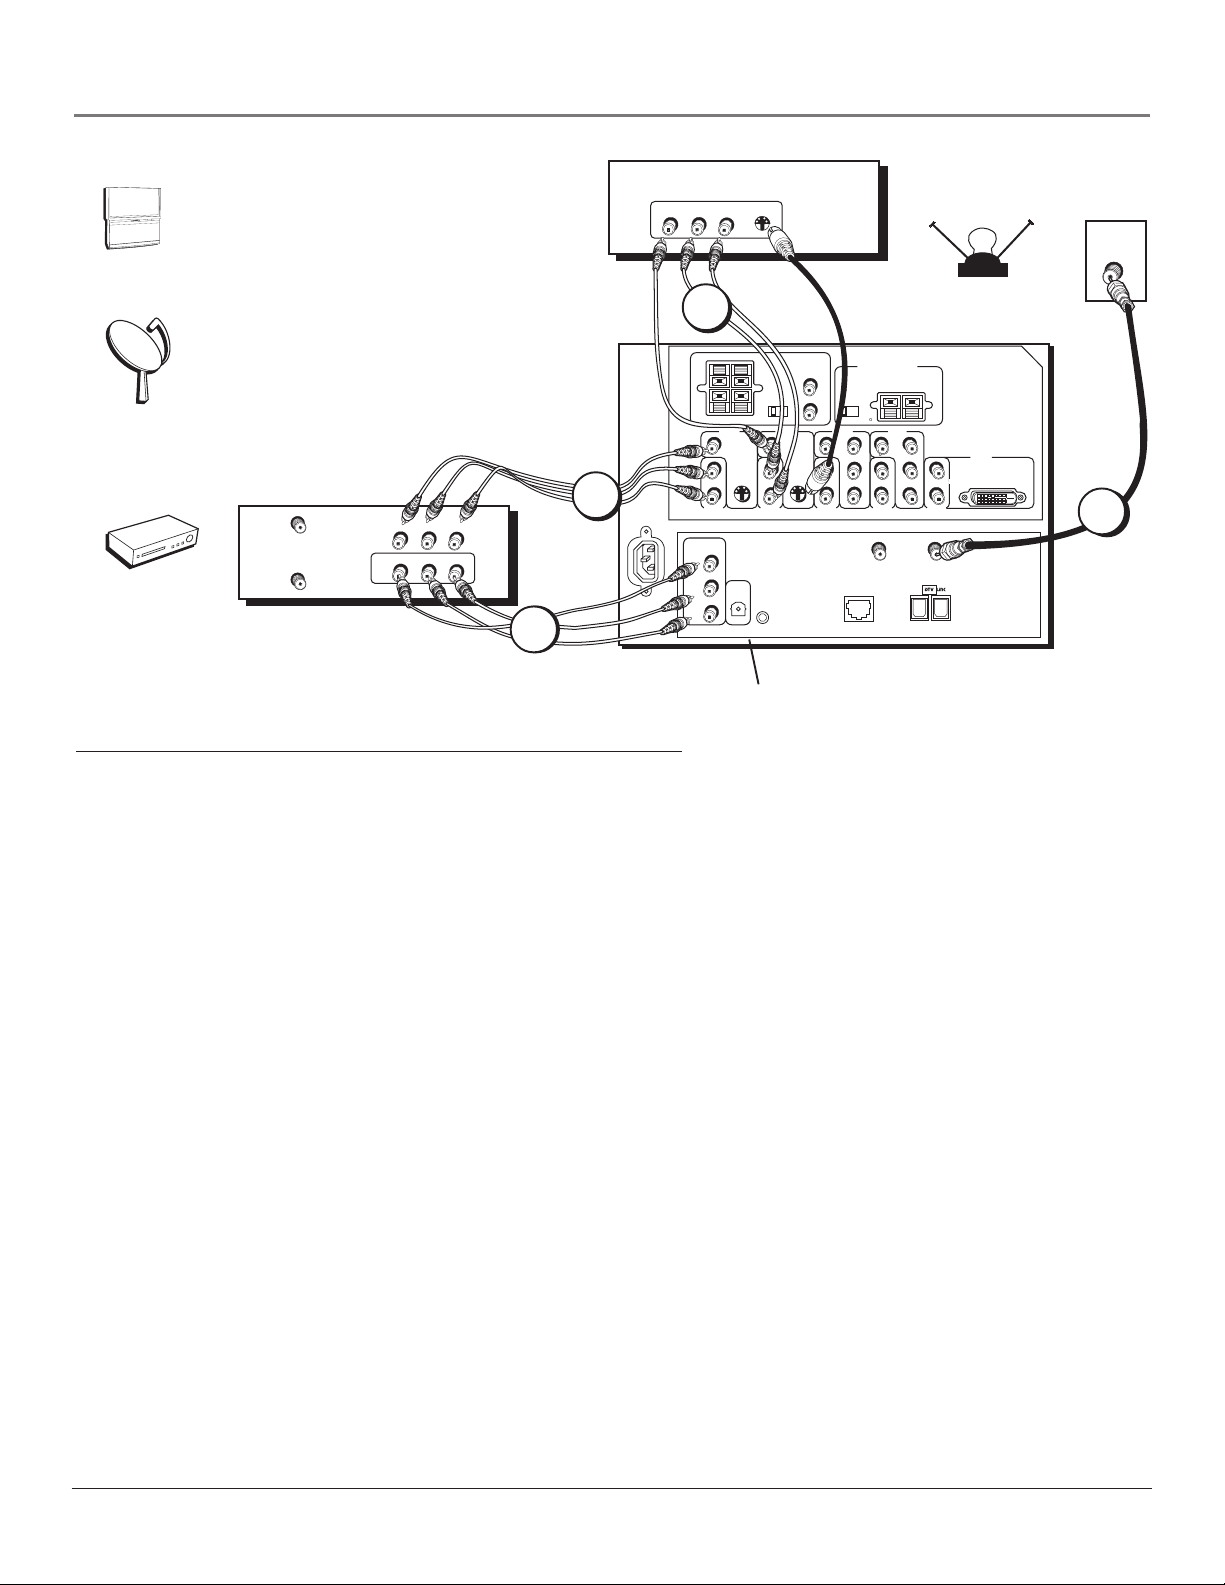
How to Connect: TV + Satellite Receiver + VCR
1. Connect your cable or off-air signal to ANTENNA A.
If you have cable and an off-air antenna, connect the cable signal to ANTENNA A INPUT (antenna A is the only source
for the GUIDE Plus+ system). Connect the off-air antenna to ANTENNA B INPUT. If you have only an off-air antenna,
connect it to ANTENNA A INPUT.
2. Connect your VCR to your TV.
A. Connect the VCR’s audio/video outputs to INPUT 1 (audio/video) on the TV using composite audio/video cables.
B. Connect the VCR’s audio/video inputs to RECORD OUTPUT on the TV. This enables recording of digital programs
(unless copy protected, using DVI HDTV or component video formats), as well as analog programs.
3. Connect your Satellite Receiver to your TV.
Connect the satellite receiver’s audio/video output jacks to the INPUT 2 AUDIO (R and L) and VIDEO jacks on the TV
using composite cables. If your satellite receiver has an S-Video output, you can make the video connection by using the
S-VIDEO jacks instead. If your satellite receiver has component outputs, then use INPUT 3 or 4.
Note: If you are using an S-Video cable or component video cables, you must also use audio cables. The S-Video cable
and component video cables only transfer video information.
Viewing the Components
1. Turn on the TV and the component(s) you want to view.
2. Press the TV button on the remote control.
3. Press the INPUT button on the remote control to scroll through the Video Input Channels.
• The VCR can be viewed on the INPUT 1 channel.
• The satellite receiver can be viewed on the INPUT 2 channel.
Note: You can set up the TV to automatically tune to the correct Video Input Channel. This is called Auto Tuning. (See
Chapter 3 for more information.
Go to page 18
Chapter 1 9
Page 12

Connections & Setup
Audio Connections
With the audio versatility of your HDTV, you can choose various connection options depending on the type and quality
of sound that you want. From good to best sound, choose one of the options or refer to the user’s manual of each
component that you are connecting to get the best results.
• Connect audio/video receiver (speakers connected to receiver) using the digital audio output jack to your TV (best sound).
• Connect audio/video receiver (speakers connected to receiver) to your TV (better sound).
• Connect speakers to your TV (good sound).
How to Connect: TV + Receiver with Dolby Digital + Speakers
If you own a receiver with Dolby Digital® or PCM (Pulse-Code Modulation) audio receiver that uses an optical cable-type
input, connect an optical cable for excellent audio quality (shown on opposite page).
1. Connect one end of the optical cable to the DIGITAL AUDIO OUT jack on your TV to the DIGITAL OPTICAL INPUT
Jack on your receiver/amplifier receiver.
• If your receiver can decode Dolby Digital and PCM, go to Audio menu, select Digital Audio Output, and
select AutoSelect (recommended) or PCM option.
• If your receiver can decode only PCM, go to Audio menu, select Digital Audio Output, and select PCM
option.
2. If you want to use your TV as the Center Channel, use speaker wire to connect the audio receiver’s CENTER
SPEAKER OUTPUT to the TV’s CENTER CHANNEL INPUT as shown on the opposite page.
• Switch INTERNAL SPEAKER SOURCE to EXT AMP.
3. Use speaker wire to connect the Audio/Video receiver to external front and rear speakers. Refer to your audio
receiver manual to complete speaker hookup to the receiver.
OR
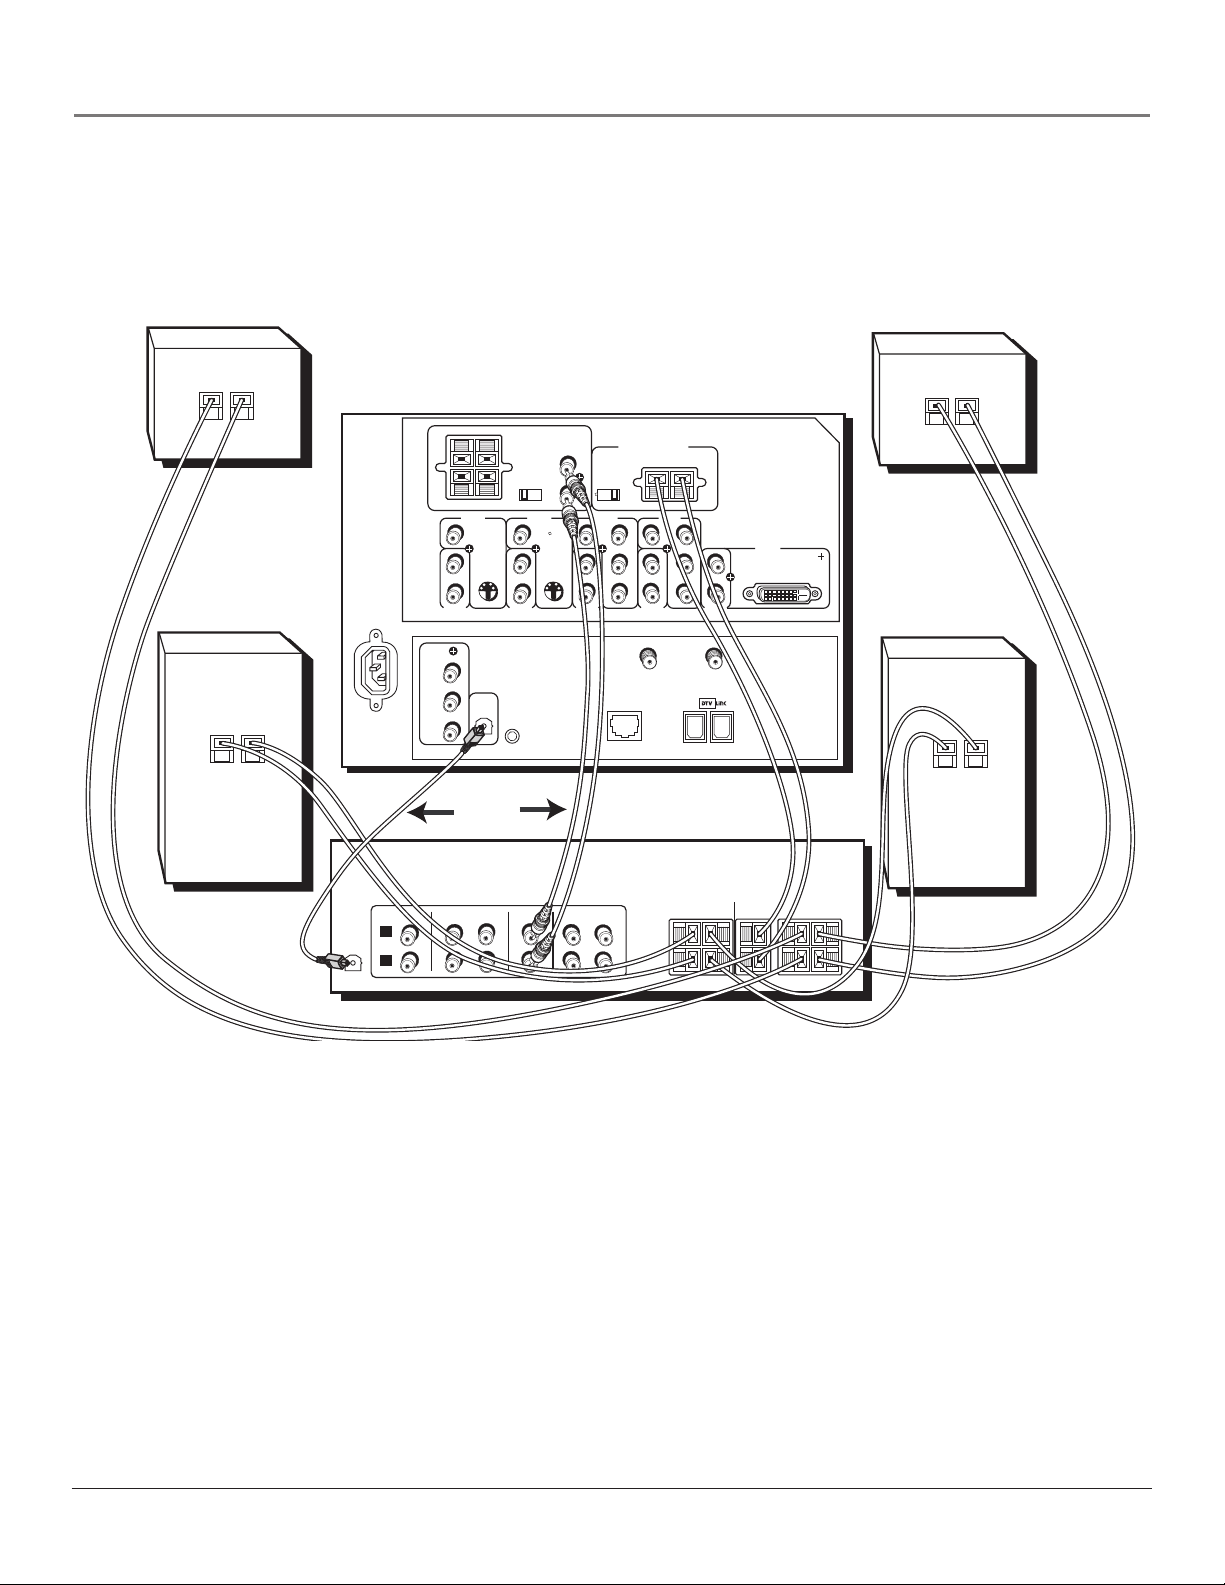
How to Connect: TV + A/V Receiver + Speakers + Use TV as Center Channel
1. Connect the FIXED/VARIABLE AUDIO OUTPUT from the TV to an A/V receiver using audio cables.
2. Be sure to go to the Fixed/Variable Out screen in the Audio menu and select whether you want the FIXED/
VARIABLE AUDIO OUTPUT jacks to send fixed volume audio or variable volume audio.
• Fixed Output provides fixed-level audio output from the TV. This audio output is ideal for connecting to an
A/V receiver that has its own volume control.
• Variable Output provides variable-level audio output. Volume levels are controlled by the volume controls on
the TV and TV remote control.
3. If you want to use your TV as the Center Channel, use speaker wire to connect the audio receiver’s CENTER
SPEAKER OUTPUT to the TV’s CENTER CHANNEL INPUT as shown on the opposite page.
• Switch INTERNAL SPEAKER SOURCE to EXT AMP.
4. Use speaker wire to connect the Audio/Video receiver to external front and rear speakers. Refer to your audio
receiver manual to complete speaker hookup to the receiver.
*Manufactured under license from Dolby Laboratories. “Dolby” and the double-D symbol are trademarks of Dolby Laboratories.
10 Chapter 1
Page 13
Connections & Setup
Caution: DO NOT connect your audio/video receiver’s outputs or center channel output to the red and black
EXTERNAL SPEAKERS OUTPUT on the TV. Damage to the TV may result.
Back of Right Rear Speaker
+
–
+
–
Back of Right Front Speaker
DIGITAL
AUDIO
INPUT
Back of Left Rear Speaker
+
–
LEFT
RIGHT FIXED/VARIABLE
EXTERNAL SPEAKERS
VIDEO
INPUT 1
V
MONO
L/
R
AUDIO
INPUT 2
Back of Left Front Speaker
DIGITAL
AUDIO
OUTPUT
RECORD
OUTPUT
VIDEO
AUDIO
R
L
V
MONO
L/
R
AUDIO
INPUT 1
SPEAKER
SELECT
EXT
G-LINK
INT W/
EXT
SURR
VIDEO
INPUT 2
AUDIO
OUTPUT
R
L
S-VIDEOS-VIDEO
V
L/
MONO
R
AUDIO
INPUT 3
INTERNAL
SPEAKER
SOURCE
TV EXT AMP
VIDEO
INPUT 3
CENTER CHANNEL INPUT
MAXIMUM AMPLIFIER POWER RATING
(60 WATTS into 8 OHMS)
VIDEO
INPUT 4
V
R
P
P
B
MONO
L/
Y
R
AUDIO
INPUT 4
ANTENNA B
INPUT
ETHERNET
R
P
P
L/
B
R
Y
INPUT 5
ANTENNA A
MONO
AUDIO
INPUT
VIDEO
INPUT 5
DVI-HDTV
TV
+
–
OR
A/V AMPLIFIER
CENTER
SURROUND SPEAKERS
REAR
RIGHT
LEFT
Back of Left Front Speaker
+
–
+
–
FRONT SPEAKERS
RIGHT
LEFT
VCR
TAPE
CD
IN
IN
L
R
TV
IN
IN
OUT
OUT
Chapter 1 11
Page 14
Connections & Setup
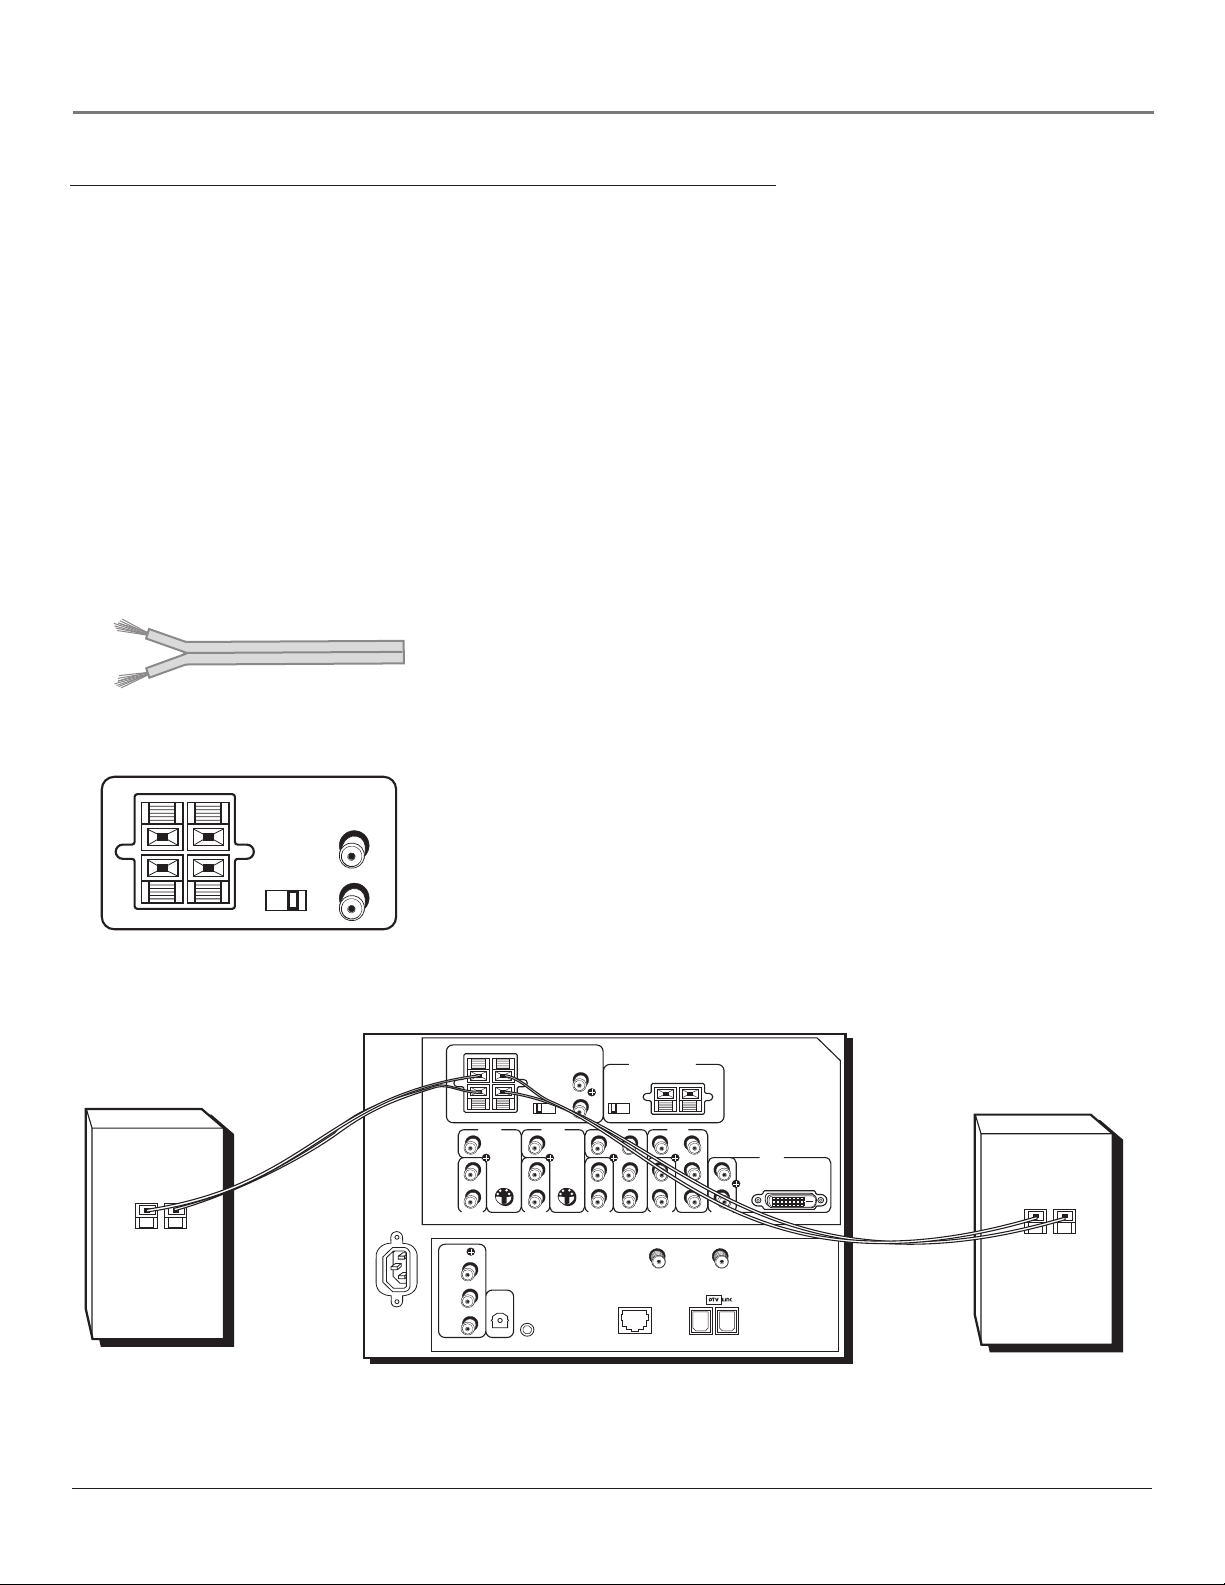
How to Connect: TV + Speakers Without A/V Receiver
You can connect two external speakers to the TV: one to the RIGHT terminal, and one to the LEFT terminal.
1. If necessary, remove the vinyl covering from the ends of the speaker wire and twist the wire core.
2. Open the lever on the speaker terminal.
3. Insert the wire core into the hole. Be sure to connect the (+) to (+) and (-) to (-).
4. Close the lever. Pull gently on the wire to see that it’s connected securely.
5. Set the SPEAKER SELECT switch to INT W/EXT SURR.
• If you connect speakers and place the EXT/INT W/EXT SURR switch on the TV back panel in the INT W/
EXT SURR position, you get audio from the internal speakers as well as L minus R from both external
speakers. This connection gives you a matrix surround effect.
• If you connect speakers and place the switch in the EXT position, you get audio from the external
speakers only. The TV’s internal speakers are turned off.
6. Go to the Audio menu and Fixed/Variable Out screen and make sure Variable Out - Speakers On is selected.
Notes: The external speaker rating is 8 ohms with 30 watts total power
handling capabilities.
When connecting the speaker wire, make sure you connect the positive
Speaker wire
LEFT
RIGHT FIXED/VARIABLE
SPEAKER
SELECT
EXT
EXTERNAL SPEAKERS
INT W/
EXT
SURR
AUDIO
OUTPUT
R
L
(+) terminal on the TV to the positive (+) terminal on the speaker. One
side of the speaker wire is usually marked with a white stripe to help you
match the terminals correctly. If the (+) and (-) terminals are not matched
properly, the speakers will not be “in phase,” causing reduction in bass
frequencies.
Do not allow the wire core to touch other wires or terminals. Damage to
components could result if the cores of two wires touch.
Arrange the speakers in your TV room to achieve maximum sound
quality.
Caution: DO NOT connect your audio/video receiver’s outputs or its
center speaker output to the red and black EXTERNAL SPEAKERS OUTPUT
on the TV. Damage to TV may result.
LEFT
+
–
Back of Right Speaker
RIGHT FIXED/VARIABLE
EXTERNAL SPEAKERS
VIDEO
INPUT 1
MONO
AUDIO
INPUT 1
DIGITAL
AUDIO
OUTPUT
V
L/
R
INPUT 2
RECORD
OUTPUT
VIDEO
AUDIO
V
L/
R
R
L
MONO
AUDIO
SPEAKER
SELECT
EXT
G-LINK
INT W/
EXT
SURR
VIDEO
INPUT 2
AUDIO
OUTPUT
R
L
S-VIDEOS-VIDEO
V
L/
MONO
R
AUDIO
INPUT 3
TV EXT AMP
INPUT 3
CENTER CHANNEL INPUT
MAXIMUM AMPLIFIER POWER RATING
INTERNAL
(60 WATTS into 8 OHMS)
SPEAKER
SOURCE
VIDEO
V
P
R
P
L/
B
Y
R
INPUT 4
ANTENNA B
INPUT
ETHERNET
AUDIO
VIDEO
INPUT 4
P
R
P
L/MONO
MONO
B
R
Y
AUDIO
INPUT 5
ANTENNA A
INPUT
VIDEO
INPUT 5
DVI-HDTV
TV
+
–
Back of Left Speaker
12 Chapter 1
Page 15
Connections & Setup
Digital Audio
Output Jack
Explanation of Input Jacks and Cables
This section describes the jacks and cables you might use to make connections (cables may be ordered separately by using
the order form on page 73). There are several ways to connect components to your TV.
Different jacks and cables provide a different level of performance. It’s important to remember the different degrees of
picture improvement for comparison. The component jacks are considered an excellent improvement; S-Video and
composite jacks are considered very good, while connecting components with the antenna RF connection is good.
VIDEO
INPUT 5
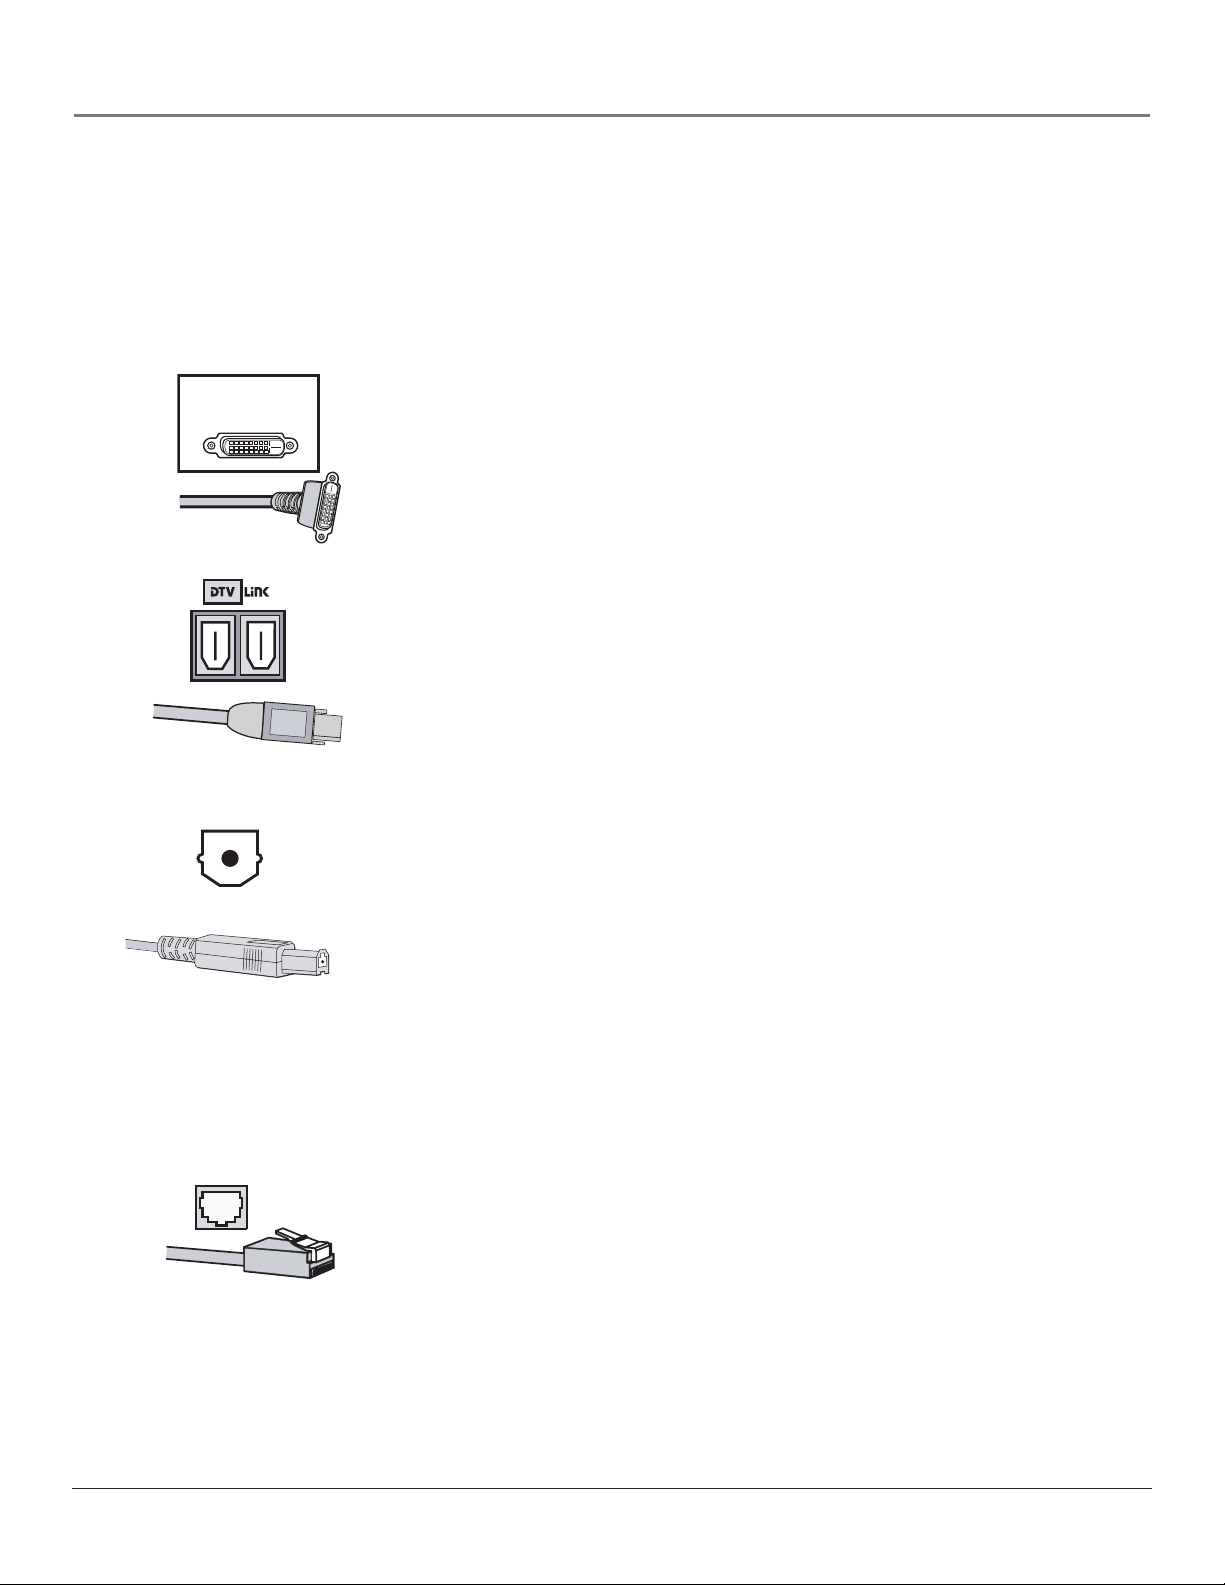
DVI-HDTV
DVI-HDTV (Digital Visual Interface-High Definition Television) Connector
DVI-HDTV is an uncompressed, high-speed digital visual interface designed to
deliver digital video in its native format. It supports the overlay of highresolution graphics used by some program guides and interactive components.
Note: Remember to connect the left and right audio cables for Input 5
(DVI-HDTV) because the DVI-HDTV cable carries only the picture signal,
not the sound.
DTVLink® (Digital Television Link) Connectors
DTVLink uses a format better known to some as IEEE-1394 or FireWire®.
DTVLink is a compressed digital video input/output offering an IEEE 1394-type
connection that meets the CEA specifications. This connection is a high-speed
and inexpensive way of interconnecting 1394 compliant consumer electronic
components. If your 1394 component has the DTVLink logo on it, it should
work with this TV. You can use either or both connectors to link your
components but don’t connect the components in a loop.
Notes: Audio and video information is carried on a single wire.
Digital Audio Out Jack and Optical Cable
The optical cable is used to connect an audio receiver with Dolby Digital or
PCM (Pulse-Code Modulation) audio receiver to your TV. If you own a receiver
that uses an optical cable input, you can use an optical cable to connect the TV
to that receiver for the best sound quality.
Note: This TV’s optical digital output jack fully complies with the
international standard governing this type of jack (IEC958), and is
designed for connection to a Dolby Digital (AC-3® or PCM) receiver or
Dolby Digital (AC-3 or PCM) decoder. Older equipment, some of which is
not fully compliant with IEC958, may not be compatible with the Dolby
Digital bitstream. Such a connection using anything other than a Dolby
Digital (AC-3 or PCM) receiver or decoder could create a high noise level,
causing damage to headphones or speakers.
ETHERNET
Ethernet Jack and Cable
This jack is used to connect a router, cable modem or DSL (Digital Subscriber
Line) unit with a CAT 5 (ethernet) cable (not provided). It is recommended that
you only connect a router to this jack although you could connect a DSL/cable
modem directly.
DTVLink® Certification Logo is a U.S. registered mark of CEA.
FireWire® is a trademark of Apple Computer, Inc., registered in the U.S. and other countries.
Chapter 1 13
Page 16
Connections & Setup
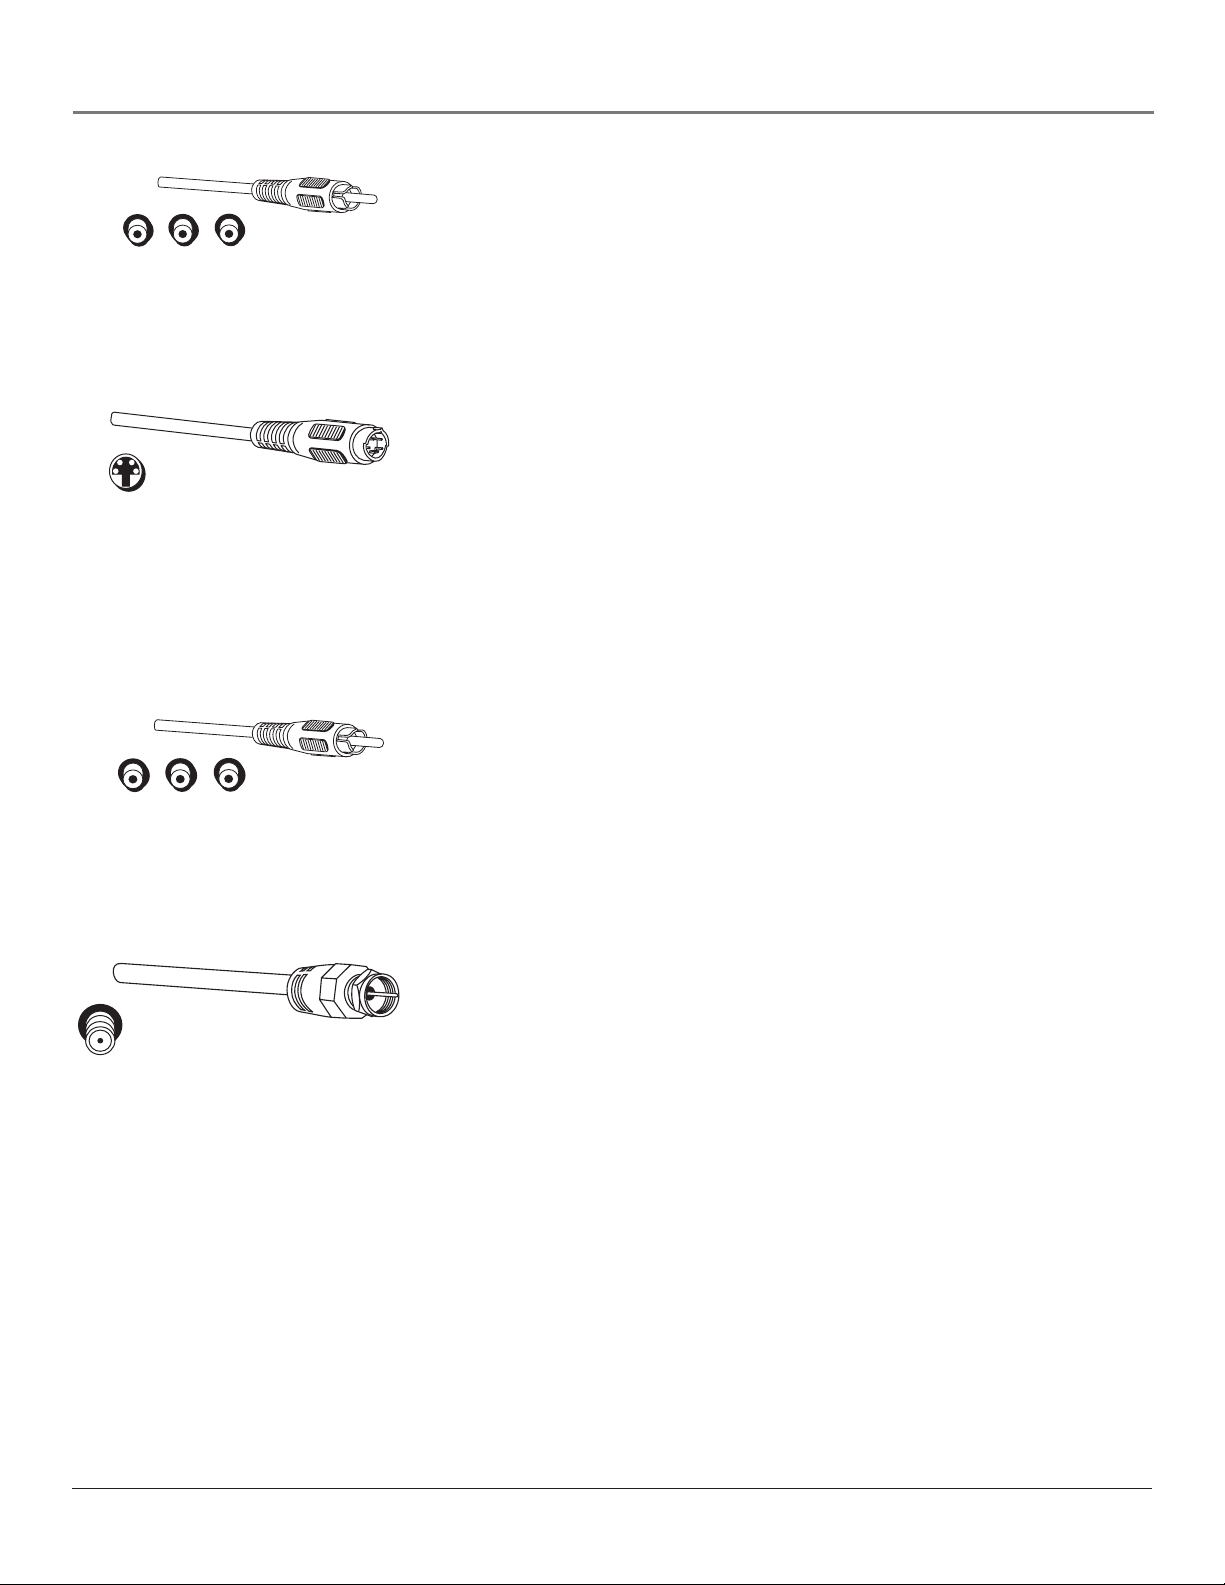
Component Video (Y•Pb•Pr) Jacks and Cables
The Y•Pb•Pr jacks allow you to connect a component, such as a DVD player.
This connection provides excellent picture quality because the video is
Y PB PR
Component Jacks
S-Video Jack
separated into three signals. To ensure maximum picture quality, use three
video-grade cables for the connection.
S-Video Jacks and Cables
The S-Video (separate video) jacks provide better picture quality than the
regular video jacks because the color (chrominance, also called chroma) part of
the signal is separated from the black and white (luminance) part of the picture.
If a component you’re connecting to your TV (like a DVD player) has an
S-VIDEO jack and composite video, connect the component to the TV with an
S-Video cable (not provided) for a better quality picture.
Note: Also, remember to connect the left and right audio cables because
the Y•Pb•Pr cables carry only the picture signal, not the sound.
Note: Remember to connect the left and right audio cables because the
S-Video cable carries only the picture signal, not the sound.
RF Jack
V L R
Audio/Video Jacks
Composite Audio/Video Jacks and Cables (RCA-type)
These jacks are used for most audio/video connections between components.
The audio/video jacks are often color coded (yellow for video, red for right
audio, and white for left audio). This is also called composite video.
Note: If your component has only one output for audio (mono), connect it
to the left (white L/Mono) audio jack on the TV and don’t connect the
right (red) audio part of the cable.
RF Jacks and Coaxial Cables (F-type)
RF jacks are primarily used for reception of off-air broadcasts and cable signals
(possibly older VCRs or cable boxes). The RF and coaxial jacks on the TV are
labeled ANTENNA A INPUT and ANTENNA B INPUT.
14 Chapter 1
Page 17

Connections & Setup
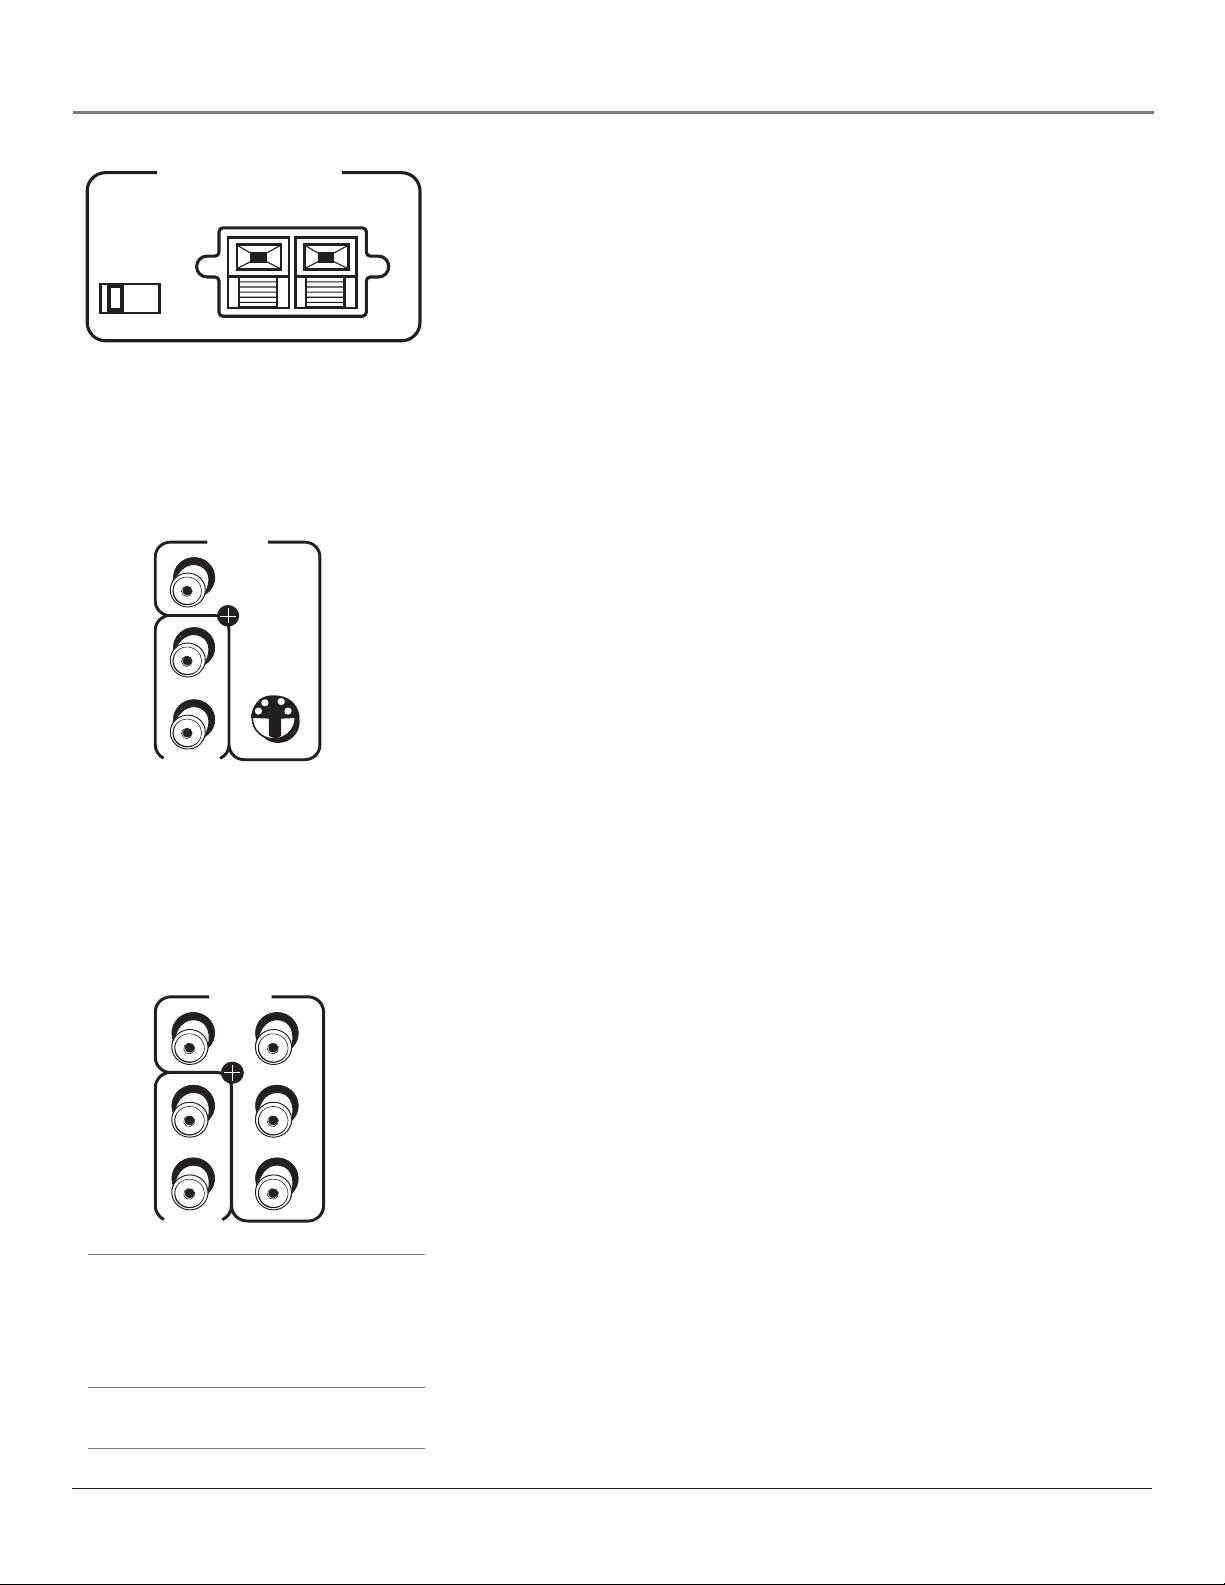
Back of the TV
The diagrams below illustrate jacks found on the back of the TV. When connecting cables, be sure to connect corresponding
outputs and inputs (video in to video out, right audio in to right audio out, etc.).
RIGHT FIXED/VARIABLE
LEFT
EXTERNAL SPEAKERS
VIDEO
INPUT 1
SPEAKER
SELECT
EXT
INPUT 2
INT W/
EXT
SURR
VIDEO
AUDIO
OUTPUT
R
L
INTERNAL
SPEAKER
SOURCE
TV EXT AMP
VIDEO
INPUT 3
CENTER CHANNEL INPUT
EXTERNAL AMPLIFIER
MAXIMUM POWER RATING
(60 WATTS into 8 OHMS)
VIDEO
INPUT 4
TV
V
L/
MONO
R
AUDIO
INPUT 1
RECORD
OUTPUT
VIDEO
AUDIO
R
L
RIGHT FIXED/VARIABLE
EXTERNAL SPEAKERS
LEFT
SPEAKER
SELECT
INT W/
EXT
EXT
SURR
AUDIO
OUTPUT
R
L
TV’s AUDIO OUTPUTS except
for RECORD OUTPUT audio
Caution: Connect external
speakers only to the TV’s
EXTERNAL SPEAKERS terminals.
DO NOT connect your audio/video
receiver to the red and black
EXTERNAL SPEAKERS terminals.
Damage to TV may occur.
DIGITAL
AUDIO
OUTPUT
V
L/
MONO
R
AUDIO
INPUT 2
G-LINK
V
S-VIDEOS-VIDEO
MONO
L/
R
AUDIO
INPUT 3
P
P
Y
ETHERNET
V
R
L/
B
MONO
R
AUDIO
INPUT 4
ANTENNA B
INPUT
R
P
L/
MONO
B
P
R
Y
AUDIO
INPUT 5
ANTENNA A
INPUT
VIDEO
INPUT 5
DVI-HDTV
AUDIO OUTPUTS
• RIGHT and LEFT EXTERNAL SPEAKER Terminals Used to connect
external speakers if you don’t have an audio amplifier or receiver. For use,
if you want better sound than the TV’s speakers. See page 10.
• SPEAKER SELECT - EXT. or INT W/EXT SURR Switch Lets you direct
where the output of the TV’s internal speakers goes. With the switch in the
EXT position, you hear the external speakers connected to the TV. In INT
W/EXT SURR position, you hear the TV’s internal speakers and external
speakers connected to the TV for a matrix surround sound effect.
Note: To turn the TV’s internal speakers on and off, press MENU on the
remote control and choose Audio. Then choose Fixed/Variable Out from
the menu and choose an option.
• FIXED/VARIABLE AUDIO OUTPUT L/R Provides fixed-level or variablelevel audio output from the television. Fixed/Variable is an option in the
Audio menu, details on page 60.
-Fixed controls the volume through the audio/video receiver.
-Variable controls the volume through TV.
Chapter 1 15
Page 18
Connections & Setup
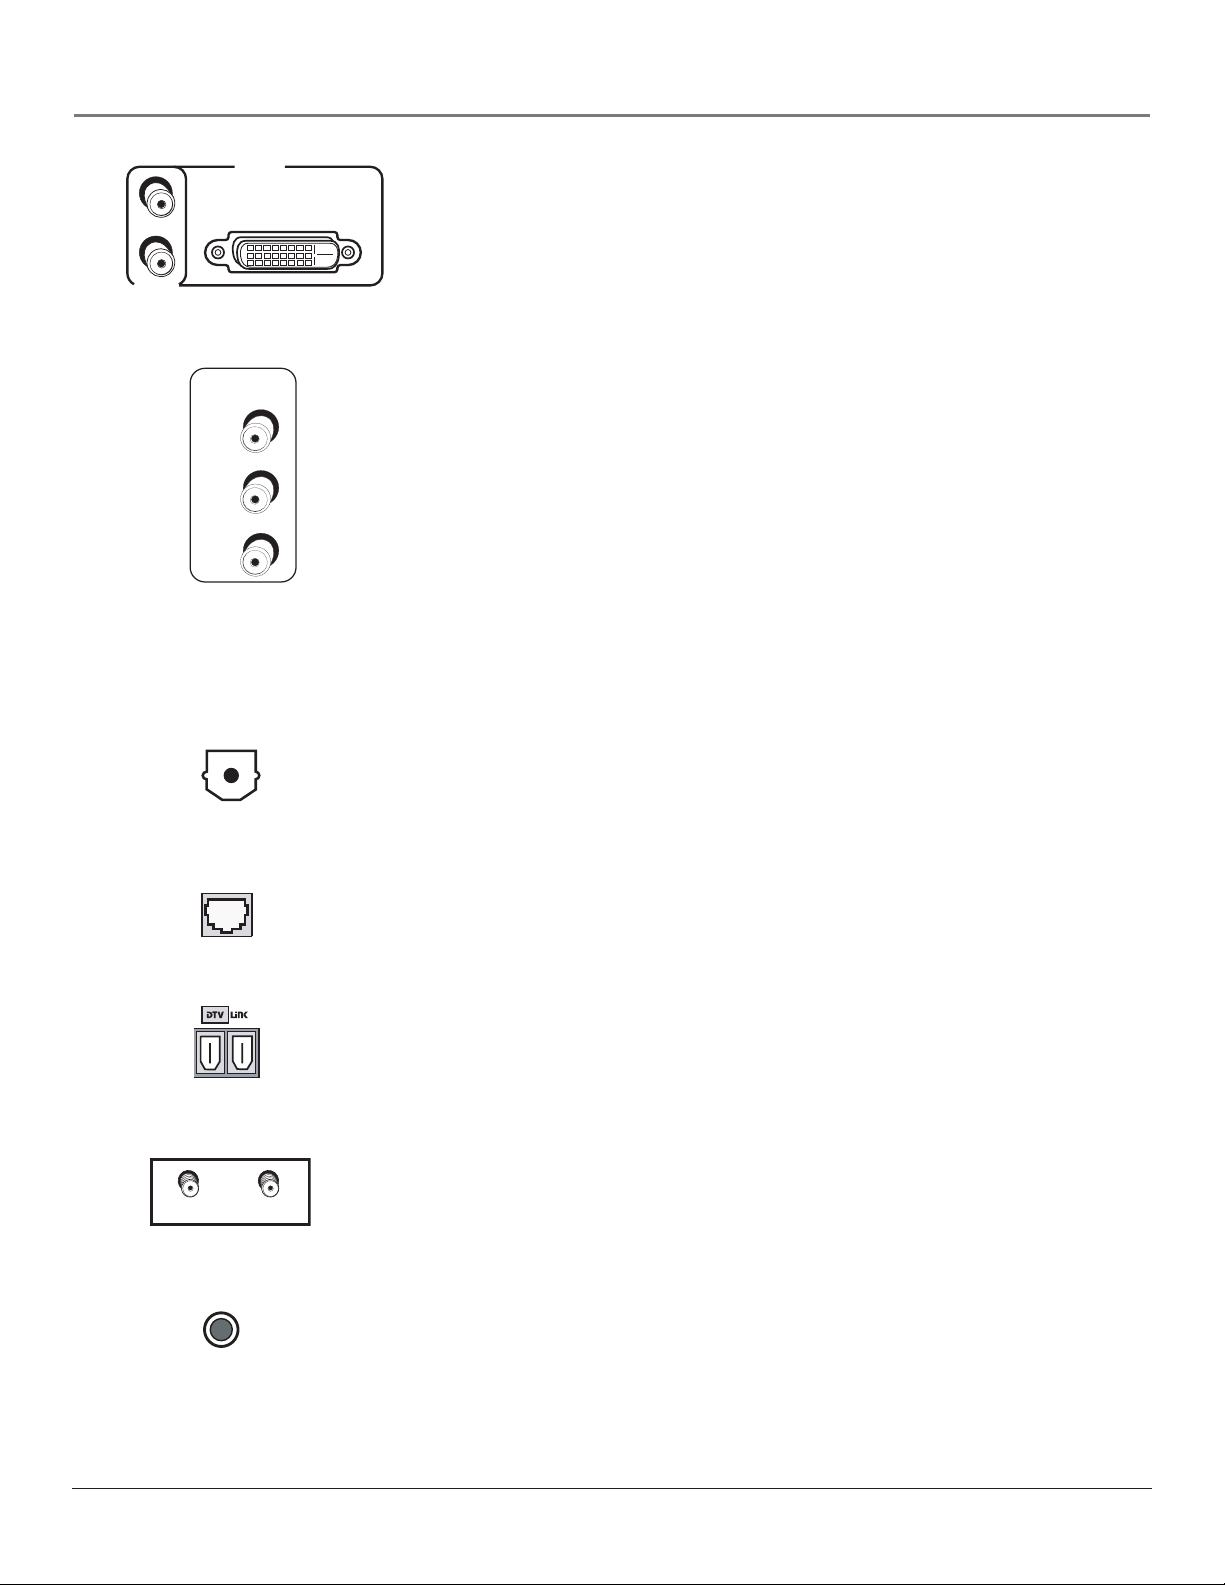
CENTER CHANNEL INPUT
INTERNAL
SPEAKER
SOURCE
TV EXT AMP
MAXIMUM AMPLIFIER POWER RATING
(60 WATTS into 8 OHMS)
TV’s CENTER CHANNEL INPUTS
Caution: Do not connect the A/V
receiver’s CENTER CHANNEL
output to the TV’s EXTERNAL
SPEAKERS terminals. Damage to
TV may occur.
VIDEO
INPUT 1
V
MONO
L/
R
AUDIO
INPUT 1
S-VIDEO
CENTER SPEAKER INPUT
• INTERNAL SPEAKER SOURCE - TV / EXT AMP Switch
- TV Position Sound comes from TV’s internal speakers.
- EXT AMP Position Internal speakers are used for an external center
channel. When an external audio/video receiver’s center channel
output is connected to the TV’s center channel input, center channel
audio comes out of the TV’s internal speakers.
• CENTER CHANNEL TERMINALS Connect the audio/video receiver’s
center channel output to the TV’s center channel input. Switch the
INTERNAL SPEAKER SOURCE to EXT AMP position.
VIDEO/AUDIO INPUTS
VIDEO INPUT 1/AUDIO INPUT 1 Connect an NTSC (analog) component.
•V (VIDEO) provides composite video connection and connector is usually
yellow.
•L/MONO AUDIO provides left audio connection and connector is usually
white.
Note: If your component has only one output for audio (mono), connect
it to the left (white L/Mono) audio jack on the TV and don’t connect the
right audio part of the cable.
•R AUDIO provides right audio connection and connector is usually red.
VIDEO
INPUT 3
V
L/
MONO
R
AUDIO
INPUT 3
P
R
P
B
Y
Tips
Inputs 3/4 can be used as either a component
video (Y PB PR ) input or a composite video (V)
input. The TV auto detects the connection with
Y PB PR having highest priority.
PIP cannot be displayed from component
(Y•Pb•Pr) inputs.
• S-VIDEO lets you connect an S-Video cable for better video quality picture
to a component with S-Video capability, such as a VCR or DVD player.
When using S-Video, make sure to connect the two audio cables as well as
the S-Video connector.
VIDEO INPUT 2/AUDIO INPUT 2 Provides connection to a second NTSC
(analog) video component such as a VCR. The jacks are as described for INPUT 1.
VIDEO INPUT 3/AUDIO INPUT 3 Connect an optional component (Y PB PR)
video source, such as a DVD player or satellite receiver. Note that it is essential to
match the color coded connectors between a compatible component and the TV.
• AUDIO R/L/MONO The audio jacks provide stereo sound. When connected,
audio volume from the main front and rear speakers are variable.
•V (VIDEO) provides composite video connection and connector is usually yellow.
• Y PB PRUnlike a single video input, component video maintains the video
signal as three separate parts through these three jacks. To ensure
maximum picture quality, use three video-grade cables for the Y PB P
R
connections. Accepts 480i, 480p, 1080i signals. Has priority over V
connection.
VIDEO INPUT 4/AUDIO INPUT 4 Provides connection to a second optional
component video source, such as a DVD player or satellite receiver. The jacks
are the same as described in INPUT 3.
16 Chapter 1
Page 19
Connections & Setup
L/
MONO
R
AUDIO
INPUT 5
DVI-HDTV
RECORD
OUTPUT
VIDEO
AUDIO
R
L
VIDEO
INPUT 5
VIDEO INPUT 5/AUDIO INPUT 5 Provides DVI-HDTV and analog audio
connections.
•L/MONO AUDIO provides left audio connection and connector is usually
white.
•R AUDIO provides right audio connection and connector is usually red.
• DVI-HDTV provides a digital video connection from a video source to the TV.
RECORD OUTPUT Connect a VCR or DVD-recorder to record mainly digital (or
analog) programs from Antenna A or B and inputs (excluding DVI-HDTV and some
component video formats) while TV is turned on. You must leave TV on same
channel you are recording.
•VIDEO provides composite video connection and connector is usually yellow.
• AUDIO L provides left audio connection and connector is usually white.
• AUDIO R provides right audio connection and connector is usually red.
Notes: When recording from this output, remember to tune to the channel
you are recording.
If an unusual pattern appears when you connect your VCR input to the
RECORD OUTPUT, playing a tape or switching to the VCR’s tuner removes the
pattern.
ANTENNA B
INPUT
Digital Audio
Output Jack
ETHERNET
ANTENNA A
G-LINK
INPUT
DIGITAL AUDIO OUTPUT Use a digital optical cable (or SPDIF cable) to connect
your TV to a compatible Dolby Digital or PCM receiver or decoder. Dolby Digital
offers theatre-quality sound (six audio channels). Use the Digital Audio Out screen
in the Audio menu to select Auto Select or PCM as the output for this jack.
ETHERNET Connect a router, cable modem, or Digital Subscriber Line to the TV
using an Ethernet cable (CAT 5). Do not connect a telephone cable because of risk
of fire or shock. A green light on the jack means that an active network has been
detected. An orange light means the data is either being sent or received.
DTVLink Use either or both connectors to connect compatible DTVLink (IEEE-
1394) components but don’t loop the components together. When connecting
several components, use a hub or component-to component method. Be sure to
connect the fastest of the 1394 components closer to the connection point of the
TV and the slower components furthest away. Details on page 16.
ANTENNA A INPUT / ANTENNA B INPUTs Used to connect an off-air antenna
and/or cable TV signal to the TV. If you have both cable and air, connect cable to
ANTENNA A and off-air to ANTENNA B. If you have air only, connect it to
ANTENNA A. These inputs are also used to receive programming and connect
older components.
G-LINK Connect the G-LINK cable for VCR one touch recording and/or cable box
control with GUIDE Plus+ system.
Chapter 1 17
Page 20
Connections & Setup
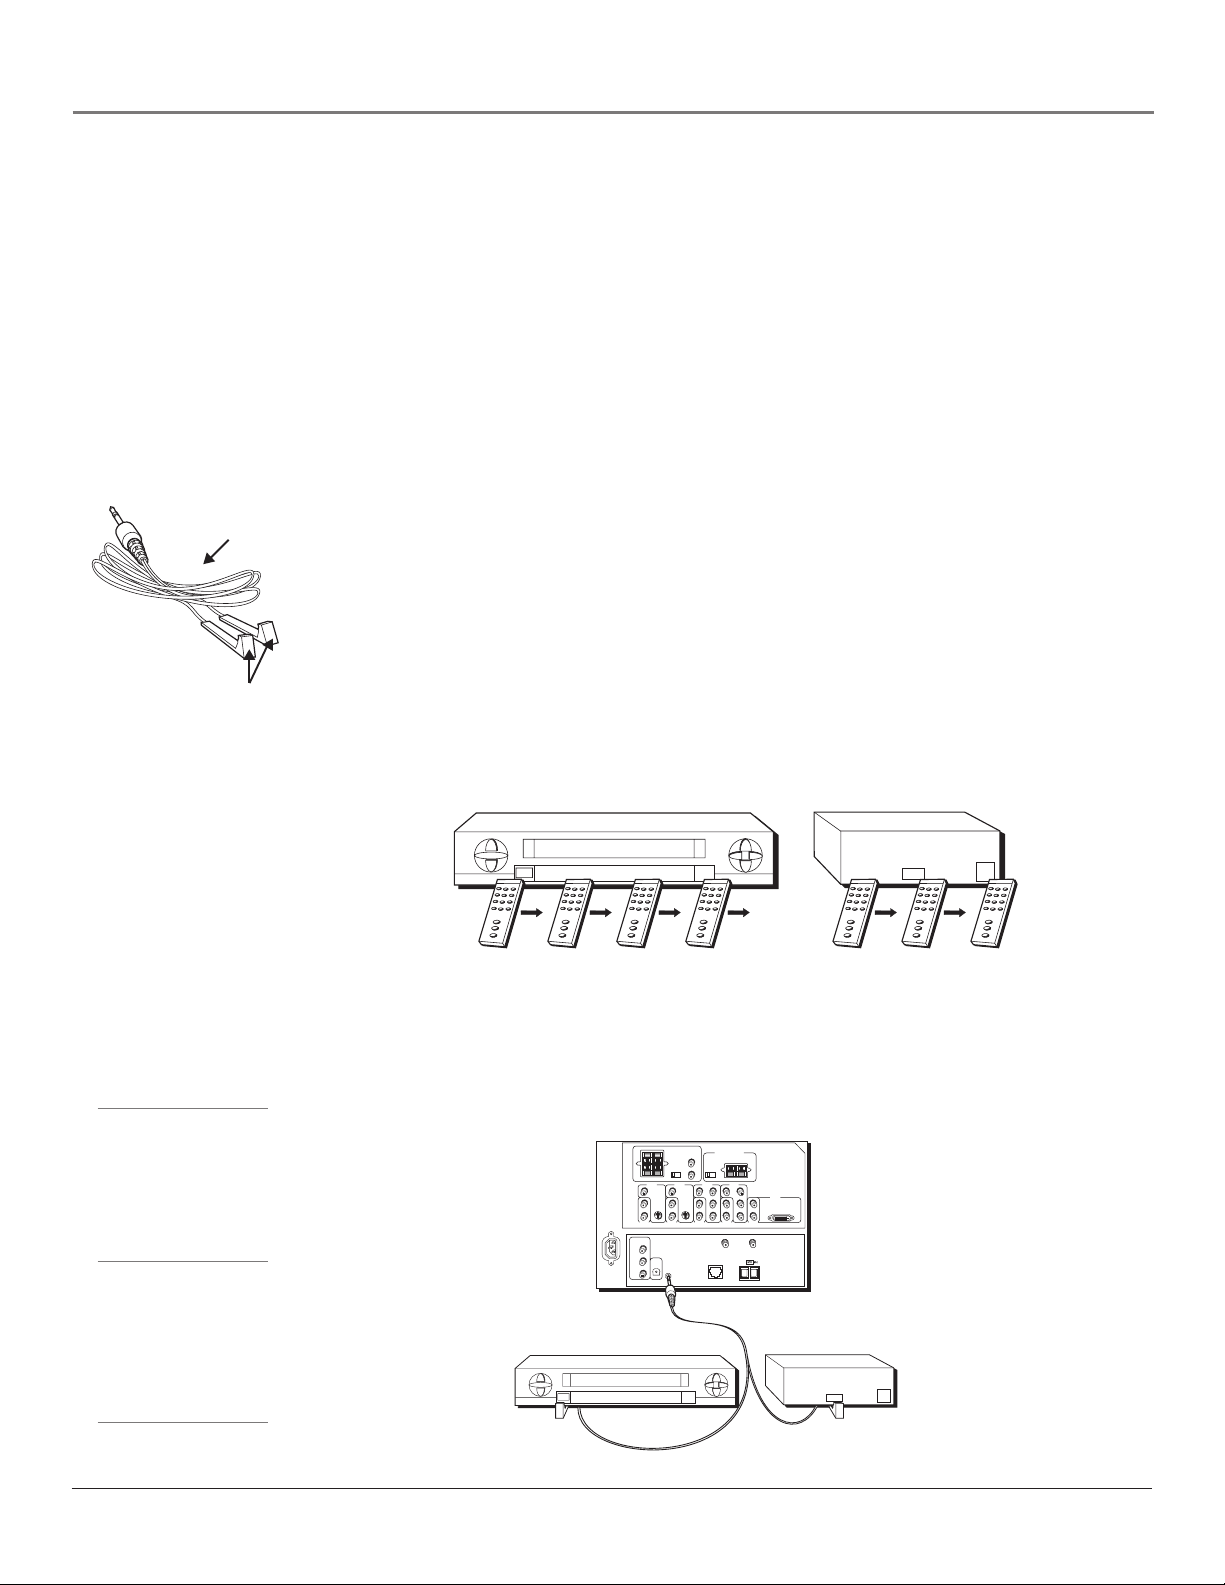
Why You Should Connect the G-LINK™ Cable
The G-LINK cable enables the GUIDE Plus+ system (the on-screen interactive program guide) to
work with your VCR and/or cable box.
Cable Box – If your TV is connected to a cable box, you must connect the G-LINK cable to receive
TV program listings for your area and to tune directly to a channel when the program guide is on
your TV screen.
VCR – If your TV is connected to a VCR and you don’t connect the G-LINK cable, one-touch VCR
recording and timed recordings won’t work. The other features of the guide will work properly.
How to Find the Remote Sensor
You have to place the G-LINK wands in front of the remote sensor on the VCR and/or cable box.
G-LINK cable
G-LINK wands
Some cable boxes and VCRs have the remote sensor labeled on the unit. If the remote sensor isn’t
labeled on your VCR and/or cable box, you need to use the remote control that came with the
VCR and/or cable box to locate the sensor.
1. Turn off the VCR and/or cable box.
2. Hold the remote control (not the one that came with your TV, but the one that came with the
cable box and/or VCR to which you’re attaching the G-LINK cable) so that it is touching the
front of the component.
3. Slowly move the remote control across the front of the component (VCR or cable box) while
you press the power button on and off. You must press and release the power button each
time you move the remote (holding down the button won’t work).
Tips
If you have both a VCR
and a cable box, it
doesn’t matter which
wand is connected to
which box.
If you don’t have both a
cable box and a VCR
connected to your TV,
just coil the cable of the
extra G-LINK wand with a
twist tie and leave it
behind the TV.
VCR
CABLE BOX
CHANNEL
03
4. When the component turns on, you’ve located the VCR’s or cable box’s remote sensor.
Placing the G-LINK Wands
Place the G-LINK wands in front of the remote sensor on your VCR and/or cable box
approximately one inch away from the remote sensor (see below).
LEFT
RIGHT FIXED/VARIABLE
AUDIO
OUTPUT
CENTER CHANNEL INPUT
MAXIMUM POWER RATING!
SPEAKER
INTERNAL
(60 WATTS into 8 OHMS)
SELECT
SPEAKER
SOURCE
R
INT W/
EXT
SURR
EXT
TV EXT AMP
L
EXTERNAL SPEAKERS
VIDEO
VIDEO
VIDEO
INPUT 1
INPUT 2
INPUT 3
V
V
S-VIDEOS-VIDEO
L/
MONO
MONO
L/
R
R
AUDIO
AUDIO
INPUT 2
INPUT 3
ETHERNET
G-LINK
Connect to G-LINK jack
on the back of the TV
V
P
R
P
B
MONO
L/
Y
R
AUDIO
INPUT 4
ANTENNA A
INPUT
TV (back p
V
MONO
L/
R
AUDIO
INPUT 1
RECORD
OUTPUT
VIDEO
AUDIO
DIGITAL
AUDIO
OUTPUT
R
L
anel)
.
SENSOR
VCR
EXTERNAL AMPLIFIER
VIDEO
INPUT 4
TV
P
R
VIDEO
INPUT 5
P
L/
MONO
B
DVI-HDTV
R
Y
AUDIO
INPUT 5
ANTENNA B
INPUT
CHANNEL
SENSOR
03
18 Chapter 1
Page 21
Connections & Setup
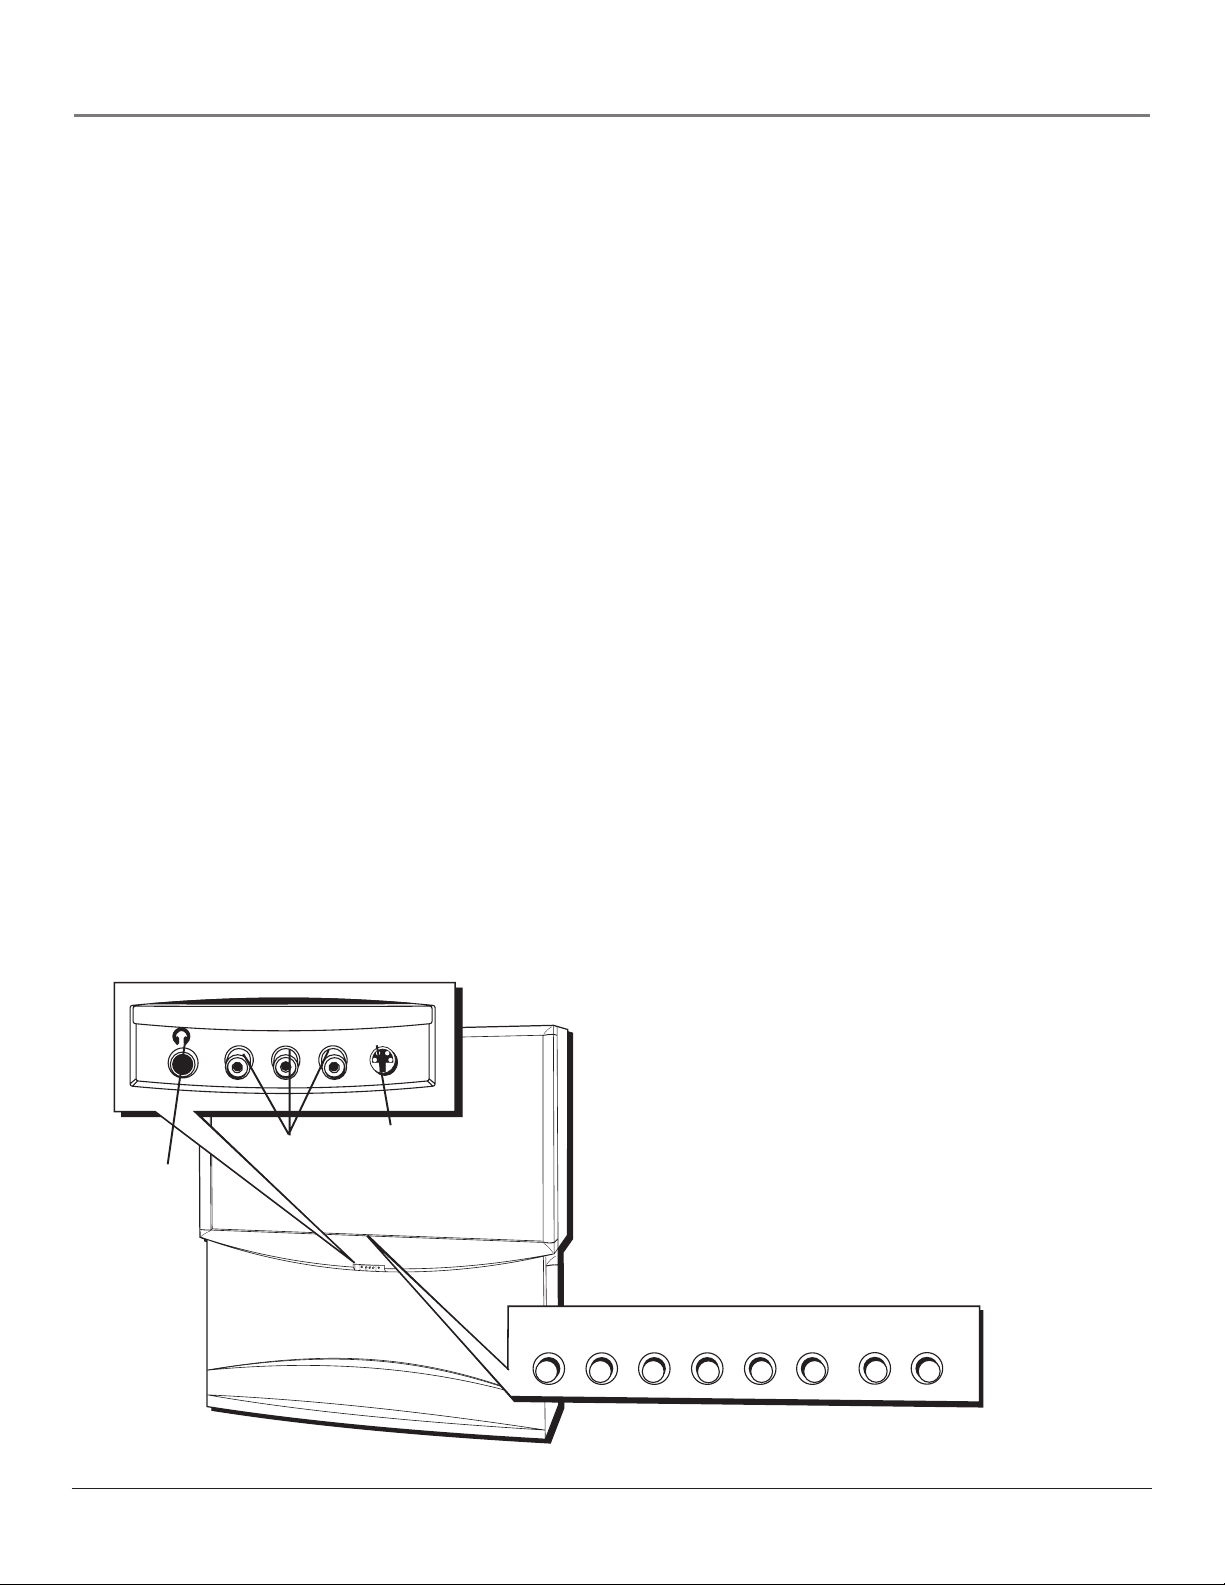
The Front of Your TV
Front Input Jacks
The TV has front input jacks for convenience in connecting a camcorder, digital camera, or video game: an S-VIDEO input,
one set of composite AUDIO/VIDEO inputs, and a headphone jack. Look for a hinged door and press to open the cover.
Please note the illustration below is just an example of how jacks might appear.
Notes: When you plug in headphones, the TV’s internal and external speakers, Fixed/Variable Audio Output, and
Digital Audio Output are automatically turned off.
When connecting a component that uses a monaural cable, such as some camcorders, use the Left (mono) input jack to
get sound from both speakers.
Front Panel
If you cannot locate your remote, you can use the front panel of your TV to operate many of the TV’s features. As this
user’s guide covers several models, your TV may or may not have all of the buttons described below.
MENU/OK Brings up the Main menu. When the menu system is displayed, pressing MENU/OK selects highlighted items.
CH
Scans down through the current channel list. In the menu system, it points down to items and adjusts menu
controls.
CH
Scans up through the channel list. In the menu system, it points up to items and adjusts menu controls.
VOL
Decreases the volume. In the menu system, it points left to items and adjusts menu controls.
VOL
Increases the volume. In the menu system, it points right to items and adjusts menu controls.
POWER Turns the TV on and off. The indicator in the button lights when TV is on
INPUT Toggles through the TV’s available input sources (Front Input, INPUT 1, INPUT 2, INPUT 3, INPUT 4, INPUT 5,
DTVLink, the last active antenna (Antenna A or Antenna B).
INFO Brings up the channel banner with channel and viewing information. Press again to remove the banner. In the
GUIDE Plus+ system, brings up more program or promotional information.
Notes: The front panel illustration
shows a typical front panel layout. The
exact look may be different from the
one on the front of your TV.
If you use the Front Button Block
feature, the front panel no longer
provides access to the menus. The Front
Button Block feature disables all front
panel buttons but not inputs. For more
information, see Chapter 3.
Headphone jack
A/V jacks
H
C
H
C
U
N
E
M
S-VIDEO IN
R
E
W
O
P
+
L
O
V
—
L
O
V
S
V
ID
E
O
V
ID
E
O
L
/M
O
N
O
R
H
E
A
D
P
H
O
N
E
IN
P
U
T
4
A
U
D
IO
MENU
CHCHVOL VOL POWER
•OK
INPUT
INFO
Chapter 1 19
Page 22
Connections & Setup
O
GO
CK
V
O
L
U
OK
C
R
GU
C
Plug in the TV
Plug the flat end of the cable into the power jack on the back of the TV. Then plug the end of the
power cord into an appropriate wall outlet. Be sure to insert the plug completely. Do not plug
into an outlet controlled by a light switch. The TV needs some power to acquire guide listings, do
recordings, etc.
Note: When you first plug your TV into an outlet, the Power LED indicator on the front
panel will light for approximately 15 seconds and then go off during the initialization of the
TV. The TV can only be turned on after the Power LED indicator goes off. This happens every
time power is reapplied to the TV.
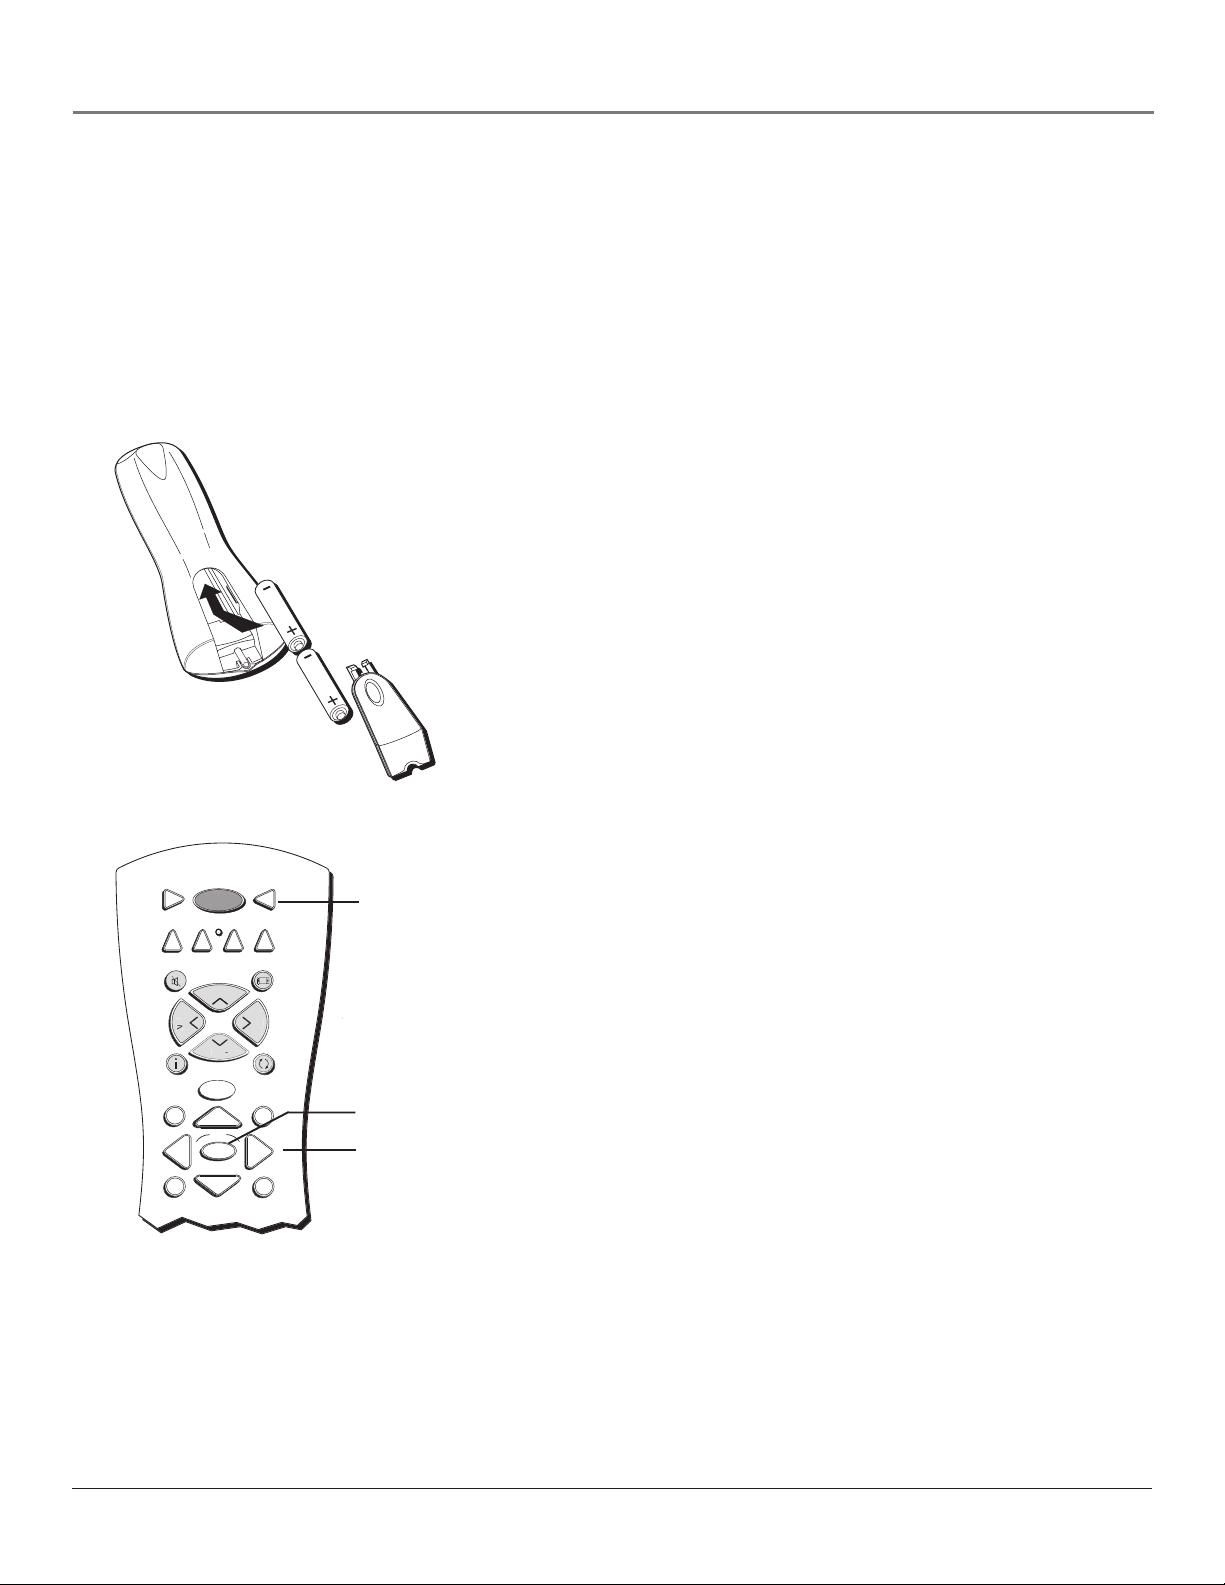
Put batteries in the remote
• Remove the battery compartment cover from the back of the
remote by pushing down on and sliding off the cover.
•Insert 2 “AA” fresh batteries. Make sure the polarities (+ and -) are
aligned correctly.
• Replace the cover.
Note: Batteries need replacing when the remote indicator is red
and blinks rapidly with each button press.
VCR1
DVD
MUTE
INF
MEN
L
ON • OFF
VCR2
CH +
AUX
H
IDE
TV
SAT • CABLE
FORMAT
V
BA
LEA
TV button
OK button
Arrow buttons
Turn on the TV
Press TV on the remote, or press POWER on the TV’s front panel.
Note: Pressing the TV button turns on the TV and puts the
remote into TV mode. “TV mode” means that the buttons on
the remote control operate the TV’s functions.
Use the Remote Control to
Complete the Assisted Setup
The technical term is “Navigation” – how you move through the onscreen menus. The method is the same throughout the menu screens:
highlight your choice and select it.
To highlight a menu item, put the remote into TV mode by pressing
the TV button then MENU. Press the arrow buttons on the remote to
highlight one of the items listed in the menu. Use the up or down
arrow button to move up or down. Use the right or left arrow button
to move right or left.
To select the item that you’ve highlighted, press OK.
Note: Highlighted means that the menu item stands out from
other menu items on the list (appears darker, brighter, or a
different color).
20 Chapter 1
Page 23
Connections & Setup
Tip
To access the setup menus manually, press
MENU and choose Assisted Setup.
Complete the Assisted Setup
The menu system in your TV allows the TV’s features to be configured to work
properly. On-screen information helps you make the right selections for your
setup. The first time you turn on your TV, the Assisted Setup screens appear
automatically.
Set the Menu Language
The first part of the Assisted Setup menu asks you to select your preferred
language for the menu system.
1. Highlight your preferred language for the menu system using the arrow
buttons.
2. Press OK to select that language.
Complete Channel Search
The next part of the Assisted Setup asks you if you want the TV to search for all
channels viewable through your antenna or cable TV system.
1. Highlight Full Search and press OK to tell the TV to begin searching for
channels. A progress report appears on the screen.
Tip
Channel Search takes several minutes because
the TV is searching for all possible analog and
digital channels. You may want to leave and
come back later.
Tip
If you move to a new ZIP or postal code, or if
any of your information changes and you need
to access the setup screens from the TV’s main
menu— press MENU, choose GUIDE Plus+
Menu, and choose GUIDE Plus+ Setup, then
choose “No, repeat setup process.”
2. When search is complete, press OK (the first GUIDE Plus+ system setup
screen appears).
Notes: If you skip Channel Search now, you can access it later through
the Connections menu. See Chapter 4 for more details.
If cable box is connected to ANTENNA A, Channel Search cannot work.
The GUIDE Plus+™ System Setup
Important Notes: If you have a VCR and/or cable box connected to the
TV, you need to connect the G-LINK cable to use the GUIDE Plus+ system.
If you didn’t connect the G-LINK cable, go to page 18. Disregard the
screen that tells you to refer to the Quick Setup sheet because all of the
instructions are included in this User’s Guide.
The TV must be off to download information. Leave your TV off overnight,
for at least 10 hours, to receive the initial download for your area.
The GUIDE Plus+ system is a no-fee, on-screen interactive program guide that
lists what shows are on TV in your area. In order to receive program listings,
you need to complete the following steps after you’ve read through the
introductory screens.
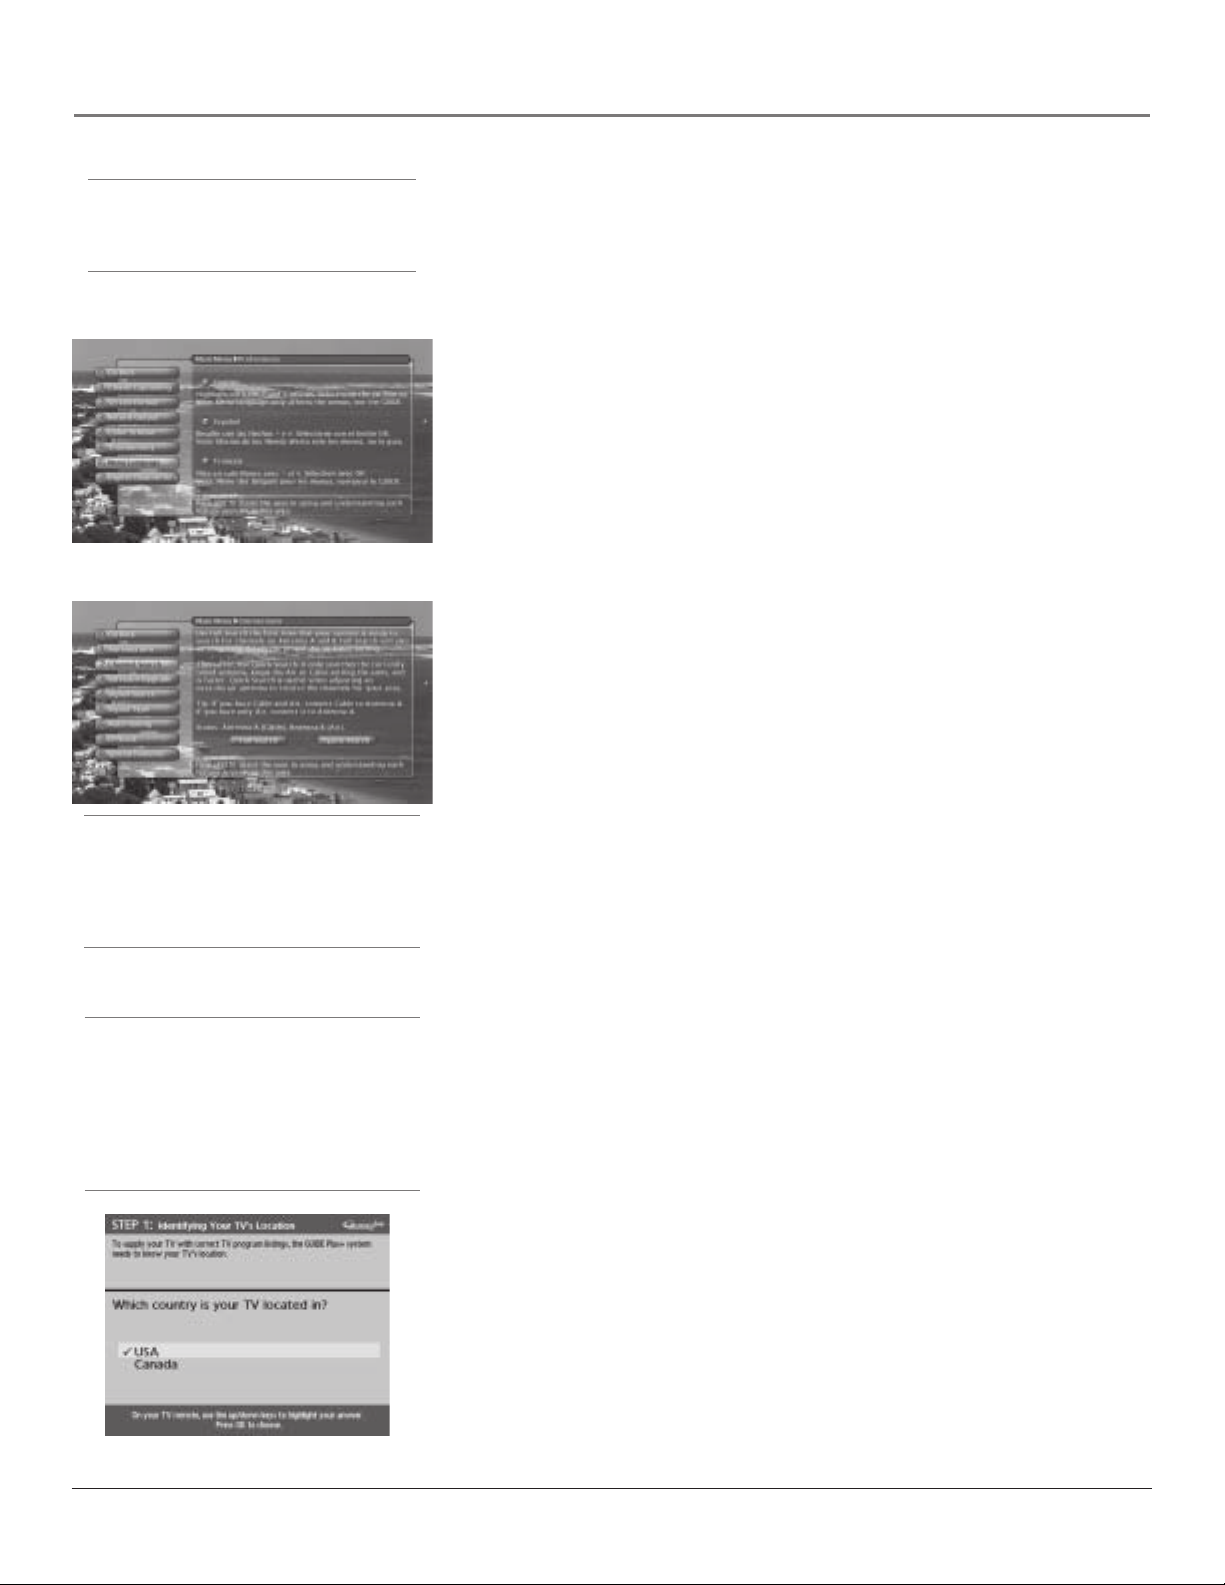
Step 1: Identifying Your TV’s Location
1. If your country is highlighted, press OK on the remote control.
If your country isn’t highlighted, press the up or down arrow button on the
remote control to highlight your country and press OK.
Chapter 1 21
Page 24
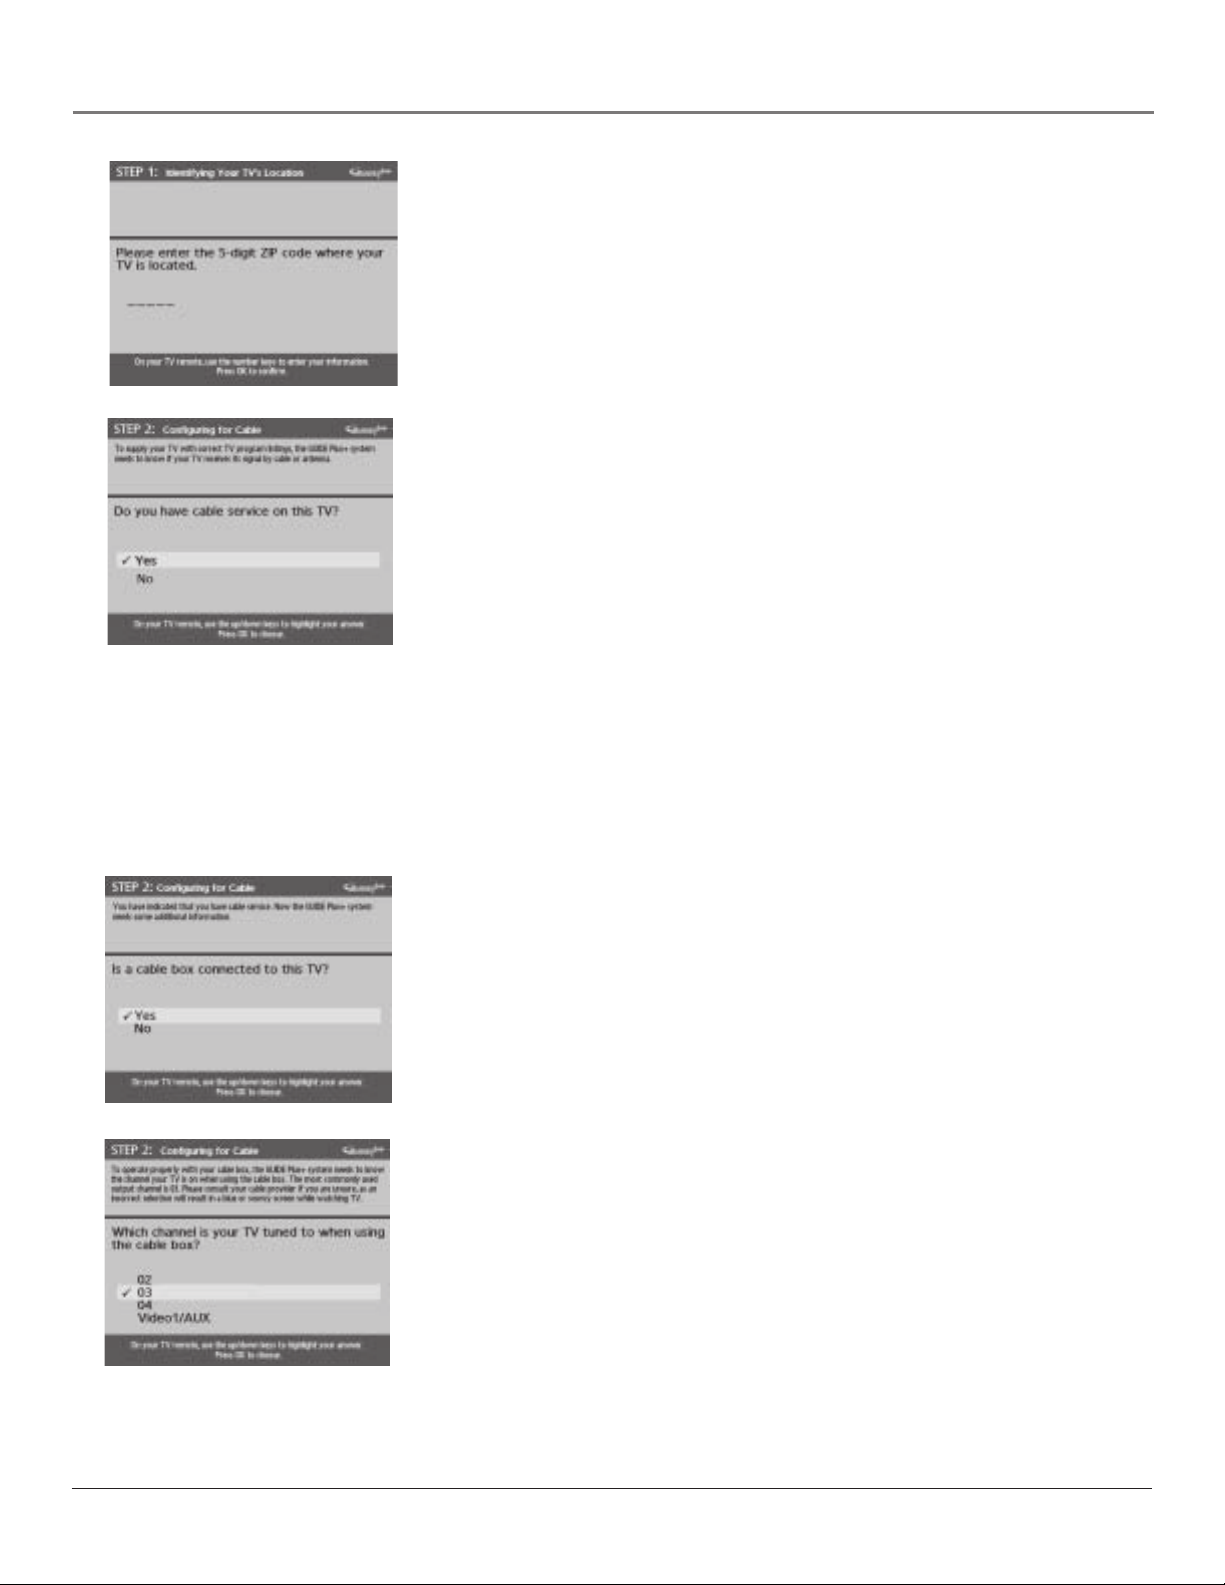
Connections & Setup
2. Use the number buttons and/or the arrows on your remote to enter your
Step 2: Configuring for Cable
The next series of screens asks you about your cable setup. To supply your TV
with the correct TV program listings, the GUIDE Plus+ system needs to know if
your TV is connected to a cable TV connection.
zip code or postal code. Press OK when you’re finished.
Note: If your postal code contains letters, press the up and down arrow
buttons on your remote to enter letters, and press the right arrow button
to go to the next space. The left arrow button also moves the highlight
to the left.
Notes: : If you’re using a cable box, leave it on so you can receive
program information.
If you have two off-air antennas connected (one to ANTENNA A and one
to ANTENNA B) and you aren’t getting the guide listings, try swapping
the antennas.
If your cable system retransmits digital off-air channels over cable, you
should select YES to cable inquiry.
You cannot tune to digital channels from the GUIDE Plus+ system if you
have cable service or a cable box connected unless an off-air antenna is
connected to Antenna B.
1. If your TV is connected to cable, highlight Yes and press OK.
If your TV isn’t connected to cable, highlight No and press OK. (STEP 3:
Configuring for a VCR appears--go to page 23.)
2. If you have a cable box connected to this TV, highlight Yes and press OK
Notes: The next series of screens is very important because the GUIDE
Plus+ system must find the correct cable box information in order to
receive the correct TV program listings.
If you don’t have a cable box connected to this TV, highlight No and
press OK (STEP 3: Configuring for a VCR appears--go to page 23).
3. Highlight the channel on ANTENNA A where you have to tune your TV to
see cable box programming, and press OK (a screen appears reminding
you to connect your G-LINK cable to your TV and cable box).
Notes: If not using INPUT 1 (VIDEO1/AUX), you must connect to
ANTENNA A not B.
Channel 03 is the most common.
Choose Video1/AUX if your cable box is connected to your TV with audio/
video cables instead of a coaxial cable. Go to page 7 for pictures of these
cables. If you choose Video 1/Aux, then connect the cable box to the TV’s
INPUT 1.
22 Chapter 1
Page 25
Connections & Setup
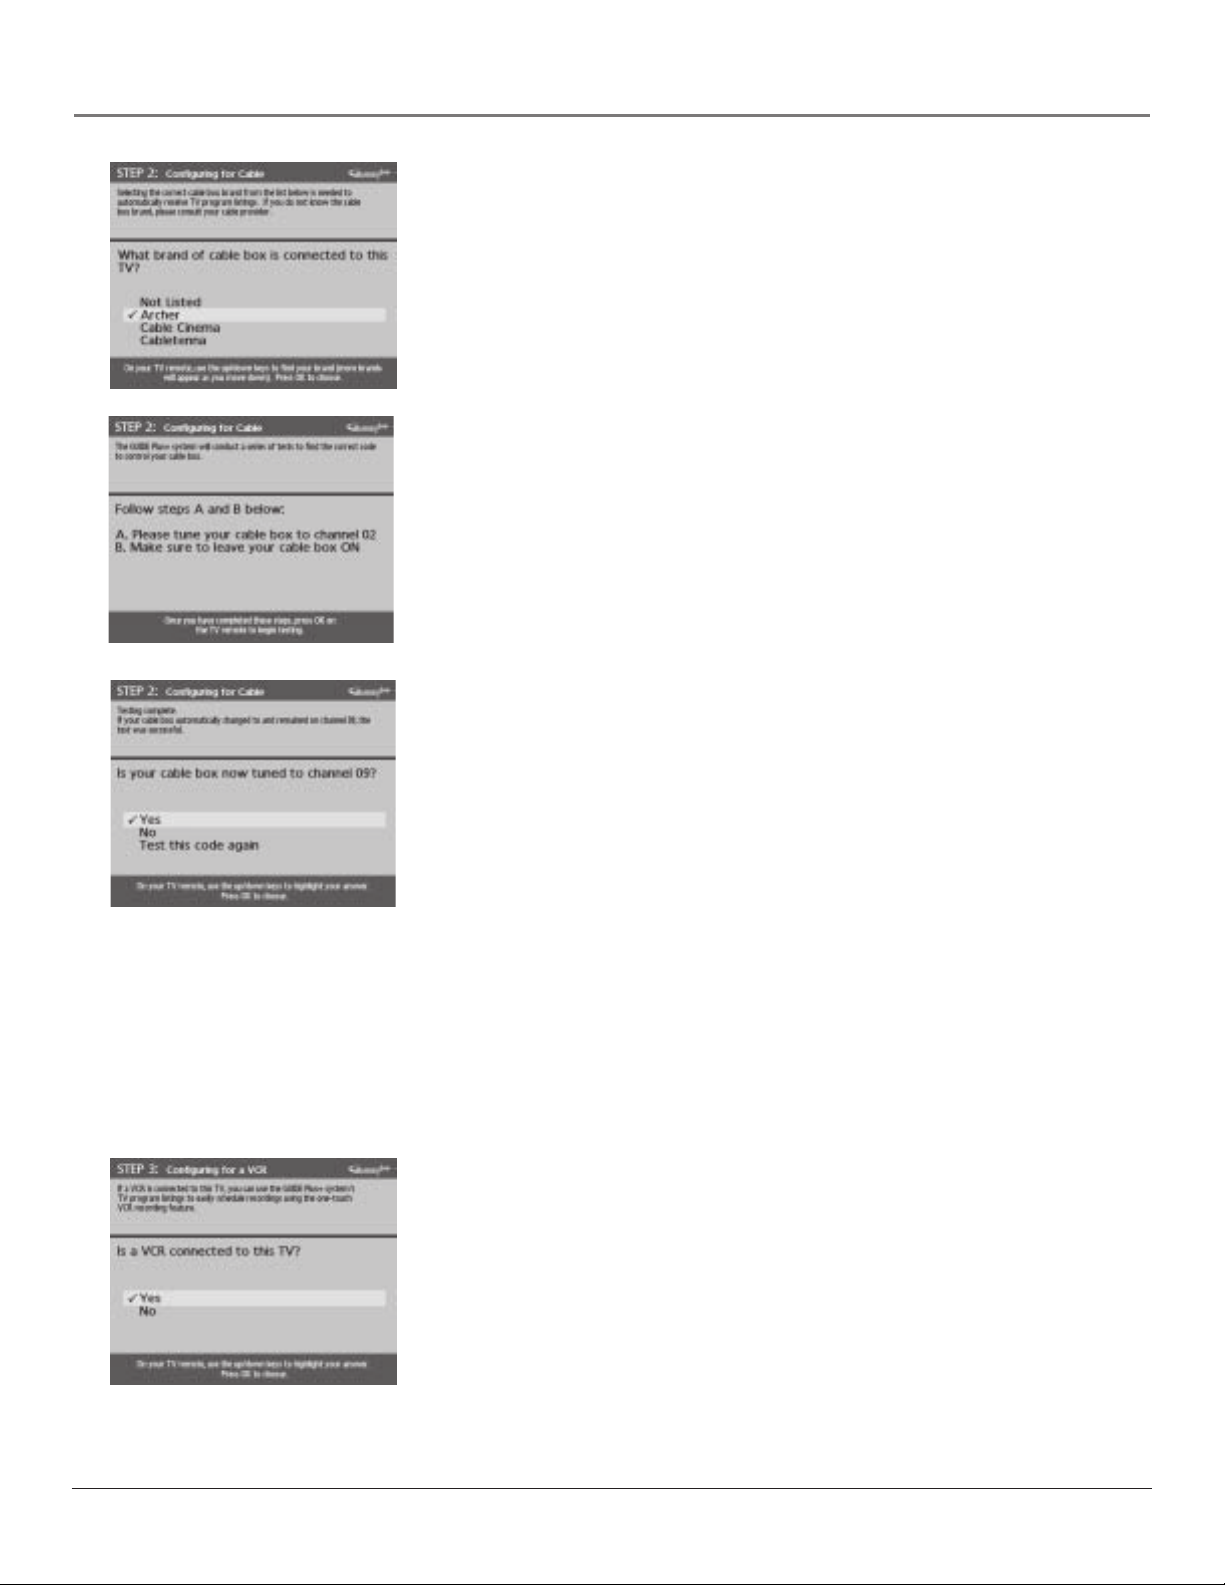
4. Highlight your brand of cable box, and press OK.
If your brand isn’t listed, highlight Not Listed and press OK.
Important Note: Cable box may only be connected to ANTENNA A or
INPUT 1 if it is to be controlled by GUIDE Plus+ System
5. Make sure your cable box is on.
Tune the cable box to channel 02 (use the remote control that came with
your cable box, or press the channel buttons on the cable box).
Press OK (the GUIDE Plus+ system starts testing codes).
Important Note: When code testing is in progress, don’t touch your TV,
VCR, cable box or any of the remote controls for these products.
6. Look at your cable box. If it is still on and changed to channel 09, the test
was successful. Highlight Yes, and press OK (STEP 3: Configuring for a VCR
appears).
If your cable box didn’t change to channel 09 or turned itself off, you have
two choices: No and Test this code again.
Test this code again: If you think the TV, the cable box, or any of the
remote controls might have been touched or bumped during the test,
highlight Test this code again and press OK (the GUIDE Plus+ system runs
the same set of codes).
No: If you don’t think the test was interrupted, highlight No and press OK
(GUIDE Plus+ system tests the next code).
Repeat the previous instructions until the TV finds the correct cable box
code. Follow the instructions on the screen.
Note: If the TV can’t find your cable box code, a troubleshooting checklist
appears. Carefully review each checklist and follow the instructions on the
screen.
Step 3: Configuring for a VCR
1. If your TV is connected to a VCR, press OK (a screen appears reminding
you to connect your G-LINK cable to your TV and VCR).
If it is not, highlight No and press OK.
Chapter 1 23
Page 26
Connections & Setup
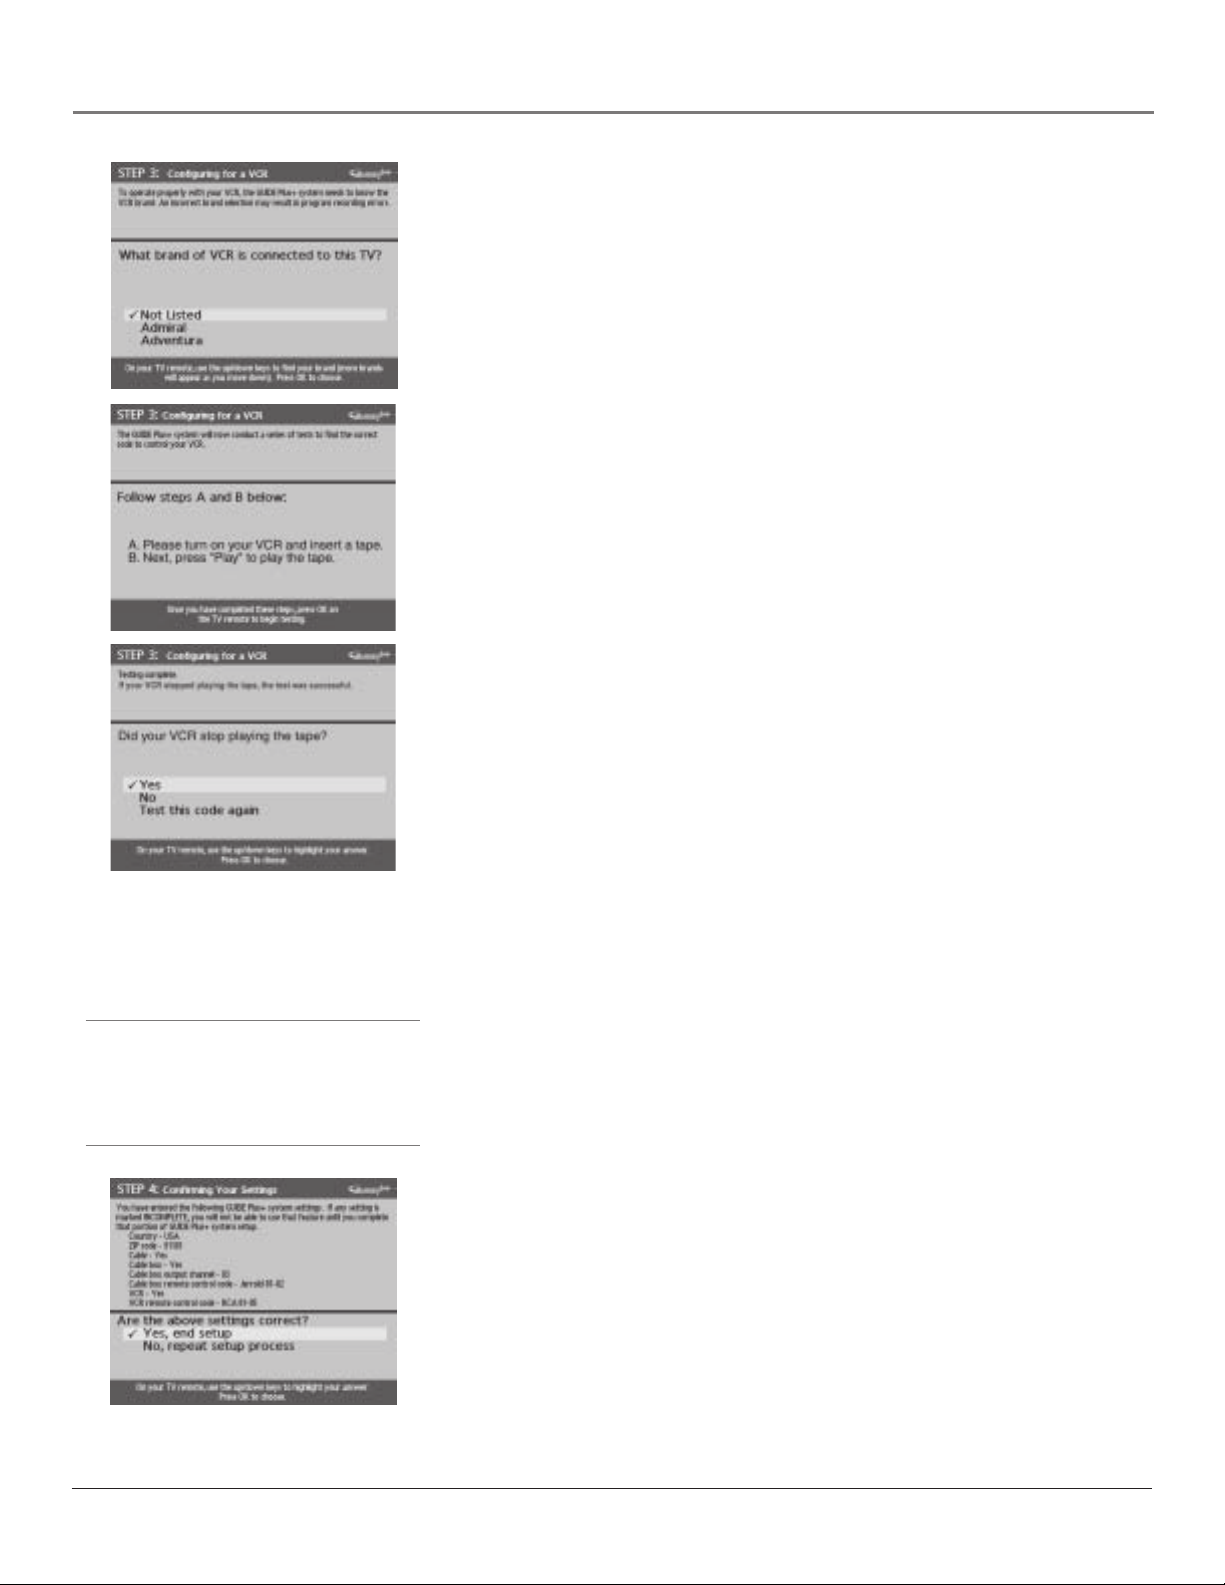
2. Use the up and down arrow buttons to highlight the brand of your VCR
3. Keep the VCR on and insert a tape. When you complete these steps, press
4. Look at the front of your VCR. If your VCR stopped playing the tape, the
that is connected to the TV and press OK.
If your brand isn’t listed, highlight Not Listed and press OK.
OK to begin testing.
Important Note: When code testing is in progress, don’t touch your TV,
VCR, or any of the remote controls for these products.
test was successful. Highlight Yes and press OK.
Tips
Leave your cable box turned ON to download
program information.
Leave your VCR turned OFF to record programs.
If your VCR didn’t stop playing a tape, you can either choose No or Test this
code again.
If you think your TV or remote might have been touched during the test,
make sure the VCR is on and playing a tape. Highlight Test this code again.
If you don’t think the test was interrupted, highlight No. Make sure the VCR
is playing a tape and is on. Press OK (the GUIDE Plus+ system starts testing
another set of codes.)
Keep following the previous instructions until the TV finds the
correct code for the VCR.
Note: If the GUIDE Plus+ system can’t locate the correct code for the VCR, a
list of troubleshooting instructions appears to help you before you try again.
•Try VCR configuration again: repeat VCR setup.
•Test alternate codes: tests selected brands and if this fails, the test
continues with all codes in the system.
• Skip this step: the GUIDE Plus+ system won’t be able to automatically
schedule programs to record on your VCR.
Step 4: Confirming Your Settings
1. Check to make sure all settings are complete and correct. If all settings are
complete, highlight Yes, end setup and press OK. If your cable box and/or
VCR code testing failed, you should see INCOMPLETE where the cable
box and VCR codes are listed. Once setup is complete, additional
screens appear.
Disregard the screen that tells you to refer to the Quick Setup sheet because
all of the information is in this User’s Guide.
If any settings are incomplete or incorrect, highlight No, repeat setup process
and press OK. Follow the instructions on the screen.
24 Chapter 1
Page 27

Connections & Setup
What to Expect
The next time you turn on your TV, the GUIDE Plus+ system will appear on the screen. The
following examples explain what you might see:
• If all of the program information has been sent to your TV, the GUIDE Plus+ system appears
with all of your TV program listings.
• If the program information hasn’t been sent to your TV yet, an outline of the GUIDE Plus+
system (without TV program listings) will appear on the screen. Program information is
usually sent to your TV at night.
• If more than one cable company services your area, you may be prompted with a Channel
Mapping screen after the first GUIDE Plus+ system download. You will need to identify your
cable company by selecting the correct channel numbers for the stations in question.
Features of the GUIDE Plus+ system are explained in Chapter 3.
To clear the guide from your screen, press CLEAR or GUIDE on the remote control.
Changing Channels
Depending upon the type of signals you have connected to your HDTV, you might notice that
the channels change slower than you’re used to. This is perfectly normal. Your HDTV is able to
interpret and display both analog (NTSC) and digital (ATSC) signals and the digital subchannels
(when available). Also, you may notice that the size of the Channel Banner changes as you scan
through analog and digital channels.
Next Steps
Now that you’ve finished the Assisted Setup, you’re ready to watch TV. This might be a good time
to program your remote control. The remote control that came with this TV can be programmed
to operate other components. Go to the next chapter to find out how to program your remote.
Chapter 1 25
Page 28

This page left blank intentionally.
Page 29

Chapter 2
Using the Remote Control
Chapter Overview:
• The Buttons on the Remote Control
•Programming the Remote to Operate Other Components
• How To Use the Remote After You’ve Programmed It
• Code List
Changing Entertainment. Again.
Graphics contained within this publication are for representation only. 27
Page 30

Using the Remote Control
S
SKIP
CH CTRL
V
V
O
V
L
R
The Buttons on the Remote Control
ON • OFF
Indicator
Green action
button
Blue action
button
VCR1
DVD
MUTE
VCR2
CH +
AUX
SAT • CABLE
TV
FORMAT
LEA
Blue action Button In the GUIDE Plus+ system, it activates features
(located in the Action bar on TV screen).
Green action Button In the GUIDE Plus+ system, it activates the
features (located in the Action bar on TV screen).
(Backlight button) Press to illuminate some of the remote
control’s buttons. To conserve battery power, the light turns off after
several seconds. Backlight won’t activate if batteries are low, but blinks
on and off quickly.
(0-9) Number Buttons Enter channel numbers and time settings
directly through the remote control. Also used in the GUIDE Plus+
system and in the TV menu to make selections.
ANTENNA Switches the source of the off-air signal between HDTV’s
ANTENNA A and B. When in the VCR mode, the ANTENNA button
functions as a TV/VCR button. In the satellite mode, it functions as a TV/
SAT button. If tuned to an input, ANTENNA takes TV back to last-viewed
antenna and channel.
E
WAP
Tip
The VCR1, DVD, VCR2, and SAT•CABLE buttons
also turn on most RCA, GE, and Proscan
products.
Arrows (up, down, left, right) Used to move through the TV menu
system, GUIDE Plus+ system, and on-screen displays. Also moves the PIP
window when the menu is not on the screen. See page 49 for more
information.
AUX Places the remote in auxiliary mode to operate a component (such
as a cable box, satellite receiver, VCR, DVD, or audio receiver) that
you’ve programmed to work with this button.
CH + or CH – Scrolls up or down through the current channel or input
list. Press once to change the channel up or down; press and hold to
continue changing channels. In the GUIDE Plus+ system, scrolls a page at
a time.
CH CTRL (Channel control) Toggles the channel control between the
main TV picture and the PIP window. Use channel up, channel down,
INPUT, or number buttons to change channels. You can tell which
picture changes by looking at the channel banner. CH CTRL is marked
by in the banner.
CLEAR Removes any menu or display from the screen and returns you
to normal viewing. Used to cancel the commercial skip timer. Used to
quit the browser.
DVD Places the remote in DVD mode. If Auto Tuning is enabled,
pressing the DVD button turns on the TV and tunes to the correct input
channel.
FORMAT Toggles through screen formats (Normal, Zoom, and Stretch).
In browser mode, toggles through three different view sizes: full-size
video, video window on the left, and video window on the right.
28 Chapter 2
Page 31

Using the Remote Control
Tip
To turn off most the RCA, GE, and Proscan
components that are connected to the TV, press
ON•OFF twice within two seconds.
This feature only works with most RCA, GE, and
Proscan products.
GO BACK Returns you to the previous channel or previous screen in the
menu system.
GUIDE Brings up the Listings screen for the GUIDE Plus+ system.
INDICATOR Indicates the programming mode when programming the remote
to operate components. Lights when a button is pressed and a valid command
is sent. Turns red and blinks rapidly when batteries are low.
INFO Brings up channel banner with channel and viewing information. Press
again to remove the banner. In the GUIDE Plus+ system, brings up more
program information.
INPUT Toggles through the TV’s available input sources (Front Input, INPUT
1, INPUT 2, INPUT 3, INPUT 4, INPUT 5, DTVLink (if available), last-active
Antenna).
MENU Turns the Main menu on or off.
MUTE Reduces the TV’s volume to its minimum level. Press again to restore
volume.
OK When a menu is on the screen, press OK to select the item that is
highlighted.
ON•OFF When in TV mode, turns the TV on or off. If in another mode (VCR,
DVD, SAT•CABLE, AUX) and programmed, it turns the component on and off.
PIP Makes the PIP window appear and disappear (See Chapter 3 for more
information about using PIP.) Locks/unlocks video window in GUIDE Plus+
system.
REVERSE, PLAY, FORWARD, REC•VCR+, STOP, PAUSE If programmed,
provides transport control for some remote-controllable VCRs, DVD players,
and CD players. Press REC•VCR+ outside of the GUIDE Plus+ System to set a
manual timer program or enter a PlusCode number.
SAT•CABLE Places the remote in SAT•CABLE mode. If Auto Tuning is
enabled, turns on the TV and tunes to the correct input channel.
SKIP Press once before changing channels and the TV returns to the original
channel after 30 seconds. Press repeatedly to add more time. Cannot be used
with the browser. Use CLEAR to cancel.
SWAP When using PIP, switches the main picture with the PIP window.
TV Places the remote in TV mode. Turns on the TV and tunes to the last-
viewed TV channel or input. Placing the remote in TV mode enables you to
access the TV’s menu system as well as tune to analog, digital, or cable TV
channels.
VCR1 Places the remote in VCR1 mode. If Auto Tuning is enabled, turns on
the TV and tunes to the correct input channel.
VCR2 Places the remote in VCR2 mode. If Auto Tuning is enabled, turns on
the TV and tunes to the correct input channel.
VOL – or VOL + Decreases or increases the TV’s volume when the TV Audio
Output option is set to Variable Speakers On.
Chapter 2 29
Page 32

Using the Remote Control
STOP
ON
OFF
SE
C
+
C
V
V
O
L
1
C
R
VCR
Indicator
REVER
LEA
Programming the Remote to Operate
Other Components
The universal remote can be programmed to operate many brands of remotecontrollable VCRs, audio components, DVD players, cable boxes, satellite
receivers and other components. In addition to being programmed to operate
your television, it’s already programmed to operate most RCA, GE, and
PROSCAN components.
The AUX button can be programmed to operate most brands of an additional
remote-controllable component.
Note: The TV button can’t be programmed on this remote.
Find Out If You Need to Program the Remote
To determine whether the universal remote needs to be programmed to operate
one of the components connected to your TV, such as a VCR, do the following:
1. Turn on the component (in this example, a VCR).
2. Point the remote at the component.
3. Press the corresponding component button (in this example, VCR1).
4. Press ON•OFF to see if the VCR responds. If the VCR doesn’t respond, you
need to program the remote to operate it.
You’ll use these buttons when
you program the remote.
Important Note: The remote may
not be compatible with all models
of all brands of components. It
also may not operate all functions
of the remote that came with your
component.
Important for Direct Entry
You must continue pressing the component
button while you enter the code.
Let’s say you have a Zenith VCR. To program the
universal remote to operate the VCR, you
would:
Press and hold the VCR1 button while you enter
the first code listed for Zenith in the VCR Codes
column.
Release the VCR1 button. Press ON•OFF to see if
the VCR responds. If it doesn’t, follow the same
steps, but enter the second code for Zenith
VCRs instead of the first.
Programming the Remote
There are two ways to program the remote control:
•direct entry
• automatic code search
Using Direct Entry
Note: The AUX button can only be programmed using direct entry.
1. Turn on the component you want to operate (VCR, DVD player, etc.)
2. Look up the brand and code number(s) for the component on the code list
in this section.
3. Press and hold the component button you want to program on the remote.
4. Enter the 4-digit code from the remote control code list on the following
pages. If the indicator flashes, you have either entered an invalid code or
the button isn’t programmable.
5. Release the component button, point remote at component, and then press
ON•OFF to see if the component responds to the command. If it doesn’t,
try pressing the component button and then ON•OFF again.
• If you get no response, repeat these steps using the next code listed for
your brand, until the component responds to the remote commands.
• If you try all the codes for your component brand and none work, try the
automatic code search method. If automatic code search doesn’t find the
code, the remote is not compatible with your component.
30 Chapter 2
Page 33

Tip
To stop the automatic code search without
programming any components, press and
hold CLEAR until the indicator on the
remote turns off.
Using the Remote Control
Using Automatic Code Search
If Direct Entry does not work for your component, try Auto Code Search. The
following instructions can be used to program the remote to operate each of
your components. If you want to stop the automatic code search without
programming any of your components, press and hold CLEAR until the indicator
on the remote turns off.
1. Turn on the component you want to operate (VCR, DVD player, etc.)
2. Press and hold the component button you want to program (VCR1, DVD,
etc.). While holding the component button, press and hold ON•OFF until
the indicator on the remote turns on, then release both buttons.
3. Point the remote at the component.
4. Press and release PLAY, then wait 5 seconds or until the indicator on the
remote stops flashing.
At this point the remote is searching for the correct code to program. If, after
5 seconds, the component you want to operate does not turn off, press PLAY
again to tell the remote to search the next set of codes.
Continue pressing PLAY until the component turns off or you have searched
through all of the codes. There are more than 20 total sets of codes. If the
component does not turn off after pressing PLAY more than 20 times, then
the remote can’t be programmed to operate that component.
Tip
Some of the remote’s buttons might operate
differently for other components, especially
when you’re using another component’s
menu system.
If the component you want to control does turn off:
1. Press and release REVERSE, then wait 2 seconds. Repeat this step until the
device turns back ON.
2. To finish, press and hold STOP until the indicator on the remote turns off.
How to Use the Remote After You’ve Programmed It
Because this universal remote can control several different components (TV,
DVD, VCR, satellite receiver, etc.), it uses operational modes triggered by the
component buttons.
1. Press the appropriate component button (DVD, TV, VCR1, VCR2,
SAT•CABLE, AUX) to set the remote to control the component.
2. Press ON•OFF to turn the component ON or OFF.
3. Use the remote buttons that apply to that component.
Notes: The remote control may not be compatible with all brands and
models of components.
If you keep pressing buttons and nothing happens, the remote is probably
in the wrong mode. You must press the component button that matches
the component you want to operate (i.e., if you want to operate the VCR,
press VCR1, VCR2, or AUX on the remote control to put the remote in VCR
mode.)
Chapter 2 31
Page 34

Using the Remote Control
S
SKIP
CH CTRL
V
V
O
V
L
R
Using the INPUT Button
Input source
INPUT
button
VCR1
DVD
MUTE
ON • OFF
VCR2
WAP
CH +
AUX
TV
SAT • CABLE
FORMAT
LEA
E
Note: Watch the channel banner to see the input
sources change each time you press the INPUT button.
1. Repeatedly press the INPUT button to scroll through the available input
sources until you find the input associated with the component (such as
VCR or DVD player) you want to view.
2. Once you have found the input source you want, stop pressing INPUT.
• If you tune to INPUT 1 and your DVD is connected to that input, you
will be able to view your VCR. To play, stop, or rewind the VCR tape
using the remote that came with your TV, you must first press the
VCR1, VCR2, or AUX button to put the remote control in VCR mode.
There are other ways of selecting an input channel:
•Program the component (VCR, DVD, etc.) buttons on the remote control to
automatically tune to the correct input channel when pressed. For more
details on Auto Tuning, see Chapter 3.
• When viewing an input, to go back to viewing channels, press ANTENNA,
or press INPUT until you see your channel, or use the number keys to
enter the channel number.
32 Chapter 2
Page 35

VCR Codes
Programmable for VCR1, VCR2, and
AUX buttons.
Admiral ........................................................ 2132
Adventura .................................................... 2026
Aiko ............................................................. 2027
Aiwa ............................................................. 2026
Akai ..................... 2003, 2004, 2005, 2007, 2008,
................................................. 2111, 2112, 2113
American High ............................................ 2021
Asha ............................................................. 2013
Audio Dynamics ................................ 2009, 2010
Audiovox ..................................................... 2014
Bell & Howell ............................................. 2011
Beaumark .................................................... 2013
Broksonic .......................................... 2012, 2025
Calix ............................................................. 2014
Candle .......................... 2013, 2014, 2015, 2016,
................................................. 2017, 2018, 2019
Canon ...................................... 2021, 2022, 2114
Capehart ............................................ 2020, 2110
Carver .......................................................... 2062
CCE .................................................... 2027, 2061
Citizen ............................................... 2013, 2014,
................... 2015, 2016, 2017, 2018, 2019, 2027
Colortyme .................................................... 2009
Colt .............................................................. 2061
Craig .............................. 2013, 2014, 2023, 2061
Curtis-Mathes .......................... 2000, 2009, 2013,
.......... 2016, 2018, 2021, 2022, 2024, 2115, 2131
Cybernex ..................................................... 2013
Daewoo .............. 2015, 2017, 2019, 2025, 2026,
Daytron ........................................................ 2110
DBX ................................................... 2009, 2010
Dimensia ........................................... 2000, 2131
Dynatech ..................................................... 2026
Electrohome ...................................... 2014, 2029
Electrophonic .............................................. 2014
Emerson .... 2012, 2014, 2015, 2021, 2024, 2025,
2026, 2029, 2030, 2031, 2032, 2033, 2034, 2035,
................... 2036, 2037, 2038, 2039, 2040, 2041,
................. 2042, 2044, 2045, 2046, 2047, 2065,
...................................... 2113, 2116, 2117, 2130
Fisher ...................................... 2011, 2023, 2048,
............................. 2049, 2050, 2051, 2052, 2118
Fuji ..................................................... 2021, 2119
Funai ............................................................ 2026
Garrard ........................................................ 2026
GE ........................................... 2000, 2001, 2013,
................... 2021, 2022, 2053, 2115, 2120, 2131
Goldstar ............... 2009, 2014, 2018, 2054, 2131
Gradiente ..................................................... 2026
Harley Davidson ......................................... 2026
Harman Kardon .......................................... 2009
Harwood ..................................................... 2061
Headquarter ................................................ 2011
Hitachi .............................................. 2055, 2056,
............................. 2057, 2107, 2111, 2120, 2122
Hi-Q ............................................................. 2023
Instant Replay ............................................. 2021
JCL ............................................................... 2021
JC Penney ..................... 2009, 2010, 2011, 2013,
............................ 2014, 2021, 2022, 2055, 2056,
............................. 2058, 2059, 2060, 2107, 2118
Jensen ...................................... 2055, 2056, 2111
JVC ............. 2009, 2010, 2011, 2018, 2111, 2123
Kenwood ................................ 2009, 2010, 2011,
...................................... 2016, 2018, 2111, 2123
KLH .............................................................. 2061
Kodak ................................................ 2014, 2021
Lloyd ............................................................ 2026
Logik ............................................................ 2061
LXI ............................................................... 2014
2027, 2028, 2110
Using the Remote Control
Magnavox ...................................................2021, 2022, 2062,
................................................. 2063, 2104, 2105, 2108, 2124
Magnin ............................................................................ 2013
Marantz .......................................................2009, 2010, 2011,
............................................... 2016, 2018, 2021, 2062, 2064
Marta ............................................................................... 2014
Masushita ........................................................................ 2021
Mei .................................................................................. 2021
Memorex ............................................................. 2011, 2013,
....................................... 2014, 2021, 2023, 2026, 2104, 2132
MGA ............................................................. 2029, 2065, 2113
MGN Technology ........................................................... 2013
Midland ........................................................................... 2053
Minolta ......................................................... 2055, 2056, 2107
Mitsubishi ........... 2029, 2055, 2056, 2065, 2066, 2067, 2068,
........ 2068, 2070, 2071, 2072, 2073, 2074, 2106, 2113, 2123
Montgomery Ward ............................................... 2075, 2132
Motorola ............................................................... 2021, 2132
MTC ...................................................................... 2013, 2126
Multitech .................................. 2013, 2016, 2026, 2053, 2061
NEC .......................................... 2009, 2010, 2011,2016, 2018,
....................................... 2064, 2076, 2078, 2079, 2111, 2123
Nikko .............................................................................. 2014
Noblex ............................................................................ 2013
Olympus ......................................................................... 2021
Optimus ................................................................ 2014, 2132
Optonica ......................................................................... 2096
Panasonic ...................... 2021, 2022, 2109, 2125, 2126, 2127
Pentax ...................................... 2016, 2055, 2056, 2107, 2120
Pentex Research ............................................................. 2018
Philco ................................................. 2021, 2022, 2062, 2063
Philips ................................................2021, 2062, 2096, 2124
Pilot ................................................................................. 2014
Pioneer .................................... 2010, 2055, 2080, 2081, 2123
Portland ............................................. 2016, 2017, 2019, 2110
PROSCAN .................................................... 2000, 2001, 2131
Protec .............................................................................. 2061
Pulsar .............................................................................. 2104
Quarter ........................................................................... 2011
Quartz ............................................................................. 2011
Quasar ......................................................... 2021, 2022, 2125
RCA ..................... 2000, 2001, 2003, 2013, 2021, 2055, 2056,
................. 2082, 2083, 2084, 2085, 2086, 2087, 2088, 2089,
................... 2090, 2091, 2107, 2115, 2120, 2125, 2131, 2133
Radioshack/Realistic ........................ 2011, 2013, 2014, 2021,
................... 2022, 2023, 2026, 2029, 2049, 2050, 2096, 2132
Radix ............................................................................... 2014
Randex ............................................................................ 2014
Ricoh ............................................................................... 2128
Runco ............................................................................. 2104
Samsung ........................ 2005, 2013, 2015, 2033, 2053, 2112
Sanky .................................................................... 2104, 2132
Sansui ................................................ 2010, 2092, 2111, 2123
Sanyo ...........................................................2011, 2013, 2023
Scott ................................................... 2012, 2015, 2025, 2032
Sears ....................................... 2011, 2014, 2021, 2023, 2048,
............................ 2049, 2050, 2051, 2055, 2056, 2107, 2118
Sharp .................... 2017, 2029, 2094, 2095, 2096, 2097, 2131
Shintom ............................................. 2004, 2056, 2061, 2098
Shogun ........................................................................... 2013
Signature ......................................................................... 2131
Singer ........................................................... 2021, 2061, 2128
Sony ...................................................2004, 2098, 2099, 2119
STS ........................................................................ 2021, 2107
Sylvania ............................................................... 2021, 2022,
............................................... 2026, 2062, 2063, 2065, 2124
Symphonic ...................................................................... 2026
Tandy .............................................................................. 2011
Tashiko ........................................................................... 2014
Tatung ............................................................................. 2111
TEAC ............................................................ 2026, 2085, 2111
Technics ................................................................ 2021, 2109
Teknika .................................... 2014, 2021, 2026, 2100, 2129
TMK ............................................................. 2013, 2024, 2047
2038, 2065, 2093, 2116
Toshiba ............................................ 2015, 2049, 2051,
............................................... 2055, 2065, 2093, 2116
Totevsion .................................................... 2013, 2014
Unitech ................................................................. 2013
Vector Research...................... 2009, 2010, 2015, 2016
Victor .................................................................... 2010
Video Concepts ............ 2009, 2010, 2015, 2016, 2113
Videosonic ............................................................ 2013
Wards ..................................... 2013, 2014, 2015, 2021,
.......................... 2023, 2026, 2029, 2055, 2056, 2061,
................. 2096, 2101, 2102, 2103, 2107, 2116, 2132
XR-1000 ............................................ 2021, 2026, 2061
Yamaha ......................... 2009, 2010, 2011, 2018, 2111
Zenith ........................... 2004, 2098, 2104, 2119, 2128
Cable Box Codes
Programmable for SAT•CABLE and
AUX buttons.
ABC ..................... 5002, 5003, 5004, 5005, 5006, 5053
Antronix ...................................................... 5008, 5009
Archer ............................................... 5008, 5009, 5010
Cabletenna ........................................................... 5008
Cableview ............................................................. 5008
Colour Voice............................................... 5012, 5013
Comtronics ........................................................... 5014
Contec .................................................................. 5016
Eastern .................................................................. 5017
Garrard ................................................................. 5011
GC Electronics ...................................................... 5009
GE ............................................................... 5000, 5001
Gemini ........................................................ 5018, 5019
General Instrument .............................................. 5003
Hamlin ................ 5020, 5021, 5022, 5028, 5035, 5045
Hitachi .................................................................. 5003
Jerrold ................. 5003, 5018, 5023, 5024, 5046, 5053
Magnavox ............................................................. 5025
Memorex .............................................................. 5026
Movie Time .......................................................... 5027
NEC ....................................................................... 5005
NSC ....................................................................... 5027
Oak ............................................................. 5016, 5029
Panasonic .................................................. 5048, 5052
Philips ........................... 5011, 5012, 5013,5015, 5019,
Pioneer ....................................................... 5033, 5034
PROSCAN ................................................... 5000, 5001
RCA ......................................... 5007, 5047, 5049, 5052
Realistic ................................................................. 5009
Regal ........................................................... 5022, 5035
Regency ................................................................ 5017
Rembrandt ............................................................ 5003
Samsung ............................................................... 5034
Scientific Atlanta ..................... 5006, 5036, 5037, 5038
Signal .................................................................... 5018
Signature ............................................................... 5003
Sprucer ................................................................. 5052
Standard Components ............................... 5039, 5044
Starcom ....................................................... 5018, 5053
Stargate ................................................................. 5018
Starquest ............................................................... 5018
Tandy .................................................................... 5040
Teleview ............................................................... 5014
Tocom ......................................................... 5004, 5023
Tusa ...................................................................... 5018
TV86 ..................................................................... 5027
Unika .......................................................... 5008, 5009
United Cable ........................................................ 5053
Universal ........................................... 5008, 5009, 5010
Viewstar ...................................................... 5025, 5027
Zenith ......................................................... 5050, 5051
5025, 5030, 5031, 5032
Chapter 2 33
Page 36

Using the Remote Control
Kenwood ....................................................................... 4269
Satellite Receiver Codes
Programmable for SAT•CABLE and AUX
buttons.
Alphastar ................................................................ 5079
Chapparal ..................................................... 5056, 5057
Dishnet ................................................................... 5078
Drake ............................................................ 5058, 5059
Echostar .................................................................. 5089
GE ................................................................. 5000, 5001
General Instruments .......................... 5060, 5061, 5062
Hitachi .......................................................... 5083, 5084
Hughes ......................................................... 5077, 5090
JVC .......................................................................... 5082
Panasonic ............................................................... 5075
Philips ..................................................................... 5085
Primestar ................................................................. 5076
PROSCAN ..................................................... 5000, 5001
RCA ..................................5000, 5001, 5071, 5080, 5081
Realistic ................................................................... 5063
Sony ........................................................................ 5072
STS1 ........................................................................ 5064
STS2 ........................................................................ 5065
STS3 ........................................................................ 5066
STS4 ........................................................................ 5067
Toshiba ......................................................... 5068, 5073
Uniden .......................................................... 5069, 5086
DVD codes
Programmable for DVD and
AUX buttons.
Aiwa ........................................................................ 3009
Apex ............................................................. 3023, 3024
GE ........................................................................... 3000
Hitachi .................................................................... 3008
JVC ................................................................ 3002, 3010
Konka ........................................................... 3011, 3012
Magnavox ............................................................... 3003
Mitsubishi ............................................................... 3004
Panasonic ............................................................... 3013
Philips ........................................3003, 3019, 3021, 3022
Pioneer ................................................................... 3005
PROSCAN ............................................................... 3000
RCA ............................................................... 3000, 3001
Samsung ................................................................. 3025
Sanyo ...................................................................... 3014
Shinco ..................................................................... 3001
Sony .................................................... 3006, 3015, 3016
Toshiba ............................................... 3007, 3017, 3020
Zenith ..................................................................... 3018
Onkyo ............................................................................ 4278
Optimus ......................................................................... 4284
Panasonic ............................................................ 4279, 4280
Pioneer .......................................................................... 4275
RCA ................................................................................ 4270
Sherwood ...................................................................... 4282
Sony ........................................................... 4271, 4272, 4281
Technics ............................................................... 4279, 4280
Wards ............................................................................. 4275
Yamaha ................................................................ 4274, 4275
CD Players
ADC ........................................................... 4200, 4201, 4220
Aiwa ..................................................................... 4175, 4203
Akai ................................................................................ 4205
Denon ............................................................................ 4208
Dynatech ....................................................................... 4177
Emerson ......................................................................... 4178
Fisher ......................................................... 4179, 4212, 4213
GE .................................................................................. 4216
Hitachi ........................................................................... 4180
JVC ....................................................................... 4181, 4221
Kenwood ................................................... 4183, 4222, 4224
Luxman .......................................................................... 4225
Marantz ................................................................ 4185, 4226
Mitsubishi ............................................................ 4229, 4230
MCS ................................................................................ 4228
Nakamichi ........................................................... 4232, 4233
NEC ................................................................................ 4184
Onkyo ........................................................ 4186, 4234, 4235
Optimus ..................................................... 4237, 4238, 4239
Panasonic ...................................................................... 4188
Pioneer ................................................................ 4189, 4240
RCA ...................................................................... 4190, 4211
Sanyo ............................................................................. 4250
Sears .............................................................................. 4207
Sherwood ...................................................................... 4243
Sony ........................................................... 4195, 4209, 4244
Teac ........................................................... 4245, 4246, 4247
Technics ......................................................................... 4197
Toshiba .......................................................................... 4231
Yamaha ...................................................... 4198, 4199, 4268
Audio Codes
Programmable for the AUX button only.
RCA and Dimensia
AM/FM ..................................................... 4003, 4270
AUX ................................................................... 4004
Phono ................................................................ 4005
Tape ................................................................... 4006
CD .................................................. 4007, 4190, 4211
Receivers
Aiwa ........................................ 4261, 4262, 4263, 4264,
................................................... 4265, 4266, 4267, 4277
Denon ..................................................................... 4283
Harman Kardon ..................................................... 4276
JVC .......................................................................... 4268
JVL .......................................................................... 4276
34 Chapter 2
Page 37

Chapter 3
Using the TV’s Features
Chapter Overview:
• Channel Banner
• Digital or Analog Channels
• All About the GUIDE Plus+ System
• Parental Controls
• Auto Tuning
• PIP (Picture-In-Picture) Operation
•Web Browser
Changing Entertainment. Again.
Graphics contained within this publication are for representation only. 35
Page 38

Using the TV’s Features
About the Channel Banner
The Channel Banner appears when you press the TV or INFO button on the remote. If an icon in the channel banner is
grayed out (dim), the feature is not available. The following list describes the items on the Channel Banner screen (left to
right and top to bottom). Other displays that are not described here are self-explanatory.
Note: You may notice the size of the channel banner changes when you change channels. This is perfectly normal and
occurs because analog (NTSC) broadcasts and digital (ATSC) broadcasts use different formats. Your HDTV can display
both types and adjusts the picture accordingly.
The icons change appearance to show the item’s status or availability.
Program Title/Acquiring Channel Title of program (if available) or Acquiring Channel appears when tuning a channel.
00:30 Displays the time remaining before the TV tunes back to the channel where
Commercial Skip was activated.
12:30 AM The time when the TV shuts off as set by the Sleep Timer in Time menu.
12:39 PM
888 - 888 WWWW Current channel, subchannel and the station call letters, if available.
Antenna/Auto Tuning/DTVLink Type of signal (Antenna A/B, Air, Cable) you’re viewing and what input jack has a
Audio Format Icon Sound mode icons (mono, stereo, Dolby surround, four-channel surround, 4.1-
REC Appears when a program can be recorded; otherwise, it is grayed out.
Parental Controls Icon Red when the TV is locked, Green when the TV is unlocked, and Yellow when the
Current time if the Time feature is set in Time menu or GUIDE Plus+ system is set up.
Note: The station call letters may be unfamiliar to you; this is normal.
The channel number display in the GUIDE Plus+ system and the banner may not match
because the GUIDE Plus+ system and banner may use different tuning mechanisms.
Channel logo or label (if available) and if the GUIDE Plus+ Label has been turned ON
in the GUIDE Plus+ menu.
component connected.
Displays when Closed Captioning is available on the current channel and in the
format selected in the Caption Priority menu.
SAP or Audio language icon appears when the current analog channel is
broadcasting SAP (Second Audio Program) information or when current digital
channel is broadcasting an alternate audio track, respectively.
channel surround, five-channel surround), etc.
TV is temporarily unlocked.
MPAA - Not Rated V-chip program rating (not the TV’s rating set up in Parental Control menu).
16:9 1080i HD Aspect ratio (4:3 or 16:9); original resolution of the broadcast, not resolution of the TV.
For example, 4:3 Normal, 480i SD (Standard Definition) or 16:9 1080i HD (High Definition).
36 Chapter 3
Page 39

Using the TV’s Features
V
V
O
V
L
Digital or Analog TV Channel
A single off-air antenna can pick up both analog and digital air channels. Channels can be made
up of primary channels and subchannels.
Note: Subchannels (sometimes called “minor” channels) are channels associated with the
primary channel (sometimes called the “major” channel).
Tip:
Use the channel banner to determine
whether a channel is digital or analog.
A digital (ATSC) channel has a dash and
Primary
Channel
Subchannel
(if necessary)
second number after it (e.g., 21-1); an
analog channel doesn’t (e.g., Ch 21).
ON • OFF
VCR1
DVD
MUTE
VCR2
CH +
AUX
TV
SAT • CABLE
FORMAT
TV button
Right arrow button
Tip
If a digital and analog channel have the same primary
channel number, tune to the analog channel by
entering the analog channel number or entering the
analog channel number and then a subchannel of “0.”
1. Make sure the TV is in TV mode by pressing TV on the remote
control.
2. Enter the primary channel number (up to three digits). This number
appears in the primary channel entry box. Press OK or wait a few
seconds. If you don’t enter a subchannel, the TV tunes to the lowest
subchannel.
3. If the primary channel number has fewer than three digits and you
want to enter subchannel numbers, press the right arrow to advance
to the subchannel entry box.
4. Enter the number of the subchannel. This number appears in the
subchannel entry box.
5. Press OK to tune to the channel or wait a few seconds.
Notes: You can always use the channel up and down buttons on
the remote control to change channels within the TV mode.
You may notice the size of the channel banner changes when you
change channels. This is perfectly normal and occurs because analog
(NTSC) broadcasts and digital (ATSC) broadcasts use different
formats. Your HDTV can display both types and adjusts the picture
accordingly.
If you wait too long before entering the subchannel, the TV tunes
to the lowest subchannel.
Chapter 3 37
Page 40

Using the TV’s Features
Video
window
Promotional
Information
Action
buttons
Channel Listings
Program
information
Menu
options
Tips
The GUIDE Plus+ system automatically comes up when
you use the TV or ON/OFF button on the remote to
turn on the TV. You can turn off this feature by
selecting Setup from the GUIDE Plus+ menu, selecting
Options, then setting Auto Display to Off.
Also, since the program information provided by the
GUIDE Plus+ system is based on your locale, you will
need to run Setup again if you move to a different ZIP
or postal code.
About the GUIDE Plus+ System
The GUIDE Plus+ system is a no-fee, on-screen program guide that lists
TV schedules for your area and allows your TV direct control of a cable
box and/or VCR. You must first set up the GUIDE Plus+ system in order
to view this on-screen program guide (see Chapter 1 for details).
There are six sections of the GUIDE Plus+ system:
•A video window
•Blue and Green Action buttons at the top of the screen
•Program information
•Promotional information
• Channel listings
• Menu options (Listings, Sort, News, Messages, Promotions, Schedule,
Channels, Setup)
Notes: If you have cable and air signals, connect cable to Antenna
A. If you have air signal only, connect it to Antenna A. Antenna A is
where the GUIDE Plus+ system gets its Listings.
Whenever the GUIDE Plus+ system is activated in the TV, the lastviewed channel of Antenna A appears in the video window.
The GUIDE Plus+ system screens illustrated in this book are
representations of what you are likely to see. Not all channels,
programs, and GUIDE Plus+ information depicted will be available
in your area. New features and options can be downloaded to the
GUIDE Plus+ system, so these are subject to change also. The GUIDE
Plus+ system doesn’t display program listings for satellite TV.
Using the GUIDE Plus+ System
To enter the GUIDE Plus+ system:
•Press GUIDE on the remote or press MENU on remote and select GUIDE Plus+ menu. Then select GUIDE Plus+ system,
press MENU, then OK twice.
To exit the GUIDE Plus+ system:
•Highlight a program and press OK to exit the GUIDE Plus+ system and tune to the program (channel).
•Press GUIDE to exit the GUIDE Plus+ system and tune to the program (channel) displayed in the video window.
•Press CLEAR to exit the GUIDE Plus+ system and return to the original channel except when the channel is an analog
channel on Antenna B. Pressing CLEAR switches you to Antenna A, same channel.
The GUIDE Plus+ System Menus
The GUIDE Plus+ system offers different options on the Menu bar: Listings, Sort, News, Schedule, Messages, Promotions,
Channels, and Setup. To access the Menu bar:
1. Press GUIDE (the GUIDE Plus+ programming guide appears).
2. Press MENU or up and down arrow buttons to select the Menu bar (the Grid Guide appears by default).
3. Use the left and right arrow buttons to access other menus.
4. Press OK, or MENU, or use the down arrow button to see the menu options.
38 Chapter 3
Page 41

Using the TV’s Features
Listings
The Listings appear each time you enter the GUIDE Plus+ system. They display the current programming
for each channel. The current program of Antenna A is displayed in the video window.
•Press the up and down arrow buttons on the remote to browse
channel listings and the channel up and down buttons to page
through the listings. Use the right and left arrow buttons to browse
future program listings.
•Press the Green button to skip ahead 24 hours; press the Blue button
to go back 24 hours.
•To tune to a channel, highlight the program you want to view in the
channel listings and press OK.
•Directly access a channel by using the number buttons. To access a
digital channel, enter major # (13), right arrow, then subchannel #.
If you are highlighting a digital channel, the
channel label will include a subchannel, such as
CBS [8-4].
Use the Guide Action Buttons as described below.
Listings menu selection
Network logos (if available) or labels
Blue action
button
Action buttons
OK
Green action
button
Guide Action Buttons
The Blue and Green action buttons’ actions or commands change
according to where you are in the GUIDE Plus+ system. Be sure to look
at the action bar before pressing the action buttons.
When highlighting a program, the following Action buttons appear:
• Wat ch Press the Blue button on the remote to place a timer into the
Schedule so the TV turns on and tunes to the program highlighted in
the channel listing.
• Record Press the Green button on the remote to place a timer into
the Schedule so the VCR records the program highlighted in the
channel listing.
If you have a cable box, changing channels on the TV causes the
cable box channel to change while recording.
Record appears only if you have set up the GUIDE Plus+ system and
specified your VCR type.
Important Note: You need to make sure that your VCR is tuned to
the Line INPUT, and is turned off prior to recording start time. Do
not change channels on the TV or VCR when making a recording.
Expanded Information
Press INFO on the remote to see additional program information.
Chapter 3 39
Page 42

Using the TV’s Features
Locking the Video Window
When highlighting the channel names (the left column on the channel listing), the following Action buttons appear:
• Lock/Unlock Press the Blue action button to lock or unlock the video window to either stay at one channel as you
browse the GUIDE Plus+ system (lock) or change as you browse through different channels (unlock). The PIP button
also locks/unlocks the video window.
Note: When the video window is unlocked, changing channel in the guide might switch the video window to the same
channel on the other antenna.
Sort menu selection
News menu action buttons
Sort options
News menu selection
Sort
The Sort menu lets you browse programs by different categories, such as
Sports, Movies, and Children’s programs. You can sort alphabetically by
selecting “A-B-C.”
•Use the arrow buttons to select the sort option.
•Use the Action buttons to schedule a watch timer or a record timer.
•Press OK to select a category, letter, or program.
•Highlight Sort or press MENU to select another category or letter.
News
The News menu lets you browse current news stories by headline.
1. Use the up and down arrow buttons to highlight a story.
•Use the up and down arrows to browse the list one story at a time.
•Use the channel up and down buttons to browse through the list
one page at a time.
2. Press the right arrow or the INFO button to see all of the text for the
story.
Note: If available, MSNBC is tuned while using the News feature.
Messages
Occasionally you receive messages regarding your GUIDE Plus+ system, as well as special programming
information. You can access these messages from the Messages menu on the Menu bar.
Schedule
The Schedule menu allows you to alter the programs for either viewing or recording programs.
Schedule Menu Action Buttons
• Remove Highlight the Watch or Record timer you wish to remove from the schedule and press the Blue
button on the remote.
• Change Highlight the Watch or Record timer you wish to change and press the Green button on the
remote to toggle the frequency between the following choices:
ONCE records only on that day.
WEEKLY records each week at the same day and time.
40 Chapter 3
Page 43

Using the TV’s Features
REGULARLY records the program every day of the week when it appears on the same
channel at the same time.
OFF turns off timer.
Promotions
The Promotions menu displays a list of all the promotions available through the GUIDE Plus+
system. Highlight the Promotions menu and then use the down arrow to scroll through the list.
When the promotion you want to view is highlighted, press INFO (the promotional information
appears on-screen). Press the right arrow to return to the Promotions list.
Channels
You can customize the channel listing by enabling or disabling the display of certain channels. For
instance, you may disable channels that you never watch. Use the action buttons to remove,
replace, or change channels. Any changes in the guide Channels only affect the program guide
display and not the channel lists in the television’s Main Menu.
Setup
The Setup menu allows you to access the GUIDE Plus+ setup information. You can do the
following in the Setup menu:
• Change system settings Confirms the settings you completed in the GUIDE Plus+ system
setup are correct.
• Change channel display displays the Channel Editor which lets you choose which channels
are highlighted.
• Review options Displays the GUIDE Plus+ auto display options.
On Automatically displays the GUIDE Plus+ system when you press the ON•OFF or TV
button on the remote control.
Off Disables the GUIDE Plus+ system from being displayed automatically each time you turn
on the TV.
Promotions and Advertising
To find out more information about a program, advertisement or special,
use the left arrow button to highlight the channel listing or promotional
information box. Press INFO for more information.
You can view a list of all advertisements and promotions by selecting
Promotions from the menu bar.
Promotional Information
Chapter 3 41
Page 44

Using the TV’s Features
Parental Controls
The Parental Controls menu allows you to program your TV so that
children cannot see certain programs, channels, browser, or use the front
panel controls. The Parental Controls menu also involves software inside
your TV (referred to as V-Chip) which lets you program your TV so it
won’t display certain programs and movies based on violence, sex, or
other content you may believe children should not view. Once you
block programs, you or other adults can unblock programs by entering a
password to unlock video or enter the password to edit the features in
Tip
You must lock the TV for the parental controls settings
to be enforced.
the Parental Controls menu. By default, the software inside your TV is
turned “off,” so if you don’t want to use this feature, you can just ignore it.
The options of the Parental Controls menu are Unlock/Lock TV, Video
Input List, Antenna A List, Antenna B List, V-Chip TV Rating, V-Chip Movie
Rating, V-Chip Unrated, Front Button Block, and Web Browser Block.
Lock/Unlock TV
Selecting this option lets you lock and unlock the parental controls and the
TV using a password. It also affects the channel lists. If you select the
Unlock option when watching TV, you see the channels that have a
checkmark in the Unlocked List. If you select Lock when watching TV, you
see the channels that are Viewable in the Locked List. If the TV is locked,
all channels can be directly accessed by using the number buttons on the
remote control but may not be viewed if they are blocked.
Notes: When locking the TV, you’ll be asked to enter a password and
then to re-enter the password a second time to re-confirm your
password choice.
If you do not lock the TV, none of the settings for V-Chip, channel block,
front panel block, and web browser block take effect.
If you forget your password, simultaneously press and hold the MENU/
OK button on the front panel and VOLUME down button on the
remote for three seconds. This resets the password only and unlocks the
TV; all other settings in Parental Controls are not changed.
If you’ve locked the TV, set a record timer in the GUIDE Plus+ system
and aren’t there to provide your password, the recording takes place
only if the program doesn’t exceed the V-Chip ratings or you’ve
unlocked your TV.
Channel Lists (Video Input List, Antenna A List,
Antenna B List)
The channel lists contain the following information: major channel
number (with subchannel number only if a digital channel), channel call
letters (when channel is tuned), Locked List, and Unlocked List. The major
channels listed in Antenna A List and Antenna B List for off-air or cable
sources are based on the channel search results. If a major channel is not
found, then it is not listed. A channel search does not affect the Video
Input List; all video inputs are listed.
42 Chapter 3
Page 45

Using the TV’s Features
For each major channel 0 through 125 found through channel search in Antenna A and B Lists, there are six
subchannels (1, 2, 3, 4, 5, and 6 to 999). The subchannels are the same for every major channel and are not
based on which subchannels a broadcaster is actually broadcasting. Subchannels are not supported for
major channels 126 through 999. An analog channel (major) and a digital channel (subchannel) can share
the same channel number and are both listed in the Antenna A/B List screens.
Editing Channels in the Channel Lists
All the lists are only editable through the Unlocked List and Locked List in the Parental Controls menu You
can remove or “hide” a channel from the Unlocked List by removing the checkmark in the checkbox. Also,
you can remove or “hide” a channel from the Locked List by selecting Blocked in the Locked List. When you
press the channel buttons, that channel will be skipped. When the TV is locked, you can still access the
channel directly by using the number buttons on the remote control but may not be able to see the video
until a valid password is entered.
You can also add ALL or delete ALL channels in a list by changing the checkbox or choice field in the line
that says All channels, but be very careful because you could erase all of your selections with one selection.
Notes: The GUIDE Plus+ system and Parental Controls both have a channel selection feature.
The Channel feature in the GUIDE Plus+ system controls which channels appear in the guide and has
no effect on which channels appear in the channel lists, and vice versa.
If a cable box is connected to Antenna A, the channel list can be edited for Antenna A in the Parental
Controls menu. If a cable box is connected via INPUT1, the channel list cannot be edited. You can only
use channel up/down or use the number buttons.
How V-Chip Works
The V-Chip software reads a code that most broadcasters send with programs. That code tells the software
the program’s age-based rating (TV-MA, TV-14, etc.) and content themes [(Violence (V), Adult Language (L),
etc.)]. If you have blocked the rating and/or content themes that the program contains and the TV is locked
and you tune to a program whose rating exceeds the rating limit you set, you will receive a message telling
you that the program is not approved for viewing.
Broadcasters are not required to provide content themes, so programs received with no content themes will
only be blocked if you block their age-based rating and the TV is locked. You can also block out programs
that have been given a rating of “Not Rated,” and programs that are considered “unrated.” The TV age-based
ratings and content themes you can block are in the table on the next page.
V-Chip TV Ratings
The V-Chip TV Rating lets you decide which TV programs can and
cannot be viewed. To set TV programming limits:
1. Choose Parental Controls from the Main menu. If Parental Controls
(TV) have previously been locked, you must enter your password.
2. Highlight and select V-Chip TV Rating.
3. Once you get to the V-Chip TV Rating screen, use the arrow buttons
and OK on your remote to change the status of a TV program rating
or content theme from Viewable to Blocked.
Proceed to the next sections for more details about how to change the
status of TV program limits.
Chapter 3 43
Page 46

Using the TV’s Features
The V-Chip Rating Limit Screen
The following is an example of where items are located within the V-Chip TV Rating screen.
Rating Field
Lets you select from a
list of age-based ratings
you can block or view.
Rating Settings
Area
Lets you see the current
block/view state of age-
based ratings and
associated content. The
Viewable (V) settings are
coded in green, and the
Blocked (B) settings are
coded in red.
Age-Based
Rating
Rating Status Field
Lets you select whether the status of the age-based
rating limit to the left is Viewable or Blocked.
Content Themes
Lists the content themes you
can block or view.
Content Status Fields
Lets you select which
content themes to view for
the selected rating, and
whether the status of the
content theme is currently
Viewable (V) or Blocked (B).
Description and Content Themes for Age-Based Ratings
TV-MA
TV-14
TV-PG
TV-G
TV-Y7
TV-Y
Mature Audience Only. Specifically designed to be viewed by adults and may be unsuitable for children
under 17. It contains one or more of the following content themes: crude indecent language (L), explicit
sexual activity (S), or graphic violence (V).
Parents Strongly Cautioned. Contains some material that many parents would find unsuitable for children
under 14. Parents are strongly urged to exercise greater care in monitoring this program and are cautioned
against letting children under the age of 14 watch unattended. This program contains one or more of the
following content themes: intensely suggestive dialogue (D), strong coarse language (L), intense sexual
situations (S), or intense violence (V).
Parental Guidance Suggested. Contains material that parents may find unsuitable for younger children. Many
parents may want to watch it with their younger children. The program contains one or more of the following
content themes: some suggestive dialogue (D), infrequent coarse language (L), some sexual situations (S), or
moderate violence (V).
General Audience. Most parents would find this program suitable for all ages. It contains
little or no sexual dialogue (D) or situations (S), no strong language (L), and little
or no violence (V).
Directed to Children 7 years and older. Designed for children ages 7 and above. It may be more
appropriate for children who have acquired the developmental skills needed to distinguish between makebelieve and reality. Themes and elements in this program may include mild fantasy violence (FV) or comedic
violence, or may frighten children under the age of 7.
All Children. Themes and elements in this program are designed for a young audience, including children
from ages 2-6. It is not expected to frighten younger children.
44 Chapter 3
Page 47

Using the TV’s Features
Blocking Age-Based Ratings
You can automatically block all program ratings above a specified age-based rating level. For example, if
you only want your child to watch programs that have a TV-G rating and lower (in other words, you want
the child to watch TV-G, TV-Y7, and TV-Y), then you need to block out higher ratings.
To block programs with higher ratings:
1. First, determine the lowest level rating you don’t want the child to watch (see chart of age-based
ratings on previous page).
2. Highlight the lowest rating you do not want the child to watch. In the example discussed above, you
would highlight TV-PG, since the highest rating you want the child to watch is TV-G.
3. Press the OK button to toggle between Viewable and Blocked. The status for the rating listed to the
right and all higher ratings automatically change to Blocked (and B).
4. Select Lock TV from the Parental Controls menu. Enter a password and re-enter password a second
time to confirm the password.
Hierarchy of Age-Based Ratings
Viewing Age-Based Ratings
After you block age-based ratings, you have the option of changing some
TV-MA Mature Audience Only
TV-14 Parents Strongly Cautioned
TV-PG Parental Guidance Suggested
TV-G General Audience
TV-Y7 Directed to Children 7 years
and older
TV-Y All Children
of the ratings back to Viewable ( V).
1. Determine which blocked rating you want to view.
2. Use the up and down arrow buttons to highlight the rating with a
status of Blocked.
3. Press the OK button to select Viewable.
Notes: The content status fields corresponding to the unblocked
rating become Viewable as well. They and the age-based rating
status are the only fields that automatically change back to Viewable
when you complete this process.
You must remember to lock the TV for rating limits to take effect.
Blocking Specific Content Themes
You can block programs based on their content. When you block a content theme for a particular rating, you
automatically block that content theme for higher rated programs as well.
For example, if you do not want your child to watch programs that have adult language (L) rated TV-PG or higher,
then you could block out all programming TV-PG and above containing adult language.
To block program content:
1. Determine the lowest level of content you don’t want the child to watch.
2. Use the up and down arrow buttons on the remote to highlight the age-based ratings that correspond with the
lowest content you do not want the child to watch. (In the example above, you would highlight TV-PG.)
3. Press the OK button to change content status from (V ) Viewable to (B ) Blocked. All higher ratings’ content
themes change to Blocked.
Notes: Broadcasters are not required to provide content themes or age-based ratings.
You must remember to lock the TV for rating limits to take effect.
Chapter 3 45
Page 48

Using the TV’s Features
Viewing Specific Content Themes
If you block specific content themes, you have the option of going back and changing some of the
content themes back to (V) Viewable:
1. Determine the content themes you want to change to (V) Viewable.
Content Themes
D Sexually explicit dialogue
LAdult language
S Sexual situations
VViolence
FV Fantasy Violence
2. Use the up and down arrow buttons to highlight the age-based rating
whose content theme you want to change to Viewable
3. Press the OK button to change its status back to V. Your child would
then be able to watch programs with TV-14 adult language content,
but not programs with TV-PG or TV-MA language content.
Note: Only the content theme status corresponding to TV-14
(L) language changes to (V) View. Higher rated content themes, such
as that for TV-MA language, do not change.
V-Chip Movie Rating Limit
You set movie (MPAA) rating limits by blocking movies rated above a
specified rating. How to block movie ratings and view movie ratings is
explained in the next two sections.
To access the V-Chip Movie Rating menu:
1. Press MENU on the remote control (the Main Menu appears).
2. Select Parental Controls.
3. Select V-Chip Movie Rating.
Blocking Movie Ratings
If you only want your child to watch movies that have a PG rating and lower (in other words,
movies rated PG and G), then you could automatically block out all other movies with higher ratings.
To block movies:
1. Highlight the rating that is the lowest rating you don’t want the child to watch. (In the example
above, you would highlight the rating status button corresponding to PG-13, since the highest
rating you want the child to watch is PG.)
2. Press the OK button to change the button from Viewable to Blocked. All higher ratings
automatically change to Blocked.
3. If the TV is not locked, you must lock it so the movie rating limits will take effect.
Note: Some movies may be given a Not Rated (NR) rating. After blocking movie ratings, you
must set NR to Viewable separately to view NR movies.
Viewing Movie Ratings
After you block movie ratings, you have the option of changing some of the rating status buttons
back to Viewable:
1. Highlight the rating you want to view.
2. Press the OK button to change the button from Blocked to Viewable.
46 Chapter 3
Page 49

Using the TV’s Features
For example, if movies with a rating of PG-13 and higher are blocked, you can change the
rating status corresponding with NC-17. Your child would then be able to watch all movies
with a G, PG, and NC-17 Rating.
3. Exit the screen, and be sure the TV is locked.
V-Chip Unrated Program Block
Selecting this option lets you decide if programs that the V-Chip
recognizes as “unrated” can be viewed. Note that “unrated” TV programs
may include news, sports, political, religious, local and weather
programs, emergency bulletins, public announcements, and programs
without ratings, the movie rating “N/A,” and the TV rating “None.”
Block Unrated Programs All unrated programs are available.
View Unrated Programs All unrated programs are not available.
Note: You must remember to lock the TV for rating limits to take
effect.
Front Button Block
Selecting this option lets you block (disable) or unblock (enable) the TV’s
front buttons. The remote still tunes to any channel. Front Panel Block
can:
• Keep children from watching TV when the parent is not present.
• Keep young children from playing with the buttons on the TV.
(When using this as a Parental Control method, you should remove
access to any remote that is capable of operating the television while you
have the front panel blocked.)
Don’t forget to lock the TV after you select Blocked. If you do not, the
front panel block will not take effect.
Note: If power to the TV is lost for more than an hour, the buttons
become unblocked. Blocking the front buttons does not disable the
front input.
Web Browser Block
Selecting this option lets you decide if the web browser can be accessed.
Block Web Browser Need a password to view web content
View Web Browser Web browser is accessible.
Make sure the TV is locked. If you do not, Block Web Browser will not
block browser access if it is set the Block Web Browser.
Chapter 3 47
Page 50

Using the TV’s Features
Auto Tuning Feature
The way you set up the Auto Tuning feature in the TV’s menu
corresponds to the component buttons on the remote and the way you
have each component connected to your TV. When you set auto tuning,
you’re telling the TV what channel to tune to when you press the VCR1,
VCR2, DVD, or SAT•CABLE button on the remote control.
1. Press MENU (the MAIN MENU appears)
2. Highlight Connections and press OK.
3. Highlight Auto Tuning and press OK
VCR2
AUX
TV
SAT¥CABLE
VCR1
DVD
With the Auto Tuning feature, you can
set up the TV to tune to the channel
you want to watch by pressing that
component’s button. Auto Tuning for
the TV button cannot be set.
4. Highlight the component button field and continually press OK to
scroll through the selection of inputs.
The choices and a brief explanation follow:
Not Connected Choose this if you don’t have this particular
component connected to the TV, or if you don’t want the TV to
automatically tune to the correct channel when you press one of the
component buttons on the remote.
Channel 2, 3 or 4 Antenna A Component is connected to the
ANTENNA A jack on the back of the TV, and you want the TV to tune to
channel 2, 3, or 4 when you press the corresponding button on the
remote. Reminder: make sure the component’s Channel 2/3 or 3/4 switch
is set to match the channel in Auto Tuning.
Channel 2, 3 or 4 Antenna B Component is connected to the
ANTENNA B jack on the back of the TV, and you want the TV to tune to
channel 2, 3, or 4 when you press the corresponding button on the
remote. Reminder: make sure the component’s Channel 2/3 or 3/4 switch
is set to match the channel in Auto Tuning.
Front Input Component is connected to the S-VIDEO IN or VIDEO IN
jack on the front of the TV and you want the TV to tune to the front
video input when you press the corresponding button.
Input 1, Input 2 Component is connected to a VIDEO or S-Video jack
on the back of the TV and you want the TV to tune to the video input
channel when you press the corresponding button.
Input 3, Input 4 Compatible component video source, such as a DVD
player or satellite receiver, is connected to the composite/component
VIDEO INPUT jacks (Y•Pb•Pr) on the back of the TV and you want the
TV to tune to the composite/component video input when you press the
corresponding button.
Input 5 Component is connected to the DVI-HDTV jack on the back of
the TV and you want the TV to tune to this input when you press the
corresponding button.
Note: DTVLink devices can also be auto tuned, if present.
48 Chapter 3
Page 51

Using the TV’s Features
SWAP
SKIP
CH CTRL
V
V
O
V
L
R
PIP (Picture-in-Picture) Operation
The PIP (Picture-In-Picture) feature lets you display a second, smaller analog (NTSC format) picture on top of the main
analog picture. The main and PIP channels must be from the same antenna A or B; you cannot have the main picture from
Antenna A and the PIP picture from Antenna B. However, inputs can use PIP regardless if Antenna A or B is used for the
main or PIP picture. You will only be able to use the PIP window and main picture with analog channels.
PIP Buttons
There are certain remote buttons that control the way the PIP window
works:
PIP Brings up the PIP window. Press PIP again to remove the window.
Arrows Let you move the PIP window to different areas of the screen.
SWAP Switches, or “swaps,” the video from the PIP window with the
main picture.
CH CTRL (Channel Control) Lets you switch channel control between
the PIP window and the main picture. To determine whether you are
controlling the PIP or the main picture, look at the channel banner as
you change channels. The triangular indicator is beside the channel
number for the picture you’re controlling with channel up/down, number
buttons, etc.
Arrow buttons
VCR1
MUTE
ON • OFF
TV
VCR2
DVD
AUX
SAT • CABLE
FORMAT
CH +
LEA
PIP buttons
Tip
A typical use of SWAP is to scan through channels in
the PIP window, and when you find a channel you
like, press SWAP to display that channel in the main
picture, sending the current channel to the PIP
window.
Main picture
channel number
Channel control
indicator
PIP channel number
Using the PIP Feature
The PIP feature is only available for analog (NTSC) channels. PIP won’t
work when tuned to a digital (ATSC) channel. Use the channel banner to
determine whether a channel is digital or analog. A digital (ATSC)
channel has a dash and second number after it (e.g., 21-2); an analog
channel doesn’t (e.g., Ch21). While you may use PIP in different ways,
this basic PIP scenario should get you started. When watching an analog
channel, follow these steps.
1. Press the PIP button on the remote control. The PIP window appears
on the screen and Channel Control is automatically put on the PIP
window.
2. Use the channel up and down or digit buttons to change the PIP
channel.
3. To change the program in the main picture window, press CH CTRL.
Then use the channel up and down or digit buttons. To go back and
forth between controlling the PIP window and the main picture,
press the CH CTRL button.
Chapter 3 49
Page 52

Using the TV’s Features
PIP Problems?
• If you are channel surfing and the PIP disappears, you may have tuned to a digital channel. To view PIP
and the main picture, make sure that both the main and PIP channels are analog inputs, or signals. Continue
changing the channel until you find an analog (NTSC format) channel. The PIP window will reappear.
The message “PIP Not Viewable or Exceeds Rating” in the channel banner lets you
know that PIP is not available on this channel and you should tune to another channel.
• If you press PIP and the PIP box is grayed, you may have activated the Parental control
feature and the program exceeds the rating limits you set. For information on removing limits,
see the “Parental Controls” section.
•You cannot view closed captioning in the PIP window.
•PIP channel skips all digital (ATSC) TV channels and tunes to analog channels.
•PIP cannot be displayed from component (Y•Pb•Pr) inputs.
Using the Web Browser
Important: To use the TV’s browser, you must have your TV connected
to the Internet (e.g., cable modem or DSL) and subscribe to an Internet
Service Provider (ISP).
You can start the browser on your TV by selecting it from the main
menu. The TV front panel and remote control provide basic navigation
without a keyboard. If you launch the browser from the main menu, a
message pops up to suggest that you use a keyboard to use with this TV
to connect to the Internet.
The optional keyboard will allow you to get optimum use of web browser features. The keyboard (model
number KBR755TA1) is available at www.rca.com/keyboard or 800-798-5875.
Tips
Inputs cannot be viewed in the video window of the
browser.
If you use the video window in the browser and you
press channel up/down and the video window seems to
disappear, this means you’ve either tuned to a channel
which is blocked or has a weak signal. Use the channel
up/down to go to another channel.
You can use channel up/down to tune to a different
channel in the video window. Number keys cannot be
used to tune channels in the video window.
When you start the browser for the first time, it goes to an RCA website.
All FAV keyboard buttons are also initially programmed to that site. The
FAV SEARCH and FAV HOME buttons on the keyboard default to a
search site but you can reprogram them.
The FORMAT button on your remote (or keyboard) allows you to cycle
through various combinations of a less than full screen browser and
some TV video. Just press the button again to use a different format.
Note: If you usually use this method to browse, change the layout
periodically to reduce the effects of uneven screen aging.
To close the browser entirely, press CLEAR on the remote.
You may discover that other browser windows are open. This may be
the result of a pop-up window being delivered from the site you were
viewing. Press “Close Window” button to close it or click the “Close
Window icon” on the window.
Note: The browser won’t display streaming video or audio, and
some animated graphics.
50 Chapter 3
Page 53

Using the TV’s Features
Browser Screen Burn Prevention
If the browser is idle for a period of time, a pop-up message appears to remind you to turn it off
when you are not using it to prevent uneven wear of the screen. Remember that fixed images tend
to “burn” in. In browser mode, the contrast level of your TV is automatically set to a reduced level to
help slow the effects of uneven screen aging.
Additional steps have been taken to mitigate uneven screen aging on your TV. You will notice that
the usual browser menu and on-screen buttons that you may be accustomed to working with on a
PC are not displayed on-screen. Instead, these functions are on your remote or optional keyboard.
Saving Your Favorite URLs
Tip
Sometimes the browser locks onto an incompatible
website and it won’t open. Exiting the browser will
not correct this condition. When the browser is
restarted, the browser returns to the last-used
website. To correct this condition, either press a FAV
button to go to a known good website or press
“Address” and enter a good website.
Program any favorite (FAV) key, including HOME and SEARCH, to any
URL (website address). After you’ve browsed to a favorite URL, just press
the desired key and hold it until a message appears. That site’s URL will
be assigned to the key you pressed and saved in the TV. The next time
you press the key briefly, the browser will automatically go to the site you
saved.
You can store 32 additional URLs (websites) by using the following
buttons together: SHIFT and FAV, CTRL and FAV, ALT and FAV.
If you have the optional keyboard, previously visited sites are also
available as a drop-down listing from the address bar. The list can hold
only a certain number of addresses, so at some point a new address will
replace the oldest one.
Controlling the Web Browser
As stated previously, the remote control and front panel buttons support only basic browser functions. However, the
optional keyboard makes browser navigation much easier and is the only way to enter a URL address. Below is a
table that shows which remote buttons work what function.
Web Browser Button Interaction
Remote: Front Panel: Browser Function:
MENU MENU/OK Close browser and opens main menu
CLEAR Quits the browser
SWAP Displays the previous browser window, if multiple windows displayed
CH CTRL Displays the next browser window, if multiple windows displayed
STOP Stops loading the current page; STOP
PLAY Reloads the current page; REFRESH
REVERSE Go to the previous page if one exists; BACK equivalent on opt. keyboard
FORWARD Go to the next page if one exists; FORWARD equivalent on opt. keyboard
FORMAT Toggles between Full-Size browser & browser plus video in multiple layouts
Up/Down/Left/Right Arrow Moves the cursor in the web page
GUIDE Closes the browser and opens the guide
REC•VCR+ Closes the browser and opens the guide
CH Up/Down CH Up/Down Changes channels if video window is displayed
VOL Up/Down VOL Up/Down Changes volume if video window is displayed
Chapter 3 51
Page 54

This page is intentionally left blank.
Page 55

Using the TV’s
Menu System
Chapter Overview:
• Menus and Control Panels
• Picture Quality Menu
• Audio Menu
Chapter 4
• Time Menu
• Connections Menu
•Preferences Menu
Changing Entertainment. Again.
Graphics contained within this publication are for representation only. 53
Page 56

Using the TV’s Menu System
Menus, On-screen Help, and Control Panels
This section highlights your TV’s on-screen menu system. The menu system has several types of screens. An overview
follows.
Note: The GUIDE Plus+ Menu, Parental Controls, Web Browser, and 1394 Recording menu items are discussed in the
Features chapter while Assisted Setup is discussed in the Connections and Setup Chapter.
Navigating the Menu System
The first menu you see when you press the MENU button on the remote is
called the Main Menu. To access the Main Menu:
1. Press the MENU button (the Main Menu appears).
2. Use the arrow buttons (left,right,up,down) to move through the menu and
highlight different options.
Note: Press the number buttons on the remote that matches the number
next to the on-screen menu selection.
3. Press the OK button to select a highlighted item.
Tips
A shortcut method to access a menu item is to
press the number button on the remote that
matches the number next to the on-screen
menu. For example, in the Main Menu, press 3
to go straight to the Audio menu.
Exiting a menu
There are three ways to exit a menu:
•Highlight 0 (Go Back) menu button and press OK, or press GO BACK on
the remote.
Feel free to explore the menu system. If you’re
ever unsure where you are in the menu system,
look at the menu path at the top (for example,
Main Menu, Picture Quality) or if you’re just
plain tired of exploring, press CLEAR to remove
the menus from the screen and start over
again.Menu Path
Menu Path
Highlighted Menu
Selection
Help Text
•Press 0 on the remote when you are highlighting the left side of the menu.
•Press CLEAR. The on-screen displays are cleared from the screen and you
return to TV viewing.
On-Screen Help
Information appears on the screen to assist you in understanding your menu
selection. To the right of the highlighted menu item is a display area that
might provide on-screen help text of the item selected along with any submenu
items. In addition, a menu path appears at the top of the screen to let you
know where you are in the menu system. At the bottom of the screen are two
lines of text that explain the currently highlighted item.
Controls
Controls let you adjust the default settings of your TV. You can choose a setting,
enter a number, or adjust a level such as tint or brightness. There are four types
of controls: sliders, choice lists (check boxes, radio buttons), alpha/numeric
entries, and menu (action, choice fields) buttons.
54 Chapter 4
Page 57

Using the TV’s Menu System
Sliders
Sliders are used to select a specific point of a control that has continuous levels.
To make adjustments:
1. Press the left or right arrow to select the slider control for the feature you
want to adjust.
2. Press the up or down arrow to adjust the indicator on the vertical slider.
Note: Some sliders are positioned horizontally, for example, Translucency,
Balance, and Initial Volume.
Choice Lists
Check boxes and radio buttons are used to select options from among a list of
choices. Check boxes let you select one or more options in a choice list. A radio
button lets you select only one option in a choice list.
Check Box List
Radio Button List
1. Use the arrow buttons to move left/right/up/down.
2. Press OK to select or de-select the option.
Numeric Entries
Numeric entry fields are used to enter numbers, passwords, and time values.
The number buttons on the remote and the arrow, channel up/down, volume
up/down, MENU and OK buttons on the front panel can be used to enter the
information.
1. Use the left/right button to highlight the field.
2. Use the up/down arrows, number buttons or OK button to enter
information.
On-screen Menu Buttons
An on-screen button is used to transfer control from one item to another or
perform a specific command. An on-screen button responds to the OK or right
arrow button or to the number button on the remote which appears on the onscreen menu button
Action Buttons
An on-screen button that performs the action labelled on the button. Press right
arrow button to highlight and press OK to select.
Choice Fields
A choice field cycles through at least two or more choices. Press OK to select
the next entry in the choice field.
Chapter 4 55
Page 58

Using the TV’s Menu System
Picture Quality Menu
The Picture Quality menu contains menus to configure video settings: Picture
Settings, Picture Presets, Auto Color, Color Warmth, Noise Filter, Convergence,
SVM, Reset Controls.
To access the Picture Quality menu:
1. Press MENU on the remote control (the Main Menu appears).
2. Press the down arrow button on the remote control to highlight Picture
Quality, and then press OK or 2. The following menu options appear and
are described in order on the following pages.
Picture Settings
The Picture Settings menu displays five slider controls for adjusting the way the
picture looks. Your options under the Picture Settings menu are:
• Contrast Adjusts differences between the light and dark areas of
the picture.
• Color Adjusts the richness of the color.
• Tint Adjusts the balance between the red and green levels.
• Black Level Adjusts the brightness of the picture.
• Sharpness Adjusts the crispness of the edges in the picture.
To create picture settings for the video inputs:
1. Press the INPUT button while in the Picture Settings menu until the correct
the Video Input Channel appears in the upper right corner.
2. Press the right and left arrow buttons on the remote control to select the slider.
3. Press the up and down arrow buttons to operate the slider.
Note: When changing an item in the Picture Quality menu, the graphics
become transparent to allow you to clearly see the video behind the displays.
Picture Presets
Picture Presets displays a choice list that lets you select one of the four preset
picture settings: Bright Lighting, Normal Lighting, Soft Lighting, Personal Picture
Preset.
Choose your setting based on the degree of lighting in your room. After you
select a setting, the contrast, color, tint, black level and sharpness settings found
under the Picture Settings menu are adjusted automatically.
If you choose Personal Picture Preset, you can customize color, tint, black level,
and sharpness to your desired level, and the television saves those settings. After
you’ve done this, you can go back into the menu and select Bright, Normal or
Soft Lighting without losing your personal preset. For example, if you normally
use Personal Picture Preset but want to watch a show in Bright Lighting, you
can choose Bright Lighting, watch the show, and then afterwards return to your
customized settings by choosing Personal Picture Preset.
56 Chapter 4
Page 59

Using the TV’s Menu System
Auto Color
Auto Color minimizes the flesh tone variations of the TV picture. The Auto Color
setting can be stored for each input. Choose On or Off, depending on your
preference.
Color Warmth
Color Warmth automatically adjusts the color temperature of the picture. Color
War mth can be stored for each input. The feature lets you set one of three
automatic color adjustments:
• Cool for a more blue palette of picture colors.
• Normal for an ordinary picture color.
• War m for a more red palette of picture colors.
Noise Filter
Noise Filter displays a list that lets you set one of the three settings that allows
you to reduce picture “static” or any type of interference. A Noise Filter setting
can be stored for each input. You can set the Noise Filter to Frame Comb, Off or
Adaptive. The settings are explained in the on-screen help text.
Convergence
The Convergence feature lets you adjust the TV’s three tubes. When the TV tubes’
images are precisely aligned, they create the color images you see on the screen.
Over time, the picture can drift out of alignment (this is normal). If your picture
seems fuzzy or has a yellow tint, using Convergence could correct this
misalignment.
Note: Make sure the TV has been on for at least 30 minutes (TV needs to
warm up for best results) before starting Auto Converge or Red/Blue
Centering.
When you select the Convergence feature, a submenu appears with three options:
• Auto Converge automatically aligns the projection lenses to self-correct color images. You’ll
see flashing squares of color dance across the screen (this is normal).
Note: After performing auto convergence, use the Blue Centering and Red Centering
menus to fine tune convergence in the center of the screen, if necessary.
• Blue Centering aligns the blue and green images to fine tune the picture.
• Red Centering aligns the red and green images to fine tune the picture.
Note: The ability to change channels is disabled when adjusting the convergence options.
The TV must be tuned to a usable signal to converge the picture.
Chapter 4 57
Page 60

Using the TV’s Menu System
SVM
SVM stands for Scan Velocity Modulation. This feature improves the sharpness of
the picture by changing the speed of the cathode-ray tubes’ electron beam when
it transitions between dark and light areas of the screen. It sharpens the black-towhite edges and white-to-black edges. Choose On or Off, depending on your
preference.
Reset Controls
The Reset Controls menu button resets all picture quality controls to their
original factory settings (except for the convergence settings) for the current
input.
1. Tune to the “input” for which you would like to apply the setting.
2. Press MENU to access the main menu.
3. Select Picture Quality, and then select Reset Controls to set reset the settings
for the currently tuned input.
Audio Menu
The Audio menu lets you adjust audio output. To access the Audio menu, press
MENU on the remote, and then select Audio from the main menu. The
following audio items can be adjusted: Graphic Equalizer, Audio Processor,
Sound Logic, Audio Language, SAP, Balance, Fixed/Variable Out, Digital Audio
Out, Subwoofer.
Graphic Equalizer
The seven-band graphic equalizer lets you adjust the audio frequency settings.
The equalizer can only be changed if the Fixed/Variable Audio Output is set to
Variable Output. If the Fixed/Variable Audio Output is set to Fixed Output, you
cannot make changes to the equalizer and the bands are set to 0dB. However,
the graphic equalizer levels for Var iable Output are stored in memory in case
you switch to Fixed Output then back to Variable Output.
Note: If the internal speakers are used as the center channel audio
speaker from an external audio receiver, the graphic equalizer settings do
not apply.
58 Chapter 4
Page 61

Using the TV’s Menu System
Audio Processor
The Audio Processor displays a choice list of available audio modes, which
control the way the sound comes through your speakers. The selected setting
affects all inputs and antennas.
To create the settings:
1. Press the MENU button to access the main menu.
2. Select Audio, and then Audio Processor. Depending on your speaker setup,
any combination of the following options appear:
• Mono plays the sound in monophonic audio only. This should only be used when receiving
broadcasts where distance from the broadcasters makes the stereo signal weak. The channel
banner displays the word Mono when you tune to a program that is broadcast in mono.
• Stereo Splits the incoming stereo audio signal into left and right front channels. Most TV
programs and recorded materials have stereo audio. The channel banner displays the word
Stereo when you tune to a program that is broadcast in stereo.
• Adds greater depth and stereo separation to stereo audio signals. Delivers a panoramic
3D sound stage from stereo material.
• Redirects the treble portion of the audio in the speaker system to make dialog more
understandable. Repositions and elevates the audio to the center of the TV.
• Creates a virtual 5.1 surround sound from multichannel source material through any twospeaker playback system.
Sound Logic
Monitors a program’s audio track and limits volume excursions to a minimum
and maximum volume range from current volume setting. Acting like a
dynamic range limiter, it compresses the dynamic range to limit suggested
volume increases (for example, the sudden increase in volume you sometimes
hear when a commercial starts). Choose Sound Logic On or Sound Logic Off
depending on your preference.
Audio Language
The Audio Language menu lets you choose the default audio language you
want to hear for ATSC (digital TV) programs. If the Audio Language icon in the
banner lights, it means there is more than one audio language available. The
system automatically sets the audio program to the selected audio language
when the channel you are viewing is a digital terrestrial channel and the
specified language is available for that program.
In the Audio Language menu, highlight the audio language you want by pressing the up and
down arrow buttons on your remote control. Press OK to activate.
Some programs can have audio languages available that can be heard, but that cannot be set as
the default. To select and hear those audio languages, navigate to the “Change Audio” action
button and select OK.
TruSurround, SRS and (O) symbol are trademarks of SRS Labs, Inc.
TruSurround technology is incorporated under license from SRS Labs, Inc.
Chapter 4 59
Page 62

Using the TV’s Menu System
SAP (Second Audio Program)
When turned on, Second Audio Program plays the program’s audio in a second
language, if one is available. SAP is also used to broadcast a program’s audio
with descriptions of the video for the visually impaired. Or, SAP might contain
audio which is totally unrelated to the video.
Note: SAP is broadcast in mono and is only available for analog programs,
not digital programs.
Balance
The Balance setting applies to the internal speakers, rear external speakers and
the headphone output. Balance does not affect the internal subwoofer nor any
other audio output. Balance is how much audio (loudness) gets sent to the left
and right speakers.
Fixed/Variable Out
The Fixed/Variable Out menu displays a choice list that lets you turn the TV’s
front internal and external speakers on or off and set the Fixed/Variable audio
output to a fixed- or variable-control level. The choices are:
• Variable Output, Speakers On This setting turns the TV’s front speakers
On and allows variable output from the TV’s Fixed/Variable Audio Output
jacks. Use this setting if the TV is not connected to an audio receiver or
amplifier and the volume is controlled by the TV.
• Variable Output, Speakers Off This setting turns the TV’s front speakers Off and allows
variable output from the TV’s Fixed/Variable Audio Output jacks. Use this setting if the TV
is connected to an audio receiver or amplifier and the volume is controlled by the TV.
• Fixed Output, Speakers Off This setting turns the TV’s front speakers Off and provides
fixed output from the TV’s Fixed/Variable Audio Output jack to a receiver or amplifier. With
the Fixed Output, the TV’s volume control, graphic equalizer, and mute are disabled. This
output is ideal when connecting to an audio receiver or amplifier that has its own remote
control for controlling the volume.
Note: If the Internal Speaker source switch on the back of the TV is set to EXT AMP, it
overrides any above setting of Speakers Off and allows the internal speakers to be used as
a center speaker input.
Digital Audio Out
If you’ve connected a six-channel amplifier/receiver to the TV’s DIGITAL AUDIO
OUTPUT jack with a digital optical cable, you can receive Dolby Digital* surround
sound if transmitted. Choose the correct setting in the Digital Audio Out menu:
• Auto Select If selected, your TV automatically chooses between Dolby Digital
and PCM based on the audio signal it is receiving. This is the best selection if
you have a Dolby Digital* and PCM decoder that was manufactured in the last
several years.
• PCM (Pulse Code Modulation) If selected, the TV sends all signals through
the Digital Audio Output in PCM.
60 Chapter 4
Page 63

Using the TV’s Menu System
Subwoofer
The built-in Subwoofer enhances low-frequency audio. The Subwoofer setting
can only be changed if the Fixed/Variable audio output is set to the Variable
Output. The choices are: Subwoofer On or Subwoofer Off.
Time Menu
The Time menu lets you set up time-related features such as: Sleep Timer, Wakeup Timer, or Time of Day. Just follow the on-screen help text to assist you in
setting up the features–the information is explained in detail.
Note: If your TV does not automatically acquire the time, you must
remember to set your TV’s time when the time changes to Daylight Saving
Time. Sleep Timer and Wake-up Timer will not function as you expect if
you forget to change the TV’s time.
Connections Menu
The Connections menu specifies various ways to adjust the inputs to your television. Items in
the Connections menu are: Antenna Info, Channel Search, Software Upgrade, Signal Source,
Signal Type, Auto Tuning, DTVLink, Special Features, Ethernet Setup.
Antenna Info
This screen lists any channel EVER added to the TV. The list shows the channel
number, the station name when tuned, e.g. NBC, whether the channel is digital
or analog, which antenna is picking up the channel, and current signal strength
of digital channels.
When you move the highlight to the Antenna Info list, the TV attempts to tune to
the channel. You can then adjust your off-air antenna for maximum signal
strength (largest number) for the selected channel. The signal strength for a
digital channel will be shown as “- -” until the signal is strong enough for use,
then numbers will appear. Analog channels will always have the display,
“N/A”, since analog signal strength is not measured.
Only primary channels appear in the list. Subchannels, e.g. 8-1, 8-2, do not
appear.
*“Dolby”, “Pro Logic”, and the double-D symbol are trademarks of Dolby Laboratories.
Chapter 4 61
Page 64

Using the TV’s Menu System
Channel Search
Engaging in a channel search tells the TV to search for all the terrestrial TV
channels available through the antenna inputs. When the TV finds an active
channel, it places it in the channel list. Inactive channels (weak stations or
channels with no signal at all) aren’t placed in the channel list.
The Channel Search screen lets you choose a Full Search or a Quick Search.
Full Search Searches both Antenna A and B, automatically detects whether
you are using cable or an off-air antenna.
Note: A Full Search can take several minutes.
Quick Search Searches only for channels on the antenna you’re currently
using and uses the current Air or Cable setting. For optimum reception, you
need to conduct a Quick Search after you’ve adjusted a terrestrial antenna
because the TV might pick up new channels.
Notes: Channel Search takes a long time to complete because all possible
analog and digital channels are being searched.
If a cable box is connected to Antenna A and GUIDE Plus+ setup was
informed, a channel search will not be permitted.
Software Upgrade
The Software Upgrade screen contains current software information and
indicates if a new upgrade is available. The software information and upgrades
can be accomplished only if you have the TV connected via the Ethernet cable
to the Internet.
Signal Source
The Signal Source menu allows you to choose the source from which you
would like the signal to come: Antenna A, Antenna B, or Video Inputs. The
same can be accomplished using the component buttons if you’ve set up Auto
Tuning on the remote or the INPUT button. But, if you misplace the remote, this
feature gives you another way to tune to a signal source.
Signal Type
The Signal Type screen lets you choose whether you are receiving a signal from
cable TV or an off-air antenna for Ant A or Ant B. When you run Channel
Search, the TV automatically detects your signal and you don’t have to specify it
here. However, if you decide to change the source, you can use the Signal Type
screen. Changing the source on Antenna A may mean that you will have to
make changes to your GUIDE Plus+ setup settings.
62 Chapter 4
Page 65

Using the TV’s Menu System
Auto Tuning
This menu lets you specify the various components you have connected to your
TV. It lets you program a component button on the remote control (VCR1, VCR2,
DVD, or SAT•CABLE) so that pressing the button automatically turns on the TV
and turns the TV to the correct video input channel (see the Features chapter on
page 48 for detailed information).
DTVLink® (Digital Television Link)
Better known to some as IEEE 1394 or FireWire*, these jacks enable connection
of high-speed digital technology to DTVLink devices. With the two jacks, you
can network your digital devices by linking them together.
Some DTVLink set top devices need an additional analog video connection to
the TV. The screen tells you which device needs this connection. You then
select which analog input is used for the connection.
Notes: When a device is plugged in or unplugged, the DTVLink screen is
updated automatically.
Some IEEE 1394 devices supply power to other devices. This TV does not
supply power to other devices.
Some devices that do not support Digital Copy Protection may cause errors
on the DTVLink connection if another source that supports Digital Copy
Protected material is connected to the DTVLink.
Special Features
Initial Channel and Initial Volume are two special features that are for
commercial/retail use only.
Initial Channel You can select the channel that your TV tunes to each time
the TV is turned on or plugged in.
Initial Volume This features works only if the Initial Channel feature is set to
On. Select the volume level that you want when the TV is turned on.
Chapter 4 63
Page 66

Using the TV’s Menu System
Ethernet Setup
If you have a NAT (Network Address Translation)/PAT (Port Address Translation)
device with DHCP capability, no setup is required. The TV automatically sets
itself up for Ethernet use. If you do not have a NAT/PAT router, you may need
to establish some settings in conjunction with your ISP (Internet Service
Provider) before you can connect to the Internet. Your ISP needs your TV’s MAC
(Media Access Control) address to give you a host name. This appears on the
same screen where you set the host name as required by your ISP. It is unlikely
you may need to fill in the IP address and/or Port by your ISP. You may need to
enter another IP address for the proxy server to gain access to other hosts on
the Internet. This address, if required, will be provided by your ISP.
A Reset All selection is provided for your convenience if you move the TV to
another city and have to enter new information.
Preferences Menu
The Preference menu allows you to change some aspects of your TV to fit your
personal preferences. Features in the Preference menu are: Closed Captioning,
Screen Format, Record Output, Color Scheme, Translucency, Menu Language,
Digital Channel Info.
Closed Captioning
You may set the type of captioning displayed from the main tuner. Captioning is
not available from the PIP tuner. Choices within the Closed Captioning menu
are: Caption Display, Analog Captions, Digital Captions, Caption Priority,
Caption Style.
Caption Display
The Caption Display menu displays a choice list that lets you choose when
closed captioning information is shown on the screen. Input 5 (DVI-HDTV) is
not supported by Closed Captioning.
Closed Captioning On Captioning information is shown always, when
available.
Closed Captioning Off No captioning information is displayed.
On When Muted Captioning information is only shown when the TV’s sound
is muted, when available. (To mute the sound, press the MUTE button on the
remote control and captioning information will appear on the screen.)
Note: If you turned off the speakers in the Audio menu (Fixed Output,
Speakers Off), Closed Captioning won’t appear when you press the MUTE
button on the remote even when you choose On when Muted.
64 Chapter 4
Page 67

Using the TV’s Menu System
Analog Captions
You can select a closed caption mode, which is the mode, or source, used for
displaying captioning information for all analog channels. The content of CC and
Text are different; you can select which one you want to see on the screen.
CC CC displays information at any position on the screen. It overlays the text
on top of the picture as it is received.
Text Text displays information at one particular position (such as the bottom
third) of the screen. You cannot see the picture underneath the text.
You can choose between eight closed caption modes, or sources:
• CC1 and Text 1 are the primary caption and text services. The captioning or
text is displayed in the same language as the program’s dialog.
• CC3 and Text 3 serve as the preferred data channels. The captioning or text
is often a secondary language translation, simplified English, or displayed at
a slower rate.
• CC2 and CC4 and Text 2 and Text 4 are rarely available and broadcasters
use them only in special conditions, such as when CC1 and CC3 are not
available, or Text1 and Text3 are not available.
Digital Captions
You can select a closed caption, service mode (1-6) for digital channels. The
service modes support MPEG-2 based transport sources such as DTVLink.
Service 1 and Service 2 are the primary and secondary languages, respectively.
Service 3 and Service 4, 5, 6 are additional caption sources that may be
available. Specific label names may be displayed (e.g., Spanish) instead of a
generic label (e.g., Service 1), if available.
Caption Priority
You can choose whether the TV uses digital or analog captions for digital TV
programs that have both or either.
• If you select analog captions and they are available for a digital TV
program, the CC icon in the banner lights.
• If you select digital captions and they are available for a digital TV program,
the CC icon in the banner lights.
Caption Style
Customize closed captioning for the digital captions by choosing the settings for
the following options:
Caption Size is the font size (Standard, Large, Small) of the text characters.
Caption Font is a complete assortment of letters, numbers, punctuation marks,
etc. of a given font design. You have eight fonts with varying styles of spacing
from which to choose.
Note: A preview graphic of the caption font appears on the right.
Chapter 4 65
Page 68

Using the TV’s Menu System
Caption Color allows you to choose the font color: White, Black, Red, Green, Blue, Yellow,
Magenta, Cyan.
Background Color allows you to choose the background color: White, Black, Red, Green,
Blue, Yellow, Magenta, Cyan.
Background Opacity allows you to change the see-through options: Solid, Transparent,
Translucent, and Flashing. Solid is the default setting.
Caption Opacity allows you to change the see-through options: Solid, Transparent,
Translucent, and Flashing.
Screen Format
The Screen Format feature allows you to change how the image of a 4:3
picture is displayed on your 16:9 screen. The options are Normal, Zoom or
Stretch. If your TV receives an image with a 4:3 aspect ratio, the image can
be displayed in one of three ways:
Normal The image of a 4:3 video signal is centered with gray bars on the
right and left sides of the screen.
Stretch The image of a 4:3 video signal is stretched horizontally by
approximately 33% while the vertical size stays the same.
Zoom The image of a 4:3 video signal increases by approximately 33% and
the vertical size increases by approximately 33%.
Notes: There is no need to change the screen format for a 16:9 video
signal since it fills up the entire area of the TV’s screen.
The FORMAT button on the remote gives you access to change the
format with a one-button press rather than navigating through the
menu system.
Normal and Stretch do not affect Record Output; Zoom may alter the
original video.
Some programs are copy protected and cannot be recorded. If REC icon
in banner is dim, a recording cannot be made because of copy
protection limits.
The format of some video cannot be changed even though it appears
to be a 4:3 aspect-ratio picture.
Depending on the input and video content, the TV may or may not be
able to display the side panels as gray. Therefore, limited viewing of a
4:3 image is recommended when no side panels are present. The same
advice applies even if the side panels are present. Use the FORMAT
button to view screen formats other than those with side panels
(Zoom, Stretch). Some video formats may not be able to be changed
with the FORMAT button.
66 Chapter 4
Page 69

Using the TV’s Menu System
Record Output
16:9 signals can be recorded in one of two ways: Cropped Recording (Center
Cut) and Anamorphic Mode Recording. Cropped Recording records the center of
a 16:9 signal and the Anamorphic Mode Recording compresses the 16:9 signal
into a 4:3 area.
Notes: To make the “clearest” recording, avoid using PIP, GUIDE Plus+
system, browser, or zoom screen format. Doing so will have unwanted
effects on the recorded video.
The TV does not need to be on to make a recording as long as the
recording being made was set up in the GUIDE Plus+ system. When the TV
is off, the Record Output may show the TV tuning channels in a date
acquisition activity. This is normal.
If an unusual pattern appears when you connect your VCR input to the
RECORD OUTPUT, playing a tape or switching to the VCR’s tuner removes
the pattern.
Color Scheme
Select from among four colors (Sky Blue, Emerald, Raspberry, Plum) to change
the color of the menu system and banner.
Note: The guide and browser colors are unaffected.
Translucency
You can change the translucency (see-through) level of the menu screens. Adjust
the slider by using the left and right arrow buttons.
Notes: This does not apply to GUIDE Plus+ system and browser.
Some video formats do not support the display of translucency on-screen
displays.
Menu Language
The menu language can be changed to one of three languages: English, Spanish
or French. The menu language can also be selected when using the Assisted
Setup menu.
Note: Spanish and French are not available in the guide, browser, or in
some software upgrade pop-up screens.
Chapter 4 67
Page 70

Using the TV’s Menu System
Digital Channel Info
The Digital Channel Info option allows the TV to receive information about
digital TV channels like program titles. The default is set to Acquire Digital
Channel Information. Disabling this option should be reserved as a last resort
because you may not receive important terrestrial program guide information,
such a program ratings, channel names, program titles, program times, etc.
Notes: When the TV is locked and you try to access the Digital Channel
Info screen, the Password Entry screen appears and you must enter the
password.
Disabling Digital Channel Info feature does not affect the acquisition of
GUIDE Plus+ channel listings.
Channels remain blocked or viewable in Parental Control feature
regardless of the Digital Channel Info setting although the channels may
appear to have changed.
68 Chapter 4
Page 71

Reference
Chapter Overview:
•Troubleshooting
• Specifications and Features
• Accessory Information
• Limited Warranty
• Care and Cleaning
Chapter 5
• Index
Changing Entertainment. Again.
Graphics contained within this publication are for representation only. 69
Page 72

References
Troubleshooting
Most problems you encounter with your TV can be corrected by consulting the following troubleshooting list.
TV Problems
TV won’t turn on
•Press the TV button or ON/OFF button while remote is in TV mode and there’s a source of power to the outlet or
outlet strip.
• Make sure the TV is plugged in.
• Check the wall receptacle (or extension cord) to make sure it is “live” by plugging in something else.
• Something might be wrong with your remote control. Press the POWER button on the front of the TV. If the TV turns
on, check the remote control solutions on page 73.
• The front panel controls may be locked (disabled). Use the remote control to unlock the front panel controls by
selecting the Front Button Block in the Parental Controls menu and choosing Unblocked.
• When you first plug your TV into an outlet, the Power LED on the front panel will light for approximately 15 seconds
and then go off during the initialization of the TV. The TV can only be turned on after the Power LED goes off. This
happens every time power is reapplied to the TV.
Buttons don’t work
• If you’re using the remote control, press the TV button first to make sure the remote is in TV mode.
• The front panel controls may be locked (disabled). Use the remote control to unlock the front panel controls by
selecting the Front Button Block in the Parental Controls menu and choosing Front Buttons Unblocked.
• Unplug the TV for five minutes and then plug it back in. Turn the TV on and try again.
TV turns off while playing
•Sleep Timer, Wake-up Timer, or Watch feature may have been activated. Go to page 40 or 61 for instructions.
•Electronic protection circuit may have been activated because of a power surge. Wait 30 seconds and then turn on
again. If this happens frequently, the voltage in your house may be abnormally high or low.
• The sleep timer may be set.
• Unplug. Wait five minutes. Plug in again.
TV turns on unexpectedly
•Wake-up Timer feature or Watch from the GUIDE Plus+ system may have been activated. Go to page 40 or 61 for
instructions.
Blank screen
• Make sure you have connected the component to the TV correctly.
• Make sure the component connected to the TV is turned on and tuned to the corresponding Video Input Channel.
•Try another channel.
• If you’re trying to tune to a digital (ATSC) channel that you know exists, you may need to disable the Digital Channel
Info. Go to the Main Menu (press MENU); choose Preferences; choose Digital Channel Info.
• If you’re using the TV’s Web Browser, it times out automatically when idle for a period of time.
70 Chapter 5
Page 73

References
Unusual sound quality
• Check the Graphic Equalizer, SRS, and Sound Logic settings.
No sound, picture okay
• Maybe the sound is muted. Try pressing the volume up button to restore sound.
• Maybe the speakers are turned off. Check the FIXED/VARIABLE OUT control panel in the Audio menu.
• Check the position of the INT W/EXT SURR and EXT switch on the back of the TV.
• Make sure the correct Audio Processor mode (Mono, Stereo, SRS, FOCUS and TruSurround) is selected.
• Check the position of the INTERNAL SPEAKER SOURCE - TV/EXT AMP switch on the back of the TV.
Can’t select certain channel
• May be blocked or not approved in the Parental Controls menu.
• If using a VCR, check to make sure the TV/VCR button on the VCR is in the correct mode (press the TV/VCR button on
your VCR).
Noisy stereo reception
• May be a weak station. Use Audio menu to choose Mono sound.
No picture, no sound but TV is on
• Maybe the cable/air function is set to the wrong position. Select GUIDE Plus+ Menu from the Main menu, select
the GUIDE Plus+ Setup option, and provide the correct information on the following screens. Go to pages 21-24 for
detailed instructions.
• The channel might be blank — change channels.
• If you’re watching your VCR and it’s connected with coaxial cable to the CABLE/ANTENNA jack, tune the TV to channel
3 or 4 (whichever channel is selected on the 3/4 switch on the back of your VCR). Also check to make sure the TV/VCR
button on the VCR is in the correct mode (press the TV/VCR button on your VCR).
Sound okay, picture poor
• Check antenna connections. Make sure all of the cables are firmly connected to the jacks.
•Try adjusting sharpness function to improve weak signals. Go to page 56 for more instructions.
Black box appears on the screen
•Closed-captioning might be on. Check the Caption Display control panel in the Preferences menu. Go to page 64 for
more instructions.
Every time I turn on the TV, the Guide is on the screen
• The GUIDE Plus+ system automatically appears on the screen when you use the TV button on the remote to turn on
the TV. You can turn off this feature by pressing GUIDE on your remote control and then select the Menu bar. Press the
right arrow button to select Setup. Choose Review options and select OFF.
Chapter 5 71
Page 74

References
GUIDE Plus+ System Problems
GUIDE Plus+ setup won’t turn off tape for VCR setup and/or channel 02 cable box
• Check to see if the G-LINK wands are positioned correctly in front of components’ remote sensors.
• GUIDE Plus+ system control of cable box is slower than direct control of the box itself. Keep this in mind when
changing channels.
•You may have an incorrect GUIDE Plus+ channel lineup. The guide may get out of sync with the cable provider. Use
the GUIDE Plus+ setup in the GUIDE Plus+ menu to change the zip code to 99999. Turn the TV off for 10 minutes. Use
Setup again to change the zip code back to the correct value. If asked, be sure to select the correct channel lineup from
the on-screen list.
Program information doesn’t download
• Review your setup information and make sure it’s correct. Press MENU on the remote and select GUIDE Plus+ system
menu and then Setup. Go to page 21 for detailed instructions about the GUIDE Plus+ setup menus.
• The TV must be off to download information. Leave your TV off overnight, for at least 10 hours, to receive the initial
download for your area.
• If you’re using a cable box, leave it on so you can receive program information.
• The GUIDE Plus+ system doesn’t display program listings for satellite TV.
Scheduled Watch or Record doesn’t occur
• Check Schedule for timer conflicts. Go to page 40 for instructions.
• Make sure the wands of the G-LINK cable are placed in front of the remote sensor(s) on the component(s).
• Make sure your VCR is turned off during the time you’ve scheduled to record a program because the system turns the
VCR on when it starts recording (if it’s already on when recording starts, the system will turn it off).
• Make sure there is a tape in the VCR and that the VCR is connected properly.
• Make sure VCR is tuned to the line input. Don’t change channels.
• Be sure that you set up the VCR in the GUIDE Plus+ setup menus. If you don’t complete the Configuring for a VCR steps
successfully, the Record option won’t be available. Go to page 23 for detailed instructions.
• If a cable box is attached to your TV, make sure you set it up correctly in the GUIDE Plus+ setup menus. Go to page 22
for detailed instructions.
• The guide comes up each time you turn on the TV. You can disable the guide by going to the Auto-on feature in the
Setup menu and select Review Options.
72 Chapter 5
Page 75

References
The Remote Control Doesn’t Work
• Something might be between the remote and the remote sensor on the component. Make sure there is a clear path.
• Maybe the remote isn’t aimed directly at the component (TV or VCR) that you’re trying to operate.
• Maybe remote is not in TV Mode. Press the TV button so the remote controls the TV.
• Maybe batteries in remote are weak, dead, or installed incorrectly. If batteries are weak, you will not be able to activate
backlighting on the remote; instead, backlight will blink once when activated. Put new batteries in the remote. (Note, if
you remove the batteries, you may have to reprogram the remote to operate other components.)
•You might need to drain the remote’s microprocessor: remove batteries and press the number 1 button for at least 60
seconds. Release the 1 button, replace the batteries, and (if necessary) program the remote again.
• Replace the batteries when the remote indicator turns red and blinks rapidly with each button press.
Problems with V-Chip/Parental Controls
The rating limits don’t work
•You must lock the settings. Go to the MAIN MENU (press MENU on your remote), select Parental Controls (press 5 on
your remote), select Lock TV (press 1 on your remote).
I don’t remember my password and I want to unlock the TV
• If you forget your password, simultaneously press and hold MENU/OK on the television and VOL down on the remote
for 3 seconds. Nothing appears on the screen, Parental Controls simply unlock and you can re-enter a password via
Lock TV.
The V-Chip won’t let me watch a program even though it’s not rated as violent.
• Maybe the movie was given an NR (Not Rated) status. After you block movie ratings, you must set V-Chip Unrated to
View separately in order to view movies with an NR rating.
Chapter 5 73
Page 76

References
HDTV Specifications
**
Tuning Capability Channel Tuning........................................................................ NTSC/ATSC
Digital Cable Compatibility .....................................................DTVLINK, DVI/HDTV,
.................................................................................................. Component
Video Adaptive Video Noise Reduction ............................................Yes
Adjustable Color Warmth ....................................................... Yes
4:3 Format Control (Screen) .................................................... Normal, Zoom, Stretch
Auto Color Control .................................................................. Yes
Convergence (Auto & Manual) ............................................... Yes
Optimum Contrast, High-Resolution Screen ..........................Yes
Integrated Shield ..................................................................... Yes
Viewing Angle (Degrees) ........................................................ 160
Comb Filter ............................................................................... Digital Frame Comb (3D Y/C)
Dynamic Focus.......................................................................... Yes
High Performance Scan Velocity Modulation (SVM) .............Yes
Horizontal Resolution (Picture Width) ................................... 1200
Picture Tube Pitch ....................................................................Screen .52mm
Picture Power (Watts) .............................................................. 42
Scan Rate Converter ................................................................ Yes
3:2 Pull Down (Film Mode) ...................................................... Reverse
Picture Presets ..........................................................................Bright, Normal, Soft, Personal
Wide Band Video Amplifier .................................................... Yes
Sound Audio Power (Watts) Front Speakers ..................................... 15 Watts/Channel
Integrated Subwoofer/Boomer ............................................... 30 Watt-Sub
Graphic Equalizer..................................................................... 7 Band
Front Speakers ......................................................................... 2--130mm Midrange Drivers
.................................................................................................. plus 2 - 19 mm Tweeters
Fully Enclosed Speaker System ................................................ Yes
Balance Control........................................................................ Yes
Broadcast Stereo w/dbx
Matrix Surround Sound ...........................................................Yes
Second Audio Program (SAP) .................................................. Yes
Sound Logic Audio Leveler...................................................... Yes
SRS Labs TruSurround .............................................................. Yes
SRS Labs Focus .......................................................................... Yes
†
Noise Reduction ............................. Yes
Convenience Web Browser ............................................................................ Yes
Auto Channel Search (Full and Quick).................................... Yes
Multilingual On-screen Display ............................................... English, French, Spanish
Auto Tuning (One-button Launch) ......................................... Yes, four components
Closed Captioning.................................................................... Analog & Digital
Front Button Block................................................................... Yes
Commercial Skip ...................................................................... Yes
† dbx is a registered trademark of Carillon Electronics Corporation.
**Specifications are subject to change.
74 Chapter 5
Page 77

References
Parental Control with V-Chip ........................................ Yes
Picture Reset ...................................................................Yes, in Menu
Picture-in-Picture (PIP) ................................................... Analog on Analog
Picture Memory Presets for Video Inputs ..................... Yes
(Individual Memory)
GUIDE Plus+ system with Digital Channels ................... Yes
One Touch VCR Record w/GUIDE Plus+ system ............ Yes
Picture in GUIDE Plus+ system .......................................Yes
Clock (Time), Sleep and Wake-up Timers ...................... Yes
Front Panel Stereo Headphone Jack ................................................. 3.5mm Stereo Mini-jack
Front A/V Input............................................................... Composite with S-Video
Back Panel Inputs/Outputs A/V Inputs .......................................................................2 - S-Video / Composite
Component/Composite Video Inputs ............................ 2 - Y PrPb (RCA Jacks)
......................................................................................... SYNCHROSCAN
Antenna/Cable Inputs .................................................... 2 - RF
DVI-HDTV Input with Audio Inputs............................... 1
Broadband Connection (Ethernet RJ45) ....................... 1
DTVLink (IEEE 1394) ....................................................... 2
Record Output (Composite with Audio) ....................... 1
Digital Audio Output .....................................................1
External Speaker Terminals ........................................... Yes
Fixed or Variable Audio Outputs................................... 1 set, menu switchable
External Center Channel Input ...................................... Maximum amplifier power
......................................................................................... rating 60 watts into 8 ohms
G-LINK Jack .....................................................................Yes
Chapter 5 75
Page 78

References
Accessory Information
The following accessories are available from most dealers and electronics supply stores in case
you want to position your components farther apart or need additional cables.
Monaural VCR Dubbing
Audio/Video Cable is a
double cable that lets you
connect the video and audio
jacks of two VHS VCRs to
duplicate tapes. It can also be
used to connect a VCR to your
TV. The cable is color-coded
and shielded. It has RCA-type
phono plugs on each end.
Gold-Tipped cable, VH83 (6-ft)
Stereo VCR Dubbing Audio/
Video Cable is a triple cable
that lets you connect the
and AUDIO jacks of stereo
components. Gold-Tipped
cable, VH84 (6-ft)
Push-on Cable* attaches to
the round antenna connectors
(called 75-ohm F-type) on the
back of your VCR or TV. The
ends push on for a quick
connection. VH89 (6-ft)
VIDEO
Screw-on Cable* attaches to
the round antenna connectors
(called 75-ohm F-type) on the
back of your VCR or TV. The ends
screw onto the connectors for a
secure connection. VH82 (6-ft),
VH81 (3-ft)
S-Video Cable has multi-pin
connectors on each end for
connecting S-Video components
to your TV. VH976 (6-ft), VH913
(12-ft)
RG-6 Coaxial Burial
Cable with weatherproof “F”
connectors. D905
Optical/SPDIF cables help you
connect to a component with an
Optical Audio In jack, such as a
Dolby Digital decoder or
receiver. DV3 (3-ft), DV6 (6-ft)
* This accessory is intended for use with an off-air or cable TV signal distribution and is not suitable for distribution of the
satellite signal originating from your satellite dish antenna.
76 Chapter 5
Page 79

References
U
S
E
TV
A
U
X
DVD
SAT • CABLE
P
I
P
SWAP
SKIP
CH CTRL
V
O
V
L
FORMAT
MUTE
C
L
E
A
R
1
4
VCR1
VCR2
ON • OFF
CH +
RCR160TBLM1
2-way Splitter (VH47)
4-way Splitter (VH49)
Remote Control This is the
remote control that came
packed with your TV.
Replacements or spares can
be ordered as needed.
2-way Signal Splitter, 4way Signal Splitter* helps
you connect to other
components.
Accessory Order Form
Description
Part No.
Screw-on antenna cable* (3-ft) VH81 $3.95
Screw-on antenna cable* (6-ft) VH82 $4.95
Push-on antenna cable* (6-ft) VH89 $5.95
RG-6 Weatherproof “F” Cable D905 $5.95
Monaural VCR Dubbing Cable (6-ft) VH83 $5.95
Stereo VCR Dubbing Cable (6-ft) VH84 $9.95
S-Video Cable (6-ft) VH976 $7.95
S-Video Cable (12-ft) VH913 $14.95
2-way Signal Splitter* VH47 $3.95
4-way Signal Splitter* VH49 $6.95
Amplified Antenna ANT200 $49.95
Antenna Mixer 193984 $11.15
Remote Control (RCR160TBLM1) 257076 $24.00
Optical/SPDIF Cable (3-ft) DV3 $15.95
Optical/SPDIF Cable (6-ft) DV6 $19.95
Price
Qty
Total
Amplified VHF/UHF/FM
Antenna allows you to
easily switch from the
antenna signal to cable or
satellite easily without
disconnecting antenna.
ANT200
* This accessory is intended for use with an off-air or cable
TV signal distribution and is not suitable for distribution
of the satellite signal originating from your satellite dish
antenna.
Audio•Video Adapter 228449 $4.45
Diplexer D920 $19.95
Total Merchandise...............................................................
Sales Tax ...............................................................................
We are required by law to collect the appropriate sales
tax for each individual state, country, and locality to
which the merchandise is being sent.
Shipping and Handling* ....................................................
Total Amount Enclosed ......................................................
Use VISA, MasterCard, or Discover Card preferably.
Money order or check must be in U.S. currency only.
No COD or CASH.
Prices are subject to change without notice.
✂
All accessories are subject to availability.
Where applicable, we will ship a superseding model.
Please complete other side also
$
$
$ 5.00
$
Detach Here
Chapter 5 77
Page 80

References
Charge your order on your VISA,
MasterCard, or Discover Card by
filling in below
USE YOUR CREDIT CARD
IMPORTANT: Copy complete account number
IMPORTANT: Copy complete account number
Copy Number
above your
name on
MasterCard
IMPORTANT: Copy complete account number
from your VISA card
My card expires:
from your MasterCard
My card
expires:
from your Discover Card
Placing an Order
To place your order by phone, have your Visa, MasterCard
or Discover Card ready and call the toll-free number listed
®
s
rr
TM
below.
Use this number only to place an order for accessory items
listed on this order form.
1-800-338-0376
To place your order by mail, detach and mail the completed
order form with credit card information, money order or
check in US currency (made payable to Thomson Consumer
Electronics, Inc.) to the following address:
Video Accessories
PO Box 8419
Ronks, PA 17573
My card expires:
AUTHORIZED SIGNATURE
(Credit card order will not be processed without signature)
Print or type your name and
address clearly.
Name:
Street:
City:
State: Zip:
Daytime Phone Number:
A complete and correct
order will save you days
of waiting.
Apt:
Please make sure that both sides of this form
have been filled out completely.
• Allow 4 weeks for delivery.
• All accessories are subject to availability.
• Prices are subject to change.
78 Chapter 5
Page 81

References
Limited Warranty
What your warranty covers:
• Defects in materials or workmanship.
For how long after your purchase:
• One year from date of purchase for labor.
• One year from date of purchase for parts.
•Two years from date of purchase for the picture tube.
The warranty period for rental units begins with the first rental or 45 days from date of shipment to the rental firm,
whichever comes first.
What we will do:
• Pay an Authorized Service Center the labor charges to repair your unit.
• Pay an Authorized Service Center for the new, or at our option, refurbished replacement parts and picture tube required
to repair your unit.
How you get service:
• Call 1--877-RCA-HDTV and have your unit’s date of purchase and model/serial number ready.
•A representative will troubleshoot your problem over the phone.
• If the representative determines that you should receive service, they will provide you with the name(s) of the
Authorized Service Center in your area.
• Contact the Service Center and arrange for home or pick up, repair, and return service, provided that your unit is
located within the geographic territory covered by an Authorized Service Center. If not, you must take your unit to the
Service Center location at your own expense, or pay for the cost the Service Center may charge to transport your unit to
and from your home.
•Proof of purchase in the form of a bill of sale or receipted invoice which is evidence that the product is within the
warranty period must be presented to obtain warranty service. For rental firms, proof of first rental is also required.
What your warranty does not cover:
• Customer instruction. (Your Owner’s Manual describes how to install, adjust, and operate your unit. Any additional
information should be obtained from your dealer.)
•Installation and related adjustments.
• Damage resulting from non-approved installation methods.
•Signal reception problems not caused by your unit.
• Damage from misuse or neglect.
• Batteries.
•Images burnt onto the screen.
•A television that has been modified or incorporated into other products, or is used for institutional or other commercial
purposes.
•A unit purchased or serviced outside the U.S.A.
• Acts of nature, such as but not limited to lightning damage.
Chapter 5 79
Page 82

References
Product Registration:
•Please complete and mail the Product Registration Card with your unit. It will make it easier to contact you should it ever
be necessary. The return of the card is not required for warranty coverage.
Limitation of Warranty:
• THE WARRANTY STATED ABOVE IS THE ONLY WARRANTY APPLICABLE TO THIS PRODUCT. ALL OTHER
WARRANTIES, EXPRESS OR IMPLIED (INCLUDING ALL IMPLIED WARRANTIES OF MERCHANTABILITY OR
FITNESS FOR A PARTICULAR PURPOSE) ARE HEREBY DISCLAIMED. NO VERBAL OR WRITTEN INFORMATION
GIVEN BY THOMSON INC., ITS AGENTS OR EMPLOYEES SHALL CREATE A GUARANTY OR IN ANY WAY INCREASE
THE SCOPE OF THIS WARRANTY.
• REPAIR OR REPLACEMENT AS PROVIDED UNDER THIS WARRANTY IS THE EXCLUSIVE REMEDY OF THE
CONSUMER. THOMSON INC. SHALL NOT BE LIABLE FOR INCIDENTAL OR CONSEQUENTIAL DAMAGES
RESULTING FROM THE USE OF THIS PRODUCT OR ARISING OUT OF ANY BREACH OF ANY EXPRESS OR IMPLIED
WARRANTY ON THIS PRODUCT. THIS DISCLAIMER OF WARRANTIES AND LIMITED WARRANTY ARE GOVERNED
BY THE LAWS OF THE STATE OF INDIANA. EXCEPT TO THE EXTENT PROHIBITED BY APPLICABLE LAW, ANY
IMPLIED WARRANTY OF MERCHANTABILITY OR FITNESS FOR A PARTICULAR PURPOSE ON THIS PRODUCT IS
LIMITED TO THE APPLICABLE WARRANTY PERIOD SET FORTH ABOVE.
How State Law relates to warranty:
• Some states do not allow the exclusion nor limitation of incidental or consequential damages, or limitations on how long
an implied warranty lasts, so the above limitations or exclusions may not apply to you.
• This warranty gives you specific legal rights, and you also may have other rights that vary from state to state.
If you purchased your unit outside the United States:
• This warranty does not apply. Contact your dealer for warranty information.
Service calls which do not involve defective materials or workmanship are not covered by this warranty. Costs
of such service calls are the sole responsibility of the purchaser.
80 Chapter 5
Page 83

References
FCC Information
This equipment has been tested and found to comply with the limits for a Class B digital device, pursuant to Part 15 of the
FCC Rules. These limits are designed to provide reasonable protection against harmful interference in a residential
installation. This equipment generates, uses, and can radiate radio frequency energy and, if not installed and used in
accordance with the instructions, may cause harmful interference to radio communications. However, there is no guarantee
that interference will not occur in a particular installation. If this equipment does cause harmful interference to radio or
television reception, which can be determined by turning the equipment off and on, the user is encouraged to try to correct
the interference by one or more of the following measures:
• Reorient or relocate the receiving antenna.
• Increase the separation between the equipment and receiver.
• Connect the equipment into an outlet on a circuit different from that to which the receiver is connected.
• Consult the dealer or an experienced radio/TV technician for help.
This Class B digital apparatus complies with Canadian ICES-003
Chapter 5 81
Page 84

References
Care and Cleaning
CAUTION: Turn OFF your TV before cleaning.
You can clean the TV as required, using a soft lint-free cloth. Be sure to occasionally dust the ventilation
slots in the cabinet to help assure adequate ventilation.
The TV’s screen may be cleaned with a soft, lint-free cloth as well. Take care not to scratch or mar the
screen. If necessary, you may use a cloth dampened with warm water.
Never use strong cleaning agents, such as ammonia-based cleaners, or abrasive powder. These types of
cleaners will damage the TV.
While cleaning do not spray liquid directly on the screen, or allow liquid to run down the screen and inside
the TV. Also, avoid placing drinks or vases with water on top of the TV. This could increase the risk of fire or
shock hazard or damage to the TV.
82 Chapter 5
Page 85

This page left blank intentionally.
Page 86

This page left blank intentionally.
Page 87

This page left blank intentionally.
Page 88

This page left blank intentionally.
Page 89

This page left blank intentionally.
Page 90

This page left blank intentionally.
Page 91

Index
Index
Symbols
1394 Jacks 17
16:9 icon 36
A
Accessories 76
Action buttons 28, 55
GUIDE Plus+ system 39
Age-based rating 44
Blocking 45
Viewing 45
Amplifier 6
Analog captions 65
Analog TV channel 37
ANTENNA A 8, 9, 14
ANTENNA A INPUT 17
ANTENNA B 8, 9, 14, 17
ANTENNA button 28
Antenna Info 61
Arrow buttons 28, 49
Assisted setup 20, 21
AUDIO
L/MONO 16
Audio codes 34
Audio format icon 36
AUDIO INPUT 3/VIDEO INPUT 3
16
AUDIO INPUT 5 / VIDEO INPUT 5
17
AUDIO INPUT 1/VIDEO INPUT 1
16
Audio language 59
Audio menu 58
AUDIO OUTPUT
Digital 17
Audio processor 59
Audio receiver 6
Audio/video cables 7
Authorized service 8, 79
Auto channel search 21
Auto color 56, 57
Auto converge 57
Auto tuning 48, 63
Automatic code search 31
Autotuning
Front Input 48
AUX button 28, 33
B
Back of the TV 15
Backlight button 28
Balance 60
Batteries 20
Black Level 56
Block
Age-based ratings 45
Front Panel 47
Movie ratings 46
Specific content themes 45
V-Chip unrated program 47
Web browser 47
Blue action button 28
Blue centering 57
Browser, web 50, 51
Buttons
ANTENNA 28
Arrows 28, 49
AUX 28, 33
Backlight 28
Blue action 28
CH CTRL 28
CH ctrl 49
Channel down 19, 28
Channel up 19, 28
CLEAR 28
Don't work 70
DVD 28
FORMAT 28, 50
FORWARD 29
Front panel 19
GO BACK 29
Green action 28
GUIDE 29
INFO 19, 29
INPUT 19, 29, 32
MENU 19, 29
Number 28
OK 19, 29
PAUSE 29
PIP 29, 49
PLAY 29
POWER 19
REC VCR + 29
Remote control 28
REVERSE 29, 30
SAT CABLE 29, 33
STOP 29
SWAP 29, 49
TV 29
VCR1 29
VCR2 29
Volume down 19
Volume up/down 29
C
Cable box 18
Cable box remote codes 33
Cables 13, 76
1394 17
Audio/video 7, 14
Coaxial 7
COMPONENT VIDEO 14
Digital optical 13
DVI 13
Ethernet 13, 17
For Y, Pb, Pr jacks 14
G-LINK 7
Optical 13
RF 14
S-Video 7, 14
Caption display 64
Caption priority 65
Caption style 65
Care and Cleaning 71, 82
Center channel connections 10
CENTER CHANNEL INPUT 16
Center channel input 16
Center speaker 10
Center speaker input 16
CH CTRL button 28, 49
Channel 3 48
Search 21
Channel banner 36
Channel down button 19
Channel lists 41, 42
Channel search 21, 62
Channel up button 19
Channels
Digital or Analog 37
Chart, of connections 7
Choice fields 55
Choice lists 55
Choose Your Connection 7
Chapter 5 89
Page 92

Index
Cleaning and care 82
CLEAR button 28
Closed captioning 36, 64, 65
Coaxial cable 7
Codes
Audio 34
Cable box 33
DVD 34
Satellite receiver 34
VCR 33
Color 56
Warmth 57
Color scheme 67
Color warmth 56
Component video cables 7
Components, connecting 7
Composite jacks 14
Connection
DVD player, TV, VCR 8
Illustrations 6
Satellite Receiver, TV, VCR 9
TV, Satellite Receiver, VCR 9
TV, VCR, DVD Player 8
VCR, TV, DVD player 8
VCR, TV, Satellite Receiver 9
Connections
Audio/video receiver 10
Center channel 10
TV + receiver + speakers 10
Content Themes 44
Viewing 46
Content themes
Blocking 45
Contrast 56
Control panel 54
Actions buttons 55
Choice fields 55
Choice lists 55
Menu buttons 55
Numeric entries 55
Sliders 55
Convergence 56, 57
D
Digit buttons 28
Digital audio out 60
DIGITAL AUDIO OUT jack 13, 17
Digital channel info 68
Digital optical input 10
Digital TV channel 37
Direct entry 30
Dolby digital 10
Dolby Digital receiver 13
DTVLink
Connector 13
Jacks 13
DTVLink connector 17
DVD button 28
DVD codes 34
DVD player, VCR, TV
Connection 8
DVI-HDTV
Connector 13
E
Ethernet
Cable 17
Ethernet jack 13, 17
Ethernet setup 64
Exiting a menu 54
External speakers 15
EXTERNAL SPEAKERS OUTPUT
11, 12
F
Favorite URLs 51
FCC information 81
Finding the sensor 18
Fixed output 10
FIXED/VARIABLE AUDIO OUTPUT
L/R 15
Fixed/variable out 60
Format screen 66
FORMAT button 28, 50
FORWARD button 29
Front
And rear speaker jacks 16
Front Panel
Buttons 19
Inputs 19
Front panel block 47
G
G-LINK 17
Cable 7
Connecting 18
GO BACK button 29
Graphic equalizer 58
Green action button 28
GUIDE button 29
GUIDE Plus+ system 21, 25, 38
Action buttons 39
Blue action button 28
Channels 41
Expanded information 39
Green action button 28
Listings 39
Lock/Unlock 40
Messages 40
News 40
Promotions 41
Promotions & Advertising 41
Schedule 40
Setup 21, 41
Sort 40
H
Help text 54
I
Indicator, remote control 29
Indirect light 6
INFO button 19, 29
INPUT
2 jacks 16, 17
3 jacks 16
Button 19, 29, 32, 56
Input
ANTENNA A 17
Center channel 16
Inputs
Front panel 19
J
Jacks
1394 17
Audio/video 14
Composite 14
DIGITAL AUDIO OUT 13
DIGITAL AUDIO OUTPUT 17
Digital optical 10
DTVLink 13, 17
DVI-HDTV 13
Ethernet 13, 17
90 Chapter 5
Page 93

Index
EXTERNAL SPEAKERS 11, 12
Input 13
RF 14
S-VIDEO 14
S-Video 16
Y•Pb•Pr 14
K
Keyboard, optional 50
L
Language
Audio 59
Menu 21, 67
Languages, selecting 21
LED, front panel 20, 70
Limited warranty 79
Listings, GUIDE Plus+ system 39
Locating remote sensor 18
M
Main Menu 54
Menu
Audio 58
Exiting 54
Picture Quality 56
Preferences 64
Time 61
MENU button 19, 29, 54
Menu buttons 55
Menu language 21, 67
Menus 54
GUIDE Plus+ system 21, 38
Moving through 54
Messages menu 40
Modes, remote control 31
Mono 59
Mute button 29
N
News menu 40
Noise filter 56, 57
Number buttons 28
Numeric entries 55
O
OK button 19, 29
On-screen help 54
On-screen help text 54
Optical cable 13
Order form
Accessory 77
Output
RECORD 17
OUTPUTS
Audio 15
P
Parental controls 42
Channel lists 42
Editing 43
Editing channels 43
Lock/unlock 42
Parental controls icon 36
PAUSE button 29
PCM 10
PCM receiver 10
Picture
Presets 56
Picture presets 56
Picture quality menu 56
Convergence 57
Picture settings 56
PIP
Channel control 28
PIP (Picture in Picture)
Buttons 49
Problems 50
PIP button 29, 49
PIP, using 49
PLAY button 29, 31
POWER button 19
Power surges 6
Preferences menu 64
Problems
GUIDE Plus+ system 72
Parental controls 73
Remote control 73
TV 70
V-Chip 73
Programming
Cable box codes 33
DVD codes 34
Satellite receiver codes 34
VCR codes 33
Programming codes
Audio 34
Programming the remote
Automatic code search 30
Direct entry 30
Promotions, GUIDE Plus+ system
41
Pulse code modulation 13, 60
Q
Quick Search 62
R
Rating Limits
movies 46
TV 43
Ratings
Blocking movie 46
Viewing movie 46
RCA-type cables 14
REC VCR+ button 29
Receiver
Dolby Digital 13
Receiver with Dolby Digital 10
RECORD OUTPUT 17
Record Output 67
Red centering 57
Remote
Programming 30
sensor 18
Remote control
Buttons 28
Indicator 29
Installing the Batteries 20
Programming codes 33
Reset controls 56, 58
REVERSE button 29, 31
RF jacks 14
S
S-VIDEO cable 7
S-VIDEO jacks 14, 16
SAP 60
Chapter 5 91
Page 94

Index
SAT CABLE button 29, 33
Satellite receiver codes 34
Satelllite receiver connection 9
Scan velocity modulation 58
Schedule menu 40
Screen, Format 66
Search
Automatic code 31
Channel 21, 62
Full 21, 62
Quick 62
Second audio program 60
Service, authorized 8
Setup
Ethernet 64
GUIDE Plus+ system menus 21
Setup, assisted 20
Setup menu 41
Sharpness 56
Signal source 62
Signal type 62
SKIP button 29
Sliders 55
Software ungrade 62
Sort menu, GUIDE Plus+ system 40
Sound logic 59
Speaker
Center input 16
Speaker connection 10
SPEAKER SELECGT
EXT. or INT W/EXT SURR switch 15
Special features 63
Specifications 74
Back panel 75
Convenience 74
Front panel 75
Sound 74
Video 74
Stand 6
Stereo 59
STOP button 29
Subchannels 61
Subwoofer 61
SVM 56, 58
SWAP button 29, 49
T
Things to Consider Before You
Connect 6
Time menu 61
Tint 56
Translucency 67
Troubleshooting 70
Turn on TV 20
TV + audio receiver
Connection 10
TV button 29
TV connection 9
TV mode 20
TV problems 70
TV, VCR, DVD Player
Connection 8
U
Universal remote
programming to control other brands
of components 31
URLs, saving 51
V
V-Chip 42
Age-Based Ratings 43
Blocking age-based 45
Blocking Movies 46
Content Themes 43
TV ratings 43
Viewing age-based rating 45
V-Chip unrated program 47
Variable Output 10
Variable/Fixed out 60
VCR 18
Guide Plus+ system 23
VCR codes 33
VCR connection 9
VCR1 button 29
VCR2 button 29
VIDEO 16
VIDEO INPUT 2 / AUDIO INPUT 2
16
VIDEO INPUT 3 16
VIDEO INPUT 1/AUDIO INPUT 1
16
VIDEO INPUT 4/AUDIO INPUT 4
16
Viewing
Movie ratings 46
Specific content themes 46
Volume down button 19
Volume up button 19
Volume up/down buttons 29
W
Warranty, limited 79
Web browser 51
Block 47
Controlling 51
Using 50
Y
Y Pb Pr jacks 14
92 Chapter 5
Page 95

Page 96

Visit the RCA website at www.rca.com
Please do not send any products to the Indianapolis address listed in this manual or on the carton. This will only
add delays in service for your product.
Thomson Inc.
10330 North Meridian Street
Indianapolis, IN 46290
©2003 Thomson Inc.
Trademark(s)® Registered
Marca(s) Registrada(s)
Printed in USA
TOCOM 16300450
 Loading...