

Page 1
Televmsmo
User's G mde
Changing Entertainment. Again.
Page 2
Important Information
WARNING
To reduce the risk of fire or
electric shock, do not expose
this TV to rain or moisture.
dp°a ° rs i e°v'
Refer servicing to qualified service personnel.
_IIL This symbol indicates _ This symbol indicates
"dangerous voltage" inside important instructions
the product that presents a accompanying the product
risk of electric shock or
personal injury.
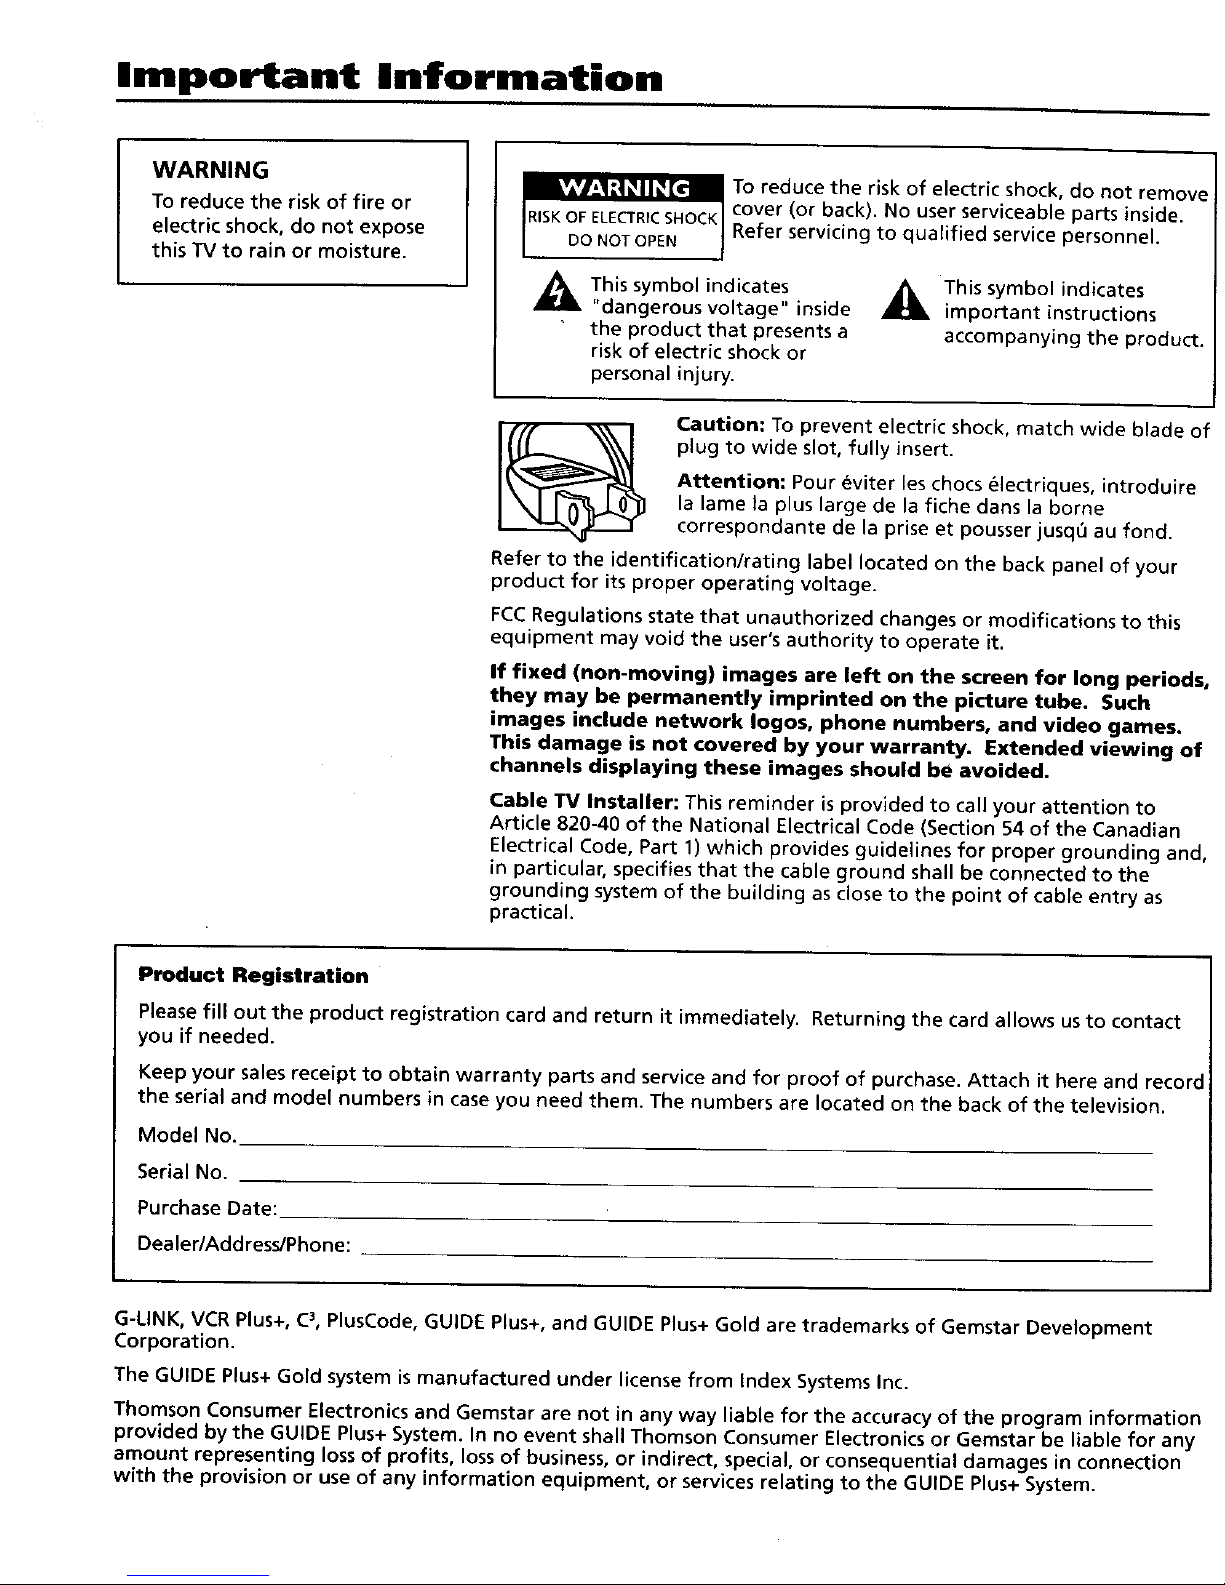
Caution: To prevent electric shock, match wide blade of
plug to wide slot, fully insert.
Attention: Pour eviter les chocs electriques, introduire
la lame la plus large de la fiche dans la borne
correspondante de la prise et pousser jusq6 au fond.
Refer to the identification/rating label located on the back panel of your
product for its proper operating voltage.
FCCRegulations state that unauthorized changes or modifications to this
equipment may void the user's authority to operate it.
If fixed (non-moving) images are left on the screen for long periods,
they may be permanently imprinted on the picture tube. Such
images include network Iogos, phone numbers, and video games.
This damage is not covered by your warranty. Extended viewing of
channels displaying these images should be avoided.
Cable TV Installer: This reminder is provided to call your attention to
Article 820-40 of the National Electrical Code (Section 54 of the Canadian
Electrical Code, Part 1) which provides guidelines for proper grounding and,
in particular, specifies that the cable ground shall be connected to the
grounding system of the building as close to the point of cable entry as
practical.
Product Registration
Please fill out the product registration card and return it immediately. Returning the card allows us to contact
you if needed.
Keep your sales receipt to obtain warranty parts and service and for proof of purchase. Attach it here and record
the serial and model numbers in case you need them. The numbers are located on the back of the television.
Model No.
Serial No.
Purchase Date:
Dealer/Add ress/Phone:
G-LINK, VCR Plus+, C3,PlusCode, GUIDE Plus+, and GUIDE Plus+ Gold are trademarks of Gemstar Development
Corporation.
The GUIDE Plus+ Gold system is manufactured under license from Index Systems Inc.
Thomson Consumer Electronics and Gemstar are not in any way liable for the accuracy of the program information
provided by the GUIDE Plus+ System. In no event shall Thomson Consumer Electronics or Gemstar be liable for any
amount representing loss of profits, loss of business, or indirect, special, or consequential damages in connection
with the provision or use of any information equipment, or services relating to the GUIDE Plus+ System.
Page 3
Introduction
Key Features Overview
Your TV is equipped with features that x_ill add to your TV \'ie_ing experience. The |k_llow ng
in{k)rlnation SLlnlnlal+iZCS a few of these features. C]lal')ter 3 provides more in_k)rn]ation abotlt the
rest of the TV's features and how to use them.
_t_nan
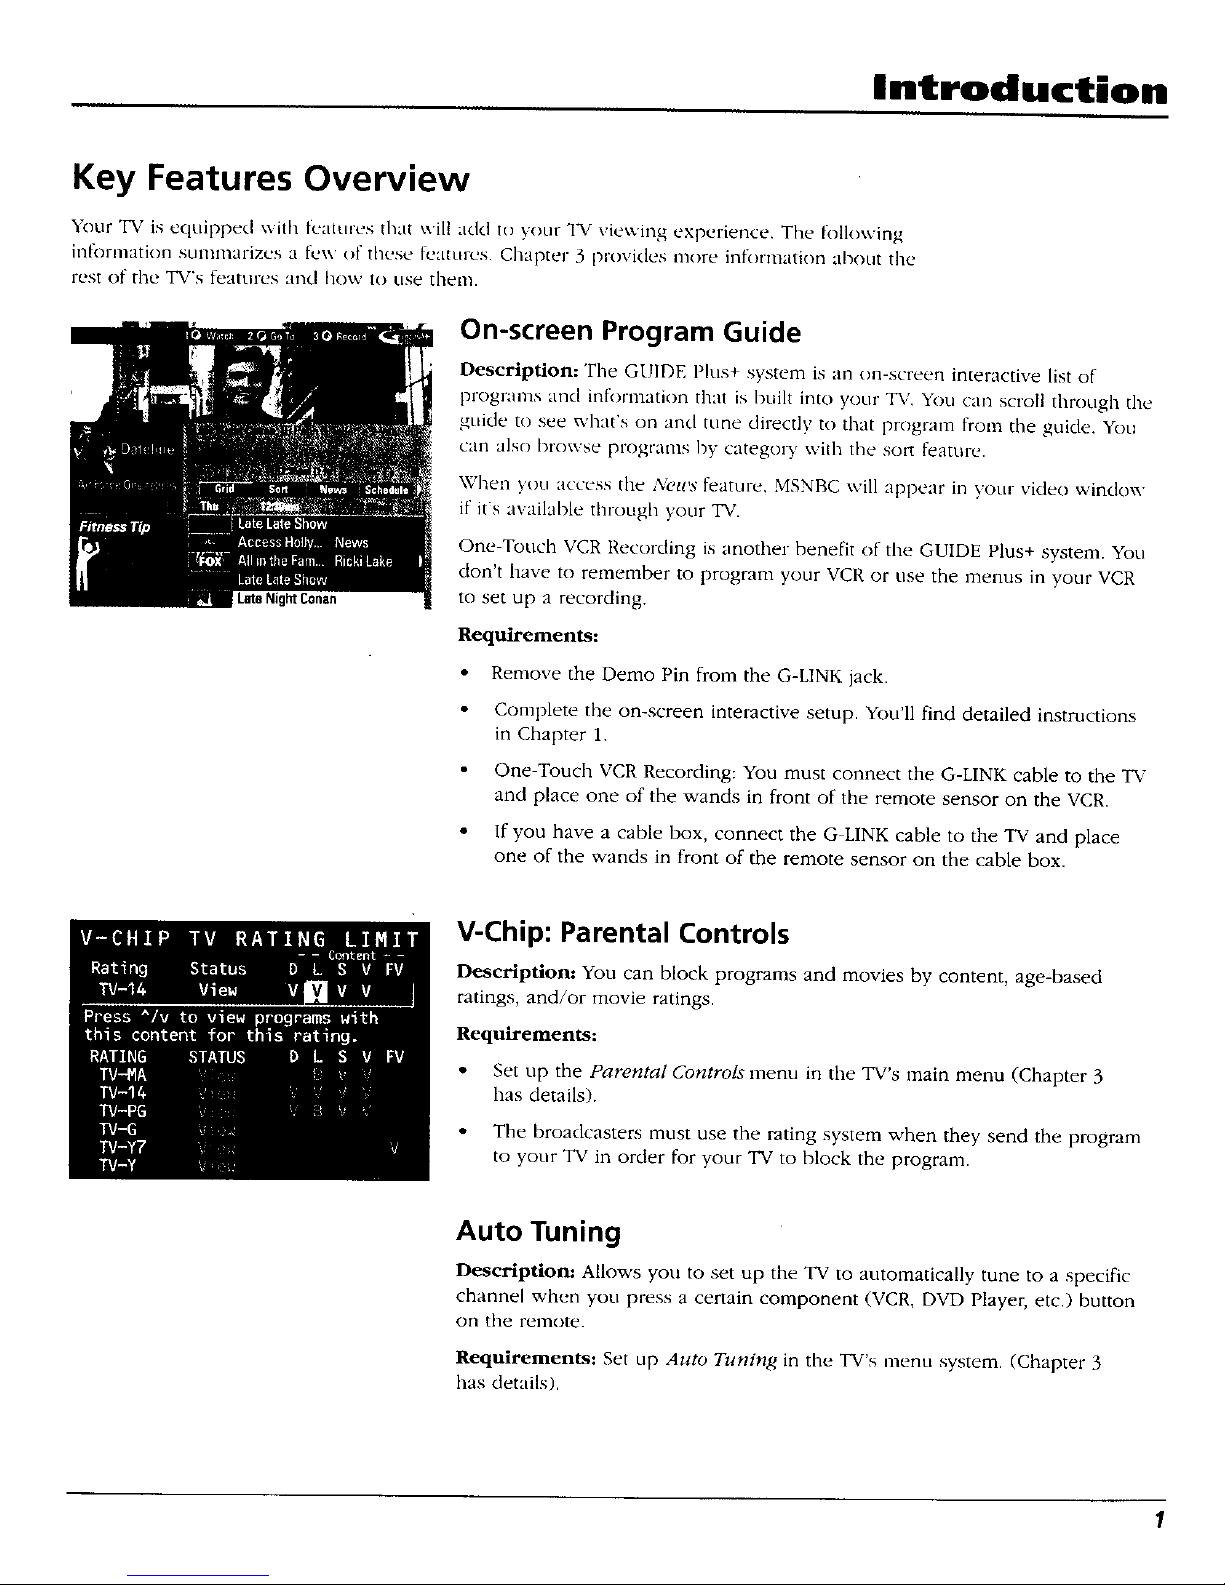
On-screen Program Guide
Description= The GUIDE Plus+ system is an on-screen interactive list of
programs and information that is built into your TV, You can scroll through the
guide to see what's on and tune directly to that program from the guide. You
can also browse programs hy categmT with the sort feature.
When _r_L,:_CCeSSthe ,\_ws feature, MSNBC will appear in your video window
if it's available through your TV.
One-Touch VCR P,ecording is another benefit of the GUIDE Plus+ system. You
don't have to remember to program your VCR or use the menus in your VCR
to set up a recording.
Requirements:
• Remove the Demo Pin from the G-LINK jack.
• Complete the on-screen interactive setup. You'll find detailed instructions
in Chapter 1.
• One-Touch VCR Recording: You must connect the G-LINK cable to the TV
and place one of the wands in front of the remote sensor on the VCR,
• If you have a cable box, connect the G LINK cable to the TV and place
one of the wands in front of the remote sensor on the cable box.
V-Chip: Parental Controls
Description: You can block programs and movies by content, age-based
ratings, and/or movie ratings.
Requirements:
• Set up the Parental Controls menu in the TV's main menu (Chapter 3
has details).
• The broadcasters must use the rating system when they send the program
to your TV in order for your TV to block the program.
Auto Tuning
Description: Allows you to set up the TV to automatically tune to a specific
channel when you press a certain component (VCR, DVD Player, etc.) button
on the remote.
Requirements: Set up Auto Tuning in the TV's menu system. (Chapter 3
has details).
Page 4

Introduction
(This page intentionally left blank)
2
Page 5
Table of Contents
Introduction
Key Features Overview .................................................................................................... 1
On-screen Program Guide ......................................................................................... 1
V-Chip: Parental Controls ........................................................................................... 1
Auto Tuning ................................................................................................................ 1
Chapter 1: Connections & Setup
Things to Consider Before You Connect ......................................................................... 6
Protect Against Power Surges ................................................................................... 6
Protect Components from Overheating ............... :................................................... 6
Position Cables Properly to Avoid Audio Interference ............................................ 6
Important Stand and Base Safety Information ........................................................ 6
Use Indirect Light ....................................................................................................... 6
Connection Pictures ................................................................................................... 6
Demo Pin .................................................................................................................... 6
Choose Your Connection .................................................................................................. 7
Connection: TV + VCR....................................................................................................... 8
Connection: TV Only ......................................................................................................... 9
Connection: TV + VCR + Satellite Receiver ................................................................... 11
Jackson the Back of Your TV .................................................................... ;.................... 12
Why You Should Connect This G-LINK Cable ............................................................... 13
Placing the G-LINK Wands ....................................................................................... 13
How to Find the Remote Sensor ............................................................................. 13
Complete the Interactive Setup ..................................................................................... 15
Set the Menu Language .......................................................................................... 15
Complete Auto Channel Search .............................................................................. 15
The GUIDE Plus+ System Setup ................................................................................ 15
What to Expect ............................................................................................................... 20
Next Steps ....................................................................................................................... 20
Chapter 2: Using the Remote Control
The Buttons on the Remote Control ............................................................................. 22
Using the WHO.INPUT Button ................................................................................ 23
Programming the Remote to Operate Other Components ......................................... 24
Find Out If You Need to Program the Remote ....................................................... 24
How to Program the Remote .................................................................................. 24
How to Use the Remote After You've Programmed It ................................................ 25
Chapter 3: Using the TV's Features
About the GUIDE Plus+ System .............................................. i...................................... 28
Downloading Data ................................................................................................... 28
Getting In & Out of the GUIDE Plus+ System ......................................................... 29
The GUIDE Plus+ System Menus .............................................................................. 29
Grid Guide ................................................................................................................ 29
Sort ............................................................................................................................ 31
News .......................................................................................................................... 32
Schedule .................................................................................................................... 32
3
Page 6
Table of Contents
Messages ................................................................................................................... 33
Channels ................................................................................................................... 34
Setup ......................................................................................................................... 34
How to Get More Information About an Advertisement or a Program ............... 35
GUIDE Plus+ Menu Items ............................................................................................... 35
Channel Banner .............................................................................................................. 36
Why You Should Use the Auto Tuning Feature ............................................................ 36
How to Set Up the Auto Tuning Feature ................................................................ 36
Parental Controls and V-Chip ......................................................................................... 38
How V-Chip Works ................................................................................................... 38
V-Chip TV Rating Limit ............................................................................................. 39
Blocking Specific Content Themes .......................................................................... 41
Viewing Specific Content Themes ........................................................................... 42
V-Chip Movie Rating Limit ....................................................................................... 43
V-Chip Unrated Program Block ............................................................................... 44
Channel Block ........................................................................................................... 44
Front Panel Block ..................................................................................................... 44
Lock/Unlock Parental Controls ................................................................................ 44
Chapter 4: Using the TV's Menu System
How to Use Your TV's Menu System ............................................................................. 46
Audio Menu .................................................................................................................... 46
Picture Quality Menu ..................................................................................................... 47
Screen Menu ................................................................................................................... 48
Using Closed Captioning ................................................................................................ 48
Channel Menu ................................................................................................................. 49
Time Menu ...................................................................................................................... 50
Chapter 5: Other Information
Troubleshooting .............................................................................................................. 52
Care and Cleaning ........................................... ;.............................................................. 54
Front Panel ...................................................................................................................... 55
RCA TV Limited Warranty .............................................................................................. 55
Index ................................................................................................................................ 59
4
Page 7
Chapter 1
Connections & Setup
Chapter Overview:
• Things to Consider Before You Connect
• Choose Your Connection
• Connections
Jacks on the Back of Your TV
Why You Should Connect This G-LINK Cable
Plug in the TV
Put Batteries in the Remote
How to Use the Remote Control to Complete the
Interactive Setup
• Turn on theTV
• Complete the Interactive Setup
Changing Entertainment. Again.
5
Page 8
Connections 8. Setup
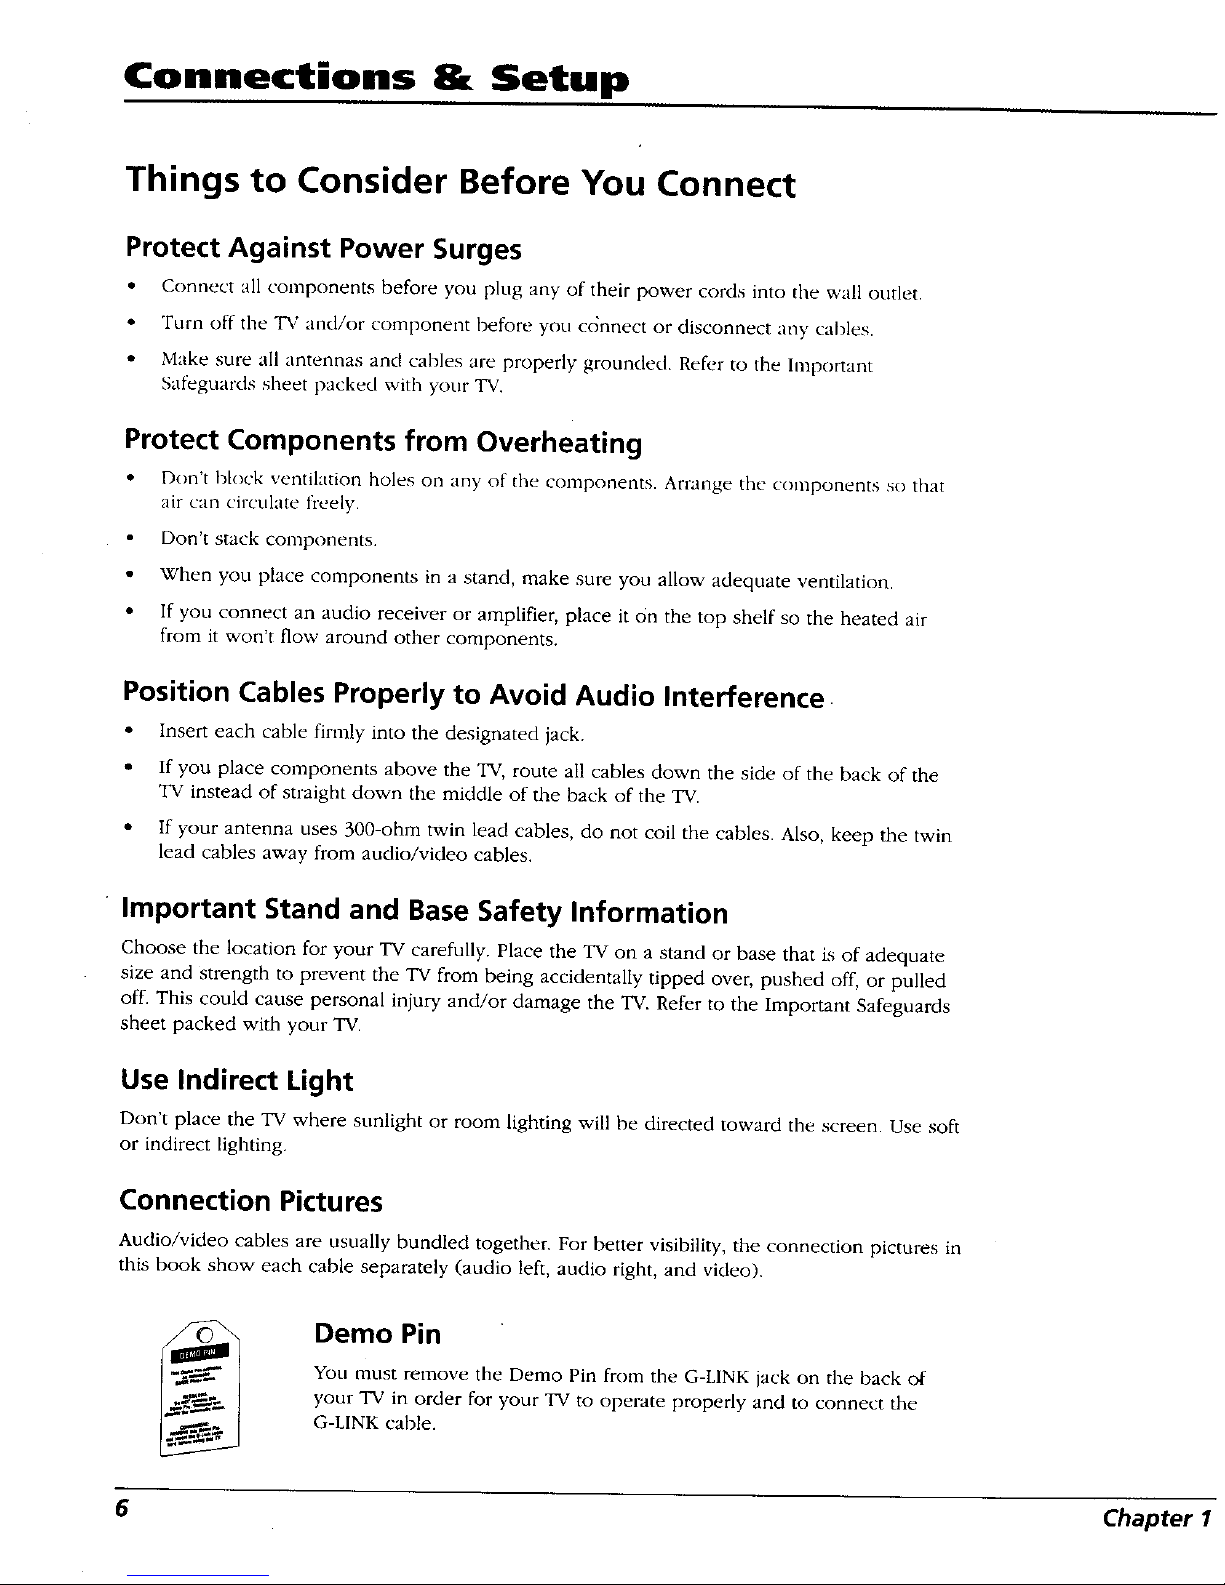
Things to Consider Before You Connect
Protect Against Power Surges
• Connect all components before you plug any of their power cords into tire wall outlet.
• Turn off the TV and/or component before you connect or disconnect any cables.
• Make sure all antennas and cables are properly grounded. Refer to tile hnportant
Safeguards sheet packecl with your TV.
Protect Components from Overheating
• Don't brock ventilation holes on any of the components. Arrange the components so that
air can circulate freely.
Don't stack components.
• When you place components in a stand, make sure you allow adequate ventilation.
• If you connect an audio receiver or amplifier, place it On the top shelf so the heated air
from it won't rio',,/"around other components•
Position Cables Properly to Avoid Audio Interference.
• Insert each cable firmly into the designated jack.
• If you place components above the TV, route all cables down the side of the back of the
TV instead of straight down the middle of the back of the TV.
• If your antenna uses 300-ohm twin lead cables, do not coil the cables. Also, keep the twin
lead cables away from audio/video cables.
• Important Stand and Base Safety Information
Choose the location for your TV carefully. Place the TV on a stand or base that is of adequate
size and strength to prevent the TV from being accidentally tipped over, pushed off, or pulled
off. This could cause personal injury and/or damage the TV. Refer to the Important Safeguards
sheet packed with your TV.
Use Indirect Light
Don't place the TV where sunlight or room lighting will be directed toward the screen. Use soft
or indirect lighting.
Connection Pictures
Audio/video cables are usually bundled together. For better visibility, the connection pictures in
this book show each cable separately (audio left, audio right, and video).
Demo Pin
You must remove the Demo Pin from the G-LINK jack on the back o_
your TV in order for your TV to operate properly and to connect the
G-LINK cable.
6 Chapter 1
Page 9

Connections & Setup
Choose Your Connection
There are several ways to connect your TV. Please use tile following cllall, to determine which
connection is best for you. Proceed to tile appropriate page and connect your TV.
Components
Cables
Needed
Coaxial
Audio/video
G-LINK cable
Coaxial
Coaxial
Audio/video
S-Video (optional)
G-LINK cable
Connection
Title
TV + VCR
TV Only
TV + VCR +
Satellite Receiver
Go to...
page 8
page 9
pages 10-11
Cables Needed to Connect Components to Your TV
The pictures below show the cables needed for the connections represented in this book.
Noles: A udio/Video cables (A/V cables for short) are usually sold as a bundled set, but
the connection pictures in this book show each cable separately for better visibility.
Please locate the G-LINK cable (provided) when you're getting ready to set up your T!Z
You need to connect this cable to .your TV, and to your VCR and/or cable box in order for
all of the features of the program guide to work properly.
G-LINK cable Audio/Video cables Coaxial cable S-Video cable
Chapter 1 7
Page 10
Connections & Setup
TV (back panel)
FromCabie
or Antenna
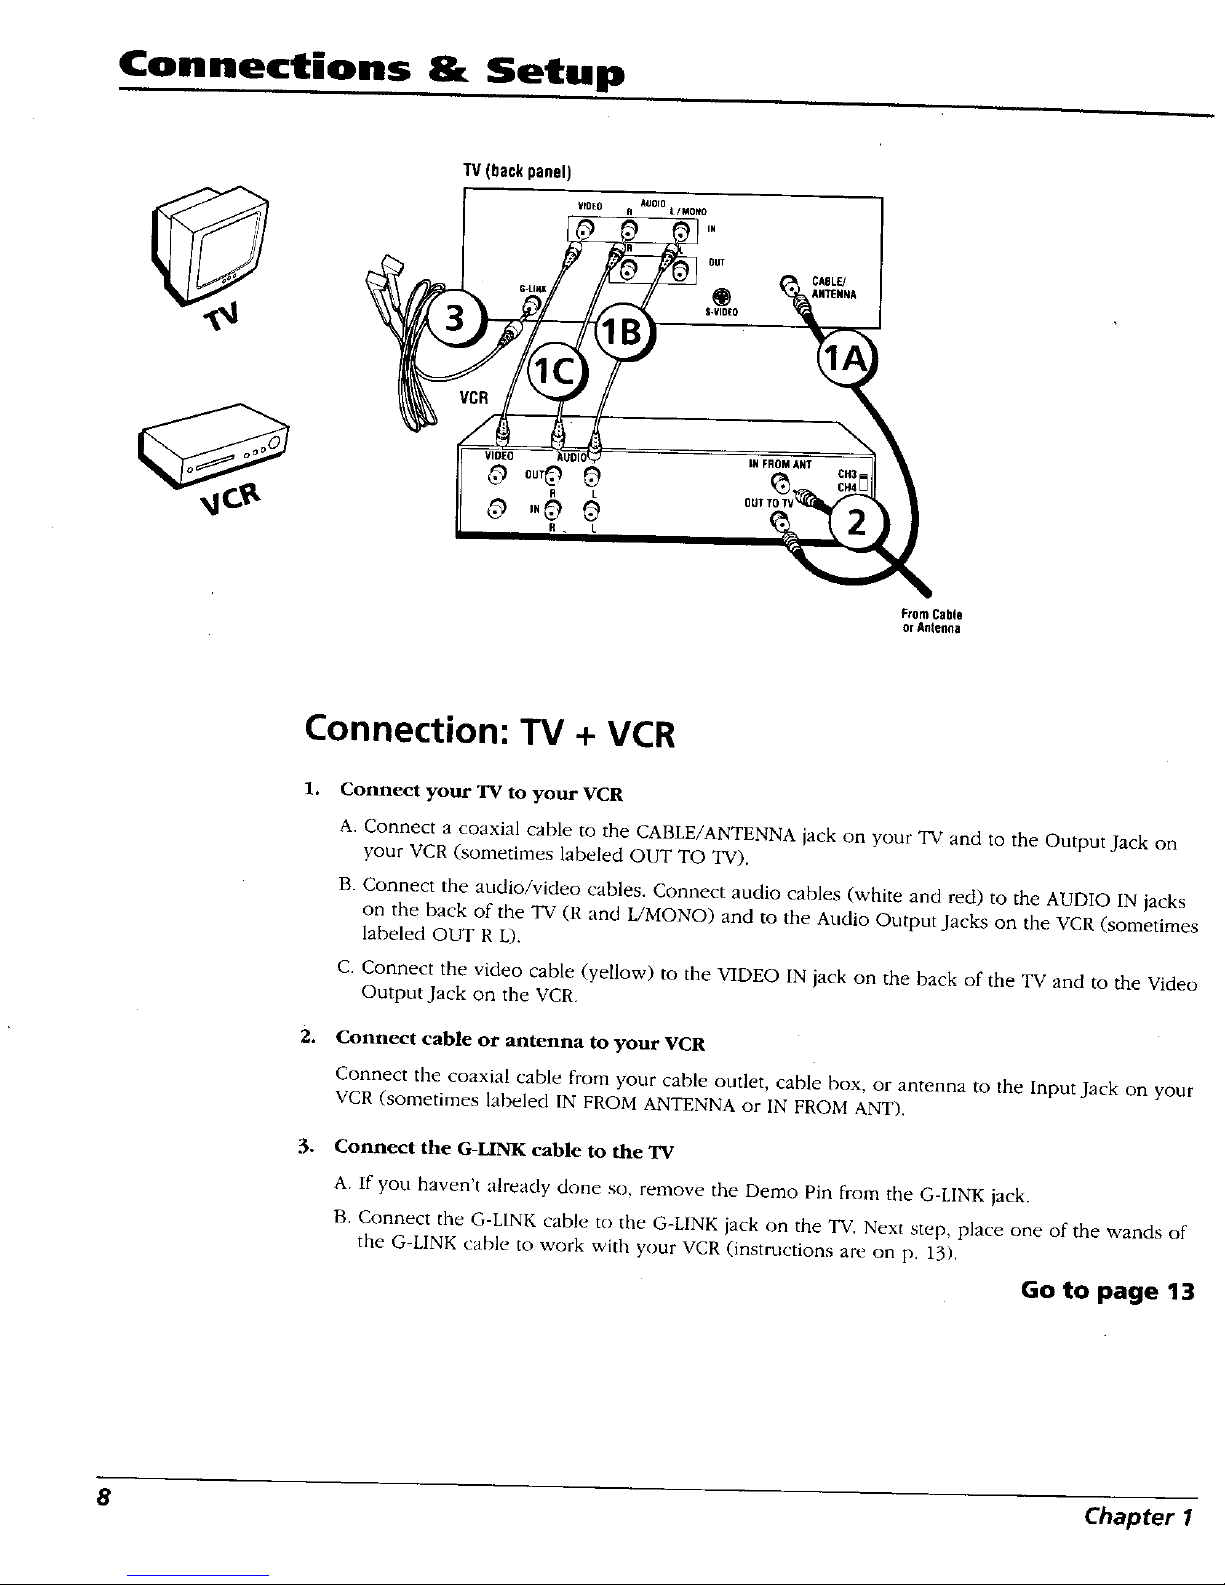
Connection: TV + VCR
1. Connect your TV to your VCR
,
.
A. Connect a coaxial cable to the CABLE/ANTENNA jack on your TV and to the Output Jack on
your VCR (sometimes labeled OUT TO TV).
B. Connect the attdio/video cables. Connect audio cables (white and red) to the AUDIO IN jacks
on the back of tbe TV (R and L/MONO) and to the Audio Output Jacks on the VCR (sometimes
labeled OUT R L).
C. Connect the video cable (yellow) to the VIDEO IN jack on the back of the TV and to the Video
Output Jack on the VCR.
Connect cable or antenna to your VCR
Connect tim coaxial cable from your cable outlet, cable box, or antenna to the Input Jack on your
VCR (sometimes labeled IN FROM ANTENNA or IN FROM ANT).
Connect the G-LINK cable to the TV
A. If you haven't already done so, remove the Demo Pin from the G-LINK jack.
B. Connect the G-LINK cable to the G-LINK jack on tbe TV. Next step, place one of the wands of
the G-LINK cable to work with your VCR (instructions are on p. 13).
Go to page 13
8 Chapter 1
Page 11
Connections & Setup
TV(backpanel)
VIDEO R AUDIO LIMONO
R t
OUT
G'LINK
S-VIDEO
FromCable,
CableBox,
orAntenna
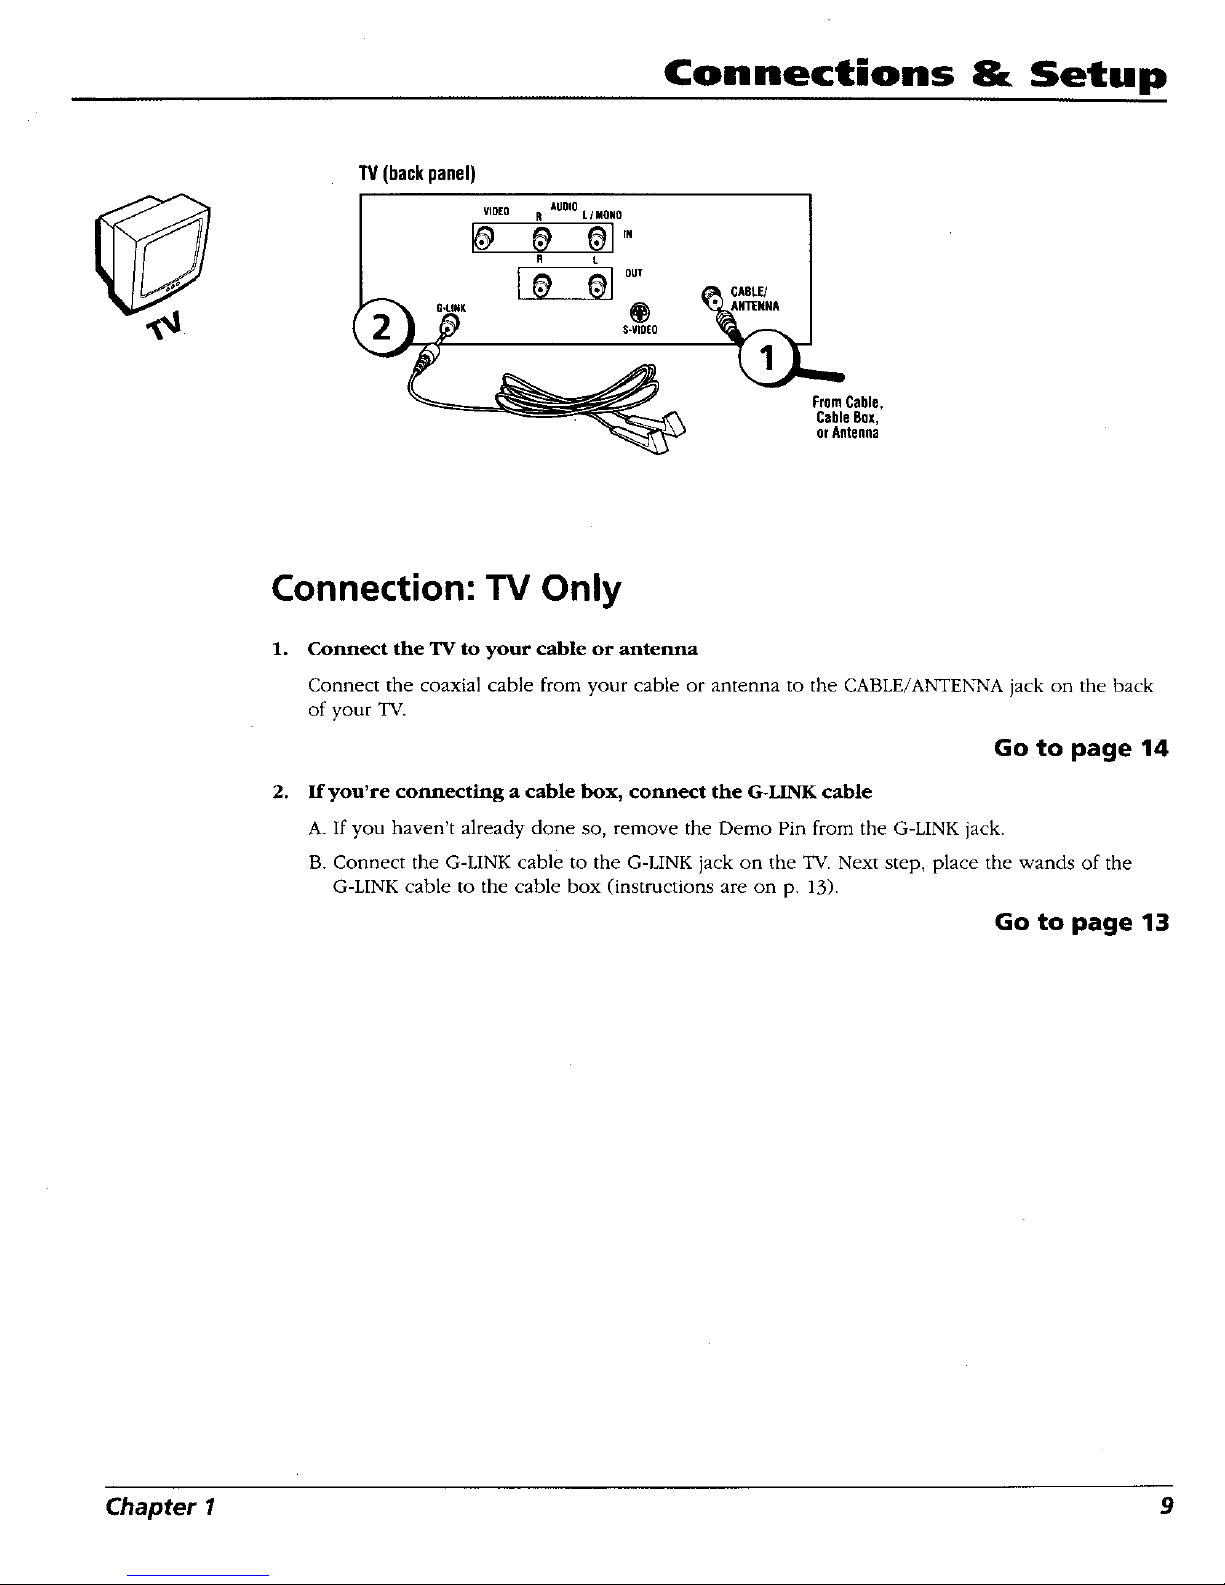
Connection: TV Only
1. Connect the TV to your cable or antenna
Connect the coaxial cable from your cable or antenna to the CABLE/ANTENNA jack on the back
of your TV.
Go to page 14
2. If you're connecting a cable box, connect the G-LINK cable
A. If you haven't already done so, remove the Demo Pin from the G-LINK jack.
B. Connect the G-LINK cable to the G-LINK jack on the TV. Next step, place the wands of the
G-LINK cable to the cable box (instructions are on p. 13).
Go to page 13
Chapter I 9
Page 12
Connections & Setup
SATELLITERECEIVER
From Cable or Antenna
IN FROM ANT
OUT
0_0 o
VI()EO R L S-VIDEO
VCR
Satellite
Signal
TV (back panel)
IN
ANTENNA
S-VIDEO
10 Chapter 1
Page 13
Connections 8t Setup
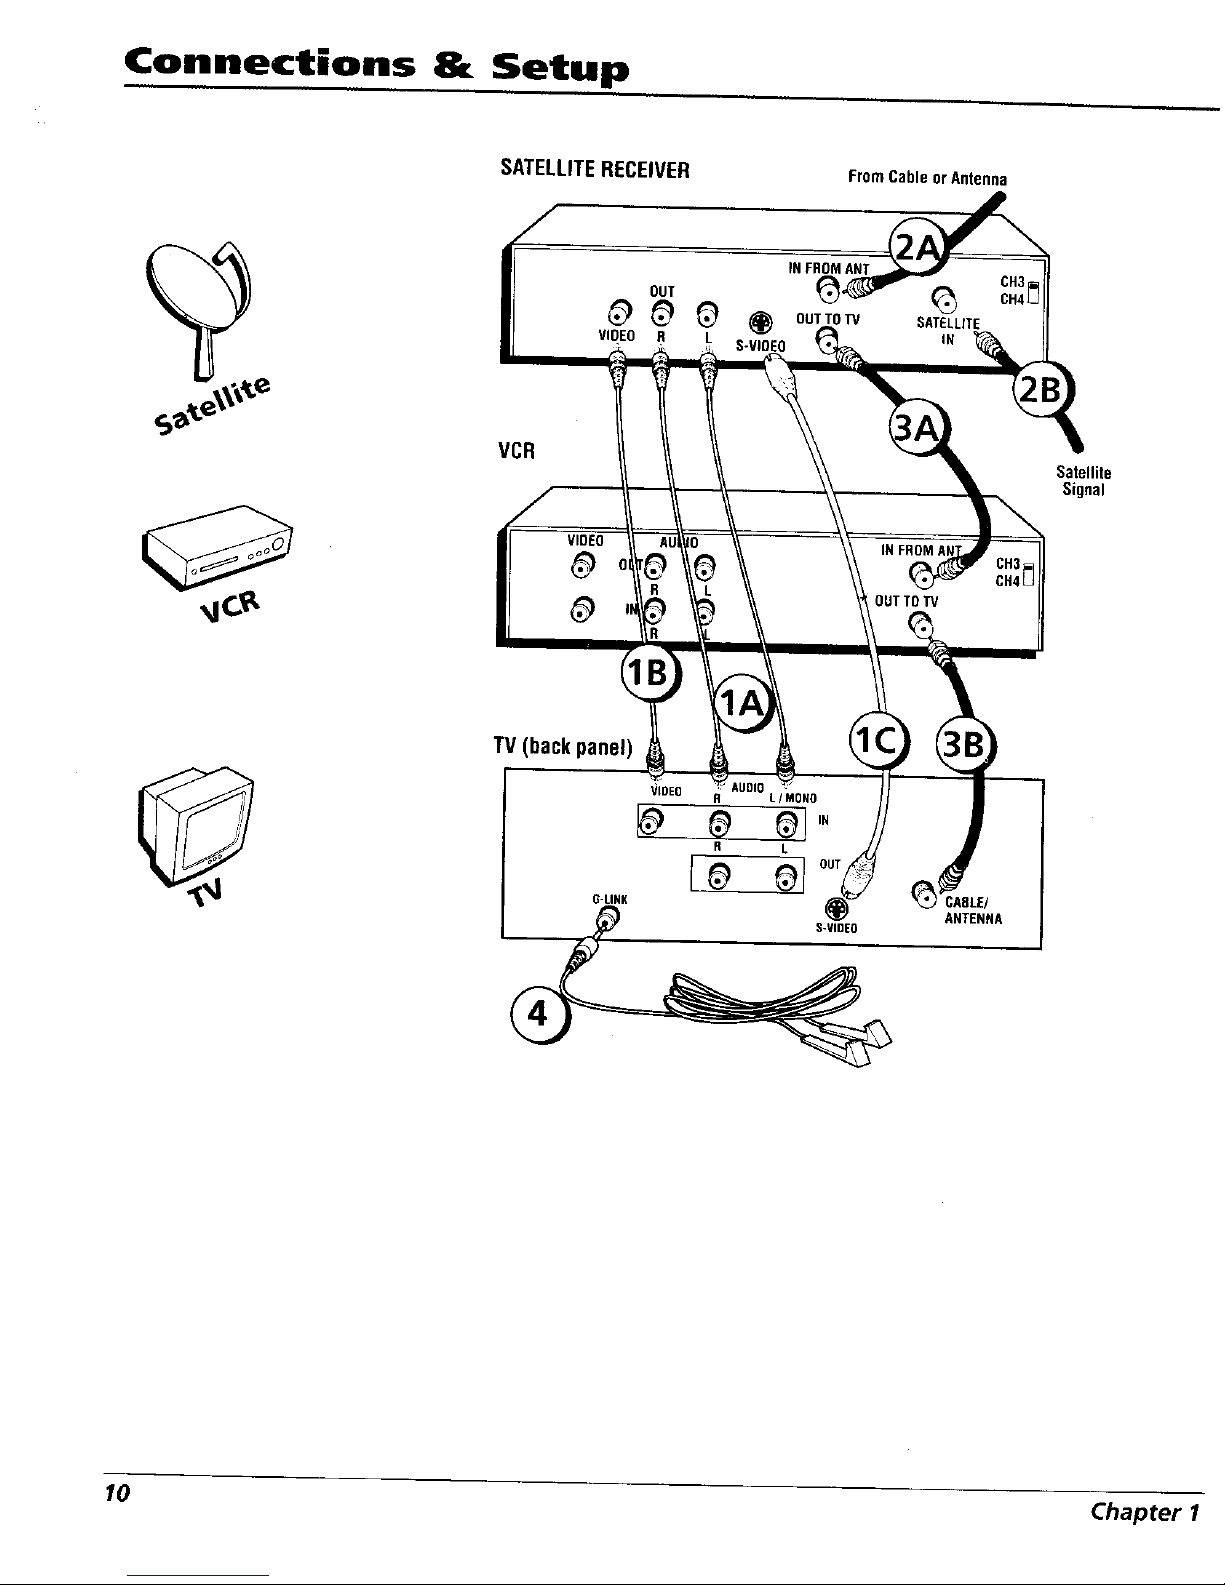
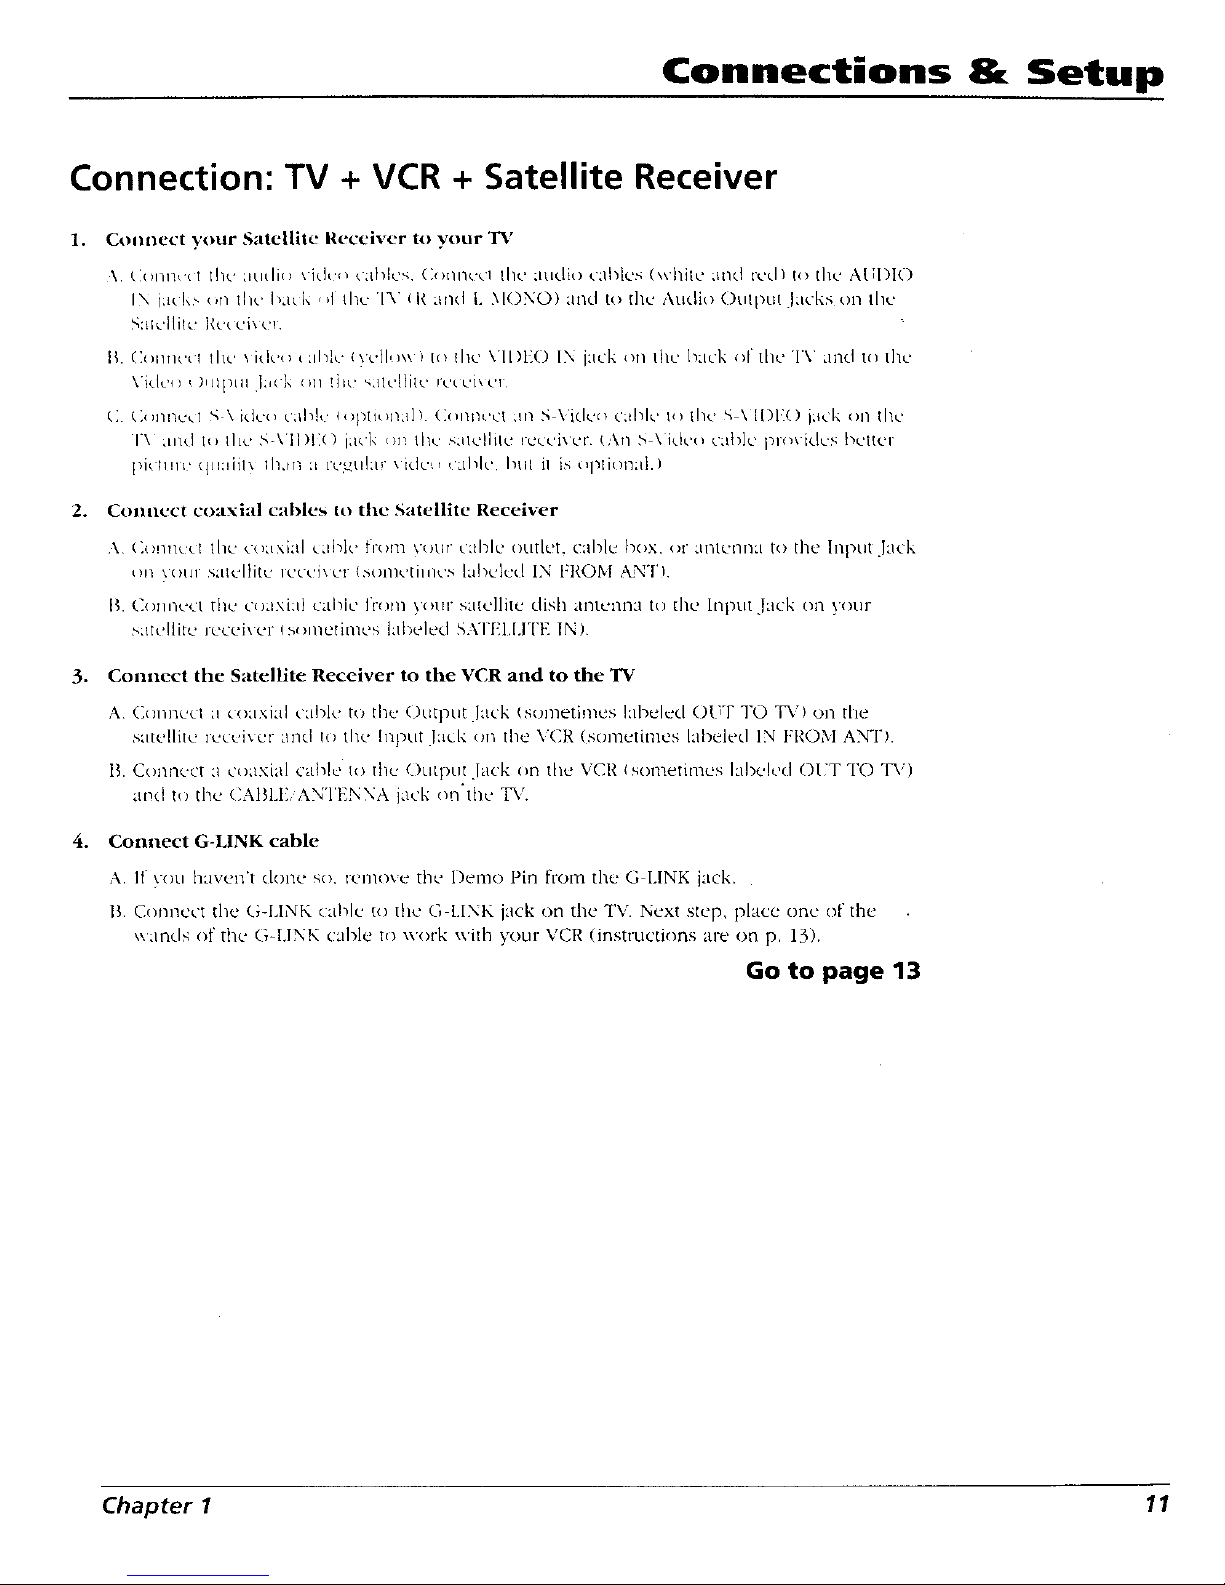
Connection: TV + VCR + Satellite Receiver
1. Co I _ect your Satellite Receiver to your'B'
\ t i)ma_t the :mtli() \ idt'++ <tbk'-, ()>ill?evl the :liLt+lie tableN (\\hilt: _H1cl red+ t<>the AITDI()
IN j:ic I.,, (,tl the l)_Ic [.. , )I¸ the IX. . If( _itl+.l L _IONO) and to the Audio ()ulput .lacks t)n lhe
N. (]omk.tt tl_c, _ i0_> _:il+l,: <,+u[b\\ ) It> lhe VIL)EO IN jack on tklu' bad, +>I tit<: +I'x. and to t]IC
\ i_[C_) t )!]IpLtt I:+( i< ()tl tile '_ttc'Nit,.' PC( u'i',c't
+.; C;<+m_u,.t '+; \ kk'u ulh],' (g)titm:tl+ (:(mnuct :ti_ 5 \ i(Iv¢+ (:+l+lu' t+) the _ \ IDI:() i:i,-l', <m tlw
I+\ :Had to+ tile. 5A ll)I t) i:t& <>t+tk:,: +,:tie[file iccci,+ur t,\tl > \ idct+ citb]u pl(+',idcs l',uttm
pitt;ram Htmiil_. ih,ttl :t l'C'_tl]:l+ \ic]c'_+ _:tl+I(' l,Ill iI i:_ (+l+Jli()n:II.)
Connect coaxial cables to the Satellite Receiver
'_ (](_m_ccl the _o:txlal c:tblt + trc>m VOtlT"u:Iblc' ot.urlet, c:tblc + be×, <>tatltenila [o the ln['_ut Jad,+
tm ,.(>iN +,atdlitu ncccJ',cz (>()m,:tilm'_, labcqcd IN FROM ANT!
[:LC<)m_c+ct the c()axi:i) cabiu' ]toIll )(>t+r :+,atc,]litu dish al++tetlna ttl tile h'tput Jack ell )our
_utc!!litc ieceix el+(soinetimes labeled SATI'I,I,ITt'] IN)
.
Connect the Satellite Receiver to the VCR and to the TV
A (]cmnc,ct ;t (o:txial c':iblct to t]+c+(JuG+ut .Jack (sometimes labelecl OITF TO "IX<:) on the
satellite rc.ccq'+cr :tnct to the IrG+tit !:ic.l-t on the VCR (sonletitl!es lal+eled IN FROM ANT).
l:l. Col+the+or:l coaxial cable to the, Outptlt ,lack (m tile VCR (sot_letinle<+ lal)e!('(I OI;T TO TV)
at+d to tke (]AISLt', AN"I'PLNNA jack o!_'thc TV.
. Connect G-LINK cable
A. If you haven't (loire so, i-ell/ore the l)emo Pin from the G LINK lack.
1L Connect the (;-LINK cab]c to the G LINK iack on the TV. Next step, place one of the
\<rods of the G41NK cable to x\ork x\ith your VCR (instructions arc' on p. 13).
Go to p ,ge 13
Chapter1 11
Page 14
Connections & Setup
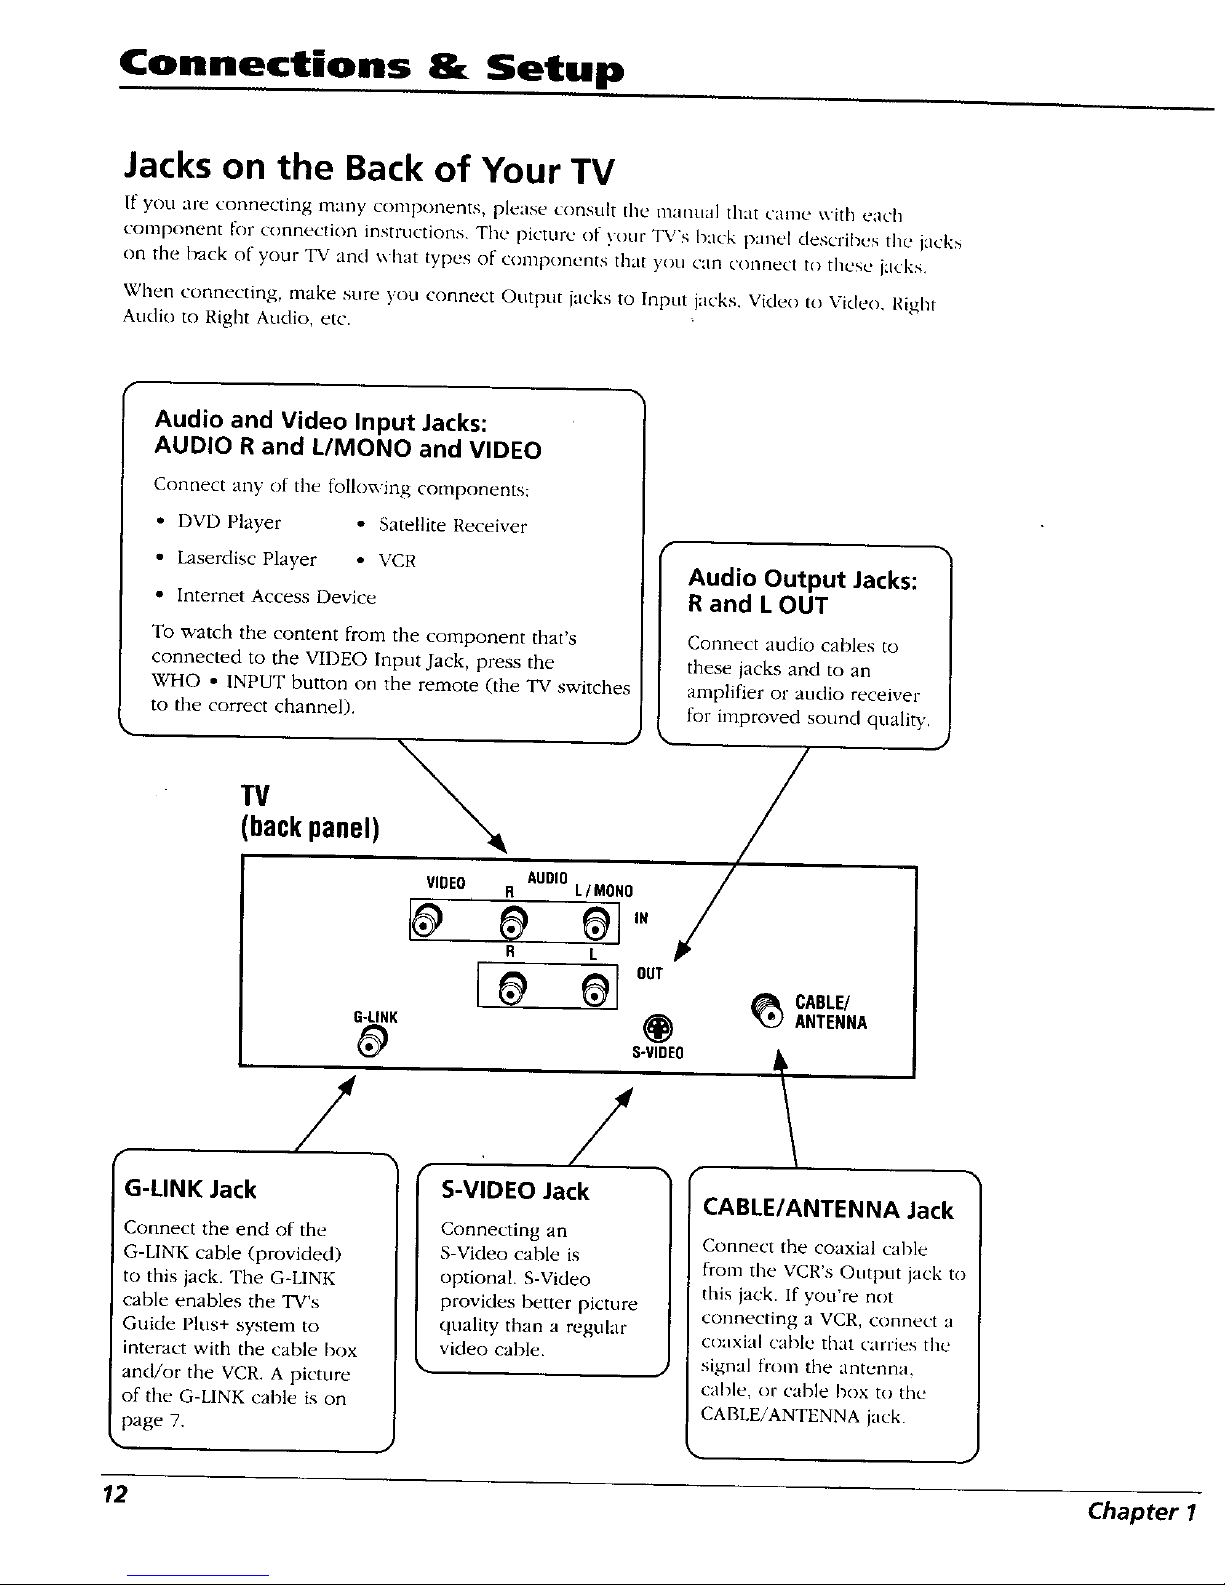
Jacks on the Back of Your TV
If you al'e cormecting many components, please consult tile man_.tal that came with each
component I_:)rconnection instructions. The picture of your TV's back pLIlle[ describes tile jacks
on the I_ack of your TV and what types of conlponents that you can connect to these jacks.
When connecting, make sure you connect Output jacks to Input iacks. Video to Video, Right
Audio to Right Audio, etc.
Audio and Video Input Jacks:
AUDIO R and L/MONO and VIDEO
Connect any of the following components:
• DVD Player o Satellite Receiver
• Laserdisc Player - VCR
• Internet Access Device
To watch the content from tile component that's
connected to the VIDEO Input Jack, press the
Audio Output Jacks:
R and L OUT
Connect audio cables to
these iacks and to an
TV
(backpanel)
WHO • INPUT button on the remote (the TV switches
to the correct channel).
J
amplifier or audio receiver
for improved sound quality.
/
G-LINK
/
VIDEO R AODIDL/MONO /'
/
k
{o el"
/
G-LINK Jack
Connect the end of the
G-LINK cable (provided)
to this jack. The G-LINK
cable enables the TV's
Guide Plus+ system to
interact with the cable box
and/or the VCR. A picture
of the G-LINK cable is on
page 7.
/
S-VIDEO Jack
Connecting an
S-Video cable is
optional S-Video
provides better picture
quality than a regular
video cable.
@
S-VIDED
]
_ CABLE/
ANTENNA
CABLE/ANTENNA Jack
Connect the coaxial callle
from tile VCR's Output jack to
this iack. If you're not
connecting a VCR, connect a
coaxial cable that carries tile
signal flon] the antenna,
cal)le, or cable box to the
CABLE/ANTENNA iack.
12 Chapterl
Page 15
Connections & Setup
Why You Should Connect This G-LINK Cable
The G-LINK cable enables the GUII)E Plus+ system (tile on-screen interactive program guide) to
work with your VCR and, or cable box
Cable Box- If your 'Ix,' is connected to a cable box you must connect tire G LINK cable to rece ve
TV program listings Ik)r y()ur area, :ill(.]tO tune directly to a channel when the program guide is on
your TV screen.
VCR- If your "IA' is connected to a VCR and you don't connect the G-LINK cable, one-touch VCR
ecr)rding won't work. The other features of the guicle will work properly.
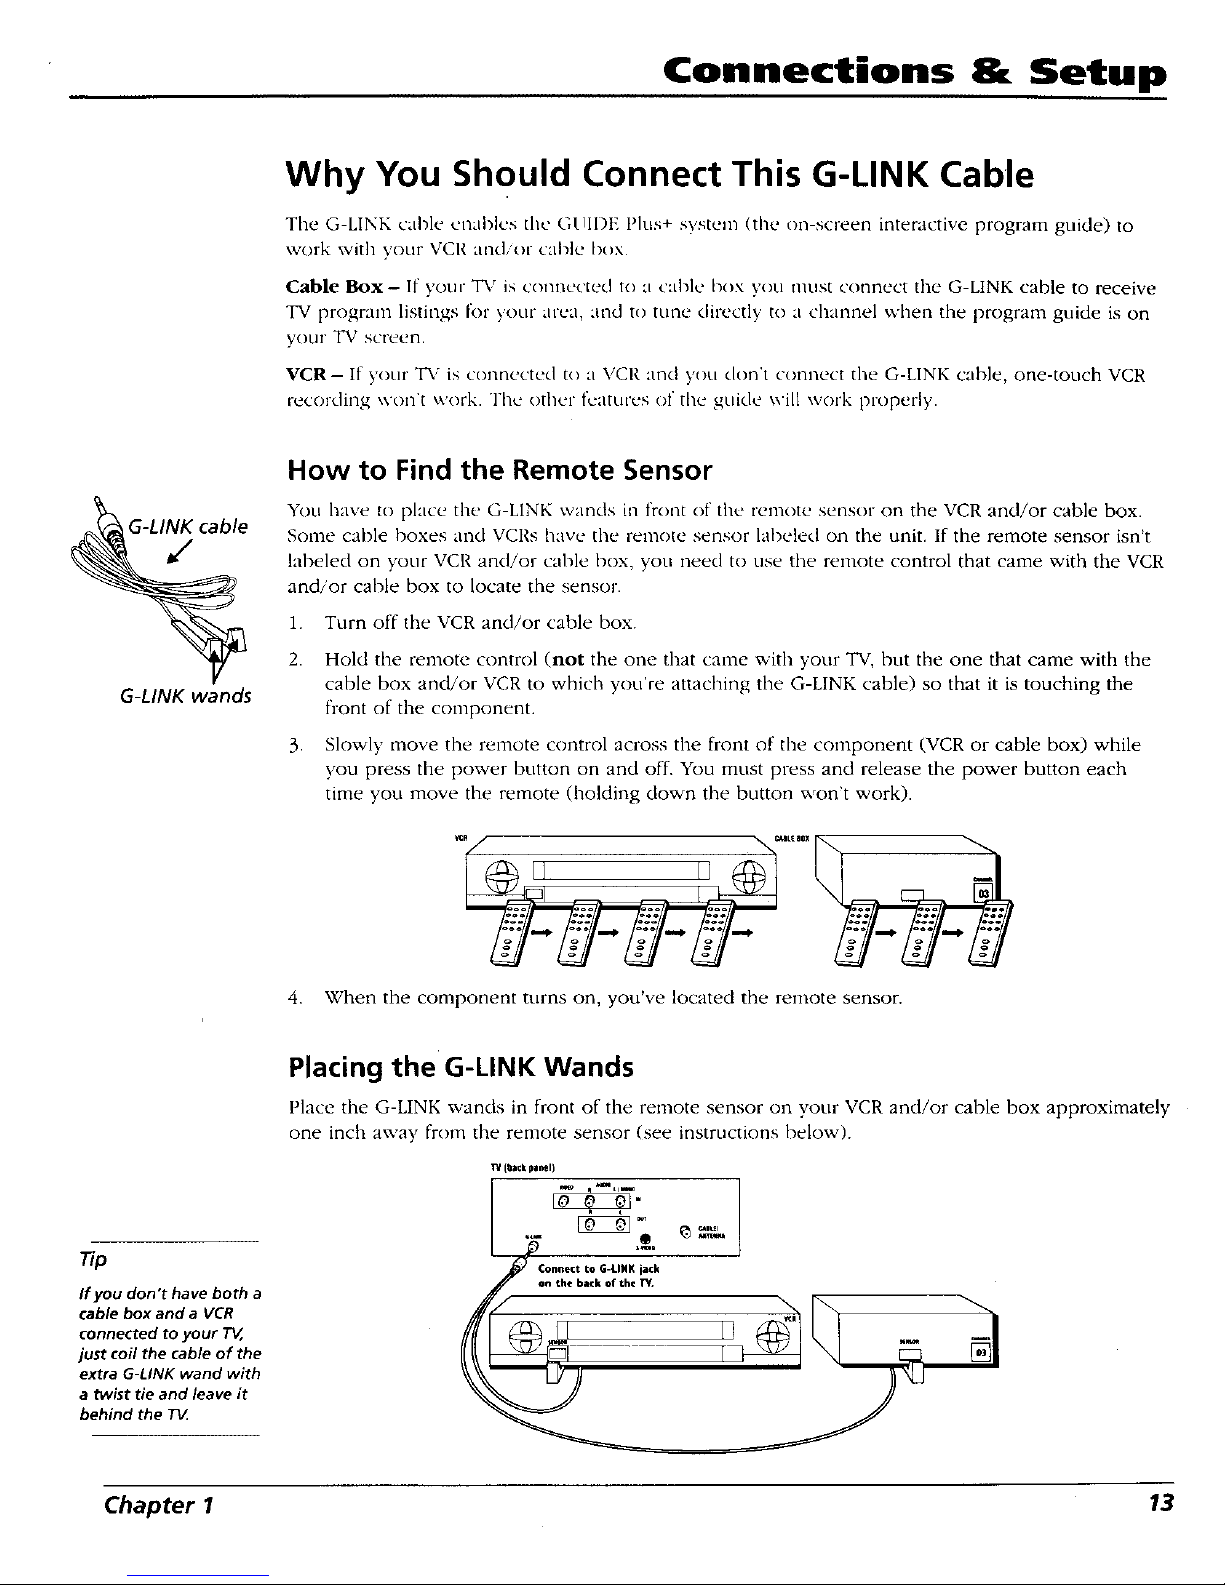
G-LINK wands
How to Find the Remote Sensor
You have to place the G LINK wands in fi'ont of the remote sensor on the VCR and/or cable box.
Sonre cable boxes and VCRs have the remote sensor labeled on the unit. If the remote sensor isn't
labeled on your VCR and/or cahle box, you need to use the remote control that came with the VCR
and/or cable box to locate the sensor.
1. Turn off the VCR and/or cable box.
2. Hold the remote control (not the one that came with your TV, but the one that came with the
cable box and/or VCR to wbich you're attaching the G-LINK cable) so that it is touching the
front of the component.
3. Slowly nrove the remote control across the front of tl_e component (VCR or cable box) while
you press the power button on and off. You must press and release the power button each
time you move the remote (bolding down the button won't work).
4,
When the component turns on, you've located the renrote sensor.
If you don't have both a
cable box and a VCR
connected to your T_,
just coil the cable of the
extra G-LINK wand with
a twist tie and leave it
behind the TV
Placing the G-LINK Wands
Place the G-LINK wands in front of the renrote sensor on your VCR and/or cable box approximately
one inch away from the remote sensor (see instructions below).
TV(ba©kpanel)
Connect to G-LINK iack
/_ mortthe ba_:k of the _. _'_l I_ _.
Chapter 1 13
Page 16
Connections & Setup
Plug in the TV
Plug the end of the p(n.,.er cord into the wall outlet. Match the wide blade of the
plug with the xxide slot in the outlet, lnselt tile plug completely into
ttae outlet.
\
\
\
\
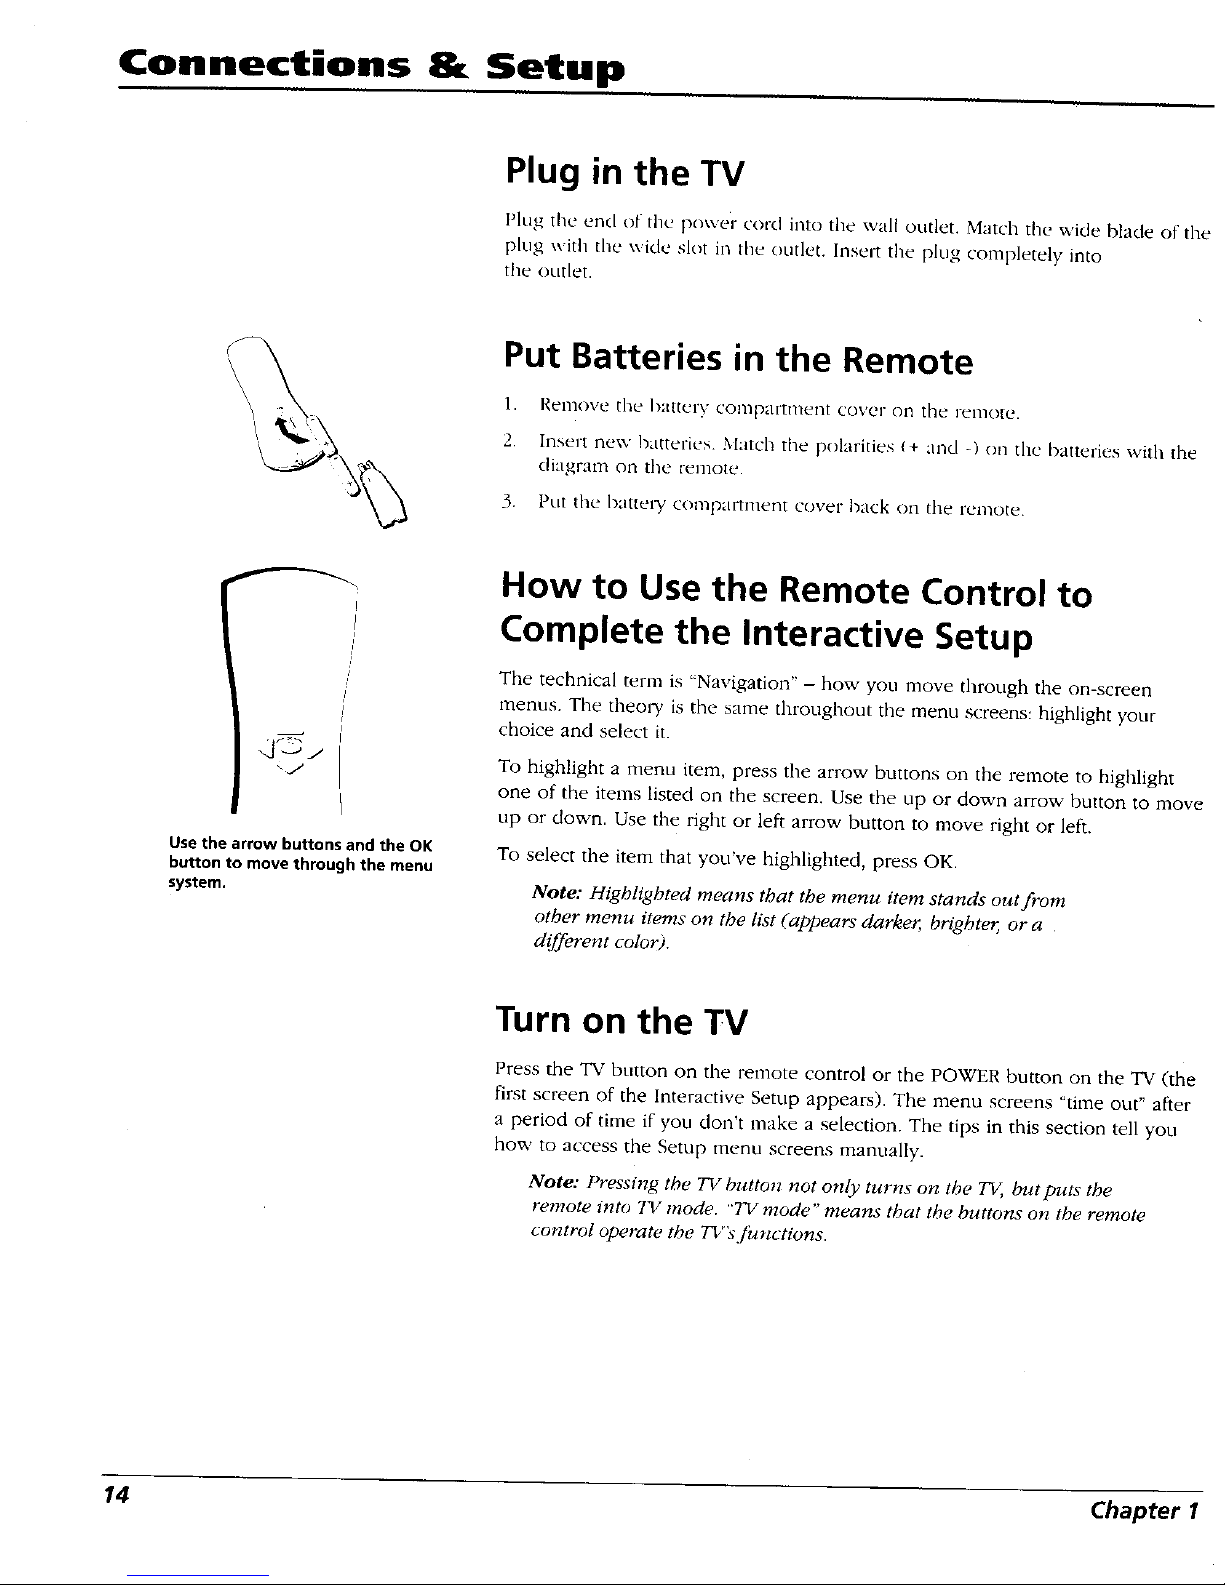
Put Batteries in the Remote
1. Remove the battery compartmel'lt cover nrl the remote.
2. Insert new batteries. Match the polarities (+ and -_ on the batteries with the
(liagmn_ on the remo;e.
3r Put the battel T conlpartnlent cover hack (nl {lie renlote.
_]-.-,j
Use the arrow buttons and the OK
button to move through the menu
system.
How to Use the Remote Control to
Complete the Interactive Setup
The technical term is "Navigation" - how you move through the on-screen
menus. The theow is the same throughout the menu screens: highlight your
choice and select it.
To highlight a ntenu item, press the arrow buttons on the remote to highlight
one of the items listed on the screen. Use the up or down arrow button to move
up or down. Use the right or left arrow button to move right or left.
To select the item that you've highlighted, press OK.
Note: Highlighted means that the menu item stands out from
other menu items on the list (appears darker, brighter, or a
different color).
Turn on the TV
Press the TV button on the remote control or the POWER button on the TV (the
first screen of the Interactive Setup appears), The menu screens "time out" after
a period of time if you don't make a selection. The tips in this section tell you
how to access the Setup menu screens manually.
Note: Pressing the TV butto*_ not only turns on the TV, but puts the
remote into TV mode. "TV mode" means that the buttons on the remote
control operate the TV's fi_nctions.
14 Chapter1
Page 17

Connections 8t Setup
Tip
To access the setup menus manually,
press MENU and choose Setup.
Complete the Interactive Setup
The menu system in your TV allows the TV's tbattnvs to work properly. In this
book, we call it tile "interactive setup" because the TV asks you questions, you
answer, and tire TV makes the appropriate adjustments. The fhst tinle you tuna
on your TV, the setup screens appear automatically.
Set the Menu Language
The first part of the SETZZPasks you to select your preferred language for tire
menu system.
1. Highlight your preferred language for the nrenu system.
2. Press OK to select that language.
Complete Auto Channel Search
The next part of the SETUP asks you if you want the TV to search for all
channels viewable through your antenna or cable TV system. This is sometimes
called "auto programming."
1. Press OK to tell the TV to begin searching for channels. A progress report
appears on the screen.
2. When the screen on the TV tells you the search is complete, press OK (the
first GUIDE Plus+ system setup screen appears).
Note: If you skip Auto Channel Searcb now, you can access it later
through the Channel menu. See Chapter 4for more details.
Tip
If you move to a new zip or postal
code, or if any of your information
changes, you need to accessthe
setup screens from the TV's main
menu-- press MENU, choose GUIDE
Plus+ Menu, and choose GUIDE
Plus+ Setup.
The GUIDE Plus+ System Setup
The GUIDE Plus+ system is an on-screen interactive program guide that lists
what shows are on TV in your area. In order to receive program listings, you
need to complete the following steps.
The G-LINK cable must be connected to the back of your TV, and the wands
must be placed in front of the remote sensor of the cahle box and/or VCR in
order for the GUIDE Plus+ system to work (go back to p. 13 for details).
1. You should see a screen displaying the features of the Guide Plus+ system.
Press OK to continue.
2. The next screen asks you to locate setup materials and hardware. Once you
have done this, press OK to continue.
Chapter 1 15
Page 18
Connections & Setup
.t USA
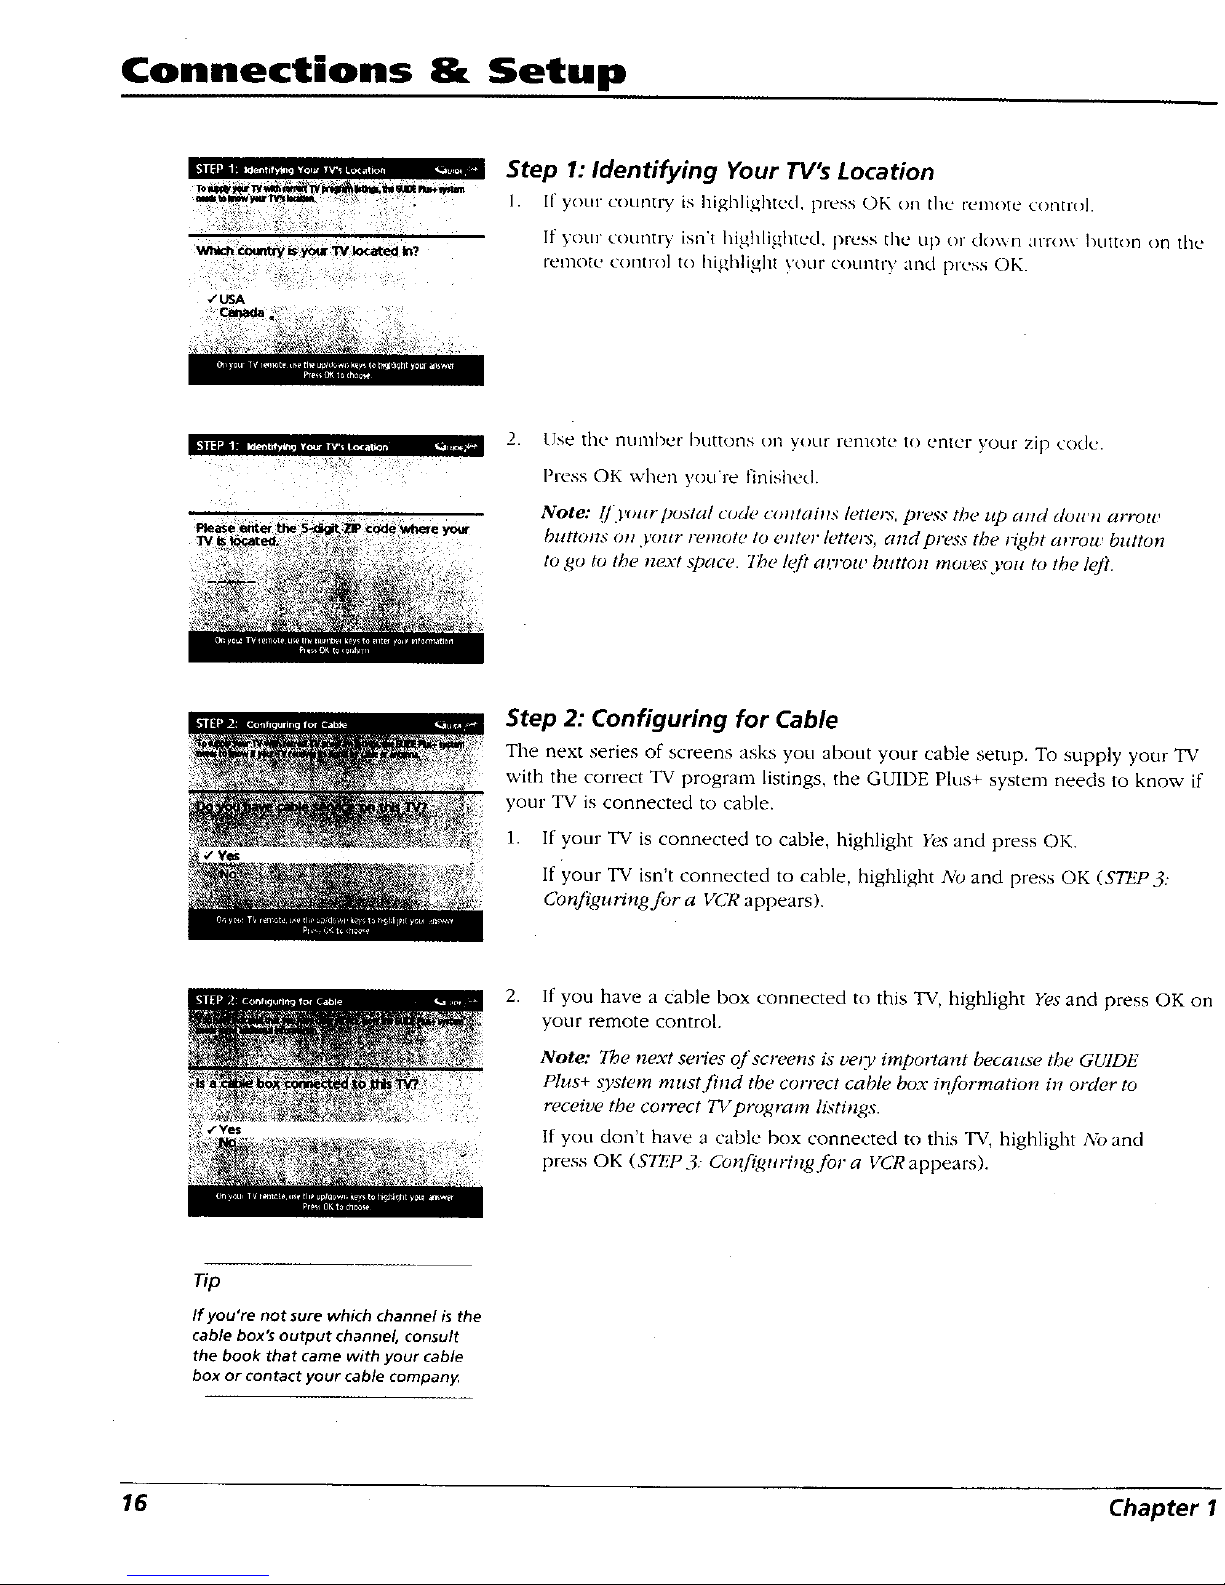
Step 1: Identifying Your TV's Location
1. 1["your counu'y is highlig]ltcd, press OK on the remote __onno].
If your country isn't I'fighlighted. press the up or down anox,, button on the
remote contlx)] to highlig]it your country and pl'c+ss OK.
your
2.
Use the number buttons on you[ remote to enter your zip code.
Press OK when you're finished.
Note: []3'ot+rpostal code coHtailh+ I+)tlg,rs, plz<%" tbe lip alld Nolell arrote
buttons (_pl your remote to c;tter letters, and press the right arrow button
to go to the n_vt space. 7be lq[? at'rou, button moves you to the left.
Step 2: Configuring for Cable
The next series of screens asks you about your cable setup. To supply your TV
with the correct TV program listings, the GUIDE Plus+ system needs to know if
your TV is connected to cable.
1. If your TV is connected to cable, highlight Yes and press OK.
If your TV isn't connected to cable, highlight No and press OK (STEP3:
Config,uring for a VCR appears).
2,
If you have a Cable box connected to this TV, highlight Yes and press OK on
your remote control.
Note: The next se*qes of screens is very important because the GUIDE
Plus+ s},stem must find the correct cable box #u_ormation in order to
receive the correct 7q/program h-_+tings.
If you don't have a cable box connected to this "IV,highlight A'o and
press OK (STEP 3. Configttring for a VCR appears).
_p
If you're not sure which channel is the
cable box's output channel, consult
the book that came with your cable
box or contact your cable compan)_
16 Chapter I
Page 19
Connections & Setup
_f_J_dwmr_#m.PmN_rcJK_W_7_rttm4rl_m
k_o_,_t _ wI m_c _ abkmer _ _ _ wa_ TV.
Wht<_ _1 is your "fVtuned to v/hen usk_J
_02
._ 03
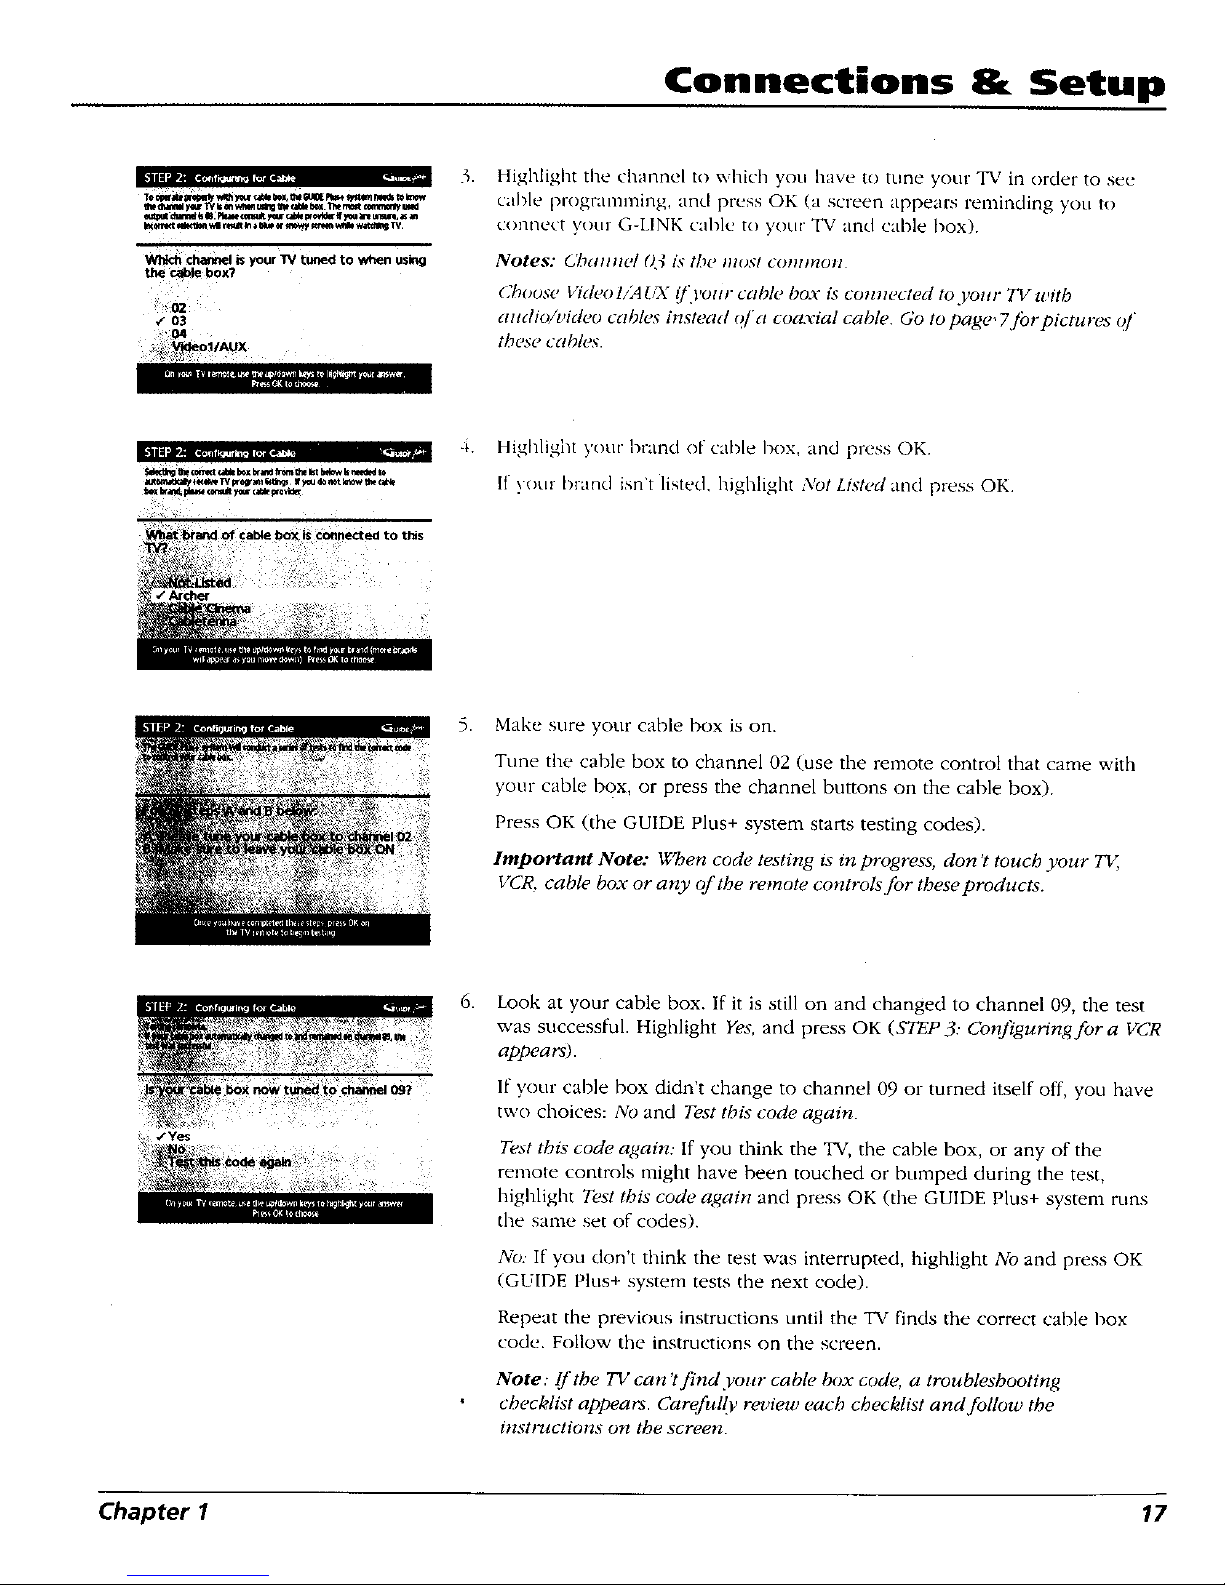
3.
Highlight the channel to which you have to tune your TV in order to see
cable programnling, and press OK (a screen appears l_minding you to
connect your G-LINK cable to your TV and cable box).
Notes: C'bamze/ 03 l_ tbe mos! cnnnnou
Choose lqden l/Mf_7_"iJ_rottr cable box is conm,cted to yonr TVwitb
andio/video cables instead q['a coaxial cable. Go to page" 7Jbrpictures (_/"
thes_ _ cclblt_s.
4. Highlight your bnmd o[ cahle box. and press OK.
If your brand isn't listed, highlight Not Listed and press OK.
,
Make sure your cable box is on.
Tune flae cable box to channel 02 (use tim remote control that came with
your cable box, or press the channel buttons on the cane box).
Press OK (the GUIDE Plus+ system starts testing codes).
Important Note: When code testing is in progress, don't touch your TV,,
VCR, cable box or any of the remote controls for theseproducts.
.
Look at your cable box. If it is still on and changed to channel 09, the test
was successful. Highlight Yes, and press OK (STEP 3: Configuring for a VCR
appears).
ff your cane box didn't change to channel 09 or turned itself off, you have
two choices: No and Test this code again.
Test this code again: If you think the TV, tire cable box, or any of the
remote controls might have been touched or bumped during the test,
highlight Test this code again and press OK (the GUIDE Plus+ system runs
dae same set of codes).
No: If you don't think the test was interrupted, highlight No and press OK
(GUIDE Plus+ system tests the next code).
Repeat the previous instructions until the TV finds the correct cable box
code. Follow the instructions on the screen.
Note: I/'the TV can ?find your cable box code, a troubleshooting
checklist appears. Carefully review each checklist and follow the
inMrTlclions on the screen.
Chapter 1 17
Page 20
Connections 8. Setup
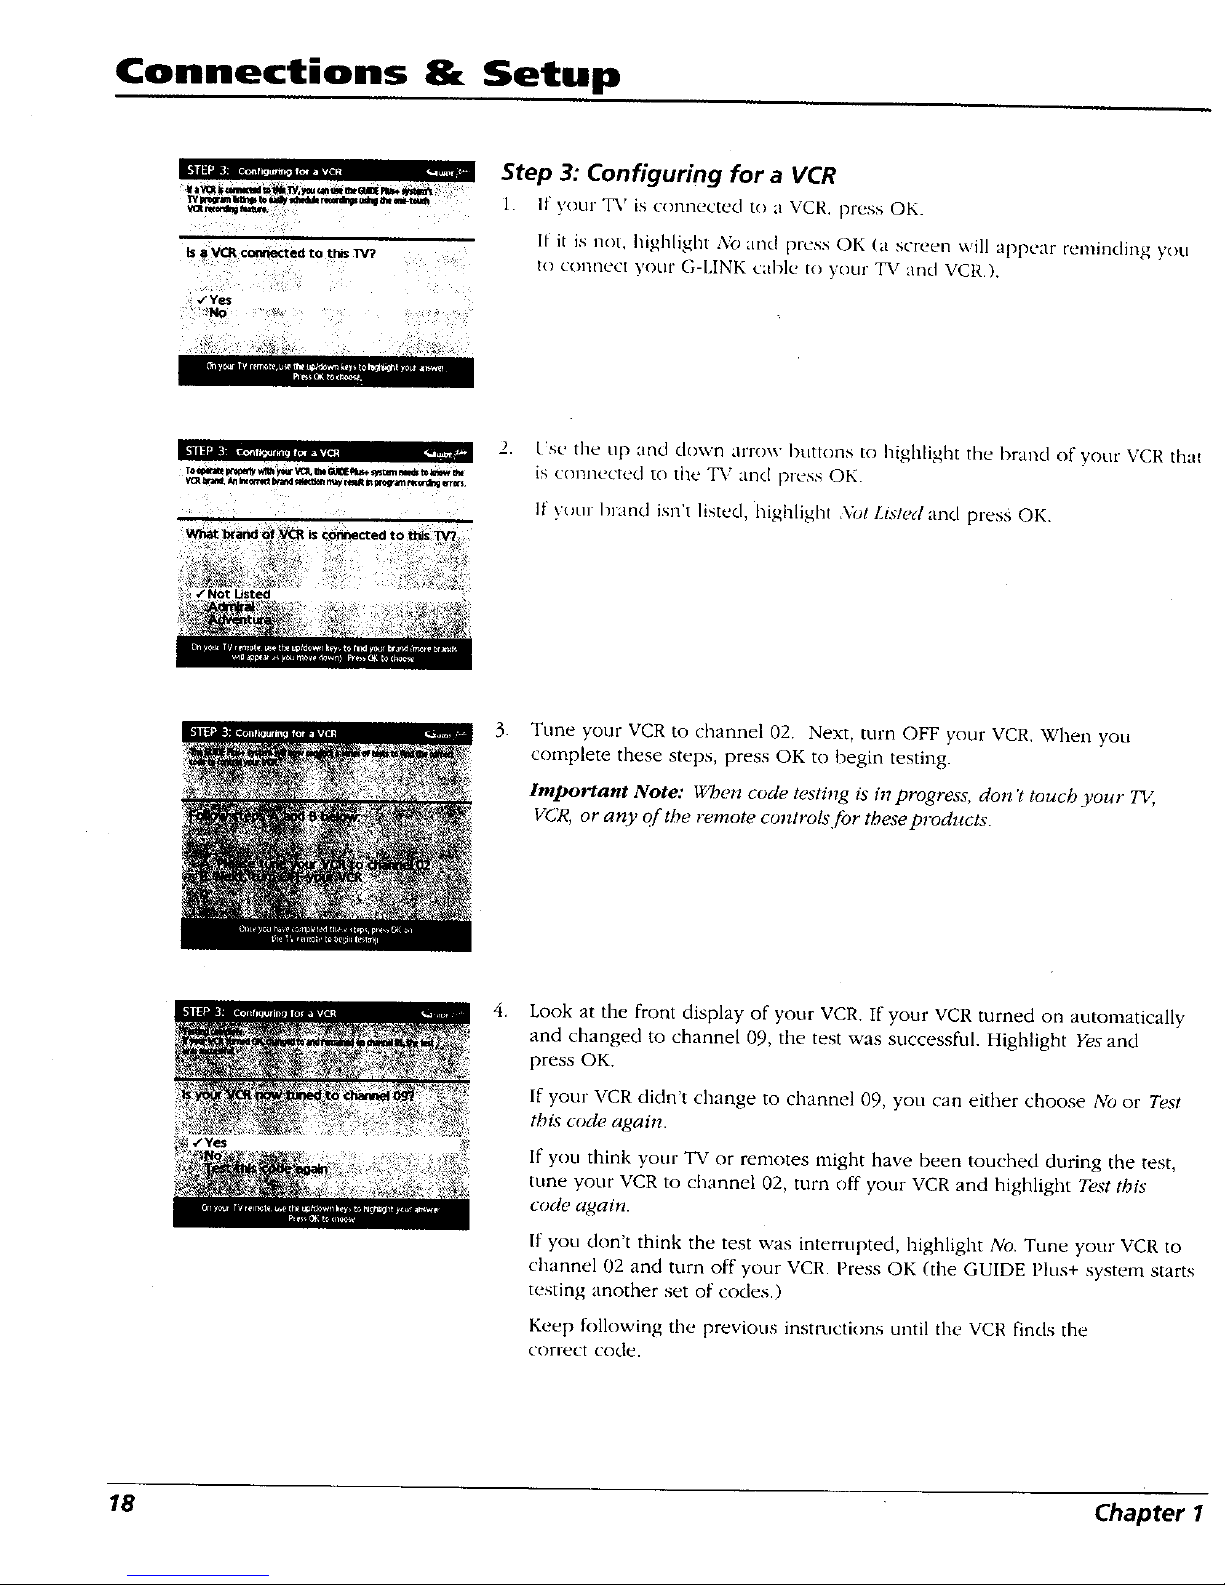
Step 3: Configuring for a VCR
1. If your 'IX'is connected to a VCR. prvss OK.
Is 8 V(3_ co_w)cted to this 1Y?
.rYeS
°No
It' it is not, high[ight No and press OK (a screen will appear reminding you
to COlmeCt your G-LINK cable to your TV and VCP..).
2. t_sc' the up anti down arrow buttons tn highligl'Jt the brand of your VCR that
_o_,,_,_._,,_,,,,.,*,,,m_, is connected to the "IX'and press OK.
'tCR_rx_ AnImcc_t _r,d _,lrgaatt_ _ In_am _¢¢_g trr0rs
.... If your brand isn't listed, highlight Xot Listed and press OK.
.
Time your VCR to channel 02. Next, turn OFF your VCR. When you
complete these steps, press OK to begin testirtg.
Important Note: When code testing ts i_1progress, don't touch your TV,,
VCR, or any o[ the remote controls for these products.
4.
Look at the front display of your VCR. If your VCR turned on automatically
and changed to channel 09, the test was successf'al. Highlight Yes and
press OK.
If your VCR didn't change to channel 09, you can either choose No or Test
this code, again.
If you think your TV or remotes might have been touched during the test,
tune your VCR to channel 02, turn off your VCR and highlight Test this
code again.
If you don't think the test was interrupted, highlight No. Tune your VCR to
channel 02 and turn off your ¥CR. Press OK (the GUIDE Plus+ system starts
testing another set of codes.)
Keep h)llowing the previous instmctkms until the ¥CR finds the
correct code.
18 Chapter 1
Page 21

Connections & Setup
_p
Leave your cable box turned ON to
download program information.
Leaveyour VCRturned OFFto record
programs.
Note: (/'the (;{ 7DE Plus+ ._ystem ccm 7 locate the com'ect code.[br the VCR,
tt list qf trottt_k'.sbooti;ig iuslrttcti(ms a!(_ectl> to belp.l'ott tx_l(>re.l,ou tp3,
a qailz
• 1)3' I "C'R cOll/'iqttl'ztlioll tt_(//ll: reDetll t L'R selltlL
Test afleruate codes: tests selected brauds ctJTcl (/'tbis.[ails. the Wst
cotttiutles tt'ith all codes in the ._l'stem.
Sk@ Ibis step. tbe GUIDE Phts+ a_},stem u'olz 7 be able to atttomaticallF
sc_e[hl[(_/_t'(_rclms to record Oil .l'OttY _'C'R
Step 4: Confirming Your Settings
]. Check to make sure all suttings are complete and correct. If all settings are
complete, highlight }E,s. _,nd seltt/) ala(.l p]-cg,;sOK, if your cable box and/or
\CR codu testing failed, you should see I,VCOMFLETtSwhere the cahle
box and VCR codes are listed. Once setup is conaplete, additional
screens appear,
If any settings are incomplete or incorrect, highlight NcJ, repeat setup process
and press OK. Follow the instructions on the screen.
2. You cart choose to view a demo of the GUIDE Pins+ features, which may
rake a few minutes to load If you don't want to see the demo right now,
press OK to watch TV.
Chapter 1 19
Page 22

Connections & Setup
What to Expect
The next time you turn on your TV. the GUII)E Plus+ system \'rill appear on tile screen. Tile
fk,llowing examples explain what you might see:
If all of the progranl information has been sent to your TV tile GUIDE Plus+ systeln
appears with all of your TV program listings.
If the program information hasn't been sent to your TV yet. an outline of the GUIDE
(without TV program listings) will appear on the screen. Program infornmtion is usually
sent to your TV at night.
If the TV detected that you have multiple cable companies in your area, STEP 5 Cl_oosi*zg
Your Cha*nwl Lineup appears.
Features of the GUII)E Plus+ system are explained in Ch tpte- 2,
To clear the guide from your screen, press CLEAR or GUIDE on the remote control.
Next Steps
Now that you've finished the Interactive Setup, you're ready to watch TV. This might be a good
time to program your remote control. The remote control that came with this TV can be
programmed to operate other components. Go to the next chapter to find out how to program
your remote.
20 Chapter 1
Page 23

Chapter 2
Using the Remote Control
Chapter Overview:
• The Buttons on the Remote Control
• Programming the Remote to Operate Other Components
• How To Use the Remote After You've Programmed It
• Code List
Changing Entertainment. Again
21
Page 24

Using the Remote Control
L.E.D.
SOUND 00 BACK
GUIDE INFO
0 O
MENU CLEAR
,0 80 90
WHO.INPUT ANTENNA
0°0 0
REVERSE PLAY FORWARD
REC'VCR* STOP PAUSE
The Buttons on the Remote Control
0-9 (Number buttons) Enter channel numhers and time settings directly
through the remote control.
To enter a two-digit channel, press tile t\\o digits. To enter a three-digit channel.
press and hold the first digit for two seconds until two dashes appear to the
right of the number, then add the second two. Example: to tune to channel 123,
press and hold 1 for two seconds, press 2, then press 3,
Arrow buttons (up, down, left, right) Press the arrow buttons to move
throttgh the on-screen menu system.
ANTENNA Functions as TV!VCg buttoi1 in VCR mode and TV/receiver button
in SAT'CABLE n'tode.
AUX (auxiliary) Puts the remote in atixilim T mode to operate the component
you've programmed the remote to operate with this button. You can program
this button to control a cable box, most RCA, GE and PROSCAN audio
components, a laserdisc playe_; or a VCR. If you set up the Auto Tuning feature
(Chapter 3), pressing the AUX button automatically tunes the TV to the
correct channel.
CH (up and down) buttons Scan tap or down through the current channel list.
Press once to change the channel tap or down; press and hold to continue
changing channels.
CLEAR Removes any menu or display from the screen and returns you to
TV viewing.
DVD Puts the remote in DVD mode. If you set up the Auto Tuning feature
(Chapter 3), pressing the DVD button atttomatically tunes the TV to the
correct channel.
FORWARD If you're operating a VCR or DVD Player with the remote control,
press FORWARD to advance a disc or videotape.
GO BACK Returns you to the previous channel.
GUIDE Press GUIDE to make the GUIDE Plus+ system appear on the screen:
press GUIDE again to remove it from the screen.
INTO Displays channel information.
LE.D. (light-emitting diode) The little light on the remote that lights when you
are programming the remote. It also lights when you press a valid button on
the remote.
MENU Displays the TV's Main menu. You can also press and hold for 2
seconds to display the GUIDE Plus+ system.
MUTE Lowers the volume to its minimum level, Press again to restore volume.
OK When a menu is on the screen, press OK to select the item that
is highlighted.
ON-OFF Turns the TV on alld off. When the remote is in another mode (VCR,
DVD, Satellite, etc.) and the remote is programmed to operate that component,
you can press ON*OFF to turn the component on and off.
22 Chapter 2
Page 25

Using the Remote Control
To turn off all the
RCA, GE, and
PROSCAN
components that are
connected to the TV,
press ONoOFF twice
within two seconds.
Th_ _ature on_
works with mostRCA,
GEandPROSCAN
produc_.
PAUSE If you're operating a VCR or DVD Player with the remote control, press PAUSE when the disc
or videotape is playing to pause playback.
PLAY If you're operating a VCR or DVD Player, plays tl_e disc or videotape.
REC*¥CR+ When the GUIDE Plus+ program guide is on the screen, press REC-VCR+ to program
your VCR to record it program. If tile remote is in VCR mode. press REC°VCR+ to start recording
REVERSE If you're operating a VCR or DVI) Player with the remote control, press REVI_RSEto go
backwards on a disc or videotape.
SAT°CABLE Puts the remote in SAT°CABLE mode. If you set up the Auto Tuning lOature (Chapter
3), pressing the SAT*CABLE button automatically tunes the TV to the correct channel.
SKIP If you press this button before you change the channel, the TV waits 30 seconds and
automatically goes back to the original channel. Each time you press SKIP, you add 30 seconds (i.e, if
you press SKIP txxo times before you change tl_e channel, the TV waits 60 seconds and automatically
turns back to the original channel).
SOUND Displays the AUDlO PROCESSORmenu.
STOP If you're operating a VCR or DVD Player, stops playing the disc or videotape.
'IV Turns on the TV and puts the remote in TV mode. Also displays channel information.
YER1 Puts the remote in VCR mode. If you set up the Auto Tuning feature (Chapter 3), pressing the
VCR1 button automatically tunes the TV to the correct channel.
VCR2 Puts the remote in VCR mode. If you set up the Auto Tuning feature (Chapter 3), pressing the
VCR2 button automatically tunes the TV to the correct channel.
VOL (up and down) buttons Decrease or increase the TV's volume.
WHO-INPUT In TV mode, press WHO-INPUT to toggle through the available Video Input channels
(VID/SVID and the current channel). In SAT mode, press to select available channel lists.
Using the WHO.INPUT Button
Use the WHO-INPUT button to toggle through the available input sources (VID and the current
channel) and view the content from the component you have connected to the TV.
1. Press TV to place the remote in TV mode. Make sure that the content from the component is
turned ON.
2. Press WHO-INPUT to tune to the available input source and view the component.
3. Press WHO.INPUT again to rune back to the channel you were previously watching.
Chapter 2 23
Page 26

Using the Remote Control
WRI ON_aFF TV
DVO VC_ AUX S_,CABIE
REV[RS[ pLAY
STO_
You'll use these buttons when you program the
remote to operate another component.
The remote may not operate all models of
all brands.
Programming the Remote to Operate
Other Components
The ucdversal remote control can be programmed to operate most brands
of remote controllahle VCRs, satellite receivers and cable boxes. The
remote is already programmed to operate most RCA, GE and PP,OSCAN
TVs. VCRs. DVD players, laserdisc players and satellite receivers.
Find Out If You Need to Program the Remote
To determine whether the universal remote needs to be programmed,
turn a component ON. such as a VCR, point the remote at the VCF,, and
press the VCR1 button. "l'her_press ON*OFF or channel up or channel
doyen to see if the VCR responds Io the remote conmlands. If not, the
remote needs to be programmed.
How to Program the Remote
There are two ways to program tla.eremote control: automatic code
search and direct entry. Instructions for both ways follow.
To stop the automatic code search without
programming any components, press and hold CLEAR
until the light on the remote turns off.
Using Automatic Code Search
1. Turn on the component you want the remote to operate (VCR, DVD
Player, etc.)
2,
Press and hold the component button on the remote control that
corresponds to the component you want the remote to operate
(VCR1, DVD, etc.). While you hold down the component button,
press and ho'td ON*OFF (when the red light on the remote turns
on, release both buttons).
3. Press PlAY (the red light on the remote, located below the ON*OFF
button, starts flashing).
The remote is searching the first set Of component codes (there are
20 sets of codes). If the component you want to operate doesn't
turn off automatically after 5 seconds, press PlAY again (the red
light starts flashing again as the remote searches through the next
set of codes).
4.
Continue pressing PLAY until the component turns off.
Note: lJ'lhe component doesn't turn of/'qfter you 'repressed the
PLAY bullon 20 times, the component call 'tbe prn[_rammed.
Press REVEKqE. wait 2 seconds. Repeat this step until the
componem turns back on.
5. To finish, press and hold the STOP button until the red light on the
remote turns off.
24 Chapter 2
Page 27

Using the Remote Control
Using Direct Entry
1. Turn on the component you want tile remote to operate.
2. Look tip tile brand and code nuh_ller(s) for the component on tile code list on page 26.
3. Press and hold the component button that corresponds to the component you want the
remote to operate (VCR1, DVD, etc.)
4. Enter the code Dora the code list.
5. Release tile component button.
6. Press ON*OFF to see if tile component responds to tile remote conlnlands. If it doesn't, try
pressing tile component button and then ON-OFF again.
7. If you get no response, repeat these steps using the next code listed for your brand until tile
component responds to tile remote conlnlands.
The buttons might
operate differently for
other components,
especially when you're
using another
eomponent's menu
system.
How to Use the Remote After You've
Programmed It
Once the remote has been programmed successfully, you are ready to use it to control your
components. To operate the component:
1. Press tile component button (TV, VCR1, VCR2, DVD, AUX, or SAT-CABLE) to set the remote
to operate the component.
2. Press ON-OFF to turn the component ON or OFF.
3. Use the remote buttons that apply to that component.
Note: If you keep pressing buttons and nothing happens, the remote isprobably in the
wrong *node. You must press the component button that matches the component you
want to operate (i.e., if you want to operate the VCR, press VCR1 on the remote control to
put the remote in VCR mode.)
Chapter 2 25
Page 28

Using the Remote Control
VCR
Admiial ......................... 21_,1
Ad; _2_%Ll_a............................ lOlt_
Aik_) ............................. 202-
Aiwa ......................... 2_1(}2. 2020
Akai 2003 2001 2005,2(i(}- 2q_),S 2111¸2112,2113
Anwvican IligR ...................... 21121
Asha ................................... 21113
Au0io I)ytlamics .......................... 2009, 20I[I
Audio_ ox ........................ 2OI (
IIcll & IIowcll .......................... 2011
Ik_;iunlat k .................................. 2013
Bi_3k',onk ..................................................................
Calix .................................... 201¸1
Catldlv 2015¸ 20! i 2(115 2OI6, 2!}1-¸ 2018, 2019
Canon ..................... 21121¸ _o22 211 t
C;iprgRart ........................ 2o2(), 21 II)
Carrel .................................... 211fl2
CCE .............................. 2027¸ 2001
Citi/*'r,. _113,201q 2015. 2010,_![-.2(118_11910f
Coloilyme ............................... 20(_
C_,II .................................. 2001
Craig ...................... 2013, 201 i. 2023, 2001
Curw-Malhcs ...................... 200(L 2002¸ 2009, 2013¸
.......................... 2016, 20ltd. 2021. 2022 2'024, 2115
C 1 hcrnex ........................... _..................... 201_
l)aev_oo. 2015, 21117. 2019,2025, 2026, 202- 2028, 2110
I)aytron ........................................................ 21 IO
Dbx ........................................... 2009, 2010
Dimensia ................................................ 2t_l
Dvnatech ............................................... 2002, 21/26
ElectroRome ................................... 2¢114 2029
Electropilomc .................. '.................. 2014
Emerson ................................ 2002, 2u12,2014,
................ 20}5, 2021, 2024, 2025,2026,2029, 2030 2032,
2033, 2034, 2035. 2036, 2037. 21138. 2039. 2040, 204I
.. 2042,2044,2045,2047 2065. 2105 2113 2116. 2!17
2130
Fisher 2011. 2023. 2048, 2049, 2050, 2051, 2052,2118
Fuji .................................................. 2021, 2119
Funai ...................................................... 2002 2026
Garcard ........................................................ 2026
GE ........ 2000, 2001, 21/13. 2021, 2022. 21/53 2115, 2!20
Goldstar ........................... 2009, 2014, 2018, 2054 2121
Gradiente ............................................... 2026
Harley Davidson ......................................... 2020
l-larman Kardon ........................................... 2009
Harwood ........................................................ 2061
Headquarter .......................................................... 2011
tl0achi .. 2002, 2055, 2056, 2057, 2107, 2111, 2120, 2122
HI-Q ....................................................... 2023
I_';tant Repla 5' ................................................................
JCL .................................................................. 2021
JC Penney ............. 20119, 2010, 2011, 2013, 20!4, 2021,
............ 2022, 2055, 2056, 2058, 2059. 2060, 2107, 2118
Jensen ......................................... 2055. 2056, 2111
JVC ................ 2009. 2010, 2011, 2018 2/158, 2111, 2123
Kenw{x×I 2009, 2010, 2011, 2016. 2018 2058. 2111.2123
KLH ..................................................... 21161
Kodak ......................................... 2014, 2021
I.Ioyd ....................................... 2002. 2026
Logik ................................................ 2061
LXI .................................................... 2014
Magnavox 2021, 2022, 2062, 2063, 2104 21118. 212_
MagnJn .................................................... 2013
Maranlz ...................................... 20f>) 2010, 2011
......................... 2016, 2018, 21121, 2058, 21162,206_
Mafia ............................................. 201i
Masushita ................................................. 2021
MEI ......................................................... 2021
Mefnort:x ......................................... 2002 2011,
............... 2013, 2014, 2021,2023, 2026 2104,2131
MGA ........................................ 2029, 2005, 2113
MGN '1_', hi_<s_{sgy ................................... 2013
M/dhmd ................................................... 2053
Minolla ...................................... 2055 21156. 210 v
Mit_,ubishi 2029, 2055, 2056, 2065, 2(Xlfi, 21a6-, 2069
........ 2070, 2071. 2072, 207_, 20"q. 211R1 2113, 2123
M'.mtg_m','eev Ward ......................... 20"5. 2131
Mr)torola .......................................... 20212131
MIC ....................... 211h2 2/11 _, 202/)
\luhitvtll ....... 2002¸ 21113. 201(_ 21110, 205_ 2116I
NEC ............... 2oo_; 1111¢) 2011 21116, 20l_
.... 205S 2110t. 20"(* 20_8 20-9, 211[ 212_
Nikk_ .......... 20! i
N( _/lkIX ............... 2011
OI5 nil/US ................ 2021
Optunu/s ................... 2111 t 21_[
( )1511 illl_ I ...................... 2Ot)()
Oiion ........................ 2t155
l)m;txoni_ .... 2021. 2022 2104 2125, 2126 212-
I)crlt:ix .......... 20ff_, 2o55, 20-30 21o-. 212o
Pv'l/le x R_.,_,v-a_t 0 ................... 2t_18
10ilk<: ............. 2021 21122 21;h2 20fl';
l'hilip_ ...... 21121 201_2 J1_96 212 I
Pi[ol ....................... 2Ul p
Pi<)lYct't ......... 21!11) 21J_ 20_113 21P_I 212f!
Ptw03131_ . ..... 2tl_(/ 2_/1- 2_/) 211(I
Pit 1St ;tn ............. 2Qtltl 2001
01o[ut ................. 2001
Plll_il ..................... 21111
Qmmui ................ 2011
()tt Iflz ................... 2011
Qu:t',:u ............... 2021 2022 2125
RCA .................. 2fll)o. 2OO1 2no3. 2013. 2021
...... 2055 2/156 21282. 2083, 21181.2085, 2086.2118-
....... 2/188 2089. 21100 2091 210-. 2115 21217 2125
Rt0k)sha¢k Realistic .............. 211112. 21111 2013, 201i
2021 21122, 2023, 2020 2029, 2049, 2050 21N6 213l
Radix .............................................. 20 [ i
Randcx .............................................. 201 i
Ricoh ........................................... 2128
RLIIYCO .................................................... 2104
Samsung .............. 2005, 2013, 2015, 2033, 2053. 2112
Sank} ................................... 2131. 2 t0-t
Sansui ...................... 2010 2092. 2111. 2123
San}_) ................................ 2(/11,201_ 2025
SCott 2012, 2015 2025. 2032 2035 2038, 2005 2093
2110
Sears ..................... 20I[ 2_d14, 2021, 2023 20_8,
.......... 2049 2051/, 2051 2055 2056, 2107 2118
Sharp ........ 2002. 2017 21129, 21/94, 2095, 2096. 2131
Shintom ......................... 2004, 2056, 2061, 2iN8
Shogun ........................................................ 2013
gignamre ................................. 2(XI2, 2131
Singer ................................... 2021 2061,2128
Son} .............. 2002. 2004 2098, 20941 2119, 2128
ST5 ................................................... 2021, 2107
Sylwmia 2002, 2021 2022 2n26, 2062, 2063 2065, 2124
Symphonk ........................................... 2/102, 2020
Tandy .............................................. 2002, 2011
Tmshiko ................................................. 2014
TaiLing ........................................... 2058. 2111
TEAC ....................... 2002, 2026, 2058, 2085, 2111
Technics ................... _.......................... 2021, 2109
Teknika ............... 2002, 2014, 2021, 2026, 2100, 2129
TMK .......................................... 2015, 2024, 2047
lbshiba ........ 2015 2049, 2051, 2055. 2{,g_5 2093, 2116
'12_teVision .......................................... 2013, 2014
Unitec]_ ................................................... 21/13
Vector Rest:arc0 .................... 2009, 2010 2015. 201/)
Vict_lr ..................................................... 2010
VideoContcpta ........... 2009 2010, 2015,2016,2/!3
Videosonic ...................................... 2013
Wards ........ 2002 2013,2014, 2015,2021,2023.2020,
2029 2055, 2056 2001 2096, 21111 2102, 2if13 2107,
21!(_, 2131
XR-I(X)O ............................ 202l 2026, 20(:1
Yamalla ........... 2009, 2010 2011.2018 2058. 2111
Zenith ................... 2004,2098.2t0i 21IU 2128
Cable Boxes
ABC ....... 5002, _O()3, 5004, 5(R)5, 5006. 5(}07 5053
Anllx mlx ................................. 5(}(!8, 50(D
Ar_}cr .......................... 50(Y3, 51'_, 501/)¸ 5(111
Cai0elcnn:t ............................... 5008
Cal)lcl icw ............................ 500_
Cvtlt uly" . ....................... 501 I
Cilizen ................................... 5(311
Col,mr V_)ic¢ ....................... %012¸ 5_113
(]onlttonlc _, .............................. 5014, 5015
{]*n/It c ................. 501(i
l{Lt-[c Ill ............................................................. _01-
(kut:uO ............... 5OLI
(;( 1!I_ _II(_r)r_ s ............. _110t)
()trnuli ............................... _II!N '_lllt) 50 0)
GCll_'l d Ir),:F4uncn[ ............... 5005
ili)nlin qO)O q_)21 fi')22 _(135, "30t _,
I [il:l_ 0i ....................... 5Ot/_
I1_t_¸\ ........................ "%1}02
/;l_t _) .......................... 50]1
"q:tglLi/, )\ ...................... 5(12-_
X{_ I//,_v ,_'- .................... "_/!(_
M(_ i_¸ Ih!l_ ....... _oI)2 5027, 502,_
\"( ...... _t}02 513!-¸ 5025
( ),_k ...... %(1!)2 5010 5o2_
P:tv:l_*,_/ ........ qi2i/
!']lilip,; ........ 5rll I 5()12 5(0 _ 5019¸
Pi(Jt!, _ i ............. _t)3_ -3031
i'tl]- it .................. 502h
RCS ............................................ qlil- _1)¢) £t)%2
Rv'.d i>[it ............... 5009 _0¢9
Regal ................ 5022 _0_5
I{cgk'/l{ ! ................. '501"
Rt,lnbl:uldi .......................... 5()0_
Runto ........................... &O2()
_31/lSttllg ........................ t "_()]} 503 I
Sciuntitk Atlztilt:l ............... 501X) 5!)36 5037. '5038
Signal ....................... 501i 5018
NJg!l;l[ LH'k' ........................... 5011_
SL Mmx ........................... 5<11i
_;plu, _l .................................... 5052
_[#rcclt%% .................... 500 _ 501R, 5053
5LIrg;lte ............................ 50] i, 5(HN
St:U(ILtCSt ............................. 5018
lanLR ................................. 5010
Yelcx Jel_ ............................. 501 t
_kv.{_lll ........................ 51_)_, 5023, 504I
IbMliha ................................ 5020
'Fusa ......................................... 5018
T_80 .............................................. 5(127
(:nika ................................. 5008, 5d09, 501 t
lJnit et[ Atlists ........................................ ¢A'_2
Uniled CaBle .............................................. 5055
t ;fixLusal .......................... 500,q 5009, 5010, 5011
Videox_ a_ . ......................................... 50i4
Viex\ st;u ......................... 5015, 5025, 502 v, 5040
Zcn0h .................................... "%)26, 5050 5051
Satellite Receivers
CRappara[ .................................. 5056, 5057
l)rake ..................................... 5058, 5059
(;1! .......................................... 5000
Gcner:d Inshunlents ............... 5060, 5061, 5062
P;trK{sol_ic .............................. _07-_
Pr[tllest:u .................................... 51176
Qf'./S_ ;tl_ ................................... qOOO
ItCA ..................................... 5000
Realist8 ¸ ............................... 5063
S/_l]x ....................................... 5072
S'I_I .................................... 5t_i
SI'S2 ....................................... _,_q
SlS5 ............................... 5066
S'IS ) ........................... 506 _
"l_)shih:l .................. 501/S
Ik,Mob;I ..................... "_o75
I IliOcn ....................... ¢AR_)
26 Chapter 2
Page 29

Chapter 3
Using the TV's Features
Chapter Overview:
• All About the GUIDE Plus+ System
• The Channel Banner
• Auto Tuning
• Parental Controls and V-Chip
Changing Entertainment. Again.
27
Page 30

Using the TV's Features
Action Video Program Menu
buttons window information options
Promotional Channel
information listings
About the GUIDE Plus+ System
The GUII)E Plus+ system is an interacth,e on-s,.'ru__,n progran+ gLlidu that lists TV
schedules for _,o1.11' :uua aFtd all+.)ws your "IW L_irect control t)fa ca_)}e h()x alld/Of
VCR. You tntist first set up the GUII)E Phts+ '.(enu system in order to view this
on-scn+en progr:un guide (sue Ch:tp[er I tot details), lhess GI.JII)E to hrit'Jg up
the GUIDE Plus+ system.
There are six suctions of the GI.'IDE Phts+ system:
• A row of Action bnmms at tile top of the screen ( l. 2 and .{)
• Video window
• Progranl inI}.)nl/ation
• A row of mentt opttotls fG;irL Snr/. ,\ews 3'chud///e. :l/6<';..;g/t{es,
Chatl*wls, Selz@)
• Channel listings
• Promotional information
Note: The GUIDE Plus+ {l'stem scree+ts il/.strated i*+ this book are
representations of whal yot+ are h'ke{y 1o s+.e. +&btall cba+znels, pro_grams,
and GUIDE Plus+ b+furmalio+z depicted will be a+'a/lahle tJz yore" area.
New features and options ca*+ be dot+'lUoaded to the G{ 7Dk +Plus+
system, so these too are subjectgo cha*l+q,e.
Tip
Since the program information provided by
the GUIDE Plus+ system is based on your
locale, you will need to run Setup again if
you move to a different zip or postal code.
Downloading Data
The GUIDE Plus+ system is not available until it completes its first download of
program listings. When the power is turl'led off, tile TV locates a "host channel"
that carries GUIDE Plus+ systet+a data containing program schedule and channel
lineup information. A channel lineup is the list of stations and their respective
channels.
To ensure that your first download of data is complete, you should leave your
TV off overnight. Downloads occur several times a day. The TV must be turned
off"for GUIDE Plus+ system data to download.
If the TV loses power or is unplugged, GUIDE Plus+ system program listings
may be lost. When power is restored, make sure the setup inforn'tation is still
correct. The GUIDE Plus+ system will receive ttpdated program inikmnation
during the next scheduled download.
Channel Lineup
If more than one cable company services your area, you may be prompted with
STEP 5: Choosing Your Channel Lineup after the first GUIDE Plus+ system
download. You will need to identify your cable company by selecting the
correct channel numbers for tile stations in question.
Use tile up and down arrow ])Llttons to chatlgL' th+., channel group and
press OK when tile correct channel gtoup is highlighted.
28 Chapter 3
Page 31

Using the TV's Features
roDf
J
Getting In & Out of the GUIDE Plus+ System
To enter the GUII)E Plus+ system:
• Press GUII)E on the remote.
• l'ress and hold MENU lk)r 2 seconds on tile front panel.
To exit the GUIDE Phks+ system:
• Highlight a progranl and press OK to exit tile GUII)E Plus+ system and tune
tO tile channel.
• Press GUIDE to exit the GIII)E Plus+ system and rune to the channel
displayed in the xideo window.
Press CLEAR to exit the GUII)E Plus+ system and return to the original
channel.
Press GUIDE on the remote control to see
the GUIDE Plus+ system. To remove the
program guide from the screen, press
OK, GUIDE, or CLEAR.
LateNight Conan
The GUIDE Plus+ System Menus
The GUIDE Plus+ system offers seven diff_erent options on the Menu bar: Grid.
Surt, News, Schedule, Messages, Channels and Setup. To access tile Menu bar:
1. Press GUIDE to access the GUIDE Plus+ system.'
2. Press MENU or use the up and down arrow buttons to select tile Menu bar
(the Grid Guide appears by defauh).
3. Use the left and right arrow buttons to access other menus.
4. Press OK, or MENU, or use the down arrow hutton to see the menu options.
Grid Guide
The Grid Guide appears each time you enter the GUIDE Plus+ system. It
displays the current programming for each channel. The current program is
displayed in tbe video window.
Press the up and down arrow buttons on the remote to browse channel
listings and the channel up and down buttons to page throug a t e listings.
Use tbe right and left arrow buttons to browse future program listings.
To tune to a channel, highlight the program you want to view in the
channel listing and press OK. PreSs CLEAR to exit the GUIDE Plus+ system
and return to tile original channel. Press GUII)E to exit the GUIDE Plus+
system and tune to the channel in the video window.
Then use the Grid Guide Action Buttons as described next.
Chapter 3 29
Page 32

Using the TV's Features
Grid guide Grid guide
menu action buttons
selection
Lale Night C0nan
Grid Guide Action Buttons
Action buttons will change according to where you are in the GUIDE Plus+
system. Be sure to look at the action bar hefore pressing the
com[ua nO n n nl/_el_s.
When highlighting the program, timefollowing Action buttons appear:
Watch Press 1 on the remote to place a {imm in the Schedule fl)r the TV to
turn on and tune to the program highlighted in the channel listing. When
the TV turns on, the GUIDE Plus+ system will autonmtically appear with the
scheduled pt'ogram highlighted and tuned it1 the video window.
Go To Press 2 on the remote to bring up thc direct dial hox and enter the
n(unher of the channel you want. Press OK to highlight timechannel and
cun-ent program in the channel listing uf timeGrid guide. Press OK again to
tune to timehighlighted channel. If timevideo window is unlocked, it will
automatically tune to the channel.
• Record Press 3 on the remote to place a timer in the Schedule for the VCR
to record the program highlighted in the channel listing.
If you have a cable box, changing channels on the,TV will not cause the
cable box channel to change while recording.
Record will only appear if you have set up the GUIDE Plus+ system and
specified yovtr VCR type.
The program in[brmation window will display a confirmation when you have
successfully scheduled a program to watch or record.
Note: lf you have selected two programs to watch or record which begin
at the same time or overlap, you will receive a timer conflict message.
You must choose between the two programs.
When highlighting the Channel names (the left column on the channel listing),
the following Action buttons appear:
• £ock/Un_ck Press 1 to lock or unlock the video window to either stay at
one channel as you browse the GUIDE Plus+ system (lock) or change as
you browse through different channels (unlock).
To Press 2 on the remote to bring up the direct dial box and enter the
number of the chant_el you want. Press OK to highlight the channel and
current program in the channel listing of the Grid Guide. If the video
window is locked, press OK to tune to the highlighted channel. If the video
window is unlocked_ it will automatically tune to that channel.
30 Chapter 3
Page 33

Using the TV's Features
Sort menu
selection
Categories
Sort
The Sort menu lets you browse programs by category. The channel to wbich
you arc currently tuned is displayed in the video windov,,,
To Sort:
1. If the GUIDE Plus+ svstem isn't on your screen, press GUIDE on your
remote control.
2. Press MENU on the remote to select the Menu bar.
3.
4.
Use the arrows to highlight Sort. When Sort is highlighted t_)r the first time,
the Movies category is displayed Thereafter, the htst category used becomes
the dethult. A listing of subcategories is displayed I_elow the catego W name.
Use the left and right arrows to highlight other categories.
Use the up and dov.n arrow buttons to highlight a subcategol"y. For
example, highlight All and press OK (the GUIDE Plus+ system sorts
the programs).
,
6.
Press the up and down arrow buttons to review the list one program at a
time. Press the channel up and down to review the list one page at a time.
Select MENU to return to the menu bar, or press GUIDE or CLEAR to exit
the GUIDE Plus+ system.
Then use the Sort Menu Action Buttons as described next..
Sort Menu Action Buttons
When viewing the results of a Sort, the following Action buttons appear:
Watch Press 1 on the remote to place a timer in the Schedule, and then
follow the on-line help for further options. Placing a timer in the Schedule
will cause the "IV to turn on and tune to the program highlighted in the
channel listing at the predetermined time.
• Record Press 3 on the remote to set the VCR to record the program
highlighted in the channel listing. If you have a cable box, changing TV
channels will not cause the cable box channel to change while recording.
The program information window will display a confirmation when you have
successfully scheduled a program to watch or record.
Note: lf you have selected two programs to watch or record which begin
at the same time or overlap, you will receive a timer conflict message.
You must choose between the two programs.
Note: Be sure that during the GUIDE Plus+ a3,stem setup you specified
that you have a VCR. If you didn't, the RECORD option will not
be available.
Chapter 3 31
Page 34

Using the TV's Features
News menu News menu
action buttons selection
News
ThL + +\'ellt_ tn_2nLi IL+tS yoLI [)I'O\VSL • cLtrr_2llt nL_\vs S[Ot'ii2s ])v headli]'l( +.
1. If the GIHI)E Phis+ systcin isn't on your scix*en,press GUIDE on yoclr
ienlot_ c'ontlOl
2, Press MI'NU on the rt.lnote c'onlr()[ to select the metlu bar.
3, Usethe arlo_+\s t() highli_4h[ ,\eu's(if MSNBC is available on your TV, it will
appear in the video whldow)
4 Use Ihc>up and down arrox\s to ]/ightight astorx >
Use* the Lip anti {.]O\\l] ONTO\\ S tO browse tile list one story at a time.
• Use the channel tip and clown t<) ]_rox\ so, tlnoug]l the list one page ;it
a time.
_, Press the right arrow button to see full text.
6. If" there are muhii'J]e pages of text, press the right or left arrow button to
page forward or back through the pages of text, Press the down arrow to
viev<"the next story.
7. Select MENU to return to the Menu Bar. or press GUIDE or CLEAR on the
remote to exit the GUIDE Plus+ system.
Schedule menu
selection
Schedule
The Sche(hde metal allows you to alter ticners for either viewing or recording
programs. The GUIDE Plus÷ system allows one-touch VCR recording if you
have connected the G-LINK cable to your VCR. See Chapter 1 for more details
on connecting the G-LINK cable.
To schedule a program to watch or record:
1. If the GUIDE Plus+ system isn't on your screen, press GUIDE on your
remote control..
2,
3.
4.
5,
Press MENU on the remote to select the Menu bar.
Highlight a program within the channel listing.
Select Watch or Record from the Action buttons bar. The timer is then
aLltomatically logged into the Schedule menu.
If you select Record, make sure to place a blank tape in the VCR and turn
it off.
Note," (/),ou haw, a cab& box connected to your TVand VCR, tune your
VCR to the cabh, box output channel prior to tzcrning off tbe VCR.
The program infbrmatkm window will display a confirmation when you have
successhilly scheduled a program to watch or record.
Note: l]),oH bare selected lwo programs to u'gltch or record which begin
at the S_llile lit#l(" or OLJ('rlglp. |'Ol! will rc, ceil2e (I timer co_flict message.
}011 nnlsl choosy beltvL,en Ibm? tH>o pro_r_inls
32 Chapter 3
Page 35

Using the TV's Features
To remove or change the frequency (daily, once, or weekly) of a scheduled
event, access the Scbcdtt/{, lllent_ from tile Menu bar.
1. Press GUIDE to bring up tile GUII)E Plus+ system.
2. Press MENU on tile remote to select the Memt bar.
3. Use the arro\\s to highlight the Scl._edlll_, menu selection.
4. Use the up and dowt'_ arrows to highlight tile program you want to edit.
Then use tile Schedule Menu Action Buttons as described next.
Schedule Menu Action Buttons
When viewing the Scln, dttle menu the following Action Imttons appear:
• Remoz_e Highlight tile Wtttch or Recorrltimer you \XiSITto remove floln
tile schedule and press 1 on tile remote.
Change Highlight the Watch or Record timer you wish to change and
press 3 on the remote to toggle the frequency between the tbllowing
choices:
DAILY records the same program each day Monday through Friday.
ONCE records only on that day.
WEEKLY records the program each week at the same time.
Messages menu
selection
Messages
Occasionally you will receive messages regarding your GUIDE Plus+ system, as
well as special programming information. You can access these messages from
the Messages menu on the Mem_ bar.
To read messages:
1. If the GUIDE Plus+ system isn't on your screen, press GUIDE on your
remote control.
2. Press MENU on the remote to select the Menu bar.
3. Use the arrows to highlight the Messages menu selection.
4. Highlight the message you want to read by using tile up and
down arrow buttons.
5. Press INFO to display the full text of the message. If the text continues
beyond the screen, press INFO to view the next page of text. Once you
have reached the end of the message, press INFO to close the expanded
information and return to the Messages screen.
Then use the Messages Menu Action Button as described next.
Messages Menu Action Button
When viewing the Messages menu tile following Action button appears:
• Remove Highlight the message you want to delete and plvss 1 on
the remote.
Chapter3 33
Page 36

Using the TV's Features
Channels menu Channels menu
action buttons selection
Channels
"lk_ucan customize tl_e channel listing b_ cnal>ling or disabling the display of
certain channels. For instance, you may disable chap, ntis tlult ),ou ncxer v,atch.
You c:u'l restore disab]ed channels at ;I I:llcr poll1{ ill thne,
1. If the Gukle Plus+ system isn't on _our screen, plcss GI:II)E im your
remote control.
2. Press MENU to select the Menu bar.
3, L!se [lie right and lefl aH-oxvsto highlight the (.7_amz_>/._lneutl scluction.
-i. Use tile' up and down aH'OWSto select LI chanilel
Tllen use tile CIlannels Menu Action lltit(ons ;is dcscribcd next.
Channels Menu Action Buttons
While browsing the Chanm4s metal tile following Action buttons appear:
• Ca_ce_ Press 1 on the renlote to caDcl'l any changes )otl made since
entering the Channels Menu.
Change Press 2 on the remote to change the channel numher t_.)rthe
highlighted channel line.
• On/Off Press 3 on the remote to toggle the state of the channel between
On and Q/I;
il[_1[lil;illil_ll|r|tlati.lill:_l- "-]llllillll];
Setup
The Setup menu allows you to access the GUIDE Plus+ system setup information. To access the
Setup option:
1. If the Guide Plus+ system isn't on your screen, press GUIDE on your remote control.
2. Press MENU to select the Menu Bar.
3. Use the right arrow to highlight the Setup menu selection.
4. Use the tip and down arrows to select Change _[ystenlsettings, Review option& or
View demo.
Change system settings Confirms the settings you completed in the GUIDE Plus+
system setup are correct.
Review options Displays the GUIDE Plus+ auto display options.
On Automatically displays the GUIDE Plus+ system when you press the ON-OFF
btltton on the remote control.
Off Disables the GUIDE Ph.ls+ system flom being displayed when you press the
ON•OFF button on the remote control.
• View demo Runs the GUIDE Plus+ systen', demonstration.
Note: {[you have 1lot compleWd your GI,'TDE Plus+ .system setiqz these optioJts will m_l &,
available. A screen will prompl you to complete your .%,lup.
34 Chapter 3
Page 37

Using the TV's Features
hi Conan
Promotional information
How to Get More Information About an
Advertisement or a Program
To find OLIt tnon_' inl()nllatR)[1 about a progranl, advel-tisenle[+lt or special, LtSe
the le/t arrow button to high g _ the channel listing or prnnlotional
information hox.
Requesting more infornlation about a partk'ulal- show displays tile PlusCode
prognumlling number and the Shows (m _;Z<\'tfk)rthat channel.
Press tile INFO butto11 to exit the expanded in{_)rmation screen
GUIDE Plus+ Menu Items
The G&TDEPlus+ M_,uu gives you access to features in the GUIDE Plus+ system.
To access the GUIDE Plus+ Menu:
1. Press MENU on the remote.
2 Highlight GUIDE Plus+ Menu and press OK.
Each menu and the sub-menus are listed below:
GUIDEPIus+ Setup Displays the GUIDE PMs+ system setup screen.
Change system settings Confirms the settings you completed in the
GUIDE Plus+ system setup are correct.
Review options Displays GUIDE Plus+ system auto display options.
View demo Runs the GUIDE Plus+ system demonstration.
GUIDEPIus+ Label Displays the GUIDE Plus+ label menu.
On Displays the station name when you change channels.
Of,[ The station name isn't displayed when you change channels.
Continuous Demo Runs the GUIDE Plus+ system demonstration until it is
turned off. To turn off the demonstration, you must turn off the TV.
Note: If you have not completed your GUIDE Plus+ ._l_stemsetup, these
options will not be available. A screen will prompt you to complete
your setup.
Chapter 3 35
Page 38

Using the TV's Features
Sample displays on a Channel Banner.
ChannelBanner
There are several indicators that might appear when you press the TV or INFO
buttons on the remote. This display is called the Channel Banner. The following
list describes the items on the Channel Banner screen (left to right and top to
bottom).
12:01
[]
l)isplays the current time.
The lock is displayed to indicate when the Parental Controls
are locked or unk)cked.
Displayed when Closed Captioning is available on the
current channel.
ESPN
6O
It
Displays the lahel assigned to the current channel.
Displays the current channel or input channel.
Mute is displayed when you mute the audio.
Stereo is displayed when the current channel is broadcasting
in Stereo.
SAP
O"
l)isplayed when the current channel is broadcasting SAP
(Second Audio Program) information.
Displayed when the Sleep Timer has been set.
O0:OO
Displayed to count down time left on the commercial skip
(SKIP) timer.
With the auto tuning feature, you can
set up the TV to tune to the channel
you need to watch by pressing that
component's button.
Why You Should Use the Auto
Tuning Feature
Tim auto-tuning feature automatically runes the TV to the correct channel for
different components you have connected to your TV (like a VCR, DVD Player,
etc.) When you set up auto tuning in the menu system you don't have to
remember to change your TV to channel 3, for example, when you want to
watch the tape in your VCR.
How to Set Up the Auto Tuning Feature
The way you set up the auto tuning l>atum in the TV's menu corresponds to
the component buttons on the remote and the way you have each component
connected to your TV. When you set auto tuning, you're telling the TV what
charmel to tune to when you press the VCR1, VCR2, DVD, or SAT-CABLE
button on the remote control,
36 Chapter 3
Page 39

Using the TV's Features
l. Press MENU (the 71"MAlNMENlappears).
2 ltighlight Chunneland press OK on your remote control.
3. llighlight Aztto 7_lHing and press OK.
4 Choose whic]l channel _r_t_would like to set:
Set VCR 1 Channel Displays a list that lets ynu set up the channel that the
TV tunes to when you press the VCR1 button on the remote.
Set VCR 2 Channel Displays a list that lets you set up the channel that the
"I*z tunes to when you press the \:CR2 I_utton.
Set DVD Channel I)isplax s a list that lets you select the channel that the
"IV tunes to when you press the !)VD button.
5.
Set SAT/CABLE Channel Displays a list that lets you set up the channel
that the TV tunes to when you press SAToCABLE.
Highlight the choice that matches the way you have the component
connected to this TV, and press OK.
The choices and a brief explanation follow:
Not connected Choose this if you don't have this particular component
connected to the TV. or if you don't want the TV to automatically tune to the
correct channel when you're using this component,
Channel2 (SAT/CABLE only) Component (satellite or cable box) is
connected to the CABLE/ANTENNA jack on the hack of the TV, and you want
the TV to tune to channel 2 when you press the SAT,, CABLE button on the
remote. Reminder: make sure the component's Channel 2/3/4 switch is set to
channel 2. Usually this switch is on the back of the component.
Channel3 Component is connected to the CABLE/ANTENNA jack on the back
of the TV, and you want the TV to tune to channel 3 when you press the
corresponding button on the remote. Reminder: make sure the component's
Channel 3/4 switch is set to channel 3.
Channel 4 Component is connected to the CABLE/ANTENNA jack on the
back of the TV, and you want the "IV to tune to channel 4 when you press the
corresponding button on the remote. Reminder: make sure the component's
Channel 3/4 switch is set to channel 4.
Video Input Component is connected to the VIDEO jack on the back of the
TV and you want the TV to tune to VII) (SVID if you nsed an S-Video cable)
Input Channel when you press the component button.
Note: You should choose tbis,/br your VCR !}"yon connected it to the TV
with audio/video cables.
Chapter 3 37
Page 40

Using the TV's Features
Parental Controls and V-Chip
The Parental Controls menu allows you 1o progranl your TV so that chiMren
cannot see certain programs, channels, or use [he fi_)n_ pane] coiltrols.
The first three choices in the Parental Controls menu involve software inside
your "IX_ (referred to as V-Chip) which allows yon to block TV programs and
movies based on violence, sex, or other content you may believe children
should not view. In other words, it lets you program your TV so it won't displa 3
certain programs.
Once yoLI block programs, you or other adults can unblock programs by
entering a password.
By defimlt, the software inside your T_' is turned 'off," so if you don't wa]1t to
use this feature, yotl can iust ignore it.
How V-Chip Works
When turned "on," the V-Chip software reads a code that most broadcasters
send with programs. That code tells the software the program's age-based rating
(TV-MA, TV-14, etc.) and content themes [(Violence (V), Adult Language (L),
etc.)]. If you have blocked the rating and/or content themes that the program
contains, you will receive the message, "This channel is not approved for
viewing," when you tune to that particular channel.
Broadcasters are not required to provide content themes, so programs received
with no content themes will only be blocked if you block their age-based
rating. You can also block out programs that have been given a rating of "Not
Rated," and programs that are considered "unrated" because no code has been
sent by the broadcaster. The TV age-based ratings and content themes you can
block are listed in the following table.
38 Chapter 3
Page 41

Using the TV's Features
Age-Based Description and Content Themes for Age-Based Ratings
Rating
TV-MA Mature Audience Only. Specifically designed to he viewed by adults and may be unsuitable t_)r children
tt0cler 17. It contains one or more oi the following content t[/emes: crude indecetat language (L), explicit
sexual activity (S), or graphic violence (V),
Parents Strongly Cautioned. Contains some material that many parents *,vould find unsuitable tk>r children
IV-14 under 14 Parents are strongly urged to exercise greater care in monitoring this program and are cautioned
against letting children under the age of 14 watch unattended. This program contains one or more of the
fi_llowing content themes: intensely suggestive dialogue (D), strong coarse language (L), intetase sexual
situations (S). or intense violence (V).
Parental Guidance Suggested, Contains material that parents may find unsuitable for younger children. Many
TV-PG parents may want to watch it with their younger children. The program contains one or more of the ff)tlowing
content t[aemes: some suggestive dialogue (D), infrequent coarse hmguage (L), some sexual situations (S), or
moderate violence (V).
TV-G General Audience. Most parents would find this program suitable R_r all ages. It contains
little or no sexual dialogue (D) or situations (S), no strong language €,L), and little
or no violence (V).
Directed to Children 7 years and older. Designed for children ages 7 and above. It may be more
TV-Y7 appropriate for children who have acquired the developmental skills needed to distinguish between make-
believe and reality. Themes and elements in this program may include mild fantasy violence (FV) or comedic
violence, or may frighten children under the age of 7,
TV-Y All children. Themes and elements in this program are designed for a young audience, including children
from ages 2-6. It is not expected to frighten younger children.
V-Chip IV Rating Limit
The V-Chip TVRating Limit lets you decide which TV programs can and cannot
be viewed.
To set TV programming limits:
1.
Choose Parental Controls from the Main menu. If Parental Controls have
previously been locked, you must enter your password. If they are not
locked, you will get a message reminding you that your limits will not be
effective until you lock Parental Controls.
2. Press MENU to continue.
3,
4.
Highlight and select V-Chip TV Rating Limit.
Once you get to the V-Chip TVRating Limit screen, use the arrow buttons
and OK on your remote to change the status of a TV program rating or
content theme from View to Block.
The following sections give you more details about how to change tim status of
TV program limits.
Chapter 3 39
Page 42

Using the TV's Features
The V-Chip Rating Limit Screen
Tile following is an example of where items are located within tile Rating IJmit scre,t_r
Rating Status Field
I_'ts you selecl whether the status o1" the" age-hascd Kuing lin/il I(i
the leh is Ve_ )r _ _,'k
Rating Field
Eels _(}LI _ek_Ll h-ill11 _1
listof age-based uuin_s
)oU can bhlck Ol vice\
Content Themes
l;lI1 hl/l_k Ill \W\\
Content Status Fields
I.L_D, _llu %'lv_.l _\[/i_]1
LIllll_qll I]]_'llle, Ill i jr'\\ I(_1
lh_' sdu_tcd latillg, and
_(inI,q_[ thLql/_ _ i_ _Ul'l'Lq_l/_
Viu;\ (VI or Block (B)
Rating Settings Area
[._ts yOU see the curre/lt block_view state of age hased ratings and
associated content The View (V) settings a]v _oded in green, and the
Block (B) settings are coded in red,
Rating Rating Content
field status field status fields
Tip
When you change the status of a rating to
Block, the system will automatically block
higher ratings and all corresponding
content themes.
Blocking Age-Based Ratings
You can automatically block all program ratings above a specified age-based
rating level. For example, if you only want your child to watch programs that
have a TV-G rating and lower (in other v, ords, you want the child to watch
TV-G, TVY7, and TV-Y), then you need to block out other programming with
higher ratings.
To block progranrs with higher ratings:
1,
2.
3.
First, determine the lowest level rating you don't want the chiM to watch
(see chart of age based ratings on next page).
Press the left and right arrow buttons to a ga gat ae R_ti l,q fed
Press tire up and down arrow buttons on the remote to scroll through the
age-based rating limits. Keep scrolling until the rating corresponding with
the lowest rating you do not want the child to \vatch appears on the screen.
In the example discussed above, you would scroll through the Rating field
until W-PG appears, since the highest rating you want the child to watch is
TV-G.
40 Chapter 3
Page 43

Using the TV's Features
Hierarchy of Age-Based Ratings
TV-MA Mature Audience Only
TV-14 Parents Strongly Cautioned
TV-PG Parental Guidance Suggested
TV-G General Audience
TV-Y7 Directed to Children 7 years
and older
TV- Y All Children
Tip
TOreset the ratings to View and V,press the RESET
button on the remote.
5.
.
7.
Press the right arrow button to move the yellow highlight to t le
Status field,
Press t]/(2 Lip OF do\vn LIn'O\V I_LIl[OI1 [o toggle between View and Block. The
status for the rating listed to tile left and all higher ratings atttomatically
changes to Block (and B).
Press OK on the relnote to return to the lnenkl or exit the screen when yon
are finished.
Select Lock Parelttal (.})ll!l'o/.q holn the ]'arelltul Controls nlenu. Enter a
password, and ifyou ]I_i\ei1otalready set your password, you wili be
prompted to enter itagai0 to confirm,
Rating Rating Content
field status field status fields
Viewing Age-Based Ratings
After you block age-based ratings, you have the option of changing some of the
ratings back to Vtew.
1. Determine which blocked rating you want to view.
2. Use the up and down arrow buttons to select the rating with a status
of Block.
3. Press the right arrow button to move the yellow highlight to the rating
status field.
4. Press the up button to select View.
Note: The content slatus fields co*responding to the unblocked rating
become View as well. Thel_ and the age-based rating status are the only
fields that automatically change back to View when .you complete
this process.
Note: You must remember to lock Parental Controls for rating limits to
take effect.
Content Themes
D Sexually explicit dialogue
L Adult language
S Sexual situations
V Violence
FV Fantasy Violence
TV-Y All Children
Blocking Specific Content Themes
You can blockprograms based on their content. (Content is represented by the
D, L, S, V, FV and TV Y on your screen. See the heginning of this section for
details.) When you block a content theme for a pmticulhr rating, you
automatically block that content theme for higher rated programs as ,,veil.
For example, if you do not want your child to watch programs that have adult
language (L) rated TV-PG or higher, then you could block out all programming
"IAZ-PGand above containing adult language.
(Steps continued on next page)
Chapter 3 41
Page 44

Using the TV's Features
Rating Rating Content To
field status field themes
1.
2.
Content
status fields
3.
4.
5.
block program content:
Detennhlc the lov,-es( le\,e] ol" content _,ou don't v, am the child t<>watch.
Use tile up and do_\ n _l[]x)_ r buttons on tile rcm,_t,: to sc,oll Ihrotlgh me
age-based ratings tultil the rating [hat corres]lozids with the !owesl c(>n(ent
you do not want the child to watch appears. (In (]lcexamp]c al/ove, y(>u
would scroll through the ratings until the TV PG rati_-Jg appeared.)
Press the right an'ow hulton to move the hi_hlight to the field
corresponding v.,ith the conten[ thenle you \\ 2(I1I()b]ocl,: o/ff,
Press tile lip o1 dok\n an-o\v I)llllon [0 change content stattlS [:n)ll/ [ "1o /J'
AI! higher ratings' con(enl flleme will aL]tomatically change Io 13
Press OK to return to the lnCllkl or exil the sL Fc'ci3
Note: BroadcaslelTq al-e tlnl Feqllil_'d lo pl'Ol'lde COII/('III /bellH_s ol a_(. a-
based ratings. Programs receiued u,itb no coHteHt themes wi!l olllr be
blocked if you block tbeir age based rating.
Note: You mz,tst remember to lock Parenlal CoHtrols./br ratln 2 limits to
take effect.
Rating
field
Rating
status field
Content
status fields
Content
themes
Viewing Specific Content Themes
If you block specific content thenaes, you have the option of going back and
changing some of the content themes back to (V) Vieze
1,
2.
.
Deternline the content thenles you ,,,,'ant to change Io (|7) _Telt'.
Use the up and down arrow buttons to scroll through the age-based ratings
until the rating whose content thenle you want to change to View appears.
Pi'ess the right arrow button to nlove the yello,a highlight to a pa]ticular
content theme status, such as the B under language (L) corresponding with
TV-14.
4.
Press the up or down arrow button to change its status back to 14 Your
child would then be able to watch programs with TV-14 adult language
content, but not programs with TV-PG or TV-MA language content.
Note: Only tbe content tbenze status coneaponding lo 72_-14
(L) language changes to (V) View. Higher rated co,trent themes, such as
that for TV-MA language, do not change.
42 Chapter 3
Page 45

Using the TV's Features
V-Chip Movie Rating Limit
You set mo\iu ratilIg limits by b[ocking movius rated above a specifk, d [cv_q.
[|ow to block mo\it._ ratings and vi_\\ ¸ mo\iu ratings is explained in th_ next two
sections.
To access the I'-CHII%IIOVIEI&I77AGLLIIITnacnu:
1. Press MENU on the remote control (the 7l'lLdlArMF.AUappears).
2 Select Parental Controls (press 6)
3. Select l'(._ip Movie RatD*g Limit {press 2)1
Rating field Rating
status field
Blocking Movie Ratings
If you on]y want your child to watch movies that have a PG rating and lower
(in other words, movk.s rated PG and G). then you could automatically hlock
out all other movies with higher ratings.
To block movies:
1.
2.
,
4.
Highlight the Rating field and press the up and down arrow buttons to find
the rating that is the k)west rating you don't want the child to watch. (In
the example above, you would highlight the rating status button
corresponding to PG-13, since the highest rating you want the child to
watch is PG.)
Press the right arrow button to highlight the rating Status field. Press tl_e up
and down arrow buttons to change the button front lqewto Block. All
higher ratings automatically change to Block.
Press OK to return to the mentl or exit the screen.
if Parental Controls are not locked, you must lock them so the movie rating
limits will take effect.
Note: Some movies may be given a Not Rated (NR) rating. After blocking
movie ratings, you must set NR to View separately to view NR movies.
Rating field
Rating
status field
Viewing Movie Ratings
After you block movie ratings, you have the option of changing some of the
rating status buttons back to Viez_
1. liighlight the Rating field and press the Lip and down arrow buttons to find
the rating you want to view.
2. Press the right arrow I_utton to highlight the rating 5;tatus field. Press the up
and down arrows to change the button from Block to Vteu,.
For example, if movies with a rating of PG-13 anti higher are blocked, you can
change the rating status corresponding with NC-17. Your child would then he
able to watch all movies with a G, PG, and NC-17 Rating.
3. Press OK to exit the screen, and be sure parental controls arc locked.
Chapter3 43
Page 46

Using the TV's Features
V-Chip Unrated Program Block
Selecting this option lets you decide if programs that the V-Chi I) recognizes as
"'unl-ated" can he viewed. Note that "Llnrated" TV progranls nray include news,
sports, political, religious, local and weather programs, emergency bulletins.
public announcements, and programs wit]lout ratings.
View All tmrated programs are available.
Block All unrated programs are not availahle,
Note: _btt nlttSt rementber to !ock Paretttal C_mtrols.fi)r ralittg limits to
take qff_'cl
Channel Block
Selecting this nption lets you decide what channels can he \iewed.
View Makes the selected channel viewable.
Block The front panel and remote control CH (channel) buttons will tune
nnly to channels that you have marked as View. Tile remote will still tune to
the blocked channel if you use the digits to access the channel, but the
channel will be blocked.
Don't forget to lock parental controls after you change the status of Channel
Block. If you dr) not, the channel block will not take effect.
Note: lf you have a digital cabl# box channels 126-999 ca** be blocked
but will not be removable from your scan list.
Front Panel Block
Selecting this option lets you bk)ck (disable) or unblock (enable) the TVs front
panel. The remote still tunes to any channel. Front Panel Block can:
• Keep children from watching "IV when the parent is not present.
• Keep young children from playing with the buttons.
(When using this as a Parental Control method, you should remove access to
any remote that is capable of operating the television while you have the front
panel blocked.)
Don't forget to lock parental controls after you change the status. If you do not,
the front panel block will not take etTect.
Lock/Unlock Parental Controls
Selecting this option lets you lock and unlock parental controls settings using a
password.
If you do not lock parental controls, none of the settings for V-Chip,
Channel Block, or Front Panel Block will take effect.
If you forget your password, simultaneously press and hold MENU on the
television and volume down on the remote for 3 seconds. Nothing appears on
the screen, Parental Controls simply unlock and yott can re-enter a password via
Lock Parental Controls.
44 Chapter 3
Page 47

Chapter 4
Using the TV's
Menu System
Chapter Overview:
• How to Use the Different Types of Menus
• Audio Menu
• Picture Quality Menu
• Screen Menu
• Channel Menu
• Time Menu
Changing Entertainment. Again.
45
Page 48

Using the TV's Menu System
How to Use Your TV's Menu System
You use the buttons on the remote or the front of your TV to access the menu system and
make changes to the settings.
The [k_llowing pages explain how to use tile different types of menus to adjust tile l_'atures of
your TV.
Feel free to explore the menu system, If you're
ever unsure where you are in the menu system,
or you're just plain tired of exploring, press
CLEAR to remove the menus from the screen
and start over again.
Menus
Tile first menu is called the Main menu. Press MENU on tile remote or on the
flont pane[ to bring aLptile Main menn. Note that hoMing MENU for 2 seconds
displays the GUIDE Pins+ system.
Menus take you to another inenn or a control panel. Tilere are two ways to
select a choice in a menu:
Use your arrow buttons on your remote control to highlight your choice,
and press OK.
Press a number hutton on the remote. For example, in tile Main menu press
3 to go straight to the Screen menu.
Exiting a menu
There are three ways to exit a menu:
• Highlight Exit and press OK,
• Press 0 on the remote.
Press CLEAR. The on-screen displays are cleared from tile screen anti you
return to TV viewing.
Audio Menu
Mute Press OK to reduce the TV's volume to its minimun-t level. Press OK
again to restore the volume.
Tone Controls Displays the slider controls for adjusting the TV's treble, bass
and balance.
Audio Processor Displays a choice list of available audio modes, which
control the way tile sound comes through your speakers. You can also access
the AUDIO PROCESSOR menu by pressing the SOUND button on the remote.
Mono Plays the sound in mono only. Use this setting _xhen receiving
broadcasts with weak stereo signals.
Stereo Splits the incoming stereo attdio signal into left and right channels.
Most TV programs and recorded materials have stereo audio. The word
STEREO appears on the 1_/when you tune to a program that is hroadcast
in stereo.
46 Chapter 4
Page 49

Using the TV's Menu System
Expanded Stereo Electronically "widens" sound from stereo broadcasts,
stereo VCRs, digital satellite systems, DVD players, and LaserDisc players
for a fuller, more spacious sound.
Sound Logic" Stereo Reduces the annoying blasts in volume during
commercial breaks, and also amplifies softer sounds in program material.
Eliminates the need to constantly adjust volmne conn'ol.
SecondAudto Program (SAP) Plays the program's audio in a second
language, if one is available. The word SAP appears on the "IV when you
tune to a program that is broadcast with SAP information. SAP audio is
broadcast in mono. SAP is also used to broadcast a program's audio with
descriptions of the video for the visually impaired.
Audio Output & Speakers Displays a choice list that lets you turn the TV's
internal speakers on or off, and set the audio outputs to fixedqevel or variable
control level.
Variable Output, Speakers On This setting turns the TV's speakers on
and allows variable output from the TV's audio output jacks.
Variable Output, Speakers Off This setting turns the TV's speakers off
and allows variable output from the TV's audio output jacks.
Fixed Output, Speakers Off This setting turns the TV's speakers off and
allows fixed output from the TV's audio output jacks to an external
component such as a surround sound amplifier. With Fixed Output On, the
TV's volume control, tone controls, and mute are disabled.
Picture Quality Menu
Basic Picture Controls Displays the five slider controls for adjusting the way
the picture looks.
Contrast Adjusts the difference between the light and dark areas of
the picture.
Color Adjusts the richness of the color.
Tint Adjusts the balance between the red and green levels.
Black Level Adjusts the brightness of the picture.
Sharpness Adjusts the crispness of the edges in the picture.
When exiting this menu, the Save Personal Picture Preset choice list will appear.
You can choose either Yes or No. If you save the settings as a Personal Picture
Preset, the TV will store the settings so you can re-select them quickly if
someone changes the settings.
(Continued on next page)
Chapter 4 47
Page 50

Using the TV's Menu System
Picture Presets Displays a choice list that lets you select one of three preset
picture settings: Bright Lighting, Normal Lighting, Soft Lighting or Personal
Picture Preset. Choose the setting that is best for your viewing environment.
Auto Color Displays a choice list that lets you turn on the feature that
automatically corrects the color of the picture. (This is especially useful for
tracking realistic flesh tone colors as you switch fiom channel to channel.)
Choose On or O/'_ depending on your preference.
Color Warmth Displays a choice list that lets you set one of three automatic
color adjustments: Cool for a more blue palette of picture colors; Normal; and
\_rarm t'or a more red palette of picture colors. The wan'n setting corresponds to
the NTSC standard of 6500 K.
Screen Menu
Closed-Caption Display Displays a choice list that lets you choose the way
closed captioning information is shown on the screen.
Off always No captioning information is displayed,
On always Captioning information is shown always, when available.
On when sound is muted Captioning information is shown, when
available, whenever the TV's sound is muted. (To mute the sound, press
the MUTE button.) The captioning information is not displayed when the
sound is not muted.
Closed-Caption Mode Displays a choice list that lets you choose which
captioning mode is used for displaying captioning information.
Menu Language Displays a choice list that lets you select your preferred
language for the menus: English, Spanish or French.
Picture Tilt (Direct View "IV 31" or above) Your TV has an extra large picture
tube that makes it vulnerable to the effects of the Earth's magnetic field. You
may need to adjust the picture tilt.
Using Closed Captioning
Many programs are encoded with closed-captioning information, which lets you
display the audio portion of a program as text on the TV screen.
Closed captioning is not available on all channels at all times. Only specific
programs encoded with closed-captioning information are applicable. When a
program is closed captioned, the CC icon is displayed in the channel banner.
See Chapter 3 for more information about the channel banner.
48 Chapter 4
Page 51

Using the TV's Menu System
If you don't know which Closed-Caption mode
to use, select CC1. CC1 is probably the mode
that is used in your area. CC2, CC3, and CC4
are reserved for foreign languages, but are
rarely used at this time.
Closed-Caption Modes
The "IWof|_rs eight closed-captioned modes, including four text modes.
To set tile Closed-Caption Mode
1. Select .qcreen from the Main menu.
2. Highlight Closed-Caption :_fode and press OK (tile Closed-Captio_t Mode
appears).
3. Highlight your choice and press OK (tl_.e5'eree_t menu appears againL
Note; The Text modes cover ttearly half o!_tbepictmv on the screen to
dt_'plg4Fthe closed-captioned text. Most bt>adcastet_ ttse the CC mode,
which displa)_s a few li*Tesof captions at a time.
Turning off Closed-Caption
1. Select Screen from the Main menu.
2. Press OK to select Closed-Caption Display.
3. Highlight Off Always and press OK. The closed captioning is turned off and
you go back to the Screen menu.
Channel Menu
Signal _ype Displays a choice list that lets you select the current antenna
type. This option does not appear when the GUIDE Plus+ system is set up.
UHF/VHFAntenna Choose this if you are currently using an off-air
antenna for "IV signals.
Cable TV Choose this if you are currently using cable or a cable box for
TV signals.
Auto Channel Search Tells the TV to search automatically for all the channels
available through the antenna input. When the TV finds an active channel, it
places it in the Normal channel list; inactive channels (weak stations or channels
with no signal at all) will be removed from the channel list. If you am using a
cable box and have set up the GUIDE Plus+ system, this option does not
appear.
List andLabels Displays a control panel that lets you edit your Nornlal
channel list and choose a six-character label for each channel. Follow the on-
screen directions to enter your channels and other information.
(Continued on next page)
Chapter 4 49
Page 52

Using the TV's Menu System
To enter a number greater than 99, press and
hold "I" to enter the hundreds digit, then
press the two remaining numbers.
Channel # Use the LIp and doxvn a[T(I'_VNto scroll up and down through
the c['mnnels available via your :.mttqlna. You call iJnter 111¢"channtq nuinher
directly rising the number buttons.
NormalList Only the channels included in the Nornlal [is\ arc available
\,,hen }on scan Lip :Ill(.[ dO\Vl+l using channel tip and down. Use the up and
down arrow buttons to indicate \\ hetllcr tilt: channt.,] nuinl_r indicated is
included (}7.>x) or is not incltldcd (.Vo) ii_ the Normal channel list.
ChannelLabel Use the Lip and do\xn artx)w btlttOtlS t() entc+r a six
character label for each channel ltold the buuon do\\n to scio!l quickly
through the characters. The T\' call store up to 2- labcls in llleln()i}
Auto Tuning Displays a choice list tl_clt lets ,,<>uset up flit, '1\ to aUtOlnafically
tune to the correct input channel when }()kl ])I'L2NSa colnponL,nt I)tllt()13 tV(]ltl.
D\D. VCR2, Ol SAToCABI.E) on the icmole, (,o to Chapter 3 7oi details ab_nn
the Auto Tuning l;.:ature.
Video Input Source Lets you select _ hethel or not you have used tile S Video
jack to connect a component. If yoi.i are clsing the S-Video lack in this way.
select S-_ideo Input. 11:not, select lideo input.
Time Menu
Sleep Timer Displays a control panel that lets ) ou select the alm)tn/t of time
you want to give the TV beli_re it shuts itself off.
Schedule Displays a control panel that lets you set tip a schedule for turning
tile TV on and off automatically. Reminder: you nlus_ turn the schedule On. The
on-screen directions guide you through tile steps needed to set the schedule.
Set Time Displays a control panel that lets you enter the current time. The on-
screen directions guide you through the steps needed to set the time. If your
GUIDE Plus+ system is set up, it will automatically update your time and this
option will not appear.
50 Chapter 4
Page 53

Chapter 5
Other Information
Chapter Overview:
• Troubleshooting
• Care and Cleaning
• Front Panel Buttons
• Limited Warranty
• Accessory Order Form
• Index
Changing Entertainment. Again
51
Page 54

Other Information
Troubleshooting
Most prol_lems you encounter _.\ilh your TV you can correct by consulting tile Troubleshooting list that follows.
TV Problems
TV won't turn on
Press the' "J_+ bttltt)zl
Make sure' the T\ is phigged in
Check the \_al! receptacle (or c,xfc'i_sion cord) t_ make sure it is "live" by plugging in something else,
Sonic?thing lllight be \t roi/g with your Fell]oft' con{rol. Press the POWER button on the from of the "IX/'. If tile TV turns on,
check the ic't/l()lc' c(inlrol st)hitiOllS on p. _zl
"lhe Ii_ml pane! btttlol/s ilia) bt, locked (disabled). [:se the renlote control to unlock the front panel controls by selecting the
bif_#l! I'aJ#_,//7l+,_k m the IJaJ%>#ll(ll(,I;IIDXJls nienu aild choosing Viem
Buttons don't work
If you'le rising the remote control, press the TV button first to make sure the remote is in TV mode.
_ll_e front panel buttons may be locked (disabled). Use the remote control to unlock the front panel controls by selecting the
Fro_tt Panel Block in tile Patv*_tal Co_ltrols menu and choosing View.
Unphig the TV for t_xo minutes and then phlg it back in. Turn the TV on and try again.
TV turns off while playing
Scheduled off fLmction may ha\e been activated. Go to p. 50 for instructions.
Electronic protection cncuit may have heen activated because of a power surge. Wait 30 seconds and then turn the TV on
again If this happens fl-equently, tile voltage in your house may be abnormally high or low.
"IV turns on unexpectedly
Scheduled On or Watch from the GUIDE Plus+ system may have been activated, Go to p, 50 for instructions.
Blank screen
Make sure th_ conlponent connected to the TV is turned on.
Try another channel.
Press RF,SET, in case the picture controls are set too low.
When I turn on the TV an icon is moving on the screen
Make sure you have temoved the Demo Pin from tbe G-LINK jack on tile back of your "IV,
No sound, picture okay
_yl)e St)'Lilld iN nltltt'd PTes$ _h fe volt.il"Fl_ _lp I__titton to restore sound.
Maybe speakers are lurncd off Check the Audio Output and Speakers control panel in the Audio menu. Go to p. 47 for
detailed instructions
If using S-V[DEt) cahles t<_ connect a component, remember to also connect the component's left and right Audio Output Jacks
to the "]_,"'s Iclt and right INPUT Jacks.
Can't select certain channel
Channd may bc hlocked or not approved in the PareHtgglConlrols nleiItl.
If using ;t \CR, m:lke sure the "l_.' VCR button on the VCR is in the correct mode (press the TV/VCR button on your VCR),
Noisy stereo reception
The statism might b_. \_eak, Press the SOUNI) button on your remote control to clmnge from stereo to morn)
52 Chapter 5
Page 55

Other Information
Troubleshooting
No picture, no sound but TV is on
• Mayi_e tile cable/air setting is set to the _,'_rong position. ,Se](.,c.'t GUIDE Phts+ ,_[_lttt h'om the Main ll/enu, sele{.i
tilt. _'_c,tup option, and provide tile correct information on the follox\ing screens. Go to pages 16 17 for detailed instructions
• The chalme{ might be empty change channels.
If you're watching your VCR and it's connected with coaxial cahle to the CABLE/ANTENNA jack, tune the TV to channel 3 or 4
(whichever channel is selected on the 3/4 switch on the hack of your VCR). Also check to make sine the T_/VCR bunon on tile
VCR is in the correct mode (press the TV/VCR bumm on your VCR)
Sound okay, picture poor
• Check allt_.'0na co[lnections. Make _ure a[] of the ca])les a[-_ firnl]y connected to the jacks.
• "1"1"._adjusting sharpness function to improve weak signals. Go to page 47 for more instructions.
Black box appears on the screen
• Closed captioning might be on, Check the Closed-Caption Displa) control panel in tile Screeplmenu. Go to page 48 t_)rmore
instructions.
Every time I turn on the TV, the Guide is on the screen
• The GUIDE Plus+ system automatically appears on the screen when you use the TV button on the remote to turn on the TV. You
can turn off this feature by pressing GUIDE on your remote control and then select the Menu har. Press tile right arrow button to
select Setup• Choose Rezfiew optio*Ts and select OFF.
GUIDE Plus+ System Problems
GUIDE Plus+ setup won't switch to channel 9 for VCR and/or channel 02 cable box
• MaRe sure you have removed the Demo Pin from the G-LINKiack. Check to see if the G-LINKwands are positioned correctly in
front of components' remote _ensors.
GUIDE Plus+ system control of cable box is slower than direct control of the box itself. Keep this in mind when changing channels•
You may have an incorrect GUIDE Plus+ Channel Lineup. The guide may get out of sync with the cable provider, Use the GUIDE
Plus+ Setup in the GUIDE Plus+ Menu to change the zip code to 99999. Turn the TV off for 10 minutes. Use Setup again to change
the zip code back to the correct value• If asked, be sure to select the correct channel lineup from the on screen list•
Program information doesn't download
• Review your setup information and make sure it's correct. Press MENU on the remote and select GUIDE Plus+ Setup. Go to page 16
for detailed instructions abnut the GUIDE Plus+ Setup menus.
The TV must be oft to download information. Leave your TV off overnight, for at least 10 hours, to receive the initial download f_)r
your area.
If you're using a cable box, leave it on so you can receive program information.
Scheduled Watch or Record doesn't occur
Check Schedule for timer conflicts. Go to page 50 for instructions.
Make sure the wands of the G-LINK cable are placed in front of the remote sensor(s) on the component(s).
Make sure your ¥CR is turned off during the time you've scheduled to record a program because the system turns the VCR on when
it starts recording (if it's already on when recortling Still'IS,the system will turn it off)
Make sure there is a tape in the VCR and that the VCR is connected p_operly.
Be sure that you set up tile VCR in tile GUIDE' lqtts+ _S'etupmenus. If you don't complete t!le Cb*g_wtri*l,_.fi)r (t I'CR steps
successfully, tht' Record oplion \\ont he avaitahle Go t_ p. 18 R_I"detaited instructions
If a cable box is attached to yc_tir "1_.r,make sure you set it up correttly in tile G{,Jl)l:lqus+ S{,!zq_i//cnus. (}1) t(>p:tge 16 17 Ior
detailed instructions
Chapter 5 53
Page 56

Other Information
The Remote Control Doesn't Work
5onlething illight [)e bet_\ een the iv.mole :tilt] the ielllote sensor on the component. Make sure there is a clear path.
Maybe the t_2mote isn't aimed directly at the component ('IV or VCR) that you're t13,ing to opel_te.
May]_c remote is not in TV Mode. Press the TV button so relllote will control TV.
Maybe batteries in ren'*ote are _r_'ak, dead or installed incorrectly. Put new batteries in the remote. (Note, if you remo\'e the
batteries, you may have to ieprograt/1 the r_lnote to operate odler components.)
goLi might tleed to drain the t_mote's tltictx)processor: remove batteries and press the nt_lalber 1 button for at least 60 seconds.
Release the t button, replace the batteries, and (if necessaz T) program the remote again¸
Problems with V-Chip/Parental Controls
The rating limits don't work
hk)u must loci-: the settmgs. Go to the 71"MAINMk;X'{(press MENU on your remote), select Paternal 6bntrols (press 6 on your
retllote), select Lock Patwtltal _)itlrols (press 6 on your remote).
I don't remember my password and I want to unlock the TV
If you forget your password, simultaneously press and hold MENU on the television and volmne down on the remote tk0r3 seconds.
Nothing appears on the screen, Parental Controls simply unlock and you can re-enter a password via Lock Parental CoJztrols.
The V-Chip won't let me watch a program even though it's not rated as violent.
Maybe the movie was given an NR (Not Rated) status. After you block movie ratings, you must set NRto 14'ew separately in order to
view movies with an NR rating.
Care and Cleaning
CAUTION: Turn OFF your TV before cleaning.
You can clean the TV as required, uising a soft lint-free cloth. Be sure to occasionally dust the ventilation slots in the cabinet
to help assure adequate ventilation.
The TV's screen may be cleaned with a soft, lint-free cloth as well. Take care not to scratch or mar the screen. If
necessary, you may use a cloth dampened with warm water.
Never use strong cleaning agents, such as ammonia-based cleaners, or abrasive powder. These types of cleaners
will damage the TV.
While cleaning do not spray liquid directly on the screen, or allow liquid to run down the screen and inside the TV. Also,
avoid placing drinks or vases with water on top of the TV. This could increase the risk of fire or shock hazard or damage to
the TV.
Caution: If fixed (non-moving) images are left on the screen for long periods, they may be permanently imprinted on the
picture tube. Such images include network logos, phone numbers, and video games. This damage is not covered by your
warranty. Extended viewing of channels displaying these images should be avoided.
54 Chapter 5
Page 57

Other Information
Front Panel
If you can't find your remote control you can use the buttons on your TV to operate many of the "lW's features.
MENU Brings up tile TV MAIN MENU. When in the menu system, it selects highlighted hems. Also returns you to the
previous menu. Press and hold MENU for two seconds to access the GUIDE Plus+ system
Ctl v Scans down through the current channel list. When you're using tile TVs menu system, it acts like the arrow down
button on the remote control,
7
EH A Scans up through the channel list. When ok re lslng the TV's menu systenl, it acts like the alTo\x/ up buttou ()tl the
remote control.
VOE- Decreases tile volume. When you're using the TV's menu system, it acts like the left _l_r(_x_rbutton on the
remote control.
VOL + Increases the volume. When you're using the TV's menu system, it acts like the right arrow button on the
remote control.
POWER Turns the TV on and off.
RCA TV Limited Warranty
What your warranty covers:
• Any defect in materials or workmanship,
For how long after your purchase:
• 90 days for labor charges.
• One year for parts.
• Two years for the picture tubes.
The warranty period for rental units begins with the first rental or 45 days from date of shipment to the rental finn,
whichever comes first.
What we will do:
• Pay any Authorized RCA Television Service Center the labor charges to repair your television.
• Pay any Authorized RCA Television Service Center for the new or, at our option, refurbished replacement patl.s and
picture tubes required to repair your television.
How you get service:
• For screen sizes of 26" and smaller: Take your RCA television to any Authorized RCA Television Service Center and pick
up when repairs are complete.
• For screen sizes larger than 26": Request home or pick up, repair, and return service from any Authorized RCA
Television Service Center, provided that your television is located within the geographic territory covered by an
Authorized RCA Television Service Center. If not, you must take your television to the Selwice Center location at w_ur
own expense, or pay for the cost the Service Center may charge to transport your television to and from your hol_le.
• To identify your nearest Authorized RCA Television Service Center, ask your dealer, look in the Yellow Pages, or call 1-
800-336-1900.
(Continued on next page)
Chapter 5 55
Page 58

Other Information
Show tile Authorized Service Center Representative your sales receipt or other evidence of purchase date or first rental.
What your warranty does not cover:
Customer instruction. ('_ksur Owner's Manual cteady describes l_ow to install, adiust, and _perate your television. Any
additional in_)rmation should be obtained from your dealer).
• Installation alIC[ related adjnstments.
,Signal reception problems not caused by your television.
• Dau'lage hoM UliStlSe of neglect.
Batteries.
• Cttstouler ieplacenlerlt |'uses.
Images btlrned onto the screen.
A television t[lat has heen modified or incorporated into other products or is tlsed for institutional or uther co!lnllercia]
purposes.
A television purchased or serviced outside the U.S.A.
• Acts of God, such as but not limited to lightning damage.
Product registration:
Please complete and mail the Product Registration Card packed with your TV, It will make it easier to contact you
shouk| it ever he necessat T. The return of the card is not required for warrat W coverage.
Flow state law relates to this warranty;
This warranty gives you specific legal rights, and yon also may have other rights that yaw from state to state.
If you purchased your television outside the United States:
• This warranty does not apply. Contact your dealer for warranty information.
Service calls which do not involve defective materials or workmanship are not covered by this warranty. Costs of
such service calls are the sole responsibility of the purchaser.
56 Chapter 5
Page 59

Other Information
VH81 (3-ft)
VH82 (6-ft)
Screw-on Cable attaches to
the round antenna
co**nectora tcalled 75 ohm
F-Otx,) oJz the back cf 3'our
VCR or TI 2 7_Je e_zds screw
onto the connectors for a
Secltr_ Con_l&ctioll.
Push-on Cable attaches
to the round antenna
connectom (called 75
ohm l:-tgpe) on the back
of }our VCR or 71: Ends
pztsh o_,fi_r a q_lic_
con_l_.,ctioT1
Gold-Tipped cable
VH83 (6-ft)
Monaural VCR Dubbing
Cable Double cable that lets
you connect the video and
audio jacks of two VHS
VCRs to duplicate tapes.
Can also he used to connect
a VCR to your TI_ Cable is
colo*_coded and shielded.
Has RCA-Ope pbono plugs
on each end.
Stereo VCR Dubbing Cable
Triple cable that lets you
connect the _o_o and AUDIO
jacks of stereo components.
Gold-Tipped cable
VH84 (6-ft)
VH976 (6-ft)
VH913 (12-ft)
&Video Cable has multi-
pin connectors Ott each
end for connecting S-Video
compone*zts to your TK
Continued on next page .......
Accessory Order Form
Description
Screw-on antenna cable (3-ft)
Screw-on antenna cable (6-ft)
Push-on antenna cable (6-ft)
Monaural VCR Dubbing Cable (6-ft)
Stereo VCR Dubbing Cable (6-ft)
S-Video Cable (6-ft)
S-Video Cable (12-ft)
2-way Signal Splitter
Amplified Antenna
Antenna Mixer (not shown)
Remote Co_tro_ (CRK76T£1)
Audio,Video Adapter (not shown)
Part No. Price
VH81 $3.95
VH82 $5.95
VH89 $5.95
VH83 $5.95
VH84 $9.95
VH976 $7.95
VH913 $1495
VH47 $3.95
ANT200 $49.95
193984 $11.15
242524 $30.35
228449 $4.45
u
+_
o
Prices are subject to change without notice.
Total Merchandise ............................................
Sales Tax ............................................................. -$__
We are required by law to collect the
appropriate sales tax for each individual
state, country, and locality to which the
merchandise is being sent.
Shipping and Handling .................................... $ 5.00
Total Amount Enclosed ..................................... $-_
Use VISA, MasterCard, or Discover Card
preferably.
Money order or check must be in U.S.
currency only.
No COD or CASH,
All accessories are subject to availability.
Where applicable, we will ship a superseding model.
ii;ii!iiiiiii_Oleasecompleteothersidealso
Chapter 5 57
Page 60

Other Information
Charge your order on your VISA.
MasterCard. or Discover Card by
filling in below
USE YOUR CREDIT CARD
IMPORTANT: Copy complete account number
from your VISA card
VISA"
M-Tqm-M r]-M
My card expires: _
IMPORTANT: Copy complete account number
fronl yotn MasterCard
[SI]ZD r-I--FT-qFF]-]-]
Copy Number
above your
name on
MasterCard
My.card F--['_ [----_
expires:
IMPORTANT: Copy complete account number
from your Discover Card
M-I-M [SZ]EI2 FFTT]
My card expires: _ [-_
AUTHORIZED SIGNATURE
(Credit card order Will not be processed without signature)
Print or type your name and A complete and correct
address clearly, order will save you days
of waiting.
Name:
Street:
City:
State:
Daytime phone number:
Apt:
Zip:
Please make sure that both sides of this form
have been filled out completely.
• Allow 4 weeks for delivery.
• All accessories are subject to availability.
• Prices are subject to change.
Splitter VH47
2-u,ay Signal Splitter
lle[/)51'olt Colltl_cl tl second "l_"
or I "CR
ANT200
Amplified Antenna
Allotl_'3'ott to qtlic-klr swilcb
./)'onl 1/_' (ttlt_'tllltl S_?tal to thc
ctlhlt_ t>r sttfelIile Si,qltoI wilboltl
(hSCOIIHt_ctilI_ the (fll[_'_lllCI.
_2"27
• J
.y_ ..
j,J.j
Remote Control
This is the remoW control that
came packed u,itb.pour TE
Replacemellts or spares ca_ be
ordered as needed¸
CRK76TE1
To Order
To place your order by phone, have your Visa,
MasterCard or Discover Card ready and call the toll-free
number listed below.
Use this nunrber only to place an order for accessory
items hsted on thl.s order fort'n,
1-800-338-0376
To place your order by mail, detach and mail the
completed order lorm with credit card information,
money order or check in US currency (made payable to
Thomson Consumer Electronics, Inc.) to the following
address:
I
Video Accessories
POBox 8419
Ronks, PA 17573
58 Chapter 5
Page 61

Index
A
,',cccss(liies i-
.\thallced c'Ollnet'liolls I l
A_e-lkl',c'c) Ratin_ ;18
,\N'HiNNA I_clNot/ 22
Al'ro%% I_[ltIi)llS ]2
Audio
OUlpUl \_oltlille & Speakers i-
PI%)t c'SSt II" i[l
+_tndil) \'ktco tal}Ic' "7
\tit( 3
Chamlcl Sc'aich I'_. i9
( ]olor 18
I tulili_ "_0
I)VD Channc.I 3=
SAT CAISLt ('hanncl 37
VCR (]hanlli.ls 3-
:\[ X (ittlxiliar) t l_tlttOi] 2Z
B
Basic
coi]nccti0ns H. 9
Picture Controls _T
l_altelics l(}r tht_ lellR)tc 14
Black I.¢'_el 4 _
Bhx'k
Age-Based Ratings 40
Front Panel 44
Mmie Ratings _3
Specific Content Theme.<, 41
','-Chip Unrated Program 44
I;g[ttons, remote control 22
C
Cable Box
code list 26
Cables
Audk+B,;ideo 7
coaxial 7
G LINK 7
S Vkleo 7
CC (Closed Captioning) 48
CH + button 22
CH button 22
Channel
2 37
3 37
]_ill]neF _, 3(]
Block 4,7
l=il}eis 50
Lineup 28
Menu iI)
%t';tIch 1_
Channels nlcncl 3i
t;I.I!AR I1Latl)l_ 22
( :!<)st'd ( :al}lI(>ll
f)ispla} I_
MHclc iH
(:¢)clxiil] tilblt' -
t;+,clc Ii_t
Cabk' Box 26
Salv!lite Receiver 26
VCR 26
(h)hlr \X':tlnlt]l t8
(_111111U(. [i( Ills
IY ÷ \CR 8
D," + VCR + Satellite Recei'_er
I1
"IN' ()illy 9
(]ontcnt rhcnles 38
CoIll FIISt t"7
D
I)em_)Pm 6, 8, 9. II
DVI)
t_til[<)i_ 22
Channc.I 3=
F
Fh_dJllg the sen_or 13
Fixed
{nlages 54
Otitput, Speakers Off 47
FORWARD button 22
Front Panel
Block 44
Front panel 55
Front panel block 44
G
G-L[NK
cable 7
connecting 13
GO BACK I)unon 22
GPd Guide menu 29
GUIDE button 22
GUll)E Plus+ system
Channel Lineup 28
Channels 35
Downloading Information 28
Setup 15
Guide Plus+ system 15, 20
I
INFO button 22
lntcr:lctive setup 15
J
Jacks on the'lY 12
L
LEI). button 22
L/MONO lack 12
Labels 50
Language 48
I.itngtlages
Sclcclin_ 1-_
I,otiltJi_ nc'lnotc 5_.'11",oF ]_
l,{)ti... I);ttcitlal (2(}nll<}ls t]
M
Mcnl{ }n'y 50
Menu
Audi*_ 46
Channel -t9
Channels 34
(;rkl Guide 29
Ianguagc 48
Messages 33
Nc_\ s 32
Pit'tulw QualRy 47
Schedule 32
Screen 18
Setup 3-t
Sorf 31
Time 5(1
MENU button 22
Menus
GIIIDF Phis+ System setup 1_
Messages tllenu 33
Mute 46
MUTE button 22
N
News menu 32
Normal List 30
Number buttons 22
o
OK button 22
ON.OFF button 22
p
Parental Controls
Locking, Unlocking 44
menu 38
PAUSE button 23
Picture
Presets 48
Quality Menu 47
Tilt 48
PLAy button 23
Program guide
after setup 20
R
Rating Limits
movies 43
TV 39
REC"VCR+ button 23
Remote. batteries 14
R(mlote sensor 13
REVERSE button 23
s
S VIDEO
c;ib[e 7
SAP i7
',\T-CABH{ butlOll 2.1
SAI'iCahIe Ch;umel _,7
Saleltile Receiver
code list 26
c(mnccting 11
Schedule
menu 32
time 50
Screell Menu 48
Second Audio Ih{}gram (SAP)
iF
Set
DVI) Channel 37
SAT,'CABLE Channd 32
Tune 50
VCRI Channel .'$7
VCR2 Chmmel 37
Setup
G[ II)E I)his+ s)slen/
IllellUS l_
I/1Lq'l U 3_i
Shan'pllCSS 47
Signal T) pe
C'able TV i9
UHF VHF Antenna 49
SK[P button 23
Sleep Timer 36, 50
Sort illetlu 31
SOUND bunon 23
Stereo 46
STOP button 23
"1"
Time
Current 36
Melm 50
Tint 47
Tone Controls 46
Troubleshooting 52
TV button 23
u
UHFiVHF Antenna 49
Unlock, Parental Controls 44
v
V Chip 38
Age-Based Ratings 38
Blocking Movies 43
Content Themes 38
Variable Output, Speakers
On, Off 47
VCR
1 Channel 37
2 Charmer 37
cocle list 26
connecting g
VCRI button 23
VCR2 btitton 23
Vkleo ¢,(!
VII)EO IN lack 8. 11 12
V{)i.÷ butttm 23
MOt.- I)UlIOil 23
w
Warrant} 55
WIIO-INPIIT button 23
Chapter 5 59
Page 62

(This page intentionally left blank)
Page 63

(This page intentionally left blank)
Page 64

C23
_CJ
Please do not send any products to the Indianapolis address listed in this manual or on the carton. This will only
add delays in service for your product.
€,_ THOMSON CONSUMER ELECTRONICS
10330 North Meridian Street
Indianapolis, IN 46290
©2000 Thomson Consumer Electronics, Inc.
Trademark(s)® Registered
Marca(s) Registrada(s)
Printed in USA
TOCOM 15491880 MODEL#: 15491880
F25648 F36648 F26317
F31317 F27647 F35317
F27648 G27648
The following materials were used in
printing this publication:
60%
RECYCLEgPAPER
MINIMUM20%POSTCONSUMER
___JlIPRINTEDWITHI
/ ISOYINKI.
F32648 G27649
 Loading...