

Page 1

U.S E R"
GU I'D'E 6 3s173
C
O. LOR
TV
Page 2
ImpOrtant-lmormat, on
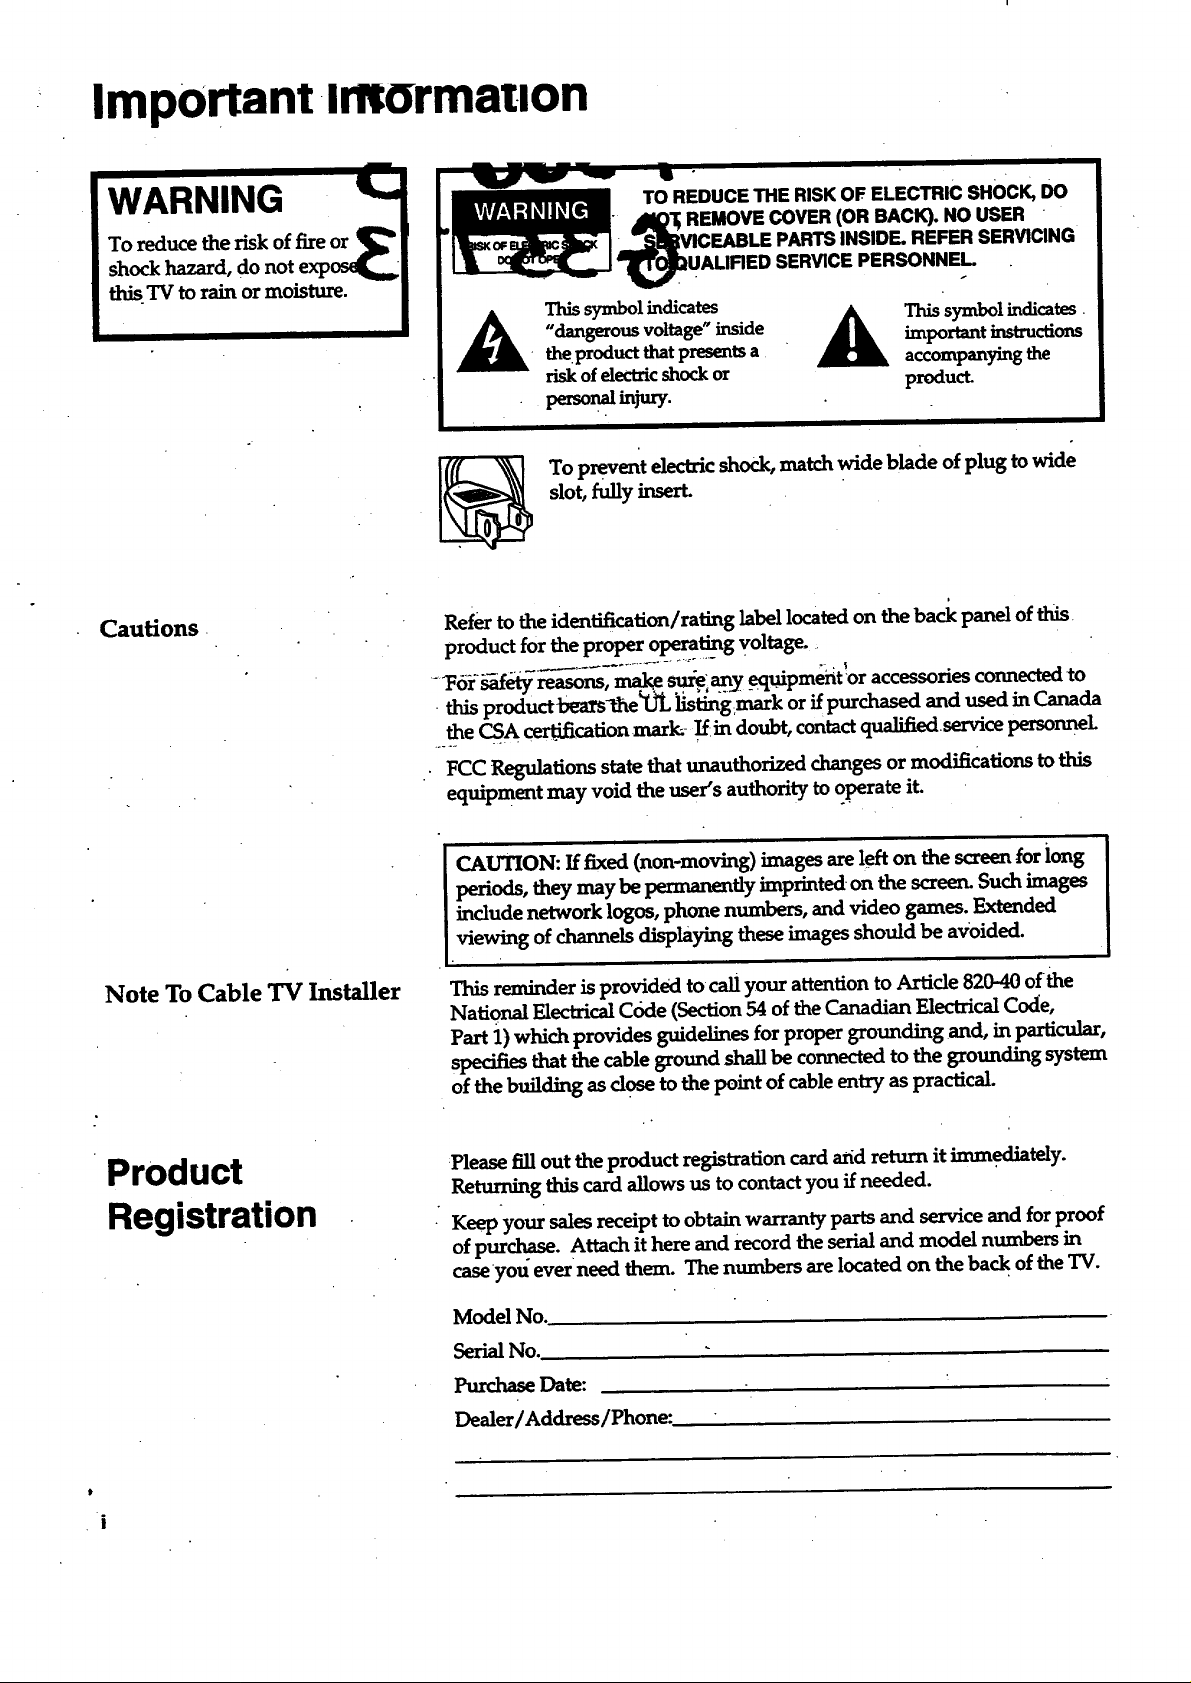
IWARNING
To reduce the risk of fire or _ !
shock hazard, do not exp_ I
,this TV to rain or moisture. /
Cautions
TO REDUCE THE RISKOF,ELECTRIC SHOCK, DO
• _I_'I; REMOVE COVER(OR BACK). NO USER "
UA',mDS'=R CEPfRSO.. L. .
A hissymbolindicates
Refertotheidentification/ratinglabellocatedon theback panelofthis
productfortheproperoperatingvoltage.
....l_orbLafetymasons,_ .s_elany_equipmentoraccessoriesconnectedto
•thisproductbears11_e'UL_stingmark orifpurchasedand used inCanada
theCSA cer_fi."cationmark-!f:indoubt,contactqualifiedservicepersonnel
"dangerous voltage"inside
the.productthatpresentsa
riskofelectric shock or
To preventelectricshock,match wide blade ofplug towide
slot, fullyinsert.
FCC Regulationsstatethat unauthorized changes or modifications to this
equipment may void the user's authority to operate it.
importantinstructions
Thissymbolindicates.
accompanyingthe
product.
Note To Cable TV Installer
Product
Registration
I CAUTION: Iffixed(non-moving)images arelefton thescreen[orlong
periods,theymay be permanently imprintedon thescreen.Such images
includenetwork logos,phone numbers,and videogames. Extended
.viewingofchannelsdisplayingtheseimagesshould be avoided.
Thisreminderisprovidedtocallyour attentionto Article820-40ofthe
National Electrical Code (Section 54 of the Canadian Electrical Code,
Part 1) which provides guidelines for proper grounding and, in particular,
specifiesthatthecablegroundshallbe connectedto thegroundingsystem
of the building as dose to the point of cable entry as practical.
:Pleasefillouttheproductregistrationcardaridreturnitimm.ediately.
Returningthiscardallowsus tocontactyou ifneeded.
Keep your sales receipt to obtain warranty parts and service and for proof
of purchase. Attach it here and record the serial and model numbers in
caseyou ever•need them. The numbers are located on the back of the "IV.
Model No.
Serial No.
Purchase Date:
Dealer / Address/Phone:
t
i
Page 3
Table of Contents
Important Information
Quick. Guide to Your TV
Using Your TV and Remote
Adjusting Your TV
Warning_ Produ_ Registration
Sta_up
Hook up, Plug in TV, Put Batteries in the Remote,
Turn on the TV, Adjust Picture Tilt,
Place Channels into Memory, Set the Tune
Basic Tour of the Remote
Basic Button Layout and Functions
Menu Basics
Colors, Menu Buttons, Moving through the Menus
With Remote Buttons
With VCRs
With a Cable Box
With a Laserdisc Player
With Audio Equipment
Overall-Picture 16
Picture Settings 17
Color, 1_mt,BrightneSs, Sharpness, Autocolor, Picture Reset
2-3
6-7
8-11
12-13
14
15
4
5
Using Advanced Features
References
Sound Settings 18-19
Stereo, .Ex'panded Stereo, SAP, Tone, Speake_
Placing Channels in Memory/Autoprogram 20
Naming the Channels 21
Setting the Sleep Timer 22
Setting the Alarm Clock 23
Watching Picture-in-Picture 24-25
Selecting a Language 26
Watching Closed Captioning 26
Setting Your 'IV for Antenna or Cable 27
Front Panel Buttons
Displays onthe Screen "
Trouble Checks
Limited.Warranty
Order Form for Parts
Glossary
Index
28
29
30-31
32
33-34
35
36-37
Page 4
Quick Guide to Your TV
Startup
The steps belowwill get your TV connected and ready for watching.
Far more details, see the page numbers listed.
1. Hook up your TV
Details are in the
Connections Guide.
2. Plug in the TV
3. Put batteries in the remote
Hook up any antennas, cables or
other equipment to your TV before
you follow the steps below.
Plug the cord into .the outlet,
matching the wide and the small
end of the plug with the outlet.
A. Pull off the cover of the battery
compartment.
.
B. Place the four AAA batteries as
shown, matching the + and-
end of each battery in the
compartment.
C. Replace the cover.
4. Turn on the TV
)
2
'0 '0 '0
"0 sO60
'0 '0 '0
o0"8"
Press "IV on the remote. Press POWER onthe TV.
Page 5
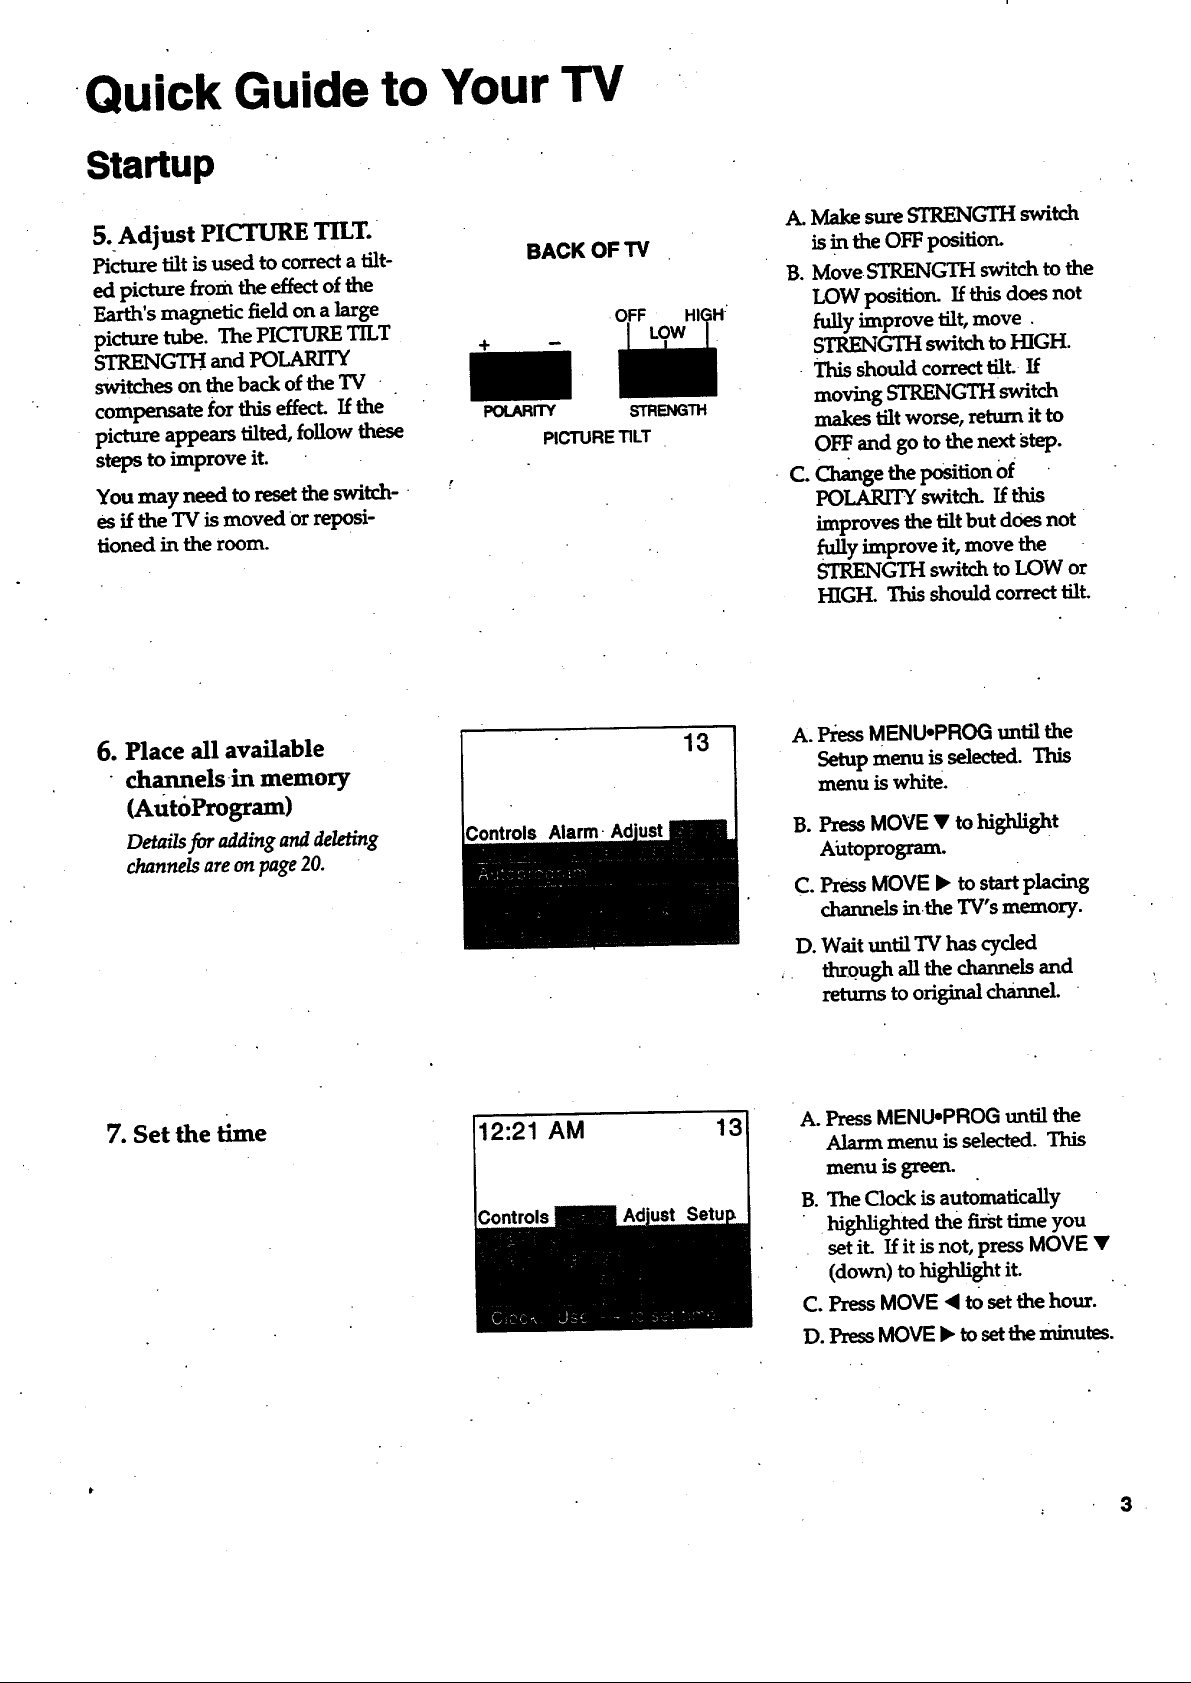
Quick Guide to Your TV
Startup '
5. Adjust PICTURE TILT.
Picture tilt is used to correcta tilt-
ed picture from the effect of the
Earth's magnetic field on a large
picture tube. The PICTURE TILT
STRENGTH and POLARITY
switches on the back of the TV
compensate for this effect. If the
picture appears tilted, follow these
steps to improve it.
You may need to reset the switch-
es if the TVis moved or reposi-
tioned in the room.
6. Place all available
channels in memory
(AutdProgram)
Details for adding and deleting
channels are on page 20.
BACK OF TV
POtARR'Y
PICTURE TILT
Controls Alarm-
OFF
STRENGTH
13
A. Make sure STRENGII-I switch
is in the OFF position.
B. Move STRENGTH switch to the
LOW position. If this does not
fully improve tilt, move.
STRENGTH switch to HIGH.
- This should correct tilt If
moving STRENGTH switch
makes tilt worse, return it to
OFF. and go to the next step.
C. Change the position Of
POLARITY switd_ If this
improves the tilt but does not
fully improve it, move the
STRENGTH switch to LOW or
HIGH. This should correct tilt.
A° PressMENU-PROG until the
Setup menu is selected. This
menu is white.
B. Press MOVE • to highlight
Aiztoprogram.
C. Press MOVE • to start placing
channels in.the TV's memory.
7. Set the time
12:21 AM
D. Wait until TV has cyded
through all the channels and
returns to original channel.
A. Press MENUopROG until the
Alarm menu is selected. This
menu is green.
B. The Clock is automatically
highlighted the first time you
set it. If it is not, press MOVE •
(down)to hishlight it.
C. Press MOVE < to set the hour.
D. PressMOVE • to setthe minutes.
3
Page 6
Quick Guide to Your TV
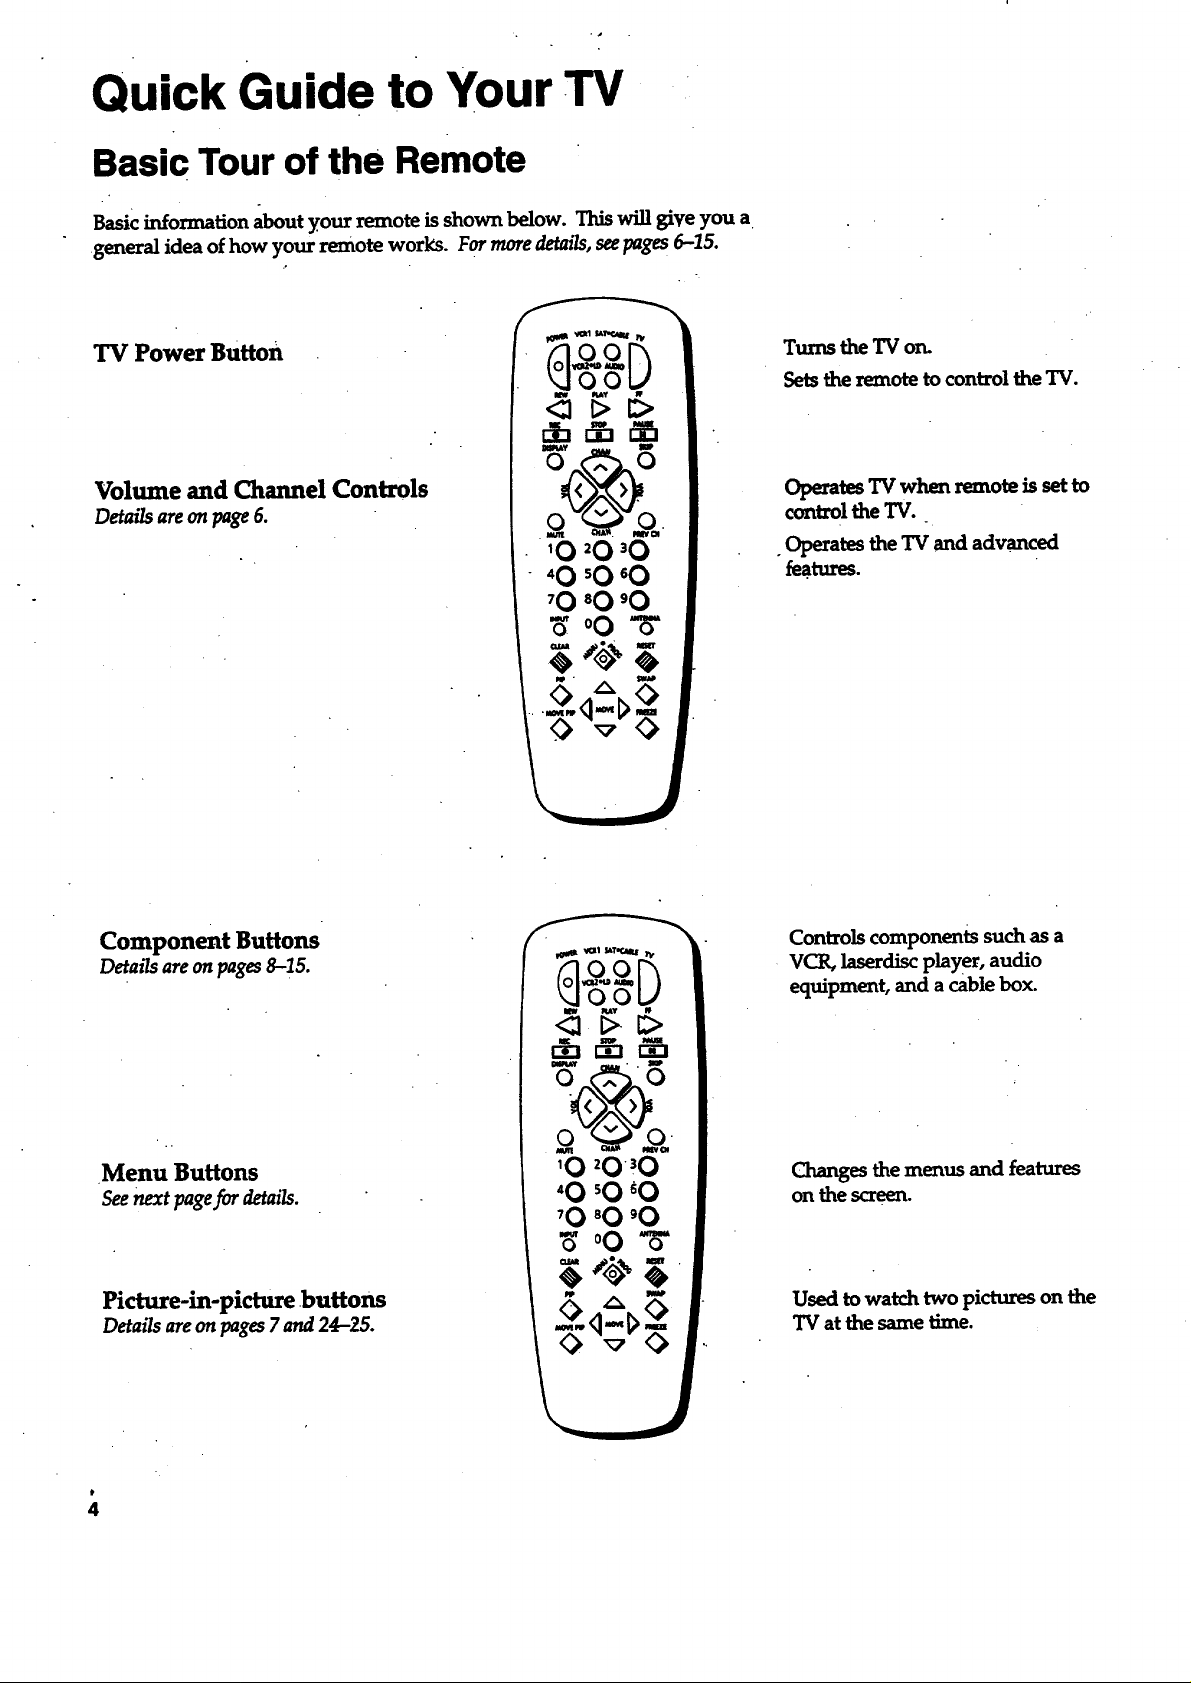
Basic Tour of the Remote
Basic information about your remote is shown below. This will give you a
general idea of how your remote works. For more detazTs,see pages 6-15.
TV Power Button
Volume and Channel Controls
Detailsareonpage6.
Turns the TV on.
Sets the remote to control the TV.
Operates TV when remote is set to
control the TV.
. Operates the TV and advanced
fea.tures.
Component Buttons
Details areonpages8-15.
Menu Buttons
See next page for details.
Picture-in-picture buttons
Detailsareon pages7 and 24-25.
Controls components such as a
VCR, laserdiscplayer, audio
equipment, and a cable box.
Changes the menus and features
on the screen.
Used to watch two pictures on the
TV at the same time.
Page 7
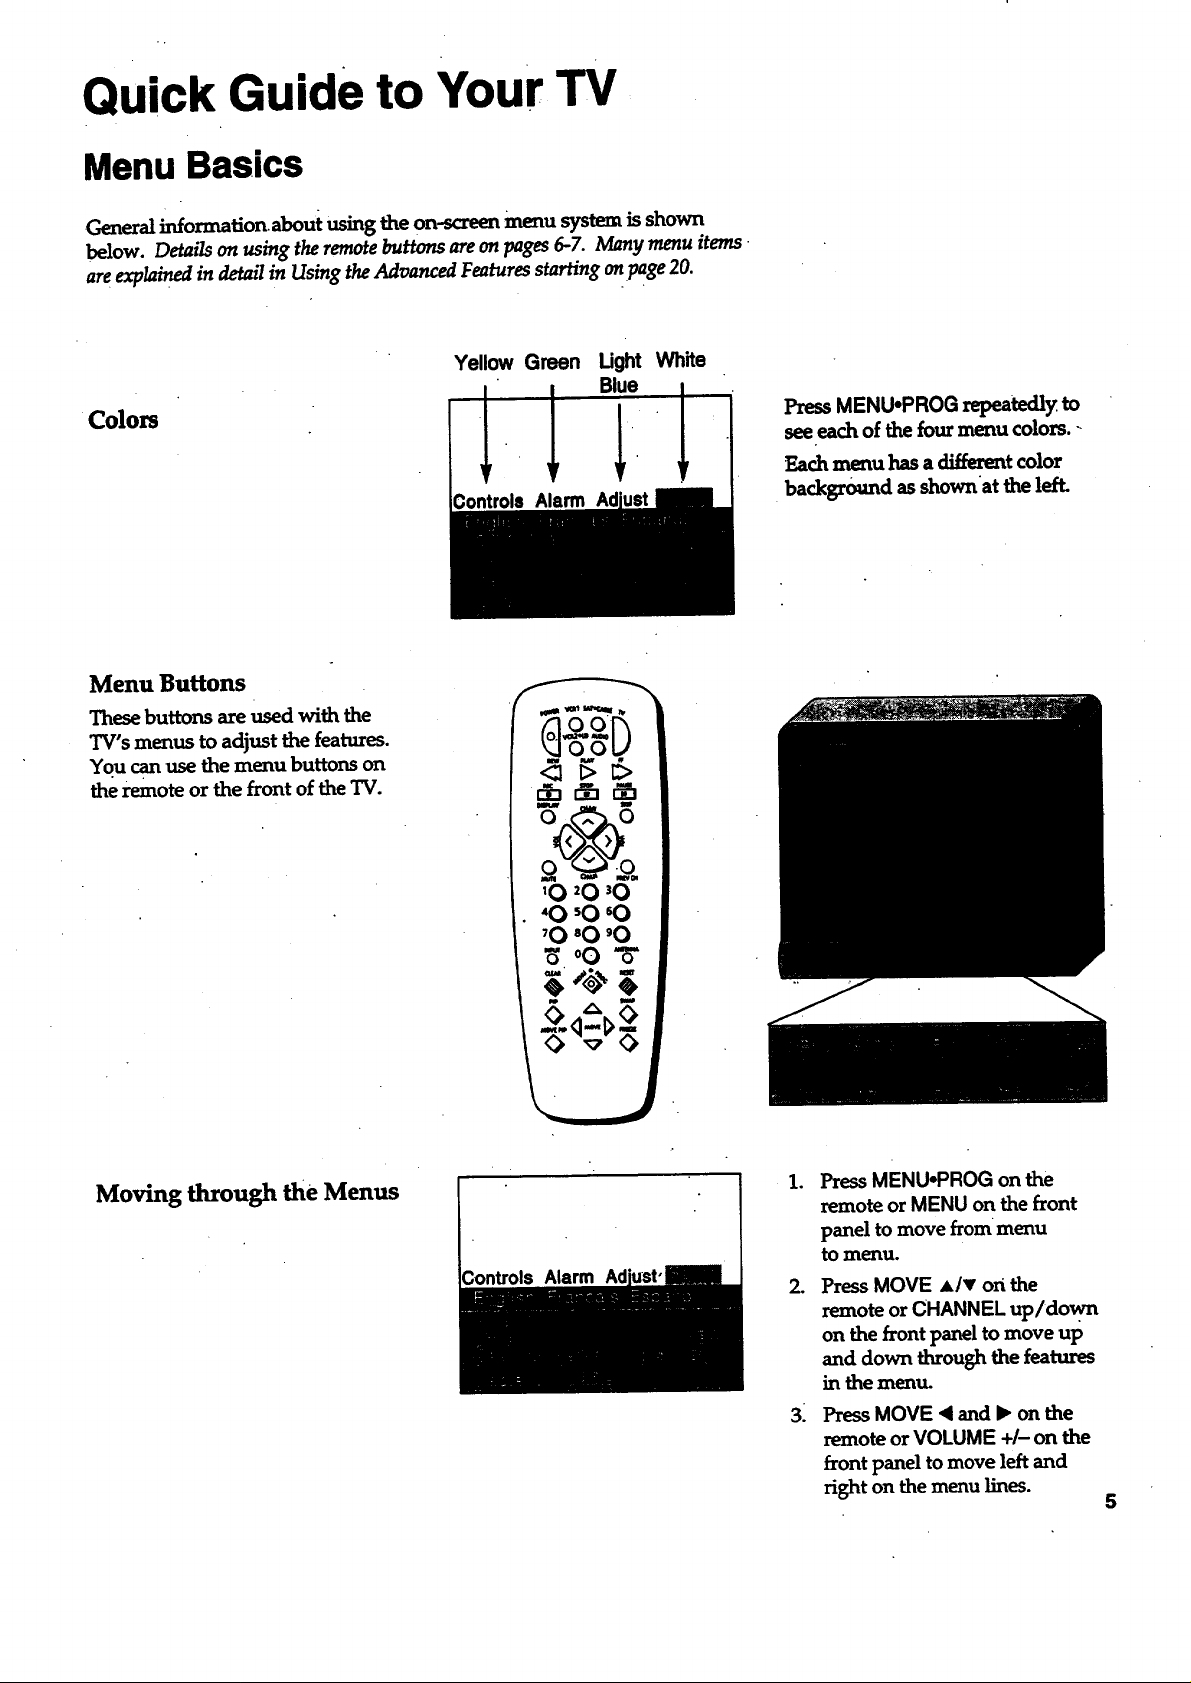
Quick Guide to Your TV
Menu Basics
General information about using the on-screen menu system is shown
below. Details on using the remote buttons are on pages 6-7. Many menu items
are explained in detail in Using the Advanced Features starting on page 20.
Wh_e
Colors
Menu Buttons
These buttons are used with the
TV's menus to adjust the features.
You canuse themenu buttonson
theremoteor thefrontoftheTV.
PressMENU,PROGrepeatedly to
seeeachofthefourmenucolors.-
Each menu has a _t color
•backgro_md as shownat the left.
Moving through theMenus
Controls Alarm
.
PressMENU-PROG on the
remote or MENU on the front
panel to move from menu
to menu.
2.
PressMOVE Alv on the
remoteor CHANNEL up/down
on thefrontpaneltomove up
and down throughthefeatures
in the menu.
3:
Press MOVE < and l_ on the
remote or VOLUME +/- on the
front panel to move left and
right on themenu lines.
5
Page 8
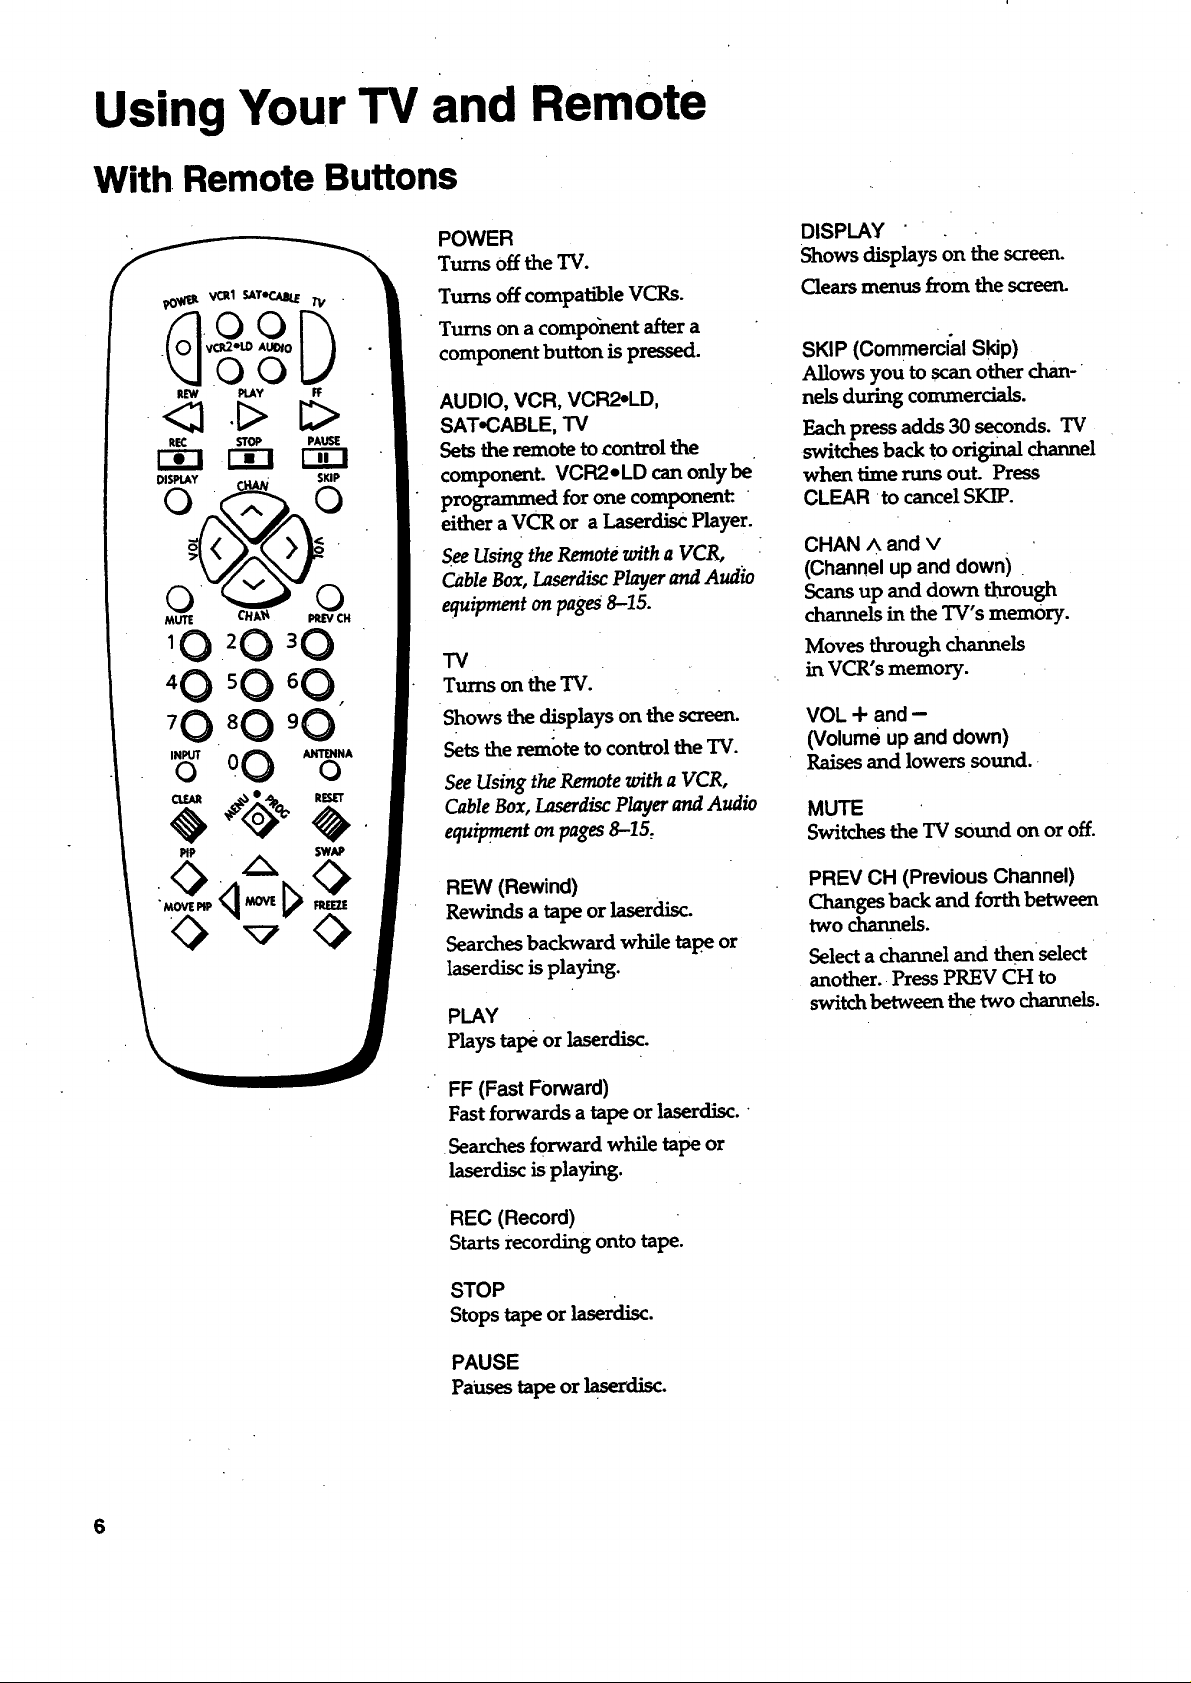
Using Your TV and Remote
With. Remote Buttons
PIP SwAP
POWER
Turns off the "IV.
Turns off compatible VCRs.
Turns on a component after a
component button is pressed.
AUDIO, VCR, VCR2-LD,
SAT-CABLE, TV
Sets theremote to control the
component. VCR2* LD can only be
programmed for one component:. "
either a VCR or a Laserdisc Player.
See Using the Remote with a VCR,
Cable Box, Laserdisc Player and Audio
equipment on pages 8--15.
TV
Turns on theTV.
Shows the d!splays on the screen.
Sets the remote to control the TV.
See Using the Remote with a VCR,
Cable Box, Laserdisc Player and Audio
equipment on pages 8--I5,
DISPLAY
Shows displays on the screen.
Clears menus from the screen.
SKIP (Commerci'al Skip)
Allows you to scan other chan-
nels during commercials.
Each press adds 30 seconds. TV
switches back to original channel
when time runs out. Press
CLEAR to cancel SKIP.
CHAN A and v
(Channel up and down) .
Scansup and down through
chazme]s in the ]W's memory.
Moves LhLroughchannels
in VCR's memory.
VOL + and -
(Volume up and down)
Raises and lowers sound.
MUTE
Sw_.tchesthe TV sound on or off.
REW (Rewind)
Rewinds a tape or laserdisc.
Searches backward while tape or
laserdisc is playing.
PLAY
Plays tape or laserdisc.
FF (Fast Forward)
Fast forwards a tape or laserdisc.
Searches forward while tape or
laserdisc is playing.
REC (Record)
Starts recording onto tape.
STOP
Stops tape or laserdisc.
PAUSE
Pauses tape or laserdisc.
PREV CH (Previous Channel)
Changes back and forth between
two charmeLs.
Select a channel and thenselect
another. Press PREV CH to
switch between the two channels.
6
Page 9
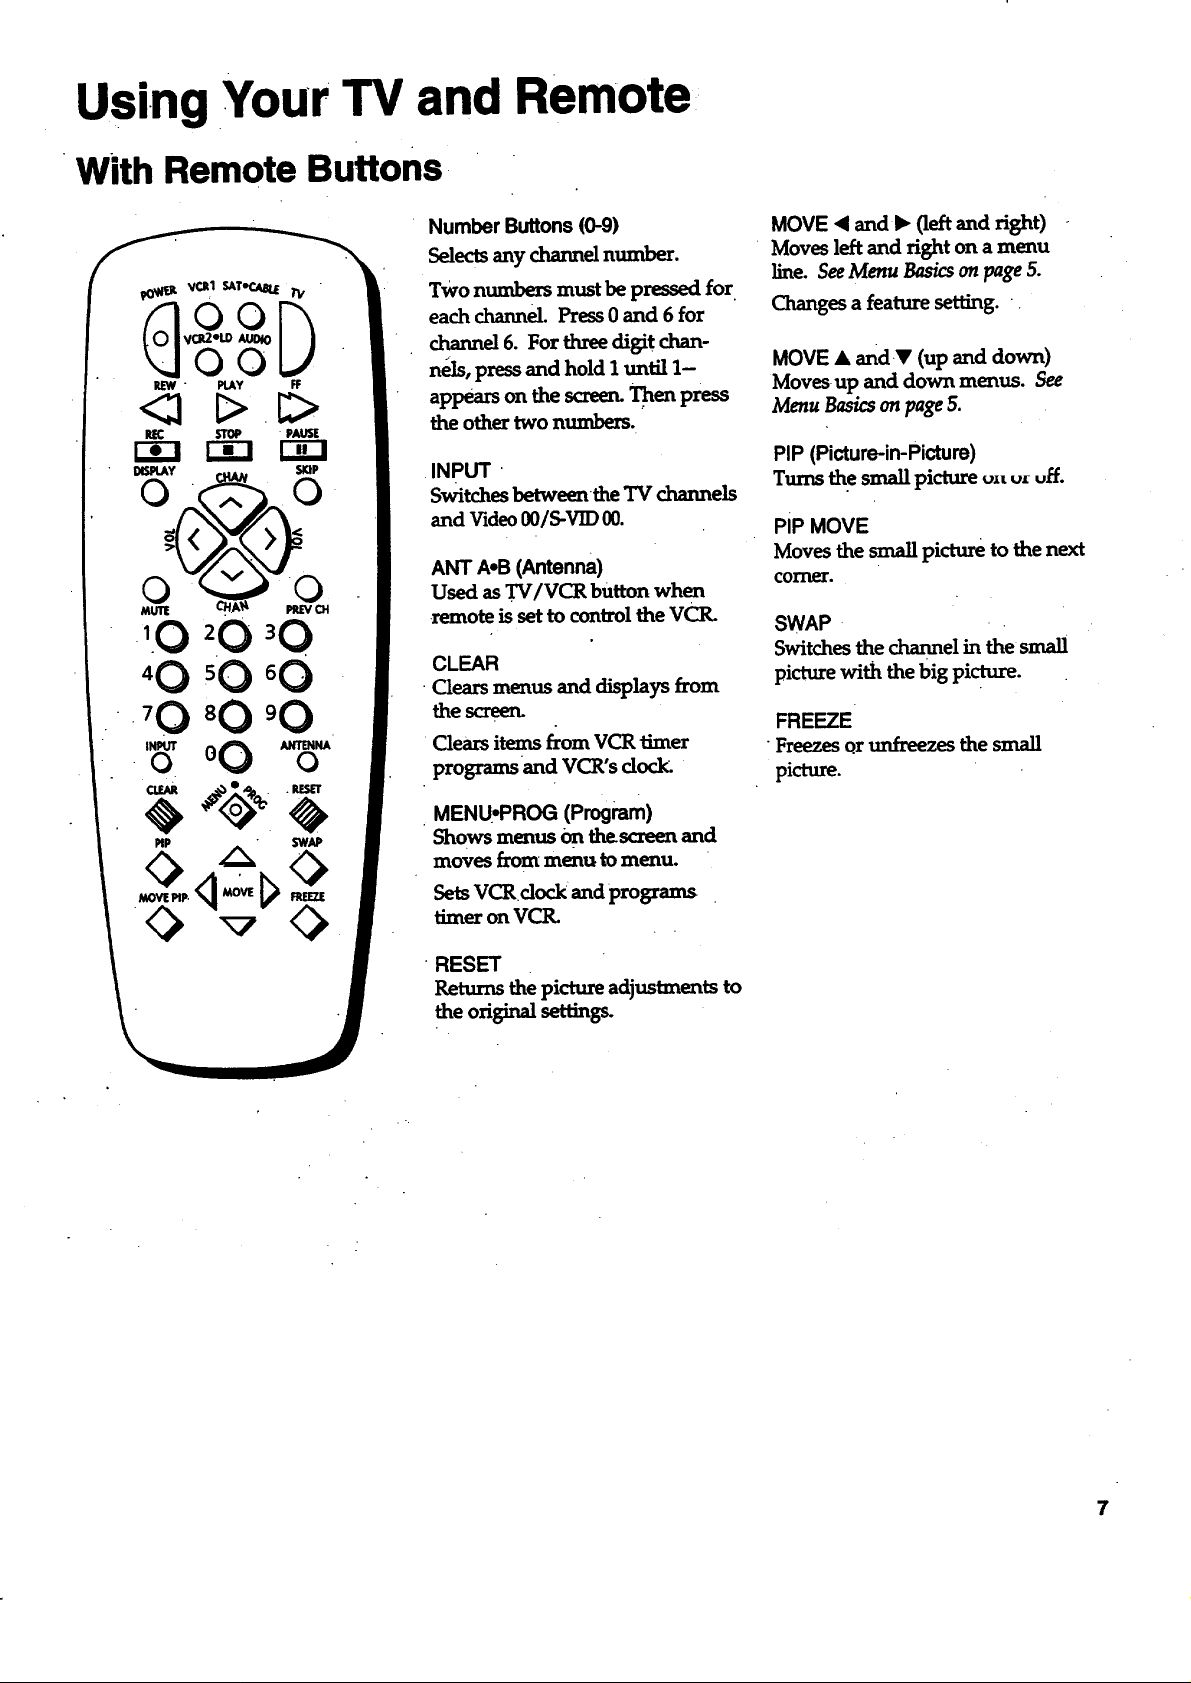
Using Your TV and Remote
With Remote Buttons
NumberButtons(0-9)
Selectsanychannelnumber.
TWOnumbers must be pressed for
each channel. Press 0 and 6 for
channel 6. For three digit chan-
nels, press and hold I until 1-
appears onthe screen.Then press
the other two numbers.
INPUT '
Switches betweenthe'IV channels
and VideoO0/S-VID00.
ANT A.B (Antenna)
Used as TV/VCR button when
remoteissettocontrol theVCR.
CLEAR
Clea_ menus and displays from
the screen.
Clears items from VCR timer
programs and VCR's docl_
MOVE • and I_ (left and right)
Moves left and right on a menu
line. See Menu Basics on page 5.
Changes a feature setting. .
MOVE • andY (up and down)
Movesup and down menus. See
Menu Basics on page 5.
PIP (Picture-in-Picture)
Turns the small picture u==u=uff.
PiP MOVE
Moves the small picture to the next
comer.
SWAP
Switches the channel in the small
picture with the big picture.
FREEZE
•Freezes or unfreezes the small
picture.
MENU, PROG (Program)
Shows menus On thescreenand
moves from menu to menu.
Sets VCRdock and programs
timer on VCR.
RESET
Returns the picture adjustments to
the original setting_
7
Page 10
Using Your TV and Remote
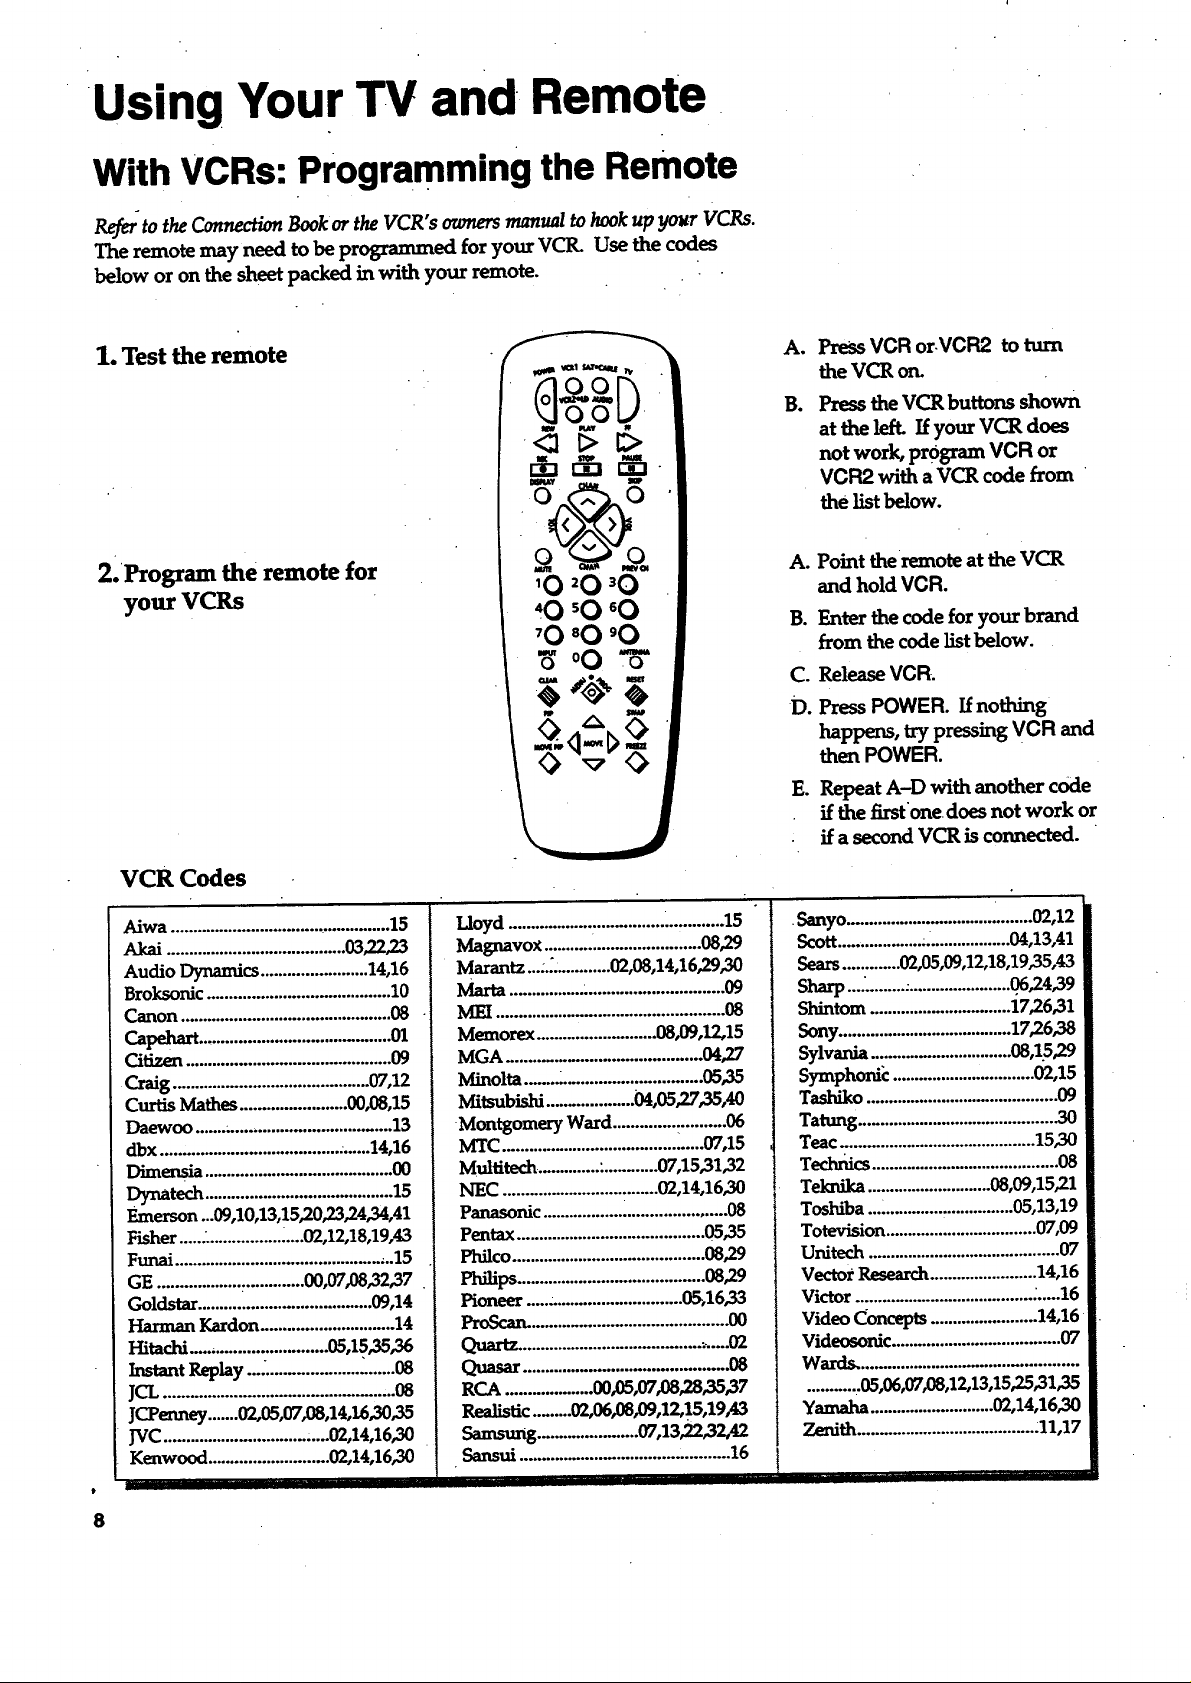
With VCRs: Programming the Remote
Ref_ to the Connection Book or the VCR"s owners manual to hook up your VCRs.
The remote may need to be programmed for your VCR. Use the codes
below or on the sheet packed in with your remote.
1. Test the remote
A,
PreSsVCR or.VCR2 to turn
the VCR or_
PresstheVCR buttons shown
B.
at the left. If your VCR does
not work, program VCR or
VCR2 with a VCR code from "
the list below.
2. Program the remote for
your VCRs
VCR Codes
Aiwa ..................................................15
Akai ........................................03,22,23
AudioDynamics........................14,16
Broksonic .........................................10
Canon ...............................................08
Capehaa ..........................................01
Citizen ..............................................09
•Craig ............................................07,12
Curtis Mathes........................00,08,15
Daewoo .......;................................... 13
dbx ...............................................14,16
Dimeosia ..........................................00
Dynatech ..........................................15
Emerson ...09,10,13,15,20,23,24,34,41
Fisher............................02,12,18,19,43
Funai.................................................15
GE .................................00,07,08,32,37
Goldstar.......................................09,14
Harman Kardon..............................14
Hitachi ...............................03,15,35,36
Instant Replay...:. ...................._.......08
JCL ....o...,..........................,.......o........08
lCl'eaney .......02,05_L08,14,16,30,35
JVC.....................................02,14,16,30
Kenwood ...........................02,14,16,30
t
8
°O
o
Lloyd ................................................15
Magnavox...................................08,29
Marantz....._.............02,08,14,16,29,30
Marta................................................09
Memorex ...........................08,09,12,15
MGA ........................................... 04,27
Minolta........................................05,35
Mitsubishi ....................04,05,27,35,40
•Montgomery Ward.........................06
MTC.............................................07,15
Multitech. ............ :............07,15,31,32
NEC ...................................02,14,16,30
Panasonic .........................................08
Pentax ..........................................05,.35
Philco...........................................08,29
Philips ..........................................08,29
Pioneer ...................................05,16,33
P_'oS_.°°o.. ..... .o°°°°°.... ........ ..o° ....... o°00
............................................ 08
RCA ....................00,05,07,08,28,35,37
Rea_tic........02,06_,12,15,19_3
Samsung.......................07,13,22,32,42
•Sansui .............................................. 16 1
A. Point the remote at the VCR
and hold VCR.
B. Enter the code for your brand
from the code list below.
C. Release VCR.
D. PressPOWER. If nothing
happens, try pressing VCR and
then POWER.
E. Repeat A-D with another code
if the first one does not work or
if a second VCR is connected. "
Sanyo.................................i........02,12
Scott...................:...................04,13,41
Sears.............02,05,09,12,18,19,35,43
Sharp .....................................06,24,39
Shintom ................................17,26,31
Sony.......................................17,26,38
Sylvania ................................08,1.5,29
Symphonic ................................02,15
Tashiko ...........................................09
Tatung ............................................_30
Teac ............................................15,30
Technics ..........................................08
Teknika ............................08,09,15,21
Toshiba ................._...............05,13,19
Totevision ..................................07,09
Unifier ...........................................07
Vector Research........................14,16
Victor ........................................_.....16
Video Concepts ........................14,16
Videoeonic......................................07
Wal_d_.°°.°°°°°o ......... .°°..o.°..,°°,°_..°°°.°°°.o.°
...........,05,06,07,08,12,13,15,25,31,35
Yamaha............................02,14,16,30
Zenith........................................111,17
I
Page 11
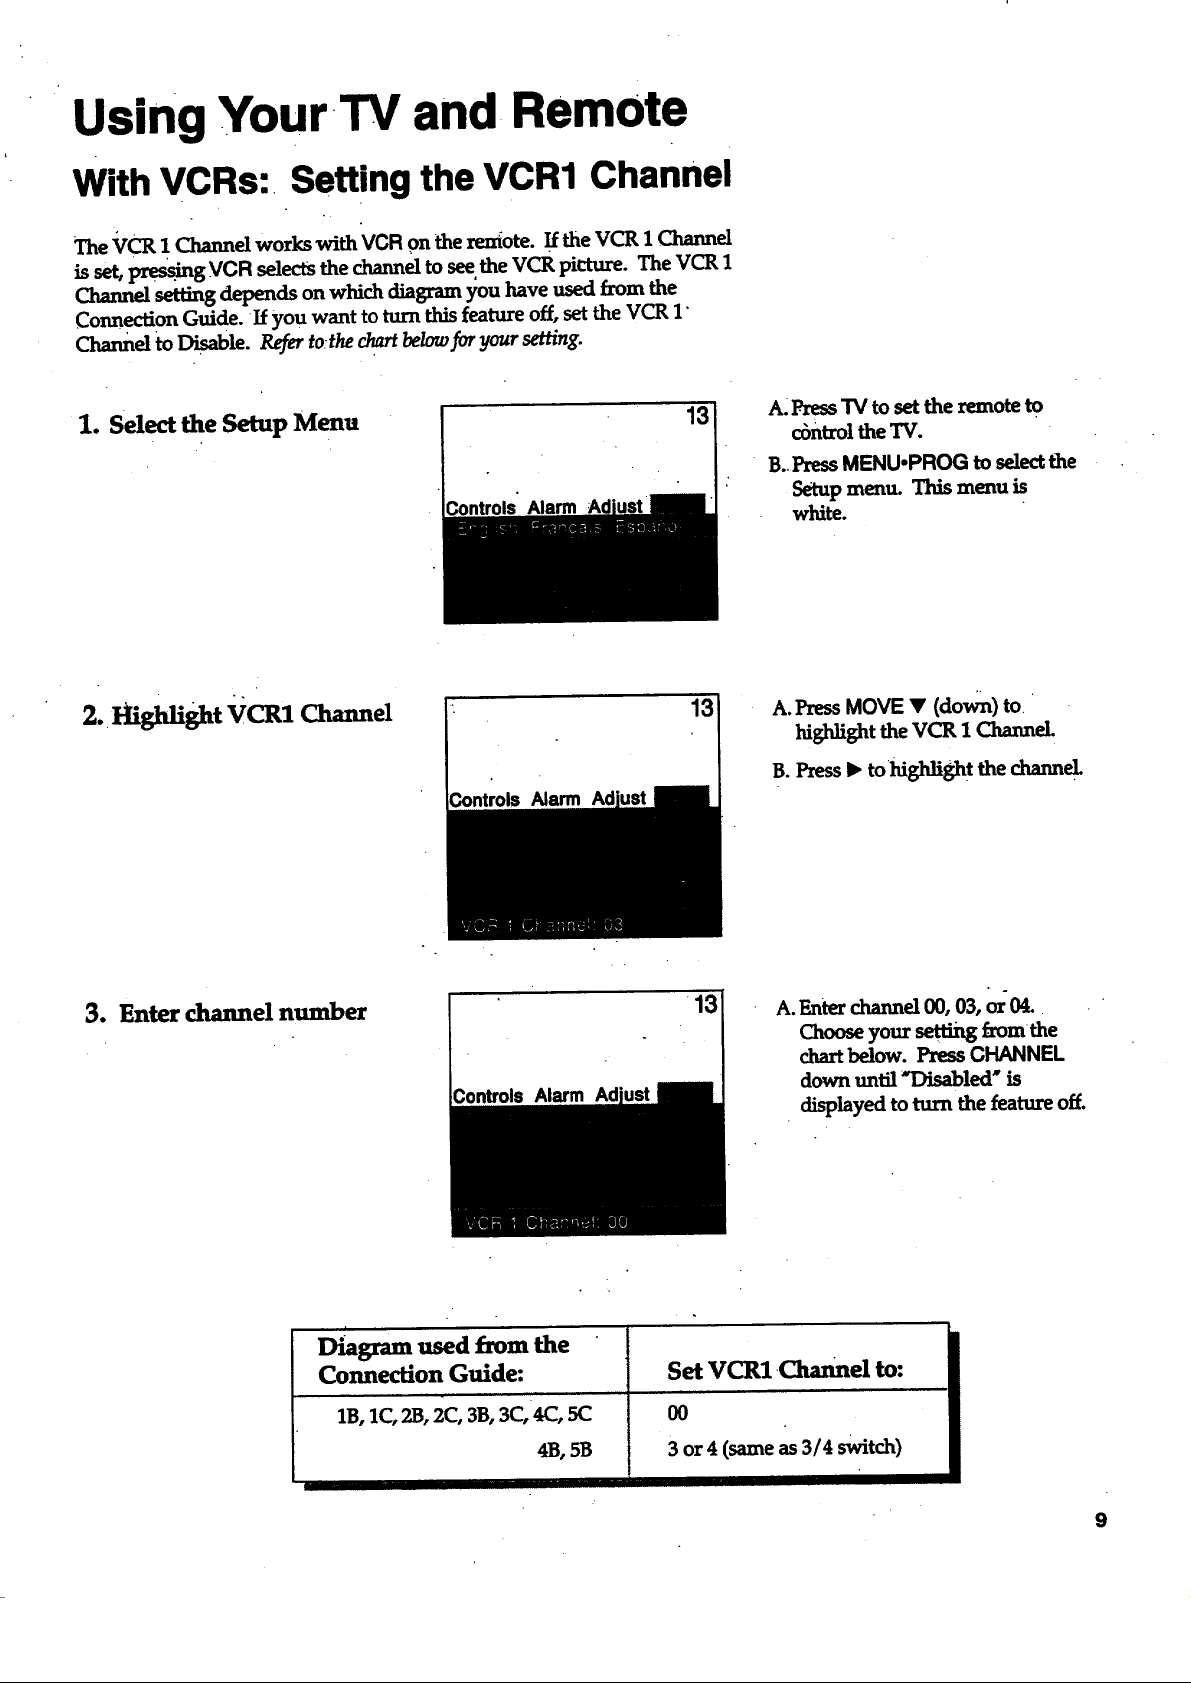
Using Your-TV and, Remote
With VCRs: Setting the VCR1 Channel
The VCR ! Channd works withVCR on theremote.IftheVCR 1Channd
isset,pre_" g VCR _.lectsthechanneltoseetheVCR picture.The VCR 1
Channel setting depends on which diagram };ou have used from the
Connection Guide. If you want to turn rids feature off, set the VCR 1"
Channel to Disable. Refer to:the chart below for your setting.
1. Select the Setup Mena
2. Hi.Might VCR1 Channel
Controls" Alarm
Controls Alarm
13
A: Press TV to set the remote to
cbntrol the TV.
B..PressMENU.PROG to selectthe
Setup menu. This menu is
white.
13 A. PressMOVE • (down) to.
highlight the VCR 1 Channel.
B. Press • tohighligh t the channel
3. Enter channel number
Diagram used from the
Connection Guide:
1B,1C, 23, 2(:, 3B, 3C,4C, 5(3
Controls Alarm Ad
4B, 5B
A.Emer channel00, 03,or04..
Chooseyour settingfromthe
chartbelow. PressCHANNEL
downuntil*Disabled" is
displayed toturnthe featureoff.
Set VCRl.0tannel to:
O0
3 or 4 (same as 3/4 switch)
ii
9
Page 12
Using,,Your TV and Remote
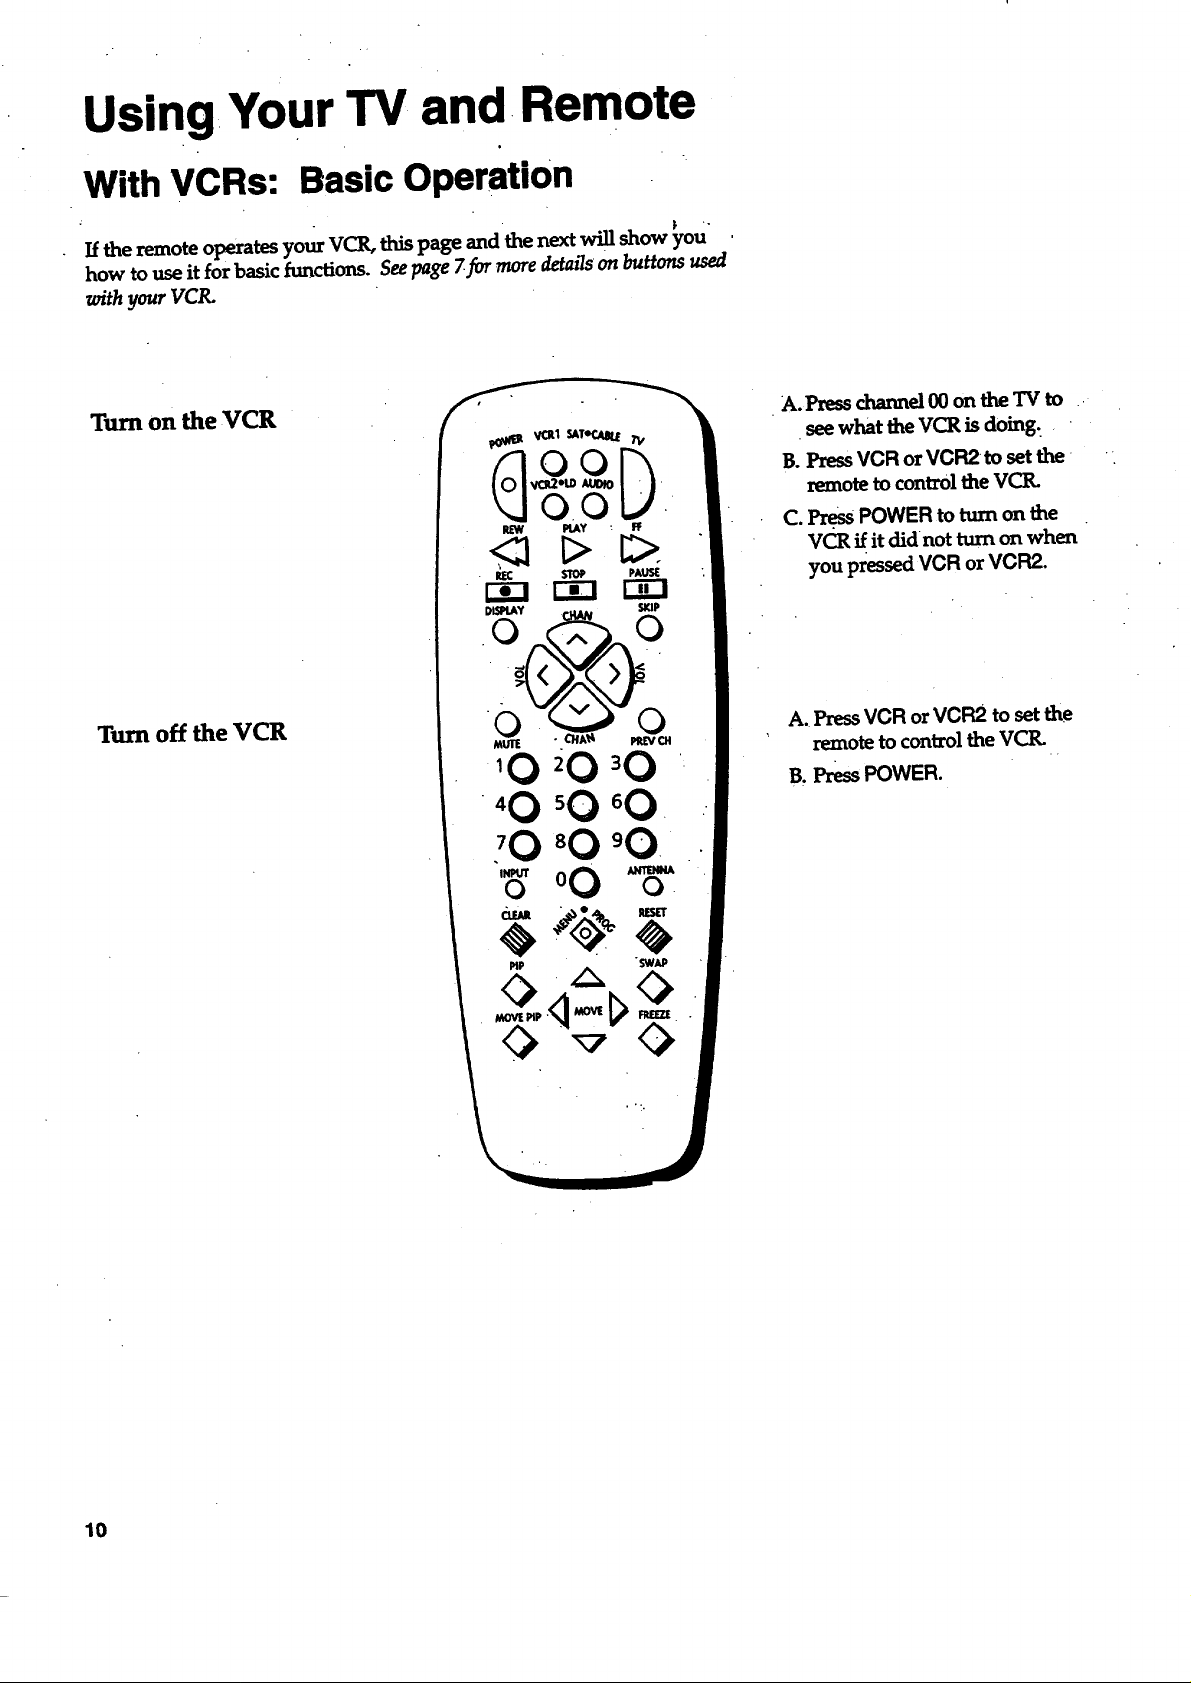
With VCRs: Basic Operation
If the remote operates your VCR, this page and the next will show you
how to use it for basic functions. See page _for more detmTs on buttons used
withyourVCR.
Turn on the VCR
Turn off: the VCR
A. Press channel 00 on the TV to
•see what the VCR is doing.
B. Press VCR or VCR2to set the
remote to control the VCR.
C. Press POWER to turn on the
VCR if it didnot turn on when
you pressed VCR or VCR2.
A. Press VCR orVCR2 to set the
remote to contzol the VCtL
B, Press POWER.
10
Page 13

Using Your TV and Remote
With VCRs: Basic operation
Ifthe remote operates your VCR, this page and page 10 will show you
how to use it forbasic functions..See page 7for moredetailson buttons used
with your VCIL
Record one "IVprogram
and watch another
Watch a tape in your VCR
<a.l>
A. Press VCR orVCR2 to set the
remote to control the VCIL
B. Tune the VCR to the channel
you want to record using
CHANNEL up and down or
pressing two number buttons.
C. Press RECORD to start
recording.
D. PressTVNCR on the VCtL
E. PressTV to setthe remote to
control the TV.
F. Press.CHANNEL up or down to
change channelson the TV.
G. To see the channel you are
•record£ng, tune tl_e TV back to
channel 00.
A. Turn on VCIL
B. Inserra tapein the yCl_
C. PressPLAY to start the tape
p_y_ng..
D. Press STOP when you are
finished.
E. Press REW to rewind the tape.
11
Page 14

Using Your TV and Remote
With a Cable Box: Programming and Basic Operation
Refer to the Connection Bookor contact your cable company'to hook up yaur cable
box. If you have a cable box with its own remote, then you may also be able
to use the TV's remote with your cable box. Use the codes behnaor on the
sheet packed in with your remote.
Program the remote for your
cable box
Basic Operation:
Turn on the Cable Box
pip SWAp
A. Point the remote at the cable
box and hold CABLE.
B. Enter the code numbers for
your brand from the list below.
C. Release CABLE.
D. Press POWER to turn it on. If
nothing happens, try pressing
CABLE and then POWER.
E. Repeat A-D with another code
if the first one does not work.
A.Tune TV to channel 02, 03, 04,
05, or 06--the cable box channel.
B. Point remote at the cable box
and press CABLE.
C. Press POWER to turn it on.
D. Press CHANNEL up or down to
change Channels on the cablebox.
Turn off the Cable Box
Cable Box Codes
ABC ...................................... ....... 22,46
An vision .................... •................... 07,08
Cablestar ...................................... 0708
Eagle.............................".....................08
Eastern International ....................... 02
General Instn_me_at .............................
....................04,05,15,23,24,25,30,36,46
Ham]in ............................... 12,13,34,48
Hitachi ....................................37,43,46.
Jerrold.......................,............................
..........04,05,15,23,24,25,30,36,45,46,47
MACOM ..................................... 37,43
Magnavox .........................................._..
.......... 07,08,19,21,26,28,29,32,33,40,41
t
12
NSC ...................._.........i....................o9
Oak...........................................01j6;38
Oak Sigma ........................................ 16 ;
Panasonic ................................03,27_39
Philips ..........................:.........................
..,....... 0708,19,21 _.6,28,29,32,33,40,41
PioneeT.....................................18,20,44
Randtek ....................... ................. 07,08
RCA..:...........................................oo,27
Regal:............................................m,13
-...............--....--........ ......... ...44
Scientific Atlanta ................... 03,22,35
Signature ........................................... 46
A. Press CABLE.
B. Press POWER to turn it off.
Sprucer............................................ 27
Starcom .............................................46
Sylvania.............................................11
Teknika .............................................06
T_ .....................................:..10,11
Tocom............................,....17,21,49,50
Unika .......................................31,32,41
Viewstar ..............................................
..........0708,19,21,26,28,29,32,33,40,41
warner Amex ..................._...............44
Zenith...........................................14,42
Page 15

Using Your TV-and. Remote , "
With a Cable Box: Setting the Cable Channel
The Cable Channel works with GABLE on the remote. If the Cable
Channel is set, pressing CABLE selects the channel to see cable channels.
The Cable ChaImel setting depends on which channel your cable box
must be on to see cable channels. The channels usually used are 02, 03,
04, 05 or 06. Consult your cable company for more information.
1. Select the Setup menu
2. Highlight Cable Channel
Alarm
Controls Alarm
13
13
A. Press TV to set the remote to
control the TV.
B. Press MENU.PROG to selectthe
Setup menu. This menu is
white..
A. Press MOVE • (down) to move
down the menu until Cable
Charme_Uh_sh_ghted.
B. Press _ to underline the
channel
3. Enter channel number
Controls Alarm Ad
13
A. Enter the number for your cable
box, either 02,03,04,05, or 06.
Press CHANNEL downuntil
"Disabled _ is displayed to turn
this feature off.
13
Page 16

Using Your TV and Remote
With a Laserdisc Player: Programming and Basic Operation
Refer to your Laserdisc Player owner's manual to hook up your Laserdisc_Player.
The remote may need to be programmed for your laserdisc player. Use the
codes below or on the sheet packed in With your remote.
Programthe remote for
your Laserdisc Player
Basic Operation
PIP SWAP-
A. Point the remote at the laserdisc
playe_ and.hold LD.
B. Enter the code for your brahd -"
from the code list below.
C. Release LD.
D. Press POWER. If nothing
happens, try pressing LD and
then POWER.
A. Tune TV to channel 00, 03, or04.
B. Point the remote at the laserdisc
player and press:I.D.
C. Press POWER to turn it on. "
D.Use the buttons onthe remote
that relate to laserdisc player
functions. Not all buttons high-
lighted may work with your
laserdisc player.
E. Press POWER to turn it off.
Laserdisc Player Codes
ProScan......................33
RCA ................... ........33
J Pioneer .......................33
t
14
Page 17

UsingYour TV and Remote
With Audio Equipment: Programming and Basic Operation
Refer to the Connection. Book or your Audio equipment owner's manual to hook
up your audio equipment. Your remote controls only RCA audio equipment
such as a radio, CD player, ta_>eplayer, turntable, or amplifier. The
•remote may need to be programmed for your equipment. Use the codes
below or on the sheet packed in with your remote.
Program the remote fo r
audio equipment
Basic Operation
A. Point the remote at the audio
equipment and hold AUDIO.
B. Enter the code from the code
list.
C. Release AUDIO.
D. Press POWER totum it on. If
nothing happens, try pressing
AUDIO and then POWER.
E. Repeat A-D with another code
if the first one doesnot worl_
A. Point the remote at the audio
equipment and press AUDIO.
B. Press POWER to turn it on.
C. Use the buttons on the remote
that relate to audio functions.
Not allbuttons highlighted
" may workwith your
equipment.
D. Turn the audio equipment off
using the audio component's
powe_ off button.
Audio Codes
acA/Dtmensia
AM/FM. ..........................03
CD....:...............................07
Tape.................................06
Photo ..... ....... ...o.........,..o.0_
Aux .................................. 04
15
Page 18

AdjustingYour TV
Overall Picture
Follow the steps beIow,to lighten or darken the overall pk'turewithout
changing the color levels.
1. .Select the Controls Menu
2. Highlight Picture
PressMENU*PROG'to selectthe
Controls menu. This menu is yel-
low. _ ,.
PressMOVE • (down) to high-
Alarm
3. Use MOVE _ and II to..
adjust the Picture
P
16
PressMOVE • (right) to lighten
the picture.
OR
PressMOVE < (].eft)to darken the
pict_.
Page 19

Adjusting,Your TV
Picture Settings •
Follow the steps below to change the picture on the screento your
personal setting. The chart at the bottom of the page explains your options.
1. Select the Adjust Menu
2. Highlight ilmn to change
3. Use MOVE • or < to
adjust each item
Press MENU.PROG repeatedly to
select the Adjust menu. This menu
is light blue.
Press MOVE • (down) to
higldight the picture item you
want to adjust.
Press MOVEI_or 4 to adjust each
iiem.
Color
"Umt
Bright (Brightness)
Sharp (Sharpness)
Autocolor
Picture Reset
Press MOVE • to:
Increase color richness
Give •red tint to skin color
Add more light to dark parts of
the picture
Show deanex,.dearer images
Turn on to keep Color and Tint in
proper balance each t_meyou.
changechannels
Reset the picture back to the
oa_semn_
Press MOVE • to:
I
LOwercolor to black and white
Give green tint to skin color
Addmore dark to light parts of
the picture
Make picture more smooth
Turnoff for manual adjustment
of Color and Tint
Reset the picture back to the
oa_#nalsetUngs
17
Page 20

Adjusting Your TV
Sound Settingsi Stereo, Expanded Stereo, SAP and Tone
FoIlow these steps to adjustlthe Stereo, Expanded Stereo, SAP or Tone of
your TV. SAP(Second Audio Program) is sometimes used to offer the
program being watched in another language.The chart below explains
your options.
1. Select the Controls Menu
2. Highlight item to change
3 Use MOVE I_ or < to
adjust each item
PressMENU-PROGto selectthe
•Controlsmenu. This menu is yel,
low.
PressMOVE • (down) to
highlight the sound item you
want to adjust.
PressMOVE I_ or < to adjust each
item.
Ad
18
#
Stereo
SAP
Tone
On
Sound is automatically
reproduced in stereo or
mono, whichever the TV
station is broadcasting.
On
Sound is reproduced in
another sound channel
If nothing happens,
your broadcast may not
have SAP.
High
Highpitchedsoun_ are
louder.
Off
Sound is reproduced in
mono
Off
Sound is reproduced in
Stereo, Expanded Stereo
or Mono, whichever is
selected in the Stereo
Menu Item.
Low
Low pitched sound_iare
louder.
I Expanded
Expanded stereoadds greater
width and dimension to stereo
, broadcasts creating a more
•spacious stereo sound effect.
Page 21

Adjusting Your TV
Sound Settings: Speakers
Follow the steps below to turn the speakers on or off in your TV. The
chartbeJow explainsyour options.
1. Select the Setup Menu
2.Hi_aight speakers
PressMENU,PROG repeatedly to
selectthe Setup menu. This menu
"iswhite.
PressMOVE • (down) until
Speakers is highlighted.
Alarm
3. Turn Speakers on or off
On
The sound comes from the TV's
intematspeakers.
l_ MOVE• or< toturnthe
speakersonoroff.
Off
No sound comes from the TV.
i
19
Page 22

Using Advanced Features
Placing channels in Memory (Autoprogramming)
Only channeb 2-13 appear in the TV's memory when you first turrt it on.
The channels available in your area must be programmed into the TV_s
memory when you hook up your TV. Using CHANNEL up or down
allows you to scan through these channels.
You may want to add or delete a few channels if some stations have weak
signals or were off the air when the TV was progranuned. Refer to th_Add
or De/de Channds section be/ow.
.A.
1. Place channels in
memory (AutoProgram)
Alarm
Hook up an antenna_ cable or
components before you begin
these steps or you will not be
able to add channels into
memory.
B.
PressMENU,PROG repeatedly
to select the Setup Menu and
highlight Autoprogram. This
menu is white. .-
2. Add or delete channels
ControLsAlarm Ad
13
C. Press MOVE • (down) to
highlight Autoprogram.
Do
Press MOVE • to start theTV
adding all active channels intO:
memory. :
E. Wait until the TV has Cycled
thi'oughallthe channels and .
returns to the original channeL
AI PressMENU,PROG repeatedly
to selectthe Setup menu. This
menu is white.
B. PressMOVE V (down) to
highlight Channel Memory.
C. Press MOVE • to underline the
channel number.
D. Selectthe channel number you
want to add or delete with the
numberbuRons.
E. Press MOVE • to add or delete
a channel (you will see Stored
on the screen when added and
Erased when deleted).
1:. Repeat D and E for more
channels.
2O
Page 23

Using Advanced Features
Naming,the Channels -
You can name the channels using the character lisi below. Full appears
beside Label when the memory is used up. Fixed appears beside Label
for channel 00--it cannot be named.
1. Name a channel
Alarm
Alarm Ad
NBC
12
A. PressMENU.PROGrepeatedly
to select the Setupmenu, This
menu is white.
B. Press MOVE V !down) to
C. Press MOVE • to underline the
channel number.
D. Select the channel number With
the number buttons.
E. Press MOVE • to underline the
first characteT of the name.
F. Choose the character using
MOVE.&/V (up or down).
G. Rel>eat E-F to.complete the
llanle.
H. Press MOVE '4 to move
backward if youwant to .
change an item.
•2. Erasea name
12
;ontrols Alarm
A. Follow A and B above.
B. Press MOVE • until dear is
underlined-
C. Press MOVE _ (up or down) '
to clear the name.
Character
ABCDEFGHIJKLM N O PQRSTUVWXYZ&.
I " /
,()_+,;_./0123456789 •;<=>?@blankspace •
21
Page 24

UsingAdvanced Features
.Setting the Sleep Timer
You can set yourw to turn itself off. If you're watching TV at night and
fall asleep, the TV will turn off for you.
1. Set Sleep T'mer
11:00 PM
Sleep
13
A.
PressMENU-PROG to select
theControls menu and
l_gMight Sleep T_en
menu is yenow. '
B°.
PressMOVE • to enter the
mount of time you want to
watch TV before it shuts Off.
Each press equals 15 minutes.
C.
PressMOVE <1to sub'a-acttime
from the deep timer.
2. Add more time
3. Cancel the Tuner
Alarm
Alarm
Alarm Ad
A. When @.01appea_ on the
screen, the TV will shut offin
one minute. Press MOVE • to
add more time.
A. PressMENU*PROG to select
• the Contzob menu and
highlightSleepTuner.
.,B. Press MOVE '4 until the time
]reaches - : --.
.22
Page 25

Using Advanced Features
Setting the Alarm Clock
The TV can be set to turn on each day like your alarm dock. You can set
it to turn on to your favorite channel at a certain time. You can also set it
to.turn itself off agai_ The Alarm cannot be used until the dock is set.
I. Turn on the Alarm
12:34 AM
Alarm'
2. Set the Alarm Channel 12:34 AM
Alarm
13
13
A. Press MENU.PROG to select
the Alarm menu and highlight
Alarm. "I'his menu is 8teen.
B. Pre_ MOVE • or 41to select
Onor Off.
A. Press MOVE • (down) to
• highlight the Alarm Channel.
B. Press MOVE • to higMight the
channel number.
C. Enter the channel that you
wantthe TV to turn on to with
the number buttons.
3. Set On and Off Times
12:34 AM 13
Alarm
12:34 AM
Alarm
13
A, Press MOVE • (down) to
_t the On or Off Time.
B. Press MOVE < to set the hour.
C. Press MoVE • to set the
minutes.
D. Press and hold MOVE _ to.
choose Disabled. This turns
the TV only on or only off at a
certain time each day.
23
Page 26

Using Advanced Features
Watching Picture-in-Picture
Picture-in-Picture allows you to display a small picture within the Big picture of the TV screen. To watch two
different programs at once, you must connect a VCR, Laserdisc Player or Camcorder. You may need to disable
the VCR1 Channel if you can not get two different programs at once. •
A°
Turn on Picture-in;Picture
Hook up a VCR, Laserdisc
F1ayer, or Camcorde_ to the
video jacks on the back of the
TV. See the Connec_ Guide.
B°
PressTV to turn the TV on.
¢.
PressCHANNEL up or down tc
selectthe channel you want to
Watch on the big picture.
Do
Turn on the VCR, Laserdisc
Player, or Camcorder.
E.
PressPIP to put the small
picture on the screen. It is the
same as the big picture.
F°
Press O0to see the signal fzom
the VCR, Laserdisc Player, or
Camcorder connected to the
video jacks.
Chang_ channels on the
large picture
Change channels on the.
small picture
VClq,_i_
Playw, or
Camcorder
Picture
Press CHANNEL up and down or
two number buttons to change
channels on the large picture.
Change channels on your VCR,
Laserdisc Player, or Camcorder to
change channels on the small pi€-
ture.
24
Page 27

Using Advanced Features
-Watching Picture-in-Picture
Move the small picture
Swap the big picture with
the little picture
Freeze the small picture
Press PIP MOVE to move the
small ')icture to the next comer.
PressSWAP _ switch the small
picture with the big picture.
A. Press FREEZE to stop action in
thesmall picture.
Turn off Picture-in-Picture
B. PressFREEZE again to return
to an action picture.
PressPiP to turn off picture-
in-picture.
25
Page 28

Using Advanced Features
Selecting a Language
The on-screen displays in this TV can be displayed in three langua_s: English, French, and Spanish. When you
select a language, most of the displays will be shown on the screen in your preferred language.
1. Select the Setup menu
Controls Narm
2. Select Language
13
PressMENU repeatedly to select..
the Setup menu. This menu is
white.
Press + or-to select English,
Fran_Lis(French),orEspaaol
(Span_).
Watching Closed Captioning
Closed captioning displays the audio portion ofa Frogram as words on the TV screen..It is useful for the deaf,
hearing impaired, or anyone who wants to watch a program without sound If you have turned Closed
Captioning on and it does not appear on thescreen, it is not available on _the channel you are watching. This TV
does not support the text mode. Text information typically consists of program information, weather bulletins,
local activities, etc.
1. Select the Controls Menu
2. Highlight Closed
Captioning
3. Select Setting
Alarm
Alarm
PressMENU-PROG to select the
Controls menu. This menu is
yellow.
PressMOVE • (down) to highlight
Closed Captioning.
A. Press MOVE • or • to select
Off, C1, or C2. Select C1 for fuji
translation of the primary lan-
guage in your area. Select C2
for secondary language transla-
tion, simplified English, or
whatever is being broadcast in
your area.
Page 29

Using Advanced Features
Setting Your TV for Antenna or Cable
Your TV automatically adjusts this feature when the TV places channels in memory (autoprogram). FoIlow the
steps below to change the setting as needed.
1. Select the Setup menu
2. HighlightCab1_JA_
Controls"Alarm
13 Press MENU-PROG repeatedly to
select the Setup menu. This menu
is white.
13
PressMOVE • (down) to
highlight Cable/Air.
•3. Select Cable or Air
Controls Alarm
13
A. Press MOVE ,< or • to select
Cable or _kir. Select Cable if
you have cable. Select Air if
you have a home antenna con-
nected to your TV.
27
Page 30

References
Front Panel Buttons
For details on using buttons with menus, see Menu Basics on page 5.
OR
MENU
CH A and v •
VOL -!- and -
(ALsoVOL A and VOL V)
POWER
+ and -
(Not on all models)
Shows menus on screen.
Moves from metiu to menu.
Channel up and down.
Scans up and down through channels in the TV's memory.
•Moves up and down menus.
Volume up and down
Raises and lowers sound.
Moves left and right on a menu line.
Changes a features setting.
Turns the TV on or off.
Same asVOL + and buttons.
28
Page 31

References
Displays on the Screen
Your _ shows the ,settingsof several features on the screen. To see what
features have been set on your TV, press DISPLAY on the remote.
Screen Display
12:00 AM
KNBC
13
S-Vid O0
Video 00
12:00 AM KNBC 13
Alarm Sleep PIP 00
Volume - ....... I ..... ... +
Mute Stereo 1:55
Description
Time of the dock. Details are on page 3.
Name you chose to descr_ the channel. Details are on page 21.
Channel number you are wa_ing.
Indicates that a component conn.ect_ to the S-VIDEO jack on the back
of the TV, it is turned on, and channel 00 is selected.
> or Video 00, S-Vid 00
> or Unusable Signal •
Indicates that a component is connected to the VIDEOjack on the back of
'theTV, it is turned on, and channel 00 is selected.
Alarm
Sleep
PIP 00
Volume
Unusable Signal
Mute
SAP
1:55
Alarm-dock is set to turn on or off. Details are on page 23.
Sleep Timer is set to turn off the TV. Details are on page 22
Picture-in-picture is turned onto channel 00. Details are on pages 24-25.
Sound level of the TV.
No signaliscoming inon video input channel00.
There is no sound_ See MUTE button on page 6.
The sound is being broadcast in stereo. Details are on page 18.
SAP isselectedinthemend, but itisnotavailablefortheprogram being
broadcast. Details are on page/8.
Secondary Audio Program. SAP is selected and it is available for the
program .being broadcast. Detailsare on page 18.
The time remaining for commercial skip. D'etails are on page 6.
29
Page 32

References
Trouble Checks
You may have problems that can be fixed with a few minor adjust, ents.
Look for the type of problem you are having below and then try the
suggestions to get your TV going again. For warranty information see page 32.
Trouble Checks and Adjustments
Power
TV will not turn on
Hug TV
Plug something else into the outlet to make sure it is working.
Make sure batteries in the remote are not dead.
Aim the remote at the TV and press TV. "
Malce sure baReries amplaced in the remote the right way. See batteries
on page 2.
Unplug TV for a few minutes and then turn it on again.
No picture, no sound but
TV has power
Ficture
Blank screen or Unusable
Signa! appears on screen
Picture poor, sound okay
Pi re-in-Picture
Can't get two different
Channels in'picture-in-picture
Check antem_a connections.
Check position of.Cable/Air feature. S_ page 27.
Tryanother channel. Inactive channel may be tuned.
Make sure component connected to the VIDEO INPU T jacks is turned on
ifyou choosechannel00.
Make sure TV is.tuned to the same channel as the switch on back of VCR
ifwatching aVCR.
Make sure TV/VCR button OnVCR is in con_-t position when using VCIL
Try anotherchannel.
Scan,the channels.
Check antenna connectior_
Adjust 'IV picture. Seepages 16-17.
Make suresmallpictureistunedtochannel00.
Make surethecomponent conned:tedtothebackoftheTV isturnedon.
Make sure a video cable is also connected to the TV's VIDEO INPUT jack
if using an S-VI_ component.
Make sure the AUDIO and VIDEO OUT jacks on the VCR, Laserdisc
player, or Camcorder are connected to the TV's VIDEO and AUDIO IN
jacks.
Make sure VCR 1 Channel is set to Disabled. See page 9.
/
3O
No picturewhileusing
.picture-in-picturewith
S-VHS VCR orcamcorder
Make sure a video cable is also connected to the TV's VIDEO INPUT jack.
Page 33

References
Trouble Checks
Trouble
Remote
Buttons don't work when you
'pressthem
Works part ornone of the
time
Can't selectcertainchannei
Sound
Noisystereoreception
Checks and Adjustments
Press "iV to set the remote tO control the TV. Seebuttons on page 6-7.
Clear the path .between the remote and "IVof any objects.
Aim the/emote at the component you are trying to control
Press TV so remote will control TV.
Make sure batteries in the remote are not dead.
See ifbatteries are placed in remote correctly: Seebatteries, page 2.
Press number buttons. Channel may not be in memory. See autoprogram
on page 20.
Make sure TV/VCR switch on VCR is in the TV position.
For numbers over 100, press and hold I until 1- appears, then press the
other two numbers.
Set Cable/Air feature to Cable for channels higher than 69. See page 27.
Turn Stereo off. The stereo broadcast may not be dear. See page 18.
Picture okay, no sound
Picture okay, sound poor
No stereo on stereostation
TV Turns on or off
Turns off by itself
Turns on by itself
Does not turn off at
Alarm Time
PressVOLUME + orMUTE to restore sound.
Make sure TV's speakers are on. Details are on page 19.
Tryanother channel.
Try adjusting the Tone. Seepage 18.
Change Stereo to off. The stereo broadcast may not be dear. Seepage 18.
Make sure Stereo is turned on. Seepage18.
Check Sleep Timer. See sleep timer on page 22.
Wait 30 seconds and turn on again, a power surge may have occured.
Check Alarm Off time. See alarm clock on page 23.
Check Aiarm On Time. See alarm clock on page 23.
Check dock Fune. See clock on page 3.
\ •
Make sure alarm is turned on or off. See alarmdock on page 23.
Check clock time. See clock on page 3.
31
Page 34

References
Limited Warranty
What your warranty covers:
How long after YOurpurchase:
What we will do:
How you get service:
• Any defect in material or workmanship.
• 90 days for labor charges.
• One year for parts.
. Two years for picture tube.
(The warranty period for rental units begins with the first rental Or45 days
from date of shipment to the rental finn, whichever come s first)
•. Pay any Authorized RCA Television Servicenter tb_ labor _-ges.to repair
your television.
• Pay any Authorized RCA Television Servicenter for the new or, at our
•option, rebuilt replacement parts and picture tube required to repair
your television.
*For.screensizesof20"and smaller:. Take your RCA televisiontoany
AuthorizedRCA TelevisionServicenter.
•For screensizes larger than 20":Requestservicefrom any Authorized
RCA TelevisionServicenter.
• To identifyyour nearestAuthorizedRCA TelevisionServicenter,askyour
dealer,lookintheYellow-Pages,orcall1-800-336-1900.
' Show theservicetechnicianyourevidenceofpurchasedateorfirstrental
W_tatyour wanunty does not coven.
ProductRegistration:
How statelaw relates to warranty:.
If you purchased your product
outside the United States:
• Customer instruction.(Yourowner'smanual dearlydescribeshow to
• install,adjust,and operateyour television.Any additionalinformation
shouldbe obtainedfrom your dealer.)
• Installation and related adjustmentz.
• Signalreceptionproblemsno tcausedby yourtelevision.
• Damage from misuseorneglect.
• I_tteries.
• Customer replacabfe fuses.
• Imagesburntontothescreen.
• A televisionthathasbeen modifiedorincorporatedintoo_er productsor
isused forinstitutionalorothercommercialpurposes.
•A televisionpurchasedorservicedoutsidetheUSA.
• Actsof God, suchas,:butnotlimitedtolightningdamage.
• Pleasecompleteand mailtheProdUct RegistrationCard packed withyour
set.Itwillmake iteasierto contactyou shoulditeverbe necessary.The
retm'nofthecardisnotrequiredforwarrantycoverage.
• k
• Thiswan'antygivesyou specificlegalrights,and you alsomay have other
rightsthatvaryfrom statetostate.
• This warr_ty doesnotapply.Contactyourdealerforwarrantyinformation.
32
Page 35

References
Order Form for Parts
Remote #233064
If your TVhas the
picture-in-picture
feature, this is the
remote that came
packedwith your TV.
You can use the order
form at the right to
order it by mail
Cleaner
#AHO35
To clean your TV cabinet, we.recom-
mend Murphy's ° Oil Soap or Cleaner
#AH035. You should not use cleaners
such as Winde_ with vinegar, Lenox"
Furniture Polish spray or Heinz e
Cleaning Vinegar to dean your TV
cabinet. Using these deaners will
permanently mar the surface of the
cabinet. Such damage is not covered
under your purchase warranty.
_a ah a_
,O_OlO
•O sO'O
'O'O'O
_ 00 "6"
Order Form
Book No. 1512782A
Part
Cleaner
Remote-CRK74A2 233064 $.34.85
Total($10 Minimum Order) ....................
Sales Tax
We are required by law to collect the
appropriatesalestaxfor each individual
state,county, and locality to which the
merchandise is being sent.
Shipping, Handling, and Insurance ....... $
TotalAmount Endosed ............................ $
Part Number Price
AH035 $ 6.95
$
$
Qty
Total
5.00
Matching Stands
A matching standisdesigned to be
used with some of the TV models in-
cludedin this book. Toe recommended
stands are provided with hardware to
secure the TV to the stand so that it can-
not be easily pulled off, pushed off, or
•tippedover.
CAUTION: If you choose not to use
the stand recommended for your TV,
take precautionsthat{hestandor
other furniture the TV is placed on is
properly located and of adequate size
and strength to prevent the "IV from
a_dentallybe_ tippedoveror,pushed
off, or pulled off. This could cause dam-
age to the TV and/or personal injury.
Stands are not available by mail order.
To locate your nearest RCA dealer call
this toll-free number. 1-800-336-1900.
VISA orMaste:Card prefei'red.
Money orderorcheckmust be inu.q.currencyonly.
No COD or CASH.
.o
Allspecificationsand descriptionsofpartsaresubjectto
changewithoutnotice.
a
33
Page 36

References
Order Form for Parts
USE YOUR CREDIT CARD
Copy complete account number
I I I I II'T-[-]I i [11 ! I I
r-l--!FT-!
Copycompleteaccountnumber
FN-'N FFT FF-FTq -r-Tq
Cow N_'a_,e _ name
onyour_
AUTHORIZED SIGNATURE
Pricesaresubjecttochangewithout notice.
U.S. and Canadian Orders
By Phone:
1 -800 - 338 - 0376
Call this toll-free number between
8AM and 8PM Eastern Standard Time
and place your order using your Visa
or MasterCard. Use this number
only to place an order for accessory"
items listed on this order form.
By Mail:
Detach the information at the left and
mail the payment to Thomson
Consumer Electronics, Inc., a_.
| ,.
Video Accessories
PO Box 8419
Ronks, PA 17573
Most ordersareshippedUPS within
72hours.If itisnotpossibletoship
within30days,we willnotifyyou.
PLEASE
Make sure that both sides of this
form have been filled out.
Print or type your name and address,
This will be your mailing label
A complete and correct orderwill
save you days of waiting.
APt:
Zip-,
•For morn current information on
these accessorles, write to the
following address:
Video Accessories Customer Service
Thomson Consumer Electronics, Inc.
Dist_utor & Special _oducts
2000ClementsBridgeRd
I)eptford,r_,08096-20SS
International Orders
This offer is valid only in the U.S.
Send your request for price quotation
£
(not orders) to:
International Customer Service
J_
O
Thomson Consumer Electronics, Inc.
Distributor & Special Products
E
2000 Clements Bridge Rd
Deptfo_,NJ 08096-2088 USA.
4
Page 37

References
Glossary
Anteima
A device used to receive broadcast
signals from TV stations.
Audio
Sound reproduced by the TV.
Audio/videO cables
Cables that carry sound and
picture signals from one
component to another.
Autocolor
Adjusts the Color and Tmt of the
picturesignalstotheproper
balance for all channels.
.AutoProgram
A procedurethat automatically
adds only the active channels in
your area to the TV's memory.
Brightness
Light and dark areas of apicture.
Channel Label
-A name that is giventoa specific
channel number.
Channel Memory
Where channelsarestored after
they have been placed in memory.
Channels can be added or deleted
fromchannel memory.
Commerical Skip
A feature that allows the viewer to
scan other channels during
commercials, and return to the
origL,_ channel after a timed "
break.
Component
Device such as VCR, laserdisc
player, audio equipment,
camcorder, etc.
Disabled
Turns off feature.
Display
A word, words or graphicsthat
eppear on the TV screerL
Inputs
Located on back of the TV for
connection of a component to the
TV. Used to route signals into the
TV from components.
Jacks
Connectorslocatedon thebackof
theTV forconnectingantennasor
othercomponents.
Menu
A listing of features, controls, and
adjustments shown on the TV
screen that can be changed.
Mono
Slang for monaural. Sound comes
throughonechannel
On-Screen Display
seec_splay.
Outputs
Located on back of the TV for
connection of another component.
Signalsarerouted outof theTV
intotheothercomponent.
Picture-in-picture
A feature that allows,you to watch
two ch_eJs at'the same time, a
small picture within a big picture.
The smaller picture comes Rom a
VCR or other component
connected to the TV.
Picture Reset
Returns all of your TV picture
adjustments back to :thefactory
sett_.
.PIP
Shortforpicture-in-picture.
S_ness
Clearnessof a picture.
sKIP See_7_,ri_ZSk_.
Signal
Electrical waves that are sent or
receivedthroughcablesorthrough
the air.
Sleep Timer
A feature where the TV _a be set
to turn off at a specific time within
four hours.
• Source(s)
..Componentsordevicesthat are
connected to the TV.
Stereo
Sound signa]sthat come through
two channels (left and right).
Tone
Quality of the sound.
Tuner
A devicethatreceivesand selects
signals.The desiredsignalis
selectedby thetuner.
Unusable Signal
A messagethatshows no signal is
coming in on the video input.
Video
Picturereproducedby the
television.
35•
Page 38

References
Index
A
Adding Channels to Memory....20
Adjust Menu
Autocolor ................................... 17
Bright.................:........................17
Color ................... ;....................... 17
Picture Reset .............................. 17
Sharpness ................................... 17
•Tint .............................. ......... .......17
Adjusting
Picture ....................... :................ 16
Picture Settings ......................... 17
Sound Settings ..................... 18,19
Air or Cable feature ................ .27
Alarm Channel ............................ .23
Alarm Clock ................................. 23
Alarm Display ........... :................. .28
Alarm Mehu..._ ............................ .2.3 •
Alarm ........................................ ,23
Alarm Channel ........................ .23
Off Time .................................... .23
On Time ..................................... 23
Set Clock ...................................... 3
ANT A-B Button ..................... ,....7
Antenna ....................................... .27
Audio ............. ............. 7,15,18,19,35
AUDIO Button .......................... 7,15
Audio Codes ............... _................ 15
Audio Equipment Buttons ......... 15
CLEAR
FF/Fast Forward
PAUSE
PLAY
REC/Record
REW/Rewind
STOP
Audio/video cables ................... 235
Autocolor .............................. ...17,35
Autoprogram ....................... 3,20,3,5
B
Batteries (Remote) ........................ .2
Bright ............................................ 17
Brightness ...................... ,......... 17,35
.Buttons
+ and-. .........................2,3,4,5,6,7
Audio Equipment .....................15
Component ..................................4
Laserdisc ................................... .14
Menu .................... _.................... 4,5
Number ........................................ 6
Picture-in-Picture ...... 4,7,24,25,35
Power ....................... :................... 6
Remote Control ..................... 4,6,7
TV ........................................... .4,12
TV Front Panel ......................... .28
VCR ............................................ 13
C
CABLE/ANTENNNA Jac_ ....... 15"
Cable Box ....._........................... 12,13
Cable Box Codes ..................... .....12
CABLE Button .............. ........7,I2,13
Cable Channel ....................... .......13
Cable or Air Feature ................... .27
•_ SleepTimer...............22
Captioning, Closed....... ...............26
• Cautions ........................ ................... i
Channel/.abel ....;....................21,35
Channel Memory ................ .3,20,35
ChannelNameDisplay ..............29
ChannelNumber_sp_y ..........29
CHANNEL Up/Down Buttons
Remote ...................................4,5,6
TV .......... .-.................................. .9.8
Channels
Adding .......................... i........... .2.0
t leting......................................20
Naming ................................. 21,29
Placing in Memory.,. .....,...... 3,20
Checks and Adjustments .......30,31
Cleaner .......................................... 33
CLEAR Button ..................... .......6,7
Clock .......................................... 23,23
Closed Captioning ...................... .26
Codes
Audio ......................................... 15
Cable Box ................................... 12
Laserdisc Player. ....................... 14
VCR... ........................................... 8
Color ............. ................................. 17
C61ors (Menus) ........................... :..5
Commerical Skip. ................ 6,29A5
Button ........................................... 6
Display....................................... 29
Component ................................... 35
Component Buttons ...,......... .......13
AUDIO, CABLE, LD,
VCK VCR2, Components
Audio Equipment ..................... 15
Cable Box ..... .......... :.............. 12,13
Laserdisc Player ................. .......14
VCR ................................. 8,9,10,11
Contents .......................................... 1
Controls
TV Front Panel ......................... .28
Remote ...................................... 6,7
Controls Menu
Closed Captioning .................... 26
Picture .................................. ......16
Sleep Timer .......................... ....._.2
Stereo ...................... .................... 18-
Tone ............................................ 18
D
Delete Channels from Memory.20
Disabled........................................ 35
DISPLAY Button ....... ;............... 6,23
r__splays(On-Screen)..................29
Alarm, Channel Name,
Channel Number, Commerical
Skip, Mute, PIP 00, Sleep, Stereo,
ime, UnusableSignal,
VIDEO 00, Volume
DISPLAY Button ....................... 6,29
E
F_ase a Name ............................... 21
Erasing Channels from Memory20
•F
FF/Fast Forward Button .............. 7
Front Panel Controls ................ 4,28
FREEZE Button .................:........7,25
G
Glossary ............. ............................ 35
Guide
Colors .......................................... .5
Menu Buttons ........................ _..4,5
Moving through theMenus ......5
'IV ........................... ............ .2,3,4,5
H
Hook up TV....Connectious Guide
I
l_rPt.rrButton............._..................7
Inputs.............................,..............35
J
Jacks...............................................35
L
l.aserdisc Player Codes.... ........... 14
Laserdisc Player Buttons ......... 7,14
FF/Fast Forward, PAUSE, PLAY,
PROG/Program, REW/Rewind,
STOP
Laserdisc Player ....... .................... 14
Page 39

: M ' " •
Menu ........................... ,....., ......... .35
MENU Buttons .,., ...................... 4,5
Menus ............................................. .5
Menu Colors ................................... 5
Mono ......... .............................. 18,35
MOVE Button. .......... _.............. _.,5,7
through the Menus ......... 5
tton ................................ .6
Mute Display ...............................
N
Naming the Channels ........... ......21.
Number Buttons ............................ 6
.
Off Time (Alarm)............:............23
On-ScreenDL ]ays...............
On Time (Alarm) ........................ .23
Order Form for Parts............. ,33,34
Outputs ......................................... 35
P
PAUSE Button ................. ....... 7,8,14
Picture ...;.................................. 16,17
Picture Adi.us.tmen.ts ............... 16,17
Picture-in-Picture .............. 4,7,24,25
Change Channels ...................... 24
Turn on. ...................................... 24
Tiarnoff ...... ...............................
Use PIP Buttons ..................... 7,25
•Picture-in-Picture Buttons....7,25
FREEZE, PIP, PIP MOVE, SWAP
Picture Settings ...................... 16,17 •
Picture Reset ......................... ........17
Picture Tilt .............................. ...... ..3
PIP............................. _......... 4,7,24,25
PIP Button .......................... 4,7,24,25
PIP 00 Display .............................. 29
PIP MOVE Button .................... 7,25
Place Channels in Memory .....3,20
PLAY Button ..................... 7,8,14,15
PluginTV .......................... ............ .2
POWER Button .......................... .2,6
Power Buttons.... ................. ....... .2,6
PREV CH Button ............. .............. 6
Previous Channel Button ............. 6
Problem Solving ..................... 31.32
Product Registration ...................... i
PROG/Program Button ............... 7
Programming the Remote
Audio Equipment ..................... 15
Cable Box .............................. 12,13
Laserdisc Player ........................ 14
VCR ................................. 8,9,10,11
Put Batteries in Remote ............... .2
Q
Quick Guide to Your TV .....2,3,4,5
R
REC/Record Button ............ 7,11,15
l_a_ferences .............................. .28-37
Glossary ..................................... 35
Order Form for Parts ...........33,34
Trouble Checks .................... 30,31
Warranty .................................... 32
tration Card ........................... i
Control
Batteries ...................................... .2
Buttons ...................................... 6,7
Order Form ................................ 33
Tour .............................................. 4
With Components .............. 7,8-15
Button...: ............................. 6
REW/Rewind Button .7,8,11,14,15
S
Safety Information ........ ................. i
Screen Displays.... .................... ,.29
Service ........................................... 32
Set Clock ......................................... 3
Set Time. ........... ,. .......................... .3
_g Cable/Air ..._................... 27
the Cable Channel .......... 12
g the Sleep Timer ............... 22
Setup Menu
Autoprogram .......... ..........3,20,35
• Cable/Air ....."............................ .27
Cable Channel ........................... 13
Channel Label ........................... 21
Channel Memory ................... 3,20
Speakers ....................................... 9
VCR 1 Channel ........................... 8
Sharpness ...................................... 17
Signal ...................... ... .................... 35
SKIP ........... ,_............................... 6,35
SS_eepDisplay ......................... ..22,28
eep Timer ................................. .22
Sharpness .................. .................... 17
Sound ............ _.......................... 18,19
Source ........... ................................. 35
• .....°°..o_ ....o....°..°......°.....1oo.12,3
Stereo. ....................................... 18,35
stereoDisplay.............................
STOP Button..... ....... .......... 7,8,!1,15
SWAP Button .................... 4,7,24,25
T
Table of Contents ........................... 1
Time
Alarm ......................................... 23
Clock .................... ......................... 3
Sl .Ti er ...............................22
Time Display ....................... ,..L....29
Tilted Picture ........ .......................... 3'
Tint..; ......................................... L...17
.Tone.......................................... 18,35
Tour of the Remote... .................... .4
Trouble Checks ....................... 30,31
Turn on Alarm ................ ........... ..23
Turn on Picture-in-Picture _.24,25
Turn on TV ........................... ........ .2
TV
Buttons .................... ............. 4,6,28
Guide to ................................. 2,3,4
TV Button ................................. 3,4,6
•Time.......................................... .......3
Two Pictures at one time ...... .24,25
U
Unusable Signal Display ....... 29,35
Using Advanced Features...._20-27
Naming the Channels .............. 21
Place Channels in Memory .....20
•Setting Cable or Air...... ............ 27
Setting the Alarm Clock ......... .23
Setting the Sleep Timer ........... 22
Watching Closed Captioning..26
Watching .Two Pictures ......24,25
Using the Remote
Audio Equipment ..................... 15
Laserdisc Player ..................... ...14
Cable Box .............................. 12,13
VCR ............... :................. 8,9,10,11
V
VCR
Turn on-. ................................. "..10
Turn off ........................ .............. 10
Record one TV program and
watch another........................... II '
Watch a tape .............................. 11
VCR Button ......................... 7,8,9,10
VCR 1 Channel._ ....... .....,................ 8
VCR2 Button. ...................... 7,8,9,10
VCR Codes ................................. ....8
VCR Buttons ............... :.......... _.....7,8
CLEAR, FF/Fast Forward,
PAUSE, PLAY, PROG/Program,
REC/Record, REW/Rewind,
STOP
Video ............................................ .35
VIDEO 00 Display ...................... .29
Volume Display ........................... 29
VOL + and - B(ittons
Remote ..................................... .4,6
TV .............................................. .28
W
Warning .............. ........................ :...,i
Warranty ....................................... 32
Watching Closed Captioning .....26
Watching Picture-in-picture .24,25
$7
Page 40

CREATING A GREENER FUTURE •
At Thomson Consumer Electronics we are dedicated to the preservation of our
natural heritage and to a healthy and safe way of life for current and future
generations. This is a global effort which encompasses every THOMSON facility
throughout the world.
We believe that clean air, clean water, a protected earth, and healthy people are
not only practicaland desirable goals, but achievable ones as well. Our Corporate
Environmental, Health and Safety Charter acknowledges our commitment tO
protect these preciousassets and provides a challenging vision and guideline for
conducting our business. "
0 w mm comma m mmcs
•Below are a few examples of Thomson's achievements in our efforts to preserve our natural resources.
WA JR
Thomson reclaims millions of peunds
of hazardous waste annually, diverting
it from landfills.
Thomson treats millions of pounds of
wastewater sludgeannuallyand renders
it no_-hazardous. .
Thomson .recycles over 50 million
pounds of'non-hazardous material
annually that otherwise .would have
been treated as trash, an overall
recovery rate of 50%.
Thomson globally recycles millions of
pounds of broken television picture tube
glass annually through both intemal and
external reclaim processes.
Thomson has replaced solvent-based
paints at many locations resulting in an
80% reduction in toxic air emissions for
equivalent material used.
Thomson has eliminated the use of
ozone-depleting, substances at t e I e-
vision manufacturing facilities around
•the w0dd.
Thomson collects and returns over 1.5
million pounds of glass and furnace dust
to the glass making process annually.
Thomson has launched worldwide
energy savings programs which con-
tribute to efforts to reduce air emissions
from electrical generating facilities.
Thomson recovers over 2 million
pounds of fine glass particles from
process water each year and recycles
them back into its glass furnaces.
Thomson's state-of-the-art waste water
treatment plants filter out over 26
million pounds of solids from process
water each.yesr.
Thomson's U.S. glass factorY recycles
2,500 gallons of water per minute and
cleans 2.6 million gallons of water per
day.
• Thomson is researching new processes
and is developing new manufacturing
equipment and technologies to further
reduce largevolume water use.
CONSUmee -rimmcs
10330 North Meridian Street
Indianapolis, IN 46290
©1996 Thomson Consumer Electronics,Inc.
Trademark(s)® Registered
Printed in USA
TOCOM 1512782A
 Loading...