

Page 1
C O •
Page 2
f WARNING:: _ _ -/_
k
TO reduce the risk of fi;e or"-"
shock hazard, do not exp,ose/, ....
thisWto rainormoisture. :
To,reduce the risk of electric shock, do not remove
(:oger (or back). No user 'serviceable parts inside.
Referservicing to qualified service personnel. .
_k his symbol indicates
."dangerous voltage" inside
the prOduct that presentsa
risk,of electric shock or
persohal injury.
i
This symbol indicates
prO_nt in=ructions ° ...=
" _ __ d
.i_an in .th fo
• "_ri_
Caution: To reduce the risk'of e_ectricst_:k, _ch v_itlg-
blade of plug to widdslot, fully insert.
Attention: Pour 6viter leschocs _lectriq ues, introduire la
• lame la pluslarge de la fiche dane la borne
corresponda nte de la prise et pousser jusqO au fond.
t_'_theidentification/rating label located on the back panel of.Refer
your
product for'i_s-_'" "_proper Ope_rati'ng voltage.
FCCRe_l-uiationsstate thatunauthorized changes or modifications to this
equipment may void the user's authority to operate it.
If fixed (non-moving) images are left on the screen for long
periods; they_ may be permanently imprinted on the screen. Such
images include network Iogos, phone numbers, and video games.
This damage is not covered by your warranty. Extended viewing
of channels displaying these images should be avoided.
Cable TV Installer: Thisreminder isprovided to call your attention to
Article 820-40 of the National ElectricalCode (Section 54 of the Canadian
Electrical Code, Part 1)which provides guidelines for proper grounding
and_ in particular, specifiesthat the cable ground Shall be connected to the
grounding systemof the building as close to the point Of cable entry as
practical
_Ti_eGUIDE Plus+ Gold system ;smanufactured under license from Index /
: /L SystemsInc..,'. ' "
J
Page 3
SETUP AND CONNECTIONS ]r.,_..._................................... ]............. )
Step !: Unpack the TV ..................'................... .......]...................... ...4
Step 2: Connecting your Tv ........................... ._.i.._,_.........._............._4
TV Only (PIP Not Available) ................. ....._............................ .... 4
The BasicCOnnection (pip not available) ........:......................... 5
Advanced Connections .;................. .............. ................ ......... .... 6
:Step 3: connecting the IR Controller ............... ..._....... ........ ,......... 9
Attaching the IR Controllers ............ :...,].......,............ ............... 9
Step 4: Plug in the TV ............................ ].,...................................... 10
Step 5: Place batteries in remote 10
Step 6: Turn on the TV 10
On-Screen ProgTan_Guide ....................................................... 10
Step 7: Program the TV .......... _.................................................... ... 10
INTERACTIVE SETU P . , 11
Using Point and Select ................................................................... 12
Entering Setup ......................................................................... ,...... 12
Select a Language .............. ................. :.......................................... 13
Auto Channel Search. ............................... ................ t.................. .. i3
GUIDE Plus+ System. .......................... ........ ].................................. .. 14
Setthe lime. ......................... .:......._........._...................................... 14
Set the VCR1 Channel (auto tuning) ............ _................................. 15
Set the VCR2 Channel (auto tuning) ............................................. 15
I
Set the DVD Channel (auto tuning) .............................................. 16
Set the SAT/CABLECl_annel (auto tuning) .................................... 17
Label *theChannels ...................... ........... _..................... _.................. 18
USING THE REMOTE ....................... .............................................. 19
Remote Buttons .............................................................................. 20
Using the WHOolNPUT button .......... ].......... '................ ............ 21
Programming the Remote ............................................................. 22
Testing the remote 22
Programming the remote ...........;........................................... 22
Using tl_e remote to control a device 23
Modes of Operation 23
Front Panel,.]..,..;..;.;.._._i.......].._..._............... _....... :.............. ]....._....... 23
Page 4
FEATURESAND MENUS _................. -................ ................. i ....... ." 25
Menus and Control Panels ..... .............................. .......... :.-............. 26
Menus • _ ...._ ....... ............... ._..... .......... 26
Control Panels ..................................................... ..................... 27
Audio Menu ..................... :...........•..... .................... ..................... :.... 28
Using the remote to select an audio processor .............. i............. 29
_-Picture QualityMenu.... ........ ._,......._.,.................. -..... -..:.......... -..... 30
Screen Menu .............................. •.... •.......................... _......._......... ;...31
Using Closed Captioning ............ ............................................. 32
channel Menu ............................................................................... .33
Time Menu .........,........ i........................ 34
Parental Controls Menu .......... ......i............................................. _..35
GUIDE Plus+ Menu ........................ . ................. ,........................... ..i.36,
Setup Menu ........................... •.......................... •............................. _36
PIP (Picture-in-Picture) Operation ...................................... ;.......... 37
Channel Marker .................... ................... ....................... _................ 38
TROU BLESHOOTI NG .................................................................... 39
CARE AND CLEANING ........ ...................................... :..,.... ...._".....40
RCA LIMITED wAR RANTY .., ..................................... ... ....... •.... .4!
ACCESSORY IN FORMATION ...................................................... 42
INDEX......................................................................!......:.............
Page 5
GE'rrlNG STARTED
. . o
This-man_Jalis •designed to get you sta_ed quickly.
The first four sectionJ of the manual show you how
to get your TV Setup and Connected, run the
Interactive Setup; Program the Remote, and use all of
the Features and Menus of your TV.
The Referencesection in the back of the book
contains troubleshooting tips_care and cleaning
instructions, accessoryordering information and your.
warranty.
We!l... if your TV's out of the box, let's get started.
Ii 1.,_.;_Tuu).,Xiq..b_-€OiqNEr.Tio,s II
¥.
.y
¥
( Ch_ko=the.oi,,th.t_,,,_,...,dd,d_:
| throughoutthe.manual in these Tip". "+T,• :|i
| Boxes,There aresomeImportant, ,. " |
I tips.that will help you get'the'most from : |_
3
Page 6

• 4 -. . •
• .o
STEP 1: UNPACK THE TV
Makesure to locate the remote control and your GUIDE Plus+. Booklet.
STEP 2: CONNECTING YOUR TV
There are three,types of connections outlined in this Section:
TV only: if you're only going to connect the
TVto your home antenna or cable
system.
The Basic Connection:
Advanced Connections:
, - . . .-
If you're going to connectthe TVto a
VCRor satellite receiver.
If you're going tO make multiple
connections, hooking up the TV to
one or two VCRs, DVD player, and a
satellite receiver.
Cableinformation and illustrationsare givenfor eachtype of connection.
Onceyou havecompleted your desiredconnectionyou mayskipforward
to .Step3.
TV 1ON LY (PI P NOT AVAI I.ABLE)
• /r
This rsa basic connectionfrom'an antenna' or cable system to your TV.
Connect the cable into the Cable/Antenna jack as shown. .
. Important Stand Information
• , -
• CAUTION: Choose the location for your TV
carefully. Take precautions that the stand
or other fumiturethe TV is placed on is
:properly, located (see Important
Safeguards sheet) and of adequate size
and strength to prevent the TV from
accidentally being tipped over, pushed off,
or pulled off. This could cause damage to
the TV and/or personal injury.
_4
t=
Before You Connect
Protect against power surges:
• Connect all components b_fore
plugging any power cords into the wall
outlet.
• .Turn off the TV and/or component
before connecting or disconnecting any
cables.
• Make sureall antennas and cables are
properly grounded. Referto your
Safety Tipssheetpecked with your 1_/.
Cables
YOUwill use the-following cable to make your•connection:
Coaxial Cable: These Cables carry audio and video
.... signal to the TV from an ante.nna; cable, or
cablebox.
CABLE,CABLE BOX,OR ANTENNA
TV
Once you have completed this connection you may skip to Step 3:
This Connection Will Not Allow
You to Use Your PIP
Your TV is equipped with a single tuner
which means you must connect with a
second video source using Audio/Video
Cable_ This TV Only connection will not
_enable you touse your PIP,but will get,
your'rV up and running quickly.
Refer to Advanced Connections for
connecting Audio/Video cables to your
VCR or other video component.
%
4
Page 7
BASi€ P.OTAVA
The basicconnection below (TV and VCR)isthe most common
• conn_,cti_onand istherefore usedto illustrate a_singlecomp'onent
connectionwithyour TV. Forbetter soundand picture quality and
multiple component connectioninformation refer to the nextsection,
Advanced Connections.
Cables
YoUwilluse the following cableto make your connection:
Coaxial Cables: Thesecablescarryboth the audio
and video Signalto the TV from an antenna, cable,
or cablebox.In this Connection,asecondCoaxial
Cablecarriesthe signalthroughthe VCRto the TV.
CABLE, CABLE BOX, OR ANTENNA
: VCR 1
IN FROM ANT CH3
@ @ ou.olv
VIDEO AUDIO
This Connection Will NotAllow
You to Use PIP
YourTV isequipped with a singletuner
which meansyou mustconnect with a
secondvideo sourceusingAudio/Video
Cables.This BasicConnectionwill not
enableyou to useyour PIP,but will get
yourTV up and running quickly.
Refer to Advanced Connectionsfor
connectingAudio/Video cablesto your
VCR or other video component.
TV
CABLE/ANTENNA
How to View the VCR
To watchthe VCRinthis connectiont_ne TV to
Channel3 or 4.
Later, in the Interactive Setup section you will
program the TV,to automaticallytune to Channel 3 or
4 when you turn on the VCR.
Once you have completed this connection you may skip to Step 3,
"Connectingthe IR Controller."
5
Page 8
ADVANCED ¢oNNEcTIONS
Advanced connections give you better sound and video by separating"
the audioandvideo Signals and enableyou tO connect multiple _" * <
components, i " ' ; _ .... } ; "
This section describes the types of inputs available on the back of your '
TV and suggests ways_you can use them for optimum pe_ormance. ....
- . . - ,.... * . , -. .
k of he "
Bac t TV : _ i.
- .. ".
The diagram below describes each of the back panel jacks. When
• connecting AN cables, be sure to connect corresponding OUTPUTS and
INPUTS (Video to Video, Right Audio to Right Audio, etc.).
, . • - , .
Once youhave made your connections" "
you will need to programthe TV to tune _
to the correct Video INPUT channel in- ' '
order to see and hear audio and video
from the component. You will program
this iater m the Interactive Setup. ' "
i
Input I " " *
Connect any of the,following components:
• VCR * Internet AccessDevice
• LaserdiscPlayer * DVD Player
-. Satellite Receiver
To view the component connected to Input 1:
Usethe WHO-INPUT button on the remote.
input, 2
i
Connect any of the following components:
• VCR • Internet Access Device
• Laserdisc Player • DVD Player
• Satellite Receiver
To view the componentconnected to Input 2:
'Usethe WHO*INPUT button on the remote.
S-Video
This oPtional
connection can
be used for
better video
quality picture.
%
VIDEO" VIDEO R .
mono
VCR
CABLE/
ANTENNA
r Audio Outputs
/Conne_ to anlaudioreceiveror
|amplifier for Variable controlled
ot fixed level stereo output_ '
VCR Control
Connect Guide Plus+_
controller for one-buttor_
recording and channel
tuningfrom the Guide.
- _ Cable/Antenna
JTakesthe signalinput from a cable, J
|cable box, or anoff-air antenna, Canalso |
* L_|beusedfor basiccomponent connections._'.
6
Page 9
SamPleConnections
The following are sample connection scenarios which-YOU may encounter
-whenconnecting comPonents tOYour T_. Note: those components which
offer an S-Video connection, such as DVD, VCR or Satellite Receivers,
must match their S-Video connection With their audio INPUT connection. -
Cables
You will use the following cable to make your connection: "
Coaxial Cables: Carries the signal from the
antenna or cable directly to the television or
through a cablebox, as needed by your cable
system.
Audio/Video Cables: Carries sound and video
from the component to the TV.
S-Video Cable: Carries video from an S-Video'
capable component which provides best
picture quality.
TV and Stereo VCR
CABLE, CABLE BOX, OR ANTENNA
r
•cautions:
i
Position cables to Avoid Audio Hum
or Interference
• insert all cables firmly !nto jacks.
• Place the audio/video cable_ to the
• sides of the W_ back panel !nsteed of
straight down the middle. • ....
. . , -',
i _j not to coil any twin-lead cables and
•keep them away from the audio/video
cables.
Protect your components from
Overheating
• Do not block ventilation holes in any of
the components. Arrange the
components so that air can drculate
freely.
• Do not stack components.
• Allow adequate ventilation when
plating you r components in a stand.
• Pla_:ean amplifier on the top shelf of
the stand so heated air rising from it
will not flow around other
components.
VCR 1
OUT"
t
_@_
VIDEO ,R . L
n fl n
> .
IN F_M ANT OH3 '
• @
OUT TO IlV
" ° ' i
I
,
__.2, LrI _
, .
,. OUTPUT
o
How to View Your VCR
To watch the VCR inthis connection, press TV to put the
remote control into TV mode, then pressWHOolNPUT to
si:rollthrough the video input channels until you tune to
VID1 input.
In the Interactive setup section you• can program the TV to-
automatically tune to the VID1 input channel when you
turn onthe VCR.
. Compared,to the Basic Connection, using audio, Video and
S-Video (if available) cables will enhance the sound and picture quality
. . . ., . ,-.
froma component. ". :
7
Page 10
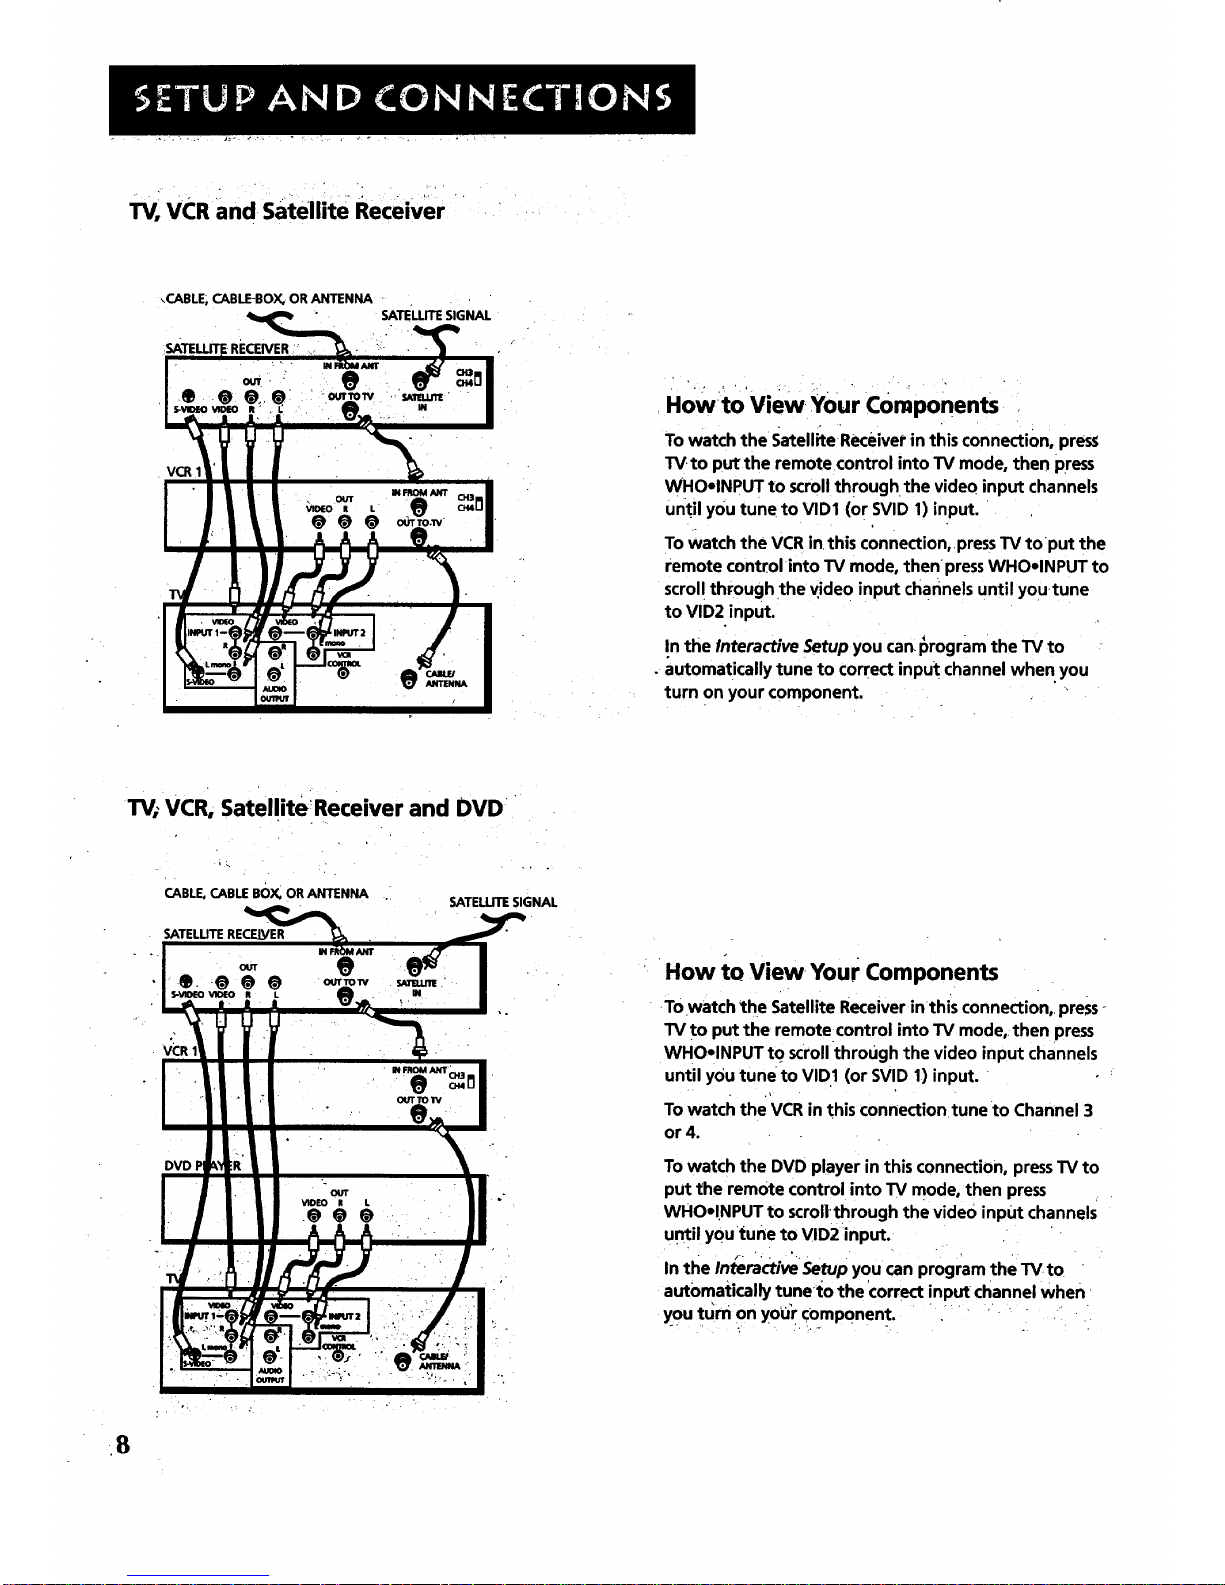
TV, VCR and satellite Receiver
\CABLE, CABLE-BOX, OR ANTENNA -
SATELLITE SIGNAL
,SATELLITERECEIVER ._ .
Howto View •Your Components
To watch the Satellite Receiver in this connecti0n, press
TV.to put the remote control into TV mode, then press
WHOolNPUT to scroll through the video input channels
Until you tune to VID1 (or SVID 1) input.
To watch the VCR in this connection,.press TV toput the
remote control into TV mode, then press WHOolNPUT to
scrol! through the vide 0 input channels until YoU.tune
to VID2 input.
In the Interactive Setup you can I_rogramthe TV to
. automatically tune to correct input channel when you
turn on your component.
TV_VCR, Satellite Receiver and DVD
CABLE, CABLE BOX, OR ANTENNA
SATELLITE SIGNAL
VCR
How to View Your Components
Towatch _he Satellite Receiver inthis connection,, press °
TV to put the remote control into TV mode,, then press
WHOelNPUT t0 scroll through the video input channels
until you tuneto VID1 (or SVID 1) input.
To watch the VCR in this connection tune to Channel 3
or 4.
To watch the DVD player in this connection, press TV to
put the remote control into TV mode, then press
WHOolNPUT to scrollthrough the video input channels
until you tune to VID2 input.
t - • °.
In the Interactive Setup you can program the TV to
automatically tunel:o the correct input channel when
you turn on your component.
" "r " " "-- " "
•8
Page 11
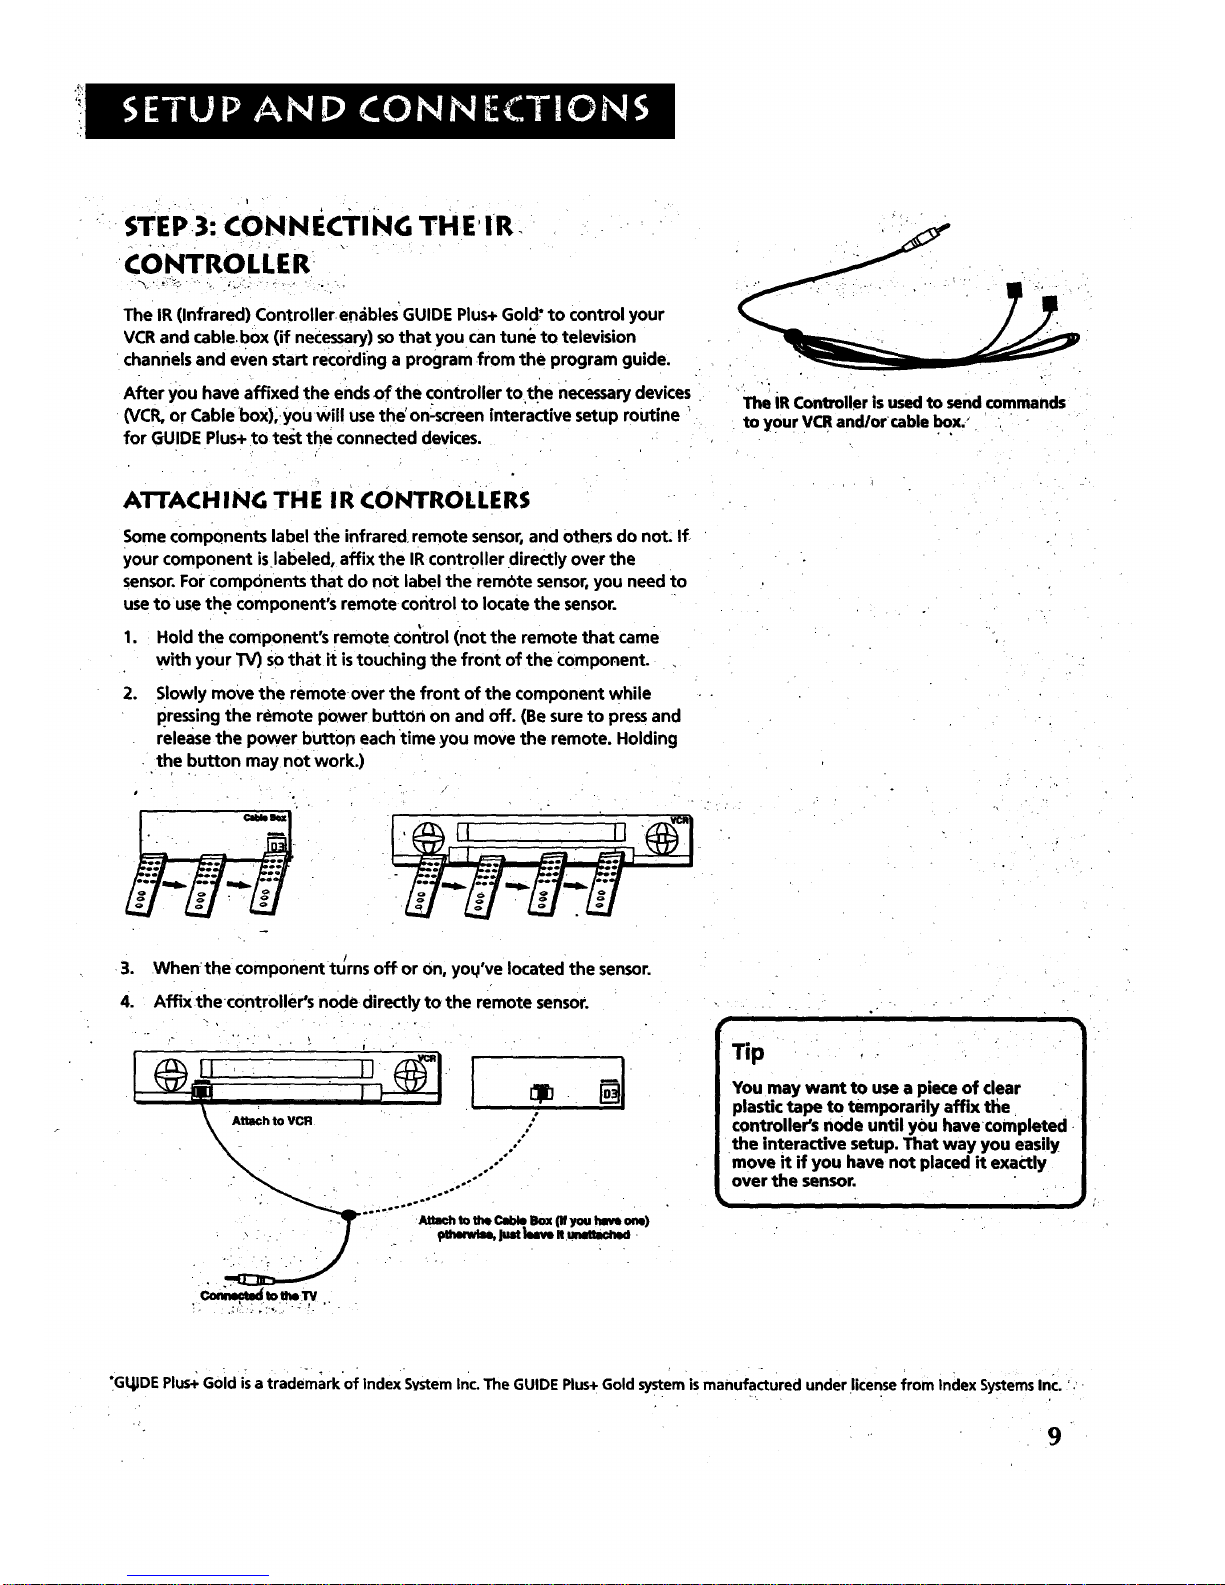
STEP3: CONNECTING THE'IR.
CONTROLLER "
The IR (Infrared) Controller.enables' GUIDE Plus+ Gold" to control your
VCR and cablebox (if necessary) so that you can tune to television
channels and even start recording a program •from the program guide.
After you have affixed the ends of the controller to the necessary devices
(VCR, or Cable box),you will use the' on_creen interactive setup routine
for GUIDE Plus+ to test the connected devices.
The iR Controller is used to send commands
to your VCR and/orcable Ix)x,"
ATTACH I NG TH E I R CONTROLLE RS
Some components label the infrared, remote sensor, and others do not. If
your component islabeled, affix the IR controller directly over the
sensor. For components that do not label the rembte sensor, you need to
use to usethe component's remote control to locate the sensor.
1. Hold the component's remote €Or;trol (not the remote that came
with your TV) Sothat it is touching the front of the Component.
.
Slowly move the remoteover the front of the component while
pressing the remote power button on and off. (Be sure to press and
release the power button each •time you move the remote. Holding
•the button may not work.)
0
3. Whenthe component turns off or on, you've located the sensor.
4. Affix thecontroller's node directly to the remote sensor.
,ol
...... AU_h_otheC_ Ikx (Wyo.haveone)
I
i
Tip •
You may want to use a piece of clear
plastic tape to temporarily affix the
controller's node until you have completed
the interactive setup. That way you easily
move it if you have not placed it exactly
over the sensor.
"GqlDEPlus+Gold isa trademarkof IndexSvsteminc.The GUIDEPlus. Gold systemismanufactured under licensefrom indexSystemsInc. '.-
9
Page 12
•STEP14:IP[UG:_i N THE TV
Plug the end into the wall outlet, matching•the wide blade of the plug
wil_h.the wide slot in the Outlet. Besure to insert the plug completely.
STEPS: PLACE BA'I-Ir'ERiES IN REMOTE
• Remove the battery compartment cover from the back of the
remote.
• Insertfreshbatteries. Make sure that the polarities(+ and -) are
alignedcorrectly.
• Replace the cover.
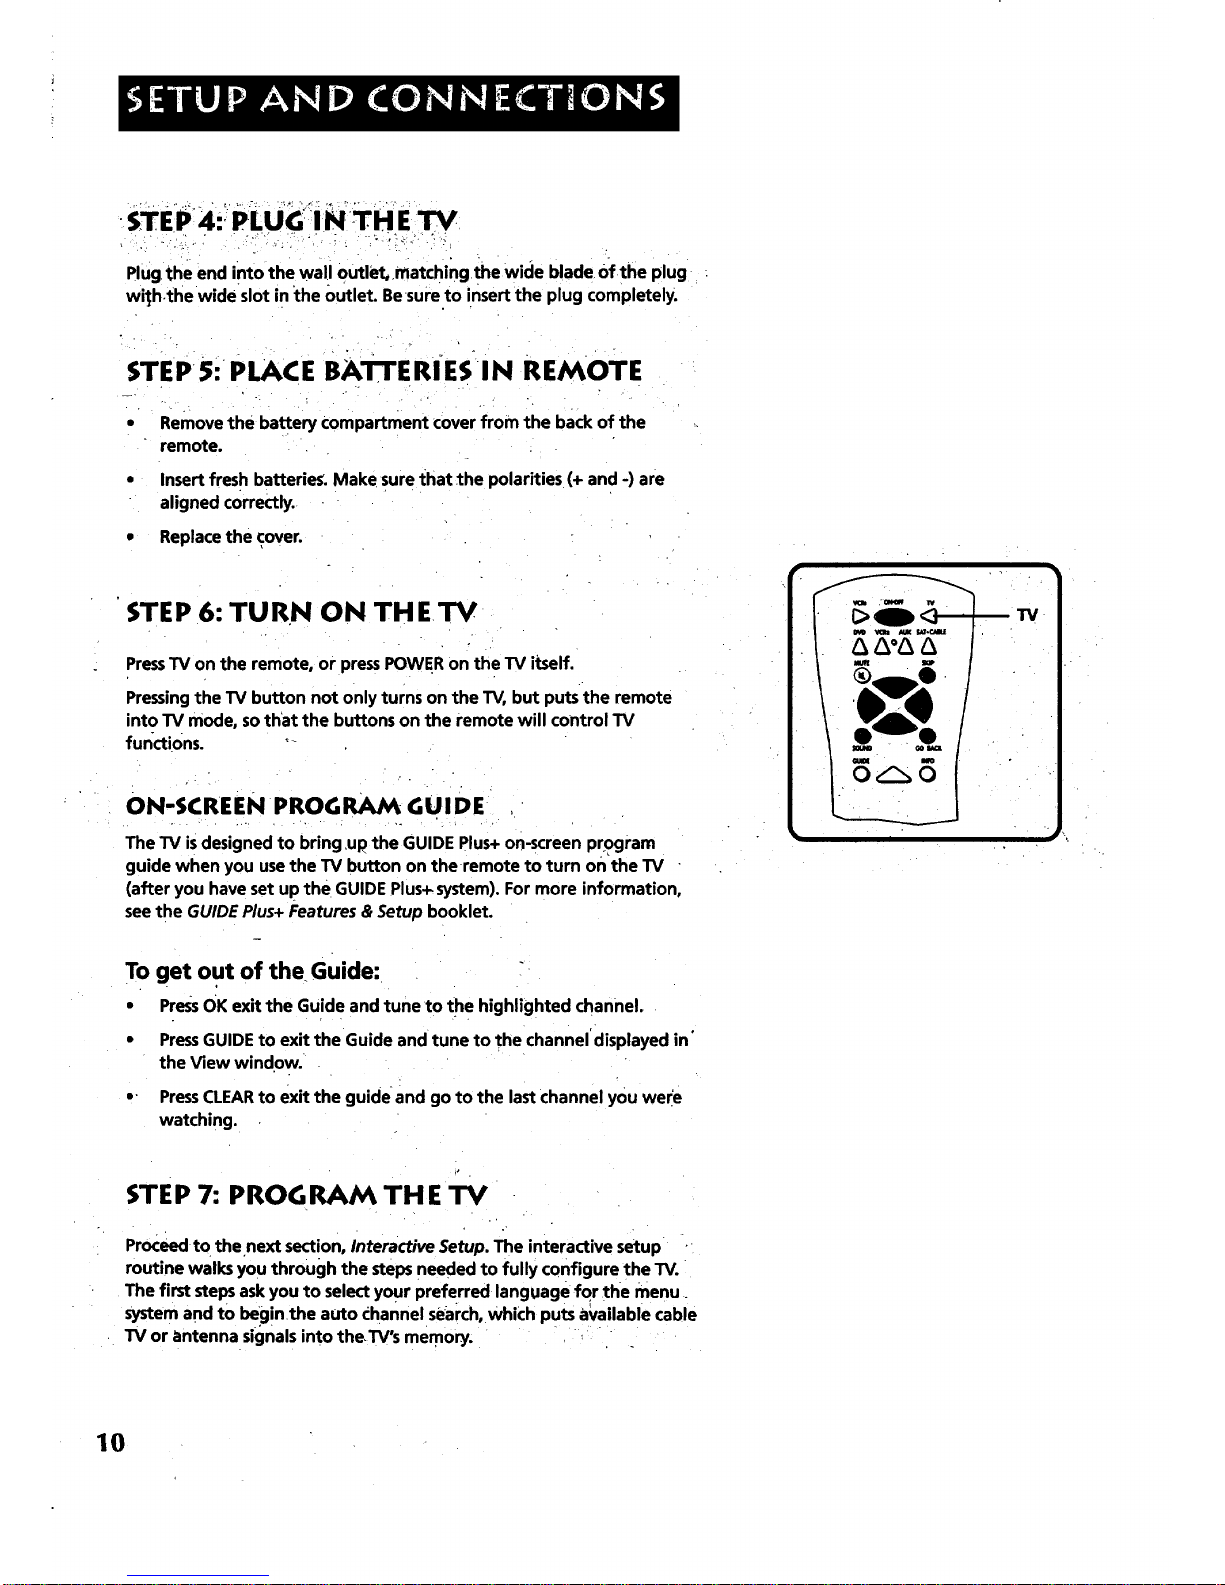
STEP 6: TURN ON THETV
PressTV on the remote, or pressPOWERon the TV itself.
Pressingthe TV button not onlyturns on the TV, but puts the remote
intoTV mode,sothat the buttonson the remote will controlTV
functions. *
ON-SCREEN PROGRAM GUIDE
The TV is designed to bring up the GUIDE Plus+ on-screen program
guide when you use the TV button on the •remote to turn on the TV
(after you have set up the GUIDE Plus+ system). For more information,
see the GUIDE Plus+ Features & Setup booklet.
To get out of the Guide:
• PressOK exit the Guide and tune to the highlighted channel.
• Press GUIDE to exit the Guide and tune to the channel displayed in'
the View window.
o- PressCLEAR to exit the guide and go to the last channel you were
watching.
STEP 7: PROGRAM THE TV
Proceed to the.next section, Interactive Setup. The interactive setup
routine walks you through the steps needed to fully configure the TV.
The first steps ask you to select your preferred language for •the menu
System and to beginthe auto channel search, which puts available cable
TV or antenna signals into theTV's memory.
10
Page 13
THERE;S AN ON'SCREEN SETUP ROUTINE •
The interactive setup routine takes you through thesteps
neededto configure.the TV: •- "_, ' - •
• Select a menu language
• Search foravailable channels
• _ .Set up the GUIDE Plus+ system
• Set the time
• Set the VCR1 channel
Set the VCR2 channel
set the DVD channel
Set the SATICABLE channel
Make the channel list and labels
¥
,
:¥
1:.1
Page 14
USING POINT AND SELECT
You only needto know one rule when_using the remot e toaccess on-
screen menus and control panels_point and select. The point and select
metho.d has two steps.
1. "Point to a menu item using the MOVE arrows on the remote.
To point up or down, press the up ordown arrow_ TO point left dr
_' ! right,, press the left or right arrows.
2;
Select a menu item by pressingMENU orOK.
Selectingan item tellsthe TV'smenu systemto go aheadand make
the change or go to a placeyou have indicated.
ENTERINGSETUP
The first screen of.the Interactive Setup appears automatically when
you turn on your TV for the first time or after a power outage.
1. PressMENU to begin setup or CLEAR to exit.
Point and Select
buttons
You can also acc-essthe Interactive Setup through the Main menu:
1. •PressMENU to bring*up the Main menu.
.
12
Point to Setu_oand press MENU or OK,.The first Setup screen comes
Up, 'asking youto confirm that you want to begin.
. . _ . . ,. . . ,,
You can.also select a menu item by
entering the item number with the
number buttons on the remote.
Press cUEAR at anytime to remove all
displays from the screen and retu.rn toW:
ii
Many vat.user manuals refer to a
.PROGRAM button; The MENU button on
this• remote works as a PROGRAM button_
_in Vat mode, Other manuab may refer to
• a SELECTbutton, The OK button on this
remote works as a SELECTbutton.
Page 15
3. PointtoBegin setup now and press MENU or OK.
SELECTALANGUAGE ' • " '-.
The first part of the setup routine asks you to select your preferred
language for the menu system.
1;, Point to You:r preferred language for the menu system.'
2. Press •MENU or OK to select that language.
AUTO CHANNEL SEARCH "
The next part of the setup routine asksyou if you want the TVto search
automatically for all channels available throughyour antenn a or cable
TV system. This is sometimes called =autoprogramming."
'a ': . / i = '
: 1.!: PressMENU or OK totell the TV to beg!n searching for channels;
The display gives you,a progress report and tells you when it has
finished. _
2._ Press MENUor OK:to continue,:
• r If you"s"p Auto Channel seardl now, you
I can access it later through the channel /
/.menu._Youcan also put channels i;t,:: . i :, :|,
/ memory manually_ using Ust & Labels.See: l
| Featuresand Menus,for morQ1details;: • |
• ,r
13
Page 16

GUIDE PLUS+ SYSTEM
The next step letsyou set _Jpthe GUIDE Plus+ system to display your '_
local progr.am listings;and control your cablebox and VCR. _ ' !
You can either press MENU or OK to bring up the GUIDE Plus+ initial
menu or point t o Skip this Step to move tothe next step in the •
Interactive Setup. .....
P_
For M0re GUIDE Plus+
•_iInformation i
Specific-information about the GUIDE
Plus+System is contained in a separate
ibooklet thataccompanied this producL
See the GUIDE Plus+ Features & Setup Booklet for detailed setup
instructions.
SET TH ETIME
J
The next step in the Interactive Setup lets you set the time of day. If your r
GUIDE Plus+ system has not completed itsfirst download you need to set
the time. Once the Guide system hascompleted its first download, it'sets
the time for you automatically. ,'
' . . . . • T .
1. •Press MENU or OK to bring up the set Time control panel.
2. • Usethe left and right aiTOWs to point tothe hour and minutes
:space_ Use_the up and down arrows to scroll through Z_e numbers
;and change frc_mAM to PM_ ........
3v Press MENU or OK to continue.
14
Page 17

SETTHE VCRiCHANNEL (AUTOTUNING)
. . ..... , ..... '.
,r The,_next step lets youset the VCR1 channel. Wheny0usetthe VCRll "
channel, You're telling theTV what channel to tune to when you press.,
theVCR1 button on the remote. This is Auto Tuning.
Indik,ate which inputyou used to connect the VCR.. If you don'l: have a.
-VCR1 component connected to the TV, Skip this step or select Not ,
Connecte_ from the VCR1 Channel choice list. (FOr more; SeeAuto '
, Tuning,in the Features andMenus section.) ,,
1. Press MENU or OK to bring upthe VCRi choice list.
2.
Point to the choice that matches the way you have your VCR
Connected to the TV.
3. PressMENU or OK to continue. •
SET THE VCR2 CHANNEL (AUTO TUNING)
The next step lets you set the'VCR2 channel, when you setthe VCR2
channel, you're telling the TV what channel to tune to when you press
tl_e VCR2 buttqn on the remote.
Indicate which_input you used to connect a second VCR. If you don't
have a sec0ndVCR component connected to the TV, skip this step or. -
select Not Connected from the VCR2 Channelchoice list. (For more, see
Auto Tuning,in the Features and Menus section.)
.. . .
15
Page 18

1.. PressMENU or OKto bring up the VCR2 choice' list.
,
i
Point to the choice that matches the way you have your second VCR
connected'to the TV.
3. PressMENU or OK to continue.
SETTHE DVD CHANNEL (AUTO TUNING)
The next stel_ iets you set the DVD channel. When you set the I)VD
channel, you're telling the TV what channel to tune to when you press
the DVD button on the remote.
Indicate which input you used to connect a DVD player. If yoU don't have
a DVD player connected to the TV, skip ,this step or se!ectNot Connected
from the DVD Channel choice list. (For more, see Auto Tuning in the
Features and Menus section.)
1. Pres_MENU or OKto brin_q."UPtheDVD choice list;
16 ,
Page 19

2. Point to the choice that matches.the wayyou haveyour DVD player
connected to the TV.
3. PressMENU or OK to continue.
SET THE SAT/CABLE CHANNEL(AUTO
TUNING)
The next step lets you set the SATICABLEchannel. When you set the SAT/
CABLEchannel, you're telling the TV what channel to tune to when you
press the SAT, CABLE button on the remote.
Indicate which input you used to connect a satellite receiver or a cable
box_ If you don't have a satellite receiver or cable box connected to the
TV, skip this step or select Not Connected from.the SAT/CABLE Channel
clloiceilist. (For more, see Auto Tuning in the Features and Menus section.)
1. PressMENU or OK to bring up the SAT/CABLEchoice list.
2.' " Pointto the choice that matches the way youhave your satellite
: receiv'eror Cable box connected to th_'TV.
:-;._".:_.:,.- . .. ..
PressMENU or OK to continue.
If You Have Both a Satellite
Receiver and a Cable Box
Connected tO the TV
The remote cannot control both a cable
box and the satellite receiver. If you. .
choose to have the remote control the.
satellite receiver, you must then use your
(able box remote to control the cable box.
You;may. however, prefer to use the
satellite receiver remote for satellite .,.
programming; and set your, SAT, CABLE _i.
button to control your cable box, It'syour
choice.
17
Page 20

LABE LTHE ,¢ HANN ELS
This.la_ step in thernteractive Setup letsyou create your channel list and
label your channels. (For more, see Listand Labelsin the Featuresand
Menussection.)
1. PressMENU qr OKto bring up the Listand'Labelscontrol.panel.
r. - _.>: . . .,. ,. ....
Usethe CH^ (channelup) or CHv
(channel down) buttonsto change :_.
channels inthe Chan# field, This works
even if you're not in the Chan# field. Or,
enter the channelnumber directlyusing
the number buttons on the universal
remote. To enter a number greater:than
99, press and hold "1"to enterthe
hundreds digit, then press the two"
remaining numbers.
The list and labels feature can also be
accessed from the Channel menu. Because
this procedure can be time consuming,
feel free to skip this step and come back
to it later.
2. Usethe left and right arrows to point to the three different areas of
thecontrol panel (called"fields").
3. Usethe up and down arrowsto scroll through the numbersand
lettersand select Yesor No in theNormal List field. You maywish to
refer to the call letters listed in your newspaper'sTV section for ideas
on labellingthe channels....
4. Repeatthis processfor each of your chanr_els.Then pressMENUor
•OKto continue. The TV canstore up to 27 labelsin memory.
WHAT NOW?.
Now that you've finishedthe interactivesetup,you can sit back,relax,
and enjoy the TV.Or... .
PROGRA/_ THE REMOTE •
Sinceyou've gone this far, YOucantake inuresto programthe ;.
remOteto.contro.!.your VCR,DVDplayer, Satellite receiver,or other..
components. To find out how to program the remote, goto ti_enext
section. " _'
18
Page 21

HOW TO USE YOUR UNIVERSAL REMOTE
This sectioq defines the buttons of the remote and
howto progi_amit to control .other _components. ........ ....
The universal remote can be programmed to control
most brands of remote controllableVCRs, satellite
receivers, DVD players and cSble boxes. If you have
an-RCA, GE, or PROSC_J_] comPonent, you
probably don't need to program it at all.
13
v
USl NG TH E REMOTE
y .
Modes of Operation • ,1
Becausethis universelremote can control
severaldifferent components(DVD
player,VCR,CableBox,eta) ituses
'operational modes triggered by the .':i
componentbuttonr_,For example if you i
:want the remoteto control:the,lV, you :; :
?would pressthe 1V button to put the _::_',::_"
.: remote intoTV.mode before youcould _._
•"controlthelr_ . :., : _- ; ...._
_u i "1
1•9
Page 22

REMOTE BUTTONS
ON.OFF When in TV mode, turns TVo n and off: If in anotherdevice _.
mode (VCR, DVD, Satellite, etc.) and programmed, will turn the device
on and off. When pressed twice within two seconds all devices that are
on will be turned off (this feature only works with most RCA, ProScan
. J
.and GE products). :
VOM Puts the remote in VCR mode and if autotuning isenabled, it will ' :i.
turn on the' T_. and, tune tothe correct channel..
UD: :'
lrv Turns on the TV and putsthe remote in TV mode.Also displays
channel information.
DVD Puts the remote in DVD mode and if autotuning is enabled,it will
turn on the TV and tune to the correct channel.
VCR2 Putsthe remotein VCR2mode and if autotuning isenabled, it
will turn on the TV and tune to the correctchannel.
LED Red light which indicates programming mode when programming
the remote.
AUX Puts the r_mote in AUX mode. Also turns on the TV.
SAT.CABLE Puts the remotein SAT.CABLE mode and ifautotuning is
enabled, it will turn on the TV and tune to the correct channel.
MUTE Reduc_ the TV's volume to its minimum level. Pressagain to
restore the volume.
SKIP Pressonce before changing channel_ and the TV will wait 30
sec_ondsbefore returniilg you to the original channel. Press repeatedly
to add more time.
CN ^ or CN v Scans up or down through the current channel list. Press
once to change the channel up or down; pressand hold to continue
changing channels.
VOL - or VOL + Decreases or increases the TV's volume.
SOUND Pressonce to display the audio processor choice list. Point and
select to choose a different processor or press CLEARto exit
GO BACK Returns you to the previous channel.
• SOUND GO BACK
GUIDE INFO
GUIDE Brings up GUIDE Plus+ system and exits the Guide. In SAT.CABLE
mode brings up available on-screen guides.
INFO Brings up channel information.
MENU CLEAR
,Q O30
,O 00,O
WHO-INPUT ANTENNA
O°O O
REVERSE . PLAY FORWARD
PIP SWAP CH CTRL RESET
OOOO
MOVE (Arrows) Used tO point to different items in the menu system.
Also used to adjust the menu controls. Also move the PIP window when
no menus are on the screen.
OK, When in the menusystem, selects highlighted items or returns you
to the previous menu.
ElgU:_B.rin'g_:up:t._eMain menuand:serects highlighted items, When. in .
VCR mbd_,, it functionsas aPROGRAM huron, '. . ' -
20
Page 23

CLEAR Removes any menu Or display from t_e screen and returns you
to TV viewing. Will also exit the Guide system.
(0_9) Number Buttons Enters channel numbers and time settings _-
directly though the remote control. To enter a two-digit channel, press
the two digits. To enter a three-digit channel, press and hold the first
digit, then add the second two. Example: to tune to channel 123,press
and ho!d 1, press2, then press 3.
wHOqNPUT In TV mode, press to toggle through the available input i
sources (VIDt/SVID1, VlD2/SVID2, previous channel). In SATmode, press
to select available channel lists,
ANTENNA Functions asTVNCR button in VCR mode and TV/receiver
button in SAT,CABLE mode.
REVERSE, PLAY, FORWARD, RECORD, STOP, PAUSE If programmed,
provides transport control for some remote<ontrollable VCRs, DVD
players, laserdisc players, tape decks, and CD players. Pressing RECORD
when using'the GUIDE Plus+ system sets the VCR to record a program.
PIP Brings up the small picture-in-picture window. Pressagain to
remove the PIP window. When PIPCaption Display - Alternate with PIP -
has been Selected, will display captioning in the PIPwindow;
SWAP Swaps the main picture withthe PIPwindow.
CH CIrRL Selects the picture window, (that is,the main or PIPwindow)
to be changed by theCH ^_(channel up) or CH v (channel down) buttons.
RESET Resets picture quality controls to the Bright Lighting Picture
Control Preset. Point and select to choose a different Picture Control
Preset.
USING THE WHO.INPUT BUII'ON
Use the WHO*INPUT button to scroll through the available input channels
and view components you have connected to the TV.
1. PressTV to place the remote in TV mode. Make sure that the
component you want to view isturned QN.
2. PressWHO*iNPUT to tu_e to an available input channel.
.
Continue to press the WHO*INPUT button to scroll through the
channels.
Modes of Operation
Because this Universal remote can control
several different components (DVD
player, VCR, Cable Box, etc.) ituses
operational modes triggered by the
component buttons. For exampleif y0u.
• want the remote to control the TV, you
would press the .TV button to put the •
'remote'into TV mode before YoU couldi-
control the TV.'
21
Page 24

PROG RAMMI NG TH E REMOTE
: The universal Fem0te can be programmed to Control most brands of
remote controllable VCRsl satellite receivers and cable boxes. The
remote isalready programmed to control most RCA, GE and PROSCJ_I
TVs, VCRs, DVD players, laserdisc players and satellite receivers.
TESTI NG TH EREMOTE
Todetermine whether the universalremote needsto be.programmed;
turn a deviceON, suchasa VCR, point the remote at the VCR,and press
the VCR1button. ThenpressPOWERor CH ^ (channel up) or CHv
(channeldown) to seeif the VCRrespondsto the remote commands.If
not, the remote needsto be programmed.
PROGRAMMING TH E REMOTE
Using Automatic Code Search
The following instructions can be used"to.program the remote to
control each of the devices connected to your TV./f you want to exit the
automatic code search without programming any of your devices, press
CLEARuntil the LED turns off.
1. Turn on thedeviceyou want to control (VCR, SAT, etc:)
2. Pressand hold the button you want to program (VCR1, VCR2, etc.).
While holding the device button, press and hold ONeOFFuntil the
red light on the remote turns on, then release both buttons.
3. Pressand release PLAY,then wait 5 seconds or until the LED stops
flashing.
At this point the remote is searching for thecorrect code to.
program. If, after 5 seconds, the device you want to control does
not turn off, press PLAY again totell the remote to search the next
set of •codes.
Continue pressing PLAY untitthe device turns off or you have
searched through all of the codes.There are •20 total sets of codes.
If the device does not turn off after pressingPLAY 20 times, then
the remote cannot controlthat particular device.
If the device you wantto control does turn Off:
1. Pressand release REVERSE,then wait 2 seconds. Repeat this step
until the device turns back ON.
2. To finish,pressand hold STOPuntil the red light onthe remote
turns offi
Using Direct Entry
1.• 'Turn On thec0mponent to be programmed.
O'
RAY
v
You'll usethese buttons when you
program the remote to control any
device.
The remote may not •operate all models
of all brands.
• 22
Page 25

2. Look Ul_the brand and_ode number(s) for the component on the
code list on the last page of this section, Using the Remote.
3.- I_ressand hold-the buttbn onthe remote you want to program.
4. Enter the code•from the code list.
5. Release button, and then press ON;OFF to see if the component
•responds to the remote commands. If it does *
+
.... component button and then ONoOFF again.
6. If you get n° response, repeat these.steps us
for your brand, untilthe component respon(
commands.
USING THE REMOTETO CONTR(
Once the remote has been programmed successf_
use it to control your devices.
To operate the device:
1. Pressthe device button (TV, VCR1, VCR2, DVl
to set the remote to control the device.
2_ PressON.OFF to turn the device ON or OFF.
3. Usethe remote buttons that apply to that d,
MODESOF OPERATION
Because this universal remote can control several
(DVD player, VCR, Cable Box, etc.) it uses operati(
by the component buttons. For examp!e if you w
control the TV, you would press the TV button to
mode before you could control the TV.
FRONT PANEL
If you cannot I_ocate your remote you can use the front panel of your TV
to operate many of the TV's features.
MENU Brings up the Main menu. when in the menu system, it selects
highlighted items. Also returns you to the previous menu.
CH v Scans down through the current channel list. In the menu system,
it points down to items and adjusts menu controls.
CH ^ Scans up.through the channel list. In the menu system, it points :
up to items andadjusts menu coi_tr01s:
VOL' Decreases the Volume. When in the menu system, VOL - isused'
to point left tO items and adjust menu controls. _, ... +o_.
•VOL'+ i.i+lncr+ase_\the volume.°Wher_ inthe+menu system, VOL + is used
to point right tO items and adjust menu controls. " "
ROWER Turns the'TV on and off.
rill i i i
_The front panel above shows a typical
button layout. The exact look ,ofthe
buttons may be different fro_ those on
the front of your TV.
If you use the Channel BlOd; feature, the
r_1front paneLno longer provides access tO,
the ment_ The Front Panel Lockout
•featur6 disables all front panel butt0ns+,
For morn information, see Parental ,?;
contml_ in the Featuresbnd Menus;!
section.
ii
23
Page 26

Cyl_rnex ................ 2013
D'aewoo __ 2015, 2017, 2019,2025, 2026, 2027, .,,.20_
.................... 2110
Dbx .... __ ............... 2009, 2010
Dlmensla_ -.L.._ 2000
Dynatech'......., . . -'.2002,2026.
.El_eroKo_ "" - 201'4,2029
Eiec.-opho_........ 2014
_., - 2002,2012,2014,
---- 2015, 2021,2024, 2025_.026,2029, 2030, 2032,
2033, 2034,2035, 2036, 2037, 2030, 2039, 2040, 2041,
2m2,2022; 2m7,20 ,2105,13,21
_+ 2011,2023, 2041_ 2049, 2050, 205 I, 2052,2118
--___ 20_8, 20B9, 2090, 2091, 2107, 2115,2120, 2125
Radloshac_eaRs_c______ 2002,2011,2013,2014
• 2021,2022" 2023, 2026, 2029, 2049, 2050,2096, 213 I
Radix_.; .............. : 2014
I_ndex _ 2014
Rlcoh ................ 2128
Runco ................... 2104
SamsunI ..... 2005,2013,2015,2033,2053;2112
",Tmnk'y ____ - 2132,2104
Sznsui __ 2010,2092,2111,2123
.sin+-" . 2011,2m_,2_
Sc__20_2,201s,_.s,2032'_s, 203_,2065._3_
S.r,.... 2011,20,4,_1,2o23,2o48,
...... 2022,2050,ml. 2055.2056,2_07,2_m
sh_..... 200_20_7.m+,20_.202S,20_2m
'-/... .-' " 'x_ ..-- x -:_22021.2119 ++:.SNmom,, , . 2004; 205_ 2061,2098
:-++'+..,.--,+../'.(' +.;,.'-2002"_ ....m,o_m-+-:,- . .- , _013
;.?:u.+,_..__....:_,-_.,,+......_. L......2026' _-.Sigrmtum.=.._-. ' " . 2002,2131
G_.;.--.*'_0,+2_1.2013,3J021,202_._2053,21'15,2120. ""P_nIp'+'_. ' -- .... 2021,2061,2120
'C_I+_+_'tir. ....... .21X39, 2014,2018,2034,2121 Sony ...___.__ 2002,2004, 209B, 20_, 2119, 2128
Gr'adlente ..... 2026
Hm"Iny_ ..... 2026
Harn'wn Kardon ......................... 2009
Harwood .................................. 2061
Headquarter ............................ 2011
Hltachi2002, 2055, 2056; 2057, 2107, 211 I, 2120, 2122
HI-Q ....... 2023
Instant _ ............... 2021
JCL -- 2021
JC I%nney __ 2009,2010,2011,2013,2014,2021,
--2029.,2055,2056, 2058, 2059,'2060,2107, 2118
J_m_n ,2055, 2056,2111
JVC ____ 2009,.2010, 2011,2018, 2058,21'01,2123
._ _ 2009,2010,201 I, 2016,201B_2058,
- • - " 2111,3,123
KI.H _.2061
Kodak__ _ 2014,2021
Lloyd................... 2002, 2026
Lo_ik _.+.......... :____ 206-1
LXl .................................. ;.2014
M_navox _ 2021,2022, 2062" 2063, 2104, 210_, 2124
Magnin....... ;..................... 2013
Marmn_............... 2009,2010, 201 I,
.?-- 2016, 2018, 2021,2058, 2062'2064
Mm'ta.... --- 2014
Masushit______ 202 I
MEI. " + . _+..- 2021
-Me_ " '_ __. 2002, 201 I,
2013,2014,2021,2023,2026,2104,2131
MGA + _2029, 2065, 2113
I'tGN T_:hno_ofly . -, .... 2013_
Midbnd " "'. %, 2053
Mlnol_ .... ' " : ' -_ }+ 2055,,20_,2t07
Mltsublshl. 2029, 20+5+_ 2065, 2066, 2067, 2069.
2070, 2071_t072, 2073,2074, 2106, 2113,2123
_V_rd,_.__ - " ' L./...:-:2075,2131
Motorola__ ...... 2021,2131
HTC + _2002,20_13,2026
STS .:......... "- -- .... -.-._-- 2021,2107
Sylvanlz2002,2021,2022,2026,2062"2063,2065,2124
Symphonic. ....... .:................. .+- 2002, 2026
Tzndy ............................. ;...... 2002, 2011
T_hiko ......................................... 2014
Tatung __ 2058, 211 I
TEAC .............. 2002; 2026, 2058, 20B5,2111
Technics _ ".__ -- 2021,2109
T_mlba _ 2002,2014,2021,2026,2100,2129
Trek .......... 2013, 2024, 2047.
Toshil_ 2015,2049, 2051,2055, 2065, 2093, 2116
To_Vidon ....... 2013, 2014
Ul_ech. .2013
Vector Remmm:h --_ 2009, 2010, 2015, 2016
Victor __ 2010
-VideoConcepts___ 2009,2010,2015,2016,2113
Vk_eosonic__..+__ --. 201"3
• _+ards.___ ,2002,20t3,2014,2015,2021,2023,2026,
.2022,_ss,20s+,202k_&_,2101,2to_21032_07
. " 2 16,2131'
XR-1000 ..... 2021,2026,2061
Yamaha........... 2009, 2010, 2011 , 201_ 2058, 2 I
Zenith ......... _ .... 2004,2098,2104,2119,2128
ABC .--..--'5002, 5003, 5004, 5005, 5006, 5007; 5053
Anm_ .... 5008,5009
....... __5008, 5009, 5010, 5011
5008
.. +C._kvl_,, , +,, , " ' 'i," : .... 500_ -
.c.m_ ___ - - .... SOlt-
:"Cititan ,. :" " 5011
- ColourVok_ : " __5012,5013
•' _ .... 5014,5015
Comec._ 5016
Eas_m __ " 5017
24
:-_ Gm'mrd" ' ............................... }......... 5011
GC Electronics ............................................. 5009
Gemini ................... 5018,5019, 5049
General Instrument ........ 5003
Hamlin - . _ 5020,5021, 5022, 5035, 5045
Hitachi_._ ........ _. 5003
................. so02
Jasco , " ., , ".... 5011
Jei'Told __ 5003,5005, 5007,5018, 5023, 5024, 5046, 5053:
Magnavox...... __....... _........ ._................... 5025"
- Hemore_ ..... ._................................ 5026
MovieTm_ ............. .5002,5027, 5028
NSC. __ 5002, 5027, 502B
. Oak . 5002,5016, 5029
":_ ' • 504_5052
mm_ __ 501_,5012"50_3,501_,5025,so_.s031,502_
' _ 5033,5034
Pulsar -- 5026
RC_. r " . , 5047, 5049, 5052
Rm+mk::............... S009.5049
Re_ __ 50"z_5035
ReIency _................................. :......... 5017
Rimbrandt ........................................................ 5003
Runco .................................. 5026
Samsung.............................. 5014, 5034
Scl_lfl_ Adama ..................... 5006, 5036, 5037, 5038
SlgnaJ............................................. 5014,5018
Sl_ture ............................................................ 5003
SL _ ................................. ._5014
Sprucer ........................................................ 5052
Starcom " 5007,5018, 5053
Stm_ate ................................... _.. 5014,5018
Starquest ................... _...................... 5018
Tandy ......................................... 5040
Televlew................................ 5014
Tocom ..................... 5004,5023, 504 I
Toshiba..................................... 5026
Tus_...... _ ................................. 5018
"I'VB6.......... .12............................. 5027
Untka ....... 500_, 5009. 5011
Unlmd Artists ..................... 5002
United Cable. ---.......... ..__ 5053
•Universal__ 5008,5009,5010,5011
Videoway ___....._ ............................ 5044
Vim ......................... 5015, 5025, 5027,5040
•ZenitE ....... 502++5050, 5051
.Chal_aral ................... J...........................5056, 5057
Drake .....................................5058, .5059
GE DSS ............................. 5000, 5001
General Insemmmts.... 5060,5061, 5062
PwwsonicDSS......................... 5075
Prtmestzr DBS..... '_.............. 5076
Prosc_n DSS 5000,5001
RCA DSS..................................... 5000,5001
R_t;allstic.... .._...................... _ .................. 5063
SonyDSS.........................................................507_
5"1"51................................................. -..... 5064
STS2 ............................................... 5065
STS3.................................................................. 5066
STS4......... :...................................... 5067
Toshiba.......................................................... 5068
ToshibaDSS...................................................... 5073
Unlden DSS............. :...................... .................. 5069
(For RCA_nd mmemb bmmb o_y)
AM/FM .... _ 4003
Aux ..... 4004
Phono. .____-4005
CD- 4007
Tape ........... "4006
GE ---- _.,+.3.001
ProScan............................................ 2001
•RCA ........................................ ._.......... 2001
Page 27

USING THE TV
,."
This section •explores the features and menus of your TV
beginningwith sonie inforrn_ltion _n USillg menus_and control
panels. •
_Each menu is then outlined and special features are detailed in
order to heip you get the most from your TV. " ' .....
r ''. •
-I-nf-ormation on using your GUIDE Plus+ system can be found in
a separate booklet for easier accessand so it can be placed near
you while you become with the feature.
+,
14
V
FEATURES AND MENUS
25
Page 28

MENUS AND. CONTROL i
PANELS
• Using the buttonsonboth the remote andfront panel enable you to _.,_:
access and make changes to the Menus and Control Panels.•
Menus use the point and select rule to navigate, but control panels use a _i
variety of methqds to adjust_features=on your TV.The following pages ,
detail how to use•these controls in order to customize the functions of
your TV. " "
MENUS
The first menu iscalled the Main menu. Press MENU on theremote or on
the front panel to bring up the Main menu:
k_
Menus take you to another menu 'ora control panel. There are two ways
to select a choice in a menu:
• Point with the MOVE arrows and the,n select with MENU or OK.
• Press a number button on the remote. For example, in the Main
menu press 3 to go straight to the Screen menu.
Exiting• a menu
There are three ways to exit a menu:
• Point to Exit and press MENU or OK.
• Press 0 on the remote.
• Press CLEAR. The on-screen displays are cleared from the screen and
you are returned to TV viewing.
• • • . •
Feel_free to exp|ore the menu system. If
• you"re ever unsure where you are in the- .,,:-
menu system; or you're just plain tired of _
exploring, pressCLEARito remove the.. *_' '.
menus-from the screen and start over _.
again;
n II
26
Page 29

CONTROLPANELS
Control Panels allow you to adjust the default settings on many features ....
of your TV. You can choose a setting, enter a number, or adjusta level
such astint,or brightness. There are three types of control panels: sliders,
choice lists,-and. numeric entry.
Sliders
Sliders areused to make adjustments to a particular control.
To use a Slider in a menu:
1.
Pressthe up or down arrow to select the slider control for the
feature you want to adjust.
2. Pressthe right or left arrow to adjust the indicatorline on the slider.
. - . ., -
Numeric Entry
A numeric entry control panel is used to enteb ,,u,.u=,> u, ,=LL<*>.
A pointer appear_underneath the column you are changing.
Arrows
W
MUTE SKIP
SOUND GOIl_
.Ct._
,0,0',0
.,0 sO,O
,O,O,O
I_AY FORWARD
QC>C
PIP " SWAP I_ _ RESET
1. Pressthe u p arrow to enter a number in the column above the
pointer.
2. Pressthe right arrow to move to the next column, then presstheup
or down arrow to enter a number.
3. When yourhave finished entering information, presslMENU or OK:
if the conl_rol panel ts not set at the-
current time, use the left arrowto go beck
over .the columns and the up arrow to
make ch_mges,-.... .. ".. __._ .... o--
. , . ,. - , -_ ,
"You can also enter numbers directly by
using thenumber buttons,
27
Page 30

CHOICE LISTS I__
. . ; •
• Choicelists ar_ used to choosea I_articular setting from a list of settings.
1. Point to a choice on a menu and press MENU o_Ol(to Sel_t that
choice. _i _ ': • i :i ..... -
Now that you know how to access;the menus and adjust the control .
panels the following pages provide a brief explanation of all the menu "
features. The features are organized in order of their location onthe
Main Menu.
AUDIO MENU
Mute PressOK to reduce the TV's voiume to its minimum level. Press
OK again to restore the volume.
. .. -. L
Tone Controls Displays the slider controls for adjusting the TV's treble,
bass and balance.
Audio Processor Displays a choice list of available audio modes, which
control the way the sound comes through your speakers.
Mono. Playsthe sound in mono only. Use this setting when
receiving broadcasts with weak stereo signals.
Stereo Splits the incoming stereo audio signal into left and right
channels. Most TV programs and recorded materials have stereo
audio. The TV displays the word STEREOwhen you tune to a
program that is broadcast in stereo.
Second Audio Program (SAP) Playsthe program's audio ir_a
second language, if one is available; The TV displays the word SAP
when you tune to a program that is broadcast with SAP
information. SAP audio isbroadcast in mono. SAP isalso used to
broadcast a program's audio with descriptions of the video for the
visually impaired;
28
Page 31

Audio Ouq_ &.Sl_akeTs_- Displays a-choice list that lets youturn the
TV's internal speakers on or_off and set the audio outputs to fixed-level
orvariab!eco_oUevel.
Variable _ Speakers On This settingturns the TV's Speakers
on and allows variable_output from the TV's audio output jacks_
.Variable Output, Speakers Off This setting turns the TV's
speakers off and allows variable output from the TV'S audio output
jacks. . .... _ - "
Fixed O.tput. Speakers Off This setting turns the TV's speakers
off and allows fixed output from the TV's audio output jac_ to an
external device such as a surround sound amplifier. With Fixed
Output On, the TV's volume control, tone controls and mute are
disabled.
USING THE REMOTE TO SELECT AN
AUDIO PROCESSOR
You can change the audio processor from the Audio menu, asillustrated
above, or by pressing the SOUND button on the remote. To mal(e 'a
selection using the remote:
1_ Press SOUND to d'isplay the audio processor choice list.
2. Point to and se!ect a different audio processor or press CLEARto
exit.
Sound--
button:
29
Page 32

PICTURE QUALITY MENU
BesicPicture Controls Displays thefive slider controls for adjusting*
the way the picture looks.
Contrast Adjusts the difference between the lightand dark areal
of the picture.
Color Adjusts the richness of the color.
Ti'nt Adjusts the b_lance be_veen the red and green levels.
Black Level Adjusts the brightness of the picture.
Sharpness Adjusts the crispness of edges in the picture.
When exiting this menu the Save PersonaIPicture Preset Choice List will
appear. You can choose either Yes or No.
Picture Presets Displays a choice list tha t lets you selectone of three
preset picture settings: Bright Lighting, Normal Lighting, Soft Lighting
or Personal Picture Presets. Choose the setting that is best for your
viewing environment and edit your Personal Picture Preset.
Auto Color Displays a choice list that lets you turn on the feature that
automatically corrects the color of'the picture. (This isespecially useful
for tracking realistic flesh tone <olors as you switch from channel to
channel.) Choose On or Off, depending onyour preference. It's you F
choice.
Color Warmth Displays a choice list that lets you set one of three
automatic color adjustments: Cool for a more blue palette of picture
colors; Normal; and Warm for a more red palette of picture colors. The
warm setting corresponds to the NTSC standard of 6500°K.
Video Noise Reduction Displays a choice list that lets you turn on the
feature that auto,matically reduces noise from the picture.
r _the RESETbuttonon the mmo_-tO " l'
/ bring up the Picture Control Preset s choice / : '
| list, Point to the desired setting; press . I
L MENU or OK to select it. ..... . • J -
30 :
Page 33

SCREEN MENU
Closed-Caption Displayl Displays a choice list that !ets you choose the.
wayclosed captioning information iSshown On the screen. ; :-_
Off No cap_tioning information displayed.
On Captioning information shown always, when available.
On When Sound is Muted -Displays captioning information, When
:available, whenever the TV's sound is muted by pressing the MUTE
button; The captioning information is not displayed when the sound
isnot muted.
Closed_.aption Mode Displays a choice list that letsyou choose .which
captioning mode is used for displaying captioning information.
PiP Closed-Caption Display Displays a choice list that lets you choose
the way closed captioning information isshown in the PIPwindow.
Off No captioning information displayed,
On Captioning• information shown always, when available.
Alternate with PIP button Displays captioning information,
when available, by pressing the PIPbutton while the PIPwindow•is
displayed.
PIP Closed-Caption Mode Displays a choice list that lets you Choose
which captioning models used for displaying captioning information
within the PIPwindow.
Menu Language Displays a choice list that lets you select your
preferred language for the menus: English, Spanish or French.
Picture Tilt (Direct View 1_/32" or above) Your TV has an extra-large
picture tube, Which makes it vulnerable to the effects of the Earth's
magnetic field. You may need to adjust the picture tilt. Use the left and
right arrow buttons adjust the picture tilt.
•31
Page 34

USINGCLOSED CAPTIONING
Many_grams are,_n_e_.wh.h ¢IQs_I captJ'onjng information, which:.
letsyou display the audlo'p0rtlon of a program as text on the TV screen.
...:1'. , . -.... , °
:Closed captioning isriot.available on all channels'at all times. 0nly
specific programs encoded Witl_ cl_ed captioriing information are .-
app!!cable: When a program JSC!0sedcaptioned, the letters CC are.
displayed inthe channel marker.
ClOsed CaPtionir g Modes
The_offers eight closed'ca _i0ned modes, including four textmodes.
To Set the Closed-Captioning Mode:
1. Select Screen from the Main menu.
2. Point to Closed-Caption Mode and press OK. A choice list displays:
.
Point to your choice and press OKto select it and return tothe
Screen menu.
Turning off Closed
Captioning
1. Select Screen from the Main menu.
2. "PressOK to;select Closed-Caption Display
3. Pointto OffAIways and pressOK, The closed captioning is turned
offand you are returned to the Screen menu.
I If youare unsureOf.the differences.
among the modes,.youmay prefer to
leave the dosed captioned mc_le setto'.
CCl, which displayscomplete text of the
program in the primary language in your _
area.
32
Page 35

CHANN EL,MENU
. €
Signal lypo _:Displays a choice list that lets you select the current _ -
antenna type. This option does not appear when the TV GUIDEPlus+
system is set upl
. \, . .- -
UHFNHFAntenna Choose_thisif you are Currently using an off-air
antenna for TV signals.
Cable lrv Choose this if you;are currently using cable or a cable
box for TV signals.
Auto Channel Seardt Tells ti_e TV to search automatically for'all the
channels available through the antenna input. When the TV finds an
active channel, it places it in the channel list; inactive channels (weak
stations or channels with no sigr_alat all) will be removed from the
channel list. If you are using a cable box and have setup the GUIDE
Plus+system then this option does not appear.
List and Labels Displays a control panel that lets you custom-build
your Normal channel list and choose a six-character label for each
channel. Follow the on-screen directions to enter your channels and
other information;
Chan # Use the up and down arrows to scroll up and down
through the channel scan list. You can enter the channel number
directly using the number buttons.
Normal List Only the channels included in the Normal list are
available when you scan up and down using the CHAN buttons. Use
the up and down arrows to indicate whether the channel number
indicated is included (Yes) or is not included (No) in the Normal
channel list,
Chan Labels Use the up and down arrows to enter a six-character
label for each-chahnel. Hold the button down to scroll quickly
through the characters. Press RESETto clear a label. The lrv can
store up to 27 labels in memory.
Auto Tuning Displays a choice list that lets you set up the TV to
automatically tune to the correct in put Channel when you press a
comPonent button (VCR1, DVD_ VCR2, AUX or SATeCABLE) on the
-remote.
Set VCR i Channel Displays a_choicelist that lets you select the.
channel that the TV tunes to when you press the VCR1 button.
Set VCR2 Channel Displays a choice list that lets you select the
channel that the TV tunes to when you press.the VCR2 button.
Set DVD Channel Displays a choice list that lets you select the
channel thatthe TV tunes to when you press the DVD button.
Set SAT/Cable;Channal Displays a choice list that lets you _lect;
_thechannei that the TV tunes _towhen youpress the SAToCABLE:
buttOn.
33
Page 36

The choices for each screen are." -
Not Connected Choose this if you do not have a component
connected 1;oan antenna or video input on the back of the TV, or if
you don't Want the TV _o tune toa channel when theparticular
component button ispressed.
Channel 2 (SAT/Cable only) Choose this if your component is
connected tothe antenna jack on the back of the TV_ and you want
4othe.TV tC_tune to channel 2when you pressthe specified
component button. Reminder: Make sure the component's Ch 2/3/4
switch isset to channel 2.
Channel 3 Choose this if your component isconnectedto the
antenna jack On the back of the TV, and you want the TV to tune to
channel 3 when you press the specified component button..
Reminder: Make sure the components Ch 3/4 switch is set to
channel 3.
Channel 4 Choose this if your component is connected to the
antenna jack on the back of the TV, and you want the TV to tune to
channel 4 when you press the specified component button.
Reminder: Make sure the components Ch 3/4 switch is set to
channel 4.
Video I Input Choose this if your component isconnected to the
INPUT1 jacks on the backOf the TV and you want the TV to tune to
VIDI(SVID1 if you used an S-Video cable) input channel when you
press the specified component button.
Video 2 Input Choose this if your component isconnected to the
INPUT2 jacks on the back ofthe TV and you want the TVto l:une_:o
VID2 (SVID2 if you used an S-VideO cable) input channel when you
press the specified component button.
TIME MENU
Sleep Timer Displaysa control panelthat letsyou selectthe amount
of time you want to give the TV before it shutsitself off.
Schedule Displays a control panel that lets you set up aschedule for
turning the TV on and off automatically. Make sure to turn the
schedule On. The on-screen directions guide you through the steps
needed to set the schedule.
Set Time Displays a control panel that lets you enter the current time.
The on-screen directions guide you through the steps needed to set the
time. If your TV Guide Plus+ system issetup and running then it will
automatically update your time and this option will not be available.
View Warranty Clock Displays the number of hours the TV has been in
operation (,up to5 years)and the date the TV was first turned on.
34 ""
Page 37

'PARE N AL€O,TRO'SMENU
Parent Approved Channels Displaysa controlpanel that lets you
decide_hat_:h_h'_diS_Can'beviewedor :selectedusingthe TV's-front:
panelcontrols.; .-.
Chan #. Usethe.uP and down arrowsto scrollup anddown
"through the Channe_scanlist.You can enter the channel numbe
- directlyusingthe numberbu_ons_
parent Approved Usethe up and down arrowsto choose -
whetherthe.Channet indicated shouldbe shownwhen the Channel•'
Block.feature isturned on. SelectYesto indicatethat the channel
can be Shownat any time, regaPdlessof whether ChannelBlock is
turned on. SelectNoto indicate that the front panelcannot tune to
that channelwhen Channel Blockisturned on. ImPortant: You
• must turn the ChannelBlockfeature on. (SeeChannelBlock
be!ow.)
Channel Block Displaysa control panel that lets"youdecide when a
channel can be viewed. With Channel BlockOn, the Menu button on
the front panel of the TV will be lockedsothat settings cannotbe
altered. In order for thisto be usedasa parental control, the remote
mustbe hiddenor placedout of reachof children.
Off All'channelsare available.
On,Always The front panel CH (channel)buttonswill tune
onlyto Channelsthat,you have marked as"Parent Approved."
The remote will still tune to anychannel.
!
Scheduled Selectedchannelswill be blockedoutbetween
start'and stoptimesyou enter inthe control panel. The front
partelCH(channel)buttonswill tune onlyto channelsthat you
havemarked as "Parent Approved." The remote will still tune to.
anychannel.
Frent Panel Lockout Displaysa control panelthat letsyou lock
(disable)the TV'sfront contl'olpanel, or unlock (enable) the TV'sfront
control panel.Tl_eremotewill.stilltune to anychannel.
Front Panellockoutcan beused to:
• Keep•children from'watching TVwhen the parent isnot present.
• , Keepsmalichildren from playingwith the buttons.
(Whenusingthisas a Parental•Control method you must remove access
to the remote while you have the Front Panellocked.)
If you can't accessa channel or use the TV's front panel buttons,
maybeyou'veforgotten to rum off a parental control; Check
the;Chahnel Biodc.andFront Panel Lockout control panels .... _"
35
Page 38

GUIDE PLUS+ MENU
GLIIDE p!.US+._Up, Displays theGUlDE plus+ setup screen.
setup setting up the GUIDE Plus+ system is detailed in the GUIDE
Plus+ booklet.
View Demo Runs the GUIDE Plus+ demonstration.
GUIDE j Plus+ Label Displays the GUIDE Plus+ Label menu.
On Displays the s_(ationname when you chang e channels.
Off Disables the Label feature.
GUIDE Plus+ Auto Display Displaysthe GUIDE Plus+ display options.
On Automatically displays the Guide when you use the TV button
on the remote to turn on the TV.
Off Disables the Guidefrom being displayed when you use theTV
button on the remote t'o turn on the TV.
Continuous Demo Runsthe GUIDE Plus+ demonstration until it is
turned off.
For additional information on using the GUIDE Plus+ system see the
GUIDE Plus+ Setup & Features booklet included in your literature pack.
SETUP MENU
The setup routine is detailed earlier in the manual in the Interactive
Setup section.
The first screen of the Interactive Setup appears automatically when you
turn on YOUrTV for the first time or after a power outage.
You canalso accessthe Interactive Setup from the Main Menu.
36
Page 39

r -.
PIP (PiCTURE-IN'PICTURE) OPERATION.
The PiP(picture-in-picture)feature letsyoudisplayasecond,smaller '
pictureon tOPofthe main picture.
YourTV isequippedWith a singletuner that tunes to cable or off-air
televisionsignals.The PIPfeature on yourTV requiresa secondvideo
source, I-ikeaVCRor satellitereceiverto supplythe second pictureto the
screen.;ThePIPfeature alsorequiresconnecting the Secondvideo source
to the TV with audio/video cables.
PIP Buttons
There are four remote buttonsthatcontrol the way the PIPwindow
works:
PIP Brings up the PIP window. PressP!Pagain to remove the, window.
When PIP Caption Display - Alternate with PIP- has been selected, will-
d_play captioning in the PIPwindow.
MOVE 1buttons Let.you move the PIP window to different areas of the
screen.
SWAP Switches, or "swaps," the video from the PIP window with the
main picture.
CH €IrRLI (Channel Control) Lets you switch channel control between
the.piP-window andthe main picture.
Using the PIP Feature
While YOU may use PIP in different ways, this basic PIPscenario should
get ybu started. While watching the TV, follow these steps to use your
VCR to supply the picture for PIP.
1. Press the PIPbutton on the remote. The PIPwindowappears on the
screen.
2. Turn on the VCR,
3. Pressthe TV button, then press;WHOoiNPUT until you see the VCR
signal displayed in the PIP window. The PIP window should display
the channel that you have the VCR tuned to.
4. At this point, in order to change the program in the PIP window,
you need to change the charinel on the VCR because that isthe
signal source for the PIP picture. -.
5. Usethe channel upand down buttons and the other PIP buttons,
MOVE, SWAP and CH CTRLto adjust thetwo pictures.
I
PIP buttons
buttons
I
A typical use Of SWAP is to scan through
channels in the PiPWindow, and when,
you find a channel you like, press SWAP
to display that channel in the main
picture, sending the current channetto
the PiP Window.
. . " ,
Y0u must change the m_le between th*e
TV and VCR after every SWAR
37
Page 40

PIP Problems7
Make-sure the remote is in the right mode. For exam!!e, once you
turn on the VCR with the VCR1 ,button, you can'tSWAP the pictures :
until you put the remote in TV mode. Just press the TV button.
No signal or bad reception? Most VCRs and satellite receivers have
an antenna or TV button. If your cable or off-air antenna goes into
your VCR Orsatellite receiver, then into your TV, try pressing the
antenna or TV button on the front of the component. "
Tip: If programmed to control your VCR, the ANTENNA button on
the remote acts as a TVNCR button.
Check the connections. PIP requires a second video source, like a
VCR or satellite receiver, Connected to your TV with audio/video
cables. If you use a cable box, you may need extra equipment.
Contact your cable company for more information.
CABLE,'CABLE BOX, OR ANTENNA
VCR 1
To see a different picture in the PIP
window, you must connect another video
source, like a VCR. This connection
requires audio/video cables.
CHANN ELMARKER
There are several indicators that come up when you pressthe TV, INFO, PiP
or SWAP butto n. This display iscalled the, Channel Marker.
12:01 Displays the current time.
CC Displayed when Closed Captioning is available on the current
channel.
VCR1 Displays the label assigned to the current channel.
VlD1 Displays thecurrent channel or input Channel.
Mute (or Stereo) Mute is displayed when you mute the audio. Stereo
isdisplayed when the current channel is broadcasting in Stereo.
SAP Displayed when the current channel isbroadcasting SAP (Second
Audio Program) information.
PIP 59 (PIP Chan) Displays the current PIP channel.
Sleep Displayed when the Sleep Timer has been sat.
00:00 Displayed to count down time left on the commercial skip (SKIP)
timer.
You can program the TVto tune to a
specific channel when you press the VCR1,
SAT-CABLE, DVD and VCR2 buttons. This
is an easy way to tune the PIPwindow to
the correct video input channel.
Check Out the Autotuning feature in the'
Interactive Setup and Features and Menus
sections.
: - ". ', ; : ." " :_. ,_-_'.:"_,. _" ' :._._;_:"_: _ _"':"_" ' ,:_Ei. : -
.Sampledisplaysona ChannelMarkei"_"" "
38
Page 41

TROUBLESHOOTING
Troubles sometimes are caused by simple "faults" that you can correct without the help of a service tecl_nician. If you
experience any difficulty with your TV,'check a few basic remedies before calling your service technician.
TV will not turn on
• (_.heckto make sure it is plugged in.
• Check the wall receptacle (or extension cord) to make sure it is "live" by plugging in something else.
• Maybe batteries in remote control are "dead."
• Maybe remote control is not aimed at remote sensor.
• The front panel controls may be locked (disabled). Use the remote control to unlock the front panel controls by
selecting the Front Panel Lockout in the Parental Controls menu and choosing Unlock.
Controls don't work
• If using remote control, make sure remote is in TV mode by first pressing TV button.
!
• The front panel MENU button may be disabled. Use the remote control to turn off channel blocking. Select
Channel Block in the Parental Controls menu and choose Off.
• Try unplugging set for two minutes and then plug it back in and turn it on again.
Problems with Remote
• Maybe something is between the remote and the remote sensor.
• Maybe the remote is not aimed directly at the component (TV or VCR) you are trying to control.
• Maybe remote is not in TV Mode. Pressthe TV button so remote will control TV.
• Maybe batteries in remote are weak, dead or installed incorrectly. Try replacing batteries. (Note, if you remove the
batteries, you may have reprogram the remote to control other components.)
• Remove batteries and hold number I for at least 60 seconds to drain the microprocessor inside the remote. Release
number 1, replace the batterie.s, and (if necessary) reprogram the remote.
• Remove all batteries for approximately 12 hours. Then replace batteries and (if necessary) reprogram the remote.
Guide Comes On When I Turn on TV
• The Guide automatically comes up when you use the TV button on the remote to turn on the TV. You can turn off this
feature by selecting GUIDE Plus+ Auto Display from the GUIDE Plus+ Menu, and setting it to off.
Turns off while playing
• Schedule off function may have been activated.
• Electronic protection circuit may have been activated because of a power surge. Wait 30 seconds and then turn on
again. If this happens frequently, the Voltage in your house may be abnormally high or low.
TV Turns on unexpectedly
• Schedule On or Watch from the Guide may have been activated. :
• Blank screen
• Maybe the component connected to the input jacks isnot turned on.
• Try another channel.
- • PressRESET,in casethe picture controls are set too low.
Nosound, picture okay
• ° Maybe sound is muted, oTnJpressing v01uine up button to res{ore sound.
• Mayb e speakers are (urned off. Check the Auclio Outpul_ and Sl_eakers cc>ntrolpanel in the Audio menu.
' • If using an S-VHS component, remember t0"also connect the components L and R AUDIO oUT jacks'to the TV's L and R
" INPUT jacks.
39
Page 42

Can't_select certain channel. "
* Channel may be blocked or not approved in'the Parental Controls menu:
• If usingaVCR, Check to make sure the TVNCR, switch on the VCR is in the correct position.
Noisy stereo reception
• May be a weak station. Use SOUND buttonto change to mono mode instead of _ereo.
No picture, no sound but TV ison
Maybe the cable/air function isset to the Wrong position.
• Maybe_a vacant channel is tuned.
• Ifwatching VCR (connected only through antenna input), make sure TV istuned to.channel 3 or 4 ' Sanie as CH3/4
switch on VCR. Also check to make sure TV/VCR switch on VCR is in correct position.
Sound okay, picture poor
• Check antenna connections.
• Try adjusting sharpness function to improve weak signals.
Black Box appears on the screen
= Captioning maybe turned on. Check the Closed-Caption Displal
GUIDE Plus+ IR Controllers not Working
• Check to make sure the controllers are positioned correctly over the IR remote sensors.
"• Your remote may be ,interfering with the IR controller. Place a piece of dark tape over the IR controller. =
• * GUIDE Plus+ Control of cable box isslower than direct control of the box itself. Keep this inmind whe,n changing
channels.
control panel in the Channel menu.
CARE AND CLEANING
CAUTION: Turn OFF your IV before cleaning.
You can clean the IV as required, using a soft'lint-free doth. Be sure to o_.asionally dust the ventilation slots -
in the cabinet to help assure adequate ventilation.
The TV's screen may be cleaned with a soft, lint-free doth as well. Take care not to scratch or marthe screen. If
necessary, you may use a cloth dampened with warm water.
Never use strong cleaning agents, such as ammonia-based cleaners, or abrasive powder. These types of
Cleaners will damage the TV.
While cleaning do not spray liquid directly on the screen, or allow liquid torun down the screen and inside the
IV. Also, avoid placing drinks or vases with water on top of the IV. This could increase the risk of fire or shock
hazard or damage to the TV.
[ CauUon: If fixed(non-moving)images are left on the screen for ,_)ng piriods, they may b e. permanently impr!nted _oli the 1
screen. _Suchimages include network Iogos, phone numbers, and Video games. This damage isnot covered by your , ", _ i
t Warranty' Extended viewing of channel_ displayingthese images shouldbe avoided_ /- , :: _ ; o_-
J
4O
Page 43

RCA DIRECT VI EW 5"36" TELEVISION .LIMITED WARRANTY
What your warranty covers:
• Any defect in materials _r workmanship. _
For how long after your purchase:
• 90 days for_labor charges.
• One year for parts.
• Two years for the picture tube.
The warranty period for rental units begins with the first rental or45 days from date of shipment to the rental firm,
whichever comes first.
What we will do:
• Pay any Authorized RCA Television Service Center the labor charges to repair your television.
• pay any Authorized RCA Television Service Center for the new or, at our option, refurbished replacement parts
and picture tube required to repair your television.
How you get service:
• For screen sizes of 20" and smaller: Take your RCA television to any Authorized RCA Television Service Center and
pick up when repairs are complete.
• For screen sizes larger than 20": Request home service from any Authorized RCA Television Service Center, provided
that your television is located within the geographic territory covered by'an Authorized RCA Television Service
-Center. If not, you must take your television to the Service Center location at your own expense, or pay for the cost
the Service Center may charge to transport your television to and from your home.
• To identify your nearest Authorized RCA Television Service Center, ask your dealer, look in the YellOw Paqes, or
call 1-800-447-1700.
• Show the Authorized Service Center Representative your evidence.of purchase date or first rental.
What your warrantydoes not cover:
• Customer instruction. (Your Owner's Manual clearly describes how to instalL, adjust, and operate your television.,
Any additional information should be obtained from your dealer.)
• Installation and related adjustments.
• Signal reception problems not caused by Your television.
• Damage from misuse or neglect.
• Batteries.
• Customer replacement fuses.
• Images burnt onto the screen.
• A teievision that has been modified or incorporated into other products or is used for institutional or other
commercial purposes.
• A television purchased or•serviced outside the U.S.A.
• Acts of God, such as but not limited to lightning damage.
Product Registration:
• PleaSe complete and mail the Product RegistratiOn Card packed with your television. It will make it easier to
contact you should it ever be necessary. The return of the card is not required for warranty coverage.
How state law relates to thiswarranty:
If you purchasedYour product outside the United States: . ..
• This warranty does not apply_ Contact your dealer for warranty information.
• IP
o .This warranty gives you specific legai rights, and you also:may:have other r!ghts tha t vary from state to P_ate_
41
Page 44

Accessory Information
Antenna (or cabie-TV) connections are made with either
coaxial antenna cable or twin-lead cable. Coaxial cables
are shielded so they are lesssusceptible to hum or
interference from adjacent'cables.
Most audio/video connections between components can
Push-on Connector
, _ Screw-on Coaxial
Round 75-ohm Coaxial cable Connector
Flat 300-ohm twin-lead cable
be made with shieldedaudio and videocablesthat have
RCA-typephonoconnectors.
StandardAudio/Video cable withRCA-type
phono plugs'(suchasNo. VH83)
Color-Coded Jacks
The jacks on the TV'smonitor panel are color-coded for
ease of use. The video jacks are yellow, the right audio
jacks are red, and the left audio jacks are white. When
connecting components to each other, be sure that you
always connect left outputs to left inputs and right
outputs to right inputs. If a component has only one
output (mono), connect it to the r/mono input jack.
To connect S-VHS (Super-VHS) components, an
S-VHS video cable is required. •
The following accessoriesare available from most dealers and
ele_ronics supply stores in caseyou want to p_ition your
components farther apart or need additional cables.
Antenna Cables
VH81 (3-ft)
VH82 (6-ft)
_rew-on Cable attachesto the
round antenna connectors (called
75-ohm F-type)onthe backof your
VCR,orTV.The endsscrew ontothe
connectorsfor a secureconnection.
Push-on Cable attaches to the
round antenna connectors (called
75-ohm F-type) on the back of your
VCR or TV. Ends push on for a quick
connection_
Audio/Video Cables
VH89 (6-ft)
GoldoTippedcable
VH83 (6-ft)
Monaural vat Dubbing Cable
DoUble cable that lets you connect
the video and audio jacks of two
VHS VCRs to duplicate tapes. Can
also be used to Connect a VCR to
your TV. Cable iscolor-coded and
shielded. Has RCA-type phono
PlUgs on each end.
Stereo VCR Dubbing Cable
Triple cable that lets you connect
the _OSOand AUD_ jacks of stereo
components.
S-Video cable (such as No. VH913)
Gold-Plated Jacks and Gold-Tipped Cables
Gold p!ating helps prevent oxidation of cqntacts which
provides much lesslossthan conventional contacts. A
complete line of gold-tipped cables isavailable to help
you obtain optimum performance from your equipment.
Gold-71pped cable
AH84 (6-ft)
VH976 (6-ft)
VH913 (12-ft)
S-Video Cable- has multi-pin
connectors on eachend for
connecting S-Video components to
_your TV.
42
Page 45

CRK76TA1
Splitter
VH47
ANT200
Remote Control This is the
remote control that came
packed with• your TV....
Replacements or spares can
be ordered as needed.
I
I
! Accessory Order Form
Description
_, _ ,_ • _/:;_--, _.
t. Screw-on antenna cable (3-ft)
I Screw-on antenna cable (6-ft)
I
,I Push-on antenna cable (6-ft) '
Monaural VCR Dubbing Cable (6-ft)
Stereo VCR Dubbing Cable (6-ft)
S-VideoCable(6-ft)
S-VideoCable(12-ft)
2-way Signal Splitter helps 2-way Signal Splitter .
you connectto a secondT_/or
VCR. Amplified Antenna
Antenna Mixer
Remote Control (CRK76TA1)
AudioeVideo Adapter
Amplified VHF/UHF/FM
Antenna allows youto easily
switchfrom the antenna
signalto.cable or satellite ....
-. • easilywithout disconnecting
• antenna.
VH82 $6.95
tVH89 $5.95
V1_83 $5.95
VH84 • S9.95
VH976 $7.95
VH913 $8.95
VH47 $3.95
ANT200 $49.95
193984 $10.95
240895 $39.95
228449 $4.35
Prices are subject to Change without notice.
Total Merchandise ..."..i......_ ....., .......... ....... $
•Sales Tax........,..". .......................... ,, ................ ... $
I
We•are required by law to collect the
I appropriate sales taxfor each individual •
state, country, and locality to which the
merchandise is being sent.
;]and Handling ................... .....:. .......... $ 5:00
Total Amount Enclosed. ........i............ :.,...; ......
I Use VISA, MasterCard, or Discover •Card
preferably.
Money order or.check must be in U.S.
currency only.
No COD 0_rCASH.. _ •
' • R ,, ,
' _ All accessories:are subjectt0 availability.
_. ' :z:: _'Where applicable° we will'ship a:suPerseding model.
': , _. ;_'.. , . .:" ._ .
/'_.
43
Page 46

Charge your order on your VISA,
MasterCard, or Discover Card by *
filling in below
IMPORTANT: Copy complete account number
from yourVISA card
I'III IIII IIII _ILIII
Mycardoxp_:[--1--I1--1--!
IMPORTANT: Copy complete account number
fromyourMasterCard
IIIill IIIIIIIIIIIIII
Copy Number
aboveyour
nal]le on
Mas_Card
exptres:
IMPORTANT: Copy complete _ount number
from your Discover Card
FVT-I-il t il It i i l I T-T-i
My .x : r-Y-Ir-T-I
AUTHORIZED SIGNATURE
(Credit card order will not be processed without signature)
Pricesare subjecttochange withoutnotice.
i
Print or _ your name and [
address clearly. This will be
t
your mailing label.
A complete"and correct
order will save you days
of waiting.
Name:
Street:
Apt:
City:
State: Zip: "
t
Please.make s_re that both sides of this form
- have.been filled out completely.
- Allow 4 weeks for delivery.
: All accessories are subjectto availability.
*"i_des_are _subject to change '
United States and Canada Orders •
To place your order by phone, have your Visa, MasterCard
or Discover Card ready and call the toll-free number listed
below between 8AM and 8PM (EST) M_nday_through Friday
or between 9AM and 5PM (EST) Saturday.
i °
Use this number only tO place on order for accessory items
listed on this order form. •
1-800-338-0376
To place your order by mail, detach and mail the completed
order form with credit card information, money order or
check in US currency (made payable to Thomson Cohsumer
• Electronics, Inc.) to the following address:
Video Accessories
PO Box 8419
Ronks, PA 17573
44 ¸_
Page 47

A
Accessories 42
Advanced connections 4, 6
Audio menu 28
Audio Output 6
Audio Outpt_ Volume & Speakers
29
Audio Processor 28
Audio remote codes 24
Audio/Video cables 7
Auto Channel Search 13, 33
Auto Color 30
Auto Tuning 18
DVD Channel .16, 33
SAT/Cable Channel 17, 33
VCR1 Channel 15, 33
VCR2 Channel 15, 33
B
Back of the TV 6
BasicConnection 4, 5
BasicPicture Controls 30
Batteries 10r 38
Black Level 30
Buttons
Remote 20
¢
Cable box remote codes 24"
Cable/Antenna 6
Care and Cleaning 40
CC 38
Chan # 33
Chan Labels 33
Channel 3 34
Channel 4 34
Channel Block 35
Channel. Marker 38
Channel menu 33
Closed Caption
Display 3.1
Mode 31, 32
PIPDisplay 31
PIPMode 31
Coaxial Cable 4, 5, 7
Color 30
Color Warmth 30
Connections
Advanced 4, 6
Basic 4, 5
TV and stereo VCR 7
TV Only 4
TV, VCR and Satellite Receiver 8
TV, VCR, Satellite Receiver.and
DVD 8
Contrast 30
Control Panels 27-.
D
DVD Channel 16, 33
DVD Player remote codes 24_
Fixed images 40
Fixed Output, Speakers Off 29
Front panel buttons 23
Front Panel-Lockout 35 •
G
GUIDE Plus+
Menu 36.
Setup 14
INPUT1 6, 34
INPUT2 6, 34
IR Controller
attaching to other components
g
locating IR sensorson your
components 9
L
Labels 18, 33
Language 13; 31
Locating IR sensors 9
M
Memory 33
Menu Language 13, 31
Menus 26
Mono 28
Mute 28
p
Parent Approved 35
Parental Controls
Cl_annel Block 35
Front Panel Lockout 35
Parental Controls menu 35
Picture Presets 30
Picture Quality menu 30
Picture .Tilt 31 -
PIP(Picture in Picture)
Buttons 37
Closed caption display 3i
Closed caption mode. 31.
PIPChan 38
Problems. 38
Using 37
Point and Select. 12
Programming the remote to
control components 22
R .
Remote Cor_trol
Installing the batteries 10
Programming 22
Remote batteriesare low. 38
$
S-Video 6
S-Video Cable 7
SAP 38
SAT/CableChannel 17, 33 •
Satellite receiver remote codes 24
Schedule 34
Screen menu 31
Second Audio Program (SAP) 28
Set
DVDChannel 16, 33
SAT/CABLEChannel 17, 33
VCR1 Channel 15, 33
VCR2Channel 15, 33
Set Time 34
Setup 12
Setup menu 36
Sharpness 30
Signal Type
Cable TV 33
UHFNHF Antenna 33
Sleep 38
Sleep Timer 34, 38
Stereo 28, 38
T
Time
Current 38
Set Time 14
Time menu 34
Tint 30
Tone Controls 28
Troubleshooting. 39
TV only connection 4
U
UHF/VHF Antenna 33
V
Variable Output, Speakers Off 29
Variable Output, Speakers On 29
.VCRcontrol 6
VCR remote codes 24
VCR1 Channel 15, 33
VCR2Channel 15, 33
Video Noise Reduction 30
View Warranty Clock- 34
V¢
Warranty 41
45
Page 48

_ 1HOMSONO011SlIMEBEU_mONES
RE_TiNG_ G REEN ER_iFU_ RE_
At Thomson Consumer :Electronics we are dedicated to the preservation of our
natural heritageand to a healthy and safe way of life for current and future
generations. This is a global effort which encom passesevery THOMSON facility
throughout the world.
We believe that clean air, clean water, a protected earth, and healthy people are not.
only practical and desirable goals, but achievable ones as well. Our Corporate
Environmental, Health and Safety Charter acknowledges our commitment to protect
these precious assetsand provides a challenging vision and guideline for conducting
our business..
Below are a few examples of Thomson's achievements in our efforts to preserve our natural resources.
THE EARTH
Thomson reclaims millions of pounds
of hazardous waste annually, diverting
it from landfills.
Thomsontreatsmillionsof poundsof
waste water sludgeannuallyand
rendersit non-hazardous.
Thomson recycles over 50 million
pounds of non-hazardous material
annually that otherwise would have
been treated astrash, an overall
recovery rate of 50%.
Thomson globally recycles millions of
pounds of broken television picture
tube glass annually through both
internal and external reclaim processes.
THE AIR
Thomson has replaced solvent-based
paints at many locations resulting in an
80% reduction in toxic air emissions for
equivelant material used.
Thomson has eliminated the use of
ozone-depleting substances at television
manufacturing facilities aroundthe
world.
Thomson Collects and returns over 1.5
million pounds of glass and furnace dust
to the glass making process annually.
Thomson has launched worldwide
energy savings programswhich
contribute to efforts to reduce air
emissions from electrical generating
facilities.
TH E WATER
Thomson recovers over 2 million
pounds of fine glass particles from
process water each year and recycles
them back into its glass furnaces.
Thomson's state-of-the-art waste water
treatment pla nts filter out over 26
million pounds of solids from process
water each year.
Thomson's U.S. glassfactory recycles
2,500 gallons of water per minute and
cleans 2.6 million gallonsof water per
day.
Thomson is researching new processes
and is developing new manufacturing
equipment and technologies to further
reduce large volume water use.
Thomson has also increased'its usage of recycled materials for packaging Of our products. For example, in the U.S. and Mexico
our television plants use recycled cor_tent in our television cartons and instruction booklets. The inks used for the print on
cartons and instruction booklets are soy based. For a free brochure regarding Thomson's Environmental Health and Safety
Programs, write to Thomson Consumer Electronics'address below, attention Environmental Programs: INH340.
Please do not send any products to the Indianapolis address listed in this manual or on the carton. This will only add delays in
service for your product.
The following materials were used "in
printing this publication:
_ THOMSON CONSUMER ELECTRONICS
10330 North Meridian Street
Indianapolis, IN46290
01998 Thomson Consumer Electronics, Inc.
Trademark(s)® Registered o
Marca(s) Registrada(s)
Printed in USA
TOCOM 1531050A
8S%
gillBlSl_flHl 8r_
r61=BIIJ_IL
.=wmmnm A
TOT__ _
ISOYINKJ,,
 Loading...