

Page 1
A
f
Q
3 _<-/3
Page 2

Important Information
WARNING
To reduce the risk of fire or
shock hazard, do not expose
this TV to rain or moisture.
TO REDUCE THE RISK OF ELECTRIC SHOCK, DO
NOT REMOVE COVER (OR BACK). NO USER
SERVICEABLE PARTS INSIDE. REFER SERVICING
TO QUALIFIED SERVICE PERSONNEL.
This symbol indicates
"dangerous voltage" inside
the product that presents a
risk of electric shock or
personal injury.
This symbol indicates
important instructions
accompanying the .
product.
Cautions CAUTION:
To prevent electric shock, match wide blade of plug to wide
slot, fully insert.
ATTENTION-
Pour _viter les chocs 61ectriques, introduire la lame la plus
large de la fiche dans la borne correspondante de la prise et
pousser jusqd au fond.
o.
Note To Cable TV Installer
° .
Refer to the identification/rating label on the back of this product for the
proper operating voltage.
FCC RegulatiOns state that unauthorized changes or modificatioris to this
equipment may void the user's authority to operate it.
CAUTION: If fixed (non-moving) images are left on the screen for long
periods, they may be permanently imprinted on the screen. Such images
include network logos, phone numbers, and video games. Extended view-
ing of channels displaying these images should be avoided.
This reminder is provided to call your attention to Article 820-40 of the
National Electrical Code (Section 54 of the Canadian Electrical Code,
Part 1) which provides guidelines for proper grounding and, in particular,
specifies that the cable ground shall be connected to the grounding system
of the building as dose to the point of cable entry as practical.
Product
Registration
Please fill out the product registration card and return it immediately.
Returning this card allows us to contact you if needed.
Keep your sales receipt to obtain warranty parts and service and for proof
of purchase. Attach it here and record the serial and model numbers in
case you ever need them. The numbers are located on the back of the TV.
:- ./ .
- • . ... ,,
Model No..
•Serial No.
• Purchase Date:
• DealerJAddress/Phone:
Page 3
Table of Contents
Important Information.
Warning, Product Registration
Quick Guide to Your TV Startup 2-3
Hook up your TV,Plug in the TV, Put Batteries in the Remote,
Turn on the TV,Adjust Picture Tilt,
Place Channels into Memory, Set the Time
Basic Tour of the Remote
Button Layout and Functions
Menu Basics
Colors, Menu Buttons, Moving through the Menus
5
Using Your TV and Remote
With Remote Buttons
With VCRs
With a Satellite Receiver
With. a Cable Box
With a Laserdisc Player
With Audio Equipment
6-7
8-10
11
12.13
14
15
Adjusting Your TV
Overall Picture 16
Picture Settings 17
Color, Tint, Brightness, Sharpness; Autocolor, Picture Reset
Sound Settings 18-19
Stereo, Expanded Stereo, SAP, Tone, Speakers
Using Advanced Features
Placing Channels in Memory/Autoprogram
Naming the Channels
Setting the Sleep Timer
•Setting the Alarm Clock
Selecting a Language
Watching Closed Captioning
Setting Your TV for Antenna or Cable
20
21
22
23
24
24
25
References
Front Panel Buttons
Displays on the Screen
Trouble Checks
Limited Warranty
Order Form for Parts
Index
26
27
28-29
30
31-32
33
Page 4
Quick Guide tO Your TV
Startup
The steps below will get your TV connected and ready for watching.
For more details, see the page numbers listed.
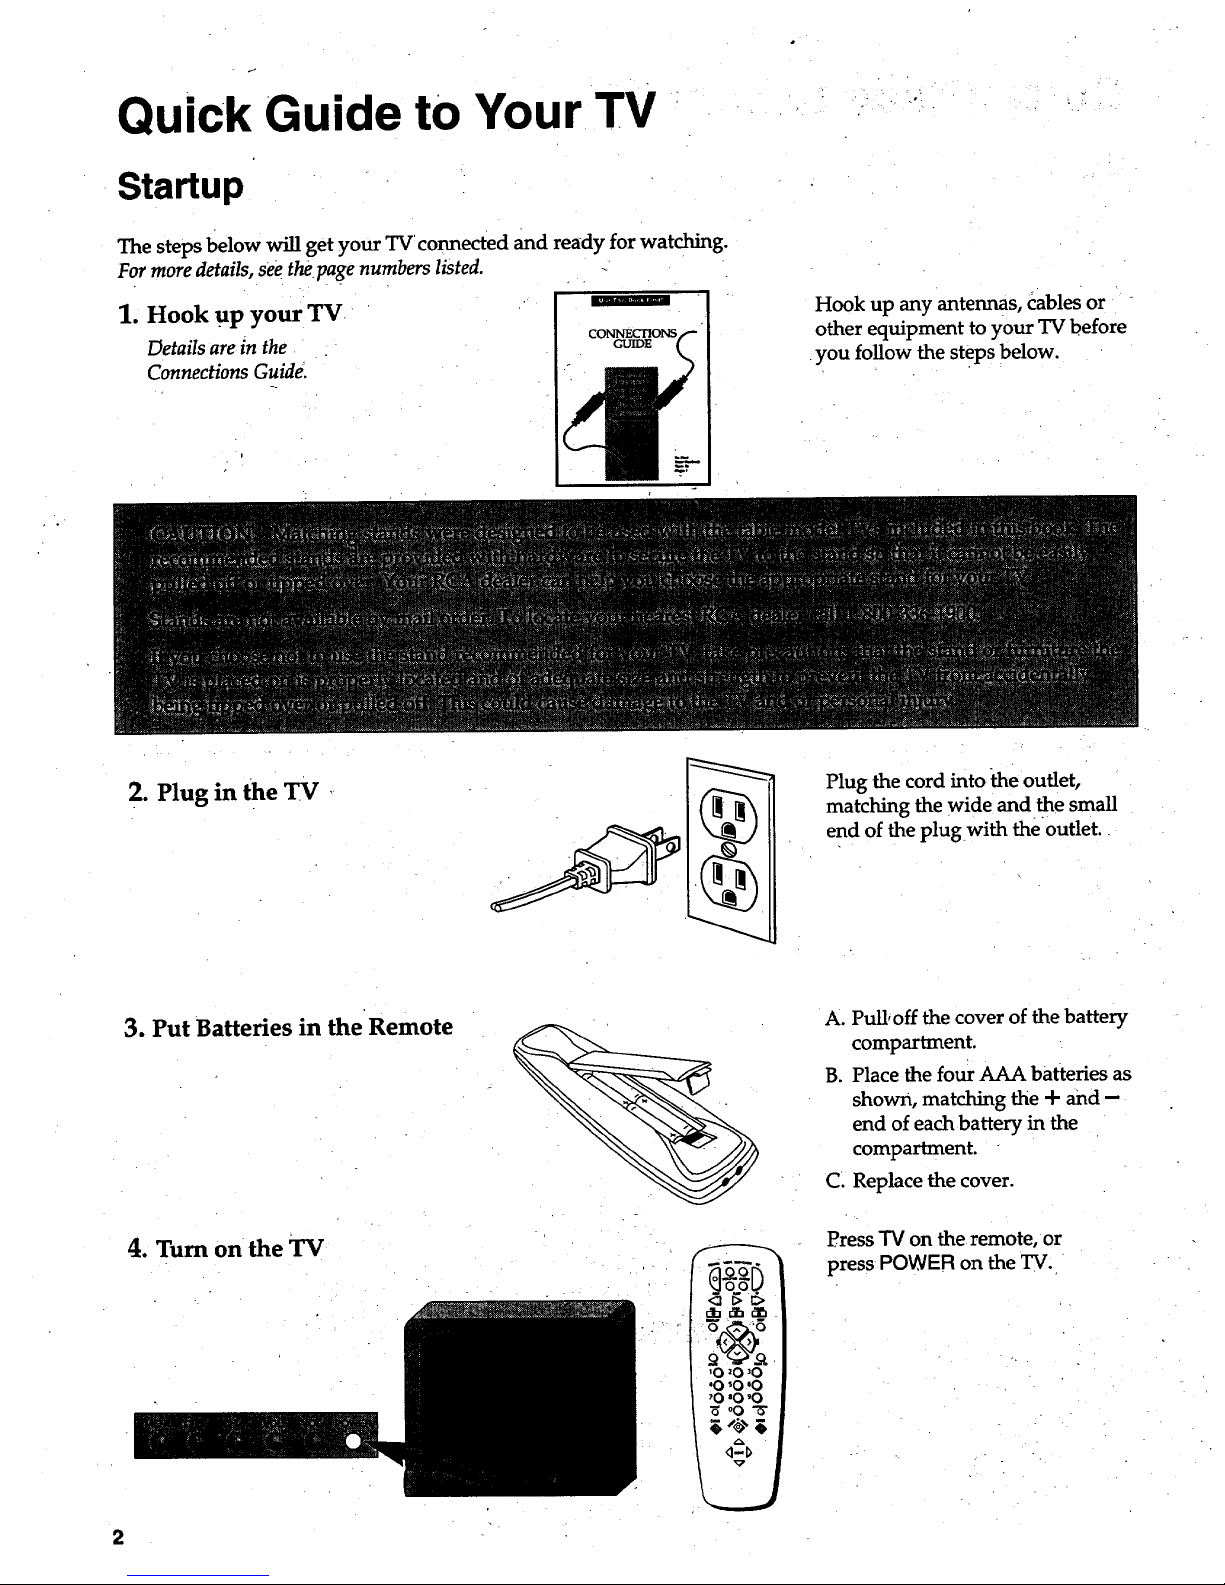
1. Hook UP your TV I
CONNECTIONS
Details are in the _
Connections Guide.
Hook up any antennas, tables or "
other equipment to your TV before
you follow the steps below.
2. Plug in the TV
Plug the cord into the outlet,
matching the wide and the small
end of the plug with the outlet.
3. Put Batteries in the Remote
4. Turn on the TV
2
" €.(_.'x>m
'O 20 30
'O 'O '0
'0 '0 '0
i _ oO ,_.
A. Pull, off the cover of the battery
compartment.
B. Place the four AAA batteries as
shown, matching the + and -
end of each battery in the
compartment.
C. Replace the cover.
Press TV on the remote, or
press POWER on the TV.
Page 5
Quick Guide to Your TV
Startup
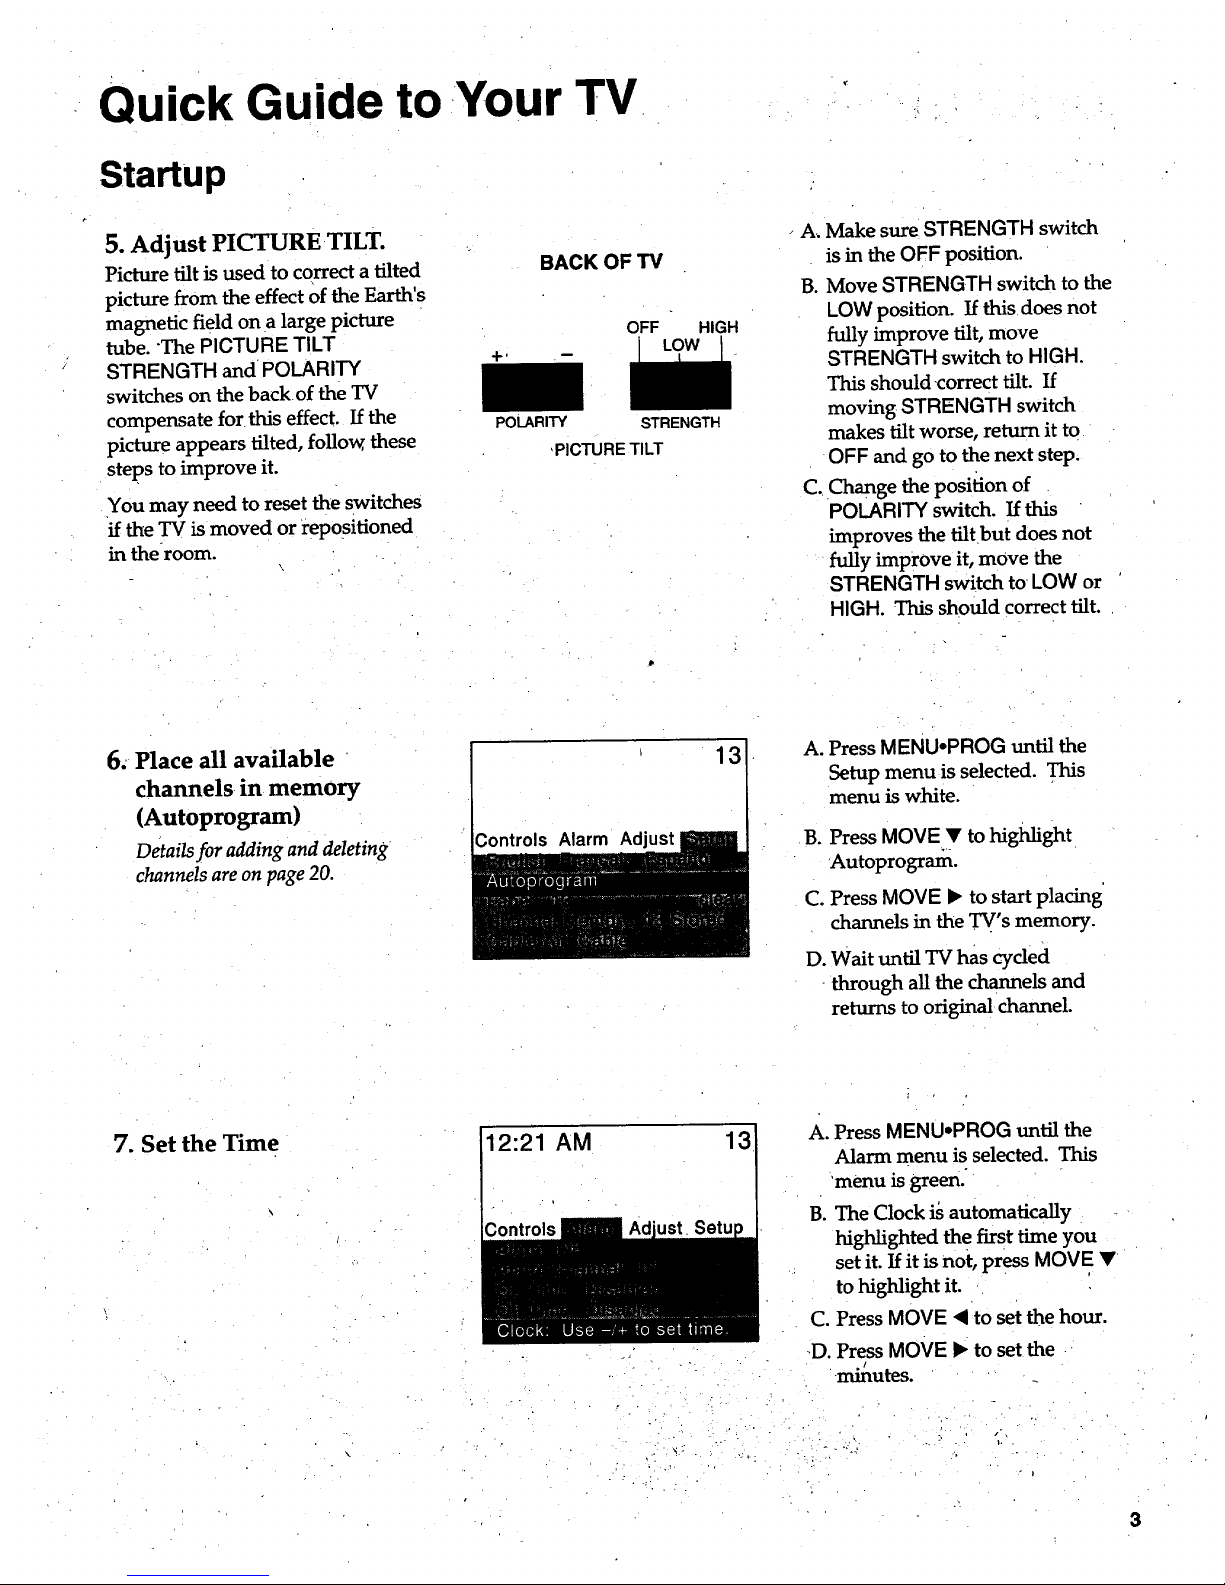
5. Adjust PICTURE TILT.
Picture tilt is used to correct a tilted
picture from the effect of the Earth's
magnetic field on a large picture
tube. "The PICTURE TILT
STRENGTH and POLARITY
switches on the backof the TV
compensate for this effect. If the
picture appears tilted, follow, these
steps to improve it.
You may need to reset the switches
if the TV is moved or repositioned
in theroom.
\
BACK OF TV
OFF
POLARITY
STRENGTH
,PICTURE TILT
HIGH
A. Make sure STRENGTH switch
is in the OFF position.
B. Move STRENGTH switch to the
LOW position. If this does not
fully improve tilt, move
STRENGTH switch to HIGH.
This should-correct tilt. If
moving STRENGTH switch
makes tilt worse, return it to
OFF and go to the next step.
C. Change the position of
POLARITY switch. If this
improves the tilt but does not
fully improve it, move the
STRENGTH switch to LOW or
HIGH. This should correct tilt.
6. Place all available
channels in memory
(Autoprogram)
Details for adding and deleting
channels are on page 20.
13
A. Press MENU*PROG until the
Setup menu is selected. This
menu is white.
B. Press MOVE • to highlight
Autoprograrn.
C. Press MOVE 1_to start placing
channels in the TV's memory.
D. Wait until TV has cycled
through all the channels and
returns to original channel.
7. Set the Time 12:21 AM
13
• ° .
. • • •
. ... -. • .
A. Press MENU.PROG until the
Alarm menu is selected. This
menu is green.
B. The Clock is automatically
highlighted the first time you
set it. If it is not, press MOVE •
to highlight it.
C. Press MOVE < to set the hour.
D. Press MOVE • to set the
/
minutes.
_ . "'
3
Page 6
Quick Guide to Your TV --
BasicTour of the Remote
Basic information about your remote is shown below. This will give you a
general idea of how your remote works. For more details, see pages 6-15.
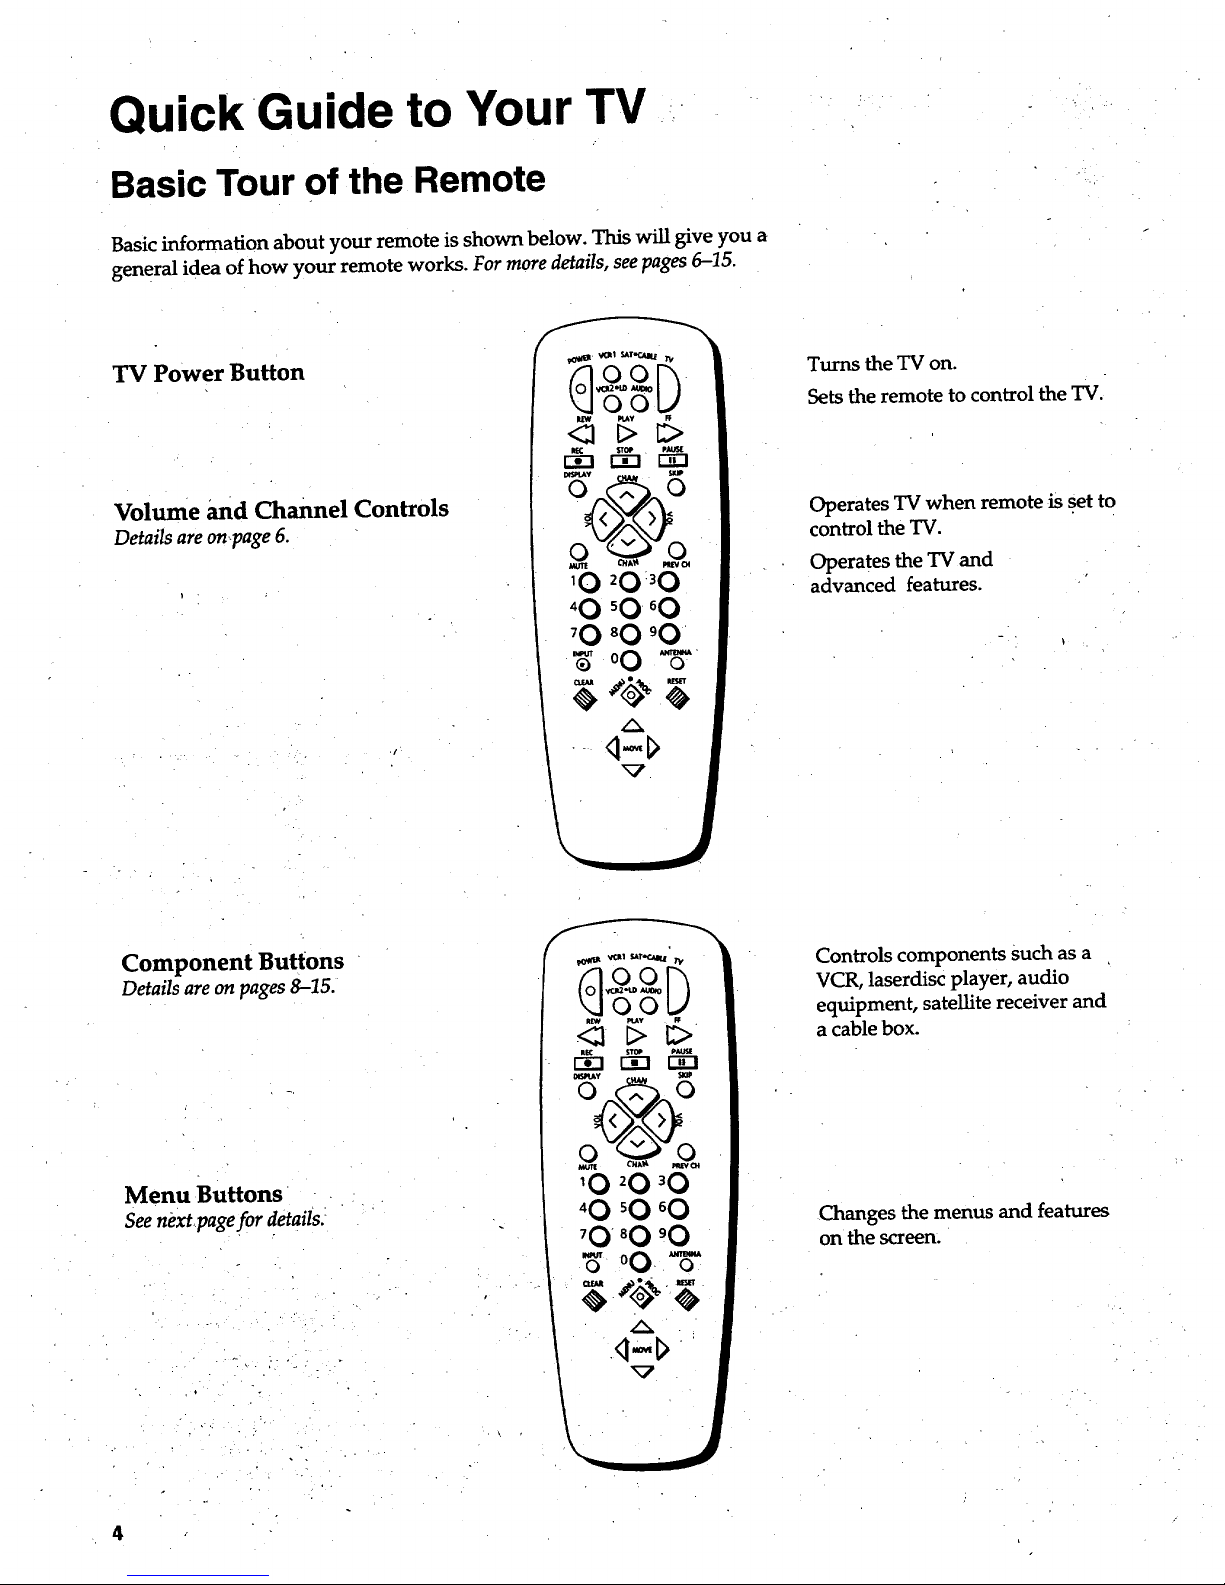
TV Power Button
Volume and channel Controls
Details are on,page 6.
Turns the TV on.
Sets the remote to control the TV.
Operates TV when remote is set to
control the TV.
Operates the TV and
advanced features.
Component Buttons
Details are onpages 8-15.
Menu Buttons
Seenext pagefor details._
°
f
OO
r-_ _D
laUR CNAt_ _OI
'0 _0 _0
'0 _0 _0
'0 _0 '0
"_ 00. _"
A
<I-I>
Controls components such as a
VCR, laserdisc player, audio
equipment, satellite receiver and
a cable box.
Changes the menus and features
on the screen.
4
Page 7
Quick Guide to Your TV
Menu Basics
General information about using the on-screen menu system is shown
below. Details on using the remote buttons are on pages 6-7. Many menu items
are explained in detail in Using the Advanced Features starting on page 20.
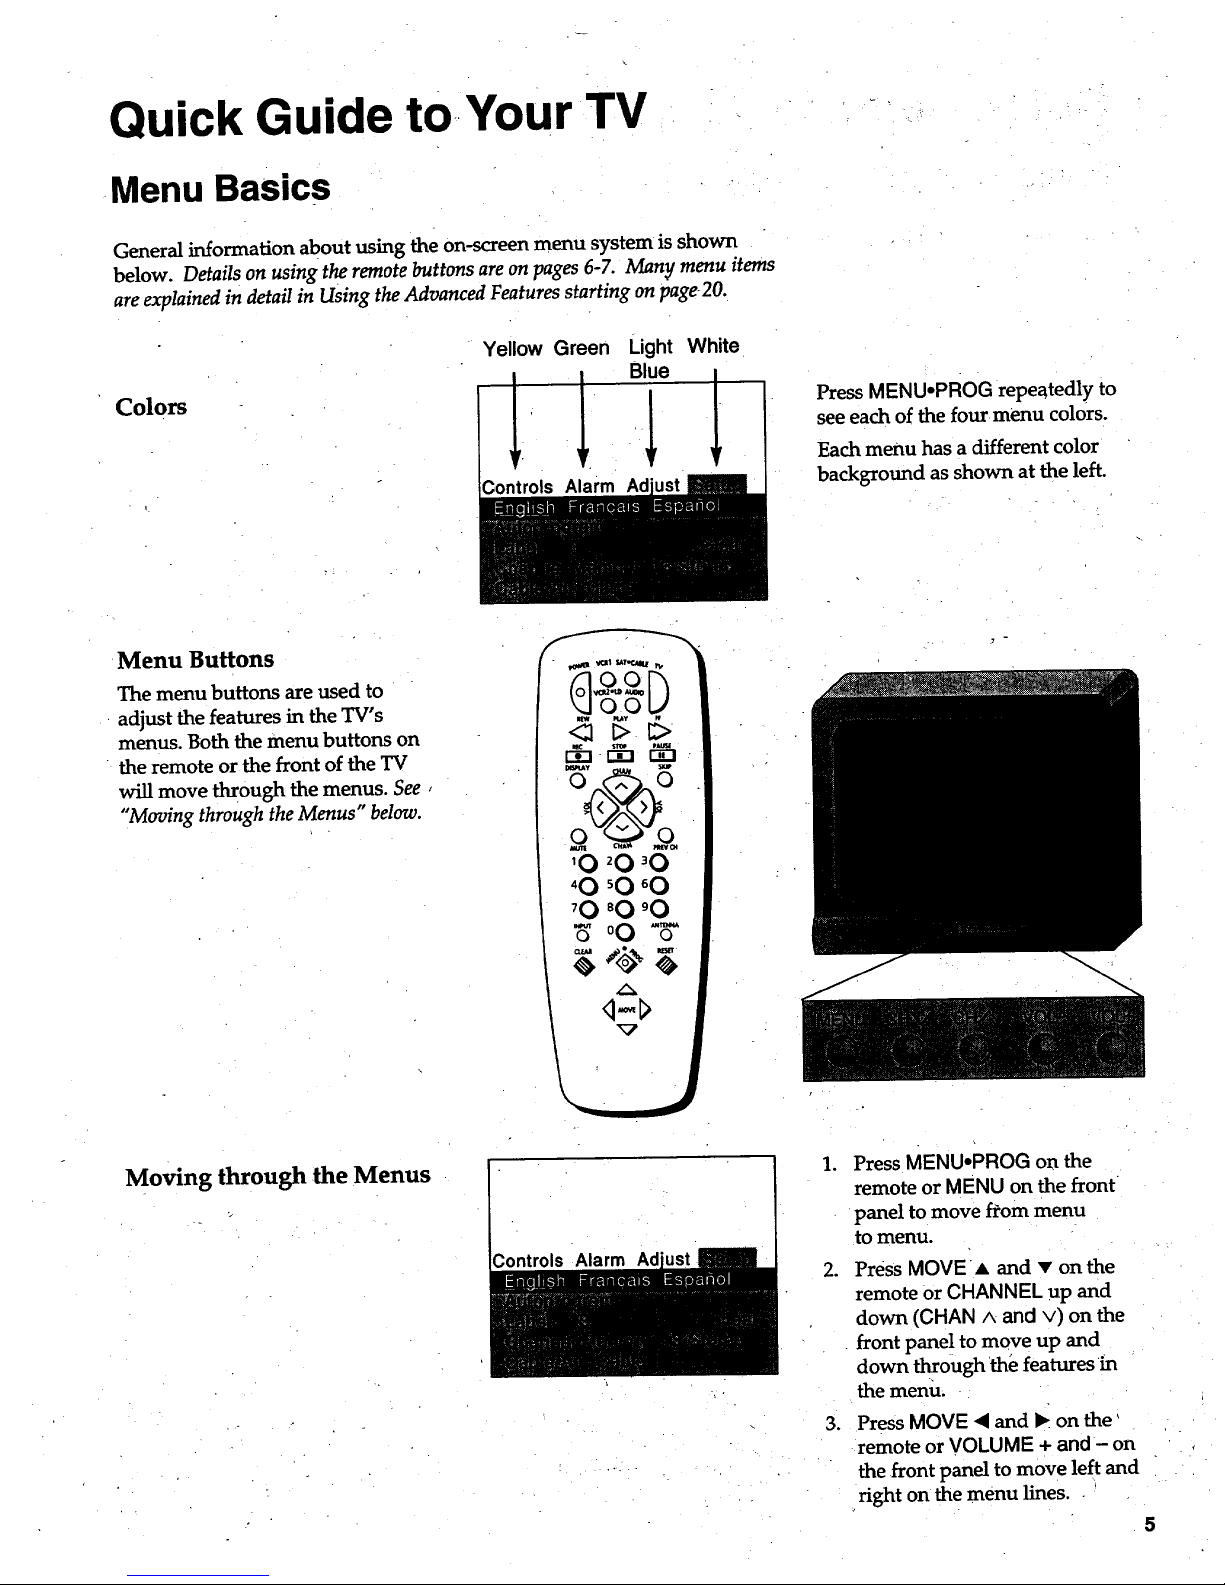
Colors
Yellow Green Light White
Alarm
Press MENU.PROG repeatedly to
see each of the four menu colors.
Each menu has a different color
background as shown at the left.
Menu Buttons
The menu buttons are used to
adjust the features in the TV's
menus. Both the menu buttons on
the remote or the front of the TV
will move through the menus. See,
"Moving through the Menus" below,
r_l s_ P_
rl-!
'O 20 30
'O 'O 60
'O 80 'O
-_ oO -_"
Moving through the Menus
Controls Alarm Ad
,
.
.
Press MENU.PROG on the
remote or MENU on the front
panel to move f-tom menu
to menu.
Press MOVE a and • on the
remote or CHANNEL up and
down (CHAN ^ and v) on the
front panel to move up and
down through the features in
the menu.
Press MOVE < and 1_on the'
remote or VOLUME + and - on
the front panel to move left and
right on the menu lines.
Page 8
Using Your TV and Remote
With Remote Buttons
?0_._ VCR1 SATe.CABLE "/"V
O0
R_ PLAY FF
REC STOP PAUSE
DISPLAY SKIP.
CHAg PREVCH
MUTE
q MOVE [_
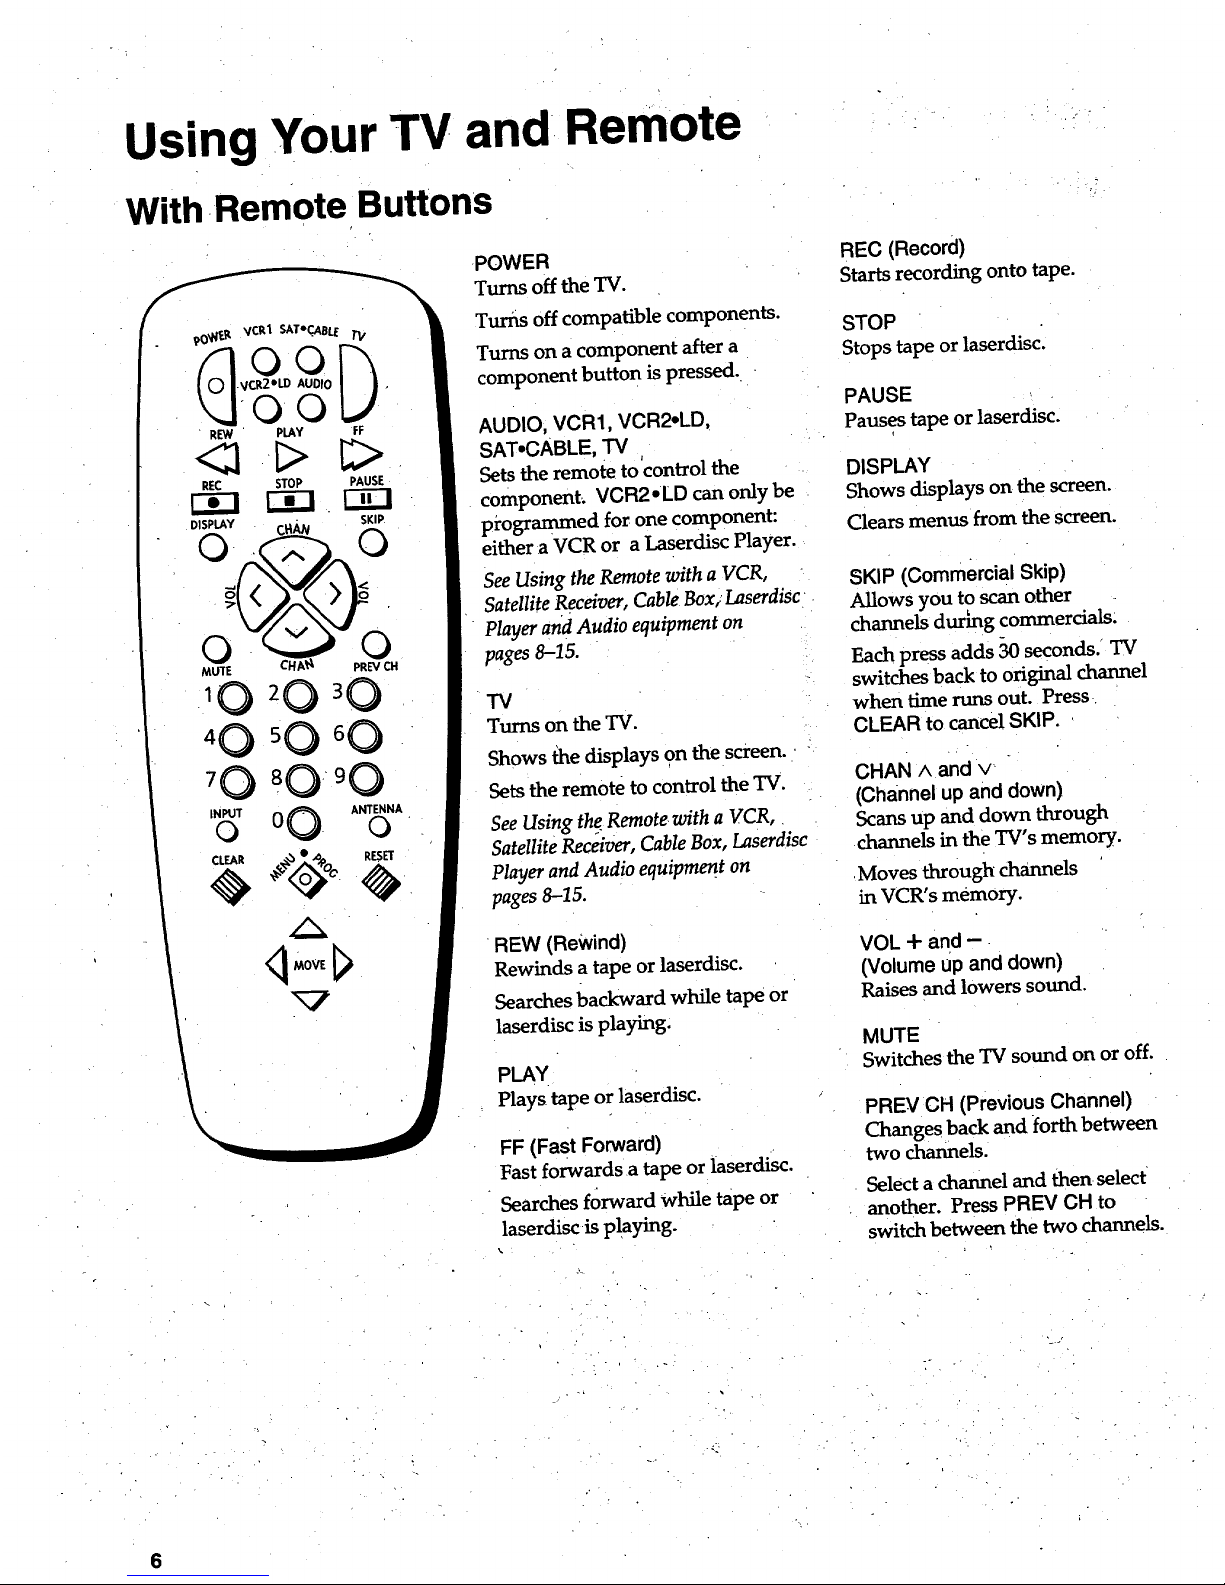
POWER
Turns off the TV.
Turns off compatible components.
Turns on a component after a
component button is pressed.
AUDIO, VCR1, VCR2*LD,
SAT*CABLE, "IV
Setsthe remote to control the
component; VCR2*LD can only be
programmed for one component:
either a VCR or a LaserdiscPlayer.
See Using the Remote with a VCR,
Satellite Receiver, Cable Box; LaserdiSc
Player and Audio equipment on
pages 8-15.
TV
Turns on the TV.
Shows the displays on the screen.
Sets the remote to control the TV.
See Using the Remote with a VCR,
Satellite Receiver, Cable Box, Laserdisc
Player and Audio equipment on
pages 8-15.
REW (Rewind)
Rewinds a tape or laserdisc.
Searches backward while tape or
laserdisc is playing.
PLAY
Plays tape or laserdisc.
FF (Fast Forward)
Fast forwards a tape or laserdisc.
Searches forward while tape or
laserdisc is playing.
REC (Record)
Starts recording onto tape.
STOP
Stops tape or laserdisc.
PAUSE
Pauses tape or laserdisc.
DISPLAY
Shows displays on the screen.
Clears menus from the screen.
SKIP (Commercial Skip)
Allows you to scan other
channels during commercials:
Each press adds 30 seconds. TV
switches back to original channel
when time runs out. Press
CLEAR to cancel SKIP.
CHAN A and v
(channel up and down)
Scans up and down through
channels in the TV's memory.
Moves through channels
in VCR's memory.
VOL + and -
(Volume up and down)
Raises and lowers sound.
MUTE
Switches the TV sound on or off.
PREV CH (Previous Channel)
Changes back and forth between
two channels.
Select a channel and then select
another. Press PREV CH to
switch between the two channels.
. _ • .:
Page 9
Using Your TV and Remote
With Remote Buttons
90_N_.R VCR1 SAToCABLETI/
AUDIO
_L°0
REW . ' PLAY FF
<21 C>
REC STOP PAUSE
F_ r-_ r_-i
DISPLAY SKIP
tHAN
- k./
4 0 50 6 0
70:_80 90_:
INPUTo 00' ANTENNAo
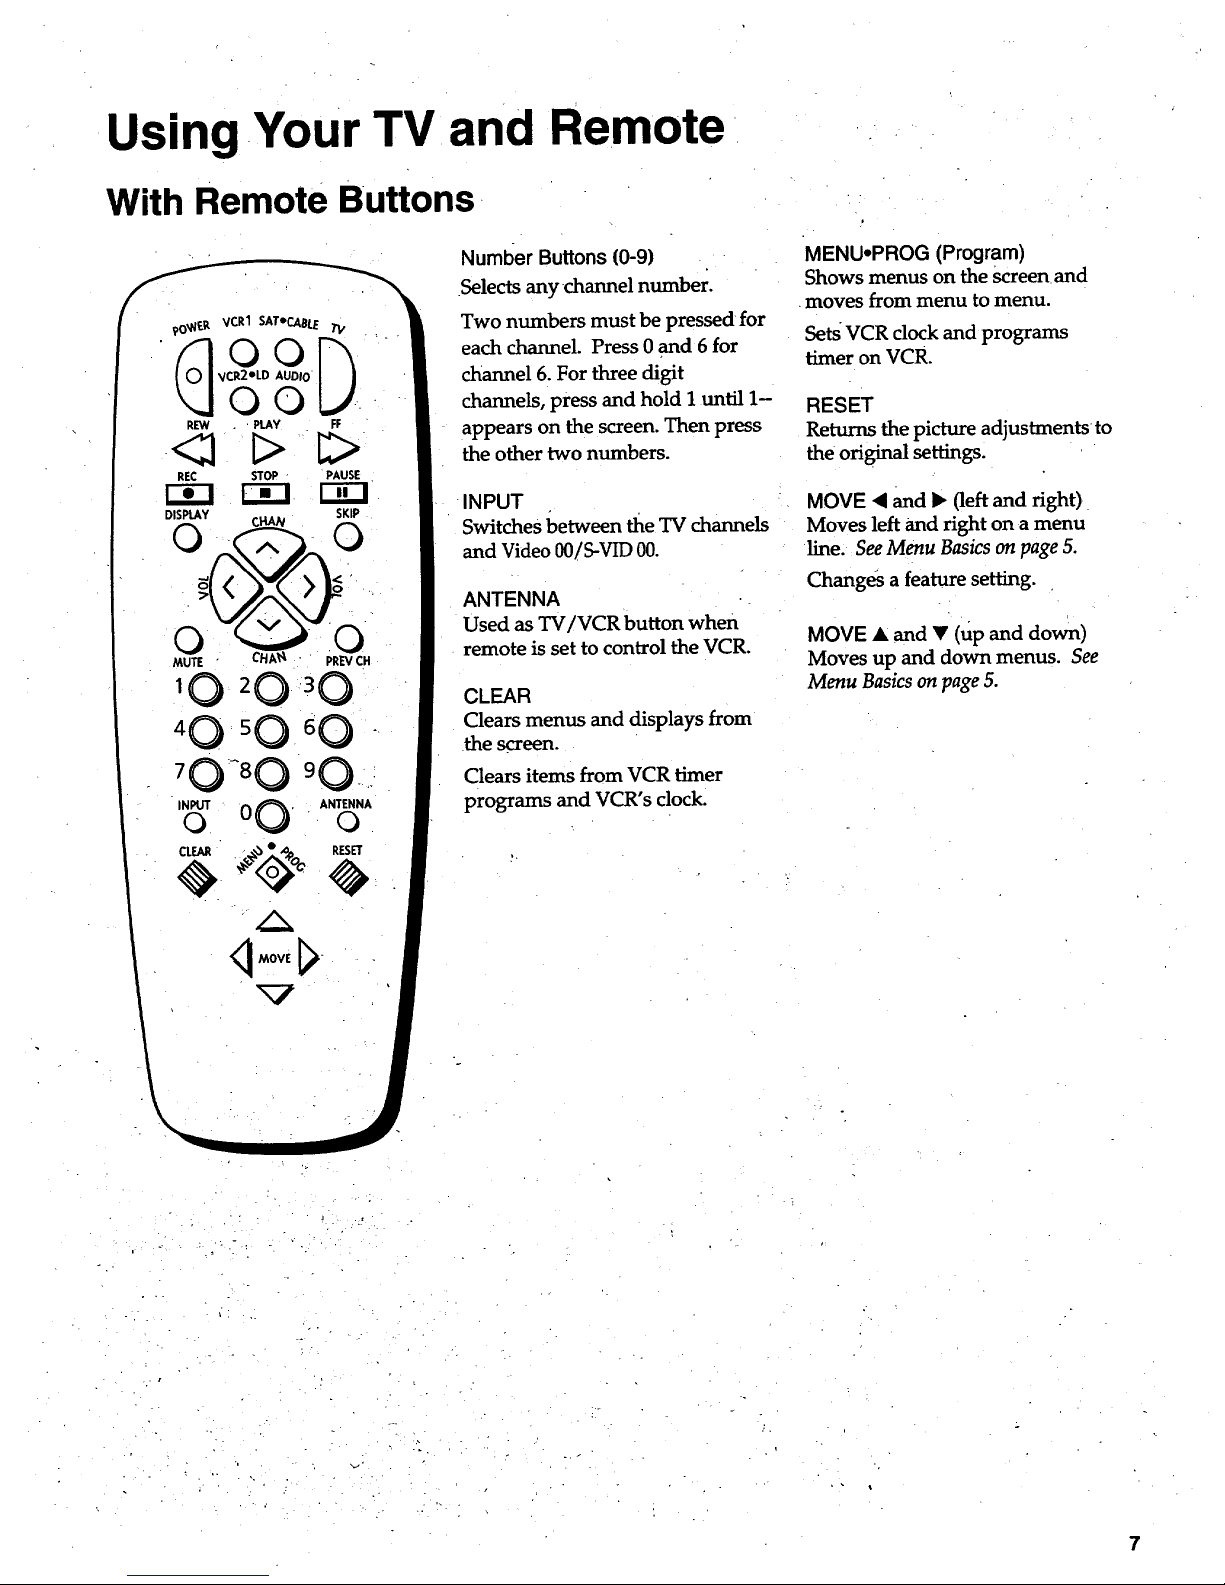
Number Buttons (0-9)
.Selectsany channel number.
Two numbers must be pressed for
each channel. Press 0 and 6 for
channel 6. For three digit
channels, press and hold I until 1-
appears on the screen. Then press
the other two numbers.
INPUT
Switches between the TV channels
and Video 00/S-VID 00.
ANTENNA
Used as TV/VCR button when
remote is set to control the VCR.
CLEAR
Clears menus and displays from
the screen.
Clears items from VCR timer
programs and VCR's clock.
MENU,PROG (Program)
Shows menus on the screen and
moves from menu to menu.
Sets VCR clock and programs
timer on VCR.
RESET
Returns the picture adjustmentsto
the original settings.
MOVE • and • (left and right)
Moves left and right on a menu
line. See Menu Basics on page 5.
Chang_ a feature setting.
MOVE • and • (up and down)
Moves up and down menus. See
Menu Basics on page 5.
k
7
Page 10
Using Your TV and Remote
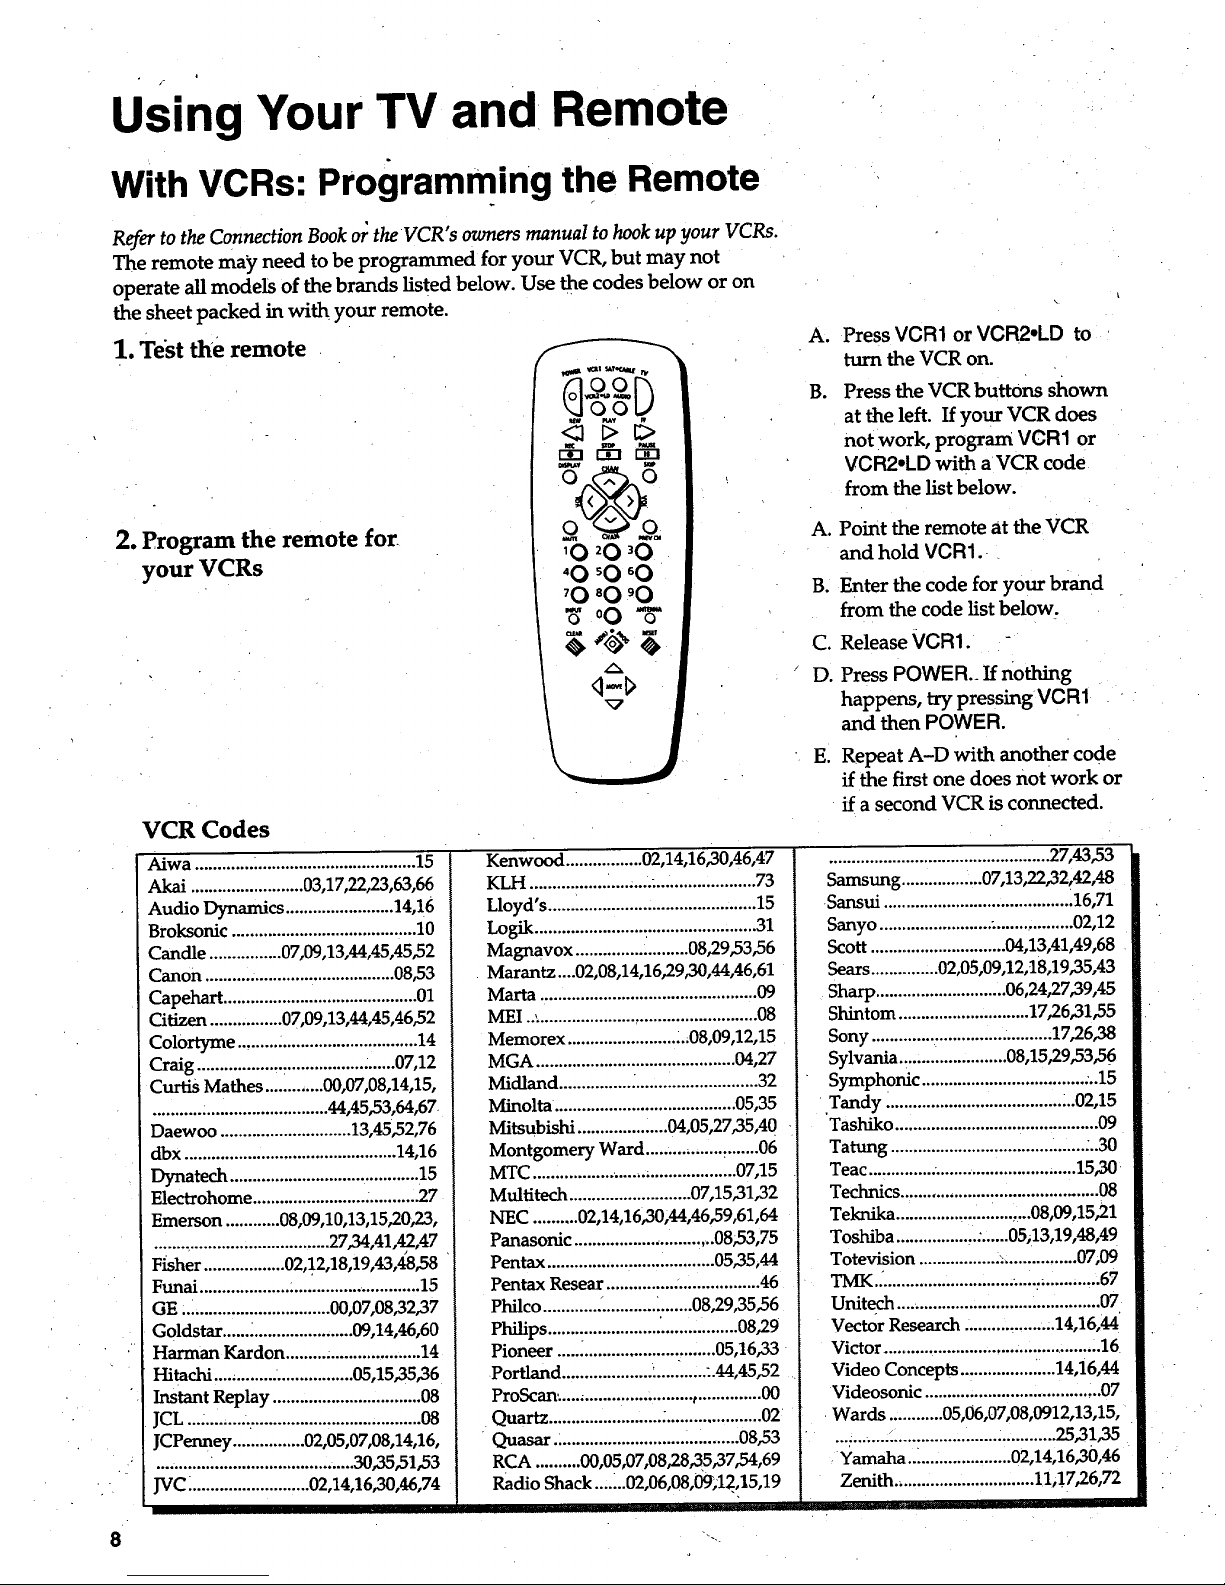
With VCRs: Programming the Remote
Refer to the Connection Book or the VCR" s owners manual to hook up your VCRs.
The remote may need to be programmed for your VCR, but may not
operate all models of the brands listed below. Use the codes below or on
the sheet packed in with your remote.
1. Test the remote
2. Program the remote for
your VCRs
_1 _f,f_mt r_
10 2 0 30
"0 _0 '0
'0 _0 '0
_ 00 -_"
q-l>
VCR Codes
A°
B.
Press VCR1 or VCR2.LD to
turn the VCR on.
Press the VCR buttons shown
at the left. If your VCR does
not work, program VCR1 or
VCR2.LD with a VCR code
from the list below.
A. Point the remote at the VCR
and hold VCR1.
B. Enter the code for your brand
from the code list below.
C. Release VCR1.
D. Press POWE R._If nothing
happens, try pressing VCR1
and then POWER.
E. Repeat A-D with another code
if the first one does not work or
if a second VCR is connected.
Aiwa ................................................. 15
Akai ......................... 03,17,22,23,63,66
Audio Dynamics ........................ 14,16
Broksonic ......................................... 10
Candle ................ 07"09,13,44,45,45,52
Canon .......................................... 08,53
Capehart ........................................... 01
Citizen ................ 07,09,13,44,45,46,52
Colortyme ........................................ 14
Craig ..................................... •......07,12
Curtis Mathes ............. 00,07,08,14,15,
....................................... 44,45,53,64,67
Daewoo ............................. 13,45,52,76
dbx ............................................... 14,16
Dynatech ..........................................15
Electrohome ......................... ........... 2.7
Emerson ............ 08,09,10,13,15,20,23,
....................................... 27,34,41,42,47
Fisher .................. 02,12,18,19,43,48,58
Funai .................................... ............. 15
GE ................................. 00,07,08,32,37
Goldstar ......_...................... 09,14,46,60
Harman Kardon ......... _.................... 14
Hitachi ............................... 05,15,35,36
Instant Replay ................................. 08
JCL ..._................................................ 08
JCPenney ................ 02,05,07,08,14,16,
............................................ 30,35,51,53
JVC ........................... 02,14,16,30,46,74
Kenwood ................. 02,14,16,30,46,47
KLH ........................... ....................... 73
Lloyd's .............................................. 15
Logik ................................................. 31
Magnavox ......................... 08,29,53,56
Marantz....02,08,14,16,29,30,44,46,61
Marta ................................................ 09
MEI .................................................... 08
Memorex ........................ .._08,09,12,15
MGA ............................................ 00,27
Midland ............................................ 32
Minolta ........................................ 05,35
Mitsubishi .................... 04,05,27"35,40
Montgomery Ward ................. ,....... 06
MTC ............................................. 07,15
Multitech ........................... 07,15,31,32
NEC .......... 02,14,16,30,44,46,59,61,64
Panasonic ............................... 08;53,75
Pentax ..................................... 05,35,44
Pentax Resear ................ .................. 46
Philco ............ ,. ................... 08,29,35,56
Philips ....... :................. '................. 08,29
Pioneer ................................... 05,16,33
Portland .................... :.............44,45,52
ProScan:...., ........................ ,.............. 00
Quartz ......................... ...................... 02
Quasar ......................................... 08,53
RCA .......... 00,05,07,08,2.8,35,37 ,54,69
Radio Shack ....... 02,06,08,09;12,15,19
................................................. 27,43,53
Samsung .................. 07,13,22,32,42,48
Sansui .......................................... 16,71
Sanyo ......................... :................. 02,12
Scott .............................. 04,13,41,49,68
Sears ............... 02,05,09,12,18,19,35,43
Sharp ............................. 06,24,27,39,45
Shintom ............................. 17,26,31,55
Sony .............................. .......... 17,26,38
Sylvania ........................ 08,15,29,53,56
Symphonic .................................... :..15
Tandy ....................................... _.02,15
Tashiko ............................................. 09
Tatung .................................... •...... :..30
Teac .............. ................................ 15,30
Technics ............................................ 08
Teknika .............................. 08,09,15,21
Toshiba .................. :......05;13,19,48,49
Totevision ................................... 07,09
TMK... .................................. _............ 67
Unitech .............................. :.............. 07
Vector Research ................. ...14,16,44
Victor ................................................. 16
Video Concepts ................ _....14,16,44
Videosonic ....................................... 07
Wards ............ 05,06,07"08,0912,13,15,
.................................... . ............ 25,31,35
Yamaha ....................... 02,14,16,30,46
Zenith .............................. 11,!7,26,72
.
Page 11
Using Your TV and Remote
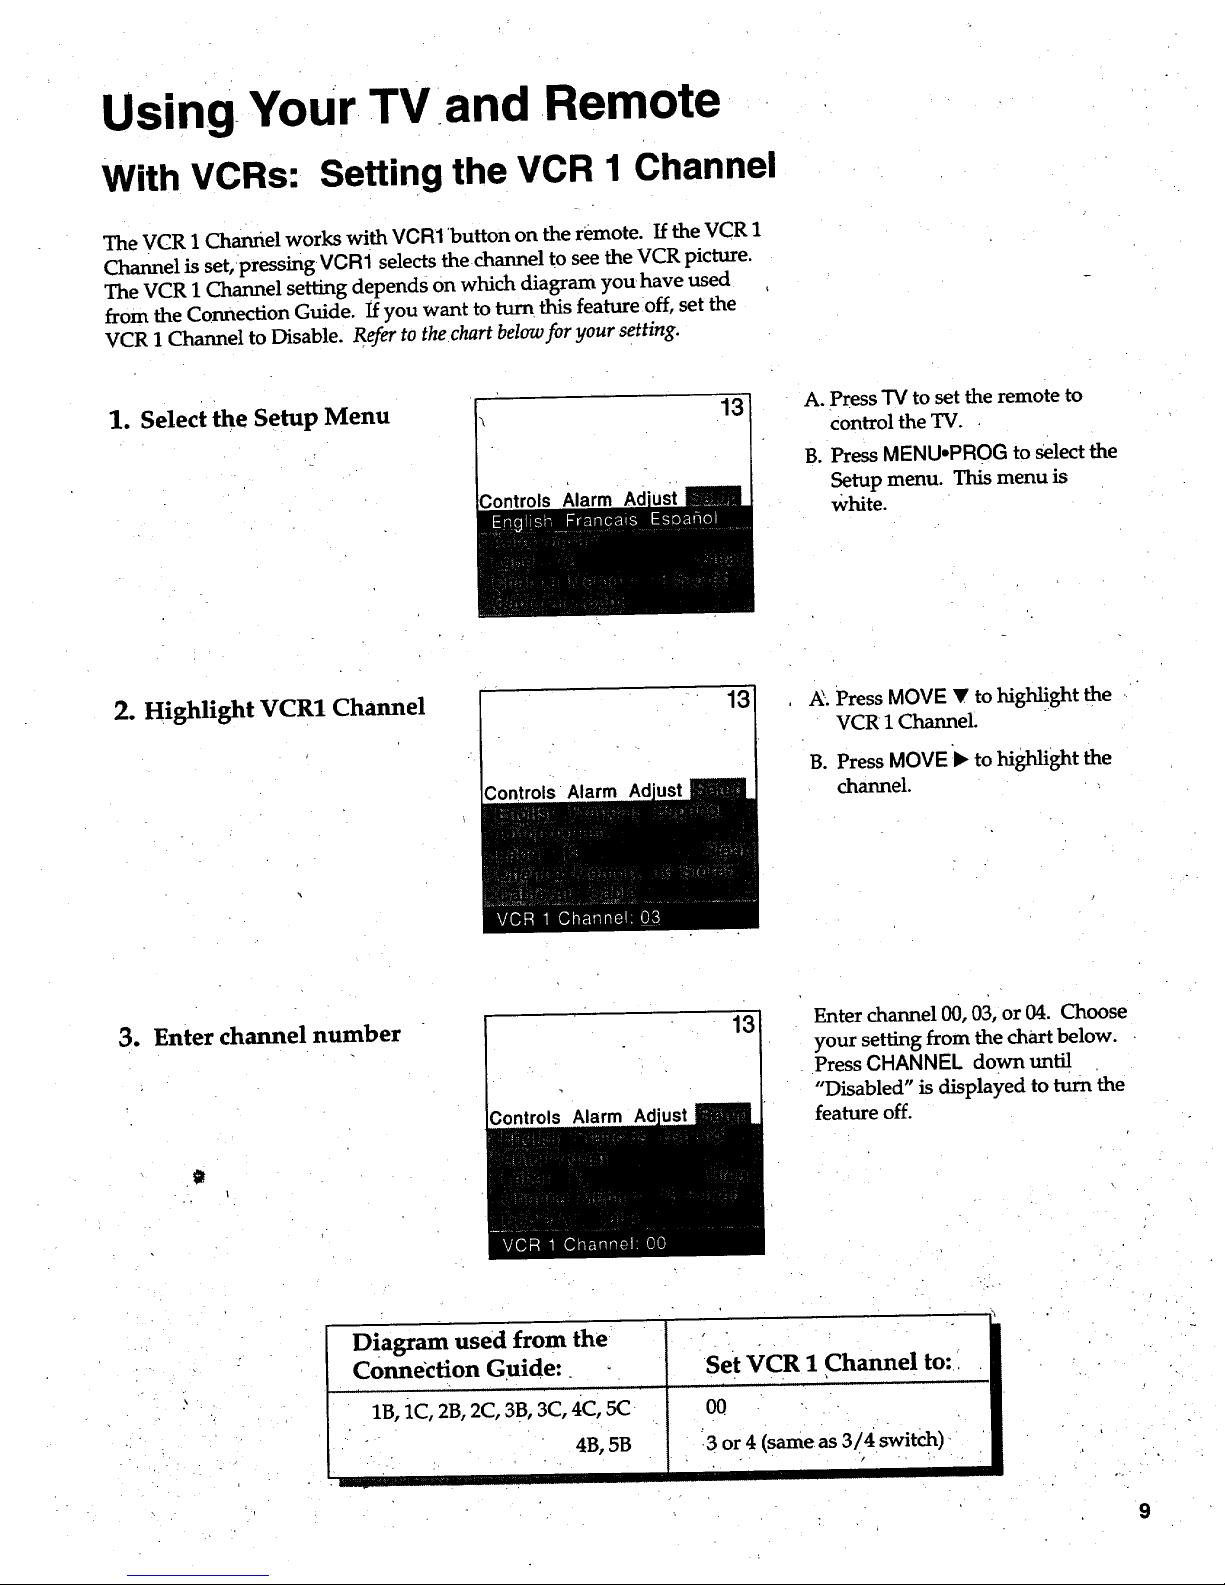
With VCRs: Setting the VCR 1 Channel
The VCR 1 Channel works with VCR1 'button on the remote. If the VCR 1
Channel is set, pressing vcRi selects the channel to see the VCR picture.
The VCR 1 Channel setting depends on which diagram you have used
from the Connection Guide. If you want to turn this feature off, set the
VCR 1 Channel to Disable. Refer to the chart below for your setting.
1. Select the Setup Menu
13
A. Press "IVto set the remote to
control the TV.
B. Press MENU°PROG to select the
Setup menu. This menu is
White.
2. Highlight VCR1 Channel
13 _. Press MOVE _' to highlight the
VCR 1 Channel.
B. Press MOVE i_ to highlight the
channel.
3. Enter channel number
g
i
13
Enter channel 00, 03, or 04. Choose
your setting from the chart below.
Press CHANNEL down until
"Disabled" is displayed to turn the
feature off.
Diagram used from the
Connection Guide:
1B, iC, 2B, 2C, 3B, 3C, 4C, 5C
4B, 5B
1
Set VCR 1 Channel to:
00
_3 or 4 (sameas 3/4 switch)
Page 12

Using.Your TV,and Remote "
With VCRs: Basic Operation
i
If the remote operates your VCR, this page will show you how to use it for
basic functions. See pages 6-7for more details on buttons used with your VCR.
Turn on the VCR
i
Turn off the VCR
.
q }D
<_ _> _>
r-an r-_
'0 '0 '0
'0 '0 _0
'0 '0'0
_o0- 6-
q-,_,
,J
A. Press channel 00, 03, or 04 on
the TV to see what the VCR
is doing.
B. Press VCR1 or VCR2.LD to set
the remote to control the VCR.
C. Press POWER to turn on the
VCR if it did not turn on when
you pressed VCR1 or VCR2oLD.
A. Press VCR1 or VCR2°LD to set
the remote to control the VCR.
B. Press POWER.
Record one TV program
and watchanother
Watch a tape in your VCR
<_ ;> [:>
'0
'0 'O '0
'0 '0 '0
'_'°0 "6"
A
A. Press VCR1 or VCR2°LD to set
the remote to control the VCR.
B. Tune the VCR to the channel
you want to record using
CHANNEL up or down or
pressing two number buttons.
C. Press RECORD to start
recording.
D. Press "rVNCR on the VCIL
E. Press TV to set the remote to
control the TV.
F. Press CHANNEL up or down to
change channels on the TV.
G. TOsee the channel yodPare
recording, tune the TV back to
channel 00, 03, or 04.
A. Turn on VCR.
B. Insert a tape in the VCR.
C. Press PLAY to start the tape
playing.
D. Press STOP when you
are finished.
E. Press REW to rewind the tape.
10
Page 13

Using Your TV and Remote
With a Satellite Receiver: Basic Operation
You may also be able to use the TV's remote with satellite receivers. Rqcer
to your Satellite Receiver owner's manual to hook up your Satellite Receiver.
The remote may need to be programmed for other brands of satellite
receivers, but may not operate all models of the brands listed below. Use.
the codes below or on the sheet packed in with your remote.
Follow the instructions below for basic operation of your receiver. You
may also want to experiment with other buttons on the remote to see if
[hey work with your receiver.
Program the remote for your
Satellite Receiver
Turn on the Satellite
Receiver
Turn off the Satellite
Receiver
Satellite Receiver Codes
Chaparral..........................80,81
Cheyenne ............................... 81
Drake ................................. 82,83
DS_ ................. •........................ 00
GB................. --......................... 00
General Instruments ...92,93,94
' ProScan...................................00
RCA......... ................. :", ........... 00
Realistic_..... ........._.............,...84
Sierra I,II,III........................_...81
STS1 ....................... .....--.-.........85
STS2....._:..:_.:...:..:............... _.....86
• STS3.............•...........................87
STS4..........._.............:........_......88
_ T0shiba .....•...... _......... -.. ......... 89
/ Uniden ............................ --......90
| Video Cipl_er II.::...:....: .......... 91
vO_'_-R VCR1 SAT"C_LE "/'V
VCR2 *!..D AUDIO
O0
REW PLAY FF
REC STOP PAUSE
o -@ o
"0 60
oOAW
A. Point the remote at the satellite
receiver and hold SAT-CABLE.
B. Enter the code for your brand
from the code list below.
C. Release SAT*CABLE.
D. Press POWER. ffnothing
happens, try pressing
SAT'CABLE and then POWER.
A. Press SAT*CABLE to set
the remote to control the satel-
lite receiver.
B. Press POWER to turn on the
receiver if it did not turn on
when you pressed SAT.GABLE.
A. Press SAT.CABLE to set
the remote to control _e satel-
lite receiver.
B. Press POWER to turn off
the receiver.
.. .:..... J.
11
Page 14

Using Your TV and Remote
With a Cable Box: Programming and Basic-Operation
Re_ to the Connection Book or contact your cable company to hook up your cable
box. If you have a cable box with its own remote, then you may also be able
tOuse the TV's remote with your cable box. This remote may not operate all
models of the brands listed below. Use the codes below or on the sheet packed in
with your remote.
Program the remote for your
cable box
Basic Operation:
Turn on the Cable Box
Turn off the Cable Box
A. Point the remote at the cable
box and hold SAT-CABLE.
B. Enter the code numbers for
your brand from the list below.
C. Release SAT-CABLE.
D. Press POWER to turn it on. If
nothing happens, try pressing
SAT,CABLE and then POWER.
E. Repeat A-D with another code
if the first one does not work.
A. Tune TVto channel 02, 03, 04,
05, or 06--the cable box channel.
B. Point remote at the cable box
and press SAT, CABLE.
C. Press POWER to turn it'on.
D. Press CHANNEL up/down to
change channels on the•cable box.
A. Press SAT, CABLE. •
B. Press POWER to turn it off.
12
Cable Box Codes
ABC ................. ............ .......22,46,5.3,54
Anvision.:. .................................... 07,08
Cablestar ................... ................... 07,08
Diamond .................... ....................... 56
Eagle ............................................. 07,08
Eastern International ...................... 02
General Instrument ................... ;.....46
G1400 ........ .,..04,05,15,23,24,25,30,36
Hamlin .......................... 03,12,13,34,48
Hitachi- .................................. 37,43,46
Jerrold...._ ................. 04,05,15,23,24,25,
............................. ;30,36,45,46,47,62,65
Macom ......................................... 37,43
Magnavox ................. :..07,08,19,21,26,
............................ ....... 28,29,32,33,40,41
NS_ .......... • ................. • ...................... 09 "
Oak .......................................... 01,16,38
Oak Sigma .............. :......................... 16
Panasonic ........................... 03,27,39,61
Philips .............. :.07,08,19,21,26,28,29,
............................................. 32,33,40,41
Pioneer ........................... _........ 18,20,44
Randtek .......................... •............. 07,08
RCA. ............................. .... ............ 00,27
Regal...... .................................. 03,12,13
Regency ............................. ;..:.......02,33
Samsung ....................................... ;...44
Scientific Atlanta ..........03,22,35,63,64
Signature .....,.............................. .......46
Sprucer ........... ....................... •........... 27
Starcom ............................................. 46
Stargate 2000.. .................................. 58
Sylvania.., ..................................... 11,59
Teknika ............................................. 06
Texscan ....................................10,11,59
Tocom ............................17,21,49,50,55
Unika .............................['........31,32,41
Universal ....... .......................... 51,52,60
Viewstar .............07,08,19,21,26,28,29;
.............. _.............................. 32,33,40,41
Warner Amex ............ .................... 2.44
,Zenith' ......... :.............. :......':.14,42,57,61
• , • ,
Page 15

Using Your TV and Remote
With a Cable Box: • Setting=the Cable Channel
The Cable Channel works with SAT,CABLE button on the remote. If the
Cable Channel is set; pressing SAT,CABLE selects the channel to see
cable channels. The Cable Channel setting depends on which channel
your cable box must be on to see cable channels. The channels usually
used are 02, 03, 04, 05 or 06. Consult your cable company for more information.
1. Select the Setup menu
Controls Alarm
A. Press "IVto set the remote to.
control (he TV.
B. Press MENU-PROG to select the
Setup menu. This menu is white.
2. Highlight Cable Channel
,ontrols Alarm Ad
13
A. Press MOVE V to move down
the menu until Cable Channel
is highlighted.
B. Press MOVE II*to underline
the item.
3. Enter channelnumber
Controls Alarm.
Enter the number for your cable
box, either 02, 03, 04, 05, or 06.
•Press MOVE • or • until
"Disabled" is displayed to turn
this feature off.
13
Page 16

UsingYour TV and Remote
Witha Laserdisc Player: Programming and Basic Operation
Refer to your Laserdisc Player owner's manual to hook up your Laserdisc Player.
The remote may need to be programmed for your laserdisc player, but may
not operate an models of the brands listed below. Use the codes below or on the
sheet packed in with your remote.
Program the remote for
your Laserdisc Player
Basic Operation
r
90_NER VCR1 ,_TeOiB_" YV
REW PIAY FF
<_ +I> 1:3:>
REC STOP PAUSE
DISPLAY SKIP
0 _ .0
_0 _0 _0
-+0 +0 +0
_0 "0 _0
. INPUTo 0 0 ANTENNAo
+++@+
q MOVE
x7
A. Point the remote at the laserdisc
player and hold VCR2. LD.
B. Enter _e code for your brand '_
from the code list below.
C.Release VCR2 * LD.
D. Press POWER. If nothing
happens, try pressing
VCR2°LD and then POWER.
/
A. Tune TV to channel 00, 03,
or04.
B. Point the remote at the laserdisc
player and press VCR2oLD.
'C. Press POWER to turn it on.
D. Use the buttons on the remote
that relate to laserdisc player
functions. Not all buttons
highlighted may work with
your laserdisc player.
E. Press POWER to turn it off.
Laserdisc Player Codes
Pioneer ........................ 33 II
ProScan ..].................... 33
i
RCA... .................. ,....:..33
14
Page 17

Using Your TV and Remote.
With Audio Equipment: Programming and Basic Operation
Refer to the Connection Book or your Audio equipment owner's manual to hook
up your audio equipment. Your remote controls only RCA audio equipment
such as a radio, CD player, tape player, turntable, or amplif!'er. The
remote may need to be programmed for your equipment, but may not
operate all models of the brands listed below. Use the codes below or on the
sheet packed in with your remote.
Program the remote for
audio equipment
Basic Operation
Audio Codes
RCA/Dimensia
AM/FM.._........................03
CD ....................................07
Tape.................................06
Phono ..............................05
Aux ..................................04
vo_Nt_ VCR1 SAT_,CAB/.E7"V
REW PLAY FF
D[>
REC STOP "PAUSE
10 2 0 30
40
INPUTo 0 0 ANTENNAo
CLEAR _ • RESET
A. Point the remote at the audio
equipment and hold AUDIO.
B. Enter the code from the
code list.
C. Release AUDIO.
D. Press POWER to turn it on. If
nothing happens, _ pressing
AUDIO and then POWER.
E.
Repeat A-D with another code
if the first one does not work.
A. Point the remote at the audio
equipment and hold AUDIO.
B. PressPOWER to turn it on.
C. Use the buttons on the remote
that relate to audio functions.
Not all buttons highlighted may
work with your equipment.
D. Turn the audio equipment off
using the audio component's
power off button.
15
Page 18

Adjusting Your TV
Overall Picture
Follow the steps below to lighten or darken the overall picture without
changing the color levels.
1. Select the Controls Menu
Alarm Ad
Press MENU.PROG to select the
Controls menu. This menu is
yellow.
2. Highlight Picture
Alarm
Press MOVE • to highlight
Picture.
3. Use MOVE 1_ and '< to
adjust the Picture
Press MOVE • to lighten the
picture.
OR
Press MOVE < to darken the
picture.
[',]IS[{I]FJ,,,W_n___RRa
16
Page 19

Adjusting Your TV
Picture Settings
Follow the steps below tOchange the picture on the screen to your
personal setting. The chart at the bottom of the page explaius your options.
1. select the Adjust Menu
2. Highlight item to change
_ntrols Alarm
Press MENU-PROG repeatedly to
select the Adjust menu.This menu
is ligl_t blue.
Press MOVE • to highlight the
picture item you want to adjust.
3. Use MOVE • or < to
adjust each item
Controls Alarm
Press MOVE I_ or ( to adjust each
item.
Color
Tint
Bright (Brightness)
Sharp (Sharpness)
Autocolor
•Picture Reset
Pres_ MOVE • to: •
Increase color richness
Give red tint to skin color
Add more light to dar k parts of
• _e pict_e
'Show cleaner,dearer images
Turn on to keep Color and Tint in
properbalance each tithe you
change channels
Reset the picture back to the
original settings
Press MOVE < to:
Lower color to blackand white
Give green tint to skin color
Add more dark to light parts of
the picture
Make picture' more smooth
Turn off for manual adjustment
of Color and Tint
Reset the picture back to _e
original settings ,-
17
Page 20

Adjusting Your TV
v.
Sound Settings: Stereo, Expanded Stereo, SAP and Tone:
Follow these steps tO adjust the Stereo, Expanded Stereo, SAP or Tone of
your TV. SAP (Second Audio Program) is sometimes used to offer the
program being watched in another language. The chart below explains
your options.
1. Select the Controls Menu
2. Highlight item to change
Press MENU*PROG to select the
Controls menu. This menu is
yellow.
r
Press MOVE • to highlight the
sound item you want to adjust.
3. Use MOVE I_ or "d to
adjust each item
Ad
Press MOVE b"or< to adjust each
item.
Stereo
SAP
Tone
On
Sound is automatically
reproduced in stereo or
mono, Whichever the TV
station is broadcasting.
i
On
Sound is reproduced in
another sound channel.
If nothing happens_
your broadcast may not_
Off
Sound is reproduced in
mono.
off
Sound is reproduced in
Stereo, Expanded Stereo
or Mono, whichever is
selected in the Stereo
Menff Item.
•Expanded
Expanded stereo adds greater
width and dimension to stereo _
broadcasts creating a more
spacious stereo sound effect.
have SAP.
High .. " . Low
•High pitched sounds are Low pitched sounds are
louder.• ', - louder. .
.k
, • . .. •
18
Page 21

Adjusting Your TV
Sound Settings:: Speakers
Follow the steps below tOturn the speakers on or off in your TV. The
chart below explains your options.
1. Select the Setup Menu
;ontrols Alarm
Press MENU-PROG repeatedly to
select the Setup menu. This menu
is white.
2. High!ight speake_
Controls Alarm Ad
Press Move • until Speakers is
highlighted.
3. Turn Speakers on or off
Speakers
•.
On
The sound comes _om the TV'S
internalspeakers. •
.,o
Press MOVE I_ or < to turn the
speakers on or off.
t Off
No sound comes from the TV.
19
Page 22

Using Advanced Features
Placing Channels in Memory (Autoprogramming)
(My channels 2-13 appear in the TV's memory when you first turn it on.
q_e channels available in your area must be programmed into the TV's
memory when you hook up your TV. Using CHANNEL up and down
_dlows you to scan through these channels.
You may want to add or delete a few channels if some stations have weak
signals or were off the air.when the TV was programmed. Refer to the Add
or Delete Channels section below.
1. Place channels in
memory (Autoprogram)
A. Hook up an antenna, cable or
components before you begin
these steps or you will not be
able to add channels into
memory.
B. Press MENU.PROG repeatedly
to select the Setup Menu and
highlight Autoprogram. This
menu is white.
C. Press MOVE • to highlight
Autoprogram.
D. Press MOVE • to start the :IV
adding all active channels into
memory.
E. Wait until the TV has cycled
through all the channels and
returns to the original channel.
2. Add or delete channels
13
13
A. Press MENUopROG repeatedly
to select the Setup menu. This
menu is white.
B. Press MOVE • to highlight
Channel Memory.
C. Press MOVE • to underline the
channel number.
D. select the channel number you
want to add or delete with the
number buttons.
E. Press MOVE • to add or delete
a channel (you will see Stored
on the screen when added and
Erased when deleted).
F. Repeat D and E for more
channels.
2O
Page 23

Using Advanced Features
• Naming the Channels
You can name at least 20 channels with four characters in each name.
Full appears beside Label when the memory is used up. Fixed apt)ears
when a channel number cannot be named. Below are the characters
that can be used in a name.
1. Name a channel 12
_ontrols Ad
NBC 12
Controls Alarm
A. Press MENU.PROG repeatedly
to select the Setup menu. This
menu is white.
B. Press MOVE • to highlight
Label.
C. Press MOVE • to underline the
channel number.
D. Select the channel number with
the number buttons.
E. Press MOVE • to underline the
first character of the name.
F. Choose the character using
MOVE • or •.
G. Repeat E-F to complete the
naii_e,
H. Press MOVE _ to move
backward if you want to
change an item.
2. Erase a name
Controls Alarm
12
A. Follow A and B above.
B. Press MOVE • until clear is
underlined.
C. Press MOVE • or • tOclear the
naine,
Character List " " =,. "" "
IA B'CD,E FG H IJ K LM NOPQR,STUVWXYZ& /
" '() & +. - /:01234567 8 9 _;•'< = > . @ blank Space
21
Page 24

Using Advanced Features
Setting the Sleep Timer
You can set your TV to turn itself off. If you're watching TV at night and
fall asleep, the TV will turn off for you.
1. Set Sleep Timer
11:00 PM 13
Sleep
A. Press MENU°PROG to select the
Controls menu and highlight
Sleep Timer. This menu is
yellow.
B. Press MOVE • to enter the
amount of time you want to
watch TV before it shuts off.
Each press equals 15 minutes,
C. Press MOVE • to subtract time
from the sleep timer.
Alarm Ad
2. Add more time
When 0:01 appears on the screen,
the TV will shut off in one minute.
Press MOVE • to add more time.
3. Cancel the Timer
Ad
A. Press'MENU°PROG to selectthe
Controls menu, and highlight
Sleep Timer.
B. Press MOVE • until the time
reaches -
22
Page 25

Using Advanced Features
Setting the Alarm Clock
The TV can be Set to turn on each day like your alarm clock. You can set it
to turn on to your favorite channel at a certain time. You can also set it to
turn itself off again. The Alarm cannot be used until the clock is set.
1. Turn on the Alarm
12:34 AM 13I
rm
A. PressMENUoPROG to select
the Alarm menu and highlight
Alarm. This menu is green.
B. Press MOVE • or • to select
Onor Off.
2. Set the Alarm Channel
12:34 AM 13
Alarm
A. Press MOVE • to highlight the
Alarm Channel.
B. Press MOVE • to highlight the
channel number.
C. Enter the channel that you want
the TV to turn on to with the
number buttons.
3. Set On and Off Times
12:34 AM 13
Alarm
12:34 AM 13
Alarm
Ao
B.
C.
D.
Press MOVE • to _ghlight the
On OrOff Time.
Press MOVE • to set the hour.
Press MOVE • to set the
minutes.
Press and hold MOVE • to
choose Disabled. This turns
the TV ()nly on or only off at a
certain time each day.
23
Page 26

Using,Advanced Features
Selecting a Language
The on-screen displays in this TV can be displayed in three languages:
English, French, and Spanish. When you select a language, most of the
displays will be shown on the'screen in your preferred language.
1. Select the Setup menu
2. Seiect Language
13 Press MENUoPROG repeatedly to
select the Setup menu. This menu
is white.
Press MOVE • or • to select
English, Fran_ais (French), or
Espafiol (Spanish).
Watching CloSed Captioning
Closed captioning displays the audio portion of a program as words on
the TV screen. It is useful for the deaf, hearing impaired, or anyone who
wants to watch a program without sound. If you have turned Closed
Captioning on and it does not appear on the screen, it is not available on
the channel you are watching. This TV does not support the text mode.
Text information typically consists of program information, weather
bulletins, local activities, etc.
1. Select the Controls Menu
2. Highlight Closed
-Captioning
Alarm Ad
Press MENU*PROG to select the
Controls menu. This menu is
yellow.
Press MOVE • to highlight Closed
Captioning.
3. Select Setting
Press MOVE 41 or • to select Off,
Ct, or C2. Select C1 for full
translation of the primary
language in your area. Select C2
for secondary language
translation, simplified English, or
whatever is being broadcast in
your area.
24
Page 27

Using Advanced Features
Setting Your TV for Antenna or Cable
Your TV automatically adjusts this feature when the TV places channels
in memory (Autoprogl"am). Follow the steps below to change the setting
as needed.
1. Select the Setup men u
13
Controls
PressMENU-PROG repeatedly to
select the Setup menu. This menu
is white.
. .°
2. Highlight Cable/Air
Controls Alarm
13
Press MOVE • to highlight
Cable/Air..
3. Select Cable or Air
Controls Alarm Ad
13
Press MOVE <1or • to select
Cable or Air. Select Cable if you
have cable. Select Air if you have
ahome antenna connected to
your TV.
25
Page 28

References
Front Panel Buttons
The CHANNEL up and down and VOLUME + and- buttons not only change the
channels and volume of the TV, but work like the MOVE buttons when you are in
the TV menus. For details on using buttons wi."thmenus, see Menu Basics on page 5.
MENU
Shows menus on screen.
Moves from menu to menu.
CH A and v
Channel up and down.
Scans up and down through channels in the TV's memory.
Moves up and down menus.
VOL -I-and -
Volume up and down
Raises and lowers sound.
Moves left and right on a menu line.
Changes a features setting.
•POWER
TUrns the TV on or off.
26
Page 29

References
Displays on the Screen
Your TV shows the settings of several features on the screen. To see what
features have been set on your TV, press DISPLAY on the remote.
Screen Display
12:00 AM
KNBC
13
Video 00
S-Vid O0
Alarm
Sleep
Volume
Unusable Signal
Mute
Stereo
Stereo*
SAP
•1:55
12:00 AM KNBc 13
_.larm Sleep
Volume -. ...... I ...... •.+
Mute Stereo 1:55
or Video 00, S-Vid 00
or Unusable Signal
or Stereo*; SAP
Description
Time of the clock. Details are on page 3.
Name you chose to describe the channel. Details are on page 21.
Channel number you are watching.
Indicates that a component is connected to the VIDEO jack on the back of
the TV, it is turned on, and channel 00 is selected.
Indicates that a component connected to the S-VIDEO jack on the back of
the TV, itiS turned on, and channel 00 is selected.
Alarm clock is set to turn on or off. Details are on page 23.
Sleep Timer is set to turn off the TV. Details are on page 22.
Sound level of the TV.
No signal is coming in on video input channel 00.
There is no so_-_d. See MUTE button on page 6.
The sound is being broadcast in stereo. Details are on page 18.
SAP is selected inthe menu, but it is not available for the program being
broadcast. Details are on page 18.
Secondary Audio Program. SAPis seiected and it is available for the
progra m being broadcast. Details are on page 18.
The time rebaa_'xing for commercial skip, Details are on page 6.•
27
Page 30

References
TrOuble Checks
You may have problems that can be fixed with a few minor adjustments.
Look for the type of problem you arehaving below and theri try the
suggestions to get your TV going again. For warranty information see page 30.
Trouble
Checks and Adjustments
i
Power
TV will not turn on
Plug TV in.
Plug something else into the outlet to make sure it is working.
Make sure batteries in the remote are not dead.
Aim the remote at the TV and press TV.
Make sure batteries are placed in the remote the right way. See batteries
on page 2.
UnplUg TV for a few minutes and then turn it on again.
No picture, no sound but
TVhaspower
Check antenna connections.
Check position of Cable/Air feature. See page 25.
Try another channel, inactive channel may be tuned.
Make sure component connected to the VIDEO INPUT jacks is turned on
if you choose channel 00.
Make sure TV is tuned to the same channel as the switch on back of VCR
if watching a VCR.
Make sure TV/VCR button on VCR is in correct position when using VCRI
_icture
Blank screen or Unusable
Signal appears on screen
Picture poor, sound okay
Try another channel.
Scan the channels.
Check antenna connections.
Adjust TV picture. Seepages 16-17.
TV, Turns on or off_
Turns off by itself
Turns on bY itself
Check Sleep Timer. See sleep timer on page 22.
Wait 30 seconds and turn on again, a power surge may have occurred.
Check Alarm Off time. See alarm clock on page 23.
Check Alarm On Time. See a_arm clock on page 23.
Check clock time. See clock on page 3,
h ..
Does not turn off at
Alarm Time
Make sure alarm is turned on Oroff. Seealarm clock on page 23.
Check clock t_me. See clock on page 3.
28
Page 31

Reference
Trouble Checks
Trouble
Checks and Adjustment s
Remote
.Remote lockup
Buttons don't work when you
press them
Remove batteries and hold dow_ one or more buttons for several seconds
to drain the microprocessor inside the remote and reset it. Re-instaU the
batteries and try remote again.
Press TV to set the remote to control the TV. See buttons on page 6-7.
• Workspart or none of the
time
Clear the path between the remote and TV of any objects.
Aim the remote at the component you are trying to control.
Press "IVso remote will control TV.
Make sure batteries in the remote are not dead.
See if batteries are placed in remote correctly. See batteries, page 2.
Can't select certain channel Press number buttons. Channel may not be in memory. See Autoprograrn
on page 20.
Make sure TV/VCR switch on VCR is in the TV position.
For numbers over 100, press and hold I until 1- appears/then press the
other two numbers.
Set Cable/Air feature to Cable for channels higher than 69. See page 25.
Sound
Noisy stereo reception
Picture okay, no sound
Turn Stereo off. The stereo broadcast may not be clear. See page 18.
Press VOLUME + or MUTE to restore sound.
Make sure TV speakers are on. Details are on page 19.
Picture okay, sound poor
Try another channel.
Try adjusting the Tone. See page 18.
Change Stereo to off. The stereo broadcast may not be clear. See page 18.
No stereo on stereo station
Make sure Stereo is turned on. See page 18.
29
Page 32

References
Limited Warranty
What your warranty covers:
How long after
your purchase:
Whatwewilldo:
How you get service:
Wha[ your warranty does not cover.
Product Registration:
How state law relates to warranty:
If you purchased your product
outside the United States:
• Any defect in material or workmanship.
• 90 days for labor charges.
• One year for parts.
• Two years for picture tube. •
(The warranty period for renial units begins with the first rental or 45 days
from date of shipment to the rental firm, whichever comes first.)
• Pay any Authorized GE Television Servicenter the labor charges to repair
your television.
• Pay any Authorized GE Television Servicenter for the new oi, at our
option, rebuilt replacement parts and picture tube required to repair
your television.
• For screen sizes of 20" and smaller: Take your GE television to any
Authorized GE Television Servicenter.
• For screen sizes larger than 20": Request service from any Authorized _GE
• Television Servicenter.
• To identify your nearest Authorized GE Television Servicenter, ask your
Dealer; look in the Yellow Pages, or call 1-80(1-447-1700.
• Show the service technician your evidence of purchase date or first rental.
• Customer instruction. (Your owner's manual clearly descfi_bes how to
install, adjust, and operate your television. Any additional information
should be obtained from your dealer.)
• Installation and related adjustments.
• Signal reception problems not caused by your television.
• Damage from misuse or neglect.
• Batteries,
• Customer replacable fuses.
• Images burnt onto the screen.
• A television that has been modified or incorporated into other products or
is used for institutional or other commercial purposes.
• A television purchased or serviced outside the USA.
• Acts of God, such as_ but not limited tOlightning damage.
• Please complete and mail the Product Registration Card packed with your
set. It will make it easier to contact you should it ever be necessary. The
return of the card is not required for warranty coverage.
• This warranty gives you specific legal rights, and you also may have other
rights that vary from state to state.
• This warranty does not apply.Contact your dealer for warranty information.
3O
Page 33

References
Order Form for Parts
:Remote # 221133
If your TV has the
picture-in-picture
feature, this is the
remote that came
packed with your TV.
You can use the order
form at the right to
order it by mail.
<:l D _>
db_fl5
'0'030
'0'0'0
'0'0'0
A
_-_
Cleaner
#AHO35
To clean your TV cabinet, we
recommend Murphy's ®Oil Soap or
Cleaner #AH035. You should not use
cleaners such as Windex ®with vinegar,
Lenox _ Furniture Polish spray or
Heinz _ CleaningVinegar to clean your
TV cabinet. Using these cleaners will
permanently mar the surface of the-
cabinet. SuCh damage is not covered
under your purchase warranty.
° .
Order Form
Book No. 1508137A
Part Part Number Price
Cleaner i AH035 i $6.95
Remote-CRK74B2 i 221133 _ $39.95
i
t
....To_t _
i
i
i"
i
i
Total ($10 Minimum Order) ....................
SalesTax .....................................................
We are required by law to collect the
appropriate sales tax for each individual
state, county, and locality to which the
merchandise is being sent.
$
$
Shipping, Handling, and Insurance ....... $
Total Amount Enclosed ............................ $
5.00
VISA or MasterCard preferred.
Money order or check must be in U.S. currency only.
No COD or CASH.
=
. • , ......
Allspecifications and descriptions of l_ar_ _re subject to
change ,without notice.
/
_31
Page 34

References
Order Form for Parts
USE YOUR CREDIT CARD
Copy complet'e account number
Iil11|
Card expires:
Copy complete account number
I I'1 I 1[I I I Ill I I II I I I!
CopyN=_obovo_e_=_eIIII 1
on your MasterCard
Card expires'. [_]
.AUTHORIZED SIGNATURE
Prices are subject to change without notice.
PLEASE
Print or type your name and address.
This will be your mailing label.
A complete and correct order will
save you days of waiting.
Name-
Street:
Apt:
City-
State: Zip:.
I
Make sure that both sides of this
form have been filled out.
/
32
!
!
l-_
"r"
t-
O
a
U.S. and Canadian Orders
By Phone:
1 - 800 - 338 - 0376
Call this toll-free number between
8AM and 8PM Eastern Standard Time
and place your order using your Visa
or MasterCard. Use this number
only to place an order for accessory
items listed on this order form.
By Mail:
Detach the information at the left and
mail the payment to Thomson
Consumer Electronics, Inc., ati
Video Accessories
PO Box 8419
Ronks, PA 17573
Most orders are shipped UPS within
72 hours. Ifit is not possible to ship
within 30 days, we will notify you.
For more current information on
these accessories, write to the
following address:
Video Accessories Customer Service
Thomson Consumer Electronics, Inc.
Distributor & Special Products
2000 Clements Bridge Rd
Deptford, NJ 08096-2088
International Orders
This offer is valid only in the U.S. and
Canada. Send your request for price
quotation (not orders) to:
International Customer Service
Thomson Consumer Electronics, Inc.
Distributor & Special Products
2000 Clements Bridge Rd
Deptford, NJ 08096-2088 USA
Page 35

References
Index
A
Adjust Menu
Autocolor ............................ :......17
Bright .......................................... 17
Color.. ................................... ......17
Picture Reset .............................. 17
Sharpness ................................... 17
Tint .............................................. 17
Air or Cable Feature .................... 25
Alarm Clock .................... _............ 23
Alarm Display .............................. 27
Alarm Menu ................................. 23
Alarm ......................................... 23
Alarm Channel .......................... 23
Off Time ............................ ......... 23
On Time ..................................... 23
Set Clock ...................................... 3
Cancelling Sleep Timer ............22
Antenna ........................................ 25
Audio/Codes ................................ 15
Autocolor ...................................... 17
Autoprogram ............................ 3;20
B
Batteries (Remote) ......................... 2
Brightness ..................................... 17
C
Cable Box & Codes ................ 12-13
Cable Channel .............................. 13
Cautions ........................................ i,2
Channel Label .............................. 21
Character List ............................... 21
Channels
Adding .................................... 3,20
Deleting.. ........................... .........20
Naming ...................................... 21
Placing in Memory ................ 3,20
Setting Cable Channel ............. 13
Checks and Adjustments. .....28-29
Cleaner .......................................... 31
Closed Captioning ....................... 24
Color .............................................. 17
Colors (Menus) .............................. 5
Commercial Skip ........................... 6
Button ............................................ 6
Display .................................... ...27
Controls
TV Front Panel ......................... .26
Remote ....... ............................... 6,7
D
Displays (On-Screen) .................. 27
G
Guide
Colors ......... _................................. 5
Menu Buttons ........................... 4,5
Moving through the Menus ......5
TV .......... :............................. 2,3,4,5
L
Laserdisc Player Codes ............... 14
Laserdisc Player .......................... 14
M
Menus .............................................. 5
Menu Colors ................................... 5
Mono ......... ....................... ............. 18
Mute Display ............................. ...27
O
On-Screen Displays ..................... 27
Order Form for Parts ............. 31-32
P
Picture ...................................... 16-17
Picture Adjustments .................... 17
Picture Quality .......................... :..17
Picture Reset ................................. 17
Plug in TV ................................... :...2
Power Buttons ................................ 6
Previous Channel Button ............. 6
Problem Solving ..................... 28-29
Product Registration .............. ;....... i
Q
Quick Guide to Your TV .....2,3,4,5
Quick Button Guide ...................... 4
R
References ............................... 26-33
Order Form for Parts .......... 31-32
Trouble Checks .................... 28-29
Warranty ....................... _............ 30
Registration Card ........................... i
Remote Control
Batteries ....................................... 2
Buttons ................................... 4,6,7
Order Form ..................... ........... 31
Tour .......... :................................... 4
With Components ................. 8-15
S
S-VHS ......... ._............................. 7,27
Safety Information ......................... i
Satellite Receiver .............. ............ 11
Satellite Receiver Codes ............. 11
Screen Displays ............................ 27
Service ........................................... 30
Set Clock ......... ................................ 3
Set Time .......................................... 3
Setting Cable/Air ........................ 25
Setting theCable Channd .......... 11
Setting the Sleep Timer ............... 23
Setup Menu
Autoprogram ......................... 3,20
Cable/Air ......... .............. ...........25
Channel Label ........................... 21
Channel Memory ................ :..3,20
VCR 1 Channel .......................... 10
Sharpness ......................... _........ ...17
Sleep Display ........ ........................ 27
Sleep Timer ........... ........................ 22
Sound ............................................ 18
Speakers ........................................ 19
Stereo ....................................... ...... 18
Stereo Display .............................. 18
T
Table of Contents...: ...................... .1
Time
•Alarm ...................... ............... ....23
Clock ............................................. 3
Sleep Timer ................................ 22
Time Display ................................... 6
Tint ........................ ......................... 17
Tone ............................................... 18
Trouble Checks ....................... 28-29
V
VCR
Turn on ....................................... 10
Turn off ................................... ...10
Record one TV program and
Watch another ........................... 11
Watch a tape ....................... .......11
VCR 1 Channel ............................... 9
VCR Codes ..................................... 8
W
Warning ............................. .............. i
Warranty ....................................... 30
33
Page 36

CREATING A GREENER FUTURE
At Thomson Consumer Electronics we are dedicated to the preservation of our
natural heritage and to a healthy and safe way of life for current and future
generations. This is a global effort which encompasses every THOMSON facility
throughout the world.
We believe that clean air, clean water, a protected earth, and healthy people are
not only practical and desirable goals, but achievable ones as well. Our Corporate
Environmental, Health and Safety Charter acknowledges our commitment to
protect these precious assets and provides a challenging vision and guideline for
conducting our business.
_ tHOMSON CONSUMERELECllU_ICS
Below are a few examples of Thomson's achievements in our efforts to preserve our natural resources.
EARTH
• Thomson reclaims millionsof pounds
of hazardous waste annually, diverting
it from landfills.
Thomson treats millions of pounds of
waste water sludge annually and
renders it non-hazardous.
Thomson recycles over 50 million
pounds of non-hazardous material
annually that otherwise would have
been treated as trash, an overall
recovery rate of 50%.
Thomson globally recycles millions of
pounds of broken television picture
tube glass annually through both
internal and external reclaim processes.
AER
Thomson has replaced solvent-based
paintsat many locationsresulting in an
80% reduction in toxic air emissionsfor
equivalent material used.
Thomson has eliminated the use of
ozone-depleting substances at
television manufacturing facilities
aroundthe world•
Thomson collects and returns over
1.5 million pounds of glass and furnace
dust to the glass making process
annually.
Thomson has launched worldwide
energy savings programs which
contribute to efforts to reduce air
emissions from electrical generating
facilities.
THE WATER
Thomson recovers over 2 million
pounds of fine glass particles from
process water each year and recycles
them backinto itsglassfurnaces.
Thomson's state-of-the-art waste water
treatment plants filter out over 26
million pounds of solids from process
water each year.
Thomson's U.S. glass factory recycles
2,500 gallons of water per minute and
cleans 2.6 million gallons of water per
day.
Thomson is researching new processes
and is developing new manufacturing
equipment and technologies to further
reducelarge volume water use.
Thomson has also increased its usage of recycledmaterials for packagingof our products.For example, in the U.S. and
Mexico ourtelevision plantsuse recycledcontent in our television cartonsand instructionbooklets.The inks usedfor the print
on cartonsand instructionbookletsare soy based.For a free brochure regarding Thomson's Environmental Health and Safety
Programs, write to Thomson Consumer Electronics'address below, attention Environmental Programs:INH340.
Please do not send any productsto the Indianapolis addresslisted in this manual or on the carton. Thiswill only add delays in
servicefor your product.
f_ "ITIOMSONCONSUMER ELECTRONICS
10330 North Meridian Street
Indiana polls, IN 46290
©1996 Thomson Consumer Electronics, Inc.
Trademark(s)® Registered.
Marca(s) Registrada(s)
Printed in USA
TOCOM 1508137A
The following materialswere used in
printingthis publication:
100%
RecycledPaper
Hielaan50%PestCeesener
 Loading...