

Page 1

Television
User’s Guide
Changing Entertainment. Again.
Please read this manual before
operating this product for the
first time.
TOCOM 16067450
Models: F27350, F32343, F32350
Page 2
Important Information
WARNING
To reduce the risk
of fire or electric
shock, do not
expose this
product to rain or
moisture.
Caution: To prevent electric shock, match wide blade of plug to wide slot,
fully insert.
Power Consumption: 120V ~ 60 Hz A.C. 128W (model F27350),
142W (models F32343 and F32350)
Attention: Pour éviter les chocs électriques, introduire la lame la plus large de
la fiche dans la borne correspondante de la prise et pousser jusqú au fond.
Refer to the identification/rating label located on the back panel of your product for its proper
operating voltage.
FCC Regulations state that unauthorized changes or modifications to this equipment may void
the user’s authority to operate it.
Caution: Using video games or any external accessory with fixed images for extended periods
of time can cause them to be permanently imprinted on the picture tube (or projection TV
picture tubes). ALSO, some network/program logos, phone numbers, etc. may cause similar
damage. This damage is not covered by your warranty.
Cable TV Installer: This reminder is provided to call your attention to Article 820-40 of the
National Electrical Code (Section 54 of the Canadian Electrical Code, Part 1) which provides
guidelines for proper grounding and, in particular, specifies that the cable ground shall be
connected to the grounding system of the building as close to the point of cable entry as
practical.
CAUTION
RISK OF ELECTRIC SHOCK DO
NOT OPEN
This symbol indicates
"dangerous voltage" inside
the product that presents
a risk of electric shock or
personal injury.
Caution: To reduce the risk of electric
shock, do not remove cover (or back).
No user serviceable parts inside. Refer
servicing to qualified service personnel.
This symbol indicates
important instructions
accompanying the
product.
Product Registration
Please fill out the product registration card (packed separately) and return it immediately, or
register on-line at rca.com. Returning the card allows us to contact you if needed.
Product Information
Keep your sales receipt to obtain warranty parts and service and for proof of purchase. Attach it
here and record the serial and model numbers in case you need them. These numbers are located
on the product.
Model No. ______________________________________________________________
Serial No. _______________________________________________________________
Purchase Date: ___________________________________________________________
Dealer/Address/Phone: _____________________________________________________
Page 3

Table of Contents
Chapter 1: Connections & Setup
Things to Consider Before You
Connect ................................................... 2
Connecting Component to Your TV....... 3
TV + VCR + DVD Player ........................... 3
Jacks on the Back of the TV .................. 4
Put Batteries in the Remote .................. 5
Complete the Interactive Setup ............. 5
Set the Menu Language .......................... 5
Complete Auto Channel Search ............ 5
Chapter 2: Using the Remote
Control
The Buttons on the Remote Control ..... 6
Using the INPUT Button .......................... 7
Programming the Remote to Operate
Other Components .................................. 7
Find Out If You Need to Program
the Remote ............................................... 7
How to Program the Remote ................. 8
How to Use the Remote After You’ve
Programmed It ........................................ 8
Remote Codes.......................................... 9
Parental Controls and V-Chip .............. 13
How V-Chip Works13
V-Chip TV Rating Limit .......................... 14
Blocking Age-Based Ratings .......... 15
Viewing Age-Based Ratings ........... 15
Blocking Specific Content Themes 15
Viewing Specific Content Themes 16
V-Chip Movie Rating Limit ................... 16
V-Chip Unrated Program Block ........... 16
Channel Block .......................................... 16
Front Panel Block ....................................17
Lock/Unlock Parental Controls ............17
Chapter 4: Using the TV’s Menu
System
How to Use Your TV’s Menu System ... 18
Audio Menu .......................................... 18
Picture Quality Menu ...........................19
Screen Menu ......................................... 20
Using Closed Captioning ......................20
Channel Menu ....................................... 21
Time Menu ............................................ 22
Chapter 5: Other Information
Chapter 3: Using the TV’s
Features
Channel Banner ..................................... 11
Why You Should Use the Auto
Tuning Feature ...................................... 12
How to Set Up the Auto
Tuning Feature.......................................... 12
Troubleshooting ....................................23
Care and Cleaning................................. 25
The Front of Your TV ............................ 25
Limited Warranty .................................. 26
Accessories ............................................ 28
1
Page 4

Chapter 1: Connections & Setup
Things to Consider Before You Connect
Protect Against Power Surges
• Connect all components before you plug any of their power cords into the wall outlet.
• Turn off the TV and/or component before you connect or disconnect any cables.
• Make sure all antennas and cables are properly grounded. Refer to the Important Safeguards sheet
packed with your TV.
Protect Components from Overheating
• Don’t block ventilation holes on any of the components. Arrange the components so that air can
circulate freely.
• Don’t stack components.
• When you place components in a stand, make sure you allow adequate ventilation.
• If you connect an audio receiver or amplifier, place it on the top shelf so the heated air from it won’t
flow around other components.
Position Cables Properly to Avoid Audio Interference
• Insert each cable firmly into the designated jack.
• If you place components above the TV, route all cables down the side of the back of the TV instead of
straight down the middle of the back of the TV.
• If your antenna uses 300-ohm twin lead cables, do not coil the cables. Also, keep the twin lead cables
away from audio/video cables.
Important Stand and Base Safety Information
Choose the location for your TV carefully. Place the TV on a stand or base that is of adequate size and
strength to prevent the TV from being accidentally tipped over, pushed off, or pulled off. This could cause
personal injury and/or damage the TV. Refer to the Important Safeguards sheet packed with your TV.
Use Indirect Light
Don’t place the TV where sunlight or room lighting will be directed toward the screen. Use soft or indirect
lighting.
Connection Pictures
Audio/video cables are usually bundled together. For better visibility, the connection pictures in this book
show each cable separately (audio left, audio right, and video).
Cables Needed to Connect Components to Your TV
The pictures below show the cables needed for the connections represented in this book.
Notes: Audio/Video cables (A/V cables for short) are usually sold as a bundled set, but the connection pictures
in this book show each cable separately for better visibility.
Audio/Video
cables
2 Chapter 1
Illustrations contained in this document are for representation only.
Component video
, PR) cables
(Y, P
B
Coaxial cable
S-Video cable
Page 5
Connections and Setup
VCR
VIDEO
TV (back panel)
DVD
Y
OUT
IN
1B
Pr
VIDEO
VIDEO
AUDIO
OUT
AUDIO
Y
Pb
LR
LR
R-AUDIO-L
P
R
P
B
R-AUDIO-L
RL
S
-
V
I
D
E
O
S-VIDEO
IN
P
U
T
2
IN
P
U
T
1
1D
1C
VIDEO
IN FROM ANT
OUT TO TV
1A
OUT
R
CH3
CH4
3
From Cable
or Antenna
2
CABLE/
ANTENNA
L
Connecting Components
to Your TV
For information on using the
different jacks on the back of your
TV to hook up other components
not listed below, see the following
pages.
Note: If you prefer, we can provide you
with the name of an Authorized
Service Representative who will visit
your home for a fee to install your
electronic entertainment system and
to instruct you in its operation. For
details about this service, call 1-888206-3359 or visit www.rca.com.
* If you connect an S-Video cable, you
must connect the audio cables to the
INPUT1 AUDIO R and L jacks on the back
of the TV, not the INPUT2 AUDIO jacks.
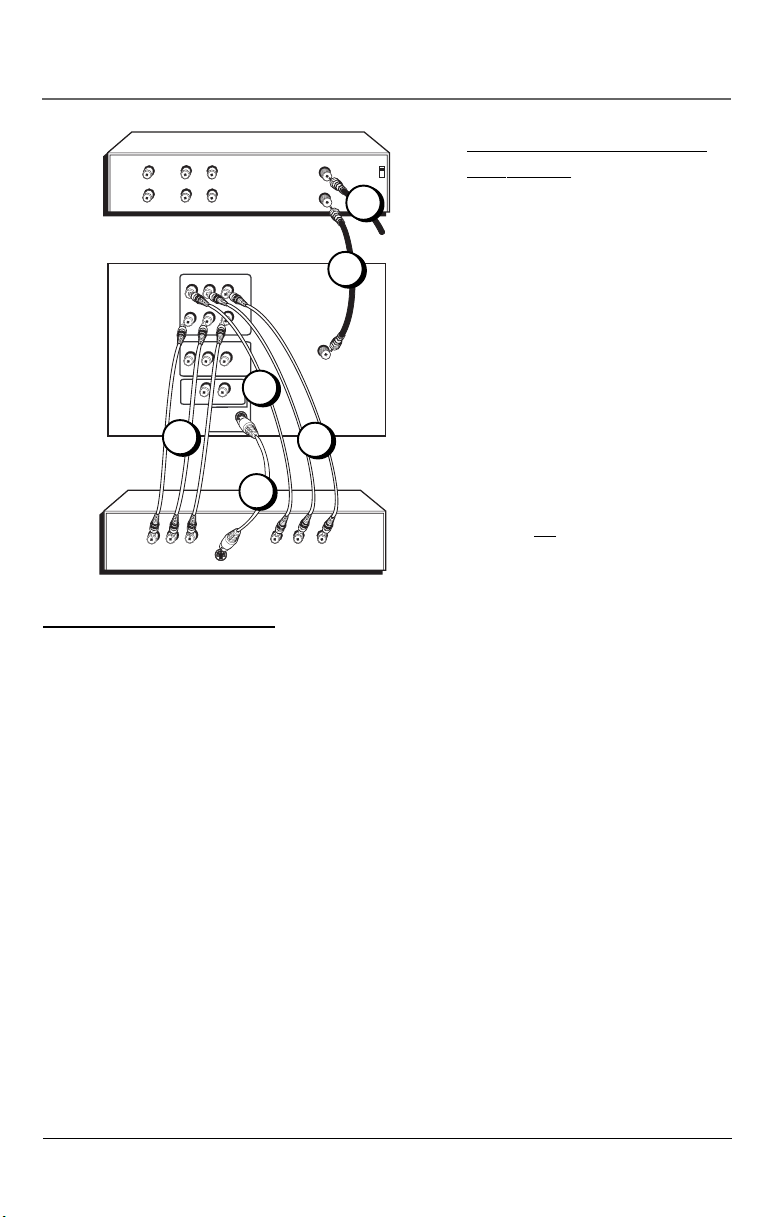
TV + VCR + DVD Player
1. Connect your TV to your DVD player
A. Connect the audio cables (white and red) to the INPUT2 AUDIO R and L jacks on the back of the
TV and to the Audio Output Jacks on the DVD player.
B. If your DVD player has Component Output Jacks (Y, PB, PR), connect three video grade cables to
the Y, PB, PR jacks on the DVD player and to the Y, PB, PR jacks on the back of the TV. If your DVD
player doesn’t have Y, PB, PR jacks, go to C.
-OR-
C. If your DVD player has an S-Video jack, connect an S-Video cable to the S-Video jack on the DVD
player and the S-VIDEO jack on the back of the TV. If your DVD player doesn’t have an S-Video
jack, go to D.
-OR-
D. Connect a video cable (yellow) to the Video Output Jack on the DVD player and to the INPUT2
VIDEO jack on the back of the TV.
2. Connect your TV to your VCR
Connect a coaxial cable to the CABLE/ANTENNA jack on your TV and to the Output Jack on your VCR
(sometimes labeled OUT TO TV).
3. Connect cable or antenna to your VCR
Connect the coaxial cable from your cable outlet or antenna to the Input Jack on your VCR (sometimes
labeled IN FROM ANTENNA or IN FROM ANT).
Chapter 1 3
Illustrations contained in this document are for representation only.
Page 6
Connections and Setup
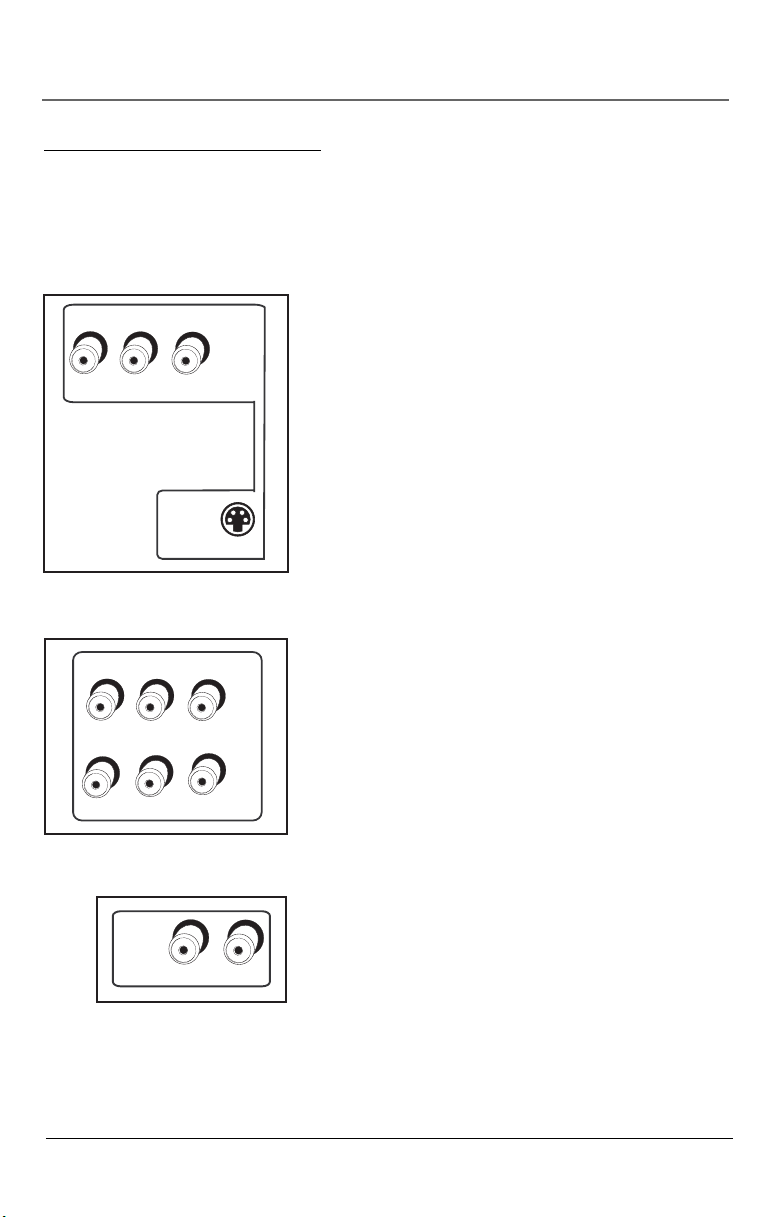
Jacks on the Back of the TV
This section describes each of the jacks on the back of the TV. When connecting A/V cables, be sure to
connect corresponding outputs to inputs (video to video, right audio to right audio, etc.)
CABLE/ANTENNA Lets you connect a coaxial cable to receive the signal from the antenna, cable or cable
box.
VIDEO
VIDEO
Y
R-AUDIO-L
I
V
-
S
R-AUDIO-L
P
B
E
D
P
INPUT1
O
INPUT2
R
INPUT1 Lets you connect a component such as a VCR, DVD
player, satellite receiver or laserdisc player.
• VIDEO provides composite video connection. The video
connector is usually yellow.
• R AUDIO provides right audio connection. The right audio
connector is usually red.
• L AUDIO provides left audio connection. The left audio
connector is usually white.
• S-VIDEO provides better picture quality than the regular
video jacks (INPUT1 and INPUT 2 VIDEO) because the color
part of the signal is separated from the black and white
part of the picture. When using S-Video, make sure to
connect left and right audio cables to the R-AUDIO-L
INPUT1 jacks.
INPUT2 Lets you connect a second component such as a VCR,
internet access device, DVD player, or laserdisc player. Its AUDIO
and VIDEO jacks are the same as described for INPUT1 above.
•Y, PB, PR (Component Video) provides optimum picture
quality because the video is separated into three signals.
Use three video-grade cables for the connection. When
using Y, PB, PR, make sure to connect left and right audio
cables to the R-AUDIO-L INPUT2 jacks.
AUDIO OUT R/L Lets you connect an amplifier or audio
O
I
D
U
A
T
U
O
RL
4 Chapter 1
Illustrations contained in this document are for representation only.
receiver for improved sound quality.
Note: You might want to turn off the TV’s speakers from the
Audio Menu. Go to page 19 for more information.
Page 7

Connections and Setup
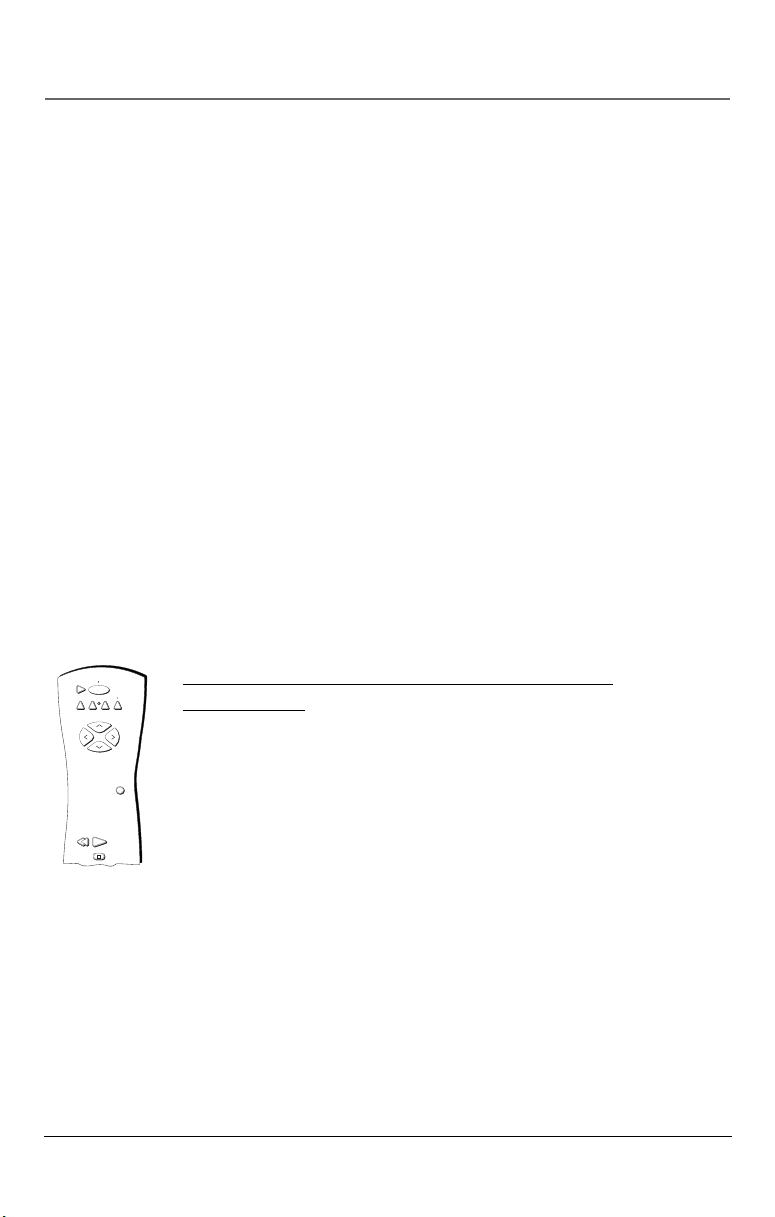
Put Batteries in the Remote
1. Remove the battery compartment cover on the remote.
2. Insert new batteries. Match the polarities (+ and -) on the batteries with the diagram on the remote.
3. Put the battery compartment cover back on the remote.
Turn on the TV
Press the TV button on the remote control or the POWER button on the TV (the first screen of the
Interactive Setup appears). The menu screens “time out” after a period of time if you don’t make a
selection. The tips in this section tell you how to access the Setup menu screens manually.
Note: Pressing the TV button not only turns on the TV, but puts the remote into TV mode. “TV mode” means
that the buttons on the remote control operate the TV’s functions.
Complete the Interactive Setup
The menu system in your TV allows the TV’s features to work properly. The first time you turn on your TV,
the setup screens appear automatically. The TV will prompt you, you answer, and the TV makes the
appropriate adjustments.
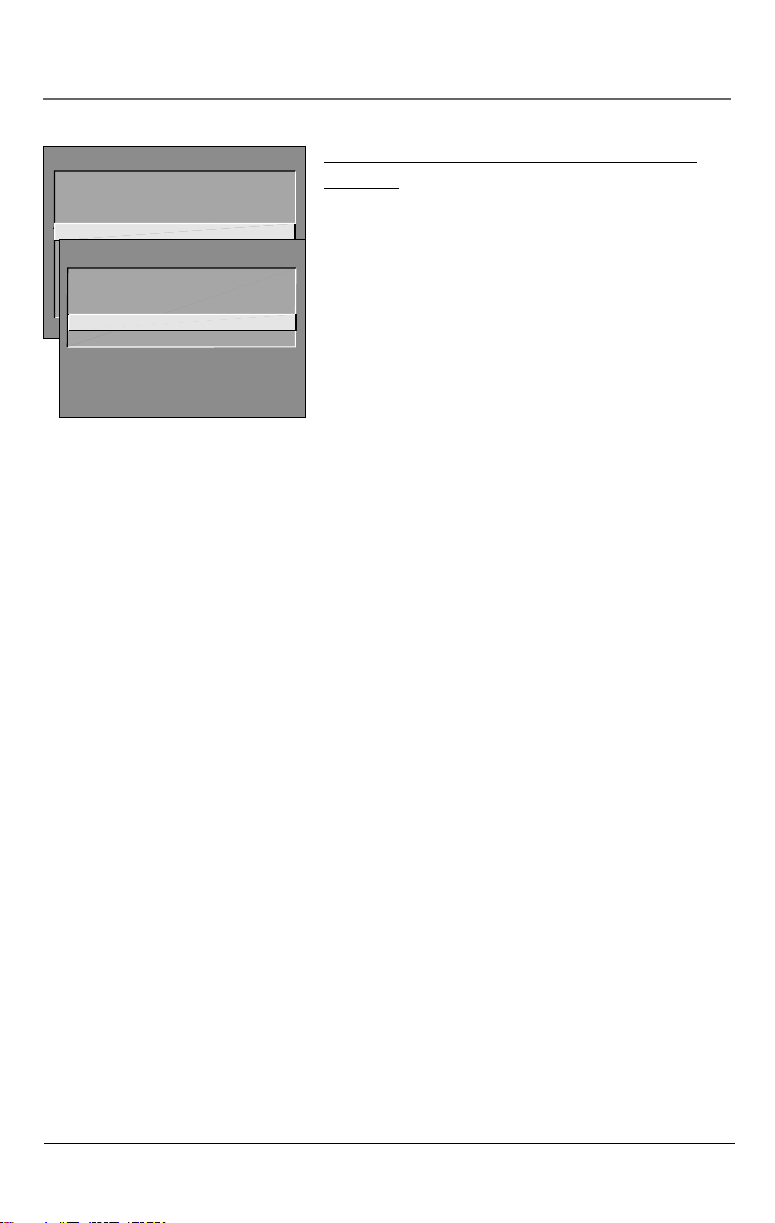
SETUP
Select the language to be used
in these menus.
1 English
2 Español
3 Français
Use the arrow buttons on the remote to
highlight an option.
SETUP
Would you like the TV to search
for all available channels?
1 Search for channels
2 Skip this step
Press OK to select.
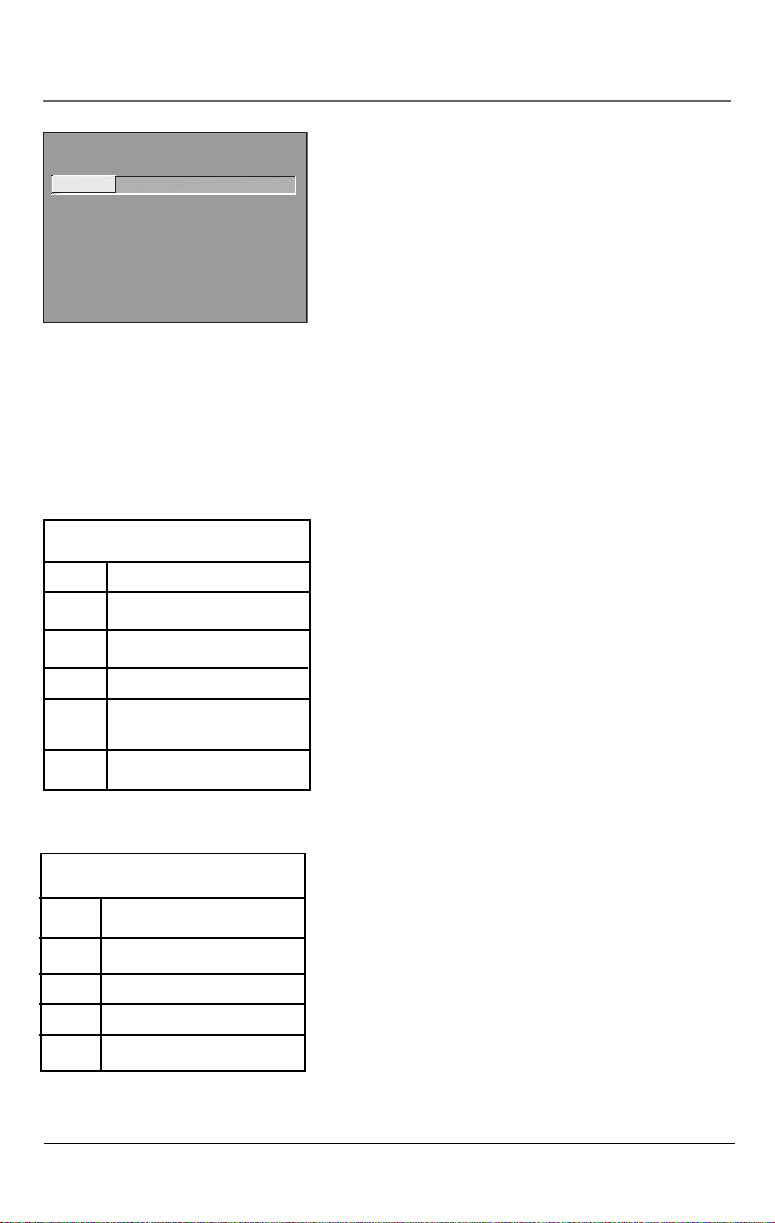
Set the Menu Language
1. Use the arrow buttons on the remote to highlight your
preferred language for the menu system.
2. Press OK to select that language.
Complete Auto Channel Search
The TV will search for all channels viewable through your
antenna or cable TV system. This is called “auto programming.”
1. Press OK to tell the TV to begin searching for channels. A
progress report appears on the screen.
2. When the screen tells you the search is complete, press
OK.
Chapter 1 5
Illustrations contained in this document are for representation only.
Page 8
Chapter 2: Using the Remote Control
STOP
AUSE
ON OFF
PLA
SOUND
GO
ACK
C
+
C
H
V
V
O
L
SKIP
MUTE
O
MENU
CLEAR
GUIDE
A
A
3
5
6
7
8
9
0
UT
CR1
L.E.D.
V
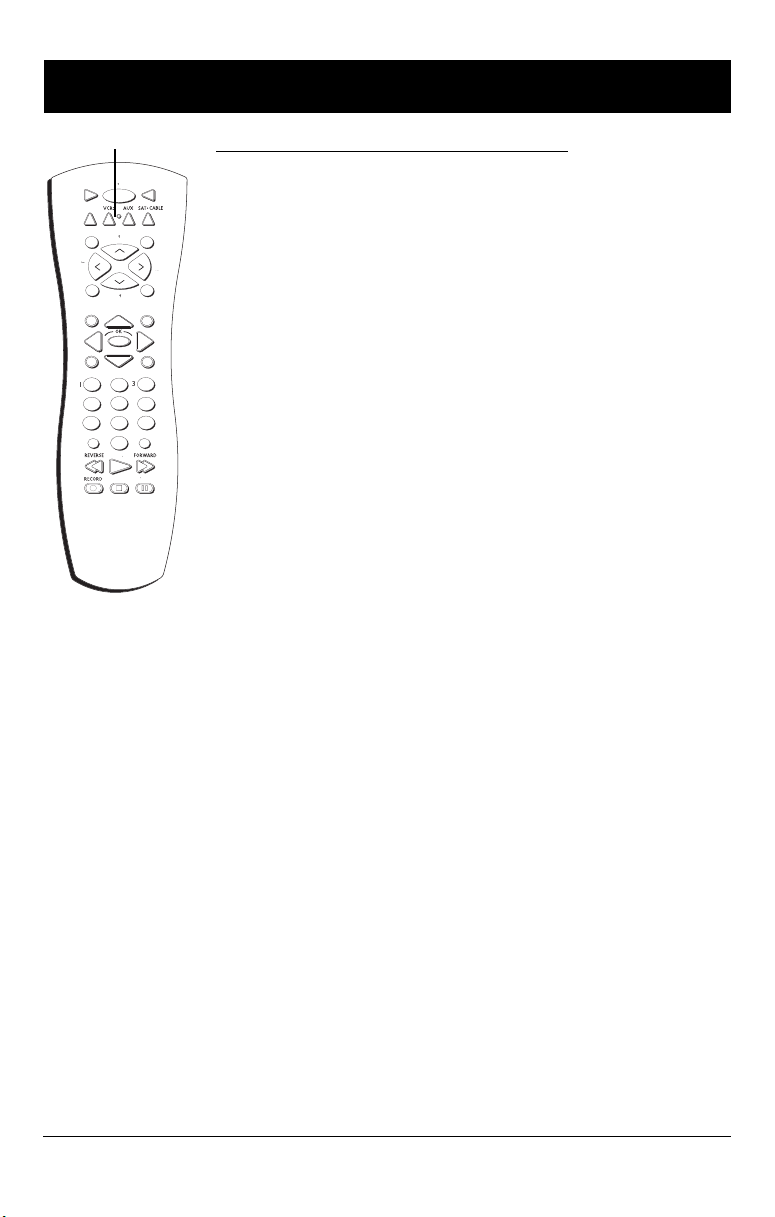
The Buttons on the Remote Control
0-9 (Number buttons) Enter channel numbers and time settings directly
through the remote control.
To enter a two-digit channel, press the two digits. To enter a three-digit
channel, press and hold the first digit for two seconds until two dashes appear
to the right of the number, then add the second two. Example: to tune to
channel 123, press and hold 1 for two seconds, press 2, then press 3.
B
INF
Arrow buttons (up, down, left, right) Move through the on-screen menu
system.
ANTENNA Functions as TV/VCR button in VCR mode and TV/receiver button in
SAT•CABLE mode.
AUX (auxiliary) Puts the remote in auxiliary mode to operate the component
you’ve programmed the remote to operate with this button. You can program
INP
NTENN
this button to control a cable box, RCA audio components, a VCR or satellite
receiver. If you set up the Auto Tuning feature (Chapter 3), pressing the AUX
button automatically tunes the TV to the correct channel.
CH (up and down) buttons Scan up or down through the current channel list.
Press once to change the channel up or down; press and hold to continue
changing channels.
CLEAR Removes any menu or display from the screen and returns you to
TV viewing.
DVD Puts the remote in DVD mode. If you set up the Auto Tuning feature (Chapter 3), pressing the DVD
button automatically tunes the TV to the correct channel. The DVD button is not programmable and
operates most RCA DVD players.
FORWARD If you’re operating a VCR or DVD player with the remote control, press FORWARD to advance a
videotape or disc.
GO BACK Returns you to the previous channel.
GUIDE If you’re operating another component that has a guide, this button access the on-screen guide.
INFO Displays channel information.
L.E.D. (light-emitting diode) The little light on the remote that lights when you are programming the
remote. It also lights when you press a valid button on the remote.
MENU Displays the TV’s Main menu.
MUTE Lowers the volume to its minimum level. Press again to restore volume.
OK When a menu is on the screen, press OK to select the item that is highlighted.
ON•OFF Turns the TV on and off. When the remote is in another mode (VCR, DVD, Satellite, etc.) and the
remote is programmed to operate that component, you can press ON•OFF to turn the component on and off.
PAUSE If you’re operating a VCR or DVD player with the remote control, press PAUSE when the videotape
or disc is playing to pause playback.
PLAY If you’re operating a VCR or DVD player, plays the videotape or disc.
RECORD If the remote is in VCR mode, press RECORD to start recording.
REVERSE If you’re operating a VCR or DVD player, press REVERSE to go backwards on a videotape or disc.
SAT•CABLE Puts the remote in SAT•CABLE mode. If you set up the Auto Tuning feature (Chapter 3),
pressing the SAT•CABLE button automatically tunes the TV to the correct channel.
6 Chapter 2
Illustrations contained in this document are for representation only.
Page 9
Using the Remote Control
SKIP If you press this button before you change the channel, the TV waits 30 seconds and goes back to the
original channel. Each time you press SKIP, you add 30 seconds (i.e, if you press SKIP two times, the TV waits
60 seconds and turns back to the original channel). Press CLEAR to cancel skip timer.
SOUND Displays the AUDIO PROCESSOR menu.
STOP If you’re operating a VCR or DVD player, stops playing the videotape or disc.
TV Turns on the TV and puts the remote in TV mode. Also displays channel information.
VCR1 Puts the remote in VCR mode. If you set up the Auto Tuning feature (Chapter 3), pressing the VCR1
button tunes the TV to the correct channel.
VCR2 Puts the remote in VCR mode. If you set up the Auto Tuning feature (Chapter 3), pressing the VCR2
button tunes the TV to the correct channel.
VOL (up and down) buttons Decrease or increase the TV’s volume.
INPUT In TV mode, press INPUT to toggle through the available Video Input channels (FRNT, VID1/SVID1,
VID2/CVID2, VPORT and the current channel). In SAT mode, press to select available channel lists.
Using the INPUT Button
Use the INPUT button to toggle through the available input sources (FRNT, VID1/SVID1, VID2/CVID2, VPORT
and the current channel) and view the content from the component you have connected to the TV.
1. Press TV to place the remote in TV mode. Make sure that the content from the component is turned ON.
2. Press INPUT to tune to the available input source and view the component.
3. Press again to tune back to the channel you were previously watching.
ON OFF
VCR1
CABLE
SAT
AUX
VCR2
DVD
+
H
C
V
L
O
O
L
V
C
H
-
Programming the Remote to Operate Other
Components
The universal remote can be programmed to operate most brands of remote
controllable VCRs, DVD players, audio receivers, satellite receivers and cable boxes.
The remote is already programmed to operate most RCA, GE and Proscan VCRs, DVD
CLEAR
PLAYREVERSE
STOP
players, audio receivers and satellite receivers. The TV button cannot be programmed.
Find Out If You Need to Program the Remote
To determine whether the universal remote needs to be programmed, turn a
component ON, such as a VCR, point the remote at the VCR, and press the VCR
button. Then press ON•OFF or channel up or channel down to see if the VCR
Use these buttons
when you
program the
remote to operate
another
responds to the remote commands. If not, the remote needs to be programmed.
How to Program the Remote
There are two ways to program the remote control: automatic code search and direct
entry. Instructions for both ways follow.
component.
The remote may
not operate all
models of all
brands.
Chapter 2 7
Illustrations contained in this document are for representation only.
Page 10

Using the Remote Control
Using Automatic Code Search
1. Turn on the component you want the remote to operate (VCR, etc.).
Note: You cannot use the search feature for AUX or DVD component buttons.
2. Press and hold the component button on the remote control that corresponds to the component you
want the remote to operate (VCR, etc.). While you hold down the component button, press and hold
ON•OFF (when the light on the remote turns on, release both buttons).
3. Press PLAY (the light on the remote, located below the ON•OFF button, starts flashing).
The remote is searching the first set of component codes (there are 20 sets of codes). If the component
you want to operate doesn’t turn off automatically after 5 seconds, press PLAY again (the light starts
flashing again as the remote searches through the next set of codes).
Continue pressing PLAY until the component turns off.
Note: If the component doesn’t turn off after you’ve pressed the PLAY button 20 times, the component can’t be
programmed.
4. Press REVERSE, wait 2 seconds. Repeat this step until the component turns back on.
5. To finish, press and hold the STOP button until the light on the remote turns off.
Using Direct Entry
1. Turn on the component you want the remote to operate.
Notes: The DVD button is not programmable and operates only most RCA DVD players.
The AUX button is only programmable to operate most RCA audio devices.
2. Look up the brand and code number(s) for the component on the code list on pages 9-10.
3. Press and hold the component button that corresponds to the component you want the remote to
operate (VCR, etc.)
4. Enter the code from the code list.
5. Release the component button.
6. Press ON•OFF to see if the component responds to the remote commands. If it doesn’t, try pressing the
component button and then ON•OFF again.
7. If you get no response, repeat these steps using the next code listed for your brand until the component
responds to the remote commands.
How to Use the Remote After You’ve Programmed It
Once the remote has been programmed successfully, you are ready to use it to control your components. To
operate the component:
1. Press the component button (TV, VCR1, VCR2, DVD, AUX, or SAT•CABLE) to set the remote to operate the
component.
2. Press ON•OFF to turn the component ON or OFF.
3. Use the remote buttons that apply to that component.
Note: If you keep pressing buttons and nothing happens, the remote is probably in the wrong mode. You must
press the component button that matches the component you want to operate (i.e., if you want to operate the
VCR, press VCR1 on the remote control to put the remote in VCR mode.)
8 Chapter 2
Illustrations contained in this document are for representation only.
Page 11

Remote Codes
VCR Codes
Programmable for VCR1, VCR2, and AUX
buttons.
Admiral .............................................................. 2131
Adventura ......................................................... 2026
Aiko .................................................................... 2027
Aiwa ....................................................... 2002, 2026
Akai 2003, 2004, 2005, 2007, 2008, 2111,2112,
American High ................................................ 2021
Asha ................................................................... 2013
Audio Dynamics .................................. 2009, 2010
Audiovox ........................................................... 2014
Bell & Howell ................................................... 2011
Beaumark .......................................................... 2013
Broksonic .............................................. 2012, 2025
Calix ................................................................... 2014
Candle ... 2013, 2014, 2015, 2016, 2017, 2018,
Canon ..........................................2021, 2022, 2114
Capehart ................................................ 2020, 2110
Carver ................................................................ 2062
CCE ......................................................... 2027, 2061
Citizen ............. 2013, 2014, 2015, 2016, 2017,
Colortyme ......................................................... 2009
Colt ..................................................................... 2061
Craig ............................... 2013, 2014, 2023, 2061
Curtis-Mathes ............ 2000, 2002, 2009, 2013,
.................. 2016, 2018, 2021, 2022, 2024, 2115
Cybernex ........................................................... 2013
Daewoo . 2015, 2017, 2019,2025, 2026, 2027,
Daytron ...............................................................2110
Dbx ......................................................... 2009, 2010
Dimensia ........................................................... 2000
Dynatech ............................................... 2002, 2026
Electrohome ......................................... 2014, 2029
Electrophonic ................................................... 2014
Emerson .................................... 2002, 2012,2014,
2015, 2021, 2024, 2025,2026,2029, 2030,
2032, 2033, 2034, 2035, 2036, 2037, 2038,
2039, 2040, 2041, 2042, 2044, 2045, 2047,
2065, 2105, 2113, 2116, 2117, 2130
Fisher .... 2011, 2023, 2048, 2049, 2050, 2051,
Fuji ........................................................... 2021, 2119
Funai ...................................................... 2002, 2026
Garrard .............................................................. 2026
GE 2000, 2001, 2013, 2021, 2022, 2053, 2115,
Goldstar ............. 2009, 2014, 2018, 2054, 2121
Gradiente .......................................................... 2026
Harley Davidson .............................................. 2026
Harman Kardon ............................................... 2009
Harwood ........................................................... 2061
Headquarter ..................................................... 2011
Hitachi ... 2002, 2055, 2056, 2057, 2107, 2111,
HI-Q ................................................................... 2023
Instant Replay ................................................. 2021
JCL ...................................................................... 2021
JC Penney2009, 2010, 2011, 2013, 2014, 2021,
2022, 2055, 2056, 2058, 2059, 2060, 2107,
Jensen ......................................... 2055, 2056, 2111
JVC 2009, 2010, 2011, 2018, 2058, 2111, 2123
Kenwood 2009, 2010, 2011, 2016, 2018, 2058,
KLH ..................................................................... 2061
Kodak ..................................................... 2014, 2021
Lloyd ....................................................... 2002, 2026
Logik ................................................................... 2061
LXI ....................................................................... 2014
Magnavox ........ 2021, 2022, 2062, 2063, 2104,
Magnin .............................................................. 2013
2113
2019
2018,2019,2027
2028, 2110
2052,2118
2120
2120, 2122
2118
2111,2123
2108, 2124
Using the Remote Control
Marantz ..................................... 2009, 2010, 2011,
.................. 2016, 2018, 2021, 2058, 2062,2064
Marta ................................................................. 2014
Masushita ......................................................... 2021
MEI ..................................................................... 2021
Memorex .............................................. 2002, 2011,
.... 2013, 2014, 2021, 2023, 2026, 2104, 2131
MGA ........................................... 2029, 2065, 2113
MGN Technology ............................................ 2013
Midland ............................................................. 2053
Minolta ...................................... 2055, 2056, 2107
Mitsubishi ....... 2029, 2055, 2056, 2065, 2066,
2067, 2069, 2070, 2071, 2072, 2073, 2074,
Montgomery Ward ............................. 2075, 2131
Motorola ............................................... 2021,2131
MTC ............................................ 2002, 2013, 2026
Multitech 2002, 2013, 2016, 2026, 2053, 2061
NEC ..................... 2009, 2010, 2011, 2016, 2018,
2058, 2064, 2076, 2078, 2079, 2111, 2123
Nikko .................................................................. 2014
Noblex ............................................................... 2013
Olympus ............................................................ 2021
Optimus ................................................. 2014, 2131
Optonica ........................................................... 2096
Orion .................................................................. 2035
Panasonic2021, 2022, 2109, 2125, 2126, 2127
Pentax ................ 2016, 2055, 2056, 2107, 2120
Pentex Research ............................................. 2018
Philco ............................. 2021, 2022, 2062, 2063
Philips ............................ 2021, 2062, 2096, 2124
Pilot .................................................................... 2014
Pioneer .............. 2010, 2055, 2080, 2081, 2123
Portland .......................... 2016, 2017, 2019, 2110
Proscan .................................................. 2000, 2001
Protec ................................................................. 2061
Pulsar ................................................................. 2104
Quarter .............................................................. 2011
Quartz ................................................................ 2011
Quasar ....................................... 2021, 2022, 2125
RCA .................... 2000, 2001, 2003, 2013, 2021,
2055, 2056, 2082, 2083, 2084,2085,
2086,2087, 2088, 2089, 2090, 2091, 2107,
Radioshack/Realistic ............. 2002, 2011, 2013,
2014, 2021, 2022, 2023, 2026, 2029, 2049,
Radix .................................................................. 2014
Randex ............................................................... 2014
Ricoh .................................................................. 2128
Runco ................................................................. 2104
Samsung 2005, 2013, 2015, 2033, 2053, 2112
Sanky ..................................................... 2131, 2104
Sansui ............................. 2010, 2092, 2111, 2123
Sanyo ......................................... 2011, 2013, 2023
Scott ...... 2012, 2015, 2025, 2032, 2035, 2038,
Sears ...................2011, 2014, 2021, 2023, 2048,
2049, 2050, 2051, 2055, 2056, 2107, 2118
Sharp ..... 2002, 2017, 2029, 2094, 2095, 2096,
Shintom .........................2004, 2056, 2061, 2098
Shogun .............................................................. 2013
Signature ............................................. 2002, 2131
Singer ......................................... 2021, 2061, 2128
Sony ....... 2002, 2004, 2098, 2099, 2119, 2128
STS .......................................................... 2021, 2107
Sylvania 2002, 2021, 2022, 2026, 2062, 2063,
Symphonic ............................................ 2002, 2026
Tandy ...................................................... 2002, 2011
Tashiko ............................................................... 2014
Tatung ..................................................... 2058, 2111
TEAC .................... 2002, 2026, 2058, 2085, 2111
Technics ................................................. 2021, 2109
Teknika ... 2002, 2014, 2021, 2026, 2100, 2129
TMK ............................................ 2013, 2024, 2047
Toshiba ............. 2015, 2049, 2051, 2055, 2065,
2106, 2113, 2123
2115, 2120, 2125
2050, 2096, 2131
2065, 2093, 2116
2065, 2124
2093, 2116
ToteVision ............................................. 2013, 2014
Unitech .............................................................. 2013
Vector Research .......... 2009, 2010, 2015, 2016
Victor ................................................................. 2010
Video Concepts 2009, 2010, 2015, 2016, 2113
Videosonic ........................................................ 2013
Wards .. , 2002, 2013, 2014, 2015, 2021, 2023,
2026, 2029, 2055, 2056, 2061, 2096, 2101,
XR-1000 .................................... 2021, 2026, 2061
Yamaha .... 2009, 2010, 2011, 2018, 2058, 2111
Zenith ................. 2004, 2098, 2104, 2119, 2128
2102, 2103, 2107, 2116, 2131
Cable Boxes
Programmable for SAT•CABLE and AUX
buttons.
ABC ......................... 5002, 5003, 5004, 5005,
Antronix ................................................ 5008, 5009
Archer ............................. 5008, 5009, 5010, 5011
Cabletenna ....................................................... 5008
Cableview ......................................................... 5008
Century .............................................................. 5011
Citizen ............................................................... 5011
Colour Voice ......................................... 5012, 5013
Comtronics ........................................... 5014, 5015
Contec ............................................................... 5016
Eastern ............................................................... 5017
Garrard .............................................................. 5011
GC Electronics ................................................. 5009
Gemini ....................................... 5018, 5019, 5049
General Instrument ........................................ 5003
Hamlin ............... 5020, 5021, 5022, 5035, 5045
Hitachi ............................................................... 5003
Hytex .................................................................. 5002
Jasco .................................................................. 5011
Jerrold .... 5003, 5005, 5007,5018, 5023, 5024,
Magnavox ......................................................... 5025
Memorex ........................................................... 5026
Movie Time ............................... 5002, 5027, 5028
NSC ............................................. 5002, 5027, 5028
Oak .............................................. 5002,5016, 5029
Panasonic ..............................................5048, 5052
Paragon ............................................................. 5026
Philips ............................ 5011, 5012, 5013, 5019,
Pioneer .................................................. 5033, 5034
Pulsar ................................................................. 5026
RCA .............................................5047, 5049, 5052
Realistic .................................................5009, 5049
Regal ...................................................... 5022, 5035
Regency ............................................................. 5017
Rembrandt ........................................................ 5003
Runco ................................................................. 5026
Samsung ............................................... 5014, 5034
Scientific Atlanta ...... 5006, 5036, 5037, 5038
Signal ..................................................... 5014, 5018
2131
Signature .......................................................... 5003
SL Marx ............................................................. 5014
Sprucer .............................................................. 5052
Starcom ..................................... 5007, 5018, 5053
Stargate ................................................ 5014, 5018
Starquest .......................................................... 5018
Tandy ..................................................................5040
Teleview ............................................................ 5014
Tocom ........................................ 5004, 5023, 5041
Toshiba .............................................................. 5026
Tusa .................................................................... 5018
TV86 ................................................................... 5027
Unika .......................................... 5008, 5009, 5011
United Artists .................................................. 5002
United Cable .................................................... 5053
Universal ....................... 5008, 5009, 5010, 5011
Videoway .......................................................... 5044
Viewstar ........................ 5015, 5025, 5027, 5040
Zenith ........................................ 5026, 5050, 5051
5006, 5007, 5053
5046, 5053
5025, 5030, 5031, 5032
Chapter 2 9
Illustrations contained in this document are for representation only.
Page 12

Using the Remote Control
Satellite Receivers
Programmable for SAT•CABLE and AUX
buttons.
Chapparal ............................................ 5056, 5057
Drake ..................................................... 5058, 5059
GE ...................................................................... 5000
General Instruments ............. 5060, 5061, 5062
Panasonic ..........................................................5075
Primestar ...........................................................5076
Proscan ............................................................. 5000
RCA .................................................................... 5000
Realistic ............................................................ 5063
Sony ................................................................... 5072
STS1 ................................................................... 5064
STS2 ................................................................... 5065
STS3 ................................................................... 5066
STS4 ................................................................... 5067
Toshiba ............................................................. 5068
Toshiba .............................................................. 5073
Uniden .............................................................. 5069
Audio
Programmable for AUX button.
RCA and Dimensia
AM/FM ..........................................................4003
Aux ...................................................................... 4004
Phono .................................................................. 4005
CD ......................................................................... 4007
Tape ..................................................................... 4006
10 Chapter 2
Illustrations contained in this document are for representation only.
Page 13

Chapter 3: Using the TV’s Features
12:01 ESPN 60
SAP
00:00
Channel Banner
There are several indicators that might appear when you press the TV or INFO buttons on the remote. This
display is called the Channel Banner. The following list describes the items on the Channel Banner screen
(left to right and top to bottom).
12:01 Displays the current time.
The lock is displayed to indicate when Parental Controls are locked or unlocked.
Displayed when Closed Captioning is available on the current channel.
ESPN Displays the label assigned to the current channel.
60 Displays the current channel or input channel.
Mute is displayed when you mute the audio.
Stereo is displayed when the current channel is broadcasting in Stereo.
SAP Displayed when the current channel is broadcasting SAP (Second Audio Program) information.
Displayed when the Sleep Timer has been set.
00:00 Displayed to count down time left on the commercial skip (SKIP) timer.
Chapter 3 11Illustrations contained in this document are for representation only.
Page 14
Using the TV’s Features
TV MAIN MENU
1 Audio
2 Picture Quality
3 Screen
4 Channel
5 Time
6 Parental Controls
1 Signal Type
7 GUIDE Plus+ Menu
2
8 Setup
3 List and Labels
0 Exit
4 Auto Tuning
0 Exit
1. Press MENU (the TV MAIN MENU appears).
2. Highlight Channel and press OK on your remote control.
3. Highlight Auto Tuning and press OK.
4. Choose which channel you would like to set:
Set VCR1 Channel Displays a list that lets you set up the channel that the TV tunes to when you press
the VCR1 button on the remote.
Set VCR2 Channel Displays a list that lets you set up the channel that the TV tunes to when you press
the VCR2 button on the remote.
Set DVD Channel Displays a list that lets you select the channel that the TV tunes to when you press the
DVD button.
Set SAT/CABLE Channel Displays a list that lets you set up the channel that the TV tunes to when you
press SAT•CABLE.
5. Highlight the choice that matches the way you have the component connected to this TV, and press OK.
The choices and a brief explanation follow:
Not connected Choose this if you don’t have this particular component connected to the TV, or if you
don’t want the TV to automatically tune to the correct channel when you’re using this component.
Channel 2 (SAT/CABLE only) Component (satellite or cable box) is connected to the CABLE/ANTENNA
jack on the back of the TV, and you want the TV to tune to channel 2 when you press the SAT• CABLE
button on the remote. Reminder: make sure the component’s Channel 2/3/4 switch is set to channel 2.
Usually this switch is on the back of the component.
Channel 3 Component is connected to the CABLE/ANTENNA jack on the back of the TV, and you want
the TV to tune to channel 3 when you press the corresponding button on the remote. Reminder: make
sure the component’s Channel 3/4 switch is set to channel 3.
Channel 4 Component is connected to the CABLE/ANTENNA jack on the back of the TV, and you want
the TV to tune to channel 4 when you press the corresponding button on the remote. Reminder: make
sure the component’s Channel 3/4 switch is set to channel 4.
Video Input 1 Component is connected to the INPUT1 VIDEO jack on the back of the TV and you want
the TV to tune to VID1 Input Channel when you press the component button.
Video Input 2 Component is connected to the INPUT2 VIDEO jack on the back of the TV and you want
the TV to tune to VID2 Input Channel when you press the component button.
Note: You should choose Video Input 1 or 2 for your VCR if you connected it to the TV with audio/video cables.
CHANNEL
Auto Channel Search
Why You Should Use the Auto Tuning
Feature
The auto-tuning feature automatically tunes the TV to the
correct channel for different components you have connected
to your TV (like a VCR, DVD Player, etc.) When you set up auto
tuning in the menu system you don’t have to remember to
change your TV to channel 3, for example, when you want to
watch the tape in your VCR.
How to Set Up the Auto Tuning Feature
The way you set up the auto tuning feature in the TV’s menu
corresponds to the component buttons on the remote and the
way you have each component connected to your TV. When
you set auto tuning, you’re telling the TV what channel to tune
to when you press the VCR, DVD, or SAT•CABLE button on the
remote control.
12 Chapter 3
Illustrations contained in this document are for representation only.
Page 15

Using the TV’s Features
Parental Controls and V-Chip
The first three choices in the Parental Controls menu involve software inside your TV (referred to as V-Chip)
which allows you to block TV programs and movies based on violence, sex, or other content you may
believe children should not view.
Once you block programs, you can unblock programs by entering a password.
By default, the software inside your TV is turned “off.”
How V-Chip Works
V-Chip reads the program’s age-based rating (TV-MA, TV-14, etc.) and content themes [(Violence (V), Adult
Language (L), etc.)]. If you have blocked the rating and/or content themes that the program contains, you
will receive the message, “This channel is not approved for viewing.”
Broadcasters are not required to provide content themes, so programs received with no content themes will
only be blocked if you block their age-based rating. You can also block out programs that have been given
a rating of “Not Rated,” and programs that are considered “unrated.” The TV age-based ratings and content
themes you can block follow:
TV-MA – Mature Audience Only. Specifically designed to be viewed by adults and may be unsuitable for
children under 17. It contains one or more of the following content themes: crude indecent language (L),
explicit sexual activity (S), or graphic violence (V).
TV-14 – Parents Strongly Cautioned. Contains some material that many parents would find unsuitable for
children under 14. Parents are strongly urged to exercise greater care in monitoring this program and are
cautioned against letting children under the age of 14 watch unattended. This program contains one or
more of the following content themes: intensely suggestive dialogue (D), strong coarse language (L),
intense sexual situations (S), or intense violence (V).
TV-PG – Parental Guidance Suggested. Contains material that parents may find unsuitable for younger
children. Many parents may want to watch it with their younger children. The program contains one or
more of the following content themes: some suggestive dialogue (D), infrequent coarse language (L), some
sexual situations (S), or moderate violence (V).
TV-G – General Audience. Most parents would find this program suitable for all ages. It contains
little or no sexual dialogue (D) or situations (S), no strong language (L), and little or no violence (V).
TV-Y7 – Directed to Children 7 years and older. Designed for children ages 7 and above. It may be more
appropriate for children who have acquired the developmental skills needed to distinguish between makebelieve and reality. Themes and elements in this program may include mild fantasy violence (FV) or
comedic violence, or may frighten children under the age of 7.
TV-Y – All Children. Themes and elements in this program are designed for a young audience, including
children from ages 2-6. It is not expected to frighten younger children.
Chapter 3 13Illustrations contained in this document are for representation only.
Page 16

Using the TV’s Features
V-Chip TV Rating Limit
The V-Chip TV Rating Limit lets you decide which TV programs can and cannot be viewed. To set TV
programming limits:
1. Choose Parental Controls from the Main menu. If Parental Controls are locked, you must enter your
password. If they are not locked, you will get a message reminding you that your limits will not be
effective until you lock Parental Controls.
2. Press MENU to continue.
3. Highlight and select V-Chip TV Rating Limit.
4. Use the arrow buttons and the OK button on your remote to change the status of a TV program rating
or content theme from View to Block.
Changing the status of TV program limits is described in more detail later in the chapter.
The V-Chip Rating Limit Screen
The following is an example of where items are located within the Rating Limit screen.
Rating Field
Lets you select from a list of
age-based ratings you can block
or view.
V-CHIP TV RATING LIMIT
Rating Status
TV-MA VIEW
^
Press ^/v to select rating.
Press MENU to exit.
RATING STATUS
TV-MA
TV-14
TV-PG
TV-G
TV-Y7
TV-Y
Rating Status Field
Lets you select whether the status of
the age-based rating limit to the left is
View or Block.
- - Content - -
D L S V FV
V V V
D L S V FV
View
View
View
View
View
View
V V V
V V V V
V V V V
V
Content Themes
Lists the content themes
you can block or view.
Content Status Fields
Lets you select which
content themes to view for
the selected rating, and
whether the status of the
content theme is currently
View (V) or Block (B).
Rating Settings Area
Lets you see the current block/view state of age-based
ratings and associated content. The View (V) settings are
coded in green, and the Block (B) settings are coded in red.
14 Chapter 3
Illustrations contained in this document are for representation only.
Page 17
Using the TV’s Features
V-CHIP TV RATING LIMIT
Rating Status
TV-MA VIEW
^
Press ^/v to select rating.
Press MENU to exit.
RATING STATUS
TV-MA
TV-14
TV-PG
TV-G
TV-Y7
TV-Y
View
View
View
View
View
View
- - Content - -
D L S V FV
V V V
D L S V FV
V V V
V V V V
V V V V
V
Hierarchy of Age-Based Ratings
TV Mature Audience Only
TV-14 General Audience
TV-PG Parental Guidance Suggested
TV-G General Audience
TV-Y7 Directed to Children 7 years
TV-Y All Children
and older
Blocking Age-Based Ratings
You can automatically block all program ratings above a
specified age-based rating level.
To block programs with higher ratings:
1. Use the arrow buttons to highlight the Rating field.
2. Press the up/down arrow buttons on the remote to scroll to
the rating corresponding with the lowest rating you do not
want the child to watch.
3. Press the right arrow button to move the yellow highlight
to the Status field.
4. Press the up or down arrow button to toggle between View
and Block. The status for the rating listed to the left and all
higher ratings automatically changes to Block (and B).
5. Press OK on the remote to return to the menu or exit the
screen when you are finished.
6. Select Lock Parental Controls from the Parental Controls
menu. Enter a password; if you have not set your password,
you will be prompted to enter it again.
Viewing Age-Based Ratings
After you block age-based ratings, you can change some of the
ratings back to View.
1. Use the up/down arrow buttons to select the rating with a
status of Block.
2. Press the right arrow button to move the yellow highlight
to the rating status field.
3. Press the up button to select View.
Notes: The content status fields corresponding to the unblocked
rating become View as well. They and the age-based rating status
are the only fields that automatically change back to View when
you complete this process.
Remember to lock Parental Controls for rating limits to take effect.
Content Themes
D Sexually explicit dialogue
L Adult language
S Sexual situations
V Violence
FV Fantasy Violence
Blocking Specific Content Themes
You can block programs based on their content. (Content is
represented by the D, L, S, V, and FV on your screen.) When you
block a content theme for a particular rating, you
automatically block that content theme for higher rated
programs as well.
To block program content, highlight the Content Field, and
then follow the same steps described for blocking age-based
ratings (above).
Notes: Broadcasters are not required to provide content themes or
age-based ratings.
You must remember to lock Parental Controls for rating limits to
take effect.
Chapter 3 15Illustrations contained in this document are for representation only.
Page 18

Using the TV’s Features
Viewing Specific Content Themes
If you block specific content themes, you have the option of going back and changing some of the content
themes back to (V) View:
1. Determine the content themes you want to change to (V) View.
2. Use the up/down arrow buttons to scroll to the rating whose content theme you want to change to
View.
3. Press the right arrow button to move the yellow highlight to a particular content theme status.
4. Press the up or down arrow button to change its status back to V.
Note: Only the content theme status corresponding to TV-14 (L) language changes to (V) View. Higher rated
content themes, such as that for TV-MA language, do not change.
V-Chip Movie Rating Limit
Set movie rating limits by blocking movies rated above a specified level.
To access the V-CHIP MOVIE RATING LIMIT menu:
1. Press MENU on the remote control (the TV MAIN MENU appears).
2. Select Parental Controls.
3. Select V-Chip Movie Rating Limit .
Blocking Movie Ratings
Once you are in the Movie Ratings menu, follow the same steps described for blocking TV ratings.
V-CHIP UNRATED PROGRAM BLOCK
1 View
2 Block
CHANNEL BLOCK
Channel # Status
59 HEADLN Block
^
Press ^ or v, keypad, or CH ^/v
to set channel, MENU to exit.
16 Chapter 3
Illustrations contained in this document are for representation only.
V-Chip Unrated Program Block
This option lets you decide if programs that the V-Chip
recognizes as “unrated” can be viewed. “Unrated” TV programs
may include news, sports, political, religious, local and weather
programs, emergency bulletins, public announcements, and
programs without ratings.
View All unrated programs are available.
Block All unrated programs are not available.
Note: You must remember to lock Parental Controls for rating
limits to take effect.
Channel Block
Selecting this option lets you decide what channels can be
viewed.
View Makes the selected channel viewable.
Block The front panel and remote control CH (channel)
buttons will tune only to channels that you have
marked as View. The remote will still tune to the
blocked channel if you use the digits to access the
channel, but the channel will be blocked.
Lock parental controls after you change the status of Channel
Block. If you don’t, the channel block will not take effect.
Note: If you have a digital cable box channels 126-999 can be
blocked but will not be removable from your scan list.
Page 19

Using the TV’s Features
FRONT PANEL BLOCK
1 Unblock
2 Block
Front Panel Block
Selecting this option lets you block (disable) or unblock
(enable) the TV’s front panel. The remote still tunes to any
channel. When using this as a Parental Control method,
remove access to any remote that is capable of operating the
television while you have the front panel blocked.
Don’t forget to lock parental controls after you change the
status. If you don’t, the front panel block will not take effect.
Lock/Unlock Parental Controls
Selecting this option lets you lock and unlock parental controls settings using a password.
If you do not lock parental controls, none of the settings for V-Chip, Channel Block, or Front Panel
Block will take effect.
If you forget your password, simultaneously press and hold MENU on the television and volume down on
the remote for 3 seconds. Nothing appears on the screen; Parental Controls simply unlock and you can reenter a password via Lock Parental Controls.
Chapter 3 17Illustrations contained in this document are for representation only.
Page 20

Chapter 4: Using the TV’s Menu System
How to Use Your TV’s Menu System
The buttons on the remote or the front of your TV access the menu system and can change the settings.
Menus
The first menu is called the Main menu. Press MENU on the remote or on the front panel to bring up the
Main menu.
Menus take you to another menu or a control panel. There are two ways to select a choice in a menu:
• Use your arrow buttons on your remote control to highlight your choice, and press OK.
• Press a number button on the remote. For example, in the Main menu press 3 to go straight to the
Screen menu.
Exiting a menu
There are three ways to exit a menu:
• Highlight Exit and press OK.
• Press 0 on the remote.
• Press CLEAR. The on-screen displays are cleared from the screen and you return to TV viewing.
TV MAIN MENU
1 Audio
2 Picture Quality
3 Screen
4 Channel
5 Time
6 Parental Controls
7 Setup
0 Exit
Audio Processor Displays a choice list of available audio modes, which control the way the sound comes
through your speakers. You can also access the AUDIO PROCESSOR menu by pressing the SOUND button on
the remote.
Mono Plays the sound in mono only. Use this setting when receiving broadcasts with weak stereo
signals.
Stereo Splits the incoming stereo audio signal into left and right channels. Most TV programs and
recorded materials have stereo audio. The word STEREO appears on the TV when you tune to a
program that is broadcast in stereo.
Expanded Stereo Electronically “widens” sound from stereo broadcasts, stereo VCRs, digital satellite
systems, DVD players, and laserdisc players for a fuller, more spacious sound.
Sound Logic™ Stereo Reduces the annoying blasts in volume during commercial breaks, and also
amplifies softer sounds in program material. Eliminates the need to constantly adjust volume control.
Second Audio Program (SAP) Plays the program’s audio in a second language, if one is available.
The word SAP appears on the TV when you tune to a program that is broadcast with SAP information.
SAP audio is broadcast in mono. SAP is also used to broadcast a program’s audio with descriptions of
the video for the visually impaired.
Audio Menu
Mute Press OK to reduce the TV’s volume to its minimum level.
Press OK again to restore the volume.
Tone Controls Displays the slider controls for adjusting the
TV’s treble, bass and balance.
18 Chapter 4
Illustrations contained in this document are for representation only.
Page 21

Using the TV’s Menu System
Audio Output & Speakers Displays a choice list that lets you turn the TV’s internal speakers on or off, and
set the audio outputs to fixed-level or variable control level.
Variable Output, Speakers On This setting turns the TV’s speakers on and allows variable output
from the TV’s audio output jacks.
Variable Output, Speakers Off This setting turns the TV’s speakers off and allows variable output
from the TV’s audio output jacks to an external component such as a surround sound amplifier.
Fixed Output, Speakers Off This setting turns the TV’s speakers off and allows fixed output from the
TV’s audio output jacks to an external component such as a surround sound amplifier. When you
choose Fixed Output Off, the TV’s volume control, tone controls, and mute are disabled.
PICTURE QUALITY
1 Basic Picture Controls
2 Picture Presets
3 Auto Color
4 Color Warmth
0 Exit
When exiting this menu, the Save Personal Picture Preset choice list appears. You can choose either Yes or
No. If you save the settings as a Personal Picture Preset, the TV stores the settings so you can re-select
them quickly if someone changes the settings.
Note: You can change the picture controls for each component connected to your Video, Y, PB, PR and S-Video
jacks on the back of your TV. The next time you tune to the component, the picture changes according to the
settings you created previously.
Picture Presets Displays a choice list that lets you select one of three preset picture settings: Bright
Lighting, Normal Lighting, Soft Lighting or Personal Picture Preset. Choose the setting that is best for your
viewing environment.
Auto Color Displays a choice list that lets you turn on the feature that automatically corrects the color
of the picture. (This is especially useful for tracking realistic flesh tone colors as you switch from channel to
channel.) Choose On or Off, depending on your preference.
Color Warmth Displays a choice list that lets you set one of three automatic color adjustments: Cool for
a more blue palette of picture colors; Normal; and Warm for a more red palette of picture colors. The warm
setting corresponds to the NTSC standard of 6500 K.
Picture Quality Menu
Basic Picture Controls Displays the five slider controls for
adjusting the way the picture looks.
Contrast Adjusts the difference between the light and
dark areas of the picture.
Color Adjusts the richness of the color.
Tint Adjusts the balance between the red and green
levels.
Black Level Adjusts the brightness of the picture.
Sharpness Adjusts the crispness of the edges in the
picture.
Chapter 4 19
Illustrations contained in this document are for representation only.
Page 22

Using the TV’s Menu System
SCREEN
1 Closed-Caption Display
2 Closed-Caption Mode
3 Menu Language
0 Exit
F27350 Screen menu
SCREEN
1 Closed-Caption Display
2 Closed-Caption Mode
3 Menu Language
4 Picture Tilt
0 Exit
F32343 and F32350 Screen menu
Screen Menu
Closed-Caption Display Displays a choice list that lets you
choose the way closed captioning information is shown on the
screen.
Off always No captioning information is displayed.
On always Captioning information is shown always,
when available.
On when sound is muted Captioning information is
shown, when available, whenever the TV’s sound is muted.
(To mute the sound, press the MUTE button.) The
captioning information is not displayed when the sound is
not muted.
Closed-Caption Mode Displays a choice list that lets you
choose which captioning mode is used for displaying
captioning information.
Menu Language Displays a choice list that lets you select
your preferred language for the menus: English, Spanish or
French.
Picture Tilt (Available only on models F32343 and F32350)
Your TV has an extra large picture tube that makes it
vulnerable to the effects of the Earth’s magnetic field. You
may need to adjust the picture tilt.
Using Closed Captioning
Many programs are encoded with closed-captioning information, which lets you display the audio portion
of a program as text on the TV screen.
Closed captioning is not available on all channels at all times. Only specific programs encoded with closedcaptioning information are applicable. When a program is closed captioned, the CC icon is displayed in the
channel banner. See Chapter 3 for more information about the channel banner.
CLOSED-CAPTION MODE
1 CC1
2 CC2
3 CC3
4 CC4
5 Text 1
6 Text 2
7 Text 3
8 Text 4
Tip
If you don’t know which Closed-Caption
mode to use, select CC1. CC1 is probably
the mode that is used in your area. CC2,
CC3, and CC4 are reserved for foreign
languages , but ar e r arely u sed at thi s time.
20 Chapter 4
Illustrations contained in this document are for representation only.
Closed-Caption Modes
The TV offers eight closed-captioned modes, including four
text modes.
To set the Closed-Caption Mode:
1. Select Screen from the Main menu.
2. Highlight Closed-Caption Mode and press OK (the Closed-
Caption Mode appears).
3. Highlight your choice and press OK (the Screen menu
appears again).
Note: The Text modes cover nearly half of the picture on the
screen to display the closed-captioned text. Most
broadcasters use the CC mode, which displays a few lines of
captions at a time.
Page 23

Using the TV’s Menu System
Turning off Closed-Caption
1. Select Screen from the Main menu.
2. Press OK to select Closed-Caption Display.
3. Highlight Off Always and press OK. The closed captioning is turned off and you
go back to the Screen menu.
CHANNEL
1 Signal Type
2
Auto Channel Search
3 List and Labels
4 Auto Tuning
0 Exit
Auto Channel Search Tells the TV to search automatically for all the channels available through the
antenna input. When the TV finds an active channel, it places it in the Normal channel list; inactive
channels (weak stations or channels with no signal at all) will be removed from the channel list.
List and Labels Displays a control panel that lets you edit your Normal channel list and choose a sixcharacter label for each channel. Follow the on-screen directions to enter your channels and other
information.
Channel # Use the up and down arrows to scroll up and down through the channels available via
your antenna. You can enter the channel number directly using the number buttons.
Normal List Only the channels included in the Normal list are available when you scan up and down
using channel up and down. Use the up and down arrow buttons to indicate whether the channel
number indicated is included (Yes) or is not included (No) in the Normal channel list.
Channel Label Use the up and down arrow buttons to enter a six-character label for each channel.
Hold the button down to scroll quickly through the characters. The TV can store up to 27 labels in
memory.
Auto Tuning Displays a choice list that lets you set up the TV to automatically tune to the correct input
channel when you press a component button (VCR, DVD, or SAT•CABLE) on the remote. Go to Chapter 3
for details about the Auto Tuning feature.
Channel Menu
Signal Type Displays a choice list that lets you select the
current antenna type.
UHF/VHF Antenna Choose this if you are currently using
an off-air antenna for TV signals.
Cable TV Choose this if you are currently using cable or a
cable box for TV signals.
Chapter 4 21
Illustrations contained in this document are for representation only.
Page 24

Using the TV’s Menu System
1 Sleep Timer
2 Schedule
3 Set Time
0 Exit
TIME
Time Menu
Sleep Timer Displays a control panel that lets you select the
amount of time you want to give the TV before it shuts itself
off.
Schedule Displays a control panel that lets you set up a
schedule for turning the TV on and off automatically.
Reminder: you must turn the schedule On. The on-screen
directions guide you through the steps needed to set the
schedule.
Set Time Displays a control panel that lets you enter the
current time. The on-screen directions guide you through the
steps needed to set the time.
22 Chapter 4
Illustrations contained in this document are for representation only.
Page 25

Chapter 5: Other Information
Troubleshooting
Consult the Troubleshooting list that follows to correct most problems you encounter with your TV.
Note: If you prefer, we can provide you with the name of an Authorized Service Representative who will visit
your home for a fee to install your electronic entertainment system and to instruct you in its operation. For
details about this service, call 1-888-206-3359 or visit rca.com.
TV Problems
TV won’t turn on
• Press the TV button on the remote.
• Check the wall receptacle (or extension cord) to make sure it is “live” by plugging in something else.
• Press the POWER button on the front of the TV. If the TV turns on, check the remote control solutions.
• The front panel controls may be locked (disabled). Use the remote control to unlock the front panel controls by selecting the Front
Panel Block in the Parental Controls menu and choosing Unblock.
Controls don’t work
• If you’re using the remote control, press the TV button first to make sure the remote is in TV mode.
• The front panel controls may be locked (disabled). Use the remote control to unlock the front panel controls by selecting the Front
Panel Block in the Parental Controls menu and choosing Unblock.
• Unplug the TV for two minutes and then plug it back in. Turn the TV on and try again.
TV turns off while playing
• Scheduled Off function may have been activated. Go to page 22 for instructions.
• Electronic protection circuit may have been activated because of a power surge. Wait 30 seconds and then turn the TV on again. If
this happens frequently, the voltage in your house may be abnormally high or low.
TV turns on unexpectedly
• Scheduled On may have been activated.
Blank screen
• Make sure the component connected to the TV is turned on.
No sound, picture okay
• Maybe sound is muted. Press the volume up button to restore sound.
• Maybe speakers are turned off. Check the Audio Output and Speakers control panel in the Audio menu.
• If using S-VIDEO cables to connect a component, remember to also connect the component’s left and right Audio Output Jacks to
the TV’s R-AUDIO-L INPUT1 Jacks.
Can’t select certain channel
• Channel may be blocked or not approved in the Parental Controls menu.
• If using a VCR, make sure the TV/VCR button on the VCR is in the correct mode (press the TV/VCR button on your VCR).
Noisy stereo reception
• The station might be weak. Press the SOUND button on your remote to change from stereo to mono.
Chapter 5 23
Illustrations contained in this document are for representation only.
Page 26

Other Information
No picture, no sound but TV is on
• Maybe the cable/air setting is set to the wrong position. Select Signal Type from the Channel menu.
• If you’re watching your VCR and it’s connected with coaxial cable to the CABLE/ANTENNA jack, tune the TV to channel 3 or 4
(whichever channel is selected on the 3/4 switch on the back of your VCR). Check to make sure the TV/VCR button on the VCR is in
the correct mode (press the TV/VCR button on your VCR).
• If you’re trying to watch content from a component that’s connected to the TV (like a DVD player or VCR), press the INPUT button on
the remote control until the content appears.
Sound okay, picture poor
• Check antenna connections. Make sure all of the cables are firmly connected to the jacks.
• Try adjusting sharpness function to improve weak signals.
Black box appears on the screen
• Closed-captioning might be on. Check the Closed-Caption Display control panel in the Screen menu.
Can’t see commercial skip timer
• If closed-captioning is on, skip timer does not stay on-screen. Turn off closed-captioning.
The Remote Control Doesn’t Work
• Make sure there is a clear path between the remote and the remote sensor on the component.
• Maybe the remote isn’t aimed directly at the component (TV or VCR) that you’re trying to operate.
• Maybe remote is not in TV Mode. Press the TV button so remote will control TV.
• Maybe batteries in remote are weak, dead or installed incorrectly. Put new batteries in the remote.
• You might need to drain the remote’s microprocessor: remove batteries and press the number 1 button for at least 60 seconds.
Release the 1 button, replace batteries, and (if necessary) program the remote again.
Problems with V-Chip/Parental Controls
The rating limits don’t work
• You must lock the settings. Go to the TV MAIN MENU (press MENU on your remote), select Parental Controls (press 6 on your
remote), select Lock Parental Controls (press 6 on your remote).
I don’t remember my password and I want to unlock the TV
• If you forget your password, simultaneously press and hold MENU on the television and volume down on the remote for 3 seconds.
Nothing appears on the screen, Parental Controls simply unlock and you can re-enter a password via Lock Parental Controls.
The V-Chip won’t let me watch a program even though it’s not rated as violent.
• Maybe the movie was given an NR (Not Rated) status. After you block movie ratings, you must set NR to View separately in order to
view movies with an NR rating.
24 Chapter 5
Illustrations contained in this document are for representation only.
Page 27

Other Information
Care and Cleaning
CAUTION: Turn OFF your TV before cleaning.
You can clean the TV as required, using a soft lint-free cloth. Be sure to occasionally dust the ventilation
slots in the cabinet to help assure adequate ventilation.
The TV’s screen may be cleaned with a soft, lint-free cloth as well. Take care not to scratch or mar the
screen. If necessary, you may use a cloth dampened with warm water. Never use strong cleaning agents,
such as ammonia-based cleaners, or abrasive powder. These types of cleaners will damage the TV.
While cleaning do not spray liquid directly on the screen, or allow liquid to run down the screen and inside
the TV. Also, avoid placing drinks or vases with water on top of the TV. This could increase the risk of fire or
shock hazard or damage to the TV.
Caution: Using video games or any external accessory with fixed images for extended periods of time can
cause them to be permanently imprinted on the picture tube (or projection TV picture tubes). ALSO, some
network/program logos, phone numbers, etc. may cause similar damage. This damage is not covered by your
warranty.
The Front of Your TV
If you can’t find your remote control you can use the buttons on your TV to operate many of the TV’s
features.
MENU Brings up the TV MAIN MENU. When in the menu system, it selects highlighted items. Also returns
you to the previous menu.
CH Scans down through the current channel list. When you’re using the TV’s menu system, it acts like
the arrow down button on the remote control.
CH ^ Scans up through the channel list. When you’re using the TV’s menu system, it acts like the arrow up
button on the remote control.
VOL – Decreases the volume. When you’re using the TV’s menu system, it acts like the left arrow button
on the remote control.
VOL + Increases the volume. When you’re using the TV’s menu system, it acts like the right arrow button
on the remote control.
POWER Turns the TV on and off.
PHONES
VIDEO
Chapter 5 25
L/MONO R
AUDIO
Illustrations contained in this document are for representation only.
Front Panel Jacks
You can access the component you connected to the front of
the TV by pressing the INPUT button on your remote until FRNT
appears on the screen.
PHONES (Available only on model F27350) Allows you to
connect headphones to listen to the sound coming from the
TV.
VIDEO (in) Receives video from another component such as a
VCR, camcorder or video game console.
L/MONO and R AUDIO Receives audio from another
component such as a VCR, camcorder or video game console.
Page 28

Other Information
Limited Warranty
What your warranty covers:
• Defects in materials or workmanship.
For how long after your purchase:
• 90 days from date of purchase for labor charges.
• One year from date of purchase for parts.
• Two years from date of purchase for the picture tube.
The warranty period for rental units begins with the first rental or 45 days from date of shipment to the
rental firm, whichever comes first.
What we will do:
• Pay any Authorized RCA Television Service Center the labor charges to repair your television.
• Pay any Authorized RCA Television Service Center for the new or, at our option, refurbished replacement parts and
picture tube required to repair your television.
How you get service:
• For screen sizes of 26” and smaller: Take your RCA television to any Authorized RCA Television Service Center and
pick up when repairs are complete.
• For screen sizes larger than 26": Request home or pick up, repair, and return service from any Authorized RCA
Television Service Center, provided that your television is located within the geographic territory covered by an
Authorized RCA Television Service Center. If not, you must take your television to the Service Center location at
your own expense, or pay for the cost the Service Center may charge to transport your television to and from
your home.
• To identify your nearest Authorized RCA Television Service Center, ask your dealer, visit rca.com, look in the Yellow
Pages, or call 1-800-336-1900.
• Proof of purchase in the form of a bill of sale or receipted invoice which is evidence that the product is within the
warranty period must be presented to obtain warranty service. For rental firms, proof of first rental is also
required.
What your warranty does not cover:
• Customer instruction. (Your Owner’s Manual describes how to install, adjust, and operate your television. Any
additional information should be obtained from your dealer.)
• Installation and related adjustments.
• Signal reception problems not caused by your television.
• Damage from misuse or neglect.
• Batteries.
• Customer replacement fuses.
• Damage from images burnt onto the screen.
• A television that has been modified or incorporated into other products or is used for institutional or other
commercial purposes.
• A television purchased or serviced outside the U.S.A.
• Acts of nature, such as but not limited to lightning damage.
26 Chapter 5
Illustrations contained in this document are for representation only.
Page 29

Other Information
Product Registration:
• Please complete the online Product Registration on RCA.com or complete and mail the Product Registration Card
packed with your TV. It will make it easier to contact you should it ever be necessary. The return of the card is
not required for warranty coverage.
Limitation of Warranty:
• THE WARRANTY STATED ABOVE IS THE ONLY WARRANTY APPLICABLE TO THIS PRODUCT. ALL OTHER
WARRANTIES, EXPRESS OR IMPLIED (INCLUDING ALL IMPLIED WARRANTIES OF MERCHANT ABILITY OR
FITNESS FOR A PARTICULAR PURPOSE) ARE HEREBY DISCLAIMED. NO VERBAL OR WRITTEN INFORMA TION
GIVEN BY THOMSON MULTIMEDIA INC., ITS AGENTS OR EMPLOYEES SHALL CREATE A GUARANTY OR IN ANY
WAY INCREASE THE SCOPE OF THIS WARRANTY.
• REPAIR OR REPLACEMENT AS PROVIDED UNDER THIS WARRANTY IS THE EXCLUSIVE REMEDY OF THE
CONSUMER. THOMSON MULTIMEDIA INC. SHALL NOT BE LIABLE FOR INCIDENTAL OR CONSEQUENTIAL
DAMAGES RESULTING FROM THE USE OF THIS PRODUCT OR ARISING OUT OF ANY BREACH OF ANY EXPRESS
OR IMPLIED WARRANTY ON THIS PRODUCT. THIS DISCLAIMER OF WARRANTIES AND LIMITED WARRANTY
ARE GOVERNED BY THE LAWS OF THE STATE OF INDIANA. EXCEPT TO THE EXTENT PROHIBITED BY
APPLICABLE LAW, ANY IMPLIED WARRANTY OF MERCHANTABILITY OR FITNESS FOR A PARTICULAR PURPOSE
ON THIS PRODUCT IS LIMITED TO THE APPLICABLE WARRANTY PERIOD SET FORTH ABOVE.
How state law relates to this warranty:
• Some states do not allow the exclusion nor limitation of incidental or consequential damages, or limitations on
how long an implied warranty lasts, so the above limitations or exclusions may not apply to you.
• This warranty gives you specific legal rights, and you also may have other rights that vary from state to state.
If you purchased your product outside the United States:
• This warranty does not apply. Contact your dealer for warranty information.
Service calls which do not involve defective materials or workmanship are not covered by this
warranty. Costs of such service calls are the sole responsibility of the purchaser.
^
Chapter 5 27
Illustrations contained in this document are for representation only.
Page 30

Other Information
Accessory Order Form
Gold-Tipped cable
DT6DC (6-ft)
DT12DC (12-ft)
Gold-Tipped cable
VH84 (6-ft)
Gold-Tipped cable
VH83 (6-ft)
VH81 (3-ft)
VH82 (6-ft)
Description
Screw-on antenna cable (3-ft) VH81 $3.95
Screw-on antenna cable (6-ft) VH82 $4.95
Push-on antenna cable (6-ft) VH89 $5.95
Monaural VCR Dubbing Cable (6-ft) VH83 $5.95
Stereo VCR Dubbing Cable (6-ft) VH84 $9.95
Component Video Cables (6-ft) DT6DC $24.95
Component Video Cables (12-ft) DT12DC $34.95
S-Video Cable (6-ft) VH976 $7.95
S-Video Cable (12-ft) VH913 $14.95
2-way Signal Splitter VH47 $3.95
Amplified Antenna ANT200 $49.95
Remote Control (CRK76BC1) 254641 $22.35
Antenna Mixer (not shown) 193984 $11.15
Audio•Video Adapter (not shown) 228449 $4.45
Part No.
Price
How to Order
ON-LINE: www.rca.com (subject to availability)
BY PHONE: Have your Visa, MasterCard or Discover Card ready and
call 1-800-338-0376
Use this number only to place an order for accessory items on this
order from.
BY MAIL: Mail money order or check in US currency (made payable to
Thomson multimedia Inc.) to the following address:
Video Accessories
P.O. Box 8419
Ronks, PA 17573
All accessories are subject to availability; prices are subject to change.
Where applicable, we will ship a superseding model.
Qty
VH89 (6-ft)
28 Chapter 5
Illustrations contained in this document are for representation only.
Page 31

Page 32

Visit the RCA web site at www.rca.com
Please do not send any products to the Indianapolis address listed in this
manual or on the carton. This will only add delays in service for your
product.
IMPORTER: (for Mexico only)
Comercializadora Thomson de México, S.A. de C.V.
Miguel de Cervantes Saavedra 57
Col. Ampliación Granada
C.P. 11529 México D.F.
Telefono: (55) 25 81 53 20
R.F.C. CTM-980723 KS5
EXPORTER:
Thomson Inc.
10330 North Meridian Street
Indianapolis, IN 46290
©2002 Thomson Inc.
Trademark(s)® Registered
Marca(s) Registrada(s)
Printed in USA
Country of Origin: Mexico
TOCOM 16067450
THOMSON
Page 33

Guide de
l’utilisateur du
Téléviseur
Transforme encore le divertissement.
Veuillez lire ce manuel d’instructions
avant d’utiliser ce produit pour la
première fois.
TOCOM 16067450
Modèles : F27350, F32343, F32350
Page 34

Information importante
AVERTISSEMENT
Afin de réduire le risque
d’incendie et de choc
électrique, ne pas
exposer ce produit à la
pluie ou l’humidité.
Caution: To prevent electric shock, match wide blade of plug to wide slot, fully insert.
Attention : Pour éviter les chocs électriques, introduire la lame la plus large de la fiche
dans la borne correspondante de la prise et pousser jusqu’au fond.
Consommation d’énergie : 120 V ~ 60 Hz c.a. 128 W (modèle F27350),
142 W (modèles F32343 et F32350)
Se reporter à l’étiquette d’identification/capacité nominale située sur le panneau arrière du produit pour
connaître la tension de fonctionnement adéquate.
Le règlement de la FCC stipule que toute modification non autorisée de ce produit peut annuler le privilège
d’utilisation de l’utilisateur.
Attention : L’utilisation de jeux vidéo ou de tout autre accessoire projetant des images fixes pendant
des périodes prolongées peut entraîner une impression permanente sur l’écran (ou sur l’écran des
téléviseurs à projection). DE PLUS, certains logos de réseaux/programmes, numéros de téléphone, etc.,
peuvent entraîner des dommages similaires. Ces dommages ne sont pas couverts par votre garantie.
À l’installateur de câble : Ce rappel à pour but d’attirer attention sur l’article 54 du Code canadien de
l’électricité, partie 1 (article 820-40 du code de l’électricité des États-Unis) qui énonce des directives de
mise à la terre et stipule que le fil de terre du câble doit être connecté au système de mise à la terre de
l’édifice, aussi près que possible du point d’entrée.
ATTENTION
RISQUE DE CHOC
ÉLECTRIQUE, NE PAS OUVRIR
Ce symbole indique une
« tension dangereuse » dans le
produit qui présente un risque
d’électrocution ou de
blessure.
Attention : Afin de réduire le risque de
choc électrique, ne pas enlever le couvercle
(ou l’arrière). Ne contient aucune pièce
réparable par l’utilisateur. Confiez
l’entretien à du personnel qualifié.
Ce symbole indique des
instructions importantes
accompagnant le produit.
Enregistrement du produit
Veuillez remplir la carte d’enregistrement du produit (emballée séparément) et la retourner immédiatement,
ou vous enregistrer en ligne au rca.com. Le renvoi de cette carte nous permet de vous contacter si
nécessaire.
Information sur le produit
Conservez votre facture comme preuve d’achat ainsi que pour obtenir des pièces ou un service sous garantie.
Attachez-la ici et inscrivez le numéro de série et de modèle au cas où vous en auriez besoin. Les numéros se
trouvent sur le produit.
N° de modèle ____________________________________________________________________
N° de série ______________________________________________________________________
Date d’achat : ___________________________________________________________________
Détaillant / Adresse / Téléphone : ____________________________________________________
Page 35

Table des matières
Chapitre 1 : Connexions et réglage
Points à prendre en considération avant
d’effectuer les connexions ............................2
Connexion de composants à votre
téléviseur ........................................................3
Téléviseur + magnétoscope +
lecteur DVD ....................................................3
Prises à l’arrière du téléviseur ....................... 4
Installation des piles dans
la télécommande ........................................... 5
Exécution du réglage interactif ....................5
Réglage de la langue des menus................ 5
Recherche automatique complète
de canaux ......................................................... 5
Chapitre 2 : Utilisation de la
télécommande
Les touches de la télécommande .................. 6
Utilisation de la touche INPUT ................... 7
Programmation de la télécommande pour
commander d’autres composants .................7
Comment savoir si vous devez
programmer la télécommande ................... 7
Programmation de la télécommande ....... 7
Utilisation de la télécommande une fois
programmée ...................................................8
Codes pour télécommande ............................9
Chapitre 3 : Utilisation des
fonctions du téléviseur
Bannière de canal ........................................ 11
Pourquoi devriez-vous utiliser la fonction
de syntonisation automatique ................... 12
Réglage de la fonction de syntonisation
automatique .................................................. 12
Contrôles des parents et puce V ................ 13
Fonctionnement de la puce V ...................13
L’écran de limite des catégories TV .........14
Blocage des catégories d’âge ...............15
Visionnement des catégories d’âge .... 15
Blocage de thèmes particuliers ...........15
Visionnement de thèmes
particuliers ................................................ 16
Limite des catégories de films
(puce V) ...........................................................16
Blocage des émissions sans code............. 16
Blocage des canaux .....................................16
Blocage du panneau avant ........................17
Verrouillage / déverrouillage des
contrôles des parents ..................................17
Chapitre 4 : Utilisation du système
de menus du téléviseur
Utilisation du système de menus du
téléviseur ..................................................... 18
Menu Audio ................................................ 18
Menu Qualité de l’image............................ 19
Menu Écran ................................................. 20
Utilisation du sous-titrage ........................ 20
Menu Canal ................................................. 21
Menu Horloge ............................................. 22
Chapitre 5 : Autres informations
Dépannage................................................... 23
Entretien et nettoyage ............................... 25
Avant du téléviseur .................................... 25
Garantie limitée .......................................... 26
Accessoires .................................................. 28
1
Page 36

Chapitre 1 : Connexions et réglage
Points à prendre en considération avant d’effectuer les connexions
Prévenez les surtensions
• Connectez tous les composants avant de brancher leurs cordons d’alimentation dans la prise murale.
• Éteignez le téléviseur et (ou) le composant avant de connecter ou de déconnecter un câble.
• Assurez-vous que toutes les antennes et tous les câbles sont mis à la terre correctement. Consultez le feuillet des
mises en garde importantes qui accompagne votre téléviseur.
Protégez vos composants contre la surchauffe
• Évitez de bloquer les trous de ventilation sur tous les composants. Disposez les composants de façon que l’air puisse
circuler librement.
• N’empilez pas les composants.
• Lorsque vous placez les composants dans un meuble, assurez-vous que la ventilation est adéquate.
• Si vous connectez un récepteur ou un amplificateur audio, placez-le au sommet du support afin que la chaleur qui en
émane n’affecte pas les autres composants.
Disposez les câbles correctement pour éviter toute interférence audio
• Insérez tous les câbles à fond dans les prises correspondantes.
• Si vous placez des composants au-dessus du téléviseur, placez les câbles sur les côtés du panneau arrière plutôt que de
les laisser pendre au centre.
• Si votre antenne utilise des câbles à deux fils 300 ohms, évitez de les enrouler. De plus, maintenez les câbles à deux fils
à l’écart des câbles audio/vidéo.
Informations de sécurité importantes concernant le support et la base
Choisissez minutieusement l’emplacement de votre téléviseur. Placez le téléviseur sur une base ou un meuble suffisamment
grand et solide pour que le téléviseur ne soit pas renversé, poussé ou tiré. La chute du téléviseur pourrait entraîner des
blessures et (ou) endommager le téléviseur. Consultez le feuillet des mises en garde importantes qui accompagne votre
téléviseur.
Utilisez un éclairage indirect
Ne placez pas le téléviseur dans une pièce où il est directement exposé à la lumière du soleil ou à un éclairage. Utilisez un
éclairage modéré ou indirect.
Illustrations des connexions
Les câbles audio/vidéo sont généralement regroupés. Pour une meilleure visibilité, les illustrations de ce guide montrent
chaque câble séparément (audio gauche, audio droit et vidéo).
Câbles nécessaires pour connecter des composants à votre téléviseur
Les illustrations ci-dessous indiquent les câbles nécessaires pour les connexions représentées dans ce manuel.
Nota : Les câbles Audio/Vidéo (câbles A/V) sont généralement vendus tous ensemble, mais les illustrations de ce guide
montrent chaque câble séparément pour une meilleure visibilité.
Câbles audio/vidéo Câbles pour vidéo à
Les illustrations contenues dans ce document servent uniquement à des fins de représentation.
2 Chapitre 1
composantes (Y, P
, PR)
B
Câble coaxial
Câble S-vidéo
Page 37

Connexions et réglage
MAGNÉTOSCOPE
VIDEO
AUDIO
OUT
LR
IN
LR
TÉLÉVISEUR (panneau arrière)
R-AUDIO-L
VIDEO
P
R
P
B
Y
R-AUDIO-L
VIDEO
AUDIO
OUT
RL
S
-
V
I
D
E
1B
DVD
Pb
Pr
Y
S-VIDEO
O
IN
P
U
T
2
IN
P
U
T
1
1D
1C
VIDEO
IN FROM ANT
OUT TO TV
1A
OUT
R
CH3
CH4
3
Du câble ou
de l’antenne
2
CABLE/
ANTENNA
L
Connexion de composants à
votre téléviseur
Pour obtenir de l’information sur les
différentes prises situées à l’arrière de votre
téléviseur, qui servent à raccorder d’autres
composants de figurant pas dans la liste cidessous, voyez les pages qui suivent.
Nota : Si vous préférez, nous pouvons vous
fournir le nom d’un représentant de service
autorisé qui, moyennant des frais, se rendra
chez vous pour installer votre système de
divertissement électronique et pour vous
montrer à l’utiliser. Pour obtenir des détails
sur ce service, appelez le 1 888 206-3359 ou
visitez www.rca.com.
* Si vous connectez un câble S-vidéo, vous
devez connecter les câbles audio aux prises
INPUT1 AUDIO R et L à l’arrière du téléviseur
non aux prises INPUT2 AUDIO.
et
Téléviseur + magnétoscope + lecteur DVD
1. Connectez votre téléviseur à votre lecteur DVD
A. Connectez les câbles audio (blanc et rouge) dans les prises INPUT 2 AUDIO R et L à l’arrière du téléviseur et dans
les prises de sortie Audio du lecteur DVD.
B. Si votre lecteur DVD a des prises de sortie pour composant (Y, P
Y, P
, PR du lecteur DVD et aux prises Y, PB, PR à l’arrière du téléviseur. Si votre lecteur DVD n’a pas de prises
B
, PR voyez C.
Y, P
B
- OU -
C. Si votre lecteur DVD comporte une prise S-vidéo, connectez le câble à la prise S-Video du lecteur DVD et à la
prise S-VIDEO à l’arrière du téléviseur. Si votre lecteur DVD n’a pas de prise S-Video, voyez D.
- OU -
D. Connectez le câble vidéo (jaune) dans la prise de sortie VIDEO à l’arrière du lecteur DVD et dans la prise d’entrée
INPUT2 VIDEO à l’arrière du téléviseur.
, PR), connectez les trois câbles vidéo aux prises
B
2. Connectez votre téléviseur à votre magnétoscope
Connectez un câble coaxial dans la prise CABLE/ANTENNA de votre téléviseur et dans la prise de sortie de votre
magnétoscope (parfois marquée OUT TO TV).
3. Connectez le câble ou l’antenne à votre magnétoscope
Connectez le câble coaxial à partir de la prise de sortie du câble ou de l’antenne dans la prise Input de votre
magnétoscope (parfois marquée IN FROM ANTENNA ou IN FROM ANT).
Chapitre 1 3
Les illustrations contenues dans ce document servent uniquement à des fins de représentation.
Page 38

Connexions et réglage
Prises à l’arrière du téléviseur
Cette section décrit chaque prise située à l’arrière du téléviseur. Lorsque vous connectez des câbles A/V, assurez-vous de
connecter les sorties et les entrées correspondantes (vidéo à vidéo, audio droite à audio droite, etc.).
CABLE/ANTENNA Vous permet de connecter un câble coaxial afin de recevoir un signal d’antenne, de câble ou de
câblosélecteur.
INPUT1 Vous permet de connecter un composant, comme un
magnétoscope, un lecteur DVD, un récepteur satellite ou un lecteur de
disques laser.
• VIDEO permet la connexion vidéo composite. Le connecteur vidéo
est généralement jaune.
• R AUDIO permet la connexion à l’audio droit. Le connecteur audio
droit est généralement rouge.
• L AUDIO permet la connexion à l’audio gauche. Le connecteur
audio droit est généralement blanc.
• S-VIDEO offre une meilleure qualité d’image que les prises vidéo
régulières (INPUT1 et INPUT2 VIDEO) parce que la portion couleur
du signal est séparée de la portion noir et blanc de l’image. Si vous
utilisez le S-vidéo, assurez-vous de connecter les câbles audio
gauche et droit dans les prises R-AUDIO-L INPUT1.
INPUT2 Vous permet de connecter un composant, comme un
magnétoscope, un appareil d’accès à Internet, un lecteur DVD ou un
lecteur de disques laser. Ses prises AUDIO et VIDEO sont identiques à
celles décrites pour l’entrée INPUT1 ci-dessus.
, PR (Vidéo à composantes) donne la meilleure qualité d’image,
•Y, P
B
car le signal vidéo est divisé en trois composantes. Utilisez trois
câbles de type vidéo pour effectuer la connexion. Si vous utilisez
, PR, assurez-vous de connecter les câbles audio gauche et
Y, P
B
droit dans les prises R-AUDIO-L INPUT2.
VIDEO
VIDEO
Y
R-AUDIO-L
I
V
-
S
R-AUDIO-L
P
B
E
D
P
INPUT1
O
INPUT2
R
AUDIO OUT R/L Vous permet de connecter un amplificateur ou un
récepteur audio afin d’améliorer la qualité du son.
O
I
D
U
A
T
U
O
RL
Les illustrations contenues dans ce document servent uniquement à des fins de représentation.
4 Chapitre 1
Nota : Vous pouvez éteindre les haut-parleurs du téléviseur à partir du
menu Audio. Voyez la page 19 pour obtenir des renseignements
supplémentaires.
Page 39

Connexions et réglage
Installation des piles dans la télécommande
1. Enlevez le couvercle du compartiment à piles de la télécommande.
2. Insérez des piles neuves. Assurez-vous de bien suivre les indications de polarité sur le diagramme (+ et -).
3. Replacez le couvercle du compartiment à piles sur la télécommande.
Mise en marche du téléviseur
Appuyez sur la touche TV de la télécommande, ou sur le bouton POWER du téléviseur (le premier écran du réglage
interactif apparaît). Les menus disparaissent après un certain « laps de temps » si vous ne faites aucune sélection. Les
conseils fournis dans cette section vous indiquent comment accéder manuellement aux menus de réglage.
Nota : Lorsque vous appuyez sur la touche TV, le téléviseur se met en marche et la télécommande se met en mode TV. « Mode
TV » signifie que les touches de la télécommande activent les fonctions du téléviseur.
Exécution du réglage interactif
Le système de menus de votre téléviseur vous permet de régler les fonctions du téléviseur. La première fois que vous
allumez votre téléviseur, les écrans de réglage apparaissent automatiquement. Le téléviseur vous pose des questions et
vous répondez pour qu’il exécute les réglages appropriés.
RÉGLAGE
Choisissez la langue de votre
choix pour ces menus.
1 English
2 Español
3 Français
Utilisez les touches à flèche de la
télécommande pour mettre en surbrillance
une option.
RÉGLAGE
Voulez-vous que le TV recherche
tous les canaux disponibles?
1 Recherche des canaux
2 Passer cette étape
Appuyez sur OK pour sélectionner.
Réglage de la langue des menus
1. Utilisez les touches de la télécommande pour mettre en surbrillance
votre choix de langue pour le système de menus.
2. Appuyez sur OK pour sélectionner cette langue.
Recherche automatique complète de canaux
Le téléviseur recherche tous les canaux pouvant être visionnés par
l’intermédiaire de votre système d’antenne ou de câble. Cette fonction
est marquée « auto-programmation ».
1. Appuyez sur OK pour indiquer au téléviseur de rechercher des
canaux. Un indicateur de progression s’affiche à l’écran.
2. Lorsque l’écran affiche que la recherche est terminée, appuyez sur
OK.
Chapitre 1 5
Les illustrations contenues dans ce document servent uniquement à des fins de représentation.
Page 40

Chapitre 2 : Utilisation de la télécommande
STOP
AUSE
ON OFF
PLA
SOUND
GO
ACK
C
+
C
H
V
V
O
L
SKIP
MUTE
O
MENU
CLEAR
GUIDE
A
A
3
5
6
7
8
9
0
UT
CR1
DÉL
V
Les touches de la télécommande
(0 à 9) Touches numériques Elles permettent d’entrer directement le numéro du canal
et de régler l’heure au moyen de la télécommande.
Pour entrer un canal à deux chiffres, appuyez sur les deux chiffres. Pour entrer un canal à
trois chiffres, appuyez sur la première touche et maintenez-la enfoncée pendant deux
secondes jusqu’à l’apparition de deux tirets (– –) à droite du chiffre, puis entrez les deux
autres chiffres. Exemple : pour régler sur le canal 123, appuyez sur 1 et maintenez cette
touche enfoncée pendant deux secondes, appuyez sur 2, puis appuyez sur 3.
B
INF
ANTENNA (Antenne) Cette touche fonctionne comme une touche TV/VCR en mode VCR
(magnétoscope) et comme une touche TV/RCV (récepteur) en mode SAT•CABLE.
AUX (auxiliaire) Met la télécommande en mode auxiliaire pour commander le composant
pour lequel vous avez programmé la touche AUX. Vous pouvez programmer cette touche
pour commander un câblosélecteur, des composants audio RCA, un magnétoscope ou un
récepteur satellite. Si vous réglez la fonction de syntonisation automatique (Chapitre 3),
appuyez sur la touche AUX pour syntoniser automatiquement le téléviseur sur le bon canal.
INP
NTENN
Boutons CH (haut et bas) Faites défiler la liste actuelle des canaux vers le haut ou vers le
bas. Appuyez une fois pour passer au canal précédent ou suivant ou maintenez la touche
enfoncée pour continuer à changer les canaux.
CLEAR (Effacer) Efface tout menu ou affichage de l’écran et vous ramène au visionnement
normal.
DÉL (diode électroluminescente) Le petit voyant sur la télécommande qui s’allume lorsque
vous programmez la télécommande. Il s’allume également lorsque vous appuyez sur une
touche valide de la télécommande.
DVD Met la télécommande en mode DVD. Si vous réglez la fonction de syntonisation automatique (Chapitre 3), appuyez
sur la touche DVD pour syntoniser automatiquement le téléviseur sur le bon canal. La touche DVD n’est pas programmable
et commande la plupart des lecteurs DVD de marque RCA.
FORWARD (Avant) Si vous faites fonctionner un magnétoscope ou un lecteur DVD avec la télécommande, appuyez sur
FORWARD pour avancer sur le disque ou faire avancer la bande vidéo.
GO BACK (Retour) Vous ramène au canal précédent.
GUIDE Si vous commandez un autre composant comportant un guide, cette touche permet d’accéder au guide à l’écran.
INFO Cette touche affiche les informations sur le canal.
INPUT (Entrée) En mode TV, appuyez sur INPUT pour alterner entre les canaux d’entrée vidéo disponibles (FRNT, VID1/
SVID1, VID2/CVID2, et le canal actuel). En mode SAT, appuyez sur cette touche pour sélectionner les listes de canaux
disponibles.
MENU Affiche le menu principal du téléviseur.
MUTE (Silencieux) Abaisse le volume au niveau le plus bas. Appuyez de nouveau sur cette touche pour rétablir le volume.
OK Lorsqu’un menu est affiché à l’écran, appuyez sur OK pour sélectionner l’élément mis en surbrillance.
ON•OFF (Allumé•Éteint) Allume ou éteint le téléviseur. Lorsque la télécommande est dans un autre mode
(magnétoscope, lecteur DVD, satellite, etc.) et programmée de façon à commander le composant correspondant, vous
pouvez appuyer sur la touche ON•OFF pour allumer ou éteindre ce composant.
PAUSE Si vous faites fonctionner un magnétoscope ou un lecteur DVD avec la télécommande, appuyez sur PAUSE
pendant la lecture du disque ou de la vidéocassette pour marquer une pause.
PLAY (Lecture) Si vous faites fonctionner un magnétoscope ou un lecteur DVD, appuyez sur cette touche pour démarrer
la lecture du disque ou de la vidéocassette.
RECORD (Enregistrement) Si la télécommande est en mode VCR, appuyez sur RECORD pour commencer l’enregistrement.
REVERSE (Arrière) Si vous faites fonctionner un magnétoscope ou un lecteur DVD, appuyez sur REVERSE pour revenir en
arrière sur un disque ou sur une bande vidéo.
Les illustrations contenues dans ce document servent uniquement à des fins de représentation.
6 Chapitre 2
Page 41

Utilisation de la télécommande
SAT•CABLE Met la télécommande en mode SAT•CABLE. Si vous réglez la fonction de syntonisation automatique
(Chapitre 3), appuyez sur la touche SAT•CABLE pour syntoniser automatiquement le téléviseur sur le bon canal.
SKIP (Sauter) Si vous appuyez sur cette touche avant de changer de canal, le téléviseur attend 30 secondes avant de
revenir au canal d’origine. Chaque fois que vous appuyez sur SKIP, vous ajoutez 30 secondes (c’est à dire que si vous appuyez
deux fois sur SKIP, le téléviseur attend 60 secondes et revient au canal d’origine). Appuyez sur CLEAR pour annuler le
minuteur de saut.
SOUND (Son) Affiche le menu du PROCESSEUR DE L’AUDIO.
STOP (Arrêt) Si vous faites fonctionner un magnétoscope ou un lecteur DVD, appuyez sur cette touche pour arrêter la
lecture du disque ou de la vidéocassette.
Touches à flèche (haut, bas, gauche, droite) Pour se déplacer dans le système de menus à l’écran.
Touches VOL (haut ou bas) Abaissent ou augmentent le volume du téléviseur.
TV Allume le téléviseur et met la télécommande en mode TV. Affiche également les informations sur les canaux.
VCR1 Met la télécommande en mode magnétoscope. Si vous réglez la fonction de syntonisation automatique (Chapitre 3),
appuyez sur la touche VCR1 pour syntoniser le téléviseur sur le bon canal.
VCR2 Met la télécommande en mode VCR (magnétoscope). Si vous réglez la fonction de syntonisation automatique
(Chapitre 3), appuyez sur la touche VCR2 pour syntoniser le téléviseur sur le bon canal.
Utilisation de la touche INPUT
Utilisez la touche INPUT pour faire défiler les sources d’entrée disponibles (FRNT, VID1/SVID1, VID2/CVID2, et le canal actuel)
et visionner le contenu du composant que vous avez branché au téléviseur.
1. Appuyez sur TV pour mettre la télécommande en mode TV. Vérifiez que le composant que vous voulez utiliser est bien
allumé.
2. Appuyez sur INPUT pour syntoniser la source d’entrée disponible et regarder le composant.
3. Appuyez de nouveau pour syntoniser encore une fois sur le canal que vous regardiez précédemment.
ON OFF
VCR1
CABLE
SAT
AUX
VCR2
DVD
+
H
C
V
L
O
O
L
V
C
H
-
CLEAR
PLAYREVERSE
STOP
Programmation de la télécommande pour commander
d’autres composants
La télécommande universelle peut être programmée pour commander la plupart des marques
de magnétoscopes, de lecteurs DVD, de récepteurs audio, de récepteurs satellite et de
câblosélecteurs. La télécommande est déjà programmée pour commander la plupart des
magnétoscopes, des lecteurs DVD, des récepteurs audio et des récepteurs satellite RCA, GE et
Proscan. La touche TV ne peut être programmée.
Comment savoir si vous devez programmer la télécommande
Pour déterminer si la télécommande universelle doit être programmée, ALLUMEZ un composant
(comme un magnétoscope), pointez la télécommande vers celui-ci et appuyez sur la touche VCR.
Appuyez ensuite sur ON•OFF ou CH + ou – pour voir si le magnétoscope répond à la
Utilisez ces touches
pour programmer la
télécommande de
façon à commander
un autre composant.
Il se peut que cette
télécommande ne
télécommande. Sinon, la télécommande doit être programmée.
Programmation de la télécommande
Il existe deux méthodes pour programmer la télécommande : la recherche automatique du code
et l’entrée directe. Voici les instructions pour chacune.
puisse faire
fonctionner tous les
modèles de toutes
les marques.
Chapitre 2 7
Les illustrations contenues dans ce document servent uniquement à des fins de représentation.
Page 42

Utilisation de la télécommande
Utilisation de la recherche automatique du code
1. Allumez le composant que vous voulez commander par télécommande (magnétoscope, etc.).
Nota : V ous ne pouvez utiliser la fonction de recherche pour les touches de composants AUX ou DVD.
2. Maintenez appuyée la touche de la télécommande correspondant au composant que vous voulez commander (VCR,
etc.). Tout en maintenant la touche du composant enfoncée, appuyez sur la touche ON•OFF (lorsque le voyant sur la
télécommande s’allume, relâchez les deux touches).
3. Appuyez sur PLAY (le voyant sur la télécommande, situé en-dessous de la touche ON•OFF, commence à clignoter).
La télécommande recherche la première série de codes pour les composants (il y a 20 séries de codes). Si, après 5
secondes, le composant que vous voulez commander ne s’éteint pas automatiquement, appuyez de nouveau sur la
touche PLAY (le voyant commence à clignoter à nouveau pendant que la télécommande poursuit sa recherche dans les
autres séries de codes).
Continuez d’appuyer sur PLAY jusqu’à ce que le composant s’éteigne.
Nota : Si le composant ne s’éteint pas après que vous ayez appuyé 20 fois sur la touche PLA Y, le composant ne peut être
programmé.
4. Appuyez sur la touche REVERSE et attendez deux secondes. Répétez cette étape jusqu’à ce que le composant se
rallume.
5. Pour terminer, appuyez sur la touche STOP et maintenez-la enfoncée jusqu’à ce que le voyant de la télécommande
s’éteigne.
Utilisation de l’entrée directe
1. Allumez le composant que vous désirez commander avec la télécommande.
Nota : La touche DVD n’est pas programmable et commande la plupart des lecteurs DVD de marque RCA.
La touche AUX est programmable seulement pour commander la plupart des appareils audio de marque RCA.
2. Identifiez la marque et le(s) numéro(s) de code du composant dans la liste des codes aux pages 9 et 10.
3. Appuyez sur la touche de la télécommande correspondant au composant que vous voulez commander (VCR, etc.) et
maintenez-la enfoncée.
4. Entrez le code indiqué dans la liste des codes.
5. Relâchez la touche du composant.
6. Appuyez sur ON•OFF pour voir si le composant répond à la télécommande. S’il ne répond pas, essayez d’appuyer sur la
touche du composant, puis de nouveau sur ON•OFF.
7. Si vous n’obtenez pas de réponse, répétez ces étapes en utilisant le code suivant dans la liste correspondant à la
marque du composant, jusqu’à ce que le composant réponde à la télécommande.
Utilisation de la télécommande une fois programmée
Une fois que la télécommande est programmée, vous êtes prêt à l’utiliser pour commander vos composants. Pour faire
fonctionner le composant :
1. Appuyez sur la touche du composant (TV, VCR1, VCR2, DVD, AUX, ou SAT•CABLE) pour régler la télécommande afin
qu’elle commande le composant.
2. Appuyez sur ON•OFF pour ALLUMER ou ÉTEINDRE le composant.
3. Utilisez les touches de la télécommande qui correspondent à ce composant.
Nota : Si vous continuez d’appuyer sur des touches et que rien ne se passe, la télécommande n’est probablement pas dans le
bon mode. V ous devez appuyer sur la touche du composant correspondant à l’appareil que vous voulez faire fonctionner
(p. ex., si vous voulez utiliser le magnétoscope, appuyez sur la touche VCR1 de la télécommande pour la mettre en mode
magnétoscope).
Les illustrations contenues dans ce document servent uniquement à des fins de représentation.
8 Chapitre 2
Page 43

Codes pour télécommande
Codes pour magnétoscopes
Programmables pour les touches VCR1,
VCR2 et AUX.
Admiral .............................................................. 2131
Adventura ......................................................... 2026
Aiko .................................................................... 2027
Aiwa ....................................................... 2002, 2026
Akai 2003, 2004, 2005, 2007, 2008, 2111,2112,
American High ................................................ 2021
Asha ................................................................... 2013
Audio Dynamics .................................. 2009, 2010
Audiovox ........................................................... 2014
Bell & Howell ................................................... 2011
Beaumark .......................................................... 2013
Broksonic .............................................. 2012, 2025
Calix ................................................................... 2014
Candle ... 2013, 2014, 2015, 2016, 2017, 2018,
Canon ..........................................2021, 2022, 2114
Capehart ................................................ 2020, 2110
Carver ................................................................ 2062
CCE ......................................................... 2027, 2061
Citizen ............. 2013, 2014, 2015, 2016, 2017,
Colortyme ......................................................... 2009
Colt ..................................................................... 2061
Craig ............................... 2013, 2014, 2023, 2061
Curtis Mathes ............. 2000, 2002, 2009, 2013,
.................. 2016, 2018, 2021, 2022, 2024, 2115
Cybernex ........................................................... 2013
Daewoo . 2015, 2017, 2019,2025, 2026, 2027,
Daytron ...............................................................2110
Dbx ......................................................... 2009, 2010
Dimensia ........................................................... 2000
Dynatech ............................................... 2002, 2026
Electrohome ......................................... 2014, 2029
Electrophonic ................................................... 2014
Emerson .................................... 2002, 2012,2014,
2015, 2021, 2024, 2025,2026,2029, 2030,
2032, 2033, 2034, 2035, 2036, 2037, 2038,
2039, 2040, 2041, 2042, 2044, 2045, 2047,
2065, 2105, 2113, 2116, 2117, 2130
Fisher .... 2011, 2023, 2048, 2049, 2050, 2051,
Fuji ........................................................... 2021, 2119
Funai ...................................................... 2002, 2026
Garrard .............................................................. 2026
GE 2000, 2001, 2013, 2021, 2022, 2053, 2115,
Goldstar ............. 2009, 2014, 2018, 2054, 2121
Gradiente .......................................................... 2026
Harley Davidson .............................................. 2026
Harman Kardon ............................................... 2009
Harwood ........................................................... 2061
Headquarter ..................................................... 2011
Hitachi ... 2002, 2055, 2056, 2057, 2107, 2111,
HI-Q ................................................................... 2023
Instant Replay ................................................. 2021
JCL ...................................................................... 2021
JC Penney2009, 2010, 2011, 2013, 2014, 2021,
2022, 2055, 2056, 2058, 2059, 2060, 2107,
Jensen ......................................... 2055, 2056, 2111
JVC 2009, 2010, 2011, 2018, 2058, 2111, 2123
Kenwood 2009, 2010, 2011, 2016, 2018, 2058,
KLH ..................................................................... 2061
Kodak ..................................................... 2014, 2021
Lloyd ....................................................... 2002, 2026
Logik ................................................................... 2061
LXI ....................................................................... 2014
Magnavox ........ 2021, 2022, 2062, 2063, 2104,
Magnin .............................................................. 2013
2113
2019
2018,2019,2027
2028, 2110
2052,2118
2120
2120, 2122
2118
2111,2123
2108, 2124
Utilisation de la télécommande
Marantz .....................................2009, 2010, 2011,
.................. 2016, 2018, 2021, 2058, 2062,2064
Marta ................................................................. 2014
Masushita ......................................................... 2021
MEI ..................................................................... 2021
Memorex .............................................. 2002, 2011,
.... 2013, 2014, 2021, 2023, 2026, 2104, 2131
MGA ........................................... 2029, 2065, 2113
MGN Technology ............................................ 2013
Midland ............................................................. 2053
Minolta ...................................... 2055, 2056, 2107
Mitsubishi ....... 2029, 2055, 2056, 2065, 2066,
2067, 2069, 2070, 2071, 2072, 2073, 2074,
Montgomery Ward ............................. 2075, 2131
Motorola ............................................... 2021,2131
MTC ............................................ 2002, 2013, 2026
Multitech2002, 2013, 2016, 2026, 2053, 2061
NEC ..................... 2009, 2010, 2011, 2016, 2018,
2058, 2064, 2076, 2078, 2079, 2111, 2123
Nikko .................................................................. 2014
Noblex ............................................................... 2013
Olympus ............................................................ 2021
Optimus ................................................. 2014, 2131
Optonica ........................................................... 2096
Orion .................................................................. 2035
Panasonic2021, 2022, 2109, 2125, 2126, 2127
Pentax ................ 2016, 2055, 2056, 2107, 2120
Pentex Research ............................................. 2018
Philco ............................. 2021, 2022, 2062, 2063
Philips ............................ 2021, 2062, 2096, 2124
Pilot .................................................................... 2014
Pioneer .............. 2010, 2055, 2080, 2081, 2123
Portland .......................... 2016, 2017, 2019, 2110
Proscan .................................................. 2000, 2001
Protec ................................................................. 2061
Pulsar ................................................................. 2104
Quarter .............................................................. 2011
Quartz ................................................................ 2011
Quasar ....................................... 2021, 2022, 2125
RCA .................... 2000, 2001, 2003, 2013, 2021,
2055, 2056, 2082, 2083, 2084,2085,
2086,2087, 2088, 2089, 2090, 2091, 2107,
Radioshack/Realistic ............. 2002, 2011, 2013,
2014, 2021, 2022, 2023, 2026, 2029, 2049,
Radix .................................................................. 2014
Randex ............................................................... 2014
Ricoh .................................................................. 2128
Runco ................................................................. 2104
Samsung 2005, 2013, 2015, 2033, 2053, 2112
Sanky ..................................................... 2131, 2104
Sansui ............................. 2010, 2092, 2111, 2123
Sanyo ......................................... 2011, 2013, 2023
Scott ...... 2012, 2015, 2025, 2032, 2035, 2038,
Sears ...................2011, 2014, 2021, 2023, 2048,
2049, 2050, 2051, 2055, 2056, 2107, 2118
Sharp ..... 2002, 2017, 2029, 2094, 2095, 2096,
Shintom .........................2004, 2056, 2061, 2098
Shogun .............................................................. 2013
Signature ............................................. 2002, 2131
Singer ......................................... 2021, 2061, 2128
Sony ....... 2002, 2004, 2098, 2099, 2119, 2128
STS .......................................................... 2021, 2107
Sylvania 2002, 2021, 2022, 2026, 2062, 2063,
Symphonic ............................................ 2002, 2026
Tandy ...................................................... 2002, 2011
Tashiko ............................................................... 2014
Tatung ..................................................... 2058, 2111
TEAC .................... 2002, 2026, 2058, 2085, 2111
Technics ................................................. 2021, 2109
Teknika ... 2002, 2014, 2021, 2026, 2100, 2129
TMK ............................................ 2013, 2024, 2047
Toshiba ............. 2015, 2049, 2051, 2055, 2065,
2106, 2113, 2123
2115, 2120, 2125
2050, 2096, 2131
2065, 2093, 2116
2065, 2124
2093, 2116
ToteVision ............................................. 2013, 2014
Unitech .............................................................. 2013
Vector Research .......... 2009, 2010, 2015, 2016
Victor ................................................................. 2010
Video Concepts 2009, 2010, 2015, 2016, 2113
Videosonic ........................................................ 2013
Wards .. , 2002, 2013, 2014, 2015, 2021, 2023,
2026, 2029, 2055, 2056, 2061, 2096, 2101,
XR-1000 .................................... 2021, 2026, 2061
Yamaha.... 2009, 2010, 2011, 2018, 2058, 2111
Zenith ................. 2004, 2098, 2104, 2119, 2128
2102, 2103, 2107, 2116, 2131
Câblosélecteurs
Programmables pour les touches
SAT•CABLE et AUX
ABC ......................... 5002, 5003, 5004, 5005,
Antronix ................................................ 5008, 5009
Archer ............................. 5008, 5009, 5010, 5011
Cabletenna ....................................................... 5008
Cableview ......................................................... 5008
Century .............................................................. 5011
Citizen ............................................................... 5011
Colour Voice ......................................... 5012, 5013
Comtronics ........................................... 5014, 5015
Contec ............................................................... 5016
Est ....................................................................... 5017
Garrard .............................................................. 5011
GC Electronics ................................................. 5009
Gemini ....................................... 5018, 5019, 5049
General Instrument ........................................5003
Hamlin ............... 5020, 5021, 5022, 5035, 5045
Hitachi ............................................................... 5003
Hytex .................................................................. 5002
Jasco .................................................................. 5011
Jerrold .... 5003, 5005, 5007,5018, 5023, 5024,
Magnavox ......................................................... 5025
Memorex ........................................................... 5026
Movie Time ............................... 5002, 5027, 5028
NSC ............................................. 5002, 5027, 5028
Oak .............................................. 5002,5016, 5029
Panasonic ..............................................5048, 5052
Paragon ............................................................. 5026
Philips ............................ 5011, 5012, 5013, 5019,
Pioneer .................................................. 5033, 5034
Pulsar ................................................................. 5026
RCA .............................................5047, 5049, 5052
Realistic .................................................5009, 5049
Regal ...................................................... 5022, 5035
Regency ............................................................. 5017
Rembrandt ........................................................5003
Runco ................................................................. 5026
Samsung ............................................... 5014, 5034
Scientific Atlanta ...... 5006, 5036, 5037, 5038
Signal ..................................................... 5014, 5018
2131
Signature .......................................................... 5003
SL Marx ............................................................. 5014
Sprucer .............................................................. 5052
Starcom ..................................... 5007, 5018, 5053
Stargate ................................................ 5014, 5018
Starquest .......................................................... 5018
Tandy ..................................................................5040
Teleview ............................................................ 5014
Tocom ........................................ 5004, 5023, 5041
Toshiba .............................................................. 5026
Tusa .................................................................... 5018
TV86 ................................................................... 5027
Unika .......................................... 5008, 5009, 5011
United Artists .................................................. 5002
United Cable .................................................... 5053
Universal ....................... 5008, 5009, 5010, 5011
Videoway .......................................................... 5044
Viewstar ........................ 5015, 5025, 5027, 5040
Zenith ........................................ 5026, 5050, 5051
5025, 5030, 5031, 5032
5006, 5007, 5053
5046, 5053
Chapitre 2 9
Les illustrations contenues dans ce document servent uniquement à des fins de représentation.
Page 44

Utilisation de la télécommande
Récepteurs satellite
Programmables pour les touches
SAT•CABLE et AUX
Chapparal ............................................ 5056, 5057
Drake ..................................................... 5058, 5059
GE ...................................................................... 5000
General Instruments ............. 5060, 5061, 5062
Panasonic ..........................................................5075
Primestar ...........................................................5076
Proscan ............................................................. 5000
RCA .................................................................... 5000
Realistic ............................................................ 5063
Sony ................................................................... 5072
STS1 ................................................................... 5064
STS2 ................................................................... 5065
STS3 ................................................................... 5066
STS4 ................................................................... 5067
Toshiba ............................................................. 5068
Toshiba .............................................................. 5073
Uniden .............................................................. 5069
Audio
Programmable pour la touche AUX.
RCA et Dimensia
AM/FM ..........................................................4003
Aux ...................................................................... 4004
Phono .................................................................. 4005
CD ......................................................................... 4007
Cassette .............................................................. 4006
Les illustrations contenues dans ce document servent uniquement à des fins de représentation.
10 Chapitre 2
Page 45

Chapitre 3 : Utilisation des fonctions du téléviseur
12:01 ESPN 60
SAP
00:00
Bannière de canal
Plusieurs indicateurs risquent d’apparaître lorsque vous appuyez sur les touches TV ou INFO de la télécommande. Cet
affichage est appelé Bannière de canal. La liste suivante décrit les éléments de l’écran Bannière de canal (de gauche à
droite et de haut en bas).
12:01 Affiche l’heure actuelle.
Le cadenas indique que les Contrôles des parents sont verrouillés ou déverrouillés.
Affiché lorsque la fonction de sous-titrage est disponible sur le canal visionné.
ESPN Affiche le nom du canal actuel.
60 Affiche le canal ou le canal d’entrée actuel.
Silence est affiché lorsque vous coupez l’audio.
Stéréo est affiché lorsque le canal actuel diffuse en stéréo.
SAP Affiché lorsque le canal actuel diffuse un SAP (deuxième piste audio).
Affiché lorsque le minuteur est programmé.
00:00 Affiché pour faire le décompte lorsque vous utilisez la fonction permettant de sauter (SKIP) les annonces
Chapitre 3 11
publicitaires.
Les illustrations contenues dans ce document servent uniquement à des fins de représentation.
Page 46

Utilisation des fonctions du téléviseur
MENU PRINCIPAL
1 Audio
2 Qualité de l'image
3 Écran
4 Canal
5 Horloge
6 Contrôles des parents
7 Menu GUIDE Plus+
1 Sorte de signal
8 Réglage
2
Recherche autom. de canaux
3 Liste et rubriques
0 Sortie
4 Syntonisation automatique
0 Sortie
CANAL
Pourquoi devriez-vous utiliser la fonction de
syntonisation automatique
La fonction de syntonisation automatique syntonise automatiquement
le téléviseur au bon canal lorsque vous utilisez les divers composants
connectés à votre téléviseur (comme un magnétoscope, un lecteur DVD,
etc.). Une fois que vous avez réglé la fonction de syntonisation
automatique dans le système de menus, vous n’êtes pas obligé de passer
le téléviseur sur le canal 3, par exemple, lorsque vous voulez regarder la
vidéocassette qui se trouve dans votre magnétoscope.
Réglage de la fonction de syntonisation
automatique
La fonction de syntonisation automatique se règle avec les touches de la
télécommande qui correspondent aux composants branchés à votre
téléviseur. Lorsque vous réglez la syntonisation automatique, vous
indiquez au téléviseur le canal qu’il doit syntoniser lorsque vous appuyez
sur la touche VCR, DVD ou SAT•CABLE de la télécommande.
1. Appuyez sur MENU (le MENU PRINCIPAL apparaît).
2. Mettez Canal en surbrillance et appuyez sur la touche OK de la télécommande.
3. Mettez Syntonisation automatique en surbrillance et appuyez sur la touche OK.
4. Choisissez le canal que vous voulez programmer :
Réglage du canal VCR1 Affiche une liste de choix qui vous permet de sélectionner le canal syntonisé par le
téléviseur à partir de la touche VCR1 sur la télécommande.
Réglage du canal VCR2 Affiche une liste de choix qui vous permet de sélectionner le canal syntonisé par le
téléviseur à partir de la touche VCR2 sur la télécommande.
Réglage du canal DVD Affiche une liste de choix qui vous permet de sélectionner le canal syntonisé par le
téléviseur à partir de la touche DVD.
Programmation du canal SAT/CABLE Affiche une liste qui vous permet de régler le canal syntonisé par le
téléviseur lorsque vous appuyez sur SAT•CABLE.
5. Mettez en surbrillance l’option correspondant à la façon dont le composant est branché au téléviseur, puis appuyez
sur OK. Les différentes options et une brève explication suivent :
Pas de connexion Sélectionnez cette option si vous n’avez pas ce type de composant connecté au téléviseur ou si
vous ne voulez pas syntoniser automatiquement le bon canal lorsque vous utilisez ce composant.
Canal 2 (SAT/CABLE seulement) Le composant (satellite ou câblosélecteur) est connecté à la prise CABLE/ANTENNA
à l’arrière du téléviseur, et vous voulez que le téléviseur syntonise le canal 2 lorsque vous appuyez sur la touche
SAT•CABLE de la télécommande. Rappel : vérifiez que le commutateur Channel 2/3/4 du composant est bien réglé au
canal 2. Généralement, ce commutateur se trouve à l’arrière du composant.
Canal 3 Le composant est connecté à la prise CABLE/ANTENNA à l’arrière du téléviseur, et vous voulez que le
téléviseur syntonise le canal 3 lorsque vous appuyez sur la touche correspondante de la télécommande. Rappel :
vérifiez que le sélecteur Channel 3/4 est bien réglé au canal 3.
Canal 4 Le composant est connecté à la prise CABLE/ANTENNA à l’arrière du téléviseur, et vous voulez que le
téléviseur syntonise le canal 4 lorsque vous appuyez sur la touche correspondante de la télécommande. Rappel :
vérifiez que le sélecteur Channel 3/4 est bien réglé au canal 4.
Entrée vidéo 1 Le composant est connecté à la prise INPUT1 VIDEO à l’arrière du téléviseur et vous voulez que le
téléviseur syntonise un canal d’entrée VID1 lorsque vous appuyez sur la touche du composant.
Entrée vidéo 2 Le composant est connecté à la prise INPUT2 VIDEO à l’arrière du téléviseur et vous voulez que le
téléviseur syntonise un canal d’entrée VID2 lorsque vous appuyez sur la touche du composant.
Nota : Vous devriez choisir cette l’entrée vidéo 1 ou 2 si votre magnétoscope est connecté au téléviseur avec des câbles A/V.
Les illustrations contenues dans ce document servent uniquement à des fins de représentation.
12 Chapitre 3
Page 47

Utilisation des fonctions du téléviseur
Contrôles des parents et puce V
Les trois premières options du menu Contrôles des parents dépendent d’un élément logiciel (communément appelé puce V)
à l’intérieur du téléviseur, qui permet de bloquer les émissions et les films contenant de la violence, du sexe ou un thème
qui, selon vous, ne devrait pas être regardé par des enfants.
Une fois que vous avez bloqué certaines émissions, vous pouvez les débloquer en entrant un mot de passe.
Par défaut, le logiciel à l’intérieur de votre téléviseur est « désactivé ».
Fonctionnement de la puce V
La puce V indique au logiciel la catégorie d’âge visée (TV-MA, TV-14, etc.) et les thèmes abordés (Violence [V], Langage
adulte [L], etc.). Si vous avez bloqué la catégorie et (ou) le thème de l’émission, le message « Le visionnement de ce canal
n’est pas approuvé » est affiché.
Les diffuseurs ne sont pas obligés de fournir les thèmes de leurs émissions, par conséquent les émissions reçues sans thème
ne seront bloquées que si vous les bloquez d’après la catégorie d’âge. Vous pouvez également bloquer les émissions sans
classification « sans cote » et celles qui sont considérées comme sans classification. Les catégories d’âge et les thèmes de
télévision que vous pouvez bloquer sont répertoriés ci-dessous :
TV-MA - Adultes seulement. Cette émission est destinée spécifiquement aux adultes et risque de ne pas convenir à des
enfants de moins de 17 ans. Elle contient un ou plusieurs des thèmes suivants : langage indécent et vulgaire (L), activité
sexuelle explicite (S) ou violence graphique (V).
TV-14 - Parents sérieusement mis en garde. Cette émission contient des scènes que de nombreux parents considéreraient
inadéquates pour des enfants de moins de 14 ans. On recommande sérieusement aux parents d’user de vigilance et de ne
pas laisser les enfants de moins de 14 ans regarder cette émission seuls. Cette émission contient un ou plusieurs des
thèmes suivants : dialogues très suggestifs (D), langage très grossier (L), scènes à caractère sexuel intense (S) ou beaucoup
de violence (V).
TV-PG - Surveillance parentale suggérée. Cette émission contient des scènes que les parents risquent de considérer
inadéquates pour de jeunes enfants. Il est conseillé aux parents de regarder l’émission avec leurs jeunes enfants. Cette
émission contient un ou plusieurs des thèmes suivants : quelques dialogues suggestifs (D), peu de langage grossier (L),
quelques scènes à caractère sexuel (S) ou violence modérée (V).
TV-G - Tout public. La plupart des parents considéreraient cette émission adéquate pour tous les âges. Elle ne contient
que peu ou pas de dialogue ou de situations (D) contenant du langage grossier (L) ou à caractère sexuel (S) et peu ou pas
de violence (V).
TV-Y7 - Destinée aux enfants de 7 ans et plus. Cette émission est destinée aux enfants de 7 ans et plus. Elle est
davantage conseillée aux enfants qui ont acquis la maturité requise pour faire la distinction entre la fiction et la réalité.
Les thèmes et les éléments comme la violence fictive légère (FV) ou violence de comédie risquent d’être présents dans cette
émission et d’effrayer des enfants de moins de 7 ans.
TV-Y - Enfants de tous âges. Les thèmes et les éléments de ce type d’émission sont conçus pour un jeune auditoire, dont
les enfants de 2 à 6 ans. Cette émission ne devrait pas effrayer les tout jeunes enfants.
Chapitre 3 13
Les illustrations contenues dans ce document servent uniquement à des fins de représentation.
Page 48

Utilisation des fonctions du téléviseur
L’écran de limite des catégories TV
L’option de limite des catégories TV Limites codes TV vous permet de décider quelles émissions peuvent et ne peuvent pas
être regardées. Pour définir les restrictions de programmation télévisée :
1. Sélectionnez Contrôles des parents dans le menu principal. Si les Contrôles des parents sont verrouillés, vous devez
introduire votre mot de passe. S’ils ne sont pas verrouillés, un message vous rappelle que les limites fixées ne seront
activées que si vous verrouillez les Contrôles des parents.
2. Appuyez sur MENU pour continuer.
3. Mettez en surbrillance l’option de limite des catégories TV Limites codes TV et sélectionnez-la.
4. Utilisez les touches à flèche et la touche OK de la télécommande pour changer l’état de classification d’une émission
télévisée ou le contenu d’un thème de Voir à Bloquer.
Le fait de modifier l’état des codes d’émissions est décrit en détails plus bas dans le chapitre.
L’écran Limites codes TV
Voici un exemple de l’emplacement des éléments dans l’écran de Limites codes TV.
Champ de la catégorie
Vous permet de sélectionner les
différentes catégories d’âge pour les
voir ou les bloquer.
LIMITES CODES TV
Code État
TV-MA VOIR
App. sur ^/v p/sélectionner un
code. App. sur MENU pour sortir.
CODE État
TV-MA
TV-14
TV-PG
TV-G
TV-Y7
TV-Y
Champ d’état de la catégorie
Vous permet de choisir Voir ou Bloquer en
fonction de la catégorie d’âge à gauche.
- - Contenu - -
DLSVFV
VVV
DLSVFV
Voir
Voir
Voir
Voir
Voir
Voir
VVV
VVVV
VVVV
Thèmes
Liste des thèmes que vous
pouvez voir ou bloquer.
Champs d’état du thème
Permettent de sélectionner les
thèmes à accepter selon la
catégorie sélectionnée et
indiquent si l’état actuel du
V
thème est Voir (V) ou Bloquer (B).
Paramètres de la catégorie
Vous permet de voir si les catégories d’âge et les thèmes associés
sont sur Voir ou Bloquer. Les catégories et les thèmes verts sont sur
Voir (V), tandis que les rouges sont sur Bloquer (B).
Les illustrations contenues dans ce document servent uniquement à des fins de représentation.
14 Chapitre 3
Page 49

Utilisation des fonctions du téléviseur
LIMITES CODES TV
Code État
TV-MA VOIR
App. sur ^/v p/sélectionner un
code. App. sur MENU pour sortir.
CODE État
TV-MA
TV-14
TV-PG
TV-G
TV-Y7
TV-Y
Voir
Voir
Voir
Voir
Voir
Voir
- - Contenu - -
DLSVFV
VVV
DLSVFV
VVV
VVVV
VVVV
V
Hiérarchie des catégories d’âge
Téléviseur Adultes seulement
TV-14 Tout public
TV-PG Surveillance parentale suggérée
TV-G Tout public
TV-Y7 Destiné aux enfants de 7 ans et plus
TV-Y Enfants de tous âges
Blocage des catégories d’âge
Vous pouvez bloquer automatiquement tous les codes des émissions qui
dépassent une tranche d’âge spécifique.
Pour bloquer les catégories supérieures :
1. Appuyez sur la touche à flèche vers la droite pour mettre en
surbrillance le champ Code.
2. Appuyez sur les touches à flèche vers le haut ou vers le bas de la
télécommande pour faire défiler la cote qui correspond au plus bas
niveau de visionnement que vous désirez pour votre enfant.
3. Appuyez sur la touche à flèche vers la droite pour mettre en
surbrillance le champ État.
4. Appuyez sur les touches à flèche vers le haut ou vers le bas pour
alterner entre Voir et Bloquer. L’état des catégories à gauche et en
haut de la liste passe automatiquement à Bloquer (et B).
5. Appuyez sur la touche OK de la télécommande pour revenir au
menu ou quitter l’écran lorsque vous avez terminé.
6. Sélectionnez Verr. contrôle parental dans le menu Contrôles des
parents. Entrez un mot de passe, et si vous ne l’avez pas encore
enregistré, un message vous invite à réintroduire ce même mot de
passe pour le confirmer.
Visionnement des catégories d’âge
Après avoir bloqué des classifications selon l’âge, vous pouvez remettre
l’état de certaines d’entre elles à Voir.
1. Utilisez les touches à flèche vers le haut ou vers le bas pour mettre
en surbrillance la classification à l’état Bloquer.
2. Appuyez sur la touche à flèche vers la droite pour mettre en
surbrillance le champ d’état des catégories.
3. Appuyez sur la flèche vers le haut pour sélectionner Voir.
Nota : Les champs d’état du contenu passent également à Voir. Ces
champs et ceux de l’état de la classification d’âge sont les seuls qui
passent automatiquement à Voir quand vous terminez ce processus.
N’oubliez pas de verrouiller les Contrôles des parents pour que les limites
code prennent effet.
Thèmes
D Dialogue sexuel explicite
L Langage adulte
S Situations à caractère sexuel
V Violence
FV Violence fictive
Chapitre 3 15
Les illustrations contenues dans ce document servent uniquement à des fins de représentation.
Blocage de thèmes particuliers
Vous pouvez bloquer des émissions d’après leur thème. (Le contenu
est représenté par les lettres D, L, S, V et FV à l’écran.) Lorsque vous
bloquez un thème, dans le cas d’une catégorie d’âge, vous bloquez
automatiquement ce thème pour les émissions de catégorie d’âge
supérieure.
Pour bloquer le contenu d’une émission, mettez en surbrillance le champ
de thème et suivez les mêmes étapes que celles décrites pour le blocage
des classifications d’âge (ci-dessus).
Nota : Les diffuseurs ne sont pas obligés de fournir les thèmes et les
catégories d’âge.
Vous devez verrouiller les Contrôles des parents pour que les limites
prennent effet.
Page 50

Utilisation des fonctions du téléviseur
Visionnement de thèmes particuliers
Une fois que vous bloquez les thèmes particuliers, vous pouvez revenir en arrière et remettre certains thèmes sur (V) Voir :
1. Déterminez les thèmes que vous voulez changer à Voir (V).
2. Appuyez sur la touche vers le bas pour atteindre la classification dont vous voulez changer le thème à Voir.
3. Appuyez sur la touche à flèche vers la droite pour mettre en surbrillance un état de thème de contenu particulier.
4. Appuyez sur les touches à flèche vers le haut ou vers le bas pour refaire passer l’état du contenu à V.
Nota : Seul l’état du thème correspondant au (L) langage de la catégorie TV-14 passe à (V) Voir. Les thèmes des catégories
supérieures, comme le langage pour la catégorie TV-MA, restent inchangés.
Limite des catégories de films (puce V)
Fixez les restrictions de classification en bloquant les films qui dépassent une catégorie d’âge spécifique.
Pour accéder au menu LIMITE CODES FILMS :
1. Appuyez sur la touche MENU de la télécommande (le MENU PRINCIPAL apparaît).
2. Sélectionnez Contrôles des parents.
3. Sélectionnez Limite codes films.
Blocage des catégories de films
Lorsque vous êtes dans le menu des Classific. des films, suivez les mêmes étapes que celles décrites pour les
Classification TV.
BLOCAGE ÉMISS SANS CODE
1 Voir
2 Bloquer
BLOCAGE DES CANAUX
Canal No. Etat
59 Voir Bloq.
^
Util. ^/v, boutons, ou CH ^/v
p/program. canal, MENU p/sortir.
Blocage des émissions sans code
Cette option vous permet de décider si les émissions que la puce V
reconnaît comme étant « sans code » peuvent être regardées ou non.
Les émissions sans catégorie « sans code » peuvent inclure les nouvelles,
les sports, la politique, la religion, les émissions locales et la météo, les
bulletins d’urgence, les déclarations publiques et les émissions qui n’ont
pas été classifiées.
Voir Toutes les émissions non codées sont disponibles.
Bloquer Aucune émission non cotée n’est disponible.
Nota : Vous devez verrouiller les Contrôles des parents pour que les
limites prennent effet.
Blocage des canaux
Cette option permet de choisir les canaux qui peuvent être regardés.
Voir Les canaux sélectionnés peuvent être regardés.
Bloquer La touche CH (canal) du panneau avant et de la
Verrouillez les Contrôles des parents après avoir changé l’état du
Blocage des canaux. Sinon, le blocage de canal n’entrera pas en
vigueur.
Nota : Si vous avez un câblosélecteur numérique, les canaux 126 à 999
peuvent être verrouillés, mais ne peuvent peut-être pas être retirés de
votre liste de balayage.
télécommande ne syntoniseront le téléviseur que sur les
canaux portant la mention Voir. La télécommande
syntonisera le téléviseur au canal bloqué si vous composez
le numéro du canal, mais ce dernier sera verrouillé.
Les illustrations contenues dans ce document servent uniquement à des fins de représentation.
16 Chapitre 3
Page 51

Utilisation des fonctions du téléviseur
BLOCAGE DU PANNEAU AVANT
1 Débloquer
2 Bloquer
Blocage du panneau avant
Cette option vous permet de bloquer (désactiver) ou de débloquer
(activer) le panneau avant du téléviseur. La télécommande syntonise
néanmoins le téléviseur sur n’importe quel canal. Si vous utilisez cette
fonction comme méthode de contrôle parental, retirez l’accès à toute
télécommande capable de commander le téléviseur pendant que le
panneau avant est bloqué.
N’oubliez pas de verrouiller les Contrôles des parents après avoir changé
l’état. Sinon, le blocage du panneau avant ne prendra pas effet.
Verrouillage / déverrouillage des contrôles des parents
Cette option vous permet de verrouiller ou de déverrouiller les réglages des contrôles des parents à l’aide d’un mot de passe.
Si vous ne verrouillez pas les contrôles des parents, aucun des paramètres de la puce V, du Blocage des canaux ou du
Blocage du panneau avant ne prendra effet.
Si vous oubliez votre mot de passe, appuyez simultanément sur la touche TV de la télécommande et le bouton MENU du
téléviseur et maintenez-les enfoncés pendant 3 secondes. Rien n’apparaît à l’écran; Les Contrôles des parents se
déverrouillent et vous pouvez réintroduire un mot de passe via l’option Verr. Contrôle parental.
Chapitre 3 17
Les illustrations contenues dans ce document servent uniquement à des fins de représentation.
Page 52

Chapitre 4 : Utilisation du système de menus du téléviseur
Utilisation du système de menus du téléviseur
Les touches de la télécommande ou les boutons du panneau avant permettent d’accéder au système de menus et de
changer les paramètres.
Menus
Le premier menu s’appelle le Menu principal. Appuyez sur la touche MENU de la télécommande ou sur le bouton
correspondant du panneau avant pour afficher le Menu principal.
Les menus vous amènent vers un autre menu ou un tableau de commande. Il y a deux façons de sélectionner un élément
dans un menu :
• Utilisez les touches à flèche de votre télécommande pour mettre votre choix en surbrillance et appuyez sur OK.
• Appuyez sur une touche numérique de la télécommande. Par exemple, dans le Menu principal, appuyez sur le 3 pour
aller directement au menu Écran.
Pour quitter un menu
Il existe trois façons de quitter un menu :
• Mettez Sortir en surbrillance, et appuyez sur la touche OK.
• Appuyez sur le 0 de la télécommande.
• Appuyez sur CLEAR. Les affichages s’effacent de l’écran et vous pouvez à nouveau regarder le téléviseur.
MENU PRINCIPAL
1 Audio
2 Qualité de l'image
3 Écran
4 Canal
5 Horloge
6 Contrôles des parents
7 Réglage
0 Sortie
Processeur de l’audio Affiche une liste des modes audio disponibles pour régler la sonorité des haut-parleurs. Vous
pouvez également accéder au menu PROCESSEUR DE L’AUDIO en appuyant sur la touche SOUND de la télécommande.
Mono Règle la sortie audio en monophonie seulement. Utilisez ce réglage pour la réception d’émissions dont le
signal stéréo est faible.
Stéréo Divise le signal audio reçu en voies gauche et droite. La plupart des émissions télévisées et des
enregistrements sont en stéréophonie. Le téléviseur affiche le mot STÉRÉO lorsque l’émission que vous regardez
est en stéréophonie.
Stéréo amplifiée « Amplifie » électroniquement le son des émissions stéréophoniques, des magnétoscopes, des
systèmes de satellite numérique, des lecteurs DVD et des lecteurs de disque laser stéréophoniques pour un son plus
plein et plus ample.
Stéréo Sound Logic™ Réduit la hausse soudaine et gênante du volume pendant les pauses commerciales et amplifie
également les sons plus doux au cours des émissions. Vous évite de changer constamment le volume.
Deuxième piste audio (SAP) Lit la piste sonore de l’émission dans une autre langue, si elle est disponible. Le
téléviseur affiche le mot SAP lorsque l’émission que vous regardez est diffusée dans une seconde langue. Le signal
audio SAP est transmis en monophonie. Le système SAP sert également à diffuser un signal audio comportant des
descriptions de l’image vidéo destinées aux malvoyants.
Menu Audio
Silence Appuyez sur OK pour réduire le volume du téléviseur au niveau
minimal. Appuyez de nouveau sur OK pour rétablir le volume.
Contrôles du timbre Affiche les commandes à glissière servant à régler
les aigus, les graves et l’équilibrage des voies (balance) du téléviseur.
Les illustrations contenues dans ce document servent uniquement à des fins de représentation.
18 Chapitre 4
Page 53

Utilisation du système de menus du téléviseur
Sortie d’audio et haut-parleurs Affiche une liste de choix vous permettant d’allumer ou d’éteindre les haut-parleurs
intégrés au téléviseur et règle les sorties audio à un niveau fixe ou variable.
Sortie variable, haut-parleurs allumés Ce réglage allume les haut-parleurs du téléviseur et permet la sortie
variable depuis les prises de sortie audio du téléviseur.
Sortie variable, haut-parleurs éteints Ce réglage éteint les haut-parleurs du téléviseur et permet la sortie audio
variable depuis les prises de sortie audio du téléviseur vers un composant externe comme un amplificateur
d’ambiophonie.
Sortie fixe, haut-parleurs éteints Ce réglage éteint les haut-parleurs du téléviseur et permet la sortie audio fixe
depuis les prises de sortie audio du téléviseur vers un composant externe comme un amplificateur d’ambiophonie.
Quand la Sortie fixe est désactivée, les commandes de volume et de tonalité du téléviseur, ainsi que le silencieux, sont
désactivés.
QUALITÉ DE L'IMAGE
1 Contrôles de base de l'image
2 Préréglages de l'image
3 Couleur automatique
4 Vivacité des couleurs
0 Sortie
En quittant ce menu, le message Sauvegarder le préréglage personnel de l’image s’affiche. Vous pouvez choisir Oui ou Non.
Si vous sauvegardez les réglages en tant que Préréglage personnel de l’image, le téléviseur sauvegarde les paramètres afin
que vous puissiez facilement les rétablir au cas où quelqu’un les modifierait.
Nota : Vous pouvez modifier les contrôles de l’image pour chaque composant connecté à vos prises vidéo, Y, P
situées à l’arrière de votre téléviseur. La prochaine fois que vous utilisez le composant, l’image change selon vos r églages
précédents.
Préréglages de l’image Affiche une liste pour sélectionner l’un des trois préréglages de l’image : Intensité forte,
Intensité normale, Intensité faible ou Préréglage personnalisé. Choisissez le réglage qui convient le mieux à votre
environnement.
Couleur automatique Affiche une liste d’options vous permettant d’activer la fonction qui corrige automatiquement les
couleurs de l’image. (Particulièrement utile pour détecter les tons réalistes de couleur de peau lorsque vous passez d’un
canal à l’autre.) Choisissez Allumé ou Éteint, selon vos préférences.
Vivacité des couleurs Affiche une liste de choix qui vous permet de sélectionner l’un des trois réglages automatiques
des couleurs : Froides pour une palette de couleurs tirant sur le bleu; Normales; et Chaudes pour une palette de couleurs
tirant sur le rouge. Le réglage chaud correspond à la norme NTSC de 6500 °K.
Menu Qualité de l’image
Contrôles de base de l’image Affiche les cinq commandes à glissière
pour régler l’image.
Contraste Sert à régler la différence entre les zones claires et
foncées de l’image.
Couleur Sert à régler la richesse de la couleur.
Teinte Sert à régler l’équilibre entre les niveaux de rouge et de
vert.
Niveau de noir Sert à régler la brillance de l’image.
Netteté Sert à régler la netteté des contours dans l’image.
, PR et S-vidéo
B
Chapitre 4 19
Les illustrations contenues dans ce document servent uniquement à des fins de représentation.
Page 54

Utilisation du système de menus du téléviseur
ÉCRAN
1 Affichage de sous-titres
2 Mode de sous-titrage
3 Langue des menus
0 Sortie
Menu à l’écran du F27350
ÉCRAN
1 Affichage de sous-titres
2 Mode de sous-titrage
3 Langue des menus
4 Rotation de l’image
0 Sortie
Menu à l’écran du F32343 et du F32350
Menu Écran
Affichage des sous-titres Affiche une liste vous permettant de
choisir le mode d’affichage des sous-titres.
Toujours désactivé Aucun sous-titre ne s’affiche.
Toujours activé Les sous-titres sont toujours affichés, s’ils sont
disponibles.
Activé en mode atténué Les sous-titres sont affichés, s’ils sont
disponibles, lorsque le volume du téléviseur est coupé. (Pour couper
le son, appuyez sur la touche MUTE.) Les sous-titres ne sont pas
affichés lorsque le son n’est pas coupé.
Mode de sous-titrage Affiche une liste de choix qui vous permet de
sélectionner le mode d’affichage des sous-titres.
Langue des menus Affiche une liste d’options vous permettant de
sélectionner la langue d’affichage des menus : Anglais, Espagnol ou
Français.
Rotation de l’image (Disponible sur les modèles F32343 et F32350)
Votre téléviseur possède un tube cathodique à image extra large qui le
rend vulnérable aux effets du champ magnétique terrestre. Il vous faut
peut-être régler la rotation de l’image.
Utilisation du sous-titrage
De nombreuses émissions sont encodées avec des sous-titres, ce qui vous permet d’afficher la portion audio de l’émission à
l’écran sous forme de texte.
Le sous-titrage n’est pas disponible en tout temps sur tous les canaux. Seules les émissions encodées spécialement sont
disponibles avec sous-titrage. Si une émission est sous-titrée, les lettres ST s’affichent dans la bannière du canal. Voyez le
chapitre 3 pour de plus amples informations sur la bannière du canal.
MODE SOUS-TITRAGE
1 ST1
2 ST2
3 ST3
4 ST4
5 Texte 1
6 Texte 2
7 Texte 3
8 Texte 4
Conseil
Si vous ne savez pas quel mode de sous-titrage
utiliser , sélectionnez ST1. Le mode ST1 est très
probablement utilisé dans votre localité. Les
modes ST2, ST3 et ST4 sont réservés aux langues
étrangèr es, mai s sont très peu utili sés pour
l’instant.
Les illustrations contenues dans ce document servent uniquement à des fins de représentation.
20 Chapitre 4
Modes de sous-titrage
Le téléviseur offre huit modes de sous-titrage, dont quatre modes texte.
Pour régler le Mode de sous-titrage :
1. Sélectionnez Écran dans le Menu principal.
2. Mettez en surbrillance Mode de sous-titrage et appuyez sur OK
(l’écran Mode de sous-titrage apparaît).
3. Mettez votre choix en surbrillance et appuyez sur OK (le menu
Écran réapparaît).
Nota : Les modes Texte couvrent pratiquement la moitié de l’image à
l’écran pour afficher les sous-titres. La plupart des diffuseurs utilisent
le mode ST , qui affiche quelques lignes de sous-titres à la fois.
Page 55

Utilisation du système de menus du téléviseur
Désactivation du sous-titrage
1. Sélectionnez Écran dans le Menu principal.
2. Appuyez sur OK pour sélectionner Affichage du sous-titrage.
3. Mettez Toujours désactivé en surbrillance, puis appuyez sur la touche OK. Le sous-titrage
est désactivé et vous revenez au menu Écran.
CANAL
1 Sorte de signal
2
Recherche autom. de canaux
3 Liste et rubriques
4 Syntonisation automatique
0 Sortie
Recherche autom. de canaux Indique au téléviseur de rechercher automatiquement les canaux disponibles sur l’entrée
d’antenne. Dès qu’il trouve un canal actif, le téléviseur l’enregistre dans la liste des canaux ; les canaux inactifs (postes
faibles ou canaux sans aucun signal) sont éliminés de la liste des canaux.
Liste et rubriques Affiche un tableau de commande vous permettant de modifier votre Liste normale de canaux et de
choisir un nom de six caractères pour chaque canal. Suivez les instructions à l’écran pour introduire vos canaux et
d’autres informations.
Numéro de canal Utilisez les flèches vers le haut ou vers le bas pour parcourir la liste des canaux disponibles via
votre antenne. Vous pouvez introduire le numéro du canal directement au moyen des touches numériques.
Liste normale Seuls les canaux de la liste normale sont disponibles lorsque vous parcourez la liste des canaux au
moyen des touches de canal vers le haut ou vers le bas. Utilisez les touches à flèche vers le haut ou vers le bas pour
indiquer si le numéro de canal indiqué est inclus (Oui) ou n’est pas inclus (Non) dans la liste normale des canaux.
Rubriques des canaux Utilisez les touches à flèche vers le haut ou vers le bas pour introduire un nom de six
caractères pour chaque canal. Tenez la touche enfoncée pour faire défiler la liste rapidement. Le téléviseur peut
enregistrer un maximum de 27 noms en mémoire.
Syntonisation automatique Affiche une liste de choix qui vous permet de syntoniser automatiquement le téléviseur
au canal approprié lorsque vous appuyez sur une touche de composants (VCR, DVD ou SAT•CABLE) sur la télécommande.
Allez au chapitre 3 pour plus de détails à propos de la fonction de syntonisation automatique.
Menu Canal
Sorte de signal Affiche un sélecteur vous permettant de sélectionner
le type de signal actuel :
Antenne UHF/VHF Choisissez cette option si vous utilisez
actuellement une antenne pour recevoir ses signaux de télévision.
Télévision câblée Choisissez cette option si vous utilisez
actuellement un réseau câblé ou un câblosélecteur pour recevoir
les signaux de télévision.
Chapitre 4 21
Les illustrations contenues dans ce document servent uniquement à des fins de représentation.
Page 56

Utilisation du système de menus du téléviseur
HORLOGE
1 Minuteur
2 Horaire programmé
3 Réglage de l'horloge
0 Sortie
Menu horloge
Minuteur Affiche un tableau de commande vous permettant de choisir
combien de temps le téléviseur doit fonctionner avant de s’éteindre
automatiquement.
Horaire programmé Affiche un tableau de commande vous
permettant de programmer les heures de mise en marche et d’arrêt
automatiques du téléviseur. Rappel : vous devez activer l’horaire. Les
instructions à l’écran vous guident tout au long de la procédure de
réglage de l’horaire programmé.
Réglage de l’horloge Affiche un tableau de commande vous
permettant de mettre l’horloge à l’heure. Les instructions à l’écran vous
guident tout au long de la procédure de réglage de l’heure.
Les illustrations contenues dans ce document servent uniquement à des fins de représentation.
22 Chapitre 4
Page 57

Chapitre 5 : Autres informations
Dépannage
Consultez la liste de dépannage qui suit pour corriger la plupart des problèmes qui surviennent avec votre téléviseur.
Nota : Si vous préférez, nous pouvons vous fournir le nom d’un représentant de service autorisé qui, moyennant des frais, se
rendra chez vous pour installer votre système de divertissement électronique et pour vous montrer à l’utiliser. Pour obtenir des
détails sur ce service, appelez le 1 888 206-3359 ou visitez rca.com.
Problèmes posés par le téléviseur
Le téléviseur ne s’allume pas
• Appuyez sur la touche TV de la télécommande.
• Assurez-vous que la prise murale (ou la rallonge) est « sous tension » en branchant un autre appareil.
• Appuyez sur le bouton POWER à l’avant du téléviseur. Si le téléviseur s’allume, essayez les solutions visant la
télécommande.
• Les commandes du panneau avant sont peut-être verrouillées (désactivées). Utilisez la télécommande pour
déverrouiller les commandes du panneau avant en sélectionnant Blocage du panneau avant dans le menu Contrôles
des parents et en choisissant Débloquer.
Les commandes ne fonctionnent pas
• Si vous utilisez la télécommande, appuyez d’abord sur la touche TV pour vous assurer que la télécommande est en
mode TV.
• Les commandes du panneau avant sont peut-être verrouillées (désactivées). Utilisez la télécommande pour
déverrouiller les commandes du panneau avant en sélectionnant Blocage du panneau avant dans le menu Contrôles
des parents et en choisissant Débloquer.
• Débranchez le téléviseur pendant deux minutes, puis rebranchez-le. Rallumez le téléviseur et essayez à nouveau.
Le téléviseur s’éteint tout seul
• La fonction d’arrêt automatique est peut-être activée. Voyez les instructions à la page 22.
• Le circuit de protection électronique a peut-être été activé à cause d’une surtension. Patientez 30 secondes, puis
rallumez le téléviseur. Si cela se produit fréquemment, la tension dans votre domicile est peut-être anormalement
élevée ou faible.
Le téléviseur s’allume à l’improviste
• La fonction d’allumage programmé est peut-être activée.
Écran vide
• Vérifiez si le composant connecté au téléviseur est allumé.
Pas de son, image normale
• Le son a peut-être été coupé. Appuyez sur la touche du volume vers le haut pour rétablir le son.
• Les haut-parleurs sont peut-être éteints. Vérifiez le tableau de commande Sortie audio et Haut-parleurs dans le
menu Audio.
• Si vous utilisez des câbles S-VIDEO pour connecter un composant, n’oubliez pas de connecter également les prises de
sortie Audio droite et gauche du composant dans les prises d’entrée R-AUDIO-L INPUT1 du téléviseur.
Impossible de sélectionner certains canaux
• Le canal est peut-être bloqué ou il n’est pas approuvé dans le menu Contrôles des parents.
• Si vous utilisez un magnétoscope, vérifiez si le bouton TV/VCR du magnétoscope est dans le bon mode (appuyez sur le
bouton TV/VCR de votre magnétoscope).
Réception stéréo bruitée
• Le poste est peut-être faible. Appuyez sur la touche SOUND de votre télécommande pour passer de stéréo à mono.
Chapitre 5 23
Les illustrations contenues dans ce document servent uniquement à des fins de représentation.
Page 58

Autres informations
Pas d’image, pas de son mais le téléviseur est allumé
• La fonction câble/antenne est peut-être mal réglée. Sélectionnez Sorte du signal à partir du menu Canal.
• Si vous regardez votre magnétoscope et qu’il est connecté avec un câble coaxial à la prise CABLE/ANTENNA, syntonisez
le téléviseur au canal 3 ou 4 (selon le canal sélectionné sur l’interrupteur 3/4 à l’arrière de votre magnétoscope).
Vérifiez si le bouton TV/VCR du magnétoscope est dans le bon mode (appuyez sur le bouton TV/VCR de votre
magnétoscope).
• Si vous essayez de visionner le contenu à partir d’un composant connecté au téléviseur (comme un lecteur DVD ou un
magnétoscope) appuyez sur la touche INPUT de la télécommande jusqu’à l’apparition du contenu.
Son normal, mauvaise image
• Vérifiez les connexions d’antenne. Assurez-vous que tous les câbles sont solidement connectés aux prises.
• Essayez de régler la fonction de netteté pour améliorer les signaux faibles.
Une boîte noire apparaît à l’écran
• Le sous-titrage est peut-être activé. Vérifiez le tableau de commande Affichage des sous-titres dans le menu Écran.
Le minuteur de saut de publicités n’est pas affiché
• Si le sous-titrage est activé, le minuteur de saut de publicité ne reste pas à l’écran. Désactivez le sous-titrage.
La télécommande ne fonctionne pas
• Assurez-vous que l’aire entre la télécommande et son capteur sur le composant est bien dégagée.
• La télécommande n’est peut-être pas dirigée directement vers le composant (téléviseur ou magnétoscope) que vous
essayez de faire fonctionner.
• La télécommande n’est peut-être pas dans le mode TV. Appuyez sur la touche TV de façon que la télécommande
commande le téléviseur.
• Les piles de la télécommande sont peut-être faibles, mortes ou mal installées. Mettez des piles neuves dans la
télécommande.
• Vous devrez peut-être décharger le microprocesseur de la télécommande : retirez les piles et appuyez sur la touche 1
pendant au moins une minute. Relâchez la touche, installez les piles et (au besoin) reprogrammez la télécommande.
Problèmes avec les Contrôles des parents ou la puce V
Les limites de catégories ne fonctionnent pas
• Vous devez verrouiller les paramètres. Allez au MENU PRINCIPAL (appuyez sur la touche MENU de votre
télécommande), sélectionnez Contrôles des parents (appuyez sur le 6 de votre télécommande), sélectionnez Verr.
contrôle parental (appuyez sur le 6 de la télécommande).
J’ai oublié mon mot de passe et je veux déverrouiller le téléviseur
• Si vous oubliez votre mot de passe, appuyez simultanément sur la touche TV de la télécommande et le bouton MENU
du téléviseur et maintenez-les enfoncés pendant 3 secondes. Rien n’apparaît à l’écran; Les Contrôles des parents se
déverrouillent et vous pouvez réintroduire un mot de passe via l’option Verr. Contrôle parental.
La puce V m’empêche de visionner une émission, même si elle n’est pas dans la catégorie
« Violence »
• Il se peut que le film ne soit pas classé dans une catégorie NR (sans code). Après avoir bloqué certaines catégories de
films, vous devez régler séparément l’état de NR à Voir si vous voulez voir les films de catégorie NR.
Les illustrations contenues dans ce document servent uniquement à des fins de représentation.
24 Chapitre 5
Page 59

Autres informations
Entretien et nettoyage
ATTENTION : ÉTEIGNEZ le téléviseur avant de le nettoyer.
Vous pouvez nettoyer le téléviseur, au besoin, en utilisant un linge doux sans charpie. N’oubliez pas de dépoussiérer de
temps à autre les fentes d’aération du boîtier pour assurer une ventilation adéquate.
L’écran du téléviseur peut également être nettoyé avec un chiffon doux non pelucheux. Veillez à ne pas égratigner ni
gâcher l’écran. Au besoin, vous pouvez utiliser un chiffon imbibé d’eau chaude. N’utilisez jamais de nettoyants forts, à
base d’ammoniac, par exemple, ou de poudre abrasive. Ces types de nettoyants endommageront le téléviseur.
Lors du nettoyage, ne vaporisez pas de liquide directement sur l’écran et ne laissez aucun liquide couler le long de l’écran
ou à l’intérieur du téléviseur. Évitez également de placer des boissons ou des vases remplis d’eau au-dessus du téléviseur.
Ceci peut augmenter les risques d’incendie, d’électrocution ou d’endommagement du téléviseur.
Attention : L’utilisation de jeux vidéo ou de tout autre accessoire projetant des images fixes pendant des périodes
prolongées peut entraîner une impression permanente sur le tube à image (ou sur le tube à image des télévision à grand
écran). DE PLUS, certains logos de réseaux/programmes, numéros de téléphone, etc., peuvent entraîner des dommages
similaires. Ces dommages ne sont pas couverts par votre garantie.
Avant du téléviseur
Si vous ne trouvez pas votre télécommande, vous pouvez utiliser les boutons de votre téléviseur pour activer ou désactiver
de nombreuses fonctions de votre téléviseur.
MENU Afficher le MENU PRINCIPAL du téléviseur. Dans le système de menus, il sélectionne les articles mis en surbrillance.
Il vous ramène également au menu précédent.
Permet de passer au canal précédent. Lorsque vous utilisez le système de menus du téléviseur, ce système agit
CH
ˇ
comme la flèche vers le bas de la télécommande.
Parcourt vers le haut la liste de canaux. Lorsque vous utilisez le système de menus du téléviseur, ce système agit
CH
^
comme la flèche vers le haut de la télécommande.
VOL – Baisse le volume. Lorsque vous utilisez le système de menus du téléviseur, ce système agit comme la flèche vers la
gauche de la télécommande.
VOL + Augmente le volume. Lorsque vous utilisez le système de menus du téléviseur, ce système agit comme la flèche
vers la droite de la télécommande.
POWER (Alimentation) Allume et éteint le téléviseur.
PHONES
VIDEO
Chapitre 5 25
L/MONO R
AUDIO
Les illustrations contenues dans ce document servent uniquement à des fins de représentation.
Prises du panneau avant
Vous pouvez accéder aux composants que vous avez connectés à l’avant
de votre téléviseur en appuyant sur la touche INPUT de votre
télécommande jusqu’à ce que l’inscription FRNT s’affiche à l’écran.
PHONES (Disponible seulement sur le modèle F27350) Vous permet
de brancher un casque d’écoute pour écouter le son provenant du
téléviseur.
VIDEO (entrée) Reçoit les signaux vidéo d’un autre composant comme
un magnétoscope, un caméscope ou une console de jeux vidéo.
L/MONO et R AUDIO Reçoit l’audio d’un autre composant comme un
magnétoscope, un camescope ou une console de jeux vidéo.
Page 60

Autres informations
Garantie limitée
Ce que couvre votre garantie :
• Les défauts de matériaux ou de fabrication.
Durée après l’achat :
• 90 jours à partir de la date d’achat pour les frais de main-d’œuvre.
• Un (1) an à partir de la date d’achat pour les pièces.
• Deux (2) ans à partir de la date d’achat pour le tube cathodique.
La période de garantie pour les appareils loués commence à la première location ou 45 jours après la date d’expédition
à l’entreprise de location, la première date prévalant.
Ce que nous ferons :
• Nous rembourserons à tout centre de service agréé pour les téléviseurs RCA les frais de main-d’œuvre encourus
pour réparer votre téléviseur.
• Nous rembourserons à tout centre de service agréé pour les téléviseurs RCA le coût du tube cathodique à image et
des pièces de rechange neuves ou remises à neuf, à notre choix, que nécessitera la réparation de votre téléviseur.
Pour obtenir le service :
• Pour les écrans de 26 po et moins : Apportez votre téléviseur RCA à un centre de service agréé pour les téléviseurs
RCA et allez le chercher une fois les réparations complétées.
• Pour les écrans de plus de 26 po : Demandez la réparation à domicile ou la cueillette et la livraison d’un centre de
service agréé pour les téléviseurs RCA, à condition que le téléviseur se trouve dans une région desservie par un
centre de service agréé pour les téléviseurs RCA. Dans le cas contraire, vous devez apporter votre téléviseur, à vos
frais, au centre de service ou payer les frais facturés par le centre de service pour le transport de l’appareil entre
votre domicile et le centre.
• Pour connaître le centre de service autorisé pour les téléviseurs RCA le plus près de chez vous, demandez à votre
détaillant, visitez rca.com, consultez les Pages Jaunes ou téléphonez au 1 800 336-1900.
• Un preuve d’achat, comme une facture ou une quittance de facture qui indique que le produit respecte la période
de la garantie, doit être présentée pour obtenir un service sous garantie. Pour les entreprises de location, la preuve
de la première location est également exigée.
Ce que
ne couvre pas votre garantie :
• La formation client. (Votre Manuel de l’utilisateur décrit l’installation, les réglages et le fonctionnement de votre
téléviseur. Toute information supplémentaire devrait être obtenue auprès de votre dépositaire.)
• L’installation et les réglages connexes.
• Les problèmes de réception de signal qui ne sont pas causés par votre téléviseur.
• Les dommages dus au mauvais usage ou à la négligence.
• Les piles.
• Les fusibles remplaçables par le client.
• Les dommages causés par les images brûlées sur l’écran.
• Les téléviseurs modifiés, incorporés à d’autres produits ou utilisés à des fins institutionnelles ou commerciales.
• Les téléviseurs achetés ou réparés à l’extérieur des États-Unis.
• Les cas de force majeure tels que, mais sans s’y limiter, les dommages par la foudre.
Les illustrations contenues dans ce document servent uniquement à des fins de représentation.
26 Chapitre 5
Page 61

Autres informations
Enregistrement du produit :
• Veuillez remplir le formulaire en ligne d’enregistrement du produit sur RCA.com ou remplir et poster la carte
d’enregistrement emballée avec le téléviseur. Nous pourrons alors vous contacter plus facilement, si nécessaire.
Le retour de la carte n’est pas obligatoire aux fins de la garantie.
Limitation de la garantie :
• LA GARANTIE ÉNONCÉE CI-DESSUS EST LA SEULE GARANTIE APPLICABLE À CE PRODUIT. TOUTE AUTRE
GARANTIE EXPRESSE OU IMPLICITE (Y COMPRIS TOUTE GARANTIE IMPLICITE DE QUALITÉ MARCHANDE OU
D’ADAPTATION À UN USAGE PARTICULIER) EST DÉCLINÉE PAR LA PRÉSENTE. AUCUNE INFORMATION DONNÉE
VERBALEMENT OU PAR ÉCRIT PAR THOMSON MULTIMEDIA INC., PAR SES AGENTS OU PAR SES EMPLOYÉS NE
CONSTITUERA UNE GARANTIE OU N’ÉTENDRA LA PORTÉE DE LA PRÉSENTE GARANTIE.
• LA RÉPARATION OU LE REMPLACEMENT, TELS QU’OFFERTS PAR CETTE GARANTIE CONSTITUENT LE SEUL
RECOURS DU CONSOMMATEUR. THOMSON MULTIMEDIA INC. NE SERA AUCUNEMENT RESPONSABLE
DES DOMMAGES INDIRECTS OU CONSÉCUTIFS RÉSULTANT DE L’UTILISATION DE CE PRODUIT OU DE
L’INOBSERVATION DE QUELQUE GARANTIE QUE CE SOIT IMPLICITE OU EXPLICITE POUR CE PRODUIT. CETTE
EXONÉRATION DE GARANTIES ET LA PRÉSENTE GARANTIE LIMITÉE SONT RÉGIES PAR LES LOIS DE L’ÉTAT
D’INDIANA. SAUF POUR LES DISPOSITIONS PROHIBÉES PAR LES LOIS APPLICABLES, TOUTE GARANTIE
IMPLICITE DE QUALITÉ MARCHANDE OU D’ADAPTATION À UN USAGE PARTICULIER RELATIVE À CE PRODUIT
EST LIMITÉE À LA PÉRIODE DE GARANTIE APPLICABLE TELLE QUE DÉCRITE CI-DESSUS.
L’effet des lois provinciales sur cette garantie :
• Certaines provinces ou juridictions ne permettent pas l’exclusion ou la limitation des dommages indirects ou
consécutifs, non plus que les limitations implicites quant à la durée d’une garantie, de sorte que les limitations ou
exclusions énoncées ci-dessus pourraient être nulles dans votre cas.
• Cette garantie vous confère des droits juridiques spécifiques qui s’ajoutent aux autres droits éventuels qui
peuvent varier d’une province à l’autre.
Si vous avez acheté votre appareil à l’extérieur des États-Unis :
• Cette garantie est nulle. Renseignez-vous auprès de votre dépositaire au sujet de la garantie.
Les visites de service ne concernant pas un défaut de matériaux ou de fabrication ne sont pas couvertes en vertu
de cette garantie. L’acheteur est entièrement responsable des coûts de telles visites de service.
^
Chapitre 5 27
Les illustrations contenues dans ce document servent uniquement à des fins de représentation.
Page 62

Autres informations
Bon de commande d’accessoires
Description
Câble d’antenne vissable (0,9 m) VH81 $3,95
Câble d’antenne vissable (1,8 m) VH82 $4,95
Câble d’antenne à pression (1,8 m) VH89 $5,95
Câble avec extrémité en
plaqué or
DT6DC (1,8 m)
DT12DC (3,6 m)
Câble avec extrémité en
plaqué or
VH84 (1,8 m)
Câble de doublage monaural pour
magnétoscope (1,8 m) VH83 $5,95
Câble de doublage stéréo pour
magnétoscope (1,8 m) VH84 $9,95
Câbles vidéo à composantes (1,8 m) DT6DC $24,95
Câbles vidéo à composantes (3,6 m) DT12DC $34,95
Câble S-vidéo (1,8 m) VH976 $7,95
Câble S-vidéo (3,6 m) VH913 $14,95
Répartiteur de signal bidirectionnel VH47 $3,95
Antenne amplifiée ANT200 $49,95
Télécommande (CRK76BC1) 254641 $22,35
Mixeur d’antenne (non illustré) 193984 $11,15
Adaptateur Audio•Vidéo (non illustré) 228449 $4,45
N° de
pièce
Prix
Qté
Câble avec extrémité en
plaqué or
VH83 (1,8 m)
Pour passer une commande
EN LIGNE : www.rca.com (selon la disponibilité)
PAR TÉLÉPHONE : Ayez sous la main votre carte Visa, MasterCard ou
Discover et appelez le 1 800 338-0376
N’utilisez ce numéro que pour commander des accessoires qui figurent sur ce
bon de commande.
VH81 (0,9 m)
VH82 (1,8 m)
PAR COURRIER : Chèque ou mandat poste en dollars américains (à l’ordre de
Thomson multimedia Inc.) à l’adresse suivante :
Video Accessories
P.O. Box 8419
Ronks, PA 17573
Tous les accessoires sont livrables selon la disponibilité; les prix sont sujet à
changement.
VH89 (1,8 m)
Les illustrations contenues dans ce document servent uniquement à des fins de représentation.
28 Chapitre 5
Si nécessaire, nous expédierons un modèle de remplacement.
Page 63

Page 64

Visitez le site Web RCA à l’adresse www.rca.com
Nous vous prions de ne pas envoyer de produits à l’adresse d’Indianapolis
indiquée dans ce manuel ou sur l’emballage, ce qui ne ferait que retarder
la réparation de votre produit.
IMPORTATEUR : (pour Mexico seulement)
Comercializadora Thomson de México, S.A. de C.V.
Miguel de Cervantes Saavedra 57
Col. Ampliación Granada
C.P. 11529 México D.F.
Telefono: (55) 25 81 53 20
R.F.C. CTM-980723 KS5
EXPORTATEUR :
Thomson Inc.
10330 North Meridian Street
Indianapolis, IN 46290
©2002 Thomson Inc.
Marque(s) de commerce déposée(s)®
Marca(s) Registrada(s)
Imprimé aux É.-U.
Pays d’origine : Mexique
TOCOM 16067450
THOMSON
 Loading...