

RCA F27700, CTC175 Owner's Manual

Color TV
Owner's Manual

WARNING: To prevent fire or shock hazard, do not
expose this TV to rain or moisture.
If you suspect that liquid has entered the TV, unplug it
immediately and have it inspected by an Authorized TV
Servicenter. Turning it off is not enough-your TV has power
applied to some circuits even when the TV is turned off.
A
The lightning flash
and arrowhead
within the triangle
Is II warning sign
alerting you of
=dangerous
voltage" Inside the
productthat
presents a risk of
electric shock.
DQ NOT OPEN
CAUTION; TO REDUCE THE
RISK OF ELECTRIC SHOCK,
DO NOT REMOVE COVER
(OR BACK). NO USER-
SERVICEABLE PARTS
INSIDE. REFER SERVICING
TO QUALIFIED SERVICE
PERSONNEL.
The exc|amation
point within the
triangle Is a
warning sign
aleflJng you of
Important
instructions
accompanldng the
product.
CAUTION: Maintain electrical safety. Powerline-operated
equipment or accessories connected to this unit should bear the
UL listing mark or, if purchased and used in Canada, the CSA
certification mark on the accessory itself and should not have
been modified so as to defeat the safety features. This will
.help avoid any potential hazard from electric shock or fire. If
in doubt, contact qualified service personnel.
Note to Cable TV Installer: This reminder is provided to call
your attention to Article 820-40 of the National Electrical
Code (Section 54 of the Canadian Electrical Code, Part 1)
which provides guidelines for proper grounding and, in
particular, specifies that the cable ground shall be connected to
the grounding system of the building as close to the point of
cable entry as practical.
• Your TV operates on 120 volts, 60 Hz AC power (normal
house power) and has a polarized AC plug. Because one
blade of the plug is wider than the other, the plug fits into the
wall socket only one way. Do not defeat the safety feature of
this plug. If you need an extension cord, make sure it is
polarized.
_ AUTION: To prevent electric shock, do not use
the polarized plug on this TV with an extension
cord, receptacle, or other outlet unless both blades
can be fully inserted to prevent blade exposure.
Match wide blade of plug to wide slot, fully insert.
MISE EN GARDE: Pour prrvenir les chocs
_lectriques, ne pas utiliser la fiche polarisre de cet
appareil avec une rallonge, une prise.de courant
• ou u:neautre sortie, _ moins que les lames ne
pu!ssent _tre ins_rres _tfond sansqu'aucune pattie ne soit
laiss_e _tdrcouvert. Introduire la lame la plus large de la
fiche dans la borne correspondante de la prise et pousser
jusqti au fond.
• All operating controls and their functions are identified and
explained in this manual. For warranty service or routine
maintenance, contact the nearest Authorizer! TV Servicenter.
All servicing and adjustments to electrical components
should be done by a qualified service technician.
Mail Your Registration Card Today.
• A Product Registration Card is packed with your set. Please
fill out the card and returnit immediately.
• Your prompt submission of this card confirms your right to
the protection available under the termsand conditions of the
warranty and also allows us to contact you should it ever
•become necessary.
o.With your .card on file, we can also help you in the event of
loss or theft by verifying your ownership.
•"If you did not receive a Product Registration Card, please
contact your dealer.
Attach Your Sales Receipt Here and File at Home for
Future Reference
• To obtain warranty parts and service, you must show your
sales receipt (or evidence of purchase) to your Authorized TV
Servicenter.
• Tape or staple your sales receipt to this manual so you will
have it handy should service ever be needed. File it at home
for future reference. Do not mail your sales receipt to us,
Record Vital Information Here
o No other set has the same serial number as yours. You will
find the serial number and the model number on the back of
your set.
• Make sure you record both numbers below so that you will
have them in case your set isstolen or if you need a complete
description for identification.
Model:
Serial:
Purchase Date:
Dealer Name/Address/Phone:
Thank you for choosing RCA
Congratulations on your purchase of
an RCA TV. You have selected a
high-quality, precision-engineered
instrument designed to give you
years of enjoyment.
About This Manual
To take full advantage of all the
features and benefits of this unique
TV, be sure to read this owner's
manual carefully and then keep it in
a safe place for future reference.
Table of Contents
Safety Precautions ................................................. Inside Front Cover
Product Registration ............................................. Inside Front Cover
First-Time Operation ..................................................................... 2-3
Operating Instructions
Front Panel Controls ................................................................................... 4
TV On-Screen Status Displays ................................................................... 5
Remote Control
• Installing Batteries .................................................................................... 6
• TV Functions ......................................................................................... 7-8
VIDEO Button---General Instructions ........................................................ 9
AUDIO Button--General Instructions .........•........._................................... 10
• Sound Retrieval System --SRS (.) ........................................................ 11
SETUP Button---General Instructions ....................................................... 12
• Setting.Closed Captioning ........ :......_........................ ......_............. _.._......13
• Setting the Sleep Timer.._ ..................................... :.................... ............. _14
• Setting the Alarm.................... _.................... _.................. '........... _..... ....... 15
• Labeling Channels ............................... ................................................... 16
• Parental Control ...................................................................................... 17
• Channel Memory (Autoprogramming Channels) ................................... 18
• Setting up VCR Channels ...................................................................... 19
-oSetting up Cable Box Channel ................................................................ 20
Detailed Connections •
Tips to Read Before Connecting Components.., ........... ........... i.......... _....21
Monitor Panel ................................................ :........................................... 22
Antenna and Cable Connections
• Home Antenna Connections ............................. .i........................ i........... 23
• Cable-TV Connections ........................ ................................................... 24
• Programming Remote to Control Cable Box ........................................... 25
• Cable-TV Operation ................................................................................ 26
Component Connections
- Speaker Connections ..:............................... .............................. :......... :...27
• Camcorder ....................................................................... "........................ 28
• Standard VCR .................................................................................... 29-30
• S-VHS (Super VHS) VCR ...................... i................. .............................. 30
• Remote Buttons That Control RCA VCRs ............................................. 31
• Controlling Other Brands of VCRs ........................................................ 32
• Audio Amplifier... i......... :..................................................................... ...33
• Computers and Other Equipment ........................................................... 34
Reference Section
Trouble Checks ......... .... ........................................................ _.............. 35 -36
Cleaning and Care ................ :..................................................................... 37
Optional Accessories and Order Form ................................................. 38-40
Index (Alphabetical Subject Reference) ................................................... 41
Limited Warranty ....................................................................... Back Cover

The steps below will help you get your i v connecteo ano
working quickly. The page numbers on which you can find
detailed instructions for each of these steps are also listed
for your convenience.
1. Unpack TV and accessories.
Shown here are the accessories thatcame packed with your TV.
Remote Control and Power Cord
Four _ Batteries
2. Install batteries in remote control.
Details are on page 6.
3. Connect antenna or cable-TV system.
Most antennaor cable-TV systems Can be connected as
show here.
Incoming Cable from Antenna or
Cable-TV System
Back
of TV
• Details for connecting a home antenna to your TV are on page
23.
• Details for connecting a cable-TV system to your TV
are on pages 24.
• Details for connecting a VCR to your TV are on
pages 29-30.
4. Attach power cord.
Firstattachthe fiat end of the power cord completely into the
connector on the back of your TV, and then plug the otherend
into a wall outl.et.
_e
"llurn on TV, adjust the volume, and select a channel.
Pressthe TV button on
the remote to tum on the __ rv
TV. When using the Button
remote, remember to
point it at the front of the
TV. Number--
Buttons Buttons
Pressthe VOLUME up or (Volume)
Buttons
down button to adjustthe
volume to a desired
level.
Press the CHANNEL up or down button to select the next
channel in memory. You can also press two number buttons to
select a channel. To select a 3-digit cable channel (up to channel
128), press and hold number button 1 until 1--appears on the
screen. Then press the other two numbers. Channels 2-13 were
programmed into the channel memory for you at the factory, so
•pressing CHANNEL up or down stops at these channels only.
6. AutoProgram the TV's channel memory.
Press the SETUP button repeatedlyto select (highlight) the
AUTOPROGRAM function, and then press +. Details are on
page 18.
- Button ---
+ Button
SETUP
Button
You can also add and erase channels from memory as desired
by first pressing SETUP to select (highlight) the CHAN MEM
function. Select the desired channel number by pressing the
CHANNEL up or down button or by pressing the two
corresponding number buttons. Then press + to add a channel,
or press - to erase a channel. Details are on page 18.

e
Adjust PICTURE TILT switches if necessary.*
Select models have an extra
large color picture tube. The F_ + HIQHI-----7
effects of geomagnetism _ Low
(Earth's magnetic field) may - OFF
cause the picture to tilt slightly. PO_R,rY STRENGTH
The POLARITY and
STRENGTH switches on the
back of the TV let you
compensate for this effect. If PUR,rV
CORRECTION
the picture appears tilted, follow
these steps to improve it.
• Make sure the STRENGTH switch is in the OFF position as
the diagram shows.
• Move the STRENGTH switch to the LOW position. If this
improves the tilt but it is still not satisfactory, move the
STRENGTH switch to the.HIGH position. This should
correct the situation. If moving the STRENGTH switch
makes the tilt worse, go to .the next step.
• Change the position of the POLARITY switch. If this
improves the tilt but it is still not satisfactory, move the
STRENGTH switch to the HIGH position. This should
Correct the situation.
You may need to reset the POLARITY and STRENGTH
switches ifthe TV is moved or repositioned in the room,
especially if the TV will be facing a different direction.
8. Set the clock.
,
Repeatedly press the SETUP
button to select the CLOCK
SET display.
Press and hold the - button to select the correct hour
(including AM or PM). Press and hold the + button to select
the correct minute. The correct time will now appear on the
screen whenever you change channels or press the TV or
DISPLAY button.
Note: If power is interrupted for an extended time, you will need
to reset the clock.
Review menus.
Press the VIDEO button to
see the video menu.
Repeatedly press the
VIDEO button to select
desired function and then
press + or - to change it.
Details are on page 9.
Picture R_set : :
Press the A UDIObutton to
see the audio menu.
Repeatedly press AUDIO to
select the desired function
and then press + or - to
change it. Details are on
page 10.
.......SRS ;;;;
Press the SETUP button to see
the setup menu.
Repeatedly press SETUP to _ot_l_mer; _:00_:_:_@_:__
seloct the desired function
and then press + or - to change .........................
it. Details are on page 12.
;_afi:_td!::No_N ::
10. Review other features.
Later, after you feel comfortable with your TV and remote
control, you can review the detailed control descriptions
and special features covered in this manuai.
You can use the rest of this manual as a reference guide to
review detailed information about each operating control
and function. The alphabetical index in the back will help
you quickly locate desired information.
*select inodcls only 3
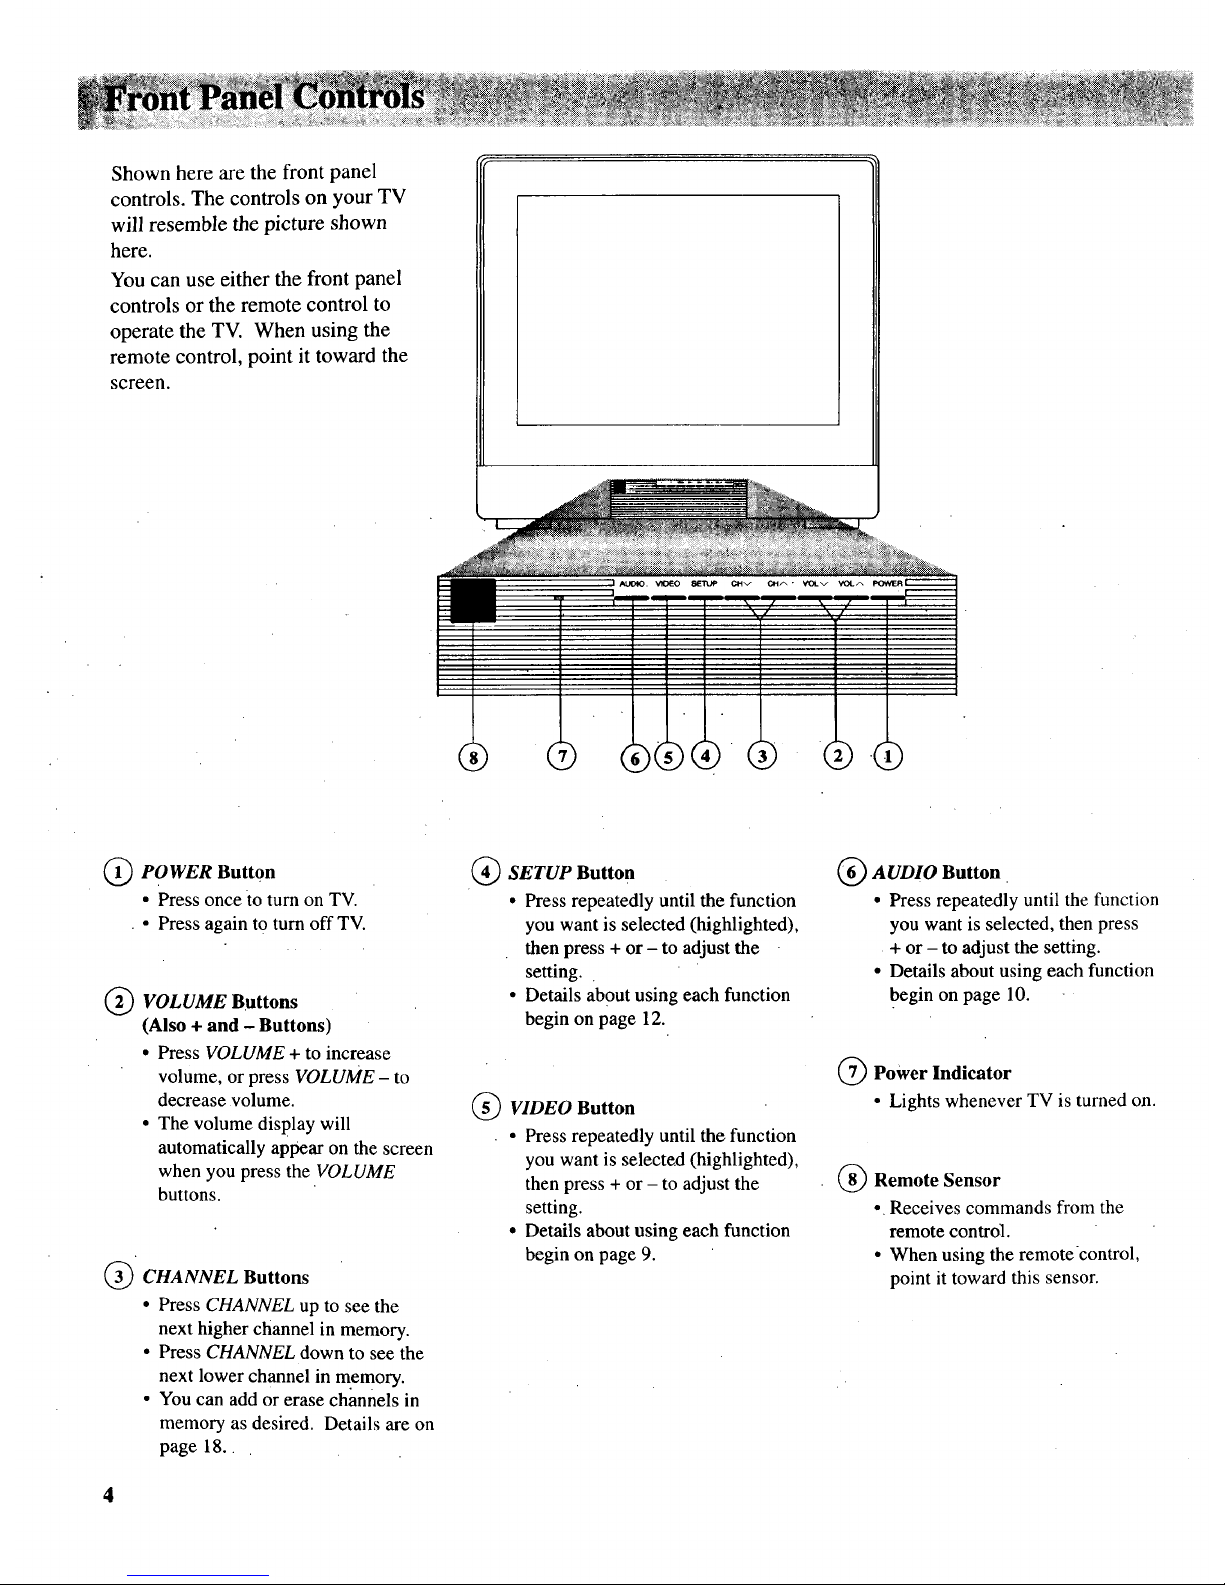
Shown here are the front panel
controls. The controls on your TV
will resemble the picture shown
here.
You can use either the front panel
controls or the remote control to
operate the TV. When using the
remote control, point it toward the
screen.
(_ PO WER Button
• Press once to turn on TV.
• Press again to turn off TV.
(_ VOLUME Buttons
(Also + and - Buttons)
• Press VOLUME + to increase
volume, or press VOLUME - to
decrease volume.
• The volume display will
automatically appear on the screen
when you press the VOLUME
buttons.
(_ CHANNEL Buttons
• Press CHANNEL up to see the
next higher channel in memory.
• Press CHANNEL down to see the
next lower channel in memory.
• You can add or erase channels in
memory as desired. Details are on
page 18.
(_ SETUP Button
• Press repeatedly until the function
you want is selected (highlighted),
then press + or - to adjust the
setting.
• Details about using each function
begin on page 12.
(_ VIDEO Button
• Press repeatedly until the function
you want is selected (highlighted),
then press + or - to adjust the
setting.
• Details about using each function
begin on page 9.
(_ AUDIO Button
• Press repeatedly until the function
you want is selected, then press
+ or - to adjust the setting.
• Details about using each function
begin on page 10.
(_) Power Indicator
• Lights whenever TV is turned on.
(_) Remote Sensor
• Receives commands from the
remote control.
• When using the remotecontrol,
point it toward this sensor.
Time
Sleep Timer
..........- @ Channel
Parental Control
@ Channel Label
Captioning
MUTE
Commercial Skip
@
®
®
@
®
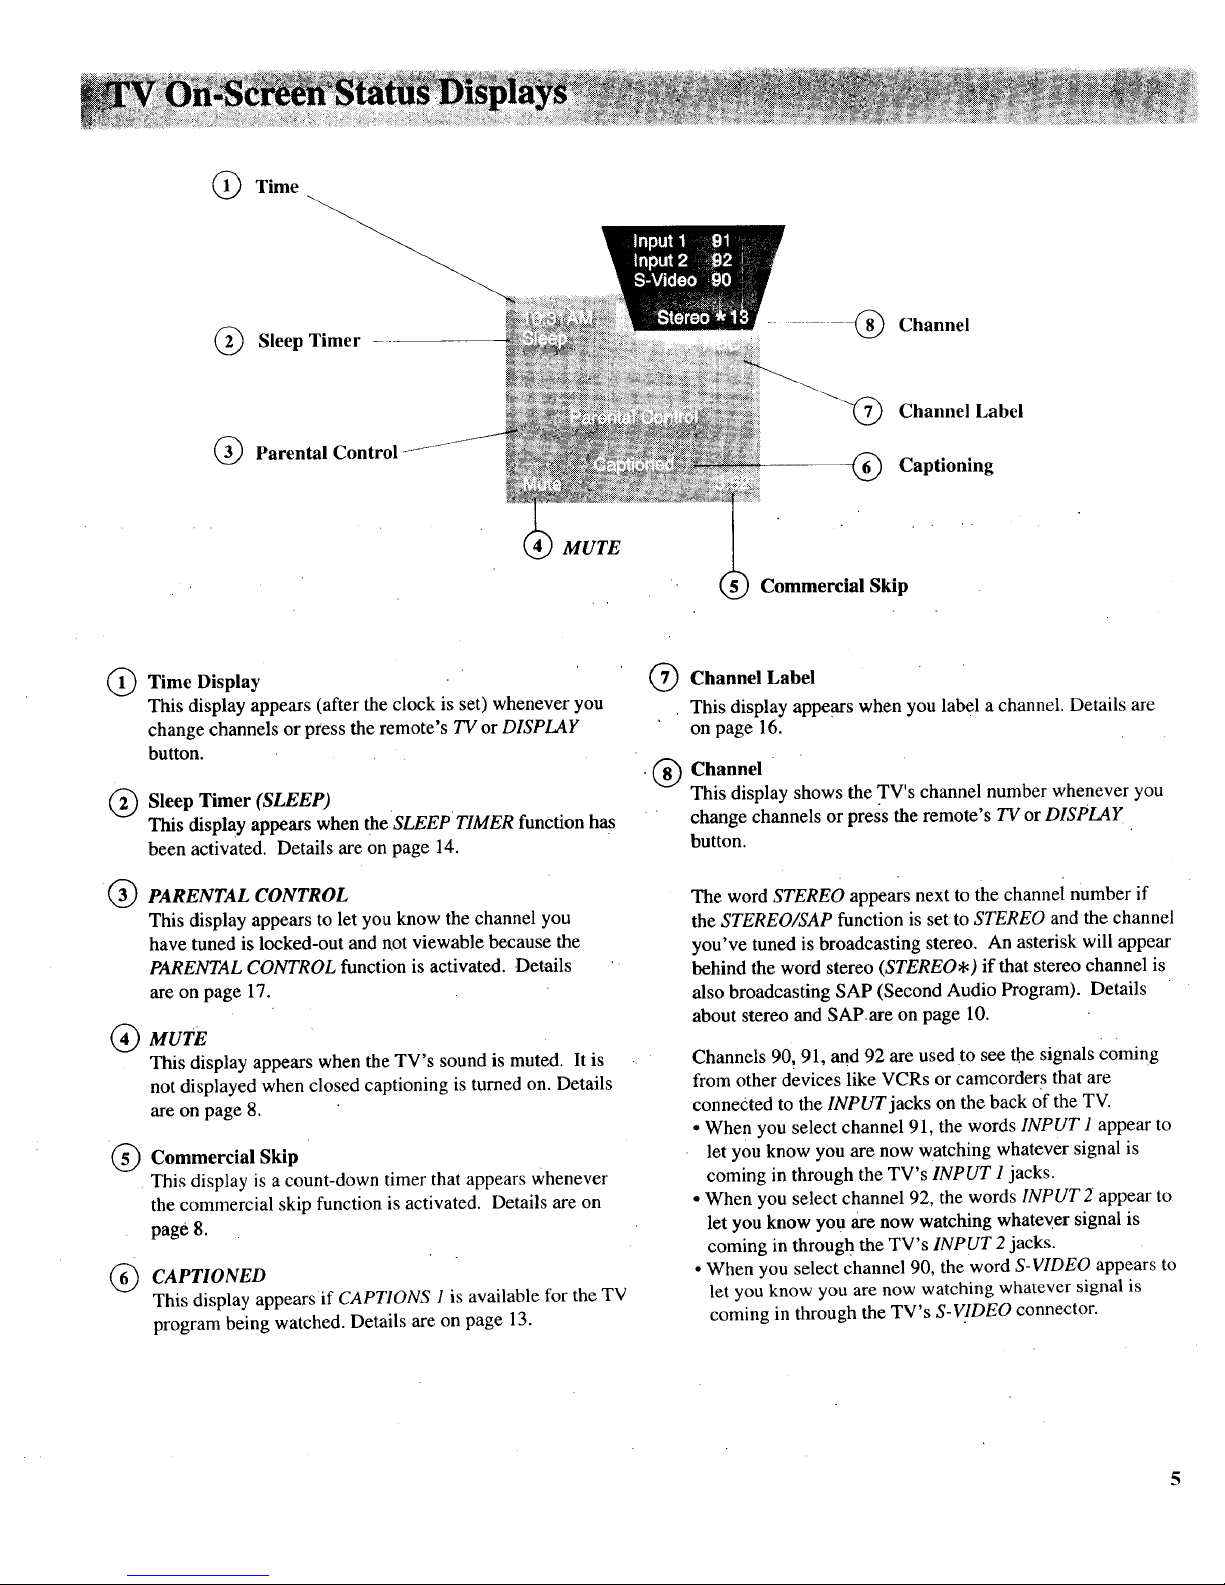
Time Display
This display appears (after the clock is set) whenever you
change channels or press the remote's TV or DISPLAY
button.
Sleep Timer (SLEEP)
This display appears when the SLEEP TIMER function has
been activated. Details are on page 14.
PARENTAL CONTROL
This display appears to let you know the channel you
have tuned is locked-out and not viewable because the
PARENTAL CONTROL function is activated. Details
are on page 17.
MUTE
This display appears when the TV's sound is muted. It is
not displayed when closed captioning is turned on. Details
are on page 8.
Commercial Skip
This display is a count-down timer that appears whenever
the commercial skip function is activated. Details are on
page 8.
CAPTIONED
This display appears if CAPTIONS 1 is available for the TV
program being watched. Details are on page 13.
@
®
Channel Label
This display appears when you label a channel. Details are
on page 16.
Channel
This display shows the TV's channel number whenever you
change channels or press the remote's TV or DISPLAY
button.
The word STEREO appears next to the channel number if
the STEREO/SAP function is set to STEREO and the channel
you've tuned is broadcasting stereo. An asterisk will appear
behind the word stereo (STEREO*) if that stereo channel is
also broadcasting SAP (Second Audio Program). Details
about stereo and SAP.are on page 10.
Channels 90, 91, and 92 are used to see the signals coming
from other devices like VCRs or camcorders that are
connected to the INPUT jacks on the back of the TV.
• Whe n you select channel 91, the words INPUT 1 appear to
let you know you are now watching whatever signal is
coming in through the TV's INPUT 1 jacks.
• When you select channel 92, the words INPUT 2 appear to
let you know you are now watching whatev.er signal is
coming in through the TV's INPUT 2 jacks.
• When you select channel 90, the word S-VIDEO appears to
let you know you are now watching whatever signal is
coming in through the TV's S-VIDEO connector.
5
Operating Remote Control
Before attempting to operate your
remote control, install the batteries as
shown here.
Your remote control is designed to be
very rugged and will withstand a
considerable drop. If it receives an
extreme blow, the case is designed to
slightly separate at the seam rather
than fracture. If this happens, simply
squeeze the case where it separated
until it snaps back together. The
operation of the remote will probably
not be affected. -
Helpful Hint:
The remote control produces an invisible
(infrared) beam thattravels in a straight
line much as the beam of a flashlight.
For this reason, when operating the
remote control, you must point it directly
atthe front of the TV Without objects
between that can block the infrared light
beam.
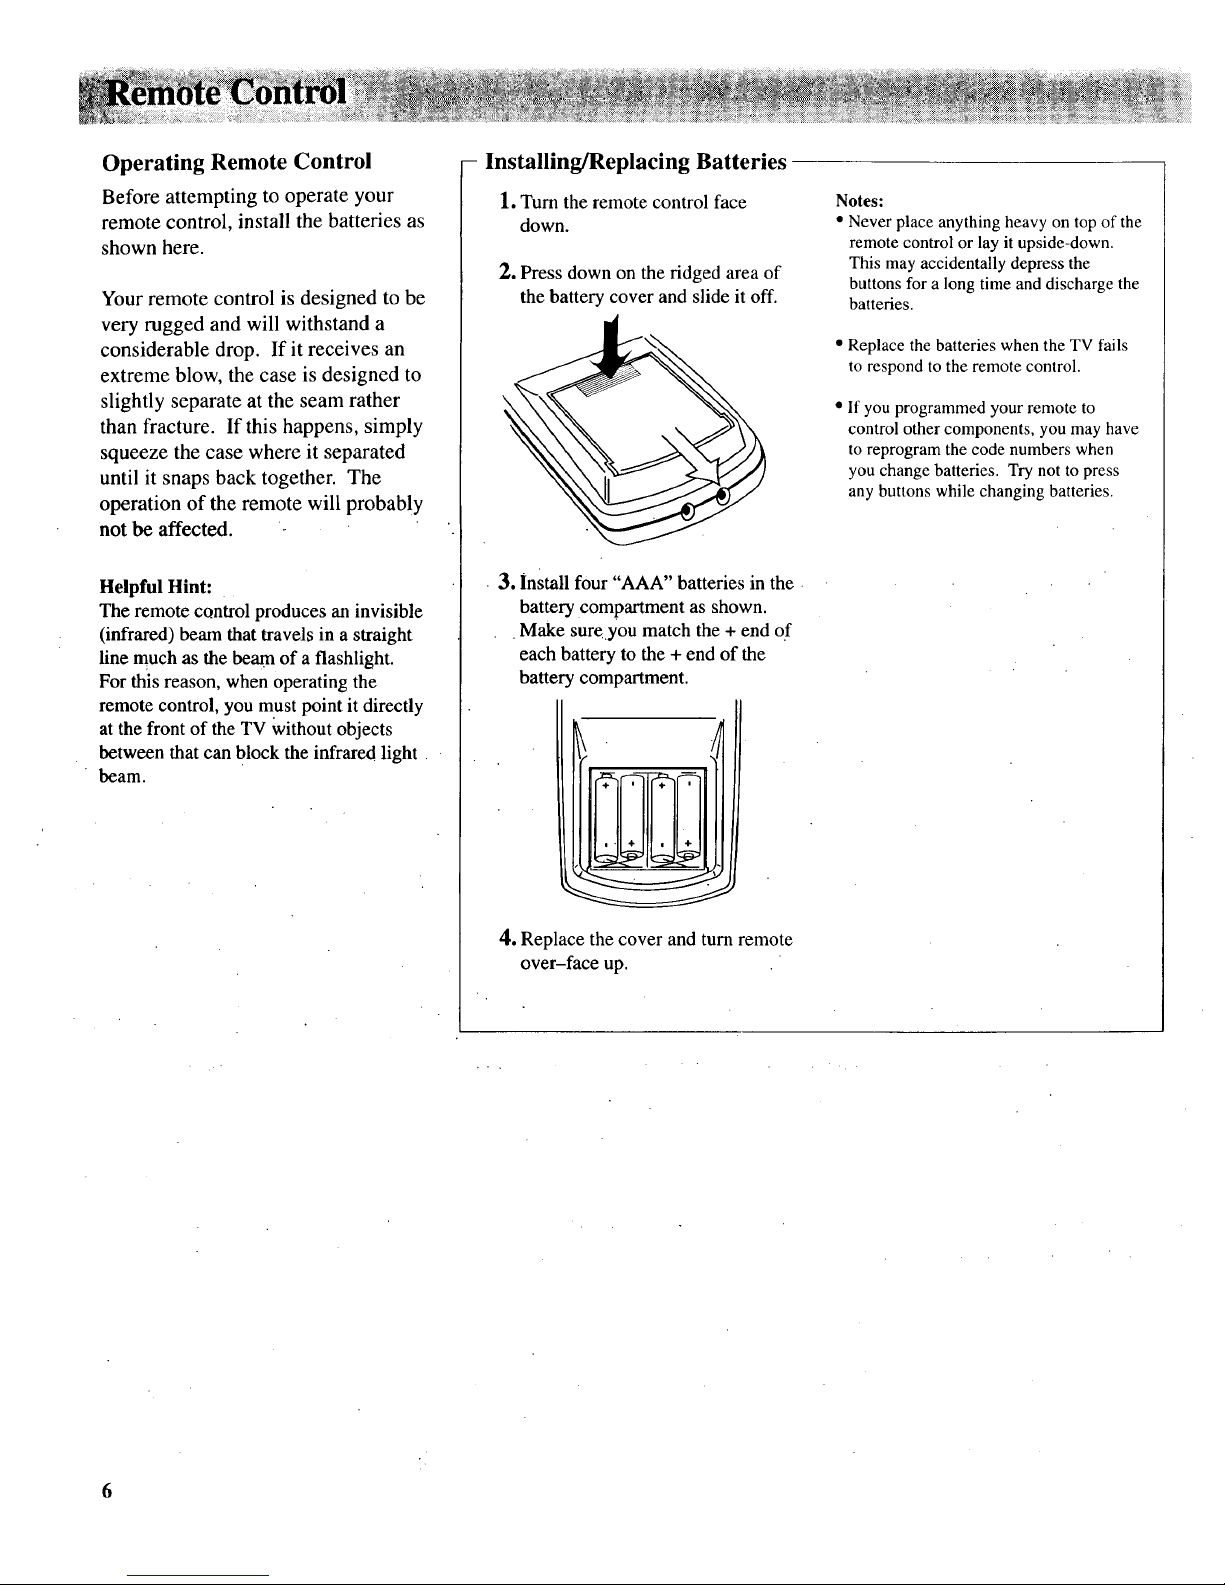
- Installing/Replacing Batteries
1. Turn the remote control face
down.
2. Press down on the ridged area of
the battery cover and slide it off.
3. install four "AAA" batteries in the
battery compartment as shown.
Make sureyou match the + end of
each battery to the + end of the
battery compartment.
4. Replace the cover and turn remote
over-face up.
Notes:
• Never place anything heavy on top of the
remote control or lay it upside-down.
This may accidentally depress the
buttons for a long time and discharge the
batteries.
• Replace the batteries when the TV fails
to respond to the remote control.
• If you programmed your remote to
control other components, you may have
to reprogram the code numbers when
you change batteries. Try not to press
any buttons while changing batteries.
6
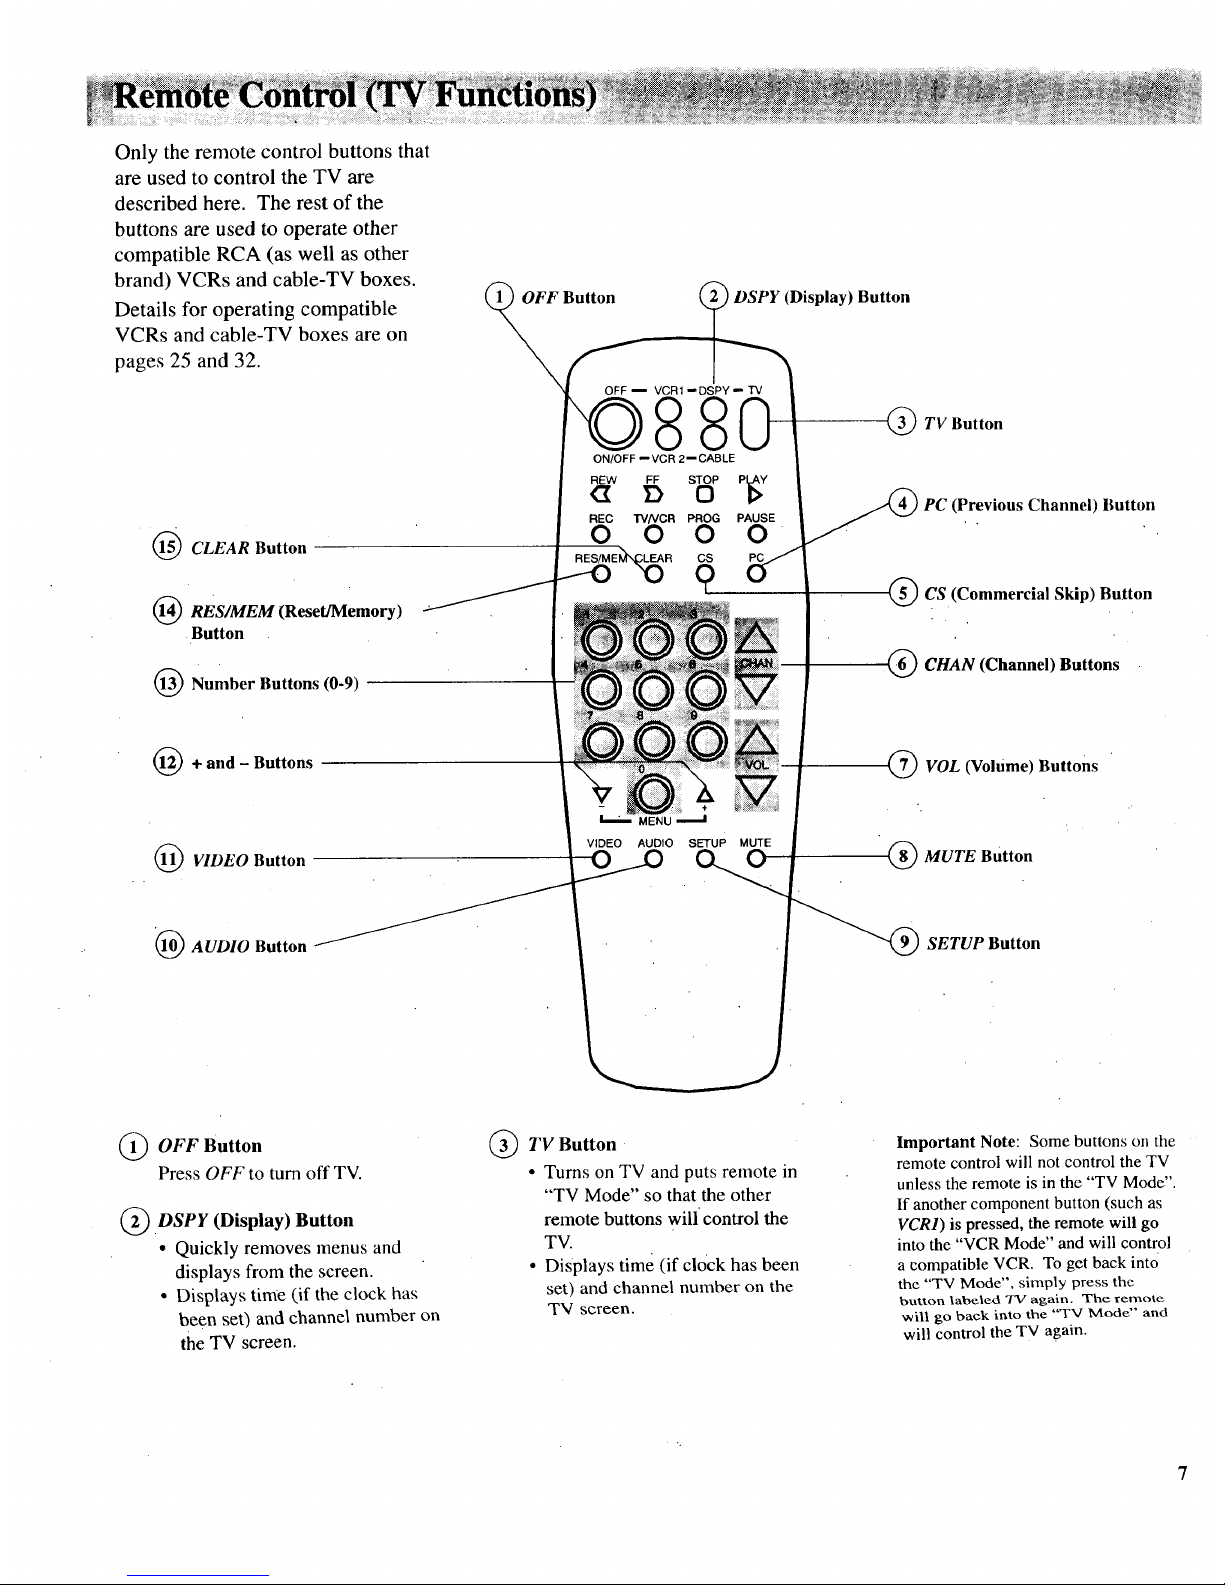
Only the remote control buttons that
are used to control the TV are
described here. The rest of the
buttons are used to operate other
compatible RCA (as well as other
brand) VCRs and cable-TV boxes.
Details for operating compatible
VCRs and cable-TV boxes are on
pages 25 and 32.
Button _ DSPY (Display) Button
_ TV Button
ON/OFF -- vcn 2-- CABLE
aw 5 s 3P
REC I"VNGR PROG PAUSE
O O O O
CS
9
I(I(I@CLEAR Button
I(I(I_RES/MEM (Reset/Memory)
Button
(_) Number Buttons (0-9)
) PC (Previous Channel) Button
CS (Commercial Skip) Button
CHAN (Channel) Buttons
(_)+ and - Buttons
I(I_ VIDEO Button
MENU
VIDEO AUDIO SETUP MUTE
(_VOL (Volume) Buttons
(_ MUTE Button
I(I_ AUDIO Button
"_ SETUP Button
_ OFF Button
Press OFF to turn off TV.
(_DSPY (Display) Button
• Quickly removes menus and
displays from the screen.
• Displays time (if the clock has
been set) and channel number on
the TV screen.
(_ TV Button
• Turns on TV and puts remote in
"TV Mode" so that the other
remote buttons will control the
TV.
• Displays time (if clock has been
set) and channel number on the
TV screen.
Important Note: Some buttons on the
remote control will not control the TV
unless the remote is in the "TV Mode".
If another component button (such as
VCR1) is pressed, the remote will go
into the "VCR Mode" and will control
a compatible VCR. To get back into
the "TV Mode", simply press the
button labeled TV again. The remote
will go back into the "TV Mode" and
will control the TV again.
PC (Previous Channel)
Button
• Pressing the PC button causes the
TV to change back to the last
tuned channel. This is useful
should you want to monitor two
channels.
• To operate, select the first channel
you wish to watch. Then select
the other channel by pressing two
numberbuttons (for example,
press 0 then 6 for channel 6).
• The TV will now change back
andforth between the two
channels each time you press the
PC button.
@ CS (Commercial Skip)
Button
• Use this button when you want to
scan other channels during a
program break.
• When a break occurs, press CS
once before changing channels.
The TV will count down 30
seconds on the screen and then
automatically switch channels
back to the original channel.
• Press CS twice if you want the
TV to count down 60 seconds.
Each additional press will add
another 30 seconds to the count-
down time (up to four minutes).
. To cancel, press CLEAR. The
countdown clock will disappear
from the screen, andthe TV will
stay tuned to the present channel.
• The counter will only display for
2 seconds if CAPTIONING is
turned on.
CHANNEL Buttons
• Press CHANNEL up to select the
next higher channel in channel
memory.
• Press CHANNEL down to select
the next lower channel in channel
memory.
• You can add or erase channels in
memory as desired. Details are
on page 18.
8
(_ VOLUME Buttons
• Press VOLUME up to increase
volume.
• Press VOLUME down to
decrease volume.
• The volume display will
automatically appear on the
screen when you press the
VOLUME buttons.
MUTE Button
• Press MUTE to quickly reduce
sound to minimum level without
affecting the picture. This is
especially useful during
•telephone calls or other
interruptions.
• When the sound is muted, the
word MUTE will be displayed on
the screen, except when
• CAPTIONING is turned on.
• To restore sound, press MUTE
again or press VOLUME up.
SETUP Button
• Press repeatedly until the
function you want is selected,
then press ÷ or - to adjust the
setting.
• Details about using each function
begin on page 12.
AUDIO Button
• Press repeatedly until the
•function you want is selected,
then press + or - to adjust the
setting.
• Details about using each function
begin "onpage 10.
VIDEO Button
• Press repeatedly until the
function you want is selected,
then press + or - to adjust the
setting. Press + or - again to
adjust the picture settings.
• Details about using each function
are on page 9.
+
and - Buttons
Use these buttons after you have
pressed one of the three menu
buttons (VIDEO, AUDIO, or
SETUP).
Number Buttons (0-9)
• These buttons let you directly
access any channel number, even
if the channel is not in the
channel memory.
• To select a Channel, press two
number buttons (first one, then
the other). For example, press 0
then 6 for channel 6.• Press 1
then 3 for channel 13.
• To select a 3-digit number (like
125), press and hold number
button luntil 1-- appears on the
screen. Then press the other two
numbers.
Note: YourTV will tune up to
channel 125. Check with your cable
company to determine which
channels are available in your area.
RES/MEM (Reset/Memory)
Button
• When the remote is in the "TV
Mode" (as explained •inthe
Important Note on page 10), this
button is the RES (Reset) button.
Pressing it will return the video
functions (color, tint, contrast,
brightness, and sharpness) to
their original factory settings.
• Vghen the remote is in the
"VCR Mode", the RES/MEM
button becomes the MEM
(Memory) button. Pressing it
turns on a compatible VCR's
counter memory function.
@ CLEAR Button
• Pressing CLEAR clears the
screen of all on-screen display
messages (except MUTE).

Repeatedly press the VIDEO button to
select (highlight) the video function
you want to change, then press + or -
to adjust it. Pressing the RES/MEM
button lets you move back up the
menu screen.
_nt ......
The COLOR function adjusts the amount of color in the picture.
Press + to increase color or press - to decrease color.
The TINT function adjusts the color of flesh tones. Press + to add
more red tint, or press - to add more green tint.
The CONTRAST function adjusts the overall brightness and contrast
of the picture. Press + to increase contrast, or press - to decrease
contrast.
The BRIGHTNESS function adjusts the brightness of the dark
portions of the picture. Press + to increase brightness, or press - to
decrease brightness.
The SHARPNESS function adjusts picture sharpness. Press + to
increase sharpness, or press - to decrease sharpness.
The PICTURE RESET function lets you quickly change al!the
video functions (shown above) back to the factory settings. Press
either + or - to reset the video functions.
The video menu will automatically disappear from the screen if
you do not press + Or - within a few seconds.
Via remote control, yout TV will "remember" .which function
you displayed last-even after the menu has disappeared from
the screen. So, if you want to adjust the same function again,
simply press the + or - button on the remote control. The last
function you adjUsted will reappear on the TV screen.
_unctions at low settings will he!p delay _e _rinfmg but ;. _
it is often too easy for someone m your family to leave the
Adjusting for a Color Picture that Pleases You
1.Decrease color to minimum. This will leave a black-and-white
image on the screen.
2. Adjust contrastuntil the picturepleases you.
3. Adjust brightness until the black partsof the picture appear
black. You may need to wait until the picture shows something
you're sure is black• to.make this adjustment. Be careful not to
lose the details•in darkly shaded areas.
4. Increase color until you reach a pleasing level of intensity.
5. Adjust tint until flesh tones or other color objects appear natural.
6. Adjust sharpness for a pleasing level of picture sharpness. (For
weak signals, the picture may be more pleasing with sharpness
decreased.)
Custom Picture Memory for Input Channels
The channel numbers you select to see signals from components
(like a VCR) that are connected to the INPUT jacks on the back of
the TV are called input channels. Selecting channel 90 lets you see
the signal coming from whatever component is attached to the
S-VIDEO connector, channel 91 lets you see the signal from the
INPUT 1 jacks, and channel 92 lets you see the signal from the
INPUT 2 jacks. Your TV is equipped with a custom picture
memory for these input channels. When the TV is tuned to one of
these channels (90, 91, 92), you can change the picture settings for
that component's signal as desired without changing the settings of
any other channel. This is very useful because you'll be able to
adjust for the best picture from each of your components and the
TV will remember those settings automatically the next time you
tune that input channel.

RepeatedlypresstheAUDIO button to
select (highlight) the audio function
you want to change, then press + or -
to adjust it. Pressing the RES/MEM
button lets you move back up the
menu screen.
!
The audio menu will automatically disappear from the
screen if you do not press + or - within a few seconds.
Via remote control, your TV will "remember" which
function you displayed last-even after the menu has
disappeared from the screen. So, if you want to adjust
the same function again, simply press the + or - button
on the remote control. The last function you adjusted
will reappear on the TV Screen.
10
The TREBLE function adjusts the high frequency audio. Press + to
increase treble or press - to decrease treble.
The BASS function adjusts the low frequency audio. Press + to increase
bass, or press - to decrease bass.
The BALANCE function adjusts the left/right balance of sound from the
speakers. When adjusting the BALANCE function, sit in your normal
viewing seat while pressing the + and - buttons until the sound seems to
originate from a point halfway between the speakers. Press + to increase
sound from the right speaker, or press - to increase sound from the left
speaker.
The STEREO/SAP function lets you choose either MONO (monaural),
STEREO, or SAP audio (if available) by pressing + or -. When a station is
broadcasting stereo and the STEREO/SAP functio n is set to STEREO, the
stereo indicator (STEREO) will appear on the screen before the channel
number. Normally you can leave the STEREO/SAP function set to
STEREO and your TV will then automatically reproduce either monaural or
stereo, audio-whichever is broadcast. Some TV stations that broadcast
stereo also broadcast another sound channel called SAP (Second Audio
Program) which is sometimesused to offer the program in another
language. Your TV lets you know when SAP audio is available by
displaying an asterisk (.) on the screen after the stereo indicator like this
(STEREO*). If you want to listen to the SAP channel when the asterisk
appears, change the STEREO/SAP function to its SAP setting. The SAP
setting will only appear in the function when SAP is available. Your TV
will then reproduce the SAP audio until you change channels or return the
STEREO/SAP function back to STEREO.
Note: Some TV stations transmit a "pilot" signal that makes your TV
think it's receiving stereo, even though the broadcast signal is monaural.
The pilot signal will make the stereo indicator (STEREO) appear on the
screen next to the channel number, however, you will not be able to hear
stereo sound. If this.happens, check with the TV station to inquire whether
the program being broadcast is in .true stereo or monaural audio.
The SRS: ON/OFF function lets you add greater depth and dimension to
stereo broadcasts. You can turn this function on and off as desired by
pressing + or - to change the setting between ON and OFF. You may
prefer to leave this function set to ON. Your TV will then automatically
process the stereo signals whenever a stereo broadcast is received (or
whenever a stereo tape is played through a stereo VCR that is connected to
the TV's audio/video jacks labeled INPUT). Details are on page 11.
The SRS WIDTH function lets you enhance the perceived audio separation
that occurs when the above SRS function is ON. Pressing + or - changes
the setting between NORMAL and ENHANCE. Details are on page 11.
The SPEAKERS function lets you turn off the TV's internal speakers by
pressing + or - to change the setting between ON and OFF.. You will
probably want to leave the TV's speakers turned on unless you connect an
amplifier (with its own set of speakers) to the appropriate jacks on the back
of the TV as described on page 27.
Your TV includes a feature called
SRS (O)* (Sound Retrieval System)
which brings dimensional realism to
both stereo and mono broadcasts.
When the SRS ON/OFF function is
set to ON and the STEREO/SAP
function is set to STEREO, your TV
electronically increases the audio
separation of the speakers so you can
perceive a more spacious stereo
sound effect. If a stereo signal is not
present, you can set the SRS
ON/OFF function to its SYNTH
STEREO setting to synthesize and
process the mono signal.
When the SRS ON/OFF function is
set to ON, you can also change the
next menu item called SRS WIDTH
between NORMAL or ENHANCED.
When this function is set to
ENHANCED, the perceived audio
separation will be greater. Try both
settings and select the one you prefer
for your room acoustics.
Note: Some material (audio) will be more
affected than others.
SRS (O) allows you to hear multiple
sound sources. Audio frequencies are
processed to establish directional
cues which gives the impression that
sound is coming from all parts of the
room. External speakers are not
required, but the addition of high
quality external speakers optimizes
the sound performance of your TV.
*SRS and (O) are registered trademarks of Hughes
Aircraft Company, a division of GM Hughes Electronics.
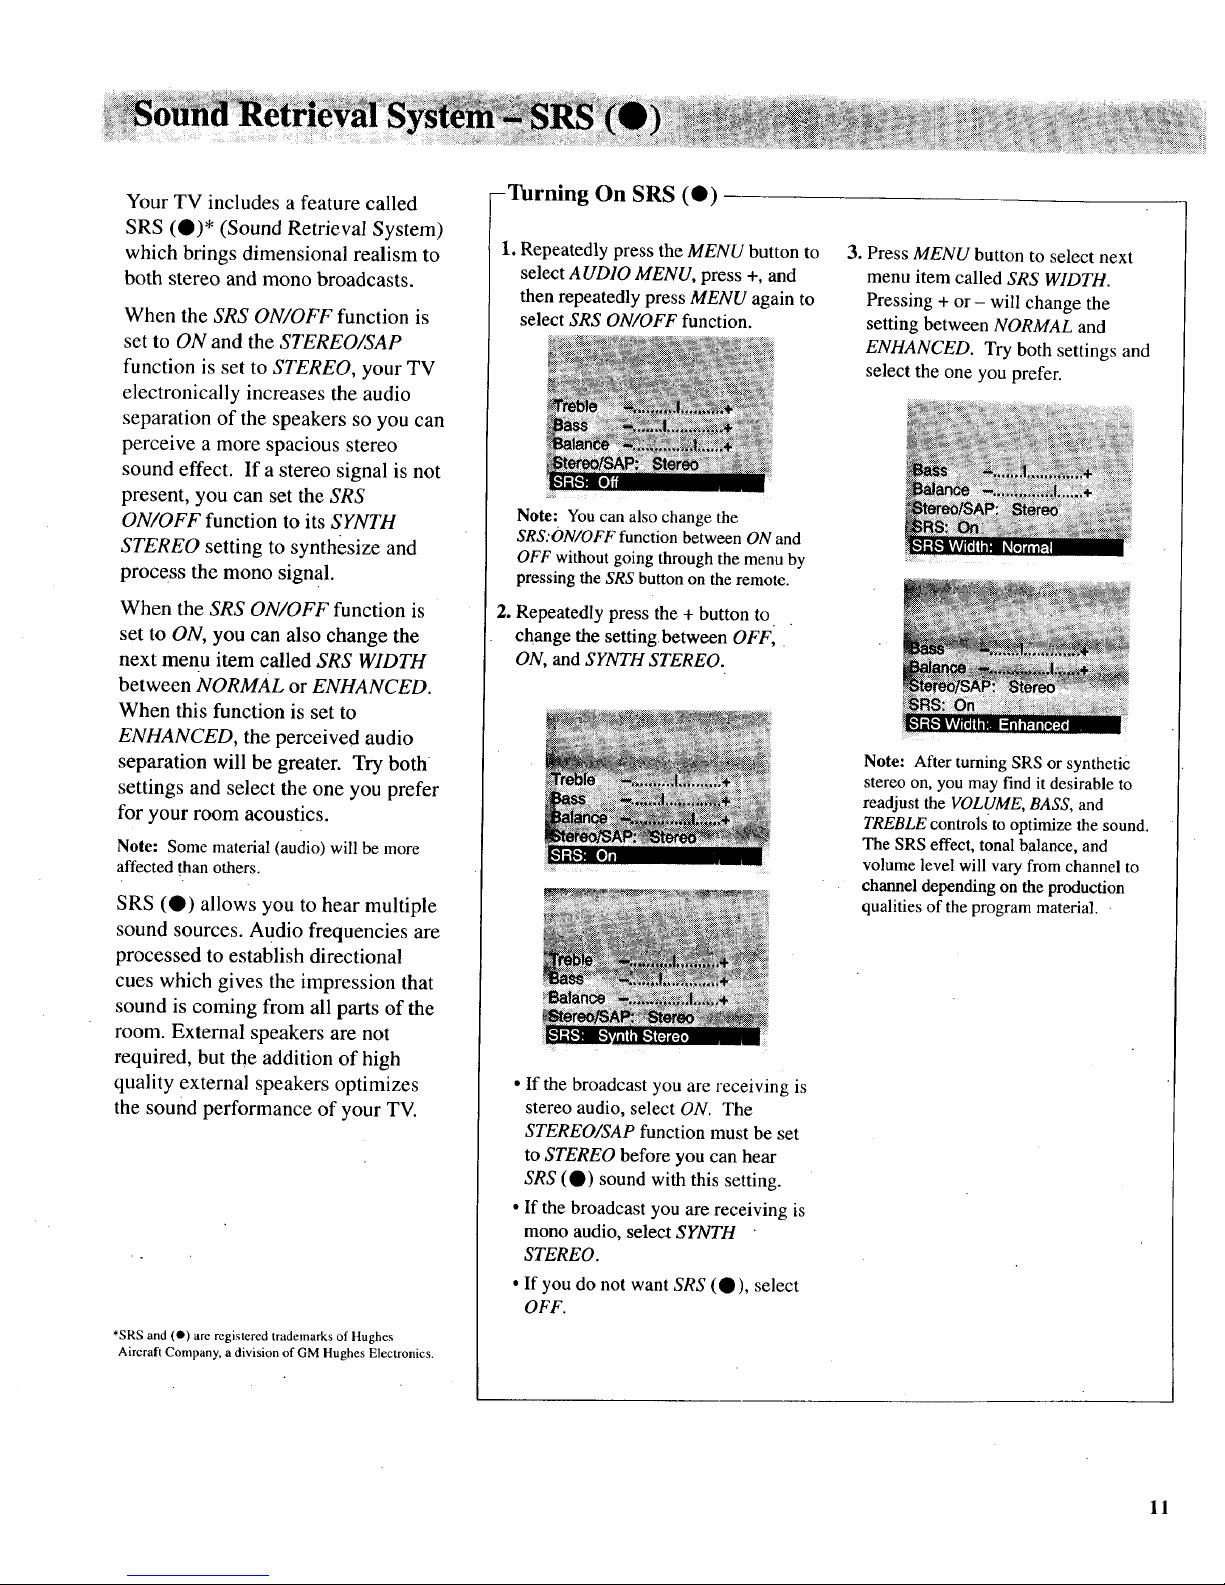
-Turning On SRS (O)
1. Repeatedly press the MENU button to
select AUDIO MENU, press +, and
then repeatedly press MENU again to
select SRS ON/OFF function.
Note: You can also change the
SRS:ON/OFF function between ON and
OFF without going through the menu by
pressing the SRS button on the remote.
2. Repeatedly press the + button to
change the settingbetween OFFI
ON, and SYNTH STEREO.
• If the broadcast you are receiving is
stereo audio, select ON. The
STEREO/SAP function must be set
to STEREO before you can hear
SRS (0) sound with this setting.
• If the broadcast you are receiving is
mono audio, select SYNTH
STEREO.
• If you do not want SRS (O), select
OFF.
3. Press MENU button to select next
menu item called SRS WIDTH.
Pressing + or - will change the
setting between NORMAL and
ENHANCED. Try both settings and
select the one you prefer.
Note: After turning SRS or synthetic
stereo on, you may find it desirable to
readjust the VOLUME, BASS, and
TREBLE controls to optimize the sound.
The SRS effect, tonal balance, and
volume level will vary from channel to
channel depending on the production
qualities of the program material.
11
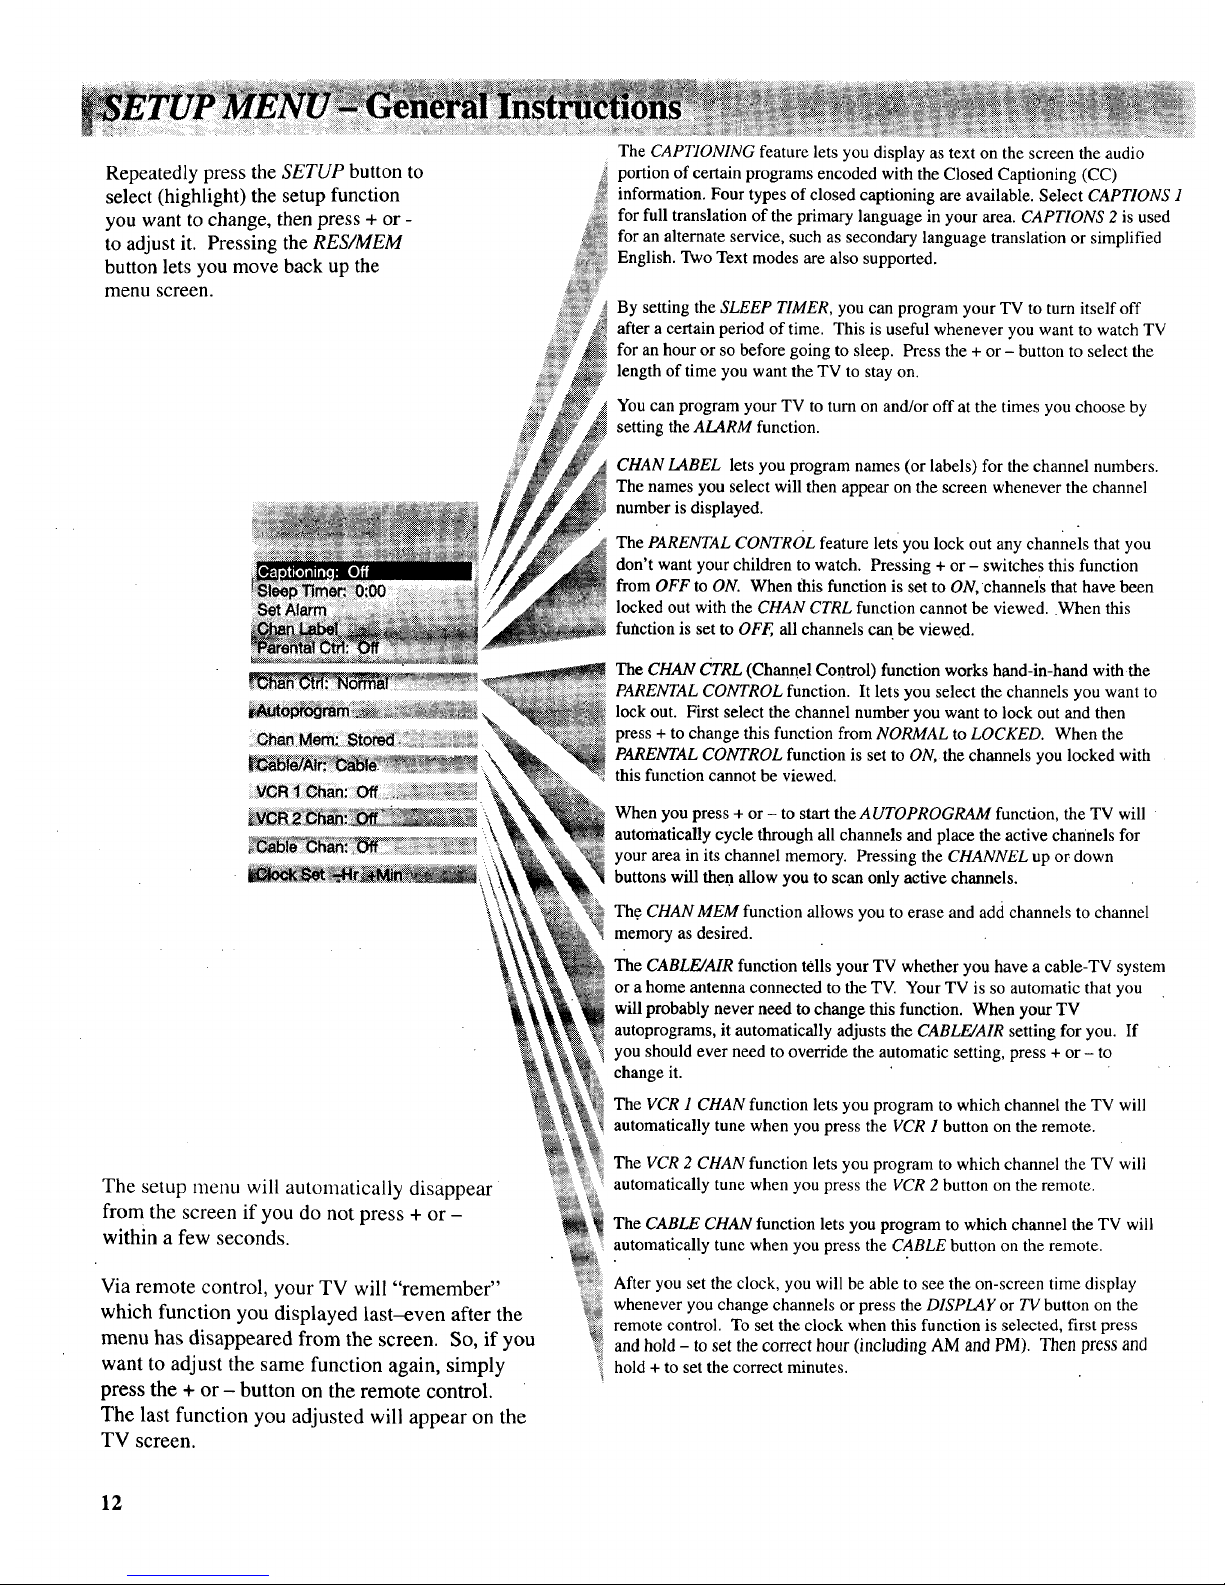
RepeatedlypresstheSETUP button to
select (highlight) the setup function
you want to change, then press + or -
to adjust it. Pressing the RES/MEM
button lets you move back up the
menu screen.
iii_i_iiiii@
N
iiiiii_iiiii!
The setup menu will automatically disappear
from the screen if you do not press + or -
within a few seconds.
Via remote control, your TV will "remember"
which function you displayed last-even after the
menu has disappeared from the screen. So, if you
want to adjust the same function again, simply
press the + or - button on the remote control.
The last function you adjusted will appear on the
TV screen.
The CAPTIONING feature lets you display as text on the screen the audio
portion of certain programs encoded with the Closed Captioning (CC)
information. Four types of closed captioning are available. Select CAPTIONS 1
for full translation of the primary language in your area. CAPTIONS 2 is used
for an alternate service, such as secondary language translation or simplified
English. Two Text modes are also supported.
By setting the SLEEP TIMER, you can program your TV to turn itself off
after a certain period of time. This is useful whenever you want to watch TV
for an hour or so before going to sleep. Press the + or - button to select the
length of time you want the TV to stay on.
You can program your TV to turn on and/or off at the times you choose by
setting the ALARM function.
CHAN LABEL lets you program names (or labels) for the channel numbers.
The names you select will then appear on the screen whenever the channel
number is displayed.
The PARENTAL CONTROL feature lets you lock out any channels that you
don't want your children to watch. Pressing + or - switches this function
from OFF to ON. When this function is set to ON, channels that have been
locked out with the CHAN CTRL function cannot be viewed..When this
function is set to OFF, all channels can. be viewed.
The CHAN CTRL (Channel Control) function works hand-in-hand with the
PARENTAL CONTROL function. It lets you select the channels you want to
lock out. First select the channel number you want to lock out and then
press + to change this function from NORMAL to LOCKED. When the
PARENTAL CONTROL function is set to ON, the channels you locked with
this function cannot be viewed.
When you press + or - to start the AUTOPROGRAM function, the TV will
automatically cycle through all channels and place the active channels for
your area in its channel memory. Pressing the CHANNEL up or down
buttons will then allow you to scan only active channels.
Th.e CHAN MEM function allows you to erase and add channels to channel
memory as desired.
_. "
The CABLE/AIR function tells your TV whether you have a cable-TV system
_ or a home antenna connected to the TV. Your TV is so automatic that you
will probably never need to change this function. When your TV "
....autoprograms, it automatically adjusts the CABLE/AIR setting for you. If
ii you should ever need to override the automatic setting, press + or - to
change it. '
The VCR 1 CHAN function lets you program to which channel the TV will
automatically tune when you press the VCR 1 button on the remote.
The VCR 2 CHAN function lets you program to which channel the TV will
automatically tune when you press the VCR 2 button on the remote.
The CABLE CHAN function lets you program to which channel the TV will
automatically tune when you press the CABLE button on the remote.
After you set the clock, you will be able to see the on-screen time display
whenever you change channels or press the DISPLAY or TV button on the
remote control. To set the clock when this function is selected, first press
and hold - to set the correct hour (including AM and PM). Then press and
hold + to set the correct minutes.
12
 Loading...