

Page 1
..US'E R'S
GUIDE
ImportantInformation.............i
TableofContents_.....................1
QuickGuidetoYour1!/..,.......2-5
UsingYourRemote..... ......6-15
AdjustingYourTV............16-19
UsingAdvancedFealures...20-27
References........................28-37
. !
C _O_IL O
R
TV
Page 2
Important Information
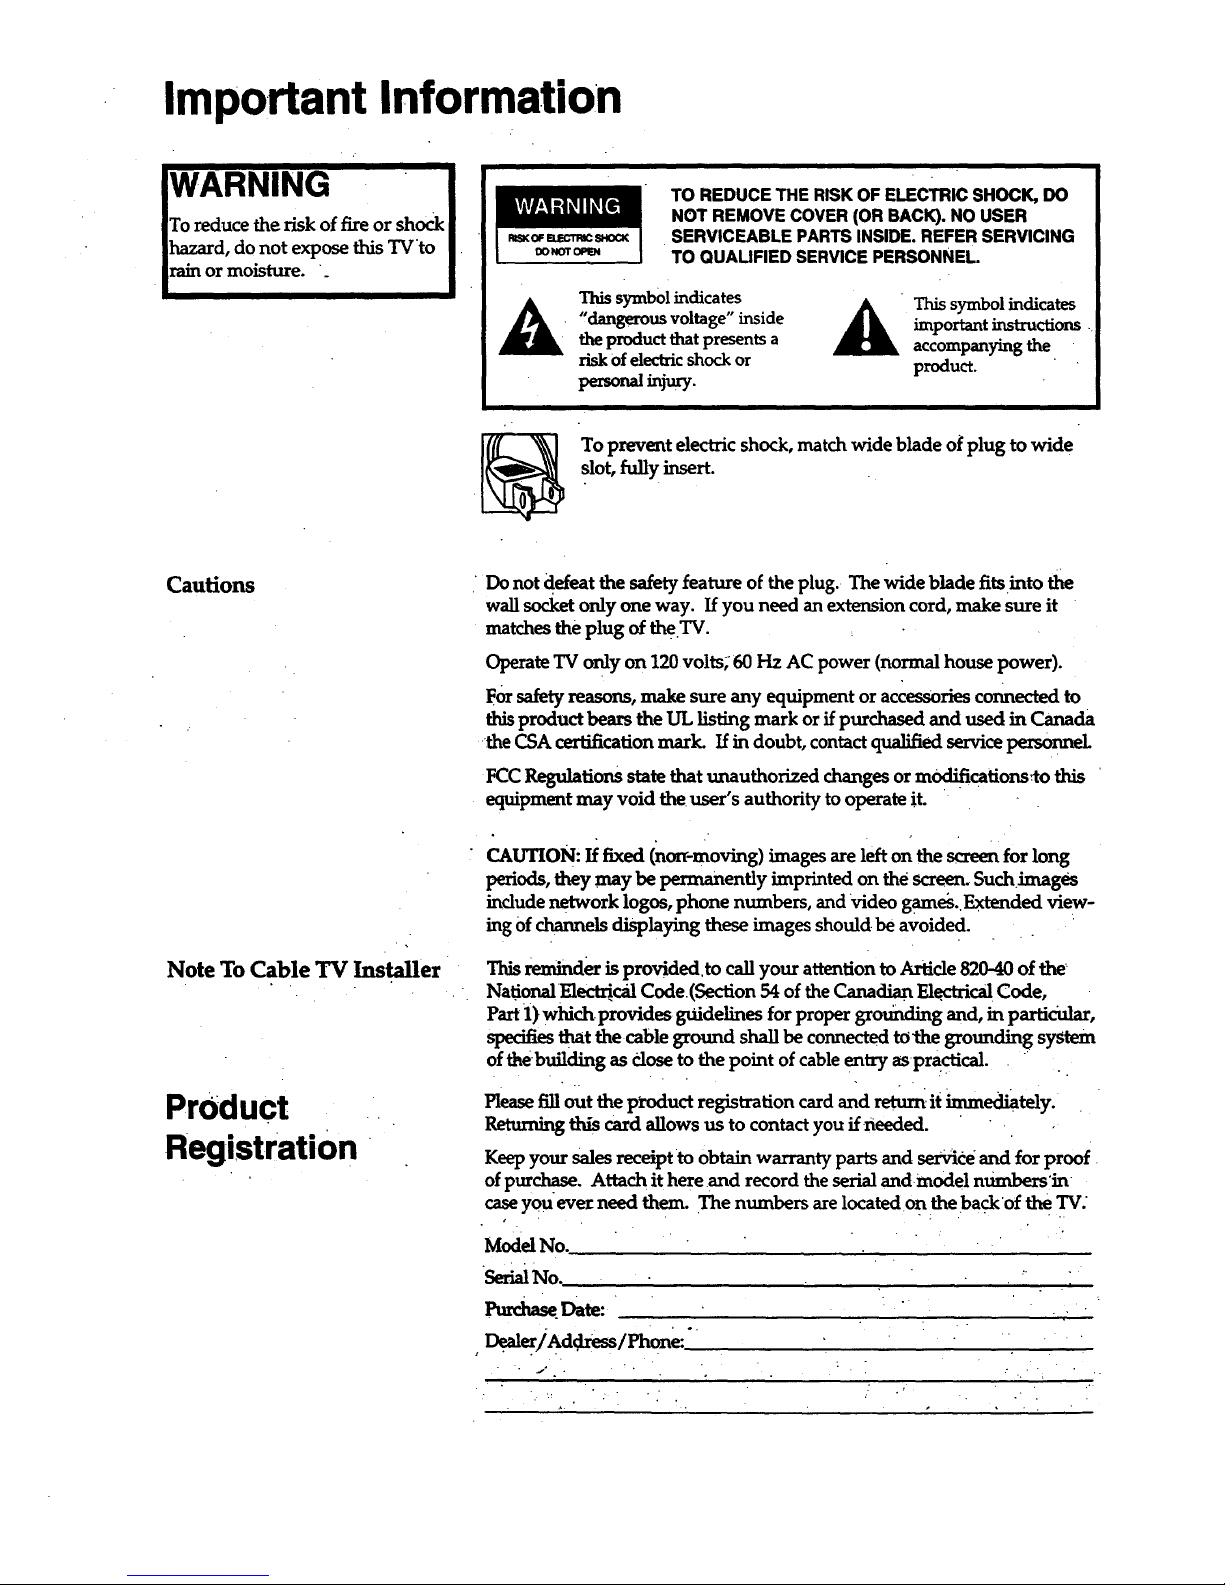
WARNING
To reduce the risk of fire or shock
b_zard, do not expose this TVto
rain or moisture.
TO REDUCE THE RISK OF ELECTRICSHOCK, DO
NOT REMOVE COVER(OR BACK). NO USER
SERVICEABLE PARTS INSIDE. REFERSERVICING
TO QUAUFIED SERVICEPERSONNEL
This symbol indicates A This symbol indicates
'dangerous voltage" inside _ important instructions
the product that presents a accompanying the
risk of electric shock or product.
To prevent electric shock, match wide blade of plug to wide
slot, fully insert.
Cautions
Note To Cable TV Installer
Product
Registration
Do not defeat the safety feature of the plug. • The wide blade fits into the
wall socket only one way. If you need an extension cord, make sure it
matches the plug of the.TV.
Operate TV only on 120 volts; 60 Hz AC power (normal house power).
For _._,fetyreasons, make sure any equipment or accessories connected to
product bears the UL listing mark or if purchased and used in Canada
•the CSA certification mark. If in doubt, contact qualified service personr_
FCCRegulations state that unauthorized changes or modifications_to this
• equipment may void the user's authority to operate it.
CAUTION: If fixed ('nommoving) images are left on the screen for long
periods, they may be permanently imprinted on the screen. SuchJmages
include network logos, phone numbers, and Video games. Extended view-
ing Ofchannels displaying these images should be avoided.
This reminder is provided.to call your attention to A_.'tide820-40 of the
National Electr_,'calCode(Section 54 of the Ca_nacl._nF_,l_-_-icalCode,
Part 1) which provides guidelines for proper grounding and, in particular,
specifies that thecable ground shall be connected to the grounding system
of the building as dose to the point of cable entry aspractical. •
Please fill out the product registration card and return.it "munediately.
Returning this card allows us to contact you ffneeded.
Keep your sales receiptto obtain warranty parts and sez_ce and for proof
of purchase. Attach it here and record the serial andmode! numbers'in
case you eve_ need thean. The numbers are located on the back'of the TV."
Model No.
, Deal_/Ad .dress/Phon_"
• . i
: - ..: • /'
Page 3

Table of Contents
Important Information Warning, Product Registration
i
Quick Guide to Your TV
Startup 2-3
Hook up your TV, Plug in the TV, Put Batteries in the Remote,
Turn on the TV, Plac e Channels into Memory, Set the Time
Basic Tour of the Remote ." 4
•Basic Button Layout and Functions
!
Menu Basics 5
Colors, Menu Buttons, Moving through the Menus
Using Your TV and Remote
With Remote Buttons
With VCRs
With a Satellite Receiver
With a Cable Box -
Witha Laserdisc Player
With Audio Equipment
-7
8-10
11
12-13
i4
15
Adjusting Your TV
OverallPicuxre 16
Picture Settings. 17
Color, Tint, Brightness, Sharpness, Autocolor, Picture Reset
Sound Sett_gs 18'19
•Stereo, Expanded.Stereo, SAP, Tone, Speakers
Using Advanced Features
Placing Channels in Memo_/Autoprogra m
Naming the Channels
•Setting the Sleep Timer
Settingthe Alarm Clock
Watching Pi_in-Picture •
Selecting a Languag e ..., ._
Watching Closed Captioning
Setting Your TV for Antenna or Cable
20
21.
22
23,
, 24-25
26
•26
27
References
Front PanelButtons
Di_lays On the Screen"
TroubleChecl_ '
Warranty
Order Form for Parts
• . 7
Glossary , •
28•
29
•30-31
32
33-341
• • . 35"
1
Page 4
Quick Guide to Your TV
Startup -
The steps below will get your TV connected and ready for watching.
For more details, see the page numbers listed.
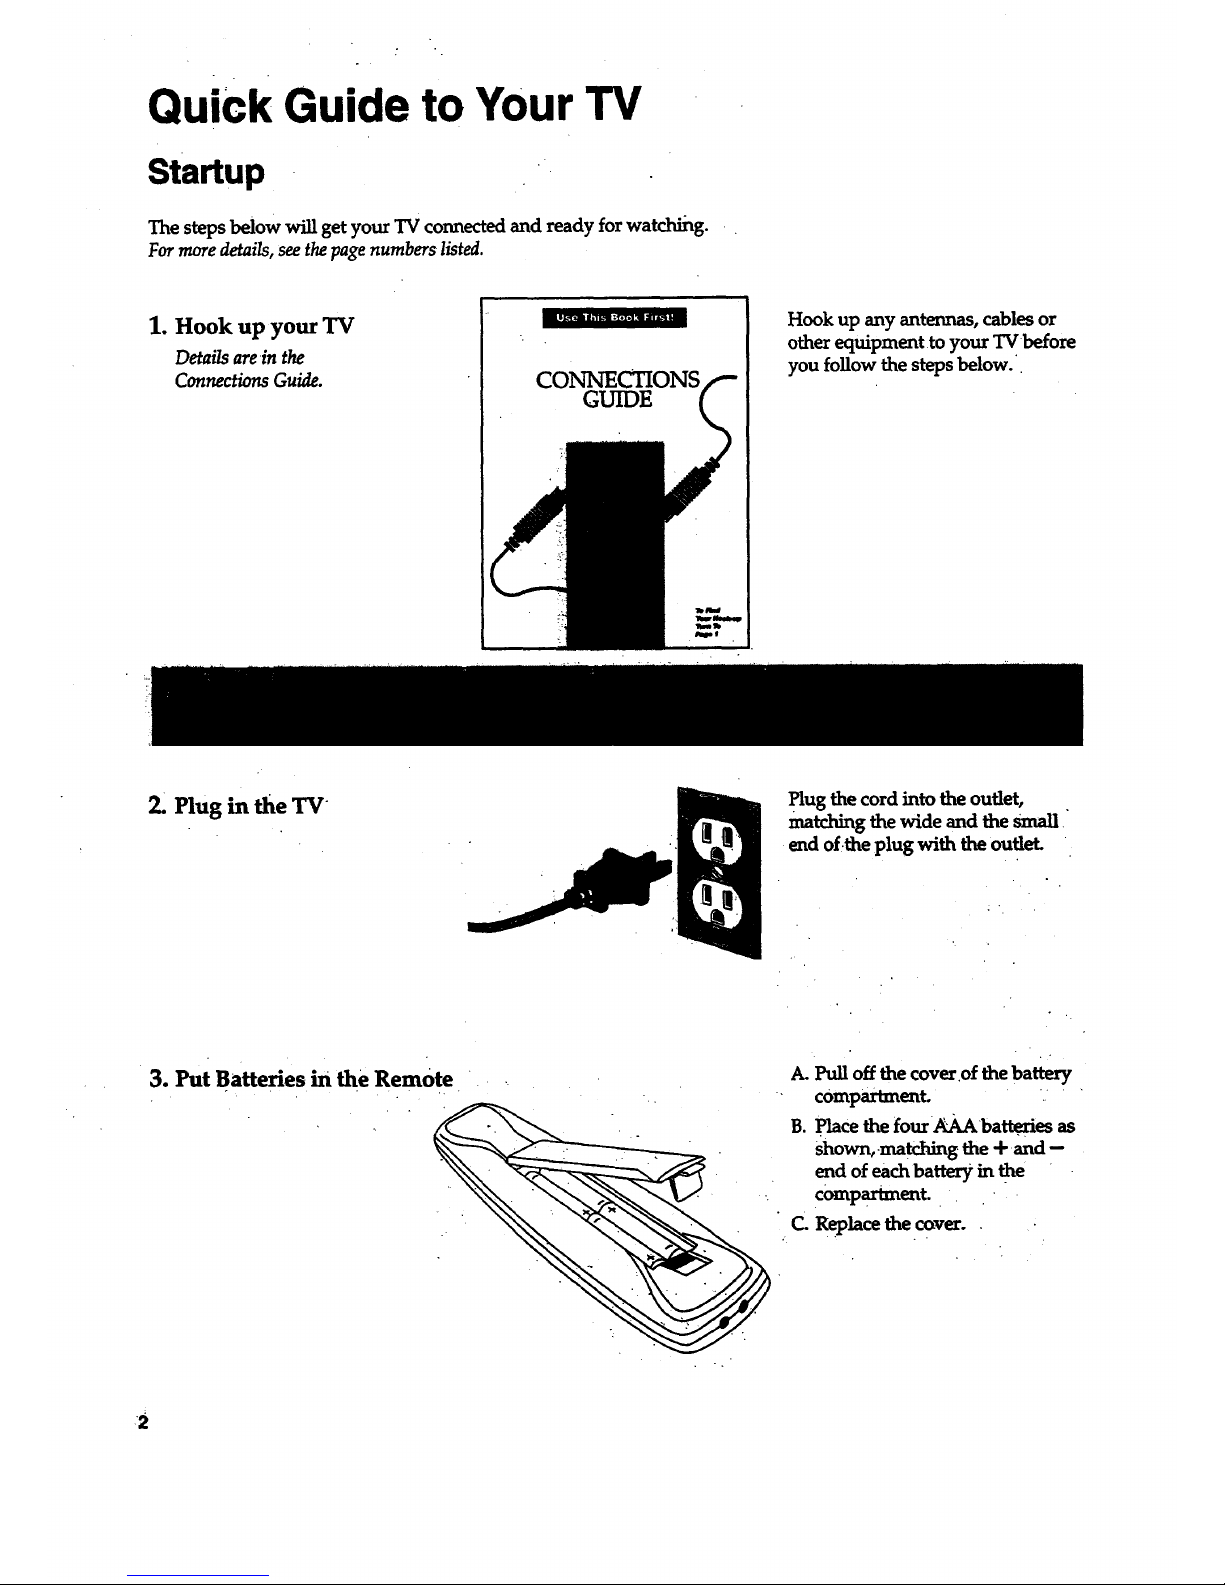
1. Hook up your TV
Details arein the
ConnectionsGuide.
GUIDE
Hook up any antennas, cables or
other equipment to your TVbefore
you follow the steps below.
2. Plug in the TV
Plug the cord into the outlet,
matching the wide and the Small
end of the plug with the outlet.
3. Put Batteries in the Remote
A. Pull off the cover.of the battery
compartment. ....
B. Place the four "AAAbatten'es as
shown,.matching the + and --
end of each battery in the
compartment.
C Replace the cover.
•2
Page 5
Quick Guide to Your TV
Startup -
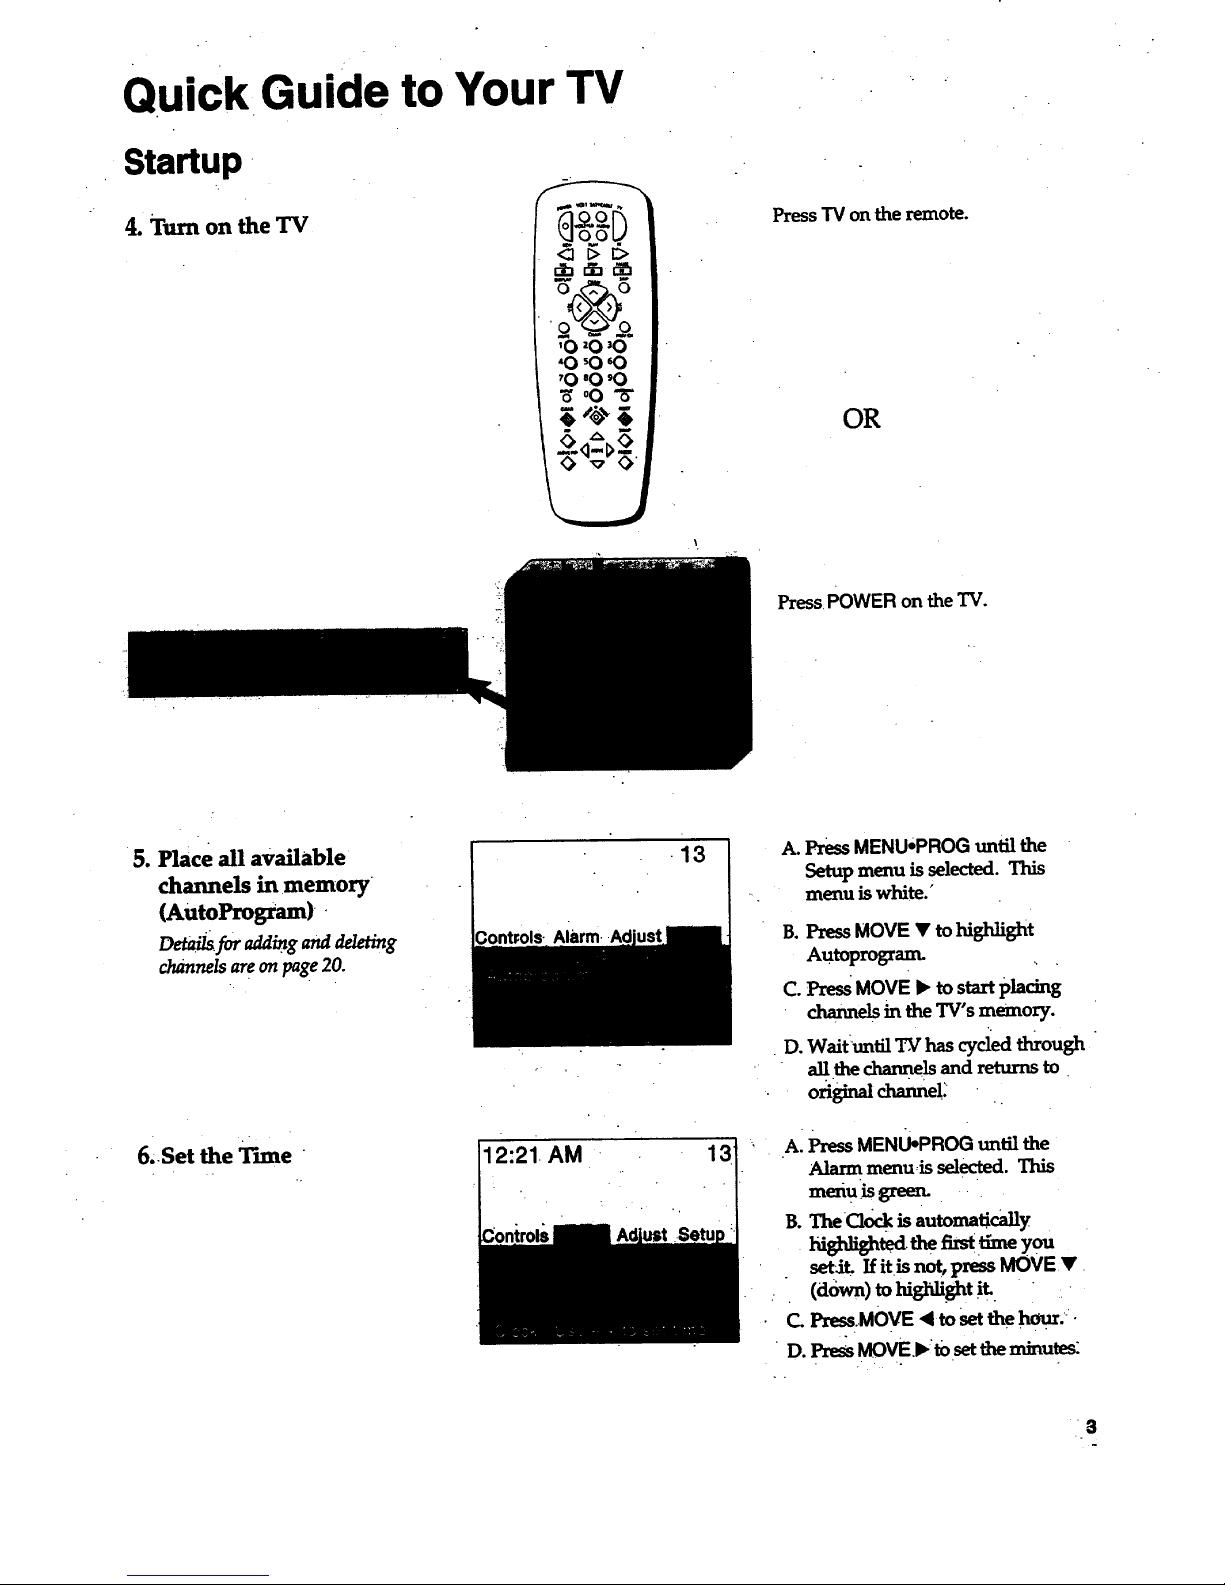
4. Turn on the TV
<23 I> D,
d:i dr:l,-_
o _o.
'O 20 30
'(3 '060
70 'On:)
_oOW'
,\.
Press TV on the remote.
OR
PressPOWER on the TV.
5. Place all available
channels in memory
(AutoProgram) -
channels are on page 20.
6;.Set the Tune
'12:21 AM
13
13
A. PressMENU*PROG until the
Setup menu is selected. This
•-. menu is white.'
B. Press MOVE • to higldight
Autoprogram.
C. Press MOVE I_ to start pladng
chax_els in the TV's memory.
D. Waituntil T_has cyded though "
the channels and returns to
original channe!:
A:_ MEN_PROa_ _
Alarm menu:is selected. This
menu:is green..
B. The C10ck is automau'cally
_ted thea_ :_e you
set_ If it/ShOt, press MOVEr
(dbwn) to higl_light it.
a Pxw_..MOVE <to setthe ]'u:Ru',"•
•D. ]:'x_sMOVE.I,,._settheminutes:
• . '-
0
Page 6
Quick Guide to Your TV
Basic Tour of the Remote
Basic information about your remote is shown below. This will give you a
general idea of how your remote works. For more details, see pages 6-,.15.
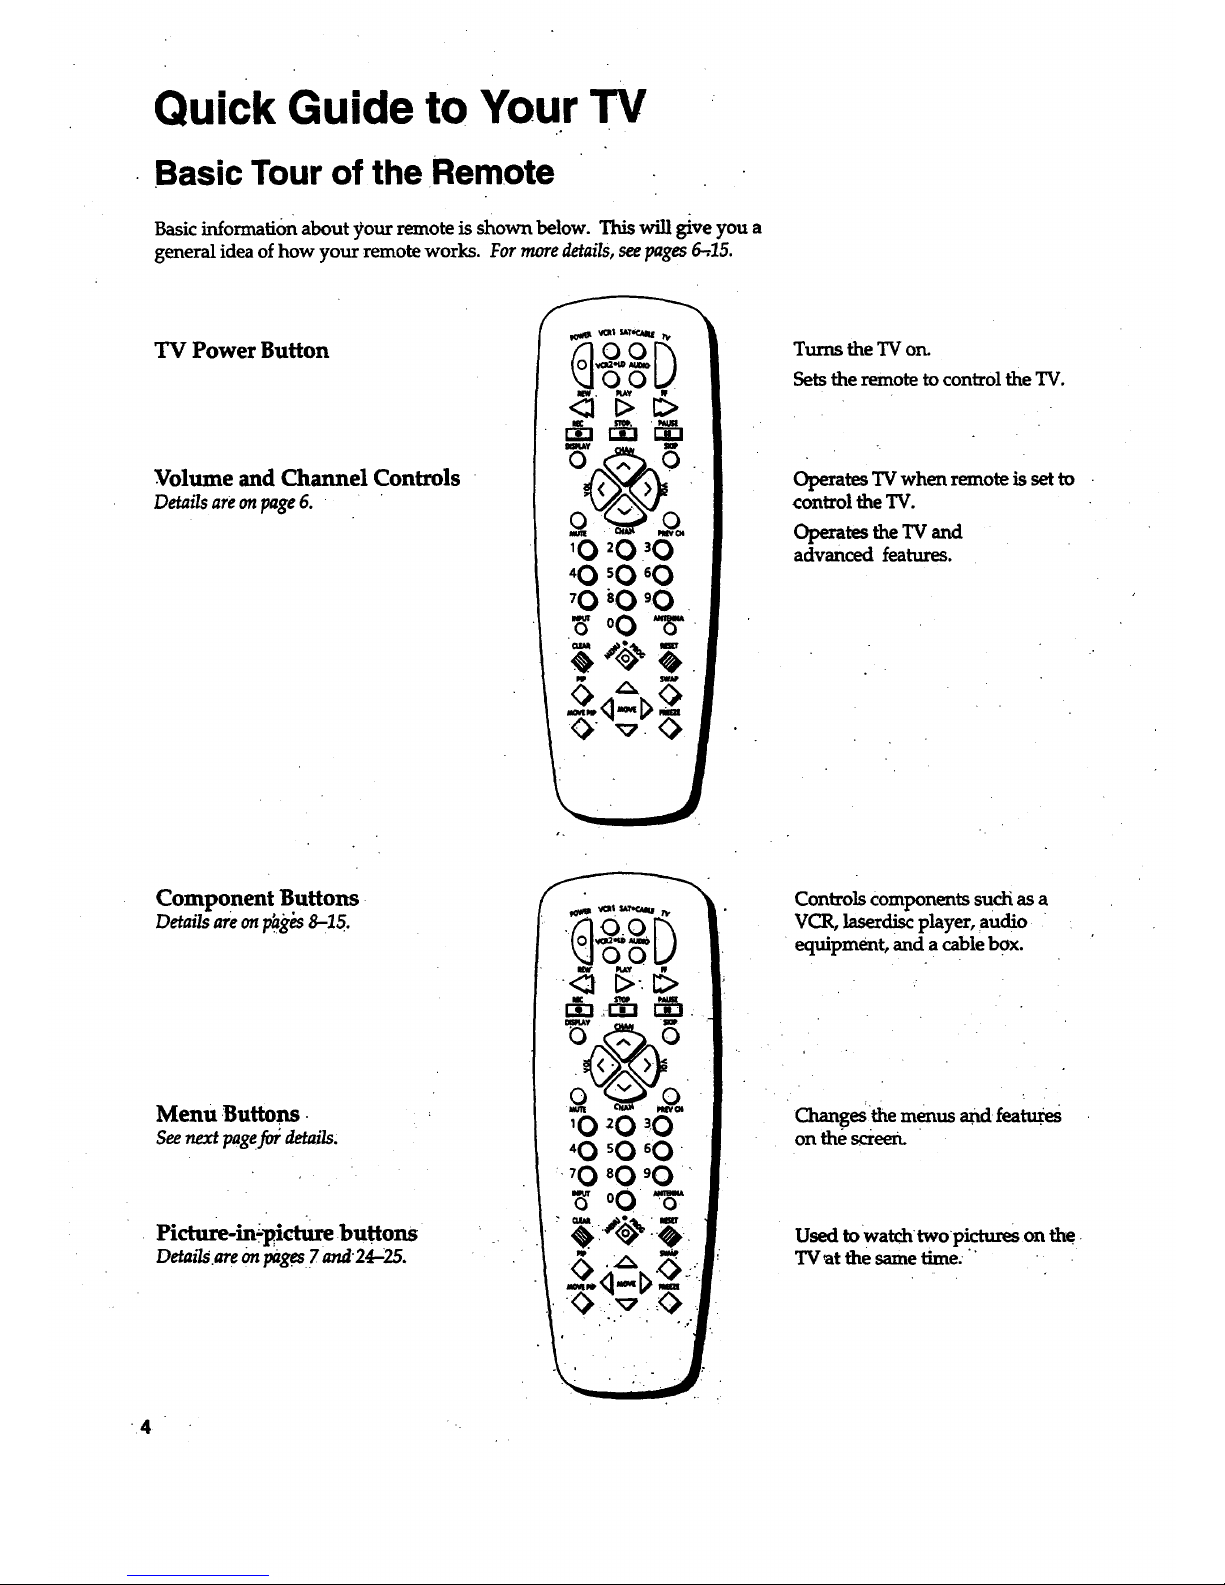
TV Power Button
Volume and Channel Controls
Details are on page 6.
Turns the TV on.
Sets the remote to control the TV.
Operates TV when remote is set to
control the TV.
Operates the TV and
advanced features.
Component Buttons
Details are on p_g_s8--15.
Menu .Buttons.
See next pagef_ details.
Picture-in.:-pictUre buttons
Details.areonpages7 and 24-;ZS.
Controls Components such as a
VCR, laserdisc player, audio •
equipment, and a cable box.
Changes the menus ,and.fea.tuTes
on the screen.
Used to watch twopictures on the.
TV.at the same time."
4
Page 7
Quick Guide to Your TV
Menu Basics
General information about using the on-screen menu system is shown
below. Details on using the remote buttons are on pages 6-7. Many menu items
are explained in detail in Using the Advanced Features starting on page 20.
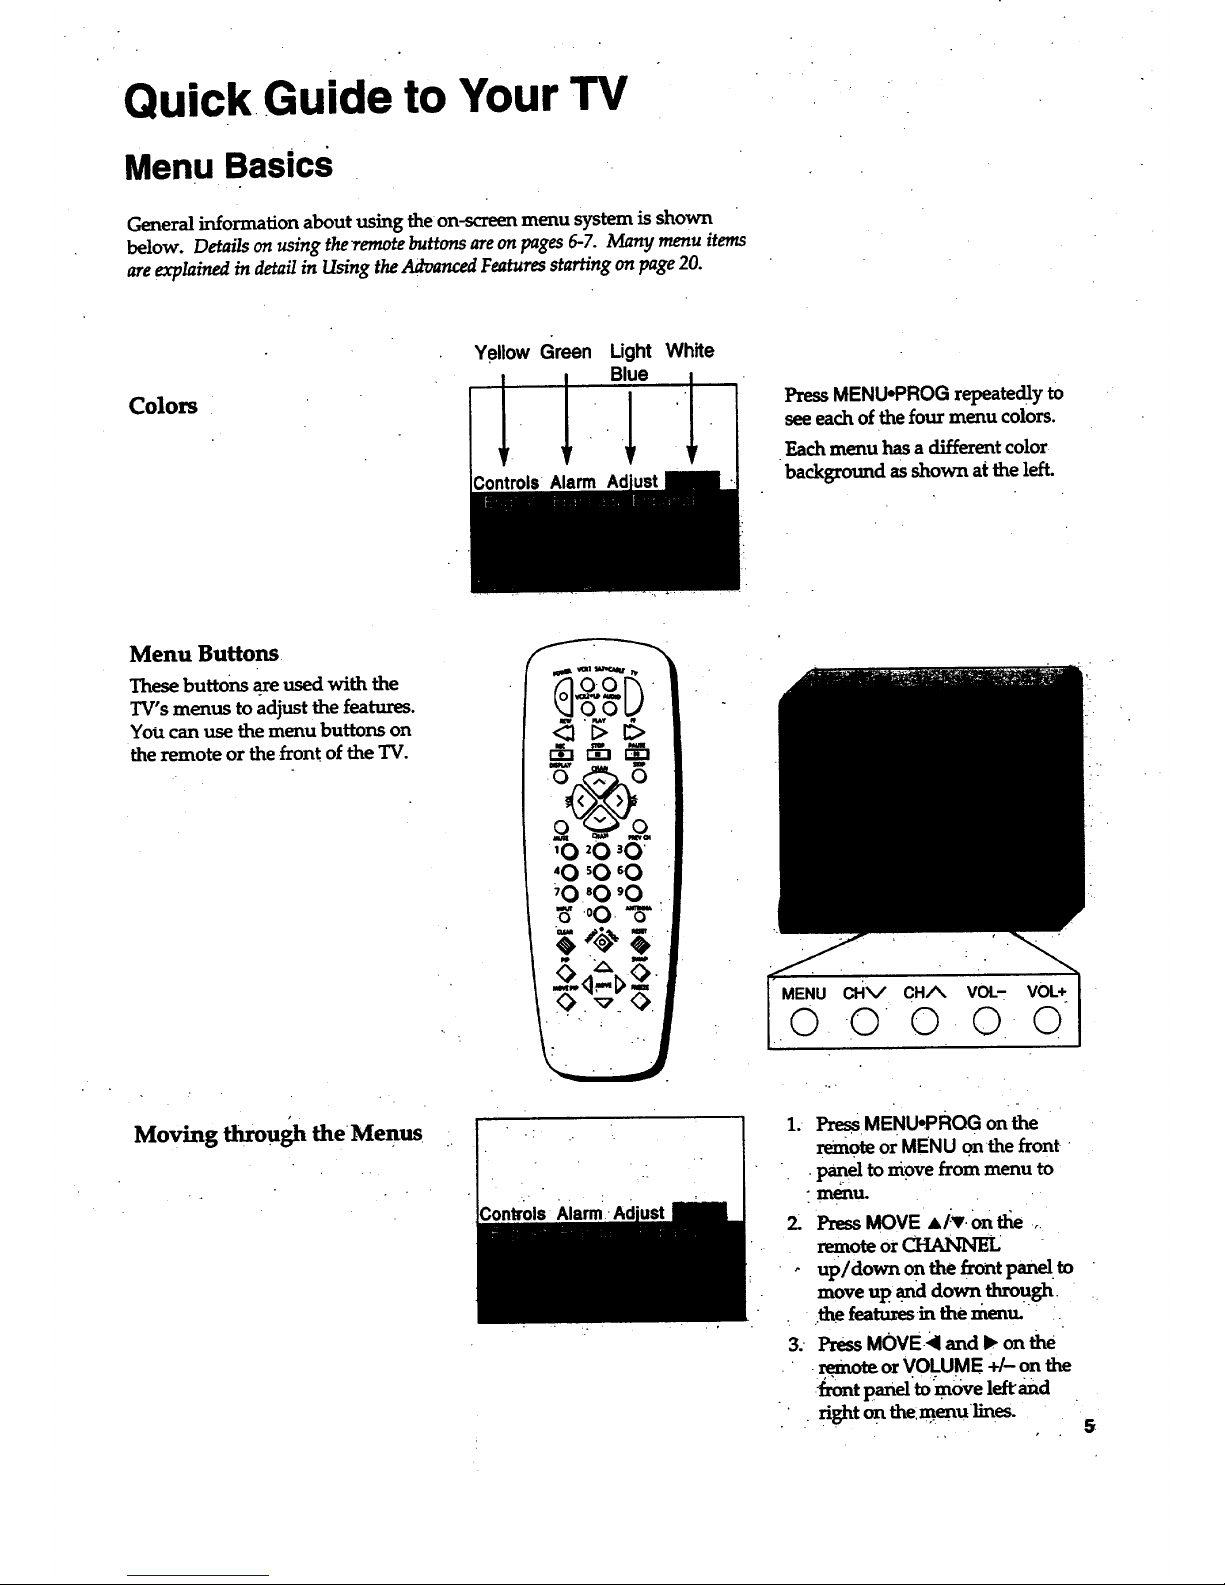
Colors
Yellow Green Light
Blue
White
PressMENU*PROG repeatedly to
see each of the four menu colors.
Each menu has a different color
background as shown at the left.
Menu Buttons
These buttons are used with the
TV's menus to adjust the features.
You can use themenu buttonson
the remote or the front of the TV.
Moving through theMenus
MENU cHv CH/_ VOL. VOL+
0 0 o 0 o
1. I_MENU*PROG on the "
remote or MENU onthe front. •
.p_.el to move from menu to
° m_rtu. ..
z PressMOVE•/:v. On_ .,,
remote or CHANNEL
- upldown on.the front panel,to
move up .anddown through.
. the featuresinthemenu.•`•..
3. PressMOVE-_I and I_ on the
.remote or VOLUME +/- on the
•_t p=_=.ltomove1_,_a
.' - rightont_:menu_es.
5
Page 8

Using Your TV and Remote
With Remote Buttons
-
POWER
Turns off the TV.
Turns off compatible VCRs.
Turns on a component after a
component button ispressed.
' AUDIO, VCR, VCR2.LD, ,
SAT.CABLE, "IV
Sets the remote to control the
component. VCR2*LD can only be
programmed for one component_
either a VCR or a Laserdisc Player.
See Using the Remote witha VCR,
Cable Box, Laserdisc Player and Audio
equipment on pages 8--15.
TV
Turns on the TV.
Shows the displays on the screen.
Sets the remote to control the TV.
See Using the Remote with a VCR,
Cable Box, Laserdisc Playerand AudiO
equipment on pages 8-15.
REW (Rewind)
Rewinds a tapeorlaserdisc.
Searchesbackward whiletapeor
laserdisc is play_g.
PLAY
Plays tape or ]aserdisc.
FF (Fast Forward)
Fast f0.i_vards a tape orlaserdisc.
Searches forward whil e tape or
laserdLsc is vla'ying.
REc (Record)
Starts recording onto tape.
sToP
_ tapeor laserdisc.
•PAusE
Pauses ta.l_eO_laserdi_
DISPLAY
Shows displays on the screen.
Clears menus from the screen.
SKiP (Commercial Skip)
Allows you to scan other chan-
nels during commercials.
Eachpress adds 30 seconds. TV
switches back to original channel
when time runs out. Press
CLEAR to cancel SKIP.
CHAN ^ and v
(Channel up and down)
Scansup and down through
channels in the TV's memory.
Moves through channels
in VCR's memory.
VOL + and -
(Volume up anddown)
Raises and lowers sound.
MUTE
Switches the 'IV sound on or off.
PREV CH (Previous Channel)
Changesback and forth between
two channels.
a channel and then select
another. PressPREV CH to
switch between the two channels,
.6 _.
Page 9
Us'ragYour TV and Remote
With Remote Buttons
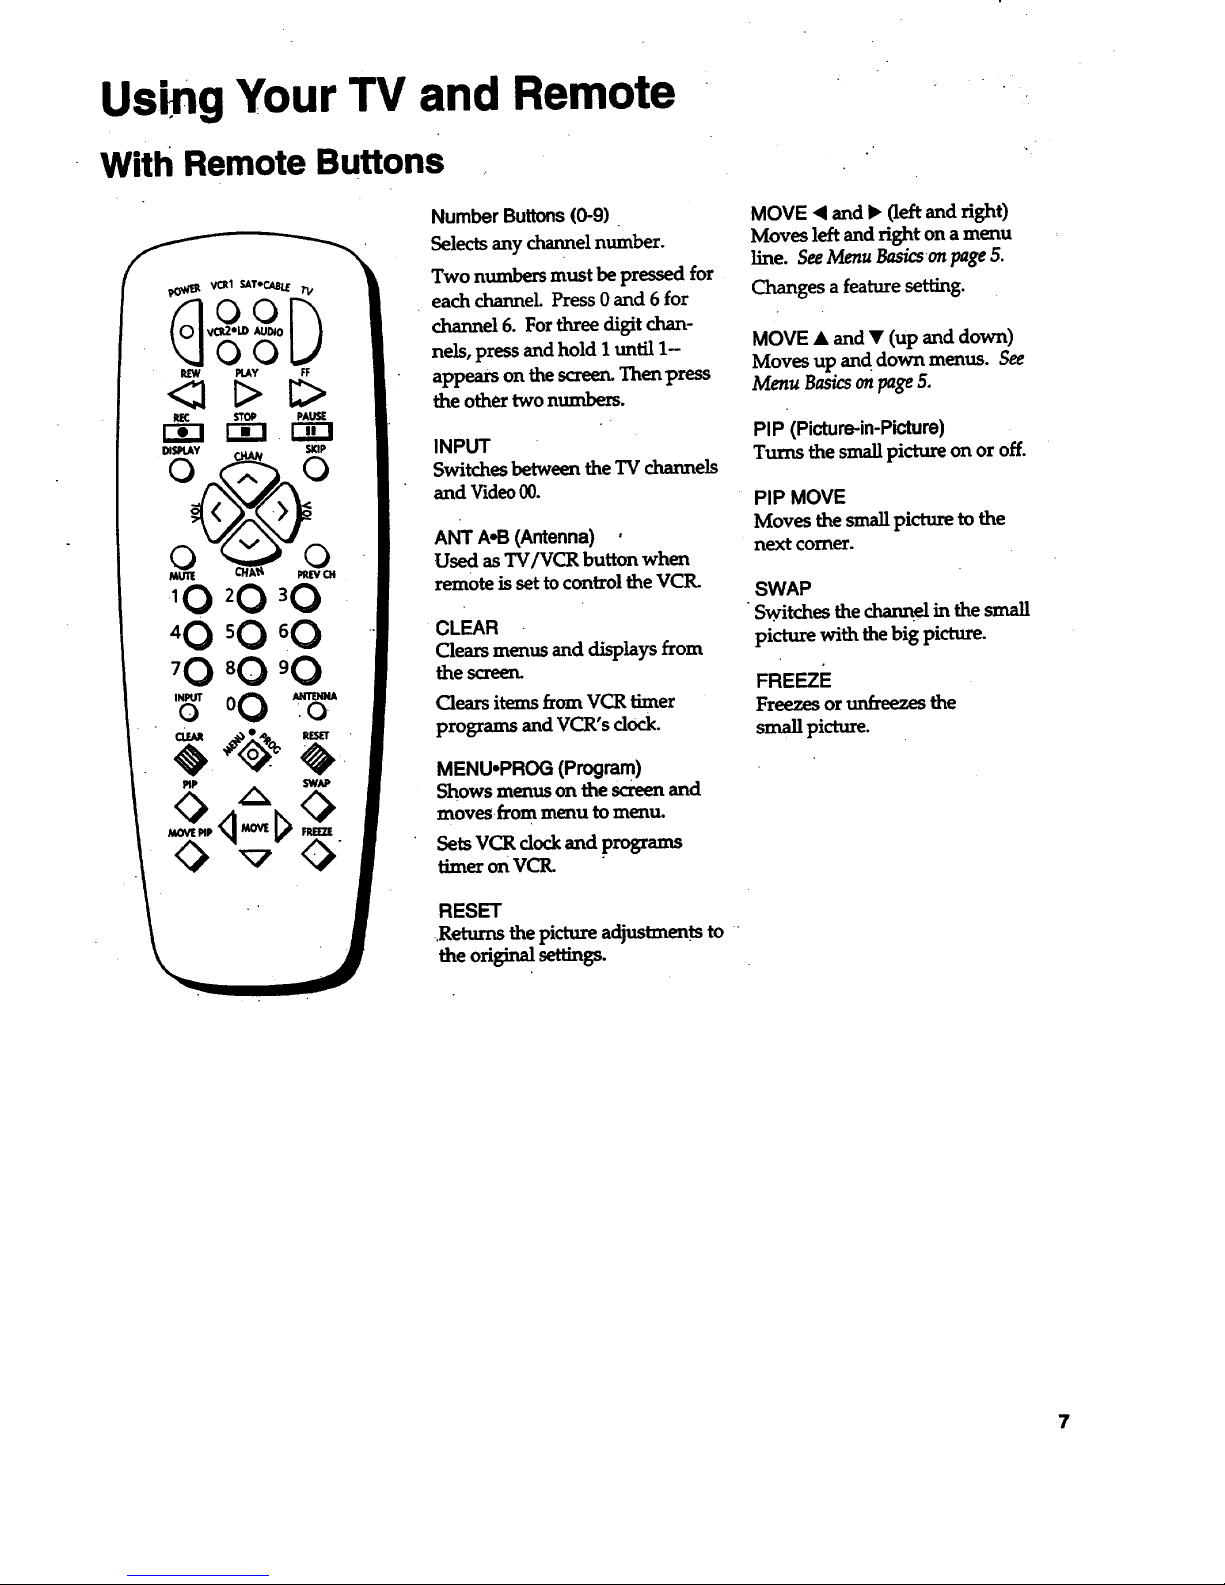
Number Buttons (0-9).
Selectsany channelnumber.
Two numbers must be pressedfor
eachchannel.Press0and 6 for
channel 6. For three cligitchan-
nels, press and hold I until 1-
appears on the screen. Then press
the othe_ two numbers.
INPUT
SwRchesbetwem theTV channels
and Video00.
ANT A.B (Antenna) .
Used as TV/VCR buttonwhen
remote issettocontroltheVCP,.
CLEAR
Clearsmenus and displaysfrom
thescreen.
Clearsitemsfrom VCR timer
programs and VCR's dock.
MENUopROG (Program)
Shows menus on thescreenand
moves from menu to menu.
SetsVCR clockand programs
timeron VCIL
RESET
.Returns the pictm_ adjustments to
the original settings.
MOVE • and b (left and right)
Moves leftand right on amenu
line.SeeMenu _cson page5.
Changes a feature setting.
MOVE • and • (up and down)
Moves up and down menus. See
Menu Basicson page5.
PIP (Picture-in-Picture)
Turns the small picture on or off.
PIP MOVE
Moves thesmallpicturetothe
next comer.
SWAP
Switches the channel in the small
picture with the big picture.
FREEZE
Freezes or _ the
small picture.
7
Page 10
Using Your TV and Remote
With VCRs: Programming the Remote
Refer to the Connection Bookor the VCR" s owners manual to hook up your VCRs.
The remote may need to be programmed for your VCtL This remote may
not operate all models of brands listed below. Use the codes below or on the
sheet packed in with your remote.
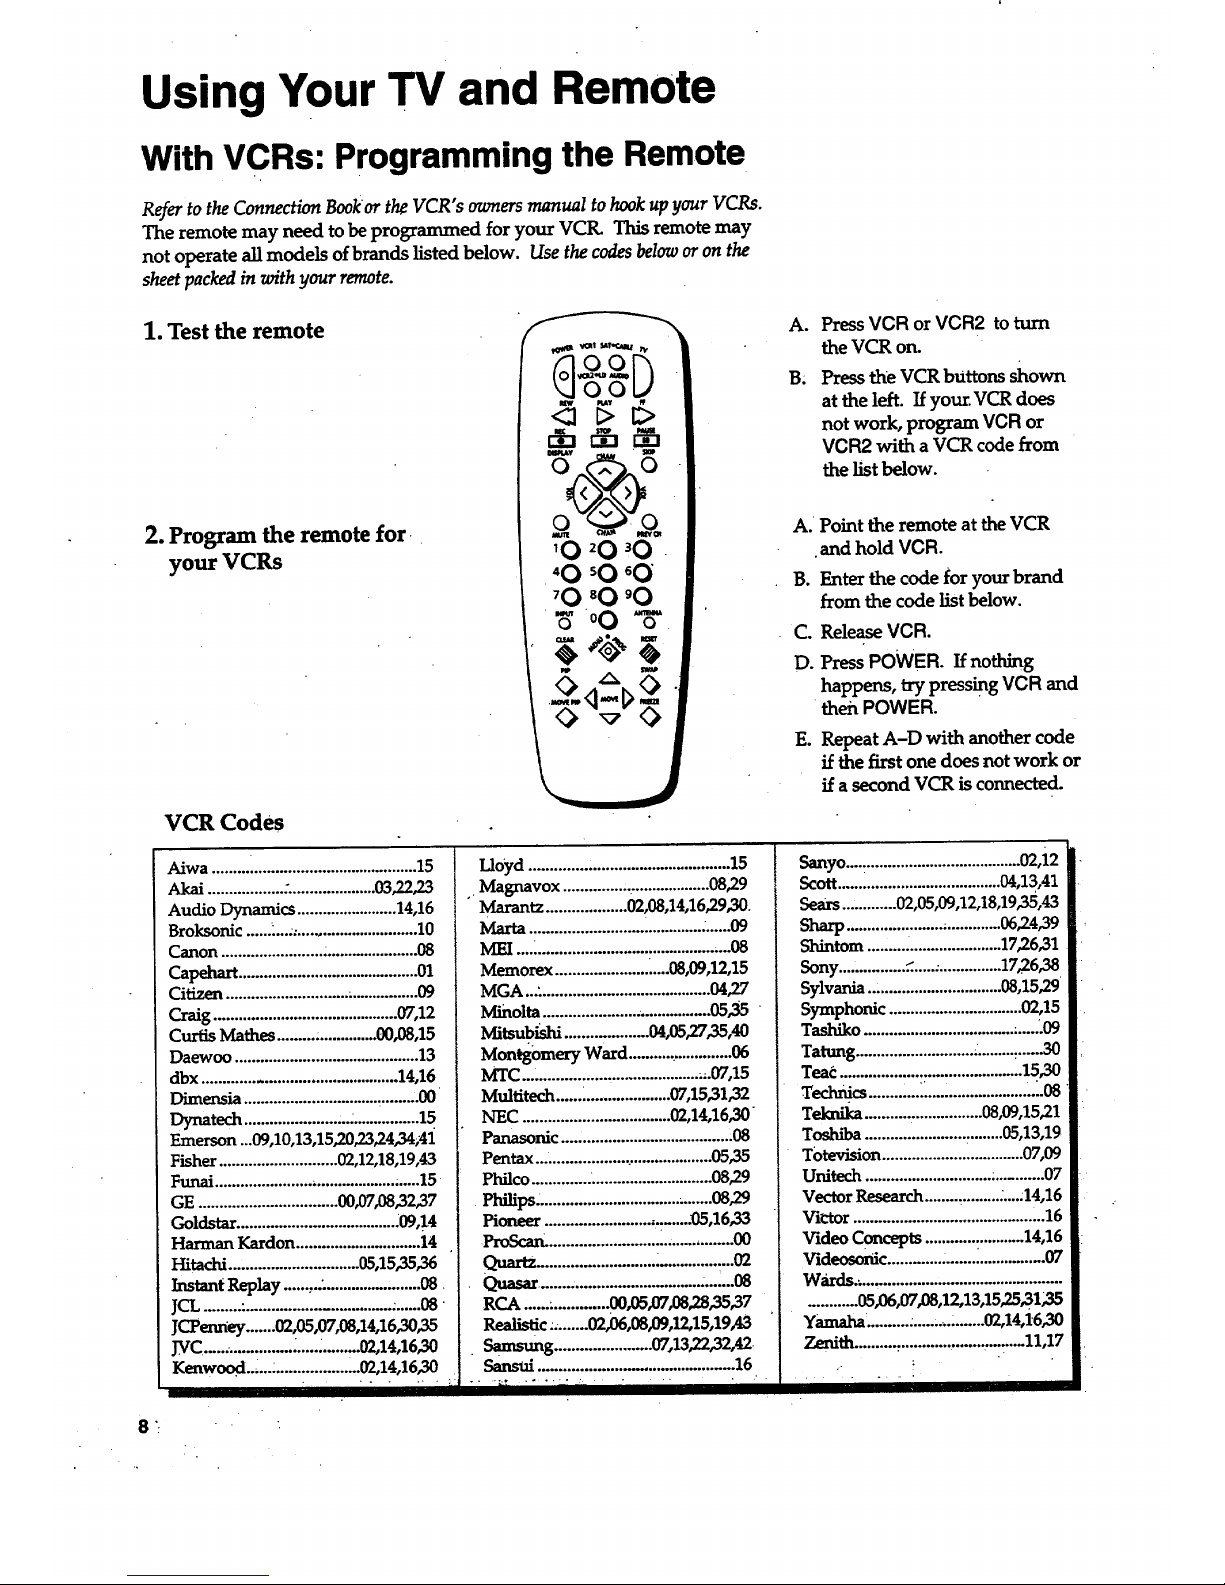
1. Test the remote
2. Program the remote for
your VCRs
.
VCR Codes
Aiwa .........i.......................................15
Akai ..................:.....................03,22,23
Audio Dynamics ........................ 14,16
Broksonic ......L...:............................. 10
Canon ..............................................08
Capehart ........................................... 01
Citizen ............................. ................. 09
Craig ...........................................07,12
Curtis Mathes ......... ...............00,08,15
Daewoo ............................................ 13
dbx .............................................. 14,16
Dimensia ..........................................00
r_natech..........................................15
Emerson...09,10,13,15,20,23,24,34;41
Fisher ............................ 00,12,18,19,43
Funai ........................................... ......15
GE ................................. 00,07,08,32,37
Goldstar ...................................... .09,14
Harman Kardon ............................. 14
Hitachi ..............................05,15,35,36
Instant Replay ......,.................,.......08
JCL........."..................................,......08
JCPenney .......00,05,07,08,14,16,30,35
J_rC...................... _.............. 00,14,16,30
Kenwood_,... ....................02,14,16,30
...... i,i,i
Lloyd ...............................................15
,.Magnavox ..............,....................08,29
Marantz...................00,08,14,16,29,30.
Maria ................................................09
MEI...._..............................................08
Memorex ...........................08,09,12,15
MGA ...,........................................04,27
M_nolta......................._................05,35
Mitsub_sm....................04,os_7_,4o
Montgomery Ward.........................06
MTC..........................................,.07,15
Multitech ...... _................... 07,15,31,32
NEC ...................................02,14,16,30
Panasonic ........................................:08
Pentax..........................................05,35
Philco...........................................08,29
Philips. .........................................08,29
Pioneer ................................. .05,16,33
ProScan_...........................................00
Quartz............................_.................O2
Quasar.....................................:._'.08
RCA,.................. 0305,07,08,28,35,37
Realistic.;.......0206,08,09,12,15,19,43
• Samsung ....................... 07,13'22,32,42
Sansui ..............................................16
A°
B.
Press VCR or VCR2 to turn
the VCR on.
Press the VCR bUttons shown
at the left. If your VCR does
not work, program VCR or
VCR2 with a VCR code from
the list below.
A. Point the remote at the VCR
and hold VCR.
B. Enter the code for your brand
from the code list below.
Co
D.
ReleaseVCR.
Press POWER. If nothing
happens, try pressingVCR and
then POWER.
E. Repeat A-D with another code
if the firstone does not work or
if a second VCR is connected.
Sanyo....:..................................... 02,i2
Scott.......................................04,13,41
Sears............. 02,05,09,12,18,19,35,43
Sharp.......................;.............06,24,39
Slxintom ................................ 17_6,31
Sony................_.....;...............1726,38
Sylvania ................................08,15'29
Symphonic ................................02,15
Tashiko .................................... .......09
Tatung ............................ .......... _...... 30
Teac ............................................ 15,30
Technics ........,..i.., ...................,_.08
Teknika ........... . ................ 08,09,15,21
Toshiba ........................ :........05,13,19
Totevision .................................. 07,09
Unitech .............................. :........... 07
Vector Research ........ ,......... ;....:14,16
VK'tor ........................................... ".16
Video Concepts ............:...........14,16
Videosonic ............ ........................07
Wards._...............................................
...........05,06,07,08,12,13,15'25_31;35
Yamaha'..........:....._._.........02,14,16,30
Zenith..........,..............................11,17
.- !
Page 11
Using Your TV and Remote
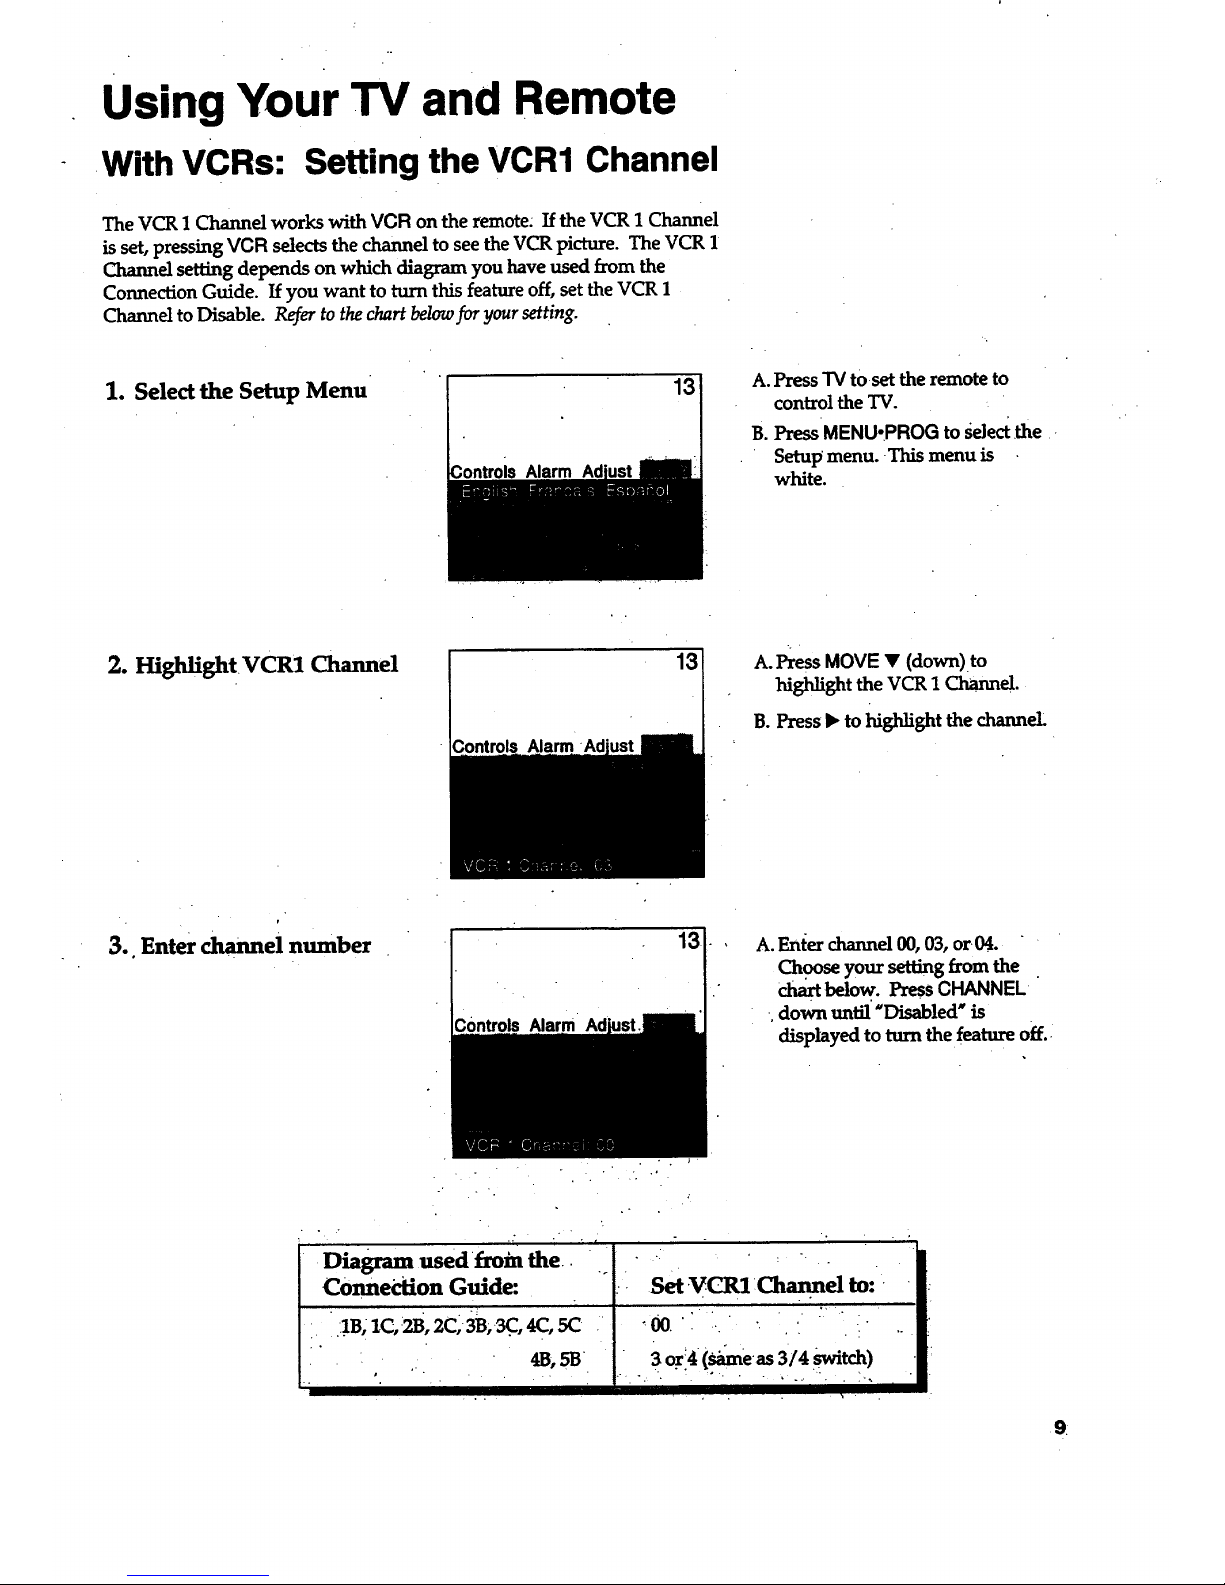
With VCRs: Setting the VCR1 Channel
The VCR 1 Channel works with VCR on the remote: If the VCR 1 Channel
is set, pressing VCR selects the channel to see the VCR picture. The VCR 1
Channel setting depends on which diagram you have used from the
Connection Guide. If you want to turn this feature off, set the VCR 1
Channel to Disable. Refer to the chart below for your setting.
1. Select the Setup Menu
13
A. Press TV to set the remote to
control the TV.
B. Press MENU-PROG to sde_ the
Setup menu. This menu is
white.
2. I-Iighlight VCR1 Channel
Alarm
13 A. PressMOVE • (down)to
m_li_t theVCR1_el.
B. Press • to highlight the channel
3.. Enter channel number
D0ntrolsNarm
•Diagram used f_rom the i
COnned:ion Guide:
• :IB; ZC,:2B,2C)3B,_, 4(:,SC
• .
4B,SB
s . • .•
13
A. Enter channel 00, 03, or04.
Choose your setting from the
chm_below. Press CHANNEL
down until "Disabled" is
displayed to turn the feature off.
SaVCRI:Ch :
*'00. ' . ".
3o:14(_e._ 3/4_tch)
9
Page 12
Using Your TV and Remote
With VCRs: Basic Operation
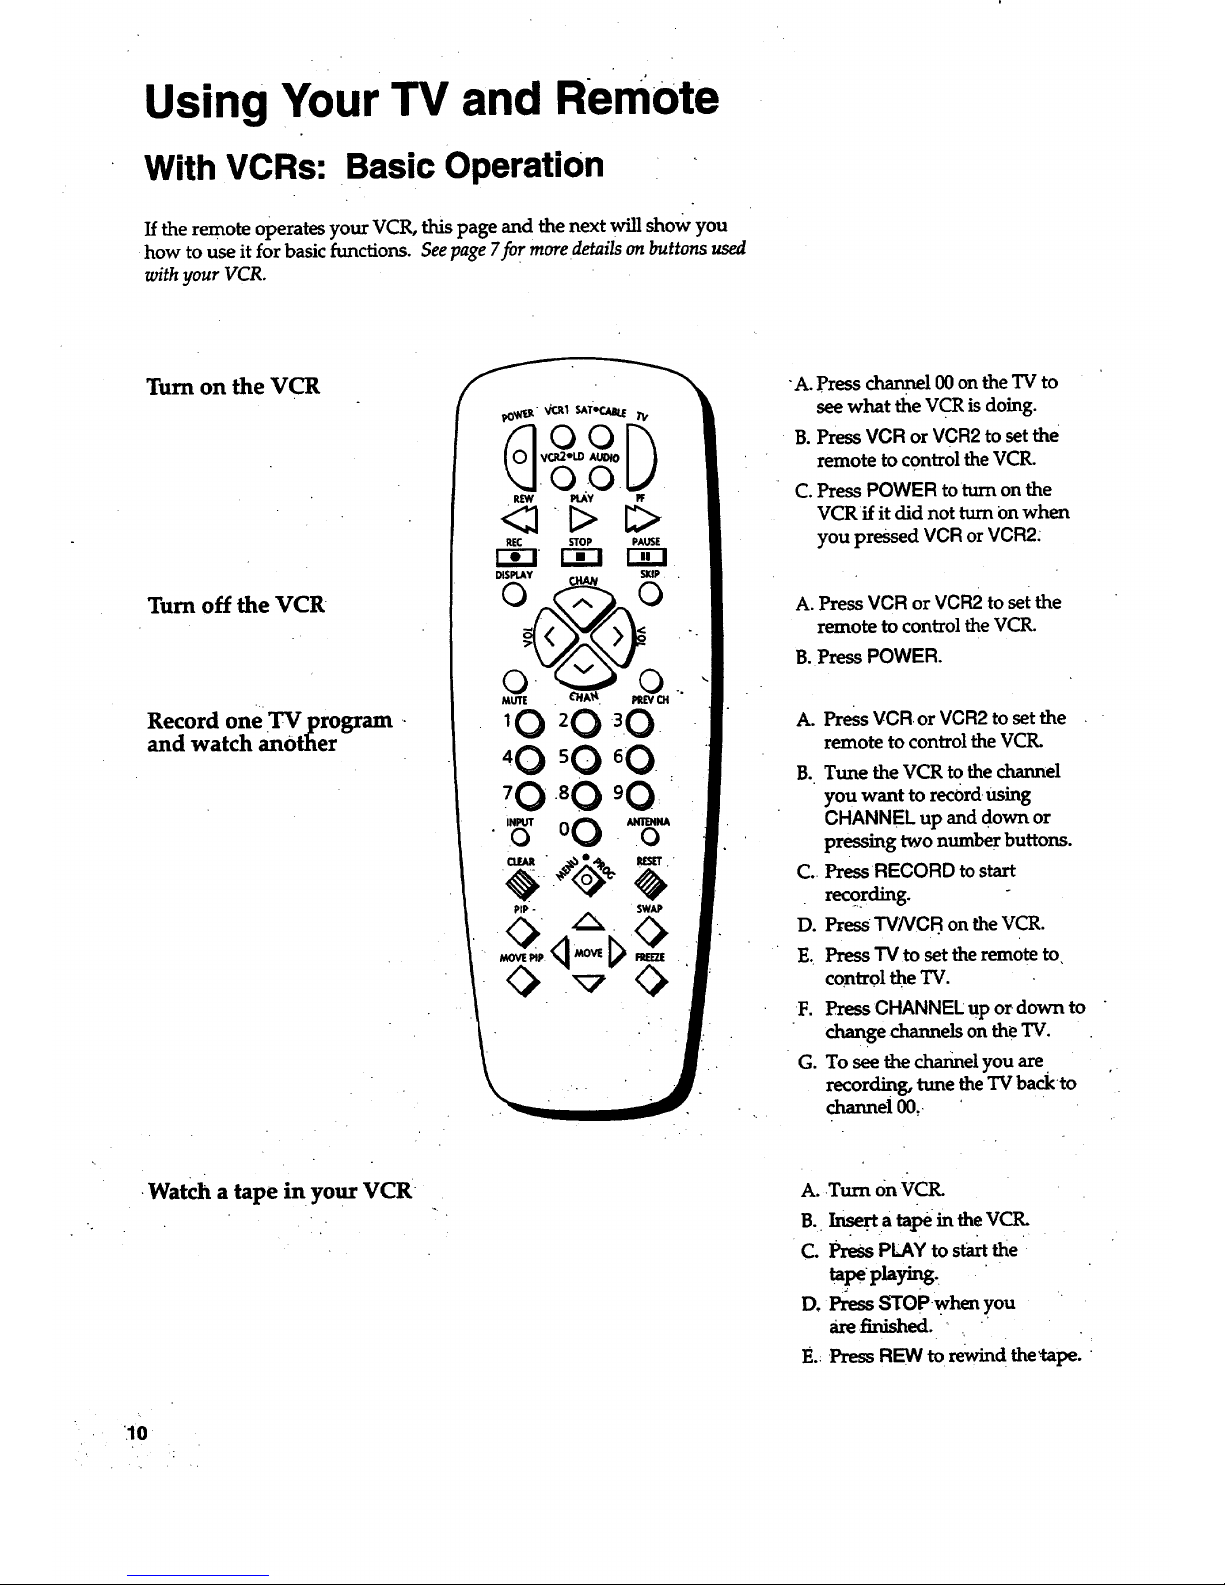
If the remote operates your VCR, this page and the next will show you
how to use it for basic functions. See page 7fo r more details on buttons used
with your VCR.
Turn on the VCR
Turn off the VCR
Record one TV program -
and watch another
•Watch a tape in your VCR
-,00- 6-
.O " .
PIP - SWAP
A. press channel 00 on the TV to
see what the VCR is doing.
B. Press VCR or VCR2 to set the
remote to control the VCR.
C. Press POWER to turn on the
VCRif it did not turn Onwhen
you pressed VCR or VCR2.
A. Press VCR or VCR2 to set the
remote to control the VCR.
B. Press POWER.
Ao
B.
Co.
D.
E_
F.
G.
Press VCR or VCR2 to setthe
remote to controlthe VCI_
Tune the VCR to the channel
you want to rec6rd using
CHANNEL up and down or
pressingtwo number buttons.
Press RECORD to start
recording.
Press TV/VCB on the VCR.
Press "IVto set the remote to,
control theTV.
PressCHANNEL up or down to
change channels on the TV.
To see the channel you are
recording,tunethe TV backto
channel00,
A..Turn on VCR.
B. I,-_Jt.a tape in the VCR.
C. Press PLAY to start the
tapep]aying.
D, Press STOPwhen you
arefinished."
E.:PressREW torewindthe_cape.
.10
Page 13

Using Your TV and Remote
With a Satellite Receiver: Basic Operation
Youmayalsobeable to use the TV's remote with other satellite receivers.
Refer to your Satellite Receiver owner"q manual to hook up your Satellite
Receive. The remote may need to be programmed for other brands of
satellite receivers, but may not operate all models of the brands listed
below. Use the codes below or on the sheet packed in with your remote.
Follow the instructions below for basic operation of your receiver. You
may also want to experiment with other buttons on the remote to see if
they work with your receiver.
Program .the remote for your
Satellite Receiver
Turn on the
Satellite Receiver
Turn off the
SatelliteReceiver
Satellite Receiver Codes
Drake ......_ ..............82,83 !
..........
GE...... ...................... ................ O0
GeneralImtn_e.n_...92,93,94_|
RCA........................................00__
............84!
s'_ ......:....81,i
STS1......._ ........ .,.85 I
_- ........ _ !!
STm_ ........:........8'7!
ST_ ......................................88
===================================1
A. Point the remote at the satellite
.receiver and hold SAT'CABLE.
B. Enter the code for your brand
from the code list below.
C. Release SAT-CABLE.
D. Press POWER. If nothing
happens, try pressing
SAT_3ABLE and then POWERI
A. Press SAT.CABLE to set
the remote to control the satel-
lite receiver.
B. Press POWER to turn on the
receiver if it did not turn on
when you pressed SAT-CABLE.
A. Press SAT.CABLE to set
the remote to control the satel-
lite receiver.
B. Press POWER to turn off
the receiver.
11
Page 14

Using Your TV and Remote
With a Cable Box: Programming and Basic Operation
Refer to the Connection Bookor contact your cable company to hook up yimr cable
box. If you have a cable box with its own remote, then you may also be able
to use the TV's remote with your cable box. This remote may not operate
all models of brands listed below. Use the codes below or on the sheet packed in
with your remote.
Program the remote for your
cable box
Basic Operation:
Turn on the Cable Box
Turn off the Cable Box
A. Point the remote at the cable
box and hold CABLE.
B. Enter the code numbers for
your brand from the list below.
C. Release CABLE.
D.Press POWER to turn it on. If
nothing happens, try pressing
CABLE and then POWER.
E. Repeat A-D with another code
if the first one does not work.
A. Tune TV to channel 02, 03, 04,
05,or 06--the cable box channel.
B. Point remote at the cable box
and press CABLE.
C. Press POWER to turn it on.
D. Press CHANNEL up or down to
" changechannelson the cablebox.
A. Press CABLE.
B. PressPOWER to turn it off.
12
Cable Box Codes
ABC ..............................................22,46
Anvision. ....................... :.............. 07,08
Cablestar...................................,07,08
Eagle .................................................. 08
Eastern International ...................... 02
C-_ter_ _'Lstrument............................
....................o4,0s,lsi3,24,2s_o_6,46
Hamlin .................... .:......... 12,13,34,48
Hitachi ................................... 37,43,46
Jen'oid.. o.o°..., ................. ,,,,..,,,,,,,,,,,,,,,,,..
NSC ............................... :............ :......09
Oak ..........................................01,16_
Oak Sigma ................... _.................... 16
Panasonic ................................ 03,27,39
Philips ooo,o,oo_....,. .......... ,,,,,,,,,,,,,,,.,,,,.,,.,
..........07,08,19_1_6,28,29_32_33,40,41
Pioneer ....................................18,20,44
Randtek ...................... .................. 07,08
RCA............................................. 002.7
Regal..... ........................................12,13
Sprucer................................:............/7 /
Starcom ............................................ .46 |:
Sy]v_.........:...................................11II
Teknika ...... ................................... ....06 _
T_ ...................................... :.10,11 I
Tocom.................................17,21,49,50 |
Unika. .....................................31,32,41 .
Vi_ ............................ .................;. |
..........07_,19;m,26_8,29_2,33,40,41 |
WarnerAmex...........:.-v..................44 I
Zenith....................................... 14,42
I
"" ............. iiJ I
., .......04,05,15,23,24,25,30,,36,45,46,47
MACOM. ................................... .37,43
Magnavox...,. ...................:...........:......
......;_07_8,19,21,26,28_9_32_3,40,41
- - -? ...
O2,33
P.egency........ ................................
Samsung ........... :..............................44
Scientific Atlanta. .................. 03,22,35
Signature...........................................46
I IIII I IIIIIII
Page 15

Using Your TV and Remote
With a Cable Box: Setting the Cable Channel
The Cable Channel works with CABLE on the remote, Ifthe Cable
Channel is set, pressing CABLE selects the channel to see cable channels.
The Cable Channel setting depends on which channel your cable box
must be on to see cable channels. The channels usually used are 02, 03,
04, 05 or 06. Consult your cable company for more information.
1. Select the Setup menu
3ontrols Alarm
13
A. Press "IV to set the remote to
control the "IV.
B. Press MENUopROG to select the
Setup menu. This menu is
white.
2. Highlight Cable Channel.
Controls Alarm
13
A. Press MOVE • (down) to move
down the menu until Cable
Channelis highlighted.
B. Press l* to underline the
channel.
3. Enter channel number
;ontrols Alarm Ad
13
A. Enter the number for your cable
box, either 02,03,04,05, or 06.
PressCHANNEL down until
"Disabled" is displayed to turn
this feature off.
Page 16

Using Your TV and Remote
With a Laserdisc Player: Programmingand Basic Operation
Refer to your Laserdisc Player owner's manual to hook up your.Laserdisc Prayer.
The remote may need to be programmed for your laserdisc player. This
remote may not operate all models of brands listed below. Use the codes below
or on the sheet packed in with your remote.
Program the remote for
your Laserdisc Player
Basic Operation
1_11_ VCR1 SATeCA_ TV
• O0
REW PLAY FF
<]-D
PiP SWAP
A. Point the remote at the laserdisc
player and hold LD.
B. Enter the code for your brand
from the code list below.
C. Release LD.
D.Press POWER. Ifnothing
happens, try pressing LD and
then POWER.
A. Tune TV to channel 00, 03, or 04.
B. Point the remote at the laserdlsc
player and press LD.
C. Press POWER to turn it on.
D. Use the buttons on the remote
that relate to laserdisc player
functions. Not an. buttons high-
lighted maywork with your
laserdisc player.
E. Press POWER to turn it off.
Laserdisc Player Codes
[ i/
Pioneer......................._3.
ProScan.......................,33
RCA............................23
'.
• 14
Page 17

o
°.
Using Your TV and Remote
With Audio Equipment: Programming and Basic Operation
Refer to the Connection Bookor your Audio equipment owner's manual to hook
up your audio equipment. Your remote controls orgyRCA audio equipment
such as a radio, CDplayer, tape player, turntable, or amplifier. The
remote may need to be programmed for your equipment. This remote
may not operate all models of brands listed below. Use the codes below or
on the sheet packed in with your remote.
Program the remote for
audio equipment
"Basic Operation
Audio codes "
RCA/D_memia
AM/FM...-.........,...........o_
CD..._..: ............................07
Tape: ......... ....... .......... :.....06
Phono ,:....:........._........,_.05
Aux. ........ ;....:.............. :.._.(N=..
_OW_ItVeal SATeC.,_I_TV
5°o
REW PLAY FF
REC " STOP PAUSE
r-_ r-in r-_
°g* .5
"@
o o
._020 _0
40_0 oO
'0 _0 _0
g-
Pip _w,_
A. Point the remote at the audio
equipment and hold AUDIO.
B. Enter the code from the
code list.
C. Release AUDIO.
D. Press POWER to turn it on. If
nothing happens, try pressing.
AUDIO and then POWER.
E. Repeat A-D with another code
if the first one does not work.
A. Pointthe remoteat the audio
equipmentand pressAUDIO.
B. PressPOWER toturniton.
C. Use thebuttonson theremote
that relate to audio functions.
• Not. all bueons highlighted may
work with your equipment.
D. Turn the audio equipment off
usingthe audiocomponent's
power offbutton.
Is
Page 18

Adjusting Your TV
Overall Picture
FoUow the steps below to lighten or darken the overall picture without
changing the color levels.
1. Select the Controls Menu
PressMENU-PROG to selectthe
Controls menu. This menu is yel-
low.
2. I-lishli_t Picture
Press MOVE • (down) to high-
lightPicture.
3. Use MOVE I_ and • to
• adjust the Picture
PressMOVE I_ (right) to lighten
the picture.
OR
L
Press MOVE • (left) to darken the
picture. ..
,is
Page 19

Adjusting Your TV
Picture Settings
Fonow the steps below to change the picture on the screen to your
personal setting. The chart at the bottom of the page explains your options.
1. Select the Adjust Menu
2. Highlight item to change
Press _IENU-PROG repeatedly to
select the Adjust menu. This menu
is light blue.
Press MOVE • (down) to
highlight the picture item you
want to adjust.
3. Use MOVE • or '4 to
adjust each item
Controls-Alarm
Press MOVE • or < to adjusteach
item.
Color •
T'mt
Bright :(Brightness)
Sharp (Sharpness)
Autocolor
Picture Reset
Press MOVE • to:
II I I
Increase color richness
Give red tint to skin color
Add more .gEt to dark parts of
the picture •
Show deaner, dear_ "u_ges
Turn on t0 keep Color and Tint in•
proper balance each time you
Reset the picture back to the
0_a settmss
Press MOVE < to:
Lower cblor'to black and white
Give green tint to skin color
Add more dark to light parts of
Make pictu_ more smooth
Turn off for manual adjustment
I- of Color and Tint
Reset the picture back tothe "
settinss "
.•17
Page 20

Adjusting Your TV
Sound Settings: Stereo, Expanded Stereo, SAP and Tone
Follow these steps to adjust the Stereo, Expanded Stereo, SAP or Tone of
your TV. SAP (Second Audio Program) is sometimes used to offer the
program being watched in another language.The chart below explains
your options.
1. Select the Controls Menu
2. Highlight item to change
PressMENU,PROG to select the
Controls menu. This menu is yel-
low.
PressMOVE V (down) to
highlight the sound item you
want to adjust.
3. Use MOVE 1_or < to
adjust each item
Alarm
Press MOVE • or < to adjust each
item.
b T -
Stereo On
SAP
- Tone
• illl
°
Sound is automatically
reproduce d in stereo or
mono, whichever the TV
station is broadcastin_
On
is reFmducedin
Sound
anoth_ sound channel.
If nothing happens,
your broadcast may not
have SAP.
High •
Highpitchedsoundsare
louder.
,_, m,
Off
Sound is reproduced in
mono. !
"i
Off
I
Sound isreproduced in
Stereo, Expanded Stereo
or Mono, whichever is ;
selected in-'the Stereo i
Menu Item.
i
!
Low i
Lo_pi_ed_nds_ i
louder" [
i Ilil
Expanded
Expanded stereo adds greater
width and dimension to stereo
broadcastscreatinga more
spadous stereosound effect
f
•. . .;
18
Page 21

Adjusting Your-TV
Sound. Settings: Speakers
Follow the steps below to turn the speakers on or off in your TV. The
chartbelow explains your options.
1. Select the Setup Menu
Controls Alarm
Press MENU.PROG repeatedly to
selectthe Setup menu. This menu
is white.
2. Highlight speakers
mtrols Alarm Ad
PressMOVE • (down)until
Speakersishighlighted.
3, Turn Speakers on or off
Controls Alarm
PressMOVE b or <1 to turn the
onoroff.
l Spea_'rs
I on ' iI
TheSoundcomesfzomtheTV's
• intemal:slxekers..
Off •
No.sound comes fzomthe TV.
.19
Page 22

Using Advanced Features
Placing Channels in Memory(Autoprogramming)
Only channels 2-13 appear in the TV's memory when you first tutti it on.
The channels available in your area must be programmed into the TV's
memory when you hook up your TV. Using CHANNELup or down
anows you to scanthrough these channels.
You may want to add or delete a few channels if some stations have weak
signals or were off the air when the TV was programmed. Referto theAdd
orDeleteChannelssectionl_"
1. Place channels in
memory (AutoProgram)
13
A.
Bo
Co
D.
Eo
Hook up an antenna,, cable or
components before you begin
these steps or you will not be
able to add channels into
memory.
Press MENUopROG repeatedly
to selectthe Setup Menu. This
menu is white.
Press MOVE• (down) to
highlight Autoprogram.
Press MOVE• to start the TV
adding allactive channels into
memory.
Wait until the TV has cycled
through all the channels and
returns to the original 'hanneL
2. Add or delete channels
_ontrols Alarm
:-."
-:" : •
13
A. PressMENU.PROG repeatedly
toselecttheSetupmenu. This
menu iswhite.
;B. Press MOVIE• (down) to
C. PressMOVE • tounderlinethe
chaimelnumber.
D. Select the chan_, numberyou
want to add or delete, with the
number buttons.
E. Press MOVE• to add or delete
a channel (you wigsee Stored
onthescreenwhen.addedand
Erased when deleted).
. F. Repeat D and E for more
channels.
Page 23

Using Advanced Features
Naming the Channels
You can name the channels using the character list below. FuLlappears
beside Label when the memory is used up. Fixed appears beside Label
• for channel O0--it cannot be named.
1. Name a channel
Controls Alarm
12
NBC 12
A. PressMENU.PROG repeatedly
to selectthe Setup menu. This
menu is white.
B. PressMOVE • (down) to
ta_!ishtLabel.
C. Press MOVE b* to underline the
Channelnumber.
D. Selectthechannelnumber with
thenumber buttons.
E. PressMOVE • tounderlinethe
first character of the name.
F. Choose the character using
MOVE _ (up or down).
G. Repeat E-F to complete the
_e.
H. Press MOVE ,< to move
backward if you want to
change an item.
2. Erase aname
•.. 12
A. Follow A and B above.
B. Pzess MOVE _ until clear is
underlined. ':
C. _ MOVE _ (up or down)
•todear the name.
CharacterList
a. . . .
ABIO'D'E F G H IJK LMN O P.Q"R.iS T'U V WX YZ.& I
' (.) gt ÷o a '[;0 i2 3145_6:7_.181:9ij ;!_i_i'>_ ? @ I_k•space I!
........ I i =-
Page 24

Using Advanced Features
Setting the Sleep Timer
You can set your TV to turn itself off. If you're watching TV at.niglit and
fall asleep, the TV will turn off for you.
1. Set Sleep Tuner
11:00 PM
Sleep
Alarm Ad
13
A. Press MENU-PROG to select'
the Controls menu and
higiai_t SleepTimer.This
menu is yellow.
B. Press MOVE • to enter the
amount of time you want to
watch TV before it shuts off.
Each press equals 15minutes.
C. Press MOVE • to Subtract time
from the sleep timer.
2. Add more time
.Alarm
A. When 0:01 appears on the
screen, the TV will shut off in
one minute.' Press MOVE •. to
add more time.
3. Cancel the Tuner
L-Alarm Ad
A. Press MENU-PROG to select
the Cont_ls menu and "
•higldight SleepTimer.
B. Press MOVE. <1until thetime
reaches
Page 25

Using Advanced Features
Setting the Alarm Clock
The TV can be set to turn on each day like your alarm dock. You can set
it to turn on to your favorite channel at a certain time. You can also set it
to turn itself off again. The Alarm chmot be used until the dock is set.
1. Turn on the Alarm 12:34 AM 13
Alarm
A. PressMENU-PROG to select
the Alarm menu and highlight
Alarm. This menu is green.
B. Pr(,ssMOVE • or <to select
On or Off.
2. Set the Alarm Channel
12:34 AM
Alarm
13
A. Press MOVE • (down) to
highlight the Alarm Channel.
B. PressMOVE • tohighlight the
channel number.
C. Enter the channel that you
want the "IVto turn on to with
the number buttons.
3. Set On and Off Tunes 12:34 AM 13
Alarm
12:34 AM
Alarm
13
A. Press MOVE • (down) to
highlight the On or Off Time.
B. Press MOVE '4 to set the hour.
C. Press MOVE • to.set the
minutes.
D. Press and hold MOVE < to
choose Disabled. This turns
the TV only on or only off at a
certain time each day.
23
Page 26

Using Advanced Features
Watching Picture-in-Picture
Picture-in-Picture allows you to display a small picture within the big picture of the TV screen. To watch two
different programs at once, you must connect a VCR, Laserdisc Player or Camcorder. You may need to disable
the VCR1 Channel if you can not get two different programs at once.
Turn on Picture-in-Picture
W Pi_lum
A°
B,
C.
D°
E.
Fo
Hook up a VCR, Laserdisc
Player,orCamcorder tothe
videojackson theback ofthe
TV. SeetheConnectionsGuide.
PressTV to turn the TY on.
PressCHANNEL up ordown to
selectthechannelyou want to
watch on thebigpicture.
Turn on theVCR, Laserdisc
Player, or Camcorder.
Press PIP to put the small
picture on the screen. It is the
same as the big picture.
Press 00 to see the signal from
the VCR, Laserdisc Player, or
Camcorder connected to the
video jacks.
VCR, Laserdlsc
• Player _'or
Camcorder
Picture
Change channels on the
largepicture
. Press CHANNEL up and down or
two number buttonstochange
channelson thelargepicture.
Change _anneb on the
small picture
•ChangechannebonyourVCK
Laserdisc Player, OrCamcorder to
change channels on thesmallpic-
tare.
24
Page 27

Using Advanced Features
Watching Picture-in-Picture -.
Move the small pictuxe
Press PIP MOVE to move the
small picture to the next comer.
Swap the big picture with
the little picture
PressSWAP to switcl_the small
picture with the big picture.
- Freeze the small picture
A. PressFREEZEto stopactionin
the small picture.
B. Press FREEZ E again to return
to an action picture.
Turn off Piaure-in-Pict_e PressPIP to turn off
picture-in-picture
Page 28

Using.Advanced Features
Selecting a Language
The on-screen displays in this TV can be displayed in three languages: English, French, and Spanish. When you
select a language, most of the displays will be shown on the screen in your preferred language.
1. Select the Setup menu
2. Select Language
13
Press MENU repeatedly to select
the Setup menu. This menu is
white.
Press + or- to select English,
Frangais (French), or Espafio!
(Spanish).
Watching Closed Captioning
Closed captioning displays the audio portion of a program as words on the TV screen. It is useful for the deaf,
hearing impaired, or anyone who wants to watch a .program without sound. If you have turned Closed
Captioning on and it does not appear on the screen, it is not available on the channel you are watching. This TV
does not support the text mode. Text inf6rmation typically consists of program information, weather bulletins,
local activities, etc.
1. Select th_ Controls Menu
- h .
2.m ishi Oozed
Captioning
Alarrd
.. ._.-.
3. Select Setting
Press MENU-PROG to select the
Controls menu. This menu is
yellow.
PressMOVE'V (down) to highlight.
Closed Captioning.
A. Press MOVE < or I_ to select
Off, C1, or C2. Select C1 for full
translation of the piimary lan-
guage-in your .area. Select (:2
for secondary language transla-
tion, simp_ English, or
whatever is being broadcast in
your area.
26
Page 29

Using Advanced Features
setting Your TV for Antenna or Cable
Your TV automatically adjusts this feature when the TV places channels in memory (autoprogram). Follow the
steps below to change the setting as needed.
1. Select the Setup menu
13 PressMENU.PROG repeatedly to
selectthe Setup menu. This menu
is white.
2. Highlight Cable/Air
"ontrols
13
PressMOVE • (down) to
higldight Cable/Air.
3. Select Cable or Air
13
A. Press MOVE • or_ to select
Cable or Air. Select Cable if
you have cable. Sel.ect Air if
you have a home antenna con-
nected to YOur TV.
27,
Page 30

References
.Front Panel Buttons
For details on using buttons with menus, see Menu Basics on page 5.
OR
MENU Shows menus on screen.
Moves frommenu to menu:
CH ^ and v
VOL + and _
(AlsoVOI ^ ariavOI.v)
•POWER "
" +and-.
(Not on all models)' .
Channel:up and down.
s_..p._a ao_t_ou_d,_ i_th__v,_memory.
Movesup and down menus. "
'Volume up, and down.
Raises and lowe_ sound"
.'Moves _ and right ona menu line.
Changes a features setting: -
Tm.m __e 'IV:on or off.
Same asVOl.+ al_l-- button.
.28.,:
Page 31

References
Displays on the Screen
Your TV shows the settings of several features on the scr_. To see what
features have been set on your TV, press DISPLAY on the remote.
12:00 AM KNBC 13
Alarm Sleep PIP 00
Volume -. ...... I ....... +
Mute Stereo. 1:55
or Video 00
or Unusable Signal
I
._ or Stereo*, SAP
Screen Display
12:00 AM
KNBC
13
Video 00
Alarm
Sleep,
PIP O0
Volume
Unusable Signal
Mute
Stereo
sAP
1:55
Descriptio n
Time of the dock. Details are on page 3.
Name you chose to describe the channel Details are on page 21.
Channelnumber you arewatching.
Indicates that a component is connected to the VIDEO jack on theback of
the TV, it is turned on, and channel 00 is selected.
Alarm dock is set to turn on or off. Details are on page 23.
Sleep Timer is set to turn off the TV. Details are on page 22.
Picture-in-picture is turned on to channel 00. Details are on pages 24-25.
Sound level of the "IV.
No signaliscoming inon videoinputdmnnel 00.
Thereisno sound. SeeMUTE buttononpage6.
.The sound is being broadcast in stereo. ._Details are on page 18.
SAP is selected in the menu, but.itisnotavailablefortheprogram being...
broadcast. Details are on page 18.
Secondary Audio Program. SAP isselectedand it is-available for li_e
program being, broadcast. Details are on page 18.
. . - . . • , • . ..
•.. . ..
Zh__memm_" gfo__o_m_ _p. _ _ _ _ge6.
Page 32

References
Trouble Checks
You may have problems that can be fixed with a few minor adjustments.
Look for the type of problem you are having below and then try the
suggestions to get your TV going again. For warranty information _ page 32.
Trouble
Checks and Adjustments
TV wi]! not turn on
Plug TV in.
PlugsomethingelseintotheOutlet to make sureit is working.
Make surebatteriesintheremotearenotdead.
Aim the remote at the TV and press TV.
Make sure batteries are placed in the remote the right way. See batteries
on page 2.
Unplug TV for a few minutes and then turn it on agai_
No picture, no sound but
"IVhas power
Picture
Blank screen or Unusable
Signal appears on screen
Check antenna connections. "
Check position of Cable/Air feature. See page 27.
Try another channel. Ina..ctive channel may be tuned.
Make sure component connected to the VIDEO INPUT jacks is turned on
if you choose channel 00.
Make sure TV is tuned to the same channelas the switch on backof VCR
ifwatchingaVCIL .
Make sureTV/VCR buttonon VCR isincorrect)o_s.itionWhen usingVCIL
Try anotherchannel.
Scanthechannels.
Picture poor, sound okay
Check antenna connections.
Adjust TV picture. S_pages 16-17.
Picture-in-Picture
Can't get two different
channelsinpicture-in-picture
Make'suresmallpictureistunedtochaJ,me100.
Make surethecomponent Connectedtotheback oftheTV isturnedon.
Make sure the AUDIO and VIDEO OUT jacks on the VCR, Laserdi_c
player, or Camcorder are connected to the TV's VIDEO and AUDIO IN
jack .
Make sure VCR 1 Channel is set to Disabled. See page 9.
30 . .
Page 33

References
.Trouble Checks
Trouble
Remote
Buttons don't workwhen you
• press them
Checks and Adjustments
Press TV to set the remote to control the TV. Seebuttons on page 6-7.
o.
Workspartor none of the
time
Clear the path between the remote and TV of any objects.
Aim the remote at the component you are trying to control.
Press TV so remote wig control TV.
Make sure batteries in the remote are not dead.
See if batteries are placed in remote correctly. See batteries, page 2.
Can't select certain channel
Noisy stereoreception
Picture okay, n0 sound
Pictureokay, sound poor
NO stereo on stereo statiott
TV Turns on or Off
Turns off by itself
Turns on by itself
.Doesnot turnoff:at.•
Alarm Time
Press number buttons. Channel may not be in memory. See autoprogram
on page 20.
Make sure TV/YCR switch on VCR is in the TV position.
For numbers over 100, press and hold lun_ 1- appears, then press the
other two numbers.
Set Cable/Air feature to Cable for channels higher than 69. See page 27.
Turn Stereo off. The stereo broadcast may not be dear. See page 18.
PressVOLUME + or MUTE to restore sound.
•Make sure TV's speakers are on. Details are on page 19.
Try another channel.
Try adjusting the Tonel See page 18.
Change Stereo to off. The stel_oo broadcast maynot be dear. Seepage 18.
:Make sure Stereo is turned on. Seepage 18.
\
Check Sleep Timer. See Sleep timer on page 22.
Wait 30 seconds and turn onagain, a power surge may have occured.
•Check Alarm Offtime. See alarm clock on page 23.
Check Alarm On Time: See alarm clock o_ page 23..
.t_l.eck d_ time. See clock on page 3..
Make surealaxmis_ on.oroff. See alarm clockon page 23.
Chec_ docktime. Seedockonpage3.
31
Page 34

References
Limited Warranty
What your warranty covers:
Any ddect in material or wor_p.
How long after your purchase:
What we will do:
90 days for labor charges.
One year for parts.
•Two years for picture tube.
The warranty period k_ rental units begins with the first rentalor45 days _m date of
shipment to the rental firm,whichever comes first.
Pay any Auflu_ized RCATelevision Servicenter the labor charges to repair your television.
Pay any Authorized RCATelevision Servicenter for the new or, at our option, rebuilt
•replacement parts and picture tube required torepairyour television.
How you get service:
Forscreensizesof20"andsmaller.TakeyourRCA televisiontoanyAutb.orizedRCA
TelevisionServicenterfandpickup when repairsarecomplete.
Forscreensizeslargerthan20":Requestin-homeservicefromanyAuthorizedRCA Television
Servicen_.
ToidentifyyournearestAuthorizedRCA TelevisionServicenter,askyourDealer,lookinthe
YellowPages,orcall1-800-336-.1.900.
Show theservice technicianyourevidence of purchasedateorfirstrental.
What your warranty does notcover Customerinstructi_0_ourOwner'sManualdearlyd_how toh_stall,adjust,and
op_ yo__ Anyad_o_ _o_tion_._dbe_ _o=yourD_er.)
I_tallationandrelatedad_ustmentr_
Signal reception problems not'caused byyour television.
_ control batter_
What to do with the Product
Registration .Caxd: ..
•How s't_ law mia_ tofl_s _ '
C,_om_mplace_ fuses.
Imagesburntonto thesc_esl.
A television that has been modified or incorporated into other pxx)ducts or is used for
insti_tionaloro4hercommercialpurposes
A televisionpm_Imsedorserv_ outside the USA.
Acts of God, such as but not tin, ted to lightning damage.
Please complete and mail the Product Registration Card packed with your set "Itwin make it
easier to ccaltactyou shouldit ever be necessary. The returnof the card is not required fi_r
warrantycovera_
Thiswan-m_ 8i_,esyou_ific legalrights,andyou alsomay haveotherfighm_t _ _
statetostate.
If you purchasedyourproduct-
outsiae_e United:States !
. " . o . •
Thiswarm_does notapply.C.onmctyourdealerfor waz_antyix_mati_.
Page 35

References
Orde(Form for Parts
Remote #233064
IfyourTVhasthe
picture-in-picture
feature, this is the
remote that came
packed with your TV.
You can use the order
form at the right to
order it by mail.
<_
,0 _0,0
"0'0'0
'0'0'0
'(3 "6"
"=5
._J
Cleaz_er
#AHO35
To clean your TV cabinet, we
recommend Murphy's* Oil Soap or '
Cleaner #AH035. You should not use
cleaners such as Windex* with vinegar,
Lenox* Furniture Polish spray or
•Heinz*Oeaning Vinegartodean your
TV cabinet.Using thesecleanerswill
permanentlymar thesurfaceofthe
cabinet.Such damage isnotcovered :
" under yourpurcha_ warranty. "
Order Form
Book No. 1512778A
Part Part Number Price Qty , Total
Cleaner AH035 $ 6.95
Remote-CRK74A2 " 233064 $39.95
Total ($10 Minimum Order) ....................
_le_ Tax °°°°°°°°°°°°°°°°° ...... °°°°°°°°.°°° ....... .°_**.°°°°°
We arerequiredbylawtocollectthe
appropriatesalestaxforeachindividual
state,county,and localitytowhichthe
merchandiseisbeingsent.
$
$
Shipping,Handling,and Insurance. ...... $
Total Amount Enclosed ...................... ....... $
VISA orMast_ preferred.
Money order or clieck must be in U.S. currency Only.
No COD or CASH.
£
e
O
I
I
|
|
,|
|
$
Allspecificationsand descriptionso'fparlsaresubjecttochange
without noti(_e; 1
Page 36

References
Order Form for Parts
USE YOUR CREDIT CARD
Copy complete accountnumber
VISA"
I-CT-N CT f CT-N
Copy complete account number
l,I, iFTT-NITTT'IVTTN
Copy Number abovet.h_name F--[--T'_
on your MastezCard
AUTHORIZED SIGNATURE
PricesaresubjecttO.change wifl_out notice.
PLEASE
Print or type your name and address.
This will be your mailing label.
A complete and correct order will
saveyou days of waiting.
I"
Apt:
Zip:
Name"
Street:.
o
i
I
I
I
• ,|
I
I
I
I
I
I
:'|
I
I
I
.. I
_-_1
0_'•
State-
/
Makesure_tbo_ sidesof•this
form havebeen filledout. "
U.S. and Canadian Orders
• ,!
By Phone:
1 - 800 - 338 - 0376
Call this toll-free number between
•8AM and 8PM Eastern StandardTime
and place your order using your Visa
or MasterC.ard. Use this number
only to place an •orderfor accessory
items listed on this order form.
By Mail: -
Detach the information at the left and
mail the payment to Thomson
Consumer Electronics, Inc., at:.
Video Accessories
PO Box 8419
Ronks,PA •17573
Most orders are shipped UPS within
, 72hours. If it is•not possib!e to ship
' within 30 days,we willnotifyyou.
!
For more _urrent information on
these accessories, write to the
following address:
Video Accessories Customer Service
Thomson Consumer Electronics, Inc.
Distributor & Special Products
2000 Clements Bridge'Rd
Depfford,NJ 08096-2088
!
!
•!
$. |
o:
e:
1
International Orders_
Thiso_ferisValidonly intheU.S.
Send your requestforprice quotation
(not orders)to:
International Customer. Service
Thomson Consumer ]_-tmmcs, Inc.
Distnt_utor & SpecialProducts
2000 Clements Bridge Rd
omg mmUSA
Page 37

References
Glossary
Antenna
A device used to receive broadcast
signals from TV stations.
Audio
Sound reproduced by the TV.
Audio/video cables
Cables that carry sound and
•picture signals from one
component to another.
Autocolor
•Adjuststhe Color and Tint of the
picture signals to the proper
balance for all channels.
AutoProgram
A procedure that automatically
adds onlythe active channels in
your area to theTV's memory.
Brightness
Light and dark areas of a picture.
Ch_el Label
•A name that is given to a specific
channel number.
Channel Memory
Where channels are stored after
they have been placed in memory.
Channels can be added or deleted
from channet memory.
Commerical Ski'p
A featurethat allowsthe viewer to.
scan other channels during
commercials, and return to the
,original e2unnel aftera timed
break:.
Componen t •
VCR,
player, audio equipment,
camcorder, etc.
Disabled :
Tu_-ns off. fei_tu_.
Display
A word, words or graphics that
appear on the TV _zee_
Inputs
Locatedon backoftheTV for
connectionofa component tothe
TV. Used toroutesignalsintothe
TV from components. :
Jacks
.Connectors located on the back of
the TV for connecting antennas or
other components.
Menu
A listing of features, controls, and
adjustments shown on the TV
.screen that can be changed.
Mono
Slangformonaural.Sound comes
through one channel.
On-Screen Display•
SeeDisplay.
Outputs
Located on back of the TV for
connection of another component.
Signals are routedout of the TV
intotheothercomponent.
Picture-in-picture
A featme that allows you to watch
two channels at the same.time, a_
smallpicturewithina bigpicture.-
The smaller picturecomes. from a
VCR or othercomponent
connected tO the 17_r.
Re a
Returnsallofyour TV pictt_e
adjus .tments back to the _ctor_.
setting.
PIP -.
Shortforpicture-in-pictu_:
sharpness
Clearness of a picture.
SKIP See CommericalSkip.
.Signal
Electrical waves that are sent or
received through cables or through
the air.
Sleep Timer
A feature where the TV can be set
to turn off at a specific time within
four hours.
Source(s)
Components or devices that are
connected tothe TV.
Stereo
Sound signalsthatcome through
two channels(leftand right).
Tone
Quality of the sound.
Tuner
A devicethat receives and selects
signals. The desired signal is
• selected by thetuner.
Unusable Signal
"A message that shows no signal is
coming inon thevide6 input.
Video
H cturereproducedby the
television.
Page 38

References
index
A
Adding Channels to Memory..120
Adjust Menu
Autocolor ................................... 17
Bright .......................................... 17
Color .................................... _.....:17
Pich_re Reset ......................... .....17
Slmrpness ...................... _............ 17
Tint. ...................... ....................... 17
Adjusting
Picture............. _.......................... 16
Picture _gs ......................... 17
Sound Settings ................. ....18,19
Air or Cable Feature ................ .27
Alarm Channel ............................. 23
Alarm Clock ....................... ..........23
Alarm Display .............................. 28
Alarm Menu ................................. 23
Alarm ..................................... ,...23
Alarm Channel ......................... .23
• Off Time. .................................... 23
On Time ............................ ;........23
Set Clock ..................... :................ 3
ANT AoB Button ........................... 7
Antenna ....................................... 27
Audio ........_:........... :....7,15,18,19,35
AUDIO Button .......................... 7,15
Audio Codes ................... .............15
Audio Equipment Buttons ......... 15
CLEAR
FF/Fast Forward
PAUSE
PLAY
REC/Record
REW/Rewind
STOP. '"
Audio/videOcables .................. _,35
Autocolor.., ..................... .........17,35
Autoprogram ....................... 320,35
B
Baeeries (Remote) .........................2
Bright............................................ 17
Brig,htness ........ ... ............. _......17,35
Buttofis
+ and-. ....... :...... :.......... 2,3,4,5,6,7
Audio Equipment ........... _..........15
Component .................................. 4'
Laserdisc...,.. .......................... :..14
Menu .......... ._............................ 4,5
Number.... ....... ...... ....... ......:.....-.6
Picture-in-Picture ......4,7,24,25,35
Power. ..... ..........,.: .................... ....6
• Remote Control .....::.............. 4,6,7
TV ........ ;....... :.......... ......:,.....:...4,12
, T_ Front Panel ..........;............... .28
VCR ......................... ........:......,..13
C
CABLE/ANTENNNA Jack ..2...15
Cable Box ........................ ......... 12,13
Cable Box Codes .......................... i2
CABLE Button ............. :........ 7,12,13
Cable Channel .............................. 13
Cable OrAir Feature ................... _27
CancellingSleepTimer...............22
Captioning, Closed ..................... 26
Cautions.., ................................. ,......i
Channel Label ........................ .21,3,5
Channel Memory ................ .3,20,35
Channel Name Display ............. _9
Channel NumberDisplay ......... .29
CHANNEL Up/Down Buttons
Remote ................................... 4,5,6
TV ..................................... .......... 28
Channels
Adding ....................................... 20
Deleting ...........'.......................... .20
Naming ................................ .21,29
Placing in Memory .............. ,.3,20
Checks and Adjustments .......30,31
Cleaner .............. ............................ 33
CLEAR Button ........................ ....6,7
Clock. ........................ :................. 3,23
Closed Captioning ...................... :26
Codes
Audio .................................. ...... .15
Cable Box ......................... .......... 12
Laserdisc Player ................... :....14
•VCR ............................................ ..8
Color ............ ....._,.. ....................... .17
Colors (Menus) ..... .......... ,._........ :...5
Commerical Skip .......... .......6,29,3 5
Button ........................... ................ 6
Display ......... :............... ............. _9
Component .............................. ;....35
• Component Buttons'. .............. ...13
• AUDIO, CABLE, LD,
VCR, VCR2, Components
Audio Equipment. ............. .......15
Cable BOx............................. 12,13
Laserdisc Player ...................... ;.14
VCR ........... ............... .......8,9,10,11
Contents ............................ :............. 1
Controls
TV Front Panel .............. ............ 28
Remote ................. ...............-.;6,7"
Controls Menu
Closed Captioning. i........... :......_6
H.c_xtre........... ............................. 16
Sleep Timer..:. ........................... :22
•Stereo .......................................... 18
Tone.._......... :......................... ......18
D
Delete Channels from Memory.20
Disabled........................................ 35
DISPLAY Button ....................... 6,23
Displays (On-Screen) .................. 29
Alarm, Channel Name,
Channel Number, C0mmerical
• Skip, Mute, PIP 00, Sleep, Stereo,
Time, Unusable Signal,
VIDEO 00, Volume
DISPLAY Button ....................... 6,29
E
Erase aName ............... ................ 21
Erasing Channels from Memory20
F
FF/Fast Forward Button ...... :....... 7
Front Panel Controls ................ 4,28
FREEZE Button ...................... ...7,25
G
Glossary ..................... .i .............. ..35
Guide
Colors .............................. ....,........5
Menu Buttons ............................ 4,5
Moving through the Menus ......5
•TV ................................ ::..... .2,3,4,5
H
Hookup TV....Connections Guide
I
INPUT Button.... ........ .......... ......... .7
Inputs ............................. ............... 35
Jacks........ :..........:.J..i.._:.........;......,35
L
La_disc Player Codes ..............14
Laserdisc Player Buttons... ...... 7;14
FF/Fast F6_ard/PAUSE, PLAY.,
PROG _ RE,!Rewind r
STOP
Laserdisc Player .......................... A4
.i
36'
Page 39

M
Menu............................._...............36
MENU Buttons ................... ........ 4,5
Memis .................... ......................... .5
Menu Colors ........................ ........... 5
Mono ..................................... ,.1835
MOVE Button. .......................... Z5,7
Moving through the Menus. ........ 5
MUTE Button, ........ ,....................... 6
Mute Display ................................ 29
N
Naming the Channels ................. 21
Number Buttons ............................ 6
, O
Off Time (Alarm) ......................... 23
On:ScreenDisplays................2935
On Time (Alarm) ......................... 23
Order Form for Parts.............. 33,34.
Outputs .........................................35
P
PAUSE Button ........................ 7,8,14
Picture ...................................... 16,17
Picture Adjustments ......... ......16,17
Picture-inPicture....,.........4,7,24,25
Change Channels ............ ;........ =?.4
Turn on. ................................... :..24
•Turnoff ............... ..................... 2.5
Use PIP Buttons ..................... 7,25
Picture-in-Picture Buttous....7,25
FREEZE, PIP,PIPMOVE, SWAP •
Picture Settings ....................... 16,17
Picture Reset. ................................ 17
PIP....:. ................................. 4,7,24,25
PIP Button ........ .................. 4,7,24,25
PIP 00 Display .................. ............ 29
PIP MOVE Bu_ ......i........,...7,25
Place Channels in Memory .....3,20
PLAY Button .......:............. 7,8,t4,15
Plug in TV..... ................................. 22
pO_rER Button ........... -...:...: ..... 2,6
Power Buttons ..... ,........... ............ 2,6
PREV CH Button ....._.................. ;..6
Prewious channel Button .......... ...6
•Problem Sohring, .................... 3132
Product Registration... ................... i
PROG/Program Button ......... ,.....7
Prig theRemote
• Audio Equ_m_.._ .......... ........ 15
Cable BOx.:. ........... :...........:..12,13
Laserdisc Play .er,.....,......,., ....... 14
.VCP_ ........ ............ ............. 8,9,!0,11
Put Batteries inRemote ......... .,.....2
• .... /
•. Q -'
Quick Guide to Your TV ....:23,4,5
. . . . . .-
R
REC/Record Button.i" ........ 7,11,15
References. ............................. 2.8-37
Glossary .......................... •.......... 35
Order Form for Parts........... 33,34
Trouble Checks ................... .3031
Warranty .................................... 32
Registration Card ........... ................ i
Remote Control
Batteries ....................................... 2
Buttons ............................. ......... 6,7
Order Form ................................ 33
Tour .............................................. 4
With Components .............. 7"8-15
RESET Button ................................. 6
REW/Rewind Button .7,8,11,14,15
S
Safety Information .............. ...... ,..,i
Screen Displays ........................... .29.
Service.........................2.................32
Set Clock ........... ......................... .....3
Set Time .......................................... 3•
Setting Cable/Air ........................ 27
Setting the Cable Channe.1 ..........12
Setting the Sleep Tuner ........... ,..__2
Setup Menu .
....................
1Air...............:................._7
Cable Channel ........................... 13
Channel Label .......................... 221
GhannelMemory...................3,20
_rlakerS ....................................... 9
VCR 1 Charm_.. ........... ,............. 8
Sharpness ...................................... 17
........................:...................
Sleep Display ........ ,................. 222_
Sleep Timer ............................ .....,22
Sharpness ...................... ................ 17
Sound .......................... ............ 18,19
Source ............ ,.................... :..........35
Speakers .................. :._................... 19
Start-up... ............. ,........ ................ .23
Steieo ....... ................. ................ 1835
Stereo Display.... ................... ....2.9
STOP Button...: ......... ......,_7,8,11,15
SWAP Button. ................... 4,7,24,25
T
Table of Contents ........ ................... 1
Time
•'Alarm ...............................,:......._3
Clock..... ......... ...:,...................... :....3
SleetT er .......:..................._..22
Time Display..., ......... :.. ......... _......29
"lTmt......_....... ;............... ................ =17
Tone ............................. ............ 18_.
-Tour.of theRemote..... ........._.._,...'..4
Trouble Checks.2_. .....,..........3031
Turnon Alarm .............'. ........... ..223•
Turn on Picture-in'Picture....24,25
Turn on TV ........... ._.......:.." .......... ..2
TV
Buttons ................................. 4,6,28
Guide to ......... ........................23,4
TV Button ..................... ............3,4,6
Time ............................ .................... 3
Two Pictures at one time ....... 24,25
U
Unusable Signal Display.......29,35
Using Advanced Features .....20-27
Naming the Channels .............. 21
Place Channels in Memory ....20
Setting Cable or Air .................. 27
• Setting the Alarm•Clock .......... 23
Setting the Sleep Timer ............ 22
Watching Closed Captioning..26
Watching Two Pictures ......24,25
Using the Remote
Audio Equipment ..................... 15
Laserdisc Player ........................ 14
Cable Box .............................. 12,13
VCR ................................. 8,9,10,11
V
V,CR
•'Turn on ....................................... 10
Turn off .............................. :........10
Recordone TV program and
watch another.....................:.....11
Watch a tape ............................. .il
VCR Button ..2:.................... 7,8,9,10
VCR 1 Channel... ............................ 8
VCR2 Button ....................... 7,8,9,10
VCR Codes ................................ .....8
VCR Buttons ............. ..i................ 7,8
CLEAR, FF/Fast Foiward,
PAUSE, PLAY, PROG/Program,
REC/Record, REW/Rewind, •
STOP °
Video ................. ................ .:.......... 35
VIDEO 00 Display ....................... 29
VolumeDisplay..:........................29
VOL + and- Buttons
.."Remote .......................... .:..,......i.4,6
.TV ....,... .................... .................. 28
W•
Warning ........... .......................... ......i
Warran_ ....................................... 32
Watching Closed Cap_tioning .....26
Watch," g Pictuxe-in-PictUre.24,25
• " . - . .
_
_37:
Page 40

•"CREATIN G A GREENER FUTURE
At Thomson Consumer Electronics we are dedicated to the preservation of our
natural heritage and' to a healthy and safe way of life for current and future
generations. This is a global effort which encompasses every THOMSON facility
throughout the world.
We believe that clean air_ clean water, a protected earth, and healthy people are
not only practical and desirable goals, but achievable ones as well. Our Corporate
Environmental, Health and Safety Charter acknowledges our commitment to
protect these precious assets and provides a challenging vision and guideline for
conduct!ng our business.
O ms,seam
Below are a few examples of Thomson's achievements in our efforts topreserve our natural resources.
THE EJLRTH
TI-1£ AIR •THE WAIF_JR
Thomson reclaims millions of pounds
of hazardous waste annually, diverting
it from landfills.
Thomson treats millions of pounds of
waste water sludge annually and
renders it non-hazardous.
Thomson recycles over 50 million
pounds of non-hazardous material
a.nnually that otherwise would have
been treated as trash, an" overall
recovery rate of 50%.
Thomson globally recycles millions of
pounds Of broken television picture
tube glass annually through both
internal and external reclaim prQcesses.
Thomson has replaced solvent-based
paints at many locations resulting in an
80% reduction in toxic air emissions for
equivalent material used.
Thomson has eliminated the use of
ozone-depleting substances at
television manufacturing facilities
around theworld.
Thomson collects and"retums over 1.5
million pounds of glass and furnace
dust to the glass making process
annually.
Thomson has launched worldwide
energy savings programs which
contribute to efforts .to reduce air
emissions from electrical generating
facilities.
Thomson recovers over 2 million
pounds of fine glass particles from
process water each year and recycles
them backinto its glass furnaces.
Thomson's state-of-the-art waste water
treatment plants filter out over 26
million pounds of solids from process
water each year.
Thomson's U.S..glass factory recycles
2,500 gallons of water per minute ands,
cleans 2.6 million gallons of water per
day.
Thomson is researching new processes
and is deve,loping new manufacturing
equil:;ment and technologies to further
reducelarge volume water use.
Thomson has also •increased its usage of recycled materials for packaging of our products. For example, in the U;S. and
Mexico our television plants use recycled content in our television cartons ;.The inks used for the print
on cartons are soy based. For a free brochure regarding Thomso.n's Environmental Health andSafety
Programs, write to Vhomson Consumer Electronics' address below, attention Environmental Programs: INH340,
Please do.not sen@any products to the Indianapolis address listed in this manual Or on the carton. This will 0nly acid d'elays in
,service"for your product.
O .0mo. to.sum=,m=nm
10330 North Meridian Street
Indianapolis, IN 46290
©1996 Thomson Consumer Electronics, |nc.
Trademark(s_P Registered
Printed in USA
-TOCOM '1512778A
 Loading...