

Page 1

Tel
m
ion
User's G mde
Changing Entertainment.
Please read this manual before
operating this
first time.
TOCOM 15891780
Page 2

l p@rtant mnf@r ati@n
WARNING
To reduce the risk of fire or
electric shock, do not expose
this product to rain or moisture.
_ Caution: To reduce the risk of electric shock, do
not remove cover (or back). No user serviceable
parts inside. Refer servicing to qualified service
personnel.
_k This symbol indicates
"dangerous voltage" inside
the product that presents a
risk of electric shock or
This symbol indicates
important instructions
accompanying the product.
personal injury.
Caution: To prevent electric shock, match wide blade of
plug to wide slot, fully insert.
Power Consumption: 120V ~ 60 Hz A.C. 128W (model
F27450), 142W (models F32444 and F32450), 146W
(models F36444 and F36450)
Attention: Pour _viter les chocs electriques, introduire
la lame la plus large de la fiche dans la borne correspondante de la prise et
pousser jusq6 au fond.
Refer to the identification/rating label located on the back panel of your
product for its proper operating voltage.
FCCRegulations state that unauthorized changes or modifications to this
equipment may void the user's authority to operate it.
Caution: Using video games or any external accessory with fixed
images for extended periods of time can cause them to be
permanently imprinted on the picture tube (or projection TV
picture tubes). ALSO, some network/program Iogos, phone
numbers, etc. may cause similar damage. This damage is not
covered by your warranty.
Cable TV Installer: This reminder is provided to call your attention to
Article 820-40 of the National Electrical Code (Section 54 of the Canadian
Electrical Code, Part 1) which provides guidelines for proper grounding
and, in particular, specifies that the cable ground shall be connected to the
grounding system of the building as close to the point of cable entry as
practical.
Product Registration
Please fill out the product registration card (packed separately) and return it immediately. Returning the card
allows us to contact you if needed.
Product Information
Keep your sales receipt to obtain warranty parts and service and for proof of purchase. Attach it here and record
the serial and model numbers in case you need them. These numbers are located on the product.
Model No.
Serial No.
Purchase Date:
Dealer/Address/Phone:
VCRPlus+,C3,PlusCode,G-LINK,andGUIDEPlus+are trademarksof GemstarDevelopmentCorporation.
TheVCRPlus+andGUIDEPlus+systemsare manufacturedunder licensefrom GemstarDevelopmentCorporation and VCRIndex
SystemsB.V.,respectively.
THOMSON MULTIMEDIA INC. AND GEMSTAR ARE NOT IN ANY WAY LIABLE FOR THE ACCURACY OF THE
PROGRAM INFORMATION PROVIDED BY THE GUIDE PLUS+ SYSTEM. IN NO EVENT SHALL THOMSON
MULTIMEDIA INC. OR GEMSTAR BE LIABLE FOR ANY AMOUNT REPRESENTING LOSS OF PROFITS, LOSS OF
BUSINESS, OR INDIRECT, SPECIAL, OR CONSEQUENTIAL DAMAGES IN CONNECTION WITH THE PROVISION
OR USE OF ANY INFORMATION, EQUIPMENT, OR SERVICES RELATING TO THE GUIDE PLUS+ SYSTEM.
VCRrequiredfor recording.
Page 3
Key Features Overview
Your TV is equipped with l_.atures that will add to your TV viewing experience. The l_>llowing
infbrmation sumnmrizes a few of these fi.atures. Chapter 3 provides more inl_)rmation about tile
rest of the TV's tl.atures and how to use them.
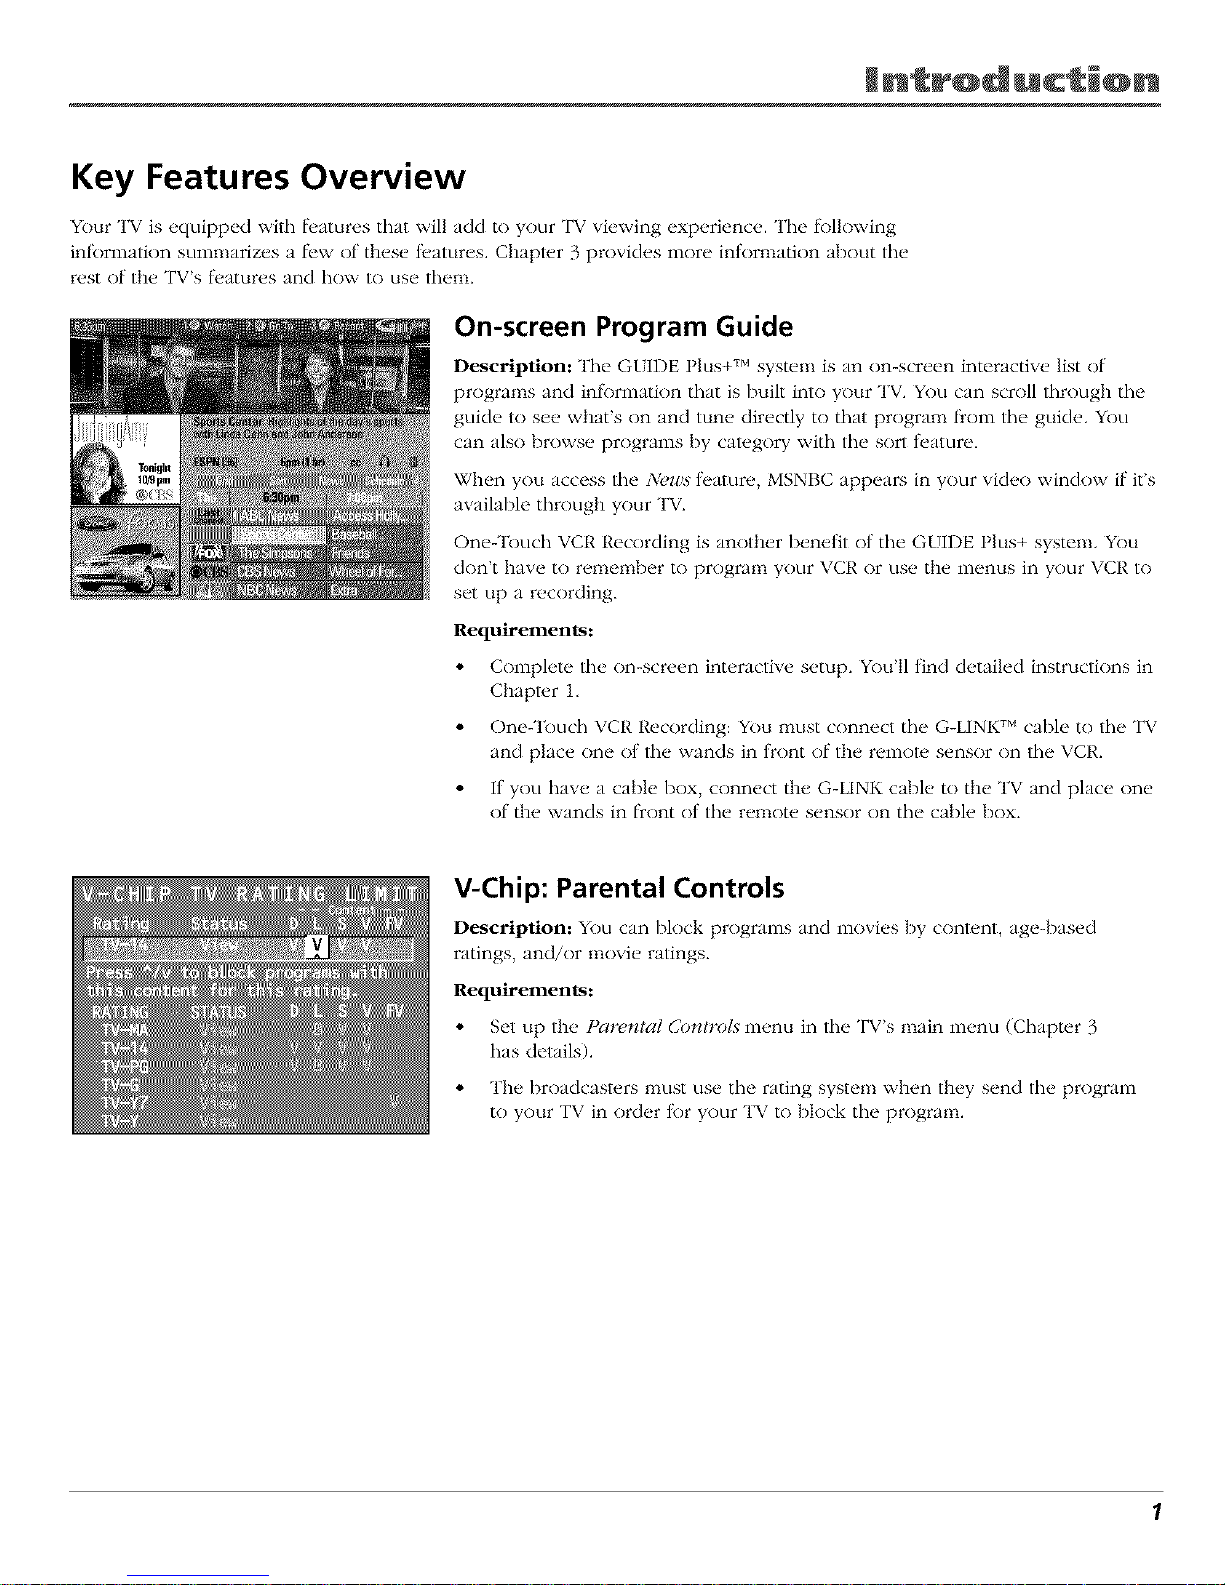
On-screen Program Guide
Description: The (;tIDE Plus+ TM system is an on-screen interactiw, list of
programs and inlkmnation that is built into your TV. You can scroll through tile
guide to see what's on and tune directly to that program t}om the guide. You
can also browse programs by cat_.gory with the sort t>ature.
When you access lhe Newa t>ature, MSNBC appears in your vide() window if it's
available through your TV.
Oneq'ouch VCR Recording is another benefit of tile GUIDE Plus+ system. You
don't have to remember to program your VCR or use the menus in your VCR to
set up a recording.
Requirements:
• Complete lhe on-screen interactive setup. You'll find detailed instructions in
Chapter 1,
• One-Touch VCR Recording: You nmst connect tile G-LINKTM cable to tile TV
and place one of lhe wands in t?ont of the tern(m, sensor on the VCR.
• If you have a cable box, connect the G-LINK cable to the TV and place one
of the wands in flcont of the remote sensor on the cable box.
V-Chip: Parental Controls
Description: You can block programs and movies by conl_.nt, age-based
ratings, and/or movie ratings.
Requirements:
• Set up the Parent_l ControL_ menu in lhe TV's main menu (Chapter 3
has details).
• The broadcast_.rs nmst use tile rating system when they send tile program
to your TV in order R)r your TV to block the program.
1
Page 4
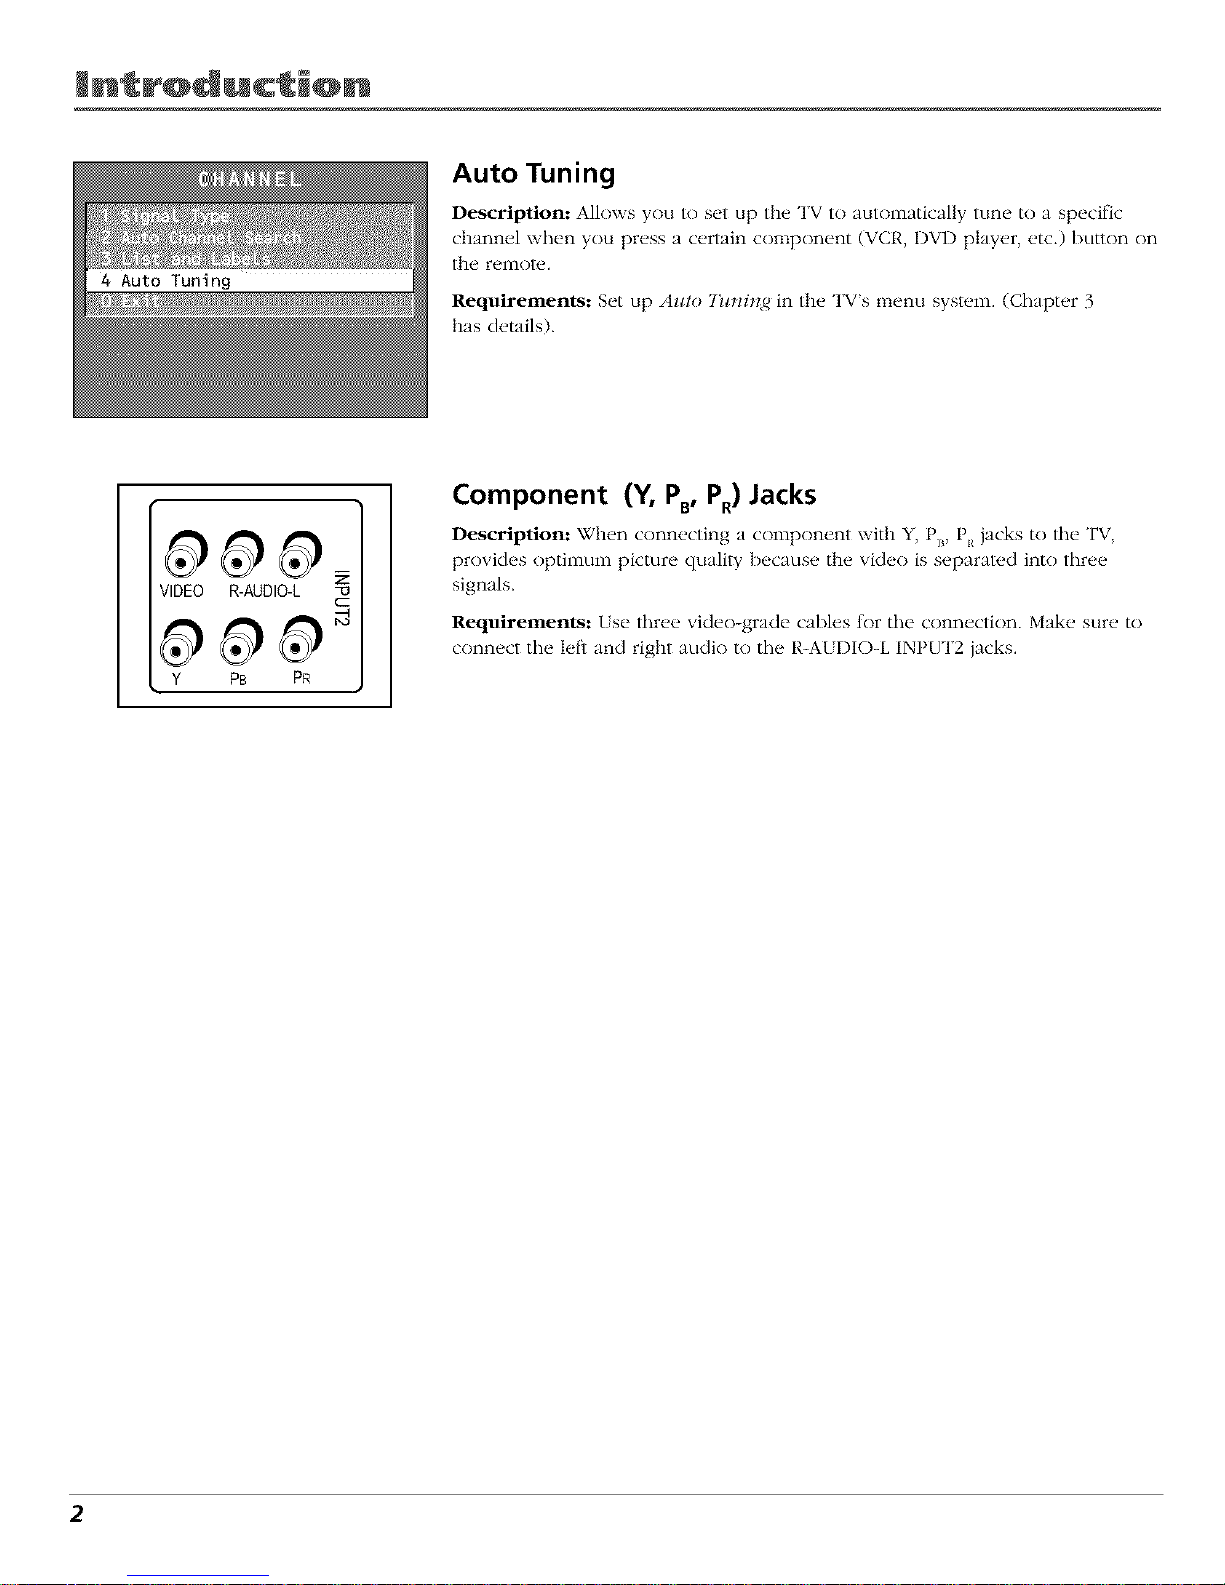
Auto Tuning
Description: Allows you to set up the TV to autonlatically tune to a specific
channel when you press a certain component (VCP,, DVD player, etc.) button on
the remote.
Requirements: Set up Azao 7_¢*H*_,4 in the TV's menu system. (Chapter 3
has details).
VIDEO R-AUDIO-L z
Y PB PR
Component (Y, PB, P.) Jacks
Description: When connecting a c'ompon_.nt with Y, P_, P_ jacks to tile TV,
provides optimum picture quality because the video is separated into three
signals.
Requirements: [se three video-grade cables for tile connection. Make sure to
connect tile left and right audio to tile R-A{ DIO-L INPUT2 jacks.
2
Page 5
bJe @f C@ntents
Introduction
Key Features Overview .................................................................................................... 1
On-screen Program Guide ......................................................................................... 1
V-Chip: Parental Controls ........................................................................................... 1
Auto Tuning ................................................................................................................ 2
Component (Y, P_,PR)Jacks ....................................................................................... 2
Chapter 1: Connections & Setup
Things to Consider Before You Connect ......................................................................... 6
Protect Against Power Surges ................................................................................... 6
Protect Components from Overheating ................................................................... 6
Position Cables Properly to Avoid Audio Interference ............................................ 6
Important Stand and Base Safety Information ........................................................ 6
Use Indirect Light ....................................................................................................... 6
Connection Pictures ................................................................................................... 6
Demo Pin .................................................................................................................... 6
Choose Your Connection .................................................................................................. 7
TV + VCR + DVD Player ..................................................................................................... 9
TV + VCR + Satellite Receiver ......................................................................................... 11
TV + VCR .......................................................................................................................... 12
Jacks on the Back of the TV ........................................................................................... 13
Why You Should Connect This G-LINK Cable ............................................................... 14
How to Find the Remote Sensor ............................................................................. 14
Placing the G-LINK Wands ....................................................................................... 14
Plug in the TV .................................................................................................................. 15
Put Batteries in the Remote ........................................................................................... 15
Now to Use the Remote Control to Complete the Interactive Setup ......................... 15
Turn on theTV ................................................................................................................ 15
Complete the Interactive Setup ..................................................................................... 16
Set the Menu Language .......................................................................................... 16
Complete Auto Channel Search .............................................................................. 16
The GUIDE Plus+ System Setup ................................................................................ 16
What to Expect ............................................................................................................... 20
Next Steps ....................................................................................................................... 20
Chapter 2: Using the Remote Control
The Buttons on the Remote Control ............................................................................. 22
Using the WHOoINPUT Button ................................................................................ 23
Programming the Remote to Operate Other Components ......................................... 24
Find Out If You Need to Program the Remote ....................................................... 24
How to Program the Remote .................................................................................. 24
Now to Use the Remote After You've Programmed It ................................................ 25
Remote Codes ................................................................................................................. 26
Chapter 3: Using the TV's Features
About the GUIDE Plus+ System ..................................................................................... 28
Downloading Data ................................................................................................... 28
3
Page 6
bJe @f C@ntents
Getting In & Out of the GUIDE Plus+ System ......................................................... 29
The GUIDE Plus+ System Menus .............................................................................. 29
Grid Guide ................................................................................................................ 29
Sort ............................................................................................................................ 31
News .......................................................................................................................... 32
Schedule .................................................................................................................... 32
Messages ................................................................................................................... 33
Channels ................................................................................................................... 34
Setup ......................................................................................................................... 34
How to Get More Information About an Advertisement or a Program ............... 35
Promotions ............................................................................................................... 35
GUIDE Plus+ Menu Items ............................................................................................... 35
Channel Banner .............................................................................................................. 36
Why You Should Use the Auto Tuning Feature ............................................................ 36
How to Set Up the Auto Tuning Feature ................................................................ 36
Parental Controls and V-Chip ......................................................................................... 38
How V-Chip Works ................................................................................................... 38
V-Chip TV Rating Limit ............................................................................................. 39
Blocking Specific Content Themes .......................................................................... 41
Viewing Specific Content Themes ........................................................................... 42
V-Chip Movie Rating Limit ....................................................................................... 43
V-Chip Unrated Program Block ............................................................................... 44
Channel Block ........................................................................................................... 44
Front Panel Block ..................................................................................................... 45
Lock/Unlock Parental Controls ................................................................................ 45
Chapter 4: Using the TV's Menu System
How to Use Your TV's Menu System ............................................................................. 48
Audio Menu .................................................................................................................... 48
Picture Quality Menu ..................................................................................................... 49
Screen Menu ................................................................................................................... 50
Using Closed Captioning ................................................................................................ 51
Channel Menu ................................................................................................................. 52
Time Menu ...................................................................................................................... 52
Chapter 5: Other Information
Troubleshooting .............................................................................................................. 54
Care and Cleaning .......................................................................................................... 56
The Front of Your TV ...................................................................................................... 57
Limited Warranty ............................................................................................................ 57
Accessory Order Form .................................................................................................... 59
Index ................................................................................................................................ 61
4
Page 7

t
Connections 8t Setup
Chapter Overview:
• Things to Consider Before You Connect
• Choose Your Connection
• Connections
• Jacks on the Back of the TV
• Why You Should Connect This G-LINK Cable
• Plug in theTV
• Put Batteries in the Remote
• How to Use the Remote Control to Complete the
Interactive Setup
• Turn on the TV
• Complete the Interactive Setup
Changing
iin.
G_cy)hics contributed _z_itbi_ this pz_b/ication are fbr _])_sentatio_ on(F. 5
Page 8
C@nnect @ns Setup
Things to Consider Before You Connect
Protect Against Power Surges
• Connect all c()mponents Ix, lore you plug any ot their power cords into the, wall outlet.
• Turn off the TV and/or component Ixd:ore you connect or disconnect any cables.
• Make sure all antennas and cables are properly grounded. Reler to the Important
Sateguards sheet packed with your TV.
Protect Components from Overheating
• Don't block ventilation holes on any ot tile components. Arrange the components so that
air can circulate freely.
• Don't stack components.
• When you place components in a stand, make sure you allow adequate ventilation.
• If you connect an audio receiver or amplifier, place it on the top shelf so the heated air
I_comit won't flow around ()tiler components.
Position Cables Properly to Avoid Audio Interference
• Insert each cable firmly into tile designated jack.
• If you place components above tile TV, route all cables down tile side of the back ot tile
TV instead ot straight down the middle of the back ot tile TV.
• If your antenna uses 300-ohm twin lead cables, do not coil the cables. Also, keep tile twin
lead cables away trom audio/video cables.
Important Stand and Base Safety Information
Choose tile location tor your TV carelully. Place the TV on a stand or base that is ot adequate
size and strength to prevent the TV flcom being accidentally tipped over, pushed olT, or pulled
ott. This could cause personal injury and/or damage the TV. Reter to the Important Sal_,guards
sheet packed with your TV.
Use Indirect Light
Don't place tile TV where sunlight or roonl lighting will be directed toward the screen. Use soil
or indirect lighting.
Connection Pictures
Audio/video cables are usually I_undlcd together. For better visibility, tile connection pictures in
this book show each cable separately (audio left, audio right, and video).
Demo Pin
You must remove the Demo Pin from tile G-LINK jack on the back ot
your TV in order lk_ryour TV to operate properly and to connect the
(;--LINK cable.
6 Chapter I
Page 9

C@nnect @ns Setup
Choose Your Connection
There are several ways to connect yoclr TV. Please use the Ik)llowing chart to determine which
connection is best for yocl. Proceed to the appropriate page and connect your TV.
Note: If you prefer, we can provide you with the name of an Authorized Service Representative who
will visit your home for a fee to install your electronic entertainment system and to instruct you in its
operation. For details about this service, call 1-888-206-3359.
Components
Connection
Title
TV + VCR + DVD
TV + VCR +
Satellite
TV + VCR
Cables
Needed
Coaxial
Audio/video
S-Video
Component video
G-LINK cable
Coaxial
Audio/video
S-Video (optional)
G-LINK cable
Coaxial
Audio/video
G-LINK cable
pages 8-9
pages 10-11
page12
Cables Needed to Connect Components to Your TV
The pictures below show the cables needed lot the connections represented in this Ix)ok.
Notes: AudioNideo cables (A!V cables for short) are usually sold as a bundled set, but the connection
pictures in this book show each cable separately for better visibility.
Please locate the G-LINK cable (provided) when you're getting ready to set up your TV. You need to
connect this cable to your TV, and to your VCR and/or cable box in order for all of the features of the
program guide to work properly.
G-LINK cable Audio/Video cables Component video (Y, PB,P.)
cables
Coaxial cable S-Video cable
Chapter I 7
Page 10

C@nnect_@ns _ Setup
VCR
VIDEO AUDIO
_OOTg@
B k
B k
TV(back panel)
DVD
iN FROMANT
ANTENNA
orAntenna
* If you connect an S-Video cable, you must
connect the audio cables to the INPUT1 AUDIO
Rand Ljacks on the back of the TV, not the
INPUT2 AUDIO jacks.
8 Chapter I
Page 11

C@nnect @ns Setup
TV + VCR + DVD Player
1. Connect your TV to your DVD player
A. Connect the audio cables (white and red) to the INPt T2 AUDIO R and L jacks on lhe
back of the TV and to lhe Audio Output Jacks on the DVD player.
I3. If your DVD player has Component Output Jacks (Y, P, PR), connect three video grade
cables to the Y, P_, PRjacks on the DVD player and to the Y, P_, P. jacks on the back of
the TV. If your DVD player doesn't have Y, P_, P. jacks, go to C.
-OR-
C. If your DVD player has an S-Video jack, connect an S-Video cable to lhe S-Video jack on
the DVD player and the S-VIDEO jack on lhe back of the TV. If your DVD player doesn't
have an S-Video jack, go to D.
Note: If you connect an S-Video cable, you must connect the audio cables to the INPUT1 AUDIO R and
Ljacks on the back of the TV, not the INPUT2 AUDIO jacks.
-OR-
D. Connect a vide() cable (yellow) lo the Video Output Jack on the DVD player and to the
INPUT2 VIDEO jack on the back of the TV.
2. Connect your TV to your VCR
Connect a coaxial cable to lhe CABLE/ANTENNA jack on your TV and to tile Output Jack
on your VCR (sometimes labeled OfT TO TV).
Note: If your VCRhas AN input jacks, you can connect your TV to your VCR using audiotvideo cables
for better quality.
3. Connect cable or antenna to your VCR
Connect the coaxial cable ll*oin your cable outlet, cable box, or antenna to the Input Jack
on your VCR (sometimes labeled IN FROM ANTENNA or IN FROM AN'D.
4. Connect the G-LINK cable to the TV
If you haven't already done so, remove the Demo Pin l_com the G-LINK jack Then, connect
the G-LINK cable to the G-LINK jack on tile TV. Next stvp, phtce one of tile wands of the
G-LINK cable lo work with your VCR (instructions are on page 14).
Go to page 14
Chap_:er I 9
Page 12

C@nnect_@ns _ Setu@
SATELLITE RECEIVER
FromCableorAntenno
IN FR__ CH3
OUT CH4
_) _ _ OOTTOTVSATE,,,TE
VCR ,_-- _ \
rv (backpanel) " " '_
Satellite
Signal
ANTENNA
* If you connect an S-Video cable, you must
connect the audio cables to the INPUTI AUDIO
Rand Ljacks on the back of the TV, not the
INPUT2 AUDIO jacks.
10 Chapter I
Page 13
C@nnect @ns Setup
TV + VCR + Satellite Receiver
1. Connect your Satellite Receiver to your TV
A. Connect tile audio/video cables. Connect tile audio cables (white and red) to tile INt l_ F2
AUDIO R and L jacks on tile back ot tile TV and to the Audio Output Jacks on tile
Satellite Receiver.
B. Connect tile video cable (yellow) to tile INPUT2 VIDEO jack on tile back of tile TV and
to tile Video Output Jack on tile sal_dlite receiver.
C. Connect S-Video cable (optional). Connect an S-Video cable to tile S-VIDEO jack on the
TV and to tile S-VIDEO jack on the satellite receiver. (An S-Video cable provides beuer
picture quality than a regular vide<) cable, but it is optional.)
Note: If you connect an S-Videocable, you must connect the audio cables to the INPUT1AUDIO Rand
Ljacks on the back of the IV, not the INPUT2AUDIO iacks.
2. Connect coaxial cables to the Satellite Receiver
A. Connect tile coaxial cable from your cable nutlet, cable box, or antenna t() tile Input Jack
on y()ur satellite receiver (sometimes lal)eled IN FROM ANT).
B. Connect tile coaxial cable from your satellite dish antenna to tile Input Jack ()n y()ur
satellite recei'_er, (sometimes labeled SATELLrFE IN)
3. Connect the Satellite Receiver to the VCR and to the TV
A. Connect a coaxial cable to tile Output Jack (sometimes labeled OUT TO TV) on tile
samllite receiver and to tile Input Jack on lhe VCR (sometimes labeled IN FROM ANT),
B. Connect a coaxial cable to tile Output Jack on tile VCR (sometimes labeled OIT TO TV)
and to tile CABLE/ANTENNA jack on tile TV.
4. Connect G-LINK cable
If you haven't already done so, remov(, tile I)emo Pin from tile G-LINK jack. Then, conn(,ct
tile G-LINK cable to tile G-LINK jack on tile TV. Next step, place one of tile wands of tile
G-LINK cable lo work with your VCR (instructions are on page 14).
Go to page 14
Chapter I 11
Page 14
C@nnect @ns Setup
TV (backpanel)
R L
0 ,°9
R L
IR FROM ART
\
From Cable
orAMefina
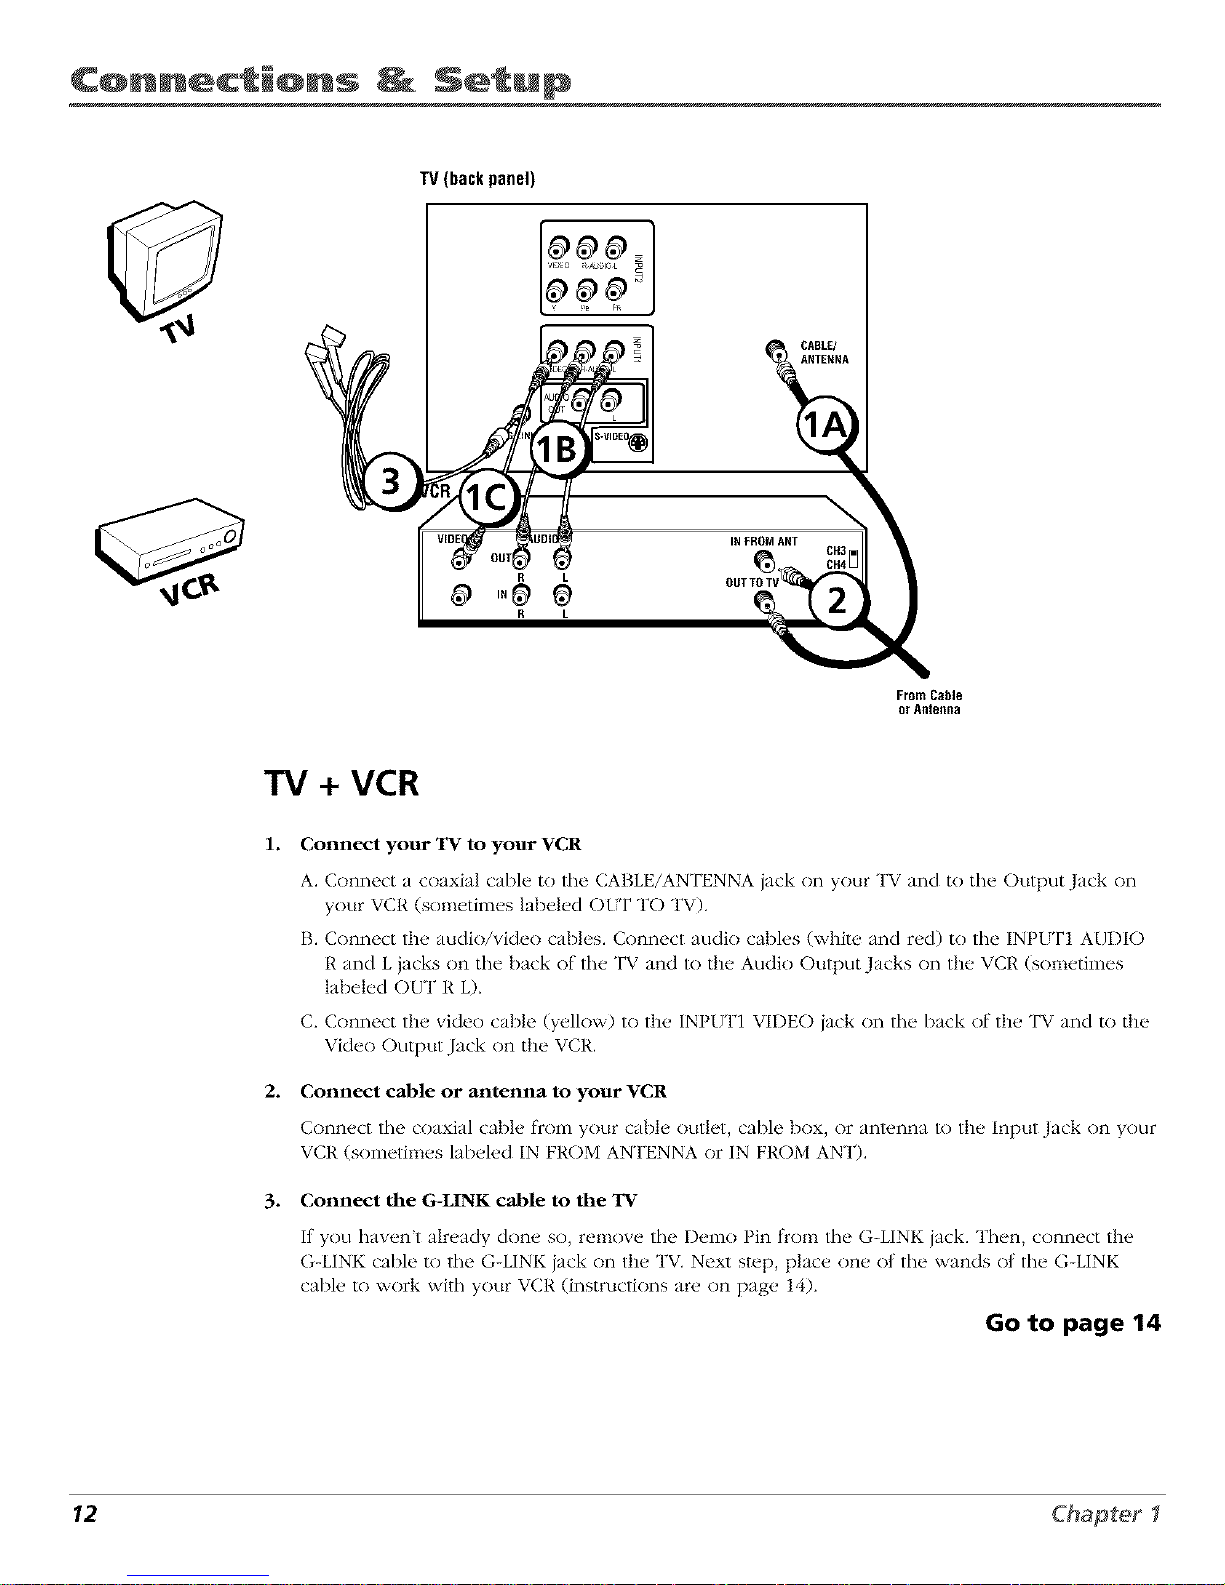
TV + VCR
1. Connect your TV to your VCR
2.
A. Connect a coaxial cable to lhe CABLE/ANTENNA jack on your TV and to tile Output Jack on
your VCR (sometimes labeled OtT TO TV).
B. Connect the audio/video cables. Connect audio cables (white and red) to the INPI_T1 AUDIO
R and L jacks on the back of the TV and to the Audio Output Jacks on the VCR (sometimes
labeled OUT R L).
C. Connect the video cable (yellow) to the INPUT1 VIDEO jack on tile back of the TV and to the
Video Output Jack on the VCR.
Connect cable or antenna to your VCR
Connvct tile coaxial cablv t]coln your cable outlet, cable box, or antenna to the Input Jack on your
1 1 1
VCR (sometimes labeled IN FROM ANTENNA or IN FROM ANT).
3. Connect the G-LINK cable to the TV
It you haven't already done so, remove tile Demo Pin lrom tile G-LINK jack. Then, connect the
(}-LINK cable to tile G-LINK jack on the TV. Next step, place one ot the wands ot the G-LINK
cable to work with your VCR (instructions are on page 14)
Go to page 14
12 Chapter I
Page 15
C@nnect @ns Setup
Jacks on the Back of the TV
This section describes each of the jacks on the back of the TV. When connecting A/V cables, be
sure to connect corresponding outputs to inputs (video to video, right audio to right audio, etc.)
G-LINK Connect tile end ol the G-LINK cable (provided) to this jack. The G-LINK cable
enables the TV's GUIDE Plus+ system to interact with the cable box and/or the VCt{. A picture
ot the G-LINK cable is on page 7.
CABLE/ANTENNA Lets you connect a coaxial cable to receive the signal l_comthe antenna,
cable or cable box.
R-AUDIO-L
S-VIDEO@
VIDEO R-AUDIO-L z
c::
Y PB PR
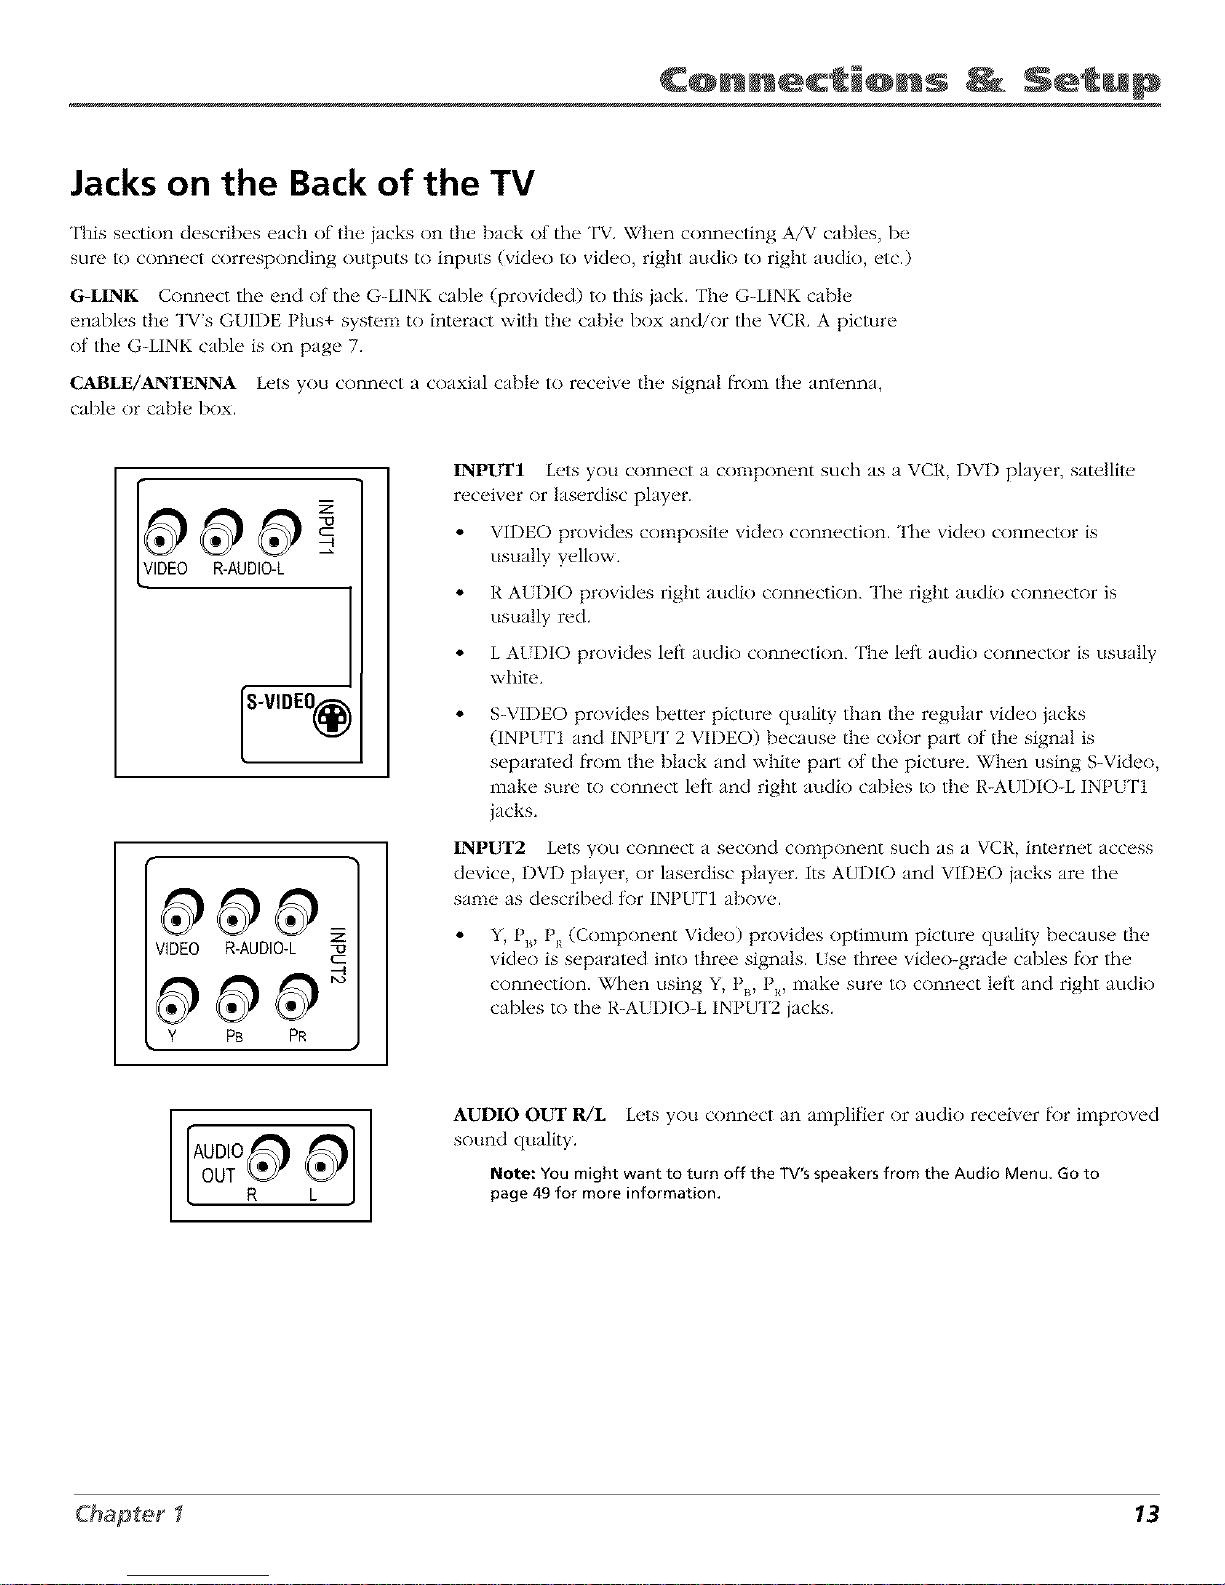
INPU_rl Lets you connect a component such as a VCR, DVD phlyer, satellite
receiver or laserdisc phlyer.
• VIDEO provides composite video connection. The video connector is
usually yellow.
• R AUDIO provides right audio connection. The right audio connector is
usually red.
• L A[DIO provides left audio connection. The left audio connector is usually
white.
S-VIDEO provides better picture quality than the regular video jacks
(INPt T1 and INPUT 2 VIDEO) because the color part of the signal is
separated fYom the black and white part of the picture. When using S-Video,
make sure to connect left and right audio cables to the R-AUDIO-L INPI_T1
jacks.
INPUT2 Lets you connect a second component such as a VCR, internet access
device, DVD player, or laserdisc player. Its AUDIO and VIDEO jacks are the
same as described tor INPUT1 above.
Y, Px_,P_ (Component Video) provides optimum picture quality because the
video is separated inlo three signals, tse three video-grade cables li>rthe
connection. When using Y_ P,_,PR, make sure to connect leti and right audio
cables to the R-A{ DIO-L INPUT2 jacks.
AUDIO OUT R/L Lets you connect an amplifier or audio receiver lk)r improved
sound quality.
Note: YOUmight want to turn off the TV'sspeakers from the Audio Menu. Goto
page 49 for more information.
Chapter I 13
Page 16
C@nnect @ns Setup
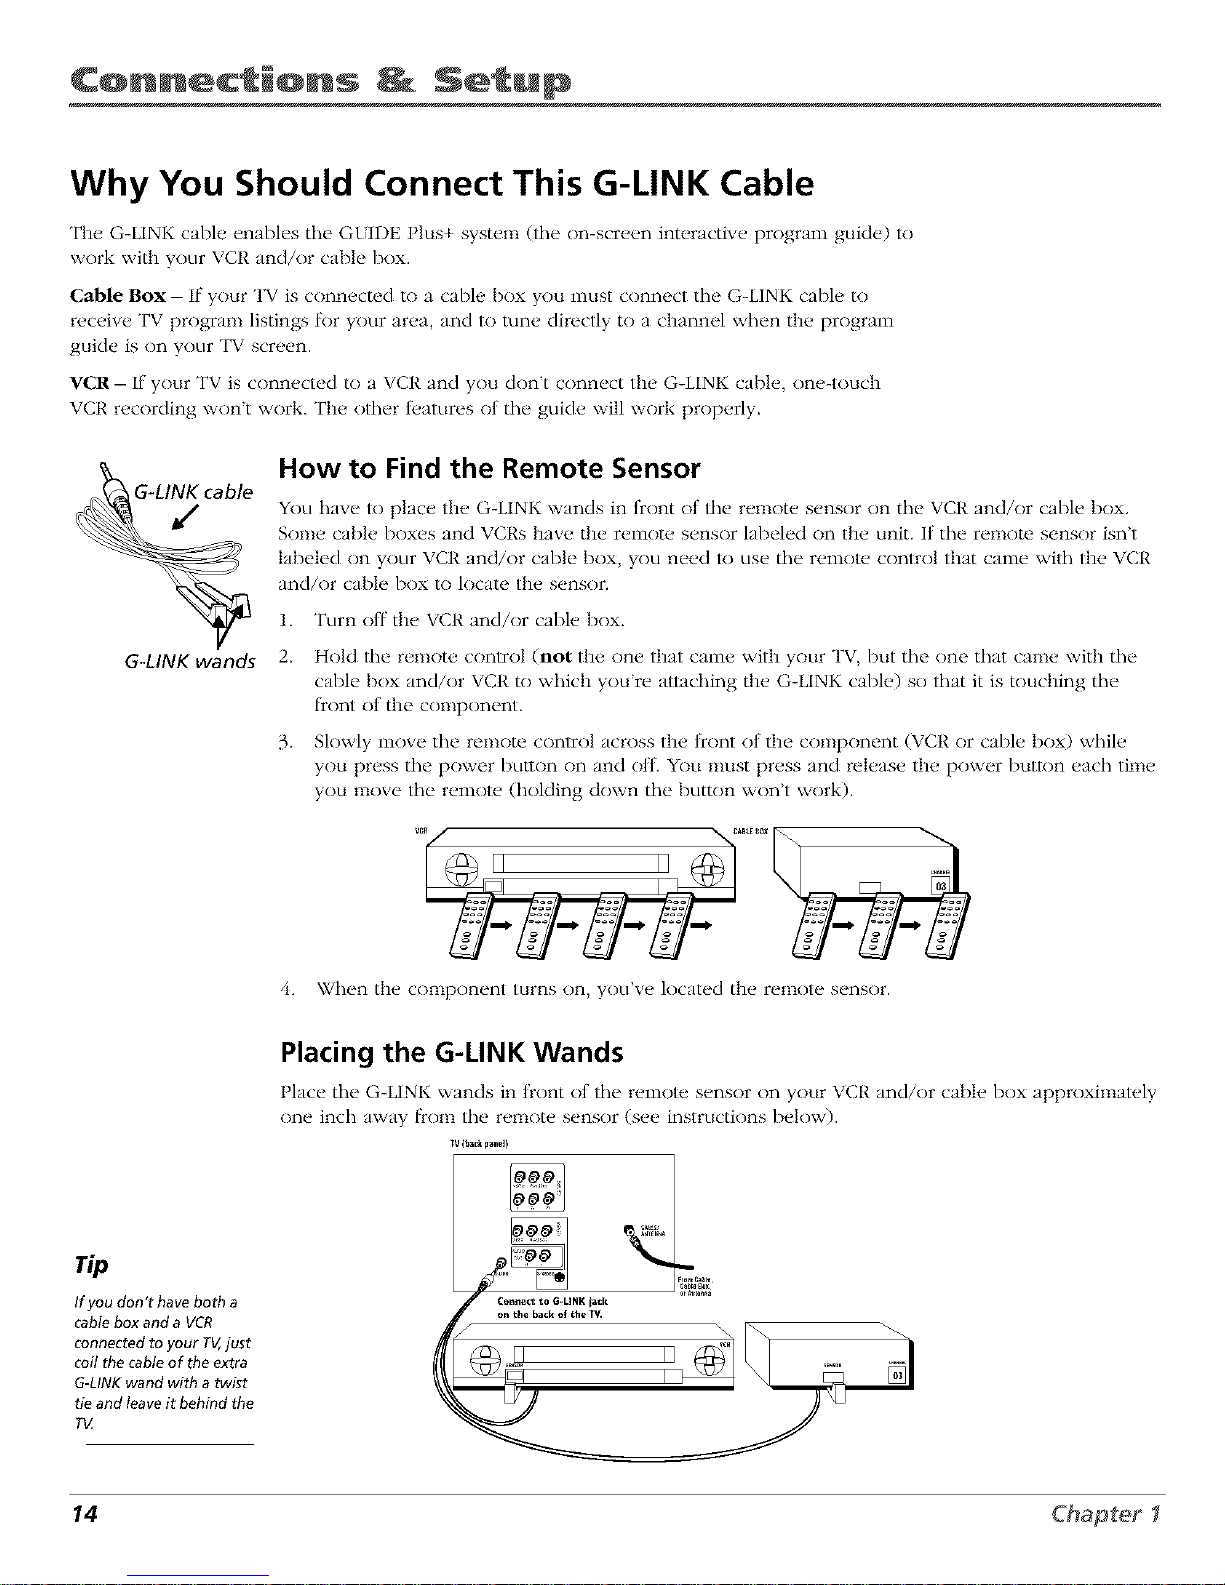
Why You Should Connect This G-LINK Cable
The G-LINK cable enables the GI_IDE Plus+ system (the on-screen interactive program guide) to
work with your VCR and/or cable box.
Cable Box- If your TV is connected to a cable box you must connect the G-LINK cable to
receive TV program listings lk_r your area, and to rune directly to a channel when the program
guide is on your TV screen.
¥CR- If your TV is connected to a VCR and you don't connect the G-LINK cable, one-touch
VCP, recording won't work. The other fl,atures ot the guide will work properly.
G41NK wands
How to Find the Remote Sensor
You have lo place the G-LINK wands in ficont of lhe remote sensor on the VCR and/or cable box,
Some cable boxes and VCRs have the remote sensor labeled on the unit. If the remote sensor isn't
labeled on your VCR and/or cable box, you need lo use the remow control that came with the VCR
and/or cable box to locate the sensor.
2.
3_
Turn off the VCR and/or cable box.
Hold tile remote control (not the one that came with your TV, but tile one that came with the
cable box and/or VCR to which you're attaching the (}-LINK cable) so that it is touching tile
l_contof the conlponent.
Slowly move the remote control across the front of the component (VCR or cable box) while
you press the power button on and ott. You nlust press and release the power button each time
you move the remote (holding down the button won't work).
vc7 _ABtF_°X _
When the component turns on, you've located the remo[e sensor.
If you don't have both a
cable box and a VCR
connected to your TV,just
coil the cable of the extra
G-LINK wand with a twist
tie and leave it behind the
T_
Placing the G-LINK Wands
t lace the G-LINK wands in tront ot the remote sensor on your VCP, and/or cable box approximately
one inch away [_om the remote sensor (see instructions below).
14 Chapter I
Page 17

C@nnect_@ns _ Setup
Plug in the TV
Plug the end of the power cord into tile wall outlet. Match the wide blade ot tile plug with the
wide slot in the outlet. Insert tile plug completely into tile outlet.
Put Batteries in the Remote
1. Remove tile battery compartment cover on the remote.
2. Insert new batteries. Malch the polarities (+ and -) on the bam.ries with the
diagram on tile remote.
3. Put the battery conlpartment cover back on the remote.
q_C>
Use the arrow buttons and the OK
button to move through the menu
system.
How to Use the Remote Control to
Complete the Interactive Setup
The technical term is 'Navigation" - how you move through the on-screen
menus. The theory is the same throughout tile menu screens: highlight your
choice and select it.
To highlight an item on-screen, press the arrow buttons on the remote. [se the
up or down arrow button to move up or down. [se tile right or left arrow
button to move right or left.
To select tile item that you've highlighted, press OK.
Note: Highlighted means that the menu item stands out from other menu items on
the list (appears darker, brighter, or a different color).
Turn on the TV
Press the TV button on the remote control or the POWER button on the TV (the
first screen of tile Interactive Setup appears). "File nlenu screens "time out" alter
a period of time if you don't make a selection. The tips in this section tell you
how to access the Setup menu screens manually.
Note: Pressingthe TV button not only turns on the TV, but puts the remote into TV
mode. "TV mode" means that the buttons on the remote control operate the TV's
functions.
Chapter I 15
Page 18
C@nnect @ns Setup
To accessthe setup menus manually,
press MENU and choose Setup.
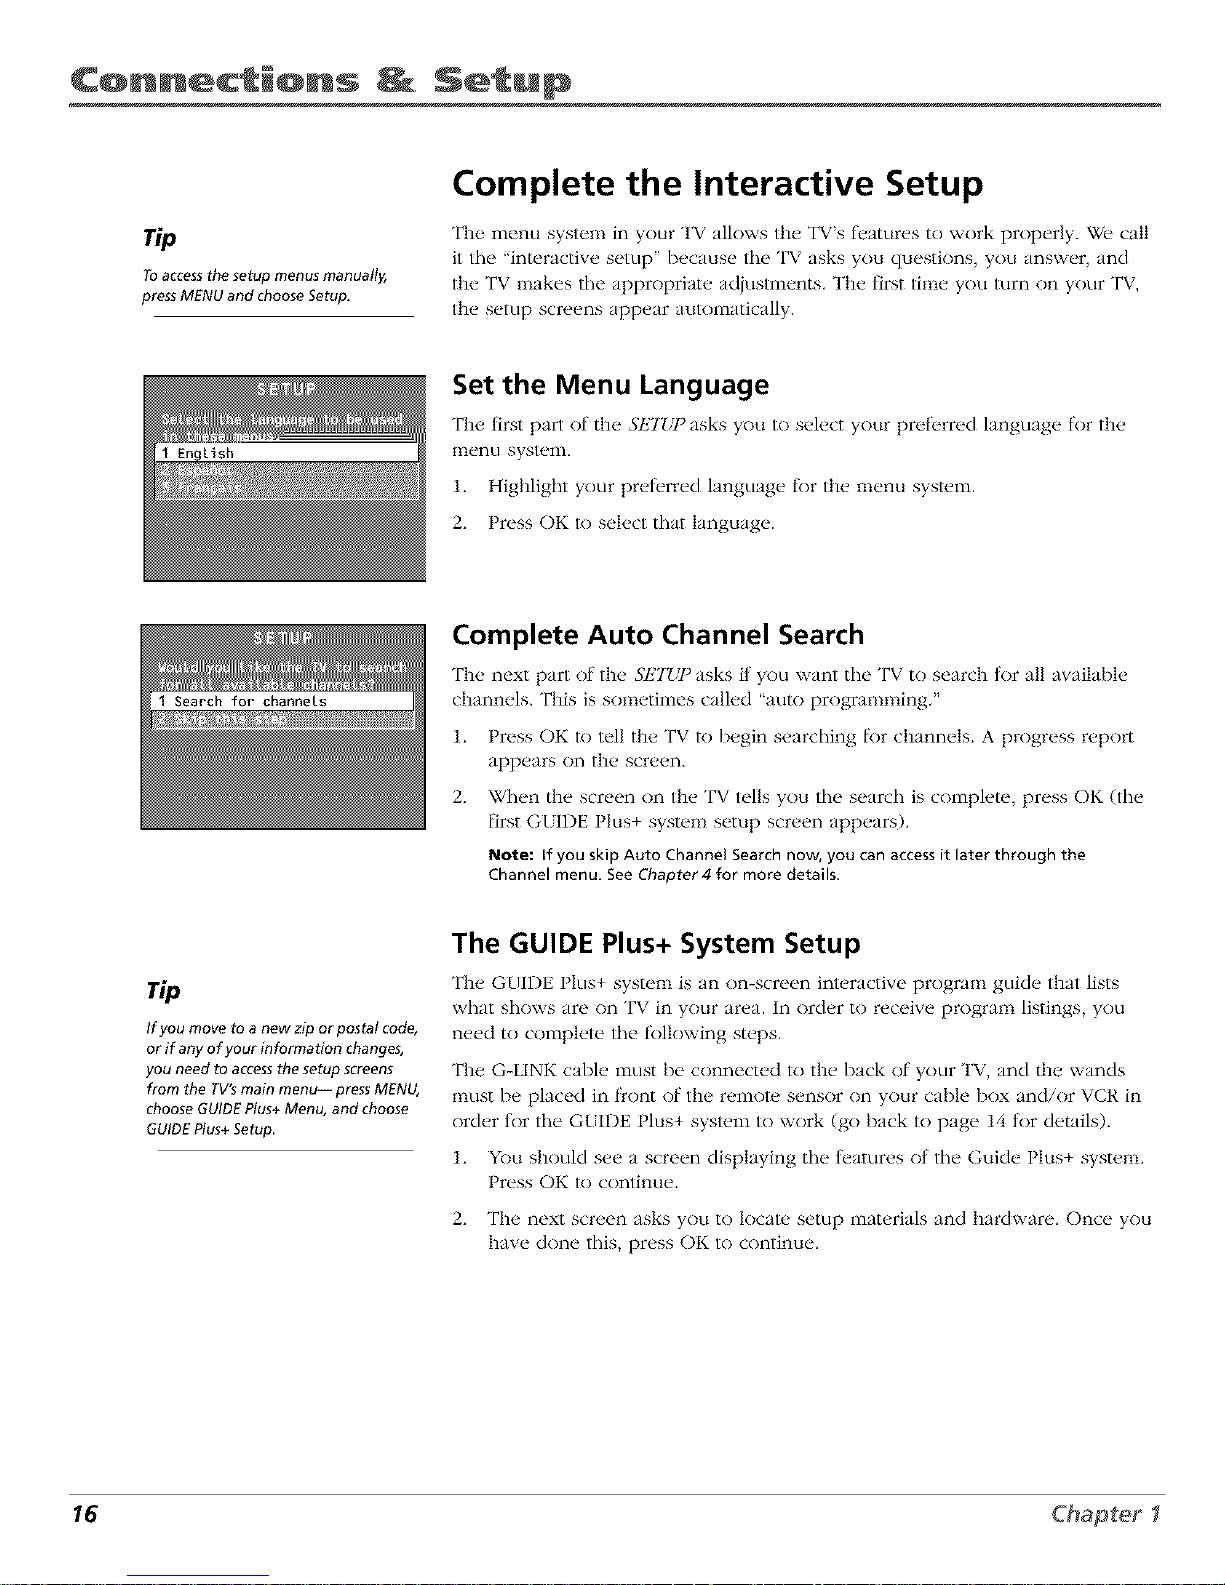
Complete the Interactive Setup
The menu system in your TV allows the TV's t_atures to work properly. We call
it lhe "interactive setup" because lhe TV asks you questions, you answer, and
the TV makes tile appropriate adjustments. The first time you turn on your TV,
the setup screens appear aulomatically.
Set the Menu Language
Tile first part of tile SETLY_asks you to select your preferred language f_r tile
menu system.
1. Highlight your preterred language tbr the menu system.
2. Press OK to select that language.
Complete Auto Channel Search
The next part of the SETUI) asks if you want the TV to search for all available
channels. This is sometimes called "auto programming."
1. Press OK to tell the TV to begin searching lk)r channels. A progress report
appears on the screen.
2_
When the screen on the TV tells you tile search is complete, press OK (tile
first GUIDE Plus+ system setup screen appears).
Note: If you skip Auto Channel Search now, you can accessit later through the
Channel menu. See Chapter 4 for more details.
If you move to a new zip or postal code,
or if any of your information changes,
you need to access the setup screens
from the TV's main menu-- press MENU,
choose GUIDE Plus+ Menu, and choose
GUIDE Plus+Setup.
The GUIDE Plus+ System Setup
The GUIDE Plus+ system is an on-screen int_,ractive program guicle that lists
what shows are on TV in your area. In order to receive program listings, you
need to complete tile tbllowing steps.
The G-LINK cable must be connected to the back of your TV, and the wands
nlust be placed in front of the remote sensor on your cable box and/or VCR in
order tor tile G{IDE Plus+ system to work (go back to page 14 tor details).
1. YOu should see a screen displaying tile features of tile Guide Plus+ system.
Press OK to continue.
2. The next screen asks you to locate setup materials and hardware. Once you
have done this, press OK to continue.
16 Chapter f
Page 19

C@nnect @ns Setup
Step 1: Identifying Your TV's Location
1. It your country is highlighted, press OK on tile remote control,
If your country isn't highlighted, press the up or down arrow button on the
remote control to highlight your country and press OK.
2. [se tile number buttons on your remote to enter your zip code.
Press OK when you're finished,
Note: If your postal code contains letters, press the up and clown arrow buttons on
your remote to enter letters, and press the right arrow button to go to the next
space. The left arrow button moves you to the left.
Step 2: Configuring for Cable
The next series of screens asks you about your cable s_.tup. To supply your TV
........................................................................................................................................................................................................with tile correct TV program listings, the G{IDE Plus+ system needs to know if
your TV is connectud to cable.
1. If your TV is connected to cable, highlight Yes and press OK.
If your TV isn't connected to cable, highlight A%and press OK (STIJa3:
Co*{/_gz_Hngibra.. VCR appears), . Go to page 19.
2,
If you have a cable box cnnnected to this TV, highlight Yes and press OK on
your remote cnntroL
Note: The next seriesof screens is very important becausethe GUIDEPlus+system
must find the correct cable box information in order to receive the correct TV
program listings.
If you don't have a cable box conn_,cted to this T% highlight No and
press OK ($71J _:;: Co_d_4mqngjbr a VCR appears). Go to page 19.
np
If you're not sure which channel is the
cable box's output channel, consult the
book that came with your cable box or
contact your cable company
Chapter I 17
Page 20

C@nnect @ns Setu@
3_
Highlight file channel to which you have to tune your TV in order to see
cable programming, and press OK (a screen appears reminding you to
connect your G-LINK cable to your TV and cable box).
Notes: Channel 03 is the most common
Choose Videol/AUX if your cable box isconnected to your TV with audio/video
cables instead of a coaxial cable. Go to page 7 for pictures of these cables.
4. Highlight your brand of cable box, and press OK.
If your brand isn't listed, highlight NOt Listed and press OK.
5_
Make sure your cable box is on.
Tune tile cable box to channel 02 (use the remow control that came with
your cable box, or press tile channel buuons on tile cable box).
Press OK (tile G{IDE Plus+ system starts testing codes).
Important Note: When code testing isin progress, don't touch your TV,VfiR, cable
box or any of the remote controls for these products.
6_
Look at your cable box. If it is still on and changed to channel 09, tile test
was successl\_l. Highlight Yes, and press OK ($7t?P3: Cot_/l_4z_r/t_/4jbra VCR
appear._.
If your cable box didn't change to channel ()9 or turned itself off, you have
two choices: No and 7_._1tbi._ code c(gain.
7_._ttbL_code c(gain: If you think the TV, the cable box, or any of the remote
controls might have been touched or/)umped during tile test, highlight Test
tbi._ codt, c(gain and press OK (tile GUIDE Plus+ system runs the same set of
codes).
No: If you don't think the test *x.asinterrupted, highlight No and press OK
(G{ IDE Plus+ syswm tests tile next code).
Repeat tile previous instructions until the TV I]nds tile correct cable box
code. Follow the instructions on tile screen.
Note: If the TVcan'tfind your cableboxcode, a troubleshooting checklistappears.
Carefully revieweachchecklistandfollow the instructionsonthe screen.
18 Chapter I
Page 21

C@nnect @ns Setup
Step 3: Configuring for a VCR
1. If your TV is cnnnected to a VCR, press OK (a screen appears renfinding
you to connect your G-LINK cable to your TV and vCR).
If it is not, highlight NO and press OK.
2. [se tile up and down arrow buttons to highlight the brand of your VCR that
is connected to the TV and press OK.
It your brand isn't listed, highlight NOt Listed and press OK.
,
Tune your VCR lo channel 02. Next, turn OFF your VCR. When you
complet*, these steps, press OK to begin testing.
Important Note: When code testing isin progress, don't touch your TV, VCR,or
any of the remote controls for these products.
4,
Look at tile front of your VCR. If your VCR turned on automatically and
g •
changed to channel 09, the test _as successful. Highlight Yes and
press OK.
If your VCR didn't change to channel 09, you can either choose _\'bor Test
this code c(gain.
. . 7It you think your T'_ or remntes might have been tnuched during the test,
tune your VCR to channel 02, turn ott your VCR and highlight 78st this
code again.
If you don't think the test was interrupted, highlight A'O.Tune your _ CR to
channel 02 and turn oil your VCR. Press OK (tile GLIDE Plus+ system starts
testing another set ot codes.)
Keep Ik>llnwing the previous instructions until the VCR finds tile
correct cnde.
Chapter I 19
Page 22

C@nnect @ns Setu@
Leave your cable box turned ON to
download program information.
Leave your VCRturned OFF to record
programs.
Note: If the GUIDE Plus+ system can't locate the correct code for the VCR, a list of
troubleshooting instructions appears to help you before you try again.
Try VCR configuration again: repeat VCR setup.
Test alternate codes: tests selected brands and if this fails, the test continues
with all codes in the system.
Skip this step: the GUIDE Plus+ system won't be able to automatically schedule
programs to record on your VCR.
Step 4: Confirming Your Settings
l. Check to make sure all settings are complete and correct, If all seltings are
complete, highlight Yes, end s_,lJ_pand press OK. If your cable box and/or
VCR code testing l_iled, you should see INCOMPLETtJ where the cable
box and VCR codes are listed. Once setup is complete, additional
screens appear.
If any settings are incomplete or incorrect, highlight NO, r_'.l;eal se/z_pprocess
and press OK. Follow tile instructions on the screen.
2. YOu can choose to view a demo of the GI_IIT)EPlus+ l)atures, which may
take a l)w minutes to load. It you don't want to see the demo right now,
press OK to watch TV.
What to Expect
The next time you turn on your TV, the GUIDE Plus+ system will appear on tile screen. The
[k)llowing exalnples explain what you might see:
• If all of tile program inlk>rmation has been sent lo your TV, tile G{IDE Pins+ system appears
with all of your TV program listings.
• If the program inlk>rmation hasn't been sent to your TV yet, an outline of the Guide (without TV
program listings) will appear on the screen. Program inlk>rmation is usually sent lo your TV at
night.
• If the TV detecled lhat you have multiple cable companies in your area, S?tZP 5: Choo._in/_ YoJ_r
Channel Lineup appears.
Features of the GLIDE Plus+ system are explained in Chapter 3.
To clear the guide from your screen, press CLEAP,or G{IDE on tile remote control.
Next Steps
Now that you'_ e linished tile Interactive Setup, you're ready to watch TV. This might be a good time
to prograln your remote control. The remote control that came with this TV can be programmed to
operate other components. Go to tile next chapter to lind out how to program your remote.
20 Chapter
Page 23

2
Using the Remote Control
Chapter Overview:
• The Buttons on the Remote Control
• Programming the Remote to Operate Other Components
• How To Use the Remote After You've Programmed It
• Code List
Changing Entertainment.
Graphics co_tct#zed _itbi_z this publicatio_ ctre./_)r rej)re_e_ztcttio_z o_l_'. 21
Page 24

Using Re te C@ntr@!
L.E.D.
SgBLE
&&°&&
MUTE SKIP
SOUND GO BACK
GUIDE INFO
MENU CLEAR
,0 0'0
40,060
,0 80 90
WHOqNPUT ANTENNA
©°0 ©
REVERSE PLAY FORWARD
<3C>C>
REC'VCR+ STOP PAUSE
The Buttons on the Remote Control
0-9 (Number buttons) Enter channel num/)ers and time settings directly
through the remote control.
lb enter a two-digit channel, press the two digits, lb enter a three-digit channel,
press and hold the first digit 11)r two seconds until hvo dashes appear to the
right of tile number, then add the second two. Example: to rune lo channel 123,
press and hold 1 11)r two seconds, press 2, then press 3.
Arrow buttons (up, down, left, right) Move through the (m-screen menu
sysleln.
ANTENNA Functkms as TV/VCR button in VCt{ mnde and TV/receiver l)uttnn
in SAT, CABLE mode.
AUX (auxiliary) Puts the remote in auxiliary mode to operate tile component
you've programmed the remote to operate with this button. You can program
this buuon to conlrol a cable box, RCA audio components, a VCR or satellite
receiver. If you set tip the Auto Tuning I)ature (Chapter 3), pressing the AI_X
button automatically tunes tile TV to tile correct channel.
CH (up and down) buttons Scan up or down through the current channel list.
Press once to change the channel up or down; press and hold to continue
changing channels.
CLEAR Removes any menu or display t}om the screen and returns you to
TV viewing.
DVD Puts the remote in DVD mode. If you set up the Auto Tuning I)ature
(Chapter 3), pressing tile DVD button automatically tunes the TV to the
correct channel.
FORWARD If you're operating a VCR or DVD player with the remote control,
press FORWARD to advance a videotape or disc.
GO BACK Returns you to the previous channel.
" _ press G{IDE again to remove it fromGUIDE Disphlys the G{IDE t It s+ system;
the screen.
INFO Displays channel information.
L.E.D. (light-emitting diode) The little light on the remote fllat lights when you
are programming the remote. It also lights when you press a valid bulton on
the remote.
MENU Displays the TV's Main menu. You can also press and hold for 2
seconds to display the GUIDE Plus+ system.
MUTE Lowers tile volume to its minilnum level. Press again to restore vnlulne.
OK When a nlenu is on tile screen, press OK to select tile item that is
highlighted.
ON.OFF Turns tile TV on and off. When the remote is in another mode (VCt{,
DVD, Satellite, etc.) and the remote is progralnmed to operate that component,
you can press ON-OFF to turn the component on and ott.
22
Page 25

Re te C@ntr@!
rip
To turn off alt the RCA,
GE,and Proscan
components that are
connected to the TV,
press ON.OFF twice
within two seconds,
This feature only works
with most RCA,GEand
Proscanproducts.
PAUSE If you're operating a VCR or DVD player with tile remote control, press PAUSE when tile
videotape or disc is playing to pause playback.
PLAY If youre operating a VCR or DVD player, plays tile videotape or disc.
REC°VCR+ When the GUIDE Plus+ program guide is on the screen, press REC°VCR+ to program
your VCR to record a program. If the remote is in VCR mode, press REC°VCR+ to start recording.
REVERSE If you're operating a VCR or DVD player with the remote control, press REVERSE to go
backwards on a videotape or disc.
SAT°CABLE Puts the remote in SAT-CABLE mode. If you set Lip tl_e Auto Tuning l_ature (Chapter
3), pressing tile SAT°CABLE buuon automatically tunes tile TV to tile correct channel.
SKIP If you press this buuon bel_)re you change the channel, the TV waits 30 seconds and
automatically goes back to lhe original channel. Each time you press SKIP, you add 30 seconds (i.e, if
you press SKIP two times belk)re you change/he channel, the TV waits 60 seconds and automatically
turns back to the original channel). Press CLEAR to cancel skip timer.
SOUND Displays the AU1)IO PROCESSOR menu.
STOP If you're operating a VCR or DVD player, stops playing the videotape or disc.
TV Turns on tile TV and puts the remote in TV mode. Also displays channel inlk)rmation.
VCR1 Puts the remote in VCR mode. If you set Lip the Auto Tuning l_.ature (Chapter 3), pressing tile
VCR1 button aulomatically tunes the TV to the correct channel.
VCR2 Puts the remote in VCR mode. If you set Lip the Auto Tuning l_.ature (Chapter 3), pressing tile
VCR2 button aulomatically tunes the TV to the correct channel.
VOL (up and down) buttons Decrease or increase the TV's v<)lume.
WHO°INPUT In TV mode, press WHO-INPt T to toggle through the available Video Input channels
(FRNT, VID1iSVID1, VID2iCVID2, and tile current channel). In SAT mode, press to select available
channel lists.
Using the WHO-INPUT Button
[se file WHO°INPUT bHlton to toggle through the availabh, input sources (FRNT, VI1)liSVII)I, VII)2/
CVID2, and the current channel) and view the content from the component you have connecled to
tile TV.
1. Press TV to place tile remote in TV mode. Make sure that the content from tile component is
turned ON.
2. Press WHO-INPI_T to tune to lhe available input source and view lhe component.
3. Press WHO°INPI_ T again to tune back to the channel you were previously walching.
Chapter 2 23
Page 26

Using Re te C@ntr@!
©
CKAR
You'll use these buttons when you
program the remote to operate another
component.
The remote may not operate all models
of all brands.
rip
Tostop the automatic code search without
programming any components, press and hold
CLEARuntil the light on the remote turns off.
Programming the Remote to Operate
Other Components
The universal relnolc control can be programmed to operate most brands of
remote controllable VCRs, RCA audio receivers, satellite receivers and cable
boxes. "llle remote is already programmed to operate most RCA, GE and
Proscan VCRs, DVD players, audio receivers and satellite receivers.
Note: The TV and DVD buttons cannot be programmed
Find Out If You Need to Program the Remote
To dewrnlin_, whether th{, universal r{,lnote needs to be progranlnled, turn a
component ON, such as a VCR, point tile remote at the VCR, and press the VCR
button. Then press ON* OFF or channel up or channel down to see if tile VCR
responds to the relnote COmlnands. If not, the relnote needs to be progranlm{,d.
How to Program the Remote
"fh_,r{, are two ways to program tile renlot_, controh autonl_ltic cod{' search and
direct entry. Instructions fbr both ways fkfllow.
Using Automatic Code Search
1. Turn on tile component you want the remote to operate (VCR, etc.)
2,
Press and hold file component button on tile remote control that
corresponds to tile component you want the remote to operate (VCR1, etc.).
While you hold down tile component buuon, press and hold ON*OFF
(when the light on the remote turns on, release both buttons).
3. Press PLAY (tile light on the remote, located below the ON-OFF button,
starts flashing).
The remolc is searching tile first set of component codes (there are 20 sets
of codes). If the component you want to operate doesn't turn off
automatically after 5 seconds, press PLAY again (the light starls flashing
again as tile remote searches through file next set of codes).
4,
Continue pressing PLAY until the component turns off.
Note: If the component doesn't turn off after you've pressedthe PLAYbutton 20
times, the component can't be programmed,
Press REVEP, SE, wait 2 seconds. Repeat this step until tile component turns
back on.
)
5. To finish, press and hold the STOt button until the light on the remote
turns off.
24
Page 27

Re ote C@ntr@!
Using Direct Entry
k Turn on fl_e component you want the remote lo operate_
2. Look up the brand and code number(s) for the component on the code list on page 26.
3. Press and hold the component button that corresponds lo the component you want tile
remow to operaw (VCR1, etc.)
4. Enter the code from file code list.
5. Release the component buuon.
6. Press ON*OFF to see if the component responds to the remow commands. If it doesn't, try
pressing tile component bunon and then ON*OFF again.
7. If you get no response, repeat these steps using tile next code listed for your brand until tile
component responds to tile remote commands.
rip
The buttons might
operate differently for
other components,
especially when you're
using another
component's menu
system.
How to Use the Remote After You've
Programmed It
Once the remole has been programmed successl\llly, you are ready to use it lo control your
components. To operaw the component:
1. Press the component bullon (TV, VCR1, VCR2, DVD, A[X, or SAT*CABLE) R> set tile remote to
operate the component.
2. Press ON-OFF to turn tile component ON or OFF.
3. [se tile remote buuons that apply to that component.
Note: If you keep pressing buttons and nothing happens, the remote is probably in the wrong mode. You
must pressthe component button that matches the component you want to operate (i.e, if you want to
operate the VCR, pressVCR1on the remote control to put the remote in VCRmode)
Chapter 2 25
Page 28

Using Re te C@ntr@!
Remote Codes
VCR
Admiral ..................................................................... 213[
Adventura .................................................. 202h
Aiko .................................................................... 2027
Aiwa .......................................................... 2{)(}2, 2026
Akai ......... 2()03, 200t, 2(}05, 20(}7, 2008, 2I 11,21 ] 2, 2[ i3
American High ...................................................... 202¸[
Asha .............................................................. 2013
Audio Dynamics .................................... 20(}9_ 201(}
Audkwox ....................................................... 2014
BeIl& ttowe]J ................................................. 201 [
Beaum_trk ............................................................ 2{)13
Broksonic .......................................... 2{)12, 2025
CalJx ................................................................... 2014
Candle .......... 2013, 2014, 2(}I5, 2(}[6, 2017, 2018_ 2019
Canon ..................................................... 2(}21, 2022, 2114
Capebart ........................................... 2020, 2110
Cal_ er ....................................................... 2062
CCE .......................................................... 2027, 2061
Citizen 2013, 2(}I4, 2(}[5, 2016. 20IV, 2018,2019,202v
Montgome W Ward .................................... 2075, 2131
Motoroh ........................................................ 202¸1.2131
M]_ ............................................... 20(}2, 2013. 2(¸)26
Muhitech ..................... 2(1{)2,2(}[3, 2016, 2026_ 2053, 2061
NEC ................................. 2(}09, 2010, 2011, 2()I6. 2(}I8,
....................... 24}58. 2064, 2076, 2078, 2{)79, 2Ill, 2[23
Nikko ............................................................. 2011
Nob]ex ............................................................. 2013
Olympus ................................................................... 2{)21
Optimus ..................................................... 2014. 2131
Optonlca ......................................................... 209(,
Orion ................................................................... 2035
Panasonic .................. 2021, 2022, 2109, 2125, 2126, 2[27
Pentax ................................ 2016, 2055, 2{)56, 2[0 v. 2120
Pentex Research ....................................................... 2018
Phlko .................................... 202I, 2022, 2062, 21)63
Philips ............................................ 202I, 2062, 2096. 2124
Pilot .................................................................... 2{)14
Pioneei ................................ 20[0, 2055, 2080. 2081, 2123
Portland ............................... 2016, 2017, 2019, 2114)
Proscan ..................................................... 2000, 2001
Protec ..................................................................... 2061
Pulsar ............................................................ 2[04
()uartei ................................................................. 2011
Quartz ................................................................. 2011
Quasar .................................................. 202L 2022. 2[25
Colo*twne ..................................................... 2009 RC'_ .............................. 2000, 200L 2003, 2013, 2021,
Coil 7................................................................... 2{)61 ................ 2055, 2056, 2082, 2083, 2084.2{)85, 2086.208_,
C_Mg ................................... 20[3, 20[4, 2023, 2{X}1
Curtis Mathes .......................... 2000, 2(}02, 2(}09, 2013_
............................ 2016, 2018, 202I, 2022, 2024, 2115
Cybemex ............................................................ 2013
I)aex_/o 2015, 20I 7, 20[9,2025, 2026, 2027, 2028. 2110
Dayu*m ........................................................ 2110
I)b_ ........................................................... 2009, 2010
Dimensia ........................................................... 2000
I)ynatech ........................................... 2002, 21)26
Electr/)home ........................................... 2014, 2{)29
Electrophonic ...................................................... 20t4
Emeison .......................................... 2002, 2{)12.2{)14.
............. 2015, 202I, 2024, 2025,2026,2029, 2030, 2032,
2033, 2034, 2035, 2036, 24)37, 2038, 2039, 2040, 20il,
2042, 2044, 20i5, 20t7, 2065, 214}5, 2113, 2116, 2117.
2134)
t ishel 20I 1, 2023, 2048, 2049, 2050, 24}51, 2052,2[ i8
tuji .................................................................... 202[, 2119
tunai ................................................. 2002, 2026
Gana_d ........................................................... 2026
GE ........... 2000, 2001, 2013, 2021, 2022, 2053, 2115. 2[20
Golds[ Er........................ 2009, 2014, 2018, 2054, 2121
Gmdiente ........................................................ 202(_
HaHey Davldson ............................................ 2026
Halman Kmdon .......................................... 2009
H Erwood ..................................................... 2{X_[
Headqum tel ....................................................... 201[
ttitachi 2002. 2055, 2056, 2057, 2107, 2I 1I, 2120, 2122
HI Q ................................................................... 2023
Instant Replay .................................................... 21)21
](L ................................................................. 202[
]( Penney ............... 2009, 20[0, 20[i, 2013, 2{)14. 2021.
.............. 2022, 2{)55, 24156, 2058, 2059, 20641, 2107, 2118
]ensen ................................................... 2055, 2056, 211 [
yvC ................ 2009, 2010, 2011, 20[8, 2058, 211[, 2123
Kenx_ood 2009, 2010, 20[ I, 2016, 2018. 2058. 2[ 11,2[23
KLH .................................................................... 2061
Kodak .................................................... 2014, 2{)21
Llo)d .......................................................... 2002, 21)26
Logik .......................................................... 206[
LX[ .................................................................... 201 _,
Magnavox ...... 202I, 2022, 24162, 204_3, 2104, 2108, 2124
Magnin ............................................................. 2013
Mamntz .......................................... 2009, 2010, 2{)11,
................................ 2016, 2018, 202I, 2058, 2{X_2,2{K_4
Malta .............................................................. 2014
Masushita ................................................... 21)2[
MEI ....................................................................... 202[
Memorex ................................................ 2002, 201L
.................. 2013, 2{)14. 2(}21, 2023, 2026, 2104, 2131
MGA .................................................... 2029, 2065, 2113
MGN Technok/gy .............................................. 2013
MidJand .......................................................... 2053
Minoha ................................................. 2055, 2056, 2107
Mitsublshi .... 21)29, 2055, 2(156, 20(_5, 2066, 2067, 20(¢),
........... 2070, 2071, 24172, 2073, 2074, 21()4_,2I 13, 2I 23
................ 2088, 2089, 2090, 209I, 2107, 2115, 2120, 2[25
Radloshad<il_ealistlc ................... 2002, 201I, 2013, 21)14
..... 202I, 2022, 2023, 2026, 2029, 2049, 2050, 2096, 2131
R_tdix ............................................................. 2014
Rm_de_ .......................................................................... 2014
R_coh .............................................................. 2128
Rtnco ................................................................... 2104
Samstmg ................... 2005, 2013, 2015, 2033, 2053, 2112
Sanky ....................................................... 213L 2104
Sans tl ......................................... 20 t0, 2092, 211 L 2123
Sanyo .............................................. 201L 21)13, 2023
Scott 2012, 2015, 2025, 2032, 2035, 2038, 21)65, 24193, 2116
Seres ............................. 20[ I, 2014, 2{)21. 2023, 2048,
..................... 2(149, 2050, 205I, 2055, 21)56, 2[0 _, 21 [8
Sharp ................. 2002, 2017, 2029, 2094, 21)95, 24)96, 213i
Shinlom .............................. 2004, 2056, 2(X_I, 2098
Shogun ................................................................... 2013
Sign tmre ............................................... 2002, 2131
Singer .................................................. 202L 2(KH. 2[28
Sony ......................... 2002, 2004, 2098, 2099, 2119, 212g
b'[}4............................................................ 202[, 2107
b)l_mia 2002, 2021, 2022, 2026, 2062, 2063, 2(X_5. 2[24
b) mphonic ........................................................ 2002, 2026
land> .................................................. 2002, 2011
lhshlko ...................................................................... 2014
lhtkmg ..................................................... 2058, 2111
IEA( .................................... 2002, 2026, 2{)58, 2085, 2111
lechnics ................................................. 202L 2109
It'knlka ........................ 2002, 20[4, 202I, 2026, 2100. 2[29
IMK ............................................... 2013, 2024, 2047
Ik/shlba ............. 24115, 2049, 205I, 2055, 2065. 24)93, 2116
Ik)teVision ............................................... 2013, 2014
Unltech .................................................................... 2013
\ectol Resemch ........................ 2009, 2010, 2015, 2{)16
Victor ..................................................................... 2010
Video ( ()ncepts .................. 20(}9, 2()1(}, 2015. 24116, 21 [3
Videosonic ............................................................ 2013
\'_4_rds............. 2002. 2013, 20[4, 2015, 202[, 2023, 2026,
2029, 2{)55, 2056, 204_I, 2096, 210I, 2102, 2[03, 2[{)7,
2116, 2131
XR 1000 .......................................... 202L 21)26. 2061
Yamaha ......................... 2009, 20[0, 201 i, 2018, 21)58. 2[ 11
Zenith ............................ 2004, 2098, 2104, 2119, 2128
Cable Boxes
AB( ................ 5002, 50(}3, 5004, 5005, 5006, 500 v, 5053
Antron_x ................................................. 5{)(}8,5009
Archer .................................... 5(}08, 5{)(19,5{)1(I, 5011
Cabletenna ................................................................. 5{){)8
Cableview .................................................... 5008
Century ................................................................... 5011
Citizen .................................................................. 5011
Cok)ur _ice ........................................... 5{)12, 5013
ComIEonlcs .......................................................... 5{)14, 5015
Contec ........................................................... 5(116
East{'ln ........................................................ 5{)17
Garrard ................................................................. 5011
GC Elecu_/nlcs .................................................... 5009
(;emini ............................................. 5018, 5019, 5049
General Instrument ............................................... 5003
]_amlin ................................ 5(}20, 5{)2I, 5022, 5(135, 5(}45
]_i[achl ............................................................ 5003
]_y_x ............................................................... 5002
Jasco .............................................................. 5011
Jer_fld 5003, 5(}(15, 5(}(17,5(}[8, 5{)23, 5024, 5(146. 5053
Magnaw_x ............................................................. 5025
Memorex ...................................................... 5026
Movie lime ...................................... 5{){)2,5{)27, 502g
NSC ........................................................ 5{)(}2, 5027. 5028
Oak .............................................. 5002,5016, 5(}29
]?anasonic ..................................................... 5(148, 5(}52
Paragon .......................................................... 5026
]?hflips ............................... 5(}[i, 5012_ 5013, 5019,
5025, 5030, 5(131, 5(132
PkmeeJ ........................................................... 5(133, 5034
P tlsa_ ........................................................ 5026
RCA ................................................. 5047, 50i9, 5052
Realistic ................................................ 5009, 5049
Regtl ............................................................ 5(}22, 5035
Regency ..................................................... 50IV
RembnmdI ...................................................... 5003
Runco .................................................................. 5026
Samstmg ............................................... 5014, 503i
Scientilic AtlanH ...................... 5004_, 5036, 503_, 503g
Signal .......................................................... 5014. 5018
Signatm e .................................................... 5003
SI Maix .................................................................. 5014
Spmcer .......................................................... 5052
Stmconl .............................................. 5007, 5{)18, 5053
Stm g._te ............................................... 5014. 5018
Stm quest ...................................................... 50Ig
hndy ............................................................... 5040
lelexiex ...................................................... 50Ii
Ixom .......................................... 5004, 5023, 5041
I )shlba .............................................................. 5026
I/sa ............................................................ 5018
IY86 ............................................................................ 51)2v
lnlkt ........................................... 5008, 5009, 5011
I nited Altists ....................................................... 5002
I nited Cable ................................................ 5053
I nlve_sal .............................. 5008, 5009, 5010, 5011
Videow ty ............................................................ 5044
Viex_sta_ ................................ 5015, 5025. 502v. 5040
Zenith ......................................... 5026, 5050, 5(}51
Satellite Receivers
Chapparal ..................................................... 5056. 505 v
Drake ..................................................... 5(158. 5059
GE .................................................................. 500(}
(;eneml Instruments ....................... 5{)6(I, 5061, 5(162
]?anasonlc ................................................................... 5075
]?_mesmr •................................................... 50v6
]?roscan ............................................................... 5000
RCA ................................................................... 5000
Realistic .......................................................... 5063
Sony .................................................................... 50v2
STS1 .................................................................... 5064
STS2 ..................................................................... 5065
STS3 .................................................................. 5066
STS4 ..................................................................... 506v
_bshlba ...................................................... 5068
I_)shiba ..................................................................... 50v3
Unlden ...................................................... 5069
Audio
(For RCA and Dimensia brands only)
AMiFM ............................................................ 4(}{)3
Aux ............................................................ 400i
Phono ......................................................................... 4005
CD ............................................................ 400 v
l_pe ............................................................ ¸4006
26
Page 29

3
Using the TV's Features
Chapter Overview:
• About the GUIDE Plus+ System
• The Channel Banner
• Auto Tuning
• Parental Controls and V-Chip
Changing
Graphics contained _zqtbin this pz_blicatio_ are./_)r r_])resent_tio_ on/F. 27
Page 30

Using %% Featu s
Video Action Program Menu
window buttons information options
Promotional Channel
information listings
About the GUIDE Plus+ System
The GUIDE Plus+ system is an interactive on-screen program guide that lists TV
schedules tk>r your area and allows your TV direct control of a cable box and/or
VCR. You nmst first set up the GUIDE Plus+ Menu system in order to view this
on-screen program guide (see Chapwr 1 tk>r details). Press GUIDE to bring up
the G{IDE Plus+ sysl_,m.
There are six sections of tile GUIDE Plus+ system:
• Video window
• A row of Action buttons at the top of the screen (1, 2 and 3)
• Program inl_)rmation
• A row of menu options (Grid, 5brt; New._; Scb#dzd_,, 3Ses.s'c(ge._;Promotions,
Channel._, Setup)
• Promotional inl_)rmation
• Channel listings
Note: The GUIDEPlus+systemscreens illustrated in this book are representations
of what you are likely to see. Not all channels, programs, and GUIDEPlus+
information depicted will be available inyour area.
New features and options can be downloaded to the GUIDE Plus+system,sothese
too are subject to change.
np
Since the program information provided by the
GUIDE Plus+system is based on your locale, you wilt
need to run Setup again if you move to a different
zip orpostat code.
Downloading Data
The GUIDE Plus+ system is not available until it completes its first download of
program listings. When the power is turned off, tile TV locates a 'host channel"
that carries GUIDE Plus+ system data containing program schedule and channel
lineup inlkmnation. A channel lineup is tile list of stations and their respective
channels.
"R>ensure that your first download of data is complete, you should leave your
TV off overnight. Downloads occur several times a day. The TV must be turned
off lk)r GUIDE Plus+ system data to download.
If the TV loses power or is unplugged, GUIDE Plus+ system program listings
may be lost, When power is restored, make sure tile setup inlbrmation is still
correct. The GLIDE Plus+ system will recefve updal_,d program inlkmnation
during tile next scheduled download.
Channel Lineup
If more titan one cable company services your area, you may be prompted with
STEP 5: Cboosin<,_Yoz_rChannel Line*_p at:t_,r tile first GLIDE Plus+ system
download, You will need to identil} your cable company by selecting the
correct channel numbers tk)r the stations in question.
• Use the up and down arrow buttons to change file channel group and
press OK when tile correct channel group is highlighwd.
28
Page 31

Using
&&°& &
o_o
GUIDE _ _....
OK--
CLEAR
'_
PressGUIDE on the remote control to see
the GUIDE Plus+ system. To remove the
program guide from the screen, press
OK, GUIDE, or CLEAR.
Getting In & Out of the GUIDE Plus+ System
_) enter lhe GUIDE Plus+ system:
• Press GUIDE on tile remote.
• Press and hold MENU lk)r 2 seconds on tile t)ront panel.
To exit the GLIDE Plus+ system:
• Highlight a program and press OK to exit the G[IDE Plus+ system and rune
to lhe channel.
• Press GLIDE lo exit tile GUIDE Plus+ system and tune to the channel
displayed in tile video window.
• Press CLEAR lo exit tile GUIDE Plus+ system and return to the original
channel.
The GUIDE Plus+ System Menus
The GUIDE Plus+ system o_rs eight di_rent options on tile Menu bar: Gr_l,
S(_rt,News, _Sk.bedzd_,,Messa_,4es,Promotions, Cbannel._ and 5"_,tJq).To access the
Menu bar:
1. Press GUIDE to access tlle GUIDE Plus+ system.
2. Press MENU or use lhe up and down arrow buttons lo select the Menu bar
(the Grid Guide appears by defhul0.
3. [se fl_e left and right arrow butlons to access other menus.
4. Press OK, or MENU, or use the down arrow button to see tile menu options.
Grid Guide
The Grid Guide appears each time you enter the GUIDE Plus+ system. It
displays tile current programming ti>r each channel. The current program is
displayed in tile video window.
• Press tile up and down arrow buttons on tile ren]oI{, to browse channel
listings and tile channel up and down buuons to page through the listings.
[se tile right and left arrow butR)ns R) browse l\_tL_re program listings.
"lb tune to a channel, highlight tile program you want to view in the
channel listing and press OK. Press CLEAR to exit tile GUIDE Plus+ system
and return to tile original channel. Press GUIDE to exit tile GUIDE Plus+
sysl_.m and rune to tile channel in the video window.
Then use tile Grid Guide Action Butlons as described next.
29
Page 32

Using %% Featu s
Grid guide Grid guide
menu action buttons
selection
Grid Guide Action Buttons
Action buttons will change according _ where you are in the GUIDE Plus+
system. Be sure to look at the action bar bel_re pressing the
command numbers.
When highlighting the program, the t_)llowing Action buttons appear:
Watch Press 1 on the remolc to place a timer in the Schedule lk)r the TV to
turn on and tune to the program highlighted in the channel listing. When
the TV turns on, the GUIDE Plus+ system will automatically appear with the
scheduled program highlighted and tuned in lhe video window.
Go To Press 2 on the remote to bring up the direct dial box and enter the
number of the channel you want. Press OK to highlight lhe channel and
current program in the channel listing of the Grid guide. Press OK again to
tune to the highlighwd channel. If the video window is unlocked, it will
automatically tune lo the channel.
• Record Press 3 on the remote to place a timer in the Schedule tk_rthe VCR
to record the program highlighted in the channel listing.
If you have a cable box, changing channels on the TV will not cause the
cable box channel to change while recording.
Record will only appear if you have set up the GLIDE Plus+ system and
specified your VCR lype.
The program information window will display a confirmation when you have
successl\_lly scheduled a program to watch or record.
Note: If you have selected two programs to watch or record which begin at the
same time or overlap, you will receive a timer conflict message. You must choose
between the two programs.
When highlighting the Channel names (the leli column on the channel listing),
the tk>llowing Action buuons appear:
• Lock/Unlock Press 1 to lock or unlock the video window to eid_er stay at
one channel as you browse the GUIDE Plus+ system (lock) or change as
you browse through dit'l)rent channels (unlock).
Go To Press 2 on the remote to bring up the direct dial box and enter the
number of the channel you want. Press OK lo highlight the channel and
current program in the channel listing of the Grid Guide. If the video
window is locked, press OK to tune to the highlighted channel. If the video
window is unlocked, it will automatically tune to that channel.
3O
Page 33

Using
Sort IT_enu
selection
Categories
Sort
The Sort menu lets you browse programs by category. The channel to which
you are currently tuned is displayed in tile vide() window.
To Sort:
1. If tile GLIDE Plus+ system isn't on your screen, press GUIDE on your
remote control.
2. Press MENU on the remote to select the Menu bar.
3. tse the arrows to highlight 5"or/. When Sort is highlighted t_)r the first time,
the Movies category is displayed. Thereafter, the last category used becomes
the detault. A listing of subcategories is displayed below the category name.
tse the left and right arrows to highlight other categories.
4. [se tile up and down arrow buttons to highlight a subcategory. For
example, highlight All and press OK (the GUIDE Phls+ system sorts
the programs).
5. Press the up and down arrow buttons to review the list one program at a
time. Press the channel up and down to review the list one page at a time.
6. Select MEN[ to return to tile menu bar, or press GUIDE or CLEAR to exit
tile GLIDE Plus+ system.
Then use the Sort Menu Action Buuons as described next.
Sort Menu Action Buttons
When viewing the results of a Sort, the t_)llowing Action buttons app_.ar:
• Watch Press 1 on the remote to place a timer in the Schedule, and then
t_)llow the on-line help l_)r lhrther options. Placing a timer in the Schedule
will cause the TV to turn on and tune to the program highlighted in the
Channel listing at the predetermined time.
• Record Press 3 on tile remote to set the VCR to record tile program
highlighled in the channel listing. If you have a cable box, changing TV
channels will not cause tile cable box channel to change while recording.
The program inlkmnation window will display a confirmation when you have
successl\dly scheduled a program to watch or record.
Notes: If you have selected two programs to watch or record which begin at the
same time or overlap, you will receive a timer conflict message. You must choose
between the two programs.
Be sure that during the GUIDE Plus+ system setup you specified that you have a
VCR.
31
Page 34

Using %% Featu s
News menu
selection
News
"l'h_" N6_ll:S n_,nu lets you browse current news stori_,s by headline,
1. If the G[ I1)E Plus+ system isnt on your screen, press GUIDE on your
remote control.
2. Press MENU on the remote conrail to select the menu bar.
3. tse the arrows to highlight News (if MSNBC is available on your TV, it will
appear in the video window).
4. tse the up and down arrows lo highlight a story.
• tse lhe up and down arrows to browse the list one story at a time.
• tse the channel up and down lo browse through the list one page at
a linle.
5. Press lhe right arrow button to see 1\_I1text.
6. If there are multiple pages of text, press the right or lel:t arrow button to
page R>rward or back through the pages of text. Press the down arrow to
view the next sR>ry.
7. Select MEN[ R>return to the Menu bar, or press GUIDE or CLEAR on the
remote to exit the GUIDE Plus+ system.
Schedule menu
action buttons
Schedule menu
selection
Schedule
The Scbedzde menu allows you to ah_.r timers lk>reither viewing or recording
programs. The GUIDE Plus+ system allows one-touch VCR recording if you
have connected the G-LINK cable to your VCR. See Chapter 1 lk_rmore details
on connecting the G-LINK cable.
To schedule a program to walch or record:
1. If the GLIDE Plus+ system isn't on your screen, press GUIDE on your
renlote control.
2. Press MEN{) on the remote to select the Menu bar.
3. Highlight a program within the Channel listing.
4. Select Watch or Record t_om the Action buttons bar. The timer is then
autonmtically logged into the Schedzde menu.
5. If you select Record, make sure to place a blank tape in the VCR and mrn
it off.
Note: If you have a cable box connected to your TV and VCR,tune your VCRto the
cable box output channel prior to turning off the VCR.
The program inlbrmation window will display a confirmation when you have
successl\_lly scheduled a program to watch or record,
Note: If you have selected two programs to watch or record which begin at the
sametime or overlap, you will receive a timer conflict message.You must choose
between the two programs.
32
Page 35

Using
TO remove or change the t}equency (daily, once, or weekly) ota scheduled
event, access tile Sch(,daI(, in('nLl fronl tile Menkl bar.
1. Press GUIDE to bring up tile GUIDE Plus+ system.
2. Press MENU on tile remole to select tile Menu bar.
3. Lse tile arrows to highlight the J;ch#dJd(_ menu selection.
4. [se lhe up and down arrows to highlight the program you want to edit.
Then use tile Schedule Menu Action F3uttnns as described next.
Schedule Menu Action Buttons
When viewing lhe Schedale menu lhe following Action buttons appear:
• Remove Highlight the Watch or Record timer you wish to remove f_com
the schedule and press 1 on the remote.
• Change Highlight tile Watch or Record timer you wish to change and
press 3 on the remote to toggle the f_equency between the tnllnwing
choices:
DAILY records tile same prograln each day Monday through Friday.
ONCtZ records only on that clay.
WEHKLY records the program each week at the same time.
Messages menu
selection
GUIDE PMS÷ tD Number
Messages
Occasionally you will receive messages regarding your GUIDE Plus+ system, as
well as special programming intkmnation. You can access these messages f_om
the Messages nlentl on the Menu bar.
"lb read messages:
1. If the GUIDE Plus+ system isn't on your screen, press G[IDE on your
remote control.
2. Press MENU on tile remote to select the Menu bar.
g •
3. [se the arro_s to highlight the M_ssa_,d_smenu selection.
4. Highlight the message you want to read by using the up and
down arrow butt(ms.
5. Press INFO to display tile full text of tile message. If tile text continues
beyond the screen, press INFO to view the next page of text. Once you
have reached the end of tile message, press INFO to close the expanded
infnrnlatinn and return tothe M_,ssa_,g_,sscreen.
Then use the Messages Menu Action Button as described next.
Messages Menu Action Button
When viewing the Jl(,x_ages menu the tkJlowing Action button appears:
• Remove Highlight the message you want to delete and press 1 on
the remote.
33
Page 36

Using %% Featu s
Channels menu Channels menu
action buttons selection
\
Channels
You can customize the channel listing by enabling or disabling the display of
certain channels. For instance, you may disable channels that you never wawh.
You can restore disabled channels at a later point in time.
1. If tile GLIDE Plus+ system isn't on your screen, press GUIDE on your
remote control.
2. Press MENU to select tile Menu bar.
3. Use file right and let_ arrows to highlight the Cha_el._ menu selection.
4. tse lhe up and down arrows to select a channel.
Then use the Channels Menu Action Buttons as described nexl.
Channels Menu Action Buttons
While browsing the, Cbct_u,l._ menu, the t_llowing Action butlons appear:
• Cancel Press 1 on the remote to cancel any changes you made since
entering the Cbannet._ Menu.
• Change Press 2 on the remow to change the channel number tk>rtile
highlighled channel line.
• On/Off Press 3 on the remote to toggle tile state of the channel between
0_ and Q/j/;
Setup
The St,tup nlenu allows you to access the GUIDE Plus+ system S(_ttlp inl_)rmation. To access tile
Setup option:
1. If tile GI_IDE Plus+ system isn't on your screen, press GUIDE on your remote control.
2. Press MENU to select file Menu Bar.
3. tse the right arrow to highlight lhe &k,tJ¢pmenu selection.
4. tse the tip and down arrows to select Change ._F.s'tt,m settit_gs, Rez,ic*woptions, or
V-iew dPmo.
• Change system settings Confirms the settings you c( mpleted in tile GDIDE Plus+
syslem setup are correct.
• Review options Displays the GUIDE Plus+ system auto display options.
On Automatically displays tile G{IDE Plus+ system when you press the ON*OFF
bullon on the remote control.
Off Disables the GUIDE Plus+ system Dora being displayed when you press tile
ON* OFF button on the remote control.
• View demo Runs lhe G{IDE Plus+ system demonstraliol_
Note: If you have not completed your GUIDE Plus+ system setup, these options will not be available. A
screen will prompt you to complete your setup.
34
Page 37

Using
Promotional information
How to Get More Information About an
Advertisement or a Program
"lb find out more inl_rmation about a program, advertisement or special, use
the left arrow button to highlight the channel listing or promotional
inl_rmation box.
Requesting more intk>rmation about a particular show displays tile PlusCode
programming number and the S]0oz_a on Next ff>r that channel.
Press tile INFO butlon to exit tile expanded inlk)rmation screen.
Promotions
The PromoHons menu displays a list of all the promotions available through the
GUIDE Plus+ system. Highlight the Promotions menu and then use lhe down
arrow lo scroll through tile list. When tile promotion you want to view is
highlighled, press INFO (file promotional inlk)rmation appears on-screen). Press
tile right arrow to return to tile Promotions list.
GUIDE Plus+ Menu Items
The GUIDE Phts+ MenJi gives you access lo ll,atures in the GUIDE Plus+ system.
"lb access tile Gt_7I)E Pills+ illt, nl_:
1. Press MEN[ on the remote.
2. Highlight GLT1)t':Ph*s+ iIlenzt and press OK.
Each inenu and the suI)-nlenus are listed below:
GUIDE Plus+ Setup Displays STIZP4: Co_db'ming Yoz_r_Sk,ttings screen of tile
GUIDE Plus+ system setup.
Ye& everythlug is correct Confirms tile sellings you completed in the
GUIDE Plus+ system setup are correct.
Ye& but my channel lineup is luco_'rect Displays SIG'Z!_5: Cboo._ing Your
Cbannet Linel_p screen, allowing you to change your lineup if it is incorrect.
No, repeat setup process Begins the GUIDE Plus+ system setup.
GUIDE Plus+ Label Displays the GLIDE Plus+ label menu.
On Displays the station name when you change channels.
Off The station name isn't displayed when you change channels.
ContinuousDemo Runs tile GLIDE Plus+ system demonstration until it is
turned off. To turn <)ITtile demonstration you must turn off tile TV.
Note:If youhavenot completed your GUIDEPlus+system setup, these options will
not beavailable.A screenwill prompt youto complete your setup.
35
Page 38

Using %% Featu s
Sample displays on a Channel Banner.
ChannelBanner
There are several indicators fllat might appear when you press tile TV or INFO
bull<ms on the remote. This display is called the Channel Banner. The lkfllowing
list describes the items on the Channel Banner screen (left. to right and top to
bouom).
12:01 Disphtys the current time.
The lock is displayed to indicate when tile Parental Controls
are locked or unlocked.
[]
Displayed when Closed Captioning is available on tile
current channel.
ESPN
6O
ti'] l
Displays the label assigned to tile current channel.
Displays the current channel or input channel.
Mul_. is displayed when you mtm. the audio.
Stereo is displayed when the current channel is broadcasting
in Sl_.reo.
SAP
00:00
Disphtyed when the current channel is broadcasting SAP
(Second Audio Program) inlk>rmation.
Displayed when the Sleep Timer has been set.
Displayed to count down time lefl on tile commercial skip
(SKIP) timer.
With the auto tuning feature, you can set
up the TV to tune to the channel you
need to watch by pressing that
components button.
Why You Should Use the Auto
Tuning Feature
The auto-tuning l_ature automatically tunes the TV to the correct channel t_>r
dit]_*n.nt conlponents you have connected to your TV (like a VCR, DVD Player,
etc.) When you set up auto tuning in the menu system you don't have to
remember to change your TV lo channel 3, tk>rexample, when you want to
watch the tape in your VCR.
How to Set Up the Auto Tuning Feature
Th(' \ray you set Lip the auto tuning l_atnre in the TVs Ini'ntl corn*sponds to
the component buttons on tile ren]ot_, and the way you have each componi, nt
connected to your TV. When you set auto tuning, you're telling the TV what
channel to tune to when you press the VCR1, VCR2, DVD, or SAT*CABLE
button on the remote control.
36
Page 39

Using
1. Press MENU (the TV31AIA"31PSVU appears).
2. Highlight Cbanneland press OK on your remot*, control.
3. Highlight AJ¢to 7i¢ningand press OK.
4. Choose which channel you would like lo set:
Set VCR1 Channel Displays a list that lets you set tip file channel that the
TV tunes to when you press tile VCR1 butlon on the remote.
Set VCR2 Channel Displays a list that lets you set tip file channel that the
TV tunes to when you press tile VCR2 butlon on the remote.
Set DVD Channel Displays a list that lets you select the channel that the
TV tunes to when you press tile DVD butlon.
Set SAT/CABLE Channel Displays a list that lets you set tip the channel
that the TV tunes to when you press SAToCABLE.
5. Highlight the choice that matches the way you have the component
connected to this TV, and press OK.
The choices and a brief explanation Ibllow:
Not connected Choose this if you don't have this particular component
connected to the TV, or if you don't want the TV to automatically tune to the
correct channel when you're using this component.
Channel2 (SAT/CABLE only) Component (satellite or cable box) is
connected to the CABLE/ANTENNA jack on tile back of the TV, and you want
the TV to tune to channel 2 when you press the SKI'- CABLE button on the
remote. Reminder: make sure the component's Channel 2/3/4 switch is set to
channel 2. Usually this switch is on the back of the component.
Channel3 Component is connected to file CABLE/ANTENNA jack on the back
of the TV, and you want the TV to tune to channel 3 when you press tile
corresponding bullon on the remote. R_.minder: make sure the component's
Channel 3/4 switch is set to channel 3.
Channel 4 Component is connected to the CABLE/ANTENNA jack on the
back of the TV, and you want the TV to tune to channel 4 when you press the
corresponding bullon on the remote. Reminder: make sure the component's
Channel 3/4 switch is set to channel 4.
Video Input 1 Component is connected to the INPUT1 VIDEO jack on tile
back of the TV and you want the TV to tune to VID1 Input Channel when you
press tile component button.
Video lnput2 Component is connected to the INPUT2 VIDEO jack on tile
back of the TV and you want tile TV to tune to VID2 Input Channel when you
press tile component button,
Note: You should chooseVideo Input 1or 2 for your VCRif you connected it to
the TV with audiotvideo cables.
37
Page 40

Using %% Featu s
Parental Controls and V-Chip
The Parental ControL_ menu allows you to program your TV so that children
cannot see certain progranls, chann_,ls, or us_, tile l)ront panel controls.
The first lhree choices in the Parental ControL_ menu involve software inside
your TV (reli:rred to as V-Chip) which allows you to block TV programs and
movies based on violence, sex, or other content you may believe children
should not view. In other words, it lets you program your TV so it won't display
certain programs.
Once you block programs, you or other aduhs can unblock programs by
entering a password.
By dethult, lhe software inside your TV is turned "off," so if you don't want to
use this t>ature, you can just ignore it.
How V-Chip Works
When turned "on," the V-Chip software reads a code that most broadcaste_
send with programs, That code tells the soliware tile program's age-based rating
(TV-MA, TV-14, etc.) and content them_,s [(Violence (V), Adult Language (L),
etc.)l. If you have blocked lhe rating and/or content themes that the program
contains, you will receive tile message, 'q]fis channel is not approved tk_r
viewing," when you rune to that particular channel.
Broadcasters are not required to provide content themes, so programs received
with no content themes will only be blocked if you block their age-based
rating. You can also block out programs that have been given a rating of "Not
Rated," and programs lhat are considered "unrated" because no code has been
sent by tile broadcaster. The TV age-based ratings and content themes you can
block are listed in tile tk>llowing table.
38
Page 41

Using
Age-Based Description and Content Themes for Age-Based Ratings
Rating
TV-MA Mature Audience Only. Specifically design_,d to bc \q_'w_'d by adults and mty bc unsuitable fi)r chfldr_,n
under I7. It contains one, or more of the' following content themes: crude indecent language (L), explicit
sexual activity (S), or graphic violence (V).
Parents Strongly Cautioned. Contains some material that many parents would find unsuitable for children
TV-_4 under i4. P trems are strongly urged to exercise greater care in monitoring this program and are cautioned
against letting children under the age of t4 watch unanended. This program contains one or more of the
f\)Ilowing content themes: intensely suggestive dialogue (I)) strong coarse language (L), intense sexual
situations (S) or intense violence (V).
ParentalGuidanee Suggested. Contains material that parents may find unsuitable fi)r younger children. Many
I"V-PG parents may want to watch it with their younger children. The program contains one or more of the fi)Ilowing
content themes: some suggestive dialogue (I)), inflequent coarse language (L), some sexual situations (S), or
moderate violence (V).
I"V-G General Audience. Most parents would find this program suitable R)r all ages. It contains little or no sexual
dialogue (I)) or situations (S), no strong language (L), and little or no violence (V).
Directed to children 7 years and older. Designed ff)r children ages 7 and above. It may be more
appropriate for children who haxe acquired the dexelopmental skills needed to distinguish between make
TV-Y7 betiexe and reality. ['hemes and elements in this program may include mild fantasy xiolence (FV) or comedic
violence, or may fl'ighten children under the age of 7.
All children. Themes and elements in tiffs program are designed for a young audience, including children
TV-Y f_-om ages 2 6. It is not expected to frighten younger children.
V-Chip TV Rating Limit
The V-Chip TVRati_zg Limit lets you decide which TV programs can and cannot
be viewed,
To set TV programming linfits:
]. Choose Parental ControLs l)com the Main menu. If Parental Controls have
previously been locked, you nmst enter your password. If they are not
locked, you will get a message reminding you that your limils will not be
et]k,ctive until you lock Parental Controls.
2. I ress MENU to continue
3. Highlight and select V-Chip TVRatin_,4 Limit:
4. Once you get to the V-Chip 7l7Rating L#nit screen, use the arrow buuons
and OK on your remote to change the status of a TV program rating or
content theme lronl 1/iczg_to 13lock.
The lk)llowing sections give you more details about how to change the status ot
TV program limits.
39
Page 42

Using %% Featu s
The V-Chip Rating Limit Screen
The fi)llowing is an example of where items are localed within the Rating Limit screen.
Rating Field
Lets you seleG from a
list of age-based ratings
you can block or view
Rating Status Field
L('ts you sch_ct whc'thc: the status of th_ _ age" bas('d rating limit to
the h'B is View or Block.
Content Themes
Lists the content themes you
can Nock or view
Lets you select which
COl]tent thel]les to vle\v _r
the selected rating, and
whether the _atus of [he
COl]tent thel]le is c_lrrent]y
View (V) or Block (B)
Rating Settings Area
Lets you see the currant block/view state of age-based ratings and
associated content The View (V) settings are coded in green, and the
Block (B) settings are coded in red
Rating Rating Content
field status field status fields
Tip
When you change the status of a rating to Block,
the system will automatically block higher ratings
and all corresponding content themes.
Blocking Age-Based Ratings
You can automatically block all program ratings above a specified age-based
rating level. For example, if you only *_.ant your child to walch programs that
have a TV-G rating and lower (in other words, you want the child to watch
TV-G, TV-Y7, and TV-Y), then you need to block out other programming with
higher ratings.
To block programs with higher ratings:
1. First, determine the lowest level rating you don't want the child to watch
(see chart of age-based ratings on next page).
2. Press the left and right arrow buttons Iohighlight fl_eRating l_eld.
3. Press the up and down arrow buttons on the remow to scroll through the
age-based rating limits. Keep scrolling until the rating corresponding with
the lowest rating you do not want the child to watch appears on the screen.
In the example discussed above, you would scroll through the Rat#_g field
until TV-PG appears, since the highest rating you want the child to watch is
TV-G.
40
Page 43

Using
Hierarchy of Age=Based Ratings
TV-MA Mature Audience Only
TV-14 Parents Strongly Cautioned
TV-PG Parental Guidance Suggested
TV-G General Audience
TV-Y7 Directed to Children 7 years
and older
TV-Y All Children
4.
5.
.
7.
Press the right arrow button to move the yellow highlight to tile
Slams field.
Press file up or down arrow button to toggle between I/Tewand Bk_cA The
status lk)r the rating listed lo tile leti and all higher ratings automatically
changes to Block (and /3).
Press OK on lhe remote to return to tile nlenu or exit tile screen when you
are finished.
Select Lock Parental Controls from tile Parental Controls menu. Enter a
password, and if you have not already set your password, you will be
prompted lo enter it again to conl]rm.
Rating Rating Content
field status field status fields
Viewing Age-Based Ratings
Afi_.r you block age-based ratings, you have tile option of changing some of tile
ratings back lo l&_w.
1. Ddermine which blocked rating you want to view.
2. [se tile up and down arrow buttons to select tile rating with a status
of Block.
3. Press tile right arrow button lo move the yellow highlight to the rating
status field.
4. Press tile up button to select View.
Notes: The content status fields corresponding to the unblocked rating become
View as well. They and the age-based rating status are the only fields that
automatically change back to View when you complete this process.
You must remember to lock Parental Controls for rating limits to take effect.
Content Themes
D Sexually explicit dialogue
L Adult language
S Sexual situations
V Violence
FV Fantasy Violence
Blocking Specific Content Themes
You can [)lock programs based on their content. (Content is represented by the
D, L, S, V and FV on your screen. See the beginning of this section tbr details.)
When you block a conl_.nt theme lk)r a particular rating, you automatically block
that conl_.nt theme tk)r higher rated programs as well.
For example, if you do not want your child to watch programs that have adult
language (L) rated TV-PG or higher, then you could block out all programming
TV-PG and above containing adult language.
(Steps explained on next page)
41
Page 44

Using %% Featu s
Rating Rating Content
field status field themes
Content
status fields
To block program content:
1. Del_.rmine tlle lowest level of content you don't want tlle child to walch.
2. [se tile up and down arrow buuons on lhe remote to scroll through tile
age-based ratings until tile rating that corresponds with tile lowest content
you do not want tile child to watch appears. (In tile example above, you
would scroll lhrough tile ratings until tile TV-PG rating appeared.)
3, Press tile right arrow butkm to move tile highlight R) tile field
corresponding with tile content theme you want lo block out.
4. Press tlle tip or down arrow buNon to change content status l_ronl I/to B.
All higher ratings' content lheme will automatically change lo B.
5. Press OK to return to tile nlenu or exit the screen.
Notes: Broadcasters are not required to provide content themes or age-based
ratings Programs received with no content themes will only be blocked if you block
their age-based rating
You must remember to lock Parental Controls for rating limits to take effect.
Rating Rating Content
field status field themes
Content
status fields
Viewing Specific Content Themes
If you block specific content themes, you have tile option of going back and
changing some of lhe conl_,nt lhemes back to (V) Vic*t_
2.
3_
Det_,rmine tile content themes you want lo change to (V) 9Tew.
Use tile up and down arrow buuons to scroll through tile age-based ratings
until tile rating whose content theme you want to change lo I/_¢zg;appears.
Press tlle right arrow butlon to move tile yellow highlight lo a particular
content theme status, such as tile/3 under language (L) corresponding with
TV-14.
4_
Press tile up or down arrow button to change its status back to l( Your
child would lhen be able to walch programs with TV-14 adult language
content, but not programs with TV-PG or TV-MA language content.
Note: Only the content theme status corresponding to TV-14 (L) language changes
to (V) View. Higher rated content themes, such asthat for TV-MA language, do not
change.
42
Page 45

Using
V-Chip Movie Rating Limit
You sut movie rating limits by blocking movies rated above a specified level
How to block movie ratings and view movie ratings is explained in tile next lwo
sections,
"lb access fl_e _-CIIIP MO V1KRATING LIMIT menu:
1. Press MENU on tile remote control (tile TVMAINMKNUappears).
2. Select Parent_l Control._ (press 6).
3. Select V-Chip M(n,ie l?aHn_,4 Limit (press 2).
Rating field
Rating
status field
Blocking Movie Ratings
If you only want your child to watch movies that have a PG rating and lower
(in other words, movies rated PG and G), then you could automatically block
out all other movies with higher ratings.
To block movies:
2.
.
4.
Highlight the l?alit(t_field and press the up and down arrow buttons to find
the rating that is lhe lowest rating you don't *_.anttile child to watch. (In
the example above, you would highlight the rating status bullon
corresponding to PG-13, since tile highest rating you want tile child to
watch is PG.)
Press the right arrow button to highlight tile rating Statz¢s field. Press fl_e up
and down arrow buttons to change tile button t)rom Vic*wto Block. All
higher ratings automatically change to Blocla.
Press OK lo return to tile nlenu or exit tile screen.
If Parental Controls are not locked, you nlust lock them so tile movie rating
limits will take el'li.ct.
Note: Some movies may be given a Not Rated (NR) rating. After blocking movie
ratings, you must set NR to View separately to view NR movies
43
Page 46

Using %% Featu s
Rating field Rating
status field
Viewing Movie Ratings
A_r you block movie ratings, you have the option of changing some of the
rating status buttons back R) HC*ll_
1. Highlight tile Rating field and press tile up and down arrow buuons to find
tile rating you want to view.
2. Press tile right arrow button to highlight the rating STares field. Press the up
and down arrows R) change tile button l_comBlock R) _Teu,.
For example, if movies with a rating of PG-13 and higher are blocked, you can
change the rating status corresponding with NC-17. Your child would then be
able to watch all movies with a G, PG, and NC-17 Rating.
3. Press OK lo exit the screen, and be sure parental controls are locked.
V-Chip Unrated Program Block
Selecting this option lets you decide if programs that the V-Chip recognizes as
'unrated" can be viewed. Note that ' unral_.d" TV programs may include news,
sports, political, religious, local and wea/her programs, emergency bulletins,
public announcemenls, and programs without ratings.
View All unrated programs are available.
Block All unrated programs are not available.
Note: You must remember to lock ParentalControls for rating limits to take effect.
Channel Block
Selecting this option lets you decide what channels can be viewed.
View Makes the selecwd channel viewable.
Block The t)ront panel and remote control CH (channel) buttons will tune
only to channels lhat you have marked as _Tew. The remote will still rune to
tile blocked channel if you use tile digits to access tile channel, but tile
channel will be blocked.
Don't lk)rget to lock parental controls after you change tile status of Channel
Block. If you do not, the channel block will not take efll.ct.
Note: If you have a digital cable box channels 126-999 can be blocked but will not
be removable from your scan list.
44
Page 47

Using
Front Panel Block
Selecting this option lets you block (disable) or unblock (enable) the TV's t)ront
panel. The rem<m, still tunes to any channel. Front Pam, l Block can:
• Keep children t)com watching TV when the parent is not present.
• Keep young children t)com playing with the buuons.
(When using this as a Parental Control method, you should remove access to
any remote, that is capable of operating tile television while you have tile flcont
panel blocked.)
Don't l_)rget to lock parental controls atier you change tile status. If you do not,
the t_ont panel block will not take el]i, ct.
Lock/Unlock Parental Controls
Selecting this option lets you lock and unlock parental controls settings using a
password.
If you do not lock parental controls, none of the settings for v-Chip,
Channel Block, or Front Panel Block will take effect.
If you ff>rget your password, sinmltaneously press and hold MENU on tile
television and volume down on tile remote" l_)r 3 seconds. Nothing appears on
the screen, Parental Controls simply unlock and you can re-enl{,r a password via
Lock Parental ControLv.
45
Page 48

(This page intentionally left blank)
Page 49

4
Using the TV's
Menu System
Chapter Overview:
• How to Use Your TV's Menu System
• Audio Menu
• Picture Quality Menu
• Screen Menu
• Using Closed Captioning
• Channel Menu
• Time Menu
Changing Entertainment.
G_cy)hics contributed _z_itbi_ this pz_b/ication are fbr _])_sentatio_ on(F. 47
Page 50

Using %% enu
How to Use Your TV's Menu System
You rise tile buttons on the remole or the t_contof your TV lo access the menu system and
make changes to tile settings.
The tkfllowing pages explain how to use the different types of menus lo adjust the fl.atures of
your TV.
rip
Feelfree to explore the menu system. If you're ever
unsure where you are in the menu system, or you're
just plain tired of exploring, press CLEARto remove
the menus from the screen and start over again.
Menus
The first menu is called tile Main menu. Press MENU on the remote or on the
tront panel to bring up tile Main menu. Note that hoMing MENU for 2 seconds
displays the GLIDE Plus+ system.
Menus take you to another menu or a control panel. There are two ways to
select a choice in a inentl:
[se your arrow buttons on your remote control to highlight your choice,
and press OK.
Press a number button on tile renlote. For exalnple, in tile Main nlenkl press
3 to go straight to the Scree** menu.
Exiting a menu
There are three ways to exit a inentl:
• Highlight l£vil and press OK.
• Press 0 on the remote.
• Press CLEAR. The on-screen displays are cleared Dom tile screen and you
return to TV viewing.
I Audio
Audio Menu
Mute Press OK to reduce the TV's volume to its minimum level. Press OK
again to restore tile volume.
Tone Controls Displays the slider controls R)r adjusting the TV's treble, bass
and balance.
Audio Processor Displays a choice list of awtilable audio modes, which
control the way the sound conies through your speakers. You can also access
tile A g_J)IOI_ROCESSOR menu by pressing the SOUND button on the remote.
Mono Plays tile sound in mono only. tse this selling when receiving
broadcasts with weak stereo signals.
Stereo Splits tile incoming stere() audio signal into left and right channels.
Most TV programs and recorded materials have stere() audio. The word
STF_EO appears on the TV when you tune to a program that is broadcast in
stere{).
48 Chapter 4
Page 51

Using
Expanded Stereo Electronically 'widens" sound from stereo broadcasts, stere(> VCRs,
digital satellite systems, DVD players, and laserdisc players tk>ra l\lller, more spacious
sound.
Sound Logic '_'Stereo Reduces the annoying blasts in volume during commercial breaks,
and also amplifies softer sounds in program material. Eliminat_.s the need to constantly
adjust volume conrail.
Second Audio Program (SAP) Plays the program's audio in a second language, if one is
awtilable. The word SAP appears on the TV when you tune to a program that is broadcast
with SAP inl_)rmation. SAP acidic>is broadcast in mono. SAP is also used to broadcast a
program's audio with descriptions of the video tbr the visually impaired.
Audio Output & Speakers Displays a choice list lhat lets you turn the TV's internal speakers
on or off, and set the audio outputs to fixed-level or variable conrail level.
Variable Output, Speakers On This setting turns the TV's speakers on and allows
variable output from the TV's audio output jacks.
Variable Output, Speakers Off This setting turns the TV's speakers off and allows
variable output from the TV's audio output jacks to an external component such as a
surround sound amplifier.
Fixed Output, Speakers Off This seuing turns the TV's speakers off and allows fixed
output from the TV's audio output jacks to an external component such as a surround
sound amplifier. When you choose Fixed Ozapz_t Q/[£the TV's volume control, tone
controls, and mute are disabled.
Picture Quality Menu
Basic Picture Controls Displays the five slider controls t_r adjusting the way
the picture looks.
Contrast Adjusts the difl>rence between the light and dark areas of
the picture.
Color Adjusts the richness of the color.
Tint Adjusts the balance between the red and green levels.
Black Level Adjusts the brighmess of the picture.
Sharpness Adjusts tile crispness of the edges in the picture.
When exiting this menu, the Save Fe_.xonal PictJ_re Preset choice list appears.
You can choose either Yes or No. If you save the settings as a Personal Picture
Preset, the TV stores the settings so you can re-select them quickly if someone
changes the settings.
Note: Youcan change the picture controlsfor eachcomponentconnectedto your
Video, Y, Pv PRandS-Videojacks on the backof your TMThenext time youtune to
the component, the picture changes accordingto the settings youcreated
previously
49
Page 52

Using %% enu
Picture Presets Displays a choice list that lets yotl svlect one of three preset pictun, settings:
Id_t{ht Lighti_zg, Normal Light#zg, S(_/tLi_,4btin_,4 or Pe_o_ml Pier,ire Preset. Choose the setting that
is best IkJr your viewing environment.
Auto Color Displays a choice list that lets you turn on tile lbature that automatically corrects
the color ot tile picture. (This is especially useful lkJr tracking realistic flesh tone colors as you
switch trom channel to channel.) Choose On or Q/[£ depending on your preterence.
Color Warmth Displays a choice list that lets you set one of three automatic color
adjustments: Coollor a more blue palette ot picture cok)rs; Normal; and Warm IkJr a more red
palette of picture colors. The warnl setting corresponds to the NTSC standard of 6500 K.
F324zM, F32450, F36Zi44 and
F36450 Screen menu
F27450 Screen menu
Screen Menu
Closed-Caption Display Displays a choice list that lets you choose the way
closed captioning inl_)rmation is shown on tile screen.
Off always No captioning intkJrmation is displayed.
On always Captioning int_Jrmation is shown always, when awtilable.
On when sound is muted Captioning inl_)rmation is shown, when
awtilable, whenever the TV's sound is muted. (To mute the sound, press the
MUTE button.) The captioning inl_Jrmation is not displayed when the sound
is not muted.
Closed-Caption Mode Displays a choice list that lets you choose which
captioning mode is used f_)rdisplaying captioning inlonnation.
Menu Language Displays a choice list that lets you select your prelbrred
hmguage for the menus: En/dlish, 5_a*Hsh or Fre_*cb.
Picture Tilt (Available only on models F32444, F32450, F36444 and
F36450) Your TV has an extra large picture tube that makes it vulnerable to
tile elt{,cts ot tile Earth's magnetic field. YoH inay need to adjust tile picture tilt.
50 Chapter 4
Page 53

Using
Using Closed Captioning
Many programs are encoded with closed-captioning inlk)rmation, which lets you display tile
audio portion of a program as text on the TV screen.
Closed captioning is not awtilable on all channels at all times. Only specific programs encoded
with closed-captioning intk)rmation are applicable. When a program is closed captioned, tile CC
icon is displayed in tile channel banner. See Chapter 3 tk)r more inlk)rmation about tile channel
banner.
rip
If you don't know which Closed-Caption mode to
use,select CCI. CC1isprobably the mode that is
used in your area. CC2, CC3, and CC4 are reserved
for foreign languages, but are rarely used at this
time.
Closed-Caption Modes
The TV off_rs eight closed-captioned modes, including four text mod_,s.
To set tile Closed-Caption Mod*,:
1. Select Screen*from tile Main menu.
2. Highlight Closed-Ccqation Mode and press OK (tile Closed-Caption Mod*,
appears).
3. Highlight your choice and press OK (tile Screen menu appears again).
Note: The Text modes cover nearly half of the picture on the screen to display the
closed-captioned text. Most broadcasters use the CC mode, which displays a few
lines of captions at a time.
Turning off Closed-Caption
1. Select 3"cret, H tronl tile Main nl_'nLl.
2. Press OK to select Closed-Coition Displc(9,.
3. Highlight OjfAtwa'ys and press OK. The closed captioning is turned off and
you go back to the 5"creammenu.
51
Page 54

Using %% enu
Toenter a number greater than 99, press and hold
"1" to enter the hundreds digit, then press the two
remaining numbers.
Channel Menu
Signal Type Displays a choice list that lels you select the current antenna
type. This option does not appear when the GUIDE Plus+ system is set up.
UHF/VHFAntenna Choose this if you are currently using an oflLair
antenna t_>rTV signals.
Cable TV Choose this if you are currently using cable or a cable box lk_r
TV signals.
Auto Channel Search Tells the TV to search automatically t_)r all tile channels
available through the antenna input. When tile TV finds an active channel, it
places it in tile Normal channel list; inactive channels (weak stations or
channels with no signal at all) will be removed from the channel list. If you are
using a cable box and have set up tile GtlDE Plus+ system, this option does
not appear.
List and Labels Displays a control panel that lets you edit your Normal
channel list and choose a six-character label lk_reach channel. Follow the on-
screen directions to enter your channels and other inlbrmation.
Channel # Use tile up and down arrows to scroll up and down through
tile channels awtilable via your anlenna. You can enter the channel number
directly using tile number buttons.
NormalList Only the channels included in tile Normal list are awtilable
when you scan tip and down using channel up and down. tse tile tip and
down arrow buttons to indicate whether tile channel number indicated is
included (Yes) or is not included (No) in tile Normal channel list.
ChannelLabel Use the up and down arrow buttons to enter a six-
character label lbr each channel. Hold the bulton down to scroll quickly
through the characters. The TV can store tip to 27 labels in memory.
Auto Tuning Displays a choice list that lets you set Lip the TV to automatically
tune to tile correct input channel when you press a component button (VCR1,
VCR2, DVD, or SAT*CABLE) on the remote. Go to Chapter 3 tk_rdetails about
tile Auto Tuning fl.ature.
Time Menu
Sleep Timer Displays a control panel that lets you select the amount of time
you want to give the TV bet_)re it shuts itself off.
Schedule Displays a control panel that lets you set up a schedule for turning
tile TV on and off"automatically. Reminder: you must turn the schedule On. The
on-screen directions guide you through the steps needed to set the schedule.
Set Time Displays a control panel that lets you enter the current time. The on-
screen directions guide you through the steps needed to set the time. If your
GUIDE Plus+ system is set tip, it will automatically update your time and this
option will not appear.
52 Chapter 4
Page 55

Other Information
Chapter Overview:
• Troubleshooting
• Care and Cleaning
• The Front of Your TV
• Limited Warranty
• Accessory Order Form
• Index
Changing Entertainment.
Grapbics co_zlcti_zed u,ilb#_ tbi_ pz¢blicalio_z ctre./br r(j)r(_se_zlcttio_ o_zl},. 53
Page 56

Troubleshooting
Most problems you encounter with your TV you can correct by consulting the Troubleshooting list that lk_llows.
Note: If you prefer, we can provide you with the name of an Authorized Service Representative who will visit your home for a fee to
install your electronic entertainment system and to instruct you in its operation. For details about this service, call 1-888-206-3359.
TV Problems
TV won't turn on
Press the ['V button.
Make sure the TV is plugged in.
Check the wall receptacle (or extension cord) to make sure it is "live by plugging in something else.
Something might be wrong with your remote control. Press the POWER button on the front of' the TV. If the TV turns on, check the
remot(, control solutions on page 56.
The front panel controls may be locked (disabled). lse the remote control to unlock the front panel controls by selecting the ,%_>nt
Parlel Block in the Parental Cow,trois menu and choosing g/rzblocle.
Controls don't work
If you're using the l-omoto control, pr('ss th(_['V button first to mak(" sur(" th(' 1('mot(" is in TV mode.
Th(" front pan('t controls may b(_lock(_d (disabI('d). Ise th(" r('mot(" control to unlock the front pan(q controls by selecting th(" ,*,'_Tt
Pa_wl Block in the Pa*wntal Controls menu and choosing I/rzblocle.
Unplug the TV f\)r two minutes and then plug it back in. Turn the TV on and tW again.
TV turns off while playing
Sch('dul('d off function may have I)('(ql activated. Go to page' 52 f_)rinstructions.
EI('ctronic protection circuit may have I)('('n activat_'d I)('caus(" of a pow('r surge'. Wait 30 s('conds and th('n turn th(" TV on again. If"
this happ_'ns frequ_'ntly, tb_" voltage in your bous_" may be abnormally higb or low.
TV turns on unexpectedly
Sch_'duh'd On or Watch from the GUIDE Plus+ system may hav_"b(_'n activawd. Go to page"32 or 52 f\_rinstructions.
Blank screen
Mak(" sur_' th(" compon('nt conn('ct('d/o the TV is turn(_d on.
TW anoth(.r chann('I.
When I turn on the TV an icon is moving on the screen
Mak(" sur( _ you hay(" remov('d the I)emo Pin from the G LINK iack on th(" back of your q'V_
No sound, picture okay
Mayb(" sound is mutod. P]('ss the x-o|um( _ up button to r('sto](" sound.
Maybe" sp_'aM'rs are turn_'d off. Check the" Audio Ozttput and .S'peale._*._-control pan_'I in the Aztdio m(.nu. Go to page 49 f\)r &'tailed
instructions.
If using S VIDEO cables to connect a component, remember to also connect the component's left and right Audio Output Jacks to
the ['Vs R AUDIO L INPU F1 Jacks.
Can't select certain channel
Chann('t may I)("block(_d or not approv('d in th(" Paret_tal (]o_trols m(,nu.
If using a VCR, iTlak("sur(" the TViVCR button on the VCR is in th(" COlT(_CtITtOd(' (pr('ss the TViVCR button on your VCIt).
Noisy stereo reception
"l'h(" station might I)(" woak. Pr('ss the SOIJNI) button on your romo/o control /o chang(" from st('r('o/o mono.
54
Page 57

Troubleshooting
No picture, no sound but TV is on
Maybe" the, cabk'iair m'tting is set to the" wrong position. Select _al 7_pe from the" Cba_Tel m_'nu. Go to page" 52 for more
inf\)rmation.
The channel l:_ight be empty change channels.
If you're watching your VCR and its connected with coaxial cable to the CABLE/ANTENNA jack, tune the ['V to channel 3 or 4
(whichever channel is se|ected on the 3/4 switch on the back of your VCR). Mso check to l:_ake sure the TViVCI_:button on the
VCR is in the correct mode (press the TV/VCR button on your VCR).
If youre twing to watch content fiom a component that's connected to the TV (like a I)VI) pkwer or VCR), press the WHOoINPUT
button on the remote control until the content appears.
Sound okay, picture poor
Ch_'ck ant_,nna conn_ctions. Make" sun" all of the' cabk's are fimaly conn_'ct_'d to the' jacks.
Try adjusting sharpness functk)n to improve" w_'ak signals. Go to page 49 f\)r more instructions.
Black box appears on the screen
Clos<'d captk)ning might b_, on. Ch_'ck the Closed (]gq}tiot7 Displ_(F control pan_q in the" 5erect7 m_,nu. Go to page 50 f\)r mort"
instructions.
Every time I turn on the TV, the Guide is on the screen
"l'h_' GI II)E Plus+ system automatically appears on the" sc're_'n when you us<, the" TV button on the" n'mot_" to turn on the" TV. YOu
can turn off this f_'atur_" by pressing GI II)E on your nq_ote control and th_'n select the M_'nu bar. Pn'ss the right arrow button to
seh, ct Set,q) Choose Rezieu opfioyls and select OFt_
Can't see commercial skip timer
If clos_'d captioning is on skip tim_'r do_'s not stay on scn'_,n. To turn off clos_'d captioning, go to page 50.
GUIDE Plus+ System Problems
GUIDE Plus+ setup won't switch to channel 9 for VCR and/or channel 02 cable box
Make" sure you have" r_'moved the" I)_'mo Pin from the" (3 LINK jack. Check to s_'_" if the" (3 LINK wands are position_,d correctly in
fiont of components' remote sensors.
GLIDE Plus+ system control of cable box is slower than direct control of the box itsetK Keep this in _:_ind when changing channels.
You may have an incorrect GLIDE Plus+ Channel Lineup. Tim guide _:aay get out of sync with the cable provider, lse the G_71)E
Plus+ ,S_,tup in the GIJDE Plus+ Men_t to change the zip code to 99999. Turn the EV off for 10 minutes. Use Setup again to change
the zip code back to the correct wdue. If asked, be sure to select the correct channel lineup from the on screen list.
Program information doesn't download
R_'vi_'w your s<,tup inf_)n_aatk)n and make, sure its correct. Press MENU on the" n'mot_" and select (,'l_ll)l']l'l_ts+ 3etup. Go to page" 16
for detaik'd instructions about the' G UII)E Plus+ Setup m_'nus.
The" TV _aust b_, off to download inf\)rmatk)n. L_'av_" your TV off ov_'rnight for at h'ast 10 hours to r_'c_'ix_' the" initial download for
your g r(_a.
If' youre using a cabh' box k'av_' it on so you can receive" program inf\)rmation.
Scheduled Watch or Record doesn't occur
Ch_'ck Sch_'duk" for timer conflicts. Go to page" [32 for instructk)ns.
Make" sure the" wands of tb(" G LINK cabl_' are plac('d in front of the" remote s<'nsor(s) on the component(s).
Make" sure your VCR is turn_'d off during the" ti_a_, youve sch_,duled to record a program b_,cause the" syst_'m turns the" VCI,' on wh_'n
it starts n, cording (if' its alr_'ady on wh_'n n'cording starts, the" syst_'m will turn it off).
Make" sure the'n" is a tap_" in tb_" VCR and that the" VCR is connected prop_'rly.
Be sun, that you set up the, VCR in the, (;_71)1"] t'/Hs+ ,Setup _:a_,nus If' you dont compk'te the" Co_{figuring,/br a VCR steps
successfully, the Record option won't be available. Go to page 19 for detailed instructions.
If a cable box is attached to your TV, make sure you set it up correctly in the GHII)Et'lzts+ ,Setup menus. Go to page 17 18 for
detailed instructions.
55
Page 58

The Remote Control Doesn't Work
Something might be between the remote and tim remote sensor on the component. Make sure there is a clear pafl_.
Maybe the remote isn't aimed directly at the component ('I'V or VCR) that you're t_ing _) operate.
Maybe remo_ is not ill TV Mode. Press tim TV bu_)n so remote will control TV_
Maybe batteries ill remote are weak, dead or installed incorrectly. Put new batteries in the remote. (Note, if you remove the batteries,
you may have to reprogram the remote to opera_ other components.)
You might need _) drain the remote's microprocessor: remove bafferies and press the number I button for at least 60 seconds.
Release the 1 button, replace the batteries, and (if necessary) program the remo_ again.
Problems with V-Chip/Parental Controls
The rating limits don't work
You must lock the settings. Go to the TVMAI:V Ml_:\'_(pr_'ss MENU on your remote) select Pare_tal Contro£-(press 6 on your
remote), select Lock t'a_mtal C()mrols (press 6 on your remote).
I don't remember my password and I want to unlock the TV
If you forg_,t your password simultaneously press and hold MEN[ on the, television and volmlle down on the remote f_)r 3 seconds.
Nothing app_ars on the' screen Parental Controls simply unlock and you can re enter a password via ].oc_ Pare_tal Co_ltroL_-.
The V-Chip won't let me watch a program even though it's not rated as violent.
Maybe the movie was given an NR (Not Rated) status. After you block movie ratings you must set NR to View separately in order to
view movies with an NR rating.
Care and Cleaning
CAUTION: Turn OFF your TV before cleaning.
You can clean the TV as required, using a soft lint-flee cloth. Be sure to occasionally dust the ventilation slots in the cabinet
to help assure adequate ventilation.
The TV's screen may be cleaned with a soft, lint-free cloth as well. Take care not to scratch or mar the screen. If
necessary, you may use a cloth dampened with warm water. Never use strong cleaning agents, such as ammonia-
based cleaners, or abrasive powder. These types of cleaners will damage the TV.
While cleaning do not spray liquid directly on the screen, or allow liquid to run down the screen and inside the TV. Also,
avoid placing drinks or vases with water on top of the TV. This could increase the risk of fire or shock hazard or damage to
the TV.
Caution: Using video games or any external accessory with fixed images fi)r extended periods of time can cause them to
be permanently imprinted on the picture tube (or projection TV picture tubes). ALSO, some network/program logos, phone
numbers, etc. may cause similar damage. This damage is not covered by your warranty.
Page 59

The Front of Your TV
Front Panel
If you can't I]ncl your remote control you ('an use Ill(' buttons on your TV to operate many of tile TVs t)eatures.
MENU Brings up tile TV MAIN MEN[. When in tile menu system, it selects highlighted items. Also returns you to tile
previous menu. Press and hold MEN[ t_)r two seconds to access tile GUIDE Phls+ system.
CH v Scans down through tile current channel list. When you're using tile TV's menu system, it acts like tile arrow down
button on tile remote control.
Ctt ^ Scans up through tile channel list. When lou're using lhe TV's menu system, it acts like tile arrow up button on tile
remote control.
VOL-- Decreases tile volume. When you're using tile TV's menu system, it acts like tile lelk arrow button on tile remote
control.
VOL + Increases tile volume. When you're using tile TV's menu system, it acts like tile right arrow button on tile remote
control.
POWER Turns tile TV on and off.
Front Panel Jacks
You can access tile component you connected to tile _ont of _le TV by
pressing tile WHO°INPUT button on your remote until FRNT appears on
tile screen.
PHONES (Available only on model F27450) Allows you to connect
headphones to listen to tile sound coming t}om tile TV.
VIDEO (in) Receives video ficom another component such as a VCR,
camcorder or video game console.
L/MONO and R AUDIO Receives audio l_comanother component such
as a VCR, camcorder or video game console.
Limited Warranty
What your warranty covers:
° Del)ec'ts in nmterials or workmanship.
For how long after your purchase:
° 90 days from date of purchase ff)r labor charges.
° One year t}om date of purchase 12)rparts.
° Two years ficom date of purchase tk)r tile picture tube.
The warranty period t2)r rental units begins with tile first rental or 45 days from date of shipment to tile rental firm,
whichever comes first.
What we will do:
o Pay any Authorized RCA "Ik.levision Service Center tile labor charges to repair your television.
° Pay any Authorized RCA Television Service Center lk>r tile new or, at our option, ret\lrbished replacement parts and
picture robe required to repair your television.
57
Page 60

How you get service:
• For screen sizes of 26" and smaller: "Fake your RCA television to any Authorized RCA Television Service Center and
pick up when repairs are complete.
• For screen sizes larger than 26": Request home or pick up, repair, and return service l)com any Authorized RCA
Television Service Center, provided that your television is located within tile geographic territory covered by an
Authorized RCA T_.levision Service Center. If not, you nmst take your television to tile Service Cenl_.r location at your
own expense, or pay t_)r tile cost tile Service Cenl_.r may charge to transport your television to and l)com your home.
• To identil_v your nearest Authorized RCA Television Service Center, ask your dealer, look in tile Yellow Pages, or call
1-800-336-1900.
• Proof of purchase in tile t2)rm of a bill of sale or receipted invoice which is evidence that tile product is wilhin tile
warranty period must be presented to obtain warranly service. For rental firms, proof of first rental is also required.
What your warranty does not cover:
• Customer instruction. (Your Owner's Manual describes how to install, adjust, and operate your television. Any
additional inlbrmation should be obtained t)com your dealer.)
• Installation and related adjustments.
• Signal reception problems not caused by your television.
• Damage l£olu nlisuse or neglect.
• Batteries.
• Custonler replacement fl_ses.
• Damage l}oIU Images burnt onto tile screen.
• A television that has been modified or incorporated into other products or is used tk>r institutional or other commercial
purposes.
• A television purchased or serviced outside tile U.S.A.
• Acts of nature, such as but not limil{,d to lightning damage.
Product Registration:
• Please complete and mail the Product Registration Card packed with your TV. It will make it easier to contact you
should it ever be necessary. The return of tile card is not required R_r warranty coverage.
Limitation of Warranty:
• THE WARRANTY STATED ABOVE IS THE ONLY WARRANTY APPLICABLE TO THIS PRODUCT. ALL OTHER
WARRANTIES, EXPRF_SS OR IMPLIED (INCLUDING ALL IMPLIED WARRANTIES OF MERCHANTABILITY OR
FITNESS FOR A PARTICULAR PURPOSE) ARE HEREBY DISCLAIMED. NO VERBAL OR WRITTEN INFORMATION
GIVEN BY THOMSON MULTIMEDIA INC., ITS AGENTS OR EMPLOYEES SHALL CREATE A GUARANTY OR IN ANY
WAY INCREASE THE SCOPE OF THIS WARRANTY.
• REPAIR OR REPLACEMENT AS PROVIDED UNDER THIS WARRANTY IS THE EXCLUSIVE REMEDY OF THE
CONSUMER. THOMSON MULTIMEDIA INC. SHALL NOT BE LIABLE FOR INCIDENTAL OR CONSEQUENTIAL
DAMAGES RESULTING FROM THE USE OF THIS PRODUCT OR ARISING OUT OF ANY BREACH OF ANY EXPRESS
OR IMPLIED WARRANTY ON THIS PRODUCT. THIS DISCLAIMER OF WARRANTIES AND LIMITED WARRANTY
ARE GOVERNED BY THE LAWS OF THE STATE OF INDIANA. EXCEPT TO THE EXTENT PROHIBITED BY
APPLICABLE LAW, ANY IMPLIED WARRANTY OF MERCHANTABILITY OR FITNESS FOR A PARTIC_
PURPOSE ON THIS PRODUCT IS LIMITED TO THE APPLICABLE WARRANTY PERIOD SET FORTH ABOVE.
How state law relates to this warranty:
• Some states do not allow tile exclusion nor limitation of incidental or consequential damages, or limitations on how
long an implied warranty lasts, so tile above limitations or exclusions may not apply to you.
• This warranty gives you specific legal rights, and you also may have other rights that vary from state to state.
If you purchased your product outside the United States:
• This warranty does not apply. Contact your dealer ['or warranly inl_rmation.
Service calls which do not involve defective materials or workmanship are not covered by this warranty. Costs
of such service calls are the sole responsibility of the purchaser.
58
Page 61

VH81(340
VH82 (640
Screw-on Cable r_ttacbes to
contzocto*x (called ZS-obm
F-O'p_,) on tbe back of your
V(JR or TV "lbe ettds screzt
onto the comzectom fJr a
VH89 (6-ft)
Push-on Cable attaches to
tl:lt_r()ll!_d (t?lt_ll?la
CO!ltloct014_ (called ZS-obm
I:-t}_)<) on the back (f your
V(dR or TV lPnd._pusb on
fiJr a qui_ k con*_ection
Gold-Tipped cable
VH83 (6-ft)
Monaural VCR Dubbing
Cable Double cable/kat [eL_
JZ)tt Cot_l_'cl lb_ L_deo rtyld
attdio jc_cks (f lwo VHS
VCRs to dxqJlicale tapes
(._tn aL_o l)e u,s-ed to col_*tec't
a VCR toyour TH (.?_bl(, i_
colo>coded and shielded
Has RCA -l}g_t, pbono plugs
Stereo VCR Dubbing Cable
Tripb, cablu that lets you
co_l_tct lbe vil)Eo a?_d Al _)io
_cks _f stereo cotrq;onen&
Gold-Tipped cable
VH84 (6-ft)
Component Video Cables
7_l)J/u cable used to comzect
a vMeo ._ource with E !_ 1_
jac_ to lbe 7]/.
Gold-Tipped cable
DT6DC (6-ft)
DT12DC (12-ft)
Continued on next page .......
e_
-r
u
e_
r_
Accessory Order Form
Description
Screw-on antenna cable (3-ft)
Screw-on antenna cable (6-ft)
Push-on antenna cable (6-ft)
Monaural VCR Dubbing Cable (6-ft)
Stereo VCR Dubbing Cable (6-ft)
Component Video Cables (6-ft)
Component Video Cables (12-ft)
S-Video Cable (6-ft)
S-Video Cable (12-ft)
2-way Signal Splitter
Amplified Antenna
Remote Control (CRK76TEI)
Antenna Mixer (not shown)
Audio,Video Adapter (not shown)
Part No.
VH81
VH82 $4.95
VH89 $5.95
VH83 $5.95
VH84 $9.95
DT6DC 24.95
DT12DC 34.95
VH976 $7.95
VH913 14.95
VH47 $3.95
ANT200 49.95
242524 38.35
193984 11.15
228449 $4.45
Prices are subject to change without notice.
Total Merchandise ............................................. $__
Sales Tax ............................................................. $
We are required by law to collect the
appropriate sales tax for each individual
state, country, and locality to which the
merchandise is being sent.
Shipping and Handling ..................................... $ 3_0
Total Amount Enclosed ..................................... $-_
Use VISA, MasterCard, or Discover Card
preferably.
Money order or check must be in U.S.
currency only.
No COD or CASH.
All accessories are subject to availability.
Where applicable, we will ship a superseding model.
59
Page 62

Charge your order on your VISA,
Master( ard, or Discover Card by
filling m below
USE YOUR CREDIT CARD
IMPORTANT: (opy complete account number
fi'om your VISA card
VISA
My card expires: I---V-] I---V-]
IMPORTANT: (opy complete account number
ti'om yotlr MasterCard
v-v-v v-v-v v-v1-1-1v-v-v1-1
Copy Number
above your
nanle on
MasterCard
My,card [""_ [""_
expn'es:
IMPORTANT: Copy complete account number
t}onl your Discover Card
My card expires: _
AUTHORIZED SIGNATURE
(Credit card order will not be processed without signature)
Print o1"type your name and
address clearly.
A complete and correct
order will save you days
of waiting.
Nalne:
Street:
City:
Apt:
State: Zip:
Daytime phone number:
Please make sure that both sides of this form
have been filled out completely.
• Allow 4 weeks for delivery.
• All accessories are subject to availability.
• Prices are subject to change.
O
-r
r_
Q
VH976 (640
VH913 (124t)
S-Video Cable has multi-
])ill COFIt_t?CIOFS o1_ P_l(-h
end./br co_rlvct#_g%YMeo
corrq)(me_ts to your 71'
2-way Signal Splitter
or V(,7_.
Splitter VH47
Amplified Antenna
Alhm_s you to quick(i' switch
,/?om tbe antenna s{gnal to lhe
cabke or xat_llile sig_lal without
dL_conn_ct#_g the ant_'_z_a
ANT200
CRK76TE1
Remote Control
7}_isis the re,thole, corllrol Ibat
carr*_,packed with Four TI'
R_'Jdac_'mems or.spare<, can &
To Order
To place your order by phone, trove your Visa,
MasterCard or Discover Card ready and call the toll-t_we
number listed below.
Use this number only to place an order for accessory
items listed on this order form.
1-800-338-0376
"R)place your order by mail, detach and mail the
completed order l_)rm with credit card int_)rmalion,
money order or check in US currency (made payable to
Thomson multimedia Inc.) to the tk)llowing address:
Video Accessories
PO Box 8419
Ronks, PA 17573
60 Chapter 5
Page 63

A
Accessories 59
Advanced connections 9, 11
Age Based Ratings 39
ANTENNA button 22
Arrow buttons 22
Audio
Code list 26
Menu 48
Out jacks 13
Output Volume & Speakers
49
Processor 48
Audio/Video
cables 7
;lacks 13
Auto
Channel Search 52
Color 50
Tuning 52
DVD Channel 37
SK[YCABLE Cbannd 37
VCR1 Channd 37
VCR2 Channd 37
AUX (auxilia W) button 22
B
Basic
connectkms 12
Picture Controls 49
Batteries fi)r the remote 15
Black Level 49
Block
Age Based Ratings 40
Front Pand 45
Movie Ratings 43
Specific Content Themes 41
V Chip I nrated Program 44
Buttons, remote control 22
C
Search 16
Channels menu 34
CLEAR button 22
Closed Caption
I)isplay 50
Mode 51
Coaxial cable 7
Code list
Audio 26
Cable Box 26
S*ellite Receiver 26
VCR 26
Color Warmth 50
Connectk)ns
TV + VCR 12
TV + VCI,',+ I)VI) Player 9
TV + VCR + Satellite
Receiver 11
Content ['bemes 39
Contrast 49
D
Demo Pin 6
DVD
button 22
Channel 37
Finding the sensor 14
Fixed
Output, Speakers Off 49
FORWARI) button 22
Front panel 57
block 45
jacks 57
G
Cable Box
code list 26
Cable/Antenna jack 13
Cables
Audio/Video 7
coaxial 7
G LINK 7
S Video 7
Y PJ_Pa 7 I
CC (Closed Captioning) 50
CH + button 22
CH - button 22
Channel
Banner 36
Block 44
Labels 52 J
Lineup 28
Menu 52 Jacks, 13
G LINK
cable 7
connecting 14
jack 13
GO BACK button 22
Grid Guide menu 29
GUIDE button 22
GUIDE Plus+ system
Channd Lineup 28
I)ownloading Inf\_rmatkm
28
Setup 16
INFO button 22
INPU['I jacks 13
INPU['2 jacks 13
Interactive setup 1(i
AUI)IO OUI" RiL 13
AUI)IO RiL 13
CABLE/'ANTENNA 13
Front panel 57
G LINK 13
INPUT1 13
IN PUT2 13
S VIDEO 13
VIDEO 13
Y P_ PE_13
t.
L.E.D. button 22
Labels 52
Language 50
Languages
Selecting 16
Locating remote sensor 14
Lock, Parental Controls 45
M
Memoi T 52
Menu
Acidic) 48
Channel 52
Channels 34
Grid Guide 29
Language 50
Messages 33
News 32
Picture Quality 49
Schedule 32
Screen 50
Setup 34
Sort 31
Time 52
MENU button 22
Menus
GI II)E Plus+ System setup
16
Messages menu 33
Mono 48
Mute 48
MUTE button 22
N
News menu 32
Normal List 52
Number buttons 22
o
OK button 22
ON-OFF button 22
P
Parental Controls
Locking, Unlocking 45
menu 38
PAUSE button 23
Picture
Presets 50
Quality Menu 49
Tilt 50
PLAY button 23
Promotions 35
R
Rating Limits
movies 43
['V 39
RECoVCR+ button 23
Remote, batteries 15
Remote sensor 14
REVERSE button 23
S VIDEO
cable 7
jack 13
SAP 49
SAToCABLE button 23
SAT/Cable Channel 37
Satellite Receiver
code list 26
connecting 11
Schedule
menu 32
time 52
Screen Menu 50
Second Audio Program
(SAP) 49
Set
DVD Channel 37
SXlYCABLE Cbannd 37
Time 52
VCR1 Channd 37
VCR2 Channel 37
Setup
GLIDE Plus+ system
menus 16
menu 34
Sharpness 49
Signal ['ype
Cable l_,' 52
I HFiVHP Antenna 52
SKIP button 23
Sleep ['imer 52
Sort menu 31
SOUND button 23
Stere{) 48
SI'OP button 23
1"
Time
Menu 52
Tint 49
Tone Controls 48
3¥oublesbooting 54
TV button 23
U
UHFiVHF Antenna 52
[Jnlock, Parental
Controls 45
V
V Chip 38
Age Based Ratings
38
Blocking Movies 43
Content Themes 38
Variable Output,
Speakers On, Off
49
VCR
code list 26
connecting 12
VCR1
button 23
Channel 37
VCR2
button 23
Channel 37
VOL+ button 23
VOL button 23
W
Warranty 57
WHO ° INP /JT button
23
¥
Y P_ P_
cables 7
jacks 13
61
Page 64

Visit the RCA web site at www.rca.com
Please do not send any products to the Indianapolis address listed in this manual or on the carton. This will only
add delays in service for your product.
IMPORTER: (for Mexico only)
Comercializadora Thomson de M6xico, S.A. de C.V.
Miguel de Cervantes Saavedra 57
Col. Ampliacion Granada
C.P. 11529 M_xico D.F.
Telefono: (55) 25 81 53 20
R.F.C. CTM-980723 KS5
EXPORTER:
Thomson multimedia Inc.
10330 North Meridian Street
Indianapolis, IN 46290
©2002 Thomson multimedia Inc.
Trademark(s)® Registered
Marca(s) Registrada(s)
Printed in USA
TOCOM 15891780
"n.IOMSON
THOMSON !"_
 Loading...