

RCA F26432TX41AD8, F26432TX51AD5, F26433TX51AD5, F26432TX41AD4, F26432TX51AD9 User Manual
...Page 1
Telev,s,o
User's G ,de
Changing Entertainment. A lain.
Page 2
l pQrtant mnfQr ation
WARNING
To reduce the risk of fire or
electric shock, do not expose
this TV to rain or moisture.
To reduce the risk of electric shock, do not remove
cover (or back). No user serviceable parts inside.
Refer servicing to qualified service personnel.
This symbol indicates
"dangerous voltage" inside
the product that presents a
risk of electric shock or
personal injury.
_IL This symbol indicates
important instructions
accompanying the product.
Caution: To prevent electric shock, match wide blade of
plug to wide slot, fully insert.
Attention: Pour _viter les chocs electriques, introduire
la lame la plus large de la fiche dans la borne
correspondante de la prise et pousser jusqQ au fond.
Refer to the identificationlrating label located on the back panel of your
product for its proper operating voltage.
FCCRegulations state that unauthorized changes or modifications to this
equipment may void the user's authority to operate it.
Caution: Using video games or any external accessory with fixed
images for extended periods of time can cause them to be
permanently imprinted on the picture tube (or projection TV picture
tubes). ALSO, some network/program Iogos, phone numbers, etc.
may cause similar damage. This damage is not covered by your
warranty.
Cable TV Installer: This reminder is provided to call your attention to
Article 820-40 of the National Electrical Code (Section 54 of the Canadian
Electrical Code, Part 1) which provides guidelines for proper grounding and,
in particular, specifies that the cable ground shall be connected to the
grounding system of the building as close to the point of cable entry as
practical.
Product Registration
Please fill out the product registration card and return it immediatel_ Returning the card allows us to contact
you if needed.
Keep your sales receipt to obtain warranty parts and service and for proof of purchase. Attach it here and record
the serial and model numbers in case you need them. The numbers are located on the back of the television.
Model No.
Serial No.
Purchase Date:
DealerlAdd resslPhone:
G-LINK, VCR Plus+, C3,PlusCode, GUIDE Plus+, and GUIDE Plus+ Gold are trademarks of Gemstar Development Corporation.
The VCR Plus+ and GUIDE Plus+ systems are manufactured under license from Gemstar Development Corporate and VCR Index Systems t3.V.
respectively.
GEMSTAR AND THOMSON MULTIMEDIA INC. ARE NOT IN ANY WAY LIABLE FOR THE ACCURACY OF THE PROGRAM
SCHEDULE INFORMATION PROVIDED BY THE GUIDE PLUS+ SYSTEM. IN NO EVENT SHALL GEMSTAR OR THOMSON
MULTIMEDIA INC. BE LIABLE FOR ANY AMOUNT REPRESENTING LOSS OF PROFITS, LOSS OF BUSINESS, OR INDIRECT,
SPECIAL, OR CONSEQUENTIAL DAMAGES IN CONNECTION WITH THE PROVISION OR USE OF ANY INFORMATION,
EQUIPMENT, OR SERVICES RELATING TO THE GUIDE PLUS+ SYSTEM.
VCR required for recording.
Page 3

Key Features Overview
Your TV is equipped with features that will add to your TV walching experience. "File tkJlowing
intbrmation sun]marizes a l_w of these teatures. Chapter 2 provides more inl_)rmation about the
rest of the TV's fl, atures and how to use them.
Late Night Conan
On-screen Program Guide
Description: Thv G[ II)E Phls+ system is an on-scwen interactive list of
programs and intbrmation that is built into your TV. You can scroll through the
guide to see what's on and tune directly to that program front tile guide. You
can also browse progrants by category with the sort tl.ature.
When you access the News t>ature, MSNBC will appear in your video window if
it's availal)le tim)ugh your TV.
One-Touch VCR 1,'ecording is another benefit of tile GI_IDE Plus+ syshqn. You
don't have to remember lo program your VCR or use tile 111enus in your VCR lo
set tip a recording.
Requirements:
• Remove the Demo Pin from tile G-LINK jack.
• Contplew the on-screen interactive setup. You'll find detailed instructions in
Chapter 1.
• One-Touch VCR 1,'ecording: You nlus[ connect the G-LINK cable to the TV
and place one of the wands in front of the rentote sensor on the VCR.
• If you have a cable box, connect tile G-LINK cal)le to the TV and place one
of tile wands in Dont of tile remow sensor on the cable box.
V-Chip: Parental Controls
Description: You can block programs and movies by content, age-based
ratings, and/or movie ratings.
Requirements:
• Set Lip the Paretztal Ct)tzlrol.s 111t.nuin the TV's main menu (Chapter 2 has
details).
• The broadcasters nmst use tile rating system when they send tile program to
your TV in order tk)r your TV lo block the program.
Page 4

(This page intentionally left blank)
2
Page 5
TabW@ @f C@nt@nts
Introduction: Key Features overview ..................................................... 1
On-screen Program Guide ......................................................................................... 1
V-Chip: Parental Controls ........................................................................................... 1
Chapter 1: Connections & Setup .............................................................. 5
Things to Consider Before You Connect ......................................................................... 6
Protect Against Power Surges ................................................................................... 6
Protect Components from Overheating ................................................................... 6
Position Cables Properly to Avoid Audio Interference ............................................ 6
Important Stand and Base Safety Information ........................................................ 6
Use Indirect Light ....................................................................................................... 6
Demo Pin .................................................................................................................... 6
Choose Your Connection .................................................................................................. 7
Connection: TV + VCR....................................................................................................... 8
Connection: TV Only ......................................................................................................... 9
Connection: TV + VCR + Satellite receiver ................................................................... 11
The Front of Your TV ...................................................................................................... 12
Why You Should Connect This G-LINK Cable ............................................................... 13
How to Find the Remote Sensor ............................................................................. 13
Placing the G-LINK Wands ....................................................................................... 13
Complete the Interactive Setup ..................................................................................... 15
Set the Menu Language .......................................................................................... 15
Complete Auto Channel Search .............................................................................. 15
The GUIDE Plus+ System Setup ................................................................................ 15
What to Expect ............................................................................................................... 19
The Buttons on the Remote Control ............................................................................. 20
Chapter 2: Using the TV's Features ........................................................ 21
About the GUIDE Plus+ System ..................................................................................... 22
Downloading Data ................................................................................................... 22
Getting In & Out of the GUIDE Plus+ System ......................................................... 23
The GUIDE Plus+ System Menus .............................................................................. 23
Grid Guide ................................................................................................................ 23
Sort ............................................................................................................................ 25
News .......................................................................................................................... 26
Schedule .................................................................................................................... 26
Messages ................................................................................................................... 27
Setup ......................................................................................................................... 28
Channels ................................................................................................................... 28
How to Get More Information About an Advertisement or a Program ............... 29
GUIDE Plus+ Menu Items ............................................................................................... 29
Channel Banner .............................................................................................................. 30
3
Page 6
bJe of C@ntents
Parental Controls and V-Chip ......................................................................................... 30
How V-Chip Works ................................................................................................... 31
V-Chip TV Rating Limit ............................................................................................. 32
Blocking Specific Content Themes .......................................................................... 34
Viewing Specific Content Themes ........................................................................... 35
V-Chip Movie Rating Limit ....................................................................................... 35
V-Chip Unrated Program Block ............................................................................... 37
Channel Block ........................................................................................................... 37
Front Panel Block ..................................................................................................... 37
Lock/Unlock Parental Controls ................................................................................ 38
Chapter 3: Using the TV's Menu System ............................................... 39
How to Use the Different Types of Menus and Control Panels .................................. 40
Menus ....................................................................................................................... 40
Control Panels .......................................................................................................... 40
Audio Menu .................................................................................................................... 42
Picture Quality Menu ..................................................................................................... 42
Screen Menu ................................................................................................................... 43
Using Closed Captioning ................................................................................................ 43
Closed-Caption Modes ............................................................................................. 43
Channel Menu ................................................................................................................. 44
Time Menu ...................................................................................................................... 44
Other Information: ................................................................................. 45
Troubleshooting .............................................................................................................. 46
Care and Cleaning .......................................................................................................... 49
RCA TV Limited Warranty .............................................................................................. 49
Accessory Order Form .................................................................................................... 51
Index ................................................................................................................................ 53
4
Page 7
t
Connections & Setup
Chapter Overview:
• Things to Consider Before You Connect
• Choose Your Connection
• Connections
• The Front of Your TV
• Why You Should Connect This G-LINK Cable
• Plug in theTV
• Put Batteries in the Remote
• How to Use the Remote Control to Complete the
Interactive Setup
• Turn on the TV
• Complete the Interactive Setup
• Buttons on the Remote Control
Changing Entertainment.
Graphics z_secl _ithi_z tbis publiccttio_z at?.fiJr r_greJe_ztatio_z o_zl_'. 5
Page 8
C@nnections Setup
Things to Consider Before You Connect
Protect Against Power Surges
• Connect all components betore you plug any of their power cords into the wall outlet.
• Turn ofl the TV and/or component betk)re you connect or disconnect any cables.
• Make sure all antennas and cables are properly grounded. Reti,r to the Important
Sali, guards sheet packed with your TV.
Protect Components from Overheating
• Don't block ventilation holes on any ot the components. Arrange the components so that
air can circulate t_ceely.
• Don't stack components.
• When you place components in a stand, make sure you allow adequate ventilation.
• If you connect an audio receiver or amplifier, place it on the top shelf so the heated air
t:rom it won't t]ow around other components.
Position Cables Properly to Avoid Audio Interference
• Insert each cable firmly into the designawd jack.
• If you place components above the "I'_, route all cables down the side of the back ot the
7
"F_ instead (7t straight down the middle of the back (7t the TV.
• If your antenna uses 300-ohm twin lead cables, do not coil the cables. Also, keep the twin
lead cables away from audio/video cables.
Important Stand and Base Safety Information
Choosy the location tor your TV carefully. Place the TV on a stand or basv/hat is ot adequate
size and strength to prevent the TV t_combeing accidentally tipped over, pushed off, or pulled
off. This could cause personal injury and/or damage the TV. Reter to the Important Sal_.guards
sheet packed with your TV.
Use Indirect Light
Don't place the TV where sunlight or roonl lighting will be directed toward the screen. Use soft
or indirect lighting.
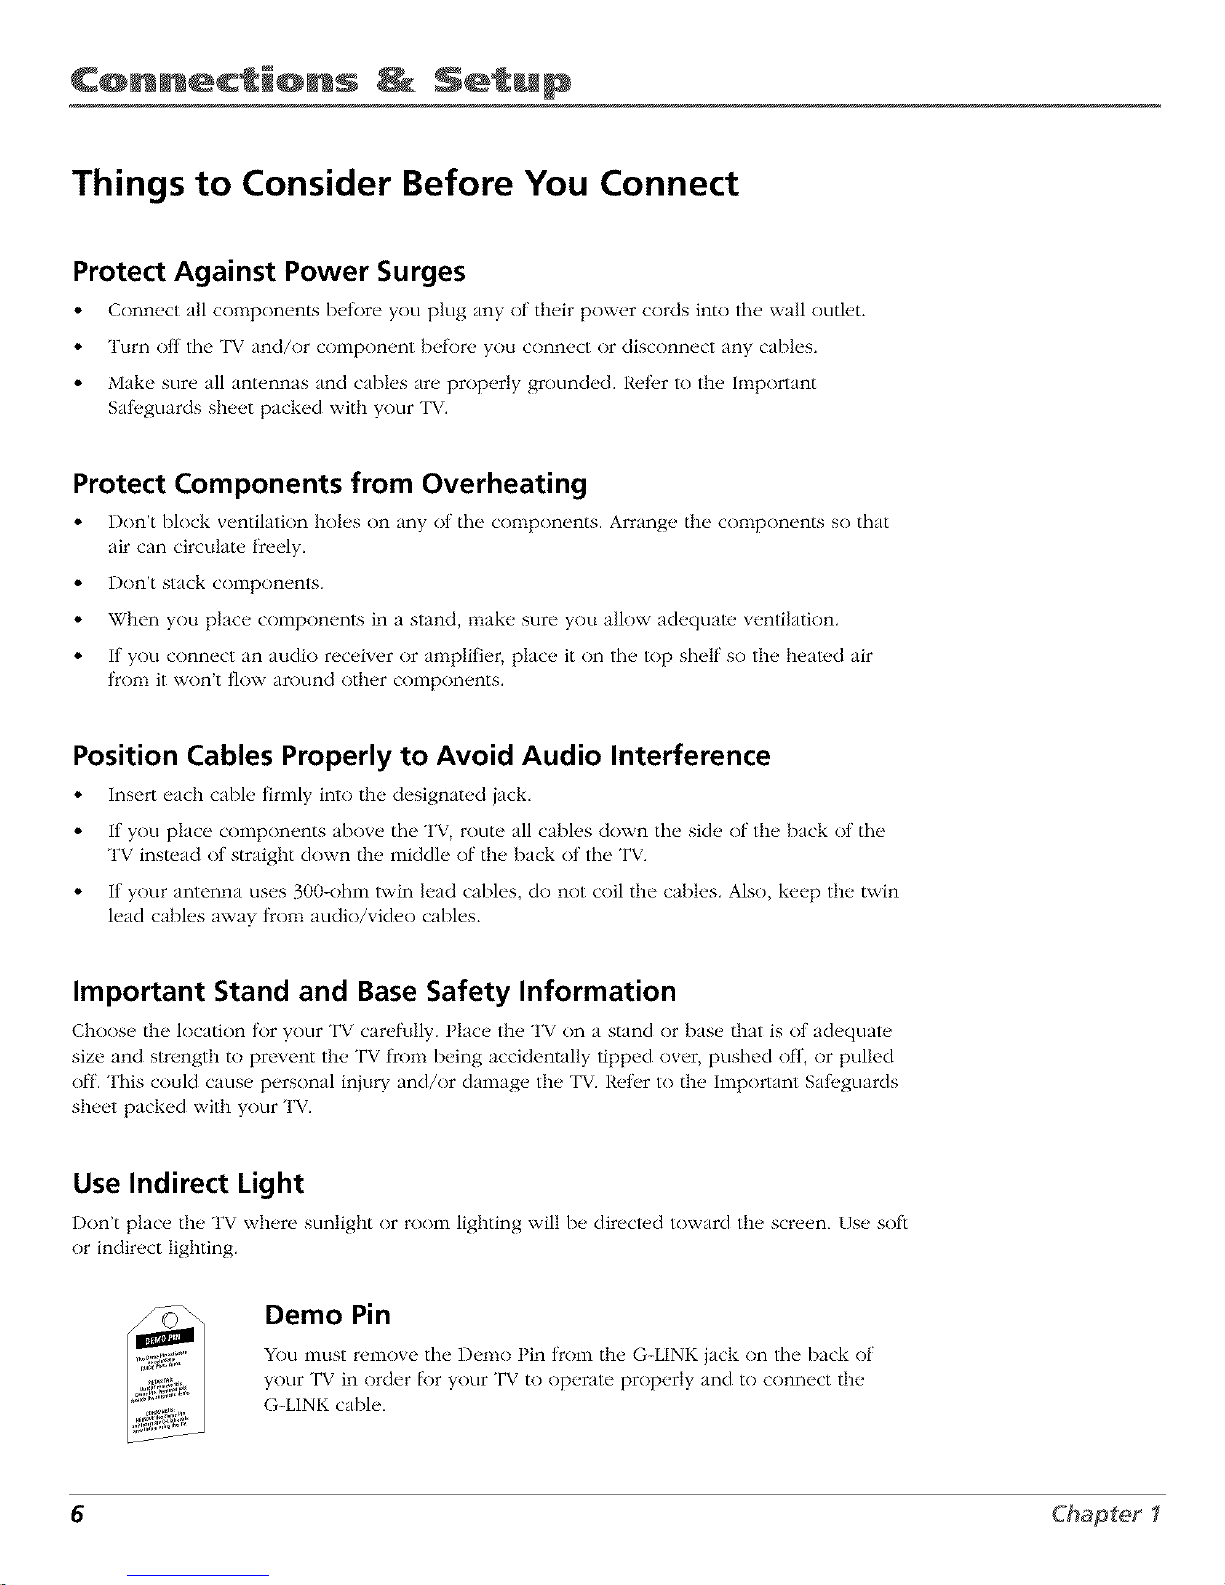
Demo Pin
YOUmust remo_,e the Demo t in from the G-LINK jack on the back of
your TV in order lk)r your TV to operate properly and to connect the
G-LINK cable.
6 Chapter I
Page 9
C@nnections Setup
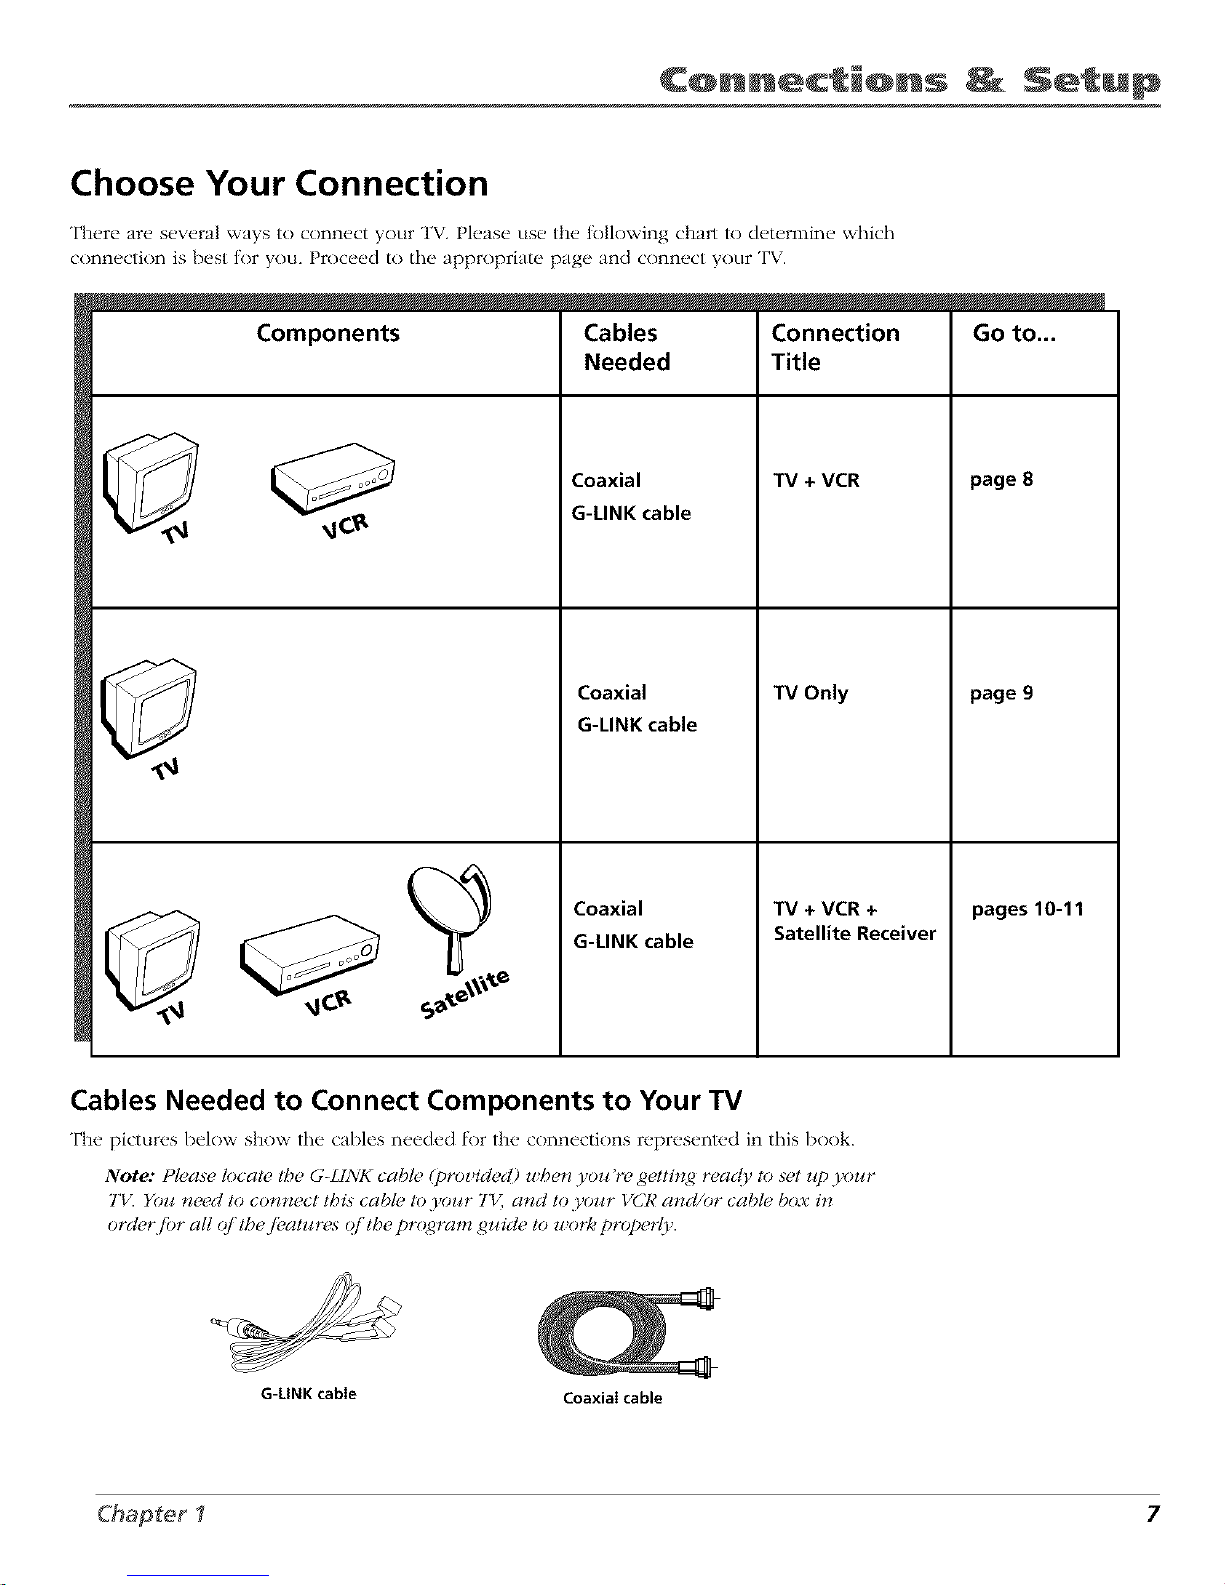
Choose Your Connection
There are several ways to connect your TV. Please use the lk_llowing charl to determine which
connection is best tor you. Proceed to the appropriate page and connect your TV.
Components
Cables
Needed
Coaxial
G-LINK cable
Coaxial
G-LINK cable
Connection
Title
TV + VCR
TV Only
Coaxial
G-LINK cable
TV + VCR +
Satellite Receiver
Go to...
page 8
page 9
pages 10-11
Cables Needed to Connect Components to Your TV
The pictures I_elow show the cables n_,ecled lk_r the connections represented in this Ix)ok.
Note: t lease tocat_ the G-Lh'_7_ cab!e (proz ided) u,he_z 3 oz_ re getting reac(9 to s_t z_p3 our
7'1_: You need to connect this cab& to 3'our 7'1_ and to your VCR and/or cable box in
orcler fiJr all (f tbe /_,atures q/'the pr(_ram guide to u,ork proper(7.
G-LINK cable
Coaxiaicable
Ghapter I 7
Page 10

C@nnections Setup
TV (back panel)
CABLE/
G-LINK ANTENN_
VCR
AUDIO
0 OUT? _L I, FBOMANI CH3
FromCable,
Cable Box,
orAntenna
Connection: TV + VCR
1.
2.
*
Connect your TV to your VCR
Connect a coaxial cable to the CABLE/ANTENNA jack on your TV and to the Output Jack on your
VCR (sometimes labeled OUT TO TV).
Connect cable or antenna to your VCR
Connect the coaxial cable fronl your cabl_, outl_.t, cable box, or antenna to the Input Jack on your
VCR (sometimes labeled IN FROM ANTENNA or IN FROM ANT).
Connect the G-LINK cable to the TV
A. If you haven't already done so, remove the Demo Pin Dora the G-LINK jack.
B. Connect the G-LINK cable to the G-LINK jack on the TV. Next step, place the wands of the G-
LINK cable to work with your VCR (instructions are on p. 13).
Go to page 13
8 Chapter I
Page 11
C@nnections Setup
TV (back panel)
CABLE/
l_From Cable
or Antsfln8
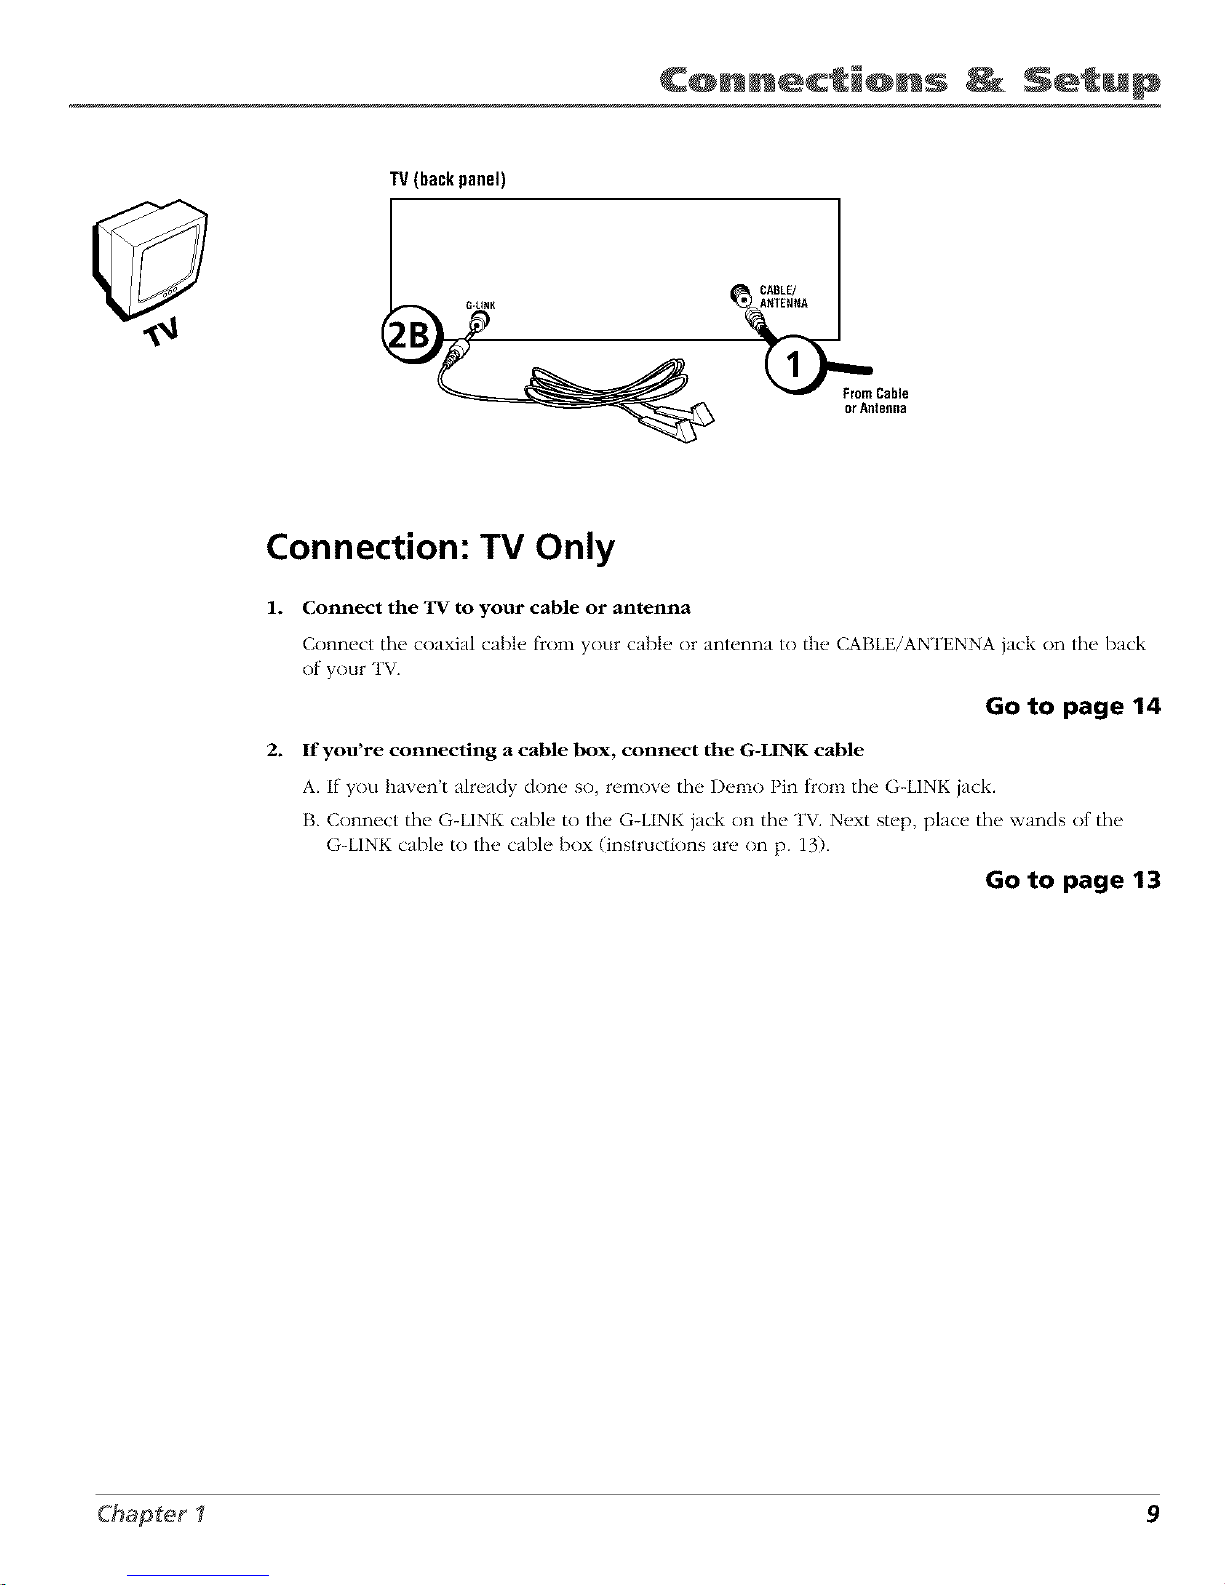
Connection: TV Only
1. Connect the TN to your cable or antenna
Connect tile coaxial cable t_comyour cable or antenna to the CABLE/ANTENNA jack on the back
of your TV
Go to page 14
2. If you're connecting a cable box, connect the G-LINK cable
A. If you haven't already don(, so, r_,move the Demo Pin t_om the G-LINK jack.
B. Connect the G-LINK cable to lhe G-LINK jack on the TV. Next step, place the wands of the
G-LINK cable to the cable box (instructions are on p. 13).
Go to page 13
Chapter I 9
Page 12
C@nnections _ Setup
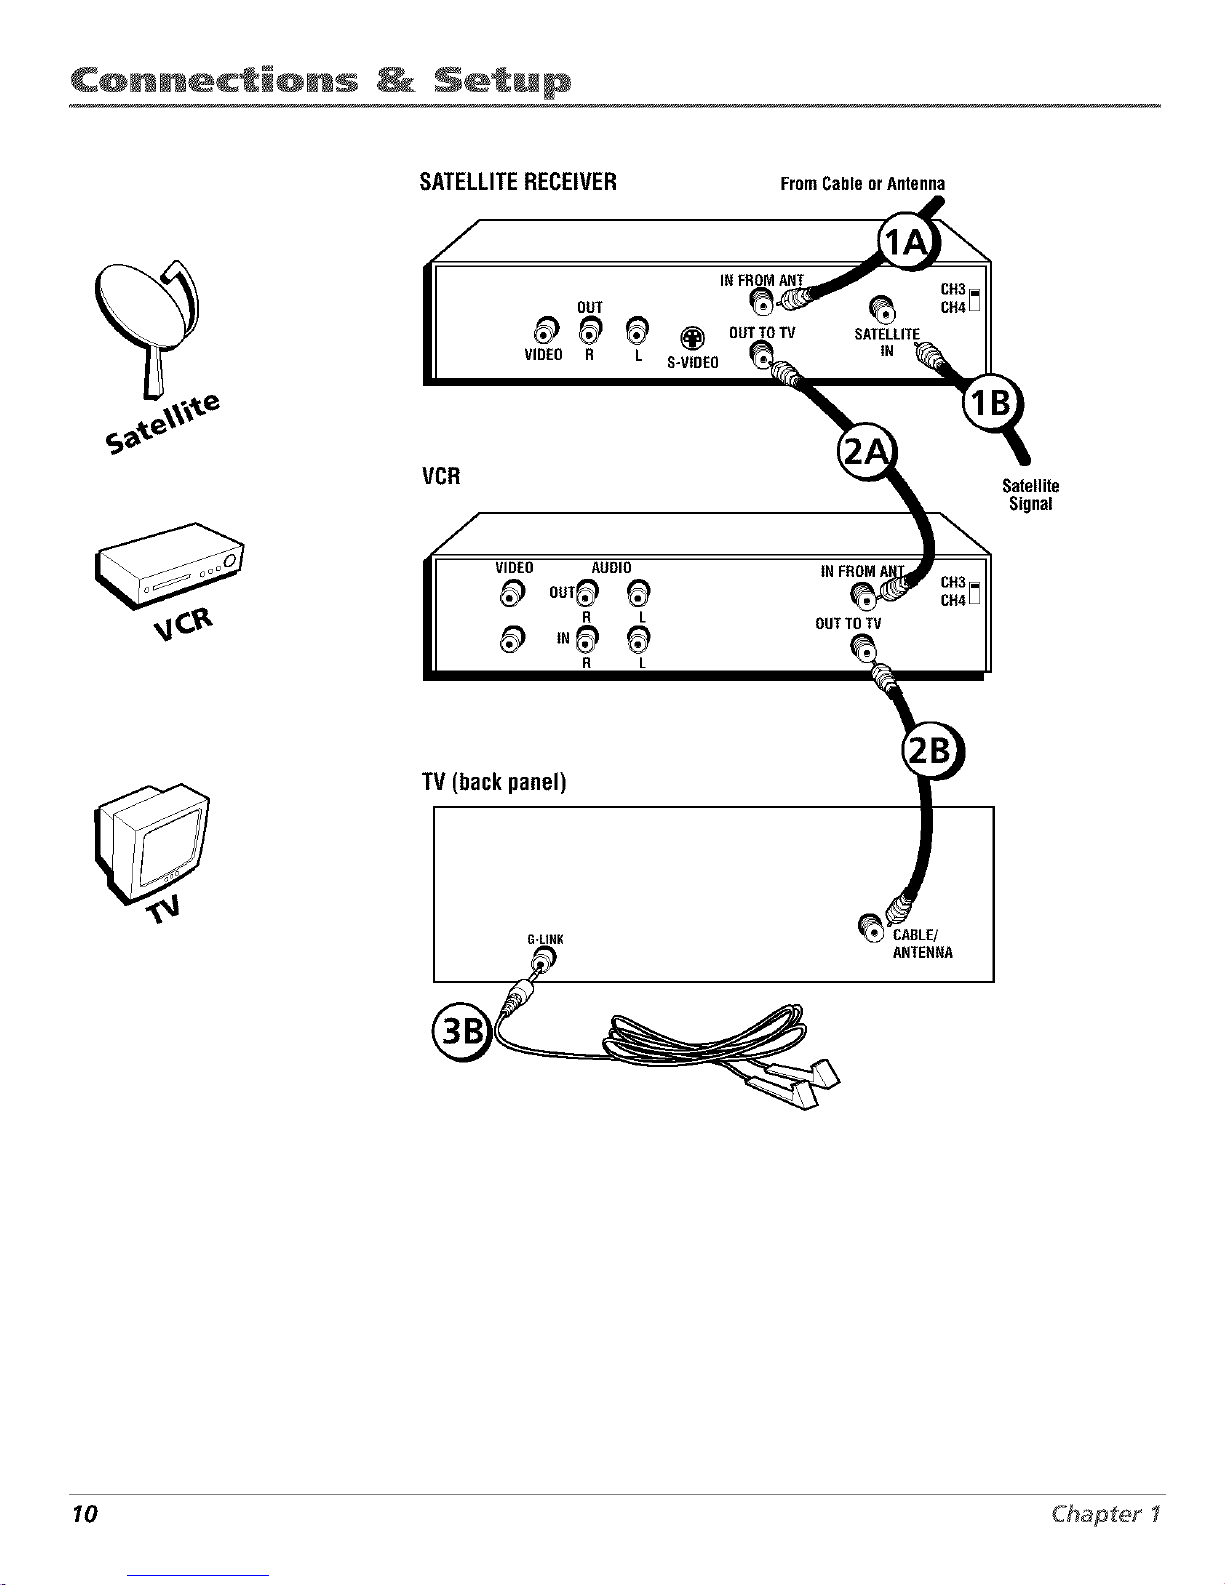
SATELLITERECEIVER FromCableorAntenna
VCR
OUT
VIDEO R L
INFROMANT
i_ OUTTOTV
S-VIDEO
SATELLITE
IN
Satellite
Signal
VIDEO AUDIO
_OUT_
R L
_,N_
R L
OUTTO W
TV (backpanel)
ANTENNA
10 Chapter I
Page 13
C nnections Setup
Connection: TV + VCR + Satellite Receiver
1. Connect coaxial cables to the Satellite Receiver
A. Connect the coaxial cable t_()m your cable nudet, cable box, or antenna to the Input Jack
on your satellite receiver (sometimes labeled IN FROM ANT).
I3. Connect the coaxial cable t_nm your satellite dish antenna to the Input Jack on your
satellite receiver (sometimes labeled SATELLITE IN),
2. Connect the Satellite Receiver to the VCR and to the TV
A. Connect a coaxial cable to the Output Jack (sometimes labeled OUT TO TV) on the
satellite receiver and to the Input Jack on the VCR (sometimes labeled IN FROM ANT),
I3. Connect a coaxial cable to the Oulput Jack on the VCR (sometimes labeled OfT TO TV)
and to the CABLE/ANTENNA jack on the TV.
3. Connect G-LINK cable
A. If you haven't done so, remove the Demn Pin tknm the G-LINK jack.
I3. Connect the G-LINK cable to the G-LINK jack on the TV. Next step, place the wands of
the G-LINK cable to work with your VCR (instmctinns are on p. 13).
Go to page 13
Chapter I 1 1
Page 14

C@nnections Setup
The Front of Your TV
Front Panel
If you cannot locate your r_'illOh" yOLl can LIS_"the" bLlttons of your ]'V to operate"
many of the TVs t_.atures.
MENU Brings up the Main menu. When in the menu system, it selects
highlighted items. Also returns you to the previous menu. Press and hold MENU
lbr two seconds to access the G[IDE Plus+ system.
CH v Scans down through tile current channel list. When you're using tile TV's
menkl system, it acts like tile arrow down button on tile remote control.
CH A Scans up through tile channel list. When you're using tile TV's menu
system, it acts like tile arrow tip button on tile remote control.
VOL-- Decreases tile volHine. When you're using tile TV's lllentl system it acts
like the lett arrow button on the remote conrail.
VOL + Increases the volume. When yotl're tlsing the TV's illentl svstel]] it acts
like tile right arrow button on tile remote control.
POWER Turns tile TV on and off:.
12 Chapter I
Page 15

C@nnections Setup
Why You Should Connect This G-LINK Cable
The G-LINK cable enables the GUIDE Plus+ system (the on-screen interactive program guide) to
wnrl,: with your VCR and/or cable box.
Cable Box- If your "1"*7is connected to a cable box you must connect the G-LINK cable to
receive TV program listings {'or your area, and to tune directly to a channel when the program
guide is on your TV screen.
VCR-- It your TV is connected to a VCR and you don't connect the G-LINK cable, one-touch VCR
recording won't work. The other fl,atures nt the guide will work prnperly.
G_LINK cable
G_LINK wands
How to Find the Remote Sensor
You have to place the G-LINK wands in f_contof tile remote sensor on tile VCR and/or cable bnx.
Some cable boxes and VCI,'s have tile remote sensor labeled on the unit, If tile remote sensor
isn't labeled on your VCR and/or cable box, you need to use tile remote control that came with
tile VCR and/or cable box to locate the sensor.
]*
2.
3.
Turn off the VCR and/or cable box.
Hold the remote control (not the one that came with your TV, but the one that came with
the cable box and/or VCR to which you're attaching the G-LINK cable) so that it is touching
the trnnt nt the component.
Slowly move tile remote control across the lrnnt nt the component (VCR or cable box) while
you press tile power button on and off, YOu must press and release the power bumm each
time you move the remote (holding down tile button won't work).
......../
II II
4. When the component turns on, you've located the remote sensor.
If you don't have both a
cable box and a VCR
connected to your TV,
just coil the cable of the
extra G-LINK wand with a
twist tie and leave it
behind the TV
Placing the G-LINK Wands
Place the G-LINK wands in front of the remote sensor on your VCI,' and/or cable box
approximately one inch away from tile remote sensor (see instructions below).
TV (bagk panel)
.... @ _,%%
Chapter I 13
Page 16
C@nnections _ Setup
Plug in the TV
Plug the end of the power cord into the wall outlet. Match the wide blade nt tile
plug with the wide slot in tile outlet. Insert the plug completely into
tile outlet.
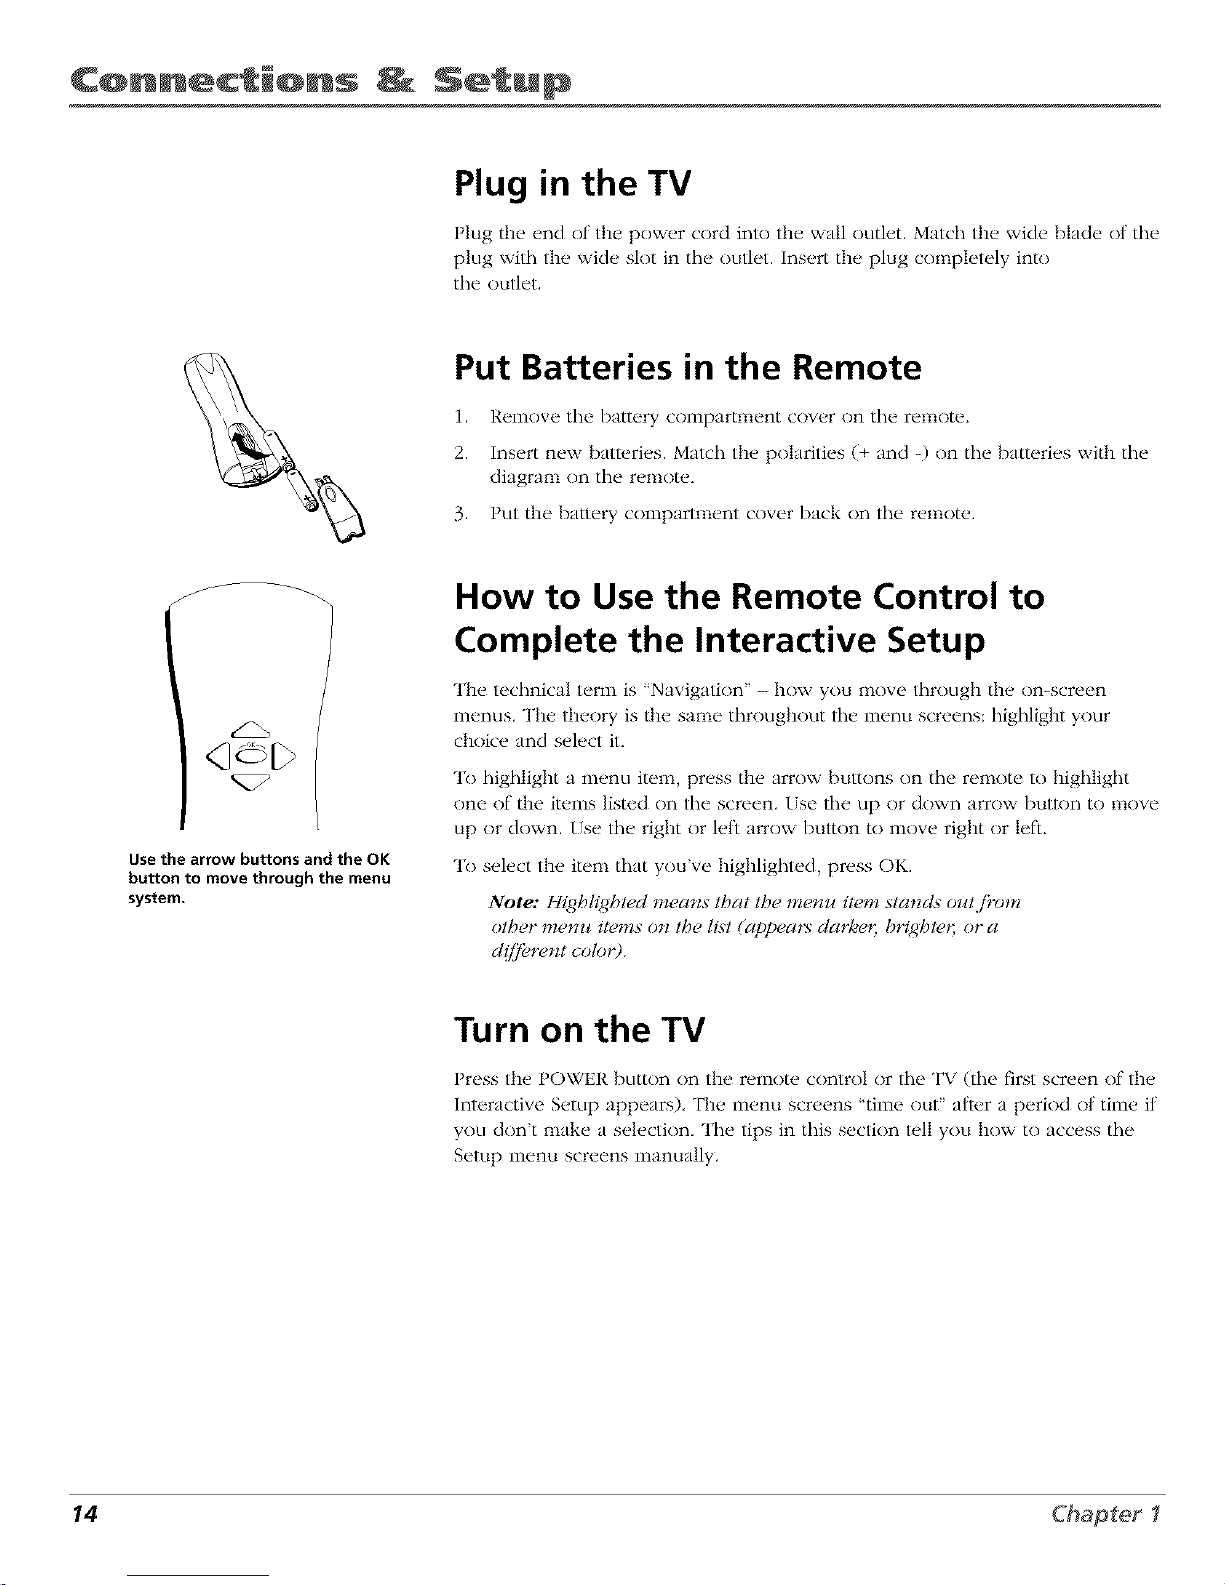
Put Batteries in the Remote
1. Remove tile battery compartment cover on tile remote.
2. Insert new batteries. Malch the polarities (+ and -) on the batteries with the
diagram on tile remote.
3. Put the ba/lery compartment cover back on tile remote.
d225
Use the arrow buttons and the OK
button to move through the menu
system.
How to Use the Remote Control to
Complete the Interactive Setup
The technical term is "Navigation" - how you move through the on-screen
menus. The theory is the same throughout tile menu screens: highlight your
choice and select it.
To highlight a menu item, press the arrow buttons on tile remote to highlight
one (7t'/he items listed on tile screen, tse tile Lip or down arrow button to 111ove
up or down. [se tile right or left arrow button to move right or leti.
To select the item that you've highlighted, press OK.
Note: Highli_,4htecl*nearts that the me nu item stancl._ outji'om
other menu items o* the li._t(appeat:_ clarke,; b*v_@tet;or a
d(/]brent coto_9.
Turn on the TV
Press the POWER button on the remote control or lhe TV (tile first screen of the
Interactive Setup appears), The menu screens 'time nut" after a period of time if
you don't make a selection, "llle tips in this section lull you how to access tile
Setup menu screens manually.
14 Chapter I
Page 17

C nnections Setup
Complete the Interactive Setup
The menu system in your TV allows the TVs fl, atures to work properly. In this
Tip book, we call it the 'interactive setup'/)ecause the TV asks you questions, you
To access the setup menus manually, answer, and the TV makes the appropriate adjustments. The first time you turn
pressMENU and choose Setup. on vour TV the setup screens appear automatically.
Set the Menu Language
The first part of the SF,7_/Pasks you to select your preferred language for the
menu system.
1. Highlight your preterred language tnr the menu system.
2. Press OK to select that language.
Complete Auto Channel Search
The next part ()f the SETZ_) asks you if you want the TV to search for all
channels viewable through your antenna or cable TV system. This is sometimes
called "auto programming."
1. Press OK to tell the TV to begin searching R)r channels. A progress report
appears on the screen.
2. When the screen on the TV tells you the search is complete, press OK (the
+
tirst GUIDE I lus system setup screen appears).
Note: [/'9,oz¢skip AuIo Cbannel Search **ow,you can access it lat*,r
Ibroz¢gh the Cbannd m_ *m. _k_ Cbapter 3 jbr more delait,_.
The GUIDE Plus+ System Setup
The G{IDE Plus+ system is an on-screen interactive program guide that lists
Tip what shows are on TV in your area. In order to receive program listings, you
If you move to a new zip or postal
code, or if any of your information
changes, you need to access the
setup screens from the TV's main
menu-- press MENU, choose GUIDE
Plus+ Menu, and choose GUIDE
Plus+ Setup.
need to complete the following steps.
The G-LINK cable nmst be connected to the back of your TV, and the wands
must be placed in tront nt the remote sensor on the cable box and/or x,CR in
) + .order tnr the GLIDE I lus system to work (go back to p. 13 tnr details).
+ .1. You should see a screen displaying the features of the Guide I lus system.
I tess OK to continue.
2. The next screen asks you to locate setup inaterials and hardware. Once you
have done this, press OK to continue.
C_hapter I 15
Page 18
C@nnections Setup
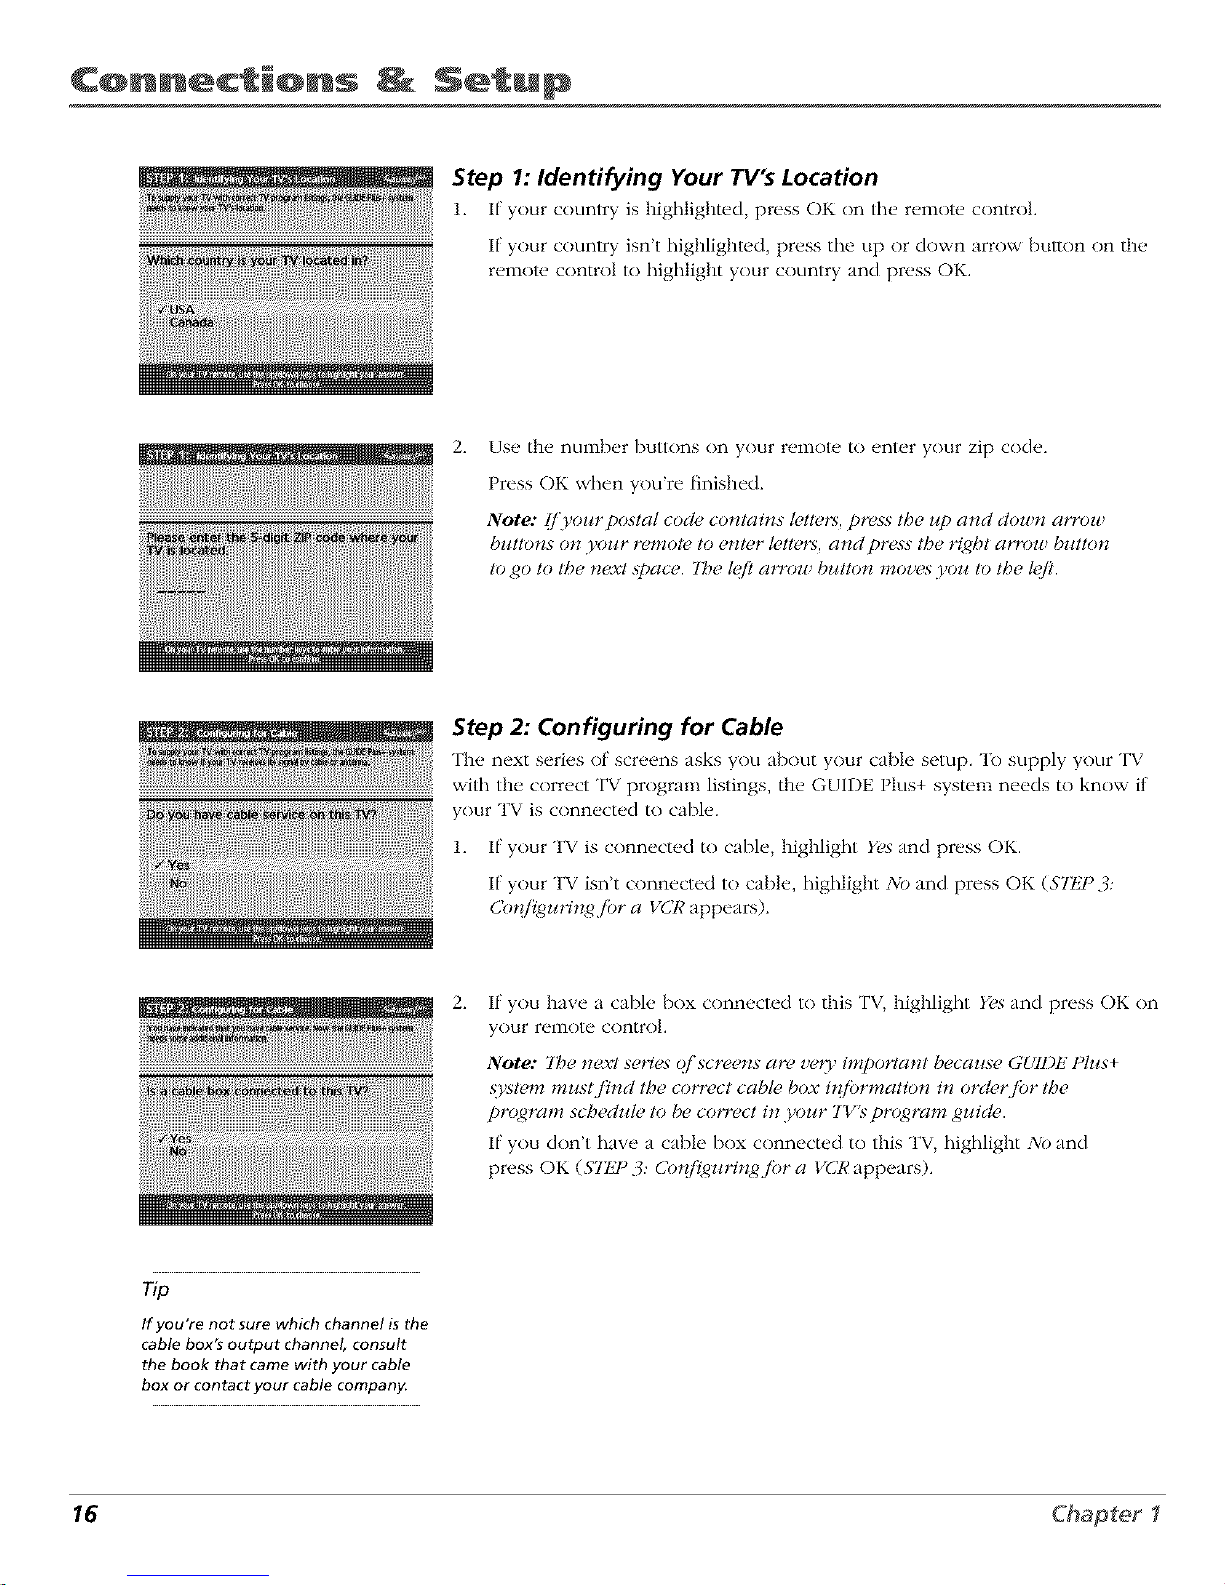
Step 1: Identifying Your TV's Location
1. If your country is highlighted, press OK on the remote control
If your country isn't highlighted, press tile up or down arrow button on tile
remote control to highlight your country and press OK.
2.
Use tile number buttons on your ren_ole tn enter your zip cnde.
Press OK when you're finished.
Note: [/'yoz¢rposlal code contains l_,lte_:_,press the z¢pand down arrow
bz_ttons on 3'olaf remote to enter l_,tt*,rs,and press the _v_@tarrow button
to go to the next .space. 7be lgfl a,row bz¢tton *noz,esyou to the lgfl.
Step 2: Configuring for Cable
The next series of screens asks you about your cable setup. "Ib supply your TV
with tile correct TV program listings, tile GUIDE Plus+ system needs to know if
your TV is connected to cable.
1. If your TV is connected to cable, highlight Yes and press OK.
If your TV isn't connected to cable, highlight NO and press OK (STt£P.:J:
Co_il_gz_rin/4.ibr a I/%'Rappears).
2.
If you have a cable box connected to this TV, highlight Y(,s and press OK on
your remote control.
Note: 7be next series o/'screens are z,e_3' impo_qant because G{,gl)t_ IOh¢s+
._Fst*,mmz¢stj'ind the correct cab!*, box ir{fiJrmation in orcler/br the
program scb#ghd*, to be cotwect in .yoz¢r 7Y_ program gz¢icl*,.
If you don't have a cable box connected to this TV, highlight No and
press OK (ST/J °3: Co*d_J_Hngjbr a VCR appears).
If you're not sure which channel is the
cable box's output channel, consult
the book that came with your cable
box or contact your cable company.
16 Chapter I
Page 19

C@nnections Setup
,
Highlight tile channel to which you have to tune your TV in order to see
cable programming, and press OK (a screen appears reminding you to
connect your G-LINK cable to your TV and cable box).
Note: Cham_el 0)_ is the most common.
4. Highlight your brand of cable box, and press OK.
If your brand isn't listed, highlight Not Listed and press OK.
iiiiiiiiiiii/iiiiii_iii_ii{i!iiii!i¸
5,
Make sure your cable box is on.
Tune the cable box to channel 02 (use the remote control that came with
your cable box, or press the channel buttons on the cable box).
Press OK (the GUIDE Plus+ system starts testing codes).
lmportant Note: When code testing Ls ir_p_%_ress, don't toucb)'our 7'K
VCR, cable box or at(}, (f tbe remote controLs j_)r tbese products.
,
Look at your cable box. It it is still on and changed to channel 09, tile test
was successful. Highlight Yes', and press OK (Slt/I):_: Co_fi_z_ri_zg.fiJra VCR
appeat:O.
It your cable box didn't change to channel 09 or turned itself ofl, you have
two choices: ?ViJ_'md 7&st,this code_again.
70st this code again: If you think tile TV, the cable box, or any of the
remote controls might have been touched or bumped during the test,
highlight Test this cod(, a<,4ain and press OK (tile GUIDE Plus+ system runs
tile same set of codes).
3)iz. If you don't think the test ,,,,;asinterrupted, highlight 3)k_and press OK
(GUIDE Plus+ system tests the next code).
Repeat tile previous instructions until the TV finds tile correct cable box
code. Follow the instructions on tile screen.
Note: I/'the TV can t.find )our cable box code, a troubleshootim4
checklist appeat:_. Cat @d(y re_,ieu, each checklist a*M /bllow the
i*zstrz_ctions or* the scree**.
Chapter I 17
Page 20
C@nnections Setup
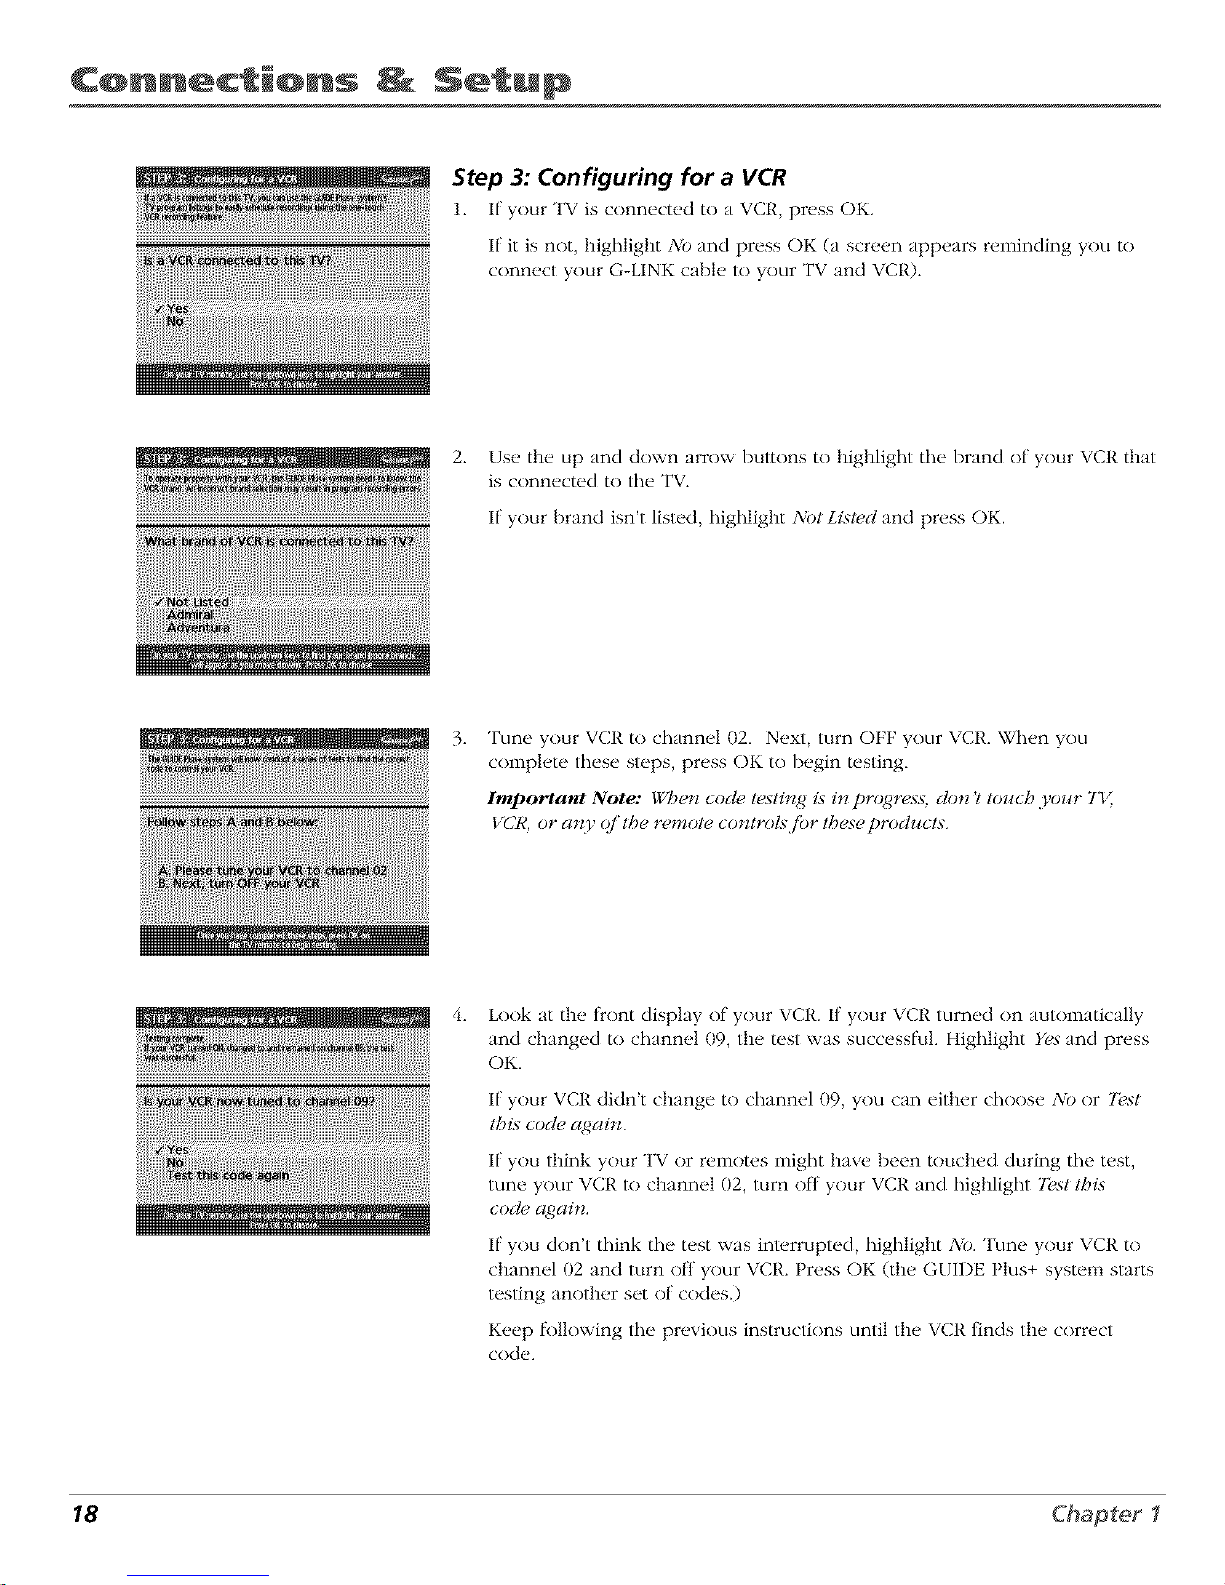
Step 3: Configuring for a VCR
1. If: your TV is connected to a VCt{, press OK.
If:it is not, highlight 3/0 and press OK (a screen appears reminding you to
connect your G-LINK cable to your TV and VCP.).
2. Use the up and down arrow buttons to highlight tile brand of your VCR that
is connected to the TV.
If:your brand isn't listed, highlight Not Listed and press OK.
3.
Tune your VCR to channel 02. Next, turn OFF your VCR. When you
complete these steps, press OK to begin testing.
Important Note: When cod*_te.;ting i._in progre.;s, don't toz_ch yoz_r 7'_
I/CR, or a_zy ql't,Se remote controts fiJr these prodz_cts.
lit.
Look at the front display of your VCR. If your VCR turned on automatically
and changed to channel 09, the test was successful. Highlight Yes"and press
OK.
If:your VCR didn't change to channel 09, you can either choose A_bor 70st
this cocl_,a_,daDz.
If you think your TV or relnotes might have been touched during tile test,
tune your VCP. to channel 02, turn ofl your VCR and highlight 7>st this
code again.
If:you don't think tile test was interrupted, highlight NO. Tune your VCR to
channel 02 and turn off your VCtL Press OK (the GUIDE Plus+ system starts
testing another set of codes.)
Keep lk)llowing tile previous instructions until the VCR finds the correct
code.
18 Chapter I
Page 21

C@nnections Setup
Tip
Leave your cable box turned ON to
download program information_
Leave your VCR turned OFF to record
programs,
Note: [/'tbe G_)E Ph_s+ ,_>_temcan't locate tbe co!Tect codejbr the VCR,
a ti._t(_/'trouble._booti_z_,_inst_ctio_s appear._ Io betpyoJ_ bq/breyoJ_ t_y
a_,qain.
• 7_7>,VCR co_d_quration again: repeal VCR setup.
• 7k,st alternate codes: lests selected brands and ij'tbt._jkttl._-,tbe test
continues witb all codes ill the ._FMem.
• Skip tbis step: the ._Fslem won't be able to automatically schedule
pr_4_rams to record on your VCR.
Step 4: Confirming Your Settings
1. Check t() nmke surv all settings are complete and c()rrect. If all settings ar_.
complete, highlight Yes, end.wtJq)and press OK. If your cable box and/or
VCR code testing failed, you should see IN(20_'III)LETt_where the cable
box and VCR codes are listed. Once setup is complete, additional
screens appear.
If any settings are incomplete or inc()rrect, highlight 3;b, r_'peat sempprocess
and press OK. Follow the instructions on the screen.
2. You can choose to view a demn of the GUIDE Plus+ fl.atures, which may
rake a few minutes to load. It you don't want to see the demo right now,
press OK to watch TV.
What to Expect
The next time you turn on your TV, the G[IDE Plus+ systum will appear on the
screen. The lbllowing examples explain what you might see:
• If all of the program infk)rmation has been sent to your TV, the GUIDE Plus+
system appears with all ()f y()ur TV program listings.
• If the program inlk)rmatinn hasn't been sent t() your TV yet, an ()utline of
the GUIDE (without TV pr()gram listings) will appear on the screen.
Program inlbrmation is usually sent to your TV at night.
• If the TV detected that you have multiple cable companies in your area,
STEP 5: Choosing Your Cbannd LineJq) appears.
Features of the GLIDE Plus+ syslum are explained in Chapter 2.
"lk) clear the guide from your screen, press CLEAR or GI_IDE on the
remote contrnL
Chapter I 19
Page 22

C nnections Setup
POWER
0
VOL GO CHAN
GUIDE INFO
© Zb©
O K2;>O
MENU CLEAR
'0 '(2)
00
,0 00
t 00
The Buttons on the Remote Control
0-9 (Number buttons) Enter channel numbers and time settings directly
thrnugil tile remote cnntroL
To enlcr a two-digit channel, press tim two digits. ]b enter a three-digit channel,
press and hold the first digit tk)r two seconds until two dashes appear to the
right of tile number, then add the second two. Example: to rune to channel 123,
press and hold 1 tk/r two seconds, press 2, then press 3.
Arrow buttons (up, down, left, right) Press the arrow buttons to move
through tile on-screen menu system.
CH (up and down) buttons Scan up or down through tile current channel
list. Press once to change tile cimnnel up or down; press and i_nld to continue
changing channels.
CLEAR Removes any menu or display I_com tile screen and returns you tn
TV viewing.
GO BACK Returns you to tile previous channel.
GUIDE Press G{IDE to make tile G{IDE Plus+ system appear on tile screen.
Press GUIDE again to remove it i_cnm the screen.
INFO Displays channel information.
INPUT Changes your TV to its video input channel. "File Video Input Cilannel
is tile channel your TV nlos[ tune to in order fi_r you to access a cnmponcnt
that's connected to your TV's VIDEO IN and AUDIO IN jacks. Example: to view
a tape t_cnm your camcorder, connect the camcorder to tile TV's AUDIO and
VIDE() jacks with tim audio/video cables.
MENU Displays the TV's Main menu. You can also press and hold for 2
seconds to display the GLIDE Plus+ system.
MUTE Lowers the volume to its minimum le;el. I ress again to restore ;olume.
OK When a lllenH is on tile screen, press OK to select tile item that
is highlighted.
POWER Turns tile "rv on and off,
SKIP If you press this button betk>re you change tile cllannel, the TV waits 30
seconds and automatically goes back to tile original channel. Eacll time you
press SKIP, you add 30 seconds (Le, if you press SKIP two times betk_re you
cllange tile channel, tile TV waits 60 seconds and aulonlatically turns back to tile
original channel).
VOL (up and down) buttons Decrease or increase tile TV's volume.
20 Chapter f
Page 23

2
Using the TV's Features
Chapter Overview:
• All About the GUIDE Plus+ System
• The Channel Banner
• Parental Controls and V-Chip
Changing Entertainment.
Grat)bics used u_ith#z tbis publicatio_z at_,./_Jr repre_e_ztatio_z o_z/_'. 21
Page 24

Using the Features
Action Video Program Menu
buttons window information options
Promotional Channel
information listings
About the GUIDE Plus+ System
The GUIDE Plus+ system is an interactive on-screen program guide that lists TV
schedules tk)r your area and allows your TV direct control of a cable box and
VCR. You nlust first set up tile GUIDE Plus+ Menu system in order to view lhis
on-screen program guide (see Chapter 1 Ik)r details). Press GUIDE to bring up
the GLIDE Plus+ system.
There are six sections of tile GLIDE Plus+ sysl_.m:
• A row of Action buttons at the top of tile screen (1, 2 and 3)
• Vide() window
• Program information
• A row of menu options (Grid, &J,q;Ne'u E Scb#duk,, Messu/des,
Channe& Setzcp)
• Channel listings
• Promotional intk)rmation
Note: 7be G{,JI)ti Ptus+ ._Fslemscreens llb_strated in tbi._ book are
represerttations q}'wbat 3'ou are ilk@' to see. Not all cbar_nel._;pro£)rams;
and GSql)t,2Plus+ #{f!Jrmation depicted will be az.'ailuble in your area.
NewjL.utures and options can be downloaded to the G{,ql)t£ Plus+
._Fstem, so these too are subject to change.
Tip
Since the program information provided
by the GUIDE Plus+ system is based on
your locale, you will need to run Setup
again if you move to a different zip or
postal code.
Downloading Data
The GUIDE PIus+ system is not awtilable until it completes its first download of
program inl_)rmation. When the power is turned off, tile TV locates a 'host
channel" that carries GLIDE Plus+ system data containing program schedule
and channel lineup inlkmamtion. A channel lineup is tile list of stations and their
respective channels.
"R)ensure that your first download of data is complete, you should leave your
TV off overnight. Downloads occur several times a day. The TV must be turned
off tk)r GUIDE Plus+ system data to download.
If the TV loses power or is unplugged, GLIDE Plus+ sysl_.m program listings
may be lost. When power is restored, make sure tile setup inlkmnation is still
correct. The GUIDE Plus+ system will recefve updal_.d program inlk)rmation
during tile next scheduled download.
Channel Lineup
If:more than one cable company services your area, you nmy be prompted with
S'It/P 5: Cboosin<,_Your Cbannel Lineup afi_.r tile first GLIDE Plus+ system
download, You will need to identit_ your cable company by selecting the
correct channel numbers lk)r the stations in question.
• Use the up and down arrow buttons to change tile channel group and
press OK when the correct channel group is highlighled.
22
Page 25

Using the TV%
©
CLE_
PressGUIDE on the remote control to see
the GUIDE Plus+ system. To remove the
program guide from the screen, press
OK, GUIDE, or CLEAR.
Getting In & Out of the GUIDE Plus+ System
To ent_,r the, G[ I1)E Plus+ system:
• Press GUIDE on tile remote.
• Press and hold MENU fl_r 2 seconds on the t_ont panel.
To exit tile G{IDE Plus+ sysl_,m:
• Highlight a program and press OK to exit tile G{IDE Plus+ system and tune
to lhe channel.
• Press GLIDE lo exit tile GUIDE Plus+ system and tune lo tile channel
displayed in tile vide() window.
• Press CLEAR lo exit tile GUIDE Plus+ system and return lo tile original
channel.
The GUIDE Plus+ System Menus
The GLIDE Plus+ system ofll, rs seven dit'l_renl options on the Menu bar: Grid,
Sort, News, Sche(hd< Messa_,4es, Channel.* and 5_,tnp. "R_access tile Menu bar:
1. Press GUIDE to access tile GUIDE Plus+ system.
2. Press MENU or use lhe up and down arrow buttons lo select tile Menu bar
(the Grid Guide appears by defimlt).
3. tse tile left and right arrow bull(ms to access ()tiler menus.
4. Press OK, or MENU, or use tile down arrow button to see tile menu nptions.
Grid Guide
The Grid Guide appears each time yOLlenter tile GUIDE PILls+ system. It
displays tile current programming Ik)r each channel. The current program is
displayed in tile video window.
• Press tile tip and down arrow buttons on tile retools, to browse channel
listings and tile channel up and down buttons to page through tile listings.
Use tile right and left arrow buunns lo browse future program listings.
To tune to a channel, highlight tile program you want to view in tile
channel listing and press OK. Press CLEAR to exit tile GUIDE Plus+ system
and return to/he original channel. Press GUIDE to exit tile G{IDE Plus+
sysl_,m and tune to tile channel in lhe video window.
Then use tile Grid Guide Action Buttons as described next.
23
Page 26

Using the Features
Grid guide Grid guide
menu action buttons
selection
Grid Guide Action Buttons
Actinn buttons will change according _ where you are in the GUIDE Plus+
system, Be sure to lnnk at the action bar before pressing the
command numbers.
When highlighting the program, the tk)llnwing Action bul/ons appear:
Watch Press 1 on the remote to place a timer in tile Schedule l_)r the TV lo
turn on and tune to the program highlighted in the channel listing. When
tile TV turns on, the GUIDE Plus+ system will automatically appear with the
scheduled program highlighted and tuned in the vide(> window.
Go To Press 2 on the remote to bring Lip the direct dial box and enter the
number of the channel you want. This will highlight tile channel and
current program in tile channel listing of tile Grid Guide. Press OK to tune
to tile highlighted channel. If tile vide() window is unlocked, it will
automatically tune to the channel.
• Record Press 3 on tile remote to place a timer in tile Schedule t_)r tile VCR
to record the program highlighted in tile channel listing.
If you have a cable box, changing channels on tile TV will not cause the
cable box channel to change while recording.
Record will only appear if you have set up GUIDE Plus+ system and
specified your VCR type.
The program ini_)rmation window will display a confirmation when you have
successfully scheduled a program to watch or record.
Note: i/'you have selected two programs Io watch or record w,Sicb b<qin
at the same time or overlap, yoJ_ will receive a timer co*l/lick message.
YoI! ll21*sl choose belll_eerl lbe ilg;o programs.
When highlighting the Channel names (the left column on tile channel listing),
tile t_)llnwing Action buttons appear:
• Lock/Unlock Press 1 to lock or unlock tile video window to either stay at
one channel as you browse tile GUIDE Plus+ system (lock) or change as
you browse through difl>rent channels (unlock).
Go To Press 2 on the remote to bring up the direct dial box and enter the
number of the channel you want. Press OK to highlight the channel and
current program in tile channel listing of the Grid Guide. If the video
window is locked, press OK to tune to the highlighted channel. If the vide()
window is unlocked, it will automatically tune to that channel.
24
Page 27

Osing the
Sort menu
selection
Categories
Sort
The Sort menu lets you browse programs by catvgnry. The channel to which
you are currently tuned is displayed in the video window.
To Sort:
1. If the GLIDE Plus+ sysl_.m isn't on your screen, press GUIDE on your
remote control.
2. Press MENU on the remote lo select the Menu bar.
3. Use the arrows to highlight Sort. When Sort is highlighted li_>rthe first time,
the Movies category is displayed. "II_ereafler, the last category used becomes
the detlmlt. A listing of subcategnries is displayed below the category name.
Use the let/: and right arrows to highlight other categories.
4. Use the up and down arrow buttons to highlight a subcategnry. For
example, highlight A!/and press OK (the GUIDE Plus+ system sorts
the programs).
5. Press the up and down arrow buttons to review the list one program at a
time. Press the channel up and down to review the list one page at a time.
6. Select MENL to return to the menu bar, or press GUIDE or CLEAR to exit
the GUIDE Plus+ system.
Then use the Sort Menu Action Bunnns as described next..
Sort Menu Action Buttons
When viewing the results of a Sort, the ff_llnwing Action but_ns appear:
• Watch Press 1 on the remote to place a timer in the Schedule, and then
t_)llnvv the on-line help t_)r Alrther options. Placing a timer in the Schedule
will cause the TV to turn on and tune to the program highlighted in the
channel listing at the predel_.rmined time.
• Record Press 3 on the remote to set the VCR to record the program
highlighted in the channel listing. If you have a cal)le box, changing TV
channels will not cause the cal)le box channel to change while recording.
The program inti_mnation window will display a confirmation when you have
successfully created a timer to watch or record.
Note: [/',},oJ_have selected two programs h) watch or record which h<_4in
at the same time or overlap, yoJ_ will receive a timer co*{/lict message.
You ml¢sl choose helween t,_e two programs.
Note: Be sz_re that chllqng hSe GUll)IS Ph_s+ system selzq) you spec(fied
that yoz_ hart, a VCR.
25
Page 28

Using the Features
News menu News menu
action buttons selection
News
"I'll(" N6_lgS in(*nu lets you brovvs(, curr(,nt news stork, s by h(,adlin(',
1. If the GLIDE Plus+ sysl_.m isnt on your screen, press GUIDE on your
remote control.
2. Press MENU on the remote control to select the Menu bar.
3. Use the arrows to highlight News (if MSNBC is available on your TV, it will
appear in the vide() window).
4. Use the up and down arrows lo highlight a story.
• Use the up and down arrows to browse the list one story at a time.
• Use the channel up and down to browse through tile list one page at
a tinl{'.
5. Press the right arrow button to see full text.
6. If there are multiple pages of text, press the right or left arrow button to
page ti_rward or back through the pages of text. Press the down arrow to
view the next story.
7. Select MENll to return to the Menu bar, or press GUIDE or CLEAR on the
remote to exit tile GI_IDE Plus+ system.
Schedule menu
selection
Schedule
The Schedule menu allows you to alter timers lk)r either viewing or recording
programs. The GUIDE Plus+ system allows one-touch VCR recording if you
have connected tile G-LINK cable to your VCR. See Chapter 1 tk_rmore details
on connecting tile G-LINK cable.
To schedule a program lo watch or record:
1. If tile GLIDE Plus+ sysl_.m isn't on your screen, press GUIDE on your
renlot(" control.
2. Press MENU on the remote to select tile Menu bar.
3. Highlight a program within tile channel listing.
4. Select Watch or Record from tile Action buttons bar. The timer is then
autonmtically logged into the Schedule menu.
5. If you select Record, make sure to place a blank tape in the VCR and turn
it oil
Note: [/',},oJ_have a cable box connected/o3'oz_:r TV and VCR, tJ¢ne)'our
VCR to the cable box oJ_tput charmel prior to tur_l#_g off'the VCR.
The program intkmnation window will display a confirmation when you have
successfully scheduled a program to watch or record.
Note: [/',},oJ_ have selected two pro2rams to watc,5 or record w,Sich begin
at the same time or overlap, 3'oJ_ will receive a timer co*_/lict message.
You ml_sl choose belween the two pr(_rams.
26
Page 29

Using the
"lk) remove or change the frequency (daily, once, or weekly) of a scheduled
event, access tile 5"cht,dlllt, lll(,nLl fronl the Menu bar.
1. Press GUIDE to bring tip the GUIDE Plus+ system.
2. Press MENU on the remole to select the Menu bar.
3. tse the arrows to highlight the Sch#dJde menu selection.
4. [se the tip and down arrows to highlight the program you want to edit.
Then use the Schedule Menu Action Buttons as described next.
Schedule Menu Action Buttons
When viewing the Schedule menu the _)llowing Action buttons appear:
• Remove Highlight the Watch or Record tinter you wish to remove flcom
the schedule and press 1 on the remote.
• Change Highlight the Watch or Record timer you wish to change and
press 3 on the remote to toggle the flcequency between the tbllowing
choices:
DAILY records the same program each day Monday through Friday.
ONCE records only on that day.
WF,F,KLY records the program each week at the same time.
Messages menu
selection
Messages
Occaskmally you will receive messages regarding your GUIDE Plus+ system, as
well as special programming int_mnation. You can access these messages flcom
the M(,ssages inen[l on the Menu bar.
"lb read inessages:
1. It your G[IDE Plus+ system isn't on your screen, press GUIDE on your
remote control,
2. Press MEN[ on the remote to select the Menu bar.
2. Use the arrows to highlight the Messages menu selection.
3. Highlight the message you want to read by using the up and
down arrow buuons.
4. Press INFO to display the full lext of the message. If the text continues
beyond the screen, press INFO to view the next page of text, Once you
have reached the end of the message, press INFO to close the expanded
inl_)rmation and return to the Messages screen.
Then use the Messages Menu Action Buuon as described next.
Messages Menu Action Button
When viewing the M_<_sagesmenu the lk)llowing Action button appears:
• Remove Highlight the message you want to delete and press 1 on
the remote.
27
Page 30

Using the Features
Channels menu Channels menu
action buttons selection
\
Channels
You can custonfize tile channel listing by enabling or disabling the display of
certain channels. Fnr instance, you may disable channels that you never watch.
You can restore disabled channels at a later point in time.
1. If tile Guide Plus+ system isn't on your screen, press G{IDE on your
remote contrnl.
2. Press MENU on the remot_ _to select the Menu bar.
3. Use the right and let]: arrows to highlight the Channel._ menu selection.
4. [se the up and down arrows to select a channel.
Then use the Channels Menu Action Buttons as described next.
Channels Menu Action Buttons
While browsing the Channels menu, tile _/llnwing Action but_ns appear:
• Cancel Press 1 on the renlote to cancel any changes you made since
entering the Channel._ Menu.
• Change Press 2 on the remote, to change the channel number [_)r the
highlighted channel line.
• On/Off Press 3 on the remote to toggle the state nt the channel between
O_ and Ojf
Setup
Thv S_,lup menu allows you to access tile GUIDE Plus+ system setup inlkmnation. "l_ access the
Setup option:
1. If lhe Guide Plus+ system isn't on your screen, press GUIDE on your remote control.
2. Press MENU to select the Menu Bar.
3. [se the right arrow to highlight tile 5>rap menu selection.
4. tse the up and down arrows to select (2ha'age sysWm sellitl/gs , Revic*w options, or
Vigil dcII2o.
• Change system setting* Confirms the settings you completed in the G{IDE Plus+
system setup are correct.
• Review option* Displays the GUIDE Plus+ auto display options.
On Automatically displays tile G{IDE Plus+ system when you press the POWER
bul/on on the remote control
Off Disables the GtIDE Plus+ system l)com being displayed when you press the
POWER butlon on the remote control.
• View demo Runs the G{IDE Plus+ system demonstratio_
Note: [/'you have not completed,Four GUll)l/Plus+ ,_}_'temsetup, these options will not he
availabh,. A screen witl prompt Fou to comph, te your setup.
28
Page 31

Using the TV%
How to Get More Information About an
Advertisement or a Program
_) find out more inlbrmation about a program, advertisemem or special, use
the let_ arrow bunon to highlight the channel listing or promotional
inl_)rmation box.
Requesting more inlk)rmation about a particular show displays the PlusCode
programming number and the Shows on Next li)r that channel.
Press the INFO button lo exit the expanded inlk)rmation screen.
GUIDE Plus+ Menu Items
The G{,qDE Ph_s+ Menu gives you access lo fl,atures in the GUIDE Plus+ system.
"1_ access the GUIDE Ph_s+ Menu:
1. Press MEN[ on the remote.
2. Highlight GUI1)E i)tus+ Menu and press OK.
Each menu and the sub-menus are listed below:
GU1DEPlus+ Setup Displays the GUIDE Plus+ system setup screen.
Change system settings Confirms the settings yOLlcompleted in the
GUIDE Plus+ system setup are correct.
Review options Displays GtlDE Plus+ system auto display options.
View demo Runs tile GUIDE Plus+ system demonstration.
GUIDE Plus+ Label Displays the GUIDE Plus+ label menu.
On Displays the station name when you change channels.
Off The station name isn't displayed when you change channels.
ContinuousDemo Runs the GtlDE Plus+ demonstration until it is turned off.
"1_)turn off the demonstration you must turn off the TV.
Note: I]'you have not comp/_4_,d your G{,JI)t5Plus+ system setzlp, these
options will not be az,clilable. A screen u ill pl_mJat you to compk, le
your semi).
29
Page 32

Using the Features
Sample displays on a Channel Banner.
Channel Banner
There are several indicators that might appear when yotl press the TV or INFO
bunons on the remote. This display is called the Channel Banner. The fl)llowing
list describes the items on tile Channel Banner screen (let]: to right and top to
bonom).
12:01
Displays the current tilne.
The lock is displayed to indicate when Parental Controls are
locked or unlocked.
Displayed when Closed Captioning is available on tile
current channel.
ESPN
6O
ti3)l
Displays the label assigned to tile current channel.
Displays the current channel or input channel (FRN'D.
Mute is displayed when you mule the audio.
Stereo is displayed when the current channel is broadcasting
in Stereo.
SAP
00:00
Displayed when the current channel is broadcasting SAP
)
(Second Audio t rograln) intbrmation.
Displayed when the Sleep Timer has been set.
Disphtyed tocount down time lelt on tile commercial skip
(SKIP) timer.
Parental Controls and V-Chip
"llle Parental Control._ menu allows you to program your TV st) that children
cannot see certain progranls, channels, or use the t_ont panel controls.
"llle first three choices in the Parental Cor_troA menu involve sotlware inside
your TV (rel_rred to as V-Chip) which allows you to block TV programs and
movies based on violence, sex, or other content you may believe children
should not view. In other words, it lets you program your TV st) it won't display
certain programs.
Once you block programs, you or ()tiler aduhs can unblock programs by
entering a password.
By default, tile sottware inside your TV is turned "ott," so if you don't want to
use this fl.ature, you can just ignore it.
3O
Page 33

Using the
How V-Chip Works
When turned 'on,' tile V-Chip sot_ware reads a code that ntnst broadcasters send with
programs. That code tells the sol'ware the program's age-based rating (TV-MA, TV-14, etc.) and
content themes [(Violence (V), Adult Language (L), etc.)l. I1 you have blocked tile rating and/or
content themes that tile program contains, you ,,,,,ill receive the message, "This channel is not
approved tnr viewing," when you tune to that particular channel.
Broadcasters are not required to provide content themes, so prngranls received with no content
themes ,,*,'illonly be blocked if you block their age-based rating. You can also block out
programs that have been given a rating of 'Not Rated," and programs that are considered
'unrated" because no code has been sent by tile broadcaster. "File TV age-based ratings and
content themes you can block are listed in tile tk/llnwing table.
Age-Based
Rating
Description and Content Themes for Age-Based Ratings
Mature Audience Only. Specifically designed to be xiewed by adults and may be unsuitable fi_r children
TV-MA under 17. It contains one or more of the following content themes: crude indecent hmguage (L) explicit
sexual activity (S), or graphic violence (V).
Parents Strongly Cautioned. Contains some materi tl that mmy parents would find unsuitable fi)r children
TV-14 under 14. Parents are strongly urged to exercise gre tter care in monitoring this program md are cautioned
against letting children under the age of 14 watch unattended. This program contains one or more of the
R)llowing content themes: intensely suggestive dialogue (I)), strong coarse language (L), intense sexual
situations (S), or intense violence (V).
Parental Guidance Suggested. Contains material that parents may find unsuitable for younger children. Many
TV-PG parents may want to watch it with their younger children. Tim program contains one or more of the following
content themes: some suggestive dialogue (D), infrequent coarse language (L), some sexual situations (S), or
moderate violence (V).
TV-G General Audience. Most parents would find this program suitable fbr all ages. It contains
little or no sexual dialogue (I)) or situations (S), no strong language (L), and little
or no violence (V).
Directed to Children 7 years mid older. Designed for chikhen ages 7 md above. It may be more
TV-Y7 tppropriate for children who htve required the developmental sMlls needed to distinguisll between mtke
believe and reality. Fbemes and elements in this program may include mild fantasy violence (FV) or comedic
violence, or may frighten children under the age of 7.
TV-Y All Children. l'bemes and elements in tiffs program are designed fbr a young audience, including children
from ages 2 6. It is not expected to flighten younger children.
31
Page 34

Using the Features
V-Chip TV Rating Limit
The _Cbip TVRating Limit lets you decide which TV programs can and cannot
be viewed.
"lb set TV programming limits:
].
Choose Parental ControA l_om the Main menu. If Parental Controls have
previously been locked, you must enler your password, If they are not
locked, you ,,*,'illget a message reminding you that your limits will not be
ef[_ctive until you lock Parental Controls.
2. Press MENU to continue.
3. Highlight and select V-Chip 71ZRatin_,4Limit.
4. Once you get to the V-Chip 71ZRatin<,gLimit screen, use the arrow buttons
and OK on your remote to change the status of a TV program rating or
content theme l]com View to Block.
The lk_llowing sections give you more details about how to change the status of
TV program limils.
The V-Chip Rating Limit Screen
The t_|lowing is an example of where items are located within the Rating Limit screen.
Rating Status Field
Lets you s('h'ct _\hcthet the status of the age_bas_'d rating limit to
the lc'_ is View ot lflock
Rating Field
Lets you select from a
list ofage-based ratings
you _an bkxk or _ie\_
Content Themes
Lists the content themes you
C_ln ])lock oI vi(2_,v
Fields
Lets youselect which
Col]tent themes to view for
the selected rating, and
whether the status of the
content thelne is cLlrr_q]tly
View (V) or Bklck (B)
Rating Settings Area
Lets you s_'e the _m'rent block view state of agl_d3ased ratings and
assodated content. "lhe \'ie_ (V) settings me _och'd in green, and the
Block (B) settings arc coded in md
32
Page 35

Using the
Rating Rating Content
field status field status fields
Tip
When you change the status of a rating to
Block, the system will automatically block
higher ratings and all corresponding
content themes.
Hierarchy of Age-Based Ratings
TV-MA Mature Audience Only
TV-14 Parents Strongly Cautioned
TV-PG Parental Guidance Suggested
TV-G General Audience
TV-Y7 Directed to Children 7 years
and older
TV-Y All Children
Blocking Age-Based Ratings
You can automatically block all program ratings above a specified age-based
rating level. For example, if you only want your child to watch programs that
have a TV-G rating and lower (in other words, you ,,*,'anttile child to watch
TV-G, TV-Y7, and TV-Y), then you need to block out other programming with
higher ratings.
To
1.
2.
3.
4.
block programs with higher ratings:
First, determine tile lowest level rating you don't want tile child to watch
(see chart of age-based ratings on next page).
Press tile left: and right arrow buuons to highlight tile Rating field.
Press tile up and down arrow buttons on tile rem()te tn scroll through the
age-based rating limits. Keep scrolling until tile rating cnrrespnnding with
tile lowest rating you do not want tile child lo ,,*,.atchappears on the screen.
In tile example discussed above, you would scroll through tile Ratin,_4field
until TV-PG appears, since tile highest rating you want tile child to walch is
TV-G.
Press tile right arrow button to move tile yellow highlight lo tile
Statics field.
5.
.
7.
Press tile lip or down arrow button to toggle between Vieu and Block. "File
status tk)r tile rating listed to tile left and all higher ratings automatically
changes to Block (and B).
Press OK on tile remote lo return tn tile lkl_*nunr exit the screen when ynu
are finished.
Select Lock Parental Controls t_om tile Parental Control._ menu. Enl_.r a
password, and if you have not already set your password, you will be
prompted to enter it again to cnnfirm.
33
Page 36

Using the Features
Rating Rating Content
field status field status fields
Viewing Age-Based Ratings
A_r you block age-based ratings, you have the option of changing some of the
ratings back to View.
1. Determine which blocked rating you want lo view.
2. l_se the up and down arrow buttons to select the rating with a status
of Block.
3. Press tile right arrow button to move the yellow highlight lo the rating
status field.
4. Press tile up button to select View.
Note: 7be content status.fields corresponding Io the unblocked rating
become Vieu as well. 7bey, and the ageJ)ased rating status are the only
fields that automaticatl)' cban_,4eback to Vieu when you complete
tbi._process.
Note: You must remember to lock Parental Controt.Lfi_r rating limits to
take, _flOct.
Content Themes
D Sexually explicit dialogue
L Adult language
S Sexual situations
V Violence
FV Fantasy Violence
TV-Y All Children
Rating Rating Content
field status fieM themes
Blocking Specific Content Themes
You can block programs based on their content. (Content is represented by the
D, L, S, V, FV and TV-Y on your screen. See the beginning of this section li_>r
details.) When you block a content theme tk)r a particular rating, you
automatically block that content theme fi_r higher rated programs as well.
For example, if you do not want your child to watch programs that have adult
language (L) rated TV-PG or higher, then you could block out all programming
TV-PG and above containing adult language.
"lk_block program content:
1. Determine the lowest level of content you don't want the child to watch.
2.
l_se the up and down arrow buttons on the remote to scroll through tile
age-based ratings until tile rating that corresponds with tile lowest content
you do not want the child lo watch appears. (In the example above, you
would scroll through the ratings until the TV-PG rating appeared.)
Content status
fields
34
Page 37

Using the
,
4.
5.
Press tlle right arrow bu/lnn to move tile highlight to tlle field
corresponding with tile content theme you wish to block nut.
Press tlle up or down arrow button to change content status ti'()n] Vtn/3.
All higher ratings' content theme will automatically change to B.
Press OK to return to tile n]('n[l or ('xit tile screen.
Note: Broaclcaste_:_ are r_ot required toprovide content themes or age-
based rati_zgs. Progrctms received with no content themes will onlF be
blocked i/'you block their age-based rating.
Note: You must remember to lock Parental Conlrol._ jbr rati*_g limits to
take el/Oct.
Rating
field
Rating
status field
Content
themes
Content status
fields
Viewing Specific Content Themes
If you block specific content themes, you have tile option of going back and
changing some of tile content themes back to (_9 Vieu_
1. Deh'rmine tile content themes you want to change to (V) I/Tc-_u'.
2. tse tile up and down arrow buttons to scroll through tile age-based ratings
until tile rating whose cnnh'nt theme you want lo change to Vieu appears.
3. Press tile right arrow bu/ton lo move tile yellow highlight to a particular
content theme status, such as tile B under language (L) corresponding with
TV-14.
4,
Press tile lip or down arrow buKon to change its status back to 17. Your
child would then be able to watch programs with TV-14 adult language
content, but not programs with TV-PG or TV-MA language content.
Note: Onl)' the content hSeme st_tus cotwes.l)or_cling to TV-14
(L) language cba_ges to (V) View. Higher rat_,d content t,Seme._) such as
hSat./br TV-MA tat_guage, do not change.
V-Chip Movie Rating Limit
You set moviv rating limits by blocking movies ratvd abow. a specified levvl.
How to block movie ratings and view movie ratings is explained in tile next two
sections.
"lb access tile V-CIIIP MO VIii RA71NG LIMiT menu:
1. Press MEN[ on tile remoh" control (tile TVMAhVMtk'_rUappears).
2. Select Parental ControL_ (press 6).
3. Select V-Chip Movie RatinJ 4 Limit (press 2).
35
Page 38

Using the Features
Rating field Rating
status field
Rating field Rating
status field
Blocking Movie Ratings
If you only want your child to wash movies that have a PG rating and lower
(in other words, movies rated PG and G), then you could automatically block
(}Litall other movies with higher ratings.
1.
2.
.
4.
block IlK)vies:
Highlight tile Rating field and press tile up and down arrow buuons to find
the rating that is the lowest rating you don't want the child to watch. (In
the example above, you would highlight the rating status button
corresponding to PG-13, since the highest rating you want the child lo
watch is PG.)
Press the right arrow button to highlight the rating Statics field, Press the Lip
and down arrow buttons to change the button from Vic*w to Block. All
higher ratings automatically change to Blocl<
Press OK to return to tile nlenn or exit tile screen.
If Parental Controls are not locked, you must lock them st) the movie rating
limits will take efli*ct.
Note: 5k)me movies mcO,be giz,er_ a Not Rated (A_) rating. After blocking
movie, ratings, you re.st set NR to Vieu separately to vi_.u NR movies.
Viewing Movie Ratings
A_r you block movie ratings, you have the option of changing some of the
rating status buttons back to View:
1. Highlight the Rating field and press the Lip and down arrow buttons to find
the rating you want to view.
2. Press the right arrow button to highlight the rating SlatJ¢s field. Press the Lip
and down arrows to change the buuon from Block to View.
For example, if movies with a rating of PG-13 and higher are blocked, you can
change the rating status corresponding with NC-17. Your child would then be
able to walch all movies with a G, PG, and NC-17 Rating.
3. Press OK to exit the screen, and be sure parental controls are locked.
36
Page 39

Using the
V-Chip Unrated Program Block
Selecting this option lets you decide if programs that the V-Chip recognizes as
' unral_,d" can be vi_,wed. Note that ' unral_,d" TV programs may include news,
sports, political, religious, local and weather programs, emergency bulletins,
public announcements, and programs without ratings.
View All unrated programs are awtilable.
Block All unrated programs are not available.
Note: You must remember to lock Parenial ConiroL_ jbr rating limits to
take ql)lbct.
Channel Block
Selecting this option lets you decide what channels can be viewed.
View Makes the selected channel viewabl_,.
Block The, t_nnt panel and remora, control CH (channel) buttons will tune
only to channels that you have marked as Vic_uz "II_e remora, will still tune
to the blocked channel if you use the digits to access the channel, but the
channel will be blocked.
Don't l_>rget to lock parental controls after you change the status of Channel
13lock. If you do not, the channel block will not take effect.
Note: [i'you have a digital cable box cbannets 126-999 can be blocked
but u ill not be remoz,ableji_om ,},our scan list.
Front Panel Block
Selecting this option lets you block (disable) or unblock (enable) the TV's _nnt
panel. The remote still tunes to any channel. Front Panel Block can:
• Keep children t_om watching TV when the parent is not present.
• Keep young children t_om playing with the buttons.
(When using this as a Parental Control method, you should remove access to
any remote that is capable of operating the television while you have the front
panel blncked.)
Don't t_>rget to lock parental controls after you change the status. If you do not,
the t_nnt panel block will not take ef'll.ct.
37
Page 40

Using the Features
Lock/Unlock Parental Controls
Selecting this option lets you lock and unlock parental controls settings using a
password.
If yon do not lock parental controls, none of the settings for v-Chip,
Channel Block, or Front Panel Block will take effect.
If you ff>rget your password, simultaneously press and hold MENL on the
television and volume down on the remote l_r 3 seconds. Nothing appears on
the screen, Parental Controls simply unlock and you can re-enl*.r a password
via Lock Parental Control._.
38
Page 41

3
Using the TV's
Menu System
Chapter Overview:
• How to Use the Different Types of Menus and Control Panels
• Audio Menu
• Picture Quality Menu
• Screen Menu
• Using Closed Captioning
• Channel Menu
• Time Menu
Changing Entertainment.
Grcq)bics used u_itbi_z this publicatio_z are./_)r ret)rese_ztatio_z o_z/y,. 39
Page 42

Using the enu
How to Use the Different Types of Menus and
Control Panels
The "I_/'s menu system has three types ()f screens: menus, cnn/rol panels, and choice lists. Ybu use
tile buttons on tile remote or tile t_contpanel to access tile menu system and make changes to tile
settings.
The tk)llowing pages explain how to use tile diff..rent types of menus to adjust tile teatures nl
your TV.
Menus
The first menu is called tile Main menu, Press MENU on tile remote or on tile
front panel to bring up the Main menu. Note that holding MEN[ Ik)r 2 seconds
displays the GUIDE Plus+ system.
Menus take you to another menu or a control panel. There are two ways to
select _t choice in a menu:
rip
Feel free to explore the menu system
If you're ever unsure where you are in
the menu system, or you're just plain
tired of exploring, press CLEAR to
remove the menus from the screen
and start over again.
[se your arrow buttons on your remote contrnl to highlight your choice,
and press OK.
Press a nulnl)er button on tile relnote. For exalnple, in the Main l]]enu press
3 to go straight to the Scree** menu.
Exiting a menu
"l'h(_r( _ at( _ thr(_( _ ways t() (_xit a lll('ntl:
• Highlight tDcitand press OK.
• Press 0 on the remote,
• Press CLEAR. "File nn-screen displays are cleared from tile screen and you
return to TV viewing.
Control Panels
Control panels allow you to adjust tile defmlt settings on many lUatnres of your
TV. You can choose a setting, enter a number, or adjust a level such as tint or
brighmess. "lllere are three/ypes of control panels: sliders, numeric entry and
choice lists.
4O
Page 43

Using the
Tip
If the control panel is not set to the
current time, use the arrows to go
back over the columns and the digits
to make changes.
You can also enter numbers by using
the up and down arrows on the
remote.
Sliders
Sliders are used to make adjustments to a particular control.
"lk) use a Slider in a menu:
1. Press the up or down arrow button to select the slider control fk)r the
tl.ature you want to adjust.
2. Press the right or letk arrow button lo adjust the indicator line on the slider.
Numeric Entry
A numeric entry control panel is used to enter numbers nr lelters.
A pointer appears underneath the column you are changing.
1. Use the digits to enter a number in the column above the pointer.
2. Press the right arrow buunn lo move to the next column, then use the digits
to enter a number.
3. When you have finished entering inlk)rmation, press MENU or OK.
Choice Lists
Choice lists are used to choose a particular s_qting l_com a list. When the choice
list appears, the highlighted item is the one that is currently selected, or 'in
use."
Highlight a choice on a menu and press OK lo select that choice. You will then
return to the previous screen.
Now that you know how lo access the menus and adjust the control panels the
t_>llnwing pages provide a brief explanation of all the menu l>atures. The
teaIures are organized in order of their location on the Main Menu.
41
Page 44

Using the enu
1 Audio
Audio Menu
Mute Press OK lo reduce the TV's volume to its mininlunl level. Press OK
again to restore tile volumt,.
Audio Processor Displays a choice list of available audio modes, which
control tile way tile sound conies througil your speakers. You can also access
tile ALq)IO PROCESSOR menu by pressing tile SO[ND button on tile remow.
Mono Plays tile sound in mono only. Use this selling wllen receiving
broadcasts with weak st_.reo signals.
Stereo Splits tlle incoming stereo audio signal into left and right channels.
Most TV programs and recorded materials Imve stereo audio. The word
STFJ_EOappears on tile TV when you tune to a program tlmt is broadcast
in stere<).
Second Audio Program (SAP) Plays the program's audio in a second
language, if one is awdlable. Tile word SAP appears on tile TV wllen you
rune to a program tlmt is broadcast witll SAP inl_)rmation. SAP audio is
broadcast in mono. SAP is also used to broadcast a program's audio with
descriptions of tile video fl)r tile visually impaired.
Picture Quality Menu
Basic Picture Controls Displays tile five slider controls fbr adjusting tile way
tile picture looks.
Contrast Adjusts tile difl>rence between tile light and dark areas of
tile picture.
Color Adjusts tile richness of tile color.
Tint Adjusts the balance between tile red and green levels.
Black Level Adjusts tile brighmess of tile picture.
Sharpness Adjusts the crispness of tile edges in the picture.
Wllen exiting this menu, tile Sat,t, Fersorml Pictz¢re Preset choice list will appear.
You can choose either Yes"or No. If you save tile settings as a Personal Picture
Preset, tile TV will store the se/lings so you can re-select them quickly if
someone changes the settings.
Picture Presets Displays a clloice list that lets you select one of tllree preset
picture settings: Bright Li<,4htit_/_;Normal L_btit_/_; S(?flLighting or 1)e_:s'onal
Pictz¢re Preset: Choose tile setting that is best Ik)r your viewing environment.
Auto Color Displays a choice list that lets you turn on tile t>ature that
automatically corrects tile color of tile picture. (Tills is especially uset\ll t_)r
tracking realistic flesh tone colors as you switcll flcom clmnnel to clmnnel.)
Choose O;_or Q/[/idepending on your pretl.rence.
Color Warmth Displays a choice list tlmt lets you set one of three automatic
color adjustments: Coolfl)r a more blue pale/le of picture colors; Normal; and
Warm fl)r a more red palette of picture colors. The warm setting corresponds to
tile NTSC standard of 6500 K.
42
Page 45

Using the
Screen Menu
Closed-Caption Display Displays a choice list that lets you choose the way
closed captioning intbrmation is shown on the screen.
Off always No captioning inlk_rmation is displayed.
On always Captioning inlk_rmation is shown always, when awtilable.
On when sound is muted Captioning inlk)rmation is shown, when
available, whenever the TV's sound is muted. ('Ib mute the sound, press the
MUTE button.) The captioning inR)rmation is not displayed when the sound
is not muted.
Closed-Caption Mode Displays a choice list that lets you choose which
captioning mode is used f_)r displaying captioning int_)rmation.
Menu Language Displays a choice list that lets you select your preli, rred
language fi)r the menus: En/4lisb, Spanish or t,_'e_cb.
Using Closed Captioning
Many programs are encoded with closed-captioning information, which lets
you display the audio portion of a program as text on the TV screen.
Closed captioning is not awtilable on all channels at all times. Only specific
programs encoded with closed-captioning information are applicable. When a
program is closed captioned, the CCicon is displayed in the channel banner.
See Chapter 2 fbr more inl_)rmation about the channel banner.
If you don't know which Closed-Caption mode
to use, select CCI. CCI is probably the mode
that is used in your area. CC2, CC3, and CC4
are reserved for foreign languages, but are
rarely used at this time.
Closed-Caption Modes
The TV ot'lk,rs eight closed-captioned modes, including tour text modes.
To set tile Closed-C'cq)tion _llod_
1. Select Scr_,,n from the Main menu.
2. Highlight Closad-Captio** Mode and press OK (the Closed-Ccqation Motif,
appears).
3. Highlight your choice and press OK (the Sctwen menu appears again).
Note: 7_e 7_:vl modeo cover _zaarly ha(/'q/'tbepictz¢t'e on the screen to
cli.splc(ythe closed-caplio*zed le.vl. Most broadcasters z¢sethe CC mode,
which displc(Fs a./_w ti**esq/'ccqations at a litlle.
Turning off Closed-Caption
1. Select Sc_een_l_om the Main mvnu.
2. tress OK to select Closed-Caption Di.sJ)la>.
3. Highlight QffAlwco:._ and press OK. The closed captioning is mined ofl and
you go back to the _'C?*('(_ll menu.
43
Page 46

Using the enu
Tip
To enter a number greater than 99, press and
hold "1" to enter the hundreds digit, then
press the two remaining numbers,
Channel Menu
Signal Type Displays a choice list that lets you select the current antenna
/ype. This option does not appear when the GUIDE Plus+ system is set up.
UHF/VHFAntenna Choose this if you are currently using an oflLair
antenna lk_rTV signals.
Cable TV Choose this if you are currently using cable or a cable box lk)r
TV signals.
Auto Channel Search Tells the TV to search automatically l_)r all the channels
available tllrnugh the antenna input. When tile TV finds an active channel, it
places it in the Normal channel list; inactive channels (weak stations or
channels with no signal at all) will be removed l_cnmthe channel list. If you are
using a cable box and have set up tile GLIDE Plus+ system, this option does
not appear.
List and Labels Displays a control panel that lets you edit your Normal
channel list and choose a six-character label t_)r each channel. Follow tile on-
screen directions to enter your channels and other inl_)rmation.
Channel # [se the tip and down arrows to scroll tip and down through
the channels available via your antenna. You can enter the channel number
directly using tile number buttons.
NormalList Only the channels included in tile Normal list are available
when you scan tip and down using channel up and down. tse the up and
down arrow buttons to indicate whether tile channel number indicated is
included (Yes) or is not included (No) in tile Normal channel list.
ChannelLabel tse the up and down arrow buttons to enter a six-
character label tk>reach channel. Hold the buunn down to scroll quickly
through the characters. The TV can store up lo 27 labels in memory.
Time Menu
Sleep Timer Displays a control panel that lets you select tile amount of time
you want to give the TV betk)re it shuts itself off.
Schedule Displays a control panel that lets you set up a schedule ti)r turning
the TV on and oft automatically. Reminder: you must turn tile schedule On. The
on-screen directions guide you through the steps needed to set the schedule.
Set Time Displays a control panel that lets you enter tile current time. The on-
screen directions guide you through the steps needed to set the time. If your
GUIDE Plus+ system is set Lip, it will automatically update your time and this
option will not appear.
44
Page 47

4
Other Information
Chapter Overview:
• Troubleshooting
• Care and Cleaning
• Limited Warranty
• Accessory Order Form
• Index
Changing Entertainment. Again.
Grcq)bics used u_itbi_z this publicatio_z are.f_)r ret)rese_ztatio_z o_z/y,. 45
Page 48

Troubleshooting
Most problems you encounter with your TV you can correct by consuhing the Troubleshooting list that tk)llows.
TV Problems
TV won't turn on
Press the POWER button.
Make sure the TV is plugged in.
Check the wall receptacle (or extension cord) to make sure it is qive" by plugging in something else.
Something might be wrong with your remote control. Press tlm PO_rER button on the front of the TV. If the TV turns on, check the
remote control solutions on p. 48.
Tim front panel buttons may be locked (disabled). Use tim remote control to unk)ck the front panel controls by selecting the Front
Panel Bloc/_¢in tim Pare_ital Controls menu and choosing [/nblocle.
Buttons don't work
"I'h_"front pan_'t buttons may b_" IocM'd (disabI_'d). lse the" remote control to unk)ck the" front pan_'l controls by s_qecting the Front
Panel B/oc/_ in the Pare_ital ControL_ menu and choosing L_zblocle.
Unplug the TV fi)r two minutes and then plug it back in. Turn the TV on and tW again.
TV turns off while playing
Sch_'duh'd off functkm may have I)_'_,nactivated. Go to p. 44 fi_r instructkms.
Electronic protection circuit may have been activated because of a power surge. Wait 30 seconds and then turn the TV on again. If
this happens frequently, the voltage in your house may be abnormally high or low.
TV turns on unexpectedly
Sch_'dul_'d On or _ratch from the GUIDE Plus+ system may have" b_'_'n activat_'d. Go to page" 26 or 44 fi_r instructkms.
Blank screen
Make" sur__the" compon_'nt conn_'ct_'d to the TV is turn_d on.
"I'W anoth_q" chann_'l.
When I turn on the TV an icon is moving on the screen
Make" sure you have" rem_v_'d the I)emo Pin fiom the (3 LINK iack on the" back of your 'I'V_
No sound, picture okay
Maybe" sound is muted. Pr_'ss the votum_" up button to r_'stor_" sound.
Can't select certain channel
Chann_'t may I)_"block_'d or not approv_'d in the" Paretltal (]o_troLs m_,nu.
If tlsilag a VCR, mak+" sur+" the TViVCR button on the VCR is in th+" corr+'ct moct_" (pr+'ss the TViVCR button on your VCI,').
Noisy stereo reception
The, station might b_"w_'ak.
46
Page 49

Troubleshooting
No picture, no sound but TV is on
Mtybe the cabk'/air s_,tting is set to tlw wrong position. Select S_gtlal T_,pefrom the Channel m_'nu. (3() to page 44 fl)r more
infl_rmatk)n.
Tim channel might be empty change channels.
If you're watching your VCR and it's connected with coaxial cable to the CABLE/ANTENNA jack, tune the ['V to channel 3 or 4
(whichever channel is se|ected on the 3/4 switch on the back of your VCR). Also check to make sure the TV/VCR button on the
VCR is in the correct mode (press the TV/VCR button on your VCR).
Sound okay, picture poor
Check ant_,nna c(mnections. Make sure all of tlw cables are firmly connected to tlw jacks.
Try ad}usting sharpness function to improve weak signals. Go to page 42 fl_r more instructions.
Black box appears on the screen
Clos_'d captioning iTtight be on. Check the (]losed(]aptiotl Z)i,_pl_O' control pan_q in the 5creetz ITt_qlU. (3() to page 43 fl_r ITtOr{_
inst FklCtions.
Every time I turn on the TV, the Guide is on the screen
The GLIDE Plus+ system automatically appears on tlw scre_,n when you us_' tlw POWEh' button on the' remote to turn on tlw ['VL
You can turn off this feature by pressing GUIDE on your remote control and then s_qect the Menu bar. Press the right arrow button
to s_qect Setup Choose Rez,ieu options and s_qect OFt_
GUIDE Plus+ System Problems
GUIDE Plus+ setup won't switch to channel 9 for VCR and/or channel 02 cable box
Make sure you have removed tlw I)emo Pin from the G LINK jack. Check to se_, if the G LINK wands are positk_n_,d correctly in
front of COl]lpOll_'nts' I'(_l]1ot_ _ s(_nsors.
GUIDE Plus+ system control of cable box is slower than direct control of the box itself. Keep this in mind when changing channels.
You may have an incorrect GUIDE Plus+ Channel Lineup. ['be guide may get out of sync with tim cable provider. Use tim G_71)E
lqus+ Setup in the GbIDE lqus+/v/e_lu to change the zip code to 99999. Furn the ['V off for 10 minutes. Use Setup again to change
the zip code back to the correct value. If asked, be sure to select the correct channel lineup flom the on screen list.
Program information doesn't download
Revi_,w your s_,tup infl)rmatk)n and make sure its correct. Press MEN[} on the remote and s_qect G'Ull)tJl'hts+ 5etz@. Go to page 16
for detailed instructions about tlw GUII)E Plus+ Setup menus.
The TV must I)_" off to download infl_rmatk_n. Leave your TV off overnight for at h'ast 10 hours, to receive the initial download for
your ar(_a.
If yourc using a cable box leave it on so you can n'ccive program infl_rmatk_n.
(Continued on next page)
47
Page 50

Scheduled Watch or Record doesn't occur
Check Schedule for tim_'r conflicts. Go to page 26 for instmctk)ns.
M_lke sure the wJnds of the G LINK cable are pl_lced in fiont of the remote sensor(s) on the component(s).
Make sure your VCR is turned off during tim time you've scheduled to record a program because the system turns the VCR on when
it starts recording (if it's already on when recording starts, the system will turn it off).
Make sure there is a tape in the VCR and that tim VCR is connected properly.
Be sure tlmt you set up the VCR in the GblI)E Plus+ Setz@ menus If you don't complete tim (2ot_fii_uHngf_)r a VCK steps
successf_flly, the Record option won't be available. Go to p. 18 for detailed instructions.
If a cable box is attached to your TV_ make sure you set it up correctly in the GUII)tJI'hts+ &,tuff menus. Go to page 16 17 for
detailed instructions.
The Remote Control Doesn't Work
Something might be between the remote and the remote sensor on the component. Make sure there is a clear path.
Maybe the remote isn't aimed directly at the component (['V or VCR) that you're nTing to operate.
Maybe batteries in remote are weak, dead or installed incorrectly. Put new batteries in the remote.
You might need to drain the remote's microprocessor: remove batteries and press the number 1 button fi)r at least 60 seconds.
Release the 1 button, replace the batteries, and (if necessa W) program the remote again.
Problems with V-Chip/Parental Controls
The rating limits don't work
You must lock the settings. Go to the TI'MAL_ MEN[ (press MENU on your remote) s_,lect Pare_ital Controls (press 0 on your
remote), select Lock Parental C'otltrols (press 6 on your remote).
I don't remember my password and I want to unlock the TV
If you forget your pJssword simultaneously press Jnd hold MEN[ on the television _md volume down on the remote fi_r 3 seconds.
Nothing _pp_'ars on the" scre_,n Parent_I Controls simply unlock and you can re enter J pnssword vi_ l.ocle ]'are_ztal (2o_ztroL_:
The V=Chip won't let me watch a program even though it's not rated as violent.
Mnybe the movie' w_s giv_'n an NR (Not Rated) stJtus. After you block movie ratings you must s_.t NR to View s_.parJtely in orch'r to
vh'w movies with an NR rating.
48
Page 51

Care and Cleaning
CAUTION: Turn OFF your TV before cleaning.
You can clean the TV as required, using a snff lint-flee cloth. Be sure to occasionally dust the ventilation slots in the cabinet
to help assure adequate ventilation.
The TV's screen may be cleaned with a soft, lint-free cloth as well. Take care not to scratch or mar the screen. If
necessary, you may use a cloth dampened with warm water.
Never use strong cleaning agents, such as ammonia-based cleaners, or abrasive powder. These types of cleaners
will damage the TV.
While cleaning do not spray liquid directly on the screen, or allow liquid to run down the screen and inside the TV. Also,
avoid placing drinks or vases with water on top of the TV. This could increase the risk of fire or shock hazard or damage to
the TV.
Caution: If fixed (non-moving) images are lefi on the screen ff)r long periods, they may be permanently imprinted on the
picture tube. Such images include network logos, phone numbers, and video games. This damage is not covered by your
warran/y. Extended viewing of channels displaying these images should be avoided.
RCA TV Limited Warranty
What your warranty covers:
• Defects in materials or wnrknmnship.
For how long after your pahmse:
• 90 days flcom date of purchase t_)r labor charges.
• One year l_com date of purchase l_)r parts.
• Two years t_om date of purchase t_r the picture tubes.
The warranly period liar rental units begins with the first rental or 45 days from date of shipment to the rental firm,
whichever comes first.
What we will do:
• Pay any Authorized RCA Television Service Center the labor charges to repair your television.
• Pay any Authorized RCA Television Service Center t2)r the new or, at our option, refurbished replacement parts and
picture tube required to repair your television.
How you get service:
• For screen sizes of 26" and smaller: Take your RCA television to any Authorized RCA "Iblevisinn Service Center and
pick tip when repairs are complete.
• For screen sizes larger than 26": Request home or pick up, repair, and return service t_cnmany Authorized RCA
"l_,levisinn Service Center, provided that your television is located within the geographic territory covered by an
Authorized RCA "I_,levisinn Service Center. If not, you nmst take your television to the Service Center location at your
own expense, or pay t2)r the cost the Service Center may charge to transport your television to and I_comyour home.
• "lk_identit) your nearest Authorized RCA Televisinn Service Center, ask your dealer, look in the Yellow Pages, or call
1-800-336-1900.
• Proof of purchase in the tkmn of a bill of sale or receipted invoice which is evidence that the product is within the
warran/y period must be presented to obtain warranty service. For rental firms, proof of first rental is also required.
(Continued on next page)
49
Page 52

What your warranty does not cover:
• Customer instruction. (Your Owner's Manual clearly describes how to install, adjust, and nperate ynur television. Any
additional inlkmnation should be obtained flcom your dealer).
• Installation and relat(*d adjustments.
• Signal receptinn problems not caused by your television.
• Damage from misuse or neglect.
• Batteries.
• Cuslon'ter replacement l'tlses.
• Images burned nntn tile screen.
• A television that has been modified or incorporat_*d into other products or is used tk)r institutional or other commercial
purposes.
• A television purchased or serviced outside tile U.S.A.
• Acts of nature, such as but not limited to lightning damage.
Product registration:
• Please complete and mail the Product Registration Card packed with your TV. It will make it easier lo contact you
should it ever be necessary. The return of tile card is not required tk)r warran/y coverage.
Limitation of Wrranty:
• THE WARRANTY STATED ABOVE IS THE ONLY WARRANTY APPLICABLE TO THIS PRODUCT. ALL OTHER
WARRANTIES, EXPRESS OR IMPLIED (INCLUDING ALL IMPLIED WARRANTIES OF MERCHANTABILITY OR
FITNESS FOR A PARTICULAR PURPOSE) ARE HEREBY DISCLAIMED. NO VERBAL OR WRITTEN INFORMATION
GIVEN BY THOMSON MULTIMEDIA INC., ITS AGENTS OR EMPLOYEES SHALL CREATE A GUARANTY OR IN ANY
WAY INCREASE THE SCOPE OF THIS WARRANTY.
REPAIR OR REPLACEMENT AS PROVIDED UNDER THIS WARRANTY IS THE EXCLUSIVE REMEDY OF THE
CONSUMER. THOMSON MULTIMEDIA INC. SHALL NOT BE LIABLE FOR INCIDENTAL OR CONSEQUENTIAL
DAMAGES RESULTING FROM THE USE OF THIS PRODUCT OR ARISING OUT OF ANY BREACH OF ANY EXPRESS
OR IMPLIED WARRANTY ON THIS PRODUCT. THIS DISCLAIMER OF WARRANTIES AND LIMITED WARRANTY
ARE GOVERNED BY THE LAWS OF THE STATE OF INDIANA. EXCEPT TO THE EXTENT PROHIBITED BY
APPLICABLE LAW, ANY IMPLIED WARRANTY OF MERCHANTABILITY OR FITNESS FOR A PARTICULAR PURPOSE
ON THIS PRODUCT IS LIMITED TO THE APPLICABLE WARRANTY PERIOD SET FORTH ABOVE.
How state law _lates to this warranty:
• Some states do not allow tile exclusion nor limitation of incidental or consequential danmges, or limitations on how
long an implied warranty lasts, so tile above limitations or exclusions may not apply to you.
• This warranty gives you specific legal rights, and you also may have other rights that vary from stal_* to stal_*.
If you puehased your television outside the United States:
• This warranty dnes not apply. Contact your dealer t_)r warran/y information.
Service calls which do not involve defective materials or workmanel'liptamovea_l by this warranty. Costs of
such service calls to'the sole _rsponsibility of the llnlmaser
5O
Page 53

VH81(340
VH82 (6-ft)
Screw-on Cable rcHacbes to
_lc Fo1d!_d gltll_ntla
conneclor._ (called ZS-obm
F-Opt,) on the, back c_vour
VCR or TV 7be emts screu
onto tbe colmec[omJbr a
S{_CL_IZ" co*lll{_cIio!l
VH89 (640
Push-on Cable al[acbes
[o [be rotttld antem_a
connec[or._ (called 75-
ohm l:-O_)e) on [ke bnck
*f your VCR or TV EmLv
push onjbr a quick
COtl_7ec[[ot2
Gold-Tipped cable
VH83 (640
Monaural VCR Dubbing
Cable Double cable [tint leLs
}'o_ co_!lect tbe L_[eo at_d
audio _cks _tu_) VHS
VCRs 1o duplica_ tapes¸
Can also _ used to connect
a VCR toyour 7_ (._b_ is
cok)_coded and sb_lded.
Has RCA-O_ pbono plugs
o_l each e_d
Stereo VCR Dubbing Cable
Triph, cabl_, that lets/'(m
COtlllec[ [k( _ _71)1:0 £tt_d AI )lO
Gold-Tipped cable
VH84 (640
Continued on next page .......
o
u
o
r_
Accessory Order Form
Description
Screw-on antenna cable (3-ft)
Screw-on antenna cable (6-ft) VH82
Push-on antenna cable (6-ft) VH89
Monaural VCR Dubbing Cable (6-ft) VH83
Stereo VCR Dubbing Cable (6-ft) VH84
2-way Signal Splitter VH47
Amplified Antenna ANT200
Antenna Mixer (not shown) 193984
Remote Control (CRK17TA1) 242778
Audio,Video Adapter (not shown) 228449
$5.95
$5.9s
SsI9s
$9.95
$3.95
$49.95
$11.15
$19.35
$4.45
Prices are subject to change without notice.
Total Merchandise ............................................. $__
Sales Tax ............................................................. $
We are required by law to collect the
appropriate sales tax for each individual
state, country, and locality to which the
merchandise is being sent.
Shipping and Handling ..................................... $ 5_0
Total Amount Enclosed ..................................... $-_
Use VISA, MasterCard, or Discover Card
preferably.
Money order or check must be in U.S.
currency only.
No COD or CASH.
All accessories are subject to availability.
Where applicable, we will ship a superseding model.
51
Page 54

Charge your order on your VlSA,
Master( ard, or Discover Card by
filling in below
USE YOUR CREDIT CARD
IMPORTANT: (opy complete account number
f}-om your VISA card
VISA
r-N-N r-NN r-NN r-NN
M,cal'doxpire :I--f--II--f--I
IMPORTANT: (opy complete account number
f}-om your Master( ard
FTTT-]FTT-F-]FTT-F-]FTTT-]
(opy Number
above your
name Oll
Master( ard
My card F--[-_ F--[-_
expires:
IMPORTANT: (opy COlnplete account number
t?om your Discover (ard
FTTT-]FTT-F-]FTT-F-]FTTT-]
My card expires: _ FT-]
AUTHORIZED SIGNATURE
(Credit card order will not be processed without signature)
Print o1"type your name and
address clearly.
A complete and correct
order will save you days
of waiting.
Name:
Street:
City:
Apt:
State: Zip:
Daytime phone number:
Please make sure that both sides of this form
have been filled out completely.
• Allow 4 weeks for delivery,
• All accessories are subject to availability,
• Prices are subject to change,
2-way Signal Splitter
Help._ you connect a second "I'_
or V(;/_.
Splitter VH47
Amplified Antenna
Alhmt_ I'ou to quickly switch
./komthe anlenna signal IoIbe
cable or salellile siqnal withoul
d[SCOHt_C[_H_ tbC glt_[_HHa
ANT200
,5,o 6
_0_D_O
_o ,5
v_..J
CRK17TAI
Remote Control
7}M_ is the remole conlrol Ibat
came paca, ed wftll )'our 7"K
Replacements orspare._can be
ordered glS t_t_{_gl_'d
To Order
To place your order by phone, have your Visa,
MaswrCard or Discover Card ready and call the loll-Dee
number listed below.
Use this number only to place an order llar accessory
items listed on this order torm.
1-800-338-0376
To place your order by mail, detach and mail the
completed order lk>rmwith credit card intk>rmation,
money order or check in US currency (made payable to
Thomson multimedia Inc.) to the tk_llowing address:
0
.-r
Q
Video Accessories
PO Box 8419
Ronks, PA 17573
52
Page 55

Index
A
Accessories 51
Advanced connections 11
Age Based Ratings 30
Arrow buttons 20
Audio
Menu 42
Processor 42
Auto
Channel Search 15, 44
Color 42
B
Basic
connections 8, 9
Picture Controls 42
Batteries for the remote 14
Black Level 42
Block
Age Based Ratings 33
Channel 37
Front Panel 37
Movie Ratings 36
Specific Content Themes 34
V Chip I nrated Program 37
Buttons, remote control 20
C
CABLE/ANTENNA jack
8,9,11
Cables
coaxial 7
G LINK 7
CC (Closed Captioning) 43
CH+ button 20
CH button 20
Channel
Banner 30
Block 37
Labels 44
Lineup 22
Menu 44
Search 15
Channels menu 28
CLEAR button 20
Closed Caption
I)isplay 43
Mode 43
Coaxial cable 7
Color WanTtth 42
CoI]I]ectioi1s
multiple 11
FV + VCR 8
FV Only 9
Content Themes 30
Contrast 42
Control Panels 40
D
I)emo Pin 6, 8, 9, 11
F
Finding the sensor 13
Fixed hnages 49
Front panel
block 37
buttons 12
G
G LINK
cable 8
connecting 13
wands 13
GO BACK button 20
Grid Guide menu 23
GUIDE button 20
GUIDE Plus+ system 22
Channel Lineup 22
Downk)ading Infbrmation
22
setup 15
INFO button 20
INPUI" button 20
Interactive setup 15
L
Labels 44
Language 43
Languages
Selecting 15
Locating remote sensor 13
Lock, Parental Controls 38
M
Memory 44
Menu
Acidic) 42
Channel 44
Channels 28
Grid Guide 23
Language 43
Messages 27
News 26
Picture Quality 42
Schedule 26
Screen 43
Setup 28
Sort 25
Time 44
MENU button 20
Menus
GLIDE Plus+ system setup 15
Messages menu 27
Mono 42
Mute 42
MI}TE button 20
N
News IT1eI]u 26
Normal List 44
Number buttons 20
O
OK button 20
p
Parental Controls
Locking, Unk)cking 38
menu 30
Picture
Presets 42
Quality Menu 42
POWER button 20
R
Rating Limits
movies 35
TV 32
Remote, batteries 14
Remote control buttons 20
Remote sensor 13
S
SAP 42
Satellite Receiver connecting 11
Schedule 44
menu 26
Screen Menu 43
Second Audio Program (SAP) 42
Set ['ime 44
Setup
GLIDE Plus+ system menus 15
menu 28
Sharpness 42
Signal Type
Cable ['V 44
UHFiVHF Antenna 44
SKIP button 20
Sleep Timer 30, 44
Sort menu 25
Stere() 42
T
Fime Menu 44
Fint 42
I'roubleshooting 46
TV; connecting 9
U
UHFiVHF Antenna 44
linlock, Parental Controls 38
V
V Chip
Age Based Ratings 31
Blocking Movies 35
Content I'fiemes 31
VCR, connecting 8
VOL+ button 20
VOL button 20
W
Warranty 49
Page 56

(This page intentionally left blank)
Page 57

(This page intentionally left blank)
Page 58

(This page intentionally left blank)
Page 59

(This page intentionally left blank)
Page 60

(This page intentionally left blank)
Page 61

(This page intentionally left blank)
Page 62

(This page intentionally left blank)
Page 63

(This page intentionally left blank)
Page 64

Visit the RCA web site at www.rca.com
Please do not send any products to the indianapolis address listed in this manual or on the carton. This will only
add delays in service for your product.
Thomson multimedia Inc.
10330 North Meridian Street
Indianapolis, IN 46290
©2001 Thomson multimedia Inc.
Trademark(s)® Registered
Marca(s) Registrada(s)
Printed in USA
TOCOM 15814840
O
THOMSON
THOMSON _1;
 Loading...