

Page 1

Tele ismon
User's
Changing Entertainment. _nn.
Page 2

WARNING
To reduce the risk of fire or
electric shock, do not expose
this product to rain or moisture.
To reduce the risk of electric shock, do not remove
cover (or back). No user serviceable parts inside.
Refer servicing to qualified service personnel.
_This symbol indicates
"dangerous voltage" inside
the product that presents a
risk of electric shock or
_This symbol indicates
important instructions
accompanying the product.
personal injury.
Caution: To prevent electric shock, match wide blade of
plug to wide slot, fully insert.
Attention: Pour eviter les chocs 61ectriques, introduire
la lame la plus large de la fiche dans la borne
correspondante de la prise et pousser jusq0 au fond.
Refer to the identification/rating label located on the back panel of your
product for its proper operating voltage.
FCCRegulations state that unauthorized changes or modifications to this
equipment may void the user's authority to operate it.
If fixed (non-moving) images are left on the screen for long periods,
they may be permanently imprinted on the picture tube. Such
images include network Iogos, phone numbers, and video games.
This damage is not covered by your warranty. Extended viewing of
channels displaying these images should be avoided.
Cable TV Installer: This reminder is provided to call your attention to
Article 820-40 of the National Electrical Code (Section 54 of the Canadian
Electrical Code, Part 1)which provides guidelines for proper grounding and,
in particular, specifies that the cable ground shall be connected to the
grounding system of the building as close to the point of cable entry as
practical.
Product Registration
Please fill out the product registration card and return it immediately. Returning the card allows us to contact
you if needed.
Keep your sales receipt to obtain warranty parts and service and for proof of purchase. Attach it here and record
the serial and model numbers in case you need them. The numbers are located on the back of the television.
Model No.
Serial No.
Purchase Date:
Dealer/Address/Phone:
G-LINK, VCR Plus+, C3,PlusCode, GUIDE Plus+, and GUIDE Plus+ Gold are trademarks of Gemstar Development
Corporation.
The GUIDE Plus+ Gold system is manufactured under license from Index Systems Inc.
Thomson multimedia Inc. and Gemstar are not in any way liable for the accuracy of the program information
provided by the GUIDE Plus+ System. In no event shall Thomson multimedia Inc. or Gemstar be liable for any
amount representing loss of profits, loss of business, or indirect, special, or consequential damages in connection
with the provision or use of any information equipment, or services relating to the GUIDE Plus+ System.
Page 3

Key Features Overview
Your TV is equipped with Datures that will add to your TV viewing experience. The lk)llowing
infi_rmation sumnmrizes a llew of these t_atures. Chapl_r 3 provides more inlk)rmation about the
rest of the TV's fl.atures and how to use them.
On-screen Program Guide
Description: The GUIDE Plus+ system is an on-screen interactive list of
programs and inlk>rmation that is built into your TV. You can scroll through tile
guide to see what's on and tune direc/ly to that program l_om tile guide. You
can also browse programs by category with tile sort l_ature.
When you access tile News fi:ature, MSNBC will appear in your video window if
it's awtilable through your TV.
Oneqbuch VCR Recording is another benefit of tile GUIDE Plus+ system. You
don't have to remember to program your VCR or use tile menus in your VCR to
set up a recnrding.
Requirements:
• Remove tile Demn Pin lkom tile G-LINK jack.
• Complete tile nn-screen interactive setup. You'll find detailed instructions in
Chapter 1,
• Oneqbuch VCR Recording: You must connect tile G-LINK cable to tile TV
and place one of the wands in f_ont of the relnow sensor on tile VCR.
• If you have a cable box, connect tile G-LINK cable to the TV and place one
of tile wands in t}nnt of tile remote sensor on tile cable box.
V-Chip: Parental Controls
Description: You can block programs and movies by conl*.nt, age-based
ratings, and/or movie ratings.
Requirements:
• Set up the l)arertt_l CorttroL_ menu in tile TV's main m_,nu (Chapter 3
has details).
• The broadcasters nmst use/he rating system when they send tile program
to your TV in order lk_ryour TV to block tile program.
1
Page 4

(This page intentionally left blank)
Page 5
bJe @f C@ntents
Introduction
Key Features Overview .................................................................................................... 1
On-screen Program Guide ......................................................................................... 1
V-Chip: Parental Controls ........................................................................................... 1
Chapter 1: Connections & Setup
Things to Consider Before You Connect ......................................................................... 6
Protect Against Power Surges ................................................................................... 6
Protect Components from Overheating ................................................................... 6
Position Cables Properly to Avoid Audio Interference ............................................ 6
Important Stand and Base Safety information ........................................................ 6
Use Indirect Light ....................................................................................................... 6
Demo Pin .................................................................................................................... 6
Choose Your Connection .................................................................................................. 7
Connection: TV + VCR....................................................................................................... 8
Connection: TV Only ......................................................................................................... 9
Connection: TV + VCR + Satellite Receiver ................................................................... 11
Why You Should Connect This G-UNK Cable ............................................................... 12
How to Find the Remote Sensor ............................................................................. 12
Placing the G-LINK Wands ....................................................................................... 12
Complete the Interactive Setup ..................................................................................... 14
Set the Menu Language .......................................................................................... 14
Complete Auto Channel Search .............................................................................. 14
The GUIDE Plus+ System Setup ................................................................................ 15
What to Expect ............................................................................................................... 20
Next Steps ....................................................................................................................... 20
Chapter 2: Using the Remote Control
The Buttons on the Remote Control ............................................................................. 22
Programming the Remote to Operate Other Components ......................................... 24
Find Out If You Need to Program the Remote ....................................................... 24
How to Program the Remote .................................................................................. 24
Now to Use the Remote After You've Programmed It ................................................ 25
Chapter 3: Using the TV's Features
About the GUIDE Plus+ System ..................................................................................... 28
Downloading Data ................................................................................................... 28
Getting In & Out of the GUIDE Plus+ System ......................................................... 29
The GUIDE Plus+ System Menus .............................................................................. 29
Grid Guide ................................................................................................................ 29
Sort ............................................................................................................................ 31
News .......................................................................................................................... 32
Schedule .................................................................................................................... 32
Messages ................................................................................................................... 33
Setup ......................................................................................................................... 34
Channels ................................................................................................................... 34
How to Get More information About an Advertisement or a Program ............... 35
3
Page 6
bJe @f C@ntents
GUIDE Plus+ Menu Items ............................................................................................... 35
Channel Banner .............................................................................................................. 36
Parental Controls and V-Chip ......................................................................................... 36
How V-Chip Works ................................................................................................... 37
V-Chip TV Rating Limit ............................................................................................. 38
Blocking Specific Content Themes .......................................................................... 40
Viewing Specific Content Themes ........................................................................... 41
V-Chip Movie Rating Limit ....................................................................................... 41
V-Chip Unrated Program Block ............................................................................... 43
Channel Block ........................................................................................................... 43
Front Panel Block ..................................................................................................... 43
LocklUnlock Parental Controls ................................................................................ 44
Chapter 4: Using the TV's Menu System
How to Use Your TV's Menu System ............................................................................. 46
Picture Quality Menu ..................................................................................................... 46
Screen Menu ................................................................................................................... 47
Using Closed Captioning ................................................................................................ 48
Channel Menu ................................................................................................................. 49
Time Menu ...................................................................................................................... SO
Chapter 5: Other Information
Troubleshooting .............................................................................................................. 52
The Front of Your TV ...................................................................................................... 55
Care and Cleaning .......................................................................................................... 55
RCA TV Limited Warranty .............................................................................................. 56
Index ................................................................................................................................ 59
4
Page 7
t
Connections & Setup
Chapter Overview:
• Things to Consider Before You Connect
• Choose Your Connection
• Connections
• Why You Should Connect This G-LINK Cable
• Plug in theTV
• Put Batteries in the Remote
• How to Use the Remote Control to Complete the
Interactive Setup
• Turn on the TV
• Complete the Interactive Setup
Changing Entertainment. Again.
5
Page 8

C@nnect @ns Setup
Things to Consider Before You Connect
Protect Against Power Surges
• Connect all components betore you plug any of their power cords into the wall outlet.
• Turn off the TV and/or component betk)re you connect or disconnect any cables.
• Make sure all antennas and cables are properly grounded. Reti,r to the Important
Sali, guards sheet packed with your TV.
Protect Components from Overheating
• Don't block ventilation holes on any ot the components. Arrange the components so that
air can circulate ficeely.
• Don't stack components.
• When you place components in a stand, make sure you allow adequate ventilation.
• If you connect an audio receiver or amplifier, place it on the top shelf so the heated air
from it won't flow around other components.
Position Cables Properly to Avoid Audio Interference
• Insert each cable firmly into the designated jack.
• If you place components above the TV, route all cables down the side of the back ot the
7 •
T'_ instead of straight down the middle of the back of the TV.
• If your antenna uses 300-ohm twin lead cables, do not coil the cables. Also, keep the twin
lead cables away from audio/video cables.
Important Stand and Base Safety Information
Choos_, the location tor your TV carefully. Place the TV on a stand or bas_, that is ot adequate
size and strength to prevent the TV ficom being accidentally tipped over, pushed ofl, or pulled
• 7
ofL This could cause personal injury and/or damage the T\. Reler to the Important Sail, guards
sheet packed with your TV.
Use Indirect Light
Don't place the TV where sunlight or room lighting will be directed toward the screen. Use soft
or indirect lighting.
Demo Pin
You must remove the Demo I in from the G-LINK jack on the back of
your TV in order |k_r your TV to operate properly and to connect the
G-LINK cable.
6 Chapter I
Page 9
C@nnect @ns Setup
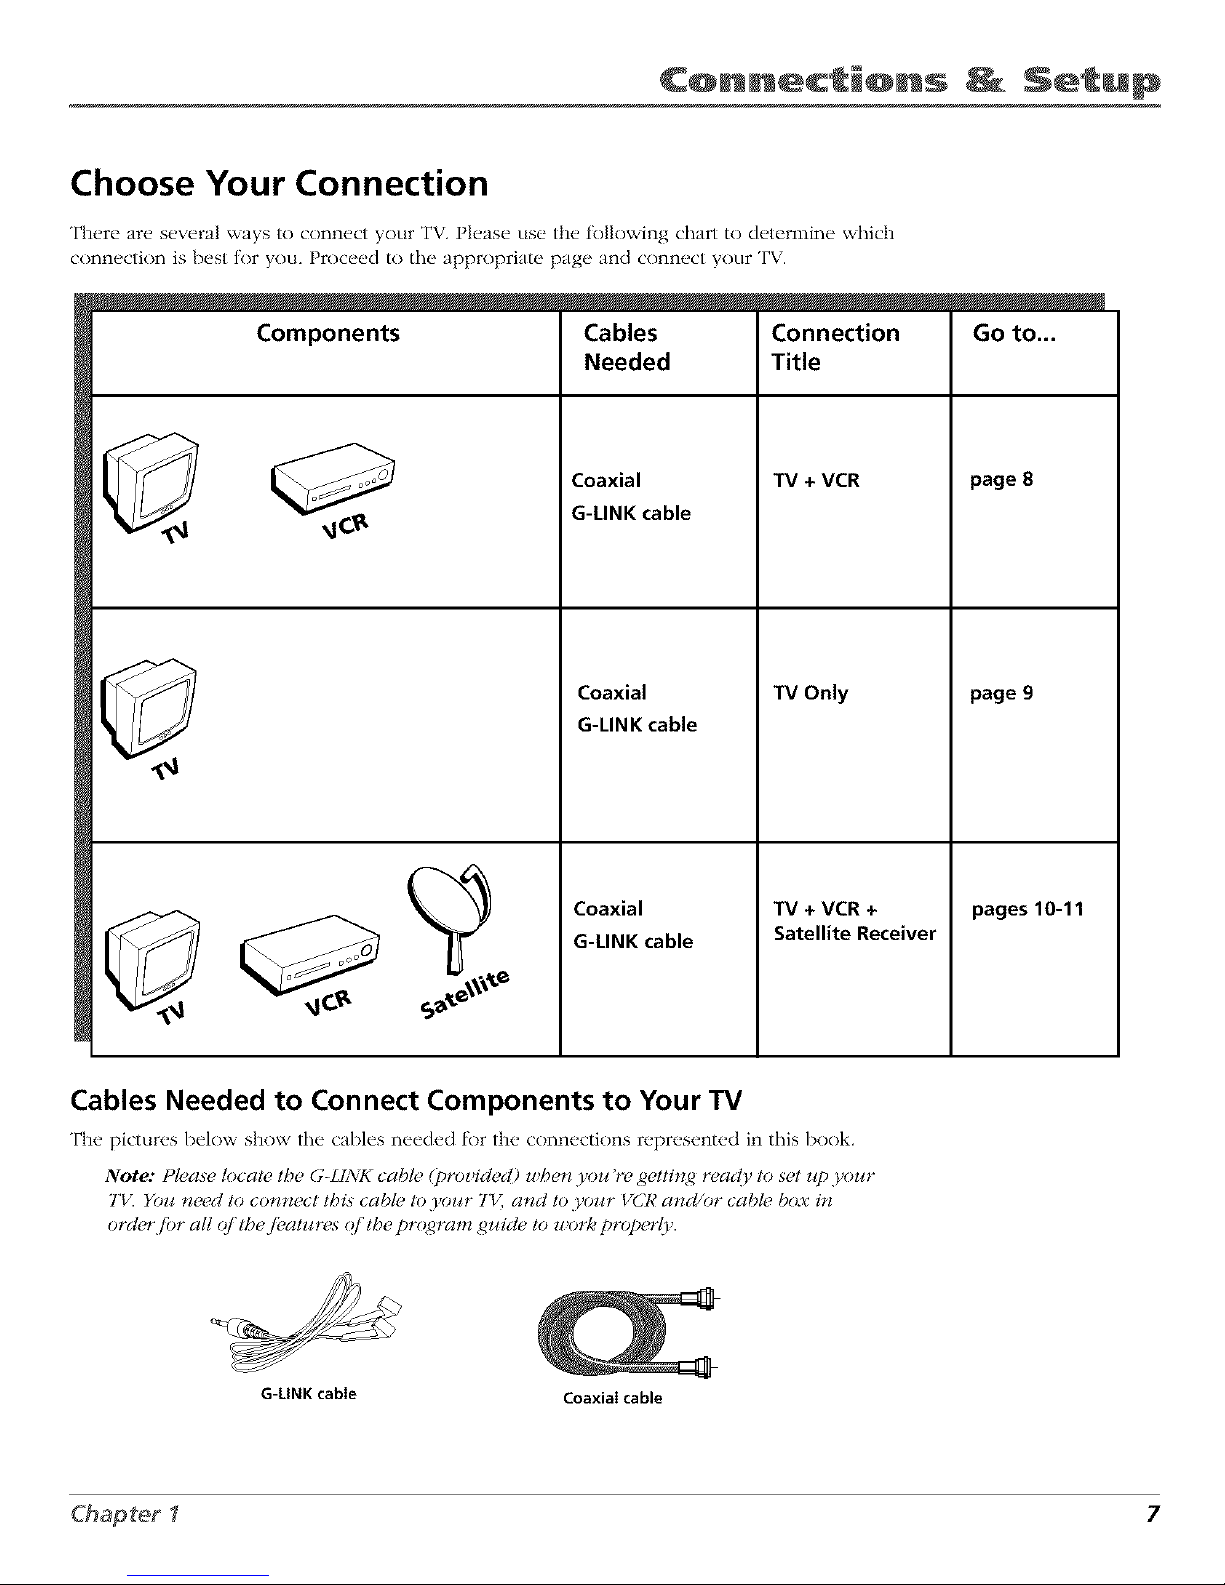
Choose Your Connection
There are several ways to connect your TV. Please use the fk)llowing chart to determine which
connection is best tor you. Proceed to the appropriate page and connect your TV.
Components
Cables
Needed
Coaxial
G-LINK cable
Coaxial
G-LINK cable
Connection
Title
TV + VCR
TV Only
Coaxial
G-LINK cable
TV + VCR +
Satellite Receiver
Go to...
page 8
page 9
pages 10-11
Cables Needed to Connect Components to Your TV
The pictures below show the cables needed l_>rthe connections represented in this book.
Note: t lease t_cat_ Ih_ G-LL_VKcab!_ (proz ided) z,tbe_zb oz¢,re getlin<,d tea#{9 to s_I z_p,>ozc,r
7'17_Yozl Iz_'ed to eolzlzect Ibis cab& to 3'our 7'1_;and to ,_o_r _CR and/or cab& box in
ord_,r fiJr all (#'tbej_,alu*ws (#'Ibe pr(4_ram gz_ide to worleproper(7.
G-LINK cabie
Coaxiai cable
7
Page 10

C@nnect @ns Setup
TV(backpanel)
CABLE/
G-LINK ANTENN_
VCR
AUDIO
0 OUT? _L I, FBOMANT CH3
FromCable,
Cable Box,
orAntenna
Connection: TV + VCR
1.
2.
*
Connect your TV to your VCR
Connect a coaxial cable to the CABLE/ANTENNA jack on your TV and to the Output Jack on your
VCR (s()metimes labeled OUT TO TVL
Connect cable or antenna to your VCR
Connect the coaxial cable fronl your cable outlvt, cable box, or antenna to the Input Jack on your
VCR (sometimes labeled IN FROM ANTENNA or IN FROM ANT).
Connect the G-LINK cable to the TV
A. If you haven't already done so, remove the Demo Pin tYom the G-LINK jack,
B. Connect the G-LINK cable to the G-LINK jack on the TV, Next step, place the wands of the
G-LINK cable to work with your VCR (instructions are on p. 12).
Go to page 12
8 Chapter I
Page 11

C@nnect @ns Setup
TV (back panel)
CABLE/
l_From Cable
or Antsfln8
Connection: TV Only
1. Connect the TV to your cable or antenna
Connect tile coaxial cable flcom your cable or anl_.nna to the CABLE/ANTENNA jack on tile back
of your TV
Go to page 13
2. If you're connecting a cable box, connect the G-LINK cable
A. If you haven't already don(. so, remow, the Demo Pin from thE. G-LINK jack.
B. Connect the G-LINK cable to the G-LINK jack on the TV. Next step, place the wands of the
G-LINK cable to the cable box (instructions are on p. 12).
Go to page 12
9
Page 12

C@nnect_@ns _ Setu@
SATELLITERECEIVER FromCableor Antenna
VCR
OUT
VIDEO R L
INFROMANT
i_ OUTTOTV
S-VIDEO
SATELLITE
IN
Satellite
Signal
VIDEO AUDIO
_OUT_
R L
R L
OUTTO W
TV (back panel)
ANTENNA
10 Chapter I
Page 13

C@nnect @ns Setup
Connection: TV + VCR + Satellite Receiver
1. Connect coaxial cables to the Satellite Receiver
A. Connect the coaxial cable t_()m your cable outlet, cable box, or antenna to the Input Jack
on your satellite receiver (sometimes labeled IN FROM ANT).
B. Connect the coaxial cable t_cnm your satellite dish antenna to the Input Jack on your
satellite receiver (sometimes labeled SATELLITE IN).
2. Connect the Satellite Receiver to the VCR and to the TV
A. Connect a coaxial cable to the Output Jack (sometimes labeled OUT TO TV) on the
satellite receiver and to the Input Jack on the VCR (sometimes labeled IN FI,'OM ANT),
B. Connect a coaxial cable to/he Output Jack on the VCR (sometimes labeled OUT TO TV)
and to the CABLE/ANTENNA jack on the TV.
3. Connect G-LINK cable
A. If you haven't done so, remove the Demo Pin ff()m the G-LINK jack,
B. Connect the G-LINK cable to the G-LINK jack on the TV. Next st*,p, place the wands of
the G-LINK cable to work with your VCR (instructions are on p. 12).
Go to page 12
11
Page 14
C@nnect @ns Setup
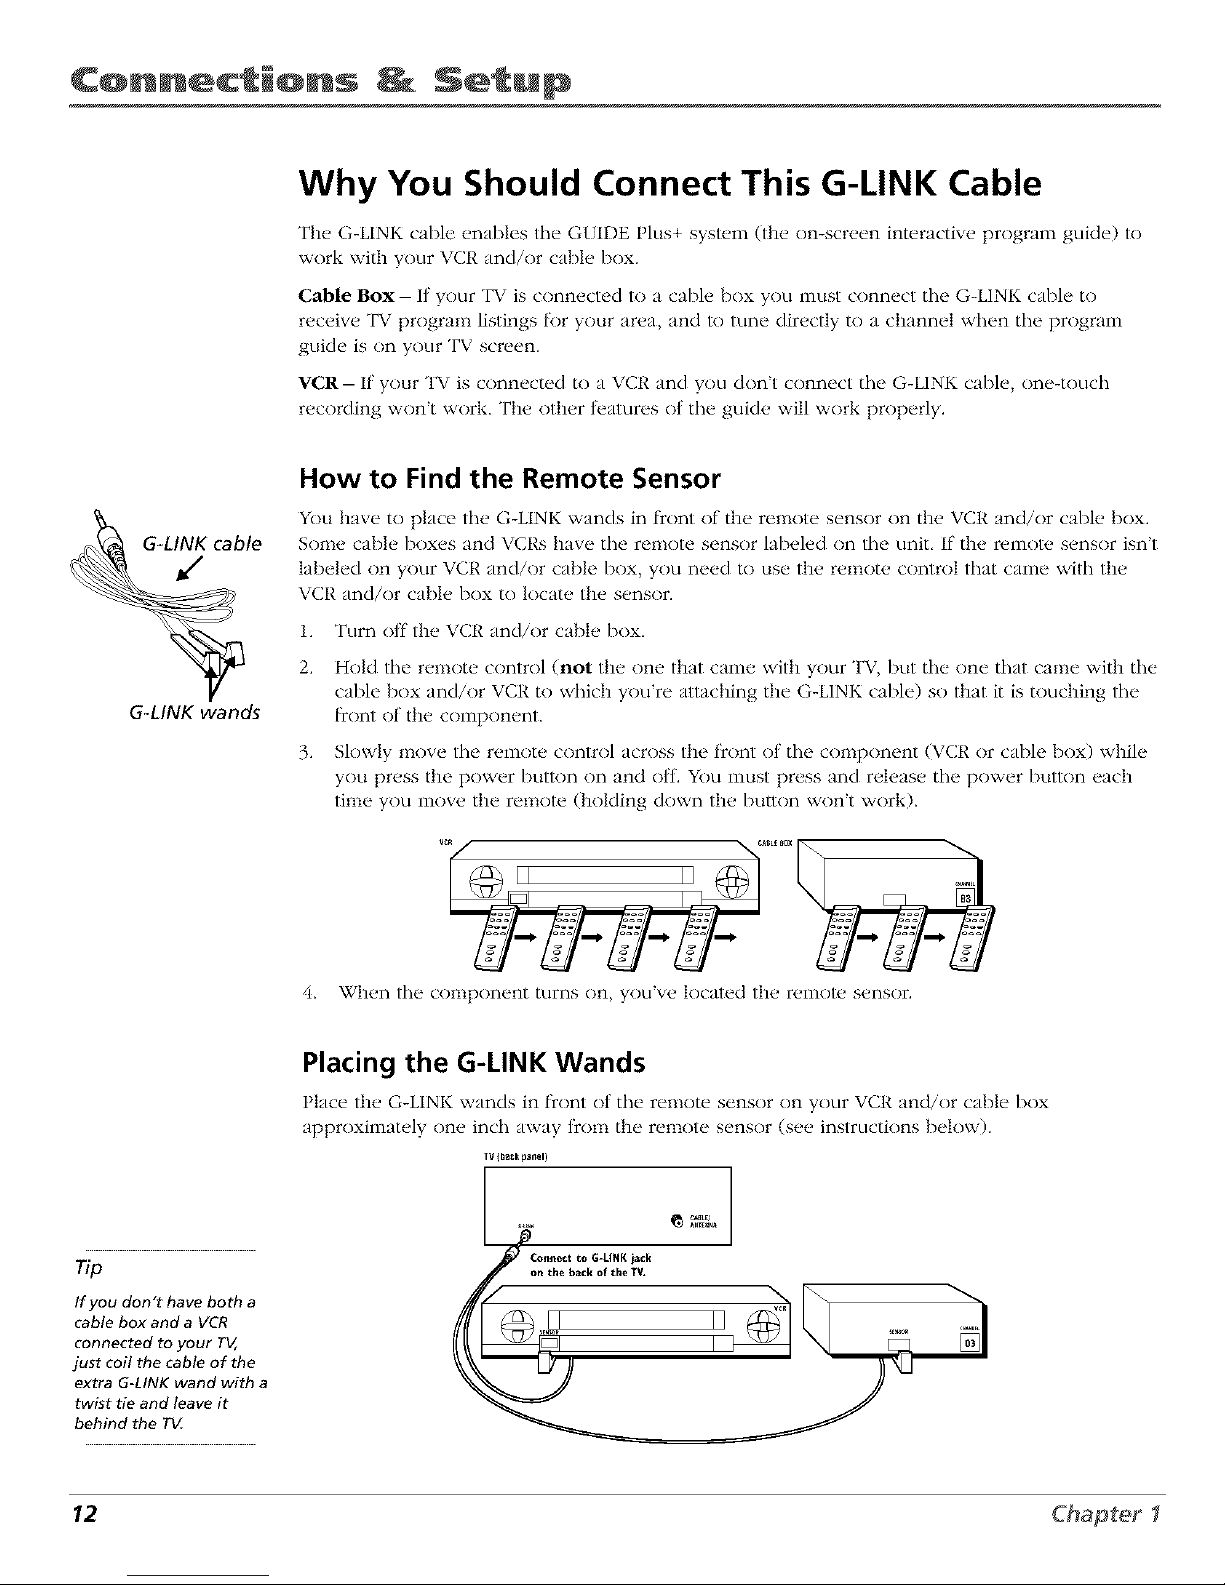
Why You Should Connect This G-LINK Cable
The G-LINK cable enables the G{IDE Plus+ system (the on-screen interactive program guide) to
work with your VCR and/or cable box.
Cable Box- If your TV is connected to a cable box you must connect tile G-LINK cable to
receive TV program listings lbr your area, and to tune directly to a channel when the program
guide is on your TV screen.
VCR- If your TV is connected to a VCR and ynH don't connect tile G-LINK cable, one-touch
recording won't work. The other teatures nt the guide will work properly.
le
G_LINK wands
How to Find the Remote Sensor
You have to place tile G-LINK wands in l_cnntof the remote sensor on the VCR and/or cable box.
Some cable boxes and VCRs have tile remote sensor labeled on tile unit. If the remolu sensor isn't
labeled on your VCR and/or cable box, you need to use the remote cnntrnl that came with the
VCR and/or cable box to locate the sensor.
1. Turn off the VCR and/or cable box.
2. Hold tile remote control (not the one that came with your TV, but tile one that came with tile
cable box and/or VCR to which you're attaching the G-LINK cable) so that it is touching the
frnnt of the component.
3. Slowly move tile remote cnntrnl across the front ol tile component (\ CR or cable box) v_hile
you press the power button on and off. Ybu must press and release the power button each
time you move the remote (holding down the button won't work).
4_
When tile component turns on, you've located the remote sensor.
Tip
If you don't have both a
cable box and a VCR
connected to your TV,
just coil the cable of the
extra G-LINK wand with a
twist tie and leave it
behind the T_
Placing the G-LINK Wands
Place the G-LINI<_",,_ands in front of tile remote sensor on your VCR and/or cable box
approximately one inch away 11"()i11the remote sensor (see instructions below).
IV (ba_k panel)
12 Chapter I
Page 15

C@nnect_@ns _ Setup
Plug in the TV
Plug the end of the power cord into the wall outlet. Match the wide blade of the
plug with the wide slot in the outlet. Insert the plug completely into
the outlet.
Put Batteries in the Remote
1. Remove the battery compartment cover on the remote.
2. Insert new batteries. Malch the polarities (+ and -) on the baueries with the
diagram on the remote.
3. Put the battery compartment cover back on the remote.
/'N
q_D
Use the arrow buttons and the OK
button to move through the menu
system.
How to Use the Remote Control to
Complete the Interactive Setup
The technical term is 'Navigation" - how yOklinove through the on-screen
menus. The theory is the same throughout the menu screens: highlight your
choice and select it.
To highlight a inenkl item, press the arrow buttons tin the remote to highlight
one tit'/he items listed on the screen, tse tile tip or down arrow button to nlove
up or down. tse the right or left arrow button to move right or left.
To select the item that you've highlighted, press OK.
Note: Highlightecl means that the mem_ item stands out./?om other
mem_ items on the list (appears claH_e_;b_@t_ _; or a cl([/_rent col_ _9.
Turn on the TV
Press the TV bul/on on the remote control or the POWER button on the TV (the
first screen of the Interactive Setup appears). The menu screens "time out" al_er
a period of time if yotl don't make a selection. The tips in this section tell yoLl
how to access the Setup menu screens manually.
Note: Pressingg the TV bzttto_ not o_(I' tztrns on the 7'_ but puts the
# # 7 # 7 #_ •
t'emote i!_ _1_ t_locle. '_1_ mode ' m_a_s that the bz_ttons o_* the remote
control operate the TlT_f!_zctions.
13
Page 16
C@nnect @ns Setup
Tip
To access the setup menus manually,
press MENU and choose Setup
Complete the Interactive Setup
The menu system in your TV allows the TV's fl.atures to work properly. In this
book, we call it the 'interactive setup" because the TV asks you questions, you
answer, and the TV makes tile appropriate adjustments. The first time you turn
on your TV, the setup screens appear automatically.
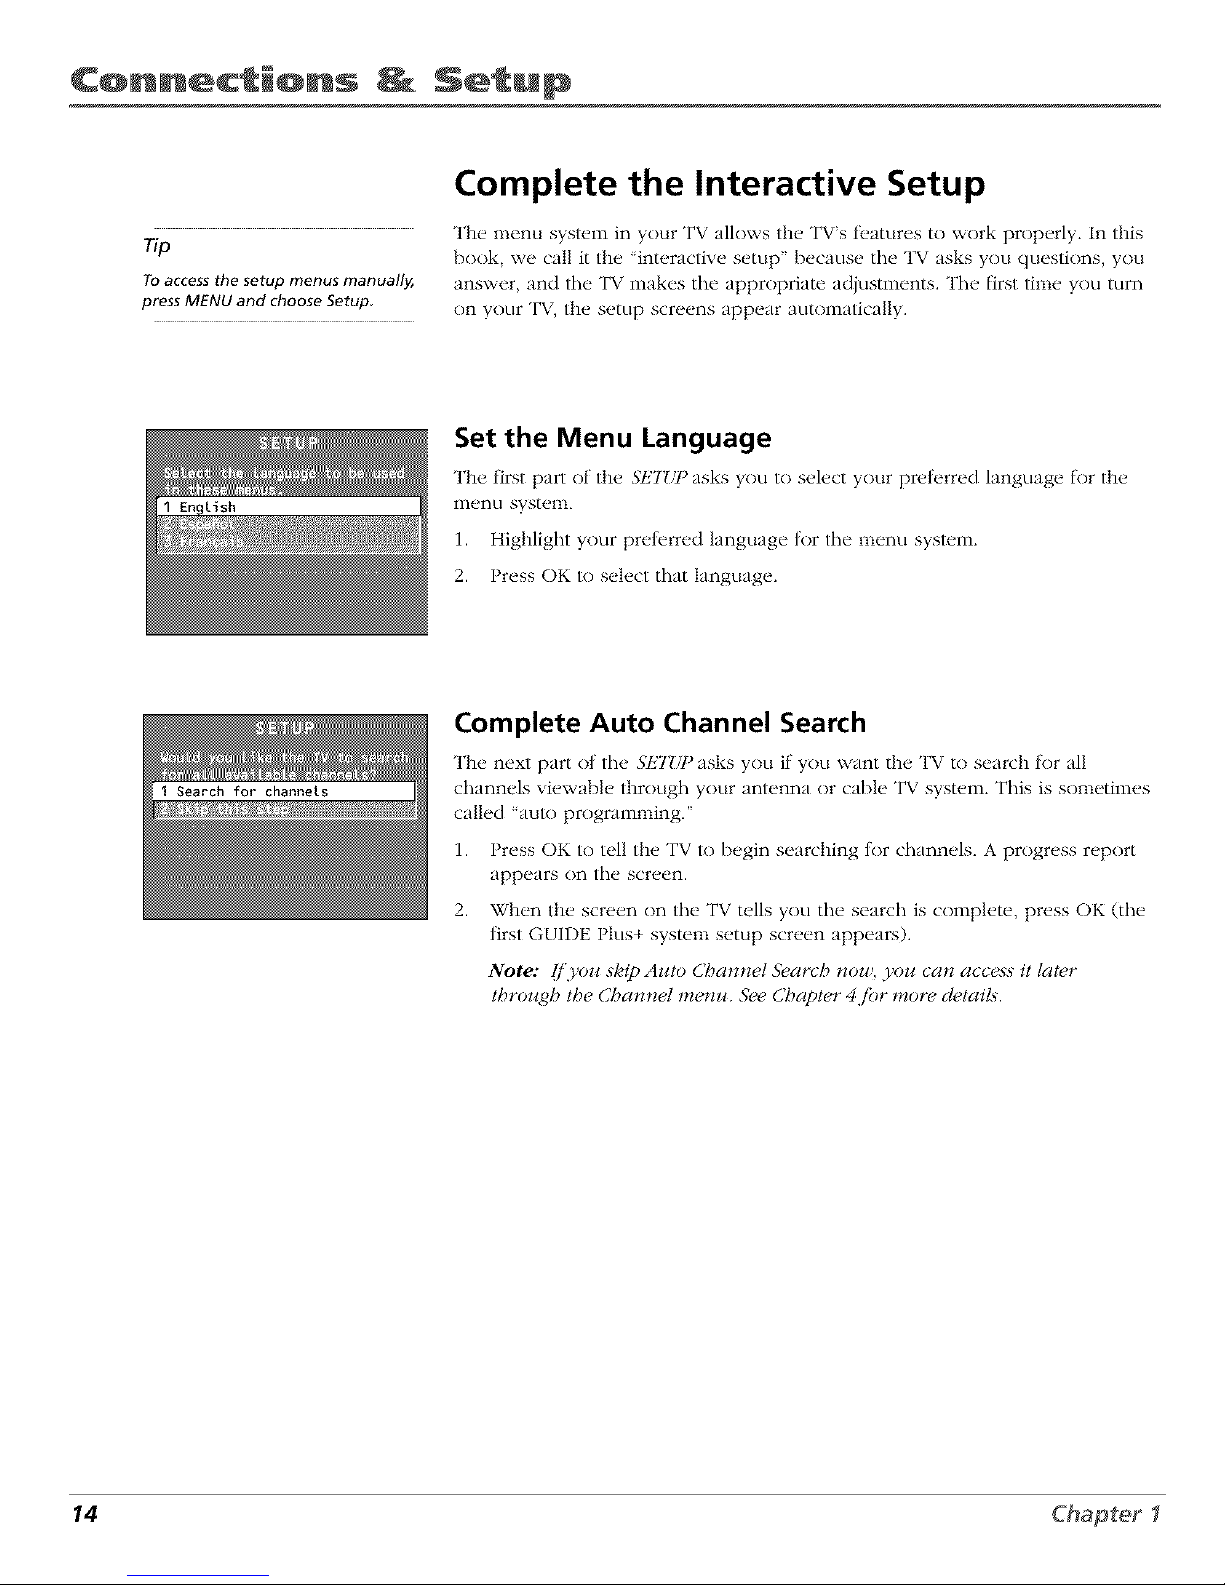
Set the Menu Language
The first part of the SET_,q_asks you to select your preterred hmguage t_r the
menu system.
1. Highlight your preterred language tnr the menu system.
2. Press OK to select that language.
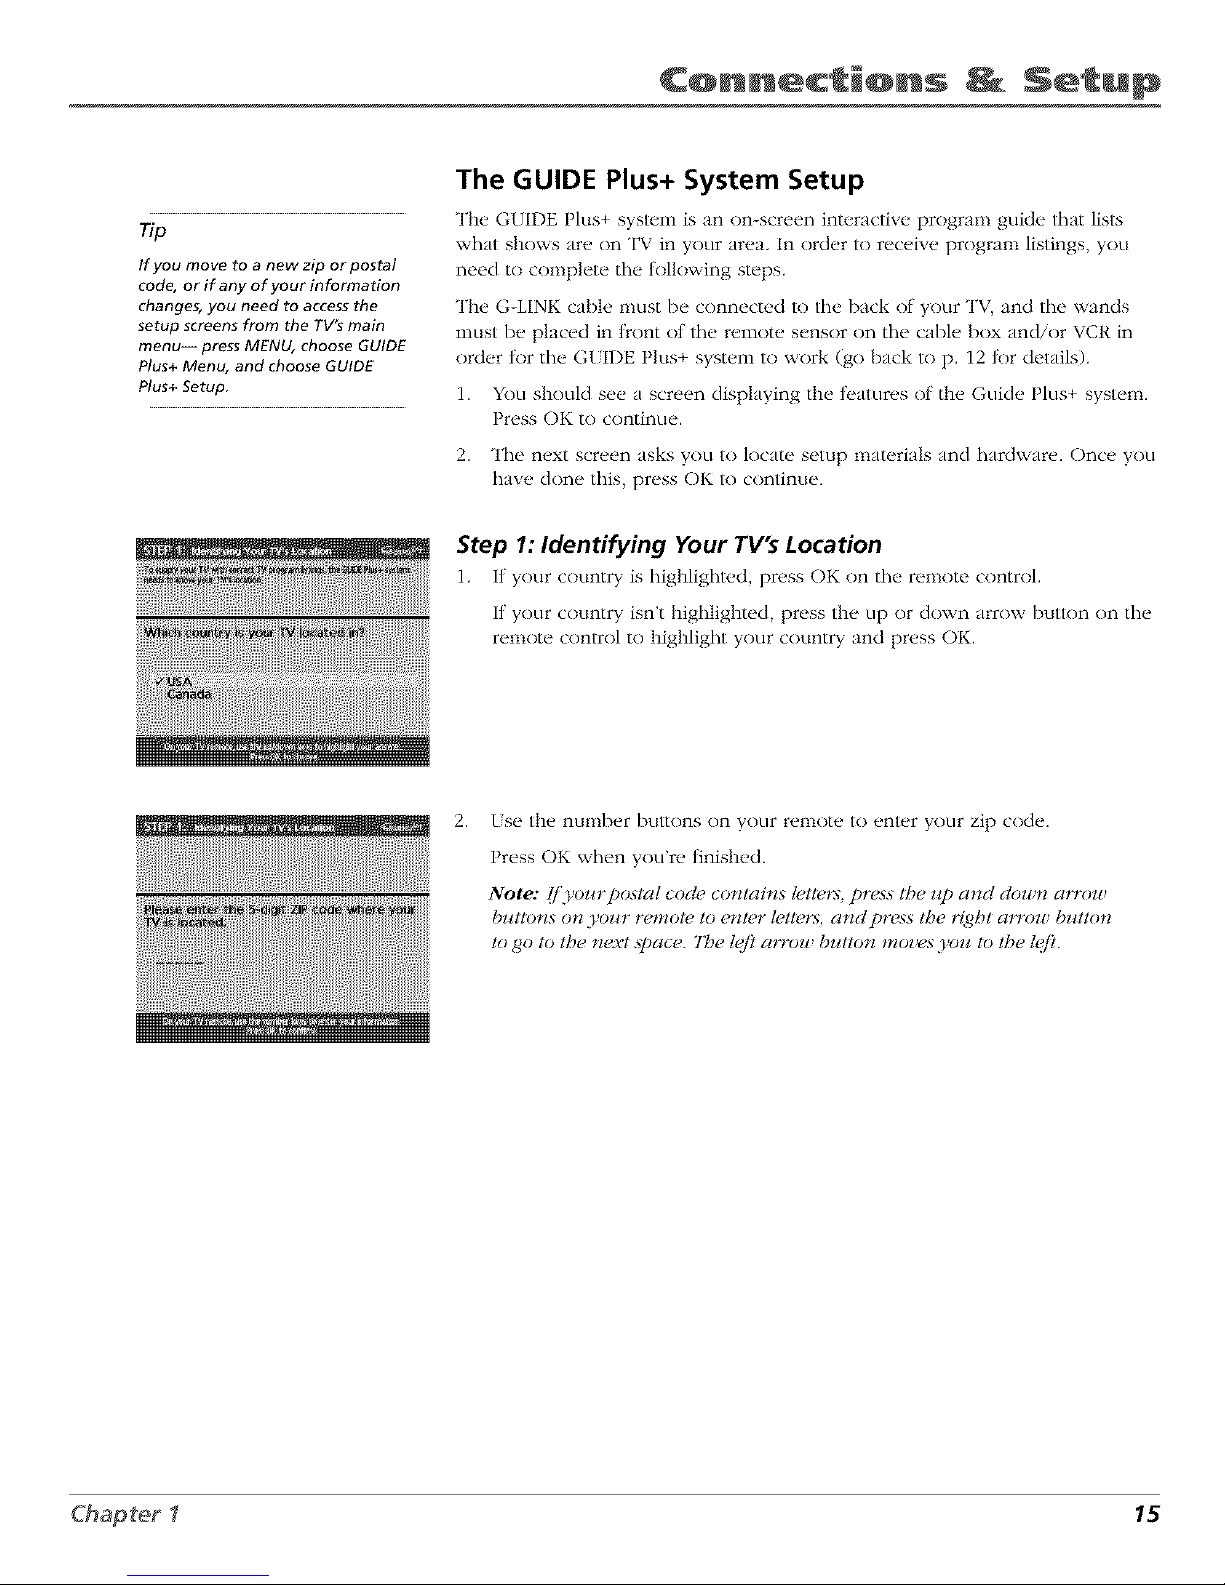
Complete Auto Channel Search
The next part of the 3"ET/__asks you if you want the TV to search for all
channels viewable through your antenna or cable TV system. This is sometimes
called "auto programming."
1. Press OK to tell the TV to begin searching tnr channels. A progress report
appears on the screen.
2. When the screen on tile TV tells you tile search is complete, press OK (tile
+
first GUIDE I lus system setup screen appears).
Note: [/'yozi skip Azao Cbannel S>arcb nou!, you can access it later
/broz_gh the Channel memo. 5_,e Chapter 4jbr more d_,/ait._.
14 Chapter I
Page 17
C@nnect @ns Setup
np
If you move to a new zip or postal
code, or if any of your information
changes, you need to access the
setup screens from the TV9 main
menu--press MENU, choose GUIDE
Plus+ Menu, and choose GUIDE
Plus+ Setup,
The GUIDE Plus+ System Setup
The GUIDE Plus+ system is an on-screen interactive program guide that lis_
what shows are on TV in your area, In order to receive program listings, you
need to complete the RJlowing steps.
The G-LINK cable nmst be connected to the back of your TV, and tile wands
must be placed in tYont of the remote sensor on the cable box and/or VCR in
order t2)r the G[IDE Plus+ system to work (go back to p. 12 tk)r details).
1. You should see a screen displaying tile t>amres of tile Guide Plus+ system.
Press OK to continue.
2. The next screen asks yon to locate setup materials and hardware. Once you
have done this, press OK lo continue.
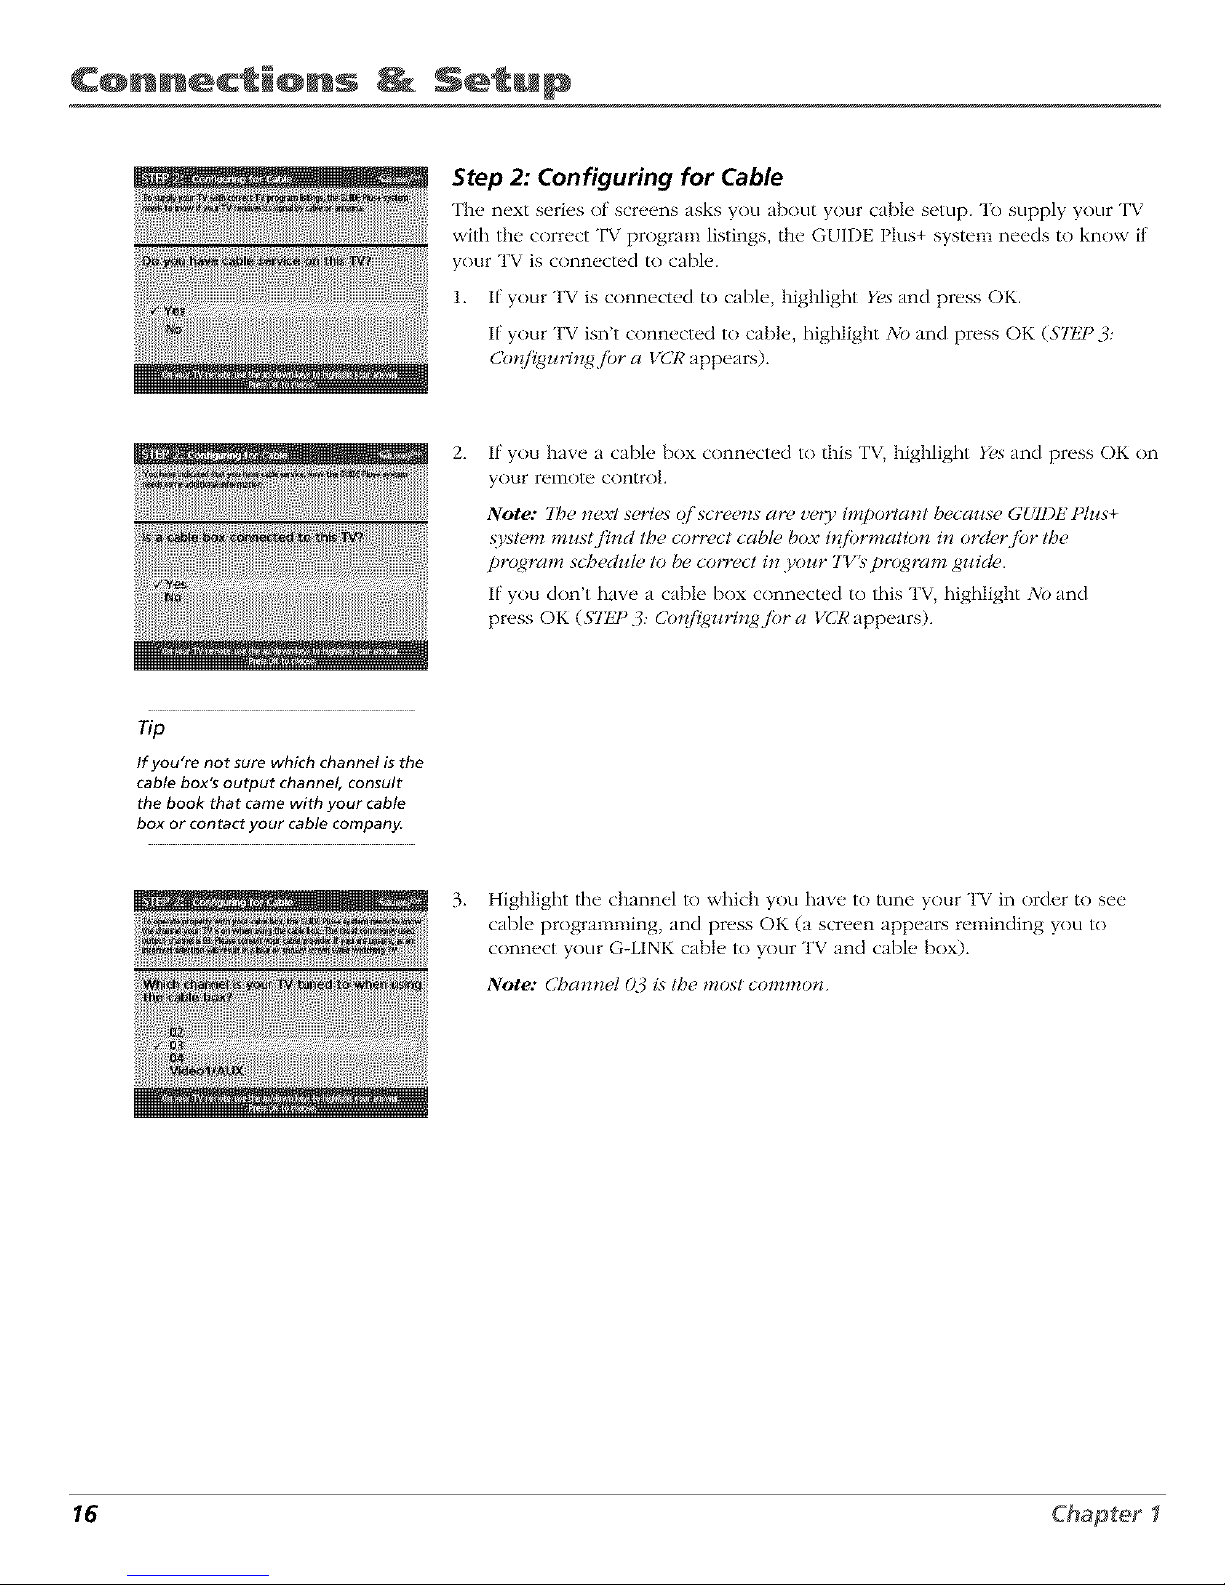
Step 1: Identifying Your TV's Location
1. if your country is highliglm, d, press OK on the remote control.
If your country isn't highlighted, press tile up or down arrow butlon on the
remote control to highlight your country and press OK.
2.
[se tile nunlber buuons on your remote to em{,r your zip code.
Press OK when you're finished.
Note: lj'yonrpost_l cocl_,contains tettel:%press" the np and down a,row
buttons on,Four remote to enter letters, und press the Hgbt a_Tow button
logo to the _ext space. 7be t<,/?urrou butto_ moz,es Fou to the t<,/?.
15
Page 18
C@nnect @ns Setu@
Step 2: Configuring for Cable
The next series of screens asks you about your cable setup. To supply your TV
with the correct TV program listings, the GUIDE Plus+ system needs to know if
your TV is connected to cable.
1. If your TV is connected to cable, highlight Yes and press OK.
If your TV isn't connected to cable, highlight No and press OK (Slt_F 3:
Co*_/l_guHngjbr a VCR appears).
2_
If you have a cable box connected to this TV, highlight Yes and press OK on
your remote control.
Note: 7be next series o/'screens are ve_3' impo_qant becw_se Gt,gDtZi)tus+
,_ystem must,/'ind the correct cable box #{/brmation in order,/br the
program sc,5#dut_, to be co_Tect in your 7Y_ program guicl_,.
If you don't have a cable box connected to this TV, highlight No and
press OK (ST/J °3: Cotd_mqngjbr a VCR appears).
Tip
If you're not sure which channel is the
cable box's output channel, consult
the book that came with your cable
box or contact your cable company,
3_
Highlight lhe channel lo which you have to tune your TV in order to see
cable programming, and press OK (a screen appears reminding you to
connect your G-LINK cable to your TV and cable bnx).
Note: Channel (b4 is the most commotL
16 Chapter I
Page 19

C@nnect @ns Setup
4. Highlight your brand of cable box, and press OK.
It your brand isn't listed, highlight 2viJtListed and press OK.
5.
Make sure your cable box is on.
Tune tile cable box to channel 02 (use tile remote control that came with
your cable box, or press tile channel buttons on the cable box).
Press OK (tile GUIDE Plus+ system starts testing cndes).
Important Note: When corl_,testirlg i._in pr%{4ress, don't/oz_:ch 3,oz_:rTK
VCR, cable, box or ar(F (?/'the remote control._ j_)r tbese prodz_cts.
.
Look at your cable box. If it is still on and changed to channel 09, tile test
was successful. Highlight Yes', and press OK (STIJ°3: Co*{f!g*¢*qn/4.fiJra VCR
appeatx).
If your cable box didn't change to channel 09 or turned itself off, you have
two choices: 3)k_and 7_st this cod_, a/da#z.
78st this cod(, a/4ain: If you think tile TV, the cable box, or any of tile
remote controls might have been louched or bumped during the test,
highlight Te._tthi._code a/4ain and press OK (tile GUIDE Plus+ system runs
tile sanle set of cndes).
3)1):If y(xl don't thinl< tile test was interrupted, highlight 3)k_and press OK
(GUIDE Plus+ system tests the next code).
Repeat tile previous instructions until the TV finds the correct cable box
code. Follow the instructions on tile screen.
Note.. I]'the 7_z ca_ 't f!_zd 3'oz¢r cable box code, atr( z¢bleshoot#_g
checklist appea_:_. Car@dl_ re_.iew each checklist and lbllow t,Se
instrzlctions oi* the screen.
17
Page 20

C@nnect @ns Setu@
Step 3: Configuring for a VCR
1. If your TV is connect_d to a VCR, press OK.
If it is not, highlight No and press OK (a screen appears reminding you to
connect your G-LINK cable to your TV and VCR).
2. Use the Lip and down arrow bul/ons to highlight the brand of your VCR that
is connected to the TV.
If your brand isn't listed, highlight Not Listed and press OK.
3_
Tune your VCR to channel 02. Next, turn OFF your VCR. When you
complete these steps, press OK to begin testing.
Important Note: Wher_ code testing i._in progress, don't toJ_ch yoJ_r 7'I_;
VCR, or an)' of the remote cont_dsjbr tbese products.
4_
Look at the front of your VCR. If your VCR turned on automatically and
changed to channel 09, the lest was successful. Highlight Yes and press OK.
If your VCR didn't change to channel 09, you can either choose No or 7_,st
this code a/4airt.
If you think your TV or relnotes might have been touched during the test,
tune your VCR to channel 02, turn off your VCR and highlight 7?,st tbLs
code again.
If you don't think the test was interrupted, highlight No. Tune your VCR to
channel 02 and turn off your VCR. Press OK (the GUIDE Plus+ system starts
testing another set of codes.)
Keep lk_llowing the previous instructions until the VCR finds the correct
code.
18 Chapter I
Page 21

C@nnecti@ns Setup
Tip
Leave your cable box turned ON to
download program information.
Leave your VCR turned OFF to record
programs,
Note: [/'tbe GUI1)IZ Plus+ ._tem can't locate the co*wect codejbr the VCR,
a ti._t (ftrouble_boot#zg instr1_ctio_s appeas_ to betpyou b_/breyou t_,
• 77_, VCR co_[7_quration again: repeal VCR setup.
• 70st alternate codes: tests setecteU brands and (]'tbi._jktil.s-, the test
continues witb all codes in the .2_,_tem.
• Skip this step: the ._},stem worz 't be able to automatically, schedule
pr(_rams to record o_ your VCR.
Step 4: Confirming Your Settings
1. Check to nlakt, sure all settings an, complete and correct. If all settings are
complete, highlight Yes, endsemp and press OK. If your cable box and/or
VCR code testing failed, you should see INCO_'llI)LtZ775where the cable
box and VCR codes are listed. Once setup is complete, additional
screens appear.
If any se/lings are incomplel_, or incorrect, highlight No, repeat sempp*_cess
and press OK. Follow the instructions on the screen.
2. You can choose to view a demn of the GUIDE Plus+ t_.atures, which may
take a l_w minutes to load. If you don't want to see the demo right now,
press OK to watch TV.
19
Page 22

C@nnect @ns Setu@
What to Expect
The next time you turn on your TV, the GUIDE Plus+ system will appear on the screen. The
tkfllowing exampl_,s explain what you might see:
• If all of tile program inl_>rnlation has been sent lo your TV, tile G[IDE Plus+ system
appears with all of your TV program listings.
• If the program intk>rmation hasn't been sent to your TV yet, an outline of the GUIDE
(without TV program listings) will appear on the screen. Program inh)rmation is usually
sent to your TV at night.
• If the TV detected that you have multiple cable companies in your area, S7IJ ° 5: CbooMrzg
Yoz_rChannel Lineup appears.
Features of the GUIDE Plus+ system are explained in Chapter 3.
To clear the guide flcom your screen, press CLEAR or GUIDE on the remow control.
Next Steps
Now that you've finished the Interactive Setup, you're ready to watch TV. This might be a good
time to program your remote control. The remote cnnlrnl that came with this TV can be
programmed to operal_, other components. Go to the next chapl_,r lo lind out how to program
your remow.
20 Chapter f
Page 23

2
Using the Remote Control
Chapter Overview:
• The Buttons on the Remote Control
• Programming the Remote to Operate Other Components
• How To Use the Remote After You've Programmed It
• Code List
Changing Entertainment. Again.
21
Page 24

Using Re te C@ntr@!
L.E.D.
VCRI TV
<]
DVD VCR2 AUX SAT.CABLE
&&&&
MUTE SKtP
SOUND GO BACK
GUIDE INFO
<Y©C>
MENU CLEAR
,O20'O
ANTENNA
O
REVERSE PLAY FORWARD
{2>c>
REC'VCR+ STOP PAUSE
The Buttons on the Remote Control
0-9 (Number buttons) Enter channel numbers and time settings directly
through tile remote contrnl.
To enter a two-digit channel, press the twn digits. To enter a three-digit channel,
press and hold the first digit fl)r two seconds until two dashes appear to the
right of the number, then add the second two. Example: to rune to channel 123,
press and hold 1 tk)r two seconds, press 2, then press 3.
Arrow buttons (up, down, left, right) Press the arrow buttons to move
through tile ()n-screen menu system.
ANTENNA Functions as TV/VCR buunn in VCR mode and TV/receiver button
in SAT,, CABLE mud e.
AUX (auxiliary) Puts the remote in auxiliary mode to operate the component
you've programmed the remote to operate with this button. You can program
this bu/tnn lo control a cal)le box, most RCA, GE and PROSCAN audio
components, a laserdisc player, or a VCR.
CIt (up and down) buttons Scan up or down through/lie current channel list.
Press once to change the channel up or down; press and hold to continue
changing channels.
CLEAR Removes any menu or display from the screen and returns you to
TV viewing.
DVD Puts the remote in DVD mnde.
FORWARD If you're operating a VCR or DVD Player with the remote control,
press FOI,'WARD to advance a disc or videotape.
GO BACK l,'eturns you l© the previous channel.
GUIDE Press GUIDE to nmke the GLIDE Plus+ system appear on the screen:
press GUIDE again l©remove it t_nm the screen.
INFO Displays channel inlk)rmatinn.
LE.D. (light-emitting diode) The lil/le light on the remote that lights when you
are programming the remote. It also lights when you press a valid bunnn on
the remnte.
MENU Displays the TV's Main menu. You can also press and hold for 2
seconds to display the GLIDE Plus+ system.
MUTE Lowers the vnlLlme to its nlinilnum level. Press again to restore vnlulne.
OK When a menu is on the screen, press OK to select the item that
is highlighted.
22
Page 25

Re te C@ntr@J
To turn off all the
RCA, GE, and
PROSCAN
components that are
connected to the T_,
press ONoOFF twice
within two seconds
This feature only
works with most RCA,
GE and PROSCAN
products
ON-OFF Turns the TV on and off. When the remote is in another mode (VCR, DVD, Satellil% etc.)
and the remote is programmed to operate that component, you can press ON*OFF to turn tile
component on and ofT.
PAUSE If you're operating a VCR or DVD Player with tile remote control, press PAUSE when the disc
or videotape is playing to pause playback.
PLAY If you're operating a VCR or DVD Player, plays the disc or videotape.
REC-VCR+ When the GLIDE PILLS+program guide is on the screen, press REC*VCR+ to program
your VCR to record a program. If tile remol(, is in VCR mode, press REC-VCR+ to start recording.
REVERSE If you're operating a VCR or DVD Player with the remote control, press REVERSE to go
backwards on a disc or videotape.
SAT-CABLE Puls the remote in SAT*CABLE mode.
SKIP If you press this button betk/re you change tile channel, tile TV waits 30 seconds and
automatically goes back to the original channel. Each time you press SKIP, you add 30 seconds (i.e, if
you press SKIP two times belk)re you change tile channel, the TV waits 60 seconds and aulomatically
turns back lo tile original channel).
SOUND This butlon does not have a I\mction tk)r riffs model.
STOP If:you're operating a VCR or DVD Player, stops playing the disc or videotape.
TV Turns on tile TV and puts the remora, in TV mode. Also displays channel intbrmation.
VCR1 Puts tile tern(m, in VCR mode.
VCR2 Puts tile rem(m" in VCR mode.
VOL (up and down) buttons Decrease or increase tile TV's vohlme.
WHO*INPUT If you're operating another component, such as a saIellite receiver, press the
WHO* INPUT bul/on to select available channel lists.
23
Page 26

Using Re te C@ntr@!
j_
jf
_w vc_2 Au× S*_T*Ct*B_
¢_ ÷
You'll use these buttons when you program the
remote to operate another component.
The remote may not operate all models of
all brands.
Programming the Remote to Operate
Other Components
"File universal renlote control can be prngranlmed to operate lllost brands
of remote cnntrnllable VCRs, satellite receivers and cable boxes. "File
remote is already programmed to operate most RCA, GE and PROSCAN
TVs, VCRs, DVD players, laserdisc players and satellile receivers.
Find Out If You Need to Program the Remote
To determine whether the universal remote needs to be programmed,
turn a component ON, such as a VCR, point the remote at the VCR, and
press the VCR1 button. Then press ON *OFF or channel tip or channel
down to see it the VCR responds to the remote commands. If not, the
r(,niot(, ne('ds tn be progranlnlt, d.
How to Program the Remote
There ar(* two ways t() pr()graln tile remote control: automatic cod(*
search and direct entry. Instructions t_)r both ways fi)llow.
To stop the automatic code search without
programming any components, press and hold CLEAR
until the light on the remote turns off.
Using Automatic Code Search
1. Turn on tile component you want tile remote to operate (VCR, DVD
Player, etc.)
2_
Press and hold the conlpnnent button on the renlnte cnntrnl that
corresponds to the component you want tile remote to operate
(VCR1, DVD, etc.). While you hold down tile component button,
press and hold ON°OFF (wl_en tile red light on tile remote turns
on, release both buttons).
3. Press PLAY (the red light on the remote, located belnv,_ tile ON,,OFF
button, starts flashing).
The remote is searching tile first set of component codes (there are
20 sets of codes). If the component you *_.ant to operal_, doesn't
turn off automatically afler 5 seconds, press PLAY again (the red
light starts flashing again as the remote searches through the next
set of codes).
Continue pressing PLAY until the component turns off.
4_
Note: I/'the component doesn't turn (ffff'c(fleryoz_'_,epress(,d the
IoIAY bz_tto_ 20 time._, linecomponent can't be programmed.
Press REVERSE, wait 2 secnnds. Repeat this sl(.p until the
component turns back on.
5. "lb finish, press and hold the STOP button until the red light on the
remote turns off.
24
Page 27

Re te C@ntr@J
Using Direct Entry
], Turn on the conlponent you _,ant the ren_o[_ _ to operate.
2. Look up tile brand and code number(s) l_)r the component on the code list on page 26.
3. Press and hold the cnmponenl button that corresponds to the component you want the
remote to operate (VCR1, DVD, etc.)
4. Enler the code from the code list.
5. Release the component button.
6. Press ON.OFF lo see if the component responds lo the remole cnmmands. If it doesn't, try
pressing the component buuon and then ON*OFF again.
7. If you get no response, repeat these steps using the next code listed tk)r your brand until the
component responds to the remote commands.
The buttons might
operate differently for
other components,
especially when you're
using another
component's menu
system
How to Use the Remote After You've
Programmed It
Once the remote has been programmed successl\_lly, you are ready to use it to control your
cnmpnnents. To operale the component:
1. Press the component button (TV, VCR1, VCR2, DVD, ALX, or SAT*CABLE) lo set the remote
to operate the component.
2. Press ON-OFF to turn the component ON or OFF.
3. Use the remote bul/ons thai apply to that component.
Note: [i'.YOZ_keep pressin_,g bJ_ttons and tlolbirlg [gappetl._. the relJ_ole i._prohal)])' in the
u rorlg mode,. Yoz_ tnz_st press the cotnponenl bullon that matches lhe colnponetll.vou
want to operate (_.e., _l'.goz_ want to operate lbe VCR, press" VCRI on hSe remote contl_t to
put hSe remote in VCR triodes.)
25
Page 28

Using Re te C@ntr@!
VCR
Admiral .............................................................. 213[
Adv_nmra .................................................... 2026
Aiko ....................................................................... 2027
Ai\\ a ................................................. 2(102, 2026
Akai ...... 2003. 2004¸ 2(1{)5, 200 v, 2008, 2111,2112, 2113
American High ................................................. 202¸[
Asha ........................................................... 2{)13
A_lc/i_/ Dynamics ................................... 2009, 2010
Audiovox ................................................ 2014
Bell & It//well ...................................................... 201 l
Beat/mark ........................................................ 2013
B_/ksonlc .......................................... 2012, 2025
Calix .............................................................. 2014
Candle ........... 2{)13. 2{)14, 2(115, 2016, 20[7, 2018, 2019
Canon ................................................. 202I, 2022, 2114
Capehart ................................................ 2(120, 2110
Cal_ er ........................................................ 21_2
CCE ...................................................... 2027, 206I
Citlzen 2{)13. 2014¸ 2(115, 2016, 2017, 2018,2019,2027
Co]ortyme ................................................... 2009
Co]I .................................................................. 206 [
Craig .................................... 20[3, 20[4, 2023, 2{)61
C_lrtis Mathes .......................... 200(1. 2(1{)2, 2(109, 2013,
............................ 2016. 2018, 2(121, 2022, 2024, 2115
Cybernex ..................................................... 2013
Daewoo 2015. 2{317, 2(119,2{325, 2(126, 2027, 2028, 2110
Daynon ........................................................... 211(I
Dbx ................................................. 2009, 20[0
Dimensia ............................................................. 2000
l)ynalech .............................................. 2002, 2026
Electrohome ............................................... 2014, 2029
Electiophonic .................................................. 2014
Emerson ........................................ 2002, 2012,2014,
.............. 2(115, 2021, 2024, 2025,2026,2029, 2030, 2032,
2033, 2034, 2035, 21336, 2(137, 2(138, 2039, 2040, 2041.
2042, 2044, 2045, 20t7, 2(165, 2I{)5, 2113, 2116, 2117.
213(I
Fishe_ 2{31I. 2{)23, 2(148, 2049, 2050, 205I 2052,2118
Fnii ................................................................ 2021, 2119
Fvmti .................................................... 2002, 202{_
Gmmrd .............................................................. 2026
GE ...... 2000, 2001. 2{)13, 21)21. 2(122, 2053, 2115, 212(I
GoldstaJ ....................... 2009, 20It, 2018, 2054. 212[
Gradiente ............................................................. 2026
Hmley I)avkison ........................................... 2026
Ham_an K n'don ................................................... 2009
Harxxood .................................................... 206[
Headqtlarter .................................................... 2{)11
Hit tchJ 2002, 2055, 2056, 2057. 2I() 7, 2111, 2120, 2122
HI Q ................................................................... 2023
Instant Replay ............................................... 202[
]CI ................................................................... 202[
JC Penne) ............. 2009. 2010. 2(111, 2013, 20[4, 202[,
............ 2022. 21355. 2{)56, 2(158, 2059, 2060, 2107. 2118
lensen ............................................ 2055, 2056. 2111
JVC ............. 2()(39, 2010, 2(111, 20[8, 2058, 211[, 2123
Kenwood 2009, 2010, 2(111, 2016, 2018, 2058, 2111,2123
KLH ................................................................. 2(X,[
Kodak ................................................. 20[4, 2021
Llo)d .......................................................... 2002, 2026
Logik ...................................................... 21)6[
LXI .............................................................. 21)14
Magn tvox 202[. 2022, 2(162, 2063, 21(14, 2108. 2124
Magnin .......................................................... 21)13
MI]antz .......................................... 2009, 201(L 21)11.
.............................. 2(116, 2018, 2021, 2058. 2(X,2.2064
Martt .......................................................... 2{)14
Mast shit _ .................................................... 202[
MEI ................................................................. 202[
Memorex ................................................. 2002, 201 [,
................... 2013, 2014. 2{321. 2023, 2026, 2104, 213[
MGA .................................................. 2029, 2065, 2113
MGN IcchnoIogy .......................................... 2013
Midland ............................................................... 2053
Minolt _ ............................................. 2055, 2056, 2107
Mitstd_ishi 21)29, 21)55. 2056. 2065, 2066, 2067, 2069,
............ 2070. 2{371, 2{)72, 2(173, 2074, 21(16 2113, 2123
Montgome W \vmd ...................................... 2075, 213[
MotoJola ............................................... 20212131
MIC .............................................. 2002, 2013, 2026
Mu]Iitech ............... 2002. 2013, 2(116, 2026, 2(53, 206¸[
NEC ............................... 2009. 2010. 2(111, 20[6, 20[8,
.................. 2058. 2064, 2{)76, 2(178, 2079, 211I, 2123
Nikko .................................................................. 20[4
Noblex .................................................... 20[3
O]ymptts ........................................................... 202I
Optimus .................................................... 2014, 213[
Oplon*ca ................................................... 2096
OJion ........................................................... 2035
]?an tsonic .............. 202[, 21)22, 2[09, 2[25, 2126, 2127
Pentax .......................... 2016, 2055, 2(156, 210 _, 2120
Penlex Researd_ ................................................. 20E8
Philco .................................... 2(121, 2022, 20(_2, 2063
Philips ................................... 2(121, 2(162, 2096, 2124
Pilot .................................................................... 20[4
]?ioneei ......................... 2010. 21)55, 2080, 2081, 2123
Portland ................................... 2(116, 20I 7, 20[9, 21[{)
]?loScan .............................................. 2000, 2001
Protec .......................................................... 20(_I
]?t lsm ................................................................. 21(14
Qu trtcJ ...................................................... 2011
Quartz ......................................................... 2011
Quasm ...................................... 202I, 2022, 2125
RCA ................................. 2000. 2001. 2003, 2(113, 202I,
.............. 21355, 2056, 2(182, 2083, 2084,2085, 2086,2087,
............. 2088, 2()89, 2090, 2{391, 2[() 7, 2115, 2120, 2125
Rtdloshad</Realistic .................. 2(1{32,2(111, 20[3, 20[4
202I, 2022, 2023, 2{)26, 2029, 2(149, 2050, 2096, 2131
Rt(/ix ....................................................................... 20[4
Rmdex .................................................... 20[4
Ricoh ........................................................... 2128
Runco ............................................................ 21(14
Samsnng .................. 2005, 2013_ 2015_ 2(133, 2053, 2112
Sanky ................................................. 2131, 2104
Sansnl ..................................... 2010, 2(192, 211I, 2123
Sanyo ............................................. 2011, 2013, 2023
S<ott 2012, 2015. 2{)25, 2032_ 2(135, 2038, 20(_5, 2()93,
2116
Seals ............................ 201 [. 2{)14. 2(121. 2023, 2048,
................... 2049, 2050, 205[, 2{)55, 2(156, 21{)7, 21 [8
Shtq) ........... 2002, 2017 2{)29, 209t, 2095, 2096, 2131
Shintom ..................................... 200t, 2056, 206I, 2098
Shogun ....................................................... 20[3
Signalm e ............................................... 2002, 2131
SingeJ .............................................. 2021, 206[, 2128
Sony ...................... 2002. 2004 2098, 2099, 21 [9, 2128
STS .......................................................... 202I, 2107
Sylvanh 2002, 202I, 2022. 2{)26. 2062, 2063, 20(_5, 2124
Symphonic ........................................... 2002, 2026
Tandy ............................................................. 2002, 201[
Tashiko ................................................... 20[4
Tamng ........................................................ 2058, 211 [
"[tAC ............................ 2002. 2026, 2(158, 2085, 21 [ i
"[ethnics ...................................................... 202I, 2109
"[cknika ............... 21302. 2014 2021, 2026, 21(10, 2129
"[MK ................................................ 20[3, 2024. 20t7
"[_)shlba ........ 2015 2049, 205I. 21355, 2(165, 2(193, 21 E6
"[_)teVision .......................................... 2013 2014
I nilech ............................................................. 20[3
"vector Research ...................... 2(109. 2010, 20[5 2016
\ictor .............................................................. 20[0
\ideo Concepls ................. 2009, 2010, 2(115, 2016, 2113
\ ideosonlc ......................................................... 20[3
\_rds ......... , 2002, 21313, 2014, 2(115,202I, 2023, 2026.
2029, 2055. 2056. 2061, 2(196, 2[{31, 21(12, 2103, 2107.
2116, 213[
XR 1000 ........................................... 2021, 2026. 21)6[
5_mlaha ................ 2009, 2010. 2(111. 2(118, 2058, 211 [
Zenith ....................... 200t, 2098, 21(14, 2119, 2128
Cable Boxes
ABC ............... 5002, 5003, 5004, 5005, 5006, 500 v, 5053
Anlronlx ........................................... 5008, 5009
Archer ....................................... 5008, 5009, 5010, 50[ i
Cabletenna ......................................................... 5008
Cableview ...................................................... 5008
Centm_ ................................................... 50¸[I
Citizen ............................................................ 50[ I
CoIot/r _/ice ................................................. 50[2, 5013
Comtl onics ......................................... 5014, 5015
Comet ............................................................... 5(116
Eastern .................................................... 5(117
Garrard .................................................................. 5(111
GC Elect_/nlcs ................................................. 5(1{)9
Gemini ........................................ 5(118, 5(119, 5049
General Inslrt/ment ........................................... 5(1{)3
Hamlin .............................. 5(120, 502I, 5022, 5035, 5(145
Hitachi ....................................................... 5(1{)3
l_ytex ..................................................................... 5002
lasco .......................................................... 5(111
ler_]d 5003¸ 5005. 50(1v.5018. 5023, 5(124, 5(146, 5(53
Magnaw_x ............................................................. 5(125
Memorex ....................................................... 5(126
Movle Iime ..................................... 5(1{)2, 5(12v, 5028
NSC .................................................. 5002. 5(127, 5028
Oak .......................................... 5002,5016, 5029
Panasonlc ................................................. 5048, 5(152
Paragon ....................................................... 5(126
PhiIips ............................... 5{)1[, 5012_ 5(113, 50[9,
5025. 5030, 5031, 5032
Pioneer •.......................................................... 5(133, 5(134
P_/lsar •..................................................... 5(126
RCA ................................................ 5(14v, 5049, 5(52
Realistic ............................................... 5009, 5(149
Regal ...................................................... 5(122, 5035
Regency ........................................................ 5(117
Rembrandt .................................................... 5(1{)3
Runco .................................................................... 5026
Samstmg .............................................. 5(114, 5(134
Sdentific Atlanta ..................... 5006, 5036, 503 v, 5(138
Signal ....................................................... 5(1I4, 5018
Signamre ....................................................... 5003
SI Malx ............................................................... 5014
Sprucer ........................................................... 5(152
Starcom ....................................... 500 v, 5018, 5(53
Stargale ............................................. 50IL 5(118
Starqtlest ........................................................ 5(118
l_ndy ................................................................. 5040
3_leviexv •................................................... 5(114
l_m ...................................... 500t. 5(123, 5041
l_shlba ............................................................ 5026
3_/sa ........................................................ 5(118
I_/86 .............................................................. 502_
Unika .......................................... 5008, 5009, 50¸[1
UniIed Artists ...................................................... 5(1{)2
Uniled Cable ................................................ 5(153
Universal .......................... 5008, 5009, 5010, 5(111
Videoway .............................................................. 5044
Viewstar •........................... 5{315, 5025, 502v. 5040
Zenith ..................................... 5(126, 5(150, 5(15I
Satellite Receivers
Chappm al ..................................................... 5(156, 5057
Drake ................................................. 5(158, 5(159
G E ................................................................. 5000
General Instr_/ments ................... 5060, 5(161, 5062
Panasonlc ............................................................. 50v5
Pdmes_r ....................................................... 5(176
ProScan ............................................................ 500(1
RCA ................................................................... 5000
Realistic .......................................................... 5(163
Sony ............................................................... 5(172
STSl ................................................................. 506¸4
STS2 ................................................................... 5065
STS3 ......................................................... 50_
STS4 ....................................................................... 50_
l_Mdba ..................................................... 5068
l_Mdba ..................................................................... 5(173
Unld_n .................................................... 5060
26
Page 29

3
Using the TV's Features
Chapter Overview:
• All About the GUIDE Plus+ System
• The Channel Banner
• Parental Controls and V-Chip
Changing Entertainment.
27
Page 30

Using %% Features
Action Video Program Menu
buttons window information options
Promotional Channel
information listings
About the GUIDE Plus+ System
The GUIDE Plus+ system is an interactive on-screen program guide that lists TV
schedules t_r your area and allows your TV direct control of a cable box and/or
VCR. You nlust first set up the GUIDE PIus+ Menu system in order to view this
on-screen program guide (see Chapter 1 Ik>r details). Press GUIDE to bring up
the GLIDE Plus+ sysl_.m.
There are six sections of tile GLIDE Plus+ sysl_.m:
• A row of Action buttons at the top of the screen (1, 2 and 3)
• Vide() window
• Progranl int_)rmation
• A row of menu options (Grid, &J,q; Ne'u E Scb#duh,, Messa/des ,
Cbanne& Setzcp)
• Channel listings
• Promotional infi)nllation
Note: 7be G{,71)t5 Plus+ system screens illustrated in tbis book are
represerztatiorzs q/'wbat you are lik@, to see. Not all cbar_r_el._; pro£)rams;
and GUI1)E Plus+ #{f!)rmation depicted wilt be az.'ailabte in your area.
NewjL.atures arm options car_ be dowrzloaded to tbe GUll)tS l)h¢s+
._Fstem, so these too are sul)iect to cbarzge.
Since the program information provided by
the GUIDE Plus+ system is based on your
locale, you will need to run Setup again if
you move to a different zip or postal code.
Downloading Data
The GUIDE Plus+ system is not awtilable until it completes iB fi_t download of
program listings. When the power is turned off, tile TV locates a 'host channel"
that carries GUIDE Plus+ system data containing program schedule and channel
lineup inlkmnation. A channel lineup is the list of stations and their respective
channels.
"R) ensure that your first download of data is complete, you should leave your
TV off overnight. Downloads occur several times a day. The TV must be turned
off tk)r GUIDE Plus+ system data to download,
If the TV loses power or is unplugged, GLIDE Plus+ sysl(,m program listings
may be lost, When power is restored, make sure the setup inlkmnation is still
correct. The GUIDE Plus+ system will receive updated program inlkmnation
during tile next scheduled download.
Channel Lineup
If more than one cable company services your area, you nmy be prompted with
S7t_P 5: Cboosin_,_ Your Channel Lineup afi_,r tile first GLIDE Plus+ system
download, You will need to identit? your cable company by selecting tile
correct channel numbers lbr the stations in question.
• Use the up and down arrow buttons to change tile channel group and
press OK when the correct channel group is highlighled.
28
Page 31

Using
9
PressGUIDE on the remote control to see
the GUIDE Plus+ system. To remove the
program guide from the screen, press
OK, GUIDE, or CLEAR.
Getting In & Out of the GUIDE Plus+ System
To ent_,r tile GLIDE Plus+ system:
• Press GUIDE on tile remote.
• Press and hold MENU t_r 2 seconds on tile t_ont panel.
To exit tile GLIDE Plus+ system:
• Highligl_t a program and press OK to exit the GLIDE Plus+ system and tune
to the channel.
• Press GLIDE to exit the GUIDE Plus+ system and tune to tile channel
displayed in the video window.
• Press CLEAR to exit the GUIDE Plus+ system and return to tile original
channel.
The GUIDE Plus+ System Menus
The GLIDE Plus+ system ofl_,rs seven different options on the Menu bar: Grid,
Sort, _,_?_ws,Schech_l< Messa_,d¢.s,Cban_el._ and _k,tz_p.To access the Menu bar:
1. Press GUIDE to access tile GUIDE Plus+ system.
2. Press MENU or use lhe up and down arrow buttons lo select tile Menu bar
(tim Grid Guide appears by deibult).
3. [se tile leI_ and rigllt arrow bu/tnns to access other menus.
4. Press OK, or MENU, or use tile down arrow button to see tile menu options.
Grid Guide
The Grid Guide appears eacl_ time you enter tile GLIDE t It s+ system. It
displays tile current programming l_)r each channel. The current program is
displayed in tile video window.
• Press tile up and down arrow buttons on tile relnote tn browse channel
listings and tim channel up and down buttons to page through the listings.
[se tile right and left arrow buttons to browse future program listings.
To tune to a clmnnel, lfighlight tlle program you want to view in tile
clmnnel listing and press OK. Press CLEAR _o exit tlle GUIDE Plus+ system
and return to/he original channel. Press GUIDE to exit tile GLIDE Plus+
sysl{.m and tune to tlle channel in lhe video window.
Then use the Grid Guide Action Buttons as described next.
29
Page 32

Using %% Features
Grid guide Grid guide
menu action buttons
selection
Grid Guide Action Buttons
Action buttons will change according _ where you are in the GUIDE Plus+
syslem, Be sure to look at the action bar befk>re pressing the
command numbers.
When highlighting the program, the tk)llowing Action bul/ons appear:
Watch Press 1 on the remote to place a timer in tile Schedule l_)r tile TV to
turn on and tune to the program highlighted in the channel listing, When
tile TV turns on, the GUIDE Plus+ system will automatically appear with tile
scheduled program highlighted and tuned in the video window.
Go To Press 2 on the remote to bring up the direct dial box and enter tile
number of the channel you want, Press OK to highlight tile channel and
current program in the channel listing of the Grid guide. Press OK again to
tune to tile highlighted channel, If the vide() window is unlocked, it will
automatically tune to the channel.
• Record Press 3 on tile remote to place a timer in the Schedule tk>rtile VCR
to record the program highlighted in the channel listing.
If you have a cable box, changing channels on the TV will not cause tile
cable box channel to change while recording.
Record will only appear if you have set up the GUIDE Plus+ system and
specified your VCR type.
The program infk>rmation window will display a confirmation when you have
successfully scheduled a program to watch or record.
Note: i]'3'oz_have seh,cled two programs Io watch or record which bed,gin
at the same time or overlap, y(m will receive a timer co*{flict message.
YoI! Inl*sl choose l)etll_eerl l_e tzg_o pr(4qrams.
When highlighting the Channel names (the left column on tile channel listing),
tile tbllowing Action buttons appear:
• Lock/Unlock Press 1 to lock or unlock tile video window lo either stay at
one channel as you browse the GUIDE Plus+ system (lock) or change as
you browse through dill>rent channels (unlock).
Go To Press 2 on the remote to bring up the direct dial box and enter tile
number of the channel you want. Press OK to highlight the channel and
current program in tile channel listing of tile Grid Guide. If the video
window is locked, press OK to tune to the highlighted channel. If the vide()
window is unlocked, it will automatically tune to that channel.
3O
Page 33

Using
SOrt menu
selection
Categories
Sort
The 5"o_Vmenu lets you browse programs by cat(,gnry. The channel to which
you are currently tuned is displayed in tile video windnw.
To Sort:
1. If the GLIDE Plus+ syslem isn't on your screen, press GUIDE on your
remote control
2. Press MENU on tile remote lo select tile Menu bar.
3. Use the arrows to highlight Sort. When Sort is highlighted li_>rthe first time,
tile Movies category is displayed. "Illereafler, the last category used becomes
the detault. A listing of subcalegnries is displayed below tile category name.
Use the let/: and right arrows to highlight other categories.
4. Use the up and down arrow buttons to highlight a subcategnry. For
example, highlight All and press OK (the GUIDE Plus+ system sorts
tile programs).
5. Press the up and down arrow buttons to review the list one program at a
time. Press tile channel up and down to review the list one page at a time.
6. Select MENL to return to tile menu bar, or press GUIDE or CLEAR to exit
tile GUIDE Plus+ system.
Then use the Sort Menu Action Buuons as described next..
Sort Menu Action Buttons
\Vixen viewing the results of a Sort, the tk)llnwing Action bull(ms appear:
• Watch Press 1 on the remote to place a timer in tile Schedule, and then
t2>llnw the nndine help t2>rI_mher options. Placing a timer in tile Schedule
will cause the TV to turn on and tune to the program highlighted in the
channel listing at tile predelermined time.
• Record Press 3 on tile remote to set tile VCR to record tile program
highlighled in tile channel listing. If you have a cable box, changing TV
channels will not cause the cable box channel to change while recording.
The program intkmnation window will display a confirmation when you have
successfully scheduled a program to watch or record.
Note: if'you have selected two programs Io watch or record which begin
at the same time or overlap, you will receive a timer cot_flict message.
You must choose between the two programs.
Note: Be sure that clu_qng the GUll)IS Plus+ system setup you spec(fied
lhat 3,ou have a VCR.
31
Page 34

Using %% Features
News menu News menu
action buttons selection
News
"I'll(" N6_lgS in(*nu lets y()u I_r()vvs(, curr('nt n('ws stori(,s by h(,adlin(',
1, If the (K I1)E Plus+ sysl_.m isnt on your screen, press GUIDE on your
remote cnntrnl.
2. Press MENU on the remote control to select the menu bar.
3. Use the arrows to highlight News (if MSNBC is available on your TV, it will
appear in the vide() window).
4. Use the up and down arrows to highlight a stnry.
• Use the up and down arrows to browse the list one story at a time.
• Use the channel up and down to browse through tile list one page at
a tim{.,
5. Press the right arrow button to see full text.
6. If there are multiple pages of text, press the right or let_ arrow button to
page fi)rward or back through the pages of text. Press the down arrow to
view the next story.
7. Select MEN[ to return to the Menu bar, or press GUIDE or CLEAR on the
remote to exit tile GUIDE Plus+ system,
Schedule menu
selection
Schedule
The Sche(hde menu allows you to all_.r timers lk)r either viewing or recording
programs. The GUIDE Plus+ system allows one-touch VCR recording if you
have connected the G-LINK cable to your VCR. See Chapter 1 tk_r more details
on connecting tile G-LINK cable.
To schedule a program lo watch or record:
1. If the GLIDE Plus+ sysl_,m isn't on your screen, press GUIDE on your
remnt(" cnntrnl.
2. Press MENU on the remote lo select tile Menu bar.
3. Highlight a program within tile channel listing.
4. Select Watch or Record from the Action buttons bar. The timer is then
autonmtically logged into the Schechde menu.
5. If you select Record, make sure to place a blank tape in the VCR and turn
it off.
Note: {i',YoJ_have a cable box co*mect*,d Io 3'oz¢r 7"17and VCR, tz¢ne )'oz¢r
VCR to the cabk, box oJ_tpza chatmelp_qor to tJ_rtti_,q qff'the VCR.
The program intk)rmation window will display a confirmation when you have
successfully scheduled a program to watch or record.
Note: {i',YoJ_ have selected two pr(4_rams to watc,5 or record which b<_in
at the same time or overlap, y(m will receive a timer co*{/lict message.
You tritest choose betlgeen the two pr<4qrams.
32
Page 35

Using
To remove or change the tkequency (daily, once, or weekly) of a scheduled
event, access tile 5"cht,dldt, lll('nH fronl the Menu bar.
1. Press GUIDE to bring tip the GUIDE Plus+ system.
2. Press MENU on the remol_, to select the Menu bar.
3. [se the arrows to highlight the Sch#dJde menu selection.
4. [se the up and down arrows to highlight the program you want to edit.
Then use the Schedule Menu Action Buttons as described next.
Schedule Menu Action Buttons
When viewing tile Schechde menu tile following Action buuons appear:
• Remove Highlight the Watch or Record timer you wish to remove t_om
the schedule and press 1 on the remote.
• Change Highlight the Watch or Record timer you wish to change and
press 3 on the remote to toggle the f_equency between the fbllowing
choices:
DAILY records the same program each day Monday through Friday.
ONCE records only on that day.
WEEKLY records the program each week at the same time.
Messages menu
selection
Messages
Occaskmally you will receive messages regarding your GUIDE Plus+ system, as
well as special programming int_mnation. You can access these messages flcom
the M_ssag_s nlenH on the Menu bar.
"lb read lnessages:
1. If the GUIDE Plus+ system isn't on your screen, press G[IDE on your
remote control.
2. Press MENU on the remote to select the Menu bar.
3. Use the arrows to highlight the MessaI4es menu selection.
4. Highlight the message you want to read by using the up and
down arrow buuons.
5. Press INFO to display the full l_*xtof/he message. If the text continues
beyond the screen, press INFO to view the next page of text. Once you
have reached the end of the message, press INFO lo close the expanded
inl_/rmation and return to the Messa/4es screen.
Then use the Messages Menu Action Buuon as described next.
Messages Menu Action Button
/ •
When viewing thv M_,._sagesmenu the, lk)llo_ing Action button appears:
• Remove Highlight the message you want to delete and press 1 on
the remote.
33
Page 36

Using %% Features
Channels menu Channels menu
action buttons selection
\
Channels
You can custonfize tile channel listing by enabling or disabling the display of
certain channels. For instance, you may disable channels that you never watcll.
You can restore disabled channels at a later point in time.
1. If tile Guide Plus+ system isn't on your screen, press G{IDE on your
remote control.
2. Press MENU to select tile Menu bar.
3. [se tile right and left arrows to lliglflight tile Cba*mel._ menu selection.
4. [se tile up and down arrows to select a clmnnel.
Tllen use tile Clmnnels Menu Action Buttons as described next.
Channels Menu Action Buttons
Wllile browsing tile Channels menu, tile _/llnwing Action buttons appear:
• Cancel Press 1 on tile renlote to cancel any cllanges yokl made since
entering tile Channel._ Menu.
• Change Press 2 on tile remote, to change tile cllannel number tk/r tile
lfigllligllted cllannel line.
• On/Off Press 3 on the remote to toggle tile state ol tile clmnnel between
On and Ojf
Setup
Thv S_,lup menu allows you to access tile GUIDE Plus+ system setup inlk>rmation. "Ik>access tile
Setup option:
1. If lhe Guide Plus+ system isn't on your screen, press GUIDE on your remote control.
2. Press MENU to select tile Menu Bar.
3. [se tile rigllt arrow to highligllt tile 5_,mp menu selectinn.
4. tse tile up and down arrows to select Change ._>_temsellimgs , Revic*w options, or
1/ieg/dt'_D?O.
• Change system settings Cnnt]rms tile settings you completed in tile G{IDE Plus+
system setup are correct.
• Review options Displays tile GUIDE Plus+ auto display options.
On Automatically displays tile G{IDE Plus+ sysl_.m when you press tile ON*OFF
button on tile remote control.
Off Disables tlxe GLIDE Plus+ system [)cornbeing displayed when you press tile
ON* OFF button on the remote control.
• View demo Runs tile G{IDE Plus+ system delnonstratini_
Note: lj'you have not completed your GUII)E PtHs+ ,'_}_'temsemi), these options u ill not be
availabh,. A screen witl prompt you to comph, te your setup.
34
Page 37

Using
Promotional information
How to Get More Information About an
Advertisement or a Program
_ find out more inlbrmation about a program, advertisemem or special, use
the let_ arrow bu_on _ highlight the channel listing or promotional
inl_)rmation box.
Requesting more intkmnation about a particular show displays the PlusCode
programming number and the Shows on _'v>xtfor that channel.
Press the INFO button to exit the expanded inlkmnation screen.
GUIDE Plus+ Menu Items
The Gt,JDF PtJ_s+Menu gives you access lo l_.atures in the GUIDE Plus+ system.
"1_)access the GUIDE PtJ_s+31enz_:
1. Press MEN[ on the remote.
2. Highlight GUI1)k"Phg.s+Menz_ and press OK.
Each menu and the sub-menus are listed below:
GU1DEPlus+ Setup Displays tile GUIDE Plus+ system setup screen.
Change system settings Conlirms the settings you completed in the
GUIDE Plus+ system setup are correct.
Review options Displays GI_IDE Plus+ system auto display options.
View demo Runs the GUIDE Plus+ system demonstration.
GUIDE Plus+ Label Displays tile GUIDE Plus+ label menu.
On Displays the station name when you change channels.
Off The station name isn't displayed when you change channels.
ContinuousDemo Runs the GI_IDE Plus+ system demonstration until it is
turned off. To turn off the demonstration, you must turn off the TV.
Note: I]'3'oz_bav_, not compt_,t_,d 3'oz_r GUII)E I)h_s+system setz_p, these
options will not &, available. A screen witlprompt 3'oz_to compl_,te
yoJ_r setup.
35
Page 38

Using %% Features
Sample displays on a Channel Banner.
ChannelBanner
There are several indicators that might appear when you press the TV or INFO
buttons on/he remote. This display is called the Channel Banner. The lk_llowing
list describes the items on the Channel Banner screen (leti to right and top to
bottoi'tl).
12:01
i
[]
r)isplays the current time.
The lock is displayed to indicate when the Parental Controls
are locked or unlocked.
r)isplayed when Closed Captioning is available on tile
current channel.
ESPN
6O
00:00
Displays the label assigned lo the current channel.
Displays the current channel or input channel.
Mule is displayed when you mute tile audio.
Displayed when the Sleep Timer has been set.
Displayed to count down time left: on the commercial skip
(SKIP) timer.
Parental Controls and V-Chip
The Parental ControL_ menu allows you to program your TV so that children
cannot see certain programs, channels, or use tile l_ont panel controls.
The first three choices in tile Parental Controls menu involve software inside
your TV (rel_rred to as V-Chip) which allows you to block TV programs and
movies based on violence, sex, or other conlent you may believe children
should not view. In ()tiler words, it lets you program your TV so it won't display
certain programs.
Once you block programs, you or ()tiler adults can unblock programs by
entering a password.
By default, the soflware inside your TV is turned "off," so if you don't want to
use this teature, you can just ignore it.
36
Page 39

Using
How V-Chip Works
\Vhen turned 'nn,' tile V-Chip soft:ware reads a code that ntnst broadcasters send with
programs. That code tells tile software tile progranfs age-based rating (TV-MA, TV-14, etc.) and
content themes [(Violence (V), Adult Language (L), etc.)]. It you have blocked tile rating and/or
content thelnes that tile program contains, you will receive tile message, 'This channel is not
approved for viewing," when you tune to that particular channel.
Broadcasters are not rt.quired to prnvi&, content thenles, st> prngranls received with no content
themes ,,*,'illonly be blocked if you block their age-based rating. You can also block out
programs that have been given a rating of 'Not lkited," and programs that are considered
'unrated" because no code has been sent by tile broadcaster. "Ille TV age-based ratings and
content themes you can block are lisl*.d in tile tbllnwing table.
Age-Based
Rating
Description and Content Themes for Age-Based Ratings
Mature Audience Only. Specifically designed to be xiewed by adults and may be unsuit tble for children
TV-MA under 17. It contains one or more of the fiJlowing content themes: crude indecent hmguage (L), explicit
sexual activity (S), or graphic violence (V).
Pal'ents Strongly Cautioned. Contains some materi tl that many parents would find unsuitable f_)rchildren
TV-14 under 14. Parents are strongly urged to exercise greater care in monitoring this program md tre cautioned
against letting children under the age of 14 watch unattended. ['his program contains one or more of the
ffJlowing content themes: intensely suggestive dialogue (D), strong coarse language (L), intense sexual
situations (S), or intense violence (V).
Parental Guidallce Suggested. Contains material that parents may find unsuitable for younger children. Many
TV-PG parents may want to watch it with their younger children. Tim program contains one or more ofthe folk)wing
content themes: some suggestive dialogue (D), infrequent coarse language (L), some sexual situations (S), or
moderate violence (V).
TV-G General Audience. Most parents would find this program suitable fl)r all ages. It contains
little or no sexual dialogue (I)) or situations (S), no strong language (L), and little
or no violence (V).
Directed to Children "7years aald older. Designed for chikhen ages 7 md above. It may be more
TV-Y7 tppropriate for children who htve tcquired the developmental skills needed to distinguish between mtke
believe and reality. Fhemes and elements in this program may include mild fantasy violence (FV) or comedic
violence, or may frighten children under the age of 7.
TV-Y all Children. l'hemes and elements in tiffs program are designed fl)r a young audience, including children
fiom ages 2 6. It is not expected to flighten younger children.
37
Page 40

Using %% Features
V-Chip TV Rating Limit
The _Cbip TVRating Limit lets you decide which TV programs can and cannot
be viewed.
"lb set TV programming limils:
].
Choose Parental ControA from the Main menu. If Parental Controls have
previously been locked, you nmst enler your password. If they are not
locked, you will get a message reminding you that your limits will not be
et]_ctive until you lock Parental Controls.
2. Press MENU to continue.
3. Highlight and select V-Chip 7YRatin/4 Limit.
4. Once you get to the V-Chip 7YRating Limitscreen, use the arrow buttons
and OK on your remote to change the status of a TV program rating or
content theme l_com View to Block.
The lkfllowing sections give you more details about how to change the status of
TV program limils.
The V-Chip Rating Limit Screen
The f_Jlowing is an example of where items are located within the Rating Limit screen.
Rating Status Field
Lets you select whether the status o[ the age-based rating limit to
the h'ff is \'ic_ or Bkx'k.
Content Themes
Lists the coI]tent [hen]es yoH
can bhx'k or view.
Rating Field
Lets you sdect from a
list o[ age-based ratings
yOH C_H] blol_k or vi_v.
Content Status Fields
Lets you select which
C(31]t(_t]tthul]l(_sto V]U_N" {_)I"
the selected rating, and
x\hcther the status o[ the
c(3rlterl[ thel]le is cHrrel]tly
Vie_ (V) or Block (B)
Rating Settings Area
Lets you sec the cun'cnt bkxkiview state of age-based ratings and
ass(xiatcd content The _tew (\) settings arc coded in green, and the
Bkx'k (B) settings arc" _och<l in ted
38
Page 41

Using
Rating Rating Content
field status field status fields
Tip
When you change the status of a rating to
Block, the system will automatically block
higher ratings and all corresponding
content themes.
Hierarchy of Age-Based Ratings
TV-MA Mature Audience Only
TV-14 Parents Strongly Cautioned
TV-PG Parental Guidance Suggested
TV-G General Audience
TV-Y7 Directed to Children 7 years
and older
TV-Y All Children
Blocking Age-Based Ratings
You can automatically block all program ratings above a specified age-based
rating level. For example, if you only want your child lo watch programs that
have a TV-G rating and lower (in other words, you ,,*,'anttile child to watch
TV-G, TV-Y7, and TV-Y), then you need to block out other programming with
higher ratings.
"lb block programs with higher ratings:
1. First, determine tile lowest level rating you don't want tile child to watch
(see chart of age-based ratings on next page).
2. Press tile let_ and right arrow buuons to highlight tile Ratit_,g field.
3. Press tile up and down arrow buttons on tile remote to scroll through tile
age-based rating limits. Keep scrolling until tile rating corresponding with
tile lowest rating you do not want tile child to walch appears on tile screen.
In tile example discussed above, you would scroll through tile RatDzg field
until TV-PG appears, since tile highest rating you want tile child to watch is
TV-G.
4. Press tile right arrow button to move tile yellow highlight to tile
Statns field.
5. Press tile up or down arrow button to toggle between Viewand Block. Tile
status tbr tile rating listed lo tile left and all higher ratings automatically
changes to Block (and B).
6. Press OK on tile remote lo return to tile menu or exit tile screen when you
are finished.
7. Select Lock Paret_tal Cot_trots from tile Paretltal Cot_trol._menu. Enl_.r a
password, and if you have not already set your password, you will be
prompted to enter it again lo confirm.
To reset the ratings to View and V,press the RESET
button on the remote.
39
Page 42

Using %% Features
Rating Rating Content
field status field status fields
Viewing Age-Based Ratings
A_r you block age-based ratings, you have tile option of changing some of tile
ratings back to _c_t_
1. Determine which blocked rating you want lo view.
2. [se tile tip and down arrow bul/ons to select tile rating with a slams
of Block.
3. Press tile right arrow button to move tile yellow highlight to the rating
status field.
4. Press tile up buuon to select !_Tezv.
Note: 7l'_econtent status fields co_wespo*Ming to the Jmblocked rating
become Vieu as well 7t)<F and the age-based rating stilt,s are the only
.fields that az_tomaticalty change bach Io Vieu when yoz_ complete
lbi._process.
Note: Yoz¢ retest remem&,r to lock Parental Conlrot.</br rating limits to
take, _yf!,cl.
Content Themes
D Sexually explicit dialogue
L Adult language
S Sexual situations
V Violence
FV Fantasy Violence
TV-Y All Children
Rating Rating Content
field status field themes
Blocking Specific Content Themes
You can block programs based on their content. (Content is represented by the
D, L, S, V, FV and TV-Y on your screen. See tile beginning of this section lk)r
details,) When you block a content theme lk)r a particular rating, you
automatically block that content theme lk)r higher rated programs as well.
For example, if you do not want your child to watch programs that have adult
language (L) rated TV-PG or higher, then you could block out all programming
TV-PG and above containing adult language.
To block program content:
1. Determine tile lowest level of content you don't want tile child to walch.
2.
[se tile up and down arrow buttons on tile remote to scroll through the
age-based ratings until the rating that corresponds with the lowest content
you do not want the child lo watch appears. (In the example above, you
would scroll through tile ratings until tile TV-PG rating appeared.)
3. Press tile right arrow button to move tile highlight to the field
corresponding with the content theme you want Ioblock out.
4. Press tile tip or down arrow buKon to change content status t)'Oll't Vt(/ L_*
All higher ratings' content theme will automatically change to /d.
Content
status fields
40
Page 43

Using TV%
5. Press OK to return to the menu or exit the screen.
Note: Broadcaster._ are riot required to proz_icle cor_lent themes or aJde-
based ratings. Pro<,gramsreceived with no content themes will on{F be
blocked (/'you block their age-based rat#u+
Note: You must remember to lock Parental Controt._ jbr rat#u4 limits 1o
Rating
field
Rating
status field
Content
themes
Content
status fields
Viewing Specific Content Themes
If you block specific conlent themes, you have tile option of going back and
changing some of the content themes back to (V) View:
1. Determine the content themes yOU want lo change to (V) Vic*w.
2. 12se the up and down arrow buttons to scroll through the age-based ratings
until the rating whose content theme you want to change to Vic*wappears.
3. Press the right arrow button to move the yellow highlight to a particular
content theme status, such as the B cinder language (L) corresponding with
TV-14.
4. Press the klp or down arrow button to change its status back lo 1Z Your
child would then be able to watch programs with TV-14 adult language
content, but not programs with TV-PG or TV-MA language content.
Note: On(i, the corzterzt theme status co_wespond#u. _to TlZl4
(L) language cba_ges to (V) lZicytg.Hi_ber rated conlP_lt tbeme._; such as
tbat /br TV-MA ta_,4ua_,4e, do not c,Sa_,4e.
V-Chip Movie Rating Limit
You set movie rating limits by blocking movi_,s rated above, a sp_,cil]ed lev_,l.
How to block movie ratings and view movie ratings is explained in the next two
sections.
"R)access the V-CIIIP MO VItZRATING LIMIT menu:
1. Press MENU on the remote control (the 71ZMAhVMENUappears).
2. Select Parer_t_l Controt._ (press 5).
3. Select V-Chip Mo_,ie Rat#u4 Limit (press 2).
41
Page 44

Using %% Features
Rating field Rating
status field
Rating field Rating
status field
Blocking Movie Ratings
If you only want your child to wash movies that have a PG rating and lower
(in other words, movies rated PG and G), then you could automatically block
out all other movies with higher ratings.
_b
1.
2.
.
4.
block inovies:
Highlight the Rating field and press the up and down arrow buttons lo lind
the rating that is the lowest rating you don't want the child to watch. (In
the example above, you would highlight the rating status bu/ton
corresponding to PG-13, since the highest rating you want the child to
watch is PG.)
Press the right arrow button to highlight the rating Statns field. Press the tip
and down arrow buttons to change the butlon from ViclJ_to 13lock.All
higher ratings automatically change to Block.
Press OK to return to the nlenn or exit the screen.
If Parental Controls are not locked, you must lock them st) the movie rating
limits will take et'l]*ct.
Note: Sk)*nemovies mc O,be giz,er_ a Not Rated (NR) rating. After blocking
movie, ratings, .you mJ_._tset NR to Vieu separately 1o vi_,u NR movies.
Viewing Movie Ratings
A_r you block movie ratings, you have the option of changing some of the
rating status buttons back to View:
1. Highlight the Ratit(t 4 field and press the tip and down arrow buttons to find
the rating you want to view.
2. Press the right arrow button to highlight the rating SlatJ¢s field. Press the up
and down arrows to change the bu/ton from Block to Viez_,.
For example, if movies with a rating of PG-13 and higher are blocked, you can
change the rating status corresponding with NC-17. Your child would then be
able to ,,valch all movies with a G, PG, and NC-17 Rating.
3. Press OK to exit the screen, and be sure parental controls are locked.
42
Page 45

Using
V-Chip Unrated Program Block
Selecting this option lets you decide if programs that tile V-Chip recognizes as
'unrated" can be viewed. Not_. that "unrated" TV programs may include news,
sports, political, religious, local and weather programs, emergency bulletins,
public announcements, and programs without ratings.
View All unrated programs are available.
Block All unrated programs are not awdlable.
Note: You must remember to lock Pare*ztal Co*zt*_d.s./brrati*_g limits to
take, _flOct.
Channel Block
Selecting this option lets you decide what channels can be viewed.
View Makes lhe selected channel viewable.
Block "File t_ont panel and remote control CH (channel) buttons will tune
only to channels that you have marked as Vic*w."File remote* will still tune
to the blocked channel if you use tile digits to access tile channel, but tile
channel ,,*;illbe blocked.
Don't lk)rget to lock parental conlrols alker you change the status of Channel
Block. If you do not, the channel block will not take et]i.ct.
Note: i]'you have a digital cable box cbannets 126999 can be blocked
bJ_twill not be removablej?om .yoJ_r scan list.
Front Panel Block
Selecting this option lets you block (disable) or unblock (enable) the TV's t_)nt
panel. The remote, still tunes to any channel. Front Panel Block can:
• Keep children Dora walching TV wlmn tlle parent is not present.
• Keep young children Dora playing with tile buttons.
(When using lifts as a Parental Control method, you should remove access to
any remote that is capable of operating tile television while you have tile front
panel blocked.)
Don't l_)rget to lock parental conlrols alder you change the staIus. If you do not,
the t_ont panel block will not take el'l_.ct.
43
Page 46

Using %% Features
Lock/Unlock Parental Controls
Selecting this option lets yoH lock and unlock parental controls se/lings Hsing a
password.
If yon do not lock parental controls, none of the settings for V-Chip,
Channel Block, or Front Panel Block will take effect.
If you ff>rget your password, simultaneously press and hold MENI[ on tile
television and volume down on the remote* l_)r 3 seconds. Nothing appears on
tile screen, Parental Controls simply unlock and you can re-enter a password via
Lock Parental C'ontrol._.
44
Page 47

4
Using the TV's
Menu System
Chapter Overview:
• How to Use the Different Types of Menus
• Picture Quality Menu
• Screen Menu
• Channel Menu
• Time Menu
Changing Entertainment. Again
45
Page 48

Using %% enu
How to Use Your TV's Menu System
You use the buttons on tile remol(, or tile Dnnt of your TV to access tile menu sysl('m and
make changes to tile settings.
The tkfllowing pages explain how lo use tile diff',rent types of menus lo adjust tile t_atures of
your TV.
Tip
Menus
The first menu is called tile Main menu. Press MEN{ on tile remote or on tile
front panel to bring up the Main menu. Note that holding MEN[ for 2 seconds
displays the GUIDE Plus+ system.
Menus take you to another menu or a control panel. There are two ways to
select a choice in a 111entl:
l_se your arrow buttons on your remote contrnl to highlight your choice,
and press OK.
Feel free to explore the menu system If you're
ever unsure where you are in the menu system,
or you're just plain tired of exploring, press
CLEAR to remove the menus from the screen
and start over again.
Press a nulnber butt()n on tile renlote. For exanlple, in the Main lllen[l press
2 to go straight to the Screen menu.
Exiting a menu
Th(,r(, are thre( _ ways t() ('Kit a lilt'riLl:
Highlight t£_it and press OK.
• Press 0 on tile remote.
• Press CLEAR. The on-screen displays are cleared Dora tile screen and you
return to TV viewing.
1 Picture Qualit
Picture Quality Menu
Basic Picture Controls Displays tile five slider controls t_r adjusting tile way
tile picture looks.
Contrast Adjusts tile difl_rence between tile light and dark areas of
tile picture.
Color Adjusts tile richness of the cnlnr.
Tint Adjusts tile balance between tile red and green levels.
Black Level Adjusts tile brighmess of tile picture.
Sharpness Adjusts tile crispness of tile edges in tile picture.
46
Page 49

Using
When exiting tiffs menu, the 5"az,ePe_+._onalPicture Preset choice list will appear.
You can choose either Yes"or No. If yoH save tile settings as a Personal Picture
Preset, the TV will store the sel/ings so you can re-select them quickly if
someone changes tile seuings.
Picture Presets Displays a choice list that lets you select one of three preset
picture settings: B_qbt Lighting, Normal Ligbtin<+g;Sqft Li++_htingor Pe_+._onal
Pictnre Presel. Choose the selling that is best tk)r your viewing environment.
Auto Color Displays a choice list that lets you turn on the ll.ature that
automatically corrects the color of tile picture. (This is especially useful fi)r
tracking realistic flesh tone colors as you switch l?om channel to channel.)
Choose On or Q/[£depending on your pretbrence.
Color Warmth Displays a choice list that lets you set one of three autonmtic
color adjustments: Coolfl)r a more blue palette of picture colors; Normal; and
Warm fl)r a more red palette ofpicture cnlnrs. "File warm setting corresponds to
the NTSC standard of 6500 K.
Screen Menu
Closed-Caption Display Displays a choice list that lets you choose the way
closed captioning intk)rmatinn is shown on tile screen.
Off always No captioning inlk)rmation is displayed.
On always Captioning inlkmnation is shown ahvays, when available.
On when sound is muted Captioning intbrmation is shown, when
available, whenever tile TV's sound is muted. (To mute/lie sound, press the
MUTE bu/tnn.) The captioning inlkmnation is not displayed when tile sound
is not muted.
Closed-Caption Mode Displays a choice list that lets you choose which
captioning mode is used tbr displaying captioning infl)rmatinn.
Menu Language Displays a choice list that lets you select your preferred
language t_)r tile menHs: English, 5"pani._bor French.
47
Page 50

Using %% enu
Using Closed Captioning
Many programs are encoded with closed-captioning information, which lets you
display tile audio pnrtinn nt a program as text on tile TV screen.
Closed captioning is not available on all channels at all times. Only specific
programs encoded with closed-captioning inl2mnation are applicable. When a
program is closed captioned, the CC icon is displayed in lhe channel banner.
See Chapter 3 tk)r more information about the channel banner.
rip
If you don't know which Closed-Caption mode
to use, select CC1 CC! is probably the mode
that is used in your area. CC2, CC3, and CC4
are reserved for foreign languages, but are
rarely used at this time
Closed-Caption Modes
The TV oflers eight clnsed-captioned modes, including [_)ur text mndes.
"11)set the Closed-Caption Mod_
1. Select Screen from tile Main menu.
2. Highlight C7osed-Caption Mode and press OK (the Closed-Caption* Mode
appears).
3. Highlight your choice and press OK (the Screen menu appears again).
Note: 7be Texl modes cot,er nearly ba{l'tf tbepictz_r# on the screen to
displcO' lb# clos#d-captioned text. Most broadcasters use 1,5#CC mode,
which cli.splco_._a./b-a_t#*es (f captions at a time.
Turning off Closed-Caption
1. Select 5"cree_]rom the Main metal
2. Press OK to select Closed-Ccq)tion I)i.splc(T.
3. Highlight Q/yAtu,a}_s and press OK. The closed captioning is turned off and
you go back to the 5"cre_,_zmenu.
48
Page 51

Using
Tip
To enter a number greater than 99, press and
hold "1" to enter the hundreds digit, then
press the two remaining numbers,
Channel Menu
Signal Type Displays a choice list that lets you select the current antenna
/ype. This option does not appear when the GUIDE Plus+ system is set up.
UHF/VHFAntenna Choose this if you are currently using an ofl2air
antenna l_)r TV signals.
Cable TV Choose this if you are currently using cable or a cable box lk)r
TV signals.
Auto Channel Search "Iblls the TV to search automatically fi)r all the channels
available through the antenna input. When the TV finds an active channel, it
places it in the Normal channel list; inactive channels (weak stations or channels
with no signal at all) will be removed ficom the channel list. If you are using a
cable box and have set up the GUIDE Plus+ system, this option does not
appear.
List and Labels Displays a control panel that lets you edit your Normal
channel list and choose a six-character label tbr each channel. Follow the on-
screen directions to enl*.r your channels and other information.
Channel # lise the up and down arrows to scroll up and down through
the channels available via your anwnna. You can enter the channel number
directly using the number buttons.
NormalList Only the channels included in the Normal list are available
when you scan Lip and down using channel up and down. tse the up and
down arrow but/ons to indicate whether tile channel number indicat*.d is
included (Fes) or is not included (No) in the Normal channel list.
ChannelLabel Lse the up and down arrow buttons to ent_.r a six-
character label ti)r each clmnnel. Hold tile buuon down to scroll quickly
through the characters. The TV can store up to 27 labels in memory.
Time Menu
Sleep Timer Displays a conlrol panel that lets you select the amount of time
you want to give the TV before it shuts itself off.
Schedule Displays a control panel that lets you set up a schedule t29rturning
the TV on and oft automatically. Reminder: you must turn the schedule On. The
on-screen directions guide you through the steps needed to set the schedule.
Set Time Displays a control panel that lets you enter the current time. The on-
screen directions guide you through the steps needed to set the time. If your
GUIDE Plus+ system is set tip, it will automatically update your time and this
option will not appear.
49
Page 52

(This page intentionally left blank)
Page 53

Other Information
Chapter Overview:
• Troubleshooting
• The Front of Your TV
• Care and Cleaning
• Limited Warranty
• Accessory Order Form
• Index
Changing Entertainment. Again
51
Page 54

Troubleshooting
Most problems you encounter with your TV you can correct by consuhing the "Doubleshooting list that tk)llows.
TV Problems
TV won't turn on
Press the ['V button.
Make sure the TV is plugged h_.
Ch_'cl< the, wall r_'c_'pmch" (or _'xtension cord) to make' sure it is 'live" by plugging in som_'thing _'ts_'.
Something might be wrong with your remote control. Press the PO2VER button on the front of the TV. If the TV turns on, check the
remote control solutions on p. 54.
Tim front panel buttons may be locked (disabled). Use the remote control to unlock the front panel controls by selecting the Front
I)atlel ;q/oc_¢in the Pare_ital Controls menu and choosing View.
Buttons don't work
If you're using the remote, control, pr_'ss the" ['V button first to make" sur_" the remote, is in ['V moth'.
"I'h_"front pan_'t buttons may b_" Iock_'d (disabh, d). Us_"the, remote control to unk)ck the" front pan_'l controls by s_qecting the" Front
PaY144131oc_¢in the Pare_ital (2ontrols menu and choosing Vieu'.
Unplug the TV fi)r two minutes and then plug it back in. Turn the TV on and tW again.
TV turns off while playing
Sch_'duh'd off function may have b_'_,n activat_,d. Go to p. 49 f_)r instructions.
Electronic protection circuit may have been activated because of a power surge. Wait 30 seconds and then turn the TV on again. If
this happens frequently, the voltage in your house may be abnormally high or low.
TV turns on unexpectedly
Sch_'duh'd On or Watch fiom the GUIDE Plus+ system may hav_" b_'_'n activawd. Go to p. 32 or 49 fi_r instructkms.
Blank screen
Make" sur_, the" compon_'nt conn_'ct_'d to the ['V is turn_,d on.
TW another chann_'l.
Pr_'ss RESE[' in cas_, the" picture controls ar_"set too low.
When I turn on the TV an icon is moving on the screen
Make" sure you hav_" remov_'d the I)emo Pin fiom the (3 LINK iack on the" back of your TV_
No sound, picture okay
Maybe" sound is muted. Pr_'ss the volume" up button to r_'stor_" sound.
52 Chapter 5
Page 55

Troubleshooting
Can't select certain channel
ChJnnet m_ly be blocked or not approved in the I)aretltu/(]ontro/s m_nu.
If using _l VCIL m_lke sure the TV/VCR button on the VCR is in the correct mod_ _ (press the TV/'VCR button on your VCR).
No picture, no sound but TV is on
Mnybe tb+" c_fl_Ie/nir setting is set to th+' wrong position. Select (;_JI)E l)hxs+ Metlu fl'om the' MJin menu, select
the Setu])option, and provide thu corn'ct infi)rmatk_n on th__ fi_tlowing scn'ens. Go to pJges 15 17 for ct_tJiled instructk_ns.
The channel might be cmpW change channels.
If you'n' xwltcbing your \!OR m_d it's connected with coaxi_lI c_lble to tb_ _ CABLE/AN ['ENNA iack tcin_' the TV to chnnn_,l 3 or 4
(whichever channel is selected on the 3/4 switch on the back of your VCR). Also check to make sure the TWVCR button on the
VCR is in the correct mode (press the TWVCR button on your VCR).
Sound okay, picture poor
Check nnt_,nna com_ections. M_ke sure all of th__c_ff)Ies _re firmly connected to th__j_cl<s.
"I'c__cliusting sh_u'pn_ss functk_n to improve weak signMs. Go to page 46 fi_r more instructions.
Black box appears on the screen
Clos_,d cnptioning might be on. Check the (2k)sed(]gl/)tio_1 l)lis])/eO ' control pan_d in the 5cree_z ITtl_nU. (30 to page 47 fi)r ITtOI'C_
instructk)ns.
Every time I turn on the TV, the Guide is on the screen
The GLIDE Plus+ system automnticn|ly appem's on the screen when you use the' ['V button on the' remote to turn on the TV. You
can turn off this t'e_tun, by pressing GI. II)E on your remote control JiM then s_dec't the Menu Ixu'. Press the right Jrrow button to
seh, ct Setu/_ Cboos_ _ I_ez,ieu o/)tions and s_dect OFt_
GUIDE Plus+ System Problems
GUIDE Plus+ setup won't switch to channel 9 for VCR and/or channel 02 cable box
Mnke sure you h_we removed the I)emo Pin from the (3 LINK j_cl<. Check to se_, if the (3 LINK wands are position_,d correctly in
front of co1_lpol_'nts' I'_lTtot_ _ s_nsol's.
GUIDE Plus+ system control of cable box is slower than direct control of the box itself. Keep this in mind when changing channels.
You may have an incorrect GUIDE Plus+ Channel Lineup. ['be guide may get out of sync with the cable provider. Use the G_71)E
Phxs+ 5etzff)in the GbIDE Phxs+ Met_u to change the zip code to 99999. Furn the ['V off for 10 minutes. Use Setup again to change
the zip code back to the correct value. If asked, be sure to select the correct channel lineup from the on screen list.
(Continued on next page)
53
Page 56

Program information doesn't download
Review your setup inf_)rmation and make sure its correct. Press MENU on the remote and sch, ct G'UII)t_'P/us+ 5etlqz Go to page 15
for detailed instructions about the GUII)E Plus+ Setup menus.
The TV must bc off to download inf_rmation. Lcaw, your TV off overnight for at h'ast 10 hours to receive the initial download for
your area.
If' you're using a cable box, leave it on so you can receive program inf_rmation.
Scheduled Watch or Record doesn't occur
Check Schedule for timer conflicts. Go to page 32 f_)r instructkms.
Make sure the wands of the G LINK cable are placed in front of the remote sensor(s) on the component(s).
Make sure your VCR is turned off during the time you've scheduled to record a program because the system turns the VCR on when
it starts recording (if it's already on when recording starts, the system will turn it off).
Make sure there is a tape in the VCR and that the VCR is connected properly.
Be sure that you set up the VCR in the G_71)E t'l_ts+ 5etz_p l_aenus If you don't complete the Co_/}i_uri_(g,/br a VCI¢steps
successfLflly, the Record option wont be available. Go to page 18 f_)r detailed instructions.
If a cable box is attached to your TV make sure you set it up correctly in the GUII)Et'lus+ 3etup menus. Go to page 16 17 R)r
detailed instmctions.
The Remote Control Doesn't Work
Something might be between the remote and the remote sensor on the component. Make sure there is a clear path.
Maybe the remote isn't aimed directly at the component (TV or VCR) that you're tly'ing to operate.
Maybe remo_ is not in TV Mode. ¸Press the TV button so remote will control T_
Maybe batteries in remote are weak, dead or installed incorrectly. Put new batteries in the remote. (Note, if you remove the
batteries, you may have to reprogram the remote to operate other components.)
You might need to drain the remote's microprocessor: remove batteries and press the number 1 button for at Ieast 6() seconds.
Release the 1 button, replace the batteries, and (if necessary) program the remote again.
Problems with V-Chip/Parental Controls
The rating limits don't work
You must lock the settings. Go to the T/'MA/A:MI£'_'_ (press MENU on your remote) select Pare_ita/Controls (press 5 on your
remote), select Lock t'a_mtal Cbntrols (press 6 on your remote).
I don't remember my password and I want to unlock the TV
If'you forget your password, simultaneously press and hold MENI on the television and volume down on the remote f_)r 3 seconds.
Nothing appears on the screen, Parental Controls simply unlock and you can re enter a password via Lock Parental Controls.
The V=Chip won't let me watch a program even though it's not rated as violent.
Maybe the movie was given an NR (Not Rated) status. After you block movie ratings, you must set NR to View separately in order to
view movies with an NI,' rating.
54 Chapter 5
Page 57

The Front of Your TV
If you cannot locate your remote you can use the t_contpanel of your TV to operate many of the TV's tl.atures.
MENU Brings up the Main menu. When in the menu system, it selects highlighted items. Also returns you to the previous
menu. Press and hold MENU fi)r two seconds to access the G[IDE PILls+ system.
CH v Scans down through the current channel list. When you're using the TV's menu system, it acts like the arrow down
button on the remote control.
CH ^ Scans up through the channel list. When 7ou're using the TV's menu sysl_.m, it acts like the arrow up butlon on the
remote control.
VOL-- Decreases the volume. When you're using the TV's menu system, it acts like the let_:arrow button on the remote
control.
VOL + Increases the volume. When you're using the TV's menu system, it acts like the right arrow button on the remote
control.
POWER Turns the TV on and off.
Care and Cleaning
CAUTION: Turn OFF your TV before cleaning.
You can clean the TV as required, using a soil lint-tree cloth. Be sure to occasionally dust the ventilation slots in the cabinet
to help assure adequate ventilation,
The TV's screen may be cleaned with a soft, lint-free cloth as well. Take care not to scratch or mar the screen. If
necessary, you may use a cloth dampened with warm water.
Never use strong cleaning agents, such as ammonia-based cleaners, or abrasive powder. These types of cleaners
will damage the TV.
While cleaning do not spray liquid directly on the screen, or allow liquid to run down the screen and inside the TV. Also,
avoid placing drinks or wtses with water on top of the TV. This could increase the risk of fire or shock hazard or damage lo
the TV.
Caution: If fixed (non-n_oving) inmges are lelk on the screen tk)r long periods, they may be permanently imprinted on the
picture tube. Such images include network logos, phone numbers, and vide(> games. This damage is not covered by your
warran/y. Extended viewing of channels displaying these images should be avoided.
55
Page 58

RCA TV Limited Warranty
What your warranty covers:
• Any detect in materials or workmanship.
For how long after your purchase:
• 90 days fi_r labor charges.
• One year tbr parts.
• Two years tk)r the picture tubes.
The warranty period tk)r rental units begins with tile first rental or 45 days t_om date of shipment to the rental firm,
whichever comes first.
What we will do:
• Pay any Authorized RCA "Ik.levision Service Cenwr tile labor charges to repair your television.
• Pay any Authorized RCA Television Service Cenwr lbr the new or, at our option, refurbished replacement parts and
picture robes required to repair your television.
How you get service:
• For screen sizes of 26" and smaller: Take your RCA television to any Authorized RCA Television Service Center and
pick up when repairs are complete.
• For screen sizes larger than 26": Request home or pick up, repair, and return service flcom any Authorized RCA
Television Service Cenwr, provided that your television is located within tile geographic territory covered by an
Aufllorized RCA Television Service Center. If not, you must take your television to the Service Center location at your
own expense, or pay tbr the cost the Service (-;enter may charge to transport your television to and flcom your home.
• To identil_v your nearest Authorized RCA Television Service Center, ask your dealer, look in tile Yellow Pages, or call 1-
800-336-1900.
• Show the Authorized Service Center Representative your sales receipt or other evidence of purchase date or first rental.
What your warranty does not cover:
• Customer instruction. (Your Owner's Manual clearly describes how to install, adjust, and operate your television. Any
additional inlbrmation should be obtained I_om your dealer).
• Installation and relat(.d adjustments.
• Signal reception problems not caused by your television.
• Damage troln misuse or neglect.
• Batteries.
• Custonler replacement Irises.
• Images burned onto tile screen.
• A television that has been modified or incorporated into other products or is used t2)r institutional or other commercial
purposes.
• A television purchased or serviced outside the t .S.A.
• Acts of nature, such as but not limiwd to lighming damage.
Product registration:
• Please complete and mail the Product Registration Card packed with your TV. It will make it easier to contact you
should it ever be necessary. The return of tile card is not required tbr warranty coverage.
How state law relates to this warranty:
• This warranty gives you specific legal rights, and you also may have other rights that wtry t_om state to state.
If you purchased your television outside the United States:
• This warranty does not apply. Contact your dealer t_)r warran/y inl_)rmation.
Service calls which do not involve defective materials or workmanship are not covered by this warranty. Costs of
such service calls are the sole responsibility of the purchaser.
56 Chapter 5
Page 59

VH82 (6-ft)
Screw-on Cable rcHacbes to
_lc Fo1d!_d gltll_ntla
conneclor._ (called ZS-obm
F-Opt,) on the, back c_vour
VCR or TV 7be emts screu
onto tbe colmec[omJbr a
S{_CL_IZ" co*lll{_cIio!l
VH89 (640
Push-on Cable al[acbes
[o [be rotttld antem_a
connec[or._ (called 7%
ohm l:-O_)e) on [ke bnck
*f your VCR or TV EmLv
push onjbr a quick
COtl_7ec[[ot2
Gold-Tipped cable
VH83 (640
Monaural VCR Dubbing
Cable Double cable [tint leLs
}'o_ co_!lect tbe L_[eo at_d
audio _cks _tu_) VHS
VCRs 1o duplica_ tapes¸
Can also _ used to connect
a VCR toyour 7_ (._ble is
cok)_coded and sb_lcled
Has RCA-O_ pbono plugs
o_l each e_d
Stereo VCR Dubbing Cable
Triph, cabl_, that lets/'(m
COtlllec[ [k( _ _71)1:0 £tt_d AI )lO
Gold-Tipped cable
VH84 (640
Continued on next page .......
o
u
o
r_
Accessory Order Form
Description
Screw-on antenna cable (3-ft)
Screw-on antenna cable (6-ft)
Push-on antenna cable (6-ft)
Monaural VCR Dubbing Cable (6-ft)
Stereo VCR Dubbing Cable (6-ft)
2-way Signal Splitter
Amplified Antenna
Antenna Mixer (not shown)
Remote Control (CRK76TE1)
Audio,Video Adapter (not shown)
Part No.
VH81
VH82
VH89
VH83
VH84
VH47
ANT200
193984
242524
228449
$5.95
Ss.9s
Ss.9s
$9.95
$3.95
$49.95
$11.15
$30.35
$4.45
Prices are subject to change without notice.
Total Merchandise ............................................. $__
Sales Tax ............................................................. $
We are required by law to collect the
appropriate sales tax for each individual
state, country, and locality to which the
merchandise is being sent.
Shipping and Handling ..................................... $ 3_0
Total Amount Enclosed ..................................... $-_
Use VISA, MasterCard, or Discover Card
preferably.
Money order or check must be in U.S.
currency only.
No COD or CASH.
All accessories are subject to availability.
Where applicable, we will ship a superseding model.
57
Page 60

Charge your order on your VISA,
Master( ard, or Discover Card by
filling in below
USE YOUR CREDIT CARD
IMPORTANT: (opy complete account number
f}-om your VISA card
VISA
r-N-N r-NN r-NN r-NN
M,cal'doxpire :I--[--II--[--I
IMPORTANT: (opy complete account number
f}-om your Master( ard
FTTT-]FTT-F-]FTT-F-]FTTT-]
(opy Number
above your
name Oll
Master( ard
My,card F--[-_ F--[-_
expires:
IMPORTANT: (opy complete account number
t?om your Discover (ard
FTTT-]FTT-F-]FTT-F-]FTTT-]
My card expires: _ FT-]
AUTHORIZED SIGNATURE
(Credit card order will not be processed without signature)
Print o1"type your name and
address clearly.
A complete and correct
order will save you days
of waiting.
Name:
Street:
City:
Apt:
State: Zip:
Daytime phone number:
Please make sure that both sides of this form
have been filled out completely.
• Allow 4 weeks for delivery,
• All accessories are subject to availability,
• Prices are subject to change,
2-way Signal Splitter
Help._ yo. connect a second "I'_
or V(;/_.
Splitter VH47
Amplified Antenna
Alhmt_ I'ou to quickly switch
./kotnthe anlenna signal mIbe
cable or salell[le s_nal withoul
d[sco_lt_CH_l_ tbC glt_l_tlHa
ANT200
O _
CRK76TEI
Remote Control
7}Hs is the remole conlrol Ibat
came packed with .your "I'K
Reldacements or._pare._can be
ordered glS t_t_{_gl_'d
To Order
To place your order by phone, have your Visa,
MaswrCard or Discover Card ready and call the loll-t%ee
number listed below.
Use this number only to place an order for accessory
items listed on this order form.
1-800-338-0376
To place your order by mail, detach and mail the
completed order lk_rm with credit card information,
money order or check in IS currency (made payable to
Thomson multimedia Inc.) to the tk_llowing address:
0
"r-
Q
Video Accessories
PO Box 8419
Ronks, PA 17573
58 Chapter 5
Page 61

A
Accessories 57
Advanced c(mnections 11
Age Based Ratings 36 38
ANTENNA button 22
Arrow bumms 22
Auto
Channel Search 14, 49
Color 47
AIX (auxilku T) button 22
Basic
connectkms 8 9
Picture Controls 4(i
Batteries fi_r tim remote 13
Black Level 46
Block
Age Based Ratings 39
Front Panel 43
Movie Ratings 42
Specific Content Themes 40
V42hip l]nrated Program 43
Buttons, remote control 22
C
Cable Box
code list 26
CABLE/ANTENNA jack
8,9,11
Cables
coaxial 7
G LINK 7
CC (Closed Captioning) 47
CH + button 22
CH button 22
Channel
Banner 35 36
Block 43
Labels 49
Lineup 28
Menu 49
Search 14
Channels menu 34
CLEAR button 22
Closed Caption
Display 47
Mode 48
Coaxial cable 7
Code list
Cable Box 26
Satellite Receiver 26
VCR 26
Color Warmth 47
Connectk)ns
multiple 11
IN' + VCR 8
I%J Only 9
Content Themes 36
Contrast 46
D
I)emo Pin 6, 8, 9, 11
I)VI)
button 22
F
Finding the sensor 12
Fixed Images 55
FOII_ZARI) button 22
Front panel
Block 44
G
G LINK
cable 8
connecting 12
wands 12
GO BACK button 22
Grid Guide menu 29
GLIDE button 22
GLIDE Plus+ system
Channel Lineup 28
Channels 35
Downloading Intbrmation
28
setup 15
Guide Plus+ system 20
INFO button 22
Interactive setup 14
1.
L.E.D. button 22
Labels 4})
Language 47
Languages
Selecting 14
Locating remote sensor 12
Lock, Parental Controls 44
M
Memory 49
Menu
Channel 49
Channels 34
Grid Guide 29
Language 47
Messages 33
News 32
Picture Quality 46
Schedule 32
Screen 47
Setup 34
Sort 31
Time 49
MENI button 22
Menus
GLIDE Plus+ system setup 15
Messages menu 33
MUTE button 22
N
News menu 32
Normal List 49
Number buttons 22
O
OK button 22
ON-OFF button 23
P
Parental Controls
Locking, Unk)cking 44
menu 36
PAUSE button 23
Picture
Presets 47
Quality Menu 46
PLAY button 23
R
Rating Limits
movies 41
TV 38
REC-VCR+ button 23
Remote
buttons 22
Remote, batteries 13
Remote sensor 12
REVERSE button 23
S
SAT*CABLE button 23
Satellite Receiver
code list 26
Satellite Receiver, connecting 11
Schedule
menu 32
time 49
Screen Menu 47
Set
Time 49
Setup
GUIDE Plus+ system menus 15
menu 34
Sharpness 46
Signal Type
Cable TV 49
I HFiVHF Antenna 49
SKIP button 23
Sleep Timer 36 49
Sort menu 31
SOIND button 23
STOP button 23
1"
Time
Current 36
Menu 49
Tint 46
"Ikoublesbooting 52
TV button 23
TV, connecting 9
U
UHFiVHF Antenna 49
Unlock, Parental Controls 44
V
V Chip 36
Age Based Ratings 37
Blocking Movies 41
Content Themes 37
VCR
code list 26
VCR, connecting 8
VCR1 button 23
VCR2 button 23
VOL+ button 23
VOL button 23
W
Warranty 56
WHO-INPUT button 23
Page 62

(This page intentionally left blank)
Page 63

(This page intentionally left blank)
Page 64

Please do not send any products to the Indianapolis address listed in this manual or on the carton. This will only
add delays in service for your product.
Thomson multimedia Inc.
10330 North Meridian Street
Indianapolis, IN 46290
©2001 Thomson multimedia Inc.
Trademark(s)® Registered
Marca(s) Registrada(s)
Printed in USA
TOCOM 15729070
 Loading...