

Page 1
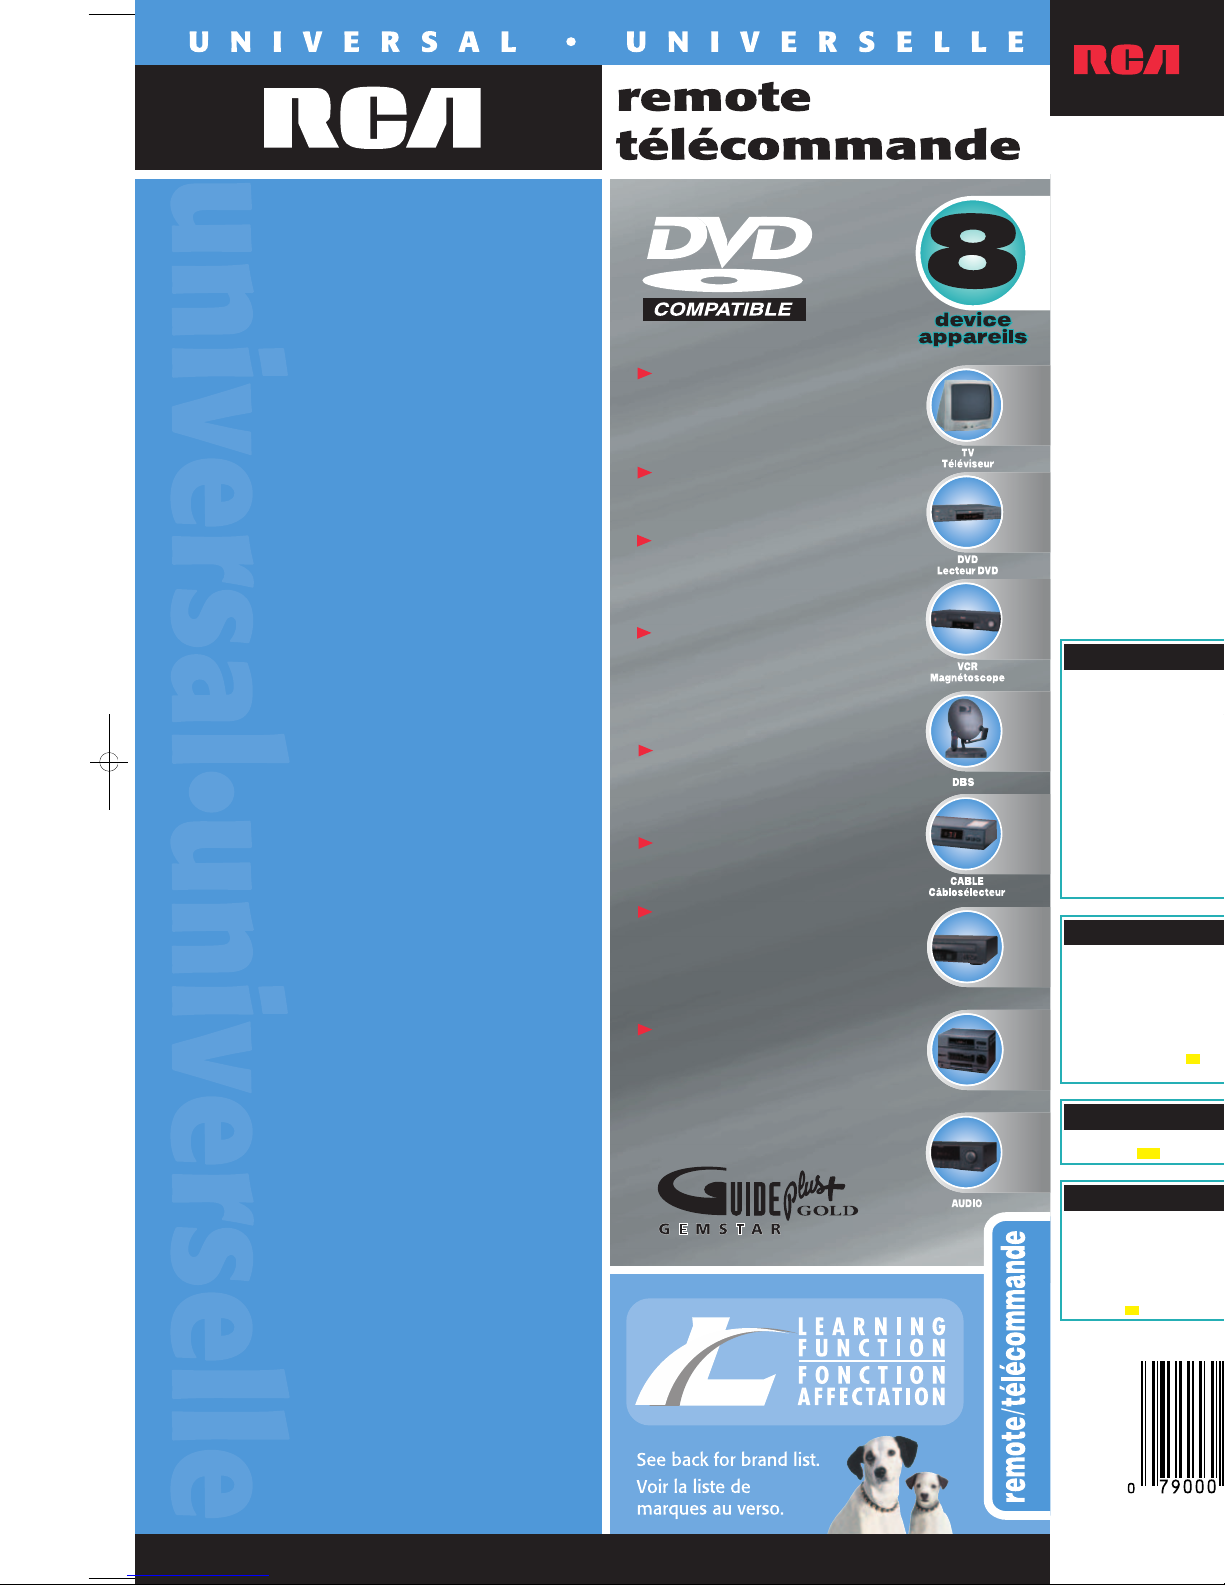
Multi-Brand / Multimarque CRCU805MSL
Four Learning Keys
Copy Unique Key Functions from your
Original Remote
Control On-Screen
Channel Guides
Compatible with the
Latest Technology
Control DBS & DVD Codes
Home Theatre & Audio Control
Picture-in-Picture
Surround Sound
Quatre touches intelligentes
Copie de fonctions de touches uniques
depuis la télécommande originale
Commande des guides de
canaux à l’écran
Compatible avec la plus
récente technologie
Contrôlez les codes
de DBS et DVD
Commande Cinéma au foyer
et audio
Image sur image
Ambiophonie
CD PLAYER
Lecteur CD
MINI SYSTEM
Mini-chaîne stéréreo
More than 200 TV and VCR brands, including... Plus de 200 marques de téléviseurs et magnétoscopes, dont...
Akai
Apex
Denon
GE
Hitachi
JVC
Magnavox
Marantz
See inside for complete brand listing.
EXTENSIVE UNIVERSAL CODE LIBRARY...
All brands listed and more!
More than 90 Satellite, Cable Box and DBS brands, including... Plus de 90 marques de satellites, câblosélecteurs et systèmes DBS, dont...
More than 15 DVD and Laser Disc brands, including... Plus de 15 marques de lecteurs DVD et de disques laser, dont...
More than 15 Audio System and CD Player brands, including... Plus de 15 marques de chaînes stéréo et lecteurs CD, dont...
Universal Remote Control/Télécommande universelle
This RCA Universal Remote Is Compatible With Most Models
Of The Following Brands
(Of Infrared Remote Controlled Components manufactured after 1990):
Replace Eight
Remotes With One!
■ Learning Keys
Provides space to transfer additional key functions from your
original remote control. Program other keys with the original
remote to resolve compatibility issues.
■ Extensive Code Library to Operate Your Brand
TV, VCR, DBS Systems, Cable Box, DVD, and Audio Equipment
■ Menu/Select Button
Controls Advanced Features of major TV and DBS brands
including RCA, GE, Proscan, Hitachi, Sony, and Zenith
■ Home Theatre Keys
Take full advantage of your Home Theatre equipment with
Surround Sound and DSP buttons
■ Code Search
Easy Set-up. Scan the entire code library for the right code
for your device
■ Toll-Free Consumer Helpline
See the instruction book for details
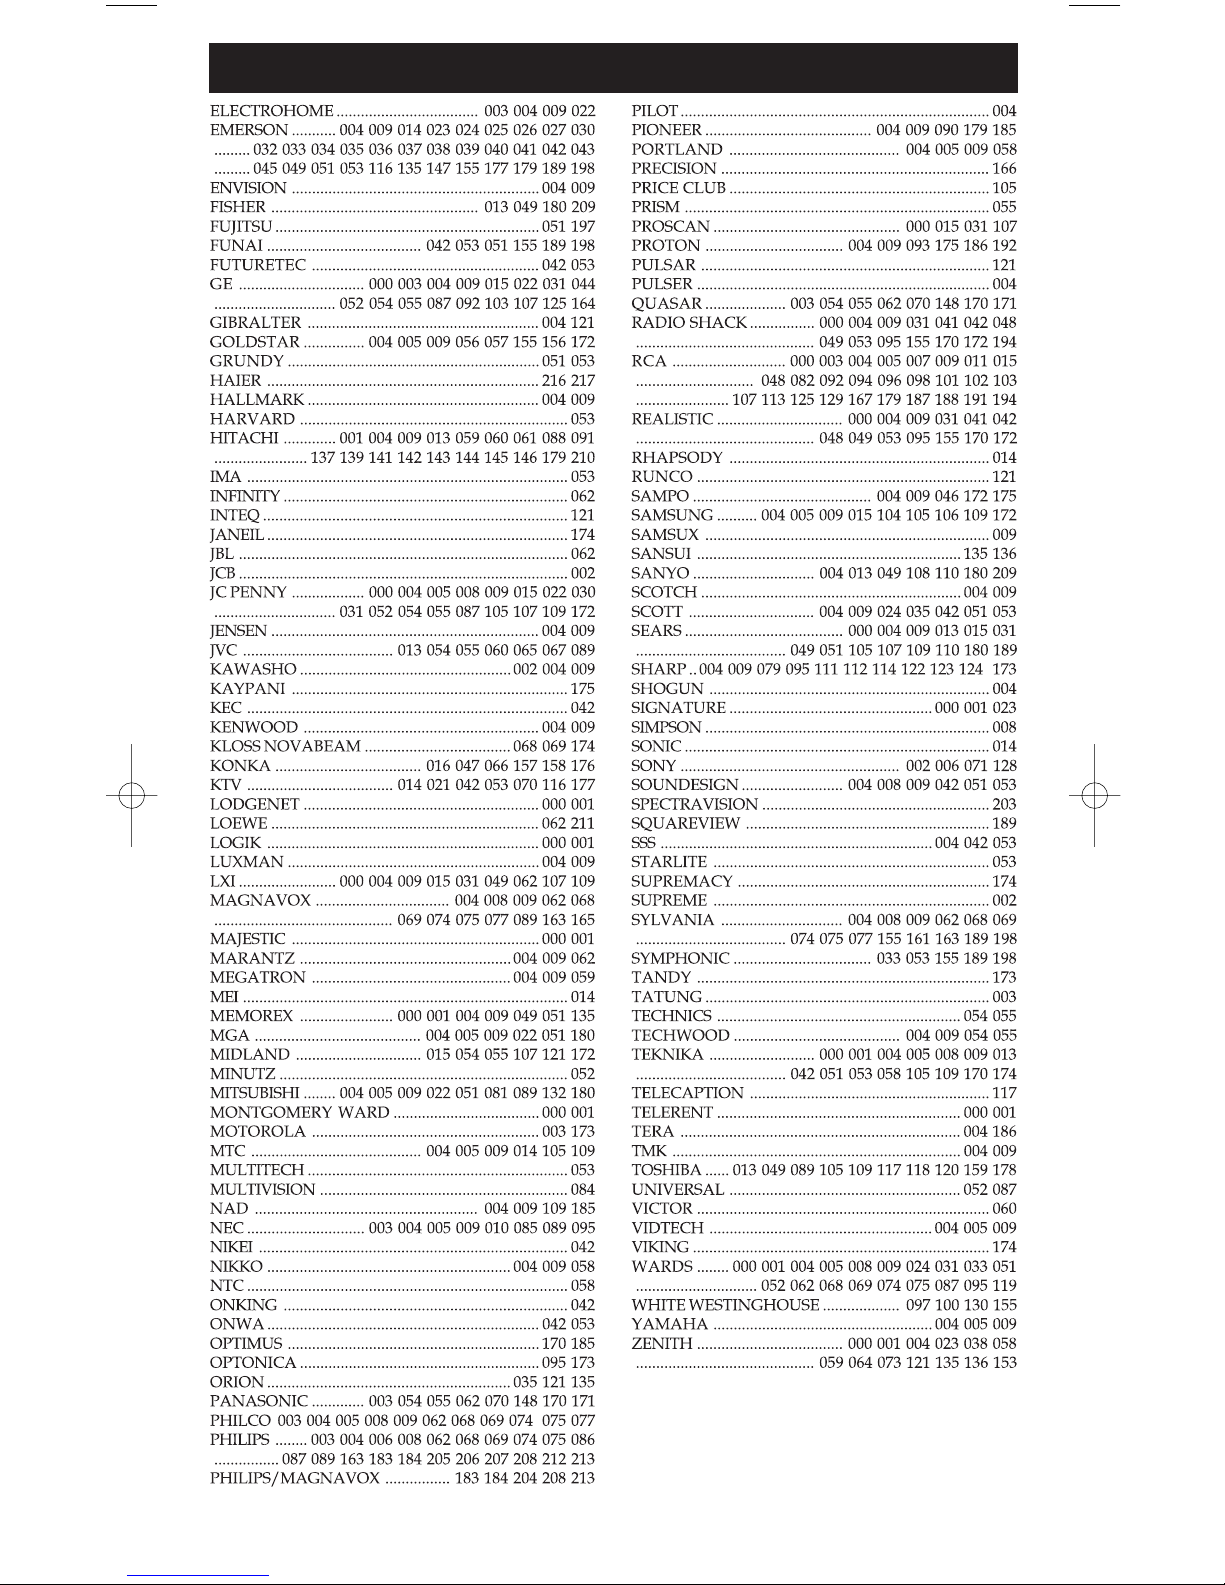
ABEXA
ABEX
ACME
ADA
ADC
ADMIRAL
ADVENTURA
AIKO
AIWA
AKAI
ALLEGRO
ALLERON
AMARK
AMERICAN HIGH
AMTRON
AMSTRAD
ANAM NATIONAL
ASHA
AOC
APEX
ARCHER
AUDIO
DYNAMICS
AUDIOVOX
BANG &
OLUFSEN
BEAUMARK
BELCOR
BELL & HOWELL
BRADFORD
BROKSONIC
BROKWOOD
CALIX
CANDLE
CANNON
CARVER
CCE
CAPEHART
CELEBRITY
CENTURION
CETRONIC
CHANGHONG
CITIZEN
CLAIRTONE
CLASSIC
COLORTYME
COLT
CONCERTO
CONCIERGE
CONTEC/CONY
CRAIG
CROWN
CURTIS MATHES
CYBERNEX
CXC
DAEWOO
DBX
DAYTRON
DIMENSIA
DUMONT
DYNASTY
DYNATECH
ELEKTRA
ELECTROBAND
ELECTROHOME
ELECTROPHONIC
EMERSON
ENVISION
FISHER
FUJI
FUJITSU
FUNAI
FUTURETEC
GARRARD
GE
GIBRALTER
GOLDSTAR
GO-VIDEO
GRADIENTE
GRUNDY
HAIER
HALLMARK
HARLEY
DAVIDSON
HARMAN
KARDON
HARVARD
HARWOOD
HITACHI
HEADQUARTER
HI-Q
IMA
INFINITY
INSTANT REPLAY
INTEQ
JANEIL
JBL
JCB
JCL
JC PENNY
JENSEN
JVC
KAWASHO
KAYPANI
KEC
KENWOOD
KLH
KLOSS
NOVABEAM
KODAK
KONKA
KTV
LLOYD
LODGENET
LOEWE
LOGIK
LUXMAN
LXI
MAGNAVOX
MAGNIN
MAJESTIC
MARANTZ
MARTA
MATSUSHITA
MEGATRON
MEI
MEMOREX
MGA
MGN
TECHNOLOGY
MIDLAND
MINOLTA
MINUTZ
MITSUBISHI
MONTGOMERY
WARD
MOTOROLA
MTC
MULTITECH
MULTIVISION
NAD
NEC
NIKEI
NIKKO
NOBLEX
NTC
ONKING
ONWA
OPTIMUS
OPTONICA
OLYMPUS
ORION
PANASONIC
PENTAX
PENTEX
RESEARCH
PHILCO
PHILIPS
PHILIPS/
MAGNAVOX
PILOT
PIONEER
PORTLAND
PRECISION
PRICE CLUB
PRISM
PULSAR
PROSCAN
PROTEC
PROTON
PULSAR
PULSER
QUARTER
QUARTZ
QUASAR
RADIO SHACK
RADIX
RANDEX
RCA
REALISTIC
REPLAY
RICOH
RHAPSODY
RUNCO
SAMPO
SAMSUNG
SAMSUX
SANKY
SANSUI
SANYO
SCOTCH
SCOTT
SEARS
SHARP
SHINTOM
SHOGUN
SIGNATURE
SIMPSON
SINGER
SONIC
SONY
SOUNDESIGN
SPECTRAVISION
SQUAREVIEW
SSS
STARLITE
STS
SUPREMACY
SUPREME
SYLVANIA
SYMPHONIC
TANDY
TASHIKO
TATUNG
TEAC
TECHNICS
TECHWOOD
TEKNIKA
TELECAPTION
TELERENT
TERA
TiVo
TMK
TOSHIBA
TOTEVISION
TMK
UNITECH
UNIVERSAL
VECTOR
RESEARCH
VICTOR
VIDTECH
VIDEO CONCEPTS
VIDEOSONIC
VIKING
WARDS
WHITE
WESTINGHOUSE
XR-1000
YAMAHA
ZENITH
ABC
ADELPHIA
ALLEGRO
AMERICAST
AMPLICA
ANTRONIX
ARCHER
AT&T
CABLETENNA
CABLEVIEW
CENTURY
CHANNEL
MASTER
CHAPPARAL
CHEYENNE
CITIZEN
COLOUR VOICE
COMTRONICS
CONTEC/
CONY
DRAKE
DISH NETWORK
DX ANTENNA
EASTERN
ECHOSPHERE
ECHOSTAR
BELL EXPRESS VU
FUJITSU
GARRARD
GC ELECTRONICS
GEMINI
GE
GENERAL
INSTRUMENT
DSS HITACHI
DSS HUGHES
SATELLITE
HAMLIN
HITACHI
HYTEK
JASCO
JERROLD
JVC
KENWOOD
LUXOR
DSS
MAGNAVOX
MACOM STATE
MAGNAVOX
MEMOREX
MOTOROLA
MOVIE TIME
NORSTAT
NSC
OAK
DSS
PANASONIC
PACE
PANASONIC
PARAGON
PHILIPS
PHILIPS/
MAGNAVOX
PIONEER
PRIMESTAR
PROSCAN
PULSAR
DSS RCA
RADIO SHACK
RCA
REALISTIC
REGAL
REGENCY
REMBRANDT
RUNCO
DSS SONY
SAMSUNG
SCIENTIFIC
ATLANTA
SHARP
SIERRA I, II, III
SIGNAL
SIGNATURE
SL MARX
SPRUCER
STANDARD
COMPONENTS
STAR CHOICE
STARCOM
STARGATE
STAR SIGHT
STAR SIGHT
CABLE
SERVICE
STARQUEST
STAR TRAK
STS
SUPER GUIDE
TANDY
TELEVIEW
TELEWEST
TEXSCAN
THOMSON
TOCOM
TOSHIBA
TOSHIBA DSS
TUSA
TV86
DSS UNIDEN
UNIDEN
UNIKA
UNITED ARTISTS
UNITED CABLE
UNIVERSAL
VIDEO CIPHER II
VIDEOWAY
VIEWSTAR
VIDEO TECH
ZENITH
ADC
ADCOM
AIWA
AKAI
AUDIO
TECHNICA
CALIFORNIA
AUDIO LABS
CAPETRONIC
CARVER
CASIO
CITIZEN
CURTIS
MATHES
DENON
EMERSON
FISHER
GE
GENEXXA
GOLDSTAR
HARMAN
KARDON
HITACHI
INKEL
JC PENNEY
JVC
KENWOOD
KRELL
KYOCERA
LUXMAN
LXI
MAGNAVOX
MARANTZ
MCS
MGA
MISSION
MITSUBISHI
NAD
NAKAMICHI
NEC
NIKKO
NSM
ONKYO
OPTIMUS
PANASONIC
PHILIPS
PIONEER
PROTON
QUASAR
RADIOSHACK
RCA
REALISTIC
ROTEL
SAE
SAMSUNG
SANSUI
SANYO
SCOTT
SEARS
SHARP
SHERWOOD
SHURE
SONY
STS
SYLVANIA
SYMPHONIC
TEAC
TECHNICS
THETA DIGITAL
TOSHIBA
VENTURER
VICTOR
YAMAHA
ZENITH
Page 2
Thank you for purchasing this RCA Universal
Remote Control. This product is designed to
provide years of service operating a wide variety
of video and audio components.
Please retain this guide for future reference.
Installing The Batteries .............................................1
Button Description ....................................................2-3
Programming For TV................................................4
Code List For TV .......................................................4-5
Programming VCR 1 and VCR 2 ............................6
Code List For VCR ....................................................6-7
Programming For DVD and Code List..................8
Programming For DBS System and Code List......9-10
Programming For Sat and Code List......................10
Programming For Cable Box and Code List .........11
Programming For Audio..........................................12
Code List For Audio..................................................13-14
Operating Audio Functions .....................................15
Programming For AUX Button ...............................16
Learning Functions....................................................16-17
Sleep Function............................................................18
Menu Function...........................................................18
Programming With Code Search ............................19
Identifying Codes From Your Remote ...................20
Trouble Shooting........................................................21
Help Line ....................................................................22
This Universal Remote Control is already
programmed for most RCA, GE and ProScan TVs,
VCRs, DBS Systems, DVD Players, and Audio
Video Receivers.
Note: For users of RCA, GE and ProScan DBS
Products, older DBS models require that the
DISPLAY Button on this remote be used to make
program selections. Use the SELECT button for
making program selections on newer RCA, GE
and ProScan DBS models.
Table of Contents
Your Universal Remote requires 2 new AAA
alkaline batteries.
To install the batteries:
1. Turn the remote over and push down on
the cover and slide it off.
2. Insert the batteries, matching the batteries
to the (+) and (-) marks inside the
battery case.
3. Slide the battery cover back into place.
Note: Reprogramming may be required after
batteries are removed.
Battery Installation
1
Merci d’avoir acheté cette télécommande universelle
RCA. Ce produit vous permettra de commander
pendant de nombreuses années un vaste choix
d’appareils vidéo et audio.
Veuillez conserver ce guide pour référence ultérieure.
Installation des piles ...................................................................1
Description des boutons ............................................................2-3
Programmation pour téléviseur................................................4
Liste des codes de téléviseurs ...................................................4-5
Programmation de VCR 1 et VCR 2.........................................6
Liste des codes de magnétoscopes ...........................................6-7
Programmation pour lecteur DVD et liste de codes .............8
Programmation pour système DBS et liste de codes.............9-10
Programmation pour satellite et liste de codes......................10
Programmation pour câblosélecteur et liste de codes...........11
Programmation pour chaîne stéréo..........................................12
Liste de codes de chaîne stéréo.................................................13
Utilisation des fonctions audio .................................................14
Programmation pour bouton AUX ..........................................15
Fonctions intelligentes................................................................16-17
Fonction Sommeil .......................................................................18
Fonction Menu.............................................................................18
Programmation par recherche de codes..................................19
Identification des codes à partir de votre télécommande.....19
Dépannage ...................................................................................20
Service d’assistance.....................................................................21
Cette télécommande universelle est déjà programmée
pour la plupart des téléviseurs, magnétoscopes, systèmes
DBS, lecteurs DVD et récepteurs audio vidéo RCA, GE et
ProScan.
Note : Si vous utilisez des produits DBS autres que RCA,
GE et ProScan, les plus anciens modèles DBS exigent que
vous utilisiez la touche DISPLAY de la télécommande
pour choisir les émissions. Utilisez la touche SELECT
pour choisir les émissions avec les modèles DBS RCA,
GE et ProScan plus récents.
Table des matières
Cette télécommande universelle fonctionne avec 2
piles alcalines AAA neuves.
Pour installer les piles :
1. Tournez la télécommande sens dessus dessous et
appuyez sur le couvercle et
glissez-le vers l’extérieur.
2. Insérez les piles en faisant correspondre les
marques (+) et (-) des piles avec celles à
l’intérieur du logement.
3. Remettez le couvercle du logement en place.
Note : Il faut parfois reprogrammer après avoir
enlevé les piles.
Installation des piles
Page 3
2
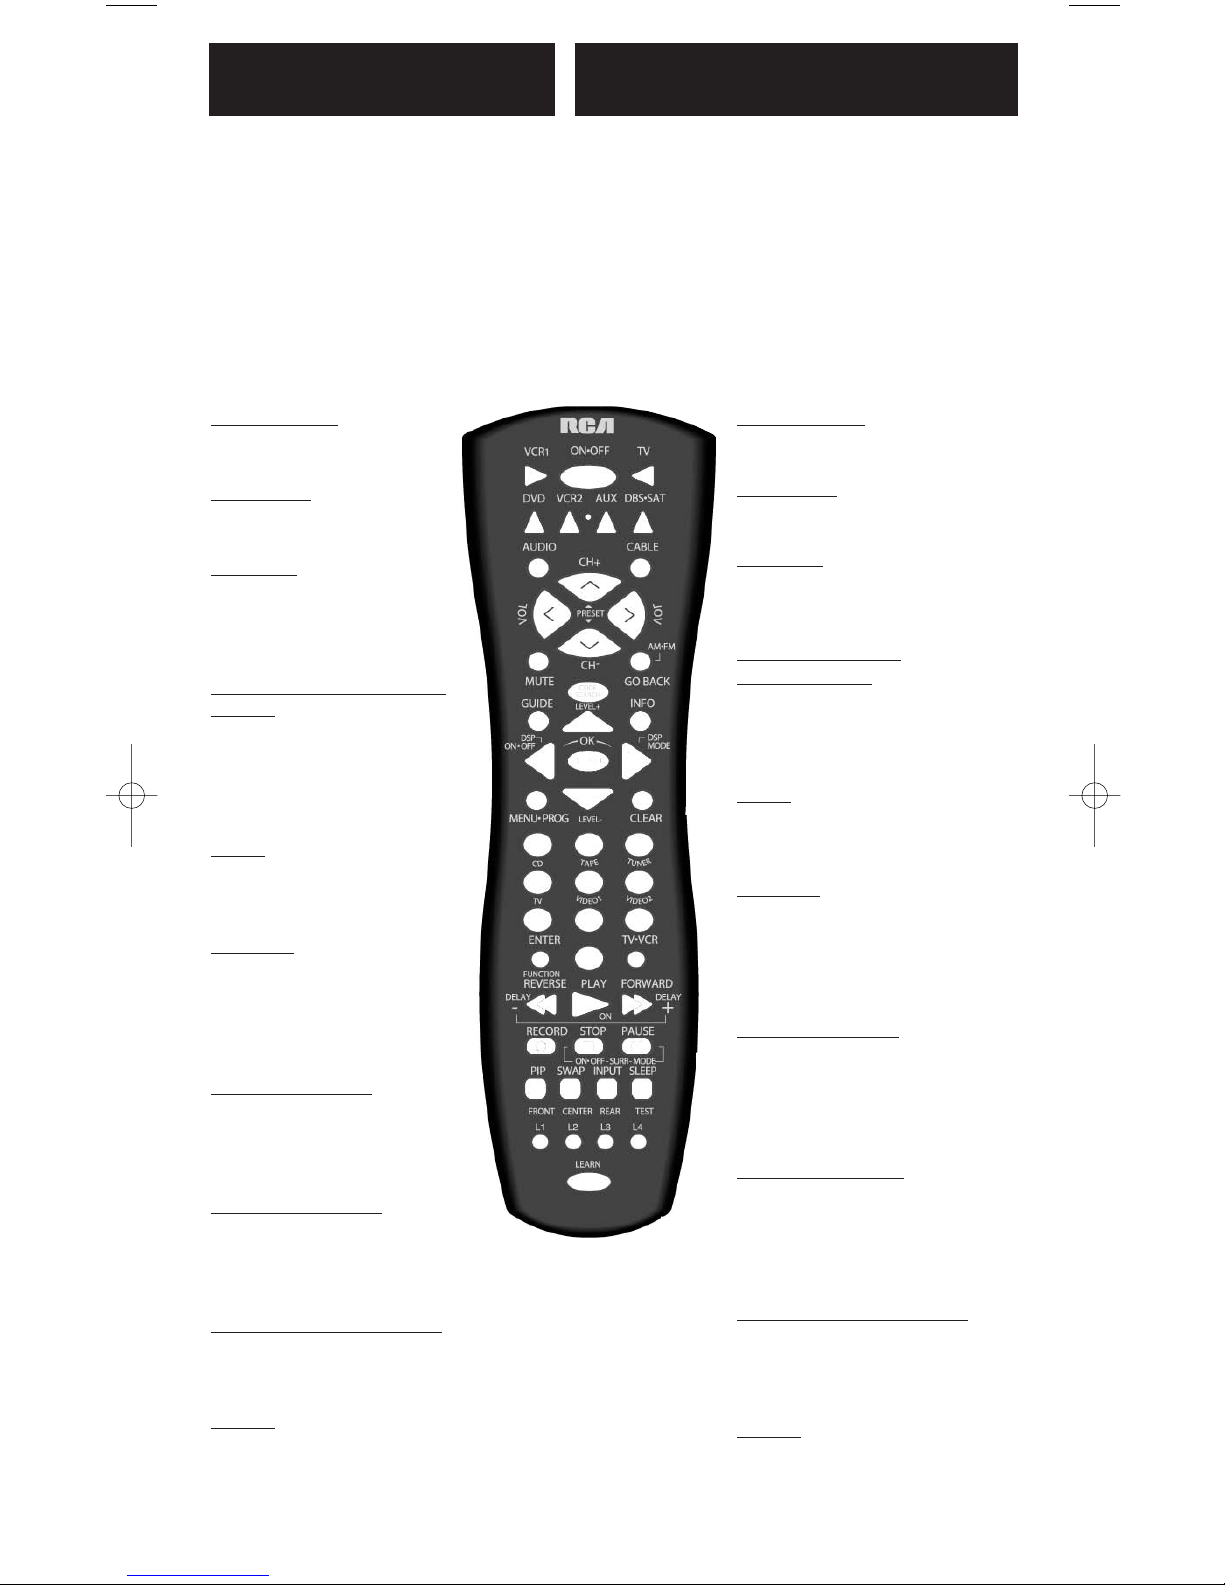
Button Description For
Video Operation
INDICATOR LIGHT
The Indicator Light flashes to show that the remote is
working.
ON•OFF
The ON•OFF button operates the same as your original
remote.
Note: Some RCA, GE and ProScan models require you to
press the device button to turn the device on and the
ON•OFF button to turn the device off.
TV,VCR1, DVD,VCR2,
AUX, DBS•SAT, AUDIO,
CABLE
The TV, VCR1, DVD, VCR2, AUX, DBS•SAT, AUDIO, and
CABLE buttons are used to select the device you want to
control.
VOL & CH
The VOL (Volume) and CH (Channel) buttons increase or
decrease the channel numbers or volume.
MUTE
Mutes volume on the TV.
GO BACK
The GO BACK button allows you to go to the previous
channel you selected. Operates the same as Last Channel,
Previous Channel, or Recall button on your original remote.
CODE SEARCH
Used to program the remote or to search through codes.
GUIDE
Brings up the on-screen TV program guide if your TV has
that feature.
INFO
Shows the date and the time if your TV or VCR has that
feature. Functions the same as a Display button.
NAVIGATION BUTTONS & SELECT
Used to move through on screen menuing and guides. With
some DBS models the INFO button should be used to select
the highlighted item. Use the navigation buttons to move
the highlighted choice up, down, left, or right.
MENU•PR
OG
Brings up the Main Menu. If you are already in the menu
system, press SELECT to select a highlighted choice. Use the
arrow buttons to move through the Menu Selections.
CLEAR
Removes the on screen display to return to normal viewing.
0-9
The number buttons operate the same as on your original
remote, and are used for entering device codes.
ENTER
The ENTER button is used to complete channel selection for
some brands of TV. It is also used to complete the code entry
process.
TV•VCR
The TV•VCR button operates the TV•VCR function of your
VCR.
REVERSE, PLAY, FORWARD, RECORD, STOP, PAUSE
These buttons operate the same as on your original VCR or
remote. You must press the REC button twice to begin
recording.
PIP, SWAP, & INPUT
PIP (Picture-in-Picture) and SWAP operate your Television’s
Picture-in-Picture features. INPUT selects the video inputs of
your TV if equiped with this feature.
LEARN
The LEARN button allows you to program and delete
learned functions from your original remote control.
SLEEP
The SLEEP button allows you to set a time for you to turn
off your TV automatically.
Description des touches de
commande d’appareil vidéo
VOYANT
Le voyant clignote pour indiquer que la
télécommande fonctionne.
ON•OFF
La touche ON•OFF fonctionne comme celle de la
télécommande originale.
Note : Certains modèles RCA, GE et ProScan exigent que
vous appuyiez sur la touche de l’appareil pour allumer
celui-ci et sur la touche ON•OFF pour
l’éteindre.
TV,
VCR1, DVD, VCR2, A
UX, DBS•SAT, A
UDIO, CABLE
Les touches TV, VCR1, DVD, VCR2, AUX, DBS•SAT,
AUDIO et CABLE permettent de sélectionner
l’appareil à commander.
VOL et CH
Les touches VOL (Volume) et CH (Canal) permettent de
monter ou de baisser le volume ou les indicatifs de canal.
MUTE
Coupe le son du téléviseur.
GO BACK
La touche GO BACK permet de passer au canal
précédemment sélectionné. Fonctionne comme la touche de
Dernier canal, Canal précédent ou Rappel de la
télécommande originale.
CODE SEARCH
Permet de programmer la télécommande ou de
parcourir les codes.
GUIDE
Fait apparaître le guide des émissions de télé à l’écran si le
téléviseur dispose de cette fonction.
INFO
Indique la date et l’heure si le téléviseur ou le
magnétoscope dispose de cette fonction. Fonctionne comme
la touche Display.
TOUCHES DE NAVIGATION ET SÉLECTION
Permettent de parcourir les menus et les guides à l’écran.
Sur certains modèles DBS, la touche INFO doit être utilisée
pour sélectionner l’élément en évidence. Utilisez les touches
de navigation pour vous déplacer vers le haut, le bas, à
gauche ou à droite.
MENU•PR
OG
Affiche le Menu principal. Si vous vous trouvez déjà dans le
système de menu, appuyez sur SELECT pour sélectionner
un choix en évidence. Utilisez les
touches fléchées pour parcourir les sélections de menu.
CLEAR
Fait disparaître l’affichage à l’écran et ramène au
visionnement normal.
0-9
Les touches numérotées fonctionnent comme celles de la
télécommande originale, et sont utilisées pour entrer les
codes d’appareil.
ENTER
La touche ENTER permet de sélectionner les canaux de
quelques marques de téléviseur. Permet aussi d’entrer les
codes.
TV•VCR
La touche TV•VCR commande la fonction TV•VCR du
magnétoscope.
REVERSE, PLAY, FORWARD, RECORD, STOP, PAUSE
Ces touches fonctionnent comme celles du
magnétoscope ou de la télécommande originale. Vous devez
appuyer deux fois sur la touche REC pour
entreprendre un enregistrement.
PIP, SWAP et INPUT
Les touches PIP (Image sur image) et SWAP (Permutation)
commandent les fonctions Image sur image de votre
téléviseur. La touche INPUT permet de sélectionner les
entrées vidéo du téléviseur s’il dispose de cette fonction.
LEARN
Le bouton LEARN permet de programmer et de supprimer
les fonctions apprises de la télécommande originale.
SLEEP
La touche SLEEP permet de programmer une heure d’arrêt
automatique du téléviseur.
Page 4
13
Button Description For
Audio Operation
AUDIO OPERATION
This remote does not work all brands of
audio equipment. See page 12-13 for the
audio code and brand list to operate your
brand of equipment. You may need to
experiment with your system since not
all manufacturers products work the
same way.
Press AUDIO button to enable the
AUDIO mode.
LEVEL+/LEVEL-
Sets the level of the speakers
during test tone mode.
DSP ON•OFF
Enables the receiver’s Digital
Signal Processing mode.
DSP MODE
When the DSP mode is enabled,
pressing this button allows the
user to toggle through the
various DSP modes.
CD,TAPE,TUNER,TV, VIDEO 1,
VIDEO 2
The CD, TAPE, TUNER, TV,
VIDEO 1, and VIDEO 2 buttons
are used to directly select the
device you want to control.
(Works in AUDIO mode)
AM•FM
The AM•FM button allows you to
select the AM•FM band on you
audio reciever.
FUNCTION
Toggles the different audio input
devices. The number buttons
also select the function labeled
below the buttons when in
AUDIO mode.
DELAY-, ON, DELAY+
Increases or decreases the delay
between the surround and main
speakers when the receiver is in
the surround sound mode.
ON•OFF, SURR, MODE
ON•OFF SURR toggles the
surround modes on and off. SURR
MODE toggles through the receiver’s various
surround sound mode settings.
FRONT, CENTER, REAR, TEST
Adjust the levels of the front, center, and rear
speakers respectively. The test tone must be
enabled first by pressing the TEST button.
PRESET
Used to operate preset channels while in
Audio Mode.
Description des touches de
commande d’appareil audio
FONCTIONNEMENT AUDIO
Cette télécommande ne commande pas toutes les
marques d’appareils audio. Consultez la page 12-13
pour connaître le code audio et la liste des marques
pour commander la marque de votre appareil. Vous
devrez peut-être faire quelques essais avec votre
système, car les produits des fabricants ne
fonctionnent pas tous de la même façon.
Appuyez sur le bouton AUDIO pour activer le
mode AUDIO.
LEVEL+/LEVEL-
Règle le niveau des enceintes en mode
Tonalité d’essai.
DSP ON•OFF
Active le mode Traitement de signal
numérique du récepteur.
DSP MODE
En mode DSP, appuyez sur cette
touche pour basculer d’un mode DSP
à l’autre.
CD
, T
APE, TUNER, TV,
VIDEO 1, VIDEO 2
Les touches CD, TAPE, TUNER, TV,
VIDEO 1 et VIDEO 2 permettent de
sélectionner directement l’appareil à
commander. (en mode AUDIO)
AM•FM
La touche AM•FM permet de
sélectionner la bande AM•FM au
récepteur audio.
FUNCTION
Permet de basculer d’un appareil
audio à l’autre. Les touches
numérotées permettent aussi de
sélectionner la fonction indiquée sous
les touches en mode AUDIO.
DELA
Y-, ON, DELAY+
Permettent d’augmenter ou de réduire
le délai entre les enceintes
ambiophoniques et principales quand
le récepteur est en mode
Ambiophonie.
ON•OFF
, SURR MODE
ON•OFF permet d’activer et de
désactiver les modes ambiophoniques.
Surr Mode permet de parcourir les
différents modes ambiophoniques du
récepteur.
FR
ONT, CENTER, REAR,TEST
Règle les niveaux des enceintes avant,
centrale et arrière, respectivement. La
tonalité d’essai doit d’abord être
activée à l’aide de la touche TEST.
PRESET
Permet de commander les canaux
préréglés en mode Audio.
Page 5
4
TV Code List / Liste de codes de téléviseur
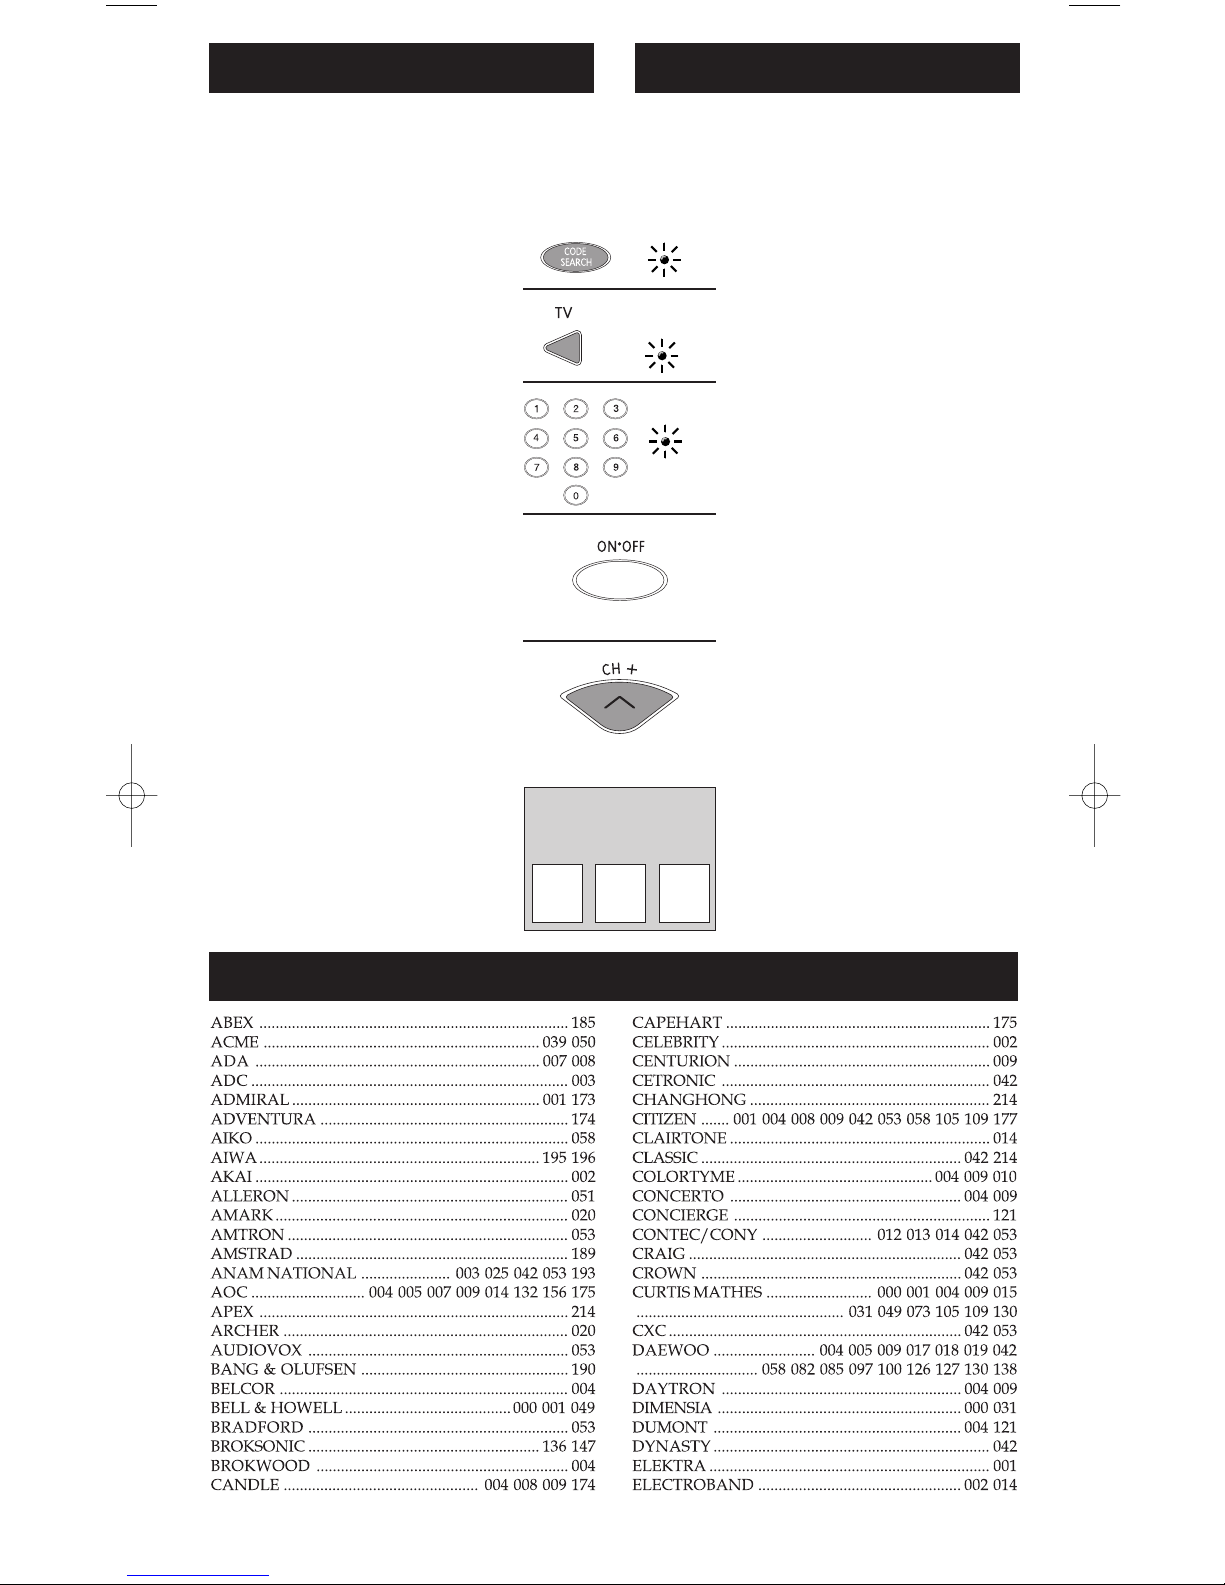
Programming For TV
1. Manually turn on the TV.
Find the three digit code for your
TV in the code list below.
2. Press and hold the CODE
SEARCH button until
the INDICATOR LIGHT lights,
then release the CODE SEARCH
button.
3. Press and release the TV button
(The INDICATOR LIGHT will
blink then remain lit).
4. Enter the code using the Number
Buttons.
After your code is entered, the
INDICATOR LIGHT will
turn off. If the code is not valid,
the INDICATOR LIGHT will
blink. Check the code list and
repeat process.
5. Aim the remote at your TV and
press the ON•OFF button. Your
TV should turn off.
Note: If your TV does not respond, try all the
codes for your brand. If the codes do not work,
or your brand is not listed, try the Code Search
method on page 19.
6. With your TV on, press CH+
(CHANNEL UP) If the TV
responds, no further
programming is required.
7. Enter your code here for easy
reference.
Most RCA, GE and ProScan TVs will not require
programming. Check to see if your TV responds to
the remote before you begin programming.
(BLINK)
(CLIGNOTEMENT)
INDICATOR LIGHT /
VOYANT
(OFF)
(ÉTEINT)
Programmation pour téléviseur
1. Allumez le téléviseur
manuellement. Trouvez le code à
trois chiffres du téléviseur dans
la liste de codes ci-dessous.
2. Maintenez la touche CODE
SEARCH enfoncée jusqu’à ce
que le VOYANT s’allume, puis
relâchez la touche CODE
SEARCH.
3. Appuyez sur la touche TV (le
VOYANT clignote, puis reste
allumé).
4. Entrez le code à l’aide des
touches numérotées.
Une fois le code entré, le
VOYANT s’éteint. Si le code est
invalide, le VOYANT clignote.
Vérifiez la liste de codes et
recommencez.
5. Pointez la télécommande en
direction du téléviseur et
appuyez sur la touche ON•OFF.
Le téléviseur devrait s’éteindre.
Note : Si le téléviseur ne réagit pas, essayez
tous les codes de la marque. Si les codes ne
fonctionnent pas, ou si votre marque ne figure
pas dans la liste, essayez la méthode de
recherche de code à la page 19.
6. Le téléviseur allumé, appuyez
sur CH+ (CANAL HAUT).
Si le téléviseur réagit, la
programmation est terminée.
7. Inscrivez votre code ici pour
référence ultérieure.
La plupart des téléviseurs RCA, GE et ProScan
n’exigent aucune programmation. Vérifiez si le
téléviseur réagit à la télécommande avant de
programmer.
TV CODE
CODE DE
TÉLÉVISEUR
Page 6
5
TV Code List Continued / Liste de codes de téléviseur Suite
Page 7
6
VCR Code List / Liste de codes de magnétoscope
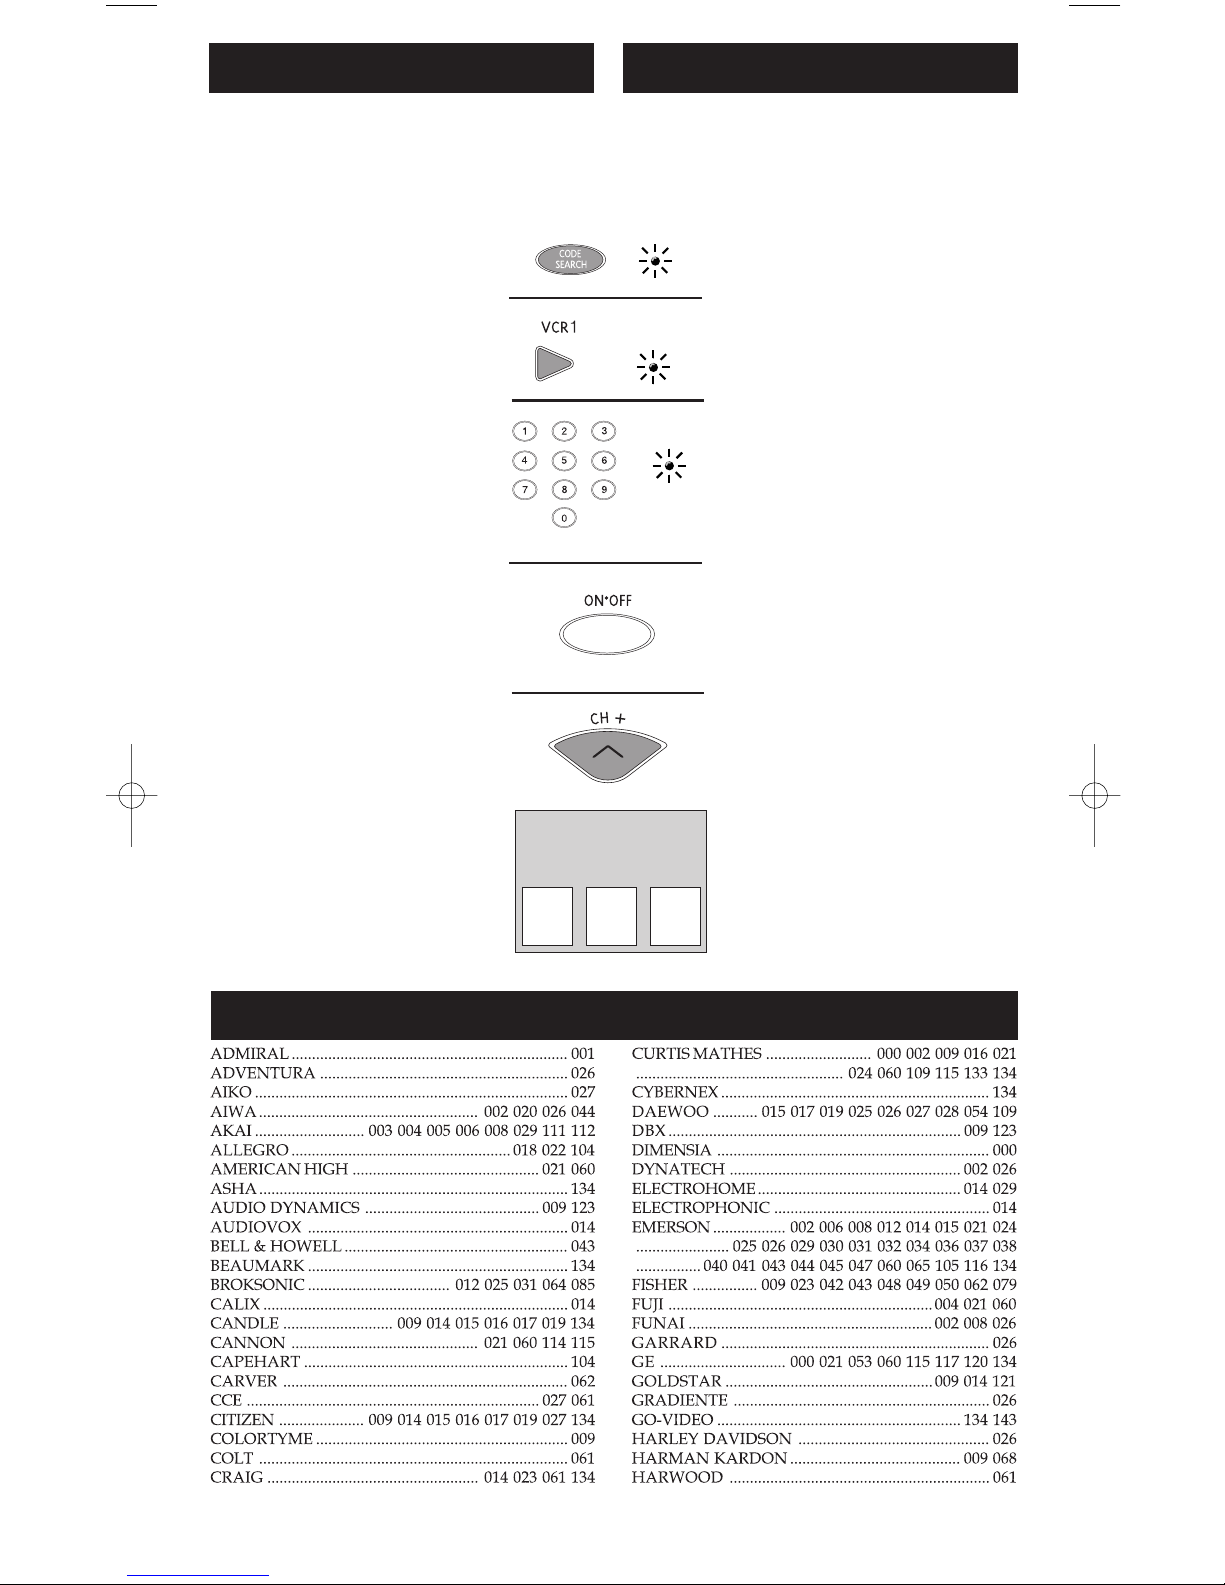
1. Manually turn on the VCR.
Find the three digit code for your
VCR in the code list starting below.
2. Press and hold the CODE SEARCH
button until the INDICATOR LIGHT
lights, then release the CODE
SEARCH button.
3. Press and release the VCR1 button
(The INDICATOR LIGHT will blink
then remain lit).
4. Enter the code using the Number
Buttons.
After your code is entered the
INDICATOR LIGHT will turn off. If
the code is not valid, the
INDICATOR LIGHT will blink.
Check the code list and repeat
process.
5. Aim the remote at your VCR and
press the ON•OFF button. Your VCR
should turn off.
Note: If your VCR does not respond, try all the
codes for your brand. If the codes do not work, or
your brand is not listed, try the Code Search
method on page 19.
6. With your VCR on, press CH+
(CHANNEL UP). If the VCR
responds, no further programming
is required.
7. Enter your code here for easy
reference.
Programming For VCR1, & VCR2
Most RCA, GE and ProScan VCRs will not require
programming. Check to see if your VCR responds to
the remote before you begin programming.
INDICATOR LIGHT/
VOYANT
1. Allumez le magnétoscope
manuellement.
Trouvez le code à trois chiffres du
magnétoscope dans la liste de codes
ci-dessous.
2. Maintenez la touche CODE
SEARCH enfoncée jusqu’à ce que le
VOYANT s’allume, puis relâchez la
touche CODE SEARCH.
3. Appuyez sur la touche VCR1 (le
VOYANT clignote, puis reste
allumé).
4. Entrez le code à l’aide des touches
numérotées.
Une fois le code entré, le VOYANT
s’éteint. Si le code est invalide, le
VOYANT clignote. Vérifiez la liste
de codes et recommencez.
5. Pointez la télécommande en
direction du magnétoscope et
appuyez sur la touche ON•OFF.
Le magnétoscope devrait s’éteindre.
Note : Si le magnétoscope ne réagit pas, essayez
tous les codes de la marque. Si les codes ne
fonctionnent pas, ou si votre marque ne figure
pas dans la liste, essayez la méthode de recherche
de code à la page 19.
6. Le magnétoscope allumé, appuyez
sur CH+ (CANAL HAUT).
Si le magnétoscope réagit, la
programmation est terminée.
7. Inscrivez votre code ici pour
référence ultérieure.
Programmation pour VCR1 et VCR2
La plupart des magnétoscopes RCA, GE et ProScan
n’exigent aucune programmation. Vérifiez si le
magnétoscope réagit à la télécommande avant de
programmer.
(BLINK)
(CLIGNOTEMENT)
(OFF)
(ÉTEINT)
VCR CODE
CODE DE
MAGNÉTOSCOPE
Page 8

7
VCR Code List Continued / Liste de codes de magnétoscope Suite
Page 9

8
DVD Codes / Codes DVD
Programming For DVD
1. Manually turn on the DVD
System.
Find the three digit code for your
DVD System in the code list
below.
2. Press and hold the CODE
SEARCH button until the
INDICATOR LIGHT lights, then
release the CODE SEARCH
button.
3. Press and release the DVD button
(The INDICATOR LIGHT will
blink then remain lit).
4. Enter the code using the Number
Buttons.
After your code is entered, the
INDICATOR LIGHT will turn off.
If the code is not valid, the
INDICATOR LIGHT will blink.
Check the code list and repeat
process.
5. Aim the remote at your DVD
System and press the ON•OFF
button. Your DVD System should
turn off.
6. If the DVD System responds, no
further programming is
required.
Note: If your DVD does not respond, try all the
codes for your brand. If the codes do not work,
or your brand is not listed, try the Code Search
method on page 19.
7. Enter your code here for easy
reference.
Most RCA, GE and ProScan DVD systems will not
require programming. Check to see if your DVD
System responds to the remote before you begin
programming.
Programmation pour lecteur DD
1. Allumez le lecteur DVD
manuellement.
Trouvez le code à trois chiffres du
lecteur DVD dans la liste de
codes ci-dessous.
2. Maintenez la touche CODE
SEARCH enfoncée jusqu’à ce que
le VOYANT s’allume, puis
relâchez la touche CODE
SEARCH.
3. Appuyez sur la touche DVD (le
VOYANT clignote, puis reste
allumé).
4. Entrez le code à l’aide des
touches numérotées.
Une fois le code entré, le
VOYANT s’éteint. Si le code est
invalide, le VOYANT clignote.
Vérifiez la liste de codes et
recommencez.
5. Pointez la télécommande en
direction du lecteur DVD et
appuyez sur la touche ON•OFF.
Le lecteur DVD devrait
s’éteindre.
6. Si le lecteur DVD réagit, la
programmation est terminée.
Note : Si le lecteur DVD ne réagit pas, essayez
tous les codes de la marque. Si les codes ne
fonctionnent pas, ou si votre marque ne figure
pas dans la liste, essayez la méthode de
recherche de code à la page 19.
7. Inscrivez votre code ici pour
référence ultérieure.
La plupart des lecteurs DVD RCA, GE et ProScan
n’exigent aucune programmation. Vérifiez si le
lecteur DVD réagit à la télécommande avant de
programmer.
(BLINK)
(CLIGNOTEMENT)
INDICATOR LIGHT /
VOYANT
(OFF)
(ÉTEINT)
DVD CODE
CODE DE
LECTEUR DVD
Page 10

9
PVR/DVR Codes / Codes de PVR/DVR
VCR/DVD Combo Codes / Codes de magnetoscope/DVD combine
TV/VCR, TV/DVD Combo Codes / Codes de tele/magnetoscope, tele/DVD combine
Programming For DBS System
1. Manually turn on DBS System.
Find the three digit code for
your DBS System in the code list
below.
2. Press and hold the CODE
SEARCH button until
the INDICATOR LIGHT lights,
then release the CODE SEARCH
button.
Most RCA, GE and ProScan Satellite systems will not
require programming. Check to see if your DBS
Satellite System responds to the remote before you
begin programming.
Programmation pour système DBS
1. Allumez le système DBS
manuellement.
Trouvez le code à trois chiffres
du système DBS dans la liste de
codes ci-dessous.
2. Maintenez la touche CODE
SEARCH enfoncée jusqu’à ce
que le VOYANT s’allume, puis
relâchez la touche CODE
SEARCH.
La plupart des systèmes de satellite RCA, GE et
ProScan n’exigent aucune programmation.
Vérifiez si votre système de satellite DBS réagit à la
télécommande avant de programmer.
INDICATOR LIGHT / VOY-
ANT
Page 11

10
HDTV/SAT Codes / Codes de HDTV/SAT
PVR/DVR-SAT Combo Codes / Codes de PVR/DVR-SAT combine
3. Press and release the DBS•SAT
button (The INDICATOR LIGHT
will blink then remain lit).
4. Enter the code using the
Number Buttons.
After your code is entered, the
INDICATOR LIGHT will turn off.
If the code is not valid, the
INDICATOR LIGHT will blink.
Check the code list and repeat
process.
5. Aim the remote at your DBS
System and press the ON•OFF
button. Your DBS System should
turn off.
Note: If your DBS System does not respond,
try all the codes for your brand. If the codes
do not work, or your brand is not listed, try
the Code Search method on page 19.
6. With your DBS System on, press
CH+ (CHANNEL UP). If the
satellite system responds, no
further programming is
required.
7. Enter your code here for easy
reference.
3. Appuyez sur la touche DBS•SAT
(le VOYANT clignote, puis reste
allumé).
4. Inscrivez le code à l’aide des
touches numérotées.
Une fois le code entré, le
VOYANT s’éteint. Si le code est
invalide, le VOYANT clignote.
Vérifiez la liste de codes et
recommencez.
5. Pointez la télécommande en
direction du système DBS et
appuyez sur la touche ON•OFF.
Le système DBS devrait s’éteindre.
Note : Si le système DBS ne réagit pas, essayez
tous les codes de la marque. Si les codes ne
fonctionnent pas, ou si votre marque ne figure
pas dans la liste, essayez la méthode de
recherche de code à la page 19.
6. Le système DBS allumé, appuyez
sur CH+ (CANAL HAUT). Si le
système de satellite réagit, la
programmation est terminée.
7. Inscrivez le code ici pour
référence ultérieure.
(BLINK)
(CLIGNOTEMENT)
(OFF)
(ÉTEINT)
SATELLITE CODE
CODE DE
SATELLITE
Satellite Codes / Codes de satellite
Page 12

11
Programming For Cable Box
1. Manually turn on the Cable Box.
Find the three digit code for your
Cable Box in the code list below
2. Press and hold the CODE
SEARCH button until
the INDICATOR LIGHT lights,
then release the CODE SEARCH
button.
3. Press and release the CABLE
button (the INDICATOR LIGHT
will blink then remain lit).
4. Enter the code using the Number
Buttons.
After your code is entered, the
INDICATOR LIGHT will
turn off. If the code is not valid,
the INDICATOR LIGHT will
blink. Check the code list and
repeat process.
5. Aim the remote at your Cable
Box and press the ON•OFF
button. Your Cable Box should
turn off.
Note: If your Cable Box does not respond, try
all the codes for your brand. If the codes do not
work, or your brand is not listed, try the Code
Search method on page 19.
6. With your Cable Box on, press
CH+ (CHANNEL UP). If
the Cable Box responds, no
further programming
is required.
7. Enter your code here for easy
reference.
Programmation pour câblosélecteur
1. Allumez le câblosélecteur
manuellement.
Trouvez le code à trois chiffres du
câblosélecteur dans la liste de
codes ci-dessous.
2. Maintenez la touche CODE
SEARCH enfoncée jusqu’à ce que
le VOYANT s’allume, puis
relâchez la touche CODE
SEARCH.
3. Appuyez sur la touche CABLE
(le VOYANT clignote, puis reste
allumé).
4. Entrez le code à l’aide des
touches numérotées.
Une fois le code entré, le
VOYANT s’éteint. Si le code est
invalide, le VOYANT clignote.
Vérifiez la liste de codes et
recommencez.
5. Pointez la télécommande en
direction du câblosélecteur et
appuyez sur la touche ON•OFF.
Le câblosélecteur devrait s’
éteindre.
Note : Si le câblosélecteur ne réagit pas, essayez
tous les codes de la marque. Si les codes ne
fonctionnent pas, essayez la méthode de
recherche de code à la page 19.
6. Le câblosélecteur allumé,
appuyez sur CH+ (CANAL
HAUT). Si la câblosélecteur
réagit, la programmation est
terminée.
7. Inscrivez le code ici pour
référence ultérieure.
(BLINK)
(CLIGNOTEMENT)
INDICATOR LIGHT /
VOYANT
(OFF)
(ÉTEINT)
CABLE BOX CODE
CODE DE
CÂBLOSÉLECTEUR
Cable Box Code List / Liste de codes de câblosélecteur
Page 13

12
Programming For Audio
This remote control will operate many features found in
audio/video receivers and mini-systems. The remote
control is already programmed to operate most RCA
and ProScan brand A/V receivers. Other brands of
receivers and mini-systems need to be set up under the
AUDIO button prior to using the device. See page 12-13
for the list of AUDIO codes.
1. Manually turn on the device you
wish to control.
Find the three digit code for your
AUDIO system in the code list
below.
2. Press and hold the CODE
SEARCH button until the
INDICATOR LIGHT lights, then
release the CODE SEARCH
button.
3. Press and release the AUDIO
button
(The INDICATOR LIGHT will
blink then remain lit).
4. Enter the code using the Number
Buttons.
After your code is entered, the
INDICATOR LIGHT will
turn off. If the code is not valid,
the INDICATOR LIGHT will
blink. Check the code list and
repeat process.
5. Aim the remote at the device you
wish to control and press the
ON•OFF button. The device
should turn off.
Note: If your device does not respond, try all
the codes for your brand. If the codes do not
work, or your brand is not listed, try
the Code Search method on page 19.
6. With your device on, press VOL+
(VOLUME UP). If it responds, no
further programming is required.
7. Enter your code and the type of
device you programmed here for
easy reference.
Note: The CD codes need to be programmed
using the Audio or Aux keys.
Audio Component Code List / Liste des codes d’appareil audio
Programmation pour audio
Cette télécommande commande de nombreuses
fonctions de récepteurs audio/vidéo et mini-chaînes.
Elle est déjà programmée pour commander la plupart
des récepteurs A/V de marques RCA et ProScan. Il faut
programmer les autres marques de récepteurs et de
mini-chaînes à la touche AUDIO avant d’utiliser
l’appareil. Voir la liste des codes AUDIO à la page 12-13.
1. Allumez manuellement l’appareil
à commander.
Trouvez le code à trois chiffres de
l’appareil AUDIO dans la liste de
codes ci-dessous.
2. Maintenez la touche CODE
SEARCH enfoncée jusqu’à ce que
le VOYANT s’allume, puis
relâchez la touche CODE
SEARCH.
3. Appuyez sur la touche AUDIO (le
VOYANT clignote, puis reste
allumé).
4. Entrez le code à l’aide des
touches numérotées.
Une fois le code entré, le
VOYANT s’éteint. Si le code est
invalide, le VOYANT clignote.
Vérifiez la liste de codes et
recommencez.
5. Pointez la télécommande en
direction de l’appareil à
commander et appuyez sur la
touche ON•OFF. L’appareil
devrait s’éteindre.
Note : Si l’appareil ne réagit pas, essayez tous
les codes de la marque. Si les codes ne
fonctionnent pas, ou si votre marque ne figure
pas dans la liste, essayez la méthode de
recherche de code à la page 19.
6. L’appareil allumé, appuyez sur
VOL+ (VOLUME HAUT).
Si l’appareil réagit, la
programmation est terminée.
7. Inscrivez votre code et le type
d’appareil programmé ici pour
référence ultérieure.
Note : Il faut programmer les codes CD à l’aide
des touches Audio ou Aux.
(BLINK)
(CLIGNOTEMENT)
INDICATOR LIGHT /
VOYANT
(OFF)
(ÉTEINT)
AUDIO CODE
CODE AUDIO
CD RCVR LD
Lecteur CD Récepteur Disque laser
✓
Page 14

13
Audio Component Code List / Liste des codes d’appareil audio
Page 15

14
Note: Not all functions work for all brands. See page 12-13 for the Audio code
list to operate your brand of equipment.
TURNING ON THE RECEIVER OR MINI-SYSTEM
Point the remote control at the receiver and press the AUDIO
button. The receiver should turn on. In some cases, it may require
pressing the AUDIO button and then the ON•OFF
button to turn the system on.
SELECTING A DEVICE INPUT
Device inputs such as CD Player or Tape Deck may
be selected depending on the features of your
receiver or mini-system. Input selection may be
made either by pressing the labeled digit button, or
by pressing the FUNCTION button to toggle
through the inputs available on your system.
Note: You may need to experiment with your system since
manufacturers products do not all work the same way.
USING THE NUMBER BUTTONS TO CHANGE
AUDIO INPUTS
To select a device, press the number button (1-6) that
corresponds with the device you want to operate
(CD, TAPE, TUNER, TV, VIDEO 1, & VIDEO 2).
USING
THE FUNCTION BUTTON TO CHANGE
AUDIO DEVICES
To select a device, press the FUNCTION button until
the input you want to operate appears on your
system.
OPERA
TING A CD PLAYER OR T
APE DECK
Use the Play, Forward, Reverse, Record, Stop, and
Pause buttons for CD players and tape decks. In some
cases, the Preset buttons (CH+/CH-) may work in
changing tracks on CD players.
OPERA
TING THE AM/FM TUNER
1. Press the AUDIO button
2. Press the TUNER (3) button
3. Press the AM/FM button to toggle between AM and FM
4. Use the Preset (CH+/CH-) buttons to move up and down
channel presets.
OPERA
TING A HOME THEATER SURROUND SOUND
SYSTEM
With RCAreceivers, a second press of the TV button should turn
the receiver on.
1. Turn the TV on.
2. Press the AUDIO button.
3. Select the Audio input either by using the labeled number
buttons or the FUNCTION button.
4. Press the VOL+ or VOL- buttons to control volume
Note: The Volume buttons may operate both TV and receiver volume at the
same time. If this presents a problem, it may be resolved by disabling the TV
speakers by going into the TV menu.
CONTROLLING THE SURROUND SOUND FEATURE
The Surround Sound feature may be turned ON/OFF by
pressing the SURR ON•OFF button.
1. Press the SURR MODE button until the desired mode is
found.
2. Press DELAY+ or DELAY- to achieve the desired delay effect.
3. Press the DSP ON•OFF button to turn DSP (Digital Signal
Processor) ON or OFF.
4. Press the DSP button until the desired effect is achieved.
5. Press the TEST button to listen to speaker levels.
6. Press FRONT, CENTER, or REAR buttons to select speakers.
7. Press the LEVEL+ or LEVEL- buttons to adjust speaker
levels.
Operating Audio Functions
Note : Toutes les fonctions ne sont pas accessibles pour toutes les marques. Voir la
liste de codes Audio à la page 12-13 pour commander votre marque d’appareil.
MISE EN MARCHE DU RÉCEPTEUR OU DE LA MINI-CHAÎNE
Pointez la télécommande en direction du récepteur et appuyez
sur la touche AUDIO. Le récepteur devrait s’allumer. Dans
certains cas, il peut être nécessaire d’appuyer sur la
touche AUDIO, puis sur la touche ON•OFF pour
allumer l’appareil.
SÉLECTION D’UN APP
AREIL
Les appareils comme un lecteur CD ou un
magnétocassette peuvent être sélectionnés selon les
fonctions du récepteur ou de la mini-chaîne. La
sélection peut se faire en appuyant sur la touche
numérotée marquée ou sur la touche FUNCTION pour
parcourir les entrées offertes par votre système.
Note : Vous devrez peut-être faire des essais avec votre système puisque
les produits des fabricants ne fonctionnent pas tous de la même façon.
UTILISATION DES TOUCHES NUMÉROTÉES POUR
SÉLECTIONNER LES ENTRÉES AUDIO
Pour sélectionner un appareil, appuyez sur la touche
numérotée (1 à 6) correspondant à l’appareil à
commander (CD, TAPE, TUNER, TV, VIDEO 1 VIDEO 2).
UTILISA
TION DE LA TOUCHE FUNCTION POUR
SÉLECTIONNER LES APPAREILS AUDIO
Pour sélectionner un appareil, appuyez sur la touche
FUNCTION jusqu’à ce que l’entrée désirée apparaisse à
votre système.
COMMANDE D’UN LECTEUR CD OU D’UN
MA
GNÉTOCASSETTE
Utilisez les touches Play, Forward, Reverse, Record, Stop
et Pause pour les lecteurs CD et les magnétocassettes.
Dans certains cas, les touches de préréglage (CH+/CH-)
peuvent permettre de changer les plages de CD.
COMMANDE DU SYNT
ONISATEUR AM/FM
1. Appuyez sur la touche AUDIO.
2. Appuyez sur la touche TUNER (3).
3. Appuyez sur la touche AM/FM pour passer de AM à FM, et
vice versa.
4. Utilisez les touches de préréglage (CH+/CH-) pour parcourir
les canaux préréglés.
COMMANDE D’UN SYSTÈME AMBIOPHONIQ
UE CINÉMA AU
FOYER
Vous devez appuyez une seconde fois sur la touche TV pour
allumer certains récepteurs RCA.
1. Allumez le téléviseur.
2. Appuyez sur la touche AUDIO.
3. Sélectionnez l’entrée Audio à l’aide des touches numérotées
marquées ou de la touche FUNCTION.
4. Appuyez sur les touches VOL+ ou VOL- pour commander le
volume.
Note : Les touches de volume peuvent commander le volume du téléviseur et du
récepteur en même temps. Si cela pose un problème, désactivez les haut-parleurs
du téléviseur par le menu TV.
COMMANDE DE LA FONCTION AMBIOPHONIE
La fonction Ambiophonie peut être activée/désactivée à l’aide de
la touche SURR ON•OFF.
1. Appuyez sur la touche SURR MODE jusqu’à ce que le mode
désiré soit trouvé.
2. Appuyez sur DELAY+ ou DELAY- pour obtenir l’effet désiré.
3. Appuyez sur la touche DSP ON•OFF pour activer ou
désactiver la fonction DSP (processeur de signal numérique).
4. Appuyez sur la touche DSP jusqu’à ce que l’effet désiré soit
obtenu.
5. Appuyez sur la touche TEST pour écouter les niveaux
d’enceintes.
6. Appuyez sur les touches FRONT, CENTER, ou REAR pour
sélectionner les enceintes.
7. Appuyez sur les touches LEVEL+ ou LEVEL-
pour ajuster les niveaux d’enceintes.
Utilisation des fonctions audio
Page 16

15
Programming For AUX Button
You can assign any one of the following devices to the
AUX button:
Audio Components (CD Player, Amplifier, Receiver,
Tape Deck), Laser Disc Player or a second TV, VCR, DBS
Satellite System or Cable Box.
1. Manually turn on the
device you wish to control.
Find the three digit code
for the device you wish to
program in the code list.
2. Press and hold the CODE
SEARCH button until the
INDICATOR LIGHT lights,
then release the CODE
SEARCH button.
3. Press and release the AUX
button
(The INDICATOR LIGHT will
blink then remain lit).
Then press the button for the
device you want to program
(TV, VCR, DBS•SAT, DVD)
(Press DBS•SAT to add
another Cable Box and press
DVD for CD).
4. Enter the code using the
Number Buttons.
After your code is entered,
the INDICATOR LIGHT will
turn off. If the code is not
valid, the INDICATOR LIGHT
will blink. Check the code list
and repeat process.
5. Aim the remote at the device
you wish to control and press
the ON•OFF button. The
device should turn off.
Note: If the device you have programmed
does not respond, try all the codes for
your brand. If the codes do not work, or
your brand is not listed, try the Code
Search method on page 19.
6. With your device on, press
CH+ (Channel UP) or
ON•OFF button. If the device
responds, no further
programming is required.
7. Enter your code and the
type of device you
programmed here for easy
reference.
Device / Appareil Page
TV / Téléviseur . . . . . . . . . . . . . . . .4-5
VCR / Magnétoscope . . . . . . . . . . .6-7
DVD / Lecteur DVD . . . . . . . . . . . .8
DBS System / Système DBS . . . . . .9-10
Cable Box / Câblosélecteur . . . . . .11
Audio / Audio . . . . . . . . . . . . . . . .13-14
OR/OU
Programmation de la touche AUX
Vous pouvez affecter l’un des appareils suivants à la
touche AUX :
Composants audio (lecteur CD, amplificateur, récepteur,
magnétocassette), lecteur de disque laser ou second
téléviseur, magnétoscope, système de satellite DBS ou
câblosélecteur.
1. Allumez manuellement
l’appareil à commander.
Trouvez le code à trois
chiffres de l’appareil à
programmer dans la liste
de codes.
2. Maintenez la touche
CODE SEARCH enfoncée
jusqu’à ce que le VOYANT
s’allume, puis relâchez la
touche CODE SEARCH.
3. Appuyez sur la touche
AUX (le VOYANT clignote,
puis reste allumé).
Appuyez ensuite sur la
touche de l’appareil à
programmer (TV, VCR,
DBS•SAT, DVD)
(Appuyez sur DBS•SAT
pour ajouter un
câblosélecteur et appuyez
sur DVD pour un lecteur
CD).
4. Entrez le code à l’aide des
touches numérotées.
Une fois le code entré, le
VOYANT s’éteint. Si le
code est invalide, le
VOYANT
clignote. Vérifiez la liste
de codes et recommencez.
5. Pointez la télécommande
en direction de l’appareil à
commander et appuyez
sur la touche ON•OFF.
L’appareil devrait
s’éteindre.
Note : Si l’appareil programmé ne
réagit pas, essayez tous les codes de la
marque. Si les codes ne fonctionnent
pas, essayez la méthode de recherche
de code à la page 19.
6. L’appareil allumé,
appuyez sur CH+
(CANAL HAUT) ou sur la
touche ON•OFF.
Si l’appareil réagit, la
programmation est
terminée.
7. Inscrivez votre code et le
type d’appareil
programmé ici pour
référence ultérieure.
(BLINK)
(CLIGNOTEMENT)
INDICATOR LIGHT /
VOYANT
(OFF)
(ÉTEINT)
AUX CODE
CODE AUX
TV VCR CABLE DBS
Téléviseur Magnétoscope Câblosélecteur Système DBS
CD RCVR LD DVD
Lecteur CD Récepteur Disque laser Lecteur DVD
✓
Page 17

16
OR / OU
Any Other Function Keys
Toute autre touche de fonction
(BLINK)
(CLIGNOTEMENT)
(BLINK)
(CLIGNOTEMENT)
2 INCHES
2 POUCES
Learning Function
The learning feature is used as a supplement to the
standard preprogrammed library. The standard
code library provides most of the functions needed,
but you can add additional functions.
1. Place the RCA remote control unit
and the Original remote control
unit so that they face each other.
They should not be any more than
2 inches apart.
2. Press and hold the CODE
SEARCH button until the
INDICATOR LIGHT lights, then
release the CODE SEARCH
button.
3. Press and release the desired Mode
button (TV, VCR, CABLE, AUX,
etc…). The INDICATOR LIGHT will
blink, once button press is
accepted.
4. Press and release the LEARN
button.
5. Press and release the valid button
to be learned on the RCA remote in
which you will store a new
function. The L1, L2, L3, L4, or
other functions keys may be used
in this programming mode.
NOTE: When learning the additional
function buttons it is important to
have the other remote in the same
device mode as the RCA remote.
6. Press and hold the button on the
original remote control until
INDICATOR LIGHT on the RCA
remote blinks. Once the
INDICATOR LIGHT blinks you
may continue with the next
function.
If there is an error in learning the
new function the INDICATOR
LIGHT will flash for 3 seconds but
remain in the learning mode.
Return to step 5 if the INDICATOR
LIGHT flashed.
NOTE: Hold the function key on
your original remote for at least 3
seconds for the command to be
successfully learned.
7. Repeat steps 5 and 6 to store more
functions.
8. Once the selected functions are
stored press the CODE SEARCH
button and the remote will return
to original operation mode.
NOTE:
• It is not possible to edit a function
once it has been learned. The
function must be cleared of any
previously learned commands
before new learned command can
be added.
• No functions may be stored under
the LEARN, SLEEP, CODE
SEARCH or any of the device
buttons.
Fonction d’affectation
La fonction Affectation est utilisée comme un complément de
la bibliothèque préprogrammée standard. La bibliothèque des
codes standard contient la plupart des fonctions nécessaires,
mais vous pouvez ajouter de nouvelles fonctions.
1. Placez la télécommande RCA et
la télécommande originale l’une
face à l’autre (maximum de 2
pouces l’une de l’autre).
2. Maintenez le bouton CODE
SEARCH enfoncé jusqu’à ce que
le VOYANT s’allume, puis
relâchez-le.
3. Appuyez sur le bouton Mode
désiré (TV, VCR, CABLE, AUX,
etc.…). Le VOYANT clignote
quand l’enfoncement est accepté.
4. Appuyez sur le bouton LEARN.
5. Appuyez sur le bouton valide
d’affectation de la télécommande
RCA auquel une nouvelle
fonction sera affectée. Vous
pouvez utiliser les boutons de
fonction L1, L2, L3, L4 et autres
dans ce mode de
programmation.
NOTE : Quand vous affectez
d’autres boutons de fonction, il est
important que l’autre
télécommande soit dans le même
mode d’appareil que la
télécommande RCA.
6. Maintenez enfoncé le bouton de
la télécommande originale
jusqu’à ce que le VOYANT de la
télécommande RCA clignote.
Quand le VOYANT clignote,
vous pouvez passer à la fonction
suivante.
En cas d’erreur d’affectation
d’une nouvelle fonction, le
VOYANT clignote pendant 3
secondes, mais reste en mode
d’affectation. Retournez à
l’étape 5 si le VOYANT a
clignoté.
NOTE : Maintenez enfoncé le
bouton de fonction de la
télécommande originale pendant
qu moins 3 secondes pour garantir
l’affectation de la commande.
7. Répétez les étapes 5 et 6 pour
affecter d’autres fonctions.
Une fois les fonctions
sélectionnées mémorisées,
appuyez sur le bouton CODE
SEARCH pour que la
télécommande retourne au mode
de fonctionnement initial.
NOTE :
•Vous ne pouvez modifier une
fonction une fois qu’elle est
affectée. Il faut annuler toutes
les commandes déjà apprises
avant de pouvoir ajouter une
nouvelle commande.
• Aucune fonction ne peut être
affectée aux boutons LEARN,
SLEEP, CODE SEARCH ou
d’appareil.
INDICATOR LIGHT
VOYANT
Page 18

17
INDICATOR LIGHT
VOYANT
(BLINK)
(CLIGNOTEMENT)
To clear a learned button sequence, use the
procedure below.
Clearing A Learned Button
This procedure will erase all learned functions in
every device mode. This step is recommended
when attempting any learning of a new function
from a new remote.
Clearing All Learned
Functions
1. Press and hold the CODE
SEARCH button until the
INDICATOR LIGHT lights (about
4 seconds), then release the CODE
SEARCH button.
2. Press and release the LEARN
button twice. The INDICATOR
LIGHT will blink, once the button
press is accepted.
3. Press and release the CODE
SEARCH button and the remote
will return to original operation
mode. All learned command
entries are now cleared.
Pour supprimer une séquence de bouton d’affectation, procédez
comme suit :
Suppression d’un bouton d’affectation
1. Maintenez le bouton CODE
SEARCH enfoncé jusqu’à ce que le
VOYANT s’allume (environ 4
secondes), puis relâchez-le.
2. Appuyez sur le bouton Mode désiré
(TV, VCR, CABLE, AUX, etc.…). Le
VOYANT clignote quand
l’enfoncement du bouton est
accepté.
3. Appuyez deux fois sur le bouton
LEARN. Le VOYANT clignote
quand l’enfoncement du bouton est
accepté.
4. Appuyez sur le bouton CODE
SEARCH pour que la
télécommande retourne au mode
de fonctionnement initial. Toutes
les fonctions apprises de l’appareil
sont désormais supprimées.
NOTE :
•Vous ne pouvez modifier une fonction
une fois qu’elle est affectée. Il faut
annuler toutes les commandes déjà
apprises avant de pouvoir ajouter une
nouvelle commande.
• Aucune fonction ne peut être affectée
aux boutons LEARN, SLEEP, CODE
SEARCH ou d’appareil.
Cette opération efface toutes les fonctions affectées dans
tous les modes d’appareil. On recommande d’effectuer
cette opération quand on tente d’affecter une nouvelle
fonction d’une nouvelle télécommande.
Suppression de toutes les
fonctions affectées
1. Maintenez le bouton CODE
SEARCH enfoncé jusqu’à ce que
le VOYANT clignote (environ 4
secondes), puis relâchez-le.
2. Appuyez deux fois sur le bouton
LEARN. Le VOYANT clignote
quand l’enfoncement du bouton
est accepté.
3. Appuyez sur le bouton CODE
SEARCH pour que la
télécommande retourne au mode
de fonctionnement initial. Toutes
les commandes affectées sont
désormais supprimées.
1. Press and hold the CODE SEARCH
button until the INDICATOR LIGHT
lights (about 4 seconds), then
release the CODE SEARCH button.
2. Press and release the desired Mode
button (TV, VCR, CABLE, AUX,
etc…). The INDICATOR LIGHT will
blink, once the button press is
accepted.
3. Press and release the LEARN
button twice. The INDICATOR
LIGHT will blink, once the button
press is accepted.
4. Press and release the CODE
SEARCH button and the remote
will return to original operation
mode. All learned command
functions under the device are now
cleared.
NOTE:
• It is not possible to edit a function
once it has been learned. The function
must be cleared of any previously
learned commands before new learned
command can be added.
•No functions may be stored under the
LEARN, SLEEP, CODE SEARCH or
any of the device button.
INDICATOR LIGHT
VOYANT
Page 19

18
The Sleep Function will turn off your TV automatically
after the user programs the time interval from one (1) to
ninty-nine (99) minutes.
Sleep Function
1. Press and hold the SLEEP button.
The INDICATOR LIGHT will stay
lit. Release the SLEEP button.
2. Enter time in minutes using the
numerical key pad. Indicator light
will go off.
(Min: 1 minute/keypad
entry 0-1)
(Max: 99 minutes/keypad
entry 9-9)
3. Point the remote at television.
IMPORTANT: Sleep Feature will not
work unless remote is left aimed at
television.
To Turn Off The Sleep Timer:
1. Sleep timer program will be
cancelled and reset to zero by
either of the following:
Press and hold SLEEP button until
INDICATOR LIGHT blinks or press
ON•OFF button, turning TV OFF.
The Menu Function is used to make changes in the
selected settings such as setting colour, channels,
timer, etc. The MENU button invokes TV, and
DBS•SAT Modes. Each menu will vary from brand
to brand.
Menu Function
Entering the Menu Mode:
1. Push the device button on the
remote for the desired menu screen.
2. Push the Menu button.
This allows you to view the menu of
the device chosen. The menu should
now be visible on your television.
3. While in Menu Mode these
buttons will function as follows:
Navigation Left/Right
buttons will operate as cursor
right and left.
Navigation UP/DOWN
buttons will operate as cursor
up and down.
SELECT button applies the
highlighted menu item.
Not all functions in competitive
models and brands of televisions may
be fully supported. Some brands with
Menu function my allow you to push
the Menu button to select the mode.
EXITING THE MENU MODE
To exit the Menu Mode and clear the
screen, push the CLEAR button you
have chosen on the remote. Some
brands with Menu function my allow
you to push the Menu button to exit
the mode.
La fonction Sommeil éteint automatiquement le
téléviseur quand l’utilisateur programme un délai entre
une (1) minute et quatre-vingt-dix-neuf (99) minutes.
Fonction Sommeil
1. Maintenez la touche SLEEP
enfoncée. Le VOYANT reste
allumé. Relâchez la touche
SLEEP.
2. Entrez l’heure en minutes à l’aide
du clavier numérique. Le voyant
s’éteint.
(Min : 1 minute/entrée au clavier
0-1)
(Max : 99 minutes/entrée au
clavier 9-9)
3. Pointez la télécommande en
direction du téléviseur.
IMPORTANT : La fonction Sommeil
ne fonctionne que si la télécommande
est pointée en direction du téléviseur.
Pour désactiver la fonction Sommeil :
1. La fonction Sommeil est annulée et
remise à zéro comme suit :
Maintenez la touche SLEEP
enfoncée jusqu’à ce que le
VOYANT clignote ou appuyez sur
la touche ON•OFF pour éteindre le
téléviseur.
La fonction Menu permet de modifier les réglages
sélectionnés, comme le réglage des couleurs, les
canaux, la minuterie, etc. Le bouton MENU appelle
les modes TV, VCR, DVD et DBSoSAT. Chaque
menu varie d’une marque à l’autre.
Fonction Menu
Sélection du mode Menu :
1. Appuyez sur la touche d’appareil de la
télécommande pour faire apparaître le
menu désiré à l’écran.
2. Appuyez sur la touche Menu.
Vous pouvez ainsi voir le menu de
l’appareil choisi.
Le menu doit maintenant être visible à
l’écran du téléviseur.
3. En mode Menu, ces touches
fonctionnent comme suit :
Les touches de navigation
gauche/droite fonctionnent comme
le curseur gauche et droite.
Les touches de navigation
haut/bas fonctionnent comme le
curseur haut et bas.
La touche SELECT s’applique à l’élément
de menu en évidence.
Il se peut que toutes les fonctions des
modèles et marques de téléviseurs des
concurrents ne soient pas entièrement
supportées. Certaines marques à
fonction Menu peuvent permettre
d’enfoncer le bouton Menu pour
sélectionner le mode.
POUR QUITTER LE MODE MENU
Pour quitter le mode Menu et effacer
l’écran, appuyez sur le bouton CLEAR
choisi sur la télécommande. Certaines
marques à fonction Menu peuvent
permettre d’appuyez sur le bouton Menu
pour quitter le mode.
INDICATOR LIGHT /
VOYANT
(BLINK)
(CLIGNOTEMENT)
SELECT
OR/OU
Page 20

19
Programming With Code Search
Identifying Codes From Your
Universal Remote
1. Manually turn on the device you
wish to program.
2. Press and hold CODE SEARCH
until the INDICATOR LIGHT
lights, then release CODE
SEARCH.
3. Press and release the device
button for the device you are
programming. The INDICATOR
LIGHT will blink once, then
remain lit.
Note: For Aux programming (when not an
audio code) press AUX followed by the device
button. Use DBS•SAT button for programming
CABLE.
4. Press and release ON•OFF until
your device turns off.
Important: You may have to press
ON•OFF up to 200 times.
5. When your device turns off,
press ENTER, the INDICATOR
LIGHT will turn off.
1. Press and hold CODE SEARCH
until the INDICATOR LIGHT
lights, then release CODE
SEARCH.
2. Press and release the device
button for the code you are
retrieving. The Indicator Light
will blink once.
Note: For AUX retrieving press AUX button
followed by thedevice button.
3. Press and release CODE
SEARCH. The INDICATOR
LIGHT will turn off.
4. Starting with 0 on the keypad,
press the number buttons in
order (0-9) until the INDICATOR
LIGHT blinks.
5. The number which causes the
indicator light to blink is the first
digit of your code.
6. Repeat step 4 until you have
retrieved all three numbers in
the code.
If your TV, VCR, DBS Satellite System, Cable Box or
Audio System does not respond after you have tried all
the codes for your brand, or if your brand is not listed,
try searching for your code by following the steps
below.
If you need to find the three-digit code for your TV,
VCR, DBS System, Cable Box or Audio System after
your device is set-up use this procedure.
Programmation avec recherche
de code
1. Allumez manuellement
l’appareil à programmer.
2. Maintenez la touche CODE
SEARCH enfoncée jusqu’à ce
que le VOYANT s’allume, puis
relâchez la touche CODE
SEARCH.
3. Appuyez sur la touche de
l’appareil à programmer. Le
VOYANT clignote une fois, puis
reste allumé.
Note : Pour la programmation AUX (s’il ne
s’agit pas d’un code audio), appuyez sur AUX,
puis sur la touche de l’appareil. Utilisez la
touche DBS•SAT pour programmer le
CÂBLE.
4. Appuyez sur ON•OFF jusqu’à ce
que l’appareil s’éteigne.
Important : Vous devrez peut-être
appuyer sur ON•OFF jusqu’à 200
fois.
5. Lorsque l’appareil s’éteint,
appuyez sur ENTER ; le
VOYANT s’éteint.
Si le téléviseur, le magnétoscope, le système de satellite
DBS, le câblosélecteur ou la chaîne audio ne réagit pas
une fois que vous avez essayé tous les codes de la
marque, ou si votre marque ne figure pas dans la liste,
essayez de rechercher votre code en procédant comme
suit :
Identification des codes depuis
la télécommande universelle
1. Maintenez la touche CODE
SEARCH enfoncée jusqu’à ce
que le VOYANT s’allume, puis
relâchez la touche CODE
SEARCH.
2. Appuyez sur la touche
d’appareil du code que vous
récupérez. Le voyant clignote
une fois.
Note : Pour AUX, appuyez sur la touche AUX,
puis sur la touche de l’appareil.
3. Appuyez sur CODE SEARCH.
Le VOYANT s’éteint.
4. En commençant par le 0 au
clavier, appuyez sur les touches
numérotées dans l’ordre (0 à 9)
jusqu’à ce que le VOYANT
clignote.
5. Le chiffre qui fait clignoter le
voyant est le premier chiffre de
votre code.
6. Répétez l’étape 4 jusqu’à ce que
vous ayez récupéré les trois
chiffres du code.
Pour trouver le code à trois chiffres du téléviseur,
magnétoscope, système DBS, câblosélecteur ou
chaîne audio une fois que l’appareil est programmé,
procédez comme suit :
(BLINK)
(CLIGNOTEMENT)
INDICATOR LIGHT /
VOYANT
(OFF)
(ÉTEINT)
(BLINK)
(CLIGNOTEMENT)
INDICATOR LIGHT /
VOYANT
(OFF)
(ÉTEINT)
Page 21

20
90 Day Warranty Garantie de 90 jours
Thomson multimedia Ltd. warrants that for 90
days from date of purchase this product is free
from defects in material and workmanship. If the
item is defective within that period, return it at
your expense to the dealer from whom it was
purchased together with proof of purchase for
replacement. This warranty excludes defects or
damage due to misuse, abuse, or neglect.
This warranty gives you specific legal rights which
are in addition to statutory warranties which may
vary from Province to Province and which take
precedence over the terms of this warranty.
© 2004 Thomson multimedia Ltd.
Thomson multimédia Ltée.
6200 Edwards Blvd., Mississauga, Ontario L5T 2V7
Trademark(s) ®Registered
Marque(s) déposée(s)
Made in China/ Fabriqué en Chine
Thomson multimédia Ltée. garantit que, pendant 90 jours
à compter de la date d’achat, ce produit sera libre de tout
défaut de matériaux et de main-d’oeuvre. S’il devient
défectueux durant cette période, le retourner à ses frais au
marchand vendeur, en même temps que la preuve d’achat,
pour obtenir un remplacement. Cette garantie exclut les
défauts ou dommages attribuables à la mauvaise
utilisation, à l’abus ou à la négligence.
La présente garantie vous confère des droits légaux
spécifiques, en plus de certaines garanties statutaires
pouvant varier d’une province à l’autre et qui ont
préséance sur les conditions de la présente garantie.
Help Line Service d’assistance
If you need additional set-up help, please call
our toll-free Help Line at:
1-800-420-7968
Pour obtenir une aide additionnelle, appelez sans frais
le service d’assistance, au
1-800-420-7968
PROBLEM
Red light not blinking when you press any key
The remote does not operate
your video devices
Not performing commands properly
Problems programming a TV/VCR Combo
Unit
VCR not recording
Problems changing channels
No response after pressing a key
SELECT button not responding
Flashing Indicator Light
IR LEARN cannot be made successfully
Note: Reprogramming may be required after batteries are removed.
Trouble Shooting
SOLUTION
A) Replace the batteries with 2 new AAA alkaline batteries.
B) Check if batteries are properly installed.
A) Try all the codes listed for your brand.
B) Try the Code Search method (page 18).
Start Code Search over again to locate the proper code for full compatibility.
Try the VCR code for your brand. Some combo units, however, may require both a TV and a VCR
code for full operation.
As a safety feature on your remote, you must press the REC button twice.
If your original remote required ENTER after a channel, press ENTER after you select a channel.
A) Make sure you have new batteries and you are aiming your remote at your devices.
B) Check that batteries are properly installed. See page 1.
Try using the MENU or INFO button to make the selection while in the Program Guide.
Invalid Code for the device. Check the Code list and reprogram the Remote Control.
A) The batteries in the remote unit and/or the other remote unit is weak.
B) The distance between the two remote control units is too long or too short.
C) Memory capacity is full.
D) The signal coding is not compatible with this remote and the other remote.
PROBLÈME
Le voyant rouge ne clignote pas quand
une touche est enfoncée
La télécommande ne commande pas
vos appareils vidéo
Les commandes ne sont pas exécutées
correctement
Problèmes de programmation d’un
combiné télé/magnétoscope
Le magnétoscope n’enregistre pas
Problèmes de changement de canaux
Aucune réponse après l’enfoncement
d’une touche
La touche SELECT ne répond pas
Voyant clignotant
Impossible d’exécuter l’affectation IR
Note : Il faut parfois reprogrammer la télécommande après le remplacement des piles.
Dépannage
SOLUTION
A) Remplacez les piles par 2 piles alcalines AAA neuves
B) Vérifiez si les piles sont correctement installées.
A) Essayez tous les codes de la marque.
B) Essayez la méthode de recherche de code (page 18).
Redémarrez la recherche de code pour repérer le code entièrement compatible.
Essayez le code de magnétoscope de votre marque. Certains appareils combiné peuvent toutefois exiger
un code de téléviseur et un code de magnétoscope pour bien fonctionner.
Par mesure de sécurité, vous devez appuyez deux fois sur la touche REC.
Si la télécommande originale exigeait l’enfoncement de la touche ENTER après l’entrée d’un canal,
appuyez sur ENTER après avoir sélectionné un canal.
A) Assurez-vous que les piles sont neuves et que vous pointez la télécommande en direction de vos
appareils.
B) Assurez-vous que les piles sont correctement installées. Voir page 1.
Utilisez la touche MENU ou INFO pour faire les sélections dans le guide des émissions.
Code invalide pour l’appareil. Vérifiez la liste de codes et reprogrammez la télécommande.
A) Les piles de la télécommande et/ou de l’autre télécommande sont faibles.
B) La distance entre les deux télécommandes est trop grande ou trop courte.
C) La mémoire est pleine.
D) Le codage de signal est incompatible avec cette télécommande et l’autre télécommande.
Page 22

CD PLAYER
Lecteur CD
MINI SYSTEM
Mini-chaîne stéréreo
More than 200 TV and VCR brands, including... Plus de 200 marques de téléviseurs et magnétoscopes, dont...
Akai
Apex
Denon
GE
Hitachi
JVC
Magnavox
Marantz
Mitsubishi
Panasonic
Philips
Pioneer
ProScan
RCA
Samsung
Sanyo
Sharp
Sony
Toshiba
Yamaha
Zenith
See inside for complete brand listing.
EXTENSIVE UNIVERSAL CODE LIBRARY...
All brands listed and more!
Voir la liste complète des marques à l’intérieur.
BIBLIOTHÈQUE COMPLÈTE DE CODES UNIVERSELS...
Toutes les marques indiquées et plus !
More than 90 Satellite, Cable Box and DBS brands, including... Plus de 90 marques de satellites, câblosélecteurs et systèmes DBS, dont...
More than 15 DVD and Laser Disc brands, including... Plus de 15 marques de lecteurs DVD et de disques laser, dont...
More than 15 Audio System and CD Player brands, including... Plus de 15 marques de chaînes stéréo et lecteurs CD, dont...
Universal Remote Control/Télécommande universelle
This RCA Universal Remote Is Compatible With Most Models
Of The Following Brands
(Of Infrared Remote Controlled Components manufactured after 1990):
SET UP
INSTRUCTIONS
INSIDE
INSTRUCTIONS
D’INSTALLATION
À L’ INTÉRIEUR
Replace Eight
Remotes With One!
Huit télécommandes
en une !
■ Boutons d’affectation
Permettent d’affecter d’autres fonctions de la télécommande originale. Programmez
d’autres boutons avec la télécommande originale pour régler les problèmes de
compatibilité.
■ Liste complète de codes de commande de votre marque de
téléviseur, magnétoscope, système DBS, câblosélecteur, lecteur DVD et appareils audio
■ Bouton Menu/Sélection
Commande les fonctions avancées des principales marques de téléviseur et
systèmes DBS, dont RCA, GE, Proscan, Hitachi, Sony, et Zenith
■ Touches Cinéma au foyer
Profitez pleinement de votre système Cinéma au foyer grâce aux boutons
Surround Sound et DSP
■ Recherche de code
Programmation simple. Explorez la liste complète des codes à la recherche
du code de votre appareil
■ Assistance téléphonique sans frais
Détails dans le guide de l’utilisateur
Cette télécommande universelle RCA est compatible avec la
plupart des modèles des marques suivantes
(d’appareils à télécommande infrarouge fabriqués après 1990) :
■ Learning Keys
Provides space to transfer additional key functions from your
original remote control. Program other keys with the original
remote to resolve compatibility issues.
■ Extensive Code Library to Operate Your Brand
TV, VCR, DBS Systems, Cable Box, DVD, and Audio Equipment
■ Menu/Select Button
Controls Advanced Features of major TV and DBS brands
including RCA, GE, Proscan, Hitachi, Sony, and Zenith
■ Home Theatre Keys
Take full advantage of your Home Theatre equipment with
Surround Sound and DSP buttons
■ Code Search
Easy Set-up. Scan the entire code library for the right code
for your device
■ Toll-Free Consumer Helpline
See the instruction book for details
No Setup Required For Most Models of
These Brands
Aucune programmation requise pour la
plupart des modèles de ces marques
Requires 2 AAA Batteries
(not included)
2 piles AAA requises
(non comprise)
©2004 Thomson multimedia Ltd.
Thomson multimédia Ltée.
6200 Edwards Blvd., Mississauga, Ontario L5T 2V7
Made in China/ Fabriqué en Chine
Trademark(s) ®Registered / Marque(s) déposée(s)
www.rca.com
CRCU805MSL
ABEXA
ABEX
ACME
ADA
ADC
ADMIRAL
ADVENTURA
AIKO
AIWA
AKAI
ALLEGRO
ALLERON
AMARK
AMERICAN HIGH
AMTRON
AMSTRAD
ANAM NATIONAL
ASHA
AOC
APEX
ARCHER
AUDIO
DYNAMICS
AUDIOVOX
BANG &
OLUFSEN
BEAUMARK
BELCOR
BELL & HOWELL
BRADFORD
BROKSONIC
BROKWOOD
CALIX
CANDLE
CANNON
CARVER
CCE
CAPEHART
CELEBRITY
CENTURION
CETRONIC
CHANGHONG
CITIZEN
CLAIRTONE
CLASSIC
COLORTYME
COLT
CONCERTO
CONCIERGE
CONTEC/CONY
CRAIG
CROWN
CURTIS MATHES
CYBERNEX
CXC
DAEWOO
DBX
DAYTRON
DIMENSIA
DUMONT
DYNASTY
DYNATECH
ELEKTRA
ELECTROBAND
ELECTROHOME
ELECTROPHONIC
EMERSON
ENVISION
FISHER
FUJI
FUJITSU
FUNAI
FUTURETEC
GARRARD
GE
GIBRALTER
GOLDSTAR
GO-VIDEO
GRADIENTE
GRUNDY
HAIER
HALLMARK
HARLEY
DAVIDSON
HARMAN
KARDON
HARVARD
HARWOOD
HITACHI
HEADQUARTER
HI-Q
IMA
INFINITY
INSTANT REPLAY
INTEQ
JANEIL
JBL
JCB
JCL
JC PENNY
JENSEN
JVC
KAWASHO
KAYPANI
KEC
KENWOOD
KLH
KLOSS
NOVABEAM
KODAK
KONKA
KTV
LLOYD
LODGENET
LOEWE
LOGIK
LUXMAN
LXI
MAGNAVOX
MAGNIN
MAJESTIC
MARANTZ
MARTA
MATSUSHITA
MEGATRON
MEI
MEMOREX
MGA
MGN
TECHNOLOGY
MIDLAND
MINOLTA
MINUTZ
MITSUBISHI
MONTGOMERY
WARD
MOTOROLA
MTC
MULTITECH
MULTIVISION
NAD
NEC
NIKEI
NIKKO
NOBLEX
NTC
ONKING
ONWA
OPTIMUS
OPTONICA
OLYMPUS
ORION
PANASONIC
PENTAX
PENTEX
RESEARCH
PHILCO
PHILIPS
PHILIPS/
MAGNAVOX
PILOT
PIONEER
PORTLAND
PRECISION
PRICE CLUB
PRISM
PULSAR
PROSCAN
PROTEC
PROTON
PULSAR
PULSER
QUARTER
QUARTZ
QUASAR
RADIO SHACK
RADIX
RANDEX
RCA
REALISTIC
REPLAY
RICOH
RHAPSODY
RUNCO
SAMPO
SAMSUNG
SAMSUX
SANKY
SANSUI
SANYO
SCOTCH
SCOTT
SEARS
SHARP
SHINTOM
SHOGUN
SIGNATURE
SIMPSON
SINGER
SONIC
SONY
SOUNDESIGN
SPECTRAVISION
SQUAREVIEW
SSS
STARLITE
STS
SUPREMACY
SUPREME
SYLVANIA
SYMPHONIC
TANDY
TASHIKO
TATUNG
TEAC
TECHNICS
TECHWOOD
TEKNIKA
TELECAPTION
TELERENT
TERA
TiVo
TMK
TOSHIBA
TOTEVISION
TMK
UNITECH
UNIVERSAL
VECTOR
RESEARCH
VICTOR
VIDTECH
VIDEO CONCEPTS
VIDEOSONIC
VIKING
WARDS
WHITE
WESTINGHOUSE
XR-1000
YAMAHA
ZENITH
ABC
ADELPHIA
ALLEGRO
AMERICAST
AMPLICA
ANTRONIX
ARCHER
AT&T
CABLETENNA
CABLEVIEW
CENTURY
CHANNEL
MASTER
CHAPPARAL
CHEYENNE
CITIZEN
COLOUR VOICE
COMTRONICS
CONTEC/
CONY
DRAKE
DISH NETWORK
DX ANTENNA
EASTERN
ECHOSPHERE
ECHOSTAR
BELL EXPRESS VU
FUJITSU
GARRARD
GC ELECTRONICS
GEMINI
GE
GENERAL
INSTRUMENT
DSS HITACHI
DSS HUGHES
SATELLITE
HAMLIN
HITACHI
HYTEK
JASCO
JERROLD
JVC
KENWOOD
LUXOR
DSS
MAGNAVOX
MACOM STATE
MAGNAVOX
MEMOREX
MOTOROLA
MOVIE TIME
NORSTAT
NSC
OAK
DSS
PANASONIC
PACE
PANASONIC
PARAGON
PHILIPS
PHILIPS/
MAGNAVOX
PIONEER
PRIMESTAR
PROSCAN
PULSAR
DSS RCA
RADIO SHACK
RCA
REALISTIC
REGAL
REGENCY
REMBRANDT
RUNCO
DSS SONY
SAMSUNG
SCIENTIFIC
ATLANTA
SHARP
SIERRA I, II, III
SIGNAL
SIGNATURE
SL MARX
SPRUCER
STANDARD
COMPONENTS
STAR CHOICE
STARCOM
STARGATE
STAR SIGHT
STAR SIGHT
CABLE
SERVICE
STARQUEST
STAR TRAK
STS
SUPER GUIDE
TANDY
TELEVIEW
TELEWEST
TEXSCAN
THOMSON
TOCOM
TOSHIBA
TOSHIBA DSS
TUSA
TV86
DSS UNIDEN
UNIDEN
UNIKA
UNITED ARTISTS
UNITED CABLE
UNIVERSAL
VIDEO CIPHER II
VIDEOWAY
VIEWSTAR
VIDEO TECH
ZENITH
ADC
ADCOM
AIWA
AKAI
AUDIO
TECHNICA
CALIFORNIA
AUDIO LABS
CAPETRONIC
CARVER
CASIO
CITIZEN
CURTIS
MATHES
DENON
EMERSON
FISHER
GE
GENEXXA
GOLDSTAR
HARMAN
KARDON
HITACHI
INKEL
JC PENNEY
JVC
KENWOOD
KRELL
KYOCERA
LUXMAN
LXI
MAGNAVOX
MARANTZ
MCS
MGA
MISSION
MITSUBISHI
NAD
NAKAMICHI
NEC
NIKKO
NSM
ONKYO
OPTIMUS
PANASONIC
PHILIPS
PIONEER
PROTON
QUASAR
RADIOSHACK
RCA
REALISTIC
ROTEL
SAE
SAMSUNG
SANSUI
SANYO
SCOTT
SEARS
SHARP
SHERWOOD
SHURE
SONY
STS
SYLVANIA
SYMPHONIC
TEAC
TECHNICS
THETA DIGITAL
TOSHIBA
VENTURER
VICTOR
YAMAHA
ZENITH
 Loading...