

RCA ANT103, ANT146, ANT121 Owner's Manual
Passive Indoor Antenna User’s Guide
VHF/UHF
VHF
UHF
Dipoles
Loop
Welcome!
Thank you for choosing an RCA antenna. RCA antennas are designed to give you
the sharpest, clearest picture you can get. All RCA antennas are easy to set up
and use. Before you get started, remove all the parts from the box and read this
manual.
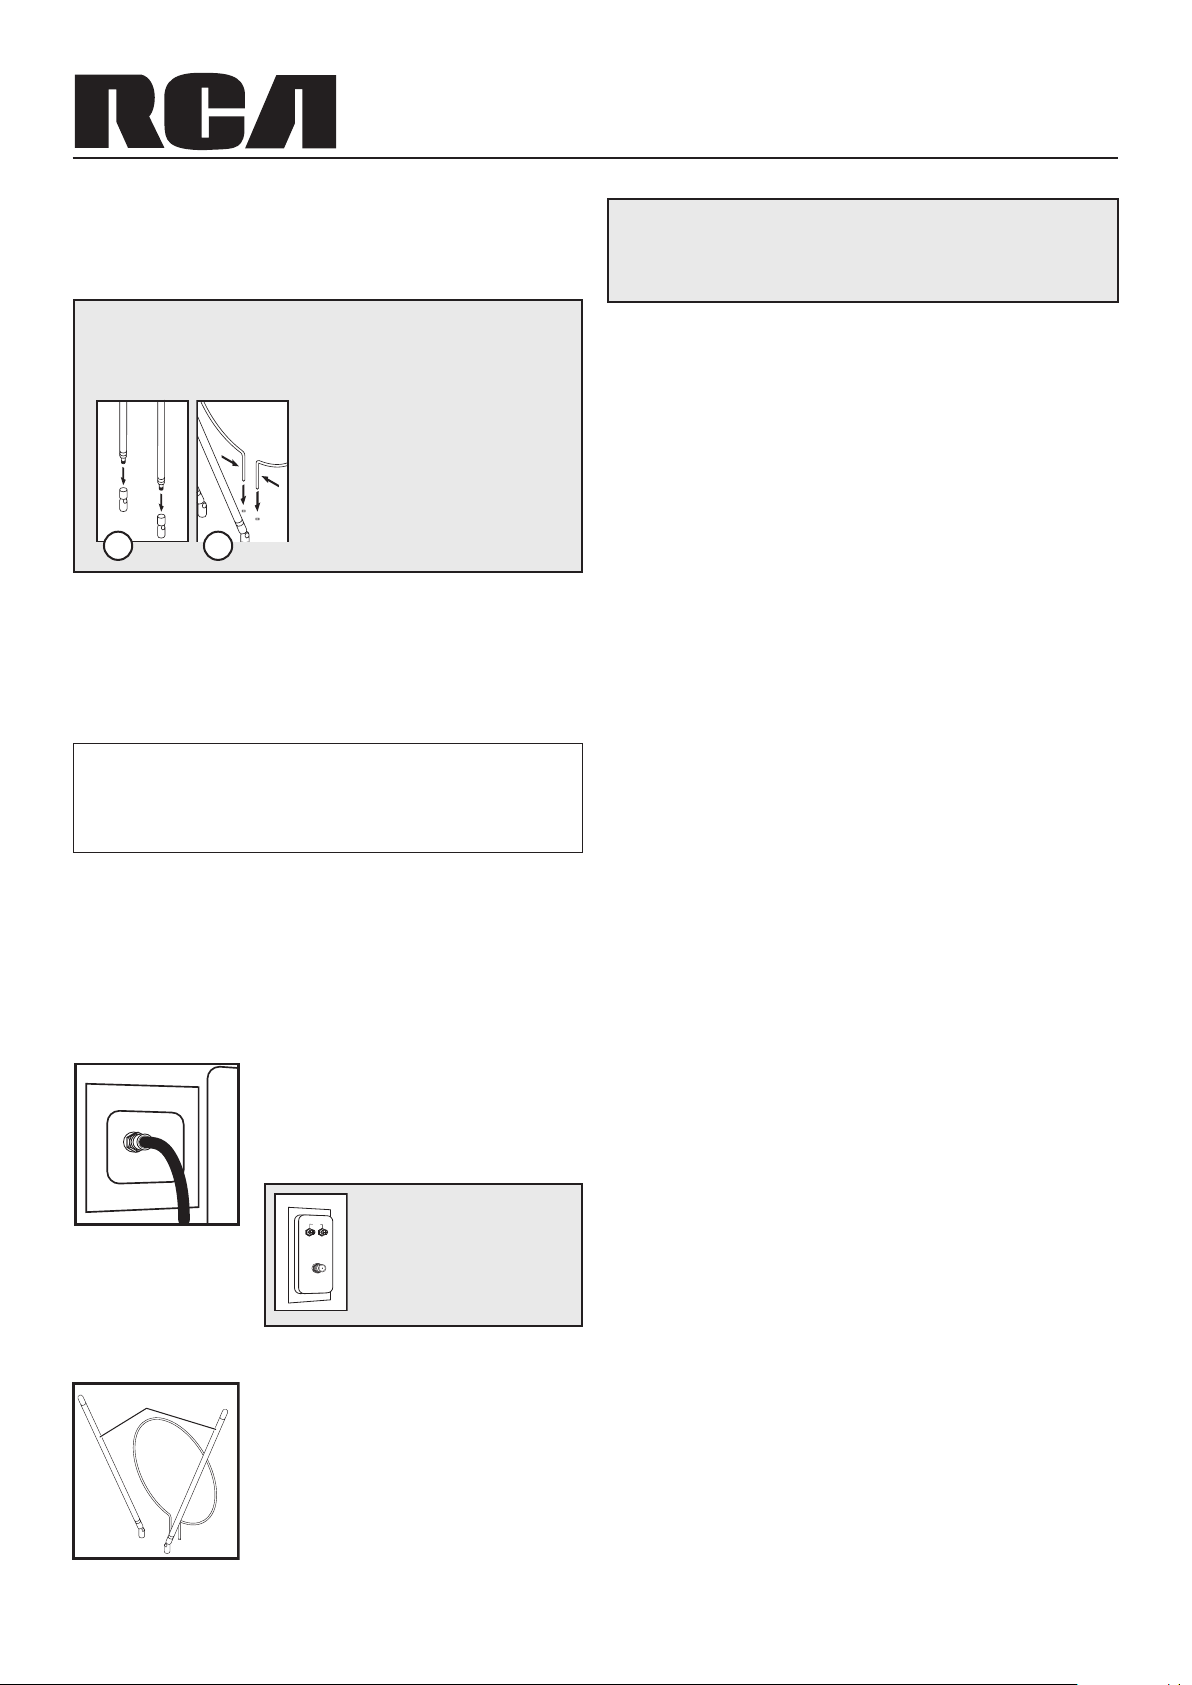
Assembling your antenna (certain models only)
Some antenna models require assembly. If your package comes with
several separate pieces—two long poles, a loop, and a base— follow these
instructions to assemble the antenna.
1. Screw the dipoles into the base.
2. Squeeze the bottom poles of the UHF
loop together and insert them into the
smaller holes on the antenna base.
1 2
Finding the best location for the antenna
Before you connect the antenna, determine the best spot in your home for
optimum reception. Visit www.antennaweb.org to see where your local broadcasts
are coming from. Then, try as much as possible to avoid obstructions between
these transmitters and your antenna.
Note: Many times the best location for the antenna is close to a window.
Product Information
Keep your sales receipt to obtain warranty parts and service and for proof of purchase. Attach it here and
record the model number in case you need it. These numbers are located on the product.
Model No.:_________________ Purchase Date:_________________
Dealer/Address/Phone:_________________
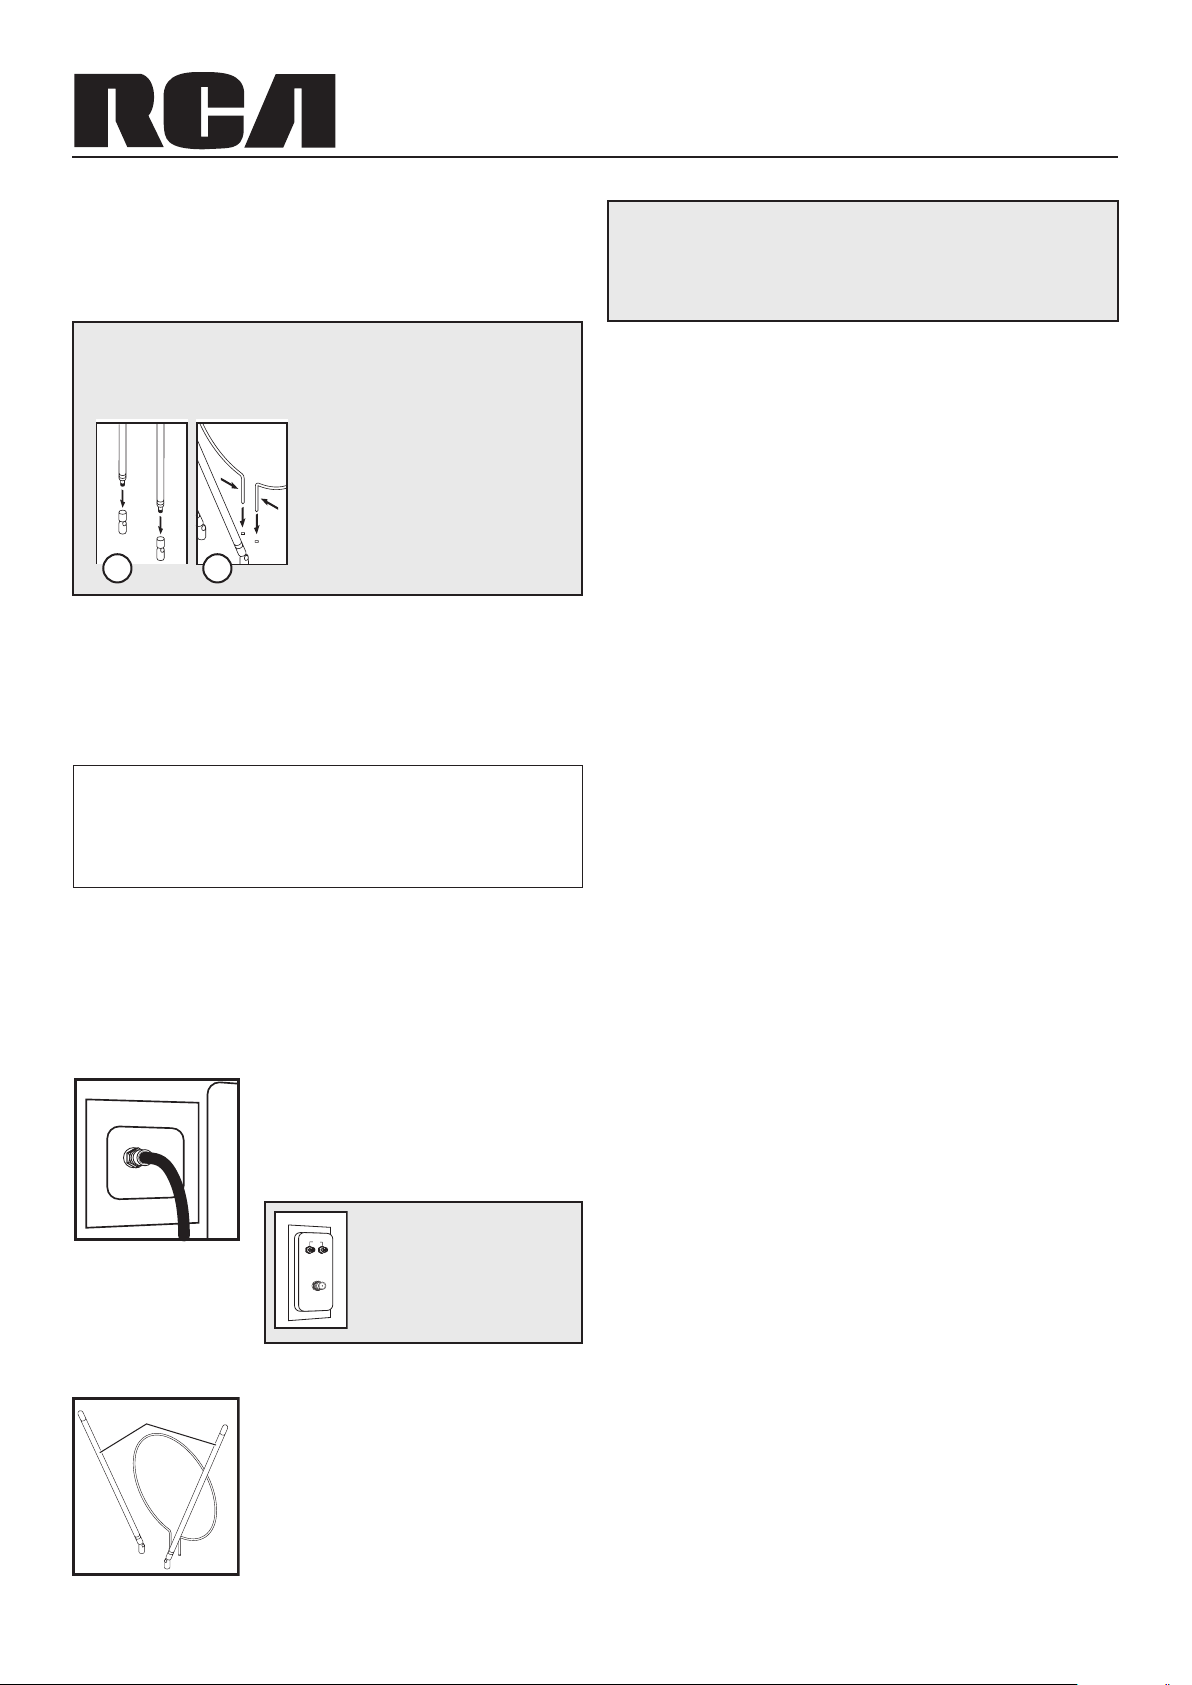
Connecting the antenna to your TV
Once you’ve found the best place for your antenna, it’s time to connect it to your
TV.
1. Find the coaxial cable that comes with the antenna. On some models this cable
is built into the antenna. On others it’s separate.
• If the coaxial cable is separate: connect one end of the cable to the jack on
the back of the antenna.
2. Connect the loose end of the coaxial cable to
the antenna jack on the back of your TV. This
jack might be labeled ANTENNA, VHF/UHF,
RF INPUT, or something similar. Make sure
you screw the connector onto the jack until the
connection is rm.
If the back of your TV looks
like this...
You’ll need a band separator
(not included) to connect this
antenna to your TV.
Adjusting the antenna for best reception
1. Turn on your TV.
2. Tune to your favorite local channel above 14.
Adjust the antenna’s UHF loop until you get the
best picture.
3. Tune to your favorite local channel between 2
and 13. Extend the antenna’s dipoles (rods) and
rotate them until you get the best picture.
Note: Different channels may require different antenna
adjustments.
If your antenna has a selector knob...
This selector lets you ne tune your antenna to improve reception further.
Once you’ve found the best positions for the dipoles and UHF loop, nd the
selector position that gives you the best picture.
Note about digital channels
All RCA antennas are designed to receive both analog and digital signals. To
display digital signals on your TV, you’ll need to have the right equipment: either a
TV that is capable of decoding digital signals or a digital converter box.
Troubleshooting
I have a cable ready TV. Why am I not getting any channels above 13?
The tuners inside of cable ready TVs have two modes. One mode is for cable and
the other mode is for antenna. When the TV is in cable mode, and you are using
an antenna, you will not be able to receive any channels above 13. To x this,
simply access the menu of your TV and switch the TV from Cable/CATV mode
to ANT/AIR mode.
I have my TV in a metal cabinet. Will the antenna work for me?
Any large metal objects will prevent the antenna signal from reaching the antenna.
You must place the antenna outside of or above the metal cabinet.
My home has aluminum siding/insulation. Where should I place my antenna?
Place the antenna near a window to minimize interference and improve your
reception.
Can I use my antenna in a basement?
TV signals usually cannot penetrate into basement locations due to their lower
elevation.
Please Note:Other variables, which are not related to antenna performance, can
effect your reception. These include distance from the source transmitting the
desired station, and man-made and natural conditions. Example: Obstacles such as
buildings between the transmitting source and your antenna.
12 Month Limited Warranty
Audiovox Electronics Corporation (the “Company”) warrants to the original retail purchaser
of this product that should this product or any part thereof, under normal use and conditions,
be proven defective in material or workmanship within 12 months from the date of original
purchase, such defect(s) will be repaired or replaced (at the Company’s option) without charge
for parts and repair labor. To obtain repair or replacement within the terms of this Warranty,
the product along with any accessories included in the original packaging is to be delivered with
proof of warranty coverage (e.g. dated bill of sale), specication of defect(s), transportation
prepaid, to the Company at the address shown below. Do not return this product to the Retailer.
This Warranty is not transferable and does not cover product purchased, serviced or used
outside the United States or Canada. The Warranty does not extend to the elimination of
externally generated static or noise. This Warranty does not apply to costs incurred for
installation, removal or reinstallation of the product, or, if in the Company’s opinion, the
product has been damaged through acts of nature, alteration, improper installation, mishandling,
misuse, neglect, or accident. This Warranty does not cover damage caused by an AC adapter not
provided with the product. THE EXTENT OF THE COMPANY’S LIABILITY UNDER
THIS WARRANTY IS LIMITED TO THE REPAIR OR REPLACEMENT PROVIDED
ABOVE AND, IN NO EVENT, SHALL THE COMPANY’S LIABILITY EXCEED THE
PURCHASE PRICE PAID BY PURCHASER FOR THE PRODUCT.
This Warranty is in lieu of all other express warranties or liabilities. ANY IMPLIED
WARRANTIES, INCLUDING ANY IMPLIED WARRANTY OF MERCHANTABILITY
OR FITNESS FOR A PARTICULAR PURPOSE, SHALL BE LIMITED TO DURATION
OF THIS WARRANTY. ANY ACTION FOR BREACH OF ANY WARRANTY
HEREUNDER, INCLUDING ANY IMPLIED WARRANTY, MUST BE BROUGHT
WITHIN A PERIOD OF 24 MONTHS FROM THE DATE OF ORIGINAL PURCHASE.
IN NO CASE SHALL THE COMPANY BE LIABLE FOR ANY CONSEQUENTIAL OR
INCIDENTAL DAMAGES WHATSOEVER. No person or representative is authorized to
assume for the Company any liability other than expressed herein in connection with the sale of
this product.
Some states/provinces do not allow limitations on how long an implied warranty lasts or
the exclusion or limitation of incidental or consequential damage so the above limitations or
exclusions may not apply to you. This Warranty gives you specic legal rights and you may also
have other rights which vary from state/province to state/province.
U.S.A.: Audiovox Electronics Corporation, 150 Marcus Blvd., Hauppauge, New York 11788
CANADA: Audiovox Return Center, c/o Genco, 6685 Kennedy Road, Unit 3, Door 16,
Mississauga, Ontario L5T 3A5
© 2008 Audiovox Accessories Corporation
111 Congressional Blvd., Suite 350
Carmel, IN 46032
Trademark(s) Registered
www.rca.com
All other brands and product names are
trademarks or registered trademarks of their
respective owners.
Product specications are subject to change.
Antena Pasiva para Interiores Guía del Usuario
VHF/UHF
VHF
UHF
Dipolos
Bucle
¡Bienvenido!
Gracias por elegir una antena RCA. Las antenas RCA han sido diseñadas para
ofrecerle la imagen más nítida y clara posible. Todas las antenas RCA son fáciles
de congurar y utilizar. Antes de comenzar, extraiga todas las piezas de la caja y
lea este manual.
Cómo ensamblar la antena (algunos modelos solamente)
Algunos modelos de antena deben ser ensamblados. Si su paquete incluye
varias piezas separadas, o sea, dos postes largos, un bucle y una base, observe
estas instrucciones para ensamblar la antena.
1. Enrosque los dipolos en la base.
2. Sujete entre sí los polos inferiores
del bucle UFH e introdúzcalos en los
oricios más pequeños de la base de
la antena.
1 2
Cómo encontrar la mejor ubicación para la antena
Antes de conectar la antena, determine la mejor ubicación en su hogar donde se
pueda obtener una recepción óptima. Visite www.antennaweb.org para informarse
de dónde provienen las transmisiones locales. Luego, intente tantas como sea
posible para evitar obstrucciones entre estos transmisores y su antena.
Aviso: Muchas veces la menor ubicación para la antena es cerca de una ventana.
Información sobre el Producto
Guarde el recibo como prueba de su compra y preséntelo para obtener repuestos o solicitar servicio bajo garantía.
Anéxelo aquí y anote el número de modelo para referencia en caso necesario. Estos números se encuentran en el
producto.
Núm. de Modelo:_______________ Fecha de Compra:_______________
Distribuidor/Dirección/Teléfono:_______________
Cómo conectar la antena al TV
Una vez haya encontrado la mejor ubicación para su antena, es hora de conectarla a
su TV.
1. Encuentre el cable coaxial incluido con la antena. En algunos modelos, este
cable viene integrado a la antena. En otros modelos, el cable está separado.
• Si el cable coaxial está separado: conecte un extremo del cable al jack de la
parte posterior de la antena.
2. Conecte el otro extremo del cable coaxial
al jack para antena de la parte posterior del
TV. Este jack podría estar identicado como
ANTENNA, VHF/UHF, RF INPUT, o algo
similar. Asegúrese de enroscar el conector en el
jack hasta que la conexión esté ja.
Si la parte posterior del TV
se parece a ésta...
Necesitará un separador de
banda (no incluido) para conectar
la antena a su TV.
Cómo ajustar la antena para obtener la mejor recepción
1. Encienda el TV.
2. Sintonice su canal local favorito superior al 14.
Ajuste el bucle de la antena hasta que obtenga la
mejor imagen.
3. Sintonice su canal local favorito entre el 2 y el
13, extienda los dipolos (barras) de la antena, y
luego gírelos hasta que obtenga la mejor imagen.
Aviso: Diferentes canales podrían necesitar diferentes
ajustes de antena.
Si su antena cuenta con una perilla selectora...
Este selector le permite sintonizar de forma na su antena para optimizar aún
más la recepción. Una vez haya encontrado las mejores ubicaciones para los
dipolos y para el bucle UHF, ajuste el selector en la posición que le ofrezca la
mejor imagen.
Aviso acerca de canales digitales
Todas las antenas RCA han sido diseñadas para recibir tanto señales analógicas
como digitales. Para mostrar señales digitales en su TV, necesitará contar con
el equipo adecuado: ya sea un TV capaz de descodicar señales digitales o un
convertidor digital.
Resolución de Problemas
Tengo un TV listo para cable. ¿Por qué no puedo sintonizar ningún canal superior al 13?
Los sintonizadores dentro de los TV listos para cable tienen dos modos. Un modo
es para cable y el otro para antena. Cuando el TV se encuentra en modo cable,
y está utilizando una antena, no podrá sintonizar canales superiores al 13. Para
solucionar esto, sencillamente acceda al menú del TV y cambie el TV del modo
Cable/CATV al modo ANT/AIR (Antena/Aérea).
Coloqué mi TV en un gabinete de metal. ¿La antena funcionará?
Cualquier objeto grande de metal evitará que la señal de la antena alcance la
antena. Deberá colocar la antena sobre el gabinete de metal, o en otra ubicación.
Mi casa tiene aislamiento/desviadero de aluminio. ¿Dónde debo instalar la antena?
Instale la antena cerca de una ventana para minimizar la interferencia y optimizar la
recepción.
¿Puedo utilizar la antena en un sótano?
Por lo general, las señales de TV no pueden penetrar sótanos debido a su baja
elevación.
Observe: Otras variables, no relacionadas al desempeño de su antena, pueden
afectar la recepción. Éstas incluyen la distancia de la fuente que transmite la
emisora desea, y condiciones naturales y provocadas por el hombre. Por ejemplo:
Obstáculos, tales como edicios entre la fuente de transmisión y su antena.
Garantía Limitada de 12 Meses
Audiovox Electronics Corporation (la “Compañía”) le garantiza a usted, el comprador original
de este producto que si, bajo condiciones y uso normales, se encontrara que este producto
o alguna pieza presenta defectos materiales o de mano de obra dentro de los primeros 12
meses a partir de la fecha de compra original, tales defectos serán reparados o reemplazados (a
opción de la Compañía) sin cargo alguno por las piezas y labores de reparación. Para obtener
los servicios de reparación o reemplazo dentro de los términos de esta Garantía, el producto
junto con cualquier accesorio incluido en el empaque original se entregarán con prueba de
cubierta de garantía (por ejemplo, factura fechada de venta), especicación de los defectos,
transporte prepagado, a la Compañía a la dirección indicada abajo. No devuelva este producto
al Distribuidor.
Esta Garantía no es transferible y no cubre un producto adquirido, mantenido o utilizado
fuera de los Estados Unidos o Canadá. Esta Garantía no incluye la eliminación de estática o
ruido generados externamente. Esta garantía no incluye los costos incurridos en la instalación,
remoción o reinstalación de este producto, o, si es opinión de la Compañía, que este producto
ha sufrido daños debido a causas de fuerza mayor, alteraciones, instalación inadecuada, abuso,
uso indebido, negligencia o accidente. Esta Garantía no incluye daños ocasionados por un
adaptador de CA que no haya sido suministrado con el producto. EL ALCANCE DE LA
RESPONSABILIDAD DE LA COMPAÑÍA BAJO ESTA GARANTÍA ESTÁ LIMITADO
A LA REPARACIÓN O EL REEMPLAZO PROVISTO ARRIBA Y, EN NINGÚN CASO,
DEBERÁ LA RESPONSABILIDAD DE LA COMPAÑÍA EXCEDER EL PRECIO DE
COMPRA PAGADO POR EL COMPRADOR DE ESTE PRODUCTO.
Esta Garantía reemplaza cualesquiera otras responsabilidades o garantías expresas.
CUALESQUIERA GARANTÍAS IMPLÍCITAS, INCLUYENDO CUALQUIER
GARANTÍA IMPLÍCITA DE COMERCIABILIDAD O ADAPTABILIDAD PARA UN
PROPÓSITO EN PARTICULAR ESTARÁN LIMITADAS A LA DURACIÓN DE ESTA
GARANTÍA. CUALQUIER ACCIÓN PARA EL INCUMPLIMIENTO DE CUALQUIER
GARANTÍA EN EL PRESENTE, INCLUYENDO CUALQUIER GARANTÍA
IMPLÍCITA, DEBERÁ PRESENTARSE DENTRO DE UN PERÍODO DE 24 MESES
A PARTIR DE LA FECHA DE COMPRA ORIGINAL. EN NINGÚN CASO LA
COMPAÑÍA SERÁ RESPONSABLE POR DAÑOS EMERGENTES O INCIDENTALES.
Ninguna persona ni representante está autorizado a asumir, a nombre de la Compañía, ninguna
responsabilidad salvo la expresada aquí en conexión con la venta de este producto.
Algunos estados/provincias no permiten limitaciones sobre la duración de una garantía implícita
o la exclusión o la limitación de daños incidentales o emergentes, de modo que es posible que las
limitaciones o exclusiones anteriores no apliquen en su caso. Esta Garantía le conere derechos
legales especícos; según el estado/provincia, puede disfrutar además de otros derechos.
EE.UU.: Audiovox Electronics Corporation, 150 Marcus Blvd., Hauppauge, New York 11788
CANADÁ: Audiovox Return Center, c/o Genco, 6685 Kennedy Road, Unit 3, Door 16,
Mississauga, Ontario L5T 3A5
© 2008 Audiovox Accessories Corporation
111 Congressional Blvd., Suite 350
Carmel, IN 46032
Marca(s) Registrada(s)®
www.rca.com
Todas las demás marcas y nombres de
productos son marcas comerciales o marcas
registradas de sus respectivos dueños.
Las especicaciones del producto están
sujetas a cambio.
 Loading...