

Page 1
START
GUIDE
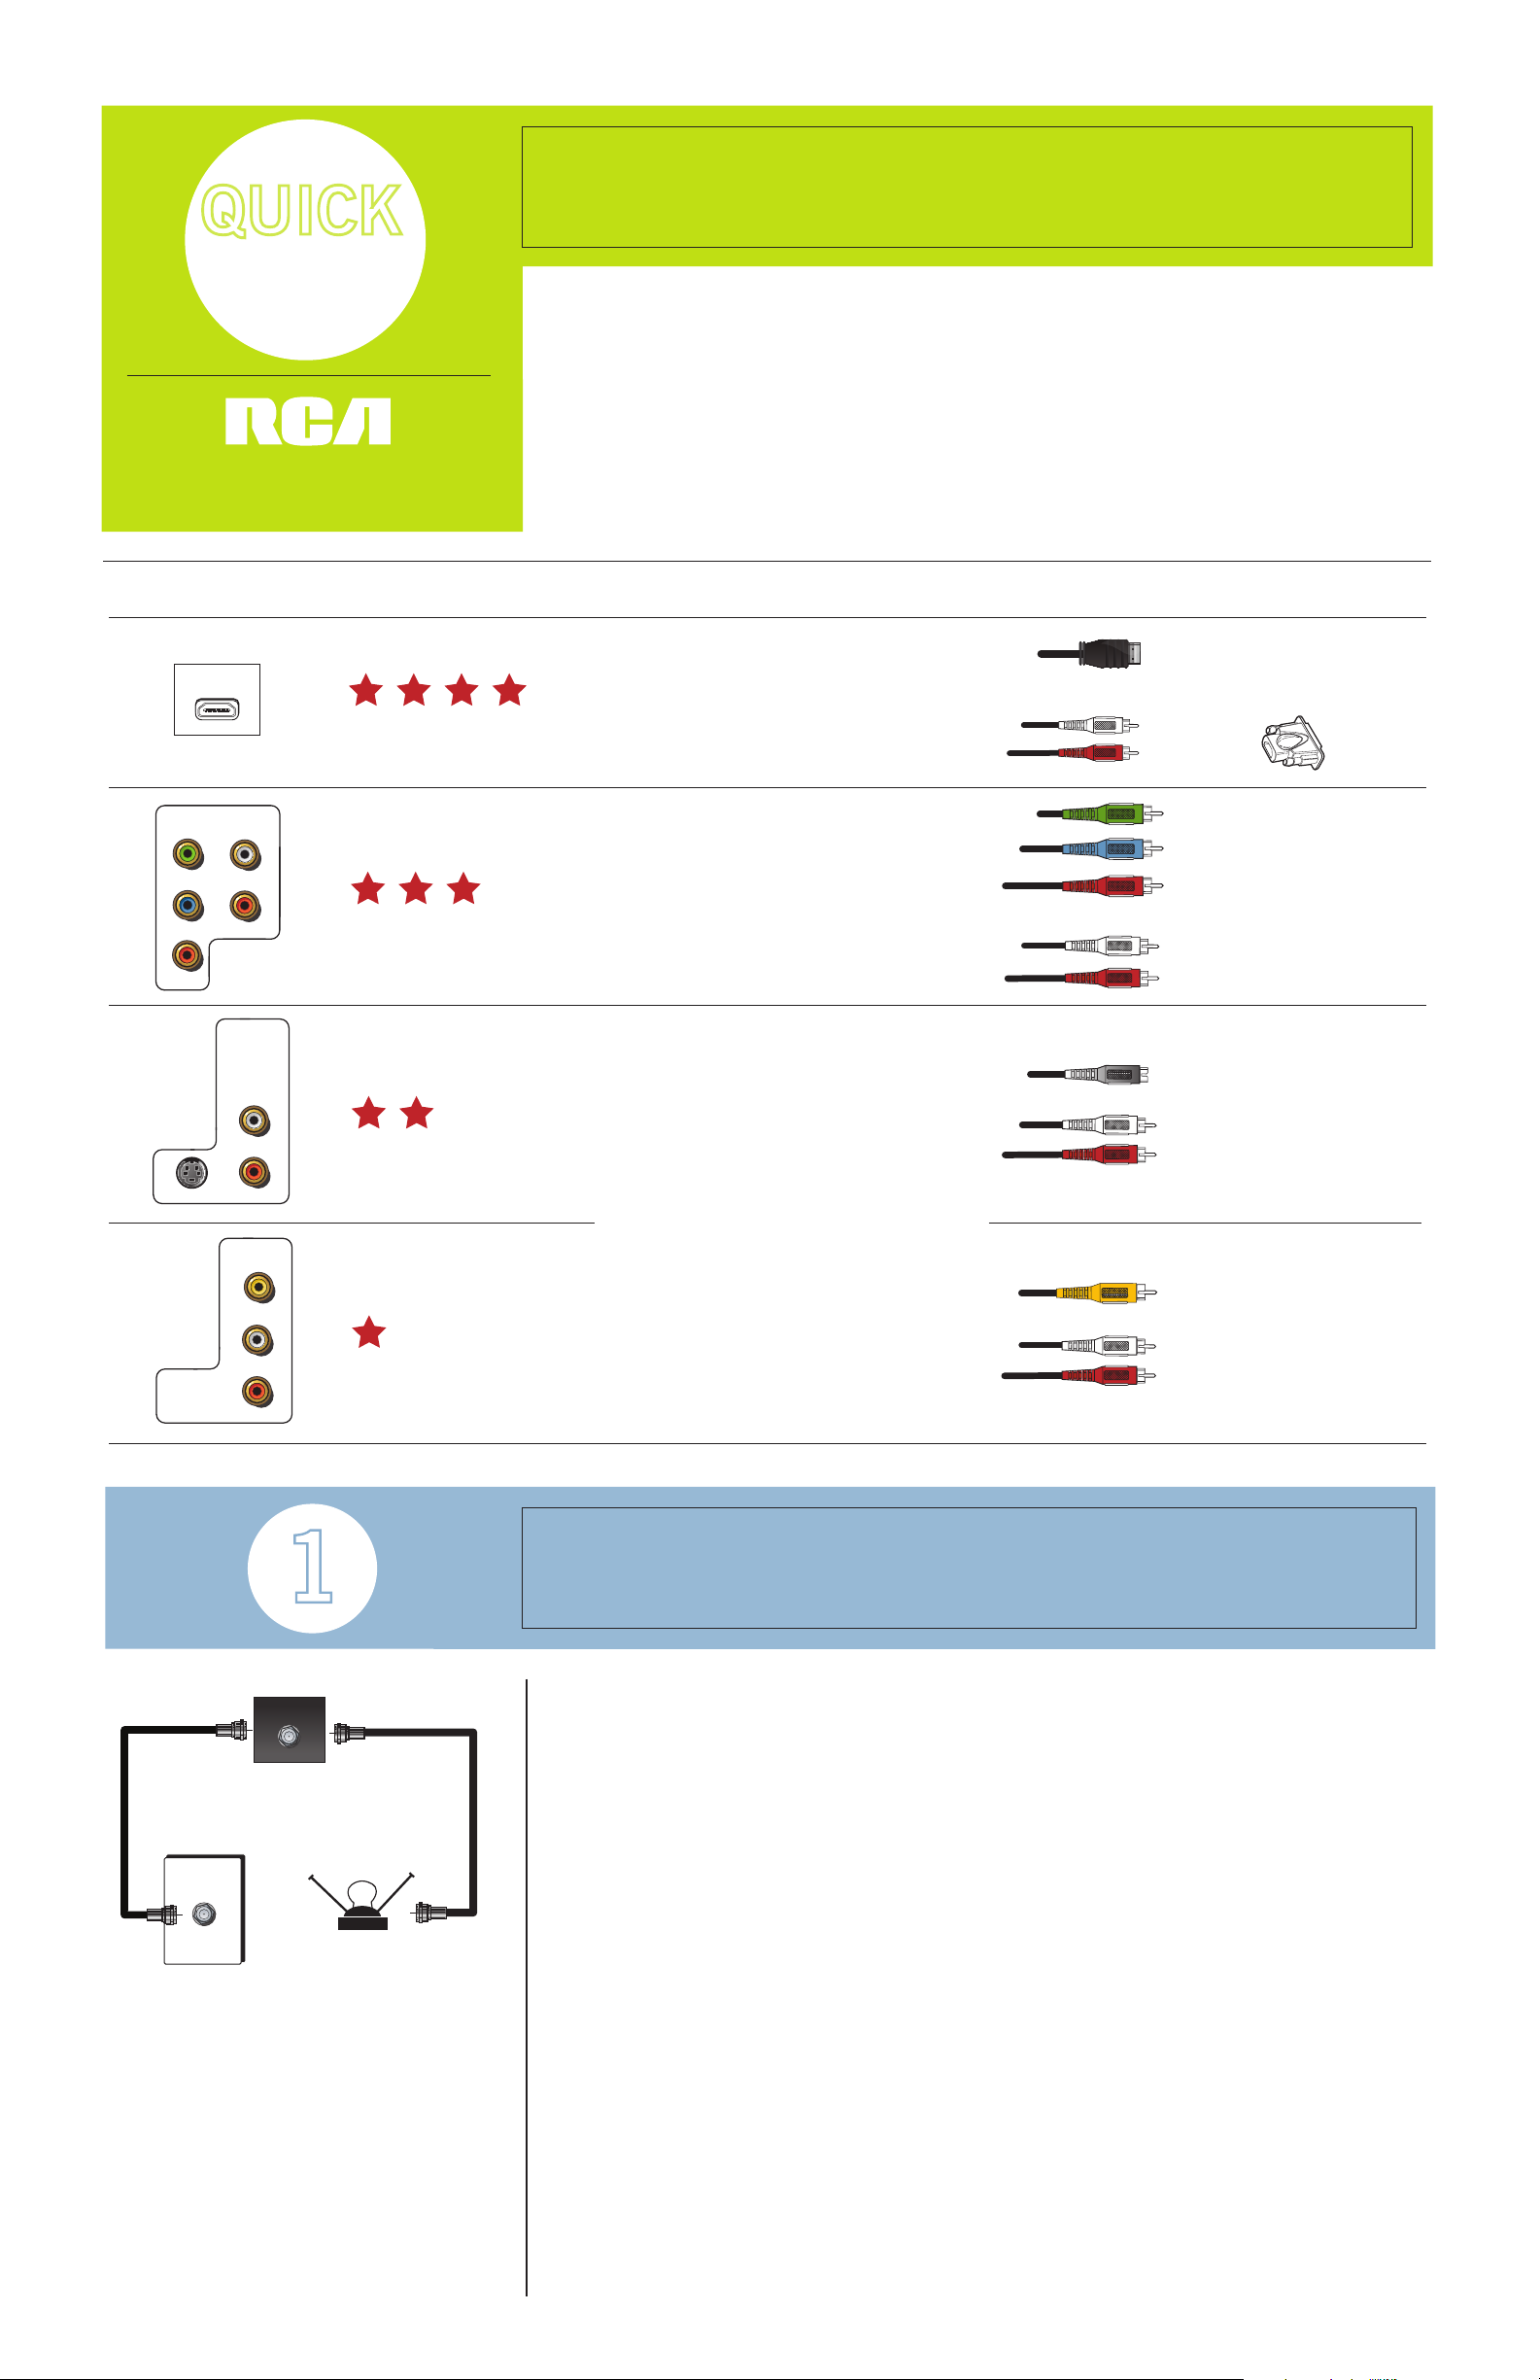
Choose Your Connections
Quality Connects to...
Cables needed (not included)
Jacks
Devices with an HDMI or a
DVI output, such as HD
Receivers, Satellite Receivers,
and Cable Boxes
Devices with Y Pb Pr
(component) outputs, such as
HD Receivers, Satellite
Receivers, Cable Boxes,
DVD-PVRs, and DVD Players
Devices with S-Video or Video
outputs, such as DVD Players,
VCRs, Satellite Receivers, and
Cable Boxes
Component
Video
Audio
Audio
Audio
S-Video
Video
HIGH DEFINITION TELEVISION
INPUT 1
COMPONENT
Y/VIDEO
PB
PR
R
L
S-VIDEO
VIDEO
Audio
HDMI 1 INPUT
INPUT 2
COMPOSITE
R
L
HDMI
INPUT 4
COMPOSITE
R
L
Or if connecting to a DVI device, use these with an HDMI cable
DVI
Adapter
+
www.rca.com/television
Antenna
ANTENNA /
CABLE
TV back panel
Cable
(wall outlet)
or
Connect a Signal Source
Make your connection decision easier by taking a few minutes to review the jacks on
your new HDTV. Compare the jacks on the device you want to connect and see if the
same jacks are available on your HDTV. Then refer to the chart below to determine the
best connection to make.
For more information about connecting your HDTV to other devices, refer to Chapter 1
of the User’s Guide. Make sure you read the safety information sheet provided seperately
before you connect and operate your TV.
Connect your regular cable to the TV’s ANTENNA/CABLE INPUT to receive analog
channels or connect an antenna to the TV’s ANTENNA/CABLE INPUT to receive off-air
local digital and analog channels.
Note: If you have regular cable, your TV is able to receive some digital channels (using
the ANTENNA/CABLE INPUT) because it has a capability called QAM. QAM is a tuner
that enables reception of unscrambled digital cable content. Check with your cable
provider for information about content availability in your area. Refer to Step 3,
Operate Your TV, for information on digital channels.
If you’re connecting a cable box or satellite receiver, use the chart above to help
determine which jacks to use for the best connection. Your cable box or satellite receiver
needs to be high denition if you want to receive high denition programming. Check
with your cable provider for more information.
Continue to Step 2, Set Up Your TV, on the back page.
RCA and associated marks are trademarks of THOMSON S.A. used under license to TTE Corporation.
HDMI, the HDMI logo, and High-Definition Multimedia Interface are trademarks or registered trademarks of HDMI Licensing LLC.
Page 2
Make sure you have connected your TV to a signal source and all of your devices. Also,
Set Up Your TV
Operate Your TV
Cancel Setup
Continue Setup
Go Back
2
1
0
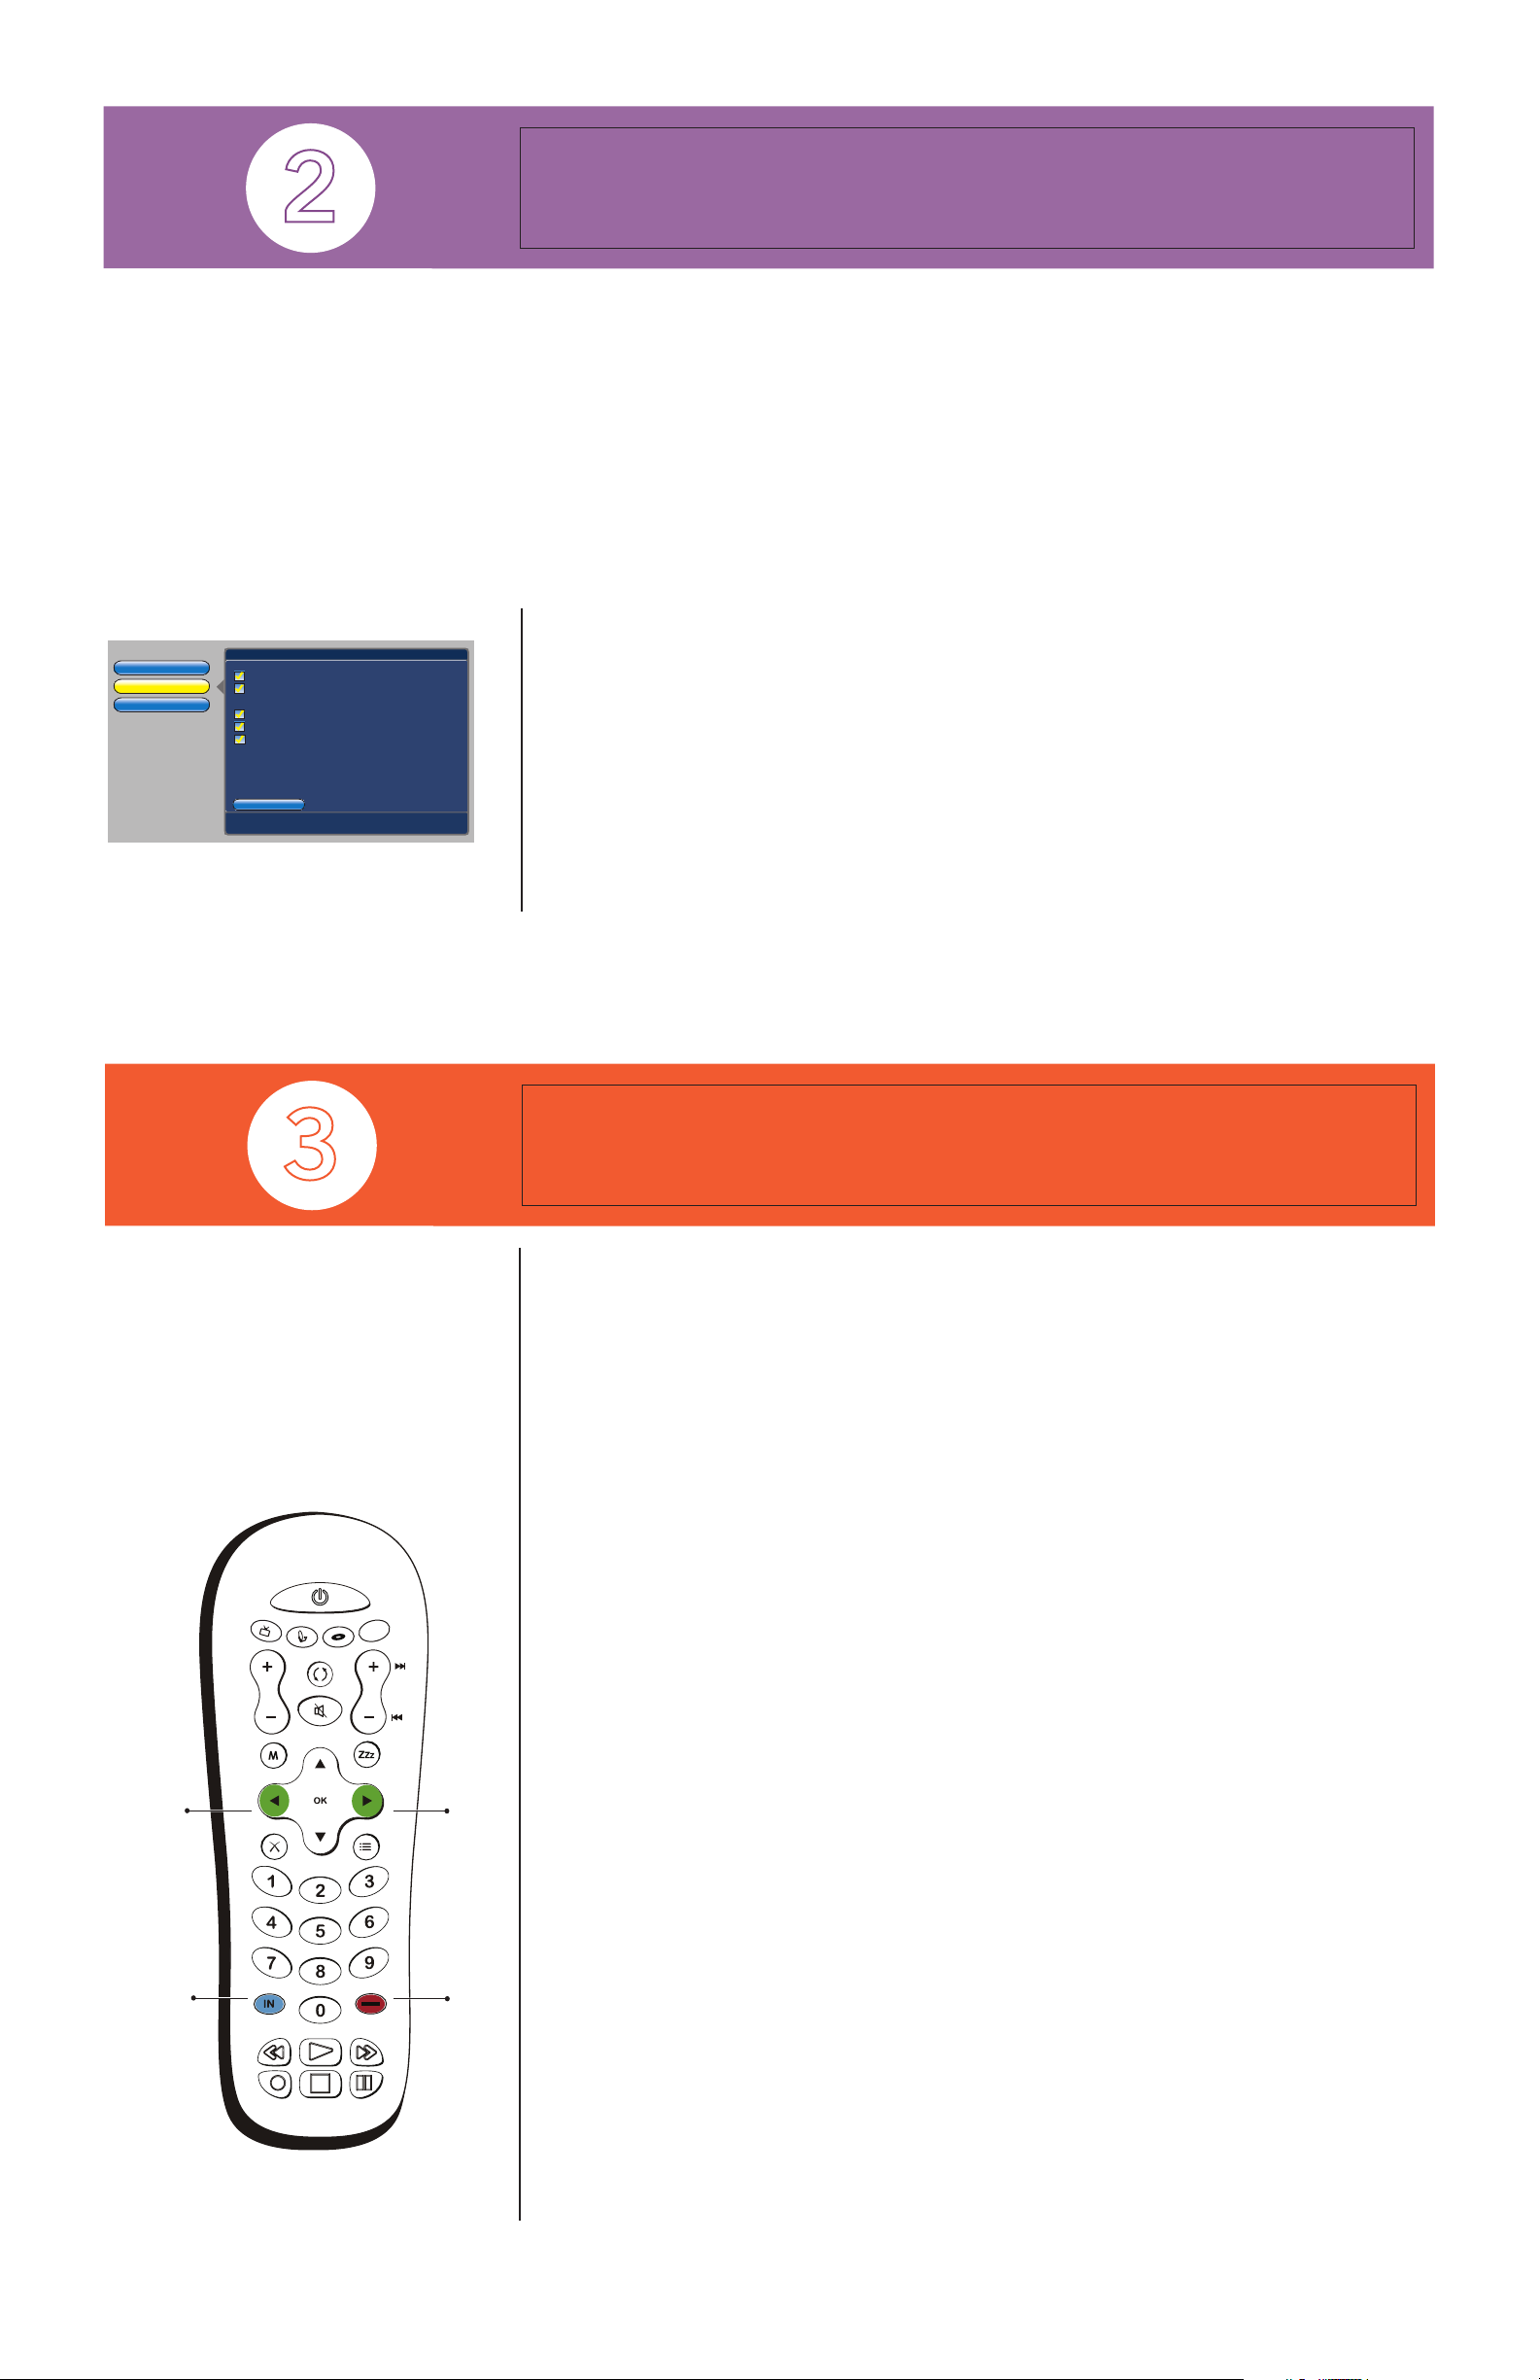
Press > to make changes to this s creen’s settings.
Press OK to go to the next step i n the setup routine.
Check fewer boxes to make the search faster (but less
complete) and vice versa. A complete search takes about
50 minutes.
To add a channel that Channel Search didn't find, clear all
menus and tune to the channel with the number keys.
Start Search
Detect antenna or cable signal
Search channels already in my channel list(s)
Remove scrambled digital cable channels
Select other search options:
Digital channels
Analog channels
Select channels to search:
Main Menu u Assisted Setup u Channel Setup
§
INPUT
ZOOM -
INPUT
SUB CH
CLEAR
GUIDE
ZOOM -
ZOOM +
SLEEPMENU
MUTE
GO BACK
VOL
CH
ON•OFF
TV
SAT-AUX
DVD
FAV
ZOOM +
SUB CH
INFO
PRESETS
?!+ -
DEF
ABC
GHI
MNO
JKL
PQR S
WXY Z
TUV
_,. :=$
make sure you put the batteries in the remote.
Now, plug in the TV. The Power indicator on the front panel lights for a few seconds and
goes off during initialization. This only happens when the TV is unplugged and plugged
back in, or if power is lost.
Once the Power indicator goes off, turn on the TV. Wait for one minute for the picture
to appear as the TV warms up. You’ll hear audio during this time and the picture gets
increasingly brighter. The assisted setup screen appears once the TV has warmed up. Press
OK to continue.
• Set the Menu Language. Press OK to select English and continue to the next step. To
choose another language, press the down arrow button to highlight the language and then
press OK.
• Search Channels. A channel search must be completed in order for your TV to display
channels and programming information. Make sure you’ve connected your TV to cable or
an off-air antenna before you begin the channel search.
All the options are selected for you to ensure a full channel search is completed. Press
the right arrow button. An alert screen appears to allow you to start a channel search or
customize the options.
Press OK to start a channel search or if you want to change some of the options, use the
arrow buttons to highlight those options. Press OK to check or uncheck an option. Then
highlight Start Search and press OK to start the channel search.
When the channel search is complete a message screen appears. Press OK to continue.
• Set the Quick Startup Option. Enable Quick Startup to have the TV turn on faster. Disable
Quick Startup and approximately 15 seconds are added to the TV’s turn on time, but the
TV uses less energy when turned off. Press OK to continue. Read through the next screens
that appear and continue to press OK until the screens disappear.
Watching TV
Turning On Your TV
Press the TV button to turn on the TV and put the remote in TV mode. To turn off your
TV, press the ON•OFF button.
Changing Channels
• If you have both analog and digital cable channels these will be put into the same
channel list. As you change channels, an A appears next to the analog channel; a D
appears next to the digital channel.
• Depending upon the type of signals you have connected to your HDTV, you might
notice the channels change slower than you’re used to. This is perfectly normal. Digital
channels sometimes take longer to tune.
Entering Channel Numbers
To tune to a channel, enter the channel number and press OK or wait a few seconds for
the channel to tune. Digital channels can have both primary channels (like the analog
channel number) and subchannels. To tune to a digital channel with a subchannel, such
as 6-1, enter the primary channel number (6), then press the SUB CH button. Enter the
subchannel number (1) and press OK.
Viewing Devices Connected to Your TV
To view devices connected to your TV, press the INPUT button on your remote. If you
have a DVD player, for example, connected to the INPUT 2 VIDEO jack, press INPUT
until INPUT2 appears. Another way to view devices connected to your TV is by using the
Autotuning feature. Go to Chapter 3 of the User’s Guide for details.
Using the Universal Remote
You can program the SAT•AUX or DVD buttons to operate a different brand of device
connected to your TV. Go to Chapter 2 of the User’s Guide for details on programming the
remote.
Changing the Screen Format
Your TV allows you to change the format of the picture you’re viewing by pressing the
ZOOM+/- buttons on the remote. The format changes as you press the button and the
format style is displayed on-screen.
PART NUMBER: 70-T19931-310
Thank you for your purchase. Before making a trip back to the retailer, please refer to the enclosed User’s Guide or contact us at the support number provided in your warranty so that we may assist you in
operating the unit, replacing missing parts, and ensuring your satisfaction with the product.
 Loading...