

Page 1
42-7011
Dual-Tray CD Player/Recorder
Refer to your Owner’s Manual for complete instructions.
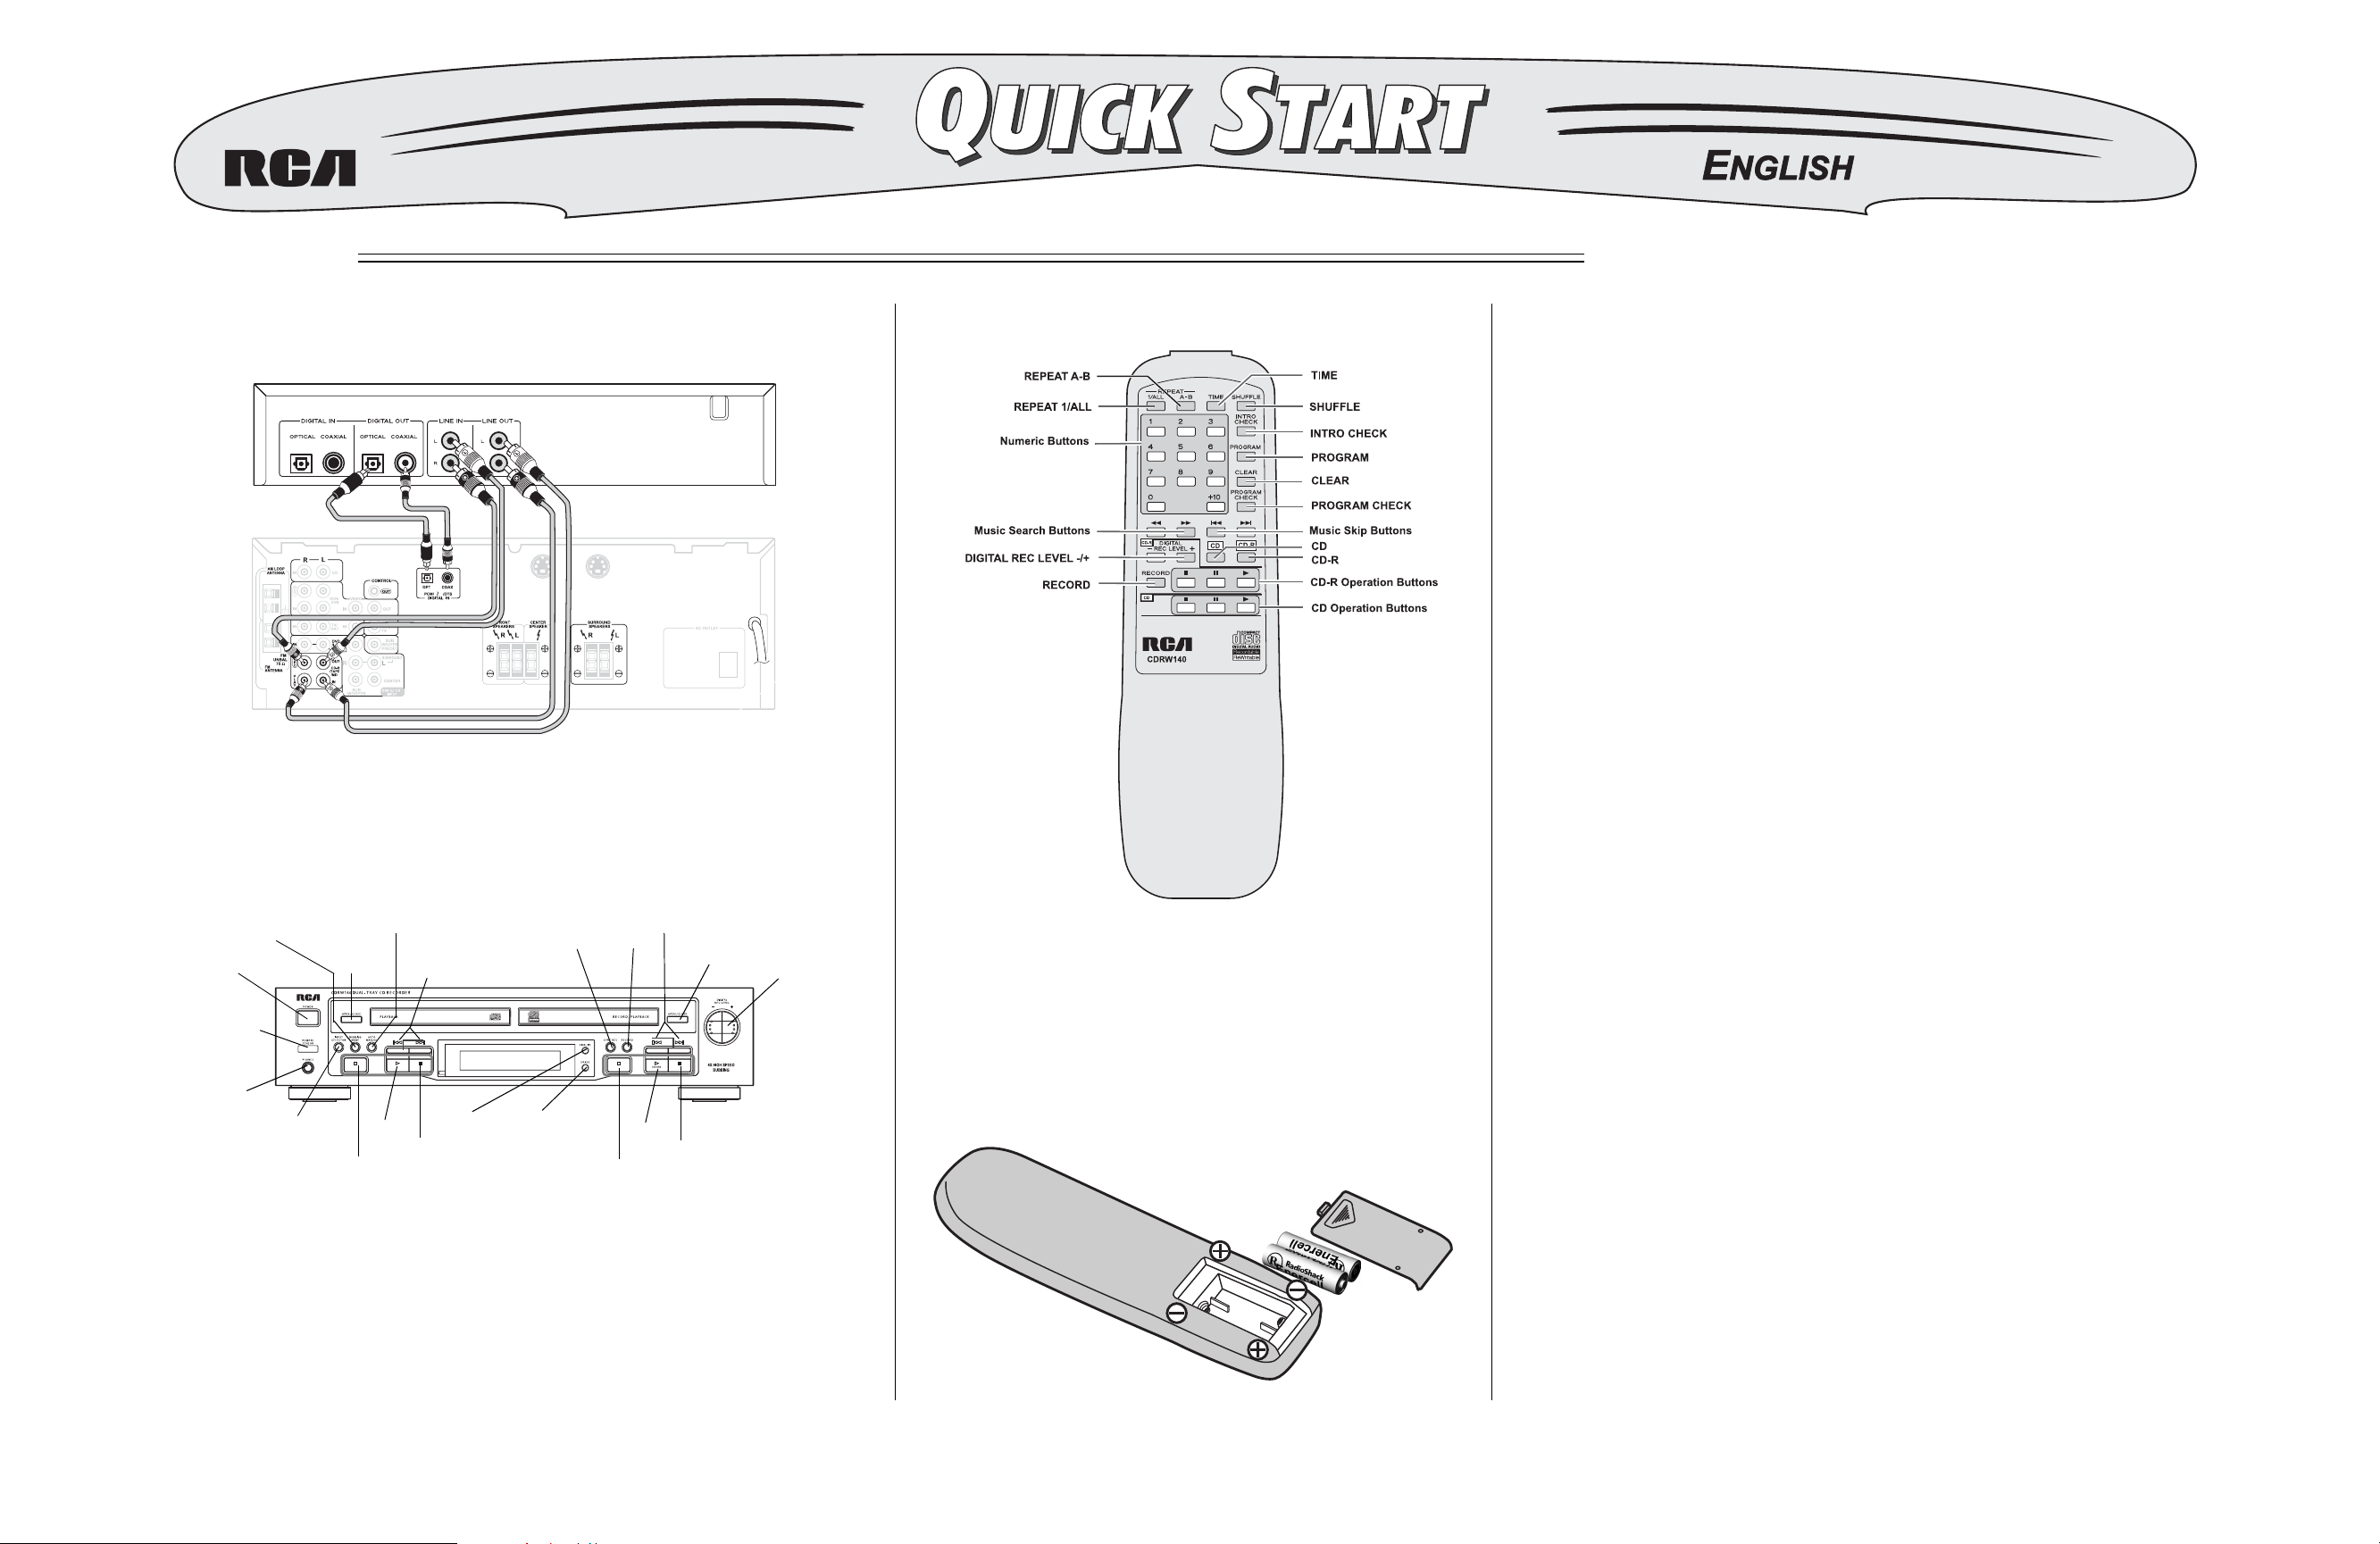
CONNECTING AND POWERING YOUR RECORDER
Follow the diagram to connect your recorder to your receiver.
S-VIDEO IN S-VIDEO OUT
Note: The receiver, shown above, does not have digital out jacks. If your
receiver also does not have digital out jacks, you can use a digital source such as
a CD player or MD player.
A QUICK LOOK AT THE RECORDER
A QUICK LOOK AT THE REMOTE
PLAYING A CD
You can use the RECORD/PLAYBACK tray to play back CD, CD-R, and CDRW discs. You can use the PLAYBACK tray to play back CD and finalized
CD-R/CD-RW discs. You cannot play CD-R/CD-RW discs that have not
been finalized on the PLAYBACK tray.
1. Press
2. Press the respective OPEN/CLOSE for the PLAYBACK tray or the
3. Carefully place the disc, label side up, into the recessed CD holder.
4. Press
POWER on the recorder. READING flashes for a while. When no
disc is set,
no DISC or DISC no appears.
RECORD/PLAYBACK tray.
OPEN/CLOSE for the PLAYBACK tray or the RECORD/
PLAYBACK tray to close the disc tray. When a disc is loaded into the
recorder,
READING flashes as it determines the contents of the disc.
When the recorder reads the TOC (Table of Contents), the display shows
the total number of tracks, total play time, and the type of disc (the
RECORD/PLAYBACK tray only).
• When a blank disc is set on the RECORD/PLAYBACK tray, BLANK
appears.
MUSIC SKIP
Buttons
RECORD
PLAY
STOP
PAUSE
OPEN/
CLOSE
DIGITAL REC
LEVEL –/+
POWER
REMOTE
SENSOR
PHONES
DUBBING
MODE
INPUT
SELECTOR
OPEN/
CLOSE
STOP
AUTO
MANUAL
MUSIC SKIP Buttons
PLAY
PAUSE
FINALIZE
SYNC REC
ERASE
“Think RadioShack for all of Your
CD Player/Recorder Accessories”
Headphones Batteries Blank CD-R Discs
Optical Cable Audio Cable CD Lens Cleaner
INSTALLING BATTERIES
1. Press down on the battery compartment cover and slide it
off in the direction of the arrow.
2. Insert the batteries into the battery compartment as
indicated by the polarity symbols (
3. Replace the cover.
+ and –) marked inside.
• When a disc is set on the RECORD/PLAYBACK tray, the display shows
one of the following:
CD — a commercial pre-recorded CD.
CD-R —finalizedCD-R.
CD-R, NO TOC —aCD-Rwhichhasyettobefinalized.
CD-RW, NO TOC — a CD-RW which has yet to be finalized.
CD-RW — a finalized CD-RW.
BLANK — No disc or unreadable disc.
5. Press
for the PLAYBACK tray or
²
/ENTER for the RECORD/PLAYBACK tray to start playback.
²
6. Press † to temporarily stop playback. To resume playback, press † or ².
7. Press G to stop playback.
If you set CDs on both the PLAYBACK tray and the RECORD/PLAYBACK
tray, the recorder automatically plays the other CD when the current CD
finishes. The CD recorder stops playing at the end of the second CD.
RadioShack Corporation
Fort Worth, Texas 76102
© 2003 RadioShack Corporation.AllRights Reserved.
03A03
PrintedinChina
Page 2
42-7011
Reproductor/Grabadora de Discos
Compactos de Doble Bandeja
Consulte el manual del propietario, donde encontrará las instrucciones completas.
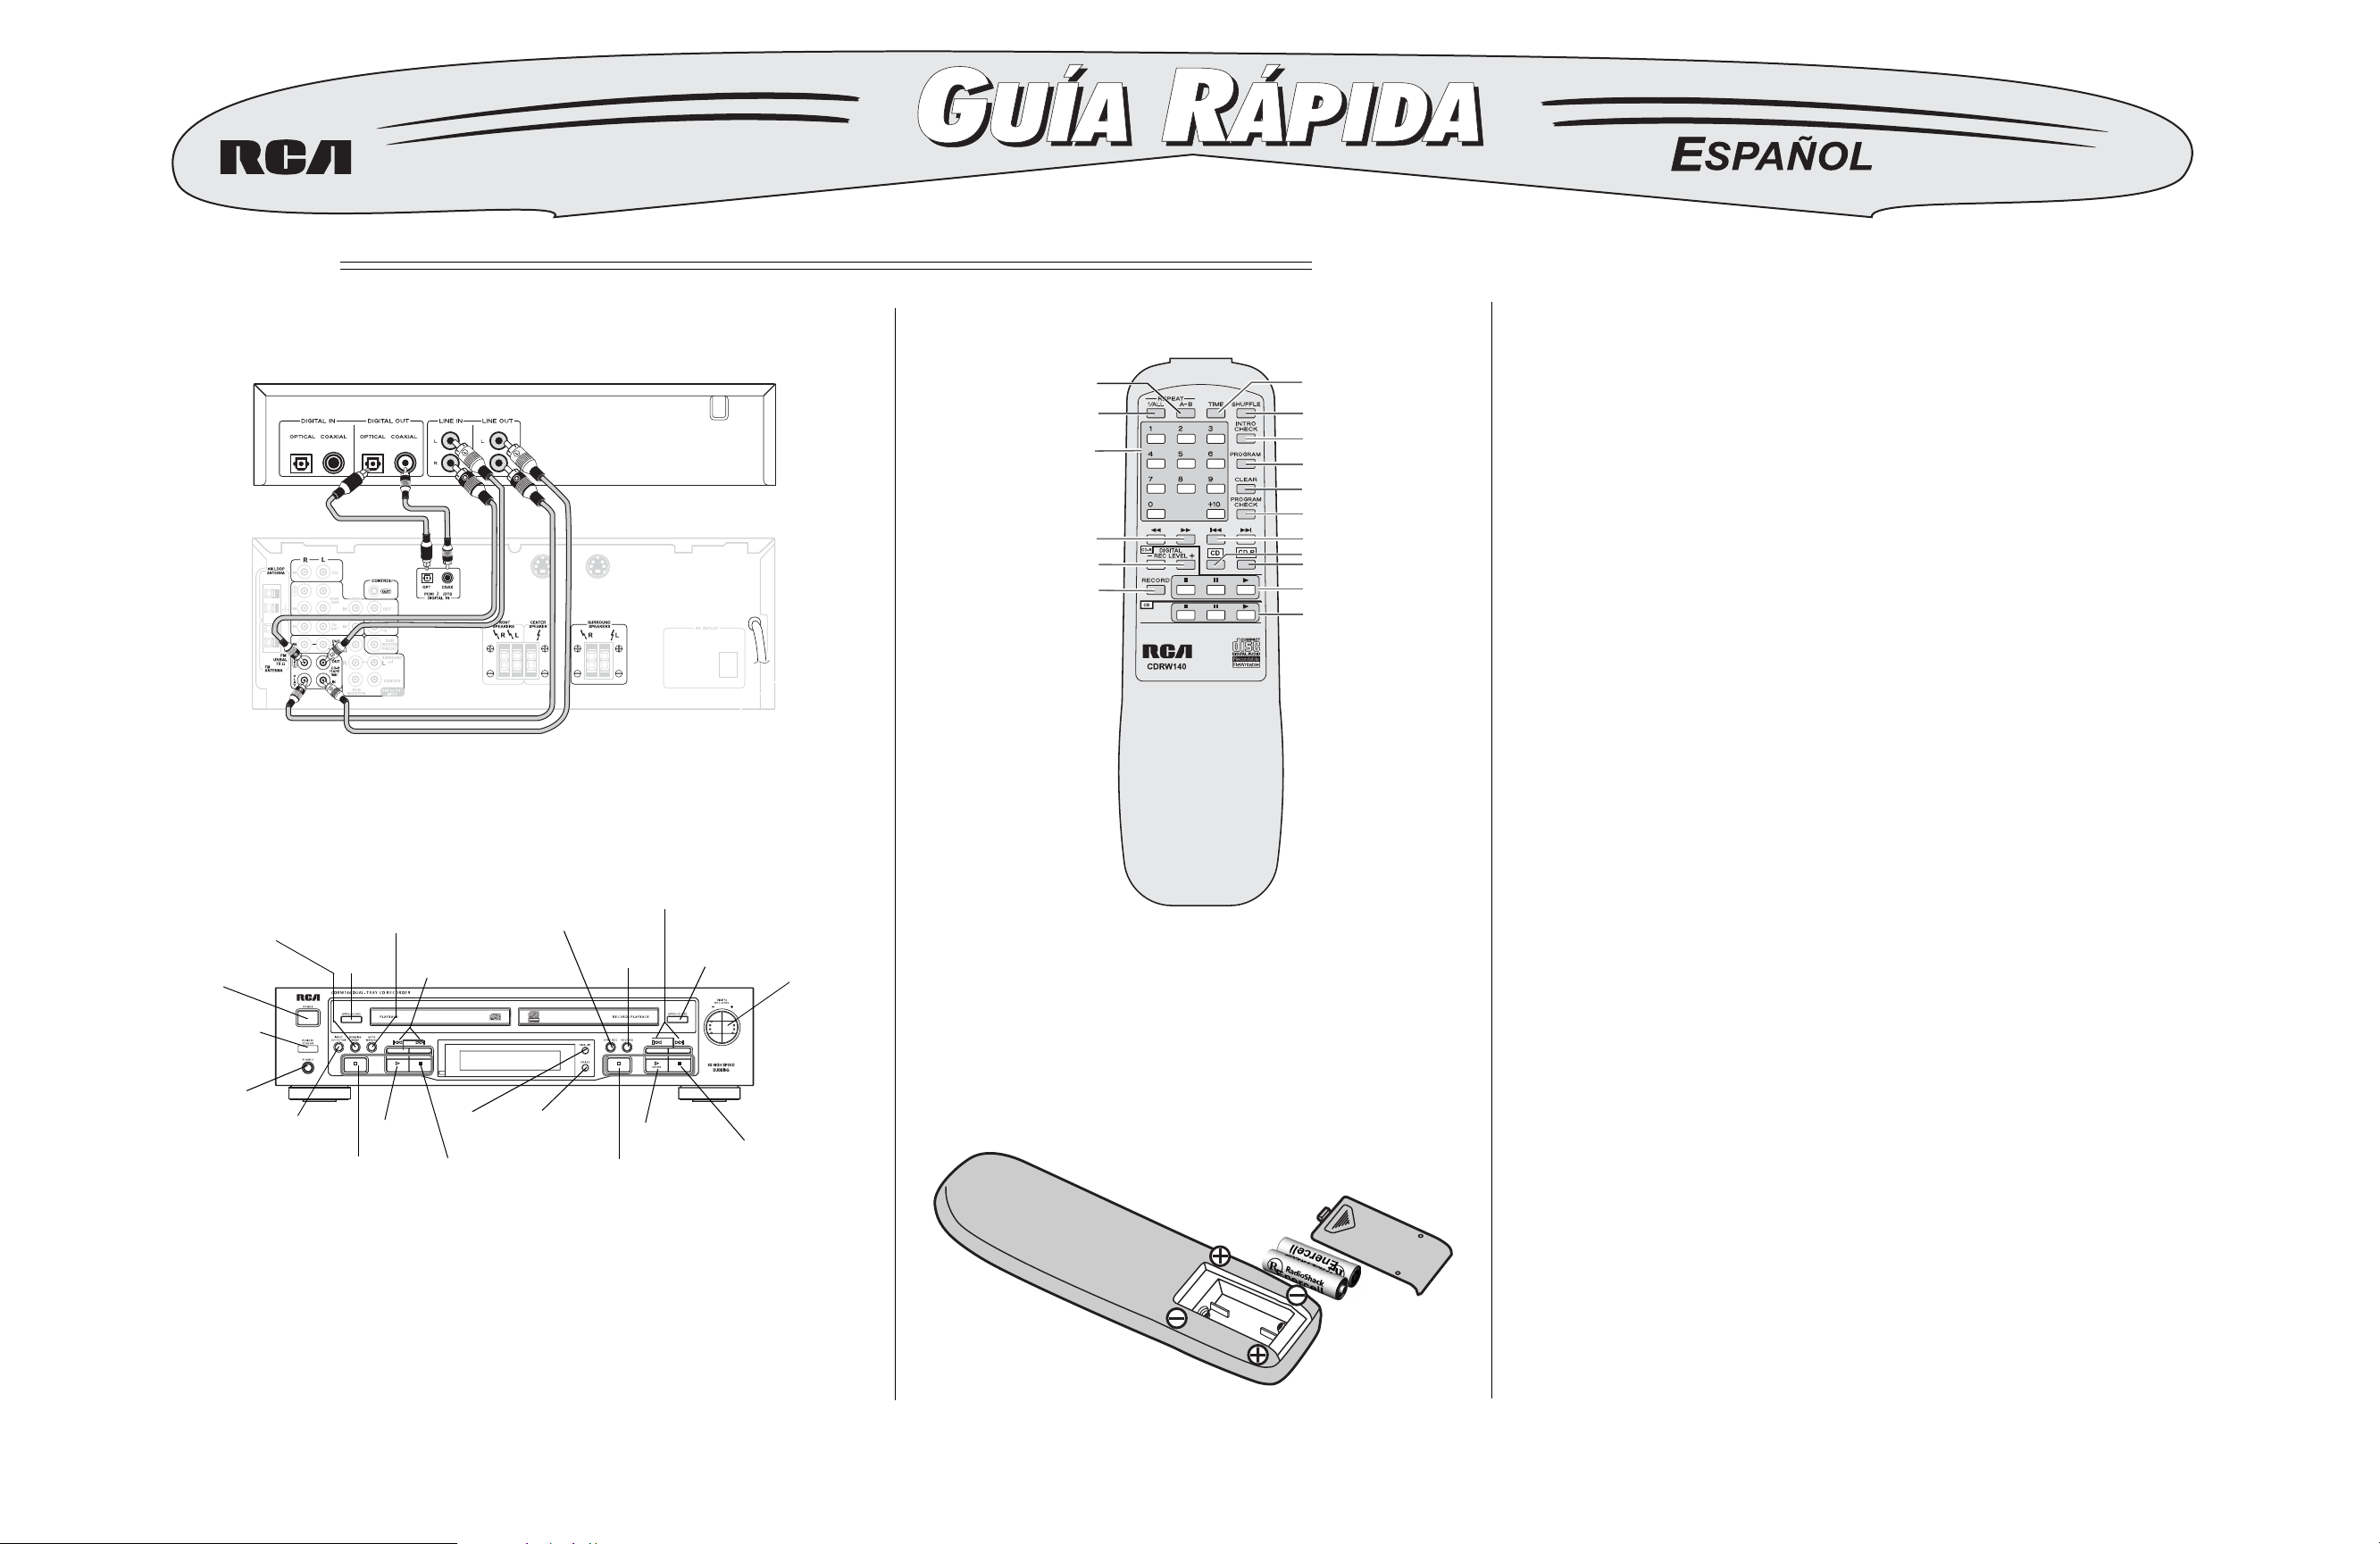
CONEXIÓN Y ALIMENTACIÓN DE CORRIENTE
DE LA GRABADORA
Para conectar la grabadora al receptor, siga el diagrama.
Nota: El receptor, mostrado abajo, no dispone de enchufes de salida digital.
Si el receptor tampoco cuenta con enchufes de salida digital, puede utilizarse una
fuente digital como un reproductor de CD o un reproductor de MD.
S-VIDEO IN S-VIDEO OUT
UN VISTAZO RÁPIDO AL
REPEAT A-B
[REPETIR A-B]
REPEAT 1/ALL
[REPETIR 1/TODO]
Botones numéricos
Botones para buscar música
DIGITALREC LEVEL –/+
[NIVEL GRAB. DIGITAL –/+]
RECORD [GRABAR]
CONTROL REMOTO
TIME [HORA]
SHUFFLE [REVOLVER]
PROGRAM [PROGRAMA]
PROGRAM CHECK
[REVISIÓN PROGRAMA]
Botones parasaltarmúsica
CD-R
Botones de control de CD-R
Botones de control de CD
INTRO CHECK [REVISIÓN INTRO]
CLEAR [DESPEJAR]
CD
REPRODUCCIÓN DE UN DISCO COMPACTO
La bandeja RECORD/PLAYBACK [GRABAR/REPRODUCIR] para reproducir discos
CD, CD-R, y CD-RW. La bandeja PLAYBACK puede utilizarse para reproducir
discos CD, CD-R y CD-RW. No se pueden reproducir discos CD-R o CD-RW que
no hayan sido finalizados en la bandeja PLAYBACK
1. Oprima el botón POWER [CORRIENTE] de la grabadora. El rótulo
READING [LEYENDO] destella durante un tiempo. Cuando no hay ningún
disco puesto, aparece el rótulo no DISC [NO HAY DISCO] o DISC no
[NO HAY DISCO].
2. Oprima el botón respectivo OPEN/CLOSE [ABRIR/CERRAR] de la
bandeja PLAYBACK o de la bandeja RECORD/PLAYBACK.
3. Cuidadosamente coloque el disco, con la etiqueta hacia arriba, en el
portadiscos.
4. Oprima el botón OPEN/CLOSE de la bandeja PLAYBACK o de la bandeja
RECORD/PLAYBACK para cerrar la bandeja del disco. Cuando se coloca un
disco en la grabadora, el rótulo READING destella mientras aquélla determina
el contenido del disco. Cuando la grabadora acaba de leer el IDC (índice de
contenido), en la pantalla aparece el número total de pistas, el tiempo total de
reproducción y el tipo de disco (sólo la bandeja RECORD/PLAYBACK)
.
.
UN VISTAZO RÁPIDO A LA GRABADORA
DUBBING
MODE
[MODO DE
MEZCLA]
POWER
[CORRIENTE]
REMOTE SENSOR
[SENSOR REMOTO]
PHONES
[AUDÍFONOS]
OPEN/CLOSE
[ABRIR/CERRAR]
INPUT SELECTOR
[SELECTOR DE
ENTRADA]
AUTO/
MANUAL
[AUTOM./
MANUAL]
PLAY
[REPRODUCIR]
STOP
[PARAR]
Botones MUSIC SKIP
[SALTAR MÚSICA]
FINALIZE
[FINALIZAR]
PAUSE
[PAUSA]
SYNC REC
[GRABACIÓN SINCR.]
ERASE
[BORRAR]
Botones MUSIC SKIP
[SALTAR MÚSICA]
RECORD
[GRABAR]
PLAY
[REPRODUCIR]
STOP
[PARAR]
OPEN/CLOSE
[ABRIR/CERRAR]
PAUSE [PAUSA]
DIGITAL REC
LEVEL –/+
[NIVEL GRAB.
DIGITAL –/+]
“En materia de accesorios para reproductores
y grabadoras de discos compactos,
¡siempre tenga presente RadioShack!”
Audífonos Pilas Discos CD-R en blanco
Cable óptico Cable de audio Limpiador para lente de CDs
INSTALACIÓN DE LAS PILAS
1. Oprima la tapa del compartimiento de las pilas y luego deslícela
en la dirección de la flecha para retirarla.
2. Introduzca las pilas en el compartimiento correspondiente en la
forma indicada por los símbolos de polaridad (+ y –) marcados en
el interior del mismo.
3. Coloque de nuevo la tapa.
• Cuando se coloca un disco en blanco en la bandeja RECORD/PLAYBACK,
aparece el rótulo BLANK[EN BLANCO].
• Cuando se coloca un disco en la bandeja RECORD/PLAYBACK, en la pantalla
aparece uno de los siguientes rótulos
CD — Un disco CD comercial pregrabado.
CD-R — Un disco CD-R finalizado.
CD-R, NO TOC — Un disco CD-R que debe finalizarse.
CD-RW, NO TOC — Un disco CD-RW que debe finalizarse.
CD-RW — Un disco CD-RW finalizado.
BLANK — No hay disco puesto, o es un disco ilegible.
5. Para iniciar la reproducción, oprima el botón
o el botón
/ENTER para la bandeja RECORD/PLAYBACK.
²
6. Para detener temporalmente la reproducción, oprima el botón †. Para reanudar
la reproducción, oprima el botón †o ².
7. Para detener la reproducción, oprima el botón G.
Si colocas discos CD en los dos bandejas de PLAYBACK y RECORD/PLAYBACK, la
grabadora automáticamente reproduce el otro CD quando el CD actual acaba. La
grabadora deja de reproducir al final del segundo disco
:
para la bandeja PLAYBACK
²
.
RadioShack Corporation
Fort Worth, Texas 76102
© 2003 RadioShack Corporation. Todos los derechos reservados.
03A03
Impreso en China
 Loading...