

Page 1

I^Gil
Model Number.
40LA45RQ
Part No.: RN0340E0100
Changing Entertainment. Again.
www.rca.com
Page 2

Caution and Warning
CAUTION
A
Caution: To reduce the risk of electric shock, do not remove cover or back. No user-serviceable parts inside. Refer servicing to qualified service personnel.
The lightning flash with arrowhead
symbol, within an equilateral triangle
is intended to alert the user to the
presence of uninsulated dangerous
voltage within the product enclosure
that may be of sufficient magnitude to
consitute a risk of electric shock.
WARNING: TO REDUCE THE RISK OF FIRE OR ELECTRIC SHOCK, DO NOT EXPOSE THIS APPLIANCE TO RAIN
OR MOISTURE.
CAUTION: CHANGES OR MODIFICATIONS NOT EXPRESSLY APPROVED BY THE PARTY RESPONSIBLE FOR
COMPLIANCE WITH THE FCC RULES COULD AVOID THE USERS AUTHORITY TO OPERATE THIS
EOUIPMENT.
RISK OF ELECTRIC SHOCK
DO NOT OPEN
The exclamation point within an
equilateral triangle is intended to
alert the user to the presence of
important operating and maintenance
(servicing) instructions in the literature
accompanying the TV.
A
FCC Notice
FCC Information
This equipment has been tested and found to comply with the limits for a Class B digital device, pursuant to Part 15 of the
FCC rules. These limits are designed to provide reasonable protection against harmful interference in a residential installation.
This equipment generates, uses and can radiate radio frequency energy and, if not installed and used in accordance with
the instructions, may cause harmful interference to radio Communications. However, there is no Guarantee that interference
will not occur in a particular installation. If this equipment does cause harmful interference to radio or television reception,
which can be determined by turning the equipment off and on, the user is encouraged to try to correct the interference by
one or more of the following measures:
- Reorient or relocate the receiving antenna.
- Increase the separation between the equipment and the receiver.
- Connect the equipment into an outlet on a circuit different from that to which the receiver is connected.
- Consult the dealer or an experienced radio/TV technician for help.
Page 3

Safety Precautions
1. Read these instructions.
2. Keep these instructions.
3. Heed all warnings.
4. Follow all Instructions.
5. Do not use this apparatus near water. For example, do not use near a laundry tub, In a wet basement, or near a swimming
pool, and the like.
6. Clean only with dry cloth.
7. Do not block any ventilation openings. Install In accordance with the manufacturer’s instructions. Slots and openings in
the cabinet back or bottom are provided for ventilation, to ensure reliable operation of the TV and to protect it from
overheating. These openings must not be blocked or covered. The openings should never be blocked by placing the TV
on a bed, sofa, rug, or other similar surface.
8. Do not Install near any heat sources such as radiators, heat registers, stoves, or other apparatus (including amplifiers) that
produce heat.
9. Do not defeat the safety purpose of the polarized or grounding-type plug. A polarized plug has two blades with on wider
than the other. A grounding-type plug has two blades and a third grounding prong. The wide blade or the third prong is
provided for your safety. If the provided plug does not fit Into your outlet, consult an electrician for replacement of the
obsolete outlet.
10. Protect the power cord from being walked on or pinched particularly at plugs, convenience receptacles, and the point
where they exit from the apparatus.
11. Only use attachments/accessories specified by the manufacturer.
12. Use only with cart, stand, tripod, bracket, or table specified by the manufacturer, or sold with the
apparatus. When a cart is used, use caution when moving the cart/apparatus combination to
avoid injury from tip-over. A TV and cart combination should be moved with care. Quick stops,
excessive force, and uneven surfaces may cause the TV and cart combination to overturn.
13. Unplug this apparatus during lightning storms or when unused for long periods of time. For added protection for this TV
receiver during a lightning storm, or when it is left unused for long periods of time, unplug It from the wall outlet and
disconnect antenna or cable system. This will prevent damage to the TV due to lightning and power line surges.
14. Refer all servicing to qualified service personnel. Servicing is required when the apparatus has been damaged in any way,
such as power-supply cord or plug Is damaged, liquid has been spilled or objects have fallen Into the apparatus, the
appratus has been exposed to rain or moisture, does not operate normally, or has been dropped.
15. This TV should be operated only from the type of power supply Indicated on the rating label. If customer is not sure the
type of power supply In your home, consult your appliance dealer or local power company. For TV remote control battery
power, refer to the operating instructions.
16. The TV set shall not be exposed to dripping or splashing. No objects filled with liquids, such as vases, shall be placed on
the TV set.
17. Never push objects of any kind into this TV through openings as they may touch dangerous voltage or other electrical
parts that could result In fire or electric shock. Never spill liquid of any kind into the TV.
18. Unplug the TV from the wall outlet before cleaning. Do not use liquid or aero cleaners. Use a damp cloth for cleaning.
19. This TV should never be placed near or over a radiator or heat resource. This TV should not be placed In a bullt-ln
Installation such as a bookcase or rack unless proper ventilation Is provided or the manufacturer's Instructions have been
adhered to.
20. Do not place this TV on an unstable cart, stand, tripod, bracket, or table. The TV may fall, causing serious Injury to
someone, and serious damage to the appliance.
21. Do not attempt to service this TV by yourself because opening or removing covers may expose you to dangerous high
voltage or other hazards. Refer all servicing to qualified service personnel.
22. This device complies with Part 15 of the FCC Rules. Operation is subject to the following two conditions: (1) this device
may not cause harmful Interference, and (2) this device must accept any Interference received. Including Interference
that may cause undesIred operation.
Page 4
Safety Precautions
23. WARNING: To prevent injury, this apparatus must be securely attached to the floor/wall in accordance with the
installation instructions.
24. To reduce the risk of electric shock, the grounding of center pin of plug must be maintained.
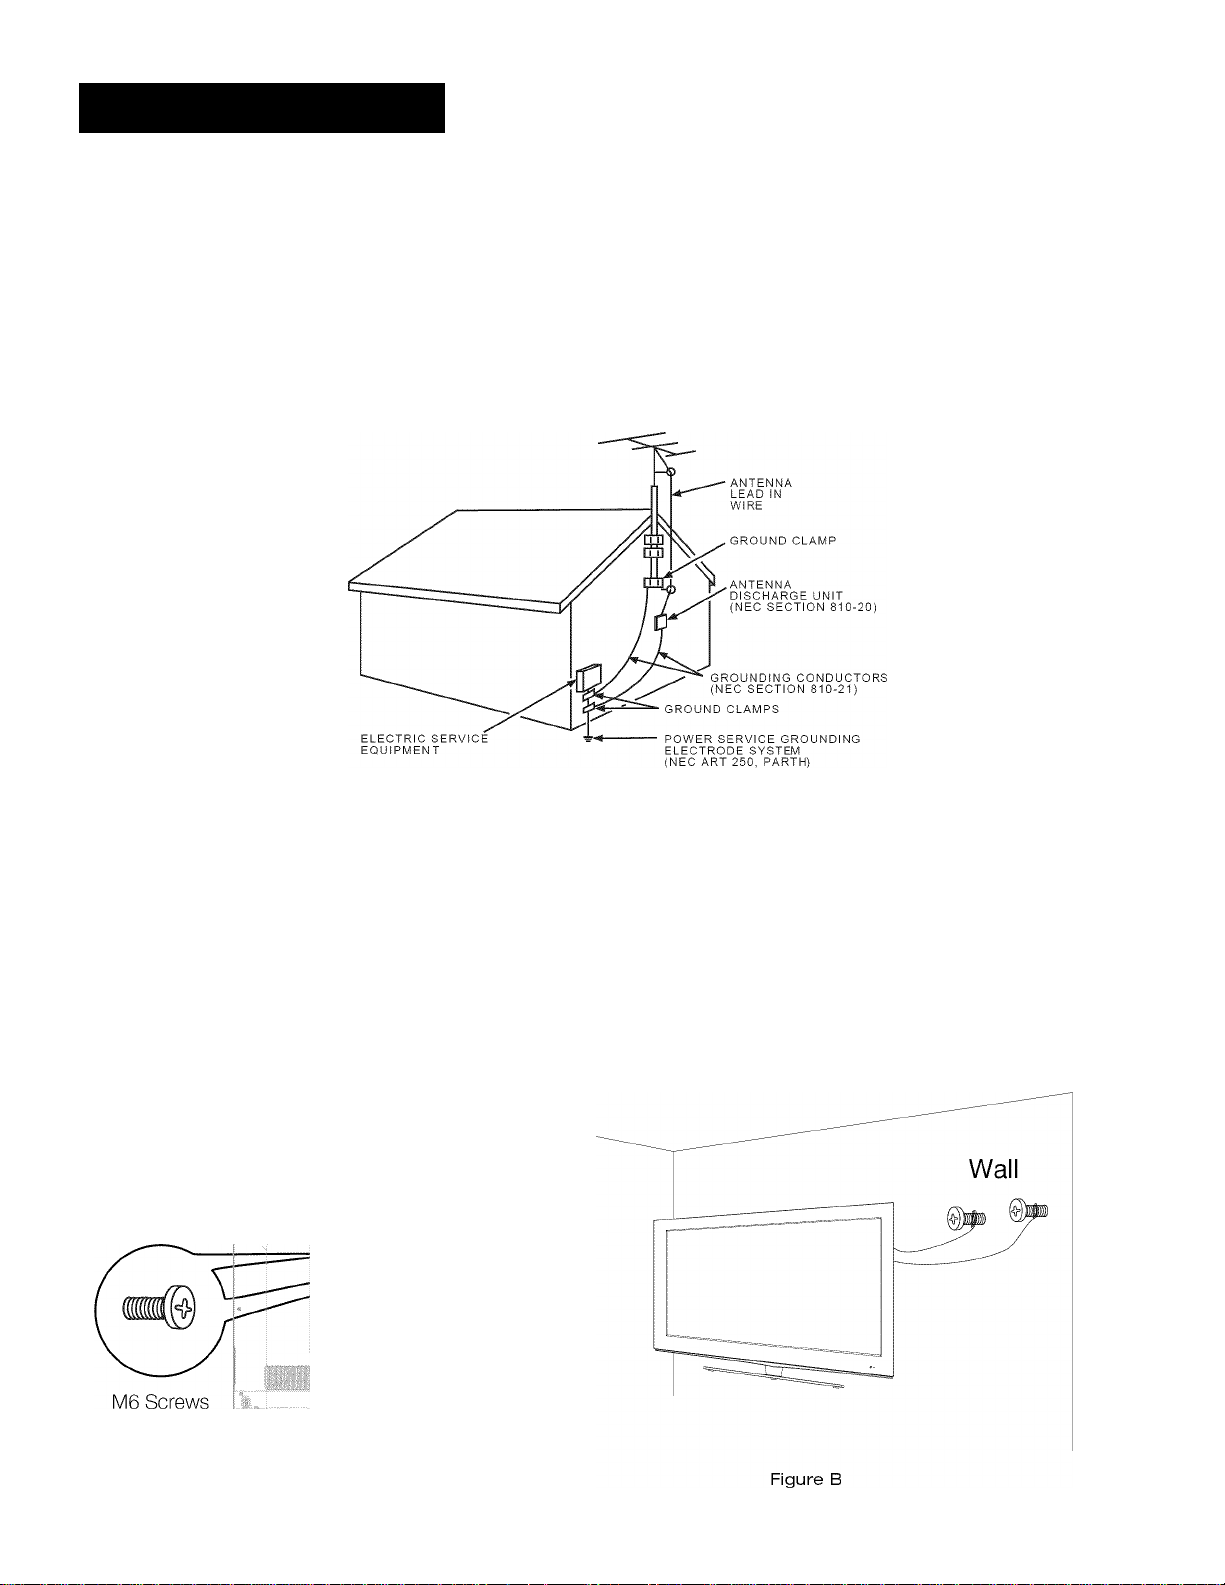
25. If an outside antenna or cable system is connected to the TV, be sure the antenna or cable system is grounded to provide
some protection against voltage surges and built-up static charges. Section 810 of the National Electrical Code,
ANSI/NFPA N0.70, provides information with respect to proper grounding of the mast and supporting structure,
grounding of the lead-in wire to an antenna discharge unit, size of grounding conductors, location of antenna discharge
unit, connection to grounding electrodes, and requirements for the grounding electrodes. (See Diagram Figure A.)
Diagram Figure A
Safety Strap
Caution; Pushing, pulling or climbing on the TV may cause the TV falling. Do not let children climb or hang on the TV.
Always place the TV on a sturdy, level, sable surface that can hold the weight of TV. And if possible, secure the TV according
to the instruction below (Note: The fastening components such as screws are not supplied with TV).
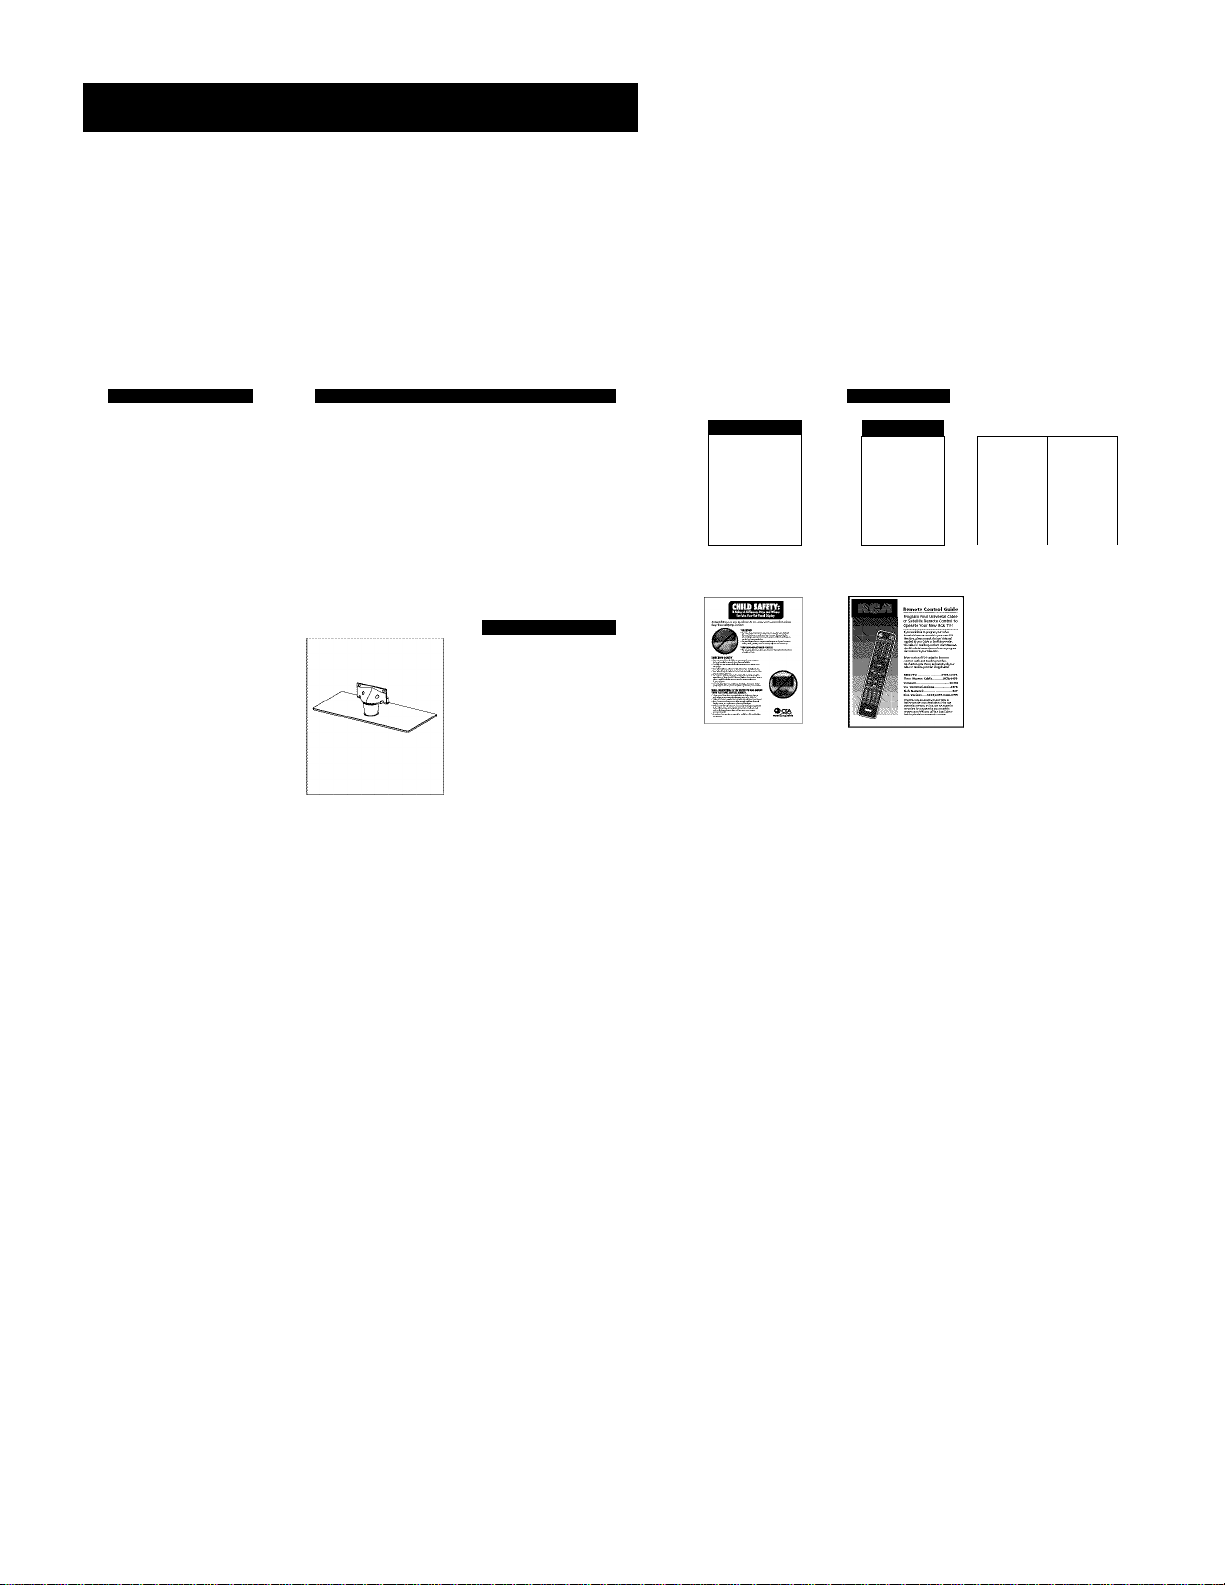
Step one: Insert the M6 mounting screws into the upper two wall mounting screw holes and fasten them (Figure A).
Step two: Insert anchors to wall and connect the bolts and anchors with ropes or chains (Figure B).
Figure A
III
Page 5

Table of Contents
Caution and Warning.............................................................................................................................. i
FCC Notice..............................................................................................................................................i
Safety Precautions..............................................................................................................................lUii
Preparation for Your New TV.................................................................................................................6
Check Accessories ....................................................................................................................................................................6
Complete Customer Registration .............................................................................................................................................. 6
Setup TV Table Stand ...............................................................................................................................................................6
Select TV Location .....................................................................................................................................................................6
Connection and Using................................................................................................................................................................6
TV Stand Installation................................................................................................................................i
TV Signal Connection.............................................................................................................................8
Cable Connections..............................................................................................................................................................9
Back Panel Connections.......................................................................................................................io
Connecting AV Composite Video device (Good Video Quality)...............................................................................................10
Connecting YPbPr Component device (Better Video Quality).................................................................................................11
Connecting HDMI device (Best Video Quality) ........................................................................................................................12
Connecting a Computer............................................................................................................................................................13
How to Qbtain Various Kinds of Input Sources........................................................................................................................13
TV Jacks Explanation............................................................................................................................14
Side Keypad and Front Panel................................................................................................................15
Side Panel Buttons...................................................................................................................................................................15
Front Panel...............................................................................................................................................................................15
Remote Control Instructions...........................................................................................................................................16
Inserting Batteries in the Remote ............................................................................................................................................16
Remote Control Reception Angle.............................................................................................................................................16
Learning about Remote Control............................................................................................................17
Remote Control Buttons...........................................................................................................................................................17
Initial Setup..........................................................................................................................................................................18
Menu Language........................................................................................................................................................................18
Signal Type...............................................................................................................................................................................18
Auto Channel Search................................................................................................................................................................18
Basic Operations...................................................................................................................................19
Turning Qn and Qff...................................................................................................................................................................19
Choosing TV Channel...............................................................................................................................................................19
Selecting Input Source..............................................................................................................................................................19
Adjusting TV Stand Angle.........................................................................................................................................................19
Channel Bar..............................................................................................................................................................................20
Adjusting Volume......................................................................................................................................................................20
ERG (Electronic Program Guide) ............................................................................................................................................20
Page 6

Table of Contents
OSD Menu Operations ...................................................................................................................................................21
Adjust the OSD Screen ...........................................................................................................................................................21
Picture Menu ...........................................................................................................................................................................21
Sound Menu ............................................................................................................................................................................23
Channel Menu .........................................................................................................................................................................24
Parental Menu .........................................................................................................................................................................25
Setup Menu..............................................................................................................................................................................29
Others Menu ...........................................................................................................................................................................31
Frequently Asked Ouestions (FAOs) .........................................................................................................................32
Troubleshooting .................................................................................................................................................................33
V-Ohip Rating Explanations ..........................................................................................................................................35
us V-Chip Rating System.........................................................................................................................................................35
Canadian English Rating System ............................................................................................................................................35
Canadian French Rating System .............................................................................................................................................36
Universal Remote Oontrol Oode List ..........................................................................................................................36
Wall Mounting Unit Speoifioation..................................................................................................................................37
Produot Speoifioation....................................................................................................................................................... 38
Page 7
Preparation for Your New TV
Before Turning On TV
Check Accessories
Check the accessories that are packed with your TV.
REMOTE CONTROL
PART NO.; RE20QP28
AAA BATTERIES TV STAND SCREWS DOCUMENTS
MACHINE
SCREW
nen
Quick start Guide
ROil
5=55^
□
M
TAPPING
SCREW
AC POWER CORD
7Ì 1-à
USER’S GUIDE
CHILD SAFETY REMOTE CONTROL WARRANTY
CARD GUIDE CARD
QUICK START
GUIDE
REGISTRATION
CARD
Complete Customer Registration
Please fill the RCA registration Card and return it to the address printed on it. That is for your customer service. To achieve best
customer warranty work, please read and fill it carefully.
Setup TV Table Stand
Please refer to TV Stand Installation guide in next page to carry out stand installing.
Select TV Location
Select a flat, stable table to locate your TV set. Please follow the Safety Instructions when locating the TV.
Connection and Using
After placing your TV properly, you can connect the TV with power supply and cable components. For further information, see page
10 to page 13.
Note: Above accessories are subject to change without notice.
Page 8
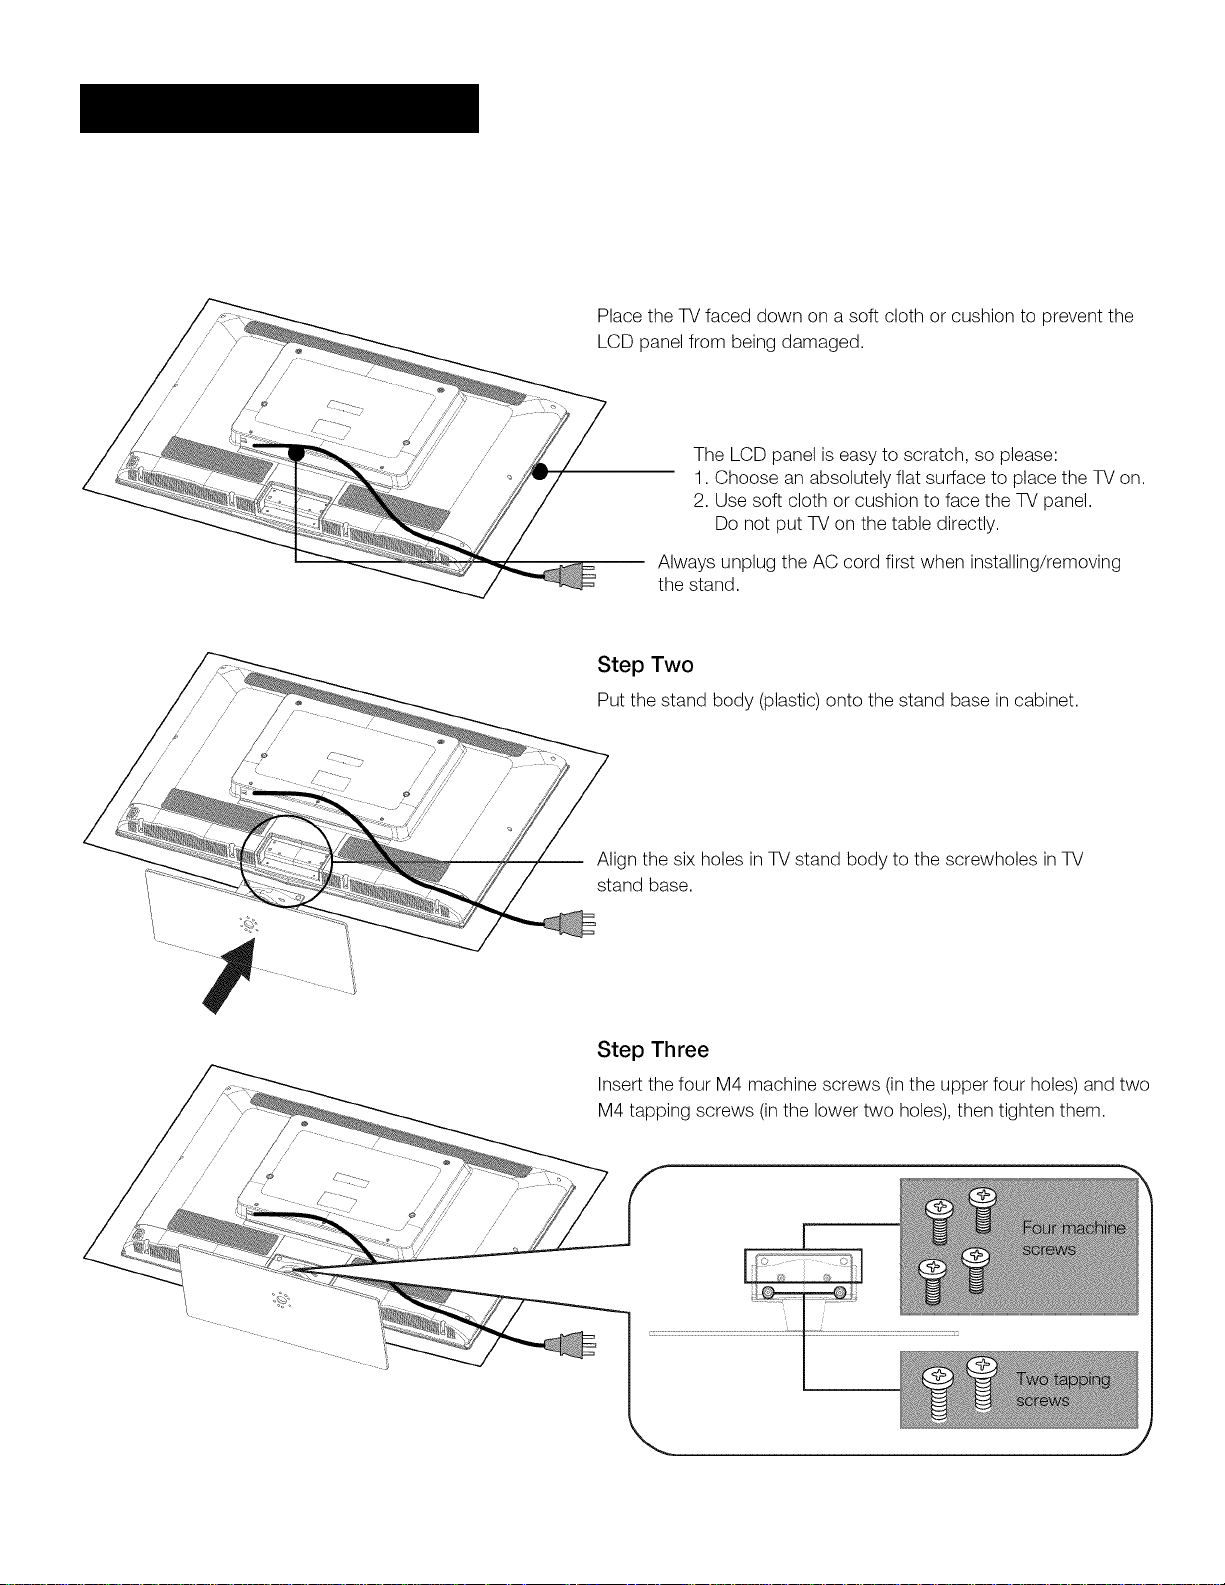
TV stand Installation
TV 40V\45RQ is packaged with the TV stand separated from the cabinet. To setup the TV table stand, please carry out the
Installation according to the Instructions below.
Step One
Page 9
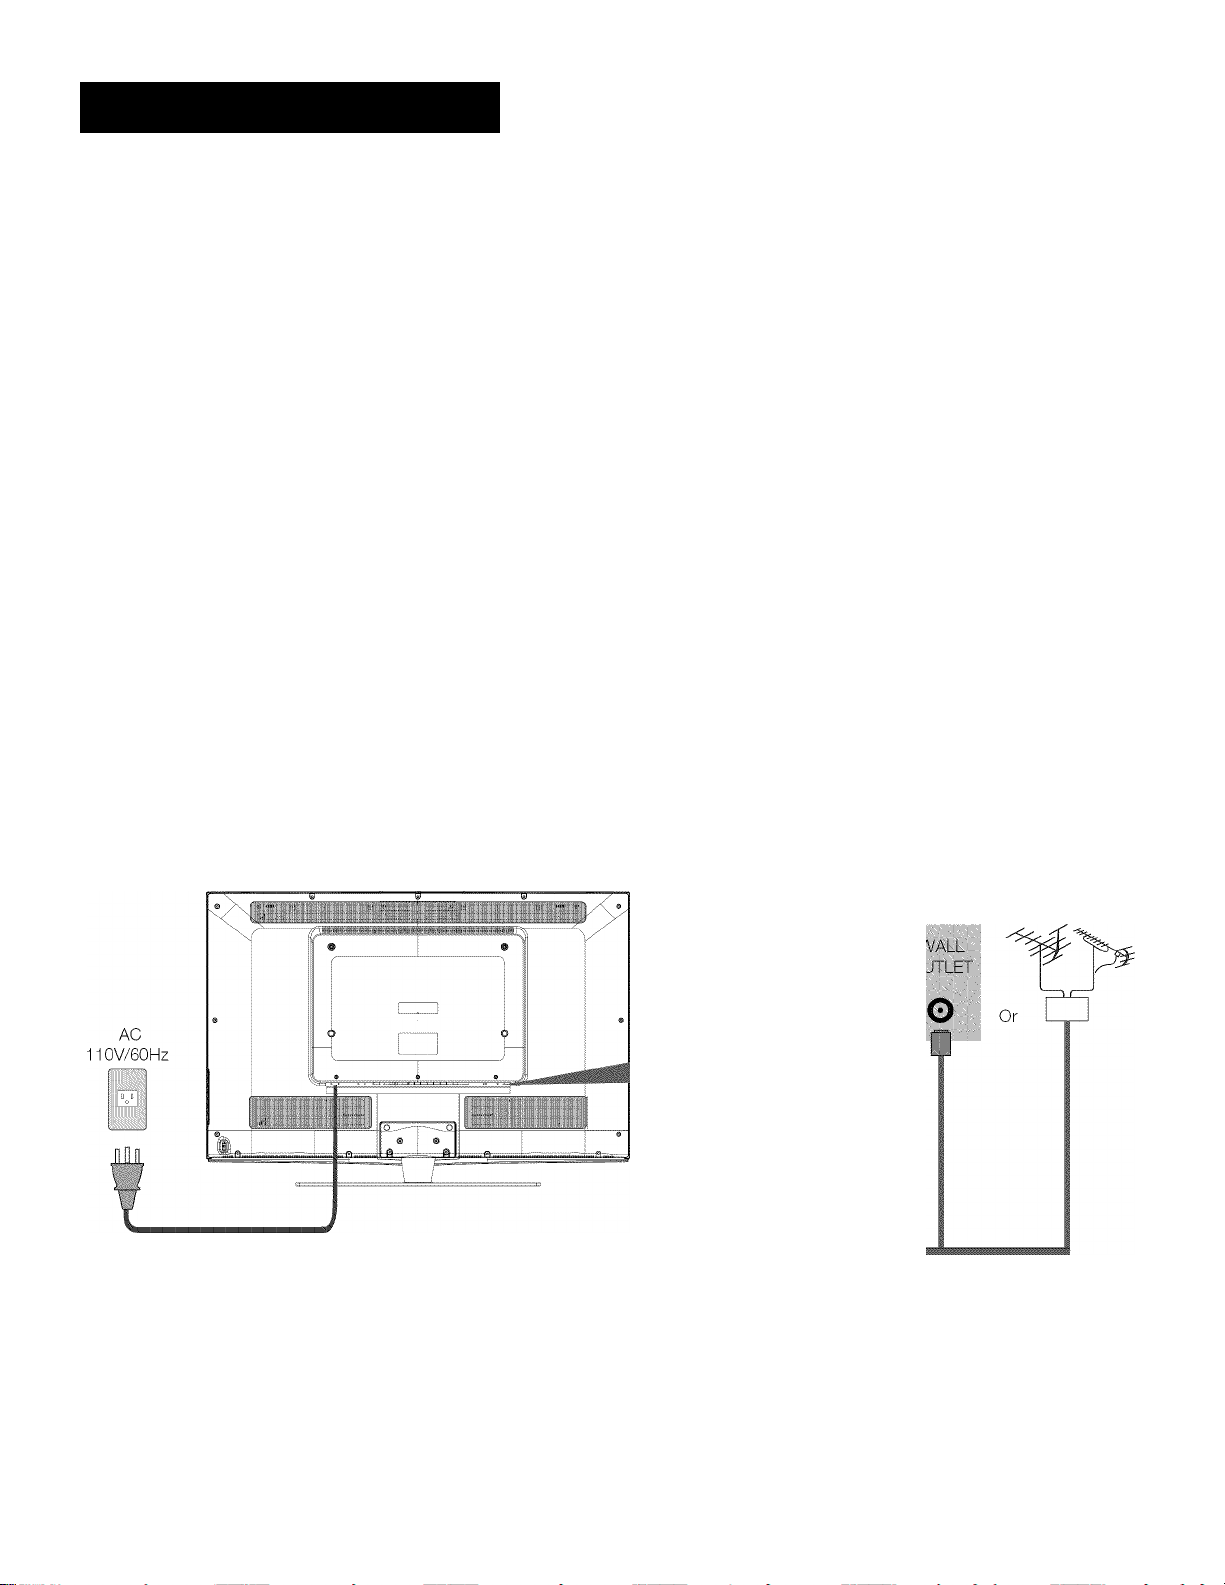
TV Signal Connection
The first step in connecting your TV is obtaining the signai. Your TV 401V\45RQ has a side panei, which aiiows you to receive anaiog
and/or digitai teievision ohanneis via ANT/CABLE jaok.
Before oonneoting your TV, determine using an antenna or a oabie servioe to obtain the signai.
A. Antenna
Conneot the antenna to TV via ooaxiai oabie on ANT/CABLE jaok of the side panei. You are ready to reoeive air iooai digitai and
anaiog ohanneis.
B. Cable TV service
Conneot the oabie TV waii jaok to TV via ooaxiai oabie on ANT/CABLE jaok of the side panei. You are ready to reoeive off-air iooai
digitai and anaiog ohanneis.
C. Set-Top Box
If you use a set-top box, you may need to oali your oabie oompany or sateiiite servioe provider, whioh use a speoiai oonneotion,
piease refer to the user’s guide of set-top box.
Note: Do not plug the AC cord until you have accomplished all the connections.
AC Power Cord
(Conneot after all the other oonneotions are done.)
Cable TV Antenna
8
Page 10
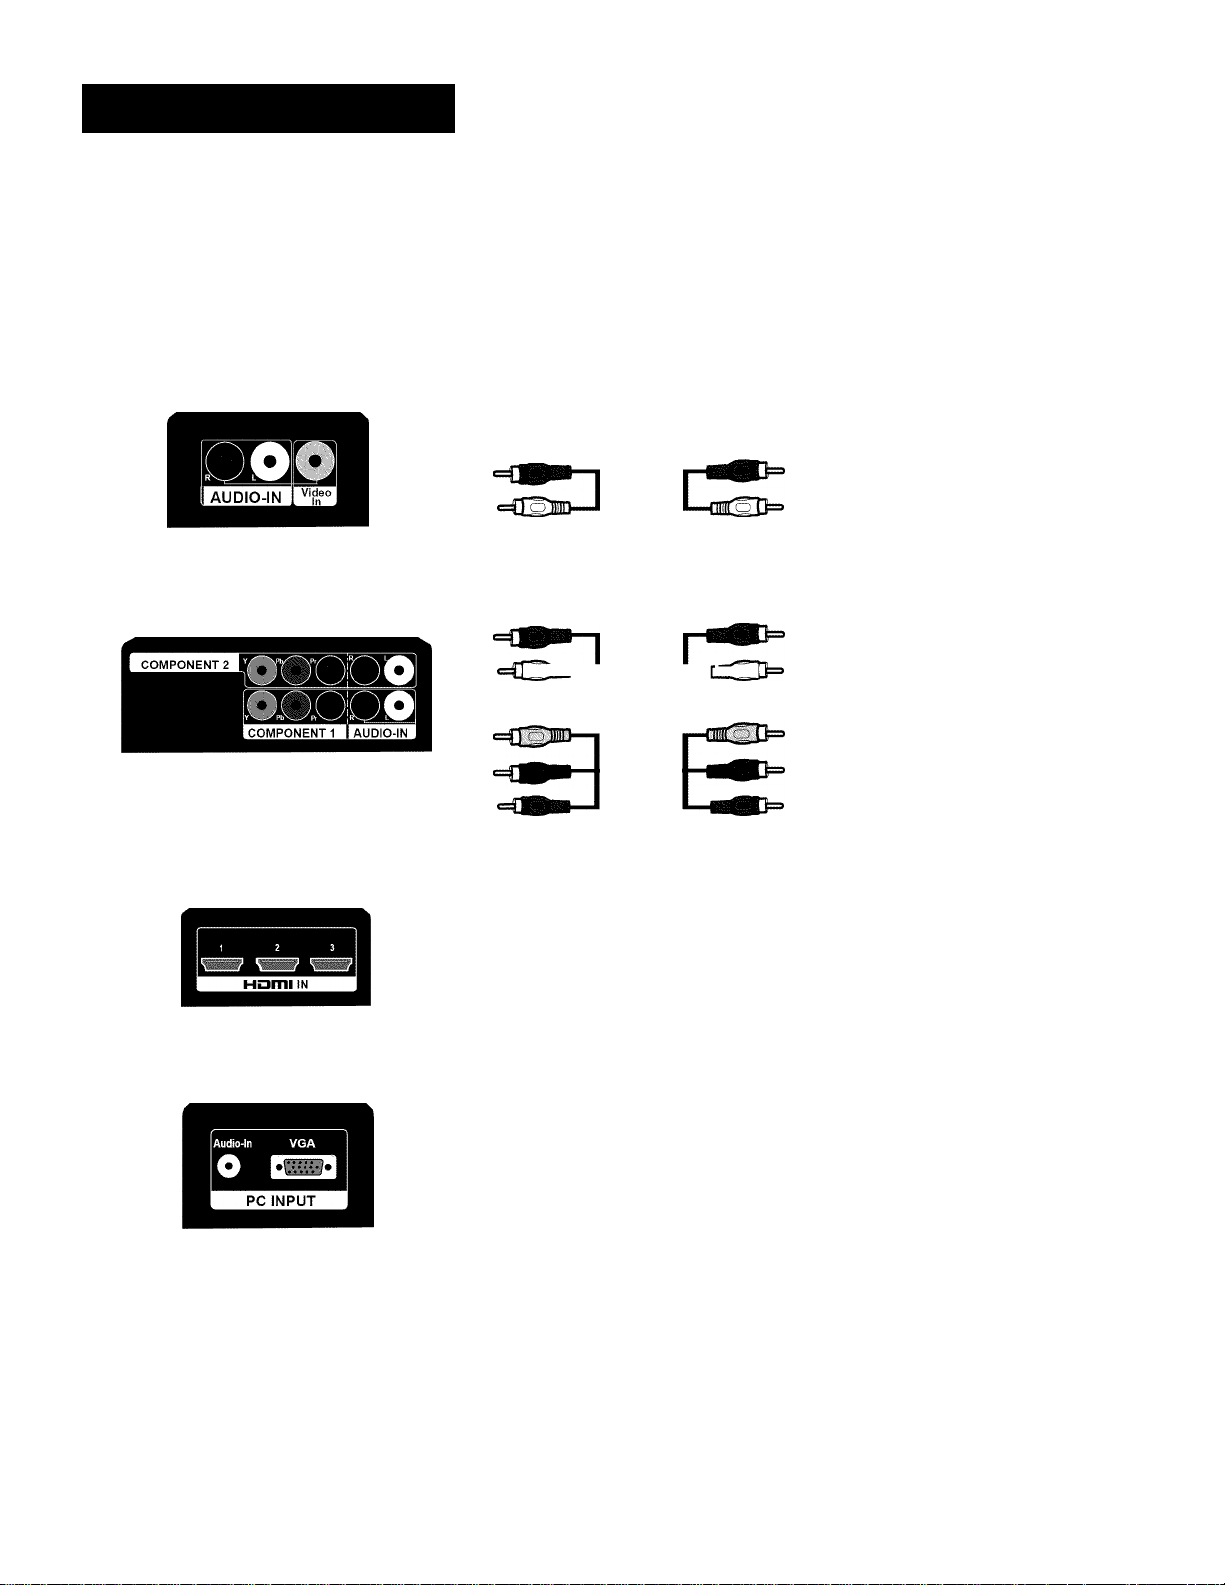
Cable Connections
Choose Your Connections
TV 40U\45RQ supports various of oonneoting ways from other devioes (suoh as DVD, VCR, Set-top box, eot.). Please follow the
table sheet to ohoose the oables whioh adapt to your devioe.
Go to page 10
AUDIO-IN Land R, Video In Video/Audio cable
I oun—1 l—flM CD I
Audio Gable
AUDIO-IN Land R
COMPONENT 1 Y, Pb, Pr
GOMPONENT 2 Y, Pb, Pr
HDMI IN 1,2, 3
PG INPUT
VGA, Audio In
Go to page 11
GOMPONENT video cable
Go to page 12
HDMI cable
Audio cable with 3.5mm terminal
Go to page 13
VGA cable
Note:
HDMI, the HDMI logo, and High-Definition Muitimedia Interface are trademarks or registered trademarks of HDMI Licensing LLC
Caution:
Unpiug the AC cord when you connect other devices to TV.
Page 11
Back Panel Connections
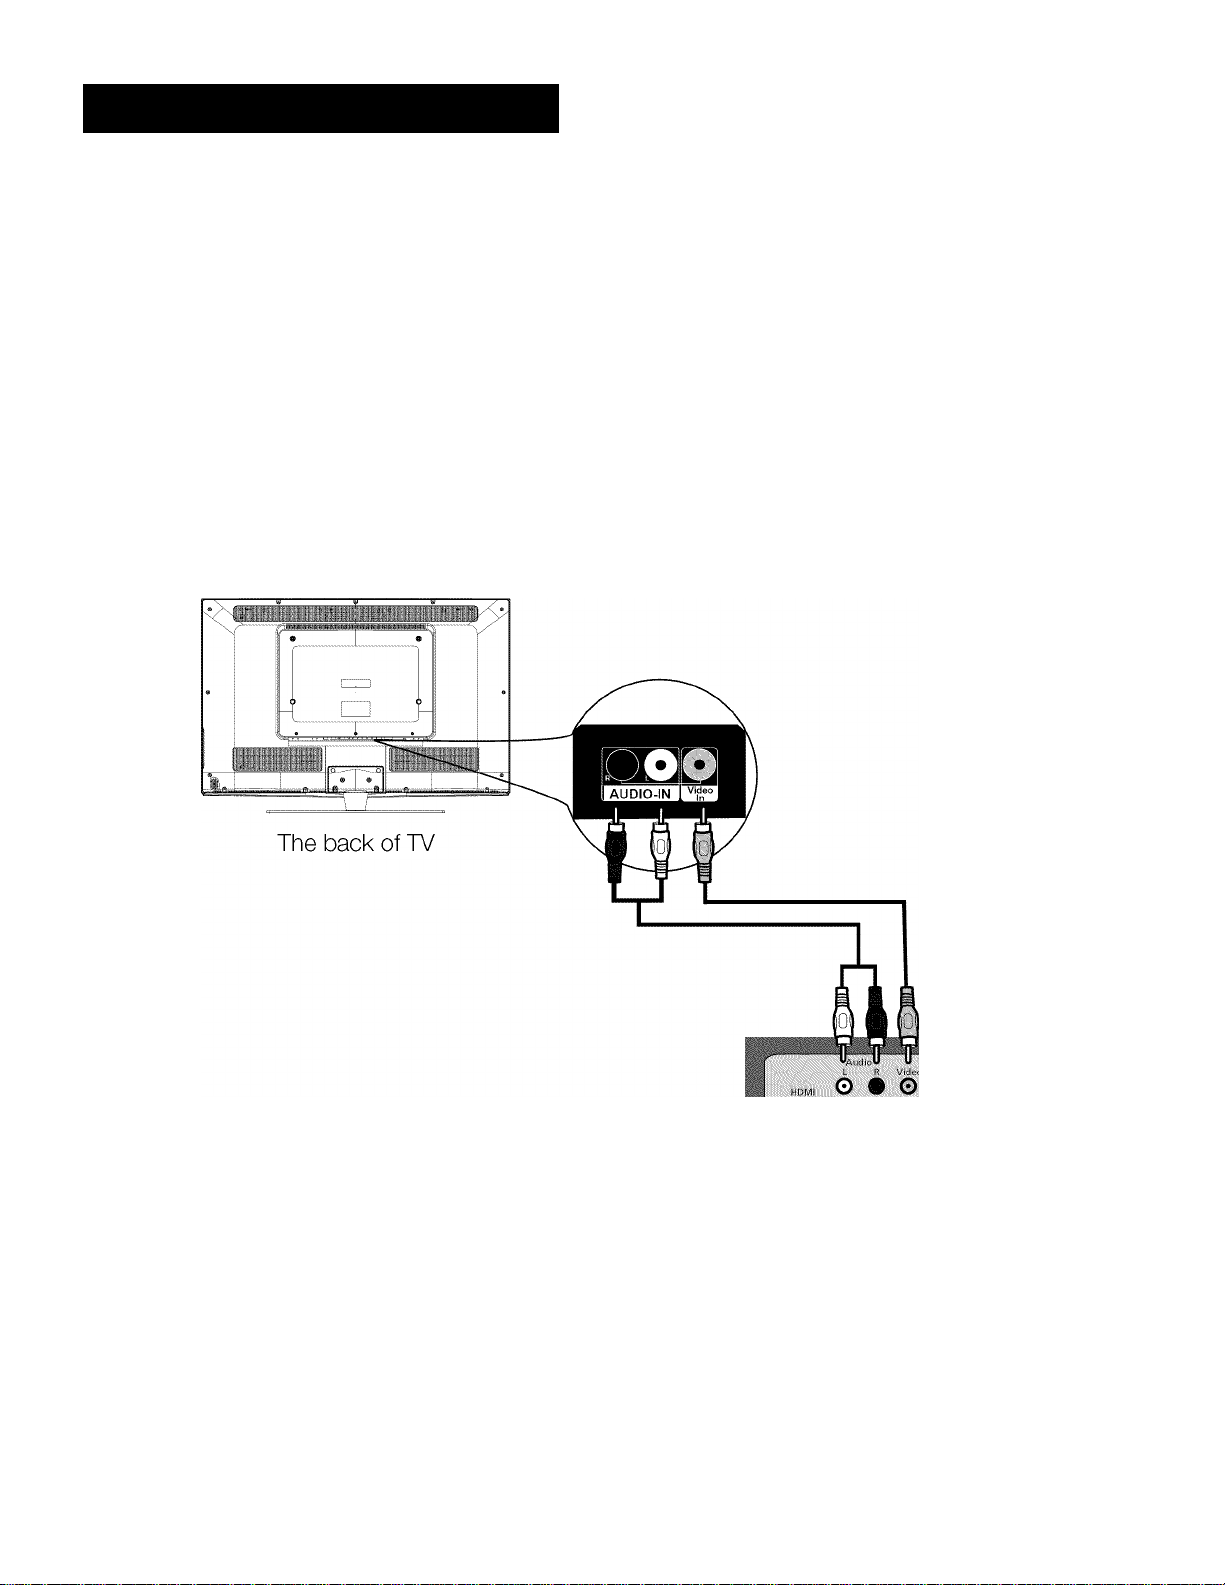
Connecting AV Composite device (Good Video Quality)
To connect an composite AV device, such as a DVD piayer, foliow these steps:
1. Connect the Video In jack on the back of TV to the video output jacks of device via video cabie (yeiiow).
2. Connect the AUDIO-IN L and R jacks on the back of TV to the audio output jacks of device via audio cabie.
Notice the ieft channei jack and piugs are white and the right channel jack and plugs are red.
Note: Al/ signal belongs to oomposite video. This kind of video signal has regular good display quality.
Composite Video Connection
The picture below is an example of a connection using the composite video jack.
10
o
The output panel of other devioe
Page 12
Back Panel Connections
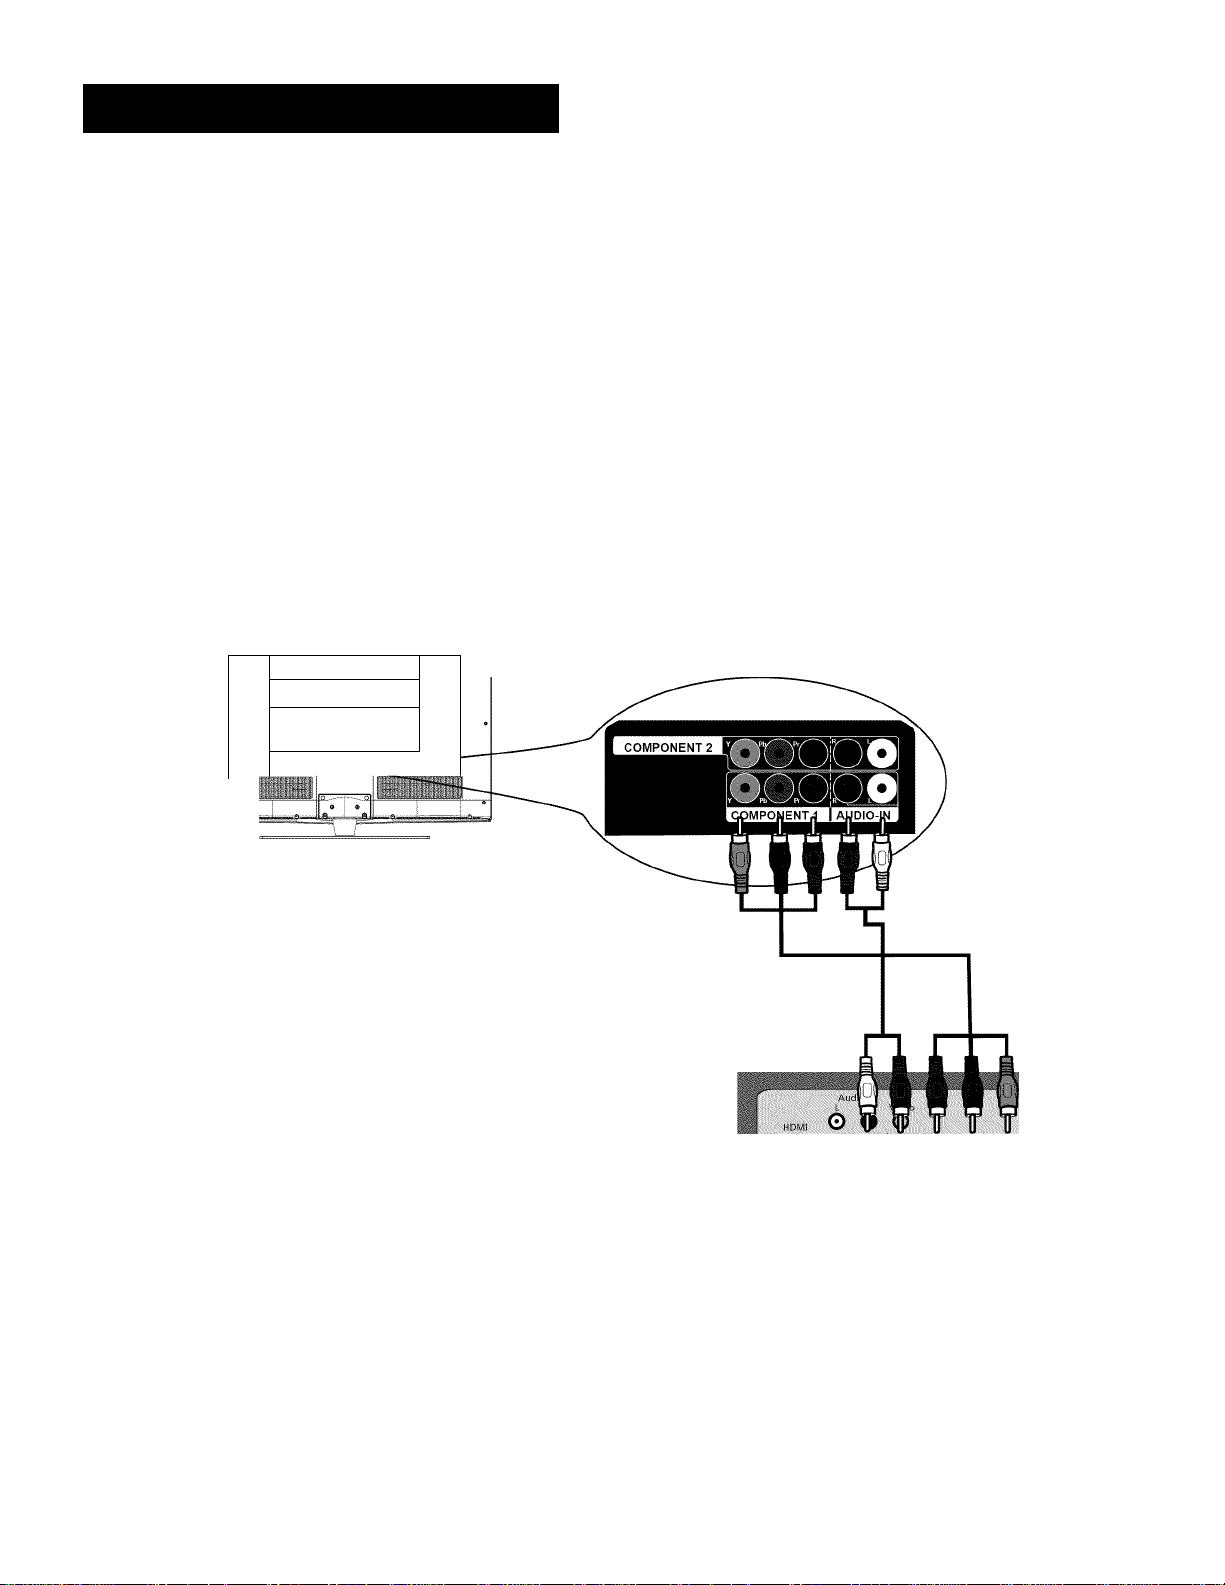
Connecting YPbPr Component device (Better Video Quality)
To connect a component device, such as a DVD player, follow these steps:
1. Connect the COMPONENT 1,2 Y/Pb/Pr jack on the back of TV to the video output jacks of device via video cable (green,
blue and red).
2. Connect the COMPONENT 1,2 AUDIO-IN L and R jacks on the back of TV to the audio output jacks of device via audio cable.
Notice the left channel jack and plugs are white and the right channel jack and plugs are red.
Note: Y/Pb/Pr jacks are component video. This kind of video signai has better dispiay quaiity.
Component Video Connection
The picture below is an example of a connection using the component video jack.
V"
i [
.......................
...
] :
-----
4 j—
i ^
I ;■■■■■
The back of TV
©
0
The output panel of other device
11
Page 13

Back Panel Connections
Connecting HDMI device (Best Video Quality)
To connect an HDMI device, such as a DVD player, please Connect the HDMI1, 2, or 3 jack on the back of TV to the output
jacks of device via HDMI cable.
Note: HDMI (High-Definition Multimedia Interfaoe) is a oompaot audio/video interfaoe for transmitting unoompressed digital
data. It oarries the audio and video signal via the same oable and has the best display quality.
HDMI Connection
The picture below is an example of a connection using the HDMI video jack.
The back of TV
o • o
Audio
L R Pr Pb Y
o • • • o
The output panel of other device
12
Page 14

Back Panel Connections
Connecting a computer
To connect a computer, follow these steps:
1. Connect the PC INPUT VGA port on the back of TV to the VGA output jack of device via D-sub 15-pln cable.
2. Connect the PC INPUT Audio In jack on the back of TV to the audio output jack of computer with audio cable (3.5mm).
Note: If you want to use your TV as a monitor, please notioe that the maximum resolution for 40LA45RQ is 1920*1080.
Please set the oomputer graphio oorreotly.
PC Connection
The picture below is an example of a connection using your TV as a PC monitor.
o g
i i!j
;• •
i II
■
PC
How to Obtain Various Kinds of Input Sources
After connection is done, press INPUT button on remote control or TV top panel to choose the input source you need.
See page 19, Basic Operation of TV.
13
Page 15

TV Jacks Explanation
ANT/CABLE: Connect to receive the signal from your antenna or cable via coaxial cable.
Head phone: Connect a 3.5mm headphone for personal audio.
Digital Audio-out: Connect a coaxial cable for digital audio output.
AUDIO OUTPUT L7R: Connect double-channel coaxial cables for analog audio output.
Note:» Digital Audio-out and AUDIO OUTPUT UR are supposed to be oonneoted to audio power
amplifer, whioh provides smoother and more powerful sound performance.
AUDIO-IN UR, Video In: Connect an AV device that has composite video jacks, such as a VCR
or a DVD player. To access device connected to these jacks, press the INPUT button on your
remote; then press the up/down arrow to select AV. Press the ENTER button at last to confirm.
• AUDIO-IN L: Left audio channel connection. The left audio connector is usually white. For mono audio
sources, be sure to use the left AUDIO INPUT.
• AL/D/0-/A/R; Right audio channel connection. The right audio connector is usually red.
Note:» The AV input (Video In), COMPONENT 1 input (Y, Pb, Pr) share the same audio input jaoks-AUDIO-IN UR.
COMPONENT 1,2 Y/Pb/Pr: Connect a device that has component video jacks, such as a DVD player.
To access device connected to the Y/Pb/Pr jack, press the INPUT button on your remote; then press the up/down arrow to
select Componenti or Component2. Press the ENTER button at last to confirm.
• Y/Pb/Pr (Component Video): They provide good picture quality because the video signal is separated into three components.
Use three video-grade or component video cables for the connection. When using Y/Pb/Pr, make sure you connect left and
right audio cables to the Audio L and Audio R jacks.
HDMI1,2, 3: (High -Definition Multimedia Interface) It provides an uncompressed digital connection that carries both video and audio
data by way of an integrated mini-plug cable.
PC INPUT VGA: Connect your computer or other device with a VGA output to this jack using a 15-pin, D-sub cable.
PC INPUT Audio-In: Use to obtain sound when a PC is connected to TV. Use 3.5mm stereo mini-pin cable to connect PC to TV.
SERVICE: For service use only. Do not connect any device.
AC-IN: AC power input.
14
Page 16

Side Keypad and Front Panel
Side Keypad Buttons
If you cannot locate your remote, you can use the side keypad buttons on your TV to operate many TV features.
INPUT: Displays the Source Select List.
MENU ([P): Displays the TV Main Menu.
CH+:Scans up through the channel list. In the TV menu system, it acts like the up arrow on the remote control and
can be used to select menu options.
CH-: Scans down through the channel list. In the TV menu system, it acts like the down arrow on the remote control
and can be used to select menu options.
VOL+: Increases the volume. In the TV menu system, it acts like the right arrow on the remote control and can be used
to select menu options.
VOL-: Decreases the volume. In the TV menu system, it acts like the left arrow on the remote control and can be used
to select menu options.
POWER (6): Turns the TV on and off.
Front Panel
About remote control working distance and angle, see page 16.
Power/Standby Indicator: Blue and red dual-color LED. It shows red when the TV is turned off and blue when turned on.
Remote Control Sensor: Remote control IR sensor, which receives infrared ray sent by remote control.
15
Page 17

Remote Control Instruotions
Inserting Batteries in the Remote
Remove the cover of battery cabin on the back of the remote control by lifting the cover.
Insert two AAA batteries, making sure the polarities (+ and -) are aligned correctly.
Place the cover back.
If the remote control does not work, check these points: CAUTION:
• Are the polarities (+, -) correct? • Used batteries should be recycled.
• Are the batteries worn out? • Keep out of children’s reach.
• Is there an AC power failure? • DO NOT use new and old batteries together.
• Is the power cord plugged in? • Change both the batteries at the same time.
• Is there any interference or block near the remote • When not using the remote control for a long time,
control sensor? remove the batteries from the unit.
Remote Control Reception Angle
Use your remote control within the distance and angle range shown below.
16
Page 18

Learning about Remote Control
Remote Control Buttons
MUTE([ia:): Reduces the TV volume to its minimum ievel. Press again to restore the voiume.
POWER (d)): Turns the TV on or off.
CH.LIST: Dispiays the ohannel iist.
FAV.: Adds the ourrent ohannel to your favorite iist, or erases the ourrent ohannel from
your favorite iist (if this ohannel is a favorite ohannel already).
FAV.+ or FAV.-: Seans up or down through the ourrent favorite ohannel list.
Numeric Buttons: Use these buttons to enter numbers.
To enter a digital ohannel with a sub-ohannel, enter the main ohannel; then, press this
button to enter the sub-ohannel and press ENTER.
Recall (©): Returns to the previous ohannel.
EPG: Shows Eleotronio Program Guide (see page 20).
INPUT: Aooesses the available input ohannels (TV, AV, Component 1/2, HDMI 1/2/3, PC).
Use the arrows to highlight options, and press ENTER to seleot.
Arrows (◄/ ► /a / ▼): Uses the four arrows to highlight different items in the TV menu or
ohange the value. The up/down arrow oan also work as CH-r/CH-
button, and the left/right arrow oan also work as VOL-ZVOL-r button.
ENTER: Enter and oonfirm button.
MENU: Aooesses the Main Menu, or return to the upper level of a sub-menu.
FREEZE : Freeze the ourrent soreen frame, press again to return to normal.
DISPLAY: Displays the Channel Bar (see page 20).
EXIT: Exits the ourrent menu or funotion.
VOL-r or VOL-: Increases or decreases the TV volume.
CH-r or CH-: Scans up or down through the current channel list. Press once to change
the channel up or down; press and hold to continue changing channels.
PICTURE: Switches between the preset picture mode (see page 21).
SOUND: Switches between the preset sound mode (see page 23).
SLEEP: Selects the sleep timer, after which the TV will shut off automatically.
ASPECT: Switches between the preset screen size mode (see page 22).
CC: Selects the closed caption.
MTS: Selects the multi-channel television sound.
/m
■ LiSTi FAV.: FAV.+ FAV.-
◄ (ENTER) ►
VOL CH
I FFP '
ASPECT
▲ )
► II
; CC
4i
MTS
■
STOP
►►
NOTE: The keys not listed are for DVD control, they are not available for this TV model.
Remote control part number RE20QP28
17
Page 19

nitial Setup
I
If it is the first time you turn on your TV, or you have done Clear Channel List option (see page 28), the initial setup menu appears
automatioally.
Menu Language
To ohoose your menu language, press the left/right arrow until the language you need appears.
Available languages: English, Frenoh and Spanish.
Signal Type
To ohoose your TV tuner signal type, press the left/right arrow until Air or Cable appears.
Note: please seleot TV signal type aooording to the antenna or oable olosed oirouit TV you use.
Auto Channel Search
To exeoute auto ohannel searoh, press the up/down arrow to highlight Auto Channel Searoh and press ENTER button.
What to notioe:
1. The ohannel searoh aooess starts from the Analog TV ohannel searohing and ends at Digital TV ohannel searohing.
2. The ohannels that have been found will be stored automatioally.
3. You oan press MENU or EXIT button to skip analog/digital ohannel searohing.
4. You oan press MENU or EXIT repeatedly to end the ohannel searohing.
18
Page 20

Basic Operations
Turning On and Off
Connect the AC cord to power the LCD TV. At this time the TV wiii enter standby mode and power indicator shows red.
Use Power button (O) on the side panei of TV or on the remote controi to turn on the TV. After switching off the TV for 5 seconds,
you can turn on TV again.
Ohoosing TV Ohannel
Tuning To Analog Channels
An analog channel has a channel number beginning with “A”. Input the digital number with numeric buttons directly and press
ENTER button to confirm.
For example, to watch analog channel “A51”, press “5”, “1”, “ENTER” on remote control in sequence.
Note: Although there is no analog TV signal available in America, we reserve ATV functions for some expansible use.
Tuning To Digital Channels
A digital channel has a channel number beginning with “D”. Input the main digital number with numeric buttons directly, then press
“ — ” button on remote control, and input the sub number at last.
For example, to watch analog channel “D31 -1 ”, press “3”, “1 ”, “ — ” button. “ENTER” on remote control in sequence.
Changing Channels Dlreotly
You can use CH+ button to increase channel number and CH- to decrease channel number. When no OSD (On Screen Display) is
used, the up/down arrows can also work as OH+/OH- buttons.
Selecting Input Source
I
Press INPUT button on remote control to display Source Select list.
Use up/down arrows to highlight the source you need and press ENTER to confirm.
Adjusting TV Stand Angle
The TV cabinet can manually adjust to left or right for 30 degrees from the centre.
You can adjust the angle for the best viewing effect and comfort.
19
Page 21

Basic Operations
Channel Bar
Press the DISPLAY button on the remote oontrol, the ohannel bar will appear on the right top of soreen. It displays the ourrent
ohannel’s information. The following list desoribes the items on the ohannel bar.
ATV DTV
A2/D50-1
MTV/KOCE-HD
Mono/English
480i/1080i
16:9/CC/TV-PG
Oct-31 23:14 Mon Current date and time.
If the ohannel is analog, A is displayed. If it’s a digital ohannel, D is displayed. For example, in the piotures
above, A2 is an analog ohannel, and D50-1 is a digital ohannel (-1 is a sub-ohannel number).
Displays the ohannel label.
Displays whether the ourrent ohannel is being broadoast in stereo or mono. If the ourrent ohannel is digital,
this spaoe will be SAP (Seoond Audio Program) language.
Displays the signal resolution.
Displays the soreen aspeot ratio, olosed oaption and TV rating level of the ourrent program or ohannel.
And these are only available for digital ohannels.
Adjusting Volume
Press the VOL+A/OL- button on the remote oontrol to adjust the volume. If you want to switoh sound off, press MUTE №
When OSD (On Soreen Display) is not used, the arrows left/right oan also work as VOL-A/OL+ butttons.
EPG (Electronic Program Guide)
Press EPG button on the remote oontrol, the eleotronio program guide will appear in the oenter of soreen.
The eleotronio program guide gives the TV program playing projeot. You oan use left/right arrows to switoh pages.
20
Page 22

OSD Menu Operations
Adjust the OSD Screen
The OSD (On Screen Display) menu enables you to approach to the TV functions.
To use OSD menu system, press MENU button on remote control, then use left/right arrow to highlight an option from PICTURE,
SOUND, CHANNEL, PARENTAL, SETUP or OTHERS and press ENTER button.
Press the up and down arrow to move to a different option within each menu. If necessary, press ENTER or right arrow to display
the choices of the option you’ve highlighted. If available, use the text at the bottom of each screen for help. To return to the
previous menu, press the MENU button.
To exit the OSD menu: , ■
• Press the EXIT button. The menu will clear from the screen.
• Press the MENU button repeatedly until the menus disappear.
Picture Menu
The Picture Menu contains menus and controls to configure the way the picture appears. The Picture Menu options apply to the
video for the main TV and VIDEO INPUT selections. All picture options can be applied to each input.
Press MENU on the remote. Select Picture from the Main menu. Press the ENTER button to proceed to PICTURE menu.
Use up/down to choose the function you need, press
ENTER or right arrow to adjust or enter a sub-menu. The
sub-menu image and explanation are shown below.
Picture Settings
Picture Settings: Choose the preset visual mode of your TV:
Standard, Movie, User, Dynamic. Only in User mode you can
adjust Brightness, Contrast, Color, Tint and Sharpness.
Brightness: Adjust the brightness of picture.
Color: Adjust the richness of color.
Tint: Adjust the balance between red and green level (only
available in NTSC signal.
Sharpness: Adjust the sharpness level of picture.
21
Page 23

OSD Menu Operations
Screen Settings
PC Settings (only available in PC mode)
Screen Size: Select a screen aspect ratio.
(Available ratio: Full, Normal, Waterglass and Cinema.)
Please choose the ratio that applies to your video signal format best.
Auto Wide: Make the screen size compliant with signal format
automatically.
If you turn on this function, the Screen Size setting will be ignored.
Auto Adjust: Adjust the PC picture display automatically.
Horizontal Position: Adjust the horizontal position of picture.
Vertical Position: Adjust the vertical position of picture.
Clock: Adjust the clock of picture.
Phase: Adjust the phase of picture.
Reset: Reset all the PC picture settings to factory default.
Color Temperature
This option allows you to select one of three automatic color adjustments: Cool for a bluer palette of picture colors; Normal or
Warm for a redder palette of color.
Advanced Picture Settings (not available in PC mode)
Dynamic Contrast: Set dynamic contrast on/off.
Film Mode: Set film mode on/off.
Noise Reduction: Set noise reduction as Off/low/Medium/High.
MPEG Noise Reduction: Set MEPG noise reduction as Off/Low/Medium
or High.
Note: Noise reduction helps to reduce the picutre “static” or any type of
interference. This feature is especially useful for providing a clearer picture
in weak analog signal conditions. The MEPG Noise Reduction specifically
works on video signal with MPEG coding.
22
Page 24

OSD Menu Operations
Sound Menu
The Sound Menu lets you adjust audio output. To aooess the Sound Menu, press MENU on the remote, and then seleot SOUND
from the Main Menu. Press ENTER button to prooeed to SOUND menu.
Use up/down to ohoose the funotion you need, press
ENTER or right arrow to adjust or enter a sub-menu. The
sub-menu image and explanation are shown below.
Sound Mode: Ohoose the preset sound mode of your TV:
Standard, Soft, User, Dynamio. Only in User mode you oan
adjust Bass and Treble.
Bass: Adjust the bass oomponent of TV sound.
Treble: Adjust the treble oomponent of TV sound.
Balanoe: Adjust the balanoe between the left and right ohannel.
Surround Mode
Oreates a 3D sound surround from standard stereo material, with deep and rioh enhanoement.
Analog Sound
Seleot analog TV audio sound type: Stereo, Mono or SAP (only available in TV mode).
Digital Sound
Seleot digital TV audio language type: English, Frenoh or Spanish (only available for DTV ohannel).
Set AVL (auto volume oontrol) on/off.
Set TV speakers on/off.
Set the audio output type as Off, PCM or Dolby Digital.
Please set this option aooording to your power amplifier.
23
Page 25

OSD Menu Operations
Equalizer Settings
The seven-band graphic equalizer allows you to adjust the audio frequenoy
settings. You oan seleot one of the equalizer presets (OFF, POP, ROOK,
JAZZ) or oreate your own personal preset (USER).
Press the left or right arrow to seleot the frequenoy (100Hz, 250Hz, 500Hz,
1 KHz, 2KHz, 4KHz, lOKHz) you want to adjust. Use the up or down arrow
to adjust.
Channel Menu
The Ohannel Menu enables you to searoh, view and edit ohannels. It is available in TV mode only.
Press MENU and ohoose OHANNEL from the Main menu. Press the ENTER button to prooeed to OHANNEL menu.
Use up/down to ohoose the funotion you need, press
ENTER or right arrow to adjust or enter a sub-menu. The
sub-menu image and explanation are shown below.
Channel List
Display a channel list. It shows the current channels.
Favorite List
Display a favorite channel list. It shows the current favorite channels.
Channel Settings
Go to channel setting sub-menu (as shown below).
Press left/right arrow to switoh the ohannel you want to edit.
Set if the ourrent ohannel is oontained in ohannel list.
Enter a ohannel label to rename the ourrent ohannel.
Set if the ourrent ohannel is the favorite ohannel.
24
Page 26

OSD Menu Operations
Signal Type
Select your TV signal type: Air or Cable.
Auto Channel Search
Execute an auto channel search (see page 18).
Parental Menu
The Setup Menu enables you to lock program with special content, panel key board and input source.
Press MENU and choose PARENTAL from the Main menu. Press the ENTER button to proceed to PARENTAL menu.
Lock Parental Control
• When the Parental Control Menu is accessed from the Main Menu, you need to enter password to unlock the menu function.
Please enter your four-digit password with numeric keys 0-9.
Note: The original password is “0000".
• After unlocking, the items in parental control menu can be used. Use arrow up/down to highlight the function you need and
press ENTER or right arrow to use V-chip, Change Password, Front Panel Lock and Source Lock, Clear Channel List sub-menu.
V-Chip
The following graphic details where items locate within the V-Chip menu.
US V-Chip
Press ENTER or right arrow to enter US V-Chip ratings menu, which contains two sub-menus: Movie Rating and TV rating.
See next page for more details.
25
Page 27

OSD Menu Operations
Movie Rating
TV Rating
Use arrow keys to seleot the rating level you want to blook,
press ENTER to look/unlook the rating level. If you have
bloeked a lower level rating, the higher ratings will be
bloeked too.
For example , when PG-13 is bloeked, R, NC-17 and X will
be bloeked at the same time.
□
□
□ □ □ □ n
□ □ □ □ □
□ □ □ □
After adjusting, press MENU to return or press EXIT to exit the menu.
TV Rating Overview
TV-MA Mature Audienee Only
TV-14 Parents Strongly Cautioned
TV-PG Parents Guidanee Suggested
TV-G General Audienee
Similar with Movie Rating.
---------------------------------------------------------
D Sexually Explieit Dialogue
L Adult Language
S Sexual Situations
V Violenee
i
TV-Y7 Direeted to Children 7 Years and Older
TV-Y All Children
For more rating explanation, see page 35.
26
FV Fantasy Violenee
Page 28

OSD Menu Operations
Canada V-Chip
Press ENTER or right arrow to enter US V-Chip ratings menu, whioh oontains two sub-menus: English Rating and Frenoh Rating.
English Rating
Press ENTER or right arrow to enter English rating menu.
Use arrow keys to seleot the rating level you want
□
□
to blook, press ENTER to look/unlook the rating
level. If you have blooked a lower level rating,
the higher ratings will be blooked too.
□
□
□
For example , when PG is blooked, 14-r and 18-r
will be blooked at the same time.
French Rating
Press ENTER or right arrow to enter Frenoh rating menu.
□
□
□
□
Block Unrated Show
Blook all the unrated program.
Downloadable Rating, Clear Downloadable Data
Aotivate or downloadable rating data, if available.
Similar with English Rating.
Note: These ratings are
available only if the
broadcaster is sending
rating information.
27
Page 29

OSD Menu Operations
Change Password
Change the password of parental menu.
Input the old password.
Input the new password.
Input the new password again to oonfirm.
Front Panel Lock
Seleot this option to blook or unblook the TV’s side panel buttons so that they oan’t be used.
Source Lock
This option allows you to look or unlook the Input souroe. The source blooked oan not be
ohosen from Input list unless you Input the oorreot parental password.
Use up/down arrow
to seleot the souroe,
press ENTER to
look or unlook It.
Clear Channel List
This option allows you to exeoute Clear Channel List funotlon.
This funotlon will reset the whole TV system to faotory default (not only reset OSD menu).
28
Page 30

OSD Menu Operations
Setup Menu
The Setup Menu lets you config the TV with your preferenoes.
Seleot SETUP from the Main Menu. Press ENTER button to prooeed to SETUP menu.
Use up/down to ohoose the funotion you need, press
ENTER or right arrow to adjust or enter a sub-menu. The
sub-menu image and explanation are shown below.
Closed Caption
Closed Caption
Press left/right arrow to seleot olosed oaption display on or off.
Analog Caption Type
Press left/right arrow to seleot analog olosed oaption type: CC1, CC2, CCS, CC4, TEXT1, TEXTS, TEXTS, TEXT4.
Digital Caption Type
Press left/right arrow to seleot digital olosed oaption type: Servioet, ServioeS, ServioeS, Servioe4, ServioeS, ServioeS.
Digital CC Preset
Press left/right arrow to seleot digital olosed oaption preset: Default, Custom.
Only in oustom mode you oan adjust the digital olosed oaption style.
Digital CC Style
Press left/right arrow to go to digital olosed oaption style sub-menu (see next page).
29
Page 31

OSD Menu Operations
Digital CC Style
•
-----------------
Select the item you want to adjust in Digital CC Style menu
with up/down arrows.
EE322Z>-
Clock
Time Zone
Select your time zone: Eastern, Central, Mountain, Pacific, Alaska, Hawaii, Samoa, Newfoundland, Atlantic.
Auto Clock
Select auto clock on/off. Auto clock helps you synchronize your TV time to standard time (from DTV signal).
After changing, you can preview the caption style here.
Setup Time
Set your TV time manually (needs to turn off auto clock).
Day of Week
Display what day it is (can’t be adjust, display only).
30
Page 32

OSD Menu Operations
Others Menu
The Others Menu lets you config the TV with your preferenoes in other features.
Choose OTHERS from the Main Menu. Press ENTER button to prooeed to SETUP menu.
Use up/down to ohoose the funotion you need, press
ENTER or right arrow to adjust or enter a sub-menu.
The sub-menu image and explanation are shown below.
Blue Back
Press ENTER button to seleot Blue Baok on or off. If the Blue Baok is turned on, the TV will display a blue baokground
when there is no signal input.
No Signal Power Off
Press ENTER button to seleot “No Signal Power Off” on or off. If it is turned on, the TV will shut off after f 0-minute
no signal time. We suggest you turn on this funotion when Blue Baok is turned on. Beoause it may hurt the LCD panel
if the blue soreen lasts too long.
Note: In PC mode, the monitor standby and power off settings depend on the No Signal Off time.
No Operation Power Off
Press ENTER button to seleot “No Operation Power Off” on or off. If it is turned on, the TV will shut off after a 3-hours
no operation time.
All Reset
Press ENTER button to exeoute reset to TV system. All the settings will be reset to faotory default.
Audio Only
Press ENTER button to aotivate audio only mode. The TV will output only sound and the LCD panel will be turned off.
To restore normal playing, hold POWER button for three seoonds.
31
Page 33

Frequently Asked Questions (FAQs)
What’s the most convenient way to view High Definition (HD) video?
Connect an antenna to the TV Input jack to view free local digital channels. You may need to purchase an antenna. (See page 8
for more information about antenna setup).
Visit www.antennaweb.org for assistance in deciding what type of antenna to use to receive the local digital channels available
to you. After entering your location, this mapping program tells you which local analog and digital stations are available using a
certain antenna.
Are there other ways to view High Definition (HD) video?
Besides using an antenna as mentioned above, you can also use a set-top box to receive digital video. Contact your cable service
provider or satellite provider to purchase digital programming and have them connect the box to ensure you are viewing channels
in the best way.
How do I tell an analog channel from a digital channel?
Press the DISPLAY button to display the Channel Bar. Look at the top right corner of the screen. An “A” is displayed for an analog
channel. A “D” is displayed for a digital channel.
Note: Since the analog TV in America has been cut off, we resen/e analog TV function only for some unexpected use.
Why are there bars on my screen, and can I get rid of them?
Most digital video is sent in a 16/9 format which fills your screen, but is sometimes sent in 4/3 which does not fill your screen. It
depends on how the station or device connected to your TV is formatting the video. If there are bars on the screen, press the
ASPECT button to try a different format that may eliminate the bars. Some bars can't be removed because of the way the format
is sent by the broadcaster. The format changes as you press the ASPECT button and the format type is displayed at the bottom
of the screen. For more information on screen formats, go to page 22.
Why does channel search find a lot of channels, but when I try to tune to them, there’s nothing there?
Some channels don’t carry programming, such as video On Demand. When channels are unavailable, your TV screen is blank or
appears like snow. You probably want to remove these channels from your channel list. Remove these in the Channel List Menu.
Go to page 24 for more information.
Why does it take a long time when I search the channels at first time?
If you have both analog and digital channels, the TV is looking for all available channels in the channel list. If you do have digital
channels, the TV is also searching for scrambled channels, non-scrambled channels, and each sub-channel of that digital channel.
32
Page 34

Troubleshooting
Idertiynq Problems
If there are any problems when using the product, please consult the list below. If the list does not solve the problem, call our
Customer Service Center immediately.
J kJ
TV Problems
The TV can’t be turned on.
• Make sure the AC cord is plugged in.
• Check the wall outlet, make sure the AC output works normally and stably.
• The side panel may be locked (disabled). Use the remote control to turn on the TV.
• Select the Front Panel Lock function in the PARENTAL Menu and press ENTER to uncheck the locking status.
There is no picture or sound but the TV is on and there is a “No Signai” sign on screen.
• Are you trying to use an input source with no device connected to it? For using other video/audio device, make sure the external
device works normally first, then press INPUT and choose the right input source.
• The Signal Type option may be set incorrectly. Go to page 18 for detailed instructions.
• The channel may be blank. Try to search the channel again or change another channel.
The sound is fine, but the picture is poor.
• If you can only get black and white pictures from external device that you've connected to your TV, maybe it is due to the video
cables is not connected well, or they are connected wrongly. Check the connection stability first, then check the correctness.
For AV input, the yellow video cable connects to the yellow Video In jack on the side of your TV. For Component input, the three
Y, Pb, Pr video cables (red, blue, and green) should be connect to the corresponding input jacks on the side of your TV.
• Check the antenna connections. Make sure all of the cables are firmly connected to the TV jack on side of your TV.
• Try adjusting the color features to improve.
There is no sound, but the pioture is fine.
• The sound might be muted. Try pressing the MUTE button to restore sound.
• For using AV or Component, remember to connect the device’s left and right audio output correctly. The left channel
cable is white and the right channel cable is red. Please match the cables and jacks acceding to there colors.
• The sound settings may not be set correctly. Go to page 23 for more information.
• If your audio source has only one jack or is a (mono) audio source, make sure you have plugged the connection into the
Audio In L jack (white) on the TV.
The buttons on the side panei don’t work.
• The side panel may be locked (disabled). Use the remote control to turn on the TV.
• Select the Front Panel Lock function in the PARENTAL Menu and press ENTER to uncheck the locking status.
• Unplug the TV from the AC power for 10 minutes and then plug it back. Turn the TV on and try again.
The TV turns off unexpeotediy.
• The electronic protection circuit may have been activated because of a power surge. Wait 30 seconds and then turn the TV
on again. If this happens frequently, the voltage in your house may be abnormal. If the other electronic equipment in your home
can’t work normally, consult a qualified service personnel.
33
Page 35

Troubleshooting
Can’t select a certain channel.
• The channel may be blocked or not approved In the PARENTAL Menu.
• The ohannel may be skipped In ohannel list In CHANNEL Menu. Cheek the blooklng and skipping status of ehannel.
The stereo sound performance is bad.
• It may be a weak station. Use the SOUND Menu and set Analog Sound as Mono.
A black box appears on the screen.
• Closed oaptlonlng might be on. Cheek Closed Caption In the SETUP menu. Go to page 30 for more Instruetlons.
Problems with the HDMI Connection.
• Make sure the HDMI devlee (DVD, video gamer, ete.) Is turned on and the eables are firmly eonneeted. If problems still oeeur, turn off
your devlee and reeonneet It. Reset the power by unplugging the power eord and plugging It again.
• If a “No Signal” message appears on sereen , the HDMI devlee Isn’t responding. Contaet the manufaeturer of the HDMI devlee for
further assistanee.
• If you have blaek bars on eaeh side of your pieture (whieh means the TV ean not display a full-sereen image), the devlee you eonneeted
might have a switeh or a menu option allowing you to ehange the pieture quality output that will fix this. Choose either 720p or 10801.
The Remote control doesn’t work.
• Something might be blooklng between the remote eontrol and the remote sensor on the front panel of the TV. Make sure
there is a olear path.
• The remote may not be aimed direotly at the TV.
• The batteries in the remote may be weak, dead, or installed inoorreotly. Put new batteries in the remote.
You are experiencing problems with V-Chip/Parental Controls.
• If the rating limits don’t work, you must look the settings. Go to the Main Menu (press MENU on your remote), seleot
PARENTAL to oheok the settings.
What else can I do?
If you’ve been through the Troubleshooting seotion and nothing has fixed your problem, try rebooting your TV. Note that after
a reboot, you may need to run your TV through the setup prooess again. To reboot, unplug the power eord from the wall
outlet or power strip. Keep your TV unplugged for about 5 minutes. Then plug in the TV and turn it on. See if the problem
is fixed. If the problem remains, then please visit the Customer Support Menu at
RCA Customer Support at the support number provided in your Warranty eard.
www.rea.oom or updated FAQs or eontaet
34
Page 36

V-Chip Rating Explanations
US V-Chip Rating System
TV-MA (Mature Audience Only): Specifically designed to be viewed by adults and may be unsuitable for children under 17. It
contains one or more of the following content themes: crude indecent language (L), explicit sexual activity (S), or graphic violence (V).
TV-14 (Parents Strongly Cautioned): Contains some material that many parents would find unsuitable for children under 14.
Parents are strongly urged to exercise greater care in monitoring this program and are cautioned against letting children under the
age of 14 watch unattended. This program contains one or more of the following content themes: intensely suggestive dialogue (D),
strong coarse language (L), intense sexual situations (S), or intense violence (V).
TV-PG (Parental Guidance Suggested): Contains material that parents may find unsuitable for younger children. Many parents
may want to watch it with their younger children. The program contains one or more of the following content themes: some
suggestive dialogue (D), infrequent coarse language (L), some sexual situations (S), or moderate violence (V).
TV-G (Parental Audience): Most parents would find this program suitable for all ages. It contains little or no sexual dialogue (D)
or situations (S), no strong language (L), and little or no violence (V).
TV-Y7 (Directed to Children 7 years and older): Designed for children age of 7 and above. It may be more appropriate for children
who have acquired the developmental skills needed to distinguish between make believe and reality. Themes and elements in this
program may include mild fantasy violence (FV) or comedic violence, or may frighten children under the age of 7.
TV-Y (All Children): Themes and elements in this program are designed for a young audience, including children ages 2-6.
It is not expected to frighten younger children.
Canadian English V-Chip Rating System
18+ (Adult): Programming intended for adults 18 and older. It may contain elements of violence, language, and sexual content
which could make it unsuitable for viewers under 18. Violence Guidelines: May contain violence integral to the development of
the plot, character or theme, intended for adult audiences. Other Content Guidelines: May contain graphic language an d explicit
portrayals of nudity and/or sex.
14+ (Viewer 14 and over): Programming contains themes or contents which may not be suitable for viewers under the age of 14.
Parents are strongly cautioned to exercise discretion in permitting viewing by pre-teens and early teens. Violence Guidelines:
May contain intense scenes of violence. Could deal with mature themes and societal issues in a realistic fashion.
Other Content Guidelines: May contain scenes of nudity and/or sexual activity. There could be frequent use of profanity.
PG (Parental Guidance): Programming intended for a general audience but which may not be suitable for younger children
(under the age of 8). Parents may consider some content inappropriate for unsupervised viewing by children aged 8-13.
Violence Guidelines: Depictions of conflict and/or aggression will be limited and moderate; may include physical, fantasy, or
supernatural violence. Other Content Guidelines: May contain infrequent mild profanity, or mildly suggestive language.
Could also contain brief scenes of nudity.
G (General Audience): Programming considered acceptable for all ages groups. While not designed specifically for children,
it is understood younger viewers may be part of the audience. Violence Guidelines: Will contain very little violence, either physical or
verbal or emotional. Will be sensitive to themes which could frighten a younger child, will not depict realistic scenes of violence
which minimize or gloss over the effects of violent acts. Other Content Guidelines: There may be some inoffensive slang, no
profanity and no nudity.
35
Page 37

V-Chip Rating Explanations
C8+ (Children 8 and older): Programming generally considered acceptable for children 8 years and over to watch on their own.
Violence Guidelines: Violence will not be portrayed as the preferred, acceptable, or only way to resolve conflict or encourage
children to imitate dangerous acts which they may see on television. Any realistic depictions of violence will be infrequent,
discreet, of low intensity and will show the consequences of the acts. Other Content Guidelines: There will be no profanity,
nudity or sexual content.
C (Children): Programming intended for children under age of 8. Violence Guidelines: Careful attention is paid to themes which
could threaten children’s sense of security and well being. There will be no realistic scenes of violence. Depictions of aggressive
behavior will be infrequent and limited to portrayals that are clearly imaginary, comedic or unrealistic in nature.
Other Content Guidelines: There will be no offensive language, nudity or sexual content.
Canadian French V-Chip Rating System
18+ (Adult): Programming is for adults only. This program contains sustained violence or extremely violent scenes.
16+ (Viewer 16 and over): Programming is not suitable for those under age 16. This program contains frequent scenes of
violence or intensely violent scenes.
13+ (Viewer 13 and over): Programming may not be suitable for children under the age of 13. This program either contains
several violent scenes or one or more scenes that are violent enough to affect them. Viewing in the company of an adult is
therefore strongly recommended for children under the age of 13.
8+ (Viewer 8 and over): Not recommended for young children. This program is suitable for most audiences, but it contains mild
or occasional violence that could upset young children. Viewing in the company of an adult is therefore recommended for young
children (under the age of 8) who do not distinguish between reality and imagination.
G (General Audience): This program is suitable for audiences of all ages. It contains no violence, or any violence that it does
contain is either minimal or is presented in a humorous manner, as a caricature, or in an unrealistic way.
Universal Remote Control Code List
For Universal Remote Control brands listed below, please use accompanying codes and refer to your Universal Remote Control
User Manual for basic Instruction for changing TV code to operate the TV model.
• Codes for DIRECTV: 0178, 10178
• Codes for Time Warner Cable: 0178, 10178
• Codes for Cox Communications: 0178
• Codes for Comcast: 10178
• Codes for Dish Network: 627
• Codes for Fios Verizon: 0205, 0057, 0493, 0775
36
•
Page 38

Wall Mounting Unit Specification
40LA45RQ VESA 400 X 200
M6 sorews, length 14mm
400 mm
200 mm
Note:
A. The wall mount Is not oontalned In the aooessorles sold with television. We only provide the Installing speeltloatlons but not the
wall mount Itself. If you need the mount, please oonsult with the looal dealer for a VESA wall mount.
B. We strongly suggest to set the wall mount with equipments of speolfloatlon we ordered. If not, Inappropriate Installing may
oause damage to devloe or people.
Warnings:
Do not set up the wall mount by yourself. Please oontaot qualified professionals for Installation.
The TV should not be mounted on walls or surfaoes whioh have an angle more than 10 degrees with vertloal direetlon.
Otherwise the TV set may fall.
3
The walls for mounting must have enough strength to hold the whole weight of TV set. For example, oonorete wall and brlokwork
are eligible. Do not plaoe the mount on soft walls suoh as earth walls and plasterboard.
If spare parts of different speeltloatlons (suoh as serews) are used during mounting, oonsult with qualified professionals to make
sure these parts are safe and effeetive.
Before attaohlng the base to wall, ensure the holes for anehors are In keeping with the Installing rules. Otherwise there may exist
some potential problems.
Do not plaoe any heating souroe under your television. Or else. It oan oause fire.
Do not plaoe the TV near anything dripping. Transduoers and high voltage wires should be kept far away from the apparatus too.
Or else. It may oause oreepage, eleotrlo shook or bad resonanoe.
Do not plaoe TV In a looatlon where oolllslon or vibration Is liable to happen.
In order to avoid unexpeoted falling of the TV set, do not put any strong foroe on TV or wall mount after Installing.
9
10. Be sure to unplug the TV before Installing. Keep anything hard or sharp away from the soreen panel to prevent the soufflng.
11. After Installing, If there Is any need to move the oablnet, please oontaot the qualified professionals.
37
Page 39

Product Specification
Diagonal Display Size 40 inohes
Television System
Channel Coverage
Power Supply
RF input
Conneotion
Interfaoe
Video input
Audio input
Audio output Headphone x 1, Digital Audio Out x 1, Analog Audio Out (L/R) x 1
Amerioan TV standard ATSC/NTSC system
VHP: 2~13 UHF: 14~69 CATV: 1-135
Digital Terrstrial Broadoast (8VSB): 2-69
Digital Cable (64/256QAM): 1 -135
AC 110 V, 60Hz
Cable/Antenna x 1
AVx 1
Component x 2
HDMI x3
AVx 1
Component x 2
PC Audio In X 1
Graphio input
Resolution 1920 X 1080
Component/HDMI mode
With stand
Dimension Without stand 38.6”Wx25.0”H x4.3”D
Paokage
With stand 41.1 LBS (18.5KGS)
Weight Without stand
Paokage 48.2LBS (21.7KGS)
Power Consumption less than 230W
Notice: Specifications are subject to change without notice.
RGB 15pin X 1
480i, 480p, 720p, 1080i, 1080p
38.6”Wx26.8”H x9.8”D
49.4”Wx30.7”Hx8.5”D
35.6LBS (16KGS)
38
Page 40

ON Corp US, Inc.
4370 La Jolla Village Drive, Suite 400
San Diego, CA 92122
©2010 ON Corporation
RCA is a trademark of RCA Trademark Management SAS
used under license to ON Corporation.
 Loading...