

RCA 40, 50 Owner's Manual

owner’s manual
AC/DC VIDEO
CASSETTE PLAYER

FEATURES
Your RC A M odel 50 AC/DC Video Cassette
Player (VCP) is lightweight, easy to use, and
includes a remote control. Its dual power
options let you enjoy it almost anywhere —
at home or the offic e, or even in your
vehicle. The VCP’s compact size and
front-loading design are especially ideal for
vans, RVs, or campers.
Its other features include:
Automatic Power-On
— automatically
turns on the VCP’s power when you load a
video cassette.
Automatic Play Speed Selection
— senses
the tape’s rec ording speed an d automatica lly
adjusts the VC P for proper playback.
Automatic Rewind
— rewinds the tape
when it reaches the end.
Automatic Repeat
— lets you set the VCP
to automatic ally rewind and repl ay the video
tape when it reaches the end.
Quick Start Mechanism
— automatically
starts playback when you load a prerecorded
video cassette.
Dew Protection System
———— prevents the
VCP from playing a tape when the system
senses moisture on the tape heads.
Soft-Touch Controls
— let you easily
control the VCP’s functions.
Note:
The remote control require s two AAA
batteries (not supplied) for power.
We recommend that you caref ul ly read this
owner’s manual. It was prepared to assist
you with the initial setup procedures and to
guide you in the everyday op eration of the
VCP.
Copyright Information:
Most material
performed in public, such as conc erts, pla ys,
and movies, or distributed on prerecorded
video tapes is copyrighted. The
unauthorized recording or duplication of
copyrighted material is a violation of the
copyright laws of most countries and such
duplication may result in fines and/or
imprisonment. Note , however, that in the
United States, it is not a violation of U.S.
copyright laws for a consumer to record a
broadcast television program for private
(in-home) viewing.
—
Visual Search
— lets you play a tape at a
— —
faster speed to quickly locat e a s pecific
portion of the tape.
Freeze-Frame
— lets you pause the tape
during playba ck so you can view a single
frame.
Digital Auto Tracking
— automatically
aligns the pl ay back heads to the re corded
track.
2
1999, 2002 RadioShack Corporation.
©
All Rights Reserved.
WARNING:
shock hazard, do not expose this product t o rain
or moisture.
To reduce the risk of fire or
CAUTION
RISK OF ELECTRIC SHOCK.
DO NOT OPEN.
!
CAUTION:
ELECTRIC SHOCK, DO NOT REMOVE
COVER OR BACK. NO USER-SERVICEABLE PARTS INSIDE. REFER SERVICING
TO QUALIFIED PERSONNEL.
!
TO REDUCE THE RISK OF
This symbol is intended to alert
you to the presence of uninsulated dangerous voltage within
the product’s enclosure that might
be of sufficient magnitude to constitute a risk of electric shock. Do
not open the product’s case.
This symbol is intended to inform
you that important operating and
maintenance instructions are
included in the literature accompanying this product.
3

CONTENTS
Preparation ............................................................................................................... 5
Accessories ................................................................................................................... 5
Choosing A Location .................................................................................................... 5
Making Connections .................................................................................................... 6
Connecting a Standard TV ..................................................................................... 7
Connecting a TV/Monitor ...................................................................................... 8
Connecting a VCR ................................................................................................. 9
Setting the Channel Switch ......................................................................................... 10
Connecting Power ...................................................................................................... 10
Using AC Power .................................................................................................. 10
Using Vehicle Battery Power ................................................................................ 11
Dew Protection System ........................................................................................ 12
Installing the Remote Control’s Batteries ..................................................................... 12
Operation ................................................................................................................ 14
Using the Remote Control .......................................................................................... 14
Playing a Video Tape .................................................................................................. 14
On-screen Display ...................................................................................................... 15
Fast-Forward / Rewind ........... .. .................................................................................... 15
Visual Search ................................................. ...................................................... 16
Fast Scan Forward/Review ................................................................................... 16
Freeze-Frame .............................................................................................................. 17
Auto Repeat Play ba c k ............................................................................................... .. 17
Adjusting Tracking ..................................................................................................... 17
Watching Broadcast TV ............ .................................................................................. 18
Copying a Video Tape ......................................................................................... 18
Troubleshooting ...................................................................................................... 19
Care and Maintenance ............................................................................................ 20
Cleaning the Video Heads .......................................................................................... 21
Video Tape Tips ......................................................................................................... 21
Replacing the Fuse ..................................................................................................... 22
The FCC Wants You To Know ................................................................................... 22
Specifications ........ ................................................... ............................................... 23
4
PREPARATION
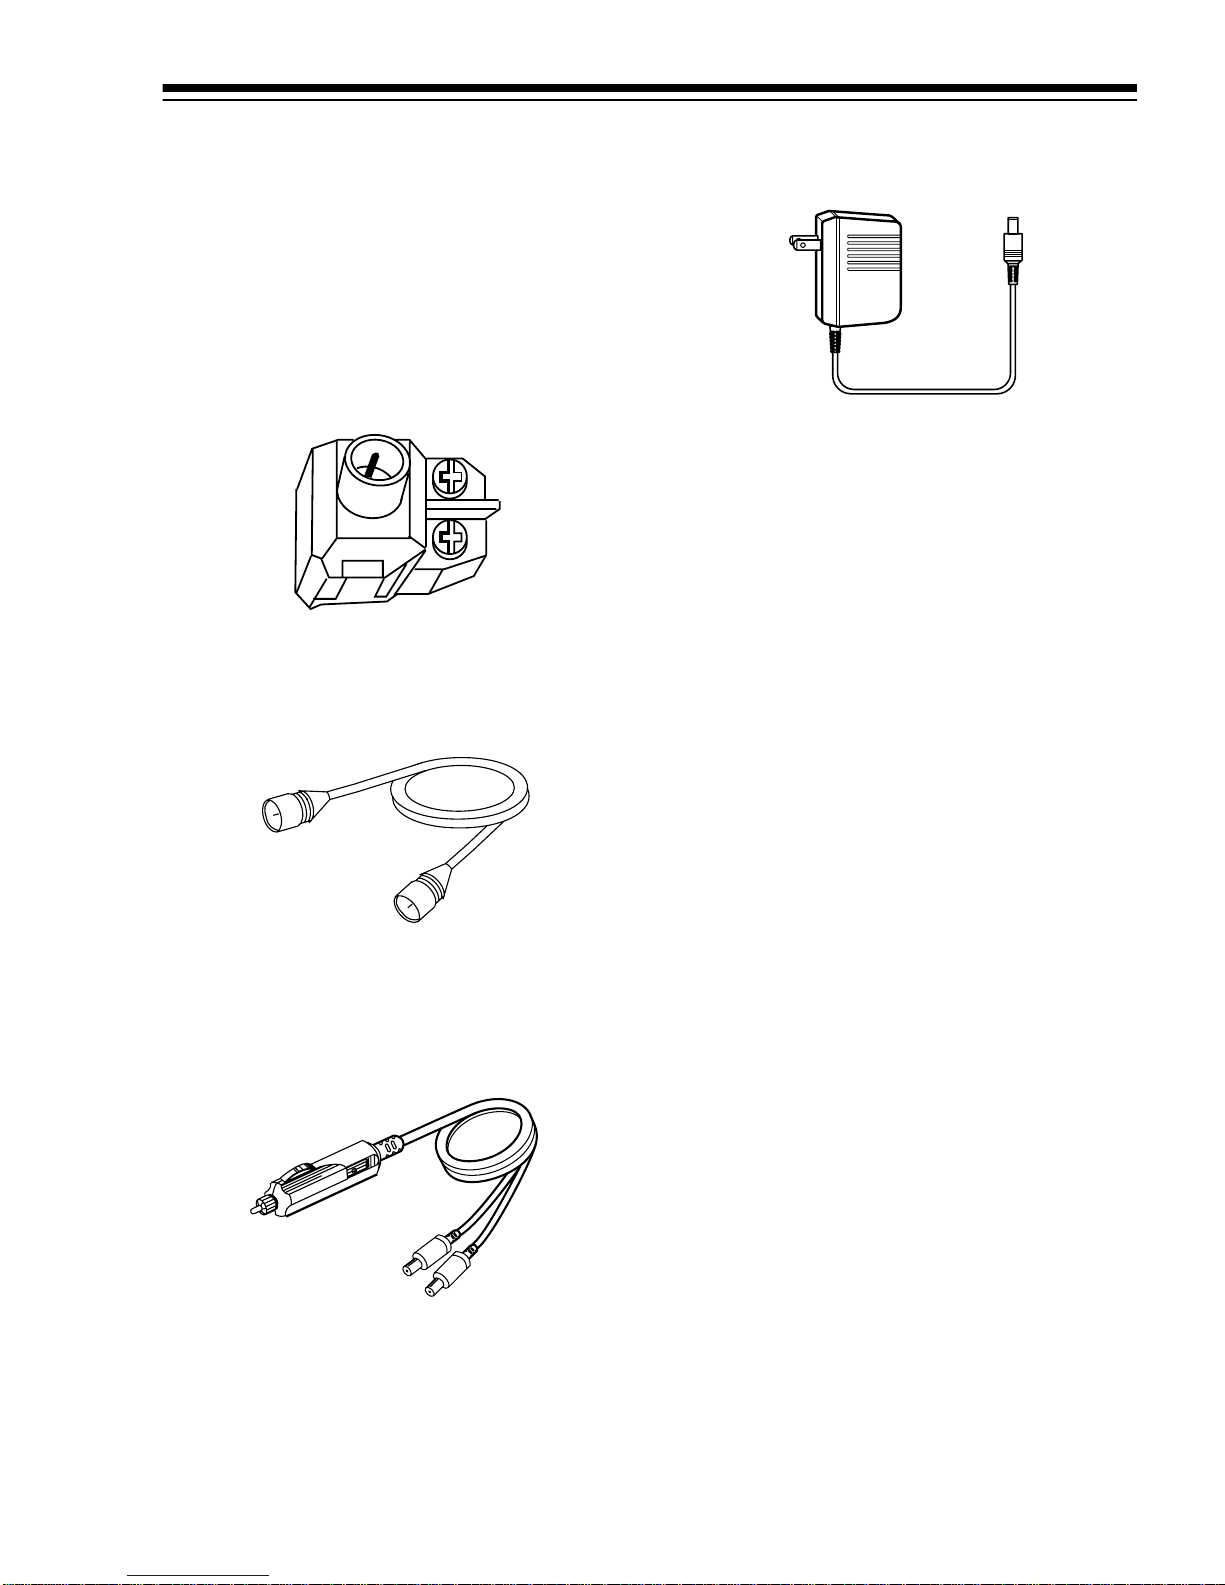
ACCESSORIES
Your VCP inclu des t he foll owing connec tion
accessories. Be sure to unpack all of them
before you throw away the packing mat erial.
300-to-75-ohm Adapter
300-ohm antenna wire to the VCP’s
terminal.
75-ohm Coaxial Cable
VCP’s
antenna terminal.
RF.OUT
terminal to your TV’s 75-ohm
— connects a
ANT.IN
— connects the
AC Adapter
from a standard AC outle t.
— lets you power the VCP
CHOOSING A LOCATION
For safe and effecti ve operat ion of yo ur VCP,
consider the following when you choose an
installation location.
• Place the VCP away fr om direct sunlight
and heat sources, such as radiators and
heat vents.
VCP/TV DC Power Cord
power the VCP and a portable TV (not
supplied) from you r vehicle’s cigarette
lighter socket.
— lets you
• Do not place the VCP in a dusty or
humid area.
• Do not block the VCP’s ventilation
holes. For example, do not push the
back of the VCP against a padded
surface.
• Place the VCP on a flat surface, away
from strong vibrations or magnetic
fields.
• Do not put anything on top of the VCP.
5

MAKING CONNECTIONS
You can connect y our VCP to a TV/ moni tor,
a VCR (video casse tte recorder), or bot h. To
help you make the right connections:
• If connecting a TV, use the conne ctions
described in “Connecting a Standard
TV” on Page 7.
A standard TV can rece ive br oadcast TV
signals from an antenna or cabl e system,
and can be tuned to different channels
to view the broadcasts. It does not have
separate audio and video input jacks.
• If connecting a mo nitor or TV/monitor,
use the connections described in
“Connecting a TV/ M onitor” on Page 8.
(You need an additional audio/video
cable to make this connection.)
Note to the CATV System Installer:
reminder is provided to call the CATV
system installer’s attention to arti cle 820-40
of the National Electri cal Code t hat prov ides
guidelines for proper grounding and, in
particular, specifies that the cable ground
shall be connected to the gro unding system
of the building , a s close to the po int of cab le
entry as practical.
This
A TV/monitor is like a st andar d TV, bu t
it also has separate audio and vide o
input jacks. Using the separate audio
and video input jacks results in a better
quality pictu re and sou nd.
• If you want to connect a VCR to the
VCP for copying tape s, use the
connections des cribe d i n “Con nec ting a
VCR” on Page 9. (You need an
additional audio/video cable to make
this connection.)
6
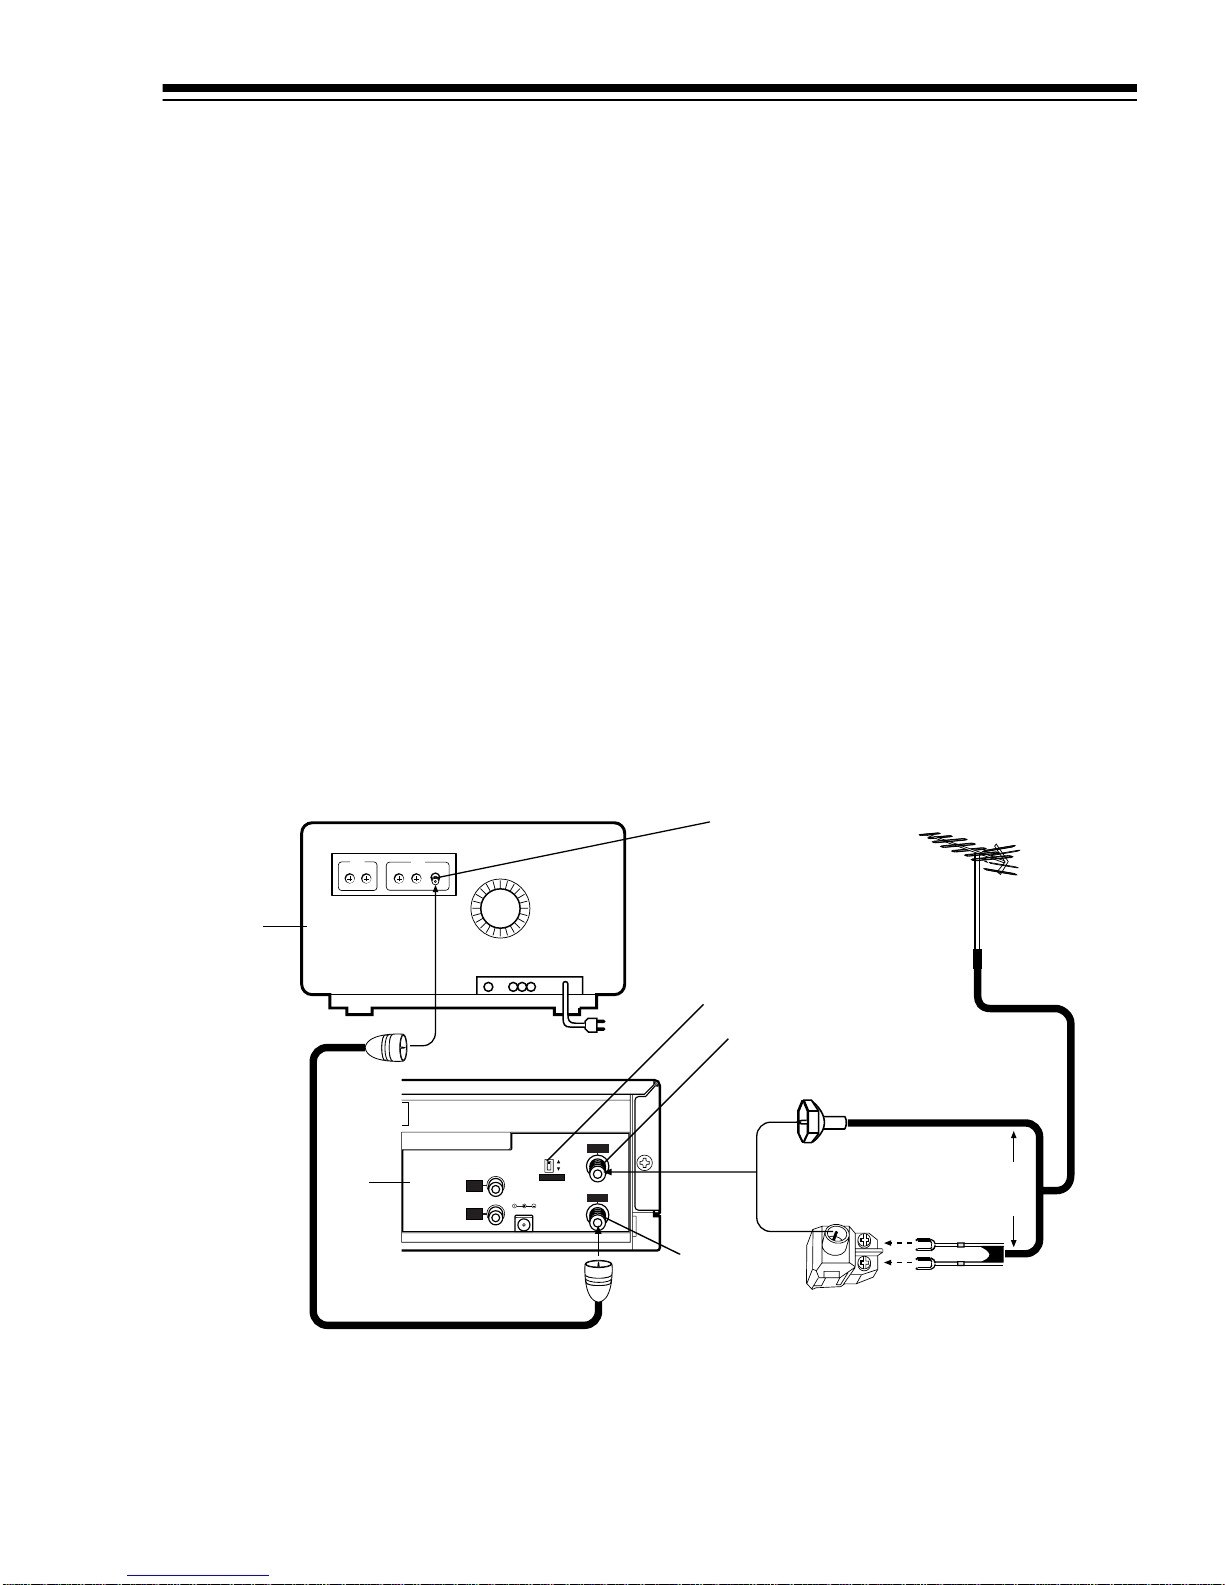
Connecting a Standard TV
Follow th ese steps to con nect the VCP to a standard TV that has a 75-oh m cable jack (but
does not have separate audio and vi deo input jacks).
1. Make sure the TV is off, then disconnect the antenna or cable wire from your TV’s VHF
antenna terminal and connect it to the VCP’s
ANT.IN
Notes:
• If your antenna has a 300-ohm wire, connect the wire to the 300-ohm screw terminals
on the supplied 300-to-75-ohm adapter. Then connect the adapter’s 75-ohm
connector to the VCP’ s
ANT.IN
terminal.
• If you have a VHF/UHF splitter connected to your TV, disconnect the antenna wire
from the splitter’s input terminal and leave the splitter connected to the TV.
• If you have a separate UHF antenna, leave the UHF antenna wire connected to the TV.
terminal.
2. Using the supp lied 75-ohm coaxial cable, conn ect the VCP’s
RF.OUT
terminal to the TV’s
VHF antenna terminal (or the splitter’s input term in al ) . If yo u r T V h as onl y 300- o hm
antenna terminal, use a 75-to-300-ohm adapter ( not suppl ie d ) to co n ne ct the VCP’s
output to your TV.
VHF Antenna Terminal Antenna
UHF
TV
VCP
VHF
300-ohm 75-ohm
CHANNEL
ANT.IN
ANT.IN
3
4
DC IN 12V
CHANNEL
RF.OUT
Or
VIDEO
OUT
AUDIO
OUT
3. Set the
CHANNEL
switch on the back of the VCP as described under “Setting the Channel
Switch” on Page 10.
RF.OUT
7
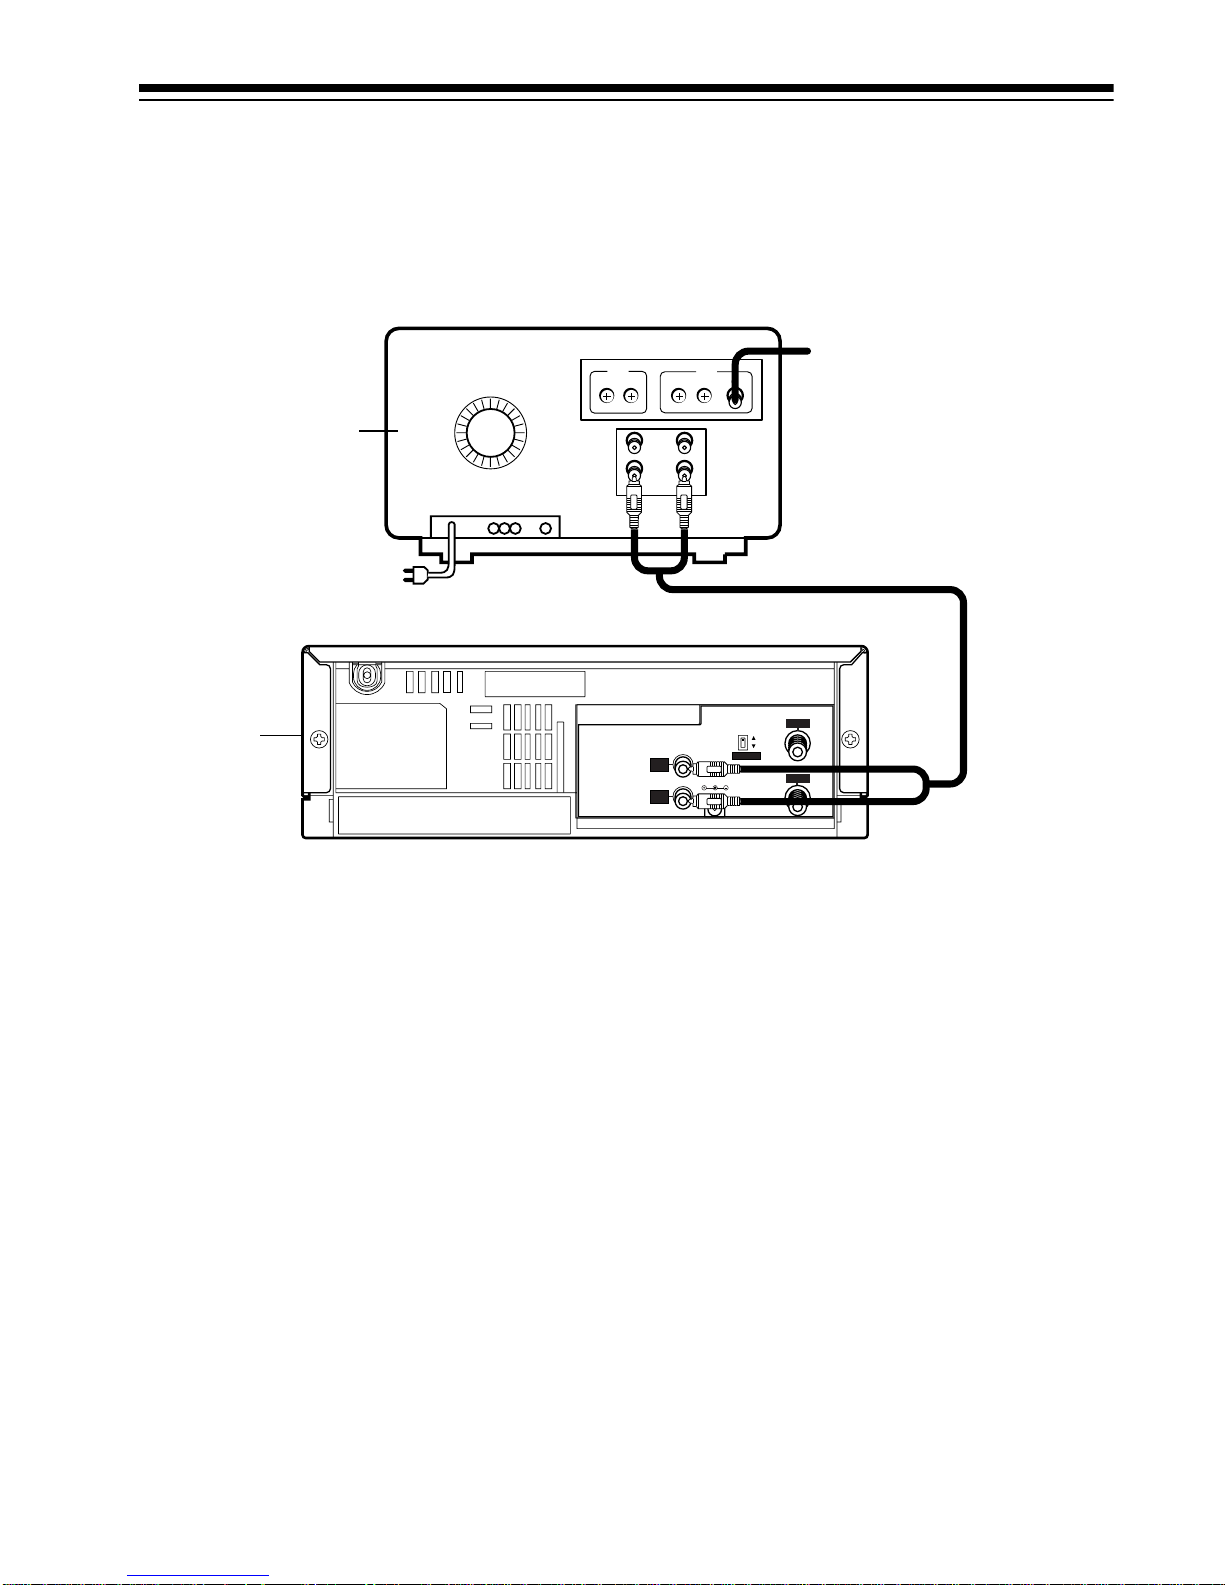
Connecting a TV/Monitor
To connect your VCP to a TV/monitor’s separate audio and video input jacks, connect the
VCP’s
AUDIO
video-quality shielded cable (not supplied).
and
VIDEO OUT
jacks to the TV/monitor’s audio and video input jacks using a
In from Antenna
UHF
VHF
300-ohm 75-ohm
Caution:
TV
VCP
You must use a video-quality cable for this type of connection. Do not use a
OUT
IN
AUDIO VIDEO
VIDEO
OUT
AUDIO
OUT
DC IN 12V
CHANNEL
ANT.IN
3
4
RF.OUT
standard audio cable. Your local RadioShack store sells the proper type of cable.
8
 Loading...