

Page 1
9-Number Memory
2-9480
Two-Line Telephone
User’s Guide
We bring good things to life.
EQUIPMENT APPROVAL INFORMATION
Your telephone equipment is approved for connection to the Public Switched Telephone Network and is in
compliance with parts 15 and 68, FCC Rules and Regulations and the Technical Requirements for Telephone
Terminal Equipment published by ACTA.
1 Notification to the Local Telephone Company
On the bottom of this equipment is a label indicating, among other information, the US number and Ringer
Equivalence Number (REN) for the equipment. You must, upon request, provide this information to your
telephone company.
The REN is useful in determining the number of devices you may connect to your telephone line and still have all of
these devices ring when your telephone number is called. In most (but not all) areas, the sum of the RENs of all
devices connected to one line should not exceed 5. To be certain of the number of devices you may connect to your line
as determined by the REN, you should contact your local telephone company.
Notes
• This equipment may not be used on coin service provided by the telephone company.
• Party lines are subject to state tariffs, and therefore, you may not be able to use your own telephone equipment if
you are on a party line. Check with your local telephone company.
• Notice must be given to the telephone company upon permanent disconnection of your telephone from your line.
2 Rights of the Telephone Company
Should your equipment cause trouble on your line which may harm the telephone network, the telephone company
shall, where practicable, notify you that temporary discontinuance of service may be required. Where prior notice is
not practicable and the circumstances warrant such action, the telephone company may temporarily discontinue
service immediately. In case of such temporary discontinuance, the telephone company must: (1) promptly notify you
of such temporary discontinuance; (2) afford you the opportunity to correct the situation; and (3) inform you of your
right to bring a complaint to the Commission pursuant to procedures set forth in Subpart E of Part 68, FCC Rules and
Regulations.
The telephone company may make changes in its communications facilities, equipment, operations or procedures
where such action is required in the operation of its business and not inconsistent with FCC Rules and Regulations. If
these changes are expected to affect the use or performance of your telephone equipment, the telephone company
must give you adequate notice, in writing, to allow you to maintain uninterrupted service.
INTERFERENCE INFORMATION
This device complies with Part 15 of the FCC Rules. Operation is subject to the following two conditions: (1) This device
may not cause harmful interference; and (2) This device must accept any interference received, including interference
that may cause undesired operation.
This equipment has been tested and found to comply with the limits for a Class B digital device, pursuant to Part 15 of the
FCC Rules. These limits are designed to provide reasonable protection against harmful interference in a residential
installation.
This equipment generates, uses, and can radiate radio frequency energy and, if not installed and used in accordance
with the instructions, may cause harmful interference to radio communications. However, there is no guarantee that
interference will not occur in a particular installation.
If this equipment does cause harmful interference to radio or television reception, which can be determined by turning
the equipment off and on, the user is encouraged to try to correct the interference by one or more of the following
measures:
• Reorient or relocate the receiving antenna (that is, the antenna for radio or television that is “receiving” the
interference).
• Reorient or relocate and increase the separation between the telecommunications equipment and receiving
antenna.
• Connect the telecommunications equipment into an outlet on a circuit different from that to which the receiving
antenna is connected.
If these measures do not eliminate the interference, please consult your dealer or an experienced radio/television
technician for additional suggestions. Also, the Federal Communications Commission has prepared a helpful booklet,
“How To Identify and Resolve Radio/TV Interference Problems.” This booklet is available from the U.S. Government
Printing Office, Washington, D.C. 20402. Please specify stock number 004-000-00345-4 when ordering copies.
US NUMBER IS LOCATED ON THE CABINET BOTTOM
REN NUMBER IS LOCATED ON THE CABINET BOTTOM
ATLINKS USA, Inc.
Model 29480
15799700 (Rev. 0 E/S)
01-39
Printed in China
10330 North Meridian Street
Indianapolis, IN 46290
© 2001 ATLINKS USA, Inc.
Trademark(s) ® Registered
Marca(s) Registrada(s)
BEFORE YOU BEGIN
MODULAR JACK REQUIREMENTS
You need an RJ11C or RJ14C type modular jack, which is the most
common type of phone jack and might look like the one pictured
here. If you don’t have a modular jack, call your local phone
company to find out how to get one installed.
CAUTION: When using telephone equipment, there are basic
safety instructions that should always be followed. Refer to the
IMPORTANT SAFETY INSTRUCTIONS provided with this product
and save them for future reference.
VOLUME
The volume controls for the handset and line ringers are separate on this
phone so you can adjust one without affecting the others.
To adjust the handset volume, use the RECEIVER HI MID LO switch on the left
side of the phone.
To adjust RINGER 1 and RINGER 2 volumes, use the switches on the left side
of the base unit to choose HI, LO or OFF. Note that, if in the OFF position, that
line will not ring. Your telephone has separate and distinct ringer sounds for
each line allowing you to determine (audibly) the line of an incoming call.
INSTALLATION
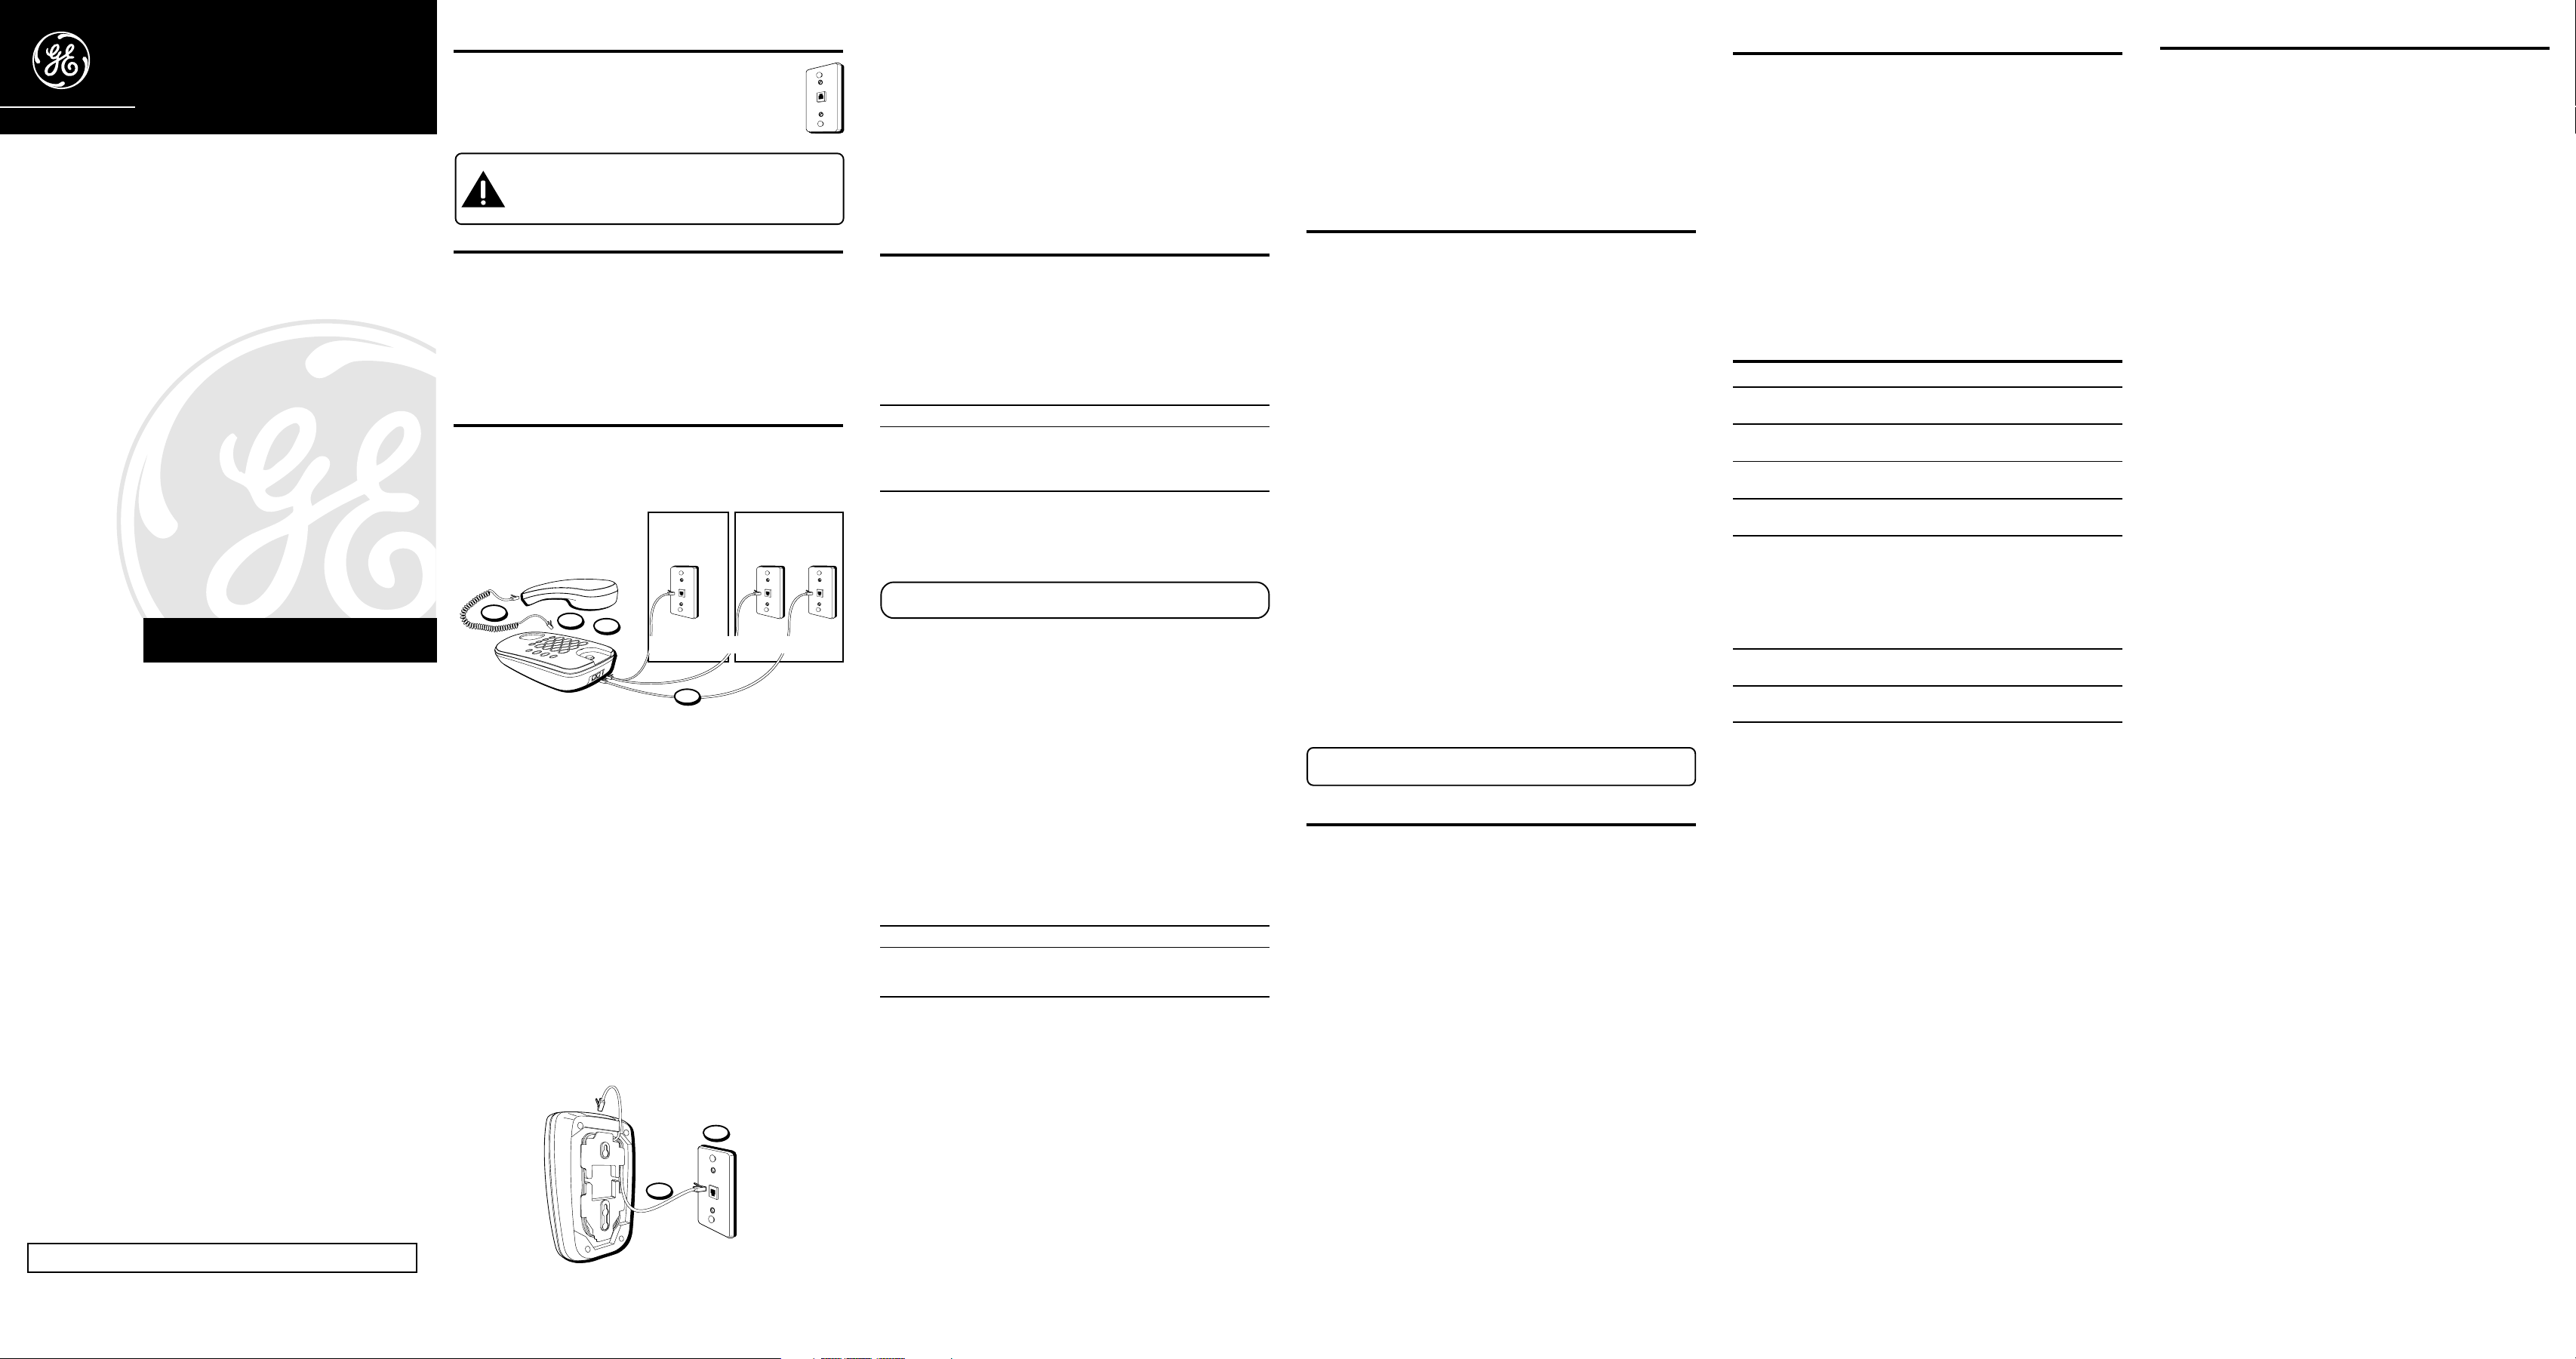
DESKTOP INSTALLATION
A coiled handset cord and two straight telephone line cords are packaged
with your unit.
FIGURE 1.
One dual-line jack
Cord from
LINE 1+2 jack
2
4
3
(RJ14C)
WHITE
1
1. (See Figure 1) If you have one dual-line phone jack (RJ14C).
Plug the white straight cord in the LINE 1+2 jack at the top of the base.
Plug the opposite end of the cord into the modular RJ14C dual-line jack.
(See Figure 2) or if you have two single-line phone jack (RJ11C).
Plug the straight cord in the LINE 1+2 jack at the top of the base.
Plug the straight cord into the LINE 2 jack.
Then, plug the opposite end of the cords into the modular RJ11C jacks.
2. Plug one end of the coiled handset cord into the handset and the opposite
end into the base.
3. Set the RINGER 1 and RINGER 2 volume switches to HI, LO or OFF.
Note in OFF position that line will not ring. Your telephone has separate
and distinct ringer sounds for each line this will allow you to determine
(audibly) the line of an incoming call.
4. Set the mode switch to TONE. Note that if you have problems dialing
switch to PULSE.
WRAPPING THE TELEPHONE LINE CORD
You may wrap the excess telephone line cord around the mounting bracket on
the bottom of the base.
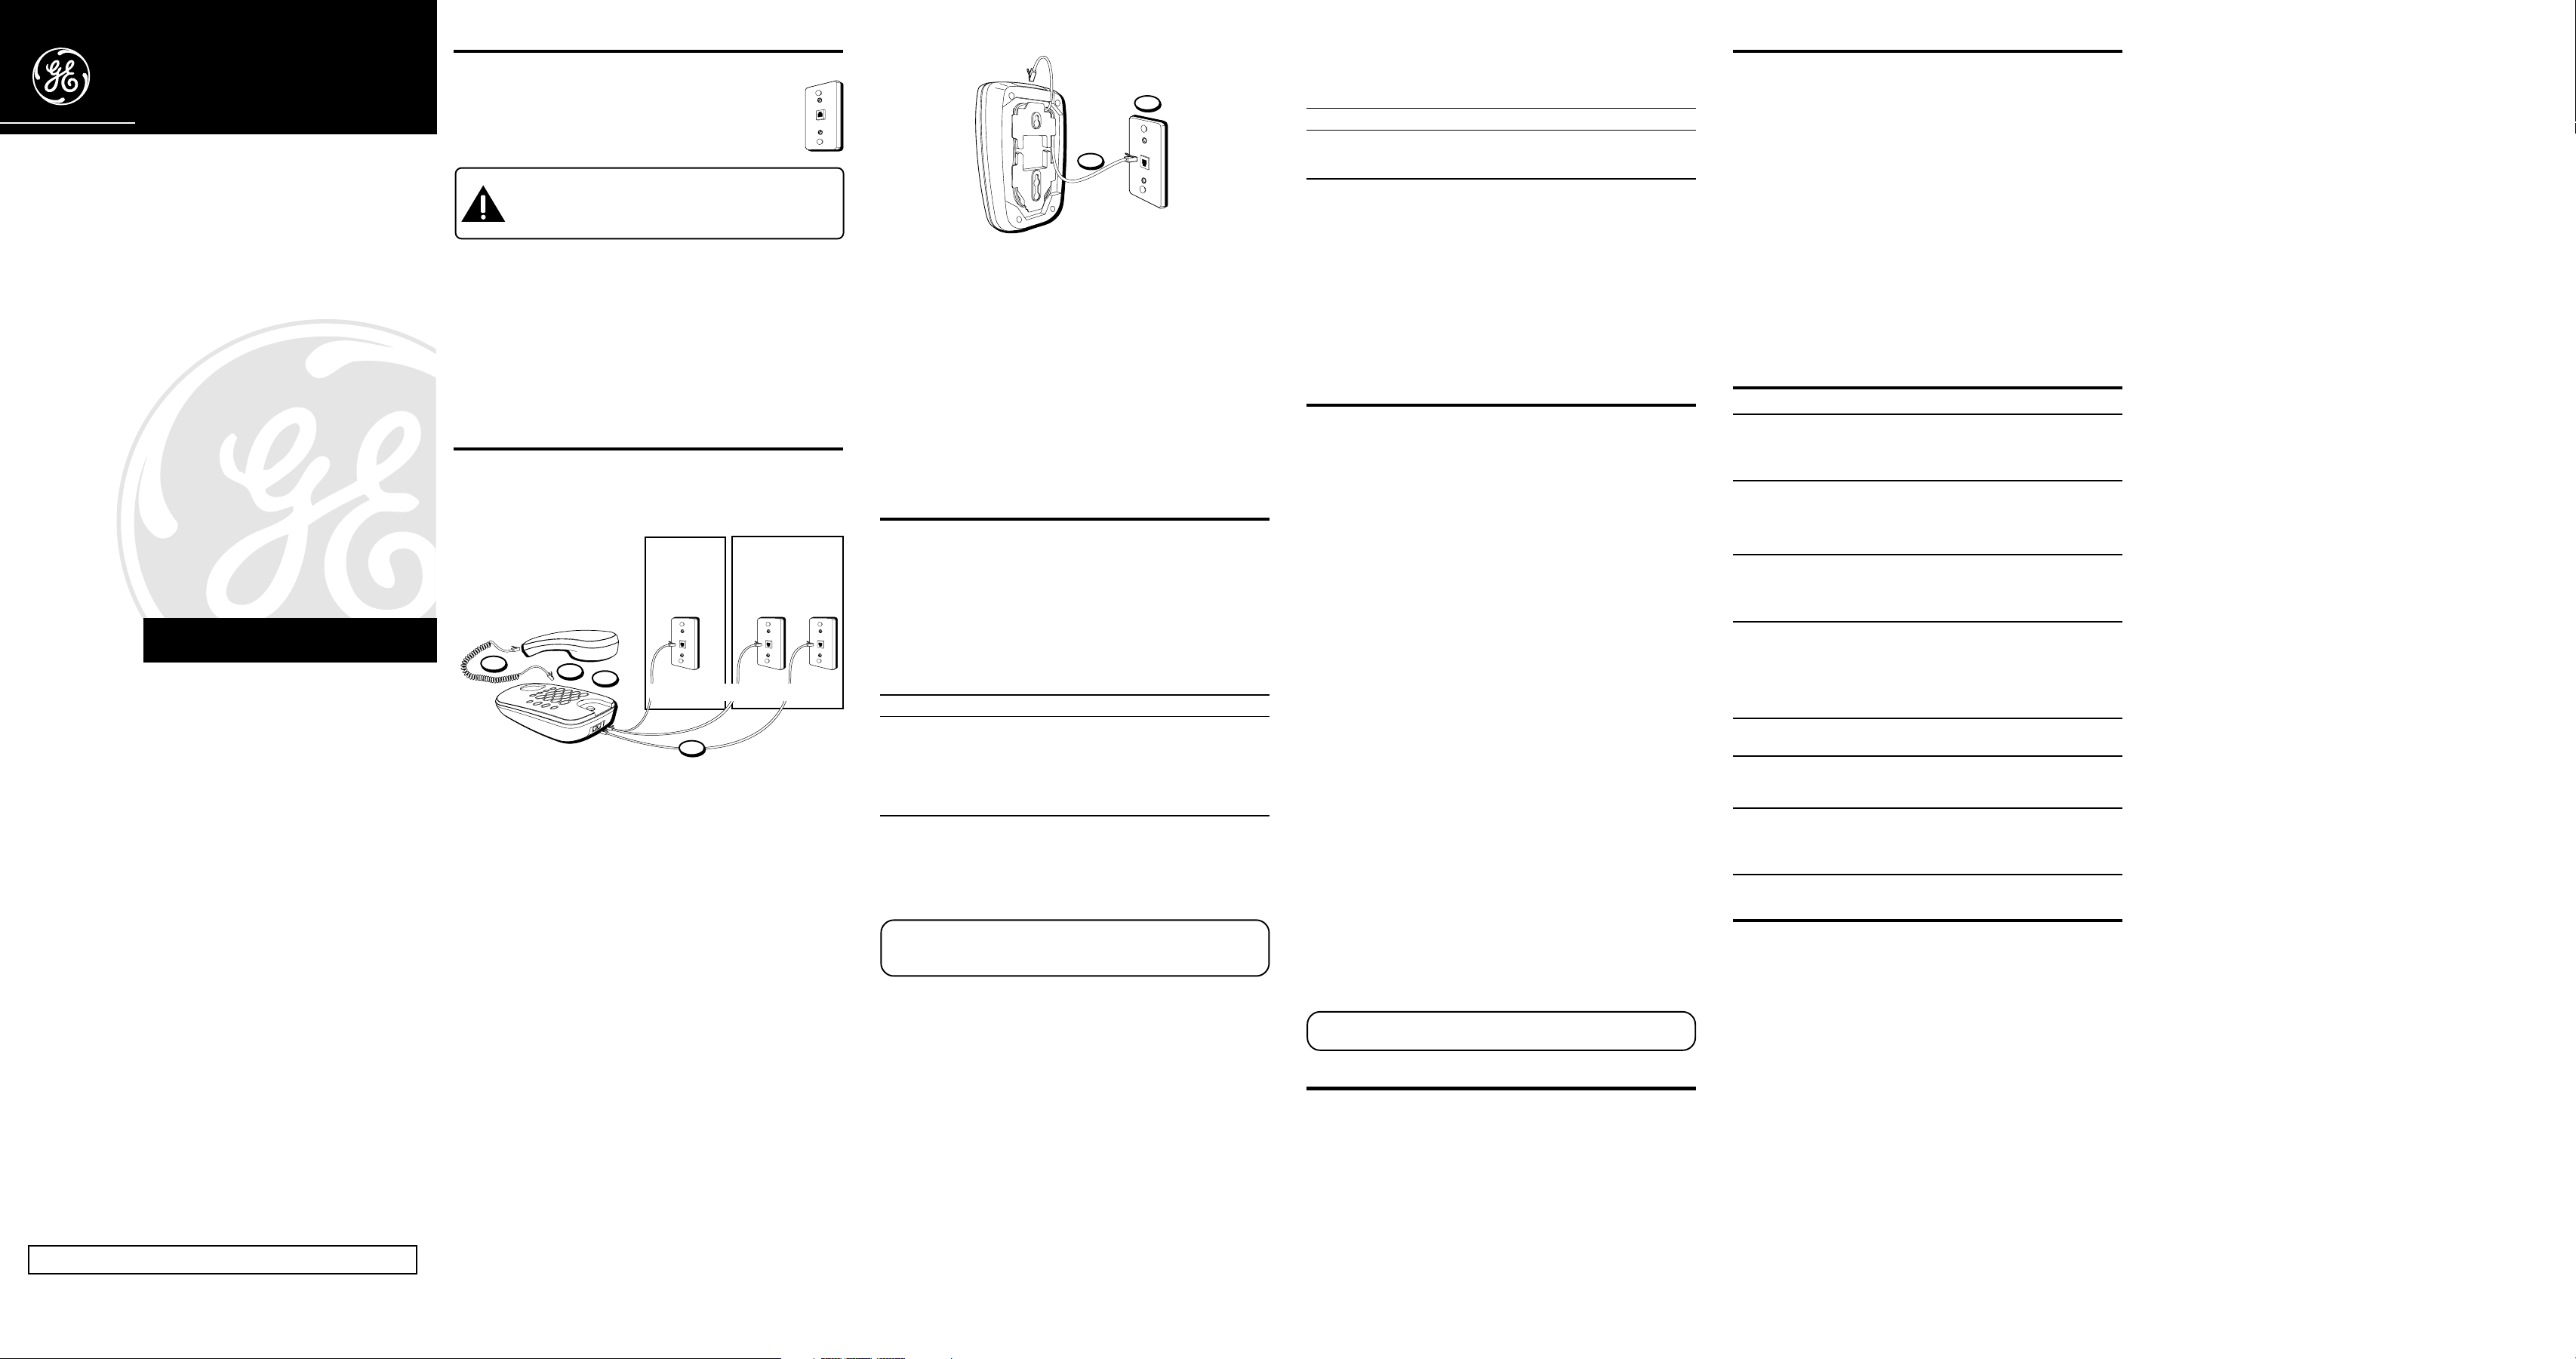
WALL MOUNT INSTALLATION
2
1
FIGURE 2.
Two single-line jacks
Cord from LINE 1+2 jack
Cord from
LINE 2 jack
(RJ11C)
WHITE
WHITE
(RJ11C)
1. Plug white straight line cord into base jack LINE 1+2. Note that you must
use a RJ14C jack.
2. Connect to the RJ14C wall jack and position wall mount holes over the
wall plate and slide down until base assembly is firmly in place.
3. Plug one end of the coiled handset cord into the handset and the opposite
end into the base.
4. Set the RINGER 1 and RINGER 2 volume switches to HI, LO or OFF. Note in
OFF position that line will not ring. Your telephone has separate and
distinct ringer sounds for each line this will allow you to determine
(audibly) the line of an incoming call.
5. Set the mode switch to TONE. Note that if you have problems dialing
switch to PULSE.
TELEPHONE BASICS
TEMPORARY TONE FEATURE
If you have Pulse (rotary) service, and want to access customer calling
services that require tone dialing, such as getting information from a local
bank, you can use this feature.
1. Press the TONE BUTTON (*) after you have connected to the service to
enable Tone dialing.
2. When you hang up, the phone automatically returns to Pulse dialing mode.
To Make a Call To Receive a Call
1. Pick up the handset. 1. Press the line number of the flashing
2. Press LINE 1 or LINE 2. indicator.
3. Replace the handset to hang up. 2. Pick up the handset.
3. Replace the handset to hang up.
MAKING AND RECEIVING CALLS
CHOOSE A LINE
Press LINE 1 or LINE 2. When the handset is off hook, an indicator lights
above the button indicating the line is in use.
NOTE: You can use the telephone if you have only one incoming line.
However you cannot access a second line.
REDIAL
Use REDIAL, to quickly redial the last number that was manually dialed. This
is useful when a line is busy for a long time.
1. Pick up the handset.
2. Wait for dial tone.
3. Press the REDIAL button. The phone automatically redials the last number
that was dialed (up to 32 digits).
FLASH
Press the FLASH button to activate custom calling services such as call
waiting or call transfer, which are provided by your local phone company. Do
not use the hook switch because you might hang up the phone.
HOLD
Press HOLD button and hang up the handset. The LINE indicator blinks to
indicate the party is on hold.
TO CONTINUE THE CONVERSATION:
At this phone From another phone
1. Pick up handset. 1. Pick up handset.
2. Press LINE on hold.
CONFERENCE
The conference feature enables you to carry on three-way conversation
using LINES 1 and 2 simultaneously.
1. Place first party on HOLD.
2. Press the alternate LINE.
3. Dial phone number for second party.
4. Press CONF and talk to both parties.
5. When finished with conference press LINE 1 or 2 to talk privately and
disconnect other line.
6. When finished hang up.
MEMORY
Each of the memory buttons is capable of storing phone numbers that are up
to 24 digits.
STORING A NUMBER IN MEMORY
1. Pick up the handset.
2. Select line 1 or 2, and wait for a dial tone.
3. Press STORE button.
4. Enter the telephone number to be stored.
5. Press STORE button.
6. Press number key 1-9 dial buttons to assign a memory address.
7. Replace the handset.
8. To store another number repeat steps 1-7 .
INSERTING A PAUSE IN THE DIALING SEQUENCE
Press the REDIAL button to insert a delay in the dialing sequence of a stored
telephone number when a pause is needed to wait for a dial tone (for example
after you dial 9 for an outside line, or to wait for a computer access tone). Each
pause counts as 1 digit in the dialing sequence.
CHANGING A STORED NUMBER
To change a stored number, you just replace it with a different number using
the procedure for storing a number.
DIALING A STORED NUMBER
1. Pick up the handset.
2. Press the line you want (line 1 or line 2).
3. Wait for a dial tone.
4. Press MEM DIAL button.
5. Press memory address button 1-9.
NOTE: If you make a mistake while storing a number, hang up and repeat
the storing procedure.
GENERAL PRODUCT CARE
To keep your Telephone working and looking good, follow these guidelines:
• Avoid putting it near heating appliances and devices that generate
electrical noise (for example, motors or fluorescent lamps).
• DO NOT expose to direct sunlight or moisture.
• Avoid dropping the unit and/or other rough treatment.
• Clean with a soft cloth.
• Never use a strong cleaning agent or abrasive powder because this will
damage the finish.
• Retain the original packaging in case you need to ship it at a later date.
SERVICE
This product may be serviced only by the manufacturer or its authorized
service agents. Changes or modifications not expressly approved by ATLINKS
USA, Inc. could void the user’s authority to operate this product. For
instructions on how to obtain service, refer to the warranty included in this
guide or call customer service at 1-800-448-0329.
Or refer inquiries to:
ATLINKS USA, Inc.
Manager, Consumer Relations
P O Box 1976
Indianapolis, IN 46206
Attach your sales receipt to the booklet for future reference or jot down the
date this product was purchased or received as a gift. This information will be
valuable if service should be required during the warranty period.
Purchase date ________________________________________________
Name of store ________________________________________________
TROUBLESHOOTING TIPS
Problem Solution
No dial tone. • Check hook switch to make sure it pops up.
• Check if a LINE button depressed.
Phone dials in pulse with tone service • Make sure TONE/PULSE switch is set to TONE
Phone won’t dial out with pulse service • Make sure TONE/PULSE switch is set to PULSE
Phone doesn’t ring • Check RINGER VOLUME.
• You might have too many phones on one line.
Light and tone fluctuating with • This is normal as power is feedback flutter
when dialing in pulse mode phone outpulsing.
Can’t be heard by • Make sure phone line is connected properly.
other party • Make sure other phones are not OFF hook at
the same time. If so, this is normal condition as
volume drops when additional phones are
used at once.
Memory dialing • Make sure you entered numbers correctly.
(See “Memory.”)
Memory Loss • Is Lithium battery installed correctly.
• Does lithium battery need to be replaced.
Indicator lights do not • Check all of the phones on this line.
Turn on or off properly • Switch the line cord jacks for lines 1 and 2.
LIMITED WARRANTY
What your warranty covers:
• Defects in materials or workmanship.
For how long after your purchase:
• One year, from date of purchase.
(The warranty period for rental units begins with the first rental or 45 days
from date of shipment to the rental firm, whichever comes first.)
What we will do:
• Provide you with a new or, at our option, a refurbished unit. The exchange unit
is under warranty for the remainder of the original product’s warranty period.
How you get service:
• Properly pack your unit. Include any cables, etc., which were originally
provided with the product.
•”Proof of purchase in the form of a bill of sale or receipted invoice which is
evidence that the product is within the warranty period, must be presented
to obtain warranty service.” For rental firms, proof of first rental is also
required. Also print your name and address and a description of the
defect. Send via standard UPS or its equivalent to:
ATLINKS USA, Inc.
c/o Thomson multimedia Inc.
11721 B Alameda Ave.
Socorro, Texas 79927
• Pay any charges billed to you by the Exchange Center for service not
covered by the warranty.
• Insure your shipment for loss or damage. ATLINKS accepts no liability in
case of damage or loss.
• A new or refurbished unit will be shipped to you freight prepaid.
What your warranty
• Customer instruction. (Your Owner’s Manual provides information
regarding operating instructions and user controls. Any additional
information, should be obtained from your dealer.)
• Installation and setup service adjustments.
• Batteries.
• Damage from misuse or neglect.
• Products which have been modified or incorporated into other products.
• Products purchased or serviced outside the USA.
• Acts of nature, such as but not limited to lightning damage.
Limitation of Warranty:
• THE WARRANTY STATED ABOVE IS THE ONLY WARRANTY APPLICABLE
TO THIS PRODUCT. ALL OTHER WARRANTIES, EXPRESS OR IMPLIED
(INCLUDING ALL IMPLIED WARRANTIES OF MERCHANTABILITY OR
FITNESS FOR A PARTICULAR PURPOSE) ARE HEREBY DISCLAIMED. NO
VERBAL OR WRITTEN INFORMATION GIVEN BY ATLINKS USA, INC., ITS
AGENTS, OR EMPLOYEES SHALL CREATE A GUARANTY OR IN ANY WAY
INCREASE THE SCOPE OF THIS WARRANTY.
• REPAIR OR REPLACEMENT AS PROVIDED UNDER THIS WARRANTY IS THE
EXCLUSIVE REMEDY OF THE CONSUMER. ATLINKS USA, INC. SHALL NOT
BE LIABLE FOR INCIDENTAL OR CONSEQUENTIAL DAMAGES RESULTING
FROM THE USE OF THIS PRODUCT OR ARISING OUT OF ANY BREACH OF
ANY EXPRESS OR IMPLIED WARRANTY ON THIS PRODUCT. THIS
DISCLAIMER OF WARRANTIES AND LIMITED WARRANTY ARE GOVERNED
BY THE LAWS OF THE STATE OF INDIANA. EXCEPT TO THE EXTENT
PROHIBITED BY APPLICABLE LAW, ANY IMPLIED WARRANTY OF
MERCHANTABILITY OR FITNESS FOR A PARTICULAR PURPOSE ON THIS
PRODUCT IS LIMITED TO THE APPLICABLE WARRANTY PERIOD SET
FORTH ABOVE.
How state law relates to this warranty:
• Some states do not allow the exclusion nor limitation of incidental or
consequential damages, or limitations on how long an implied warranty
lasts so the above limitations or exclusions may not apply to you.
• This warranty gives you specific legal rights, and you also may have other
rights that vary from state to state.
If you purchased your product outside the USA:
• This warranty does not apply. Contact your dealer for warranty information.
does not
cover:
Page 2
2-9480
Memoria de 9 números
Dos líneas telefónicas
Guía del usuario
Le damos vida a las cosas buenas.
INFORMACIÓN SOBRE LA APROBACIÓN DE EQUIPO
El equipo de su teléfono esta aprobado para la conexión con la red Telefónica Pública (Public Switched Telephone
Network) y cumple con los requisitos establecidos en las secciones 15 y 68 de las Reglas y Regulaciones de la FCC
y con los Requerimientos Técnicos para Equipos de Terminales Telefónicas (Technical Requirements for Telephone
Terminal Equipment), publicado por ACTA.
1 Notificación a la Compañía Telefónica Local
En la parte de abajo de este equipo hay una etiqueta que indica, entre otra información, el número de US y el
Número de Equivalencia de Timbres (REN) para este equipo. Usted debe, cuando sea requerido, proveer esta
información a su compañía telefónica.
El REN es útil para determinar el número total de artefactos que Ud. puede conectar a su línea telefónica,
todavía asegurando que todos estos artefactos sonarán cuando se llame su número telefónico. En la mayoría
de las áreas (pero no en todas), el total de los números REN de todos los artefactos conectados a una línea
no debe exceder 5. Para estar seguro del número total de artefactos que Ud. pueda conectar a su línea
(determinado por el REN), Ud. deberá ponerse en contacto con su compañía telefónica local.
NOTAS:
• No se puede usar este equipo con un teléfono de previo pago proveído por la compañía telefónica.
• Las líneas compartidas son sujetas a las tarifas del estado, y por eso, es posible que Ud. no pueda usar su
propio equipo telefónico si Ud. estuviera compartiendo la misma línea telefónica con otros abonados.
• Se debe notificar la compañía telefónica cuando se desconecte permanentemente su teléfono de la línea.
2 Derechos de la Compañía Telefónica
Si su equipo causase algún problema en su línea que pudiera dañar la red telefónica, la compañía telefónica
siempre que sea posible le avisará de la posible interrupción temporal de su servicio. En caso que la compañía
no pudiera avisarle de antemano y hubiera necesidad de tomar tal acción, la compañía telefónica podrá
interrumpir su servicio inmediatemente. En caso de tal interrupción telefónica temporal la compañía debe : (1)
darle aviso al momento de tal interrupción temporal de servico, (2) concederle a Ud. la oportunidad de corregir
la situación, (3) informarle a Ud. de sus derechos de presentar una questa a la Comisión de acuerdo con los
procedimientos dictados en la Subparte E de la Parte 68 de las Regulaciones y Reglas de la FCC.
La compañía telefónica puede hacer los cambios en sus instalaciones de comunicación, en equipos, en sus
funcionamientos o procedimientos que digne necesarios para el manejo de sus negocios y que no sean
incompatibles con las Reglas y Regulaciones de l a FCC. Si estos cambios pudieran alterar el uso o el
funcionamiento de su equipo telefónico, la compañía telefónica deberá darle aviso adecuado en escrito para
que Ud. goce de un servico ininterrumpido.
INFORMACIÓN DE INTERFERENCIAS
Este artefacto cumple con la Parte 15 de las Reglas de la FCC. Su funcionamiento es sujeto a las dos condiciones
siguientes: (l) Este artefacto no puede causar interferencia dañosa, y (2) Este artefacto debe aceptar cualquier
interferencia recibida, incluyendo interferencia que puede causar un funcionamiento no deseado.
Este equipo ha sido probado y cumple con los límites para un artefacto digital de la Clase B, de conformidad con la
Parte 15 de las Reglas de la FCC. Estos límites han sido diseñados para proporcionar una protección razonable
contra una interferencia dañosa que pueda existir en una instalación doméstica.
Este equipo genera, usa y puede radiar la energía de frecuencia de una radio y, si no fuera instalado y usado de
acuerdo con las instrucciones, puede causar interferencia dañosa a las transmisiones radiales. Sin embargo, no
hay garantía que la interferencia no ocurrirá en una instalación en particular.
Si este equipo causa en efecto una interferencia dañosa a la recepción de la radio o de la televisión, lo cual puede
ser determinado apagando y prendiendo el equipo, le animamos a Ud. de tratar de corregir la interferencia por
medio de una (o más) de las sugerencias siguientes:
• Cambie la posición o la ubicación de la antena (quiere decir la antena de la radio o de la televisión que está
recibiendo la interferencia).
• Cambie la posición o cambie la ubicación y aumente la distancia entre el equipo de telecomunicaciones y la
antena receptora de la radio o de la televisión que está recibiendo la interferencia.
• Conecte el equipo de telecomunicaciones a una toma en un circuito diferente del circuito al cual la antena
receptora esté conectada.
Si estas medidas no eliminan la interferencia, favor de consultar a su distribuidor o a un técnico de radio/televi
sión experto por otras sugerencias. También, la Comisión Federal de Comunicaciones (FCC) ha preparado un
folleto muy útil, “How To Identify and Resolve Radio/TV Interference Problems” (“Como Identificar y Resolver
Problemas de Interferencia de Radio/Televisión”). Este folleto se puede obtener del U.S. Goverment Printing Office,
Washington, D.C. 20402. Favor de especificar el número 004-000-00345-4 cuando haga su pedido.
El número de la US está ubicado en el fondo de la base
El numero REN esta ubicado en el fondo de la base
ATLINKS USA, Inc.
Modelo 29480
15799700 (Rev. 0 E/S)
01-39
Impreso en China
10330 North Meridian Street
Indianapolis, IN 46290
© 2001 ATLINKS USA, Inc.
Trademark(s) ® Registered
Marca(s) Registrada(s)
ANTES DE COMENZAR
REQUISITOS PARA EL ENCHUFE HEMBRA MODULAR
Usted necesita un enchufe hembra modular de tipo RJ11C ó RJ14C,
el cual es el tipo de enchufe hembra modular más común y su
imagen es la que aquí se muestra. Si no tiene un enchufe hembra
modular, llame a su compañía local de teléfonos para averiguar qué
hacer para que le sea instalado.
CUIDADO: Cuando utilice equipo telefónico, hay instrucciones
básicas de seguridad que siempre deben seguirse. Refiérase a la
guía de INSTRUCCIONES DE SEGURIDAD IMPORTANTES
provista con este producto y guárdela para referencia futura.
Los controles para volumen del auricular y del timbre de la línea están separados
en este teléfono para que pueda ajustar uno sin afectar a los otros.
Para ajustar el volumen del auricular, utilice el control RECEIVER (AURICULAR) HI
(ALTO), MID (MEDIO), LO (BAJO), en el lado izquierdo del teléfono.
Para ajustar el volumen de los timbres (“RINGER 1” y “RINGER 2”), utilice los
selectores localizados al costado de la base para seleccionar entre alto, bajo y
desactivado (“HI,” “LO,” y “OFF”). Observe que si el selector está en la posición
de desactivado (“OFF”), esa línea no timbrará. Su teléfono tiene timbres con
sonidos separados y distintos para cada línea, lo cual le permite a usted
determinar (auditivamente) la línea por donde está entrando una llamada.
INSTALACIÓN
INSTALACIÓN SOBRE ESCRITORIO
Un cordón rizado y dos cables lisos de líneas telefónicas han sido embalados
junto a su aparato.
FIGURA 1.
Un enchufe
hembra de línea
dual
Cable que sale del
enchufe hembra
LINE 1+2
2
4
3
(RJ14C)
BLANCO
1
1. (Consulte la figura 1) Si tiene un enchufe hembra de línea dual (RJ14C)
Enchufe el cable liso blanco en el enchufe hembra LINE 1+2 (LINEA 1+2)
en la parte superior de la base.
Enchufe el lado opuesto del cable en el enchufe hembra de línea dual
RJ14C modular.
(Consulte la figura 2) o si tiene dos enchufes hembra de línea simple (RJ11C)
Enchufe el cable liso gris en el enchufe LINE 1+2 en la parte superior
de la base.
Enchufe el cable liso blanco en el enchufe LINE 2.
Después, enchufe los lados opuestos de los cables en los enchufes
hembra modulares RJ11C.
2. Enchufe un extremo del cordón rizado del auricular en éste y el extremo
opuesto en la base.
3. Ajuste los controles de volumen del RINGER 1 (TIMBRE 1) y RINGER 2
(TIMBRE 2) en HI (ALTO), LO (BAJO), u OFF (APAGADO)
Tenga en cuenta que la línea no sonará cuando el control esté en la
posición OFF. Su teléfono tiene sonidos de timbre distintos para cada línea
para ayudarle a determinar (auditivamente) la línea por la que está
entrando una llamada.
4. Ajuste el control para el modo TONE (TONO). Tenga en cuenta que podría
tener problemas al marcar y tendría que pasarlo a PULSE (PULSO).
PARA GUARDAR LA LÍNEA DE CABLE TELEFÓNICO
Usted puede guardar el excedente del cable de la línea telefónica alrededor
de la placa para montaje en la parte de debajo de la base.
FIGURA 2.
Dos enchufes hembra de
línea simple
(RJ11C)
BLANCO
Cable que
sale del
enchufe
hembra LINE 2
(RJ11C)
Cable que
sale del
enchufe
hembra
LINE 1+2
BLANCO
INSTALACIÓN EN LA PARED
2
1
1. Enchufe el cable blanco liso en el enchufe hembra modular de la base
LINE 1+2 (LINEA 1+2). Tenga en cuenta que debe utilizar un enchufe
hembra RJ14C.
2. Conecte al enchufe de pared RJ14C y coloque los agujeros para montaje
frente a la placa de pared y deslice hacia abajo hasta que la placa de
pared quede ajustada en su sitio firmemente.
3. Enchufe un extremo del cordón rizado del auricular en éste y el extremo
opuesto en la base.
4. Ajuste los controles de volumen del RINGER 1 (TIMBRE 1) y RINGER 2
(TIMBRE 2) en HI (ALTO), LO (BAJO), u OFF (APAGADO). Tenga en cuenta
que la línea no sonará cuando el control esté en la posición OFF. Su
teléfono tiene sonidos de timbre distintos para cada línea para ayudarle a
determinar (auditivamente) la línea por la que está entrando una llamada.
5. Ajuste el control para el modo TONE (TONO). Tenga en cuenta que podría
tener problemas al marcar y tendría que pasarlo a PULSE (PULSO).
OPERACIÓN TELEFÓNICA
TONO TEMPORARIO
Si usted recibe un servicio telefónico de impulsos (rotativo) y quiere tener
acceso a servicios de llamadas del cliente que requieran marcación por
tonos, como el servicio automático para obtener información de un banco
local, por ejemplo, usted puede utilizar esta característica.
1. Oprima el botón (*) TONE después de que haya establecido conexión
telefónica con el servicio para activar la marcación por tonos.
2. Al colgar, el teléfono regresa automáticamente al modo de marcación
por impulsos.
Para hacer una llamada Para recibir una llamada
1. Descuelgue el auricular. 1. Oprima el número de línea del indicador parpadeante.
2. Oprima LINE 1 (LÍNEA 1) ó 2. Descuelgue el auricular.
LINE 2 (LÍNEA 2).
3. Cuelgue el auricular al 3. Cuelgue el auricular al terminar de hablar.
terminar de hablar.
HACER Y RECIBIR LLAMADAS
SELECCIONE UNA LÍNEA
• Oprima LINE 1 (LÍNEA 1) ó LINE 2 (LÍNEA 2); cuando el auricular está
descolgado, un indicador se ilumina sobre el botón indicando que la línea
está siendo utilizada.
NOTA: Puede utilizar el teléfono si tiene sólamente una línea telefónica para
llamadas; sin embargo, no podrá acceder a una segunda línea. Vea también
"Baterías para energía suplementaria".
REDIAL
Utilice REDIAL (volver a marcar) para marcar automáticamente el último
número que marcó manualmente. Resulta muy útil cuando una línea está
ocupada por mucho tiempo.
1. Descuelgue el auricular.
2. Espere el tono para marcar.
3. Oprima el botón REDIAL (volver a marcar). El teléfono marcará
automáticamente el último número que usted marcó (hasta 16 dígitos).
BOTÓN FLASH
Oprima el botón FLASH para activar servicios personalizados de llamadas,
como la llamada en espera o transferencia de llamadas, que le son ofrecidos
por su compañía local de teléfonos. No oprima el gancho para colgar, pues
podría perder una llamada.
BOTÓN HOLD (ESPERA)
• Oprima el botón HOLD (ESPERA) y cuelgue el auricular. El indicador de LÍNEA
parpadea para indicar que su interlocutor está en espera.
CONTINUACIÓN DE LA CONVERSACIÓN
Desde el mismo teléfono Desde otro teléfono
1.
Descuelgue el auricular.
2.
Oprima el botón de LÍNEA en espera.
1.
Descuelgue el auricular.
BOTÓN CONFERENCE (CONFERENCIA)
La función de conferencia le permite a usted llevar a cabo una conversación
con tres líneas, utilizando la línea 1 y la línea 2 simultáneamente.
1. Ponga al primer interlocutor en HOLD (espera).
2. Oprima la LÍNEA alterna.
3. Marque el número de teléfono de la segunda persona.
4. Oprima CONF y hable con las dos personas.
5. Al terminar la conferencia, oprima LINE 1 or 2 (LÍNEA 1 ó 2) para hablar en
privado y desconecte la otra línea.
6. Al terminar, cuelgue.
MEMORIA
Cada una de las teclas de memoria puede guardar números telefónicos de
hasta 24 dígitos.
ALMACENAMIENTO DE UN NÚMERO EN MEMORIA
1. Descuelgue el auricular.
2. Seleccione la línea 1 o 2, y espere al tono de marcar.
3. Oprima el botón para almacenar (“STORE”).
4. Inscriba el número telefónico que será almacenado.
5. Oprima el botón para almacenar (“STORE”).
6. Oprima los botones de las teclas numéricas (1-9) para asignar la dirección
de memoria.
7. Vuelva a colocar el auricular en su sitio.
8. Para almacenar otro número, repita los pasos 1-7.
INSERCIÓN DE UNA PAUSA EN LA SECUENCIA AL MARCAR
Oprima el botón REDIAL (volver a marcar) para insertar una pausa en la
secuencia de números de un número de teléfono almacenado cuando ésta
sea necesaria para esperar a obtener tono para marcar (por ejemplo,
después de marcar 9 para obtener una línea exterior, o para esperar por un
tono de acceso a un ordenador). Cada pausa cuenta como 1 dígito en la
secuencia al marcar.
CAMBIAR UN NÚMERO ALMACENADO EN MEMORIA
Para cambiar un número almacenado en la memoria, sólo tiene que
reemplazarlo con un número diferente utilizando el procedimiento para
almacenar un número.
MARCAR UN NÚMERO ALMACENADO EN LA MEMORIA
1. Levante el auricular.
2. Oprima la línea que usted quiera (línea 1 o 2).
3. Espere al tono de marcar.
4. Oprima el botón “MEM DIAL.”
5. Oprima los botones de las direcciones de memoria del 1 al 9.
NOTA: Si comete un error al almacenar un número, cuelgue y repita el
proceso de almacenamiento.
CUIDADO GENERAL DEL APARATO
Para mantener su teléfono funcionando y luciendo bien, observe
siguientes consejos:
• Evite colocarlo cerca de aparatos que emitan calor y de dispositivos que
generen ruido eléctrico (por ejemplo, motores o lámparas fluorescentes).
• NO lo exponga a luz del sol directa o a humedad.
• Evite dejar caer la unidad o maltratarla.
• Límpielo con un paño suave.
• Nunca utilice un agente fuerte o polvo abrasivo de limpieza, ya que esto
dañará el acabado.
• Retenga el paquete original en caso de que necesite embalarlo
más adelante.
CÓMO OBTENER SERVICIOS DE MANTENIMIENTO
Este producto puede únicamente ser reparado por el fabricante o sus
agentes de reparación autorizados. Cualquier cambio o modificación no
aprobados expresamente por ATLINKS USA, Inc. podría ser motivo de
anulación de la autoridad del usuario para operar este producto. Para recibir
instrucciones sobre cómo obtener servicios de mantenimiento, por favor
consulte la garantía incluida en esta Guía, o llame a Información para el
Usuario, 1-800-448-0329.
O envíe sus preguntas a:
ATLINKS USA, Inc.
Gerente, Servicio al Consumidor
P.O. Box 1976
Indianápolis, IN 46206
Adjunte su recibo al folleto, para futura referencia, o anote la fecha en la que
se compró o recibió este producto como regalo. Esta información será
valiosa si se llegase a requerir durante el período de garantía.
Fecha de compra________________________________________________
Nombre de la tienda______________________________________________
CONSEJOS DE REPARACIÓN
Problema
No hay tono de marcar • Verifique que el interruptor del auricular se
El teléfono marca por pulso con • Asegúrese que el selector “TONE/PULSE”
servicio de tono está en la posición de “TONE.”
El teléfono marca hacia fuera con • Asegúrese que el “TONE/PULSE” está
servicio rotatorio en la posición de “PULSE.”
No suena el timbre • Revise el control RINGER VOLUME
No es escuchado por • Asegúrese de que la línea esté bien
su interlocutor conectada.
Marcar desde la memoria • Asegúrese de haber almacenado los números
Pérdida de memoria •¿Está la batería de litio correctamente
Luces indicadoras no se • Revise todos los teléfonos conectados a la
encienden y apagan línea.
correctamente • Cambie los enchufes hembra modulares para
Solución
levante.
• Asegúrese de que está en la posición
correcta TONE/PULSE.
(volumen del timbre).
• Puede que tenga demasiadas teléfonos
conectados a la línea.
• Asegúrese de que los otros teléfonos no
estén descolgados
al mismo tiempo, pues el volumen baja al
utilizar aparatos adicionales a la vez.
correctamente.
instalada?
•¿Necesita cambiar la batería de litio?
las líneas 1 y 2.
GARANTÍA LIMITADA
Lo que cubre su garantía:
• Defectos de materiales o de trabajo.
Por cuánto tiempo después de la compra:
• Un año, a partir de la fecha de compra.
(El periodo de garantía para unidades arrendadas se inicia con
la primera renta o 45 días de la fecha del embarque a la firma
de arrendamiento, lo que ocurra primero).
Lo que haremos:
• Proporcionarle una unidad nueva o, a nuestra opción, una
reacondicionada. La unidad de intercambio quedará bajo
garantía por el resto del periodo de garantía del producto
original.
Cómo obtener servicio:
• Empaque bien la unidad, incluyendo todos los cables, etc., que
originalmente venían con el producto. Se recomienda usar el
cartón y materiales de empaque originales.
• “Prueba de compra como factura o recibo de compra, que
ofrezca evidencia de que el producto está dentro del periodo
de garantía, debe ser presentado para obtener servicio bajo
garantía.” Para compañías de arrendamiento, se requiere
como evidencia el primer contrato de renta. También escriba
claramente su nombre, dirección y la descripción del defecto.
Mande vía UPS o un servicio de paquetería equivalente a:
ATLINKS USA, Inc.
c/o Thomson multimedia Inc.
11721 B Alameda Ave.
Socorro, Texas 79927
• Pague cualquier cargo que le facture el Centro de Intercambio
por servicio que no esté cubierto por garantía.
• Asegure su empaque para prevenir pérdida o daño. ATLINKS
no acepta responsabilidad en caso de pérdida o daño.
• Un aparato nuevo o uno remozado se le enviará con los cargos
pagados.
no
Lo que
cubre la garantía:
• Instrucciones al cliente. (Su manual de propietario le
proporciona la información con respecto a las instrucciones de
operación y los controles del usuario. Cualquier información
adicional debe obtenerse con su agente de ventas.
• Ajustes de instalación y de preparación del servicio.
• Baterías.
• Daño por mal uso o negligencia.
• Productos que han sido modificados o incorporados a otros
productos.
• Productos comprados o que han recibido servicio fuera de los
Estados Unidos.
• Desastres naturales, por ejemplo y sin limitarse a ellos, daños
por relámpagos.
Limitaciones sobre la Garantía:
• LA GARANTÍA ESPECIFICADA ANTERIORMENTE ES LA ÚNICA
GARANTÍA APLICABLE A ESTE PRODUCTO. CUALQUIER OTRA
GARANTÍA, EXPRESA O IMPLÍCITA (INCLUYENDO TODAS LAS
GARANTÍAS IMPLÍCITAS DE MERCADO O DE SALUD PARA
CUALQUIER PROPÓSITO) SON CONSIDERADAS NO VÁLIDAS.
NINGUNA INFORMACIÓN VERBAL O ESCRITA OTORGADA
POR ATLINKS USA,INC., SUS AGENTES, O EMPLEADOS SERÁ
CONSIDERADA PARA CREAR UNA GARANTÍA NI PARA
AUMENTAR BAJO NINGUNA CIRCUNSTANCIA LA
COBERTURA DE ESTA GARANTÍA.
• LA REPARACIÓN O REEMPLAZO DE UN PRODUCTO COMO SE
ESPECIFICA BAJO ESTA GARANTÍA ES EL REMEDIO
EXCLUSIVO DEL CONSUMIDOR. ATLINKS USA, INC. NO SE
HACE RESPONSIBLE POR DAÑOS INCIDENTALES, DAÑOS
DERIVADOS COMO CONSECUENCIA DEL USO DE ESTE
PRODUCTO, O COMO RESULTADO DEL INCUMPLIMIENTO DE
CUALQUIER GARANTÍA IMPLÍCITA O EXPRESA DE ESTE
PRODUCTO. LA INVALIDEZ DE LAS GARANTÍAS O LAS
GARANTÍAS LIMITADAS ESTÁN REGLAMENTADAS POR LAS
LEYES DEL ESTADO DE INDIANA. EXCEPTO POR EL ALCANCE
ESTABLECIDO POR LAS LEYES APLICABLES, CUALQUIER
GARANTÍA IMPLÍCITA DE MERCADO O DE SALUD PARA
CUALQUIER PROPÓSITO, EN ESTE PRODUCTO ES LIMITADA
AL PERÍODO DE GARANTÍA ESPECIFICADO ANTERIORMENTE.
Cómo se Relaciona la Ley Estatal a esta Garantía:
• Algunos estados no permiten la exclusión ni limitación de
daño incidental o derivado de alguna consecuencia, o la
limitación con respecto al período de tiempo que debe
aplicarse para garantías implícitas, por lo tanto las
limitaciones y exclusiones mencionadas anteriormente pueden
no ser aplicables para usted.
• Esta garantía le ofrece derechos legales específicos, y usted
puede tener otros derechos legales que varían de estado a
estado.
Si compró su producto fuera de los Estados Unidos:
• Esta garantía no se aplica. Vea a su distribuidor para
información sobre la garantía.
 Loading...