

Page 1

12 Number Memory FM/AM Clock
Radio Telephone User’s Guide
2-9291
We bring good things to life.
Page 2

FCC REGISTRATION INFORMATION
Your GE telephone equipment is registered with the Federal Communications Commission and is in compliance
with parts 15 and 68, FCC Rules and Regulations.
1 Notification to the Local Telephone Company
On the bottom of this equipment is a label indicating, among other information, the FCC Registration
number and Ringer Equivalence Number (REN) for the equipment. You must, upon request, provide this
information to your telephone company.
The REN is useful in determining the number of devices you may connect to your telephone line and still
have all of these devices ring when your telephone number is called. In most (but not all) areas, the sum of
the RENs of all devices connected to one line should not exceed 5. To be certain of the number of devices you
may connect to your line as determined by the REN, you should contact your local telephone company.
Notes
• This equipment may not be used on coin service provided by the telephone company.
• Party lines are subject to state tariffs, and therefore, you may not be able to use your own telephone
equipment if you are on a party line. Check with your local telephone company.
• Notice must be given to the telephone company upon permanent disconnection of your telephone from your
line.
2 Rights of the Telephone Company
Should your equipment cause trouble on your line which may harm the telephone network, the telephone
company shall, where practicable, notify you that temporary discontinuance of service may be required.
Where prior notice is not practicable and the circumstances warrant such action, the telephone company
may temporarily discontinue service immediately. In case of such temporary discontinuance, the telephone
company must: (1) promptly notify you of such temporary discontinuance; (2) afford you the opportunity to
correct the situation; and (3) inform you of your right to bring a complaint to the Commission pursuant to
procedures set forth in Subpart E of Part 68, FCC Rules and Regulations.
The telephone company may make changes in its communications facilities, equipment, operations of procedures
where such action is required in the operation of its business and not inconsistent with FCC Rules and Regulations.
If these changes are expected to affect the use or performance of your telephone equipment, the telephone
company must give you adequate notice, in writing, to allow you to maintain uninterrupted service.
INTERFERENCE INFORMATION
This device complies with Part 15 of the FCC Rules. Operation is subject to the following two conditions: (1) This
device may not cause harmful interference; and (2) This device must accept any interference received, including
interference that may cause undesired operation.
This equipment has been tested and found to comply with the limits for a Class B digital device, pursuant to
Part 15 of the FCC Rules. These limits are designed to provide reasonable protection against harmful
interference in a residential installation.
This equipment generates, uses, and can radiate radio frequency energy and, if not installed and used in
accordance with the instructions, may cause harmful interference to radio communications. However, there is
no guarantee that interference will not occur in a particular installation.
If this equipment does cause harmful interference to radio or television reception, which can be determined by
turning the equipment off and on, the user is encouraged to try to correct the interference by one or more of
the following measures:
• Reorient or relocate the receiving antenna (that is, the antenna for radio or television that is “receiving” the
interference).
• Reorient or relocate and increase the separation between the telecommunications equipment and receiving
antenna.
• Connect the telecommunications equipment into an outlet on a circuit different from that to which the
receiving antenna is connected.
• Consult the dealer or an experienced radio/TV technician for help.
If these measures do not eliminate the interference, please consult your dealer or an experienced radio/
television technician for additional suggestions. Also, the Federal Communications Commission has
prepared a helpful booklet, “How To Identify and Resolve Radio/TV Interference Problems.” This booklet is
available from the U.S. Government Printing Office, Washington, D.C. 20402. Please specify stock number
004-000-00345-4 when ordering copies.
HEARING AID COMPATIBILITY
This telephone system meets FCC standards for Hearing Aid Compatibility.
2
FCC NUMBER IS LOCATED ON THE CABINET BOTTOM
REN NUMBER IS LOCATED ON THE CABINET BOTTOM
Page 3
INTRODUCTION
O
H
A
G
O
T
S
T
Your GE 2-9291 12 Number Memory FM/AM Clock Radio Telephone is
designed to give you flexibility in use and high quality performance. To get
the most from your new clock radio telephone, we suggest that you take a
few minutes right now to read through this instruction manual.
TABLE OF CONTENTS
FCC REGISTRATION INFORMATION ........... 2
NTERFERENCE INFORMATION ................... 2
I
HEARING AID COMPATIBILITY .................. 2
NTRODUCTION ..................................... 3
I
ETTING STARTED ................................ 4
G
BEFORE YOU BEGIN .............................. 4
ODULAR JACK REQUIREMENTS ............. 4
M
OWERING UP ..................................... 5
P
“NO WORRY” BATTERY BACKUP ............ 5
NSTALLATION ....................................... 6
I
OWER FAILURE INDICATOR ..................... 6
P
EMO LOG .......................................... 6
M
TELEPHONE OPERATION ......................... 7
ETTING RINGER VOLUME ...................... 7
S
EMPORARY TONE FEATURE ................... 7
T
FLASH BUTTON .................................... 8
EDIAL BUTTON ................................... 8
R
EMORY DIALING ................................ 9
M
STORING A NUMBER IN MEMORY ............ 9
TORING A PAUSE TO THE DIALING
S
SEQUENCE ........................................ 9
CHANGING A STORED NUMBER ............. 10
IALING A NUMBER FROM MEMORY ...... 10
D
IALING THE EMERGENCY QUICK DIAL
D
WARNING:
OR ELECTRICAL SHOCK HAZARD,
DO NOT EXPOSE THIS PRODUCT
TO RAIN OR MOISTURE.
TO PREVENT FIRE
NUMBERS ....................................... 10
PERATE THE RADIO ............................. 11
O
BUILT-IN AFC ....................................... 11
NTENNAS ......................................... 11
A
ET THE TIME ..................................... 12
S
SET THE WAKE TIME ............................. 12
AKE TO MUSIC ................................. 13
W
AKE TO ALARM ................................. 13
W
SLEEP TO MUSIC ................................. 14
LEEP TO MUSIC AND WAKE TO MUSIC OR
S
............................................ 15
ALARM
SING SNOOZE ALARM ....................... 15
U
MINUTES AND SECONDS T IME DISPLAY .. 16
ROUBLESHOOTING TIPS ...................... 17
T
ELEPHONE ........................................ 17
T
GENERAL PRODUCT CARE .................... 18
ERVICE ............................................ 18
S
NDEX ............................................... 19
I
LIMITED WARRANTY ............................ 20
CAUTION
RISK OF ELECTRIC SHOCK
THE LIGHTNING
FLASH AND ARROWHEAD WITHIN THE
TRIANGLE IS A
WARNING SIGN
ALERTING YOU OF
"DANGEROUS
VOLTAGE" INSIDE
THE PRODUCT.
DO NOT OPEN
CAUTION: TO REDUCE THE
RISK OF ELECTRIC SHOCK,
DO NOT REMOVE COVER
(OR BACK). NO USERSERVICEABLE PARTS INSIDE. REFER SERVICING
TO QUALIFIED SERVICE
PERSONNEL.
SEE MARKING ON BOTTOM / BACK OF PRODUCT
THE EXCLAMATI
POINT WITHIN T
TRIANGLE IS
WARNING SI
ALERTING YOU
IMPORTAN
INSTRUCTION
ACCOMPANYIN
THE PRODUC
3
Page 4
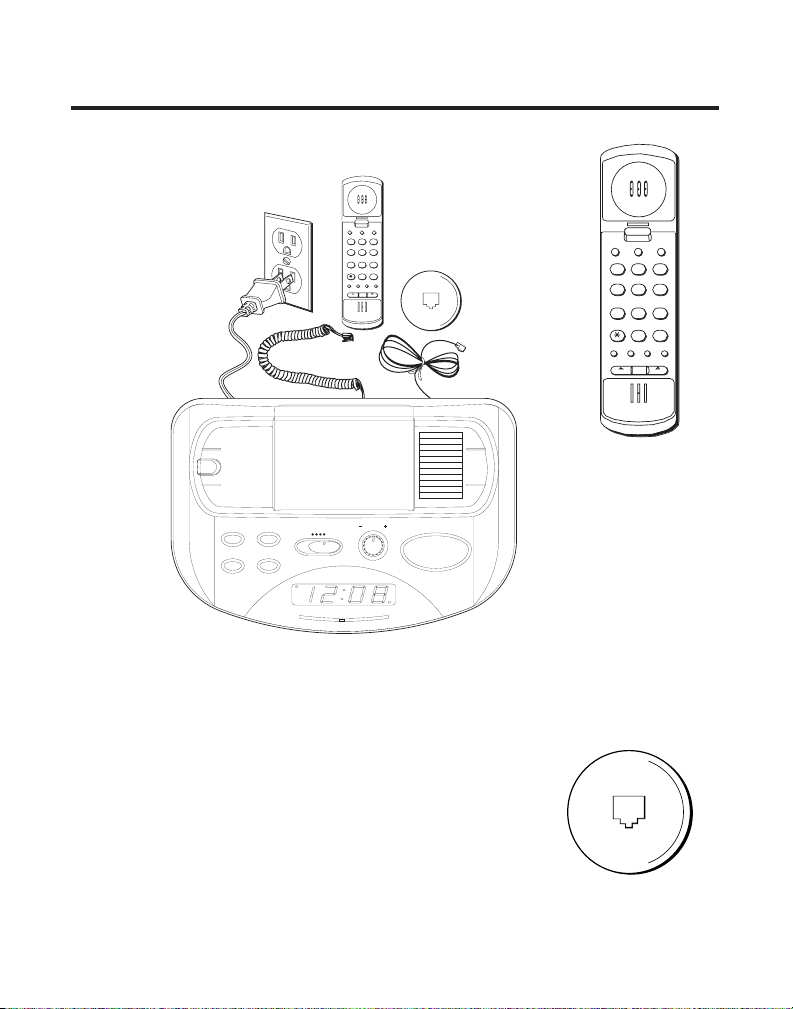
GETTING STARTED
Make sure your package contains the following items:
QUICK DIAL
A
C
B
ABC3DEF
2
1
MNO5JKL4GHI
6
WXYZ8TUV7PQRS
9
OPER
0
#
STORE
FLAS REDIAL
MEM DIAL
HI LO OFF PULSE TONE
AC power cord
handset cord
Telephone
line cord
QUICK DIAL
A
B
ABC3DEF
2
1
MNO5JKL4GHI
WXYZ8TUV7PQRS
OPER
0
STORE
FLAS REDIAL
MEM DIAL
HI LO OFF PULSE TONE
Handset
C
6
9
#
HOUR MIN
SLEEP WAKE
AM
F
M
A
ON ALARM
8
8
M
5
OFF MUSIC
9
3
0
6
VOLUME
SNOOZE
WAKE
z
H
M
8
0
1
2
4
9
0
1
6
0
1
0
z
kH
0
0
7
1
5
30
0
1
0
0
800
1
Base
BEFORE YOU BEGIN
MODULAR JACK REQUIREMENTS
You need an RJ11(CA11A) type modular jack, which is
the most common type of phone jack and might look
like the one pictured here. If you don’t have a modular
jack, call your local phone company to find out how to
get one installed.
4
Page 5

POWERING UP
“NO WORRY” BATTERY BACKUP
This clock radio is equipped with a
memory holding system that can be
powered with a customer-installed
9-volt alkaline battery (not included).
When power is interrupted, or AC
line cord is unplugged, the battery
will power the clock radio to keep
track of time and alarm settings
programmed into memory. When
on battery power, the digital display
will not light; however, should
WAKE time occur during the power
interruption, the radio will operate
or the alarm will sound if remaining
battery power is adequate. Normal
operation will resume after AC
power is restored.
Install battery as follows:
1. Open the battery compartment
door (located on the back of the
radio) by applying thumb pressure to area indicated on battery
door and pushing out.
2. Connect a 9-volt battery.
3. Insert battery in compartment
and replace compartment door.
NOTE: Alkaline (NEDA 1604A)
batteries are recommended. Carbonzinc (NEDA 1604) batteries may be
used but memory holding time will be
substantially reduced. Memory holding
time for a fresh alkaline battery is
approximately 8 hours (if Wake System
is not activated), which should take care
of short, nuisance-type AC power
failures. To preserve battery life, the
radio should remain plugged into an
AC outlet. As the battery gets older, its
voltage will drop and memory may be
lost. Be sure to replace the battery
periodically. Battery is not included
with this clock radio.
5
Page 6
INSTALLATION
1. Plug the telephone cord into the
modular wall jack.
2. Connect the handset to the base
unit.
3. Set the PULSE/TONE switch (located
on the handset) to TONE if you have
touch-tone service, or to PULSE if
you have rotary dial service.
4. Plug the power cord into any
120V AC wall outlet.
POWER FAILURE INDICATOR
If AC power is interrupted (disconnected) for a short period both time
and alarm settings will change unless
optional battery is installed. After AC
power is restored (reconnected) the
digital display will blink to indicate that
power was interrupted and you must
readjust the time and alarm settings. To
stop display from blinking, press the
HOUR or MIN button.
MEMO LOG
For your convenience a memo log
located beneath the handset on the base
unit can be used to write down emergency or personal phone numbers.
4
HOUR MIN
SLEEP WAKE
OFFMUSIC
ON ALARM
AM
F
M
8
8
9
2
A
M
5
3
0
6
5
OPER
0
STORE
FLAS REDIAL
MEM DIAL
HI LO OFF PULSE TONE
2
QUICK DIAL
A
C
B
ABC3DEF
2
1
MNO5JKL4GHI
6
WXYZ8TUV7PQRS
9
OPER
0
#
STORE
FLAS REDIAL
MEM DIAL
HI LO OFF PULSE TONE
1
VOLUME
SNOOZE
WAKE
z
H
M
8
0
1
4
9
0
1
6
0
1
0
z
kH
0
0
7
1
30
0
1
0
0
800
1
#
3
6
Page 7

TELEPHONE OPERATION
SETTING RINGER VOLUME
The ringer volume switch is located
on the handset. Set it to HI, LO, or
OFF.
Remember that the RINGER switch
must be set to HI or LO or the phone
will not ring for incoming calls.
TEMPORARY TONE FEATURE
Use the Temporary Tone feature if
you have Pulse (rotary) service, and
want to access custom calling
services that require touch-tone
dialing, such as getting information
from a local bank or credit card
company.
1. Dial the number for the custom
calling service.
2. Press button after you have
connected to the service to
enable touch-tone dialing.
3. When you hang up, the phone
automatically returns to Pulse
dialing mode.
QUICK DIAL
A
1
GHI
4
PQRS
7
FLAS REDIAL
STORE
HI LO OFF PULSE TONE
Ringer volume switch
B
ABC3DEF
2
JKL
5
TUV
8
OPER
0
MEM DIAL
WXYZ
C
MNO
6
9
#
7
Page 8

FLASH BUTTON
Press the FLASH button instead of
using the hook switch to activate
custom calling services such as call
waiting or call transfer, which may
be provided by your local phone
company.
REDIAL BUTTON
Redial the last number you called
by pressing the REDIAL button after
you get a dial tone.
The Redial feature holds in memory
the last phone number you dialed
manually. If you pressed any
numbers after dialing the phone
number, (for example, when
accessing a voice-menu system)
those numbers also are redialed.
NOTE: To redial a number stored
in memory, you must press the
MEM DIAL button followed by the
memory location.
QUICK DIAL
A
1
GHI
4
PQRS
7
FLASH STORE MEM DIAL REDIAL
BC
ABC
JKL
TUV
OPER
2
5
8
0
DEF
MNO
WXYZ
#
3
6
9
8
Page 9

MEMORY DIALING
Store as many as 12 numbers in memory for easy dialing. Three can
be stored in the Emergency Quick Dial locations, and nine additional
numbers can be stored in the numbered keys (1-9).
STORING A NUMBER IN MEMORY
1. Pick up the handset.
2. Press the STORE button.
3. Dial the number to be stored.
4. Press the STORE button.
5. Press a memory location (1-9 on
the keypad), or an EMERGENCY
QUICK DIAL button (A, B, or C).
6. Hang up the handset.
STORING A PAUSE TO THE DIAL-
ING SEQUENCE
Use the REDIAL button to insert a
delay in the dialing sequence when
storing a number, for example,
when you need to dial 9 to get an
outside line.
Press REDIAL at the point in the
dialing sequence in which a pause
is required:
1. Pick up the handset.
2. Press STORE button.
3. Press 9.
QUICK DIAL
A
1
GHI
4
PQRS
7
FLASH STORE MEM DIAL REDIAL
BC
ABC
JKL
TUV
OPER
2
5
8
0
DEF
MNO
WXYZ
#
3
6
9
9
Page 10

4. Press REDIAL to add a pause,
and then dial the number.
5. Press the STORE button.
6. Press an EMERGENCY QUICK
DIAL button, or press MEM DIAL
followed by a memory location
(1-9 on the keypad).
CHANGING A STORED NUMBER
Change a stored number by
replacing it with a different number.
DIALING A NUMBER FROM
MEMORY
You can dial numbers from memory
when using the handset. When you
get a dial tone, press the MEM DIAL
button followed by the memory
location (1-9) for the number you
want to dial.
1. Pick up the handset.
2. Press an emergency quick dial
button (A, B, or C).
or
3. Press MEM DIAL, followed by a
memory location (1-9 on the
keypad).
IMPORTANT: If you make test
calls to emergency numbers,
remain on the line and explain the
reason for the call. Also, make
these calls in off-peak hours, such
as early morning or late evening.
DIALING THE EMERGENCY QUICK
DIAL NUMBERS
To dial emergency quick dial
number, just press (A, B, or C).
10
Page 11

OPERATE THE RADIO
1. Slide function selector to ON.
2. Slide the AM/FM BAND switch
(located on the right side of the
unit) to the desired broadcast
band.
3. Turn TUNING knob to select a
station.
4. Adjust the VOLUME control to
your preferred listening level.
5. To turn the radio off, slide the
function selector to OFF.
BUILT-IN AFC
The Built-In Automatic Frequency
Control (AFC) works only on FM. It
helps keep the radio locked in on
the FM station to which it is tuned.
When tuning in FM stations, you
may notice that often the station
you desire can be heard on two or
three nearby points on the dial.
Always tune carefully to the loudest
and clearest point.
TUNER
OFF MUSIC
ON ALARM
AM
FM
VOLUME
ANTENNAS
AM Antenna - A built-in ferrite rod
antenna eliminates the need for an
outside antenna for AM reception.
Rotating the unit slightly may
improve reception of distant AM
stations.
11
Page 12

FM Antenna - The power cord acts
as your FM antenna. The power
cord picks up moderate to strong
stations and eliminates the need for
an external antenna in most strong
signal areas. Be sure the power
cord is stretched out to its full
length. Do not coil or bunch the
cord together. Changing position of
the power cord may improve
reception.
SET THE TIME
Your digital clock timer operates on
a 24-hour cycle. The AM indicator
on the left of the display will light
up to let you know if the display is
reading AM or PM time.
1. Press the HOUR button to get the
correct AM or PM hour.
2. Press the MIN button to get to
the exact minute time.
SET THE WAKE TIME
1. Press and hold WAKE button.
2. While holding the WAKE button,
use the HOUR and MIN buttons
to change the display to desired
AM or PM wake-up time.
3. Release WAKE button and the
current time is displayed again.
Wake time is set.
12
AM
WAKE
HOUR MIN
SLEEP WAKE
Page 13

WAKE TO MUSIC
1. Select an AM or FM station
2. Set the wake time.
3. Set function selector to MUSIC
position. (The WAKE indicator in the
display will light.)
The radio will turn on at the wake
time you set and will turn itself off
after approximately 2 hours. To
turn the radio off sooner, set
function selector to OFF.
WAKE TO ALARM
1. Set the wake time.
2. Place the function selector in the
ALARM position. (The WAKE
indicator in the display will light.)
The tone alarm will sound at the
wake time you set and turn itself off
after approximately 2 hours. To
turn the alarm off sooner, set
function selector to OFF.
Your clock radio has a 24-hour
timer. When function selector is left
in MUSIC or ALARM wake mode, it
will turn itself on, sound for
approximately 2 hours, turn itself
off and turn on again at the same
time the following day.
The WAKE indicator in the display
lights when the clock radio is in a
WAKE mode.
OFF MUSIC
ON ALARM
AM
WAKE
13
Page 14

SLEEP TO MUSIC
You can drift off to sleep to music
knowing that the radio will turn
itself off automatically. Simply:
1. Set the function selector to the
OFF position.
2. Press and hold the SLEEP button.
The time display will exhibit 0:59.
The radio will turn on automatically.
3. While holding SLEEP button, press
the MIN button and time will start
to count down. Select any sleep
time between 59 minutes and 1
minute. For sleep time of more
than 59 minutes, up to 1 hour and
59 minutes, momentarily press the
HOUR button (while holding down
the SLEEP button). The display will
exhibit 1:59. Then, press MIN
button to select the desired
amount of sleep time in excess of
1 hour.
4. Release SLEEP button and the
current time is once again displayed. The radio is now on and
you can select your station in the
usual way. Play will be for the
chosen length of time (up to 1
hour 59 minutes), and then the
radio will turn itself off. If you
decide to turn the radio off sooner,
press the SNOOZE button.
OFF MUSIC
ON ALARM
HOUR MIN
SLEEP WAKE
14
Page 15

SLEEP TO MUSIC AND WAKE TO
HOUR MIN
SLEEP WAKE
MUSIC
OR ALARM
You can set your clock radio to lull
you to sleep, turn itself off, then
awaken you at a preset time - all
automatically.
1. Set the wake time.
2. Follow the steps under WAKE TO
MUSIC or WAKE TO ALARM.
3. Then, proceed with Steps 2
through 4 under SLEEP TO
MUSIC.
NOTE: Be sure the function
selector is in the correct WAKE
position.
USING SNOOZE ALARM
After the wake mode has activated,
you can silence it for another 9
minutes by pressing the SNOOZE
button.
You can use the SNOOZE feature
repeatedly for up to two hours,
after which the radio or alarm will
turn off until the next day.
SNOOZE
15
Page 16

MINUTES AND SECONDS TIME
HOUR MIN
SLEEP WAKE
DISPLAY
For a display of time in minutes and
seconds:
1. Press and hold the WAKE button.
2. While holding down WAKE
button, momentarily press the
SLEEP button. The hour digits
will display minutes; the minute
digits will display seconds and
start to increment. Release WAKE
button to return to the hour and
minute display.
16
Page 17

TROUBLESHOOTING TIPS
TELEPHONE
Problem Solution
No dial tone. • Check hook switch to make
Won't dial out sure it pops up.
• Make sure TONE/PULSE is set to correct
position.
• Unplug the phone, wait 30 seconds, and
plug the phone back in.
Phone doesn’t ring • Check RINGER VOLUME.
• Could have too many phones on one line.
(See FCC registration information regarding
REN).
Light and tone • This is normal as power is fluctuating
feedback flutter when with phone outpulsing.
dialing in PULSE mode.
Can’t be heard by • Make sure coiled phone cord is securely
other party plugged in
• Make sure other phones are not OFF hook at
the same time. If so, this is normal condition
as volume drops when additional phones are
used at once.
.
Memory dialing • Make sure you entered numbers correctly.
(See "Memory Dialing.")
17
Page 18

GENERAL PRODUCT CARE
To keep your phone working and looking good, follow these guidelines:
• Avoid putting it near heating appliances and devices that generate
electrical noise (for example, motors or fluorescent lamps).
• DO NOT expose to direct sunlight or moisture.
• Avoid dropping and other rough treatment of the unit.
• Clean with a soft cloth.
• Never use a strong cleaning agent or abrasive powder because this will
damage the finish.
• Retain the original packaging in case you need to ship it at a later date.
SERVICE
This product should be serviced only by those specially trained in appropriate servicing techniques. Attach your sales receipt to the booklet for
future reference or jot down the date this product was purchased or
received as a gift. This information will be valuable if service should be
required during the warranty period.
18
Page 19

INDEX
A
Adding a Pause to Dialing Sequence 9
Antennas 11
B
Before You Begin 4
Built-in afc 11
C
Changing a Stored Number 10
D
Dialing a Number from Memory 10
Dialing the Emergency Quick Dial
Numbers 10
Display Brightness 6
F
FCC Registration Information 2
Flash Button 8
G
General Product Care 18
Getting Started 4
H
Hearing Aid Compatibility 2
I
Installation 6
Interference Information 2
Introduction 3
M
Memo Log 6
Memory Dialing 9
Minutes and Seconds Time Display 16
Modular Jack Requirements 4
N
“No Worry” Battery Backup 5
O
Operate the Radio 11
P
Power failure indicator 6
Powering Up 5
R
Redial Button 8
S
Service 18
Set the Time 12
Set the wake time 12
Setting Ringer Volume 7
Sleep to music 14
Sleep to music and wake to music or
alarm 15
Storing a Number in Memory 9
T
Telephone 17
Telephone Operation 7
Temporary Tone Feature 7
Troubleshooting Tips 17
U
Using Snooze Alarm 15
W
Wake to alarm 13
Wake to music 13
Warranty 20
19
Page 20

LIMITED WARRANTY
What your warranty covers:
• Any defect in materials or workmanship.
For how long after your purchase:
• One year.
(The warranty for rental units begins with the first rental or 45 days from date of
shipment to the rental firm, whichever comes first.)
What we will do:
• Provide you with a new, or at our option, a refurbished unit.
• The exchange unit is under warranty for the remainder of the original product’s warranty
period.
How to make a warranty claim:
• Properly pack your unit. Include any cables, etc., which were originally provided with the
product. We recommend using the original carton and packing materials.
• Include in the package evidence of purchase date such as the bill of sale. Also print your
name and address and a description of the defect. Send standard UPS or its equivalent to:
Thomson Consumer Electronics, Inc.
Product Exchange Center
32B Spur Drive
El Paso, Texas 79906
• Pay any charges billed to you by the Exchange Center for service not covered by the
warranty.
• A new or refurbished unit will be shipped to you prepaid freight.
What your warranty
• Customer instruction. (Your Owner’s Manual provides information regarding operating
instructions and user controls. For additional information, ask your dealer.)
• Installation and set-up service adjustments.
• Batteries.
• Damage from misuse or neglect.
• Products which have been modified or incorporated into other products.
• Products purchased or serviced outside the USA.
• Acts of God, such as but not limited to lightning damage.
Product Registration:
• Please complete and mail the Product Registration Card packed with your unit. It will make
it easier to contact you should it ever be necessary. The return of the card is not required
for warranty coverage.
How state law relates to this warranty:
• This warranty gives you specific legal rights, and you may have other rights which vary
from state to state.
If you purchased your product outside the USA:
• This warranty does not apply. Contact your dealer for warranty information.
does not
cover:
Models 2-9291
20910010 (Rev. 1 E/S)
98-10
Printed in China
20
P.O. Box 1976, Indianapolis, IN 46206
© 1998 Thomson Consumer Electronics, Inc.
Trademark(s) ® Registered
Marca(s) Registrada(s)
 Loading...