

Page 1
Changing Entertainment. _=n.
User's Guide
Page 2
IRISK OF ELECTRICSHOCK /
DO NOT OPEN |
Caution: To reduce the risk of electric shock, do not remove cover (or back). No user serviceable parts inside. Refer
servicing to qualified service personnel.
_lk This symbol indicates "dangerous voltage" inside A This symbol indicates important instructions
the product that presents a risk of electric shock or _kaccompanying the product.
personal injury.
[_ his symbol indicates that this product incorporates double insulation
between hazardous mains voltage and user accessible parts. When servicing
use only identical replacement parts.
WARNING
To reduce the risk of fire or electric
shock, do not expose this product to
rain or moisture.
The apparatus shall not be exposed
to dripping or splashing and no
objects filled with liquids, such as
vases, should be placed on the
apparatus.
"Changing Entertainment. Again." is
a trademark of THOMSON used under
license to TTECORPORATION.
Manufactured under license from
Dolby Laboratories.
Refer to the identification/rating label located on the back panel of your product for
its proper operating voltage.
FCCRegulations state that unauthorized changes or modifications to this equipment
may void the user's authority to operate it.
Caution: To prevent electric shock, match wide blade of plug to wide slot, fully insert.
Caution: Using video games or any external aeeessory with fixed images for
extended periods of time ean cause them to be permanently imprinted on the
picture tube (or projection TV picture tubes]. ALSO, some network/program Iogos,
phone numbers, black borders (sides, top and bottom], ete. may cause similar
damage. This damage is not covered by your warranty.
Cable TV Installer: This reminder is provided to call your attention to Article 820-40
of the National Electrical Code (Section 54 of the Canadian Electrical Code, Part 1)
which provides guidelines for proper grounding and, in particular, specifies that the
cable ground shall be connected to the grounding system of the building as close to
the point of cable entry as practical.
Important Stand and Base Safety Information
Choose the location for your TV carefully. Place the TV on a stand or base that is of
adequate size and strength to prevent the TV from being accidentally tipped over,
pushed off, or pulled off. This could cause personal injury and/or damage the TV.
Refer to the Important Safety Instructions on page 1.
Product Registration
Please fill out the product registration card (packed separately) and return it immediately. For US customers: Your RCA Consumer
Electronics product can also be registered at www.rca.com/television. Registering this product allows us to contact you if needed.
Product Information
Keep your sales receipt to obtain warranty parts and service and for proof of purchase. Attach it here and record the serial and
model numbers in case you need them. These numbers are located on the product.
Model No. Serial No. Purchase Date:
Dealer/Address/Phone:
Page 3
IMPORTANT SAFETY INSTRUCTIONS
Read before operating equipment
1. Read these instructions.
2. Keep these instructions.
3. Heed all warnings.
4. Follow all instructions.
5. Do not use this apparatus near water.
6. Clean only with a dry cloth.
7. Do not block any of the ventilation openings. Install inaccordance with
the manufacturer's instructions.
8. Do not install near any heat sources such as radiators, heat registers,
stoves, or other apparatus (including amplifiers) that produce heat.
9. Do not defeat the safety purpose of the polarized or grounding type
plug. A polarized plug has two blades with one wider than the other.
A grounding type plug has two blades and a third grounding prong.
The wide blade or third prong are provided for your safety. When the
provided plug does not fit into your outlet, consult an electrician for
replacement of the obsolete outlet.
10. Protect the power cord from being walked on or pinched, particularly
at plugs, convenience receptacles, and the point where they exit from
the apparatus.
11. _ Only use attachments/accessories specified by the
q[,._,B_llj manufacturer.
12. '.&_,_F' Use only with a cart, stand, tripod, bracket, or table specified
by the manufacturer or sold with the apparatus. When a cart is used,
use caution when moving the cart/apparatus combination to avoid
injury from tip-over.
13. Unplug this apparatus during lightning storms or when unused for long
periods of time.
14. Refer all servicing to qualified service personnel. Servicing is required
when the apparatus has been damaged in any way, such as if the
power-supply cord or plug is damaged, liquid has been spilled or
objects have fallen into the apparatus, or if the apparatus has been
exposed to rain or moisture, does not operate normally, or has been
dropped.
15. This product may contain lead and mercury. Disposal of these
materials may be regulated due to environmental considerations. For
disposal or recycling information, please contact your local authorities
or the Electronic Industries Alliance (www.eiae.org).
16. Damage Requiring Service - The appliance should be serviced by
qualified service personnel when:
A. The power supply cord or the plug has been damaged;
B. Objects have fallen or liquid has been spilled into the appliance;
C. The appliance has been exposed to rain;
D. The appliance does not appear to operate normally or exhibits a
marked change in performance;
E. The appliance has been dropped or the enclosure damaged.
17. Tilt/Stability - All televisions must comply with recommended
international global safety standards for tilt and stability proper ties of
its cabinet design.
. Do not compromise these design standards by applying excessive
pull force to the front, ortop, of the cabinet, which could ultimately
overturn the product.
.Also, do not endanger yourself, or children, by placing electronic
equipment/toys on the top of the cabinet. Such items could
unsuspectingly fall from the top of the set and cause product damage
and/or personal injury.
18. Power Lines - An outdoor antenna should be located away from
power lines.
19. Outdoor Antenna Grounding - If an outside antenna is connected to
the receiver, be sure the antenna system is grounded so as to provide
some protection against voltage surges and built up static charges.
Section 810 of the National Electrical Code, ANSI/NFPA No. 70- 1984,
provides information with respect to proper grounding of the mast
and supporting structure, grounding of the lead-in wire to an antenna
discharge unit, size of grounding connectors, location of antenna-
discharge unit, connection to grounding electrodes, and requirements
for the grounding electrode. See Figure below.
20. Object and Liquid Entry - Care should be taken so that objects do not
fall and liquids are not spilled into the enclosure through openings.
21. Battery usage CAUTION - To prevent battery leakage that may result
in bodily injury, property damage, or damage to the unit:
. Install all batteries correctly, with + and - aligned as marked on the
unit.
. Do not mix batteries (old and new or carbon and alkaline, etc.).
. Remove batteries when the unit is not used for a long time.
22. Apparatus shall not be exposed to dripping or splashing and no
objects filled with liquids, such as vases, shall be placed on the
apparatus.
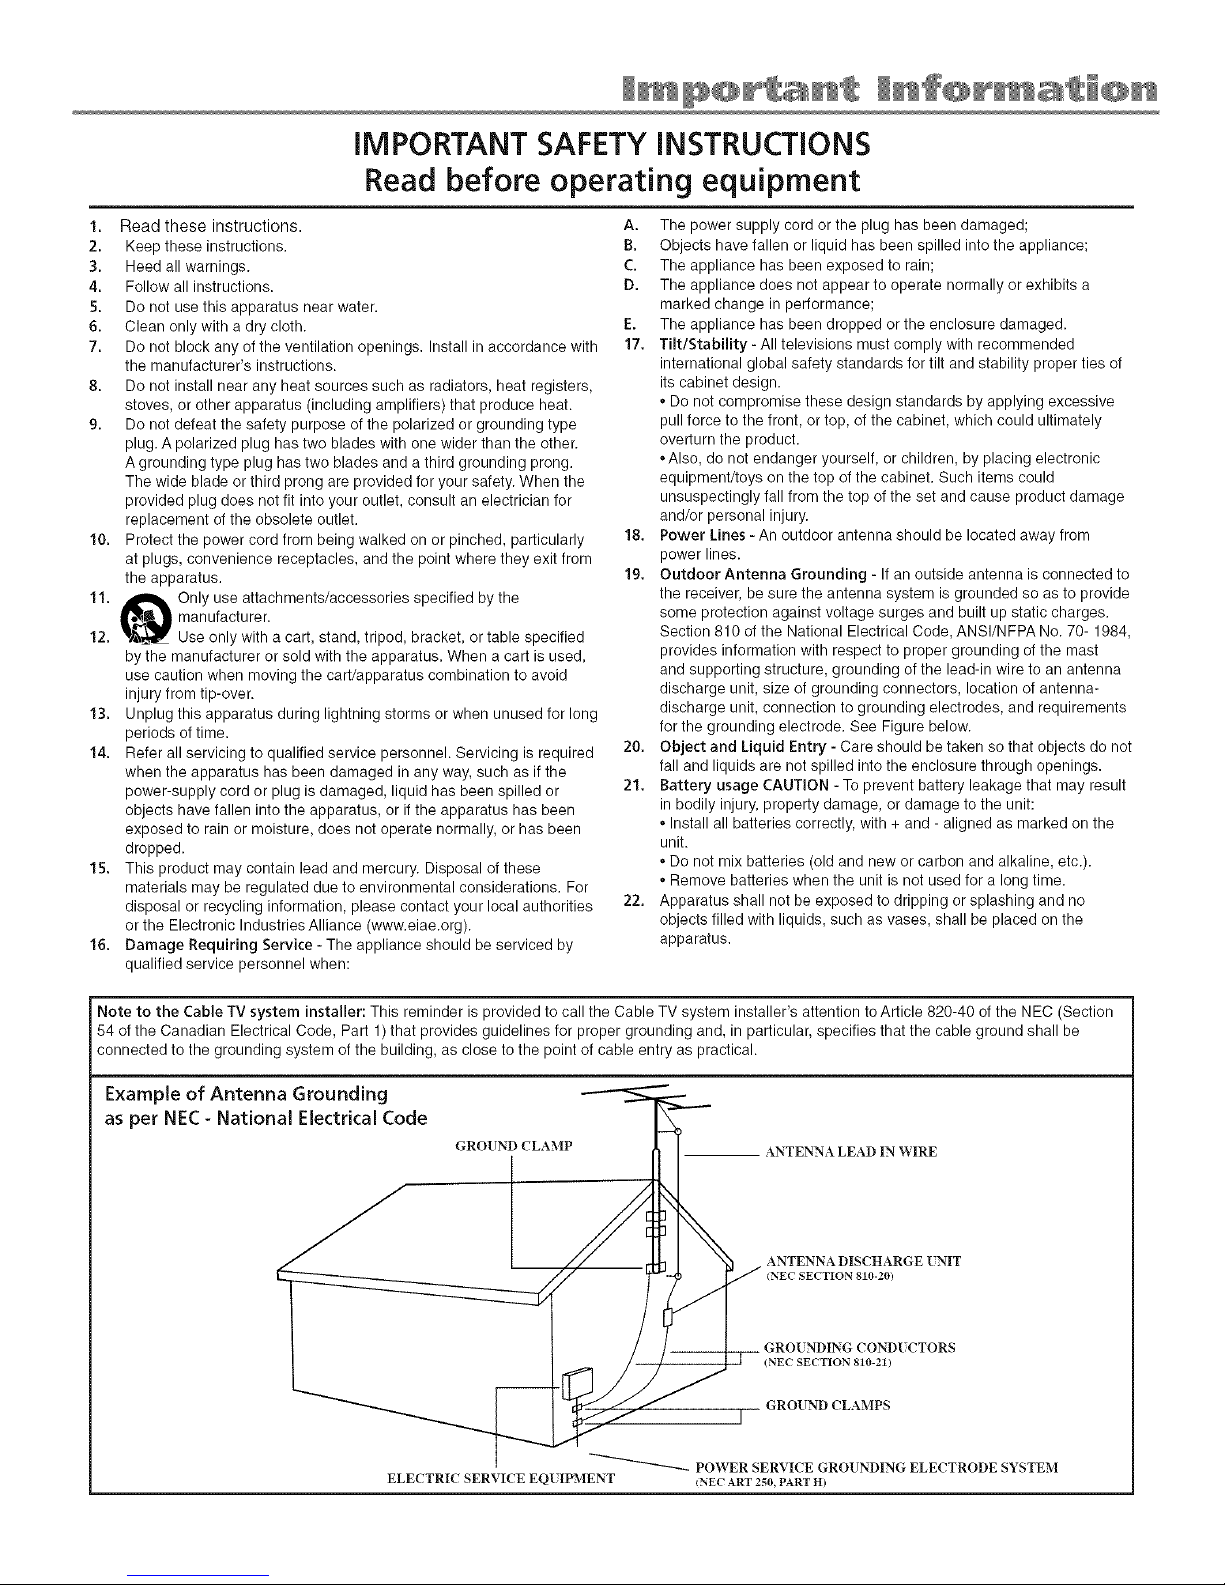
Note to the Cable TV system installer: This reminder is provided to call the Cable TV system installer's attention to Article 820-40 of the NEC (Section
54 of the Canadian Electrical Code, Part 1) that provides guidelines for proper grounding and, in particular, specifies that the cable ground shall be
connected to the grounding system of the building, as close to the point of cable entry as practical.
Example of Antenna Grounding
as per NEC- National Electrical Code
ELECTRIC SERVICE EQ[ IPMENT
GROUND CLAMP ANTENNA LEAD IN WIRE
ANTENNA DISCHARGE [NIT
INEC SECTION 810-20)
GRO[ NDING COND[ CTORS
(NEC SECTION 810-21)
GROUND CLAMPS
J
POWER SERVICE GROUNDING ELECTRODE SYSTEM
(NEC ART 2_0, PART H)
Page 4
Chapter 1: Connections & Setup
Things to Consider Before You Connect ......................................................................... 4
Protect Against Power Surges .................................................................................... 4
Protect Devices from Overheating ............................................................................ 4
Position Cables Properly to Avoid Audio Interference ............................................. 4
Use Indirect Light ........................................................................................................ 4
Get the Picture .................................................................................................................. 5
Receiving Cable Channels .......................................................................................... 5
What You Need ........................................................................................................... 5
What You Need to Know ........................................................................................... 5
Receiving Channels with an Antenna ........................................................................ 6
What You Need ........................................................................................................... 6
What You Need to Know ........................................................................................... 6
Choose Your Connection .................................................................................................. 7
Y Pb Pr (Component Video) Connection ......................................................................... 7
Using the Side Jacks.......................................................................................................... 9
Plug in the TV and Turn It On ......................................................................................... 10
Put Batteries in the Remote ........................................................................................... 10
Use the Remote Control to Complete the Initial Setup ............................................... 10
Complete the Initial Setup ............................................................................................. 11
Choose the Menu Language .................................................................................... 11
Tuning to a Channel ................................................................................................. 11
What to Expect ................................................................................................................ 12
Watching TV.............................................................................................................. 12
Explanation of Jacks....................................................................................................... 13
The Front of Your TV ...................................................................................................... 14
Front Buttons ............................................................................................................ 14
Remote Buttons .............................................................................................................. 15
Using the INPUT Button .................................................................................................. 16
Using the PRESETSButton .............................................................................................. 16
Chapter 2: Using the TV's Features
Channel Banner ............................................................................................................... 17
Parental Controls and V-Chip ......................................................................................... 18
How V-Chip Works .................................................................................................... 18
Activate Parental Control ............................................................................................... 18
Resetting the Password ............................................................................................ 18
Set V-Chip TV Programming Limits .......................................................................... 19
The V-Chip Rating Screen ......................................................................................... 19
Blocking Age-Based Ratings .................................................................................... 19
Blocking Specific Content Themes ........................................................................... 20
Blocking USA V-Chip Movie Ratings ........................................................................ 21
Blocking Canadian V-Chip Movie Ratings ............................................................... 22
V-Chip Exempt Program Block ................................................................................. 22
Activate KidPass ........................................................................................................ 23
Block Channel ........................................................................................................... 23
Front Panel Lock ....................................................................................................... 24
Change Password ...................................................................................................... 24
Page 5
Chapter 3: Using the TV's Menu System
Sound Menu .................................................................................................................... 25
Picture Menu ................................................................................................................... 27
Setup Menu ..................................................................................................................... 28
Parental Control Menu .................................................................................................. 32
Time Menu ....................................................................................................................... 33
Notepad Menu ................................................................................................................ 34
Page 6
Things to Consider Before You Connect
Protect Against Power Surges
• Connect all devices Ix'for(' you plug any of their power cords into the wall outk't.
• Turn off tile TV and/or device before you connect or disconnect any cables.
• (7sing a surge protector can help prevent damage to your T\.' from electrical power surges. In
case of lightning, unplug your TV.
,, Make sure all antennas and cables are properly grounded. Refer to tile Important Saf_,ty
Instructions packed separate]>
Protect Devices from Overheating
,, I)on't block v(,ntilation hok,s on any of the' devk'os. Arrange, tho dovkos so that air can
circulate freely.
,, I)on't stack devices.
,, If you place devices in a stand, make sure you allow adequate ventilation.
,, If you connect an audio receiver or amplifier, place it on the top shelf so tile heated air from
it won't flow around ()tiler devices. Position Cables Properly to Avokl Audio Interference
Position Cables Properly to Avoid Audio Interference
Insort c'ac]l cable firmly into the dosignated jack.
,, If you place devices above tile T\.', route all cables down tile side of tile back of tile T\"
instead of straight down tile middle of tile TV.
,, If your antenna uses 300-ohm twin lead cables, do not coil tile cables. Also, keep tile twin
lead cables away from audio/video cables.
Use Indirect Light
Don't place th(' TV wher(, sunlight ol room lighting will be directed toward the screen. (Tse soft
or indirect lighting.
(;Izphicx (:ozzl(_iz_'d zz'ilbiz/ lhix pztblicaliozz at(, for r_])r(,x_,z/l(_lio_ oz_/),.
Page 7
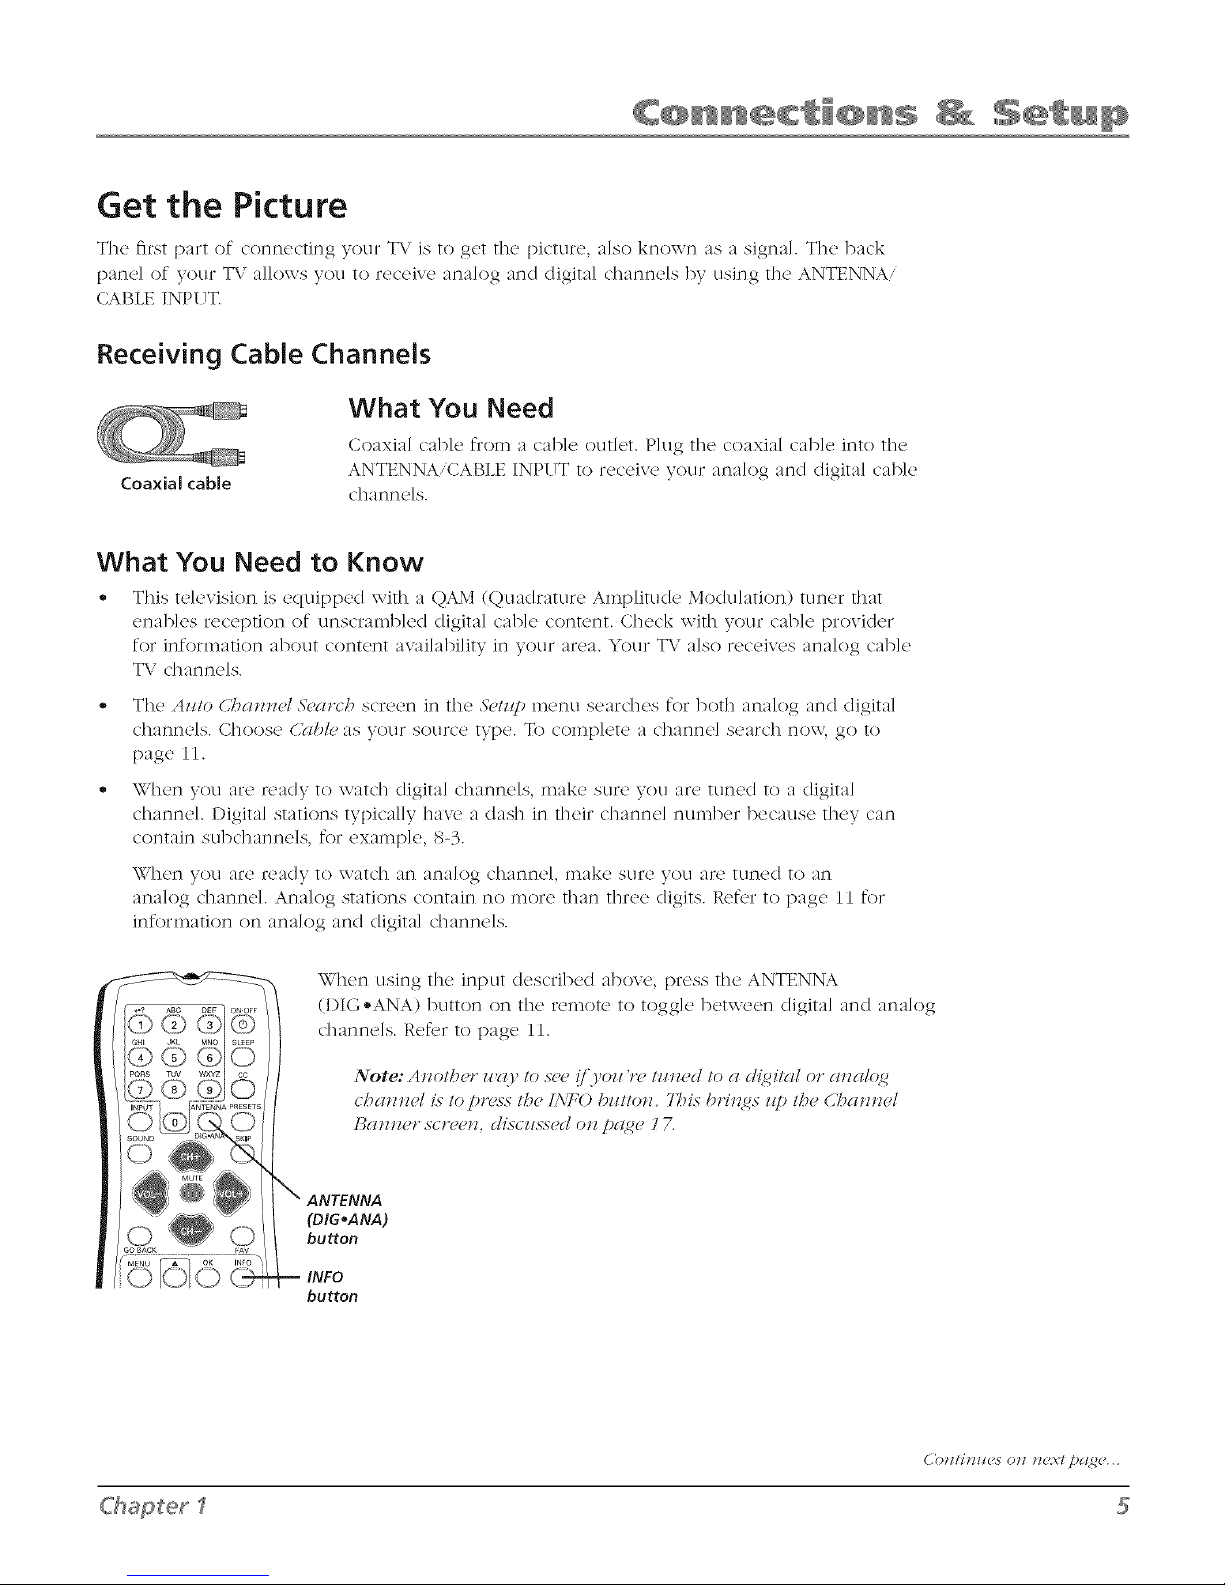
Get the Picture
The first part of connecting your T\. is to get the picture, a]so known as a signal The back
pane] of your T\.' allows you to receive an:dog :rod digital dmnneIs by using the ANTENNA,
CABLE INPI 7T.
Receiving Cable Channels
What You Need
Coaxia] cable from a cable out]et. Plug the coaxial cable into the
Coaxial cable
What You Need to Know
This television is equipped with a QAM (Quadrature Amplitude Modulation) tuner that
enables reception of unscrambled digital cable content. Check with your cable provider
for information about content availability in your area. Your TV also receives analog cable
TV channels.
', The Azllo C].'*nnn_# 5_'arcb screen in the 5'eizq) menu searches for both analog and cligita]
channels. Choose (,>_bl_,as yoklr SOtlrce tvDe. To comp]ete a c]mnne] search now, go to
page I 1.
ANTENNA,CABLE INPUT to receive your analog and digital cab]e
C]]af]f]e]s.
,, \\'hen you are ready to watc]l digim] dmnnels, make sure you are tuned to a digim]
channel. I)igim] stations typically ]mxe a (lash in their channel number because they can
contain subc]mnne]s, for example, 8-3.
\\7]len you are ready to watc]] at] af]a]og channel, inakc sure yOU arc [ur](2d 10 ai]
analog channel. Analog stations contain no more than three digits. Refer to page 11 for
information on ana]og and digital dmnne]s.
\Vhen using the input described above, press the ANTENNA
(I)IG-ANA) button on the remote to toggle between digital and ana]og
chan ne]s. Retbr to page ii.
ANTENNA
(DIG,ANA)
button
INFO
button
#haSerl
( _)t l!iH_tCS 0tl l_{:x:t[)&14_,c...
Page 8
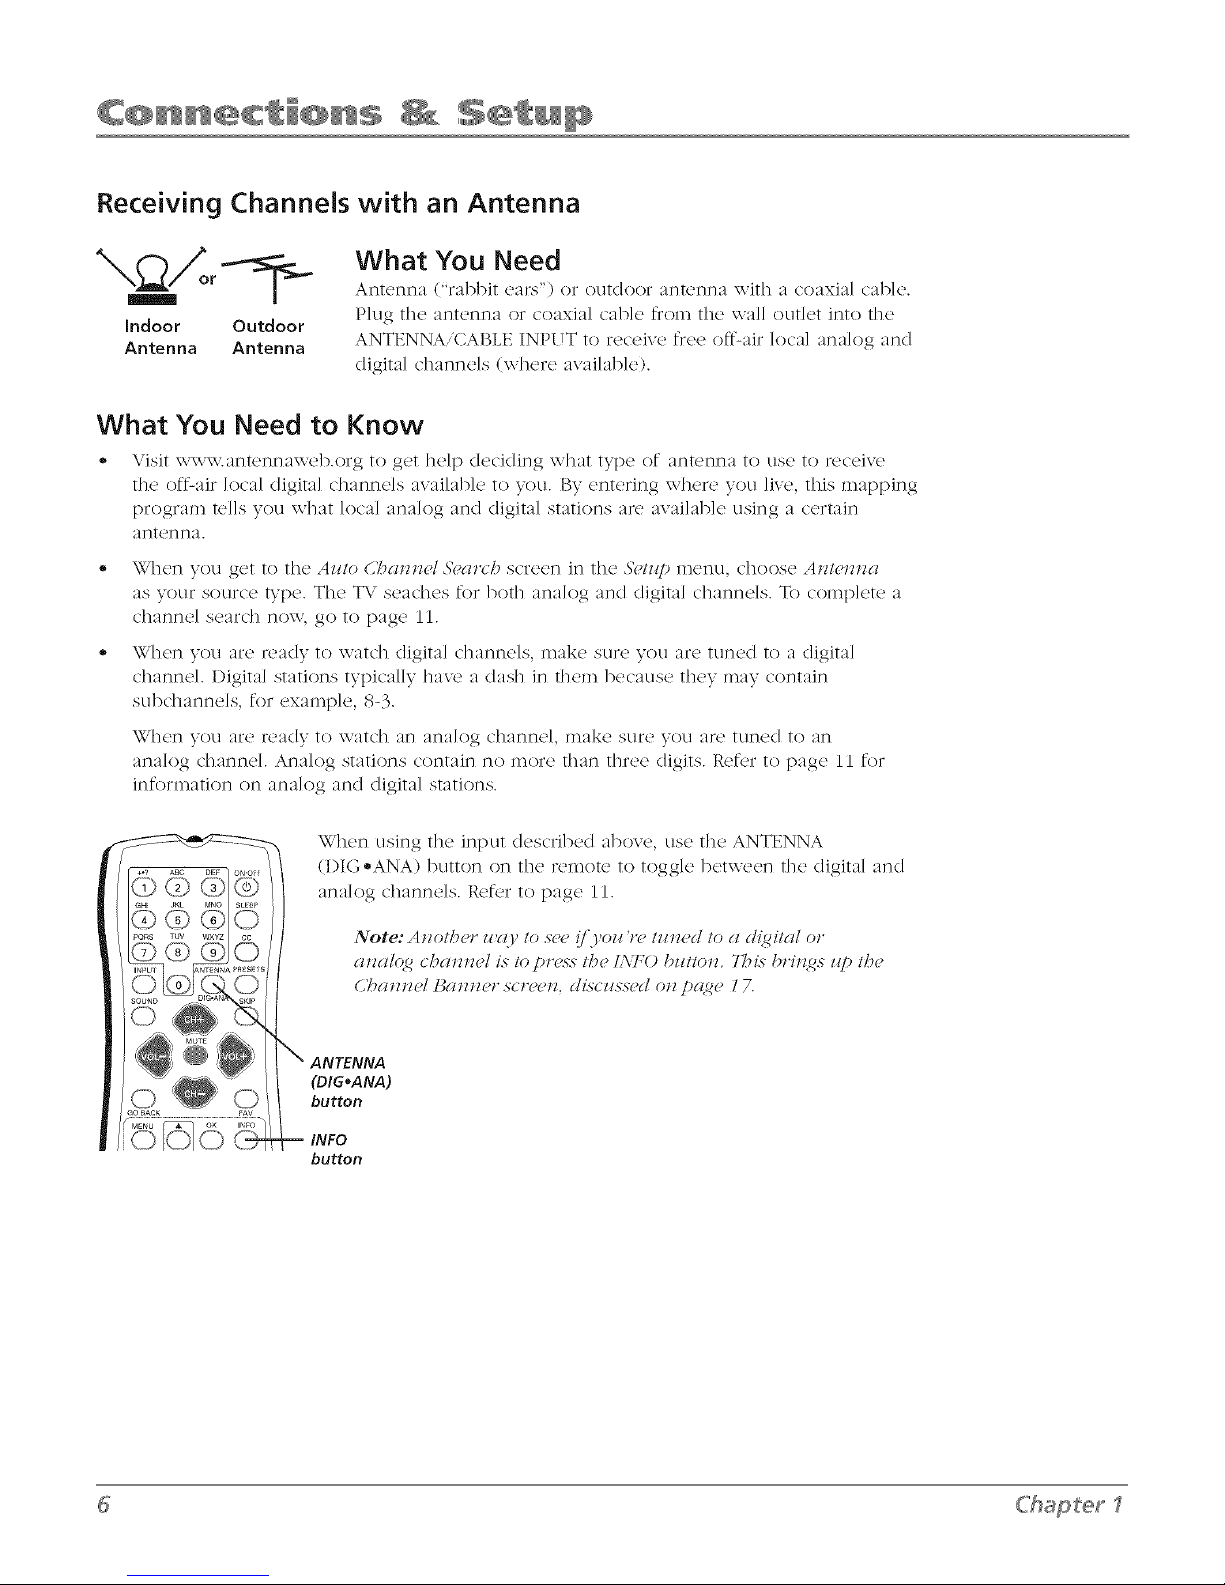
Receiving Channels with an Antenna
What You Need
Antenna ("rabbit ears") or outdoor antenna with a coaxial c':lblc.
Indoor Outdoor
Antenna Antenna
Plug tile antenna or coaxial cable from the wall outlet into the
ANTENNA/CABLE INPUT to receive flee off-:dr local analog and
digital channels (where :lvailabIe).
What You Need to Know
Visit www.antenna_eb.org to get help deciding what type of antenna to use to receive
the oftLair ]oca] digital c]mnne]s :_vailabIe to you. By entering where you live, this mapping
program te]ls you what Iota] :ma]og :rod digim] stations are available using a certain
antenna.
• When you get to the Az_/o CZ'_annH &,girth screen in the &,/z@ menu, choose An/mn_a
as your source type. The TV seaches for both analog and digital channels. To complete a
channd search now, go to [)age 11.
,, When you are ready to watch digital channels, make sure you are tuned to a digital
channel. Digital stations typically have a dash in them because they may contain
subdmnnels, for example, 8-3.
\X,"hcl] you are readv 1o \v_:ttc]] an _/n}i_t]og c]l_:tl]lld, Inak{* SL1E<_ yOU aft [tilled 1o an
analog channel Analog stations contain no more than fllree (ligits. Refer to) page 11 for
infornmtion on analog and digital smHons.
When using the input described above, use the ANTENNA
(DIG ®ANA) button on the re,note to toggle between the digital :m(I
ana]og channe]s. Refer to page i 1.
{l!l{ll({g CI'){IIIlI{?/ J,S" /O DI*{*NN 1/'){? ]'\']7() /)I11101l. 7_')iN bl*illif_S It D 1/'){?
C_{I!IlIF ]_{l!lll{q* s( l*{'{'ll, dLs'(z_sscdon pg{g_, 17.
ANTENNA
(DIG,ANA)
button
-- INFO
button
Chapter1
Page 9
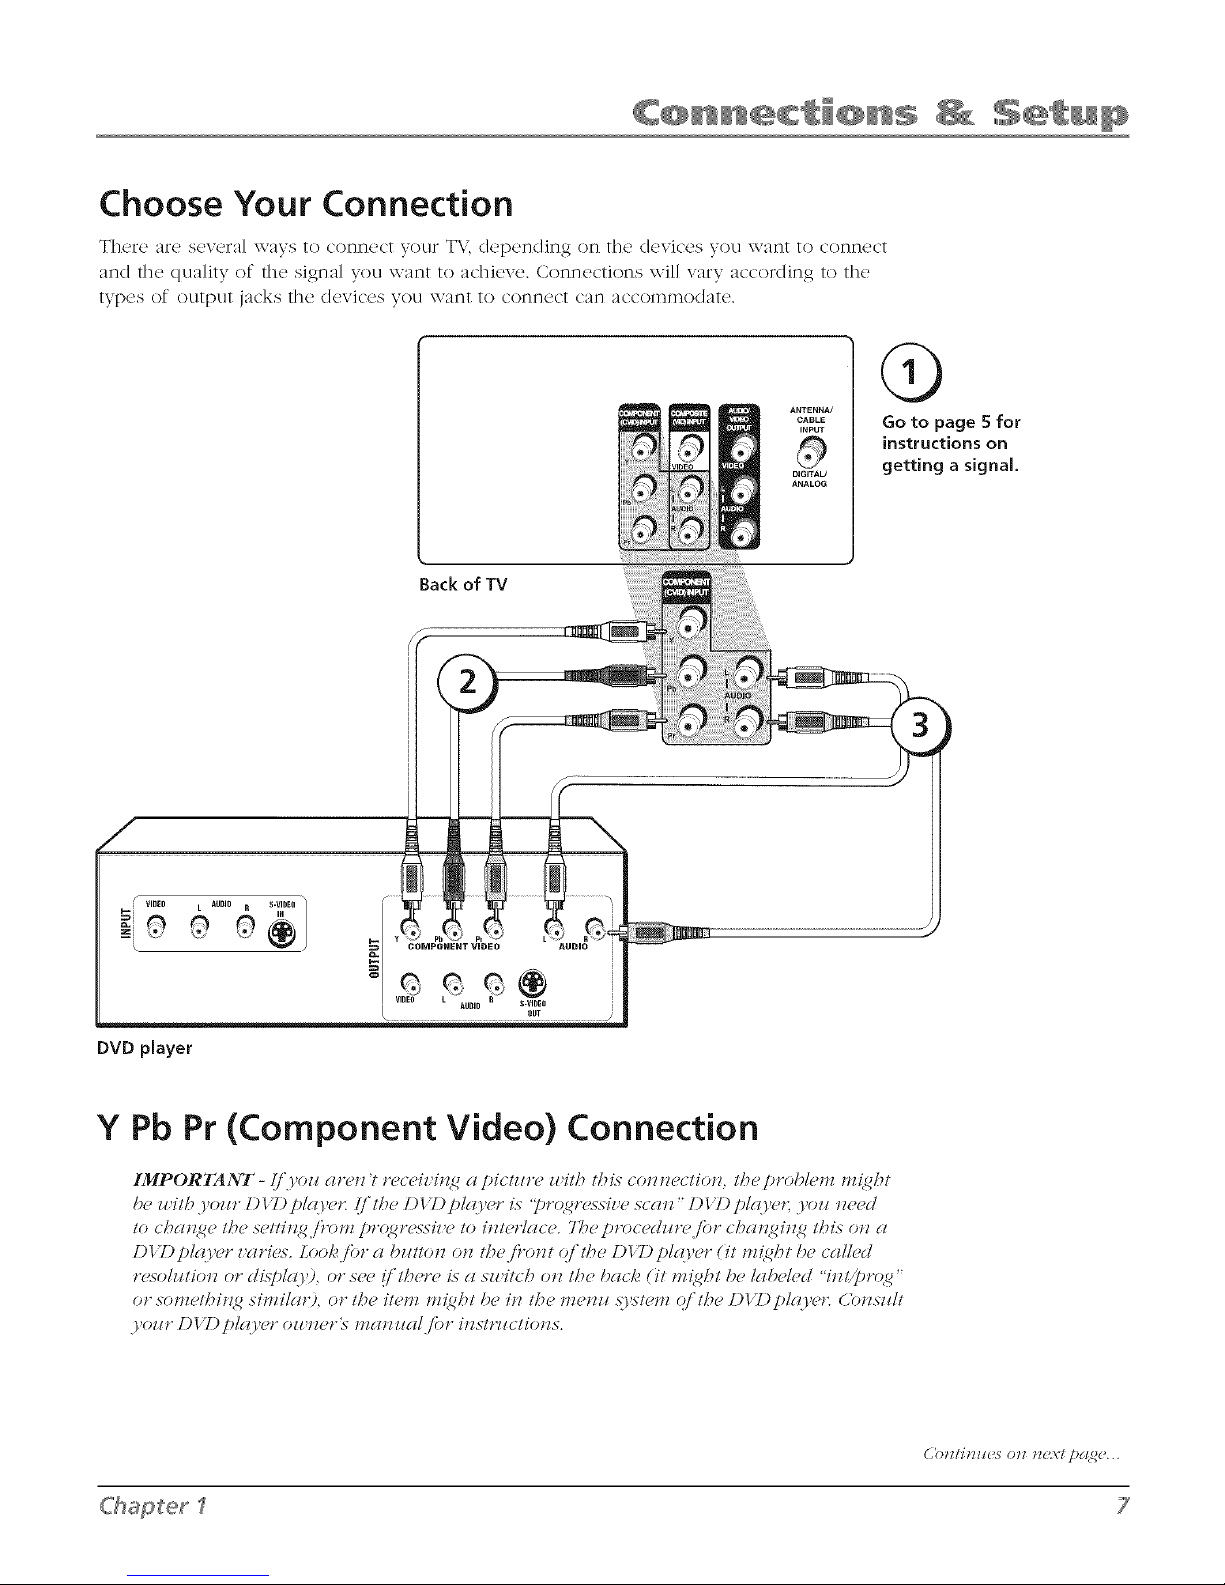
Choose Your Connection
There arc scvcFa] ways to conn(_ct your T\,', depending on the devices yOLI xxant 1o connect
and the quality of the signal you want t() achieve. C()nnecti()ns will vary acc()rding t() tile
[yDC!S ()f O/l[p/l[ jacks the devices yOU \\_11_1[ [O C()I_]I_]L}C[ c_/n _/cconlIno(l;/t<L
ANTENNA]
CABLE
INPUT
DIGITAU
ANALCSG
Back of TV
Q
Go to page 5 for
instructions on
getting a signal.
DVD player
Y Pb Pr (Component Video) Connection
IMPORTANT - (/")/oz_(truJz 't r('c('iz;iJ<g a pictzlru luit/? t/?is co*z*zectio*z, t/?(" pro/)/('n_ n_[_g/?t
b(' _#11/7)/oz!r/) 17)j')/(/)/('*: I/'//Te /)17)j')/(i)/(?r ix '[)r(4{l:,.<_iz'{" stall"/)17)p/({)/('*; yozl lle(,d
to cbat%ge the .s_,t/it%g./}>nl pr(4g,v,.s>'iz,e to it_terlgl( e_ 7]_e pt>ced_/twjor cba,%git%g t/Ti._ ot_ a
DI T)pl(oY'r z,ari('_. Lool_ /or a bz_t/o_z otz t/_e iPotzt ()./the DI T) pl(l_ter (it n_ht be cc_ll(,d
r(,_olz#tio,z or di.sT)l(o ), or s(,u (l tlTet°( , i.s (_ sz_ itcl? o,z 117(, I)(_ck (it n_{g/Tt !)(, I(_l)(,l(,d "i, zi/])rc4g"
or son_(,t/?i_<_ sin_ilg_tg, or t/?(? it(,n_ n_/?t be i_ t/?e H_(,_z_ .!y_/(,n_ q/ t/?(, DI T) plgo'ut: C_n_szdt
ChaSet_
('()tllJt?_[cs 0tl t_{:x:t [)&l_C...
7
Page 10
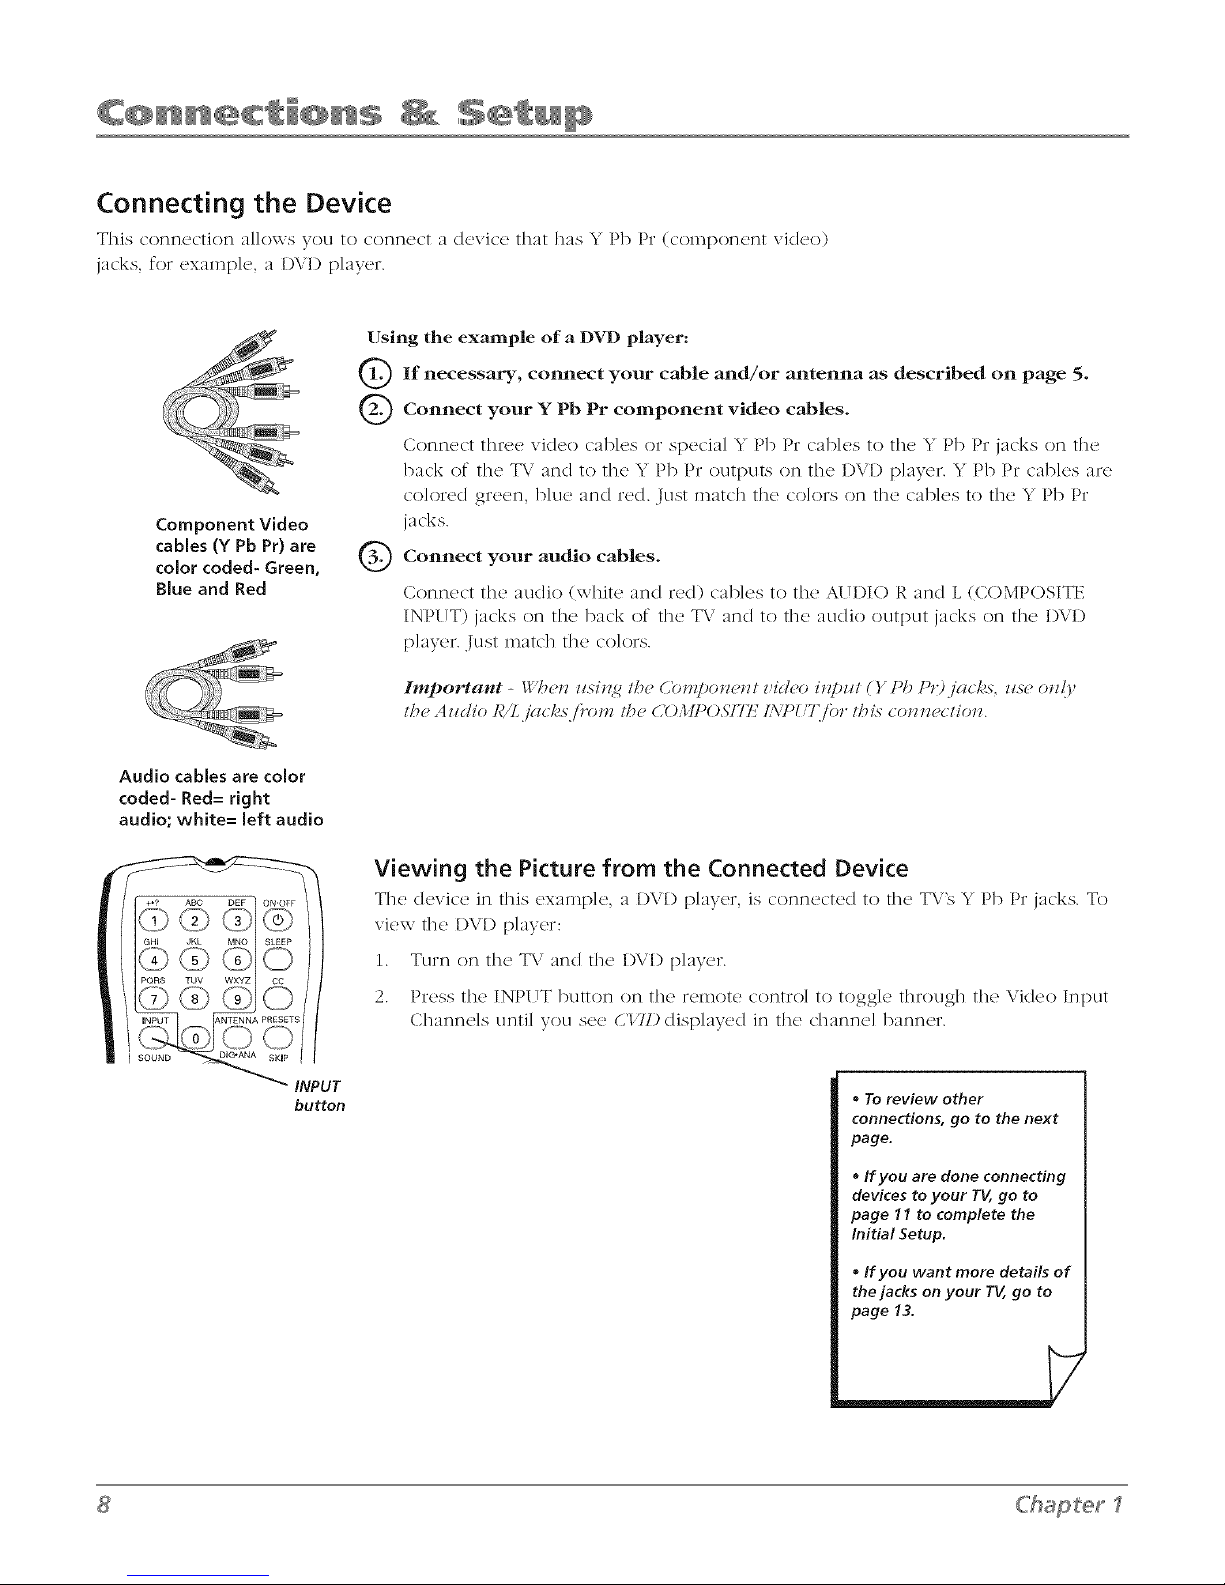
Connecting the Device
. S •This connection aJJows Vou to connect a device that ha. _ Pb Pr (component vklco)
jacks, for examp]e, a I)\.'D p]ayer.
Using the example of a D_¢I)player:
Component Video
cables (Y Pb Pr) are
color coded- Green,
Blue and Red
Audio cables are color
coded- Red= right
audio; white= left audio
if necessary, coln_ect your and/or antenna as on page 5.
Connect Y Pb Pr video cables.
your component
cable described
Connect three video c_l>k,s or spc_ci_HY Pl) Pr c:_l)]cs to the Y Pb Pr jacks on the
back of the T\.' and to the Y Pb Pr OUtl)UtSon the I)Vl) p]ayer. Y Pb Pr cables are
co]ored green, blue and red. Just match the colors on the cables to the Y Pb Pr
jacks.
Connect audio cables.your
Connect the audio (white and red) cab]es to the A[H)IO R and L (COMPOSITE
INPUT) jacks on the back of the T\" and to the au(lio output jacks on the DVI)
player. Just match the colors.
Iml_ortattt - _:'b_,iz zlsilzg I_, Cbl'Jzpo_z_,izl _,ic!_,o i_?pzll () Pb P<)jc_cks, _se oll{y
lh_ A liclio lg/L.jg_( /.s.i}.onz I/_, C011PO57Tl,/ I.XT)_'7_for lh is COllll{_(/iOll.
iNPUT ANTENNA PRESETS
SOUND _ SKiP
INPUT
button
Viewing the Picture from the Connected Device
The device in this cx;_mp]_,, ;_ player, is c'onncc'tcd to the TV's Y Pb Pr jacks. To
view the I)VI) [)layer:
1. Turn on the T\.' and the I)VI) p]ayer.
2. Press the INPUT button on the reIllot<_ contro] to toggle through the Video Input
Channe]s until you see CITD disp]ayed in the channe] banner.
• To review other
connections, go to the next
page.
• If you are done connecting
devices to your TV, go to
page 11 to complete the
Initial Setup.
• If you want more details of
the jacks on your TV, go to
page 13.
Chapter 1
Page 11
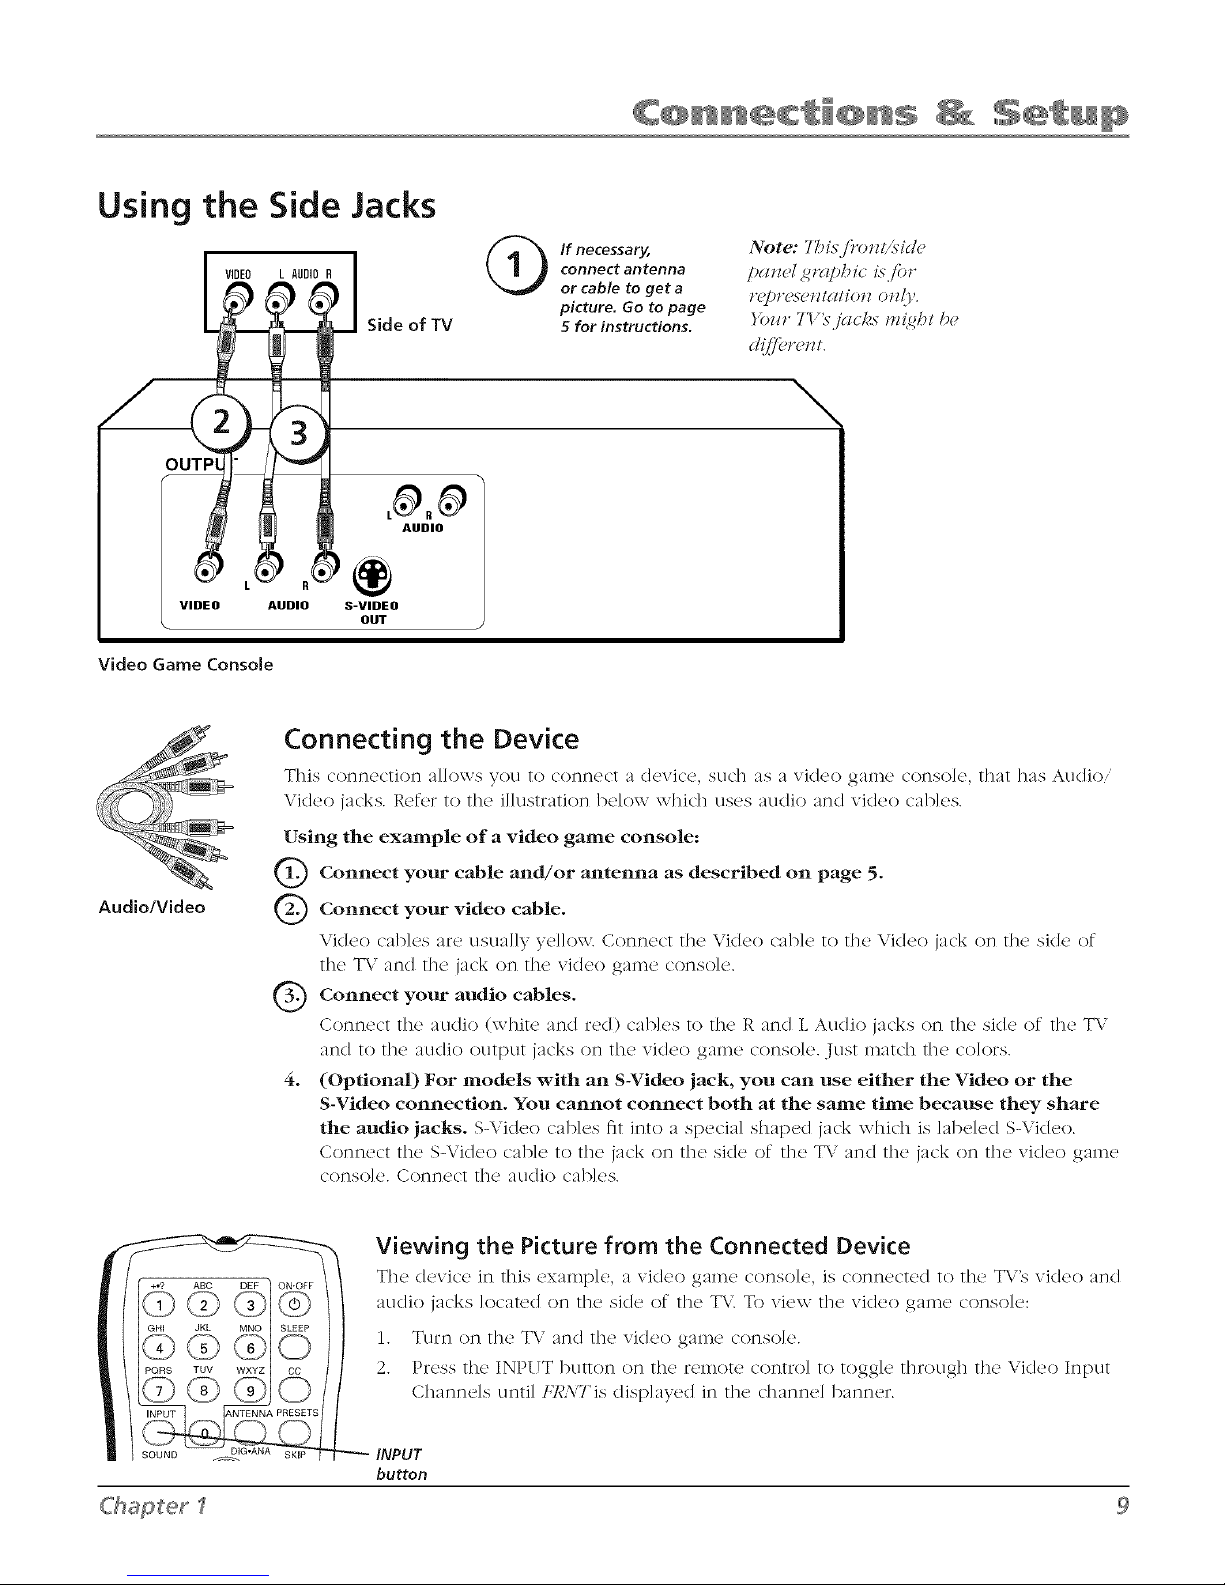
Using the Side Jacks
VIDEO
OUTPI
VIDEO AUDIO S-VIDEO
Video Game Console
connect antenna
if necessary,
or cable to get a
picture. Go to page
5 for instructions.
NOte: 7_M_-j)'o_7l/{s-id_>
pmzH <_nlpbic isjor
r_]_t'PsPtT/cl/iot7otT!y.
}'_mr7<l'_'jctcl_.s"m_/_/ &>
\
OUT
Connecting the Device
This cormeotion a]]ows VOLI to cor]r]ecl :/dev]c(,, SLid] :Is :/ v]d(2o game corlso]¢._ ti]f/t ]]:/s ALid]o,
\ideo jacks. R('fer to the illustration b(,low whic]l clses 3tl(]]o 373d video cab]es.
Audio/Video
Using the example of a video game console:
Connect your and/or antenna as on page 5.
Connect video cable.
Vid{,o c':fl>lc's are uscmlly ydlow. Conn{'c't th{' Video cal>l<' to the Video jack on th{' ski{' of
th(' T\.' and th(' jack on th(' vid('o galn(' conso]c'.
Connect audio cables.
Conn('ct the audio (whir{, and red) c'ab]c's to th(' R and L Audio jacks on th(' sJd{, of th(' TV
and to the' audio OLIE['}U[ j3dgs or) th(' vid('o game' cot]sol('. Just match the' colors.
4. (OptionaD For models with an S-Video jack, you can use either the Video or the
S-Video connection. You cannot connect both at the same time because they share
the audio jacks. S-Vidc'o cab]('s fit into a sp('cia] shalx'd jack which is ]abded S-Vid{,o.
Connect the S-Video cab]e to the jack on the side of the TV and the jack on the video game
conso]e. Connect the au(lio cab]es.
cable described
your
your
Viewing the Picture from the Connected Device
Th(' tic'vie'(' in this ('xampl(', a vicl('o galn(' c'orlsole, is c'orm{'c't('d to the' T\."s vid(,o and
audio jacks located on the side of the T\". To view the video game console:
1. Turn on the T\" and the video game console.
2. Press the INPUT button on the remote control to toggle through the Video Input
(2hannds until FR,\Tis disp]ayed in the channd banner.
SOUND
iNPUT
button
C'h_pterl
Page 12

Plug in the TV and Turn it On
P]ug "the end oJ"t]l(_! powel cord into a ground(,d wa{] outlet, h'lSClt t]l(.! p]ug colnp]<,tdy into
the outlet. Press ON-OFF on tile 1emote' or press POWER on the T\'s fixmt pane].
Put Batteries in the Remote
,_ Relnove tile battery con_partment cover from tile back of tile remote by pushing down
and sliding ()ft tile cover.
,_ Insert 2 fresh <AA"batteries. Make sure the polarities (+ and -) are aligned correctly to the
diagram inside the battery compartment.
- Replace the cover.
Note:/i.Yozl won 'I _eec! Io zsse.yozl," ,'emol</o," gl km 2 pmHod qili1"um. /"mmo_,mIbm
bgll/_>lJ_,5Io gll,oid d(7t7l(1<_C Nil4? 10possiblm lmcll,c_gm.
Use the Remote Control to
Complete the Initial Setup
The tcdlnical term is "Navigation' - ]low you ,hove t]lroug]l the
on-screen menus. The ineth(/d is the Salne throughout the menu
screens: hig]Jight VOLIr dlo]cc 3nd se]cct it.
OKbutton
Arrow
buttons
To high]ight a menu iteln, press tile arrow buttons on tile remote to
high]ight one of the itelns listed on the screen. Use the up or down
arrow button to move up or down. l[Jse tile right or let} arrow button
to inox_, right or ]e_}.
To select the item that you've hig]Jighted, press OK.
Note: H{ghl{_hlecl me(Tns/hal Ibe means ilmm .<,'l(Tnc/.<,"onlj')'(m_
01_7{?1" 171{?1717/l{?l'llS017 Ih{' /Ls'l(glpp_'471>d41r[Tcl7 br{_/_l_>rof 41
d{/'/_g'm!7l (o1o19.
Chapter 1
Page 13
SETUP
Go Back
--> Auto Ch, Search _!_ ,..
List & Labels ,..
Closed Caption ,..
Favorite CH ,..
Language English.,,
Auto. format 4:3
AUTO CHANNEL SEARCH
Go Back
--> Signal Type _- Cable,,.
Start ..,
Search Percent 0
Analog Channels 0
Digital Channels 0
SETUP
Go Back
Auto Ch. Search ,..
List & Labels ,..
Closed Caption ,..
Favorite CH ,..
--> Language _!_ English.,,
Auto. format 4:3
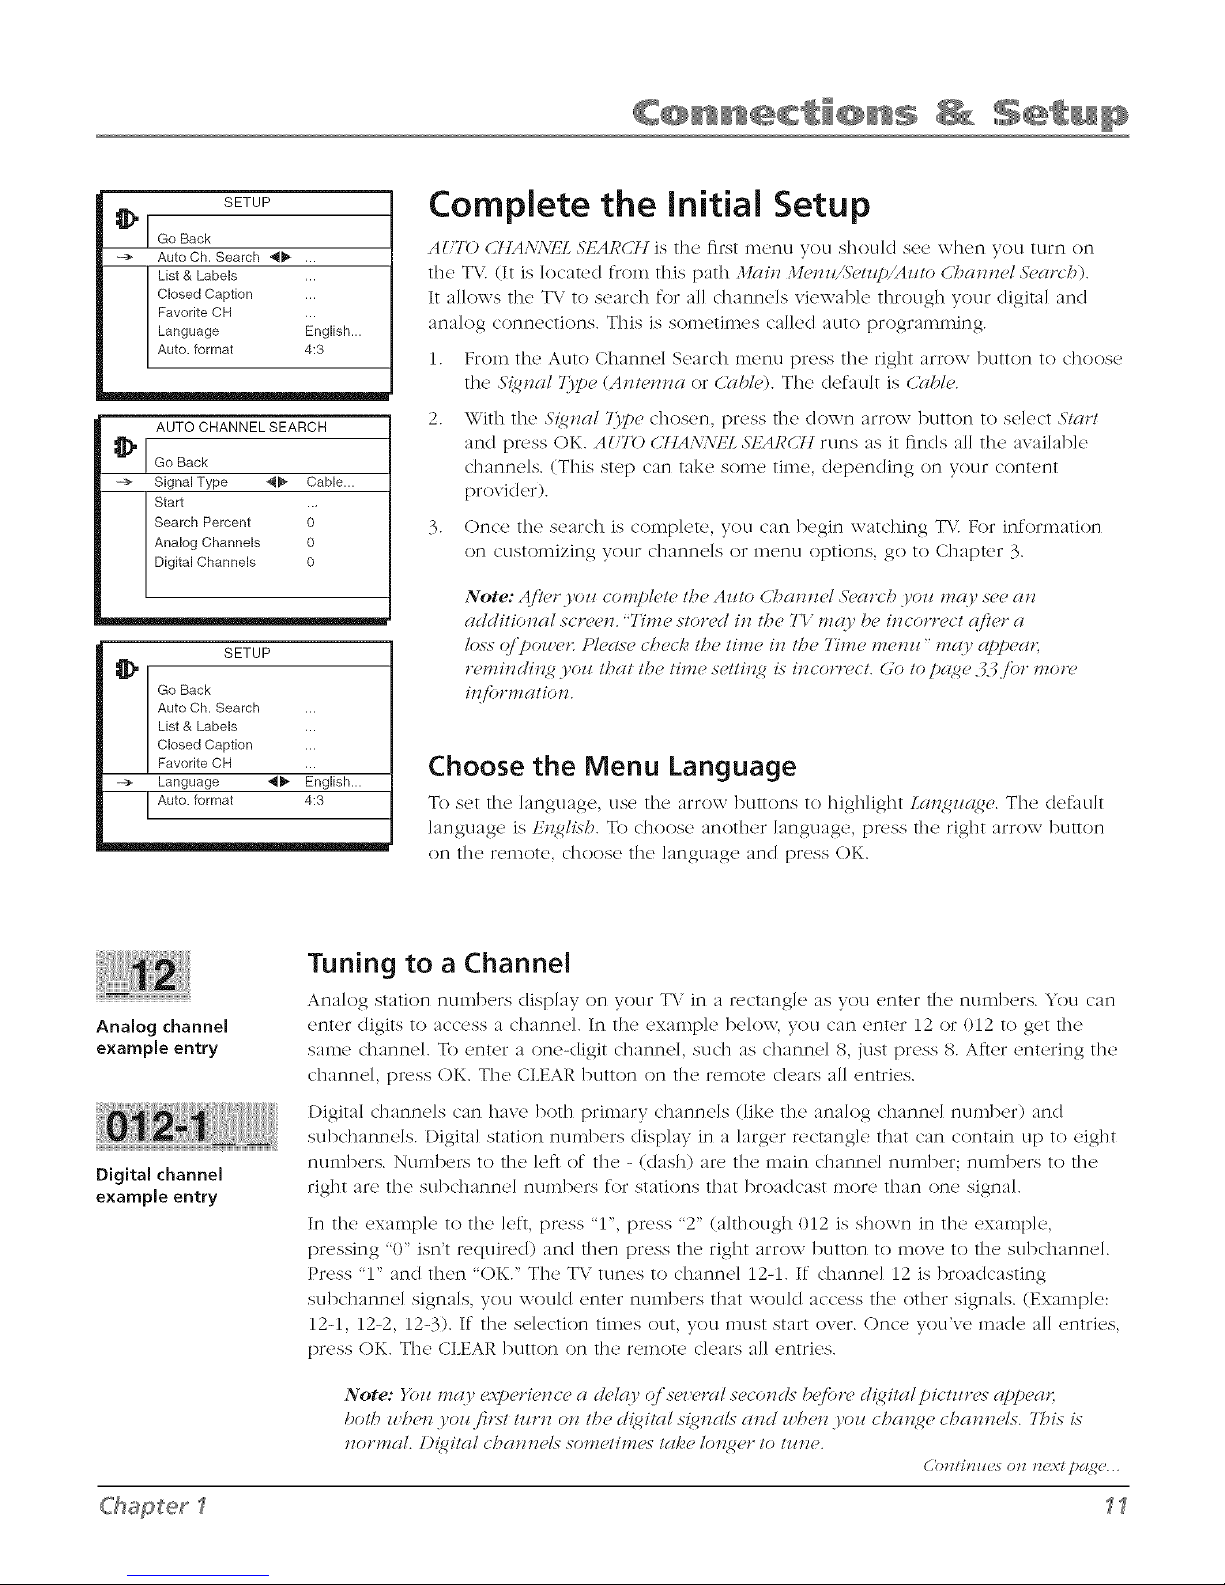
Complete the Initial Setup
,4_7b C/IA.\:\EL _S:/SA/_'C'/]is the first m('nu you should s('e \\-hen you tt]rn on
tile T\.'. (It is ]oc'ated from tills path .llclit_ 3ldm,,SWup,,_izlt_, CT_m_Jz_'l Yum>_&
It al]o\\-s tile T\" to search for all channels viewable through your digital and
analog _onnedions. This is sometimes _al]ed auto programming.
1. From the Auto Channel Seardl menu press tile right arrow button to dloose
the S{_Jlal 7.)?e (AJltemza or Orbit,). The default is Oble.
2. With the S{_,_al 77!_echosen, press the down arrow button to select Stct,:/
and press OK. AUTO C71A.\.\lg4 _STZARCTIruns as it finds all the available
channels. (This step can take some time, depending on your content
provider).
3. Once the search is complete, you can begin watching T\'. For information
on customizing your C]lal]l]L}]S or In()l]!.l options, go to Chapter 3.
Note: djl_,rjol_ {:ot.ll!_/{,tethe Azlto C_at_tld .5'oclroh yozl l_lglltsd, at_
additkmal sc,_,_,tz. "Tim{, ston'ri it_ th{" Tl" mr{}t be it_con'{,ct (('l# a
loss o/_oz#d: PIg'glse chec/_ the ti*_e i*z the 7Yl_e l_let_ll" Yllqy rl/_l_eat:
t>mi*_di*_g yo_ that the time sett#_g is JllCOflgd: (.;o to/_(lgg .:_._ibr motw
i_{lorm atio_.
Choose the Menu Language
To sd tI> language, us(' the ar>w buttons to highlight Lan_/_e. The default
language is E_lish To choose another language, press the right arrow ]9Litton
on tile renlote, c]loosc tile language and press (-)K.
Tuning to a Channel
Analog station numb(,rs display on your T\.' in _ r<tangk, _s you _'nter tll_' numb_,rs. You __m
Analog channel
example entry
Digital channel
example entry
C'hapter_ _
enter digits to access a channel. In the example be]o\\-, you can enter 12 or 012 to get tile
same channd. To enter a onedigit channd, such as channd 8, jtlst press S. A_}er entering tile
channd, press OK. Tile CLEAR button on tile remote clears all entries.
I)igital dlannels can have both primary channds (like tile analog channd number) and
subchannds. I)igita] station numbers display in a larger rectangle that can contain up to eight
numbers. Numbers to tile Id} of tile - ((lash) are tile main channel number; numbers to tile
right are tile subchannd numbers for stations that broadcast more than one signal.
In tile example to tile left, press 'T', press "2" (although 012 is shox\-n in tile example,
pressing "0" isn't r<,quired) and then press tile right arrow button to move to tile subchannd.
Press "1" and then "OK." The TV tunes to channd 12-1. If channel 12 is broadcasting
subchannd signals, you would enter numbers that would access the ()tile, signals. (Example:
12-1, 12-2, 124). If tile sdection times out, you must start over. Once you've made all entries,
press OK. Tile CLEAR button on tile remote clears all entries.
Note: _%u mg O, c::x'/_eri_'t_cea k'/_y c('se_,eml secot_c/s b_'j'on, d{dtal pictm>s- g¢/_!_ea,:
both z_hc,_zyoz{first tunz otz th(, {dig# s{g,zals mzd z_,he,z.},oz_chat?_(' ( hamz(,Is. 7_?is is
tmrmal. [){git(_l ( hmztzds somdim{,s tal{,e lo_<get"to tz_ze.
C'ot_/inm,s ot_ n¢\'t p_(go..
Page 14
Tuning to a Channel (continued)
Some channds might have bccn found during the channel search that m'c unavailable to
view and you might want to get rid of these so they don't :lppe:u" as you d-range channels.
To do this go to Main Menu/Setup MentliList & Labels. Note that removing channels flom
your channel list may be time consuming, so you might want to do it later. Go to page 28 for
details on editing your channel list.
What to Expect
Watching TV
• Remember: If you hav_, an analog signa] conncctc(I to your ANTENNAi(D, BLE INPUT,
then you]] view analog channds. (Tile ANTENNA button on tile remote toggles anak)g
and digital channels). Analog channels are sent in a 4:3 format. You can press the lett
arrow/ZOOM- and right arrow,ZOOM+ buttons on the remote to choose diftbrent screen
formats (4:3, 16:9 or stretch). This is also known as tile aspect ratio. Go to page 32 for
examples of screen formats.
Remember: If you have a digital signal connected to your ANTENNA/CABLE INPUT, then
you'H view digital channels. (The ANTENNA button on the remote toggles analog and
digital channds). Most digital channels are sent in a 16:9 format; it depends on how the
station is formatting tile video. If so, you'H see gray or black bars at tile top and bottom
of tile screen. You can press tile left arrow/ZOOM- and right arrow/ZOOM+ buttons to
choose (lift,,rent screen formats (4:3, 16:9 or stretch). This is also known as tile aspect
ratio.
Note: D(_ilal slalio_> in nati_,_,4.3.fn wznl (yon 71s-_,_,black o,%g,'cO, ha,> o_ l/_e sid_,s
Q/ II'I_' ])i( /IIP_ S_'Ill (lS [)(llll Q/ II'_' S{_ll(ll /i'Ot'll 1l')_ l) "o(l(lc(ls/{_ ") t'1l_71 I1O1 ].')(H'(? l,{?i._,"
•i'tl_l( lio u.
Chapter
Page 15
Explanation of Jacks
This section (k_SCl'ib(_s t]](2 jacks you can use to n]ake connections. There arc several
combinations avai]ab]e to connect devices to yOLlr T\/.
ANTENNA/
CABLE
INPUT
0
OIGITAU
ANALOG
I
( 8 )]U
_/JDEO
; (Q)_'
_,UDIO
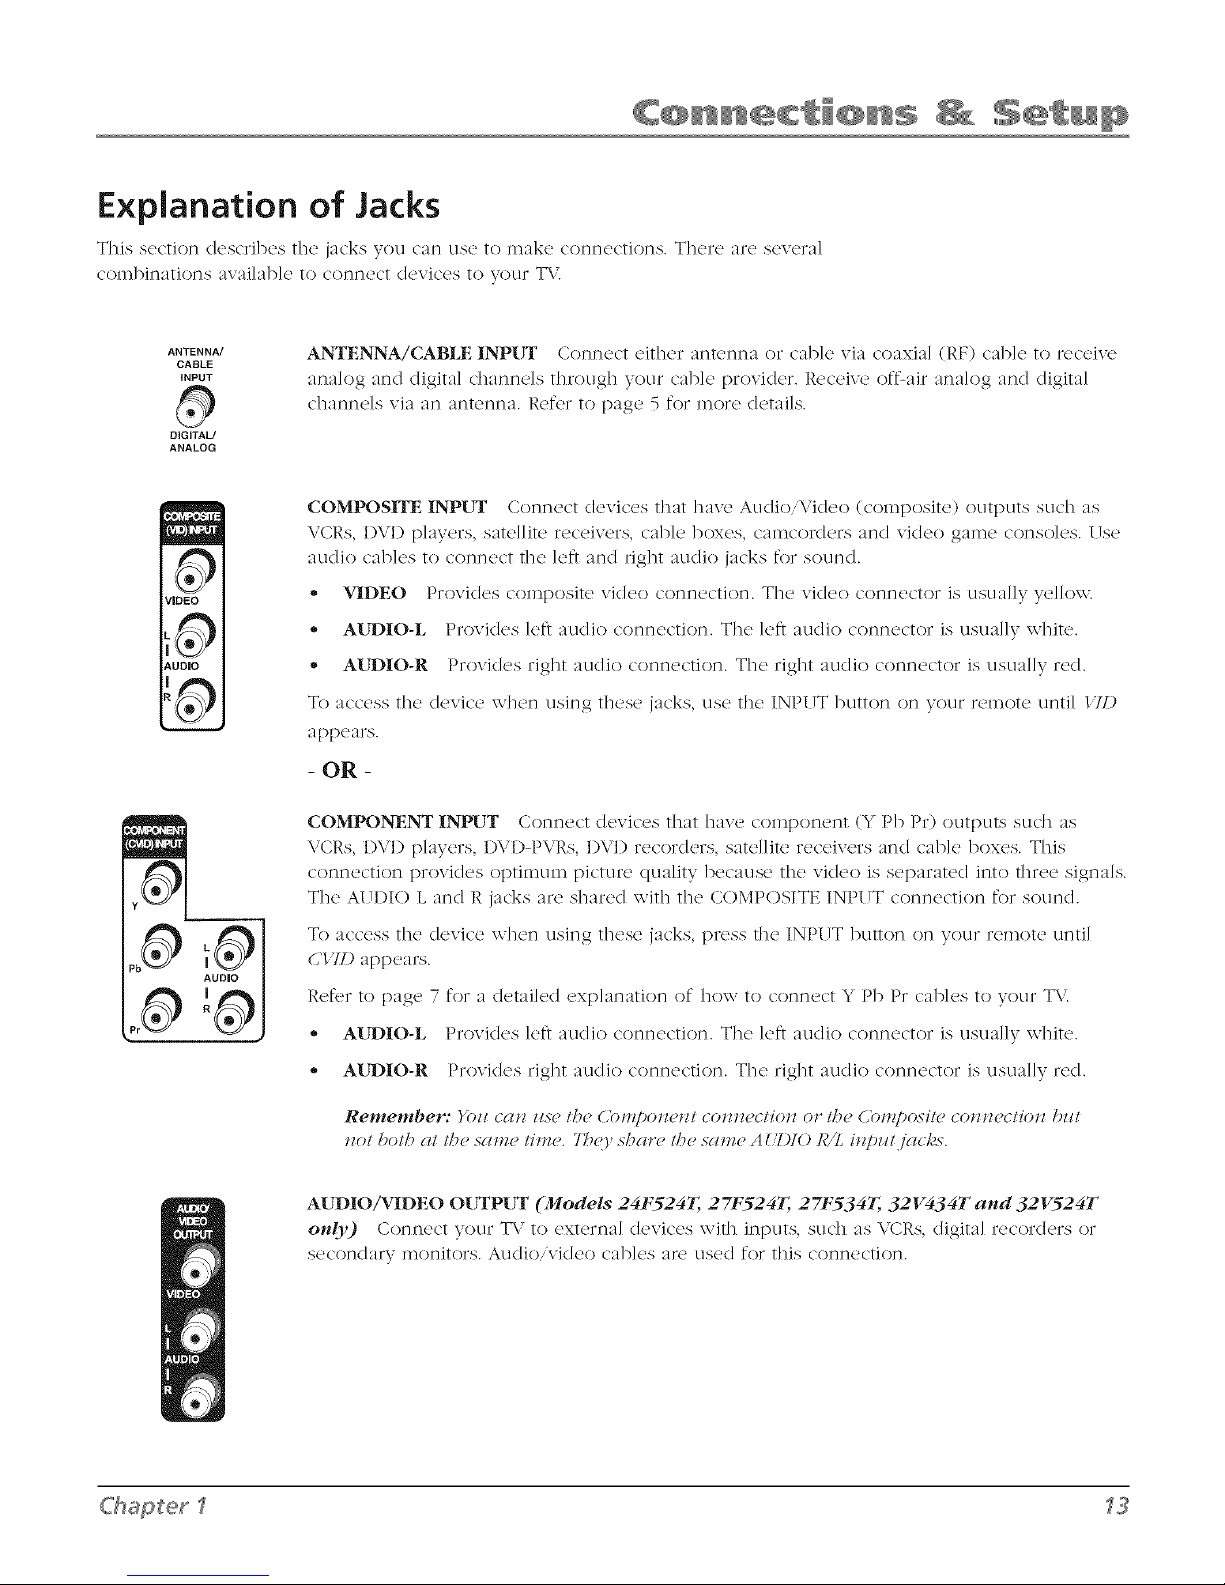
ANTENNA/CABLE INPUT Connect either antenna or cable xia coaxial (RE) cable to receive
analog and digital channels t]m)ugh your cane provider. Receive oft%_ir analog and digital
dlanne]s via an antenna. Refer to page 5 for in(Tre details.
COMPOSITE INPUT Connect devices that have AudioiVkleo (composite) outputs such as
VCRs, I)VI) players, satellite receivers, cane boxes, camcorders and vkleo game consoles, lJse
audio canes to connect the let} and right audio jacks for sound.
• VIDEO Provides composite vkleo connection. The video connector is usually yellow.
,, AltDIO-L Provkles let} audio connection. The left audio connector is usually white.
,, AUDIO-R Provkles right audio connection. Tile right audio connector is usually red.
To access the device when using these jacks, use the INPUT button on your remote until //D
appears.
- OR -
COMPONENT INPUT Connect devices that have colnponent (Y Pb Pr) outputs such as
VCRs, DVD players, I)\'I)-PVRs, DVD recorders, satd]ite receivers and cable boxes. This
connection provkles optimum picture quality because tile video is separated into three signals.
The AUI)IO L and R jacks are shared with tile COMPOSITE INPIJT connection for sound.
6'hapterl
To access the device when using these jacks, press the INPIJT button on your remote until
C'IID appears.
Refer to page 7 for a derailed explanation of ]low to connect Y Pb Pr cables to your T\(
,, AUD][O-L Provkles let} audio connection. The left audio connector is usually white.
,, AUD][O-R Provkles right audio connection. Tile right audio connector is usually red.
Remember: }'¢7ll C{Ilg IlS{? 1_)_? (_blJlDOll4?lll COlgll4?CllOll (71" I/?_? (](71"l!/)osJ/_? COllll4?c/loll I)ll1
1l(7I!_olh 411lh_' SglHl_' IIHI_'. 7_ O' 5hgll'_? lh_? SglHl_? A ('DIO ]£'Z lllplll jgl( /g5.
AUDIO/VIDEO OUTPUT (Models 24F524T, 27F524T, 27F534T, 32V434T and 32V524T
only) Conncc't your TV to external (Icxiccs with inputs, suc]l as \.CRs, digital recor(Icrs or
sec(71]dary in(7_]it(Trs. Au(li(7,vi(le(7 cables are used for this connection.
Page 16

The Front of Your TV
_'/'()U car] use tile ]3Uttons arid jacks on the front of your TV to in_).k(2 additional connections.
FRONT (INP{JT) These jacks are located on the skle of tile T\.'. Connect devices that
VIDEO L AUDIOR
have composite outpt]ts stlch as \.'Clq'.s,I)\1) p]avers, satd]ite receivers, cab]or boxes,
video game conso]es and calHcor(k2rs.
VIDEO Provides composite vkleo connection. The video connector is llSlla]]v
ye/]ow.
AUDIO-L Provides left audio connection. The left audio connector is L1SLla]Iv
white.
i
AIUDIO-R Provides right audio connection. The right audio connector is L1SLla]]v
red.
S-VIDEO Connect external devices that have S-Video outputs such as VCRs, I)VI)
players, satellite receivers and cane boxes. Connect the le_t and right audio jacks
located on the side of the TV for sound. Refer to [)age 9 for a (letai]e(I explanation of
how to connect S-Video cab]es to your TV.
To access the tie\ice when using these jacks, use the INP[_T button on your remote
until FI_.\T appears. If your model has an S-\.'kleo jack, _STU_'.\Tappears.
Remember: (i.yozlr modd has 41 l'icleo azzd _%lTc/_,ojnc/, (s_,cozzcl grgq>hi( ),
_l_OOS_'eilb(?l" lbe Video (COl'l!,bosile) of .5-1"ideo (Oll!lc(1iOll.)'Oil ((HIlIOI IlS{_/)()lb
I)_ca zis_ Ih_9' sha re Il'_' sa nz_' A _ :Z)I() ]_/L izz[)z_!,j(_c/'s.
Front Buttons
][ TSL! t]](2 ]3llttOnS on t]]L! front oJ" your T\ / to Ol)(_r_It(_ inarly oJ" t]]L! T\/'s f_._atllres.
POWER Turns the TV on and off.
SENSOR Receives infrared signals from the remote.
TV/V[DEO (INPUT) Mode127V414Ton!y Choose between T\" programming and the
availab]e Video Input Channds. Acts like the INPUT button on the remote.
MEN{)" Brings up the MAL\ ML%U_Also goes back ()memenu in the menu system.
VOLUME -/+ Decreases/increases the volume. In the menu system, acts like the left/right
arrow button on the remote control and adjusts menu controls.
CHAI'<N-EL-/+ Scans up and down through the current channd list. In the menu system, acts
like the (Iowniup arrow button on the remote control. Use to highlight items.
_4 Chapter
Page 17

Remote Buttons
+,? ABC DEF
@@@
GHI JKL MNO
@@@
PQRS TUV W×YZ
@@ @
A_NA PRESETS
0
SOUND DIGoANA SKIP
ANTEN]_qA, DIG®ANA Tunes to digJta] and ana]og dmnne]s. ]x_efer to page 5
for a fell] description.
Arrow- buttons (A, T, 4, 1_.) Use to ]]igh]ight different items in the T\.' menu.
The right and ]oft arrows se]c_cthigh]ighted items.
(0-9) Number buttons Enter c]lannd nun]hers (rebr to page 11), time settings
(refc,r to page ), labels (17eJ'_.!rto page _8) and notepad messages (retbr to page 34)
33 _ > .
CC Toggles dosed captioning on and off when dosed-caption menu option is
t/lrl]e(] /)n.
CH + or CH- Scans tip or down tim)ugh a]] the avai]ab]e stations on analog
anti /)r digita] connections. Press once to change tile channel L1131)1" (]{)xvl_]; press
and hold to continuously change dmnne]s.
CLEAR Removes any l]](!l]tl 1)1" dJsp]ay from the SC17(2()1_] an(I rettlrl]s V/)L1 t()
normal T\ viewing
FAV (Favorite) Press to browse the channe]s in your F(7_,orilc LU. ]x_efer to
page 31 for i111)17(!Jnf!)rlnatJ/)n.
GO BACK I_etclrns t!) tile previous c]lanne] /)1"II]entl.
INF'O Brings up the channel banner. Press again to remove. Retbr to page 17
for in/)re Jnf!)171natJ/)n.
INPUT Togg]es through the avai]ab]e Video Input (2hannds (171). CI7I). ]:R.\72
_STG{.\7"anc/curR,nt channel).
Note: ./i'>u s.>_>dio
n>!/uce Voz_r n>JTzole, cdl
7-<<700:7.7<%0.776: A
sDip/_i.<_md bmUlin<_
./'_,{>,ill bmc'D(ll:_md
ztOllt" I 7_V(I, 3](IStPt(,211"fl Of
[)Lvco_'dt" (,(liT[ tT>(IC[} t.
]'0 l! I" I'PI'II OIc [)dl'l l l l! fll bCl"
is 1{;,70(;;.
MENU Brings up tile MAL\ :1I£A{/sysR'n].
MUTE Reduces the TV's vdun]e to its n]inin]un] lexz,]. Press again to restoR,
tile volun]e.
OK/Ctt LIST \\ihen in the menu systen], selects hig]l]ig]lted items.
ON*OFF Turns the TV on and off.
PRESETS Press to set cclstoln picture settings. (:]loose fr/)ll] _'}'()/_',\;(_II/IzU,
LTr{ghl or PPrsonal. Also allows tile default and current language to be set for
(]]gJta] channels. (31) t/) page 16 for more inf!)rn]ati/)n.
SKIP Press once before changing channds; watch tile screen for tile ,S7qlI"box
() t/)appear. Press tile SKIP bum)n again - 3 ) seconds wi]] appear.
Enter tile new channd nun]bet. The T\.' will change to tile new channel and
return to tile original channd in 30 seconds. Press repeate(I]y to acid more time.
SLEEP Press t!) activate,deactivate the sleep timer. Takes you t/) the _';IEK/)77mEre
menu. ]x_t_fE_rto page 33.
SO[D4D When viewing an ana]og channd, selects one of the five sound
settings when viewing analog signals (57gmdgm/. Music, _f[)(,¢cb.7b,,t,w or
PPtxonal). Ref_,r to [)age 25 for more inforn]ation. When a digital channel
is being viewed, displays tile digital audio mode. Retbr to [)age 26 for more
infom]ation.
C'hapterl
('()tltJlTlt{TS 0tl t7{;;:I [)d<_{}&..
Page 18

VOL - or VOL + I)ecreases or increases the TV's volume.
ZOOM-, ZOOM+ During nornm] T\, viewing, changes the screen format (aspect ratio).
The zoom status appears n?omenmrily. Retbr to page 32 for more information about dJf[erent
forlllats.
Using the INPUT Button
Use the INPUT button to scrol] through the avaJlab]c Vi(Ico Input Channds
to view devices you have connected to the TV.
1. Make sure the device you want to view is turned ON.
2. Press INPUT to tune to an avaJ]ab]e Video Input Channe] and view
the device.
button
button
GO BACK FAV
OK
0(i)
O0
ZOOM-
3. To return to the previous channel, continue pressing INPUT.
Using the PRESETS Button
The fo]]owJng Jtcn?s arc avai]ab]e for digital dmnne]s only:
Cur. Language (Current Digital Channel Audio Language) Press the
right arrow button to choose the dialog language avai]ab]e for the program
you're watching. If the language you choose here is not being broadcast
with a progran_, then the T\/ will play the default audio for the progran_
(usually English in the (J.S.).
Def. Language (Default Digital Channel Audio Language) Press
the right re'row button to choose the dJa]og language avaJlabh, on digital
channels. If your preferred language is being broadcast with a program,
the T\/ will play it. If not, then the TV will play the default audio for the
program (usually English in the U.S.). The det:mlt digital audio language
options are 19<_li.sb,_S/_aJH.sb,]:,>Jl_b, di_,rmaJ< Imligm, ](l/mll(,s< U_ill(,su
and Kotwatz.
Chapter 1
Page 19

SAP _UKidPass: 08:30 CC
STEREO Skip: 0:30 07:18am
11 CNN (] X
Channel Banner menu for an
anamog channel.
Channel Banner
There are several items that might appear on-screen when you press tile INFO
button on tile remote. This display is called the Channel Banner. Tile following
list describes tile items on tile Channel Banner screen.
SAP I)isplayed when tile current channel is broadcasting SAP (Second
Audio Program) information. Refer to page 25 for more information.
• 1dock) or _'_ (unlock) for Parental Control (Re_br to page 18).
', The lock icon is displayed when all lqiruJltgd Om/rol settings arc
active.
• The unlock icon is displayed when all l'm>Jlm/Omtrol settings are
(leactivated.
KidPass: 08(_0 Corresponds to the KiclPgiss function (refer to [)age 23).
Shows the amount of time left before the TV switches off.
CC I)isp]ayed when C]ose(I Captioning is available on the current channel
STEREO or (MONO) STISREO is displayed when the current channel is
broadcasting in stere(). M(Z\O is displayed when the current channel is
broadcasting in mono.
Skip: 0#_0 Corresponds to the SKIP button. Shows the amount of time left
before the TV switches back to the previous channel. (Re_br to 15).
English _u KidPass: 08:30 CC
STEREO Skip: 0:30 07:18am
11-2 (] X
DTV Program
DTV Program Description
Channem Banner menu for
a digital channel.
0%°18 an, I)isp]ays the current time.
(] X I)isp]ayed when you MUTE the sound.
The following Channel Banner display is available for analog signals
only:
11 CNN I)isp]ays the current channel and label assigned to the channel
The following Channel Banner display is available for digital signals
only:
English Displays the audio language ff_l digital programming. Go to the
Sound menu to choose your current and clefuult language settings. Re_br to
[)age 26 for more information.
11-2 Displays the current channel but does not clisp]ay the channel label
that you entered in the Lisls aJ_d Lab(,/s screen.
Digital signals can contain the channel name and program description. If
available, look for that inforn)ation to be displayed below the current channel
n tl inber.
KidPassis a trademark of THOMSON used under license to TTECORPORATION.
(,'lwpbic.s- co_zmin_,d _ itbin tbLs pzddiccltfo_z cn'(,/br r_'/n'(,.s_,nmti_m only.
17
Page 20

Parental Controls and V-Chip
The choices in the USA _'-(£[[[P menu invo]ve software inside your T\; (re_brred to as \'-C]lip) whk]l
a]]ows you to b]ock T\ / prograll]S and movk, s bas(,d on vio]ence sex or other content you may
bdieve c]li](hTen shou]d not view,
Once you block programs, you can unblock programs by entering a password.
By default, the software inside your TV is turned "off." For instructions to turn on V-Chip, refer to
A( liU(ll_ Pglr_,l_l_fl Co!?/rol be]ow.
How V-Chip Works
V-Chip reads the program's age-based rating (TI'-JdA, T/'-14, etc.) and content themes (l'[olPJm(" (1"),
Adtdt Lat?Rz¢rl2u (L), etc.). If you have blocked the rating and,or content themes that the program
contains, you will receive the message: 77"*Ls"chaJnw/ has Jzot /)e_,J2 gl/#)roz,udjor z,icwi, z2. U,aJl2e
Cl')(lllll('l or/)r(,88 01{ 1o ('ll/(,rlHlss'word (llld /('H!/)orglrJ{F dugm/iz;rtlu tl?(, Pgn'PJHal (,bll/tol.
Sroadcast(Ts at\2 not r('qu1B2d to provid( ' coIlt('nt theIll('s, so [3rogralns r(,c(_ix,(,d xAit]l no content
themes wi]] on]v be blocked if Vou block their age-based rating _ xl can also block out progra11_s
that have been gixen a rating of Not Rated and programs that are considered unrated.
The T\, aged>ase(I ratings and content themes you can b]ock are i(lentifle(I and exp]ained in detail
in Chapter 4.
The fo]lowing sections give you more details about how to change the status of TV' program limits.
PARENTAL CONTROL
i
¢m
I Go Back
r
-> Lock
] Settings /,,,
Parental Control is locked. A
password is now necessary
to change settings.
Activate Parental Control
Note: The I'ASNWORD s(:rP(,Jl (q)p(,gn*x tbe.firxt time yoz# eJHur the
l'arPJztal Onltrol n/eJzzl, t:oll(n_ the oJ2 scru(q? iJzstrtmti(n/s lo crPat(" yoz#"
PASSWORD z_siJl2 the Jlz_mb('r bzit/oJzs oJz the rPmot('. [/'yozQfot_g(,t tbix
paxxword, r('/i'r to the bottom oj tbLv pr_2g'.for it?sttvmtiot?s or? how to
ch(m2(, the paxsz_ ord.
This featur(' luts you activate and deactivate par(,ntal control featur('s.
Frolll the ) "X"
Loci,'..
Press the right or ]eft arrow button to activate ([]) or deactivate ([2) PAIUL\'TAL
COXTNOL _q.!atures.
Resetting the Password
If" yOU forg('t your Dassxvord, vo/I can r(_s('t It. Here is how to do it:
1. Make stir(' the TX is off.
2. Simu]taneously press and ho]d VOL- on the TV's front pand and CLEAR on
t'AR£ TAL CONTROL menu, press the down arrow button to hig]_]ig]_t
Remember: (/.yol/ do Ilol aclil'al_ t (Ir_ Ilia/Colllrol (@, lockil/£ il), I1oI/_?
()/ t)ar_?llla/ Colllro/j'ualllr_,.s" z_ill l(lk_ ffff_(:l.
the relnote for al)[)roxitnatdy 5 seconds.
3. Enter a new password the next time you access the PARtLX;TAL COX;TI,)OL
inen!.].
Page 21

_ USA V-CHIP
Go Back
! Movie Ratings .,.
Set V-Chip TV Programming Limits
1. Chc_c_se tJc_r_,zz/a/Cb_/ro/flora thc_ lIdizz _/_,zzz_ and press the OK button.
2. Highlight S_llizz2s in the next P(_r_'zzl_lCozzlrol screen; then, press the right
arrow button.
3. Highlight i_SN /'-CT_ip. Press the right arrow button. Then select 7"l'R(ztiJz2s
and press the right arrow button.
4. Once you get to the Tl'A'A77.'_C7Ll.lllTscreen, use the arrow buttons and
OK on your remote to change the status of a T\.' program rating tiom
view (_) to block ( _ ) or content theme from View (1') to Block (1_).
The V-Chip Rating Screen
The following is an example of where items are ]ocatud within the T_'RATI._'C; lJ.lIlTscreen.
Rating Status Field
Lets you select whether to view ( _ )
or block (_).
Rating Field
Lets you select from a list of age-
based ratings you can block or view.
Refer to chart below.
TV-MA Mature Audience Only
TV-14 Parents Strongly
Cautioned
TV-PG Parental Guidance
Suggested
TV-G General Audience
TV-Y7 Directed to Children 7
years and older
TV-Y All Children
TV RATING LIMIT
Go Back
m
m
/
TV-PG V V V V
TV-G
TV-Y7 I_ V
TV-Y I_
Press OK to view/block prog,
containing adult language,
_ Content Themes
Lists the content themes you can block
or view. Refer to chart at top of next
page.
Content Status Fields
Lets you select which content themes to
view for the selected rating and whether
the status of the content theme is
currently View (V) or Block (B).
Blocking Age-Based Ratings
T( _L1can automatically b]ock all program ratings above a specifle(I age-
based rating ]evd.
To block programs with higher ratings:
1. Press the up or down arrow button to scroll to the rating
corresponding with the lowest rating you do not want the child to
watch.
2,
Press the OK button to toggle between view ( _'_ ) and
block ( _1 ). The status for the rating ]isted to the left an(I a]] higher
ratings automatically changes to block ( _ ).
Press the up or down arrow button to high]ig]]t d;o ]_ack and press
OK.
4,
After you Block aged>ased ratings, you can change some of the
ratings back to view ( _' ).
Note: }bz! r_/z/sl r_,r_z_r_!/>_,rIo c_cliz,c_l_,Pg_rdz/lg_l(]n_/lrol.for rg_lizz<g4
li_zils Io la/a_'_t/'fi'cl. l_t/'_'__Io pd2_' l,S'.
Page 22

HI Sexually explicit dialogue
_1 Adult language
S II Sexual situations
v IIViolence
FvnFantasy Violence
Broadcasters are not required to provide content
themes or age-based ratings.
Only the content theme status corresponding to
TV-14 (L) language changes to (W View. Higher rated
content themes, such as that for TV-MA language, do
not change.
Blocking Specific Content Themes
You can b]ock programs based on their content. (Content is represented
by the D, L, X V and FV on your screen.) Wh('n you block a cont('nt
theme for a particular rating, you automatically block that content theme
for higher rated programs as well.
To b]ock program contctnt:
1. Determine the content themes you want to block.
2. Press the down arrow button to scroll to the rating whose content
theme you want to change.
3. Press the right arrow button to moxK, the highlight to a particular
conR, nt th(,m(, status.
4. Press the (-)K button to change its status to B. (In the example on
the previous [)age you block the language (L) corresponding with
TI'-14. The language for TI'-MA is blocked as well).
5. After you B]ock specific content themes, you can change some of
the content themes back to (/3 view.
Note: }bz/ mzlsl rer_zember Io c_cl/z'c_le t)(_rel/lcff Co_/lro/,i'or rg_lin 2
lirl/ils Io l(lke (t"/'(_(7I. 1_!/'_" Io pgl<_e 1N.
Page 23

PARENTAL CONTROL
¢u
Go Back
Lock []
-e. Settings < > ,,,
Change Passwrd
PARENTAL CONTROL SETTINGS
Ca
Go Back
-_ USA V-Chip > ,,,
Canada V-Chip
Exempt Prgms
KidPass
Bbck CH
Lock Fr, PaneF []
Blocking USA V-Chip Movie Ratings
The 110z,ie Ral#z_ Lim il _ts you deddc whic]l T\ plograms can and cannot be
vJewe(I.
To set Movie programming limits:
1. Choose I#ltx,Jltctl Omtr_d from the 3I(tiJl 3leJlzl and press the OK button.
2. Highlight &'lt#lqs in the next I#lr_'Jlt(ll Omtrol screen; then, press the right
3rro\v.
3. Highlight [f5_ /'-CTffp. Press the right arrow button. Then select 3h)_'i_,
]_(ltill_8 and press the right arrow button.
4. Once you get to the MOITI/RAT_.\(; Ll.lllTscreen, use the arrow buttons
and OK on your remote to change the status of a TV program rating from
vie\\- ( l_ ) to block ( _1 ) .
5. Press the OK button to change its status to block - the lock icon
( i_l ) appears. All ratings above the one you selected change to lock.
__ USA V-CHIP
÷ ! °, ;C atings>_,
MOVIE RATING LFMff
Go Back
_-_ NR < > _"
x _"
NC-17
R _"
PG-13
PG
G
Notes,. }bll mllsl rg?r_zemh_r lo (_clitwle t#_reizl(_l (]nl/l x)l,/n " "(_IiI/_
lis'lzils lo lake _j[l'(_cl. R({_r lo pd,_e 78
(/'.Voz# /'c)_:_etyo_/rpassu ord. yoz# (:a_z ,_,s_,t it, Make s_/re the TV is
(j'/i Sim_d/aw,oz_s{v press a_zd hold VOL- o_ the TVW./}'o_zt pa_el
a,zd CZI!AR o,z the twmole /br rqgm,:vimate{_, 5 s_'((nzds. thz/er a _zew
password the _e_:t time yoz/ acc(,ss the PAIUF.\7"AL C'().\ 7NOL men,z<
Page 24

PARENTAL CONTROL
I Go Back
Lock []
!
-=> Settinqs < > ,,,
l Change Passwrd
Blocking Canadian V-Chip Movie Ratings
If you rcceJ_c Canadian programs you can b]ock (,_izadialz !hz2/1%band
l:r_,_mb _'LCT_i!.,ratings. \\."hen you block a particular rating, you autolnatJc:_.]]y
b]ock the higher rated pTogran_s as we]].
To b]ock Canadian Eng]ish an(I French program ratings:
PARENTAL CONTROL SETTINGS
Go Back
USA V-Chip ,,,
--> Canada V-Chip > ,,,
Exempt Prgms _"
KidPass ,,,
Block CH ,,,
Lock Fr, Panel []
ENGLISH RATINGS
Go Back
--> 18+ <> _"
14+
PG [_
G
CB+ [_
c
FRENCH RATINGS
@a
Go Back
-_ 18+ <> _"
16+ [_
13+
s+ E_
G
1. C]loose Pglre_ll/gll Co!_/ro/fToln the l]dilz 11_Illl and press the OK button.
2. Highlight ,S'_'llizz2sin the next PglngH_l C'cmlrol screen; then, press the right
ar]7ow b/ittoll.
.
Highlight Ck_zzada l_U'*ip. Press the right arrow button. Then se]ect either
EI/<_/is/) RdTlil/<gor Fl*{g2cbRdllill_ and press the right arrow button.
4.
Determine the rating you want to block.
5.
Once you get to the RATI.\G screen for your choice, use the arrow buttons
and OK on your remote to change the status of a TV program rating fiom
view ( _'_ ) to block ( _1 ).
.
Press the OK button to change its status to b]ock - the lock icon
(_1) appears and a]] ratings above the one you selected change to lock.
Note: }'ozl rmlsl rg,rn_r_zb_g"Io a( li!,al_,Par_zzl_/ Cozzlro/.ibr rg_lizz2 /ir_zils
V-Chip Exempt Program Block
The JL_x,mpt P6gms option lets you c/cck/c if programs theft the \.'-Chip
recognizes as unrated can be viewed. Unrated T\.' programs may include news,
sports, political, religious, local and weather programs, emergen% bulletins,
public announcements and programs without ratings. The E_wmp/option
applies to both USA and Canadian unrated programs, and Canadian programs
rated E.
Unlocked A]] unrated programs are availab]e.
Locked A]] unrated programs are not avai]ab]e.
Go to the l'(_r_,tztal Cbt_tro/screen and pick ,5'#t/it?2sand press OK. In the
l'<ztx,tz/al Cbt_/rol _S'_,ttit?gsscreen press the down arrow button to high]ight
!'k_,mpt Ptgms. Then press the right arrow button to toggle between the lock
( _ ) and unlock ( _ ) icon.
Note: )'ozz rnz/sl rd;"_z,_,,';zb_g"Io acliz'al_, Parcz_la/ C'cmlrol ibr rgzlizz2 li_Hls
Io lal_,_,¢'/'fiel. RL'/_ r Io pa, g_ l &'.
> > > > o >
Page 25

@u
KIDPASS
Go Back
--> Monday < > 1:30
Tuesday 2:00
Wednesday 2:00
Thursday 0:30
Friday Free
Saturday Free
Sunday Free
Activate KidPass
This feature allows you to speci_ Thow much T\ you want a child to watch. The
C]loJc¢_S and a brief explanation are as follows:
Current Day Shows the current day such as ll01_dd.},, 7}/escla},... or
Slnzcld.F. The value of Czn're1_i Dd3, changes autoinatica]]y to the day after at
12:00 am.
Monday to Sunday The selected options are Fro'e, 00.'30 to 16:00 with
30 minute steps. The settings are valid every week. Once the viewing
allowance of current clay is elapsed, the TV is switches ()ft and no wake
ul) timer event can take [)]ace for that day. If the TV is switched on while
the viewing allowance of current day is elapsed, sound is inured and the
I'ASS_Ut_I_Dmenu is displayed on the screen. Make sure to set the time and
calendar in your TM Refer to page 33 for more inforlnation.
Note.. }t_z/nzz_st,_,J_en_ber to actiz,a/e l#nx,Jl/al db_ltr_d./br tw/iJlg limi/s
to lgfl,e q[fi<t. k@r to prl_e l&
Block Channel
Note: 7his oplioll mor/?s c!(/'/_'re1_l{Fu,ilb cli[/i,relzl co_eclio_zs. Ij'.yo_l
arez/silzg lbe A'_ 772"_'_/'(,'ABLI_L'X/_t"'T.}'oz/bcl_'e l_'o opliol_.s: In blo_l"
cl/l CbClIIII{?IN or IIOlI_L llldit'idllCl/ CbCTlllld?lsC(71IlIOI bC block_d z_'ilb l/_Ls"
COl/!?CCHO!2.
/i'.}'o_ cite _/si_,g4 /be A'VT/L'_'V_/%'A,qLt{ L*;2-V'T lbe_ Bloc'k U'*Cl_el u,or/?s
as described belou,.
This option lets you Mock specific channels.
1. Fl'o]_ the t'ARtL'VTAL CO'V71_'OL menu, press the down arrow button to
highlight Blo( /, CTL
2.
Press OK to display Block C7t options.
3.
Press the down arrow button to highlight 5>/eci C71 and enter the channel
nulnber you want to lock. Ref_,r to page 11 for information about tuning to
digital channels with the nulnber buttons. If you would like, you can use
the right and left arrow buttons to scroll through the channel nulnbers.
4. Press the down arrow to highlight Lock. Press the right or ]e_}arrow to block
([]) or zmblo_/, (_) the channel selected on step 3.
In the example to the left, Channel 50 is blocked. _,2_ucan block asmany
channels as you ]ik_._using this procedure.
Note: }'oz/ _7_z/slre_Tze_TzberIn g_cli_'alet#_re_lal C'cn_l"ol.fo"¥_Ii_ l#Tzils
In la/,e q[fi_l. R_:/_"Inpa,_e 18'.
Page 26

PARENTAL CONTROL SETTINGS
On
Go Back
USA V-Chip
Canada V-Chip
Exempt Prgms
KidPass
Block CH
_> Lock Fr. Panel >
L
Front Panel Lock
Sel(,ctJng this option lets you lock (disab]e) or lmlock (enable) t]l(, TV's front
[haiti('] 13tltto]tls. Th(' lx._l]Io[(._ 5[J]] [LI]tl(._s [o arlS 7 C]lar]r](._] So /x.,ii](._l]_13(.!] [o /X.'I]]OVL!
;/CC(.'SS [o ;/]3V ]:(.}In()[(2 []]_/[ C;/]3 ()[3('1"_/[(.} []](2 [('](.wJsJ()II.
1. From file tJzlI_l:;'_'Y_L C'OYTY_'OL menu, press file down arrow to hig]l]Jght
2. Press the right or ]eft arrow button to choose lock ([E)or unlock (D).
Change Password
Se]ecting fills option lets you simp]y c_x, ate a new passwold at any time. Once
you entel a new passwol'd from (.7_a_g4_'t'(l._.surd in the t'AI_IL'_TA£ COX, 71_OL
menu, it is the password you use until you change it again.
Page 27

SOUND
(l)'
Go Back
Tone Control < > ,,,
Balance i-
Sound Type STEREO,,,
SAP []
Auto Vol Level []
SOUND menu for analog signals.
Sound Menu
To access tile Sound menu, press MENU on tile re*I)ote and select SO{,AI) fro())
the MA/.\ ME.XUIDepending on tile Mnd of signal you're watching, tile Sound
Menu will hax_, difR,rent items available for you to adjust.
If you are watching analog programming or any vide() inputs, you'll see a
screen similar to the example SO{.XT) menu to tile left.
If you're watching digital progralnming, you'/1 see the second n_enu to the
left. The ANTENNA button on the remote toggles between analog and digital
Inen (IS.
SOUND
<l:ilJGoBack
--> Tone Control < > ,,,
Balance ..... I........
Sound Type STEREO,,,
Auto Vol Level []
I Deft Language Spanish.,,
Cur, Language English,,,
SOUND menu for digital signals.
+,? ABC DEF
GHI JKL MNO
PQRS TUV WXYZ
Tone Control All()xvs you to c]]oos(.! your desired soLll_lC] ino(le anti adjust
the equalizer sliders.
* Preset Press the ]eft or right arrow button to select your desired
sound n_ode: t'_,rsom_/. _S'/azzdgn-d, lJi/si(, _S/)_,ch and 7Z_alr_,. When
you change any equalizer slider, the Preset changes to P(?INOIZgI/.
* Treble/Bass Press the right arrow button to increase the treble or
]3ass OLltpLlt; SIS(.! tilL! ](.!ft afro\\ _ ])Litton 1o (](.!creas(_ 1]](.! OLItDLIt.
Balance Press the right arrow button to increase the audio output in the
right speaker; press the ]e_} arrow button to increase the au(liooutput in the
left speaker.
Sound Type Press the right arrow button to scroll throug]l the available
au(lio types which control the way the sound comes through your speakers:
* MONO Plays the sound in inono only. Use this setting when
receiving broadcasts with weak stereo signals.
* STEREO Splits the incoming stere() audio signal into ]eft an(I right
c]lanne]s.
• Enhanced (on!y available for analog signals) Makes the sound
sJlnLl]ate sLlrroLlD(I SOLl]3(I.
SOUND
ANTENNA
button
d;_Yzpbi(:s c:c)zzl_:_iz?_'e!u'il/Hzz lbis /mb/i(:(_liozz (_z'd /'n_" z'_'pz'_,._,zH(_lio_? oz?/.),.
SAP (Second Audio Program) (on!y available for analog
broadcasts) P]ays the, program"s audio in a s_'cond language', if one' is
availab](,. Th(' T\" displays th(' word ,S'AP in the chann(q banner \\-h('n you
tune to a program that is broadcast with SAP information. SAP audio is
broadcast in (non(). SAP is also used to broadcast a program's audio with
descriptions of the vide() for the visually in_paire(I. Press the right arrow
button to turn SAP on or off.
Page 28

Auto VolLevel (Auto Volume Level) Reduces the annoying blasts in volulne during
commercial breaks. Eliminates the need to constantly adjust volume control. Press tile
right arrow burton to turn on or ()ft.
Tile following items aru available for digital broadcasts only:
Def. Language (Default Digital Channel Audio Language) Press the right arrow
button to choose the language you pref_,r for dialog on digital channels. If your pref_,rred
language is being broadcast with a progran_, the TV will play it. If not, then the TV will
play the default audio for the program (usually English in the U.S.). The default digital
channel audio language options are l:_H_lisl_,NpatHsl_. <,'_mmat_.I/glliat_./gipat_o.s-_,.C7:_i_o.s_,
and Ko**{,gltl.
Cur. Language (Current Digital Channel Audio Language) Press the right arrow
button to choose the audio language available for the program you're watching. If the
language you choose here is not being broadcast with a program, then the TV will play
the defimlt audio for the program (usually English in the U.S.).
Page 29

PICTURE
! Go Back
---> Picture Preset
Pict, Enhanc.
Color Warmth
Brightness
Contrast
Color
Sharpness
Tint
< > Soft,,,
High,,.
Normal,,,
..... I........
..... I........
..... I........
..... I........
..... I........
Picture Menu
The IqCTfId_ menu options apply to the video for the main TV and Video Input
Channels. As you scroll through tile options available tile background image
will change to fit that choice. Choose tile setting that is best for your programs.
Press tile left or right arrow button to toggle among tile cll<)ices listed below:
Picture Preset Press the right arrow button to scroll through tile
available picture [)reset settings: Sqii, .\?t/_n'<d.Br(_b/ or I't,*xoJzal.
Pict Enhanc (Picture Enhancement) Iml)roves unstable or poor
quality video pictures. Press tile right arrow button to scroll through tile
options: Qi7] Midd/_, orH{qb.
Color Warmth Press tile right arrow button to scroll through tile color
adjustments:
* Cool For a more blue palette of colors.
* Normal Standard picture color. This is tile defimlt setting.
* Warm For a more red palette of colors.
Brightness Adjusts tile brightness of tile picture.
Contrast Adjusts the diff,,fence between tile light and dark areas of tile
picture.
Color A(Ijusts tile richness of tile color.
Sharpness Adjusts tile crispness of the edges in tile picture.
Tint Adjusts tile balance between tile red and green lev_qs.
When you change any of these picture settings, tile Pict_nz, Pru.set changes
to I'_,,ts-o,zaLPress tile left or right arrow button to make adjustments. To
return to tile I'/(.7"IRi:. menu, press tile uI) or down arrow button.
Page 30

SETUP
Go Back
--> Auto Ch, Search < > ,,,
List & Labels
Closed Caption
Favorite CH
Language English,,,
Format 4:3
AUTO CHANNEL SEARCH
Go Back
--> Signal Type _ Cable,,.
Start Running,,.
Search Percent 20%
Analog Channel 8 Found
Digital Channel 0 Found
Setup Menu
Auto ChannelSearch Allows you to choose your signal type and begin
an Auto Channel Search.
Pr(,ss t]]cf ]Lift or right arrow button to choose among the signal sources
])el ow:
• Antenna If you have connected an antenna to the ANTENNA,
CABLE INPI:JT, choose A1ll_'lllla. Re_br to page 5 for a complete
explanation of these connections.
Cable If you have connected cable to the ANTENNA/CABLE
INPUT, choose Cbb/(,. I)epending on which package you have you
can receive analog, digital or both stations. Retbr to [)age 5 for a
complete explanation of these connections.
A_'t(.Tyou hav(, lllad(._ t]le sd(.}ctJons abov(,, pr(._ss t]le down arrow bLitton
to high]ig]lt ,5lglpl.
Start Press the right arrow button to start the search. Searches
for channels the T\,' is receiving and stores them in the channel list.
This step can take some time, depending on your content provider.
The LisLs-& LabeLs-menu is displayed. Go to [)age 11 (Az_/o C_'*aJlJlel
,S>atX/_)for more information.
Search percent Number displayed indicates how much of the
search has been completed on analog and digital signals.
MSTS AND LABELS
_ Go Back
Channel < > 10,,,
--> Label
In list
Analog Channels Shows the number of analog channe]s found as
they are being searched. These are searched for first.
Digital Channels Shows the number of digital channels found as
they are being searched. These are scardled for ]ast.
List & Labels Edit the channels in the list or choose labds for each
channel. Select Lisls & LdbcIs from t]l(.!,S't:'TI7_menu and press the right or
]e_} arro-_v button.
* Channel Press the right or left arrow button to select the channel
number that 'y()[l want to give a ]abe]. Press the down arrow button
to highlight Lg_bd.
* Label For example, if channe] 12 has the call letters WXYZ, you
can use this _bature to ]abd it WXSZ so it appears on-screen as part
of the Channel Banner.
1.
Press the right arrow button to hig]l]ig]lt the first space.
2.
lJse the number buttons on your remote to spd] out your new labd.
For example, above the number button 7 is the label PQRS. The
letter P is typed by pressing the number 7 button one time; the letter
Q is typed by pressing the number 7 two times; the letter R is three
times and the letter S is four times.
3. Move spaces with the right and ]eft arrow buttons.
4. lTse the up arrow button to highlight Go Ba_/- and press OK to exit
this menu when you have finished.
Page 31

In List This option allows you to keep or delete a channN flom the clmnnN list.
Follow tile procedure for (,bcmt_el (see above) to select the dmnne]. Then highligl-_t
hz list and press the right or lett arrow button to add (_) or delete ([]) the channel.
Use the up arrow button to highlight GO !_A(,K and press OK to exit.
Note: (/.Vo_ u a,_t to add c/elePd cbamzels to the cbamzel lisL ,vm the Az_to 6bamze/
&,m'cb (nj'_,r to pc<_e2,_').
Closed Caption Many programs are encoded with c]osed<aptioning information, whic]l
lets you display the audio portion of a program as text on the TV screen. C]osed captioning
is not available on all channels at all times. Only specific programs encoded with dosed-
captioning information are applicable. When a program is dosed-captioned, CF)is displayed
in the Channel Banner. Retbr to [)age 17 for more information. Press the left or right arrow
button to toggle among the choices below:
CLOSED CAPTION
CLOSED CAPTION menu for
analog signals.
CLOSED CAPTION
Go Back
--> CC Preset > Default,,,
CC Display On,..
Aria. CC Type CC1
Dig. CC Type Service1 ,,,
Dig. CC Style ,,,
The following Closed Caption options are available for analog signals:
* CCDisplay Lets you choose the way dose(I-captioning information
is shown on the screen.
Off No captioning information displayed.
On Captioning information ahvays appears, when available.
Muted=On Displays captioning inR)rmation, when available,
whenever the TV's sound is muted by pressing the MUTE button.
The captioning information is not (lisplayed when the sound is not
muted.
Aria. CC Type (Analog Closed Caption Type) Choose which
captioning mode is used for displaying captioning information. If
you are unsure of the differences among the modes, you may prefer
to leave the dosed-captioned mode set to C(.'L, which clisp]:_ys
complete text of the program in the primary language in your area.
The following Closed Caption options are avaHabk for digital signals:
• CCPreset Lets you select between the Dq/?lzdt and Cz_stom
opti on s.
Default Captioning information disp]ays using settings sent with
the broadcaster's signals (e.g., size, color, font).
Custom Avai]ab]e after you hax_. changed the [){_ CF)Ni34e
settings as described below.
CLOSED CAPTION menu for
digital signals
• CCDisplay Lets you choose the way dosed captioning information
is shown on the screen.
Off No captioning information displayed.
On Captioning information ahvays appears, when available.
Muted=On Displays captioning information, when available,
whenever the TV's sound is muted by pressing the MUTE button.
The captioning information is not (lisplayed when the sound is not
muted.
• Dig. CC Type (Digital Closed-Caption Type) Lets you select a
dosed caption service mode (1-6) for digital channels.
(Tbntitnte,_ olznc:\7 pct<_c,..
Page 32

Service 1 and Service 2 These choices are for the primary and
secondary ]angu ages, respectively
Service 3 and Services 4, 5, 6 These choices are additiona]
caption SoklrC(2S that may be available.
DIGITAL CC STYLE
(])l
Go Back
CC Size > Large,..
CC Font Ashley
CC Opacity Solid...
CC Color Green...
Bkgrnd Opacity Solid...
Bkgmd Color White,..
Notes: 7h(, Stl,l(,s shou ,z above
o,z{p (@[)(,at o,z d{@tal co,zt(,,zt
(A.\7_lg.A;\Hic/AI3/.]i DIG77_ L
/.\P( 7)jgmk. (/ a d{@tal slatioJz
do(>._Jz't carlT)' d_itgzl closP(1
c(@ti(mi_7<_, )'oz_ z_ o_z t s(>+>tbes(>
ch(m<_(>.s.
.//'.pOll 'r_' lllTld?d lo (_1l (_1l(_/o,_
sl(lliolz poz! _!'olz 'l s_ IZ')_'x_?
Dig. CC Style (Digital Closed-Caption Style) When 6_,'Presel
(above) is set to Cz/.slom you can customize the following display
o[)tions:
CCSize Lets you set the size of the digital dosed-caption text -
Sl(_Izdarc!, La*_ge or Small.
CCFont Lets you select a character design for the digital closed-
caption text. A font is a comp]ete assortment of type of a given
design. You can choose from a variety of fonts (Ashley, Floridian
etc.).
CC Opacity Lets you set the appearance of the space behind
the digital closed-caption text: Solid, 7)z_izslz!(ezH, 7)'(_msparezz! or
]g/gist?il Zg.
CC Color Lets you choose the color of the digital dosed-captioned
text: _g'l?ile,t_l(l(l;L Red, (;reel& _llle, }'dllom, ]](lgClll(_ or Q'}'(III.
Bkgrd Opacity (Background Opacity) Lets you choose the
appearance of the screen behind the digital dosed-cal)tioned text.
Bkgrd Color (Background Color) Lets you choose the color
of the area of th{, scre(,n behind the (ligita] dosed-captioned text:
t_v'bil_?,t_[(l(;/a, Red, (;reez& Bh/e, }'Plloz!,, ]](lg_?lll(_ or Q'p(III.
"Monotype" is a trademark of Monotype Imaging, Inc. registered in the U.S. Patent and
Tra(lemark Office and may be registered in certain other jurisdictions.
"iType" is a tra(lemark of Monotype Imaging, Inc. and may be registered in certain other
jurisdictions.
"Floridian", "Plate Gothic", and "Screen" are trac/emarks of The Monotype Corporation and
may be registered in certain other jurisdictions.
'Ashley" is a trademark of The Monotype Corporation Registered in the U.S. Patent and
Trademark Office and may be registered in certain other jurisdictions.
Page 33

_bu have many choices available to customize the digital dosed-caption display. In order to
help you deckle \vhic]l view you like, try this:
1. In the Setup Menu for C/o,swd C?@tioJz,turn your CE'Di,_p/cO, to OJl. Make sure you're
tuned to a digital channel with dosed-captioning available.
2. In tile same menu, change any setting. Press CLEAR to exit.
3. Now your screen displays custom dosed-captioning. As you change size, font, opacity,
caption color, background opacity or background color, you will see tile change in tile
dosed-caption display by waiting for new text to scroll onto the screen. Not all digital
stations carry digital dosed captioning. If your digital station doesn't carry digital dosed
captioning, you'll see the station's defuult style for analog dosed captioning.
Not all digital stations carry digital dosed captioning. If your digital station doesn't carry
digital dosed captioning, you won't see these changes. _bu'lI see the station's defuult style for
analog dosed captioning.
FAVORITE CH
Go Back
--> Signal Source > Analog,,,
Fav. 1 70 HGTV
Fay. 2 26 WTH
Fay, 3 75 CNN
Fav. 4 36 MSNB
Fay. 5 28 NICK
Fay, 6 88 DISN
FAVORITE CH menu for analog
signals.
FAVORITE OH
@,
Go Back
--> Signal Source > Digital_,
Fay, 1 13-1 NBC
Fav. 2 8-3 ABC
Fay. 3 79-4 CBS
Fay, 4 5-2 FOX
Fav. 5 17-3 WTR
Fay, 6 28-1 IND
FAVORITE CH menu for digital
signals.
Favorite CH (Favorite Channe 0 Store up to six of your preforred
channels for each signal source into a favorite list. There is one list for tile
analog channels and a separate list for the digital channels.
To set your favorite channels, go to tile ]2(lz,oFi/(,C7/option under tile ,ST:'Tt1"
menu and press OK. Press the right arrow button to select A*_alr4_or D{@lgU
signal type (tile T\ / will switch to that signal). Press tile down arrow button
to select t%lz'. 7 and use the right and left arrow buttons to scroll through
the channel numbers to tind your fuvorite. If you haw entered channel
labels for a channel, it will appear to tile right.
As you watch T\,', press tile FA\; button on your remote to call up your
favorite channels in tile order that you entered them.
This foature can be very helpful for persons with limited tinge, dexterity or
young children, since it avok/s the need to remember the channel numbers
and press multiple number combinations.
La,_guage Lets you select your preferred language for tile menus,
which you should have set in tile Initial Setup. (Refer to page 11 for more
information about setup). You can change the language at any time by
using tile right ()r left arrow buttons to scroll through tile language (l;H21Lsh,
_Sjt)aJli.s'/_and FmJm/'_).
Page 34

16:9 Format
Stretch Format (stretched
verticaJJy to fiJJ the 4:3 screen)
/
gray or
black
bars
Format This _bature is designed for tile cliftbrent signal formats.
4 : 3 This is a full TV screen disp]ay which is for traditional
TV programs. This is also know as Standard.
16 : 9 This is for digital signals, DVD or video programs that
are in 16 : 9 screen size. This is also know as Widescreen.
There are gray or black bars on tile top and bottom on the
screen.
Stretch The image is stretched vertically to fl]] tile TV screen
(for digital content only).
7"I'5" S_ I'_C!_ ./'OIV'llgl/.
Parental Control Menu
The _ "V'
tNR£ 721LCO\TIrOL menu was explained in Chapter 2. Go to page
18 for more JnforlnatJon.
Page 35

@sin@ %% Sys ®®
TIME
Go Back
Sleep Timer 00:45
Time 08:25am
Calendar
Wake-up Timer
Wake-up Time 08:15am
Wake-up Ch 05
Recurrence Once,,,
Turn-Off Timer [_
Turn-Off Time 10:00pro
Recurrence Daily,,,
Time Menu
When entering tile 71.1It7 menu tile PASLVWORD screen appears first if parental
controls have been set. You must enter your password which is tile same one
you created in the PAREATHL C'O.\7NOL menu.
Sleep Timer Set the TV to turn off after a given time. Press tile fight
arrow button to add 15 minutes to tile clock (up to four hours).
Time To set tile time, enter it manual]> If it is 8:25, for example, you
must first press the number 0 on the remote, then number 8, then 2 and
then 5. Use the OK button to choose between AM and P.1L
Calendar Enables you to set the date easily.
Wake-Up Timer Set the T\" to turn on (at a specific time).
Notes: UtA_,ss _:?ll,e-( p 77_zdr is .s_,/1o Oth the" t_e_'l //_t'ee op/iotzs ( _:?U,_,-
(/._7Vine, W<'#lc,e-z@ C7.'*atTd Rg>cz#tvw_me) atwt7 7 az,ailgible.
tVT'_et_/be TV /z_t'*_sot_ !O,/be Wgl/_,e-(p 77met a*_d t_o tw*uo/e or /7>t_/
l}dtze/ bzd/otls clr<,!_r<>ss<>d/br 2 holTrs, Ibm TI' z_i// tz_t't7 il.s_>(l'c*_77
Wake-Up Time Set the tJlne you want the T\ / to turn itself on.
Wake-Up Ch (Wake-Up Channe 0 Select a specific channel the TV tunes
to when the tV'<U_,_>-ztp77",_>r is set.
Recurrence Select how often the tt;TU-e-(p 771_et" feature takes effect:
OJ_cg' or Dgti{y.
Turn-OJfTimer Lets you set the T\ / to turn itself ()ft.
Turn-OJfTime Set the time you want the TV to turn itself ()ft.
Recurrence Select how often the 771rl/-Q_f77tller feature takes effect:
OJme or lJgH{y.
Note: 2;'sTl_,,_sl/_mlil_zmis sml. I/o_m (if'Ibm lisTzmrm/almc!ilm_TzsClbO_,mclrm
az,ailable.
Page 36

MAiN MENU
Exit
I_}1 Sound
Picture
I_ Setup
Parental Control
(_ Time
--> '] Notepad
NOTEPAD
3
Go Back
Edit Note
Delete note
-> Display note < > []
At switch on []
On time 10:30am
On date []
Date --/--/--
Notepad Menu
Lets you enter inessagcs tJ-lat wJ]] _/Dl)(x/r Ol] yOL] W\, scr£!()l] _/t tJnl(2s yOLl s£!J(2ct.
From the l£_kX se](_ct Xo/dpgld and press ()K.
Edit note Fo]]oxv t]]c [)roce(]ur(, below to enter a Hiessagc into t]]c
not(._13a (]:
lJse the number buttons to spell out your new label.
For example, above the number button 7 is the label PQRS. The letter
P is typed by pressing the number 7 button one time; the letter Q is
typed by pressing the number 7 two times; the letter R is three times
and the letter S is four times.
2. The left arrow button is used to delete the unwanted text and the
right arrow button is for the blank space.
3. The up arrow button is pressed to toggle the entry mode between
uppercase or lowercase letters.
4. When completed, press the OK button to saxt, the note.
Delete note Lets you delete the whole message.
Display note Enables you to display ([]) or not to display (D) the
message on the screen.
At switch on If the box is checked, the stored message win be displayed
on the screen the next time the _,' is turned on.
On time Enables you to display the message at a time you specify, lJse the
OK button to choose between AM and 1",1I}
On date Allows you to display the message on a date you specify.
Date Lets you set the (late when the message will be displayed.
Page 37

Frequently Asked Questions (FAQs)
How do I tell an analog channel from a digital channel?
Press the' INFO button to display the chann_'! banner. Look at the' k'ft si(k, for the' chann('] nun_b_,r. Chann_']s that
hay{, a primary channc,I and a subc'hann{'] an' digital chann<,ls. R_,m_,mb(,r how{,v_,r that not all digital c'hannols hav{,
subchannels. Go to [)age 11 for more information on tile dift<Tence between analog and digital channels.
Why does the channel search take a long time?
\X."h{'nth{' TV s{,archc,s for digital ch:]nn(']s it is also b(' s{'arching for th{' sub-ch:]nn{']s of that digital ch:]nn{']. Although
Ellis can tak<' sore<' tim<', (dep<'nding on your cont('nt provid<,r) you only hay<, to do Ellis or]c<'.
Why does channel search find a lot of channels, but when ] try to tune to them there's nothing there?
Some channels are {'nablc'd bv tho cabl<' company that don't carry programming, such as vid{'o-on-dc'mand. Wb{'n
channels are unavailable, your TV's screen displays Ut_sah/e ,S'{_t_al.You probal>]y want to get rid of these so they no
longer appear in your channel list. Re,nox_, these in tile LLs-t& Lab<,/.s-menu. Go to page 28 for more infornmtion.
Why are there black bars on my screen and can I get rid of them?
Your T\/has a 4:3 screen so most (ligita] channels are displayed with gray or black bars at tile top and bottom of tile
screen because most are sent in a 16:9 format. It depends on how the station is formatting the video. Aspect ratios are
determined by the broadcaster and may change from one program to another, lJse the ZOOM-and ZOOM+ buttons
on tile remote to see tile dift<,rent formats available that may eliminate tile bars. Go to [)age 12 for more information.
No other options are possible aside/Tom those you see by cycling through this button. However, you can change tile
(lefault settings for both analog and (ligita] progran]ming through the menu. Go to page 32 for more details.
G'rglphics (;o_ztgli,_(,d _,itbi,_ thLspz_blicatio_z ar(, /br rPpr(,x(,,HgH4o,_ o*_/,F.
Page 38

Troubleshooting
Most prob]en_s you encounter with your TV can be corrected ])y consulting tile following Troubleshooting lisT.
TV Problems
TV won't turn on
,, :vJak_'sure Tilt' TV is plugged in.
- Check tile wall receptacle (or extension cord) To make sure it is "live" l,y plugging in something else.
• Something might be wrong with your remote conTroL Press ThePOWER buTTon on The front of The TV. If The TV
Turns on, check Tile remoTu conTroL
,, Tile Front Panel Lock may be oil. Go to [)age 24 for more information.
Buttons don't work
- The, Front Pan_q Lock may be ot_. Go To page' 24 for mort' information.
TV turns off unexpectedly
', 3'1_'_I) 7Ynm__might haw, bot,n acTivaTed. Go To page 33 for insTrucTions.
• 7_*w Q/}"-Tgme*"might hav_, been acTivaTed. Go To[)age 33 for insTrucTions.
® Kidl'glxx might have been set. Go To page 23 for insTrucTions.
- Electronic protection circuit may havu been activated because of a power surge. If This happens ffuquent]y, Tile
voltage in your house may be abnormally high or low.
TV turns on unexpectedly
', t_211_'c-_p71inlm'might have been set. Go To page 33 for instructions.
Blank screen
• You may be on an inactive channel. Try another channel.
• Make sure devices connected ToTile TV are Turned on.
• If you've connecTud another device (such as a camcorder or D\"I) player) make sure you select tile Vide() Input
Channel That is used for That device. Use Tile INPUT buTTon ToToggle Through The avatab]e Video Input Channels.
Digital tuning delayed
', You may <,xperk,nco a c/clay of s_'v<'ra] seconds bc'for_' digital pictures appoar, both wht,n you first Turn on Tilt'
digital signals and when you change channels. This is normal.
No sound, picture okay
• Maybe th(' sound is muted. Try pressing th(' volume up buTTon to restore sound.
• If using component jacks (Y Pb Pr), remember To also connect The (levice's let} and right au(lio output jacks To The
TV's A1ETI)IOinput jacks.
Can't select certain channel
- Channe] may be blocked or not approve'el Through PAI4!_ATAL C<).\7140L5.
• If using a VCR, check Tomake sure Tile TVi\.'CR buTTon on Tile \T_R is in Tile correct mode (press TileTVi\.'CR
button on your VCR).
Noisy stereo reception (analog channels only)
• May be a weak sTaTion. Change tile 3'ozl_ld 7])'p_to =lloJlo. Go to page 25 for moru insTrucTions.
Chapter 4
Page 39

No picture, no sound but TV is on
- Maybe tile S_*zal 7]_I)_"is set wrong. Go to [)age 11 for more instructions.
• You *nay hav_' the wrong video input channel selected. Use tile ANTENNA button to toggle through tile available
video input channels.
Sound okay, picture poor (analog channeJs only)
• Ch_'ck ant('nna connoctions. MaM, suro all of thc, cabk,s are firmly conn_'ctc'd to thc' jacks.
• Try adjusting sharpness to improve weak signals. Go to [)age 27 for inoru instructions.
BJackbox appears on the screen
• Closed caption might b(' on. Check (_7()s_,d(k#)/io_ in the' ,ST:'TII"m_'nu. Go to page 29 for n_or(' instructions.
The Remote Control Doesn't Work
,, Son_ething inight be between tile remote and tile remote sc,nsor on tile device. Make surc' there is a clear path and
point directly at tile TV.
- Maybe batteries in the remote are weak, dead or installed incorrectly. Put new batteries in the remote.
Problems with Parental Controls
Can't seJect a certain channel
,, Tile channel may be Mocked or not approved through I'ARIJ_THL (_).\7"ROL _ST_TTL\C;A'.
The rating limits don't work
® You must activate, thc' sottings. Go to pagc' 18 for instructions.
I don't remember my password and I want to unlock the TV
® If you forg_'t your password, you can rc's_'t it. MaM, surc' the' TV is ofL Sin_ultan_,ous]y prc,ss and hold V()L- on
the T\."s front panel and CLEAR on tile remote for approximately 5 seconds. Enter a new passwor(I next time you
access the I'AI_£1\7_AL (,r().\7]_OL inenu.
The Parental Controls won't let me watch a program even though it's not rated as violent
• Maybe' the' Inovk' was giv_'n an NR (Not Ratc'd) status. Ch_'ck to s(,o if thc' !Lx'urn/)/I'l_1_.s option is Lockc'(I. R_,fbr to
[)age 22 for instructions.
Connection Problems with a DVD Player. Set-top Box etc.
• If the ck'vice you're connected to has "progressive, sc_n' _1_c/you _ren't receiving a picture using a component
(Y Pb Pr) connection, you need to change the setting from progressive to interlace. The procedure for changing
this varies. Look for a button on tile fiont of the device (it might be called resolution or display), or see if there
is a switch on tile back (it inight be labeled "intiprog" or solnething silnilar), or tile iteln inight be in tile menu
system. Consult the user"s guide for instructions.
What Else Can I Do_
• If you'v(' b('('n through th(' Troub]('shooting soction and nothing has flx('d your problc'ln, try rcqgooting your T\/.
Note that after a reboot you may need to run your TV through tile setup process again. To do a reboot, unplug
the power cor(I fron_ the wall outlet, power strip, etc. Keep your TV unplugged for about 5 ininutes. Then plug
the TV back in, turn on tile TV, and see if tile problen_ is fixed. If tile problen_ relnains, then please visit www.
rca.com_te]evision for update(I FAQs or contact RCA Custolner Support at the support number provided in your
\\."urranty un(ler How To Get Service.
How Do I Replace My Remote
• If you need to replace your relnote, ca]] 1-800-338-0376. A shipping and handling rue will 10echarged upon
ordering, and the appropriate sales tax. Have your Visa, MasturCard or I)iscover Card read> Your relnote part
number is R130C1.
Page 40

USA V-Chip Rating System
TV-MA (Mature Audience Only) Specifically ok,signed to bc vi(,wcd 1U adults and may
TV-14 (Patents Strongly Cautioned) Contains some material that many parents would
TV-PG (Parental Guidance Suggested) Contains material that parents may find
TV-6: (GeneralAudience) Most parents would find this program suitable for all ages. It
TV-Y7 (Directed to Chiklren 7 years and older) Designed for children ages 7
be unsuitable for children under 17. It contains one or more of the following
content themes: crude indecent language (L), explicit sexual activity (S) or
graphic violence (V).
find unsuitable for children under 14, Parents are strongly urged to exercise
greater care in monitoring this progran_ and are cautioned against letting children
under tile age of 14 watch unattended. This program contains one or more of
the following content themes: intensely suggestive dialogue (1)), strong coarse
language (L), intense sexual situations (S), or intense violence (V).
unsuitable for younger children. Many parents may want to watch it with their
younger children. Tile program contains one or more of the following content
themes: some suggestive dialogue (1)), infrequent coarse language (L), some
sexual situations (S), or mo(lerate violence (V).
contains little or no sexual dialogue (1)) or situations (S), no strong language (L),
and little or no violence (V).
and above. It may be more appropriate for children who have acquired the
developmental skills needed to distinguish between make-believe and reality.
Themes and elements in this program may include mild fimtasy violence (FV) or
comedic violence, or may tiighten children under tile age of 7.
TV-Y (All Children) Themes and elelnents in this program are designed for a young
audience, including children from ages 2-6. It is not expected to tiighten younger
chil(Iren.
Canadian English V-Chip Rating System
18+ (Adults) Programming intended for adults 18 and older. It Inav contain elements
14+ (¥iewers 14 and over) Progranmfing contains themes or content which may
PG (Parental Guidance) Programming intended for a general audience but which
of violence, language, and sexual content which could make i[ unsuitable for
viewers under 18. Violence Guidelines: May contain violence integral to the
development of the plot, character or theme, intended for adult audiences. Other
Content Guidelines: May contain graphic language and explicit portrayals of
nudity and/or sex.
not be suitable for viewers under the age of 14. Parents are strongly cautioned to
exercise discretion in permitting viewing by pre-teens and early teens. Violence
Guidelines: May contain intense scenes of violence. Could deal with mature
themes and societal issues in a realistic fashion. Other Content Guidelines: May
contain scenes of nudity and/or sexual activit> There coukl be fiequent use of
profanit>
may not be suitable for younger children (under the age of 8). Parents may
consider some content inappropriate for unsupervised viewing by children aged
8-13. Violence Guidelines: Depictions of conflict and/or aggression will be limited
and moderate; may include physical, fantas B or supernatural violence. Other
Content Guidelines: May contain infrequent mild profimity, or mild]y suggestix_.
language. Could also contain brief scenes of nudit>
Chapter 4
Page 41

Canadian English V-Chip Rating System (cont .ued)
G
(7,8+
(GeneralAudience) Programming considered acc(,ptable for all age groups.
Whik' not designed specifically for children, it is und('rstood younger vi(,w(,rs nmy
be part of the audience. Violence Guidelines: Will contain very little violence,
either physical or yell)a] or elnotiona]. Will be sensitive to themes whicll could
tiighten a younger child, will not depict realistic scenes of violence which
ininilnize or gloss ovc.r tile eft_,cts of violent acts. ()tiler Content Guidelines: There
may be some inoftbnsive slang, no profanity and no nu(lity.
(Children 8 and Older) Programming generally considered acceptable for
children 8 years and ov_,r to watch on their own. Violence Guidelines: Violence
will not be portrayed as the pretbrred, acceptable, or only way to resolve conflict
or encourage children to ilnitate dangerous acts which they may see on television.
Any realistic depictions of violence will be infrequent, discreet, of low intensity
and will show the consequences of the acts. Other Content Guidelines: There wil]
be no profanit 5 nu(lity or sexual content.
(Children) Programming intended for children under age 8. Violence Guidelines:
Careful attention is paid to tl-te,nes whicll could threaten children's sense of
security and well being. There will be no realistic scenes of violence. Depictions
of aggressive behavior will be infrequent and limited to portrayals that are clearly
imaginary, Colnedic or unrealistic in nature. Other (](intent Guidelines: There will
be no oftbnsix_, language, nu(lity or sexual content.
Canadian French V-Chip Rating System
18+
13+
8+
G
(Adults) Programlning is tbr adults only. This program contains sustained
violence or extremely violent scenes. 16+ (Viewers 16 and over) Programming
is not suitab]e for those under age 16. This program contains tiequent scenes of
violence or intensely violent scenes.
(Viewers 13 a,ld over) Progralnming may not be suitable for children under
the age of 13. This program either contains several violent scenes or one or more
scenes that are violent enough to aft'<'ct theln. Viewing in the COlnpany of an
aclult is therefore strongly recolnlnended for children under the age of 13.
(Viewers 8 and over) Not recommended for young children. This program
is suitab]e for most audiences, but it contains mild or occasional violence that
could upset young children. Viewing in the company of an adult is fl-ten,fore
recommended for young children (under the age of 8) who do not distinguish
between reality and imagination.
(GeneralAudience) This program is suitable for audiences of all ages. It
contains no violence, or any violence that it does contain is either ininilnal or is
presented in a hunlorous manner, as a caricatur<,, or in an uni<,alistic way.
Page 42

Limited Warranty
What your warranty covers:
Defects in materials or workmanship.
For how long after your purchase:
- 90 claysfrom chin' of purchaseforlaborcharges.At our optionwe will_,ithcrpay an
Authorized P,CA Service Center the labor to repair your television or replace your television
with a new or lefurbished unit.
- One year flom date of purchase for parts. At our option we will either supply new or
refurbished [)arts to an Authorized RCA Service Center for them to repair your television or
replace your television with a new or refurl)ishe(I unit. At}er 90 days, labor charges will be at
your expense.
• One year from date of purchase for tile picture tube. At our option we will either stlpply
new or refurbished [)arts to an Authorized RCA Service (]enter for them to repair your
television or replace your television with a new or refurbished unit. Atter 90 clays, labor
charges will be at your expense.
How you get service:
® (]:ill 1-800-33(>1900 or visit www.rca.com. Plcaso have' your unit's c/ate' of purchase' and
mo(leliserial number read> Tile mo(lel,serial number information can be found on tile back
of your unit.
,, Proof of purchase in the form of a bill of sale or receipted invoice which is evidence that
the product is within tile warranty period must be presented to obtain warranty service. For
rental firms, proof of first rental is also require(I.
What your warranty does not cover:
• Customer instruction. (Your Own(,r's bl:mua] dcscrib(,s how to install, adjust, :rod op('ratc
your television. Any additional information should be obtained tiom your dealer).
• Installation and re]ate(I ac/jusm_ents.
- Signal reception problems not caused by your television.
,, Damage tiom misuse or neglect.
• Batteries.
,_ Custolner replacelnent fuses.
• Damage from images burnt onto tile screen.
• Special, incidental or consequential damages.
• A television that has been modified or incorporated into ()tiler products or is used for
institutional or ()tiler commercial purposes.
,_ A television purchased or serviced outside the U.S.A.
® Acts of nature, such as but not limited to lightning damage.
Chapter 4
Page 43

Product registration:
- P]ease comp]ew and mail the P_ocluct Regism_tion Carol packccl wifll your T\,'. It wi]] make it
(2_l/SJ@l" [0 C()_][_I/('[ yOU S]]O/1]d ][ (2V(21 13(2 F](2C@SS_I//'y. The /'('[/l/_] ()_" []](2 ('_l//d IS F]O[ RxiI/1]/'(2d for
\V_/]71"_I_][V COV@]'_Ig@.
Limitation of Warranty:
" THE \X.'24Rh'ANTY STATEI) AB(-)V'E IS THE ONLY \X.'24RRANTY APPLI(2AI_,LE TO THIS
PROI)IJCT. NO VEP, BAL OR \VRI_EN INFORMATION GIVEN BY _E TE(2HNOL(-)GY, INC.,
ITS AGENTS ()It EMPL(-)YEES SHALL CREATE A GI _&RANTY ()It IN ANY \X.'AYINCREASE ()11
MO1)IFY THE SCOPE OF THIS \X.'AP,RANTS2
REPAIR OR REPLACEMENT AS PROVII)EI) UNDER THIS \X.'2_XRRANTYIS THE EXCLUSIVE
REMEI)Y OF THE CONSIJMER. TTE TECHNOLOGS2 INC. SHALL NOT BE LIABLE FOR
SPECIAL, INCIDENTAL OR CONSEQIJENTIAL I)AMAGES RESIJLTING FROM THE USE
OF THIS PRODIJCT OR ARISING OUT OF ANY BREACH OF ANY EXPRESS OR IMPLIED
\X,'24RRANTY ON THIS PRO1)IJCT. THIS I)ISCLAIMER OF 9;,'24RRANTIES AND LIMITEI)
\X.'24RRANTY ARE GO\/ERNE1) BY THE LAWS OF THE STATE OF INI)IANA. EXCEPT
TO THE EXTENT PROHIBITEI) BY APPLICABLE LA\V, ANY IMPLIED \X.'24RRANTY OF
MERCHANTABILITY OR FITNESS FOR A PARTICIJLAR PURPOSE ON THIS PROI)IJCT IS
LIMITE1) TO THE APPLICABLE \X.'24RRANTY AND \X.'24RRANTY PERIOI) SET FORTH ABOVE.
How state law reJates to this warranty:
_, Soll_{4 states do not a]]ow the ('xclusior] nor ]Jll]J[:/[iOr] oF incidental or cor]sctqu(,r]tia]
([amages, or Iinlitations on how long an iml)lie(I x,va/'I{tll[}: ]:/SIS, SO []1{.?al)ov() limitations or
cxdusions may not apply to you.
- This warranty gixes you• specific legal riohts,., and vou• also mav• ]]av(_ ot]]e!r rights that vary•
hom state to state.
If you purchased your unit outside the United States or seek warranty
coverage outside the United States:
• This x,V:/IF{tT][}: dO(2S F]O[ :/[)[)]}:. C()r][:/C[ VOL1F (1(.}{t]{21" J"()F x,V:/IT_tl][y ]lTf{)l'lnat]ol3.
Service calls which do not involve defective materials or workmanship are not covered
by this warranty. Costs of such service calls are the sole responsibility of the purchaser.
4_
Page 44

Care and Cleaning
CAUTION: Turn OFF your T\" before c]eaning.
/<)ucan c]ean the T\. as required, using a soft lint-free c]<)th. Be sure to occasiona]]y, dust the
ventilation slots in the cabinet to help assure adequate ventilation.
The TV's screen may be cleaned with a soft, lint-free cloth as well. Take care not to
scratch or mar the screen. If necessary, you may use a cloth dalnpened with warln
water. Never use strong cleaning agents, such as aininonia-based cleaners, or abrasive
powder. These types of cleaners will dainage the TV.
\\/]-zile c]eaning do not spray liquid directly <)n tile screen, or a]Iow liquid t<) run down tile
screen and inside the TV. A]so, never place drinks or vases with wat<_r <)n top <)f the T\( This
c()tllcl increase the risk <)f fire <Jr shock hazard <)1damage t<) the T\£
Caution: Using video games or any external accessory with fixed ilnages for extended periods
of time can cause them to be perlnanently imprinted on tile picture tube (or projection T\,'
picture tubes). ALSO, some network,prograln ]ogos, phone nulnbers, etc. inay cause sJlnJ]ar
dalnage. This dalnage is not covered by your warranty.
FCCInformation
This equipn_ent has been tested anti found to COlnp]y with the ]ilnits for a Class B digital
device, pursuant to Part 15 of the FCC Rules. These lilnits are designed to provide reasonable
protection against harli_fu] interf<,rence in a residential installation. This equipn_ent generates,
uses, and can radiate radio frequency energy and, if not installed and used in accordance with
tile instructions, inav cause harmful inter_Drence to radio cOlnlnunications. However, there
is no guarantee that interf<,rence will not occur in a particular installation. If this equiplnent
does cause harmful interf_,rence to radio o1 television reception, which can be determined by
turning the e<luipment off ant/ on, tile user is encouraged to try to correct tile interf_,rcnce by
one or inore of tile fol]owing ineasures:
1. Reorient or re]ocate the receiving antenna.
2. Increase tile separation between tile e<luiplnent and receiver.
3. Connect the equipment into an outlet on a circuit different froln that to which the
receiver is connected.
4. Consult the dealer or an experienced radio,T\' technician for he]i).
This Class B digita] apparatus comp]ies with ( m _< m I( ES- ) )3
Chapter 4
Page 45

This page intentionally left blank.
Page 46

This page intentionally left blank.
Page 47

Thispageintentionallyleftblank,
Page 48

As an ENERGY STAR" Partner, TTE Technology, Inc. has determined that this
product meets the ENERGY STAR guidelines for energy ettSciency.
ENERGY STAR and The ENERGY STAR mark are registered U.S. marks.
Visit the RCA website at www.rca.com/television
Please do not send any products to the Indianapolis address listed in this manual or on the carton. This will
only add delays in service for your product.
TTE Technology, Inc.
101West 103rd Street
Indianapolis, IN46290
©2007 TTE Technology, Inc.
RCA and associated marks are trademarks of THOMSON S.A. used under license to TTE Corporation.
TOCOM 16721630
 Loading...