

RBH Sound A-615, A-615L, A-815, TK-615, MC-615 Installation And Instruction Manual
...
IN-CEILING SPEAKERS
I n s t a l l a t i o n a n d I n s t r u c t i o n M a n u a l


Introduction
Break In Period
Congratulations on your purchase of RBH Sound in-ceiling speakers! Your speakers are
the result of many years of research and development dedicated to producing high
quality products for home audio and audio/video systems.
This manual is designed to give you, the installer or owner, basic information as to the
speaker’s installation and operation. We recommend you thoroughly read through the
material contained in this manual before installing your speakers. This will ensure that
you have an understanding of how to setup your speakers for optimum performance
and allow for years of listening enjoyment.
Allow several hours of listening time to adequately break in the speakers. As the
speakers break-in, the driver suspension will loosen. The result of break-in will be an
increase in low frequency response, improved definition, clarity and detail.
Features
All RBH Sound in-ceiling speakers feature a swing out dog leg mounting system
with pre-started screws for fast and easy installation. Most RBH Sound in-ceiling
speakers feature directional swivel tweeters to direct the sound to the main
listening area. All RBH Sound in-ceiling speakers feature polyswitch protection
circuitry designed to protect the tweeter from being over driven. This circuit will
automatically reset itself once the volume is turned down or the problem causing
the circuit to activate is removed.
Steep acoustic slope crossovers are used to integrate the drivers. The use of steep
crossover slopes allows high power handling, minimized driver interaction anomalies,
and maximizes the clarity with which each driver is able to produce its respective
frequency band.
1
Painting the Speakers
A paint shield is included with your speakers. This shield can be used to protect the
speaker when painting the speaker’s rim (frame). If you plan to paint your speakers,
we recommend it be done prior to installation. If you decide to paint your speakers
sometime in the future, it is best to remove them from the ceiling or wall. When
painting speakers, the paint shield provided in the packaging must be installed in
place of the grille. The grille can also be painted. Painting the speaker’s grille should
be done with a paint sprayer set to fine. Remove the grille from the speaker, peel off
the grille fabric on the back of the grilles and set aside. Place the grilles on a flat
surface. Do not use a brush or roller on the grilles as this will clog the holes, greatly
reducing the sound quality of the speakers. Do not paint the grilles while attached to
the speakers. Be sure to remove the paint shields from the speakers and replace the
fabric to the back of the grilles before reinstalling them and using the speakers.
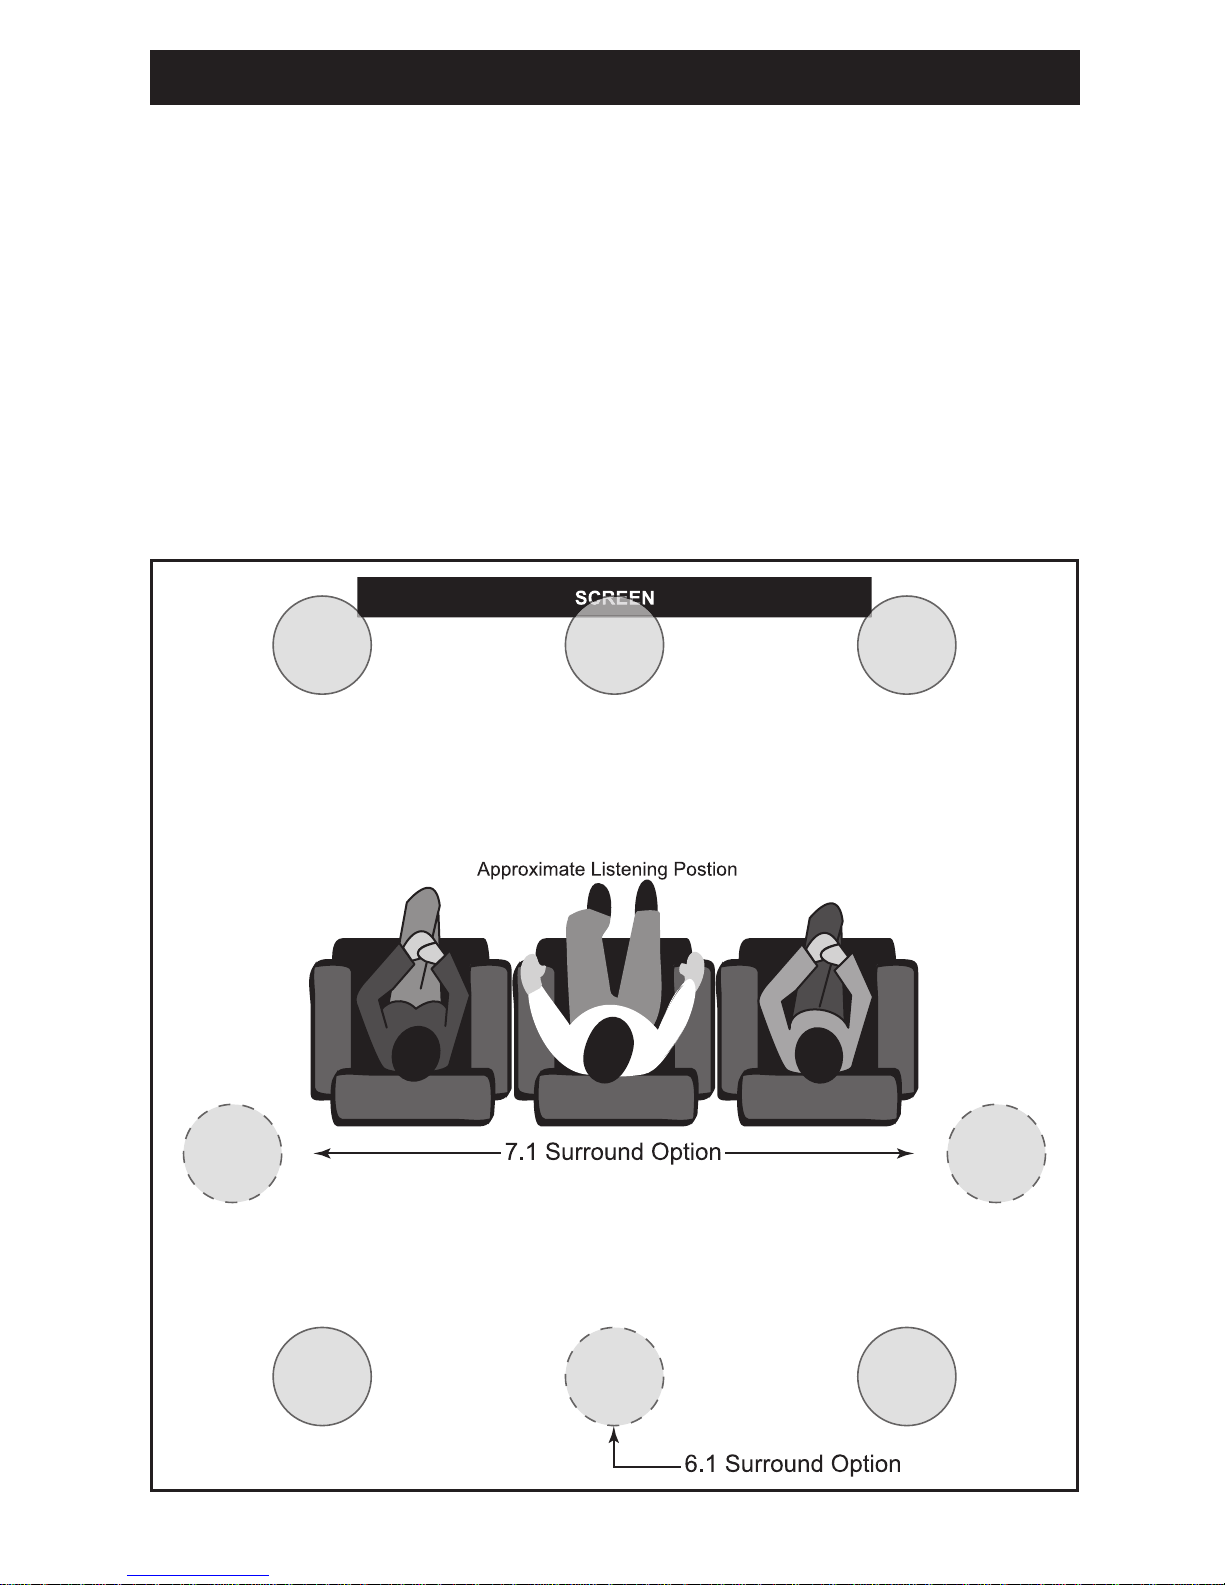
Room Setup Suggestions
With nearly endless placement options, careful consideration for placement of the
in-ceiling speakers needs to be considered, as installation requires cutting a hole
in your wall or ceiling! When using speakers in home theater applications follow the
guidelines illustrated below.
Swivel Tweeter Placement
The swivel tweeter allows sound to be directed toward or away from the listening
area depending on the application. A tweeter aimed toward your listening position
improves imaging and detail. When using a speaker with a swivel tweeter as front/
main home theater speakers or as stereo speakers in a distributed audio system, aim
the tweeter toward the main listening position. For rear/surround speakers, aim the
tweeter toward the nearest reflecting surface (an adjacent wall or ceiling) for a more
diffuse sound field (for more direct sound, aim the tweeter at your listening position).
2

RBH Sound in-ceiling speakers are designed on an infinite baffle configuration. This
means a back box is not required for the speaker to perform properly. RBH Sound
in-ceiling speakers have also been designed to make installation as easy as possible.
Upon opening the speaker boxes you will notice that the screws are pre-started into
the dog legs. The basic idea behind in-ceiling speakers is the speaker is held in place
by sandwiching the speaker and the drywall. A frame around the speaker conceals the
cutout in the drywall and presses against the front of the ceiling. Behind the ceiling,
the speaker has a set of dog legs which cinch the speaker to the drywall.
CAUTION: Be certain there are no electrical wires, water pipes, heating ducts or any
other obstructions in the planned area of installation before starting to drill or cut
into the ceiling or wall. If there is an electrical outlet nearby, turn off the circuit
breaker to avoid possible injury.
Installing WITH a New Construction Bracket:
If using a new construction bracket for the size of the speaker being installed,
cutting the drywall should not be necessary. Continue with “Connecting the Speaker”
instructions on the next page.
Installing WITHOUT a New Construction Bracket:
Use the cutout template supplied with the speaker for
guidance in cutting the drywall, following “Using the
Template” instructions below.
Using the Template:
1. These speakers are designed to be mounted between
the framing members. Use a stud finder to locate the
positions of joists and rafters. Make sure you have a
2-inch clearance from the outside of the cutout hole
from joists and rafters.
2. Drill a 1/4-inch hole in the center of the area you plan
to mount the speaker. Cut or bend a piece of wire (a
coat hanger works well) to a 90-degree angle. Insert
the wire into the pilot hole and fish around to make
sure there aren’t any obstructions which will interfere
with the installation.
NOTE: If you must choose another location, the pilot
hole can be easily patched.
3. Once a suitable location is found, use masking tape to
temporarily place the supplied cutout template on the
ceiling or wall, centered over the pilot hole. Draw a
circle around the inside edge of the template.
4. Carefully cut the hole with the appropriate cutting tool to remove the material
inside the circle inscribed by the template.
Speaker Installation
3
Speaker Installation (continued)
4
NOTE: The frame will overlap the cutting edge by about a 1/2-inch which will
mask any minor cutting inaccuracies.
5. Confirm the speaker easily fits into the hole, without any gaps.
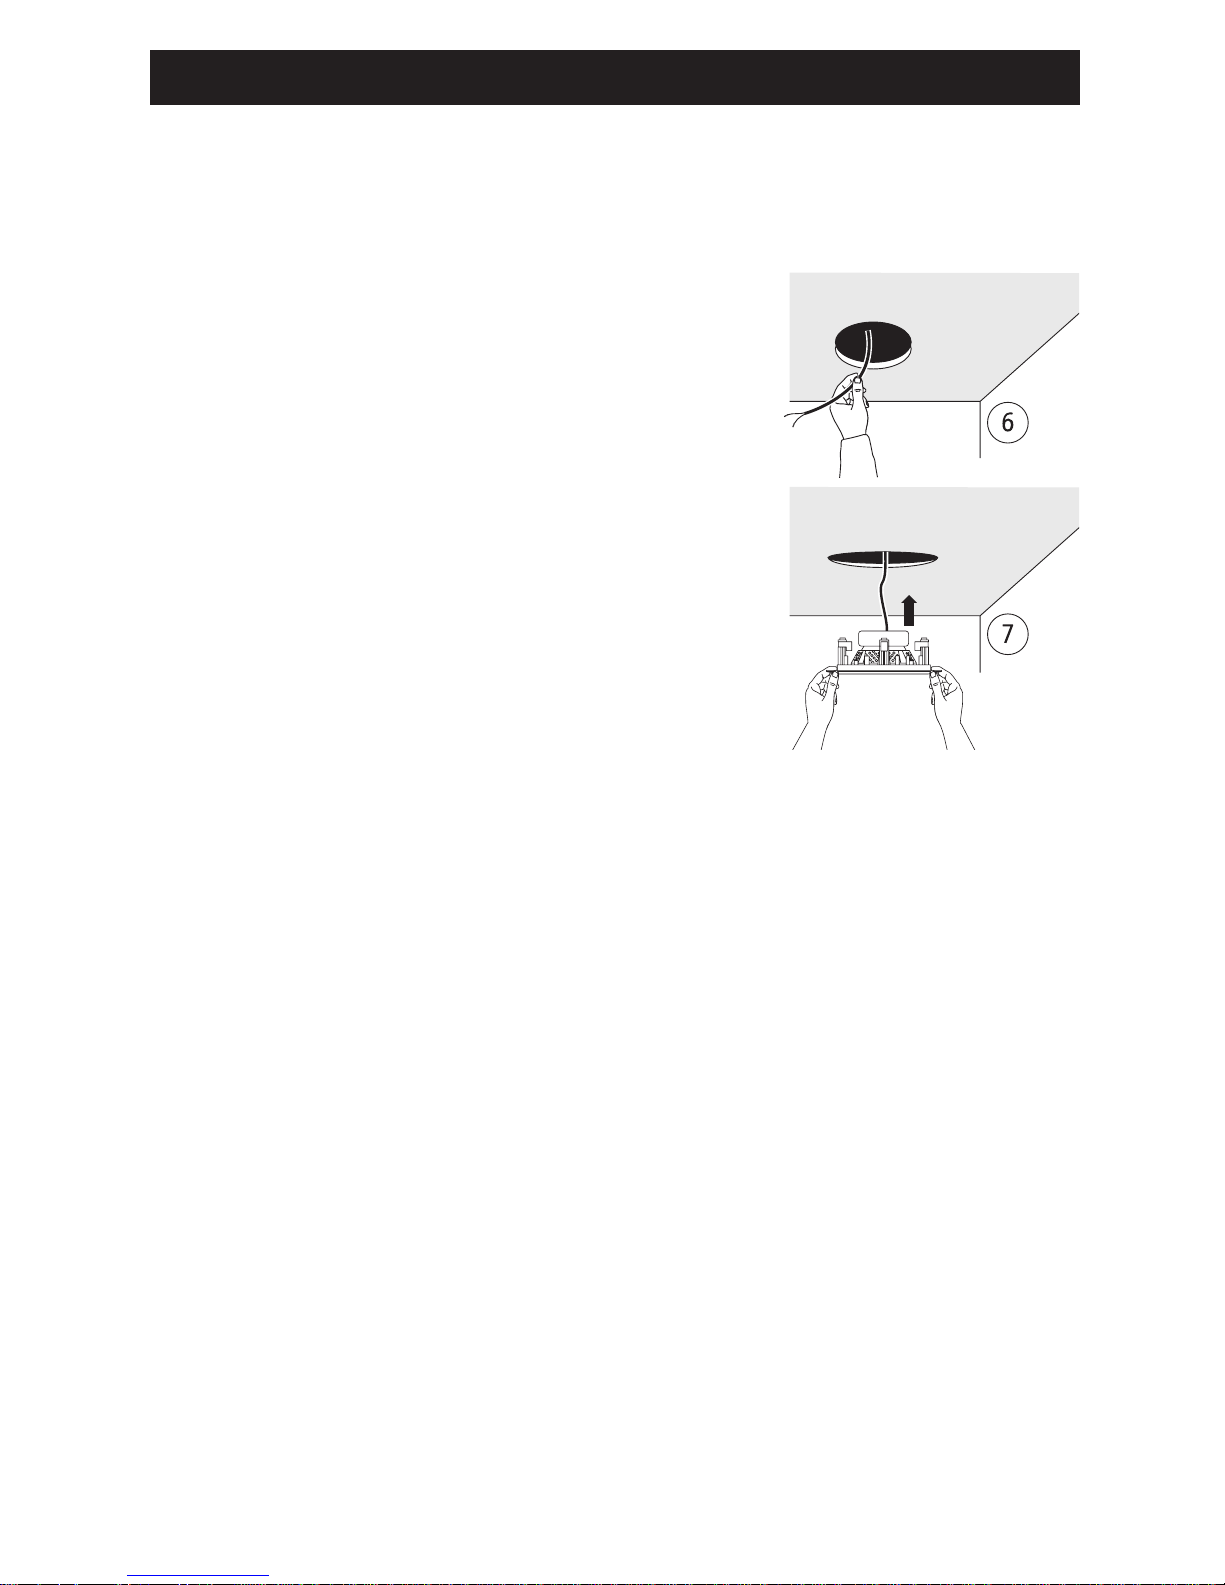
Connecting the Speaker:
6. Pull the speaker wire out of the hole and connect the
speaker. Split the two conductors of the speaker wire
apart about 3-inches so they form a “Y”. Using wire
strippers, remove about 1/2-inch of insulation from
each of the two conductors of the wire to expose the
bare metal and twist each of the conductors into a
single unfrayed strand.
The speaker terminals will accommodate any speaker
wire up to 14-gauge. Select an appropriate wire gauge
from the following chart:
18 gauge for up to 50-feet
16 gauge for up to 100-feet
14 gauge for up to 200-feet
NOTE: When connecting a speaker it is very important
to retain the correct polarity (improper polarity will
cause reduced bass performance and unnatural imaging
effects). To do this, be sure the wire attached to the
positive terminal on the speaker (marked [+] or colored red) connects to the
positive terminal on the amplifier. Similarly, the negative terminal (marked [-] or
colored black) must connect to the negative terminal on the amplifier.
Finishing the Installation
7. Slide the speaker into the pre-cut hole in drywall or new construction bracket
keeping the speaker cable above and out of the way to prevent pinching it.
8. Tighten the screws. The dog legs will automatically swing out and tighten
(pinch) themselves against the new construction bracket or the drywall with
the turning of the screws and will hold the speaker solidly in place. Don’t over
tighten screws, if you over-tighten the screws the speaker frame may bend which
will make it difficult to properly install the grille.
NOTE: If using a drill/driver, set the clutch to a low setting to prevent over
tightening and possible damage to the frame or dog legs. If using hand tools,
tighten just until firm.
9. If the speaker has any tone controls or has a pivoting tweeter, leave the grille off
until you can listen to the speaker. Once the speaker is adjusted, install the grille.
NOTE: Handle the grille carefully, as they pressure-fit into the installed speaker.
If the grille does not install easily, try loosening the mounting screws before
resorting to forcing the grille onto the speaker.
 Loading...