

rba RBA8910-500 Series Installation, Operation And Maintenance Instructions

Australia 1300 788 778 | www.rba.com.au New Zealand 0800 722 111 | www.rbagroup.co.nz
1/8
INSTALLATION, OPERATION AND MAINTENANCE INSTRUCTIONS
RBA8910-500 Series Sensor & Push Button Operated Outdoor Bottle Filler
Date
17/06/14
Model
Outdoor Bottle Filler
Pedestal Mounted
Supercedes all previous
22005
22108
22007
Lic. #W1186
1186
022317

Australia 1300 788 778 | www.rba.com.au New Zealand 0800 722 111 | www.rbagroup.co.nz
2/8
INSTALLATION, OPERATION AND MAINTENANCE INSTRUCTIONS
Note to Installer
Rough-in and Dimensional Drawing
• Please leave this documentation with the owner of the fixture when finished.
• Please read this entire booklet before beginning the installation.
• Check your installation for compliance with plumbing, electrical and other applicable codes.
• Unit to be installed in accordnace with AS3500.1 & AS 3500.2 and other local codes.
GENERAL NOTES
1. All dimensions are in inches [mm].
2. Dimensions shown are for recommended adult height. Adjust vertical dimensions as necessary to comply with federal, state, & local codes.
3. Water lines from chiller to foundation should be covered with sponge foam rubber or ice water type insulation of adequate thickness.
OUTDOOR PEDESTAL MOUNTED BOTTLE FILLER
* Meets US ADA requirements
52
1
4
"
[1327]
31
3
4
"
[806]
2
3
4
"
[71]
ACCESS
PANEL
15
5
8
"
[395]
36
3
4
"
[934]
11
3
8
"
[290]
A
VIEW A-A
BASE FLANGE
7" [178]
TYP
3
1
2
" [89]
TYP
1
1
2
" [38]
MIN
GRAVEL DRAIN
WELL
A. (4) 5/8" MOUNTING HOLES IN BASE
FLANGE, MOUNTING HARDWARE BY
B. 1-1/2" NOMINAL DRAIN PIPE, OPEN AT
BOTH ENDS, BY OTHERS
C. 7/8" OD FLEXIBLE DRAIN HOSE
D. 1/2" BSP SUPPLY INLET FLEXIBLE
12"
[Ø305]
D CONNECTION
C
B
OTHERS
MOUNTING DETAIL
2
3
8
"
[60]
D
CB
Australia 1300 788 778 | www.rba.com.au New Zealand 0800 722 111 | www.rbagroup.co.nz
3/8
INSTALLATION, OPERATION AND MAINTENANCE INSTRUCTIONS
Prior to Installation
IMPORTANT
1. Read all installation instructions carefully, before proceeding.
2. Carefully remove fixture from packaging, preventing scratching or damage.
3. Unit is provided with six AA alkaline batteries.
4. Provide mounting surface, sufficient to support the fixture and loads on the fixture.
5. Provide rough-ins as shown on the roughing-in and dimensional drawing, including water supply, drain pipe and gravel drain well. (See page 2 for
rough-in details)
6. Completely flush water supply lines of all foreign debris, before connecting to the fixture.
Installation Instructions - Outdoor Bottle Filler
INSTALLATION (SEE DRAINAGE & MOUNTNG ROUGHING-IN PAGE 2)
1. Locate the unit over rough-ins on mounting pad, mark mounting holes in base flange.
2. Tilt the unit down on its side, next to the mounting location. Install ½“ mounting anchors (by others). Optional -IAP (in-ground anchor plate) which is
cast into the concrete, is available.
3. Feed the 7/8” OD flexible drain tube into the open ended drain tube. Connect the ½” male BSP fitting to a potable water supply. Then tilt the unit into
place, making sure that the tubing is not pinched or kinked. Secure the base flange to the mounting pad.
4. Connect the battery pack to matching battery wire terminals. When connected the unit is active.
5. Test for leaks and proper operation, and then install the access panel.
Start Up Procedure
Air within the bottle filler system or the structure supply piping will cause an irregular spout outlet stream until purged out by incoming water. Press and hold
pushbutton until steady water stream is achieved.
OPERATION INSTRUCTIONS
Hand operation: Hold container to be filled just below the filler tube in the center of the unit, then push pushbutton. When the container is almost filled,
release the pushbutton.
Sensor Operation: Hold container to be filled just below the sensor in the center of the filler spout and then move the container upward and water flow will
start automatically. When the container is almost filled, lower the container below the sensor until the water stops flowing. (see label on the bottle filler)
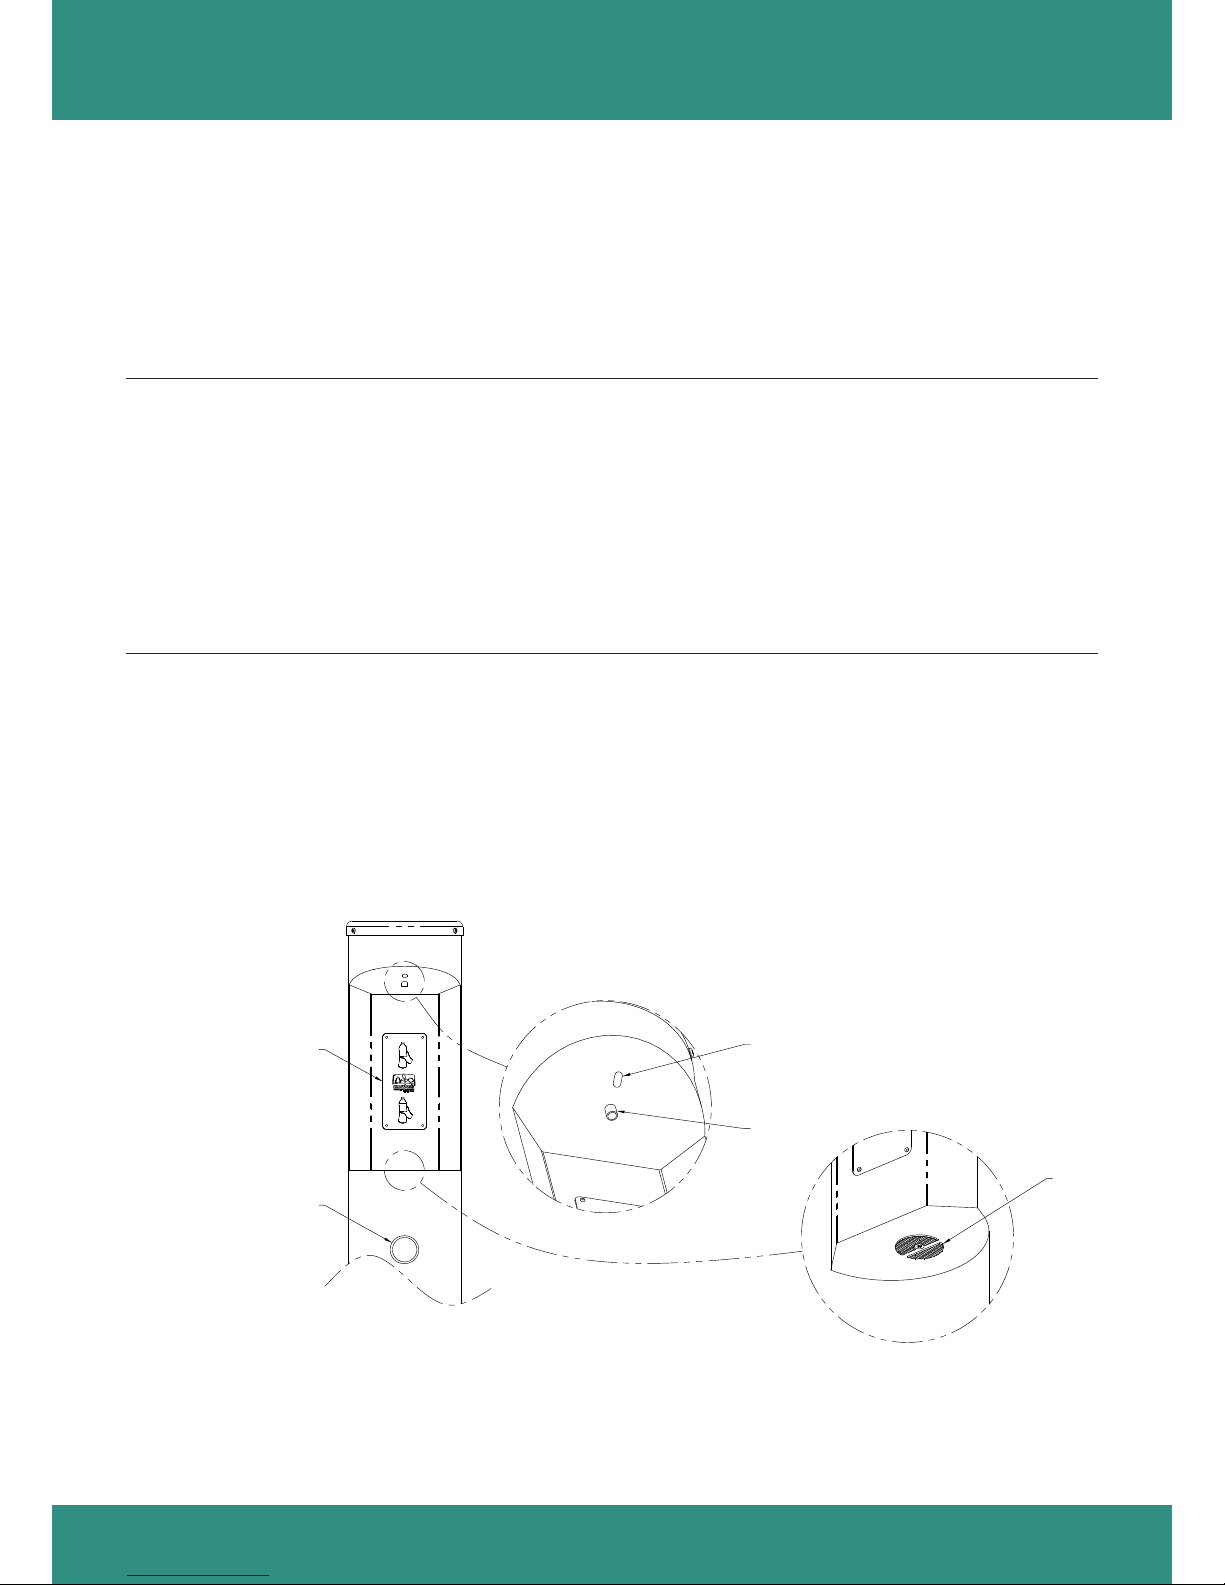
Fill Spout
Sensor
Aluminum Name Plate
Drain
Pushbutton
 Loading...