

Razor Scream Machine Jr Owner's Manual

Owner’s Manual
TM
TM
TM
This owner’s manual is applicable to the original Scream
Machine with pneumatic front tire and the Scream
Machince Jr with the airless front tire.
Scream Machine Jr.
Scream Machine

2
NOTE: This manual contains many “Warnings” and “Cautions”
concerning the consequences of failing to maintain or inspect your
bicycle. Because any incident can result in serious injury or even death,
we do not repeat the warning of possible serious injury or death each
time such a warning is mentioned.
WARNING: Riding the Razor Scream Machine can be hazardous.
Proper inspection and maintenance of the product is your responsibility
and can reduce the risk of injury.
WARNING: The Scream Machine has been built to Razor’s
design specifications. All the original equipment supplied at the time of
Razor Owner’s Manual
+ Safety Handbook
Table of Contents
1. Parts of the Scream Machine . . . . . . . . . . . . . . . . . . . . . . . . .3
2. Proper fit and size adjustments . . . . . . . . . . . . . . . . . . . . . . . .4
3. Brake . . . . . . . . . . . . . . . . . . . . . . . . . . . . . . . . . . . . . . . . . . . .4
4. Safety . . . . . . . . . . . . . . . . . . . . . . . . . . . . . . . . . . . . . . . . . . . .5
5. Safety Check . . . . . . . . . . . . . . . . . . . . . . . . . . . . . . . . . . . . . .6
6. Assembly . . . . . . . . . . . . . . . . . . . . . . . . . . . . . . . . . . . . . . . . .6
6A. Un-box . . . . . . . . . . . . . . . . . . . . . . . . . . . . . . . . . . .7
6B. Install the rear wheels . . . . . . . . . . . . . . . . . . . . . . . .7
6C. Install fork . . . . . . . . . . . . . . . . . . . . . . . . . . . . . . . . .9
6D. Attach seat . . . . . . . . . . . . . . . . . . . . . . . . . . . . . . .11
6E. Assemble the brake cable . . . . . . . . . . . . . . . . . . . .12
6F. Brake cable adjustment . . . . . . . . . . . . . . . . . . . . . .13
6G. Pedals, cranks and front wheel drive . . . . . . . . . . .16
7. Razor Safety Tips . . . . . . . . . . . . . . . . . . . . . . . . . . . . . . . . .17
8. Limited Warranty and owner registration . . . . . . . . . . . . . . .19
3
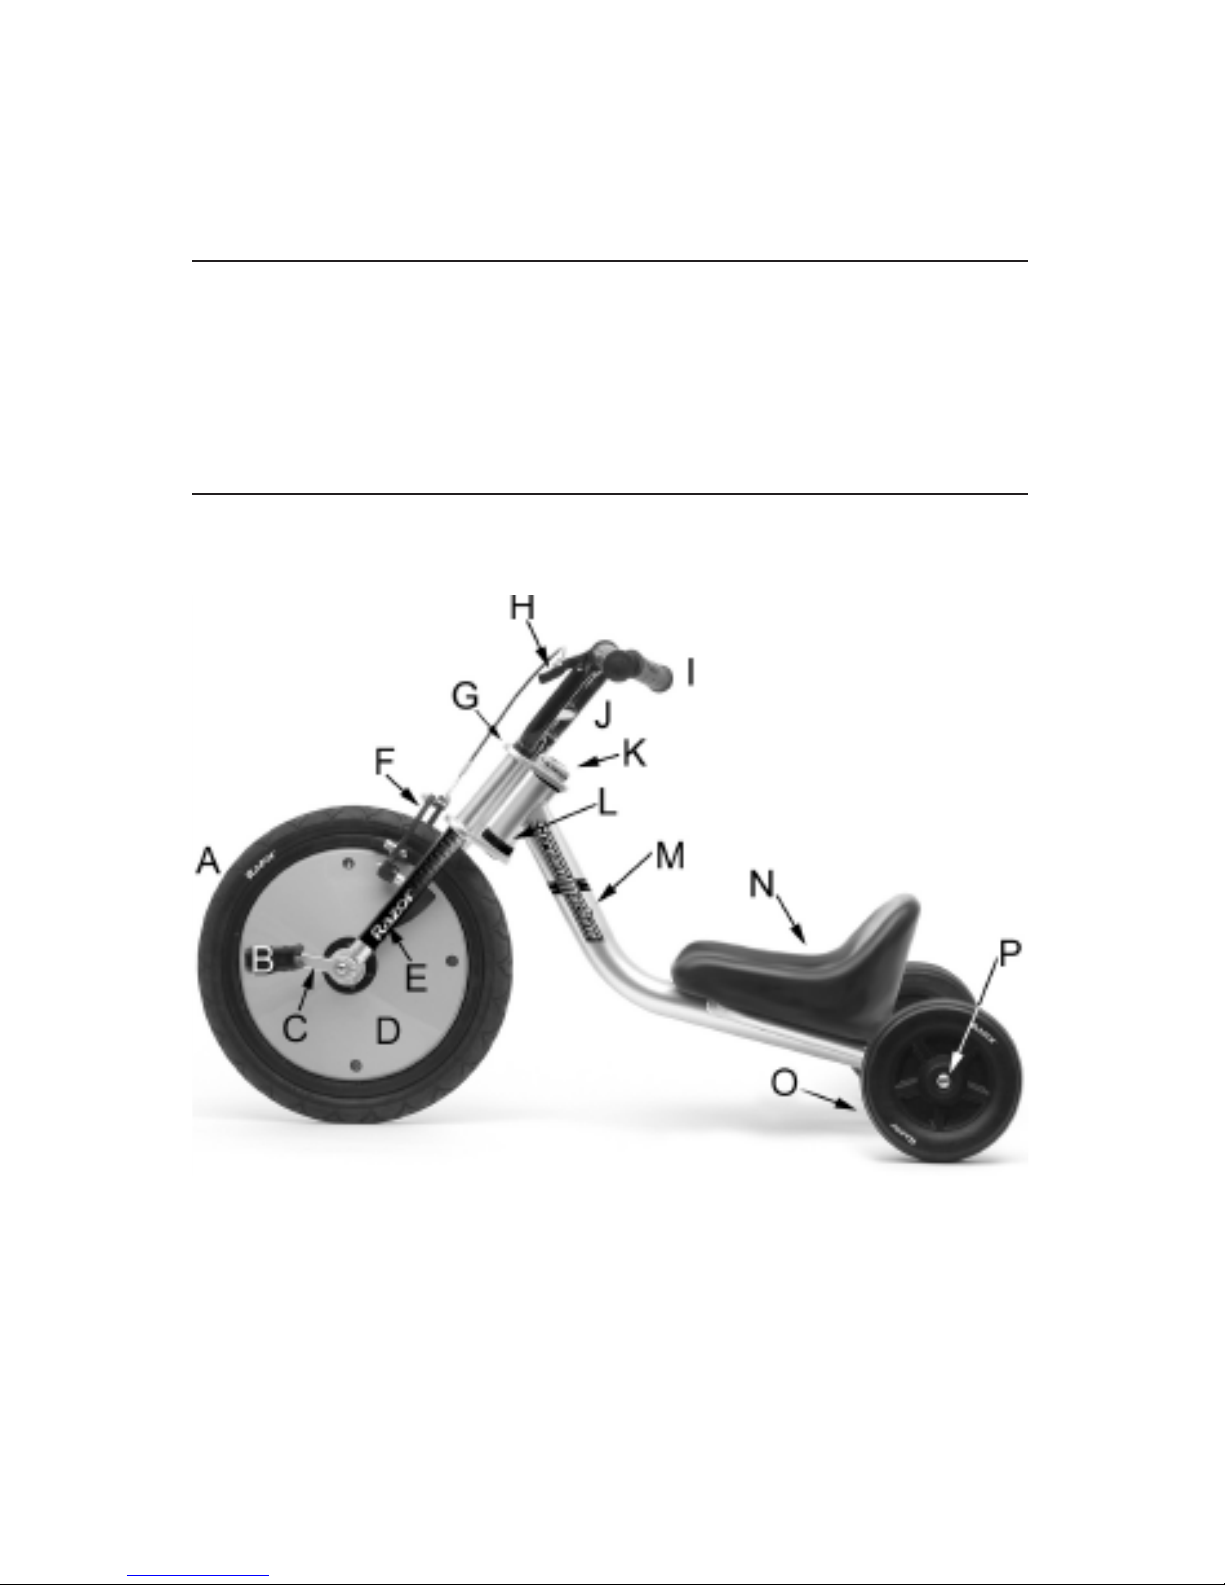
1. Parts of the Scream Machine
5mm hex (Allen) key
6mm hex (Allen) key
17mm open end wrench
10mm open end wrench for brake cable
Razor recommends assembly by an adult with
experience in bicycle mechanics. Some tools
may be supplied, however we recommend the
use of mechanic’s grade tools and use the
supplied tools only as a last resort.
A. Front wheel
B. Pedal
C. Crank arm
D. Wheel cover
E. Fork
F. Brake
G. Fork crown
H. Brake lever
I. Handlebar grip
J. Handlebar
K. Headset
L. Head tube
M. Main frame
N. Seat
O. Rear wheels
P. Rear axle
Additional components not
shown in this view will be
detailed in the assembly
section.
TOOLS REQUIRED FOR ASSEMBLY ONLY
sale were selected on the basis of their compatibility with the frame, fork
and all other parts. Certain after-market products may or may not be
compatible with your Razor Scream Machine. Consult your retailer or
call Razor prior to modifying or replacing any component with a nonfactory specified product.
4
2. Proper fit and size adjustments
2. Fit. When properly adjusted, the rider should be able to pedal
comfortably and steer with both feet remaining on the pedals at all
times. If the rider has to stretch to reach the pedals or is too cramped,
the seat should be adjusted fore or aft accordingly.
WARNING: The age recommendation is only an estimate. If you
are too small or too large to comfortably reach the pedals or
handlebars, do not ride the Scream Machine.
WARNING: Failing to properly adjust and tighten the screws, bolts
and clamps that affix the handlebars, seat and rear wheels can cause
you to lose control and fall. When properly tightened, you cannot twist
the front wheel out of line with the handlebars or move the saddle out of
adjustment. If you can twist or force these components to move or
come off by hand, readjust and properly retighten the screws and bolts.
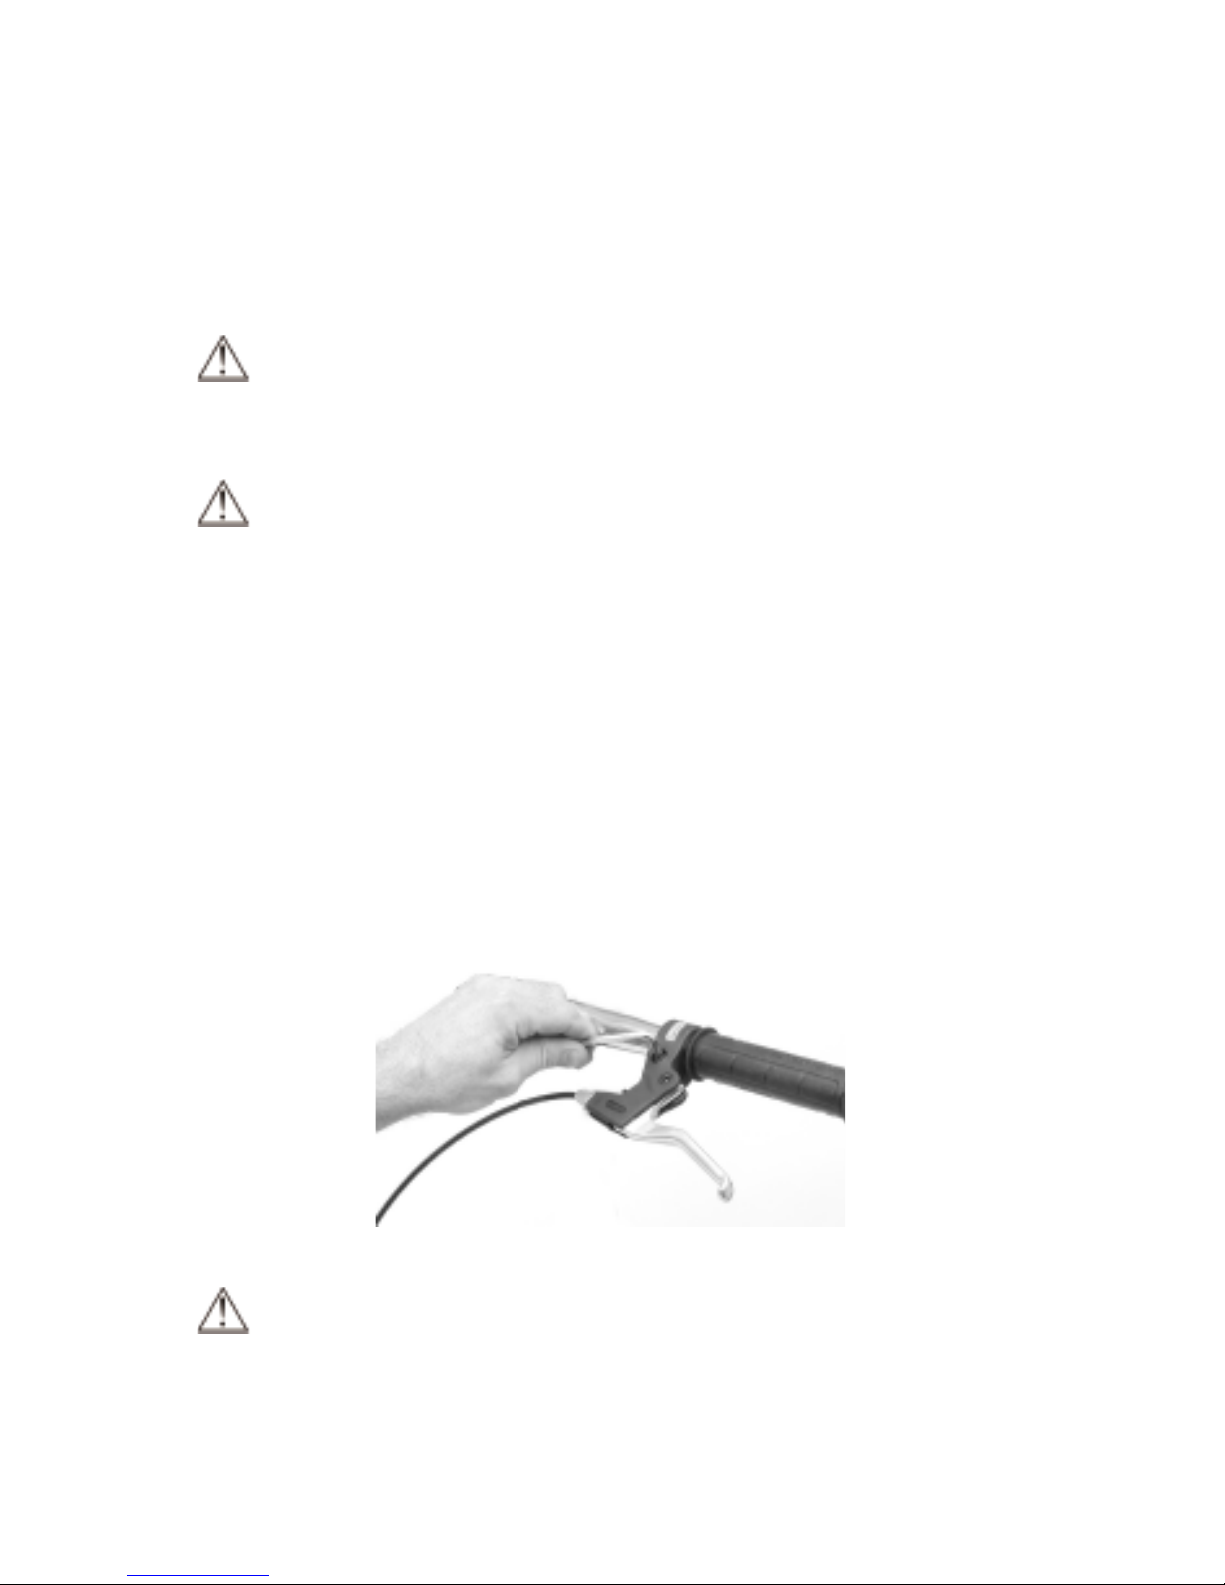
3. Brake
Your Razor Scream Machine is fitted with a hand-operated brake. The
brake lever may be positioned on the handlebar where it is most
comfortable for the rider. To change the position, loosen the clamping
screw and slide the brake lever to the new position and retighten
securely.
Figure 1. Brake lever adjustment.
WARNING: The brake, when properly adjusted, is capable of
skidding the tire and throwing an unsuspecting rider. Practice in an
open area free from obstacles until you are familiar with the brake
function.

5
WARNING: Cable operated brakes are very effective but must be
adjusted and maintained on a regular basis. Check or have them
checked and adjusted by a qualified mechanic. Worn brake parts,
stretched or frayed inner wires or a kinked housing indicate brake
service or parts replacement may be necessary for proper function.
4. Safety
4A. Helmets. Although not every state or municipality requires juvenile-
age cyclists to wear a helmet, Razor strongly recommends you wear a
properly approved helmet, such as ANSI or SNELL, even if the law
does not mandate the use of a helmet.
Suitable helmets are available in a variety of styles. The most popular
for kids is the skateboard-style “stunt” helmet. There are many brands
available and they come in various sizes to fit any child or adult.
Keep feet on the pedals at all times while riding in the seated position.
Do not ride more than one person at a time.
Never use near steps or
swimming pools.
WARNING: Helmets must be properly fitted and the straps
adjusted properly to be effective. Ask your dealer to help you with the
selection, fit and adjustment of your helmet.
4B. Night riding and low-light conditions. Razor strongly
recommends against riding at night or when lighting or visibility
conditions are less than optimal (such as dawn and dusk).
WARNING: Lighting for night riding or low light conditions are not
required and are not standard equipment on the Scream Machine. We
do not recommend riding at night or in low-light conditions.
4C. Wet weather riding. Under wet conditions, the stopping power of
your brakes is reduced significantly. This makes it harder to control your
speed and easier to lose control. In wet conditions it is advised that you
ride more slowly and apply your brakes earlier and with greater caution
than in normal, dry conditions.
WARNING: Wet weather impairs traction, braking, control and
visibility. The risk of accident is increased dramatically in wet weather.
WARNING: Keep your fingers and other body parts away from the
crank, steering system, wheels and all other moving components.

6
5. Safety check (before each ride)
5A. Loose parts. While straddling the Scream Machine, lift the front
wheel off the ground two or three inches and let go so it can bounce on
the ground. Does everything sound tight? There should not be any
unusual rattles or sounds from loose parts or broken components. If you
are not sure, ask an experienced mechanic to check.
5B. Cranks and pedals. Grasp the cranks and wobble them vigorously
to check for play. The cranks and pedals should be attached and tight
with no play between the crank and drive shaft or the pedal shaft and
crank arms.
5C. Brake. Check the brake for proper function. When you pull the lever
the brake should act against the rim and provide positive braking action.
The cable should have the proper slack so the brakes do not drag, yet
the lever should not touch the handlebars when pulled except under the
hardest braking action.
5D. Frame, fork and handlebars. Check for cracks or broken
connections. Although broken frames are rare, it is possible for an
aggressive rider to bash into a curb or wall and wreck and bend or
break a frame, fork or handlebar. Get in the habit of inspecting yours
regularly.
5E. Bar ends. Your Razor is equipped with plugs in the end of the
handlebars designed to provide protection from exposed handlebar
ends, which can act like a cookie-cutter. If your bar plugs are worn out
or missing and the handlebar end is exposed, replace them or cover the
exposed end(s) with after-market bar-end protectors.
5F. Tire inflation. The front tire on the Scream Machine requires 35~45
psi inflation pressure. Periodically and regularly check the tire
pressure and reinflate as necessary. If you get a flat tire the inner
tube is available at any retailer that sells bicycle parts and accessories.
The correct size is embossed on the side of the tire (16 x 1.75).
NOTE: The Scream Machine Jr. is equipped with a airless front tire and
does not require any maintenance.
6. Assembly
WARNING: Razor highly recommends that you have your Scream
Machine assembled by an experienced, adult mechanic. Many retailers
provide assembly but some charge extra. If your retailer can’t do the
assembly, you can have your Scream Machine assembled at a bicycle
shop for a fee. Although you may have to pay up to $30 or even more
 Loading...