

Razor Pocket Rocket Owner's Manual
Owner’s Manual
TM
TM
Pocket Rocket
Read and understand this entire manual before riding.
(
Specifications subject to change without notice.)

NOTE:
This manual contains many “Warnings” and “Cautions” concerning the consequences of failing to
maintain, inspect or properly use your Pocket Rocket. Because any incident can result in serious injury or even death,
we do not repeat the warning of possible serious injury or death each time such a warning is mentioned.
AN IMPORTANT MESSAGE TO RIDERS AND PARENTS:
READ THIS ENTIRE MANUAL BEFORE
OPERATING OR ALLOWING USE OF THE POCKET ROCKET, AND KEEP THIS MANUAL AVAILABLE FOR FUTURE
REFERENCE.This manual contains important safety information. For safety, it is your responsibility to review this
information and make sure that all riders understand all warnings, cautions, instructions and safety topics and assure
that young riders are capable and able to safely and responsibly use this product. Razor USA recommends that you
periodically review and reinforce the information in this manual with younger riders, and you are required to inspect and
maintain your child’s vehicle to insure their safety.
The recommended rider age is only an estimate, and can always be effected based upon a particular rider’s size,
weight or skills. If the rider is unable to fit comfortably on the Pocket Rocket, don’t attempt to ride it.
Keep this product away from small children and always understand that this product is intended for use only by
persons who are, at a minimum, completely comfortable and competent riding a bicycle without training wheels.
GENERAL WARNING: Riding the Pocket Rocket can be a hazardous activity. Electric vehicles can, and are
intended to, move
and it is therefore possible to get into dangerous situations and/or lose control and/or fall off. If such
things occur you can be seriously injured or die. LIKE ANY OTHER MOVING PRODUCT,USING THE POCKET
ROCKET CAN BE A DANGEROUS ACTIVITY AND MAY RESULT IN INJURY OR DEATH EVEN WHEN USED WITH
SAFETY EQUIPMENT AND OTHER PRECAUTIONS. USE AT YOUR OWN RISK AND USE COMMON SENSE.
• Always check and obey any local laws or regulations which may affect the locations where the Pocket Rocket may be
used on public property. The Pocket Rocket is meant to be used only in controlled environments free of potential
traffic hazards, and not on public streets or sidewalks. Do not try to ride your Pocket Rocket on public streets or in
any areas where pedestrian or vehicle traffic may present a risk of collision or injury to yourself or others. Watch out
for potential obstacles including pedestrians, skaters, skateboards, bikes, children or animals who may enter your
path, and respect the rights and property of others.
• Do not ride the Pocket Rocket in wet weather and never immerse the Pocket Rocket in water, as the electrical and
drive components of the Pocket Rocket could be damaged by water or
create other possibly unsafe
conditions.
• The Pocket Rocket is designed to perform best outdoors on solid flat, clean and dry surfaces. Wet, slick or uneven and
rough surfaces may impair traction and contribute to possible accidents. Use only on flat, dry, level ground without
loose debris, such as rocks or gravel. Do not ride a Pocket Rocket in mud, ice, puddles or water. Avoid excessive
speeds that can be associated with downhill rides. Never risk damaging indoor surfaces such as carpet or flooring by
use of a Pocket Rocket indoors.
Table of Contents
1. Key Parts of the Pocket Rocket . . . . . . . . . . . . . . . . . . . . . . . . . . . . . . . . . . . . . . . . . . . . . . . . . . . . . . . . . . .3
2. Preparing for First-Time Use
2A. Un-box . . . . . . . . . . . . . . . . . . . . . . . . . . . . . . . . . . . . . . . . . . . . . . . . . . . . . . . . . . . . . . .4
2B. Handlebars . . . . . . . . . . . . . . . . . . . . . . . . . . . . . . . . . . . . . . . . . . . . . . . . . . . . . . . . . . . .4
2C. Attach the fairing . . . . . . . . . . . . . . . . . . . . . . . . . . . . . . . . . . . . . . . . . . . . . . . . . . . . . . .5
2D. Inflating the tires . . . . . . . . . . . . . . . . . . . . . . . . . . . . . . . . . . . . . . . . . . . . . . . . . . . . . . . .6
2E. The brake . . . . . . . . . . . . . . . . . . . . . . . . . . . . . . . . . . . . . . . . . . . . . . . . . . . . . . . . . . . . .7
2F. Charging prior to use . . . . . . . . . . . . . . . . . . . . . . . . . . . . . . . . . . . . . . . . . . . . . . . . . . . .8
2G. Circuit breaker . . . . . . . . . . . . . . . . . . . . . . . . . . . . . . . . . . . . . . . . . . . . . . . . . . . . . . . . . 9
3. Safety Check Before Riding . . . . . . . . . . . . . . . . . . . . . . . . . . . . . . . . . . . . . . . . . . . . . . . . . . . . . . . . . . . . .9
4. Maintenance and Repairs . . . . . . . . . . . . . . . . . . . . . . . . . . . . . . . . . . . . . . . . . . . . . . . . . . . . . . . . . . . . . .10
5. Safety . . . . . . . . . . . . . . . . . . . . . . . . . . . . . . . . . . . . . . . . . . . . . . . . . . . . . . . . . . . . . . . . . . . . . . . . . .15
6. Illustrated Parts Breakdown . . . . . . . . . . . . . . . . . . . . . . . . . . . . . . . . . . . . . . . . . . . . . . . . . . . . . . . . . . . .16
7. Limited Warranty and Owner Registration . . . . . . . . . . . . . . . . . . . . . . . . . . . . . . . . . . . . . . . . . . . . . . . . .19

3
• Do not ride at night or in impaired visibility conditions.
• Always wear proper protective equipment, such as an approved safety helmet, elbow pads and kneepads. A helmet may
be legally required by local law or regulation in your area, and should always be worn when riding a Pocket Rocket.
Always wear shoes, never ride barefooted or in sandals, and keep shoelaces tied and out of the way of the wheels,
motor and drive system.
• The electric motor in your Pocket Rocket can become hot when in use. Do not touch the motor and handle the Pocket
Rocket carefully.
• Do not exceed the weight limit of 220 pounds (see warning on back page).
• Do not attempt or do stunts or tricks on your Pocket Rocket. The Pocket Rocket is not made to withstand abuse from
misuse such as jumping, grinding or any other type of stunts.
FAILURE TO USE COMMON SENSE AND HEED THE ABOVE WARNINGS FURTHER INCREASES RISK OF SERIOUS
INJURY. USE AT YOUR OWN RISK AND WITH APPROPRIATE AND SERIOUS ATTENTION TO SAFE OPERATION.
USE CAUTION.
Brake lever
Brake adjuster
Brake adjuster
On/Off switch
Chain drive
Speed control
Front fork
Tire
Wheel
NOTE: Do not activate the speed control on the handlebar
unless you are on the Pocket Rocket and in a safe, outdoor
environment. Use this product only in areas free of potential
traffic hazards and not on public streets or sidewalks.
1. Key parts of the Pocket Rocket
Charger port

4
WARNING: Failing to properly adjust and tighten the clamps and
retainers that affix the handlebars can cause you to lose control and fall.
When properly adjusted, you cannot twist the front wheel out of line or
move the handlebars out of adjustment. If you can twist or force these
components to move by hand, readjust and properly retighten the clamp
mechanisms.
2. Preparing for First-Time Use
2A. Un-box. Remove contents from box. Remove the foam separators
that protect the various components from damage during shipping.
Inspect the contents of the box for scratches in the paint, dents or
kinked cables that may have occurred during shipping. The Pocket
Rocket was 99% assembled and packed at the factory to prevent
shipping damage and there should not be any problems, even if the box
has a few scars or dents. But if there are, contact Razor USA, toll free,
at (866) 467-2967 to resolve any problems.
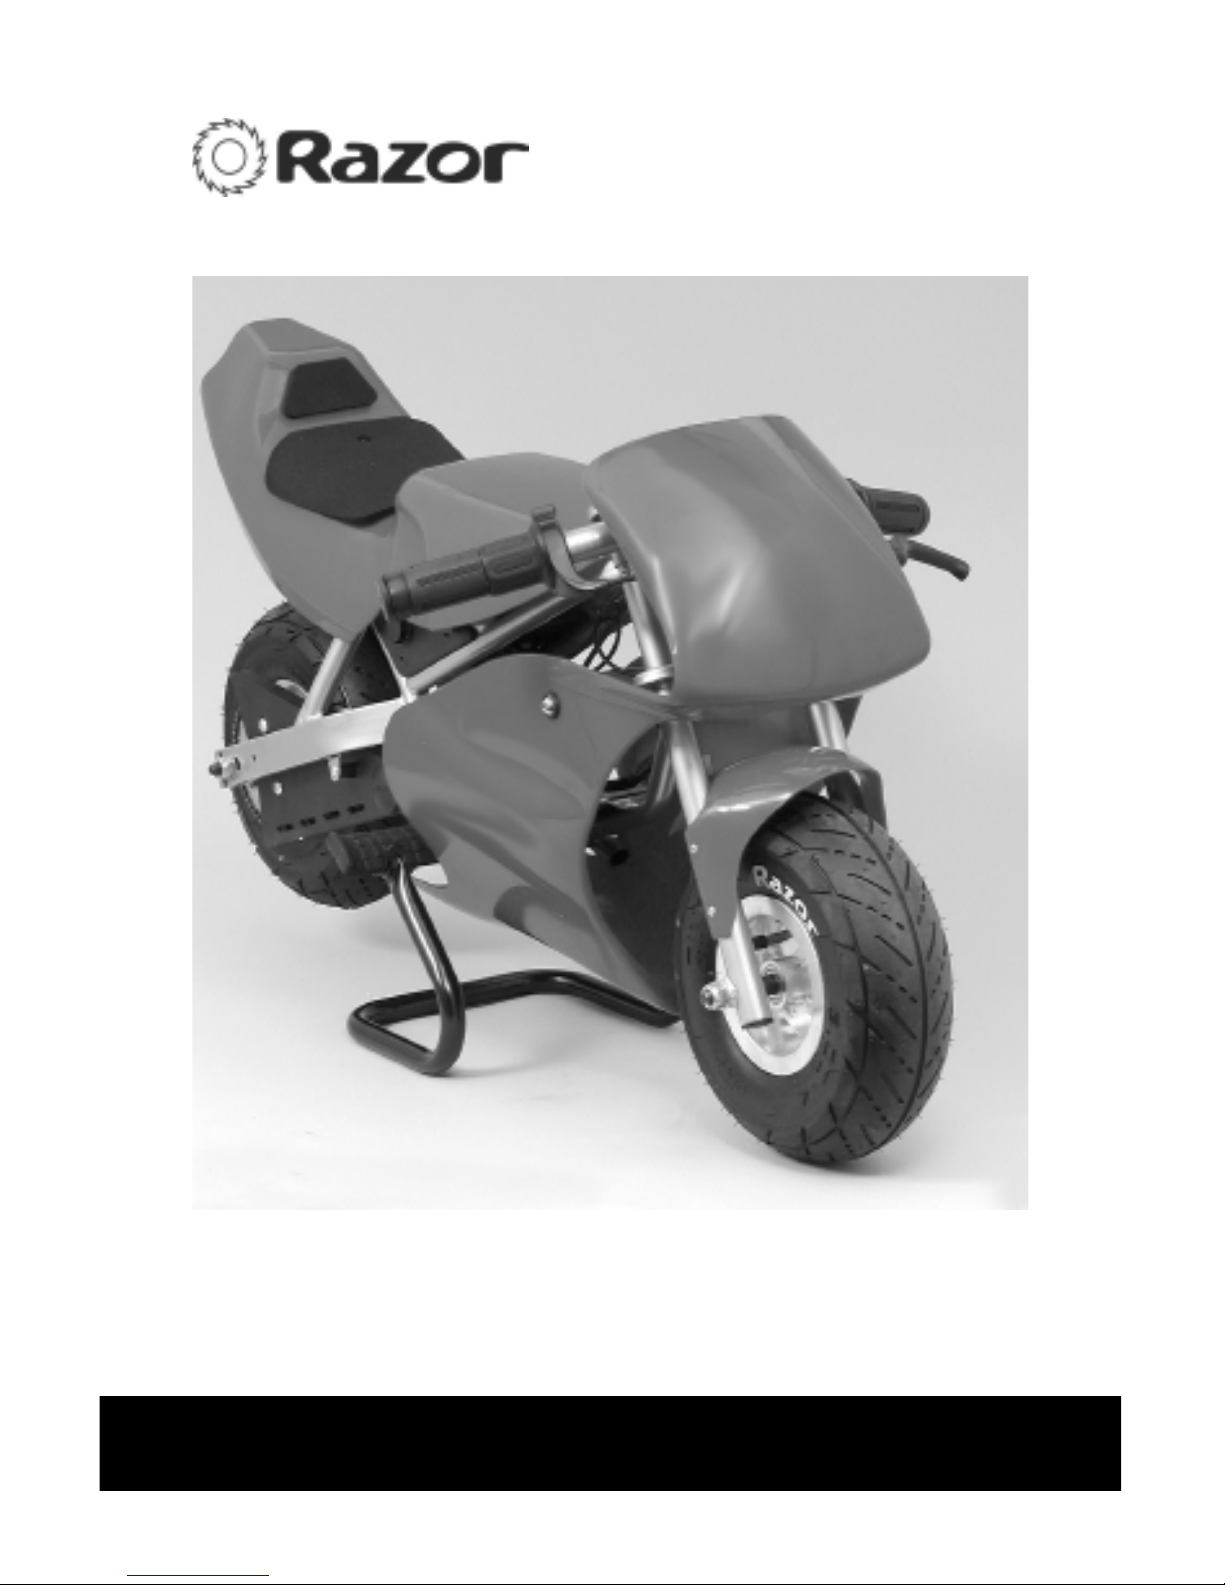
2B. Handlebars. Swing the handlebars outward as shown. You may
have to loosen the clamps to allow the bar to pivot on the fork.
• Bicycle-style tire pump for Schrader
valve tires, with pressure gauge.
• 5mm and 6mm hex key wrenches.
• Inflation valve extender/adapter
(supplied).
• Razor recommends assembly by an
adult with experience in bicycle
mechanics. Some tools may be
supplied, however we recommend the
use of mechanic’s grade tools. Use
the supplied tools only as a last resort.
TOOLS REQUIRED FOR ASSEMBLY
WARNING: REGARDING USE OF NON-RAZOR PRODUCTS WITH YOUR RAZOR
POCKET ROCKET. The Pocket Rocket has been built to certain Razor design specifications.
The original equipment supplied at the time of sale were selected on the basis of their
compatibility with the frame, fork and all other parts. Certain after-market products may or may
not be compatible. Consult your retailer or call Razor prior to modifying or replacing any
component with a non-factory specified product.
WARNING: CHECK LOCAL LAWS REGARDING USE. Check local laws and regulations
to see where and how you may use your Razor Pocket Rocket legally. In many states and local
areas, riders are required BY LAW to wear a helmet. Check local laws and regulations regarding
laws governing helmet use, age and vehicle operation in your area.
5
Figures 2a and 2b. Positioning the handlebars.
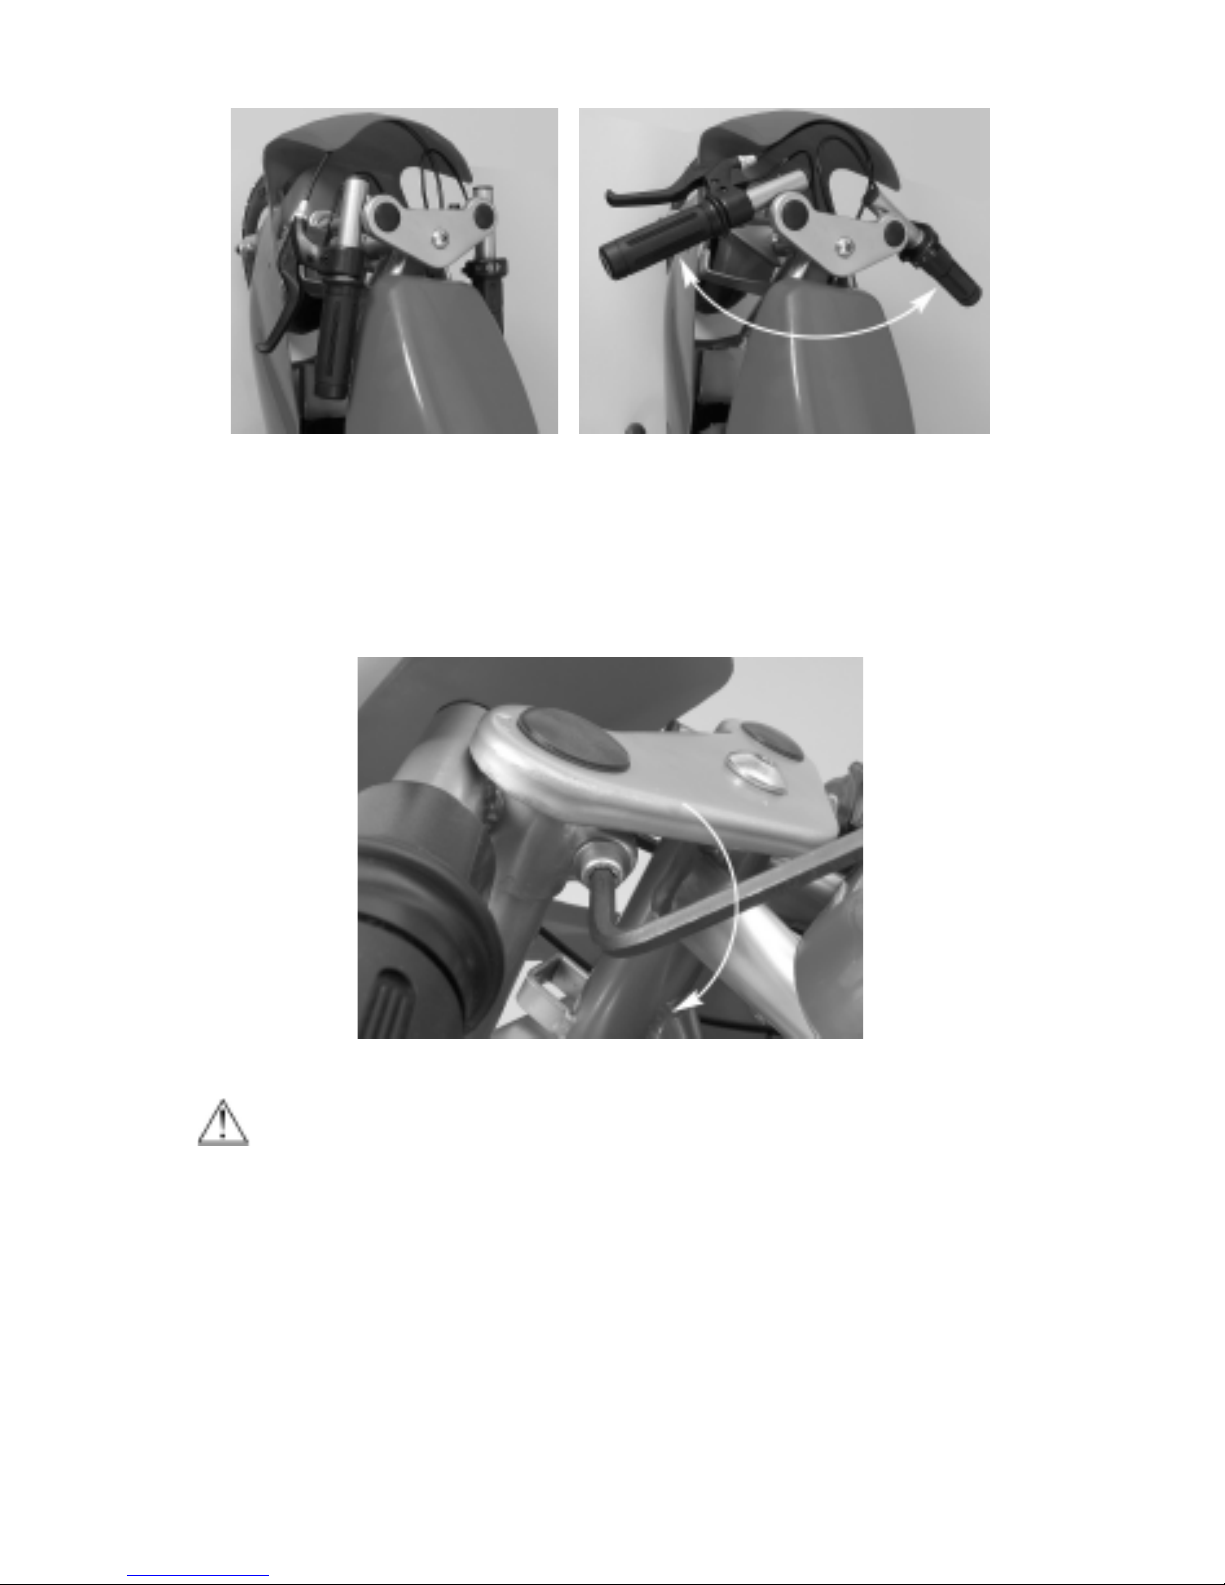
Tighten securely. Using a 5mm hex key wrench, tighten both the left
and right side handlebar clamps by turning the screws clockwise as
shown in Figure 3. Tighten securely. When properly tightened, the
handlebars cannot be twisted out of alignment.
Figure 3. Tighten the handlebar using a 5mm hex key wrench.
WARNING: Failure to properly tighten both sides may cause the
handlebars to dislodge while riding and may cause you to lose control
and fall. When correctly tightened, the handlebars will not rotate out of
alignment under normal circumstances.
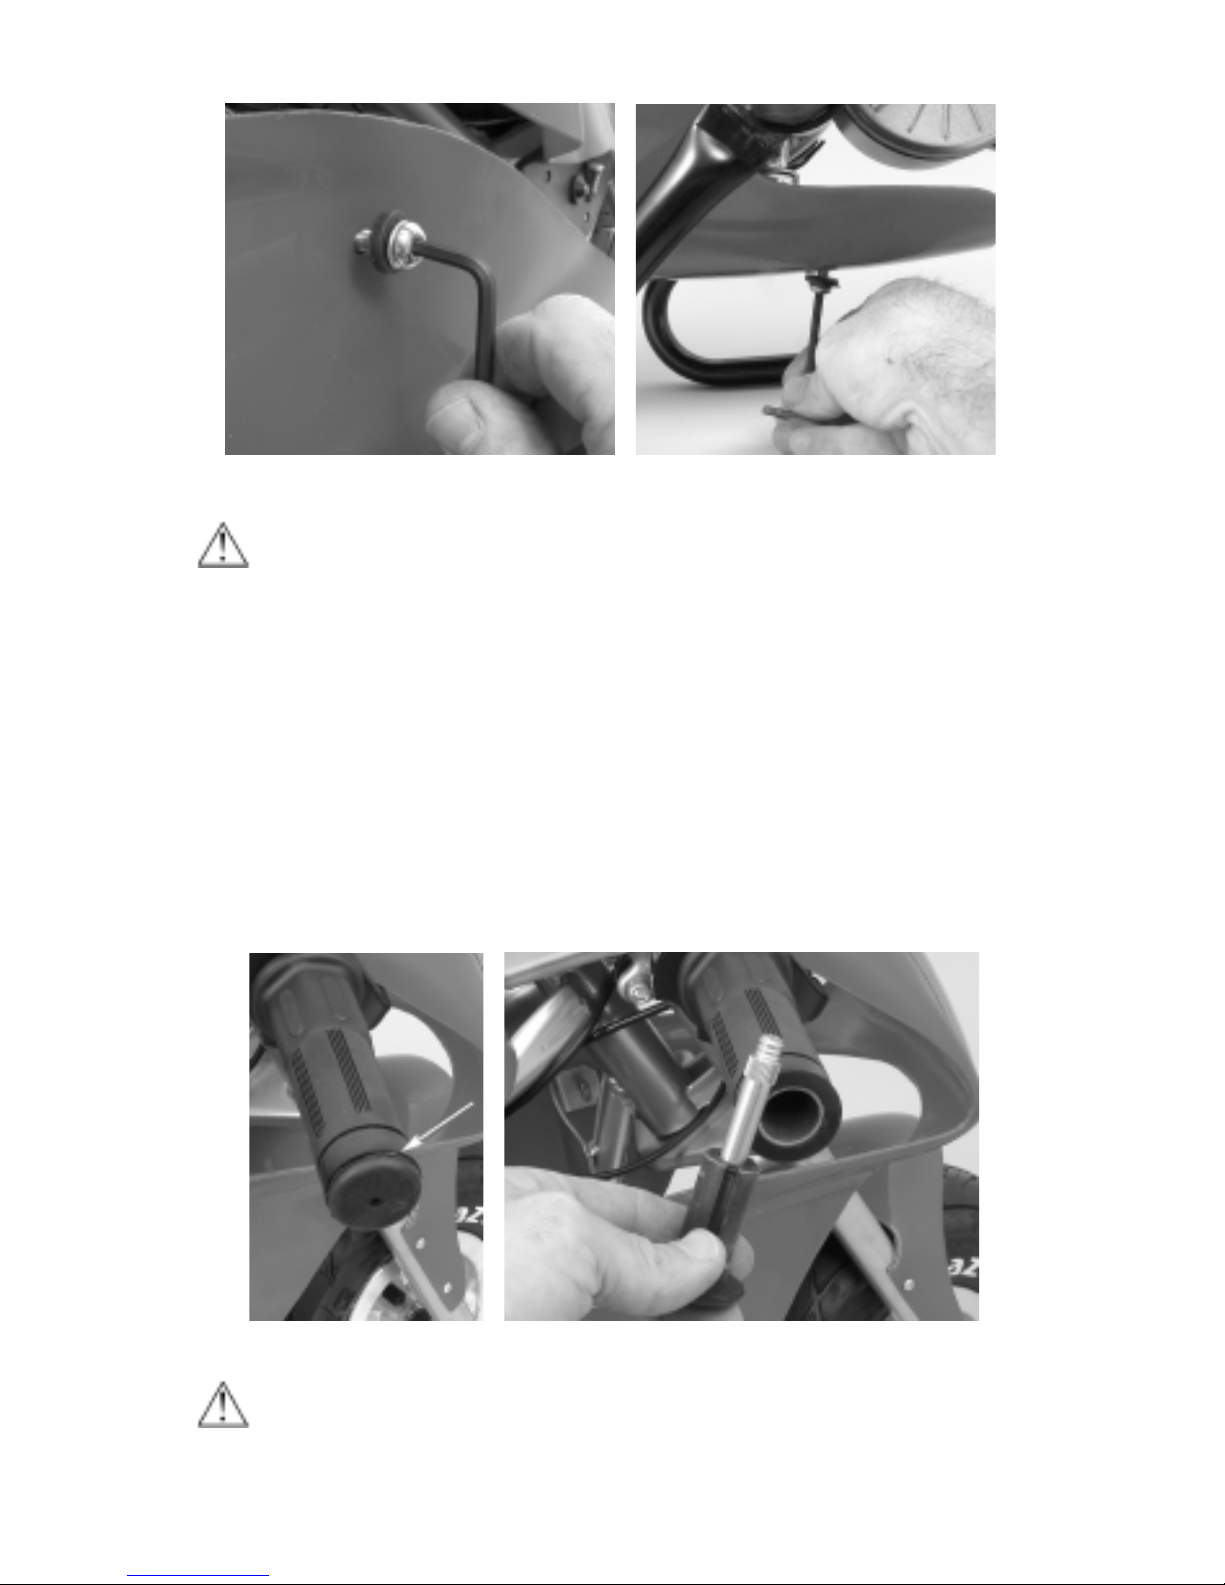
2C. Attach the fairing. Using the two button head screws with the
shock-absorbing rubber washers, attach the fairing to the mounting
points as shown in figure 4a and tighten. If the screws do not line up,
loosen the mounting screw on the bottom of the fairing as shown in
figure 4b to help slide it into position. Tighten all screws.
6
Figure 4a. Figure 4b.
NOTE: Although we make every effort to keep our manual up-to-
date, if your Pocket Rocket does not look exactly this, then we’ve made
improvements since this document was printed. Check out the Razor
website: www.razor.com for technical updates on the latest service and
adjustment procedures.
2D. Inflating the tires. The tires are inflated when shipped, but they
invariably will lose some pressure between the point of manufacturing
and your purchase.
Using a bicycle style tire pump equipped for a Schrader-type valve,
inflate the front tire to the psi indicated on the sidewall of the tire.
Figure 5a. Figure 5b.
NOTE regarding the rear wheel: Inflating the rear tire requires
the use of a special valve extender/adapter, supplied with the Pocket
 Loading...