

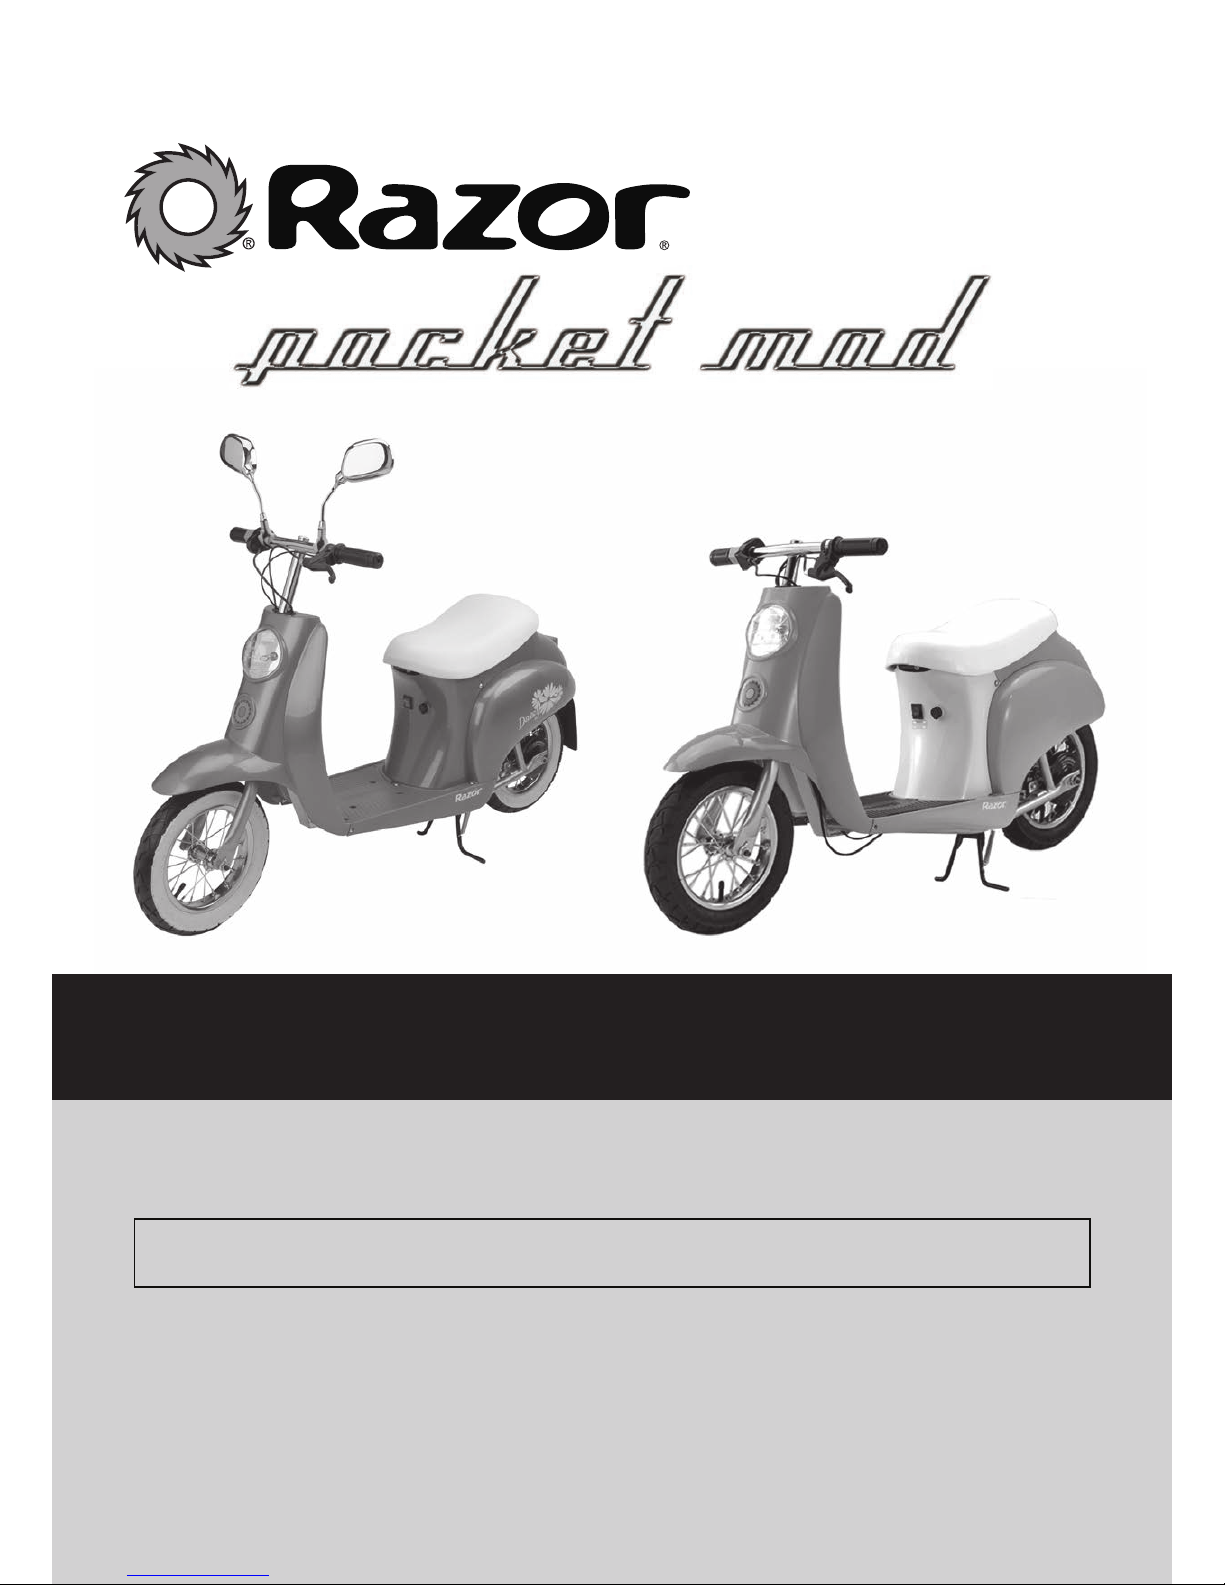
Razor Pocket Mod Owner's Manual

TM
NOTE: Illustrations are for demonstration purposes only. Specifications subject
to change without notice.
OWNER’S MANUAL
Read and understand this entire manual before riding!
DO NOT RETURN TO STORE!
Item Number:
Vapor RAZPMOD-BLA
Bella RAZPMOD
Bella S0755
Betty 15130661
Daisy 15130650
Français .................. Page 8
Deutsch ................... Seite 16
Italiano .................... Pagina 24
Español ................... Página 32

WARNING: Riding the Pocket Mod can be a hazardous activity.
Certain conditions may cause the equipment to fail without fault of the
manufacturer. Like other electric products, the Pocket Mod can and is
intended to move, and it is therefore possible to lose control, fall off and/or
get into dangerous situations that no amount of care, instruction or expertise
can eliminate. If such things occur you can be seriously injured or die, even
when using safety equipment and other precautions. RIDE AT YOUR OWN
RISK AND USE COMMON SENSE.
This manual contains many warnings and cautions concerning the
consequences of failing to maintain, inspect or properly use your Pocket
Mod. Because any incident can result in serious injury or even death, we do
not repeat the warning of potential serious injury or death each time such a
possibility is mentioned.
APPROPRIATE RIDER USE AND
PARENTAL SUPERVISION
This manual contains important safety information. It is your responsibility
to review this information and make sure that all riders understand all
warnings, cautions, instructions and safety topics and assure that young
riders are able to safely and responsibly use this product. Razor recommends
that you periodically review and reinforce the information in this manual
with younger riders, and that you inspect and maintain your children’s
product to insure their safety.
The recommended rider age of 12 and older for Pocket Mod is only an
estimate, and can be affected by the rider’s size, weight or skills. Any rider
unable to fit comfortably on the Pocket Mod should not attempt to ride it. A
parent’s decision to allow his or her child to ride this product should
be based on the child’s maturity, skill and ability to follow rules.
Keep this product away from small children and remember that this product
is intended for use only by persons who are, at a minimum, completely
comfortable and competent while operating the product.
DO NOT EXCEED THE WEIGHT LIMIT OF 170lbs (77kg).
Rider weight does not necessarily mean a person’s size is appropriate to fit
or maintain control of the Pocket Mod.
Do not touch the motor on your Pocket Mod when in use as it can become
very hot.
ACCEPTABLE RIDING PRACTICES AND
CONDITIONS
Always check and obey any local laws or regulations which may affect the
locations where the Pocket Mod may be used on public property. The Pocket
Mod is meant to be used only in controlled environments free of potential
traffic hazards and not on public streets or sidewalks. Do not ride your
Pocket Mod in any areas where pedestrian or product traffic is present.
Ride defensively. Watch out for potential objects that could catch your
wheel or force you to swerve suddenly or lose control. Be careful to avoid
pedestrians, skaters, skateboards, scooters, bikes, children or animals who
may enter your path, and respect the rights and property of others.
Do not attempt or do stunts or tricks on your Pocket Mod. The Pocket Mod is
not made to withstand abuse from misuse such as jumping, curb grinding or
any other type of stunts.
Maintain a hold on the handlebars at all times.
Never carry passengers or allow more than one person at a time to ride the
Pocket Mod.
Never use near steps or swimming pools.
Keep your fingers and other body parts away from the ride chain, steering
system, wheels and all other moving components.
Never use headphones or a cell phone when riding.
Never hitch a ride with another product.
Do not ride the Pocket Mod in wet weather and never immerse the Pocket
Mod in water, as the electrical and ride components could be damaged
by water or create other possibly unsafe conditions.
The Pocket Mod is intended for use on solid, flat, clean and dry surfaces such
as pavement or level ground without loose debris such as rocks or gravel.
Wet, slick or uneven and rough surfaces may impair traction and contribute
to possible accidents. Do not ride the Pocket Mod in mud, ice, puddles or
water. Avoid excessive speeds that can be associated with downhill rides.
Never risk damaging surfaces such as carpet or flooring by use of a Pocket
Mod indoors.
Do not ride at night or when visibility is impaired.
PROPER RIDING ATTIRE
Always wear proper protective equipment such as an approved safety
helmet, elbow pads and kneepads. A helmet may be legally required by local
law or regulation in your area. Always wear shoes, never ride barefooted or
in sandals, and keep shoelaces tied and out of the way of the wheels, motor
and ride system.
USING THE CHARGER
The charger supplied with the Pocket Mod should be regularly examined for
damage to the cord, plug, enclosure and other parts, and in the event of such
damage, the product must not be charged until the charger has been repaired
or replaced.
Use only with the recommended charger.
Use caution when charging.
The charger is not a toy. Charger should be operated by an adult.
Do not operate charger near flammable materials.
Unplug charger and disconnect from the battery operated product when not
in use.
Do not exceed charging time.
Always disconnect from the charger prior to wiping down and cleaning your
Pocket Mod with liquid.
FAILURE TO USE COMMON SENSE AND HEED THE
ABOVE WARNINGS INCREASES RISK OF SERIOUS
INJURY. USE WITH APPROPRIATE CAUTION AND
SERIOUS ATTENTION TO SAFE OPERATION.
SAFETY WARNINGS
1
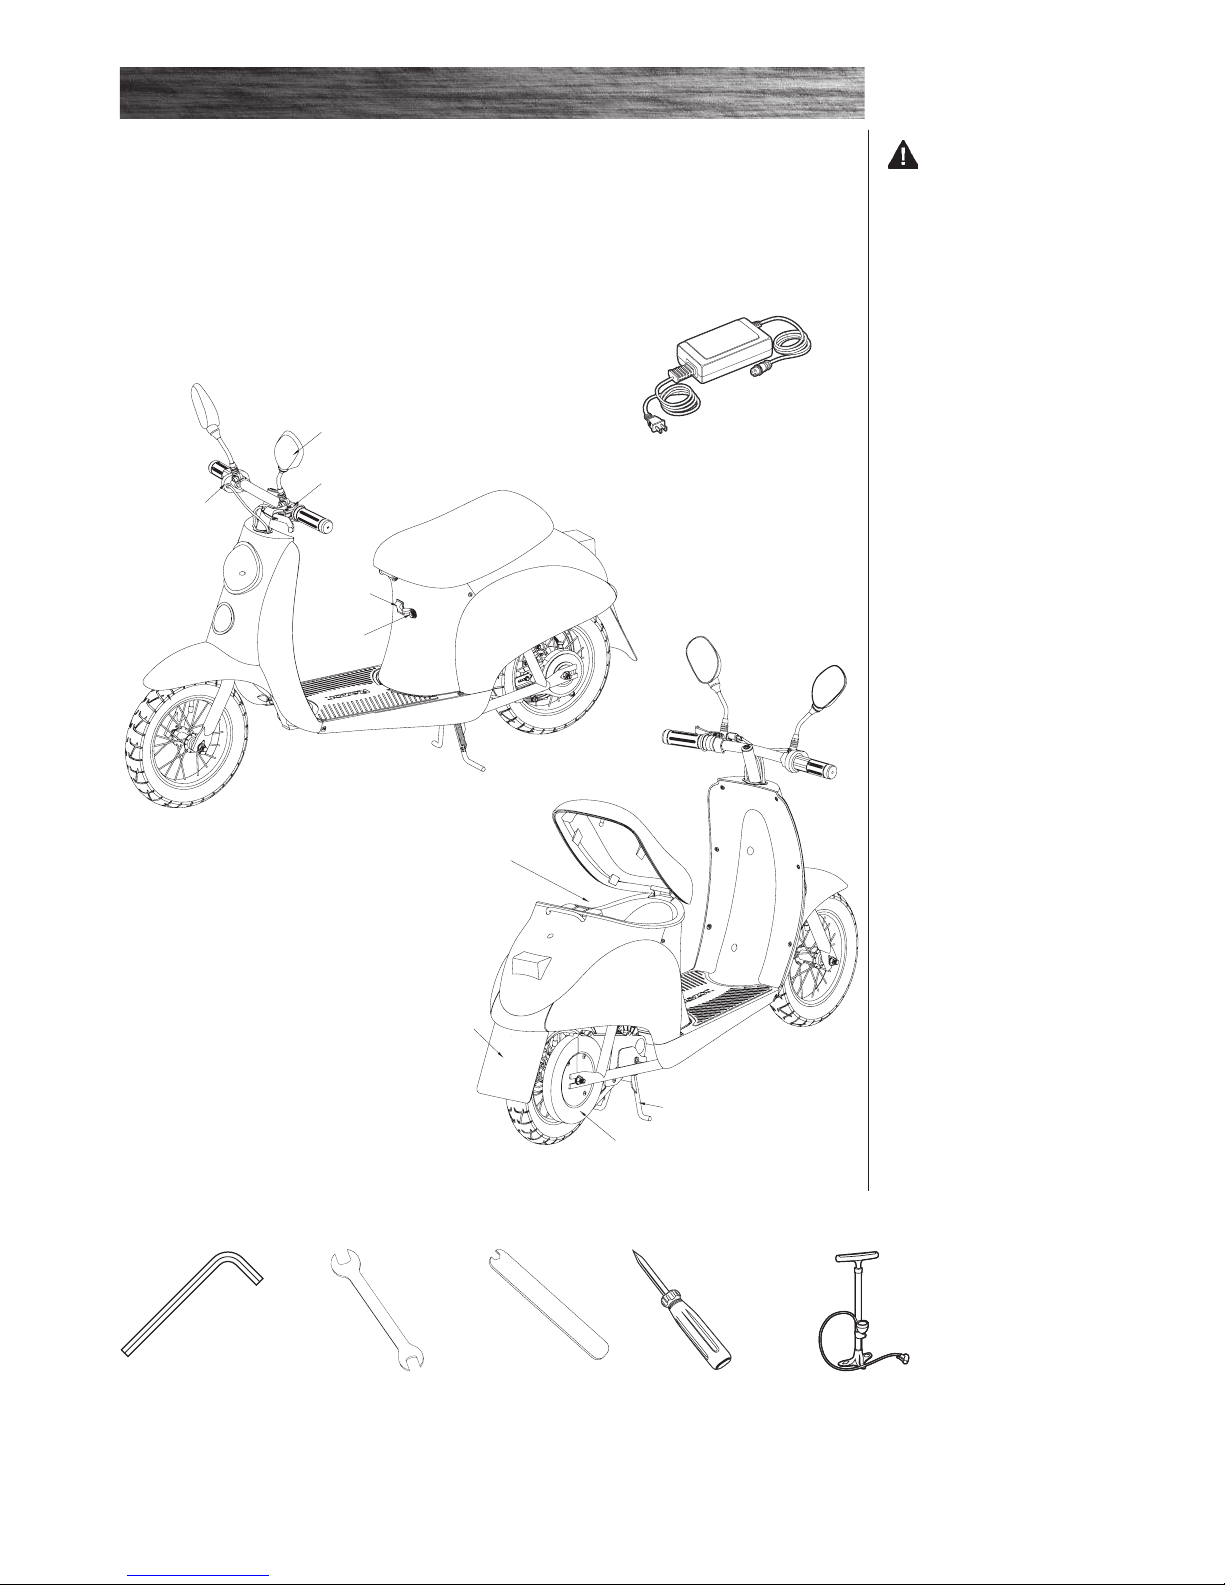
BEFORE YOU BEGIN
2
WARNING:
DO NOT USE NON-RAZOR
PRODUCTS WITH YOUR
RAZOR POCKET MOD.
Required Tools
3mm (Daisy only)
2.5mm key wrench
(Not Included)
Bicycle-style tire pump
for Schrader valve tires,
with pressure gauge
(Not Included)
14mm (Daisy only)
8mm and 10mm wrenches
(Not Included)
Charger
Phillips screwdriver
(Not Included)
Storage Compartment
Under Seat
Rear Mudap
(if applicable)
Chain Guard
Kick Stand
Throttle
Side View Mirror
(if applicable)
Brake Lever
On/O
Switch
Charger Port
Inspect contents of box for scratches in paint, dents or kinked cables that may have occurred during
shipping.
MAKE SURE POWER SWITCH IS TURNED “OFF” BEFORE CONDUCTING ANY ASSEMBLY
OR MAINTENANCE PROCEDURES.
Razor recommends assembly by an adult.
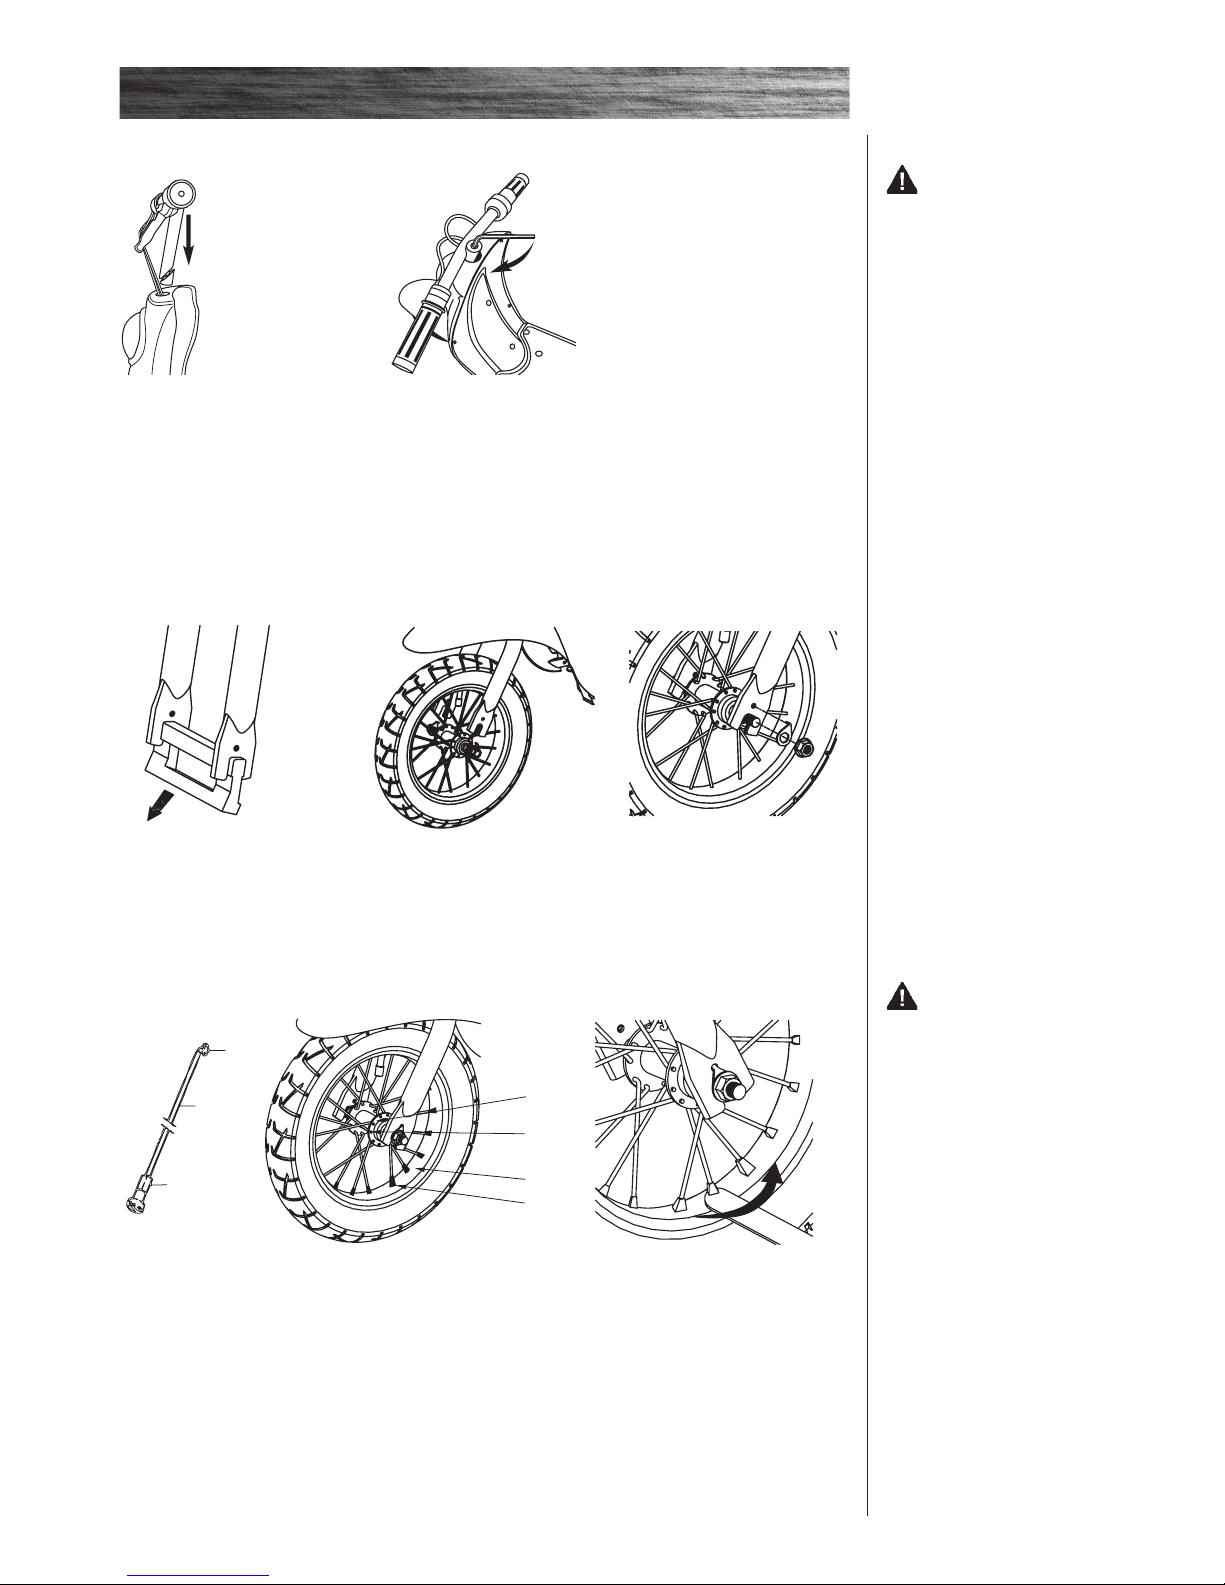
3
ASSEMBLY AND SET-UP
WARNING: Failing to
properly adjust and tighten the
clamps and retainers that affix the
handlebar can cause you to lose
control and fall.
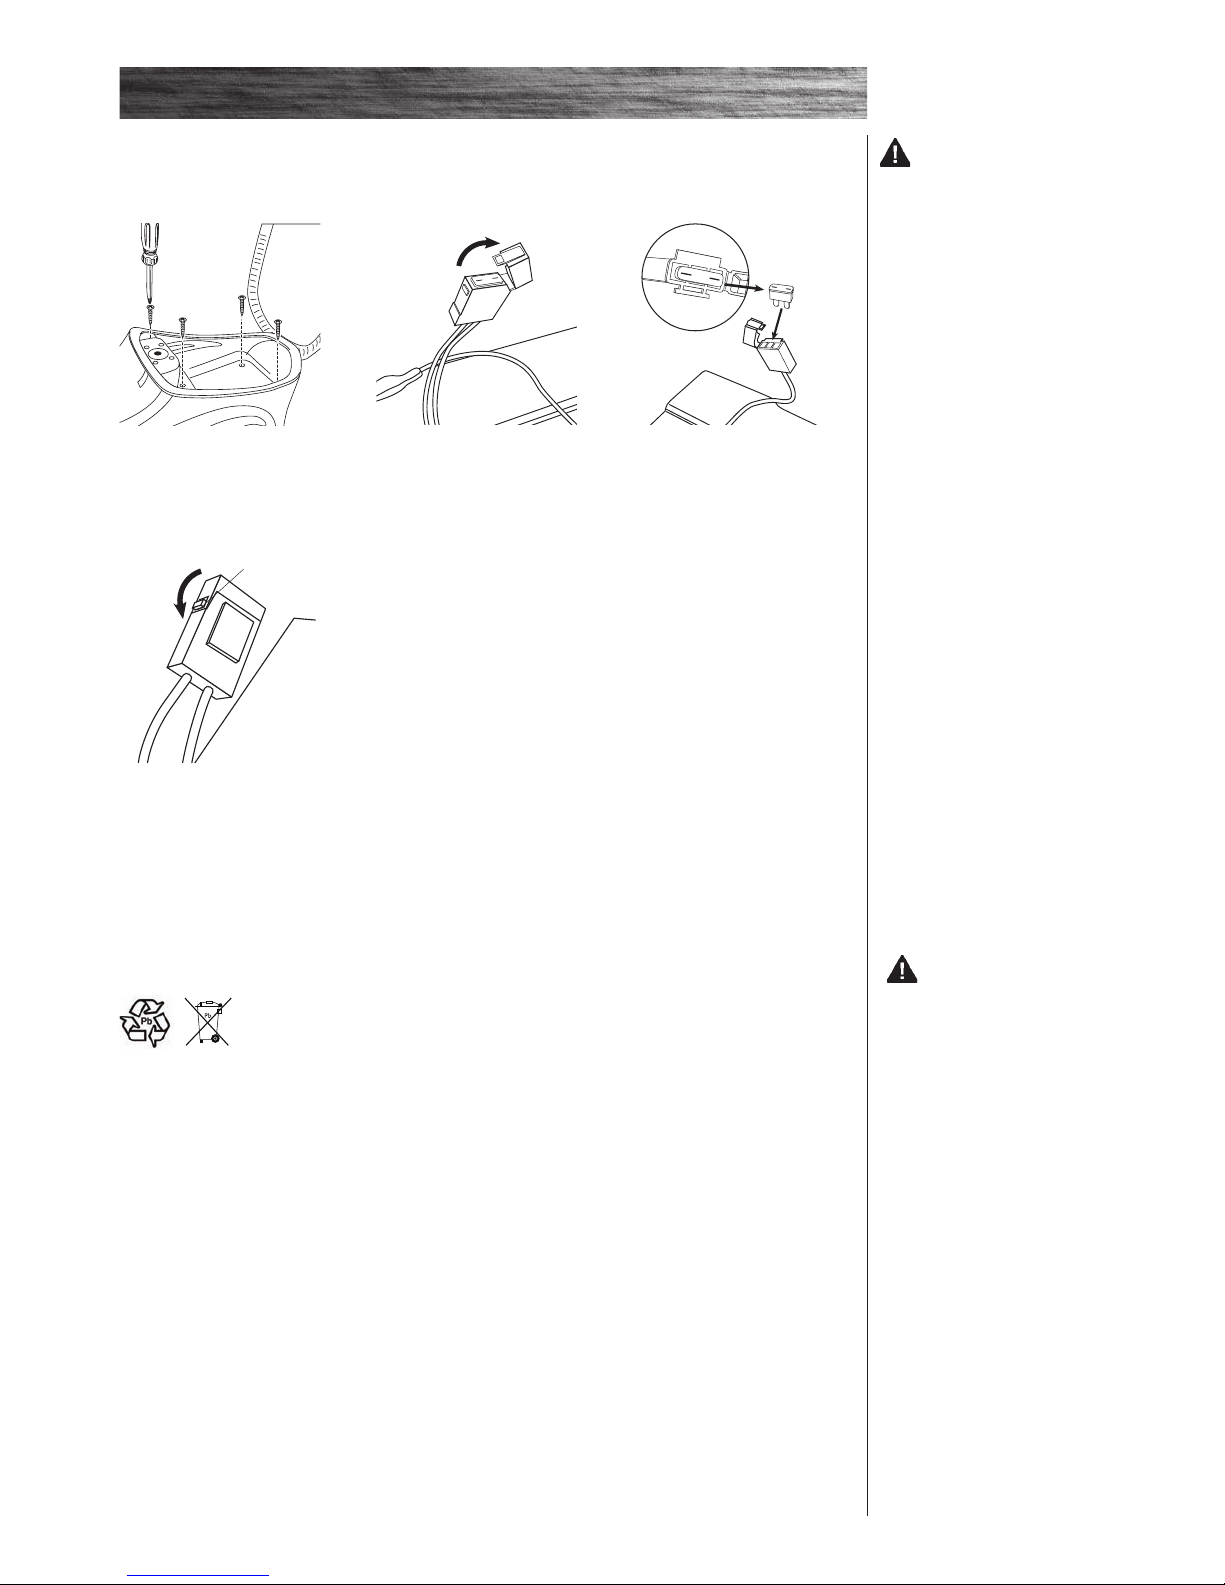
1 Remove plastic protector
and insert handlebar assembly
through front fairing and into fork
until it stops. Raise to desired
height keeping the handlebars
and fairing aligned within the red
arrows of the safety zone.
2 Tighten down bolt.
Attaching Handlebars
1 Remove packing material
from the front fork.
2 Insert wheel into front fork with
lock washers on outside of fork.
3 Insert tab on lock washer into
hole on front fork and tighten nuts.
q Checking Spoke Tension
1
Verify spoke tension by grasping and shaking each spoke. Spoke
should not be loose from hub. Look for any play between spoke flanges
where it mates with hub. You should not be able to spin any nipple by
hand. If one or more spokes are loose, or if you can turn any nipple using your fingers, all spokes must be checked and need to be tightened
with a spoke wrench.
2 Start with spoke cloest to tire valve
and tighten each nipple. In sequence,
exactly 1/4 to 1/2 turn. Continue tightening all spokes no more than 1/2 turn in
sequence until all spokes are tight.
WARNING: Regularly
check the spoke tension and
retighten the spokes whenever
loose. If you ave any doubt, ask an
experienced motorcycle or bicycle
mechanic to inspect your spokes
to determine if the spokes need
tightening or adjusting.
Note: Tightening each nipple more
than a 1/2 turn each can cause the
wheel to become distorted and
wobbly thus permanently damaging
the wheel.
Spoke
Flange
Spoke
Nipple
1
2
3
20
19
4
18
17
Hub
Flange
Spoke
Flange
Rim
Nipple
q Attaching Front Wheel
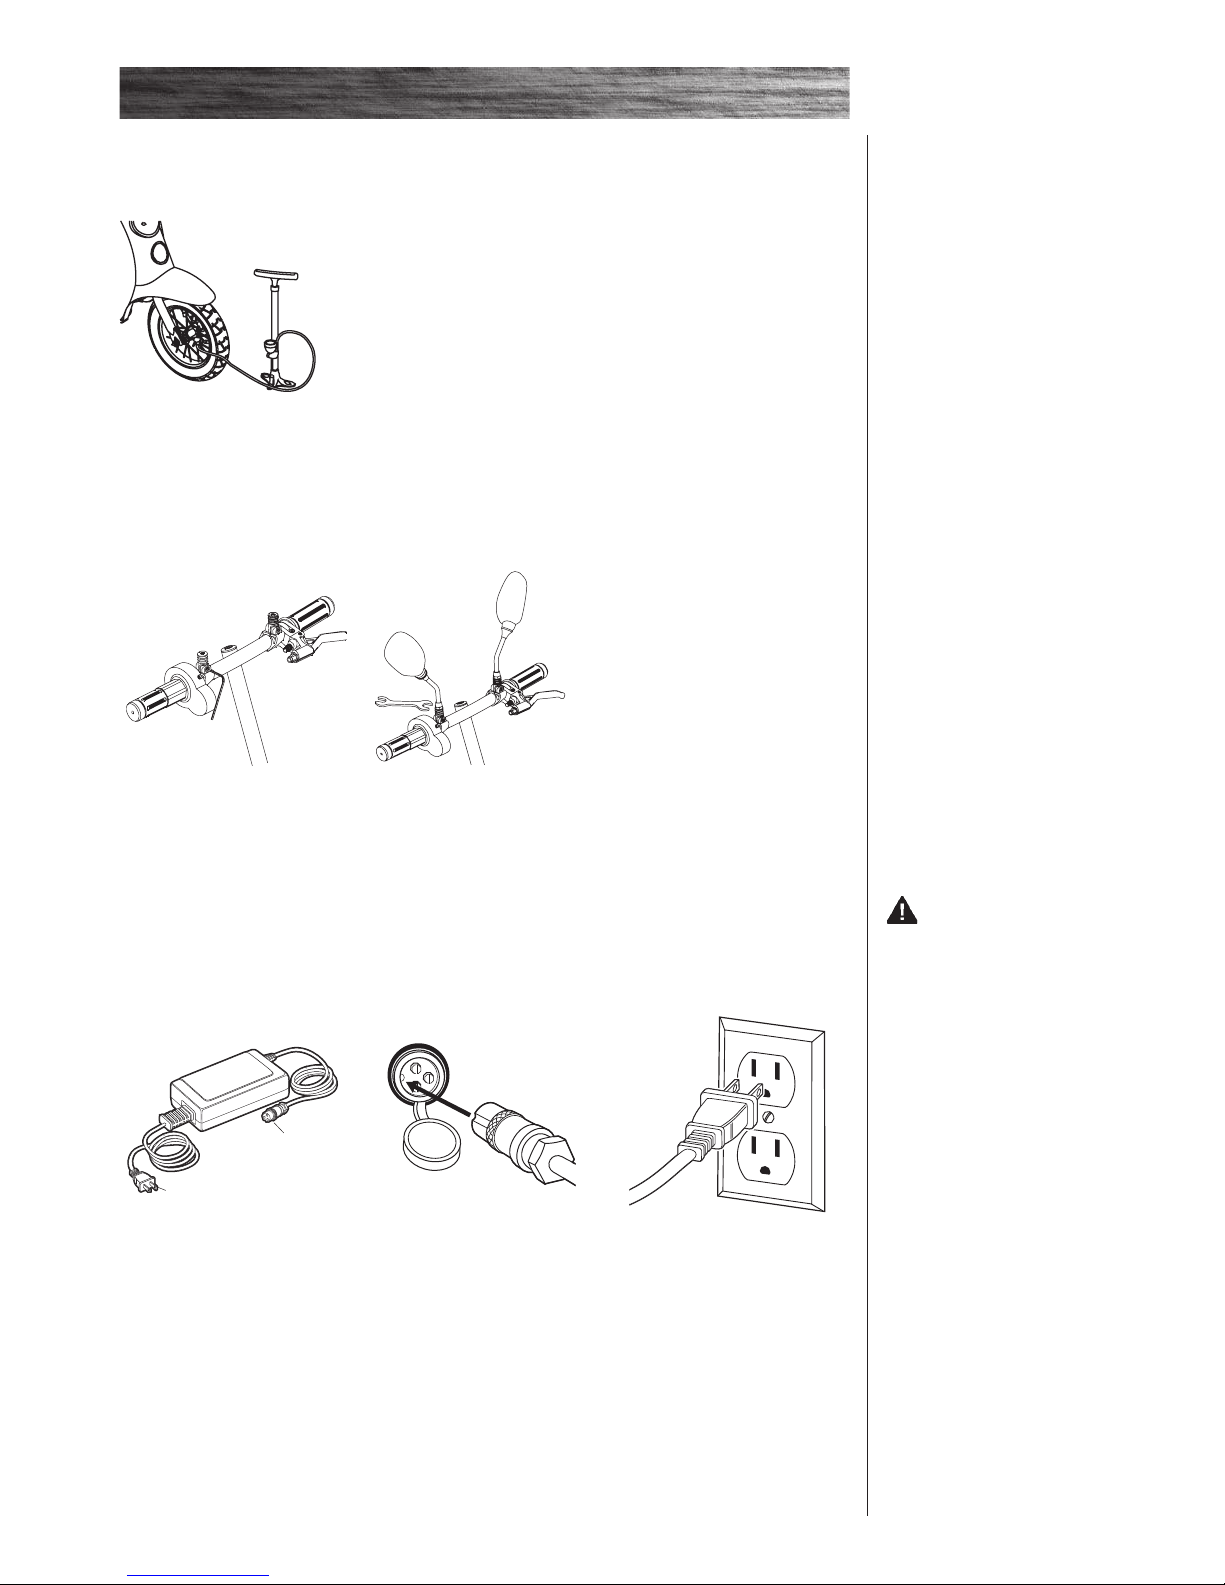
4
Charging the Battery
Charge battery prior to use.
• Initialchargetime:18hours •Runtime:Up to 30 minutes of continuous ride time
• Rechargetime:upto12hours •Averagebatterylife:250charge/dischargecycles
depending on the level of depletion
1Turn power OFF before charging.
2
WARNING:
Rechargeable batteries are only to
be charged under adult supervision.
Always disconnect your Pocket Mod
from the charger before cleaning
with liquid.
Note: If your charger does not
look like the one illustrated,
your unit has been supplied
with an alternative charger.
The specifications and charging
procedure would not change.
The charger has a small window
with one LED or two LEDs to
indicate the charge status. Refer
to the illustration on the charger
unit for the actual “charging” and
“charged” status indications for
your model charger.
Chargers have built-in protection
to prevent battery from being overcharged.
Be sure to properly align the
groove on the charger input
plug with the corresponding
socket on the case; otherwise,
no charging action will occur.
Charger
Plug
Charger
Port
ASSEMBLY AND SET-UP
q Inflating Tires
Note: The pressurized air supplies
found at gasoline stations are
designed to inflate high-volume
automobile tires. If you decide to
use such an air supply to inflate
your Pocket Mod tires, first make
sure the pressure gauge is working,
then use very short bursts to
inflate to the correct PSI. If you
inadvertently over-inflate the
tires, release the excess pressure
immediately.
q Side View Mirror Assembly Instructions (if applicable)
1
Adjust side view mirror
sockets into fixed place and
tighten down.
2 Insert side view mirrors into
sockets and tighten down nuts.
1 Inflate tires to PSI indicated
on sidewall of tire.
5
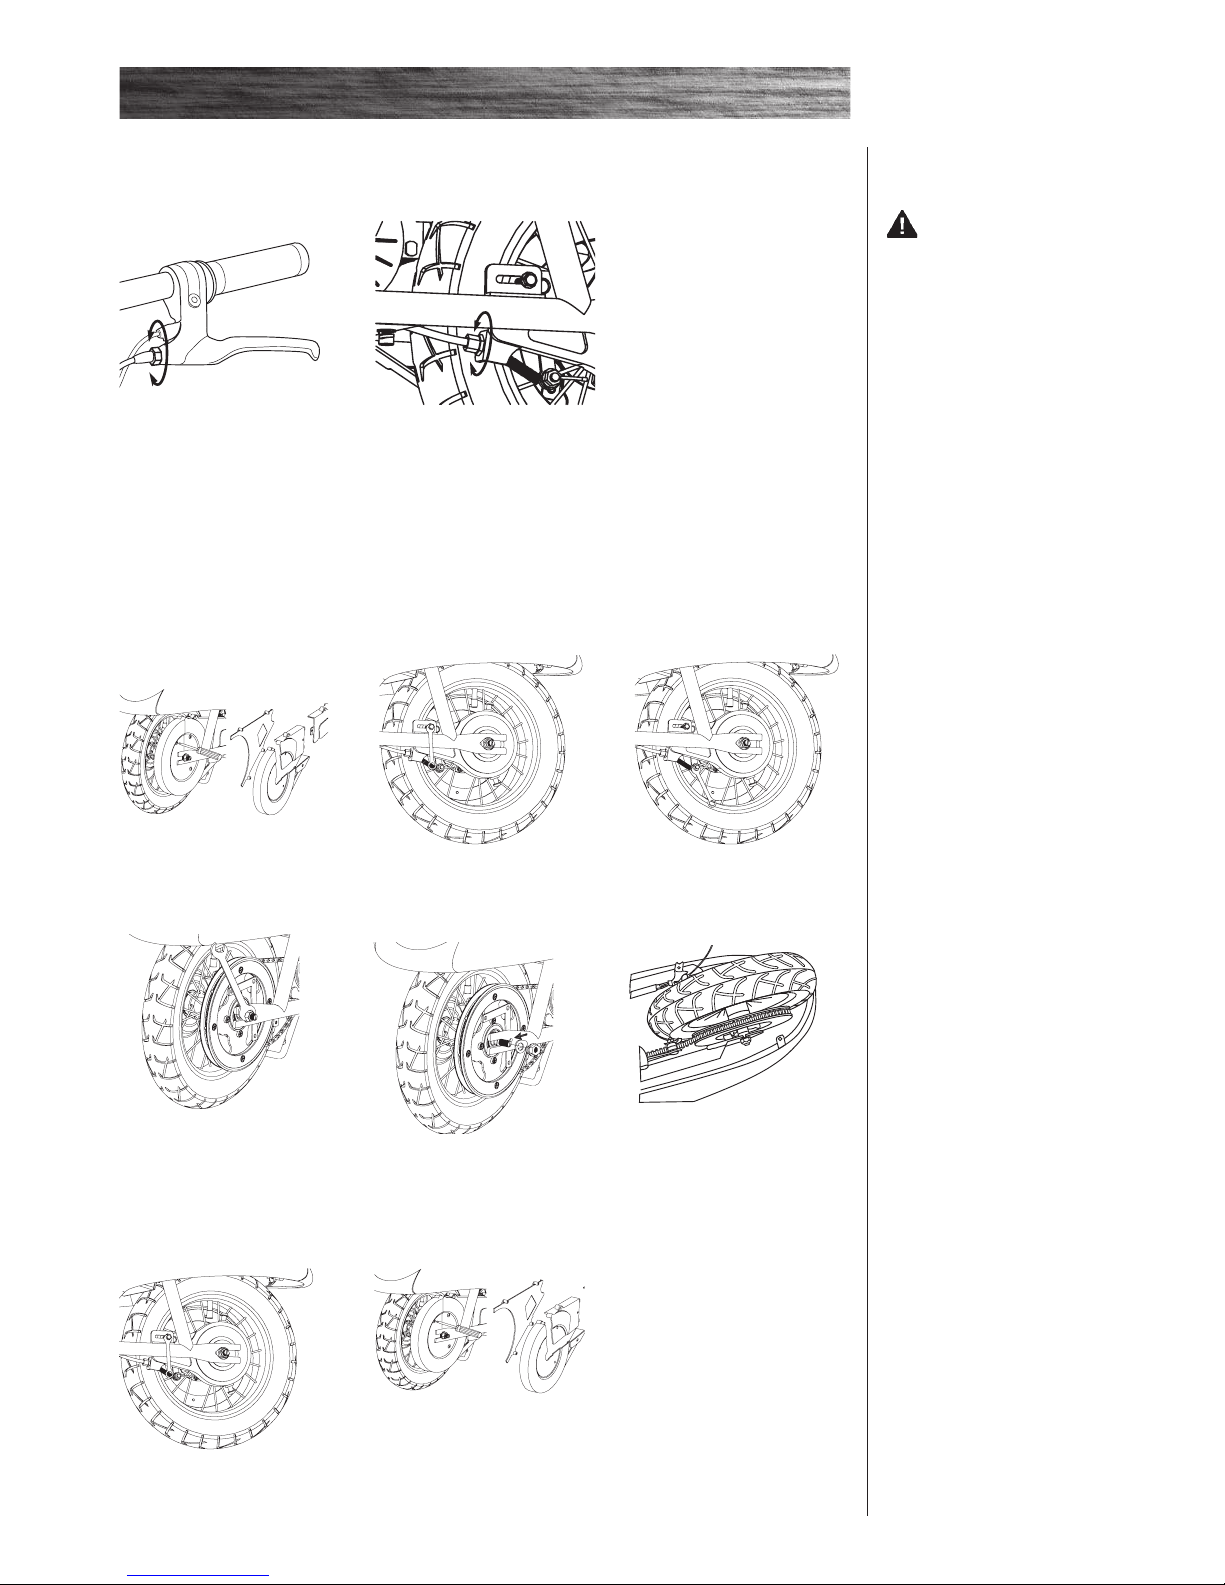
REPAIR AND MAINTENANCE
4 Loosen axle. Slide wheel
forward to loosen the chain.
5 Remove wheel.
q Chain and Rear Tire Replacement
1
Remove screws that secure
chain guard and remove chain
guard.
3 Loosen brake housing anchor
and disconnect. Keep spacer and
washers together.
2 Loosen brake cable anchor and
disconnect cable.
6 Install new chain or wheel by
slipping chain around axle. Slide
axle into the slots on frame. Slide
wheel forward and maneuver chain
onto rear sprocket, motor shaft and
chain tensioner.
7 Tighten brake housing
anchor securely.
8 Re-attach chain guard. Test ride
and readjust as needed.
Note arrangement of
hardware:
Right (Throttle)
Safety hook
3/8Axlelocknut
Left (Brake)
Spacer
Safety hook
3/8Axlelocknut
Turn power “OFF” before conducting any maintenance procedures.
q Adjusting Brakes
1
Thread brake lever adjuster in
or out 1/4 to 1/2 turn until desired
brake adjustment is attained. If
brake still needs further
adjustment, proceed to step 2.
2 If brake is too tight or has too
much slack, loosen nut for additional adjustment on brake cable.
Securely tighten nut when done.
WARNING: The brake
is capable of skidding the tire and
throwing an unsuspecting rider.
Practice in an open area free from
obstacles until you are familiar with
the brake function. Avoid skidding
to a stop as this can cause you to
lose control or damage the rear tire.
Note: The brake lever contains a
safety switch to stop the motor
when the brake is applied. In an
emergency, applying the brake
will always stop the motor. Do not
disable or replace this lever with
anything other than a genuine Razor
replacement part.
66
q Battery Care and Disposal
Do not store the battery in temperatures above 75° F (23.8° C) or below -10° F (-23.3° C).
CONTAINS SEALED NON-SPILLABLE LEAD ACID BATTERY. BATTERY MUST BE RECYCLED.
Disposal: Your Razor product uses sealed lead-acid batteries which must be recycled or disposed of in an
environmentally sound manner. Do not dispose of a lead-acid battery in a fire. The battery may explode or leak. Do not
dispose of a lead-acid battery in your regular household trash. The incineration, land filling or mixing of sealed leadacid batteries with household trash is prohibited by law in most areas. Return exhausted batteries to a federal or state
approved lead-acid battery recycler or a local seller of automotive batteries.
q Charger
The charger supplied with the Pocket Mod should be regularly examined for damage to cord, plug, enclosure and other
parts, and, in the event of such damage, product must not be charged until it has been repaired or replaced.
WARNING: If a battery
leak develops, avoid contact with
the leaking acid and place the
damaged battery in a plastic bag.
Refer to the disposal instructions at
left. If acid comes into contact with
skin or eyes, flush with cool water
foratleast15minutesandcontact
a physician.
REPAIR AND MAINTENANCE
WARNING:
To prevent shock, please follow the
instructions accordingly and do not
skip or combine any steps.
1 Lift up seat and unscrew 4
screws in storage compartment and
remove tray.
3 Remove fuse and replace with
new one of equal
amperage. Amperage rating is
located on top of fuse.
4 Close fuse box. Replace seat/
storage compartment with 4
screws.
Amperage
number
2 Locate fuse box on top of bat-
tery assembly. Open fuse cover to
expose fuse.
q Replacing Fuse
Turn power “OFF”.

Tire Inflation
Periodically inspect tires for excess wear and replace as
needed. Regularly check tire pressure and inflate as needed.
If you get a flat tire, inner tube can be patched or a new tube
can be purchased from Razor or an authorized repair center.
Safety Gear
Always wear proper protective equipment such as an
approved safety helmet. Elbow pads, kneepads, pants and
long sleeves are recommended. Always wear shoes, never
ride barefooted or in sandals, and keep shoelaces tied and
out of the way of the wheels, motor and ride system.
Razor Limited Warranty
The manufacturer warranties this product to be free of manufacturing defects
for a period of 90 days from date of purchase. This Limited Warranty does not
cover normal wear and tear, tires, tubes, cables, or any damage, failure or
loss caused by improper assembly, maintenance, storage or use of the Razor
Pocket Mod.
This Limited Warranty will be void if the product is ever
•usedinamannerotherthanforrecreation
•modiedinanyway
•rented
The manufacturer is not liable for incidental or consequential loss or damage
due directly or indirectly to the use of this product.
Razor does not offer an extended warranty. If you have purchased an
extended warranty, it must be honored by the store at which it was
purchased.
WARRANTY
For your records, save your original sales receipt with this manual and write
the serial number below. The serial number is located on the left hand side
between the back stand and rear wheel stamped into the metal frame.
__________________________________________
Loose Parts
There should not be any unusual rattles or sounds from
loose parts or broken components. If you are not sure, ask an
experienced mechanic.
Brake
Check brake for proper function. When you squeeze lever, brake
should provide positive braking action. When you apply the brake
with speed control on, brake cut-off switch will stop the motor.
Frame, Fork and Handlebars
Check for cracks or broken connections. Although broken frames
are rare, it is possible for an aggressive rider to run into a curb or
wall and wreck, bend or break the frame. Inspect regularly.
SAFETY REMINDERS
q
q
q
q
PRE-RIDE CHECKLIST
7
DO NOT RETURN TO STORE
Do not use this product for the first time until you have inflated the tires
to the correct PSI and charged the battery for at least 18 hours.
Failure to follow these instructions may damage your product and
void
your warranty
Item Number:
Vapor RAZPMOD-BLA
Bella RAZPMOD
Bella S0755
Betty 15130661
Daisy 15130650
Copyright © 2003-2009 Razor USA LLC. All rights reserved. RAZOR and the Razor Logo Design
are among the registered trademarks of Razor USA LLC in the United States and/or select foreign
countries.
11/2008
q
TM
NOTE : Les illustrations sont fournies comme démonstration uniquement.
Spécifications susceptibles de changer sans préavis.
MANUEL UTILISATEUR
Lisez et assimilez l’intégralité de ce manuel avant
d’utiliser le scooter !
NE RETOURNEZ PAS AU MAGASIN !
Numéro d’article :
Vapor RAZPMOD-BLA
Bella RAZPMOD
Bella S0755
Betty 15130661
Daisy 15130650
8

AVERTISSEMENT : La pratique du Pocket Mod peut être une
activité dangereuse. Certaines conditions peuvent entraîner une défaillance
de l’équipement sans que le fabricant soit mis en cause. Comme d’autres
véhicules électriques, le Pocket Mod peut, et est prévu pour, se déplacer ;
il est donc possible de perdre le contrôle, de chuter et / ou d’être confronté
à des situations dangereuses qu’aucune précaution, aucune connaissance
ou aucune expertise ne saurait éviter. Dans de tels cas, vous pouvez être
grièvement blessé ou mourir, et ce même si vous utilisez un équipement de
sécurité et prenez d’autres précautions. VOUS UTILISEZ CE SCOOTER À VOS
PROPRES RISQUES ET DEVEZ FAIRE PREUVE DE BON SENS.
Ce manuel contient de nombreux avertissements et mises en garde
concernant les conséquences d’un manque de maintenance, d’inspection
ou d’une mauvaise utilisation de votre Pocket Mod. Tout accident peut
provoquer des blessures sérieuses ou même la mort, c’est pourquoi nous ne
vous avertissons pas du potentiel de blessure ou de mort chaque fois qu’une
telle possibilité est mentionnée.
UTILISATION APPROPRIÉE ET SURVEILLANCE
PARENTALE
Ce manuel contient des informations de sécurité importantes. Il est de
votre responsabilité d’étudier ces informations et de vous assurer que tous
les utilisateurs comprennent tous les avertissements, mises en garde,
instructions et consignes de sécurité. Vous devez également vous assurer
que les jeunes usagers sont capables d’utiliser ce produit en toute sécurité
et de façon responsable. Avec de jeunes usagers, Razor recommande de
reprendre régulièrement les informations contenues dans ce manuel et d’en
souligner de nouveau l’importance ; vous êtes également tenu d’inspecter et
d’entretenir le scooter de votre enfant pour assurer sa sécurité.
L’âge recommandé de 12 ans pour l’utilisation du Pocket Mod est seulement
une estimation, et il peut être affecté par la taille, le poids ou les capacités
de l’utilisateur. Toute personne ne se sentant pas à l’aise sur le Pocket
Mod ne doit pas essayer de pratiquer. Les parents doivent décider de
permettre ou non à leur enfant d’utiliser ce produit en fonction de
sa maturité, de ses capacités et de son aptitude à respecter les
consignes.
Tenez ce produit hors de portée des enfants en bas âge et rappelez-vous
qu’il est exclusivement destiné à des personnes qui, au minimum, se sentent
totalement à l’aise et compétents pour utiliser le produit.
NE PAS DÉPASSER LA LIMITE DE POIDS DE 77 KG.
Le poids de l’utilisateur ne signifie pas forcément que la taille de la personne
est appropriée pour convenir au Pocket Mod ou en maintenir le contrôle.
Ne touchez pas le moteur de votre Pocket Mod durant le fonctionnement car
il devient très chaud.
PRATIQUES ET CONDITIONS DE CONDUITE
ACCEPTABLES
Vérifiez et respectez toujours les lois ou réglementations locales qui peuvent
s’appliquer aux endroits où le Pocket Mod peut être utilisé dans des espaces
publics. Le Pocket Mod est prévu pour être utilisé uniquement dans des
environnements contrôlés, exempts de tous dangers potentiels liés à la
circulation et il ne doit pas être utilisé sur des voies publiques ou sur les
trottoirs. Ne roulez pas avec votre Pocket Mod dans des secteurs où un trafic
piéton ou mécanique est présent.
Ayez une attitude défensive lorsque vous roulez. Prenez garde aux obstacles
potentiels qui pourraient s’accrocher à votre roue ou vous forcer à tourner
brusquement ou à perdre le contrôle. Veillez à éviter les piétons, les
planchistes, les planches à roulettes, les trottinettes, les vélos, les enfants
ou les animaux qui pourraient couper votre trajectoire ; respectez les droits
et la propriété d’autrui.
N’essayez pas de faire ou ne faites pas d’acrobaties ou de figures sur votre
Pocket Mod. Le Pocket Mod n’est pas conçu pour résister à des abus tels que
sauter, grimper sur des trottoirs ou toute autre acrobatie.
Gardez les mains sur le guidon à tout moment.
Ne transportez jamais de passagers ou ne laissez jamais plus d’une personne
à la fois monter sur le Pocket Mod.
N’utilisez jamais la moto à proximité de marches ou de piscines.
Tenez vos doigts et les autres parties de votre corps à l’écart de la chaîne,
du système de direction, des roues et de tous les autres éléments en
mouvement.
N’utilisez jamais d’écouteurs ou de téléphone portable lorsque vous roulez.
Ne vous accrochez jamais à un autre véhicule.
Ne conduisez pas le Pocket Mod par temps humide ou en présence de verglas
et n’immergez jamais le scooter dans l’eau car les éléments électriques et
les organes de transmission pourraient être endommagés par l’eau ou créer
d’autres conditions d’insécurité potentielles.
Le Pocket Mod est conçu pour être utilisé sur sol solide, plat, propre et sec,
tel que des trottoirs ou des terrains plats exempts de débris tels des cailloux
ou des graviers. Les surfaces humides, glissantes ou inégales et rugueuses
peuvent affecter la traction et contribuer à d’éventuels accidents. Ne
pratiquez pas le Pocket Mod dans la boue, sur la glace, dans les flaques ou
l’eau. Évitez des vitesses excessives qui peuvent être associées à la pratique
en descentes. Ne risquez jamais d’endommager des surfaces telles que de la
moquette ou du plancher en utilisant le Pocket Mod à l’intérieur.
Ne roulez pas de nuit où lorsque la visibilité est limitée.
ÉQUIPEMENT APPROPRIÉ POUR ROULER
Portez toujours un équipement de protection approprié, tel qu’un casque
homologué, des coudières et des genouillères. Le port du casque peut être
légalement exigé par les lois et réglementations locales de votre secteur.
Portez toujours des chaussures ; ne roulez jamais pieds nus ou en sandales,
et assurez-vous que vos lacets restent noués et hors de la trajectoire des
roues, du moteur et du système de transmission.
UTILISER LE CHARGEUR
Le chargeur fourni avec le Pocket Mod doit être régulièrement examiné pour
déceler un éventuel défaut du câble, de la prise, du boîtier et des autres
pièces ; en présence d’un tel défaut, le produit ne doit pas être chargé tant
que le chargeur n’a pas été réparé ou remplacé.
Utilisez uniquement le chargeur recommandé.
Prenez vos précautions durant la charge.
Le chargeur n’est pas un jouet. Le chargeur doit être utilisé par un adulte.
N’utilisez pas le chargeur à proximité de matériaux inflammables.
Débranchez le chargeur et déconnectez-le de la batterie du produit lorsque
vous ne l’utilisez pas.
Ne dépassez pas le temps de charge.
Déconnectez toujours le chargeur avant d’essuyer et de nettoyer votre Pocket
Mod avec un liquide.
L’ABSENCE DE BON SENS ET LE NON RESPECT
DES AVERTISSEMENTS CI-DESSUS AUGMENTE
LE RISQUE DE LÉSIONS GRAVES. UTILISEZ CE
PRODUIT AVEC L’ATTENTION ET LE SÉRIEUX
NÉCESSAIRES À UNE PRATIQUE SÉCURISÉE.
AVERTISSEMENTS DE SÉCURITÉ
9

Storage Compartment
Under Seat
Rear Mudap
(if applicable)
Chain Guard
Kick Stand
Throttle
Side View Mirror
(if applicable)
Brake Lever
On/O
Switch
Charger Port
AVANT DE COMMENCER
10
AVERTISSEMENT :
UTILISEZ EXCLUSIVEMENT
DES PRODUITS RAZOR
AVEC VOTRE POCKET MOD
RAZOR.
Outils nécessaires
Clé de 3 mm
(Daisy uniquement) /
2,5 mm (non incluse)
Gonfleur type pompe
à vélo, pour chambres
à air à valve Schrader
avec manomètre
(non inclus).
Clés de 14 mm
(Daisy uniquement) / 8 mm
et 10 mm (non incluses)
Chargeur
Poignée de frein
Interrupteur
On/Off
Port du
chargeur
Rétroviseur latéral
(si applicable)
Poignée
d’accélérateur
Tournevis Phillips
(non inclus)
Inspectez le contenu de la boîte pour détecter d’éventuelles éraflures sur la peinture, des bosses ou des
nœuds dans les câbles qui peuvent être provoqués durant l’expédition.
ASSUREZ-VOUS QUE L’INTERRUPTEUR EST PLACÉ SUR « OFF » AVANT D’EFFECTUER
TOUTE OPÉRATION D’ASSEMBLAGE OU DE MAINTENANCE.
Razor recommande que l’assemblage soit effectué par un adulte.
Compartiment de stockage
sous le siège
Béquille
Garde-chaîne
Bavette de pare-boue
(si applicable)

11
ASSEMBLAGE ET RÉGLAGE
AVERTISSEMENT :
Si vous ne réglez et ne serrez pas
correctement les fixations et les
arrêtoirs qui bloquent le guidon,
vous risquez de perdre le contrôle
et de chuter.
1 Retirer la protection plastique et
insérer le guidon assemblé dans la
fourche via le carénage jusqu’à ce
qu’il bloque. Lever le guidon jusqu’à
la hauteur souhaitée en maintenant
les poignées et le carénage alignés
dans la limite des flèches rouges de
la zone de sûreté.
2 Serrez le boulon.
q Fixer le guidon
1 Retirer l’emballage de
la fourche avant.
2 Insérer la roue dans la fourche
avant avec les rondelles frein
placées à l’extérieur de la fourche.
3 Insérer la languette sur la
rondelle frein dans le trou de la
fourche avant et serrer les écrous.
q Vérifier la tension des rayons
1
Vérifier la tension des rayons en saisissant et en secouant chaque
rayon. Le rayon de doit pas être lâche par rapport au moyeu. Vérifiez
la présence d’un jeu éventuel entre les flasques, là où elles sont en
contact avec le moyeu. Vous ne devriez pas pouvoir faire tourner un
écrou de rayon à la main. Si un ou plusieurs rayons bougent, ou si vous
pouvez tourner un écrou avec les doigts, tous les rayons doivent être
vérifiés et resserrés avec une clé à rayons.
2 Commencer par le rayon le plus
proche de la valve du pneu et serrer
chaque écrou, dans l’ordre, d’exactement
1/4 à 1/2 tour. Continuer à serrer tous
les rayons dans l’ordre, sans dépasser
1/2 tour jusqu’à ce que tous les rayons
soient serrés.
AVERTISSEMENT :
Vérifiez régulièrement la tension
des rayons et resserrez-les si ils
sont lâches. Si vous avez un doute,
demandez à un mécanicien moto
ou vélo expérimenté d’inspecter
vos rayons afin de déterminer si ils
nécessitent d’être serrés ou réglés.
Note: En serrant chaque écrou de
plus d’1/2 tour, vous risquez de
tordre la roue et de la déséquilibrer,
l’endommageant ainsi de façon
irrémédiable.
Spoke
Flange
Spoke
Nipple
1
2
3
20
19
4
18
17
Hub
Flange
Spoke
Flange
Rim
Nipple
q Fixer la roue avant
Flasque
Flasque de
moyeu
Flasque
Plaquette
Écrou de
rayon
Rayon
Écrou de rayon
 Loading...