

OWNER’S MANUAL
13111110 Red
wist the throttle to start motor.
E_Series_Manualv10.indd 1 3/10/06 2:10:49 PM

WARNING:
fail without fault of the manufacturer. Like other electric vehicles,
the scooter can and is intended to move, and it is therefore possible
to lose control, fall off and/or get into dangerous situations that no
This manual contains many warnings and cautions concerning the
APPROPRIATE RIDER USE AND
This manual contains important safety information. It is your
the information in this manual with younger riders, and that you
The recommended rider ages of 8 and older for the E100 scooter and
fi t comfortably on the scooter should not attempt to ride it.
A parent’s decision to allow his or her child to ride this
to fi t or maintain control of the scooter.
these parts can become very hot.
ACCEPTABLE RIDING PRACTICES AND
Always check and obey any local laws or regulations which
your wheel or force you to swerve suddenly or lose control. Be careful
to avoid pedestrians, skaters, skateboards, scooters, bikes, children or
the scooter and in a safe, outdoor environment suitable for riding. The
will start.
the handlebars and folding system can cause you to lose control and
fall. When properly adjusted, you cannot twist the front wheel out of
twist or force these components to move or come off by hand, readjust
The scooters are not made to withstand abuse from misuse such as
jumping, curb grinding or any other type of stunts.
the scooter.
the scooter in water, as the electrical and drive components could be
The E100, E200 and E300 scooters are intended for use on fl at, dry
Always wear proper protective equipment such as an approved safety
A long-sleeved shirt, long pants, and gloves are recommended. Always
wear athletic shoes (lace-up shoes with rubber soles), never drive
the wheels, motor and drive system.
The charger supplied with the E100, E200 or E300 scooter should be
The charger is not a toy.
Always disconnect from the charger prior to wiping down and cleaning
your scooter with liquid.
THE ABOVE WARNINGS INCREASES RISK OF
SAFETY WARNINGS
Warnings
...........................................................
Assembly and Set-Up
...........................................
4
Troubleshooting Guide
......................
Warranty
........................................................
CONTENTS
E_Series_Manualv10.indd 2 3/10/06 2:10:50 PM
Allow up to 20 minutes for assembly, not including initial charge time.
Allow up to 12 hours for initial charge (see page 3 for charging information.
BEFORE YOU BEGIN
WARNING:
The scooter
fork and all other parts. Certain
tools only as a last resort.
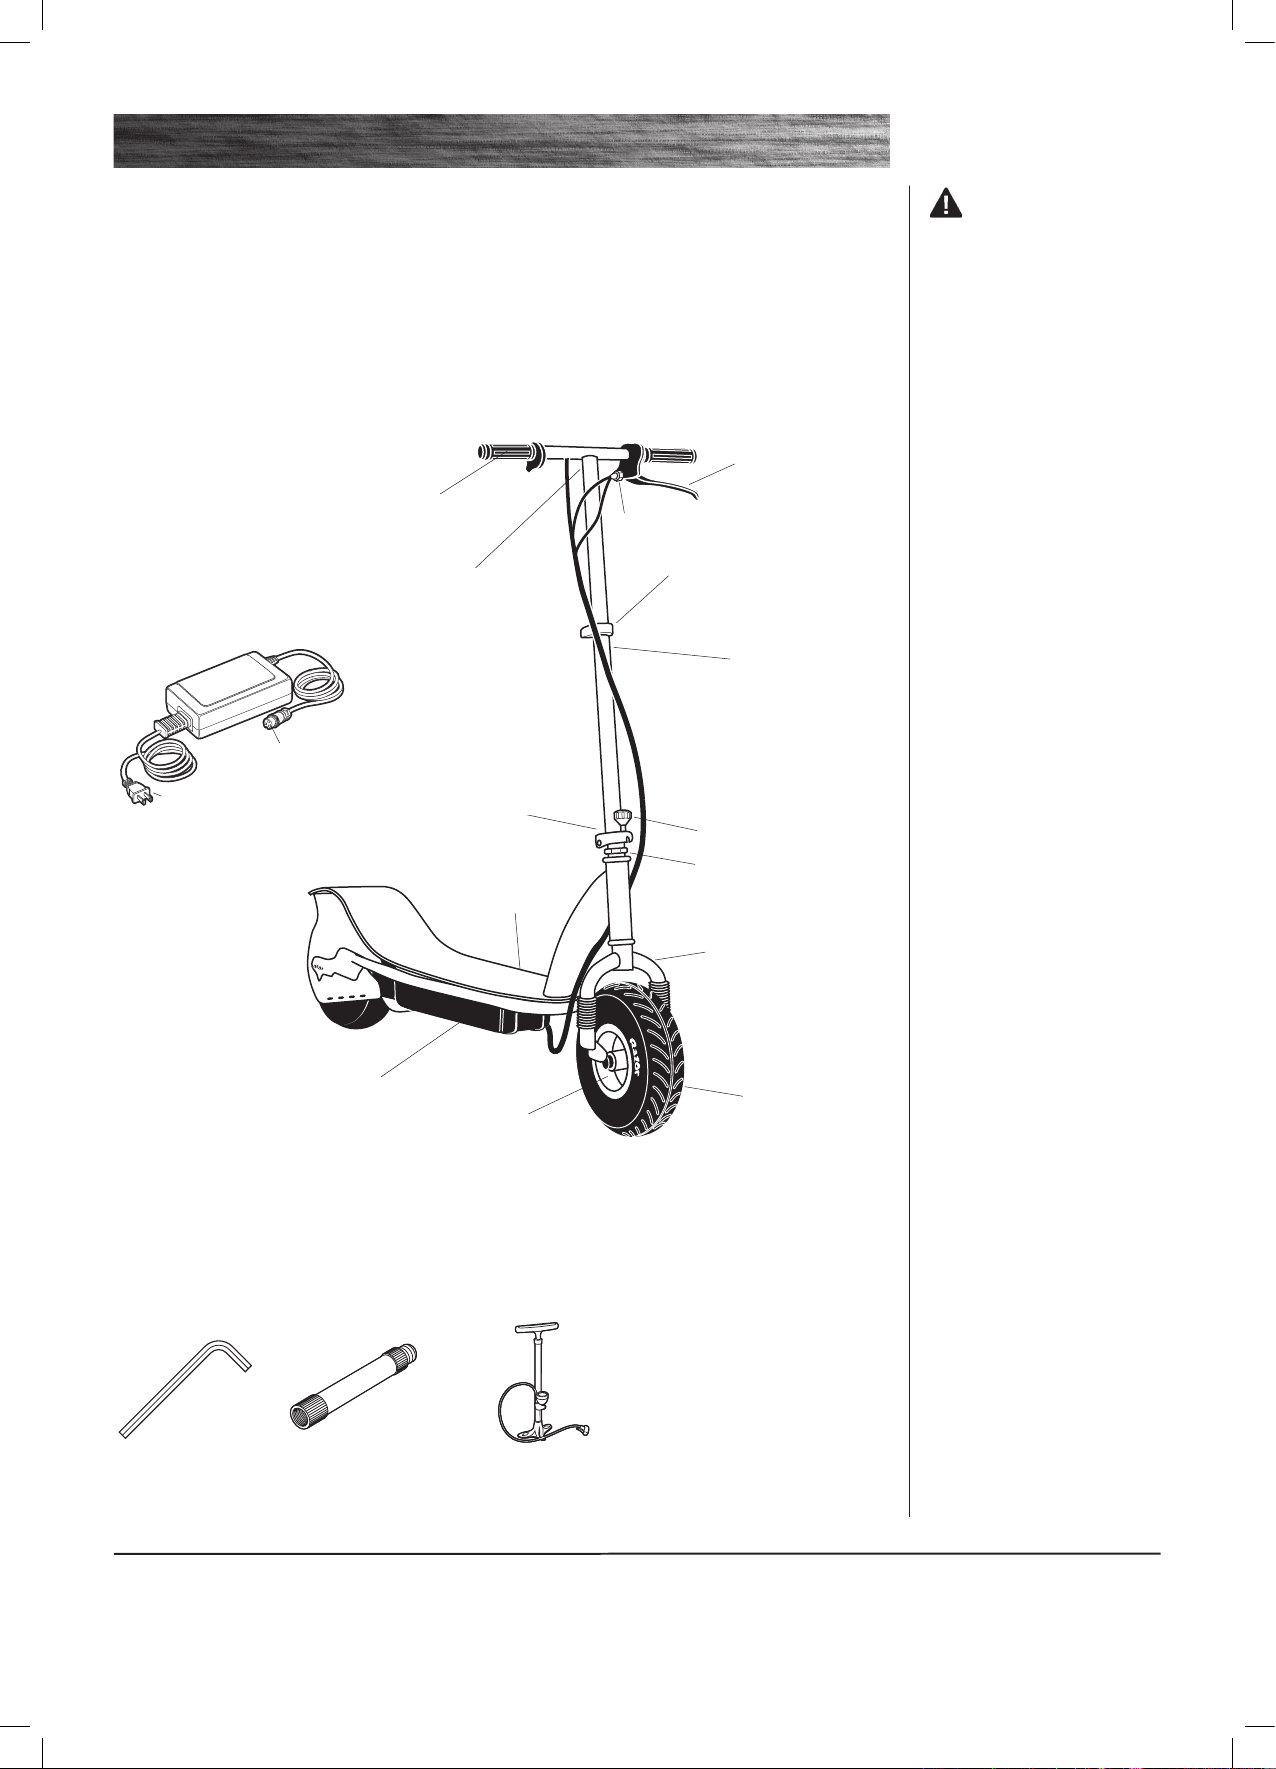
V
our web site
for updates and a list of authorized service centers
at
www.razor.com
t
Pacifi c
wrench
for Schrader valve
tires, with pressure
Wheel
Adjuster
Tire
T-tube
E_Series_Manualv10.indd 3 3/10/06 2:10:52 PM
ASSEMBLY AND SET-UP
Attaching the
WARNING:
to properly tighten the wedge
fall. When correctly tightened,
the handlebars will not rotate
front wheel under normal
WARNING:
fi ngers clear of the pivoting
The cable and wire
Your electric scooter may not have a fully charged battery. Th
idea
to charge the battery
Average battery life:
a minimum of 8 hours after
each use. When the vehicle
is not in regular use, recharge
the battery a
t least once a
month until normal use
is resumed.
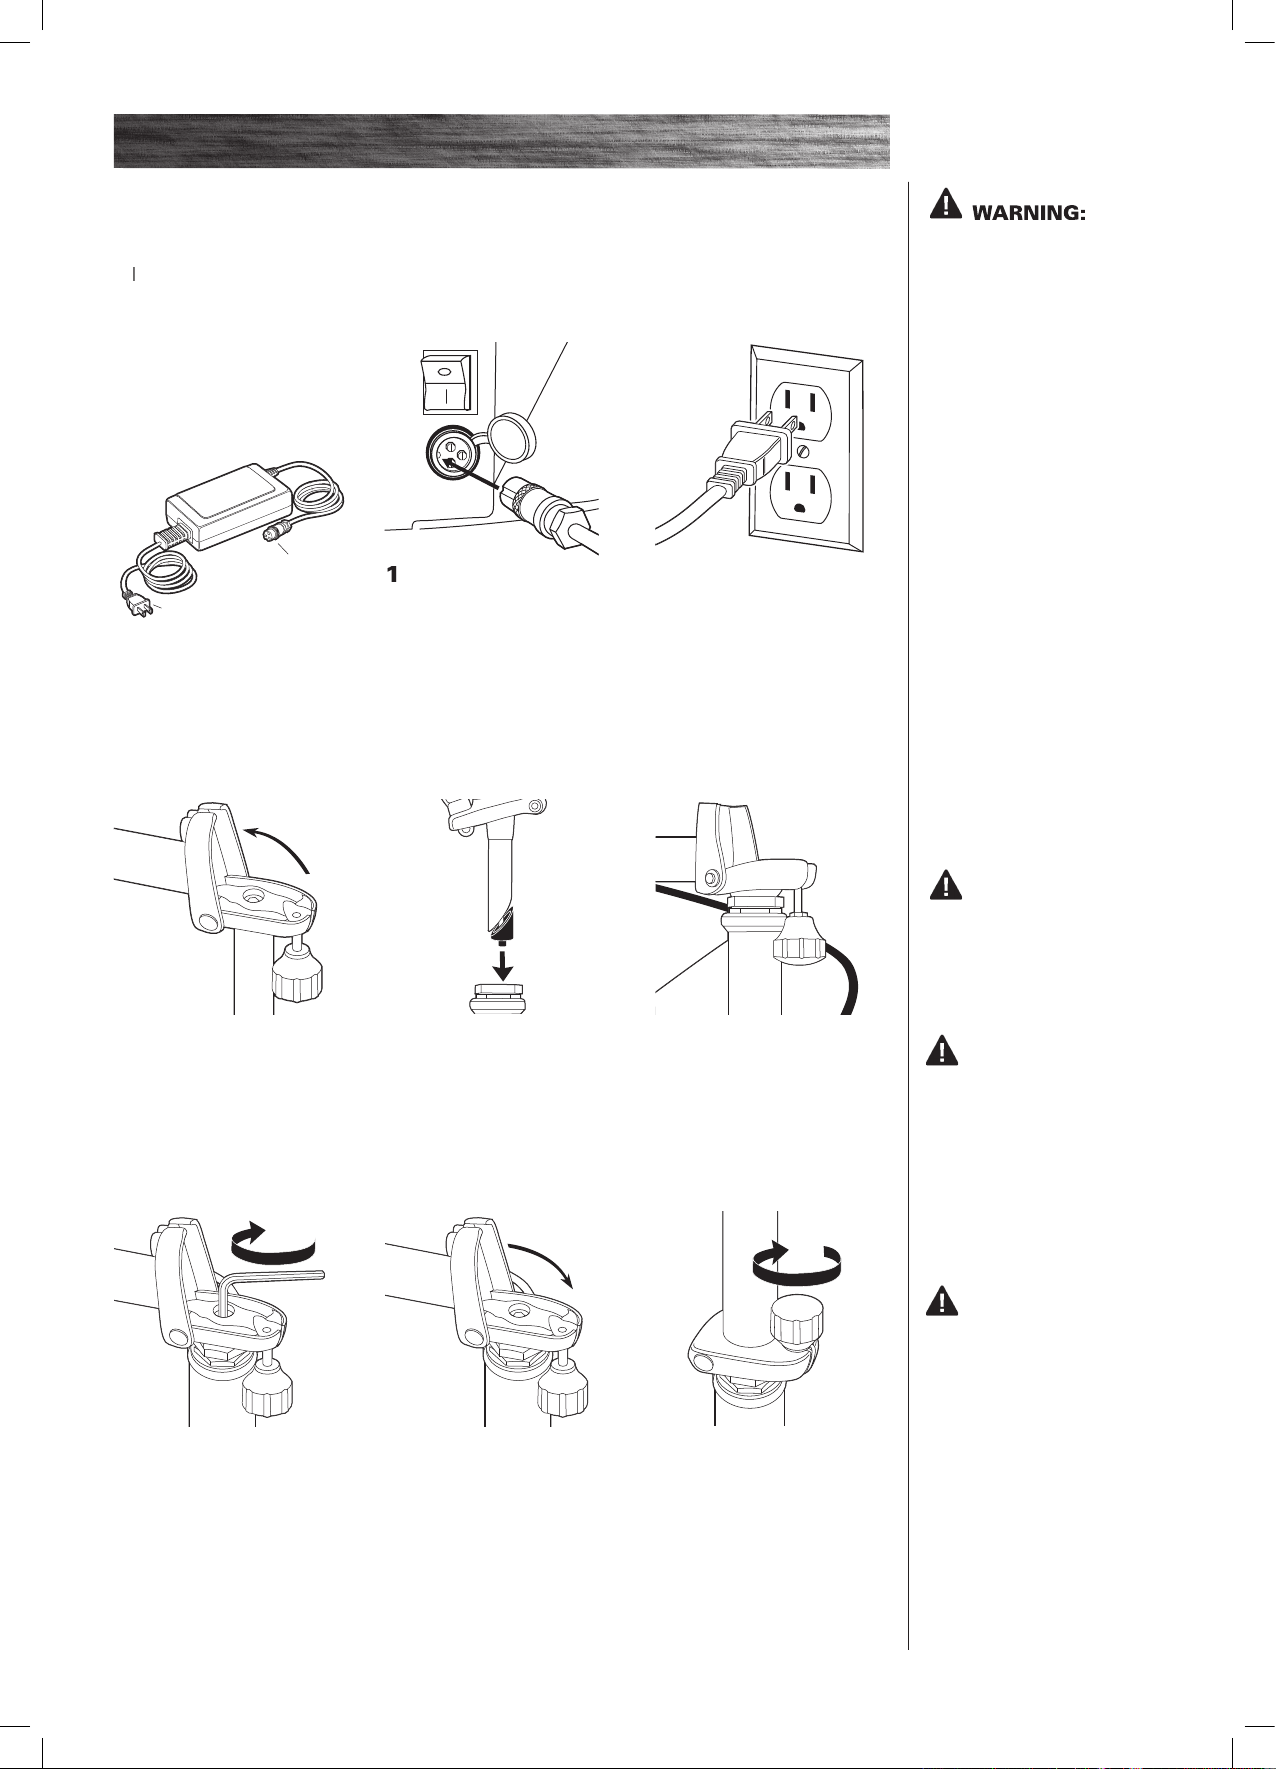
into the
The charger
works with the power switch
The charging input, on/off
front left-hand side.
wall outlet.
WARNING:
A
your scooter from
the charger before cleaning with
your unit has been supplied
with an alternative charger.
The specifi cations and charging
The charger has a small window
with one LED or two LEDs to
the charger unit for the actual
socket on the case;
wedge by turning the bolt
front wheel.
3
fork until it bottoms on the
the 12 o’clock position and
tighten by hand as fi rmly as
WARNING:
to recharge the battery at leas
t
E_Series_Manualv10.indd 4 3/10/06 2:10:54 PM
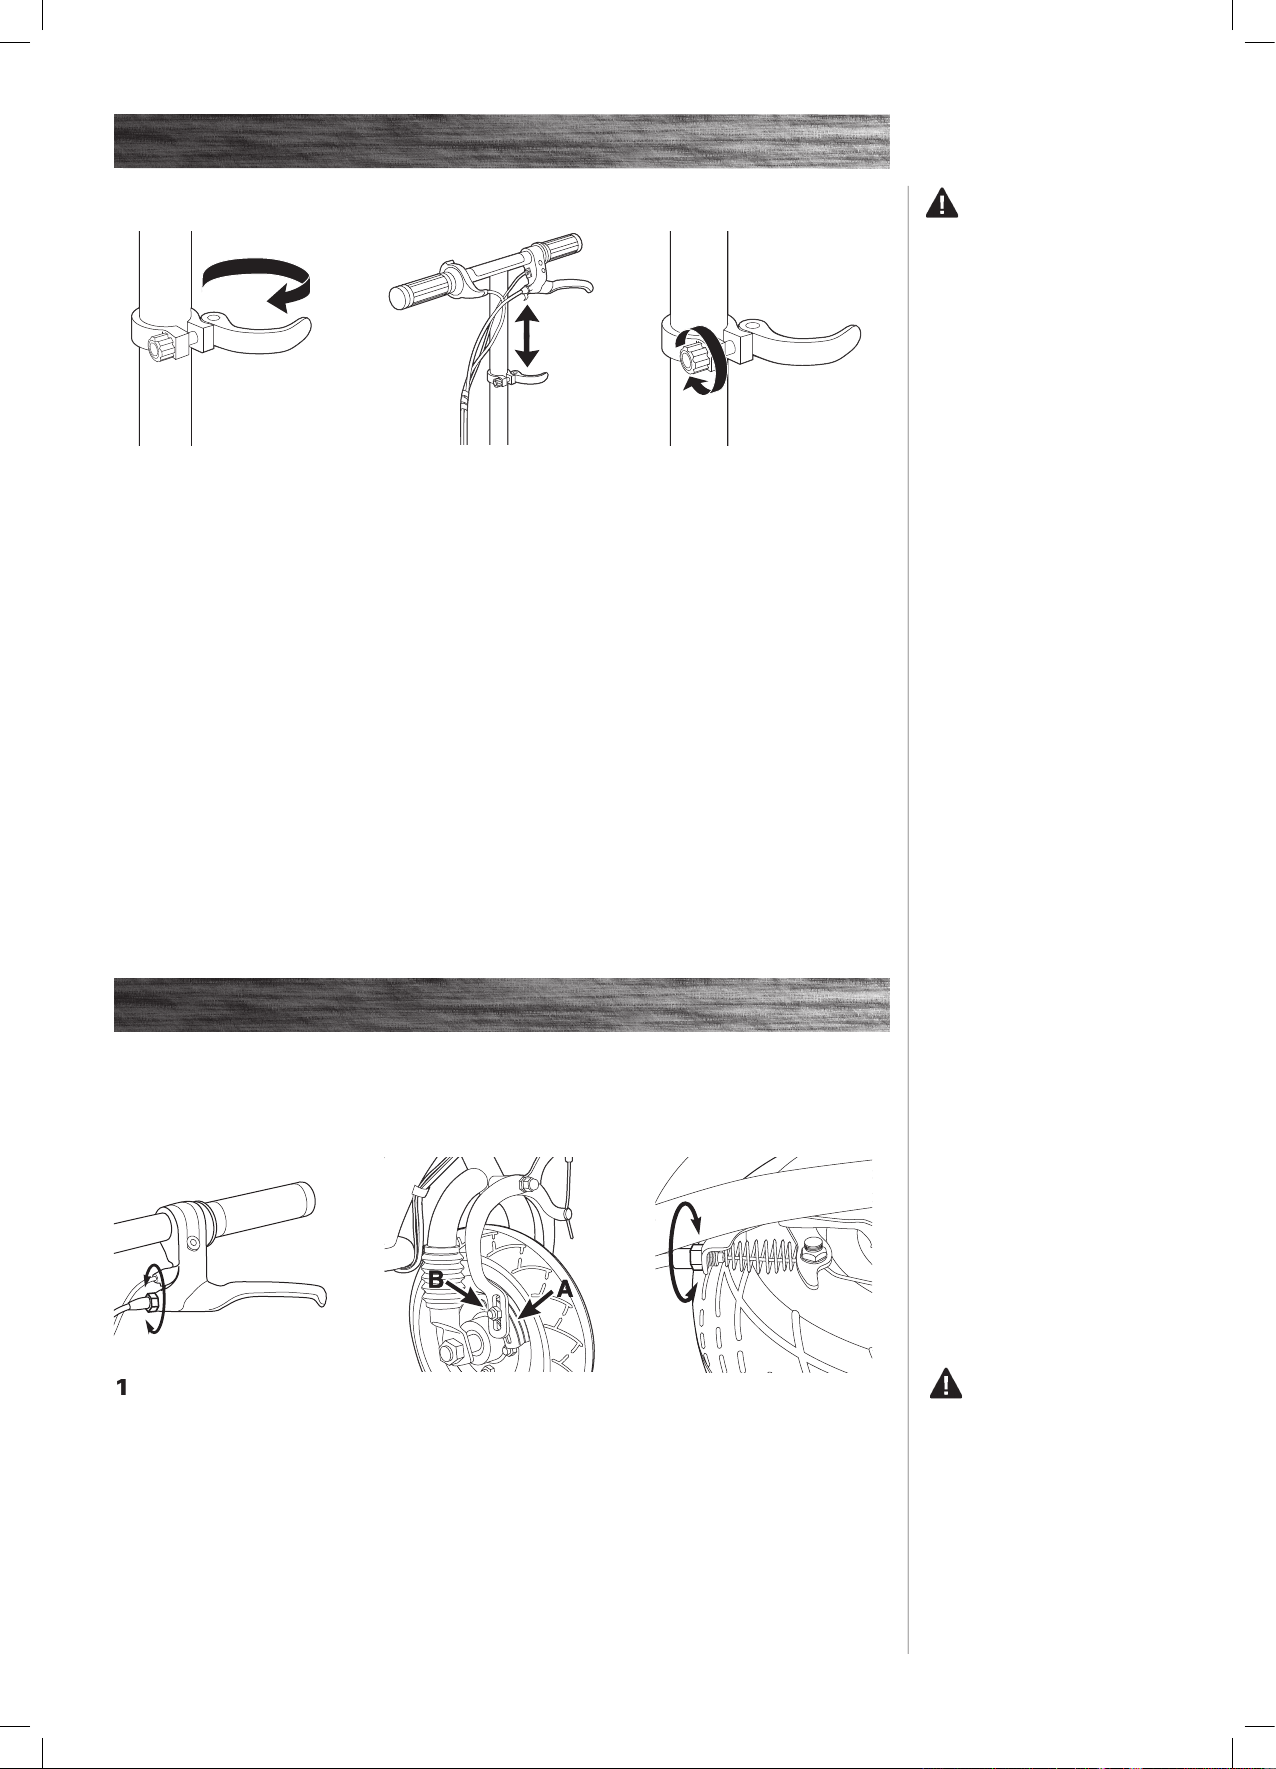
Adjusting the Handlebar Height
Testing the Brakes –
To use the brakes, squeeze the front and back brake levers to increase the
The E100 must be going 3 mph before the motor will start. Kick to 3 mph then activate the speed
ASSEMBLY AND SET-UP
3
The tension of the quick-
your fi ngers.
WARNING:
to properly engage the quick-
T-tube to move up or down
while riding, which may cause
you to lose control and fall.
With the quick-release properly
tighten. You should be able
to open and close the quick-
T-tube should move up and
WARNING:
The
the tire and throwing an
with the brake function. Avoid
Turn power switch off before conducting any maintenance procedures.
Adjusting the Brakes
REPAIR AND MAINTENANCE
To adjust the brake cable
ustment is attained. Most
adjustments are complete at
this step. If brake still needs
further adjustment, proceed to
step 2.
for proper alignment against
the wheel or excess wear. To
fi xing nut (B) and adjust the pad
to contact the rim. Retighten
threaded outward and the brake
tional adjustment.
E_Series_Manualv10.indd 5 3/10/06 2:10:57 PM
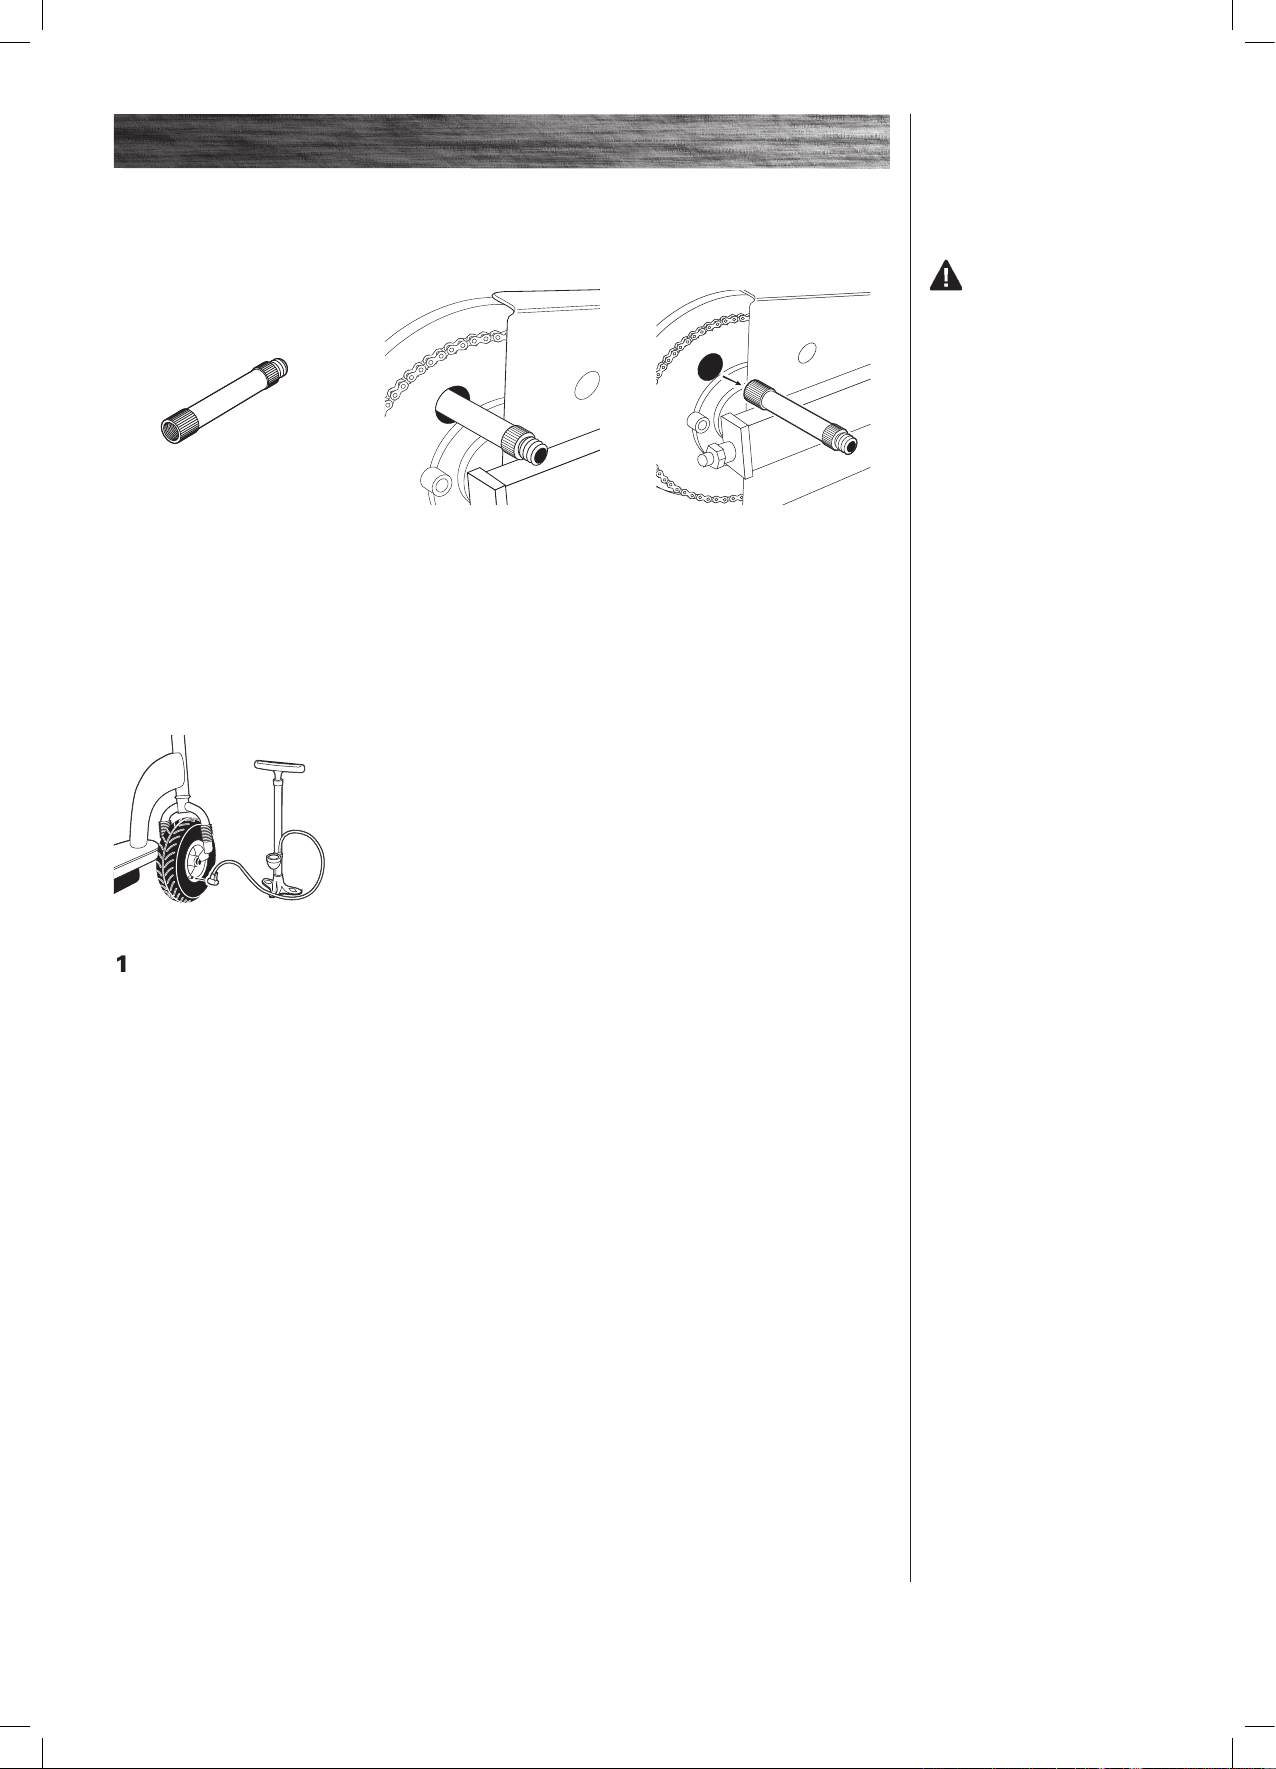
REPAIR AND MAINTENANCE
The valve adap
ter is located
Align the access hole in
the drive sprocket with the
tire valve. Thread the adapter
the PSI indicated on the tire
3
Tires are infl ated when shipped, but they invariably lose some pressure between the point of
your purchase.
type valve, infl ate the front
tire to the PSI indicated on the
WARNING:
to remove the valve adapter
The pressurized air
the pressure gauge is working,
then use very short bursts to
tire, release the excess pressure
E_Series_Manualv10.indd 6 3/10/06 2:10:59 PM

REPAIR AND MAINTENANCE
Adjusting the Chain
Tools required:
two (2)
wrenches
two (2) 1
wrenches
turning the wrenches counter
which is located in the long slot
3
tighten the tension adjusters on
the axle 1/8 to 1/4 turn to fi ne-
tune the chain tension. Both
wheel alignment.
4
tighten the axle and brake an-
This system of adjusters
familiar with it or do not feel
justment, consult an authorized
fi ed BMX bike or motorcycle
The chain should be “just taut”
– in other words snug, but not
TIGHT. The tensioning system
the motor shaft. Adjust 1/8 to
tension each time.
E_Series_Manualv10.indd 7 3/10/06 2:11:01 PM

REPAIR AND MAINTENANCE
Tire
Replacement
Tools required:
screwdriver
two (2) 8
wrench
and
two (2) 1
wrenches
With a 10mm wrench,
3
With two 8mm wrenches,
With two 17mm wrenches,
forward in the slots to loosen
the chain.
the small spacer between the
To hook up the brake housing
fi nal step.
thread the cable wire into the
to its original position and
tighten securely.
E_Series_Manualv10.indd 8 3/10/06 2:11:04 PM

REPAIR AND MAINTENANCE
just barely hold the hardware
Tighten both axle adjust-
to fi ne-tune the tension on the
wheel.
T
E_Series_Manualv10.indd 9 3/10/06 2:11:07 PM

REPAIR AND MAINTENANCE
the brake pad bolt and remove
Tools required:
two (2) 1
wrenches
and a fl athead screwdriver
turning the wrenches counter
3
tire. To reinstall wheel, reverse
these steps.
You
E_Series_Manualv10.indd 10 3/10/06 2:11:09 PM

CONTAINS SEALED LEAD BATTERY. BATTERY M
Your Razor product uses sealed lead-acid batteries which must be recycled or disposed of in
The transformer/charger supplied with the scooter should be regularly examined for damage to the cord,
The most frequently requested replacement parts (wheels, tires, tubes, batteries and chargers) are
WARNING:
water for at least 15 minutes
REPAIR AND MAINTENANCE
E_Series_Manualv10.indd 11 3/10/06 2:11:10 PM

TROUBLESHOOTING GUIDE
Solution
-
Scooter must be
trav
Tripped circuit breaker
full charge
Tires are not properly infl ated
the wall.
You may check to see if your charger is working by using a volt meter
The circuit breaker (next to on/off switch) will automatically shut off
the power if the motor is overloaded.
An excessive overload, such as too heavy a rider or too steep a hill,
tightly plugged into the charger connector, and that the charger is
Average battery life is 1 to 2 years depending on scooter use and
The tires are infl ated when shipped, but they invariably will lose
the scooter. If the scooter is overloaded, the circuit breaker may trip
to reset the circuit. Avoid repeatedly tripping the circuit breaker.
wheel is centered between pads
Adjust brake at lever (page 4) to allow wheel to spin
without brake contact.
E_Series_Manualv10.indd 12 3/10/06 2:11:11 PM

TROUBLESHOOTING GUIDE
VVV
our web site our web site our web site
for updates and a list of authorized service centers
for updates and a list of authorized service centersfor updates and a list of authorized service centers
at at at
www.razor.comwww.razor.comwww.razor.com
ttt
Pacifi c Pacifi c Pacifi c
times it does
when applying the brake
Solution
they are tight.
for concern. If your charger does not get warm during use, it does not
Apply a lubricant such as 3 in 1
TM
or Tri-Flow
TM
to the chain.
E_Series_Manualv10.indd 13 3/10/06 2:11:11 PM

E100 PARTS
4 T-Bar
Wheel, rear on
40 Spacer, rear center
41 Sprocket, rear wheel drive
42 SHCS Screw, for sprocket
43 Washer, locking for sprocket
44 Spacer, rear outside, sprocket side
45 Chain guard
46 Screws for chain guard
47
Rear fender
48 Circuit breaker, prewired
49
Electronic control module
E_Series_Manualv10.indd 14 3/10/06 2:11:11 PM

E100 PARTS
E_Series_Manualv10.indd 15 3/10/06 2:11:12 PM

E200 PARTS
4 T-bar
40 Spacer, rear outside, non-drive side
41 Axle, rear
42 Bearing, 608
43 C-clip for brake shoulder
44 Rear wheel (tire, tube and rim assembly)
45 Spacer, rear center
46 Sprocket, rear wheel drive
47 Washer, locking for sprocket
48 SHCS screw, for sprocket
49 Spacer, rear outside, sprocket side
Charger receptacle
FH screw, for deck
E_Series_Manualv10.indd 16 3/10/06 2:11:12 PM

E200 PARTS
E_Series_Manualv10.indd 17 3/10/06 2:11:13 PM

E300 PARTS
4 T-bar
40 Washer
41 Spacer, rear outside, non-drive side
42 Axle, rear
43 Bearing, 608
44 C-clip for brake shoulder
45 Rear wheel (tire, tube and rim assembly)
46 Spacer, rear center
47 Locknut, for sprocket to freewheel
48 Freewheel
49 Sprocket, rear wheel drive
Nut for rear deck screws
E_Series_Manualv10.indd 18 3/10/06 2:11:14 PM

E300 PARTS
E_Series_Manualv10.indd 19 3/10/06 2:11:14 PM

YOUR INSURANCE POLICIES MAY NOT PROVIDE COVERAGE FOR
ACCIDENTS INVOLVING THE USE OF THIS SCOOTER/ELECTRIC
VEHICLE. TO DETERMINE IF COVERAGE IS PROVIDED, YOU SHOULD
E_Series_Manualv10.indd 20 3/10/06 2:11:14 PM

E_Series_Manualv10.indd 21 3/10/06 2:11:14 PM

Tire Infl ation
Always wear proper protective equipment such
the way of the wheels, motor and drive system.
The manufacturer warranties this product to be free of manufacturing
Warranty does not cover normal wear and tear, tires, tubes or
This Limited Warranty will be void if the product is ever
The manufacturer is not liable for incidental or consequential loss or
WARRANTY
our web site
for updates and a list of authorized service centers
at
www.razor.com
t
PM
Pacifi c
T
for
© Copyright 2006 Razor USA. All rights reserved.
write the serial number below.
__________________________________________
13111110 Red
you squeez
When you apply the
Although broken frames are rare, it is possible
for an aggressive driver to bash into a curb or
wall and wreck and bend or break a frame. Get
SAFETY REMINDERS
DO NOT RETURN TO STORE
Do not use this vehicle for the fi rst time until you have infl ated the
tires to the correct PSI and charged the battery for at least 12 hours.
Failure to follow these instructions may damage
your vehicle and void your warranty.
E_Series_Manualv10.indd 22 3/10/06 2:11:15 PM
 Loading...