

NOTE: The E100/E125/E150/E175 must be traveling up to 3mph before motor will
engage. Kick start up to 3mph while applying the throttle to engage motor.
Owner’s Manual
Read and understand this entire manual before riding!
DO NOT RETURN TO STORE!
NOTE: Manual illustrations are for demonstration purposes only. Illustrations
may not reflect exact appearance of actual product. Specifications subject to
change without notice.
Item Number:
E100 Red 13111260
E100 Pink 13111261
E100 Daisy 13111061
E125 Red 13111110
E125 Silver 13111101
E125 Black 13125E-BK
Français .................. Page 13
Español ................... Página 21
E150 Red 13111601
E150 Pink 13111661
E175 Red 13111259

CONTENTS
Safety Warnings ............................................................ 1
Before You Begin ........................................................... 2
Assembly and Set-Up .................................................... 3
Hardware Maintenance ................................................. 4
SAFETY WARNINGS
WARNING: Riding the electric scooter can be a hazardous activity.
Certain conditions may cause the equipment to fail without fault of the
manufacturer. Like other electric vehicles, the scooter can and is intended
to move, and it is therefore possible to lose control, fall off and/or get into
dangerous situations that no amount of care, instruction or expertise can
eliminate. If such things occur you can be seriously injured or die, even when
using safety equipment and other precautions. RIDE AT YOUR OWN RISK
AND USE COMMON SENSE.
This manual contains many warnings and cautions concerning the
consequences of failing to maintain, inspect or properly use your electric
scooter. Because any incident can result in serious injury or even death, we
do not repeat the warning of possible serious injury or death each time such
a possibility is mentioned.
APPROPRIATE RIDER USE AND
PARENTAL SUPERVISION
This manual contains important safety information. It is your responsibility
to review this information and make sure that all riders understand all
warnings, cautions, instructions and safety topics and assure that young
riders are able to safely and responsibly use this product. Razor recommends
that you periodically review and reinforce the information in this manual
with younger riders, and that you inspect and maintain your children’s
vehicle to insure their safety.
The recommended rider age is 8 and older. Any rider unable to fit
comfortably on the scooter should not attempt to ride it. A parent’s decision
to allow his or her child to ride this product should be based on the child’s
maturity, skill and ability to follow rules.
Keep this product away from small children and remember that it is
intended for use only by persons who are, at a minimum, completely
comfortable and competent while operating the scooter.
DO NOT EXCEED THE WEIGHT LIMIT OF 120 pounds (54kg). Rider weight
does not necessarily mean a person’s size is appropriate to fit or maintain
control of the scooter.
Do not touch the brakes or motor on your scooter when in use as these parts
can become very hot.
Refer to the section on safety for additional warnings.
ACCEPTABLE RIDING PRACTICES AND
CONDITIONS
Always check and obey any local laws or regulations which may
affect the locations where the electric scooter may be used.
Ride defensively. Watch out for potential obstacles that could catch your
wheel or force you to swerve suddenly or lose control. Be careful to avoid
pedestrians, skaters, skateboards, scooters, bikes, children or animals who
may enter your path, and respect the rights and property of others.
Do not activate the speed control on the hand grip unless you are on the
scooter and in a safe, outdoor environment suitable for riding. The electric
scooter must be moving at 3 miles per hour before the motor will
engage.
Repair and Maintenance ............................................. 4-7
Troubleshooting Guide ................................................ 8-9
Electric Scooter Parts .................................................. 10
Warranty ...................................................................... 12
Keep your fingers and other body parts away from the chain, steering system,
wheels and all other moving components.
Never use headphones or a cell phone when riding.
Never hitch a ride with another vehicle.
Do not ride your scooter in wet or icy weather and never immerse the scooter
in water, as the electrical and drive components could be damaged by water
or create other possibly unsafe conditions.
The electric scooter is intended for use on flat, dry surfaces such as
pavement or level ground without loose debris such as sand, leaves, rocks or
gravel. Wet, slick, bumpy, uneven or rough surfaces may impair traction and
contribute to possible accidents. Do not ride your scooter in mud, ice, puddles
or water. Avoid excessive speeds that can be associated with downhill rides.
Never risk damaging surfaces such as carpet or flooring by use of an electric
scooter indoors.
Do not ride at night or when visibility is limited.
PROPER RIDING ATTIRE
Always wear proper protective equipment such as an approved safety helmet
(with chin strap securely buckled), elbow pads and kneepads. A helmet may
be legally required by local law or regulation in your area. A long-sleeved
shirt, long pants, and gloves are recommended. Always wear athletic shoes
(lace-up shoes with rubber soles), never ride barefooted or in sandals, and
keep shoelaces tied and out of the way of the wheels, motor and drive
system.
USING THE CHARGER
The charger supplied with the electric scooter should be regularly examined
for damage to the cord, plug, enclosure and other parts, and in the event of
such damage, the scooter must not be charged until the charger has been
repaired or replaced.
Use only with the recommended charger.
Use caution when charging.
The charger is not a toy. Charger should be operated by an adult.
Do not operate charger near flammable materials.
Unplug charger and disconnect from scooter when not in use.
Do not exceed charging time.
Always disconnect from the charger prior to wiping down and cleaning your
scooter with liquid.
FAILURE TO USE COMMON SENSE AND HEED THE ABOVE
WARNINGS INCREASES RISK OF SERIOUS INJURY. USE WITH
APPROPRIATE CAUTION AND SERIOUS ATTENTION TO SAFE
OPERATION.
Do not attempt or do stunts or tricks on your electric scooter. The scooter is
not made to withstand abuse from misuse such as jumping, curb grinding or
any other type of stunts.
Maintain a hold on the handlebars at all times.
Never allow more than one person at a time to ride the scooter.
Never use near steps or swimming pools.
1
BEFORE YOU BEGIN
Remove contents from box. Remove the foam separators that protect the components from damage during
shipping. Inspect the contents of the box for scratches in the paint, dents or kinked cables that may have
occurred during shipping. Because the scooter was 95 percent assembled and packed at the factory, there
should not be any problems, even if the box has a few scars or dents.
MAKE SURE POWER SWITCH IS TURNED “OFF” BEFORE CONDUCTING ANY
MAINTENANCE PROCEDURES.
Estimated Assembly and Set-Up Time
Razor recommends assembly by an adult with experience in bicycle mechanics.
Allow up to 20 minutes for assembly, not including initial charge time.
Allow up to 18 hours for initial charge (see page 3 for charging information)
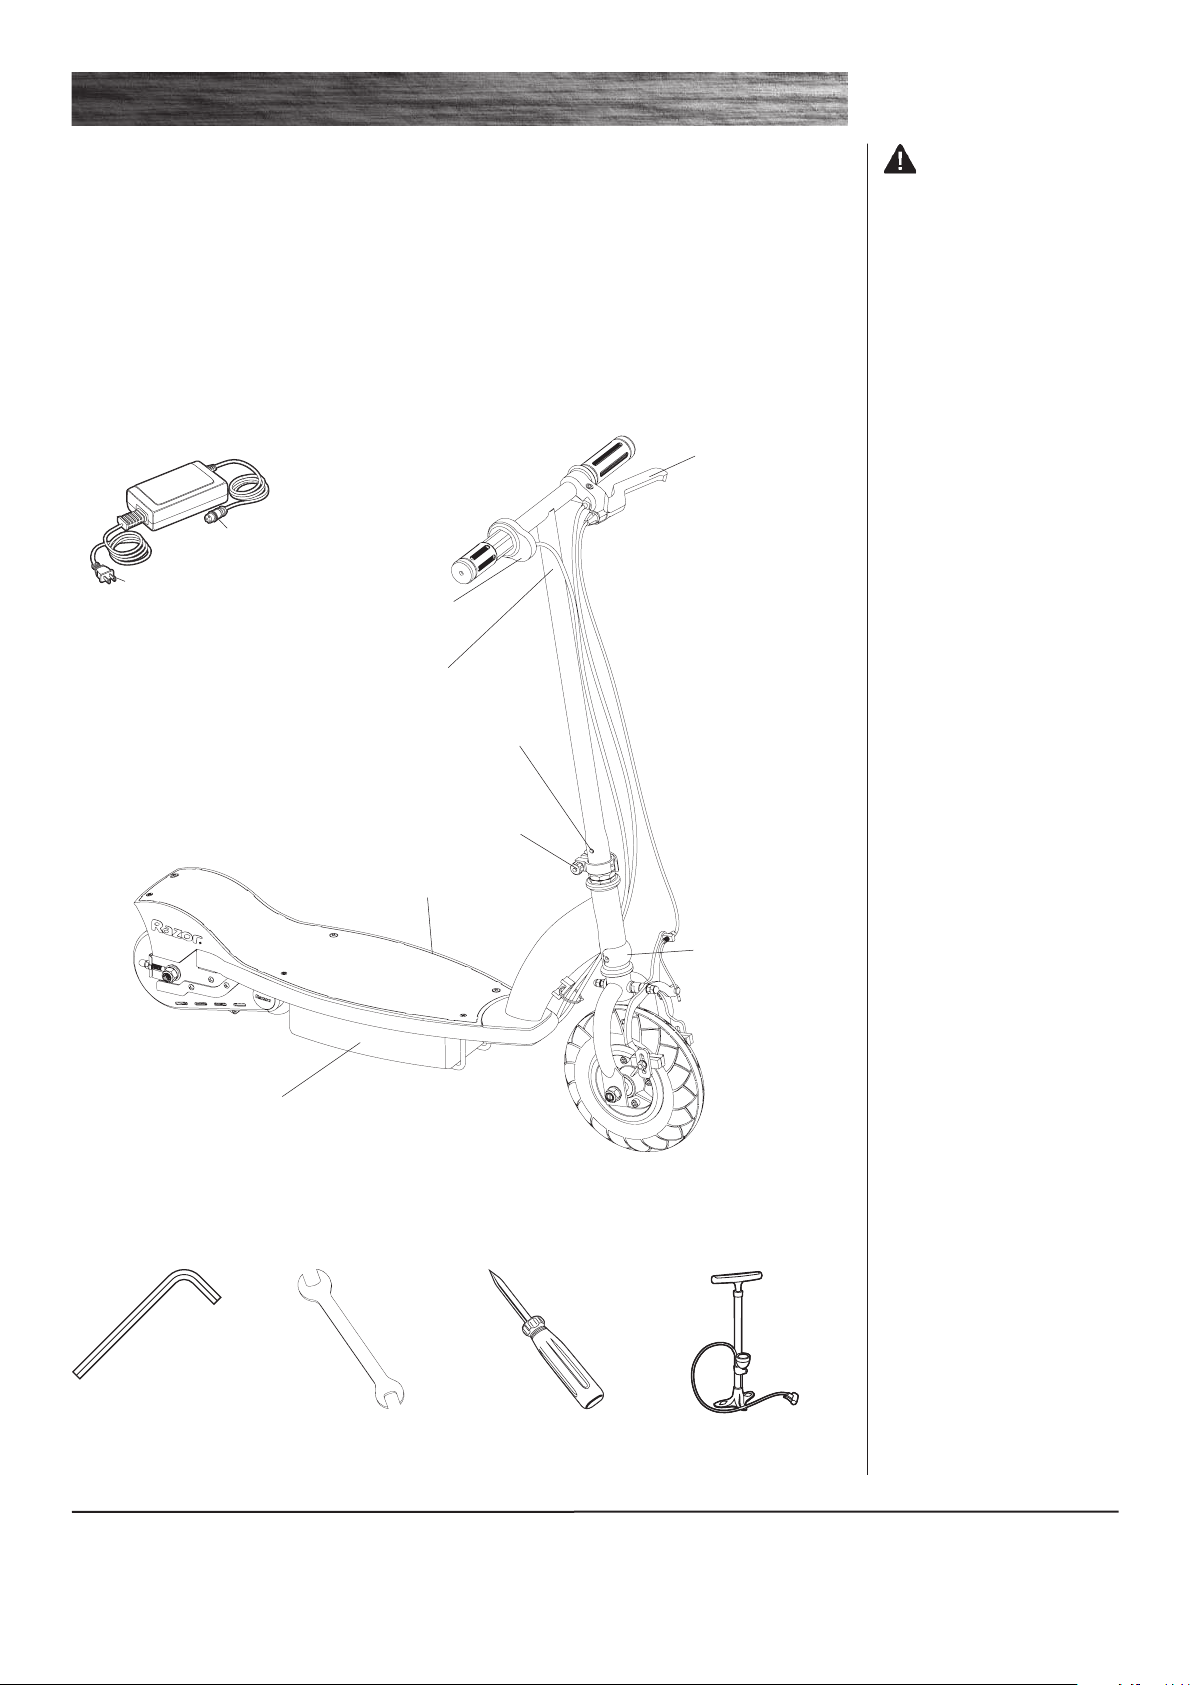
Charger
Charger
Plug
Charger
Port
Twist Grip Throttle
Handlebar
Stem
Brake Lever
WARNING:
DO NOT USE NONRAZOR PRODUCTS
WITH YOUR RAZOR
ELECTRIC SCOOTER.
The scooter has been built
to certain Razor design
specifications. The original
equipment supplied at the time
of sale was selected on the
basis of its compatibility with
the frame, fork and all other
parts. Certain aftermarket
products may or may not be
compatible.
- Battery
- Motor
- Control Module
Required Tools
Push Button
Quick Release
On/off switch
Reset button
Charger port
Limiter
2.5mm / 6mm key wrench
(Included)
8mm, 10mm, 13mm and
17mm wrenches
(Included)
Screwdriver
(Included)
Bicycle-style tire pump
for Schrader valve tires,
with pressure gauge
(Not included)
Need Help? Visit our web site for replacement parts, product support and a list of authorized service centers
at www.razor.com or call toll free 866-467-2967 Monday - Friday 8AM - 5PM Pacific Time.
2
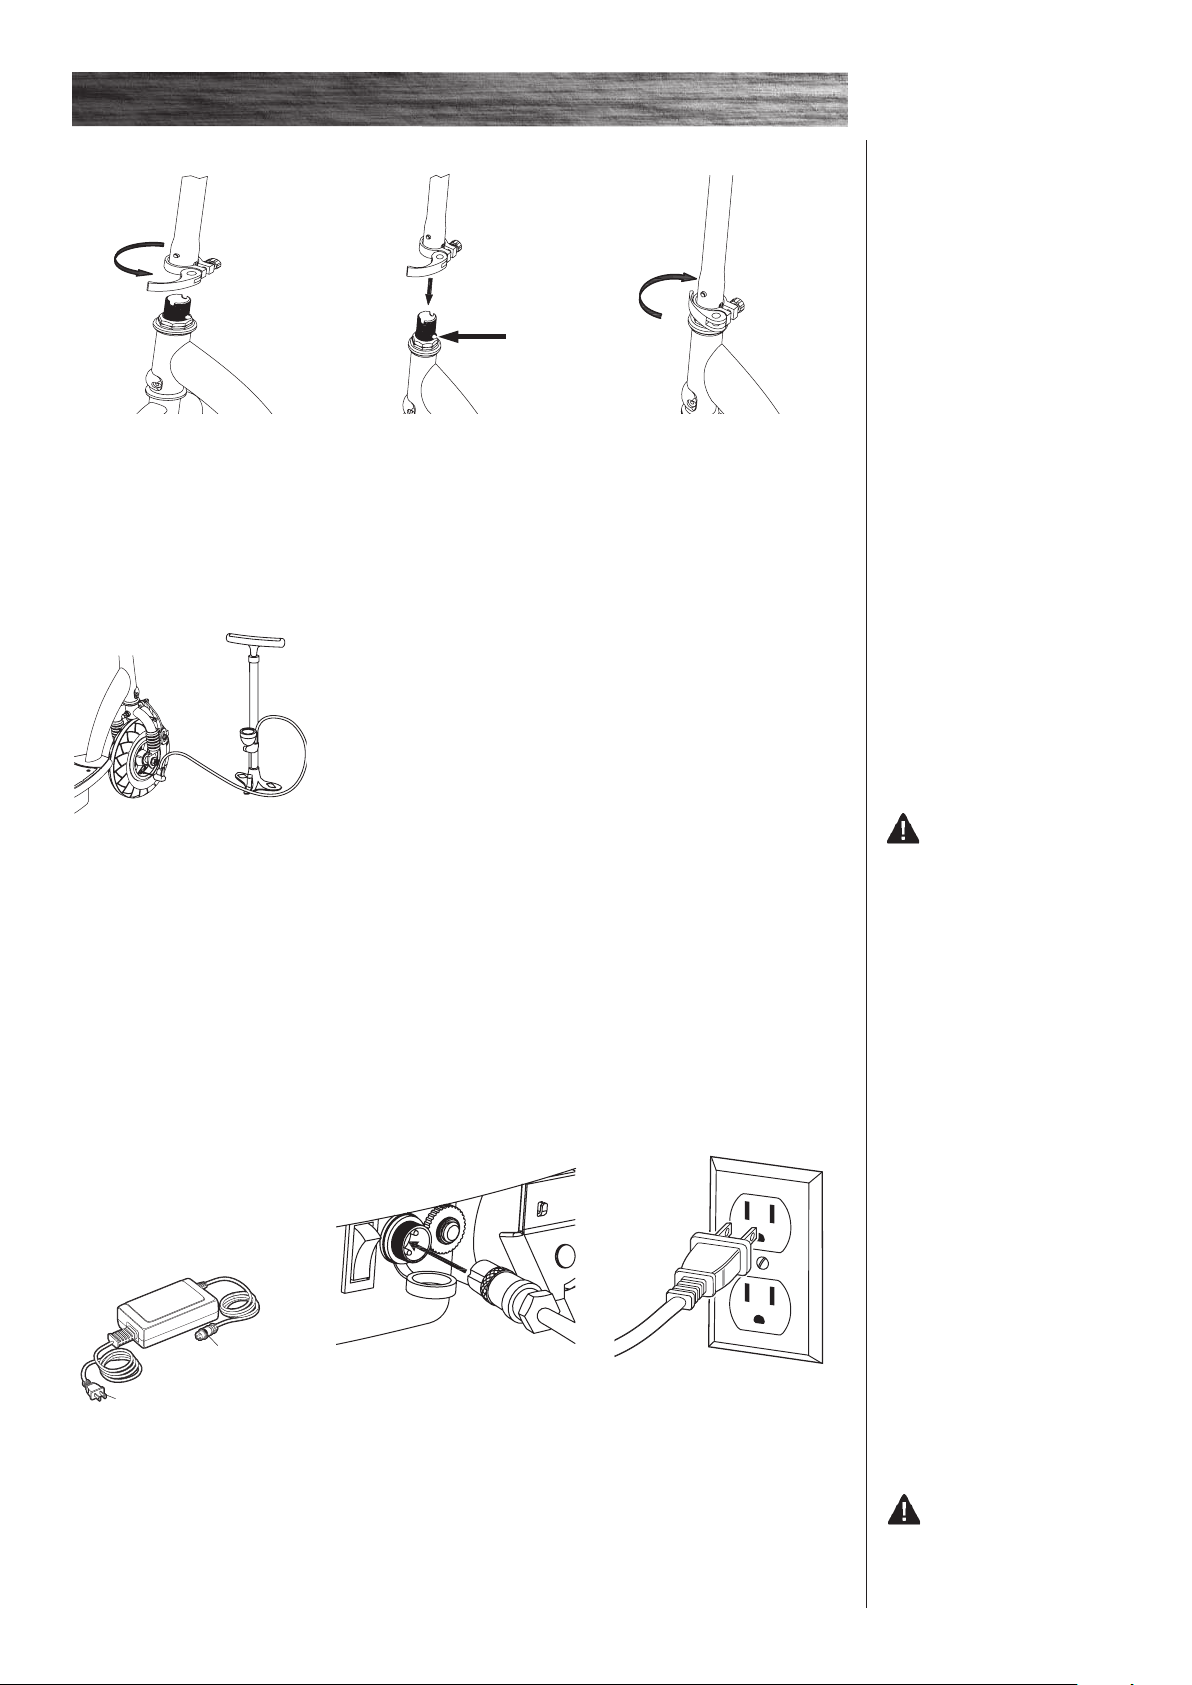
ASSEMBLY AND SET-UP
(a)
q Attaching the Handlebars
1 Open the quick release.
2 Depress the push button (a)
located on the front fork and
insert the handlebar stem until
the button locks securely into
the fork.
3 Adjust the tension of the
quick release to where you can
close the lever all the way to
secure the stem.
q Inflating the Tire
The front tire is inflated when shipped, but it invariably may lose some pressure between the point of
manufacturing and your purchase.
Note: Make sure the cables/
wires are out of the way before
inserting the stem into the fork.
Note: The pressurized air
supplies found at gasoline
stations are designed to inflate
high-volume automobile tires.
If you decide to use such an
air supply to inflate the tire,
first make sure the pressure
gauge is working, then use very
short bursts to inflate to the
correct PSI. If you inadvertently
over-inflate the tire, release the
excess pressure immediately.
1 Using a bicycle style tire
pump equipped for a Schradertype valve, inflate the front
tire to the PSI indicated on the
sidewall of the tire.
q Charging the Battery
Your electric scooter may not have a fully charged battery. Therefore it is a good idea to charge the battery
prior to use.
•Initialchargetime:18hours • Runtime:Upto40minutesofcontinuousridetime
•Rechargetime:upto12hours • Averagebatterylife:250charge/dischargecycles
When the scooter is not in regular
use, recharge the battery at least
once a month until normal use is
resumed.
Charger
Charger
Port
Charger
Plug
1 Turn power OFF before
charging. Plug the charger into
the charger port on the electric
scooter.
2 Plug the charger into a wall
outlet. If the lights on charger
do not light up, check the power
to the outlet. If necessary, try a
different outlet.
WARNING: Always
disconnect your scooter from
the charger before cleaning with
liquid.
Note: If your charger does not
look like the one illustrated,
your unit has been supplied
with an alternative charger.
The specifications and charging
procedure would not change.
The charger has a small window
with one LED or two LEDs to
indicate the charge status.
Refer to the illustration on
the charger unit for the actual
“charging” and “charged” status
indications for your model
charger.
Chargers have built-in overcharge protection to prevent
battery from being over-charged.
Charger will get warm during
use. This is normal for some
chargers and is no cause for
concern. If your charger does
not get warm during use, it does
not mean that it is not working
properly.
WARNING: Failure
to recharge the battery at least
once a month may result in
a battery that will no longer
3
accept a charge.
CONNECTORS/HARDWARE MAINTENANCE
q
q
q
Brake
Check the brakes for proper function. When you squeeze the lever,
the brake should provide positive braking action. When you apply
the brake with the speed control on, the brake cut-off switch
should stop the motor. Make sure that brakes are not rubbing.
Frame, Fork and Handlebars
Check for cracks or broken connections. Although broken frames
are rare, it is possible for an aggressive rider to run into a curb
or wall and wreck and bend or break a frame. Get in the habit of
inspecting your scooter on a regular basis.
Tires
Periodically inspect the tires for excess wear, and regularly check
the front tire pressure and re-inflate as necessary.
Do not use this product for the first time until you have inflated the
tires to the correct PSI and charged the battery for at least 18 hours.
Failure to follow these instructions may damage
your product and void your warranty.
q
q
Safety Gear
Always wear proper protective gear such as an approved safety
helmet. Elbow pads and kneepads are recommended. Always
wear athletic shoes (lace-up shoes with rubber soles), never ride
barefooted or in sandals, and keep shoelaces tied and out of the
way of the wheels, motor and drive system.
Battery
Make sure the power switch is turned off whenever the scooter is
not in use. Never store the product in freezing or below freezing
temperatures! Freezing will permanently damange the battery.
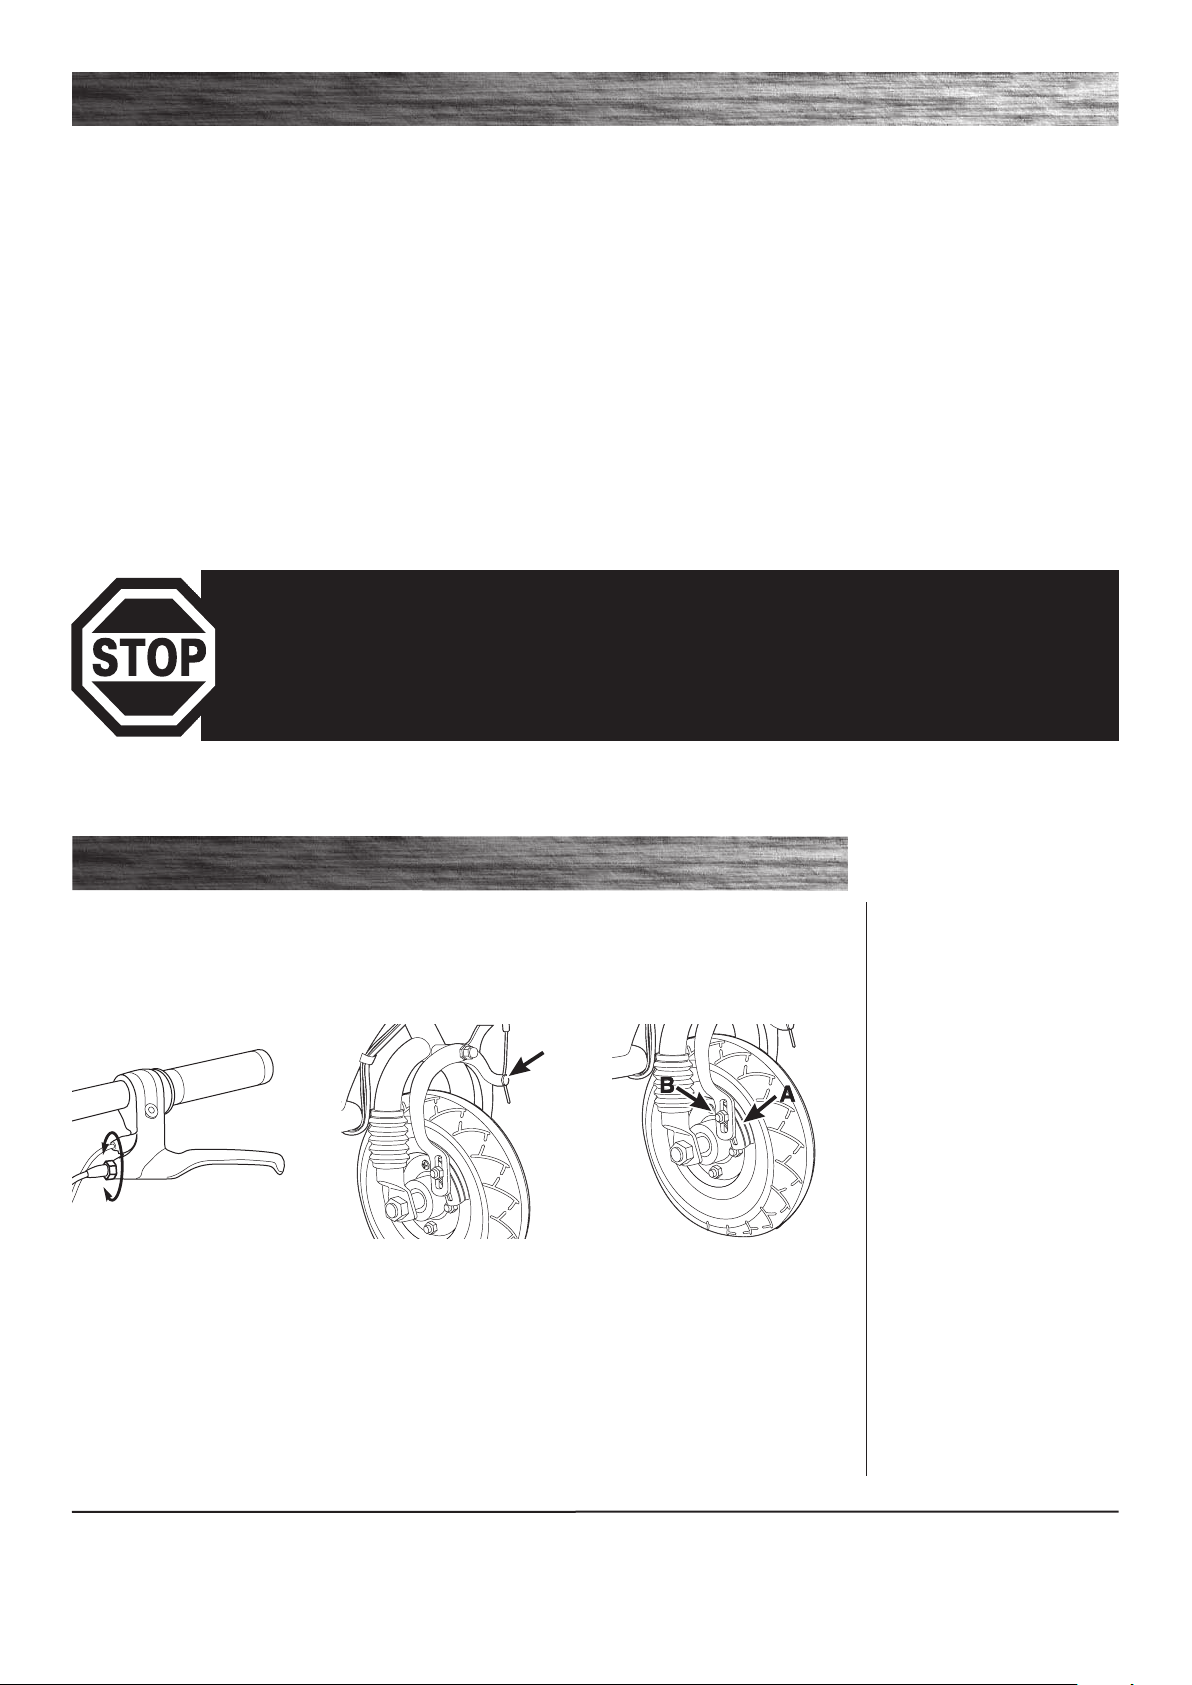
REPAIR AND MAINTENANCE
Turn power switch “OFF” before conducting any maintenance procedures.
q Adjusting the Brakes
Tools required: 10mm wrench
1 To adjust the brake cable
play, thread the brake lever
adjuster in or out 1/4 to 1/2 turn
until the desired brake adjustment is attained. Most
adjustments are complete at
this step. If brake still needs
further adjustment, proceed to
step 2.
2 If brake is too tight or has
too much slack, use a 10mm
open wrench. Loosen the brake
cable and adjust accordingly.
3 Inspect the brake pads (A)
for proper alignment against
the wheel or excess wear. To
realign brake pads, loosen the
fixing nut (B) and adjust the pad
to contact the rim. Retighten
and test. Readjust as needed.
Need Help? Visit our web site for replacement parts, product support and a list of authorized service centers
at www.razor.com or call toll free 866-467-2967 Monday - Friday 8AM - 5PM Pacific Time.
4
REPAIR AND MAINTENANCE
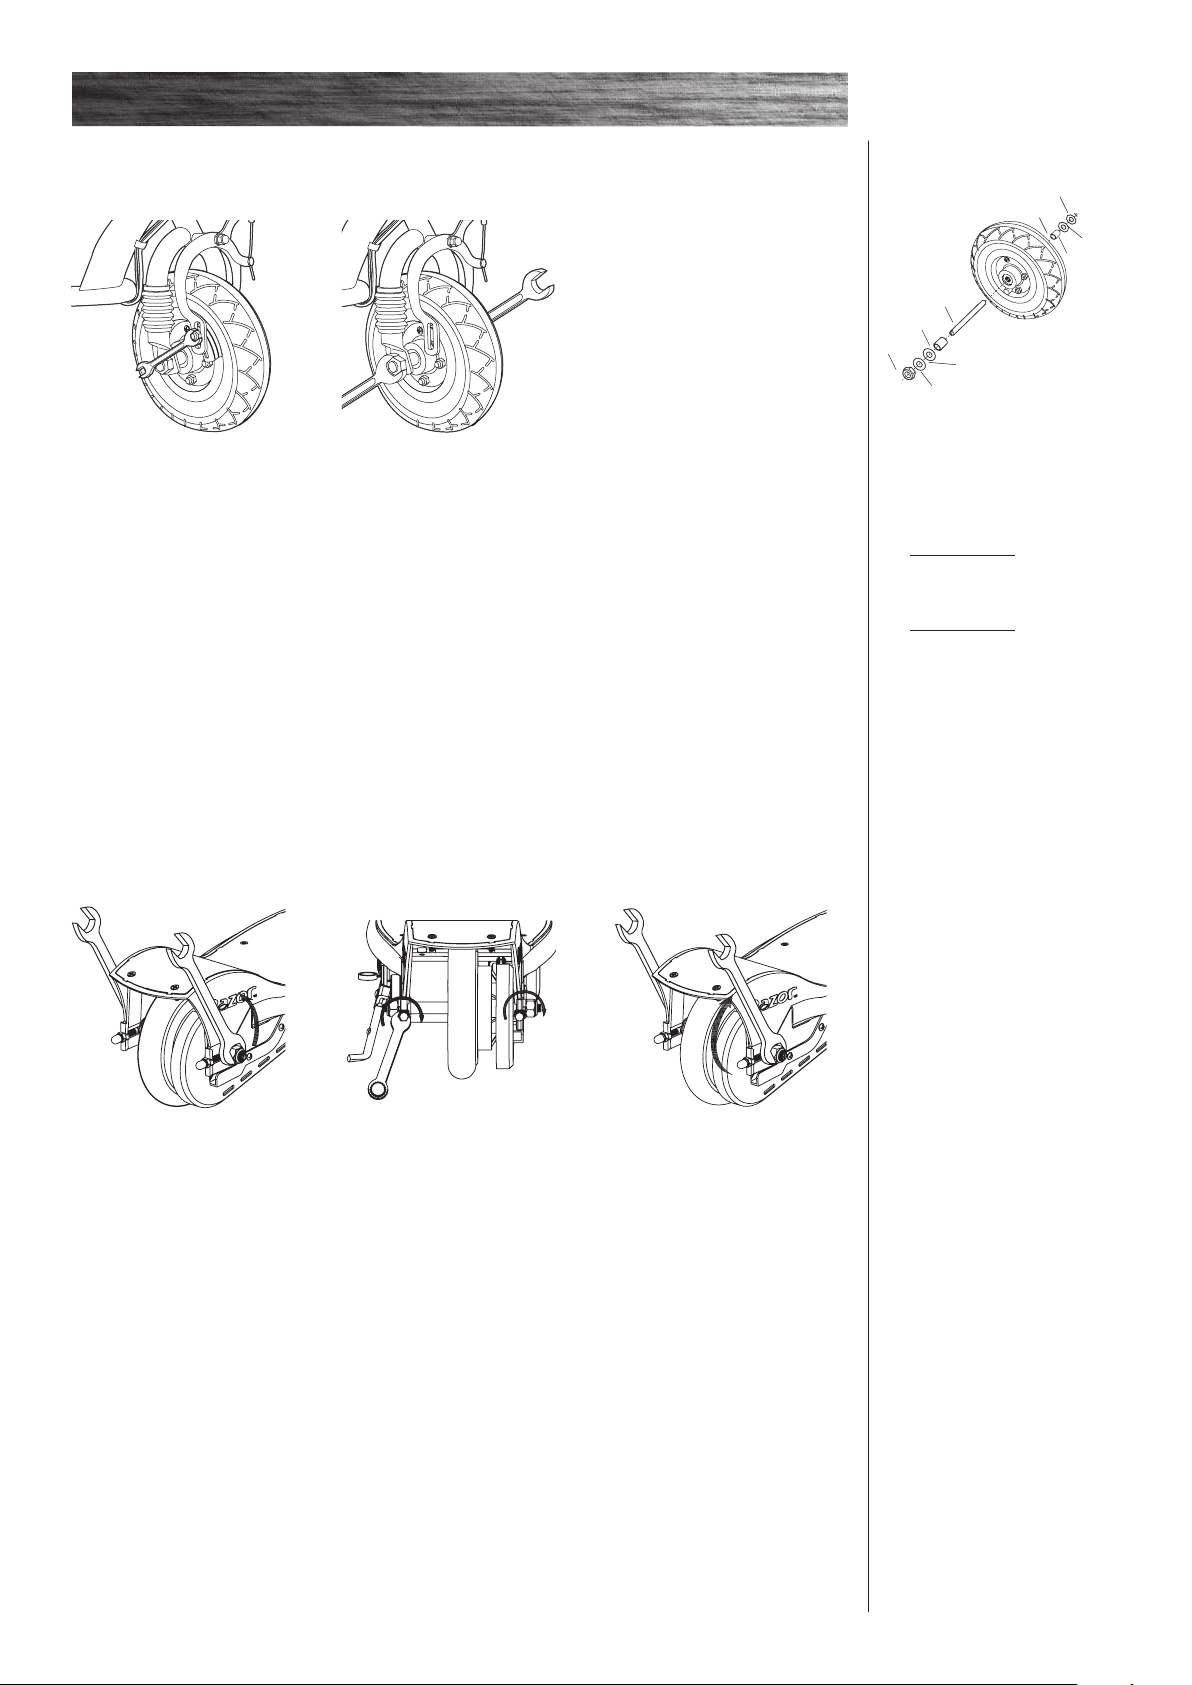
q Front Tire Replacement
Tools required: 10mm wrench, two (2) 17mm wrenches and a flathead screwdriver.
1 Using a 10mm open wrench,
loosen the brake cable bolt.
2 Using two 17mm wrenches,
loosen the front axle bolts by
turning the wrenches counter
clockwise. Remove wheel and
install replacement wheel.
Note: Hardware sequence
8-1
8-3
8-2
8-2
8-6
8-5
8-1
8-2
8-2
Right Side (Throttle)
8-3 - (Short) spacer
8-2 - Washer
8-2 - Washer
8-1 - 17mm locknut
Middle
8-6 - Front axle bolt
Left Side (Brake)
8-5 - (Long) spacer
8-2 - Washer
8-2 - Washer
8-1 - 17mm locknut
q Adjusting the Chain
Tools required: 10mm wrench, two (2) 8mm wrenches, and two (2) 13mm wrenches.
1 Using two 13mm wrenches,
loosen the rear axle bolts by
turning the wrenches counter
clockwise.
2 Using a 10mm wrench,
tighten the tension adjusters on
the axle 1/8 to 1/4 turn to finetune the chain tension. Both
adjusters must be tightened the
exact same amount to maintain
wheel alignment.
3 Once the tension is correct,
tighten the axle bolts. Test ride
the scooter. Readjust as needed.
Note: This system of adjusters
is common to motorcycles and
BMX bicycles. If you are not
familiar with it or do not feel
comfortable performing the adjustment, consult an authorized
Razor service center or a qualified BMX bike or motorcycle
mechanic.
The chain should be “just taut”
– in other words snug, but not
piano-wire tight. The tension
should be similar to the fan
chain on an automobile. BE
CAREFUL NOT TO ADJUST TOO
TIGHT. The tensioning system
can easily impart too much tension and snap the chain or bend
the motor shaft. Adjust 1/8 to
1/4 turn at a time and check the
tension each time.
5
REPAIR AND MAINTENANCE
18-1
18-2
18-3
18-4
18-5
18-7
18-6
18-8
18-9
18-11
18-10
18-8
18-7
18-3
18-2
18-1
18-4
18-5
18-6
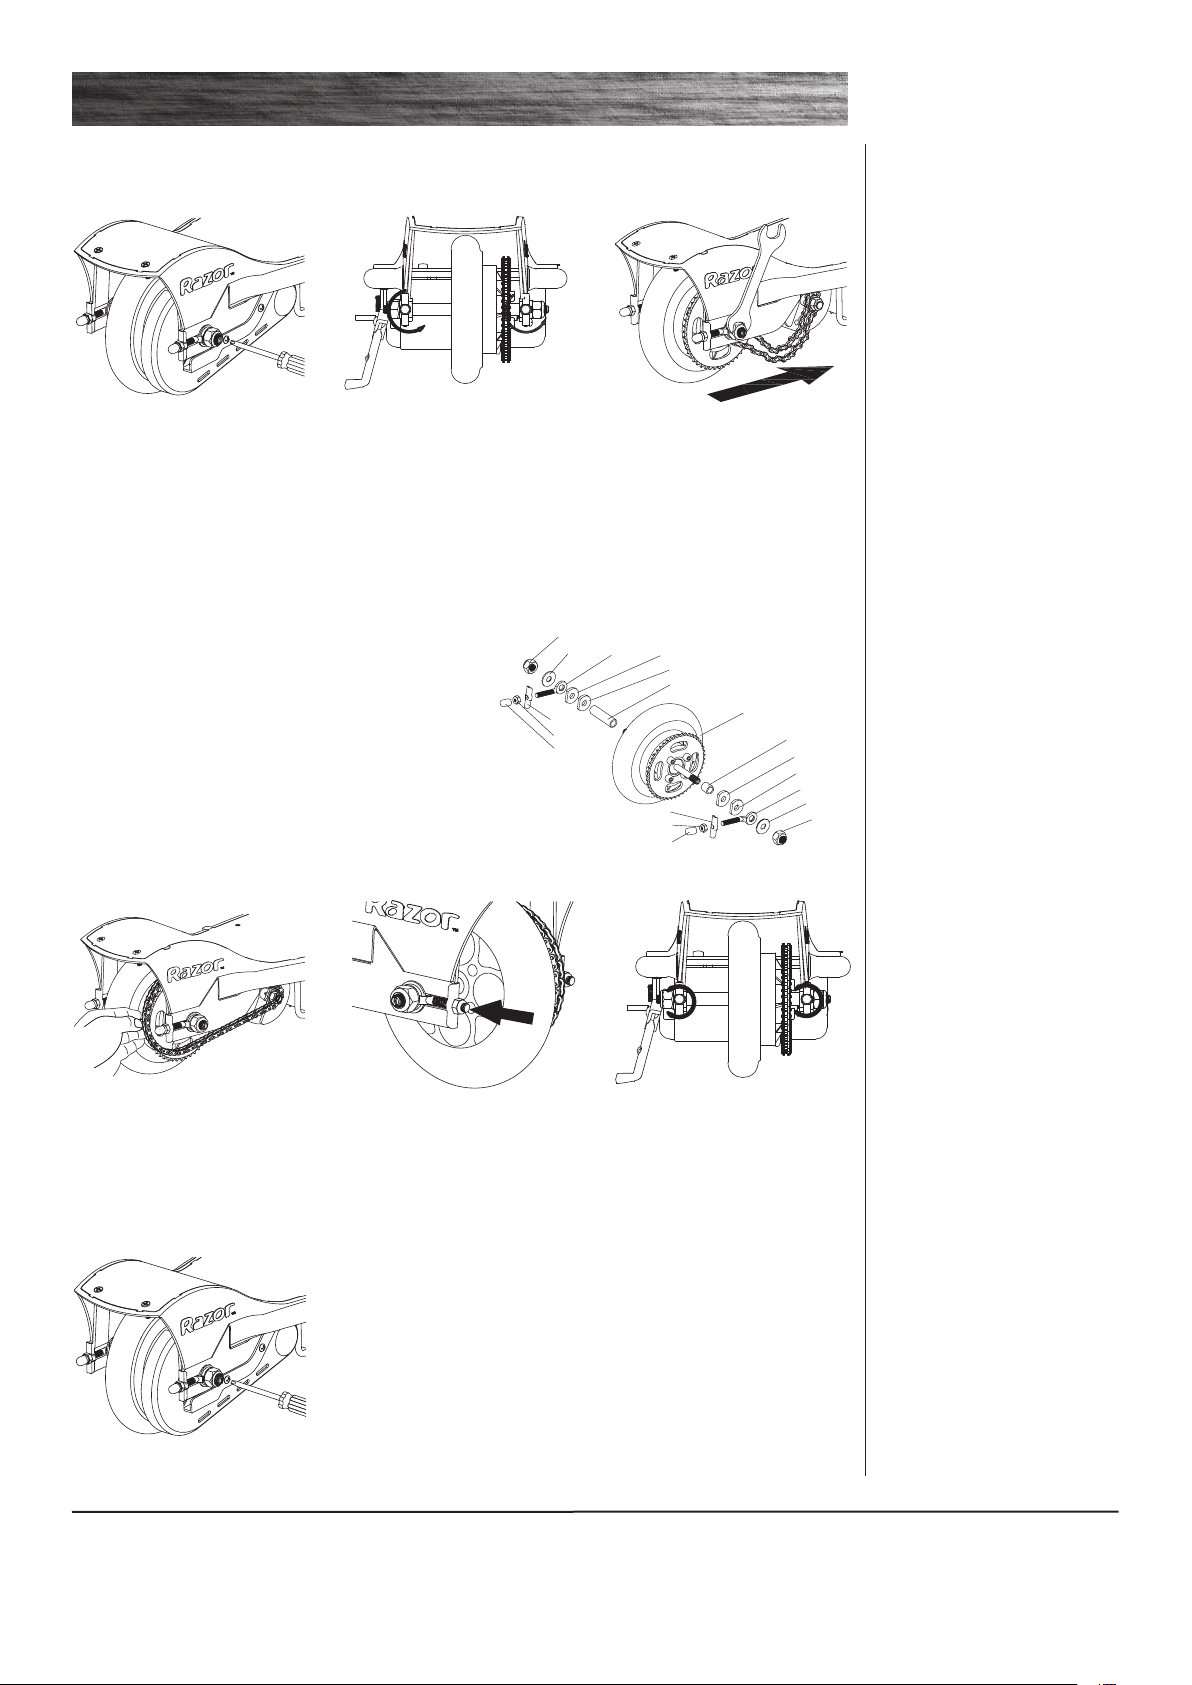
q Chain and Rear Tire Replacement
Tools required: Phillips screwdriver, 10mm wrench, two (2) 8mm wrenches, and two (2) 13mm wrenches.
1 With a Phillips screwdriver,
loosen the two screws and
remove the chain guard.
2 With a 10mm wrench, loosen
both axle adjusters an equal
amount, approximately five
turns.
4 Remove wheel.
Note thesequenceofthehardware:
Right Side (Throttle) Left Side (Brake)
18-1 M8 Nut 18-1 M8 Nut
18-2 Washer 18-2 Washer
18-3 Axle adjuster eye bolt 18-3 Axle adjuster eye bolt
18-4 U Piece 18-4 U Piece
18-5 M6 Locknut 18-5 M6 Locknut
18-6 Cap 18-6 Cap
18-7 Plate cut washer 18-7 Plate cut washer
18-8 Thick cut washer 18-8 Thick cut washer
18-9 (Short) spacer 18-9 (Long) spacer
3 With two 13mm wrenches,
loosen the axle. Slide the wheel
forward to loosen the chain.
5 Install new chain or wheel by
maneuvering the chain onto the
sprocket and slipping the axel
into the slots on the frame.
8 Replace the chain guard.
Need Help? Visit our web site for replacement parts, product support and a list of authorized service centers
at www.razor.com or call toll free 866-467-2967 Monday - Friday 8AM - 5PM Pacific Time.
6 Install the axle adjusters and
axle nuts. Tighten until they
just barely hold the hardware
in place.
7 Tighten both axle adjusters
the same number of turns to
fine-tune the tension on the
chain and center of the wheel.
6
REPAIR AND MAINTENANCE
q Battery Care and Disposal
Do not store the battery in temperatures above 75° or below -10° F.
CONTAINS SEALED LEAD BATTERIES. BATTERIES MUST BE RECYCLED.
Disposal: Your Razor product uses sealed lead-acid batteries which must be recycled or disposed of in
an environmentally sound manner. Do not dispose of a lead-acid battery in a fire. The battery may explode
or leak. Do not dispose of a lead-acid battery in your regular household trash. The incineration, land filling
or mixing of sealed lead-acid batteries with household trash is prohibited by law in most areas. Return
exhausted batteries to a federal or state approved lead-acid battery recycler or a local seller of automotive
batteries. If you live in Florida or Minnesota, it is prohibited by law to throw away lead-acid batteries in the
municipal waste stream.
q Charger
The charger supplied with the scooter should be regularly examined for damage to the cord, plug,
enclosure and other parts, and, in the event of such damage, the scooter must not be charged until the
charger has been repaired or replaced.
q Replacement Parts
For a complete selection of replacement parts visit www.razor.com.
q Repair Centers
ForalistofauthorizedRazorrepaircenters:
•Checkonlineatwww.razor.com.
•Call866-467-2967forthecenternearestyou.
WARNING: If a
battery leak develops, avoid
contact with the leaking acid
and place the damaged battery
in a plastic bag. Refer to the
disposal instructions at left. If
acid comes into contact with
skin or eyes, flush with cool
water for at least 15 minutes
and contact a physician.
7

TROUBLESHOOTING GUIDE
Problem Possible Cause Solution
Scooter does not run
Scooter must be traveling 3mph
before motor will engage.
Kick start to 3mph while twisting the throttle to engage motor.
Scooter suddenly
stopped working while
in use
Short run time (less
than 15 minutes per
charge)
Battery needs a charge
Charger is not working
Tripped circuit breaker
Undercharged battery
Charge the battery. A new battery should be charged for at least 18
hours before using the scooter for the first time and up to 12 hours
after each subsequent use.
Check all connectors. Make sure the charger connector is tightly
plugged into the charging port, and that the charger is plugged into
the wall.
Make sure power flow to the wall outlet is on.
Check all wires and connectors to make sure they are tight.
The circuit breaker (next to on/off switch) will automatically shut off
the power if the motor is overloaded.
An excessive overload, such as too heavy a rider or too steep a hill,
could cause the motor to overheat. If the scooter suddenly stops
running, wait a few seconds and then push the breaker to reset the
circuit. Correct the conditions that caused the breaker to trip to avoid
repeatedly tripping the breaker.
Charge the battery. A new battery should be charged for at least 18
hours before using the scooter for the first time and up to 12 hours
after each subsequent use.
Check all wires and connectors. Make sure the battery connector is
tightly plugged into the charger connector, and that the charger is
plugged into the wall.
Scooter runs sluggishly
Battery is old and will not accept
full charge
Brakes are not adjusted properly
Riding conditions are too stressful
Tire is not properly inflated
Scooter is overloaded
Brake dragging
Brakes are not adjusted properly
Make sure power flow to the wall outlet is on.
Even with proper care, a rechargeable battery does not last forever.
Average battery life is 1 to 2 years depending on scooter use and
conditions. Replace only with a Razor replacement battery.
Refer to adjusting the brakes instructions on page 4.
Use only on solid, flat, clean and dry surfaces such as pavement or
level ground.
The tire is inflated when shipped, but it invariably will lose some
pressure between the point of manufacturing and your purchase.
Refer to instructions on page 3 of this manual to properly inflate tire.
Make sure you do not overload the scooter by allowing more than
one rider at a time, exceeding the electric scooters 120 pounds (54kg)
maximum weight limit, going up a hill or towing objects behind the
scooter. If the scooter is overloaded, the circuit breaker may trip and
shut off power to the motor. Correct the riding conditions that caused
the overload, wait a few seconds, and then push the breaker to reset
the circuit. Avoid repeatedly tripping the circuit breaker.
Use your fingers to twist the adjuster in either direction until front
wheel is centered between pads.
Refer to adjusting the brakes instructions on page 4.
8

TROUBLESHOOTING GUIDE
Problem Possible Cause Solution
Sometimes the scooter
doesn’t run, but other
times it does
Loose wires or connectors
Motor or electrical switch
damage
Check all wires around the motors and all connectors to make sure
they are tight.
Contact your local Razor authorized service center for diagnosis and
repair.
Scooter makes loud
noises or grinding
sounds
Chain is too dry
Apply a lubricant such as 3 in 1
TM
or Tri-FlowTM to the chain.
9

E100/E125/E150/E175 PARTS
Keep your scooter running for years with genuine Razor parts. Visit our web site or e-mail us for more information on spare part availability.
(Specifications subject to change without notice.)
01 Handlebar grip (right/left)
02 Single speed twist grip throttle
02-1 Sleeve
03 Handlebar stem
04 Brake lever assembly
05 Quick release
06 Headset (upper/lower)
07 Front fork
07-1 V Spring push button
08 Limiter
09 Front wheel complete
(refer to pg. 7 for hardware sequence)
10 Front caliper brake
11 On/ Off switch
12 Charger port
13 Reset button
14 Control module
15 Battery (2- 12V/ 4.5Ah)
16 Kickstand
17 Motor (24V / 100W)
18 Rear wheel complete
(refer to pg.6 for hardware sequence)
19 Chain
20 Chain guard
21 Deck plate with grip tape
Need Help? Visit our web site for replacement parts, product support and a list of authorized service centers
at www.razor.com or call toll free 866-467-2967 Monday - Friday 8AM - 5PM Pacific Time.
10

SB 1918 (CALIFORNIA) DECLARATION
YOUR INSURANCE POLICIES MAY NOT PROVIDE COVERAGE FOR ACCIDENTS
INVOLVING THE USE OF THIS SCOOTER/ELECTRIC VEHICLE. TO DETERMINE
IF COVERAGE IS PROVIDED, YOU SHOULD CONTACT YOUR INSURANCE
COMPANY OR AGENT.
11

WARRANTY
Razor Limited Warranty
The manufacturer warranties this product to be free of manufacturing defects
for a period of 90 days from date of purchase. This Limited Warranty does
not cover normal wear and tear, tires, tubes or cables, or any damage, failure
or loss caused by improper assembly, maintenance, or storage or use of the
Razor E100, E125, E150, E175.
This Limited Warranty will be void if the product is ever
•usedinamannerotherthanforrecreationortransportation
•modiedinanyway;
•rented.
The manufacturer is not liable for incidental or consequential loss or damage
due directly or indirectly to the use of this product.
Razor does not offer an extended warranty. If you have purchased an
extended warranty, it must be honored by the store at which it was
purchased.
For your records, save your original sales receipt with this manual and write
the serial number below.
__________________________________________
Item Number:
E100 Red 13111260
E100 Pink 13111261
E100 Daisy 13111061
E125 Red 13111110
E125 Silver 13111101
E125 Black 13125E-BK
E150 Red 13111601
E150 Pink 13111661
E175 Red 13111259
Need Help? Visit our web site for replacement parts, product support and a list of authorized service centers at
www.razor.com or call toll free 866-467-2967 Monday - Friday 8AM - 5PM Pacific Time.
U.S. Design Patent D497,397 S
Printed in China for:
Razor USA LLC
PO Box 3610
Cerritos, CA 90703
Copyright © 2008 Razor USA LLC. All rights reserved. RAZOR and the Razor Logo Design are among
the registered trademarks of Razor USA LLC in the United States and/or select foreign countries.
10/2008
12

NOTE: Les modèles E100/E125/E150/175 doivent atteindre une vitesse de 4 km/h
avant que le moteur s’enclenche. Poussez le démarreur au pied à 4 km/h tout en tournant la
poignée d’accélérateur afin d’engager le moteur.
Manuel uTIlIsaTeur
Lisez et assimilez l’intégralité de ce manuel
avant d’utiliser la trottinette !
NE RETOURNEZ PAS AU MAGASIN !
NOTE : Les illustrations sont fournies comme démonstration uniquement.
Spécifications susceptibles de changer sans préavis.
Numéro d’article :
E100 Rouge 13111260
E100 Rose 13111261
E100 Marguerite 13111061
E125 Rouge 13111110
E125 Argent 13111101
E125 Noir 13125E-BK
E150 Rouge 13111601
E150 Rose 13111661
13
E175 Rouge 13111259

AVERTISSEMENTS DE SÉCURITÉ
AVERTISSEMENT : La pratique de la trottinette électrique peut
être une activité dangereuse. Certaines conditions peuvent entraîner une
défaillance de l’équipement sans que le fabricant soit mis en cause. Comme
d’autres véhicules électriques, la trottinette peut, et est prévue pour, se
déplacer;ilestdoncpossibledeperdrelecontrôle,dechuteret/oud’être
confronté à des situations dangereuses qu’aucune précaution, aucune
connaissance ou aucune expertise ne saurait éviter. Dans de tels cas, vous
pouvez être grièvement blessé ou mourir, et ce même si vous utilisez un
équipement de sécurité et prenez d’autres précautions. VOUS UTILISEZ
CETTE TROTTINETTE À VOS PROPRES RISQUES ET DEVEZ FAIRE PREUVE DE
BON SENS.
Ce manuel contient de nombreux avertissements et mises en garde
concernant les conséquences d’un manque de maintenance, d’inspection ou
d’une mauvaise utilisation de votre trottinette électrique. Tout accident peut
provoquer des blessures sérieuses ou même la mort, c’est pourquoi nous ne
vous avertissons pas du potentiel de blessure ou de mort chaque fois qu’une
telle possibilité est mentionnée.
UTILISATION APPROPRIÉE ET SURVEILLANCE
PARENTALE
Ce manuel contient des informations de sécurité importantes. Il est de
votre responsabilité d’étudier ces informations et de vous assurer que tous
les utilisateurs comprennent tous les avertissements, mises en garde,
instructions et consignes de sécurité. Vous devez également vous assurer
que les jeunes usagers sont capables d’utiliser ce produit en toute sécurité
et de façon responsable. Avec de jeunes usagers, Razor recommande de
reprendre régulièrement les informations contenues dans ce manuel et d’en
soulignerdenouveaul’importance;vousêteségalementtenud’inspecteret
d’entretenir la trottinette de votre enfant pour assurer sa sécurité.
Il est recommandé d’être âgé de 8 ans et plus pour utiliser la trottinette.
Toute personne ne se sentant pas à l’aise sur la trottinette ne doit pas
essayer de pratiquer. Les parents doivent décider de permettre ou non à leur
enfant d’utiliser ce produit en fonction de sa maturité, de ses capacités et de
son aptitude à respecter les consignes.
Tenez ce produit hors de portée des enfants en bas âge et
rappelez-vous qu’il est exclusivement destiné à des personnes
qui, au minimum, se sentent totalement à l’aise et compétents pour
utiliser la trottinette.
NE PAS DÉPASSER LA LIMITE DE POIDS DE 54 Kg. Le poids de l’utilisateur
ne signifie pas forcément que la taille de la personne est appropriée pour
conveniràlatrottinetteouenmaintenirlecontrôle.
Ne touchez pas aux freins ou au moteur de votre trottinette en
fonctionnement car ces pièces peuvent être très chaudes.
Gardez les mains sur le guidon à tout moment.
Ne laissez jamais plus d’une personne à la fois monter sur la trottinette.
N’utilisez jamais la trottinette à proximité de marches ou de piscines.
Tenez vos doigts et les autres parties de votre corps à l’écart de la chaîne, du
système de direction, des roues et de tous les autres éléments en mouvement.
N’utilisez jamais d’écouteurs ou de téléphone portable lorsque vous roulez.
Ne vous accrochez jamais à un autre véhicule.
Ne conduisez pas votre trottinette par temps humide ou en présence de
verglas et n’immergez jamais la trottinette dans l’eau car les éléments
électriques et les organes de transmission pourraient être endommagés par
l’eau ou créer d’autres conditions d’insécurité potentielles.
La trottinette électrique est conçue pour être utilisée sur sol plat et sec,
tel que des trottoirs ou des terrains plats exempts de débris tels du sable,
des feuilles, des cailloux ou des graviers. Les surfaces humides, glissantes,
bosselées, inégales ou rugueuses peuvent affecter la traction et contribuer
à d’éventuels accidents. Ne pratiquez pas la trottinette électrique dans la
boue, sur la glace, dans les flaques ou l’eau. Évitez des vitesses excessives
qui peuvent être associées à la pratique en descentes. Ne risquez jamais
d’endommager des surfaces telles que de la moquette ou du plancher en
utilisant une trottinette électrique à l’intérieur.
Ne roulez pas de nuit ou lorsque la visibilité est limitée.
ÉQUIPEMENT APPROPRIÉ POUR ROULER
Portez toujours un équipement de protection approprié, tel qu’un casque
homologué (avec la jugulaire correctement bouclée). Il est recommandé
de porter des coudières, des genouillères, un T-shirt à manches longues et
un pantalon. Le port du casque peut être légalement exigé par les lois et
réglementations locales de votre secteur. Il est recommandé de porter un
T-shirt à manches longues, un pantalon et des gants. Portez toujours des
chaussuresdesport(deschaussuresàlacetsavecdessemellescaoutchouc);
ne roulez jamais pieds nus ou en sandales, et assurez-vous que vos lacets
restent noués et hors de la trajectoire des roues, du moteur et du système de
transmission.
UTILISER LE CHARGEUR
Le chargeur fourni avec la trottinette électrique doit être régulièrement
examiné pour déceler un éventuel défaut du câble, de la prise, du boîtier et
desautrespièces;enprésenced’unteldéfaut,latrottinettenedoitpasêtre
chargée tant que le chargeur n’a pas été réparé ou remplacé.
Utilisez uniquement le chargeur recommandé.
Prenez vos précautions durant la charge.
PRATIQUES ET CONDITIONS DE CONDUITE
ACCEPTABLES
Vérifiez et respectez toujours les lois ou réglementations locales
qui peuvent s’appliquer aux endroits où la trottinette électrique peut
être utilisée.
Ayez une attitude défensive lorsque vous roulez. Prenez garde aux obstacles
potentiels qui pourraient s’accrocher à votre roue ou vous forcer à tourner
brusquementouàperdrelecontrôle.Veillezàéviterlespiétons,les
planchistes, les planches à roulettes, les trottinettes, les vélos, les enfants
oulesanimauxquipourraientcoupervotretrajectoire;respectezlesdroits
et la propriété d’autrui.
N’actionnezpaslecontrôledelavitessesurlapoignéetantquevousn’êtes
pas sur la trottinette et dans un environnement extérieur approprié pour
rouler. La trottinette électrique doit se déplacer à 4 km/h avant que le
moteur s’enclenche.
N’essayez pas de faire ou ne faites pas d’acrobaties ou de figures sur votre
trottinette électrique. La trottinette n’est pas conçue pour résister à des
abus tels que sauter, grimper sur des trottoirs ou toute autre acrobatie.
Le chargeur n’est pas un jouet. Le chargeur doit être utilisé par un adulte.
N’utilisez pas le chargeur à proximité de matériaux inflammables.
Débranchez le chargeur et déconnectez-le de la trottinette lorsque vous ne
l’utilisez pas.
Ne dépassez pas le temps de charge.
Déconnectez toujours le chargeur avant d’essuyer et de nettoyer votre
trottinette avec un liquide.
L’ABSENCE DE BON SENS ET LE NON RESPECT DES
AVERTISSEMENTS CI-DESSUS AUGMENTE LE RISQUE DE LÉSIONS
GRAVES. UTILISEZ CE PRODUIT AVEC L’ATTENTION ET LE SÉRIEUX
NÉCESSAIRES À UNE PRATIQUE SÉCURISÉE.
14

AVANT DE COMMENCER
Inspectez le contenu de la boîte pour détecter d’éventuelles éraflures sur la peinture, des bosses ou des
nœuds dans les câbles qui peuvent être provoqués durant l’expédition.
ASSUREZ-VOUS QUE L’INTERRUPTEUR EST PLACÉ SUR « OFF » AVANT D’EFFECTUER
TOUTE OPÉRATION D’ASSEMBLAGE OU DE MAINTENANCE.
Razor recommande que l’assemblage soit effectué par un adulte.
Chargeur
Poignée de frein
Poignée d’accélérateur tournante
Pied du guidon
AVERTISSEMENT :
UTILISEZ EXCLUSIVEMENT
DES PRODUITS
RAZOR AVEC VOTRE
TROTTINETTE
ÉLECTRIQUE RAZOR.
- Interrupteur On/Off
- Port du chargeur
- Bouton de réenclenchement
- Batterie
- Moteur
-Moduledecontrôle
Outils nécessaires
Desserrage rapide
Limiteur
15
Gonfleur type pompe
à vélo, pour chambres
à air à valve Schrader
avec manomètre
(non inclus).

ASSEMBLAGE ET RÉGLAGE
q Fixer le guidon
Note : Assurez-vous que les
câbles / fils sont à distance
avant d’insérer la tige dans la
fourche.
1 2
q Gonfler le pneu
Gonfler le pneu avant jusqu’à
1
la pression en Pascals indiquée
surlecôtédupneu.
ASSEMBLAGE ET RÉGLAGE
q Charger la batterie
Chargez la batterie avant l’utilisation.
•Tempsdechargeinitial:18heures
•Tempsderecharge:jusqu’à12heures
Lorsque la trottinette n’est pas utilisée
régulièrement, rechargez la batterie au
moins une fois par mois jusqu’au retour
à une utilisation normale.
•Duréedefonctionnement:jusqu’à40minutesde
temps de fonctionnement en continu
•Duréedeviemoyennedelabatterie:250cyclesde
charge / décharge
3 Ajuster la tension du
desserrage rapide jusqu’à ce
que vous puissiez fermer le
levier tout en bloquant le pied.
Note: Les pompes à air
comprimé se trouvant dans les
stations-service sont destinées
au gonflage des pneus
d’automobiles à fort volume.
Si vous décidez d’utiliser une
telle pompe pour gonfler le
pneu, assurez-vous d’abord
que le manomètre fonctionne,
puis exercez de très légères
pressions pour atteindre
la pression de gonflage
appropriée. Si vous surgonflez
le pneu par inadvertance,
évacuez la pression en excès
immédiatement.
AVERTISSEMENT :
Déconnectez toujours la
trottinette du chargeur avant
de la nettoyer avec du liquide.
Note: Si votre chargeur ne
ressemble pas à celui illustré,
votre unité a été fournie avec
un chargeur alternatif. Les
spécifications et la procédure de
charge sont les mêmes.
Chargeur
Prise du
chargeur
Port du
chargeur
1 Placez l’interrupteur
sur OFF avant de charger.
16
2
Le chargeur possède une petite
fenêtre avec une DEL ou deux
DEL indiquant l’état de charge.
Les chargeurs sont équipés d’une
protection intégrée évitant une
surcharge de la batterie.
Le chargeur peut chauffer
durant l’utilisation. Ceci est
normal pour certains chargeurs
et ne doit pas vous inquiéter.
AVERTISSEMENT :
Si vous ne rechargez pas la
batterie au moins une fois par
mois, celle-ci pourrait ne plus
tolérer une charge.

MAINTENANCE DES CONNECTEURS / DU MATÉRIEL
q
q
q
Frein
Contrôlezlebonfonctionnementdesfreins.Lorsquevousappuyez
sur la poignée, le frein doit entraîner une action de freinage
positive.Lorsquevousfreinezalorsquelecontrôledelavitesse
est enclenché, l’interrupteur de frein devrait stopper le moteur.
Assurez-vous que les freins ne frottent pas.
Cadre, fourche et guidon
Contrôlezl’absencedessuresouderupturesdeliaison.Bienque
les cadres cassent rarement, il est possible qu’un conducteur agressif
rentre dans une bordure de trottoir ou un mur, ce qui peut provoquer
une torsion ou une cassure du cadre. Inspectez régulièrement.
Pneus
Inspectez périodiquement les pneus pour détecter une usure
excessiveetcontrôlezrégulièrementlapressiondupneuavant,
puis regonflez si nécessaire.
N’utilisez pas ce produit pour la première fois avant d’avoir gonflé
les pneus à la pression appropriée et d’avoir chargé la batterie durant
Un non respect de ces instructions peut endommager votre produit
et éteindre votre garantie.
Équipement de sécurité
q
q
au moins 18 heures.
Portez toujours un équipement de protection adapté, tel qu’un
casque de sécurité homologué. Il est recommandé de porter des
coudières et des genouillères. Portez toujours des chaussures de
sport(deschaussuresàlacetsavecdessemellescaoutchouc);ne
roulez jamais pieds nus ou en sandales, et assurez-vous que vos
lacets restent noués et hors de la trajectoire des roues, du moteur
et du système de transmission.
Batterie
Assurez-vous que l’interrupteur est positionné sur Off lorsque la
trottinette n’est pas utilisée. Ne stockez jamais la trottinette à des
températures de gel !
RÉPARATIONS ET MAINTENANCE
Placez l’interrupteur sur « OFF » avant de procéder à toute opération de maintenance.
q Régler les freins
1
Tournez la mollette de
réglage de la poignée de frein
d’1/4 ou d’1/2 tour jusqu’à
ce que le réglage souhaité
soit obtenu. Si un réglage
supplémentaire s’avère toujours
nécessaire, passez à l’étape 2.
2 S’il est trop serré ou trop
lâche, desserrez le câble de
frein et ajustez-le comme
nécessaire.
3 Vérifiez que les plaquettes
de frein (A) sont correctement
alignées par rapport à la
roue et qu’elles ne sont pas
excessivement usées. Pour
réaligner les plaquettes
de frein, desserrer l’écrou
de fixation (B) et ajustez la
plaquette pour qu’elle touche
la jante. Resserrez et testez.
Réajustez si nécessaire.
17

RÉPARATIONS ET MAINTENANCE
q Remplacement du pneu avant
1 Desserrez le boulon du câble
de frein.
Desserrer les boulons
2
de l’axe avant. Retirer la
roue et installer la roue de
remplacement.
Note : Ordre des éléments
9-1
9-3
9-2
9-2
9-6
9-5
9-1
9-2
9-2
Droite (accélérateur)
9-3 - Entretoise (courte)
9-2 - Rondelles
9-1 - Contre-écrou de 17 mm
Milieu
9-6 – Boulon de l’axe avant
Gauche (Frein)
9-5 - Entretoise (longue)
9-2 - Rondelles
9-1 - Contre-écrou de 17 mm
RÉPARATIONS ET MAINTENANCE
q Régler la chaîne
1
Desserrer les boulons de
l’axe arrière.
2 Serrer les tendeurs sur l’axe
d’1/8 à 1/4 de tour pour ajuster
la tension de la chaîne. Les deux
tendeurs doivent être serrés
exactement au même niveau
pour maintenir l’alignement des
roues.
3 Une fois que la tension est
correcte, serrer les boulons
de l’axe. Tester la conduite.
Réajustez si nécessaire.
Note : La chaîne doit être
« juste tendue ». La tension doit
être similaire à la courroie de
ventilateur d’une automobile.
VEILLEZ À NE PAS SERRER
TROP. Le système de tension
peut facilement générer une
tension trop importante et
faire casser la chaîne ou tordre
l’arbre du moteur. Ajuster
d’1/8 ou 1/4 de tour à la fois et
vérifier la tension à chaque fois.
18

RÉPARATIONS ET MAINTENANCE
18-1
18-2
18-3
18-4
18-5
18-7
18-6
18-8
18-9
18-11
18-10
18-8
18-7
18-3
18-2
18-1
18-4
18-5
18-6
q Remplacement de la chaîne et du pneu arrière
1 Desserrer les vis et retirer le
garde-chaîne.
4 Retirer la roue.
Notezl’ordredeséléments:
18-1 Écrou M8
18-2 Rondelle
18-3 Boulon à œil du tendeur
18-4 Pièce U
18-5 Contre-écrou M6
18-6 Capuchon
18-7 Rondelle plate coupée
18-8 Rondelle épaisse coupée
18-9 Entretoise
2 Desserrer les tendeurs
de façon équivalente,
approximativement 5 tours.
3 Desserrer l’axe. Faire
coulisser la roue vers l’avant
pour détendre la chaîne.
5 Diriger la chaîne sur la roue
dentée et faire glisser l’axe
dans les fentes du cadre.
8 Remplacer le garde-chaîne.
6 Installer les tendeurs et les
écrous de l’axe. Serrer jusqu’à
ce qu’ils maintiennent juste à
peine les éléments en place.
7 Serrer les tendeurs du même
nombre de tours pour ajuster
la tension sur la chaîne et le
centre de la roue.
19

RÉPARATIONS ET MAINTENANCE
q Entretien et élimination de la batterie
Ne stockez pas la batterie à des températures supérieures à 23,8 °C ou inférieures à -23,3 °C.
CONTIENT DES BATTERIES AU PLOMB ÉTANCHES SANS ENTRETIEN. LES BATTERIES
DOIVENT ÊTRE RECYCLÉES.
Élimination : Votre produit Razor utilise des batteries étanches plomb-acide qui doivent être recyclées ou
éliminées de façon respectueuse de l’environnement. Ne jetez pas une batterie plomb-acide dans un feu. La
batterie peut exploser ou fuir. Ne jetez pas une batterie plomb-acide dans votre poubelle habituelle destinée
aux déchets ménagers. Dans la plupart des secteurs, l’incinération, la mise en décharge ou le mélange des
batteries étanches plomb-acide avec les ordures ménagères est interdit par la loi. Retournez les batteries
usées à un centre de recyclage fédéral ou approuvé par l’état ou à un vendeur local de batteries automobiles.
q Chargeur
Le chargeur doit être régulièrement examiné pour déceler un éventuel défaut du câble, de la prise, du boîtier
etdesautrespièces;enprésenced’unteldéfaut,latrottinettenedoitpasêtrechargéetantquelechargeur
n’a pas été réparé ou remplacé.
GARANTIE
Garantie limitée Razor
Le fabricant garantit que ce produit est exempt de défauts de fabrication pour
une durée de 90 jours à compter de la date d’achat. Cette garantie limitée ne
couvre pas l’usure normale, les pneus, les tubes ou câbles, ou tout dommage,
casse ou perte résultant d’un assemblage, d’une maintenance, d’un stockage
ou d’une utilisation inadaptés de la trottinette électrique de Razor.
Cettegarantielimitées’éteindrasileproduitest:
•utiliséautrementqu’àdesnsdeloisirsoudetransport;
•modiédequelquemanièrequecesoit;
•loué.
Le fabricant n’est pas responsable des dégâts accidentels ou indirects, ni
des dommages résultant directement ou indirectement de l’utilisation de ce
produit.
Razor ne propose pas d’extension de garantie. Si vous avez souscrit à une
extension de garantie, elle doit être honorée par le magasin où elle a été
souscrite.
Conservez votre ticket de caisse original avec ce manuel et écrivez le numéro
de série en dessous.
__________________________________________
Numéro d’article :
E100 Rouge 13111260
E100 Rose 13111261
E100 Marguerite 13111061
E125 Rouge 13111110
E125 Argent 13111101
E125 Noir 13125E-BK
E150 Rouge 13111601
E150 Rose 13111661
E175 Rouge 13111259
AVERTISSEMENT :
Si une batterie fuit, évitez
tout contact avec l’acide qui
s’échappe et placez la batterie
endommagée dans un sac en
plastique. Si de l’acide entre
en contact avec votre peau ou
vos yeux, rincez à l’eau fraîche
durant au moins 15 minutes et
contactez un médecin.
Copyright © 2003-2009 Razor USA LLC. Tous droits réservés. RAZOR et le logo Razor font
partie des marques déposées de Razor USA LLC aux États-Unis et/ou dans une sélection de
pays étrangers.
11/2008
20

NOTA: Los modelos E100/E125/E150/175 deben alcanzar los 4 km/h, antes de que
se ponga en marcha el motor. Se impulsan con el pie, hasta alcanzar los 4 km/h, mientras se
acelera, para poner en marcha el motor.
Manual Del PrOPIeTarIO
¡Lea todo el contenido de este manual y familiarícese con
él, antes de circular con el producto!
¡NO DEVOLVER A LA TIENDA!
NOTA: Las ilustraciones sólo tienen fines demostrativos.
Especificaciones sujetas a cambio sin previo aviso.
Número de artículo:
E100 Rojo 13111260
E100 Rosa 13111261
E100 Margarita 13111061
E125 Rojo 13111110
E125 Plata 13111101
E125 Negro 13125E-BK
E150 Rojo 13111601
E150 Rosa 13111661
21
E175 Rojo 13111259

ADVERTENCIAS DE SEGURIDAD
ADVERTENCIA: Conducir el escúter eléctrico puede ser una
actividad peligrosa. Determinadas condiciones pueden causar fallas en
el equipamiento, sin que exista culpa del fabricante. Como todo vehículo
eléctrico, el escúter puede desplazarse y está previsto para ello, por lo que
es posible perder el control, caer y/o encontrarse en situaciones peligrosas,
que ningún cuidado, instrucción o experiencia pueden evitar. De producirse
tales situaciones, el conductor puede resultar gravemente herido o morir,
aun cuando se use equipo de seguridad y se tomen otras precauciones.
CONDUCIR BAJO PROPIO RIESGO Y APLICANDO EL SENTIDO COMÚN.
Este manual contiene numerosas advertencias y precauciones, respecto a
las consecuencias surgidas por falta de mantenimiento, inspección o uso
apropiado del escúter eléctrico. Debido a que todo accidente puede derivar
en lesiones graves e incluso en la muerte, no reiteramos la advertencia
sobre posibles lesiones graves o muerte, cada vez que esta posibilidad sea
mencionada.
USO CORRECTO POR PARTE DEL CONDUCTOR Y
SUPERVISIÓN DE LOS PADRES
Este manual contiene importante información sobre seguridad. Es su
responsabilidad examinar esta información y asegurar que todos los
conductores entiendan todas las advertencias, precauciones, instrucciones
y pautas sobre seguridad, así como garantizar que los conductores jóvenes
sean capaces de usar este producto de forma segura y responsable. Razor le
recomienda releer y reforzar periódicamente la información de este manual
con los conductores más jóvenes y realizar la inspección y mantenimiento
del vehículo de sus niños, a fin de garantizar su seguridad.
La edad recomendada del conductor es de 8 años o más. Todo conductor que
no se sienta cómodo en el escúter, debe evitar conducirlo. La decisión de los
padres de permitir que su niño circule con este producto debe basarse en la
madurez, la habilidad y la capacidad del niño para seguir las reglas.
Mantenga este producto alejado de los niños pequeños y recuerde
que está previsto sólo para ser usado por personas que, como
mínimo, pueden manejar el producto de forma totalmente cómoda y
competente.
EL PESO DEL CONDUCTOR NO DEBE EXCEDER EL LÍMITE DE 54 kg. El peso
del conductor no necesariamente significa que el tamaño de la persona es
apropiado para estar cómodo o mantener el control del escúter.
No tocar los frenos ni el motor del escúter cuando se lo usa, ya que estas
partes pueden calentarse mucho.
Mantenerse permanentemente aferrado al manillar.
Nunca permitir que más de una persona a la vez conduzca el escúter.
No circular nunca cerca de peldaños ni piscinas.
Mantener los dedos y otras partes del cuerpo lejos de la cadena, el sistema
de dirección, las ruedas y todo otro componente móvil.
Nunca usar auriculares ni teléfonos móviles al circular.
Nunca hacerse remolcar por otro vehículo.
No circular con el escúter con tiempo lluvioso o heladas y nunca sumergir el
escúter en agua, ya que los componentes eléctricos y de propulsión podrían
dañarse o crear otras condiciones de posible inseguridad.
El escúter eléctrico está previsto para su uso sobre superficies planas y
secas, tales como pavimento o pisos nivelados, sin material suelto como
arena, hojas, piedras o gravilla. Las superficies húmedas, con baches,
irregulares o rugosas pueden afectar la tracción y propiciar posibles
accidentes. No conducir el escúter sobre lodo, hielo, charcos ni agua. Evitar
la velocidad excesiva en trayectos en pendiente. No arriesgarse a dañar
superficies como alfombras o pisos, usando el escúter eléctrico en interiores.
No circular de noche ni con visibilidad limitada.
VESTIMENTA APROPIADA PARA CONDUCIR
Llevar siempre equipo de protección adecuado, como casco de seguridad
aprobado (con el barboquejo bien abrochado). Se recomienda usar coderas,
rodilleras, camiseta de manga larga y pantalones largos. Es posible que
las leyes o reglamentaciones locales de su área exijan el uso de casco.
Es aconsejable llevar una camiseta de manga larga, pantalones largos y
guantes. Llevar siempre zapatos deportivos (zapatos con cordones y suela de
goma);nuncaconducirdescalzooconsandaliasytenersiempreloscordones
atados y lejos de las ruedas, del motor y del sistema de tracción.
UTILIZACIÓN DEL CARGADOR
Es necesario comprobar periódicamente que el cargador suministrado con el
escúter no presente daños en el cable, el enchufe, la carcasa u otras partes.
En caso de daños, no debe cargarse el escúter, hasta que el cargador sea
reparado o sustituido.
Usar únicamente el cargador recomendado.
Tomar precauciones al efectuar la carga.
PRÁCTICAS DE CONDUCCIÓN Y CONDICIONES
ACEPTABLES
Infórmese y respete siempre las leyes y reglamentaciones locales,
que puedan determinar los lugares permitidos para el uso de
escúteres eléctricos.
Conducir a la defensiva. Prestar atención a posibles obstáculos, que puedan
enganchar las ruedas y obligar a un viraje brusco o llevar a la pérdida
repentina del control. Tener cuidado, para esquivar a peatones, patinadores,
monopatines, escúteres, bicicletas, niños o animales, que pudieran cruzarse
en el camino, y respetar los derechos y la propiedad de los demás.
No activar el control de velocidad en la empuñadura, excepto estando
montado en el escúter y en un ambiente exterior adecuado para circular.
El escúter eléctrico debe alcanzar los 4 km/h, antes de que se ponga
en marcha el motor.
No intentar ni hacer piruetas o trucos con el escúter eléctrico. El escúter no
está hecho para resistir el maltrato originado en el mal uso, como dar saltos,
hacer equilibrio en el bordillo de la acera u otro tipo de piruetas.
El cargador no es un juguete. El cargador debe ser manejado por un adulto.
No utilizar el cargador cerca de materiales inflamables.
Desenchufar el cargador y desconectarlo del escúter, cuando no se lo utilice.
No exceder el tiempo de carga.
Antes de lavar o limpiar el escúter con líquidos, desconectarlo siempre el
cargador.
NO APLICAR EL SENTIDO COMÚN Y HACER CASO OMISO DE LAS
ADVERTENCIAS ARRIBA MENCIONADAS AUMENTA EL RIESGO DE
SUFRIR LESIONES GRAVES. UTILIZAR EL PRODUCTO CON LA DEBIDA
PRECAUCIÓN Y PRESTANDO SUMA ATENCIÓN PARA GARANTIZAR
UN MANEJO SEGURO.
22

ANTES DE COMENZAR
Verifique que las piezas contenidas en la caja no tengan raspaduras en la pintura, abolladuras ni cables
doblados, lo que podría haberse producido durante el transporte.
ASEGÚRESE DE QUE EL INTERRUPTOR DE ENCENDIDO ESTÉ EN “OFF”, ANTES DE
EFECTUAR CUALQUIER TAREA DE MONTAJE O MANTENIMIENTO.
Razor recomienda que un adulto realice el montaje.
Cargador
Maneta de freno
Acelerador
Tija del manillar
ADVERTENCIA:
UTILIZAR SÓLO
PRODUCTOS
ORIGINALES RAZOR
PARA EL ESCÚTER
ELÉCTRICO RAZOR.
- Interruptor On/Off
- Puerto del cargador
- Botón de reinicio
- Batería
- Motor
- Módulo de control
Herramientas necesarias
Cierre rápido
Limitador
23
Inflador de neumáticos
de tipo bicicleta para
válvula Schrader, con
manómetro (no incluido)

MONTAJE Y PREPARACIÓN
q Colocación del manillar
Nota: Asegurarse de que los
cables/hilos estén alejados,
antes de introducir la tija en la
horquilla.
1 2
3 Ajustar la tensión del cierre
rápido, hasta poder cerrar la
palanca completamente, para
asegurar la tija.
q Inflado del neumático
Inflar el neumático delantero
1
hasta la presión en PSI,
indicada en la banda lateral del
neumático.
MONTAJE Y PREPARACIÓN
q Carga de la batería
Cargar la batería antes de usar.
•Tiempodecargainicial:18horas • Tiempodeautonomía:Hasta40minutosdecirculacióncontinua
•Tiempoderecarga:Hasta12horas • Duraciónpromediodelabatería:250ciclosdecarga/descarga
Cuando el escúter no se use
regularmente, recargar la batería
por lo menos una vez al mes,
hasta reanudar el uso normal.
Nota: El suministro de aire
comprimido disponible en las
gasolineras está concebido
para inflar neumáticos de
automóviles de gran volumen.
De utilizar dicho suministro de
aire para inflar los neumáticos,
asegurarse primero de que el
manómetro funcione y luego,
introducir el aire a intervalos
muy breves, para obtener la
presión correcta en PSI. En caso
de sobre inflar el neumático
accidentalmente, liberar de
inmediato el exceso de presión.
ADVERTENCIA:
Antes de limpiar el escúter con
líquidos, desconectarlo siempre
el cargador.
Nota: Si su cargador no es
igual al de la ilustración, la
unidad ha sido suministrada
con un cargador alternativo.
Las especificaciones y el
procedimiento de carga no varían.
Cargador
Enchufe del
cargador
Puerto del
cargador
1 Poner el interruptor en OFF,
antes de cargar.
24
2
El cargador tiene una ventana
pequeña con uno o dos LED,
que indican el estado de carga.
Los cargadores cuentan con
una protección incorporada,
para evitar la sobrecarga de la
batería.
Es posible que el cargador
se caliente durante la carga.
Esto es normal en algunos
cargadores y no constituye
motivo de preocupación.
ADVERTENCIA:
Si la batería no se carga por lo
menos una vez al mes, puede
ocurrir que en el futuro no
admita más carga.

MANTENIMIENTO DE LOS CONECTORES/LAS PIEZAS
Freno
q
q
q
Controlar el correcto funcionamiento de los frenos. Al presionar la
maneta, el freno debe proporcionar una acción de frenado segura.
Al accionar el freno con el control de velocidad conectado, el
interruptor de corte del freno debe detener el motor. Asegurarse
de que los frenos no friccionen.
Cuadro, horquilla y manillar
Verificar que no haya conexiones defectuosas o rotas. Si bien
la rotura del cuadro es infrecuente, es posible que un conductor
agresivo circule contra un bordillo o un muro y dañe, tuerza o
rompa el cuadro. Inspeccionar periódicamente.
Neumáticos
Inspeccionar periódicamente que los neumáticos no estén
desgastados en exceso, controlar regularmente la presión del
neumático delantero y de ser necesario, volver a inflarlo.
ALTO
Equipo de seguridad
q
q
No usar este producto por primera vez, hasta haber inflado los
neumáticos con la presión en PSI correcta y haber cargado la batería
por lo menos durante 18 horas.
La inobservancia de estas instrucciones puede dañar el producto
y anular la garantía.
Llevar siempre equipo de protección apropiado, como un casco
de seguridad aprobado. Se recomienda usar coderas y rodilleras.
Llevar siempre zapatos deportivos (zapatos con cordones y
sueladegoma);nuncaconducirdescalzooconsandaliasytener
siempre los cordones atados y lejos de las ruedas, del motor y del
sistema de tracción.
Batería
Asegúrese de que el interruptor de encendido esté en OFF, cada
vez que el escúter no se use. ¡No guardar nunca a temperaturas
de congelación o bajo cero!
REPARACIÓN Y MANTENIMIENTO
Colocar el interruptor de encendido en “OFF”, antes de efectuar cualquier tarea de
mantenimiento.
q Ajuste de los frenos
Girar el tensor de la maneta
1
de freno de 1/4 a 1/2 giro,
hasta obtener el ajuste de freno
deseado. Si aún fuera necesario
ajustarlo, seguir con el paso 2.
2 Si está demasiado
tenso u holgado, aflojar el
cable de freno y ajustarlo
adecuadamente.
3 Comprobar que las pastillas
de freno (A) estén bien
alineadas con la rueda y no
presenten desgaste excesivo.
Para realinear las pastillas
de freno, aflojar la tuerca de
fijación (B) y ajustar la pastilla,
para que tome contacto con la
llanta. Reapretar y controlar.
Volver a ajustar, si fuera
necesario.
25

REPARACIÓN Y MANTENIMIENTO
q Sustitución del neumático delantero
1 Aflojar el perno del cable de
freno.
Aflojar los pernos de eje
2
delantero. Retirar la rueda y
colocar la rueda de recambio.
Nota: Secuencia de las piezas
9-1
9-3
9-2
9-2
9-6
9-5
9-1
9-2
9-2
Derecha (acelerador)
9-3 - Separador (corto)
9-2 - Arandelas
9-1 - Contratuerca de 17 mm
Centro
9-6 - Perno de eje delantero
Izquierda (freno)
9-5 - Separador (largo)
9-2 - Arandelas
9-1 - Contratuerca de 17 mm
REPARACIÓN Y MANTENIMIENTO
q Ajuste de la cadena
1
Aflojar los pernos de eje
trasero.
2 Apretar los tensores sobre
el eje de 1/8 a 1/4 de giro, para
regular la tensión de la cadena
con precisión. Los dos tensores
deben apretarse exactamente
con la misma tensión, a fin de
mantener la rueda alineada.
3 Una vez obtenida la tensión
correcta, apretar los pernos de
eje. Dar una vuelta de prueba.
Volver a ajustar, si fuera
necesario.
Nota: La cadena debe estar
tensada “lo justo”. La tensión
debe ser similar a la de la
correa trapezoidal de un coche.
PRESTAR ATENCIÓN DE NO
TENSARLA DEMASIADO. El
sistema de tensado puede
transmitir con facilidad una
tensión excesiva y romper la
cadena o torcer el eje del motor.
Ajustar con un giro de 1/8 a 1/4
cada vez, controlando la tensión
en cada ocasión.
26

REPARACIÓN Y MANTENIMIENTO
18-1
18-2
18-3
18-4
18-5
18-7
18-6
18-8
18-9
18-11
18-10
18-8
18-7
18-3
18-2
18-1
18-4
18-5
18-6
q Sustitución del neumático trasero y la cadena
1 Aflojar los tornillos y retirar
el cubrecadena.
4 Quitar la rueda.
Nóteselasecuenciadelaspiezas:
18-1 Tuerca M8
18-2 Arandela
18-3 Armella del tensor de eje
18-4 Pieza en U
18-5 Contratuerca M6
18-6 Cubierta
18-7 Arandela cortada plana
18-8 Arandela cortada gruesa
18-9 Separador
2 Aflojar los tensores de eje en
igual medida, aproximadamente
5 giros.
3 Aflojar el eje. Desplazar
la rueda hacia adelante, para
soltar la cadena.
5 Acomodar la cadena en la
rueda dentada y deslizar el eje
en las muescas del cuadro.
8 Volver a colocar el cubrecadena.
6 Montar los tensores de eje
y las tuercas de eje. Ajustarlos
sólo hasta que sostengan
ligeramente la pieza en su lugar.
7 Apretar los tensores de eje
con el mismo número de giros,
para regular con precisión la
tensión de la cadena y el centro
de la rueda.
27

REPARACIÓN Y MANTENIMIENTO
q Cuidado y eliminación de la batería
No almacenar la batería a temperaturas superiores a 23,8° C o inferiores a -23,3° C.
CONTIENE BATERÍAS SELLADAS DE PLOMO NO DERRAMABLE. LAS BATERÍAS DEBEN
SER RECICLADAS.
Eliminación: Los productos Razor utilizan baterías selladas de plomo-ácido, que deben ser recicladas
o eliminadas respetando el medioambiente. No arrojar la batería de plomo-ácido al fuego. La batería
puede explotar o perder líquido. No desechar la batería de plomo-ácido junto con la basura doméstica.
La incineración, el relleno sanitario o la mezcla de baterías selladas de plomo-ácido con la basura doméstica
están prohibidos por ley en la mayoría de las áreas. Lleve las baterías usadas a un punto de reciclado de
baterías de plomo-ácido legalmente autorizado o a una tienda de venta de baterías para automóviles.
q Cargador
Debe comprobarse periódicamente que el cable, el enchufe, la carcasa u otras partes del cargador no estén
dañadas. En caso de daños, no debe cargarse el escúter, hasta que el cargador sea reparado o sustituido.
GARANTÍA
Garantía limitada de Razor
El fabricante garantiza que este producto está exento de defectos de
fabricación por un período de 90 días, a partir de la fecha de compra. Esta
garantía limitada no cubre el desgaste normal, los neumáticos, cámaras o
cables, ni ningún otro daño, falla o pérdida, surgidos del incorrecto montaje,
mantenimiento, almacenamiento o uso del escúter eléctrico Razor.
Esta garantía limitada se anulará, cuando en algún momento el producto
•seutiliceconotrosnesquenoseanrecreativosodetransporte;
•semodiquedealgunaforma;
•sealquile
El fabricante no será responsable por pérdida alguna o daño incidental o
consecuente, debido al uso directo o indirecto de este producto.
Razor no ofrece extensión alguna de la garantía. Si usted ha adquirido una
garantía extendida, ésta debe ser cubierta por la tienda donde se efectuó la
compra.
Conserve la factura original de compra como constancia, junto con este
manual, y anote el número de serie de abajo.
__________________________________________
Número de artículo:
E100 Rojo 13111260
E100 Rosa 13111261
E100 Margarita 13111061
E125 Rojo 13111110
E125 Plata 13111101
E125 Negro 13125E-BK
E150 Rojo 13111601
E150 Rosa 13111661
E175 Rojo 13111259
ADVERTENCIA:
Si una batería presenta
derrames, evitar el contacto con
el ácido derramado y colocar
la batería dañada en una bolsa
plástica. Si la piel o los ojos
toman contacto con el ácido,
enjuagar con agua fría por lo
menos durante 15 minutos
y consultar a un médico.
Copyright © 2003-2009 Razor USA LLC. Todos los derechos reservados. RAZOR y el diseño
del logotipo de Razor son marcas registradas de Razor USA LLC en EE.UU. y/o en determinados países.
11/2008
28
 Loading...